04/03/13 Resume Design Tutorial for Professional Designers www.designzzz.com/designer-resume-tutorial/ 1/18 Advertisement advertise here advertise here Home Articles Photoshop Web Design Inspiration + Photography Digital Art Designs Illustrations Freebies + Fonts Brushes Premium Files Tutorials + Photoshop 3D Tutorials Sign up Login Select Category Search Creating a Designer’s Resume in Photoshop Tutorial for designing a single-color creative resume for designers. Designers have a hard time creating a resume (also called CV), that’s because a designer is supposed to design something outrageous for his introducer… I mean resume is the thing that’s gonna makes a designer’s first impression, not the designer himself! I was coping with the same problem a some time ago, so I designed this thing. The aspects which make this resume design superior than some others is that it is a single color design, it can be xeroxed/photocopy-ed but more importantly, it doesn’t take much time to be studied. Bosses usually don’t like it when they have to study a lot. To download PSD files of this resume, please check out: Free PSD Resumes

Resume Design Tutorial for Professional Designers.pdf
Jan 11, 2016
Welcome message from author
This document is posted to help you gain knowledge. Please leave a comment to let me know what you think about it! Share it to your friends and learn new things together.
Transcript
04/03/13 Resume Design Tutorial for Professional Designers
www.designzzz.com/designer-resume-tutorial/ 1/18
Advertisement
advertise hereadvertise here
HomeArticlesPhotoshopWeb DesignInspiration +
PhotographyDigital ArtDesignsIllustrations
Freebies +FontsBrushes
Premium FilesTutorials +
Photoshop3D Tutorials
Sign up Login
Select Category
Search
Creating a Designer’s Resume in Photoshop
Tutorial for designing a single-color creative resumefor designers.
Designers have a hard time creating a resume (also calledCV), that’s because a designer is supposed to designsomething outrageous for his introducer… I mean resume isthe thing that’s gonna makes a designer’s first impression, notthe designer himself!
I was coping with the same problem a some time ago, so I
designed this thing.The aspects which make this resume design superior thansome others is that it is a single color design, it can bexeroxed/photocopy-ed but more importantly, it doesn’t takemuch time to be studied. Bosses usually don’t like it whenthey have to study a lot.
To download PSD files of this resume, please check out: Free PSD Resumes

04/03/13 Resume Design Tutorial for Professional Designers
www.designzzz.com/designer-resume-tutorial/ 2/18
Basic Info
I’m using A4 Landscape size for making this CV. I suggest you choose the same size, but of course, you’re a creative
mind, you’re allowed to make variations.
First of all, fill the background with this color.
Now select the Rectangle Tool and make a rectangle on the left side of the canvas.
I added 3 type elements. The first on was “Hi!” in the rectangle we drew in the previous step, then I wrote my name,
father’s name in front of it. This time we didn’t create a box in the background. I used bebas nuene but you can choose
any font you like.
Ads by Google Resume Make a Resume Photoshop How to Resume

04/03/13 Resume Design Tutorial for Professional Designers
www.designzzz.com/designer-resume-tutorial/ 3/18
Now I selected Rectangle Tool once again and created a box. This will highlight the data on it. I plan to put my onlinecontact here; you know, social media profiles, email ID etc.I used free icons for stylizing this data.
04/03/13 Resume Design Tutorial for Professional Designers
www.designzzz.com/designer-resume-tutorial/ 4/18
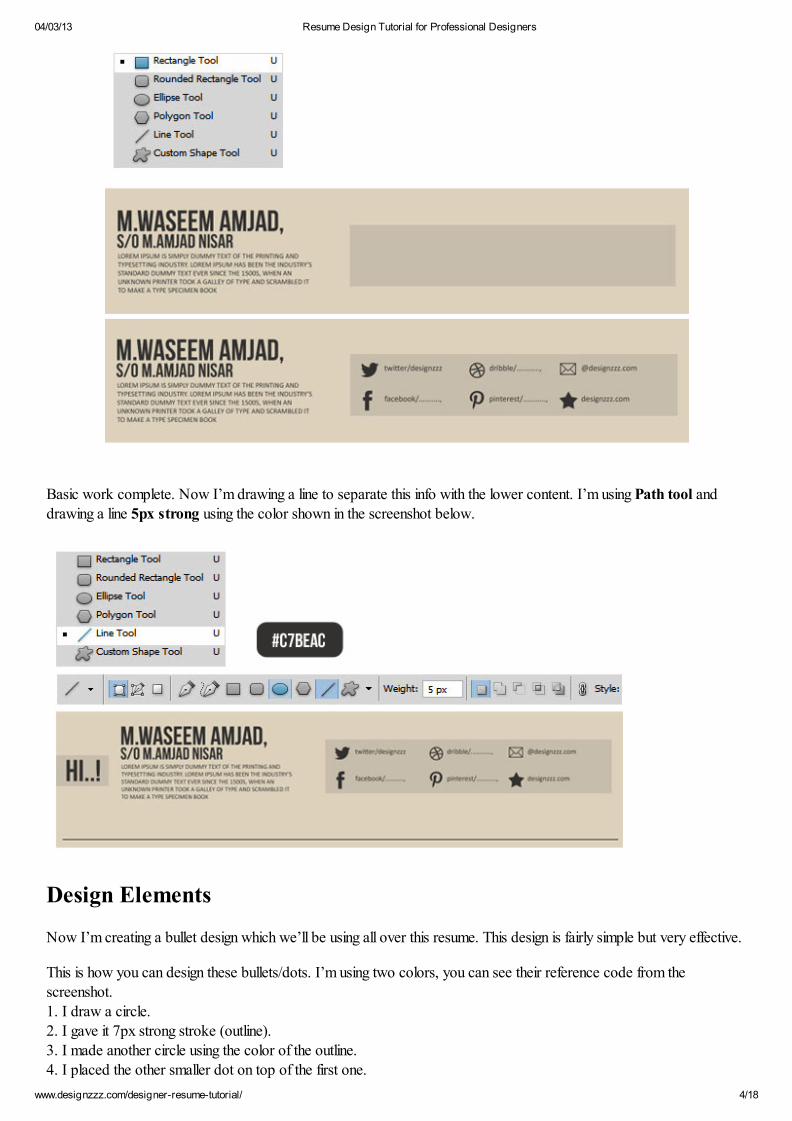
Basic work complete. Now I’m drawing a line to separate this info with the lower content. I’m using Path tool anddrawing a line 5px strong using the color shown in the screenshot below.
Design Elements
Now I’m creating a bullet design which we’ll be using all over this resume. This design is fairly simple but very effective.
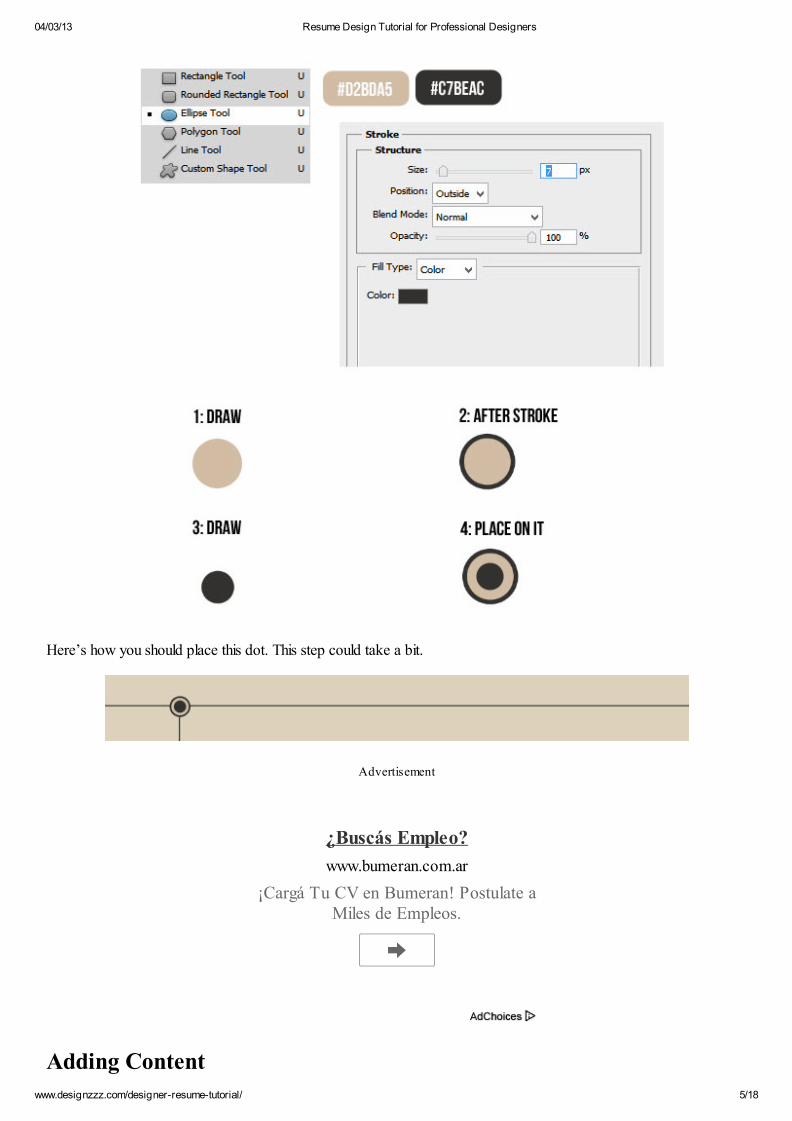
This is how you can design these bullets/dots. I’m using two colors, you can see their reference code from thescreenshot.1. I draw a circle.2. I gave it 7px strong stroke (outline).3. I made another circle using the color of the outline.4. I placed the other smaller dot on top of the first one.
04/03/13 Resume Design Tutorial for Professional Designers
www.designzzz.com/designer-resume-tutorial/ 5/18
Here’s how you should place this dot. This step could take a bit.
Advertisement
Adding Content
¿Buscás Empleo?
www.bumeran.com.ar
¡Cargá Tu CV en Bumeran! Postulate aMiles de Empleos.

04/03/13 Resume Design Tutorial for Professional Designers
www.designzzz.com/designer-resume-tutorial/ 6/18
Time to add data. I’m starting with “Education“. Select Type tool and type EDUCATION.
Remember the bullet we just created, make a copy of that along the line. You can just select the bullet’s layers and hitCTRL + J to duplicate them.
After copying the bullet, add the subheading. This is supposed to be your first art degree.
Here’s how the final design should/could look. The description on the right side could contain the info about yourgrades, final project etc.
Education tab is complete, now let’s make a tab SKILLS.
04/03/13 Resume Design Tutorial for Professional Designers
www.designzzz.com/designer-resume-tutorial/ 7/18
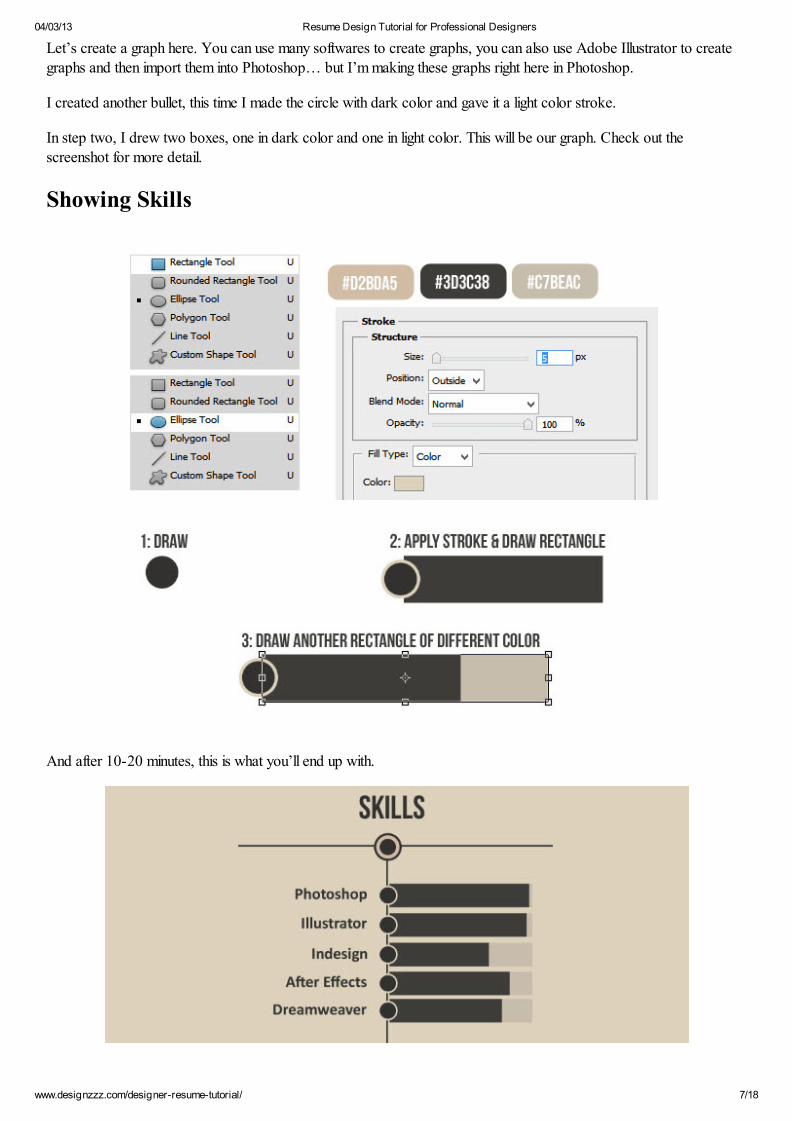
Let’s create a graph here. You can use many softwares to create graphs, you can also use Adobe Illustrator to creategraphs and then import them into Photoshop… but I’m making these graphs right here in Photoshop.
I created another bullet, this time I made the circle with dark color and gave it a light color stroke.
In step two, I drew two boxes, one in dark color and one in light color. This will be our graph. Check out thescreenshot for more detail.
Showing Skills
And after 10-20 minutes, this is what you’ll end up with.
04/03/13 Resume Design Tutorial for Professional Designers
www.designzzz.com/designer-resume-tutorial/ 8/18
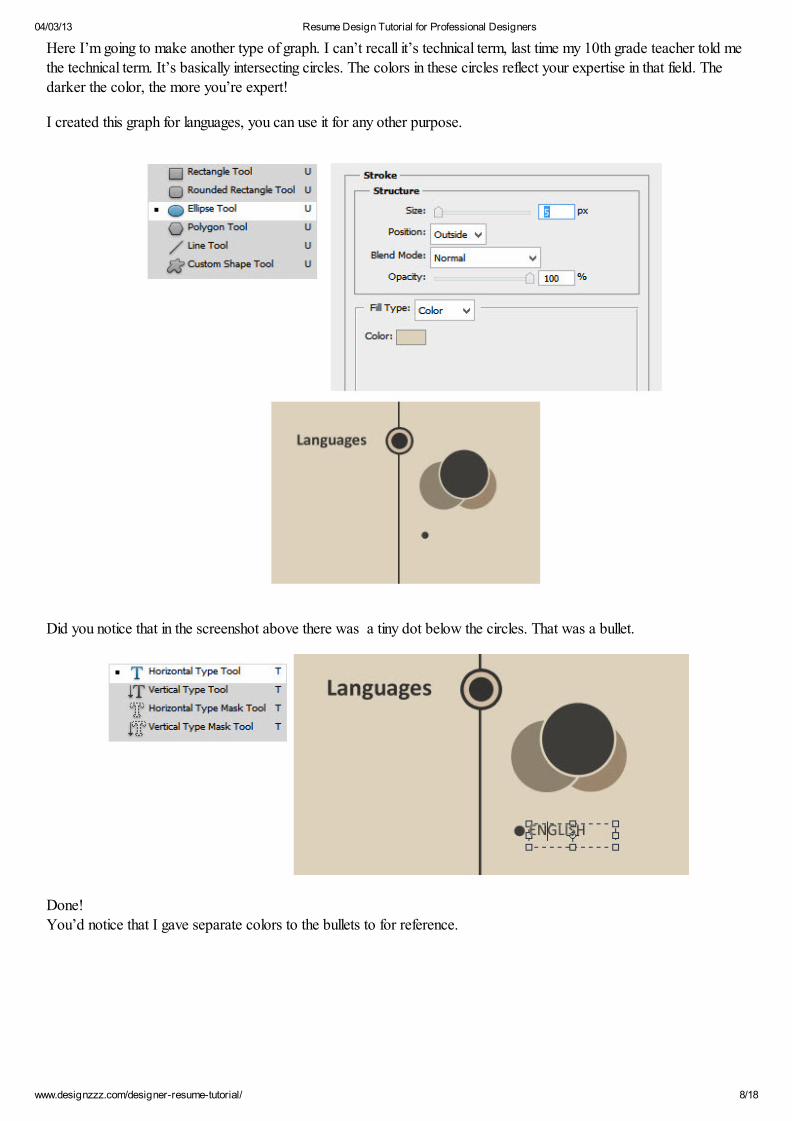
Here I’m going to make another type of graph. I can’t recall it’s technical term, last time my 10th grade teacher told methe technical term. It’s basically intersecting circles. The colors in these circles reflect your expertise in that field. Thedarker the color, the more you’re expert!
I created this graph for languages, you can use it for any other purpose.
Did you notice that in the screenshot above there was a tiny dot below the circles. That was a bullet.
Done!You’d notice that I gave separate colors to the bullets to for reference.

04/03/13 Resume Design Tutorial for Professional Designers
www.designzzz.com/designer-resume-tutorial/ 9/18
Time to note down your professional experience.For that, I copied the Education tab style again. This will create a symmetry. Same design on the left, on the right andgraphs in the center.
Finishing Note
People usually love to add a Mission Statement in their resumes. So here’s the place to add it.
04/03/13 Resume Design Tutorial for Professional Designers
www.designzzz.com/designer-resume-tutorial/ 10/18
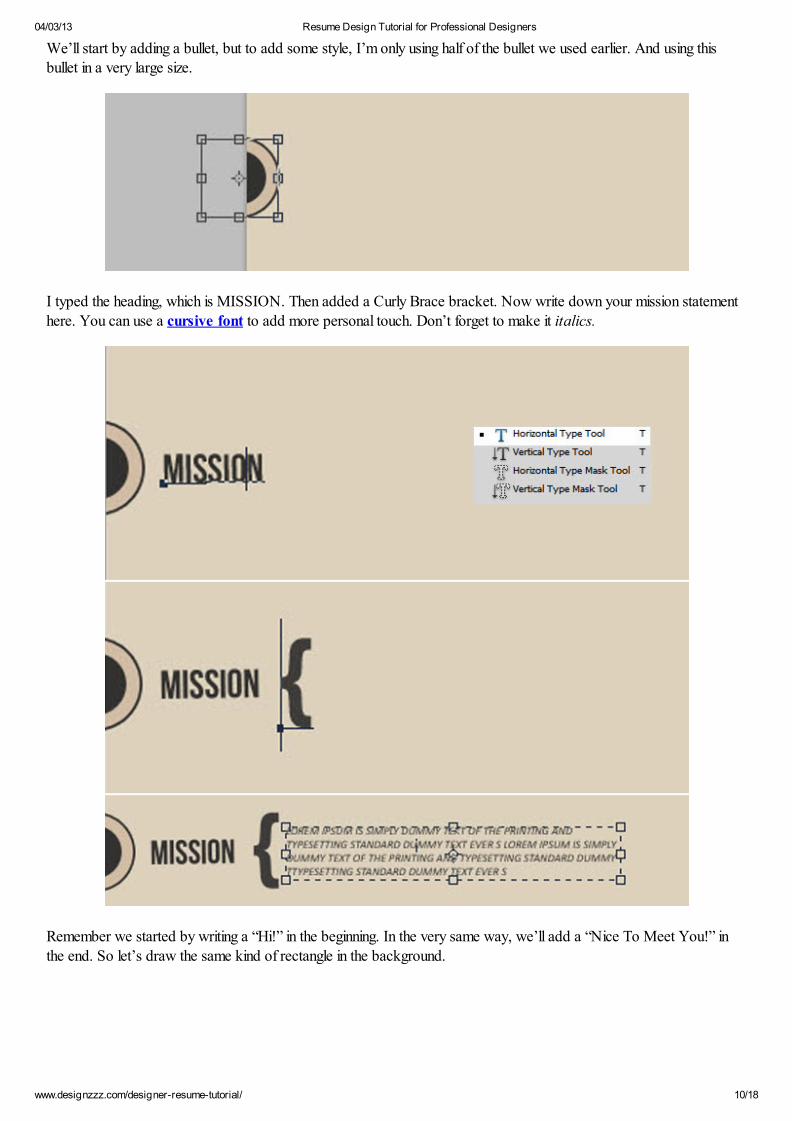
We’ll start by adding a bullet, but to add some style, I’m only using half of the bullet we used earlier. And using thisbullet in a very large size.
I typed the heading, which is MISSION. Then added a Curly Brace bracket. Now write down your mission statementhere. You can use a cursive font to add more personal touch. Don’t forget to make it italics.
Remember we started by writing a “Hi!” in the beginning. In the very same way, we’ll add a “Nice To Meet You!” inthe end. So let’s draw the same kind of rectangle in the background.
04/03/13 Resume Design Tutorial for Professional Designers
www.designzzz.com/designer-resume-tutorial/ 11/18
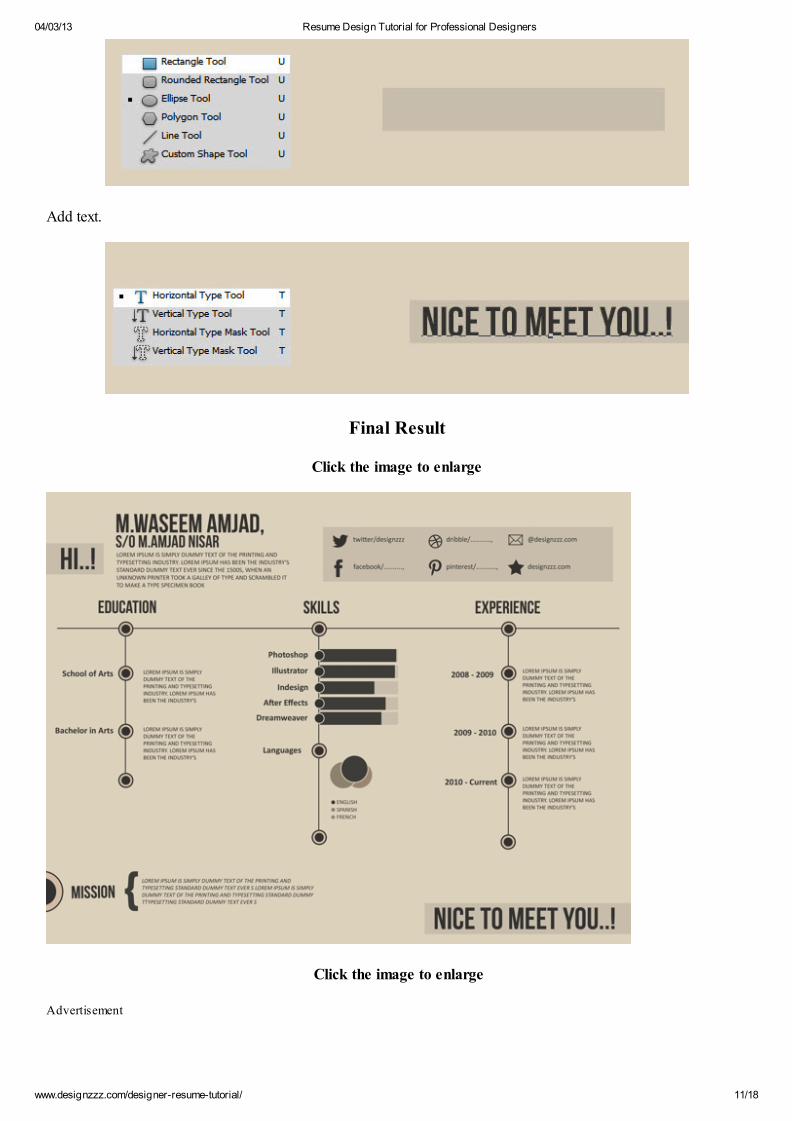
Add text.
Final Result
Click the image to enlarge
Click the image to enlarge
Advertisement
04/03/13 Resume Design Tutorial for Professional Designers
www.designzzz.com/designer-resume-tutorial/ 12/18
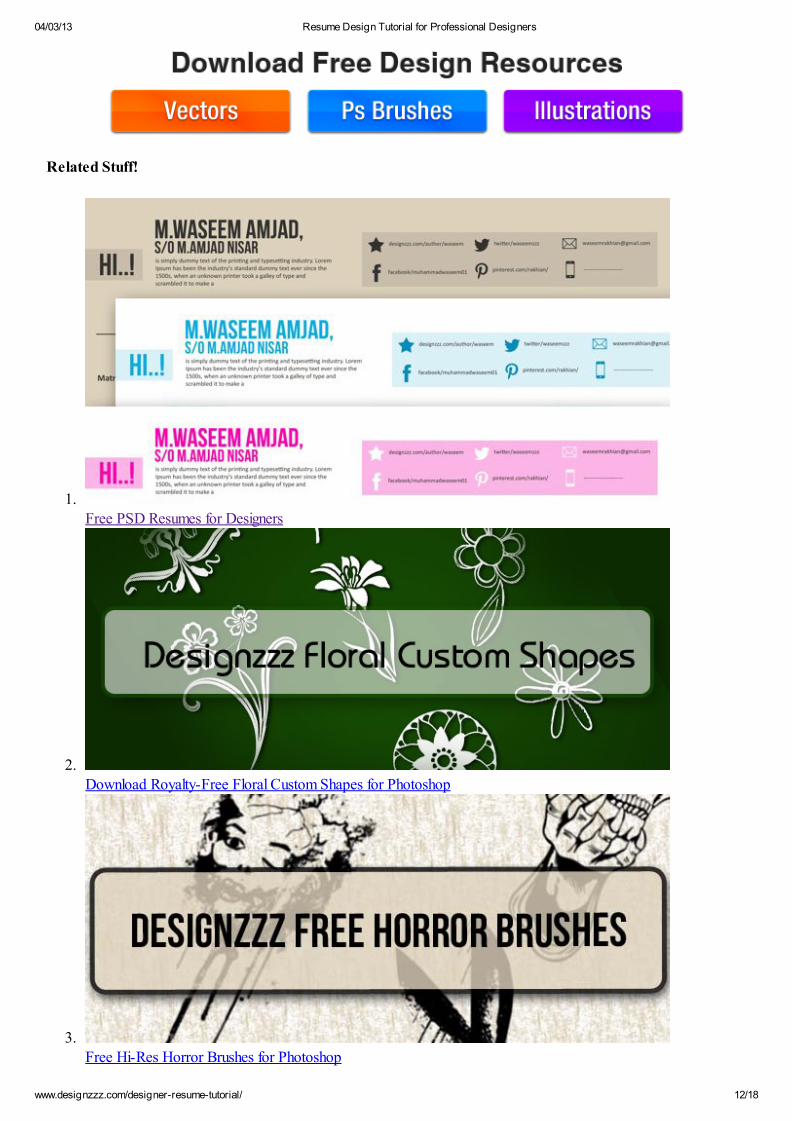
Related Stuff!
1. Free PSD Resumes for Designers
2. Download Royalty-Free Floral Custom Shapes for Photoshop
3. Free Hi-Res Horror Brushes for Photoshop

04/03/13 Resume Design Tutorial for Professional Designers
www.designzzz.com/designer-resume-tutorial/ 13/18
4.
High Resolution Free Floral Patterns for Photoshop
Published on: February 23, 2013
ENJOYED THE POST??
Share This Article!
TweetTweet
30
StumbleUpon1
26
Me gusta
7
Author
waseem
I'm Muhammad Waseem Amjad. I like Photography, Creativity. I'm a Graphic designer and also working for
Designzzz.com You can catch me on twitterAll Articles by waseem
04/03/13 Resume Design Tutorial for Professional Designers
www.designzzz.com/designer-resume-tutorial/ 14/18
2 Responses to “Creating a Designer’s Resume in Photoshop”
1. Dante Mdz. says:
February 24, 2013 at 6:49 pm
Very good. It will be helping to inspire me. Thanks!
Reply
2. mahi says:
March 1, 2013 at 11:30 pm
(y) Thumbs up mAn !!!
Reply
Leave a Reply
Name (required)
Mail (will not be published) (required)
Arma tu CV
www.ZonaJobs.com.ar
Envia tu CV y consigue Empleo enGrandes Empresas. ¡Registrate!
04/03/13 Resume Design Tutorial for Professional Designers
www.designzzz.com/designer-resume-tutorial/ 15/18
Submit Comment
Connect with Us:
Subscribe to our Newsletter!
email address Subscribe
We respect your Privacy!
Advertisements
04/03/13 Resume Design Tutorial for Professional Designers
www.designzzz.com/designer-resume-tutorial/ 16/18
Advertise Here
Designzzz on
+665
Follow
Popular Articles!
Giveaway: 7 Premium Web Hosting Accounts from ZymaGiveaway Winners: 5 Premium WordPress Themes by Rockable Themes
Creating a Designer’s Resume in Photoshop7 Things to Remember When Designing an eCommerce Website
20 Free and Famous Content Management Systems
Advertisements
04/03/13 Resume Design Tutorial for Professional Designers
www.designzzz.com/designer-resume-tutorial/ 17/18
CDN Powered By:
Site StuffPrivacy Policy
Contact UsAdvertise
04/03/13 Resume Design Tutorial for Professional Designers
www.designzzz.com/designer-resume-tutorial/ 18/18
Free StuffFonts
Photoshop Brushes
Connect Online
TwitterFacebook
RSS FeedEmail Updates
Google+
Connect with Us
Get Notified for Updates
email address Subscribe
Copyright © 2009 - 2013. All Rights Reserved. Designzzz
Related Documents