This document will guide you through the basic installation process for your new D-Link Wireless N Services Router. Building Networks for People DSR-250N Quick Installation Guide Installationsanleitung Guide d’installation Guía de instalación Guida di Installazione Documentation also available on CD and via the D-Link Website Quick Installation Guide Wireless Services Router Appliance

Welcome message from author
This document is posted to help you gain knowledge. Please leave a comment to let me know what you think about it! Share it to your friends and learn new things together.
Transcript

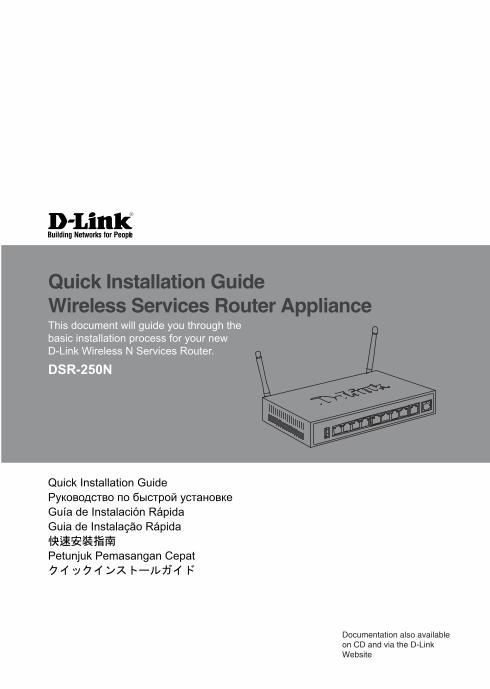
This document will guide you through the basic installation process for your new D-Link Wireless N Services Router.
Building Networks for People
DSR-250N
Quick Installation GuideInstallationsanleitungGuide d’installationGuía de instalaciónGuida di Installazione
Documentation also available on CD and via the D-Link Website
Quick Installation GuideWireless Services Router Appliance
2 D-Link Wireless N Services Router
ENGLISH About This Guide
This guide gives step by step instructions for setting up D-Link DSR-250N Services Router. Please note that the model you have purchased may appear slightly different from those shown in the illustrations.
Unpacking the ProductOpen the shipping carton and carefully unpack its contents. Please consult the packing list located in following information to make sure all items are present and undamaged. If any item is missing or damaged, please contact your local D-Link reseller for replacement. - One (1) DSR-250N Wireless Services Router
Appliance. - One (1) 12V/1.5A Power Adapter - One (1) Console Cable (RJ45-to-DB9 Cable) - One (1) Ethernet (CAT5 UTP/Straight Through)
Cable - One (1) Reference CD (CD-ROM containing
product documentation in PDF format) - Two (2) Detachable Omni-direction antennas .
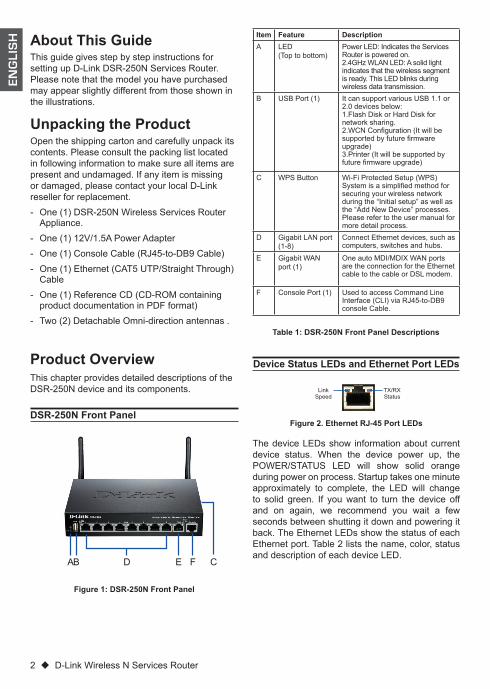
Item Feature DescriptionA LED
(Top to bottom)Power LED: Indicates the Services Router is powered on.2.4GHz WLAN LED: A solid light indicates that the wireless segment is ready. This LED blinks during wireless data transmission.
B USB Port (1) It can support various USB 1.1 or 2.0 devices below:1.Flash Disk or Hard Disk for network sharing.2.WCN Configuration (It will be supported by future firmware upgrade)3.Printer (It will be supported by future firmware upgrade)
C WPS Button Wi-Fi Protected Setup (WPS) System is a simplified method for securing your wireless network during the “Initial setup” as well as the “Add New Device” processes. Please refer to the user manual for more detail process.
D Gigabit LAN port (1-8)
Connect Ethernet devices, such as computers, switches and hubs.
E Gigabit WAN port (1)
One auto MDI/MDIX WAN ports are the connection for the Ethernet cable to the cable or DSL modem.
F Console Port (1) Used to access Command Line Interface (CLI) via RJ45-to-DB9 console Cable.
Table 1: DSR-250N Front Panel Descriptions
Device Status LEDs and Ethernet Port LEDs
The device LEDs show information about current device status. When the device power up, the POWER/STATUS LED will show solid orange during power on process. Startup takes one minute approximately to complete, the LED will change to solid green. If you want to turn the device off and on again, we recommend you wait a few seconds between shutting it down and powering it back. The Ethernet LEDs show the status of each Ethernet port. Table 2 lists the name, color, status and description of each device LED.
Figure 2. Ethernet RJ-45 Port LEDs
TX/RXStatus
LinkSpeed
DSR-250N Front Panel
Product Overview
Figure 1: DSR-250N Front Panel
This chapter provides detailed descriptions of the DSR-250N device and its components.
FDA CEB
D-Link Wireless N Services Router 3
ENGLISH
LED Indicators
Color Status Description
Power / Status
Orange/Green
Solid Orange
Device during power-on process
Solid Green Completion of power onBlinking Orange
Device is crashed and under recovery mode
Blinking Green
The system is defective, such firmware upgrades fail.
Light Off The device is power-off2.4GHz WLAN
Green Steady Green
The link is good
Blinking Green
There is activity on this port
Light Off No linkWPS Blue Blinking
BlueStart to process
Solid Blue The connection is successfully established
Light Off No Link.TX/RX Status
Green Light Off No Link.
Solid Green Link present.Blinking Green
Port is sending or receiving data.
LINK Speed
Green/Orange
Light Off Port is operating at 10Mbps.
Solid Green Port is operating at 100Mbps
Solid Orange
Port is operating at 1000Mbps
Connecting Power and Turn the Device On/Off
DSR-250N Default Interface Settings
Table 2: Device Status LED Descriptions
Installing and Connecting the DeviceThis chapter describes how to connect cables and power to the device.
Before You BeginObserve the following precautions to help prevent shutdowns, equipment failures and injuries:
- Before installation, always check that the power supply is disconnected
- Ensure that the room in which you operate the device has adequate air circulation and that the room temperature does Not exceed 40˚C (104˚F)
- Allow 1 meter (3 feet) of clear space to the front and back of the device.
- Do not place the device in an equipment rack frame that blocks the air vents on the sides of the chassis. Ensure that enclosed racks have fans and louvered sides.
- Correct these hazardous conditions before any installation: moist or wet floors, leaks, ungrounded or frayed power cables, or missing safety grounds.
To connect power to the device, plug the AC/DC power adapter into the DC power phone jet on the back panel of the device.Note: We recommend using a surge protector for the power connection.
To power on the DSR-250N device, press the DC power switch on the rear panel to the on position. To power off the device, press the power switch to the off position.
Ethernet Interface
Interface Type IP Address
Web-Based Management
DHCP Client
LAN(1-8) / WLAN
Static IP 192.168.10.1 Enabled Enabled
WAN DHCP Client
0.0.0.0 Disabled Disabled
Table 3: Default Interface Settings
Note: D-Link Services Routers only allow Web GUI access from LAN and WLAN interfaces by default for security reason.
4 D-Link Wireless N Services Router
ENGLISH
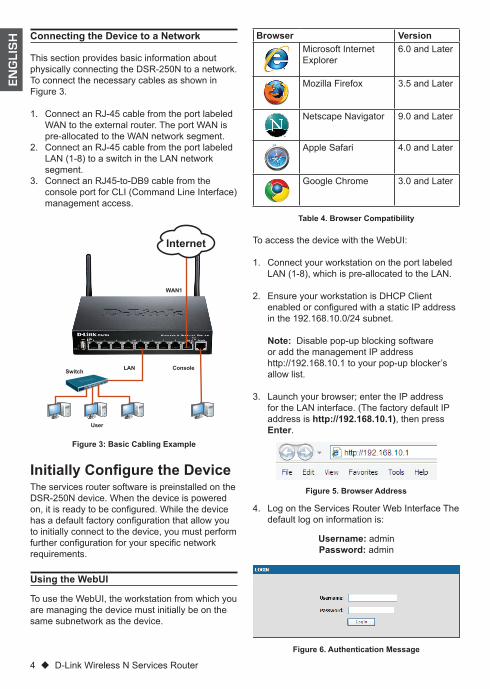
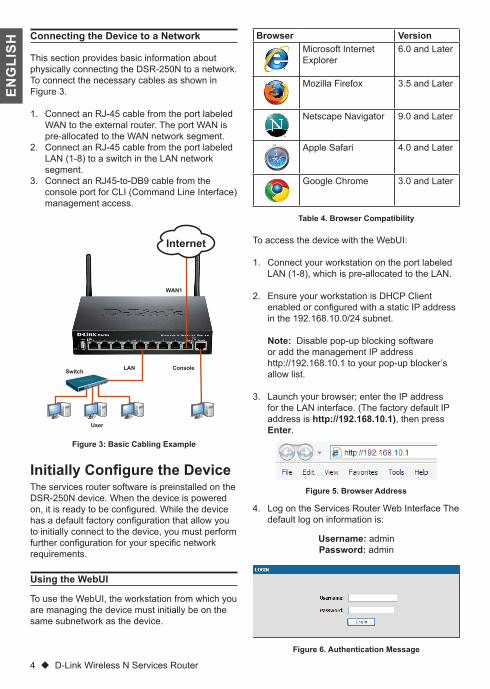
To access the device with the WebUI:
1. Connect your workstation on the port labeled LAN (1-8), which is pre-allocated to the LAN.
2. Ensure your workstation is DHCP Client enabled or configured with a static IP address in the 192.168.10.0/24 subnet. Note: Disable pop-up blocking software or add the management IP address http://192.168.10.1 to your pop-up blocker’s allow list.
3. Launch your browser; enter the IP address for the LAN interface. (The factory default IP address is http://192.168.10.1), then press Enter.
4. Log on the Services Router Web Interface The default log on information is:
Username: adminPassword: admin
Connecting the Device to a Network
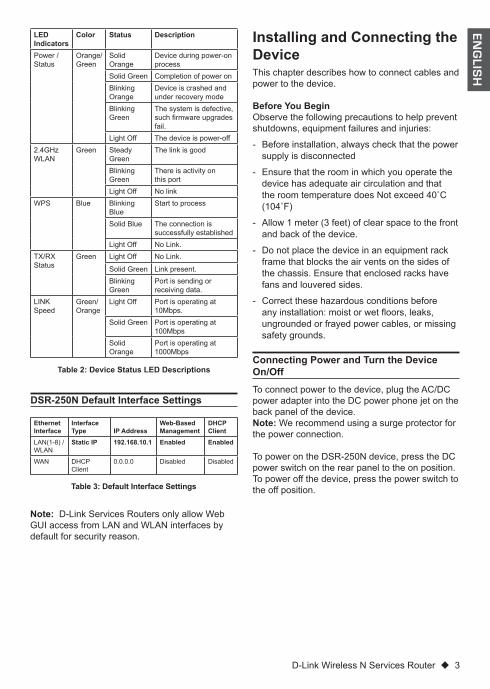
Figure 3: Basic Cabling Example
Initially Configure the DeviceThe services router software is preinstalled on the DSR-250N device. When the device is powered on, it is ready to be configured. While the device has a default factory configuration that allow you to initially connect to the device, you must perform further configuration for your specific network requirements.
Using the WebUI
To use the WebUI, the workstation from which you are managing the device must initially be on the same subnetwork as the device.
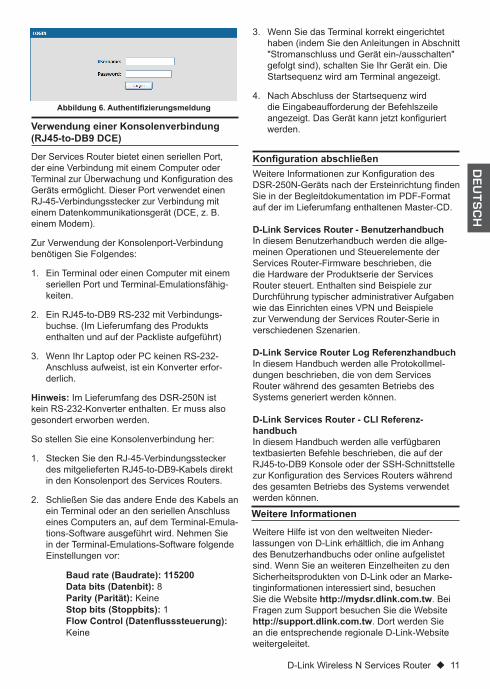
Figure 6. Authentication Message
Figure 5. Browser Address
Table 4. Browser Compatibility
Browser VersionMicrosoft Internet Explorer
6.0 and Later
Mozilla Firefox 3.5 and Later
Netscape Navigator 9.0 and Later
Apple Safari 4.0 and Later
Google Chrome 3.0 and Later
This section provides basic information about physically connecting the DSR-250N to a network. To connect the necessary cables as shown in Figure 3.
1. Connect an RJ-45 cable from the port labeled WAN to the external router. The port WAN is pre-allocated to the WAN network segment.
2. Connect an RJ-45 cable from the port labeled LAN (1-8) to a switch in the LAN network segment.
3. Connect an RJ45-to-DB9 cable from the console port for CLI (Command Line Interface) management access.
WAN1
LAN Console
Internet
Switch
User
D-Link Wireless N Services Router 5
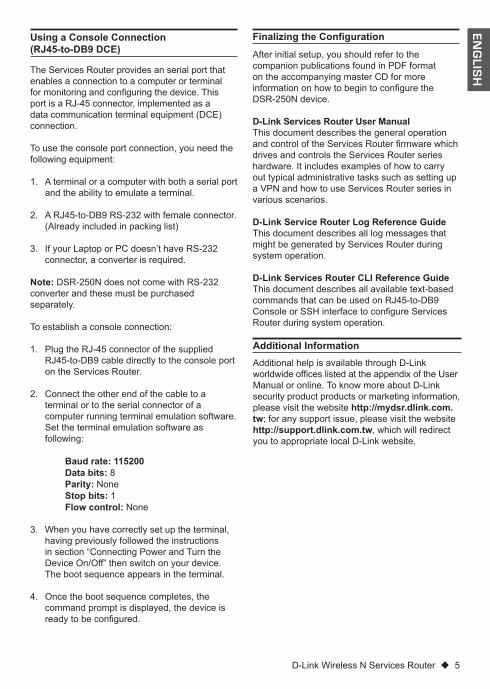
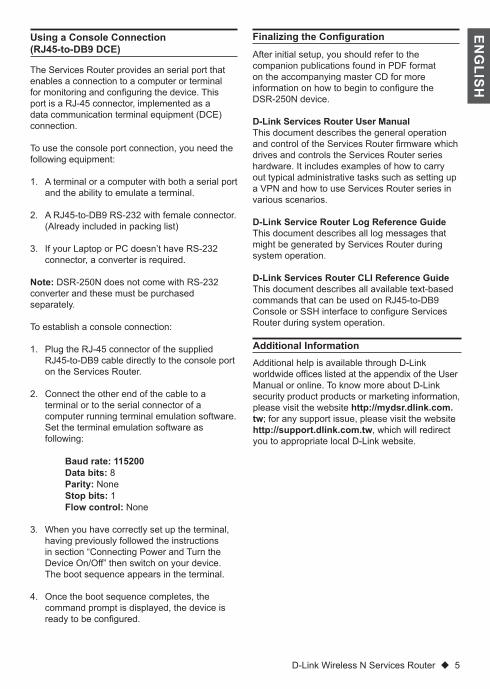
ENGLISHThe Services Router provides an serial port that
enables a connection to a computer or terminal for monitoring and configuring the device. This port is a RJ-45 connector, implemented as a data communication terminal equipment (DCE) connection.
To use the console port connection, you need the following equipment:
1. A terminal or a computer with both a serial port and the ability to emulate a terminal.
2. A RJ45-to-DB9 RS-232 with female connector. (Already included in packing list)
3. If your Laptop or PC doesn’t have RS-232 connector, a converter is required.
Note: DSR-250N does not come with RS-232 converter and these must be purchased separately.
To establish a console connection:
1. Plug the RJ-45 connector of the supplied RJ45-to-DB9 cable directly to the console port on the Services Router.
2. Connect the other end of the cable to a terminal or to the serial connector of a computer running terminal emulation software. Set the terminal emulation software as following:
Baud rate: 115200Data bits: 8Parity: NoneStop bits: 1Flow control: None
3. When you have correctly set up the terminal, having previously followed the instructions in section “Connecting Power and Turn the Device On/Off” then switch on your device. The boot sequence appears in the terminal.
4. Once the boot sequence completes, the command prompt is displayed, the device is ready to be configured.
Using a Console Connection (RJ45-to-DB9 DCE)
Additional help is available through D-Link worldwide offices listed at the appendix of the User Manual or online. To know more about D-Link security product products or marketing information, please visit the website http://mydsr.dlink.com.tw; for any support issue, please visit the website http://support.dlink.com.tw, which will redirect you to appropriate local D-Link website.
Additional Information
After initial setup, you should refer to the companion publications found in PDF format on the accompanying master CD for more information on how to begin to configure the DSR-250N device. D-Link Services Router User ManualThis document describes the general operation and control of the Services Router firmware which drives and controls the Services Router series hardware. It includes examples of how to carry out typical administrative tasks such as setting up a VPN and how to use Services Router series in various scenarios.
D-Link Service Router Log Reference GuideThis document describes all log messages that might be generated by Services Router during system operation.
D-Link Services Router CLI Reference GuideThis document describes all available text-based commands that can be used on RJ45-to-DB9 Console or SSH interface to configure Services Router during system operation.
Finalizing the Configuration
6 D-Link Wireless N Services Router
ENGLISH Technical Support
United Kingdom (Mon-Fri) website: http://www.dlink.co.uk FTP: ftp://ftp.dlink.co.ukHome Wireless/Broadband 0871 873 3000 (9.00am–06.00pm, Sat 10.00am-02.00pm)Managed, Smart, & Wireless Switches, or Firewalls 0871 873 0909 (09.00am- 05.30pm) (BT 10ppm, other carriers may vary.)
Ireland (Mon-Fri) All Products 1890 886 899 (09.00am-06.00pm, Sat 10.00am-02.00pm) Phone rates: €0.05ppm peak, €0.045ppm off peak times

Building Networks for People
DSR-250N
Diese Anleitung führt Sie durch den allgemeinen Installationsprozess für Ihren neuen D-Link Wireless N Services Router.
Die Dokumentation ist auch auf CD und über die D-Link-Website verfügbar.
SchnellinstallationsanleitungWireless Services Router Appliance
8 D-Link Wireless N Services Router
DEUTSCH
Informationen zum HandbuchDiese Anleitung weist Sie Schritt für Schritt an, wie Sie D-Link DSR-250N Services Router einrichten können. Beachten Sie, dass Ihr Modell sich möglicherweise geringfügig von den Abbil-dungen unterscheidet.
Lieferumfang und Auspacken des ProduktsÖffnen Sie den Versandkarton, entnehmen Sie den Inhalt und packen Sie ihn vorsichtig aus. Stellen Sie bitte sicher, dass alle auf der Packliste aufgeführten Artikel auch tatsächlich geliefert wurden und unbeschädigt sind. Sollte ein Artikel fehlen oder beschädigt sein, wenden Sie sich zum Zwecke einer Ersatzlieferung umgehend an Ihren D-Link-Fachhändler. - Ein (1) DSR-250N Wireless Services Router - Ein (1) 12V/1,5A Netzteil/Stromadapter - Ein (1) Konsolenkabel (RJ45-to-DB9-Kabel) - Ein (1) Ethernet-Kabel (CAT5 UTP/Straight-
Through) - Eine (1) Referenz-CD (CD-ROM mit der
Produktdokumentation im PDF-Format) - Zwei (2) abnehmbare, allseitig bewegliche
Antennen
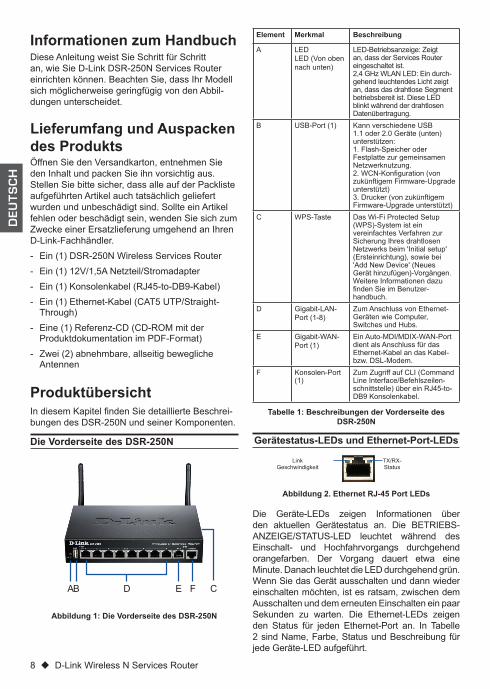
Element Merkmal Beschreibung
A LED LED (Von oben nach unten)
LED-Betriebsanzeige: Zeigt an, dass der Services Router eingeschaltet ist.2,4 GHz WLAN LED: Ein durch-gehend leuchtendes Licht zeigt an, dass das drahtlose Segment betriebsbereit ist. Diese LED blinkt während der drahtlosen Datenübertragung.
B USB-Port (1) Kann verschiedene USB 1.1 oder 2.0 Geräte (unten) unterstützen:1. Flash-Speicher oder Festplatte zur gemeinsamen Netzwerknutzung.2. WCN-Konfiguration (von zukünftigem Firmware-Upgrade unterstützt)3. Drucker (von zukünftigem Firmware-Upgrade unterstützt)
C WPS-Taste Das Wi-Fi Protected Setup (WPS)-System ist ein vereinfachtes Verfahren zur Sicherung Ihres drahtlosen Netzwerks beim 'Initial setup' (Ersteinrichtung), sowie bei 'Add New Device' (Neues Gerät hinzufügen)-Vorgängen. Weitere Informationen dazu finden Sie im Benutzer-handbuch.
D Gigabit-LAN-Port (1-8)
Zum Anschluss von Ethernet-Geräten wie Computer, Switches und Hubs.
E Gigabit-WAN-Port (1)
Ein Auto-MDI/MDIX-WAN-Port dient als Anschluss für das Ethernet-Kabel an das Kabel- bzw. DSL-Modem.
F Konsolen-Port (1)
Zum Zugriff auf CLI (Command Line Interface/Befehlszeilen-schnittstelle) über ein RJ45-to-DB9 Konsolenkabel.
Tabelle 1: Beschreibungen der Vorderseite des DSR-250N
Gerätestatus-LEDs und Ethernet-Port-LEDs
Die Geräte-LEDs zeigen Informationen über den aktuellen Gerätestatus an. Die BETRIEBS-ANZEIGE/STATUS-LED leuchtet während des Einschalt- und Hochfahrvorgangs durchgehend orangefarben. Der Vorgang dauert etwa eine Minute. Danach leuchtet die LED durchgehend grün. Wenn Sie das Gerät ausschalten und dann wieder einschalten möchten, ist es ratsam, zwischen dem Ausschalten und dem erneuten Einschalten ein paar Sekunden zu warten. Die Ethernet-LEDs zeigen den Status für jeden Ethernet-Port an. In Tabelle 2 sind Name, Farbe, Status und Beschreibung für jede Geräte-LED aufgeführt.
Abbildung 2. Ethernet RJ-45 Port LEDs
TX/RX-Status
LinkGeschwindigkeit
Die Vorderseite des DSR-250N
Produktübersicht
Abbildung 1: Die Vorderseite des DSR-250N
In diesem Kapitel finden Sie detaillierte Beschrei-bungen des DSR-250N und seiner Komponenten.
FDA CEB

D-Link Wireless N Services Router 9
DEUTSCH
LED- Anzeigen
Farbe Status Beschreibung
Betriebsan-zeige / Status
Orange-farben/Grün
Durchgehend orangefarben
Gerät während Einschalt- und Hochfahrvorgang
Durchgehend grün
Ende Hochfahr-vorgang
Blinkt orange-farben
Gerät abgestürzt und in Wieder-herstellmodus
Grün blinkend System defekt. Firmware-Upgrades fehlge-schlagen.
LED leuchtet nicht
Gerät ist ausge-schaltet.
2,4 GHz WLAN
Grün Durchgehend grün
Gute Verbindung
Grün blinkend Dieser Port ist aktiv
LED leuchtet nicht
Keine Verbindung
WPS Blau Blau blinkend ProzessstartDurchgehend blau
Verbindung erfolgreich hergestellt
LED leuchtet nicht
Keine Verbindung
TX/RX-Status Grün LED leuchtet nicht
Keine Verbindung
Durchgehend grün
Verbindung hergestellt
Grün blinkend Port sendet oder empfängt Daten
Verbindungs-geschwin-digkeit
Grün/Orange-farben
LED leuchtet nicht
Port-Betrieb mit 10 Mbit/s
Durchgehend grün
Port-Betrieb mit 100 Mbit/s
Durchgehend orangefarben
Port-Betrieb mit 1000 Mbit/s
Stromanschluss und Gerät ein-/ausschalten
Standardeinstellungen für die DSR-250N-Schnittstellen
Tabelle 2: Beschreibungen der Status-LEDs des Geräts
Gerät installieren und an-schließenIn diesem Kapitel wird beschrieben, wie Sie Kabel am Gerät anschließen und die Stromzufuhr herstellen.
Erste SchritteBeachten Sie die folgenden Vorsichtsmaß-nahmen, um Fehler, Geräteausfälle und Verlet-zungen zu vermeiden:
- Vor der Installation muss die Stromversorgung getrennt werden
- Das Gerät muss in einem Raum mit ausrei-chender Belüftung betrieben werden. Die Raumtemperatur darf 40˚C nicht überschreiten.
- Vor und hinter dem Gerät muss freier Platz von etwa 1 Meter sein.
- Achten Sie beim Installieren des Geräts in einem Rackrahmen darauf, dass die Lüftungs-öffnungen an den Seiten des Gehäuses nicht blockiert sind. Stellen Sie sicher, dass geschlossene Racks über Lüfter und seitliche Lüftungsschlitze verfügen.
- Beseitigen Sie vor der Installation die folgenden Gefahrenquellen: feuchte oder nasse Böden, Lecks, beschädigte oder nicht geerdete Strom-kabel und fehlende Sicherheitserdungen.
Zur Stromversorgung des Geräts stecken Sie das Netzteil (Wechsel-/Gleichstrom-Adapter) in die Netzteil-Telefonbuchse an der Geräterückseite.Hinweis: D-Link empfiehlt die Verwendung eines Überspannungsschutzes für die Stromverbindung.
Zum Einschalten des DSR-250N stellen Sie den Netzschalter an der Geräterückseite in die Position EIN (On). Zum Ausschalten des Geräts stellen Sie den Netzschalter in die Position AUS (Off).
Ethernet-Schnitt-stelle
Schnittstel-lentyp IP-Adresse
Webba-siertes Management
DHCP Client
LAN (1-8) / WLAN
Statische IP
192.168.10.1 Aktiviert Aktiviert
WAN DHCP Client
0.0.0.0 Deaktiviert Deakti-viert
Tabelle 3: Standardeinstellungen für die Schnittstellen
Hinweis: Standardmäßig ermöglichen D-Link Services Router aus Sicherheitsgründen nur den webbasierten Zugriff über die grafische Benut-zeroberfläche von LAN- und WLAN-Schnittstellen.
10 D-Link Wireless N Services Router
DEUTSCH
So greifen Sie über die WebUI auf das Gerät zu:
1. Schließen Sie Ihren Arbeitsplatzrechner am Port an, der mit LAN (1-8) gekennzeichnet und standardmäßig dem LAN zugewiesen ist.
2. Stellen Sie sicher, dass Ihr Arbeitsplatzrechner für den automatischen Bezug der IP-Adresse eingestellt ist (DHCP-Client-fähig) oder mit einer statischen IP-Adresse im Subnetz 192.168.10.0/24 konfiguriert ist. Hinweis: Deaktivieren Sie die Popup-Blocker-Software oder fügen Sie die Management-IP-Adresse http://192.168.10.1 der Liste der zugelassenen Adressen Ihrer Popup-Blocker-Software hinzu.
3. Starten Sie Ihren Browser. Geben Sie die IP-Adresse für die LAN-Schnittstelle ein. (Die werkseitig vorgegebene Standard-IP-Adresse ist http://192.168.10.1). Drücken Sie dann auf die Eingabetaste.
4. Melden Sie sich auf der Services Router-Web-Benutzeroberfläche an. Die standardmäßigen Anmeldeinformationen lauten:
Username (Benutzername): adminPassword (Kennwort): admin
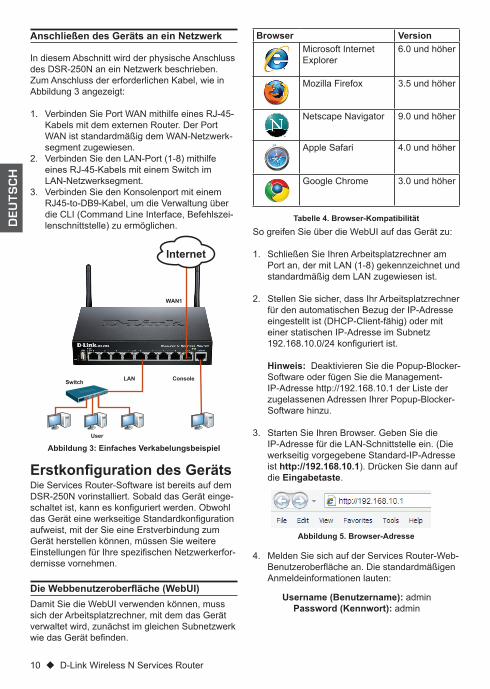
Anschließen des Geräts an ein Netzwerk
Abbildung 3: Einfaches Verkabelungsbeispiel
Erstkonfiguration des GerätsDie Services Router-Software ist bereits auf dem DSR-250N vorinstalliert. Sobald das Gerät einge-schaltet ist, kann es konfiguriert werden. Obwohl das Gerät eine werkseitige Standardkonfiguration aufweist, mit der Sie eine Erstverbindung zum Gerät herstellen können, müssen Sie weitere Einstellungen für Ihre spezifischen Netzwerkerfor-dernisse vornehmen.
Die Webbenutzeroberfläche (WebUI)Damit Sie die WebUI verwenden können, muss sich der Arbeitsplatzrechner, mit dem das Gerät verwaltet wird, zunächst im gleichen Subnetzwerk wie das Gerät befinden.
Abbildung 5. Browser-Adresse
Tabelle 4. Browser-Kompatibilität
Browser VersionMicrosoft Internet Explorer
6.0 und höher
Mozilla Firefox 3.5 und höher
Netscape Navigator 9.0 und höher
Apple Safari 4.0 und höher
Google Chrome 3.0 und höher
In diesem Abschnitt wird der physische Anschluss des DSR-250N an ein Netzwerk beschrieben. Zum Anschluss der erforderlichen Kabel, wie in Abbildung 3 angezeigt:
1. Verbinden Sie Port WAN mithilfe eines RJ-45-Kabels mit dem externen Router. Der Port WAN ist standardmäßig dem WAN-Netzwerk-segment zugewiesen.
2. Verbinden Sie den LAN-Port (1-8) mithilfe eines RJ-45-Kabels mit einem Switch im LAN-Netzwerksegment.
3. Verbinden Sie den Konsolenport mit einem RJ45-to-DB9-Kabel, um die Verwaltung über die CLI (Command Line Interface, Befehlszei-lenschnittstelle) zu ermöglichen.
WAN1
LAN Console
Internet
Switch
User
D-Link Wireless N Services Router 11
DEUTSCH
Der Services Router bietet einen seriellen Port, der eine Verbindung mit einem Computer oder Terminal zur Überwachung und Konfiguration des Geräts ermöglicht. Dieser Port verwendet einen RJ-45-Verbindungsstecker zur Verbindung mit einem Datenkommunikationsgerät (DCE, z. B. einem Modem).
Zur Verwendung der Konsolenport-Verbindung benötigen Sie Folgendes:
1. Ein Terminal oder einen Computer mit einem seriellen Port und Terminal-Emulationsfähig-keiten.
2. Ein RJ45-to-DB9 RS-232 mit Verbindungs-buchse. (Im Lieferumfang des Produkts enthalten und auf der Packliste aufgeführt)
3. Wenn Ihr Laptop oder PC keinen RS-232-Anschluss aufweist, ist ein Konverter erfor-derlich.
Hinweis: Im Lieferumfang des DSR-250N ist kein RS-232-Konverter enthalten. Er muss also gesondert erworben werden.
So stellen Sie eine Konsolenverbindung her:
1. Stecken Sie den RJ-45-Verbindungsstecker des mitgelieferten RJ45-to-DB9-Kabels direkt in den Konsolenport des Services Routers.
2. Schließen Sie das andere Ende des Kabels an ein Terminal oder an den seriellen Anschluss eines Computers an, auf dem Terminal-Emula-tions-Software ausgeführt wird. Nehmen Sie in der Terminal-Emulations-Software folgende Einstellungen vor:
Baud rate (Baudrate): 115200Data bits (Datenbit): 8Parity (Parität): KeineStop bits (Stoppbits): 1Flow Control (Datenflusssteuerung): Keine
Verwendung einer Konsolenverbindung (RJ45-to-DB9 DCE)
Weitere Hilfe ist von den weltweiten Nieder-lassungen von D-Link erhältlich, die im Anhang des Benutzerhandbuchs oder online aufgelistet sind. Wenn Sie an weiteren Einzelheiten zu den Sicherheitsprodukten von D-Link oder an Marke-tinginformationen interessiert sind, besuchen Sie die Website http://mydsr.dlink.com.tw. Bei Fragen zum Support besuchen Sie die Website http://support.dlink.com.tw. Dort werden Sie an die entsprechende regionale D-Link-Website weitergeleitet.
Weitere Informationen
Weitere Informationen zur Konfiguration des DSR-250N-Geräts nach der Ersteinrichtung finden Sie in der Begleitdokumentation im PDF-Format auf der im Lieferumfang enthaltenen Master-CD. D-Link Services Router - BenutzerhandbuchIn diesem Benutzerhandbuch werden die allge-meinen Operationen und Steuerelemente der Services Router-Firmware beschrieben, die die Hardware der Produktserie der Services Router steuert. Enthalten sind Beispiele zur Durchführung typischer administrativer Aufgaben wie das Einrichten eines VPN und Beispiele zur Verwendung der Services Router-Serie in verschiedenen Szenarien.
D-Link Service Router Log ReferenzhandbuchIn diesem Handbuch werden alle Protokollmel-dungen beschrieben, die von dem Services Router während des gesamten Betriebs des Systems generiert werden können.
D-Link Services Router - CLI Referenz-handbuchIn diesem Handbuch werden alle verfügbaren textbasierten Befehle beschrieben, die auf der RJ45-to-DB9 Konsole oder der SSH-Schnittstelle zur Konfiguration des Services Routers während des gesamten Betriebs des Systems verwendet werden können.
Konfiguration abschließen
Abbildung 6. Authentifizierungsmeldung
3. Wenn Sie das Terminal korrekt eingerichtet haben (indem Sie den Anleitungen in Abschnitt "Stromanschluss und Gerät ein-/ausschalten" gefolgt sind), schalten Sie Ihr Gerät ein. Die Startsequenz wird am Terminal angezeigt.
4. Nach Abschluss der Startsequenz wird die Eingabeaufforderung der Befehlszeile angezeigt. Das Gerät kann jetzt konfiguriert werden.
12 D-Link Wireless N Services Router
DEUTSCH
Technischer SupportDeutschland: Web: http://www.dlink.de Telefon: +49(0)1805 2787 0,14 € pro Minute Zeiten: Mo. –Fr. 09:00 – 17:30 UhrÖsterreich: Web: http://www.dlink.at Telefon: +43(0)820 480084 0,116 € pro Minute Zeiten: Mo. –Fr. 09:00 – 17:30 UhrSchweiz: Web: http://www.dlink.ch Telefon: +41(0)848 331100 0,08 CHF pro Minute Zeiten: Mo. –Fr. 09:00 – 17:30 Uhr* Gebühren aus Mobilnetzen und von anderen Providern können abweichen.

Building Networks for People
DSR-250N
Ce document vous guidera tout au long de la procédure élémentaire d'installation de votre nouveau routeur de services Wireless N D-Link.
Documentation également disponible sur CD et sur le site Web de D-Link.
Guide d'installation rapideRouteur de services sans fil
14 D-Link Wireless N Services Router
FRANÇAIS
À Propos de ce GuideCe guide fournit des instructions qui vous aideront à configurer étape par étape le routeur de services DSR-250N D-Link. Notez que le modèle que vous avez acheté peut légèrement différer de celui illustré sur les figures.
Déballage du produitOuvrez le carton d'emballage et déballez soigneu-sement son contenu. Veuillez consulter la liste d'emballage suivante pour vérifier que tous les éléments sont présents et non endommagés. Si un des éléments est manquant ou endommagé, veuillez contacter votre revendeur D-Link local pour obtenir un remplacement. - Un (1) routeur de services sans fil DSR-250N. - Un (1) adaptateur secteur 12 V/1,5 A - Un (1) câble de console (câble RJ45 à DB9) - Un (1) câble Ethernet (CAT5 UTP/droit) - Un (1) CD de référence (CD-ROM contenant la
documentation du produit au format PDF) - Deux (2) antennes omni-directionnelles
amovibles
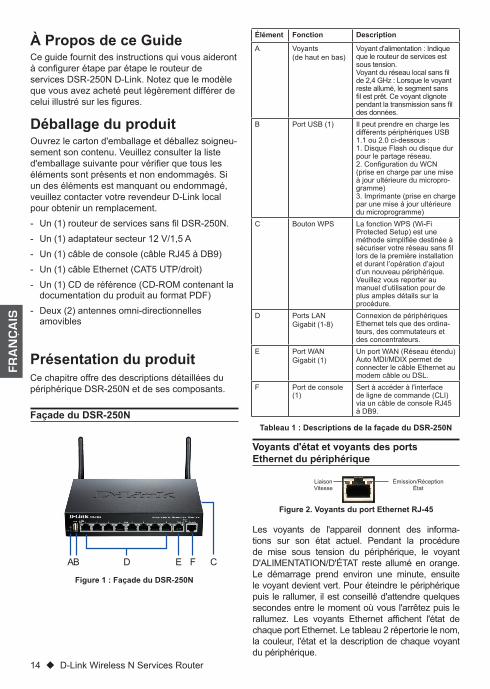
Élément Fonction Description
A Voyants (de haut en bas)
Voyant d'alimentation : Indique que le routeur de services est sous tension.Voyant du réseau local sans fil de 2,4 GHz : Lorsque le voyant reste allumé, le segment sans fil est prêt. Ce voyant clignote pendant la transmission sans fil des données.
B Port USB (1) Il peut prendre en charge les différents périphériques USB 1.1 ou 2.0 ci-dessous :1. Disque Flash ou disque dur pour le partage réseau.2. Configuration du WCN (prise en charge par une mise à jour ultérieure du micropro-gramme)3. Imprimante (prise en charge par une mise à jour ultérieure du microprogramme)
C Bouton WPS La fonction WPS (Wi-Fi Protected Setup) est une méthode simplifiée destinée à sécuriser votre réseau sans fil lors de la première installation et durant l’opération d’ajout d’un nouveau périphérique. Veuillez vous reporter au manuel d’utilisation pour de plus amples détails sur la procédure.
D Ports LAN Gigabit (1-8)
Connexion de périphériques Ethernet tels que des ordina-teurs, des commutateurs et des concentrateurs.
E Port WAN Gigabit (1)
Un port WAN (Réseau étendu) Auto MDI/MDIX permet de connecter le câble Ethernet au modem câble ou DSL.
F Port de console (1)
Sert à accéder à l'interface de ligne de commande (CLI) via un câble de console RJ45 à DB9.
Tableau 1 : Descriptions de la façade du DSR-250N
Voyants d'état et voyants des ports Ethernet du périphérique
Les voyants de l'appareil donnent des informa-tions sur son état actuel. Pendant la procédure de mise sous tension du périphérique, le voyant D'ALIMENTATION/D'ÉTAT reste allumé en orange. Le démarrage prend environ une minute, ensuite le voyant devient vert. Pour éteindre le périphérique puis le rallumer, il est conseillé d'attendre quelques secondes entre le moment où vous l'arrêtez puis le rallumez. Les voyants Ethernet affichent l'état de chaque port Ethernet. Le tableau 2 répertorie le nom, la couleur, l'état et la description de chaque voyant du périphérique.
Figure 2. Voyants du port Ethernet RJ-45
Émission/RéceptionÉtat
LiaisonVitesse
Façade du DSR-250N
Présentation du produit
Figure 1 : Façade du DSR-250N
Ce chapitre offre des descriptions détaillées du périphérique DSR-250N et de ses composants.
FDA CEB
D-Link Wireless N Services Router 15
FRANÇAIS
Voyants lumineux
Couleur État Description
Alimen-tation/ État
Orange / Vert
Orange fixe Périphérique pendant la procédure de mise sous tension
Vert fixe Mise sous tension terminée
Orange clignotant
Le périphérique a planté ou est en mode de récupération
Vert clignotant
Le système est défectueux, par exemple suite à un échec de mise à jour de microprogramme.
Voyant éteint
Le périphérique est éteint.
Réseau local sans fil de 2,4 GHz
Vert Vert fixe La connexion est correcte.
Vert clignotant
Ce port présente une activité.
Voyant éteint
Pas de liaison.
WPS Bleu Bleu clignotant
Début de la procédure.
Bleu fixe La connexion a été établie avec succès.
Voyant éteint
Pas de connexion.
Émission/Réception
Vert Voyant éteint
Pas de connexion.
Vert fixe Une connexion est active.
Vert clignotant
Le port envoie ou reçoit des données.
Vitesse de la LIAISON
Vert / Orange
Voyant éteint
Le port fonctionne à 10 Mbits/s.
Vert fixe Le port fonctionne à 100 Mbits/s.
Orange fixe Le port fonctionne à 1 000 Mbits/s.
Connexion de l'alimentation et allumer/éteindre le périphérique
Paramètres par défaut de l'interface du DSR-250N
Tableau 2 : Description du voyant d'état de l'appareil
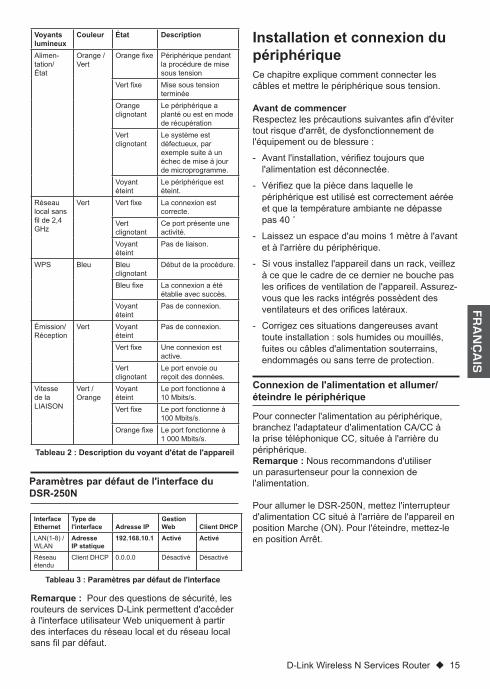
Installation et connexion du périphériqueCe chapitre explique comment connecter les câbles et mettre le périphérique sous tension.
Avant de commencerRespectez les précautions suivantes afin d'éviter tout risque d'arrêt, de dysfonctionnement de l'équipement ou de blessure :
- Avant l'installation, vérifiez toujours que l'alimentation est déconnectée.
- Vérifiez que la pièce dans laquelle le périphérique est utilisé est correctement aérée et que la température ambiante ne dépasse pas 40 ˚
- Laissez un espace d'au moins 1 mètre à l'avant et à l'arrière du périphérique.
- Si vous installez l'appareil dans un rack, veillez à ce que le cadre de ce dernier ne bouche pas les orifices de ventilation de l'appareil. Assurez-vous que les racks intégrés possèdent des ventilateurs et des orifices latéraux.
- Corrigez ces situations dangereuses avant toute installation : sols humides ou mouillés, fuites ou câbles d'alimentation souterrains, endommagés ou sans terre de protection.
Pour connecter l'alimentation au périphérique, branchez l'adaptateur d'alimentation CA/CC à la prise téléphonique CC, située à l'arrière du périphérique.Remarque : Nous recommandons d'utiliser un parasurtenseur pour la connexion de l'alimentation.
Pour allumer le DSR-250N, mettez l'interrupteur d'alimentation CC situé à l'arrière de l'appareil en position Marche (ON). Pour l'éteindre, mettez-le en position Arrêt.
Interface Ethernet
Type de l'interface Adresse IP
Gestion Web Client DHCP
LAN(1-8) / WLAN
Adresse IP statique
192.168.10.1 Activé Activé
Réseau étendu
Client DHCP 0.0.0.0 Désactivé Désactivé
Tableau 3 : Paramètres par défaut de l'interface
Remarque : Pour des questions de sécurité, les routeurs de services D-Link permettent d'accéder à l'interface utilisateur Web uniquement à partir des interfaces du réseau local et du réseau local sans fil par défaut.
16 D-Link Wireless N Services Router
FRANÇAIS
Pour accéder au périphérique via l'interface Web :
1. Connectez votre poste de travail au port étiqueté LAN (1-8), qui est pré-affecté au réseau local.
2. Assurez-vous que le poste de travail est un client DHCP ou qu'il configuré avec une adresse IP statique dans le sous-réseau 192.168.10.0/24. Remarque :Désactivez le blocage des fenêtres publicitaires ou ajoutez l'adresse IP de gestion http://192.168.10.1 à la liste des sites autorisés du bloqueur de fenêtres publici-taires.
3. Lancez votre navigateur, puis saisissez l'adresse IP de l'interface du réseau local. (l'adresse IP d'usine par défaut est http://192.168.10.1), puis appuyez sur Entrée.
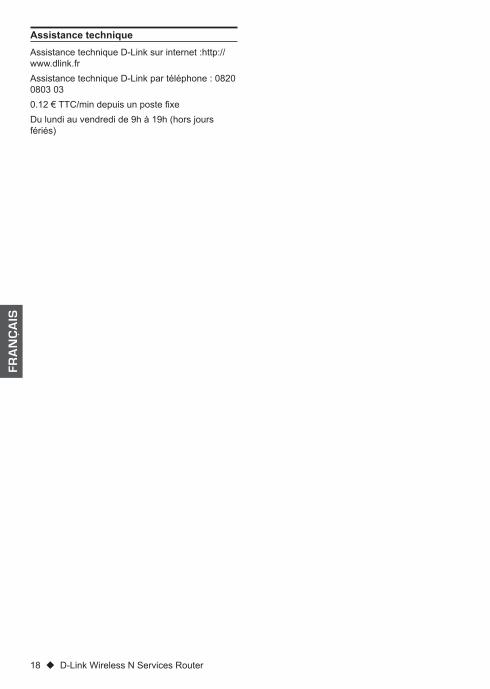
4. Connectez-vous à l'interface web du routeur de services. Par défaut, les informations d'ouverture de session sont les suivantes :
Nom d’utilisateur : adminPassword (Mot de passe) : admin
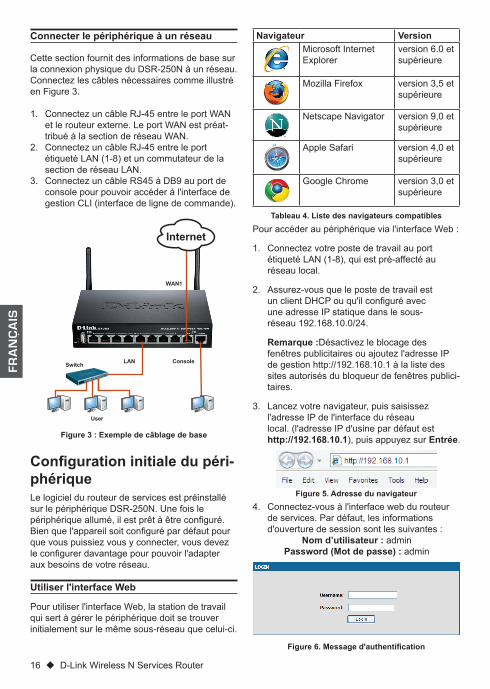
Connecter le périphérique à un réseau
Figure 3 : Exemple de câblage de base
Configuration initiale du péri-phériqueLe logiciel du routeur de services est préinstallé sur le périphérique DSR-250N. Une fois le périphérique allumé, il est prêt à être configuré. Bien que l'appareil soit configuré par défaut pour que vous puissiez vous y connecter, vous devez le configurer davantage pour pouvoir l'adapter aux besoins de votre réseau.
Utiliser l'interface Web
Pour utiliser l'interface Web, la station de travail qui sert à gérer le périphérique doit se trouver initialement sur le même sous-réseau que celui-ci.
Figure 6. Message d'authentification
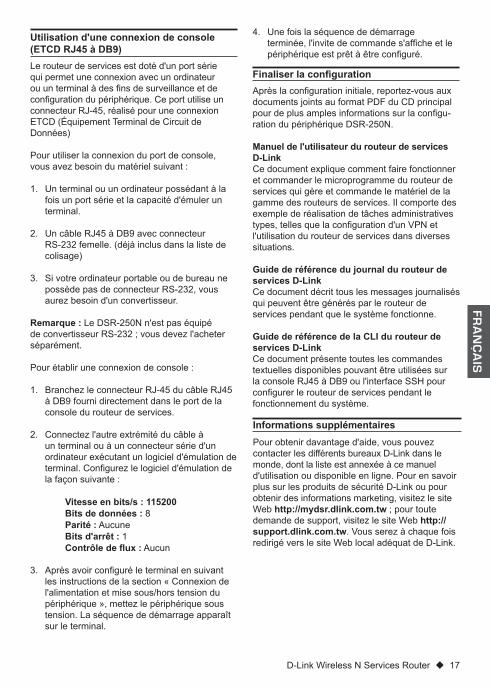
Figure 5. Adresse du navigateur
Tableau 4. Liste des navigateurs compatibles
Navigateur VersionMicrosoft Internet Explorer
version 6.0 et supérieure
Mozilla Firefox version 3,5 et supérieure
Netscape Navigator version 9,0 et supérieure
Apple Safari version 4,0 et supérieure
Google Chrome version 3,0 et supérieure
Cette section fournit des informations de base sur la connexion physique du DSR-250N à un réseau. Connectez les câbles nécessaires comme illustré en Figure 3.
1. Connectez un câble RJ-45 entre le port WAN et le routeur externe. Le port WAN est préat-tribué à la section de réseau WAN.
2. Connectez un câble RJ-45 entre le port étiqueté LAN (1-8) et un commutateur de la section de réseau LAN.
3. Connectez un câble RS45 à DB9 au port de console pour pouvoir accéder à l'interface de gestion CLI (interface de ligne de commande).
WAN1
LAN Console
Internet
Switch
User
D-Link Wireless N Services Router 17
FRANÇAIS
Le routeur de services est doté d'un port série qui permet une connexion avec un ordinateur ou un terminal à des fins de surveillance et de configuration du périphérique. Ce port utilise un connecteur RJ-45, réalisé pour une connexion ETCD (Équipement Terminal de Circuit de Données)
Pour utiliser la connexion du port de console, vous avez besoin du matériel suivant :
1. Un terminal ou un ordinateur possédant à la fois un port série et la capacité d'émuler un terminal.
2. Un câble RJ45 à DB9 avec connecteur RS-232 femelle. (déjà inclus dans la liste de colisage)
3. Si votre ordinateur portable ou de bureau ne possède pas de connecteur RS-232, vous aurez besoin d'un convertisseur.
Remarque : Le DSR-250N n'est pas équipé de convertisseur RS-232 ; vous devez l'acheter séparément.
Pour établir une connexion de console :
1. Branchez le connecteur RJ-45 du câble RJ45 à DB9 fourni directement dans le port de la console du routeur de services.
2. Connectez l'autre extrémité du câble à un terminal ou à un connecteur série d'un ordinateur exécutant un logiciel d'émulation de terminal. Configurez le logiciel d'émulation de la façon suivante :
Vitesse en bits/s : 115200Bits de données : 8Parité : AucuneBits d'arrêt : 1Contrôle de flux : Aucun
3. Après avoir configuré le terminal en suivant les instructions de la section « Connexion de l'alimentation et mise sous/hors tension du périphérique », mettez le périphérique sous tension. La séquence de démarrage apparaît sur le terminal.
Utilisation d'une connexion de console (ETCD RJ45 à DB9)
Pour obtenir davantage d'aide, vous pouvez contacter les différents bureaux D-Link dans le monde, dont la liste est annexée à ce manuel d'utilisation ou disponible en ligne. Pour en savoir plus sur les produits de sécurité D-Link ou pour obtenir des informations marketing, visitez le site Web http://mydsr.dlink.com.tw ; pour toute demande de support, visitez le site Web http://support.dlink.com.tw. Vous serez à chaque fois redirigé vers le site Web local adéquat de D-Link.
Informations supplémentaires
Après la configuration initiale, reportez-vous aux documents joints au format PDF du CD principal pour de plus amples informations sur la configu-ration du périphérique DSR-250N. Manuel de l'utilisateur du routeur de services D-LinkCe document explique comment faire fonctionner et commander le microprogramme du routeur de services qui gère et commande le matériel de la gamme des routeurs de services. Il comporte des exemple de réalisation de tâches administratives types, telles que la configuration d'un VPN et l'utilisation du routeur de services dans diverses situations.
Guide de référence du journal du routeur de services D-LinkCe document décrit tous les messages journalisés qui peuvent être générés par le routeur de services pendant que le système fonctionne.
Guide de référence de la CLI du routeur de services D-LinkCe document présente toutes les commandes textuelles disponibles pouvant être utilisées sur la console RJ45 à DB9 ou l'interface SSH pour configurer le routeur de services pendant le fonctionnement du système.
Finaliser la configuration
4. Une fois la séquence de démarrage terminée, l'invite de commande s'affiche et le périphérique est prêt à être configuré.
18 D-Link Wireless N Services Router
FRANÇAIS
Assistance techniqueAssistance technique D-Link sur internet :http://www.dlink.frAssistance technique D-Link par téléphone : 0820 0803 03 0.12 € TTC/min depuis un poste fixe Du lundi au vendredi de 9h à 19h (hors jours fériés)
Building Networks for People
DSR-250N
Este documento le guiará a través del proceso de instalación básico de su nuevo router para servicios de red inalámbrica D-Link.
La documentación está también disponible en CD y a través del sitio web de D-Link
Guía de instalación rápidaRouter para servicios inalámbricos
20 D-Link Wireless N Services Router
ESPAÑOL
Acerca de esta guíaEsta guía ofrece instrucciones paso a paso para la configuración del router D-Link DSR-250N. Tenga en cuenta que el modelo que ha adquirido puede tener un aspecto ligeramente diferente al mostrado en las ilustraciones.
Desempaquetado del productoAbra la caja del envío y desempaquete su contenido con cuidado. Consulte la información contenida en la lista siguiente para asegurarse de que están presentes todos los artículos y que éstos no están dañados. Si falta algún material o está dañado, póngase en contacto con su proveedor local de D-Link para su reposición. - Un (1) router para servicios inalámbricos
DSR-250N - Un (1) adaptador de alimentación de 12 V/1,5 A - Un (1) cable para consola (cable de RJ45 a
DB9) - Un (1) cable Ethernet (CAT5 UTP/directo) - Un (1) CD de referencia (CD-ROM que contiene
la documentación del producto en formato PDF) - Dos (2) antenas omnidireccionales
desmontables
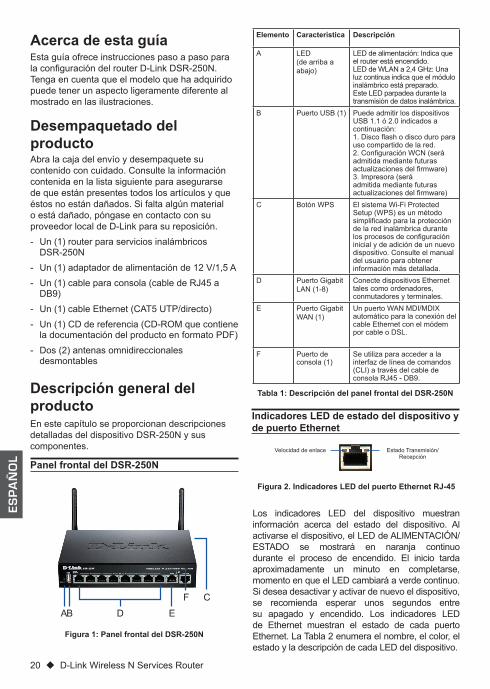
Elemento Característica Descripción
A LED (de arriba a abajo)
LED de alimentación: Indica que el router está encendido.LED de WLAN a 2,4 GHz: Una luz continua indica que el módulo inalámbrico está preparado. Este LED parpadea durante la transmisión de datos inalámbrica.
B Puerto USB (1) Puede admitir los dispositivos USB 1.1 ó 2.0 indicados a continuación:1. Disco flash o disco duro para uso compartido de la red.2. Configuración WCN (será admitida mediante futuras actualizaciones del firmware)3. Impresora (será admitida mediante futuras actualizaciones del firmware)
C Botón WPS El sistema Wi-Fi Protected Setup (WPS) es un método simplificado para la protección de la red inalámbrica durante los procesos de configuración inicial y de adición de un nuevo dispositivo. Consulte el manual del usuario para obtener información más detallada.
D Puerto Gigabit LAN (1-8)
Conecte dispositivos Ethernet tales como ordenadores, conmutadores y terminales.
E Puerto Gigabit WAN (1)
Un puerto WAN MDI/MDIX automático para la conexión del cable Ethernet con el módem por cable o DSL.
F Puerto de consola (1)
Se utiliza para acceder a la interfaz de línea de comandos (CLI) a través del cable de consola RJ45 - DB9.
Tabla 1: Descripción del panel frontal del DSR-250N
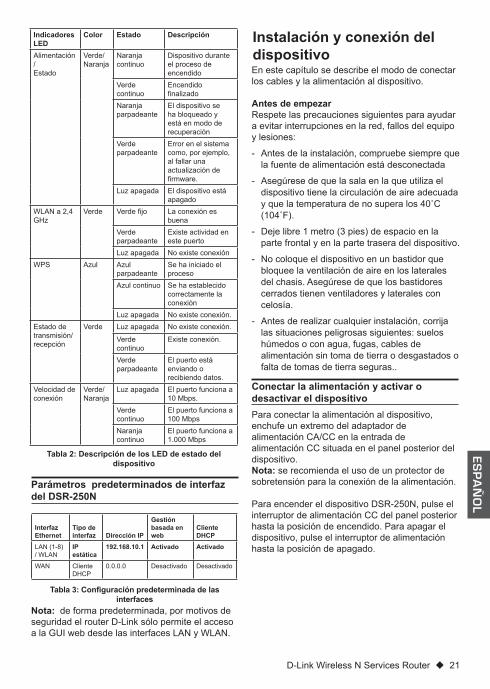
Indicadores LED de estado del dispositivo y de puerto Ethernet
Los indicadores LED del dispositivo muestran información acerca del estado del dispositivo. Al activarse el dispositivo, el LED de ALIMENTACIÓN/ESTADO se mostrará en naranja continuo durante el proceso de encendido. El inicio tarda aproximadamente un minuto en completarse, momento en que el LED cambiará a verde continuo. Si desea desactivar y activar de nuevo el dispositivo, se recomienda esperar unos segundos entre su apagado y encendido. Los indicadores LED de Ethernet muestran el estado de cada puerto Ethernet. La Tabla 2 enumera el nombre, el color, el estado y la descripción de cada LED del dispositivo.
Figura 2. Indicadores LED del puerto Ethernet RJ-45
Estado Transmisión/Recepción
Velocidad de enlace
Panel frontal del DSR-250N
Descripción general del producto
Figura 1: Panel frontal del DSR-250N
En este capítulo se proporcionan descripciones detalladas del dispositivo DSR-250N y sus componentes.
F
DA
C
EB
D-Link Wireless N Services Router 21
ESPAÑOL
Indicadores LED
Color Estado Descripción
Alimentación / Estado
Verde/Naranja
Naranja continuo
Dispositivo durante el proceso de encendido
Verde continuo
Encendido finalizado
Naranja parpadeante
El dispositivo se ha bloqueado y está en modo de recuperación
Verde parpadeante
Error en el sistema como, por ejemplo, al fallar una actualización de firmware.
Luz apagada El dispositivo está apagado
WLAN a 2,4 GHz
Verde Verde fijo La conexión es buena
Verde parpadeante
Existe actividad en este puerto
Luz apagada No existe conexiónWPS Azul Azul
parpadeanteSe ha iniciado el proceso
Azul continuo Se ha establecido correctamente la conexión
Luz apagada No existe conexión.Estado de transmisión/recepción
Verde Luz apagada No existe conexión.
Verde continuo
Existe conexión.
Verde parpadeante
El puerto está enviando o recibiendo datos.
Velocidad de conexión
Verde/Naranja
Luz apagada El puerto funciona a 10 Mbps.
Verde continuo
El puerto funciona a 100 Mbps
Naranja continuo
El puerto funciona a 1.000 Mbps
Conectar la alimentación y activar o desactivar el dispositivo
Parámetros predeterminados de interfaz del DSR-250N
Tabla 2: Descripción de los LED de estado del dispositivo
Instalación y conexión del dispositivo En este capítulo se describe el modo de conectar los cables y la alimentación al dispositivo.
Antes de empezarRespete las precauciones siguientes para ayudar a evitar interrupciones en la red, fallos del equipo y lesiones:
- Antes de la instalación, compruebe siempre que la fuente de alimentación está desconectada
- Asegúrese de que la sala en la que utiliza el dispositivo tiene la circulación de aire adecuada y que la temperatura de no supera los 40˚C (104˚F).
- Deje libre 1 metro (3 pies) de espacio en la parte frontal y en la parte trasera del dispositivo.
- No coloque el dispositivo en un bastidor que bloquee la ventilación de aire en los laterales del chasis. Asegúrese de que los bastidores cerrados tienen ventiladores y laterales con celosía.
- Antes de realizar cualquier instalación, corrija las situaciones peligrosas siguientes: suelos húmedos o con agua, fugas, cables de alimentación sin toma de tierra o desgastados o falta de tomas de tierra seguras..
Para conectar la alimentación al dispositivo, enchufe un extremo del adaptador de alimentación CA/CC en la entrada de alimentación CC situada en el panel posterior del dispositivo.Nota: se recomienda el uso de un protector de sobretensión para la conexión de la alimentación.
Para encender el dispositivo DSR-250N, pulse el interruptor de alimentación CC del panel posterior hasta la posición de encendido. Para apagar el dispositivo, pulse el interruptor de alimentación hasta la posición de apagado.
Interfaz Ethernet
Tipo de interfaz Dirección IP
Gestión basada en web
Cliente DHCP
LAN (1-8) / WLAN
IP estática
192.168.10.1 Activado Activado
WAN Cliente DHCP
0.0.0.0 Desactivado Desactivado
Tabla 3: Configuración predeterminada de las interfaces
Nota: de forma predeterminada, por motivos de seguridad el router D-Link sólo permite el acceso a la GUI web desde las interfaces LAN y WLAN.

22 D-Link Wireless N Services Router
ESPAÑOL
Para acceder al dispositivo mediante la WebUI:
1. Conecte la estación de trabajo en un puerto con la etiqueta LAN (1-8).
2. Asegúrese de que la estación de trabajo esté activada como cliente DHCP o configurada con una dirección IP estática en la subred 192.168.10.0/24. Nota: desactive el software de bloqueo de elementos emergentes o añada la dirección IP de gestión http://192.168.10.1 a la lista de sitios permitidos.
3. Inicie el navegador; introduzca la dirección IP de la interfaz de LAN (la dirección IP predeterminada de fábrica es http://192.168.10.1). A continuación, pulse Intro.
4. Inicie sesión en la interfaz web del router. La información de inicio de sesión predeterminada es:
Nombre de usuario: adminContraseña: admin
Conexión del dispositivo a una red
Figura 3: Ejemplo de cableado básico
Configuración inicial del dispositivoEl software del router está preinstalado en el dispositivo DSR-250N. Cuando se enciende el dispositivo, ya está preparado para configurarse. Aunque el dispositivo tiene una configuración predeterminada de fábrica, debe realizar la configuración adicional con los requisitos específicos de su red.
Utilización de WebUI
Para utilizar la WebUI, la estación de trabajo desde la que gestione el dispositivo debe estar inicialmente en la misma subred que el dispositivo.
Figura 6. Mensaje de autentificación
Figura 5. Dirección del navegador
Tabla 4. Compatibilidad de navegadores
Explorador VersiónMicrosoft Internet Explorer
6.0 y superior
Mozilla Firefox 3.5 y superior
Netscape Navigator 9.0 y superior
Apple Safari 4,0 y superior
Google Chrome 3,0 y superior
Esta sección proporciona información básica acerca de la conexión física entre el DSR-250N y una red. Conecte los cables necesarios como se muestra en la figura 3.
1. Conecte un cable RJ-45 desde el puerto con la etiqueta WAN al router externo. El puerto WAN está preasignado al segmento de red WAN.
2. Conecte un cable RJ-45 desde el puerto con la etiqueta LAN (1-8) a un conmutador en el segmento de red LAN.
3. Conecte un cable RJ45 - DB9 al puerto de la consola para el acceso de gestión CLI (Interfaz de línea de comandos).
WAN1
LAN Console
Internet
Switch
User

D-Link Wireless N Services Router 23
ESPAÑOL
El router D-Link incluye un puerto serie que permite su conexión a un ordenador o terminal con fines de monitorización y configuración. Este puerto es un conector RJ-45, que se utiliza como una conexión de equipo terminal de comunicación de datos (DCE).
Para utilizar la conexión del puerto de consola, necesita el equipo siguiente:
1. Un terminal o un ordenador con un puerto serie y capacidad para emular un terminal.
2. Un cable RS-232 RJ45 - DB9 con conector hembra. (Incluido en el envío)
3. Si su ordenador portátil o de sobremesa no tiene un conector RS-232, será necesario un convertidor.
Nota: el DSR-250N no se suministra con convertidor de RS-232 y deberá adquirirlo por separado.
Para establecer una conexión de consola:
1. Enchufe el conector RJ-45 del cable RJ45 - DB9 suministrado al puerto de consola del router.
2. Conecte el otro extremo del cable a un terminal o al conector serie de un ordenador que ejecute el software de emulación de terminal. Configure el software de emulación de terminal del modo siguiente:
Frecuencia de baudios: 115200Bits de datos: 8Paridad: NingunaBits de parada: 1Control de flujo: Ninguno
3. Una vez configurado correctamente el terminal, después de seguir las instrucciones de la sección “Conectar la alimentación y activar o desactivar el dispositivo”, encienda el dispositivo. En el terminal aparece la secuencia de arranque.
4. Una vez completada la secuencia de arranque, se muestra el símbolo del sistema. El dispositivo está preparado para configurarse.
Utilización de una conexión de consola (DCE de RJ45 a DB9)
Dispone de ayuda adicional a través de las oficinas de D-Link en todo el mundo, que aparecen enumeradas en el apéndice del Manual del usuario, o en línea. Para obtener más información acerca de los productos de seguridad D-Link o de su comercialización, visite el sitio web http://mydsr.dlink.com.tw; para cualquier tema sobre asistencia, visite el sitio web http://support.dlink.com.tw, que le redirigirá a la página web local de D-Link correspondiente.
Información adicional
Después de la configuración inicial, puede consultar la documentación adjunta en formato PDF que encontrará en el CD incluido para obtener más información sobre cómo configurar el dispositivo DSR-250N. Manual del usuario del router D-LinkEste documento describe el funcionamiento y control general del firmware del router, el cual activa y controla el hardware de esta serie de routers. Incluye ejemplos sobre cómo llevar a cabo las tareas administrativas normales (por ejemplo, configurar una VPN) y sobre cómo utilizar esta serie de routers en diversas situaciones.
Guía de referencia de registro del router D-LinkEste documento describe todos los mensajes de registro que puede generar el router durante el funcionamiento del sistema.
Guía de referencia CLI del router D-LinkEste documento describe todos los comandos de texto disponibles que se pueden utilizar en la consola o en la interfaz SSH para configurar el router durante el funcionamiento del sistema.
Finalización de la configuración
24 D-Link Wireless N Services Router
ESPAÑOL
Asistencia técnicahttp://www.dlink.esAsistencia Técnica Telefónica de D-Link: +34 902 30 45 45 0,067 €/minDe Lunes a Viernes de 9:00 a 19:00

Building Networks for People
DSR-250N
In questo documento è descritta la procedura rapida per l'installazione del dispositivo D-Link Wireless N Services Router.
Documentazione disponibile anche su CD e tramite il sito Web D-Link
Guida di installazione rapidaRouter per servizi wireless
26 D-Link Wireless N Services Router
ITALIANO
Informazioni sulla guidaLa presente guida contiene le istruzioni passo passo necessarie per l'installazione del router D-Link DSR-250N Services Router. Si noti che il modello acquistato potrebbe essere leggermente diverso da quello raffigurato nelle illustrazioni.
Disimballo del prodottoAprire la confezione e disimballarne il contenuto prestando particolare attenzione. Verificare il contenuto sulla base dell'elenco riportato di seguito per accertarsi che tutti gli articoli siano presenti e integri. Qualora un articolo risultasse mancante o danneggiato, chiederne la sosti-tuzione al rivenditore D-Link di zona. - Un (1) router per servizi wireless DSR-250N
Wireless Services Router - Un (1) alimentatore a 12 V/1,5 A - Un (1) cavo per connessione tramite console
(cavo RJ45-DB9) - Un (1) cavo Ethernet (UTP/diritto CAT5) - Un (1) CD-ROM contenente la documentazione
del prodotto in formato PDF - Due (2) antenne omnidirezionale staccabili
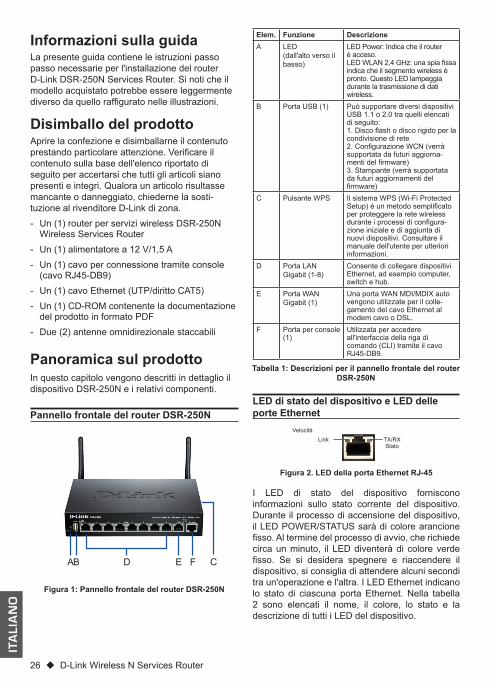
Elem. Funzione DescrizioneA LED
(dall'alto verso il basso)
LED Power: Indica che il router è acceso.LED WLAN 2,4 GHz: una spia fissa indica che il segmento wireless è pronto. Questo LED lampeggia durante la trasmissione di dati wireless.
B Porta USB (1) Può supportare diversi dispositivi USB 1.1 o 2.0 tra quelli elencati di seguito:1. Disco flash o disco rigido per la condivisione di rete2. Configurazione WCN (verrà supportata da futuri aggiorna-menti del firmware)3. Stampante (verrà supportata da futuri aggiornamenti del firmware)
C Pulsante WPS Il sistema WPS (Wi-Fi Protected Setup) è un metodo semplificato per proteggere la rete wireless durante i processi di configura-zione iniziale e di aggiunta di nuovi dispositivi. Consultare il manuale dell'utente per ulteriori informazioni.
D Porta LAN Gigabit (1-8)
Consente di collegare dispositivi Ethernet, ad esempio computer, switch e hub.
E Porta WAN Gigabit (1)
Una porta WAN MDI/MDIX auto vengono utilizzate per il colle-gamento del cavo Ethernet al modem cavo o DSL.
F Porta per console (1)
Utilizzata per accedere all'interfaccia della riga di comando (CLI) tramite il cavo RJ45-DB9.
Tabella 1: Descrizioni per il pannello frontale del router DSR-250N
LED di stato del dispositivo e LED delle porte Ethernet
I LED di stato del dispositivo forniscono informazioni sullo stato corrente del dispositivo. Durante il processo di accensione del dispositivo, il LED POWER/STATUS sarà di colore arancione fisso. Al termine del processo di avvio, che richiede circa un minuto, il LED diventerà di colore verde fisso. Se si desidera spegnere e riaccendere il dispositivo, si consiglia di attendere alcuni secondi tra un'operazione e l'altra. I LED Ethernet indicano lo stato di ciascuna porta Ethernet. Nella tabella 2 sono elencati il nome, il colore, lo stato e la descrizione di tutti i LED del dispositivo.
Figura 2. LED della porta Ethernet RJ-45
TX/RXStato
Link
Pannello frontale del router DSR-250N
Panoramica sul prodotto
Figura 1: Pannello frontale del router DSR-250N
In questo capitolo vengono descritti in dettaglio il dispositivo DSR-250N e i relativi componenti.
FDA CEB
Velocità
D-Link Wireless N Services Router 27
ITALIANO
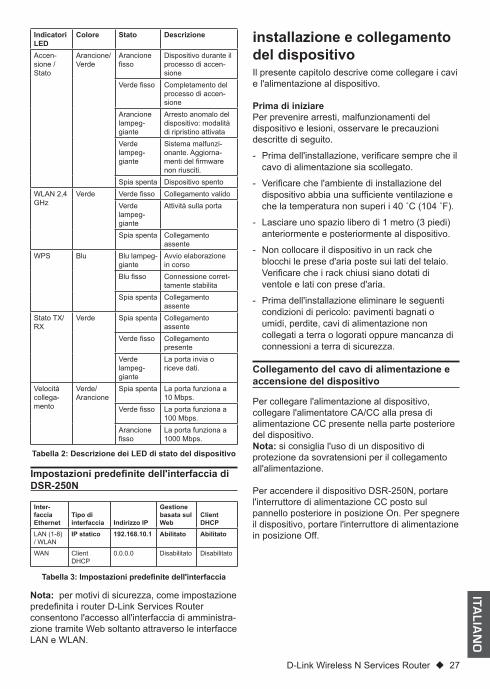
Indicatori LED
Colore Stato Descrizione
Accen-sione / Stato
Arancione/Verde
Arancione fisso
Dispositivo durante il processo di accen-sione
Verde fisso Completamento del processo di accen-sione
Arancione lampeg-giante
Arresto anomalo del dispositivo: modalità di ripristino attivata
Verde lampeg-giante
Sistema malfunzi-onante. Aggiorna-menti del firmware non riusciti.
Spia spenta Dispositivo spentoWLAN 2,4 GHz
Verde Verde fisso Collegamento validoVerde lampeg-giante
Attività sulla porta
Spia spenta Collegamento assente
WPS Blu Blu lampeg-giante
Avvio elaborazione in corso
Blu fisso Connessione corret-tamente stabilita
Spia spenta Collegamento assente
Stato TX/RX
Verde Spia spenta Collegamento assente
Verde fisso Collegamento presente
Verde lampeg-giante
La porta invia o riceve dati.
Velocità collega-mento
Verde/Arancione
Spia spenta La porta funziona a 10 Mbps.
Verde fisso La porta funziona a 100 Mbps.
Arancione fisso
La porta funziona a 1000 Mbps.
Collegamento del cavo di alimentazione e accensione del dispositivo
Impostazioni predefinite dell'interfaccia di DSR-250N
Tabella 2: Descrizione dei LED di stato del dispositivo
installazione e collegamento del dispositivoIl presente capitolo descrive come collegare i cavi e l'alimentazione al dispositivo.
Prima di iniziarePer prevenire arresti, malfunzionamenti del dispositivo e lesioni, osservare le precauzioni descritte di seguito.
- Prima dell'installazione, verificare sempre che il cavo di alimentazione sia scollegato.
- Verificare che l'ambiente di installazione del dispositivo abbia una sufficiente ventilazione e che la temperatura non superi i 40 ˚C (104 ˚F).
- Lasciare uno spazio libero di 1 metro (3 piedi) anteriormente e posteriormente al dispositivo.
- Non collocare il dispositivo in un rack che blocchi le prese d'aria poste sui lati del telaio. Verificare che i rack chiusi siano dotati di ventole e lati con prese d'aria.
- Prima dell'installazione eliminare le seguenti condizioni di pericolo: pavimenti bagnati o umidi, perdite, cavi di alimentazione non collegati a terra o logorati oppure mancanza di connessioni a terra di sicurezza.
Per collegare l'alimentazione al dispositivo, collegare l'alimentatore CA/CC alla presa di alimentazione CC presente nella parte posteriore del dispositivo.Nota: si consiglia l'uso di un dispositivo di protezione da sovratensioni per il collegamento all'alimentazione.
Per accendere il dispositivo DSR-250N, portare l'interruttore di alimentazione CC posto sul pannello posteriore in posizione On. Per spegnere il dispositivo, portare l'interruttore di alimentazione in posizione Off.
Inter-faccia Ethernet
Tipo di interfaccia Indirizzo IP
Gestione basata sul Web
Client DHCP
LAN (1-8) / WLAN
IP statico 192.168.10.1 Abilitato Abilitato
WAN Client DHCP
0.0.0.0 Disabilitato Disabilitato
Tabella 3: Impostazioni predefinite dell'interfaccia
Nota: per motivi di sicurezza, come impostazione predefinita i router D-Link Services Router consentono l'accesso all'interfaccia di amministra-zione tramite Web soltanto attraverso le interfacce LAN e WLAN.
28 D-Link Wireless N Services Router
ITALIANO
Accesso al dispositivo tramite l'interfaccia utente Web
1. Collegare la workstation alla porta LAN (1-8), preallocata per la LAN.
2. Verificare che la workstation sia abilitata per il client DHCP o configurata con un indirizzo IP statico nella subnet 192.168.10.0/24. Nota: disabilitare il software per il blocco dei popup oppure aggiungere l'indirizzo IP di gestione http://192.168.10.1 all'elenco degli indirizzi consentiti dal software per il blocco dei popup.
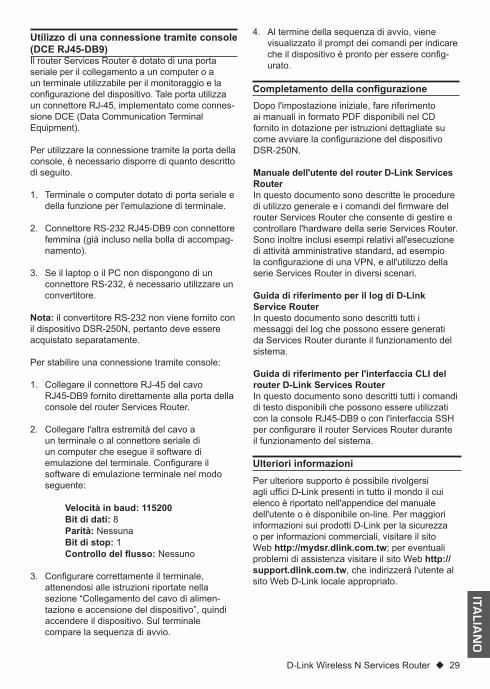
3. Avviare il browser, quindi immettere l'indirizzo IP per l'interfaccia LAN. L'indirizzo IP di default è http://192.168.10.1). Premere Invio. .
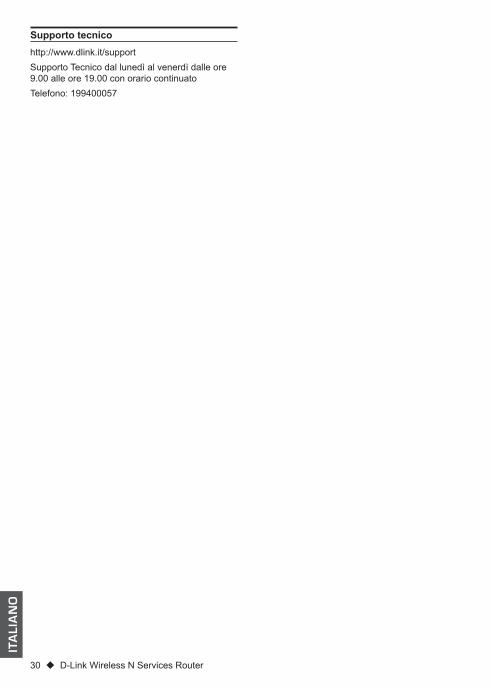
4. Accedere all'interfaccia Web del router Services Router. Le informazioni d'accesso predefinite sono:
Nome utente: adminPassword: admin
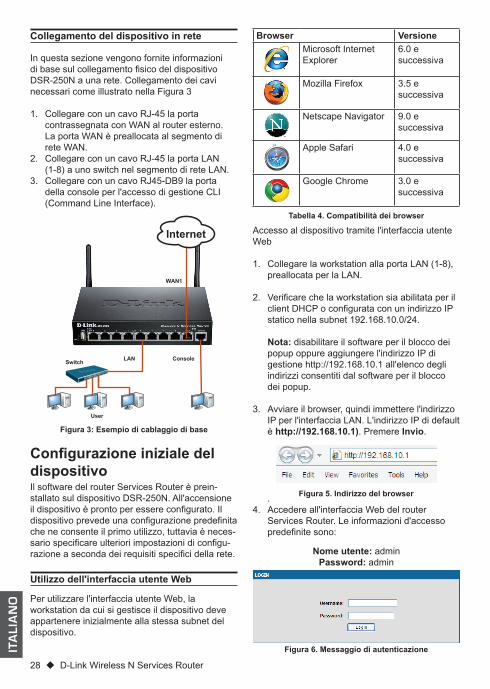
Collegamento del dispositivo in rete
Figura 3: Esempio di cablaggio di base
Configurazione iniziale del dispositivoIl software del router Services Router è prein-stallato sul dispositivo DSR-250N. All'accensione il dispositivo è pronto per essere configurato. Il dispositivo prevede una configurazione predefinita che ne consente il primo utilizzo, tuttavia è neces-sario specificare ulteriori impostazioni di configu-razione a seconda dei requisiti specifici della rete.
Utilizzo dell'interfaccia utente Web
Per utilizzare l'interfaccia utente Web, la workstation da cui si gestisce il dispositivo deve appartenere inizialmente alla stessa subnet del dispositivo.
Figura 6. Messaggio di autenticazione
Figura 5. Indirizzo del browser
Tabella 4. Compatibilità dei browser
Browser VersioneMicrosoft Internet Explorer
6.0 e successiva
Mozilla Firefox 3.5 e successiva
Netscape Navigator 9.0 e successiva
Apple Safari 4.0 e successiva
Google Chrome 3.0 e successiva
In questa sezione vengono fornite informazioni di base sul collegamento fisico del dispositivo DSR-250N a una rete. Collegamento dei cavi necessari come illustrato nella Figura 3
1. Collegare con un cavo RJ-45 la porta contrassegnata con WAN al router esterno. La porta WAN è preallocata al segmento di rete WAN.
2. Collegare con un cavo RJ-45 la porta LAN (1-8) a uno switch nel segmento di rete LAN.
3. Collegare con un cavo RJ45-DB9 la porta della console per l'accesso di gestione CLI (Command Line Interface).
WAN1
LAN Console
Internet
Switch
User
D-Link Wireless N Services Router 29
ITALIANO
Il router Services Router è dotato di una porta seriale per il collegamento a un computer o a un terminale utilizzabile per il monitoraggio e la configurazione del dispositivo. Tale porta utilizza un connettore RJ-45, implementato come connes-sione DCE (Data Communication Terminal Equipment).
Per utilizzare la connessione tramite la porta della console, è necessario disporre di quanto descritto di seguito.
1. Terminale o computer dotato di porta seriale e della funzione per l'emulazione di terminale.
2. Connettore RS-232 RJ45-DB9 con connettore femmina (già incluso nella bolla di accompag-namento).
3. Se il laptop o il PC non dispongono di un connettore RS-232, è necessario utilizzare un convertitore.
Nota: il convertitore RS-232 non viene fornito con il dispositivo DSR-250N, pertanto deve essere acquistato separatamente.
Per stabilire una connessione tramite console:
1. Collegare il connettore RJ-45 del cavo RJ45-DB9 fornito direttamente alla porta della console del router Services Router.
2. Collegare l'altra estremità del cavo a un terminale o al connettore seriale di un computer che esegue il software di emulazione del terminale. Configurare il software di emulazione terminale nel modo seguente:
Velocità in baud: 115200Bit di dati: 8Parità: NessunaBit di stop: 1Controllo del flusso: Nessuno
3. Configurare correttamente il terminale, attenendosi alle istruzioni riportate nella sezione “Collegamento del cavo di alimen-tazione e accensione del dispositivo”, quindi accendere il dispositivo. Sul terminale compare la sequenza di avvio.
Utilizzo di una connessione tramite console (DCE RJ45-DB9)
Per ulteriore supporto è possibile rivolgersi agli uffici D-Link presenti in tutto il mondo il cui elenco è riportato nell'appendice del manuale dell'utente o è disponibile on-line. Per maggiori informazioni sui prodotti D-Link per la sicurezza o per informazioni commerciali, visitare il sito Web http://mydsr.dlink.com.tw; per eventuali problemi di assistenza visitare il sito Web http://support.dlink.com.tw, che indirizzerà l'utente al sito Web D-Link locale appropriato.
Ulteriori informazioni
Dopo l'impostazione iniziale, fare riferimento ai manuali in formato PDF disponibili nel CD fornito in dotazione per istruzioni dettagliate su come avviare la configurazione del dispositivo DSR-250N. Manuale dell'utente del router D-Link Services RouterIn questo documento sono descritte le procedure di utilizzo generale e i comandi del firmware del router Services Router che consente di gestire e controllare l'hardware della serie Services Router. Sono inoltre inclusi esempi relativi all'esecuzione di attività amministrative standard, ad esempio la configurazione di una VPN, e all'utilizzo della serie Services Router in diversi scenari.
Guida di riferimento per il log di D-Link Service RouterIn questo documento sono descritti tutti i messaggi del log che possono essere generati da Services Router durante il funzionamento del sistema.
Guida di riferimento per l'interfaccia CLI del router D-Link Services RouterIn questo documento sono descritti tutti i comandi di testo disponibili che possono essere utilizzati con la console RJ45-DB9 o con l'interfaccia SSH per configurare il router Services Router durante il funzionamento del sistema.
Completamento della configurazione
4. Al termine della sequenza di avvio, viene visualizzato il prompt dei comandi per indicare che il dispositivo è pronto per essere config-urato.
30 D-Link Wireless N Services Router
ITALIANO
Supporto tecnicohttp://www.dlink.it/supportSupporto Tecnico dal lunedì al venerdì dalle ore 9.00 alle ore 19.00 con orario continuatoTelefono: 199400057
D-Link Wireless N Services Router 31
Notes

Ver. 1.00(EU)2011/04/19
29072600SR250N0
This document will guide you through the basic installation process for your new D-Link Wireless N Services Router.
Building Networks for People
DSR-250N
Documentation also available on CD and via the D-Link Website
Quick Installation GuideWireless Services Router Appliance
Quick Installation GuideРуководство по быстрой установкеGuía de Instalación RápidaGuia de Instalação Rápida快速安裝指南Petunjuk Pemasangan Cepatクイックインストールガイド

2 D-Link Wireless N Services Router
EN
GLI
SH About This Guide
This guide gives step by step instructions for setting up D-Link DSR-250N Services Router. Please note that the model you have purchased may appear slightly different from those shown in the illustrations.
Unpacking the ProductOpen the shipping carton and carefully unpack its contents. Please consult the packing list located in following information to make sure all items are present and undamaged. If any item is missing or damaged, please contact your local D-Link reseller for replacement. - One (1) DSR-250N Wireless Services Router
Appliance. - One (1) 12V/1.5A Power Adapter - One (1) Console Cable (RJ45-to-DB9 Cable) - One (1) Ethernet (CAT5 UTP/Straight Through)
Cable - One (1) Reference CD (CD-ROM containing
product documentation in PDF format) - Two (2) Detachable Omni-direction antennas .
Item Feature DescriptionA LED
(Top to bottom)Power LED: Indicates the Services Router is powered on.2.4GHz WLAN LED: A solid light indicates that the wireless segment is ready. This LED blinks during wireless data transmission.
B USB Port (1) It can support various USB 1.1 or 2.0 devices below:1.Flash Disk or Hard Disk for network sharing.2.WCN Configuration (It will be supported by future firmware upgrade)3.Printer (It will be supported by future firmware upgrade)
C WPS Button Wi-Fi Protected Setup (WPS) System is a simplified method for securing your wireless network during the “Initial setup” as well as the “Add New Device” processes. Please refer to the user manual for more detail process.
D Gigabit LAN port (1-8)
Connect Ethernet devices, such as computers, switches and hubs.
E Gigabit WAN port (1)
One auto MDI/MDIX WAN ports are the connection for the Ethernet cable to the cable or DSL modem.
F Console Port (1) Used to access Command Line Interface (CLI) via RJ45-to-DB9 console Cable.
Table 1: DSR-250N Front Panel Descriptions
Device Status LEDs and Ethernet Port LEDs
The device LEDs show information about current device status. When the device power up, the POWER/STATUS LED will show solid orange during power on process. Startup takes one minute approximately to complete, the LED will change to solid green. If you want to turn the device off and on again, we recommend you wait a few seconds between shutting it down and powering it back. The Ethernet LEDs show the status of each Ethernet port. Table 2 lists the name, color, status and description of each device LED.
Figure 2. Ethernet RJ-45 Port LEDs
TX/RXStatus
LinkSpeed
DSR-250N Front Panel
Product Overview
Figure 1: DSR-250N Front Panel
This chapter provides detailed descriptions of the DSR-250N device and its components.
FDA CEB

D-Link Wireless N Services Router 3
EN
GLIS
H
LED Indicators
Color Status Description
Power / Status
Orange/Green
Solid Orange
Device during power-on process
Solid Green Completion of power onBlinking Orange
Device is crashed and under recovery mode
Blinking Green
The system is defective, such firmware upgrades fail.
Light Off The device is power-off2.4GHz WLAN
Green Steady Green
The link is good
Blinking Green
There is activity on this port
Light Off No linkWPS Blue Blinking
BlueStart to process
Solid Blue The connection is successfully established
Light Off No Link.TX/RX Status
Green Light Off No Link.
Solid Green Link present.Blinking Green
Port is sending or receiving data.
LINK Speed
Green/Orange
Light Off Port is operating at 10Mbps.
Solid Green Port is operating at 100Mbps
Solid Orange
Port is operating at 1000Mbps
Connecting Power and Turn the Device On/Off
DSR-250N Default Interface Settings
Table 2: Device Status LED Descriptions
Installing and Connecting the DeviceThis chapter describes how to connect cables and power to the device.
Before You BeginObserve the following precautions to help prevent shutdowns, equipment failures and injuries:
- Before installation, always check that the power supply is disconnected
- Ensure that the room in which you operate the device has adequate air circulation and that the room temperature does Not exceed 40˚C (104˚F)
- Allow 1 meter (3 feet) of clear space to the front and back of the device.
- Do not place the device in an equipment rack frame that blocks the air vents on the sides of the chassis. Ensure that enclosed racks have fans and louvered sides.
- Correct these hazardous conditions before any installation: moist or wet floors, leaks, ungrounded or frayed power cables, or missing safety grounds.
To connect power to the device, plug the AC/DC power adapter into the DC power phone jet on the back panel of the device.Note: We recommend using a surge protector for the power connection.
To power on the DSR-250N device, press the DC power switch on the rear panel to the on position. To power off the device, press the power switch to the off position.
Ethernet Interface
Interface Type IP Address
Web-Based Management
DHCP Client
LAN(1-8) / WLAN
Static IP 192.168.10.1 Enabled Enabled
WAN DHCP Client
0.0.0.0 Disabled Disabled
Table 3: Default Interface Settings
Note: D-Link Services Routers only allow Web GUI access from LAN and WLAN interfaces by default for security reason.
4 D-Link Wireless N Services Router
EN
GLI
SH
To access the device with the WebUI:
1. Connect your workstation on the port labeled LAN (1-8), which is pre-allocated to the LAN.
2. Ensure your workstation is DHCP Client enabled or configured with a static IP address in the 192.168.10.0/24 subnet. Note: Disable pop-up blocking software or add the management IP address http://192.168.10.1 to your pop-up blocker’s allow list.
3. Launch your browser; enter the IP address for the LAN interface. (The factory default IP address is http://192.168.10.1), then press Enter.
4. Log on the Services Router Web Interface The default log on information is:
Username: adminPassword: admin
Connecting the Device to a Network
Figure 3: Basic Cabling Example
Initially Configure the DeviceThe services router software is preinstalled on the DSR-250N device. When the device is powered on, it is ready to be configured. While the device has a default factory configuration that allow you to initially connect to the device, you must perform further configuration for your specific network requirements.
Using the WebUI
To use the WebUI, the workstation from which you are managing the device must initially be on the same subnetwork as the device.
Figure 6. Authentication Message
Figure 5. Browser Address
Table 4. Browser Compatibility
Browser VersionMicrosoft Internet Explorer
6.0 and Later
Mozilla Firefox 3.5 and Later
Netscape Navigator 9.0 and Later
Apple Safari 4.0 and Later
Google Chrome 3.0 and Later
This section provides basic information about physically connecting the DSR-250N to a network. To connect the necessary cables as shown in Figure 3.
1. Connect an RJ-45 cable from the port labeled WAN to the external router. The port WAN is pre-allocated to the WAN network segment.
2. Connect an RJ-45 cable from the port labeled LAN (1-8) to a switch in the LAN network segment.
3. Connect an RJ45-to-DB9 cable from the console port for CLI (Command Line Interface) management access.
WAN1
LAN Console
Internet
Switch
User
D-Link Wireless N Services Router 5
EN
GLIS
H
The Services Router provides an serial port that enables a connection to a computer or terminal for monitoring and configuring the device. This port is a RJ-45 connector, implemented as a data communication terminal equipment (DCE) connection.
To use the console port connection, you need the following equipment:
1. A terminal or a computer with both a serial port and the ability to emulate a terminal.
2. A RJ45-to-DB9 RS-232 with female connector. (Already included in packing list)
3. If your Laptop or PC doesn’t have RS-232 connector, a converter is required.
Note: DSR-250N does not come with RS-232 converter and these must be purchased separately.
To establish a console connection:
1. Plug the RJ-45 connector of the supplied RJ45-to-DB9 cable directly to the console port on the Services Router.
2. Connect the other end of the cable to a terminal or to the serial connector of a computer running terminal emulation software. Set the terminal emulation software as following:
Baud rate: 115200Data bits: 8Parity: NoneStop bits: 1Flow control: None
3. When you have correctly set up the terminal, having previously followed the instructions in section “Connecting Power and Turn the Device On/Off” then switch on your device. The boot sequence appears in the terminal.
4. Once the boot sequence completes, the command prompt is displayed, the device is ready to be configured.
Using a Console Connection (RJ45-to-DB9 DCE)
Additional help is available through D-Link worldwide offices listed at the appendix of the User Manual or online. To know more about D-Link security product products or marketing information, please visit the website http://mydsr.dlink.com.tw; for any support issue, please visit the website http://support.dlink.com.tw, which will redirect you to appropriate local D-Link website.
Additional Information
After initial setup, you should refer to the companion publications found in PDF format on the accompanying master CD for more information on how to begin to configure the DSR-250N device. D-Link Services Router User ManualThis document describes the general operation and control of the Services Router firmware which drives and controls the Services Router series hardware. It includes examples of how to carry out typical administrative tasks such as setting up a VPN and how to use Services Router series in various scenarios.
D-Link Service Router Log Reference GuideThis document describes all log messages that might be generated by Services Router during system operation.
D-Link Services Router CLI Reference GuideThis document describes all available text-based commands that can be used on RJ45-to-DB9 Console or SSH interface to configure Services Router during system operation.
Finalizing the Configuration

6 D-Link Wireless N Services Router
EN
GLI
SH Technical Support
Australia:Tel: 1300-766-86824/7 Technical Support Web: http://www.dlink.com.auE-mail: [email protected]
India:Tel: +91-22-27626600 Toll Free 1800-22-8998Web: www.dlink.co.inE-Mail: [email protected]
Singapore, Thailand, Indonesia, Malaysia, Philippines, Vietnam:Singapore - www.dlink.com.sg Thailand - www.dlink.co.th Indonesia - www.dlink.co.id Malaysia - www.dlink.com.my Philippines - www.dlink.com.ph Vietnam - www.dlink.com.vn
Korea:Tel : +82-2-2028-1810Monday to Friday 9:00am to 6:00pmWeb : http://d-link.co.krE-mail : [email protected]
New Zealand:Tel: 0800-900-90024/7 Technical SupportWeb: http://www.dlink.co.nzE-mail: [email protected]
South Africa and Sub Sahara Region:Tel: +27-12-665-2165 08600 DLINK (for South Africa only)Monday to Friday 8:30am to 9:00pm South Africa TimeWeb: http://www.d-link.co.zaE-mail: [email protected]
Saudi Arabia (KSA):Tel: +966 01 217 0008Fax: +966 01 217 0009Saturday to Wednesday 9.30AM to 6.30PMThursdays 9.30AM to 2.00 PME-mail: [email protected]
D-Link Middle East - Dubai, U.A.E.Plot No. S31102,Jebel Ali Free Zone South,P.O.Box 18224, Dubai, U.A.E.Tel: +971-4-8809022Fax: +971-4-8809066 / 8809069Technical Support: +971-4-8809033General Inquiries: [email protected] Support: [email protected]
Egypt1, Makram Ebeid Street - City Lights BuildingNasrcity - Cairo, EgyptFloor 6, office C2Tel.: +2 02 26718375 - +2 02 26717280Technical Support: +2 02 26738470General Inquiries: [email protected] Support: [email protected]
Kingdom of Saudi ArabiaOffice # 84 ,Al Khaleej Building ( Mujamathu Al-Khaleej)Opp. King Fahd Road, OlayaRiyadh - Saudi ArabiaTel: +966 1 217 0008Technical Support: +966 1 2170009 / +966 2 6522951General Inquiries: [email protected] Support: [email protected]
PakistanIslamabad Office:61-A, Jinnah Avenue, Blue Area,Suite # 11, EBC, Saudi Pak Tower,Islamabad - PakistanTel.: +92-51-2800397, 2800398Fax: +92-51-2800399
Karachi Office:D-147/1, KDA Scheme # 1,Opposite Mudassir Park, Karsaz Road,Karachi – PakistanPhone: +92-21-34548158, 34326649Fax: +92-21-4375727Technical Support: +92-21-34548310, 34305069General Inquiries: [email protected] Support: [email protected]
You can f i nd so f tware upda tes and user documentation on the D-Link website.
Tech Support for customers in
D-Link Wireless N Services Router 7
EN
GLIS
H
IranUnit 5, 5th Floor, No. 20, 17th Alley , Bokharest St. , Argentine Sq. ,Tehran IRANPostal Code : 1513833817Tel: +98-21-88880918,19+98-21-88706653,54General Inquiries: [email protected] Support: [email protected]
MoroccoM.I.T.CRoute de Nouaceur angle RS et CT 1029 Bureau N° 312 ET 337Casablanca , MarocPhone : +212 663 72 73 24Email: [email protected]
Lebanon RMA centerDbayeh/LebanonPO Box:901589Tel: +961 4 54 49 71 Ext:14Fax: +961 4 54 49 71 Ext:12Email: [email protected]
Bahrain Technical Support: +973 1 3332904
Kuwait: Technical Support: + 965 22453939 / +965 22453949
Türkiye Merkez İrtibat OfisiAyazağa Maslak yoluErdebil Cevahir İş Merkezi No: 5/A Ayazağa / Maslak İstanbulTel: +90 212 2895659 Ücretsiz Müşteri Destek Hattı: 0 800 211 00 65Web:www.dlink.com.tr Teknik Destek: [email protected]

8 D-Link Wireless N Services Router
EN
GLI
SH Notes
Руководство содержит пошаговые инструкции по установке нового беспроводного 802.11n маршрутизатора D-Link.
Building Networks for People
DSR-250N
Документация также доступна на диске и на web-сайте D-Link
Руководство по быстрой установкеБеспроводной маршрутизатор
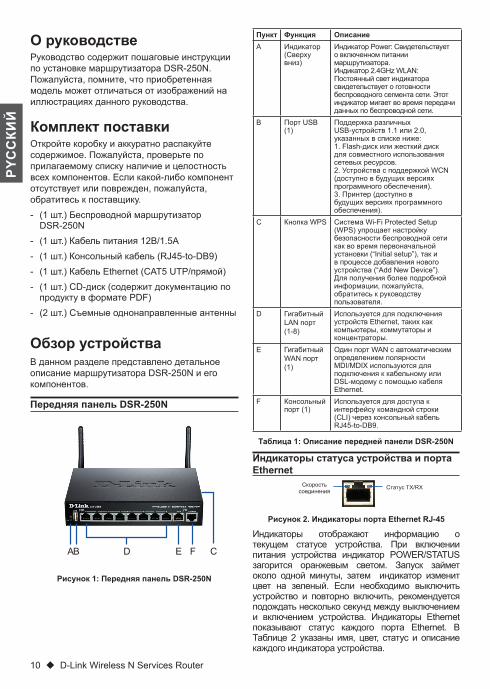
10 D-Link Wireless N Services Router
PYC
CКИ
Й
О руководствеРуководство содержит пошаговые инструкции по установке маршрутизатора DSR-250N. Пожалуйста, помните, что приобретенная модель может отличаться от изображений на иллюстрациях данного руководства.
Комплект поставкиОткройте коробку и аккуратно распакуйте содержимое. Пожалуйста, проверьте по прилагаемому списку наличие и целостность всех компонентов. Если какой-либо компонент отсутствует или поврежден, пожалуйста, обратитесь к поставщику. - (1 шт.) Беспроводной маршрутизатор
DSR-250N - (1 шт.) Кабель питания 12В/1.5A - (1 шт.) Консольный кабель (RJ45-to-DB9) - (1 шт.) Кабель Ethernet (CAT5 UTP/прямой) - (1 шт.) CD-диск (содержит документацию по
продукту в формате PDF) - (2 шт.) Съемные однонаправленные антенны
Пункт Функция ОписаниеA Индикатор
(Сверху вниз)
Индикатор Power: Свидетельствует о включенном питании маршрутизатора.Индикатор 2.4GHz WLAN: Постоянный свет индикатора свидетельствует о готовности беспроводного сегмента сети. Этот индикатор мигает во время передачи данных по беспроводной сети.
B Порт USB (1)
Поддержка различных USB-устройств 1.1 или 2.0, указанных в списке ниже:1. Flash-диск или жесткий диск для совместного использования сетевых ресурсов.2. Устройства с поддержкой WCN (доступно в будущих версиях программного обеспечения).3. Принтер (доступно в будущих версиях программного обеспечения).
C Кнопка WPS Система Wi-Fi Protected Setup (WPS) упрощает настройку безопасности беспроводной сети как во время первоначальной установки (“Initial setup”), так и в процессе добавления нового устройства (“Add New Device”). Для получения более подробной информации, пожалуйста, обратитесь к руководству пользователя.
D Гигабитный LAN порт (1-8)
Используется для подключения устройств Ethernet, таких как компьютеры, коммутаторы и концентраторы.
E Гигабитный WAN порт (1)
Один порт WAN с автоматическим определением полярности MDI/MDIX используются для подключения к кабельному или DSL-модему с помощью кабеля Ethernet.
F Консольный порт (1)
Используется для доступа к интерфейсу командной строки (CLI) через консольный кабель RJ45-to-DB9.
Таблица 1: Описание передней панели DSR-250N
Индикаторы статуса устройства и порта Ethernet
Индикаторы отображают информацию о текущем статусе устройства. При включении питания устройства индикатор POWER/STATUS загорится оранжевым светом. Запуск займет около одной минуты, затем индикатор изменит цвет на зеленый. Если необходимо выключить устройство и повторно включить, рекомендуется подождать несколько секунд между выключением и включением устройства. Индикаторы Ethernet показывают статус каждого порта Ethernet. В Таблице 2 указаны имя, цвет, статус и описание каждого индикатора устройства.
Рисунок 2. Индикаторы порта Ethernet RJ-45
Статус TX/RXСкорость соединения
Передняя панель DSR-250N
Обзор устройства
Рисунок 1: Передняя панель DSR-250N
В данном разделе представлено детальное описание маршрутизатора DSR-250N и его компонентов.
FDA CEB

D-Link Wireless N Services Router 11
PYC
CКИ
ЙИндикаторы Цвет Статус Описание
Питание / Статус
Оранжевый / Зеленый
Постоянный оранжевый
Устройство во время процесса включения питания
Постоянный зеленый
Питание включено
Мигающий оранжевый
Устройство неисправно и находится в режиме восстановления
Мигающий зеленый
Система неисправна, обновление программного обеспечения не выполнено
Не горит Питание устройства выключено
WLAN 2.4 ГГц
Зеленый Постоянный зеленый
Соединение исправно
Мигающий зеленый
Неактивный порт
Не горит Соединение отсутствует
WPS Синий Мигающий синий
Запуск процесса
Постоянный синий
Соединение установлено
Не горит Соединение отсутствует.
Статус TX/RX Зеленый Не горит Соединение отсутствует.
Постоянный зеленый
Соединение установлено.
Мигающий зеленый
Отправка или прием данных через порт.
Скорость соединения
Зеленый/ Оранжевый
Не горит Порт работает на скорости 10 Мбит/с
Постоянный зеленый
Порт работает на скорости 100 Мбит/с
Постоянный оранжевый
Порт работает на скорости 1000 Мбит/с
Подключение питания и Включение/Выключение устройства
Настройки интерфейса DSR-250N по умолчанию
Таблица 2: Описание индикаторов статуса устройства
Установка и подключение устройстваДанная глава описывает процесс подключения кабелей и включение устройства.
Перед началом работыСоблюдайте следующие меры предосторожности для предотвращения выключения, неисправности оборудования и повреждений: - Перед началом установки убедитесь, что
источник питания отключен. - Убедитесь, что помещение, в котором
выполняется установка устройства, хорошо проветривается и температура не превышает 40°С (104°F)
- Необходимо оставить 1 метр свободного пространства спереди и позади устройства.
- Располагайте устройство в стойке таким образом, чтобы не блокировать вентиляционные отверстия по боковым сторонам шасси. Убедитесь в наличии жалюзи на сторонах стойки.
- Перед началом установки убедитесь в отсутствии следующих опасных условий: влажный или сырой пол, протекания, незаземленные или потертые кабели питания, отсутствие защитного заземления.
Для подключения питания к устройству подключите кабель питания AC/DC к разъему питания постоянного тока, расположенному на задней панели устройства, и к источнику питания.Примечание: При подключении питания рекомендуется использовать сетевой фильтр.
Для включения DSR-250N установите переключатель питания постоянного тока (DC power switch) на задней панели в положение “on”. Для выключения устройства установите переключатель питания в положение “off ”.
Интерфейс Ethernet
Тип интерфейса IP-адрес
Управление на основе web-интерфейса DHCP-клиент
LAN(1-8) / WLAN
Статический IP-адрес
192.168.10.1 Включено Включено
WAN DHCP-клиент 0.0.0.0 Выключено Выключено
Таблица 3: Настройки интерфейса по умолчанию
Внимание: Беспроводной маршрутизатор D-Link 802.11n обеспечивает доступ только к Web-интерфейсу GUI с интерфейсов LAN и WLAN по умолчанию в целях обеспечения безопасности.
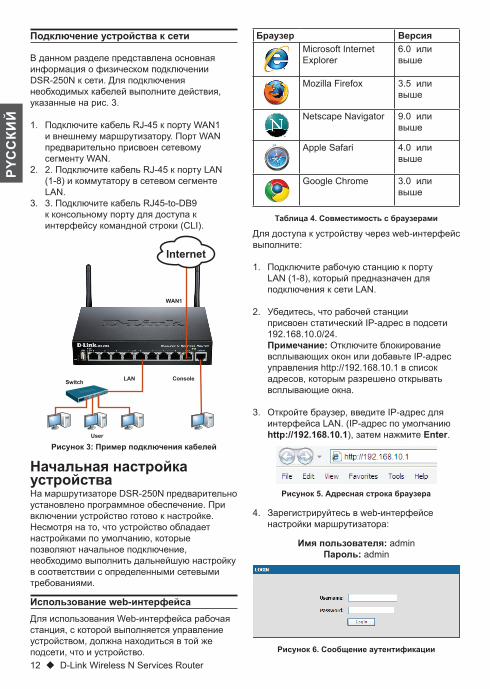
12 D-Link Wireless N Services Router
PYC
CКИ
Й
Для доступа к устройству через web-интерфейс выполните:
1. Подключите рабочую станцию к порту LAN (1-8), который предназначен для подключения к сети LAN.
2. Убедитесь, что рабочей станции присвоен статический IP-адрес в подсети 192.168.10.0/24. Примечание: Отключите блокирование всплывающих окон или добавьте IP-адрес управления http://192.168.10.1 в список адресов, которым разрешено открывать всплывающие окна.
3. Откройте браузер, введите IP-адрес для интерфейса LAN. (IP-адрес по умолчанию http://192.168.10.1), затем нажмите Enter.
4. Зарегистрируйтесь в web-интерфейсе настройки маршрутизатора:
Имя пользователя: adminПароль: admin
Подключение устройства к сети
Рисунок 3: Пример подключения кабелей
Начальная настройка устройстваНа маршрутизаторе DSR-250N предварительно установлено программное обеспечение. При включении устройство готово к настройке. Несмотря на то, что устройство обладает настройками по умолчанию, которые позволяют начальное подключение, необходимо выполнить дальнейшую настройку в соответствии с определенными сетевыми требованиями.
Использование web-интерфейсаДля использования Web-интерфейса рабочая станция, с которой выполняется управление устройством, должна находиться в той же подсети, что и устройство. Рисунок 6. Сообщение аутентификации
Рисунок 5. Адресная строка браузера
Таблица 4. Совместимость с браузерами
Браузер ВерсияMicrosoft Internet Explorer
6.0 или выше
Mozilla Firefox 3.5 или выше
Netscape Navigator 9.0 или выше
Apple Safari 4.0 или выше
Google Chrome 3.0 или выше
В данном разделе представлена основная информация о физическом подключении DSR-250N к сети. Для подключения необходимых кабелей выполните действия, указанные на рис. 3.
1. Подключите кабель RJ-45 к порту WAN1 и внешнему маршрутизатору. Порт WAN предварительно присвоен сетевому сегменту WAN.
2. 2. Подключите кабель RJ-45 к порту LAN (1-8) и коммутатору в сетевом сегменте LAN.
3. 3. Подключите кабель RJ45-to-DB9 к консольному порту для доступа к интерфейсу командной строки (CLI).
WAN1
LAN Console
Internet
Switch
User
D-Link Wireless N Services Router 13
PYC
CКИ
Й
Беспроводной маршрутизатор оснащен последовательным портом, обеспечивающим соединение с компьютером или терминалом для предоставления пользователям возможности мониторинга и настройки устройства. Данный порт с разъемом RJ-45 используется устройством DCE (модем) для передачи данных.
Для соединения через консоль, необходимо наличие следующего оборудования:
1. Терминал или компьютер с последовательным портом и возможностью эмулировать терминал.
2. Кабель RS-232 RJ45-to-DB9 с разъемом «мама» (входит в комплект поставки)
3. Если ноутбук или компьютер пользователя не оснащен интерфейсом RS-232, необходимо приобрести конвертер.
Примечание: Конвертер RS-232 не входит в комплект поставки и приобретается отдельно.
Для установки соединения через консоль выполните следующие действия:
1. Подключите коннектор RJ-45 входящего в комплект поставки кабеля RJ45-to-DB9 непосредственно к консольному порту маршрутизатора.
2. Подключите кабель к терминалу или последовательному порту компьютера с установленным программным обеспечением эмуляции терминала. Установите следующие параметры программного обеспечения эмуляции терминала:
Baud rate (Скорость передачи в бодах): 115200Data bits (Бит данных): 8Parity (Четность): None (нет)Stop bits (Стоп-бит): 1Flow control (Управление потоком): None (нет)
3. После установки терминала с предварительным выполнением инструкций раздела “Connecting Power and Turn the Device On/Off” («Подключение питания и Включение/Выключение устройства»), включите устройство. В терминале появится загрузочная последовательность.
Соединение через консоль(RJ45-to-DB9 DCE)
Дополнительную помощь можно получить в офисах D-Link по всему миру, указанных в приложении к Руководству пользователя или онлайн. Для получения более подробной информации о продукции D-Link и технической поддержки, пожалуйста, обратитесь на сайт D-Link http://www.dlink.ru.
Дополнительная информация
После завершения начальной установки необходимо обратиться к документации в формате PDF на CD-диске, входящем в комплект поставки, для получения информации по настройке DSR-250N.
Руководство пользователямДанный документ описывает основную эксплуатацию программного обеспечения беспроводного маршрутизатора, которое управляет аппаратным обеспечением маршрутизатора. Руководство содержит примеры выполнения типичных задач администратора, таких как установка VPN-соединения, а также различные варианты использования беспроводного маршрутизатора.
Справочное руководство системного журналаЭтот документ описывает все сообщения системного журнала, которые могут быть сгенерированы маршрутизатором во время работы.
Справочное руководство Данный документ описывает все доступные текстовые команды, используемые для консоли RJ45-to-DB9 или интерфейса SSH для настройки беспроводного маршрутизатора.
Завершение настройки
4. После выполнения загрузочной последовательности появится командная строка, устройство готово к настройке.
14 D-Link Wireless N Services Router
PYC
CКИ
Й
Техническая поддержка
ОФИСы
Обновления программного обеспечения и документация доступны на Интернет-сайте D-Link.D-Link предоставляет бесплатную поддержку для клиентов в течение гарантийного срока.Клиенты могут обратиться в группу технической поддержки D-Link по телефону или через Интернет.
Техническая поддержка D-Link:+7(495) 744-00-99Техническая поддержка через
Интернет
http://www.dlink.rue-mail: [email protected]
Украина,04080 г. Киев , ул. Межигорская, 87-А, офис 18 Тел.: +38 (044) 545-64-40 E-mail: [email protected]
Беларусь220114, г. Минск, проспект Независимости, 169 , БЦ "XXI Век"Тел.: +375(17) 218-13-65 E-mail: [email protected]
Казахстан,050008, г. Алматы, ул. Курмангазы, дом 143 (уг. Муканова) Тел./факс: +7 727 378-55-90E-mail: [email protected]
Узбекистан100015, г.Ташкент, ул. Нукусская, 89Тел./Факс: +998 (71) 120-3770, 150-2646E-mail: [email protected]
Армения0038, г. Ереван, ул. Абеляна, 6/1, 4 этаж Тел./Факс: + 374 (10) 398-667E-mail: [email protected]
Грузия0162, г. Тбилиси, проспект Чавчавадзе 74, 10 этаж Тел./Факс: + 995 (32) 244-563
Lietuva09120, Vilnius, Žirmūnų 139-303Tel./faks. +370 (5) 236-3629E-mail: [email protected]
EestiPeterburi tee 46-205 11415, Tallinn, Eesti , Susi Bürookeskus tel +372 613 9771 e-mail: [email protected]
LatvijaMazā nometņu 45/53 (ieeja no Nāras ielas)LV-1002, Rīgatel.: +371 6 7618703 +371 6 7618703 e-pasts: [email protected]
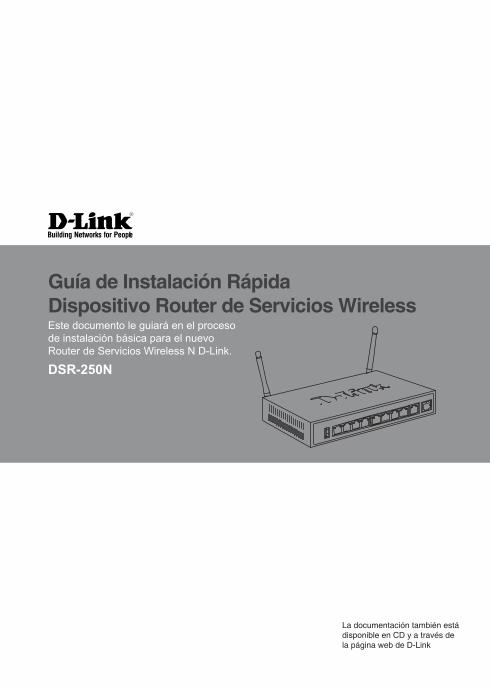
Este documento le guiará en el proceso de instalación básica para el nuevo Router de Servicios Wireless N D-Link.
Building Networks for People
DSR-250N
La documentación también está disponible en CD y a través de la página web de D-Link
Guía de Instalación RápidaDispositivo Router de Servicios Wireless
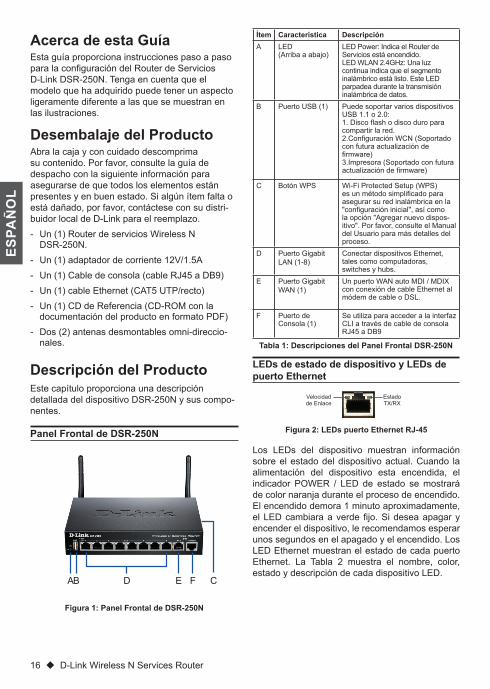
16 D-Link Wireless N Services Router
ES
PAÑ
OL
Acerca de esta GuíaEsta guía proporciona instrucciones paso a paso para la configuración del Router de Servicios D-Link DSR-250N. Tenga en cuenta que el modelo que ha adquirido puede tener un aspecto ligeramente diferente a las que se muestran en las ilustraciones.
Desembalaje del ProductoAbra la caja y con cuidado descomprima su contenido. Por favor, consulte la guía de despacho con la siguiente información para asegurarse de que todos los elementos están presentes y en buen estado. Si algún ítem falta o está dañado, por favor, contáctese con su distri-buidor local de D-Link para el reemplazo. - Un (1) Router de servicios Wireless N
DSR-250N. - Un (1) adaptador de corriente 12V/1.5A - Un (1) Cable de consola (cable RJ45 a DB9) - Un (1) cable Ethernet (CAT5 UTP/recto) - Un (1) CD de Referencia (CD-ROM con la
documentación del producto en formato PDF) - Dos (2) antenas desmontables omni-direccio-
nales.
Ítem Característica DescripciónA LED
(Arriba a abajo)LED Power: Indica el Router de Servicios está encendido.LED WLAN 2.4GHz: Una luz continua indica que el segmento inalámbrico está listo. Este LED parpadea durante la transmisión inalámbrica de datos.
B Puerto USB (1) Puede soportar varios dispositivos USB 1.1 o 2.0:1. Disco flash o disco duro para compartir la red.2.Configuración WCN (Soportado con futura actualización de firmware)3.Impresora (Soportado con futura actualización de firmware)
C Botón WPS Wi-Fi Protected Setup (WPS) es un método simplificado para asegurar su red inalámbrica en la "configuración inicial", así como la opción "Agregar nuevo dispos-itivo". Por favor, consulte el Manual del Usuario para más detalles del proceso.
D Puerto Gigabit LAN (1-8)
Conectar dispositivos Ethernet, tales como computadoras, switches y hubs.
E Puerto Gigabit WAN (1)
Un puerto WAN auto MDI / MDIX con conexión de cable Ethernet al módem de cable o DSL.
F Puerto de Consola (1)
Se utiliza para acceder a la interfaz CLI a través de cable de consola RJ45 a DB9
Tabla 1: Descripciones del Panel Frontal DSR-250N
LEDs de estado de dispositivo y LEDs de puerto Ethernet
Los LEDs del dispositivo muestran información sobre el estado del dispositivo actual. Cuando la alimentación del dispositivo esta encendida, el indicador POWER / LED de estado se mostrará de color naranja durante el proceso de encendido. El encendido demora 1 minuto aproximadamente, el LED cambiara a verde fijo. Si desea apagar y encender el dispositivo, le recomendamos esperar unos segundos en el apagado y el encendido. Los LED Ethernet muestran el estado de cada puerto Ethernet. La Tabla 2 muestra el nombre, color, estado y descripción de cada dispositivo LED.
Figura 2: LEDs puerto Ethernet RJ-45
Estado TX/RX
Velocidad de Enlace
Panel Frontal de DSR-250N
Descripción del Producto
Figura 1: Panel Frontal de DSR-250N
Este capítulo proporciona una descripción detallada del dispositivo DSR-250N y sus compo-nentes.
FDA CEB

D-Link Wireless N Services Router 17
ES
PAÑ
OL
Indicadores LED
Color Estado Descripción
Power / Status
Naranjo/Verde
Naranjo Fijo
Durante el proceso de encendido del dispositivo
Verde Fijo Encendido completoNaranjo parpadeo
El dispositivo ha fallado y se encuentra en modo recuperación
Verde parpadeo
El sistema está defectuoso, falló la actualización de Firmware.
Apagado El dispositivo está apagado
2.4GHz WLAN
Verde Verde fijo El enlace es buenoVerde parpadeo
Hay actividad en el puerto
Apagado No hay enlaceWPS Azul Azul
parpadeoComienza el proceso
Azul fijo La conexión se estableció exitosa-mente
Apagado No hay enlace.TX/RX Status
Verde Apagado No hay enlace.
Verde fijo Enlace presente.Verde parpadeo
El Puerto está enviando o recibiendo datos.
LINK Speed Naranjo/Verde
Apagado El Puerto está operando a 10Mbps.
Verde fijon El Puerto está operando a 100Mbps
Naranjo fijo El Puerto está operando a 1000Mbps
Conecte la alimentación y encienda el dispositivo
Configuración por defecto de las interfaces de DSR-250N
Tabla 2: Descripciones de LED de estado
Instalación y conexión del dispositivoEn este capítulo se describe cómo conectar los cables y de alimentación al dispositivo.
Antes de comenzarTenga en cuenta las siguientes precauciones para evitar apagones, fallos de equipo y lesiones:
- Antes de la instalación, compruebe siempre que la fuente de alimentación está desco-nectada
- Asegúrese de que la habitación en la que opere el dispositivo tiene una circulación de aire adecuada y que la temperatura ambiente no exceda de 40˚ C (104˚ F)
- Deje 1 metro (3 pies) de espacio libre al frente y parte posterior del dispositivo.
- No coloque el dispositivo en un rack que bloquea los orificios de ventilación en los laterales del chasis. Asegurar que los basti-dores tienen ventiladores y lados con rejillas.
- Corregir estas condiciones peligrosas antes de la instalación: pisos húmedos o mojados, fugas, sin conexión a tierra o los cables de alimenta-ción descubiertos, o falta de seguridad.
-
Para conectar la alimentación al dispositivo, conecte el adaptador AC/DC de alimentación en el conector DC de la parte posterior del dispositivo.Nota: Recomendamos utilizar un protector de voltaje para la conexión de alimentación.
Para encender el dispositivo DSR-250N, pulse el interruptor de alimentación de DC en el panel posterior a la posición de encendido. Para apagar el dispositivo, pulse el interruptor en la posición de apagado
Interfaz Ethernet
Tipo de Interfaz Dirección IP
Admin-istración basada en Web
Cliente DHCP
LAN(1-8) / WLAN
IP Estática 192.168.10.1 Habilitado Habilitado
WAN Cliente DHCP
0.0.0.0 Deshabil-itado
Deshabil-itado
Tabla 3: Configuración por defecto de las interfaz
Nota: Los routers de servicios D-Link sólo permiten el acceso Web GUI desde interfaces LAN y WLAN por defecto por razones de seguridad.
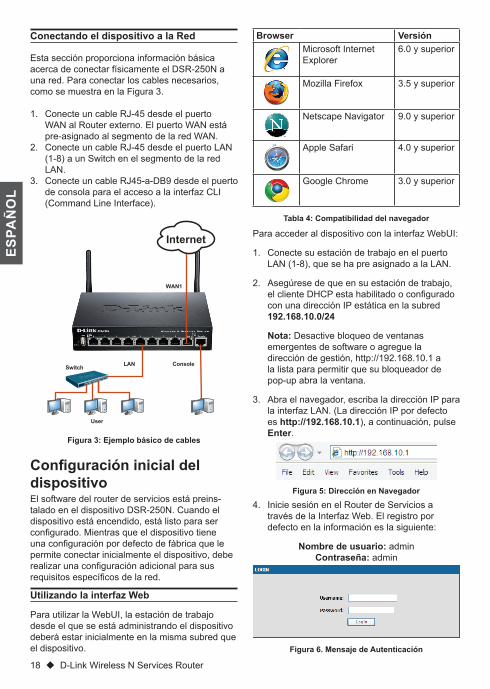
18 D-Link Wireless N Services Router
ES
PAÑ
OL
Para acceder al dispositivo con la interfaz WebUI:
1. Conecte su estación de trabajo en el puerto LAN (1-8), que se ha pre asignado a la LAN.
2. Asegúrese de que en su estación de trabajo, el cliente DHCP esta habilitado o configurado con una dirección IP estática en la subred 192.168.10.0/24 Nota: Desactive bloqueo de ventanas emergentes de software o agregue la dirección de gestión, http://192.168.10.1 a la lista para permitir que su bloqueador de pop-up abra la ventana.
3. Abra el navegador, escriba la dirección IP para la interfaz LAN. (La dirección IP por defecto es http://192.168.10.1), a continuación, pulse Enter.
4. Inicie sesión en el Router de Servicios a través de la Interfaz Web. El registro por defecto en la información es la siguiente:
Nombre de usuario: adminContraseña: admin
Conectando el dispositivo a la Red
Figura 3: Ejemplo básico de cables
Configuración inicial del dispositivoEl software del router de servicios está preins-talado en el dispositivo DSR-250N. Cuando el dispositivo está encendido, está listo para ser configurado. Mientras que el dispositivo tiene una configuración por defecto de fábrica que le permite conectar inicialmente el dispositivo, debe realizar una configuración adicional para sus requisitos específicos de la red.
Utilizando la interfaz Web
Para utilizar la WebUI, la estación de trabajo desde el que se está administrando el dispositivo deberá estar inicialmente en la misma subred que el dispositivo. Figura 6. Mensaje de Autenticación
Figura 5: Dirección en Navegador
Tabla 4: Compatibilidad del navegador
Browser VersiónMicrosoft Internet Explorer
6.0 y superior
Mozilla Firefox 3.5 y superior
Netscape Navigator 9.0 y superior
Apple Safari 4.0 y superior
Google Chrome 3.0 y superior
Esta sección proporciona información básica acerca de conectar físicamente el DSR-250N a una red. Para conectar los cables necesarios, como se muestra en la Figura 3.
1. Conecte un cable RJ-45 desde el puerto WAN al Router externo. El puerto WAN está pre-asignado al segmento de la red WAN.
2. Conecte un cable RJ-45 desde el puerto LAN (1-8) a un Switch en el segmento de la red LAN.
3. Conecte un cable RJ45-a-DB9 desde el puerto de consola para el acceso a la interfaz CLI (Command Line Interface).
WAN1
LAN Console
Internet
Switch
User
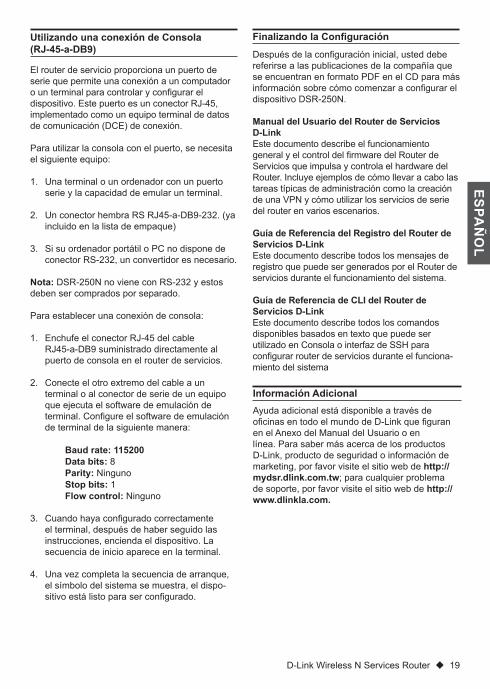
D-Link Wireless N Services Router 19
ES
PAÑ
OL
El router de servicio proporciona un puerto de serie que permite una conexión a un computador o un terminal para controlar y configurar el dispositivo. Este puerto es un conector RJ-45, implementado como un equipo terminal de datos de comunicación (DCE) de conexión.
Para utilizar la consola con el puerto, se necesita el siguiente equipo:
1. Una terminal o un ordenador con un puerto serie y la capacidad de emular un terminal.
2. Un conector hembra RS RJ45-a-DB9-232. (ya incluido en la lista de empaque)
3. Si su ordenador portátil o PC no dispone de conector RS-232, un convertidor es necesario.
Nota: DSR-250N no viene con RS-232 y estos deben ser comprados por separado.
Para establecer una conexión de consola:
1. Enchufe el conector RJ-45 del cable RJ45-a-DB9 suministrado directamente al puerto de consola en el router de servicios.
2. Conecte el otro extremo del cable a un terminal o al conector de serie de un equipo que ejecuta el software de emulación de terminal. Configure el software de emulación de terminal de la siguiente manera:
Baud rate: 115200Data bits: 8Parity: NingunoStop bits: 1Flow control: Ninguno
3. Cuando haya configurado correctamente el terminal, después de haber seguido las instrucciones, encienda el dispositivo. La secuencia de inicio aparece en la terminal.
4. Una vez completa la secuencia de arranque, el símbolo del sistema se muestra, el dispo-sitivo está listo para ser configurado.
Utilizando una conexión de Consola (RJ-45-a-DB9)
Ayuda adicional está disponible a través de oficinas en todo el mundo de D-Link que figuran en el Anexo del Manual del Usuario o en línea. Para saber más acerca de los productos D-Link, producto de seguridad o información de marketing, por favor visite el sitio web de http://mydsr.dlink.com.tw; para cualquier problema de soporte, por favor visite el sitio web de http://www.dlinkla.com.
Información Adicional
Después de la configuración inicial, usted debe referirse a las publicaciones de la compañía que se encuentran en formato PDF en el CD para más información sobre cómo comenzar a configurar el dispositivo DSR-250N. Manual del Usuario del Router de Servicios D-LinkEste documento describe el funcionamiento general y el control del firmware del Router de Servicios que impulsa y controla el hardware del Router. Incluye ejemplos de cómo llevar a cabo las tareas típicas de administración como la creación de una VPN y cómo utilizar los servicios de serie del router en varios escenarios.
Guía de Referencia del Registro del Router de Servicios D-LinkEste documento describe todos los mensajes de registro que puede ser generados por el Router de servicios durante el funcionamiento del sistema.
Guía de Referencia de CLI del Router de Servicios D-LinkEste documento describe todos los comandos disponibles basados en texto que puede ser utilizado en Consola o interfaz de SSH para configurar router de servicios durante el funciona-miento del sistema
Finalizando la Configuración
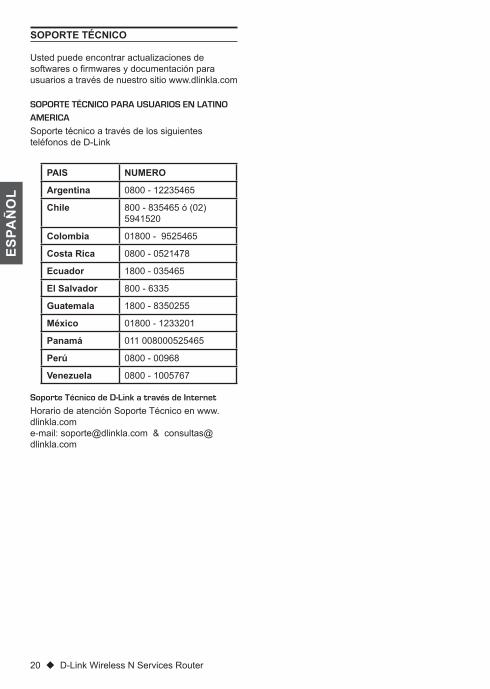
20 D-Link Wireless N Services Router
ES
PAÑ
OL
SOPORTE TÉCNICO
Usted puede encontrar actualizaciones de softwares o firmwares y documentación para usuarios a través de nuestro sitio www.dlinkla.com
SOPORTE TÉCNICO PARA USUARIOS EN LATINO
AMERICA
Soporte técnico a través de los siguientes teléfonos de D-Link
PAIS NUMERO
Argentina 0800 - 12235465
Chile 800 - 835465 ó (02) 5941520
Colombia 01800 - 9525465
Costa Rica 0800 - 0521478
Ecuador 1800 - 035465
El Salvador 800 - 6335
Guatemala 1800 - 8350255
México 01800 - 1233201
Panamá 011 008000525465
Perú 0800 - 00968
Venezuela 0800 - 1005767
Soporte Técnico de D-Link a través de Internet
Horario de atención Soporte Técnico en www.dlinkla.come-mail: [email protected] & [email protected]
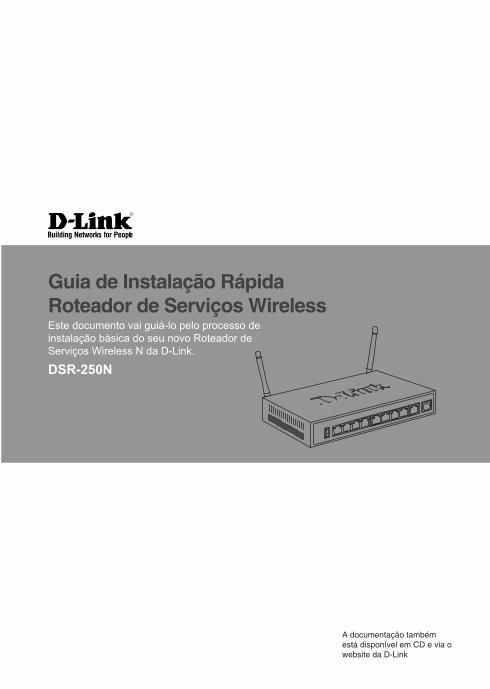
Este documento vai guiá-lo pelo processo de instalação básica do seu novo Roteador de Serviços Wireless N da D-Link.
Building Networks for People
DSR-250N
A documentação também está disponível em CD e via o website da D-Link
Guia de Instalação RápidaRoteador de Serviços Wireless
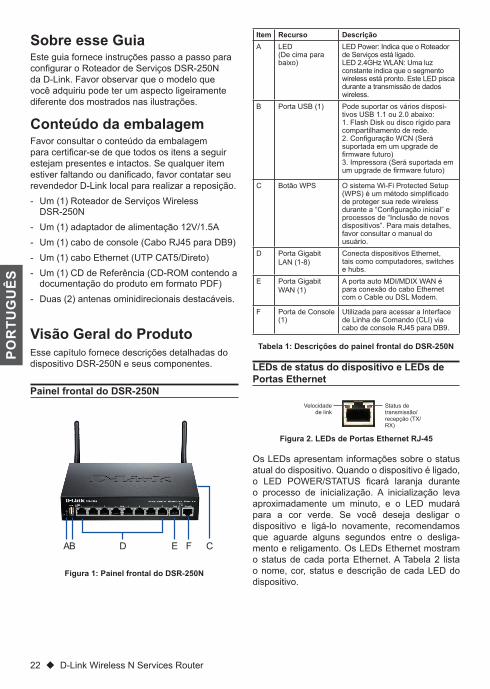
22 D-Link Wireless N Services Router
PO
RTU
GU
ÊS
Sobre esse GuiaEste guia fornece instruções passo a passo para configurar o Roteador de Serviços DSR-250N da D-Link. Favor observar que o modelo que você adquiriu pode ter um aspecto ligeiramente diferente dos mostrados nas ilustrações.
Conteúdo da embalagemFavor consultar o conteúdo da embalagem para certificar-se de que todos os itens a seguir estejam presentes e intactos. Se qualquer item estiver faltando ou danificado, favor contatar seu revendedor D-Link local para realizar a reposição. - Um (1) Roteador de Serviços Wireless
DSR-250N - Um (1) adaptador de alimentação 12V/1.5A - Um (1) cabo de console (Cabo RJ45 para DB9) - Um (1) cabo Ethernet (UTP CAT5/Direto) - Um (1) CD de Referência (CD-ROM contendo a
documentação do produto em formato PDF) - Duas (2) antenas ominidirecionais destacáveis.
Item Recurso DescriçãoA LED
(De cima para baixo)
LED Power: Indica que o Roteador de Serviços está ligado.LED 2.4GHz WLAN: Uma luz constante indica que o segmento wireless está pronto. Este LED pisca durante a transmissão de dados wireless.
B Porta USB (1) Pode suportar os vários disposi-tivos USB 1.1 ou 2.0 abaixo:1. Flash Disk ou disco rígido para compartilhamento de rede.2. Configuração WCN (Será suportada em um upgrade de firmware futuro)3. Impressora (Será suportada em um upgrade de firmware futuro)
C Botão WPS O sistema Wi-Fi Protected Setup (WPS) é um método simplificado de proteger sua rede wireless durante a “Configuração inicial” e processos de “Inclusão de novos dispositivos”. Para mais detalhes, favor consultar o manual do usuário.
D Porta Gigabit LAN (1-8)
Conecta dispositivos Ethernet, tais como computadores, switches e hubs.
E Porta Gigabit WAN (1)
A porta auto MDI/MDIX WAN é para conexão do cabo Ethernet com o Cable ou DSL Modem.
F Porta de Console (1)
Utilizada para acessar a Interface de Linha de Comando (CLI) via cabo de console RJ45 para DB9.
Tabela 1: Descrições do painel frontal do DSR-250N
LEDs de status do dispositivo e LEDs de Portas Ethernet
Os LEDs apresentam informações sobre o status atual do dispositivo. Quando o dispositivo é ligado, o LED POWER/STATUS ficará laranja durante o processo de inicialização. A inicialização leva aproximadamente um minuto, e o LED mudará para a cor verde. Se você deseja desligar o dispositivo e ligá-lo novamente, recomendamos que aguarde alguns segundos entre o desliga-mento e religamento. Os LEDs Ethernet mostram o status de cada porta Ethernet. A Tabela 2 lista o nome, cor, status e descrição de cada LED do dispositivo.
Figura 2. LEDs de Portas Ethernet RJ-45
Status de transmissão/recepção (TX/RX)
Velocidade de link
Painel frontal do DSR-250N
Visão Geral do Produto
Figura 1: Painel frontal do DSR-250N
Esse capítulo fornece descrições detalhadas do dispositivo DSR-250N e seus componentes.
FDA CEB

D-Link Wireless N Services Router 23
PO
RTU
GU
ÊS
LEDsindicadores
Cor Status Descrição
Power / Status
Laranja/Verde
Constante Laranja
Dispositivo durante processo de ligação
Verde constante
Conclusão da inicialização
Laranja piscando
O dispositivo caiu e está em modo de recuperação
Verde piscando
O sistema apresenta defeito, como falha de atualização de firmware.
Luz desligada
O dispositivo está desligado
2.4GHz WLAN
Verde Verde constante
O link está bom
Verde piscando
Há atividade nessa porta A rede wireless está enviando ou recebendo dados
Luz desligada
Sem link A rede wireless está enviando ou recebendo dados
WPS Azul Azul piscando
Começa a processar
Azul sólido A conexão foi estabelecida com sucesso
Luz desligada
Sem link.
Status de transmissão/recepção (TX/RX)
Verde Luz desligada
Sem link.
Verde constante
O link está presente.
Verde piscando
A porta está enviando ou recebendo dados.
Velocidade de link
Verde/Laranja
Luz desligada
A porta está operando a 10Mbps.
Verde constante
A porta está operando a 100Mbps.
Constante Laranja
A porta está operando a 1000Mbps.
Conectando a energia e ligando/desligando o dispositivo
Configurações da Interface padrão do DSR-250N
Tabela 2: Descrições dos LEDs de status do dispositivo
Instalando e conectando o dispositivoEsse capítulo descreve como conectar os cabos e ligar o dispositivo.
Antes de você começarObserve as precauções a seguir para ajudar a evitar desligamentos, falhas no equipamento e lesões:
- Antes da instalação, verifique sempre se a fonte de alimentação está desconectada
- Certifique-se de que a sala na qual você irá utilizar o dispositivo oferece circulação de ar adequada e que a temperatura do recinto não exceda 40˚C (104˚F)
- Providencie para que haja 1 metro (3 pés) de espaço livre na parte frontal e traseira do dispositivo.
- Não posicione o dispositivo em uma estrutura de rack de equipamentos que bloqueie os orifícios de ventilação nas laterais do chassi. Certifique-se de que os racks fechados possuam ventoinhas e laterais ventiladas.
- Corrija essas condições perigosas antes de qualquer instalação: pisos úmidos ou molhados, vazamentos, cabos de energia expostos não aterrados ou desgastados.
O Adaptador de Alimentação AC/DC fornecido com o dispositivo conecta-o ao terra quando conectado a uma tomada com aterramento AC. O dispositivo deve ser conectado ao terra durante o funcionamento normal. Observação: Recomendamos que seja utilizado um estabilizador para conexão a energia.
Para ligar o dispositivo DSR-250N, coloque a chave de energia DC no painel traseiro na posição ligada. Para desligar o dispositivo, coloque a chave de energia na posição desligada.
Interface Ethernet
Tipo de interface Endereço IP
Geren-ciamento Baseado na Web
Cliente DHCP
LAN(1-8) / WLAN
IP Estático
192.168.10.1 Habilitado Habilitado
WAN Cliente DHCP
0.0.0.0 Desabilitado Desabilitado
Tabela 3: Configurações de interface padrão
Observação: Os Roteadores de Serviços D-Link só permitem o acesso de Interfaces Gráficas do Usuário (GUI) web a partir de interfaces LAN e WLAN por default por motivos de segurança.

24 D-Link Wireless N Services Router
PO
RTU
GU
ÊS
Para acessar o dispositivo com o WebUI:
1. Conecte seu computador na porta denom-inada LAN (1-8), que está pré-alocada à LAN.
2. Certifique-se de que seu computador esteja habilitado para cliente DHCP ou configurado com um endereço IP estático na sub-rede 192.168.10.0/24. Obs.: Desabilite o software de bloqueio de pop-ups ou adicione o endereço IP de geren-ciamento http://192.168.10.1 à sua lista de pop-ups autorizados.
3. Abra o seu navegador, insira o endereço IP para a interface LAN. (O endereço IP padrão de fábrica é http://192.168.10.1), em seguida, pressione Enter.
4. Faça o login na Interface Web do Roteador de Serviços. As informações padrão de login são:
Nome do usuário: adminSenha: admin
Conectando o dispositivo a uma rede
Figura 3: Exemplo de cabeamento básico
Configuração inicial do dispositivoO software de roteador de serviços é pré-instalado no dispositivo DSR-250N. Quando o dispositivo está ligado, ele está pronto para ser configurado. Embora o equipamento possua uma configuração de fábrica que lhe permita conectá-lo inicialmente , você deve realizar configurações adicionais para os seus requisitos específicos de rede.
Utilizando o WebUI
Para utilizar o WebUI, o computador do qual você está gerenciando o dispositivo deve inicialmente estar na mesma sub-rede do dispositivo.
Figure 6. Authentication Message
Figura 5. Endereço do navegador
Tabela 4. Compatibilidade com navegadores
Navegador VersãoMicrosoft Internet Explorer
6.0 e superior
Mozilla Firefox 3.5 e superior
Netscape Navigator 9.0 e superior
Apple Safari 4.0 e superior
Google Chrome 3.0 e superior
Essa seção fornece informações básicas sobre a conexão física do DSR-250N a uma rede. Para conectar os cabos necessários conforme mostrado na Figura 3.
1. Conecte um cabo RJ-45 da porta denominada WAN em um roteador externo. A porta WAN está pré-alocada ao segmento de rede WAN.
2. Conecte um cabo RJ-45 da porta denominada LAN (1-8) a um switch no segmento de rede LAN.
3. Conecte um cabo RJ45 para DB9 da porta de console para o acesso de gerenciamento da Interface de Linha de Comando (CLI).
WAN1
LAN Console
Internet
Switch
User
D-Link Wireless N Services Router 25
PO
RTU
GU
ÊS
O Roteador de Serviços fornece uma porta serial que possibilita uma conexão de um computador ou terminal para monitorar e configurar o dispos-itivo. Essa porta é um conector RJ-45, imple-mentado como uma conexão de equipamento de terminal de comunicação de dados (DCE).
Para utilizar a conexão da porta do console, você precisa dos seguintes equipamentos:
1. Um terminal ou computador com uma porta serial e a capacidade de emular um terminal.
2. Um RJ45 para DB9 RS-232 com conector fêmea. (Já incluído no conteúdo da embalagem)
3. Caso o seu laptop ou PC não possuir um conector RS-232, é necessário um conversor.
Observação: O DSR-250N não vem com um conversor RS-232 e o mesmo deve ser adquirido separadamente.
Para estabelecer uma conexão de console:
1. Conecte o conector RJ-45 do cabo RJ45 para DB9 fornecido diretamente na porta de console no Roteador de Serviços.
2. Conecte a outra extremidade do cabo a um terminal ou ao conector serial de um computador executando o software de emulação de terminal. Defina o software de emulação de terminais da seguinte forma:
Taxa de transmissão: 115200Bits de dados: 8Paridade: NenhumBits de parada: 1Controle de fluxo: Nenhum
3. Depois que você tiver configurado o terminal corretamente e seguido previamente as instruções na seção “Conectando a energia e ligando/desligando o dispositivo”, ligue o dispositivo. A seqüência de boot aparece no terminal.
4. Uma vez que a sequência de inicializações for concluída, o prompt de comando é exibido e o dispositivo está pronto para ser configurado.
Utilizando uma conexão de console (DCE RJ45 para DB9)
Ajuda adicional está disponível por meio dos escritórios mundiais da D-Link relacionados no anexo do Manual do Usuário ou on-line. Para obter maiores informações sobre os produtos de segurança da D-Link ou informações de marketing, favor visitar o website http://mydsr.dlink.com.tw; para qualquer problema de suporte, favor visitar o website http://support.dlink.com.tw, que vai redirecioná-lo para o website local apropriado da D-Link.
Informações Adicionais
Após a configuração inicial, você deverá consultar as publicações associadas encontradas em formato PDF para o CD mestre que vem junto com o produto para maiores informações sobre como começar a configurar o dispositivo DSR-250N. Manual do Usuário do Roteador de Serviços D-LinkEsse documento descreve a operação e controle gerais de firmware do Roteador de Serviços que comanda e controla o hardware da série de Roteadores de Serviços Unificados. Ele inclui exemplos de como realizar tarefas administra-tivas típicas, como configurar uma VPN e utilizar a série de Roteadores de Serviços em diversos cenários.
Guia de Referência de Logs do Roteador de Serviços D-LinkEsse documento descreve todas as mensagens de log que poderão ser geradas pelo Roteador de Serviços durante a operação do sistema.
Guia de Referência de CLI do Roteador de Serviços D-LinkEsse documento descreve todos os comandos baseados em texto disponíveis que podem ser usados no Console RJ45 para DB9 ou interface SSH para configurar o Roteador de Serviços durante a operação do sistema.
Finalizando a configuração
26 D-Link Wireless N Services Router
PO
RTU
GU
ÊS
Suporte TécnicoCaso tenha dúvidas na instalação do produto, entre em contato com oSuporte Técnico D-Link por:
Chat Onlinewww.dlink.com.br/suporte
Back [email protected] **Acionar Garantia para 4 ou mais equipamentos
TelefonesSão Paulo: (11) 2755-6950*GO: 4052-1850 (Ligação local)*Nordeste: 0800-7024104*Demais Estados: 4062-1850 (Ligação local)*Apenas Modems ADSL
Garantia diferenciada vendida pela internet. Agilidade e tranquilidade para suas atividades!
Conheça: http://garantiapremium.dlink.com.br
Atendimento disponível das 9h as 21h de segunda a sexta feira e aos sábados das 9h as 15h

本手冊將教導您如何安裝D-Link Wireless N 整合型無線寬頻路由器
Building Networks for People
DSR-250N
光碟內同樣具備本手冊的電子檔或是您也可以至D-Link 網站下載
快速安裝手冊Wireless Services Router Appliance
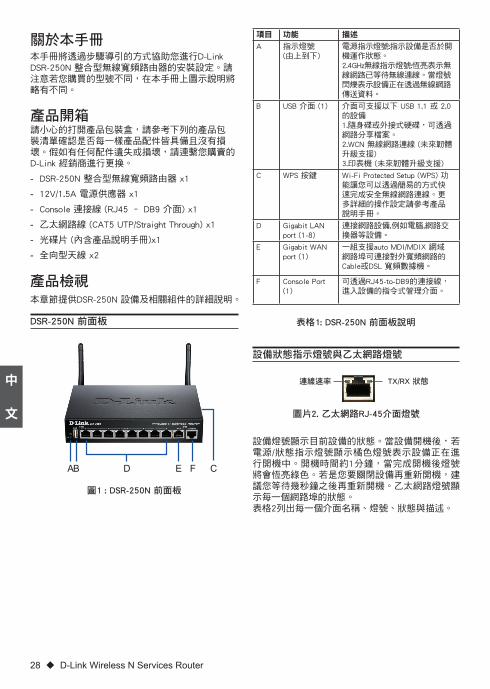
28 D-Link Wireless N Services Router
中
文
關於本手冊本手冊將透過步驟導引的方式協助您進行D-Link DSR-250N 整合型無線寬頻路由器的安裝設定。請注意若您購買的型號不同,在本手冊上圖示說明將略有不同。
產品開箱請小心的打開產品包裝盒,請參考下列的產品包裝清單確認是否每一樣產品配件皆具備且沒有損壞。假如有任何配件遺失或損壞,請連繫您購賣的D-Link 經銷商進行更換。
- DSR-250N 整合型無線寬頻路由器 x1
- 12V/1.5A 電源供應器 x1
- Console 連接線 (RJ45 – DB9 介面) x1
- 乙太網路線 (CAT5 UTP/Straight Through) x1
- 光碟片 (內含產品說明手冊)x1
- 全向型天線 x2
項目 功能 描述
A 指示燈號 (由上到下)
電源指示燈號:指示設備是否於開機運作狀態。2.4GHz無線指示燈號:恆亮表示無線網路已等待無線連線。當燈號閃爍表示設備正在透過無線網路傳送資料。
B USB 介面 (1) 介面可支援以下 USB 1.1 或 2.0 的設備1.隨身碟或外接式硬碟,可透過網路分享檔案。2.WCN 無線網路連線 (未來韌體升級支援)3.印表機 (未來韌體升級支援)
C WPS 按鍵 Wi-Fi Protected Setup (WPS) 功能讓您可以透過簡易的方式快速完成安全無線網路連線。更多詳細的操作設定請參考產品說明手冊。
D Gigabit LAN port (1-8)
連接網路設備,例如電腦,網路交換器等設備。
E Gigabit WAN port (1)
一組支援auto MDI/MDIX 網域網路埠可連接對外寬頻網路的Cable或DSL 寬頻數據機。
F Console Port (1)
可透過RJ45-to-DB9的連接線,進入設備的指令式管理介面。
表格1: DSR-250N 前面板說明
設備狀態指示燈號與乙太網路燈號
設備燈號顯示目前設備的狀態。當設備開機後,若電源/狀態指示燈號顯示橘色燈號表示設備正在進行開機中。開機時間約1分鐘,當完成開機後燈號將會恆亮綠色。若是您要關閉設備再重新開機,建議您等待幾秒鐘之後再重新開機。乙太網路燈號顯示每一個網路埠的狀態。表格2列出每一個介面名稱、燈號、狀態與描述。
圖片2. 乙太網路RJ-45介面燈號
TX/RX 狀態連線速率
DSR-250N 前面板
產品檢視
圖1 : DSR-250N 前面板
本章節提供DSR-250N 設備及相關組件的詳細說明。
FDA CEB

D-Link Wireless N Services Router 29
中
文
燈號指示 顏色 狀態 描述
電源 /狀態
橘色/綠色
恆亮橘色 設備正在進行開機程序
恆亮綠色 設備完成開機
閃爍橘色 表示設備當機且處於復原模式中
閃爍綠色 表示系統出現問題,如韌體升級失敗
燈號關閉 表示設備目前為關機狀態
2.4GHz無線網路
綠色 恆亮綠色 表示無線正常運作
閃爍綠色 表示設備正透過無線傳送資料
燈號關閉 表示無線沒有啟用
WPS 藍色 閃爍藍色 開始進行無線連線程序
恆亮藍色 成功完成無線連線
燈號關閉 沒有啟用狀態
TX/RX 狀態
綠色 燈號關閉 沒有連線
恆亮綠色 網路埠有連接設備
閃爍綠色 網路埠正在傳送或是接收資料
連線速率 綠色/橘色
燈號關閉 網路埠連線速率為 10Mbps
恆亮綠色 網路埠連線速率為 100Mbps
恆亮橘色 網路埠連線速率為 1000Mbps
連接電源並開啟/關閉設備
DSR-250N 介面出廠預設值
表格2: DSR-250N 燈號狀態說明
設備安裝與連線本章節將描述如何連接設備的電源與網路線。
在您開始之前請遵守以下預防措施,以防止設備停機,故障和損傷:
- 確保您的室內的房間空氣流通,使房間溫度不超過40˚C (104˚F)
- 請讓設備前後擁有1米(3英尺)的淨空的空間。
- 若要將設備放於機架中,請確保封閉式機架具有通風口與風扇以讓設備可以正常運作。
- 請勿在以下的環境進行設備的安裝:地面潮濕,電源線可能洩電,磨損或未接地,以及任何缺乏安全操作環境。
將電源連接到設備,請將電源供應器DC直流端連接至設備背板的電源插孔。備註:我們建議使用具備靜電突波保護裝置的電源連接。
若要開啟DSR-250N,請按下位於設備背板的電源開關。若要關閉設備電源,請將電源切換到到OFF位置。
乙太網路介面 介面類型 IP 位址
網頁是管理介面
DHCP Client
LAN(1-8) / WLAN
Static IP 192.168.10.1 啟用 啟用
WAN DHCP Client
0.0.0.0 關閉 關閉
表格3:介面出廠預設值
備註:D-Link 整合型無線寬頻路由器因安全性的考量,出廠預設僅允許透過區域網路或無線網路以Web 網頁介面進行設備的存取與管理。
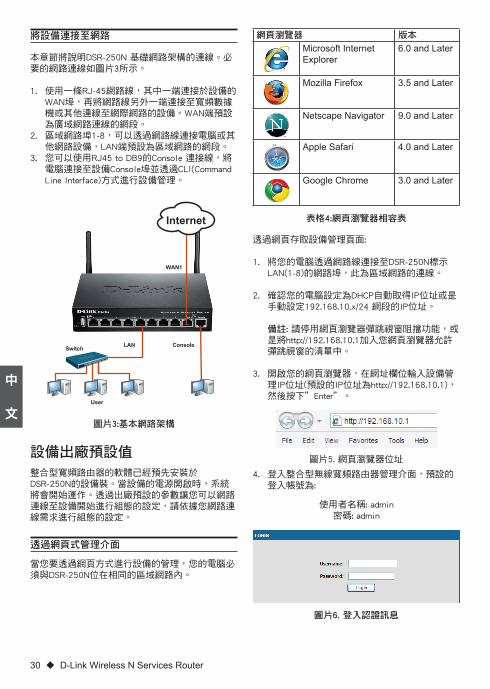
30 D-Link Wireless N Services Router
中
文
透過網頁存取設備管理頁面:
1. 將您的電腦透過網路線連接至DSR-250N標示LAN(1-8)的網路埠,此為區域網路的連線。
2. 確認您的電腦設定為DHCP自動取得IP位址或是手動設定192.168.10.x/24 網段的IP位址。 備註: 請停用網頁瀏覽器彈跳視窗阻擋功能,或是將http://192.168.10.1加入您網頁瀏覽器允許彈跳視窗的清單中。
3. 開啟您的網頁瀏覽器,在網址欄位輸入設備管理IP位址(預設的IP位址為http://192.168.10.1),然後按下”Enter”。
4. 登入整合型無線寬頻路由器管理介面,預設的登入帳號為:
使用者名稱: admin密碼: admin
將設備連接至網路
圖片3:基本網路架構
設備出廠預設值整合型寬頻路由器的軟體已經預先安裝於DSR-250N的設備裝。當設備的電源開啟時,系統將會開始運作。透過出廠預設的參數讓您可以網路連線至設備開始進行組態的設定,請依據您網路連線需求進行組態的設定。
透過網頁式管理介面
當您要透過網頁方式進行設備的管理,您的電腦必須與DSR-250N位在相同的區域網路內。
圖片6. 登入認證訊息
圖片5. 網頁瀏覽器位址
表格4:網頁瀏覽器相容表
網頁瀏覽器 版本
Microsoft Internet Explorer
6.0 and Later
Mozilla Firefox 3.5 and Later
Netscape Navigator 9.0 and Later
Apple Safari 4.0 and Later
Google Chrome 3.0 and Later
本章節將說明DSR-250N 基礎網路架構的連線。必要的網路連線如圖片3所示。
1. 使用一條RJ-45網路線,其中一端連接於設備的WAN埠,再將網路線另外一端連接至寬頻數據機或其他連線至網際網路的設備。WAN端預設為廣域網路連線的網段。
2. 區域網路埠1-8,可以透過網路線連接電腦或其他網路設備,LAN端預設為區域網路的網段。
3. 您可以使用RJ45 to DB9的Console 連接線,將電腦連接至設備Console埠並透過CLI(Command Line Interface)方式進行設備管理。
WAN1
LAN Console
Internet
Switch
User
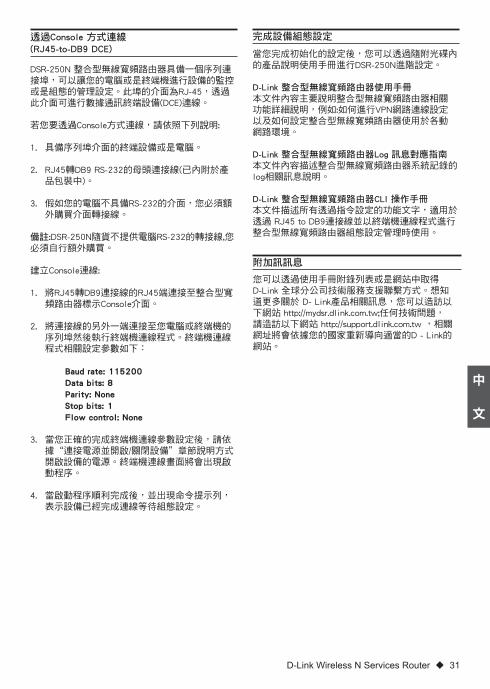
D-Link Wireless N Services Router 31
中
文
DSR-250N 整合型無線寬頻路由器具備一個序列連接埠,可以讓您的電腦或是終端機進行設備的監控或是組態的管理設定。此埠的介面為RJ-45,透過此介面可進行數據通訊終端設備(DCE)連線。
若您要透過Console方式連線,請依照下列說明:
1. 具備序列埠介面的終端設備或是電腦。
2. RJ45轉DB9 RS-232的母頭連接線(已內附於產品包裝中)。
3. 假如您的電腦不具備RS-232的介面,您必須額外購買介面轉接線。
備註:DSR-250N隨貨不提供電腦RS-232的轉接線,您必須自行額外購買。
建立Console連線:
1. 將RJ45轉DB9連接線的RJ45端連接至整合型寬頻路由器標示Console介面。
2. 將連接線的另外一端連接至您電腦或終端機的序列埠然後執行終端機連線程式。終端機連線程式相關設定參數如下:
Baud rate: 115200 Data bits: 8 Parity: None Stop bits: 1 Flow control: None
3. 當您正確的完成終端機連線參數設定後,請依據“連接電源並開啟/關閉設備”章節說明方式開啟設備的電源。終端機連線畫面將會出現啟動程序。
4. 當啟動程序順利完成後,並出現命令提示列,表示設備已經完成連線等待組態設定。
透過Console 方式連線(RJ45-to-DB9 DCE)
您可以透過使用手冊附錄列表或是網站中取得D-Link 全球分公司技術服務支援聯繫方式。想知道更多關於 D- Link產品相關訊息,您可以造訪以下網站 http://mydsr.dlink.com.tw;任何技術問題,請造訪以下網站 http://support.dlink.com.tw ,相關網址將會依據您的國家重新導向適當的D - Link的網站。
附加訊訊息
當您完成初始化的設定後,您可以透過隨附光碟內的產品說明使用手冊進行DSR-250N進階設定。
D-Link 整合型無線寬頻路由器使用手冊本文件內容主要說明整合型無線寬頻路由器相關功能詳細說明,例如:如何進行VPN網路連線設定以及如何設定整合型無線寬頻路由器使用於各動網路環境。
D-Link 整合型無線寬頻路由器Log 訊息對應指南本文件內容描述整合型無線寬頻路由器系統記錄的log相關訊息說明。
D-Link 整合型無線寬頻路由器CLI 操作手冊本文件描述所有透過指令設定的功能文字,適用於透過 RJ45 to DB9連接線並以終端機連線程式進行整合型無線寬頻路由器組態設定管理時使用。
完成設備組態設定

32 D-Link Wireless N Services Router
中
文
D-Link 友訊科技 台灣分公司 技術支援資訊
如果您還有任何本使用手冊無法協助您解決的產品
相關問題,台灣地區用戶可以透過我們的網站、電
子郵件或電話等方式與D-Link台灣地區技術支援工
程師聯絡。
D-Link 免付費技術諮詢專線
0800-002-615服務時間:週一至週五,早上9:00到晚上9:00(不含周六、日及國定假日)
網 站:http://www.dlink.com.tw電子郵件:[email protected]
如果您是台灣地區以外的用戶,請參考D-Link網
站,全球各地分公司
的聯絡資訊以取得相關支援服務。
產品保固期限、台灣區維修據點查詢,請參考以下
網頁說明:
http://www.dlink.com.tw
產品維修:
使用者可直接送至全省聯強直營維修站或請洽您的
原購買經銷商。
Dokumen ini akan menuntun anda melakukan proses dasar instalasi D-Link Wireless N Service Router baru anda.
Building Networks for People
DSR-250N
Dokumentasi juga bisa didapat dalam CD dan juga di website D-Link
Panduan Instalasi SingkatWireless Services Router Appliance

34 D-Link Wireless N Services Router
BA
HA
SA
IND
ON
ES
IA
Tentang Panduan iniPanduan ini memberikan instruksi langkah demi langkah mengenai cara pemasangan D-Link DSR-250N Service Router. Tolong perhatikan bahwa model yang anda beli mungkin akan terlihat sedikit berbeda dengan yang ditunjukkan dalam gambar.
Membuka Bungkusan BarangBuka karton kemudian secara hati-hati keluarkan barang. Perhatikan daftar barang beserta informa-sinya yang terdapat di bawah ini untuk memas-tikan bahwa barang sudah lengkap dan dalam kondisi baik. Bila terdapat bagian yang hilang atau rusak, silahkan hubungi reseller D-Link setempat untuk penggantian. - Satu (1) unit DSR-250N Wireless Service
Router Appliance - Satu (1) unit 12V/1.5A Adaptor - Satu (1) unit kabel konsol (RJ45-to-DB9) - Satu (1) unit kabel Ethernet (UTP CAT5/Straight
Through) - Satu (1) unit CD referensi (dalam CD-ROM
terdapat dokumentasi dalam format PDF) - Dua (2) unit antena omni
Butir Fitur PenjelasanA Lampu LED
(dari atas ke bawah)
LED daya: Mengindikasikan bahwa Router dalam keadaan menyala.2.4GHz WLAN LED: Lampu padat menunjukkan bahwa segmen nirkabel siap. LED ini berkedip selama transmisi data nirkabel.
B USB Port (1) Dapat mendukung berbagai perangkat USB 1.1 atau 2.0 di bawah ini:1. Flash Disk atau Hard Disk untuk berbagi jaringan.2. Konfigurasi WCN (akan didukung oleh upgrade firmware di masa depan)3. Printer (akan didukung oleh upgrade firmware di masa depan)
C Tombol WPS Wi-Fi Protected Setup (WPS) sistem adalah metode sederhana untuk mengamankan jaringan nirkabel Anda selama proses "Initial setup" serta "Menam-bahkan perangkat baru". Lihat panduan pengguna untuk rincian.
D Port Gigabit LAN (1-8)
Menyambungkan perangkat Ethernet, seperti komputer, switch dan hub.
E Port Gigabit WAN (1)
Satu port WAN auto MDI/MDIX adalah untuk sambungan kabel Ethernet ke kabel modem atau DSL modem.
F Console Port (1) Digunakan untuk mengakses Command Line Interface (CLI) via RJ45-to-DB9 kabel konsol.
Tabel 1: deskripsi Panel depan DSR-250N
LED Status perangkat dan Ethernet Port LED
LED perangkat menunjukkan informasi tentang status perangkat saat ini. Ketika perangkat dinyalakan, LED POWER/STATUS akan menampilkan warna oranye selama proses berlangsung. Startup selama sekitar satu menit, kemudian LED akan berubah menjadi warna hijau. Jika Anda ingin mematikan dan menyalakan perangkat, kami menganjurkan Anda menunggu jeda beberapa detik antara mematikan dan menyalakan kembali. LED Ethernet menunjukkan status setiap port Ethernet. Tabel 2 merupakan daftar nama, warna, status dan penjelasan dari masing-masing perangkat LED.
Gambar 2. Port RJ-45 LED
Status TX/RX
Kecepatan link
Tampilan depan DSR-250N
Peninjauan Produk
Gambar 1: Tampilan depan DSR-250N
Bab ini memberikan penjelasan detil mengenai DSR-250N beserta komponen-komponennya.
FDA CEB
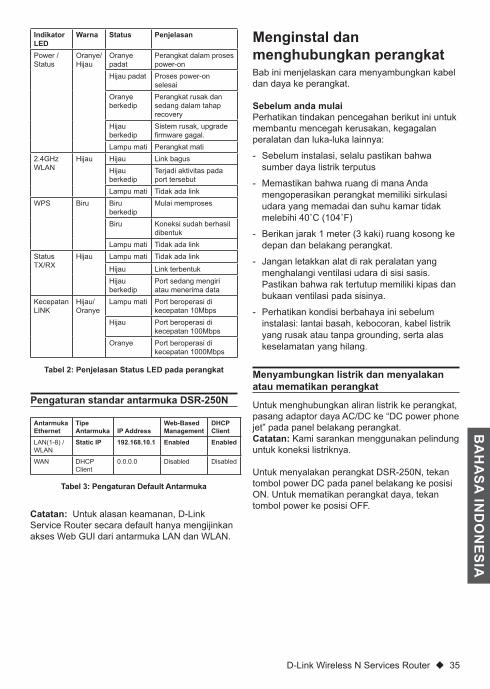
D-Link Wireless N Services Router 35
BA
HA
SA
IND
ON
ES
IA
Indikator LED
Warna Status Penjelasan
Power / Status
Oranye/Hijau
Oranye padat
Perangkat dalam proses power-on
Hijau padat Proses power-on selesai
Oranye berkedip
Perangkat rusak dan sedang dalam tahap recovery
Hijau berkedip
Sistem rusak, upgrade firmware gagal.
Lampu mati Perangkat mati2.4GHz WLAN
Hijau Hijau Link bagusHijau berkedip
Terjadi aktivitas pada port tersebut
Lampu mati Tidak ada linkWPS Biru Biru
berkedipMulai memproses
Biru Koneksi sudah berhasil dibentuk
Lampu mati Tidak ada linkStatus TX/RX
Hijau Lampu mati Tidak ada link
Hijau Link terbentukHijau berkedip
Port sedang mengiri atau menerima data
Kecepatan LINK
Hijau/Oranye
Lampu mati Port beroperasi di kecepatan 10Mbps
Hijau Port beroperasi di kecepatan 100Mbps
Oranye Port beroperasi di kecepatan 1000Mbps
Menyambungkan listrik dan menyalakan atau mematikan perangkat
Pengaturan standar antarmuka DSR-250N
Tabel 2: Penjelasan Status LED pada perangkat
Menginstal dan menghubungkan perangkatBab ini menjelaskan cara menyambungkan kabel dan daya ke perangkat.
Sebelum anda mulaiPerhatikan tindakan pencegahan berikut ini untuk membantu mencegah kerusakan, kegagalan peralatan dan luka-luka lainnya:
- Sebelum instalasi, selalu pastikan bahwa sumber daya listrik terputus
- Memastikan bahwa ruang di mana Anda mengoperasikan perangkat memiliki sirkulasi udara yang memadai dan suhu kamar tidak melebihi 40˚C (104˚F)
- Berikan jarak 1 meter (3 kaki) ruang kosong ke depan dan belakang perangkat.
- Jangan letakkan alat di rak peralatan yang menghalangi ventilasi udara di sisi sasis. Pastikan bahwa rak tertutup memiliki kipas dan bukaan ventilasi pada sisinya.
- Perhatikan kondisi berbahaya ini sebelum instalasi: lantai basah, kebocoran, kabel listrik yang rusak atau tanpa grounding, serta alas keselamatan yang hilang.
Untuk menghubungkan aliran listrik ke perangkat, pasang adaptor daya AC/DC ke “DC power phone jet” pada panel belakang perangkat.Catatan: Kami sarankan menggunakan pelindung untuk koneksi listriknya.
Untuk menyalakan perangkat DSR-250N, tekan tombol power DC pada panel belakang ke posisi ON. Untuk mematikan perangkat daya, tekan tombol power ke posisi OFF.
Antarmuka Ethernet
Tipe Antarmuka IP Address
Web-Based Management
DHCP Client
LAN(1-8) / WLAN
Static IP 192.168.10.1 Enabled Enabled
WAN DHCP Client
0.0.0.0 Disabled Disabled
Tabel 3: Pengaturan Default Antarmuka
Catatan: Untuk alasan keamanan, D-Link Service Router secara default hanya mengijinkan akses Web GUI dari antarmuka LAN dan WLAN.
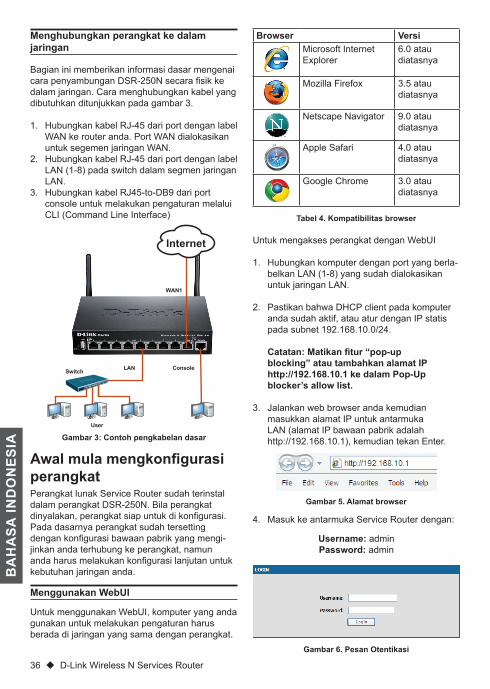
36 D-Link Wireless N Services Router
BA
HA
SA
IND
ON
ES
IA
Untuk mengakses perangkat dengan WebUI
1. Hubungkan komputer dengan port yang berla-belkan LAN (1-8) yang sudah dialokasikan untuk jaringan LAN.
2. Pastikan bahwa DHCP client pada komputer anda sudah aktif, atau atur dengan IP statis pada subnet 192.168.10.0/24. Catatan: Matikan fitur “pop-up blocking” atau tambahkan alamat IP http://192.168.10.1 ke dalam Pop-Up blocker’s allow list.
3. Jalankan web browser anda kemudian masukkan alamat IP untuk antarmuka LAN (alamat IP bawaan pabrik adalah http://192.168.10.1), kemudian tekan Enter.
4. Masuk ke antarmuka Service Router dengan:
Username: adminPassword: admin
Menghubungkan perangkat ke dalam jaringan
Gambar 3: Contoh pengkabelan dasar
Awal mula mengkonfigurasi perangkatPerangkat lunak Service Router sudah terinstal dalam perangkat DSR-250N. Bila perangkat dinyalakan, perangkat siap untuk di konfigurasi. Pada dasarnya perangkat sudah tersetting dengan konfigurasi bawaan pabrik yang mengi-jinkan anda terhubung ke perangkat, namun anda harus melakukan konfigurasi lanjutan untuk kebutuhan jaringan anda.
Menggunakan WebUI
Untuk menggunakan WebUI, komputer yang anda gunakan untuk melakukan pengaturan harus berada di jaringan yang sama dengan perangkat.
Gambar 6. Pesan Otentikasi
Gambar 5. Alamat browser
Tabel 4. Kompatibilitas browser
Browser VersiMicrosoft Internet Explorer
6.0 atau diatasnya
Mozilla Firefox 3.5 atau diatasnya
Netscape Navigator 9.0 atau diatasnya
Apple Safari 4.0 atau diatasnya
Google Chrome 3.0 atau diatasnya
Bagian ini memberikan informasi dasar mengenai cara penyambungan DSR-250N secara fisik ke dalam jaringan. Cara menghubungkan kabel yang dibutuhkan ditunjukkan pada gambar 3.
1. Hubungkan kabel RJ-45 dari port dengan label WAN ke router anda. Port WAN dialokasikan untuk segemen jaringan WAN.
2. Hubungkan kabel RJ-45 dari port dengan label LAN (1-8) pada switch dalam segmen jaringan LAN.
3. Hubungkan kabel RJ45-to-DB9 dari port console untuk melakukan pengaturan melalui CLI (Command Line Interface)
WAN1
LAN Console
Internet
Switch
User

D-Link Wireless N Services Router 37
BA
HA
SA
IND
ON
ES
IA
Service Router menyediakan port serial yang memungkinkan sambungan ke komputer atau terminal untuk tujuan memantau dan mengkonfig-urasi perangkat. Port ini adalah konektor RJ-45, diimplementasikan sebagai data communication terminal equipment (DCE).
Untuk menggunakan sambungan konsol port, Anda memerlukan peralatan berikut:
1. Sebuah terminal atau komputer dengan serial port dan kemampuan untuk meng-emulasi terminal.
2. RJ45-to-DB9 RS-232 dengan konektor betina. (Sudah termasuk dalam kemasan).
3. Jika Laptop atau PC Anda tidak memiliki konektor RS-232, maka converter diperlukan.
Catatan: DSR-250N tidak datang dengan converter RS-232. Ini harus dibeli secara terpisah.
Untuk sambungan konsol:
1. Colokkan konektor RJ-45 pada kabel RJ45-to-DB9 yang sudah tersedia pada port konsol di Service Router.
2. Hubungkan ujung satunya dari kabel tersebut pada terminal atau komputer yang memiliki perangkat lunak untuk meng-emulasi terminal. Atur emulator terminal itu dengan informasi sbb:
Baud rate: 115200Data bits: 8Parity: NoneStop bits: 1Flow control: None
3. Bila anda sudah terhubungan dengan benar, dengan mengikuti petunjuk pada bagian mengenai “Menghubungkan Listrik serta Mematikan dan Menyalakan Perangkat”, nyalakan perangkat anda. Maka urutan booting akan terlihat pada tampilan di terminal.
4. Setelah urutan booting sudah selesai, maka command prompt akan muncul dan perangkat siap untuk dikonfigurasi.
Menggunakan sambungan konsol(RJ45-to-DB9 DCE)
Bantuan tambahan dapat anda peroleh melalui kantor-kantor D-Link di seluruh dunia yang tertera pada daftar appendix dalam Buku Panduan maupun di website. Untuk mengetahui lebih lanjut mengenai perangkat keamanan D-Link lainnya atau informasi marketing, silahkan kunjungi halaman kami di http://mydsr.dlink.com.tw; untuk dukungan, silahkan kunjungi halaman kami di http://support.dlink.com.tw yang akan mengarahkan anda ke halaman D-Link Negara lokal anda.
Informasi Tambahan
Setelah konfigurasi awal, Anda harus melihat dokumen pendamping yang ditemukan dalam format PDF di CD untuk informasi lebih lanjut tentang cara memulai konfigurasi perangkat DSR-250N.
D-Link Service Router ManualDokumen ini menjelaskan pengoperasian umum serta pengontrolan firmware Service Router yang mengendalikan perangkat keras dari Service Router. Ini termasuk contoh bagaimana melak-sanakan tugas-tugas administratif yang umum seperti menyiapkan VPN dan cara menggunakan Service Router dalam berbagai skenario.
Panduan Referensi D-Link Service Router Log Dokumen ini menjelaskan semua pesan log yang mungkin dihasilkan oleh Service Router selama sistem operasi.
Panduan Referensi D-Link Service Router CLI Dokumen ini menjelaskan semua perintah CLI yang tersedia yang dapat digunakan pada konsol RJ45-to-DB9 atau melalui SSH untuk mengkon-figurasi Service Router selama sistem berjalan.
Menyelesaikan konfigurasi

38 D-Link Wireless N Services Router
BA
HA
SA
IND
ON
ES
IA
Dukungan Teknis
Update perangkat lunak dan dokumentasi pengguna dapat diperoleh pada situs web D-Link.Dukungan Teknis untuk pelanggan:
Dukungan Teknis D-Link melalui telepon:Tel: +62-21-5731610
Dukungan Teknis D-Link melalui Internet:Email : [email protected] : http://support.dlink.co.id

このドキュメントはD-Link IEEE802.11N対応 ワイヤレスルータの基本的なインストール手順を説明しています。
Building Networks for People
DSR-250N
このドキュメントは、同梱されているCDに収録されています。
クイックインストレーションガイドワイヤレスルータ

40 D-Link Wireless N Services Router
日本語
本書について本書はD-Link DSR-250Nワイヤレスルータの設定方法を説明します。ご購入いただきました製品と本書に記載されている図が若干異なる場合がありますので、ご了承ください。
パッケージ内容について本製品の箱を開梱し、下記にリストされている物が同梱されていることをご確認ください。同梱物の不足や破損がありましたら、弊社ホームページにてユーザ登録を行い、サポート窓口までご連絡お願い致します。
- DSR-250N ワイヤレスルータx 1
- 12V/1.5A 電源アダプタx 1
- コンソールケーブル(RJ-45-to-DB9ケーブル) x 1
- ネットワークケーブル(CAT5 UTP/ストレート) x 1
- CD-ROM(ユーザマニュアルを含む) x 1
- 脱着式無指向性アンテナ x 2
項目 機能 内容
A LED Power LED:本製品の電源が供給され、正常に動作しています。2.4GHz WLAN LED:点灯時は無線LANによる通信が可能な状態です。点滅時は無線LAN によりデータを送受信しています。
B USBポート(1) USB 1.1もしくは2.0に準拠する下記デバイスに対応しています。1. ネットワーク共有のフラッシュディスクもしくはハードディスク2. WCN設定(次期ファームウェアにて対応)3. プリンター(次期ファームウェアにて対応)
C WPSボタン Wi-Fi Protected Steup(WPS)機能は「新規デバイスの追加」と同様に、「初期設定」を安全なワイヤレス環境で行なうことが可能です。WPS機能の詳細に関しては、ユーザマニュアルを参照して下さい。
D ギガビットLANポート(1-8)
パソコンやスイッチ、ハブ等のネットワークデバイスを接続します。
E ギガビットWANポート(1)
Auto MDI/MDIX WANポートはネットワークケーブルを使用して、ケーブルモデムまたはDSLモデムへ接続します。
F コンソールポート(1)
RJ45-to-DB9コンソールケーブルを使用し、Command Line Interface(CLI)へ接続するために使用します。
テーブル1.DSR-250N 前面パネルの詳細
デバイスステータスとイーサネットポートのLED
各LEDの状態は本製品の状況を把握することができます。本製品に電源を供給すると、本製品が起動するまでPOWER/STATUS LEDが橙色で点灯します。本製品が起動するまでに約一分間程度かかり、完全に起動するとLEDが緑色に点灯します。本製品の電源を切り、再度電源を入れる場合には、電源を切ってから数秒間置いた後、再度電源をいれることをお勧めいたします。イーサネットLEDは各イーサネットポートの状態を表しています。テーブル2において、各デバイスLEDの名称、色、状態、そしてその内容を説明していますので、参照下さい。
図2:イーサネットRJ-45ポートのLED
TX/RXステータス
リンクスピード
DSR-250N 前面パネル
製品概要について
図1:DSR-250N 前面パネル
この章では、本製品の製品概要や前面パネルとLEDの表示について説明します。
FDA CEB
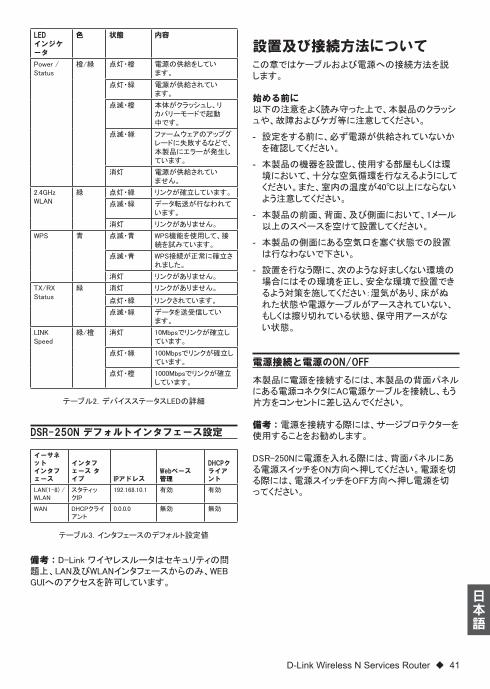
D-Link Wireless N Services Router 41
日本語
LEDインジケータ
色 状態 内容
Power / Status
橙/緑 点灯・橙 電源の供給をしています。
点灯・緑 電源が供給されています。
点滅・橙 本体がクラッシュし、リカバリーモードで起動中です。
点滅・緑 ファームウェアのアップグレードに失敗するなどで、本製品にエラーが発生しています。
消灯 電源が供給されていません。
2.4GHz WLAN
緑 点灯・緑 リンクが確立しています。
点滅・緑 データ転送が行なわれています。
消灯 リンクがありません。
WPS 青 点滅・青 WPS機能を使用して、接続を試みています。
点滅・青 WPS接続が正常に確立されました。
消灯 リンクがありません。
TX/RX Status
緑 消灯 リンクがありません。
点灯・緑 リンクされています。
点滅・緑 データを送受信しています。
LINK Speed
緑/橙 消灯 10Mbpsでリンクが確立しています。
点灯・緑 100Mbpsでリンクが確立しています。
点灯・橙 1000Mbpsでリンクが確立しています。
電源接続と電源のON/OFF
DSR-250N デフォルトインタフェース設定
テーブル2.デバイスステータスLEDの詳細
設置及び接続方法についてこの章ではケーブルおよび電源への接続方法を説します。
始める前に以下の注意をよく読み守った上で、本製品のクラッシュや、故障およびケガ等に注意してください。
- 設定をする前に、必ず電源が供給されていないかを確認してください。
- 本製品の機器を設置し、使用する部屋もしくは環境において、十分な空気循環を行なえるようにしてください。また、室内の温度が40℃以上にならないよう注意してください。
- 本製品の前面、背面、及び側面において、1メール以上のスペースを空けて設置してください。
- 本製品の側面にある空気口を塞ぐ状態での設置は行なわないで下さい。
- 設置を行なう際に、次のような好ましくない環境の場合にはその環境を正し、安全な環境で設置できるよう対策を施してください:湿気があり、床がぬれた状態や電源ケーブルがアースされていない、もしくは擦り切れている状態、保守用アースがない状態。
本製品に電源を接続するには、本製品の背面パネルにある電源コネクタにAC電源ケーブルを接続し、もう片方をコンセントに差し込んでください。
備考:電源を接続する際には、サージプロテクターを使用することをお勧めします。
DSR-250Nに電源を入れる際には、背面パネルにある電源スイッチをON方向へ押してください。電源を切る際には、電源スイッチをOFF方向へ押し電源を切ってください。
イーサネットインタフェース
インタフェース タイプ IPアドレス
Webベース管理
DHCPクライアント
LAN(1-8) / WLAN
スタティックIP
192.168.10.1 有効 有効
WAN DHCPクライアント
0.0.0.0 無効 無効
テーブル3.インタフェースのデフォルト設定値
備考:D-Link ワイヤレスルータはセキュリティの問題上、LAN及びWLANインタフェースからのみ、WEB GUIへのアクセスを許可しています。
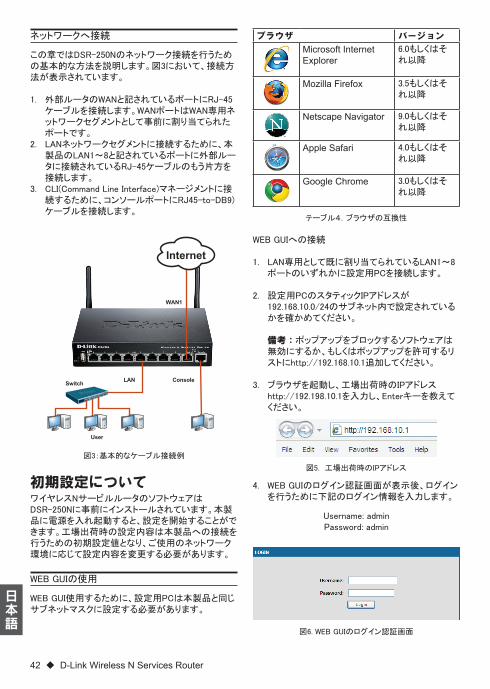
42 D-Link Wireless N Services Router
日本語
WEB GUIへの接続
1. LAN専用として既に割り当てられているLAN1~8ポートのいずれかに設定用PCを接続します。
2. 設定用PCのスタティックIPアドレスが192.168.10.0/24のサブネット内で設定されているかを確かめてください。 備考:ポップアップをブロックするソフトウェアは無効にするか、もしくはポップアップを許可するリストにhttp://192.168.10.1追加してください。
3. ブラウザを起動し、工場出荷時のIPアドレスhttp://192.198.10.1を入力し、Enterキーを教えてください。
4. WEB GUIのログイン認証画面が表示後、ログインを行うために下記のログイン情報を入力します。
Username: adminPassword: admin
ネットワークへ接続
図3:基本的なケーブル接続例
初期設定についてワイヤレスNサービルルータのソフトウェアはDSR-250Nに事前にインストールされています。本製品に電源を入れ起動すると、設定を開始することができます。工場出荷時の設定内容は本製品への接続を行うための初期設定値となり、ご使用のネットワーク環境に応じて設定内容を変更する必要があります。
WEB GUIの使用
WEB GUI使用するために、設定用PCは本製品と同じサブネットマスクに設定する必要があります。
図6. WEB GUIのログイン認証画面
図5. 工場出荷時のIPアドレス
テーブル4.ブラウザの互換性
ブラウザ バージョン
Microsoft Internet Explorer
6.0もしくはそれ以降
Mozilla Firefox 3.5もしくはそれ以降
Netscape Navigator 9.0もしくはそれ以降
Apple Safari 4.0もしくはそれ以降
Google Chrome 3.0もしくはそれ以降
この章ではDSR-250Nのネットワーク接続を行うための基本的な方法を説明します。図3において、接続方法が表示されています。
1. 外部ルータのWANと記されているポートにRJ-45ケーブルを接続します。WANポートはWAN専用ネットワークセグメントとして事前に割り当てられたポートです。
2. LANネットワークセグメントに接続するために、本製品のLAN1~8と記されているポートに外部ルータに接続されているRJ-45ケーブルのもう片方を接続します。
3. CLI(Command Line Interface)マネージメントに接続するために、コンソールポートにRJ45-to-DB9)ケーブルを接続します。
WAN1
LAN Console
Internet
Switch
User
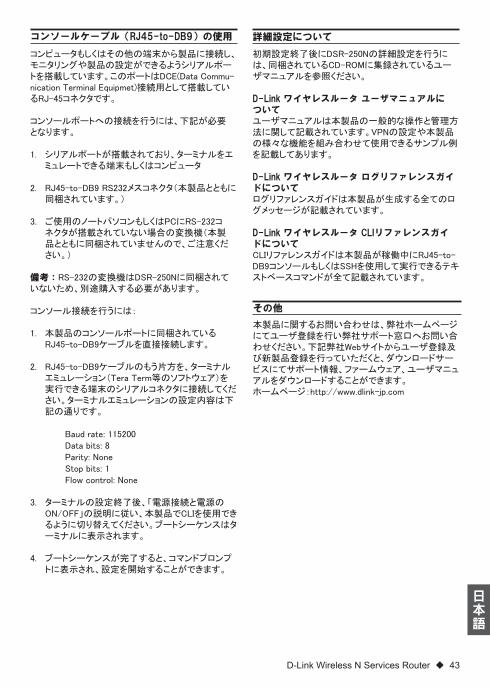
D-Link Wireless N Services Router 43
日本語
コンピュータもしくはその他の端末から製品に接続し、モニタリングや製品の設定ができるようシリアルポートを搭載しています。このポートはDCE(Data Commu-nication Terminal Equipmet)接続用として搭載しているRJ-45コネクタです。
コンソールポートへの接続を行うには、下記が必要となります。
1. シリアルポートが搭載されており、ターミナルをエミュレートできる端末もしくはコンピュータ
2. RJ45-to-DB9 RS232メスコネクタ(本製品とともに同梱されています。)
3. ご使用のノートパソコンもしくはPCにRS-232コネクタが搭載されていない場合の変換機(本製品とともに同梱されていませんので、ご注意ください。)
備考:RS-232の変換機はDSR-250Nに同梱されていないため、別途購入する必要があります。
コンソール接続を行うには:
1. 本製品のコンソールポートに同梱されているRJ45-to-DB9ケーブルを直接接続します。
2. RJ45-to-DB9ケーブルのもう片方を、ターミナルエミュレーション(Tera Term等のソフトウェア)を実行できる端末のシリアルコネクタに接続してください。ターミナルエミュレーションの設定内容は下記の通りです。
Baud rate: 115200 Data bits: 8 Parity: None Stop bits: 1 Flow control: None
3. ターミナルの設定終了後、「電源接続と電源のON/OFF」の説明に従い、本製品でCLIを使用できるように切り替えてください。ブートシーケンスはターミナルに表示されます。
4. ブートシーケンスが完了すると、コマンドプロンプトに表示され、設定を開始することができます。
コンソールケーブル(RJ45-to-DB9)の使用
本製品に関するお問い合わせは、弊社ホームページにてユーザ登録を行い弊社サポート窓口へお問い合わせください。下記弊社Webサイトからユーザ登録及び新製品登録を行っていただくと、ダウンロードサービスにてサポート情報、ファームウェア、ユーザマニュアルをダウンロードすることができます。ホームページ:http://www.dlink-jp.com
その他
初期設定終了後にDSR-250Nの詳細設定を行うには、同梱されているCD-ROMに集録されているユーザマニュアルを参照ください。
D-Link ワイヤレスルータ ユーザマニュアルについてユーザマニュアルは本製品の一般的な操作と管理方法に関して記載されています。VPNの設定や本製品の様々な機能を組み合わせて使用できるサンプル例を記載してあります。
D-Link ワイヤレスルータ ログリファレンスガイドについてログリファレンスガイドは本製品が生成する全てのログメッセージが記載されています。
D-Link ワイヤレスルータ CLIリファレンスガイドについてCLIリファレンスガイドは本製品が稼働中にRJ45-to-DB9コンソールもしくはSSHを使用して実行できるテキストベースコマンドが全て記載されています。
詳細設定について
44 D-Link Wireless N Services Router
日本語
Technical Support
この度は弊社製品をお買い上げいただき、誠にあり
がとうございます。
下記弊社Webサイトからユーザ登録及び新製品登録
を行っていただき、ダウンロードサービスにて
サポート情報、ファームウェア、ユーザマニュアルを
ダウンロードすることができます。
ディーリンクジャパン Webサイト
URL:http://www.dlink-jp.com

Notes

Ver. 1.00(DI)2011/04/21
Related Documents