PCI TV Tuner Card Page 1 PV-M4500 PCI TV Tuner Card User’s Manual

Pv-m4500 Pci Tv Tuner Card
Jan 21, 2016
Welcome message from author
This document is posted to help you gain knowledge. Please leave a comment to let me know what you think about it! Share it to your friends and learn new things together.
Transcript
PCI TV Tuner Card
Page 1
PV-M4500 PCI TV Tuner Card
User’s Manual
PCI TV Tuner Card
Page 2
FCC Requirement
This device has been certified to comply with the limits for a Class B computing device pursuant to Subpart J of Part 15 of the FCC Rules. See instructions if interference to radio reception is suspected. WARNING: This equipment generates and uses radio frequency energy and, if not installed and properly, that is, in strict accordance with the manufacturer’s instructions, may cause interference to radio or television reception. It has been tested and found to comply with the limits for a Class B compliant device in accordance with the specifications in Subpart J of Part 15 of FCC Rules, which are designed to provide reasonable protection against such interference in a residential installation. However, there is no guarantee that interference-will not occur in a particular installation. If this equipment does cause interference to radio or television reception, which can be determined by turning the equipment off and on, the user is encouraged to try to correct the interference by one or more of the following measures:
Reorient the receiving antenna Relocate the computer away from the receiver Move the computer away from the receiver Plug the computer into a different outlet so that the computer and the receiver
are on different branch circuits Ensure that the card’s mounting screws, attachment connector screws, and
ground wires are tightly secured Ensure that slot covers are installed in all unused slots
If necessary, consult your dealer, service representative, or an experienced radio/television technician for additional suggestions. The manufacturer is not responsible for any radio or TV interference caused by unauthorized modifications to this equipment. It is the responsibility of the user to correct such interference. The user may find the following booklet prepared by the Federal Communications Commission helpful: How to Identify and Resolve Radio-TV Interference Problems.
This booklet is available from the Government Printing Office, Washington D.C, 20402, Stock No. 004-000-00345-4 NOTE: You must use shielded interface cables with a ferrite bead in order to maintain compliance with the limits for a Class B device
CAUTION: CHANGES OR MODIFICATIONS NOT EXPRESSLY APPROVED BY THE
PARTY RESPONSIBLE FOR COMPLIANCE COULD VOID THE USER’S
AUTHORITY TO OPERATE THE EQUIPMENT
PCI TV Tuner Card
Page 3
Notice
The information in this document is subject to change in order to improve reliability, design, or function without prior notice and does not represent a commitment on the part of this company.
In no event will we be liable for direct, indirect, special, incidental, or consequential damages arising out of the use or the inability to use the product or documentation, even if advised of the possibility of such damages.
No part of this reference manual may be reproduced or transmitted in any form or by any means without the prior written permission of this company.
©1998 Trademark Acknowledgements
All brand names and trademarks are the property of their owners. Limited Warranty
Our company warrants this product against defects in materials and workmanship for a period of one year from the date of Shipping. During the warranty period, a product determined by us to be defective in form or function will be repaired or at our option, to be replaced at no charge. This warranty does not apply if we have damaged by accident, abuse, misuse, or as a result of service or modification other than the product.
This warranty is in lieu of any other warranty expressed or implied. In no event shall we be held liable for incidental or consequential damages, such as lost revenue or lost business opportunities arising from the purchase of a this product.
PCI TV Tuner Card
Page 4
Table Of Contents
1. Features……………………………………………………………………………………… 5
2. System Requirements ……………...……………………………………. ……………. 5
3. Package Contents ………………………..……………………………………………… 5
4. Hardware Specification…………………..………………………………………. ……. … 6
5. Hardware Installation ……………………………………………………………………… 7
6. Driver and Software Installation…………………………………………………………… 8
7. Start the Software …………..……………………………………………………………… 11
8. How to Use TVR……………………………………………….............. ………............. 12
a) TV Settings …………………………………………………………. ……………. … 14
b) Video Settings………………………………………………………. ………………. 16
c) Record Settings …………………………………………………….. ………………. 18
d) Etc Settings…………………………………………………………. ………………. 18
e) FM Control ……………………………………………………………. …………… 20
f) Video Folder ……………………………………………………….. ……………….. 21
g) Help …………………………………. …………………………………. …………… 22
h) Mouse Right Click Button……………………………………………………….. … 22
9. Remote Controller ……………………………………………………... ………………... 23
PCI TV Tuner Card
Page 5
1. Features
Fully PCI Rev 2.1 compliant
Supports Windows 98/ME/2000/XP
Full TV frequency range for CATV/VHF/UHF
FM Radio (only for FM version)
Combined S-Video & Composite video input
Supports planner YUV data format
Audio input from Video source
Audio output to sound card or Speaker
2. System Requirements
Intel Pentium III 900MHz or higher and compatible computer
A free PCI Bus
SVGA support higher than 640x480 / Hi-color
Sound Card support for audio mix functions
Cable / VHF / UHF antenna
Windows 98/ME/2000/XP
DirectX Version 9.0 or higher
3. Package Contents
TV Tuner card ×1
CDROM Driver ×1
Cable: Audio cable ×1
Remote controller ×1
Remote receiver ×1
Battery ×2
User Manual ×1
FM cable (Optional for FM Model) ×1
PCI TV Tuner Card
Page 6
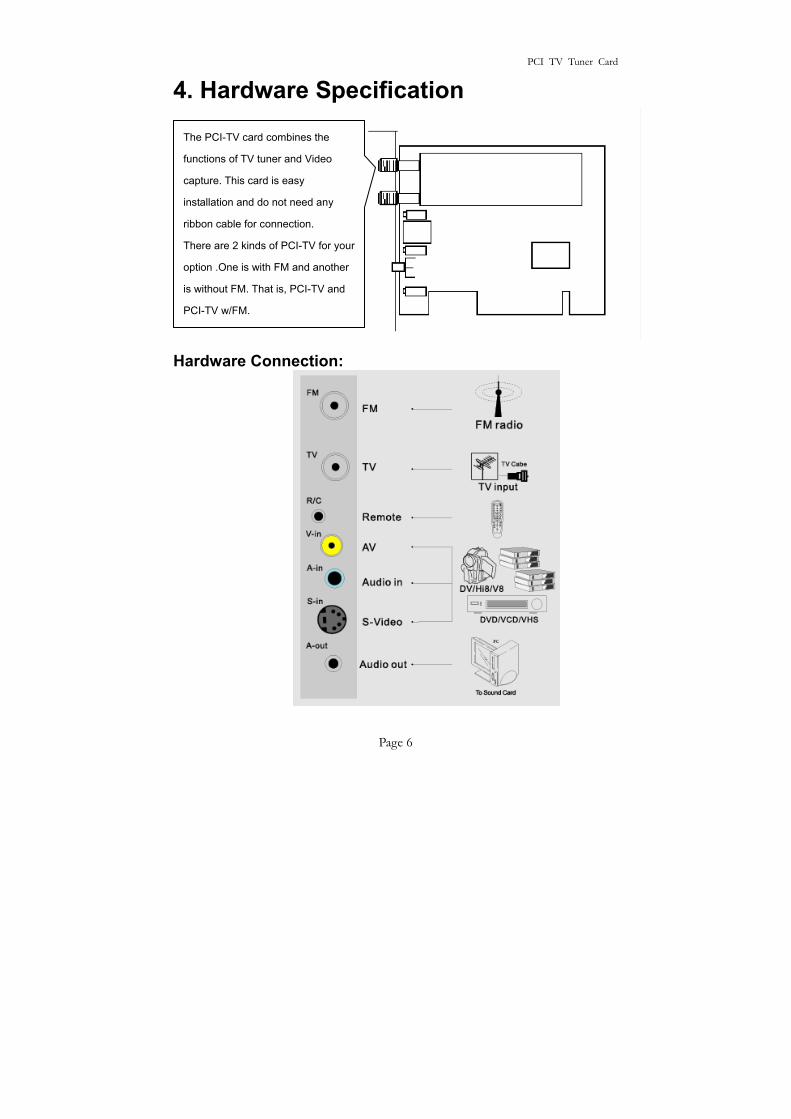
4. Hardware Specification
Hardware Connection:
The PCI-TV card combines the
functions of TV tuner and Video
capture. This card is easy
installation and do not need any
ribbon cable for connection.
There are 2 kinds of PCI-TV for your
option .One is with FM and another
is without FM. That is, PCI-TV and
PCI-TV w/FM.
PCI TV Tuner Card
Page 7
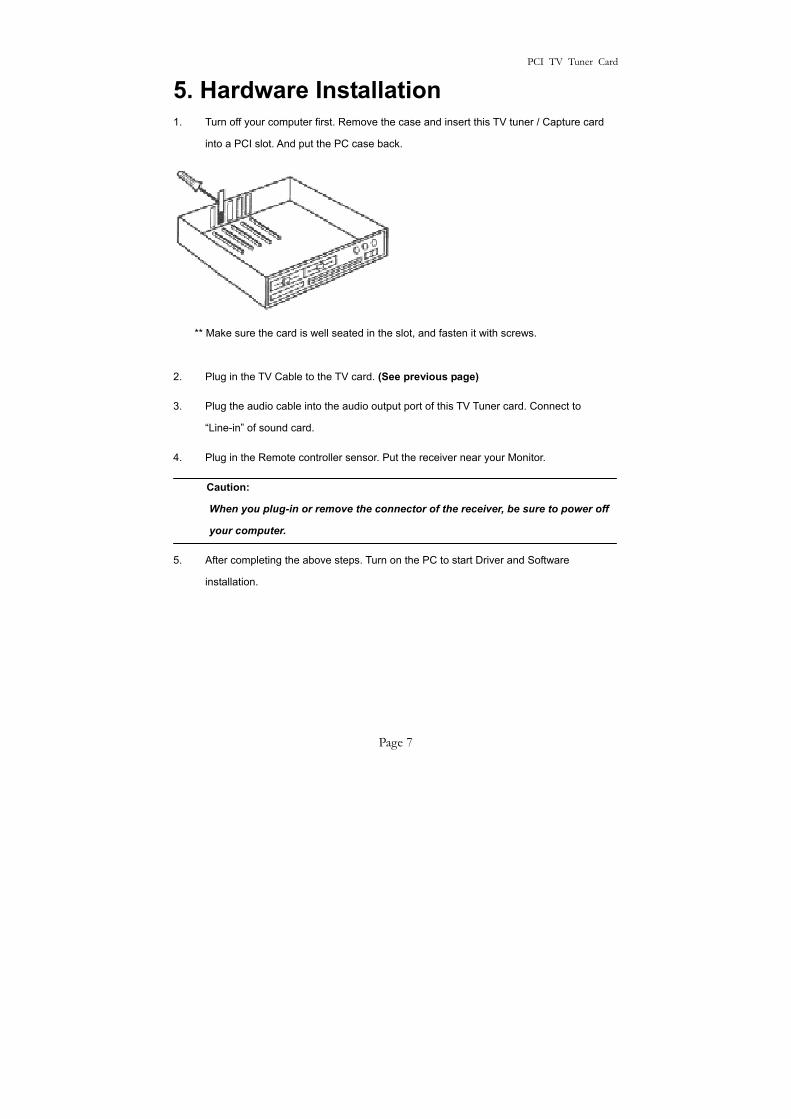
5. Hardware Installation
1. Turn off your computer first. Remove the case and insert this TV tuner / Capture card
into a PCI slot. And put the PC case back.
** Make sure the card is well seated in the slot, and fasten it with screws.
2. Plug in the TV Cable to the TV card. (See previous page)
3. Plug the audio cable into the audio output port of this TV Tuner card. Connect to
“Line-in” of sound card.
4. Plug in the Remote controller sensor. Put the receiver near your Monitor.
Caution:
When you plug-in or remove the connector of the receiver, be sure to power off
your computer.
5. After completing the above steps. Turn on the PC to start Driver and Software
installation.
PCI TV Tuner Card
Page 8
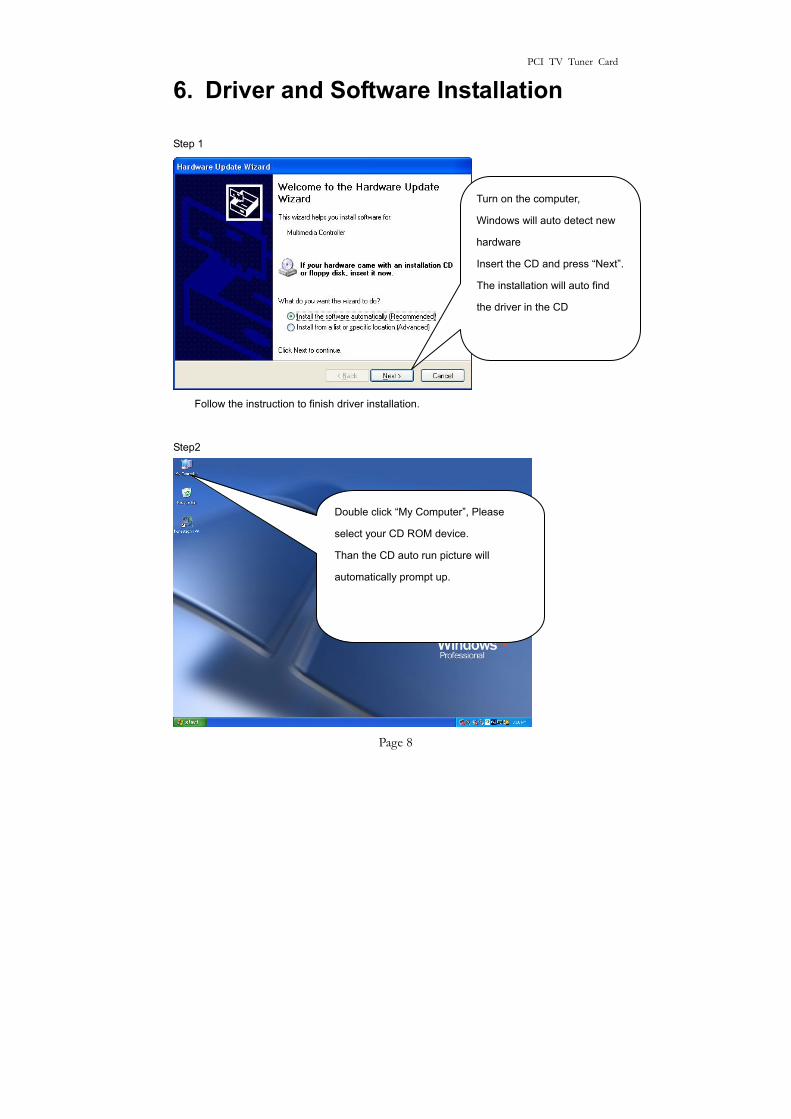
6. Driver and Software Installation
Step 1
Follow the instruction to finish driver installation.
Step2
Turn on the computer,
Windows will auto detect new
hardware
Insert the CD and press “Next”.
The installation will auto find
the driver in the CD
Double click “My Computer”, Please
select your CD ROM device.
Than the CD auto run picture will
automatically prompt up.
PCI TV Tuner Card
Page 9
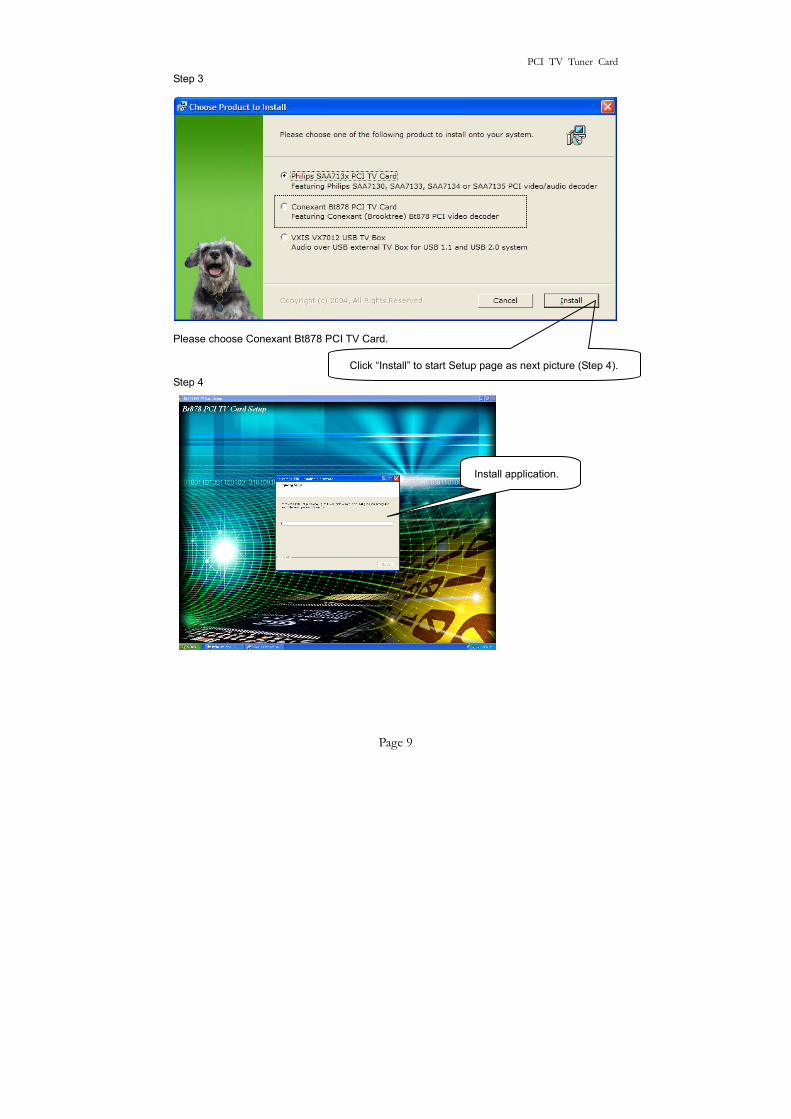
Step 3
Please choose Conexant Bt878 PCI TV Card.
Step 4
Click “Install” to start Setup page as next picture (Step 4).
Install application.
PCI TV Tuner Card
Page 10
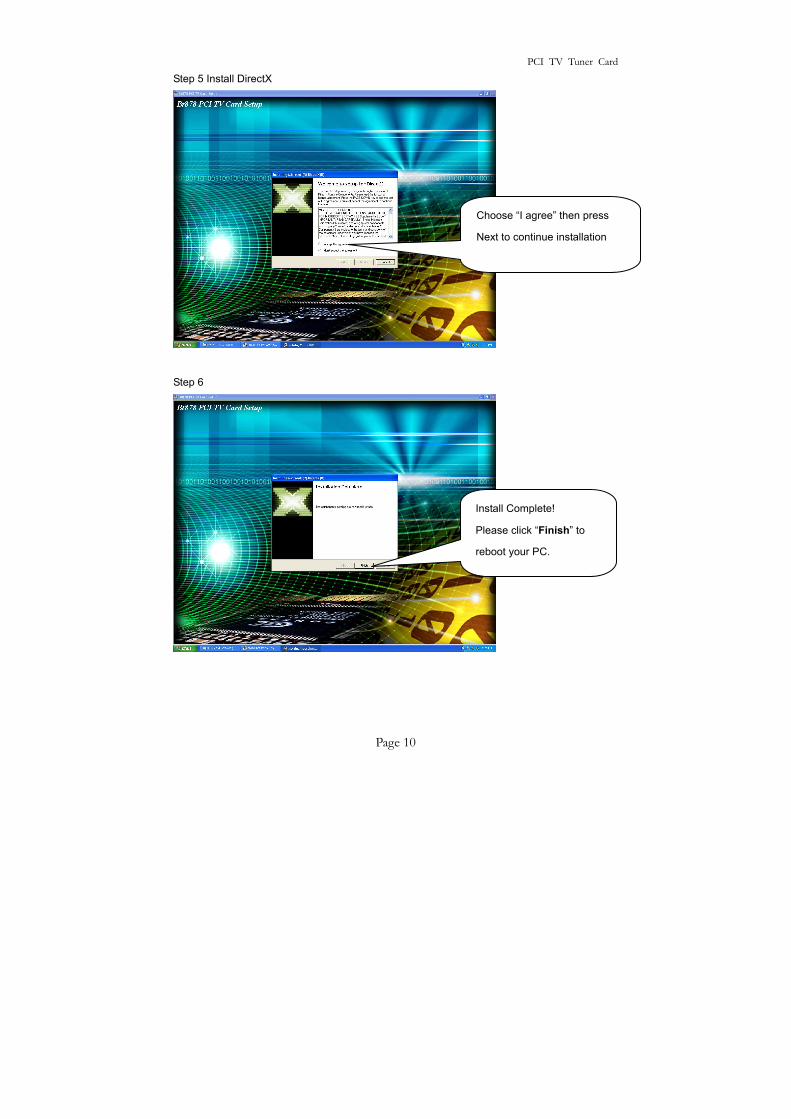
Step 5 Install DirectX
Step 6
Install Complete!
Please click “Finish” to
reboot your PC.
Choose “I agree” then press
Next to continue installation
PCI TV Tuner Card
Page 11
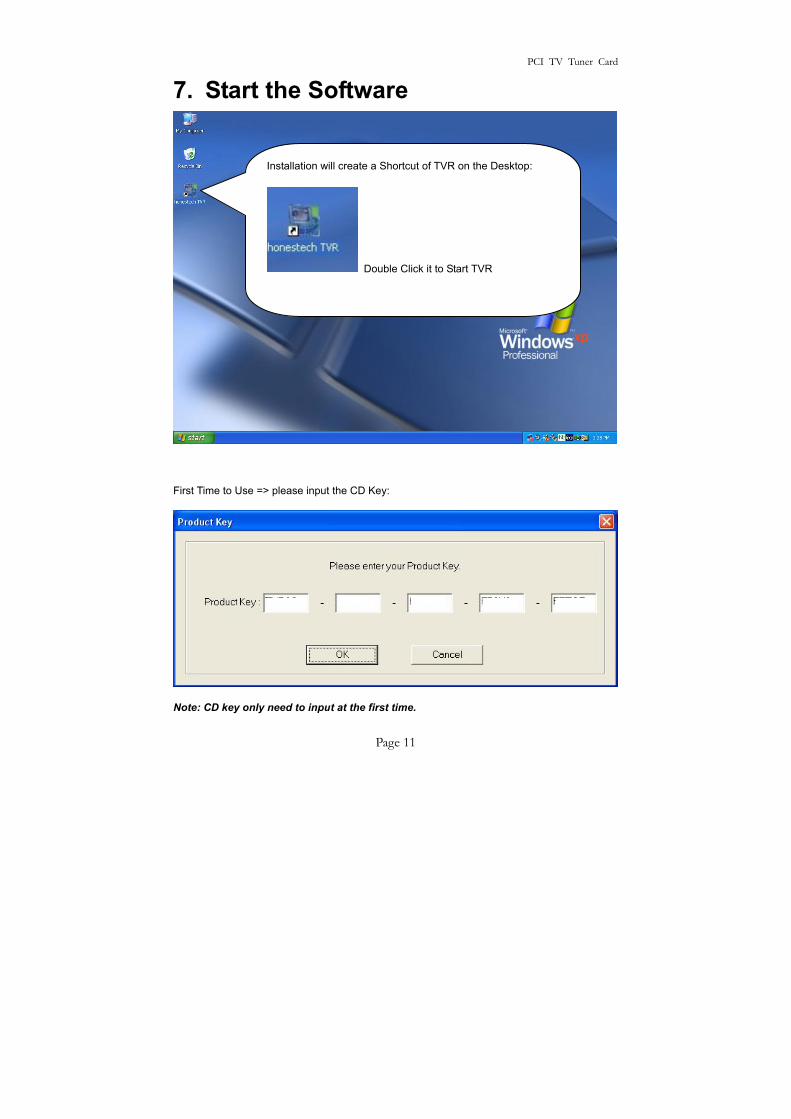
7. Start the Software First Time to Use => please input the CD Key:
Note: CD key only need to input at the first time.
Installation will create a Shortcut of TVR on the Desktop:
Double Click it to Start TVR
PCI TV Tuner Card
Page 12
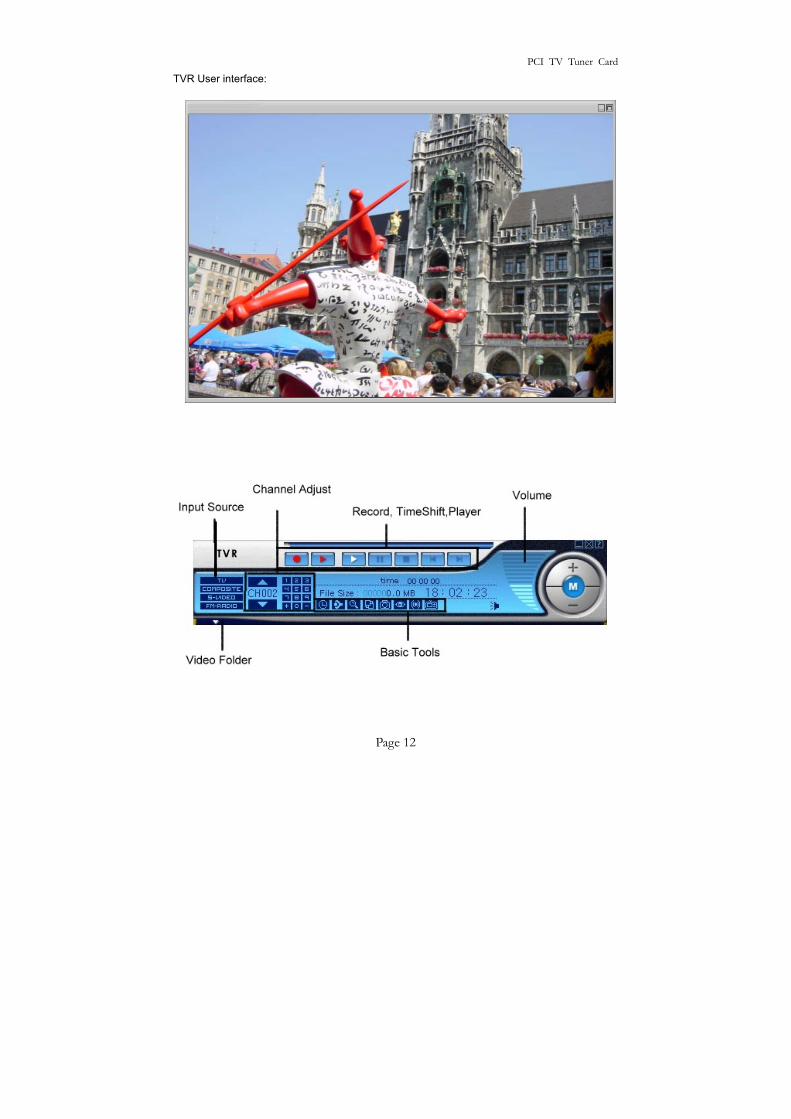
TVR User interface:
PCI TV Tuner Card
Page 13
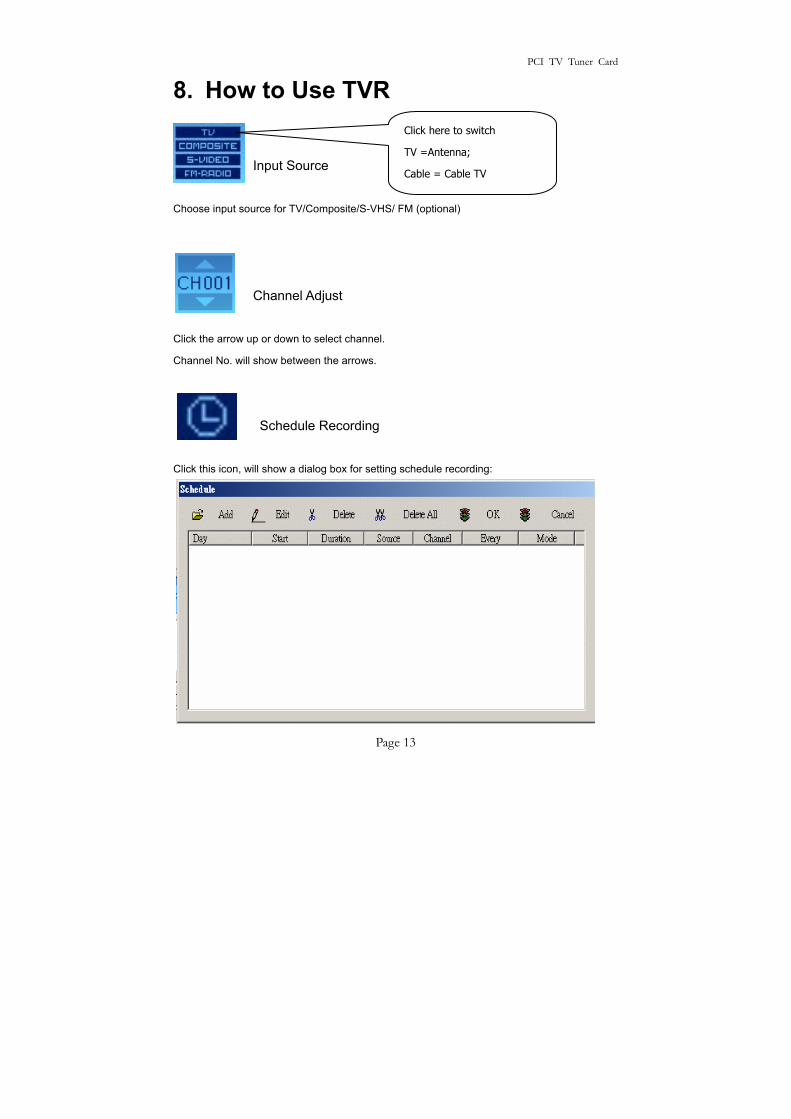
8. How to Use TVR
Input Source
Choose input source for TV/Composite/S-VHS/ FM (optional)
Channel Adjust
Click the arrow up or down to select channel.
Channel No. will show between the arrows.
Schedule Recording Click this icon, will show a dialog box for setting schedule recording:
Click here to switch
TV =Antenna;
Cable = Cable TV
PCI TV Tuner Card
Page 14
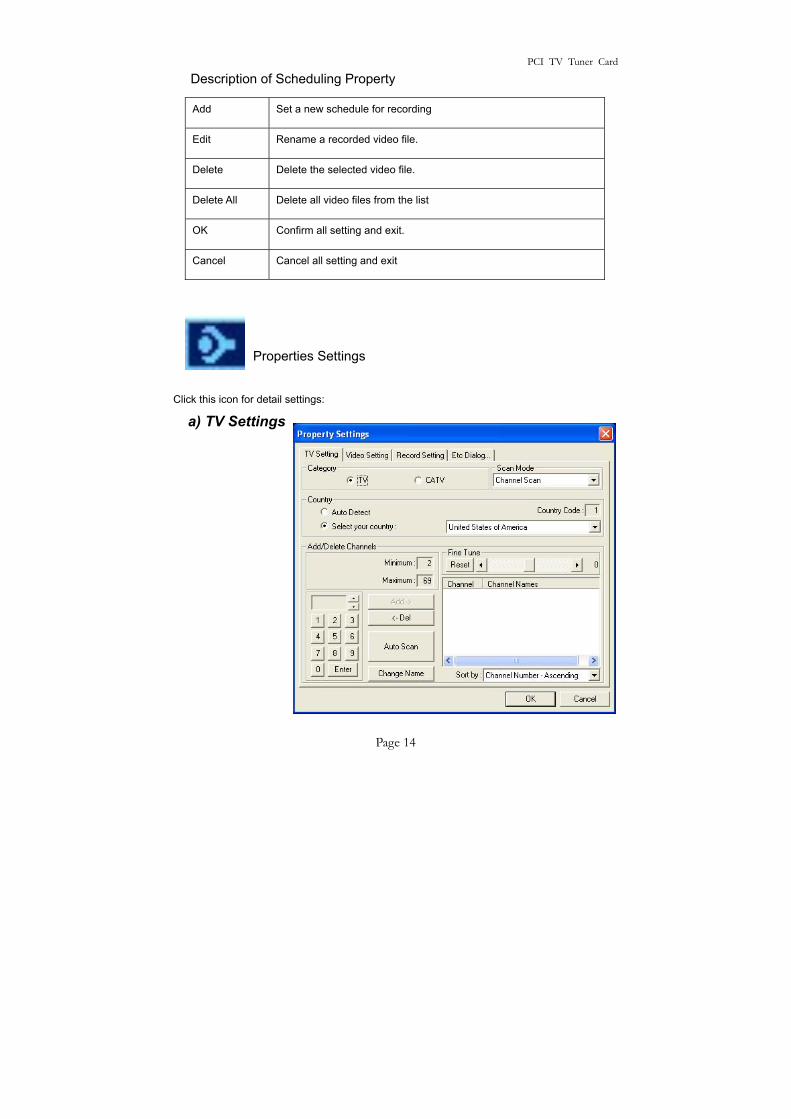
Description of Scheduling Property
Add Set a new schedule for recording
Edit Rename a recorded video file.
Delete Delete the selected video file.
Delete All Delete all video files from the list
OK Confirm all setting and exit.
Cancel Cancel all setting and exit
Properties Settings
Click this icon for detail settings:
a) TV Settings

PCI TV Tuner Card
Page 15
Category Setting TV signal from Antenna or Cable (TV=antenna; CATV=Cable)
Scan Mode Use Scroll to select:
Channel Scan -> Scan by channel Table
Frequency Scan -> Scan by each Frequency * Note: => You can use frequency scan to catch all channels cause the frequency table may be changed. It takes you few minutes to finish scanning channels.
Country Set your country from the menu or simply set on
“Auto Detect”
Add/Delete
Channels
Click “Add->” to add a channel.
Click “<-Del” to delete a channel.
Click “Auto Scan” for channel scan.
It will shows dialog box as below:
Please click “Yes to All” to save all channels
Change Name choose any channel and click to rename
Fine Tune Adjust single Channel
Sort by Sort by Channel No. or by Channel Name.
PCI TV Tuner Card
Page 16
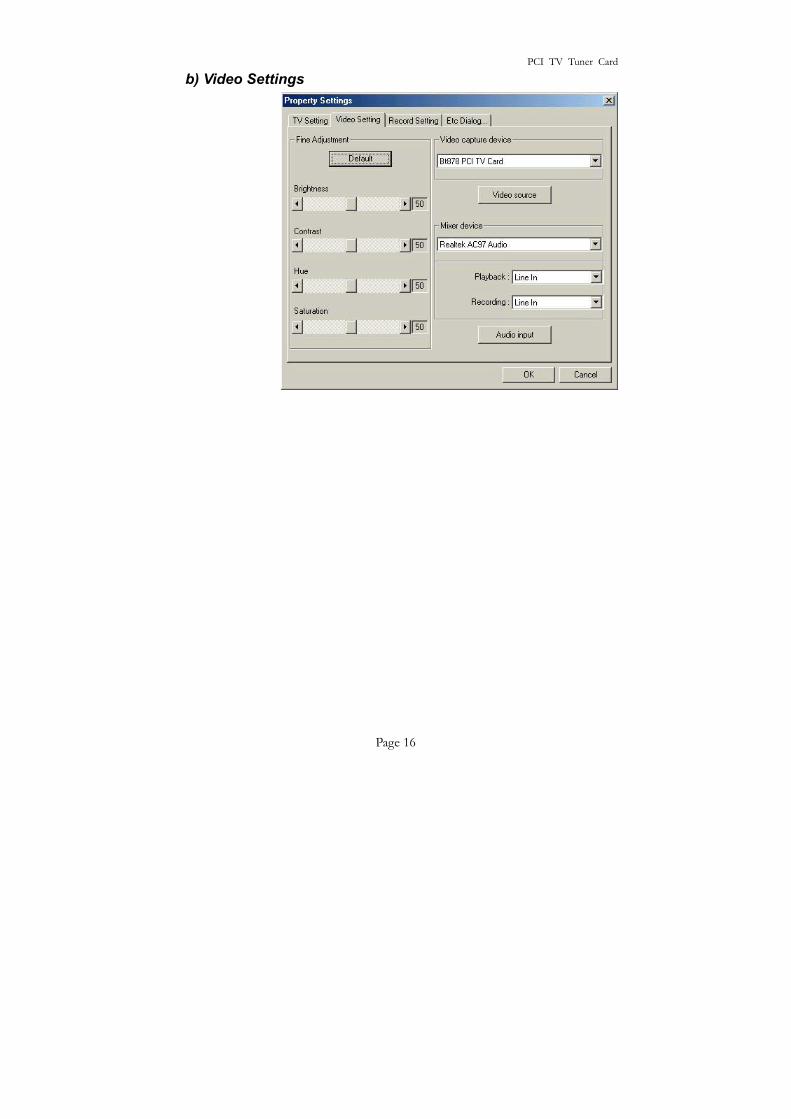
b) Video Settings
PCI TV Tuner Card
Page 17
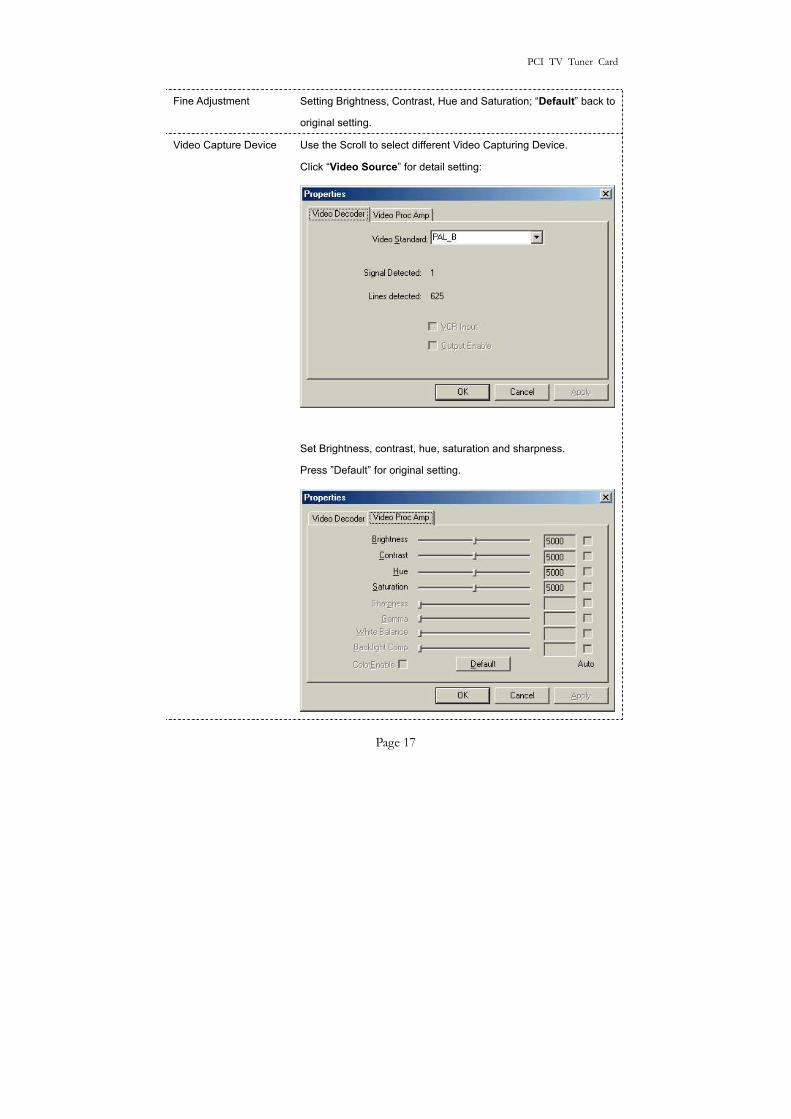
Fine Adjustment Setting Brightness, Contrast, Hue and Saturation; “Default” back to
original setting.
Video Capture Device Use the Scroll to select different Video Capturing Device.
Click “Video Source” for detail setting:
Set Brightness, contrast, hue, saturation and sharpness.
Press ”Default” for original setting.
PCI TV Tuner Card
Page 18
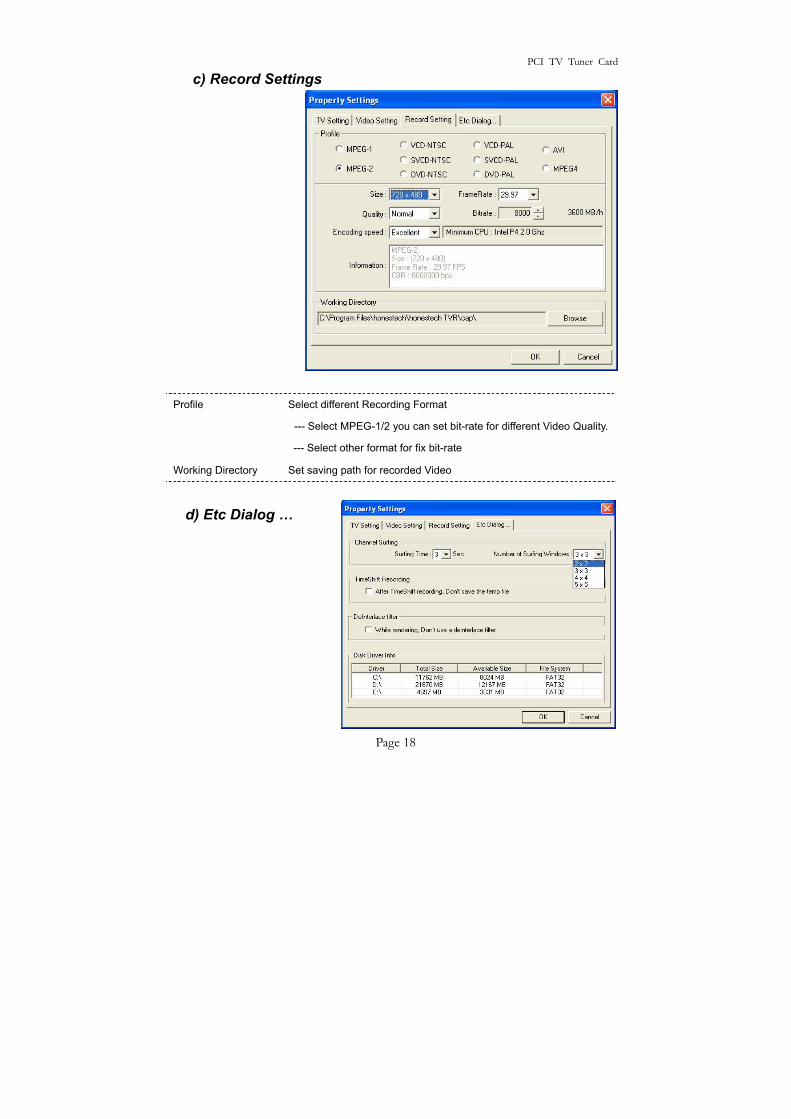
c) Record Settings
Profile Select different Recording Format
--- Select MPEG-1/2 you can set bit-rate for different Video Quality.
--- Select other format for fix bit-rate
Working Directory Set saving path for recorded Video
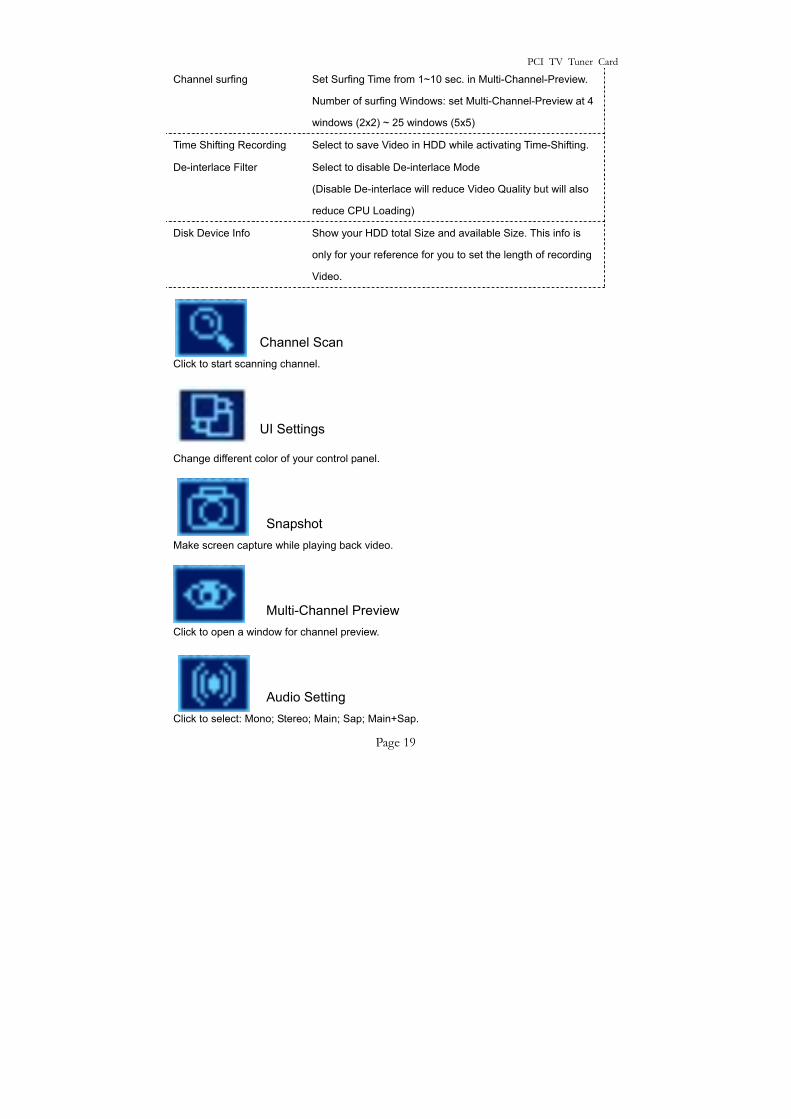
d) Etc Dialog …
PCI TV Tuner Card
Page 19
Channel surfing Set Surfing Time from 1~10 sec. in Multi-Channel-Preview.
Number of surfing Windows: set Multi-Channel-Preview at 4
windows (2x2) ~ 25 windows (5x5)
Time Shifting Recording Select to save Video in HDD while activating Time-Shifting.
De-interlace Filter Select to disable De-interlace Mode
(Disable De-interlace will reduce Video Quality but will also
reduce CPU Loading)
Disk Device Info Show your HDD total Size and available Size. This info is
only for your reference for you to set the length of recording
Video.
Channel Scan Click to start scanning channel.
UI Settings
Change different color of your control panel.
Snapshot Make screen capture while playing back video.
Multi-Channel Preview Click to open a window for channel preview.
Audio Setting Click to select: Mono; Stereo; Main; Sap; Main+Sap.
PCI TV Tuner Card
Page 20
iEPG Click for internet Electronic Program Guide
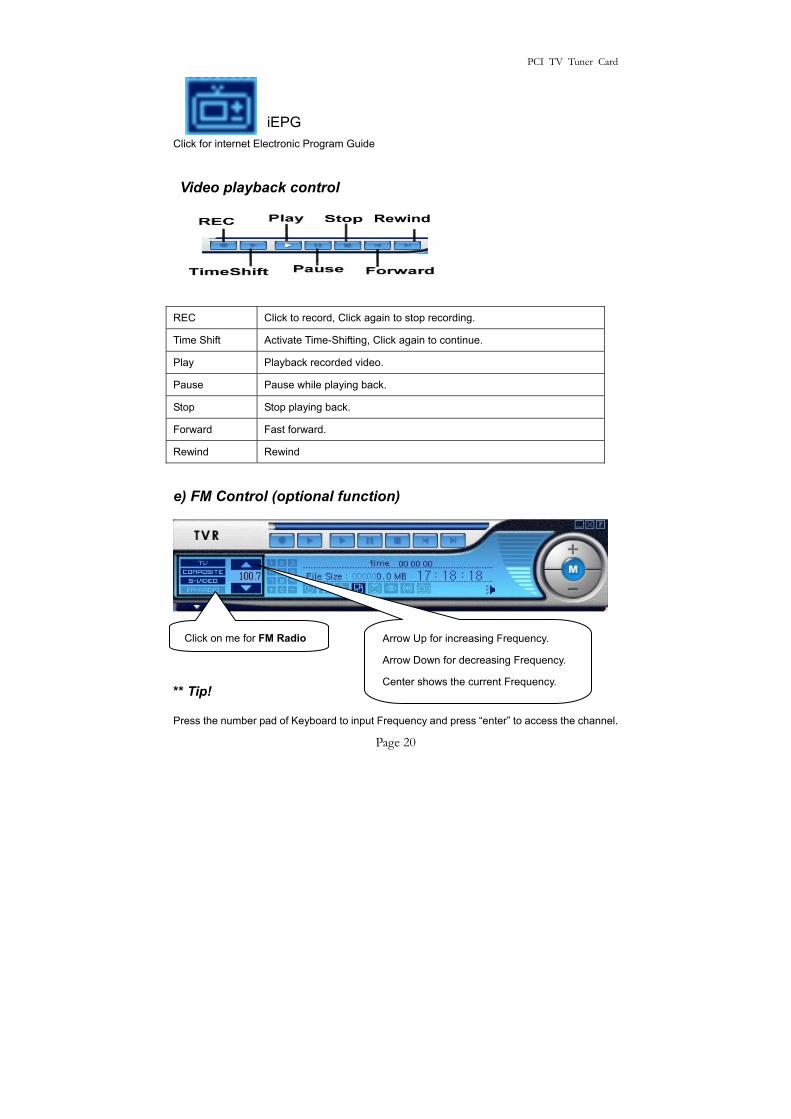
Video playback control
REC Click to record, Click again to stop recording.
Time Shift Activate Time-Shifting, Click again to continue.
Play Playback recorded video.
Pause Pause while playing back.
Stop Stop playing back.
Forward Fast forward.
Rewind Rewind
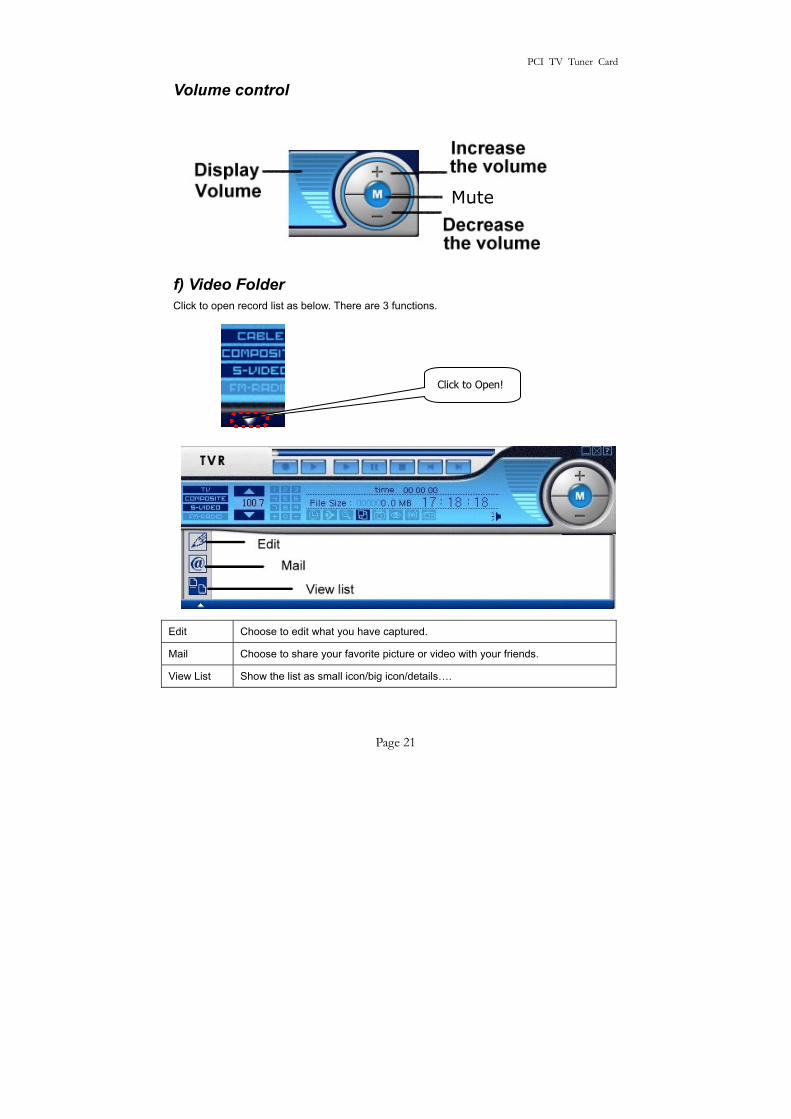
e) FM Control (optional function) ** Tip!
Press the number pad of Keyboard to input Frequency and press “enter” to access the channel.
Rewind
Click on me for FM Radio Arrow Up for increasing Frequency.
Arrow Down for decreasing Frequency.
Center shows the current Frequency.
PCI TV Tuner Card
Page 21
Volume control
f) Video Folder Click to open record list as below. There are 3 functions.
Edit Choose to edit what you have captured.
Mail Choose to share your favorite picture or video with your friends.
View List Show the list as small icon/big icon/details….
Mute
Click to Open!
PCI TV Tuner Card
Page 22
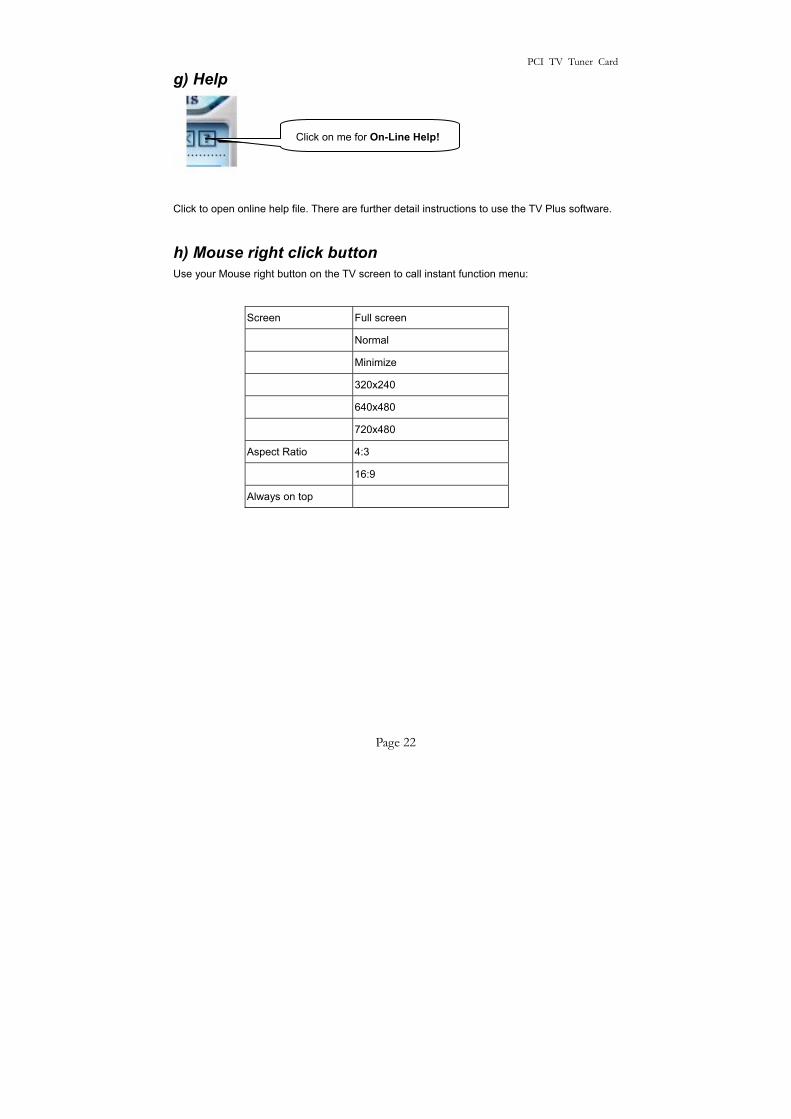
g) Help
Click to open online help file. There are further detail instructions to use the TV Plus software.
h) Mouse right click button Use your Mouse right button on the TV screen to call instant function menu:
Screen Full screen
Normal
Minimize
320x240
640x480
720x480
Aspect Ratio 4:3
16:9
Always on top
Click on me for On-Line Help!
PCI TV Tuner Card
Page 23
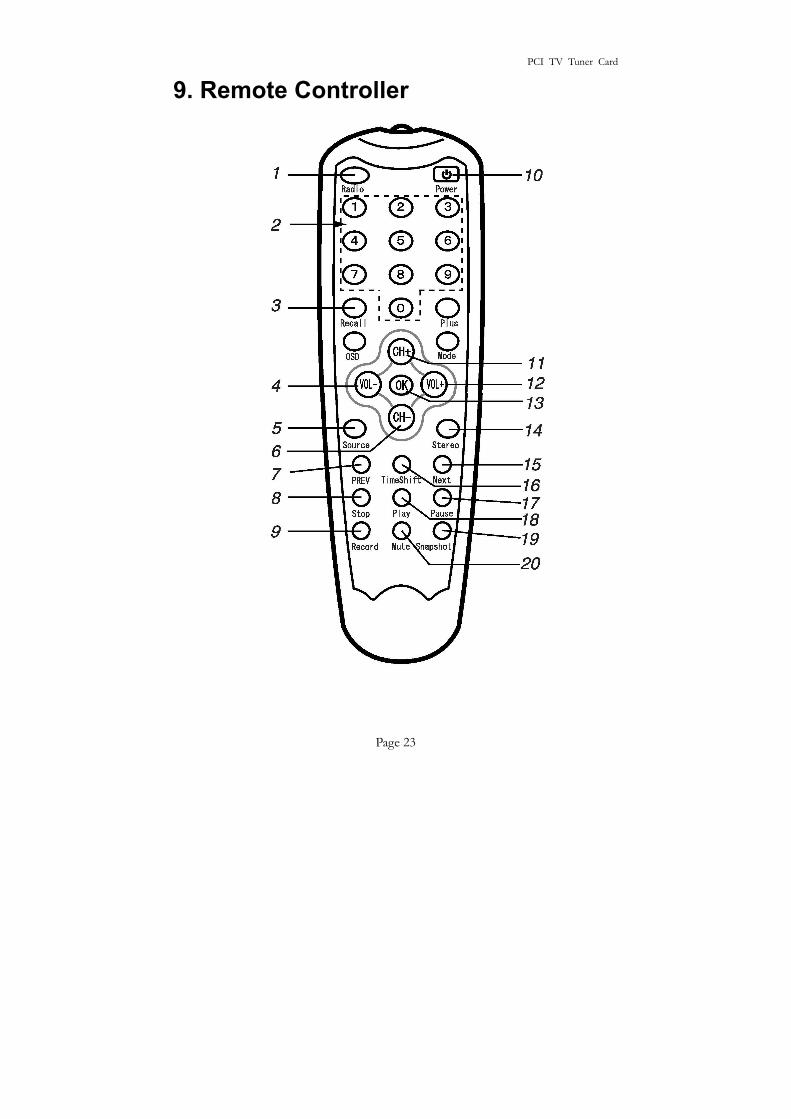
9. Remote Controller
PCI TV Tuner Card
Page 24
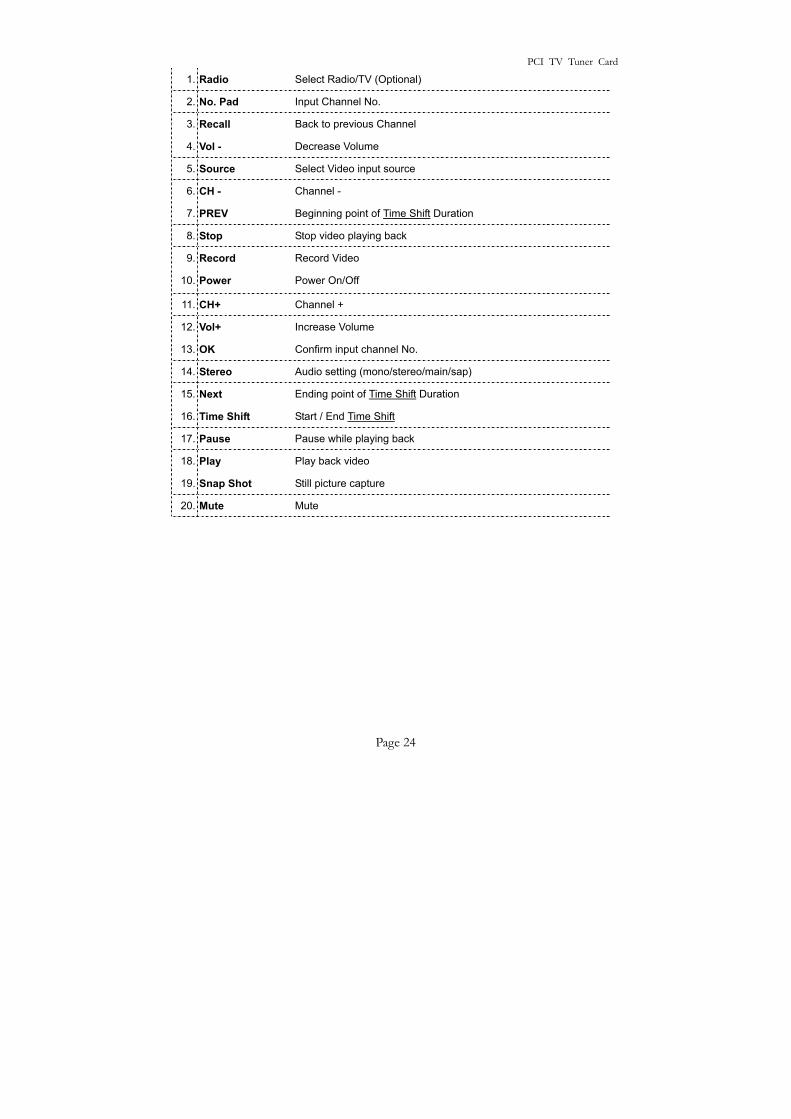
1. Radio Select Radio/TV (Optional)
2. No. Pad Input Channel No.
3. Recall Back to previous Channel
4. Vol - Decrease Volume
5. Source Select Video input source
6. CH - Channel -
7. PREV Beginning point of Time Shift Duration
8. Stop Stop video playing back
9. Record Record Video
10. Power Power On/Off
11. CH+ Channel +
12. Vol+ Increase Volume
13. OK Confirm input channel No.
14. Stereo Audio setting (mono/stereo/main/sap)
15. Next Ending point of Time Shift Duration
16. Time Shift Start / End Time Shift
17. Pause Pause while playing back
18. Play Play back video
19. Snap Shot Still picture capture
20. Mute Mute
Related Documents