water The perfect supply is here. The World’s Best Source of Water eSpring™ Water Purifier Owner’s Manual U.S. Patent Numbers: D431,084; D421,089; 4,753,728; 4,859,386; 5,017,318; 5,529,689; 5,573,666 and other patents pending

Welcome message from author
This document is posted to help you gain knowledge. Please leave a comment to let me know what you think about it! Share it to your friends and learn new things together.
Transcript

waterTheperfect
supply
is here. The World’s Best Source of Water
eSpring™ Water Purifi er Owner’s ManualU.S. Patent Numbers: D431,084; D421,089; 4,753,728; 4,859,386;
5,017,318; 5,529,689; 5,573,666 and other patents pending
Contents
Important Safeguards ....................................................................1
Important Notes ............................................................................2
Introduction ..................................................................................3
Above the Counter Existing Tap Installation ........................................4
Below Counter Tap Installation .........................................................6
How to Mount the Auxiliary Tap .......................................................6
Checking for Leaks ........................................................................8
Electronic Module Display ................................................................9
How to Read the Electronic Module Display .......................................9
Maintenance and Troubleshooting ...................................................10
Filter Replacement .......................................................................12
Installing the new Filter Cartridge ...................................................13
Testing the Water Purifi er .............................................................13
Accessories and Replacement Parts ...............................................14
Specifi cations ..............................................................................14
Technical Support ........................................................................14
Warranty ....................................................................................14
Satisfaction Guarantee .................................................................15
NSF Performance Data Sheet .......................................................16
Owner’s Manual
1
Important SafeguardsWHEN USING AN ELECTRIC APPLIANCE, BASIC SAFETY PRECAUTIONS, INCLUDING THE FOLLOWING, SHOULD ALWAYS BE FOLLOWED TO REDUCE THE RISK OF FIRE, ELECTRIC SHOCK, AND/OR INJURY TO PERSONS:
1. READ ALL INSTRUCTIONS BEFORE USE. If you still have questions concerning the installation or operation of your eSpring™ Water Purifi er, contact Technical Support toll-free, on 1 800 022 034 (in Australia), or 0 800 113 444 (in New Zealand).
2. To protect against electric shock, do not place power adapter, cord, base unit, or Electronic Module in water or other liquids.
3. Close adult supervision is required when any appliance is used by or near children.
4. Unplug from electrical outlet before cleaning or performing routine maintenance (i.e. replacing the Filter Cartridge).
5. To disconnect appliance from electrical power, remove power adapter from electrical outlet.
6. Do not operate any appliance with a damaged electrical cord or plug or after the appliance malfunctions or has been dropped or damaged in any manner. If the power adapter or cord is damaged, it must be replaced.
7. Use only the power adapter supplied with the Water Purifi er. Use of unapproved power adapters could cause system damage or injury.
8. Use only factory authorized replacement parts. The use of unauthorized replacement parts may degrade both the safety and the performance of this product and will void the Limited Warranty.
9. Do not use outdoors.
10. Do not let power cord hang over the edge of table or counter, or touch hot surfaces.
11. For household use only. Do not use this appliance for other than the intended use.
12. CAUTION: Regularly inspect product and plumbing fi ttings for water leaks, as water leaks can cause property damage.
13. WARNING: THE APPLIANCE MUST BE DRY BEFORE APPLYING ELECTRICAL POWER AND BE DRY AND FREE OF LEAKS DURING OPERATION.
14. WARNING: TO REDUCE THE RISK OF FIRE OR ELECTRIC SHOCK, DO NOT ATTEMPT TO OPEN THE ELECTRONIC MODULE. NO USER SERVICABLE PARTS ARE INSIDE THE ELECTRONIC MODULE. REPAIRS TO THE ELECTRONIC MODULE SHOULD BE DONE ONLY BY AUTHORIZED SERVICE PERSONNEL.
15. WARNING: To ensure proper performance, this product must be con-nected to a reliable source of electrical power. The electrical out-let to which this product is connected must comply with all applicable electrical codes and requirements. Connection of this product to an improperly installed electrical outlet or a double adapter can result in risk of electric shock or fi re. If you are in doubt as to whether the electrical outlet is properly installed, have the outlet inspected by a qualifi ed electrician.
Please Read and Save These instructions
Important NotesThe eSpring™ Water Purifi er is designed for use only with cold, bacterio-logically suitable (potable) water.
1. System tested and certifi ed by NSF International against ANSI/NSF Standard 42, 53, 55. See Performance Data Sheet for individual contaminants and reductions performance, page 16.
2. This Class B system conforms to ANSI/NSF 55 and contains an ultraviolet lamp that requires replacement at intervals in accordance with the manfacturer's instructions. The system is designed for the supplemental bactericidal treatment of either treated and disinfected public drinking water or other drinking water that has been tested and deemed acceptable for human consumption by the state and local health agency having jurisdiction. The system is designed to reduce normally occurring non-pathogenic or nuisance microorganisms only. Class B Systems are not intended for treatment of contaminated water. Systems certifi ed for cyst reduction may be used on disinfected waters that may contain fi l-terable cysts.
3. Installation of the Water purifi er must comply with applicable laws and regulations.
4. During normal operation, if the Water Purifi er has not been used for several hours (e.g., overnight), run water through it for 30 seconds prior to use.
5. DO NOT use with warm or hot water, as this may damage the Water Purifi er.
6. Except for lead and a few other compounds, the eSpring Water Puri-fi er is NOT designed to remove soluble inorganic substances such as iron, calcium, magnesium, nitrates or fl uorides.
7. Plumber’s thread sealing compounds should NOT be used with theeSpring Water Purifi er.
8. DO NOT allow vegetable oil, petroleum jelly, or other lubricants, solvents, ammonia, alcohols, acids, or strong cleaning solutions to come into contact with the eSpring Water Purifi er. They could cause permanent damage to the housing. When cleaning, use a mild liquid dishwashing detergent (such as DISH DROPS™ Dishwashing Liquid) and water. DO NOT use any other cleaners or abrasive pads as they could damage the plastic housing and auxiliary tap.
9. The eSpring Water Purifi er’s Electronic Module will let you know when it is time to replace the fi lter.
10. THE FILTER CARTRIDGE MUST BE REPLACED AT LEAST ONCE A YEAR. In areas of very poor water quality, you may see a drop in the fl ow rate, indicating that fi lter replacement may be needed more frequently. Even if water fl ow rate is not affected, the fi lter must be replaced as soon as a year has passed or when it has fi ltered 5000 L of water, whichever comes fi rst.
REMEMBER: OPERATIONAL, MAINTENANCE AND REPLACEMENT REQUIREMENTS ARE ESSENTIAL FOR THIS PRODUCT TO PERFORM AS REPRESENTED. IT IS IMPORTANT THAT ONLY THOSE REPLACEMENT ELEMENTS THAT ARE IDENTIFIED IN THIS MANUAL ARE USED WITH THIS PRODUCT. THE LIMITED WARRANTY DOES NOT COVER ANY DEFECT OR DIMINISHED PERFORMANCE CAUSED BY THE USE OF ANY PART OR ACCESSORY THAT IS NOT COMPATIBLE WITH THE eSpring WATER PURIFIER.
NOTE: The eSpring Water Purifi er is to be installed with the Existing Tap Kit or the Auxiliary Tap Kit only.
For service under this warranty in Australia contact Technical Support on 1800 022 034 or in New Zealand on 0800 113 444 BEFORE you return anything.
Information can also be accessed via the Internet at: www.espring.com and www.a2k.com.au or www.a2k.co.nz.
2
IntroductionCongratulations on your purchase of the eSpring™ Water Purifi er. You have made a wise investment for you and your family and have taken an important step in improving the quality of your drinking water.
Easy to Install and Maintain
The eSpring Water Purifi er is easily installed and is operational in just minutes in most homes, apartments, and cottages. Before beginning installation, please review the owner’s manual thoroughly to ensure proper performance of your eSpring Water Purifi er.
Maintenance is quick and easy. Replace the Filter Cartridge (carbon and UV) at least once a year according to the instructions in this manual. It is recommended that the tubing be replaced every two years.
To maintain maximum performance and quality drinking water, the Filter Cartridge should be replaced once a year or as soon as you have fi ltered 5000 L of water - whichever comes fi rst. The eSpring Water Purifi er’s Electronic Module monitors the amount of water fi ltered and keeps track of how long the fi lter has been in service. When a year has passed or as soon as the fi lter has treated 5000 L of water the Electronic Module alerts you to replace the Filter Cartridge.
Installation overviewThere are two ways to install the eSpring Water Purifi er: Above counter with an Existing Tap Kit or Below counter with an Auxiliary Tap Kit.
Above Counter Installation
• eSpring Water Purifi er
• eSpring Existing Tap Kit
Below Counter Installation
• eSpring Water Purifi er
• eSpring Auxiliary Tap Kit
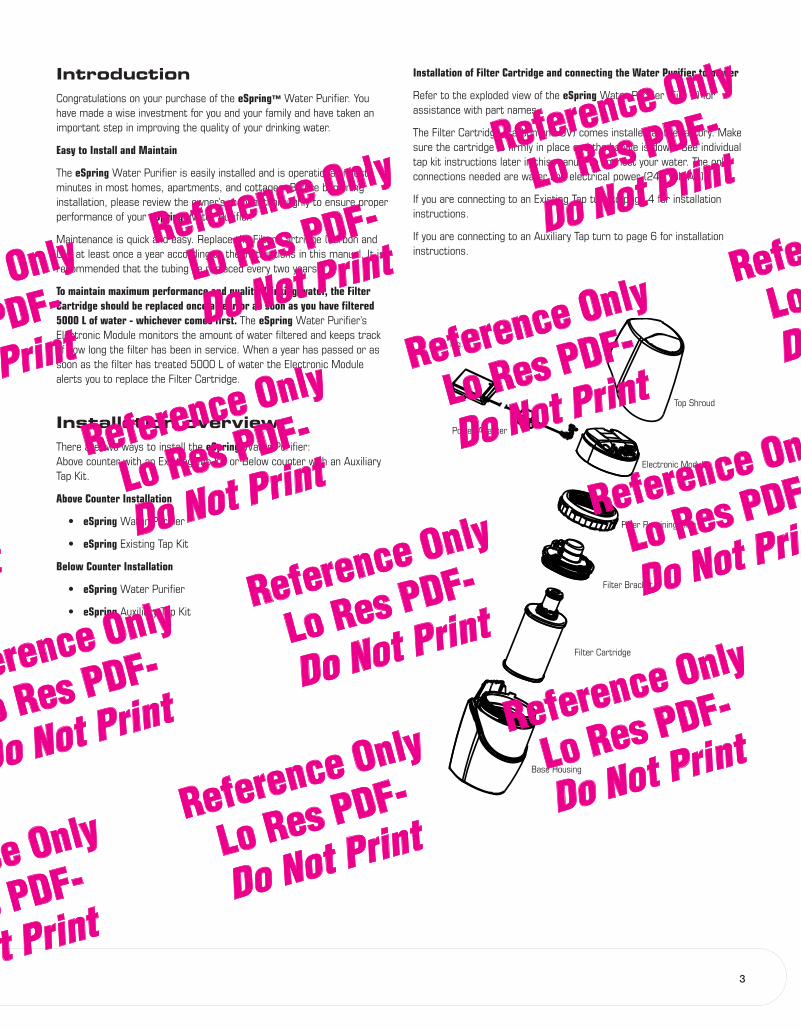
Installation of Filter Cartridge and connecting the Water Purifi er to power
Refer to the exploded view of the eSpring Water Purifi er (Fig. 1) for assistance with part names.
The Filter Cartridge (carbon and UV) comes installed at the factory. Make sure the cartridge is fi rmly in place and the handle is down. See individual tap kit instructions later in this manual to connect your water. The only connections needed are water and electrical power (240 volt AC).
If you are connecting to an Existing Tap turn to page 4 for installation instructions.
If you are connecting to an Auxiliary Tap turn to page 6 for installation instructions.
Top Shroud
Filter Retaining Ring
Electronic Module
Filter Bracket
Filter Cartridge
Base Housing
Fig. 1
Power Adapter
3

Above the Counter ExistingTap InstallationThis installation is quick and simple. The eSpring™ Water Purifi er sits on the countertop with the diverter and tubing attached directly to your tap.
Existing Tap Components (Fig. 2)
Check to make sure Existing Tap Kit contains all the correct components,before you begin installation.
a). Diverter with attached white tubing
b). 3 tap adapters includes 2 males, 1 female (knurled edge)
c). 2 tube supports
d). 2 tubing ties (nylon)
1. If there is an aerator on the end of your kitchen tap, unscrew and remove the aerator.
2. Position the diverter onto the tap and turn the knurled revolving collar counterclockwise until the diverter draws up tight to the tap. If necessary, use one of the three supplied adapters to fi t the diverter to your tap (Fig. 3).
3. Use the tubing ties to neatly secure the diverter’s tubing to the base of the tap.
4. If the tubing is too long, you may want to shorten it. Use a utility knife to cut tubing straight to form a fl at end. Do not cut where tubing is bonded together. (Fig. 4). Do not cut tubing too short.
Fig. 2
Fig. 3
a
bc
d
TapAdapterAdapter
NylonHose
Tie
Diverter
Fig. 4
4
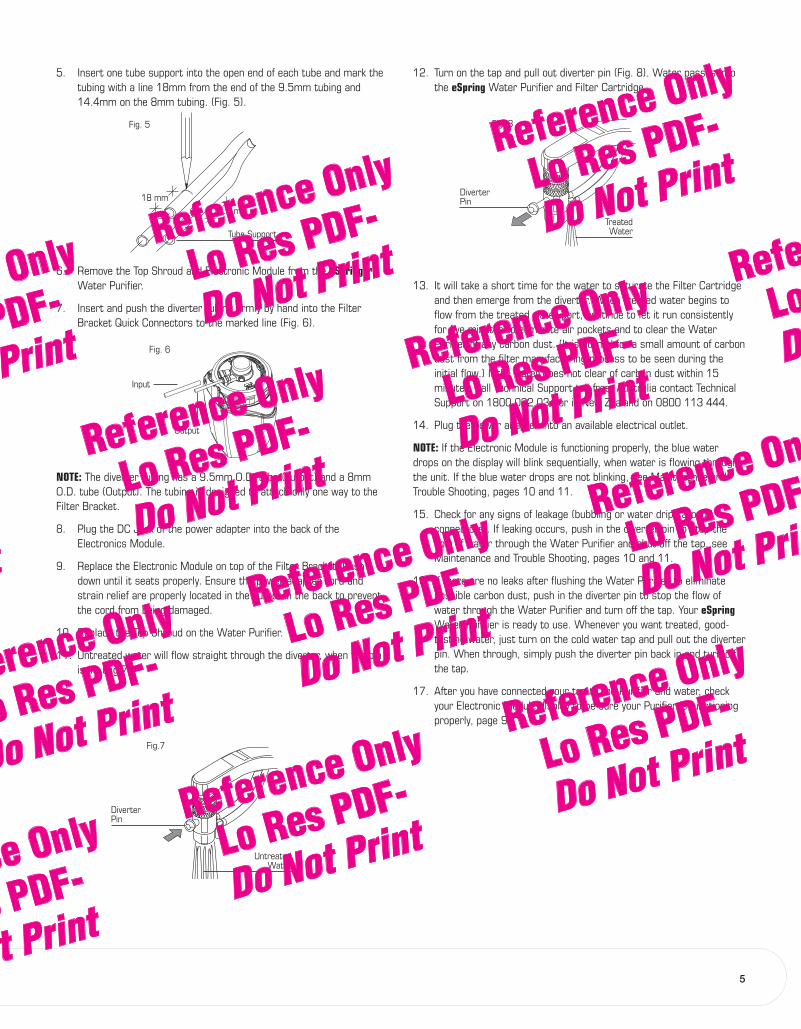
5. Insert one tube support into the open end of each tube and mark the tubing with a line 18mm from the end of the 9.5mm tubing and 14.4mm on the 8mm tubing. (Fig. 5).
6. Remove the Top Shroud and Electronic Module from the eSpring™ Water Purifi er.
7. Insert and push the diverter tubing fi rmly by hand into the Filter Bracket Quick Connectors to the marked line (Fig. 6).
NOTE: The diverter tubing has a 9.5mm O.D. tube (output) and a 8mm O.D. tube (Output). The tubing is designed to attach only one way to the Filter Bracket.
8. Plug the DC Jack of the power adapter into the back of the Electronics Module.
9. Replace the Electronic Module on top of the Filter Bracket. Push down until it seats properly. Ensure the power adapter cord and strain relief are properly located in the cutout in the back to prevent the cord from being damaged.
10. Replace the Top Shroud on the Water Purifi er.
11. Untreated water will fl ow straight through the diverter, when the pin is in. (Fig.7).
12. Turn on the tap and pull out diverter pin (Fig. 8). Water passes into the eSpring Water Purifi er and Filter Cartridge.
13. It will take a short time for the water to saturate the Filter Cartridge and then emerge from the diverter. When treated water begins to fl ow from the treated water port, continue to let it run consistently for fi ve minutes to eliminate air pockets and to clear the Water Purifi er of any carbon dust. (It is normal for a small amount of carbon dust from the fi lter manufacturing process to be seen during the initial fl ow.) If the water does not clear of carbon dust within 15 minutes, call Technical Support toll-free. Australia contact Technical Support on 1800 022 034 or in New Zealand on 0800 113 444.
14. Plug the power adapter into an available electrical outlet.
NOTE: If the Electronic Module is functioning properly, the blue water drops on the display will blink sequentially, when water is fl owing through the unit. If the blue water drops are not blinking, see Maintenance and Trouble Shooting, pages 10 and 11.
15. Check for any signs of leakage (bubbling or water drips around connectors). If leaking occurs, push in the diverter pin to stop the fl ow of water through the Water Purifi er and shut off the tap, see Maintenance and Trouble Shooting, pages 10 and 11.
16. If there are no leaks after fl ushing the Water Purifi er to eliminate possible carbon dust, push in the diverter pin to stop the fl ow of water through the Water Purifi er and turn off the tap. Your eSpring Water Purifi er is ready to use. Whenever you want treated, good-tasting water, just turn on the cold water tap and pull out the diverter pin. When through, simply push the diverter pin back in and turn off the tap.
17. After you have connected your tap to the Purifi er and water, check your Electronic Module display to be sure your Purifi er is functioning properly, page 9.
Untreated Water
Fig.7
DiverterPin
Fig. 5
Tube Support
14.4 mm18 mm
Fig. 6
Input
Fig. 8
DiverterPin
5
Output
Treated Water
Below Counter Tap InstallationThe eSpring™ Auxiliary Tap Kit must be installed by a licenced plumber. All installations are to be performed according to local plumbing codes and regulations.
This installation uses a separate, counter-mounted Auxiliary Tap, which is supplied in the Auxiliary Tap Kit. With the eSpring Water Purifi er below the counter, this installation allows maximum use of counter space, and there is no visible tubing.
REVIEW ALL INSTALLATION INSTRUCTIONS TO BE SURE YOU HAVE ALL PARTS PRIOR TO INSTALLATION.
The Auxiliary Tap Kit is designed for use with the eSpring Water Purifi er. Contact free Technical Support for assistance at 1800 002 034 / New Zealand 0800 113 444.
Auxiliary Tap Components (Fig. 9):
a. Auxiliary tap body with red, green and blue hoses, foam gasket, wing nut
b. Auxiliary tap spout
c. Union quick connector*
* Union Quick Connector contains a fl ow control that is essential for proper operation.
NOTE: A licenced plumber needs to supply and install an approved isolation valve and T-connector.
IMPORTANT: If you suspect that your water pressure exceeds 860 kPa, a plumber needs to install a pressure regulating device.
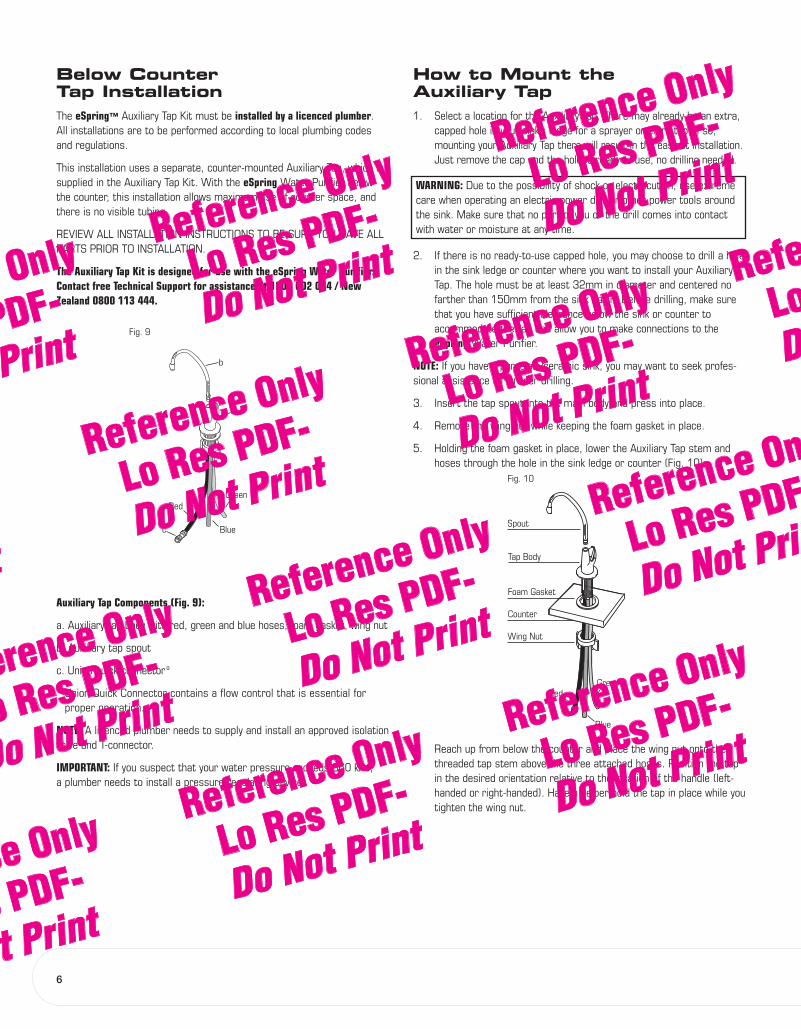
How to Mount the Auxiliary Tap 1. Select a location for the Auxiliary Tap. There may already be an extra,
capped hole in your sink’s ledge for a sprayer or extra tap. If so, mounting your Auxiliary Tap there will result in the easiest installation. Just remove the cap and the hole is ready to use, no drilling needed.
2. If there is no ready-to-use capped hole, you may choose to drill a hole in the sink ledge or counter where you want to install your Auxiliary Tap. The hole must be at least 32mm in diameter and centered no farther than 150mm from the sink basin. Before drilling, make sure that you have suffi cient clearance below the sink or counter to accommodate the tap and allow you to make connections to the eSpring Water Purifi er.
NOTE: If you have a porcelain/ceramic sink, you may want to seek profes-sional assistance for proper drilling.
3. Insert the tap spout into the main body and press into place.
4. Remove the wing nut while keeping the foam gasket in place.
5. Holding the foam gasket in place, lower the Auxiliary Tap stem and hoses through the hole in the sink ledge or counter (Fig. 10).
6. Reach up from below the counter and place the wing nut onto the threaded tap stem above the three attached hoses. Position the tap in the desired orientation relative to the location of the handle (left-handed or right-handed). Have a helper hold the tap in place while you tighten the wing nut.
a
b
c
Fig. 9
Tap Body
Spout
Foam Gasket
Counter
Wing Nut
Fig. 10
WARNING: Due to the possibility of shock or electrocution, use extreme care when operating an electric power drill or other power tools around the sink. Make sure that no part of you or the drill comes into contact with water or moisture at any time.
RedGreen
Blue
RedGreen
Blue
6
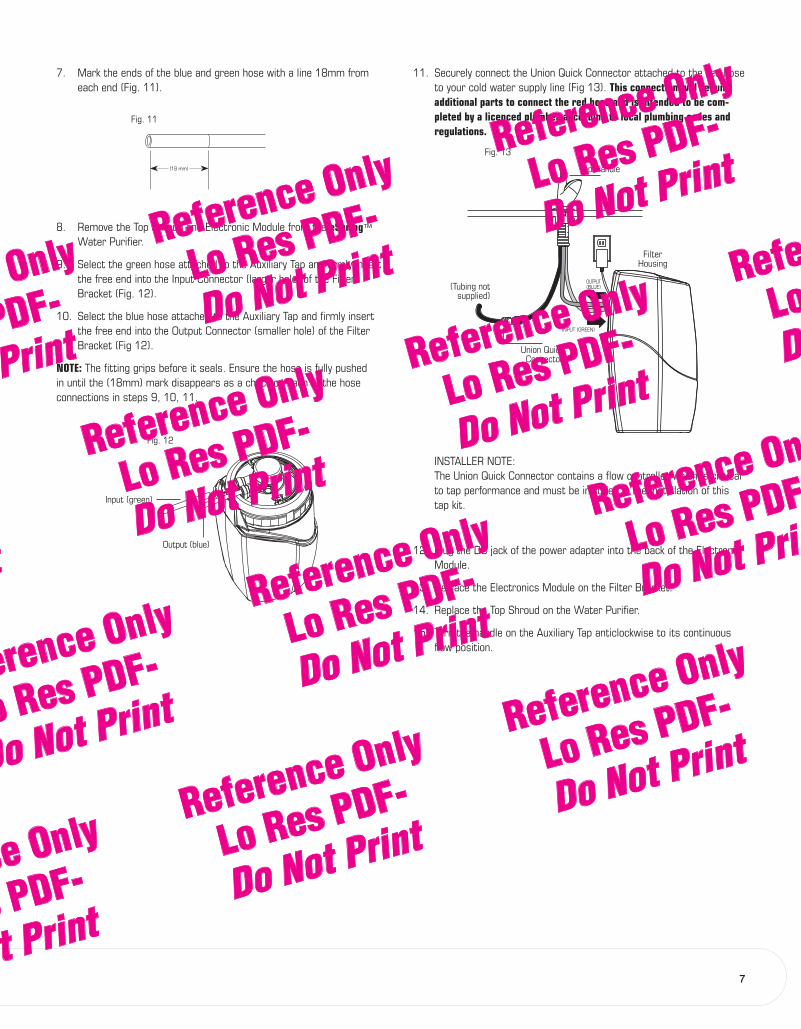
7. Mark the ends of the blue and green hose with a line 18mm from each end (Fig. 11).
8. Remove the Top Shroud and Electronic Module from the eSpring™ Water Purifi er.
9. Select the green hose attached to the Auxiliary Tap and fi rmly insert the free end into the Input Connector (larger hole) of the Filter Bracket (Fig. 12).
10. Select the blue hose attached to the Auxiliary Tap and fi rmly insert the free end into the Output Connector (smaller hole) of the Filter Bracket (Fig 12).
NOTE: The fi tting grips before it seals. Ensure the hose is fully pushed in until the (18mm) mark disappears as a check on each of the hose connections in steps 9, 10, 11.
11. Securely connect the Union Quick Connector attached to the red hose to your cold water supply line (Fig 13). This connection will require additional parts to connect the red hose and is intended to be com-pleted by a licenced plumber according to local plumbing codes and regulations.
INSTALLER NOTE: The Union Quick Connector contains a fl ow controller which is critical
to tap performance and must be included in the installation of this tap kit.
12. Plug the DC jack of the power adapter into the back of the Electronic Module.
13. Replace the Electronics Module on the Filter Bracket.
14. Replace the Top Shroud on the Water Purifi er.
15. Turn the handle on the Auxiliary Tap anticlockwise to its continuous fl ow position.
(18 mm)
Fig. 11
Fig. 12
Filter Housing
OUTPUT (BLUE)
INPUT (GREEN)
Tap Handle
Union QuickConnector
Fig. 13
Output (blue)
Input (green)
(Tubing not supplied)
7
Checking for Leaks1. Open the water supply isolation valve and turn on the auxiliary tap.
It will take a short time for the water to saturate the fi lter and then emerge from the Auxiliary Tap. When treated water begins to fl ow from the Auxiliary Tap, continue to let it run for a constant 10 min-utes to eliminate air pockets and to clear the Water Purifi er of any carbon dust. (It is normal for a small amount of carbon dust from the fi lter manufacturing process to be seen during the initial constant fl ow.) If the water does not clear of carbon dust within 15 minutes constant fl ow, call free Technical Support – Australia 1800 022 034 / New Zealand 0800 113 444.
2. Plug the power adapter into a suitable electrical outlet.
NOTE: If you do not have a electrical power outlet under your sink, have one installed by a licenced electrical contractor. Double adapters or power boards should not be used. If you have a single power outlet and wish to run another appliance as well as the eSpring™, have the single power out-let changed to a double power outlet by a licenced electrical contractor.
NOTE: The blue lights will blink sequentially on the display when water is fl owing through the Water Purifi er. If it is not blinking, see Maintenance and Trouble Shooting in the owner’s manual, pages 10-11.
3. Turn off the Auxiliary Tap and check for any signs of leakage (bubbling or water drips around fi ttings). If leaking occurs close the water sup-ply shut off valve. Make sure the hoses are inserted completely. Open water supply shut-off valve and check the eSpring Water Purifi er to verify that there are no leaks.
4. Shut off the Auxiliary Tap after verifying there are no leaks. Your eSpring Water Purifi er is now ready to serve you whenever you want great-tasting, healthier water.
5. After you have connected your tap to the Purifi er and water, check your Electronic Module display to be sure your Purifi er is functioning properly, pg. 9 in your owner’s manual.
6. Open the water supply isolation valve completely to allow maximum water fl ow.
8
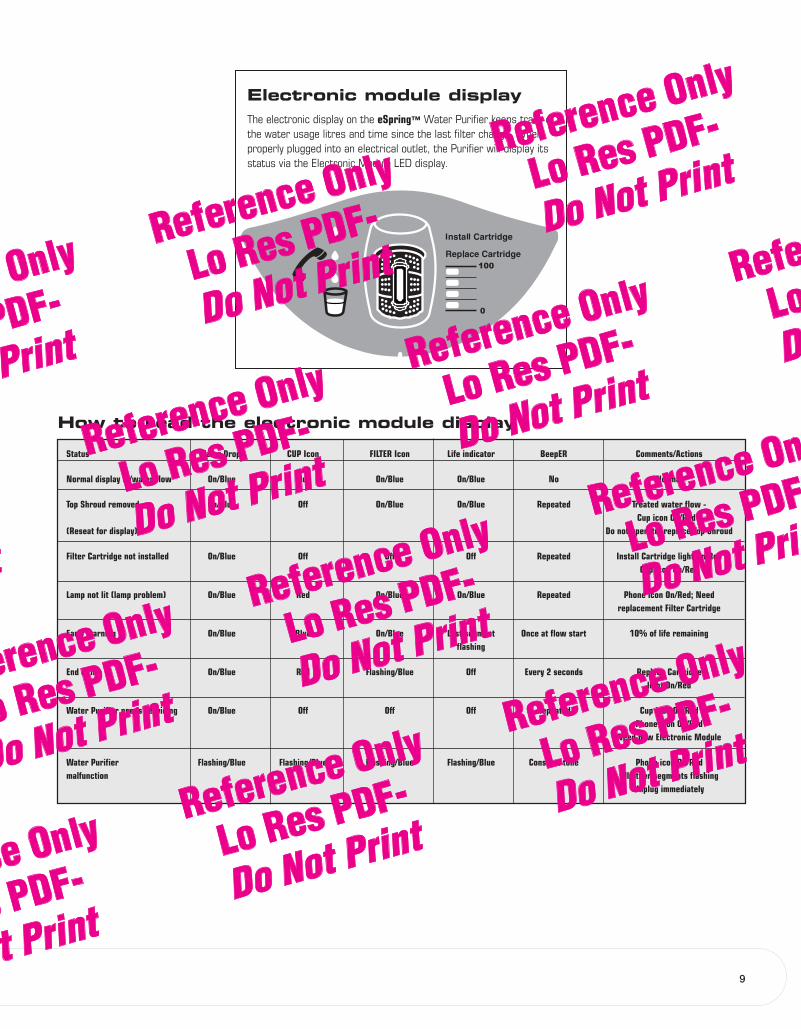
Status Water Drops CUP Icon FILTER Icon Life indicator BeepER Comments/Actions
Normal display w/water fl ow On/Blue Blue On/Blue On/Blue No Normal
Top Shroud removed On/Blue Off On/Blue On/Blue Repeated Treated water fl ow - Cup icon On/Red - (Reseat for display) Do not operate, replace Top Shroud
Filter Cartridge not installed On/Blue Off Off Off Repeated Install Cartridge light On/Red Cup icon On/Red
Lamp not lit (lamp problem) On/Blue Red On/Blue On/Blue Repeated Phone icon On/Red; Need replacement Filter Cartridge
Early warning On/Blue Blue On/Blue Last segment Once at fl ow start 10% of life remaining fl ashing
End of life On/Blue Red Flashing/Blue Off Every 2 seconds Replace Cartridge light On/Red
Water Purifi er needs servicing On/Blue Off Off Off Repeated Cup icon On/Red Phone icon On/Red Need new Electronic Module
Water Purifi er Flashing/Blue Flashing/Blue Flashing/Blue Flashing/Blue Constant tone Phone icon On/Red malfunction All other segments fl ashing Unplug immediately
How to read the electronic module display
Electronic module displayThe electronic display on the eSpring™ Water Purifi er keeps track of the water usage litres and time since the last fi lter change. When properly plugged into an electrical outlet, the Purifi er will display its status via the Electronic Module LED display.
9
Maintenance and Trouble ShootingProblem: (Existing Tap only) Water continues to run after the diverter valve is shut off.
Cause: Air in the water is causing an air bubble to form in the fi lter hous-ing. The larger the bubble, the longer the water will run after the diverter is shut off.
Solution: To minimize water run-on, run water through the Water Purifi er for at least 5 minutes to release entrapped air.
NOTE: There will always be some run-on.
Problem: (Existing Tap only) Diverter pin is sluggish or does not return fully to the IN (off) position after being in service for a while.
Cause: Water Purifi er is used in areas with very hard water.
Solution: Push pin in after use. The diverter valve may require occasional soaking in ordinary vinegar to remove lime buildup. Detach the diverter from the tap, remove the sealing washer from inside the collar, and immerse the diverter in a small container of vinegar. Try not to immerse the fl exible tubing as this may cause discoloration. After 12 hours (overnight) of soaking, remove the diverter and rinse it in water. Reinstall.
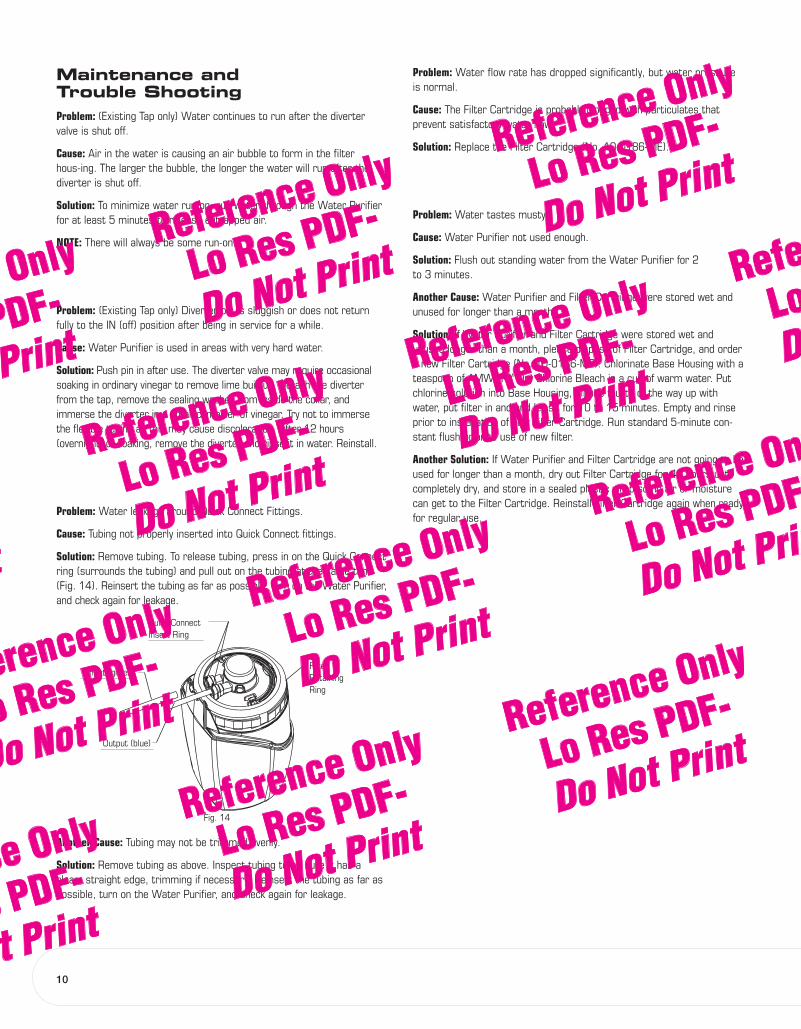
Problem: Water leakage around Quick Connect Fittings.
Cause: Tubing not properly inserted into Quick Connect fi ttings.
Solution: Remove tubing. To release tubing, press in on the Quick Connect ring (surrounds the tubing) and pull out on the tubing at the same time (Fig. 14). Reinsert the tubing as far as possible, turn on the Water Purifi er, and check again for leakage.
Another Cause: Tubing may not be trimmed evenly.
Solution: Remove tubing as above. Inspect tubing to be sure it has a clean, straight edge, trimming if necessary. Reinsert the tubing as far as possible, turn on the Water Purifi er, and check again for leakage.
Problem: Water fl ow rate has dropped signifi cantly, but water pressure is normal.
Cause: The Filter Cartridge is probably clogged with particulates that prevent satisfactory water fl ow.
Solution: Replace the Filter Cartridge (No. 10-0186-ME).
Problem: Water tastes musty
Cause: Water Purifi er not used enough.
Solution: Flush out standing water from the Water Purifi er for 2to 3 minutes.
Another Cause: Water Purifi er and Filter Cartridge were stored wet and unused for longer than a month.
Solution: If Water Purifi er and Filter Cartridge were stored wet and unused longer than a month, please dispose of Filter Cartridge, and order a new Filter Cartridge (No. 10-0186-ME). Chlorinate Base Housing with a teaspoon of AMWAY™ Dry Chlorine Bleach in a cup of warm water. Put chlorine solution into Base Housing, fi ll one fourth of the way up with water, put fi lter in and and let sit for 10 to 15 minutes. Empty and rinse prior to installation of new Filter Cartridge. Run standard 5-minute con-stant fl ush prior to use of new fi lter.
Another Solution: If Water Purifi er and Filter Cartridge are not going to be used for longer than a month, dry out Filter Cartridge for 48 hours until completely dry, and store in a sealed plastic wrap so no air or moisture can get to the Filter Cartridge. Reinstall Filter Cartridge again when ready for regular use.
Fig. 14
10
Input (green)
Output (blue)
Quick Connect Insert Ring
FilterRetainingRing
▼▼
Problem: The fi ltered water is rusty or red in color.
Cause: High content of soluble iron.
Solution: The Filter Cartridge is not designed to remove soluble iron. Use of an iron fi lter or pre-fi lter prior to the Filter Cartridge may extend its life.
Problem: The water smells like rotten eggs.
Cause: Sulfur-reducing bacteria are in the unfi ltered water supply.
Solution: Chlorinate the Filter Cartridge and eSpring™ Water Purifi er with a teaspoon of AMWAY™ Dry Chlorine Bleach in a cup of warm water. Put chlorine solution into Base Housing, fi ll one fourth of the way up with water and put fi lter in. Let it work for 10 to 15 minutes. Reassemble the eSpring Water Purifi er, and run water through the Water Purifi er for 5 minutes.
Problem: Occasional white sediment or fl akes in the water.
Cause: Calcium carbonate in the unfi ltered water supply. This normally occurs when water is boiled (white fi lm), frozen (ice cubes cloudy in center) or as white fl akes. The Filter Cartridge does not remove calcium carbonate.
Solution: The condition is normal. No action is needed.
Problem: Blue water drops do not fl ash when water is running.
Cause: eSpring Water Purifi er is not plugged into an electrical outlet with continuous power.
Solution: Plug the Water Purifi er into an electrical outlet that has continu-ous power. Verify electrical outlet has power by plugging in a night light.
Problem: Premature clogging of the Filter Cartridge (i.e. 6 to 8 weeks after installation).
Cause: Excessively high particulate content in the water.
Solution: Use of an iron fi lter or pre-fi lter prior to the Filter Cartridge may extend its life.
Problem: Lights not lit on the Electronic Module display.
Cause: Power outage
Solution: You may continue to use fi ltered water. Contaminants will still be removed through the Filter Cartridge. Be aware that you will not have the added protection of the UV lamp.
Another Cause: Water Purifi er is not plugged into an electrical outlet with continuous power.
Solution: Plug the Water Purifi er into an electrical outlet that has continu-ous power. Verify electrical outlet has power by plugging in a night light.
Another Cause: Electronic Module is not working properly.
Solution: Refer to How to Read the Electronic Module Display chart, pg. 9 or contact Technical Support, page 14.
Problem: Electronic Module is beeping continuously.
Cause: Top Shroud is removed. Refer to How to Read the Electronic Module Display chart, pg. 9.
Solution: Replace Top Shroud on Water Purifi er.
Another Cause: UV lamp does not light
Solution: For assistance with this problem, contact Technical Support,pg. 14. Lamp may need to be replaced
Another Cause: Electronic Module is defective. Refer to How to Read the Electronic Module Display chart, pg. 9.
Solution: For assistance with this problem, contact Technical Support,pg. 14. Electronic module may need to be replaced.
Problem: Water continues to run after the diverter valve is shut off.
Cause: Air in the water is causing an air bubble to form in the fi lter hous-ing. The larger the bubble, the longer the water will run after the diverter is shut off.
Solution: To minimize water run-on, run water through the Water Purifi er for at least 5 minutes to release entrapped air.
NOTE: There will always be some run-on.
11
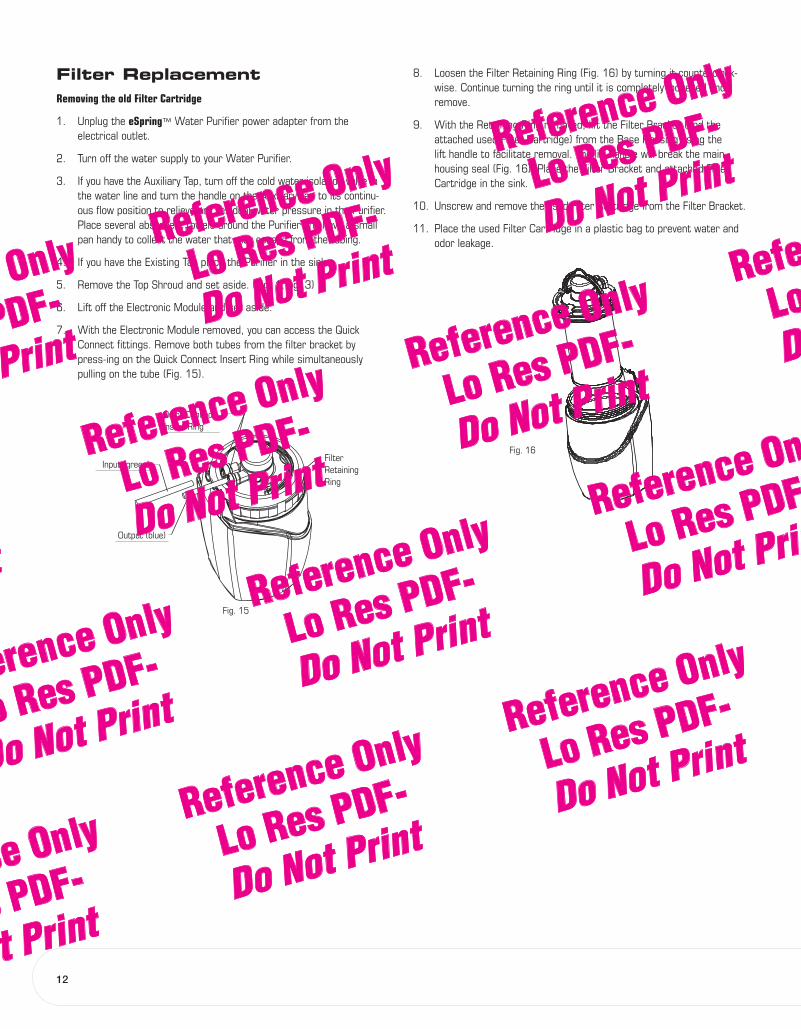
Filter ReplacementRemoving the old Filter Cartridge
1. Unplug the eSpring™ Water Purifi er power adapter from the electrical outlet.
2. Turn off the water supply to your Water Purifi er.
3. If you have the Auxiliary Tap, turn off the cold water isolation valve in the water line and turn the handle on the Auxiliary Tap to its continu-ous fl ow position to relieve any residual water pressure in the Purifi er. Place several absorbent towels around the Purifi er and have a small pan handy to collect the water that may escape from the tubing.
4. If you have the Existing Tap place the Purifi er in the sink.
5. Remove the Top Shroud and set aside. (Fig. 1, pg. 3)
6. Lift off the Electronic Module and set aside.
7. With the Electronic Module removed, you can access the Quick Connect fi ttings. Remove both tubes from the fi lter bracket by press-ing on the Quick Connect Insert Ring while simultaneously pulling on the tube (Fig. 15).
8. Loosen the Filter Retaining Ring (Fig. 16) by turning it counterclock-wise. Continue turning the ring until it is completely loosened and remove.
9. With the Retaining Ring removed, lift the Filter Bracket (and the attached used Filter Cartridge) from the Base Housing using the lift handle to facilitate removal. The lift handle will break the main housing seal (Fig. 16). Place the Filter Bracket and attached Filter Cartridge in the sink.
10. Unscrew and remove the used Filter Cartridge from the Filter Bracket.
11. Place the used Filter Cartridge in a plastic bag to prevent water and odor leakage.
Fig. 16
Fig. 15
12
Input (green)
Output (blue)
Quick Connect Insert Ring
FilterRetainingRing
▼▼
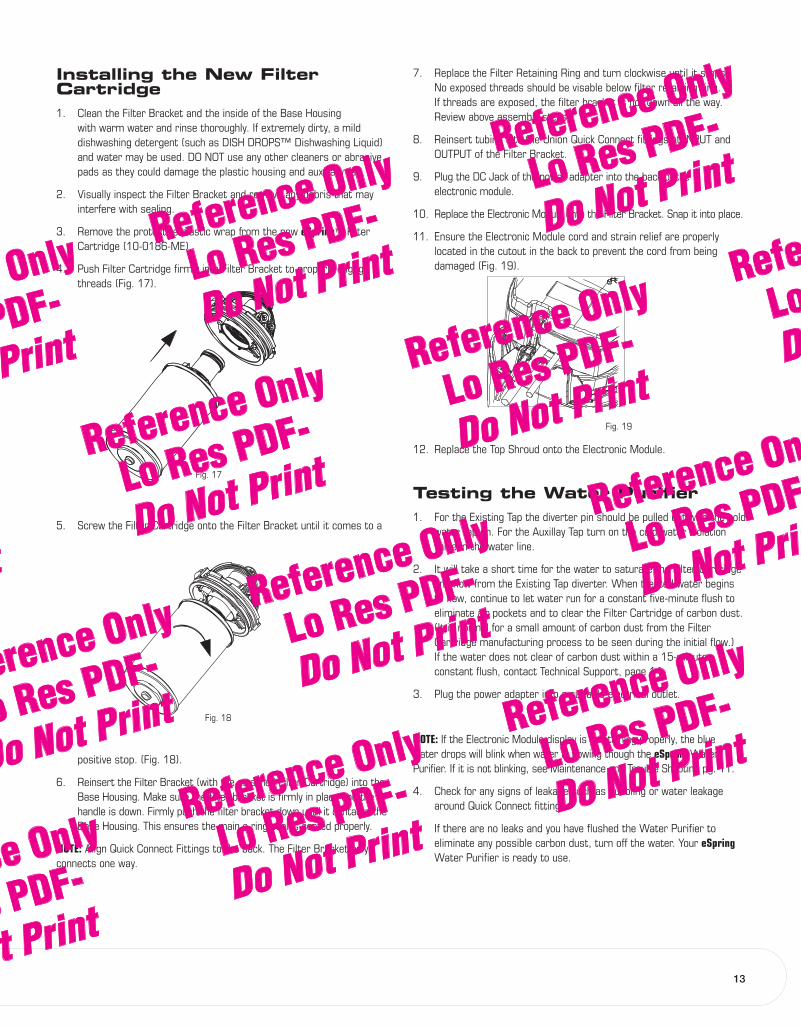
Installing the New FilterCartridge1. Clean the Filter Bracket and the inside of the Base Housing
with warm water and rinse thoroughly. If extremely dirty, a mild dishwashing detergent (such as DISH DROPS™ Dishwashing Liquid) and water may be used. DO NOT use any other cleaners or abrasive pads as they could damage the plastic housing and auxiliary tap.
2. Visually inspect the Filter Bracket and remove any debris that may interfere with sealing.
3. Remove the protective plastic wrap from the new eSpring™ Filter Cartridge (10-0186-ME).
4. Push Filter Cartridge fi rmly into Filter Bracket to properly engage threads (Fig. 17).
5. Screw the Filter Cartridge onto the Filter Bracket until it comes to a
positive stop. (Fig. 18).
6. Reinsert the Filter Bracket (with the attached Filter Cartridge) into the Base Housing. Make sure the fi lter bracket is fi rmly in place and the handle is down. Firmly push the fi lter bracket down until it contacts the Base Housing. This ensures the main o-ring seal is seated properly.
NOTE: Align Quick Connect Fittings to the back. The Filter Bracket only connects one way.
7. Replace the Filter Retaining Ring and turn clockwise until it stops. No exposed threads should be visable below fi lter retaining ring. If threads are exposed, the fi lter bracket is not down all the way. Review above assembly steps.
8. Reinsert tubing into the Union Quick Connect fi ttings at INPUT and OUTPUT of the Filter Bracket.
9. Plug the DC Jack of the power adapter into the back of the electronic module.
10. Replace the Electronic Module onto the Filter Bracket. Snap it into place.
11. Ensure the Electronic Module cord and strain relief are properly located in the cutout in the back to prevent the cord from being damaged (Fig. 19).
12. Replace the Top Shroud onto the Electronic Module.
Testing the Water Purifi er1. For the Existing Tap the diverter pin should be pulled out with the cold
water tap on. For the Auxillay Tap turn on the cold water isolation value in the water line.
2. It will take a short time for the water to saturate the Filter Cartridge and fl ow from the Existing Tap diverter. When treated water begins to fl ow, continue to let water run for a constant fi ve-minute fl ush to eliminate air pockets and to clear the Filter Cartridge of carbon dust. (It is normal for a small amount of carbon dust from the Filter Cartridge manufacturing process to be seen during the initial fl ow.) If the water does not clear of carbon dust within a 15-minute constant fl ush, contact Technical Support, page 14.
3. Plug the power adapter into a suitable electrical outlet.
NOTE: If the Electronic Module display is functioning properly, the blue water drops will blink when water is fl owing though the eSpring Water Purifi er. If it is not blinking, see Maintenance and Trouble Shooting pg. 11.
4. Check for any signs of leakage such as bubbling or water leakage around Quick Connect fi ttings.
5. If there are no leaks and you have fl ushed the Water Purifi er to eliminate any possible carbon dust, turn off the water. Your eSpring Water Purifi er is ready to use.
Fig. 19
Fig. 17
Fig. 18
13
Accessories andReplacement PartsAccessories and replacement parts may be ordered from your Amway Independent Business Owner (IBO). If you do not have an IBO, please call 1800-022-034 in Australia or 0800-113 444 in New Zealand to obtain information on an IBO near you. Information can also be accessed on the internet at www.eSpring.com. and www.a2k.com.au or www.a2k.co.nz.
Specifi cationseSpring™ Water Purifi er: Model No. 10-0185(10-0189-A) or 10-0185(10-0188-A)
Housing Height: 327mm nominal.
Diameter: 178mm nominal. Constructed of durable, high impact plastic
Electrical Input Rating: 240 V, 50 Hz, 60 W
Filter Cartridge (10-0186-ME): Pressed carbon block with internal UV lamp
Materials: All wetted materials meet U.S. FDA requirements for use in transmitting fl uids for human consumption.
Maximum Operating Pressure: 860 kPa
Minimum Operating Pressure: 103kPa
Maximum Operating Temperature: 24°C
Minimum Operating Temperature: 4.4°C
Rated Service Flow: 3.4 L per minute at 415 kPa of water pressure with a new fi lter. (Actual fl ow rate will vary directly with water pressure and the length of time the fi lter has been in service.)
Rated Service Life: The fi lter is designed to serve the average family's cooking and drinking water needs for one year or 5000 L, whichever comes fi rst.
NOTE: Actual fi lter life will vary with the amount of use and quality of the water supply.
Technical SupportPlease read the instructions in this manual carefully. After studying the manual, if you still have a question concerning the installation or operation ™of your eSpring Water Purifi er, contact Technical Support toll-free.
For service under this warranty in Australia contact Technical Support on 1800 022 034 or in New Zealand on 0800 113 444 BEFORE you return anything.
Information can also be accessed via the internet at www.eSpring.com and www.a2k.com.au or www.a2k.co.nz.
Warranty
eSpring™ Water Purifi erLIMITED WARRANTY1. WarrantyAmway warrants that the eSpring Water Purifi er (except for the fi lter) will not prove defective (as defi ned below) under normal use for two years from the date of purchase. An item will be considered “defective” if it is defective in materials or workmanship and if the defect materially impairs the performance or value of the eSpring Water Purifi er to the original purchaser (the “Purchaser”).
2. ExclusionsThis Warranty does not cover:
(a) Any eSpring Water Purifi er that has been subjected to any use that is different than or inconsistent with the use instructions in the eSpring Water Purifi er Owners Manual.
(b) Any eSpring Water Purifi er that has been subjected to any abuse, accident, physical damage, improper installation or application, alteration, neglect, improper temperature, humidity or other environmental conditions (including, but not limited to, lightning, fl ood or fi re).
(c) Any eSpring Water Purifi er that has been damaged due to improper repair, modifi cation, alteration or maintenance by anyone other than an authorized service warranty representative of Amway.
(d) Any defect or diminished performance caused by the use of any part or accessory that is not compatible with the eSpring Water Purifi er, OR;
(e) Any eSpring Water Purifi er that was not installed with an eSpring Auxiliary Tap Kit or an eSpring Existing Tap Kit.
3. Use of non-authorized parts or accessoriesPerformance claims relating to the eSpring Water Purifi er were developed through testing of the complete system as designed by the manufacturer, and as installed and operated as recommended by the manufacturer. The use of replacement parts or accessory attachments not recommended by the manufacturer may result in diminished system performance. Amway does not warrant the performance of any non-eSpring Water Purifi er parts or accessories, and is not responsible for any damage to the eSpring Water Purifi er caused by any non-eSpring Water Purifi er parts or accessories.
4. Right of the PurchaserIf any eSpring Water Purifi er that has not been subjected to any abuse, accident, physical damage, improper installation or application, alteration, neglect, improper temperature, humidity or other environmen-tal conditions (including, but not limited to, lightning, fl ood or fi re) proves to have been defective during the Warranty period then, subject to timely notifi cation of the claimed defect, Amway will, at its option, either repair or replace the defective item at its expense, or refund an appropriate part of the price of the item to the Purchaser.
14

5. ClaimIn order to make a claim under this Warranty in Australia, the Purchaser must contact Amway via telephone at Technical Support on 1800 022 034 or in New Zealand on 0800 113 444 for shipping and handling instruction BEFORE you return anything. Then return the claimed defective product to Amway together with a copy of a sales receipt or other proof of purchase and a brief description of the product defect.
No Warranty claim may be made unless the Purchaser has notifi ed Amway of the claimed defect by writing or telephoning Amway within two (2) months after its discovery, but in all events no later than two (2) months after the end of the applicable warranty period.
Upon receipt of an eSpring™ Water Purifi er that is claimed to be defec-tive, Amway will determine, in its reasonable discretion, whether the eSpring Water Purifi er is defective. By accepting a returned eSpring Water Purifi er for inspection, Amway does not concede that the returned system is defective. Amway will bear the expense of shipping, both ways, with respect to the repair or replacement of any defective eSpring Water Purifi er within the Warranty period. If, in Amway’s opinion, the eSpring Water Purifi er is not defective, it will be returned to the Purchaser.
6. Limitations This Warranty is limited to the value of the eSpring Water Purifi er.
This Warranty will not be valid if a third party has manipulated the item to repair it.
Unless otherwise required under Australian or New Zealand laws, this Warranty sets forth the Purchaser’s sole and exclusive remedies for any defect in the eSpring Water Purifi er
Unless otherwise required under relevant Australian or New Zealand law, THE WARRANTIES STATED HEREIN ARE IN LIEU OF ALL OTHER WARRANTIES, EXPRESS, IMPLIED, STATUTORY OR OTHERWISE, EXCEPT FOR THE IMPLIED WARRANTY OR CONDITION OF MERCHANTABILITY, THE IMPLIED WARRANTY OR CONDITION OF FITNESS FOR A PARTICULAR PURPOSE, AND ANY OTHER NON-DISCLAIMABLE WARRANTIES IMPOSED BY AUSTRALIA OR NEW ZEA-LAND LAW. NO SUCH NON-DISCLAIMABLE WARRANTY, INCLUDING BUT NOT LIMITED TO THE WARRANTY OR CONDITION OF MERCHANTABILITY AND THE WARRANTY OR CONDITION OF FITNESS FOR A PARTICULAR PURPOSE, SHALL BE FOR TERMS EXTENDING BEYOND THE DURATION OF THE EXPRESS LIMITED WARRANTY DESCRIBED ABOVE.
Insofar as it is permitted under Australian or New Zealand law, Amway limits its liability for incidental or consequential damages. This Warranty does not affect the Purchaser’s statutory rights under applicable con-sumer protection legislation.
Unless otherwise required under Australian or New Zealand law, no person is authorized to modify or expand the Warranty provided herein, waive any of the conditions and limitations of this Warranty, or make any different or additional warranties with respect to the eSpring Water Purifi er. Any statements to the contrary shall be of no effect unless made in writing and signed by an authorized representative of Amway.
This Warranty is applicable in Australia and New Zealand.
For further details please contact your Amway Independent Business Owner (IBO) or
Amway of Australia46 Carrington RoadCastle HillNew South Wales2154 AustraliaorAmway of New Zealand Ltd.15 Lady Ruby DriveAucklandNew Zealand
Satisfaction GuaranteeWe stand behind the quality of Amway™ products and guarantee your satisfaction.
If you are not completely satisfi ed within 90 days of purchase or receipt of this product, please return it to the Amway IBO from whom you pur-chased it. The IBO will offer you the choice to have it replaced without charge, receive full credit toward the purchase of another Amway product, or receive a refund for the full purchase price.
This guarantee does not apply to products that have been intentionally damaged or misused.
15
16
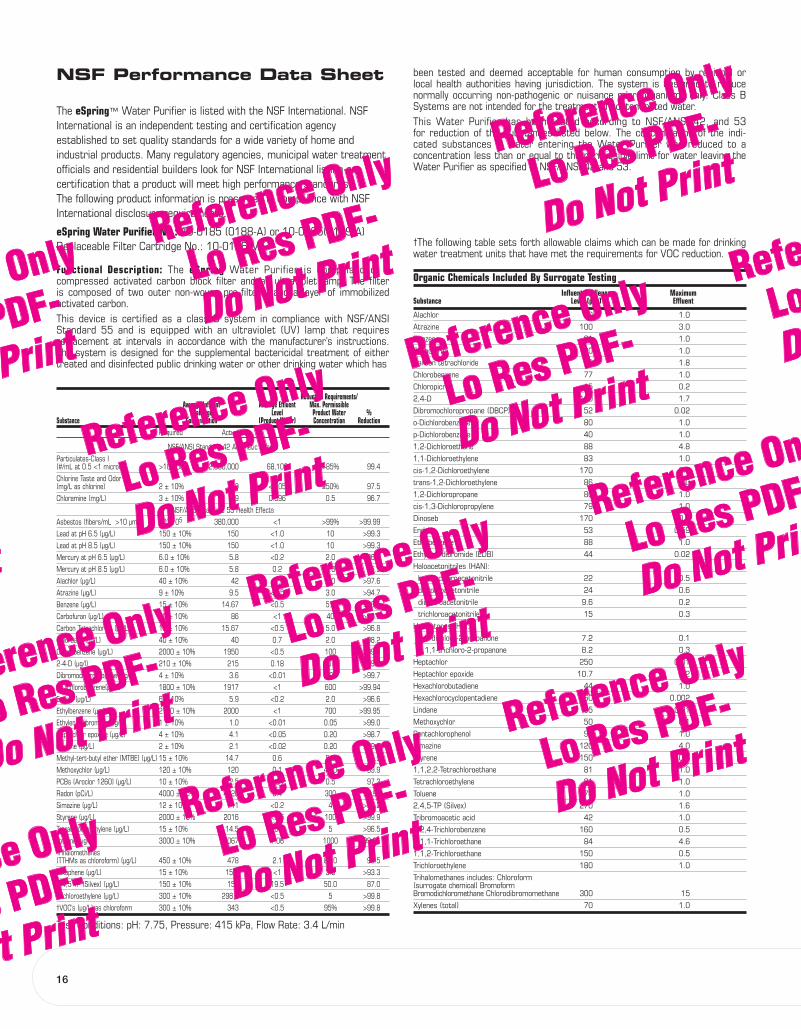
NSF Performance Data Sheet
The eSpring™ Water Purifi er is listed with the NSF International. NSF International is an independent testing and certifi cation agency established to set quality standards for a wide variety of home and industrial products. Many regulatory agencies, municipal water treatment offi cials and residential builders look for NSF International listing as certifi cation that a product will meet high performance standards. The following product information is presented in compliance with NSF International disclosure requirements.
eSpring Water Purifi er No.: 10-0185 (0188-A) or 10-0185(0189-A) Replaceable Filter Cartridge No.: 10-0186-ME
Functional Description: The eSpring Water Purifier is comprised of a compressed activated carbon block fi lter and an ultraviolet lamp. The fi lter is composed of two outer non-woven pre-fi lters, and a layer of immobilized activated carbon.This device is certifi ed as a class B system in compliance with NSF/ANSI Standard 55 and is equipped with an ultraviolet (UV) lamp that requires replacement at intervals in accordance with the manufacturer’s instructions. The system is designed for the supplemental bactericidal treatment of either treated and disinfected public drinking water or other drinking water which has
Reduction Requirements/ Average Influent Average Effluent Max. Permissible Challenge Level Product Water %Substance Concentration (Product Water) Concentration Reduction Required Actual
NSF/ANSI Standard 42 Aesthetic Effects
Particulates-Class I (#/mL at 0.5 <1 micron) >10,000 12,000,000 68,100 >85% 99.4
Chlorine Taste and Odor (mg/L as chlorine) 2 ± 10% 2.0 <0.05 ≥50% 97.5
Chloramine (mg/L) 3 ± 10% 2.9 0.096 0.5 96.7
NSF/ANSI Standard 53 Health Effects
Asbestos (fibers/mL >10 µm) 104-105 380,000 <1 >99% >99.99
Lead at pH 6.5 (µg/L) 150 ± 10% 150 <1.0 10 >99.3
Lead at pH 8.5 (µg/L) 150 ± 10% 150 <1.0 10 >99.3
Mercury at pH 6.5 (µg/L) 6.0 ± 10% 5.8 <0.2 2.0 >96.5
Mercury at pH 8.5 (µg/L) 6.0 ± 10% 5.8 0.2 2.0 96.5
Alachlor (µg/L) 40 ± 10% 42 <1.0 2.0 >97.6
Atrazine (µg/L) 9 ± 10% 9.5 <0.5 3.0 >94.7
Benzene (µg/L) 15 ± 10% 14.67 <0.5 5.0 >96.5
Carbofuran (µg/L) 80 ± 10% 86 <1 40 >98.8
Carbon Tetrachloride (µg/L) 15 ± 10% 15.67 <0.5 5.0 >96.8
Chlordane (µg/L) 40 ± 10% 40 0.7 2.0 98.2
Chlorobenzene (µg/L) 2000 ± 10% 1950 <0.5 100 >99.9
2-4-D (µg/l) 210 ± 10% 215 0.18 70.0 99.9
Dibromochloropropane (µg/L) 4 ± 10% 3.6 <0.01 0.20 >99.7
o-Dichlorobenzene(µg/L) 1800 ± 10% 1917 <1 600 >99.94
Endrin (µg/L) 6 ± 10% 5.9 <0.2 2.0 >96.6
Ethylbenzene (µg/L) 2100 ± 10% 2000 <1 700 >99.95
Ethylene dibromide (µg/L) 1 ± 10% 1.0 <0.01 0.05 >99.0
Heptachlor epoxide (µg/L) 4 ± 10% 4.1 <0.05 0.20 >98.7
Lindane (µg/L) 2 ± 10% 2.1 <0.02 0.20 >99.0
Methyl-tert-butyl ether (MTBE) (µg/L) 15 ± 10% 14.7 0.6 5.0 95.9
Methoxychlor (µg/L) 120 ± 10% 120 0.1 40.0 99.9
PCBs (Aroclor 1260) (µg/L) 10 ± 10% 12.5 0.34 0.5 97.3
Radon (pCi/L) 4000 ± 25% 4426 6.4 300 99.99
Simazine (µg/L) 12 ± 10% 11 <0.2 4 >98.2
Styrene (µg/L) 2000 ± 10% 2016 <0.5 100 >99.9
Tetrachloroehthylene (µg/L) 15 ± 10% 14.5 <0.5 5 >96.5
Toluene (µg/L) 3000 ± 10% 3067 1.06 1000 99.96
Trihalomethanes (TTHMs as chloroform) (µg/L) 450 ± 10% 478 2.1 80.0 99.5
Toxaphene (µg/L) 15 ± 10% 15.2 <1 3.0 >93.3
2,4,5 TP (Silvex) (µg/L) 150 ± 10% 150 19.5 50.0 87.0
Trichloroethylene (µg/L) 300 ± 10% 298.3 <0.5 5 >99.8
†VOC’s (µg/L) as chloroform 300 ± 10% 343 <0.5 95% >99.8
Test Conditions: pH: 7.75, Pressure: 415 kPa, Flow Rate: 3.4 L/min
been tested and deemed acceptable for human consumption by regional or local health authorities having jurisdiction. The system is designed to reduce normally occurring non-pathogenic or nuisance microorganisms only. Class B Systems are not intended for the treatment of contaminated water. This Water Purifi er has been tested according to NSF/ANSI 42, and 53 for reduction of the substances listed below. The concentration of the indi-cated substances in water entering the Water Purifi er was reduced to a concentration less than or equal to the permissible limit for water leaving the Water Purifi er as specifi ed in NSF/ANSI 42 and 53.
†The following table sets forth allowable claims which can be made for drinking water treatment units that have met the requirements for VOC reduction.
Organic Chemicals Included By Surrogate Testing Influent Challenge Maximum Substance Level (ppb) Effluent
Alachlor 50 1.0
Atrazine 100 3.0
Benzene 81 1.0
Carbofuran 190 1.0
Carbon tetrachloride 78 1.8
Chlorobenzene 77 1.0
Chloropicrin 15 0.2
2,4-D 110 1.7
Dibromochloropropane (DBCP) 52 0.02
o-Dichlorobenzene 80 1.0
p-Dichlorobenzene 40 1.0
1,2-Dichloroethane 88 4.8
1,1-Dichloroethylene 83 1.0
cis-1,2-Dichloroethylene 170 0.5
trans-1,2-Dichloroethylene 86 1.0
1,2-Dichloropropane 80 1.0
cis-1,3-Dichloropropylene 79 1.0
Dinoseb 170 0.2
Endrin 53 0.59
Ethylbenzene 88 1.0
Ethylene dibromide (EDB) 44 0.02
Haloacetonitriles (HAN):
bromochloroacetonitrile 22 0.5
dibromoacetonitrile 24 0.6
dichloroacetonitrile 9.6 0.2
trichloroacetonitrile 15 0.3
Haloketones (HK):
1,1-dichloro-2-propanone 7.2 0.1
1,1,1-trichloro-2-propanone 8.2 0.3
Heptachlor 250 0.01
Heptachlor epoxide 10.7 0.2
Hexachlorobutadiene 44 1.0
Hexachlorocyclopentadiene 60 0.002
Lindane 55 0.01
Methoxychlor 50 0.1
Pentachlorophenol 96 1.0
Simazine 120 4.0
Styrene 150 0.5
1,1,2,2-Tetrachloroethane 81 1.0
Tetrachloroethylene 81 1.0
Toluene 78 1.0
2,4,5-TP (Silvex) 270 1.6
Tribromoacetic acid 42 1.0
1,2,4-Trichlorobenzene 160 0.5
1,1,1-Trichloroethane 84 4.6
1,1,2-Trichloroethane 150 0.5
Trichloroethylene 180 1.0
Trihalomethanes includes: Chloroform (surrogate chemical) BromoformBromodichloromethane Chlorodibromomethane 300 15
Xylenes (total) 70 1.0
17
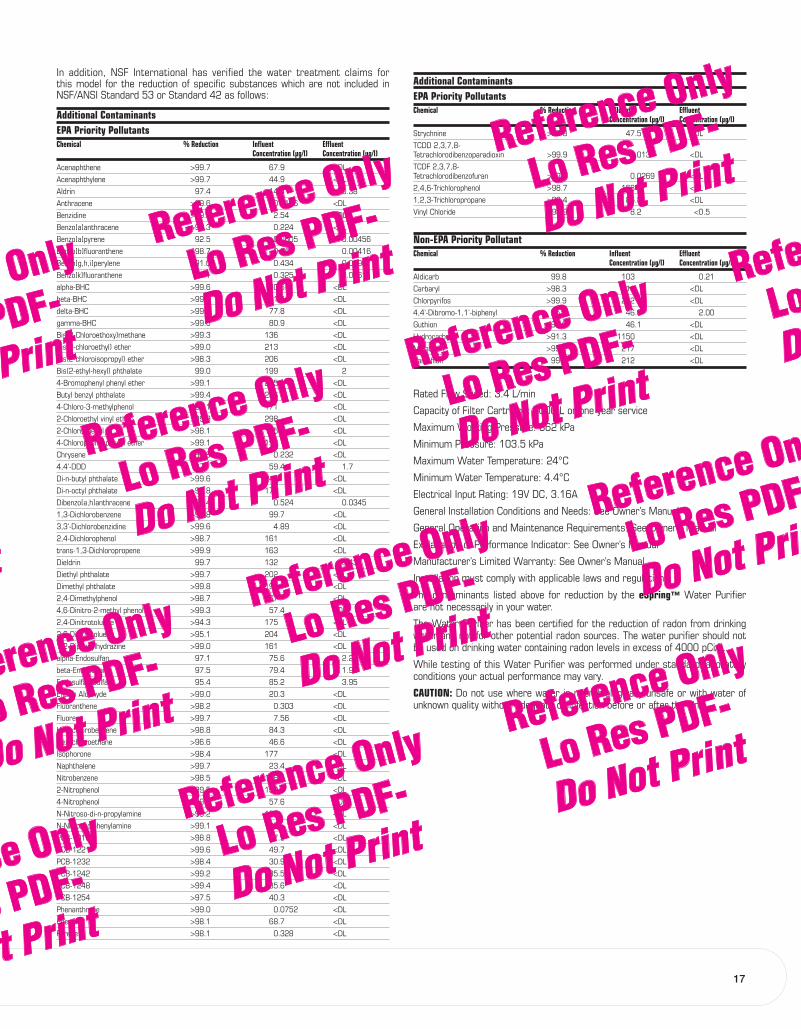
In addition, NSF International has verifi ed the water treatment claims for this model for the reduction of specifi c substances which are not included in NSF/ANSI Standard 53 or Standard 42 as follows:
Additional ContaminantsEPA Priority Pollutants Chemical % Reduction Infl uent Effl uent Concentration (µg/l) Concentration (µg/l)
Acenaphthene >99.7 67.9 <DL
Acenaphthylene >99.7 44.9 <DL
Aldrin 97.4 14.4 0.38
Anthracene >99.6 0.0106 <DL
Benzidine >99.6 2.54 <DL
Benzo[a]anthracene >99.3 0.224 <DL
Benzo[a]pyrene 92.5 0.0605 0.00456
Benzo[b]fl uoranthene 98.7 0.316 0.00416
Benzo[g,h,i]perylene 91.0 0.434 0.0390
Benzo[k]fl uoranthene 98.1 0.325 0.00611
alpha-BHC >99.6 80.6 <DL
beta-BHC >99.6 81.4 <DL
delta-BHC >99.6 77.8 <DL
gamma-BHC >99.6 80.9 <DL
Bis(2-Chloroethoxy)methane >99.3 136 <DL
Bis(2-chloroethyl) ether >99.0 213 <DL
Bis(2-chloroisopropyl) ether >98.3 206 <DL
Bis(2-ethyl-hexyl) phthalate 99.0 199 2
4-Bromophenyl phenyl ether >99.1 225 <DL
Butyl benzyl phthalate >99.4 226 <DL
4-Chloro-3-methylphenol >99.1 171 <DL
2-Chloroethyl vinyl ether >99.9 298 <DL
2-Chlorophenol >98.1 175 <DL
4-Chlorophenyl phenyl ether >99.1 197 <DL
Chrysene >97.8 0.232 <DL
4,4’-DDD 97 59.4 1.7
Di-n-butyl phthalate >99.6 245 <DL
Di-n-octyl phthalate >98.8 179 <DL
Dibenzo[a,h]anthracene 93.4 0.524 0.0345
1,3-Dichlorobenzene >99.8 99.7 <DL
3,3’-Dichlorobenzidine >99.6 4.89 <DL
2,4-Dichlorophenol >98.7 161 <DL
trans-1,3-Dichloropropene >99.9 163 <DL
Dieldrin 99.7 132 0.43
Diethyl phthalate >99.7 202 <DL
Dimethyl phthalate >99.8 197 <DL
2,4-Dimethylphenol >98.7 167 <DL
4,6-Dinitro-2-methyl phenol >99.3 57.4 <DL
2,4-Dinitrotoluene >94.3 175 <DL
2,6-Dinitrotoluene >95.1 204 <DL
1,2-Diphenylhydrazine >99.0 161 <DL
alpha-Endosulfan 97.1 75.6 2.20
beta-Endosulfan 97.5 79.4 1.95
Endosulfan Sulfate 95.4 85.2 3.95
Endrin Aldehyde >99.0 20.3 <DL
Fluoranthene >98.2 0.303 <DL
Fluorene >99.7 7.56 <DL
Hexachlorobenzene >98.8 84.3 <DL
Hexachloroethane >96.6 46.6 <DL
Isophorone >98.4 177 <DL
Naphthalene >99.7 23.4 <DL
Nitrobenzene >98.5 156 <DL
2-Nitrophenol >99.5 150 <DL
4-Nitrophenol >99.8 57.6 <DL
N-Nitroso-di-n-propylamine >99.2 157 <DL
N-Nitrosodiphenylamine >99.1 147 <DL
PCB-1016 >98.8 57.9 <DL
PCB-1221 >99.6 49.7 <DL
PCB-1232 >98.4 30.9 <DL
PCB-1242 >99.2 35.5 <DL
PCB-1248 >99.4 35.6 <DL
PCB-1254 >97.5 40.3 <DL
Phenanthrene >99.0 0.0752 <DL
Phenol >98.1 68.7 <DL
Pyrene >98.1 0.328 <DL
Additional ContaminantsEPA Priority Pollutants Chemical % Reduction Infl uent Effl uent Concentration (µg/l) Concentration (µg/l)
Strychnine >99.8 47.5 <DL
TCDD 2,3,7,8-Tetrachlorodibenzoparadioxin >99.9 0.0131 <DL
TCDF 2,3,7,8-Tetrachlorodibenzofuran >99.9 0.0269 <DL
2,4,6-Trichlorophenol >98.7 168 <DL
1,2,3-Trichloropropane >99.4 86.8 <DL
Vinyl Chloride >93.9 8.2 <0.5
Non-EPA Priority Pollutant Chemical % Reduction Infl uent Effl uent Concentration (µg/l) Concentration (µg/l)
Aldicarb 99.8 103 0.21
Carbaryl >98.3 511 <DL
Chlorpyrifos >99.9 212 <DL
4,4’-Dibromo-1,1’-biphenyl 95.7 46.0 2.00
Guthion >99.9 46.1 <DL
Hydrocarbons >91.3 1150 <DL
Malathion >99.0 217 <DL
Parathion 99.9 212 <DL
Rated Flow Speed: 3.4 L/min
Capacity of Filter Cartridge: 5000 L or one year service
Maximum Working Pressure: 862 kPa
Minimum Pressure: 103.5 kPa
Maximum Water Temperature: 24°C
Minimum Water Temperature: 4.4°C
Electrical Input Rating: 19V DC, 3.16A
General Installation Conditions and Needs: See Owner’s Manual
General Operation and Maintenance Requirements: See Owner’s Manual
Explanation of Performance Indicator: See Owner’s Manual
Manufacturer’s Limited Warranty: See Owner’s Manual
Installation must comply with applicable laws and regulations.
The contaminants listed above for reduction by the eSpring™ Water Purifi er are not necessarily in your water.
The Water Purifi er has been certifi ed for the reduction of radon from drinking water and not for other potential radon sources. The water purifi er should not be used on drinking water containing radon levels in excess of 4000 pCi/L.
While testing of this Water Purifi er was performed under standard laboratory conditions your actual performance may vary.
CAUTION: Do not use where water is microbiologically unsafe or with water of unknown quality without adequate disinfection before or after the Unit.
Dist. by Amway of Australia, 46 Carrington Rd, Castle Hill, NSW 2154 • Amway of New Zealand, AucklandProduct Information Number:
(Aust) 1800 454 647, (NZ) 0800 611 611Manufactured by Access Business Group LLC, Ada, MI 49355
Dist. by Access Business Group International LLC, Ada, MI 49355 ©2003 Access Business Group
SYSTEM TESTED AND CERTIFIED AGAINST ANSI/NSF STANDARD 42, 53, AND 55.
1009761
Related Documents