Pelican User Guide Version no : 1.0.9.2_84

Welcome message from author
This document is posted to help you gain knowledge. Please leave a comment to let me know what you think about it! Share it to your friends and learn new things together.
Transcript

Pelican User GuideVersion no : 1.0.9.2_84

Table of Contents
1. Preface 3
2. Pelican Overview 4
3. Data Store Support 5
4. Architecture 6
5. Dashboard 7
6. User Management 86.1. Login 86.2. Configure SMTP server 96.3. SMTP User creation 106.4. Authentication using LDAP/AD 136.5. LDAP/AD User Management 156.6. Admin Password 176.7. Forget Password 17
7. Datastore Configuration 187.1. Steps for Adding Database configuration 18
7.1.1. Steps for Teradata Configuration 217.1.2. Steps for Netezza Configuration 237.1.3. Steps for Oracle Configuration 257.1.4. Steps for BigQuery Configuration 267.1.5. Steps for HIVE Configuration 277.1.6. Steps for DB2 Configuration 297.1.7. Steps for Synapse Configuration 317.1.8. Steps for Snowflake Configuration 327.1.9. Steps for Deltalake Configuration 347.1.10. Steps for Greenplum Configuration 367.1.11. Steps for Redshift Configuration 387.1.12. Steps for MSSQL Server Configuration 397.1.13. Steps for Vertica Configuration 42
7.2. Editing an existing Datastore 437.3. Deleting existing datastore 44
8. Validation Configuration 448.1. Table Mapping 45
Copyright © 2022 by Datametica Solutions Pvt. Ltd. All Rights Reserved. 1

8.1.1. Edit the existing configuration 498.1.2. Delete Mapping 528.1.3. Override unmapped columns 528.1.4. Surrogate Key 538.1.5. Add Tags 57
9. Custom Source and Target 58
10. Scheduler Configuration 6010.1. Modes in Scheduler Configuration 60
10.1.1. LITMUS mode 6010.1.2. Full mode 60
10.2. Steps to configure the scheduler: 6110.3 Scheduler Report 64
11. Validation Result 6511.1. Results from Report page 6511.2. Results from Scheduler page 72
12. License - Buy Your Own license (BYOL) 7312.1. Adding /updating license 74
13. Lineage 7713.1. Add Lineage 7713.2. How to View Lineage? 81
14. API 8314.1 Export/Import API 8314.2. Pelican V3 API 9514.3. API to get Scheduler status 96
15. Automatic Backup 98
16. Frequently Asked Questions 99
17. Glossary 102
Copyright © 2022 by Datametica Solutions Pvt. Ltd. All Rights Reserved. 2

1. PrefaceThe Pelican user guide is written for developers and software engineers who are
responsible for comparing and validating the data across various data stores. The
Pelican user guide assumes that you have an understanding of your operating
systems, relational database concepts, database engines, flat files, and how the
mainframe system works in your environment. This guide also assumes that you are
familiar with the interface requirements for your supporting applications.

2. Pelican OverviewPelican is an innovative enterprise application that ensures businesses that the data ismigrated from reference to destination data store accurately and reliably by performingvalidation over the migrated data. Pelican helps the user to compare and validate the dataacross different data stores quickly.
Pelican helps the user to validate large data sets without any data transfer from source totarget. Pelican allows the user to copy a large dataset (historical and real time data) to adestination data store for validation. It uses an innovative approach to compare the datawithout moving it across data stores. It also displays the data records having differences.
The user can automate the comparison using schedulers and API. Pelican uses thephonetic matching and approximate matching algorithms to search the best possiblecombination of tables from the target datastore. It also facilitates configuring and executingvarious Schedulers as per the business requirement. These Schedulers are created tocompare and validate table dataset periodically.
You can configure an email notification for schedulers that sends an email automatically tovarious users when the scheduler executes. Pelican provides lineage support, whichenables the user to track the movement of data across various nodes. This information isretrieved from the job history server of various data stores configured in the Pelican. Oncethe validation is done, the application generates statistics with the following information:
• Count of total rows at source• Count of total rows at destination• Count of mismatch rows at destination• Count of extra rows at destination• Count of missing rows at destination• Total mismatch row count• Validation Status• Sample of mismatch data
Copyright © 2022 by Datametica Solutions Pvt. Ltd. All Rights Reserved. 4

3. Data Store SupportPelican supports comparison between the following data stores using an innovative approach:
Sr. No Source Data store Destination Data store
1 Teradata Big Query
2 Netezza Big Query
3 Hive Big Query
4 Oracle Big Query
5 BigQuery Big Query
6 DB2 Big Query
7 Oracle Hive
8 Teradata Hive
9 Netezza Hive
10 Hive Hive
11 Big Query Hive
12 Vertica BQ
13 Teradata Snowflake
14 Teradata Synapse
15 Netezza Snowflake
16 Netezza Synapse
17 Ms SQL Server Hive
18 Ms SQL Server Big Query
19 Greenplum Redshift
20 Hive Deltalake
21 Hive Synapse
Copyright © 2022 by Datametica Solutions Pvt. Ltd. All Rights Reserved. 5

4. ArchitectureHere is the complete architecture of how Pelican works.
Copyright © 2022 by Datametica Solutions Pvt. Ltd. All Rights Reserved. 6

5. Dashboard
Dashboard screen displays result, trends, graph of the scheduled mappings based on
datastore, database, tags, and date. When for the first time the dashboard screen is
loaded it will display the dashboard screen for the default datastore.User can select
datastore and databases to see the corresponding graphs.
Copyright © 2022 by Datametica Solutions Pvt. Ltd. All Rights Reserved. 7

6. User ManagementIn User Management the entire administration of the application is accessed, providing
secured authorization to the user. Each user is assigned a unique identity to authenticate
the application.
6.1. LoginPelican needs the following details for login:
● User’s Email Id
● Password
Copyright © 2022 by Datametica Solutions Pvt. Ltd. All Rights Reserved. 8
First time users will be requested to reset the default password.
After completing the steps the user will navigate to the Validation Result page.
6.2. Configure SMTP serverThe SMTP server configuration functionality allows the Administrator to configure the SMTP
server which will be used for sending passwords to the newly added user.
Copyright © 2022 by Datametica Solutions Pvt. Ltd. All Rights Reserved. 9

Configure SMTP server and Sender Email Address ;To configure the SMTP Server and senders email address:
1. Go to the Administration → Configure → Email Configuration.
2. Fill the below details in the Email Configuration window.
● Enter Host Name (http://smtp.googlemail.com/)
● Enter Port Name (587)
● Enter User Name ([email protected])
● Enter Password in the provided field.
3. Click on Test Connection.
4. Click on the Save button to save the configuration.
6.3. SMTP User creation
The User tab enables creating a new user with the role of Validator or Admin. You can edit
or delete an existing user as well. This option will be available if LDAP configuration is not
set up. (SMTP)
Steps to add a new SMTP user:1. Go to Administration → User Management → User.
Copyright © 2022 by Datametica Solutions Pvt. Ltd. All Rights Reserved. 10

2. Click Add New User.
3. In Add / Update User Details Form, enter First Name, Last Name, Email, and select
Role from the drop-down list.
The Roles are Super user and Validator.
Note:
Admin: Users having the role as admin have the same rights as Super user. They can
create new users having roles as Admin or Validator. They can create data stores for
validation and configure email for sending mails.
Validator: The users having the role as validator do not have access to create new
datastore and can't create a new user, but they can create mappings, run schedulers, and
view reports.
4. Click SAVE.
Copyright © 2022 by Datametica Solutions Pvt. Ltd. All Rights Reserved. 11

A system generated Pelical Login Credentials email is generated and sent to the first-time
login user which includes username and password. The user should login with those
credentials and reset the password.
Copyright © 2022 by Datametica Solutions Pvt. Ltd. All Rights Reserved. 12

6.4. Authentication using LDAP/AD
You can add the Authentication details for the LDAP/ Active Directory.
The steps to add authentication details are as follows:
1. Go to Administration > User Management > Authentication.
2. Click Edit.
Copyright © 2022 by Datametica Solutions Pvt. Ltd. All Rights Reserved. 13

3. Enter Host, Port, Domain Component, Object Class, Extra Parameters Before DC,
and other fields.
4. Check the checkbox if SSL is enabled.
5. Click DONE.
Field Name Description
Host Ip or machine name on which Ldap server is running
Port Port at which connection to the ldap server is to becreated
Following fields are used to create the BaseDN, in which user should besearched
Domain Component The comma separated values that are put with theattribute “dc”
Object Class Object class decides the attributes of the entry and ispart of the search criteria
Extra Parameters BeforeDC
Any extra parameters that are present between commonname & domain components.
UID or CN Value of this field will be either uid or cn. This attributedenotes the common name of the user.
Copyright © 2022 by Datametica Solutions Pvt. Ltd. All Rights Reserved. 14

Bind DN This field will hold the qualified value of the user whichmay be required to connect to ldap
Bind Password This field will hold the password corresponding to theuser mentioned in above field
SSL Enabled If ldap is secured, check the checkbox. Certificateshould also be configured in the pelican jvm
Note:● Post LDAP/AD successful connection, we will need to restart LDAP so that added
users can log in to the application.
● After configuring the Authentication page the user has to navigate to the tomcat/bin
folder where Pelican is installed. Stop the Pelican application using ./shutdown.sh
Then navigate to /webapps/ROOT/WEB-INF/classes/config.properties file.
And add the following properties and corresponding values in it:
1) authenticationByDistinguishedName = false
2) enterpriseIdAttribute = sAMAccountName
● Once you have added the credential super user can only create ldap user and can’t
create non-ldap user having role as admin or validator.
6.5. LDAP/AD User ManagementLDAP/AD user authentication is the process of validating a username and password
combination with a directory server. Only the superuser and admin has the right to create
LDAP/AD users. In the User Management module you can perform the following functions:
● Setting LDAP/AD credential
● Adding user
● Accessing control
● Assigning roles to the user
● Administrating Pelican
Copyright © 2022 by Datametica Solutions Pvt. Ltd. All Rights Reserved. 15

● Adding roles
● Granting permissions
● Assigning user groups
In User Management you can add a new LDAP user and view the details on the
User page.
Steps1. Go to Administration -> User Management -> user.2. Click the Add New User.
3. On the User Assign form enter EnterpriseID and all other details are visible
automatically in the fields.
Copyright © 2022 by Datametica Solutions Pvt. Ltd. All Rights Reserved. 16

4. Select the Is Active checkbox and click SUBMIT.
Tips: You can apply filters to view all the active and inactive users by clicking Active or
Inactive user.
6.6. Admin PasswordIn the Admin Password of User Management, the administrator can change the passwords
from original to new password.
Steps1. Go to Administration > User Management > Admin Password.
2. Enter Original Password, New Password, Confirm New Password, Email.
3. Click SAVE.
6.7. Forget Password● The LDAP user will contact their respective Admin to reset the password● The SMPT the user will contact the Pelican Admin to reset the password.
Copyright © 2022 by Datametica Solutions Pvt. Ltd. All Rights Reserved. 17

7. Datastore ConfigurationTo compare and validate data across various data stores, first, you need to configure
source and destination datastores in the Pelican. Pelican provides predefined data store
types under which you can configure data stores as per the business requirement.
The datastore configuration is similar for all the data stores except HIVE which has a few
more steps.
Let’s see how to configure the Datastores.
Go to Administration Configure Data Store.
This displays the Data Store screen as shown below.
7.1. Steps for Adding Database configurationTo perform the data store activities, you need to provide the required information in the
Basic Settings and Pelican Settings tabs.
1. Click on the datastore you want to create.
2. Go to the Basic Settings tab.
Copyright © 2022 by Datametica Solutions Pvt. Ltd. All Rights Reserved. 18

3. Enter the following information,
Basic setting:1. Data Store Host: https://www.googleapis.com//biqquery//v2
2. Data Store Port: 443
3. Project Id: dm-eagle
4. OAuth Service Account Email: [email protected]
Pelican setting:1. Pipeline Temp Location: gs://dm_pelican/tmp/
2. Pipeline Stage Location: gs://dm_pelican/staging/
3. Cluster Zone: us-west1-b
4. Temporary Database: qastage
4. Add the Data Store Name and Data Store Description.
Copyright © 2022 by Datametica Solutions Pvt. Ltd. All Rights Reserved. 19

5. Upload the service_account.json file.
Once you upload the file service.account.json and add all the details in the field, then click
on the TEST CONNECTION. If everything is correct then it displays the Success message
and enables the Save button.
6. Click on the Pelican settings button and enter the corresponding details.
Copyright © 2022 by Datametica Solutions Pvt. Ltd. All Rights Reserved. 20

7. Click on the TEST CONNECTION button.
If the connection is correct then a message will pop up as Success in green color. Once the
connection is verified, the Save button will be enabled.
8. Click Save.
The newly added datastore will be displayed in the datastore list.
7.1.1. Steps for Teradata Configuration
1. Go to Administration > Configure > Datastore.
A list of predefined datastores is visible, at the left-hand side pane.
2. Select Teradata in the data store field.
A screen to enter the corresponding datastore details will be visible.
Copyright © 2022 by Datametica Solutions Pvt. Ltd. All Rights Reserved. 21

3. Enter all the details in the Basic Settings and Pelican Settings tab fields.
4. Click TEST CONNECTION.
A success message will be displayed in case of a successful connection.
5. Click SAVE.
The newly created datastore will be displayed in the datastore list.
Basic Settings Descriptions
Field Description
Data Store Name The name the user wants given to the data store.
Data Store Description Description for the data store.
Data Store Host IP address of the data store host machine.
JDBC Username JDBC username using which Pelican will connect to the datastore.
JDBC Password JDBC password for the provided JDBC user.
Pelican Settings Description
Copyright © 2022 by Datametica Solutions Pvt. Ltd. All Rights Reserved. 22

Field Description
Temporary Database Database used by Pelican for its functioning.
7.1.2. Steps for Netezza Configuration
1. Go to Administration > Configure > Datastore.
A list of predefined datastores is visible, at the left-hand side pane.
2. Select the Netezza datastore.
A screen to enter the corresponding datastore details will be visible.
.
Copyright © 2022 by Datametica Solutions Pvt. Ltd. All Rights Reserved. 23

3. Enter information in the Basic Settings and Pelican Settings to configure the data
store.
4. Click TEST CONNECTION.
A success message will be displayed in case of a successful connection.
5. Click SAVE.
The newly created datastore will be displayed in the datastore list.
Basic Settings Field Descriptions
Field Description
Data Store Name The name the user wants given to the data store.
Data Store Description Description for the data store.
Data Store Host IP address of the data store host machine.
Data Store Port JDBC port to connect to the data store.
JDBC Username JDBC username using which Pelican will connect to the datastore.
JDBC Password JDBC password for the provided JDBC user.
Pelican Settings Field Description
Field Description
Temporary Database Database used by Pelican for its functioning.
Supplementary DataStoreLocation
Writable Path on the machine where Pelican is installed.
Copyright © 2022 by Datametica Solutions Pvt. Ltd. All Rights Reserved. 24

7.1.3. Steps for Oracle Configuration
1. Go to Administration > Configure > Datastore.
A list of predefined datastores is visible at the left-hand side pane.
2. Select the Oracle.
A screen to enter the corresponding datastore details will be visible.
3. Enter all the details in the Basic Settings and Pelican Settings tab fields.
4. Click TEST CONNECTION.
A success message will be displayed in case of a successful connection.
5. Click SAVE.
The newly created datastore will be displayed in the datastore list.
Basic Settings Descriptions
Field Description
Data Store Name The name the user wants given to the data store.
Data Store Description Description for the data store.
Copyright © 2022 by Datametica Solutions Pvt. Ltd. All Rights Reserved. 25

Data Store Host IP address of the data store host machine.
Data Store Port JDBC port to connect to the data store.
JDBC Username JDBC username using which Pelican will connect to the datastore.
JDBC Password JDBC password for the provided JDBC user.
Use SID as Service Name If the service name is provided for an Oracle instance, thenselect this checkbox and enter service name value in the SIDtextbox.
SID The SID is a site identifier.
Pelican Settings Description
Field Description
Temporary Database Database used by Pelican for its functioning.
7.1.4. Steps for BigQuery Configuration
1. Go to Administration > Configure > Datastore.
A list of predefined datastores is visible at the left-hand side pane.
2. Select the BigQuery datastore.
Copyright © 2022 by Datametica Solutions Pvt. Ltd. All Rights Reserved. 26

3. Enter all the details in the Basic Settings and Pelican Settings tab fields. Click
Choose File. And provide the path for the google cloud service account key json file.
4. Click TEST CONNECTION.
A success message will be displayed in case of a successful connection.
5. Click SAVE.
The newly created datastore will be displayed in the datastore list.
Basic Settings Field Descriptions
Field Description
Data Store Name The name the user wants given to the data store.
Data Store Description Description for the data store.
Data Store Host IP address of the data store host machine.
Data Store Port JDBC port to connect to the data store.
Project Id BigQuery Project to which Pelican will connect,
OAuth Service Account Email Service account email for authentication.
Pelican Settings Field Description
Field Description
Pipeline Temp Location A Cloud Storage path for Dataflow to stage anytemporary files.
Temporary Database Database used by Pelican for its functioning.
7.1.5. Steps for HIVE Configuration
1. Go to Administration > Configure > Datastore.
A list of predefined datastores is visible at the left-hand side pane.
2. Select HIVE data store field. A screen to enter the corresponding datastore details
will be visible.
Copyright © 2022 by Datametica Solutions Pvt. Ltd. All Rights Reserved. 27

3. Enter all the details in the Basic Settings, Security Settings and Pelican Settingsfields.
4. Click TEST CONNECTION.
A success message will be displayed in case of a successful connection.
5. Click SAVE.
The newly created datastore will be displayed in the datastore list.
Basic Settings Field Descriptions
Field Description
Data Store Name The name the user wants given to the data store.
Data Store Description Description for the data store.
JDBC Username JDBC username using which Pelican will connect to thedata store.
JDBC Password JDBC password for the provided JDBC user.
JDBC URL Hive host URL for JDBC connection.
Additional Properties ForJDBC URL
Additional Properties For JDBC URL
Copyright © 2022 by Datametica Solutions Pvt. Ltd. All Rights Reserved. 28

Security Settings Field Description
Field Description
Kerberos Enabled Check for kerberized Hive.
Use Sasl Check box based if sasl is required
User Kerberos Principal Pattern will be [email protected].
Kerberos Service Principalfor JDBC
A Kerberos principal is a unique identity to whichKerberos can assign tickets.
Kerberos Service Principalfor Meta Store
HDFS meta store path
User Keytab Location User keytab file location in case of Kerberos Enable.
SASL QOP Enable Checkbox to enable SASL QOP
SASL QOP SASL Mechanisms
Kerberos Enabled forJDBC
Can be checked if Kerberos Enable is true.
Kerberos Enabled forMetastore
Can be checked if Kerberos Enable is true.
Pelican Settings Field Description
Field Description
Temporary Database Database used by Pelican for its functioning.
Queue Name Describes the name of the queue.
Queue Value Describes the queue value.
7.1.6. Steps for DB2 Configuration
1. Go to Administration > Configure > Datastore.
A list of predefined datastores is visible at the left-hand side pane.
Copyright © 2022 by Datametica Solutions Pvt. Ltd. All Rights Reserved. 29

2. Select DB2 data store field. A screen to enter the corresponding datastore details will
be visible.
3. Enter all the details in theBasic Settings and Pelican Settings tabs.
4. Click TEST CONNECTION.
A success message will be displayed in case of a successful connection.
5. Click SAVE.
Basic Settings Description
Field Description
Data Store Name The name the user wants given to the data store.
Data Store Description Description for the data store.
Data Store Host IP address of the data store host machine.
Data Store Port JDBC port to connect to the data store.
JDBC Username JDBC username using which Pelican will connect to the datastore.
JDBC Password JDBC password for the provided JDBC user.
Pelican Settings Description
Copyright © 2022 by Datametica Solutions Pvt. Ltd. All Rights Reserved. 30

Field Description
Temporary Database Database used by Pelican for its functioning.
Supplementary DataStoreLocation
Writable Path on the machine where Pelican is installed.
7.1.7. Steps for Synapse Configuration
1. Go to Administration > Configure > Datastore.
At the left-hand side pane, a list of predefined datastores is visible.
2. Select Synapse datastore.
A screen to enter the corresponding datastore details will be visible.
3. Enter all the details in the Basic Settings and Pelican Settings fields.
4. Click TEST CONNECTION.
A success message will be displayed in case of a successful connection.
5. Click SAVE.
Copyright © 2022 by Datametica Solutions Pvt. Ltd. All Rights Reserved. 31

The newly created datastore will be displayed in the datastore list.
Basic Settings Description
Field Description
Data Store Name The name the user wants given to the data store.
Data Store Description Description for the data store.
Data Store Host IP address of the data store host machine.
Data Store Port JDBC port to connect to the data store.
JDBC Username JDBC username using which Pelican will connect to thedata store.
JDBC Password JDBC password for the provided JDBC user.
Database Database name
Account Name Name of the account
Account Key Unique account key
Pelican Settings Field Description
Field Description
Temporary Database Database used by Pelican for its functioning.
Supplementary DataStoreLocation
Writable Path on the machine where Pelican is installed.
7.1.8. Steps for Snowflake Configuration
1. Go to Administration > Configure > Datastore.
A list of predefined datastores is visible at the left-hand side pane.
2. Select Snowflake datastore field. A screen to enter the corresponding datastore
details will be visible.
Copyright © 2022 by Datametica Solutions Pvt. Ltd. All Rights Reserved. 32

3. Enter all the details in the Basic Settings and Pelican Settings fields.
4. Click TEST CONNECTION.
A success message will be displayed in case of a successful connection.
5. Click SAVE.
The newly created datastore will be displayed in the datastore list.
Basic Settings Field Description
Field Description
Data Store Name The name the user wants given to the datastore.
Data Store Description Description for the data store.
Data Store Host IP address of the data store host machine.
Data Store Port JDBC port to connect to the data store.
JDBC Username JDBC username using which Pelican willconnect to the data store.
Copyright © 2022 by Datametica Solutions Pvt. Ltd. All Rights Reserved. 33

JDBC Password JDBC password for the provided JDBCuser.
Warehouse Name Name of the warehouse
Role Add the role
OAuth Service Account Email Add service account email ID
Project Id Add project ID
Pelican Settings Field Description
Field Description
Temporary Database Database used by Pelican for itsfunctioning.
Cluster Zone Zone of the cluster
Pipeline Temp Location A Cloud Storage path for Dataflow to stageany temporary files.
Pipeline Stage Location A Cloud Storage bucket for Dataflow tostage your binary files
7.1.9. Steps for Deltalake Configuration
We are currently supporting the following Deltalake pair: Hive to Deltalake.Steps for Deltalake configuration:
1. Go to Administration > Configure > Datastore.
2. At the left-hand side pane a list of predefined datastore lists is visible. Select the
Deltalake datastore field.
A screen to enter the corresponding datastore details will be visible.
Copyright © 2022 by Datametica Solutions Pvt. Ltd. All Rights Reserved. 34

3. Enter all the details in the: Basic Settings,Pelican Settings fields.
4. Click TEST CONNECTION.
A success message will be displayed in case of a successful connection.
5. Click SAVE.
The newly created datastore will be displayed in the datastore list.
Field Description
Data Store Name The name the user wants given to the datastore.
Data Store Description Description for the data store.
Data Store Host IP address of the data store host machine.
Data Store Port JDBC port to connect to the data store.
User Token A token allows access to the datastore.Expiry date for the token can be set so that thetoken can no longer be used by anunauthorised person after its use.
Additional Properties For JDBCURL
Additional Properties For JDBC URL
Copyright © 2022 by Datametica Solutions Pvt. Ltd. All Rights Reserved. 35

Pelican Settings Field Description
Field Description
Temporary Database Database used by Pelican for its functioning.
Supplementary DataStoreLocation
Writable Path on the machine where Pelican isinstalled.
7.1.10. Steps for Greenplum Configuration
1. Go to Administration > Configure > Datastore.
2. At the left-hand side pane a list of predefined datastore lists is visible. Select the
Greenplum datastore field.
A screen to enter the corresponding datastore details will be visible.
3. Enter all the details in the Basic Settings, and Pelican Settings tab fields.
4. Click TEST CONNECTION.
A success message will be displayed in case of a successful connection.
5. Click SAVE.
You may view the created data store in the list under the respective data store type.
Copyright © 2022 by Datametica Solutions Pvt. Ltd. All Rights Reserved. 36

Field Description
Data Store Name The name the user wants given to the data store.
Data Store Description Description for the data store.
Data Store Host IP address of the data store host machine.
Data Store Port JDBC port to connect to the data store.
JDBC Username JDBC username using which Pelican will connectto the data store.
JDBC Password JDBC password for the provided JDBC user.
Database A database the user wants to connect.
Pelican Settings Field Description
Field Description
Temporary Schema Temporary schema used by Pelican for itsfunctioning.
S3 Config File Location The location of S3 Config Files.
Copyright © 2022 by Datametica Solutions Pvt. Ltd. All Rights Reserved. 37

Supplementary DataStore Location Supplementary DataStore Location
7.1.11. Steps for Redshift Configuration
1. Go to Administration > Configure > Datastore.
2. At the left-hand side pane a list of predefined datastore lists is visible. Select the
Redshift datastore field.
3. A screen to enter the corresponding datastore details will be visible.
Field Description
Data Store Name The name the user wants given to the data store.
Data Store Description Description for the data store.
Data Store Host IP address of the data store host machine.
Data Store Port JDBC port to connect to the data store.
JDBC Username JDBC username using which Pelican will connect tothe data store.
JDBC Password JDBC password for the provided JDBC user.
Copyright © 2022 by Datametica Solutions Pvt. Ltd. All Rights Reserved. 38

Database The database the user wants to connect.
4. Enter all the details in the Basic Settings, and Pelican Settings tab fields.
5. Click Test Connection.
A success message will be displayed in case of a successful connection.
Field Description
Temporary Schema Temporary schema used by Pelican for its functioning.
S3 Bucket Location Amazon S3 creates buckets in a location that you specify
AWS Access Key Access keys are long-term credentials for an IAM user orthe AWS account root user
AWS Secret key It is a secret key similar to passwords.
S3 Bucket Region Amazon S3 creates buckets in a Region that you specify.
7.1.12. Steps for MSSQL Server Configuration
1. Go to Administration > Configure > Datastore.
Copyright © 2022 by Datametica Solutions Pvt. Ltd. All Rights Reserved. 39

2. At the left-hand side pane a list of predefined datastore lists is visible. Select the MSSQL Server datastore field.
A screen to enter the corresponding datastore details will be visible.
Field Description
Data Store Name The name the user wants given to the data store.
Data Store Description Description for the data store.
Data Store Host IP address of the data store host machine.
Instance Name Name of the Instance
3. Enter all the details in the Basic Settings, JDBC Settings and Pelican Settings tab
fields.
Copyright © 2022 by Datametica Solutions Pvt. Ltd. All Rights Reserved. 40

Field Description
Data Store Port JDBC port to connect to the data store.
JDBC Username JDBC username using which Pelican will connect to thedata store.
JDBC Password JDBC password for the provided JDBC user.
Field Description
Temporary Database Database used by Pelican for its functioning.
Supplementary DataStoreLocation
Writable Path on the machine where Pelican isinstalled.
4. Click Test Connection.
A success message will be displayed in case of a successful connection.
Copyright © 2022 by Datametica Solutions Pvt. Ltd. All Rights Reserved. 41

7.1.13. Steps for Vertica Configuration
1. Go to Administration > Configure > Datastore.
2. At the left-hand side pane a list of predefined datastore lists is visible. Select
the Vertica datastore field.
A screen to enter the corresponding datastore details will be visible.
Field Description
Data Store Name The name the user wants given to the data store.
Data Store Description Description for the data store.
Data Store Host IP address of the data store host machine.
Datastore Port JDBC port to connect to the data store.
JDBC Username JDBC username using which Pelican will connect to the datastore.
JDBC Password JDBC password for the provided JDBC user.
Database Name of the Database
Copyright © 2022 by Datametica Solutions Pvt. Ltd. All Rights Reserved. 42

5. Enter all the details in the Basic Settings and Pelican Settings tab fields.
Field Description
Temporary Database Database used by Pelican for its functioning.
Supplementary DatastoreLocation
Writable Path on the machine where Pelican is installed.
7.2. Editing an existing Datastore1. Go to Administration → Configure → Datastores.
2. Select the Datastore you want to edit.
3. Click on the Edit icon.
Copyright © 2022 by Datametica Solutions Pvt. Ltd. All Rights Reserved. 43

4. Edit the information of the desired field, upload the service_account.json file.
5. Click on the Test Connection button.
If the connection is correct then the message will pop up as Success in green color.
Once the connection is verified, the Save button will be enabled.
6. Click Save.
7.3. Deleting existing datastoreSelect the data store you want to delete and click the Delete Datastore icon. The system
displays a confirmation dialog box to ensure the deletion of the data store so click DELETE.
8. Validation ConfigurationAfter the source and destination data store is created, the next step is validation
configuration. Validation configuration allows you to select tables (source and destination)
from the respective data stores and map them.
Validation configuration searches the table with similar column name and data type as in the
source Datastore. The application provides various filters to search the desired data store,
reference database, destination database, reference schema and destination schema.
Additionally, Pelican facilitates the following approximate mapping methods which allows
you to map the tables based on their names and patterns:
● Phonetic Matching: A phonetic matching is an algorithm for matching words bytheir pronounciation.
For example, the words Principal and Principle are phonetically matching words.
Which means, table names (source and destination) Principal and Principle will be
considered for mapping.
● Approximate Matching: Approximate matching is based on Levenshtein distance. It
is a metric for measuring the difference between two words.
For Example. In the word ‘Employe’ , insertion of "e" at the end → distance is 1, while
in ‘Employee’ (insertion of "ee" at the end) distance is 2.
Copyright © 2022 by Datametica Solutions Pvt. Ltd. All Rights Reserved. 44

The above-mentioned table pair (source and destination) is considered for the
mapping as the Levenshtein distance between these table pairs is either 1 or 2.
8.1. Table MappingTo validate tables between source and destination data store.
1. Go to Govern Validation Configuration.
2. Click on the create new mapping icon.
Copyright © 2022 by Datametica Solutions Pvt. Ltd. All Rights Reserved. 45

3. Select the following information:
a Datastore Pair: Displays all the combinations of source and target data
stores configured in the system.
b Reference Database: Displays all the databases of the corresponding
source data store.
c Reference Schema: This field will be enabled only if the source datastore
supports three level hierarchy. It displays all the schemas present in the
database selected in the Reference Database.
d Destination Database: Displays all the databases of the corresponding
destination data store.
e Destination Schema: This field will be enabled only if the target datastore
supports a three level hierarchy*. Displays all the schemas present in the
database selected in the Destination Database.
f Select tables in the table section.
This section allows the user to select a table that exists in the selected
reference database and schema. While mapping, the application searches
the same table name in the destination database and schema. Further it also
Copyright © 2022 by Datametica Solutions Pvt. Ltd. All Rights Reserved. 46

searches similar column names and data types as in source datastore. You
can use the approximation matching parameters to search tables, columns,
and data types of similar patterns as in the source data store.
g Click Map.
After you click on Map, the application displays the mapping result in four sections as
shown below.
a Mapped Tables: This tab contains the table where the table name and each column
of the source table matches with that of the target table.
b Partially Mapped Tables: This tab contains the table/s where few columns of a
source table/s match with the target table/s.
c Unmapped Tables: This tab contains the table/s where none of the columns of the
source table matches with the target table/s.
d Previously Mapped Tables: This tab shows the previously mapped tables.
4. Click the respective tab (section) to see the results.
Copyright © 2022 by Datametica Solutions Pvt. Ltd. All Rights Reserved. 47

5. The user can perform following operations on the result page:
• Show Column
• Edit Configuration
● Edit Column
● Edit Expression
● Edit Data Type
● Add New Columns
• Delete table and column
• Override Unmapped Columns
8.1.1. Edit the existing configuration
This functionality allows you to edit existing columns, expression, data type, and add new
columns as per the business requirement.
Steps to edit the existing configuration:
Step 1: Click the Edit Configuration icon on the screen.
The application displays the Edit Configuration pop-up window as shown
below.
Copyright © 2022 by Datametica Solutions Pvt. Ltd. All Rights Reserved. 48

In the Edit Configuration window, you can edit existing columns, existing expressions,
existing data type and add new columns.
● Edit existing column namePelican allows the user to edit the existing column name (Alias Name) to make it uniform
on both sides (Reference and Destination).
For example:
Suppose, two columns, namely, order_name and ordername exist in the reference and
destination tables respectively. Both the columns display the order name hence logically
they are the same. So, instead of having two different column names you can edit it to
either order_name or ordername as an alias name.
To edit existing column name:
Enter the desired column name in the Alias Name field of the respective column and click
OK.
The changes made in the Edit Configuration screen will be saved only in Pelican UI and
not in the original database.
● Edit existing expressionAfter mapping, the expressions are automatically created. The expressions are created
based on the datatype of the respective column. However, the user can edit these existing
expressions as per the requirement.
For example,
Suppose the date column exists on both the sides (Reference and Destination tables), the
data formats of these columns are DD:MM: YYYY HH:MM: SS and DD:MM: YYYYrespectively. the HH:MM: SS is missing in the destination table. So, using the edit
expression, you can match the mismatched expression.
To edit the existing expression:
Click the desired expression row, edit the expression and click OK.
Copyright © 2022 by Datametica Solutions Pvt. Ltd. All Rights Reserved. 49

Edit existing data typeThe user can edit the existing data type of any column in the reference and destination
table. Suppose there is a column that exists on both the sides (Reference and Destination
tables), but the data type of these columns is Varchar and String respectively. Logically
these two data types are similar in nature. Hence, instead of two data types, the user can
change it to either String or Varchar.
To edit the existing data type:
Select the new data type from the Datatype drop-down list and click OK.
Add new columnPelican allows the user to add new columns as per the business requirement, the user can
add any number of columns.
2. The application adds the new column as shown below.
Copyright © 2022 by Datametica Solutions Pvt. Ltd. All Rights Reserved. 50

3. Enter column name (Alias Name).
4. Enter expression, data type on both the sides (Reference and Destination tables) and
click Save to save the newly added column.
8.1.2. Delete Mapping
The user can delete mappings from the respective sections if they are not required.
However, the deleted mappings will be removed only from the Pelican UI and not from the
original database.
To delete a table:
1. Click Delete Table icon as shown below.
Copyright © 2022 by Datametica Solutions Pvt. Ltd. All Rights Reserved. 51

Delete columnsThe user can delete the existing columns of the reference and destination table if they are
not required. Users can delete columns from the mapped, partially mapped, unmapped and
previously mapped table sections as well. However, the deleted columns will be removed
only from the Pelican UI and not from the original database.
8.1.3. Override unmapped columns
Pelican allows the user to override the unmapped column.
For example,
Suppose column ID_P and id_p exist on both the sides (Reference and
Destination tables), logically these two columns are identical as both represent
student identification numbers in the respective databases. However, while
mapping the application won’t map ID_P and id_p due to variation in name and
mark then under the unmapped columns section. In such cases, the user can
override the unmapped columns into mapped columns.
To override unmapped columns:
1. Locate unmapped column row on the screen and click the symbol as
shown below.
Copyright © 2022 by Datametica Solutions Pvt. Ltd. All Rights Reserved. 52

2. Click the Save Mapping button to save the changes.
8.1.4. Surrogate Key
Pelican has the capability to validate any such tables where the unique key is anauto-generated value and corresponding business key exists in another table that can beused as unique (i.e, Surrogate Key). Therefore we are providing a way in Pelican to map ajoin of two tables on source to a join of two tables on target.
The steps to map tables which have surrogate key in another table:
1. Select Validation Configuration from the Govern tab.
2. Click on the ‘+’ sign.
This opens a page to Map tables from source to target.
3. Select a Datastore pair.
4. Select Reference Database.
This page allows you to select the actual table which is to be mapped, i.e. the table which isto be validated.
The tables associated with the database will be displayed on the screen.
Copyright © 2022 by Datametica Solutions Pvt. Ltd. All Rights Reserved. 53

Select the table to be validated. The table may or may not have a unique reference key.
On Selecting the table, the ‘Select Surrogate Table’ checkbox will be displayed.
Note:
● You can select only one table at a time.● On selecting multiple tables, an error message will be displayed.● If no table is selected the ‘Select Surrogate Table’ checkbox will not be visible.
5. Select Destination Database for Actual table, click on the checkbox - “Select surrogatetable”, then click Next.
The below page will be displayed.This page is for selecting the table which has thesurrogate key for the actual table.
6. Select Reference Database.This page is for selecting the table which has the surrogate key for the actual table.
All the tables related to the database will be displayed.
7. Select the table which has the surrogate key.
8. Select the Destination database for surrogate table
Copyright © 2022 by Datametica Solutions Pvt. Ltd. All Rights Reserved. 54

9. Click Map.
The mapped tables page will be displayed.
We will see 2 mapped tables, First one is the Actual table (which is to be validated) andsecond one is the Surrogate table (which has the surrogate key)
Note:
Click on the corresponding Configuration button if you want to change or edit theconfiguration of any table.
Copyright © 2022 by Datametica Solutions Pvt. Ltd. All Rights Reserved. 55

8.1.5. Add Tags
Tagging is an optional feature associated with the table mappings. It can be used to have
additional information for the mappings. user can set one or more tags on a table
mapping.
Same tags can be used with multiple mappings. user can change tags any number of
times from the Edit Mapping page.
Steps to Add tags1. A user can add a tag to an existing mapping or a new mapping.
2. Add new Tags from the Mapping page by clicking the Tag icon .
3. Click Ok.
Copyright © 2022 by Datametica Solutions Pvt. Ltd. All Rights Reserved. 56

4. Click Save.
Note: Existing tags can be edited by following similar steps.
9. Custom Source and TargetThis functionality provides the capability to create views from the User Interface, i.e. Pelicanprovides an option from the UI to generate a ‘Create view’ query in which multiple tables to beviewed can be specified. The View Creation feature is only visible to Admin/Super user.
Steps to create custom Views for mapping:
1. Select View Creation from the Govern menu.
The Create Custom Views For Mapping page will be displayed.
2. Enter a unique View Name.
3. Select the DataStore.
4. Select Database.
5. Enter an appropriate Query.
Copyright © 2022 by Datametica Solutions Pvt. Ltd. All Rights Reserved. 57

6. Click Submit.
The corresponding view will be generated in the database.
This newly created view can be used for mapping and validation. It can also be used as
an alternative to the surrogate feature.
Note:
Rules and Guidelines for SQL Views:
Certain rules and guidelines apply when you create an SQL view.
● All tables in the SQL view must exist in the same database.
● The SQL statement must use valid SQL syntax based on the database of the tables
included in the SQL view. Data Validation Option does not validate the SQL
statement syntax.
● The number and order of the columns must match in the column definitions and the
SQL statement of the SQL view.
● The scale must be zero for datetime, integer, and string data types.
● If you create a column in the SQL view, verify that the datatype, precision, and scale
match the PowerCenter data type, precision, and scale shown in the Column
Definitions area.
● You can add database functions, any join type, subqueries, and stored procedures in
the SQL statement of an SQL view.
● If the SQL view calls a stored procedure, the connection assigned to SQL view must
have Execute permission on the stored procedure.
Copyright © 2022 by Datametica Solutions Pvt. Ltd. All Rights Reserved. 58

● If you include the SQL view in a table pair, you can create a WHERE clause for the
table pair based on a field in the SQL view.
● When you use SQL view as the data source, you can edit the connection in the table
pairs, single tables, aggregate views, and join views.
10. Scheduler ConfigurationIn Pelican, the user can create a scheduler for a saved mapping, so that, after a specific time
period the scheduler executes the process and validates the source table with the destination
table. Once the user completes the table mapping process the respective schedulers can be
configured.
10.1. Modes in Scheduler Configuration
The Scheduler supports two modes of validation - Litmus and Full.
10.1.1. LITMUS mode
The Litmus mode analyzes whether the tables at source and target are matching or not. It
does not support cell level differences or samples.
10.1.2. Full mode
Along with data validation as in Litmus mode, the Full mode displays the cell level
differences through the sample rows fetched from both source and target tables.
Copyright © 2022 by Datametica Solutions Pvt. Ltd. All Rights Reserved. 59

10.2. Steps to configure the scheduler:
1. Navigate Govern -> Validation Configuration.
(Create Mappings-> then go to Schedulers -> Create New scheduler)
2. Select Table Mapping from the hierarchy and click View Scheduler icon on the
toolbar.
3. Click the Add Pelican Scheduler icon.
4. Enter Scheduler Name in the field provided and select table.
5. For validation the user can select either LITMUS or FULL mode as per requirement.
Copyright © 2022 by Datametica Solutions Pvt. Ltd. All Rights Reserved. 60

6. Select Validation Time Frame from the drop-down and then click the Enable toggle
button to set recurrence Pattern.
7. Select Email toggle button and enter email address if user wants reports to be sent
for specific scheduler.
Copyright © 2022 by Datametica Solutions Pvt. Ltd. All Rights Reserved. 61

8. Click SAVE.
9. Click Execute Now for on-demand execution of any of the schedulers.
The newly created scheduler is added to the Schedulers screen as shown below.
Copyright © 2022 by Datametica Solutions Pvt. Ltd. All Rights Reserved. 62

Note:The following scheduler report email will be sent to the email address mentioned whilecreating the scheduler:
10.3 Scheduler Report
● The Scheduler Status Report functionality enables the user to view all the iterations
of all the schedulers of the given mapping in the Pelican application.
● To View the Scheduler report click on the Scheduler Status Report hyperlink located
on the top of the Schedulers page. An .xls file will be downloaded at the bottom of the
screen.
Copyright © 2022 by Datametica Solutions Pvt. Ltd. All Rights Reserved. 63

● This scheduler report file contains the scheduler and mapping details in columns
such as mapping name, scheduler name, source and destination details, etc.
11. Validation ResultAfter scheduler execution, the application automatically generates the validation result in the
form of a report.
11.1. Results from Report page
Steps to view the validation result:
1. Go to Reports.2. Click on Validation Result.
The application displays the Validation Result screen as shown below.
Copyright © 2022 by Datametica Solutions Pvt. Ltd. All Rights Reserved. 64

The Validation Result screen displays the following information.
1. Source Table Name : This column displays the list of source tables for which mapping
has been executed in the system.
2. Mapping Name: This column displays the mapping which has been executed for the
particular table.
3. Statistics: This column displays the scheduler history of the respective table
mapping.
Click the View Mapping Historical Results icon to view detailed history.
This displays the detailed history of the respective scheduler as shown
below.
The scheduler history page displays the detailed information of the scheduler, such as:
Copyright © 2022 by Datametica Solutions Pvt. Ltd. All Rights Reserved. 65

• Scheduler name
• Result
• Sample
• Start time
• End time
• Source Rows Count
• Target Rows Count
• Cell Mismatch Cout
• Extra Rows Count
• Missing Rows Count
• Total Mismatch RowsCount
• Approve
• Exceptions
Among these following are the some of the major features: -
Approve
● It is a feature to approve a mapping if a mapping fails.
● This feature has been added for the cases where the cause of failure is a known
issue and can be considered as an exceptional case.
● As shown below we can approve a mapping by clicking on the icon in the
approve column and click save to approve a mapping.
Copyright © 2022 by Datametica Solutions Pvt. Ltd. All Rights Reserved. 66

● If the result is either approved or passed, the icon to open approve a
mapping modal will be disabled.
Exceptions● If a scheduler failed due to an exception, then log will display its
exception stack trace. Click on the logs icon to view exception logs.
● Once we click the icon on the logs column, the new pop-up window will open for the
logs.
● If Scheduler runs without Exception, then the Log option will be disabled.
4. Schedulers: Click on the icon to view scheduler details.
Copyright © 2022 by Datametica Solutions Pvt. Ltd. All Rights Reserved. 67

The screen will pop up and will show information and properties of the scheduler such as
scheduler name, scheduler running time, on schedule, starting and ending time of last
execution of scheduler, execution option of scheduler using Execute Now button and
status of the execution.
5. Table Historical Result: This column displays the execution history of the schedulers of
the respective mapping. This information is represented by Green, Red and Bluecircles. The Green circle indicates the Success, the Red circle indicates the Failure,the Blue circle indicates the Approve. The user can hover mouse over these circles to
view execution start date and end date of the respective scheduler as shown below.
6. Results: This column displays the data validation result. The Result is represented
by two flags, namely:
• Success
• Failure
Hover mouse over icon to know the reason for failure.
Copyright © 2022 by Datametica Solutions Pvt. Ltd. All Rights Reserved. 68

7. Sample: This column displays the sample of mismatch data in case the total
mismatch count is greater than zero. Click the symbol to view samples of
mismatched data. This displays the Sample Data screen as shown below:
The Sample Data report displays sample mismatch data from source and target table with
different colours. This report also provides the following filters which helps the user to view
the desired information:
● Hide/Show Match Column
● Split Horizontal
Hide/Show Match Column: The Hide/Show Match Column is a toggle button which shows
two States ON and OFF.
When the Hide/Show Match Column toggle button is set to OFF, then the application
displays both matched and unmatched columns as shown below.
Copyright © 2022 by Datametica Solutions Pvt. Ltd. All Rights Reserved. 69

When the Hide/Show Match Column toggle button is set to ON, then the application
displays only unmatched columns as shown below.
Split Horizontal: Set Split Horizontal toggle button to ON to view mismatched data in the
horizontal format, for more information, refer below image.
Copyright © 2022 by Datametica Solutions Pvt. Ltd. All Rights Reserved. 70

11.2. Results from Scheduler pageHere, the user can view validation results for the saved mapping.
To view validation result:
1. Go to the Validation Configuration page and select the saved mapping for which
you want to see the validation result and then click on the view scheduler icon
.The following screen will be displayed.
Copyright © 2022 by Datametica Solutions Pvt. Ltd. All Rights Reserved. 71

2. Click on the icon to see the statistics of the validation result page for the
mapping.
The fields (columns of the validation result page are the same as explained
above).
12. License - Buy Your Own license (BYOL)● There are two types of licenses by which you can access Pelican:
1. License for Production environments - Allows validation of all the records in a
table.
2. License for Non production environments: This license will be used for all the
lower level environments. It will support all the Pelican functionalities but with limited
capacity. Allows validation of tables having upto 1000 records. Tables with more than
1000 records will not be validated.
● Buy Your Own license (BYOL) notifies you when your license will expire. Pelican has
introduced a new feature, i.e Add licence. This new feature notifies you, the date of the
renewal.
● To get a new License contact : [email protected].
Copyright © 2022 by Datametica Solutions Pvt. Ltd. All Rights Reserved. 72

12.1. Adding /updating licenseOnce you received the pelican license file, i.e. licence.pel follow the following steps:
1. Log in to Pelican.
2. Administration -> Add License.
3. Click on the Choose license to upload button and select the license from the file
system.
Copyright © 2022 by Datametica Solutions Pvt. Ltd. All Rights Reserved. 73

A license Preview pop-up will be displayed.
4. You will be taken back to the Login Page.
Login back to continue the usage.
Note: You will be notified in the following three ways regarding the license renewal:
● Detailed email is sent to your registered email address prior to 15 days of renewal ,
mentioning your product ID and date of renewal. All the registered email addresses
will receive the email of notification. The supported mails (SMTP providers) are
Gmail, Microsoft(Office 365) and Yahoo.
● A message is displayed on the login screen, below the login tab,
Eg. Pelican validity has expired. Contact Datametica support, Contact Us.
Copyright © 2022 by Datametica Solutions Pvt. Ltd. All Rights Reserved. 74

● On the main screen, on the menu bar,
Eg. Pelican validity has expired. Contact Datametica support, Contact Us.
Copyright © 2022 by Datametica Solutions Pvt. Ltd. All Rights Reserved. 75

Once your license expires, you are able to create the mappings, but cannot run the
schedulers. To continue, you need to contact Datametica.
Once you renew the licence, all the functionalities will be resumed.
Now, you can run schedulers.
13. LineageThe Lineage feature enables the user to view the last executions of source tables anddisplay them graphically. Therefore ,it becomes easy for the tester / developer to backtrackand identify the table where the issue started. This results in quicker root cause analysis.The benefits of this functionality is as follows:
1. Finding the root-cause of the error.2. Provides metadata information, assisting to fixing issues if any gap is identified in the
data processing pipeline.3. Graphic visualisation of the data flow.
13.1. Add LineageAdd Lineage is the process of adding a CSV file, which contains two columns (FromTable,ToTable) with their qualified names in the format.
Copyright © 2022 by Datametica Solutions Pvt. Ltd. All Rights Reserved. 76

database_name.table_name or database_name.schema_name.table_name
Example:CSV file contain following details:
FromTable ToTablePelican.customer pelican.customer_salesman_order_detailsPelican.salesman pelican.customer_salesman_order_detailsPelican.orders pelican.customer_salesman_order_details
How to Add lineage?
Only Admin or superuser has access to the add Lineage Or upload CSV file.
To steps to add Lineage are as follows:
1. Go to Administration → Add Lineage.
2. Select the Datastore and click on Preview Uploaded File.
Copyright © 2022 by Datametica Solutions Pvt. Ltd. All Rights Reserved. 77

3. The previously uploaded table will be displayed on the screen.
Verify and click on the Preview button if you want to add a table to the existingtables.
You can drag and drop a CSV file or click on Upload file link.
Copyright © 2022 by Datametica Solutions Pvt. Ltd. All Rights Reserved. 78
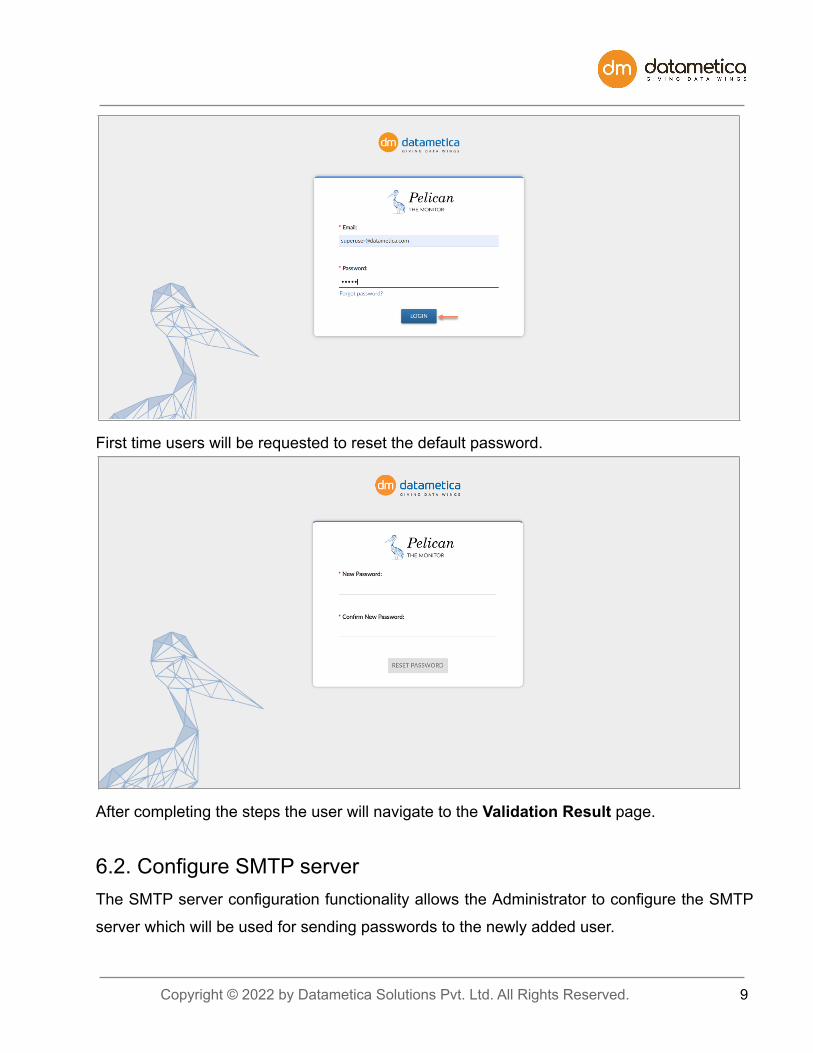
4. Select a lineage file with .csv extension and click open.
Copyright © 2022 by Datametica Solutions Pvt. Ltd. All Rights Reserved. 79

5. The add lineage file preview will be displayed. If you want to remove the file click ondelete icon and repeat the process with the new file. And click on Upload.
6. When the file is successfully uploaded, you can see the preview.
13.2. How to View Lineage?To view the lineage status, follow the steps mentioned below
1. Go to the Reports → Validation Result → Lineage (can be viewed on eachmapping result)
2. Click on the Lineage record.
3. Linagage results will be displayed in the pictorial format.
Note: Single click on the node to see the result history, while double clicking on the nodewill take you to it's parent lineage.
Copyright © 2022 by Datametica Solutions Pvt. Ltd. All Rights Reserved. 80

Single Click Result
Double click Result
Copyright © 2022 by Datametica Solutions Pvt. Ltd. All Rights Reserved. 81
14. API
14.1 Export/Import API
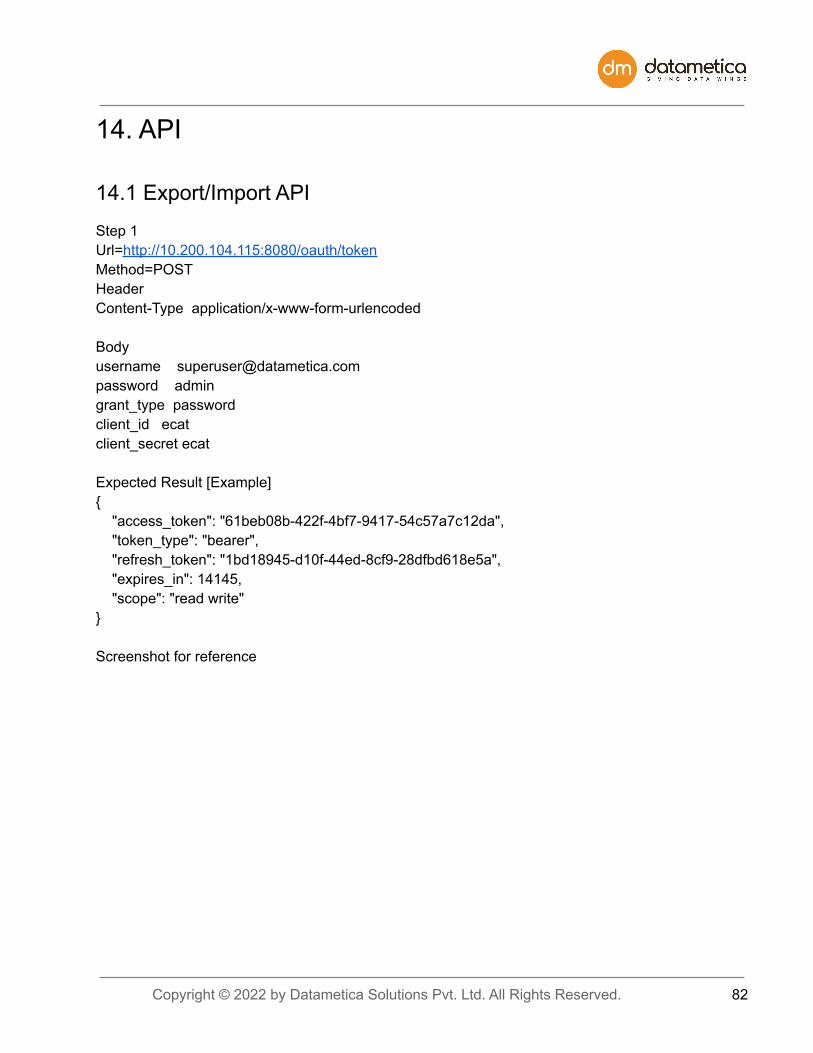
Step 1Url=http://10.200.104.115:8080/oauth/tokenMethod=POSTHeaderContent-Type application/x-www-form-urlencoded
Bodyusername [email protected] admingrant_type passwordclient_id ecatclient_secret ecat
Expected Result [Example]{
"access_token": "61beb08b-422f-4bf7-9417-54c57a7c12da","token_type": "bearer","refresh_token": "1bd18945-d10f-44ed-8cf9-28dfbd618e5a","expires_in": 14145,"scope": "read write"
}
Screenshot for reference
Copyright © 2022 by Datametica Solutions Pvt. Ltd. All Rights Reserved. 82

Step 2Url=http://10.200.104.115:8080/app/rest/pelican/tablemappingsMethod=GETHeaderAuthorization bearer {access_token generated in step 1 }
Expected Result [Example][{
"tableMappingId": 62,"tableMappingName": "BLOOMIES_OFR_SALES_BY_STR_SUMM_T_1622096947844","tableMappingDescription": "Mapping for
BLOOMIES_OFR_SALES_BY_STR_SUMM_T_1622096947844","tableName": "BLOOMIES_OFR_SALES_BY_STR_SUMM_T","selected": false,"qualifiedSource": "Teradata_Copy.pelican.BLOOMIES_OFR_SALES_BY_STR_SUMM_T","qualifiedTarget": "bigquery.Test.BLOOMIES_OFR_SALES_BY_STR_SUMM_T"
}]
Copyright © 2022 by Datametica Solutions Pvt. Ltd. All Rights Reserved. 83

Screenshot for reference
Step 3Url=http://10.200.104.115:8080/app/rest/pelican/tablemapping/{tableMappingId generated in step 1which need to be exported Ex-42}Method=GETHeaderAuthorization bearer {access_token generated in step 1 }
Expected Result [Example]{
"tableMappingId": 42,"mappingConfigId": 5,"targetTablename": "TableauExecutiveDashboard","sourceDataStoreId": 9,"sourceDbname": "test_db.dbo","sourceTablename": "TableauExecutiveDashboard","comparisionDescription": null,"tableMatching": false,"approximateMatch": false,"sourceTableFilter": null,"targetTableFilter": null,
Copyright © 2022 by Datametica Solutions Pvt. Ltd. All Rights Reserved. 84

"sourceDatastoreName": "ms_sql_server_test","targetDatastoreName": "bigquery","tableMappingName": "TableauExecutiveDashboard_1622022651390_clone","tableMappingDescription": "Mapping for TableauExecutiveDashboard_1622022651390","deleteColumnMappingList": null,"resetColumnMappings": false,"tags": [],"columnComparisionResultList": [
{"columnMappingId": 1163,"targetTableColumnName": "FORMAT(\"%.*f\",0,CYBilledRentanchor)","targetTableColumnDatatype": "STRING","sourceTableColumnName": "LTRIM(STR(CYBilledRentanchor, (CASE
WHEN(CYBilledRentanchor < 0) THEN 21 ELSE 20 END) , 4))","sourceTableColumnDatatype": "VARCHAR","comparisionDescription": null,"columnMatching": true,"ignore": false,"uniqueKeyColumn": false,"createTimestampField": false,"modifyTimestampField": false,"columnFilter": null,"sourceColumnLogicalDatatype": "Decimal Number","targetColumnLogicalDatatype": "Decimal Number","expressionName": "CYBilledRentanchor","sourceColumnLength": 400,"sourcePrecision": null,"targetColumnLength": 40,"targetPrecision": null,"initialSourceColumnname": "CYBilledRentanchor","initialTargetColumnname": "CYBilledRentanchor","initialSourceColumnDatatype": "money","initialTargetColumnDatatype": "NUMERIC","initialSourceColumnLength": null,"initialTargetColumnLength": null,"initialSourceColumnPrecision": null,"initialTargetColumnPrecision": null,"defaultSourceExpression": false,"defaultTargetExpression": false,"columnMappingStatus": 1,"incompatibleNumericDatatype": false,"approximateMatch": false
}]
Copyright © 2022 by Datametica Solutions Pvt. Ltd. All Rights Reserved. 85

Screenshot for reference
Import Mapping API
Step 1
Url=http://10.200.104.100:8080/oauth/tokenMethod=POSTHeaderContent-Type application/x-www-form-urlencoded
For more information please refer to the Step 1 of Export API
Step 2
API to get the datastore ID.
Url=http://10.200.104.100:8080/app/rest/datastoreforuiMethod=GETHeaderAuthorization bearer {access_token generated in step 1 }
Copyright © 2022 by Datametica Solutions Pvt. Ltd. All Rights Reserved. 86

Expected Result [Example]{
"id": 401,"name": "BigQuery","dataStoreList": [
{"dataStoreId": 1,"name": "bq_ftd","description": "data store","dataStoreTypeId": 401,"dataStoreTypeName": "BigQuery","dataStorePropsList": [
{"propertyId": 1,"propertyName": "dataStoreHost","propertyValue": "https://www.googleapis.com//biqquery//v2"
},{
"propertyId": 2,"propertyName": "dataStoreJdbcPort","propertyValue": "443"
},
Screenshot for reference
Copyright © 2022 by Datametica Solutions Pvt. Ltd. All Rights Reserved. 87

Step 3
To Import the mapping.
Url=http://10.200.104.100:8080/app/rest/pelican/persistmappingMethod=POSTHeaderContent-Type application/jsonAuthorization bearer 11c963b7-bb8f-4bdd-9588-20c7339324d8
Body
{"tableComparisionResultList": [{"resultName": "Mapped Tables","tableComparisionResultList": [
Response from step 3 of Export API{
"tableMappingId": null,--------------------------------------------change set as null"mappingConfigId": null,-------------------------------------------change set as null"targetTablename": "BLOOMIES_OFR_SALES_BY_STR_SUMM_T",
Copyright © 2022 by Datametica Solutions Pvt. Ltd. All Rights Reserved. 88

"sourceDataStoreId": 4,--------------------------------------------change as per 2nd API call from importprocess
"sourceDbname": "pelican","sourceTablename": "BLOOMIES_OFR_SALES_BY_STR_SUMM_T","comparisionDescription": null,"tableMatching": false,"approximateMatch": false,"sourceTableFilter": "ITEM_QTY<1","targetTableFilter": "ITEM_QTY<1","sourceDatastoreName": "Teradata_Copy","targetDatastoreName": "bq_ftd","tableMappingName": "BLOOMIES_OFR_SALES_BY_STR_SUMM_T_1622096947844","tableMappingDescription": "Mapping for
BLOOMIES_OFR_SALES_BY_STR_SUMM_T_1622096947844","deleteColumnMappingList": null,"resetColumnMappings": false,"tags": [],"columnComparisionResultList": [
{"columnMappingId": 1445,"targetTableColumnName": "ITEM_QTY","targetTableColumnDatatype": "INT64","sourceTableColumnName": "ITEM_QTY","sourceTableColumnDatatype": "integer","comparisionDescription": null,"columnMatching": true,"ignore": false,"uniqueKeyColumn": false,"createTimestampField": false,"modifyTimestampField": false,"columnFilter": null,"sourceColumnLogicalDatatype": "Non Decimal Number","targetColumnLogicalDatatype": null,"expressionName": "ITEM_QTY","sourceColumnLength": 11,"sourcePrecision": null,"targetColumnLength": 11,"targetPrecision": null,"initialSourceColumnname": "ITEM_QTY","initialTargetColumnname": "ITEM_QTY","initialSourceColumnDatatype": "integer","initialTargetColumnDatatype": "INT64","initialSourceColumnLength": 11,"initialTargetColumnLength": 11,
Copyright © 2022 by Datametica Solutions Pvt. Ltd. All Rights Reserved. 89

"initialSourceColumnPrecision": null,"initialTargetColumnPrecision": null,"defaultSourceExpression": false,"defaultTargetExpression": false,"columnMappingStatus": 1,"incompatibleNumericDatatype": false,"approximateMatch": false
},{
"columnMappingId": 1447,"targetTableColumnName": "FORMAT(\"%.*f\",2,TXN_AMT)","targetTableColumnDatatype": "STRING","sourceTableColumnName": "TRIM(LEADING '0' FROM CAST((TXN_AMT(format
'999999999.99')) AS VARCHAR(13)))","sourceTableColumnDatatype": "VARCHAR","comparisionDescription": null,"columnMatching": true,"ignore": false,"uniqueKeyColumn": true,"createTimestampField": false,"modifyTimestampField": false,"columnFilter": null,"sourceColumnLogicalDatatype": "Decimal Number","targetColumnLogicalDatatype": "Decimal Number","expressionName": "TXN_AMT","sourceColumnLength": 9,"sourcePrecision": null,"targetColumnLength": 9,"targetPrecision": null,"initialSourceColumnname": "TXN_AMT","initialTargetColumnname": "TXN_AMT","initialSourceColumnDatatype": "decimal","initialTargetColumnDatatype": "NUMERIC","initialSourceColumnLength": 9,"initialTargetColumnLength": 9,"initialSourceColumnPrecision": 2,"initialTargetColumnPrecision": null,"defaultSourceExpression": false,"defaultTargetExpression": false,"columnMappingStatus": 1,"incompatibleNumericDatatype": false,"approximateMatch": false
},{
Copyright © 2022 by Datametica Solutions Pvt. Ltd. All Rights Reserved. 90

"columnMappingId": 1446,"targetTableColumnName": "FORMAT(\"%.*f\",2,DISC_AMT)","targetTableColumnDatatype": "STRING","sourceTableColumnName": "TRIM(LEADING '0' FROM CAST((DISC_AMT(format
'999999999.99')) AS VARCHAR(13)))","sourceTableColumnDatatype": "VARCHAR","comparisionDescription": null,"columnMatching": true,"ignore": false,"uniqueKeyColumn": false,"createTimestampField": false,"modifyTimestampField": false,"columnFilter": null,"sourceColumnLogicalDatatype": "Decimal Number","targetColumnLogicalDatatype": "Decimal Number","expressionName": "DISC_AMT","sourceColumnLength": 9,"sourcePrecision": null,"targetColumnLength": 9,"targetPrecision": null,"initialSourceColumnname": "DISC_AMT","initialTargetColumnname": "DISC_AMT","initialSourceColumnDatatype": "decimal","initialTargetColumnDatatype": "NUMERIC","initialSourceColumnLength": 9,"initialTargetColumnLength": 9,"initialSourceColumnPrecision": 2,"initialTargetColumnPrecision": null,"defaultSourceExpression": false,"defaultTargetExpression": false,"columnMappingStatus": 1,"incompatibleNumericDatatype": false,"approximateMatch": false
}],"hiveDataStoreId": 3,-------------------change as per 2nd API call from import process(use bq data
store id here)"hiveDbname": "Test","comparisionResult": null
}]},{"resultName": "Partially mapped Tables",
Copyright © 2022 by Datametica Solutions Pvt. Ltd. All Rights Reserved. 91

"tableComparisionResultList": []},{"resultName": "Unmapped Tables","tableComparisionResultList": []
},{"resultName": "Previously mapped Tables","tableComparisionResultList": []
}],"pelicanMappingParameterDTO": {"pelicanMapConfigId": null,"sourceDataStoreId": 4,---------------------change as per 2nd API call from import process"sourceDbName": "pelican",---------------------set source database name"tableList": [{"tableName": "BLOOMIES_OFR_SALES_BY_STR_SUMM_T",----------set your table name
example(BLOOMIES_OFR_SALES_BY_STR_SUMM_T)"dataStoreType": null,"databaseName": "pelican",----------------------------------------------set source database name"dataStoreId": 4,------------------------------------change as per 2nd API call from import process"selected": false,"dataStoreName": null,"columnMetadataMap": {},"approximateMatch": false,"logicalDatatypeToColumnNamesMap": {},"physicalDatatypeToColumnNamesMap": {}
}],"targetDataStoreId": 1,-----------------change as per 2nd API call from import process"targetDbName": "Test",-----------------set target database name"targetTableName": null,"sourceTableName": null,"editMapping": false,"resetMapping": false,"useExistingMapping": true,"advancedMappingOptions": {"enableApproximateMapping": false,"approximationThreshold": null,"enablePhoneticMatch": false
}},"defaultSourceExpression": false
Copyright © 2022 by Datametica Solutions Pvt. Ltd. All Rights Reserved. 92

}Expected Result [Example]Mapping id of imported mapping
Screenshot for Reference
Copyright © 2022 by Datametica Solutions Pvt. Ltd. All Rights Reserved. 93

14.2. Pelican V3 APIStep 1
OAuth API call
Url= http://127.0.0.1:8100/oauth/tokenMethod=POSTHeadercontent-type : application/x-www-form-urlencodedaccept : application/json
Bodyusername [email protected] admingrant_type passwordclient_id ecatclient_secret ecat
Step 2
Pelican V3 api to get table mapping id
Url=http://127.0.0.1:8100/api/rest/v3/pelican/mapping/db2/SAMPLE.DB2ADMIN/CUSTOMER_P2?targetDsName=BQ_Sam&targetDbName=qastage&targetTableName=customer_p2
Method=GETHeaderaccept : application/jsoncontent-type : application/jsonAuthorization : Bearer {oauth token from API call #1}
**** Replace source and target db name and table name above ****
Step 3
Pelican V3 API for mapping details
Url= http://127.0.0.1:8100/api/rest/v3/pelican/mapping/ {table mapping id}Method=GETHeaderaccept : application/jsoncontent-type : application/json
Copyright © 2022 by Datametica Solutions Pvt. Ltd. All Rights Reserved. 94

Authorization : Bearer {oauth token from API call #1}
**** Replace table mapping id in url from API call #2 ******
14.3. API to get Scheduler statusStep 1:To get the authentication token.
OAuth API call
Url= http://127.0.0.1:8100/oauth/tokenMethod=POSTHeadercontent-type : application/x-www-form-urlencodedaccept : application/json
Bodyusername [email protected] admingrant_type passwordclient_id ecatclient_secret ecat
Step 2:
API to get the datastore ID.
Url=http://10.200.104.100:8080/app/rest/datastoreforuiMethod=GETHeaderAuthorization bearer {access_token generated in step 1 }
Expected Result [Example]{
"id": 401,"name": "BigQuery","dataStoreList": [
{"dataStoreId": 1,"name": "bq_ftd","description": "data store","dataStoreTypeId": 401,"dataStoreTypeName": "BigQuery",
Copyright © 2022 by Datametica Solutions Pvt. Ltd. All Rights Reserved. 95

"dataStorePropsList": [{
"propertyId": 1,"propertyName": "dataStoreHost","propertyValue": "https://www.googleapis.com//biqquery//v2"
},{
"propertyId": 2,"propertyName": "dataStoreJdbcPort","propertyValue": "443"
},
Step 3:
API to get the scheduler status.
Url= http://10.200.104.138:8080/app/rest/schedulingConfigStatus/{dataStoreId}
Ex. http://10.200.104.138:8080/app/rest/schedulingConfigStatus/12
Method=GETHeaderaccept : application/jsoncontent-type : application/jsonAuthorization : Bearer {oauth token from API call #1}
Expected Result [Example]{"status":"Completed","Id":12,"schedulerName":"td_snowflake"}
**** Replace table mapping id in url from API call #2 ******
Copyright © 2022 by Datametica Solutions Pvt. Ltd. All Rights Reserved. 96

15. Automatic Backup● The Pelican MYSQL Backups are taken automatically. They are scheduled weekly every
Sunday at 8.30 am.● Only 5 latest backup files are maintained at the designated location, as the oldest file gets
replaced by the newest one.● The backup location is a s follows:
❖ For docker and kubernetes:/usr/local/apache-tomcat-${TOMCAT_VERSION}/dbbackup
❖ For Jar based installation on VM:/(path of tomcat server}/dbbackup
Copyright © 2022 by Datametica Solutions Pvt. Ltd. All Rights Reserved. 97

16. Frequently Asked Questions1. How to view the validation result in Pelican?
The validation result can be viewed only for those tables whose table mapping is done. So,
if you are a new user and the validation mapping has not been done yet then you need to
follow the below given steps:
Step 1: First, you need to configure a data store.
Step 2: Followed by datastore configuration, you need to validate tables
between source and destination datastore.
Step 3: Next, you need to configure the scheduler for the saved
validation mapping
Step 4: Finally, go to Reports and click Validation Result. For more
information, refer to the Validation Result topic.
2. Which are the various data stores the Pelican supports?Pelican supports comparison between various data stores. For more information, refer
to the Data Store Support topic.
3. How to validate tables between source and destination datastore?You can validate tables between source and destination Datastore using Validation
Configuration functionality. For more information, refer to the Validation Mapping topic.
4. What is the scheduler and how to configure it?The Scheduler allows the user to execute processes at a regular time interval. In
Pelican, the user can create a scheduler for a saved mapping; so that, after a time
period the scheduler executes the process and it validates the source table with
destination tables. For more information, refer to the Scheduler Configuration
topic.
5. How to configure the email notification?
Copyright © 2022 by Datametica Solutions Pvt. Ltd. All Rights Reserved. 98

Email notification functionality allows the user to send an email automatically to various user
on the execution of the scheduler. For more information, refer to the Email Notification topic.
6. How to update the pelican licence?Once you received the pelican licence file, i.e. licence.pel follow the following steps.
Steps 1; log in to the Pelican
Step 2: Administration -> Add Licence
Step 3: Click on the upload and select the Pelican.pel from the file system.
Step 4: Again login to continue the usage.
7. Who can create LDAP user?Only the superuser has the right to create LDAP users. LDAP users can't create any new
users. Only users with Admin access can create new LDAP users.
8. How to get GKE server(Pelican services) start-stop access permissions to QA Lead?Step 1 - Go to GCP console > Search for GKEStep 2 - Click on Connect your cluster
Step 3 - Click on Run in cloud shell
Copyright © 2022 by Datametica Solutions Pvt. Ltd. All Rights Reserved. 99

Step 4 - Run this command after login on cluster - kubectl get podsStep 5 - Copy the web pod name and run this command to restart the service - kubectldelete podname
Note - Pelican service pod will be automatically started and old one will be deleted.9. How to get Application log file url along with access permissions to QA user(catalinaout.log and application.log) ?Step 1 - To see the application logs, we need to go inside the pelican pod. Run thiscommand to go inside the pod - kubectl exec -it podname bash
Step 2 - Now you can view the logs on this file path -/usr/local/apache-tomcat-8.5.65/logs/application_logs/log.log
10. How to add a lineage file?To add a lineage file, login to the system, to go Administration and select Add lineage. Thewindow will be displayed on the screen. For more information, visit Add Lineage.
11. What is a CSV file?The CSV file is a text file in which field values are separated by commas and each record isseparated by a new line character. First row can optionally be a header for field values.
Copyright © 2022 by Datametica Solutions Pvt. Ltd. All Rights Reserved. 100

17. Glossary● Three Level Hierarchy:
The three level DBMS architecture has following three levels:
● External or User view● Conceptual or Logical● Internal or Physical
External Level:
It is also called the view level as several users can view their required data by internallyfetching it from the database with the help of internal and conceptual level mapping. Thislevel is the top-most level of the three level database architecture.
Conceptual Level:
Also referred to as the logical level it describes the entire database design. The relationshipbetween the data, schema of data etc. are defined at this level by the Databaseadministrator. Security and database constraints are also defined at the conceptual level.
Internal Level:
The Internal level is also known as the Physical level. It describes how the database isactually stored in terms of the record layout of files and type of files (hash, b-tree, flat). TheInternal level is the lowest level of database architecture.
Copyright © 2022 by Datametica Solutions Pvt. Ltd. All Rights Reserved. 101
Related Documents