User Manual May 2022

Welcome message from author
This document is posted to help you gain knowledge. Please leave a comment to let me know what you think about it! Share it to your friends and learn new things together.
Transcript

User Manual
May 2022

Page | 1
The Department of Management Services (DMS) introduced the Statewide Travel Management System, also known as STMS, in the summer of 2018. This system is the State of Florida’s first cloud-based travel management solution designed to support the more than 115,000 government travelers and managers located in our state’s Executive and Cabinet agencies, as well as the Judiciary.
The system allows travelers to seek authorization to travel and track the status of the request through the system. It alerts users when actions are needed or approvals are granted. The system also alert travelers when they are paid for travel costs. Supervisors are alerted via email when they must attend to forms and accountants are able to fully track agency travel spend through this cloud-based system.
This user manual is one of many training materials designed to assist State of Florida employees with integration into the STMS. DMS continues adding materials to the STMS website (www.dms.myflorida.com/stms) to assist users.
In addition to materials available from DMS, each agency has identified an Agency Administrator to provide guidance regarding system access, as well as training, agency-specific policies, and other related questions you may have. The email address for your Agency Administrator can be obtained from: https://www.dms.myflorida.com/agency_administration/statewide_travel_management_system/contact_your_agency_stms_support_team

Page | 2
TABLE OF CONTENTS Login to the Statewide Travel Management System .................................................................................... 5
Introduction to the Profiles in STMS ............................................................................................................. 8
Functional Profiles .................................................................................................................................... 8
Traveler ................................................................................................................................................. 8
Proxy Traveler ....................................................................................................................................... 8
Preparer ................................................................................................................................................ 8
Approver ............................................................................................................................................... 9
Fiscal Accountant .................................................................................................................................. 9
Administrative Profiles ............................................................................................................................ 10
Auditor ................................................................................................................................................ 10
Reporter .............................................................................................................................................. 10
Agency STMS Administrator ............................................................................................................... 10
Navigation ................................................................................................................................................... 11
Home ....................................................................................................................................................... 11
My Forms ................................................................................................................................................ 11
Search...................................................................................................................................................... 13
Tab Navigation ........................................................................................................................................ 14
New Trip Form ........................................................................................................................................ 14
Log Out .................................................................................................................................................... 15
Trip Forms ................................................................................................................................................... 16
Authorization .............................................................................................................................................. 17
Details Tab............................................................................................................................................... 17
Expense Line Items Tab ........................................................................................................................... 22
Expense Line Item Details by Record Type ......................................................................................... 25
Reviewing Expense Line Items ............................................................................................................ 31
Attachments Tab ..................................................................................................................................... 31
Validation and Submission ...................................................................................................................... 34
Advance ....................................................................................................................................................... 36
Details Tab............................................................................................................................................... 36
Expense Line Items.................................................................................................................................. 37
Expense Line Item Details by Record Type ......................................................................................... 39
Reviewing Expense Line Items ............................................................................................................ 44
Attachments Tab ..................................................................................................................................... 45

Page | 3
Validation and Submission ...................................................................................................................... 47
Reimbursement .......................................................................................................................................... 49
Details Tab............................................................................................................................................... 49
Expense Line Items.................................................................................................................................. 50
Expense Line Item Details by Record Type ......................................................................................... 52
Reviewing Expense Line Items ............................................................................................................ 58
Attachments Tab ..................................................................................................................................... 58
Validation and Submission ...................................................................................................................... 61
Reimbursement with General Authorization .............................................................................................. 64
Details Tab............................................................................................................................................... 64
Expense Line Items.................................................................................................................................. 68
Expense Line Item Details by Record Type ......................................................................................... 70
Reviewing Expense Line Items ............................................................................................................ 76
Attachments Tab ..................................................................................................................................... 77
Validation and Submission ...................................................................................................................... 79
Continuous Travel / Mileage Logs ........................................................................................................... 81
Preparer ...................................................................................................................................................... 82
Details Tab............................................................................................................................................... 83
Changing the Preparer for a Trip Form ................................................................................................... 86
Editing Your Trip Forms ............................................................................................................................... 87
Cancelling a Trip Form ................................................................................................................................ 88
Approver ..................................................................................................................................................... 90
Reviewing Trip Forms .............................................................................................................................. 90
Securing a Record ................................................................................................................................... 91
Approving Trip Forms .............................................................................................................................. 92
Rejecting Trip Forms ............................................................................................................................... 94
Assigning a Delegate Approver ............................................................................................................... 95
Fiscal Accountant ........................................................................................................................................ 98
Fiscal Accountant Home Page ................................................................................................................. 98
Auditing a Trip Form ............................................................................................................................... 99
Selecting/Assigning a Trip Form for Audit .......................................................................................... 99
Making Selections to Set the Transaction Type ................................................................................ 102
Reviewing Expense Line Items .......................................................................................................... 103
Updating Trip Form Audit Status ...................................................................................................... 107
Processing FLAIR Transactions .............................................................................................................. 110

Page | 4
Editing Transaction Information ....................................................................................................... 111
Avoiding Split Vouchers .................................................................................................................... 113
Setting TR Audit Status ..................................................................................................................... 114
Transmission to FLAIR ........................................................................................................................... 115
Monitoring Transactions ....................................................................................................................... 115
Summary of Transaction Statuses..................................................................................................... 115
STMS Resources to Monitor Transaction Information ..................................................................... 118
Documenting Revolving Fund Transactions in STMS ............................................................................ 120
Advances Paid from a Revolving Fund .............................................................................................. 120
Reimbursements with an Advance Paid from a Revolving Fund ...................................................... 120
Reimbursements with General Authorizations and Reimbursements without an Advance, Paid from a Revolving Fund ............................................................................................................................... 121
Certified Forward Period and Creating 80/53 Transactions ................................................................. 121
Certified Forward Period and Creating 51C Transactions ................................................................. 124
Summary of the Fiscal Accountant Process .......................................................................................... 125
Chatter ...................................................................................................................................................... 126
Add Post ................................................................................................................................................ 126
Reports ...................................................................................................................................................... 128
Trip Report ............................................................................................................................................ 129
Knowledge ................................................................................................................................................ 131
Accessing Knowledge Articles ............................................................................................................... 131
Knowledge Article Display .................................................................................................................... 131
Creating Articles .................................................................................................................................... 131
Viewing Articles ..................................................................................................................................... 132
Cases ......................................................................................................................................................... 133
Accessing Cases ..................................................................................................................................... 133
Case Record Display .............................................................................................................................. 133
Creating Cases ....................................................................................................................................... 133
Viewing Saved Cases ............................................................................................................................. 135
Glossary ..................................................................................................................................................... 137

Page | 5
LOGIN TO THE STATEWIDE TRAVEL MANAGEMENT SYSTEM The Statewide Travel Management System (STMS) is built on the Salesforce platform. Salesforce is cloud-based, so the information contained within it is accessible from any computer. To log into STMS, navigate to https://flstms.my.salesforce.com and use one of the following two methods to log in. The first time that a user logs in, you are be required to read and accept to the User Agreement, in order to access STMS. After accepting the agreement, a copy of the agreement is emailed to you.
NOTE: STMS is optimized for Google Chrome; however, the system is also compatible with Firefox, Safari, and Microsoft Edge. STMS is not compatible with Internet Explorer. To ensure that all functionality operates properly and pages load correctly, users should ensure the browser being used is a recent version and third-party cookies are enabled within the settings.
Login Method 1 – Single Sign On (Most Common Method)
From the log-in screen, click on Log in with Different Provider Button (Figure 1)
Figure 1 – Salesforce Log In Screen – “Log In Using” Method
Select that name of your agency, located under the list, (Figure 2)
Figure 2 – Agency Selection Screen

Page | 6
Upon clicking, you are be redirected to your agency’s Azure or CyberArk’s login page. Complete the login process, using the credentials you use to log in to your computer or Office 365 account. (Figure 3)
Figure 3 - Agency Login Page (Azure version shown left; the Centrify version shown right)
After entering this information, STMS opens to the “Home” page.
Login Method 2 – Username and Password (Used by Agency Administrators)
If logging in with the Username and Password method, enter your Username (email address) and Password and click the Log In button. (Figure 4)
Figure 4 – Salesforce Log In Screen – Username and Password Method

Page | 7
The first time that you log-in, you are required to review and sign the User Agreement Form to proceed.
(Figure 5) A copy of the form is emailed to you after you have agreed to the terms and conditions.
Hours of Operation
STMS is available Monday - Saturday, 6:00 a.m. - 11:59 p.m. Eastern Time and Sunday, 1:00 p.m. - 11:59 p.m., Eastern Time, for users to access and process trips and transactions. STMS is unavailable overnight (from midnight to 6:00 a.m.) as files are processed and system data is updated. If users attempt to log in during that time, they encounter a sign in error. In some rare cases, such as when a critical fix needs to be deployed, the system may be taken down after 5:00 p.m. Eastern Time to allow time for the process to complete before the next day. In such cases, a notification banner is posted on the STMS homepage hours before to advise users.
STMS transactions submitted on holidays are processed in FLAIR the next business day (just as they are after 3 PM on Friday and on the weekend).
Figure 5 - User Agreement Form

Page | 8
INTRODUCTION TO THE PROFILES IN STMS The Statewide Travel Management System (STMS) provides you with the ability to electronically enter and track State of Florida travel. 1 Before we get started, there are some terms that should be defined.
In Salesforce, a profile determines what a user can do. Profile names match the duties performed by the user with that profile. There are 2 types of profiles: Functional and Administrative. Each user can have only one account with a Functional Profile. Certain users may have additional account with an Administrative Profile.
Functional Profiles
Traveler
A Traveler is a person who travels on behalf of the State of Florida and submits trip forms for themselves. Travelers have the following abilities and limitations:
• Can create trip forms for themselves
• Cannot prepare trips for other users
• Cannot approve trip forms
• Cannot access accounting functionality
Proxy Traveler
Proxy Travelers travel on behalf of the State of Florida, but require a Preparer to submit travel forms on
their behalf. Proxy Travelers do not have access to STMS. See the Preparer section of this manual for
more information on processing travel for Proxy Travelers.
When the Preparer has finished preparing a form on behalf of a Proxy Traveler, the form is sent directly to the Proxy Traveler’s supervisor on record in STMS to initiate the approval process. Note: Follow DFS guidance regarding any attestation or other documentation needed as an attachment to the Proxy Traveler’s trip form.
Preparer
A Preparer can create a trip form for another user in their agency, as well as themselves. Preparers have the following abilities and limitations:
• Can create trip forms for others
• Can create trip forms for themselves
• Can view all trip forms
• Cannot approve trip forms
• Cannot access accounting functionality
1 Travel expenses paid via vendor contract are not processed using STMS.

Page | 9
Approver
An Approver can approve or authorize a user’s trip form. There are four types of Approver accounts: Reviewer, Payment Approver, Agency Head or Delegate, and Self-Approver. All types of Approvers share the following abilities and limitations:
• Can create trip forms for themselves
• Can approve trip forms for users other than themselves
• Can be listed as another user’s Supervisor. When a user submits a trip form, the first person that the form is sent to is the listed supervisor.
• Can permit another Approver to sign on their behalf – i.e., can specify a Delegate
• Cannot prepare trip forms for other users
• Cannot access accounting functionality
There are four types of Approvers:
Reviewer
• Cannot provide final approval for Authorization, Advance or Reimbursement Forms
Payment Approver
• Cannot provide final approval for Authorization Forms
• Can provide final approval for Advance and Reimbursement Forms
Agency Head or Delegate
• Can provide final approval for Authorization, Advance, and Reimbursement Forms
Self-Approver
• Can provide final approval for Authorization, Advance, and Reimbursement Forms for themselves as well as others
Fiscal Accountant
A Fiscal Accountant processes authorized (fully approved) Advances, Reimbursements, and Reimbursements with General Authorization for payment. Fiscal Accountants have the following abilities and limitations:
• Can create trip forms for themselves
• Can process trip forms for payment on behalf of other users (Fiscal Accountants cannot process their own trip forms)
• Can prepare transactions for submission to FLAIR
• Cannot prepare trip forms for other users
• Cannot approve trip forms

Page | 10
Administrative Profiles
Auditor
An Auditor has access to trip forms within an Agency. Auditors have the following abilities and limitations:
• Can run reports in STMS
• Can view trip forms
• Cannot create or approve trip forms or access accounting functionality o If an Auditor needs to create or approve trip forms or access accounting functionality,
they are required to have a separate Functional account
Reporter
A Reporter can run reports within an Agency. Reporters have the following abilities and limitations:
• Can run reports in STMS
• Cannot view trip forms
• Cannot create or approve trip forms or access accounting functionality o If a Reporter needs to create or approve trip forms or access accounting functionality,
they are required to have a separate Functional account
Agency STMS Administrator
The Agency STMS Administrator is the primary point of contact for an Agency. There can only be one Agency STMS Administrator per agency. Agency STMS Administrators have the following abilities and limitations:
• Manage Cases within the agency
• Create or review Knowledge articles within the agency
• Can view trip forms in a read-only mode
• Cannot create, prepare, or approve trip forms or access accounting functionality o If an Agency STMS Administrator needs to create, prepare, or approve trip forms or
access accounting functionality, they are required to have a separate Functional account
• Manage agency Users in both the STMS and the User Management Client (UMC)
• Oversee User Account Management and User Administrators
• Can run reports
User Administrator
There can be multiple User Administrators per agency. They manage STMS accounts via the User Management Client (UMC) only. The User Administrator does not manage user accounts directly in STMS.

Page | 11
NAVIGATION STMS recognizes your profile in the system and has tailored the “Home” page to best meet your needs.
Home
STMS defaults to the “Home” page each time it opens. This page, for example, is customized for a Traveler. An Approver, Preparer, or Fiscal Accountant see additional information relevant to their job functions. (Figure 6)
Figure 6- Home Page - Traveler Perspective
My Forms
From the “Home” page, several options have been provided for ease of navigating the system.
In the center of your “Home” page, the “My Forms” section displays relevant information about all your trips, including Form ID, Destination, Form Creation Date, Type of Form, Trip Form Status, Purpose of Travel, and Agency.
You may sort the information in the “My Forms” section by clicking on any column header allowing you to group items, for instance, all the Reimbursement forms or trip destinations. (Figure 7)

Page | 12
Figure 7 – My Trip Forms, Sorted by Form ID
From the “Home” page, the status for any of the trips displays. (Figure 8)
Figure 8 - Trip Status on Home Page
Clicking the “My Forms” link at the top of the box navigates to the expanded view of the trip forms. (Figure 9)

Page | 13
Figure 9 - My Forms
If you click on “My Forms” you can select additional list views to view specific forms, based on criteria. the various list views that are available include:
• My Draft Forms – All of your forms that have not been submitted for approval or have been returned and need additional action
• My Forms in Process – All of your forms that are in the approval process, being reviewed by a Fiscal Accountant, have been submitted to FLAIR, or awaiting payment from you to the State.
• My Completed Forms – All of your forms that having completed processing in FLAIR, or by a Fiscal Accountant, if no transactions to FLAIR were created
Search
The Search Bar at the top allows for quick searches. (Figure 10)
Figure 10 -Search Bar on Home Page

Page | 14
Tab Navigation
The tabs that are provided on the menu bar on the top left of the screen are the navigational tools for processing travel. Tabs display based on the user profile.
The “Home” tab is available on all pages in STMS and returns you to your “Home” page from anywhere in the system. (Figure 11)
Figure 11 - Home Tab on Home Page
The “Trip Forms” tab contains a dropdown menu that is accessed by clicking the down arrow and provides you with the ability to quickly create a new trip form, or navigate to your Recent Records, Recent Lists, and Trip Forms.
The “Trip Forms” tab also takes you to an expanded view of your trip forms if you click on the words, “Trip Forms.” (Figure 12)
Figure 12 – Trip Forms Tab on Home Page
New Trip Form
You can create a new trip form by clicking on the “New” button:
1. On the right side of the “My Forms” section of the “Home” page (Figure 13) 2. On the “Trip Forms” tab, dropdown 3. On the “Trip Forms” page, on the right side

Page | 15
Figure 13 - New Button on Home Page
Log Out
If you need to log out of STMS, click on the User/View Profile icon (which contains your picture, if you’ve added one) at the top right of your STMS window. From the dropdown box, click on the Log Out link. (Figure 14)
Figure 14 – Log Out Link on User/View Profile Dropdown

Page | 16
TRIP FORMS
Trip forms are the digital format where STMS users are able to process travel. STMS makes the following trip form types available to agencies.
• Authorization – This form is used by agencies for Travelers to have their trips approved prior to travel.
• Advance – This form is used to provide Travelers a portion of their Reimbursement prior to travel. This option is only available if the Traveler has completed and received approval of an Authorization form. An approved Advance provides the Traveler with up to 80% of the authorized trip costs unless there is a FEMA emergency or a governor declared emergency, in which case 100% of the Advance could be approved. An advance amount of 100% may be approved specifically for Airfare expenses to take advantage of a substantially discounted common carrier ticket.
• Reimbursement – This form is used to receive reimbursement after a trip has occurred. This option is available only if the Traveler has completed and received approval of an Authorization form.
• Reimbursement with General Authorization – This form is used for Reimbursement when an Authorization form is not required by your agency, or if there is a blanket authorization on file.
STMS recognizes that each agency has different processes. The system is designed to accommodate the individual needs of each agency. Your agency may or may not use all of these form types.
Additional information on each type of trip form can be found in subsequent sections of this manual.

Page | 17
AUTHORIZATION All STMS users can prepare Authorization trip forms for themselves, but only Preparers can prepare forms on behalf of others.
To submit an Authorization, you must complete a new trip form.
From the “Home” page, click on the “New” button on the right side of the “My Trip Forms” section. (Figure 15)
Figure 15 – New Button on Home Page
Select “Authorization” and click on the “Next” button located in the lower-right corner of the pop-up window. (Figure 16)
Figure 16 – New Trip Form Pop Up
Details Tab
The form opens to the Details tab. On this tab, you there are four sections – “Form Details,” “Trip Details,” “Estimated Costs from Expense Line Items,” and “System Information.”

Page | 18
The “Form Details” section, has several fields pre-populated, including Form Type, Traveler Name, and Status. The Traveler Agency Link is editable, but Travelers should not change the information. STMS provides information for additional fields from your profile when you save the form. (Figure 17)
Figure 17 – Trip Form > Form Details Tab > Form Details Section
Fields
1. Master Trip Invoice # This field displays a system generated number that ties all the forms related to a trip together. For example, the Authorization, Advance, and Reimbursement forms for a trip share the same Master Trip Invoice Number. STMS populates this field when the form is first saved.
2. Form Type This field displays the type of form a user is creating and is pre-populated.
3. Form ID This is a system-generated unique identifying number for a trip form, which STMS populates when the form is first saved.
4. Traveler Name This field displays the Traveler’s name and is pre-populated.
5. Traveler Agency Link This field displays the Traveler’s name, their agency, and default organization code, and is pre-populated.
6. Traveler Organization Code This field displays the Organization Code of the organization that is funding the trip and is system-populated when the trip form is saved.
7. Preparer Name If the form was prepared by someone on behalf of the Traveler, this field displays the Preparer’s name. If the form is prepared by the Traveler, it displays the Traveler’s name. STMS populates this field when the form is first saved.
8. Status This field displays the status of the trip form and is auto-populated by the system.

Page | 19
9. Secured Record This checkbox displays whether the record has been secured. If there is no check in the checkbox, the trip has not been secured. The Secured Record field is one of the security features within STMS. The Traveler’s Supervisor or Approver is the only person who can secure a trip form. More details can be found in the Approver: Securing a Record section of this manual.
10. Residence City This field displays the Traveler’s residence city, which STMS populates from the Traveler’s profile when the form is first saved.
11. Headquarters This field displays the Headquarters location of the Traveler’s workplace, which STMS populates when the form is first saved.
12. Type of Employee This field displays what type of employee the Traveler is and is system-populated when the trip is saved.
13. Supervisor Name This field displays the name of the Traveler’s direct Supervisor, which STMS populates when the form is first saved.
In the “Trip Details” section, enter the Point of Origin, Destination, Dates and Times, Purpose of Travel, and other information about the trip. Required fields are indicated in red. Mission Critical Statements are pre-populated in a drop-down menu and are customizable by the agency. (Figure 18)
Figure 18 – Trip Form > Form Details Tab > Trip Details Section
Fields
1. Point of Origin This required field indicates the geographic starting place of the trip. This is an open text field. Multiple points of origin can be entered, if necessary.
2. Destination This required field indicates the geographic ending place of the trip. This is an open text field. Multiple destinations can be entered, if necessary.
3. Departure Date and Time These two required fields provide Travelers or Preparers with a calendar view to select the date and a drop-down list to select the time of the Traveler’s departure. The Departure Date and Time cannot overlap an existing trip.
4. Return Date and Time

Page | 20
These two required fields provide Travelers or Preparers with a calendar view to select the date and a drop-down list to select the time of the Traveler’s return. The Return Date and Time cannot overlap an existing trip.
5. Primary Mode of Transportation This required field provides a drop-down list to select the Traveler’s primary means of transport. Per DFS Guidance regarding Privately Owned Vehicle (POV) vs Rental Car:
If the Agency Head determines the POV is the most economical means of travel, the mileage Expense Line Items (ELI) should be used. The cost for fuel would not be included. If the Agency Head determines the rental car is the most economical means of travel, the charge for the rental car and the cost of fuel should be coded to the rental car ELI.
The traveler should complete the POV vs. Rental Car analysis and attach to the trip as supporting documentation.
6. Type of Travel This field displays the trip’s type of travel, such as In State, Out of State, and Foreign.
7. Mission Critical Statement This required field provides a drop-down list of the Traveler’s Agency’s Mission Critical Statements. The drop-down options may display only a condensed version of the Mission Critical Statement, since only up to 255 characters can be displayed. After the form is saved, the entire statement is displayed.
8. Purpose of Travel This required field is a drop-down list that provides reasons that state of Florida employees travel. Select the purpose of travel that relates best to the reason for traveling. Note: If the purpose of travel indicated is “Conference or Convention”, then the Benefit to the State must also be entered.
9. Benefit to the State This field is optional unless “Conference or Convention” is selected for Purpose of Travel.
10. Comment This field is available for any comments that the Traveler or Preparer needs to include about the trip.
11. Was Telecommunication Considered? This field is required for all forms. Forms cannot be submitted if “No” is indicated.
12. Governor Declared Emergency? This required field is a drop-down list that captures data to support reporting on emergency travel.
13. FEMA Emergency? This required field is a drop-down list that captures data to support reporting on emergency travel.
14. Trip Includes Off Duty Time This field provides the Traveler with the ability to document off-duty time during a work trip. If the Traveler was on personal time during the trip, the Traveler should select “Yes” from the drop-down list. This is not a required field and defaults to “No.”
15. Off Duty Time Begins This field is where the Traveler can capture the beginning of their off-duty time. The off-duty time must be within the travel period.
16. Off Duty Time Ends This field is where the Traveler can capture the end of their off-duty time. The off-duty time must be within the travel period.

Page | 21
17. Case #, Circuit #, and Unit # These fields are available for agencies to use as they deem appropriate.
18. Project ID, Batch, Other Cost Accumulator (OCA), Category, Year, Grant ID, and Fund ID These optional fields can be used if travel should be associated with the related field which is created in FLAIR. The Project ID data populates on ELIs. Data from all optional fields is compared to the values in FLAIR for populating transactions.
The “Estimated Costs from Expense Line Items” section provides Travelers with a summary of their ELIs. (Figure 19) This is NOT where Travelers enter their expenses, but rather where they see a summary of all their ELIs.
Figure 19 – Trip Form > Details Tab > Estimated Costs from Expense Line Items Section
Fields
1. Airfare This field displays the sum of any allowable airfare expenses entered.
2. Car Rental/Fuel This field displays the sum of any allowable car rental and fuel expenses entered.
3. General This field displays the sum of any allowable general expenses entered.
4. Incidental This field displays the sum of any allowable incidental expenses entered.
5. Lodging This field displays the sum of any allowable hotel expenses entered.
6. Meals This field displays the sum of any allowable meal expenses entered.
7. Mileage This field displays the sum of any allowable mileage expenses entered.
8. Per Diem This field displays the sum of any allowable per diem expenses entered.
9. Registration Fee This field displays the sum of any allowable registration fee expenses entered.

Page | 22
10. Total Trip Cost This field displays the sum of all allowable expenses entered.
The “System Information” section provides a log of who created the form and who last updated the form. (Figure 20) This information is system-generated.
Figure 20 – Trip Form > Details Tab > System Information
Fields
1. Owner ID This field displays the Traveler’s ID, which displays when the form is saved.
2. Created By ID This field displays the name of the user who created the trip form, which displays when the form is saved.
3. Last Modified By ID This field displays the name of the user who last saved the trip form, which displays when the form is saved.
After entering the trip details, click the “Save” button. Once the details of your trip are saved, the system generates the Master Trip Invoice Number and the Trip Form ID Number. The Master Trip Invoice Number ties related trip forms together (Authorization, Advance, and Reimbursement). Each form type receives a unique Trip Form ID. The Master Trip Invoice Number should be referenced when reconciling your P-card charges. (Figure 21)
Figure 21 – Master Trip Invoice Number and Form ID on Trip Form Home Page
Expense Line Items Tab
Once the details of your trip are saved, the next step is to enter the Expense Line Items (ELIs) for the trip. ELIs record expenses associated with the trip – some examples are per diem, hotel, and rental car. It is important to note that agency policy determine how ELIs should be entered. (Example: Hotel

Page | 23
expenses can be entered for the entire trip in one ELI or daily in separate ELIs .) To start, click on the “Expense Line Items” tab. (Figure 22)
Note: If you enter an ELI and receive an invalid object code error, reach out to your Fiscal Accountant for guidance. The Fiscal Accountant can determine if you need to use a different Organization Code or Expansion Option or if the Object Code needs to be added to the Organization Code and Expansion Option in FLAIR. It may take 24 hours for the change to be available in STMS.
Figure 22 – Expense Line Items Tab on Trip Form
To add an ELI, click on the “New” button. (Figure 23)
Figure 23 – New Button on Trip Form > Expense Line Items Tab
There are three or four sections of ELI details, depending on the Record Type ID selected by the user (the type of ELI being recorded). The sections of an ELI are the “Details”, a specialized details section that displays for some types of expenses, “Payment Details”, and “FLAIR Transaction Details.”
The ELI details sections are followed by the “System Information” section.
You must select a Record Type ID before providing any other information on the “Details” tab. Each time you select a different Record Type ID, the page refreshes as if you are creating a new ELI. (Figure 24)
Page | 24
Figure 24 – Record Type ID on Trip Form > Expense Line Item Page
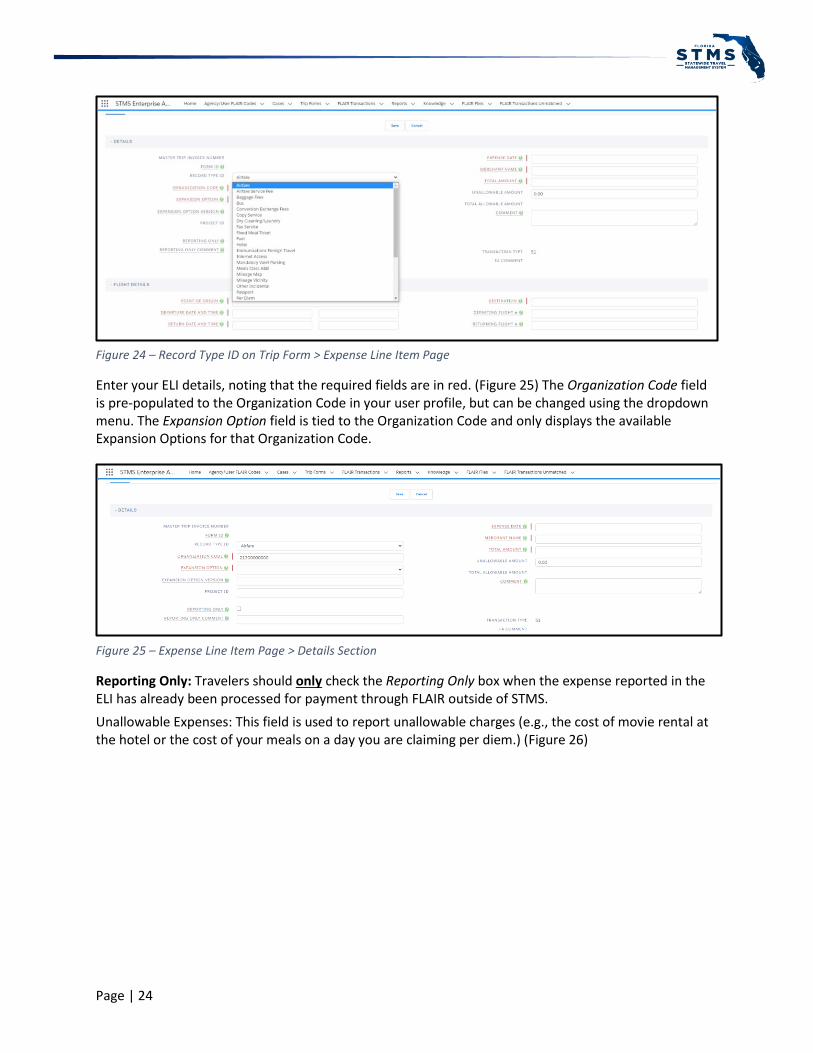
Enter your ELI details, noting that the required fields are in red. (Figure 25) The Organization Code field is pre-populated to the Organization Code in your user profile, but can be changed using the dropdown menu. The Expansion Option field is tied to the Organization Code and only displays the available Expansion Options for that Organization Code.
Figure 25 – Expense Line Item Page > Details Section
Reporting Only: Travelers should only check the Reporting Only box when the expense reported in the ELI has already been processed for payment through FLAIR outside of STMS.
Unallowable Expenses: This field is used to report unallowable charges (e.g., the cost of movie rental at the hotel or the cost of your meals on a day you are claiming per diem.) (Figure 26)

Page | 25
Figure 26 – Unallowable Amount on Trip Form > Expense Line Item Page
Expense Line Item Details by Record Type
Airfare (Flight Details Section)
When a Traveler selects “Airfare” as the Record Type ID, the “Flight Details” section displays the following fields:
1. Point of Origin This is a required open text field used to indicate the geographic starting place of the flight.
2. Destination This is a required open text field used to indicate the geographic ending place(s) of the flight. Multiple destinations can be entered, though generally a single destination is most fitting.
3. Departure Date and Time These two required fields provide a calendar view to select the date and a drop-down list to select the time of the Traveler’s flight departure. The date selected must be within the travel period.
4. Return Date and Time These two required fields provide a calendar view to select the date and a drop-down list to select the time of the Traveler’s flight return. The data selected Date must be within the travel period.
5. Departing Flight # This optional field is used to indicate departing flight number.
6. Arriving Flight # This optional field is used to indicate returning flight number.

Page | 26
Baggage Fees (Baggage Details Section)
When a Traveler selects “Baggage Fees” as the Record Type ID, the “Baggage Details” section displays the following fields:
1. Number of Bags This field is used to indicate the number of bags the traveler brought, if an expense is expected to be incurred.
Hotel (Lodging Details Section)
When a Traveler selects “Hotel” as the Record Type ID, the “Lodging Details” section displays the following fields:
1. Check-In Date This required field provides a calendar view to select the check-in date.
2. Check-Out Date This required field provides a calendar view to select the check-out date.
3. State Sponsored Event This required field is used to indicate whether the travel is for a state sponsored event. The default selection is “—None--.”
4. Night is Over State Limit This required field is used to indicate whether a hotel night expense exceeds the State Limit. If “Yes” is selected, then the Justification Comment is required. The default selection is “–None–.”
5. Justification Comment This open text field is used to record a justification if the hotel expense is over the State limit for at least one night.
Meals Class A&B (Meals Details Section)
When a Traveler selects “Meals Class A&B” as the Record Type ID, the “Meals Details” section displays the following fields:
1. Reimbursement Rate Type This field defaults to “Florida.” If the Traveler is being reimbursed at the GSA rate, select “GSA.” If “GSA” is selected, the “GSA Rate Details” field and the “View GSA Website” button is displayed and the Traveler or Preparer can enter the eligible rates for each meal.
2. Breakfast, Lunch, and Dinner checkboxes
Each of these checkboxes is available to check only if the Traveler is eligible to claim the associated meal. If a box is grayed out, the Traveler is not eligible to claim the meal for that day based on the previously entered departure and return dates and times.
• Breakfast—When travel begins before 6 a.m. and extends beyond 8 a.m.
• Lunch—When travel begins before 12 noon and extends beyond 2 p.m. • Dinner—When travel begins before 6 p.m. and extends beyond 8 p.m., or when travel
occurs during nighttime hours due to special assignment.
If the Traveler receives breakfast, lunch, and/or dinner as part of conference fees during the trip, ensure that the checkboxes are not selected for those meal(s).
Mileage Map (Travel Details Section)
When a Traveler selects “Mileage Map” as the Record Type ID, the “Travel Details” section displays.

Page | 27
If the Traveler uses a state vehicle as the primary mode of transportation but the trip also includes a segment in which a vehicle other than the state-issued vehicle is used, the traveler should only claim mileage for what was incurred using the non-state vehicle. Per DFS Guidance regarding Privately Owned Vehicle (POV) vs Rental Car:
• If the Agency Head determines the POV is the most economical means of travel, the mileage ELI should be used. The cost for fuel would not be included.
The traveler should complete the POV vs. Rental Car analysis and attach to the trip as supporting documentation.
Fields
1. Point of Origin This required open text field indicates the geographic starting place of the trip. Multiple points of origin can be entered, if necessary.
2. Destination This required open text field indicates the geographic ending place of the trip. Multiple points of origin can be entered, if necessary.
3. Mileage This required field is used to record the number of miles claimed.
4. Reimbursement Rate Type This field defaults to “Florida.” If the Traveler is being reimbursed at the GSA rate, then select “GSA.”
5. Mileage Reimbursement Rate This field displays different information, based on the Reimbursement Rate Type selected.
• If the Reimbursement Rate Type “Florida” is selected, the Mileage Reimbursement Rate is set to the current state reimbursement rate.
• If the Reimbursement Rate Type “GSA” is selected, the value becomes a blank field to enter the current GSA reimbursement rate per mile.
6. View Map Calculator Clicking on this button opens a new window to the Florida Department of Transportation Map Calculator http://fdotewp1.dot.state.fl.us/CityToCityMileage/viewer.aspx.
7. View GSA Website Clicking on this button navigates to https://www.gsa.gov/travel/plan-book/transportation-airfare-pov-etc/privately-owned-vehicle-pov-mileage-reimbursement-rates to search for the current GSA rate.
Mileage Vicinity (Travel Details Section)
When a Traveler selects “Mileage Vicinity” as the Record Type ID, the “Travel Details” section displays.
Point of Origin and Destination are optional open-text fields, as travelers may need to document multiple locations over the trip period. Travelers may enter the overall mileage amount and attach additional documentation to support the vicinity mileage.
If the Traveler uses a state vehicle as the primary mode of transportation, but the trip also includes a segment in which a vehicle other than the state-issued vehicle is used, the traveler should only claim mileage for what was incurred using the non-state vehicle. Per DFS Guidance regarding Privately Owned Vehicle (POV) vs Rental Car:

Page | 28
• If the Agency Head determines the POV is the most economical means of travel, the mileage ELI should be used. The cost for fuel would not be included.
The traveler should complete the POV vs. Rental Car analysis and attach to the trip as supporting documentation.
Fields
1. Point of Origin This optional open text field indicates the geographic starting place of the trip. Multiple points of origin can be entered, if necessary.
2. Destination This optional open text field indicates the geographic ending place of the trip. Multiple points of origin can be entered, if necessary.
3. Mileage This required field is used to record the number of miles claimed.
4. Reimbursement Rate Type This field defaults to “Florida.” If the Traveler is being reimbursed at the GSA rate, select “GSA.”
5. Mileage Reimbursement Rate This field displays different information, based on the Reimbursement Rate Type selected.
• If the Reimbursement Rate Type “Florida” is selected, the Mileage Reimbursement Rate is set to the current state reimbursement rate.
• If the Reimbursement Rate Type “GSA” is selected, the value becomes a blank field to enter the current GSA reimbursement rate per mile.
6. View Vicinity Calculator Clicking on this button opens a new window to www.maps.google.com.
7. View GSA Website Clicking on this button navigates to https://www.gsa.gov/travel/plan-book/transportation-airfare-pov-etc/privately-owned-vehicle-pov-mileage-reimbursement-rates to search for the current GSA rate.
Per Diem (Per Diem Details Section)
When a Traveler selects “Per Diem” as the Record Type ID, the “Per Diem Details” section displays.
Fields
1. Reimbursement Rate Type This drop-down list defaults to “Florida.” When “Florida” is selected, STMS auto calculates the total amount eligible to claim based on the arrival and departure date and time. If the Traveler is being reimbursed at the GSA rate, then they must select “GSA.” When “GSA” is selected, additional fields display.
2. Per Diem Allowance This field is required if “GSA” is selected and is where the amount to be reimbursed must be entered. When the ELI is saved, the Total Amount auto-calculates.
3. View GSA Website Clicking on this button navigates to https://www.gsa.gov/travel/plan-book/per-diem-rates, to search for the appropriate rate allowed based on the destination.
4. GSA Rate Details This field is where any additional details can be entered about the GSA rate.

Page | 29
If meals were provided, to deduct the meal expense from the Per Diem, enter the amount for the provided meal in the Unallowable Amount field. This deducts the meal cost from the Per Diem Amount.
Registration Fees
When a Traveler selects “Registration Fee” as the Record Type ID, there is no Specific Record Details section. The Traveler only needs to fill out the “Details” section of the ELI.
Rental Car (Rental Car Details Section)
When a Traveler selects “Rental Car” as the Record Type ID, the “Rental Car Details” section displays. Per DFS Guidance regarding Privately Owned Vehicle (POV) vs Rental Car:
• If the Agency Head determines the rental car is the most economical means of travel, the charge for the rental car and the cost of fuel should be coded to the rental car ELI.
The traveler should complete the POV vs. Rental Car analysis and attach to the trip as supporting documentation.
Fields
1. Rental Car Class This required field provides a drop-down list of the available rental car classes available.
2. Justification for Rental Car Upgrade This comment field is required if any rental car class other than “Economy” or “Compact” is selected.
Data is not required in the “Payment Details” section for ELIs on an Authorization form. On an Advance or Reimbursement form, the “Payment Details” section is required. (Figure 27)
Figure 27 – Trip Form > Expense Line Item Page > Payment Details Section
After entering all information related to an ELI, click on the “Save” button. When the ELI is saved, the system calculates a Total Allowable Amount for the ELI and updates the Total Trip Cost field of the Trip Form (Figure 28).

Page | 30
Figure 28 – Total Allowable Amount on Trip Form > Expense Line Item Page
With your ELI information saved, several options are available to you. To return to the trip details, click the “Return to Trip Form” button; to enter a new ELI, click on the “New Expense Line Item” button; to edit your current ELI, click on the “Edit” button.
Another option is the “Clone” button. Click the “Clone” button to copy the information in the displayed ELI into a new ELI. (Figure 29) After cloning, review the information displayed to ensure it is correct. Edit as desired before saving. (Note: For Meals Class A&B, change the Expense Date field on the clone record and claim the meals you are allotted for the associated day).
Figure 29 – Clone Button on Trip Form > Expense Line Item Page

Page | 31
If the ELI is not needed, the “Delete” button can be selected (Figure 30). Deleting an ELI is permanent and cannot be undone.
Reviewing Expense Line Items
You can view ELIs on the “Expense Line Items” tab. This is where you can double check that you have entered all ELIs associated with the trip. (Figure 31) Additionally, if you return to the “Details” tab and scroll down to the “Estimated Costs from Expense Line Items” section, you can see a summary of your ELI costs.
Figure 31 – Trip Form > Expense Line Item Page
Attachments Tab
To add an attachment, click on the “Attachments” tab and then click on the “New Attachment” button. (Figure 32)
Figure 32 – Attachments Tab and New Attachment Button on Attachment Details Page > Details Section
Figure 30 - Delete Button on Trip Form > Expense Line Item Page

Page | 32
On the attachment “Details” page, select the type of attachment from the “Attachment Type” dropdown menu. Click on the “Save” button to save the Attachment Details. (Figure 33)
Figure 33 – Attachment Details Page > Details Section
Fields
1. Travelers Agency This field is auto-populated with the traveler’s agency.
2. Attachment Type This field provides a dropdown of available attachment types. Required attachments vary by agency.
• Agenda – Any Agenda for an event or training.
• Amendment – Changes related to a form after it is processed including additional
expenses paid to the traveler.
• Authorization – Any authorizations created outside of STMS that need to be attached to
a Reimbursement with General Authorization, such as blank via email.
• DFS Audit – Notes from DFS related to submitted transactions.
• Expense Justification – Supporting documentation for charges related to ELIs, such as
Mileage Logs and POV vs. Rental Car forms.
• Mission Critical Statement – Any Mission Critical Statement not included in the Trip
Form Details that are related to your trip.
• Receipt – Any receipt for an ELI, such as fuel and hotel.
• Traveler Payment – Information related to a traveler owing the State or paying what
they owe.
• Other – Any other type of attachment. If you select the “Other” type, the Other
Attachment Type open text field is displayed as a required field.
3. Comments This field is an open text field.
4. Files Attached This field indicates the number of files attached to the record.
Once the Attachment Details have been saved, the attachment must be uploaded. Click on the “Files” tab in the upper-left corner. (Figure 34)

Page | 33
Figure 34 – Files Tab on Attachment Page
To attach files to the record, click on the “Upload Files” button. (Figure 35)
Figure 35 – Upload Files Button on Attachment Page > Files Tab
Select the file(s) to be uploaded from your computer and click on the “Open” button. (Figure 36)
Note: Receipts and other documentation added as an attachment should have personal or sensitive information redacted while preserving the original documentation for audit purposes. Users should follow agency policy regarding document retention and whether to group receipts when attaching.
Figure 36 – File Selection Dialog Box
Once the file(s) is loaded, “Done” appears on the screen. Click on the “Close” button to return to the Attachment Detail page. (Figure 37)

Page | 34
Figure 37 – Close Button on Upload Progress Pop Up
Attachments are required for Authorizations when the Purpose of Travel is Conference or Convention. Select Agenda as the attachment type in this case.
While your trip form has a Status of “Trip Draft” or “Submit for Approval”, you can add attachments or delete files that you uploaded, prior to submitting your trip for approval. To delete a file, return to the Files tab, of the attachment record as shown in Figure 34 – Files Tab on Attachment PageOnce the list of files displays, click on the “Del” that appear just before the name of the file that you want to delete.
Validation and Submission
Once all Attachments have been uploaded and ELIs have been entered, return to the “Details” tab and click on the “Validate” button to validate the information entered. When you click the “Validate” button, STMS runs a final validation across all tabs to ensure the form is within system requirements. In addition, any changes made to certain account details are reflected after the “Validate” button is clicked. (Figure 38)
Figure 38 – Validate Button on Trip Form > Details Tab

Page | 35
Once validation is successful, the trip form Status is updated to “Submit for Approval” and a certification statement appears. Any changes made to the form in this status causes the trip form to return to a status of “Trip Draft”, requiring the trip form to be validated, again before submitting it.
To indicate your agreement with the certification statement, check the box and click the green “Submit for Approval” button. This submits the form for approval and emails your supervisor a notification email with a link referencing your trip. (Figure 39)
After selecting the checkbox, if the “Submit for Approval” button remains gray, reload the page by clicking on your browser’s page reload button or F5. Once the page reloads, check the box again, and the “Submit for Approval” button turns green, allowing you to submit the trip form.
Figure 39 – Certfication Check Box and Submit for Approval Button on Trip Form
If your Supervisor is not active or does not have an active delegate Approver, an error message displays (Figure 40). You are not be able to submit the trip form to them until this has been resolved.
Figure 40- Inactive Approver

Page | 36
ADVANCE Advance forms are only available if your agency allows them. If allowed by your agency, all STMS users can prepare Advance trip forms for themselves, but only Preparers can prepare forms on behalf of others.
To submit an Advance form, an Authorization Trip Form must have already been approved. To request an Advance, open the associated authorized Authorization Trip Form.
Click on the “Trip Forms” tab within the Authorization trip form.
Click on the “New Advance” button. (Figure 41)
Figure 41 – New Advance Button on Trip Form Tab
Details Tab
The form opens to the Details tab. The same four sections that are displayed on the Authorization form are displayed here: “Form Details,” “Trip Details,” “Estimated Costs from Expense Line Items,” and “System Information.”
When the trip form opens, the information captured in the Details tab of the Authorization form associated with the trip is displayed. If needed, modify the information in the fields. You are required to enter a justification statement in the “Justification for Advance” field. An example justification could be “Traveler has not been issued a Pcard.” Check with your agency for valid entries for this field. Once all information is entered, click on the “Save” button. (Figure 42)

Page | 37
Figure 42 – Justification for Advance Field on Trip Form > Form Details Tab – Trip Details Section
Expense Line Items
Once the details of your trip are saved, the next step is to enter the ELIs for the Advance. ELIs do not transfer over from the associated Authorization Form.
ELIs record expenses associated with the trip – some examples are per diem, hotel, and rental car. It is important to note that agency policy determines how ELIs should be entered. (Example: Hotel expenses can be entered for the entire trip in one ELI or daily in separate ELIs.) To start, click on the “Expense Line Items” tab. (Figure 43)
Note: On each individual ELI, the Total Amount represents the full cost incurred by the traveler for the item. The Total Allowable Amount is the Total Amount less any Unallowable Amount. For Advances, the Advance Amount (the amount due to the traveler) is be 80% of the Total Allowable Amount, unless the traveler has indicated “significantly discounted airfare” or FEMA or Governor-declared emergency, in which case the Advance Amount is 100% of the Total Allowable Amount.
Note: If you enter an ELI and receive an invalid object code error, reach out to your Fiscal Accountant for guidance. The Fiscal Accountant can determine if you need to use a different Organization Code or Expansion Option or if the Object Code needs to be added to the Organization Code and Expansion Option in FLAIR. It may take 24 hours for the change to be available in STMS.
Figure 43 – Expense Line Items Tab on Trip Form
To add an ELI, click on the “New” button. (Figure 44)

Page | 38
Figure 44 – New Button on Trip Form > Expense Line Items Tab
There are three or four sections of ELI details, depending on the Record Type ID selected by the user (the type of ELI being recorded). The sections of an ELI are the “Details”, a specialized details section that displays for some types of expenses, “Payment Details”, and “FLAIR Transaction Details.”
You must select a Record Type ID before providing any other information on the “Details” tab. Each time you select a different Record Type ID, the page refreshes as if you are creating a new ELI. (Figure 45)
Figure 45 – Record Type ID Field on Trip Form > Expense Line Item Page
Enter your ELIs, noting that the required fields are in red. (Figure 46) The Organization Code field is pre-populated to the Organization Code in your user profile, but can be changed using the dropdown menu. The Expansion Option field is tied to the Organization Code and displays the available Expansion Options for that Organization Code.

Page | 39
Figure 46 – Trip Form > Expense Line Item Page > Organization Code and Expansion Option
Reporting Only: Travelers should only check the Reporting Only box when their trip (or individual expense) has been processed for payment through FLAIR outside of STMS.
Expense Line Item Details by Record Type
Airfare (Flight Details Section)
When a Traveler selects “Airfare” as the Record Type ID, the “Flight Details” section displays the following fields:
1. Point of Origin This required open text field is used to indicate the geographic starting place of the flight.
2. Destination This required open text field is used to indicate the geographic ending place(s) of the flight. Multiple destinations can be entered, though generally a single destination is most fitting.
3. Departure Date and Time These two required fields provide a calendar view to select the date and a drop-down list to select the time of the Traveler’s flight departure. The date selected must be within the travel period.
4. Return Date and Time These two required fields provide a calendar view to select the date and a drop-down list to select the time of the Traveler’s flight return. The date selected must be within the travel period.
5. Departing Flight # This optional field is used to indicate departing flight number.
6. Arriving Flight # This optional field is used to indicate returning flight number.
Baggage Fees (Baggage Details Section)
When a Traveler selects “Baggage Fees” as the Record Type ID, the “Baggage Details” section displays the following fields:
1. Number of Bags This field is used to indicate the number of bags the traveler brought, if an expense is expected to be incurred.

Page | 40
Hotel (Lodging Details Section)
When a Traveler selects “Hotel” as the Record Type ID, the “Lodging Details” section displays the following fields:
1. Check-In Date This required field provides a calendar view to select the check-in date.
2. Check-Out Date This required field provides a calendar view to select the check-out date.
3. State Sponsored Event This required field is used to indicate whether the travel is for a state sponsored event. The default selection is “—None--.”
4. Night is Over State Limit This required field is used to indicate whether a hotel night expense exceeds the State limit. If “Yes” is selected, then the Justification Comment is required. The default selection is “–None–.”
5. Justification Comment This open text field is used to record a justification if the hotel expense is over the State limit for at least one night.
Meals Class A&B (Meals Details Section)
When a Traveler selects “Meals Class A&B” as the Record Type ID, the “Meals Details” section displays the following fields:
1. Reimbursement Rate Type This field defaults to “Florida.” If the Traveler is being reimbursed at the GSA rate, select “GSA.” If “GSA” is selected, the “GSA Rate Details” field and the “View GSA Website” button displays and the Traveler or Preparer can enter the eligible rates for each meal.
2. Breakfast, Lunch, and Dinner checkboxes
Each of these checkboxes is available to check only if the Traveler is eligible to claim the associated meal. If a box is grayed out, the Traveler is not eligible to claim that meals for that day based on the previously entered departure and return dates and times.
• Breakfast—When travel begins before 6 a.m. and extends beyond 8 a.m. • Lunch—When travel begins before 12 noon and extends beyond 2 p.m. • Dinner—When travel begins before 6 p.m. and extends beyond 8 p.m., or when travel
occurs during nighttime hours due to special assignment.
If the Traveler receives breakfast, lunch, and/or dinner as part of conference fees during the trip, ensure that the checkboxes are not selected for those meal(s).
Mileage Map (Travel Details Section)
When a Traveler selects “Mileage Map” as the Record Type ID, the “Travel Details” section displays.
If the Traveler uses a state vehicle as the primary mode of transportation but the trip also includes a segment in which a vehicle other than the state-issued vehicle is used, the traveler should only claim mileage for what was incurred using the non-state vehicle.
Per DFS Guidance regarding Privately Owned Vehicle (POV) vs Rental Car:
• If the Agency Head determines the POV is the most economical means of travel, the mileage ELI should be used. The cost for fuel would not be included.

Page | 41
The traveler should complete the POV vs. Rental Car analysis and attach to the trip as supporting documentation.
Fields
1. Point of Origin This required open text field indicates the geographic starting place of the trip. Multiple points of origin can be entered, if necessary.
2. Destination This required open text field indicates the geographic ending place of the trip. Multiple points of origin can be entered, if necessary.
3. Mileage This required field is used to record the number of miles claimed.
4. Reimbursement Rate Type This field defaults to “Florida.” If the Traveler is being reimbursed at the GSA rate, then select “GSA.”
5. Mileage Reimbursement Rate This field displays different information, based on the Reimbursement Rate Type selected.
• If the Reimbursement Rate Type “Florida” is selected, the Mileage Reimbursement Rate is set to the current state reimbursement rate.
• If the Reimbursement Rate Type “GSA” is selected, the value becomes a blank field to enter the current GSA reimbursement rate per mile.
6. View Map Calculator Clicking on this button opens a new window to the Florida Department of Transportation Map Calculator http://fdotewp1.dot.state.fl.us/CityToCityMileage/viewer.aspx.
7. View GSA Website Clicking on this button navigates to https://www.gsa.gov/travel/plan-book/transportation-airfare-pov-etc/privately-owned-vehicle-pov-mileage-reimbursement-rates to search for the current GSA rate.
Mileage Vicinity (Travel Details Section)
When a Traveler selects “Mileage Vicinity” as the Record Type ID, the “Travel Details” section displays.
Point of Origin and Destination are optional open-text fields, as travelers may need to document multiple locations over the trip period. Travelers may enter the overall mileage amount and attach additional documentation to support the vicinity mileage.
If the Traveler uses a state vehicle as the primary mode of transportation but the trip also includes a segment in which a vehicle other than the state-issued vehicle is used, the traveler should only claim mileage for what was incurred using the non-state vehicle.
Per DFS Guidance regarding Privately Owned Vehicle (POV) vs Rental Car:
• If the Agency Head determines the POV is the most economical means of travel, the mileage ELI should be used. The cost for fuel would not be included.
The traveler should complete the POV vs. Rental Car analysis and attach to the trip as supporting documentation.

Page | 42
Fields
1. Point of Origin This optional open text field is where the Traveler or Preparer enters where the trip originated. Multiple cities can be entered, if necessary.
2. Destination This optional open text field is where the Traveler or Preparer enters where the trip ends. Multiple cities can be entered, if necessary.
3. Mileage This required field is used to record the number of miles claimed.
4. Reimbursement Rate Type This field defaults to “Florida.” If the Traveler is being reimbursed at the GSA rate, select “GSA.”
5. Mileage Reimbursement Rate This field displays different information, based on the Reimbursement Rate Type selected.
• If the Reimbursement Rate Type “Florida” is selected, the Mileage Reimbursement Rate is set to the current state reimbursement rate.
• If the Reimbursement Rate Type “GSA” is selected, the value becomes a blank field to enter the current GSA reimbursement rate per mile.
6. View Vicinity Calculator Clicking on this button opens a new window to www.maps.google.com.
7. View GSA Rate Clicking on this button navigates to https://www.gsa.gov/travel/plan-book/transportation-airfare-pov-etc/privately-owned-vehicle-pov-mileage-reimbursement-rates to search for the current GSA rate.
Per Diem (Per Diem Details Section)
When a Traveler selects “Per Diem” as the Record Type ID, the “Per Diem Details” section displays.
Fields
1. Reimbursement Rate Type This drop-down list defaults to “Florida.” When “Florida” is selected, STMS auto calculates the total amount eligible to claim based on the arrival and departure date and time. If the Traveler is being reimbursed at the GSA rate, then they must select “GSA.” When “GSA” is selected, additional fields display.
2. Per Diem Allowance This field is required if “GSA” is selected and where the amount to be reimbursed should be entered. When the ELI is saved, the Total Amount auto-calculates.
3. View GSA Website Clicking on this button navigates to https://www.gsa.gov/travel/plan-book/per-diem-rates, to search for the appropriate rate allowed based on the destination.
4. GSA Rate Details This field is utilized if any additional details need to be entered about the GSA rate. If meals were provided, to deduct the meal expense from the Per Diem, enter the amount for the provided meal in the Unallowable Amount field. This action deducts the meal cost from the Per Diem Amount.

Page | 43
Registration Fees
When a Traveler selects “Registration Fee” as the Record Type ID, there is no Specific Record Details section. The Traveler only needs to fill out the “Details” section of the ELI.
Rental Car (Rental Car Details Section)
When a Traveler selects “Rental Car” as the Record Type ID, the “Rental Car Details” section displays.
Per DFS Guidance regarding Privately Owned Vehicle (POV) vs Rental Car:
• If the Agency Head determines the rental car is the most economical means of travel, the charge for the rental car and the cost of fuel should be coded to the rental car ELI.
The traveler should complete the POV vs. Rental Car analysis and attach to the trip as supporting documentation.
Fields
1. Rental Car Class This required field provides a drop-down list of the available rental car classes available.
2. Justification for Rental Car Upgrade This comment field is required if any rental car class other than “Economy” or “Compact” is selected.
Since you are requesting funds for an Advance, the Payment Details Section within each ELI is required. For an advance, select Personal Payment for the “Expense Paid By” value on each ELI added. (Figure 47)
Figure 47 – Trip Form > Expense Line Item Page > Payment Details Section
After entering all information related to an ELI, click on the “Save” button. When the ELI is saved, the system calculates a Total Allowable Amount for the ELI and updates the Total Trip Cost field of the Trip Form.
With your ELI information saved, several options are available to you. To return to the trip details, click the “Return to Trip Form” button; to enter a new ELI, click on the “New Expense Line Item” button; to edit your current ELI, click on the “Edit” button.
Another option is the “Clone” button. Click the “Clone” button to copy the information in the displayed ELI into a new ELI. (Figure 48) After cloning, review the information displayed to ensure it is correct. Edit as desired before saving. (Note: For Meals Class A&B, change the Expense Date field on the clone record and claim the meals you are allotted for the associated day).

Page | 44
Figure 48 - Clone Button on Trip Form > Expense Line Item Page
If the ELI is not needed, the “Delete” button can be selected (Figure 49). Deleting an ELI is permanent and cannot be undone
Reviewing Expense Line Items
You can view ELIs on the “Expense Line Items” tab. This is where you can double check that you have entered all ELIs associated with the trip. (Figure 50) Additionally, if you return to the “Details” tab and scroll down to the “Estimated Costs from Expense Line Items” section, you can see a summary of your ELI costs.
Figure 50 – Trip Form > Expense Line Items Page
Figure 49 - Delete Button on Trip Form > Expense Line Item Page

Page | 45
Attachments Tab
To add an attachment, click on the “Attachments” tab and click on the “New Attachment” button. (Figure 51)
Figure 51 – Attachments Tab and New Attachment Button on Attachment Details Page > Details Section
On the attachment “Details” page, select the type of attachment from the “Attachment Type” dropdown menu. Click on the “Save” button to save the Attachment Details. (Figure 52)
Figure 52 – Attachment Details Page > Details Section
Fields
1. Travelers Agency This field is auto populated with the traveler’s agency.
2. Attachment Type This field provides a dropdown of available attachment types. Required attachments vary by agency.
• Agenda – Any Agenda for an event or training.
• Amendment – Changes related to a form after it is processed including additional
expenses paid to the traveler.
• Authorization – Any authorizations created outside of STMS that need to be attached to
a Reimbursement with General Authorization, such as blank via email.
• DFS Audit – Notes from DFS related to submitted transactions.
• Expense Justification – Supporting documentation for charges related to ELIs, such as
Mileage Logs and POV vs. Rental Car forms.
• Mission Critical Statement – Any Mission Critical Statement not included in the Trip
Form Details that are related to your trip.

Page | 46
• Receipt – Any receipt for an ELI, such as fuel and hotel.
• Traveler Payment – Information related to a traveler owing the State or paying what
they owe.
• Other – Any other type of attachment. If you select the “Other” type, the Other
Attachment Type open text field displays as a required field.
3. Comments This field is an open text field.
4. Files Attached This field indicates the number of files attached to the record.
Once the Attachment Details have been saved, the attachment must be uploaded. Click on the “Files” tab in the upper-left corner. (Figure 53)
Figure 53 – Files Tab on Attachment Page
To attach files to the record, click on the “Upload Files” button. (Figure 54)
Figure 54 – Upload Files Button on Attachment Page > Files Tab
Select the file(s) to be uploaded from your computer and click on the “Open” button. (Figure 55)
Note: Receipts and other documentation added as an attachment should have personal or sensitive information redacted while preserving the original documentation for audit purposes. Users should follow agency policy regarding document retention and whether or not to group receipts when attaching.

Page | 47
Figure 55 – File Selection Dialog Box
Once the file(s) is loaded, “Done” appears on the screen. Click on the “Close” button to return to the Attachment Detail page. (Figure 56)
Figure 56 – Close Button on Upload Progress Pop Up
While your trip form has a Status of “Trip Draft” or “Submit for Approval”, you can add attachments or delete files that you uploaded, prior to submitting your trip for approval. To delete a file, return to the Files tab, of the attachment record as shown in Figure 53. Once the list of files displays, click on the “Del” that appear just before the name of the file that you are deleting.
Validation and Submission
Once all Attachments have been uploaded and ELIs have been entered, return to the “Details” tab and click on the “Validate” button to validate the information entered. When you click the “Validate” button, STMS runs a final validation across all tabs to ensure the form is within system requirements. In addition, any changes made to certain account details are reflected after the “Validate” button is clicked. (Figure 57)

Page | 48
Figure 57 – Validate Button on Trip Form > Details Tab
Once validation is successful, the trip form Status is updated to “Submit for Approval” and a certification statement appears. Any changes made to the form in this status causes the trip form to return to a status of “Trip Draft”, requiring the trip form to be validated, again.
To indicate your agreement with the certification statement, check the box and click the green “Submit for Approval” button. This submits the form for approval and emails your supervisor a notification email with a link referencing your trip. (Figure 58)
After selecting the checkbox, if the “Submit for Approval” button remains gray, reload the page by clicking on your browser’s page reload button or F5. Once the page reloads, check the box again, and the “Submit for Approval” button turns green, allowing you to submit the trip form.
Figure 58 – Certfication Check Box and Submit for Approval Button on Trip Form
If your Supervisor is not active or does not have an active delegate Approver, an error message is displayed. (Figure 59) You are not be able to submit the trip form to them until this has been resolved.

Page | 49
Figure 59- Inactive Approver
If your Advance is approved and paid, an email reminder is sent to you 7 days after your trip return date, reminding you to complete your reimbursement form associated with the Advance form.
REIMBURSEMENT All STMS users can prepare Reimbursement trip forms for themselves, but only Preparers can prepare forms on behalf of others.
Select an Authorization or Advance Trip Form associated with the Traveler’s trip.
Click on the “Trip Forms” tab within the trip form.
Click on the “New Reimbursement” button to start your Reimbursement. (Figure 60)
Figure 60 – New Reimbursement Button on Trip Form > Trip Forms Tab
Details Tab
The form opens to the Details tab. The same four sections that are displayed on the Authorization form are displayed here: “Form Details,” “Trip Details,” “Estimated Costs from Expense Line Items,” and “System Information.”
The Details section of the Authorization form associated with the trip has been carried over. If you need to modify any of the fields, do so and then click on the “Save” button.

Page | 50
Expense Line Items
Once the details of your trip are saved, the next step is to enter the ELIs for the Reimbursement, which are the actual trip costs. ELIs do not transfer over from the associated Authorization Form. To start, click on the “Expense Line Items” tab. (Figure 61)
Note: If you enter an ELI and receive an invalid object code error, reach out to your Fiscal Accountant for guidance. The Fiscal Accountant can determine if you need to use a different Organization Code or Expansion Option or if the Object Code needs to be added to the Organization Code and Expansion Option in FLAIR.
Figure 61 – Expense Line Items Tab on Trip Form
To add an ELI, click on the “New” button. (Figure 62)
Figure 62 – New Button on Trip Form > Expense Line Items Tab
There are three or four sections of ELI details, depending on the Record Type ID selected by the user (the type of ELI being recorded). The sections of an ELI are the “Details”, a specialized details section that displays for some types of expenses, “Payment Details”, and “FLAIR Transaction Details.”
You must select a Record Type ID before providing any other information on the “Details” tab. Each time you select a different Record Type ID, the page refreshes as if you are creating a new ELI. (Figure 63)

Page | 51
Figure 63 – Record Type ID on Trip Form > Expense Line Item Page
Enter your ELIs, noting that the required fields are in red. The Organization Code field is pre-populated to the Organization Code in your user profile but can be changed using the dropdown menu. The Expansion Option field is tied to the Organization Code and only displays available Expansion Options for that Organization Code. (Figure 64)
Figure 64 – Organization Code and Expansion Option on Trip Form > Expense Line Item Page > Details Section
Reporting Only: Travelers should only check the Reporting Only box when their trip (or individual expense) has been processed for payment through FLAIR outside of STMS.
When you enter your total for each ELI, there is also a field to enter an Unallowable Amount. This field is used to report unallowable charges (i.e., the cost of movie rental at the hotel or the cost of your meals on a day you are claiming per diem.) (Figure 65)

Page | 52
Figure 65 – Unallowable Amount on Trip Form > Expense Line Item Page
Expense Line Item Details by Record Type
Airfare (Flight Details Section)
When a Traveler selects “Airfare” as the Record Type ID, the “Flight Details” section displays the following fields:
1. Point of Origin This required open text field is used to indicate the geographic starting place of the flight.
2. Destination This required open text field is used to indicate the geographic ending place(s) of the flight. Multiple destinations can be entered, though generally a single destination is most fitting.
3. Departure Date and Time These two required fields provide a calendar view to select the date and a drop-down list to select the time of the Traveler’s flight departure. The date selected must be within the travel period.
4. Return Date and Time These two required fields provide a calendar view to select the date and a drop-down list to select the time of the Traveler’s flight return. The date selected must be within the travel period.
5. Departing Flight # This optional field is used to indicate departing flight number.
6. Arriving Flight # This optional field is used to indicate returning flight number.
Baggage Fees (Baggage Details Section)
When a Traveler selects “Baggage Fees” as the Record Type ID, the “Baggage Details” section displays the following fields:
1. Number of Bags This field is used to indicate the number of bags the traveler brought, if an expense is expected to be incurred.

Page | 53
Hotel (Lodging Details Section)
When a Traveler selects “Hotel” as the Record Type ID, the “Lodging Details” section displays the following fields:
1. Check-In Date This required field provides a calendar view to select the check-in date.
2. Check-Out Date This required field provides a calendar view to select the check-out date.
3. State Sponsored Event This required field is used to indicate whether the travel is for a state sponsored event. The default selection is “—None--.”
4. Night is Over State Limit This required field is used to indicate whether a hotel night expense exceeds the State limit. If “Yes” is selected, then the Justification Comment is required. The default selection is “–None–.”
5. Justification Comment This open text field is used to record a justification if the hotel expense is over the State limit for at least one night.
Meals Class A&B (Meals Details Section)
When a Traveler selects “Meals Class A&B” as the Record Type ID, the “Meals Details” section displays the following fields:
1. Reimbursement Rate Type This field defaults to “Florida.” If the Traveler is being reimbursed at the GSA rate, select “GSA.” If “GSA” is selected, the “GSA Rate Details” field and the “View GSA Website” button displays and the Traveler or Preparer can enter the eligible rates for each meal.
2. Breakfast, Lunch, and Dinner checkboxes Each of these checkboxes is available to check only if the Traveler is eligible to claim the associated meal. If a box is grayed out, the Traveler is not eligible to claim that meals for that day based on the previously entered departure and return dates and times.
• Breakfast—When travel begins before 6 a.m. and extends beyond 8 a.m. • Lunch—When travel begins before 12 noon and extends beyond 2 p.m.
• Dinner—When travel begins before 6 p.m. and extends beyond 8 p.m., or when travel occurs during nighttime hours due to special assignment.
If the Traveler receives breakfast, lunch, and/or dinner as part of conference fees during the trip, ensure that the checkboxes are not selected for those meal(s).
Mileage Map (Travel Details Section)
When a Traveler selects “Mileage Map” as the Record Type ID, the “Travel Details” section displays.
If the Traveler uses a state vehicle as the primary mode of transportation but the trip also includes a segment in which a vehicle other than the state-issued vehicle is used, the traveler should only claim mileage for what was incurred using the non-state vehicle.
Per DFS Guidance regarding Privately Owned Vehicle (POV) vs Rental Car:
• If the Agency Head determines the POV is the most economical means of travel, the mileage ELI should be used. The cost for fuel would not be included.
The traveler should complete the POV vs. Rental Car analysis and attach to the trip as supporting documentation.

Page | 54
Fields
1. Point of Origin This required open text field indicates the geographic starting place of the trip. Multiple points of origin can be entered, if necessary.
2. Destination This required open text field indicates the geographic ending place of the trip. Multiple points of origin can be entered, if necessary.
3. Mileage This required field is used to record the number of miles claimed.
4. Reimbursement Rate Type This field defaults to “Florida.” If the Traveler is being reimbursed at the GSA rate, then select “GSA.”
5. Mileage Reimbursement Rate This field displays different information, based on the Reimbursement Rate Type selected.
• If the Reimbursement Rate Type “Florida” is selected, the Mileage Reimbursement Rate is set to the current state reimbursement rate.
• If the Reimbursement Rate Type “GSA” is selected, the value becomes a blank field to enter the current GSA reimbursement rate per mile.
6. View Map Calculator Clicking on this button opens a new window to the Florida Department of Transportation Map Calculator http://fdotewp1.dot.state.fl.us/CityToCityMileage/viewer.aspx.
7. View GSA Website Clicking on this button navigates to https://www.gsa.gov/travel/plan-book/transportation-airfare-pov-etc/privately-owned-vehicle-pov-mileage-reimbursement-rates to search for the current GSA rate.
Mileage Vicinity (Travel Details Section)
When a Traveler selects “Mileage Vicinity” as the Record Type ID, the “Travel Details” section displays.
Point of Origin and Destination are optional open-text fields, as travelers may need to document multiple locations over the trip period. Travelers may enter the overall mileage amount and attach additional documentation to support the vicinity mileage.
If the Traveler uses a state vehicle as the primary mode of transportation but the trip also includes a segment in which a vehicle other than the state-issued vehicle is used, the traveler should only claim mileage for what was incurred using the non-state vehicle.
Per DFS Guidance regarding Privately Owned Vehicle (POV) vs Rental Car:
• If the Agency Head determines the POV is the most economical means of travel, the mileage ELI should be used. The cost for fuel would not be included.
The traveler should complete the POV vs. Rental Car analysis and attach to the trip as supporting documentation.
Fields
1. Point of Origin This optional open text field is where the Traveler or Preparer enters where the trip originated. Multiple cities can be entered, if necessary.

Page | 55
2. Destination This optional open text field is where the Traveler or Preparer enters where the trip is ending. Multiple cities can be entered, if necessary.
3. Mileage This required field is used to record the number of miles claimed.
4. Reimbursement Rate Type This field defaults to “Florida.” If the Traveler is being at the GSA rate, select “GSA.”
5. Mileage Reimbursement Rate
This field displays different information, based on the Reimbursement Rate Type selected.
• If the Reimbursement Rate Type “Florida” is selected, the Mileage Reimbursement Rate is set to the current state reimbursement rate.
• If the Reimbursement Rate Type “GSA” is selected, the value becomes a blank field to enter the current GSA reimbursement rate per mile.
6. View Vicinity Calculator Clicking on this button opens a new window to www.maps.google.com.
7. View GSA Website Clicking on this button navigates to https://www.gsa.gov/travel/plan-book/transportation-airfare-pov-etc/privately-owned-vehicle-pov-mileage-reimbursement-rates to search for the current GSA rate.
Per Diem (Per Diem Details Section)
When a Traveler selects “Per Diem” as the Record Type ID, the “Per Diem Details” section displays.
Fields
1. Reimbursement Rate Type This drop-down list defaults to “Florida.” When “Florida” is selected, STMS auto calculates the total amount eligible to claim based on the arrival and departure date and time. If the Traveler is being reimbursed at the GSA rate, then they must select “GSA.” When “GSA” is selected, additional fields display.
2. Per Diem Allowance This field is required if “GSA” is selected and is where the amount to be reimbursed is entered. When the ELI is saved, the Total Amount auto-calculates.
3. View GSA Website Clicking on this button navigates to https://www.gsa.gov/travel/plan-book/per-diem-rates, to search for the appropriate rate allowed based on the destination.
4. GSA Rate Details This field is where any additional details can be entered about the GSA rate. If meals were provided, to deduct the meal expense from the Per Diem, enter the amount for the provided meal in the Unallowable Amount field. This deducts the meal cost from the Per Diem Amount.
Registration Fees
When a Traveler selects “Registration Fee” as the Record Type ID, there is no Specific Record Details section. The Traveler only needs to fill out the “Details” section of the ELI.
Rental Car (Rental Car Details Section)
When a Traveler selects “Rental Car” as the Record Type ID, the “Rental Car Details” section displays.

Page | 56
Per DFS Guidance regarding Privately Owned Vehicle (POV) vs Rental Car:
• If the Agency Head determines the rental car is the most economical means of travel, the charge for the rental car and the cost of fuel should be coded to the rental car ELI.
The traveler should complete the POV vs. Rental Car analysis and attach to the trip as supporting documentation.
Fields
1. Rental Car Class This required field provides a drop-down list of the available rental car classes available.
2. Justification for Rental Car Upgrade This comment field is required if any rental car class other than “Economy” or “Compact” is selected.
Now that you are requesting funds for a Reimbursement, data is required in the Payment Details Section within each ELI. Indicate whether each ELI was paid by personal payment, state credit card (PCard), or Direct Pay. If the Traveler paid by PCard the last 4 digits of the card are required.
STMS also allows for the Traveler to enter Third Party payment information, to include the Payor(s) and any Payor Details. (Figure 66)
Figure 66 – Trip Form > Expense Line Item Page > Payment Details Section
After entering all information related to an ELI, click on the “Save” button. When the ELI is saved, the system calculates a Total Allowable Amount for the ELI and updates the Total Trip Cost field of the Trip Form (Figure 67).

Page | 57
Figure 67 - Total Allowable Amount on Trip Form > Expense Line Item Page
With your ELI information saved, several options are available to you. To return to your trip details, click the “Return to Trip Form” button; to enter a new ELI, click on the “New Expense Line Item” button; to edit your current ELI, click on the “Edit” button.
Another option is the “Clone” button Click the “Clone” button to copy the information in the displayed ELI into a new ELI. (Figure 68) After cloning, review the information displayed to ensure it is correct. Edit as desired before saving. (Note: For Meals Class A&B, change the Expense Date field on the clone record and claim the meals you are allotted for the associated day).
Figure 68 – Clone Button on Trip Form > Expense Line Item Page

Page | 58
If the ELI is not needed, the “Delete” button can be selected (Figure 69). Deleting an ELI is permanent
and cannot be undone.
Reviewing Expense Line Items
You can view ELIs on the “Expense Line Items” tab. This is where you can double check that you have entered all ELIs associated with the trip. (Figure 70) Additionally, if you return to the “Details” tab and scroll down to the “Estimated Costs from Expense Line Items” section, you can see a summary of your ELI costs.
Figure 70 – Trip Form > Expense Line Items Page
Attachments Tab
To add an attachment, click on the “Attachments” tab and click on the “New Attachment” button. (Figure 71)
Figure 71 - Attachments Tab and New Attachment Button on Attachment Details Page > Details Section
Figure 69 - Delete Button on Trip Form > Expense Line Item Page

Page | 59
On the attachment “Details” page, select the type of attachment from the “Attachment Type” dropdown menu. Click on the “Save” button to save the Attachment Details. (Figure 72)
Figure 72 – Attachment > Details Section
Fields
1. Travelers Agency This field is auto-populated with the traveler’s agency.
2. Attachment Type This field provides a dropdown of available attachment types. Required attachments vary by
agency.
• Agenda – Any Agenda for an event or training.
• Amendment – Changes related to a form after it is processed including additional expenses
paid to the traveler.
• Authorization – Any authorizations created outside of STMS that need to be attached to a
Reimbursement with General Authorization, such as blank via email.
• DFS Audit – Notes from DFS related to submitted transactions.
• Expense Justification – Supporting documentation for charges related to ELIs, such as
Mileage Logs and POV vs. Rental Car forms.
• Mission Critical Statement – Any Mission Critical Statement not included in the Trip Form
Details that are related to your trip.
• Receipt – Any receipt for an ELI, such as fuel and hotel.
• Traveler Payment – Information related to a traveler owing the State or paying what they
owe.
• Other – Any other type of attachment. If you select the “Other” type, the Other Attachment
Type open text field is displayed as a required field.
3. Comments This field is an open text field.
4. Files Attached This field indicates the number of files attached to the record.
Once the Attachment Details have been saved, the attachment must be uploaded. Click on the “Files” tab in the upper-left corner. (Figure 73)

Page | 60
Figure 73 – Files Tab on Attachment Page
To attach files to the record, click on the “Upload Files” button. (Figure 74)
Figure 74 – Upload Files Button on Attachment Page > Files Tab
Select the file(s) to be uploaded from your computer and click on the “Open” button. (Figure 75)
Note: Receipts and other documentation added as an attachment should have personal or sensitive information redacted while preserving the original documentation for audit purposes. Users should follow agency policy regarding document retention and whether to group receipts when attaching.
Figure 75 – File Selection Dialog Box
Once the file(s) is loaded, “Done” appears on the screen. Click on the “Close” button to return to the Attachment Detail page. (Figure 76)

Page | 61
Figure 76 – Close Button on Upload Progress Pop Up
While your trip form has a Status of “Trip Draft” or “Submit for Approval”, you can add attachments or delete files that you uploaded, prior to submitting your trip for approval. To delete a file, return to the Files tab, of the attachment record. (Figure 73) Once the list of files displays, click on the “Del” that appear just before the name of the file that you are deleting.
Validation and Submission
Once all Attachments have been uploaded and ELIs have been entered, return to the “Details” tab and click on the “Validate” button for validation of the information entered. When you click Validate, STMS

Page | 62
runs a final validation across all tabs to ensure the form is within system requirements. In addition, any changes made to certain account details are reflected after the “Validate” button is clicked.
Once validation is successful, the trip form Status is updated to “Submit for Approval” and a certification statement appears. Any changes made to the form in this status causes the trip form to return to a status of “Trip Draft”, requiring the trip form to be validated, again.
To indicate your agreement with the certification statement, check the box and click the green “Submit for Approval” button. This submits the form for approval and emails your supervisor a notification email with a link referencing your trip (Figure 77).
After selecting the checkbox, if the “Submit for Approval” button remains gray, reload the page by clicking on your browser’s page reload button or F5. Once the page reloads, check the box again, and the “Submit for Approval” button turns green, allowing you to submit the trip form.
Figure 77 – Certification Check Box and Submit for Approval Button on Trip Form
If your Supervisor is not active or does not have an active delegate Approver, an error message is displayed (Figure 78). You are not be able to submit the trip form to them until this has been resolved.

Page | 63
Figure 78- Inactive Approver

Page | 64
REIMBURSEMENT WITH GENERAL AUTHORIZATION A Reimbursement with General Authorization is used when an agency does not require that an Authorization be filled out within STMS prior to a trip.
From the “Home” tab, click on the “New” button on the right side of “My Trip Forms” section. (Figure 79)
Figure 79 – New Button on Home Page
Select “Reimbursement with General Authorization” and click on the “Next” button located in the lower-right corner of the pop-up window. (Figure 80)
Figure 80 – New Trip Form Pop Up
Details Tab
The form opens to the Details tab. On this tab you there are see four sections – “Form Details,” “Trip Details,” “Estimated Costs from Expense Line Items,” and “System Information.”

Page | 65
In the “Form Details” section, several fields pre-populated, including Form Type, Traveler Name, and Status. The Traveler Agency Link is editable, but Travelers should not change the information. STMS provide information for additional fields from your profile when you save the form. (Figure 81)
Figure 81 – Trip Form > Form Details Tab > Form Details Section
Fields
1. Master Trip Invoice # This field displays a system generated number, which ties all the forms related to a trip together. For example, the Authorization, Advance, and Reimbursement forms for a trip share the same Master Trip Invoice Number. STMS populates this field when the form is first saved.
2. Form Type This field displays the type of form a user is creating, and is pre-populated.
3. Form ID This is a system-generated unique identifying number for a trip form, which STMS populates when the form is first saved.
4. Traveler Name This field displays the Traveler’s name, and is pre-populated.
5. Traveler Agency Link This field displays the Traveler’s name, their agency, and default organization code, and is pre-populated.
6. Traveler Organization Code This field displays the Organization Code of the organization that is funding the trip, and is system-populated when the trip form is saved.
7. Preparer Name If the form was prepared by someone on behalf of the Traveler, this field displays the Preparer’s name. If the form is prepared by the Traveler, it displays the Traveler’s name. STMS populates this field when the form is first saved.
8. Status This field displays the status of the trip form and is auto-populated by the system.
9. Secured Record This checkbox displays whether the record has been secured. If there is no check in the checkbox, the trip has not been secured. The Secured Record field is one of the security features

Page | 66
within STMS. The Traveler’s Supervisor or Approver is the only person who can secure a trip form. More details can be found in the Approver: Securing a Record section of this manual.
10. Residence City This field displays the Traveler’s residence city. STMS populates this field from the Traveler’s profile when the form is first saved.
11. Headquarters This field displays the Headquarters location of the Traveler’s workplace, which STMS populates when the form is first saved.
12. Type of Employee This field displays what type of employee the Traveler is and is system-populated when the trip form is saved.
13. Supervisor Name This field displays the name of the Traveler’s direct Supervisor, which STMS populates when the form is first saved.
In the next section Trip Details, enter your Trip Origin, Destination, Dates and Times, Purpose of Travel, and other related information and click the “Save” button. Required fields are indicated in red. Mission Critical Statements are pre-populated in a drop-down menu and are customizable by agency. (Figure 82)
Figure 82 – Trip Form > Form Details Tab > Trip Details Section
Fields
1. Point of Origin This required open text field is where the Traveler or Preparer enters where the trip originated. Multiple cities can be entered, if necessary.
2. Destination This required open text field is where the Traveler or Preparer enters where the trip is ending. Multiple cities can be entered, if necessary.
3. Departure Date and Time These are two required fields that provide Travelers or Preparers with a calendar view to select the date and a drop-down list to select the time of the Traveler’s departure. The Departure Date and Time cannot overlap an existing trip.

Page | 67
4. Return Date and Time These are two required fields that provide Travelers or Preparers with a calendar view to select the date and a drop-down list to select the time of the Traveler’s return. The Return Date and Time cannot overlap an existing trip.
5. Primary Mode of Transportation This required field provides a drop-down list to select how the Traveler arrives at their destination. Per DFS Guidance regarding Privately Owned Vehicle (POV) vs Rental Car:
• If the Agency Head determines the POV is the most economical means of travel, the mileage ELI should be used. The cost for fuel would not be included.
• If the Agency Head determines the rental car is the most economical means of travel, the charge for the rental car and the cost of fuel should be coded to the rental car ELI.
The traveler should complete the POV vs. Rental Car analysis and attach to the trip as supporting documentation.
6. Type of Travel
This field displays the trip’s type of travel, such as In State, Out of State, and Foreign.
7. Mission Critical Statement This required field provides a drop-down list of the Traveler’s Agency’s Mission Critical Statements. The drop-down options may contain a condensed version of the Mission Critical Statement. When the form is saved, the entire statement displays. The drop-down list can only accommodate up to 255 characters.
8. Purpose of Travel This required field is a drop-down list that provides reasons that state of Florida employees travel. Select the purpose of travel that relates best to the reason for traveling. Note: If the purpose of travel indicated is “Conference or Convention”, then the Benefit to the State must also be entered.
9. Benefit to the State This field is optional unless “Conference or Convention” is selected for Purpose of Travel.
10. Comment This field is available for any comments that the Traveler needs to include about the trip.
11. Was Telecommunication Considered? This field is required for all forms and Travelers must select “Yes,” that they considered telecommunication prior to every trip.
12. Governor Declared Emergency? This required field is a drop-down list that allows statewide and agency Reporters to pull reports on the number of Travelers per agency who traveled for an emergency and the total costs.
13. FEMA Emergency? This required field is a drop-down list that allows statewide and agency Reporters to pull reports on the number of Travelers per agency who traveled for an emergency and the total costs.
14. Trip Includes Off Duty Time This field provides the Traveler with the ability to document off-duty time during a work trip. If the Traveler was on personal time during the trip, the Traveler should select “Yes” from the drop-down list. This is not a required field and it defaults to “—None—."
15. Off Duty Time Begins This field is where the Traveler can capture when their off-duty time is scheduled to begin. The off-duty time must be within the travel period.
16. Off Duty Time Ends This field is where the Traveler can capture when their off-duty time is scheduled to end.

Page | 68
17. Case #, Circuit #, and Unit # These fields are available for agencies to use as they deem appropriate.
18. Project ID, Batch, Other Cost Accumulator (OCA), Category, Year, Grant ID, and Fund ID These optional fields can be used if travel should be associated with the related field which is created in FLAIR. The Project ID data populates on ELIs. Data from all optional fields is compared to the values in FLAIR for populating transactions.
Once the details of your trip are entered and saved, the system generates the Master Trip Invoice Number and the Trip Form ID Number. The Master Trip Invoice Number ties related trip forms together (Authorization, Advance, and Reimbursement) and each form type receives a unique Trip Form ID. The Master Trip Invoice Number should be referenced when reconciling your P-card charges. (Figure 83)
Figure 83 – Master Trip Invoice Number and Form ID on Trip Form Home Page
Expense Line Items
Once the details of your trip are saved, the next step is to enter the ELIs for the Reimbursement. ELIs record expenses associated with the trip – some examples are per diem, hotel, and rental car. It is important to note that agency policy determine how ELIs should be entered. (Example: Hotel expenses can be entered for the entire trip in one ELI or daily in separate ELIs.) To start, click on the “Expense Line Items” tab. (Figure 84)
Note: If you enter an ELI and receive an invalid object code error, reach out to your Fiscal Accountant for guidance. The Fiscal Accountant can determine if you need to use a different Organization Code or Expansion Option or if the Object Code needs to be added to the Organization Code and Expansion Option in FLAIR. It may take 24 hours for the change to be available in STMS.
Figure 84 – Expense Line Items Tab on Trip Form

Page | 69
To add an ELI, click on the “New” button. (Figure 85)
Figure 85 – New Button on Trip Form > Expense Line Items Tab
There are three or four sections of ELI details, depending on the Record Type ID selected by the user (the type of ELI being recorded). The sections of an ELI are the “Details”, a specialized details section that displays for some types of expenses, “Payment Details”, and “FLAIR Transaction Details.”
You must select a Record Type ID before providing any other information on the “Details” tab. Each time you select a different Record Type ID, the page refreshes as if you are creating a new ELI. (Figure 86)
Figure 86 – Record Type ID on Trip Form > Expense Line Item Page
Enter your ELIs, noting that the required fields are in red. (Figure 87) The Organization Code field is pre-populated to the Organization Code in your user profile, but can be changed using the dropdown menu. The Expansion Option field is tied to the Organization Code and only displays available Expansion Options for that Organization Code.

Page | 70
Figure 87 – Expense Line Item Page > Details Section
Reporting Only: Travelers should only check the Reporting Only box when their trip (or individual expense) has been processed for payment through FLAIR outside of STMS.
When you enter your total for an ELI, there is also a field to enter an Unallowable Amount. This field is used to report unallowable charges (e.g., the cost of movie rental at the hotel or the cost of your meals on a day you are claiming per diem.) (Figure 88)
Figure 88 – Unallowable Amount on Trip Form > Expense Line Item Page
Expense Line Item Details by Record Type
Airfare (Flight Details Section)
When a Traveler selects “Airfare” as the Record Type ID, the “Flight Details” section displays the following fields:
1. Point of Origin This required open text field is used to indicate the geographic starting place of the flight.
2. Destination This required open text field is used to indicate the geographic ending place(s) of the flight. Multiple destinations can be entered, though generally a single destination is most fitting.
3. Departure Date and Time

Page | 71
These two required fields provide a calendar view to select the date and a drop-down list to select the time of the Traveler’s flight departure. The date selected must be within the travel period.
4. Return Date and Time These two required fields provide a calendar view to select the date and a drop-down list to select the time of the Traveler’s flight return. The date selected must be within the travel period.
5. Departing Flight # This optional field is used to indicate departing flight number.
6. Arriving Flight # This optional field is used to indicate returning flight number.
Baggage Fees (Baggage Details Section)
When a Traveler selects “Baggage Fees” as the Record Type ID, the “Baggage Details” section displays the following fields:
1. Number of Bags This field is used to indicate the number of bags the traveler brought, if an expense is expected to be incurred.
Hotel (Lodging Details Section)
When a Traveler selects “Hotel” as the Record Type ID, the “Lodging Details” section displays the following fields:
1. Check-In Date This required field provides a calendar view to select the check-in date.
2. Check-Out Date This required field provides a calendar view to select the check-out date.
3. State Sponsored Event This required field is used to indicate whether the travel is for a state sponsored event. The default selection is “—None--.”
4. Night is Over State Limit This required field is used to indicate whether a hotel night expense exceeds the State Limit. If “Yes” is selected, then the Justification Comment is required. The default selection is “–None–.”
5. Justification Comment This open text field is used to record a justification if the hotel expense is over the State limit for at least one night.
Meals Class A&B (Meals Details Section)
When a Traveler selects “Meals Class A&B” as the Record Type ID, the “Meals Details” section displays the following fields:
1. Reimbursement Rate Type This field defaults to “Florida.” If the Traveler is being reimbursed at the GSA rate, select “GSA.” If “GSA” is selected, the “GSA Rate Details” field and the “View GSA Website” button displays and the Traveler or Preparer can enter the eligible rates for each meal.
2. Breakfast, Lunch, and Dinner checkboxes

Page | 72
Each of these checkboxes is available to check only if the Traveler is eligible to claim the associated meal. If a box is grayed out, the Traveler is not eligible to claim that meals for that day based on the previously entered departure and return dates and times.
• Breakfast—When travel begins before 6 a.m. and extends beyond 8 a.m. • Lunch—When travel begins before 12 noon and extends beyond 2 p.m. • Dinner—When travel begins before 6 p.m. and extends beyond 8 p.m., or when travel
occurs during nighttime hours due to special assignment.
If the Traveler receives breakfast, lunch, and/or dinner as part of conference fees during the trip, ensure that the checkboxes are not selected for those meal(s).
Mileage Map (Travel Details Section)
When a Traveler selects “Mileage Map” as the Record Type ID, the “Travel Details” section displays.
If the Traveler uses a state vehicle as the primary mode of transportation but the trip also includes a segment in which a vehicle other than the state-issued vehicle is used, the traveler should only claim mileage for what was incurred using the non-state vehicle.
Per DFS Guidance regarding Privately Owned Vehicle (POV) vs Rental Car:
• If the Agency Head determines the POV is the most economical means of travel, the mileage ELI should be used. The cost for fuel would not be included.
The traveler should complete the POV vs. Rental Car analysis and attach to the trip as supporting documentation.
Fields
1. Point of Origin This required open text field indicates the geographic starting place of the trip. Multiple points of origin can be entered, if necessary.
2. Destination This required open text field indicates the geographic ending place of the trip. Multiple points of origin can be entered, if necessary.
3. Mileage This required field is used to record the number of miles claimed.
4. Reimbursement Rate Type This field defaults to “Florida.” If the Traveler is being reimbursed at the GSA rate, then select “GSA.”
5. Mileage Reimbursement Rate
This field displays different information, based on the Reimbursement Rate Type selected.
• If the Reimbursement Rate Type “Florida” is selected, the Mileage Reimbursement Rate is set to the current state reimbursement rate.
• If the Reimbursement Rate Type “GSA” is selected, the value becomes a blank field to enter the current GSA reimbursement rate per mile.
6. View Map Calculator Clicking on this button opens a new window to the Florida Department of Transportation Map Calculator http://fdotewp1.dot.state.fl.us/CityToCityMileage/viewer.aspx.
8. View GSA Website Clicking on this button navigates to https://www.gsa.gov/travel/plan-book/transportation-airfare-pov-etc/privately-owned-vehicle-pov-mileage-reimbursement-rates to search for the current GSA rate.

Page | 73
Mileage Vicinity (Travel Details Section)
When a Traveler selects “Mileage Vicinity” as the Record Type ID, the “Travel Details” section displays.
Point of Origin and Destination are optional open-text fields, as travelers may need to document multiple locations over the trip period. Travelers may enter the overall mileage amount and attach additional documentation to support the vicinity mileage.
If the Traveler uses a state vehicle as the primary mode of transportation but the trip also includes a segment in which a vehicle other than the state-issued vehicle is used, the traveler should only claim mileage for what was incurred using the non-state vehicle.
Per DFS Guidance regarding Privately Owned Vehicle (POV) vs Rental Car:
• If the Agency Head determines the POV is the most economical means of travel, the mileage ELI should be used. The cost for fuel would not be included.
The traveler should complete the POV vs. Rental Car analysis and attach to the trip as supporting documentation.
Fields
1. Point of Origin This optional field is where the Traveler or Preparer enters where the trip originated. This is an open text field and multiple cities can be entered, if necessary.
2. Destination This optional field is where the Traveler or Preparer enters where the trip be ending. This is an open text field and multiple cities can be entered, if necessary.
3. Mileage This required field is used to record the number of miles claimed.
4. Reimbursement Rate Type This field defaults to “Florida.” If the Traveler is being reimbursed at the GSA rate, select “GSA.”
5. Mileage Reimbursement Rate This field displays different information, based on the Reimbursement Rate Type selected.
• If the Reimbursement Rate Type “Florida” is selected, the Mileage Reimbursement Rate is set to the current state reimbursement rate.
• If the Reimbursement Rate Type “GSA” is selected, the value becomes a blank field to enter the current GSA reimbursement rate per mile.
6. View Vicinity Calculator Clicking on this button opens a new window to www.maps.google.com.
7. View GSA Website Clicking on this button navigates to https://www.gsa.gov/travel/plan-book/transportation-airfare-pov-etc/privately-owned-vehicle-pov-mileage-reimbursement-rates to search for the current GSA rate.

Page | 74
Per Diem (Per Diem Details Section)
When a Traveler selects “Per Diem” as the Record Type ID, the “Per Diem Details” section displays.
Fields
1. Reimbursement Rate Type This drop-down list defaults to “Florida.” When “Florida” is selected, STMS auto calculates the total amount eligible to claim based on the arrival and departure date and time. If the Traveler is being reimbursed at the GSA rate, then they must select “GSA.” When “GSA” is selected, additional fields display.
2. Per Diem Allowance This field is required if “GSA” is selected and is where the amount being reimbursed should be entered. When the ELI is saved, the Total Amount auto-calculates.
3. View GSA Website Clicking on this button navigates to https://www.gsa.gov/travel/plan-book/per-diem-rates, to search for the appropriate rate allowed based on the destination.
4. GSA Rate Details This field is where any additional details can be entered about the GSA rate. If meals were provided, to deduct the meal expense from the Per Diem, enter the amount for the provided meal in the Unallowable Amount field. This deducts the meal cost from the Per Diem Amount.
Registration Fees
When a Traveler selects “Registration Fee” as the Record Type ID, there is no Specific Record Details section. The Traveler only needs to fill out the “Details” section of the ELI.
Rental Car (Rental Car Details Section)
When a Traveler selects “Rental Car” as the Record Type ID, the “Rental Car Details” section displays. Per DFS Guidance regarding Privately Owned Vehicle (POV) vs Rental Car:
• If the Agency Head determines the rental car is the most economical means of travel, the charge for the rental car and the cost of fuel should be coded to the rental car ELI.
The traveler should complete the POV vs. Rental Car analysis and attach to the trip as supporting documentation.
Fields
1. Rental Car Class This required field provides a drop-down list of the available rental car classes available.
2. Justification for Rental Car Upgrade This comment field is required if any rental car class other than “Economy” or “Compact” is selected.
For a Reimbursement with General Authorization form, data is required in the Payment Details Section within each ELI. The Traveler needs to select whether each ELI is being paid by personal payment, state credit card (P-Card), or Direct Pay. If the Traveler pays by PCard, the last 4 digits of the PCard are required. STMS also allows for the Traveler to enter Third Party payment information to include the Payor(s) and any Payor Details. (Figure 89)

Page | 75
Figure 89 – Expense Paid By on Expense Line Item Page > Payment Details Section
After entering all information related to an ELI, click on the “Save” button. When the ELI is saved, the system calculates a Total Allowable Amount for the ELI and updates the Total Trip Cost field of the Trip Form. (Figure 90)
Figure 90 – Total Allowable Amount on Trip Form > Expense Line Item Page
With your ELI information saved, several options are available to you. To return to the trip details, click the “Return to Trip Form” button; to enter a new ELI, click on the “New Expense Line Item” button; to edit your current ELI, click on the “Edit” button.
Another option is the “Clone” button. Click the “Clone” button to copy the information in the displayed ELI into a new ELI. (Figure 91) After cloning, review the information displayed to ensure it is correct. Edit as desired before saving. (Note: For Meals Class A&B, change the Expense Date field on the clone record and claim the meals you are allotted for the associated day).

Page | 76
Figure 91 – Clone Button on Trip Form > Expense Line Item Page
If the ELI is not needed, the Delete button can be selected (Figure 92). Deleting an ELI is permanent and cannot be undone.
Reviewing Expense Line Items
You can view ELI on the “Expense Line Items” tab. This is where you can double check that you have entered all ELIs associated with the trip. (Figure 93) Additionally, if you return to the “Details” tab and scroll down to the “Estimated Costs from Expense Line Items” section, you can see a summary of your ELI costs.
Figure 93 – Trip Form > Expense Line Item Page
Figure 92- Delete Button on Trip Form > Expense Line Items

Page | 77
Attachments Tab
To add an attachment, click on the “Attachments” tab and then click on the “New Attachment” button. (Figure 94)
On the attachment “Details” page, select the type of attachment from the “Attachment Type” dropdown menu. Click on the “Save” button to save the Attachment Details. (Figure 95)
Figure 95 – Attachment Details Page > Details Section
Fields
1. Travelers Agency This field is auto populated with the traveler’s agency.
2. Attachment Type This field provides a dropdown of available attachment types. Required attachments vary by
agency.
• Agenda – Any Agenda for an event or training.
• Amendment – Changes related to a form after it is processed including additional expenses
paid to the traveler.
• Authorization – Any authorizations created outside of STMS that need to be attached to a
Reimbursement with General Authorization, such as blank via email.
• DFS Audit – Notes from DFS related to submitted transactions.
Figure 94 - Attachments Tab and New Attachment Button on Attachment Details Page > Details Section

Page | 78
• Expense Justification – Supporting documentation for charges related to ELIs, such as
Mileage Logs and POV vs. Rental Car forms.
• Mission Critical Statement – Any Mission Critical Statement not included in the Trip Form
Details that are related to your trip.
• Receipt – Any receipt for an ELI, such as fuel and hotel.
• Traveler Payment – Information related to a traveler owing the State or paying what they
owe.
• Other – Any other type of attachment. If you select the “Other” type, the Other Attachment
Type open text field is displayed as a required field.
3. Comments This field is an open text field.
4. Files Attached This field auto calculates the number of files attached to the record.
Once the Attachment Details have been saved, click on the “Files” tab in the upper-left corner. (Figure 96)
Figure 96 – Files Tab on Attachment Page
To attach files to the record, click on the “Upload Files” button. (Figure 97)
Figure 97 – Upload Files Button on Attachment Page > Files Tab
Select the file(s) to be uploaded from your computer and click on the “Open” button. (Figure 98)
Note: Receipts and other documentation added as an attachment should have personal or sensitive information redacted while preserving the original documentation for audit purposes. Users should follow agency policy regarding document retention and whether to group receipts when attaching.

Page | 79
Figure 98 – File Selection Dialog Box
Once the file(s) is loaded, “Done” appear on the screen. Click on the “Close” button to return to the Attachment Detail page. (Figure 99)
Figure 99 – Close Button on Upload Progress Pop Up
While your trip form has a Status of “Trip Draft” or “Submit for Approval”, you can add attachments or delete files that you uploaded, prior to submitting your trip for approval. To delete a file, return to the Files tab, of the attachment record. (Figure 96) Once the list of files displays, click on the “Del” that appear just before the name of the file that you are deleting.
Validation and Submission
Once all Attachments have been uploaded and ELIs have been entered, return to the “Details” tab and click on the “Validate” button for validation of the information entered. When you click Validate, STMS runs a final validation across all tabs to ensure the form is within system requirements. In addition, any changes made to certain account details are reflected after the “Validate” button is clicked. (Figure 100)

Page | 80
Figure 100 – Validate Button on Trip Form > Details Tab
Once validation is successful, the trip form Status is updated to “Submit for Approval” and a certification statement appears. Any changes made to the form in this status causes the trip form to return to a status of “Trip Draft”, requiring the trip form to be validated, again.
To indicate your agreement with the certification statement, check the box and click the green “Submit for Approval” button. This submits the form for approval and emails your supervisor a notification email with a link referencing your trip. (Figure 101)
After selecting the checkbox, if the “Submit for Approval” button remains gray, reload the page by clicking on your browser’s page reload button or F5. Once the page reloads, check the box again, and the “Submit for Approval” button turns green, allowing you to submit the trip form.
Figure 101 – Certification Check Box and Submit for Approval Button on Trip Form
If your Supervisor is not active or does not have an active delegate Approver, an error message is displayed (Figure 102). You are not able to submit the trip form to them until this has been resolved.

Page | 81
Figure 102- Inactive Approver
Continuous Travel / Mileage Logs
STMS allows travelers to submit reimbursement requests for travel that occurs over the course of a
month or multiple weeks. (Such as the case of inspectors who travel daily and request reimbursement
for mileage and/or tolls for multiple days or weeks on a routine basis.) This type of reimbursement can
be submitted as a single trip form with a specified date range, provided there are no other trips in the
date range. Additionally, STMS allows users to create a single ELI for daily expenses, such as mileage or
tolls, rather than requiring an entry for each day, if the proper supporting documentation is provided.
Per DFS Accounting and Auditing guidance, trip forms and mileage logs provided as supporting
documentation must meet the following criteria:
• The mileage log captures the monthly mileage, and the dates coincide with the dates in STMS.
• The traveler cannot include other types of travel for claiming monthly mileage and tolls. For
example, if there are any trips that require overnight stay, those must be processed as a
separate trip.
• There can be one ELI for each expense type for the trip and the expense date is the last date of
the trip. The comment section for the ELI references attached supporting documentation and/or
mileage logs.
• The mileage log is signed by the traveler.

Page | 82
PREPARER A Preparer has the ability to create trip forms on behalf of others. Once the draft form has been validated, the person traveling is prompted via email to certify that the information on the trip form is correct before the form is submitted to the Traveler’s Supervisor. The Preparer may also complete trip forms on behalf of Proxy Travelers. This process is identical to that used when preparing for any other user, except that because Proxy Travelers do not log into the system, their forms are not being submitted to them to certify, but is submitted by the Preparer and goes directly to the Proxy Traveler’s supervisor instead. Note: Follow DFS guidance regarding any attestation or other documentation needed as an attachment to the Proxy Traveler’s trip form.
While creating a trip form as a Preparer is similar in process to creating one as a Traveler, it is important to note a few differences.
From the “Home” page, click on the “New” button on the right side of the “Prepared-All” section or the right side of the “My Forms” section (Figure 103).
Figure 103- New Button on Home Page
Next, select “Authorization” or “Reimbursement with General Authorization” and click on the “Next” button located in the lower-right corner of the pop-up window. (Figure 104). The Preparer who creates

Page | 83
an Authorization form for a trip is the only user, other than the person traveling, who can prepare the Advance and/or Reimbursement form for that trip.
Figure 104 – New Trip Form Pop Up
Details Tab
The form opens to the Details tab. On this tab, there are four sections – “Form Details,” “Trip Details,” “Estimated Costs from Expense Line Items,” and “System Information.”
Choose the Travelers Name by clicking on the lookup icon. As a Preparer you can prepare for multiple people in your agency so you must select a traveler. To do this, click on the traveler lookup icon. (Figure 105)
Figure 105 – Travel Lookup on Authorization Trip Form > Form Details Section

Page | 84
Search for the Traveler’s Name from the Users list. If no names appear in the list, begin typing either a first name or last name in the Lookup field and click on the “Go” button. A list populates at the bottom of the window. Select the Traveler’s Name from this list. (Figure 106)
Figure 106 – User Lookup Pop Up
Next, click on the Traveler Agency Link lookup icon and search for the traveler’s name that was selected in the previous step. (Figure 107)
Figure 107 – Traveler Agency Link on Authorization Trip Form > Form Details Section
This field operates the same as the Traveler Name lookup. Type the traveler’s first or last and click on the “Go” button. Select the Traveler’s Agency Link from the list of travelers that appear in the User list in the bottom of the window. (Figure 108)

Page | 85
Figure 108 – Agency/User FLAIR Codes Lookup Pop Up
Once Traveler Agency Link has been selected, you are able to select the Mission Critical Statement in the Trip Details section. (Figure 109)
Figure 109 – Mission Critical Statement on Trip Form Page > Trip Details Section
A warning message appears when a Preparer is working on a trip form and the Traveler’s account is inactive (Figure 110).
Figure 110- Inactive Traveler Message
Preparers are permitted to continue drafting the trip form but are notified of the Traveler’s inactive status and know immediately that additional action is required. Preparers are not able to validate or submit the trip form until the Traveler’s account is active.

Page | 86
Fill out all other necessary information just as a Traveler does, then click on the “Save” button. After STMS creates the Trip Form, add any required ELIs and Attachments. When you have finished, click the “Validate” button. If the traveler is not active in STMS the “Validate” button does not appear indicating that the traveler’s account is not active and must be reactivated or converted to a proxy traveler.
If the person you are preparing on behalf of is not a Proxy Traveler, immediately upon successful validation, the person traveling receives an email, letting them know that a trip form is ready for their review. Any changes made to the form in this status by the preparer or person traveling causes the trip form to return to a status of “Trip Draft”, requiring the trip form to be validated, again. If the person traveling is a Proxy Traveler, complete the attestation using the check box and then click Submit to initiate the approval process. Note: Follow DFS guidance regarding any attestation or other documentation needed as an attachment to the Proxy Traveler’s trip form.
STMS forwards the form to the person listed as the Proxy Traveler’s supervisor in STMS. Proxy travelers do not receive any email notifications about the status of their trip forms. All notifications are sent to the Preparer only.
Changing the Preparer for a Trip Form
A Preparer can assign their self on forms originally created by another Preparer or a Traveler by clicking the “Assign to Me” button (Figure 111).
Figure 111 – Trip Form Details > Assign to Me Button
The button is visible to Preparers on forms until they are fully processed. With this change, when a Traveler or the current Preparer is unable to make edits themselves, another Preparer can quickly and efficiently assume the role and assist without the need to create a case and wait for STMS support staff to make the change. Authorization forms that are Authorized continue to display the “Assign to Me” button. Changing the Preparer on an Authorization form that has a Status set to Authorized allows the new preparer to create the Advance and/or Reimbursement Form associated with that Authorization form.
The listed preparer cannot be changed for Advances, Reimbursements, and Reimbursements with General Authorizations once they have completed processing and have any of the following Statuses:
• FLAIR Paid
• Processing Complete
• Agency Audit Complete – Reporting Only
• Traveler Owes State
• Traveler Paid

Page | 87
EDITING YOUR TRIP FORMS Up to ten Personal Trip Forms are displayed in the “My Forms” section of the “Home” page. You may access additional forms by clicking on the “My Forms” link. This navigates to the “My Forms” page where all your Trip Forms are displayed. To find a specific Trip Form from the “Home” page, enter the Trip Form ID Number in the search bar at the top of the page. To open the Trip Form, click the link in the Form ID column. To edit the details of a trip, click on the “Edit” button. Your trip forms can only be edited if they are in currently in a Trip Draft Status. (Figure 112) Once validation of a trip is successful, the trip form Status is updated to “Submit for Approval” Any changes made to the form in this status cause the trip form to return to a status of “Trip Draft”, requiring the trip form to be validated, again before submitting it.
Figure 112 – Edit Button on Trip Form Page > Details Section

Page | 88
CANCELLING A TRIP FORM If your trip is cancelled, the traveler or the person preparing on behalf of a proxy traveler has the option to cancel your trip in STMS by clicking on the “Cancel Form” button on the “Details” tab within the trip form. (Figure 113)
Figure 113 – Cancel Form Button on Trip Form Page > Details Section

Page | 89
Below are the system-enforced parameters governing Trip Form cancellation.
Trip Form Can Be Cancelled Notes
Authorization At any time, provided that an Advance or Reimbursement has not been created related to Authorization.
If an Advance and/or Reimbursement has been created, the traveler must cancel these related trip forms before trying to cancel the Authorization.
Advance Up until transactions have been created for the Advance.
Another Advance can be created on an Authorization if all prior Advances associated to the Authorization have been cancelled and the traveler does not have any open advances.
Reimbursement Up until transactions have been created for the Reimbursement.
Another Reimbursement can be created on an Authorization if all prior Reimbursements have been cancelled.
Reimbursement with General Authorization
Up until transactions have been created for the Reimbursement with General Authorization.

Page | 90
APPROVER The STMS approval process has been developed to provide travel Approvers with a powerful tool for reviewing, approving, and tracking trip forms while maintaining the flexibility to accommodate each agency’s internal procedures.
Each submitted Trip Form enters a dynamic approval process. The traveler’s immediate Supervisor or the Supervisor’s Delegate is always the first Approver in the approval process. Each Approver in the process routes the Trip Form to the next Approver required by agency policy or procedure until final approval is obtained, at which time the form is considered Authorized. Each time an Approver is assigned a Trip Form, STMS sends that person a notification email stating that there is a form awaiting action.
Reviewing Trip Forms
When you log into STMS as an Approver, the “My Forms” list view, which displays your personal Trip Forms, and the “Forms to Approve” list view, which displays Trip Forms in your queue for approval or rejection. Additionally, if you have been designated as a Delegate Approver, trip forms that are pending approval are included in the “Delegated Forms to Approve” list view (Figure 114).
Figure 114 - Approver Home page
You may sort the information in any list view by clicking on a column header allowing you to group items; for instance, by a traveler’s name or trip destinations. Click on any of the list view titles for the complete list of all trips forms to be displayed.
A reminder email notification is sent for approval requests pending more than 5 days with any one approver. The email is always be sent to the assigned approver. If the assigned approver’s account is inactive, the delegate is copied as well.

Page | 91
As an Approver or Delegate Approver, you are able to review all the details of the Traveler’s Trip Form. To review a Trip Form, review the information in the “Details,” “Expense Line Items,” and “Attachments” tabs. You are able to review the information just similar to a printed copy, reviewing the ELIs and ensuring that proper documentation is attached and legible.
Notes:
• If the Traveler uses a state vehicle as the primary mode of transportation but the trip also includes a segment in which a vehicle other than the state-issued vehicle is used, the Traveler should only claim mileage for what was incurred using a vehicle other than the state-issued vehicle.
• When a traveler selects Continuous as the Purpose of Travel, the system does not prohibit Meals A&B, Hotel, and Per Diem. In most instances, Continuous travel is selected for day trips where mileage is a suitable expense type but meals, per diem, and lodging are not suitable. However, in some rare instances where an overnight stay is part of the trip, meals, per diem, and lodging may need to be claimed. Approvers and Fiscal Auditors should therefore carefully review all trip details and expenses to ensure they follow state travel guidelines and agency policies.
• On each individual ELI, the Total Amount represents the full cost incurred by the traveler for the item. The Total Allowable Amount is the Total Amount less any Unallowable Amount. For Advances, the Advance Amount (the amount due to the traveler) is 80% of the Total Allowable Amount, unless the traveler has indicated “significantly discounted airfare” or FEMA or Governor-declared emergency, in which case the Advance Amount is 100% of the Total Allowable Amount.
Securing a Record
The STMS allows for an Approver to mark a single trip as Secure. The STMS uses the privacy indicators and secure trip flags to indicate records that may require the redaction of confidential and/or exempt information for records to be produced pursuant to a public records request. Agencies must note the statutory authority for use of the secure trip feature and provide direction to their users.
Only a user with an Approver profile can secure a trip form. A user with the Preparer, Traveler or Fiscal Accountant profile cannot secure a trip form.
The Secure Record button displays to the right of the Trip Report button. (Figure 115) Click on the Secure Record button to mark the record as secured.
Figure 115 – Secure Record Button on Trip Form > Details Section

Page | 92
When a trip is secured, then a checkmark is display next to the Secured Record field. (Figure 116)
Figure 116 - Secured Trip
Do not confuse the Secure Record function with the lock icon displayed to the left of the Trip Report button. The lock icon simply indicates that trip details are not currently editable.
Approving Trip Forms
As an Approver, if your review of the Trip Form has verified that the information stated on the form is correct and receipts are attached, click on the “Approve/Reject” link in the Approval History section. (Figure 117)
Figure 117 – Approval History Section on Trip Form
Click the check box to agree with the certification statement and click the “Approve” button. (Figure 118) After selecting the checkbox, if the “Submit” button remains gray, reload the page by

Page | 93
clicking on your browser’s page reload button or F5. Once the page reloads, check the box again, and the “Approve” button turns green, allowing you to submit the trip form.
Figure 118 – Approve Button on Approval History Section of Trip Form
Based on your STMS permission, if you can be the final approver on the form you are approving, the system asks if you are the Final Approver for this trip form. Use your knowledge of your agency’s approval process to answer the question. (Figure 119)
Figure 119 – Approval History Section Showing Final Approver Prompt and Associated Buttons
If you have indicated that there is another Approver in the process, a box appears asking for you to “Select Next Approver.” Type the name of the next Approver. As you type, any names containing the letters you have typed appears below the “Select Next Approver” box, along with their Working Title. Click the name of the next Approver and then click the “Submit” button. Approvers cannot send a trip form to anyone who has already approved the form, as STMS does not allow an Approver to sign a trip form twice. If a trip form is rejected back the the traveler, all Approvers within the agency have the ability to review/approve the form during the subsequent round of approvals if the form is sent to them. (Figure 120)

Page | 94
Figure 120 – Select Next Approver Control on Trip Form Page > Approval History Section
If the next Approver does not have an active delegate Approver, you are not able to submit the trip form to that Approver until they have established an active Delegate Approver.
Once successfully submitted, the Approval History updates and the next Approver is notified via email. This process continues until the Trip Form is approved by the Final Approver. After approval by the Final Approver, the Trip Form is considered Authorized. There are no additional steps for an Authorization Form. Advances, Reimbursements and Reimbursements with General Authorization proceed to Fiscal Accountants for review.
Rejecting Trip Forms
If in your review of the Trip Form you determine that information is missing or incorrect, you can “Reject” the Trip Form and add comments for the Traveler to update their information. To Reject a trip form, click the “Approve/Reject” link in the Approval History section. (Figure 121)
Figure 121 – Approval History Section on Trip Form

Page | 95
Click on the “Reject” button. (Figure 122)
Figure 122 – Reject Button in Approval History Section of Trip Form
At this point you may add a comment informing the Traveler about what must be updated or added in order for the Trip Form to be approved. Enter the comment in the “Comments” box and click the “Submit” button. (Figure 123) To finalize the rejection without a comment, simply click the “Submit” Button.
Figure 123 – Comments Box in Approval History Section of Trip Form
After submission, STMS notifies the Traveler via email that the Trip Form has been rejected and displays the comment in the Comments column of the Approval History section. The Traveler is able to access the Trip Form on their “Home” page to revise and re-submit.
Assigning a Delegate Approver
As an Approver, you can assign a Delegate to assist in the approval process. A Delegate is an Approver who can review and approve trip forms on your behalf. A Delegate Approver has the same permissions as the Approver.
Delegates do not receive STMS notifications, but see delegated Trip Forms that are awaiting action on their “Home” page. Therefore, be sure to communicate with your delegate about when to monitor their “Home” page for Trip Forms to review.
If your Delegate Approver becomes inactive, you are not able to receive additional trip forms to approve until you establish a new Delegate Approver.
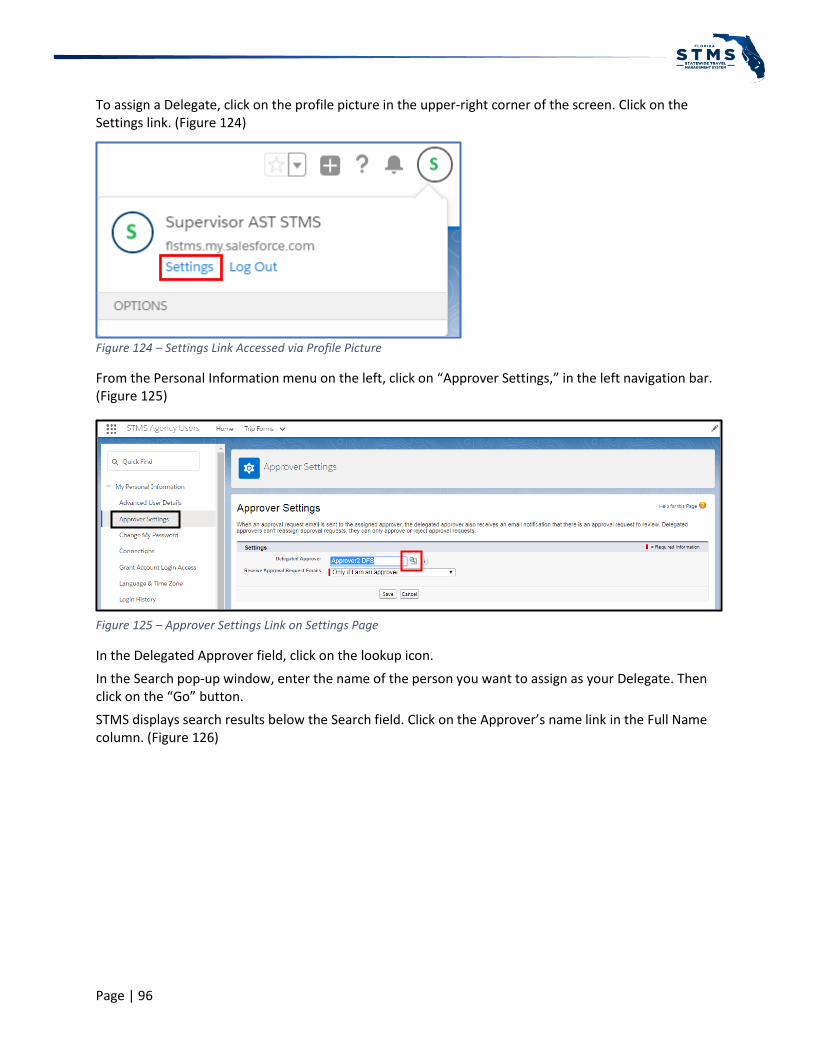
Page | 96
To assign a Delegate, click on the profile picture in the upper-right corner of the screen. Click on the Settings link. (Figure 124)
Figure 124 – Settings Link Accessed via Profile Picture
From the Personal Information menu on the left, click on “Approver Settings,” in the left navigation bar. (Figure 125)
Figure 125 – Approver Settings Link on Settings Page
In the Delegated Approver field, click on the lookup icon.
In the Search pop-up window, enter the name of the person you want to assign as your Delegate. Then click on the “Go” button.
STMS displays search results below the Search field. Click on the Approver’s name link in the Full Name column. (Figure 126)

Page | 97
Figure 126 – Approver’s Name Link on the Search
Then, on the Approver Settings screen, click the “Save” button. You can change the Delegate Approver at any time.
Note: The “Manager” and “Receiver Approval Request Emails” fields that may be displayed on the Approver Settings screen have no effect in STMS at this time.
Delegate Approvers do not automatically receive an email notification from STMS notifying them of forms they need to approve on behalf off. Individual approvers may elect to setup and activate an email forwarding rule in their email program during times they are scheduled to be out of the office.

Page | 98
FISCAL ACCOUNTANT A Fiscal Accountant is any Agency user who reviews a Trip Form after it has been authorized. A Fiscal Accountant can create transactions and mark them ready for processing by FLAIR. Fiscal Accountants include Agency accountants, auditors, and fiscal assistants. At a high level, Fiscal Accountants perform the following actions in relation to authorized Advances, Reimbursements, and Reimbursements with General Authorization:
• Audit Trip Forms o Select unassigned Trip Form from the queue of available forms and assign to self o Make Trip Form selections that later set a transaction type when the audit process is
marked complete (and supply other details as necessary) o Review ELIs
▪ Set the Organization Code, the Expansion Option, and Expansion Option Version ▪ View/add attachments as necessary
o Update audit status (Note: when you save a status that indicates the audit is complete, STMS proceeds to create potential FLAIR transactions)
• Process FLAIR Transactions o Edit details of potential FLAIR transactions o Mark FLAIR transactions ready for FLAIR submission o Process any returned transactions and resubmit if applicable
Fiscal Accountant Home Page
When you log into STMS as a Fiscal Accountant, you are on the Fiscal Accountant’s “Home” page. On the “Home” page, you the sections “Ready for Agency Audit,” “FLAIR Trans Status Review,” and “My Trip Forms” are displayed. (Figure 127)
Figure 127 - Home Page, Fiscal Accountant
Clicking on any names that appear as a hyperlink opens the user’s Profile page. The Profile page displays the user’s name, email address, and whether their STMS account is currently active. The User profile

Page | 99
also displays the People First ID Number associated with the account (for employees), or the last 4 digits of the SSN and Vendor Sequence Number associated with the account (for non-employees). The right portion of the screen shows the user’s Trip Forms and any Cases that the user is listed as the Case Reporter.
Figure 128 - Profile Page, Fiscal Accountant
Auditing a Trip Form
Selecting/Assigning a Trip Form for Audit
To find a trip to be audited, view the Pending Fiscal Accountant Audit section of your “Home” page. (Figure 129) Clicking the “Pending Fiscal Accountant Audit” link at the top of the box navigates to the expanded view of this section. You can sort the information the by clicking on any column header allowing you to group items; for instance, Form ID Number or the Record Type.
Figure 129- Trip Forms Pending Fiscal Accountant Audit
The “Pending Fiscal Accountant Audit” section displays information about Trip Forms in your agency that have been authorized by a Final Approver and still require auditing by your agency. Along with the Form ID, and Traveler Name, columns, the Fiscal Auditor Name column displays the last Fiscal Accountant to save the trip form. If the “Fiscal Auditor Name” field is blank, that indicates a Fiscal Accountant is not yet actively auditing the Trip Form.
Additional fields displayed in this section are Record Type (“Advance,” “Reimbursement,” or “Reimbursement with General Authorization”) and Transaction Date – the date that the form was approved by the Final Approver prior to audit.

Page | 100
Click on the Trip Form ID to open the trip details. The first action to take when auditing a trip form is to add your name to the trip form in the Fiscal Auditor Name field. Note: you are not allowed to serve as the Fiscal Accountant for trips where you are listed as the Traveler.
To add your name in the Fiscal Auditor Name field, click on the “Edit” button near the top of the Trip “Details” page. (Figure 130)
Figure 130 – Edit Button on Trip Form Page
Find the “Fiscal Auditor Name” field in the “Form Details” section. (Figure 131)
Figure 131 – Fiscal Auditor Name Field on Trip Form > Details Tab > Form Details Section

Page | 101
Click on the lookup icon to the right of the field, then type your first or last name into the “Search” bar and click on the “Go” button. Select your name. (Figure 132)
Figure 132 – User Lookup Pop Up
The next time that you open this window, your name appears in the bottom portion of this window under the title “Recently Viewed Users” without you needing to type your name into the search bar. Click the “Save” button on the Trip Form at this time to add your name as the Auditor for this trip. (Figure 133)
Figure 133 – Save Button and Fiscal Auditor Name Field on Trip Form > Details Tab > Form Details Section

Page | 102
Making Selections to Set the Transaction Type
Selections you make within the Trip Form selections determine the transaction type when the audit process is marked complete. Within the “Details” tab on the Trip Form, click on the “Edit” button. (Figure 134)
If you are submitting a trip as Certify (Carry) Forward, reference the section Certified Forward Period and Creating 80/53 Transactions.
Figure 134 – Edit Button on Trip Form > Details Tab > From Details Section
Revolving Fund – Transaction Type 52
Go to the “Accounting Details” section. If this trip is being paid from a revolving fund, set the value of the “Paid from Revolving Fund” field to “Yes.” By making this change, the transactions that STMS creates when the audit of the Trip Form is complete be “52” Transactions instead of “51” Transactions. (Figure 135) Reference the Documenting Revolving Fund Transactions in STMS section of this manual, which details the process of documenting the use of revolving funds in STMS.
Figure 135 – Revolving Fund-Related Fields on Trip Form > Details Tab > Accounting Details Section
Other Details
If the Traveler owes the State, the columns on the right side of the “Accounting Details” section can be used to record the amount of the payment made and additional details. (Figure 136) See the Traveler Owes State audit status section for additional details. (Page 109)

Page | 103
Figure 136 – Traveler Payment and Payment Details Fields on Trip Form > Details Tab > Accounting Details Section
Save any changes that were made to the transaction type by clicking on the “Save” button at the top or bottom of the screen.
Reviewing Expense Line Items
To view all the ELIs for a trip, click on the “Expense Line Item” tab. All the ELIs for that trip then appear on the screen. Commonly viewed fields, including the Record Type, Organization Code, and Expansion Option are displayed on this screen. To view additional details about a specific ELI, click on that ELI’s “Expense ID” number. (Figure 137)
Figure 137 – Expense ID Link on Trip Form > Expense Line Items Tab
With the complete ELI displayed, the system permits you to make edits to five fields, within the “Details” section: Organization Code, Expansion Option, Expansion Option Version, Reporting Only, and Reporting Only Comment. In addition, the PCard Works SWDN and PCard Last 4 Digits. In addition, an FA Comment Field is available, for Fiscal Accountants to provide remarks on each ELI.
To edit any of these fields, click on the “Edit” Button within the ELI “Details” page. (Figure 138)
Figure 138 – Edit Button on Trip Form > Expense Line Items Tab > Details Section
All available Organization Codes and Expansion Options that have been provided by FLAIR are available in the type-ahead field. If you change the Organizational Code and Expansion Option, the Expansion

Page | 104
Option Version field will become blank, and the system populates the latest version upon saving the changes. (Figure 139) If you fill in a value for the Expansion Option Version that version will be saved instead. All the other fields on this screen are locked.
Any changes you make to an ELI should be saved. To save the changes, click on the “Save” button at the top or bottom of the page.
Figure 139 – Auditor-Editable Fields on Trip Form > Expense Line Items Tab > Details Section
This process should be repeated for each ELI, by clicking on the “Return to Trip Form” button, then on the “Expense Line Item” tab, and then selecting the next ELI.
Once the transactions associated with this trip are submitted to FLAIR, FLAIR populates the appropriate values within the FLAIR Transaction Details section.
Note: Travelers entering an ELI and receiving an invalid object code error may reach out to their Fiscal Accountant for guidance. The Fiscal Accountant determines if the Traveler needs to use a different Organization Code or Expansion Option or if the Object Code needs to be added to the Organization Code and Expansion Option in FLAIR. If the update needs to occur in FLAIR, it may take 24 hours after the change is made in FLAIR for it to be available in STMS.
Note: On each individual ELI, the Total Amount represents the full cost incurred by the Traveler for the item. The Total Allowable Amount is the Total Amount less any Unallowable Amount. For Advances, the Advance Amount (the amount due to the traveler) is 80% of the Total Allowable Amount, unless the Traveler has indicated “significantly discounted airfare” or FEMA or Governor-declared emergency, in which case the Advance Amount is 100% of the Total Allowable Amount.
Reviewing Attachments
In many instances, the necessary associated attachments for each trip need to be viewed as the ELIs are being reviewed. To view the attachments for a trip, click on the “Attachments” tab found on the Trip Form “Details” page. (Figure 140)
Figure 140 – Attachments Tab on Trip Form Page

Page | 105
To view the details and files associated with each attachment, click on one of the attachment names. STMS displays the Attachment Details tab of the Attachment Page. (Figure 141)
Figure 141 – Attachment Page > Details Tab
Click on the “Files” tab within that attachment to view the files associated with the attachment. (Figure 142) Each file can be downloaded by clicking on the associated “Download” link.
Figure 142 – Attachment Page > Files Tab
As the assigned Fiscal Accountant, you have the ability to upload attachment files on behalf of the Traveler or attach other documentation that you need to include with the trip form while you are the assigned Fiscal Accountant. Fiscal Accountants have the ability to add attachments or delete their own attachments regardless of the Status of the trip form. To add an attachment, click on the “Attachments” tab of the Trip Form and click the “New Attachment” button. The Details Tab of the Attachment page are be displayed in edit mode. (Figure 143)

Page | 106
Figure 143 – Attachment Page > Details Tab
On the attachment “Details” page, select the type of attachment from the “Attachment Type” dropdown menu. Click on the “Save” button to save the Attachment Details. Once the Attachment Details have been saved, click on the “Files” tab that is now displayed in the upper-left. (Figure 144)
Figure 144 – Files Tab on Attachment Page
To attach files to the record, click on the “Upload Files” button. (Figure 145)
Figure 145 – Upload Files Button on Attachment Page > Files Tab

Page | 107
Select the file(s) to be uploaded from your computer and click on the “Open” button. (Figure 146)
Figure 146 – File Selection Dialog Box
Once the file(s) are loaded, “Done” appears on the screen. Click on the “Close” button to return to the Attachment Detail page. (Figure 147)
Figure 147 – Close Button on Upload Progress Pop Up
Updating Trip Form Audit Status
When your review of the information associated with a trip is complete, it is time to update the trip form Audit Status. In the “Details” tab of a trip form, click on the “Edit” button.
The Audit Status field can be found in the right column of the Form Details section. This field has a drop-down menu and you can choose from the following options: Agency Audit Received (default), Agency Audit Rejected, Agency Audit Complete, Audit Complete Reporting Only, Traveler Owes State, and Traveler Paid. (Figure 148)
Note: Make and save all desired edits to the Trip Form prior to saving the Audit Status field with any status other than Agency Audit Received. Once you save a different Audit Status, you cannot to make further changes.
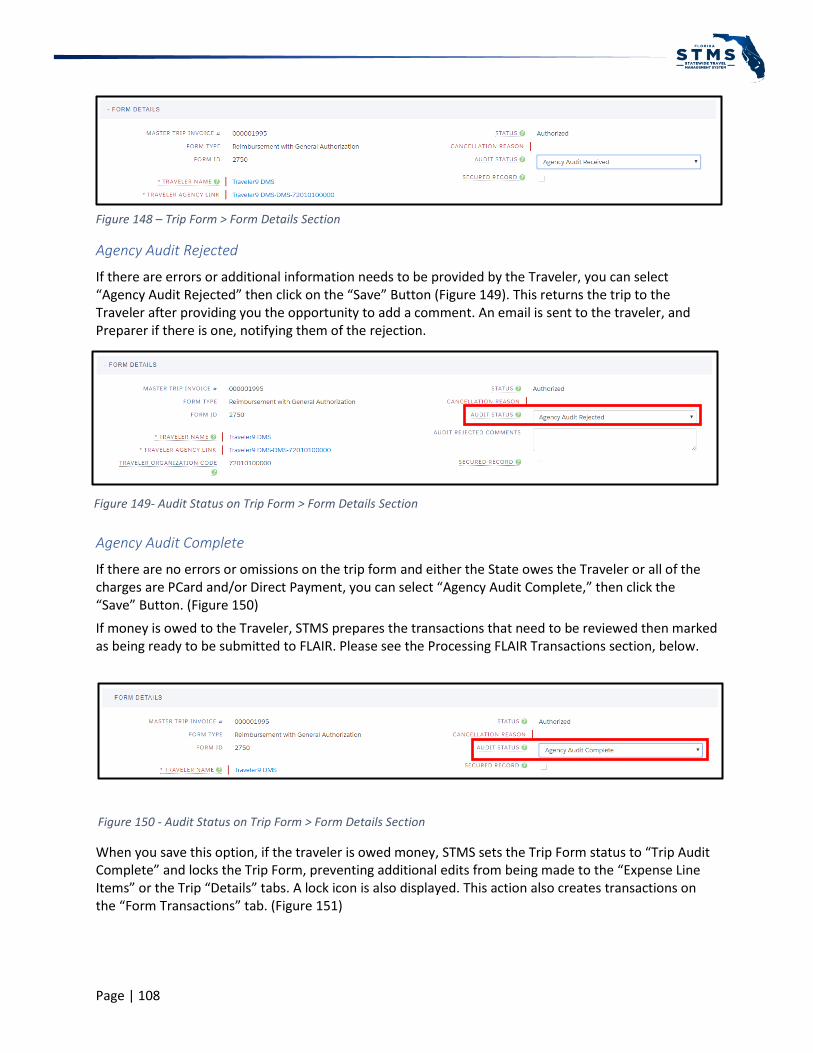
Page | 108
Figure 148 – Trip Form > Form Details Section
Agency Audit Rejected
If there are errors or additional information needs to be provided by the Traveler, you can select “Agency Audit Rejected” then click on the “Save” Button (Figure 149). This returns the trip to the Traveler after providing you the opportunity to add a comment. An email is sent to the traveler, and Preparer if there is one, notifying them of the rejection.
Agency Audit Complete
If there are no errors or omissions on the trip form and either the State owes the Traveler or all of the charges are PCard and/or Direct Payment, you can select “Agency Audit Complete,” then click the “Save” Button. (Figure 150)
If money is owed to the Traveler, STMS prepares the transactions that need to be reviewed then marked as being ready to be submitted to FLAIR. Please see the Processing FLAIR Transactions section, below.
When you save this option, if the traveler is owed money, STMS sets the Trip Form status to “Trip Audit Complete” and locks the Trip Form, preventing additional edits from being made to the “Expense Line Items” or the Trip “Details” tabs. A lock icon is also displayed. This action also creates transactions on the “Form Transactions” tab. (Figure 151)
Figure 150 - Audit Status on Trip Form > Form Details Section
Figure 149- Audit Status on Trip Form > Form Details Section

Page | 109
Figure 151 – Form and Audit Statuses and Lock Icon on Trip Form > Details Tab > Form Details Section
If all of the ELIs are marked as PCard or Direct Payment, no transactions are created, and the overall trip status updates to “Processing Complete”. A lock icon is displayed, as well. An email is sent to the traveler, and Preparer if there is one, notifying them that the Trip Form is in this status.
Audit Complete – Reporting Only
The option to select “Audit Complete – Reporting ONLY” should be used if details about this trip are being entered into STMS for reporting purposes only, but transactions should not be created and sent to FLAIR because the Traveler has already been paid. Once this option is saved, no additional actions are needed on the trip from and a lock icon is displayed. An email is sent to the traveler, and Preparer if there is one, notifying them that the Trip Form is in this status (Figure 152)
Figure 152 – Audit Status on Trip Form > Form Details Section
Traveler Owes State
If your audit is complete and the Traveler owes money to the State related to the trip that you are auditing, select Audit Status of “Traveler Owes State.” (Figure 153) Saving this status locks most Trip Form fields, preventing further edits from being made to ELIs and trip detail information. No transactions are be created. An email is sent to the Traveler, and Preparer if there is one, notifying them that the Trip Form is in this status. This is the appropriate status, for example, when a Traveler was provided an Advance and the trip expenses were less than expected. When this is the case, the Amount Due to State is reflected in the Costs from Expense Line Items section of the Details tab of the trip form.

Page | 110
Note: While the form indicates “Traveler Owes State”, a lock icon is not displayed. Once the Traveler has paid the state, enter details about the payment amount and other information in the Accounting Details section of this page and update the Audit Status. See the Traveler Paid section, below.
Figure 153 – Audit Status on Trip Form > Form Details Section
Traveler Paid
If the Traveler owed money to the State related to the trip but has paid the full amount owed, enter details about the payment amount and other information in the Traveler Payment and Payment Details fields within the Accounting Details section of this page and then update the Audit Status to “Traveler Paid.” (Figure 154) Saving this status locks the Trip Form, preventing additional edits from being made to the “Expense Line Items” or the Trip “Details” tabs. This also changes the trip form status to “Traveler Paid” and displays a lock icon.
Figure 154 – Audit Status on Trip Form > Form Details Section
Processing FLAIR Transactions
After you have saved a trip form with the “Agency Audit Complete” Audit Status, the associated transactions need to be reviewed and marked ready for FLAIR. Transactions are be sent to FLAIR without further processing.
To view the list of transactions associated with a Trip Form’s ELIs, click the “Form Transactions” tab. (Figure 155) In many cases, STMS has consolidated multiple ELIs into a single transaction based on the associated Object Codes, Organization Codes, Expansion Options, and Expansion Option Versions. Transactions that have a negative amount are not included in any consolidation.
Figure 155 – Form Transactions Tab on Trip Form

Page | 111
To access an individual transaction, click on a FLAIR Transaction Name link. (Figure 156)
Figure 156 – FLAIR Transaction Name Link on Trip Form > FLAIR Transactions Page
Next, on the FLAIR Transaction page, Details tab, click on the “Edit” button. (Figure 157)
Note: Recording transaction and override details and setting a Transaction Audit Status (TR Audit Status) must be executed separately. You must save any updates to transaction information and click Save prior to changing the transaction’s TR Audit Status and clicking on the “Save” button.
Figure 157 – Edit Button on FLAIR Transaction Page > Details Tab
Editing Transaction Information
On the FLAIR Transaction page, are the same fields that are found in FLAIR. In the FLAIR Transaction Details section, are the Master Trip Invoice Number and Trip Form ID Number that the transaction is associated with, as well as other fields that capture payment information. The Fiscal Accountant should verify the Vendor Name corresponds to the Traveler Name. If the wrong Vendor Name displays, the transaction(s) need to be cancelled. (Figure 158)

Page | 112
Figure 158 – FLAIR Transaction Details Section on FLAIR Transactions Page > Details Tab
The Overrides section allows you to enter any overrides you may have, including the Project ID field. In cases where a Project ID is provided by a traveler on the Trip Details and/or the ELI AND also expanded out from the Expansion Option or Expansion Set, the information contained in the Expansion Option or Expansion Set are be populated on the transaction. (Figure 159)
Figure 159 – Overrides Section on FLAIR Transactions Page > Details Tab
The Other Details section is where you can enter your Grouping and Batch Characters, as well as the Available Balance Override Indicator. In cases where information is provided in these funding-related fields by a traveler AND also expanded out from the Expansion Option or Expansion Set, the information contained in the Expansion Option or Expansion Set is populated on the transaction. (Figure 160)
Figure 160 – Other Details Section on FLAIR Transactions Page > Details Tab
The History Details section is populated once the transaction returns from FLAIR with the Transaction Status of FLAIR Posted. (Figure 161)

Page | 113
Figure 161 – History Details Section on FLAIR Transactions Page > Details Tab
The Batch File Info section contains your credentials for FLAIR. This allows STMS to submit your transactions under your credentials in FLAIR. Any permissions you currently have in your FLAIR account for site code T9 are extended through STMS. If you attempt to use features that you currently do not have access to in your FLAIR account for site code T9, such as Available Balance Override Indicator, your transactions are be returned on the Batch Error Report in FLAIR. (Figure 162)
Figure 162 – Batch File Info Section on FLAIR Transactions Page > Details Tab
Avoiding Split Vouchers
To ensure that all transactions for a trip form are on the same voucher, three criteria must be met. If a negative amount (a negative transaction) exists, positive transaction(s) that sum up greater than or equal to the amount of the negative transaction(s) must be on the same voucher. Transactions for a trip form appear on the same transaction if they have the same
• Grouping Character: If the grouping character is used on a subset of transactions, the transactions with one Grouping Character are placed on a separate voucher from those without a character or a different character. Leaving the Grouping Character blank is considered its own character.
• Account Code: In general, when transactions within a trip form have different combinations of Organization Codes, Expansion Options and Object Codes, the transactions for that trip form utilize multiple account codes. The account code for any transaction is listed on the Transaction details.
• Transmission date to FLAIR: All transactions for a trip form should be send to FLAIR on the same day.

Page | 114
If a negative transaction is placed on a separate voucher than the positive transaction, the traveler negative transaction cannot be processed in FLAIR. This results in an overpayment in FLAIR, requiring the agency to collect the overpayment amount from the traveler.
Setting TR Audit Status
Recording transaction and override details must be executed separately than setting a Transaction Audit Status (TR Audit Status). You must save any updates to transaction information prior to changing the transaction’s TR Audit Status.
Before changing any transaction as FLAIR Ready, review the information about, Avoiding Split Vouchers, and Monitoring Transactions. If the trip form you are working on contains a transaction with a negative amount (a negative transaction), you must first mark the corresponding positive transaction(s) to FLAIR Ready.
FLAIR Ready
After reviewing a new transaction and saving any necessary edits, if you are ready to submit that transaction to FLAIR, select the TR Audit Status “FLAIR Ready” and click on the “Save” button. (Figure 163). After saving, the Transaction Status should be updated to reflect “Ready for Submission”.
Figure 163 – TR Audit Status Field on FLAIR Transactions Page > Details Tab > FLAIR Transaction Details Section
FLAIR Ready for Resubmission
After edits are made to a transaction that has been previously submitted and returned, or if no changes are being made to the transaction and you want to submit it again, the TR Audit Status must be manually changed to “FLAIR Ready for Resubmission”, for the Transaction Status to be updated to “Ready for Submission”
Note: If a transaction was transmitted to FLAIR with a TR Audit Status of “FLAIR Ready for Resubmission” and it is returned, the TR Status needs to be changed to “FLAIR Ready” for you to submit it again. The TR Audit Status, must always be manually changed from the TR Status it was last transmitted in, into a different status for the Transaction Status to be updated. Only transactions with a Transaction Status of “Ready for Submission” are picked up in the daily batch jobs.
None
Setting the value of the TR Audit Status to “—None--” resets the Transaction Status to “None”, as well. Transactions that are marked to be submitted to FLAIR can be reset to this status, up until 3:00 p.m. (Eastern) when the transactions are submitted to FLAIR. Transactions with their TR Audit Status set to “—None--” persist in this status until another TR Audit Status is selected.

Page | 115
Transaction Cancelled
Saving this TR Audit Status permanently locks the TR Audit Status to “Transaction Cancelled” and updates the trip form’s Audit Status to “Agency Audit Received.”
• If edits are being made by the Fiscal Accountant, once the changes are complete, the Fiscal
Accountant can mark the Audit Status as “Agency Audit Complete” to generate new
transaction(s), which then need to be marked “FLAIR Ready for Submission” to submit them to
FLAIR.
• If the trip form must be rejected back to the traveler, all transactions for that trip form must be
cancelled. Then the fiscal accountant can mark the trip form “Agency Audit Rejected”, for the
traveler/preparer to then be able to make edits. After the trip has completed the approval
process the Fiscal Accountant should review the form and then can update the Audit Status to
“Agency Audit Complete” in order to generate new transactions, which then need to be marked
“FLAIR Ready for Submission” to submit them to FLAIR.
• Transactions cannot be cancelled between 3:00 p.m. and 3:03 p.m. to avoid potential conflicts
with the FLAIR submission process.
Transmission to FLAIR
Each afternoon at approximately 3:00 p.m., any transaction with a Transaction Status set to “Ready for Submission” is transmitted to FLAIR. At that time, the Transaction Status updates to “FLAIR Submitted”, the transaction is locked, and you are not able to make additional edits. Each transaction is first submitted to FLAIR Departmental. A summary of the various statuses that may display during/after processing in FLAIR is detailed below.
Monitoring Transactions
Summary of Transaction Statuses
In addition to the information in the chart below, please reference the next sub-section for additional information.
Transaction Status Definition/Action
FLAIR Audit This is an update to the Transaction Status, only. This status appears if the
transaction and associated trip is being audited by FLAIR Audit and
Accounting.

Page | 116
Transaction Status Definition/Action
FLAIR Batch Error Transactions that are not successfully written to FLAIR Departmental
display in STMS with a Transaction Status of “FLAIR Batch Error.”
The fiscal accountant should review the Batch Error report from FLAIR
and the transactions listed as Batch Error in STMS before taking any of the
steps listed below to resolve the issue.
If the transaction appears on the FLAIR Batch Error report and in STMS as
Batch Error:
• The Fiscal Accountant needs to run a Batch Error Report in FLAIR
to view the exact error.
• These transactions “FLAIR Batch Error” may be edited and
resubmitted, as noted in the section Setting the TR Audit Status.
However, if a change is required on the ELI or Trip Form, the
affected transaction(s) must be cancelled.
• If edits are being made by the Fiscal Accountant, once the
changes are complete, the Fiscal Accountant can mark the Audit
Status as “Agency Audit Complete” to generate new
transaction(s), which then need to be marked “FLAIR Ready for
Submission” to submit them to FLAIR.
• If the trip form must be rejected back to the traveler, all
transactions for that trip form must be cancelled. Then the fiscal
accountant can mark the trip form “Agency Audit Rejected”, for
the traveler/preparer to then be able to make edits. After the trip
has completed the approval process the Fiscal Accountant review
the form and mark the Audit Status as “Agency Audit Complete”
to generate new transactions, which then need to be marked
“FLAIR Ready for Submission” to submit them to FLAIR.
If the transaction appears in STMS as Batch Error, but not on the FLAIR
Batch Error Report/voucher schedule:
• Ask your Agency Administrator to ensure that the T9 site code
information for the fiscal accountant submitting the transaction
is included on the fiscal accountants STMS account. If you do not
have credentials for site code T9, please ask your agency’s FLAIR
Access Custodian to assist. If your T9 information was missing
from your STMS account, once it has been added to STMS, the
transactions can be edited and/or resubmitted as detailed above,
• If the error is not related to missing T9 site code information on
the fiscal accountant’s STMS account, create a case in STMS for
the System Administrators to review.

Page | 117
Transaction Status Definition/Action
FLAIR Dept Accepted Transactions that are successfully written to FLAIR Departmental display a
Transaction Status of “FLAIR Dept Accepted.” These transactions are
automatically forward to FLAIR Central for additional processing.
Because transactions that are successfully written to FLAIR are
automatically sent to FLAIR Central, transactions are rarely be seen in this
Status. Please contact STMS if any Transactions remain in this status for
more than one FLAIR business day. If any transaction with a negative
amount displays in STMS with this status, please submit a Case
immediately.
FLAIR Deleted
Your agency should receive notification from DFS Audit and Accounting
via email regarding any transactions that were deleted from FLAIR.
STMS allows any transaction that displays a Transaction Status of “FLAIR
Deleted” to be edited and resubmitted, as noted in the section Setting the
TR Audit Status. Prior to resubmitting any transaction in this status,
please ensure this is the correct course of action.
• If a change is required on the ELI or Trip Form, the affected
transaction(s) must be cancelled.
• If edits are being made by the Fiscal Accountant, once the
changes are complete, the Fiscal Accountant can mark the Audit
Status as “Agency Audit Complete” to generate new
transaction(s), which then need to be marked “FLAIR Ready for
Submission” to submit them to FLAIR.
• If the trip form must be rejected back to the traveler, all
transactions for that trip form must be cancelled. Then the fiscal
accountant can mark the trip form “Agency Audit Rejected”, for
the traveler/preparer to then be able to make edits. After the trip
has completed the approval process the Fiscal Accountant review
the form and mark the Audit Status as “Agency Audit Complete”
to generate new transactions, which then need to be marked
“FLAIR Ready for Submission” to submit them to FLAIR.
FLAIR Invalid Account
Code
This is an update to the Transaction Status, only. Check if the account
code is in FLAIR. If the account is not in FLAIR, it can be added back or you
can or can request that the transaction be deleted so that information
can be updated in the STMS before resubmitting it.
FLAIR Negative Balance This is an update to the Transaction Status, only. When this status is
received, the agency has a specific number of days to correct the account
balance to cover the transactions at which point it is automatically paid.
After the window, the transactions is automatically deleted by FLAIR. If an
agency does not want to wait, they can request the transactions be
deleted sooner so the transaction can be resubmitted to another account.

Page | 118
Transaction Status Definition/Action
FLAIR Rejected This is an update to the Transaction Status, only. Fiscal Auditors should
contact DFS for additional information. Transactions marked as FLAIR
Rejected display in this status until the next FLAIR File is received. At that
point, the Transaction is updated.
FLAIR Posted Once a transaction is posted in FLAIR, STMS is updated to reflect this
status. Once all transactions for a trip have been marked “FLAIR Posted”,
STMS changes the Trip Form status to “FLAIR Paid” and an email
notification is sent to the traveler and preparer, if there is one.
Unknown FLAIR Posting
Status
This is an update to the Transaction Status, only. Fiscal Auditors should
verify the status in FLAIR and open a case in the STMS.
STMS Resources to Monitor Transaction Information
After a transaction has been submitted to FLAIR, transactions should be monitored in FLAIR and STMS. If discrepancies exist between the FLAIR and STMS, FLAIR and STMS officials should be contacted before additional actions are taken.
In additional to the information provided from FLAIR, Fiscal Accountants can monitor the status of transactions within STMS
List views within the Transaction tab
You can access information about transactions by clicking on the FLAIR Transactions tab (Figure 164). Within the FLAIR Transaction tab, you can click on the title of the list view or the triangle near the left side of the page to access the various list views that are displayed (Figure 164). Available list views include:
• FLAIR Ready – All transactions that are currently set to be transmitted to FLAIR when the next batch job is picked up.
• Transactions in Process -All transactions within your agency that have not been posted to FLAIR or cancelled
• FLAIR Posted – All transactions for your agency that have posted in FLAIR
• Negative Transactions – All transactions within your agency where the amount is less than zero.
• FLAIR Batch Error – All transactions for your agency that currently reflect “FLAIR Batch Error” in Transaction Status
• FLAIR Deleted – All transactions for your agency that have deleted from FLAIR
• T51/52/80/53 – Each of these list views display all transactions for your agency that match the transaction type selected in the list view
To view the criteria used to filter the data that is displayed in any list view, click on the filter button on the right side of the screen (Figure 164)

Page | 119
Figure 164- Transactions list views
Unmatched Transactions
Transactions are listed in the FLAIR Transactions Unmatched portion of STMS when a transaction is returned from FLAIR and the Trip Form associated with that transaction cannot be identified. Auto 58 Transactions that are created by FLAIR are displayed in this section, as well.
To view unmatched transactions, click on the FLAIR Transactions Unmatched tab (Figure 165). After selecting the tab, you may need to change the list view from “Recently Viewed” to another list view. You can click on the title of the list view or the triangle near the left side of the page to access the various list views that are displayed (Figure 165). Available list views include:
• All – All of the Unmatched Transactions that you have visibility to
• Transaction 58 – Type 58 Transactions generated by FLAIR
• Today – Unmatched transactions that were received in STMS today.
• Today Non58 – All of the unmatched transactions received today that are not Type 58
Figure 165 - FLAIR Unmatched Transactions
Reports
There are several reports available to assist Fiscal Accountants that can be utilized to view
information about an individual trip form or aggregate data for your agency. These reports can
be download, allowing you to organize and sort the data, as needed. Details about accessing
reports is available in the Reports section of the User Manual.

Page | 120
Documenting Revolving Fund Transactions in STMS
As a Fiscal Accountant, when you audit an Advance, Reimbursement, or Reimbursement with General Authorization, you can choose to note that trip expenses were paid from a revolving fund. For trips you indicate are paid from a revolving fund, you should first review the Trip Details, ELIs, and Attachments for these trips, as documented in preceding User Manual sections.
To document that trip expenses were paid from a revolving fund, you must set the “Paid from Revolving Fund” field to “Yes” prior to setting the TR Audit Status and saving. Observe the “Accounting Details” section on the Trip Details page. If the trip is being paid from a revolving fund, select “Yes” in the “Paid from Revolving Fund” field. By making this change, the transactions that STMS creates when we later indicate that audit of the trip form is complete are “52” Transactions instead of “51” Transactions. Additionally, details about the revolving fund must be entered into STMS by completing the “Revolving Fund Check Number” and “Revolving Fund Check Date” fields in this section. After adding all this information, save your changes.
The following three scenarios illustrate revolving fund processes in more detail.
Advances Paid from a Revolving Fund
In this scenario, you are processing an Advance that is to be paid from a revolving fund.
With the “Paid from Revolving Fund” field set to “Yes” and your Audit Complete, the TR Audit Status of the trip form can be updated.
If there are errors or additional information needs to be provided by the traveler, you can set the TR Audit Status to “Agency Audit Rejected” and then click on the “Save” button. This returns the trip to the Traveler after providing you the opportunity to add a comment.
If there are no errors or omissions on the trip form, you can set the TR Audit Status to “Agency Audit Complete” and then click the “Save” button. This action updates the overall Status of the trip to “FLAIR Paid”. While no FLAIR transactions are created as a result, the status of “FLAIR Paid” is required for the Traveler to create the reimbursement form associated with this trip. You are not able to make additional edits to the form after the trip status is updated to “FLAIR Paid.”
If an Advance is marked as being paid from a Revolving Fund in STMS, the corresponding Reimbursement form is required to be marked as being paid from a Revolving Fund, as well.
You cannot save an Advance that has been paid from a revolving fund with a TR Audit Status of “Agency Audit Complete – Reporting Only.”
Reimbursements with an Advance Paid from a Revolving Fund
In this scenario, an Advance for the trip is marked as paid from a revolving fund and you are now processing a Reimbursement paid from a revolving fund for the same trip.
If any Advance is marked as being paid from a Revolving Fund in STMS, the corresponding Reimbursement form is required to be marked as being paid from a Revolving Fund as well. When auditing the trip form, you do not have the option to change the value of the field “Paid from Revolving Fund” – it is set by STMS to “Yes.”
If there are errors or additional information needs to be provided by the Traveler, you can set the TR Audit Status to “Agency Audit Rejected” and then click on the “Save” button. This returns the trip to the Traveler after providing you the opportunity to add a comment.

Page | 121
If there are no errors or omissions on the trip form and the State owes the Traveler, you can select “Agency Audit Complete” and then click the “Save” button. This action generates the appropriate FLAIR Transactions which you can then review as you do for trips not paid from a revolving fund. Please note that the amount of the Advance displays on the Trip Form Details, but a reversal transaction for that amount does not appear in the list of transactions.
If your audit is complete and the Traveler owes the State, set the TR Audit Status to “Traveler Owes State.” Saving this status locks most Trip Form fields, preventing further edits from being made to ELIs and trip detail information. No transactions are created. This is the appropriate status, for example, when a Traveler was provided an Advance and the trip expenses were less than expected. When this is the case, an Amount Due to State is reflected in the Costs from Expense Line Items section of the Details tab of the Trip Form.
Note: While the form indicates “Traveler Owes State”, a lock icon is not be displayed. Once the Traveler has paid the state, enter details about the payment amount and other information in the Accounting Details section of this page and update the Audit Status.
Reimbursements with General Authorizations and Reimbursements without an Advance, Paid from a Revolving Fund
In this scenario, there is not an Advance associated with the trip and you are now processing a Reimbursement for that trip that to be paid from a revolving fund.
If there are errors or additional information needs to be provided by the traveler, you can set the TR Audit Status to “Agency Audit Rejected” and then click on the “Save” Button. This returns the trip to the traveler after providing you the opportunity to add a comment.
If there are no errors or omissions on the trip form and the State owes the traveler, you can select “Agency Audit Complete” and then click the “Save” Button. This action generates the appropriate FLAIR Transactions which you can then review as you do for trips not paid from a revolving fund. All the transactions are marked as Type 52 Transactions.
If your audit is complete and the Traveler owes the State, set the TR Audit Status to “Traveler Owes State.” Saving this status locks most Trip Form fields, preventing further edits from being made to ELIs and trip detail information. No transactions are created. When this is the case, an Amount Due to State is reflected in the Costs from Expense Line Items section of the Details tab of the Trip Form.
Note: While the form indicates “Traveler Owes State”, a lock icon is not be displayed. Once the Traveler has paid the state, enter details about the payment amount and other information in the Accounting Details section of this page and update the Audit Status.
Certified Forward Period and Creating 80/53 Transactions
The option to create Type 80/53 Transactions is dependent upon the Trip Return date being prior to the Certified Forward period and the Current date being in the Certified Forward Period.
Add your name in the Fiscal Auditor Name field, as usual, and save the form.
Click on the “Edit” button and scroll down to the Accounting Details Section to change the value of the “Carry Forward” field to “Yes.” (Figure 166)
• By selecting this, “80” and “53” Transactions are created, instead of “51” Transactions. o The fields “Carry Forward” and “Revolving Fund” cannot both be set to “Yes.”
• Click on the “Save” button to save the change.

Page | 122
Figure 166- Carry Forward
• Review the trip form and create transactions (if all details meet audit requirements) by clicking on the “Edit” button and select “Agency Audit Complete” in the Audit Status and then click the “Save” Button.
- By selecting this option, the form locks, preventing additional edits from being made to the ELIs or the Trip Details page. In addition, this action builds Transactions.
• Click on the Form Transactions tab to view the transactions that have been built. (Figure 167)
- There are more transactions listed in this view than if Carry Forward was not selected, because for each Type 80 Transaction a corresponding Type 53 Transaction is created.
Figure 167- Certify Forward Transactions
• For Type 80 transactions,
o Field requirements and options include ▪ Prior Period Indicator (PPI) field is optional – can be left as None or set to
Y (year) or M (month)
• Please refer to the guidance of agency management as to PPI field input. While the use of a PPI is optional for FLAIR, an indicator may be required by the agency to ensure the transaction is recorded properly.
▪ Description is required - can be the Master Trip Invoice Number for reference or other reference of the agency’s choosing

Page | 123
▪ Payable General Ledger Code is required - must be between 31099 and 50000 and is validated against the Title file
• Set TR Audit Status to “FLAIR Ready” for the transaction to be submitted just like Type 51 and 52 Transactions.
• For Type 53 Transactions, o The Description field is required, others are optional o There are two options (Figure 168):
▪ Set TR Audit Status to “FLAIR Waiting – TR53 Only” for the transaction to be automatically set to “FLAIR Ready” once the corresponding Type 80 Transaction has been updated as “FLAIR Dept Accepted” by FLAIR. The TR53 is created with the current date as the transaction date and submitted to FLAIR with the next batch upload.
OR
▪ Leave the TR Audit Status for the Type 53 Transaction blank (--None--) to allow/require a manual change of the TR Audit Status to “FLAIR Waiting – TR 53 Only” after the corresponding Type 80 Transaction has been “FLAIR Dept Accepted.”
Figure 168- Type 53 Audit Status
If a Type 80 or Type 53 is marked “Transaction Cancelled” within the TR Status field, the corresponding transaction is automatically updated to “Transaction Cancelled.” Cancelled Type 80/53 Transactions unlocks the corresponding ELI for editing. If the trip form needs to be returned to the traveler, you must cancel all the transactions and select Agency Audit Rejected within the Accounting Details. Any transactions with a negative balance that would have otherwise created 80/53 Transactions creates a 51C with a negative balance. To process 51C Transactions, follow the instructions below.

Page | 124
Certified Forward Period and Creating 51C Transactions
On the Trip Form Details page, after auditing all details and when ready to create transactions, ensure the Carry Forward field is set to “No” (Figure 169) before changing the Audit Status to Agency Audit Complete.
Figure 169 -Creating 51c Transactions
After creating transactions, notice the transaction type is 51 (Figure 170).
Figure 170- Transactions Created
When auditing the transaction and setting it to be a 51C, place a “C” in the Certified Forward Indicator field and the related payable number in the Description field (Figure 171).

Page | 125
Figure 171 - Preparing a 51C Transaction
After saving these details, the transaction’s TR Audit Status can be updated to FLAIR Ready, to mark the transaction as being ready to submit to FLAIR.
Summary of the Fiscal Accountant Process
Figure 172 shows the general steps that must be completed to be fully process a Trip Form, including the actions to move a step forward or backwards in the process, the items that are locked or unlocked at each step, and the person responsible to take the action. Although not depicted in this graphic, Authorization forms need not be processed by Fiscal Accountants (i.e., nothing to the “right” of the Approver step in this graphic takes place for Authorization Forms).
Figure 172 – Fiscal Accountant Process Summary Graphic
Fiscal Accountant

Page | 126
CHATTER
Chatter is a feature of Salesforce that allows for collaboration directly in STMS on a Trip Form.
The Chatter Feed shows a history of all the actions taken on the form. The comments on a form are visible to anyone who has access to that form. The Chatter Feed is public record, so users should treat the function as they do other activity that produces public records. Chatter messages are also included in the Trip Report.
Chatter is a convenient way to communicate with other users about details of a specific trip. It ties communications to the form and can be used instead of external emails.
To access chatter, log in to STMS, select a Trip Form, and click on the Chatter Feed tab. (Figure 173)
Figure 173 – Chatter Feed Tab on Trip Form
There are two main parts to the Chatter Feed tab: a box for adding new posts, and the feed listing itself. The box for adding new posts has four tabs: Post, File, Thanks, and More. The commonly used functionality is found on the Post and File tabs and is addressed in this manual.
Add Post
To add a new post to the Chatter Feed, click the Post Tab. Write your message in the text box below the tab. To direct your message to a particular user and ensure the user is notified, you must “tag” the user in the message box by typing the “@” character in the box and beginning to type the recipient’s name. A list of names appears. Click to select the correct name. Multiple users can be tagged in one post.

Page | 127
Click the Share button to add the post to the trip form’s Chatter Feed. Everyone with access to this trip form can view the post.
Persons tagged in a post receive a notification email that shows they have been mentioned in Chatter. The person may log into STMS and observe the Notification icon located in the upper-right portion of the screen to. The icon includes a number indicating the number of times the person has been mentioned in Chatter. Clicking the notification icon displays all the Chatter feeds the user has been tagged in.
If you have been tagged in a Chatter post, you can respond by typing the user’s name in the text box. For example, “@Approver2, I have updated the information” and clicking on the Share button.

Page | 128
REPORTS You can access reports from the App Launcher or Reports tab on the “Home” page. The reports that are available to you are based on your profile settings. Using the menu along the left side of the screen, you can select which available reports or folders are displayed. The search bar on the right, can be used to seek individuals reports or folders within the current view. (Figure 174)
Figure 174 - Reports tab > All Reports
Click on the Report Name link to open a report. (Figure 175)
Figure 175 - Report Layout
There are some features in Reports that allow for additional functionality.
• “Add Chart” button allows for the report data to be shown in a graphic.
• Filter (Funnel icon) button allows for filtering the data in the report.
• “Export” button allows for the export of the report to Excel. Some reports have an “Add Chart” button.
• Links in the report may navigate to specific details of the record. Note: Only users with access to the record are able to view the details.

Page | 129
Trip Report
A Trip Report is available in a printable PDF format. Each Trip Report has a Trip Report button. Clicking the Trip Report button navigates to the Generate Documents screen. The screen displays two options, “Trip Report – Advance” and “Trip Report – Authorization/Reimbursements.” (Figure 176)
Figure 176 – Generate Documents Screen
Click the checkbox for the desired report and click on the Next Step button. (Figure 177)
Figure 177 – Report Checkboxes and Next Step Buttons on Generate Documents Screen

Page | 130
STMS displays the View Documents screen. Click on the View icon or on the Document Number link to view the Trip Report. The Email Selected Docs button opens the Send Email – Email Documents window. A PDF format document of the trip report is attached. STMS sends the email to the address(es) entered in the To:, CC:, or BCC: fields. The user’s email address must be in the To:, CC:, or BCC: fields for the user to receive a personal copy of the email sent. (Figure 178)
Figure 178 – View Icon, Document Number Link, and Email Selected Docs Button on View Documents Screen

Page | 131
KNOWLEDGE Salesforce Knowledge is a centralized knowledge base where users can quickly find and view relevant content, known as Articles. A Knowledge Article can originate with a User, Agency Administrator, or Enterprise Administrator and can pertain to any topic relevant to travel. Knowledge articles are available within STMS to assist users.
Accessing Knowledge Articles
Access Knowledge by clicking on the Knowledge tab found at the top of the STMS “Home” page. (Figure 179)
Figure 179 - Knowledge Home
There are three types of Knowledge Articles: FAQ, How-To, and Resource.
• Frequently Asked Questions: Frequently Asked Questions (FAQ) are topically organized Knowledge Articles designed to anticipate a user’s questions. They typically are informational only and are not designed to walk a user through a process. FAQ articles are written in a question and answer format.
• How-To: Action-based Knowledge Articles designed to walk a user through an action or actions to accomplish a specific task. How-To articles are written as a description of the action and include step-by-step instructions.
• Resource: Stand-alone items of interest related to STMS.
Knowledge Article Display
The system defaults to the most recently viewed list of Knowledge Articles, which may be changed by clicking on the “Recently Viewed” dropdown arrow to select another list view. Records available for viewing are controlled by the visibility options set by the Agency or Enterprise Administrator.
Users can search for Knowledge Articles using the search bar at the top of the screen. For example, if a user types “mission critical”, Knowledge Articles with the terms “mission” and “critical” are displayed. This tool helps users find all information related to the topic quickly.
Creating Articles
Any user can propose a topic or article be added to Knowledge by submitting a case (see Creating Cases) with Type set to Knowledge Article. The Agency Administrator can escalate the Case within the Case functionality to provide the proposed topic or article to the Enterprise Administration team. However, to have Knowledge content published in STMS, draft content must be submitted by the Agency Administrator to the Enterprise Administration team for review and publishing.

Page | 132
When a suggestion is received, it is reviewed or, where applicable, written by an Agency or Enterprise Administrator. Once review is finalized, an Enterprise Administrator approves and publishes the Knowledge Article record in the STMS. Enterprise Administrators may publish articles for a specific agency, multiple agencies, or enterprise-wide.
Viewing Articles
Articles may be opened by clicking on the blue Article Title from the display of records on the Knowledge home page. (Figure 180)
Figure 180 - Knowledge Home
Basic Article information can be found at the top of the screen, while Article Summary and System Information can be found below. (Figure 181)
Figure 181 - Knowledge Article
On the right side of the page, the user can click a “thumbs-up” icon or “thumbs-down” icon to provide feedback on the helpfulness of the Article. Categories, Files associated with the Article, and Article Versioning are also found on the right side of the page.

Page | 133
CASES The Case Management functionality in STMS enables users to submit support, report, and Knowledge article requests, and to communicate issues, suggestions, and questions relating to system functionality. All users are able to create cases, but only Agency and Enterprise Administrators, have access to edit, escalate, and close cases.
Accessing Cases
Access Cases by clicking on the Cases tab found at the top of the STMS “Home” page. (Figure 182)
Figure 182 - Cases Home
If this tab is not available, the user can click on the App Launcher, which is a set of nine dots found on the left side of the screen. Click the App Launcher to launch a pop-up window which displays all your available apps. Then click on the Cases link under the All Items section to access the Cases page.
Case Record Display
The system defaults to the most recently viewed list of Case records, which may be changed by clicking on the “Recently Viewed” dropdown arrow to select another list view. Records available for viewing are limited by the user’s Profile.
Creating Cases
To create a new Case record, click the ‘New’ button found on the right side of the page near the top. (Figure 183)
Figure 183 - Cases Home
In the New Case popup window, enter case information in each field as necessary. Required fields are marked with an asterisk (*).
Start entering the Case information in each field as necessary. Required fields are marked with a red asterisk (*). (Figure 184)

Page | 134
Figure 184 - New Case Window
Fields in the ‘New Case’ template are as follows:
• Case Number – System-generated number associated with tracking case (displayed after the record is saved).
• *Case Type – Identifies the purpose of the case.
• *Status – Identifies status of case in lifecycle. Defaults to new upon creation.
• *Severity – Identifies immediacy/urgency of the case.
• *Case Origin – How the issue was communicated to person entering the case.
• *Parent Case – Indicates a higher-level case that includes this case.
• *Area Affected – Indicates a category for the case.
• Case Owner – This field is auto-populated with the name of the user creating the case record.
• Trip Form – Trip Form ID associated with the case.
• *Subject – Descriptive title of case.
• *Description – Background summary of the case.
• Steps to Reproduce – Steps to reiterate the issue.
• *Reporter Name – User who reported the issue/question/suggestion.
• *Reporter’s Phone – Phone number of user who reported the issue/question/suggestion.
Enter the information and click on the “Save” button.

Page | 135
Viewing Saved Cases
Saved cases may be opened by clicking on the blue Case Number from the display of records on the Case home page. (Figure 185)
Figure 185 - Cases Home
After opening a Case, basic information can be found at the top of the screen. On the left side there are a Details Tab, Activity Tab, a Related Tab, and an Knowledge Tab. On the right side, you can Post an update. (Figure 186)
Figure 186 – Case Page with Details Tab Selected
The Details tab includes all the information the user entered when creating the case, including additional agency and system information. Depending on your STMS system permissions, you can do the following on the indicated tabs:
On the Case Activity tab:
• Post an update,
On the Case Related tab:
• View the Activity History.
• View the related Knowledge Articles.
• Add Files associated with the case.
On the Case Knowledge Tab:
• Search for Knowledge Articles using the “Search Knowledge” search box.

Page | 136
• Attach Knowledge Articles by selecting the Attach Article menu item on the Knowledge Article. (Figure 187)
Figure 187 – Active/Attach Article Dropdown on Case Page with Knowledge Tab Selected

Page | 137
GLOSSARY
Advance – trip form that is a request to receive payment before travel occurs
Agency Administrator – user that manages agency user set up and is the initial recipient of cases created by agency users
Agency Fiscal Accountant – user that audits travel forms and creates transactions for submission to FLAIR
Agency Head – user that is permitted to provide Final Approval on all forms except their own
Amount Due to State – the calculated amount that is owed to the state by the traveler
Amount Due to Traveler – the calculated amount that is owed to the traveler for travel expenses
Approver – user that can approve forms for travelers
Attachments – documents that can be uploaded as an artifact of expenses to a trip form
Auditor – user that can be at a statewide level or agency level; they have read-only access to forms and transactions
Authorization – trip form that is an authorization to incur expenses
Chatter – is a method to collaborate about a trip within STMS
Delegate Approver – an approver that can approve trip forms on behalf of another approver
Destination – location of traveler’s destination
Enterprise Administrator – member of DMS team that supports entire STMS
EO – expansion option that is used in combination with other data to indicate a funding source
Expense Line Item (ELI) – expense item added to a trip form
Expense Date – date that an expense was incurred
Fiscal Accountant – accountant, fiscal assistant, auditor that can audit a trip form and create transactions for FLAIR
Master Trip Invoice # - invoice number which is unique to a travel event. It links an Authorization, Advance, and Reimbursement to a single travel event
Mode of Transportation – primary method of transportation from point of origin to destination for a trip
Off Duty Time – time during a travel event when the traveler is considered off duty
Org Code – organization code used in combination with other data to indicate a funding source
Payment Approver – user that is permitted to provide Final Approval on Advance and Reimbursement forms
Per Diem – amount a traveler can receive per day when hotel and meals are not claimed
Point of Origin – originating location for trip
Preparer – user that can create travel forms for themselves and others
Purpose of Travel – reason for the travel event, such as conference, site visit, board meetings, etc.
Record Type - type of trip form (Authorization, Advance, Reimbursement, or Reimbursement with General Authorization)

Page | 138
Reimbursement – trip form to enter expenses that have been incurred
Reimbursement with General Authorization – trip form that can be submitted when the Traveler has been given a blanket authorization to travel
Reporter – user that only has access to the Reports in STMS
Reviewer – user that is permitted to review forms process but cannot provide final approval on any form
Self-Approver – user that is permitted to provide Final Approval on all forms including their own
Statewide Travel Management System (STMS) – cloud-based system for Executive and Cabinet agencies to enter trip forms
Status – identifies the state of a form or field in a process
Supervisor – in STMS, the user who is the always the first approver for a particular traveler’s trip forms
Transactions – FLAIR transactions that are created after a trip form has been audited
Traveler – user that can create and submit trip forms for themselves
Trip Form ID – unique number that is auto assigned to each trip form. Multiple Trip Form IDs can be linked to Master Trip Invoice #
Unallowable Expense – an expense that is not being reimbursed, such as a personal expense
Related Documents


![arXiv:2205.00403v1 [cs.LG] 1 May 2022](https://static.cupdf.com/doc/110x72/633385af5c229e42ad09f39c/arxiv220500403v1-cslg-1-may-2022.jpg)