PEGA PLATFORM Pega Platform 7.4 Installation Guide For WebLogic and IBM Db2 for Linux, UNIX, and Windows

Welcome message from author
This document is posted to help you gain knowledge. Please leave a comment to let me know what you think about it! Share it to your friends and learn new things together.
Transcript
PEGA PLATFORM
Pega Platform 7.4Installation Guide
For WebLogic and IBM Db2 for Linux, UNIX, and Windows
TrademarksFor Pegasystems Inc. trademarks and registered trademarks, all rights reserved. All other trademarks orservice marks are property of their respective holders.
For information about the third-party software that is delivered with the product, refer to the third-partylicense file on your installation media that is specific to your release.
NoticesThis publication describes and/or represents products and services of Pegasystems Inc. It may containtrade secrets and proprietary information that are protected by various federal, state, and internationallaws, and distributed under licenses restricting their use, copying, modification, distribution, or transmittalin any form without prior written authorization of Pegasystems Inc.
This publication is current as of the date of publication only. Changes to the publication may bemade from time to time at the discretion of Pegasystems Inc. This publication remains the propertyof Pegasystems Inc. and must be returned to it upon request. This publication does not imply anycommitment to offer or deliver the products or services described herein.
This publication may include references to Pegasystems Inc. product features that have not been licensedby you or your company. If you have questions about whether a particular capability is included in yourinstallation, please consult your Pegasystems Inc. services consultant.
Although Pegasystems Inc. strives for accuracy in its publications, any publication may containinaccuracies or typographical errors, as well as technical inaccuracies. Pegasystems Inc. shall not be liablefor technical or editorial errors or omissions contained herein. Pegasystems Inc. may make improvementsand/or changes to the publication at any time without notice.
Any references in this publication to non-Pegasystems websites are provided for convenience only anddo not serve as an endorsement of these websites. The materials at these websites are not part of thematerial for Pegasystems products, and use of those websites is at your own risk.
Information concerning non-Pegasystems products was obtained from the suppliers of those products,their publications, or other publicly available sources. Address questions about non-Pegasystemsproducts to the suppliers of those products.
This publication may contain examples used in daily business operations that include the names ofpeople, companies, products, and other third-party publications. Such examples are fictitious and anysimilarity to the names or other data used by an actual business enterprise or individual is coincidental.
This document is the property of:
Pegasystems
One Rogers Street
Cambridge, MA 02142-1209
USA
Phone: 617-374-9600
Fax: (617) 374-9620
www.pega.com
Contents
Contents
Overview and system requirements.......................................................................................................................................................5Related information....................................................................................................................................................................................5Pega Platform architecture........................................................................................................................................................................5Plan your deployment................................................................................................................................................................................6
Split-schema and single-schema configurations...................................................................................................................... 6Apache Ignite client-server clustering topology....................................................................................................................... 7Deployment methods...................................................................................................................................................................8Review the documentation..........................................................................................................................................................8Transport-layer encryption method........................................................................................................................................... 8
System requirements................................................................................................................................................................................. 8UI-based tool requirements........................................................................................................................................................ 8Application server requirements................................................................................................................................................ 9Database server requirements................................................................................................................................................... 9Storage and logging requirements.............................................................................................................................................9
Configuring Java.......................................................................................................................................................................................... 9Time zones, character encoding, and regional settings......................................................................................................................10
Database server configuration.............................................................................................................................................................. 11Prepare your database............................................................................................................................................................................ 11Configuring your database......................................................................................................................................................................11
Database users........................................................................................................................................................................... 11Create an empty database........................................................................................................................................................13Creating database schema........................................................................................................................................................14
Pega Platform installation..................................................................................................................................................................... 15Extracting and validating the distribution image.................................................................................................................................15Installing by using the Installation and Upgrade Assistant (IUA)....................................................................................................... 15Editing the setupDatabase.properties file.............................................................................................................................................17
Database connection properties and script arguments....................................................................................................... 18Optional: Enabling Kerberos authentication.........................................................................................................................................19Installing from the command line..........................................................................................................................................................19
Application server configuration...........................................................................................................................................................21Preparing to configure the application server..................................................................................................................................... 21
WAR file and EAR file considerations.......................................................................................................................................22Data source resources, data source entries, and default schema entries......................................................................... 22For Docker, multiple VMs, or multiple NICs: Setting the public address............................................................................ 23Optional: Apache Ignite client-server mode........................................................................................................................... 23
Configuring the application server.........................................................................................................................................................24Setting JVM parameters............................................................................................................................................................. 24Correcting an HTTP authentication issue with Oracle WebLogic Server 9.2 and later......................................................25Setting the user memory.......................................................................................................................................................... 26Set an explicit temporary directory......................................................................................................................................... 26Adding the JDBC driver to the Oracle WebLogic Server classpath...................................................................................... 26Configuring Oracle WebLogic Server to deploy the archive files.........................................................................................27
Deploying the Pega Platform WAR or EAR files................................................................................................................................... 31
Pega Platform Installation Guideiii
Deploying on Oracle WebLogic Server.................................................................................................................................... 31
Post-deployment configuration............................................................................................................................................................. 36System Management Application access.............................................................................................................................................. 36Starting the Pega Platform applications................................................................................................................................................36Logging in and changing the administrator password........................................................................................................................36Enabling online help and the System Management Application in Designer Studio...................................................................... 37Configuring Directed Web Access.......................................................................................................................................................... 37Configuring search index host node settings.......................................................................................................................................38Log file size................................................................................................................................................................................................ 38Database size............................................................................................................................................................................................ 39Install applications.................................................................................................................................................................................... 39Enabling server-side screen captures for application documents.....................................................................................................39
Configuring PhantomJS REST server security for including screen captures in an application document..................... 40Enabling operators................................................................................................................................................................................... 40
Appendix A — Properties files............................................................................................................................................................... 42
Appendix B — Troubleshooting............................................................................................................................................................. 43Recovering from a failed deployment................................................................................................................................................... 43PEGA0055 alert — clocks not synchronized between nodes............................................................................................................. 43ClassNotFoundException error — session persistence.......................................................................................................................43System hangs with no error message — insufficient memory..........................................................................................................44Database connection information..........................................................................................................................................................44
Appendix C — Optional: Generating and applying DDL..................................................................................................................... 45Generating the DDL file........................................................................................................................................................................... 45Applying the DDL file............................................................................................................................................................................... 45Editing the setupDatabase.properties file to bypass DDL generation.............................................................................................. 46
Appendix D — Installing user-defined functions................................................................................................................................ 47
Overview and system requirements
Overview and system requirementsThis guide describes how to install a new instance of Pega Platform. See the Platform Support Guide on thePDN for a list of supported platforms.
To upgrade, see the Pega Platform Upgrade Guide. To update from Pega 7.3.x, see the Pega Platform UpdateGuide.
Installing Pega Platform is a multiple step process that involves configuring your database and applicationserver, loading rules into the database, and then deploying application archives to the application server.
Pega Platform supports different deployment topologies and configuration options that affect howthe supporting infrastructure is configured and managed after installation. Engage your databaseadministrator and any other infrastructure resources as soon as possible in the planning process.
Related informationThe Pega Discovery Network (PDN) at https://pdn.pega.com is Pega's online documentation andinformation site. To access the latest documentation, use the Support menu.
• Platform Support Guide — Lists the databases, drivers and application servers supported for thisrelease.
• Deployment guides — Includes the latest installation, upgrade, and update guides.
• Release notes — Include information about deploying the Pega Platform that supplement theinstructions in this guide. Review the release notes before you continue.
• Updated help files
• Multitenancy Administration Guide — Describes how to configure Pega Platform in multitenant modeafter deploying.
• Business Intelligence Exchange User Guide — Describes how to install the Business Intelligence Exchange(BIX) product. BIX is included in the full distribution image, but has a separate installer.
• System Management Application Reference Guide — Describes how to use the optional SystemManagement Application to monitor and control caches, agents, requesters, and listeners.
Pega Platform architecturePega Platform is a Java EE-compliant enterprise application that requires an application server and adatabase server:
• The application server hosts the Pega Platform application archives and provides interconnectivity toother systems through various protocols.
• The database server stores the rules, data, and work objects used and generated by Pega Platform.
Application users and developers typically access Pega Platform through a web browser. Applicationscan also expose HTTP-based services (for example, SOAP, REST, or HTTP) for administration or processautomation in a headless environment.
Pega Platform Installation Guide5
Overview and system requirements
Plan your deploymentPega Platform supports several configuration options that can affect the choices that you make during thedeployment. Before beginning, read this section thoroughly.
• Do not change your environment while you are deploying Pega Platform. For example, if you aremaking changes to your application server or database server, do so before you deploy Pega Platform.
• Choose a configuration type: single-schema or split-schema configuration. Pega recommends a split-schema configuration. See Split-schema and single-schema configurations.
• Choose whether to use the standard product edition or the multitenancy edition. The multitenancyedition has different requirements, different run-time behaviors, and different administrativeprocedures from the standard edition. Before you select the multitenancy edition, review theMultitenancy Administration Guide on the PDN.
Upgrading and updating from one edition to another is not supported. The schema DDLs for the twoeditions are not compatible. For example, if you install the standard edition and later decide to use themultitenant edition, you must either drop and re-create the database or create a new database.
• Verify that the version of Business Intelligence Exchange (BIX) is the same as the version of PegaPlatform. BIX is included in the full distribution image, but has a separate installer. For informationabout installing BIX, see the Pega Platform BIX User Guide.
• Choose a deployment type: UI tool or command line. See Deployment methods.
• Choose whether to use Kerberos functionality. Kerberos is a computer network authentication protocolthat allows nodes communicating over a non-secure network to prove their identity to one another ina secure manner. If you enable Kerberos authentication, you must use the command line method todeploy Pega Platform. For more information, see your installation guide.
• Consult your database administrator to determine whether to have the deployment process makechanges directly to the database. You can either have Pega Platform apply changes directly to yourdatabase, or generate DDL files of changes for your database administrator to apply. For informationabout manually generating and applying DDL, see Appendix C — Optional: Generating and applyingDDL.
• Choose whether to cluster the Pega Platform nodes. Pega Platform supports clustered nodeswithout special configuration, but you will make different choices about ports, indexes, and clocksynchronization depending on your node configuration.
• Choose either dual-user or single-user configuration. In a dual-user configuration, an Admin useris granted full privileges, and a Base user is granted a smaller subset of privileges. In the single-user configuration, a single Base user is granted full privileges. For more information about userconfiguration, see Database server configuration.
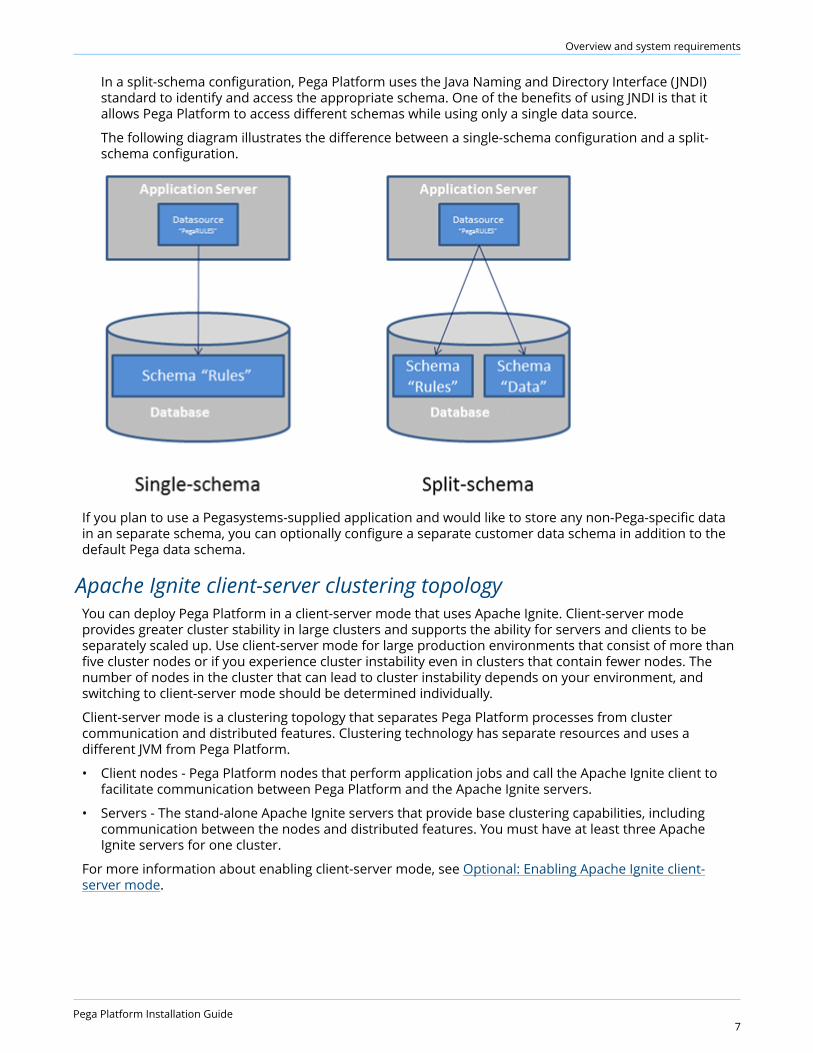
Split-schema and single-schema configurationsThere are two configuration types: single schema and split-schema. Pega recommends split-schemaconfigurations, particularly in critical development environments such as quality assurance, staging, andproduction.
• Single-schema configuration — One schema contains all rules and data objects.
• Split-schema configuration — The rules and data objects reside on separate schemas:
• A Rules schema contains rules tables and associated data and objects.
• A Data schema contains transaction data, including work objects.
With a split-schema configuration, you can upgrade one environment, and then migrate the upgradedobjects to other environments.
Pega Platform Installation Guide6
Overview and system requirements
In a split-schema configuration, Pega Platform uses the Java Naming and Directory Interface (JNDI)standard to identify and access the appropriate schema. One of the benefits of using JNDI is that itallows Pega Platform to access different schemas while using only a single data source.
The following diagram illustrates the difference between a single-schema configuration and a split-schema configuration.
If you plan to use a Pegasystems-supplied application and would like to store any non-Pega-specific datain an separate schema, you can optionally configure a separate customer data schema in addition to thedefault Pega data schema.
Apache Ignite client-server clustering topologyYou can deploy Pega Platform in a client-server mode that uses Apache Ignite. Client-server modeprovides greater cluster stability in large clusters and supports the ability for servers and clients to beseparately scaled up. Use client-server mode for large production environments that consist of more thanfive cluster nodes or if you experience cluster instability even in clusters that contain fewer nodes. Thenumber of nodes in the cluster that can lead to cluster instability depends on your environment, andswitching to client-server mode should be determined individually.
Client-server mode is a clustering topology that separates Pega Platform processes from clustercommunication and distributed features. Clustering technology has separate resources and uses adifferent JVM from Pega Platform.
• Client nodes - Pega Platform nodes that perform application jobs and call the Apache Ignite client tofacilitate communication between Pega Platform and the Apache Ignite servers.
• Servers - The stand-alone Apache Ignite servers that provide base clustering capabilities, includingcommunication between the nodes and distributed features. You must have at least three ApacheIgnite servers for one cluster.
For more information about enabling client-server mode, see Optional: Enabling Apache Ignite client-server mode.
Pega Platform Installation Guide7
Overview and system requirements
Deployment methodsYou can deploy Pega Platform either with the UI tool or from the command line. This guide includesinstructions for both methods.
• UI tool – Use the UI-based Installation and Upgrade Assistant to install either the rulebase or therulebase and the schema.
• Command line – Run scripts to deploy Pega Platform.
Regardless of which method you use, you might need to edit the setupDatabase.properties file thatcontrols the behavior of several scripts:
• The generateddl.bat or generateddl.sh script generates an SQL file that your databaseadministrator can use to apply schema changes to the database. You can run this script regardless ofwhether you use the IUA or the command-line script.
• The install.bat or install.sh script performs the following functions:
• Deploys the most recent version of Pega Platform.
• Specifies whether to generate a DDL file of changes to the database.
• Enables Kerberos authentication.
If you use the IUA to install, you do not use the install.bat or install.sh script.
Review the documentationBefore you begin the installation, review the related information available on the PDN.
• Review the Platform Support Guide before you install Pega Platform to verify that your database andapplication servers are supported.
• Review the important information in the Release Notes on the PDN before you continue.
Transport-layer encryption methodPega recommends that you use a strong transport-layer encryption method (for example, Transport LayerSecurity 1.2) to secure Pega Platform web applications. This encryption requires that you create and installtransport-layer security and secure socket layer digital certificates on your application server for PegaPlatform. Before you continue, determine what transport-layer encryption method you will use. For moreinformation, see the documentation for your application server.
System requirementsBefore you deploy, ensure that your system meets the following minimum requirements.
UI-based tool requirementsIf you plan to use the UI-based Installation and Upgrade Assistant, ensure that the system meets theseminimum system requirements in addition to all other requirements.
• Windows or Linux operating system
• 1.25 GB minimum available memory
• 10 GB minimum disk space plus at least 8 GB available space in the temporary directory of the root filesystem
• Java Platform, Standard Edition Development Kit ( JDK)
Pega Platform Installation Guide8
Overview and system requirements
Application server requirementsInstall only Pega Platform on the application server. The application server must meet the minimumrequirements listed in the Platform Support Guide on the PDN and in this section.
• All systems require a supported 64-bit JDK. See the Platform Support Guide on the PDN for a list ofsupported versions.
• 1 GB minimum free disk space. You might need additional storage space for debugging and logging.
• Memory requirements: Pega Platform runs in memory (heap) on Java Virtual Machines (JVMs). Ingeneral, all activity is distributed over multiple JVMs (nodes) on the application server.
• Standard suggested system heap size is 4 - 8 GB based on monitoring of memory usage andgarbage collection frequency.
• Larger heaps are advisable if your applications allow a high number of concurrent open tasks persession or cache a large collection of transaction or reference data.
• Do not deploy Pega Platform in an environment where the heap size exceeds the vendor-specificeffectiveness limit.
• IBM JDKs use compression to minimize the cost of large heaps. The compression option is labeledCompressedRefs and is effective up to 28 GB. In current 64-bit JVMs, compression is enabled bydefault.
• The host application server memory size must be at least 4 GB larger than the Pega Platformheap size to allow space for the operating system, monitoring tools, operating system network filebuffering, and JVM memory size (-XMX option). The minimum host application server memory size is8 GB:
4 GB heap + 4 GB for native memory, operating system, and buffering
If the server does not have enough memory allocated to run Pega Platform, the system can hangwithout an error message. The correct memory settings depend on your server hardware, thenumber of other applications, and the number of users on the server, and might be larger thanthese recommendations.
Database server requirementsYour database server must meet the minimum requirements listed in this section and in the PlatformSupport Guide on the PDN.
Storage and logging requirementsBefore you configure, configure your system to manage log storage space.
• Allocate enough storage to accommodate debugging and other logging requirements.
• Configure logging to avoid writing logs to the directory that contains the application server run-timecomponents.
Configuring JavaBefore you install, configure the JAVA_HOME environment variable.
1. Set JAVA_HOME to the root directory of the JDK.
2. Remove from the PATH any references to a Java shortcut.
Pega Platform Installation Guide9

Time zones, character encoding, and regional settingsVerify that your database server, application server, and the system on which you are deploying PegaPlatform use the same:
• Time zone
• Character encoding (UNICODE or EBCDIC)
• Regional settings/locale
Database server configuration
Database server configurationFollow these instructions to prepare and configure your database server.
Prepare your databaseBefore you begin preparing your database, confirm that your database server is installed and running andverify that your database meets the minimum requirements.
• Verify that your system includes a supported version of the JDBC4 driver.
• Ensure that the LOGFILSIZ parameter is at least 4096 pages. The default logfile size is 1000 pages.
Note: If you edit the LOGFILSIZ parameter, restart the database to make sure the settings areloaded into the database correctly.
• If you plan to use user-defined functions (UDF), enable support for UDF installed by Pega Platform.
Configuring your databaseTo prepare your database server for use with Pega Platform, complete the following steps:
1. Determine which database users you need and create database user accounts.
2. Create an empty database.
3. Create the database schema.
Database usersThis section describes deployment and runtime users and lists all required permissions.
• Deployment user — The user who runs the installation. After the installation, you can remove this user.
• Run-time users — These users perform actions on the Pega Platform after the deployment. In a dual-user configuration, an Admin user is granted full privileges, and a Base user is granted a smallersubset. Pega recommends the dual-user configuration:
• Base user — The user who runs the Pega Platform. Most run-time operations use the Base user andassociated data source.
Pega recommends that you use the dual-user configuration with separate Admin and Base users;however, you can create a single Base user with both sets of privileges. If there is no separate Adminuser, the Pega Platform uses the Base user for all run-time operations.
IBM Db2 operating-system usersAll IBM Db2 users must also exist at the operating system level. Before you create the database useraccounts, define the operating-system-level users and authorizations:
• Deployment user - This user must have Administrative privileges on the operating system. Forexample, in Windows this user is a member of the Administrators Group.
• Admin – This user must have Administrative privileges on the operating system. For example, inWindows this user is a member of the Administrators Group.
• Base – This user must not have Administrator privileges on the operating system. If the Base user isassociated with the operating systems Administrators group, the database reports an error.
Pega Platform Installation Guide11
Database server configuration
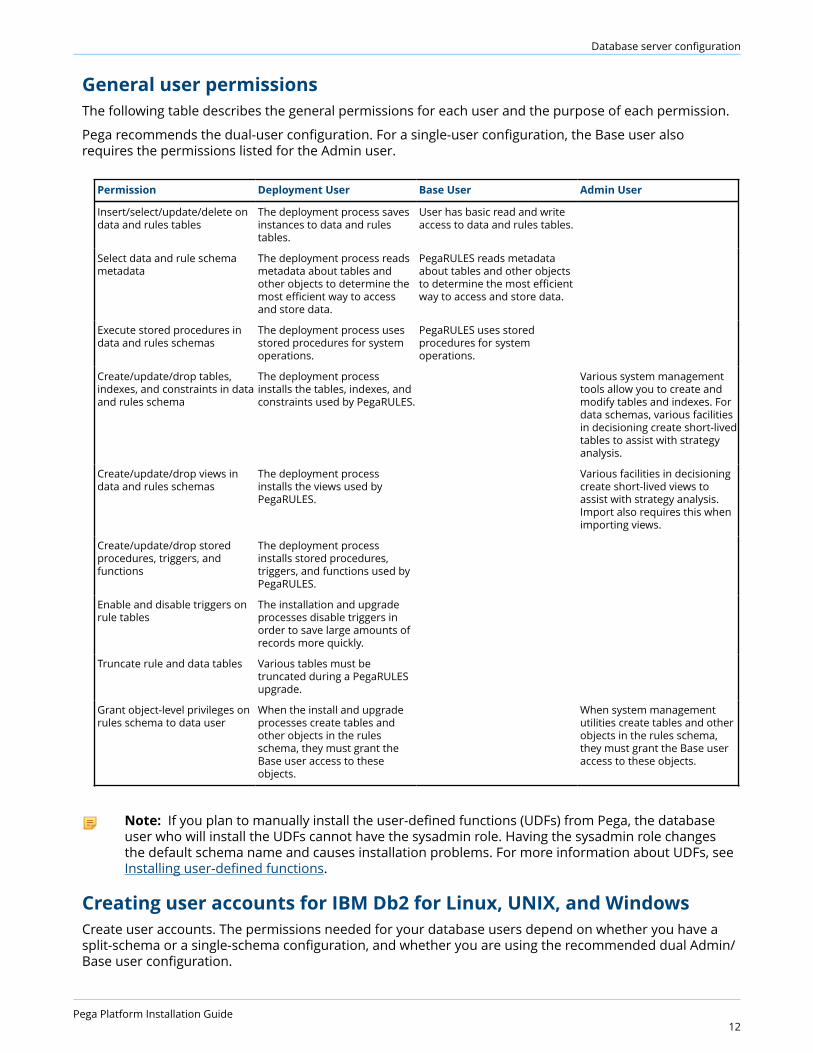
General user permissionsThe following table describes the general permissions for each user and the purpose of each permission.
Pega recommends the dual-user configuration. For a single-user configuration, the Base user alsorequires the permissions listed for the Admin user.
Permission Deployment User Base User Admin User
Insert/select/update/delete ondata and rules tables
The deployment process savesinstances to data and rulestables.
User has basic read and writeaccess to data and rules tables.
Select data and rule schemametadata
The deployment process readsmetadata about tables andother objects to determine themost efficient way to accessand store data.
PegaRULES reads metadataabout tables and other objectsto determine the most efficientway to access and store data.
Execute stored procedures indata and rules schemas
The deployment process usesstored procedures for systemoperations.
PegaRULES uses storedprocedures for systemoperations.
Create/update/drop tables,indexes, and constraints in dataand rules schema
The deployment processinstalls the tables, indexes, andconstraints used by PegaRULES.
Various system managementtools allow you to create andmodify tables and indexes. Fordata schemas, various facilitiesin decisioning create short-livedtables to assist with strategyanalysis.
Create/update/drop views indata and rules schemas
The deployment processinstalls the views used byPegaRULES.
Various facilities in decisioningcreate short-lived views toassist with strategy analysis.Import also requires this whenimporting views.
Create/update/drop storedprocedures, triggers, andfunctions
The deployment processinstalls stored procedures,triggers, and functions used byPegaRULES.
Enable and disable triggers onrule tables
The installation and upgradeprocesses disable triggers inorder to save large amounts ofrecords more quickly.
Truncate rule and data tables Various tables must betruncated during a PegaRULESupgrade.
Grant object-level privileges onrules schema to data user
When the install and upgradeprocesses create tables andother objects in the rulesschema, they must grant theBase user access to theseobjects.
When system managementutilities create tables and otherobjects in the rules schema,they must grant the Base useraccess to these objects.
Note: If you plan to manually install the user-defined functions (UDFs) from Pega, the databaseuser who will install the UDFs cannot have the sysadmin role. Having the sysadmin role changesthe default schema name and causes installation problems. For more information about UDFs, seeInstalling user-defined functions.
Creating user accounts for IBM Db2 for Linux, UNIX, and WindowsCreate user accounts. The permissions needed for your database users depend on whether you have asplit-schema or a single-schema configuration, and whether you are using the recommended dual Admin/Base user configuration.
Pega Platform Installation Guide12
Database server configuration
In a split-schema configuration, the Deployment user owns both the data and rules schemas until thedeployment is complete. After the deployment, the Admin user owns both schemas. If there is no Adminuser, the Base user owns the schemas after the deployment.
In a single-schema configuration, the Deployment user owns the single schema until the deployment iscomplete. After the deployment, the Admin user owns the schema. If there is no Admin user, the Baseuser owns the schema.
Use the Data Studio to create the Base user and Admin user accounts:
1. Ensure that the accounts are defined at the Operating System level.
2. In the Administration Explorer, expand the newly created database and the section named Usersand Groups.
3. Right click Users and select Add and Manage User.
4. In the General tab, enter the Name of the database user.
5. Select Privileges and select the appropriate privileges. For example, for the Base user, selectCONNECT and DATAACCESS. Keep the remaining default values.
Note: The Base user must not have Administrator privileges on the operating system. If theuser is associated with the operating systems Administrators group, the database reports anerror.
6. Execute the Change Plan.
Note: Repeat these steps if you are planning to use a dual Base and Admin user configuration.
7. Optional: If you have both a Base and Admin user, repeat these steps for the remaining user.
Create an empty databaseCreate a database with a minimum of 5 GB for the user tablespace and, if possible, allow the database togrow. This minimum size allows you to load the initial rulebase and do simple development. Monitor thedatabase use carefully. As development begins, the size of the database will need to increase significantly,depending on the complexity of your Pega Platform applications and the number of users.
For each schema that contains Pega Platform tables, allocate a 32K bufferpool, a 32K user regulartablespace, and a 32K user temporary tablespace.
For example:
CREATE BUFFERPOOL BP_32K SIZE 10000 AUTOMATIC PAGESIZE 32K; CREATE SYSTEM TEMPORARY TABLESPACE PRPCSYSTEMP_32K PAGESIZE 32K MANAGED BY AUTOMATIC STORAGE BUFFERPOOL BP_32K;
By default, the database create process creates a bufferpool and temporary tablespace with a 4K pagesize.
Creating an empty database by using the IBM Data StudioUse the IBM Data Studio to create the empty database.
1. Launch the IBM Data Studio.
2. Right-click the database instance and select New platform.
3. In the Specify instance details screen, enter the user credentials to connect to the instance.
Note: The user must be first defined at the Operating System level and have Administratorprivileges — for example, in Windows, associate this user with the Administrators group.
4. Click Finish.
Pega Platform Installation Guide13
5. Enter the following values:
• Database name = < DBname >
• Default buffer pool and table space page size = 32KB
• Complete the Storage and Locale tabs with values appropriate for your environment.
Note: By default, the database automatically manages storage and tablespace settings,expanding the size when necessary. The default settings on these tabs are sufficient for mostdevelopment environments. If you want to use custom settings, configure a minimum of 5GB in the User Table Space tab.
6. Click Run.
Creating database schemaUse the Data Studio to create the required schema objects:
1. In the Administration Explorer, expand the database object.
2. Right-click Schemas and select Create Schema.
3. In the General tab, enter the Name of the schema.
Note: In Pega 7.4, all table queries are schema-qualified. While the schema name itself isarbitrary, Pegasystems recommends choosing small names that are meaningful to yourconfiguration. For example, in a split-schema configuration, it is recommended that you namethe two schema Data and Rules.
4. Select Privileges. Configure the privileges for your database user. Accept the remaining defaults.
5. Execute the Change Plan.
6. If you are planning to use a split-schema configuration to create a second schema, repeat steps 1-5.
7. Increase the LOGFILSIZ parameter to at least 4096 pages before you install the Rulebase. The defaultlogfile size is 1000 pages.
Note: After making the change to the LOGFILSIZ parameter, restart the database to make surethe settings are loaded into the database correctly.
Pega Platform installation
Pega Platform installationThere are multiple methods of installing Pega Platform.
• UI tool — The Installation and Upgrade Assistant is a Java-based UI tool that sets up the Pega Platformrules schema in the database and loads the Pega Platform rules.
• Command-line script — A command-line script automates the installation of Pega Platform in headlessenvironments.
These methods use a batch process to load the rulebase. Because of the large number of rules and otherdata objects that must be loaded, Pega strongly encourages you to install on the same network as thedatabase server. If this is not possible, install on a computer with fast, direct access to the databaseserver. Do not attempt to install on a virtual private network (VPN) or a multi-hop wide area network(WAN).
Extracting and validating the distribution imageFollow these steps to extract and validate the distribution image:
1. Copy the compressed distribution image to the computer that you will use to run the installation.Extract the contents of the compressed file into an empty directory. If you are installing the softwarefrom a DVD, copy the contents of the DVD to an empty directory.
2. Verify the contents of the extracted distribution image.The Pega-image\checksum directory provides an MD5 checksum for each the file in the distributionimage. To verify that the files downloaded and uncompressed correctly, calculate a checksum usingthe Jacksum tool at www.jonelo.de/java/jacksum/. For example, if you uncompressed the distributionimage to PEGA enter the following command:
java -jar jacksum.jar -m -a md5 -r -p -O outputFile.md5PEGA
3. Compare outputFile.md5 to the md5 file located in Pega-image\checksum. The checksum valuesshould be identical.
Choose the installation method:
• To use the IUA, continue at Installing by using the Installation and Upgrade Assistant (IUA).
• To use the command line tool, continue at Editing the setupDatabase.properties file.
Installing by using the Installation and UpgradeAssistant (IUA)Because of the large volume of data, run the IUA on the same network as the database server. If this isnot possible, run the tool on a system with fast, direct access to the database server. The Deploymentuser performs these steps.
Pega Platform writes command-line output to a file in the Pega-image\scripts\logs directory.
The process can last for several hours and the time can vary widely based on network proximity to thedatabase server.
To run the IUA:
1. Double-click the PRPC_Setup.jar file to start the IUA.
Pega Platform Installation Guide15
Pega Platform installation
Note: If JAR files are not associated with Java commands on your system, start the IUA from thecommand line. Navigate to the directory containing the PRPC_Setup.jar file, and type java -jar PRPC_Setup.jar.
The IUA loads and the Pega icon is displayed in your task bar.
2. Click Next to display the license agreement.
3. Review the license agreement and click Accept.
4. On the Installer Mode screen, choose Installation and click Next.
5. Choose your database type and click Next.
6. Choose the product edition and click Next.
• Standard Edition — Install a new instance of Pega 7.4.
• Multitenancy Edition — Install Pega 7.4 in a specialized mode designed to support software-as-a-service (SaaS) run-time environments. For more information about multitenancy, see the PegaPlatform Multitenancy Administration Guide.
Note: Upgrading and updating from one edition to another is not supported. The schemaDDLs for the two editions are not compatible. For example, if you install the standard editionand later decide to use the multitenant edition, you must either drop and re-create thedatabase or create a new database.
7. Configure the database connection. The JDBC drivers allow the Pega Platform application tocommunicate with the database.
Note: Some of the fields on the Database Connection screen are pre-populated based onthe type of database you selected. If you edit these or any other fields on this screen, and thenlater decide to change the database type, the IUA might not populate the fields correctly. If thisoccurs, enter the correct field values as documented below, or exit and rerun the IUA to selectthe intended database type.
• JDBC Driver Class Name — Verify that the pre-populated value is accurate:com.ibm.db2.jcc.DB2Driver
• JDBC Driver JAR Files — Click Select Jar to browse to the appropriate driver files for your databasetype and version. For a list of supported drivers, see the Platform Support Guide.
• Database JDBC URL — Verify that the pre-populated value is accurate.
For information about URLs, see Obtaining database connection information.
• To connect to IBM Db2 for Linux, UNIX and Windows —
jdbc:db2://server:50000/database:fullyMaterializeLobData=true;fullyMaterializeInputStreams=true;progressiveStreaming=2;useJDBC4ColumnNameAndLabelSemantics=2;
• Database Username and Password — Enter the user name and password that you created for theDeployment user on your database.
• Rules Schema Name — Enter the name of the rules schema in the database.
• Data Schema Name — Enter the name of the data schema in the database. For single-schemaconfigurations the data schema name is identical to the rules schema name.
• Customer Data Schema Name — Optional: Enter the name of the customer data schema if it isseparate from the data schema.
8. Click Test Connection. If the connection is not successful, review your connection information, correctany errors, and retest. When the connection is successful, click Next.
Pega Platform Installation Guide16
Pega Platform installation
9. Optional: Specify whether you will have your database administrator manually apply the DDL changesto the schema. These changes include the user-defined functions (UDF) supplied by Pegasystems. Bydefault, the tool generates and applies the schema changes to your database.
• To generate and apply the DDL outside the UI tool, select Bypass Automatic DDL Application and continue the deployment. After you complete the deployment, manually generate and applythe DDL and UDF. For more information, see Optional: Generating and applying DDL and Optional:Installing user-defined functions.
• To have the tool automatically apply the DDL changes and the UDF, clear Bypass Automatic DDLApplication.
10. Enter the system name and production level and click Next:
• System Name — Enter the name of your Pega Platform system. To find the system name, navigateto System > Settings > System Name.
• Production Level — Enter a production level. The production level affects many security featuresof your system. Both the system name and production level can be changed after the system isrunning. Depending on the type of installation, choose:
• 5 for a system that will be used in production
• 4 for a preproduction system
• 3 for a test system
• 2 for a development system
• 1 for an experimental system
The production level can be updated from the App Explorer. Enter Data-Admin-System in thesearch field and select SysAdmin > Class > Data-Admin-System to open your system.
11. Click Start to begin loading the rulebase.Logs display in the log window and are also stored in the Pega-image \scripts\logs directory. Duringthe deployment, the log window might appear inactive when the IUA is processing larger files.
12. Click Back to return to the previous screen, and then click Exit to close the IUA.
Determine the next step:
• If you opted to have the IUA automatically apply the schema changes, and you will not enable Kerberosauthentication, configure the application server.
• If your database administrator will apply DDL manually, or if you will enable Kerberos authentication,continue at Editing the setupDatabase.properties file.
Editing the setupDatabase.properties fileEdit the setupDatabase.properties file to configure deployment scripts.
Skip this section if your deployment meets all the following criteria:
• You will use the Installation and Upgrade Assistant.
• You will allow the Installation and Upgrade Assistant to automatically apply the schema changes anddo not need to create a DDL file.
• You will not enable Kerberos authentication.
If your deployment does not meet all these criteria, follow the steps in this section to edit thesetupDatabase.properties file. The setupDatabase.properties file controls scripts which performthe following tasks:
Pega Platform Installation Guide17
Pega Platform installation
• Install Pega Platform and enable Kerberos authentication. Use the install.bat or install.shscript.
• Generate a DDL file of schema changes. Use the generateddl.bat or generateddl.sh script. Youcan use the generateddl script regardless of whether you use the IUA or the command-line script.
• Generate user-defined functions. Use the generateudf.bat or generateudf.sh script.
• Migrate schemas. Use the migrate.bat or migrate.sh script.
1. Open the setupDatabase.properties file in the scripts directory of your distribution image:Directories.distributionDirectory\scripts\setupDatabase.properties
2. Specify the properties for your system. For each property, add the appropriate value after the equalsign. See Database connection properties and script arguments.
3. Save and close the file.
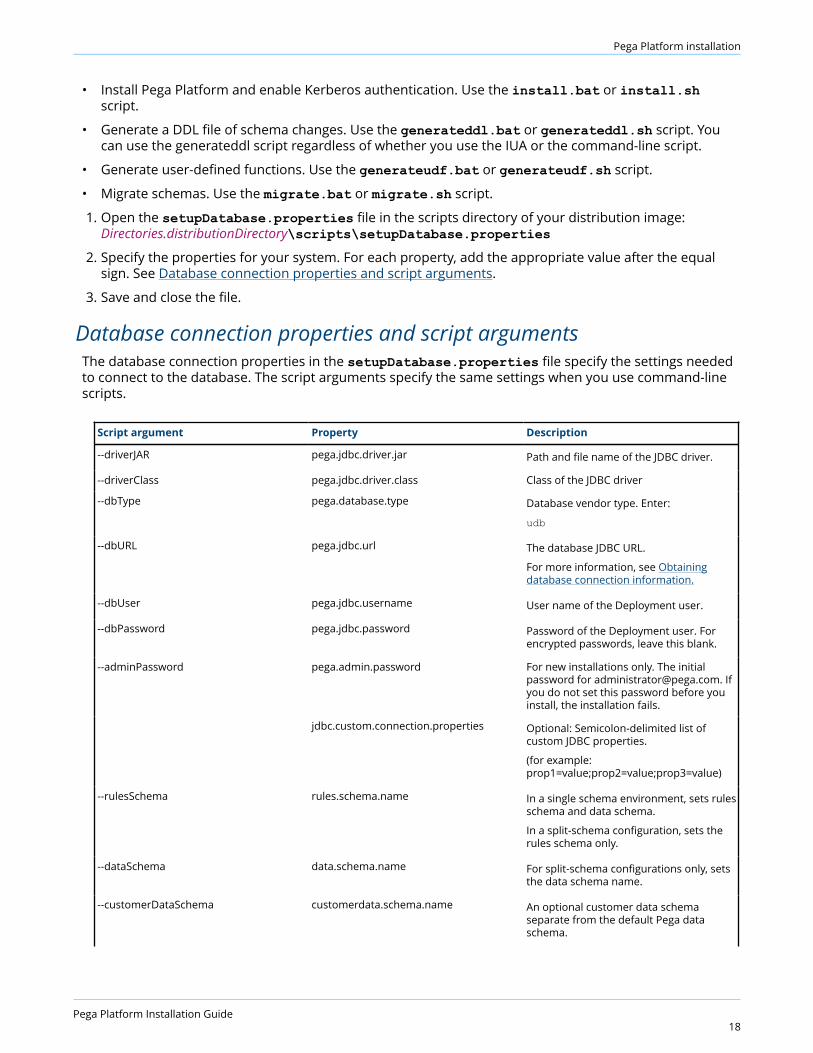
Database connection properties and script argumentsThe database connection properties in the setupDatabase.properties file specify the settings neededto connect to the database. The script arguments specify the same settings when you use command-linescripts.
Script argument Property Description
--driverJAR pega.jdbc.driver.jar Path and file name of the JDBC driver.
--driverClass pega.jdbc.driver.class Class of the JDBC driver
--dbType pega.database.type Database vendor type. Enter:
udb
--dbURL pega.jdbc.url The database JDBC URL.
For more information, see Obtainingdatabase connection information.
--dbUser pega.jdbc.username User name of the Deployment user.
--dbPassword pega.jdbc.password Password of the Deployment user. Forencrypted passwords, leave this blank.
--adminPassword pega.admin.password For new installations only. The initialpassword for [email protected]. Ifyou do not set this password before youinstall, the installation fails.
jdbc.custom.connection.properties Optional: Semicolon-delimited list ofcustom JDBC properties.
(for example:prop1=value;prop2=value;prop3=value)
--rulesSchema rules.schema.name In a single schema environment, sets rulesschema and data schema.
In a split-schema configuration, sets therules schema only.
--dataSchema data.schema.name For split-schema configurations only, setsthe data schema name.
--customerDataSchema customerdata.schema.name An optional customer data schemaseparate from the default Pega dataschema.
Pega Platform Installation Guide18
Pega Platform installation
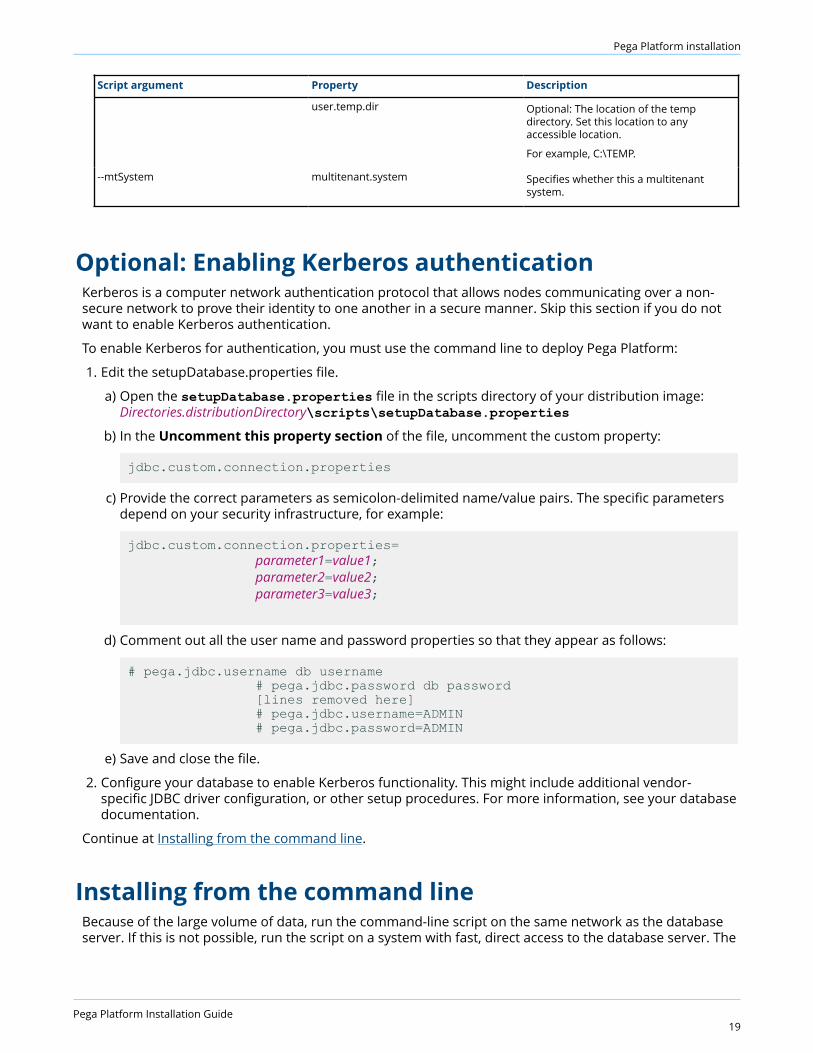
Script argument Property Description
user.temp.dir Optional: The location of the tempdirectory. Set this location to anyaccessible location.
For example, C:\TEMP.
--mtSystem multitenant.system Specifies whether this a multitenantsystem.
Optional: Enabling Kerberos authenticationKerberos is a computer network authentication protocol that allows nodes communicating over a non-secure network to prove their identity to one another in a secure manner. Skip this section if you do notwant to enable Kerberos authentication.
To enable Kerberos for authentication, you must use the command line to deploy Pega Platform:
1. Edit the setupDatabase.properties file.
a) Open the setupDatabase.properties file in the scripts directory of your distribution image:Directories.distributionDirectory\scripts\setupDatabase.properties
b) In the Uncomment this property section of the file, uncomment the custom property:
jdbc.custom.connection.properties
c) Provide the correct parameters as semicolon-delimited name/value pairs. The specific parametersdepend on your security infrastructure, for example:
jdbc.custom.connection.properties= parameter1=value1; parameter2=value2; parameter3=value3;
d) Comment out all the user name and password properties so that they appear as follows:
# pega.jdbc.username db username # pega.jdbc.password db password [lines removed here] # pega.jdbc.username=ADMIN # pega.jdbc.password=ADMIN
e) Save and close the file.
2. Configure your database to enable Kerberos functionality. This might include additional vendor-specific JDBC driver configuration, or other setup procedures. For more information, see your databasedocumentation.
Continue at Installing from the command line.
Installing from the command lineBecause of the large volume of data, run the command-line script on the same network as the databaseserver. If this is not possible, run the script on a system with fast, direct access to the database server. The
Pega Platform Installation Guide19
install.bat and install.sh scripts use the properties in the setupDatabase.properties file. Tooverwrite any property, pass command line arguments.
1. If you have not done so already, edit the setupDatabase.properties file.
a) Open the setupDatabase.properties file in the scripts directory of your distribution image:Directories.distributionDirectory\scripts\setupDatabase.properties
b) Configure the connection properties. For more information about parameter values, see Propertiesfile parameters.
c) Set the initial administrator password. If you do not set this password before you install, theinstallation fails. The administrator must change this password after the first time they log in. Formore information, see Logging in and changing the administrator password.
pega.admin.password=initial-admin-password
d) Save and close the file.
2. Open a command prompt and navigate to the scripts directory.
3. Type install.bat or ./install.sh to run the script.
Installing the rulebase can take several hours, depending on the proximity of the database to the systemrunning the installation script. When the installation is complete, you see a BUILD SUCCESSFUL message.
Pega Platform writes command-line output to a file in the Pega-image\scripts\logs directory.
Now configure the application server.
Application server configuration
Application server configurationFollow the instructions in this section to configure your application server.
• Ensure that your application server meets the prerequisites listed in Application server requirementsand in the Platform Support Guide on the PDN.
• Prepare and configure the application server.
• Deploy the Pega Platform applications.
Preparing to configure the application serverComplete these steps before you configure the application server:
1. Set your JAVA_HOME environment variable to point to the Java JDK directory.
JAVA_HOME=C:\Program Files\Java\jdkx.x.x_x\
2. Create an Oracle WebLogic Server domain. See the Oracle WebLogic Server documentation forinstructions.
3. Ensure that your operating system references a common time standard such as the one available atwww.time.gov.
• On UNIX, this is the Network Time Protocol daemon, ntpd.
• On Windows, you can set a similar service through the clock settings in the Windows Control Panelor task bar.
See the documentation for your specific hardware operating system for information about setting thiscritical service.
4. Ensure that the following ports are open and available:
• Search — One TCP port in the range 9300-9399 (the default is 9300). This port is used for internalnode-to-node communication only, and should not be externally accessible.
• Cluster communication — Leave open the port range 5701-5800. By default, the system begins withport 5701, and then looks for the next port in the sequence (5702, followed by 5703 and so on). Tooverride the default port range, set a different value for the initialization/cluster/ports setting in theprconfig.xml file.
• If you switch to Apache Ignite client-server clustering topology, you must additionally open ports inthe range of 47100-47109 for Apache Ignite stand-alone servers communication.
Note: The number of available ports in this range must be greater than or equal to the greatestnumber of JVMs on any one node in the cluster. For example, if three JVMs are on one node, andseven JVMs on another node, at least seven ports must be available.
5. Obtain the following information from your database administrator to determine the databaseconnection URL:
• Connection method, either Service or SID
• Service or SID name
• Host name
• Port number
Pega Platform Installation Guide21
Application server configuration
6. Add a headless AWT setting to the Java options in the configuration file that is passed to Java to allowthe Pega Platform to render and display graphics:
a) Open the configuration file that is passed to Java at startup. The specific file name and location issite-specific.
b) Add or modify your JAVA_OPTIONS setting to include:
–Djava.awt.headless=true
For example:
set JAVA_OPTIONS=%JAVA_OPTIONS% –Djava.awt.headless=true
c) Save and close the file.
7. Optional: To support web SSO with encrypted assertions, add the following JAR files to the endorseddirectory of the application server:
• xercesImpl-2.10.0.jar — This file is included in the Pega-image \scripts\lib directory.
• xml-apis-1.4.01.jar —This file is included in the Pega-image\scripts\lib directory.
• xalan-2.7.1.jar —Obtain this file from the Apache Software Foundation Xalan project. For moreinformation about the Apache Software Foundation Xalan project, see https://xalan.apache.org/.
Determine whether to deploy the WAR file or the EAR file. See WAR file and EAR file considerations.
WAR file and EAR file considerationsPega Platform is available both as a WAR file, prweb.war, and an EAR file prpc_j2ee14_*.ear. Usingthe WAR file is the best practice for all new deployments. Use the EAR file only if you need one of thefollowing EAR-only features:
• Java Messaging Service (JMS): Pega connectors and services
• Java Transaction API ( JTA): Two-phased commits to the database
• Enterprise Java Beans (EJB): Pega connectors and services
• Java Connector Architecture (Connect JCA)The specific EAR file name depends on your application server.
Before you continue, determine whether you will use the WAR file or the EAR file.
Continue at Data source resources, data source entries, and default schema entries.
Data source resources, data source entries, and default schema entriesThe application server configuration defines the required data source resources, data source entries, anddefault schema entries:
• Data source resources — Data source resources define the Pega Platform database connectioninformation. The number of data source resources depends on whether you have a single-user or dual-user configuration:
• All systems require one data source resource for the Base user.
• Dual-user configurations also require a second data source resource for the Admin user.
• Data source entries — Data source entries specify which data source resource to use for databaseoperations in each schema. For dual-user environments, you must explicitly define two additional datasource entries for the Admin user:
• Admin data source entry for the rules schema
Pega Platform Installation Guide22
Application server configuration
• Admin data source entry for the data schema
• Default schema entries — Every system requires two entries that define the default schema names:
• Default rules schema, for example, PegaRULES.
• Default data schema, for example, PegaDATA. For single-schema configurations, the default dataschema name is the same as the default rules schema name.
Continue at For Docker, multiple VMs, or multiple NICs: Setting the public address.
For Docker, multiple VMs, or multiple NICs: Setting the public addressIf the cluster is set up in Docker, uses separate virtual machines (VMs), or multiple network interfaces(NICs), set the public address in the prconfig.xml file for each Pega Platform node.
1. Open the prconfig.xml configuration file in the prweb/WEB-INF/classes subdirectory of theapplication server directory. For more information, see the PDN article How to change prconfig.xml filesettings.
2. Modify the prconfig.xml file. Add the following setting to set the public address:<env name=" identification/cluster/public/address" value=" IP address " />
For example, if the IP address of the computer on which you run the Pega Platform node is10.254.34.210, add the following setting:
<env name=" identification/cluster/public/address" value="10.254.34.210" />
The new setting controls the address that is used by the Pega Platform node.
3. Save and close the prconfig.xml file.
4. Repeat steps 1 to 3 for the remaining nodes.
If you plan to use Apache Ignite client-server mode, continue at Optional: Apache Ignite client-servermode. Otherwise, continue at Configuring the application server.
Optional: Apache Ignite client-server modeClient-server mode is a clustering topology that separates the Pega Platform processes from clustercommunication and distributed features. Clustering technology has separate resources and uses adifferent JVM from Pega Platform. For more information, see Apache Ignite client-server clusteringtopology.
If you will not use client-server mode, skip this section and continue at Configuring the application server.
Configuring for client-server modeTo enable Apache Ignite client-server mode, modify the prconfig.xml file that is used by Pega Platform.
1. Open the prconfig.xml configuration file in the prweb/WEB-INF/classes subdirectory of theapplication server directory. For more information, see the PDN article How to change prconfig.xml filesettings.
2. Modify the prconfig.xml file. Add the following settings to switch the Apache Ignite cluster protocoland force the Pega Platform node to start in client mode:<env name="cluster/clientserver/clientmode" value=" true " /> <envname="identification/cluster/protocol" value=" ignite " />
3. Save and close the file.
Continue at Deploying and starting the Apache Ignite servers before you deploy and start Pega Platform.
Pega Platform Installation Guide23

Application server configuration
Deploying and starting the Apache Ignite serversTo use client-server clustering, deploy and start the Apache Ignite servers before you deploy and startthe Pega cluster. The Apache Ignite servers provide base clustering capabilities, including communicationbetween nodes. You must have a minimum of three stand-alone Apache Ignite servers for one cluster.
Perform the following procedure on each Apache Ignite server.
1. Make sure that the JAVA_HOME environment variable points to a valid Java installation directory (JRE orJDK).
2. Copy the prcluster_service.war file, which is used to start the cluster service, to the webappsdirectory on the Apache Tomcat server. The prcluster_service.war file is located in the Archivesdirectory of the Pega Platform distribution image.
3. Edit the cluster protocol in the prconfig.xml file located in the /WEB-INF/classes/ directory or theprcluster_service.war file. The Hazelcast cluster protocol is the default configuration.
a) Add the following setting to the prconfig.xml file: <env name="identification/cluster/protocol" value="ignite" />
b) Pass the following JVM argument to the application server:
-DNodeSettings=identification/cluster/protocol=ignite
4. Start the JVM.
After a successful startup, you can review the topology snapshot in the PegaRULES log files. By default,the log files are generated in the ../work/Catalina/localhost/prcluster_service/ directory and are accessibleonly from a terminal window.
Optional. Set up ELK (Elasticsearch, Logstash, and Kibana) for a convenient way to access and analyzethe log files. For more information about configuring ELK, see the Configuring Elasticsearch, Logstash, andKibana (ELK) for log management article on the PDN.
Configuring the application serverThese procedures describe a typical method for setting configuration properties in a basic OracleWebLogic Server installation by modifying the setDomainEnv file. More complex installations might usedifferent start-up scripts. Review this section with your system administrator to determine the appropriatescript in which to enter these options so they are read when Pega Platform starts.
Follow the steps in this section in order to configure your application server:
1. Setting JVM parameters
2. Correcting an HTTP authentication issue with Oracle WebLogic Server 9.2 and later
3. Setting the user memory
4. Set an explicit temporary directory
5. Adding the JDBC driver to the Oracle WebLogic Server classpath
6. Configuring Oracle WebLogic Server to deploy the archive files
Setting JVM parametersSet the JVM memory options in the setenv.bat or setenv.sh file to increase the amount of systemmemory allocated to the application server running Pega Platform. If you use either UNIX or Linux, setsecurity to urandom.
1. Determine the memory parameter values. Pega recommends the following settings:
Pega Platform Installation Guide24

Application server configuration
• Initial Heap Size (Xms) — Between 4 GB - 8 GB, based on monitoring of memory usage and garbagecollection frequency
• Maximum Heap Size (Xmx) — Between 4 GB - 8 GB or larger, depending on your systemconfiguration. For more information, see Application server requirements.
If the server does not have enough memory allocated to run Pega Platform, the system can hangwithout an error message. The correct memory settings depend on your server hardware, thenumber of other applications, and the number of users on the server, and might be larger than theserecommendations.
2. Set the memory and garbage collection parameters.
a) Open the correct environment file:
• Windows — setenv.bat
• UNIX — setenv.sh
b) Set the memory parameters. Use the following examples as a guide, and substitute your values forthose given:
• Windows — set JAVA_OPTS=-Xms4096m –Xmx8192m
• UNIX — JAVA_OPTS="-Xms4096m –Xmx8192m"
-XX:+AlwaysPreTouch -XX:+UseG1GC -XX:+ScavengeBeforeFullGC -XX:+DisableExplicitGC"
c) If you are using Apache Ignite, add the garbage collection options to the end of the JAVA_OPSstatement:
-XX:+AlwaysPreTouch -XX:+UseG1GC -XX:+ScavengeBeforeFullGC -XX:+DisableExplicitGC
3. Optional: For systems that do not require Transport Layer Security (TLS) to deploy the SystemManagement Application on a different server than the Pega Platform application, modify theJAVA_OPTS environment variable to enable remote operation of the System Management Application.For more information about setting JVM parameters, see the Oracle WebLogic Server documentation.
4. If you use UNIX or Linux, enter the following argument to set security to urandom:
-Djava.security.egd=file:///dev/urandom
5. Save and close the configuration file.
Correcting an HTTP authentication issue with Oracle WebLogic Server9.2 and laterOracle WebLogic Server 9.2 and later intercept requests with "Authentication" in the header and doesauthentication without forwarding requests to the application. This can cause authentication errors withPega Platform. To avoid this error, edit the WebLogic config.xml file to disable basic authentication.For more information about the WebLogic config.xml file, see the WebLogic documentation.
1. Open the Oracle WebLogic Server config.xml file.
2. Add this line within the <security-configuration> element:
<enforce-valid-basic-auth-credentials>false</enforce-valid-basic-auth-credentials>
3. Save and close the file.
Pega Platform Installation Guide25
Application server configuration
Setting the user memoryEdit the setDomainEnv script or batch file to set the user memory.
1. Open the domain environment file: setDomainEnv.cmd for Windows or setDomainEnv.sh for UNIXplatforms, in a text editor.These scripts are located in the bin directory of your Oracle WebLogic Server domain.
For example:
C:\Oracle\Middleware\user_projects\domains\pega\bin
2. Find the setting for USER_MEM_ARGS:
@REM IF USER_MEM_ARGS the environment variable is set, use it to override ALL MEM_ARGS values RGS%"=="" (set MEM_ARGS=%USER_MEM_ARGS%)
3. Before the override setting, add the line set USER_MEM_ARGS= to specify the memory settings. Formore information, see Application server requirements. Use the following examples as a guide, andsubstitute your values for those given:
set USER_MEM_ARGS=-Xms4096m –Xmx8192m
4. Save the file.
Set an explicit temporary directoryIn the setDomainEnv file, create a JVM property to set an explicit temporary directory for the PegaPlatform. This directory stores static data during a session. It is important that it be properly specified andaccessible to the Base user.
In the setDomainEnv.cmd file for Windows or the setDomainEnv.sh file for UNIX platforms, add theline set EXTRA_JAVA_PROPERTIES=-Dpega.tmpdir= and specify the full path to a directory you haveallocated, for example:
set EXTRA_JAVA_PROPERTIES=-Dpega.tmpdir=C:\PegaTemp\pr_temp
Adding the JDBC driver to the Oracle WebLogic Server classpathTo enable the Pega Platform to connect to the relational database, the database driver must be in theOracle WebLogic Server classpath.
1. In the setDomainEnv.cmd (Windows) or the setDomainEnv.sh (UNIX) file, add the line setEXT_PRE_CLASSPATH=. Using EXT_PRE_CLASSPATH ensures that the system finds and uses the correctJDBC driver. See the Platform Support Guide for more information about supported drivers.
2. Specify the path to db2jcc.jar.
3. For example, your setting will look similar to the following:For example, your setting will look similar to the following:
set EXT_PRE_CLASSPATH=C:\Oracle\Middleware\user_projects\domains\pega\lib\db2jcc.jar
4. This JDBC driver is the Type 4 universal driver: db2jcc4.jar.
5. Save and close the setDomainEnv file.
Pega Platform Installation Guide26
Application server configuration
Configuring Oracle WebLogic Server to deploy the archive filesConfiguring Oracle WebLogic Server to deploy the Pega Platform archive files
Use the Oracle WebLogic Server Administration Console to configure the server to deploy the PegaPlatform application archives.
For more information about installing and using the administration console, see the Oracle WebLogicServer documentation at http://www.oracle.com/technetwork/middleware/weblogic/documentation/index.html.
Creating JDBC resourcesCreate a JDBC connection pool and data source in Oracle WebLogic Server to allow Pega Platformto connect to the Pega Platform database. Create a data source for the Base user. For dual-userconfigurations, also repeat these steps to create a data source for the Admin user.
1. Open the Oracle WebLogic Server Administration Console:
a) Start the administration server for the Pega Platform domain.
You can start the administration server by running the appropriate startWebLogic script,startWebLogic.cmd (Windows) or startWebLogic.sh (UNIX,) in the bin directory of your domaindirectory, for example:
Oracle\Middleware\user_projects\domains\<domain>\bin
On Windows, you can also start the Administration server from a shortcut on the Start menu byselecting Oracle WebLogic > User Projects > domain >Start Admin Server for WebLogic Domain.
b) Start the Administration Console and log in with the administrative user name and password thatyou specified in the Configuration Wizard.
You can start the Administration Console in a browser by opening the URL http://hostname:port/ console where hostname is the name of the Administration Server and port is thelisten port on which the Administration Server is listening for requests (port 7001 by default).
2. In the Oracle WebLogic Administration Console, under Domain Structure, select Services > DataSources.If configuration editing is not enabled, click Lock & Edit in the Change Center at the top-left of thepage.
3. On the Data Source page click New and select Generic Data Source.The page Create a New JDBC Data Source opens.
4. Complete this page.
• In the Name field, enter the name of the data source:
• For the Base user, enter PegaRULES.
• For the Admin user, enter AdminPegaRULES.
• In JNDI Name, enter the correct value:
• For the PegaRules data source, enter jdbc/PegaRULES.
• For the AdminPegaRules data source, enter jdbc/AdminPegaRULES.
• Select the Database Type.
• Select a Database Driver for your database. For more information about supported drivers, see thePlatform Support Guide.
Pega Platform Installation Guide27
Application server configuration
Note: If you choose an XA driver to enable two-phase commit, you must install theprpc_j2ee14.ear file as the core Pega Platform application archive. Determine the bestvalue of this setting based on your application architecture, usage profile and environmentconsiderations. If you are using XA drivers, also increase the maximum connections for theconnection pool associated with the JDBC data source for Pega Platform to more than 100.See your application server documentation for instructions.
5. Click Next.A Transactions Options page opens. The listed options depend on the type of driver you selected.
6. Unless instructed otherwise by your site database administrator, accept the defaults for thetransaction options and click Next.The Connection Properties page opens.
7. Complete this page as follows:
• In the Database Name field enter the name of the Pega Platform database.
• In the Host Name field, enter the name or IP address of the database server.
• In the Port field enter the port number to be used to connect to the database server.
• Complete the User Name and Password fields with the credentials for the Base user you createdfor the database.
8. Click Next.
9. Confirm that the driver is correct.
com.ibm.db2.jcc.DB2Driver
10. Confirm that the connection URL is correct.
For more information, see Database connection information. Enter your connection similar to thefollowing. Replace items in italics with the values for your system.
• jdbc:db2:// server : port / database
11. Update the Properties text box to include the following connection properties.
Oracle WebLogic Server populates the user, databaseName and driverType properties. If they are notpresent, add them to the text box.
user=<user> databaseName=<dbName> currentSchema=data-schema-name currentFunctionPath=SYSIBM,SYSFUN,,data-schema-name driverType=4 progressiveStreaming=2 seJDBC4ColumnNameAndLabelSemantics=2 fullyMaterializeInputStreams=true fullyMaterializeLobData=true
Replace the sample property values with the values for your environment. For example, if the schemaname is PEGA, the relevant properties and property values would be:
currentSchema=PEGA currentFunctionPath=SYSIBM,SYSFUN,PEGA
Note: Enter the schema name in capital letters as in the example. SYSIBM and SYSFUN aresystem schemas provided by IBM and are required because the Pega Platform makes use ofsome functions in these schemas.
databaseName=
Pega Platform Installation Guide28
Application server configuration
database name
selectMethod=cursor
sendStringParametersAsUnicode=false
12. Click Test Configuration. If the test is successful, click Finish.
If the test is not successful, review your settings and retest.
When you click Finish, you will be returned to Summary of JDBC Data Sources.
13. If Configuration editing is not enabled, click the Activate Changes button in the Change Center.
14. Click the name of the data source you just created in the Data Sources table.
15. On the Settings page for the data source, click the Connection Pool tab.
16. If Configuration editing is not enabled, click the Lock & Edit button in the Change Center to edit thedata source Configuration.
17. Verify that the Connection Pool properties are correct for the data source you created, and modify asneeded.
18. Select the Targets tab and select the AdminServer as the target for the data source.
19. Click Save.
20. If Configuration editing is not enabled, click Activate Changes.
21. Optional: Repeat these steps to create the data source for the Admin user.
Configuring JMS resources for EAR deploymentIf you are deploying the EAR archive, prpc_j2ee14_*.ear, define JMS resources to allow Pega Platformto integrate with external systems.
The Pega Platform EJB components use JMS Services internally. If you are deploying the EAR archive, youmust complete this procedure even if your Pega Platform application does not use messaging to integratewith external systems.
If you are deploying the WAR archive, prweb.war, you do not need to configure JMS resources. Skip thissection and continue at Deploying the Pega Platform WAR file.
For a WebLogic Cluster installation, each managed server needs a separate set of JMS resources. If thecluster consists of multiple managed servers, repeat the JMS resource configuration for each managedserver.
1. Create a JMS Server targeted at your Oracle WebLogic Server:
a) On the Administration Console, under Domain Structure, click Services > Messaging > JMSServers.
b) If Configuration editing is not enabled, click Lock & Edit in the Change Center. Click New to create anew server.
c) In the Name field, enter a name to identify the Pega Platform JMS server, such as PRJMS_Server,and click Next.
d) In the Target dropdown, select your Admin Server or the managed server you created for the PegaPlatform, and click Finish.You will return to the Summary of JMS Servers page.
Pega Platform Installation Guide29

Application server configuration
e) Confirm that you see the message, JMS Server created successfully. If Configuration editing is notenabled, click Activate Changes in the Change Center.
f) Click Home to return to the Domain home page.
2. Create a JMS Module:
a) On the Administration Console, under Domain Configurations, select Services > Messaging > JMSModules.This will become the container for the connection factory and topic.
b) If Configuration editing is not enabled, click Lock & Edit in the Change Center. Click New in the JMSModules table.
c) On the Create JMS System Module page, enter a name such as PRJMS_Module and click Next.
d) In the Targets table, select the check box for Admin Server, or the server to which you will deploythe Pega Platform and click Next.
e) Check Would you like to add resources to this JMS system module? and click Finish.The Settings page for your JMS Module opens:
f) Confirm that you see the message The JMS module was created successfully. If Configurationediting is not enabled, click Activate Changes in the Change Center.
3. In the JMS Module create a Connection Factory and subdeployment, targeted to the JMS Server:
a) Still on the Settings page for your JMS Module, click Lock & Edit in the Change Center ifConfiguration editing is not enabled. Click New in the Summary of Resources table to display thepage.
b) Select Connection Factory, and click Next.
c) Enter a Name for the Connection Factory such as PRAsyncConnectionFactory and enter exactly theJNDI Name jms/PRAsyncTCF. Click Next.
d) Click Advanced Targeting.
e) Click Create a New Subdeployment.
f) Under Subdeployment Properties, enter a Subdeployment Name such as PRJMS_Subdeploymentand click OK.You return to the Properties page for the Connection Factory.
g) Under Targets, select the check box for the JMS Server you created for the Pega Platform and clickFinish.You return to the Settings page for your JMS Module.
h) Confirm that you see the message Connection Factory created successfully. If Configurationediting is not enabled, click Activate Changes in the Change Center.
4. In the JMS Module create a topic and subdeployment, targeted to the JMS Server:
a) On the Settings page for your JMS Module, click Lock & Edit in the Change Center if needed, andNew in the Summary of Resources table to display the page Create a New JMS System ModuleResource again.
b) From the list of resource types, click Topic, and then Next to display the page Create a New JMSSystem Module Resource.
c) Enter a name for the Topic, such as PRAsyncTopic, and enter exactly the JNDI name jms/PRAsyncTopic. Click Next.
d) Select Create a New Subdeployment.
Pega Platform Installation Guide30
Application server configuration
e) On the page Create a New Subdeployment, enter a new name for the subdeployment, such asPRJMS_Subdeployment_Topic, and click OK.Use a different name than the one you used for the Connection Factory Subdeployment. TheConnection Factory and the Topic should each have their own subdeployment.
f) If the system displays a Targets section, select the check box for the JMS Server you created andclick Finish.You return to the Settings page for your JMS Module.
g) Confirm that you see the message The JMS Topic was created successfully. If Configurationediting is not enabled, click Activate Changes in the Change Center.
5. Optional: For a WebLogic cluster installation, repeat steps 1 - 4 for each managed server.
Deploying the Pega Platform WAR or EAR filesAfter you configure your application server, deploy the Pega Platform core application files, including theSystem Management Application and help.
These are the core applications and file names:
Pega Platformprweb.war or prpc_j2ee14*.ear
Note: Using the WAR file is the best practice for all new deployments. Use the EAR file onlyif you need one of the EAR-only features. For more information, see WAR file and EAR fileconsiderations.
System Management Applicationprsysmgmt.war
Helpprhelp.war
Note: When the server restarts after the applications deploy, the first node you bring up becomesthe default search node.
Caution: Do not install both the EAR and WAR files.
Deploying on Oracle WebLogic ServerOracle WebLogic Server requires a Deployment Plan for split-schema configurations. When you restartthe server after you deploy the application archives, the first node you bring up becomes the defaultsearch node. If you are deployed in a multi-node environment, the search node is node 1 and must bestarted first.
Configuring split-schema configurationsFor split-schema configurations, Oracle WebLogic Server uses a Deployment Plan to configure theJNDI setting in the application archive. A Deployment Plan is a user-configurable XML file that capturesenvironment-specific configuration properties. If you plan to use a split-schema configuration, followthese steps.
1. Create or edit a Deployment Plan.
2. Configure a specific directory structure for the Deployment Plan and the EAR/WAR archive.
3. Deploy (or redeploy) the application archive and Deployment Plan using the Oracle WebLogic Serveradministration console or the command line.
Pega Platform Installation Guide31
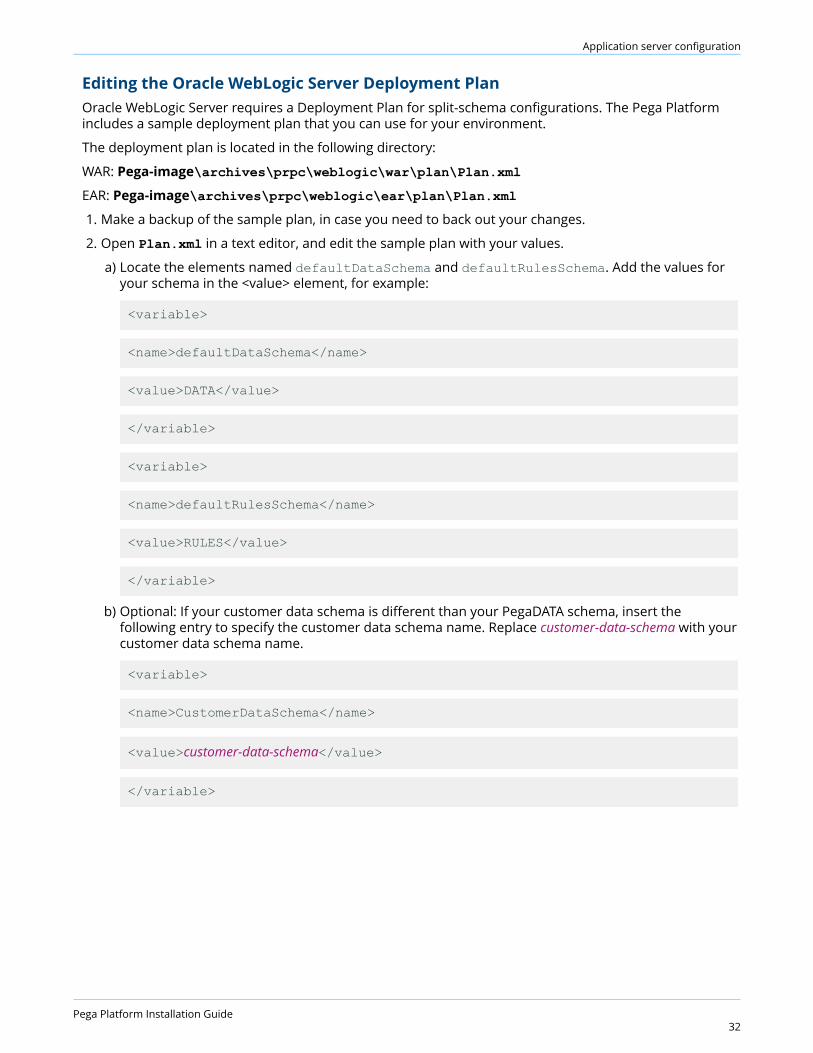
Application server configuration
Editing the Oracle WebLogic Server Deployment PlanOracle WebLogic Server requires a Deployment Plan for split-schema configurations. The Pega Platformincludes a sample deployment plan that you can use for your environment.
The deployment plan is located in the following directory:
WAR: Pega-image\archives\prpc\weblogic\war\plan\Plan.xml
EAR: Pega-image\archives\prpc\weblogic\ear\plan\Plan.xml
1. Make a backup of the sample plan, in case you need to back out your changes.
2. Open Plan.xml in a text editor, and edit the sample plan with your values.
a) Locate the elements named defaultDataSchema and defaultRulesSchema. Add the values foryour schema in the <value> element, for example:
<variable>
<name>defaultDataSchema</name>
<value>DATA</value>
</variable>
<variable>
<name>defaultRulesSchema</name>
<value>RULES</value>
</variable>
b) Optional: If your customer data schema is different than your PegaDATA schema, insert thefollowing entry to specify the customer data schema name. Replace customer-data-schema with yourcustomer data schema name.
<variable>
<name>CustomerDataSchema</name>
<value>customer-data-schema</value>
</variable>
Pega Platform Installation Guide32
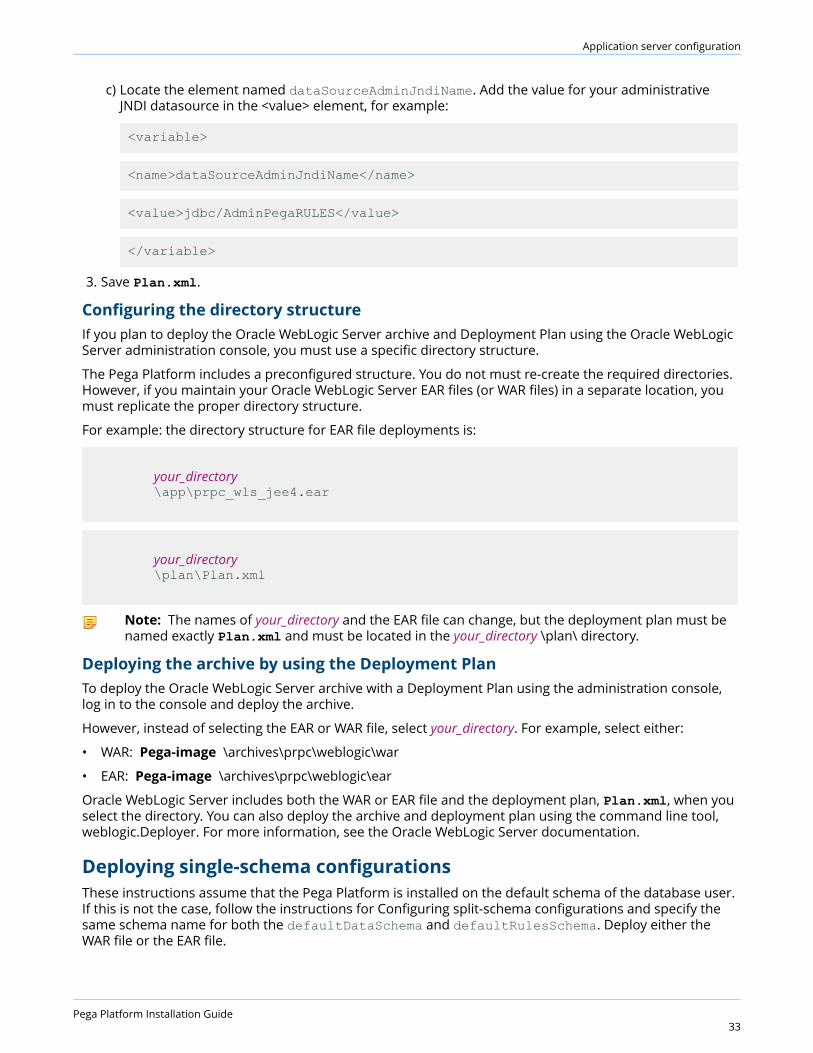
Application server configuration
c) Locate the element named dataSourceAdminJndiName. Add the value for your administrativeJNDI datasource in the <value> element, for example:
<variable>
<name>dataSourceAdminJndiName</name>
<value>jdbc/AdminPegaRULES</value>
</variable>
3. Save Plan.xml.
Configuring the directory structureIf you plan to deploy the Oracle WebLogic Server archive and Deployment Plan using the Oracle WebLogicServer administration console, you must use a specific directory structure.
The Pega Platform includes a preconfigured structure. You do not must re-create the required directories.However, if you maintain your Oracle WebLogic Server EAR files (or WAR files) in a separate location, youmust replicate the proper directory structure.
For example: the directory structure for EAR file deployments is:
your_directory \app\prpc_wls_jee4.ear
your_directory \plan\Plan.xml
Note: The names of your_directory and the EAR file can change, but the deployment plan must benamed exactly Plan.xml and must be located in the your_directory \plan\ directory.
Deploying the archive by using the Deployment PlanTo deploy the Oracle WebLogic Server archive with a Deployment Plan using the administration console,log in to the console and deploy the archive.
However, instead of selecting the EAR or WAR file, select your_directory. For example, select either:
• WAR: Pega-image \archives\prpc\weblogic\war
• EAR: Pega-image \archives\prpc\weblogic\ear
Oracle WebLogic Server includes both the WAR or EAR file and the deployment plan, Plan.xml, when youselect the directory. You can also deploy the archive and deployment plan using the command line tool,weblogic.Deployer. For more information, see the Oracle WebLogic Server documentation.
Deploying single-schema configurationsThese instructions assume that the Pega Platform is installed on the default schema of the database user.If this is not the case, follow the instructions for Configuring split-schema configurations and specify thesame schema name for both the defaultDataSchema and defaultRulesSchema. Deploy either theWAR file or the EAR file.
Pega Platform Installation Guide33
Application server configuration
Deploying the Pega Platform WAR fileSkip this procedure if you are planning to deploy the Pega Platform EAR file.
1. In the Domain Structure section, click Deployments.
2. If Configuration editing is not enabled, click Lock & Edit to unlock the page. In the Deployments table,click Install.
3. In the Install Application Assistant, click the link upload your file(s).
4. Click the Browse button next to the Deployment Archive field and navigate to Pega-image\archives\prpc\weblogic\war\app\.
5. Select the prweb.war file and click Open.
6. When the file name is displayed in the Deployment Archive field, click Next.
7. Make sure the radio button next to prweb.war is selected and click Next.
8. Select Install this deployment as an application and click Next to display the optional settings page.
9. Make sure the Name is prweb and click Next to accept the defaults.
10. Select Yes, take me to the deployment's configuration screen and review the other settings. Then,click Finish to begin deploying the application.When the WAR file has deployed, you are returned to the application Settings page.
11. Review the Overview page to confirm that the settings are as expected.
12. Click on the Targets tab and verify that the target server is correct.
13. Click Save in the Assistant or Activate Changes in the Change Center to save the configuration.
14. In the Domain Structure panel, click Deployments again deploy prsysmgmt.war and prhelp.war.
Deploying the Pega Platform EAR fileSkip this procedure if you have deployed the Pega Platform WAR file.
1. In the Domain Structure panel, click Deployments.
2. If Configuration editing is not enabled, click Lock & Edit to unlock the page. Click Install.
3. Click upload your file(s).
4. Next to the Deployment Archive field, click the Browse button and use the file dialog to navigate tothe archives directory of the Pega Platform distribution image. Select the prpc_j2ee14_*.ear. Whenthe file name is displayed in the Deployment Archive field, click Next.
5. On the Install Application Assistant, confirm the upload path and that the radio button next to thearchive name is selected and click Next.
6. Select Install this deployment as an application and click Next to display the optional settings page:
7. Click Next to accept the defaults.
8. Select Yes, take me to the deployment's configuration screen and review the other settings. Then,click Finish to begin deploying the application.When the archive deploys, you return to the application’s Settings page.
9. Review the Overview page to confirm that the settings are correct.
10. Click on the Targets tab to verify that the target server for the application is correct.
11. Click on the Overview tab again, and click Save.
12. In Domain Structure, click on Deployments to return to the Summary of Deployments page.
13. Continue with the deployments of the prsysmgmt.war and prhelp.war applications.
Pega Platform Installation Guide34
Application server configuration
Deploying the System Management Application and helpRepeat the procedure described for prweb above to deploy the two other Pega Platform applications,prsysmgmt.war and prhelp.war. Do not start these applications after deployment.
Pega Platform Installation Guide35

Post-deployment configuration
Post-deployment configurationThis section describes the post-deployment activities that are performed in the system after you havecompleted the setup and configuration of your application server and deployed the archives.
• System Management Application access
• Starting applications
• Logging in to the Pega Platform and changing your password
• Enabling help and System Administration applications
• Configuring Directed Web Access
• Configuring search index host node settings
• Log file size
• Database size
• Installing custom applications
• Enabling server-side screen captures for application documents
• Enabling operators
System Management Application accessYou can use the System Management Application to monitor and control caches, agents, requestors,listeners, and other processing. The default deployment configuration automatically assigns thePegaDiagnosticUser role to administrative users. To expand access to the System ManagementApplication, use your application server tools to assign the PegaDiagnosticUser role to other users. If theuser does not have this role they will be challenged for authentication when they attempt to access theSystem Management Application.
For more information, see the System Management Application Reference Guide on the PDN.
Starting the Pega Platform applicationsEnsure that the application server is running and start the prsysmgmt, prweb, and prhelp applications.
Logging in and changing the administrator passwordTo test the deployment and index the rules, log in to Pega Platform web application. For security, youmust change the administrator password.
1. Navigate to the PRServlet URL, replacing the server and port values with your specific values.
http://server:port/prweb
2. Use the following credentials to log in the first time:
• User ID — [email protected]
• Password — the password you set when you installed
Pega Platform Installation Guide36
Post-deployment configuration
After logging in, Pega Platform indexes the rules in the system to support full-text search. Duringthe index process, there might be a delay in the responsiveness of Pega Platform user interface. Theprocess usually takes from 10 to 15 minutes to complete depending on your system configuration.
If the index process ends without generating an error message, the deployment is successful.
3. Immediately after the index process completes, change the administrator password. Because thedefault password is widely published, it is important to protect your system after an installation bychanging the password. The new password must be at least 10 characters long.If the system does not prompt you to change your password, follow these steps:
a) From the Operator Menu located to the right of the Designer Studio header, select the Profile.
b) Click Change Password.
c) Verify the Current Password, and then enter and confirm the New Password.
d) Click Save.
Enabling online help and the System ManagementApplication in Designer StudioEnable URL access to the online help and the System Management Application.
1. Click Designer Studio > System > Settings > URLs.
2. In the Online Help URL field, enter the URL for the Help application in the format:
http://host:port/prhelp
3. In the SMA URL field, enter the URL for the System Management Application in the format:
http://host:port/prsysmgmt
4. Click Save.
5. Log out of the Pega Platform and log back in for these changes to take effect.
Configuring Directed Web AccessA Directed Web Access (DWA) address allows you to grant one-time access to external users to enablethem to process an assignment in your application. When you grant the access, the Pega Platform sendsan email to the external user; this email includes a URL to access the application and can identify a proxyserver.
Follow these instructions to configure the URL:
1. Click Designer Studio > System > Settings > URLs.
2. In the Public Link URL field, enter the URL that you want to provide in emails in this format:
http://host:port/prweb
3. Click Save.
4. Log out and log back in to Designer Studio for these changes to take effect.
Pega Platform Installation Guide37
Post-deployment configuration
Configuring search index host node settingsThe Pega Platform supports full-text search for rules, data instances, and work objects. By default, searchindexing is enabled and indexing starts when you start the application server after deploying the PegaPlatform. The first node that starts after the deployment becomes the default initial search node. Thedefault index directory is PegaSearchIndex in your temporary directory.
After the search indexes are completely built, you can change the default settings. Do not stop or bringdown the default node until the search indexes build completely. The Search Landing Page displays thestatus.
Follow these steps to configure the search index host node settings:
1. Check your directory sizes. Ensure that the directories for all Elasticsearch host nodes have sufficientfree space to hold the Elasticsearch indexes.
2. Open the Designer Studio > System > Settings> Search landing page and expand Search IndexHost Node Setting.
3. Specify one node to set as the Host Node. If necessary, delete all but one node. This is the node onwhich Elasticsearch indexes will be built.
Note: Do not include more than one node in the Search Index Host Node Setting list.Including more than one node in the list at this point might cause duplicate index builds andcompromise system performance. You will create additional nodes later in this process.
4. Verify the Search Index Host Node ID and the Search Index File Directory.
5. Expand Automated Search Alerts, and enable Automatically Monitor Files.
6. Click Submit to save the settings.
7. After the first indexing is complete, add any needed additional host nodes. The system replicates theindexes on the new nodes.
Note:
• Configure a minimum of two Elasticsearch host nodes. Pegasystems recommends that youconfigure a minimum of three nodes for maximum fault tolerance. You might need morethan three nodes depending on the size of your cluster.
• You can specify that a node is either always an index host node or that it never becomesan index host node even if it is the first node that is started after installation using the -Dindex.directory JVM setting. To specify that a node is always an index host node specifythe directory name. To specify that a node is never an index host node, leave this settingblank. If this setting is not used and a custom index file directory is specified on the Searchlanding page, the system uses the default directory when no other index host node isonline when a server starts. For more information about configuring index host nodes, seeManaging Elasticsearch index host nodes outside of the Search landing page on the PDN.
8. To enable communication between Elasticsearch host nodes in the cluster, open a TCP port in therange 9300-9399 on each node. (By default, Elasticsearch uses port 9300.) These ports are used forinternal node-to-node communication only, and should not be externally accessible. Ensure thatthese ports are not subject to an idle connection timeout policy in the software or hardware that runsbetween these host nodes.
Log file sizeThe initial log file size is 50 MB. After the installation is complete, increase the size of the log files. Thespecific size will depend on your environment and the size of your application. For more information, seethe Support area on the PDN.
Pega Platform Installation Guide38
Post-deployment configuration
Database sizeMonitor the database use carefully. As development begins, the size of the database will need to increasesignificantly, depending on the complexity of your Pega Platform applications and the number of users.
Install applicationsInstall any applications now. If you obtained your application from Pega, follow the instructions in theInstallation Guide for your application.
Caution: Grant the database user permissions as described in Database users. Some applicationsuse triggers. During startup, Pega Platform checks for triggers that reference the updates cacheand rule view tables; if these triggers exist, Pega Platform attempts to drop them. If the user doesnot have the correct permissions, Pega Platform cannot drop the triggers and fails to start up.
If you installed the applications before you deployed Pega Platform, Pega Platform automatically dropsthe triggers and this error does not occur.
Enabling server-side screen captures for applicationdocumentsRegardless of which application server platform you use, you must set up a Tomcat server to supporttaking and storing screen captures on a server rather than on a client. By taking and storing screencaptures on a server, you avoid client-side limitations, such as browser incompatibilities or client softwarerequirements.
As a best practice, virtually install Tomcat and deploy the prScreenShot.war file on the same server thatis running Pega Platform. Otherwise, use a standalone Linux or Windows server. If you use a Linux server,you must include the following components:
• fontconfig
• freetype
• libfreetype.so.6
• libfontconfig.so.1
• libstdc++.so.6
You can include screen captures in an application document that is generated by the DocumentApplication tool. Screen captures provide stakeholders with a realistic picture of an application's userinterface. Install a PhantomJS REST server to include screen captures in an application document.
1. Download the following WAR file: Pega_DistributionImage\Additional_Products\PhantomJS\prScreenShot.war
2. Deploy the WAR file on a Tomcat server.
3. Update the tomcat-users.xml file to add the following role and user. This file is located at \apache-tomcat-XX\conf\ tomcat-users.xml.
<role rolename="pegascreencapture" /> <user username="restUser" password="rules" roles="pegascreencapture" />
4. Start the Tomcat server. The service is hosted at http://IPaddress:port/prScreenShot/rest/capture,where IPaddress is the address of the system where Tomcat is hosted, and port is the port on which theservice is deployed.
Pega Platform Installation Guide39
Post-deployment configuration
5. Log in to your Pega Platform application and make the following updates:
a) Update the Data-Admin-System-Setting instance Pega-AppDefinition -CaptureScreenshotsResourcePath with the URL of the service, for example,http://10.224.232.91:8080/prScreenShot/rest/capture.
b) Update the Data-Admin-Security-Authentication profile instance CaptureScreenshotsAuthProfilewith the user that you created in step 3.
Continue at Configuring PhantomJS REST server security for including screen captures in an applicationdocument.
Configuring PhantomJS REST server security for including screencaptures in an application documentTo ensure a secure installation of Pega Platform, enable the PhantomJS REST server to take and storeserver-side screen captures. In application documents generated by the Document Application tool,screen captures provide stakeholders with a realistic picture of the application's user interface.
1. Obtain the SSL certificate from the Pega Platform administrator.
2. Add the SSL certificate to the list of trusted certificates:
a) Double-click the certificate.
b) Click Install certificate to start the Certificate Import wizard.
c) Click Next, and select Place all certificates in the following store.
d) Click Browse, select Trusted Root certificate, and click OK.
e) Click Next, and then click Finish to complete the wizard.
3. Add the certificate to the truststore of the JVM on which the REST server is installed:
a) Open a command prompt.
b) Change the root directory to the security folder in the Java installation folder. For example, C:\Program Files (x86)\Java\jre7\lib\security.
c) Run the following command:
keytool -keystore cacerts -importcert -alias certificate alias -file certificate name
d) When prompted, enter the password for the cacerts keystore. The default password is changeit.
Enabling operatorsPega Platform deployment security requires an administrator to enable new operators shipped with PegaPlatform and requires password changes after the first login.
The administrator and new operators shipped with Pega Platform must change their passwords whenthey first log in:
• ExternalInviteUser
• IntSampleUser
• PRPC_SOAPOper
Pega Platform Installation Guide40
Post-deployment configuration
• External
For more information about changing the administrator password, see Logging in and changing theadministrator password.
1. In Designer Studio, select > Org & Security > Authentication > Operator Access.
2. In the Disabled operators list, click the link for the Pega-provided operator that you want to enable.The following standard operators are installed but disabled by default. When these standard operatorsfirst log on, they are required to change their passwords. Enable only those operators you plan to use:
• ExternalInviteUser
• IntSampleUser
• PRPC_SOAPOper
• External
3. On the Edit Operator ID page, on the Security tab, select Force password change on next login andclear Disable Operator.
4. Select Update password.
5. Enter a password that conforms to your site standards and click Submit.
6. Click Save and close the operator page.
7. Repeat steps 2 through 6 for the remaining operators.
Pega Platform Installation Guide41
Appendix A — Properties filesThe Pega Platform properties files include several database-specific properties.
• JDBC driver JAR file — db2jcc4.jar
• Database driver class — com.ibm.db2.jcc.DB2Driver
• Database vendor type — udb
• JDBC URL — url="jdbc:db2:// host:port/dbname
Appendix B — Troubleshooting
Appendix B — TroubleshootingUse the information in this section to troubleshoot errors. The error logs are displayed in the Installationand Upgrade Assistant window and are also stored in the Pega-image \scripts\logs directory.
Recovering from a failed deploymentIf the deployment fails, follow these steps to drop the schemas and start a new installation:
1. Review the log files in the \scripts\logs directory.
2. Make any necessary changes to your system. If the error was due to a data entry mistake, make note ofthe correct information.
3. Generate the DDL files and drop the schemas:
a) Verify the settings in the setupDatabase.properties file. For information about the properties,see Editing the setupDatabase.properties file.
b) At a command prompt, navigate to the Pega-image \scripts directory.
c) Run the generateddl.bat or generateddl.sh script with the --action=drops option, forexample:
generateddl.bat --action=drops
d) Review the DDL files in the Pega-image \schema\generated\ output directory.
e) Have your database administrator apply the DDL to drop the schemas.
4. Repeat the installation steps.
PEGA0055 alert — clocks not synchronized betweennodesThe Pega Platform validates time synchronization to ensure proper operations and displays a PEGA0055alert if clocks are not synchronized between nodes.
For information about how to reference a common time standard, see the documentation for youroperating system.
ClassNotFoundException error — session persistenceDuring application server shutdown, Tomcat persists session information into the session.ser file inthe server file directory. When the application server restarts, it reloads the session information from thesession.ser file and deletes the file. If serialized session objects refer to classes that are not visible tothe container layer, you see a ClassNotFoundException error.
Pega Platform Installation Guide43
This is a sample error message:
May 19, 2016 2:37:46 PM org.apache.catalina.session.StandardManager doLoad SEVERE: ClassNotFoundException while loading persisted sessions: java.lang.ClassNotFoundExceptioncom.pega.pegarules.session.internal.authorization.ContextMapDiagCallback
java.lang.ClassNotFoundException: com.pega.pegarules.session.internal.authorization.ContextMapDiagCallback
To suppress these errors, turn off Tomcat session persistence in the context.xml file.
System hangs with no error message — insufficientmemoryIf the server does not have enough memory allocated to run the Pega Platform, the system can hangwithout an error message. The correct memory settings depend on your server hardware, the numberof other applications, and the number of users on the server, and might be larger than the minimumrecommendations in System requirements.
For more information about setting memory parameters, see Setting JVM parameters.
Database connection informationWhen you configure the data source resources, you need the correct database connection URL.To determine the database connection URL, obtain the following information from your databaseadministrator:
• Connection method — Service or SID
• Service or SID name
• Host name
• Port number
When you configure the application server, enter the connection string, pega.jdbc.url. Replace items initalics with the values for your system:
jdbc:db2://server:port/database
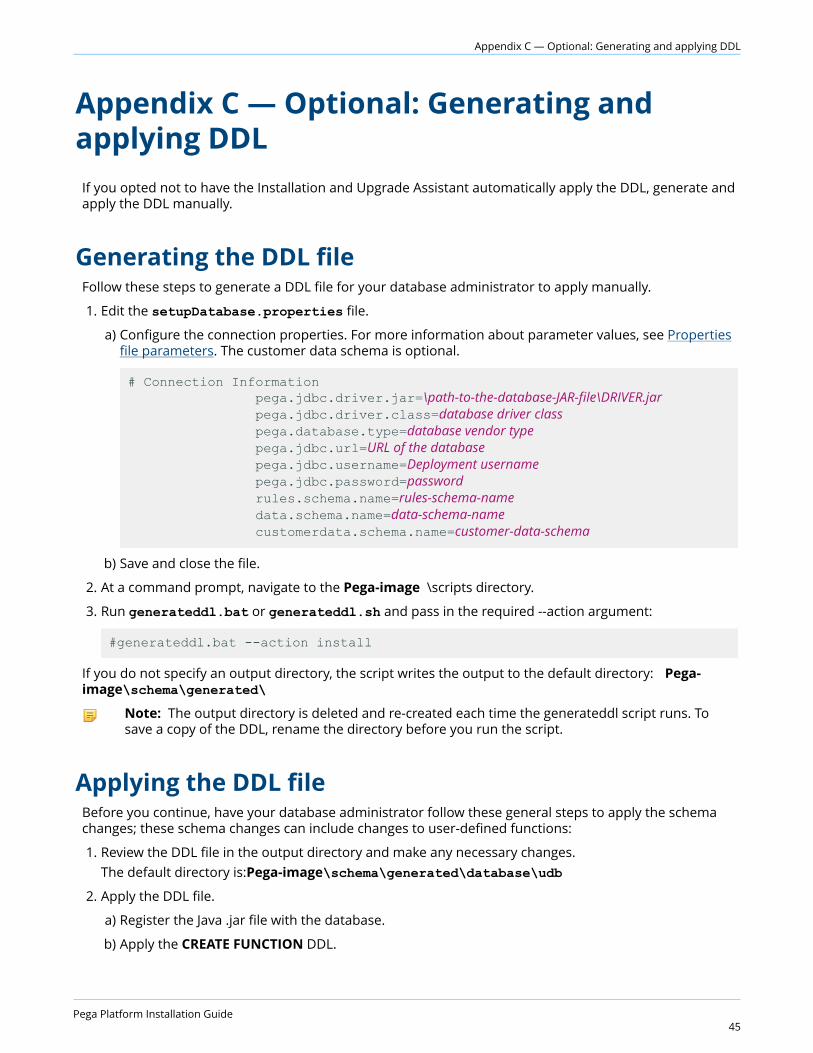
Appendix C — Optional: Generating and applying DDL
Appendix C — Optional: Generating andapplying DDLIf you opted not to have the Installation and Upgrade Assistant automatically apply the DDL, generate andapply the DDL manually.
Generating the DDL fileFollow these steps to generate a DDL file for your database administrator to apply manually.
1. Edit the setupDatabase.properties file.
a) Configure the connection properties. For more information about parameter values, see Propertiesfile parameters. The customer data schema is optional.
# Connection Information pega.jdbc.driver.jar=\path-to-the-database-JAR-file\DRIVER.jar pega.jdbc.driver.class=database driver class pega.database.type=database vendor type pega.jdbc.url=URL of the database pega.jdbc.username=Deployment username pega.jdbc.password=password rules.schema.name=rules-schema-name data.schema.name=data-schema-name customerdata.schema.name=customer-data-schema
b) Save and close the file.
2. At a command prompt, navigate to the Pega-image \scripts directory.
3. Run generateddl.bat or generateddl.sh and pass in the required --action argument:
#generateddl.bat --action install
If you do not specify an output directory, the script writes the output to the default directory: Pega-image\schema\generated\
Note: The output directory is deleted and re-created each time the generateddl script runs. Tosave a copy of the DDL, rename the directory before you run the script.
Applying the DDL fileBefore you continue, have your database administrator follow these general steps to apply the schemachanges; these schema changes can include changes to user-defined functions:
1. Review the DDL file in the output directory and make any necessary changes.The default directory is:Pega-image\schema\generated\database\udb
2. Apply the DDL file.
a) Register the Java .jar file with the database.
b) Apply the CREATE FUNCTION DDL.
Pega Platform Installation Guide45
The output directory is deleted and re-created each time the generateddl script runs. To save a copy of theDDL, rename the directory before you rerun the script.
Editing the setupDatabase.properties file to bypassDDL generationAfter your database administrator applies the changes to your database, configure thesetupDatabase.properties file to bypass applying a schema that already exists. Reapplying an existingschema would cause the deployment to fail.
1. Open the setupDatabase.properties file in the scripts directory of your distribution image:Directories.distributionDirectory\scripts\setupDatabase.properties
2. Set the property bypass.pega.schema=true.
3. Save and close the file.
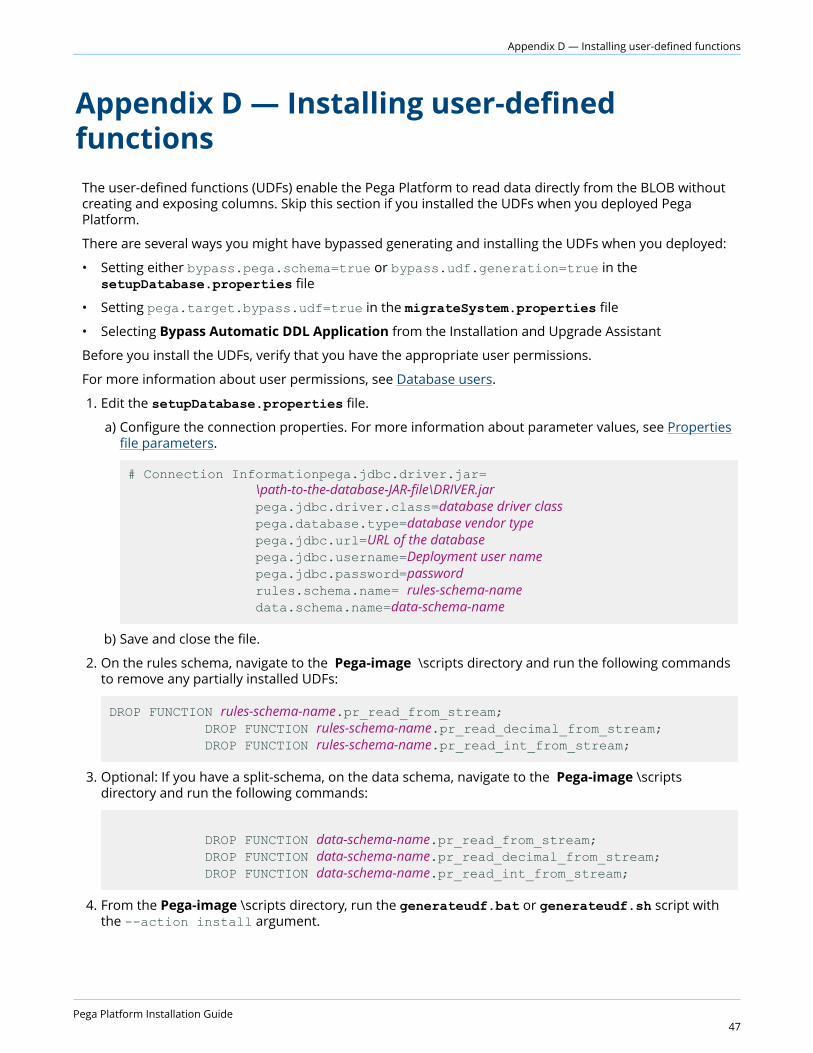
Appendix D — Installing user-defined functions
Appendix D — Installing user-definedfunctionsThe user-defined functions (UDFs) enable the Pega Platform to read data directly from the BLOB withoutcreating and exposing columns. Skip this section if you installed the UDFs when you deployed PegaPlatform.
There are several ways you might have bypassed generating and installing the UDFs when you deployed:
• Setting either bypass.pega.schema=true or bypass.udf.generation=true in thesetupDatabase.properties file
• Setting pega.target.bypass.udf=true in the migrateSystem.properties file
• Selecting Bypass Automatic DDL Application from the Installation and Upgrade Assistant
Before you install the UDFs, verify that you have the appropriate user permissions.
For more information about user permissions, see Database users.
1. Edit the setupDatabase.properties file.
a) Configure the connection properties. For more information about parameter values, see Propertiesfile parameters.
# Connection Informationpega.jdbc.driver.jar= \path-to-the-database-JAR-file\DRIVER.jar pega.jdbc.driver.class=database driver class pega.database.type=database vendor type pega.jdbc.url=URL of the database pega.jdbc.username=Deployment user name pega.jdbc.password=password rules.schema.name= rules-schema-name data.schema.name=data-schema-name
b) Save and close the file.
2. On the rules schema, navigate to the Pega-image \scripts directory and run the following commandsto remove any partially installed UDFs:
DROP FUNCTION rules-schema-name.pr_read_from_stream; DROP FUNCTION rules-schema-name.pr_read_decimal_from_stream; DROP FUNCTION rules-schema-name.pr_read_int_from_stream;
3. Optional: If you have a split-schema, on the data schema, navigate to the Pega-image \scriptsdirectory and run the following commands:
DROP FUNCTION data-schema-name.pr_read_from_stream; DROP FUNCTION data-schema-name.pr_read_decimal_from_stream; DROP FUNCTION data-schema-name.pr_read_int_from_stream;
4. From the Pega-image \scripts directory, run the generateudf.bat or generateudf.sh script withthe --action install argument.
Pega Platform Installation Guide47
Related Documents