Creating a Character with Blender Before you do any actual character animation, you need a character to animate. The goal of the first part of this book is to get you comfortable enough with the modeling and rigging tools in Blender to translate your own ideas into actual 3D characters. Blender has powerful mesh modeling tools and a very flexible system for creating materials and textures. It also boasts a state-of-the-art armature system that will enable you to create complex, highly poseable rigs for your characters. By the end of this part of the book you will have a fully-rigged character completed, which you can use to follow the animation tutorials in the following part. More importantly, you will have gained the skills to create your own. PART I COPYRIGHTED MATERIAL

Welcome message from author
This document is posted to help you gain knowledge. Please leave a comment to let me know what you think about it! Share it to your friends and learn new things together.
Transcript

Creating a Character
with Blender
Before you do any actual character animation, you need a character to animate.
The goal of the first part of this book is to get you comfortable enough with the modeling
and rigging tools in Blender to translate your own ideas into actual 3D characters. Blender
has powerful mesh modeling tools and a very flexible system for creating materials and
textures. It also boasts a state-of-the-art armature system that will enable you to create
complex, highly poseable rigs for your characters. By the end of this part of the book you
will have a fully-rigged character completed, which you can use to follow the animation
tutorials in the following part. More importantly, you will have gained the skills to create
your own.
P A R T I
02608c01.qxd 1/11/07 7:58 PM Page 1
COPYRIG
HTED M
ATERIAL

02608c01.qxd 1/11/07 7:58 PM Page 2

Blender Basics:
Interface and Objects
Blender is similar to other high-end 3D software packages. Users experienced
in other 3D software should find learning Blender relatively straightforward after they
internalize its underlying concepts. Although some might seem quirky at first, many of
these distinguishing points are deliberate design decisions that help to make Blender a
very intuitive and usable package. (If you’re already familiar with Blender’s interface and
underlying concepts, feel free to start with Chapter 2.)
Blender wears its underlying design on its sleeve. For users familiar with the ideas
behind object-oriented programming, many aspects of Blender’s organization will be
especially intuitive, such as the use of objects, function overloading, and the reuse of data-
blocks. Getting a good feel for these ideas and how they are implemented in Blender will
greatly increase your proficiency at accomplishing what you want. Nevertheless, it’s not
necessary to be a programmer to use Blender, and this book doesn’t assume any program-
ming knowledge.
Blender’s idiosyncrasies begin with its interface, and so will this book. With some prac-
tice, you will come to find the interface to be remarkably intuitive and efficient, but it
takes a little getting used to at first. Mostly, you’ll learn by doing over the course of this
book, but in this chapter, we’ll take a quick overview of the most salient points of the
Blender interface.
■ Work Areas and Window Types
■ Navigating the 3D Space
■ Objects and Datablocks
■ User Preferences
C H A P T E R 1
02608c01.qxd 1/11/07 7:58 PM Page 3

Work Areas and Window TypesWhen you first open Blender, one or two windows will open on your system’s desktop,
depending on the operating system you use. In Windows, your main Blender window
appears in front of the Blender Console window. In Linux, the Console is hidden unless
you open Blender from the command line in a terminal window, in which case the
Blender Console is the terminal itself. In Mac OS X, the console does not appear initially,
but it can be accessed from within the Applications ➔ Utilities directory. The Console is a
solid black window with white text, as shown in Figure 1.1. It should read Using Python
version 2.4 if Python has been installed properly. If not, don’t worry about it for now;
Blender runs fine without it. The console is used to display output from Python scripts
and other plugins and integrated software, such as renderers. Eventually, you will prob-
ably want to be sure that Python is installed to take advantage of the tools described in
Chapter 12 such as the pose handler and the BlenderPeople crowd-simulation script.
For the purposes of the material covered in this book, however, the only thing you need
to know about the Console is that you should not close it. If you do, Blender shuts down
unceremoniously, which might result in losing some of your work.
The other window is the main Blender window (see Figure 1.2). If it’s not already max-
imized, maximize it. Blender can use all the screen real estate you can give it.
Figure 1.1
Console
Blender does not prompt you to save changes before closing. If you accidentally close
Blender without saving, simply open a fresh session and select Recover Last Session from the
File menu. The most recent Blender session is automatically saved in a file in your /tmp/direc-
tory by default.
4 ■ chapter 1: Blender Basics: Interface and Objects
02608c01.qxd 1/11/07 7:58 PM Page 4

What you’re looking at now is your Blender desktop, which should appear a lot like the
illustration in Figure 1.2. By default, you will be looking at Screen 2, a preset desktop con-
figuration intended for modeling. Your desktop is divided into three separate work areas,
although it might appear to you to be divided into two. The biggest area, filling the middle
of the screen, is the 3D View window. The area along the bottom of the desktop is the But-
tons window. And at the very top, along the edge of your desktop, is the header of the
User Preferences window.
The User Preferences window is hidden, but you can see it by putting your mouse
over the border between the 3D View window and the User Preferences window until you
see the mouse change into a black double-arrow shape. With the mouse in this position,
hold the left mouse button and drag the mouse downward. Doing this increases the area
of the User Preferences window so that you can see what’s inside it. Your desktop should
now look like Figure 1.3. Notice that each of the three work areas now has a header and
the area itself. In the case of the User Preferences, the header is at the bottom of the work
area. In the other two areas, the header is at the top. If you place your mouse anywhere
over the headers and right-click, you are given the option to change this. You can have the
header at the top of the area, at the bottom, or you can get rid of the header entirely. You
won’t to be dealing with the User Preferences window at the moment, so you can drag the
border back up and rehide that area.
Figure 1.2
Blender desktop
work areas and window types ■ 5
02608c01.qxd 1/11/07 7:58 PM Page 5

If you roll your mouse over the border between two work areas (or between a work area
and the edge of the desktop) so that your mouse pointer switches to the black double arrow,
you can right-click for options for work area layout. Any work area can be split vertically or
horizontally, resulting in two identical work areas. Likewise, any two areas can be joined
together, provided that their borders are aligned. By splitting and joining work areas, you
can lay out your desktop in whatever way suits you. Every window also has a header, which is
the bar full of drop-down menus and buttons that runs along the top or bottom of the win-
dow. By right-clicking on the header, you can access a menu to select whether the header is
displayed at the top of the window, at the bottom of the window, or not at all.
All work areas are created equal. Blender’s various functions are accessed through spe-
cific window types, any of which can be displayed at any time in any work area. Notice the
icons in the leftmost corner of each work area header. These icons indicate which window
type is currently being displayed in that work area. If you left-click the icon, you see a
drop-down menu with all the Blender window types. You can select a window type from
this drop-down menu or you can select a window type by pressing Shift and the appropri-
ate function key over an active work area (the work area that your mouse pointer is over is
the active one). The window types are as follows:
3D View Displays 3D objects and scenes in various modes, including the Object, Edit,
and Pose modes, among others. Allows a variety of viewing options, including toggled
perspective/nonperspective drawing (NUM5). Accessed with Shift+F5.
Figure 1.3
The desktop withthe User Preferences
window in view
6 ■ chapter 1: Blender Basics: Interface and Objects
02608c01.qxd 1/11/07 7:58 PM Page 6

Buttons The main area for buttons, fields, and other controls for a variety of modes
and functions. Button groups and panels available for display in the Buttons window
depend on the current mode and the selected object type. Accessed with Shift+F7.
Outliner Allows a graphical overview of all datablocks and the links between them,
with multiple display options. Accessed with Shift+F9.
Information/User Preferences Allows the user to specify look-and-feel preferences, lan-
guage preferences, file location defaults, and other preferences.
File Browser/Data Browser In File Browser mode, allows the user to open files from the
hard drive. In Data Browser mode, allows the user to import or append Blender data-
blocks from within files on the hard drive.
Timeline Displays the progress through time of an animation; allows starting, stop-
ping, and scrubbing through the animation; and allows the user to input the start, end,
and current frame directly.
IPO Curve Editor Allows selection and editing of IPO curves and keyframes. Which
kinds of IPOs are available depends on the selected object and the type selected in the
drop-down menu in the IPO Curve Editor header. Accessed with Shift+F6.
Action Editor Allows sequences of armature poses to be stored together as actions for
subsequent use in nonlinear animation. Accessed with Shift+F12.
NLA Editor Allows actions and other animations to be combined in a nonlinear way to
form complex animations.
Image Browser Allows browsing of images and textures from the hard drive with
thumbnails.
Node Editor Allows editing and configuring of material, texture, and shading nodes.
Scripts Allows the user to browse and execute installed Python scripts.
Text Editor Allows text editing. Often used as an area for notes about the blend file or
for Python scripting. Python scripts might be executed from the Text Editor using the
Alt+P hotkeys. Accessed with Shift+F11.
Video Sequence Editor Allows nonlinear editing, compositing, and playback of video
sequences. Can take still frame or video sequences as input. Accessed with Shift+F8.
Image/UV Editor Allows editing of UV face information and image-based textures.
Accessed with Shift+F10.
Audio Allows audio playback and matching of audio to animation.
In this book, the term window usually refers to a work area with a specific window type
active. For example, the term 3D View window will mean a work area with the 3D View
window type selected. It’s perfectly possible to have more than one of the same type of
work areas and window types ■ 7
02608c01.qxd 1/11/07 7:58 PM Page 7

window open doing different things at the same time. You can have, for example, two 3D
View windows open at once—one looking at a side view and one looking at a front view of
your character.
Buttons WindowFor new users, a first look at Blender’s buttons can be intimidating. Indeed, there are a lot
of buttons, but you’ll soon get used to ignoring the ones you don’t need to use. Aside from
the character animation system you will be looking at in this book, Blender has a fairly
huge amount of functionality; from a fully implemented game engine, to sophisticated
physics simulations, to advanced rendering and lighting effects. For the purposes of this
book, you’ll be focusing on the functionality you need, so you can expect to ignore a lot
of the buttons you see for now. Nevertheless, just to get oriented, we’ll take a brief look at
the entire buttons area here.
The buttons area is divided into six contexts, several of which are further divided into
subcontexts. The contexts and subcontexts can be entered by clicking the corresponding
button in the Buttons window header or sometimes by pressing a corresponding function
key (not all contexts have function key shortcuts). If a context has a shortcut key, you can
cycle through its subcontexts by repeatedly pressing the shortcut. The contexts and their
subcontexts are as follows:
• Logic (F4)
• Script
• Shading (F5)
• Lamp buttons
• Material buttons
• Texture buttons (F6)
• Radiosity buttons
• World buttons
• Object (F7)
• Object buttons
• Physics buttons
• Editing (F9)
• Scene (F10)
• Render buttons
• Anim/Playback buttons
• Sound block buttons
8 ■ chapter 1: Blender Basics: Interface and Objects
02608c01.qxd 1/11/07 7:58 PM Page 8

This book does not cover the Logic or Script buttons contexts at all; they are mainly of
concern to game creators. You will spend a great deal of time with Edit buttons, Object
buttons, Scene buttons, and Shading buttons, although you won’t be getting into all the
subcontexts. Even within the buttons contexts you will be learning about, there will be
functionality you won’t have call to use. You’ll look more closely at the buttons areas
themselves as you use them over the course of the book.
Context-Sensitive MenusBlender contains a number of menus that are accessible in certain window types and in
specific modes. Throughout this book, we will use these menus to add objects in Object
mode, to perform special operations in Edit mode, and to key values for animation,
among other things.
Navigating the 3D SpaceThe first thing you need to get used to when using Blender, as with any 3D app, is navigat-
ing the 3D space. Three main tools to do this are the following:
Middle mouse button (MMB): Freely rotates the 3D space. By default, the 3D space is
rotated around the zero point of all axes. You can choose to have it rotate around the
active object by changing the Rotate View setting in the View & Control preferences
in the User Preferences window.
Ctrl+MMB (or mouse wheel): Zooms in and out in the 3D space.
Shift+MMB: Pans 3D view.
You will use the 3D cursor (see Figure 1.4) frequently. It can be positioned by left-
clicking where you want it in the 3D viewport.
In many cases, hotkeys and mouse movements have analogous results in different contexts. A
good example is the behavior of the Ctrl+MMB and Shift+MMB hotkeys. As just mentioned,
these keys allow zooming and panning in the 3D window. However, if the mouse is over the
Buttons window (at the bottom of the default screen), they have results analogous to zooming
and panning. Ctrl+MMB allows the user to enlarge or reduce the size of the button display,
and Shift+MMB allows the user to move the entire button display around within the work area.
The middle mouse button can be emulated by Alt+left-clicking, which can be useful for lap-
tops that have no middle button or whose “middle button” is a difficult-to-push combination
of right and left buttons. In the case of a one-button Mac mouse, the mouse click is equiva-
lent to left-clicking. The middle button is Alt+Mouse, and you simulate the right mouse but-
ton with Apple(~)+Mouse.
navigating the 3d space ■ 9
Figure 1.4
3D cursor
02608c01.qxd 1/11/07 7:58 PM Page 9

Blender Units
Blender uses one unit of measurement, unsurprisingly called a Blender Unit (BU). A Blender
Unit is the size of a single square on the background grid in the Blender 3D viewport. If
you are working on scale models, you need to decide what real-world measurement to
assign to a single BU and then proportion your work accordingly. There are several nice
Python script tools available for scale modelers who want more measurement precision
than Blender offers natively, but you won’t have any need for this kind of precision here.
Using Hotkeys
One thing that any new user can’t fail to notice is that Blender favors the use of a lot of
hotkeys. Memorizing and becoming comfortable with the various hotkeys and their spe-
cific configurations on your own machine is one of the first hurdles to learning to work
with Blender. The most important Blender hotkeys are listed in Tables 1.1 and 1.2.
H O T K E Y A L L M O D E S
Spacebar Global/Context menu
R Rotate
S Scale
G Translate (move)
X Delete
A Select all/Deselect all
B Border select
BB Circle select
Ctrl+P Make parent
Alt+P Clear parent
Shift+D Duplicate
I Insert animation key
Alt+C Object conversion menu
Right arrow Move forward one frame
Left arrow Move backward one frame
Up arrow Move forward 10 frames
Down arrow Move backward 10 frames
Shift+right arrow Go to the last frame
Shift+left arrow Go to the first frame
~ Show all layers
1-9 Show numbered layer
F12 Render
F11 Display rendered image
W Special menu
X, Y, Z Constrain transformation to [selected global axis]
XX, YY, ZZ Constrain transformation to [selected local axis]
Table 1.1
Hotkeys Common to All Modes
10 ■ chapter 1: Blender Basics: Interface and Objects
02608c01.qxd 1/11/07 7:58 PM Page 10

H O T K E Y A L L M O D E S
Shift+X, Shift+Y, Shift+Z, Constrain transformation to take place in the selected planeShift+XX, Shift+YY, Shift+ZZ
N Display transform properties
Shift+S Snap menu
Numeric 1, 3, 7 Front, side, and top view
Numeric 0 Camera view
Ctrl+lt+Numeric 0 Move camera to current view
Ctrl+Numeric 0 Use selected object for camera view:
H O T K E Y O B J E C T M O D E E D I T M O D E
Tab Go into Edit mode Go into Object mode
F Go to Face mode Make Edge/Face
P Play game Separate mesh selection into newobject
L Select linked vertices
M Move object to new layer
U Undo
E Extrude
V Rip mesh
K Loop cut/Knife menu
Ctrl+J Join meshes/curves
Ctrl+A Apply scale and rotation
Alt+R, Alt+G, Alt+S Clear rotation, clear translation, clear scale
Ctrl+N Recalculate normals outside
Ctrl+E Edge specials
Alt+S Fatten/shrink
Ctrl+S Shear
This information is also available from the Blender.org wiki site:
http://mediawiki.blender.org/index.php/Reference/Hotkey_Map
You can find this information within Blender by running the “Hotkey and Mouse
Action Reference” script from the Help menu. For users of laptops or one- or two-button
mouse devices, some further key combinations are also necessary. The instructions in this
book assume that you have a three-button mouse and a separate number keypad, but I will
point out how to simulate the key combinations if you don’t. You can also find a rundown
of the various necessary key combinations for your hardware configuration in the appendix
of this book. With a little time following the instructions in this book, the hotkeys will
begin to come naturally, and the speed and ease with which you can work with Blender
will greatly increase. If you’ve done animation in other 3D software, you probably have a
Table 1.2
Hotkeys Specific to Object and Edit Modes
navigating the 3d space ■ 11
02608c01.qxd 1/11/07 7:58 PM Page 11

good idea which of these keys you’ll use most often. If you’re new to the field, expect to
become very familiar with the R, S, and G keys for rotating, scaling, and moving things
around; and with the I key for keying frames for animation.
LayersIn the header of the 3D viewport there are 20 small square buttons, divided into 4 rows of
5 buttons. These buttons toggle the visibility of individual layers in a scene .
Layers enable you to separate objects in your 3D view so that you can see some objects,
but not others. Unlike layers in most 2D animation and graphics software, layers in Blender
are mainly used simply to hide certain items. They can be useful to organize your work
during editing and also during animation itself; the layer an object is on can be animated,
enabling you to make objects appear and disappear by switching from an invisible layer to
a visible layer. In addition to making objects visible and invisible, layers have other uses
as well. Lights can be restricted to illuminate only objects on the same layer as the light,
which is an indispensable tool in lighting. Also, forces such as wind effects and curve
guides, which will be discussed later in this book, are limited to affecting only objects on
their own layer.
You can toggle the layers that are visible in the 3D viewport and to the renderer by
using the buttons mentioned previously or by using the keyboard number keys (not the
numeric keypad). You can toggle multiple layers at once by Shift+clicking the buttons.
The top row of layers corresponds to the keyboard number keys 1 through 0. The bottom
row of layers corresponds to Alt+1 through Alt+0. In general, the numeric keypad is used
for changing views, and the keyboard numbers are used for changing layers. Either can be
used for inputting numbers into a text field, for example.
You can send an object to a different layer by selecting the object and pressing the M
key. A dialog box displays with the layer buttons in the same order as they appear in the 3D
viewport header. Simply click the layers you want to send the item to, holding Shift to select
multiple layers, and click OK. An object can reside on as many layers at once as you choose.
Views and PerspectiveThere are various ways to view your scene. When you open Blender initially, the view is by
default along the Z axis (“top view” for the purposes of this book). This default view is also
an orthographic (flat) view, in which lengths and sizes are not affected by their distance
Accidentally pressing a keyboard number key other than the layer you are working in can
provide an alarming shock for the beginner when all objects suddenly disappear from the 3D
view window! Don’t panic; simply return to viewing the layer your work was on by using the
layer buttons.
12 ■ chapter 1: Blender Basics: Interface and Objects
02608c01.qxd 1/11/07 7:58 PM Page 12

from the viewer. To toggle into Perspective mode, press 5 on the numeric keypad. This
mode gives a more realistic perspective view.
Using the number pad, you can switch your view to follow the X, Y, or Z axis. The default
view is along the Z axis and it corresponds to 7 on the numeric keypad. The numeric 1 key
changes the view to look down the Y axis, and numeric 3 will change the view to follow the
X axis. Holding down the Ctrl key while pressing these numbers changes the view to their
respective opposites, looking up the axis from the negative direction. Numeric 2 and 8 rotate
the scene vertically with respect to the 3D viewport, and numeric 4 and 6 rotate the scene
horizontally.
Camera
The 0 key on the numeric pad switches to the active camera viewpoint. Dotted rectangles
frame the view, indicating the video safe areas, as you can see in Figure 1.5. If the camera
is on a visible layer, a solid rectangle also appears, representing the camera itself. You can
right-click this rectangle to select the camera, like any other object. From other views, you
can place the camera at the current view by pressing Ctrl+Alt+numeric 0, which will also
put you automatically into camera view. You can also use Ctrl+numeric 0 to make any
object into the active camera. This can be used to switch cameras, but it can also be used
to check on the “viewpoint” of other objects as well, which can be useful for directional
objects such as spotlights.
Figure 1.5
Camera view
It is possible to zoom too far forward in Perspective view, and find yourself trapped. If your
viewpoint seems frozen or difficult to control, this is probably the problem. Simply press 5 on
the numeric keypad to toggle into Orthographic view and then zoom your viewpoint out.
navigating the 3d space ■ 13
02608c01.qxd 1/11/07 7:58 PM Page 13
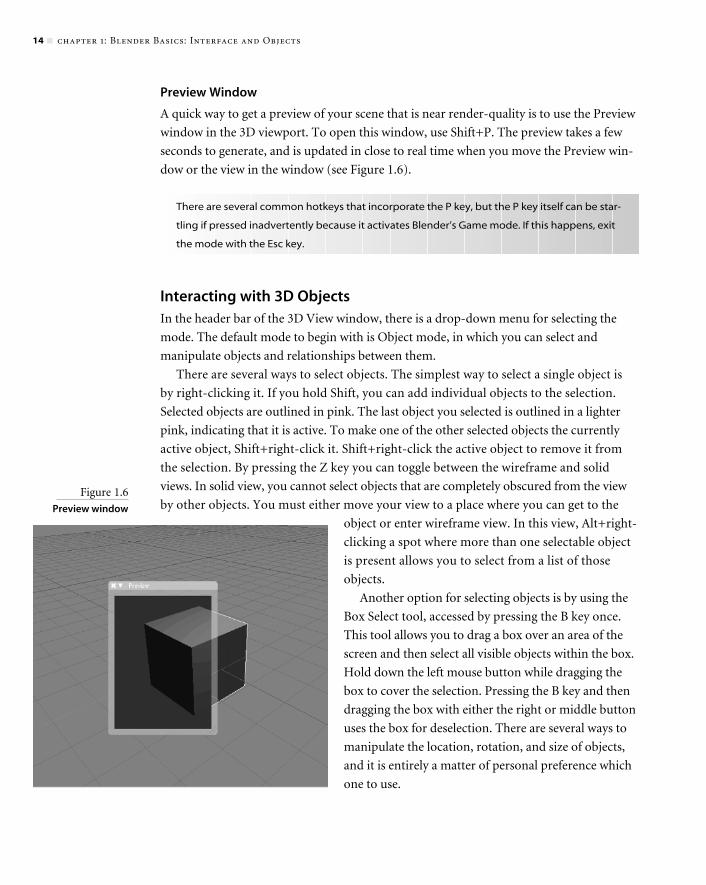
Preview Window
A quick way to get a preview of your scene that is near render-quality is to use the Preview
window in the 3D viewport. To open this window, use Shift+P. The preview takes a few
seconds to generate, and is updated in close to real time when you move the Preview win-
dow or the view in the window (see Figure 1.6).
Interacting with 3D ObjectsIn the header bar of the 3D View window, there is a drop-down menu for selecting the
mode. The default mode to begin with is Object mode, in which you can select and
manipulate objects and relationships between them.
There are several ways to select objects. The simplest way to select a single object is
by right-clicking it. If you hold Shift, you can add individual objects to the selection.
Selected objects are outlined in pink. The last object you selected is outlined in a lighter
pink, indicating that it is active. To make one of the other selected objects the currently
active object, Shift+right-click it. Shift+right-click the active object to remove it from
the selection. By pressing the Z key you can toggle between the wireframe and solid
views. In solid view, you cannot select objects that are completely obscured from the view
by other objects. You must either move your view to a place where you can get to the
object or enter wireframe view. In this view, Alt+right-
clicking a spot where more than one selectable object
is present allows you to select from a list of those
objects.
Another option for selecting objects is by using the
Box Select tool, accessed by pressing the B key once.
This tool allows you to drag a box over an area of the
screen and then select all visible objects within the box.
Hold down the left mouse button while dragging the
box to cover the selection. Pressing the B key and then
dragging the box with either the right or middle button
uses the box for deselection. There are several ways to
manipulate the location, rotation, and size of objects,
and it is entirely a matter of personal preference which
one to use.
There are several common hotkeys that incorporate the P key, but the P key itself can be star-
tling if pressed inadvertently because it activates Blender’s Game mode. If this happens, exit
the mode with the Esc key.
14 ■ chapter 1: Blender Basics: Interface and Objects
Figure 1.6
Preview window
02608c01.qxd 1/11/07 7:58 PM Page 14

Hotkeys
• To rotate, press the R key once and rotate the object with the mouse. The default
rotation axis is the current angle of the 3D View. After you rotate the object the way
you like it with the mouse, left-click to accept the new rotation; otherwise, right-click
to quit the rotation without making the change.
• To translate or change an object’s location in 3D space, the hotkey is G. Press this key
once and move the object around with the mouse. As with rotation, left-clicking
finalizes the move, and right-clicking aborts it.
• To scale an object, the hotkey is S. When you have pressed the S key, moving the
mouse closer to the pivot point reduces the scale of the object, and moving the mouse
farther from the pivot point enlarges the object. Again, left-click finalizes; right-click
aborts.
Mouse Movement Shortcuts
As an alternative to the hotkeys mentioned previously, you can rotate, translate, and scale
an object by using mouse movement shortcuts. In Object mode, with your object selected,
hold down the left button and drag your mouse in the following patterns to enter the cor-
responding manipulation modes:
• Circular motion enters Rotation mode
• Straight line enters Translation mode
• Sharp V enters Scale mode
After you enter these modes, you’ll perform the manipulations in the same way as with
the hotkeys.
Manipulators
Blender also provides the manipulator widgets shown in Figure 1.7 for rotation, transla-
tion, and scaling. These three manipulators can be toggled on and off independently of
each other by using the buttons in Figure 1.8. To use a manipulator, left-click on the col-
ored portion of the manipulator of the axis along which you want to perform the opera-
tion. In the case of translation, click the colored arrow on the appropriate axis; in the case
of scaling, click the colored rectangle; and in the case of rotation, click the colored curve
that circles the axis you want to rotate the object around.
navigating the 3d space ■ 15
02608c01.qxd 1/11/07 7:58 PM Page 15

Figure 1.8
The manipulatorselection buttons
Figure 1.7
The manipulatorwidgets: (A) rota-
tion, (B) translation,(C) scale
16 ■ chapter 1: Blender Basics: Interface and Objects
02608c01.qxd 1/11/07 7:58 PM Page 16

Restricting to Axes
When performing rotation, translation, or scaling, it is often desirable to restrict the oper-
ation to a particular axis or to fix one axis while operating in the other two. To select an
axis to rotate, scale, or translate along, press X, Y, or Z after pressing the R, S, or G key.
This restricts the operation to the global axis. Press the axis key twice to restrict the opera-
tion along the object’s local corresponding axis. To scale or translate along a plane, press
Shift and the key corresponding to the axis you do not want changed. For example, to
scale an object along its X and Y axes, press S followed by Shift+Z.
Pivot Point
The pivot point is the point around which rotations are calculated, and it is also used as
a reference point for scaling. You can choose what to use as your reference point in the
drop-down menu shown in Figure 1.9. The default, Median Point, is a point calculated to
be in the center of your entire selection. If you have multiple objects selected, the median
point is somewhere in between them all. You can choose to have objects rotate independ-
ently around their own centers, around the active object, around the 3D cursor, or around
the center of the object’s bounding box. The default median point pivot, which can be set
with the Shift+comma hotkey, is the most commonly used, but we will occasionally switch
the pivot point to be the 3D cursor for specific purposes, which can be set with the keyboard
period key.
Object Centers
Every object has a center. The center is the point around which the object rotates by default,
and the location of the center is considered to be the location of the object. Translations
and rotations done in Object mode are carried out on the entire object. However, in Edit
mode it is possible to move the 3D portion of the object (for example, in the case of a Mesh
object, by selecting and moving the entire mesh in Edit mode) without moving the center.
When doing a lot of editing, it is easy for this to happen and can result in poorly placed cen-
ters that can cause unexpected behavior with objects. The best way to reposition the center
automatically is to simply click the Center New button in the Edit Buttons area, with the
object selected and in Object mode.
Parenting
Parenting is an important way to create relationships between objects (and some other
entities, as you will see). You will use parenting often in modeling, animating, and textur-
ing. When one object is parented to another, we refer to the first object as the child and the
second object as the parent. In this case, the child object’s movements are all considered only
in relation so the parent. Any translation, rotation, or scaling performed on the parent
object is also performed on the child object. However, the relationship is not symmetrical.
navigating the 3d space ■ 17
Figure 1.9
Pivot selection drop-down menu
02608c01.qxd 1/11/07 7:58 PM Page 17

Like a moon around a planet, the child object can move or rotate in relation to the parent
object without influencing the parent object. To define a parent relationship, select more
than one object. The active object is the last object selected, and by default it is highlighted
with a lighter pink than the previously selected objects. Press Ctrl+P to parent all selected
objects to the active object; that is to say, the selected objects all become child objects to
the active object. In the case of two objects, the first object you select is parented to the
second object. To delete a parent relationship, select the objects and press Alt+P.
Parenting is not restricted to just object/object relationships. It is possible for vertices or
bones to be parents to objects. There are two types of vertex parenting: single-vertex parent-
ing and triple-vertex parenting. With single-vertex parenting, the parented object follows
only the location of the parent vertex. Triple-vertex parenting allows the object to follow
both the location and the rotation of the vertex triad it is parented to. You will see an example
of vertex parenting in Chapter 3.
Similarly, bone parenting allows an object to be in a parent relationship with a single
bone in an armature. In bone parenting, the parented object inherits the location, rota-
tion, and other qualities (such as squash and stretch) from the parent bone. You will see
examples of bone parenting in Chapter 4.
Objects and DatablocksObjects and datablocks are the fundamental building blocks for everything you will do in
Blender. It’s not a complicated system, but having an understanding of how it all hangs
together will make it much easier to work efficiently. This chapter describes objects and
object data, and introduces the ideas of datablocks and linking. Later on in the book, you’ll
see a lot more of datablocks—indeed, just about everything you see will be some kind of a
datablock—so it helps to have an idea of what the concept means in Blender.
It’s often necessary to make adjustments to the modeling of a character in the middle of
an animation. There are a number of reasons why you might want to do this. To reduce
animation or rendering time, you might want to block a scene with a simpler version of
the character you will ultimately use. You might need to fix texturing or modeling prob-
lems that you didn’t notice before beginning to animate. Also, with involved, team-based
animation projects, a certain degree of flexibility is probably required in terms of task
ordering—so that all the participants can make efficient use of their time. Allowing ani-
mators to work with armature deformations of Mesh objects while other artists are mod-
eling, rigging, and refining the meshes themselves can save considerable time. In
particular, using linked datablocks can eliminate the need to re-edit or reappend the same
datablock into different scenes or shots. For these reasons, an understanding of Blender’s
underlying object and datablock organization can be very useful.
18 ■ chapter 1: Blender Basics: Interface and Objects
02608c01.qxd 1/11/07 7:58 PM Page 18

In Blender, the basic 3D entity is an object. There are a number of different types of
objects, each of which has different characteristics and different kinds of data associated
with it. All objects have the characteristics of location, rotation, and size. 3D object types
include the following:
• Meshes
• NURBs curves/surfaces
• Bezier curves
• Meta objects
• Armatures
• Lattices
• Text objects
• Empties
• Cameras
• Lamps
In addition to location, scale, and rotation, each 3D object is associated with a data-
block of specific information to its type. In the case of the Empty object, there is no other
information besides this basic 3D object information.
All objects have certain properties. Every object has a location, which is the point in
space of the object’s center. Every object has a size defined in terms of the percent of its
size at the time of its creation. Every object has a rotation, which is the difference between
the angles of its local axes and the global axes of the 3D space.
All objects of a particular type also have type-specific datablocks associated with them.
A Mesh object requires a Mesh datablock, for example, and a Lamp object requires a Lamp
datablock. This datablock contains information pertinent to the thing itself. The proper-
ties specific to a mesh, such as the placement of its vertices and faces, are contained in the
Mesh datablock. A Lamp object datablock likewise contains information about the kind of
light source and its properties.
Meshes and Mesh ObjectsIt is easy to get confused between the object itself and the object’s type-specific datablock,
but the distinction is important. It is common shorthand, for example, to refer to a Mesh
object simply as a mesh, but strictly speaking, a mesh in Blender refers to the Mesh datablock
associated with the Mesh object.
To see an example of Mesh objects and their datablocks, open Blender and look at the
Links and Materials tab in the Buttons window. You see two drop-down menus: one
objects and datablocks ■ 19
02608c01.qxd 1/11/07 7:58 PM Page 19

reads ME:Cube, and the other reads OB:Cube. These are the names of the mesh and the object,
respectively. Because objects and datablocks have separate namespaces, it is not a problem
for them to be named identically; in fact most of the time it is intuitive that they should be.
Now, in Object mode, place your 3D cursor off to one side of the default cube, press
the spacebar, and add a mesh. A cone is a good choice. The default number of vertices for
a new cone is 32 and we’ll go with that, so click OK. Note that the mesh name and the
object name, predictably enough, are Cone, as you can see in Figure 1.10. (If you add
another object of the same type, Blender automatically appends the suffix .001 to the end
of the new name and increments for each subsequent new object.)
Whenever you add a new object to a scene, you automatically enter Edit mode for that
object. Press Tab to switch back into Object mode, and select the Cube Mesh object. In
the Links and Materials tab, left-click the small double-arrow icon at the left of the mesh
name drop-down menu where ME:Cube is written. In the drop-down menu, Cone will be
there as an option. Select this option, and your Cube object is now a cone! Not only is it a
cone, but it’s the exact same cone as the Cone object. If you edit the mesh on one of these
objects, both objects’ meshes will be edited, as you can see in Figure 1.11. On the other
Figure 1.10
Adding a cone
20 ■ chapter 1: Blender Basics: Interface and Objects
02608c01.qxd 1/11/07 7:58 PM Page 20

hand, the objects are still very much independent. To see this, in Object mode select the
Cube object. Press S and scale the object to about twice its size. Now you have a big cone
and a small cone because mesh edits are made to the Mesh datablock, which is now shared
between the objects, and overall scale is an object-level property. Go back to the mesh
drop-down menu on the Cube object and look at the options.
In the drop-down menu, there are two options: Cone and Cube. Select the Cube mesh
from the drop-down menu. Now your Cube object is again associated with a Cube mesh.
However, the cube is now twice the size that it was before because the scaling you did in
Object mode applied to the object instead of the mesh.
Exploiting this distinction between Mesh objects and the meshes themselves can be
very useful for character animation because it helps maintain a flexible and modular
workflow. An armature modifier, as you will see later in the book, operates on a Mesh
object, which means that it is possible to replace the mesh itself in the middle of an anima-
tion simply by swapping a new Mesh datablock as the object data for the animated object.
You will learn more about these meshes in Chapter 2, so it is a good idea to save this
.blend file now so that you can come back to it later.
Managing DatablocksDatablocks are used to describe most aspects of modeling and animation in Blender.
Materials, textures, IPO curves, and actions are all examples of datablocks that can be
freely associated with any number of different objects after they’re created.
Figure 1.11
Editing the mesh
objects and datablocks ■ 21
02608c01.qxd 1/11/07 7:58 PM Page 21
In the preceding example, when you looked in the drop-down menu for the name
Cube, you might have noticed a small circle to the left of the word. This circle indicates that
Cube is currently an unused datablock—a datablock that is not associated with any object.
Blender discards unused datablocks when it shuts down, so if you save the file and then
shut down and restart Blender with things in that state, this mesh is gone. In fact, there is
no way to actively delete such datablocks; they remain “alive” until Blender quits. If you
want to purge unused datablocks without completely quitting Blender, you can save and
then reopen your file.
Sometimes, it might be necessary or desirable to keep some datablock on hand, even
though it does not have a “user” object. If you want an unused datablock to persist after
saving, it is necessary to create a “fake” user for it. For datablocks that can be retained in
this way, including the ones mentioned previously, there is be a button next to the data-
block drop-down menu with the letter F, as shown in Figure 1.12.
Selecting the datablock you want to make persistent and clicking F creates a fake user
for the datablock so that it will not be discarded at shutdown.
In some cases, such as actions, Blender creates a fake user automatically when the data-
block is created. In this case, it might be desirable to remove a fake user to delete the unde-
sired datablock. To do this, it is necessary to enter the Data Browser window (by clicking
Shift+F4 in any window). In the Data Browser window, you can browse the various types
of datablocks in your .blend file. The ones that have the letter F next to them are associ-
ated with fake users. You can toggle fake users on and off by selecting the datablock and
pressing the F key.
Outliner Window
To see a graphical representation of the datablocks in a scene, select Outliner from the
Window-type drop-down menu on any window or press Shift+F9 over the window. The
Outliner window opens in the default OOPS Schematic view. In the example in Figure 1.13,
you see the schematic for the scene you created earlier with the cube and the cone. In the
Outliner window, the various datablocks and their relationships are laid out graphically.
The layout here changes predictably when you link the Cube object with the Cone mesh,
as in Figure 1.14. You cannot edit anything in the Outliner window, but you can select
objects, which are selected simultaneously in any 3D view of the scene (in which they can
be deleted, moved, or edited).
Figure 1.12
(A) The default Cubemesh has one user,
the Cube object. If itis unlinked from this
object, it is not per-sisted after the file is
closed because ithas no users. (B) Bytoggling the F but-
ton, a fake user isadded (the dis-
played number 2refers to the numberof users for that dat-ablock). Now, even if
there are no realusers of the data-
block, it persistsbecause its user
count is not zero.
22 ■ chapter 1: Blender Basics: Interface and Objects
02608c01.qxd 1/11/07 7:58 PM Page 22

You can choose which kinds of datablocks are displayed in the Outliner window by
toggling the row of icon buttons in the Outliner window header representing scene, object,
mesh, curve, metaball, lattice, lamp, material, texture, IPO, image, and library datablocks
(see Figure 1.15). You can also use the Layer
button to toggle the Outliner view to display
only visible layers or to display all layers.
In the View menu in the drop-down header of the Outliner window, you can select the
Outliner view, which gives a different visualization of the data in your file, as can be seen
in Figure 1.16. As in the OOPS schematic view, you can select the datablocks, and you are
put in the appropriate mode to edit the datablock you selected.
Figure 1.16
Outliner view
Figure 1.14
OOPS schematic with the Cube object associated with the ConeMesh datablock
Figure 1.13
OOPS schematic for the original case
objects and datablocks ■ 23
Figure 1.15
Toggle buttons forviewing object typesin the outliner
02608c01.qxd 1/11/07 7:58 PM Page 23

Accessing Data from Different Files
It is often necessary to have access to objects or datablocks from other files. Animation
projects can quickly get far too big to want to store in single .blend files, and yet many
different scenes and shots are likely to share the same main elements. There are several
ways to access datablocks between separate files in Blender.
The first and simplest way is to use append. To append a datablock from another file,
select Append from the File menu or press Shift+F1. A Data Browser window opens, in
which you can access .blend files stored on your computer and their contents. In the Data
Browser window, when you click the name of the file, you see a list of datablock types, just
as if they were directories. Enter the appropriate type directory; you see a list of the data-
blocks of that type available for appending. Here is another place to be aware of the differ-
ence between objects and object type datablocks. If you want to append a Mesh object
from another file, for example, you find the object in the Object type directory instead of
the Mesh type directory.
Another approach to using data across separate files is by linking the datablocks. Link-
ing can be done similarly to appending, except that in the Data Browser header, the Link
button is selected instead of Append. In this case, the data can be edited only in the file
from which it was originally linked, and all edits appear in the files that linked to the data.
GroupsObjects can be collected together into named groups using the Add to Group button in
the Object Buttons area, seen in Figure 1.17. Groups themselves can then be treated as an
object type when appending, allowing you to append whole collections of objects easily.
User PreferencesAt present, it’s not possible to configure your own hotkey bindings in Blender. However,
a number of interface options exist, and you can look at these in the User Preferences
window that you had a glimpse of earlier. By default, the ToolTips option is turned on, so
hovering your mouse over the various buttons and options brings up a brief explanation
of each. Under View & Controls, you can select from a number of options that affect how
the interface works. Most of them are self-explanatory, and you should experiment with
which kind of controls suit your workflow best. The Themes button allows you to select
from two button shape options and create a color scheme for your Blender
desktop. The Edit Methods panel allows you to adjust your levels of undo. The
auto-keyframing option can also be accessed here (it will be discussed in more
detail in the animation section of this book). Most of the other preferences panels
are not of direct interest to you for the purposes of this book.
24 ■ chapter 1: Blender Basics: Interface and Objects
Figure 1.17
Add to Group button
02608c01.qxd 1/11/07 7:58 PM Page 24

After you have the configuration the way you like it, press Ctrl+U. You are prompted
to Save User Defaults. If you say yes to this, a file will be created in your .blender directory
called .B.blend. From that point on, when you open Blender it will be in the same state that
you saved the user defaults, including which windows are open, and even includes the con-
tents of the 3D window. If you start up Blender ordinarily and find something amiss each
time you start up, it is possible that you inadvertently saved a user default file that you had
not intended to. To return everything to its default state, simply delete the .B.blend file in
your .blender directory. On my system, that directory is here:
C:\Program Files\Blender Foundation\Blender\.blender
You can experiment with all these user options. There’s a lot to play around with, in
terms of look and feel. As long as you don’t press Ctrl+U, all settings will return to default
on your next startup. For the rest of this book, we assume most things to be in their default
configuration, and the screen shots will all show the default theme.
Now that we’ve covered the basics of the Blender interface and the datablock system,
you’re ready to get your hands dirty and begin to do some modeling.
user preferences ■ 25
02608c01.qxd 1/11/07 7:58 PM Page 25

02608c01.qxd 1/11/07 7:58 PM Page 26
Related Documents


![Blender in Research & Education · Blender in Research •Blender as a modelling tool •Projects: •Radio Wave Propagation •Global Illumination •Character Animation [1] Wave](https://static.cupdf.com/doc/110x72/5e986a71843c4f2f7349f3ad/blender-in-research-education-blender-in-research-ablender-as-a-modelling.jpg)