HP Project and Portfolio Management Center Software Version: Content Pack 1 Document Release Date: July 2012 Software Release Date: July 2011 Operational Reporting Administrator’s Guide

Welcome message from author
This document is posted to help you gain knowledge. Please leave a comment to let me know what you think about it! Share it to your friends and learn new things together.
Transcript
HP Project and Portfolio Management CenterSoftware Version: Content Pack 1
Document Release Date: July 2012
Software Release Date: July 2011
Operational Reporting Administrator’s Guide
Legal Notices
Warranty
The only warranties for HP products and services are set forth in the express warranty statements accompanying such products and services. Nothing herein should be construed as constituting an additional warranty. HP shall not be liable for technical or editorial errors or omissions contained herein.
The information contained herein is subject to change without notice.
Restricted Rights Legend
Confidential computer software. Valid license from HP required for possession, use or copying. Consistent with FAR 12.211 and 12.212, Commercial Computer Software, Computer Software Documentation, and Technical Data for Commercial Items are licensed to the U.S. Government under vendor's standard commercial license.
Copyright Notices
© Copyright 1997-2012 Hewlett-Packard Development Company, L.P.
Trademark Notices
Business Objects and the Business Objects logo, BusinessObjects, Web Intelligence, and other Business Objects products and services mentioned herein as well as their respective logos are trademarks or registered trademarks of Business Objects Software Ltd. Business Objects is an SAP company.
Adobe® is a trademark of Adobe Systems Incorporated.
Intel®, Intel® Itanium®, Intel® Xeon®, and Pentium® are trademarks of Intel Corporation in the U.S. and other countries.
Microsoft®, Windows®, Windows® XP, and Windows Vista® are U.S. registered trademarks of Microsoft Corporation.
Oracle® and Java™ are registered trademarks of Oracle Corporation and/or its affiliates.
UNIX® is a registered trademark of The Open Group.
2

Documentation Updates
This manual’s title page contains the following identifying information:
Software version number, which indicates the software version
Document release date, which changes each time the document is updated
Software release date, which indicates the release date of this version of the software
To check for recent updates, or to verify that you are using the most recent edition of a document, go to:
h20230.www2.hp.com/selfsolve/manuals
You will also receive updated or new editions if you subscribe to the appropriate product support service. Contact your HP sales representative for details.
3
The following table indicates changes made to this document.
Publication Date Summary of Changes
July 2012
Modified the step on how to change the default installation directory of BusinessObjects Enterprise server software: step 2 on page 31.
Added a note regarding the Materialized View RPT_DIM_RM_RESOURCES to Loading PPM Center Data Into the Operational Reporting Database on page 44 and Loading PPM Center Data Into the Operational Reporting Database on page 99.
Added Oracle Trace Log Control for ETL Performance Troubleshooting on page 181.
Support
You can visit the HP Software Support Web site at:
hp.com/go/hpsoftwaresupport
HP Software Support Online provides an efficient way to access interactive technical support tools. As a valued support customer, you can benefit by using the support site to:
Search for knowledge documents of interest
Submit and track support cases and enhancement requests
Download software patches
Manage support contracts
Look up HP support contacts
Review information about available services
Enter into discussions with other software customers
Research and register for software training
Most of the support areas require that you register as an HP Passport user and sign in. Many also require a support contract.
To find more information about access levels, go to:
h20230.www2.hp.com/new_access_levels.jsp
To register for an HP Passport ID, go to:
h20229.www2.hp.com/passport-registration.html
4
Contents
1 Introduction . . . . . . . . . . . . . . . . . . . . . . . . . . . . . . . . . . . . . . . . . . . . . . . . . . . . . . . . . . . . . . . . . . . . . . . . . . . . . . 11
About HP Project and Portfolio Management Center Version Content Pack 1. . . . . . . . . . . . . . . . . . . . . . . . . . . . . . . . . . . . . . . . . . . . . . . . . . . . . . . . . . . . . . . . . . . . . 11
About this Document . . . . . . . . . . . . . . . . . . . . . . . . . . . . . . . . . . . . . . . . . . . . . . . . . . . . . . . . . . . . . . . . . . . . . . 12
Universe Hierarchy . . . . . . . . . . . . . . . . . . . . . . . . . . . . . . . . . . . . . . . . . . . . . . . . . . . . . . . . . . . . . . . . . . . . . 14
Viewing Detailed Information About Universe Structure. . . . . . . . . . . . . . . . . . . . . . . . . . . . . . . . . . . . . . . . 15
Operational Reporting Content on HP Live Network. . . . . . . . . . . . . . . . . . . . . . . . . . . . . . . . . . . . . . . . . . . . . . 17
Subscribing to Announcements on HPLN . . . . . . . . . . . . . . . . . . . . . . . . . . . . . . . . . . . . . . . . . . . . . . . . . . . 18
Accessing Operational Reporting Documentation from HPLN . . . . . . . . . . . . . . . . . . . . . . . . . . . . . . . . . . . 19
Related Documents . . . . . . . . . . . . . . . . . . . . . . . . . . . . . . . . . . . . . . . . . . . . . . . . . . . . . . . . . . . . . . . . . . . . . . . . 20
HP PPM Center Documents for PPM Center Version Content Pack 1. . . . . . . . . . . . . . . . . . . . . . . . . . . . . . 20
2 Deploying Operational Reporting on Windows Systems . . . . . . . . . . . . . . . . . . . . . . . . . . . . . . . . . . . . . . . . . 21
Operational Reporting Solution Deployment . . . . . . . . . . . . . . . . . . . . . . . . . . . . . . . . . . . . . . . . . . . . . . . . . . . . 21
High-Level Deployment Steps . . . . . . . . . . . . . . . . . . . . . . . . . . . . . . . . . . . . . . . . . . . . . . . . . . . . . . . . . . . . . . . 22
Preparing the Database Schema for Operational Reporting . . . . . . . . . . . . . . . . . . . . . . . . . . . . . . . . . . . . . . . . . 25
Setting Up a Database for Operational Reporting. . . . . . . . . . . . . . . . . . . . . . . . . . . . . . . . . . . . . . . . . . . . . . 25
Configuring Oracle Database Parameters for Operational Reporting . . . . . . . . . . . . . . . . . . . . . . . . . . . . 25
Creating Tablespaces for the Operational Reporting Schema. . . . . . . . . . . . . . . . . . . . . . . . . . . . . . . . . . . . . 26
Deploying BusinessObjects Enterprise . . . . . . . . . . . . . . . . . . . . . . . . . . . . . . . . . . . . . . . . . . . . . . . . . . . . . . . . . 28
Operating Systems Support for BusinessObjects Enterprise. . . . . . . . . . . . . . . . . . . . . . . . . . . . . . . . . . . . . . 28
Preparing to Install BusinessObjects Enterprise . . . . . . . . . . . . . . . . . . . . . . . . . . . . . . . . . . . . . . . . . . . . . . . . . . 29
Installing BusinessObjects Enterprise on a Windows System . . . . . . . . . . . . . . . . . . . . . . . . . . . . . . . . . . . . . . . 31
Installing BusinessObjects Enterprise XI 3.1, Service Pack 2 . . . . . . . . . . . . . . . . . . . . . . . . . . . . . . . . . . . . 32
Checking the Deployment Log File After BusinessObjects Service Pack 2 Installation . . . . . . . . . . . . . 34
Verifying the Upgrade to BusinessObjects XI 3.1 SP2. . . . . . . . . . . . . . . . . . . . . . . . . . . . . . . . . . . . . . . 34
Post-Installation Tasks on Windows Systems. . . . . . . . . . . . . . . . . . . . . . . . . . . . . . . . . . . . . . . . . . . . . . . . . . . . 35
Verifying Successful BusinessObjects Enterprise Installation . . . . . . . . . . . . . . . . . . . . . . . . . . . . . . . . . . . . 36
5
Configuring the Oracle JDBC Driver . . . . . . . . . . . . . . . . . . . . . . . . . . . . . . . . . . . . . . . . . . . . . . . . . . . . . . . 37
Creating the Operational Reporting Database Schema . . . . . . . . . . . . . . . . . . . . . . . . . . . . . . . . . . . . . . . . . . 39
Loading PPM Center Data Into the Operational Reporting Database. . . . . . . . . . . . . . . . . . . . . . . . . . . . . . . 44
Running the Upgrade Script . . . . . . . . . . . . . . . . . . . . . . . . . . . . . . . . . . . . . . . . . . . . . . . . . . . . . . . . . . . . . . 46
Importing and Updating Universes and Reports . . . . . . . . . . . . . . . . . . . . . . . . . . . . . . . . . . . . . . . . . . . . . . . 49
Importing Operational Reporting Universes and Reports . . . . . . . . . . . . . . . . . . . . . . . . . . . . . . . . . . . . . 49
Updating Universes and Reports to Content Pack 1 Versions . . . . . . . . . . . . . . . . . . . . . . . . . . . . . . . . . 50
Recovering from an Upgrade Failure . . . . . . . . . . . . . . . . . . . . . . . . . . . . . . . . . . . . . . . . . . . . . . . . . . . . . . . 52
Upgrade Failure Resulting from Active PPM Servers . . . . . . . . . . . . . . . . . . . . . . . . . . . . . . . . . . . . . . . 52
Failure During the sample_preupgrade_rpt.bat Run . . . . . . . . . . . . . . . . . . . . . . . . . . . . . . . . . . . . . . . . . 53
Failure During the sample_upgrade_rpt.bat Run. . . . . . . . . . . . . . . . . . . . . . . . . . . . . . . . . . . . . . . . . . . . 53
Failure During the upgradeBIARs.bat Run . . . . . . . . . . . . . . . . . . . . . . . . . . . . . . . . . . . . . . . . . . . . . . . . 53
Configuring the Operational Reporting . . . . . . . . . . . . . . . . . . . . . . . . . . . . . . . . . . . . . . . . . . . . . . . . . . . . . 54
Installing BusinessObjects Enterprise Client Tools . . . . . . . . . . . . . . . . . . . . . . . . . . . . . . . . . . . . . . . . . . . . 57
Obtaining the BusinessObjects Enterprise Client Software . . . . . . . . . . . . . . . . . . . . . . . . . . . . . . . . . . . 58
Installing BusinessObjects Client Tools: Silent Install . . . . . . . . . . . . . . . . . . . . . . . . . . . . . . . . . . . . . . . 59
Installing BusinessObjects Client Tools Using setup.exe . . . . . . . . . . . . . . . . . . . . . . . . . . . . . . . . . . . . . 59
Changing the BusinessObjects Central Management Server Password . . . . . . . . . . . . . . . . . . . . . . . . . . . . . 62
Verifying Successful Operational Reporting Deployment . . . . . . . . . . . . . . . . . . . . . . . . . . . . . . . . . . . . . . . 63
(Optional) Configuring Multilingual Operational Reporting . . . . . . . . . . . . . . . . . . . . . . . . . . . . . . . . . . . . . 63
Displaying Report Values for Non-English Speaking Locales . . . . . . . . . . . . . . . . . . . . . . . . . . . . . . . . . 71
3 Deploying Operational Reporting onUNIX Systems73
Operational Reporting Solution Deployment . . . . . . . . . . . . . . . . . . . . . . . . . . . . . . . . . . . . . . . . . . . . . . . . . . . . 73
High-Level Deployment Steps . . . . . . . . . . . . . . . . . . . . . . . . . . . . . . . . . . . . . . . . . . . . . . . . . . . . . . . . . . . . . . . 74
Preparing the Database Schema for Operational Reporting . . . . . . . . . . . . . . . . . . . . . . . . . . . . . . . . . . . . . . . . . 76
Setting Up a Database for Operational Reporting. . . . . . . . . . . . . . . . . . . . . . . . . . . . . . . . . . . . . . . . . . . . . . 76
Configuring Oracle Database Parameters for Operational Reporting . . . . . . . . . . . . . . . . . . . . . . . . . . . . 76
Creating Tablespaces for the Operational Reporting Schema. . . . . . . . . . . . . . . . . . . . . . . . . . . . . . . . . . . . . 77
Deploying BusinessObjects Enterprise on UNIX Systems. . . . . . . . . . . . . . . . . . . . . . . . . . . . . . . . . . . . . . . . . . 79
Operating Systems Support for BusinessObjects Enterprise. . . . . . . . . . . . . . . . . . . . . . . . . . . . . . . . . . . . . . 79
Preparing to Install BusinessObjects Enterprise on a UNIX System . . . . . . . . . . . . . . . . . . . . . . . . . . . . . . . . . . . . . . . . . . . . . . . . . . . . . . . . . . . . . . . . . . . . . . . . . . . 80
Installing BusinessObjects Enterprise on a UNIX System . . . . . . . . . . . . . . . . . . . . . . . . . . . . . . . . . . . . . . . . . . 83
Installing BusinessObjects Enterprise XI 3.1, Service Pack 2 . . . . . . . . . . . . . . . . . . . . . . . . . . . . . . . . . . . . 85
Checking the Deployment Log File After BusinessObjects XI 3.1 SP2 Installation . . . . . . . . . . . . . . . . 86
Verifying the Upgrade to BusinessObjects XI 3.1 SP2. . . . . . . . . . . . . . . . . . . . . . . . . . . . . . . . . . . . . . . 86
Post-Installation Tasks . . . . . . . . . . . . . . . . . . . . . . . . . . . . . . . . . . . . . . . . . . . . . . . . . . . . . . . . . . . . . . . . . . . . . 87
6
(HP-UX Only) Resetting Memory Thresholds . . . . . . . . . . . . . . . . . . . . . . . . . . . . . . . . . . . . . . . . . . . . . . . . 88
Verifying Successful BusinessObjects Enterprise Installation . . . . . . . . . . . . . . . . . . . . . . . . . . . . . . . . . . . . 92
Configuring the Oracle JDBC Driver . . . . . . . . . . . . . . . . . . . . . . . . . . . . . . . . . . . . . . . . . . . . . . . . . . . . . . . 92
Setting up the Oracle JDBC Driver on Unix or Linux . . . . . . . . . . . . . . . . . . . . . . . . . . . . . . . . . . . . . . . 92
Creating the Operational Reporting Database Schema . . . . . . . . . . . . . . . . . . . . . . . . . . . . . . . . . . . . . . . . . . 94
Running the Setup and Synchronization Scripts . . . . . . . . . . . . . . . . . . . . . . . . . . . . . . . . . . . . . . . . . . . . 94
Loading PPM Center Data Into the Operational Reporting Database. . . . . . . . . . . . . . . . . . . . . . . . . . . . . . . 99
Running the Upgrade Script . . . . . . . . . . . . . . . . . . . . . . . . . . . . . . . . . . . . . . . . . . . . . . . . . . . . . . . . . . . . . 102
Importing and Updating Universes and Reports . . . . . . . . . . . . . . . . . . . . . . . . . . . . . . . . . . . . . . . . . . . . . . 104
Importing Operational Reporting Universes and Reports . . . . . . . . . . . . . . . . . . . . . . . . . . . . . . . . . . . . 104
Updating Universes and Reports to Content Pack 1 Versions . . . . . . . . . . . . . . . . . . . . . . . . . . . . . . . . 106
Recovering from an Upgrade Failure . . . . . . . . . . . . . . . . . . . . . . . . . . . . . . . . . . . . . . . . . . . . . . . . . . . . . . 107
Upgrade Failure Resulting from Active PPM Servers . . . . . . . . . . . . . . . . . . . . . . . . . . . . . . . . . . . . . . 107
Failure During the sample_preupgrade_rpt.sh Run. . . . . . . . . . . . . . . . . . . . . . . . . . . . . . . . . . . . . . . . . 108
Failure During the sample_upgrade_rpt.sh Run . . . . . . . . . . . . . . . . . . . . . . . . . . . . . . . . . . . . . . . . . . . 108
Failure During the upgradeBIARs.sh Run. . . . . . . . . . . . . . . . . . . . . . . . . . . . . . . . . . . . . . . . . . . . . . . . 108
Configuring the Operational Reporting Database Connection . . . . . . . . . . . . . . . . . . . . . . . . . . . . . . . . . . . 109
Installing BusinessObjects Enterprise Client Tools . . . . . . . . . . . . . . . . . . . . . . . . . . . . . . . . . . . . . . . . . . . 112
Removing the BusinessObjects Central Management Server Password. . . . . . . . . . . . . . . . . . . . . . . . . . . . 113
Verify Successful Operational Reporting Deployment . . . . . . . . . . . . . . . . . . . . . . . . . . . . . . . . . . . . . . . . . 114
Displaying Report Values for Non-English Speaking Locales . . . . . . . . . . . . . . . . . . . . . . . . . . . . . . . . . . . 114
4 Upgrading Operational Reporting on Windows Systems. . . . . . . . . . . . . . . . . . . . . . . . . . . . . . . . . . . . . . . . 115
Upgrade Processes. . . . . . . . . . . . . . . . . . . . . . . . . . . . . . . . . . . . . . . . . . . . . . . . . . . . . . . . . . . . . . . . . . . . . . . . 115
Upgrade Overview . . . . . . . . . . . . . . . . . . . . . . . . . . . . . . . . . . . . . . . . . . . . . . . . . . . . . . . . . . . . . . . . . . . . . . . 116
Preparing to Upgrade . . . . . . . . . . . . . . . . . . . . . . . . . . . . . . . . . . . . . . . . . . . . . . . . . . . . . . . . . . . . . . . . . . . . . 117
Operational Reporting Upgrade for Windows Systems . . . . . . . . . . . . . . . . . . . . . . . . . . . . . . . . . . . . . . . . . . . 119
Recovering from an Upgrade Failure . . . . . . . . . . . . . . . . . . . . . . . . . . . . . . . . . . . . . . . . . . . . . . . . . . . . . . 124
Upgrade Failure Resulting from Active PPM Servers . . . . . . . . . . . . . . . . . . . . . . . . . . . . . . . . . . . . . . 124
Failure During the Sample_preupgrade_rpt.bat Run. . . . . . . . . . . . . . . . . . . . . . . . . . . . . . . . . . . . . . . . 125
Failure During the Sample_upgrade_rpt.bat Run . . . . . . . . . . . . . . . . . . . . . . . . . . . . . . . . . . . . . . . . . . 125
Failure During the upgradeBIARs.bat Script Run. . . . . . . . . . . . . . . . . . . . . . . . . . . . . . . . . . . . . . . . . . 125
5 Upgrading Operational Reporting on a UNIX System . . . . . . . . . . . . . . . . . . . . . . . . . . . . . . . . . . . . . . . . . . 127
Upgrade Processes. . . . . . . . . . . . . . . . . . . . . . . . . . . . . . . . . . . . . . . . . . . . . . . . . . . . . . . . . . . . . . . . . . . . . . . . 127
Upgrade Overview . . . . . . . . . . . . . . . . . . . . . . . . . . . . . . . . . . . . . . . . . . . . . . . . . . . . . . . . . . . . . . . . . . . . . . . 128
Preparing to Upgrade . . . . . . . . . . . . . . . . . . . . . . . . . . . . . . . . . . . . . . . . . . . . . . . . . . . . . . . . . . . . . . . . . . . . . 129
Operational Reporting Upgrade for UNIX Systems . . . . . . . . . . . . . . . . . . . . . . . . . . . . . . . . . . . . . . . . . . . . . . 131
Recovering from an Upgrade Failure . . . . . . . . . . . . . . . . . . . . . . . . . . . . . . . . . . . . . . . . . . . . . . . . . . . . . . . . . 135
7
Upgrade Failure Resulting from Active PPM Servers . . . . . . . . . . . . . . . . . . . . . . . . . . . . . . . . . . . . . . . . . 135
Failure During the sample_preupgrade_rpt.sh Run. . . . . . . . . . . . . . . . . . . . . . . . . . . . . . . . . . . . . . . . . . . . 136
Failure During the sample_upgrade_rpt.sh Run . . . . . . . . . . . . . . . . . . . . . . . . . . . . . . . . . . . . . . . . . . . . . . 136
Failure During the upgradeBIARs.sh Run . . . . . . . . . . . . . . . . . . . . . . . . . . . . . . . . . . . . . . . . . . . . . . . . . . 136
6 Refreshing Operational Reporting Data . . . . . . . . . . . . . . . . . . . . . . . . . . . . . . . . . . . . . . . . . . . . . . . . . . . . . . 137
Synchronizing Data in the Operational Reporting and PPM Center Database Schemas. . . . . . . . . . . . . . . . . . . . . . . . . . . . . . . . . . . . . . . . . . . . . . . . . . . . . . . . . . . 137
Running Incremental ETL Jobs. . . . . . . . . . . . . . . . . . . . . . . . . . . . . . . . . . . . . . . . . . . . . . . . . . . . . . . . . . . 137
Checking ETL Job Progress . . . . . . . . . . . . . . . . . . . . . . . . . . . . . . . . . . . . . . . . . . . . . . . . . . . . . . . . . . 138
Verifying Successful Incremental ETL Jobs . . . . . . . . . . . . . . . . . . . . . . . . . . . . . . . . . . . . . . . . . . . . . . 138
Running Incremental ETL Jobs Manually . . . . . . . . . . . . . . . . . . . . . . . . . . . . . . . . . . . . . . . . . . . . . . . . . . 139
Change Data Capture. . . . . . . . . . . . . . . . . . . . . . . . . . . . . . . . . . . . . . . . . . . . . . . . . . . . . . . . . . . . . . . . . . . 140
Purging Data . . . . . . . . . . . . . . . . . . . . . . . . . . . . . . . . . . . . . . . . . . . . . . . . . . . . . . . . . . . . . . . . . . . . . . 140
PPM Center Data Transfer During ETL . . . . . . . . . . . . . . . . . . . . . . . . . . . . . . . . . . . . . . . . . . . . . . . . . . . . 141
Common Dimension Data Transfer. . . . . . . . . . . . . . . . . . . . . . . . . . . . . . . . . . . . . . . . . . . . . . . . . . . . . 141
HP Project Management Data Transfer . . . . . . . . . . . . . . . . . . . . . . . . . . . . . . . . . . . . . . . . . . . . . . . . . . 141
HP Time Management Data Transfer . . . . . . . . . . . . . . . . . . . . . . . . . . . . . . . . . . . . . . . . . . . . . . . . . . . 141
HP Resource Management Data Transfer . . . . . . . . . . . . . . . . . . . . . . . . . . . . . . . . . . . . . . . . . . . . . . . . 141
HP Financial Management Data Transfer . . . . . . . . . . . . . . . . . . . . . . . . . . . . . . . . . . . . . . . . . . . . . . . . 142
Date Range for Transferred Data . . . . . . . . . . . . . . . . . . . . . . . . . . . . . . . . . . . . . . . . . . . . . . . . . . . . . . . . . 142
Date Range for Transferred HP Time Management Data . . . . . . . . . . . . . . . . . . . . . . . . . . . . . . . . . . . . 143
7 Reporting Portlets . . . . . . . . . . . . . . . . . . . . . . . . . . . . . . . . . . . . . . . . . . . . . . . . . . . . . . . . . . . . . . . . . . . . . . . . 147
About Operational Reporting Portlets. . . . . . . . . . . . . . . . . . . . . . . . . . . . . . . . . . . . . . . . . . . . . . . . . . . . . . . . . 147
Operational Report List Portlet . . . . . . . . . . . . . . . . . . . . . . . . . . . . . . . . . . . . . . . . . . . . . . . . . . . . . . . . . . . 147
Operational Report Portlet. . . . . . . . . . . . . . . . . . . . . . . . . . . . . . . . . . . . . . . . . . . . . . . . . . . . . . . . . . . . . . . 148
Enabling the Addition of Reporting Portlets to PPM Dashboard Pages . . . . . . . . . . . . . . . . . . . . . . . . . . . . . . . . . . . . . . . . . . . . . . . . . . . . . . . . . . . . . . . . . . 148
Report Portlet Security . . . . . . . . . . . . . . . . . . . . . . . . . . . . . . . . . . . . . . . . . . . . . . . . . . . . . . . . . . . . . . . . . 149
Adding Reporting Portlets to PPM Dashboard Pages. . . . . . . . . . . . . . . . . . . . . . . . . . . . . . . . . . . . . . . . . . . . . 150
Adding Ad Hoc Operational Reports to the Reporting Portlets . . . . . . . . . . . . . . . . . . . . . . . . . . . . . . . . . . . . . 154
8 Reporting on PPM Center Request Custom Parameters159
About Custom Parameters. . . . . . . . . . . . . . . . . . . . . . . . . . . . . . . . . . . . . . . . . . . . . . . . . . . . . . . . . . . . . . . . . . 159
Exposing Custom Parameter Fields in Operational Reporting . . . . . . . . . . . . . . . . . . . . . . . . . . . . . . . . . . . . . . 160
Exposing Custom Parameter Field Values in the Kernel Universe. . . . . . . . . . . . . . . . . . . . . . . . . . . . . . . . 160
Renaming Custom Parameter Objects . . . . . . . . . . . . . . . . . . . . . . . . . . . . . . . . . . . . . . . . . . . . . . . . . . . 162
Changing Object Definitions . . . . . . . . . . . . . . . . . . . . . . . . . . . . . . . . . . . . . . . . . . . . . . . . . . . . . . . . . . 164
8

Exporting the Universes . . . . . . . . . . . . . . . . . . . . . . . . . . . . . . . . . . . . . . . . . . . . . . . . . . . . . . . . . . . . . 169
A Troubleshooting . . . . . . . . . . . . . . . . . . . . . . . . . . . . . . . . . . . . . . . . . . . . . . . . . . . . . . . . . . . . . . . . . . . . . . . . . 171
Troubleshooting for Operational Reporting . . . . . . . . . . . . . . . . . . . . . . . . . . . . . . . . . . . . . . . . . . . . . . . . . . . . 171
(HP-UX Only) Resetting Memory Thresholds . . . . . . . . . . . . . . . . . . . . . . . . . . . . . . . . . . . . . . . . . . . . . . . 172
Nonexistent Table or Materialized View Error . . . . . . . . . . . . . . . . . . . . . . . . . . . . . . . . . . . . . . . . . . . . . . . 175
Changed Package Time Stamp Error . . . . . . . . . . . . . . . . . . . . . . . . . . . . . . . . . . . . . . . . . . . . . . . . . . . . . . 176
Invalid Cursor Error During ETL . . . . . . . . . . . . . . . . . . . . . . . . . . . . . . . . . . . . . . . . . . . . . . . . . . . . . . . . . 176
Folders and Objects Missing from Operational Reporting Universe . . . . . . . . . . . . . . . . . . . . . . . . . . . . . . 177
BusinessObjects Enterprise XI 3.1 Service Pack 2 is Not Installed . . . . . . . . . . . . . . . . . . . . . . . . . . . . 177
If BusinessObjects Enterprise XI 3.1 Service Pack 2 is Installed on Windows 2003 . . . . . . . . . . . . . . . 180
Oracle Trace Log Control for ETL Performance Troubleshooting. . . . . . . . . . . . . . . . . . . . . . . . . . . . . . . . . . . 181
Index . . . . . . . . . . . . . . . . . . . . . . . . . . . . . . . . . . . . . . . . . . . . . . . . . . . . . . . . . . . . . . . . . . . . . . . . . . . . . . . . . . . . . 185
9

10
1 Introduction
About HP Project and Portfolio Management Center Version Content Pack 1
HP Project and Portfolio Management Center (PPM Center) Content Pack 1, which is specific to Operational Reporting, adds reporting capability for HP Project Management. Content Pack 2 content includes the new PM Derived universe, new HP-supplied reports for reporting on your HP Project Management data, and two new portlets for viewing operational reports from the PPM Dashboard.
11
About this Document
This guide provides information about how to upgrade the Operational Reporting solution from PPM Center version 9.10 to PPM Center version Content Pack 1. It is written for PPM Center administrators, configurators, and DBAs who are knowledgeable about PPM Center and SAP BusinessObjects Enterprise. Readers are assumed to be moderately knowledgeable about enterprise application development and skilled in enterprise system and database administration.
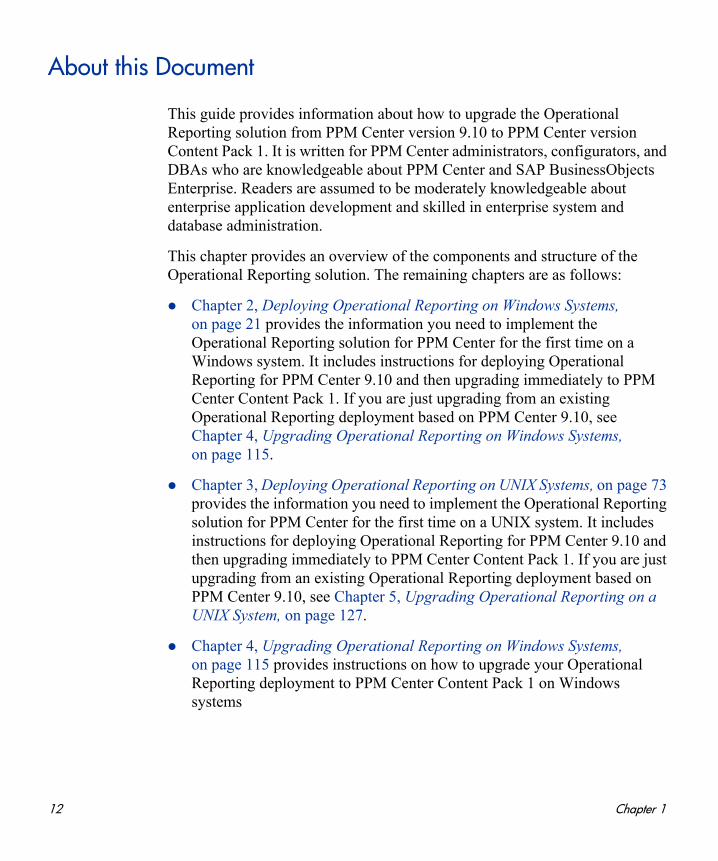
This chapter provides an overview of the components and structure of the Operational Reporting solution. The remaining chapters are as follows:
Chapter 2, Deploying Operational Reporting on Windows Systems, on page 21 provides the information you need to implement the Operational Reporting solution for PPM Center for the first time on a Windows system. It includes instructions for deploying Operational Reporting for PPM Center 9.10 and then upgrading immediately to PPM Center Content Pack 1. If you are just upgrading from an existing Operational Reporting deployment based on PPM Center 9.10, see Chapter 4, Upgrading Operational Reporting on Windows Systems, on page 115.
Chapter 3, Deploying Operational Reporting on UNIX Systems, on page 73 provides the information you need to implement the Operational Reporting solution for PPM Center for the first time on a UNIX system. It includes instructions for deploying Operational Reporting for PPM Center 9.10 and then upgrading immediately to PPM Center Content Pack 1. If you are just upgrading from an existing Operational Reporting deployment based on PPM Center 9.10, see Chapter 5, Upgrading Operational Reporting on a UNIX System, on page 127.
Chapter 4, Upgrading Operational Reporting on Windows Systems, on page 115 provides instructions on how to upgrade your Operational Reporting deployment to PPM Center Content Pack 1 on Windows systems
12 Chapter 1
Chapter 5, Upgrading Operational Reporting on a UNIX System, on page 127 provides instructions on how to upgrade your Operational Reporting deployment to PPM Center Content Pack 1 on UNIX systems.
Chapter 6, Refreshing Operational Reporting Data, on page 137 provides information about how to synchronize data in the PPM Center database schema and the Operational Reporting database schema.
Chapter 7, About Operational Reporting Portlets, on page 147 describes the portlets that enable users to view operational reports from the PPM Dashboard. It provides descriptions of the reporting portlets and instructions on how to enable users to add the portlets to PPM Dashboard pages. It also provides instructions on how to make your ad hoc reports available through the portlets.
Chapter 8, Exposing Custom Parameter Field Values in the Kernel Universe, on page 160 provides instructions on how to add objects for the custom request parameters that exist in your PPM Center instance to Operational Reporting so that users can include the custom parameters in their ad hoc reports.
Introduction 13
Universe Hierarchy
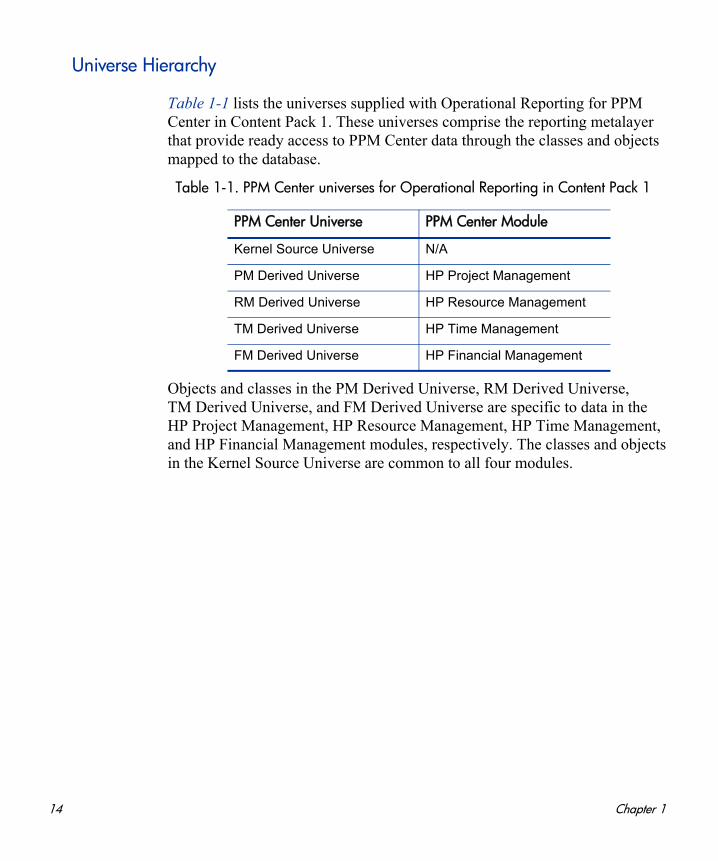
Table 1-1 lists the universes supplied with Operational Reporting for PPM Center in Content Pack 1. These universes comprise the reporting metalayer that provide ready access to PPM Center data through the classes and objects mapped to the database.
Objects and classes in the PM Derived Universe, RM Derived Universe, TM Derived Universe, and FM Derived Universe are specific to data in the HP Project Management, HP Resource Management, HP Time Management, and HP Financial Management modules, respectively. The classes and objects in the Kernel Source Universe are common to all four modules.
Table 1-1. PPM Center universes for Operational Reporting in Content Pack 1
PPM Center Universe PPM Center Module
Kernel Source Universe N/A
PM Derived Universe HP Project Management
RM Derived Universe HP Resource Management
TM Derived Universe HP Time Management
FM Derived Universe HP Financial Management
14 Chapter 1
Viewing Detailed Information About Universe Structure
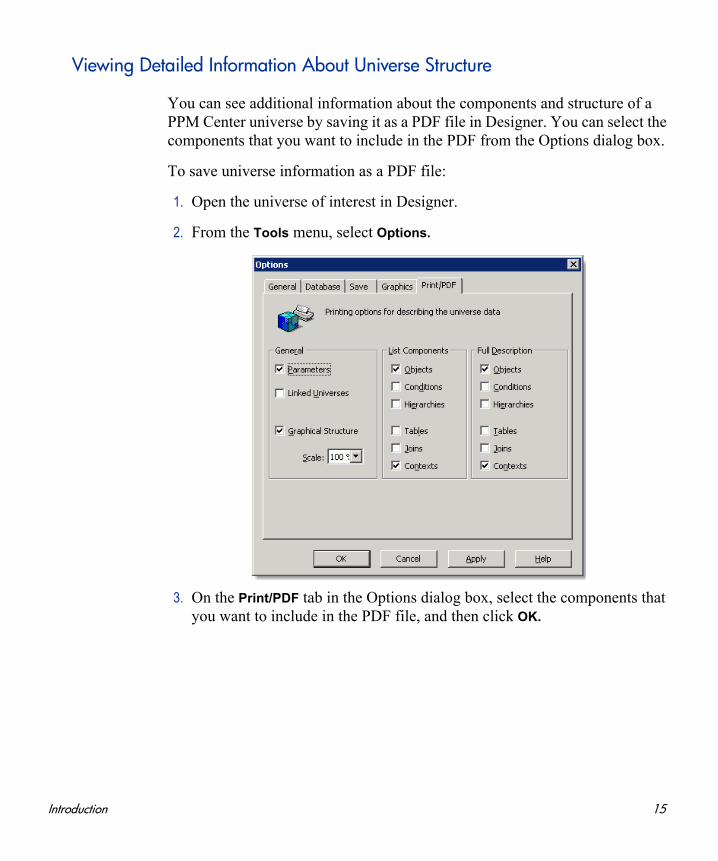
You can see additional information about the components and structure of a PPM Center universe by saving it as a PDF file in Designer. You can select the components that you want to include in the PDF from the Options dialog box.
To save universe information as a PDF file:
1. Open the universe of interest in Designer.
2. From the Tools menu, select Options.
3. On the Print/PDF tab in the Options dialog box, select the components that you want to include in the PDF file, and then click OK.
Introduction 15
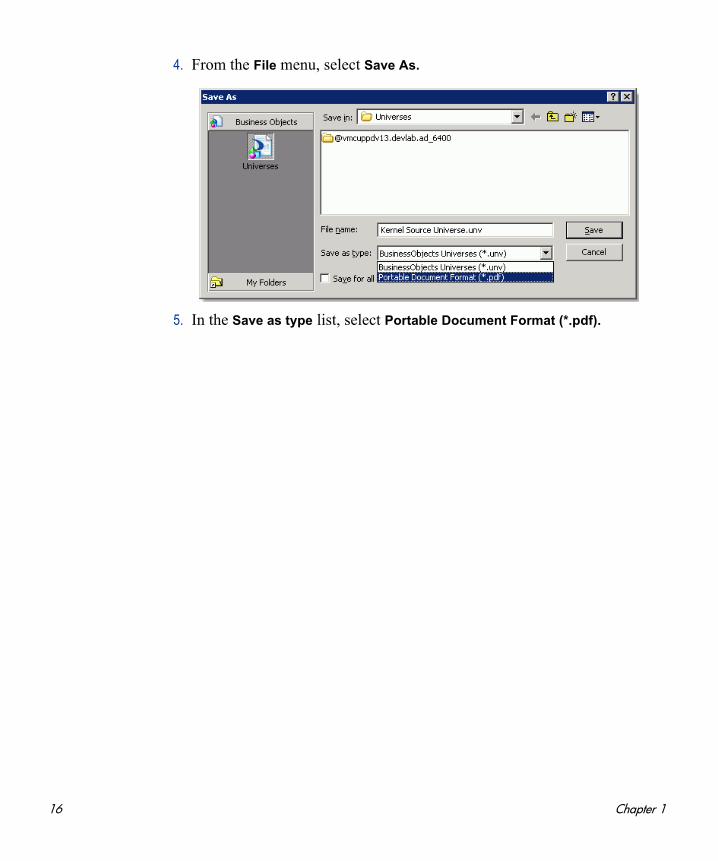
4. From the File menu, select Save As.
5. In the Save as type list, select Portable Document Format (*.pdf).
16 Chapter 1

Operational Reporting Content on HP Live Network
HP Live Network (HPLN) is an online virtual community for product experts, partners, and customers to collaborate and share knowledge, best practices, and add-on content for HP software products, including PPM Center and Operational Reporting. You can log in to the Operational Reporting Community page on HPLN to access the latest news, updates, and documentation for Operational Reporting. You can browse from the Operational Reporting community page or subscribe to receive notifications via email.
Access to HPLN is free to all PPM Center customers. You must have an HP passport account to access the PPM Center and Operational Reporting community pages.
To access Operational Reporting content on HPLN:
1. Go to the HP Support Contract information page (support.openview.hp.com/entitlement/contracts).
2. Sign in to the HP Passport page.
The HP Support Contract information page opens.
Only project owners and administrators can post to the Announcements forum. If you are not a project owner or administrator, direct your feedback to the project owner or the general discussion forum.
Introduction 17
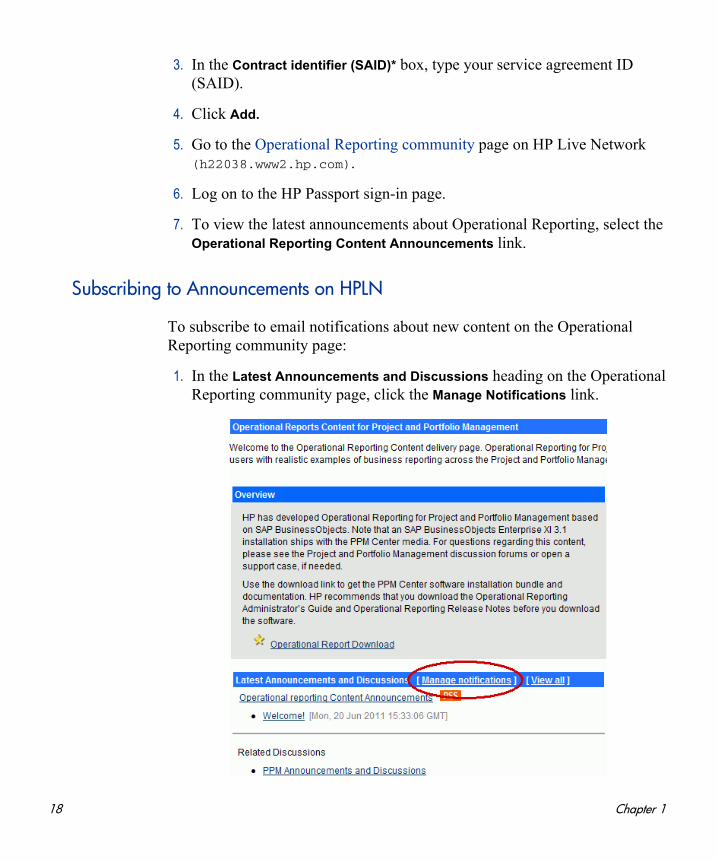
3. In the Contract identifier (SAID)* box, type your service agreement ID (SAID).
4. Click Add.
5. Go to the Operational Reporting community page on HP Live Network (h22038.www2.hp.com).
6. Log on to the HP Passport sign-in page.
7. To view the latest announcements about Operational Reporting, select the Operational Reporting Content Announcements link.
Subscribing to Announcements on HPLN
To subscribe to email notifications about new content on the Operational Reporting community page:
1. In the Latest Announcements and Discussions heading on the Operational Reporting community page, click the Manage Notifications link.
18 Chapter 1
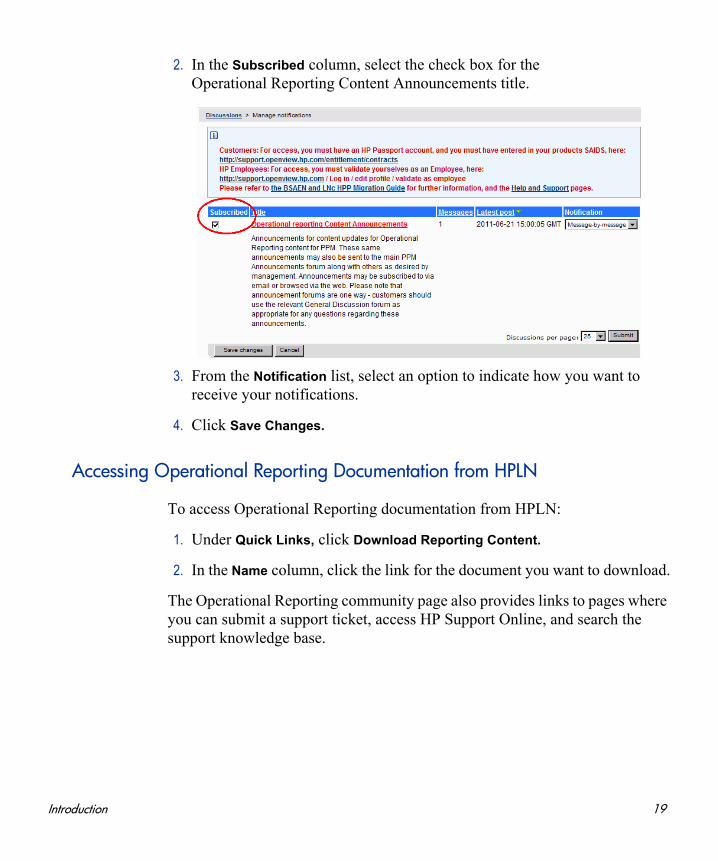
2. In the Subscribed column, select the check box for the Operational Reporting Content Announcements title.
3. From the Notification list, select an option to indicate how you want to receive your notifications.
4. Click Save Changes.
Accessing Operational Reporting Documentation from HPLN
To access Operational Reporting documentation from HPLN:
1. Under Quick Links, click Download Reporting Content.
2. In the Name column, click the link for the document you want to download.
The Operational Reporting community page also provides links to pages where you can submit a support ticket, access HP Support Online, and search the support knowledge base.
Introduction 19
Related Documents
This section lists HP documents that contain useful information for Operational Reporting administrators and users.
HP PPM Center Documents for PPM Center Version Content Pack 1
Release Notes
Deployment Best Practices for Operational Reporting
Operational Reporting User’s Guide
System Requirements and Compatibility Matrix
Before you start to deploy Operational Reporting, check the System Requirements and Compatibility Matrix document to make sure that your operating environment meets all of the minimum system requirements for installing SAP BusinessObjects Enterprise (in addition to PPM Center).
Data Model Guide
The Data Model Guide provides details about the internal structure of the data models for both PPM Center and Operational Reporting.
To obtain any of the HP PPM Center documents listed, go to the Software Product Manuals Web site (support.openview.hp.com/selfsolve/manuals). To access this Web site, you must first set up an HP Passport account.
For more detailed information about SAP BusinessObjects Enterprise, see your SAP documentation.
20 Chapter 1
2 Deploying Operational Reporting on Windows Systems
Operational Reporting Solution Deployment
This chapter provides the information you need to implement the Operational Reporting solution for PPM Center on a Windows system. It includes an overview of the deployment process and detailed instructions for each phase of deployment.
If you have already deployed Operational Reporting based on PPM Center 9.10, and you want to upgrade to PPM Center Content Pack 1, follow the instructions provided in Chapter 4, Upgrading Operational Reporting on Windows Systems, on page 115. For instructions on how to deploy Operational Reporting on a UNIX system, see Chapter 3, Deploying Operational Reporting on UNIX Systems, on page 73.
21

High-Level Deployment Steps
Deploying the Operational Reporting solution for PPM Center involves the following tasks:
1. Install PPM Center version 9.10, and then upgrade to PPM Center 9.10 service pack 2 (SP2).
2. To make sure that your system meets the requirements for BusinessObjects Enterprise installation, check the Products Availability Report (PAR) document, which is available on the BusinessObjects support site (support.businessobjects.com/documentation/supported_platforms).
3. (Optional, but strongly recommended for optimal performance) Set up an Oracle database instance specifically for Operational Reporting and set Oracle database parameters. (See Setting Up a Database for Operational Reporting on page 25.)
4. Check to make sure that the PPM Center database and the Operational Reporting database can communicate over the database link.
5. Create four Oracle tablespaces required to create the Operational Reporting schema and database objects. (See Creating Tablespaces for the Operational Reporting Schema on page 26.)
6. Download the Oracle 11g database client software and install it on both your BusinessObjects server and client machine.
7. Set the JAVA_HOME variable on the BusinessObjects server. (See step 7 on page 30.)
8. Install the SAP BusinessObjects Enterprise software and, optionally, the BusinessObjects Enterprise Client Tools software. (See Installing BusinessObjects Enterprise on a Windows System on page 31.)
For information about how to install PPM Center 9.10 and service packs, see the Installation and Administration Guide for PPM Center 9.10 or the Release Notes for the specific service pack.
The Operational Reporting database schema is created automatically during Operational Reporting deployment.
22 Chapter 2
9. Upgrade the BusinessObjects instance with BusinessObjects XI 3.1 Service Pack 2, and, optionally, upgrade the BusinessObjects Enterprise Client Tools software. (See Installing BusinessObjects Enterprise XI 3.1, Service Pack 2 on page 32.)
10. Run the BusinessObjects Diagnostic Tool to verify successful BusinessObjects Enterprise installation and upgrade. (See Verifying Successful BusinessObjects Enterprise Installation on page 36.)
11. Set up the Oracle JDBC driver to establish connections between the BusinessObjects server and the Operational Reporting databases. (See Configuring the Oracle JDBC Driver on page 37.)
12. Import the PPM Center reporting universes and preconfigured reports. (See Importing and Updating Universes and Reports on page 49.)
13. Run the setup script to create the Operational Reporting database schema. (See Creating the Operational Reporting Database Schema on page 39.)
14. Run the load script to bring PPM Center data into the Operational Reporting database schema. (See Loading PPM Center Data Into the Operational Reporting Database on page 44.)
15. Upgrade the Operational Reporting database to PPM Center Content Pack 1.
16. Upgrade the Operational Reporting universes and reports to PPM Center Content Pack 1.
17. Configure the Operational Reporting database connection. (See Configuring the Operational Reporting on page 54.) Change the connection parameters for all the universes so that the connection points to the Operational Reporting database schema.
18. Install the BusinessObjects Enterprise client applications.
19. Change the default password for the BusinessObjects Central Management Server (CMS). (See Changing the BusinessObjects Central Management Server Password on page 62.)
Deploying Operational Reporting on Windows Systems 23
20. To verify successful deployment of Operational Reporting, run the query for an HP-supplied report. For information about HP-supplied operational reports, see the Operational Reporting User’s Guide.
21. (Optional) Configure multilingual support for BusinessObjects Enterprise. (See (Optional) Configuring Multilingual Operational Reporting on page 63.)
24 Chapter 2
Preparing the Database Schema for Operational Reporting
The following sections provide instructions on how to prepare the Operational Reporting database schema.
Setting Up a Database for Operational Reporting
Requirements and recommendations for setting up the database for Operational Reporting are as follows:
(Required) Configure the Operational Reporting database to use UTF-8 encoding.
(Required) Set the Oracle NLS_CHARACTERSET parameter to UTF-8.
HP strongly recommends that you create an Oracle database specifically for Operational Reporting (independent of your PPM CenterOracle Database instance). Make sure that the PPM Center database and the Operational Reporting database can communicate over the database link.
HP strongly recommends that you use the Enterprise Edition of Oracle Database for the Operational Reporting database. The advanced compression and partitioning featured in the Enterprise Edition significantly improve performance, especially if you report on a large and growing volume of data.
Configuring Oracle Database Parameters for Operational Reporting
HP recommends that you use Oracle’s automatic memory management (AMM) feature. To do this, set the value for either the memory_max_target parameter or the memory_target parameter, and then let Oracle manage the memory (SGA and the PGA) dynamically. For more information about how to optimize performance, see the Deployment Best Practices for PPM Operational Reporting document.
To obtain the Deployment Best Practices for PPM Operational Reporting document and other HP PPM Center documents, go to the Software Product Manuals Web site (support.openview.hp.com/selfsolve/manuals). To access this Web site, you must first set up an HP Passport account.
Deploying Operational Reporting on Windows Systems 25
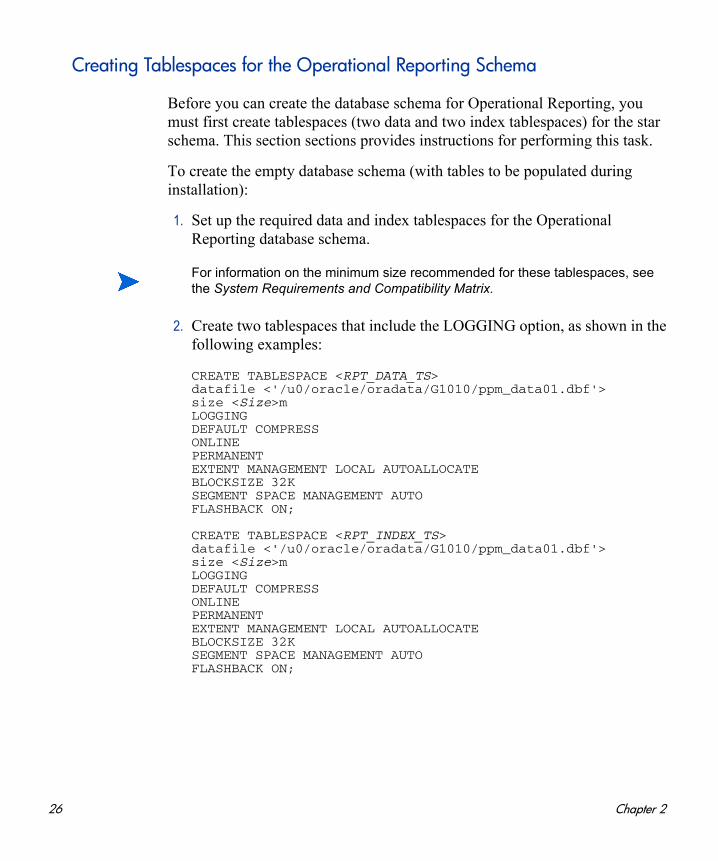
Creating Tablespaces for the Operational Reporting Schema
Before you can create the database schema for Operational Reporting, you must first create tablespaces (two data and two index tablespaces) for the star schema. This section sections provides instructions for performing this task.
To create the empty database schema (with tables to be populated during installation):
1. Set up the required data and index tablespaces for the Operational Reporting database schema.
2. Create two tablespaces that include the LOGGING option, as shown in the following examples:
CREATE TABLESPACE <RPT_DATA_TS>datafile <'/u0/oracle/oradata/G1010/ppm_data01.dbf'>size <Size>mLOGGINGDEFAULT COMPRESSONLINEPERMANENTEXTENT MANAGEMENT LOCAL AUTOALLOCATEBLOCKSIZE 32KSEGMENT SPACE MANAGEMENT AUTOFLASHBACK ON;
CREATE TABLESPACE <RPT_INDEX_TS>datafile <'/u0/oracle/oradata/G1010/ppm_data01.dbf'>size <Size>mLOGGINGDEFAULT COMPRESSONLINEPERMANENTEXTENT MANAGEMENT LOCAL AUTOALLOCATEBLOCKSIZE 32KSEGMENT SPACE MANAGEMENT AUTOFLASHBACK ON;
For information on the minimum size recommended for these tablespaces, see the System Requirements and Compatibility Matrix.
26 Chapter 2
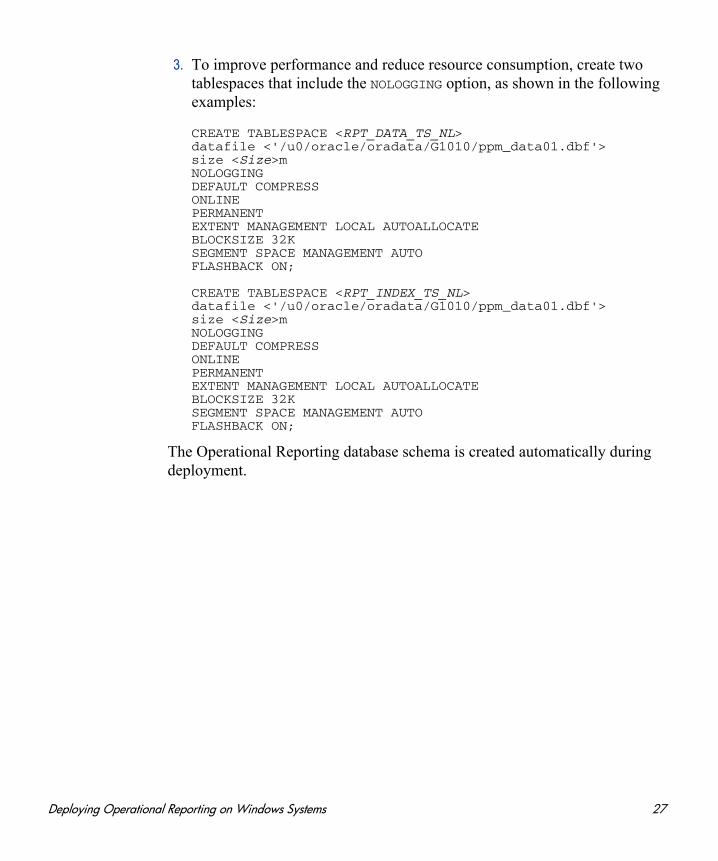
3. To improve performance and reduce resource consumption, create two tablespaces that include the NOLOGGING option, as shown in the following examples:
CREATE TABLESPACE <RPT_DATA_TS_NL>datafile <'/u0/oracle/oradata/G1010/ppm_data01.dbf'>size <Size>mNOLOGGINGDEFAULT COMPRESSONLINEPERMANENTEXTENT MANAGEMENT LOCAL AUTOALLOCATEBLOCKSIZE 32KSEGMENT SPACE MANAGEMENT AUTOFLASHBACK ON;
CREATE TABLESPACE <RPT_INDEX_TS_NL>datafile <'/u0/oracle/oradata/G1010/ppm_data01.dbf'>size <Size>mNOLOGGINGDEFAULT COMPRESSONLINEPERMANENTEXTENT MANAGEMENT LOCAL AUTOALLOCATEBLOCKSIZE 32KSEGMENT SPACE MANAGEMENT AUTOFLASHBACK ON;
The Operational Reporting database schema is created automatically during deployment.
Deploying Operational Reporting on Windows Systems 27
Deploying BusinessObjects Enterprise
This section contains information about the operating systems and languages supported by the Operational Reporting solution, instructions on how to prepare your system for BusinessObjects Enterprise installation, and the detailed steps to perform the installation.
Operating Systems Support for BusinessObjects Enterprise
BusinessObjects Enterprise XI 3.1 is supported for Windows, Linux, HP-UX IBM AIX, and Sun Solaris operating systems. For information about the specific versions of the operating systems supported, see the Products Availability Report (PAR) document, which is available on the BusinessObjects support site (http://support.businessobjects.com/documentation/supported_platforms).
28 Chapter 2

Preparing to Install BusinessObjects Enterprise
This section addresses the tasks to perform before you start to install BusinessObjects Enterprise.
To prepare your system for BusinessObjects Enterprise installation, do the following:
1. Install all necessary service packs and packages for your operating system.
2. Check to make sure that your system meets the following minimum disk space requirements for BusinessObjects Enterprise installation:
8.0 GB for BusinessObjects Enterprise (BusinessObjects Server and BusinessObjects Client)
3.0 GB for BusinessObjects Enterprise Client
3. To get the PPM Center 9.12 Content Pack 1 upgrade bundle:
a. Go to the Operational Reporting Content delivery page (h22038.www2.hp.com) on the HP Live Network site.
b. Under Quick Links, click Download Reporting Content.
c. In the Name column, click the 9.12 CP1 link.
d. Download the PPM Center 9.12 Content Pack 1 upgrade bundle for your operating system.
4. Extract the contents of the PPM Center Content Pack 1 upgrade bundle to its own directory (hereinafter referred to as the <PPM_CP1> directory), separate from the <Op_Reports_Home> directory.
5. Make sure that an additional 2 GB is available on your C:\ drive for Windows installer. (Windows installer creates install patches under the C:\Windows\Installer folder.)
To access the Operational Reporting Content delivery page, you must first sign in on the HP Passport sign-in page.
For detailed information about how to access the Operational Reporting Content delivery page, see Operational Reporting Content on HP Live Network on page 17.
Deploying Operational Reporting on Windows Systems 29
6. Log on to the system as a user with administrator privileges.
7. Set the JAVA_HOME variable in the system environment of the user account to be used to start the BusinessObjects server.
On the BusinessObjects server, set JAVA_HOME to:
<BO_Home>\bobje\jdk
where <BO_Home> is the directory in which you plan to install the BusinessObjects server.
8. Make sure that the TEMP environment variable points to a valid folder. This folder will contain temporary files during BusinessObjects Enterprise installation and upgrade.
9. BusinessObjects Enterprise installation and upgrade are memory- and CPU-intensive processes. Shut down all unnecessary processes before you perform the installation (and upgrade).
For more information about the hardware and software requirements for installing and upgrading BusinessObjects Enterprise, see your SAP documentation.
Make sure that the value you specify contains no spaces.
HP recommends that you have only the Business Object Enterprise installation running.
30 Chapter 2
Installing BusinessObjects Enterprise on a Windows System
The distribution DVD contains the PPM Center Operational Reporting software bundle, the BusinessObjects Enterprise XI 3.1 install bundle, and the BusinessObjects Enterprise XI 3.1 SP2 Upgrade bundle.
To install BusinessObjects Enterprise server software on a Windows system:
1. From the distribution DVD, extract the contents of the PPM Center Operational Reporting install bundle, the BusinessObjects Enterprise XI 3.1 install bundle, and the BusinessObjects Enterprise XI 3.1 SP2 Upgrade bundle to a new folder (hereinafter referred to as the <Op_Reports_Home> directory) on the machine that is to host BusinessObjects Enterprise.
2. If you want to install the software somewhere other than the default directory (C:\hp\ppm\reporting\boe31):
a. Navigate to the <Op_Reports_Home>\Deployment\platform\installer folder and open the windows.ini file in a text editor.
b. Replace the default installation paths for the BusinessObjects Enterprise installation parameters INSTALLDIR and AS_DIR with your values. For example, set the parameter values as follows:
AS_DIR="F:\hp\ppm\reporting\boe31\Tomcat55" INSTALLDIR="F:\hp\ppm\reporting\boe31\"
c. Save and close the windows.ini file.
3. Navigate to the <Op_Reports_Home>\Deployment folder and run the installReportingServer.bat file.
BusinessObjects Reporting Server installation begins. You can monitor the installation process by viewing the BOInstall.log file, which is located in the %TEMP% folder.
HP does not recommend changing the default installation directory. If the default installation directory is satisfactory, there is no need to change any parameter values.
Deploying Operational Reporting on Windows Systems 31
The BusinessObjects XI 3.1 server is installed in the directory that is referred to in this document as “<BO_Home>”. Depending on the resources available to you, installation may take several hours.
4. After you finish installing BusinessObjects XI 3.1, do the following:
Install BusinessObjects XI 3.1 Service Pack 2. (See Installing BusinessObjects Enterprise XI 3.1, Service Pack 2 on page 32.)
Perform required post-installation tasks. (See Post-Installation Tasks on Windows Systems on page 35.)
Installing BusinessObjects Enterprise XI 3.1, Service Pack 2
After you have successful installed BusinessObjects XI 3.1, you must install BusinessObjects XI 3.1 Service Pack 2 (SP2). For information about the requirements for installing BusinessObjects XI 3.1 SP2, see the Products Availability Report (PAR) document, which is available on the BusinessObjects support site (http://support.businessobjects.com/documentation/supported_platforms)
To install BusinessObjects XI 3.1 SP2 on Windows:
1. The SP2 upgrade is memory- and CPU-intensive. Before you begin, shut down any processes that are not absolutely required during the upgrade, including the Tomcat Windows service.
2. Navigate to the <Op_Reports_Home>\Deployment\platform\installer directory and open the windows_sp2.ini file in a text editor.
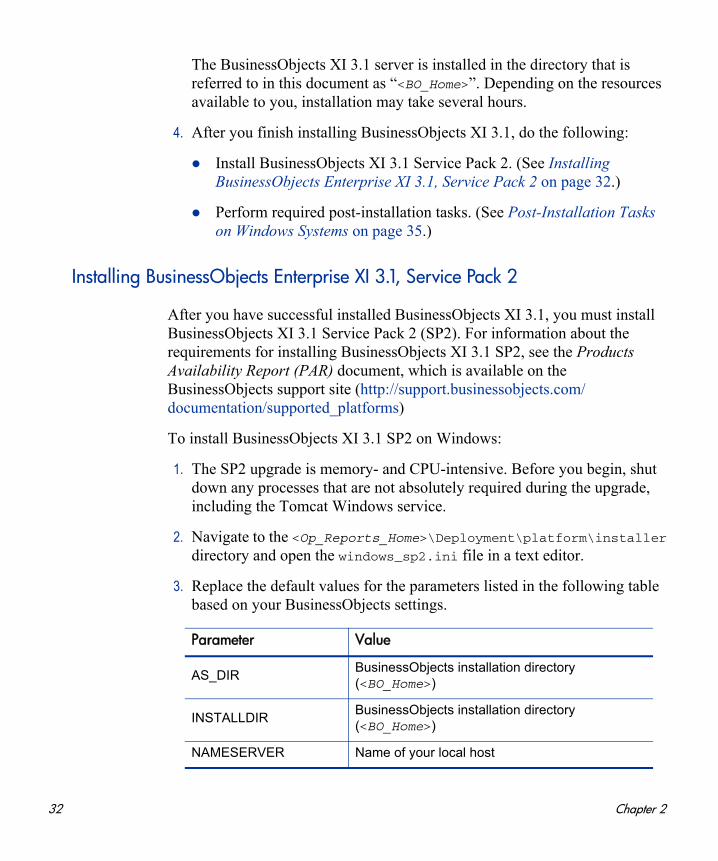
3. Replace the default values for the parameters listed in the following table based on your BusinessObjects settings.
Parameter Value
AS_DIRBusinessObjects installation directory (<BO_Home>)
INSTALLDIRBusinessObjects installation directory(<BO_Home>)
NAMESERVER Name of your local host
32 Chapter 2
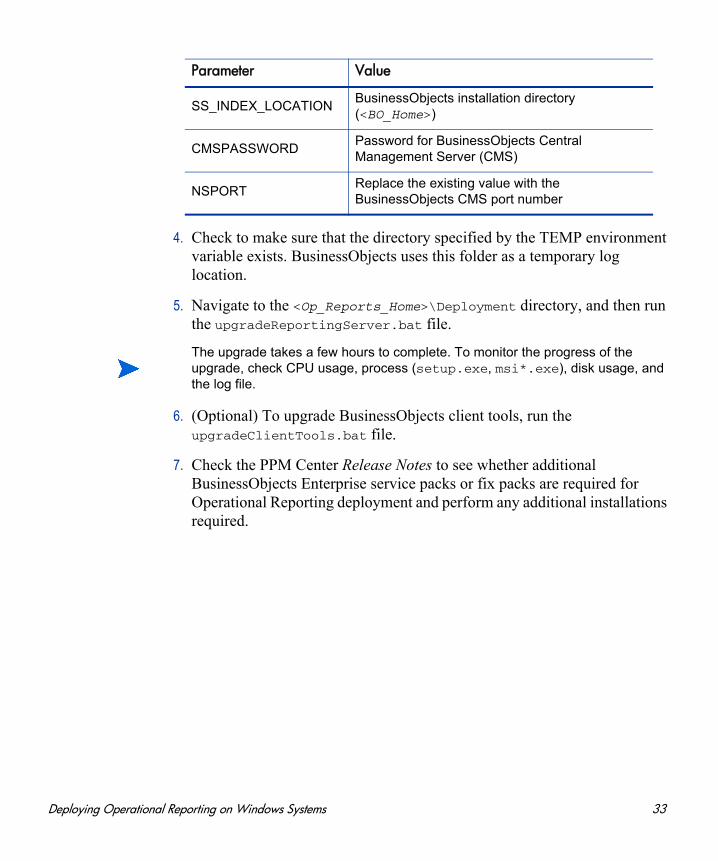
4. Check to make sure that the directory specified by the TEMP environment variable exists. BusinessObjects uses this folder as a temporary log location.
5. Navigate to the <Op_Reports_Home>\Deployment directory, and then run the upgradeReportingServer.bat file.
6. (Optional) To upgrade BusinessObjects client tools, run the upgradeClientTools.bat file.
7. Check the PPM Center Release Notes to see whether additional BusinessObjects Enterprise service packs or fix packs are required for Operational Reporting deployment and perform any additional installations required.
SS_INDEX_LOCATIONBusinessObjects installation directory(<BO_Home>)
CMSPASSWORDPassword for BusinessObjects Central Management Server (CMS)
NSPORTReplace the existing value with the BusinessObjects CMS port number
Parameter Value
The upgrade takes a few hours to complete. To monitor the progress of the upgrade, check CPU usage, process (setup.exe, msi*.exe), disk usage, and the log file.
Deploying Operational Reporting on Windows Systems 33
Checking the Deployment Log File After BusinessObjects Service Pack 2 Installation
If you install a BusinessObjects Enterprise service pack, the BusinessObjects Web application is automatically re-deployed. After you install BusinessObjects XI 3.1 SP2, do the following:
1. Navigate to the <BO_Home>\deployment\workdir directory and check the wdeploy.log file for any errors that may have occurred.
2. If errors occurred during installation, or if you cannot run a report from InfoView because of JavaScript errors, then manually re-deploy BusinessObjects Enterprise as follows:
a. Back up the <BO_Home>\deployment\workdir folder.
b. Delete all contents of the <BO_Home>\deployment\workdir folder.
c. Change to the <BO_Home>\deployment directory, and then run the command wdeploy.bat tomcat55 deployall.
3. Check the wdeploy.log file again for errors, and then run a report query from InfoView to test the deployment.
Verifying the Upgrade to BusinessObjects XI 3.1 SP2
After installation, navigate to the <BO_Home>\BusinessObjects Enterprise 12.0\Logging directory and check the BOE_SP2_Install_0.log file to make sure that the BusinessObjects XI 3.1 SP2 installation was successful.
Next, complete the tasks described in Post-Installation Tasks on Windows Systems on page 35.
34 Chapter 2
Post-Installation Tasks on Windows Systems
This section addresses the following tasks, which must be performed after you install and update BusinessObjects Enterprise:
Verifying Successful BusinessObjects Enterprise Installation
Configuring the Oracle JDBC Driver
Creating the Operational Reporting Database Schema
Loading PPM Center Data Into the Operational Reporting Database
Running the Upgrade Script
Importing and Updating Universes and Reports
Configuring the Operational Reporting
Installing BusinessObjects Enterprise Client Tools
Changing the BusinessObjects Central Management Server Password
Verifying Successful Operational Reporting Deployment
(Optional) (Optional) Configuring Multilingual Operational Reporting
Deploying Operational Reporting on Windows Systems 35
Verifying Successful BusinessObjects Enterprise Installation
After you install BusinessObjects Enterprise, you can use SAP’s Deployment Diagnostic Tool to check your installation. The Deployment Diagnostic Tool is installed automatically with BusinessObjects XI Enterprise.
To verify that the BusinessObjects Enterprise installation was successful:
1. Select Start > Programs > BusinessObjects XI 3.1 > BusinessObjects
Enterprise > Diagnostic Tool.
2. Make sure that the following diagnostic tests are passed:
Log On/Off
InfoView
Web Intelligence
Stop/Start Servers
For detailed information about the diagnostic tests and how to run them, see SAP’s BusinessObjects Enterprise XI 3.1 Deployment Diagnostic Tool User's Guide.
The BusinessObjects Enterprise default password is “admin123” (Windows).
36 Chapter 2
Configuring the Oracle JDBC Driver
Operational Reporting deployment relies on the Oracle JDBC driver to establish connections between BusinessObjects server and the Operational Reporting schema.
To configure the Oracle JDBC driver on a Windows system:
1. Check to make sure that Oracle client is installed on your BusinessObjects server. If Oracle client is not installed on your BusinessObjects server, then install it.
2. Configure the tnsnames.ora file and verify that you can connect to the Operational Reporting database schema from the command line using SQL*Plus.
3. Navigate to the <ORACLE_HOME>\jdbc\lib directory on your BusinessObjects server, and make sure that it contains the ojdbc5.jar file.
4. Navigate to the <BusinessObjects_Enterprise_Home>\win32_x86\dataAccess\connectionServer\jdbc directory and back up the jdbc.sbo file.
JDBC configuration is same for both BusinessObjects server and BusinessObjects client tools.
The tnsnames.ora file normally resides in the <Oracle_Home>\network\admin directory. For information about how to configure the tnsnames.ora file, see the Oracle Technology Network.
HP strongly recommends that you back up the jdbc.sbo file before you continue to the next step.
Deploying Operational Reporting on Windows Systems 37
5. Open the jdbc.sbo file in a text editor, and then, in the <DataBase Active="Yes" Name="Oracle 11"> section, add the class path as follows (modified based on your location):
<ClassPath><Path>C:\OracleClient\product\11.1.0\client_1\jdbc\lib\
ojdbc5.jar</Path>
<Path>C:\Program Files\Business Objects\javasdk\bin</Path></ClassPath>
6. Save and close the jdbc.sbo file.
38 Chapter 2
Creating the Operational Reporting Database Schema
To create the Operational Reporting database schema, you run the setup script. To import PPM Center data into the Operational Reporting database, you run the load script. The following sections provide detailed instructions on how to perform these tasks.
Running the Setup and Synchronization Scripts
To run the setup and synchronization scripts:
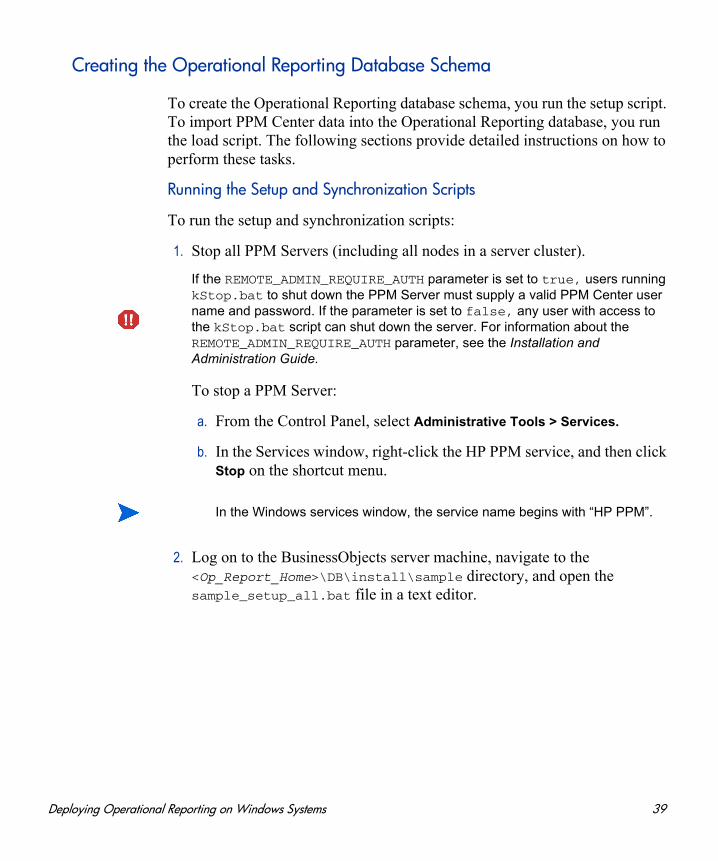
1. Stop all PPM Servers (including all nodes in a server cluster).
To stop a PPM Server:
a. From the Control Panel, select Administrative Tools > Services.
b. In the Services window, right-click the HP PPM service, and then click Stop on the shortcut menu.
2. Log on to the BusinessObjects server machine, navigate to the <Op_Report_Home>\DB\install\sample directory, and open the sample_setup_all.bat file in a text editor.
If the REMOTE_ADMIN_REQUIRE_AUTH parameter is set to true, users running kStop.bat to shut down the PPM Server must supply a valid PPM Center user name and password. If the parameter is set to false, any user with access to the kStop.bat script can shut down the server. For information about the REMOTE_ADMIN_REQUIRE_AUTH parameter, see the Installation and Administration Guide.
In the Windows services window, the service name begins with “HP PPM”.
Deploying Operational Reporting on Windows Systems 39

3. Uncomment the parameters listed in the following table, replace the placeholders with valid values, and then save and close the file.
Information Description
SYS user name of Reporting DB
SYS user name for the Operational Reporting database
Example value: sys
Reporting DB Schema Name
Operational Reporting database schema name
Example value: RPT_SCHEMA
Reporting DB TNS Name
Identifies the Oracle instance that runs the Operational Reporting database schema. TNS name is configured in the tnsnames.ora file.
Example value: RPT
PPM DB Schema Name
PPM Center database schema name.
This value should exist in the Oracle tnsnames.ora entry.
Example value: PPM_SCHEMA
Important: The PPM Center database schema name must contain all capital letters. If the name contains any lowercase characters, an error occurs.
PPM DB data_tablespace_name
PPM Center database data tablespace name
Note: This refers to the existing data tablespace in the PPM Center database schema. The PPM Center schema stores this in the KINS_TABLESPACES table.
Example value: PPM_DATA_TS
PPM DB temp_tablespace_name
PPM Center database temp tablespace name
Note: This refers to the existing temp tablespace in the PPM Center database schema. The PPM Center schema stores this in the KINS_TABLESPACES table.
Example value: PPM_TEMP_TS
PPM DB index_tablespace_name
PPM Center database index tablespace name
Note: This refers to the existing index tablespace in the PPM Center database schema. The PPM Center schema stores this in the KINS_TABLESPACES table.
Example value: PPM_INDEX_TS
40 Chapter 2

4. Run the sample_setup_all.bat script.
5. During the script run, provide the following information when prompted:
PPM Center database server SYS user password
PPM Center database server schema password
Operational Reporting database server SYS user password
Operational Reporting database server schema password
Full tnsnames.ora entry to PPM schema
Full tnsnames.ora entry for the PPM Center database schema
For HOST, specify the IP address of the PPM Center database server
For PORT, specify the PPM Center database port
For SERVICE_NAME, specify the SID in tnsnames.ora file for the PPM Center database
Example value:
"(DESCRIPTION= (ADDRESS= (PROTOCOL=TCP) (HOST=16.89.27.63) (PORT=1522)) (CONNECT_DATA= (SERVER=dedicated) (SERVICE_NAME=MDB1106A)))"
DB_LINK_NAME to PPM
Name of the link to the PPM Center database
This value is generated in the Operational Reporting database schema.
Example value: PPM_DB_LINK
SYS user name of PPM DB
SYS user name for the PPM Center database
Example value: sys
RPT_DATA_NOLOGGING_TABLESPACE_NAME>
Separate tablespace that requires no redo log for the Operational Reporting database to store data.
Example value: RPT_DATA_TS_NL
RPT_INDEX_NOLOGGING_TABLESPACE_NAME
Separate tablespace that requires no redo log for the Operational Reporting database to store indexes.
Example value: RPT_INDEX_TS_NL
Information Description
Deploying Operational Reporting on Windows Systems 41
6. Navigate to the <Op_Report_Home>\DB\install\log directory and check the setup_all.log file for errors. If the setup_all.log file indicates that compilation errors occurred, run the following:
Select * from user_objects where status = 'INVALID'
If no rows are returned, you can safely ignore the warning.
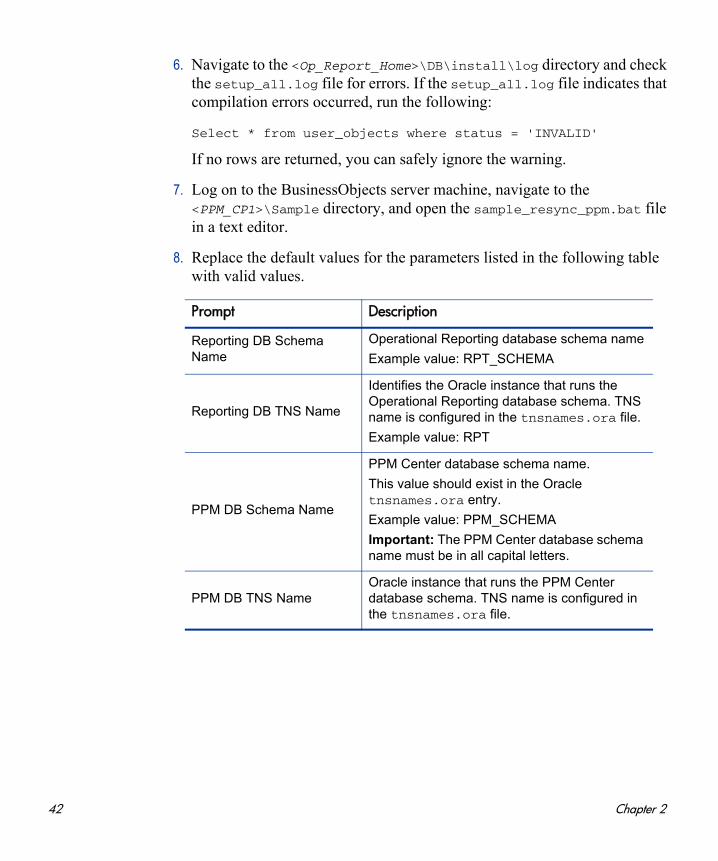
7. Log on to the BusinessObjects server machine, navigate to the <PPM_CP1>\Sample directory, and open the sample_resync_ppm.bat file in a text editor.
8. Replace the default values for the parameters listed in the following table with valid values.
Prompt Description
Reporting DB Schema Name
Operational Reporting database schema name
Example value: RPT_SCHEMA
Reporting DB TNS Name
Identifies the Oracle instance that runs the Operational Reporting database schema. TNS name is configured in the tnsnames.ora file.
Example value: RPT
PPM DB Schema Name
PPM Center database schema name.
This value should exist in the Oracle tnsnames.ora entry.
Example value: PPM_SCHEMA
Important: The PPM Center database schema name must be in all capital letters.
PPM DB TNS NameOracle instance that runs the PPM Center database schema. TNS name is configured in the tnsnames.ora file.
42 Chapter 2
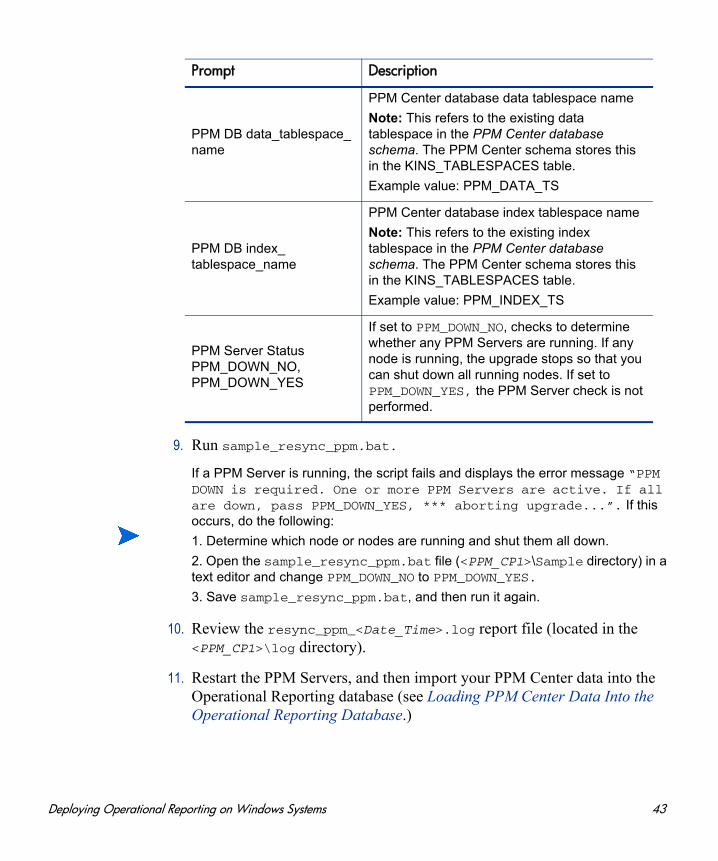
9. Run sample_resync_ppm.bat.
10. Review the resync_ppm_<Date_Time>.log report file (located in the <PPM_CP1>\log directory).
11. Restart the PPM Servers, and then import your PPM Center data into the Operational Reporting database (see Loading PPM Center Data Into the Operational Reporting Database.)
PPM DB data_tablespace_name
PPM Center database data tablespace name
Note: This refers to the existing data tablespace in the PPM Center database schema. The PPM Center schema stores this in the KINS_TABLESPACES table.
Example value: PPM_DATA_TS
PPM DB index_tablespace_name
PPM Center database index tablespace name
Note: This refers to the existing index tablespace in the PPM Center database schema. The PPM Center schema stores this in the KINS_TABLESPACES table.
Example value: PPM_INDEX_TS
PPM Server Status PPM_DOWN_NO, PPM_DOWN_YES
If set to PPM_DOWN_NO, checks to determine whether any PPM Servers are running. If any node is running, the upgrade stops so that you can shut down all running nodes. If set to PPM_DOWN_YES, the PPM Server check is not performed.
Prompt Description
If a PPM Server is running, the script fails and displays the error message “PPM DOWN is required. One or more PPM Servers are active. If all are down, pass PPM_DOWN_YES, *** aborting upgrade...”. If this occurs, do the following:
1. Determine which node or nodes are running and shut them all down.
2. Open the sample_resync_ppm.bat file (<PPM_CP1>\Sample directory) in a text editor and change PPM_DOWN_NO to PPM_DOWN_YES.
3. Save sample_resync_ppm.bat, and then run it again.
Deploying Operational Reporting on Windows Systems 43
Loading PPM Center Data Into the Operational Reporting Database
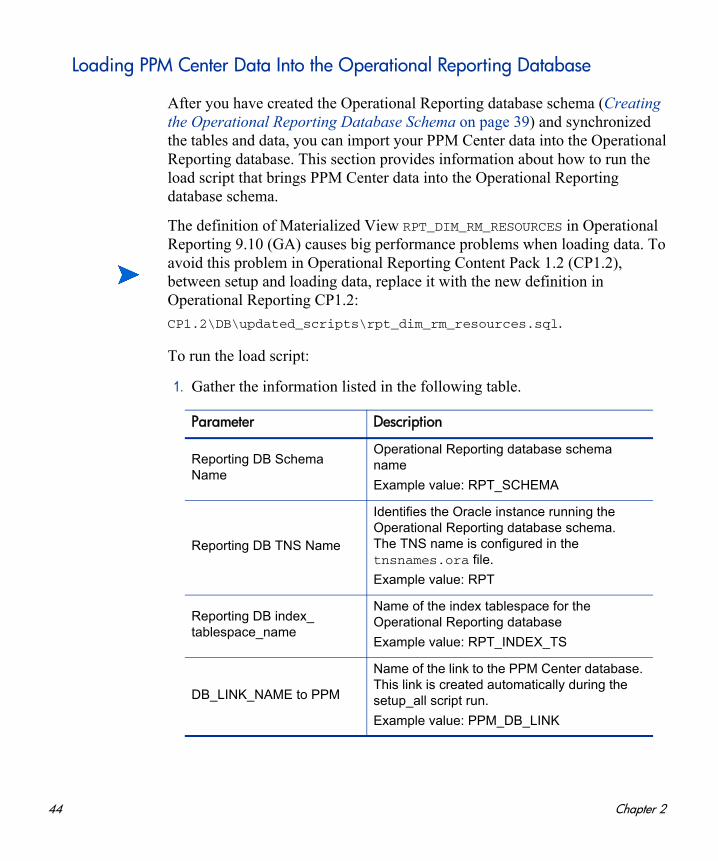
After you have created the Operational Reporting database schema (Creating the Operational Reporting Database Schema on page 39) and synchronized the tables and data, you can import your PPM Center data into the Operational Reporting database. This section provides information about how to run the load script that brings PPM Center data into the Operational Reporting database schema.
To run the load script:
1. Gather the information listed in the following table.
The definition of Materialized View RPT_DIM_RM_RESOURCES in Operational Reporting 9.10 (GA) causes big performance problems when loading data. To avoid this problem in Operational Reporting Content Pack 1.2 (CP1.2), between setup and loading data, replace it with the new definition in Operational Reporting CP1.2:
CP1.2\DB\updated_scripts\rpt_dim_rm_resources.sql.
Parameter Description
Reporting DB Schema Name
Operational Reporting database schema name
Example value: RPT_SCHEMA
Reporting DB TNS Name
Identifies the Oracle instance running the Operational Reporting database schema. The TNS name is configured in the tnsnames.ora file.
Example value: RPT
Reporting DB index_tablespace_name
Name of the index tablespace for the Operational Reporting database
Example value: RPT_INDEX_TS
DB_LINK_NAME to PPM
Name of the link to the PPM Center database. This link is created automatically during the setup_all script run.
Example value: PPM_DB_LINK
44 Chapter 2

ETL start date (mm-dd-yyyy)
Start date (in mm-dd-yyyy format) for the PPM Center data to load into the Operational Reporting database schema.
Example value: 01-01-2010
ETL end date (mm-dd-yyyy)
End date (in mm-dd-yyyy format) for the PPM Center data to load into the Operational Reporting database schema.
Note: The ETL end date you specify is converted based on the fiscal year. For details, see the Installation and Administration Guide.
Example value: 01-01-2011
Reporting DB data_tablespace_name
Name of the data tablespace for the Operational Reporting database
Example value: RPT_DATA_TS
RPT SYS UsernameSYS user name for the Operational Reporting database
Example value: sys
Request dimension ETL start date (mm-dd-yyyy)
Start date (in mm-dd-yyyy format) for the PPM Center request data to load into the Operational Reporting database schema.
Example value: 01-01-2010
Note: If your PPM Center database contains data for old, but active requests, you can include that data without importing all data from that time period.
RPT_DATA_NOLOGGING_TABLESPACE_NAME
Separate tablespace that requires no redo log for the Operational Reporting database to store data.
Example value: RPT_DATA_TS_NL
RPT_INDEX_NOLOGGING_TABLESPACE_NAME
Separate tablespace that requires no redo log for the Operational Reporting database to store indexes.
Example value: RPT_INDEX_TS_NL
Parameter Description
Deploying Operational Reporting on Windows Systems 45
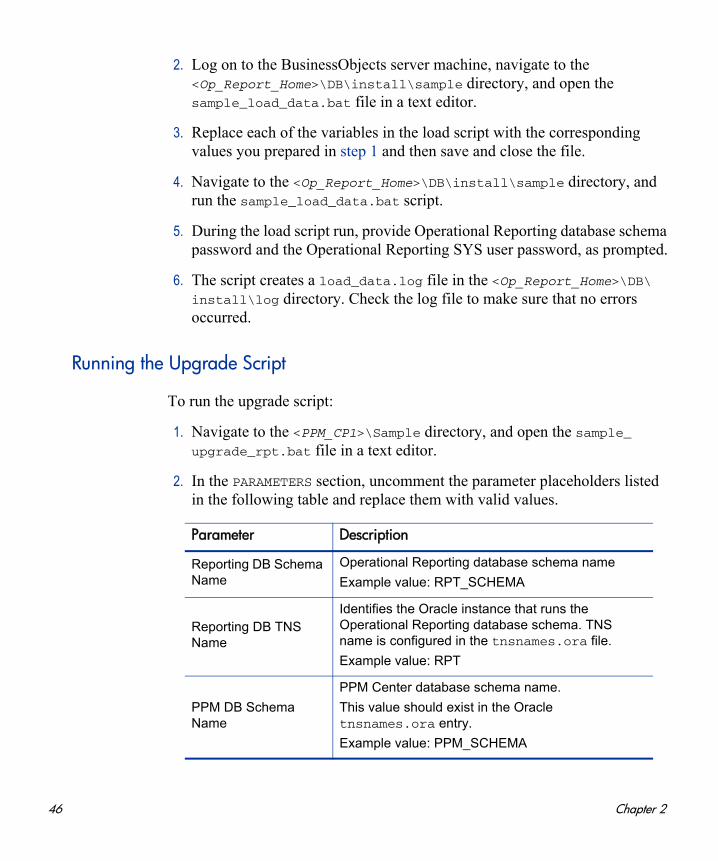
2. Log on to the BusinessObjects server machine, navigate to the <Op_Report_Home>\DB\install\sample directory, and open the sample_load_data.bat file in a text editor.
3. Replace each of the variables in the load script with the corresponding values you prepared in step 1 and then save and close the file.
4. Navigate to the <Op_Report_Home>\DB\install\sample directory, and run the sample_load_data.bat script.
5. During the load script run, provide Operational Reporting database schema password and the Operational Reporting SYS user password, as prompted.
6. The script creates a load_data.log file in the <Op_Report_Home>\DB\install\log directory. Check the log file to make sure that no errors occurred.
Running the Upgrade Script
To run the upgrade script:
1. Navigate to the <PPM_CP1>\Sample directory, and open the sample_upgrade_rpt.bat file in a text editor.
2. In the PARAMETERS section, uncomment the parameter placeholders listed in the following table and replace them with valid values.
Parameter Description
Reporting DB Schema Name
Operational Reporting database schema name
Example value: RPT_SCHEMA
Reporting DB TNS Name
Identifies the Oracle instance that runs the Operational Reporting database schema. TNS name is configured in the tnsnames.ora file.
Example value: RPT
PPM DB Schema Name
PPM Center database schema name.
This value should exist in the Oracle tnsnames.ora entry.
Example value: PPM_SCHEMA
46 Chapter 2
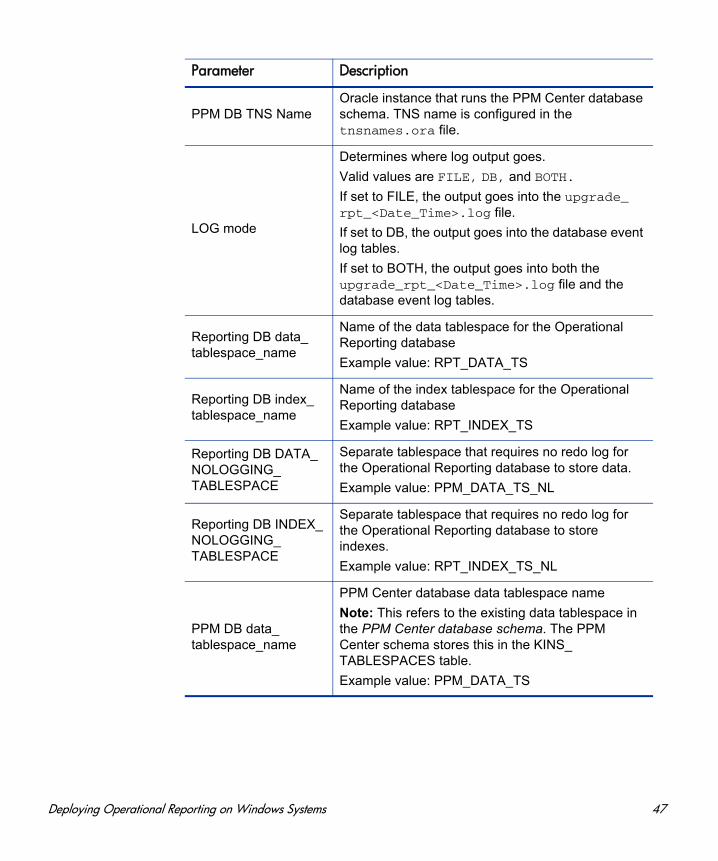
PPM DB TNS NameOracle instance that runs the PPM Center database schema. TNS name is configured in the tnsnames.ora file.
LOG mode
Determines where log output goes.
Valid values are FILE, DB, and BOTH.
If set to FILE, the output goes into the upgrade_rpt_<Date_Time>.log file.
If set to DB, the output goes into the database event log tables.
If set to BOTH, the output goes into both the upgrade_rpt_<Date_Time>.log file and the database event log tables.
Reporting DB data_tablespace_name
Name of the data tablespace for the Operational Reporting database
Example value: RPT_DATA_TS
Reporting DB index_tablespace_name
Name of the index tablespace for the Operational Reporting database
Example value: RPT_INDEX_TS
Reporting DB DATA_NOLOGGING_TABLESPACE
Separate tablespace that requires no redo log for the Operational Reporting database to store data.
Example value: PPM_DATA_TS_NL
Reporting DB INDEX_NOLOGGING_TABLESPACE
Separate tablespace that requires no redo log for the Operational Reporting database to store indexes.
Example value: RPT_INDEX_TS_NL
PPM DB data_tablespace_name
PPM Center database data tablespace name
Note: This refers to the existing data tablespace in the PPM Center database schema. The PPM Center schema stores this in the KINS_TABLESPACES table.
Example value: PPM_DATA_TS
Parameter Description
Deploying Operational Reporting on Windows Systems 47
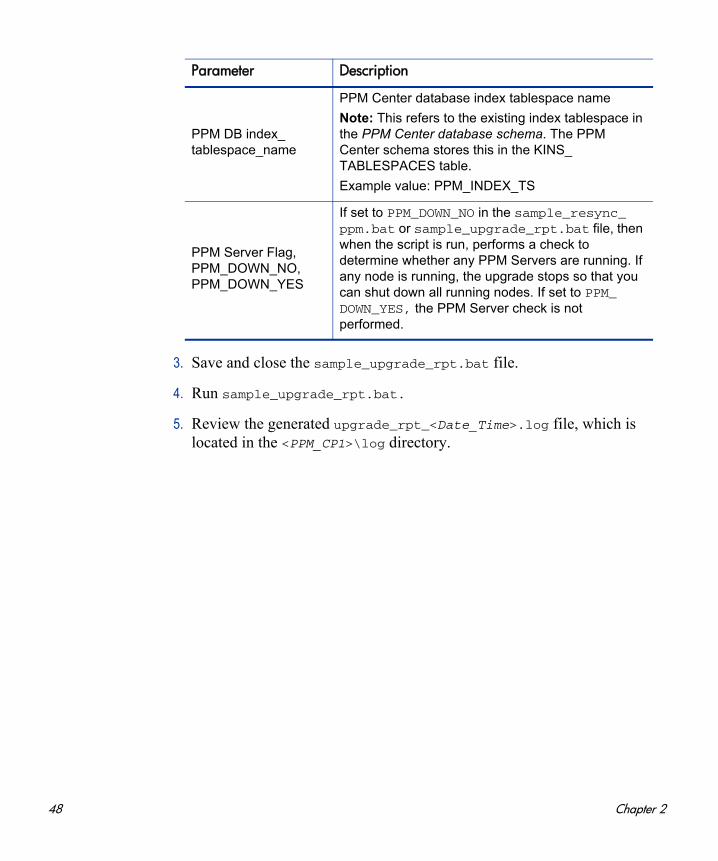
3. Save and close the sample_upgrade_rpt.bat file.
4. Run sample_upgrade_rpt.bat.
5. Review the generated upgrade_rpt_<Date_Time>.log file, which is located in the <PPM_CP1>\log directory.
PPM DB index_tablespace_name
PPM Center database index tablespace name
Note: This refers to the existing index tablespace in the PPM Center database schema. The PPM Center schema stores this in the KINS_TABLESPACES table.
Example value: PPM_INDEX_TS
PPM Server Flag, PPM_DOWN_NO, PPM_DOWN_YES
If set to PPM_DOWN_NO in the sample_resync_ppm.bat or sample_upgrade_rpt.bat file, then when the script is run, performs a check to determine whether any PPM Servers are running. If any node is running, the upgrade stops so that you can shut down all running nodes. If set to PPM_DOWN_YES, the PPM Server check is not performed.
Parameter Description
48 Chapter 2
Importing and Updating Universes and Reports
This section provides instructions on how to use the Business Intelligence Archive Resource (BIAR) import tool to import Operational Reporting universes and reports into the BusinessObjects CMS Repository, and then to update those universes and reports to the Content Pack 1 versions. The BIAR import tool reads the biar_import.properties file. It imports all of the universes and reports in the <Op_Reports_Home>\Universe and <Op_Reports_Home>\Reports directories, respectively.
Requirements for using the BIAR import tool are as follows:
The JAVA_HOME environment variable must be set (see step 7 on page 30).
The biar_import.properties file must be configured for your environment.
The CMS password must be in clear text.
Importing Operational Reporting Universes and Reports
To import Operational Reporting universes and reports into the BusinessObjects CMS Repository:
1. Navigate to the <Op_Reports_Home>\Deployment\platform\biar folder on the BusinessObjects Enterprise server.
2. Open the biar_import.properties file in a text editor.
You must enter the CMS password into the biar_import.properties file before you run the BIAR tool, and then remove it from the biar_import.properties file after the import is complete.
Deploying Operational Reporting on Windows Systems 49
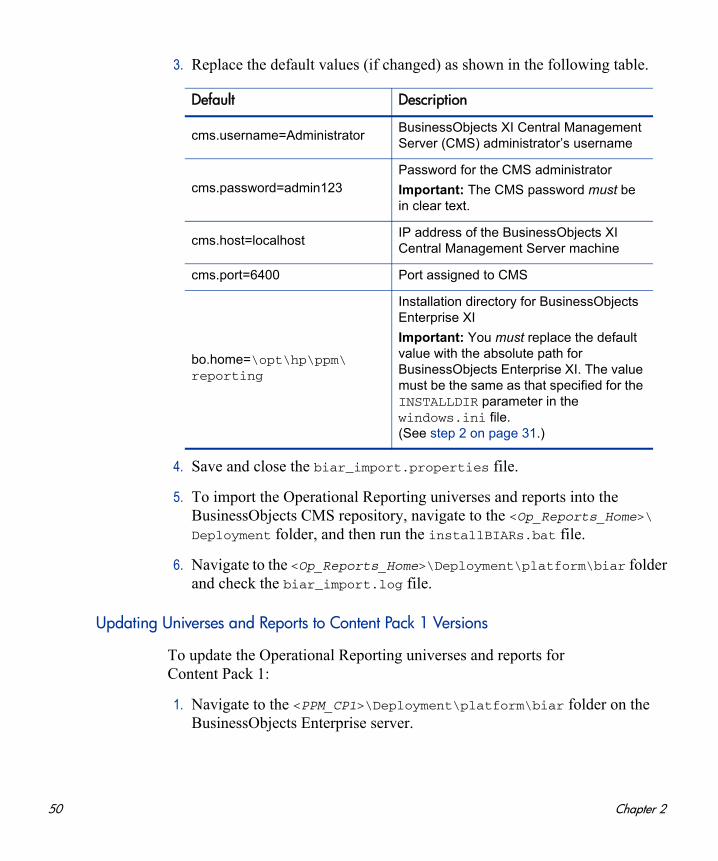
3. Replace the default values (if changed) as shown in the following table.
4. Save and close the biar_import.properties file.
5. To import the Operational Reporting universes and reports into the BusinessObjects CMS repository, navigate to the <Op_Reports_Home>\Deployment folder, and then run the installBIARs.bat file.
6. Navigate to the <Op_Reports_Home>\Deployment\platform\biar folder and check the biar_import.log file.
Updating Universes and Reports to Content Pack 1 Versions
To update the Operational Reporting universes and reports for Content Pack 1:
1. Navigate to the <PPM_CP1>\Deployment\platform\biar folder on the BusinessObjects Enterprise server.
Default Description
cms.username=AdministratorBusinessObjects XI Central Management Server (CMS) administrator’s username
cms.password=admin123Password for the CMS administrator
Important: The CMS password must be in clear text.
cms.host=localhostIP address of the BusinessObjects XI Central Management Server machine
cms.port=6400 Port assigned to CMS
bo.home=\opt\hp\ppm\reporting
Installation directory for BusinessObjects Enterprise XI
Important: You must replace the default value with the absolute path for BusinessObjects Enterprise XI. The value must be the same as that specified for the INSTALLDIR parameter in the windows.ini file. (See step 2 on page 31.)
50 Chapter 2

2. Open the biar_import.properties file in a text editor.
3. Replace the default values (if changed) as shown in the following table.
4. Save and close the biar_import.properties file.
5. Navigate to the <PPM_CP1>\Deployment directory and run upgradeBIARs.bat.
6. Navigate to the <PPM_CP1>\Deployment\platform\biar folder and check the biar_import.log file.
Default Description
cms.username=AdministratorBusinessObjects XI Central Management Server (CMS) administrator’s username
cms.password=admin123
Password for the Central Management Server (CMS) administrator
Important: The CMS password must be in clear text.
cms.host=localhostIP address of the BusinessObjects XI Central Management Server machine
cms.port=6400Port assigned to Central Management Server
bo.home=\opt\hp\ppm\reporting
Installation directory for BusinessObjects Enterprise XI
Important: You must replace the default value with the absolute path for BusinessObjects Enterprise XI. The value must be the same as that specified for the INSTALLDIR parameter in the windows.ini file. (See step 2 on page 31.)
For information about what to do if, for some reason, the upgrade fails during the script run, see Failure During the upgradeBIARs.bat Run on page 53.
Deploying Operational Reporting on Windows Systems 51
Recovering from an Upgrade Failure
An upgrade to PPM Center Content Pack 1 can potentially fail for several reasons. The process stops if, for example, the connection to a remote database is lost, the client machine running an upgrade script goes down, or if PPM Center data are missing. This section provides information about what to do if your upgrade fails during the different stages of the upgrade process.
Upgrade Failure Resulting from Active PPM Servers
The sample_resync_ppm.bat and sample_upgrade_rpt.bat files both include the PPM Server Status parameter, which can be set to either PPM_DOWN_NO or PPM_DOWN_YES. (See PPM Server Flag, PPM_DOWN_NO, PPM_DOWN_YES on page 48.) If you set the PPM Server Status parameter to PPM_DOWN_NO in either of these files and then execute the file, the upgrade checks to determine whether any PPM Servers are active. If an active node is detected during the run, the upgrade stops and the following message is displayed:
Failed with this error => PPM DOWN is required. One or more PPM Servers is active. If all nodes are down, pass PPM_DOWN_YES, *** aborting upgrade...
If this error occurs, do the following:
1. Shut down every active node in the server cluster.
2. Open the sample batch or shell script (either sample_upgrade_rpt.bat or sample_resync_ppm.bat) and change the PPM Server Status parameter value from PPM_DOWN_NO to PPM_DOWN_YES.
3. Run the script again.
The upgrade process skips the PPM Server check after you set PPM Server Status parameter value to PPM_DOWN_YES.
52 Chapter 2
Failure During the sample_preupgrade_rpt.bat Run
If the upgrade fails while the Sample_preupgrade_rpt.bat script is running, do the following:
1. Review the generated preupgrade_rpt_<Date_Time>.log file, which is located in the <PPM_CP1>\log folder.
2. Correct any reported errors, and then run the Sample_preupgrade_rpt.bat script again.
Failure During the sample_upgrade_rpt.bat Run
Errors occur during the sample_upgrade_rpt.bat run if database tables are not synchronized or if an ETL job is in progress.
Unsynchronized Database Tables Errors
If PPM Center database tables are not synchronized and you run the upgrade script, the following message is displayed:
One or more tables in the PPM Center database are not synchronized. Please check the event log and run ETL before you run the upgrade script. The PPM Center database tables must be synchronized.
If this occurs, do the following:
1. Navigate to the <Op_Report_Home>\DB\install\sample directory, and run sample_onetime_batch.bat.
2. Run sample_upgrade_rpt.bat again.
Failure During the upgradeBIARs.bat Run
If your BusinessObjects server or client machine goes down while the upgradeBIARs.bat script is running, do the following:
1. Navigate to the Upgrades\<PPM_CP1>\Deployment\platform\biar directory, open the log file for the script run, and check for reported errors.
2. If the log file indicates an issue that cannot be resolved by simply running the upgradeBIARs.bat script again, you may have to delete HP-supplied
Deploying Operational Reporting on Windows Systems 53
universes (RM Derived Universe, TM Derived Universe, FM Derived Universe, and Kernel Universe) or new reports.
3. Run the upgradeBIARs.bat script again.
Configuring the Operational Reporting
After you import the universes and reports, you must configure the connection to the Operational Reporting database. Before you can configure this connection, make sure that you have completed the following:
Installed BusinessObjects Enterprise, including SP2 (Installing BusinessObjects Enterprise on a Windows System on page 31)
Configured Oracle 11 JDBC driver (Configuring the Oracle JDBC Driver on page 37)
Imported the universes and reports (Importing and Updating Universes and Reports on page 49)
Run the setup script (Running the Setup and Synchronization Scripts on page 39) and load script (Loading PPM Center Data Into the Operational Reporting Database on page 44) to set up the Operational Reporting schema.
To configure the Operational Reporting database connection:
1. To start Designer, select Start > All Programs > BusinessObjects XI 3.1 >
BusinessObjects Enterprise > Designer.
2. Provide the following information in the User Identification dialog box:
a. In the System box, select the Central Management Server name.
b. In the User Name box, type Administrator.
c. In the Password box, type admin123.
d. From the Authentication list, select Enterprise.
Make sure that you do not delete existing (version 9.10) reports. Check the Content Pack 1 Release Notes for the reports that are new inContent Pack 1, and delete these.
54 Chapter 2
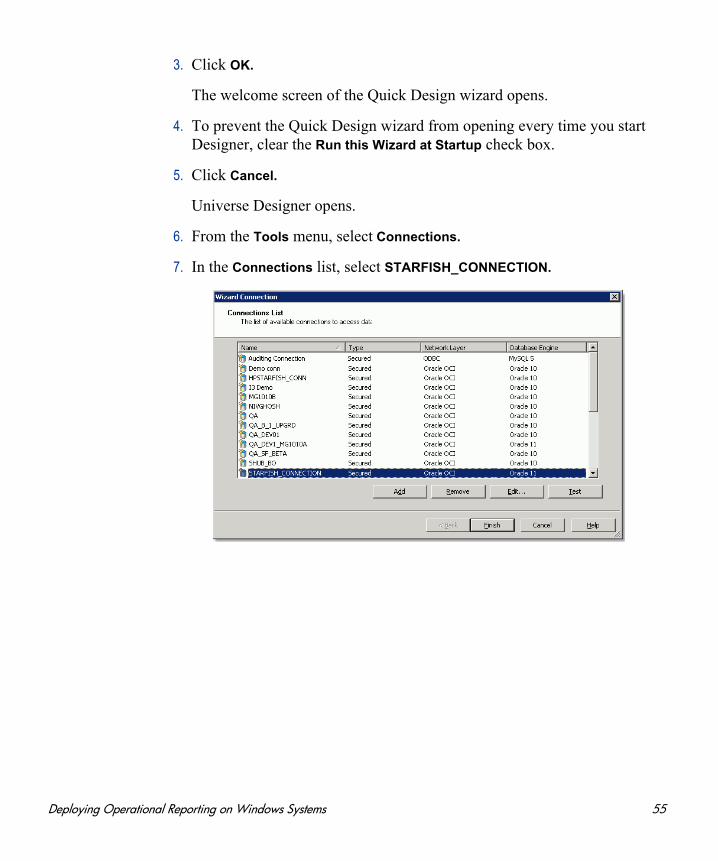
3. Click OK.
The welcome screen of the Quick Design wizard opens.
4. To prevent the Quick Design wizard from opening every time you start Designer, clear the Run this Wizard at Startup check box.
5. Click Cancel.
Universe Designer opens.
6. From the Tools menu, select Connections.
7. In the Connections list, select STARFISH_CONNECTION.
Deploying Operational Reporting on Windows Systems 55
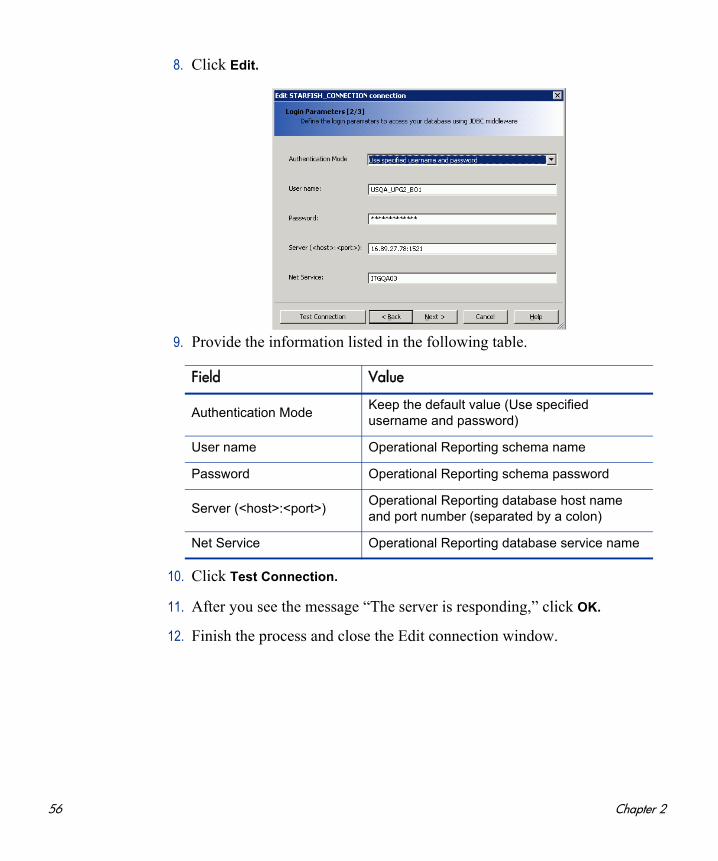
8. Click Edit.
9. Provide the information listed in the following table.
10. Click Test Connection.
11. After you see the message “The server is responding,” click OK.
12. Finish the process and close the Edit connection window.
Field Value
Authentication ModeKeep the default value (Use specified username and password)
User name Operational Reporting schema name
Password Operational Reporting schema password
Server (<host>:<port>)Operational Reporting database host name and port number (separated by a colon)
Net Service Operational Reporting database service name
56 Chapter 2
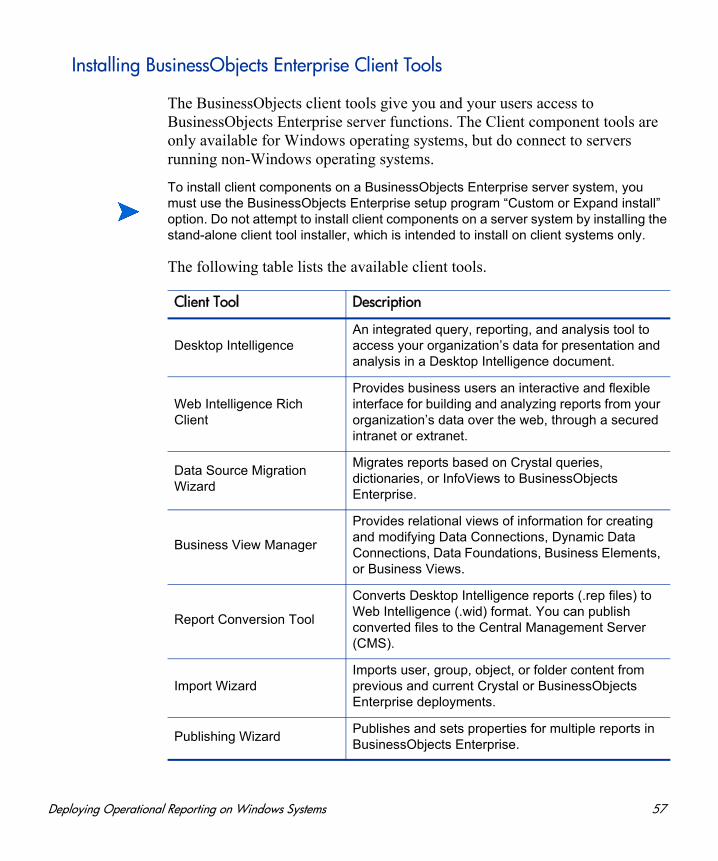
Installing BusinessObjects Enterprise Client Tools
The BusinessObjects client tools give you and your users access to BusinessObjects Enterprise server functions. The Client component tools are only available for Windows operating systems, but do connect to servers running non-Windows operating systems.
The following table lists the available client tools.
To install client components on a BusinessObjects Enterprise server system, you must use the BusinessObjects Enterprise setup program “Custom or Expand install” option. Do not attempt to install client components on a server system by installing the stand-alone client tool installer, which is intended to install on client systems only.
Client Tool Description
Desktop IntelligenceAn integrated query, reporting, and analysis tool to access your organization’s data for presentation and analysis in a Desktop Intelligence document.
Web Intelligence Rich Client
Provides business users an interactive and flexible interface for building and analyzing reports from your organization’s data over the web, through a secured intranet or extranet.
Data Source Migration Wizard
Migrates reports based on Crystal queries, dictionaries, or InfoViews to BusinessObjects Enterprise.
Business View Manager
Provides relational views of information for creating and modifying Data Connections, Dynamic Data Connections, Data Foundations, Business Elements, or Business Views.
Report Conversion Tool
Converts Desktop Intelligence reports (.rep files) to Web Intelligence (.wid) format. You can publish converted files to the Central Management Server (CMS).
Import WizardImports user, group, object, or folder content from previous and current Crystal or BusinessObjects Enterprise deployments.
Publishing WizardPublishes and sets properties for multiple reports in BusinessObjects Enterprise.
Deploying Operational Reporting on Windows Systems 57
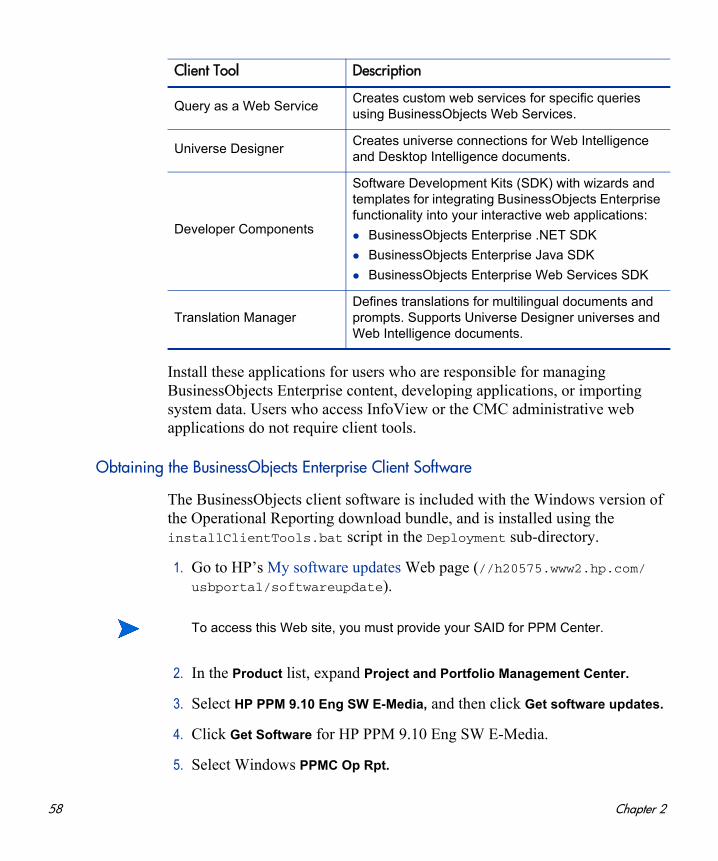
Install these applications for users who are responsible for managing BusinessObjects Enterprise content, developing applications, or importing system data. Users who access InfoView or the CMC administrative web applications do not require client tools.
Obtaining the BusinessObjects Enterprise Client Software
The BusinessObjects client software is included with the Windows version of the Operational Reporting download bundle, and is installed using the installClientTools.bat script in the Deployment sub-directory.
1. Go to HP’s My software updates Web page (//h20575.www2.hp.com/usbportal/softwareupdate).
2. In the Product list, expand Project and Portfolio Management Center.
3. Select HP PPM 9.10 Eng SW E-Media, and then click Get software updates.
4. Click Get Software for HP PPM 9.10 Eng SW E-Media.
5. Select Windows PPMC Op Rpt.
Query as a Web ServiceCreates custom web services for specific queries using BusinessObjects Web Services.
Universe DesignerCreates universe connections for Web Intelligence and Desktop Intelligence documents.
Developer Components
Software Development Kits (SDK) with wizards and templates for integrating BusinessObjects Enterprise functionality into your interactive web applications:
BusinessObjects Enterprise .NET SDK
BusinessObjects Enterprise Java SDK
BusinessObjects Enterprise Web Services SDK
Translation ManagerDefines translations for multilingual documents and prompts. Supports Universe Designer universes and Web Intelligence documents.
Client Tool Description
To access this Web site, you must provide your SAID for PPM Center.
58 Chapter 2
6. Download the Windows ISO image: PPMC Op Rpt Windows (T5570-15073.iso), and then burn this ISO image on to a DVD.
The DVD contains the DB, Deployment, Reports, Universe directories.
Installing BusinessObjects Client Tools: Silent Install
To perform a silent install of the BusinessObjects client tools on Windows XP:
1. Navigate to the <Op_Reports_Home>\Deployment\platform\installer folder.
2. Make a copy of the client.ini file, and then open the file in a text editor.
3. Set the INSTALLDIR value to the path on your local machine where you want the BusinessObjects client tools installed.
Example
INSTALLDIR="C:\boe_client_tools"
4. To start the client tools installation, navigate to the <Op_Reports_Home>\Deployment directory, and then run installClientTools.bat.
The installation process begins. When you see the message “BusinessObjects Enterprise XI Client Tools has been successfully installed”, client tool installation is complete.
Installing BusinessObjects Client Tools Using setup.exe
If the silent installation throws any errors, then install the Client Tools software using setup.exe as follows:
1. Run setup.exe from the root directory of your product distribution.
2. Click Install.
If Autoplay is enabled for your DVD-ROM drive, the Autorun program starts automatically.
The client tools installation takes a while to complete, and no progress information is displayed during the process.
Deploying Operational Reporting on Windows Systems 59
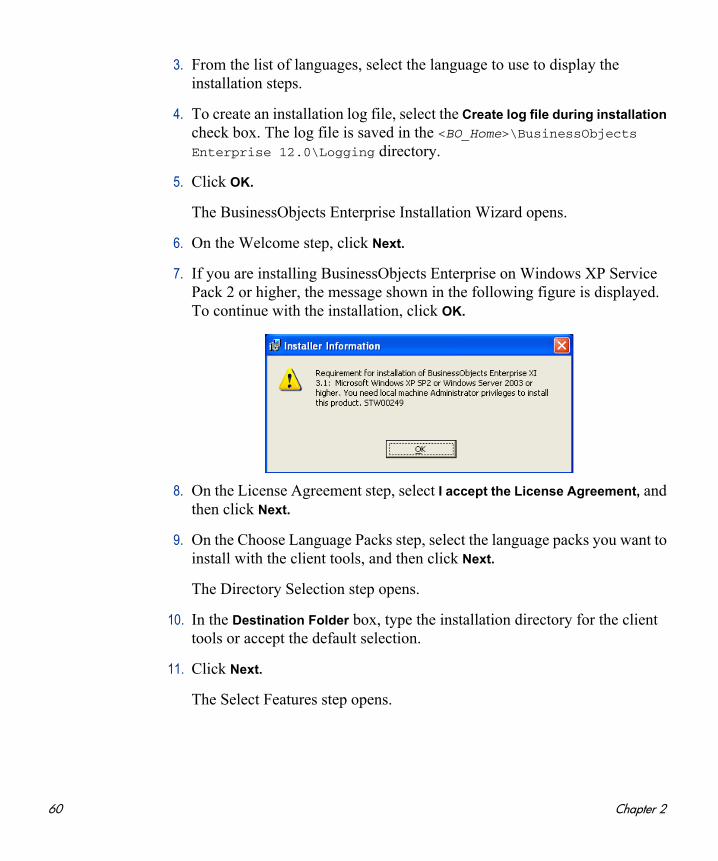
3. From the list of languages, select the language to use to display the installation steps.
4. To create an installation log file, select the Create log file during installation check box. The log file is saved in the <BO_Home>\BusinessObjects Enterprise 12.0\Logging directory.
5. Click OK.
The BusinessObjects Enterprise Installation Wizard opens.
6. On the Welcome step, click Next.
7. If you are installing BusinessObjects Enterprise on Windows XP Service Pack 2 or higher, the message shown in the following figure is displayed. To continue with the installation, click OK.
8. On the License Agreement step, select I accept the License Agreement, and then click Next.
9. On the Choose Language Packs step, select the language packs you want to install with the client tools, and then click Next.
The Directory Selection step opens.
10. In the Destination Folder box, type the installation directory for the client tools or accept the default selection.
11. Click Next.
The Select Features step opens.
60 Chapter 2

12. Under BusinessObjects Enterprise Client Tools, click the icons for the features that you want to install or exclude from installation, as shown in the following table.
13. To determine whether you have sufficient disc space to install the features you selected, click Disk Cost.
The installation program displays the storage space available on your local machine and mapped network drives. Drives that do not have enough disk space for the selected features are highlighted. To return to the Select Features step, click OK.
14. On the Start Installation step, click Next.
The installation process begins. When the “BusinessObjects Enterprise XI Client Tools has been successfully installed” message is displayed, the process is complete.
After you install the client tools, the Windows Start menu includes the BusinessObjects XI 3.1 folder, which you can use to start the client tools.
Icon Description
The selected feature and only the subfeatures you select are to be installed on the local hard drive you specified in the Setup program.
The selected feature and all its subfeatures are to be installed on the local hard drive you specified.
The selected feature or subfeature is either unavailable or will not be installed.
Deploying Operational Reporting on Windows Systems 61

Changing the BusinessObjects Central Management Server Password
During installation, a default password is used to configure CMS server and deploy HP-provided universes and reports. To prevent unauthorized access after installation, change the default password.
To change the password, do the following:
1. Open a Web browser window and enter the URL for the BusinessObjects Enterprise Central Management Console logon page.
The default URL is as follows:
http://<BusinessObjects_Server_Name>:8080/CmcApp
2. In the Central Management Console Log On window, log on using the following credentials:
In the User Name box, type Administrator.
In the Password box, type admin123.
3. Go to the Users management area of the CMC.
4. Click the link for the Administrator account.
62 Chapter 2
5. In the Enterprise Password Settings section, type a new password, and then confirm the new password.
6. If the User must change password at next logon check box is selected, clear it.
7. Click Update.
Verifying Successful Operational Reporting Deployment
To verify successful deployment of the Operational Reporting solution, log onto InfoView and generate one of the HP-supplied operational reports. For descriptions of these reports and instructions on how to run them, see the Operational Reporting User’s Guide.
(Optional) Configuring Multilingual Operational Reporting
Although reporting interface elements (control labels, headings, and so on) are displayed only in English, you can configure your BusinessObjects instance to enable users to view operational report contents in a non-English definition language.
If you have a multilingual PPM Center instance, Operational Reporting is shown in the definition language. In PPM Center, not all entities are MLU-enabled. Those entities are shown in the definition language in Operational Reporting.
This section provides information about how to enable multilingual Operational Reporting on a Windows system. The steps described in the following procedure are for a Windows 2003 system. Depending on your Windows operating system, your steps may differ from those described here.
The definition language is the language in which a PPM Center entity is defined.The definition language is used as the fallback language for PPM Center entities if no translations for those entities are available in PPM Center. For more information, see the Multilingual User Interface Guide.
Deploying Operational Reporting on Windows Systems 63
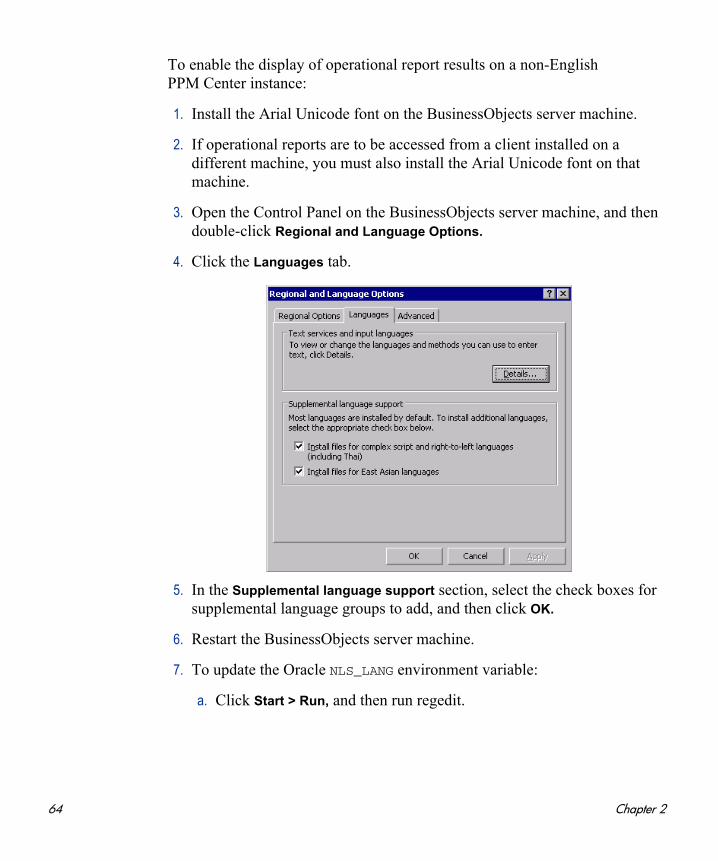
To enable the display of operational report results on a non-English PPM Center instance:
1. Install the Arial Unicode font on the BusinessObjects server machine.
2. If operational reports are to be accessed from a client installed on a different machine, you must also install the Arial Unicode font on that machine.
3. Open the Control Panel on the BusinessObjects server machine, and then double-click Regional and Language Options.
4. Click the Languages tab.
5. In the Supplemental language support section, select the check boxes for supplemental language groups to add, and then click OK.
6. Restart the BusinessObjects server machine.
7. To update the Oracle NLS_LANG environment variable:
a. Click Start > Run, and then run regedit.
64 Chapter 2
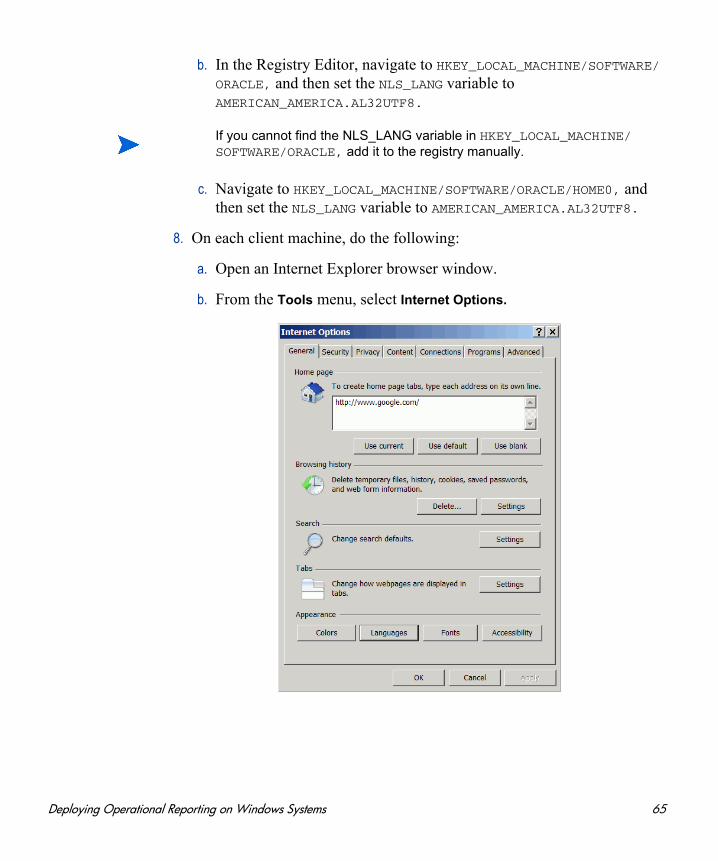
b. In the Registry Editor, navigate to HKEY_LOCAL_MACHINE/SOFTWARE/ORACLE, and then set the NLS_LANG variable to AMERICAN_AMERICA.AL32UTF8.
c. Navigate to HKEY_LOCAL_MACHINE/SOFTWARE/ORACLE/HOME0, and then set the NLS_LANG variable to AMERICAN_AMERICA.AL32UTF8.
8. On each client machine, do the following:
a. Open an Internet Explorer browser window.
b. From the Tools menu, select Internet Options.
If you cannot find the NLS_LANG variable in HKEY_LOCAL_MACHINE/SOFTWARE/ORACLE, add it to the registry manually.
Deploying Operational Reporting on Windows Systems 65
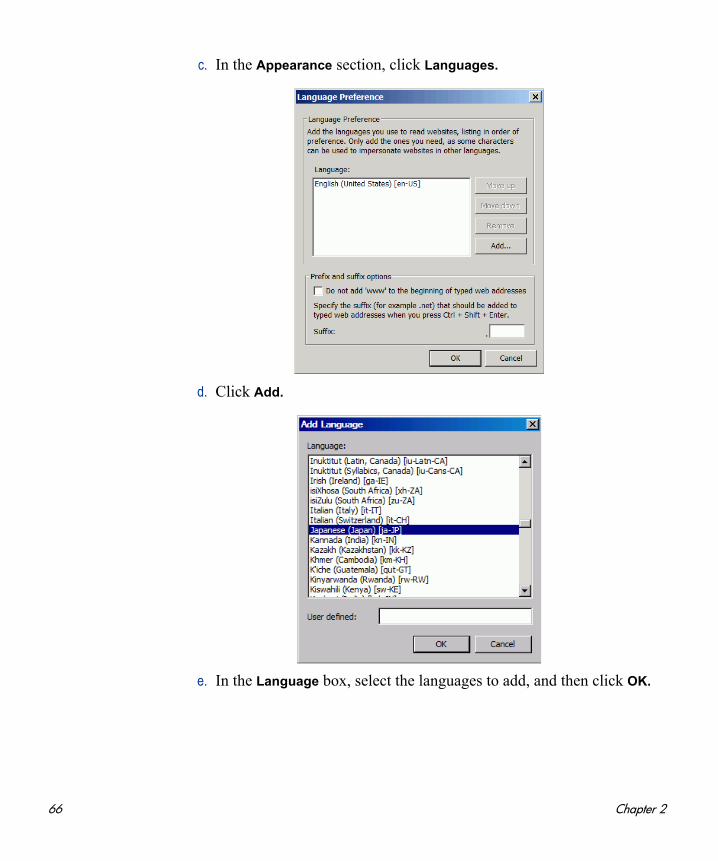
c. In the Appearance section, click Languages.
d. Click Add.
e. In the Language box, select the languages to add, and then click OK.
66 Chapter 2

9. Set Unicode management to UTF-8 encoding, as follows:
a. Navigate to the C:\Program Files\Business Objects\BusinessObjects Enterprise 12.0\win32_x86\dataAccess\
connectionServer\oracle directory and open the oracle.sbo file in a text editor and locate the <Defaults> section.
b. Replace the lines in the <Defaults> section with the following:
Parameter Name="Family">Oracle</Parameter><Parameter Name="SQL External File">oracle</Parameter><Parameter Name="SQL Parameter File">oracle</Parameter><Parameter Name="Description File">oracle</Parameter><Parameter Name="Strategies File">oracle</Parameter><Parameter Name="Driver Level">31</Parameter><Parameter Name="Array Fetch Available">True</Parameter><Parameter Name="Array Fetch Size">250</Parameter><Parameter Name="Array Bind Available">True</Parameter><Parameter Name="Array Bind Size">32767</Parameter><Parameter Name="Query TimeOut Available">False
</Parameter><Parameter Name="Binary Slice Size">32000</Parameter><Parameter Name="CharSet Table">oracle</Parameter><Parameter Name="Unicode">UTF8</Parameter>
c. Save and close the oracle.sbo file.
d. On the Oracle server, navigate to the C:\Program Files\Business Objects\BusinessObjects Enterprise 12.0\win32_x86\
dataAccess\connectionServer directory, open the cs.cfg file in a text editor.
e. Locate the <DriverDefaults> section and set the Unicode parameter as follows:
<Parameter Name="Unicode">UTF8</Parameter>
f. Save and close the cs.cfg file.
10. Modify the defaultconfig.xml file to support the Arial Unicode MS font as follows:
a. Navigate to the C:\Program Files\Business Objects\Tomcat55\Webapps\AnalyticalReporting\webiapplet\AppletConfig directory and open the defaultconfig.xml file in edit mode.
Deploying Operational Reporting on Windows Systems 67

b. Locate <CUSTOM_GUI_FONTS VALUE=""/>, and change it to the following:
<CUSTOM_GUI_FONTS VALUE="Arial Unicode MS"/>
c. Save and close the defaultconfig.xml file.
11. Modify the fontalias.xml file to support the Arial Unicode MS font as follows:
a. Navigate to the C:\Program Files\Business Objects\Business Objects Enterprise 12.0\win32_x86\fonts directory and open the fontalias.xml file in edit mode.
b. Add the following just above the <FONT NAME="default"> section:
<FONT NAME="Arial Unicode"><FONTFAMILY PLATFORM="ttf" NAME="'Arial Unicode MS'"><FONTATTRIBUTE BOLD="false" ITALIC="false"LOGICAL="'Arial Unicode MS'" PHYSICAL="ARIALUNI.ttf"/></FONTFAMILY><FONTFAMILY PLATFORM="win" NAME="'Arial Unicode MS'"/><FONTFAMILY PLATFORM="java" NAME="'ArialUnicode MS'"/><FONTFAMILY PLATFORM="html" NAME="'ArialUnicode MS'"/>
</FONT>
12. Navigate to the C:\Program Files\Business Objects\Business Objects Enterprise 12.0\win32_x86\scripts directory, open the i18n.xml file in edit mode, and then add the following to the <font_aliasing> <TTF> section:
</font><font name="Arial Unicode MS">
<os type="all"> <Attributs style="0" filename="arialuni.ttf" encoding=""aliaspsname="Arial Unicode MS"/>
</os> </font>
13. Select Start > All Programs > BusinessObjects XI 3.1 > BusinessObjects
Enterprise > Central Configuration Manager.
14. Right-click Apache Tomcat 5.5.2.0, and then select Restart from the shortcut menu.
68 Chapter 2
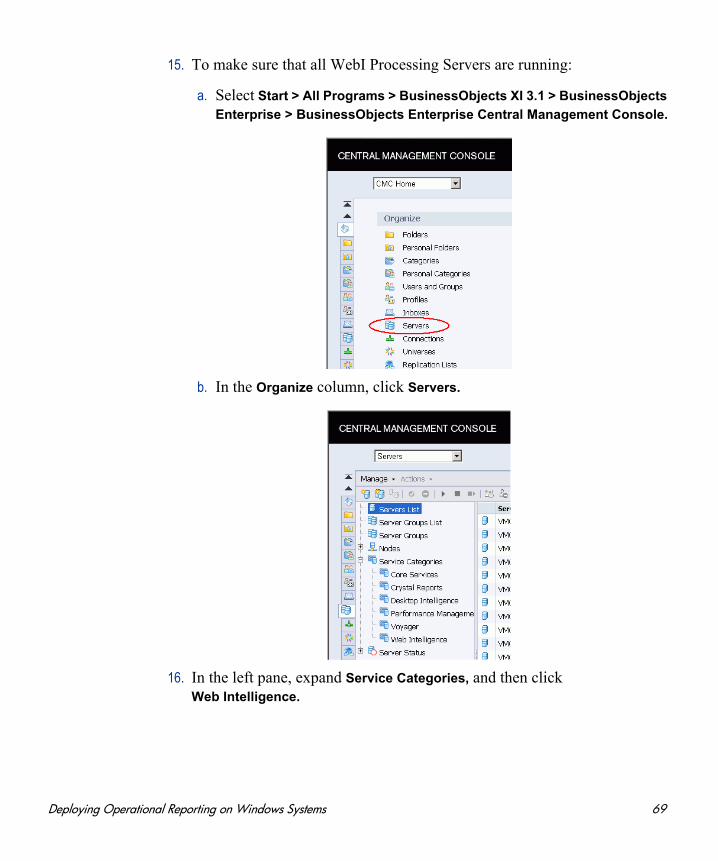
15. To make sure that all WebI Processing Servers are running:
a. Select Start > All Programs > BusinessObjects XI 3.1 > BusinessObjects
Enterprise > BusinessObjects Enterprise Central Management Console.
b. In the Organize column, click Servers.
16. In the left pane, expand Service Categories, and then click Web Intelligence.
Deploying Operational Reporting on Windows Systems 69
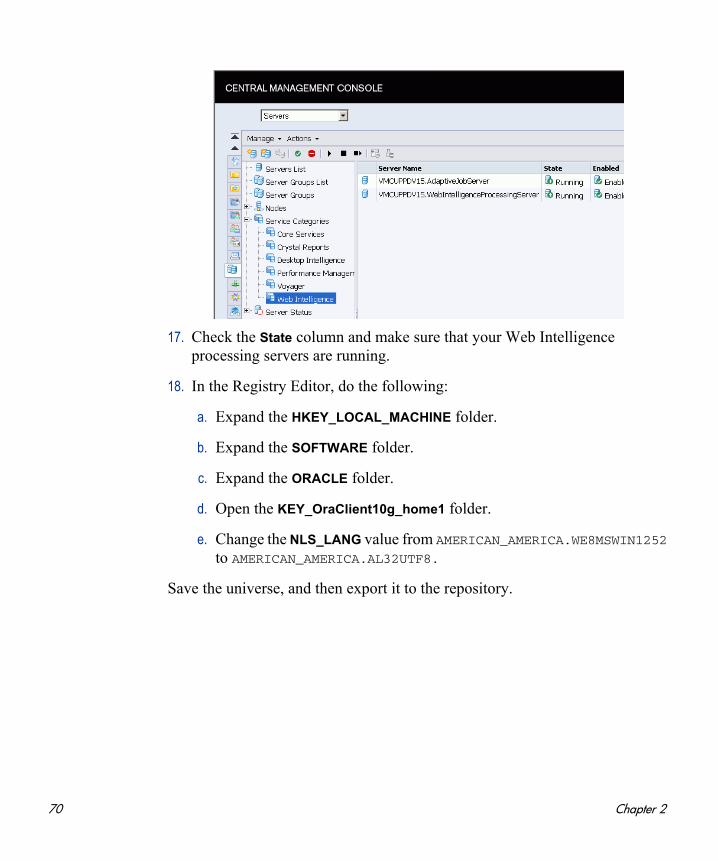
17. Check the State column and make sure that your Web Intelligence processing servers are running.
18. In the Registry Editor, do the following:
a. Expand the HKEY_LOCAL_MACHINE folder.
b. Expand the SOFTWARE folder.
c. Expand the ORACLE folder.
d. Open the KEY_OraClient10g_home1 folder.
e. Change the NLS_LANG value from AMERICAN_AMERICA.WE8MSWIN1252 to AMERICAN_AMERICA.AL32UTF8.
Save the universe, and then export it to the repository.
70 Chapter 2
Displaying Report Values for Non-English Speaking Locales
If you enable multilingual Operational Reporting, users in different locales must configure InfoView to display numeric values and dates correctly in reports.
To make sure that numeric values and dates are correctly displayed for your locale, do the following:
1. Open a web browser window and log on to InfoView.
2. Click Preferences.
3. In the General section on the Preferences page, scroll down and, from the Preferred Viewing Locale list, select a locale.
4. Click OK.
When you start viewing operational reports in InfoView, dates and numeric values are displayed correctly.
Deploying Operational Reporting on Windows Systems 71

72 Chapter 2

3 Deploying Operational Reporting onUNIX Systems
Operational Reporting Solution Deployment
This chapter provides the information you need to implement the Operational Reporting solution for PPM Center for the first time on a UNIX system. It includes instructions for deploying Operational Reporting for PPM Center 9.10 and then upgrading immediately to PPM Center Content Pack 1.
If you have already deployed Operational Reporting based on PPM Center 9.10, and you want to upgrade to PPM Center Content Pack 1 follow the instructions provided in Chapter 5, Upgrading Operational Reporting on a UNIX System, on page 127. For instructions on how to deploy Operational Reporting on a Windows system, see Chapter 2, Deploying Operational Reporting on Windows Systems, on page 21.
73
High-Level Deployment Steps
Deploying the Operational Reporting solution for PPM Center involves the following tasks:
1. Install PPM Center version 9.10, and then upgrade to PPM Center 9.10 service pack 2 (9.12).
2. To make sure that your system meets the requirements for BusinessObjects Enterprise installation, check the Products Availability Report (PAR) document, which is available on the BusinessObjects support site (http://support.businessobjects.com/documentation/supported_platforms).
3. (Optional, but strongly recommended for optimal performance) Set up an Oracle database instance specifically for Operational Reporting and set Oracle database parameters. (See Setting Up a Database for Operational Reporting on page 76).
4. Check to make sure that the PPM Center database and the Operational Reporting database can communicate over the database link.
5. Create four Oracle tablespaces required to create the Operational Reporting schema and database objects. (See Creating Tablespaces for the Operational Reporting Schema on page 77.)
6. Download the Oracle 11g database client software and install it on both your BusinessObjects server and client machine.
7. Set the JAVA_HOME variable on the BusinessObjects server. (See step 8 on page 81.)
8. Install the SAP BusinessObjects Enterprise software and, optionally, the BusinessObjects Enterprise Client Tools software. (See Installing BusinessObjects Enterprise on a UNIX System on page 83.)
For information about how to install PPM Center 9.10 and service packs, see the Installation and Administration Guide for PPM Center 9.10 or the Release Notes for the specific service pack.
The Operational Reporting database schema is created automatically during Operational Reporting deployment.
74 Chapter 3
9. Upgrade the BusinessObjects instance with BusinessObjects XI 3.1 Service Pack 2, and, optionally, upgrade the BusinessObjects Enterprise Client Tools software. (See Installing BusinessObjects Enterprise XI 3.1, Service Pack 2 on page 85.)
10. Run the BusinessObjects Diagnostic Tool to verify successful BusinessObjects Enterprise installation and upgrade. (See Verifying Successful BusinessObjects Enterprise Installation on page 92.)
11. Set up the Oracle JDBC driver to establish connections between the BusinessObjects server and the Operational Reporting databases. (See Configuring the Oracle JDBC Driver on page 92.)
12. Import the PPM Center reporting universes and preconfigured reports. (See Importing and Updating Universes and Reports on page 104.)
13. Run the setup script to create the Operational Reporting database schema. (See Creating the Operational Reporting Database Schema on page 94.)
14. Run the load script to bring PPM Center data into the Operational Reporting database schema. (See Loading PPM Center Data Into the Operational Reporting Database on page 99.)
15. Upgrade Operational Reporting to PPM Center Content Pack 1.
16. Remove the default password for the BusinessObjects Central Management Server (CMS). (See Removing the BusinessObjects Central Management Server Password on page 113.)
17. Configure the Operational Reporting database connection. (See Configuring the Operational Reporting Database Connection on page 109.) Change the connection parameters for all the universes so that the connection points to the Operational Reporting database schema.
18. To verify successful deployment of Operational Reporting, run the query for an HP-supplied report. For information about HP-supplied operational reports, see the Operational Reporting User’s Guide.
Deploying Operational Reporting on UNIX Systems 75
Preparing the Database Schema for Operational Reporting
The following sections provide instructions on how to prepare the Operational Reporting database schema.
Setting Up a Database for Operational Reporting
Requirements and recommendations for setting up the database for Operational Reporting are as follows:
(Required) Configure the Operational Reporting database to use UTF-8 encoding.
(Required) Set the Oracle NLS_CHARACTERSET parameter to UTF-8.
HP strongly recommends that you create an Oracle database specifically for Operational Reporting (independent of your Oracle Database instance). Make sure that the PPM Center database and the Operational Reporting database can communicate over the database link.
HP strongly recommends that you use the Enterprise Edition of Oracle Database for the Operational Reporting database. The advanced compression and partitioning featured in the Enterprise Edition significantly improve performance, especially if you report on a large and growing volume of data.
Configuring Oracle Database Parameters for Operational Reporting
HP recommends that you use Oracle’s automatic memory management (AMM) feature. To do this, set the value for either the memory_max_target parameter or the memory_target parameter, and then let Oracle manage the memory (SGA and the PGA) dynamically. For more information about how to optimize performance, see the Deployment Best Practices for PPM Operational Reporting document.
To obtain the Deployment Best Practices for PPM Operational Reporting document and other HP PPM Center documents, go to the Software Product Manuals Web site (support.openview.hp.com/selfsolve/manuals). To access this Web site, you must first set up an HP Passport account.
76 Chapter 3
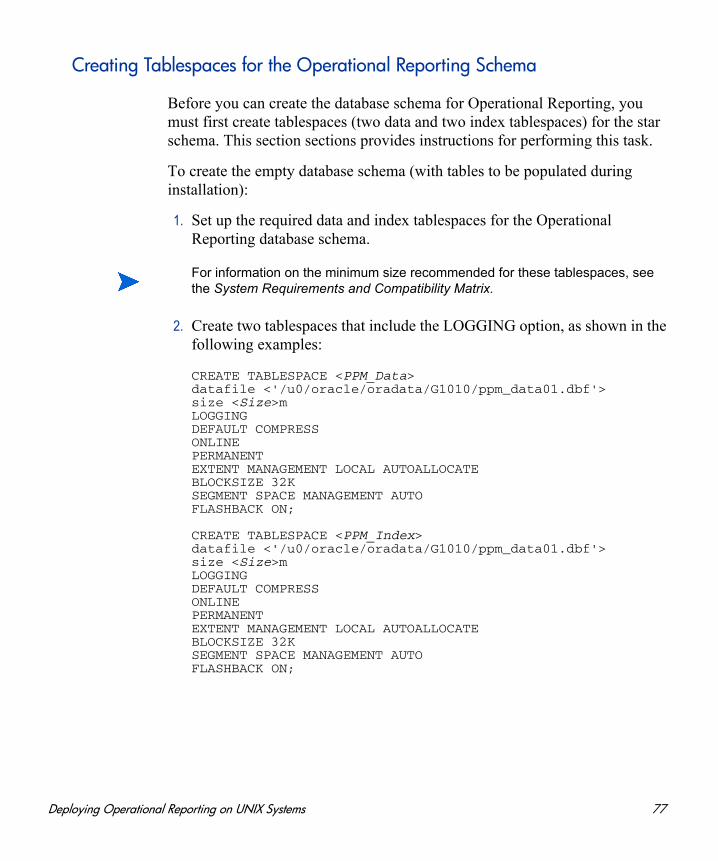
Creating Tablespaces for the Operational Reporting Schema
Before you can create the database schema for Operational Reporting, you must first create tablespaces (two data and two index tablespaces) for the star schema. This section sections provides instructions for performing this task.
To create the empty database schema (with tables to be populated during installation):
1. Set up the required data and index tablespaces for the Operational Reporting database schema.
2. Create two tablespaces that include the LOGGING option, as shown in the following examples:
CREATE TABLESPACE <PPM_Data>datafile <'/u0/oracle/oradata/G1010/ppm_data01.dbf'>size <Size>mLOGGINGDEFAULT COMPRESSONLINEPERMANENTEXTENT MANAGEMENT LOCAL AUTOALLOCATEBLOCKSIZE 32KSEGMENT SPACE MANAGEMENT AUTOFLASHBACK ON;
CREATE TABLESPACE <PPM_Index>datafile <'/u0/oracle/oradata/G1010/ppm_data01.dbf'>size <Size>mLOGGINGDEFAULT COMPRESSONLINEPERMANENTEXTENT MANAGEMENT LOCAL AUTOALLOCATEBLOCKSIZE 32KSEGMENT SPACE MANAGEMENT AUTOFLASHBACK ON;
For information on the minimum size recommended for these tablespaces, see the System Requirements and Compatibility Matrix.
Deploying Operational Reporting on UNIX Systems 77
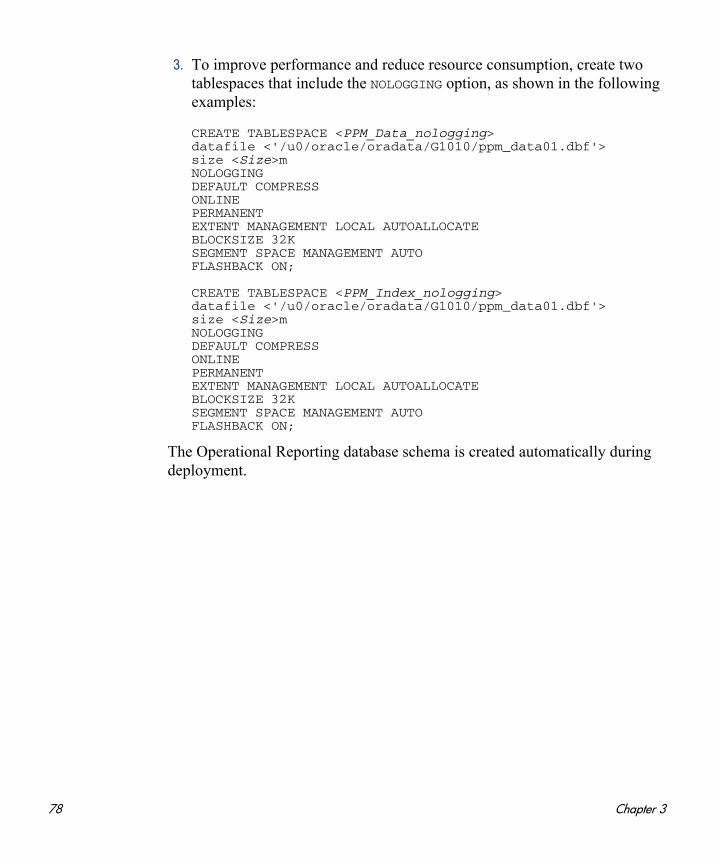
3. To improve performance and reduce resource consumption, create two tablespaces that include the NOLOGGING option, as shown in the following examples:
CREATE TABLESPACE <PPM_Data_nologging>datafile <'/u0/oracle/oradata/G1010/ppm_data01.dbf'>size <Size>mNOLOGGINGDEFAULT COMPRESSONLINEPERMANENTEXTENT MANAGEMENT LOCAL AUTOALLOCATEBLOCKSIZE 32KSEGMENT SPACE MANAGEMENT AUTOFLASHBACK ON;
CREATE TABLESPACE <PPM_Index_nologging>datafile <'/u0/oracle/oradata/G1010/ppm_data01.dbf'>size <Size>mNOLOGGINGDEFAULT COMPRESSONLINEPERMANENTEXTENT MANAGEMENT LOCAL AUTOALLOCATEBLOCKSIZE 32KSEGMENT SPACE MANAGEMENT AUTOFLASHBACK ON;
The Operational Reporting database schema is created automatically during deployment.
78 Chapter 3
Deploying BusinessObjects Enterprise on UNIX Systems
This section contains information about the operating systems and languages supported by the Operational Reporting solution, instructions on how to prepare your system for BusinessObjects Enterprise installation, and the detailed steps to perform the installation.
Operating Systems Support for BusinessObjects Enterprise
BusinessObjects Enterprise XI 3.1 is supported for Windows, Linux, HP-UX IBM AIX, and Sun Solaris operating systems. For information about the specific versions of the operating systems supported, see the Products Availability Report (PAR) document, which is available on the BusinessObjects support site (http://support.businessobjects.com/documentation/supported_platforms).
Deploying Operational Reporting on UNIX Systems 79
Preparing to Install BusinessObjects Enterprise on a UNIX System
This section addresses the tasks to perform before you start to install BusinessObjects Enterprise.
To prepare your system for BusinessObjects Enterprise installation, do the following:
1. Install all necessary service packs and packages for your operating system.
2. Check to make sure that your system meets the following minimum disk space requirements for BusinessObjects Enterprise installation:
8.0 GB for BusinessObjects Enterprise (BusinessObjects Server and BusinessObjects Client)
3.0 GB for BusinessObjects Enterprise Client
3. To get the PPM Center 9.12 Content Pack 1 upgrade bundle:
a. Go to the Operational Reporting Content delivery page (h22038.www2.hp.com) on the HP Live Network site.
b. Under Quick Links, click Download Reporting Content.
c. In the Name column, click the 9.12 CP1 link.
d. Download the PPM Center 9.12 Content Pack 1 upgrade bundle for your operating system.
4. Extract the contents of the PPM Center 9.12 Content Pack 1 upgrade bundle to its own directory (hereinafter referred to as the <PPM_CP1> directory), separate from the <Op_Reports_Home> directory.
To access the Operational Reporting Content delivery page, you must first sign in on the HP Passport sign-in page.
For detailed information about how to access the Operational Reporting Content delivery page, see Operational Reporting Content on HP Live Network on page 17.
80 Chapter 3
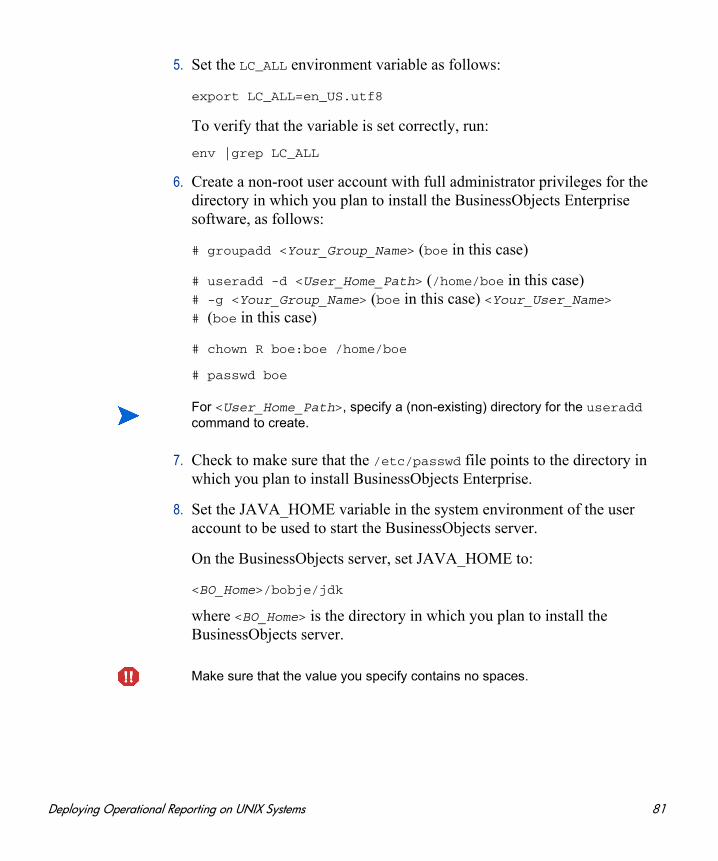
5. Set the LC_ALL environment variable as follows:
export LC_ALL=en_US.utf8
To verify that the variable is set correctly, run:
env |grep LC_ALL
6. Create a non-root user account with full administrator privileges for the directory in which you plan to install the BusinessObjects Enterprise software, as follows:
# groupadd <Your_Group_Name> (boe in this case)
# useradd -d <User_Home_Path> (/home/boe in this case) # -g <Your_Group_Name> (boe in this case) <Your_User_Name> # (boe in this case)
# chown R boe:boe /home/boe
# passwd boe
7. Check to make sure that the /etc/passwd file points to the directory in which you plan to install BusinessObjects Enterprise.
8. Set the JAVA_HOME variable in the system environment of the user account to be used to start the BusinessObjects server.
On the BusinessObjects server, set JAVA_HOME to:
<BO_Home>/bobje/jdk
where <BO_Home> is the directory in which you plan to install the BusinessObjects server.
For <User_Home_Path>, specify a (non-existing) directory for the useradd command to create.
Make sure that the value you specify contains no spaces.
Deploying Operational Reporting on UNIX Systems 81
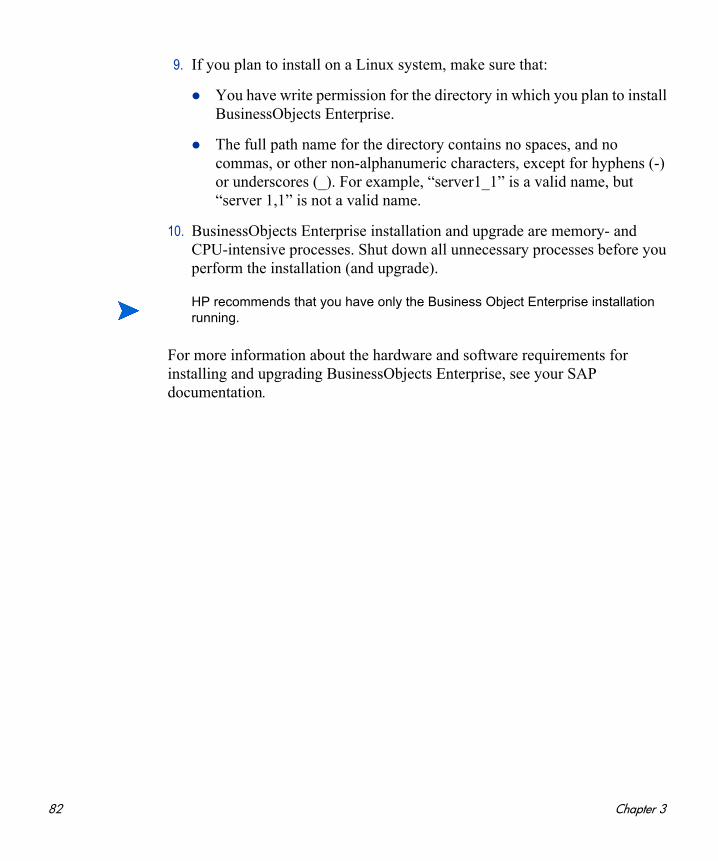
9. If you plan to install on a Linux system, make sure that:
You have write permission for the directory in which you plan to install BusinessObjects Enterprise.
The full path name for the directory contains no spaces, and no commas, or other non-alphanumeric characters, except for hyphens (-) or underscores (_). For example, “server1_1” is a valid name, but “server 1,1” is not a valid name.
10. BusinessObjects Enterprise installation and upgrade are memory- and CPU-intensive processes. Shut down all unnecessary processes before you perform the installation (and upgrade).
For more information about the hardware and software requirements for installing and upgrading BusinessObjects Enterprise, see your SAP documentation.
HP recommends that you have only the Business Object Enterprise installation running.
82 Chapter 3
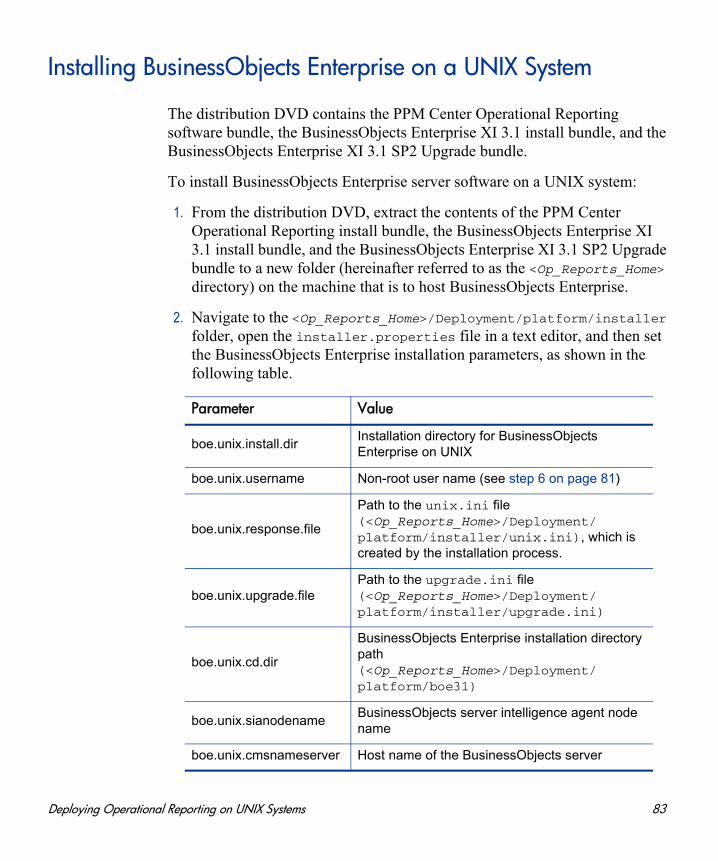
Installing BusinessObjects Enterprise on a UNIX System
The distribution DVD contains the PPM Center Operational Reporting software bundle, the BusinessObjects Enterprise XI 3.1 install bundle, and the BusinessObjects Enterprise XI 3.1 SP2 Upgrade bundle.
To install BusinessObjects Enterprise server software on a UNIX system:
1. From the distribution DVD, extract the contents of the PPM Center Operational Reporting install bundle, the BusinessObjects Enterprise XI 3.1 install bundle, and the BusinessObjects Enterprise XI 3.1 SP2 Upgrade bundle to a new folder (hereinafter referred to as the <Op_Reports_Home> directory) on the machine that is to host BusinessObjects Enterprise.
2. Navigate to the <Op_Reports_Home>/Deployment/platform/installer folder, open the installer.properties file in a text editor, and then set the BusinessObjects Enterprise installation parameters, as shown in the following table.
Parameter Value
boe.unix.install.dirInstallation directory for BusinessObjects Enterprise on UNIX
boe.unix.username Non-root user name (see step 6 on page 81)
boe.unix.response.file
Path to the unix.ini file (<Op_Reports_Home>/Deployment/platform/installer/unix.ini), which is created by the installation process.
boe.unix.upgrade.filePath to the upgrade.ini file (<Op_Reports_Home>/Deployment/platform/installer/upgrade.ini)
boe.unix.cd.dir
BusinessObjects Enterprise installation directory path(<Op_Reports_Home>/Deployment/platform/boe31)
boe.unix.sianodenameBusinessObjects server intelligence agent node name
boe.unix.cmsnameserver Host name of the BusinessObjects server
Deploying Operational Reporting on UNIX Systems 83
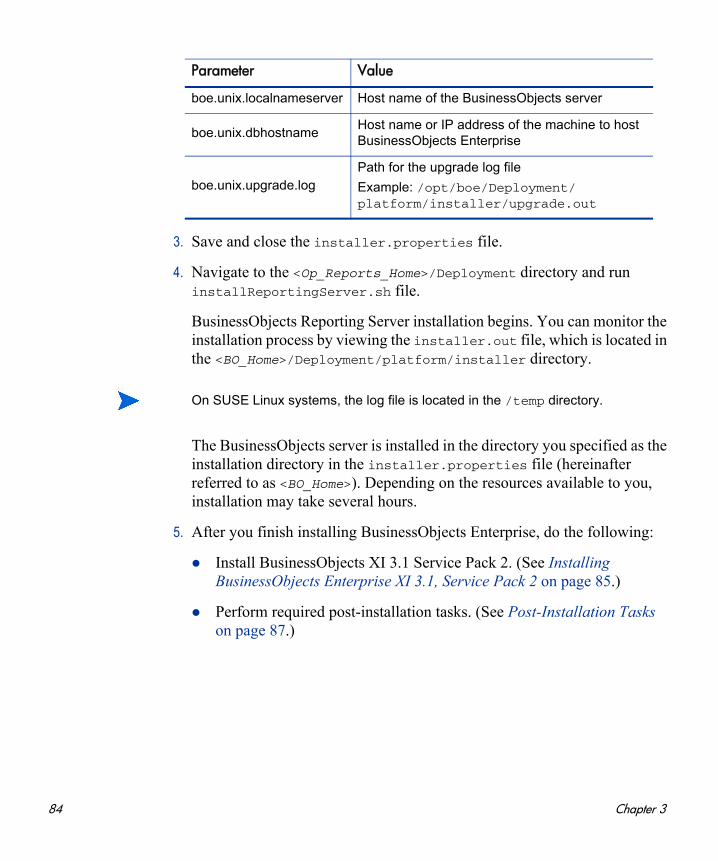
3. Save and close the installer.properties file.
4. Navigate to the <Op_Reports_Home>/Deployment directory and run installReportingServer.sh file.
BusinessObjects Reporting Server installation begins. You can monitor the installation process by viewing the installer.out file, which is located in the <BO_Home>/Deployment/platform/installer directory.
The BusinessObjects server is installed in the directory you specified as the installation directory in the installer.properties file (hereinafter referred to as <BO_Home>). Depending on the resources available to you, installation may take several hours.
5. After you finish installing BusinessObjects Enterprise, do the following:
Install BusinessObjects XI 3.1 Service Pack 2. (See Installing BusinessObjects Enterprise XI 3.1, Service Pack 2 on page 85.)
Perform required post-installation tasks. (See Post-Installation Tasks on page 87.)
boe.unix.localnameserver Host name of the BusinessObjects server
boe.unix.dbhostnameHost name or IP address of the machine to host BusinessObjects Enterprise
boe.unix.upgrade.logPath for the upgrade log file
Example: /opt/boe/Deployment/platform/installer/upgrade.out
Parameter Value
On SUSE Linux systems, the log file is located in the /temp directory.
84 Chapter 3

Installing BusinessObjects Enterprise XI 3.1, Service Pack 2
After you have successful installed BusinessObjects XI 3.1, you must install BusinessObjects XI 3.1 Service Pack 2 (SP2). For information about the requirements for installing BusinessObjects XI 3.1 SP2, see the Products Availability Report (PAR) document, which you can get from the BusinessObjects support site (http://support.businessobjects.com/documentation/supported_platforms).
To install BusinessObjects XI 3.1 SP2 on UNIX:
1. Before you begin, shut down any processes that are not absolutely required during the upgrade. The SP2 upgrade is memory- and CPU-intensive.
2. Navigate to the <Op_Reports_Home>/Deployment directory, and then run the upgradeReportingServer.sh file.
The service pack installation begins. You can monitor the installation process by viewing the upgrade.out file, which is located in the <BO_Home>/Deployment/platform/installer directory.
3. Check the PPM Center Release Notes to see whether additional BusinessObjects Enterprise service packs or fix packs are required for Operational Reporting deployment and perform any additional installations required.
The upgrade takes a few hours to complete.
Deploying Operational Reporting on UNIX Systems 85
Checking the Deployment Log File After BusinessObjects XI 3.1 SP2 Installation
If you install a BusinessObjects Enterprise service pack, the BusinessObjects Web application is automatically re-deployed.
After you install BusinessObjects XI 3.1 SP2, do the following:
1. Navigate to the <BO_Home>/bobje/setup/logs directory and check the log files for any errors that may have occurred.
2. If errors occurred during installation, or if you cannot run a report from InfoView because of JavaScript errors, then manually re-deploy BusinessObjects Enterprise as follows:
a. Back up the <BO_Home>/deployment/workdir folder.
b. Delete all contents of the <BO_Home>/deployment/workdir folder.
c. Change to the <BO_Home>/deployment directory, and then run the command wdeploy.sh tomcat55 deployall.
3. Check the wdeploy.log file again for errors, and then run a report query from InfoView to test the deployment.
Verifying the Upgrade to BusinessObjects XI 3.1 SP2
After installation, navigate to the <BO_Home>/setup/logs directory and check the BOE_SP2_Install_0.log file to make sure that the BusinessObjects XI 3.1 SP2 installation was successful.
After you finish installing BusinessObjects XI 3.1 SP2, complete the tasks described in Post-Installation Tasks on page 87.
86 Chapter 3
Post-Installation Tasks
This section addresses the following tasks, which must be performed after you install and update BusinessObjects Enterprise:
(HP-UX Only) Resetting Memory Thresholds
Verifying Successful BusinessObjects Enterprise Installation
Configuring the Oracle JDBC Driver
Creating the Operational Reporting Database Schema
Loading PPM Center Data Into the Operational Reporting Database
Running the Upgrade Script
Importing and Updating Universes and Reports
Configuring the Operational Reporting Database Connection
Installing BusinessObjects Enterprise Client Tools
Removing the BusinessObjects Central Management Server Password
Verify Successful Operational Reporting Deployment
Deploying Operational Reporting on UNIX Systems 87
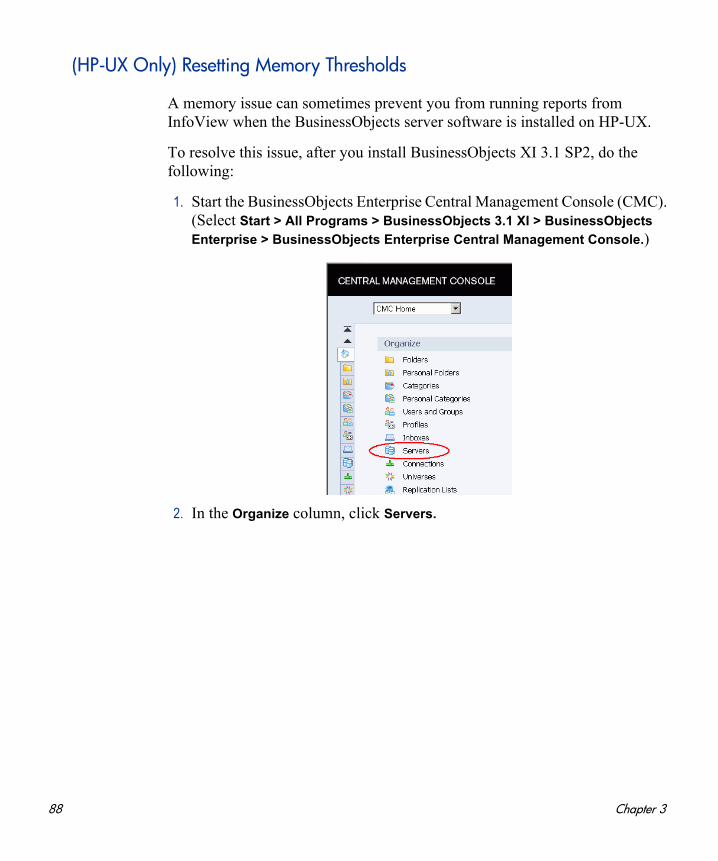
(HP-UX Only) Resetting Memory Thresholds
A memory issue can sometimes prevent you from running reports from InfoView when the BusinessObjects server software is installed on HP-UX.
To resolve this issue, after you install BusinessObjects XI 3.1 SP2, do the following:
1. Start the BusinessObjects Enterprise Central Management Console (CMC). (Select Start > All Programs > BusinessObjects 3.1 XI > BusinessObjects
Enterprise > BusinessObjects Enterprise Central Management Console.)
2. In the Organize column, click Servers.
88 Chapter 3

3. In the Server Name column, double-click <BusinessObjects_Server_Host_Name>WebIntelligenceProcessingServer.
Deploying Operational Reporting on UNIX Systems 89
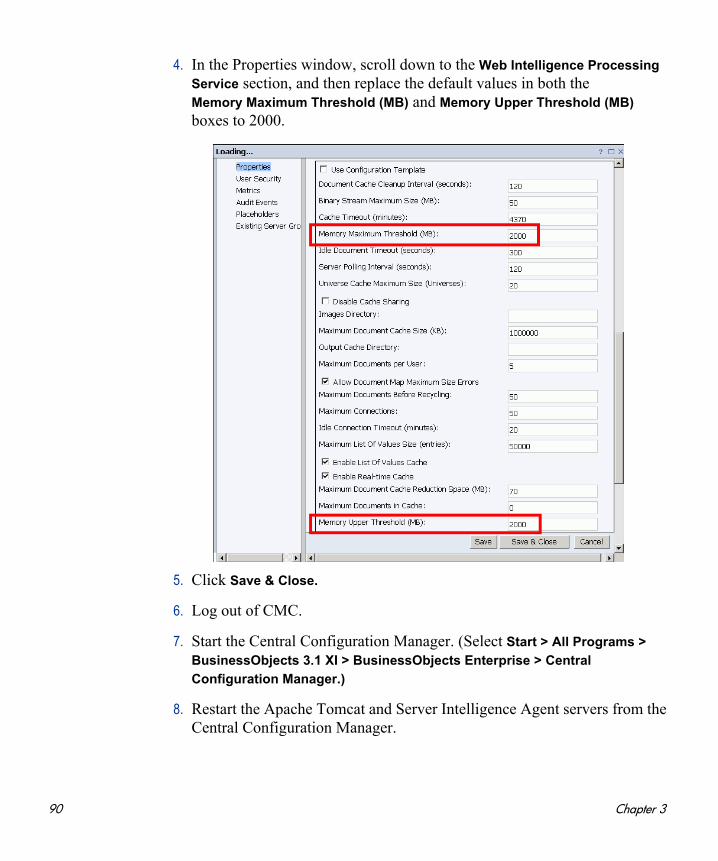
4. In the Properties window, scroll down to the Web Intelligence Processing
Service section, and then replace the default values in both the Memory Maximum Threshold (MB) and Memory Upper Threshold (MB) boxes to 2000.
5. Click Save & Close.
6. Log out of CMC.
7. Start the Central Configuration Manager. (Select Start > All Programs >
BusinessObjects 3.1 XI > BusinessObjects Enterprise > Central
Configuration Manager.)
8. Restart the Apache Tomcat and Server Intelligence Agent servers from the Central Configuration Manager.
90 Chapter 3
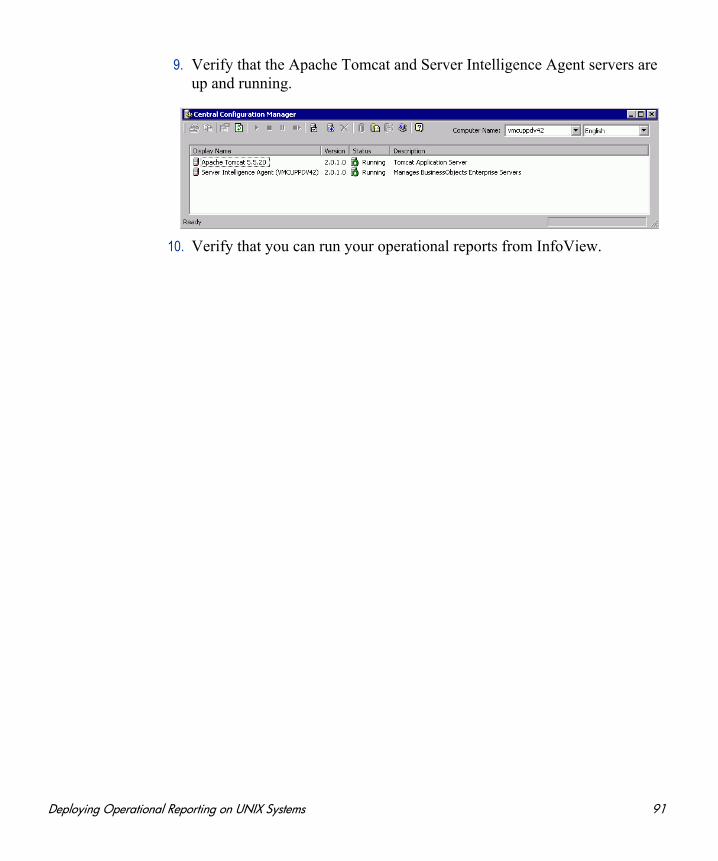
9. Verify that the Apache Tomcat and Server Intelligence Agent servers are up and running.
10. Verify that you can run your operational reports from InfoView.
Deploying Operational Reporting on UNIX Systems 91
Verifying Successful BusinessObjects Enterprise Installation
After you install BusinessObjects Enterprise, check your installation.
To verify that the BusinessObjects Enterprise installation was successful, use the BusinessObjects client tools installed on Windows (see Installing BusinessObjects Enterprise Client Tools on page 57.)
For detailed information about the diagnostic tests and how to run them, see SAP’s BusinessObjects Enterprise XI 3.1 Deployment Diagnostic Tool User's Guide.
Configuring the Oracle JDBC Driver
Operational Reporting deployment relies on the Oracle JDBC driver to establish connections between BusinessObjects server and the Operational Reporting schema. This section provides instructions for setting up the Oracle JDBC driver on UNIX or Linux systems.
Setting up the Oracle JDBC Driver on Unix or Linux
To set up the Oracle JDBC driver on a Linux or UNIX system:
1. Check to make sure that Oracle client is installed on your BusinessObjects server. If Oracle client is not installed, then install it.
2. Configure the tnsnames.ora file and verify that you can connect to the Operational Reporting database schema from the command line using SQL*Plus.
JDBC configuration is same for both BusinessObjects server and BusinessObjects client tools.
The tnsnames.ora file normally resides in the <Oracle_Home>/network/admin directory.
For information about how to configure the tnsnames.ora file, see the Oracle Technology Network.
92 Chapter 3
3. Navigate to the <ORACLE_HOME>/jdbc/lib directory on your BusinessObjects server, and make sure that it contains the ojdbc5.jar file.
4. Navigate to the <BO_Home>/boe31/bobje/enterprise120/<Operating_System_Version>/dataAccess/RDBMS/connectionServer/jdbc directory.
5. Back up the jdbc.sbo file.
6. Open the jdbc.sbo file in a text editor, and then locate the following text:
<DataBase Active="Yes" Name="Oracle 11"><Class JARFile="dbd_jdbc,dbd_oracle"> com.businessobjects .connectionserver.java.drivers.jdbc.oracle.OracleDriver</Class><JDBCDriver>
7. Add the following text under the Oracle 11 <JDBCDriver> tag:
<ClassPath><Path><Oracle_Home>/jdbc/lib/ojdbc5.jar/ojdbc5.jar</Path>
</ClassPath>
8. Save and close the jdbc.sbo file.
HP strongly recommends that you back up the jdbc.sbo file before you continue to the next step.
Deploying Operational Reporting on UNIX Systems 93

Creating the Operational Reporting Database Schema
To create the Operational Reporting database schema, you run the setup script. To import PPM Center data into the Operational Reporting database, you run the load script. The following sections provide detailed instructions on how to perform each of these tasks.
Running the Setup and Synchronization Scripts
To run the setup and synchronization scripts:
1. Stop all PPM Servers (including all nodes in a server cluster).
To stop a PPM Server:
a. Navigate to the <PPM_Home>/bin directory.
b. Run the kStop.sh script as follows:
sh ./kStop.sh -now -user <User_Name>
Make sure that you type a valid user name for a user who has Administrator privileges.
2. Log on to the BusinessObjects server machine, navigate to the <Op_Report_Home>/DB/install/sample directory, and open the sample_setup_all.sh file in a text editor.
If the REMOTE_ADMIN_REQUIRE_AUTH parameter is set to true, users running kStop.sh to shut down the PPM Server must supply a valid PPM Center user name and password. If the parameter is set to false, any user with access to the kStop.sh script can shut down the server. For information about the REMOTE_ADMIN_REQUIRE_AUTH parameter, see the Installation and Administration Guide.
Make sure that you make the file as an executable. For example: chmod +x sample_setup_all.sh
94 Chapter 3

3. Uncomment the parameters listed in the following table, replace the placeholders with valid values, and then save and close the file.
Parameter Description
SYS user name of Reporting DB
SYS user name for the Operational Reporting database
Example value: sys
Reporting DB Schema Name
Operational Reporting database schema name
Example value: RPT_SCHEMA
Reporting DB data_tablespace_name
Name of the data tablespace for the Operational Reporting database
Example value: RPT_DATA_TS
Reporting DB temp_tablespace_name
Name of the temp tablespace for the Operational Reporting database
Example value: RPT_TEMP_TS
Reporting DB index_tablespace_name
Name of the index tablespace for the Operational Reporting database
Example value: RPT_INDEX_TS
Reporting DB TNS Name
Identifies the Oracle instance that runs the Operational Reporting database schema. TNS name is configured in the tnsnames.ora file.
Example value: RPT
PPM DB Schema Name
PPM Center database schema name.
This value should exist in the Oracle tnsnames.ora entry.
Example value: PPM_SCHEMA
PPM DB data_tablespace_name
PPM Center database data tablespace name
Note: This refers to the existing data tablespace in the PPM Center database schema. The PPM Center schema stores this in KINS_TABLESPACES table.
Example value: PPM_DATA_TS
PPM DB temp_tablespace_name
PPM Center database temp tablespace name
Note: This refers to the existing temp tablespace in the PPM Center database schema. The PPM Center schema stores this in KINS_TABLESPACES table.
Example value: PPM_TEMP_TS
Deploying Operational Reporting on UNIX Systems 95
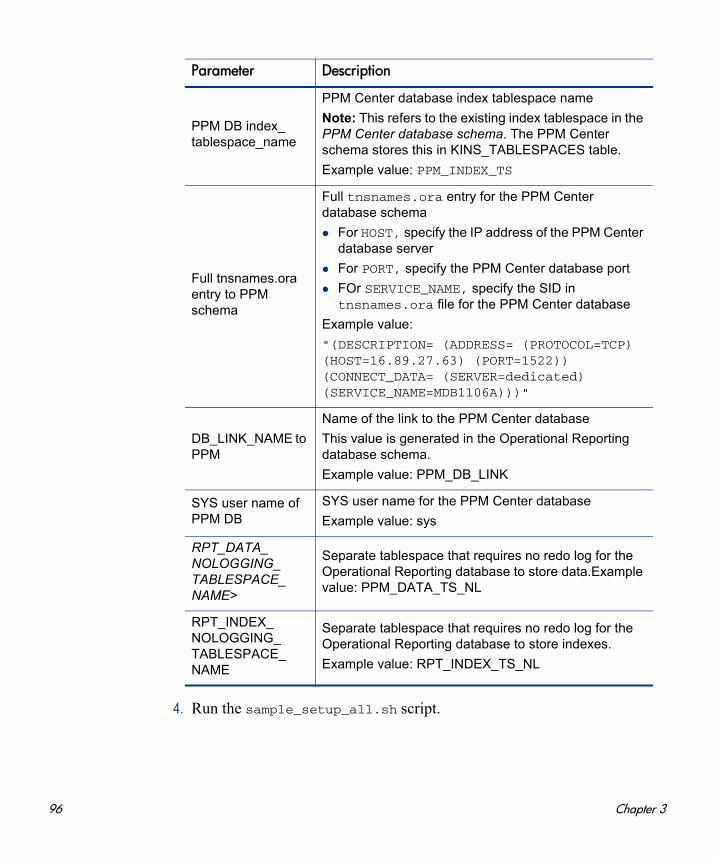
4. Run the sample_setup_all.sh script.
PPM DB index_tablespace_name
PPM Center database index tablespace name
Note: This refers to the existing index tablespace in the PPM Center database schema. The PPM Center schema stores this in KINS_TABLESPACES table.
Example value: PPM_INDEX_TS
Full tnsnames.ora entry to PPM schema
Full tnsnames.ora entry for the PPM Center database schema
For HOST, specify the IP address of the PPM Center database server
For PORT, specify the PPM Center database port
FOr SERVICE_NAME, specify the SID in tnsnames.ora file for the PPM Center database
Example value:
"(DESCRIPTION= (ADDRESS= (PROTOCOL=TCP) (HOST=16.89.27.63) (PORT=1522)) (CONNECT_DATA= (SERVER=dedicated) (SERVICE_NAME=MDB1106A)))"
DB_LINK_NAME to PPM
Name of the link to the PPM Center database
This value is generated in the Operational Reporting database schema.
Example value: PPM_DB_LINK
SYS user name of PPM DB
SYS user name for the PPM Center database
Example value: sys
RPT_DATA_NOLOGGING_TABLESPACE_NAME>
Separate tablespace that requires no redo log for the Operational Reporting database to store data.Example value: PPM_DATA_TS_NL
RPT_INDEX_NOLOGGING_TABLESPACE_NAME
Separate tablespace that requires no redo log for the Operational Reporting database to store indexes.
Example value: RPT_INDEX_TS_NL
Parameter Description
96 Chapter 3
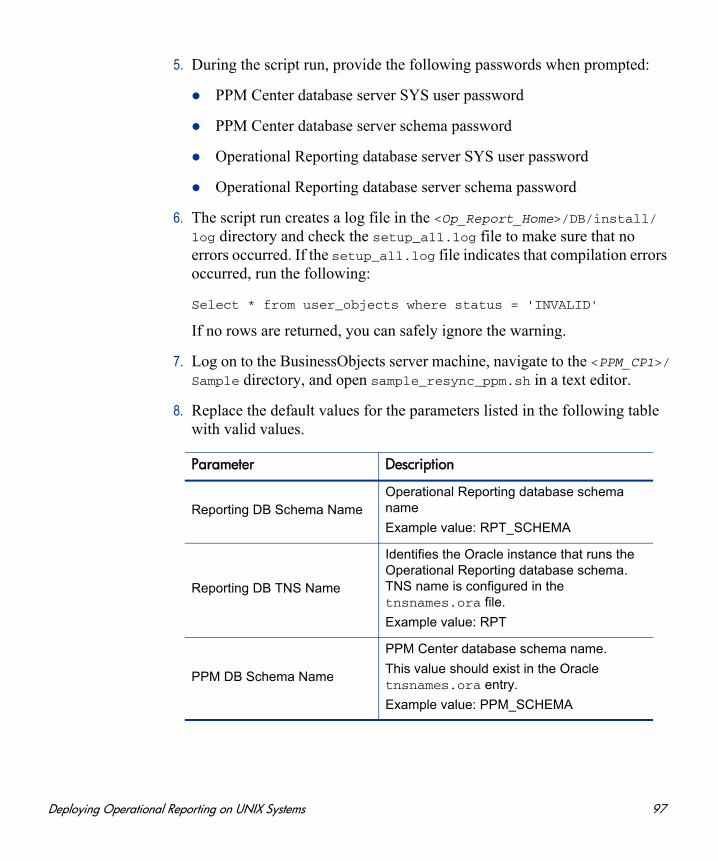
5. During the script run, provide the following passwords when prompted:
PPM Center database server SYS user password
PPM Center database server schema password
Operational Reporting database server SYS user password
Operational Reporting database server schema password
6. The script run creates a log file in the <Op_Report_Home>/DB/install/log directory and check the setup_all.log file to make sure that no errors occurred. If the setup_all.log file indicates that compilation errors occurred, run the following:
Select * from user_objects where status = 'INVALID'
If no rows are returned, you can safely ignore the warning.
7. Log on to the BusinessObjects server machine, navigate to the <PPM_CP1>/Sample directory, and open sample_resync_ppm.sh in a text editor.
8. Replace the default values for the parameters listed in the following table with valid values.
Parameter Description
Reporting DB Schema NameOperational Reporting database schema name
Example value: RPT_SCHEMA
Reporting DB TNS Name
Identifies the Oracle instance that runs the Operational Reporting database schema. TNS name is configured in the tnsnames.ora file.
Example value: RPT
PPM DB Schema Name
PPM Center database schema name.
This value should exist in the Oracle tnsnames.ora entry.
Example value: PPM_SCHEMA
Deploying Operational Reporting on UNIX Systems 97

9. Review the resync_ppm_<Date_Time>.log report file (located in the <PPM_CP1>/log directory).
10. Restart the PPM Servers.
PPM DB TNS NameOracle instance that runs the PPM Center database schema. TNS name is configured in the tnsnames.ora file.
PPM DB data_tablespace_name
PPM Center database data tablespace name
Note: This refers to the existing data tablespace in the PPM Center database schema. The PPM Center schema stores this in the KINS_TABLESPACES table.
Example value: PPM_DATA_TS
PPM DB index_tablespace_name
PPM Center database index tablespace name
Note: This refers to the existing index tablespace in the PPM Center database schema. The PPM Center schema stores this in the KINS_TABLESPACES table.
Example value: PPM_INDEX_TS
PPM Server Status PPM_DOWN_NO, PPM_DOWN_YES
If set to PPM_DOWN_NO, checks to determine whether any PPM Servers are running. If any node is running, the upgrade stops so that you can shut down all running nodes. If set to PPM_DOWN_YES, the PPM Server check is not performed.
Parameter Description
If the script fails because a PPM Server is running, you see the error message “PPM DOWN is required. One or more PPM Servers are active. If all are down, pass PPM_DOWN_YES, *** aborting upgrade...”. If this occurs, see Upgrade Failure Resulting from Active PPM Servers on page 107.
If your PPM Center instance includes multiple nodes in a cluster configuration, allow 10 to 15 seconds between node start-ups. For information about how to start PPM Servers, see the Installation and Administration Guide.
98 Chapter 3

Loading PPM Center Data Into the Operational Reporting Database
After you create the Operational Reporting database schema (Creating the Operational Reporting Database Schema on page 94), and synchronized the tables and data, you can import your PPM Center data into the Operational Reporting database. This section provides information about how to run the load script that brings PPM Center data into the Operational Reporting database schema.
To run the load script:
1. Gather the information listed in the following table.
The definition of Materialized View RPT_DIM_RM_RESOURCES in Operational Reporting 9.10 (GA) causes big performance problems when loading data. To avoid this problem in Operational Reporting Content Pack 1.2 (CP1.2), between setup and loading data, replace it with the new definition in Operational Reporting CP1.2:
CP1.2\DB\updated_scripts\rpt_dim_rm_resources.sql.
Parameter Description
Reporting DB Schema NameOperational Reporting database schema name
Example value: RPT_SCHEMA
Reporting DB TNS Name
Identifies the Oracle instance running the Operational Reporting database schema. the TNS name is configured in the tnsnames.ora file.
Example value: RPT
Reporting DB index_tablespace_name
Name of the index tablespace for the Operational Reporting database
Example value: RPT_INDEX_TS
DB_LINK_NAME to PPM
Name of the link to the PPM Center database. This link is created automatically during the setup_all script run.
Example value: PPM_DB_LINK
Deploying Operational Reporting on UNIX Systems 99
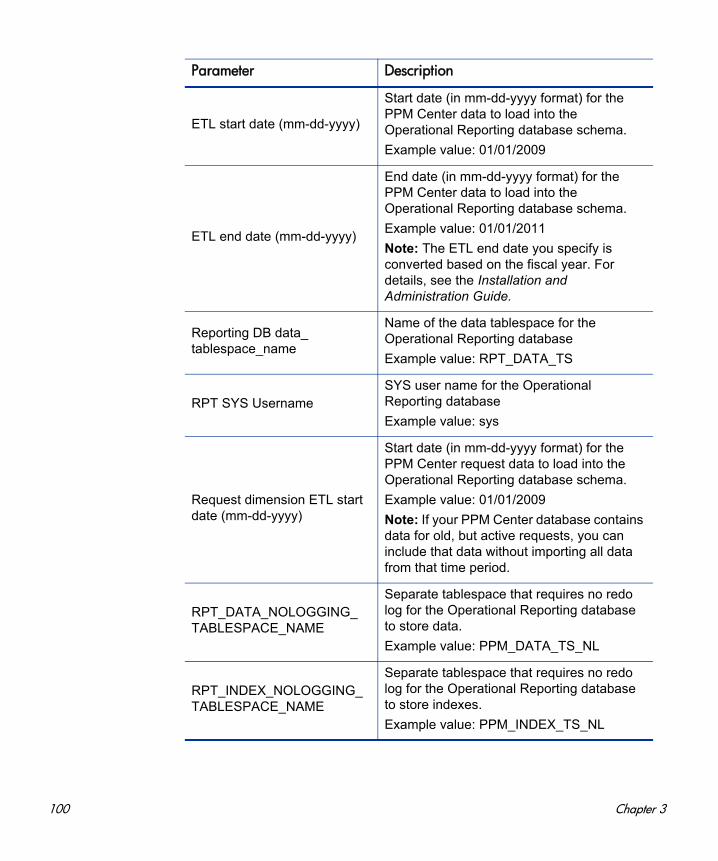
ETL start date (mm-dd-yyyy)
Start date (in mm-dd-yyyy format) for the PPM Center data to load into the Operational Reporting database schema.
Example value: 01/01/2009
ETL end date (mm-dd-yyyy)
End date (in mm-dd-yyyy format) for the PPM Center data to load into the Operational Reporting database schema.
Example value: 01/01/2011
Note: The ETL end date you specify is converted based on the fiscal year. For details, see the Installation and Administration Guide.
Reporting DB data_tablespace_name
Name of the data tablespace for the Operational Reporting database
Example value: RPT_DATA_TS
RPT SYS UsernameSYS user name for the Operational Reporting database
Example value: sys
Request dimension ETL start date (mm-dd-yyyy)
Start date (in mm-dd-yyyy format) for the PPM Center request data to load into the Operational Reporting database schema.
Example value: 01/01/2009
Note: If your PPM Center database contains data for old, but active requests, you can include that data without importing all data from that time period.
RPT_DATA_NOLOGGING_TABLESPACE_NAME
Separate tablespace that requires no redo log for the Operational Reporting database to store data.
Example value: PPM_DATA_TS_NL
RPT_INDEX_NOLOGGING_TABLESPACE_NAME
Separate tablespace that requires no redo log for the Operational Reporting database to store indexes.
Example value: PPM_INDEX_TS_NL
Parameter Description
100 Chapter 3
2. Log on to the BusinessObjects server machine, navigate to the <Op_Report_Home>/DB/install/sample directory, and open the sample_load_data.sh file in a text editor.
3. Replace each of the variables in the load script with the corresponding values you prepared for step 1, and then save and close the file.
4. Navigate to the <Op_Report_Home>/DB/install/sample directory, and run sample_load_data.sh script.
5. During the load script run, provide Operational Reporting database schema password and the Operational Reporting SYS user password, as prompted.
6. The script creates a load_data.log file in the <Op_Report_Home>/DB/install/log directory. Check the log file to make sure that no errors occurred.
Make sure that you make the file executable. For example: chmod +x sample_load_data.sh
Deploying Operational Reporting on UNIX Systems 101
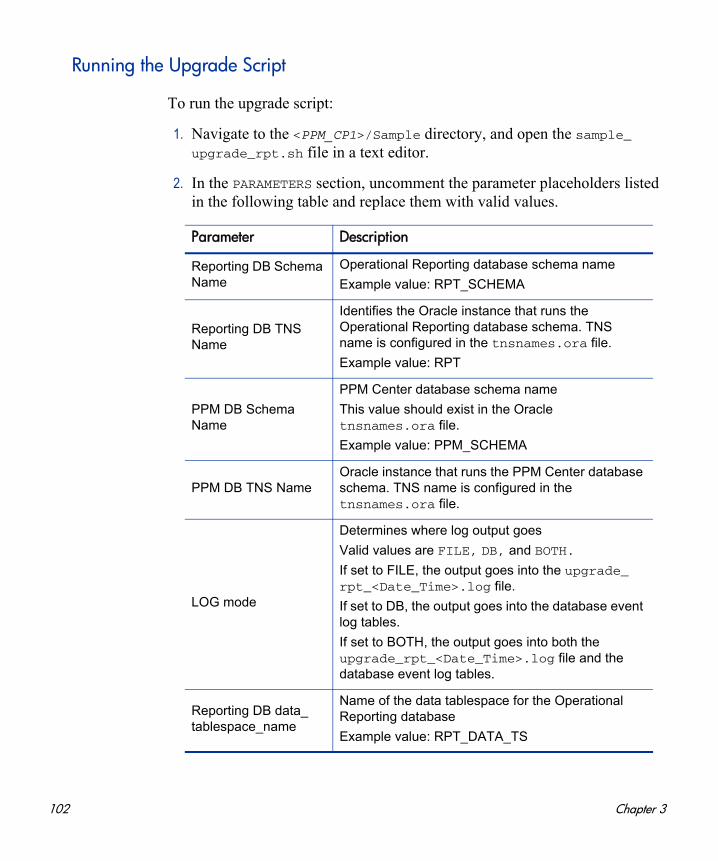
Running the Upgrade Script
To run the upgrade script:
1. Navigate to the <PPM_CP1>/Sample directory, and open the sample_upgrade_rpt.sh file in a text editor.
2. In the PARAMETERS section, uncomment the parameter placeholders listed in the following table and replace them with valid values.
Parameter Description
Reporting DB Schema Name
Operational Reporting database schema name
Example value: RPT_SCHEMA
Reporting DB TNS Name
Identifies the Oracle instance that runs the Operational Reporting database schema. TNS name is configured in the tnsnames.ora file.
Example value: RPT
PPM DB Schema Name
PPM Center database schema name
This value should exist in the Oracle tnsnames.ora file.
Example value: PPM_SCHEMA
PPM DB TNS NameOracle instance that runs the PPM Center database schema. TNS name is configured in the tnsnames.ora file.
LOG mode
Determines where log output goes
Valid values are FILE, DB, and BOTH.
If set to FILE, the output goes into the upgrade_rpt_<Date_Time>.log file.
If set to DB, the output goes into the database event log tables.
If set to BOTH, the output goes into both the upgrade_rpt_<Date_Time>.log file and the database event log tables.
Reporting DB data_tablespace_name
Name of the data tablespace for the Operational Reporting database
Example value: RPT_DATA_TS
102 Chapter 3
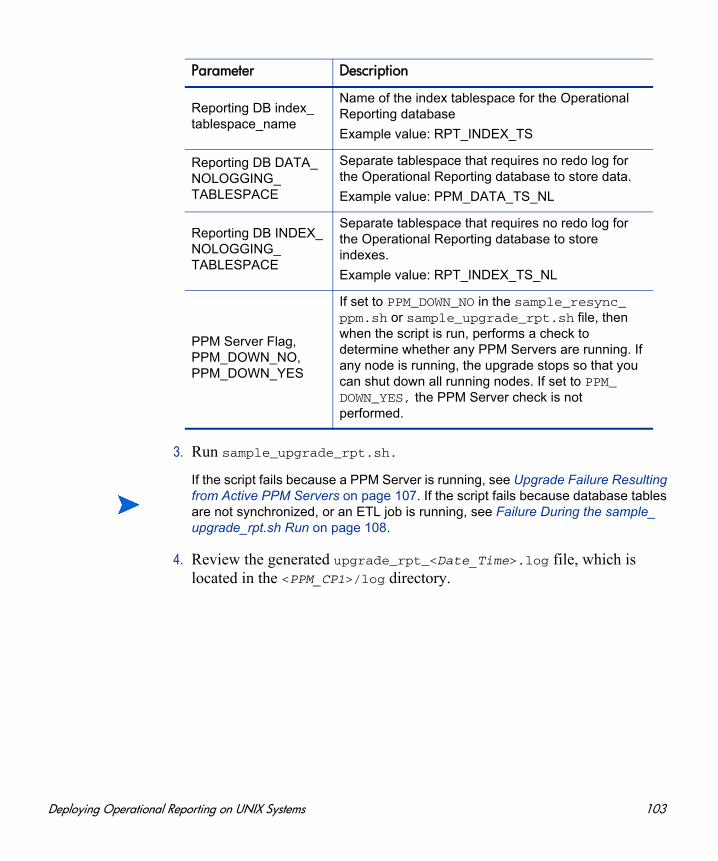
3. Run sample_upgrade_rpt.sh.
4. Review the generated upgrade_rpt_<Date_Time>.log file, which is located in the <PPM_CP1>/log directory.
Reporting DB index_tablespace_name
Name of the index tablespace for the Operational Reporting database
Example value: RPT_INDEX_TS
Reporting DB DATA_NOLOGGING_TABLESPACE
Separate tablespace that requires no redo log for the Operational Reporting database to store data.
Example value: PPM_DATA_TS_NL
Reporting DB INDEX_NOLOGGING_TABLESPACE
Separate tablespace that requires no redo log for the Operational Reporting database to store indexes.
Example value: RPT_INDEX_TS_NL
PPM Server Flag, PPM_DOWN_NO, PPM_DOWN_YES
If set to PPM_DOWN_NO in the sample_resync_ppm.sh or sample_upgrade_rpt.sh file, then when the script is run, performs a check to determine whether any PPM Servers are running. If any node is running, the upgrade stops so that you can shut down all running nodes. If set to PPM_DOWN_YES, the PPM Server check is not performed.
Parameter Description
If the script fails because a PPM Server is running, see Upgrade Failure Resulting from Active PPM Servers on page 107. If the script fails because database tables are not synchronized, or an ETL job is running, see Failure During the sample_upgrade_rpt.sh Run on page 108.
Deploying Operational Reporting on UNIX Systems 103
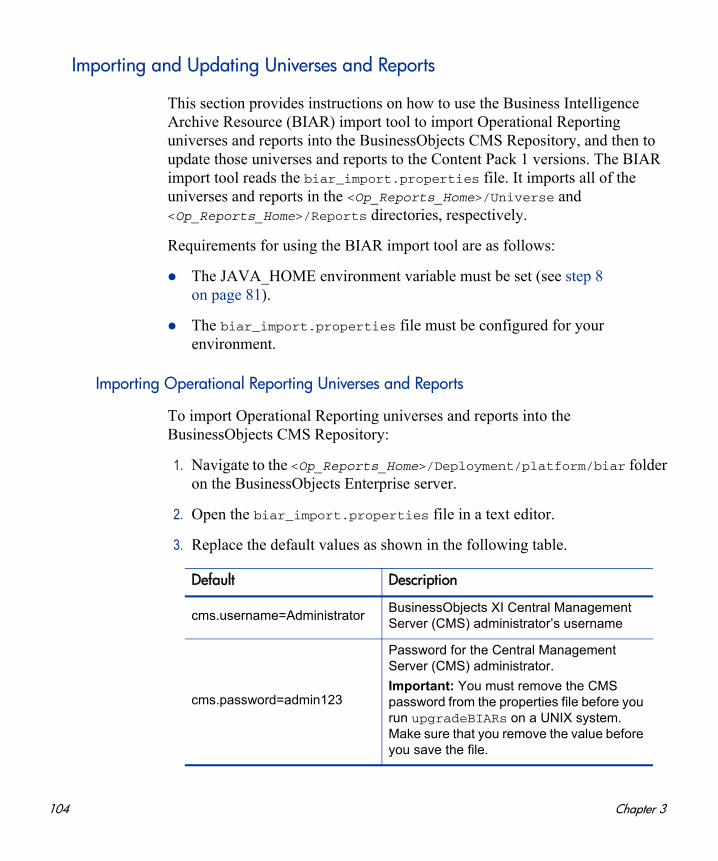
Importing and Updating Universes and Reports
This section provides instructions on how to use the Business Intelligence Archive Resource (BIAR) import tool to import Operational Reporting universes and reports into the BusinessObjects CMS Repository, and then to update those universes and reports to the Content Pack 1 versions. The BIAR import tool reads the biar_import.properties file. It imports all of the universes and reports in the <Op_Reports_Home>/Universe and <Op_Reports_Home>/Reports directories, respectively.
Requirements for using the BIAR import tool are as follows:
The JAVA_HOME environment variable must be set (see step 8 on page 81).
The biar_import.properties file must be configured for your environment.
Importing Operational Reporting Universes and Reports
To import Operational Reporting universes and reports into the BusinessObjects CMS Repository:
1. Navigate to the <Op_Reports_Home>/Deployment/platform/biar folder on the BusinessObjects Enterprise server.
2. Open the biar_import.properties file in a text editor.
3. Replace the default values as shown in the following table.
Default Description
cms.username=AdministratorBusinessObjects XI Central Management Server (CMS) administrator’s username
cms.password=admin123
Password for the Central Management Server (CMS) administrator.
Important: You must remove the CMS password from the properties file before you run upgradeBIARs on a UNIX system. Make sure that you remove the value before you save the file.
104 Chapter 3
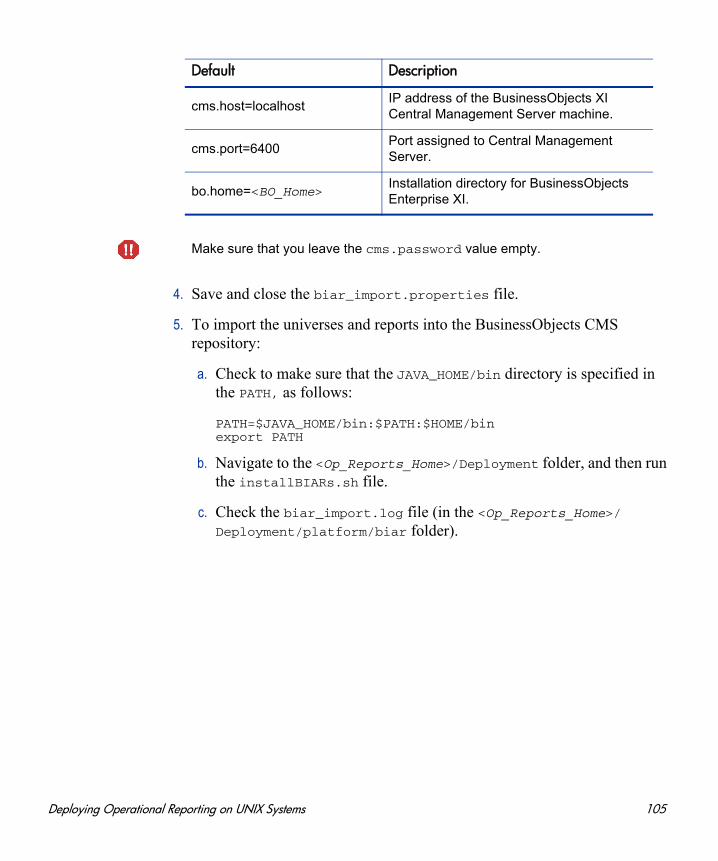
4. Save and close the biar_import.properties file.
5. To import the universes and reports into the BusinessObjects CMS repository:
a. Check to make sure that the JAVA_HOME/bin directory is specified in the PATH, as follows:
PATH=$JAVA_HOME/bin:$PATH:$HOME/binexport PATH
b. Navigate to the <Op_Reports_Home>/Deployment folder, and then run the installBIARs.sh file.
c. Check the biar_import.log file (in the <Op_Reports_Home>/Deployment/platform/biar folder).
cms.host=localhostIP address of the BusinessObjects XI Central Management Server machine.
cms.port=6400Port assigned to Central Management Server.
bo.home=<BO_Home>Installation directory for BusinessObjects Enterprise XI.
Default Description
Make sure that you leave the cms.password value empty.
Deploying Operational Reporting on UNIX Systems 105
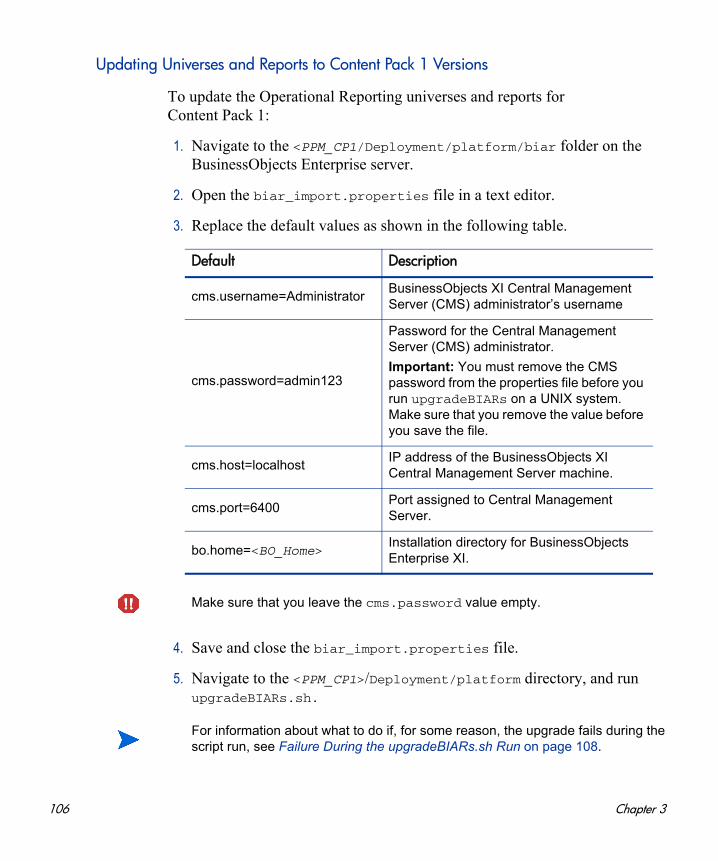
Updating Universes and Reports to Content Pack 1 Versions
To update the Operational Reporting universes and reports for Content Pack 1:
1. Navigate to the <PPM_CP1/Deployment/platform/biar folder on the BusinessObjects Enterprise server.
2. Open the biar_import.properties file in a text editor.
3. Replace the default values as shown in the following table.
4. Save and close the biar_import.properties file.
5. Navigate to the <PPM_CP1>/Deployment/platform directory, and run upgradeBIARs.sh.
Default Description
cms.username=AdministratorBusinessObjects XI Central Management Server (CMS) administrator’s username
cms.password=admin123
Password for the Central Management Server (CMS) administrator.
Important: You must remove the CMS password from the properties file before you run upgradeBIARs on a UNIX system. Make sure that you remove the value before you save the file.
cms.host=localhostIP address of the BusinessObjects XI Central Management Server machine.
cms.port=6400Port assigned to Central Management Server.
bo.home=<BO_Home>Installation directory for BusinessObjects Enterprise XI.
Make sure that you leave the cms.password value empty.
For information about what to do if, for some reason, the upgrade fails during the script run, see Failure During the upgradeBIARs.sh Run on page 108.
106 Chapter 3
6. Review the biar_import.log log file, which you can find in the <PPM_CP1>/log directory.
Recovering from an Upgrade Failure
An upgrade to PPM Center Content Pack 1 can potentially fail for several reasons. The process will stop if, for example, the connection to a remote database is lost, the client machine running an upgrade script goes down, or if PPM Center data are missing. This section provides information about what to do if your upgrade fails during the different stages of the upgrade process.
Upgrade Failure Resulting from Active PPM Servers
The sample_resync_ppm.sh and sample_upgrade_rpt.sh files both include the PPM Server Status parameter, which can be set to either PPM_DOWN_NO or PPM_DOWN_YES. (See PPM Server Flag, PPM_DOWN_NO, PPM_DOWN_YES on page 103.) If you set the PPM Server Status parameter to PPM_DOWN_NO in either of these files and then execute the file, the upgrade checks to determine whether any PPM Servers are active. If an active node is detected during the run, the upgrade stops and the following message is displayed:
Failed with this error => PPM DOWN is required. One or more PPM Servers is active. If all nodes are down, pass PPM_DOWN_YES, *** aborting upgrade...
If this error occurs, do the following:
1. Shut down every active node in the server cluster.
2. Open the sample batch or shell script (either sample_upgrade_rpt.sh or sample_resync_ppm.sh) and change the PPM Server Status parameter value from PPM_DOWN_NO to PPM_DOWN_YES.
3. Run the script again.
The upgrade process skips the PPM Server check after you set the PPM Server Status parameter value to PPM_DOWN_YES.
Deploying Operational Reporting on UNIX Systems 107
Failure During the sample_preupgrade_rpt.sh Run
If the upgrade fails while the sample_preupgrade_rpt.sh script is running, do the following:
1. Navigate to the <PPM_CP1>/log directory and review the generated preupgrade_rpt.log file.
2. Correct any reported errors, and then run the Sample_preupgrade_rpt.sh script again.
Failure During the sample_upgrade_rpt.sh Run
If the upgrade fails while the sample_upgrade_rpt.sh script is running, just run the script again when appropriate.
Failure During the upgradeBIARs.sh Run
If your BusinessObjects server or client machine goes down while the upgradeBIARs.sh script is running, do the following:
1. Navigate to the 910_CP1/Deployment/platform/biar directory, open the log file for the script run, and check for reported errors.
2. If the log file indicates an issue that cannot be resolved by simply running the upgradeBIARs.sh script again, you may have to delete HP-supplied universes (RM Derived Universe, TM Derived Universe, FM Derived Universe, and Kernel Universe) or new reports.
3. Run the upgradeBIARs.sh script again.
Make sure that you do not delete existing (version 9.10) reports. Check the Content Pack 1 Release Notes for the reports that are new in Content Pack 1, and delete these.
108 Chapter 3
Configuring the Operational Reporting Database Connection
After you import the universes and reports, you must configure the connection to the Operational Reporting database. Before you can configure this connection, make sure that you have completed the following:
Installed BusinessObjects Enterprise, including SP2 (Installing BusinessObjects Enterprise on a UNIX System on page 83 and Installing BusinessObjects Enterprise XI 3.1, Service Pack 2 on page 85)
Configured Oracle 11 JDBC driver (Configuring the Oracle JDBC Driver on page 92)
Imported the universes and reports (Importing and Updating Universes and Reports on page 104)
Run the setup script (Running the Setup and Synchronization Scripts on page 94) and load script (Importing and Updating Universes and Reports on page 104) to set up the Operational Reporting schema.
Deploying Operational Reporting on UNIX Systems 109
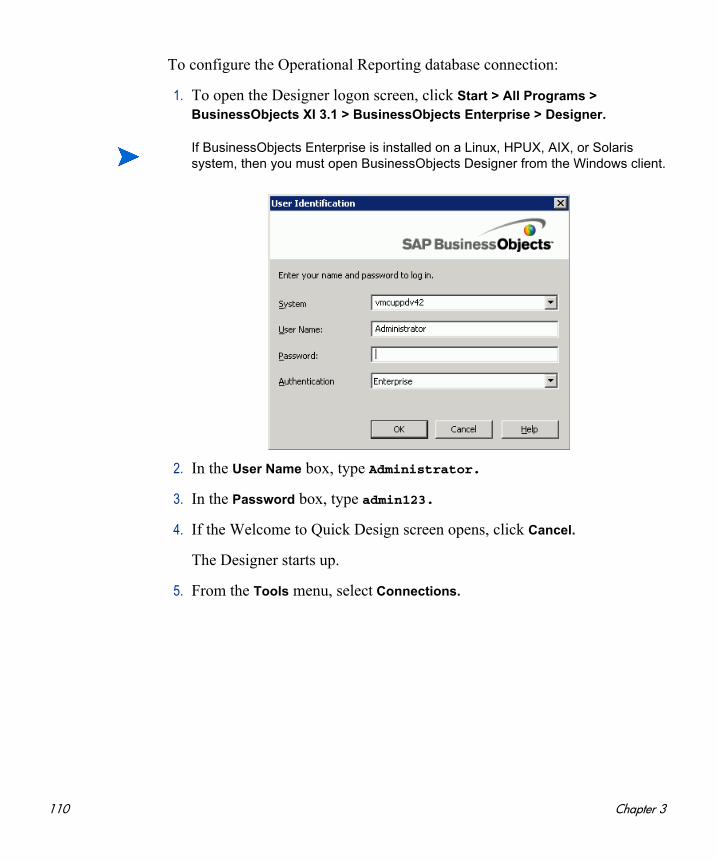
To configure the Operational Reporting database connection:
1. To open the Designer logon screen, click Start > All Programs >
BusinessObjects XI 3.1 > BusinessObjects Enterprise > Designer.
2. In the User Name box, type Administrator.
3. In the Password box, type admin123.
4. If the Welcome to Quick Design screen opens, click Cancel.
The Designer starts up.
5. From the Tools menu, select Connections.
If BusinessObjects Enterprise is installed on a Linux, HPUX, AIX, or Solaris system, then you must open BusinessObjects Designer from the Windows client.
110 Chapter 3
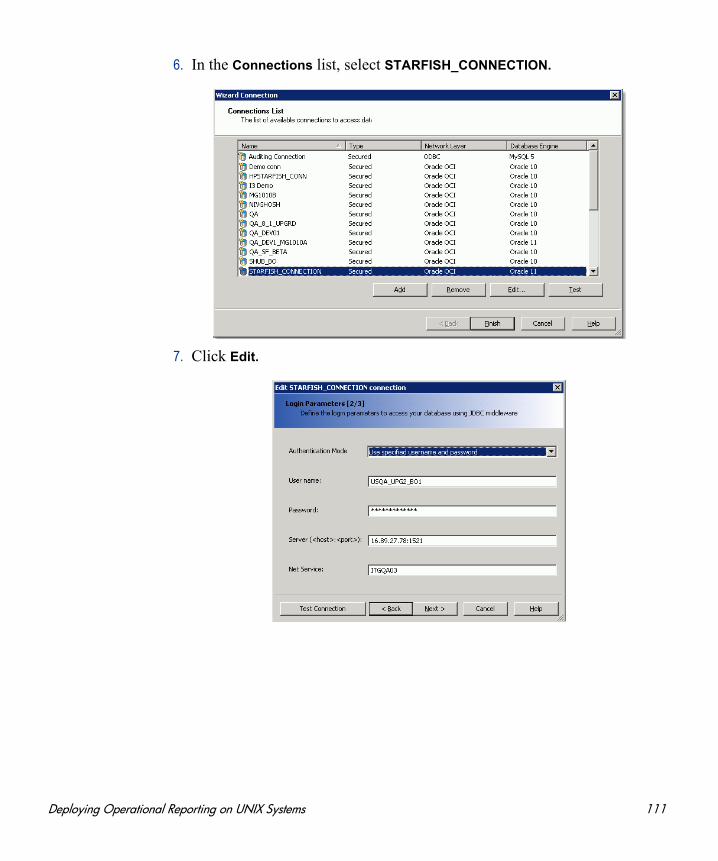
6. In the Connections list, select STARFISH_CONNECTION.
7. Click Edit.
Deploying Operational Reporting on UNIX Systems 111
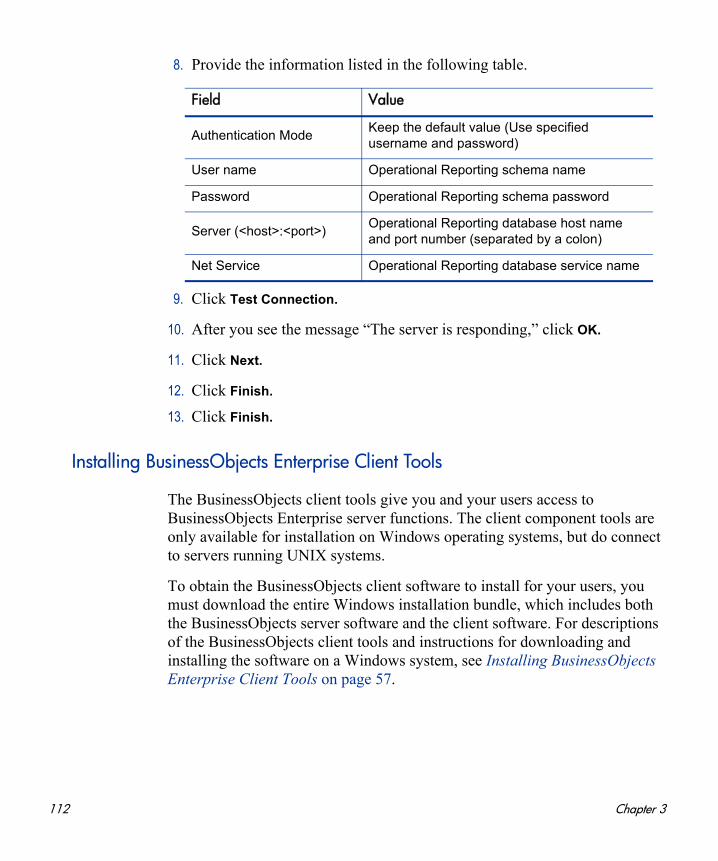
8. Provide the information listed in the following table.
9. Click Test Connection.
10. After you see the message “The server is responding,” click OK.
11. Click Next.
12. Click Finish.
13. Click Finish.
Installing BusinessObjects Enterprise Client Tools
The BusinessObjects client tools give you and your users access to BusinessObjects Enterprise server functions. The client component tools are only available for installation on Windows operating systems, but do connect to servers running UNIX systems.
To obtain the BusinessObjects client software to install for your users, you must download the entire Windows installation bundle, which includes both the BusinessObjects server software and the client software. For descriptions of the BusinessObjects client tools and instructions for downloading and installing the software on a Windows system, see Installing BusinessObjects Enterprise Client Tools on page 57.
Field Value
Authentication ModeKeep the default value (Use specified username and password)
User name Operational Reporting schema name
Password Operational Reporting schema password
Server (<host>:<port>)Operational Reporting database host name and port number (separated by a colon)
Net Service Operational Reporting database service name
112 Chapter 3
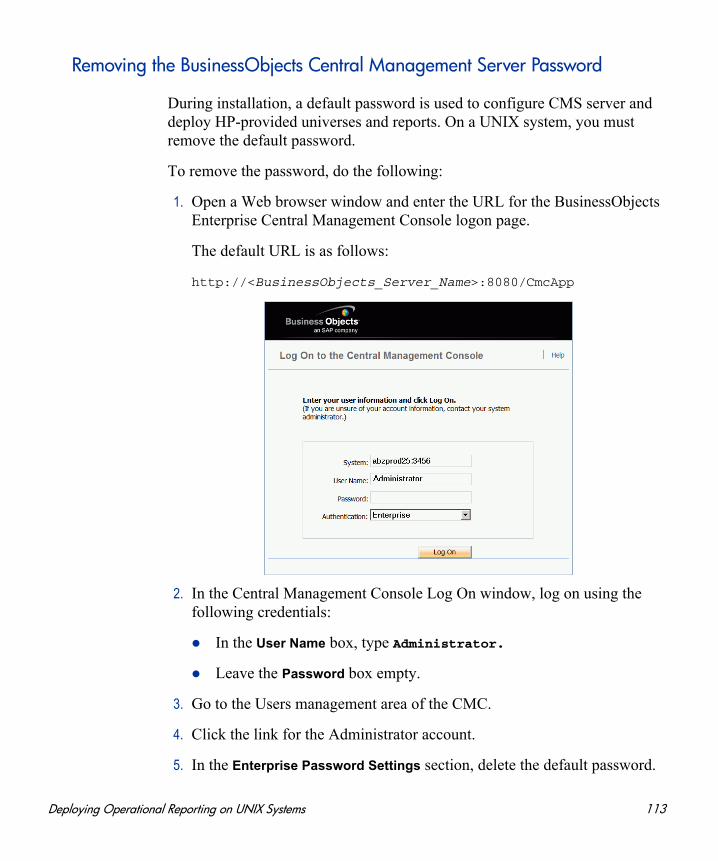
Removing the BusinessObjects Central Management Server Password
During installation, a default password is used to configure CMS server and deploy HP-provided universes and reports. On a UNIX system, you must remove the default password.
To remove the password, do the following:
1. Open a Web browser window and enter the URL for the BusinessObjects Enterprise Central Management Console logon page.
The default URL is as follows:
http://<BusinessObjects_Server_Name>:8080/CmcApp
2. In the Central Management Console Log On window, log on using the following credentials:
In the User Name box, type Administrator.
Leave the Password box empty.
3. Go to the Users management area of the CMC.
4. Click the link for the Administrator account.
5. In the Enterprise Password Settings section, delete the default password.
Deploying Operational Reporting on UNIX Systems 113
6. If the User must change password at next logon check box is selected, clear it.
7. Click Update.
Verify Successful Operational Reporting Deployment
To verify successful deployment of the Operational Reporting solution, log onto InfoView and generate one of the HP-supplied operational reports. For descriptions of these reports and instructions on how to run them, see the Operational Reporting User’s Guide.
Displaying Report Values for Non-English Speaking Locales
If you enable multilingual Operational Reporting, users in different locales must configure their browsers to display numeric values and dates correctly in reports.
To make sure that numeric values and dates are correctly displayed for your locale, do the following:
1. Open a web browser window and log on to InfoView.
2. Click Preferences.
3. In the General section on the Preferences page, scroll down and, from the Preferred Viewing Locale list, select a locale.
4. Click OK.
When you start viewing operational reports in InfoView, dates and numeric values are displayed correctly.
114 Chapter 3
4 Upgrading Operational Reporting on Windows Systems
Upgrade Processes
PPM Center version Content Pack 1 (CP1) is specific to Operational Reporting. It introduces reporting for HP Project Management to the Operational Reporting solution, and includes changes to both the Operational Reporting database and reporting universes as well as new preconfigured reports and reporting portlets that you can add to your PPM Dashboard pages.
This chapter provides information about how to upgrade an existing Operational Reporting deployment based on PPM Center 9.10, SP1 to PPM Center version Content Pack 1 on a Windows system. If you are setting up Operational Reporting for the first time, follow the procedures described in Chapter 2, Deploying Operational Reporting on Windows Systems, on page 21.
For more information about the changes to Operational Reporting in PPM Center version Content Pack 1, see the Content Pack 1 Release Notes.
115

Upgrade Overview
An Operational Reporting upgrade involves the following processes:
1. Pre-upgrade. The preupgrade validates your existing PPM Center Operational Reporting instance, determines whether any incremental ETL is running or any PPM Center data changes await synchronization with the Operational Reporting database, and then generates a report in text format.
2. Actual Upgrade. The upgrade process upgrades current PPM Operational Reporting to the newer version. PPM Servers must be down during this step.
3. Universe import. This step imports new and updated universe Business Intelligence Archive Resource (BIAR) files into the BusinessObjects CMS repository.
4. Report import. This step imports new report BIAR files into the universe.
Any customizations that you have made to HP-supplied reporting universes or preconfigured reports (for example, the Demand Versus Capacity report) on your existing Operational Reporting instance are lost during an upgrade.
116 Chapter 4

Preparing to Upgrade
This section addresses the tasks to complete before you begin to upgrade to PPM Center version Content Pack 1.
To prepare to upgrade Operational Reporting:
1. Log in to the PPM Center database as a DBA and use the following command to flush the shared pool:
alter system flush shared_pool;
2. Download the Content Pack 1 upgrade bundle as follows:
a. Go to the Support contract information page support.openview.hp.com/entitlement/contracts) and add your service agreement ID (SAID).
b. Go to the PPM Center community page on HP Live Network (https://h22036.www2.hp.com/).
c. Under Associated Projects, click the Operational Reporting Content for
Project and Portfolio Management Center (h22038) link.
d. Under Quick Links, click the Download 9.12 CP1 link, and then download the bundle to the machine that hosts your BusinessObjects server.
e. Extract the 912_CP1 bundle contents into a <PPM_CP1> directory (separate from the <Op_Reports_Home> folder).
If you are deploying the Operational Reporting solution for the first time, follow the instructions for deployment provided in Chapter 2, Deploying Operational Reporting on Windows Systems, on page 21.
You must have an HP passport account to access the PPM Center community page.
Upgrading Operational Reporting on Windows Systems 117
3. Install PPM Center version 9.10, Service Pack 1 and Service Pack 2. (The order in which you install the service packs does not matter.)
4. Back up your Operational Reporting database.
f you have the required service agreement ID (SAID), you can get PPM Center software updates through the Software Update Manager (SUM) site (www1.itrc.hp.com/service/sum/home.do).
For information about how to download and install PPM Center service packs, see the Installation and Administration Guide or the Release Notes for the service pack. You can obtain the Release Notes from the Software Product Manuals Web site (support.openview.hp.com/selfsolve/manuals).
Any customizations that you have made to HP-supplied reporting universes or preconfigured reports (for example, the Demand Versus Capacity report) on your existing Operational Reporting instance are lost during an upgrade.
118 Chapter 4
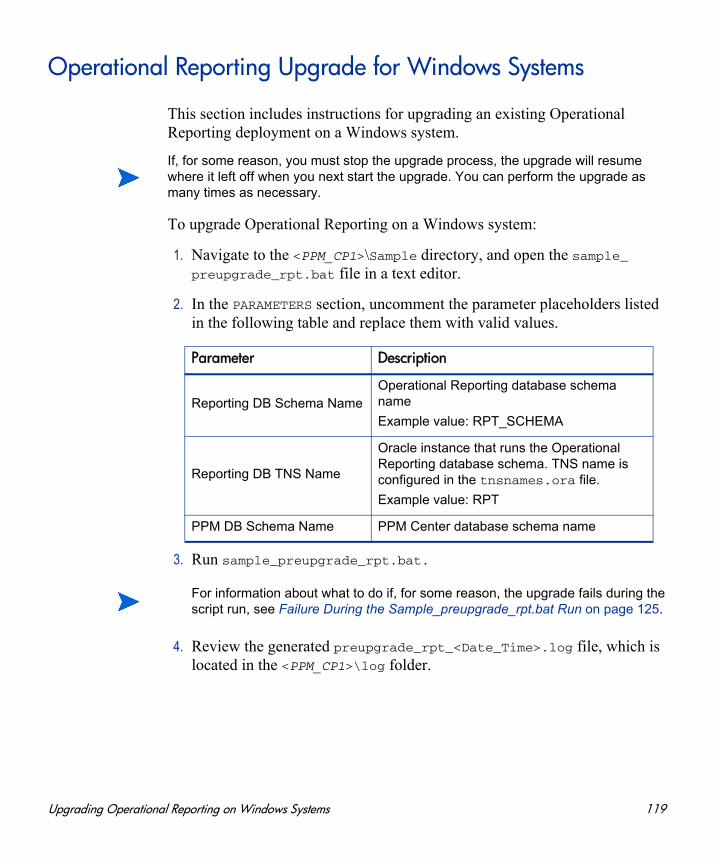
Operational Reporting Upgrade for Windows Systems
This section includes instructions for upgrading an existing Operational Reporting deployment on a Windows system.
To upgrade Operational Reporting on a Windows system:
1. Navigate to the <PPM_CP1>\Sample directory, and open the sample_preupgrade_rpt.bat file in a text editor.
2. In the PARAMETERS section, uncomment the parameter placeholders listed in the following table and replace them with valid values.
3. Run sample_preupgrade_rpt.bat.
4. Review the generated preupgrade_rpt_<Date_Time>.log file, which is located in the <PPM_CP1>\log folder.
If, for some reason, you must stop the upgrade process, the upgrade will resume where it left off when you next start the upgrade. You can perform the upgrade as many times as necessary.
Parameter Description
Reporting DB Schema NameOperational Reporting database schema name
Example value: RPT_SCHEMA
Reporting DB TNS Name
Oracle instance that runs the Operational Reporting database schema. TNS name is configured in the tnsnames.ora file.
Example value: RPT
PPM DB Schema Name PPM Center database schema name
For information about what to do if, for some reason, the upgrade fails during the script run, see Failure During the Sample_preupgrade_rpt.bat Run on page 125.
Upgrading Operational Reporting on Windows Systems 119
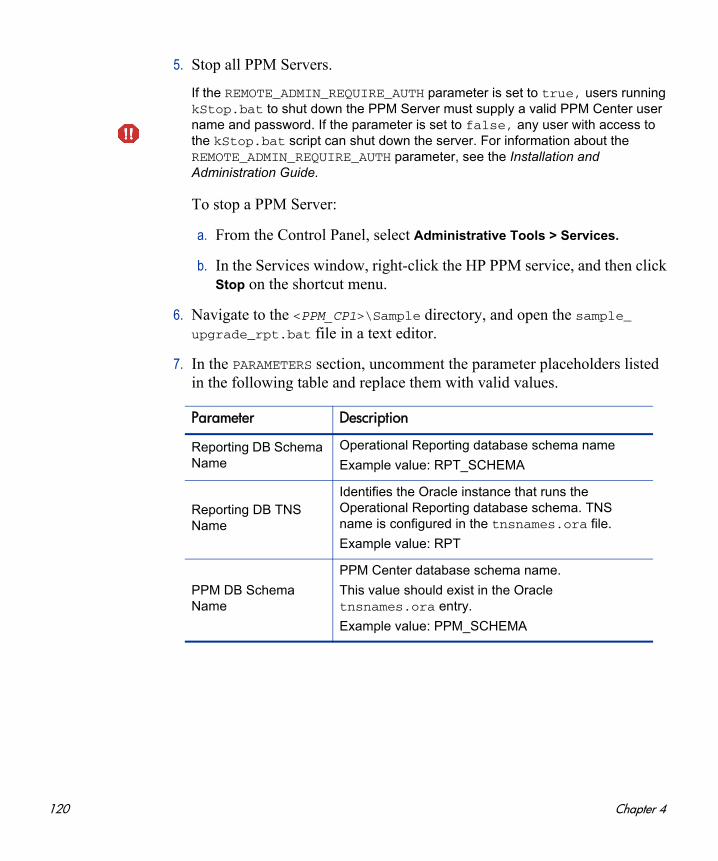
5. Stop all PPM Servers.
To stop a PPM Server:
a. From the Control Panel, select Administrative Tools > Services.
b. In the Services window, right-click the HP PPM service, and then click Stop on the shortcut menu.
6. Navigate to the <PPM_CP1>\Sample directory, and open the sample_upgrade_rpt.bat file in a text editor.
7. In the PARAMETERS section, uncomment the parameter placeholders listed in the following table and replace them with valid values.
If the REMOTE_ADMIN_REQUIRE_AUTH parameter is set to true, users running kStop.bat to shut down the PPM Server must supply a valid PPM Center user name and password. If the parameter is set to false, any user with access to the kStop.bat script can shut down the server. For information about the REMOTE_ADMIN_REQUIRE_AUTH parameter, see the Installation and Administration Guide.
Parameter Description
Reporting DB Schema Name
Operational Reporting database schema name
Example value: RPT_SCHEMA
Reporting DB TNS Name
Identifies the Oracle instance that runs the Operational Reporting database schema. TNS name is configured in the tnsnames.ora file.
Example value: RPT
PPM DB Schema Name
PPM Center database schema name.
This value should exist in the Oracle tnsnames.ora entry.
Example value: PPM_SCHEMA
120 Chapter 4
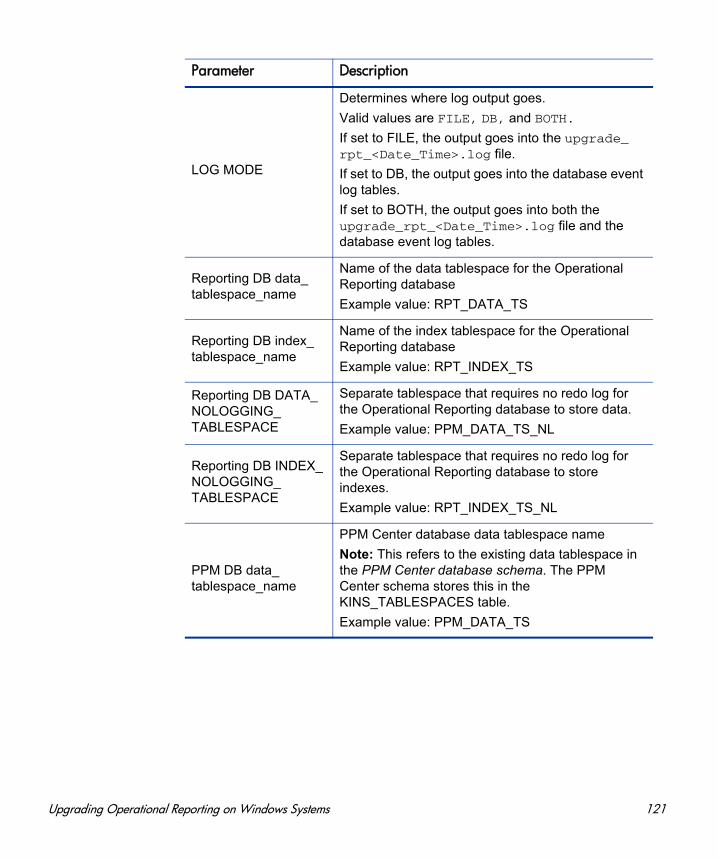
LOG MODE
Determines where log output goes.
Valid values are FILE, DB, and BOTH.
If set to FILE, the output goes into the upgrade_rpt_<Date_Time>.log file.
If set to DB, the output goes into the database event log tables.
If set to BOTH, the output goes into both the upgrade_rpt_<Date_Time>.log file and the database event log tables.
Reporting DB data_tablespace_name
Name of the data tablespace for the Operational Reporting database
Example value: RPT_DATA_TS
Reporting DB index_tablespace_name
Name of the index tablespace for the Operational Reporting database
Example value: RPT_INDEX_TS
Reporting DB DATA_NOLOGGING_TABLESPACE
Separate tablespace that requires no redo log for the Operational Reporting database to store data.
Example value: PPM_DATA_TS_NL
Reporting DB INDEX_NOLOGGING_TABLESPACE
Separate tablespace that requires no redo log for the Operational Reporting database to store indexes.
Example value: RPT_INDEX_TS_NL
PPM DB data_tablespace_name
PPM Center database data tablespace name
Note: This refers to the existing data tablespace in the PPM Center database schema. The PPM Center schema stores this in the KINS_TABLESPACES table.
Example value: PPM_DATA_TS
Parameter Description
Upgrading Operational Reporting on Windows Systems 121
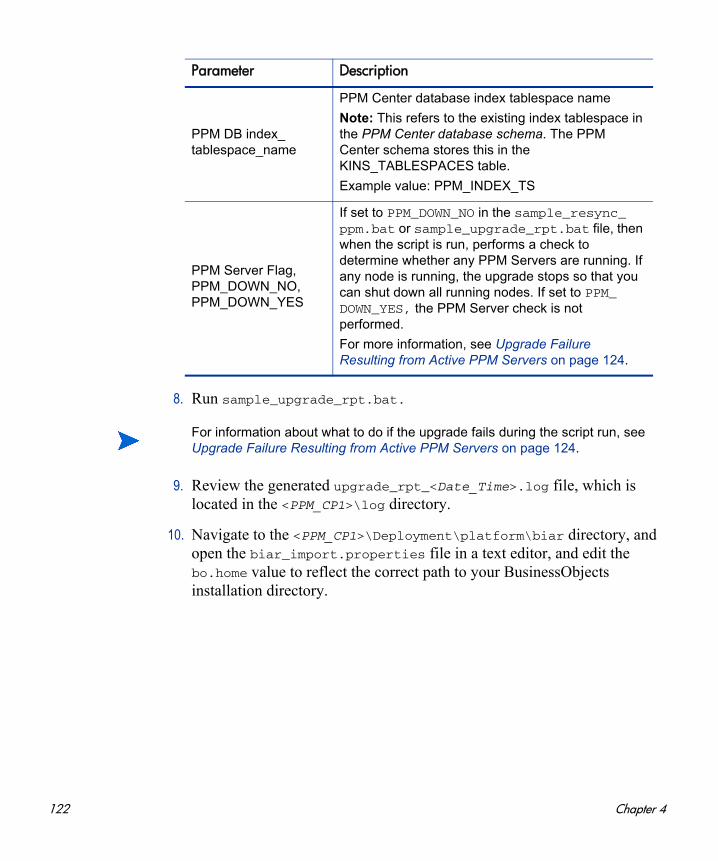
8. Run sample_upgrade_rpt.bat.
9. Review the generated upgrade_rpt_<Date_Time>.log file, which is located in the <PPM_CP1>\log directory.
10. Navigate to the <PPM_CP1>\Deployment\platform\biar directory, and open the biar_import.properties file in a text editor, and edit the bo.home value to reflect the correct path to your BusinessObjects installation directory.
PPM DB index_tablespace_name
PPM Center database index tablespace name
Note: This refers to the existing index tablespace in the PPM Center database schema. The PPM Center schema stores this in the KINS_TABLESPACES table.
Example value: PPM_INDEX_TS
PPM Server Flag, PPM_DOWN_NO, PPM_DOWN_YES
If set to PPM_DOWN_NO in the sample_resync_ppm.bat or sample_upgrade_rpt.bat file, then when the script is run, performs a check to determine whether any PPM Servers are running. If any node is running, the upgrade stops so that you can shut down all running nodes. If set to PPM_DOWN_YES, the PPM Server check is not performed.
For more information, see Upgrade Failure Resulting from Active PPM Servers on page 124.
Parameter Description
For information about what to do if the upgrade fails during the script run, see Upgrade Failure Resulting from Active PPM Servers on page 124.
122 Chapter 4
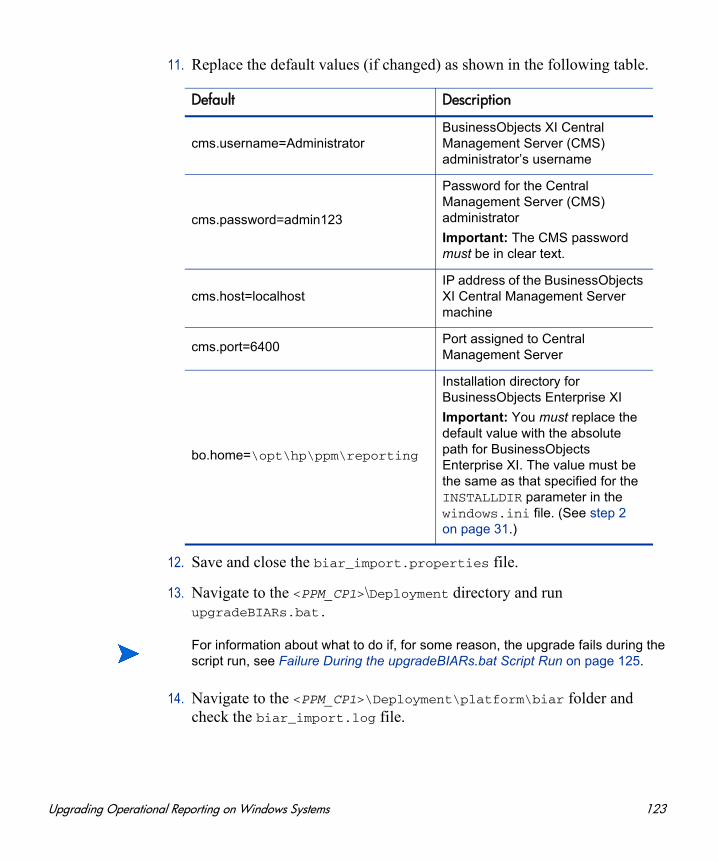
11. Replace the default values (if changed) as shown in the following table.
12. Save and close the biar_import.properties file.
13. Navigate to the <PPM_CP1>\Deployment directory and run upgradeBIARs.bat.
14. Navigate to the <PPM_CP1>\Deployment\platform\biar folder and check the biar_import.log file.
Default Description
cms.username=AdministratorBusinessObjects XI Central Management Server (CMS) administrator’s username
cms.password=admin123
Password for the Central Management Server (CMS) administrator
Important: The CMS password must be in clear text.
cms.host=localhostIP address of the BusinessObjects XI Central Management Server machine
cms.port=6400Port assigned to Central Management Server
bo.home=\opt\hp\ppm\reporting
Installation directory for BusinessObjects Enterprise XI
Important: You must replace the default value with the absolute path for BusinessObjects Enterprise XI. The value must be the same as that specified for the INSTALLDIR parameter in the windows.ini file. (See step 2 on page 31.)
For information about what to do if, for some reason, the upgrade fails during the script run, see Failure During the upgradeBIARs.bat Script Run on page 125.
Upgrading Operational Reporting on Windows Systems 123
15. Restart the PPM Servers, one at a time.
16. To verify a successful upgrade of Operational Reporting, run the query for an HP-supplied report. For information about how to run HP-supplied operational reports, see the Operational Reporting User’s Guide.
Recovering from an Upgrade Failure
An upgrade to PPM Center Content Pack 1 can potentially fail for several reasons. The process stops if, for example, the connection to a remote database is lost, the client machine running an upgrade script goes down, or if PPM Center data are missing. This section provides information about what to do if your upgrade fails during the different stages of the upgrade process.
Upgrade Failure Resulting from Active PPM Servers
The sample_resync_ppm.bat and sample_upgrade_rpt.bat files both include the PPM Server Status parameter, which can be set to either PPM_DOWN_NO or PPM_DOWN_YES. (See PPM Server Flag, PPM_DOWN_NO, PPM_DOWN_YES on page 122.) If you set the PPM Server Status parameter to PPM_DOWN_NO in either of these files and then execute the file, the upgrade checks to determine whether any PPM Servers are active. If an active node is detected during the run, the upgrade stops and the following message is displayed:
Failed with this error => PPM DOWN is required. One or more PPM Servers is active. If all nodes are down, pass PPM_DOWN_YES, *** aborting upgrade...
If this error occurs, do the following:
1. Shut down every active node in the server cluster.
2. Open the sample batch or shell script (either sample_upgrade_rpt.bat or sample_resync_ppm.bat) and change the PPM Server Status parameter value from PPM_DOWN_NO to PPM_DOWN_YES.
3. Run the script again.
Allow 10 to 15 seconds between start-ups. For information about how to start PPM Servers, see the Installation and Administration Guide.
124 Chapter 4
The upgrade process skips the PPM Server check after you set PPM Server Status parameter value to PPM_DOWN_YES.
Failure During the Sample_preupgrade_rpt.bat Run
If the upgrade fails while the Sample_preupgrade_rpt.bat script is running, do the following:
1. Review the generated preupgrade_rpt_<Date_Time>.log file, which is located in the <PPM_CP1>\log folder.
2. Correct any reported errors, and then run the Sample_preupgrade_rpt.bat script again.
Failure During the Sample_upgrade_rpt.bat Run
If the upgrade fails while the Sample_upgrade_rpt.bat script is running, just run the script again as soon as it is appropriate to do so.
Failure During the upgradeBIARs.bat Script Run
If your BusinessObjects server or client machine goes down while the upgradeBIARs.bat script is running, do the following:
1. Navigate to the Upgrades\910_CP1\Deployment\platform\biar directory, open the log file for the script run, and check for reported errors.
2. If the log file indicates an issue that cannot be resolved by simply running the upgradeBIARs.bat script again, you may have to delete HP-supplied universes (RM Derived Universe, TM Derived Universe, FM Derived Universe, and Kernel Universe) or new reports.
3. Run the upgradeBIARs.bat script again.
Make sure that you do not delete existing (version 9.10) reports. Check the Content Pack 1 Release Notes for the reports that are new inContent Pack 1, and delete these.
Upgrading Operational Reporting on Windows Systems 125

126 Chapter 4
5 Upgrading Operational Reporting on a UNIX System
Upgrade Processes
PPM Center version Content Pack 1 (CP1) is specific to Operational Reporting. It introduces reporting for HP Project Management to the Operational Reporting solution, and includes changes to both the Operational Reporting database and reporting universes as well as new preconfigured reports and reporting portlets that you can add to your PPM Dashboard pages.
This chapter provides information about how to upgrade an existing Operational Reporting deployment based on PPM Center 9.10, SP1 to PPM Center version Content Pack 1 on a UNIX system. If you are deploying Operational Reporting for the first time, follow the procedures described in Chapter 3, Deploying Operational Reporting on UNIX Systems, on page 73.
For more information about the changes to Operational Reporting in PPM Center version Content Pack 1, see the Content Pack 1 Release Notes.
127
Upgrade Overview
An Operational Reporting upgrade involves the following processes:
1. Pre-upgrade. The preupgrade validates your existing PPM Center Operational Reporting instance, determines whether any incremental ETL is running or any PPM Center data changes await synchronization with the Operational Reporting database, and then generates a report in text format.
2. Actual Upgrade. The upgrade process upgrades current PPM Operational Reporting to the newer version. PPM Servers must be down during this step.
3. Universe import. This step imports new and updated universe Business Intelligence Archive Resource (BIAR) files into the BusinessObjects CMS repository.
4. Report import. This step imports new report BIAR files into the universe.
Any customizations that you have made to HP-supplied reporting universes or preconfigured reports (for example, the Demand Versus Capacity report) on your existing Operational Reporting instance are lost during an upgrade.
128 Chapter 5
Preparing to Upgrade
This section addresses the tasks to complete before you begin to upgrade to PPM Center version Content Pack 1.
To prepare to upgrade Operational Reporting:
1. (HP-UX only) If BusinessObjects server software is installed on HP-UX, you must change two BusinessObjects server properties from BusinessObjects Enterprise Central Management Console. For instructions, see (HP-UX Only) Resetting Memory Thresholds on page 88.
2. Log in to the PPM Center database as a DBA and use the following command to flush the shared pool:
alter system flush shared_pool;
3. Download the Content Pack 1 upgrade bundle as follows:
a. Go to the Support contract information web site (support.openview.hp.com/entitlement/contracts) and add your service agreement ID (SAID) for PPM Center.
b. Go to the PPM Center community page on HP Live Network (h22036.www2.hp.com).
c. Under Associated Projects, click the Operational Reporting Content for
Project and Portfolio Management Center (h22038) link.
d. Under Quick Links, click the Download 9.10 CP1 link, and then download the bundle to the machine that hosts your BusinessObjects server.
e. Extract the 910_CP1 bundle contents into a <PPM_CP1> directory (separate from the <Op_Reports_Home> folder).
If you are deploying the Operational Reporting solution for the first time, follow the instructions for deployment provided in Chapter 3, Deploying Operational Reporting on UNIX Systems, on page 73.
You must have an HP passport account to access the PPM Center community page.
Upgrading Operational Reporting on a UNIX System 129

4. Install PPM Center version 9.10, Service Pack 1 and Service Pack 2. (The order in which you install the service packs does not matter.)
5. Back up your Operational Reporting database.
If you have the required service agreement ID (SAID), you can get PPM Center software updates through the Software Update Manager (SUM) site (www1.itrc.hp.com/service/sum/home.do).
For information about how to download and install PPM Center service packs, see the Installation and Administration Guide or the Release Notes for the service pack. You can obtain the Release Notes from the Software Product Manuals Web site (support.openview.hp.com/selfsolve/manuals).
Any customizations that you have made to HP-supplied reporting universes or preconfigured reports (for example, the Demand Versus Capacity report) on your existing Operational Reporting instance are lost during an upgrade.
130 Chapter 5
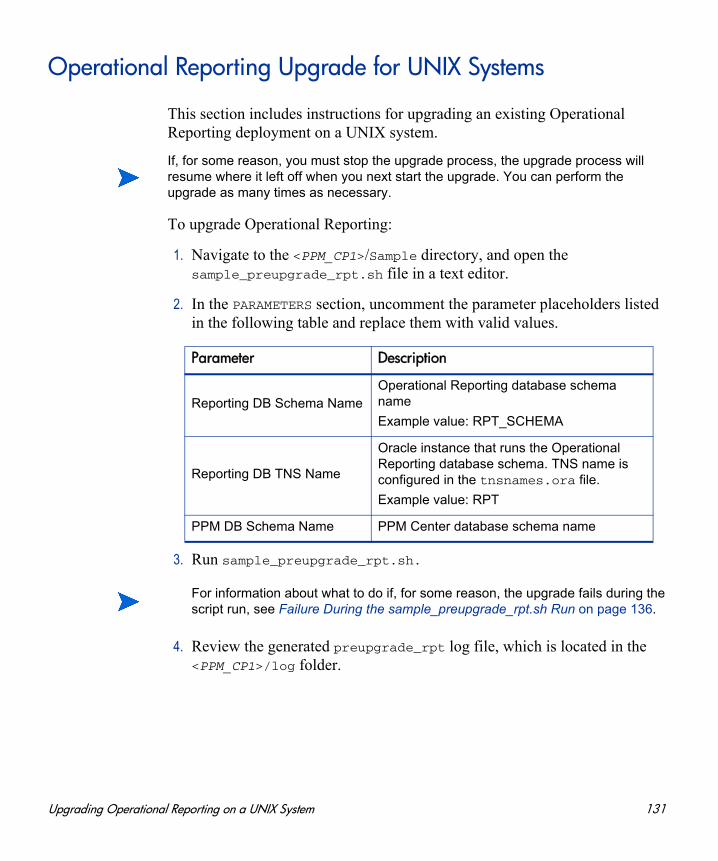
Operational Reporting Upgrade for UNIX Systems
This section includes instructions for upgrading an existing Operational Reporting deployment on a UNIX system.
To upgrade Operational Reporting:
1. Navigate to the <PPM_CP1>/Sample directory, and open the sample_preupgrade_rpt.sh file in a text editor.
2. In the PARAMETERS section, uncomment the parameter placeholders listed in the following table and replace them with valid values.
3. Run sample_preupgrade_rpt.sh.
4. Review the generated preupgrade_rpt log file, which is located in the <PPM_CP1>/log folder.
If, for some reason, you must stop the upgrade process, the upgrade process will resume where it left off when you next start the upgrade. You can perform the upgrade as many times as necessary.
Parameter Description
Reporting DB Schema NameOperational Reporting database schema name
Example value: RPT_SCHEMA
Reporting DB TNS Name
Oracle instance that runs the Operational Reporting database schema. TNS name is configured in the tnsnames.ora file.
Example value: RPT
PPM DB Schema Name PPM Center database schema name
For information about what to do if, for some reason, the upgrade fails during the script run, see Failure During the sample_preupgrade_rpt.sh Run on page 136.
Upgrading Operational Reporting on a UNIX System 131
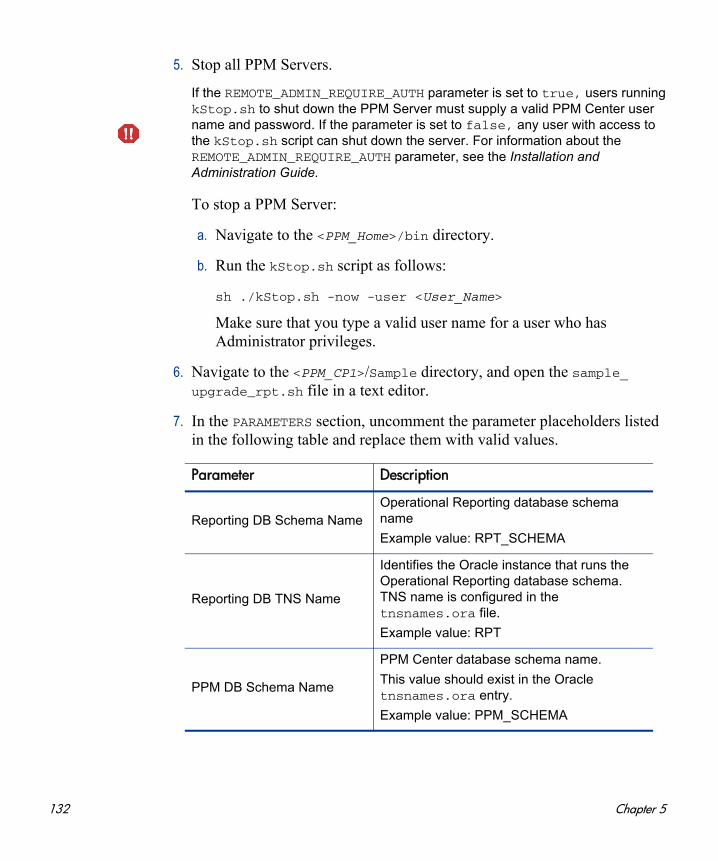
5. Stop all PPM Servers.
To stop a PPM Server:
a. Navigate to the <PPM_Home>/bin directory.
b. Run the kStop.sh script as follows:
sh ./kStop.sh -now -user <User_Name>
Make sure that you type a valid user name for a user who has Administrator privileges.
6. Navigate to the <PPM_CP1>/Sample directory, and open the sample_upgrade_rpt.sh file in a text editor.
7. In the PARAMETERS section, uncomment the parameter placeholders listed in the following table and replace them with valid values.
If the REMOTE_ADMIN_REQUIRE_AUTH parameter is set to true, users running kStop.sh to shut down the PPM Server must supply a valid PPM Center user name and password. If the parameter is set to false, any user with access to the kStop.sh script can shut down the server. For information about the REMOTE_ADMIN_REQUIRE_AUTH parameter, see the Installation and Administration Guide.
Parameter Description
Reporting DB Schema NameOperational Reporting database schema name
Example value: RPT_SCHEMA
Reporting DB TNS Name
Identifies the Oracle instance that runs the Operational Reporting database schema. TNS name is configured in the tnsnames.ora file.
Example value: RPT
PPM DB Schema Name
PPM Center database schema name.
This value should exist in the Oracle tnsnames.ora entry.
Example value: PPM_SCHEMA
132 Chapter 5
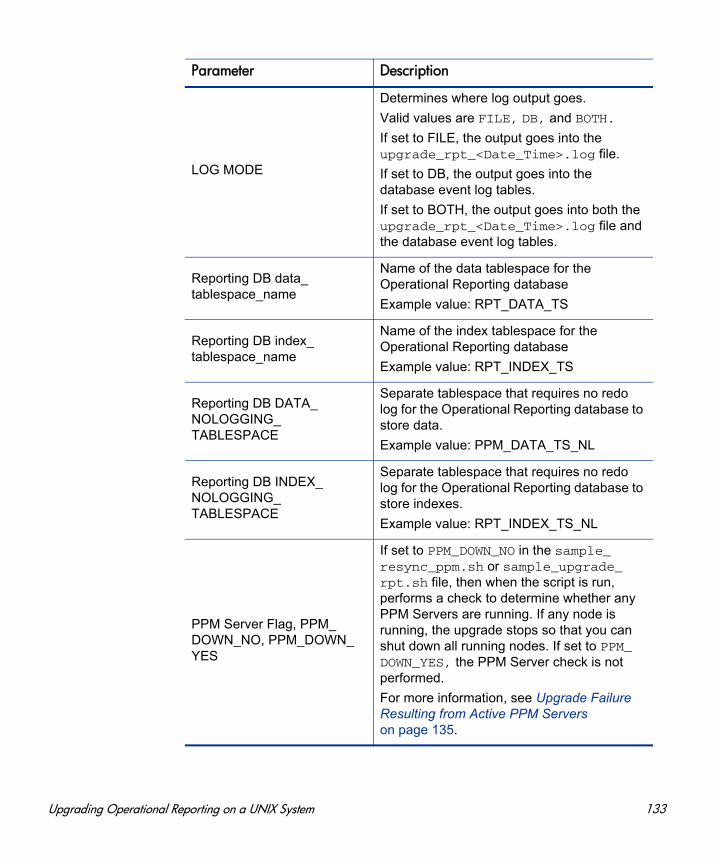
LOG MODE
Determines where log output goes.
Valid values are FILE, DB, and BOTH.
If set to FILE, the output goes into the upgrade_rpt_<Date_Time>.log file.
If set to DB, the output goes into the database event log tables.
If set to BOTH, the output goes into both the upgrade_rpt_<Date_Time>.log file and the database event log tables.
Reporting DB data_tablespace_name
Name of the data tablespace for the Operational Reporting database
Example value: RPT_DATA_TS
Reporting DB index_tablespace_name
Name of the index tablespace for the Operational Reporting database
Example value: RPT_INDEX_TS
Reporting DB DATA_NOLOGGING_TABLESPACE
Separate tablespace that requires no redo log for the Operational Reporting database to store data.
Example value: PPM_DATA_TS_NL
Reporting DB INDEX_NOLOGGING_TABLESPACE
Separate tablespace that requires no redo log for the Operational Reporting database to store indexes.
Example value: RPT_INDEX_TS_NL
PPM Server Flag, PPM_DOWN_NO, PPM_DOWN_YES
If set to PPM_DOWN_NO in the sample_resync_ppm.sh or sample_upgrade_rpt.sh file, then when the script is run, performs a check to determine whether any PPM Servers are running. If any node is running, the upgrade stops so that you can shut down all running nodes. If set to PPM_DOWN_YES, the PPM Server check is not performed.
For more information, see Upgrade Failure Resulting from Active PPM Servers on page 135.
Parameter Description
Upgrading Operational Reporting on a UNIX System 133
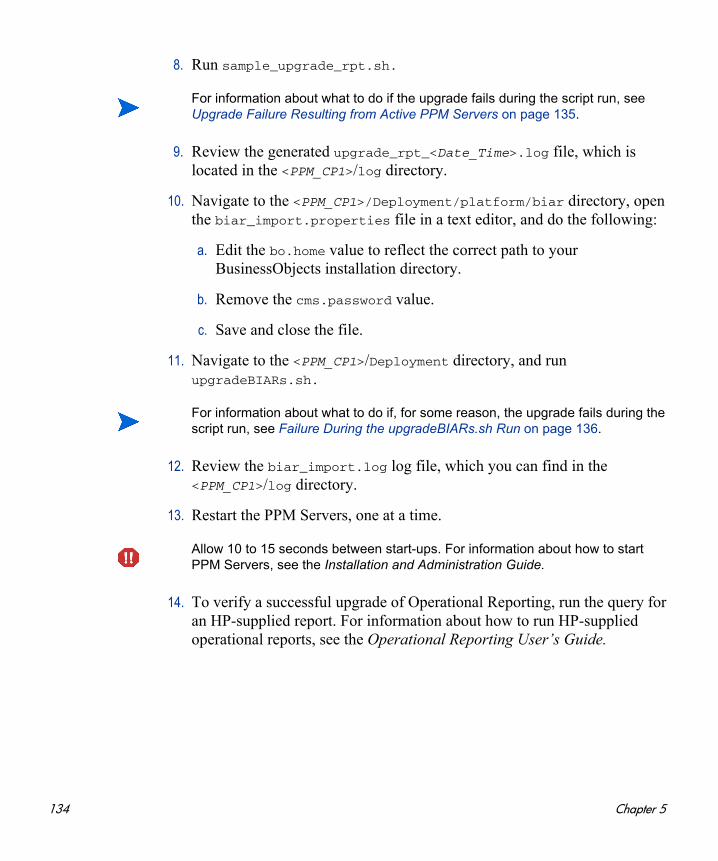
8. Run sample_upgrade_rpt.sh.
9. Review the generated upgrade_rpt_<Date_Time>.log file, which is located in the <PPM_CP1>/log directory.
10. Navigate to the <PPM_CP1>/Deployment/platform/biar directory, open the biar_import.properties file in a text editor, and do the following:
a. Edit the bo.home value to reflect the correct path to your BusinessObjects installation directory.
b. Remove the cms.password value.
c. Save and close the file.
11. Navigate to the <PPM_CP1>/Deployment directory, and run upgradeBIARs.sh.
12. Review the biar_import.log log file, which you can find in the <PPM_CP1>/log directory.
13. Restart the PPM Servers, one at a time.
14. To verify a successful upgrade of Operational Reporting, run the query for an HP-supplied report. For information about how to run HP-supplied operational reports, see the Operational Reporting User’s Guide.
For information about what to do if the upgrade fails during the script run, see Upgrade Failure Resulting from Active PPM Servers on page 135.
For information about what to do if, for some reason, the upgrade fails during the script run, see Failure During the upgradeBIARs.sh Run on page 136.
Allow 10 to 15 seconds between start-ups. For information about how to start PPM Servers, see the Installation and Administration Guide.
134 Chapter 5
Recovering from an Upgrade Failure
An upgrade to PPM Center Content Pack 1 can potentially fail for several reasons. The process will stop if, for example, the connection to a remote database is lost, the client machine running an upgrade script goes down, or if PPM Center data are missing. This section provides information about what to do if your upgrade fails during the different stages of the upgrade process.
Upgrade Failure Resulting from Active PPM Servers
The sample_resync_ppm.sh and sample_upgrade_rpt.sh files both include the PPM Server Status parameter, which can be set to either PPM_DOWN_NO or PPM_DOWN_YES. (See PPM Server Flag, PPM_DOWN_NO, PPM_DOWN_YES on page 133.) If you set the PPM Server Status parameter to PPM_DOWN_NO in either of these files and then execute the file, the upgrade checks to determine whether any PPM Servers are active. If an active node is detected during the run, the upgrade stops and the following message is displayed:
Failed with this error => PPM DOWN is required. One or more PPM Servers is active. If all nodes are down, pass PPM_DOWN_YES, *** aborting upgrade...
If this error occurs, do the following:
1. Shut down every active node in the server cluster.
2. Open the sample batch or shell script (either sample_upgrade_rpt.sh or sample_resync_ppm.sh) and change the PPM Server Status parameter value from PPM_DOWN_NO to PPM_DOWN_YES.
3. Run the script again.
The upgrade process skips the PPM Server check after you set the PPM Server Status parameter value to PPM_DOWN_YES.
Upgrading Operational Reporting on a UNIX System 135
Failure During the sample_preupgrade_rpt.sh Run
If the upgrade fails while the sample_preupgrade_rpt.sh script is running, do the following:
1. Navigate to the <PPM_CP1>/log directory and review the generated preupgrade_rpt.log file.
2. Correct any reported errors, and then run the Sample_preupgrade_rpt.sh script again.
Failure During the sample_upgrade_rpt.sh Run
If the upgrade fails while the sample_upgrade_rpt.sh script is running, just run the script again when appropriate.
Failure During the upgradeBIARs.sh Run
If your BusinessObjects server or client machine goes down while the upgradeBIARs.sh script is running, do the following:
1. Navigate to the 910_CP1/Deployment/platform/biar directory, open the log file for the script run, and check for reported errors.
2. If the log file indicates an issue that cannot be resolved by simply running the upgradeBIARs.sh script again, you may have to delete HP-supplied universes (RM Derived Universe, TM Derived Universe, FM Derived Universe, and Kernel Universe) or new reports.
3. Run the upgradeBIARs.sh script again.
Make sure that you do not delete existing (version 9.10) reports. Check the Content Pack 1 Release Notes for the reports that are new in Content Pack 1, and delete these.
136 Chapter 5
6 Refreshing Operational Reporting Data
Synchronizing Data in the Operational Reporting and PPM Center Database Schemas
This chapter provides information about how data in the PPM Center database schema and the Operational Reporting database schema are synchronized.
Running Incremental ETL Jobs
The load script that you run during Operational Reporting deployment (see Running the Load Script on page 48) performs a full ETL to load all PPM Center data into the Operational Reporting database schema. Incremental ETL jobs are scheduled to run automatically every 24 hours thereafter. These incremental ETL jobs cover the day-to-day updates for the PPM Center data tables.
The incremental ETL job that runs automatically every 24 hours is named PPM_ETL_BATCH_JOB. You can use an Oracle command to reschedule or change the frequency of the PPM_ETL_BATCH_JOB run. (For information on how to reschedule the PPM_ETL_BATCH_JOB, see the Oracle Database Online Documentation.) This section contains instructions on how to run incremental ETL jobs manually.
137
Checking ETL Job Progress
To check the job progress, you can query the RPT_EVENT_LOG_DETAIL table, as follows:
SELECT *FROM rpt_event_log_detailORDER BY event_time
To view the status of an incremental ETL job, you can query the job control tables (RPT_ETL_JOB and RPT_EVENT_LOG_DETAIL tables).
Verifying Successful Incremental ETL Jobs
To determine whether the last incremental ETL job run completed successfully, run the following:
SELECT * FROM rpt_event_log_detail ORDER BY event_time
SELECT * FROM rpt_etl_job ORDER BY etl_job_id desc;
HP recommends that you delete the contents of the rpt_event_log_detail and rpt_etl_job order tables at least once a month to prevent them from becoming too large. You must delete the contents manually.
138 Chapter 6
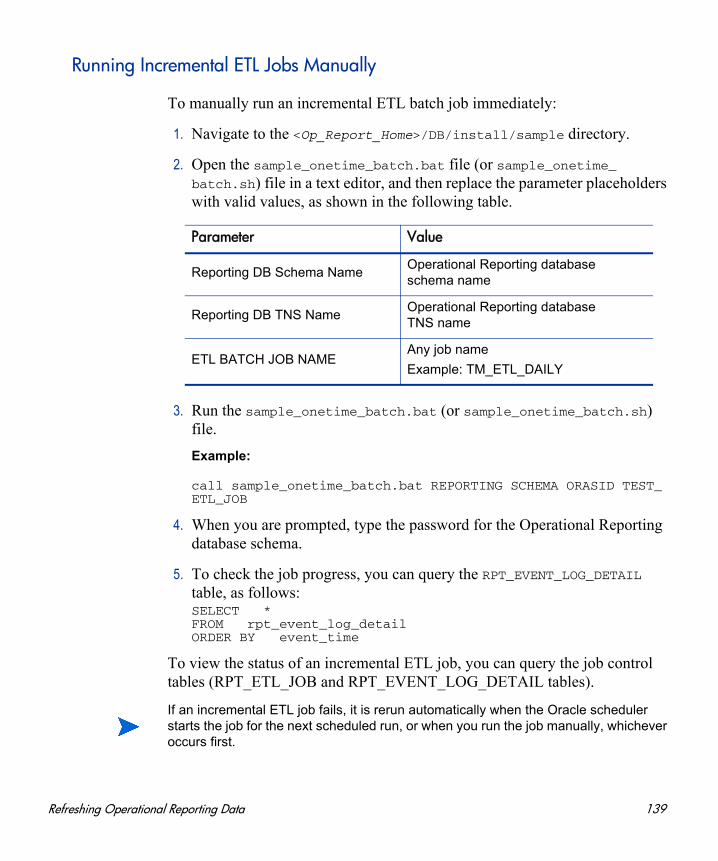
Running Incremental ETL Jobs Manually
To manually run an incremental ETL batch job immediately:
1. Navigate to the <Op_Report_Home>/DB/install/sample directory.
2. Open the sample_onetime_batch.bat file (or sample_onetime_batch.sh) file in a text editor, and then replace the parameter placeholders with valid values, as shown in the following table.
3. Run the sample_onetime_batch.bat (or sample_onetime_batch.sh) file.
Example:
call sample_onetime_batch.bat REPORTING SCHEMA ORASID TEST_ETL_JOB
4. When you are prompted, type the password for the Operational Reporting database schema.
5. To check the job progress, you can query the RPT_EVENT_LOG_DETAIL table, as follows:SELECT *FROM rpt_event_log_detailORDER BY event_time
To view the status of an incremental ETL job, you can query the job control tables (RPT_ETL_JOB and RPT_EVENT_LOG_DETAIL tables).
Parameter Value
Reporting DB Schema NameOperational Reporting database schema name
Reporting DB TNS NameOperational Reporting database TNS name
ETL BATCH JOB NAMEAny job name
Example: TM_ETL_DAILY
If an incremental ETL job fails, it is rerun automatically when the Oracle scheduler starts the job for the next scheduled run, or when you run the job manually, whichever occurs first.
Refreshing Operational Reporting Data 139
Change Data Capture
Incremental ETL relies on Oracle Change Data Capture, or CDC, which is provided as a database server component with your Oracle Database software. CDC identifies and captures data that has been added to, updated, or removed from Oracle relational tables, and makes the change data available for ETL jobs.
Purging Data
CDC uses the DBMS_SCHEDULER package (which runs under the account of the publisher who created the first change table) to create a purge job named cdc$_default_purge_job. This purge job calls the DBMS_CDC_PUBLISH.PURGE procedure to remove data that subscribers no longer use from the change tables. By default, cdc$_default_purge_job runs every 24 hours. You can reschedule the purge job using DBMS_SCHEDULER.SET_ATTRIBUTE and setting the repeat_interval attribute.
Running the cdc$_default_purge_job regularly ensures that the tables do not grow without limit. If you have a large volume of data and need to schedule frequent incremental ETL jobs, you can schedule the cdc$_default_purge_job to run more frequently than the default of every 24 hours.
You can also purge the data manually. For detailed information, see the Oracle Database Data Warehousing Guide online.
The call to the DBMS_CDC_PUBLISH.PURGE procedure evaluates all active subscription windows to determine which change data are still needed. It does not purge any data that could be referenced by one or more subscribers with active subscription windows.
For information about the DBMS_SCHEDULER package, see the Oracle Database PL/SQL Packages and Types Reference.
140 Chapter 6
PPM Center Data Transfer During ETL
The following sections describe how PPM Center data are transferred during the ETL process.
Common Dimension Data Transfer
The COMMON ETL job transfers all PPM Center data (that fall within the interval defined by the specified start and end dates) and that are shared by HP Time Management, HP Resource Management, and HP Financial Management into the Operational Reporting database schema.
HP Project Management Data Transfer
A full ETL for HP Project Management (PM) transfers all project data (that fall within the interval defined by the specified start and end dates) from the HP Project Management tables into the Operational Reporting database schema. A subsequent incremental PM ETL job loads HP Project Management data that have changed since the last PM ETL job run.
HP Time Management Data Transfer
A full ETL for HP Time Management (TM) transfers all time-sheet data (that fall within the interval defined by the specified start and end dates) from the HP Time Management tables into the Operational Reporting database schema. A subsequent incremental TM ETL job loads HP Time Management data that have changed since the last TM ETL job run.
HP Resource Management Data Transfer
A full ETL for HP Resource Management (RM) transfers all resource capacity, demand, and actual effort data (that fall within the interval defined by the specified start and end dates) from the HP Resource Management tables into the Operational Reporting database schema. A subsequent incremental RM ETL job loads HP Resource Management data that have changed since the last RM ETL job run.
Refreshing Operational Reporting Data 141

HP Financial Management Data Transfer
The FM incremental ETL job transfers all HP Financial Management data (that fall within the interval defined by the specified start and end dates) from the HP Financial Management tables into the Operational Reporting database schema. A subsequent incremental FM ETL job loads HP Financial Management data changed since the last FM ETL job run.
Date Range for Transferred Data
The date range for the data moved to the Operational Reporting database during the ETL process is determined by the values you specify for the ETL_START_DATE and ETL_END_DATE parameters. The start date of the fiscal year is determined the year you specify for the ETL_START_DATE value. Table 6-1 shows how this influences the actual start date for the ETL.
The end date of the fiscal year is determined the year you specify for the ETL_END_DATE value. Table 6-1 shows how this influences the actual end date for the ETL.
Table 6-1. Effect of PPM Center fiscal year on the calculated ETL start date
Specified ETL_START_DATE
Start Date for the PPM Center Fiscal Year
Calculated (Actual) ETL Start Date
01/15/2008 January 1 01/01/2008
November 1 11/01/2007
Table 6-2. Effect of PPM Center fiscal year on the calculated ETL end date
Specified ETL_END_DATE
End Date for the PPM Center Fiscal Year
Calculated (Actual) ETL End Date
11/30/2012 December 31 12/31/2012
October 31 10/31/2013
142 Chapter 6
Date Range for Transferred HP Time Management Data
For HP Time Management data, the value set for the ETL_START_DATE parameter determines which time sheets’ data are brought into the Operational Reporting database. If a time sheet has an end date that is on or later than the ETL_START_DATE, then that time sheet is used to generate data in the Operational Reporting schema.
The ETL_END_DATE parameter value is not used. Except for cancelled time sheets, all time sheets with end dates that fall after the ETL start date are brought over.
Date Range for Transferred HP Resource Management Data
Calculated ETL start and end dates affect HP Resource Management data transfer in the following ways:
Fiscal period definitions are brought over for fiscal periods whose start dates and end dates fall within the time period specified by the calculated start and end dates.
Resource demand data are brought over for all staffing profiles whose demand falls within the time period defined by the calculated start and end dates.
Resource capacity data are brought over for all of the resources for the time period between the calculated start and end dates, provided that the resource’s end date is later than the calculated end date, and the resource’s start date falls within the time period specified by the calculated start and end dates.
Resource actual effort data are brought over for all the time sheets (excluding cancelled time sheets) with ending dates later than the calculated start date.
If you have long-running projects, keep in mind that requests created before the ETL start date you specify are not brought over, and so the actual effort data for these requests are not available for reporting.
Refreshing Operational Reporting Data 143
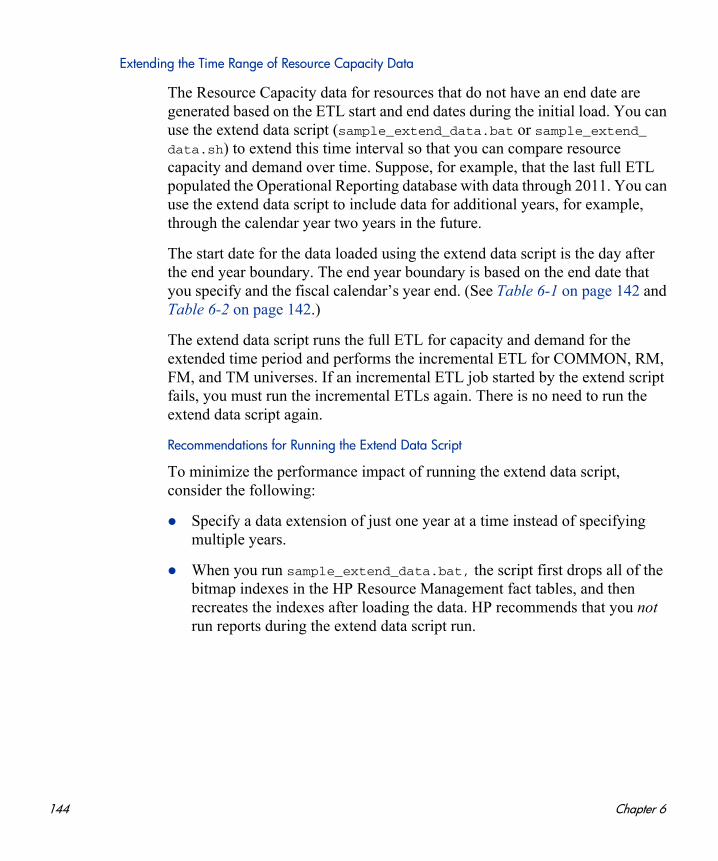
Extending the Time Range of Resource Capacity Data
The Resource Capacity data for resources that do not have an end date are generated based on the ETL start and end dates during the initial load. You can use the extend data script (sample_extend_data.bat or sample_extend_data.sh) to extend this time interval so that you can compare resource capacity and demand over time. Suppose, for example, that the last full ETL populated the Operational Reporting database with data through 2011. You can use the extend data script to include data for additional years, for example, through the calendar year two years in the future.
The start date for the data loaded using the extend data script is the day after the end year boundary. The end year boundary is based on the end date that you specify and the fiscal calendar’s year end. (See Table 6-1 on page 142 and Table 6-2 on page 142.)
The extend data script runs the full ETL for capacity and demand for the extended time period and performs the incremental ETL for COMMON, RM, FM, and TM universes. If an incremental ETL job started by the extend script fails, you must run the incremental ETLs again. There is no need to run the extend data script again.
Recommendations for Running the Extend Data Script
To minimize the performance impact of running the extend data script, consider the following:
Specify a data extension of just one year at a time instead of specifying multiple years.
When you run sample_extend_data.bat, the script first drops all of the bitmap indexes in the HP Resource Management fact tables, and then recreates the indexes after loading the data. HP recommends that you not run reports during the extend data script run.
144 Chapter 6
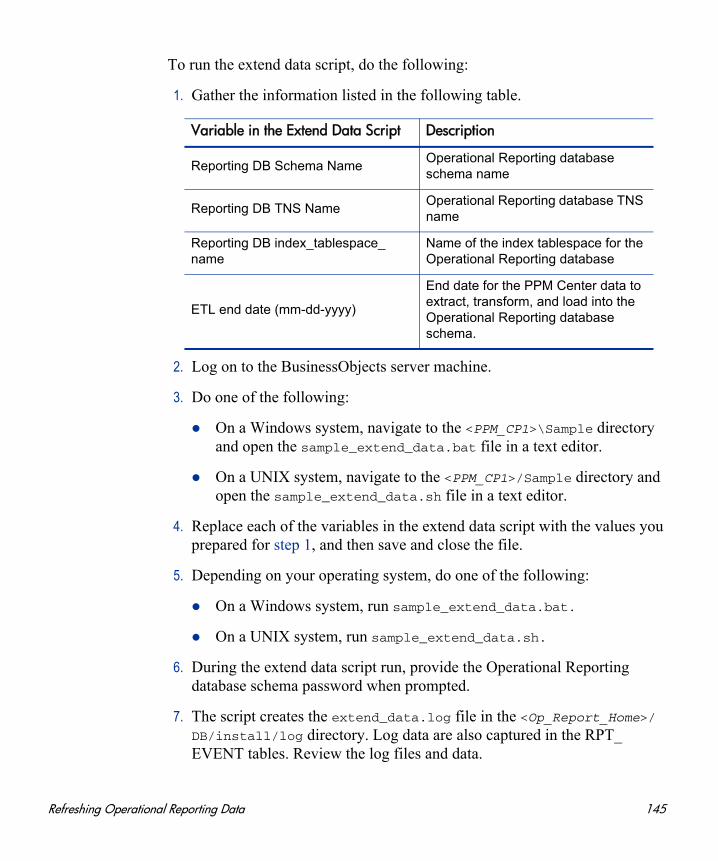
To run the extend data script, do the following:
1. Gather the information listed in the following table.
2. Log on to the BusinessObjects server machine.
3. Do one of the following:
On a Windows system, navigate to the <PPM_CP1>\Sample directory and open the sample_extend_data.bat file in a text editor.
On a UNIX system, navigate to the <PPM_CP1>/Sample directory and open the sample_extend_data.sh file in a text editor.
4. Replace each of the variables in the extend data script with the values you prepared for step 1, and then save and close the file.
5. Depending on your operating system, do one of the following:
On a Windows system, run sample_extend_data.bat.
On a UNIX system, run sample_extend_data.sh.
6. During the extend data script run, provide the Operational Reporting database schema password when prompted.
7. The script creates the extend_data.log file in the <Op_Report_Home>/DB/install/log directory. Log data are also captured in the RPT_EVENT tables. Review the log files and data.
Variable in the Extend Data Script Description
Reporting DB Schema NameOperational Reporting database schema name
Reporting DB TNS NameOperational Reporting database TNS name
Reporting DB index_tablespace_name
Name of the index tablespace for the Operational Reporting database
ETL end date (mm-dd-yyyy)
End date for the PPM Center data to extract, transform, and load into the Operational Reporting database schema.
Refreshing Operational Reporting Data 145

146 Chapter 6
7 Reporting Portlets
About Operational Reporting Portlets
HP supplies two Operational Reporting portlets—the Operational Report portlet and the Operational Report List portlet—that make operational reports available to users through the PPM Dashboard. You can add these portlets to your shared PPM Dashboard pages and enable users to add them to their private PPM Dashboard pages. This chapter provides descriptions of the reporting portlets and instructions on how to enable users to add the portlets to PPM Dashboard pages. It also provides instructions on how to make your ad hoc reports available through the portlets.
Operational Report List Portlet
The Operational Report List portlet provides a link to each of the preconfigured operational reports that HP provides with Operational Reporting. After you click the link to a report and log on to InfoView, you have access to all of the linked reports and drill-down functionality associated with the selected report.
By default, the Operational Report List portlet lists only the HP-supplied reports. You can also add your ad hoc operational reports to the portlet.
147
Operational Report Portlet
The Operational Report portlet displays an HP-supplied operational report based on the report name you select. After you edit the preferences by selecting the name of an HP-supplied report and log on to InfoView, you have access to the selected report.
Enabling the Addition of Reporting Portlets to PPM Dashboard Pages
Before Operational Report portlets can be added to PPM Dashboard pages, the REPORTING_BASE_URL server configuration parameter must be set to point to the base URL for your BusinessObjects server.
To enable the addition of operational report portlets to PPM Dashboard pages:
1. Log on to PPM Center.
2. From the menu bar, select Open > Administration > Open > Administration >
Administration Console.
In order to access and use the Administration Console, you must have the User Administration license and belong to a security group that has the Sys Admin Server Tools: Execute Admin Tools access grant.
148 Chapter 7

3. In the Administration Console Actions section, expand Admin Task, and then select Application Configuration.
4. In the Edit PPM Application Parameters table, scroll down to the row that displays the REPORTING_BASE_URL parameter.
5. In the Value box to the right of the parameter name, type the base URL for your BusinessObjects server.
6. Click Save.
Report Portlet Security
If a user has the permissions required to view a report from InfoView, that user can see the same report in a reporting portlet from PPM Dashboard pages. For information about how to restrict user access to operation reports, see the BusinessObjects Enterprise Administrator’s Guide for BusinessObjects Enterprise XI 3.1.
Reporting Portlets 149
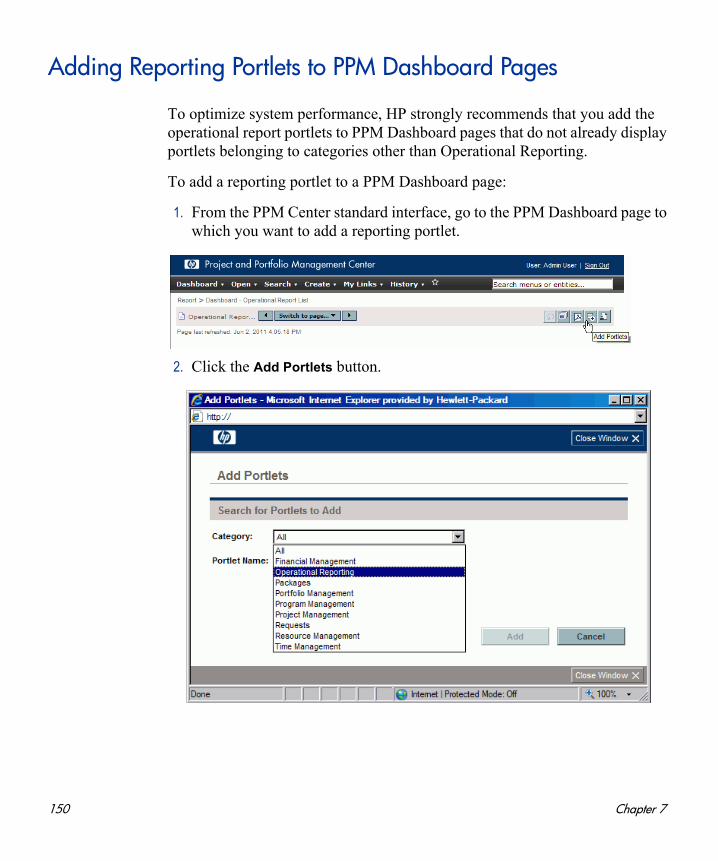
Adding Reporting Portlets to PPM Dashboard Pages
To optimize system performance, HP strongly recommends that you add the operational report portlets to PPM Dashboard pages that do not already display portlets belonging to categories other than Operational Reporting.
To add a reporting portlet to a PPM Dashboard page:
1. From the PPM Center standard interface, go to the PPM Dashboard page to which you want to add a reporting portlet.
2. Click the Add Portlets button.
150 Chapter 7
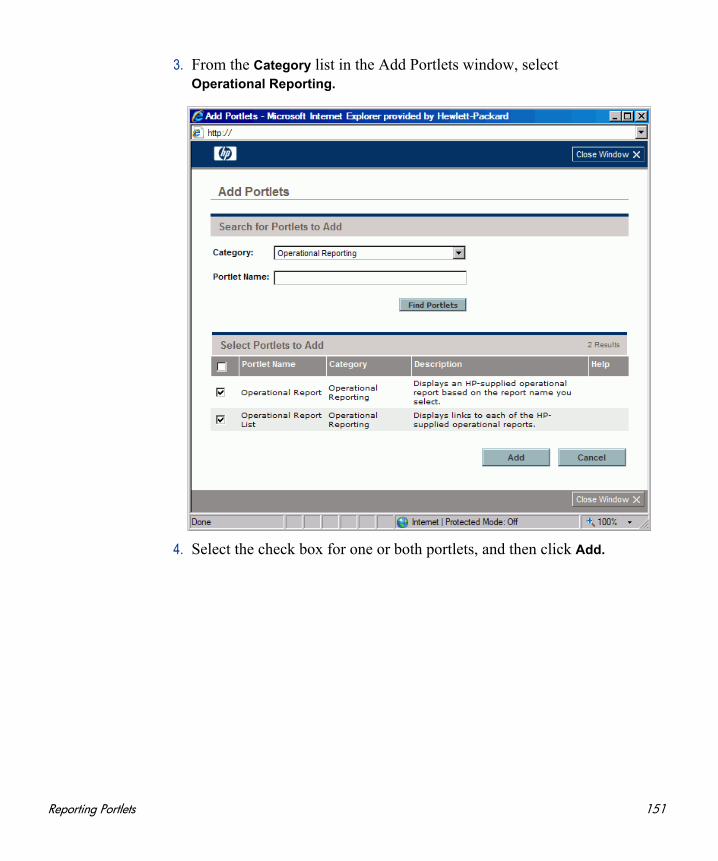
3. From the Category list in the Add Portlets window, select Operational Reporting.
4. Select the check box for one or both portlets, and then click Add.
Reporting Portlets 151

5. If you added the Operational Report portlet to the PPM Dashboard page, select the report for the portlet to display as follows:
a. In the Operational Report box, click the Edit portlet preferences icon.
The Edit Preferences page opens.
b. From the Report Name Filter list, select the name of the report to display in the portlet.
c. Click Save.
152 Chapter 7
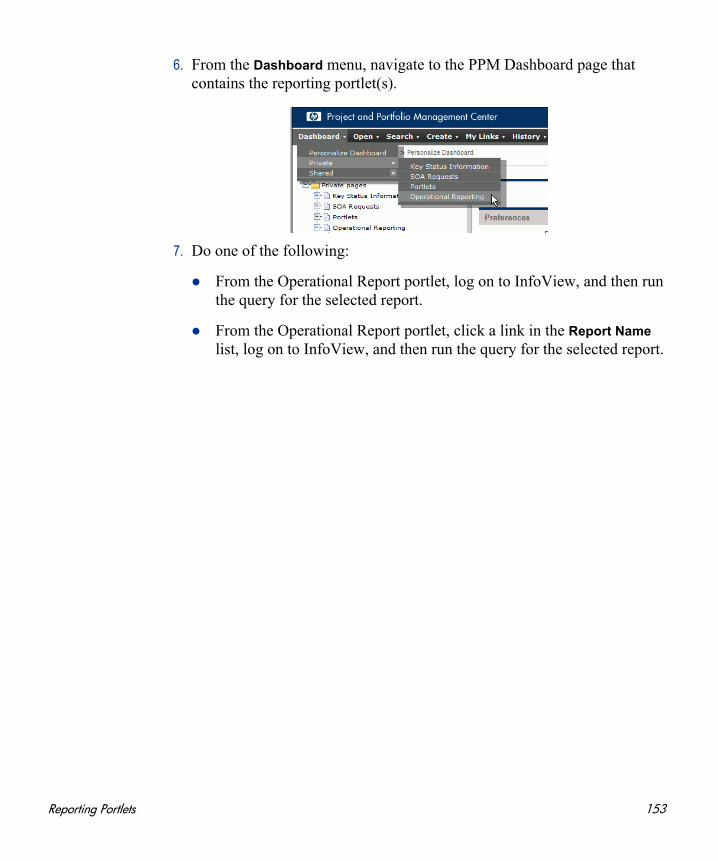
6. From the Dashboard menu, navigate to the PPM Dashboard page that contains the reporting portlet(s).
7. Do one of the following:
From the Operational Report portlet, log on to InfoView, and then run the query for the selected report.
From the Operational Report portlet, click a link in the Report Name list, log on to InfoView, and then run the query for the selected report.
Reporting Portlets 153

Adding Ad Hoc Operational Reports to the Reporting Portlets
In addition to the preconfigured reports that HP supplies, you can also display your ad hoc operational reports through the Operational Report List portlet.
To display an ad hoc operational report in a portlet:
1. Log on to BusinessObjects InfoView and navigate to an ad hoc report that you want to add to the portlet report list.
2. Right-click the report, and then select Properties from the shortcut menu.
154 Chapter 7
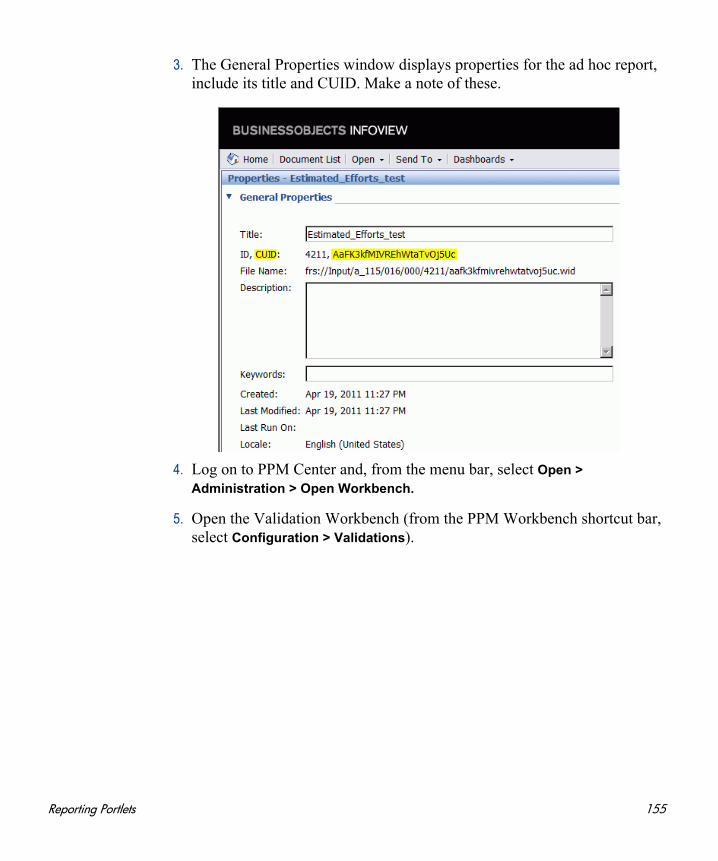
3. The General Properties window displays properties for the ad hoc report, include its title and CUID. Make a note of these.
4. Log on to PPM Center and, from the menu bar, select Open >
Administration > Open Workbench.
5. Open the Validation Workbench (from the PPM Workbench shortcut bar, select Configuration > Validations).
Reporting Portlets 155
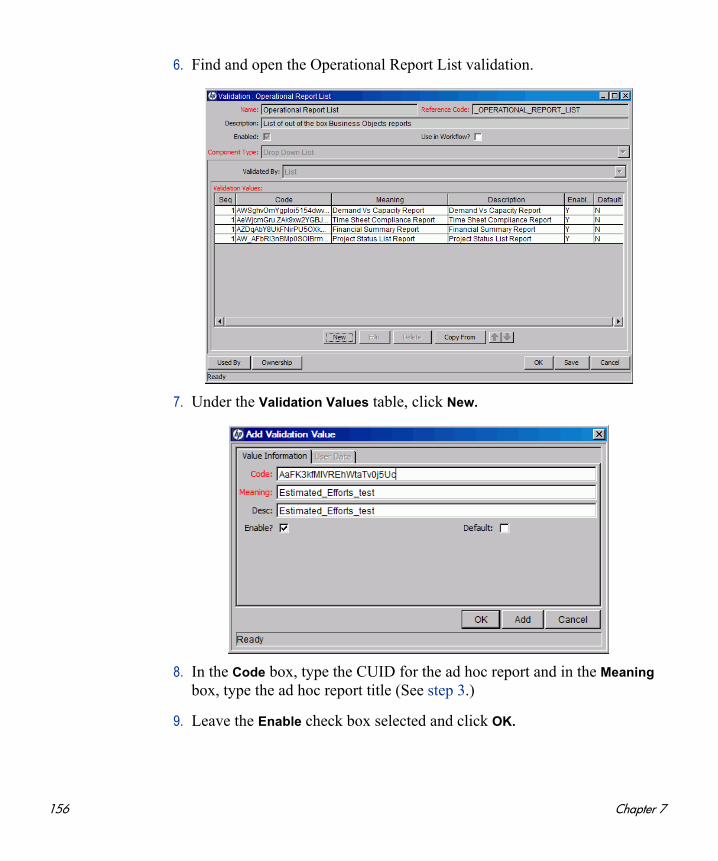
6. Find and open the Operational Report List validation.
7. Under the Validation Values table, click New.
8. In the Code box, type the CUID for the ad hoc report and in the Meaning box, type the ad hoc report title (See step 3.)
9. Leave the Enable check box selected and click OK.
156 Chapter 7
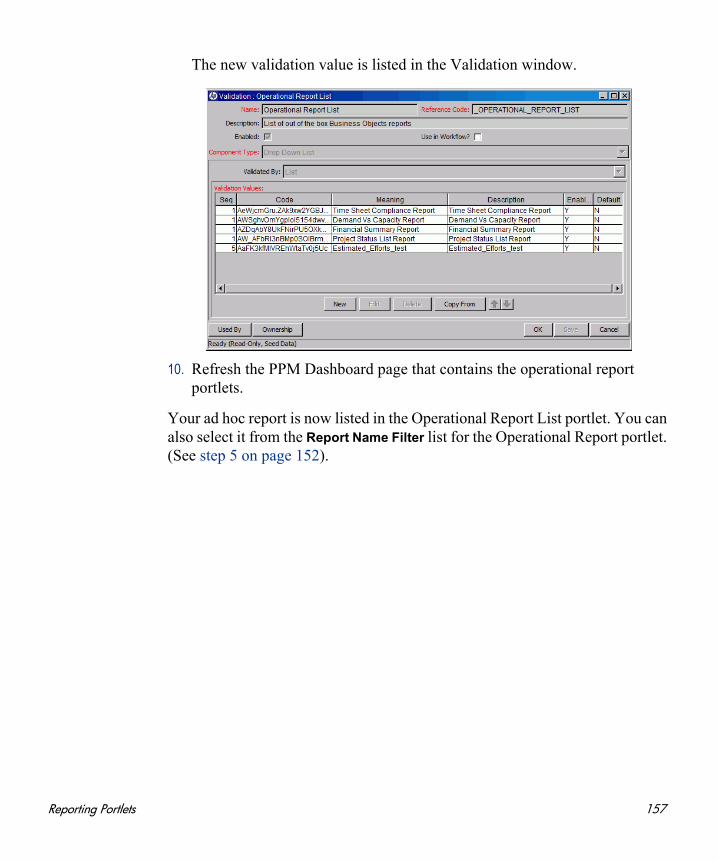
The new validation value is listed in the Validation window.
10. Refresh the PPM Dashboard page that contains the operational report portlets.
Your ad hoc report is now listed in the Operational Report List portlet. You can also select it from the Report Name Filter list for the Operational Report portlet. (See step 5 on page 152).
Reporting Portlets 157

158 Chapter 7
8 Reporting on PPM Center Request Custom Parameters
About Custom Parameters
In PPM Center, an administrator can configure up to 50 custom request parameters at the header level and any number of custom parameters at the request detail level. The Operational Reporting Kernel universe makes all of the custom parameters (at the request header level) and the first 100 custom parameters (at the request detail level) available for reporting. In Universe Designer and InfoView, you can access custom parameters in the Request Header Custom Parameters and Request Detail Custom Parameters folders under the Request Information class.
The objects that represent the custom parameters are named “Visible Parameter1”, “Visible Parameter2”, and so on, to model custom parameters in a generic way, much like Visible User Data objects represent custom data fields. The basic difference is that user data fields have the same definition for all request types, which is not true for custom parameter fields. Request custom parameters are defined in PPM Center within the context of request types. As a result, the meaning of a given custom parameter such as Parameter1 can be different for different request types.
Depending on your environment, you may have multiple request types that use custom parameters, each of which is mapped to a specific field name that is unique within the request type. Also, a given custom parameter such as “Parameter1” may be configured for more than one request type for custom fields which are very different in usage or meaning between request types. For example, Request Type 1 may include a custom parameter field Parameter10 that models “IT Organization name” while Request Type2 may also include a custom parameter field 10 that models “Solution description”. Parameter10
159
will represent the field IT Organization name for Request Type1 request and represent the field Solution description for the Request Type2.
If you plan to include custom parameters in your operational reports, use specific field names or object names in the report instead of the default names (such as Visible Parameter1), depending on the request type. Staying with the example Visible Parameter 10, keep in mind that if you use a query filter based on the object Visible Parameter10, you will want the report to show IT Organization name field values only for requests of the type Request Type1. Likewise, you want the report to show the Solution description field values only for requests of the type Request Type2.
The value of custom parameters are stored in the same underlying database table for all requests of different request types.
Exposing Custom Parameter Fields in Operational Reporting
The following sections describe how to expose custom parameter field values in the Operational Reporting schema and how to expose custom parameter field values in the Kernel universe.
Exposing Custom Parameter Field Values in the Kernel Universe
Because the custom parameters definitions vary between request types, a single universe object cannot map to a custom parameter field for all request types. Also, the field definition is not fixed, but is dynamic (which is stored in the parameter set fields for each request type defining custom parameter fields).
In this section, the following example custom parameter field and Visible Parameter objects are used to help describe how to customize your Visible Parameter object definitions.
160 Chapter 8
Example:
In this PPM Center instance, Sample Request Type 1 and Sample Request Type 2 are configured as follows.
Sample Request Type 1 includes three custom fields, defined as follows:
o IT Organization name is mapped to Request header Visible Parameter2.
o IT Manager name is mapped to Request detail Visible Parameter10.
o Business Impact is mapped to Request detail Visible Parameter55 (that is, Parameter 5, batch number 2).
Sample Request Type 2 includes three custom fields, defined as follows:
o Assigned Team is mapped to Request header Visible Parameter2.
o Solution Description is mapped to Request detail Visible Parameter55 (that is, Parameter 5, batch number 2).
o Workaround available is mapped to Request detail Visible Parameter110 (that is, Parameter 10, batch number 3).
In this example, customization involves two tasks:
1. Change the name of the custom parameter objects in the Kernel universe so that they correspond to the field names configured for the request type in PPM Center.
2. Users will likely build different reports to display information for requests of different request types—especially, if the request types are configured with different types of custom parameters.
Change the object definitions of the custom parameter objects so that reports display the value of the corresponding parameter in the context of the request type. This way, instead of displaying all values for all requests of different request types, reports display values based on the correct request type.
The following sections provide the procedures for performing these two tasks, using the example request types, custom parameters, and universe objects.
Reporting on PPM Center Request Custom Parameters 161
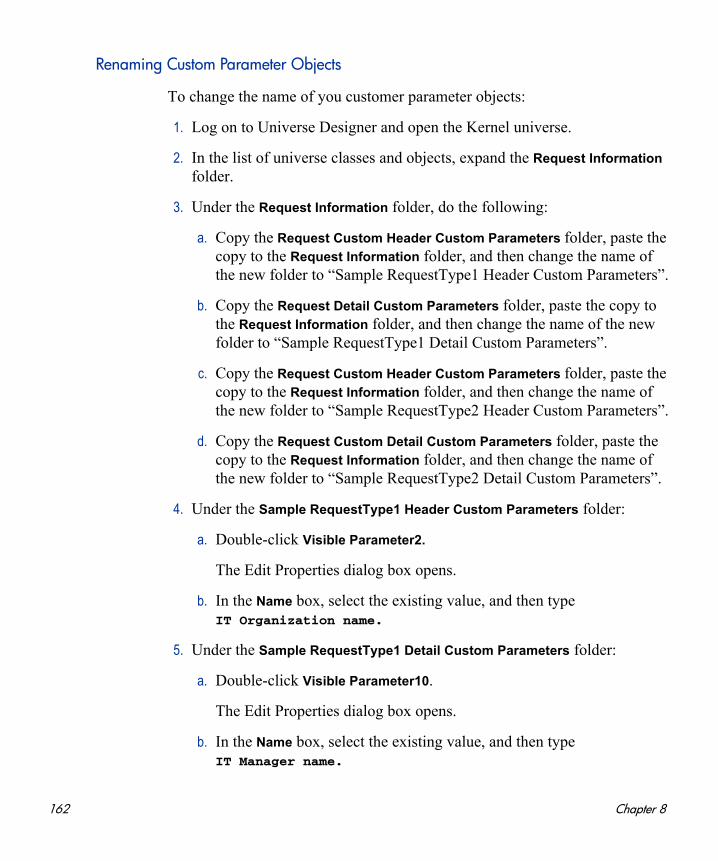
Renaming Custom Parameter Objects
To change the name of you customer parameter objects:
1. Log on to Universe Designer and open the Kernel universe.
2. In the list of universe classes and objects, expand the Request Information folder.
3. Under the Request Information folder, do the following:
a. Copy the Request Custom Header Custom Parameters folder, paste the copy to the Request Information folder, and then change the name of the new folder to “Sample RequestType1 Header Custom Parameters”.
b. Copy the Request Detail Custom Parameters folder, paste the copy to the Request Information folder, and then change the name of the new folder to “Sample RequestType1 Detail Custom Parameters”.
c. Copy the Request Custom Header Custom Parameters folder, paste the copy to the Request Information folder, and then change the name of the new folder to “Sample RequestType2 Header Custom Parameters”.
d. Copy the Request Custom Detail Custom Parameters folder, paste the copy to the Request Information folder, and then change the name of the new folder to “Sample RequestType2 Detail Custom Parameters”.
4. Under the Sample RequestType1 Header Custom Parameters folder:
a. Double-click Visible Parameter2.
The Edit Properties dialog box opens.
b. In the Name box, select the existing value, and then type IT Organization name.
5. Under the Sample RequestType1 Detail Custom Parameters folder:
a. Double-click Visible Parameter10.
The Edit Properties dialog box opens.
b. In the Name box, select the existing value, and then type IT Manager name.
162 Chapter 8
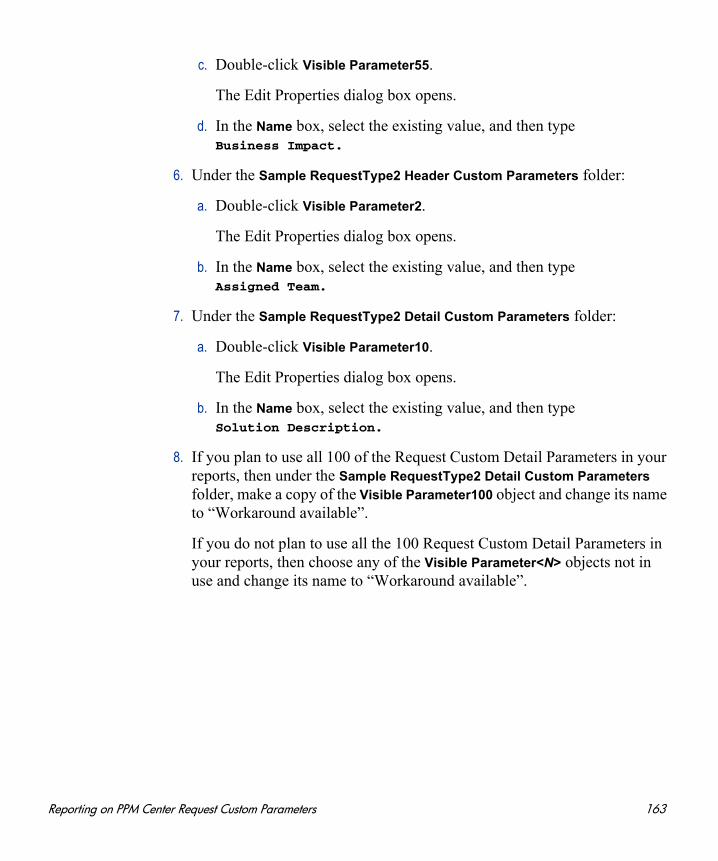
c. Double-click Visible Parameter55.
The Edit Properties dialog box opens.
d. In the Name box, select the existing value, and then type Business Impact.
6. Under the Sample RequestType2 Header Custom Parameters folder:
a. Double-click Visible Parameter2.
The Edit Properties dialog box opens.
b. In the Name box, select the existing value, and then type Assigned Team.
7. Under the Sample RequestType2 Detail Custom Parameters folder:
a. Double-click Visible Parameter10.
The Edit Properties dialog box opens.
b. In the Name box, select the existing value, and then type Solution Description.
8. If you plan to use all 100 of the Request Custom Detail Parameters in your reports, then under the Sample RequestType2 Detail Custom Parameters folder, make a copy of the Visible Parameter100 object and change its name to “Workaround available”.
If you do not plan to use all the 100 Request Custom Detail Parameters in your reports, then choose any of the Visible Parameter<N> objects not in use and change its name to “Workaround available”.
Reporting on PPM Center Request Custom Parameters 163
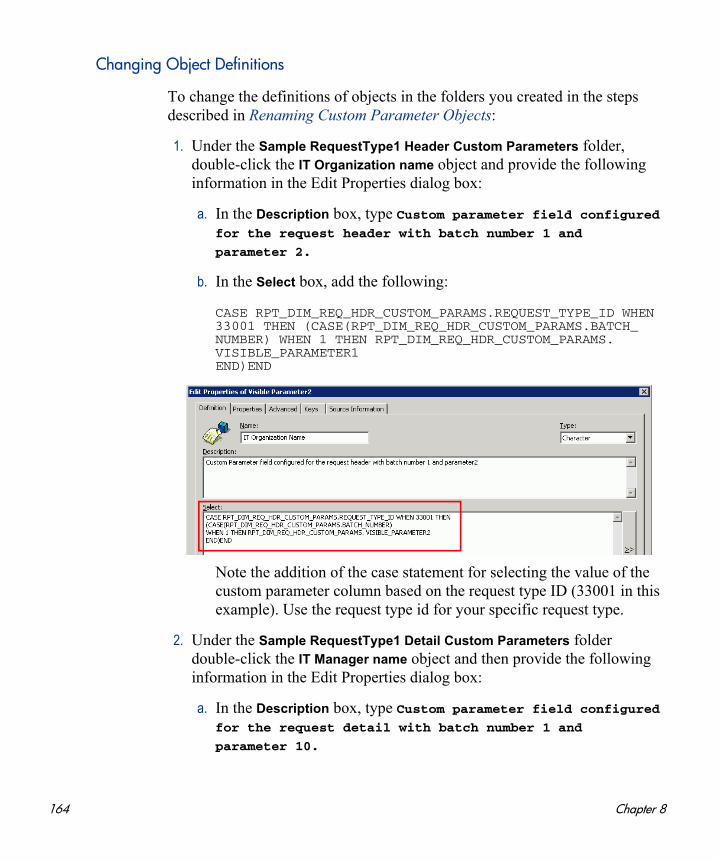
Changing Object Definitions
To change the definitions of objects in the folders you created in the steps described in Renaming Custom Parameter Objects:
1. Under the Sample RequestType1 Header Custom Parameters folder, double-click the IT Organization name object and provide the following information in the Edit Properties dialog box:
a. In the Description box, type Custom parameter field configured for the request header with batch number 1 and
parameter 2.
b. In the Select box, add the following:
CASE RPT_DIM_REQ_HDR_CUSTOM_PARAMS.REQUEST_TYPE_ID WHEN 33001 THEN (CASE(RPT_DIM_REQ_HDR_CUSTOM_PARAMS.BATCH_NUMBER) WHEN 1 THEN RPT_DIM_REQ_HDR_CUSTOM_PARAMS. VISIBLE_PARAMETER1 END)END
Note the addition of the case statement for selecting the value of the custom parameter column based on the request type ID (33001 in this example). Use the request type id for your specific request type.
2. Under the Sample RequestType1 Detail Custom Parameters folder double-click the IT Manager name object and then provide the following information in the Edit Properties dialog box:
a. In the Description box, type Custom parameter field configured for the request detail with batch number 1 and
parameter 10.
164 Chapter 8
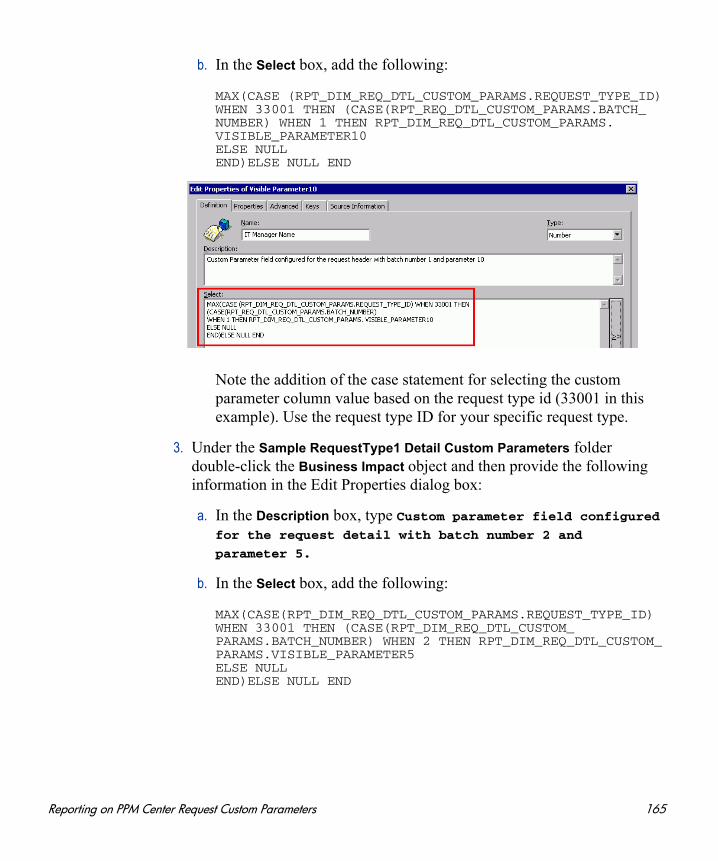
b. In the Select box, add the following:
MAX(CASE (RPT_DIM_REQ_DTL_CUSTOM_PARAMS.REQUEST_TYPE_ID) WHEN 33001 THEN (CASE(RPT_REQ_DTL_CUSTOM_PARAMS.BATCH_NUMBER) WHEN 1 THEN RPT_DIM_REQ_DTL_CUSTOM_PARAMS. VISIBLE_PARAMETER10ELSE NULLEND)ELSE NULL END
Note the addition of the case statement for selecting the custom parameter column value based on the request type id (33001 in this example). Use the request type ID for your specific request type.
3. Under the Sample RequestType1 Detail Custom Parameters folder double-click the Business Impact object and then provide the following information in the Edit Properties dialog box:
a. In the Description box, type Custom parameter field configured for the request detail with batch number 2 and
parameter 5.
b. In the Select box, add the following:
MAX(CASE(RPT_DIM_REQ_DTL_CUSTOM_PARAMS.REQUEST_TYPE_ID) WHEN 33001 THEN (CASE(RPT_DIM_REQ_DTL_CUSTOM_PARAMS.BATCH_NUMBER) WHEN 2 THEN RPT_DIM_REQ_DTL_CUSTOM_PARAMS.VISIBLE_PARAMETER5ELSE NULLEND)ELSE NULL END
Reporting on PPM Center Request Custom Parameters 165
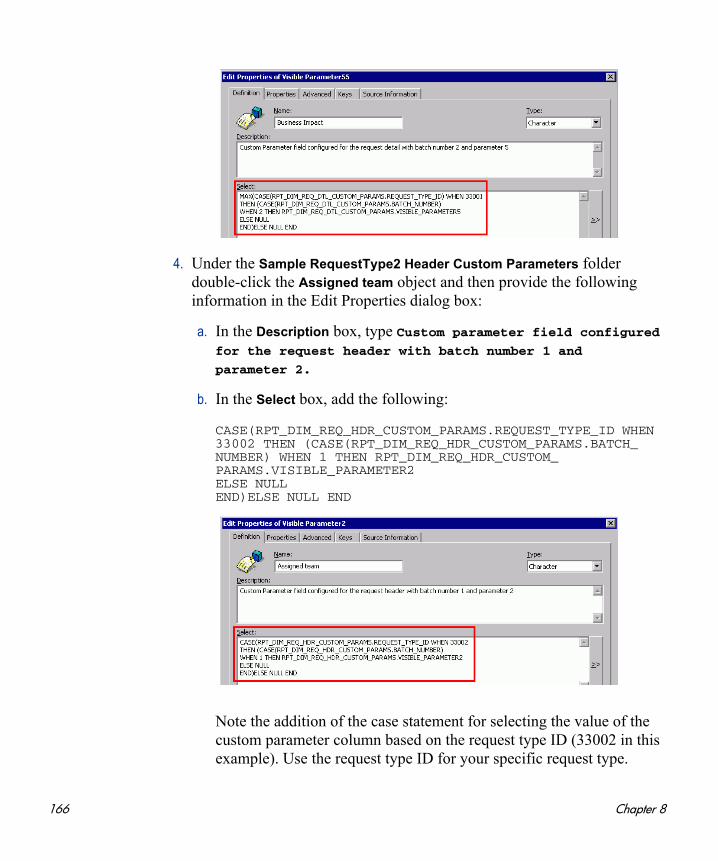
4. Under the Sample RequestType2 Header Custom Parameters folder double-click the Assigned team object and then provide the following information in the Edit Properties dialog box:
a. In the Description box, type Custom parameter field configured for the request header with batch number 1 and
parameter 2.
b. In the Select box, add the following:
CASE(RPT_DIM_REQ_HDR_CUSTOM_PARAMS.REQUEST_TYPE_ID WHEN 33002 THEN (CASE(RPT_DIM_REQ_HDR_CUSTOM_PARAMS.BATCH_NUMBER) WHEN 1 THEN RPT_DIM_REQ_HDR_CUSTOM_PARAMS.VISIBLE_PARAMETER2ELSE NULLEND)ELSE NULL END
Note the addition of the case statement for selecting the value of the custom parameter column based on the request type ID (33002 in this example). Use the request type ID for your specific request type.
166 Chapter 8
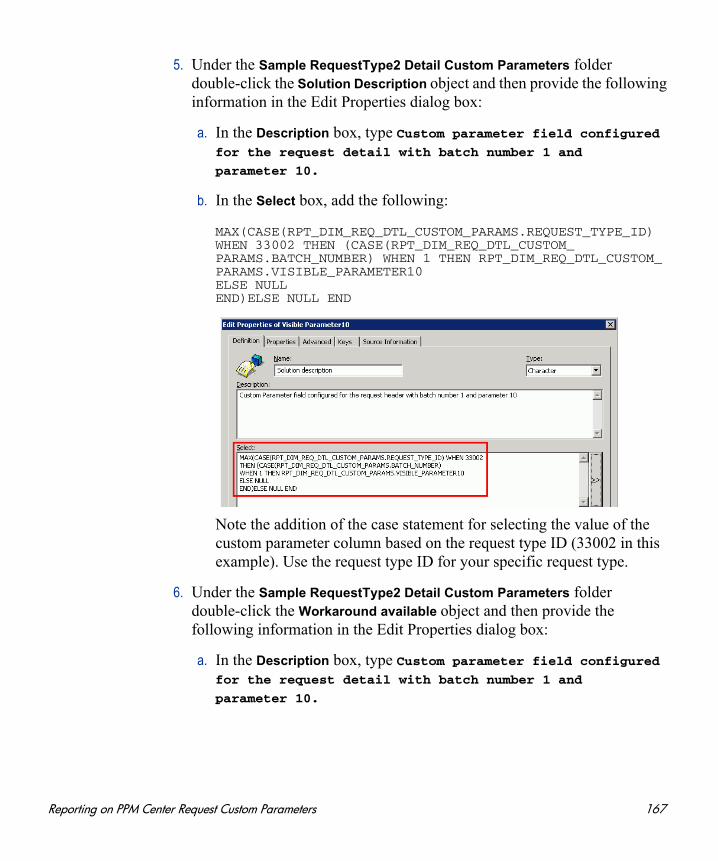
5. Under the Sample RequestType2 Detail Custom Parameters folder double-click the Solution Description object and then provide the following information in the Edit Properties dialog box:
a. In the Description box, type Custom parameter field configured for the request detail with batch number 1 and
parameter 10.
b. In the Select box, add the following:
MAX(CASE(RPT_DIM_REQ_DTL_CUSTOM_PARAMS.REQUEST_TYPE_ID) WHEN 33002 THEN (CASE(RPT_DIM_REQ_DTL_CUSTOM_PARAMS.BATCH_NUMBER) WHEN 1 THEN RPT_DIM_REQ_DTL_CUSTOM_PARAMS.VISIBLE_PARAMETER10ELSE NULLEND)ELSE NULL END
Note the addition of the case statement for selecting the value of the custom parameter column based on the request type ID (33002 in this example). Use the request type ID for your specific request type.
6. Under the Sample RequestType2 Detail Custom Parameters folder double-click the Workaround available object and then provide the following information in the Edit Properties dialog box:
a. In the Description box, type Custom parameter field configured for the request detail with batch number 1 and
parameter 10.
Reporting on PPM Center Request Custom Parameters 167
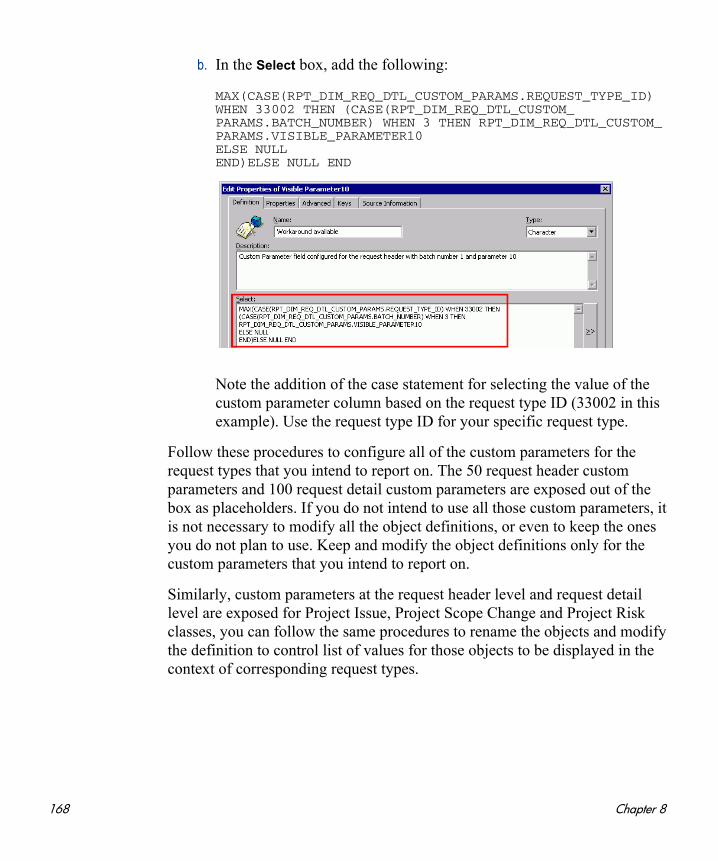
b. In the Select box, add the following:
MAX(CASE(RPT_DIM_REQ_DTL_CUSTOM_PARAMS.REQUEST_TYPE_ID) WHEN 33002 THEN (CASE(RPT_DIM_REQ_DTL_CUSTOM_PARAMS.BATCH_NUMBER) WHEN 3 THEN RPT_DIM_REQ_DTL_CUSTOM_PARAMS.VISIBLE_PARAMETER10ELSE NULLEND)ELSE NULL END
Note the addition of the case statement for selecting the value of the custom parameter column based on the request type ID (33002 in this example). Use the request type ID for your specific request type.
Follow these procedures to configure all of the custom parameters for the request types that you intend to report on. The 50 request header custom parameters and 100 request detail custom parameters are exposed out of the box as placeholders. If you do not intend to use all those custom parameters, it is not necessary to modify all the object definitions, or even to keep the ones you do not plan to use. Keep and modify the object definitions only for the custom parameters that you intend to report on.
Similarly, custom parameters at the request header level and request detail level are exposed for Project Issue, Project Scope Change and Project Risk classes, you can follow the same procedures to rename the objects and modify the definition to control list of values for those objects to be displayed in the context of corresponding request types.
168 Chapter 8
Exporting the Universes
After you modify the object names and definitions, you must export the Kernel universe. Open the RM Derived Universe, FM Derived Universe, TM Derived Universe and PM Derived Universe and export each of the universes for the changes to take effect.
Reporting on PPM Center Request Custom Parameters 169

170 Chapter 8
A Troubleshooting
Troubleshooting for Operational Reporting
This section provides information about how to resolve problems that you may encounter after you have deployed Operational Reporting based on PPM Center version Content Pack 1.
The issues described in this section are:
(HP-UX Only) Resetting Memory Thresholds
Nonexistent Table or Materialized View Error
Changed Package Time Stamp Error
Invalid Cursor Error During ETL
Error Using Oracle Client Version 9.x
Folders and Objects Missing from Operational Reporting Universe
o BusinessObjects Enterprise XI 3.1 Service Pack 2 is Not Installed
o If BusinessObjects Enterprise XI 3.1 Service Pack 2 is Installed on Windows 2003
171
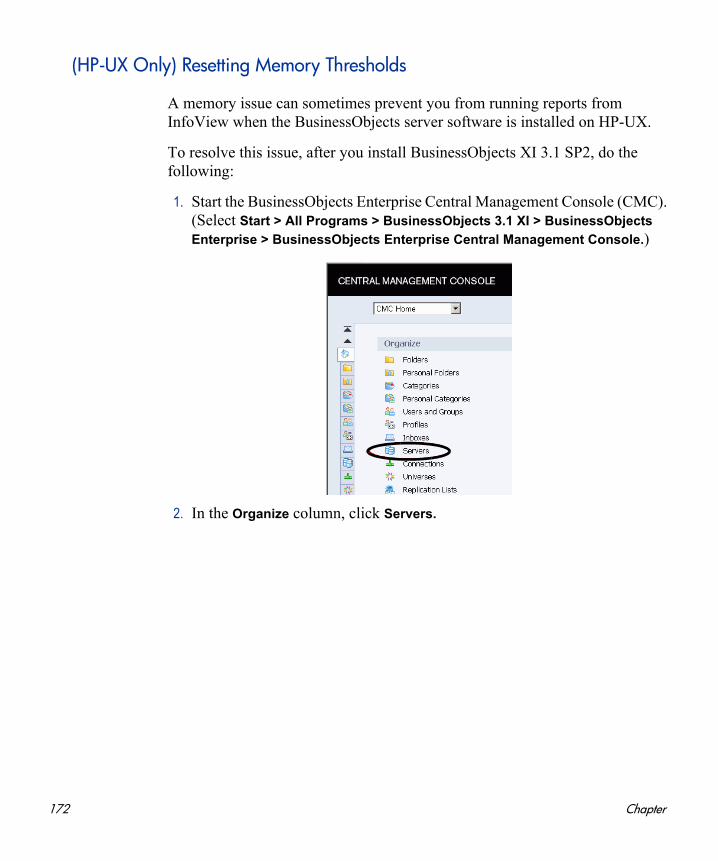
(HP-UX Only) Resetting Memory Thresholds
A memory issue can sometimes prevent you from running reports from InfoView when the BusinessObjects server software is installed on HP-UX.
To resolve this issue, after you install BusinessObjects XI 3.1 SP2, do the following:
1. Start the BusinessObjects Enterprise Central Management Console (CMC). (Select Start > All Programs > BusinessObjects 3.1 XI > BusinessObjects
Enterprise > BusinessObjects Enterprise Central Management Console.)
2. In the Organize column, click Servers.
172 Chapter

3. In the Server Name column, double-click <BusinessObjects_Server_Host_Name>WebIntelligenceProcessingServer.
Troubleshooting 173
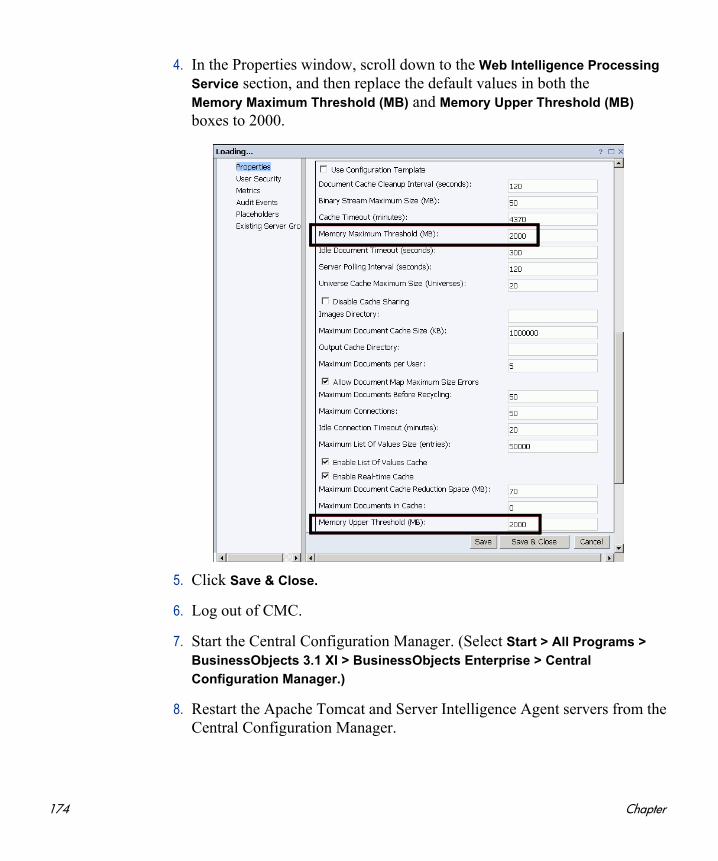
4. In the Properties window, scroll down to the Web Intelligence Processing
Service section, and then replace the default values in both the Memory Maximum Threshold (MB) and Memory Upper Threshold (MB) boxes to 2000.
5. Click Save & Close.
6. Log out of CMC.
7. Start the Central Configuration Manager. (Select Start > All Programs >
BusinessObjects 3.1 XI > BusinessObjects Enterprise > Central
Configuration Manager.)
8. Restart the Apache Tomcat and Server Intelligence Agent servers from the Central Configuration Manager.
174 Chapter

9. Verify that the Apache Tomcat and Server Intelligence Agent servers are up and running.
10. Verify that you can run your operational reports from InfoView.
Nonexistent Table or Materialized View Error
If a data in a table or a materialized view does not get refreshed during an ETL job, an error message similar to the following is displayed:
ORA-00942: table or view does not existORA-06512: at "SYS.DBMS_SNAPSHOT", line 2566ORA-06512: at "SYS.DBMS_SNAPSHOT", line 2779ORA-06512: at "SYS.DBMS_SNAPSHOT", line 2748ORA-06512: at line 4
To work around this problem:
1. Use a client tool to get the definition of the materialized view that is not refreshed during the ETL from your Oracle database schema.
2. Save the table or view definition in a file.
3. To drop the failed materialized view, run:
“Drop Materialized View <Materialized_View_Name>” ;
4. Run the file that you saved in step 2.
5. Run the following:
DBMS_MVIEW.refresh('<Materialized_View_Name>', 'cf');
Troubleshooting 175
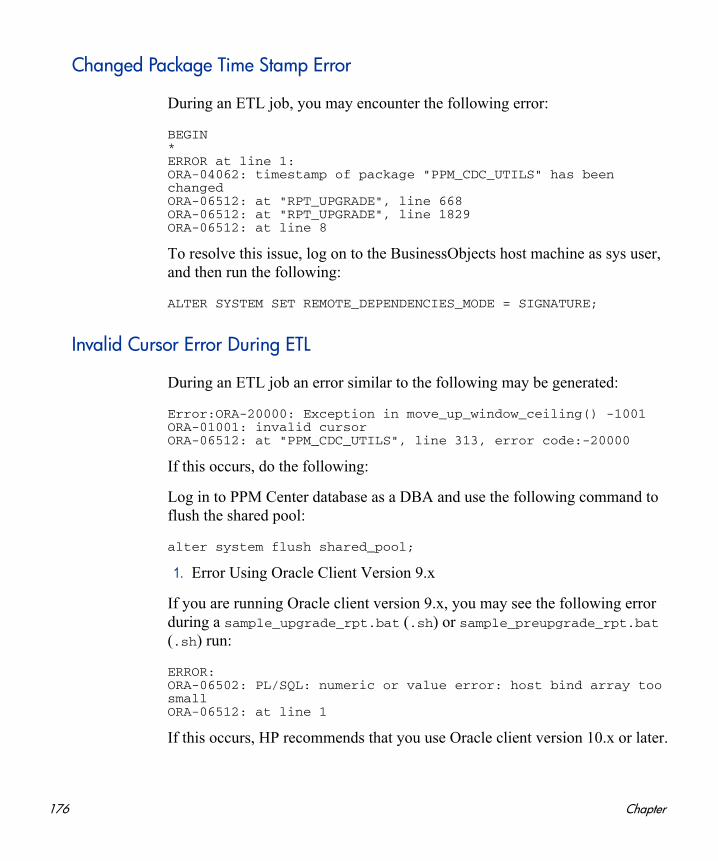
Changed Package Time Stamp Error
During an ETL job, you may encounter the following error:
BEGIN*ERROR at line 1:ORA-04062: timestamp of package "PPM_CDC_UTILS" has beenchangedORA-06512: at "RPT_UPGRADE", line 668ORA-06512: at "RPT_UPGRADE", line 1829ORA-06512: at line 8
To resolve this issue, log on to the BusinessObjects host machine as sys user, and then run the following:
ALTER SYSTEM SET REMOTE_DEPENDENCIES_MODE = SIGNATURE;
Invalid Cursor Error During ETL
During an ETL job an error similar to the following may be generated:
Error:ORA-20000: Exception in move_up_window_ceiling() -1001 ORA-01001: invalid cursorORA-06512: at "PPM_CDC_UTILS", line 313, error code:-20000
If this occurs, do the following:
Log in to PPM Center database as a DBA and use the following command to flush the shared pool:
alter system flush shared_pool;
1. Error Using Oracle Client Version 9.x
If you are running Oracle client version 9.x, you may see the following error during a sample_upgrade_rpt.bat (.sh) or sample_preupgrade_rpt.bat (.sh) run:
ERROR:ORA-06502: PL/SQL: numeric or value error: host bind array too smallORA-06512: at line 1
If this occurs, HP recommends that you use Oracle client version 10.x or later.
176 Chapter

Folders and Objects Missing from Operational Reporting Universe
Folder names and objects are sometimes missing from an Operational Reporting universe when the BusinessObjects server software is installed on a Windows system. This can occur if BusinessObjects Enterprise XI 3.1 Service Pack 2 is not installed or if the Service Pack 2 installation failed at either the server or client level.
BusinessObjects Enterprise XI 3.1 Service Pack 2 is Not Installed
This section provides instruction on how to determine whether BusinessObjects Enterprise XI 3.1 Service Pack 2 is installed and what to do if it is not installed.
To determine whether BusinessObjects Enterprise XI 3.1 Service Pack 2is installed on a Windows system:
1. Log on to the Central Management Console server (installed on Windows or UNIX) as follows:
a. Select Start > All Programs > BusinessObjects XI 3.1 > BusinessObjects
Enterprise> BusinessObjects Enterprise Central Management Console.
b. In the User Name box, type Administrator.
c. In the Password box, type admin123.
The Central Management Console home page opens.
Troubleshooting 177
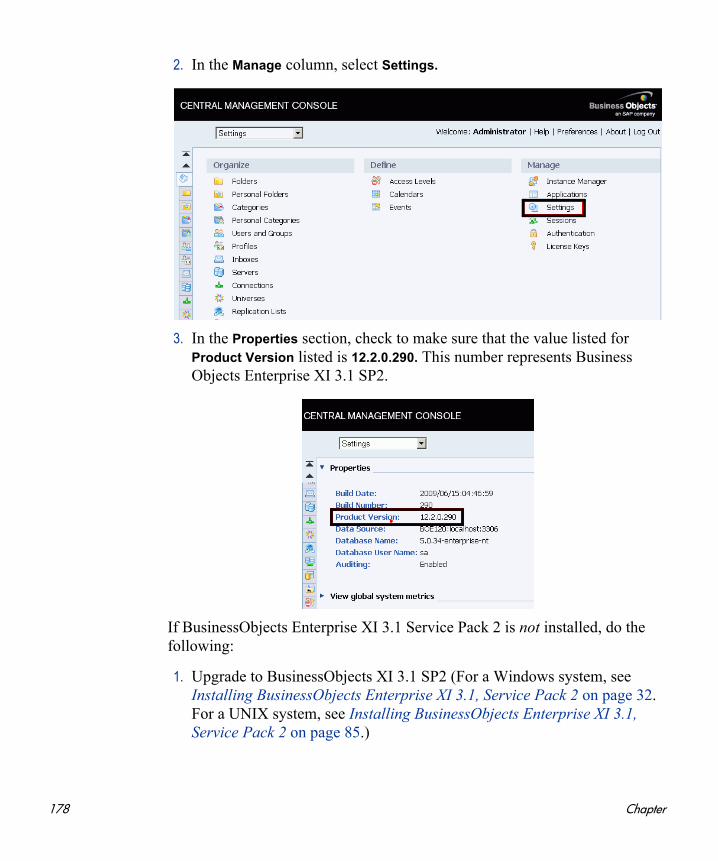
2. In the Manage column, select Settings.
3. In the Properties section, check to make sure that the value listed for Product Version listed is 12.2.0.290. This number represents Business Objects Enterprise XI 3.1 SP2.
If BusinessObjects Enterprise XI 3.1 Service Pack 2 is not installed, do the following:
1. Upgrade to BusinessObjects XI 3.1 SP2 (For a Windows system, see Installing BusinessObjects Enterprise XI 3.1, Service Pack 2 on page 32. For a UNIX system, see Installing BusinessObjects Enterprise XI 3.1, Service Pack 2 on page 85.)
178 Chapter
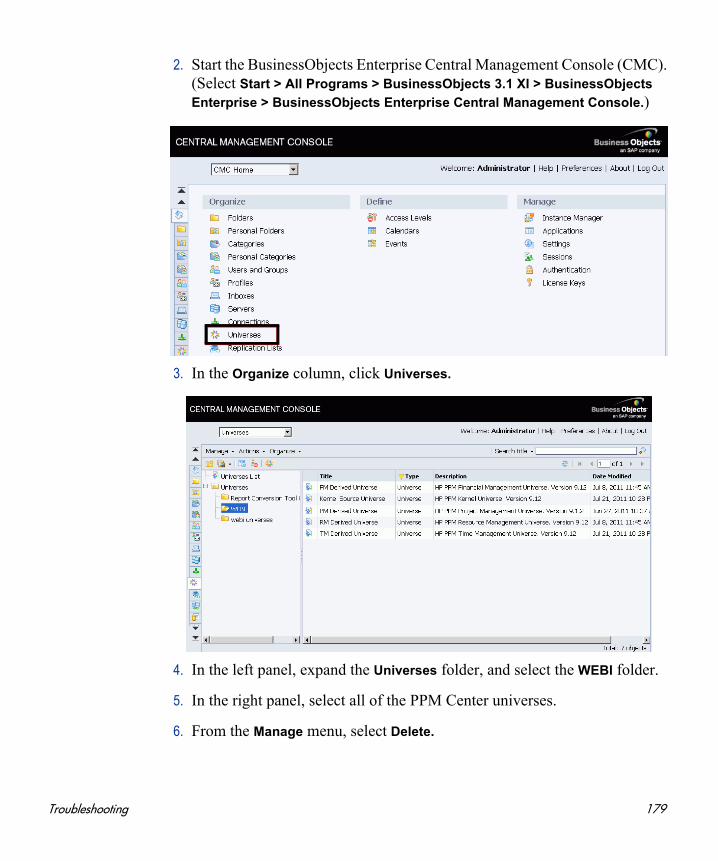
2. Start the BusinessObjects Enterprise Central Management Console (CMC). (Select Start > All Programs > BusinessObjects 3.1 XI > BusinessObjects
Enterprise > BusinessObjects Enterprise Central Management Console.)
3. In the Organize column, click Universes.
4. In the left panel, expand the Universes folder, and select the WEBI folder.
5. In the right panel, select all of the PPM Center universes.
6. From the Manage menu, select Delete.
Troubleshooting 179

7. Re-import all the PPM Center universes. (For instructions for importing on a Windows system, see Importing and Updating Universes and Reports on page 49. For instructions for importing on a UNIX system, see Importing and Updating Universes and Reports on page 104.)
8. Set the connection in the Universe Designer. (For instructions, see Configuring the Operational Reporting on page 54.)
9. Export the universes.
10. Run your preconfigured operational reports.
If BusinessObjects Enterprise XI 3.1 Service Pack 2 is Installed on Windows 2003
On Windows 2003 systems, if the Windows Installer process has insufficient contiguous virtual memory to verify that the MSI package or the MSP package is correctly signed, BusinessObjects Enterprise XI 3.1 Service Pack 2 installation can fail, either on the BusinessObjects client or on the BusinessObjects server.
To resolve this issue:
1. Install the patch that Microsoft provides for windows 2003 as follows:
a. Go to the Update for Windows Server 2003 (KB925336) page (//www.microsoft.com/downloads/en/details.aspx? FamilyId=8EFFE1D9-7224-4586-BE2B-42C9AE5B9071&
displaylang=en) of the Microsoft Download Center.
b. Download and then run the WindowsServer2003-KB925336-x86-ENU.exe file.
2. Perform step 2 on page 179 through step 10 on page 180.
180 Chapter
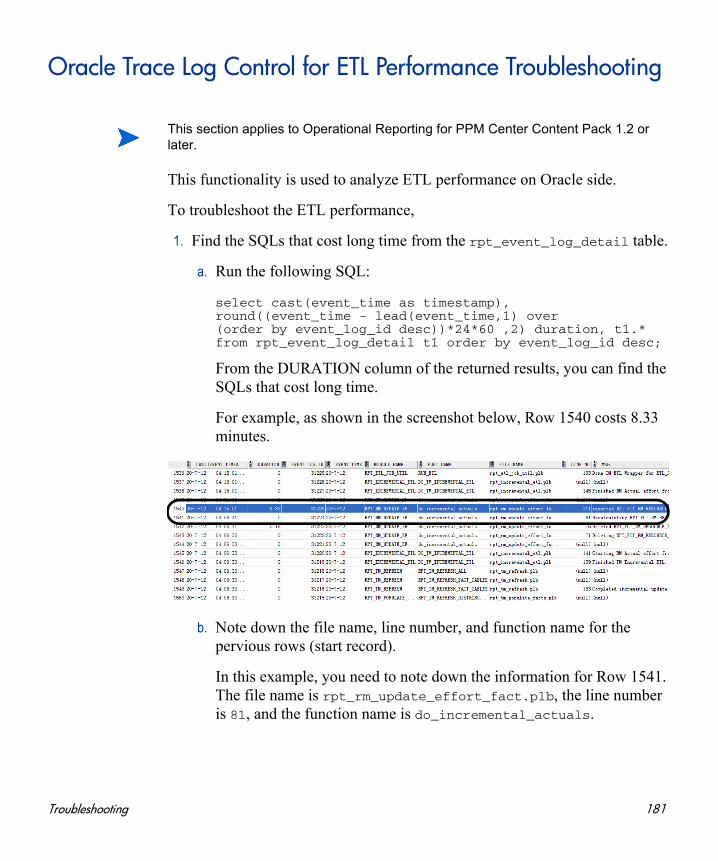
Oracle Trace Log Control for ETL Performance Troubleshooting
This functionality is used to analyze ETL performance on Oracle side.
To troubleshoot the ETL performance,
1. Find the SQLs that cost long time from the rpt_event_log_detail table.
a. Run the following SQL:
select cast(event_time as timestamp), round((event_time - lead(event_time,1) over(order by event_log_id desc))*24*60 ,2) duration, t1.* from rpt_event_log_detail t1 order by event_log_id desc;
From the DURATION column of the returned results, you can find the SQLs that cost long time.
For example, as shown in the screenshot below, Row 1540 costs 8.33 minutes.
b. Note down the file name, line number, and function name for the pervious rows (start record).
In this example, you need to note down the information for Row 1541. The file name is rpt_rm_update_effort_fact.plb, the line number is 81, and the function name is do_incremental_actuals.
This section applies to Operational Reporting for PPM Center Content Pack 1.2 or later.
Troubleshooting 181
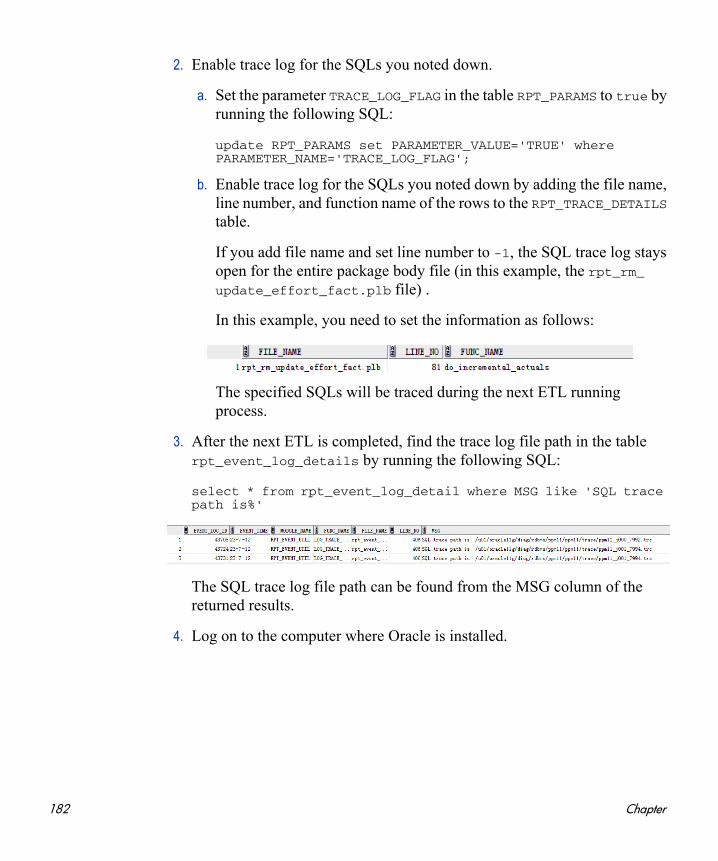
2. Enable trace log for the SQLs you noted down.
a. Set the parameter TRACE_LOG_FLAG in the table RPT_PARAMS to true by running the following SQL:
update RPT_PARAMS set PARAMETER_VALUE='TRUE' where PARAMETER_NAME='TRACE_LOG_FLAG';
b. Enable trace log for the SQLs you noted down by adding the file name, line number, and function name of the rows to the RPT_TRACE_DETAILS table.
If you add file name and set line number to -1, the SQL trace log stays open for the entire package body file (in this example, the rpt_rm_update_effort_fact.plb file) .
In this example, you need to set the information as follows:
The specified SQLs will be traced during the next ETL running process.
3. After the next ETL is completed, find the trace log file path in the table rpt_event_log_details by running the following SQL:
select * from rpt_event_log_detail where MSG like 'SQL trace path is%'
The SQL trace log file path can be found from the MSG column of the returned results.
4. Log on to the computer where Oracle is installed.
182 Chapter

5. Generate a formatted version of the SQL trace log file by running the following command:
cd <trace_file_path>tkprof <trace_file_path> <new_log_filename>
where <trace_file_path> is the SQL trace log file path you get in step 3; <new_log_filename> is the file name you specify for the target log file to be generated.
6. Open the new log file and find the SQLs that cost long time for analysis.
7. To close the SQL trace log, empty the table RPT_TRACE_DETAILS and disable the parameter TRACE_LOG_FLAG by running the following SQL:
truncate table RPT_TRACE_DETAILS;update RPT_PARAMS set PARAMETER_VALUE='FALSE' where PARAMETER_NAME='TRACE_LOG_FLAG';
Troubleshooting 183

184 Chapter
Index
BBIAR import tool
importing BIAR files, 49, 104BusinessObjects database
configuring the connection to, 54, 109BusinessObjects Enterprise
installing client tools, 57, 112installing on UNIX, 31, 83installing SP 2 on Windows, 32installing SP2 on UNIX, 85verifying successful installation, 36, 92
BusinessObjects serversetting JAVA_HOME on UNIX, 81setting JAVA_HOME on Windows, 30
CCDC and ETL, 140cdc$_default_purge_job
scheduling, 140Central Management Server
changing the password on Windows, 62, 113
Change Data Capture and ETL, 140client tools
installing, 57, 112CMS
changing the password on Windows, 62, 113
CMS password
changing on Windows, 62, 113removing on UNIX, 113
COMMON ETL job, 141configuring
BusinessObjects database connection, 54, 109
multilingual Operational Reporting on Windows, 63
Operational Reporting database schema, 39, 94
Oracle Database Parameters for Operational Reporting, 25, 76
creatingtablespaces for the Operational Reporting
schema, 26tablespaces for the operational reporting
schema, 77
Ddata range for transferred Time Management
data, 143database
dedicated DB for reporting, 25, 76database parameters
configuring for Operational Reporting, 25, 76
database schemaconfiguring for Operational Reporting, 39,
94
185
EETL
reliance on Change Data Capture, 140transferring common data, 141transferring Financial Management data,
142transferring Project Management data, 141transferring Resource Management data,
141transferring Time Management data, 141
extend data script, running, 144
Ffailed upgrade
recovering from, 52, 124FM incremental ETL job, 142
HHP Live Network
Operational Reporting community and updates, 17
Iimporting
PPM Center universes and reports, 49, 104installing, 35, 87
BusinessObjects client tools, 57, 112BusinessObjects Enterprise on UNIX, 83BusinessObjects Enterprise on Windows,
31BusinessObjects XI 3.1 SP 2 on Windows,
32BusinessObjects XI 3.1 SP2 on UNIX, 85
installing BusinessObjects Enterpriseverifying successful installation, 36, 92
JJAVA_HOME variable
setting on the BusinessObjects server (Windows), 30
setting on UNIX, 81JDBC driver
setting up after BusinessObjects Enterprise installation, 37, 92
Llanguages, 63
Mmultilingual Operational Reporting
configuring on Windows, 63
OOperational Reporting
on HP Live Network, 17Operational Reporting database schema
configuring, 39, 94Operational Reporting schema
creating tablespaces for, 26operational reporting schema
creating tablespaces for, 77Oracle database parameters
configuring for Operational Reporting, 25, 76
Oracle JDBC driversetting up after BusinessObjects Enterprise
installation, 37, 92
PPM incremental ETL job, 141post-installation tasks, 35, 87preconfigured reports
importing during deployment, 49, 104Project Management data
transfer during ETL, 141purging data, 140
186
Rrecovering from a failed upgrade, 52, 124reporting database
UTF-8 encoding, 25, 76REPORTING_BASE_URL parameter, 148,
149resource capacity
and the extend data script, 144Resource Management data
transfer during ETL, 141RM incremental ETL job, 141
SSave, 175scheduling data purges, 140
Ttable data, purging, 140tablespaces
creating for Operational Reporting schema, 26
creating for operational reporting schema, 77
Time Management datasetting the date range for data to transfer,
143transfer during ETL, 141
TM incremental ETL job, 141
Uuniverses
importing during deployment, 49, 104UNIX
installing BusinessObjects XI 3.1 SP2, 85removing the CMS password, 113
upgradesrecovering from failure, 52, 124
UTF-8 encoding
for the reporting database, 25, 76
WWindows
changing the CMS password, 62, 113
187

188
Related Documents