Mill OPERATING MANUAL

Welcome message from author
This document is posted to help you gain knowledge. Please leave a comment to let me know what you think about it! Share it to your friends and learn new things together.
Transcript
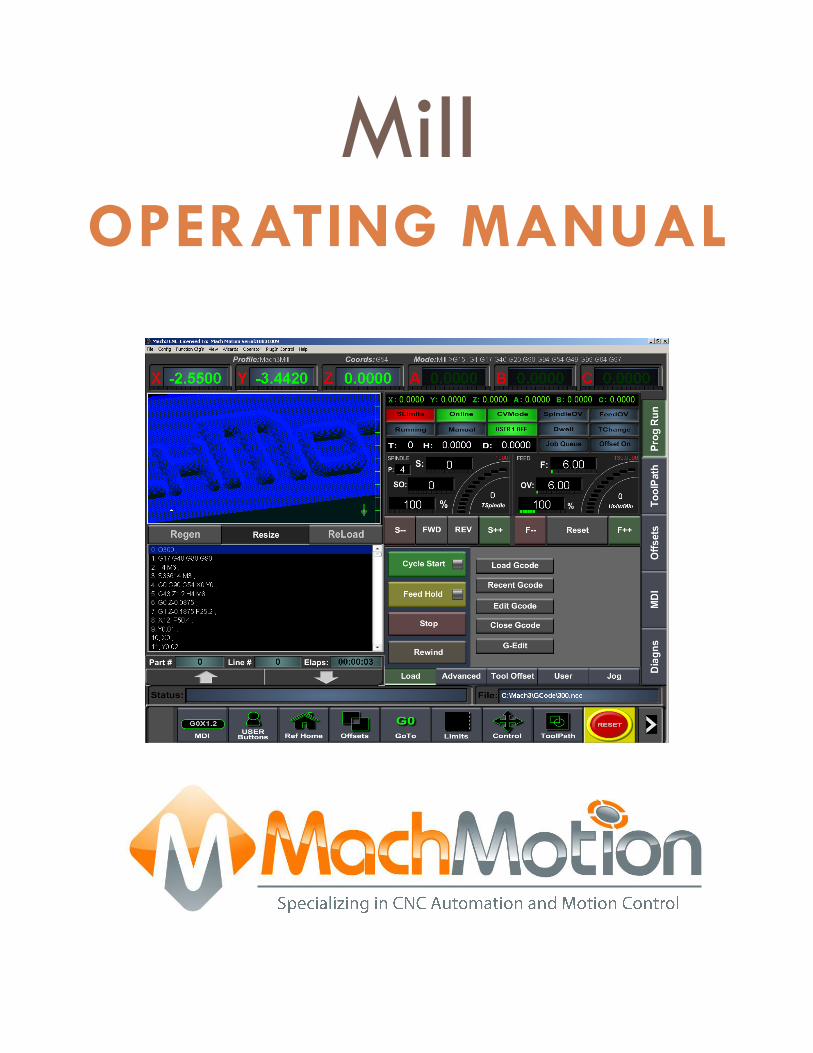
Mill OPERATING MANUAL

2 | P a g e
Mill Operating Manual
7/1/14 G0107
This manual covers the operation of the Mill Control using Mach 3. Formatting Overview:
Menus, options, icons, fields, and text boxes on the screen will be bold (e.g. the Help icon).
Clickable buttons will be bold and within brackets (e.g. the [OK] button).
Directory names, commands, and examples of editing program files will appear in
Courier New font
This manual as well as all other MachMotion manuals can be found at www.MachMotion.com
Copyright © 2014, MachMotion All rights reserved.

P a g e | 3
Mill Operating Manual
Mill
G 0 1 0 7
Table of Contents
1 INTRODUCTION ........................................................................................................... 4
1.1 Mach3 Startup ....................................................................................................................... 4
1.2 Overview ................................................................................................................................. 4
2 HOMING ....................................................................................................................... 5
3 PROGRAMMED MOVEMENT ........................................................................................ 6
3.1 MDI ........................................................................................................................................... 6
3.2 G-Code Files ........................................................................................................................... 6
3.2.1 G-Code File Controls .............................................................................................................. 7
3.2.2 Running a G-Code File Example .......................................................................................... 7
3.2.3 Tool Path Screen ...................................................................................................................... 8
3.3 Advanced Controls ................................................................................................................. 8
3.3.1 Run From Here .......................................................................................................................... 9
3.3.2 Single Line ................................................................................................................................. 9
3.3.3 Mist ............................................................................................................................................. 9
3.3.4 Flood .......................................................................................................................................... 9
4 TOOLS, TOOL OFFSETS, AND CUTTER COMPENSATION ........................................... 10
4.1 Tools and Tool Offsets ........................................................................................................ 10
4.2 Cutter Compensation .......................................................................................................... 11
5 SPINDLE CONTROL ..................................................................................................... 11
5.1 G-Code Spindle Control .................................................................................................... 11
5.2 Manual Spindle Control ..................................................................................................... 11
6 PART OFFSETS ............................................................................................................ 12
7 APPENDIX A – STARTUP PROCEDURE ....................................................................... 13
8 APPENDIX .................................................................................................................. 14
8.1 Warranty Information ........................................................................................................ 14
8.2 Additional Resources .......................................................................................................... 14
4 | P a g e
Mill Operating Manual
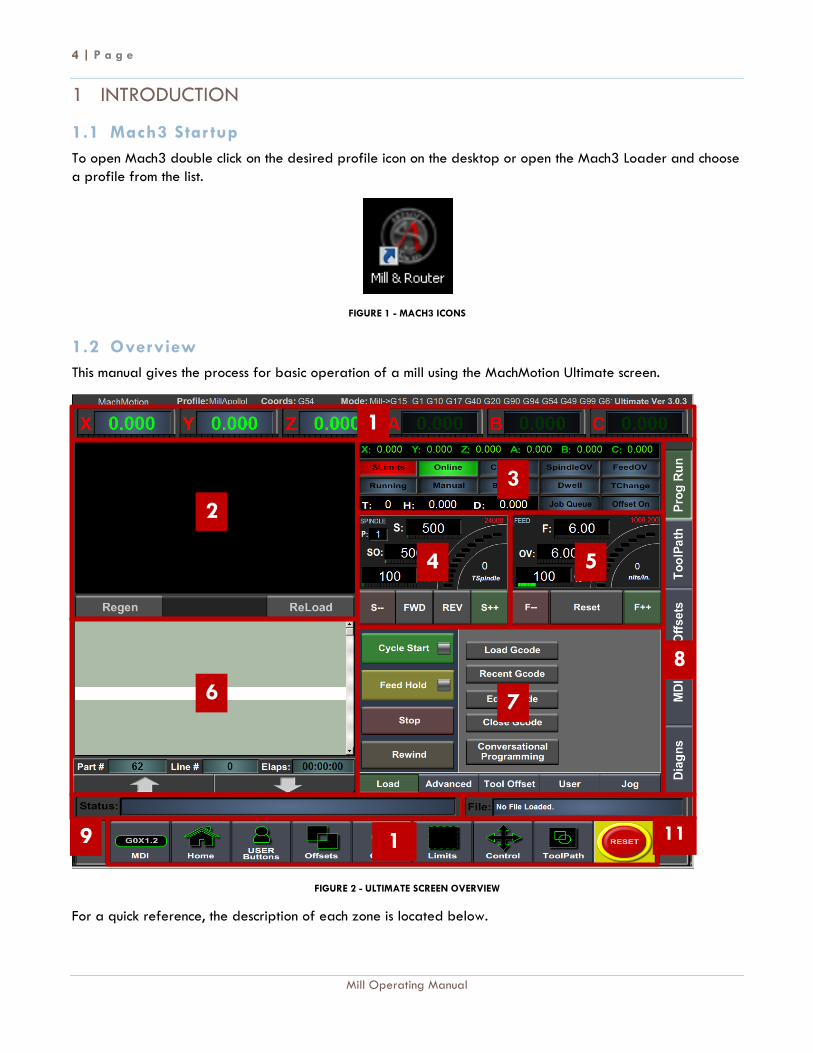
1 INTRODUCTION
1.1 Mach3 Star tup
To open Mach3 double click on the desired profile icon on the desktop or open the Mach3 Loader and choose
a profile from the list.
FIGURE 1 - MACH3 ICONS
1.2 Overview
This manual gives the process for basic operation of a mill using the MachMotion Ultimate screen.
FIGURE 2 - ULTIMATE SCREEN OVERVIEW
For a quick reference, the description of each zone is located below.
1
2
6
3
4
5
7
8
10
9
11

P a g e | 5
Mill Operating Manual
1. The axis DROs show the current part location and homing state (The axis labels turn green when the axis is homed).
2. The tool path window shows the shows the path the tool will take when a G-Code file is loaded.
3. The axis DROs display the remaining travel distance to complete the current line of G-Code. The status LEDs give information on the status of different modes and features.
4. Spindle control and status
5. Feedrate control and status
6. The G-Code window displays the text of a loaded G-Code file.
7. G-Code control and other functions
8. Main screen tabs
a. Prog Run: Primary screen for operations
b. Tool Path: A larger tool path screen for more detailed tool path inspection
c. Offsets: Detailed offset control
d. MDI: Tab for controlling the machine using the MDI (Manual Data Input) line
e. Diagns: This contains input and output status and system level controls. It is primarily used for setup and troubleshooting.
9. Status bar shows errors, alarms and status messages
10. Sub menu with commonly used control menus
11. File window showing the name of a loaded G-Code file
2 HOMING To home the mill, press the Home button on the sub menu.
FIGURE 3 - SUB MENU
To home all the axes press the HOME ALL button. The axes can also be homed individually using the individual
axis buttons.
FIGURE 4 - HOMING MENU
6 | P a g e
Mill Operating Manual
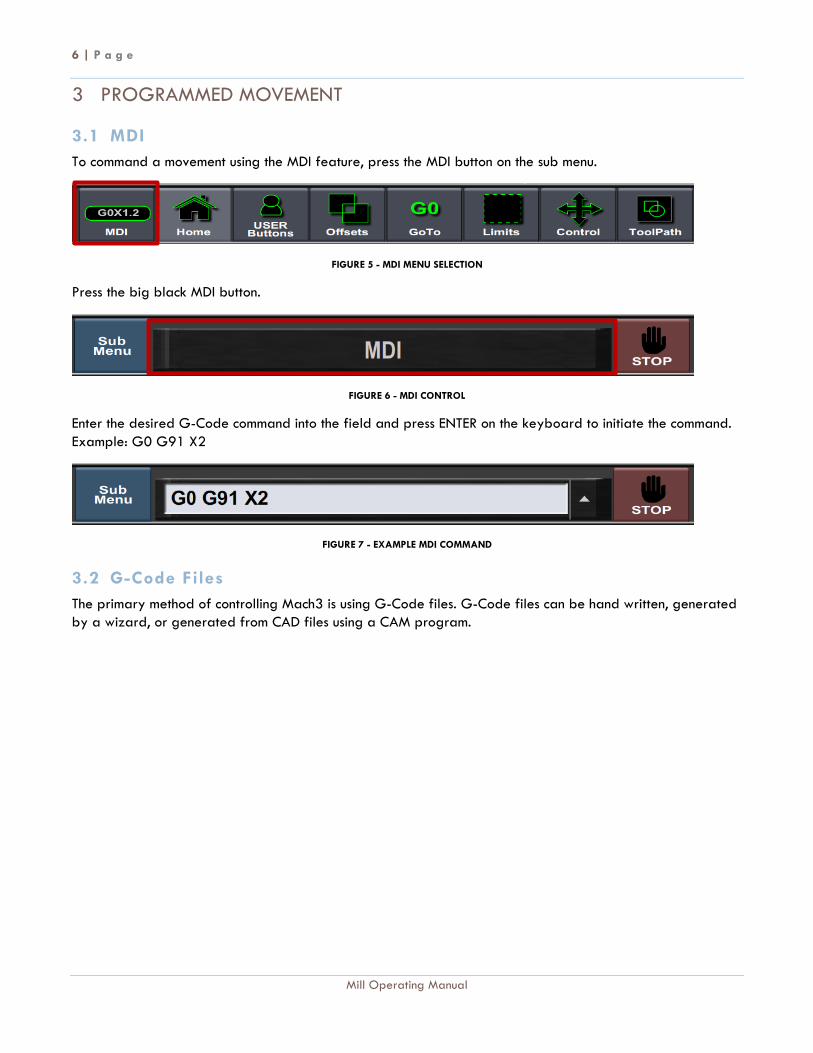
3 PROGRAMMED MOVEMENT
3.1 MDI
To command a movement using the MDI feature, press the MDI button on the sub menu.
FIGURE 5 - MDI MENU SELECTION
Press the big black MDI button.
FIGURE 6 - MDI CONTROL
Enter the desired G-Code command into the field and press ENTER on the keyboard to initiate the command.
Example: G0 G91 X2
FIGURE 7 - EXAMPLE MDI COMMAND
3.2 G-Code Files
The primary method of controlling Mach3 is using G-Code files. G-Code files can be hand written, generated
by a wizard, or generated from CAD files using a CAM program.

P a g e | 7
Mill Operating Manual
3.2.1 G-Code File Controls
The controls for G-Code files are shown below.
FIGURE 8 - G-CODE CONTROLS
1. Cycle Start – Starts a loading G-Code file
2. Feed Hold – Pauses a running G-Code file which can then be restarted by pressing Cycle Start
3. Stop – Stops a running G-Code file or other commanded movement
4. Rewind – Rewinds a loaded G-Code file to the beginning
5. Load Gcode – Opens a file browser to select an existing G-Code file
6. Recent Gcode – Opens a selection window with the ten most recent run G-Code files
7. Edit Gcode – Opens a loaded G-Code file in Notepad to allow easy editing
8. Close Gcode – Closes the loaded G-Code file
9. Conversational Programming – Opens the Newfangled Wizards
3.2.2 Running a G-Code File Example
To run a G-Code file, follow the steps below:
1. Press the LOAD GCODE button (Figure 8)
2. Select a G-Code file from the file menu window and press OK
3. Jog the machine to the work piece zero point and zero all the axes by selecting Offsets and then Zero All in the sub menu
FIGURE 9 – OFFSETS SUB MENU SELECTION

8 | P a g e
Mill Operating Manual
FIGURE 10 - ZERO ALL
4. Press CYCLE START to run the program (Error! Reference source not found., Figure 8)
5. If it is necessary to stop in the middle of a program to inspect the part press FEED HOLD (Error!
eference source not found., Figure 8)
6. If it is necessary to end a program before it has completely run press STOP (Figure 8)
3.2.3 Tool Path Screen
Below are the controls to manipulate the tool path screen:
1. Pan – right click with the mouse and move the track ball to move the part around
2. Rotate – left click with the mouse and rotate the part with the track ball
3. Zoom – press shift on the keyboard and left click with the mouse, then zoom by rolling the track ball
forward and backward
Note: Do not manipulate the tool path window or regenerate it while a G-Code file is running. It can adversely
affect G-Code execution.
3.3 Advanced Controls
The Advanced tab has a number of features that can be used to control G-Code files beyond starting and
stopping.
FIGURE 11 - ADVANCED CONTROLS
P a g e | 9
Mill Operating Manual
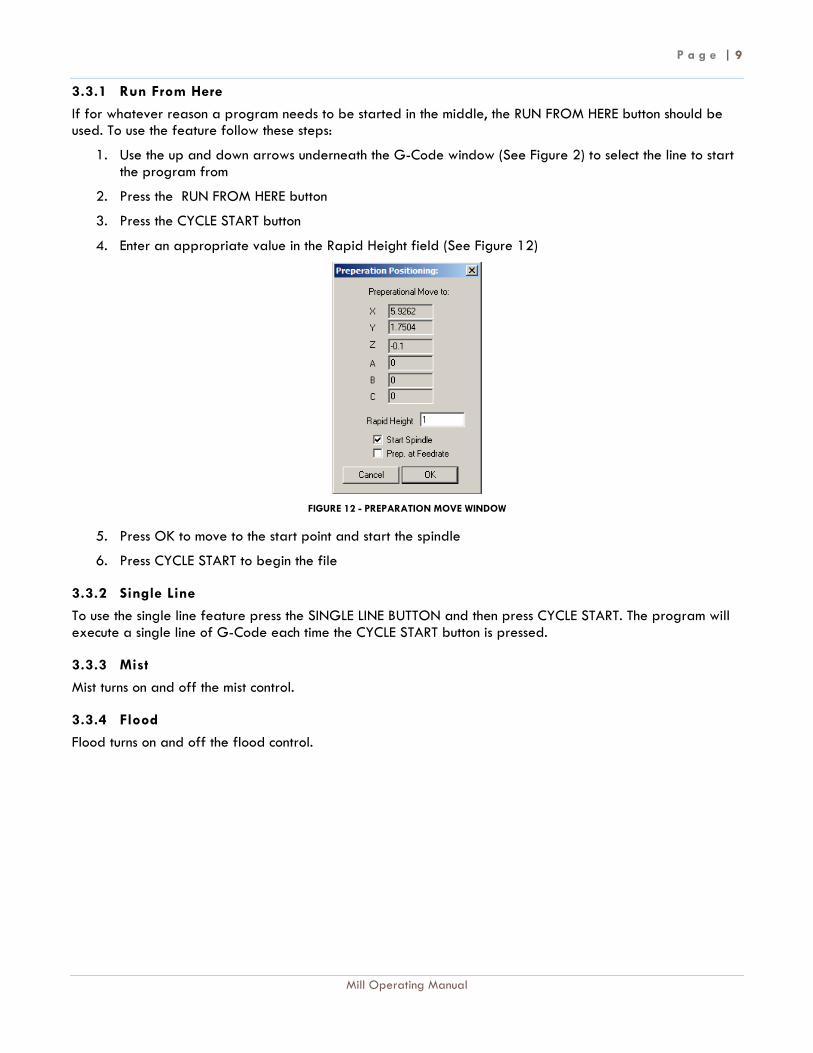
3.3.1 Run From Here
If for whatever reason a program needs to be started in the middle, the RUN FROM HERE button should be used. To use the feature follow these steps:
1. Use the up and down arrows underneath the G-Code window (See Figure 2) to select the line to start the program from
2. Press the RUN FROM HERE button
3. Press the CYCLE START button
4. Enter an appropriate value in the Rapid Height field (See Figure 12)
FIGURE 12 - PREPARATION MOVE WINDOW
5. Press OK to move to the start point and start the spindle
6. Press CYCLE START to begin the file
3.3.2 Single Line
To use the single line feature press the SINGLE LINE BUTTON and then press CYCLE START. The program will execute a single line of G-Code each time the CYCLE START button is pressed.
3.3.3 Mist
Mist turns on and off the mist control.
3.3.4 Flood
Flood turns on and off the flood control.
10 | P a g e
Mill Operating Manual
4 TOOLS, TOOL OFFSETS, AND CUTTER COMPENSATION While Mach3 does have cutter comp and tool definitions, it has limitations. Mach3 is limited by part size and
complexity. Due to this if a the G-Codes being run on the mill are generated using a CAD/CAM package,
MachMotion recommends using the cutter comp in the CAM package and bypassing Mach3’s cutter comp.
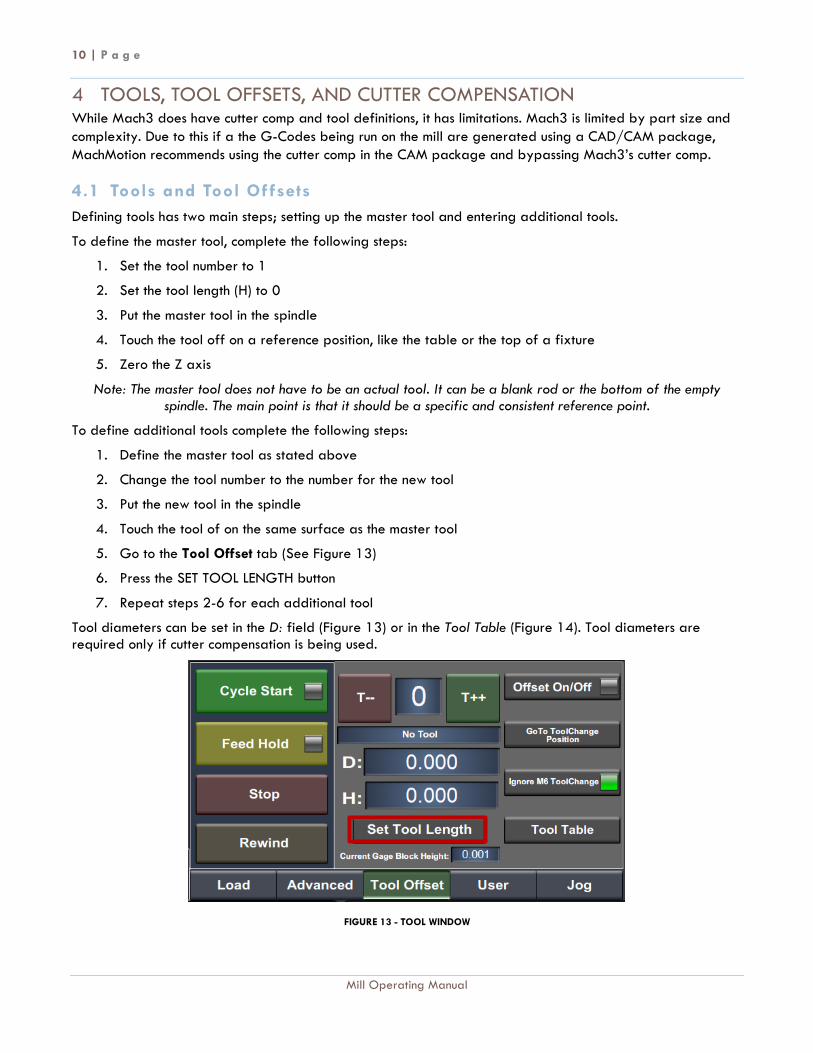
4.1 Tools and Tool Offsets
Defining tools has two main steps; setting up the master tool and entering additional tools.
To define the master tool, complete the following steps:
1. Set the tool number to 1
2. Set the tool length (H) to 0
3. Put the master tool in the spindle
4. Touch the tool off on a reference position, like the table or the top of a fixture
5. Zero the Z axis
Note: The master tool does not have to be an actual tool. It can be a blank rod or the bottom of the empty spindle. The main point is that it should be a specific and consistent reference point.
To define additional tools complete the following steps:
1. Define the master tool as stated above
2. Change the tool number to the number for the new tool
3. Put the new tool in the spindle
4. Touch the tool of on the same surface as the master tool
5. Go to the Tool Offset tab (See Figure 13)
6. Press the SET TOOL LENGTH button
7. Repeat steps 2-6 for each additional tool
Tool diameters can be set in the D: field (Figure 13) or in the Tool Table (Figure 14). Tool diameters are required only if cutter compensation is being used.
FIGURE 13 - TOOL WINDOW

P a g e | 11
Mill Operating Manual
FIGURE 14 - TOOL TABLE
4.2 Cutter Compensation
To use cutter compensation on a part the following G-Code is required:
1. Tool Definition – M6 T{desired tool number}
2. Cutter Comp On (Left/Right) – G41/G42
3. Cutter Comp Off – G40
Note: To use cutter comp on a contour it is necessary to have a lead in and lead out.
5 SPINDLE CONTROL
5.1 G-Code Spindle Control
The spindle is controlled through G-Code using the M-Codes M3 (Clockwise), M4 (Counterclockwise), and M5
(Off). To control the spindle speed in RPMs an S word is added.
Example: M3 S2000
This would turn the spindle on in the clockwise direction at 2000 RPM
5.2 Manual Spindle Control
To control the spindle separately from G-Code use the spindle control on the screen.

12 | P a g e
Mill Operating Manual
FIGURE 15 - SPINDLE CONTROL
1. S: – Commanded Speed
2. SO: – Spindle Override Speed
3. % – Override percentage
4. P: – Pulley number
5. TSpindle – Spindle speed (if feedback sensor is installed)
6. FWD – Turns spindle on clockwise
7. REV – Turns spindle on counterclockwise
8. S-- – Reduces override percentage by 10%
9. S++ – Increases override percentage by 10%
10. Red Number – Maximum configured spindle speed
6 PART OFFSETS All G-Code files have their own coordinate system. In order to allow parts to be located on the table at any
desired location the part offset can be defined to adjust the actual location of the part on the table. See
Running a G-Code File Example for how to adjust it.
Part offsets can be defined and saved using G55-G59P253. The functionality is designed to allow different tooling setups to have predefined zero points to allow for streamlined setup.
To set up saved part offsets do the following:
1. Go to the Offsets->Work Offsets tab
2. Set the desired offset in the Active Work Offset field at the top of the page
3. Jog the machine to the desired zero position
4. Set all axes to zero from the Offsets menu on the sub menu
Note: the Offsets->Work Offsets tab shows the current program coordinates, part offsets, and machine coordinates.
See the G-Code User Guide for more details on using offsets in G-Code.

P a g e | 13
Mill Operating Manual
7 APPENDIX A – STARTUP PROCEDURE
Power on the control using the key
Start Mach3 with the Mill icon
Mill
Home the machine
Verify the tool in the spindle matches the
tool number in Mach3
Clear RESET
Load G-Code file
Find and Set Part Zero
14 | P a g e
Mill Operating Manual
8 APPENDIX
8.1 Warranty Information
MachMotion guarantees all products to be free from manufacturer defects for a period of one year from the
date of purchase. Products which prove to be defective under normal conditions and proper use, during the
warranty period, will be repaired or exchanged free of charge. For warranty service the customer must
contact MachMotion for an RMA number and then return the defective product to MachMotion. If a product is
sent to MachMotion without an RMA number, the product may be misdirected or delayed. When a product or
part is exchanged, any replacement item becomes the customer’s property and the replaced item becomes
MachMotion's property.
If the defect is found to be caused by improper use or installation, the warranty is void. Otherwise the product
will be repaired or exchanged and returned to the address located on the Product Return/Repair Form.
MachMotion will cover ground shipping cost for the replacement/repaired product being returned to the
customer. MachMotion does offer expedited shipping at the customer’s expense.
If a replacement product is needed quickly, a replacement can be sent immediately. In this case the customer
will be charged for the replacement part at the time of the order and be refunded that charge when the
defective component is returned to MachMotion, assuming the defective item falls under the warranty
guidelines. MachMotion will issue a refund within two work weeks after receiving the faulty component.
8.2 Additional Resources
Additional manuals and resources can be found at MachMotion.com
The Mach Motion Team http://www.machmotion.com 14518 County Road 7240, Newburg, MO 65550
(573) 368-7399 • Fax (573) 341-2672
Related Documents