For safe and correct use, be sure to read Safety Information before using the machine. For information not found in this manual, see the online manuals available on our web site (https://www.ricoh.com/) or via the control panel. Legal and Contact Information Specifications for the Machine Troubleshooting Adding Paper and Toner Web Image Monitor Document Server Scan Print Fax Copy Getting Started About This Manual User Guide Selected Version

Welcome message from author
This document is posted to help you gain knowledge. Please leave a comment to let me know what you think about it! Share it to your friends and learn new things together.
Transcript
For safe and correct use, be sure to read Safety Information before using the machine.
For information not found in this manual, see the online manuals available on our web site (https://www.ricoh.com/) or via the control panel.
Legal and Contact Information
Specifications for the Machine
Troubleshooting
Adding Paper and Toner
Web Image Monitor
Document Server
Scan
Fax
Copy
Getting Started
About This ManualUser GuideSelected Version

How to Read the Manuals
Symbols Used in the Manuals
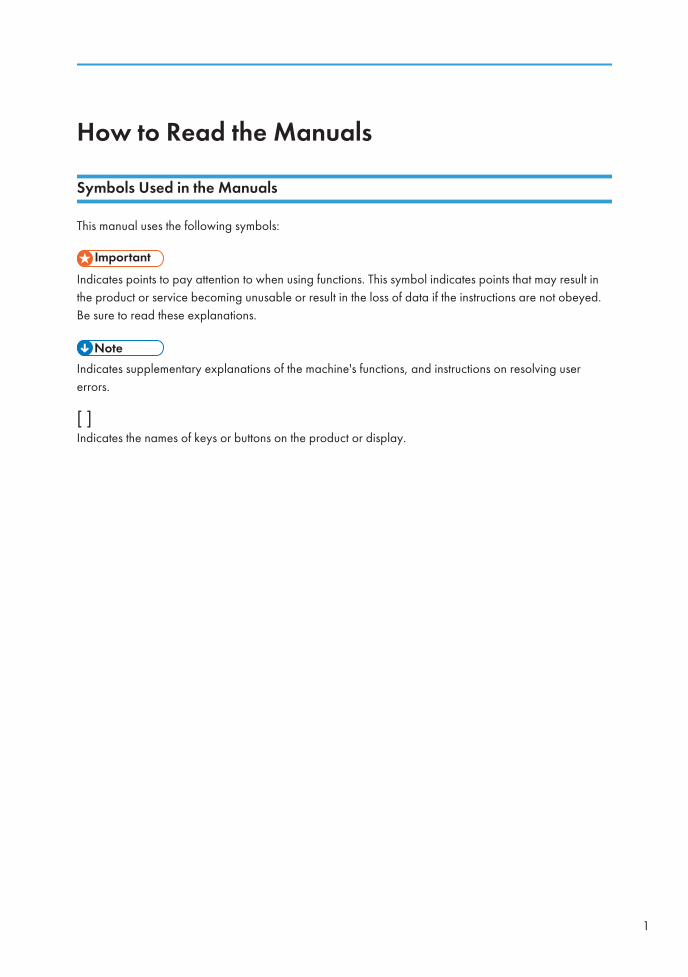
This manual uses the following symbols:
Indicates points to pay attention to when using functions. This symbol indicates points that may result inthe product or service becoming unusable or result in the loss of data if the instructions are not obeyed.Be sure to read these explanations.
Indicates supplementary explanations of the machine's functions, and instructions on resolving usererrors.
[ ]Indicates the names of keys or buttons on the product or display.
1
TABLE OF CONTENTSHow to Read the Manuals................................................................................................................................. 1
Symbols Used in the Manuals.......................................................................................................................1
1. About This Manual
Abbreviated Names of Options......................................................................................................................11
2. Getting Started
Turning On and Off the Power........................................................................................................................13
Turning On the Main Power........................................................................................................................13
Turning Off the Main Power........................................................................................................................14
Energy Saving Mode...................................................................................................................................14
Guide to Names and Functions of Components............................................................................................18
Front and Left View...................................................................................................................................... 18
Front and Right View....................................................................................................................................20
Rear and Left View.......................................................................................................................................21
Names and Functions of the Control Panel....................................................................................................22
Touch Panel/Interface.................................................................................................................................22
LED Indicators...............................................................................................................................................23
Changing the Display Language.................................................................................................................... 25
Confirming the Functions that Are Added in RICOH Always Current Technology.....................................26
Confirming the Version of RICOH Always Current Technology Implemented on the Machine............26
How to Use the Home Screen.........................................................................................................................27
Intuitive Screen Operation Using Fingertips.............................................................................................. 29
How to Use the "Settings"................................................................................................................................32
How to Use the Copy Screen..........................................................................................................................35
How to Use the Copy Screen (Standard)..................................................................................................35
How to Use the Copy Screen (No Scrolling Screen)............................................................................... 37
Changing the Layout or Display of the Keys of the Copy Function......................................................... 38
How to Use the Fax Screen.............................................................................................................................40
Customizing the [Send Settings] Screen.................................................................................................... 40
How to Use the Scanner Screen..................................................................................................................... 43
Customizing the [Send Settings] Screen.................................................................................................... 43
Adding a Frequently Used Application or Widget to the Home Screen.....................................................46
Adding an Icon/Widget to the Home Screen.......................................................................................... 47
Creating a Folder to Organize Icons......................................................................................................... 47
2
Registering Frequently Used Settings as a Program......................................................................................49
Registering Settings as a Program.............................................................................................................. 50
Changing the Contents of the Program......................................................................................................51
Logging In from the Control Panel.................................................................................................................. 52
Logging In by Entering the User Name and Password.............................................................................53
Logging In Using an IC Card...................................................................................................................... 54
Logging In Using a Mobile Device.............................................................................................................54
Authenticating Using the User Code.......................................................................................................... 56
Changing the Login Password.................................................................................................................... 56
Placing an Original on the Exposure Glass................................................................................................... 58
Placing an Original in the Auto Document Feeder (ADF).............................................................................60
3. Copy
Basic Procedure for Copying Documents...................................................................................................... 65
Reserving a Copy Job While Executing Another Copy Job.....................................................................66
Making Enlarged or Reduced Copies............................................................................................................68
Specifying a Copy Ratio or Size................................................................................................................ 68
Enlarging or Reducing According to the Paper Size................................................................................ 70
Reducing Slightly to Increase the Margins................................................................................................ 72
Duplex Copying............................................................................................................................................... 74
Combining and Copying a Multi-page Original onto a Single Sheet of Paper.........................................76
Copying Onto Envelopes................................................................................................................................ 79
Copying Onto Envelopes in the Bypass Tray............................................................................................ 79
Copying Onto Envelopes in the Paper Tray.............................................................................................. 81
Copying in Page Order or for Each Page Number...................................................................................... 82
4. Fax
Basic Procedure for Transmitting Faxes..........................................................................................................85
Registering Fax Numbers in the Address Book..............................................................................................88
Registering a Fax Number and Send Conditions......................................................................................88
Changing/Deleting the Registered Data Such as Fax Number.............................................................. 90
Displaying a Preview before Sending a Fax..................................................................................................91
Viewing the Transmission Result of Sent Faxes.............................................................................................. 93
Confirming the Information on the Fax Screen..........................................................................................93
Checking the Result in Communication Result Report............................................................................... 94
3
Checking the Result in Immediate TX Result Report...................................................................................95
Checking the Result in Communication Failure Report............................................................................. 95
Checking the Result in Error Report............................................................................................................ 95
Viewing Memory Storage Report...............................................................................................................95
Checking by E-mail......................................................................................................................................96
Confirming the Information in Web Image Monitor................................................................................. 97
5. Print
Installing the Printer Driver by Using Device Software Manager Installer...................................................99
Installing Device Software Manager from the CD-ROM......................................................................... 99
Installing Device Software Manager from the Downloaded File..........................................................102
Installing the Printer Driver for Network Connection (Windows)...............................................................105
Installing the PCL 6 Printer Driver from the CD-ROM.............................................................................105
Installing the PostScript 3 Printer Driver from the CD-ROM...................................................................108
Installing the PCL 6/PostScript 3 Printer Driver from the Downloaded File..........................................110
Installing the Printer Driver for Windows................................................................................................. 111
If the Machine Cannot Be Found............................................................................................................. 112
Installing the Printer Driver for Network Connection (macOS)..................................................................116
Installing the PPD file................................................................................................................................. 116
Registering the Machine in [Print & Scan] or [Printers & Scanners]...................................................... 117
Specifying the Option Settings................................................................................................................. 120
Basic Procedure for Printing Documents...................................................................................................... 122
Printing a Document in Windows.............................................................................................................122
Printing a Document in macOS................................................................................................................ 124
Printing on Both Sides of Paper.................................................................................................................... 127
Specifying 2-sided Print (Windows)........................................................................................................ 127
Specifying 2-sided Print (macOS)............................................................................................................127
Combining and Printing Multiple Pages on a Single Sheet of Paper........................................................ 129
Specifying the Combine 2 Originals Function (Windows).................................................................... 129
Specifying the Combine 2 Originals Function (macOS)........................................................................129
Printing on Envelopes.................................................................................................................................... 131
Printing Documents Stored in the Printer from the Control Panel............................................................... 134
Printing from a USB Flash Memory Device or SD Card Directly............................................................... 135
Printable File Formats................................................................................................................................ 135
4
Printing from a Memory Storage Device or Scan Application.............................................................. 136
6. Scan
Scanning Documents and Sending the Scanned Data by E-mail..............................................................139
Basic Procedure for Sending an E-mail................................................................................................... 139
Registering the E-mail Destination Specified When Sending an E-mail in the Address Book.............141
Scanning Documents and Sending the Scanned Data to a Folder........................................................... 144
Printing the Check Sheet........................................................................................................................... 144
Confirming the Computer Information (Windows)................................................................................. 145
Creating a Shared Folder (Windows).....................................................................................................146
Confirming the Computer Information (macOS).....................................................................................149
Creating a Shared Folder (macOS)........................................................................................................ 150
Registering the Created Shared Folder in the Address Book................................................................ 152
Basic Procedure for Performing Send to Folder......................................................................................154
Scanning an Original with Suitable Quality and Density...........................................................................156
Specifying the File Type or File Name When Scanning a Document....................................................... 159
Notes about and limitations of file types................................................................................................. 161
7. Document Server
Storing Documents in Document Server.......................................................................................................163
Printing Documents in Document Server...................................................................................................... 165
Printing a Document with the Settings Specified When Scanned..........................................................165
Changing the Print Settings to Print a Document.....................................................................................166
Specifying a Page to Print.........................................................................................................................167
8. Web Image Monitor
Using Web Image Monitor...........................................................................................................................169
What You Can Do on the Web Image Monitor..................................................................................... 170
Web Image Monitor Screen.................................................................................................................... 172
Specifying Web Image Monitor Help.....................................................................................................172
9. Adding Paper and Toner
Loading Paper into the Paper Tray...............................................................................................................175
Fanning the Paper..................................................................................................................................... 176
Loading Paper into Tray 1........................................................................................................................ 177
Loading Paper into the A3/11 × 17 Tray Unit.......................................................................................179
Loading Paper into Trays 2 and 3........................................................................................................... 180
5
Loading Tab Stock into Trays 2 and 3.....................................................................................................183
Loading Paper into the Bypass Tray........................................................................................................ 184
Loading Tab Stock into the Bypass Tray..................................................................................................186
Loading Paper into the Banner Paper Guide Tray..................................................................................187
Closing the Banner Paper Guide Tray.....................................................................................................191
Loading Paper into the Large Capacity Tray (LCT)................................................................................ 193
Loading Paper into the Wide LCT............................................................................................................ 195
Loading Tab Stock into the Wide LCT..................................................................................................... 199
Loading Paper with a Vertical Size of 100.0 mm to 139.2 mm in Wide LCT..................................... 200
Loading B5 Vertical or Larger Paper in Wide LCT................................................................................. 202
Loading Paper into the Interposer............................................................................................................205
Loading Paper into the Twin Interposer................................................................................................... 206
Specifying the Paper Size That Is Not Automatically Detected.............................................................208
Specifying a Custom Size Paper Using the Control Panel..................................................................... 209
Specifying Paper Type and Thickness Settings....................................................................................... 210
Recommended Paper Sizes and Types........................................................................................................213
Tray 1......................................................................................................................................................... 213
Tray 1 (A3/11 × 17 tray unit)................................................................................................................. 213
Trays 2 and 3............................................................................................................................................ 214
Bypass Tray................................................................................................................................................216
Large Capacity Tray..................................................................................................................................219
Extension Unit (for LCT).............................................................................................................................219
Wide LCT .................................................................................................................................................. 220
Interposer................................................................................................................................................... 223
Twin Interposer.......................................................................................................................................... 224
Notes on Special Paper............................................................................................................................226
Paper Thickness for Each Paper Weight..................................................................................................226
Unusable Paper......................................................................................................................................... 227
Paper Storage............................................................................................................................................228
Saving Printouts......................................................................................................................................... 228
Thick Paper Orientation and Recommended Status................................................................................... 229
Envelope Orientation and Recommended Status....................................................................................... 230
Using the Copy Function...........................................................................................................................231
6
Using the Printer Function..........................................................................................................................231
Loading Orientation-fixed Paper or Two-sided Paper............................................................................... 233
Copying onto Letterhead Paper............................................................................................................... 233
Printing onto Letterhead Paper Using the Printer Driver..........................................................................234
Recommended Original Size and Weight.................................................................................................. 235
Replacing the Toner.......................................................................................................................................237
Precautions When Storing Toner..............................................................................................................238
Precautions When Replacing the Toner.................................................................................................. 238
Disposing Exhausted Toners.....................................................................................................................239
Replenishing the Staples................................................................................................................................241
Replacing the Waste Toner Bottle................................................................................................................ 242
Precautions When Replacing the Waste Toner Bottle............................................................................242
Disposing the Used Waste Toner Bottle.................................................................................................. 244
10. Troubleshooting
Alert Sounds................................................................................................................................................... 245
Checking the Indicators, Icons, and Messages on the Control Panel.......................................................247
When an Icon Is Displayed with a Message.......................................................................................... 247
When the [Check Status] Indicator Is Lit or Flashing.............................................................................. 249
When the Machine Cannot Be Operated...................................................................................................251
When the Machine Does Not Respond Correctly to an Operation on the Control Panel..................251
When the Machine Does Not Respond Correctly to an Operation from a Computer....................... 255
When a Message Appears and the Machine Cannot Be Operated........................................................257
When a Message Appears While Using the Copy Function.....................................................................260
When a Message Appears While Using Document Server...................................................................... 262
When a Message Appears While Using the Fax Function........................................................................ 264
Messages that Appear During Operation or When Sending/Receiving a Fax Cannot Be Performed........................................................................................................................................................................ 264
Messages that Appear When the Machine Cannot Connect to the Network.....................................265
Messages Displayed When the Remote Fax Function Is Unavailable..................................................274
When a Message Appears While Using the Printer Function....................................................................278
Messages that Appear without Error Codes...........................................................................................278
Messages that Appear with Error Codes................................................................................................ 290
When a Message Appears While Using the Scanner Function................................................................ 292
7
Messages that Appear on the Control Panel.......................................................................................... 292
Messages that Appear on the Computer................................................................................................ 298
When Other Messages Appear...................................................................................................................304
Messages that Appear When Machine Login Fails............................................................................... 306
Messages that Appear When Logging in to the Machine Using an IC Card Fails............................. 313
Messages that Appear When the LDAP Server Is Unavailable............................................................ 314
Messages that Appear When There Is a Problem with the Certificate................................................. 315
Messages that Appear When an Application Site Cannot Be Used.................................................... 316
11. Specifications for The Machine
Model-Specific Information.......................................................................................................................... 319
List of Specifications for Standard Functions................................................................................................320
Specifications for the Main Unit............................................................................................................... 320
Specifications for the Document Server...................................................................................................329
Specifications for Printer........................................................................................................................... 330
Specifications for Scanner........................................................................................................................ 331
Specifications for Auto Document Feeder............................................................................................... 335
List of Specifications for External Options....................................................................................................337
Specifications for Finisher SR4140..........................................................................................................337
Specifications for Finisher SR4150..........................................................................................................341
Specifications for Booklet Finisher SR4160............................................................................................ 343
Specifications for Copy Tray.................................................................................................................... 347
Specifications for Punch Unit (Finisher SR4140).................................................................................... 348
Specifications for Punch Unit (Finisher SR4150, Booklet Finisher SR4160)........................................ 349
Specifications for Interposer.....................................................................................................................350
Specifications for Twin Interposer............................................................................................................ 350
Specifications for Mailbox........................................................................................................................350
Specifications for Multi-Folding Unit FD4010........................................................................................ 352
Specifications for Multi-Folding Unit FD4020........................................................................................ 353
Specifications for Output Jogger..............................................................................................................354
Specifications for Large Capacity Tray (LCT)..........................................................................................355
Specifications for Wide Large Capacity Tray.........................................................................................355
List of Specifications for Internal Options.....................................................................................................357
Specifications for Facsimile.......................................................................................................................357
8
Specifications for IEEE 1284 Interface Board........................................................................................ 362
Specifications for Wireless LAN Board................................................................................................... 362
Specifications for Device Server Option................................................................................................. 363
The Setting Values of the Transmission Function..........................................................................................364
Send Email................................................................................................................................................. 364
Send to Folder........................................................................................................................................... 365
Broadcast Transmission.............................................................................................................................366
Printable Area and Margin...........................................................................................................................367
Machine Options...........................................................................................................................................368
Guide to Functions of the Machine’s External Options..........................................................................368
Guide to Functions of the Machine’s Internal Options...........................................................................373
Special Notes When Using External Options............................................................................................. 376
Precautions for Using the Finisher............................................................................................................ 376
Removing Prints from Finisher SR4140 during Printing.......................................................................... 377
Removing Prints from Finisher SR4150/Booklet Finisher SR4160 during Printing..............................377
When Using the Z-fold Function with Multi-Folding Unit FD4020........................................................378
Functions Requiring Optional Configurations..............................................................................................382
Copy Function............................................................................................................................................382
Facsimile Functions....................................................................................................................................383
Printer Function.......................................................................................................................................... 384
Scanner Function....................................................................................................................................... 385
Interface..................................................................................................................................................... 386
Function Compatibility...................................................................................................................................387
12. Legal and Contact Information
Environmental Regulations............................................................................................................................389
ENERGY STAR Program (mainly North America)............................................................... 389
Energy Saving Functions...........................................................................................................................389
User Information on Electrical and Electronic Equipment (mainly Europe)...................... 391
Note for the Battery and/or Accumulator Symbol (For EU countries only) (mainly Europe).................................................................................................................................................................... 392
Environmental Advice for Users (mainly Europe)............................................................... 392
Notes to users in the state of California (Notes to Users in USA) (mainly North America)........................................................................................................................................................................ 393
Trademarks (User Guide)..............................................................................................................................394
9

10
1. About This Manual
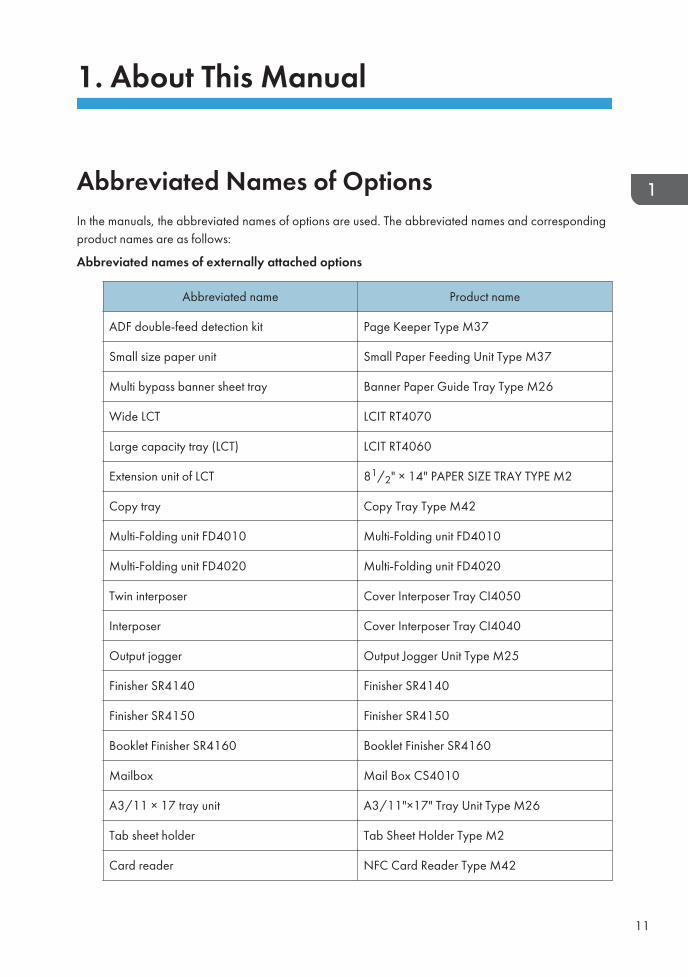
Abbreviated Names of OptionsIn the manuals, the abbreviated names of options are used. The abbreviated names and correspondingproduct names are as follows:
Abbreviated names of externally attached options
Abbreviated name Product name
ADF double-feed detection kit Page Keeper Type M37
Small size paper unit Small Paper Feeding Unit Type M37
Multi bypass banner sheet tray Banner Paper Guide Tray Type M26
Wide LCT LCIT RT4070
Large capacity tray (LCT) LCIT RT4060
Extension unit of LCT 81/2" × 14" PAPER SIZE TRAY TYPE M2
Copy tray Copy Tray Type M42
Multi-Folding unit FD4010 Multi-Folding unit FD4010
Multi-Folding unit FD4020 Multi-Folding unit FD4020
Twin interposer Cover Interposer Tray CI4050
Interposer Cover Interposer Tray CI4040
Output jogger Output Jogger Unit Type M25
Finisher SR4140 Finisher SR4140
Finisher SR4150 Finisher SR4150
Booklet Finisher SR4160 Booklet Finisher SR4160
Mailbox Mail Box CS4010
A3/11 × 17 tray unit A3/11"×17" Tray Unit Type M26
Tab sheet holder Tab Sheet Holder Type M2
Card reader NFC Card Reader Type M42
11
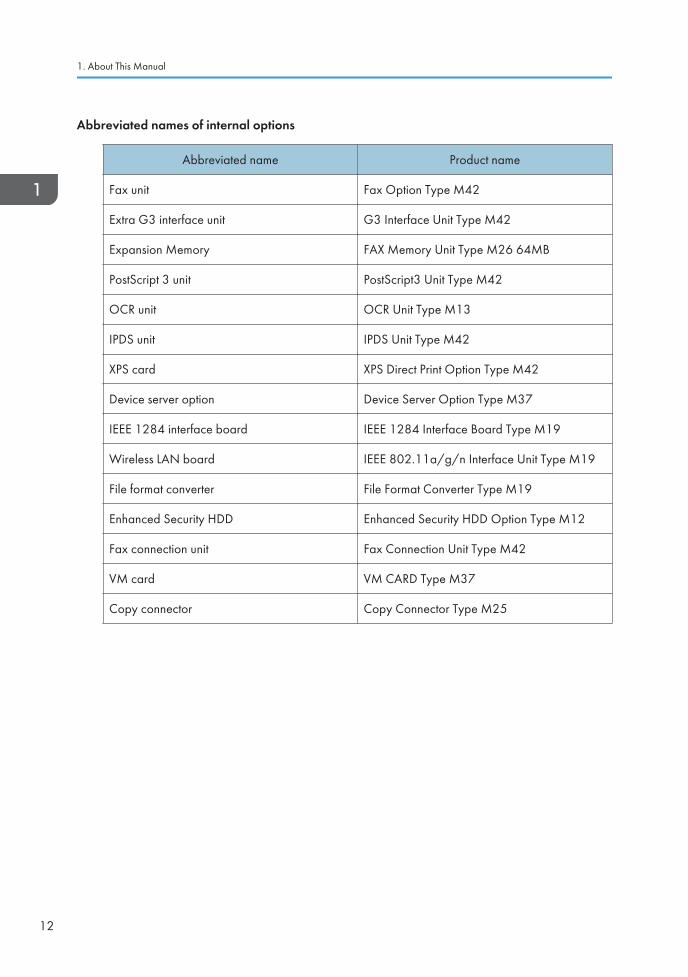
Abbreviated names of internal options
Abbreviated name Product name
Fax unit Fax Option Type M42
Extra G3 interface unit G3 Interface Unit Type M42
Expansion Memory FAX Memory Unit Type M26 64MB
PostScript 3 unit PostScript3 Unit Type M42
OCR unit OCR Unit Type M13
IPDS unit IPDS Unit Type M42
XPS card XPS Direct Print Option Type M42
Device server option Device Server Option Type M37
IEEE 1284 interface board IEEE 1284 Interface Board Type M19
Wireless LAN board IEEE 802.11a/g/n Interface Unit Type M19
File format converter File Format Converter Type M19
Enhanced Security HDD Enhanced Security HDD Option Type M12
Fax connection unit Fax Connection Unit Type M42
VM card VM CARD Type M37
Copy connector Copy Connector Type M25
1. About This Manual
12
2. Getting Started
Turning On and Off the PowerTo turn the machine on and off, press the main power switch on the left side of the machine.
• When you are using the fax function on the machine, do not turn the power off under normaloperation. If the power is turned off, data stored in the fax memory will be lost in about one hourafter the machine is turned off. If you have to turn the power off or unplug the power cord for somereason, make sure 100% is shown as available memory on the screen for the fax function.
• Confirm how much power the options draw, and then plug them into an outlet that is nearby butseparate from the outlet that the main machine is plugged into.
Turning On the Main Power
• Do not press the main power switch soon after you press the main power of the machine. Whenyou turn the power on or off, wait at least 10 seconds after confirming that the main powerindicator on the control panel has turned on or off.
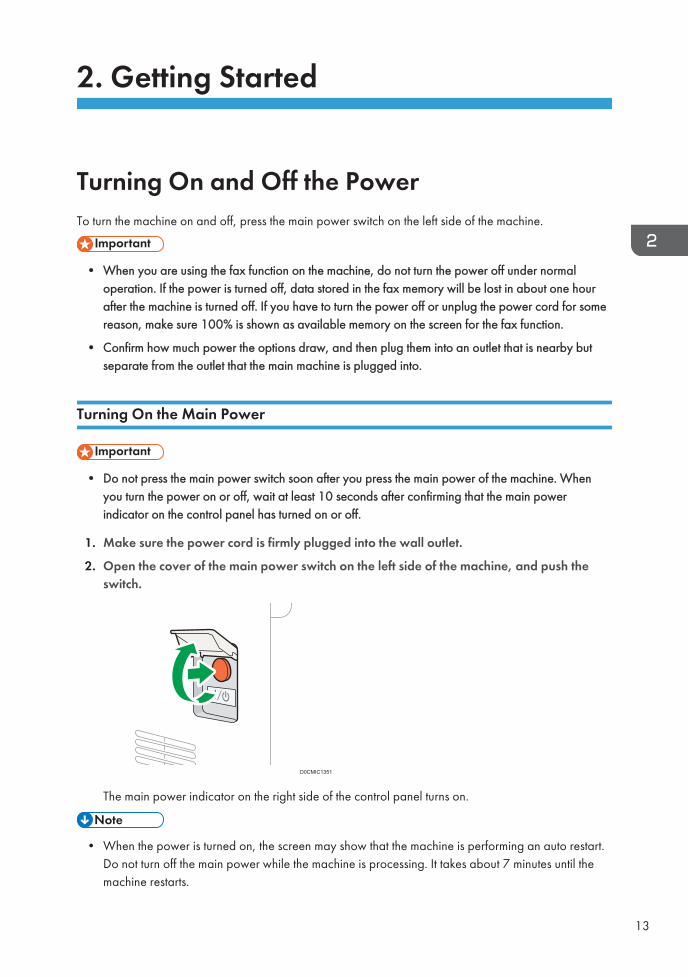
1. Make sure the power cord is firmly plugged into the wall outlet.
2. Open the cover of the main power switch on the left side of the machine, and push theswitch.
D0CMIC1351
The main power indicator on the right side of the control panel turns on.
• When the power is turned on, the screen may show that the machine is performing an auto restart.Do not turn off the main power while the machine is processing. It takes about 7 minutes until themachine restarts.
13
• If a file was deleted from memory, a Power Failure report is automatically printed as soon as thepower is restored. This report can be used to identify lost files.
Turning Off the Main Power
• Do not turn off the power while the machine is in operation. To turn the power off, confirm that theoperation is finished.
• Do not hold down the main power switch while turning off the main power. Doing so forcibly turnsoff the machine's power and may damage the hard disk or memory and cause malfunctions.
• Do not press the main power switch soon after pressing the main power switch on the machine.When you turn the power on or off, wait at least 10 seconds after confirming that the main powerindicator on the control panel has turned on or off.
• The fan inside the machine near the vents may continue running to cool the machine after a largeprint job. While the fan is running, do not turn off the main power nor disconnect the power cordfrom the wall outlet.
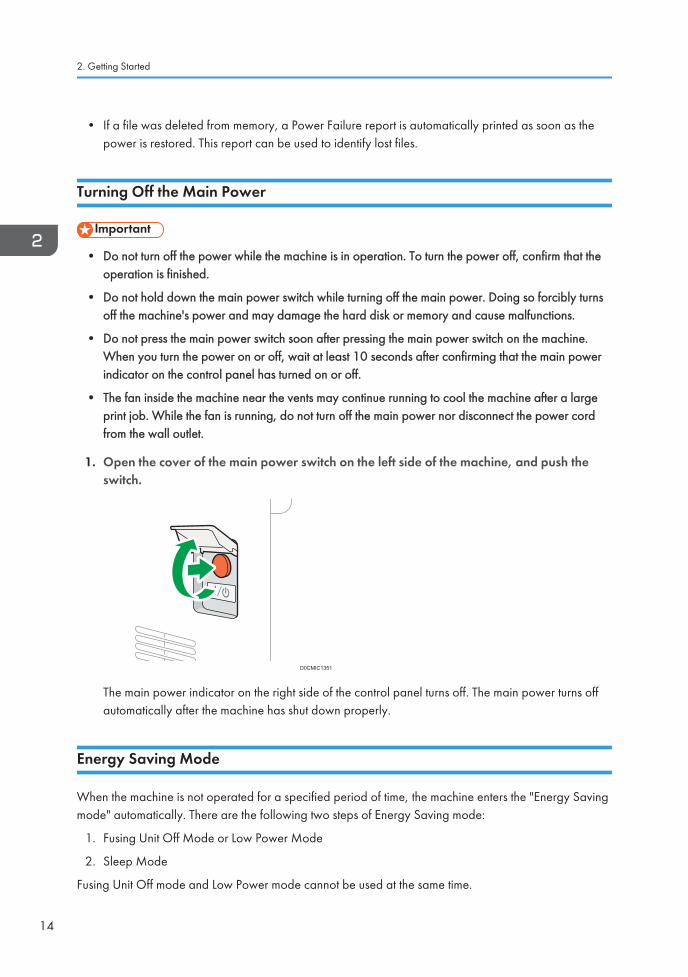
1. Open the cover of the main power switch on the left side of the machine, and push theswitch.
D0CMIC1351
The main power indicator on the right side of the control panel turns off. The main power turns offautomatically after the machine has shut down properly.
Energy Saving Mode
When the machine is not operated for a specified period of time, the machine enters the "Energy Savingmode" automatically. There are the following two steps of Energy Saving mode:
1. Fusing Unit Off Mode or Low Power Mode
2. Sleep Mode
Fusing Unit Off mode and Low Power mode cannot be used at the same time.
2. Getting Started
14
By default, the machine first switches to Low Power mode and then to Sleep mode after a lapse of time.
Fusing Unit Off Mode
In this mode, the main power indicator is lit. Because the heater of the fusing unit is turned off butthe screen of the control panel is still displayed, the power consumption decreases, but you canstart operation promptly. If you do not operate the machine for a specified period of time, themachine emits a clicking sound and enters Fusing Unit Off mode.
• You can specify whether to enable the Fusing Unit Off mode and the time to wait before themachine enters Fusing Unit Off mode under [Fusing Unit Off Mode (Energy Saving) On/Off].
See "Date/Time/Timer", User Guide (Full Version).
• In this mode, you can scan documents, send faxes, receive faxes into memory, change themachine settings on the control panel, and perform other operations that do not requireprinting.
Low Power Mode
In this mode, the control panel display turns off and the main power indicator remains lit. If themachine is left idle for a specific time, it switches to Low Power mode.
• Low Power mode cannot be used if Fusing Off mode is enabled.
• You can change the amount of time that the machine waits before switching to Low Powermode under [Low Power Mode Timer].
See "Date/Time/Timer", User Guide (Full Version).
• If you touch the control panel in Low Power mode, the machine exits the mode and the controlpanel display turns on.
Sleep Mode
In this mode, the display of the control panel turns off and the main power indicator blinks slowly.Power consumption is minimized. When you do not operate the machine for a specified period oftime or press [Energy Save] ( ), the machine enters Sleep mode.
• You can specify the amount of time that the machine waits before entering Sleep mode under[Sleep Mode Timer].
See "Date/Time/Timer", User Guide (Full Version).
• The machine recovers from Sleep mode when you perform one of the following:
• Lift the ADF.
• Place an original in the ADF.
• Touch the display of the control panel.
• Approach the machine and are detected by the human detection sensor.
See "Recovering from Sleep Mode When a Person Approaches the Machine", UserGuide (Full Version).
Turning On and Off the Power
15
• When the machine recovers from Sleep mode using the human detection sensor, the main powerindicator turns on. Even if Sleep mode is canceled, the operation screen is not displayed until youtouch the touch panel.
• The energy saving functions are disabled when an error occurs or while an operation is inprogress.
• When the machine recovers from Sleep mode using the human detection sensor, the main powerindicator turns on. Even if Sleep mode is canceled, the operation screen is not displayed until youtouch the touch panel.
• The energy saving functions will not operate in the following cases:
• When fixed warm-up is in progress
• When operations are suspended during printing
• When a warning message appears (The machine enters Fusing Unit Off mode unless thecover is open.)
• When paper is jammed (The machine enters Fusing Unit Off mode except when the cover isopen.)
• When the Data In indicator is lit or flashing (The machine enters Fusing Unit Off mode exceptwhen the Data In indicator is lit or flashing due to receiving faxes or storing documents.)
• The machine does not enter Sleep mode in the following cases:
• During communication with external equipment
• When the hard disk is active
• When the service call message appears
• When the ADF, machine's cover, or ADF cover are opened
• When the "Add Toner" message appears
• When toner is being replenished
• When one of the following screens is displayed:
• System Settings
• Counter
• Inquiry
• Address Book
• Tray/Paper Settings
• When data is being processed
• If a file is waiting to be transmitted within the next minute using the "Send Later" facsimile function
• When a recipient is being registered in the address list or group dial list
• When the sample print, locked print, hold print, or stored print screen is displayed
2. Getting Started
16

• When the screen of a document that was stored under the printer function appears
• When the internal cooling fan is active
• When accessing the machine using Web Image Monitor
Turning On and Off the Power
17
Guide to Names and Functions of Components
• Do not obstruct the machine's vents. Doing so can result in fire as the internal components areoverheated.
ADF stands for Auto Document Feeder.
Front and Left View
D0CMIC1255
10
4
6
1
8
5
7
9
11 3
2
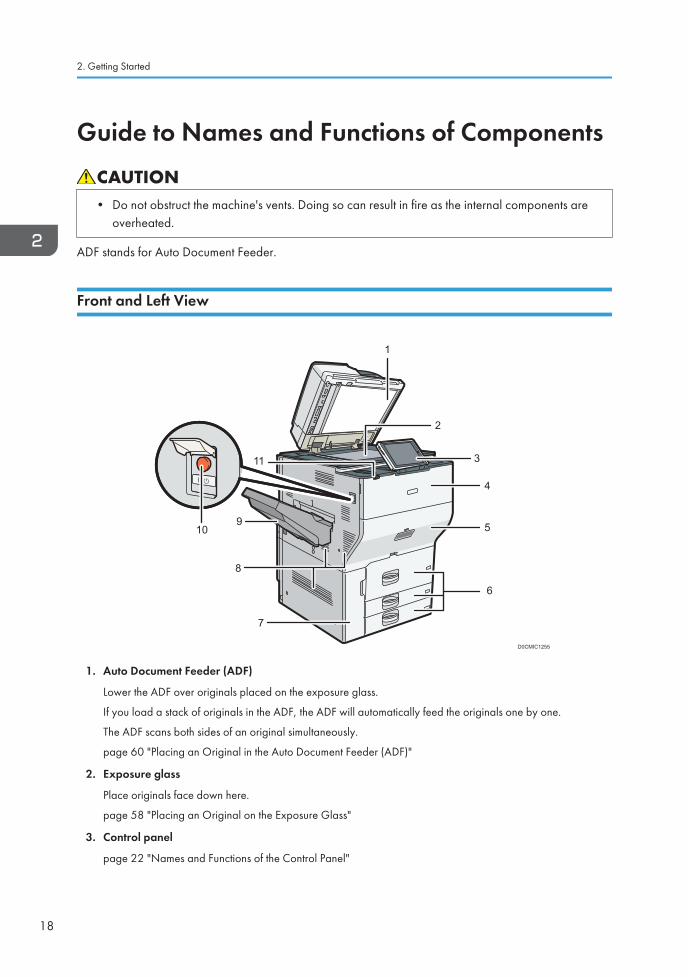
1. Auto Document Feeder (ADF)
Lower the ADF over originals placed on the exposure glass.
If you load a stack of originals in the ADF, the ADF will automatically feed the originals one by one.
The ADF scans both sides of an original simultaneously.
page 60 "Placing an Original in the Auto Document Feeder (ADF)"
2. Exposure glass
Place originals face down here.
page 58 "Placing an Original on the Exposure Glass"
3. Control panel
page 22 "Names and Functions of the Control Panel"
2. Getting Started
18

4. Front cover
Open to replace the toner cartridge.
5. Drawer
Pull out the drawer when a paper jam occurs.
6. Paper trays (Trays 1–3)
Load paper here. Tray 1 is a tandem tray where paper on the left side automatically moves to the right whenpaper there has run out.
page 175 "Loading Paper into the Paper Tray"
7. Lower front cover
Open to change the waste toner bottle.
8. Vents
Prevent overheating.
After large-volume printing, the ventilation fan may continue to work to lower the temperature inside themachine.
9. Copy tray
Copied/printed paper and fax messages are delivered here.
10. Main power switch
To turn the power on and off, open the cover of the main power switch and press the main power switch.
page 13 "Turning On and Off the Power"
11. Human detection sensor
Detects a person approaching the machine.
See "Recovering from Sleep Mode When a Person Approaches the Machine", User Guide (Full Version).
Guide to Names and Functions of Components
19
Front and Right View
D0CMIC1257
1
2
6 45
3
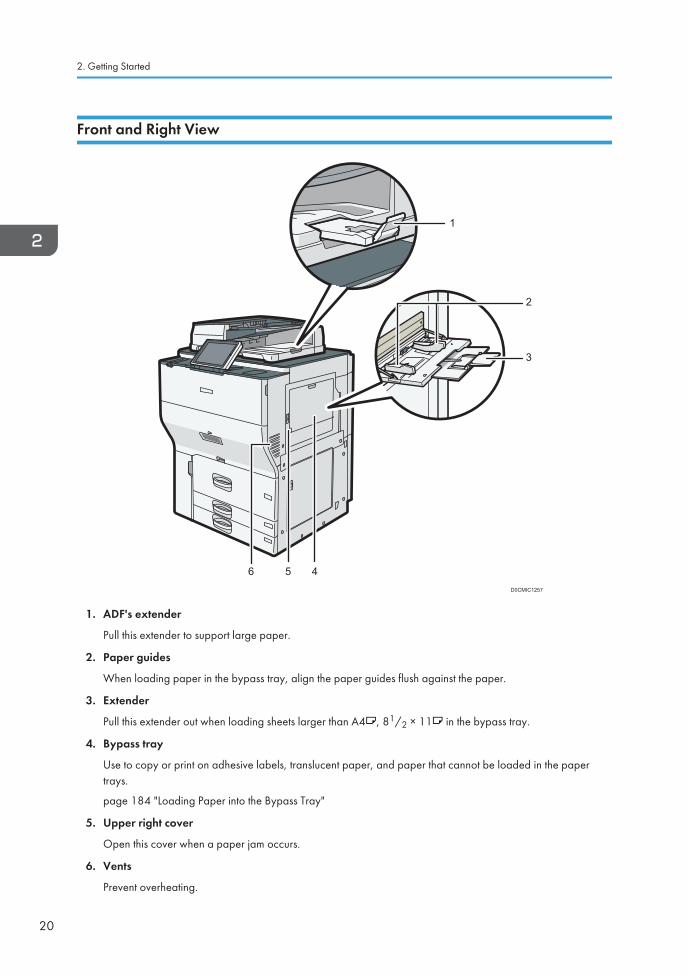
1. ADF's extender
Pull this extender to support large paper.
2. Paper guides
When loading paper in the bypass tray, align the paper guides flush against the paper.
3. Extender
Pull this extender out when loading sheets larger than A4 , 81/2 × 11 in the bypass tray.
4. Bypass tray
Use to copy or print on adhesive labels, translucent paper, and paper that cannot be loaded in the papertrays.
page 184 "Loading Paper into the Bypass Tray"
5. Upper right cover
Open this cover when a paper jam occurs.
6. Vents
Prevent overheating.
2. Getting Started
20
After large-volume printing, the ventilation fan may continue to work to lower the temperature inside themachine.
Rear and Left View
11
D0CMIC1348
1
2
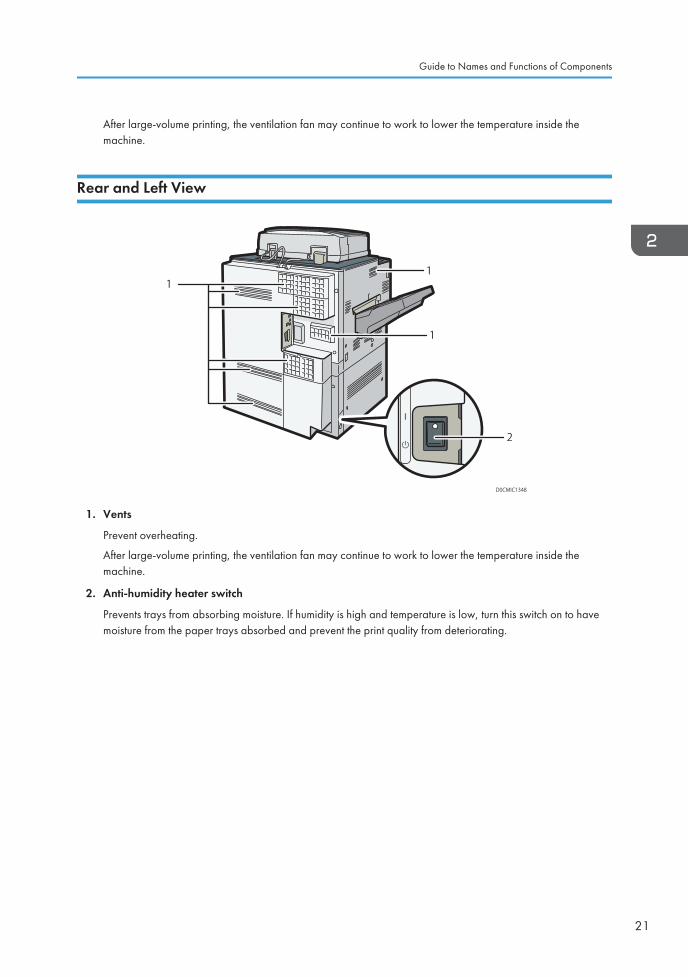
1. Vents
Prevent overheating.
After large-volume printing, the ventilation fan may continue to work to lower the temperature inside themachine.
2. Anti-humidity heater switch
Prevents trays from absorbing moisture. If humidity is high and temperature is low, turn this switch on to havemoisture from the paper trays absorbed and prevent the print quality from deteriorating.
Guide to Names and Functions of Components
21
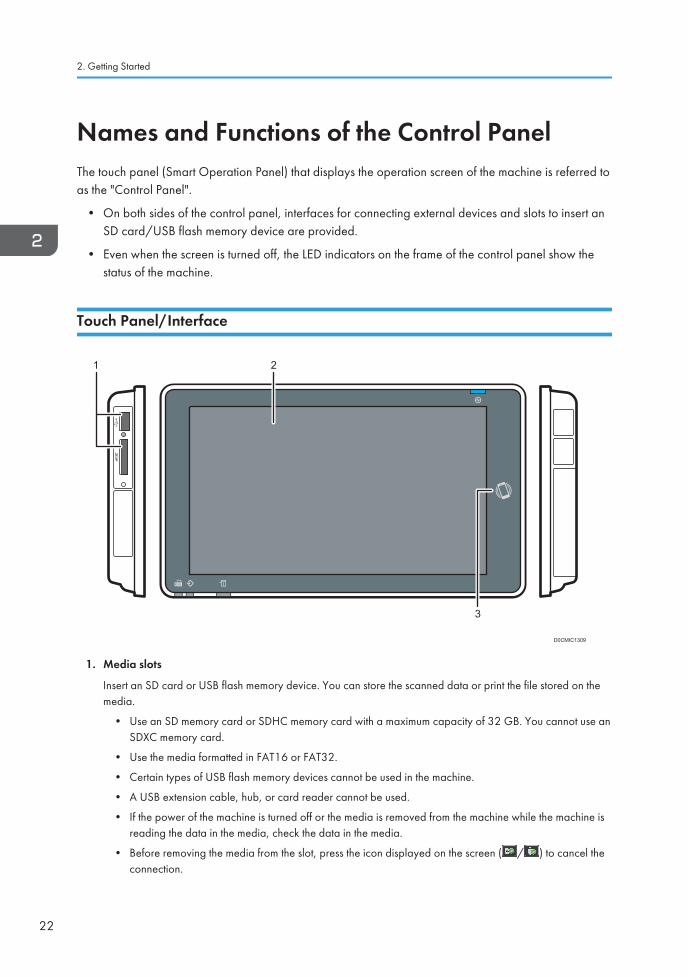
Names and Functions of the Control PanelThe touch panel (Smart Operation Panel) that displays the operation screen of the machine is referred toas the "Control Panel".
• On both sides of the control panel, interfaces for connecting external devices and slots to insert anSD card/USB flash memory device are provided.
• Even when the screen is turned off, the LED indicators on the frame of the control panel show thestatus of the machine.
Touch Panel/Interface
D0CMIC1309
3
21
1. Media slots
Insert an SD card or USB flash memory device. You can store the scanned data or print the file stored on themedia.
• Use an SD memory card or SDHC memory card with a maximum capacity of 32 GB. You cannot use anSDXC memory card.
• Use the media formatted in FAT16 or FAT32.
• Certain types of USB flash memory devices cannot be used in the machine.
• A USB extension cable, hub, or card reader cannot be used.
• If the power of the machine is turned off or the media is removed from the machine while the machine isreading the data in the media, check the data in the media.
• Before removing the media from the slot, press the icon displayed on the screen ( / ) to cancel theconnection.
2. Getting Started
22
D0CMIC1306
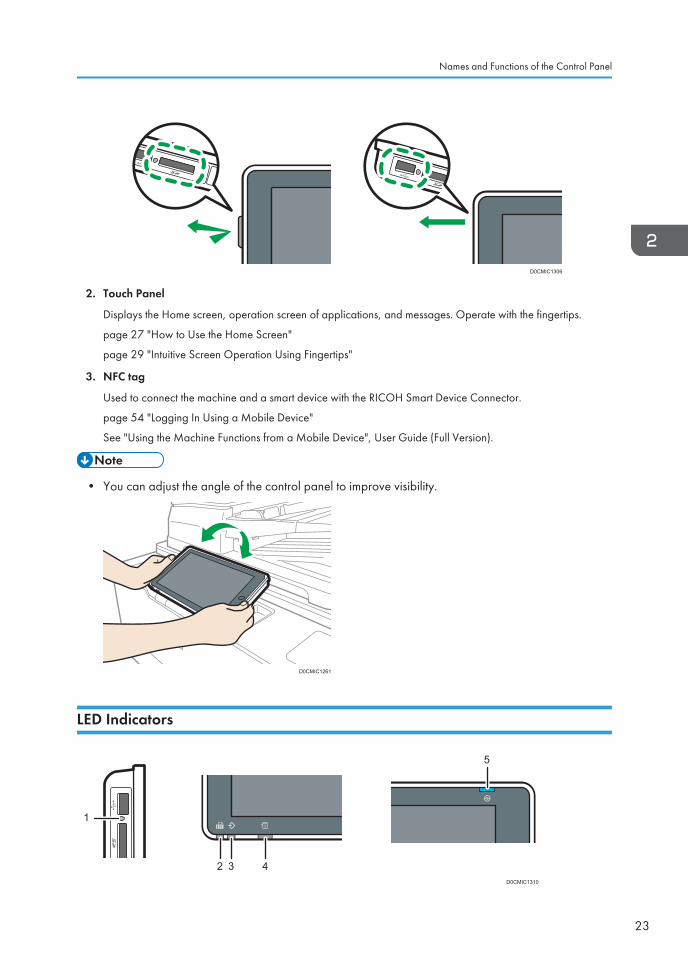
2. Touch Panel
Displays the Home screen, operation screen of applications, and messages. Operate with the fingertips.
page 27 "How to Use the Home Screen"
page 29 "Intuitive Screen Operation Using Fingertips"
3. NFC tag
Used to connect the machine and a smart device with the RICOH Smart Device Connector.
page 54 "Logging In Using a Mobile Device"
See "Using the Machine Functions from a Mobile Device", User Guide (Full Version).
• You can adjust the angle of the control panel to improve visibility.
D0CMIC1261
LED Indicators
D0CMIC1310
1
5
32 4
Names and Functions of the Control Panel
23
1. Media access indicator
Flashes when data is being read from or written to an SD card.
While the machine is accessing the SD card or USB flash memory device, do not turn the power off or removethe media.
• If the media access lamp does not light when an SD card is pushed into the media slot, do the following:
• Reinsert the SD card.
• The SD card may be broken. Contact the shop where you bought it.
2. Fax indicator
Indicates the status of the fax function.
• Flashing: transmitting and receiving data
• Lit: receiving data (Substitute RX File/Memory Lock Reception/Personal Box)
3. Data In indicator
Flashes when the machine is receiving data sent from the printer driver or LAN-Fax driver.
4. Status indicator
Indicates the status of the system. Stays lit when an error occurs or toner runs out.
page 247 "Checking the Indicators, Icons, and Messages on the Control Panel"
5. Main power indicator
The main power indicator lights up when you turn on the main power switch. In Sleep mode, it flickers slowly.
2. Getting Started
24

Changing the Display LanguageYou can change the language used on the display. English is set as default.
1. On the Home screen, press the change language widget.
2. Select the language you want to display.
3. Press [OK].
Changing the Display Language
25
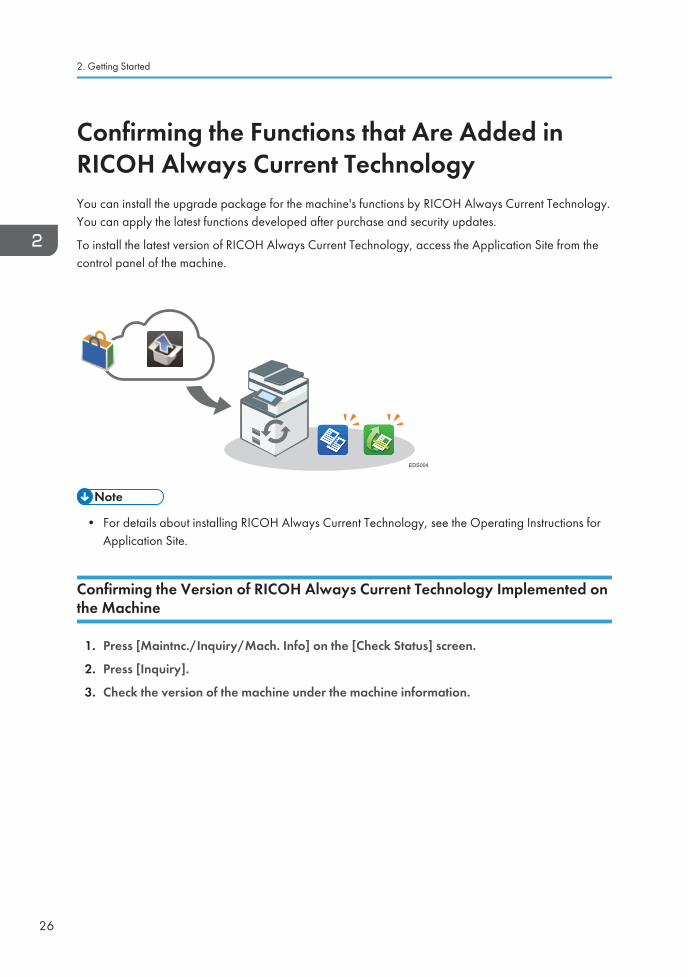
Confirming the Functions that Are Added inRICOH Always Current TechnologyYou can install the upgrade package for the machine's functions by RICOH Always Current Technology.You can apply the latest functions developed after purchase and security updates.
To install the latest version of RICOH Always Current Technology, access the Application Site from thecontrol panel of the machine.
EDS004
• For details about installing RICOH Always Current Technology, see the Operating Instructions forApplication Site.
Confirming the Version of RICOH Always Current Technology Implemented onthe Machine
1. Press [Maintnc./Inquiry/Mach. Info] on the [Check Status] screen.
2. Press [Inquiry].
3. Check the version of the machine under the machine information.
2. Getting Started
26
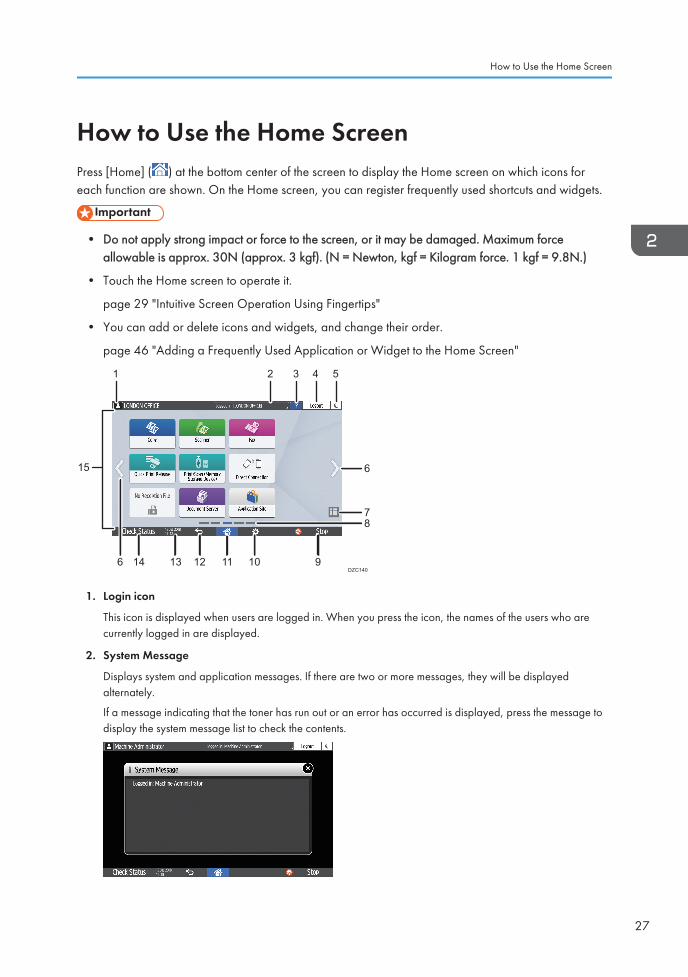
How to Use the Home ScreenPress [Home] ( ) at the bottom center of the screen to display the Home screen on which icons foreach function are shown. On the Home screen, you can register frequently used shortcuts and widgets.
• Do not apply strong impact or force to the screen, or it may be damaged. Maximum forceallowable is approx. 30N (approx. 3 kgf). (N = Newton, kgf = Kilogram force. 1 kgf = 9.8N.)
• Touch the Home screen to operate it.
page 29 "Intuitive Screen Operation Using Fingertips"
• You can add or delete icons and widgets, and change their order.
page 46 "Adding a Frequently Used Application or Widget to the Home Screen"
DZC140
1 2 3 4 5
6
78
910111214 136
15
1. Login icon
This icon is displayed when users are logged in. When you press the icon, the names of the users who arecurrently logged in are displayed.
2. System Message
Displays system and application messages. If there are two or more messages, they will be displayedalternately.
If a message indicating that the toner has run out or an error has occurred is displayed, press the message todisplay the system message list to check the contents.
How to Use the Home Screen
27
3. Help
When the machine is connected to the Internet and Help is available for the screen that is displayed or theerror that has occurred, press this icon to display a Help screen.
Specify [Cookie] in the control panel browser to [ON] to display Help properly.
4. [Login]/[Logout]
These keys are displayed when user authentication or administrator authentication is enabled. Press the keys tolog in to or log out from the machine.
page 52 "Logging In from the Control Panel"
5. [Energy Save]
Press to enter or exit Sleep mode.
page 14 "Energy Saving Mode"
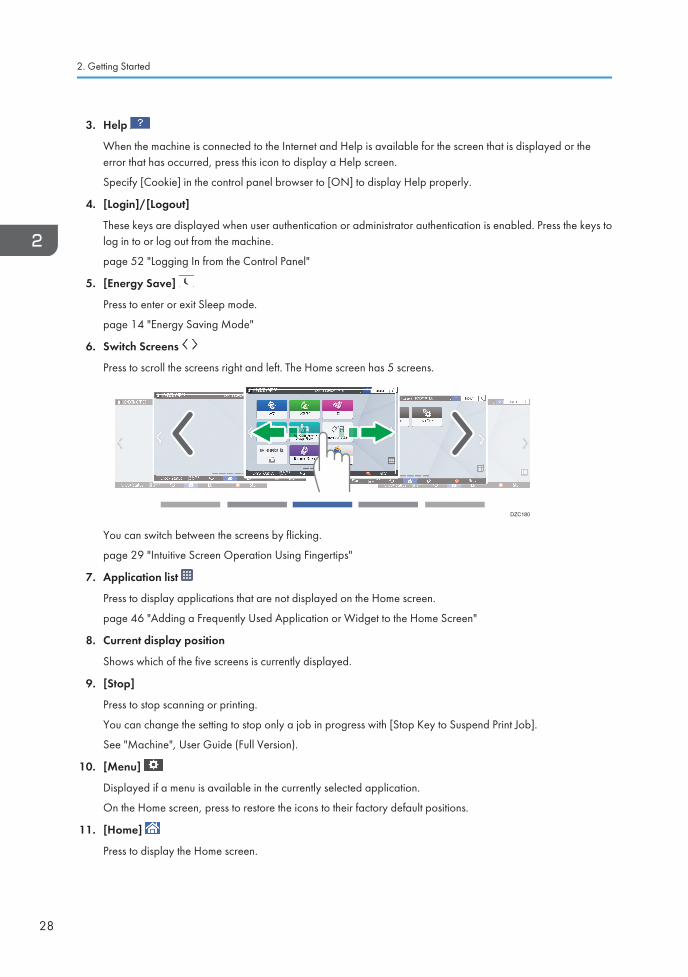
6. Switch Screens
Press to scroll the screens right and left. The Home screen has 5 screens.
DZC180
You can switch between the screens by flicking.
page 29 "Intuitive Screen Operation Using Fingertips"
7. Application list
Press to display applications that are not displayed on the Home screen.
page 46 "Adding a Frequently Used Application or Widget to the Home Screen"
8. Current display position
Shows which of the five screens is currently displayed.
9. [Stop]
Press to stop scanning or printing.
You can change the setting to stop only a job in progress with [Stop Key to Suspend Print Job].
See "Machine", User Guide (Full Version).
10. [Menu]
Displayed if a menu is available in the currently selected application.
On the Home screen, press to restore the icons to their factory default positions.
11. [Home]
Press to display the Home screen.
2. Getting Started
28
12. [Back]
Press to return to the previous screen.
13. Date/Time and Toner remaining
The current date and time is displayed.
To display the information about Toner remaining, specify [Display Time/Remaining Toner] of [System BarSettings] to [Remaining Toner].
See "Display/Input", User Guide (Full Version).
14. [Check Status]
Press to check the following system statuses of the machine. This lights up in red when an error occurs.
• Machine's status
Indicates the error status and network status.
• Operational status of each function
Status of functions such as Copy or Scanner
• Current jobs
• Job history
• Machine's maintenance information
See "Checking the Machine Status from the Control Panel", User Guide (Full Version).
15. Icon display area
Displays the icons and widgets.
• You can change the screen displayed when the power is turned on under [Function Priority].
• See "Displaying Frequently Used Functions on the First Screen", User Guide (Full Version).
• When you press [Menu] ( ) [Reset Home Screen] with the Embedded Software Architectureapplication being installed in the machine, the application icons are not deleted.
Intuitive Screen Operation Using Fingertips
On the Home screen or application screen, you can perform the following operations by touching thescreen with your fingertips.
Flick (for switching between screens)
Touch and slide your finger on the screen quickly left or right to switch between the screens.
How to Use the Home Screen
29
DZB181
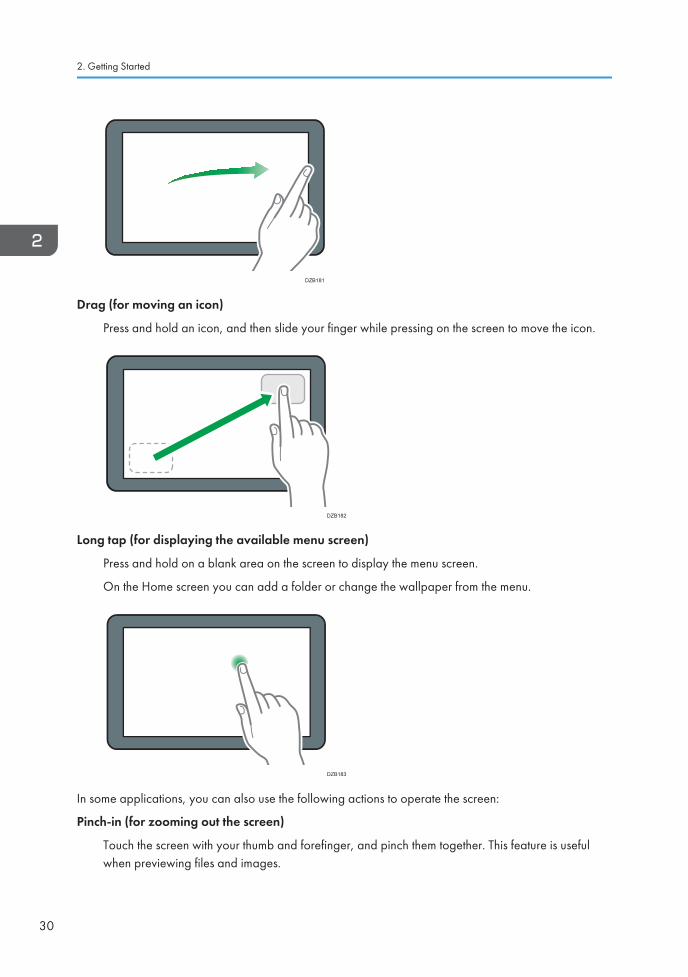
Drag (for moving an icon)
Press and hold an icon, and then slide your finger while pressing on the screen to move the icon.
DZB182
Long tap (for displaying the available menu screen)
Press and hold on a blank area on the screen to display the menu screen.
On the Home screen you can add a folder or change the wallpaper from the menu.
DZB183
In some applications, you can also use the following actions to operate the screen:
Pinch-in (for zooming out the screen)
Touch the screen with your thumb and forefinger, and pinch them together. This feature is usefulwhen previewing files and images.
2. Getting Started
30
DZB185
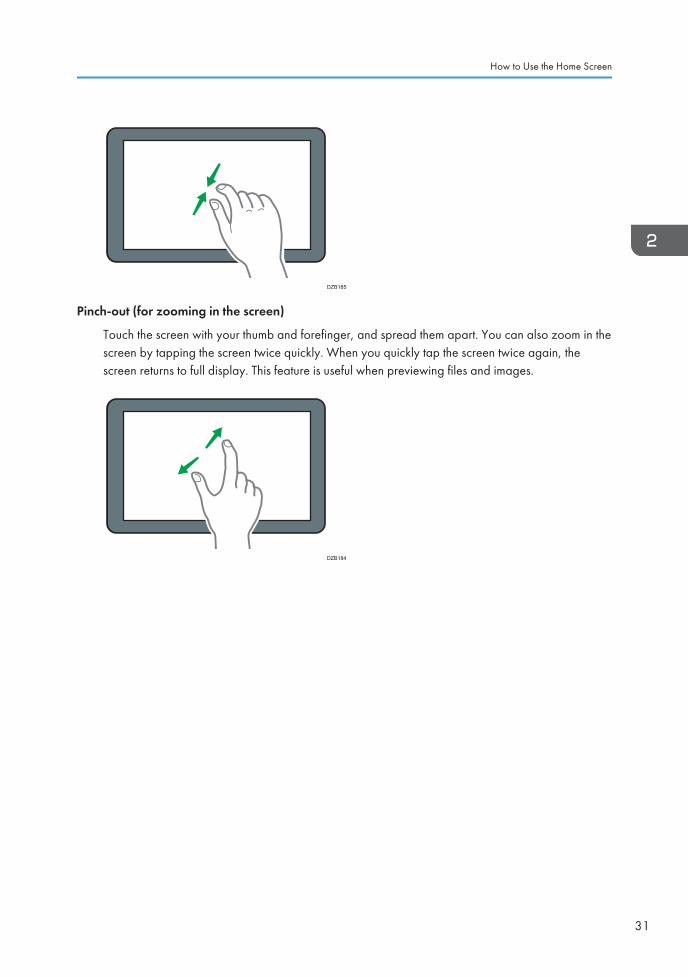
Pinch-out (for zooming in the screen)
Touch the screen with your thumb and forefinger, and spread them apart. You can also zoom in thescreen by tapping the screen twice quickly. When you quickly tap the screen twice again, thescreen returns to full display. This feature is useful when previewing files and images.
DZB184
How to Use the Home Screen
31
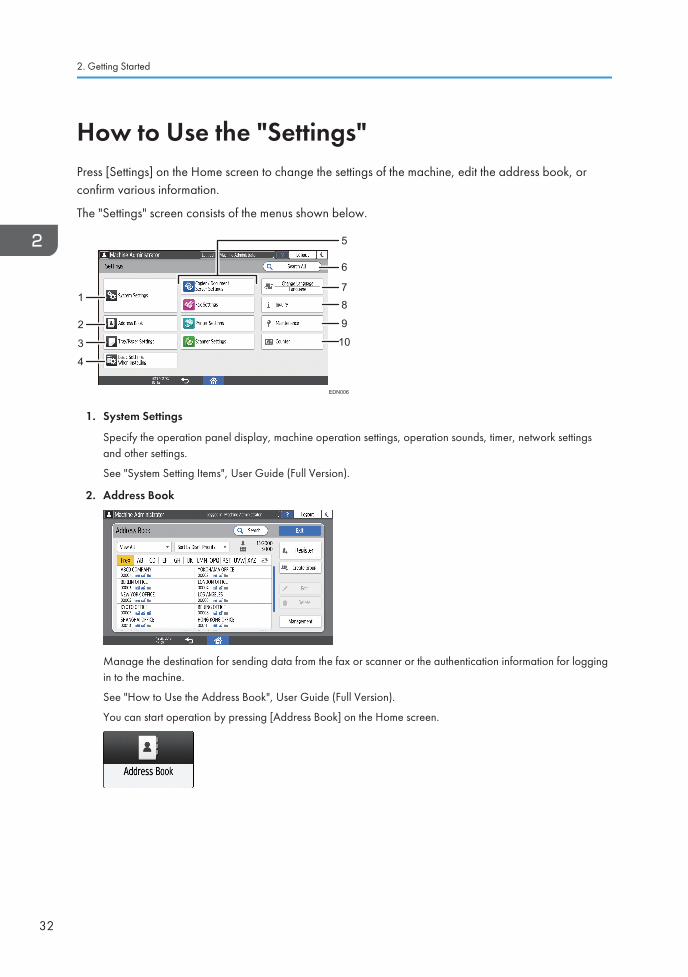
How to Use the "Settings"Press [Settings] on the Home screen to change the settings of the machine, edit the address book, orconfirm various information.
The "Settings" screen consists of the menus shown below.
1
6
78
9
102
3
4
5
EDN006
1. System Settings
Specify the operation panel display, machine operation settings, operation sounds, timer, network settingsand other settings.
See "System Setting Items", User Guide (Full Version).
2. Address Book
Manage the destination for sending data from the fax or scanner or the authentication information for loggingin to the machine.
See "How to Use the Address Book", User Guide (Full Version).
You can start operation by pressing [Address Book] on the Home screen.
2. Getting Started
32
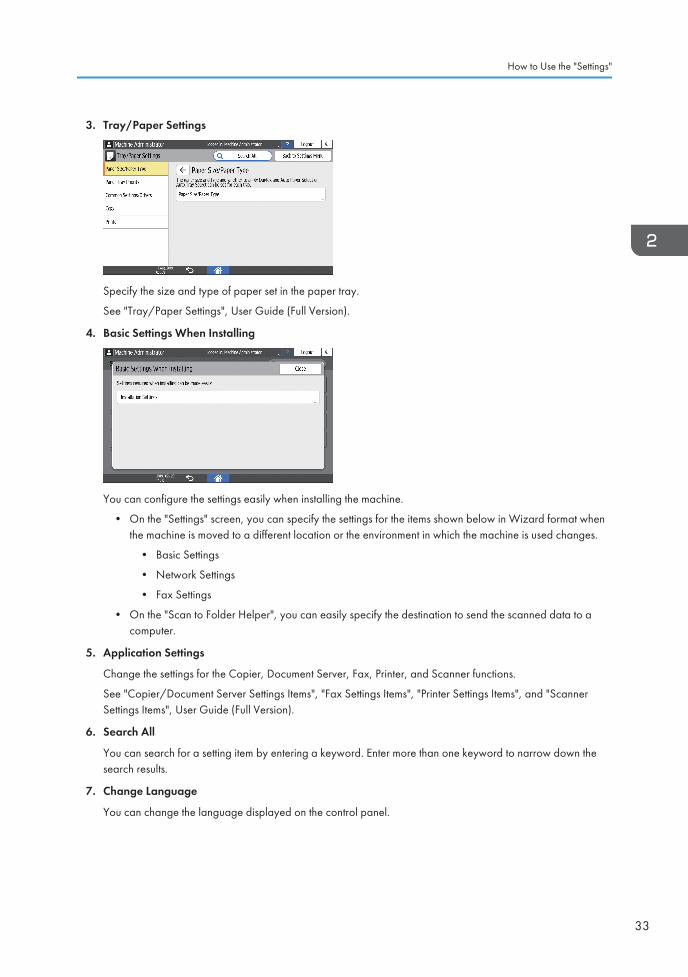
3. Tray/Paper Settings
Specify the size and type of paper set in the paper tray.
See "Tray/Paper Settings", User Guide (Full Version).
4. Basic Settings When Installing
You can configure the settings easily when installing the machine.
• On the "Settings" screen, you can specify the settings for the items shown below in Wizard format whenthe machine is moved to a different location or the environment in which the machine is used changes.
• Basic Settings
• Network Settings
• Fax Settings
• On the "Scan to Folder Helper", you can easily specify the destination to send the scanned data to acomputer.
5. Application Settings
Change the settings for the Copier, Document Server, Fax, Printer, and Scanner functions.
See "Copier/Document Server Settings Items", "Fax Settings Items", "Printer Settings Items", and "ScannerSettings Items", User Guide (Full Version).
6. Search All
You can search for a setting item by entering a keyword. Enter more than one keyword to narrow down thesearch results.
7. Change Language
You can change the language displayed on the control panel.
How to Use the "Settings"
33
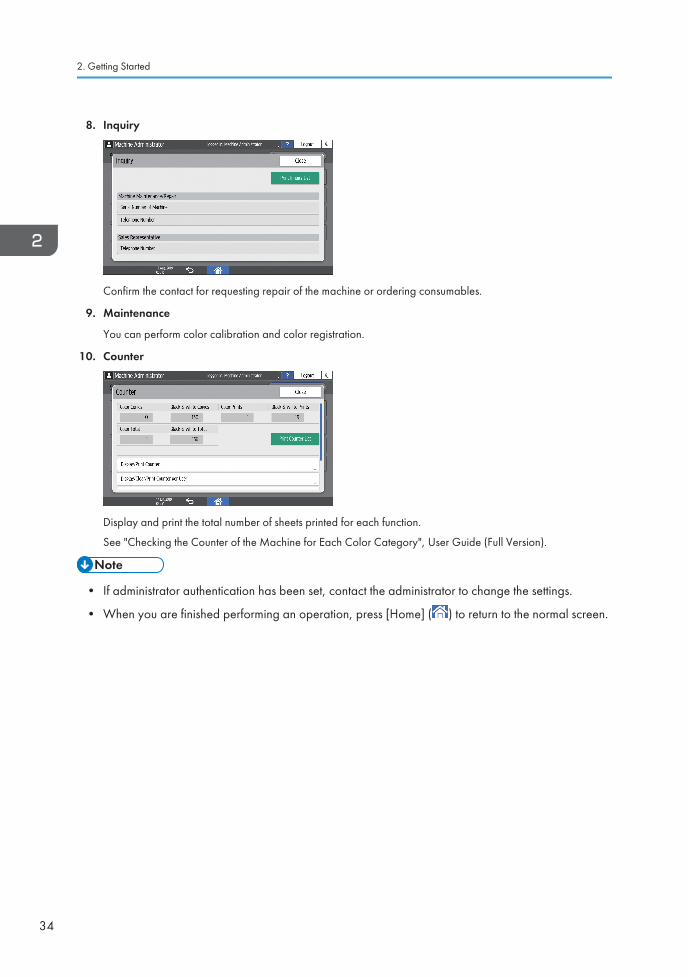
8. Inquiry
Confirm the contact for requesting repair of the machine or ordering consumables.
9. Maintenance
You can perform color calibration and color registration.
10. Counter
Display and print the total number of sheets printed for each function.
See "Checking the Counter of the Machine for Each Color Category", User Guide (Full Version).
• If administrator authentication has been set, contact the administrator to change the settings.
• When you are finished performing an operation, press [Home] ( ) to return to the normal screen.
2. Getting Started
34

How to Use the Copy ScreenYou can select from one of two types for the Copy screen:
Standard View
The basic functions that are used frequently are displayed with big keys. Scroll down the screen tosee the keys used to configure the functions for finishing or editing.
D0CMPC6352
Full View
You can see all the function keys on a single screen. You do not need to scroll through the screensto select a function.
• To switch the screen type, press [Menu] ( ) [Screen Settings] [Switch Screen Type] on theCopy screen.
• You can use the same functions on either screen.
• When the administrator has configured user authentication and User's Own Customization isenabled, each login user can change the screen type.
How to Use the Copy Screen (Standard)
You can customize the layout and how the keys are displayed on the Copy screen in Standard. Fordetails, see page 38 "Changing the Layout or Display of the Keys of the Copy Function".
How to Use the Copy Screen
35
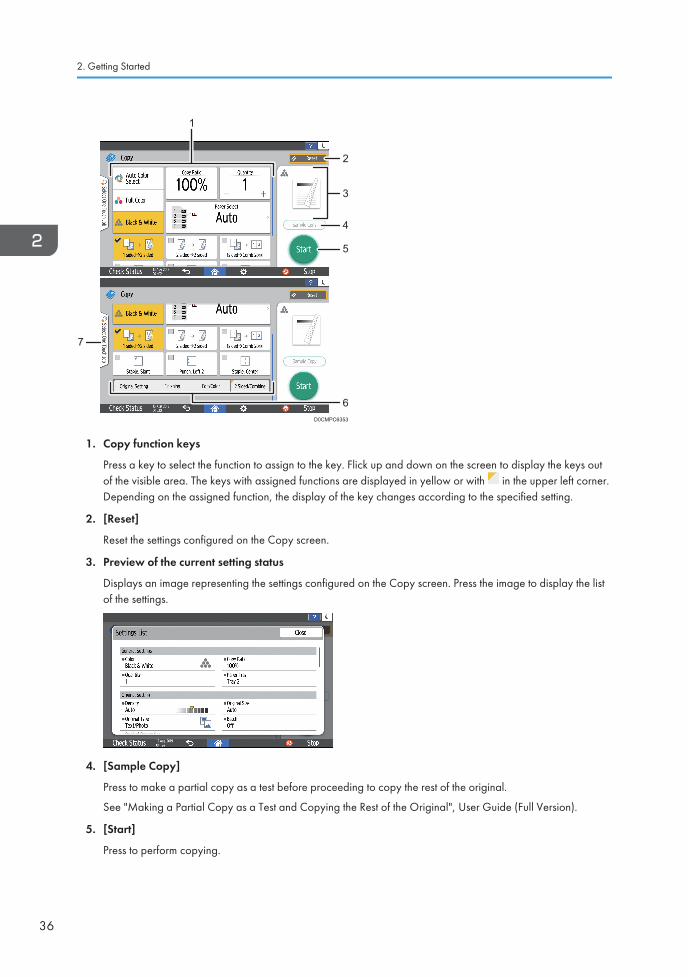
1
7
2
3
4
5
6D0CMPC6353
1. Copy function keys
Press a key to select the function to assign to the key. Flick up and down on the screen to display the keys outof the visible area. The keys with assigned functions are displayed in yellow or with in the upper left corner.Depending on the assigned function, the display of the key changes according to the specified setting.
2. [Reset]
Reset the settings configured on the Copy screen.
3. Preview of the current setting status
Displays an image representing the settings configured on the Copy screen. Press the image to display the listof the settings.
4. [Sample Copy]
Press to make a partial copy as a test before proceeding to copy the rest of the original.
See "Making a Partial Copy as a Test and Copying the Rest of the Original", User Guide (Full Version).
5. [Start]
Press to perform copying.
2. Getting Started
36
6. Other keys for Copy function
Press to select the functions whose keys are out of the visible area of the screen. The key of the function that iscurrently configured is displayed with in the upper left corner.
7. Select One Touch Job
You can see the preset settings in the machine or the job history. When user authentication is configured,display the history of the executed jobs for each login user. When selecting a job history, its settings aredisplayed on the current Copy screen. You can use the same settings as a previous job by selecting the jobhistory.
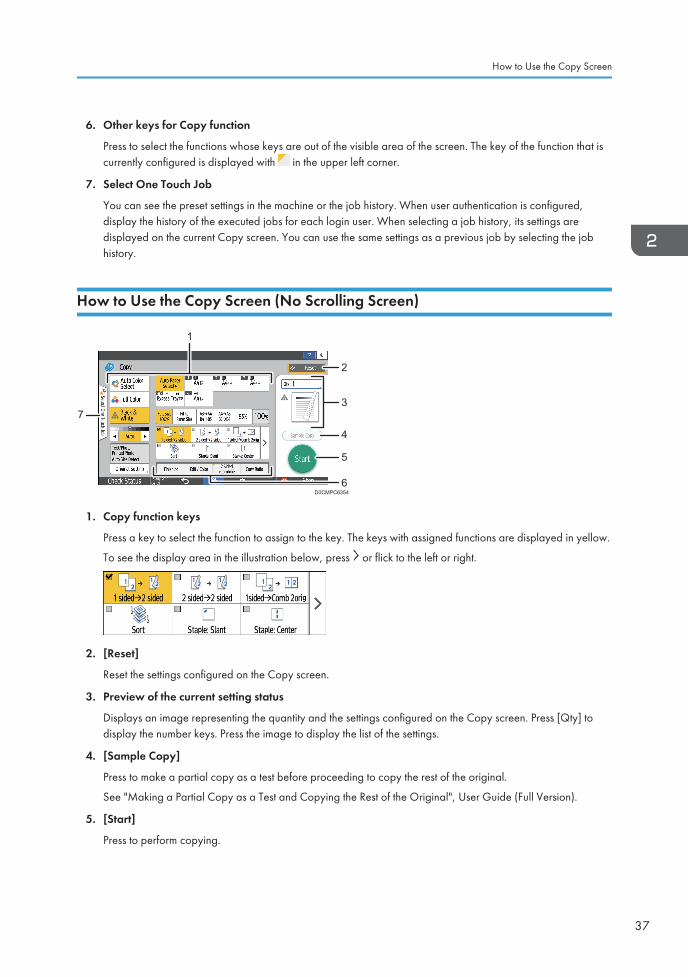
How to Use the Copy Screen (No Scrolling Screen)
1
7
2
3
4
5
6D0CMPC6354
1. Copy function keys
Press a key to select the function to assign to the key. The keys with assigned functions are displayed in yellow.
To see the display area in the illustration below, press or flick to the left or right.
2. [Reset]
Reset the settings configured on the Copy screen.
3. Preview of the current setting status
Displays an image representing the quantity and the settings configured on the Copy screen. Press [Qty] todisplay the number keys. Press the image to display the list of the settings.
4. [Sample Copy]
Press to make a partial copy as a test before proceeding to copy the rest of the original.
See "Making a Partial Copy as a Test and Copying the Rest of the Original", User Guide (Full Version).
5. [Start]
Press to perform copying.
How to Use the Copy Screen
37

6. Other keys for Copy function
Press to select the functions whose keys are out of the visible area of the screen. The key of the function that iscurrently configured is displayed with in the upper left corner.
7. Select One Touch Job
You can see the preset settings in the machine or the job history. When user authentication is configured,display the history of the executed jobs for each authenticated user. When selecting a job history, its settingsare displayed on the current Copy screen. You can use the same settings as a previous job by selecting the jobhistory.
Changing the Layout or Display of the Keys of the Copy Function
You can customize the layout and how the Copy function keys are displayed on the Copy screen inStandard mode (Arranging keys mode).
When the administrator has configured user authentication and User's Own Customization is enabled,each login user can customize the layout.
Switching to change the key layout mode
On the Copy screen, press and hold one of the keys until the screen changes, and then press [OK]to display the screen of the arranging keys mode.
Changing the key layout
Press and hold the key to move, drag it to the location to display, and then press [OK].
D0CMIC1355
2. Getting Started
38
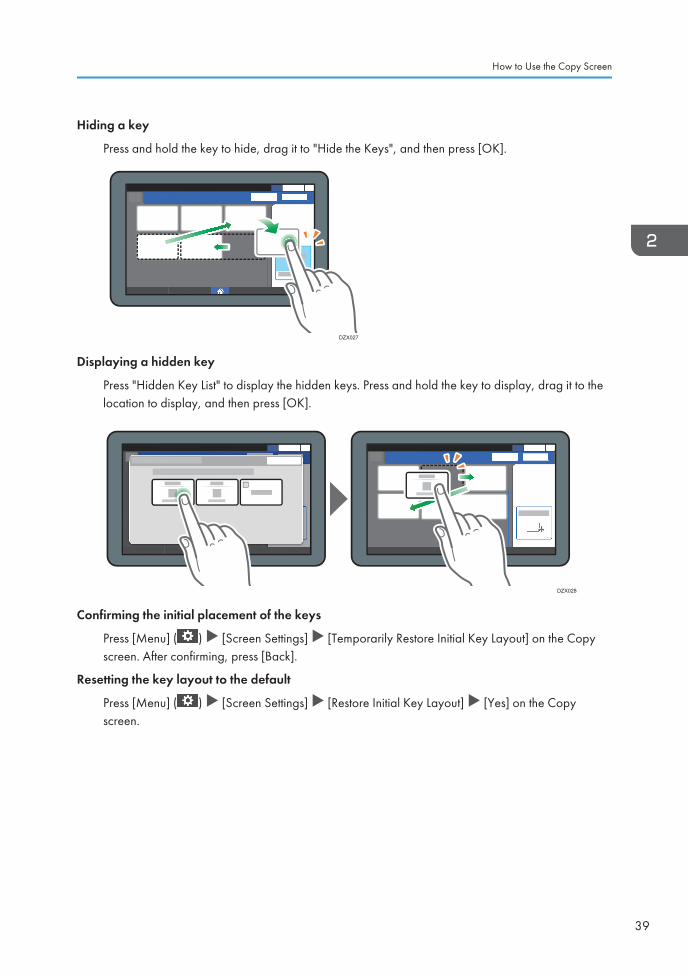
Hiding a key
Press and hold the key to hide, drag it to "Hide the Keys", and then press [OK].
DZX027
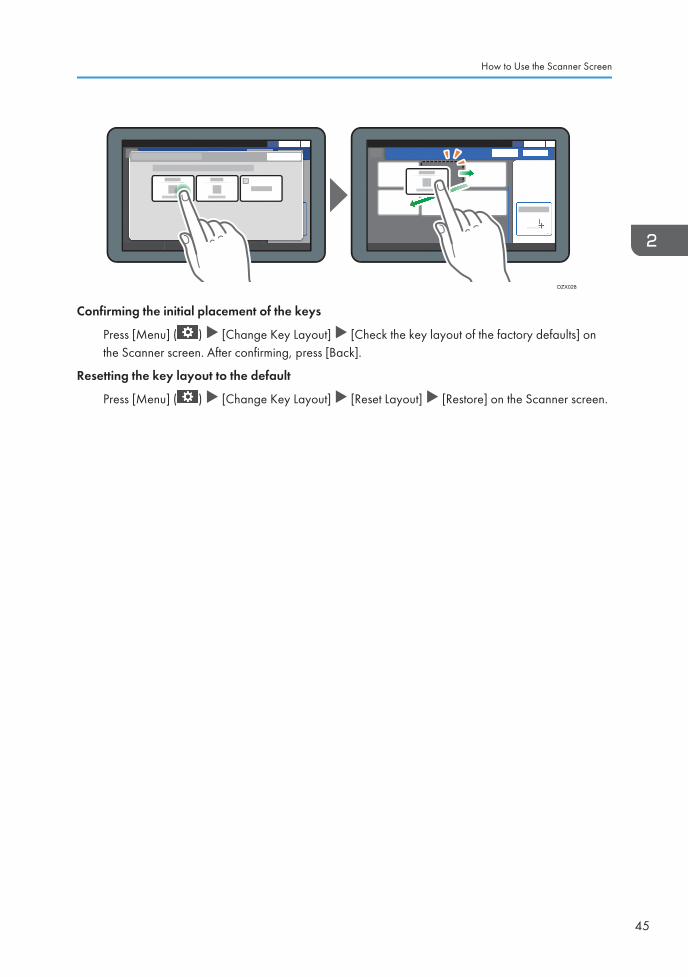
Displaying a hidden key
Press "Hidden Key List" to display the hidden keys. Press and hold the key to display, drag it to thelocation to display, and then press [OK].
DZX028
Confirming the initial placement of the keys
Press [Menu] ( ) [Screen Settings] [Temporarily Restore Initial Key Layout] on the Copyscreen. After confirming, press [Back].
Resetting the key layout to the default
Press [Menu] ( ) [Screen Settings] [Restore Initial Key Layout] [Yes] on the Copyscreen.
How to Use the Copy Screen
39
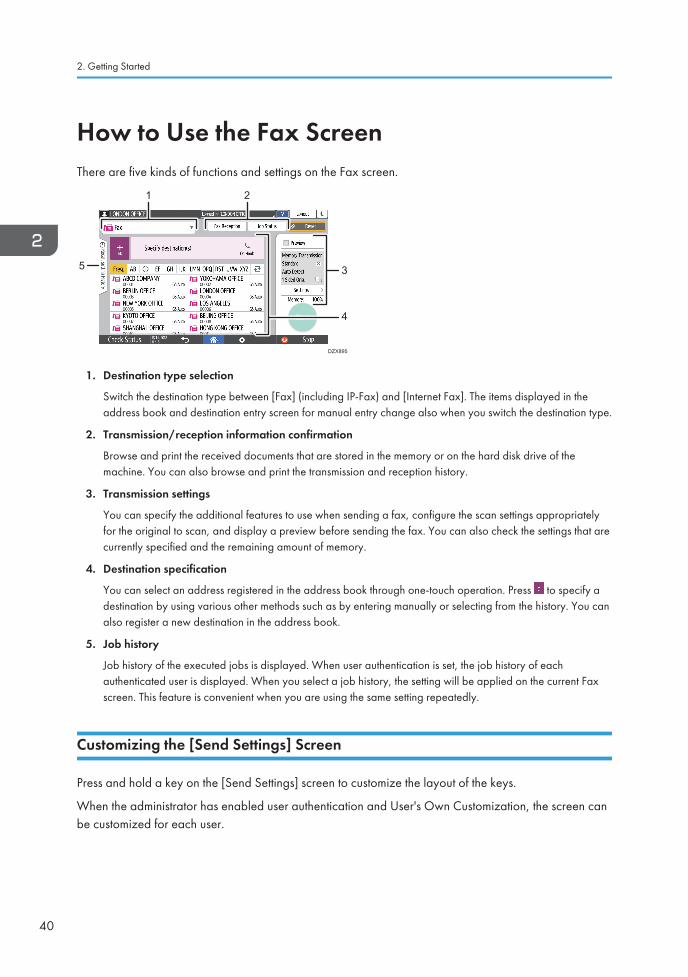
How to Use the Fax ScreenThere are five kinds of functions and settings on the Fax screen.
1
35
4
DZX895
2
1. Destination type selection
Switch the destination type between [Fax] (including IP-Fax) and [Internet Fax]. The items displayed in theaddress book and destination entry screen for manual entry change also when you switch the destination type.
2. Transmission/reception information confirmation
Browse and print the received documents that are stored in the memory or on the hard disk drive of themachine. You can also browse and print the transmission and reception history.
3. Transmission settings
You can specify the additional features to use when sending a fax, configure the scan settings appropriatelyfor the original to scan, and display a preview before sending the fax. You can also check the settings that arecurrently specified and the remaining amount of memory.
4. Destination specification
You can select an address registered in the address book through one-touch operation. Press to specify adestination by using various other methods such as by entering manually or selecting from the history. You canalso register a new destination in the address book.
5. Job history
Job history of the executed jobs is displayed. When user authentication is set, the job history of eachauthenticated user is displayed. When you select a job history, the setting will be applied on the current Faxscreen. This feature is convenient when you are using the same setting repeatedly.
Customizing the [Send Settings] Screen
Press and hold a key on the [Send Settings] screen to customize the layout of the keys.
When the administrator has enabled user authentication and User's Own Customization, the screen canbe customized for each user.
2. Getting Started
40
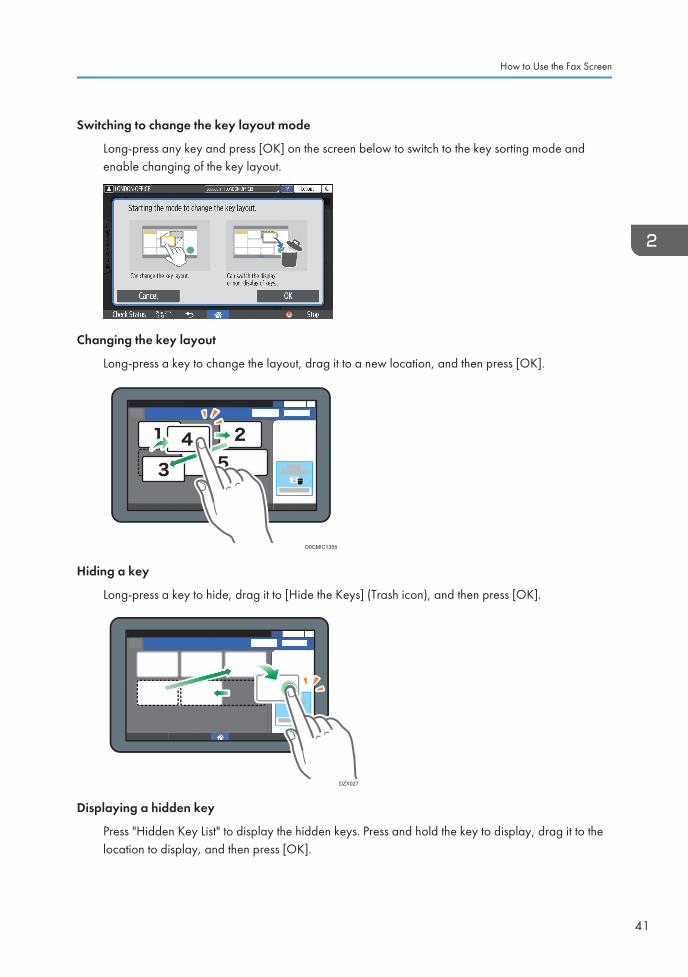
Switching to change the key layout mode
Long-press any key and press [OK] on the screen below to switch to the key sorting mode andenable changing of the key layout.
Changing the key layout
Long-press a key to change the layout, drag it to a new location, and then press [OK].
D0CMIC1355
Hiding a key
Long-press a key to hide, drag it to [Hide the Keys] (Trash icon), and then press [OK].
DZX027
Displaying a hidden key
Press "Hidden Key List" to display the hidden keys. Press and hold the key to display, drag it to thelocation to display, and then press [OK].
How to Use the Fax Screen
41
DZX028
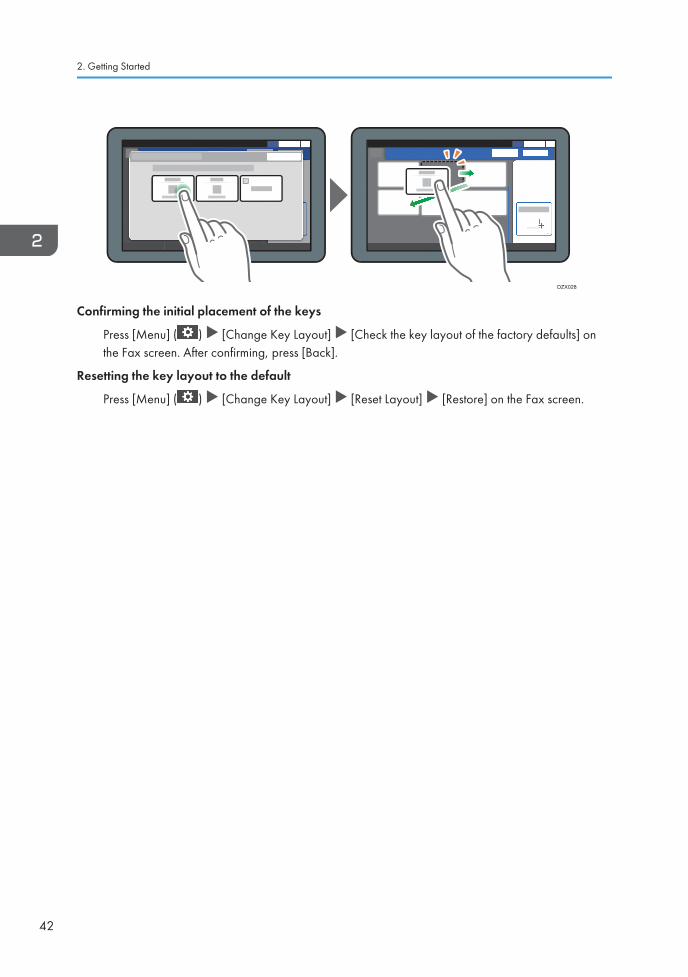
Confirming the initial placement of the keys
Press [Menu] ( ) [Change Key Layout] [Check the key layout of the factory defaults] onthe Fax screen. After confirming, press [Back].
Resetting the key layout to the default
Press [Menu] ( ) [Change Key Layout] [Reset Layout] [Restore] on the Fax screen.
2. Getting Started
42
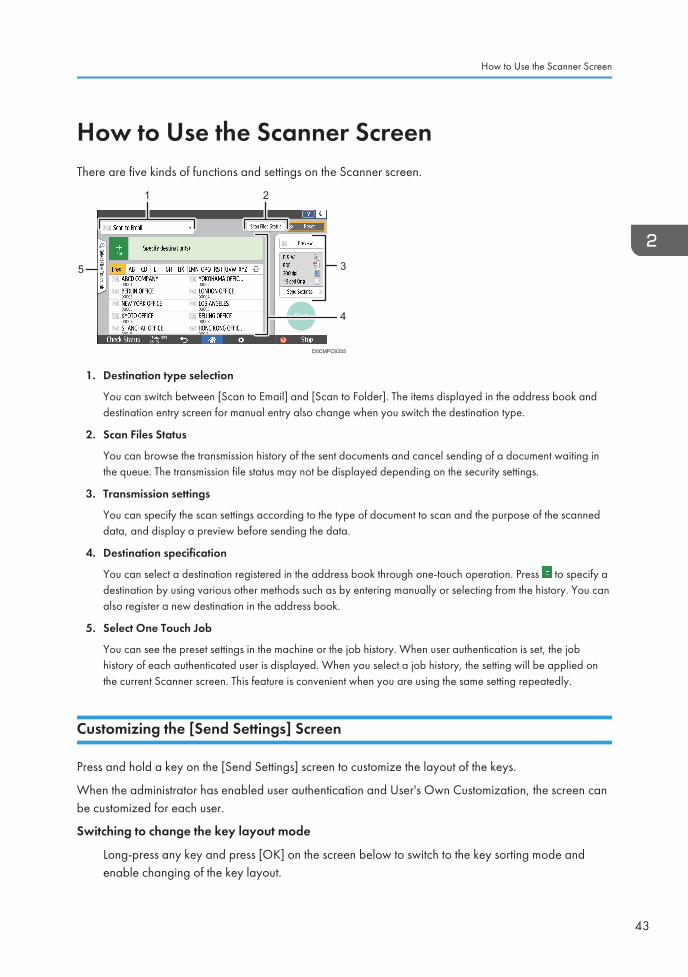
How to Use the Scanner ScreenThere are five kinds of functions and settings on the Scanner screen.
1
3
4
D0CMPC6355
2
5
1. Destination type selection
You can switch between [Scan to Email] and [Scan to Folder]. The items displayed in the address book anddestination entry screen for manual entry also change when you switch the destination type.
2. Scan Files Status
You can browse the transmission history of the sent documents and cancel sending of a document waiting inthe queue. The transmission file status may not be displayed depending on the security settings.
3. Transmission settings
You can specify the scan settings according to the type of document to scan and the purpose of the scanneddata, and display a preview before sending the data.
4. Destination specification
You can select a destination registered in the address book through one-touch operation. Press to specify adestination by using various other methods such as by entering manually or selecting from the history. You canalso register a new destination in the address book.
5. Select One Touch Job
You can see the preset settings in the machine or the job history. When user authentication is set, the jobhistory of each authenticated user is displayed. When you select a job history, the setting will be applied onthe current Scanner screen. This feature is convenient when you are using the same setting repeatedly.
Customizing the [Send Settings] Screen
Press and hold a key on the [Send Settings] screen to customize the layout of the keys.
When the administrator has enabled user authentication and User's Own Customization, the screen canbe customized for each user.
Switching to change the key layout mode
Long-press any key and press [OK] on the screen below to switch to the key sorting mode andenable changing of the key layout.
How to Use the Scanner Screen
43
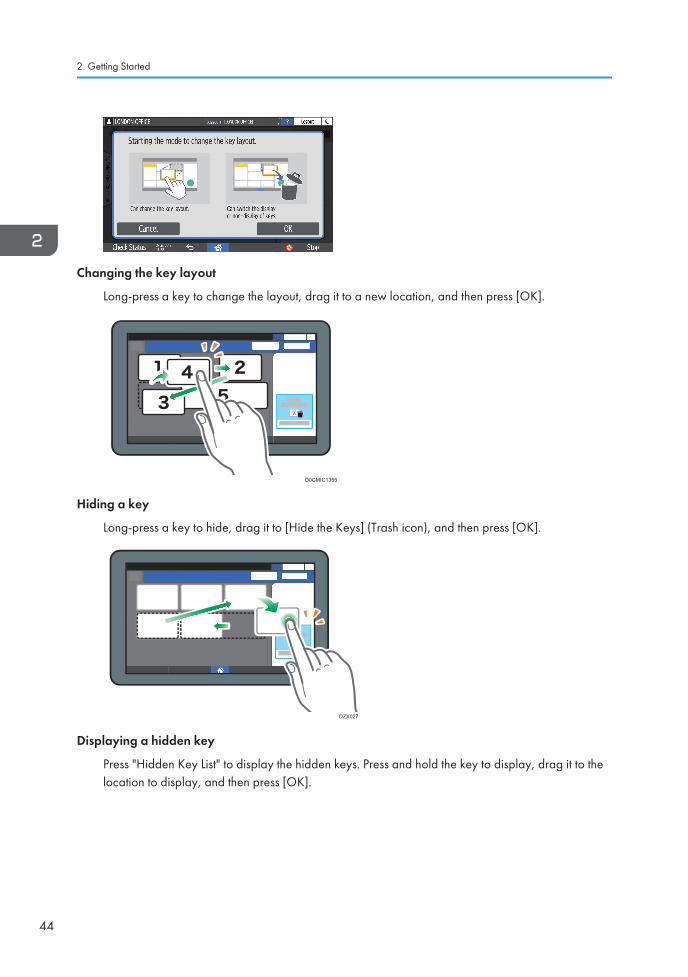
Changing the key layout
Long-press a key to change the layout, drag it to a new location, and then press [OK].
D0CMIC1355
Hiding a key
Long-press a key to hide, drag it to [Hide the Keys] (Trash icon), and then press [OK].
DZX027
Displaying a hidden key
Press "Hidden Key List" to display the hidden keys. Press and hold the key to display, drag it to thelocation to display, and then press [OK].
2. Getting Started
44
DZX028
Confirming the initial placement of the keys
Press [Menu] ( ) [Change Key Layout] [Check the key layout of the factory defaults] onthe Scanner screen. After confirming, press [Back].
Resetting the key layout to the default
Press [Menu] ( ) [Change Key Layout] [Reset Layout] [Restore] on the Scanner screen.
How to Use the Scanner Screen
45
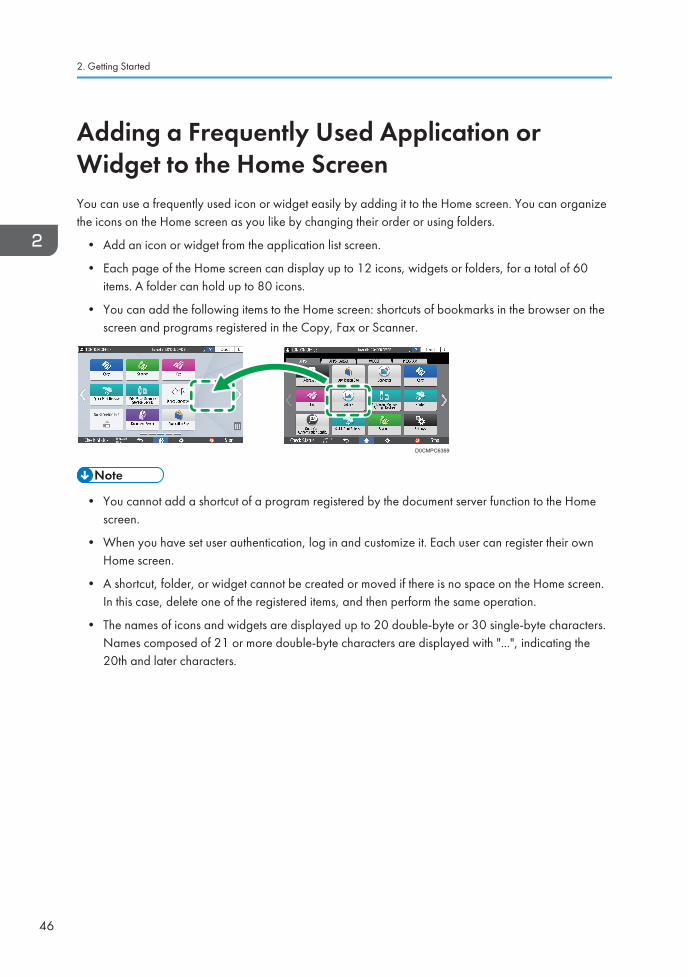
Adding a Frequently Used Application orWidget to the Home ScreenYou can use a frequently used icon or widget easily by adding it to the Home screen. You can organizethe icons on the Home screen as you like by changing their order or using folders.
• Add an icon or widget from the application list screen.
• Each page of the Home screen can display up to 12 icons, widgets or folders, for a total of 60items. A folder can hold up to 80 icons.
• You can add the following items to the Home screen: shortcuts of bookmarks in the browser on thescreen and programs registered in the Copy, Fax or Scanner.
D0CMPC6369
• You cannot add a shortcut of a program registered by the document server function to the Homescreen.
• When you have set user authentication, log in and customize it. Each user can register their ownHome screen.
• A shortcut, folder, or widget cannot be created or moved if there is no space on the Home screen.In this case, delete one of the registered items, and then perform the same operation.
• The names of icons and widgets are displayed up to 20 double-byte or 30 single-byte characters.Names composed of 21 or more double-byte characters are displayed with "...", indicating the20th and later characters.
2. Getting Started
46
Adding an Icon/Widget to the Home Screen
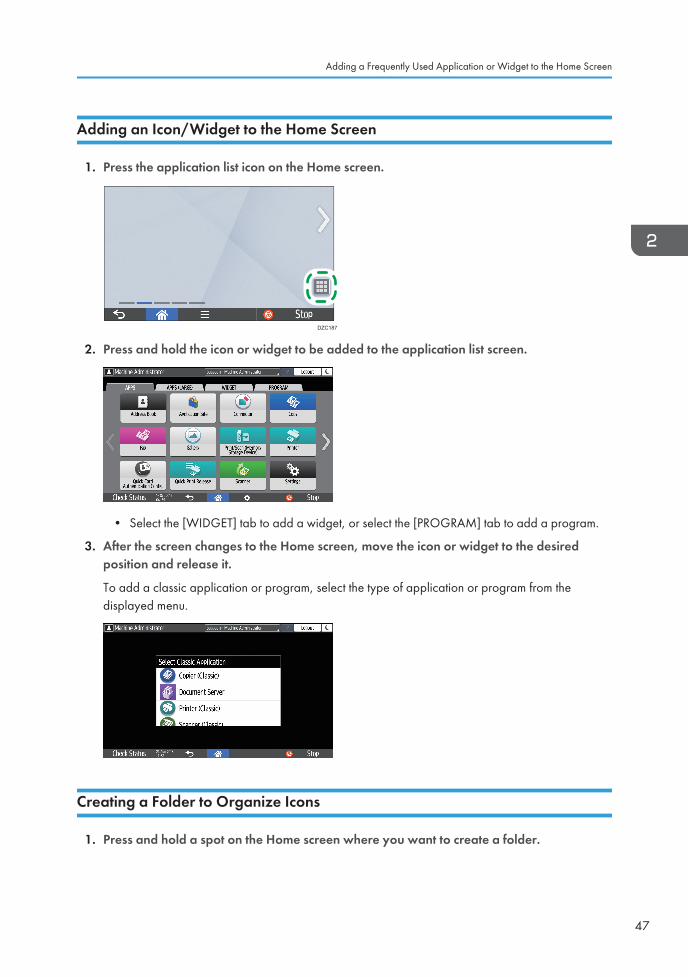
1. Press the application list icon on the Home screen.
DZC187
2. Press and hold the icon or widget to be added to the application list screen.
• Select the [WIDGET] tab to add a widget, or select the [PROGRAM] tab to add a program.
3. After the screen changes to the Home screen, move the icon or widget to the desiredposition and release it.
To add a classic application or program, select the type of application or program from thedisplayed menu.
Creating a Folder to Organize Icons
1. Press and hold a spot on the Home screen where you want to create a folder.
Adding a Frequently Used Application or Widget to the Home Screen
47
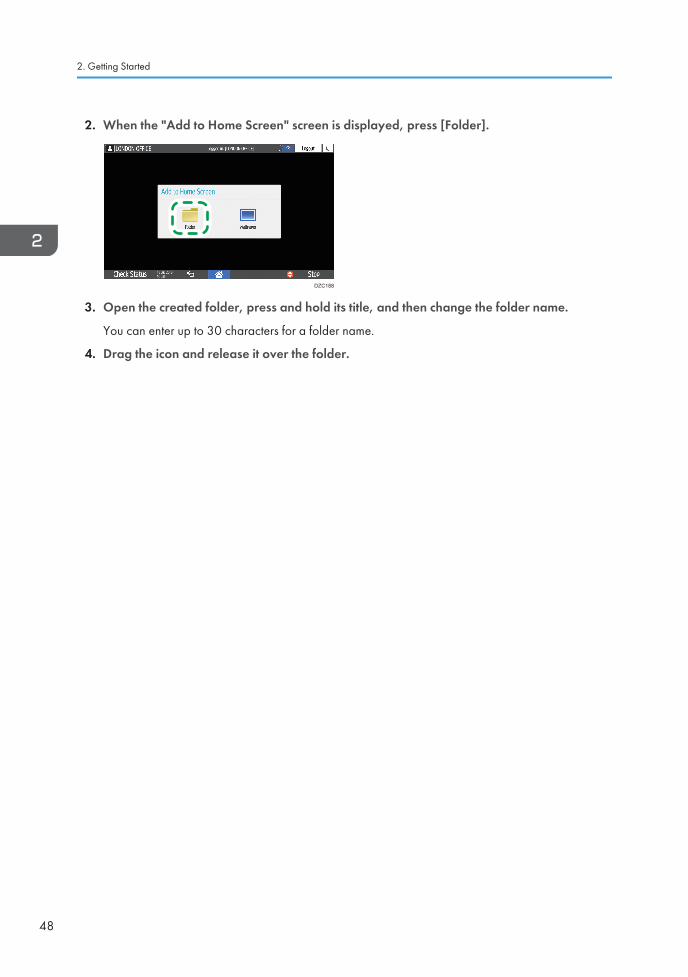
2. When the "Add to Home Screen" screen is displayed, press [Folder].
DZC188
3. Open the created folder, press and hold its title, and then change the folder name.
You can enter up to 30 characters for a folder name.
4. Drag the icon and release it over the folder.
2. Getting Started
48
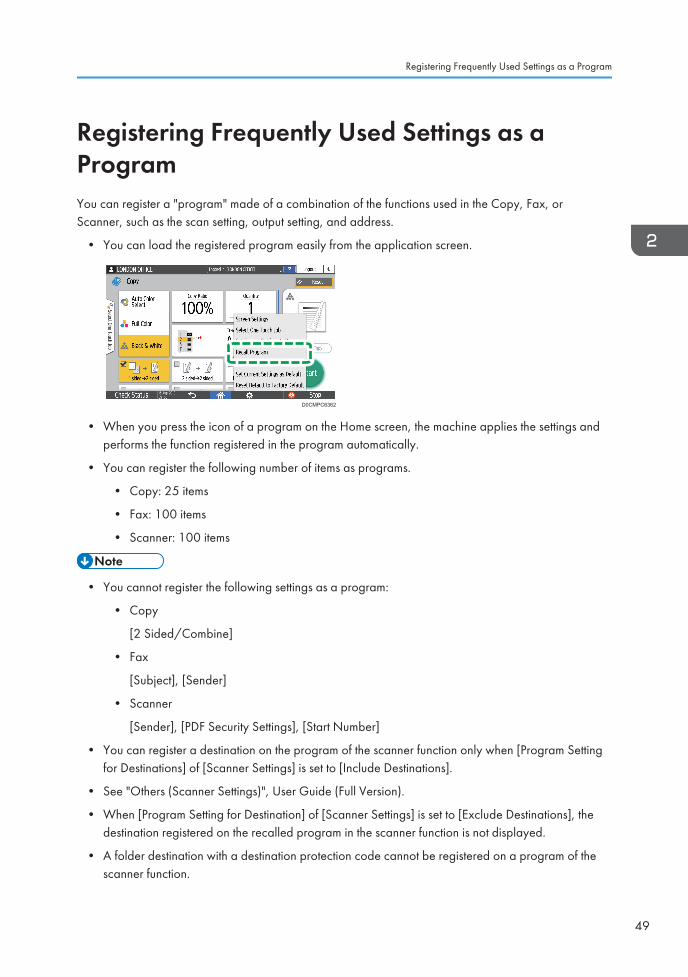
Registering Frequently Used Settings as aProgramYou can register a "program" made of a combination of the functions used in the Copy, Fax, orScanner, such as the scan setting, output setting, and address.
• You can load the registered program easily from the application screen.
D0CMPC6362
• When you press the icon of a program on the Home screen, the machine applies the settings andperforms the function registered in the program automatically.
• You can register the following number of items as programs.
• Copy: 25 items
• Fax: 100 items
• Scanner: 100 items
• You cannot register the following settings as a program:
• Copy
[2 Sided/Combine]
• Fax
[Subject], [Sender]
• Scanner
[Sender], [PDF Security Settings], [Start Number]
• You can register a destination on the program of the scanner function only when [Program Settingfor Destinations] of [Scanner Settings] is set to [Include Destinations].
• See "Others (Scanner Settings)", User Guide (Full Version).
• When [Program Setting for Destination] of [Scanner Settings] is set to [Exclude Destinations], thedestination registered on the recalled program in the scanner function is not displayed.
• A folder destination with a destination protection code cannot be registered on a program of thescanner function.
Registering Frequently Used Settings as a Program
49
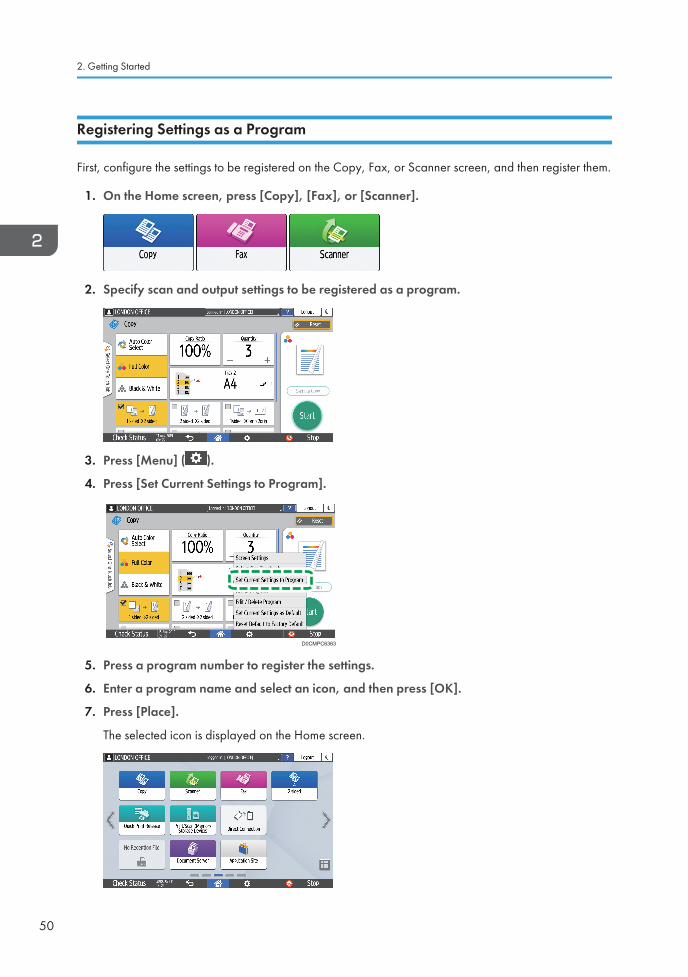
Registering Settings as a Program
First, configure the settings to be registered on the Copy, Fax, or Scanner screen, and then register them.
1. On the Home screen, press [Copy], [Fax], or [Scanner].
2. Specify scan and output settings to be registered as a program.
3. Press [Menu] ( ).
4. Press [Set Current Settings to Program].
D0CMPC6363
5. Press a program number to register the settings.
6. Enter a program name and select an icon, and then press [OK].
7. Press [Place].
The selected icon is displayed on the Home screen.
2. Getting Started
50
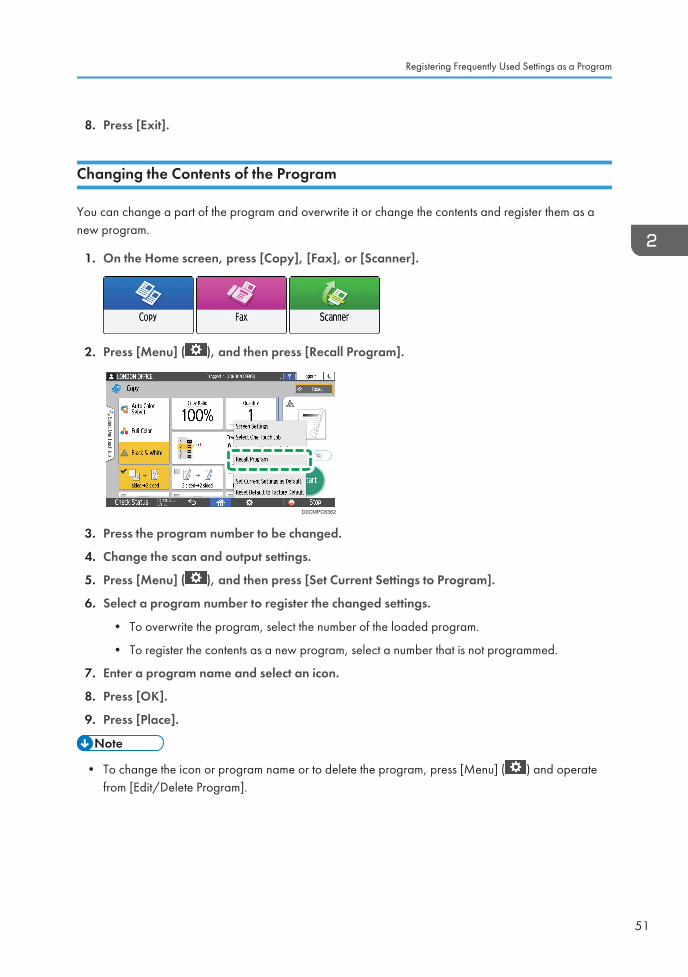
8. Press [Exit].
Changing the Contents of the Program
You can change a part of the program and overwrite it or change the contents and register them as anew program.
1. On the Home screen, press [Copy], [Fax], or [Scanner].
2. Press [Menu] ( ), and then press [Recall Program].
D0CMPC6362
3. Press the program number to be changed.
4. Change the scan and output settings.
5. Press [Menu] ( ), and then press [Set Current Settings to Program].
6. Select a program number to register the changed settings.
• To overwrite the program, select the number of the loaded program.
• To register the contents as a new program, select a number that is not programmed.
7. Enter a program name and select an icon.
8. Press [OK].
9. Press [Place].
• To change the icon or program name or to delete the program, press [Menu] ( ) and operatefrom [Edit/Delete Program].
Registering Frequently Used Settings as a Program
51
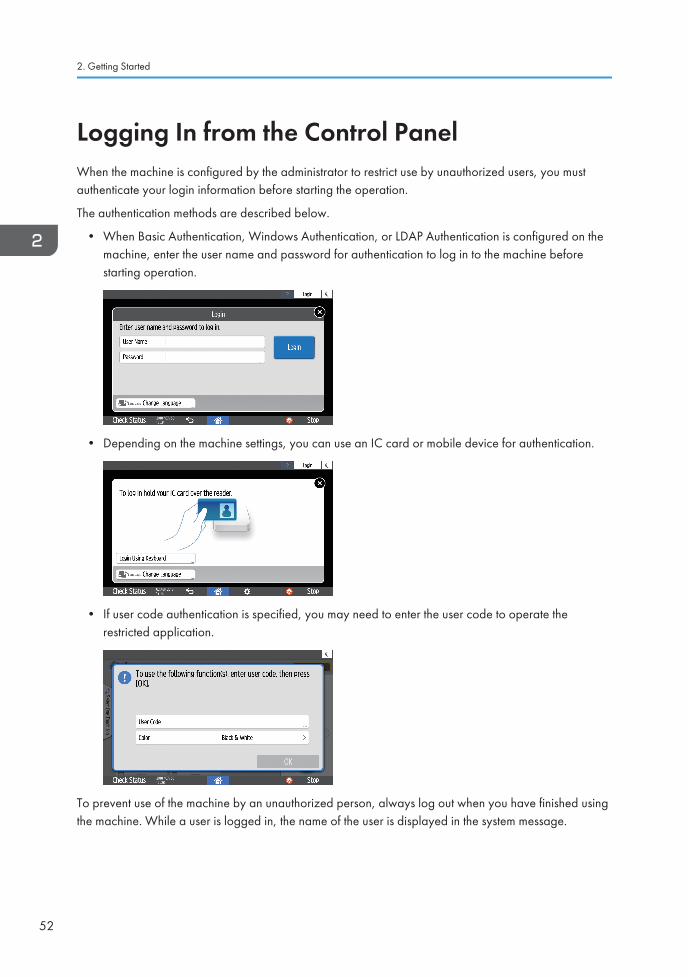
Logging In from the Control PanelWhen the machine is configured by the administrator to restrict use by unauthorized users, you mustauthenticate your login information before starting the operation.
The authentication methods are described below.
• When Basic Authentication, Windows Authentication, or LDAP Authentication is configured on themachine, enter the user name and password for authentication to log in to the machine beforestarting operation.
• Depending on the machine settings, you can use an IC card or mobile device for authentication.
• If user code authentication is specified, you may need to enter the user code to operate therestricted application.
To prevent use of the machine by an unauthorized person, always log out when you have finished usingthe machine. While a user is logged in, the name of the user is displayed in the system message.
2. Getting Started
52
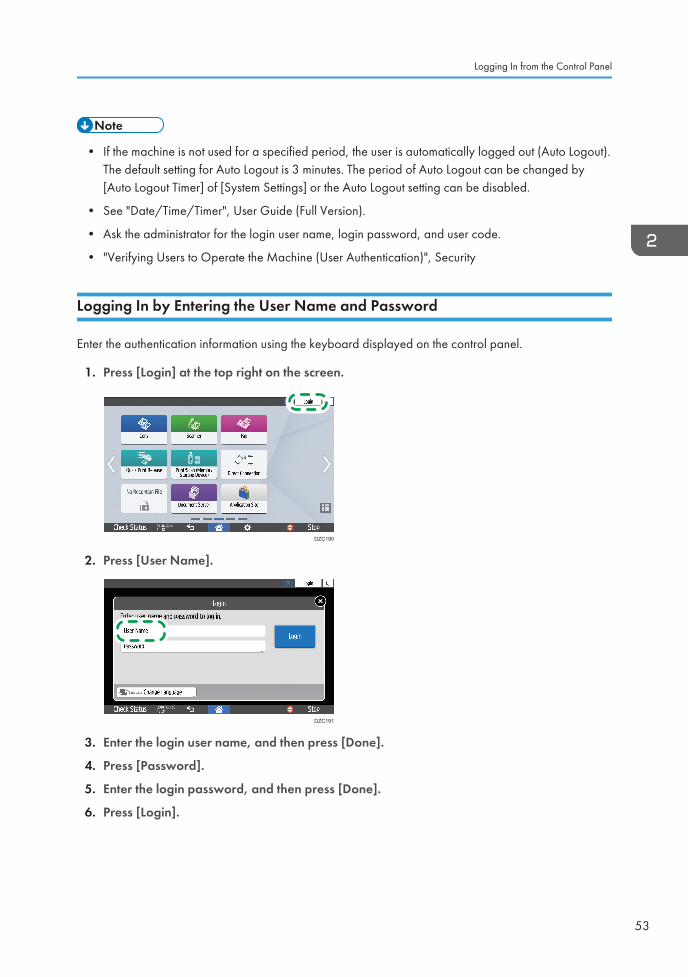
• If the machine is not used for a specified period, the user is automatically logged out (Auto Logout).The default setting for Auto Logout is 3 minutes. The period of Auto Logout can be changed by[Auto Logout Timer] of [System Settings] or the Auto Logout setting can be disabled.
• See "Date/Time/Timer", User Guide (Full Version).
• Ask the administrator for the login user name, login password, and user code.
• "Verifying Users to Operate the Machine (User Authentication)", Security
Logging In by Entering the User Name and Password
Enter the authentication information using the keyboard displayed on the control panel.
1. Press [Login] at the top right on the screen.
DZC190
2. Press [User Name].
DZC191
3. Enter the login user name, and then press [Done].
4. Press [Password].
5. Enter the login password, and then press [Done].
6. Press [Login].
Logging In from the Control Panel
53

• If an incorrect password is entered a specified number of times, login with the same name isdisabled (Lockout Function). The default setting for unsuccessful attempts before a user is locked outis five. If the user is locked out, the administrator must release the lockout.
• To log out from the machine, press [Logout] at the top right on the screen, and then press [OK].
Logging In Using an IC Card
Hold an IC card over the card reader inside the control panel. If the card is not registered on themachine, enter the authentication information and register the card.
1. Hold an IC card over the card reader.
D0CMIC1409
• When the card is registered on the machine, login operation finishes.
• When the card is not registered, the registration screen is displayed. Proceed to the next stepto register the card.
2. Enter the Login User Name and Login Password, and then press [Register].
3. Hold the IC card over the card reader again.
• To log out, hold the IC card over the card reader or press [Logout] at the top right on the screen.
• If another user holds the IC card over the card reader while you are still logged in, you areautomatically logged out and the new user logs in.
Logging In Using a Mobile Device
Log in to the machine using the RICOH Smart Device Connector app on your mobile device. You need amobile device that supports Bluetooth Low Energy (BLE).
1. Enable the Bluetooth function on your mobile device.
2. Getting Started
54
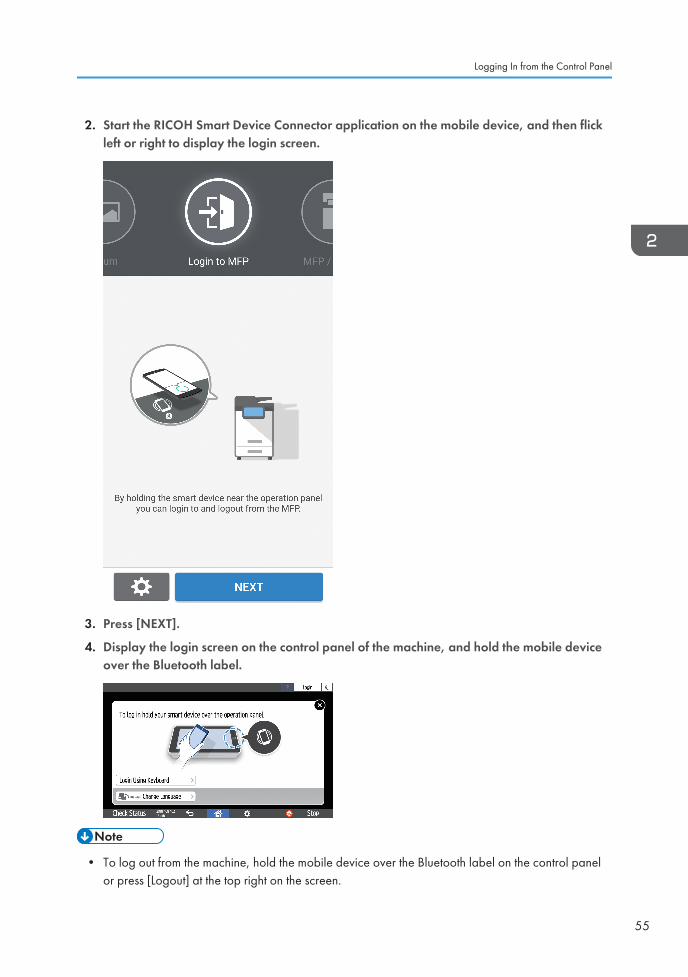
2. Start the RICOH Smart Device Connector application on the mobile device, and then flickleft or right to display the login screen.
3. Press [NEXT].
4. Display the login screen on the control panel of the machine, and hold the mobile deviceover the Bluetooth label.
• To log out from the machine, hold the mobile device over the Bluetooth label on the control panelor press [Logout] at the top right on the screen.
Logging In from the Control Panel
55
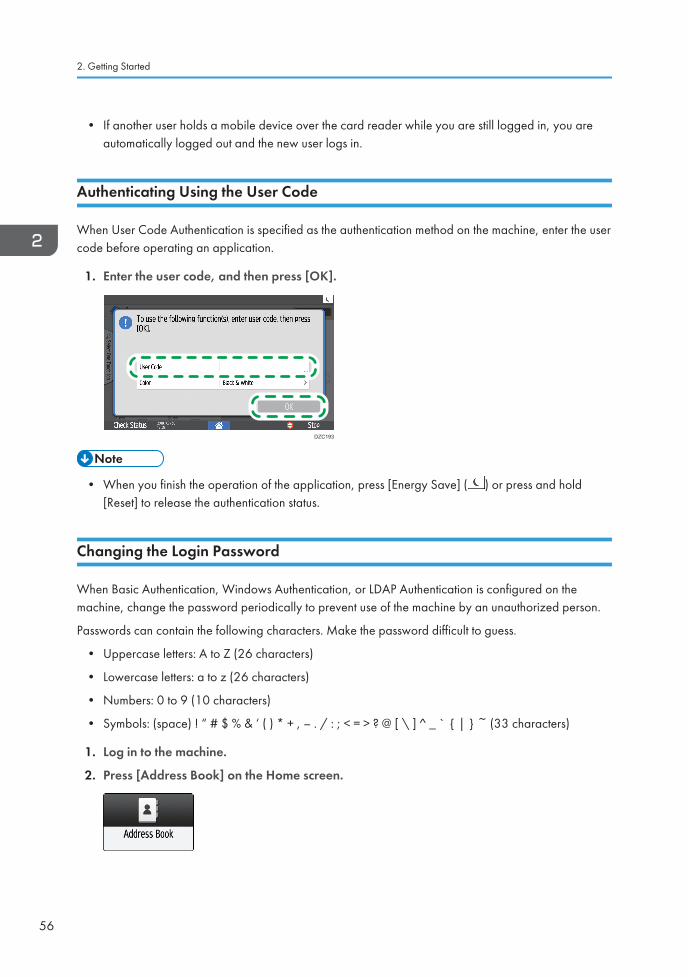
• If another user holds a mobile device over the card reader while you are still logged in, you areautomatically logged out and the new user logs in.
Authenticating Using the User Code
When User Code Authentication is specified as the authentication method on the machine, enter the usercode before operating an application.
1. Enter the user code, and then press [OK].
DZC193
• When you finish the operation of the application, press [Energy Save] ( ) or press and hold[Reset] to release the authentication status.
Changing the Login Password
When Basic Authentication, Windows Authentication, or LDAP Authentication is configured on themachine, change the password periodically to prevent use of the machine by an unauthorized person.
Passwords can contain the following characters. Make the password difficult to guess.
• Uppercase letters: A to Z (26 characters)
• Lowercase letters: a to z (26 characters)
• Numbers: 0 to 9 (10 characters)
• Symbols: (space) ! “ # $ % & ‘ ( ) * + , – . / : ; < = > ? @ [ \ ] ^ _ ` { | } ~ (33 characters)
1. Log in to the machine.
2. Press [Address Book] on the Home screen.
2. Getting Started
56
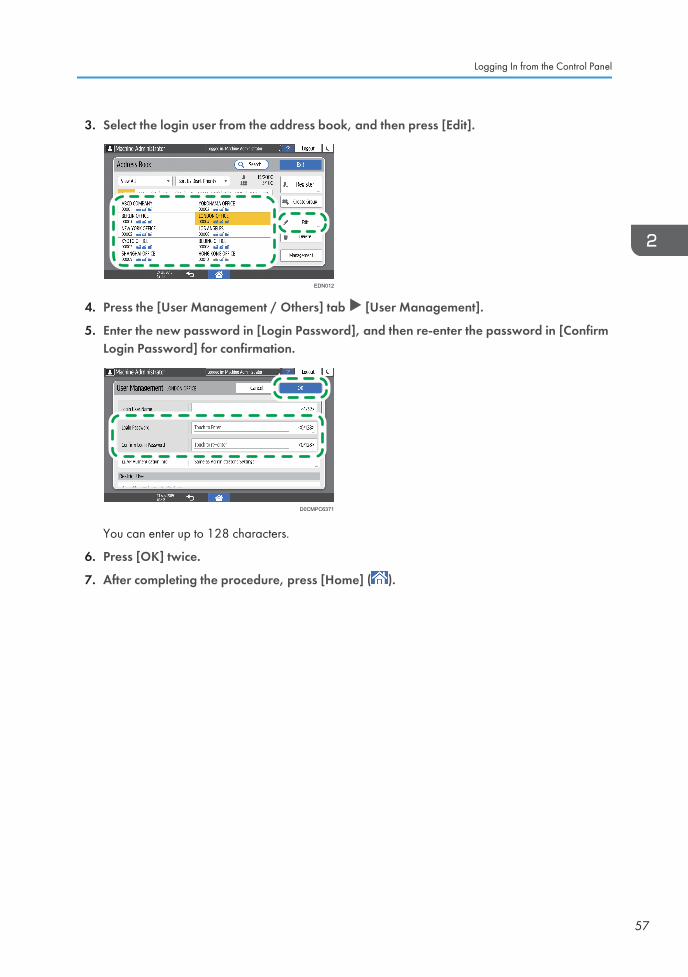
3. Select the login user from the address book, and then press [Edit].
EDN012
4. Press the [User Management / Others] tab [User Management].
5. Enter the new password in [Login Password], and then re-enter the password in [ConfirmLogin Password] for confirmation.
D0CMPC6371
You can enter up to 128 characters.
6. Press [OK] twice.
7. After completing the procedure, press [Home] ( ).
Logging In from the Control Panel
57
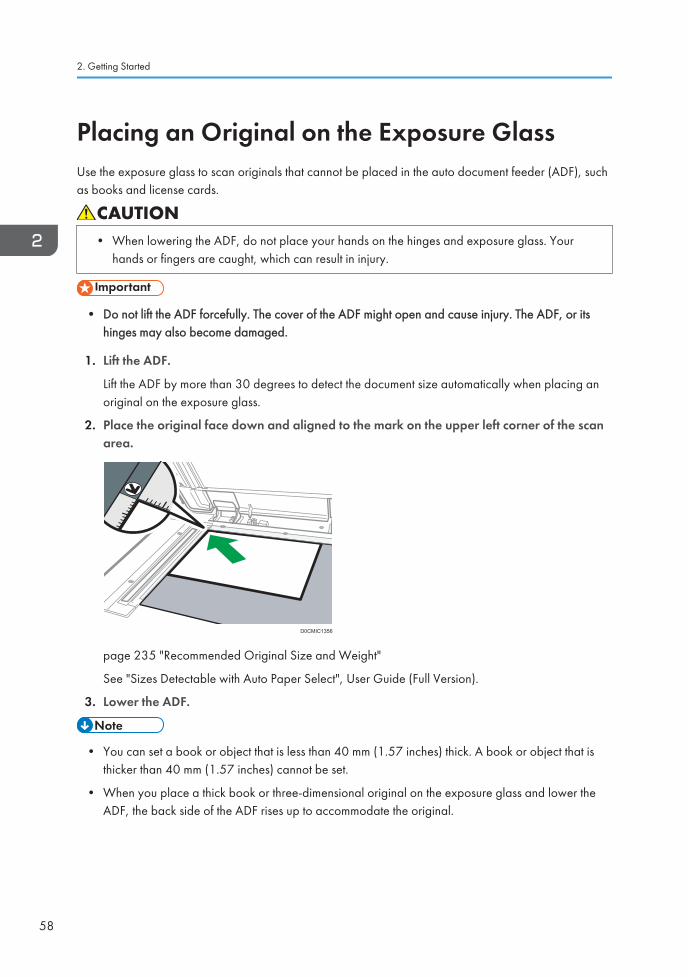
Placing an Original on the Exposure GlassUse the exposure glass to scan originals that cannot be placed in the auto document feeder (ADF), suchas books and license cards.
• When lowering the ADF, do not place your hands on the hinges and exposure glass. Yourhands or fingers are caught, which can result in injury.
• Do not lift the ADF forcefully. The cover of the ADF might open and cause injury. The ADF, or itshinges may also become damaged.
1. Lift the ADF.
Lift the ADF by more than 30 degrees to detect the document size automatically when placing anoriginal on the exposure glass.
2. Place the original face down and aligned to the mark on the upper left corner of the scanarea.
D0CMIC1356
page 235 "Recommended Original Size and Weight"
See "Sizes Detectable with Auto Paper Select", User Guide (Full Version).
3. Lower the ADF.
• You can set a book or object that is less than 40 mm (1.57 inches) thick. A book or object that isthicker than 40 mm (1.57 inches) cannot be set.
• When you place a thick book or three-dimensional original on the exposure glass and lower theADF, the back side of the ADF rises up to accommodate the original.
2. Getting Started
58
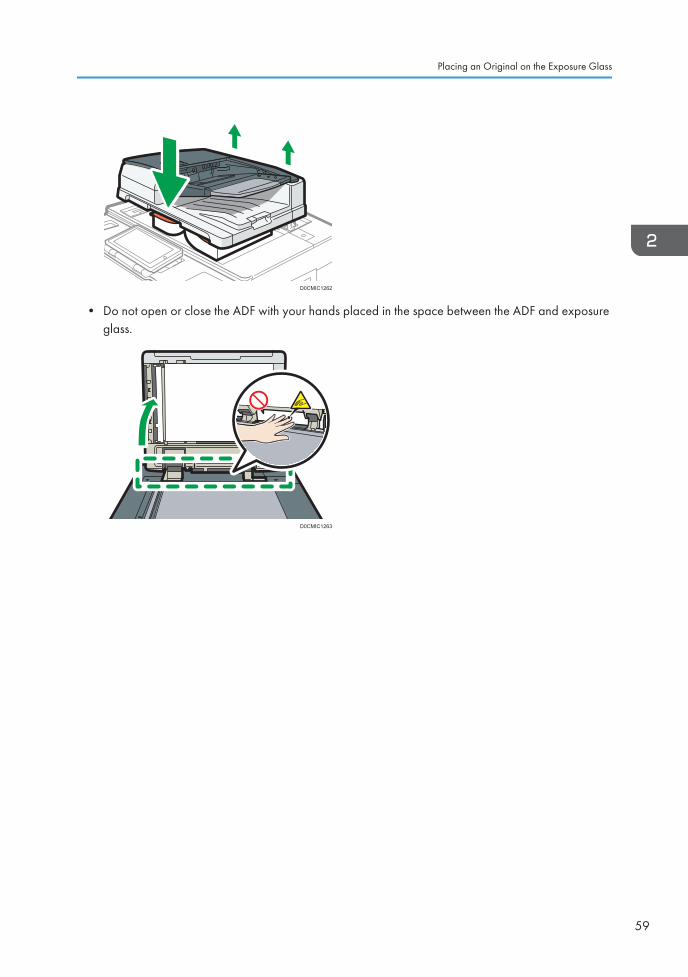
D0CMIC1262
• Do not open or close the ADF with your hands placed in the space between the ADF and exposureglass.
D0CMIC1263
Placing an Original on the Exposure Glass
59
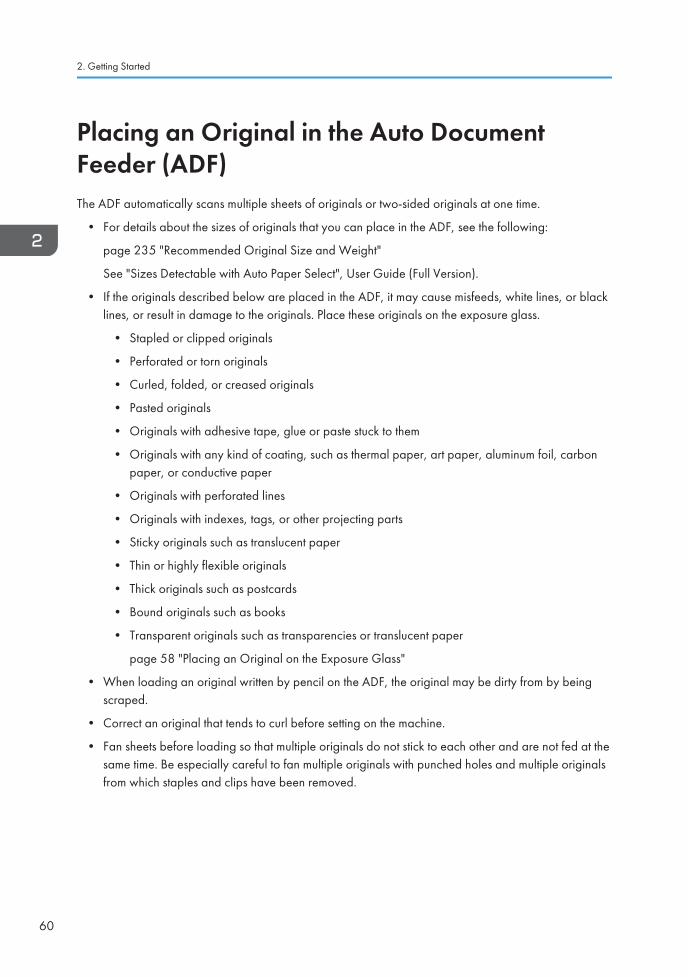
Placing an Original in the Auto DocumentFeeder (ADF)The ADF automatically scans multiple sheets of originals or two-sided originals at one time.
• For details about the sizes of originals that you can place in the ADF, see the following:
page 235 "Recommended Original Size and Weight"
See "Sizes Detectable with Auto Paper Select", User Guide (Full Version).
• If the originals described below are placed in the ADF, it may cause misfeeds, white lines, or blacklines, or result in damage to the originals. Place these originals on the exposure glass.
• Stapled or clipped originals
• Perforated or torn originals
• Curled, folded, or creased originals
• Pasted originals
• Originals with adhesive tape, glue or paste stuck to them
• Originals with any kind of coating, such as thermal paper, art paper, aluminum foil, carbonpaper, or conductive paper
• Originals with perforated lines
• Originals with indexes, tags, or other projecting parts
• Sticky originals such as translucent paper
• Thin or highly flexible originals
• Thick originals such as postcards
• Bound originals such as books
• Transparent originals such as transparencies or translucent paper
page 58 "Placing an Original on the Exposure Glass"
• When loading an original written by pencil on the ADF, the original may be dirty from by beingscraped.
• Correct an original that tends to curl before setting on the machine.
• Fan sheets before loading so that multiple originals do not stick to each other and are not fed at thesame time. Be especially careful to fan multiple originals with punched holes and multiple originalsfrom which staples and clips have been removed.
2. Getting Started
60
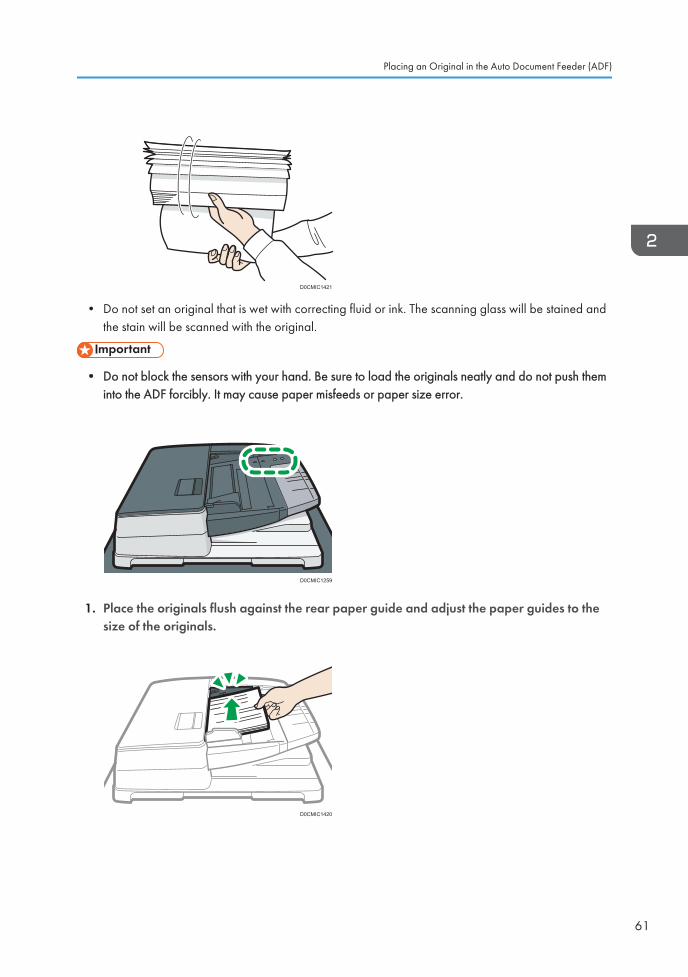
D0CMIC1421
• Do not set an original that is wet with correcting fluid or ink. The scanning glass will be stained andthe stain will be scanned with the original.
• Do not block the sensors with your hand. Be sure to load the originals neatly and do not push theminto the ADF forcibly. It may cause paper misfeeds or paper size error.
D0CMIC1259
1. Place the originals flush against the rear paper guide and adjust the paper guides to thesize of the originals.
D0CMIC1420
Placing an Original in the Auto Document Feeder (ADF)
61
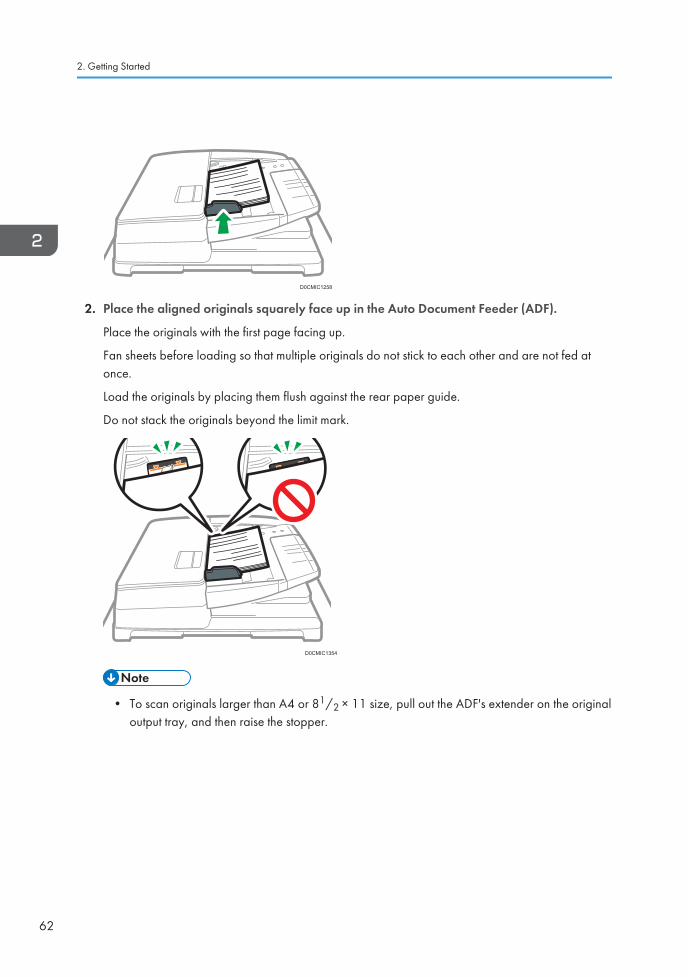
D0CMIC1258
2. Place the aligned originals squarely face up in the Auto Document Feeder (ADF).
Place the originals with the first page facing up.
Fan sheets before loading so that multiple originals do not stick to each other and are not fed atonce.
Load the originals by placing them flush against the rear paper guide.
Do not stack the originals beyond the limit mark.
D0CMIC1354
• To scan originals larger than A4 or 81/2 × 11 size, pull out the ADF's extender on the originaloutput tray, and then raise the stopper.
2. Getting Started
62
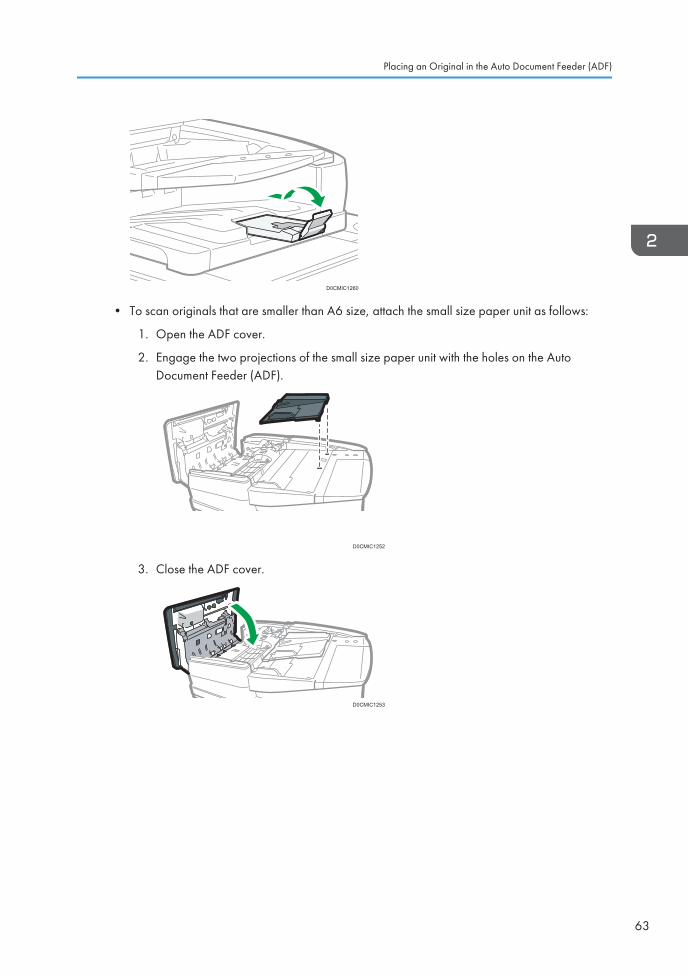
D0CMIC1260
• To scan originals that are smaller than A6 size, attach the small size paper unit as follows:
1. Open the ADF cover.
2. Engage the two projections of the small size paper unit with the holes on the AutoDocument Feeder (ADF).
D0CMIC1252
3. Close the ADF cover.
D0CMIC1253
Placing an Original in the Auto Document Feeder (ADF)
63

2. Getting Started
64
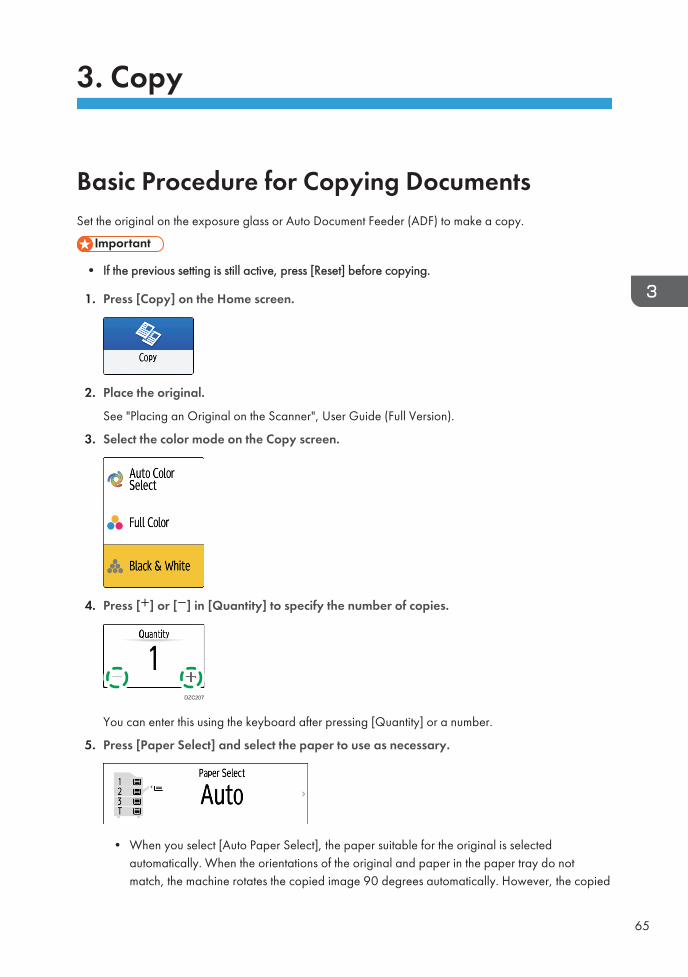
3. Copy
Basic Procedure for Copying DocumentsSet the original on the exposure glass or Auto Document Feeder (ADF) to make a copy.
• If the previous setting is still active, press [Reset] before copying.
1. Press [Copy] on the Home screen.
2. Place the original.
See "Placing an Original on the Scanner", User Guide (Full Version).
3. Select the color mode on the Copy screen.
4. Press [ ] or [ ] in [Quantity] to specify the number of copies.
DZC207
You can enter this using the keyboard after pressing [Quantity] or a number.
5. Press [Paper Select] and select the paper to use as necessary.
• When you select [Auto Paper Select], the paper suitable for the original is selectedautomatically. When the orientations of the original and paper in the paper tray do notmatch, the machine rotates the copied image 90 degrees automatically. However, the copied
65

image may not be rotated depending on the settings or types of Finishing, staple or punch, forexample.
• If the size of the original is not detected properly or when you make a copy on paper of aspecial size, specify the paper tray in which the paper to use is loaded.
• To prevent the machine from selecting other trays automatically, disable auto tray switching.
See "Tray/Paper Settings", User Guide (Full Version).
6. Press [Start].
• When the [Check the orientation of the original every time after pressing Start] check box isselected in [Select the original's orientation], the screen below is displayed. Select the originalorientation as necessary. If you do not need to select this each time, clear the check box.
• When you place the original on the ADF, the process of copying the original starts.
• When you place the original on the exposure glass, the copy process starts according to thesetting contents. To make a copy of the second page or back side of the original, place theoriginal accordingly on the exposure glass, and then press [Start]. Press [Finish Scn] afterscanning all originals if necessary according to the setting contents.
• Originals scanned when no paper is loaded or when an error has occurred will be copiedautomatically when the machine is ready to execute copying.
• If you select [Auto Color Select] as the color mode, the machine automatically scans the originalcolors. Depending on the scan settings or the content of the original, these colors may not bescanned correctly. If the colors are not scanned correctly, select the appropriate color mode.
Reserving a Copy Job While Executing Another Copy Job
When [Reserve] is displayed on the execution screen of the current copy job, you can scan the originalof another copy job to execute after the current job is completed (Job Preset).
You can make reservations for up to eight jobs each in the Copier and Document Server functions.
3. Copy
66
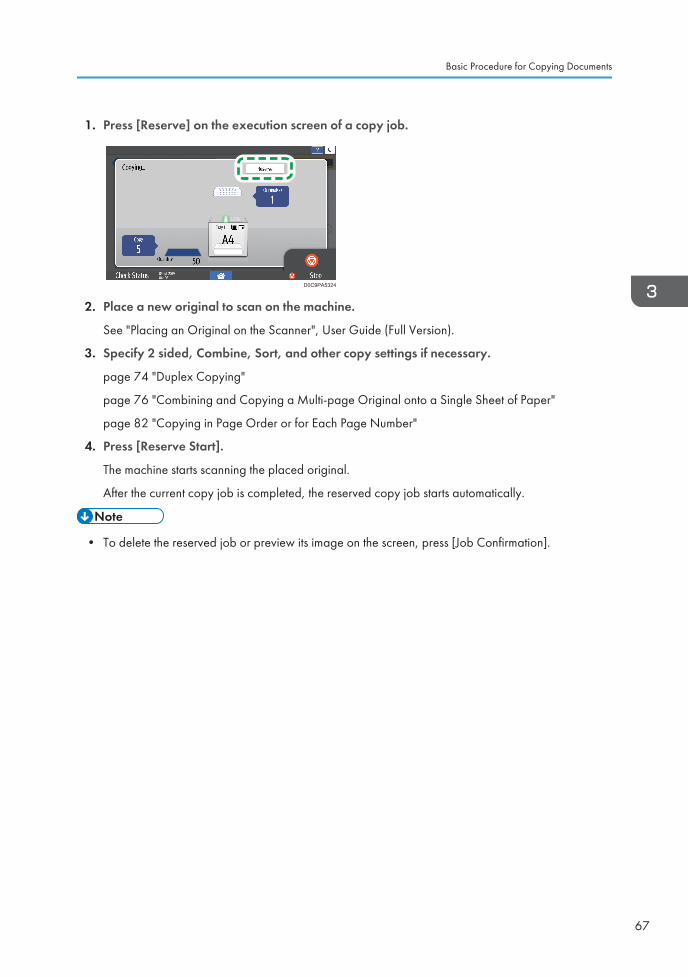
1. Press [Reserve] on the execution screen of a copy job.
D0C9PA5324
2. Place a new original to scan on the machine.
See "Placing an Original on the Scanner", User Guide (Full Version).
3. Specify 2 sided, Combine, Sort, and other copy settings if necessary.
page 74 "Duplex Copying"
page 76 "Combining and Copying a Multi-page Original onto a Single Sheet of Paper"
page 82 "Copying in Page Order or for Each Page Number"
4. Press [Reserve Start].
The machine starts scanning the placed original.
After the current copy job is completed, the reserved copy job starts automatically.
• To delete the reserved job or preview its image on the screen, press [Job Confirmation].
Basic Procedure for Copying Documents
67

Making Enlarged or Reduced CopiesYou can enlarge or reduce the original when copying with the following methods:
• Enlarging or reducing at a specified reduction ratio or into a specified size (Zoom/Reduce/Enlarge/Size Magnification)
• Enlarging or reducing according to the paper size (Auto Reduce/Enlarge)
• Reducing slightly (Create Margin)
Specifying a Copy Ratio or Size
1. Press [Copy] on the Home screen.
2. Place the original.
See "Placing an Original on the Scanner", User Guide (Full Version).
The base point of reduce/enlarge is different for the exposure glass and Auto Document Feeder(ADF) as shown in the following table:
Setting position Base point Enlarge Reduce
Exposure glass
Enlarged or reduced from thetop left.
DZB222
DZB224 DZB225
Auto DocumentFeeder (ADF)
Enlarged or reduced from thebottom left
DZB223
3. Copy
68
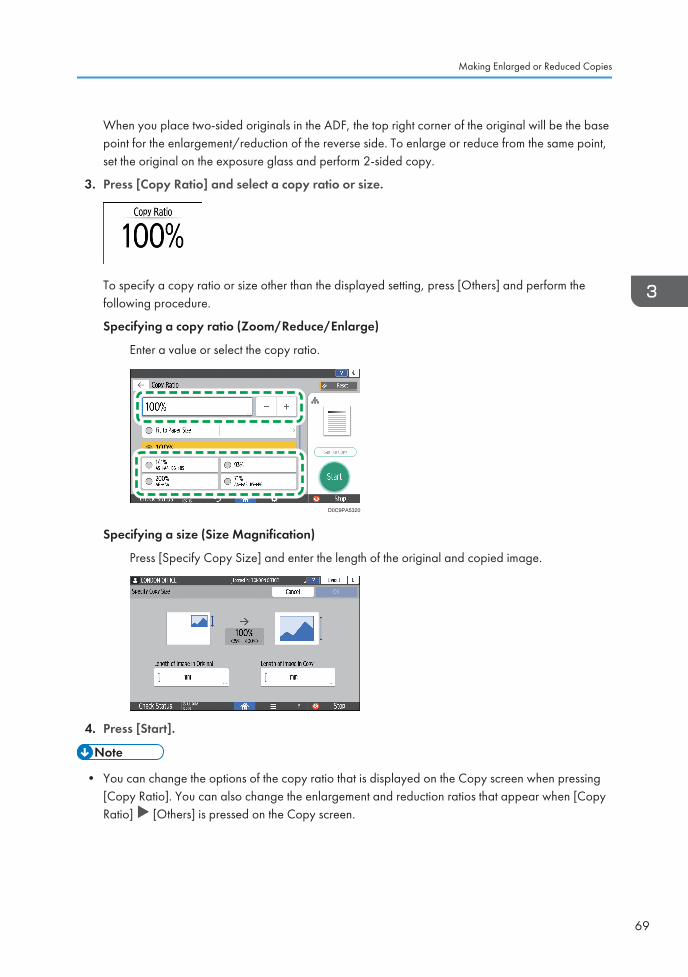
When you place two-sided originals in the ADF, the top right corner of the original will be the basepoint for the enlargement/reduction of the reverse side. To enlarge or reduce from the same point,set the original on the exposure glass and perform 2-sided copy.
3. Press [Copy Ratio] and select a copy ratio or size.
To specify a copy ratio or size other than the displayed setting, press [Others] and perform thefollowing procedure.
Specifying a copy ratio (Zoom/Reduce/Enlarge)
Enter a value or select the copy ratio.
D0C9PA5320
Specifying a size (Size Magnification)
Press [Specify Copy Size] and enter the length of the original and copied image.
4. Press [Start].
• You can change the options of the copy ratio that is displayed on the Copy screen when pressing[Copy Ratio]. You can also change the enlargement and reduction ratios that appear when [CopyRatio] [Others] is pressed on the Copy screen.
Making Enlarged or Reduced Copies
69

DZC235
• See "Reduce / Enlarge", User Guide (Full Version).
Enlarging or Reducing According to the Paper Size
The original is enlarged or reduced to fit on the specified paper size (Scale to Paper Size).
DZB236
The document sizes that can be detected automatically are shown in the table below. To copy adocument whose size is not listed in the table, specify [Original Size] on the Copy screen.
(mainly Europe and Asia)
Original size A3 B4 JIS A4 B5 JIS A5 B6 JIS11 ×17
81/2× 11
81/2× 13
Exposureglass
- - - -
ADF
*1 Portrait orientation ( ) only
3. Copy
70
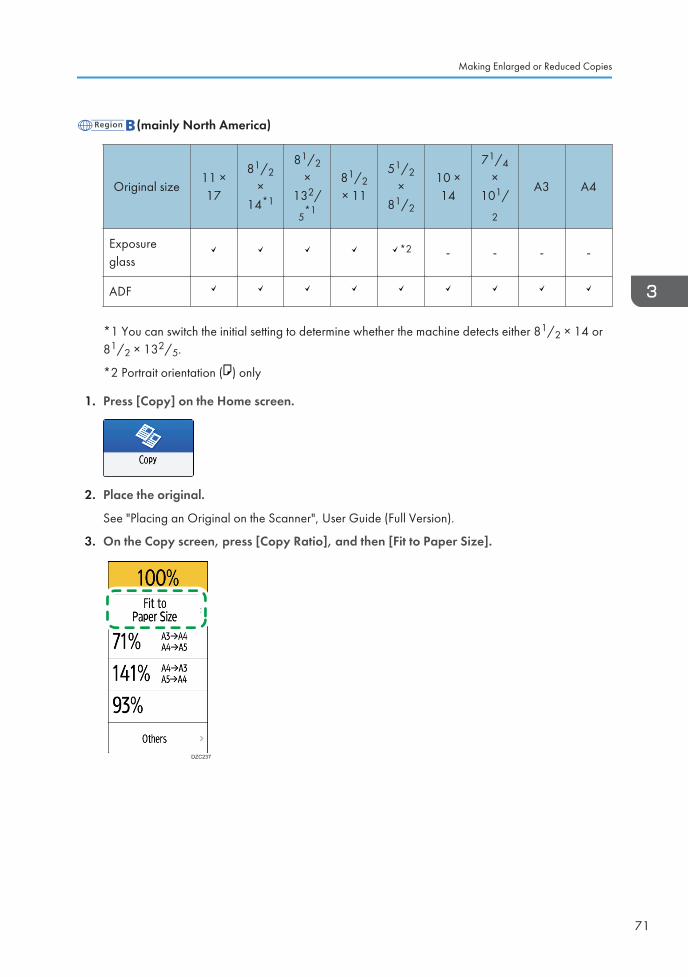
(mainly North America)
Original size11 ×17
81/2×
14*1
81/2×
132/
5*1
81/2× 11
51/2×
81/2
10 ×14
71/4×
101/
2
A3 A4
Exposureglass
*2 - - - -
ADF
*1 You can switch the initial setting to determine whether the machine detects either 81/2 × 14 or81/2 × 132/5.
*2 Portrait orientation ( ) only
1. Press [Copy] on the Home screen.
2. Place the original.
See "Placing an Original on the Scanner", User Guide (Full Version).
3. On the Copy screen, press [Copy Ratio], and then [Fit to Paper Size].
DZC237
Making Enlarged or Reduced Copies
71
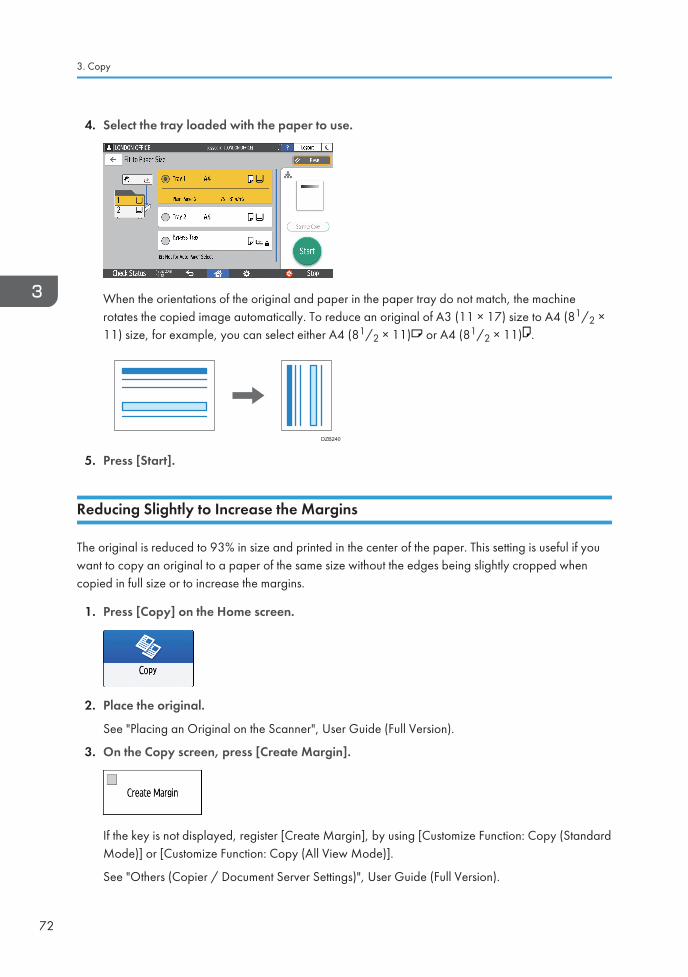
4. Select the tray loaded with the paper to use.
When the orientations of the original and paper in the paper tray do not match, the machinerotates the copied image automatically. To reduce an original of A3 (11 × 17) size to A4 (81/2 ×11) size, for example, you can select either A4 (81/2 × 11) or A4 (81/2 × 11) .
DZB240
5. Press [Start].
Reducing Slightly to Increase the Margins
The original is reduced to 93% in size and printed in the center of the paper. This setting is useful if youwant to copy an original to a paper of the same size without the edges being slightly cropped whencopied in full size or to increase the margins.
1. Press [Copy] on the Home screen.
2. Place the original.
See "Placing an Original on the Scanner", User Guide (Full Version).
3. On the Copy screen, press [Create Margin].
If the key is not displayed, register [Create Margin], by using [Customize Function: Copy (StandardMode)] or [Customize Function: Copy (All View Mode)].
See "Others (Copier / Document Server Settings)", User Guide (Full Version).
3. Copy
72

4. Press [Start].
• You can change the copy ratio of [Create Margin] to a value other than 93%.
• See "Reduce / Enlarge", User Guide (Full Version).
Making Enlarged or Reduced Copies
73
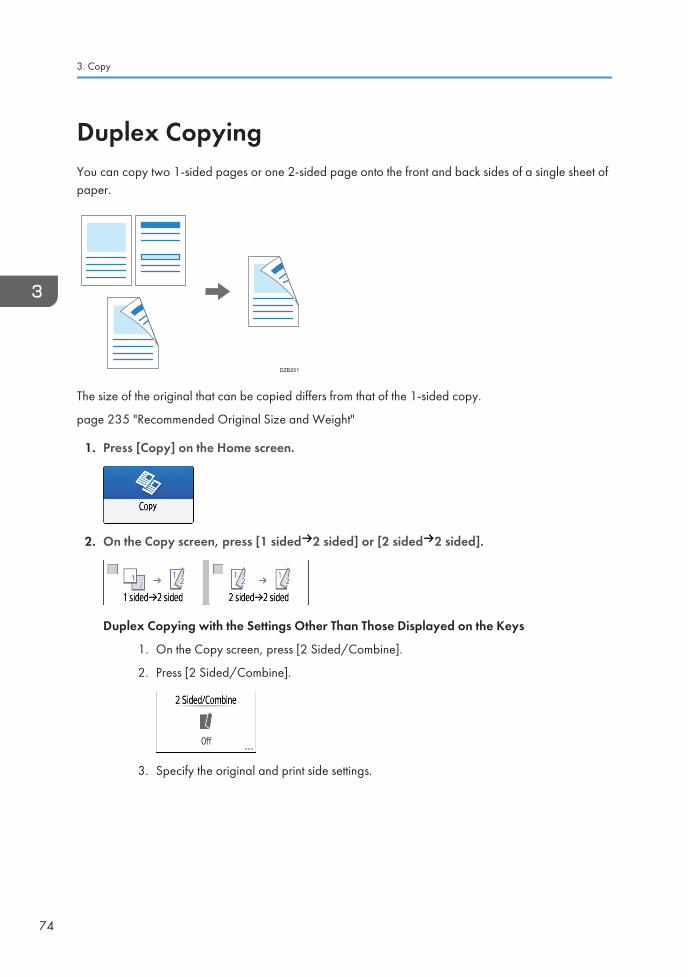
Duplex CopyingYou can copy two 1-sided pages or one 2-sided page onto the front and back sides of a single sheet ofpaper.
DZB251
The size of the original that can be copied differs from that of the 1-sided copy.
page 235 "Recommended Original Size and Weight"
1. Press [Copy] on the Home screen.
2. On the Copy screen, press [1 sided 2 sided] or [2 sided 2 sided].
Duplex Copying with the Settings Other Than Those Displayed on the Keys
1. On the Copy screen, press [2 Sided/Combine].
2. Press [2 Sided/Combine].
3. Specify the original and print side settings.
3. Copy
74
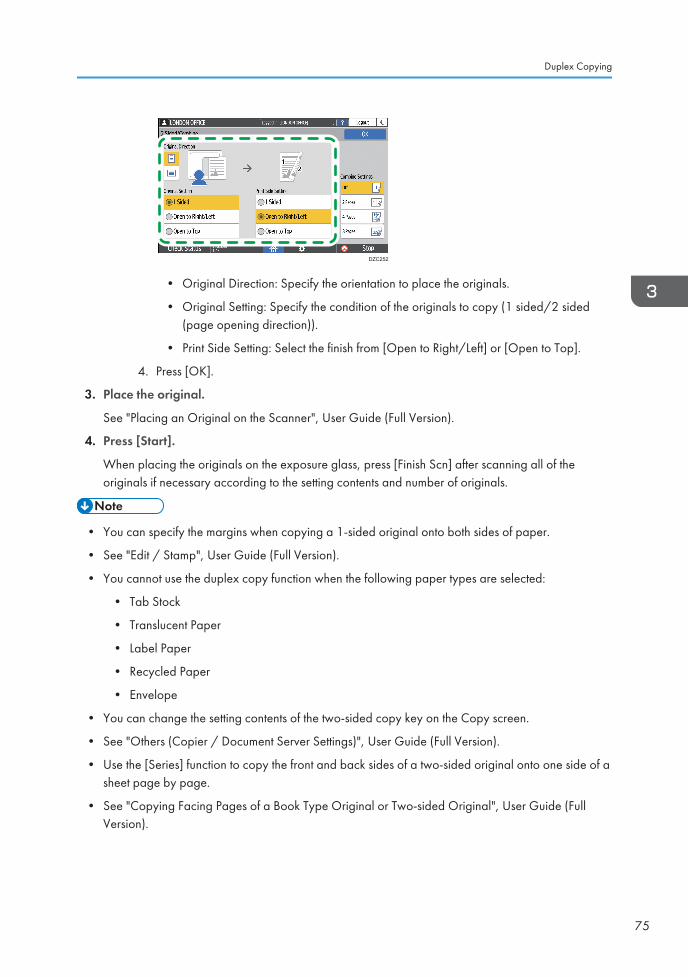
DZC252
• Original Direction: Specify the orientation to place the originals.
• Original Setting: Specify the condition of the originals to copy (1 sided/2 sided(page opening direction)).
• Print Side Setting: Select the finish from [Open to Right/Left] or [Open to Top].
4. Press [OK].
3. Place the original.
See "Placing an Original on the Scanner", User Guide (Full Version).
4. Press [Start].
When placing the originals on the exposure glass, press [Finish Scn] after scanning all of theoriginals if necessary according to the setting contents and number of originals.
• You can specify the margins when copying a 1-sided original onto both sides of paper.
• See "Edit / Stamp", User Guide (Full Version).
• You cannot use the duplex copy function when the following paper types are selected:
• Tab Stock
• Translucent Paper
• Label Paper
• Recycled Paper
• Envelope
• You can change the setting contents of the two-sided copy key on the Copy screen.
• See "Others (Copier / Document Server Settings)", User Guide (Full Version).
• Use the [Series] function to copy the front and back sides of a two-sided original onto one side of asheet page by page.
• See "Copying Facing Pages of a Book Type Original or Two-sided Original", User Guide (FullVersion).
Duplex Copying
75
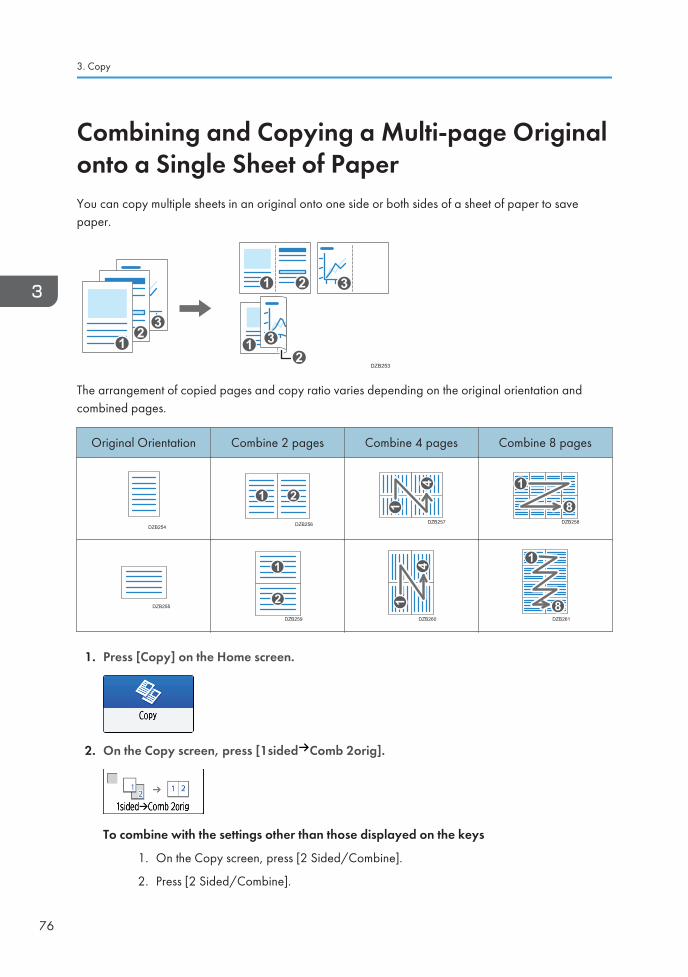
Combining and Copying a Multi-page Originalonto a Single Sheet of PaperYou can copy multiple sheets in an original onto one side or both sides of a sheet of paper to savepaper.
32
1
321
312
DZB253
The arrangement of copied pages and copy ratio varies depending on the original orientation andcombined pages.
Original Orientation Combine 2 pages Combine 4 pages Combine 8 pages
DZB254 DZB256
21
DZB257
4
1
DZB258
1
8
DZB255
DZB259
2
1
DZB260
4
1
DZB261
1
8
1. Press [Copy] on the Home screen.
2. On the Copy screen, press [1sided Comb 2orig].
To combine with the settings other than those displayed on the keys
1. On the Copy screen, press [2 Sided/Combine].
2. Press [2 Sided/Combine].
3. Copy
76
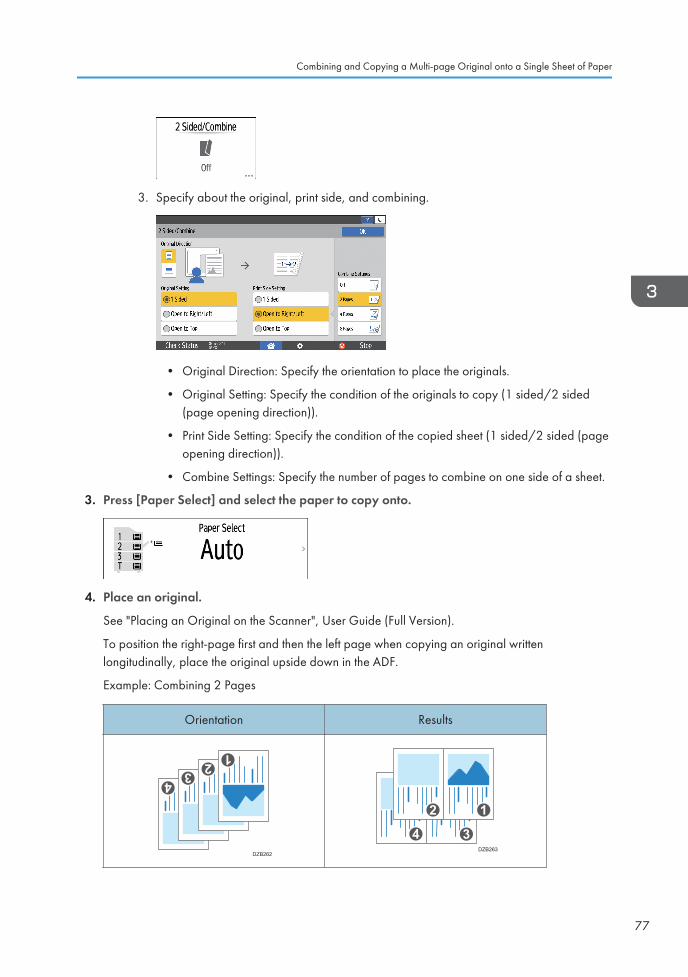
3. Specify about the original, print side, and combining.
• Original Direction: Specify the orientation to place the originals.
• Original Setting: Specify the condition of the originals to copy (1 sided/2 sided(page opening direction)).
• Print Side Setting: Specify the condition of the copied sheet (1 sided/2 sided (pageopening direction)).
• Combine Settings: Specify the number of pages to combine on one side of a sheet.
3. Press [Paper Select] and select the paper to copy onto.
4. Place an original.
See "Placing an Original on the Scanner", User Guide (Full Version).
To position the right-page first and then the left page when copying an original writtenlongitudinally, place the original upside down in the ADF.
Example: Combining 2 Pages
Orientation Results
DZB262
34
2 1
DZB263
34
2 1
Combining and Copying a Multi-page Original onto a Single Sheet of Paper
77
5. Press [Start].
When placing the originals on the exposure glass, press [Finish Scn] after scanning all of theoriginals if necessary according to the number of originals.
• The minimum copy ratio in the Combine function is 25%. For example, if you copy an A3 (11 ×17)-size original onto A4 (81/2 × 11)-size paper with [1 sided Comb 4orig], the copy ratiobecomes less than 25% and parts of the image might not be copied.
• You can configure the following settings in [Settings] [Copier / Document Server Settings] [2Sided / Combine]:
• [Copy Order in Combine]: The order of combined images
• [Separation Line in Combine]: The separation line between combined pages
See "2 Sided / Combine", User Guide (Full Version).
• You can configure the following settings in [Settings] [Copier / Document Server Settings] [Edit / Stamp]:
• [Erase Original Shadow in Combine]: Determine whether to erase the boundary marginaround each original to maintain the margin
See "Edit / Stamp", User Guide (Full Version).
• You can change the setting contents of the Combine key on the Copy screen.
• See "Others (Copier / Document Server Settings)", User Guide (Full Version).
3. Copy
78
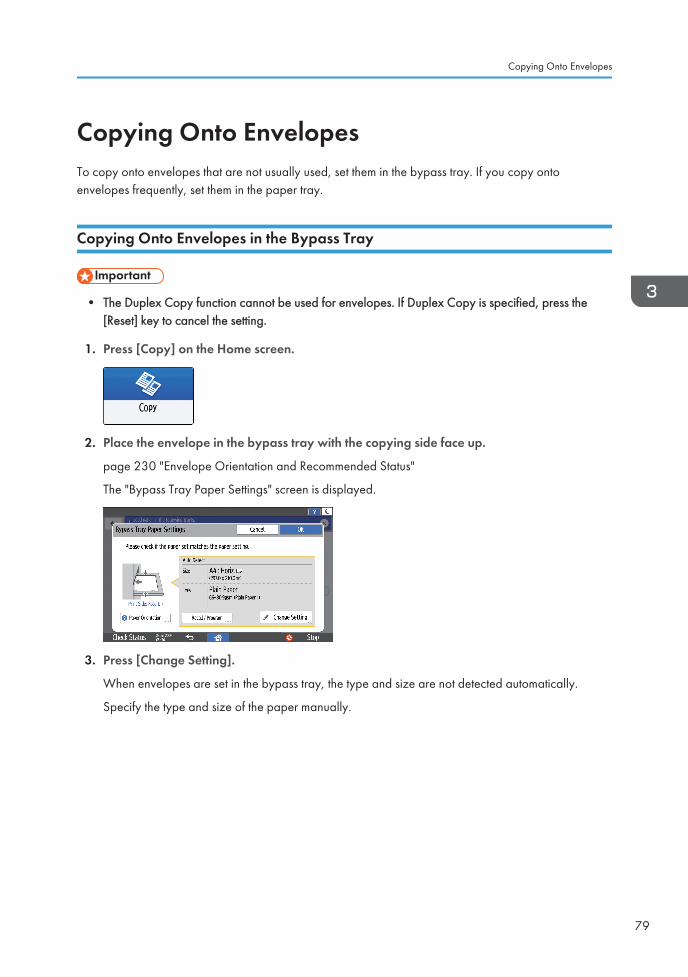
Copying Onto EnvelopesTo copy onto envelopes that are not usually used, set them in the bypass tray. If you copy ontoenvelopes frequently, set them in the paper tray.
Copying Onto Envelopes in the Bypass Tray
• The Duplex Copy function cannot be used for envelopes. If Duplex Copy is specified, press the[Reset] key to cancel the setting.
1. Press [Copy] on the Home screen.
2. Place the envelope in the bypass tray with the copying side face up.
page 230 "Envelope Orientation and Recommended Status"
The "Bypass Tray Paper Settings" screen is displayed.
3. Press [Change Setting].
When envelopes are set in the bypass tray, the type and size are not detected automatically.
Specify the type and size of the paper manually.
Copying Onto Envelopes
79
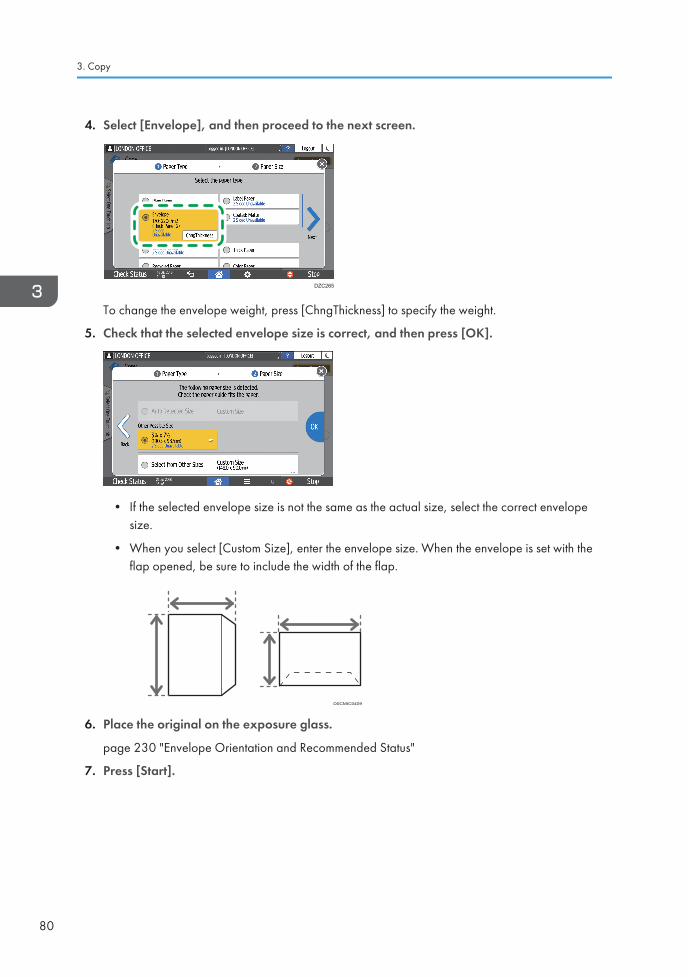
4. Select [Envelope], and then proceed to the next screen.
DZC265
To change the envelope weight, press [ChngThickness] to specify the weight.
5. Check that the selected envelope size is correct, and then press [OK].
• If the selected envelope size is not the same as the actual size, select the correct envelopesize.
• When you select [Custom Size], enter the envelope size. When the envelope is set with theflap opened, be sure to include the width of the flap.
D0CMIC0409
6. Place the original on the exposure glass.
page 230 "Envelope Orientation and Recommended Status"
7. Press [Start].
3. Copy
80
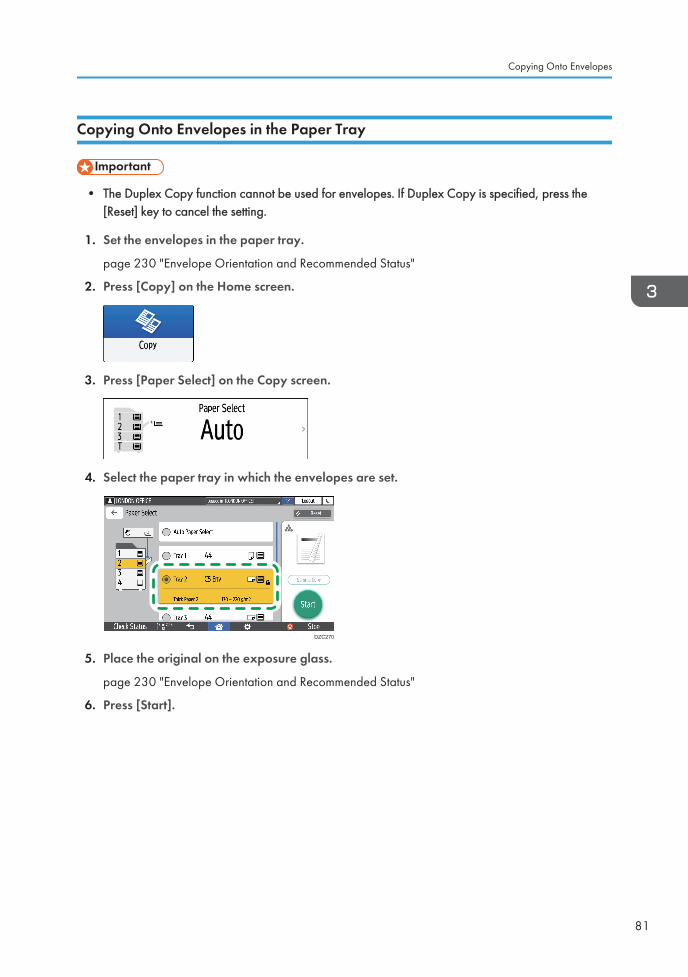
Copying Onto Envelopes in the Paper Tray
• The Duplex Copy function cannot be used for envelopes. If Duplex Copy is specified, press the[Reset] key to cancel the setting.
1. Set the envelopes in the paper tray.
page 230 "Envelope Orientation and Recommended Status"
2. Press [Copy] on the Home screen.
3. Press [Paper Select] on the Copy screen.
4. Select the paper tray in which the envelopes are set.
DZC270
5. Place the original on the exposure glass.
page 230 "Envelope Orientation and Recommended Status"
6. Press [Start].
Copying Onto Envelopes
81
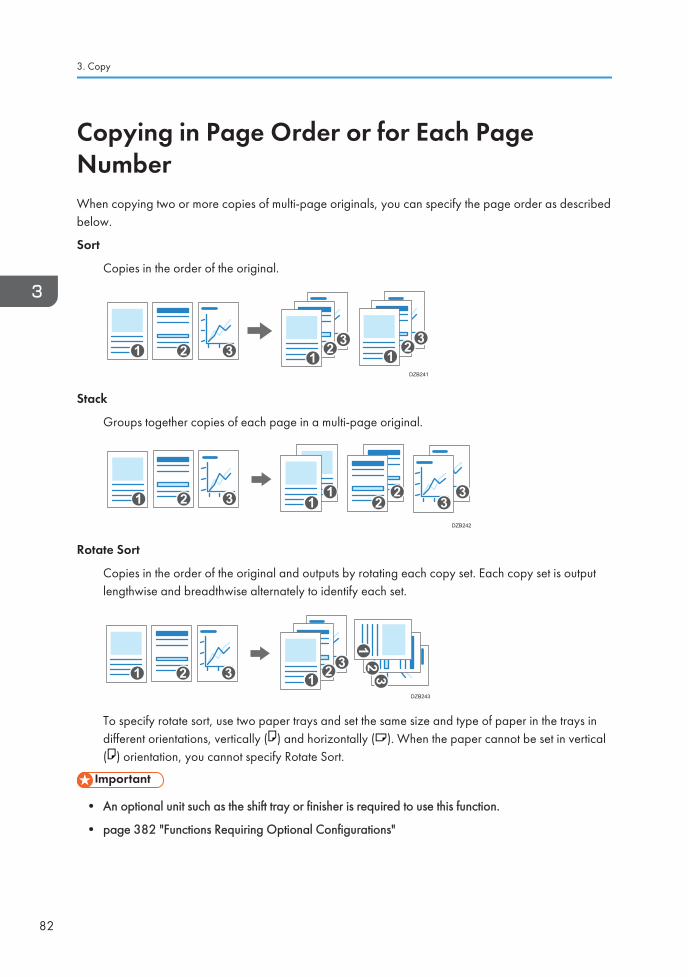
Copying in Page Order or for Each PageNumberWhen copying two or more copies of multi-page originals, you can specify the page order as describedbelow.
Sort
Copies in the order of the original.
DZB241
33 22 1
3211
Stack
Groups together copies of each page in a multi-page original.
DZB242
32 11
22
331
Rotate Sort
Copies in the order of the original and outputs by rotating each copy set. Each copy set is outputlengthwise and breadthwise alternately to identify each set.
DZB243
33 22 11 3
21
To specify rotate sort, use two paper trays and set the same size and type of paper in the trays indifferent orientations, vertically ( ) and horizontally ( ). When the paper cannot be set in vertical( ) orientation, you cannot specify Rotate Sort.
• An optional unit such as the shift tray or finisher is required to use this function.
• page 382 "Functions Requiring Optional Configurations"
3. Copy
82
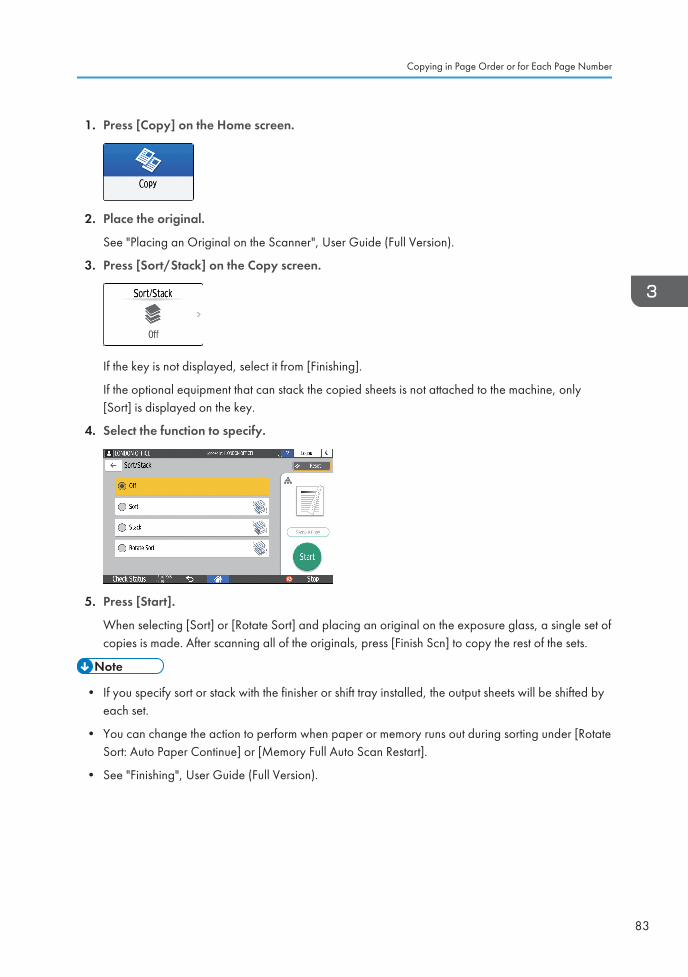
1. Press [Copy] on the Home screen.
2. Place the original.
See "Placing an Original on the Scanner", User Guide (Full Version).
3. Press [Sort/Stack] on the Copy screen.
If the key is not displayed, select it from [Finishing].
If the optional equipment that can stack the copied sheets is not attached to the machine, only[Sort] is displayed on the key.
4. Select the function to specify.
5. Press [Start].
When selecting [Sort] or [Rotate Sort] and placing an original on the exposure glass, a single set ofcopies is made. After scanning all of the originals, press [Finish Scn] to copy the rest of the sets.
• If you specify sort or stack with the finisher or shift tray installed, the output sheets will be shifted byeach set.
• You can change the action to perform when paper or memory runs out during sorting under [RotateSort: Auto Paper Continue] or [Memory Full Auto Scan Restart].
• See "Finishing", User Guide (Full Version).
Copying in Page Order or for Each Page Number
83

3. Copy
84
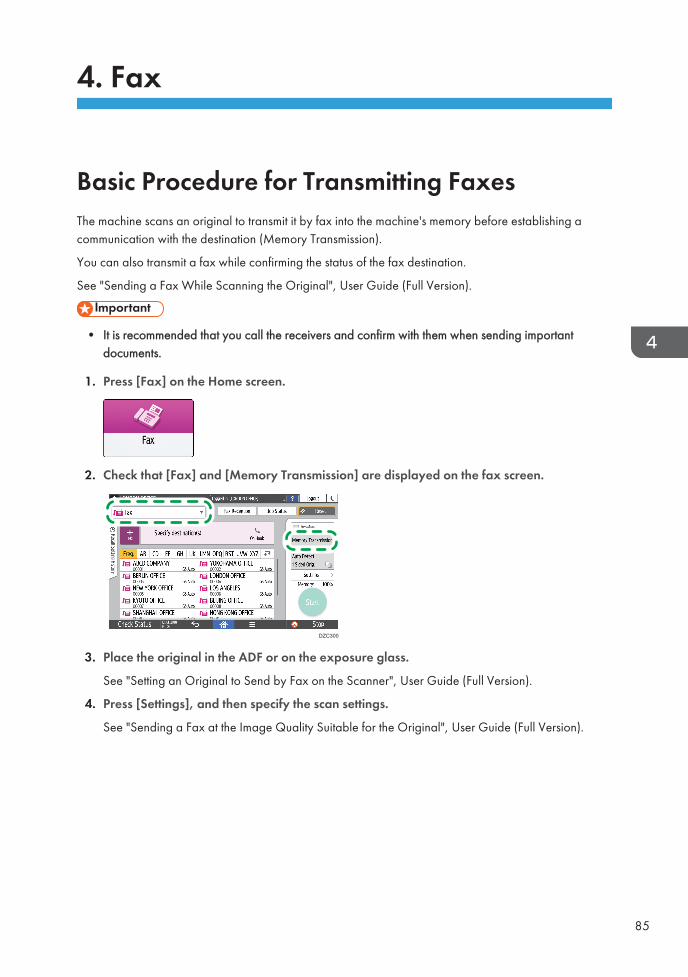
4. Fax
Basic Procedure for Transmitting FaxesThe machine scans an original to transmit it by fax into the machine's memory before establishing acommunication with the destination (Memory Transmission).
You can also transmit a fax while confirming the status of the fax destination.
See "Sending a Fax While Scanning the Original", User Guide (Full Version).
• It is recommended that you call the receivers and confirm with them when sending importantdocuments.
1. Press [Fax] on the Home screen.
2. Check that [Fax] and [Memory Transmission] are displayed on the fax screen.
DZC300
3. Place the original in the ADF or on the exposure glass.
See "Setting an Original to Send by Fax on the Scanner", User Guide (Full Version).
4. Press [Settings], and then specify the scan settings.
See "Sending a Fax at the Image Quality Suitable for the Original", User Guide (Full Version).
85
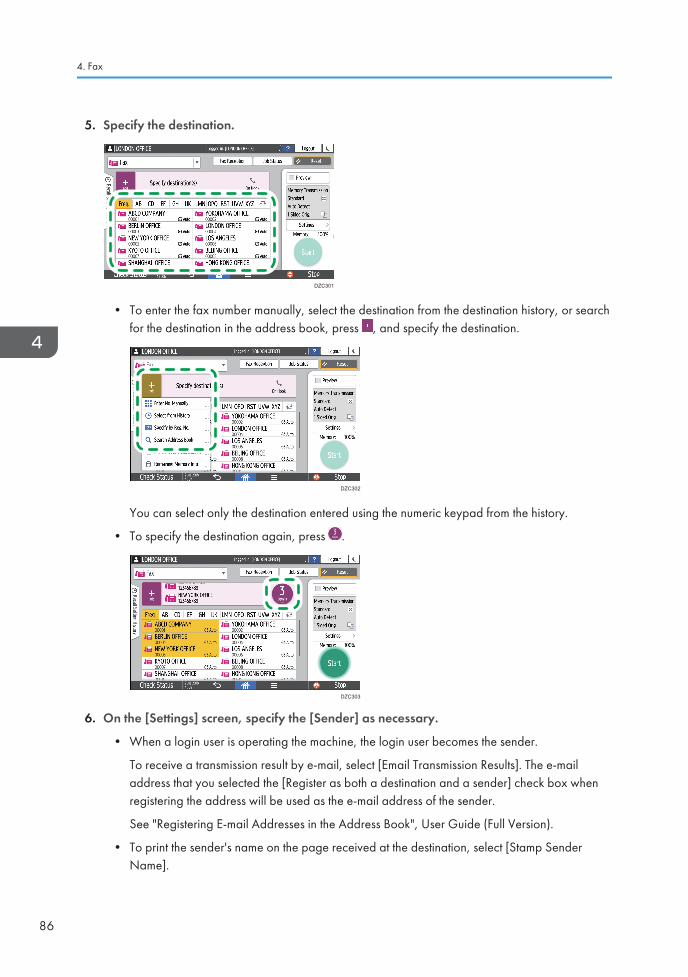
5. Specify the destination.
DZC301
• To enter the fax number manually, select the destination from the destination history, or searchfor the destination in the address book, press , and specify the destination.
DZC302
You can select only the destination entered using the numeric keypad from the history.
• To specify the destination again, press .
DZC303
6. On the [Settings] screen, specify the [Sender] as necessary.
• When a login user is operating the machine, the login user becomes the sender.
To receive a transmission result by e-mail, select [Email Transmission Results]. The e-mailaddress that you selected the [Register as both a destination and a sender] check box whenregistering the address will be used as the e-mail address of the sender.
See "Registering E-mail Addresses in the Address Book", User Guide (Full Version).
• To print the sender's name on the page received at the destination, select [Stamp SenderName].
4. Fax
86
• If the Auto Specify Sender Name function is enabled, the sender is automatically specifiedand you can omit the procedure for specifying a sender.
7. Press [Start].
To cancel transmission after scanning the original, press [Stop] and operate in [Job Status] [Transmission Standby File].
See "Confirming and Handling a Document in the Fax Queue", User Guide (Full Version).
• If the telephone line you are connected to requires time to connect to the public line after you dialthe external number, enter a [Pause] after entering the number to specify the time to wait beforedialing the number. The machine pauses for about two seconds for each single [Pause] entered.
• To use tone-dialing in a pulse-dialing environment, press [Tone]. A tone signal is generated forevery number you enter afterward.
• You can perform Immediate transmission only when the total number of destinations specified forall documents exceeds the maximum value.
• The communication that has been initiated first is displayed on the screen when performing threesimultaneous communications.
Basic Procedure for Transmitting Faxes
87
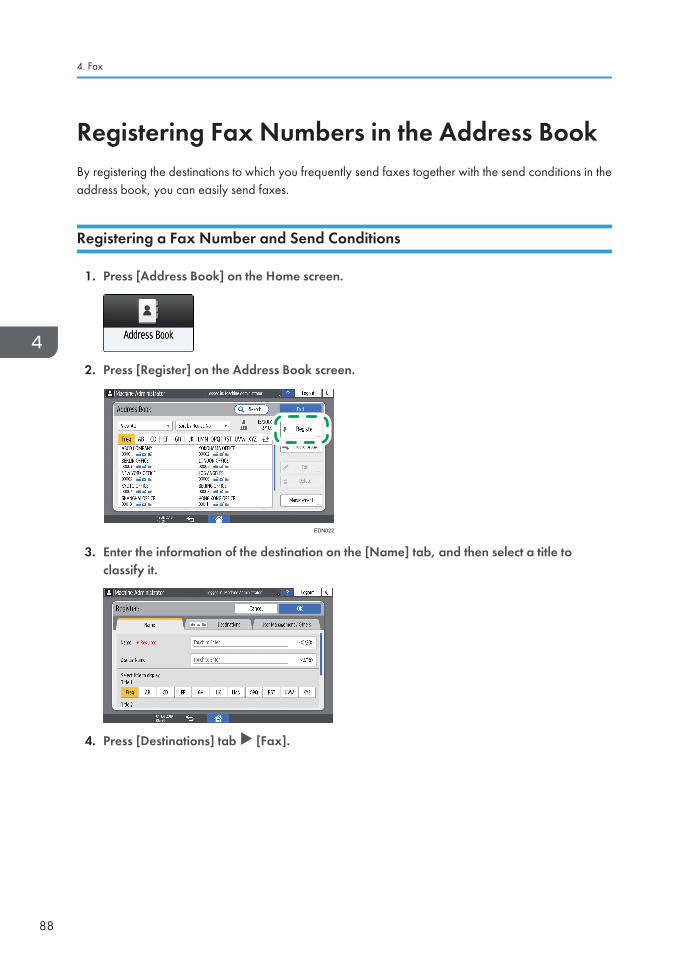
Registering Fax Numbers in the Address BookBy registering the destinations to which you frequently send faxes together with the send conditions in theaddress book, you can easily send faxes.
Registering a Fax Number and Send Conditions
1. Press [Address Book] on the Home screen.
2. Press [Register] on the Address Book screen.
EDN022
3. Enter the information of the destination on the [Name] tab, and then select a title toclassify it.
4. Press [Destinations] tab [Fax].
4. Fax
88
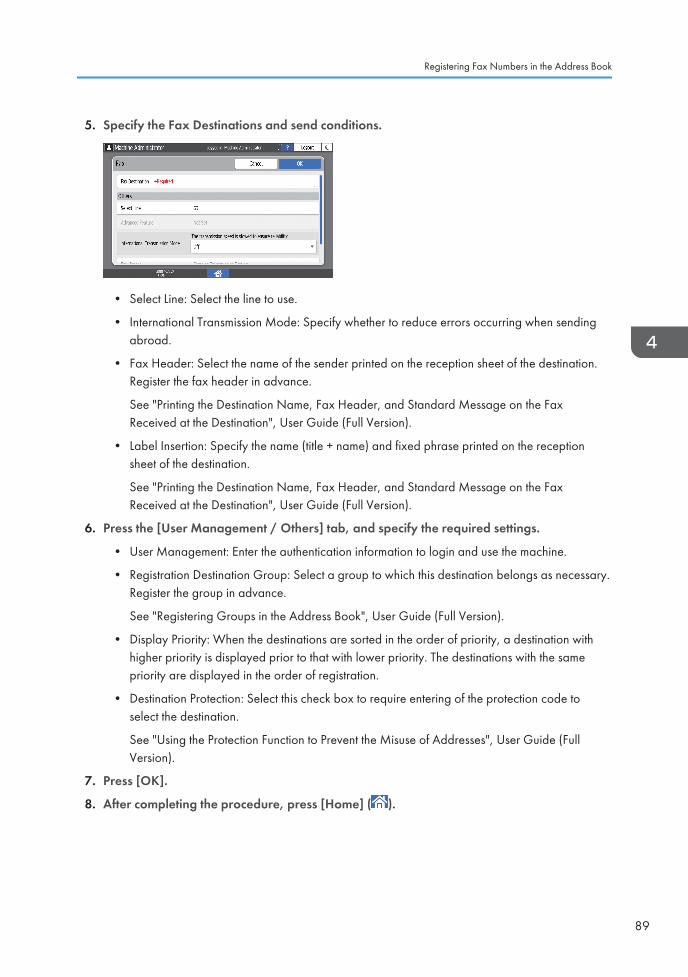
5. Specify the Fax Destinations and send conditions.
• Select Line: Select the line to use.
• International Transmission Mode: Specify whether to reduce errors occurring when sendingabroad.
• Fax Header: Select the name of the sender printed on the reception sheet of the destination.Register the fax header in advance.
See "Printing the Destination Name, Fax Header, and Standard Message on the FaxReceived at the Destination", User Guide (Full Version).
• Label Insertion: Specify the name (title + name) and fixed phrase printed on the receptionsheet of the destination.
See "Printing the Destination Name, Fax Header, and Standard Message on the FaxReceived at the Destination", User Guide (Full Version).
6. Press the [User Management / Others] tab, and specify the required settings.
• User Management: Enter the authentication information to login and use the machine.
• Registration Destination Group: Select a group to which this destination belongs as necessary.Register the group in advance.
See "Registering Groups in the Address Book", User Guide (Full Version).
• Display Priority: When the destinations are sorted in the order of priority, a destination withhigher priority is displayed prior to that with lower priority. The destinations with the samepriority are displayed in the order of registration.
• Destination Protection: Select this check box to require entering of the protection code toselect the destination.
See "Using the Protection Function to Prevent the Misuse of Addresses", User Guide (FullVersion).
7. Press [OK].
8. After completing the procedure, press [Home] ( ).
Registering Fax Numbers in the Address Book
89
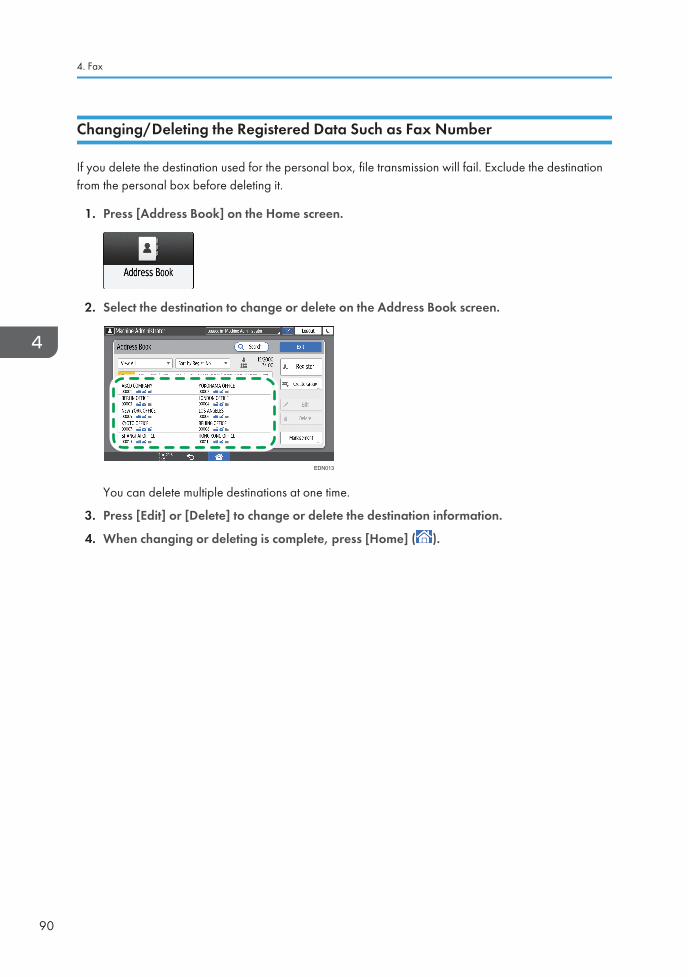
Changing/Deleting the Registered Data Such as Fax Number
If you delete the destination used for the personal box, file transmission will fail. Exclude the destinationfrom the personal box before deleting it.
1. Press [Address Book] on the Home screen.
2. Select the destination to change or delete on the Address Book screen.
EDN013
You can delete multiple destinations at one time.
3. Press [Edit] or [Delete] to change or delete the destination information.
4. When changing or deleting is complete, press [Home] ( ).
4. Fax
90
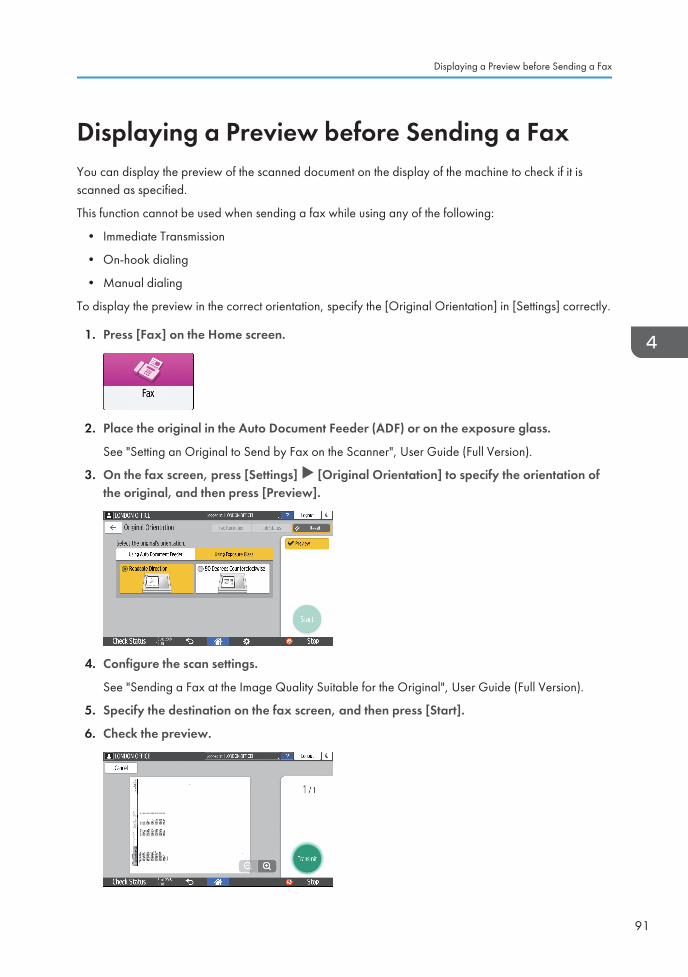
Displaying a Preview before Sending a FaxYou can display the preview of the scanned document on the display of the machine to check if it isscanned as specified.
This function cannot be used when sending a fax while using any of the following:
• Immediate Transmission
• On-hook dialing
• Manual dialing
To display the preview in the correct orientation, specify the [Original Orientation] in [Settings] correctly.
1. Press [Fax] on the Home screen.
2. Place the original in the Auto Document Feeder (ADF) or on the exposure glass.
See "Setting an Original to Send by Fax on the Scanner", User Guide (Full Version).
3. On the fax screen, press [Settings] [Original Orientation] to specify the orientation ofthe original, and then press [Preview].
4. Configure the scan settings.
See "Sending a Fax at the Image Quality Suitable for the Original", User Guide (Full Version).
5. Specify the destination on the fax screen, and then press [Start].
6. Check the preview.
Displaying a Preview before Sending a Fax
91
• Flick the image left or right to switch between the pages.
• Pinch in or out on the image to zoom in or out.
7. Press [Transmit].
To cancel transmission and perform the procedure from scanning the original again, press[Cancel].
4. Fax
92
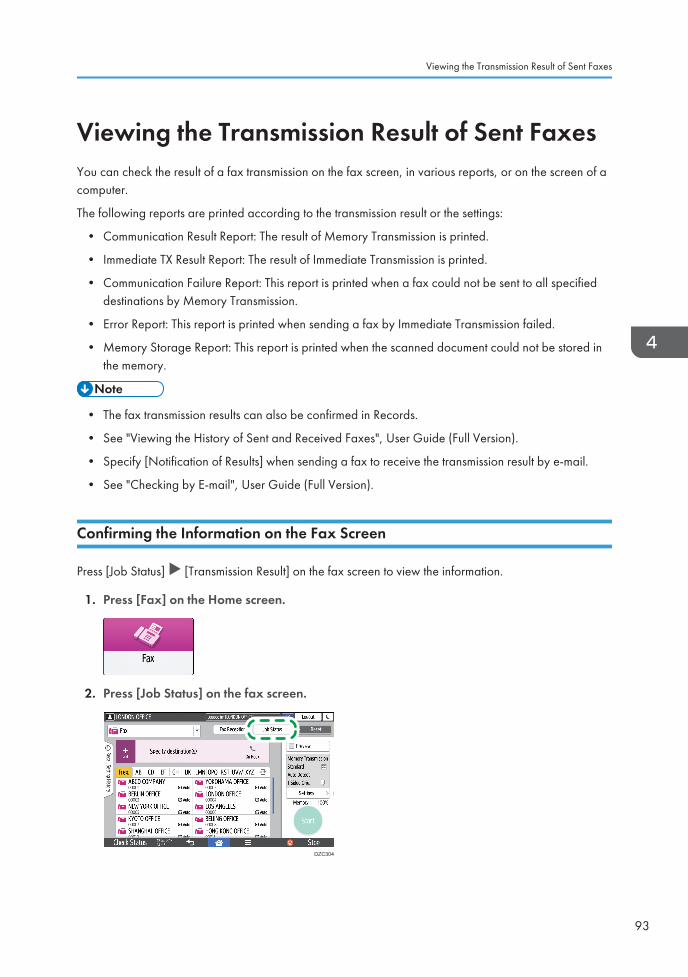
Viewing the Transmission Result of Sent FaxesYou can check the result of a fax transmission on the fax screen, in various reports, or on the screen of acomputer.
The following reports are printed according to the transmission result or the settings:
• Communication Result Report: The result of Memory Transmission is printed.
• Immediate TX Result Report: The result of Immediate Transmission is printed.
• Communication Failure Report: This report is printed when a fax could not be sent to all specifieddestinations by Memory Transmission.
• Error Report: This report is printed when sending a fax by Immediate Transmission failed.
• Memory Storage Report: This report is printed when the scanned document could not be stored inthe memory.
• The fax transmission results can also be confirmed in Records.
• See "Viewing the History of Sent and Received Faxes", User Guide (Full Version).
• Specify [Notification of Results] when sending a fax to receive the transmission result by e-mail.
• See "Checking by E-mail", User Guide (Full Version).
Confirming the Information on the Fax Screen
Press [Job Status] [Transmission Result] on the fax screen to view the information.
1. Press [Fax] on the Home screen.
2. Press [Job Status] on the fax screen.
DZC304
Viewing the Transmission Result of Sent Faxes
93
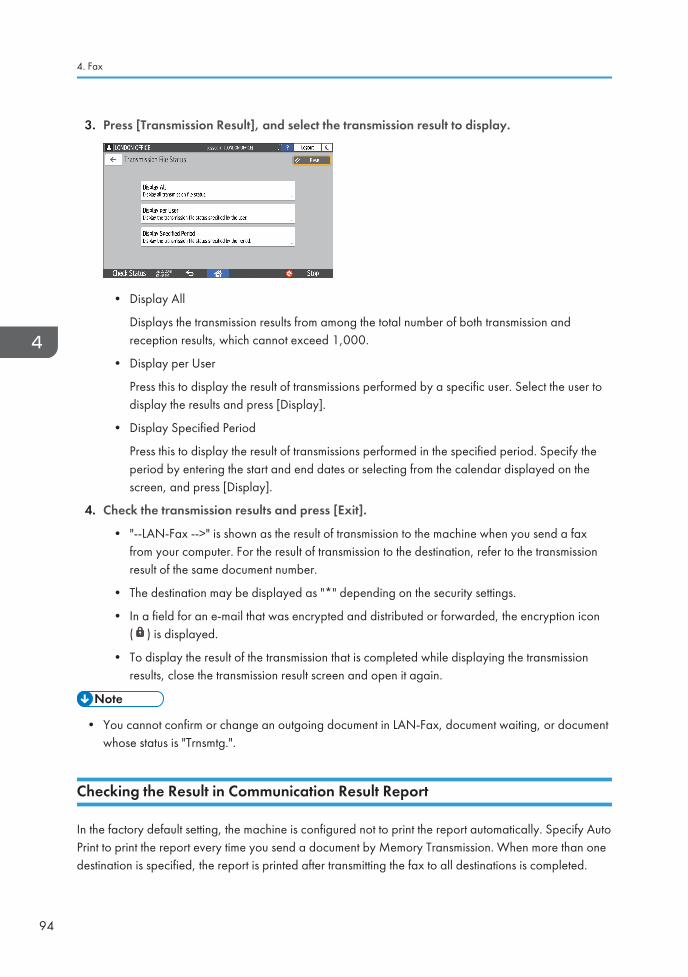
3. Press [Transmission Result], and select the transmission result to display.
• Display All
Displays the transmission results from among the total number of both transmission andreception results, which cannot exceed 1,000.
• Display per User
Press this to display the result of transmissions performed by a specific user. Select the user todisplay the results and press [Display].
• Display Specified Period
Press this to display the result of transmissions performed in the specified period. Specify theperiod by entering the start and end dates or selecting from the calendar displayed on thescreen, and press [Display].
4. Check the transmission results and press [Exit].
• "--LAN-Fax -->" is shown as the result of transmission to the machine when you send a faxfrom your computer. For the result of transmission to the destination, refer to the transmissionresult of the same document number.
• The destination may be displayed as "*" depending on the security settings.
• In a field for an e-mail that was encrypted and distributed or forwarded, the encryption icon( ) is displayed.
• To display the result of the transmission that is completed while displaying the transmissionresults, close the transmission result screen and open it again.
• You cannot confirm or change an outgoing document in LAN-Fax, document waiting, or documentwhose status is "Trnsmtg.".
Checking the Result in Communication Result Report
In the factory default setting, the machine is configured not to print the report automatically. Specify AutoPrint to print the report every time you send a document by Memory Transmission. When more than onedestination is specified, the report is printed after transmitting the fax to all destinations is completed.
4. Fax
94
To configure auto print, select bit number [0] under switch number [03], and change the current value to"1".
See "Changing the Parameter Settings", User Guide (Full Version).
Checking the Result in Immediate TX Result Report
In the factory default setting, the machine is configured not to print the report automatically. Specify AutoPrint to print it every time you send a document by Immediate Transmission.
To configure Auto Print, select bit number [5] under switch number [03], and change the current value to"1".
See "Changing the Parameter Settings", User Guide (Full Version).
• If the page was sent successfully, the Page column gives the total number of pages sentsuccessfully.
Checking the Result in Communication Failure Report
This report is printed if the fax could not be sent to all specified destinations by Memory Transmissionwhen Fax is not set to Auto Print (the factory default setting).
Checking the Result in Error Report
This report is printed if a fax could not be sent by Immediate Transmission when Immediate TransmissionResult Report is not set to Auto Print (the factory default setting).
Viewing Memory Storage Report
Memory Storage Report is printed when the document to send by Memory Transmission could not bestored in the memory. If you want to, print the report as a record, and print it even if the document wasstored correctly.
To print the Memory Storage Report every time a document is stored in the memory, select bit number[2] under switch number [03], and change the current value to "1".
See "Changing the Parameter Settings", User Guide (Full Version).
• Even if the machine is set up not to print this report, it is still printed if an original could not bestored.
Viewing the Transmission Result of Sent Faxes
95
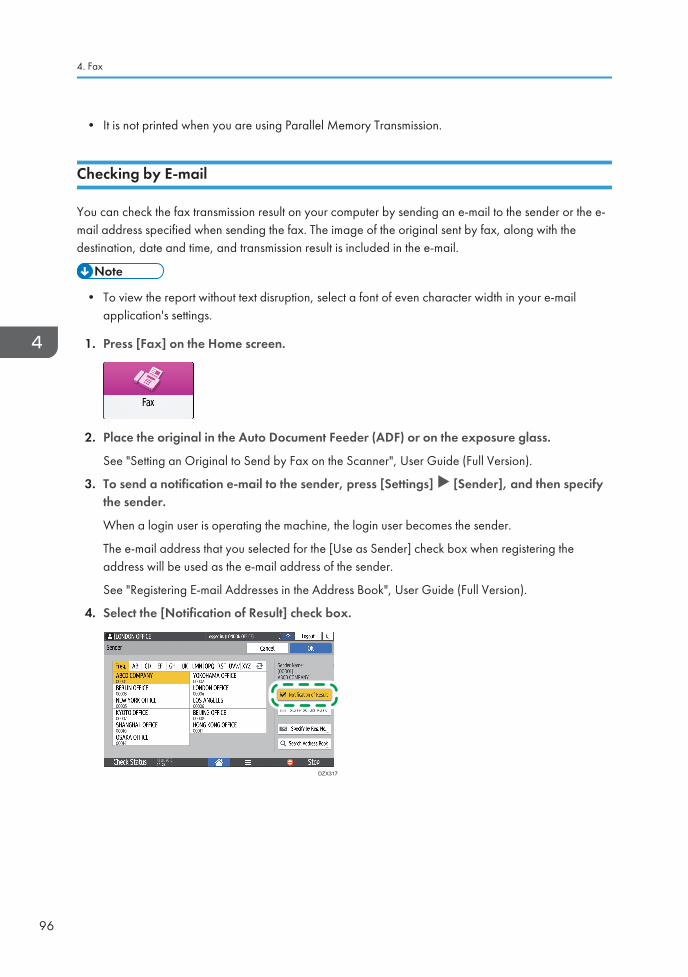
• It is not printed when you are using Parallel Memory Transmission.
Checking by E-mail
You can check the fax transmission result on your computer by sending an e-mail to the sender or the e-mail address specified when sending the fax. The image of the original sent by fax, along with thedestination, date and time, and transmission result is included in the e-mail.
• To view the report without text disruption, select a font of even character width in your e-mailapplication's settings.
1. Press [Fax] on the Home screen.
2. Place the original in the Auto Document Feeder (ADF) or on the exposure glass.
See "Setting an Original to Send by Fax on the Scanner", User Guide (Full Version).
3. To send a notification e-mail to the sender, press [Settings] [Sender], and then specifythe sender.
When a login user is operating the machine, the login user becomes the sender.
The e-mail address that you selected for the [Use as Sender] check box when registering theaddress will be used as the e-mail address of the sender.
See "Registering E-mail Addresses in the Address Book", User Guide (Full Version).
4. Select the [Notification of Result] check box.
DZX317
4. Fax
96
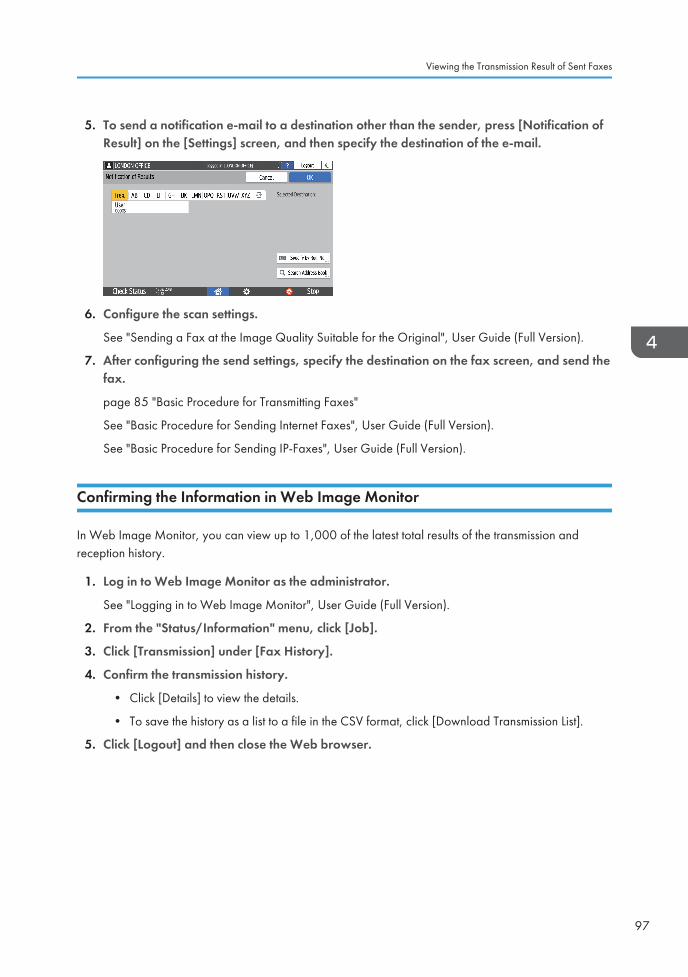
5. To send a notification e-mail to a destination other than the sender, press [Notification ofResult] on the [Settings] screen, and then specify the destination of the e-mail.
6. Configure the scan settings.
See "Sending a Fax at the Image Quality Suitable for the Original", User Guide (Full Version).
7. After configuring the send settings, specify the destination on the fax screen, and send thefax.
page 85 "Basic Procedure for Transmitting Faxes"
See "Basic Procedure for Sending Internet Faxes", User Guide (Full Version).
See "Basic Procedure for Sending IP-Faxes", User Guide (Full Version).
Confirming the Information in Web Image Monitor
In Web Image Monitor, you can view up to 1,000 of the latest total results of the transmission andreception history.
1. Log in to Web Image Monitor as the administrator.
See "Logging in to Web Image Monitor", User Guide (Full Version).
2. From the "Status/Information" menu, click [Job].
3. Click [Transmission] under [Fax History].
4. Confirm the transmission history.
• Click [Details] to view the details.
• To save the history as a list to a file in the CSV format, click [Download Transmission List].
5. Click [Logout] and then close the Web browser.
Viewing the Transmission Result of Sent Faxes
97

4. Fax
98
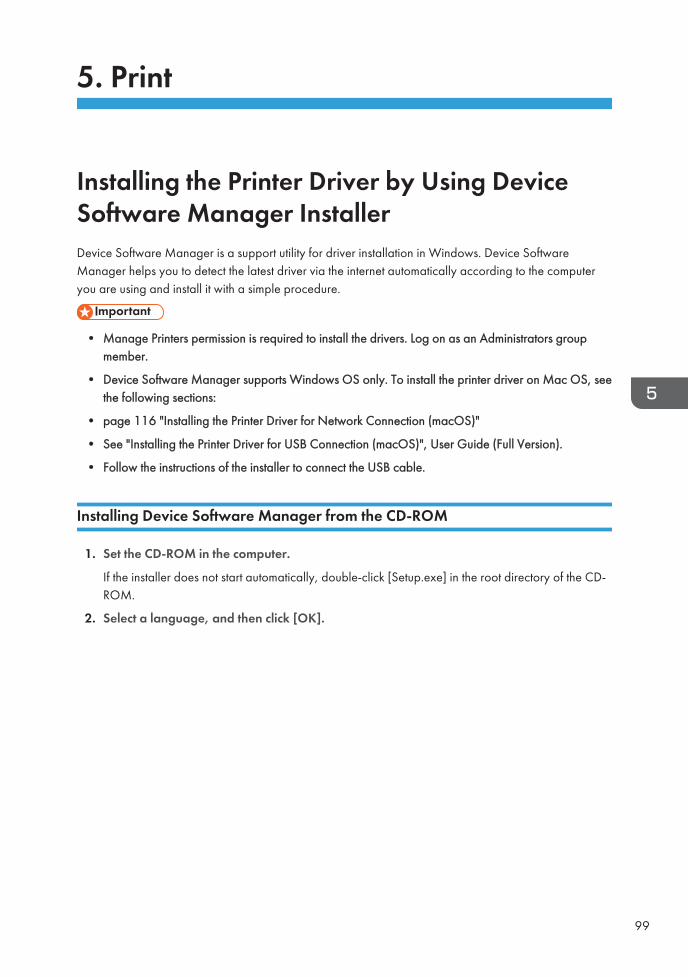
5. Print
Installing the Printer Driver by Using DeviceSoftware Manager InstallerDevice Software Manager is a support utility for driver installation in Windows. Device SoftwareManager helps you to detect the latest driver via the internet automatically according to the computeryou are using and install it with a simple procedure.
• Manage Printers permission is required to install the drivers. Log on as an Administrators groupmember.
• Device Software Manager supports Windows OS only. To install the printer driver on Mac OS, seethe following sections:
• page 116 "Installing the Printer Driver for Network Connection (macOS)"
• See "Installing the Printer Driver for USB Connection (macOS)", User Guide (Full Version).
• Follow the instructions of the installer to connect the USB cable.
Installing Device Software Manager from the CD-ROM
1. Set the CD-ROM in the computer.
If the installer does not start automatically, double-click [Setup.exe] in the root directory of the CD-ROM.
2. Select a language, and then click [OK].
99
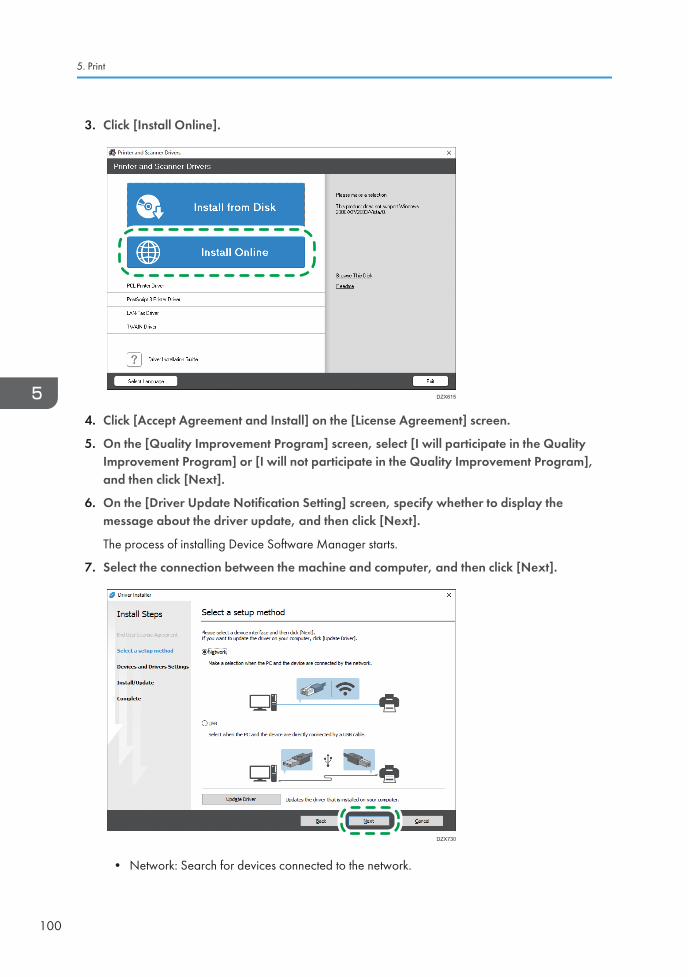
3. Click [Install Online].
DZX615
4. Click [Accept Agreement and Install] on the [License Agreement] screen.
5. On the [Quality Improvement Program] screen, select [I will participate in the QualityImprovement Program] or [I will not participate in the Quality Improvement Program],and then click [Next].
6. On the [Driver Update Notification Setting] screen, specify whether to display themessage about the driver update, and then click [Next].
The process of installing Device Software Manager starts.
7. Select the connection between the machine and computer, and then click [Next].
DZX730
• Network: Search for devices connected to the network.
5. Print
100
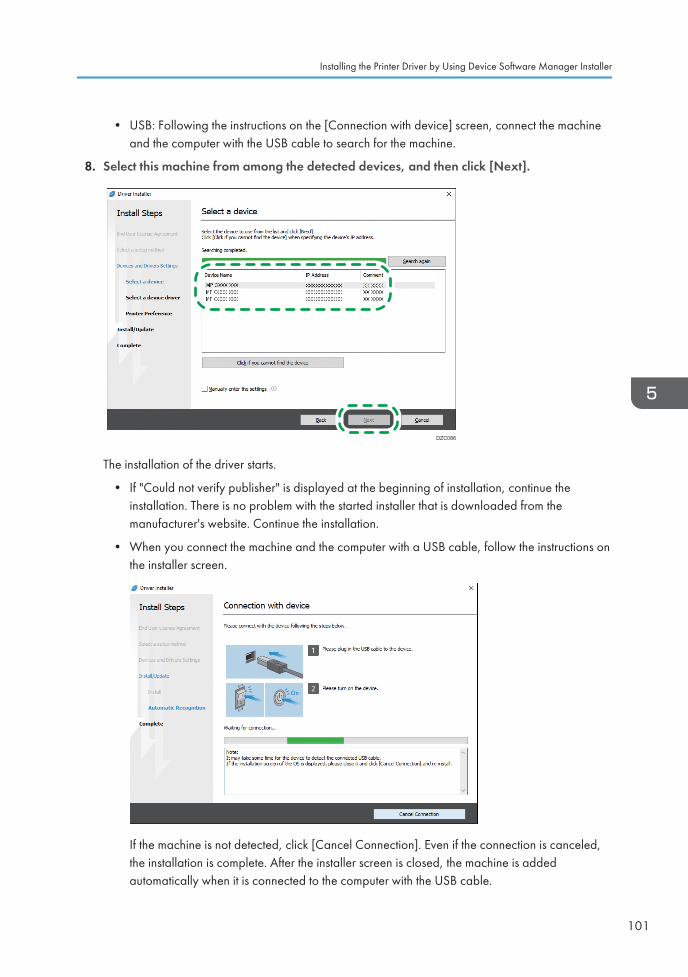
• USB: Following the instructions on the [Connection with device] screen, connect the machineand the computer with the USB cable to search for the machine.
8. Select this machine from among the detected devices, and then click [Next].
DZC086
The installation of the driver starts.
• If "Could not verify publisher" is displayed at the beginning of installation, continue theinstallation. There is no problem with the started installer that is downloaded from themanufacturer's website. Continue the installation.
• When you connect the machine and the computer with a USB cable, follow the instructions onthe installer screen.
If the machine is not detected, click [Cancel Connection]. Even if the connection is canceled,the installation is complete. After the installer screen is closed, the machine is addedautomatically when it is connected to the computer with the USB cable.
Installing the Printer Driver by Using Device Software Manager Installer
101
9. When the installation is complete, click [Finish].
When you are prompted to restart your computer, restart it by following the instructions thatappear.
• After completing the installation, Device Software Manager icon is created on the desktop screen.
• You can update the installed printer driver with Device Software Manager.
• See "Updating the Driver (Windows)", User Guide (Full Version).
• If the [User Account Control] dialog box appears during the driver installation procedure, click[Yes] or [Continue].
• If the [Windows Security] dialog box appears during the driver installation procedure, click [Installthis driver software anyway].
Installing Device Software Manager from the Downloaded File
1. Double-click the downloaded file.
2. Select [I accept the agreement] on the [License Agreement] screen, and then click [Install].
3. On the [Quality Improvement Program] screen, select [I will participate in the QualityImprovement Program] or [I will not participate in the Quality Improvement Program],and then click [Next].
4. On the [Driver Update Notification Setting] screen, specify whether to display themessage about the driver update, and then click [Next].
The process of installing Device Software Manager starts.
5. After completing the installation, select the [Run Driver Installer] check box, and then click[Finish].
The installation of Install Online is complete. Next, install the printer driver.
6. On the [End User License Agreement] screen, click [Agree and Go to Next].
5. Print
102
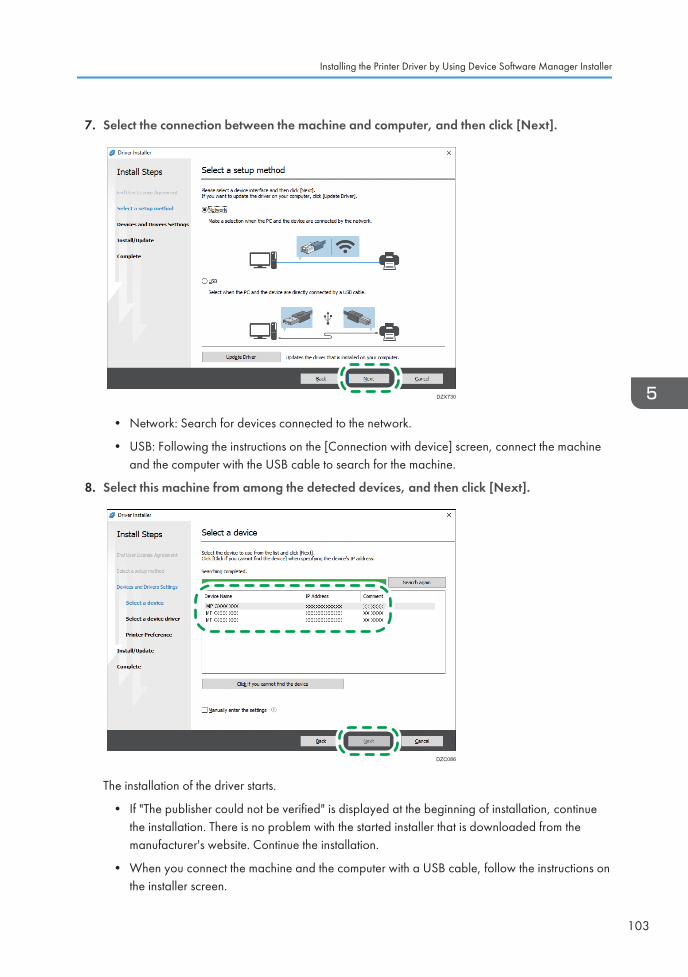
7. Select the connection between the machine and computer, and then click [Next].
DZX730
• Network: Search for devices connected to the network.
• USB: Following the instructions on the [Connection with device] screen, connect the machineand the computer with the USB cable to search for the machine.
8. Select this machine from among the detected devices, and then click [Next].
DZC086
The installation of the driver starts.
• If "The publisher could not be verified" is displayed at the beginning of installation, continuethe installation. There is no problem with the started installer that is downloaded from themanufacturer's website. Continue the installation.
• When you connect the machine and the computer with a USB cable, follow the instructions onthe installer screen.
Installing the Printer Driver by Using Device Software Manager Installer
103

If the machine is not detected, click [Cancel Connection]. Even if the connection is canceled,the installation is complete. After the installer screen is closed, the machine is addedautomatically when it is connected to the computer with the USB cable.
9. When the installation is complete, click [Finish].
• Double-click the Device Software Manager icon created on the Finder of the computer to updatethe printer driver.
• See "Updating the Driver (Windows)", User Guide (Full Version).
5. Print
104
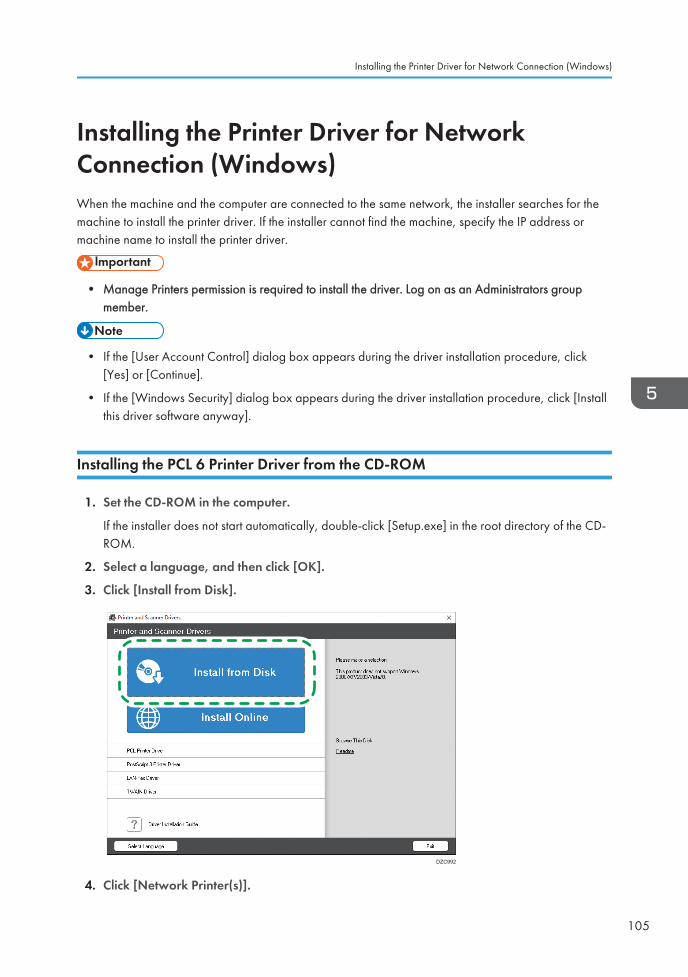
Installing the Printer Driver for NetworkConnection (Windows)When the machine and the computer are connected to the same network, the installer searches for themachine to install the printer driver. If the installer cannot find the machine, specify the IP address ormachine name to install the printer driver.
• Manage Printers permission is required to install the driver. Log on as an Administrators groupmember.
• If the [User Account Control] dialog box appears during the driver installation procedure, click[Yes] or [Continue].
• If the [Windows Security] dialog box appears during the driver installation procedure, click [Installthis driver software anyway].
Installing the PCL 6 Printer Driver from the CD-ROM
1. Set the CD-ROM in the computer.
If the installer does not start automatically, double-click [Setup.exe] in the root directory of the CD-ROM.
2. Select a language, and then click [OK].
3. Click [Install from Disk].
DZC992
4. Click [Network Printer(s)].
Installing the Printer Driver for Network Connection (Windows)
105
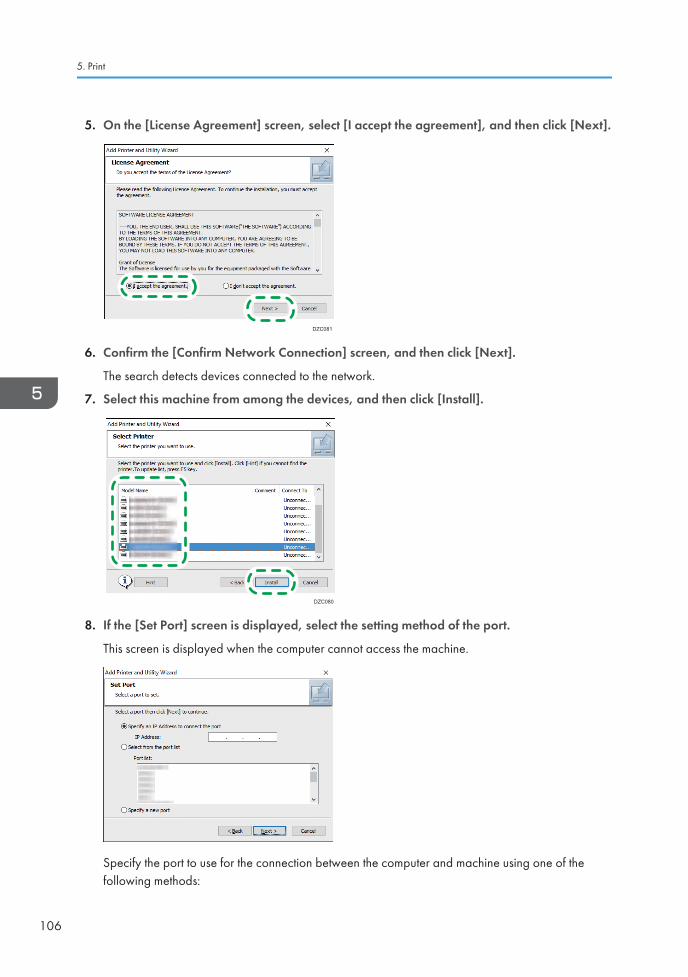
5. On the [License Agreement] screen, select [I accept the agreement], and then click [Next].
DZC081
6. Confirm the [Confirm Network Connection] screen, and then click [Next].
The search detects devices connected to the network.
7. Select this machine from among the devices, and then click [Install].
DZC080
8. If the [Set Port] screen is displayed, select the setting method of the port.
This screen is displayed when the computer cannot access the machine.
Specify the port to use for the connection between the computer and machine using one of thefollowing methods:
5. Print
106

To specify the IP address
1. Enter the IP address of the machine, and then click [Next].
2. Proceed to Step 9.
To select from the port list
1. Select the port to use for the connection between the computer and machine, and thenclick [Next].
2. Proceed to Step 9.
To create a new port
1. Select [Specify a new port], and then click [Next].
2. On the [Add Printer and Utility Wizard] screen, select [Standard TCP/IP Port] and click[Next].
3. On the [Add Standard TCP/IP Printer Port Wizard] screen, click [Next].
4. On the [Add port] screen, enter the printer name or IP address of the machine, and thenclick [Next].
The port name is automatically entered. You can change the port name.
5. When the [Additional port information required] screen is displayed, select [RICOHNetwork Printer C model], and then click [Next].
6. Click [Finish].
9. Specify the name of the printer to install, and whether to use it as the default printer.
10. Click [Continue].
Printer driver installation starts.
Installing the Printer Driver for Network Connection (Windows)
107
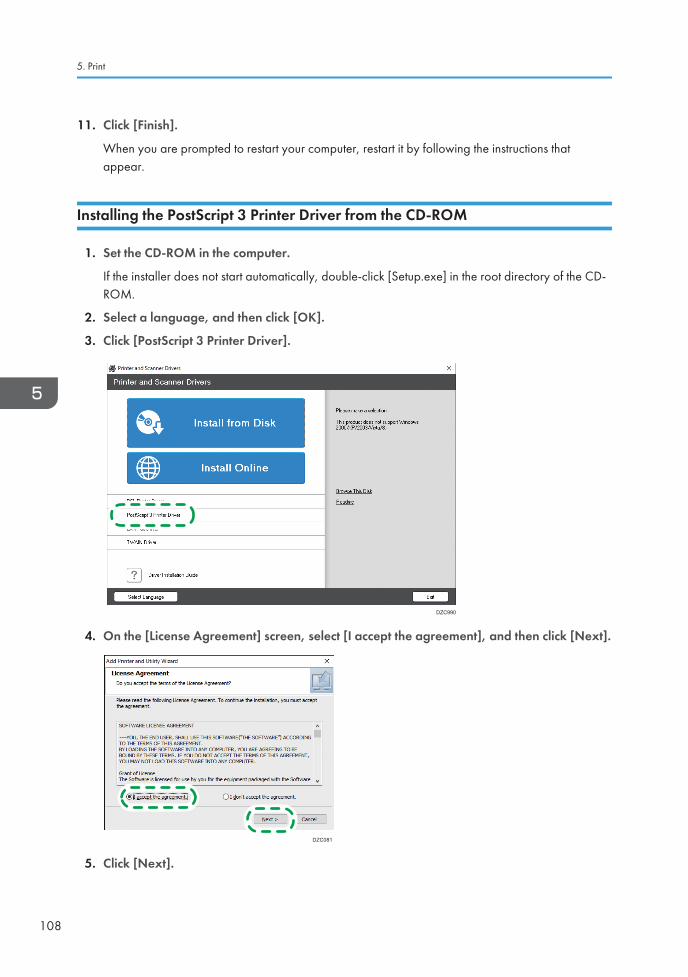
11. Click [Finish].
When you are prompted to restart your computer, restart it by following the instructions thatappear.
Installing the PostScript 3 Printer Driver from the CD-ROM
1. Set the CD-ROM in the computer.
If the installer does not start automatically, double-click [Setup.exe] in the root directory of the CD-ROM.
2. Select a language, and then click [OK].
3. Click [PostScript 3 Printer Driver].
DZC990
4. On the [License Agreement] screen, select [I accept the agreement], and then click [Next].
DZC081
5. Click [Next].
5. Print
108
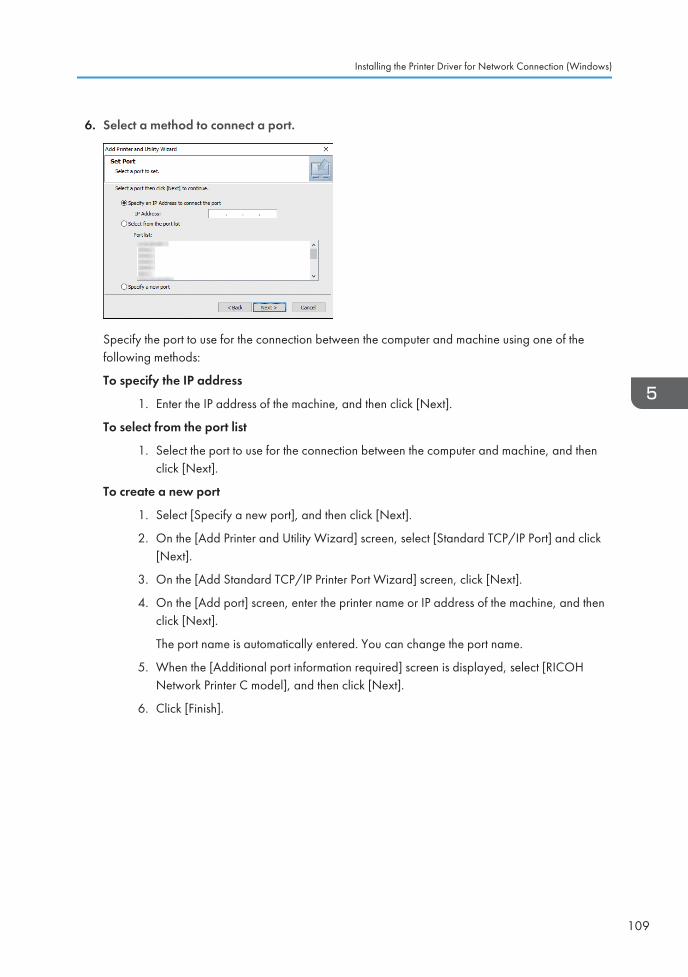
6. Select a method to connect a port.
Specify the port to use for the connection between the computer and machine using one of thefollowing methods:
To specify the IP address
1. Enter the IP address of the machine, and then click [Next].
To select from the port list
1. Select the port to use for the connection between the computer and machine, and thenclick [Next].
To create a new port
1. Select [Specify a new port], and then click [Next].
2. On the [Add Printer and Utility Wizard] screen, select [Standard TCP/IP Port] and click[Next].
3. On the [Add Standard TCP/IP Printer Port Wizard] screen, click [Next].
4. On the [Add port] screen, enter the printer name or IP address of the machine, and thenclick [Next].
The port name is automatically entered. You can change the port name.
5. When the [Additional port information required] screen is displayed, select [RICOHNetwork Printer C model], and then click [Next].
6. Click [Finish].
Installing the Printer Driver for Network Connection (Windows)
109
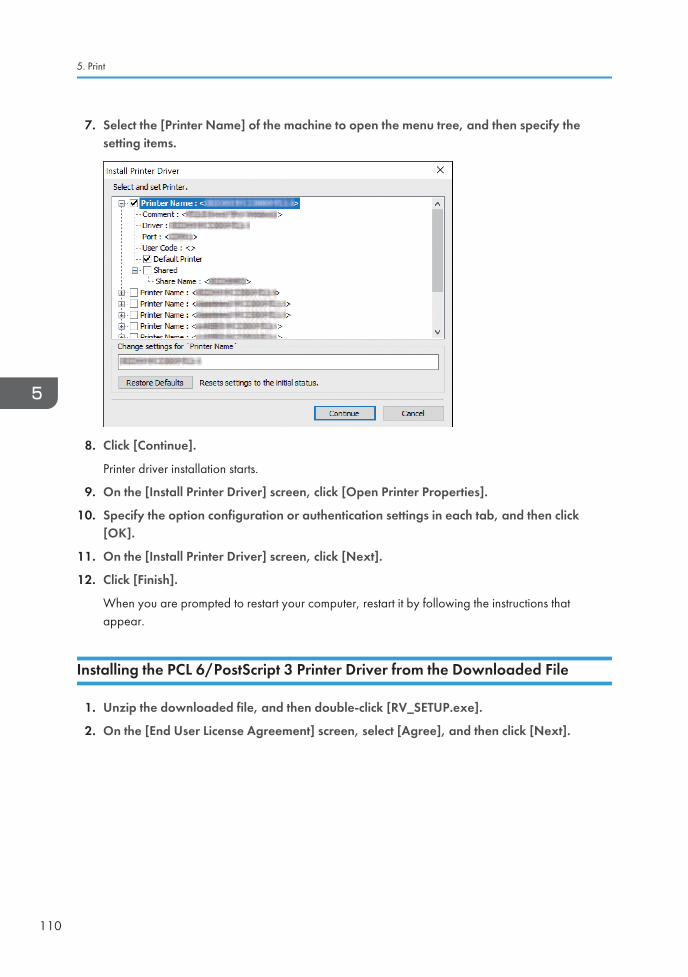
7. Select the [Printer Name] of the machine to open the menu tree, and then specify thesetting items.
8. Click [Continue].
Printer driver installation starts.
9. On the [Install Printer Driver] screen, click [Open Printer Properties].
10. Specify the option configuration or authentication settings in each tab, and then click[OK].
11. On the [Install Printer Driver] screen, click [Next].
12. Click [Finish].
When you are prompted to restart your computer, restart it by following the instructions thatappear.
Installing the PCL 6/PostScript 3 Printer Driver from the Downloaded File
1. Unzip the downloaded file, and then double-click [RV_SETUP.exe].
2. On the [End User License Agreement] screen, select [Agree], and then click [Next].
5. Print
110
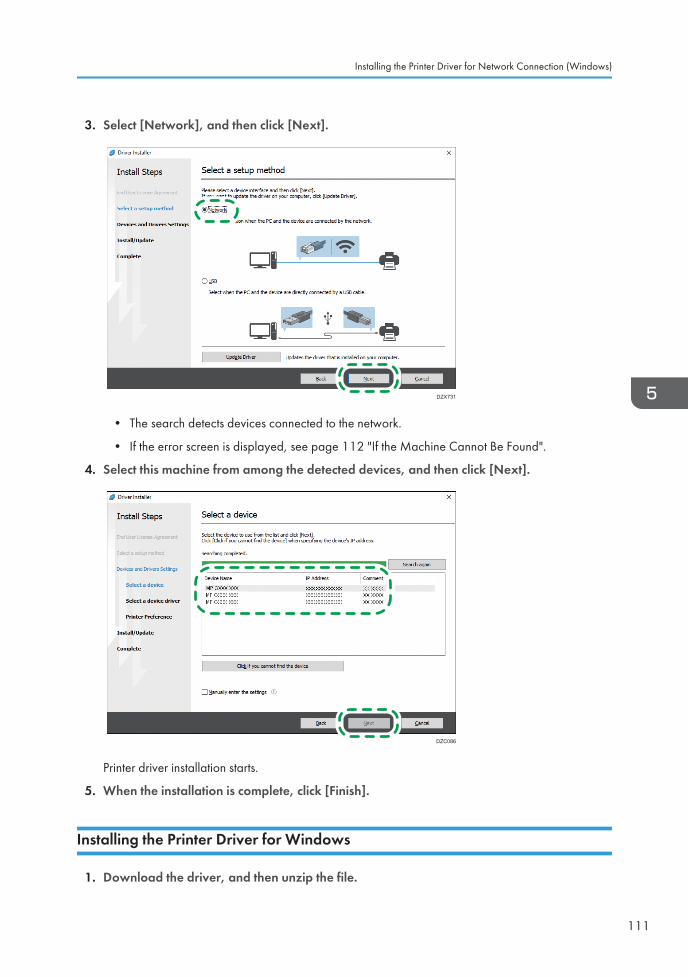
3. Select [Network], and then click [Next].
DZX731
• The search detects devices connected to the network.
• If the error screen is displayed, see page 112 "If the Machine Cannot Be Found".
4. Select this machine from among the detected devices, and then click [Next].
DZC086
Printer driver installation starts.
5. When the installation is complete, click [Finish].
Installing the Printer Driver for Windows
1. Download the driver, and then unzip the file.
Installing the Printer Driver for Network Connection (Windows)
111
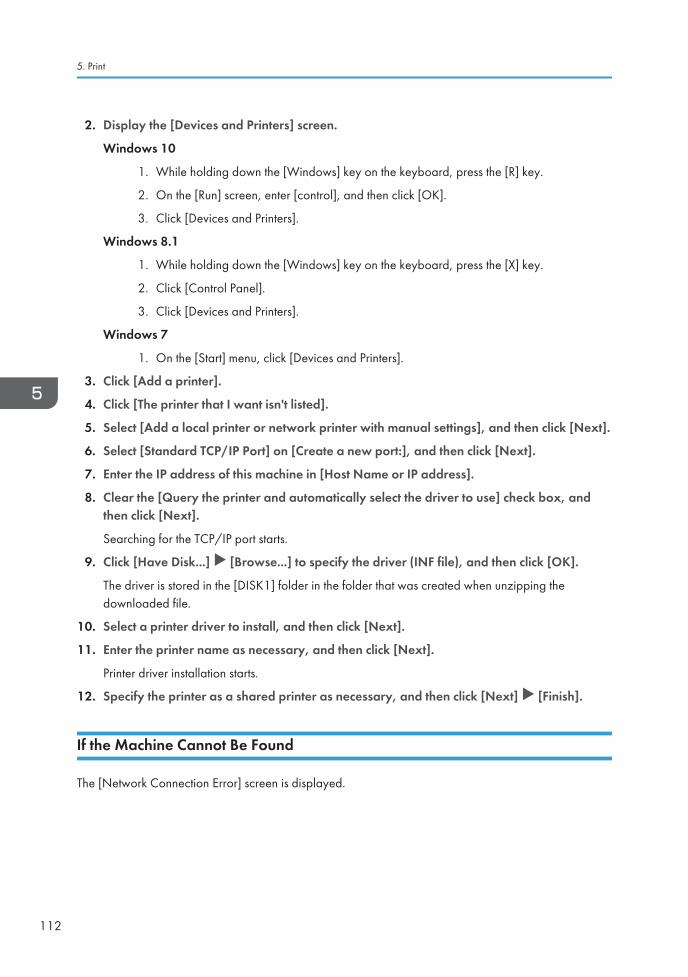
2. Display the [Devices and Printers] screen.
Windows 10
1. While holding down the [Windows] key on the keyboard, press the [R] key.
2. On the [Run] screen, enter [control], and then click [OK].
3. Click [Devices and Printers].
Windows 8.1
1. While holding down the [Windows] key on the keyboard, press the [X] key.
2. Click [Control Panel].
3. Click [Devices and Printers].
Windows 7
1. On the [Start] menu, click [Devices and Printers].
3. Click [Add a printer].
4. Click [The printer that I want isn't listed].
5. Select [Add a local printer or network printer with manual settings], and then click [Next].
6. Select [Standard TCP/IP Port] on [Create a new port:], and then click [Next].
7. Enter the IP address of this machine in [Host Name or IP address].
8. Clear the [Query the printer and automatically select the driver to use] check box, andthen click [Next].
Searching for the TCP/IP port starts.
9. Click [Have Disk...] [Browse...] to specify the driver (INF file), and then click [OK].
The driver is stored in the [DISK1] folder in the folder that was created when unzipping thedownloaded file.
10. Select a printer driver to install, and then click [Next].
11. Enter the printer name as necessary, and then click [Next].
Printer driver installation starts.
12. Specify the printer as a shared printer as necessary, and then click [Next] [Finish].
If the Machine Cannot Be Found
The [Network Connection Error] screen is displayed.
5. Print
112
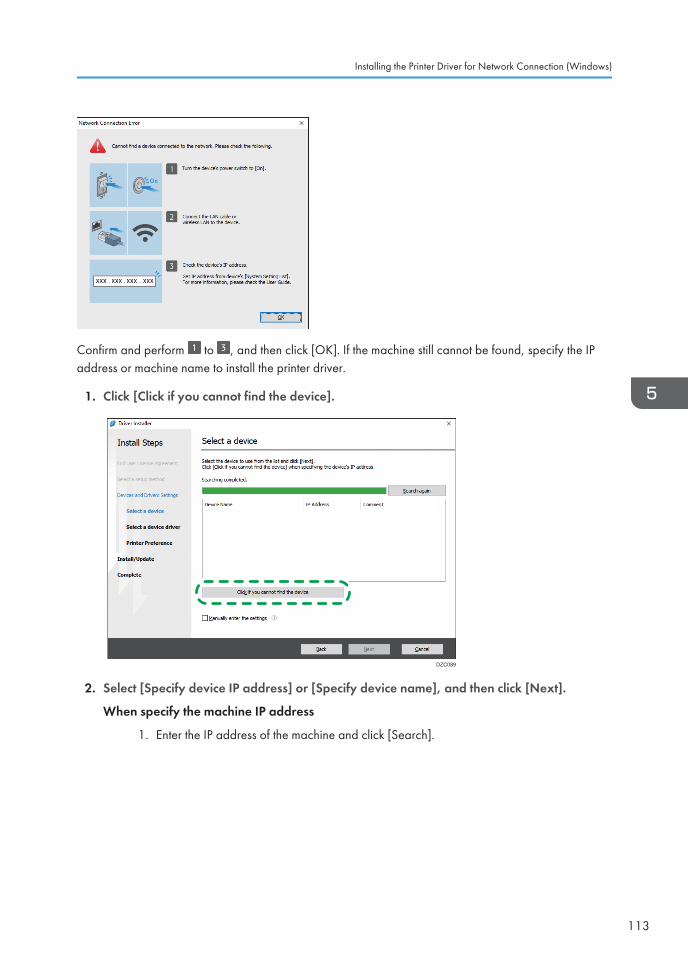
Confirm and perform to , and then click [OK]. If the machine still cannot be found, specify the IPaddress or machine name to install the printer driver.
1. Click [Click if you cannot find the device].
DZC089
2. Select [Specify device IP address] or [Specify device name], and then click [Next].
When specify the machine IP address
1. Enter the IP address of the machine and click [Search].
Installing the Printer Driver for Network Connection (Windows)
113
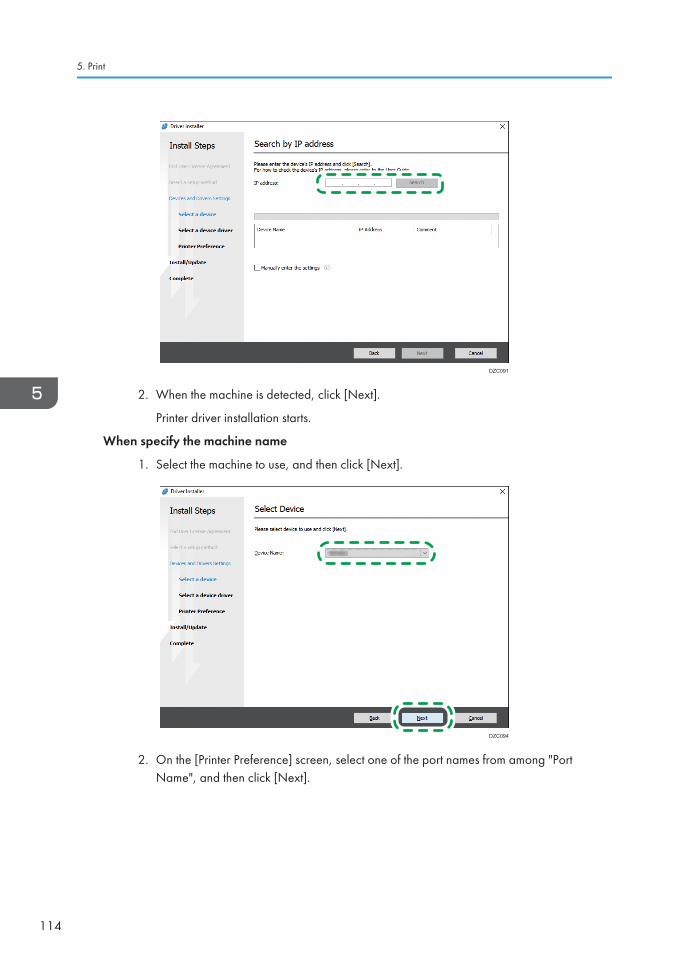
DZC091
2. When the machine is detected, click [Next].
Printer driver installation starts.
When specify the machine name
1. Select the machine to use, and then click [Next].
DZC094
2. On the [Printer Preference] screen, select one of the port names from among "PortName", and then click [Next].
5. Print
114
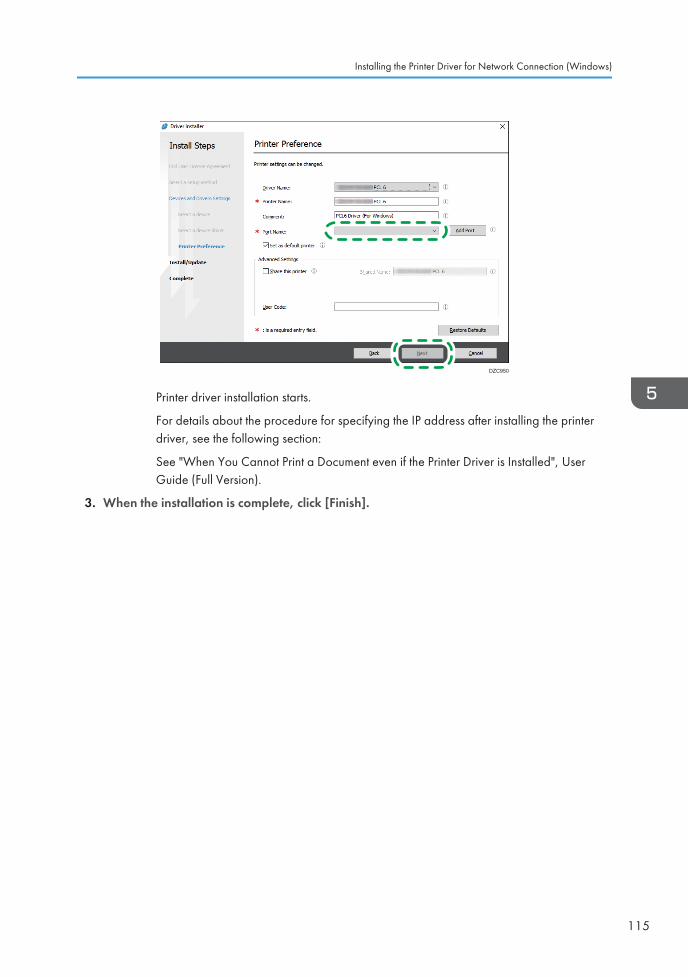
DZC950
Printer driver installation starts.
For details about the procedure for specifying the IP address after installing the printerdriver, see the following section:
See "When You Cannot Print a Document even if the Printer Driver is Installed", UserGuide (Full Version).
3. When the installation is complete, click [Finish].
Installing the Printer Driver for Network Connection (Windows)
115
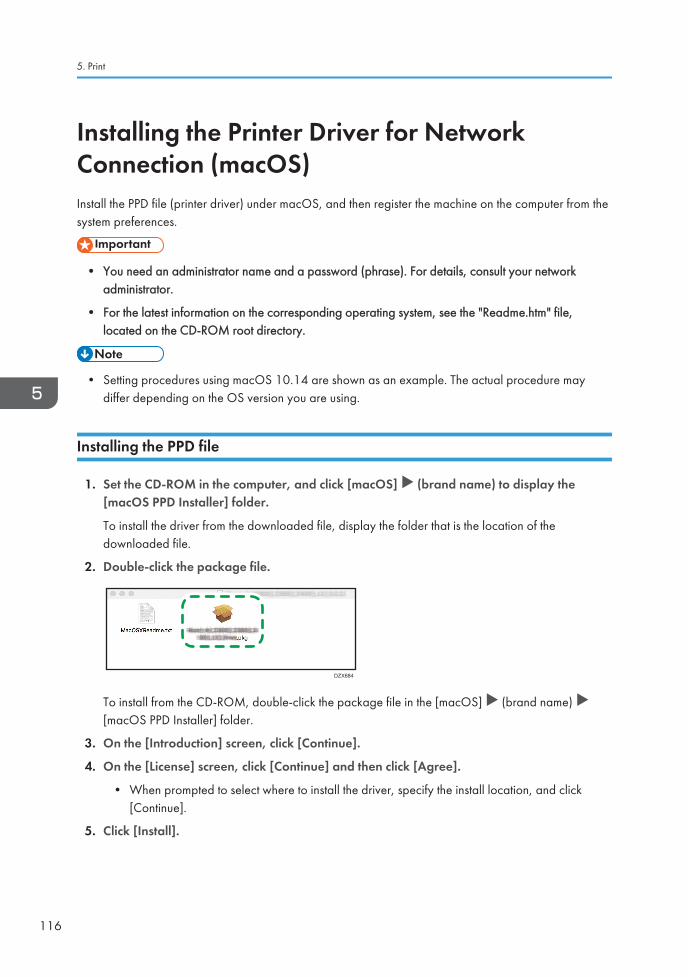
Installing the Printer Driver for NetworkConnection (macOS)Install the PPD file (printer driver) under macOS, and then register the machine on the computer from thesystem preferences.
• You need an administrator name and a password (phrase). For details, consult your networkadministrator.
• For the latest information on the corresponding operating system, see the "Readme.htm" file,located on the CD-ROM root directory.
• Setting procedures using macOS 10.14 are shown as an example. The actual procedure maydiffer depending on the OS version you are using.
Installing the PPD file
1. Set the CD-ROM in the computer, and click [macOS] (brand name) to display the[macOS PPD Installer] folder.
To install the driver from the downloaded file, display the folder that is the location of thedownloaded file.
2. Double-click the package file.
DZX684
To install from the CD-ROM, double-click the package file in the [macOS] (brand name) [macOS PPD Installer] folder.
3. On the [Introduction] screen, click [Continue].
4. On the [License] screen, click [Continue] and then click [Agree].
• When prompted to select where to install the driver, specify the install location, and click[Continue].
5. Click [Install].
5. Print
116
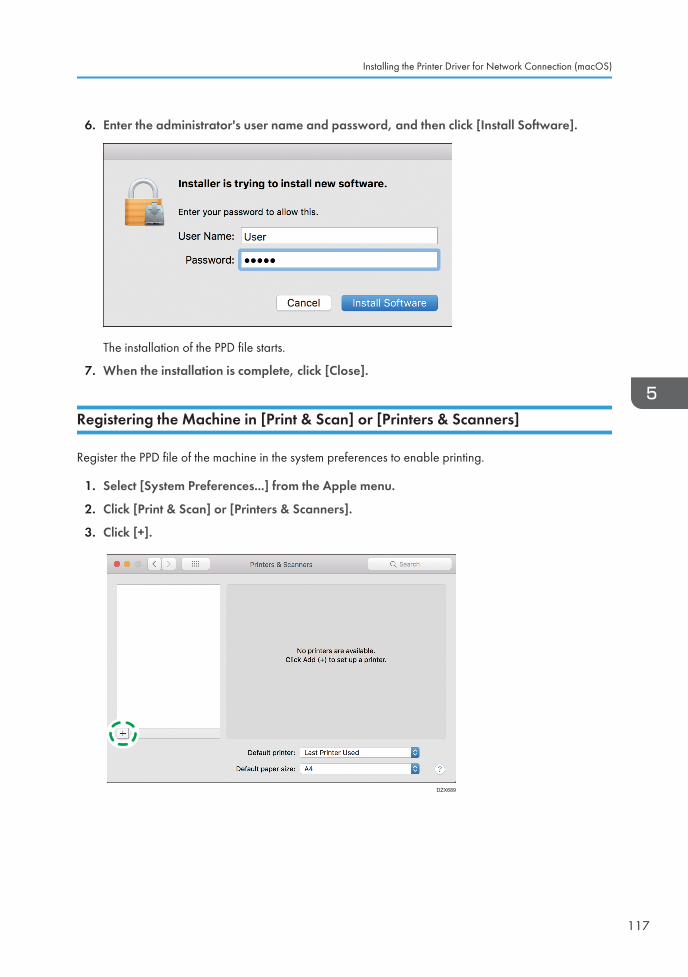
6. Enter the administrator's user name and password, and then click [Install Software].
The installation of the PPD file starts.
7. When the installation is complete, click [Close].
Registering the Machine in [Print & Scan] or [Printers & Scanners]
Register the PPD file of the machine in the system preferences to enable printing.
1. Select [System Preferences...] from the Apple menu.
2. Click [Print & Scan] or [Printers & Scanners].
3. Click [+].
DZX689
Installing the Printer Driver for Network Connection (macOS)
117
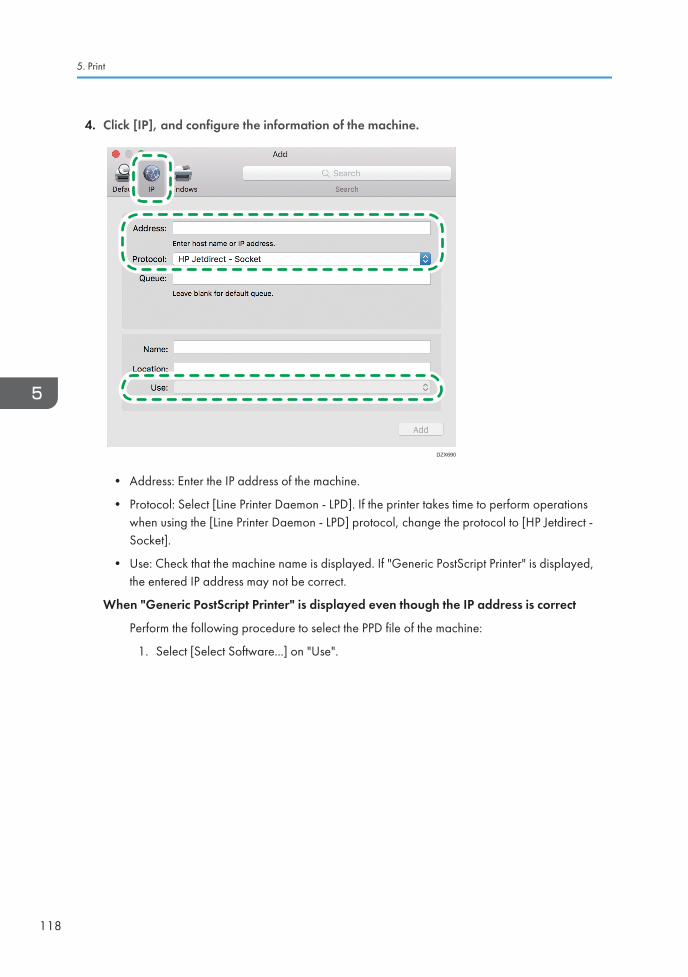
4. Click [IP], and configure the information of the machine.
DZX690
• Address: Enter the IP address of the machine.
• Protocol: Select [Line Printer Daemon - LPD]. If the printer takes time to perform operationswhen using the [Line Printer Daemon - LPD] protocol, change the protocol to [HP Jetdirect -Socket].
• Use: Check that the machine name is displayed. If "Generic PostScript Printer" is displayed,the entered IP address may not be correct.
When "Generic PostScript Printer" is displayed even though the IP address is correct
Perform the following procedure to select the PPD file of the machine:
1. Select [Select Software...] on "Use".
5. Print
118
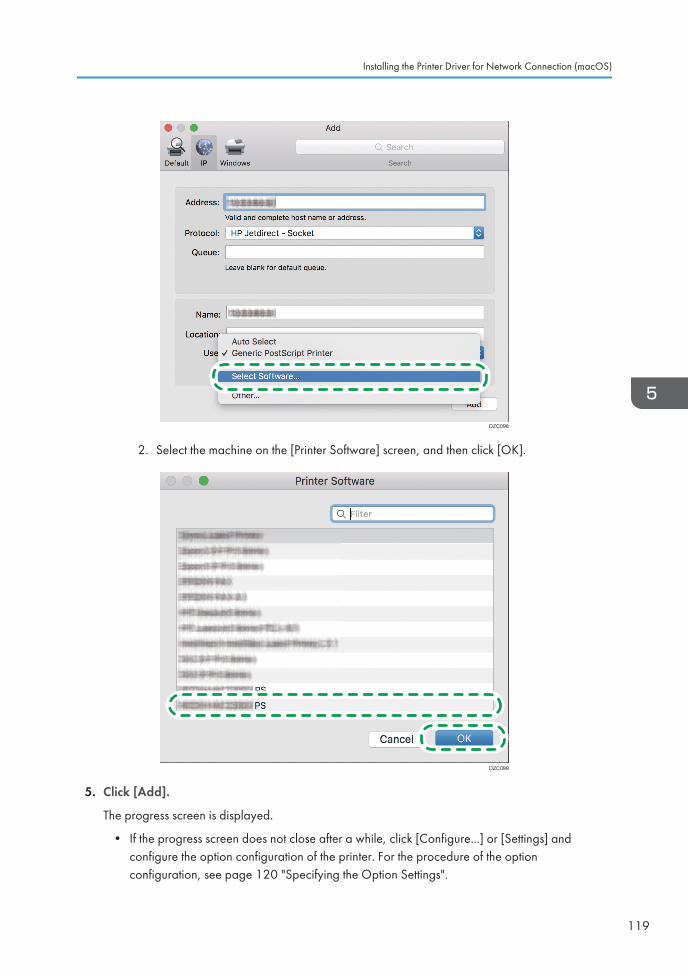
DZC098
2. Select the machine on the [Printer Software] screen, and then click [OK].
DZC099
5. Click [Add].
The progress screen is displayed.
• If the progress screen does not close after a while, click [Configure...] or [Settings] andconfigure the option configuration of the printer. For the procedure of the optionconfiguration, see page 120 "Specifying the Option Settings".
Installing the Printer Driver for Network Connection (macOS)
119
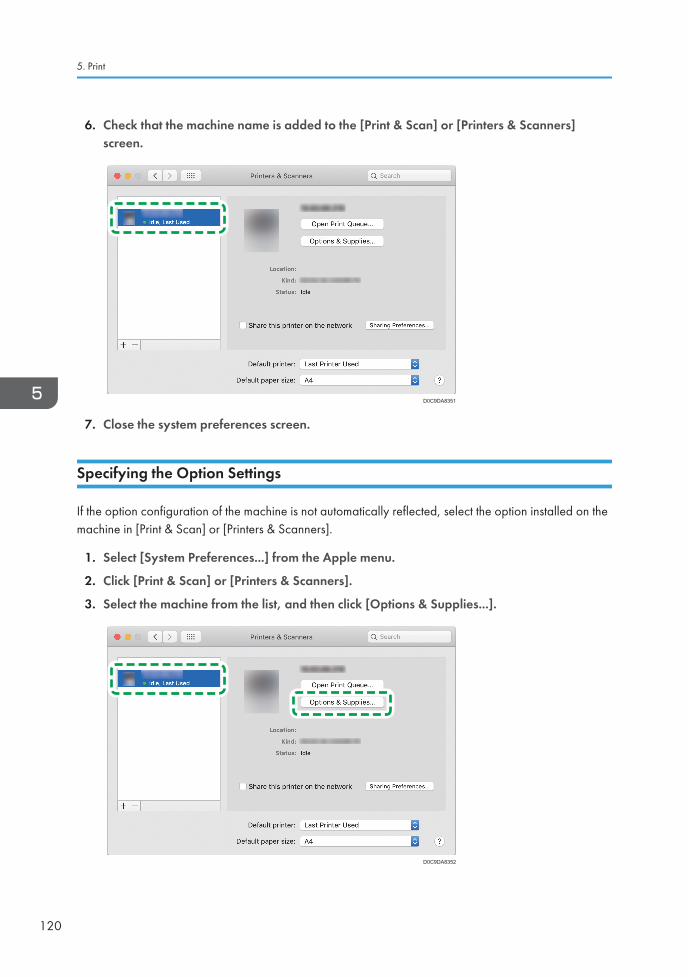
6. Check that the machine name is added to the [Print & Scan] or [Printers & Scanners]screen.
D0C9DA8351
7. Close the system preferences screen.
Specifying the Option Settings
If the option configuration of the machine is not automatically reflected, select the option installed on themachine in [Print & Scan] or [Printers & Scanners].
1. Select [System Preferences...] from the Apple menu.
2. Click [Print & Scan] or [Printers & Scanners].
3. Select the machine from the list, and then click [Options & Supplies...].
D0C9DA8352
5. Print
120

4. Click [Driver] or [Options], select the option installed on the machine, and then click [OK].
• If the usable options are not displayed, the IP address has not been entered correctly or thePPD file has not been registered properly. To enter the IP address or register the PPD file, seepage 117 "Registering the Machine in [Print & Scan] or [Printers & Scanners]".
5. Close the system preferences screen.
• If the option you want to select is not displayed, PPD files may not be set up correctly. To completethe setup, check the name of the PPD file displayed in the dialog box.
• Setting procedures using macOS 10.14 are shown as an example. The actual procedure maydiffer depending on the OS version you are using.
• To specify an optional Adobe PostScript when using a PostScript 3 printer driver, select [AdobePostScript] in the "PostScript:" list on the [Options] tab.
Installing the Printer Driver for Network Connection (macOS)
121
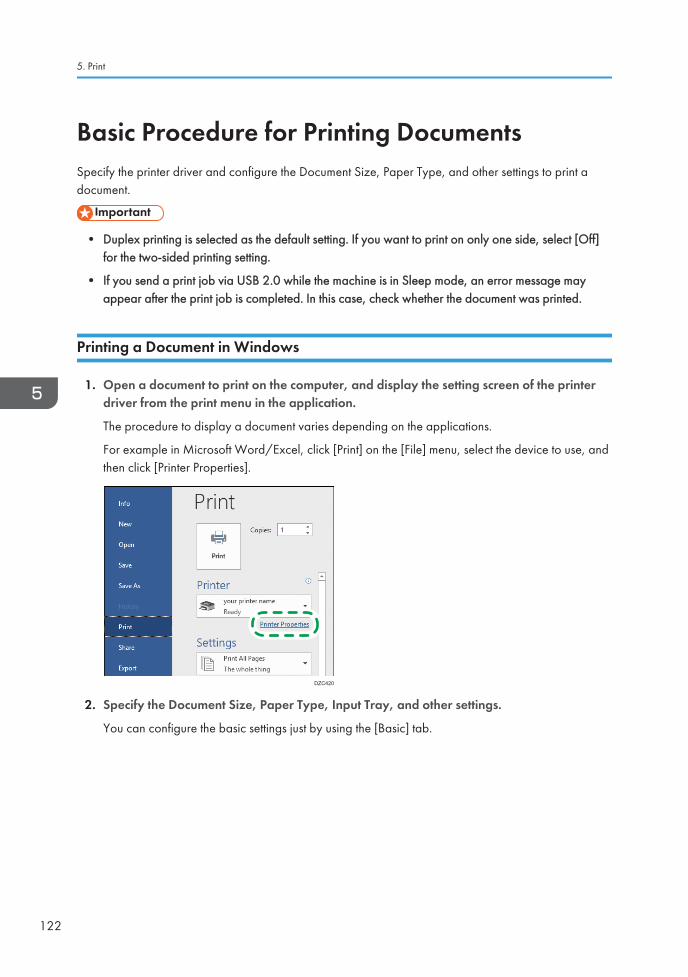
Basic Procedure for Printing DocumentsSpecify the printer driver and configure the Document Size, Paper Type, and other settings to print adocument.
• Duplex printing is selected as the default setting. If you want to print on only one side, select [Off]for the two-sided printing setting.
• If you send a print job via USB 2.0 while the machine is in Sleep mode, an error message mayappear after the print job is completed. In this case, check whether the document was printed.
Printing a Document in Windows
1. Open a document to print on the computer, and display the setting screen of the printerdriver from the print menu in the application.
The procedure to display a document varies depending on the applications.
For example in Microsoft Word/Excel, click [Print] on the [File] menu, select the device to use, andthen click [Printer Properties].
DZC420
2. Specify the Document Size, Paper Type, Input Tray, and other settings.
You can configure the basic settings just by using the [Basic] tab.
5. Print
122
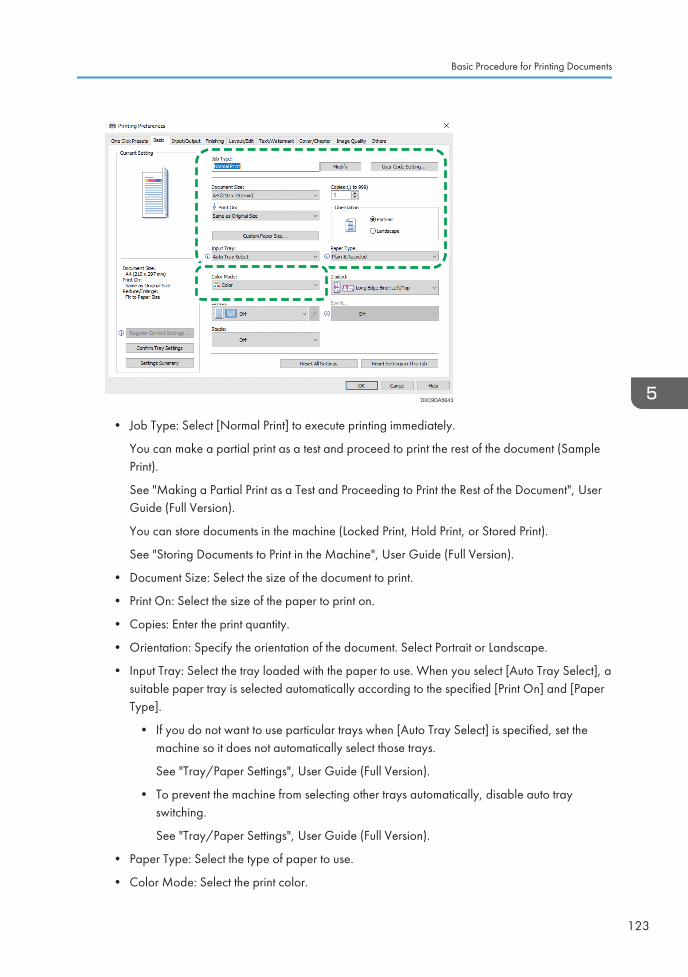
D0C9DA5643
• Job Type: Select [Normal Print] to execute printing immediately.
You can make a partial print as a test and proceed to print the rest of the document (SamplePrint).
See "Making a Partial Print as a Test and Proceeding to Print the Rest of the Document", UserGuide (Full Version).
You can store documents in the machine (Locked Print, Hold Print, or Stored Print).
See "Storing Documents to Print in the Machine", User Guide (Full Version).
• Document Size: Select the size of the document to print.
• Print On: Select the size of the paper to print on.
• Copies: Enter the print quantity.
• Orientation: Specify the orientation of the document. Select Portrait or Landscape.
• Input Tray: Select the tray loaded with the paper to use. When you select [Auto Tray Select], asuitable paper tray is selected automatically according to the specified [Print On] and [PaperType].
• If you do not want to use particular trays when [Auto Tray Select] is specified, set themachine so it does not automatically select those trays.
See "Tray/Paper Settings", User Guide (Full Version).
• To prevent the machine from selecting other trays automatically, disable auto trayswitching.
See "Tray/Paper Settings", User Guide (Full Version).
• Paper Type: Select the type of paper to use.
• Color Mode: Select the print color.
Basic Procedure for Printing Documents
123
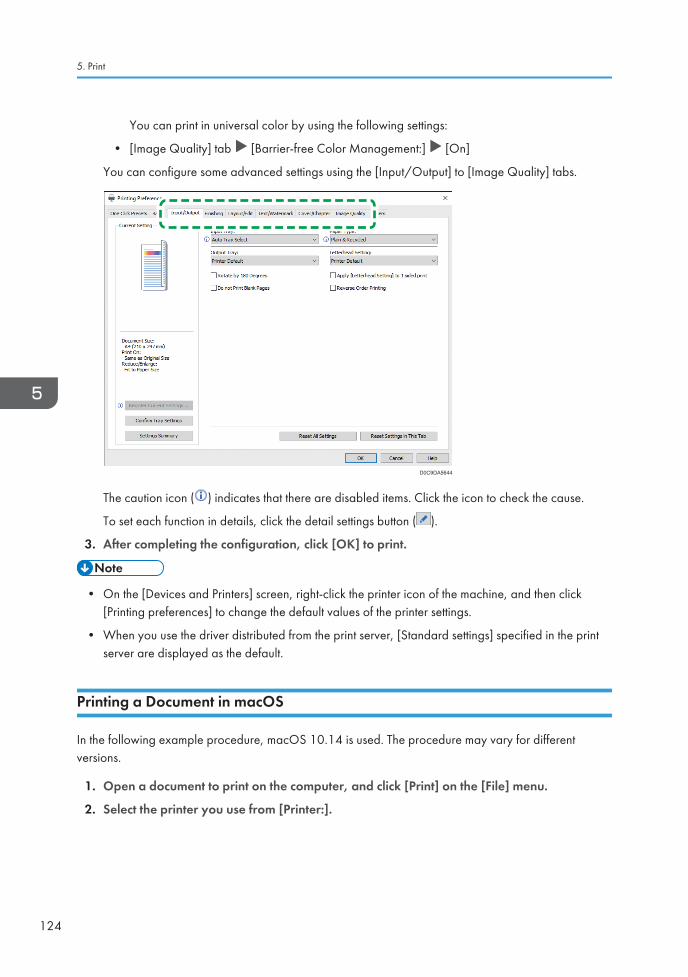
You can print in universal color by using the following settings:
• [Image Quality] tab [Barrier-free Color Management:] [On]
You can configure some advanced settings using the [Input/Output] to [Image Quality] tabs.
D0C9DA5644
The caution icon ( ) indicates that there are disabled items. Click the icon to check the cause.
To set each function in details, click the detail settings button ( ).
3. After completing the configuration, click [OK] to print.
• On the [Devices and Printers] screen, right-click the printer icon of the machine, and then click[Printing preferences] to change the default values of the printer settings.
• When you use the driver distributed from the print server, [Standard settings] specified in the printserver are displayed as the default.
Printing a Document in macOS
In the following example procedure, macOS 10.14 is used. The procedure may vary for differentversions.
1. Open a document to print on the computer, and click [Print] on the [File] menu.
2. Select the printer you use from [Printer:].
5. Print
124
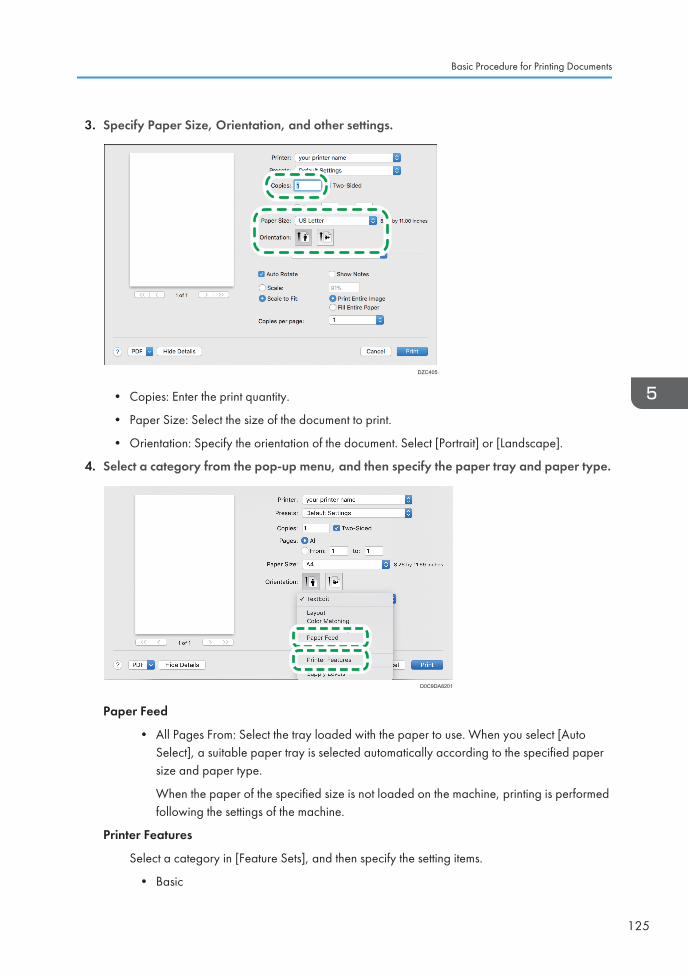
3. Specify Paper Size, Orientation, and other settings.
DZC405
• Copies: Enter the print quantity.
• Paper Size: Select the size of the document to print.
• Orientation: Specify the orientation of the document. Select [Portrait] or [Landscape].
4. Select a category from the pop-up menu, and then specify the paper tray and paper type.
D0C9DA8201
Paper Feed
• All Pages From: Select the tray loaded with the paper to use. When you select [AutoSelect], a suitable paper tray is selected automatically according to the specified papersize and paper type.
When the paper of the specified size is not loaded on the machine, printing is performedfollowing the settings of the machine.
Printer Features
Select a category in [Feature Sets], and then specify the setting items.
• Basic
Basic Procedure for Printing Documents
125
• Color Mode: Select the print color.
• Paper
• Paper Type: Select the type of paper to use.
• Job Log
• Job Type: Select [Normal Print] to execute printing immediately.
You can make a partial print as a test and proceed to print the rest of the document(Sample Print).
See "Making a Partial Print as a Test and Proceeding to Print the Rest of theDocument", User Guide (Full Version).
You can store documents in the machine (Locked Print, Hold Print, or Stored Print).
See "Storing Documents to Print in the Machine", User Guide (Full Version).
5. After completing the configuration, click [Print] to print.
5. Print
126
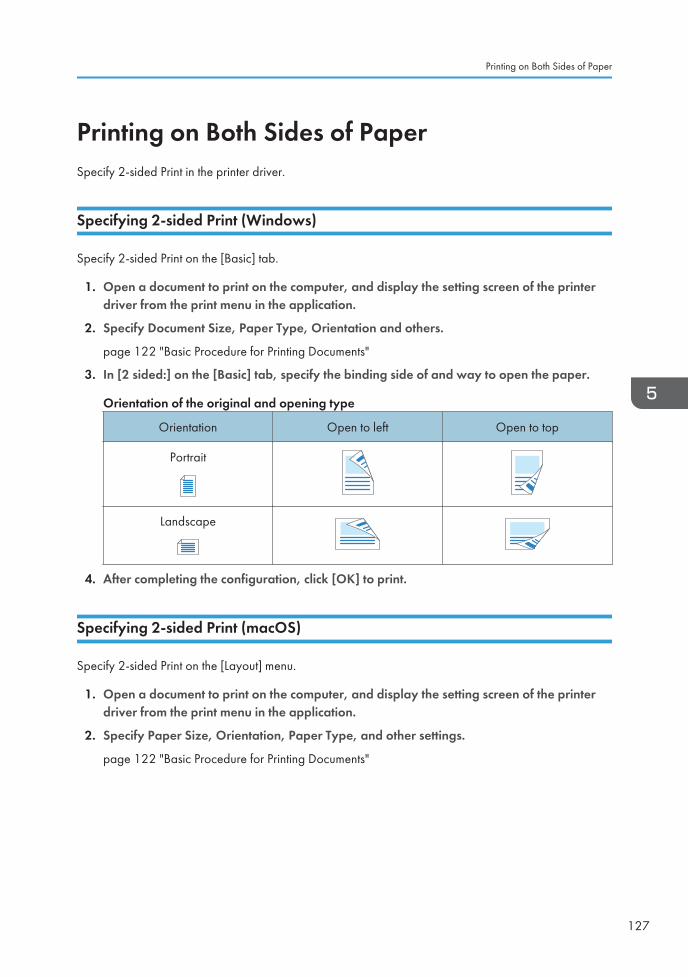
Printing on Both Sides of PaperSpecify 2-sided Print in the printer driver.
Specifying 2-sided Print (Windows)
Specify 2-sided Print on the [Basic] tab.
1. Open a document to print on the computer, and display the setting screen of the printerdriver from the print menu in the application.
2. Specify Document Size, Paper Type, Orientation and others.
page 122 "Basic Procedure for Printing Documents"
3. In [2 sided:] on the [Basic] tab, specify the binding side of and way to open the paper.
Orientation of the original and opening type
Orientation Open to left Open to top
Portrait
Landscape
4. After completing the configuration, click [OK] to print.
Specifying 2-sided Print (macOS)
Specify 2-sided Print on the [Layout] menu.
1. Open a document to print on the computer, and display the setting screen of the printerdriver from the print menu in the application.
2. Specify Paper Size, Orientation, Paper Type, and other settings.
page 122 "Basic Procedure for Printing Documents"
Printing on Both Sides of Paper
127
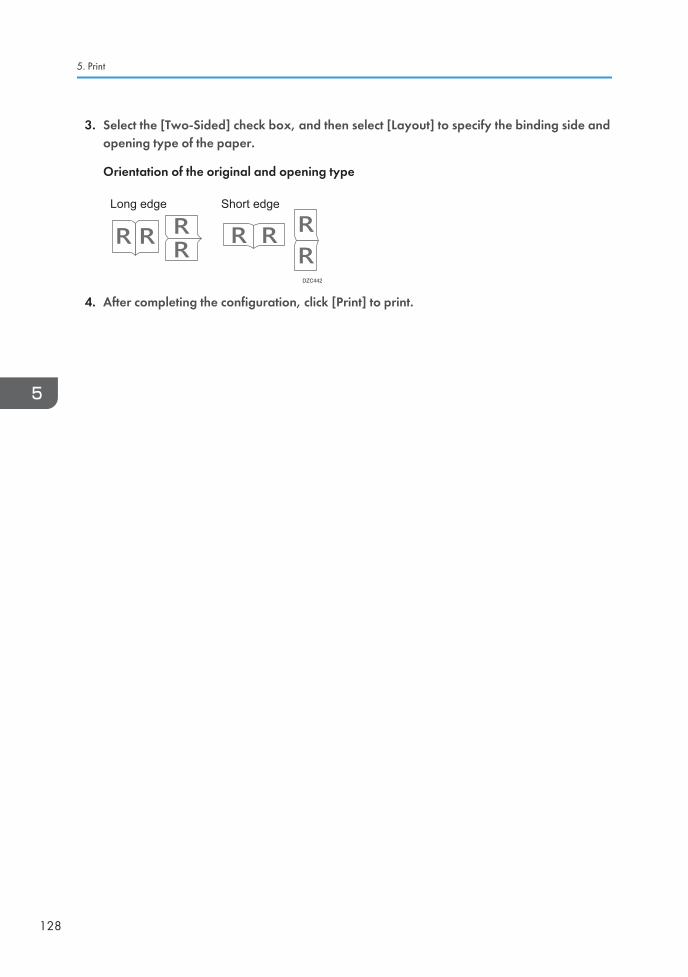
3. Select the [Two-Sided] check box, and then select [Layout] to specify the binding side andopening type of the paper.
Orientation of the original and opening type
Long edge Short edge
DZC442
4. After completing the configuration, click [Print] to print.
5. Print
128
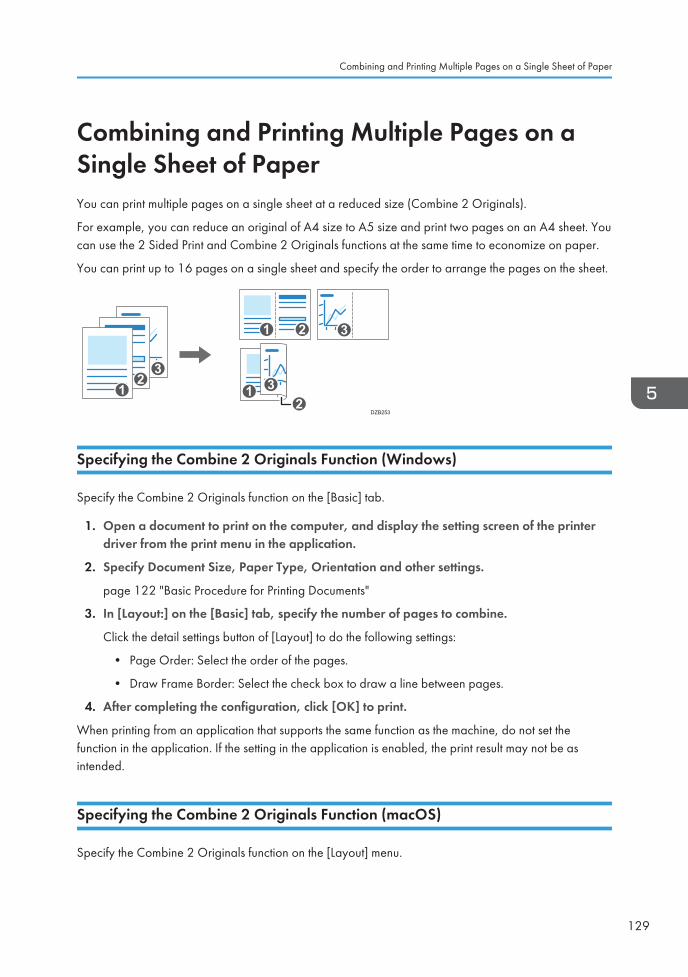
Combining and Printing Multiple Pages on aSingle Sheet of PaperYou can print multiple pages on a single sheet at a reduced size (Combine 2 Originals).
For example, you can reduce an original of A4 size to A5 size and print two pages on an A4 sheet. Youcan use the 2 Sided Print and Combine 2 Originals functions at the same time to economize on paper.
You can print up to 16 pages on a single sheet and specify the order to arrange the pages on the sheet.
32
1
321
312
DZB253
Specifying the Combine 2 Originals Function (Windows)
Specify the Combine 2 Originals function on the [Basic] tab.
1. Open a document to print on the computer, and display the setting screen of the printerdriver from the print menu in the application.
2. Specify Document Size, Paper Type, Orientation and other settings.
page 122 "Basic Procedure for Printing Documents"
3. In [Layout:] on the [Basic] tab, specify the number of pages to combine.
Click the detail settings button of [Layout] to do the following settings:
• Page Order: Select the order of the pages.
• Draw Frame Border: Select the check box to draw a line between pages.
4. After completing the configuration, click [OK] to print.
When printing from an application that supports the same function as the machine, do not set thefunction in the application. If the setting in the application is enabled, the print result may not be asintended.
Specifying the Combine 2 Originals Function (macOS)
Specify the Combine 2 Originals function on the [Layout] menu.
Combining and Printing Multiple Pages on a Single Sheet of Paper
129
1. Open a document to print on the computer, and display the setting screen of the printerdriver from the print menu in the application.
2. Specify Paper Size, Orientation, Paper Type, and other settings.
page 122 "Basic Procedure for Printing Documents"
3. Select [Layout], and then specify the number of pages to combine and the order of thepages.
Configure the following settings:
• Pages per Sheet: Select the number of pages to combine.
• Layout Direction: Select the order of the pages.
• Border: Select a type of border line to draw between the pages.
4. After completing the configuration, click [Print] to print.
5. Print
130
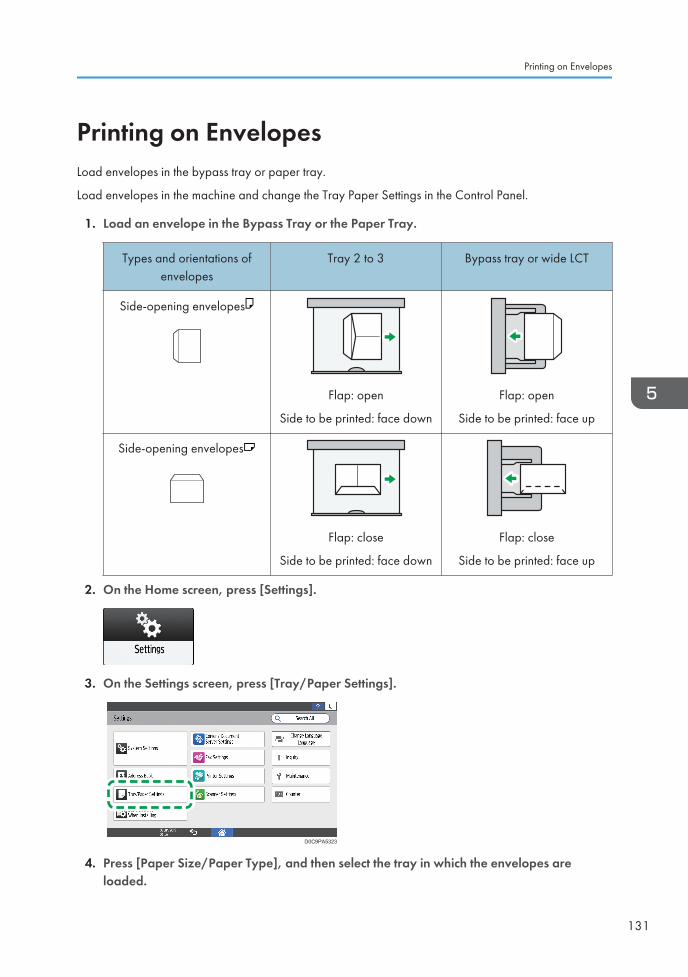
Printing on EnvelopesLoad envelopes in the bypass tray or paper tray.
Load envelopes in the machine and change the Tray Paper Settings in the Control Panel.
1. Load an envelope in the Bypass Tray or the Paper Tray.
Types and orientations ofenvelopes
Tray 2 to 3 Bypass tray or wide LCT
Side-opening envelopes
Flap: open
Side to be printed: face down
Flap: open
Side to be printed: face up
Side-opening envelopes
Flap: close
Side to be printed: face down
Flap: close
Side to be printed: face up
2. On the Home screen, press [Settings].
3. On the Settings screen, press [Tray/Paper Settings].
D0C9PA5323
4. Press [Paper Size/Paper Type], and then select the tray in which the envelopes areloaded.
Printing on Envelopes
131
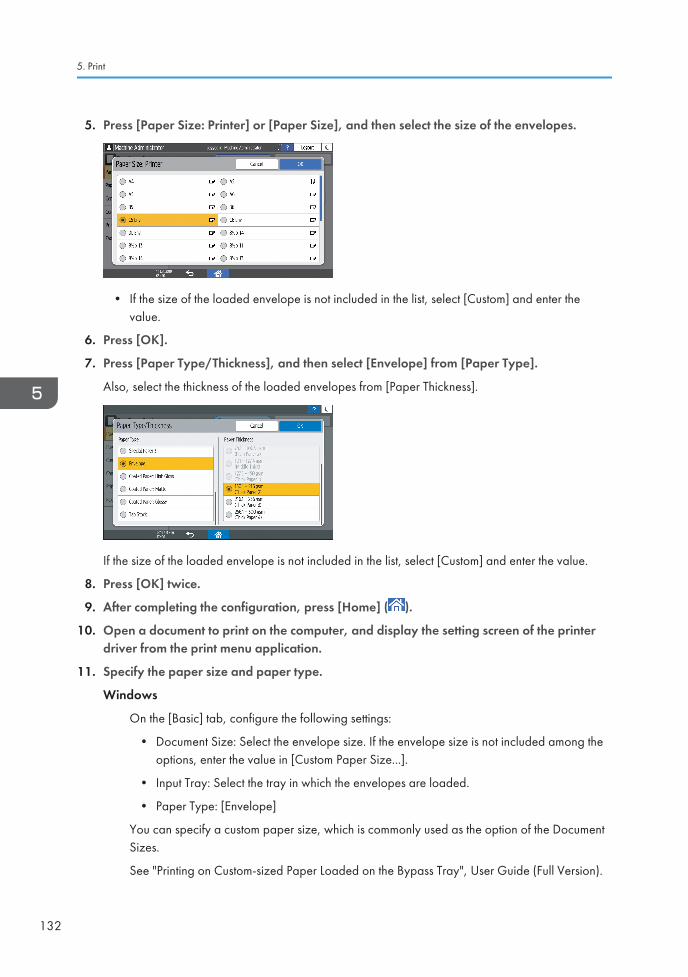
5. Press [Paper Size: Printer] or [Paper Size], and then select the size of the envelopes.
• If the size of the loaded envelope is not included in the list, select [Custom] and enter thevalue.
6. Press [OK].
7. Press [Paper Type/Thickness], and then select [Envelope] from [Paper Type].
Also, select the thickness of the loaded envelopes from [Paper Thickness].
If the size of the loaded envelope is not included in the list, select [Custom] and enter the value.
8. Press [OK] twice.
9. After completing the configuration, press [Home] ( ).
10. Open a document to print on the computer, and display the setting screen of the printerdriver from the print menu application.
11. Specify the paper size and paper type.
Windows
On the [Basic] tab, configure the following settings:
• Document Size: Select the envelope size. If the envelope size is not included among theoptions, enter the value in [Custom Paper Size...].
• Input Tray: Select the tray in which the envelopes are loaded.
• Paper Type: [Envelope]
You can specify a custom paper size, which is commonly used as the option of the DocumentSizes.
See "Printing on Custom-sized Paper Loaded on the Bypass Tray", User Guide (Full Version).
5. Print
132
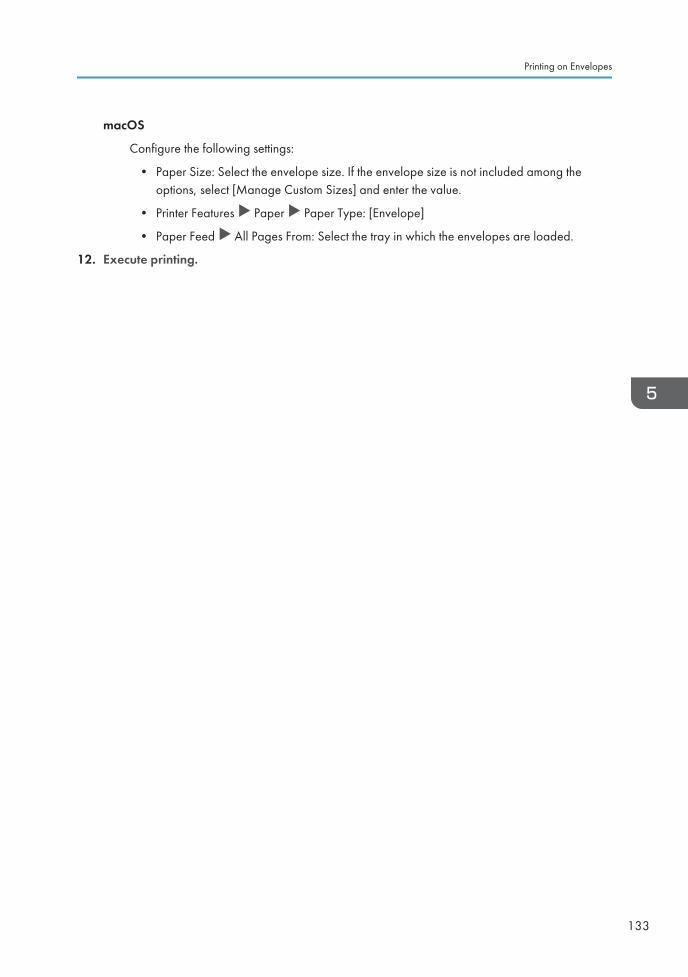
macOS
Configure the following settings:
• Paper Size: Select the envelope size. If the envelope size is not included among theoptions, select [Manage Custom Sizes] and enter the value.
• Printer Features Paper Paper Type: [Envelope]
• Paper Feed All Pages From: Select the tray in which the envelopes are loaded.
12. Execute printing.
Printing on Envelopes
133
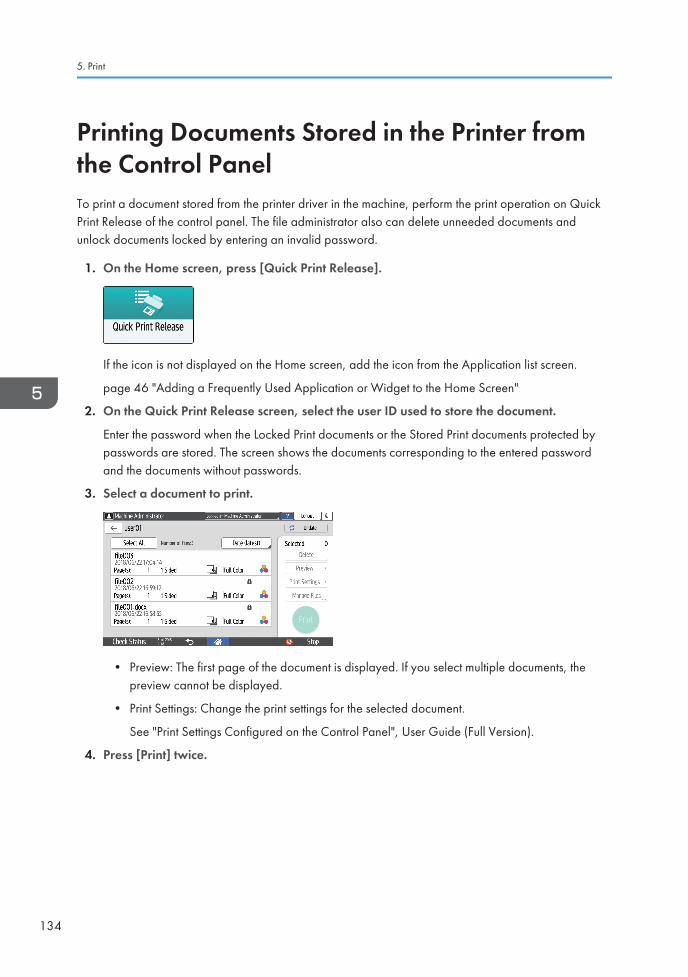
Printing Documents Stored in the Printer fromthe Control PanelTo print a document stored from the printer driver in the machine, perform the print operation on QuickPrint Release of the control panel. The file administrator also can delete unneeded documents andunlock documents locked by entering an invalid password.
1. On the Home screen, press [Quick Print Release].
If the icon is not displayed on the Home screen, add the icon from the Application list screen.
page 46 "Adding a Frequently Used Application or Widget to the Home Screen"
2. On the Quick Print Release screen, select the user ID used to store the document.
Enter the password when the Locked Print documents or the Stored Print documents protected bypasswords are stored. The screen shows the documents corresponding to the entered passwordand the documents without passwords.
3. Select a document to print.
• Preview: The first page of the document is displayed. If you select multiple documents, thepreview cannot be displayed.
• Print Settings: Change the print settings for the selected document.
See "Print Settings Configured on the Control Panel", User Guide (Full Version).
4. Press [Print] twice.
5. Print
134
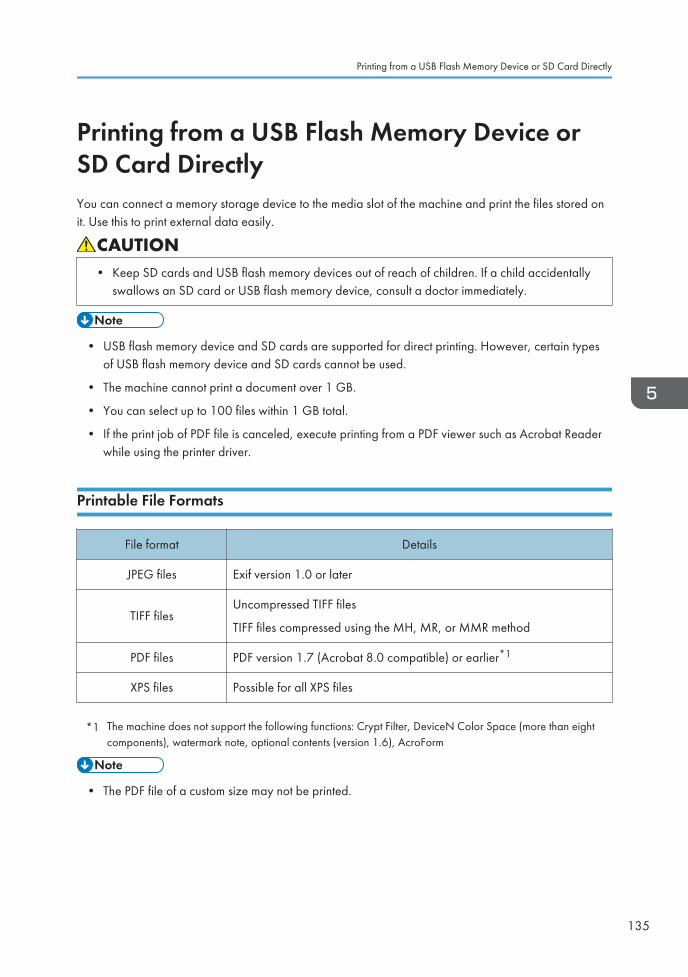
Printing from a USB Flash Memory Device orSD Card DirectlyYou can connect a memory storage device to the media slot of the machine and print the files stored onit. Use this to print external data easily.
• Keep SD cards and USB flash memory devices out of reach of children. If a child accidentallyswallows an SD card or USB flash memory device, consult a doctor immediately.
• USB flash memory device and SD cards are supported for direct printing. However, certain typesof USB flash memory device and SD cards cannot be used.
• The machine cannot print a document over 1 GB.
• You can select up to 100 files within 1 GB total.
• If the print job of PDF file is canceled, execute printing from a PDF viewer such as Acrobat Readerwhile using the printer driver.
Printable File Formats
File format Details
JPEG files Exif version 1.0 or later
TIFF filesUncompressed TIFF files
TIFF files compressed using the MH, MR, or MMR method
PDF files PDF version 1.7 (Acrobat 8.0 compatible) or earlier*1
XPS files Possible for all XPS files
*1 The machine does not support the following functions: Crypt Filter, DeviceN Color Space (more than eightcomponents), watermark note, optional contents (version 1.6), AcroForm
• The PDF file of a custom size may not be printed.
Printing from a USB Flash Memory Device or SD Card Directly
135

Printing from a Memory Storage Device or Scan Application
1. On the Home screen, press [Print/Scan (Memory Storage Device)]
2. On the Print/Scan (Memory Storage Device) screen, press [Print from Storage Device]
DZX460
3. Insert a memory storage device in the media slot on the side of the control panel.
D0CMIC1307
4. Press [USB] or [SD Card].
5. Select the file to print.
Files in the external media are displayed as icons or thumbnail images.
5. Print
136
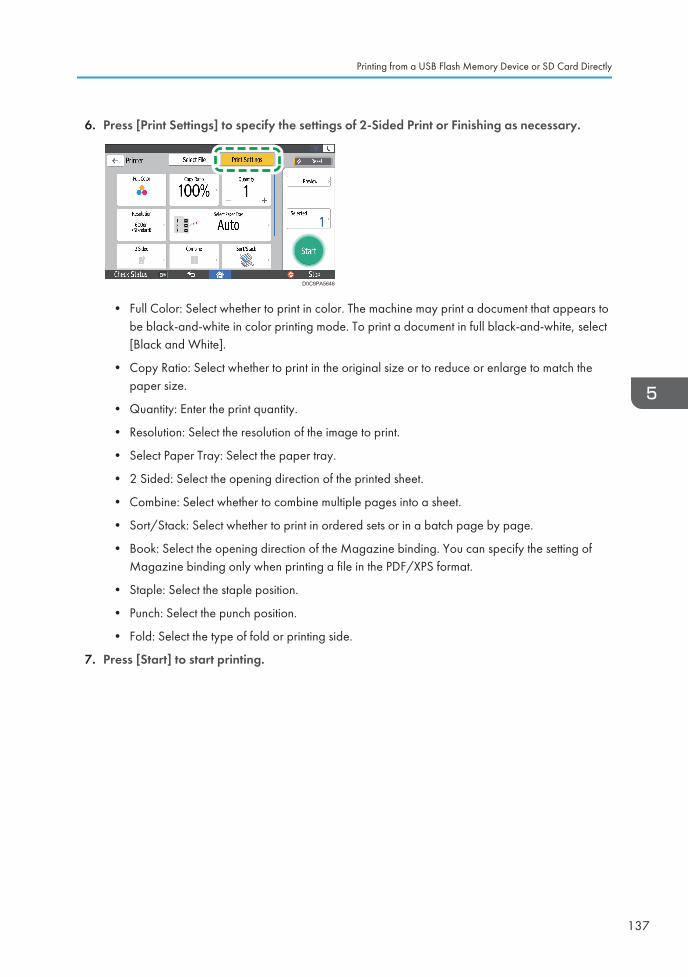
6. Press [Print Settings] to specify the settings of 2-Sided Print or Finishing as necessary.
D0C9PA5646
• Full Color: Select whether to print in color. The machine may print a document that appears tobe black-and-white in color printing mode. To print a document in full black-and-white, select[Black and White].
• Copy Ratio: Select whether to print in the original size or to reduce or enlarge to match thepaper size.
• Quantity: Enter the print quantity.
• Resolution: Select the resolution of the image to print.
• Select Paper Tray: Select the paper tray.
• 2 Sided: Select the opening direction of the printed sheet.
• Combine: Select whether to combine multiple pages into a sheet.
• Sort/Stack: Select whether to print in ordered sets or in a batch page by page.
• Book: Select the opening direction of the Magazine binding. You can specify the setting ofMagazine binding only when printing a file in the PDF/XPS format.
• Staple: Select the staple position.
• Punch: Select the punch position.
• Fold: Select the type of fold or printing side.
7. Press [Start] to start printing.
Printing from a USB Flash Memory Device or SD Card Directly
137

5. Print
138
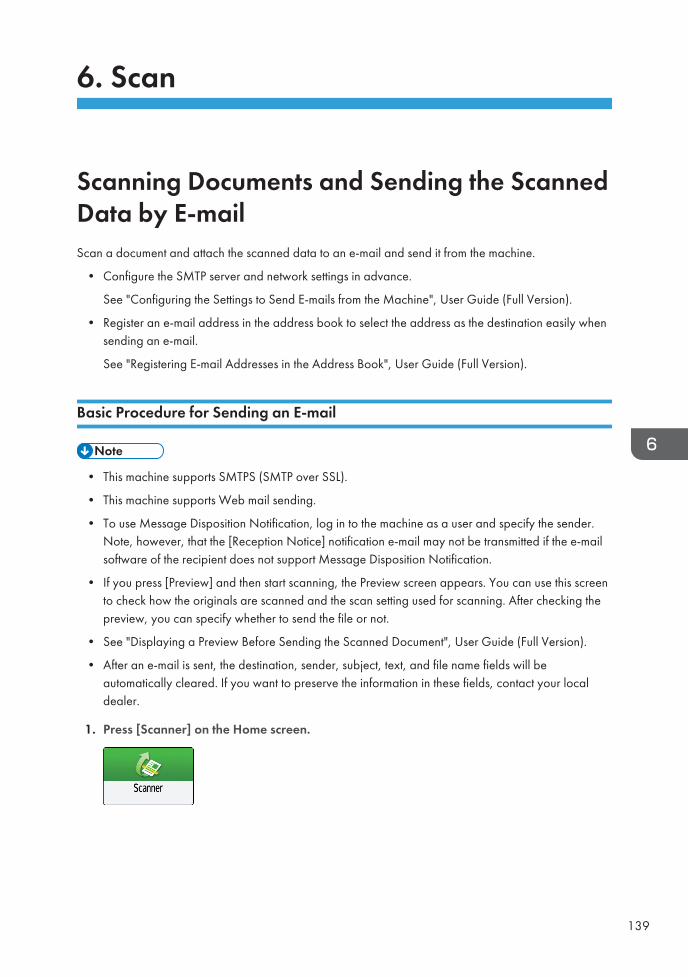
6. Scan
Scanning Documents and Sending the ScannedData by E-mailScan a document and attach the scanned data to an e-mail and send it from the machine.
• Configure the SMTP server and network settings in advance.
See "Configuring the Settings to Send E-mails from the Machine", User Guide (Full Version).
• Register an e-mail address in the address book to select the address as the destination easily whensending an e-mail.
See "Registering E-mail Addresses in the Address Book", User Guide (Full Version).
Basic Procedure for Sending an E-mail
• This machine supports SMTPS (SMTP over SSL).
• This machine supports Web mail sending.
• To use Message Disposition Notification, log in to the machine as a user and specify the sender.Note, however, that the [Reception Notice] notification e-mail may not be transmitted if the e-mailsoftware of the recipient does not support Message Disposition Notification.
• If you press [Preview] and then start scanning, the Preview screen appears. You can use this screento check how the originals are scanned and the scan setting used for scanning. After checking thepreview, you can specify whether to send the file or not.
• See "Displaying a Preview Before Sending the Scanned Document", User Guide (Full Version).
• After an e-mail is sent, the destination, sender, subject, text, and file name fields will beautomatically cleared. If you want to preserve the information in these fields, contact your localdealer.
1. Press [Scanner] on the Home screen.
139
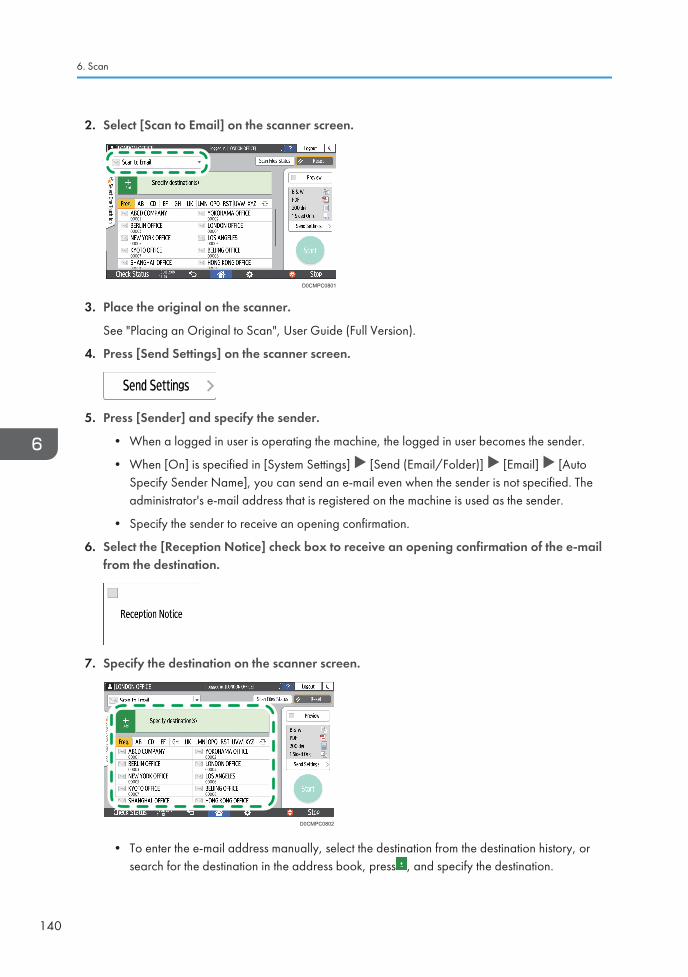
2. Select [Scan to Email] on the scanner screen.
D0CMPC0801
3. Place the original on the scanner.
See "Placing an Original to Scan", User Guide (Full Version).
4. Press [Send Settings] on the scanner screen.
5. Press [Sender] and specify the sender.
• When a logged in user is operating the machine, the logged in user becomes the sender.
• When [On] is specified in [System Settings] [Send (Email/Folder)] [Email] [AutoSpecify Sender Name], you can send an e-mail even when the sender is not specified. Theadministrator's e-mail address that is registered on the machine is used as the sender.
• Specify the sender to receive an opening confirmation.
6. Select the [Reception Notice] check box to receive an opening confirmation of the e-mailfrom the destination.
7. Specify the destination on the scanner screen.
D0CMPC0802
• To enter the e-mail address manually, select the destination from the destination history, orsearch for the destination in the address book, press , and specify the destination.
6. Scan
140
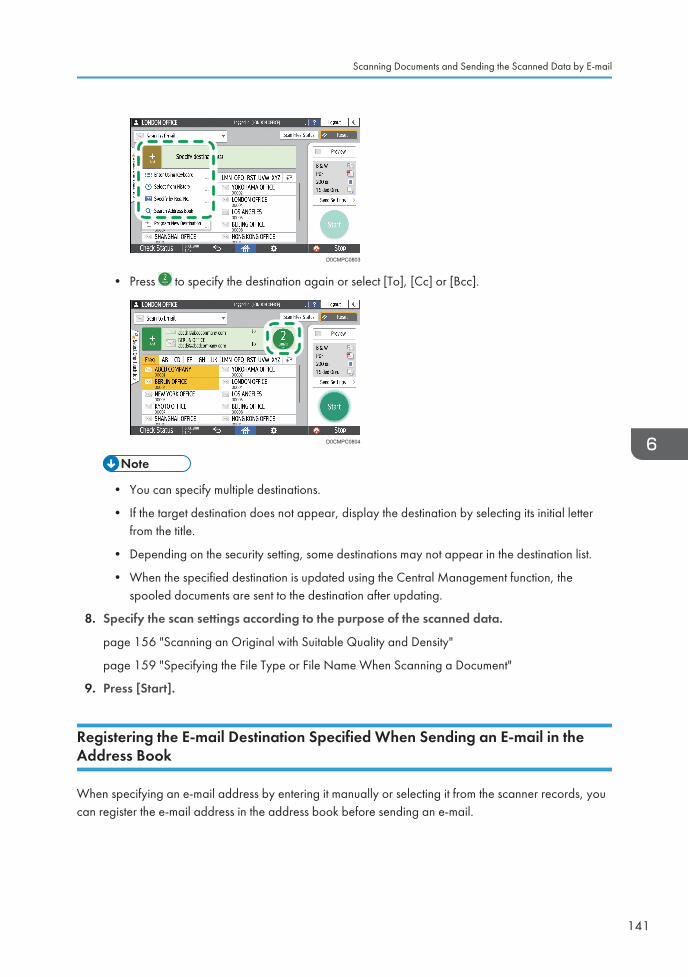
D0CMPC0803
• Press to specify the destination again or select [To], [Cc] or [Bcc].
D0CMPC0804
• You can specify multiple destinations.
• If the target destination does not appear, display the destination by selecting its initial letterfrom the title.
• Depending on the security setting, some destinations may not appear in the destination list.
• When the specified destination is updated using the Central Management function, thespooled documents are sent to the destination after updating.
8. Specify the scan settings according to the purpose of the scanned data.
page 156 "Scanning an Original with Suitable Quality and Density"
page 159 "Specifying the File Type or File Name When Scanning a Document"
9. Press [Start].
Registering the E-mail Destination Specified When Sending an E-mail in theAddress Book
When specifying an e-mail address by entering it manually or selecting it from the scanner records, youcan register the e-mail address in the address book before sending an e-mail.
Scanning Documents and Sending the Scanned Data by E-mail
141
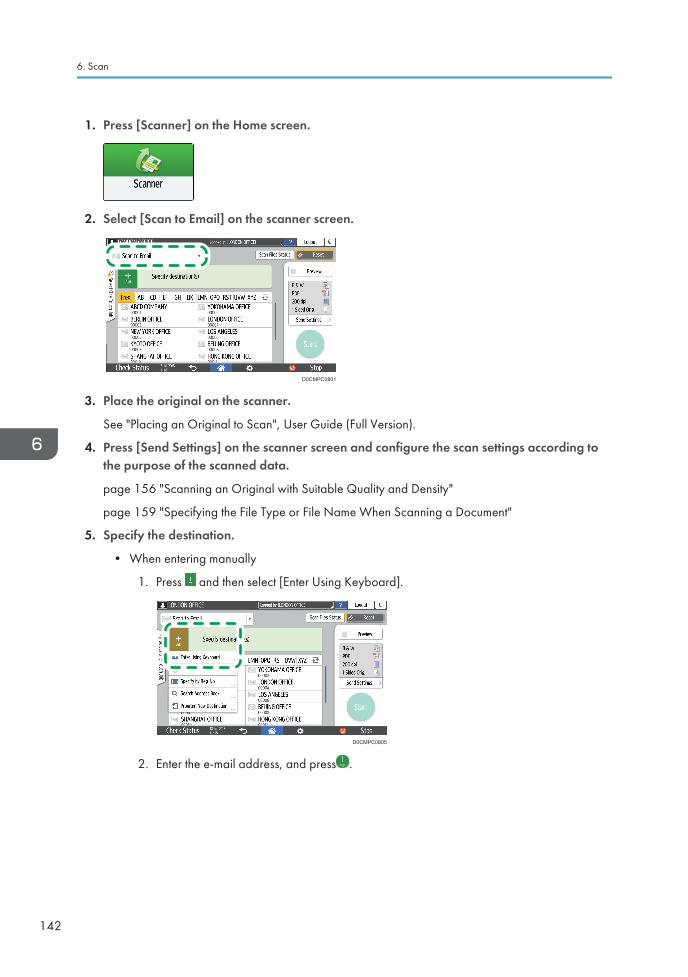
1. Press [Scanner] on the Home screen.
2. Select [Scan to Email] on the scanner screen.
D0CMPC0801
3. Place the original on the scanner.
See "Placing an Original to Scan", User Guide (Full Version).
4. Press [Send Settings] on the scanner screen and configure the scan settings according tothe purpose of the scanned data.
page 156 "Scanning an Original with Suitable Quality and Density"
page 159 "Specifying the File Type or File Name When Scanning a Document"
5. Specify the destination.
• When entering manually
1. Press and then select [Enter Using Keyboard].
D0CMPC0805
2. Enter the e-mail address, and press .
6. Scan
142
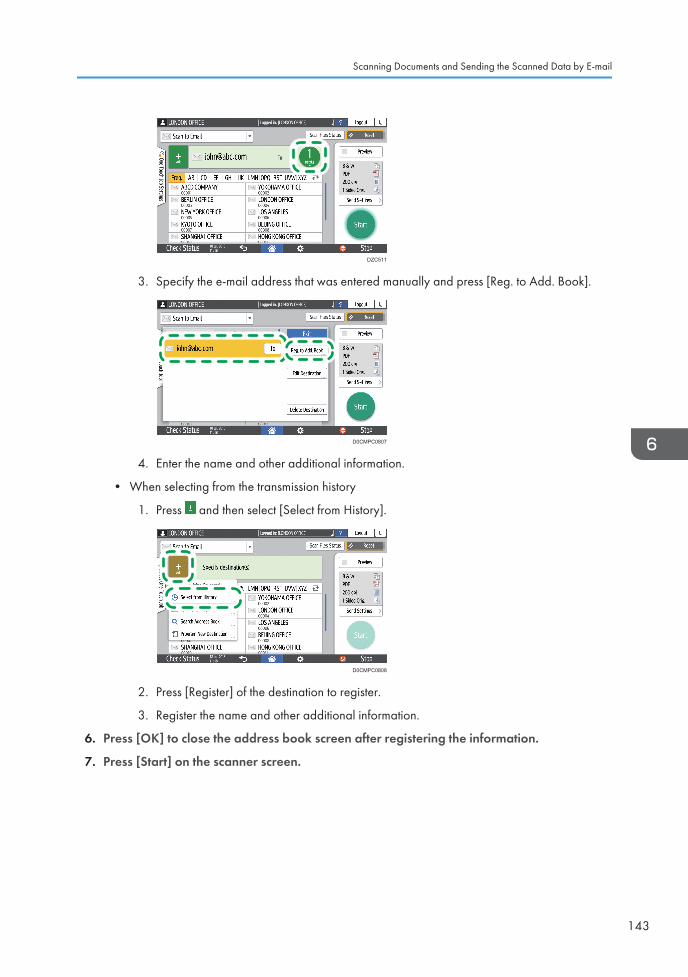
DZC511
3. Specify the e-mail address that was entered manually and press [Reg. to Add. Book].
D0CMPC0807
4. Enter the name and other additional information.
• When selecting from the transmission history
1. Press and then select [Select from History].
D0CMPC0808
2. Press [Register] of the destination to register.
3. Register the name and other additional information.
6. Press [OK] to close the address book screen after registering the information.
7. Press [Start] on the scanner screen.
Scanning Documents and Sending the Scanned Data by E-mail
143
Scanning Documents and Sending the ScannedData to a FolderTo send the data of a scanned original to a shared folder on a computer, create the shared folder on thecomputer in advance and register the destination folder in the address book.
• You also need to configure the settings for connecting to the network from the machine.
See "Connecting to a Wired LAN", User Guide (Full Version).
See "Connecting to a Wireless LAN", User Guide (Full Version).
• You can add a folder destination in the address book easily using Scan to Folder Helper.
See "Specifying the Destination of Send to Folder Using the Scan to Folder Helper App", UserGuide (Full Version).
• Using the SMB 3.0 protocol, you can save a file in the folder that was configured individually toapply encryption.
• The scanned file can be also saved to an FTP server.
• See "Registering the Destination Folder to Use for Send to Folder", User Guide (Full Version).
Printing the Check Sheet
Print the check sheet below to make a note of the setting values regarding the destination computer.
Check sheet
No. Items to check (example of the setting values) Setting entry column
[1]
Computer name
DHCP server enable/disable setting
IP address
6. Scan
144
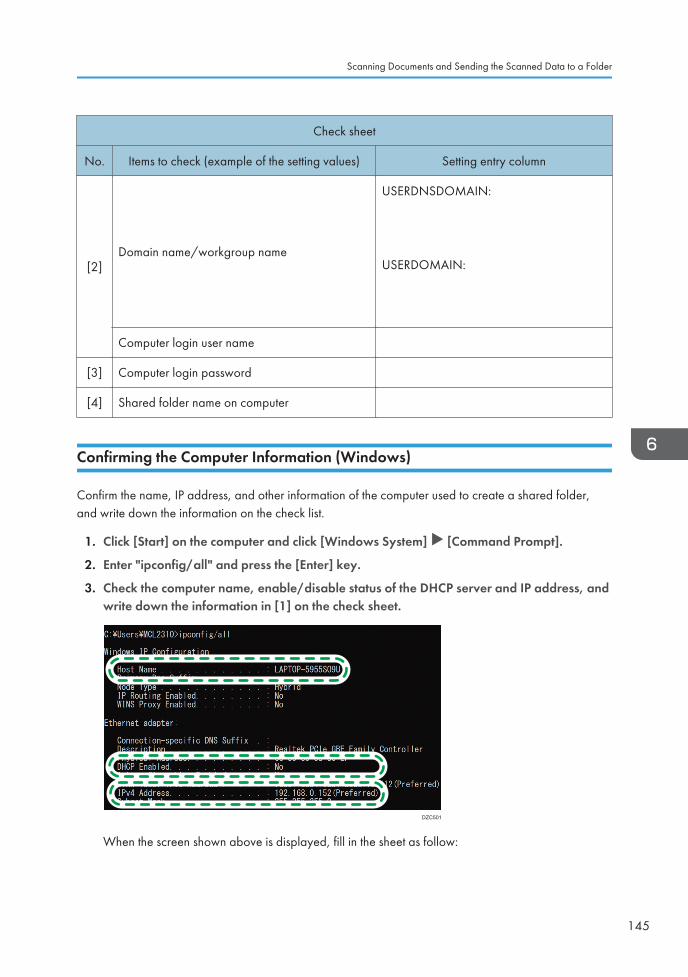
Check sheet
No. Items to check (example of the setting values) Setting entry column
[2]Domain name/workgroup name
USERDNSDOMAIN:
USERDOMAIN:
Computer login user name
[3] Computer login password
[4] Shared folder name on computer
Confirming the Computer Information (Windows)
Confirm the name, IP address, and other information of the computer used to create a shared folder,and write down the information on the check list.
1. Click [Start] on the computer and click [Windows System] [Command Prompt].
2. Enter "ipconfig/all" and press the [Enter] key.
3. Check the computer name, enable/disable status of the DHCP server and IP address, andwrite down the information in [1] on the check sheet.
DZC501
When the screen shown above is displayed, fill in the sheet as follow:
Scanning Documents and Sending the Scanned Data to a Folder
145
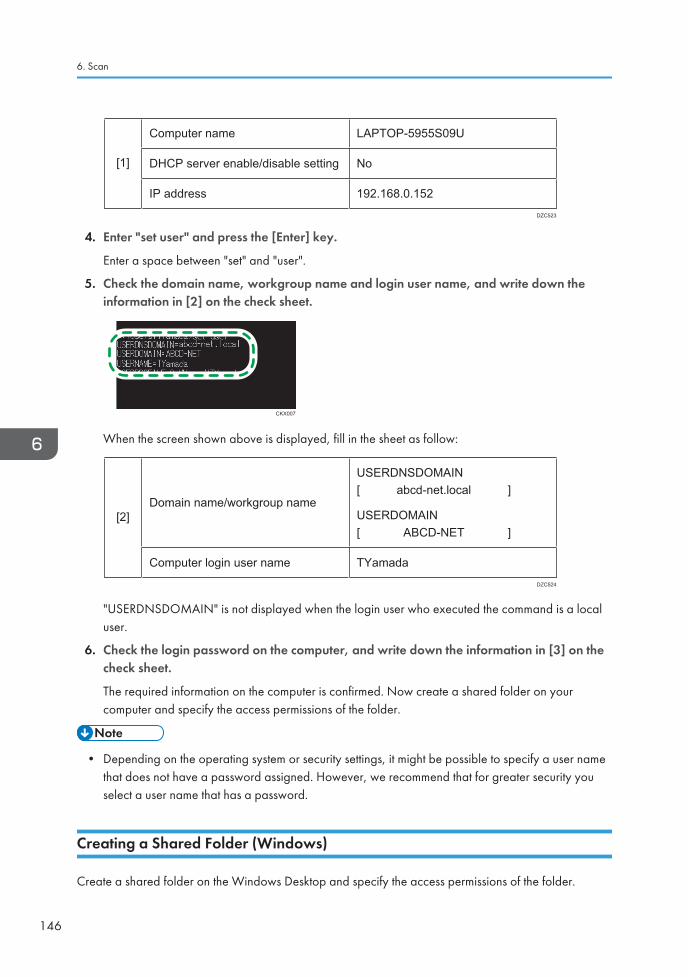
Computer name
[1] DHCP server enable/disable setting
IP address
LAPTOP-5955S09U
No
192.168.0.152DZC523
4. Enter "set user" and press the [Enter] key.
Enter a space between "set" and "user".
5. Check the domain name, workgroup name and login user name, and write down theinformation in [2] on the check sheet.
CKX007
When the screen shown above is displayed, fill in the sheet as follow:
Domain name/workgroup name[2]
Computer login user name
USERDNSDOMAIN[ abcd-net.local ]
USERDOMAIN[ ABCD-NET ]
TYamadaDZC524
"USERDNSDOMAIN" is not displayed when the login user who executed the command is a localuser.
6. Check the login password on the computer, and write down the information in [3] on thecheck sheet.
The required information on the computer is confirmed. Now create a shared folder on yourcomputer and specify the access permissions of the folder.
• Depending on the operating system or security settings, it might be possible to specify a user namethat does not have a password assigned. However, we recommend that for greater security youselect a user name that has a password.
Creating a Shared Folder (Windows)
Create a shared folder on the Windows Desktop and specify the access permissions of the folder.
6. Scan
146

• If you are creating a shared folder for the first time on this computer, you must enable the filesharing function. For details, see Windows Help.
• To register a shared folder in the machine's address book, you need the computer's IP address orcomputer name, and the user name and password of a user who has access permissions for theshared folder.
1. Log on to Windows as a user with administrative privileges.
2. Create a new folder in Windows Explorer and write down the folder name in [4] on thecheck sheet.
3. Right-click the created folder, and then click [Properties].
4. On the [Sharing] tab, click [Advanced Sharing].
DZC318
5. Select the [Share this folder] check box, and then click [Permissions].
After completing the procedure, remove Everyone (unspecified user), and then add a user allowedaccess the folder. The user whose information is written down on the check sheet is used in theexample shown below.
6. Select [Everyone] under [Group or user names], and then click [Remove].
7. Click [Add] [Advanced] [Object Types].
Scanning Documents and Sending the Scanned Data to a Folder
147
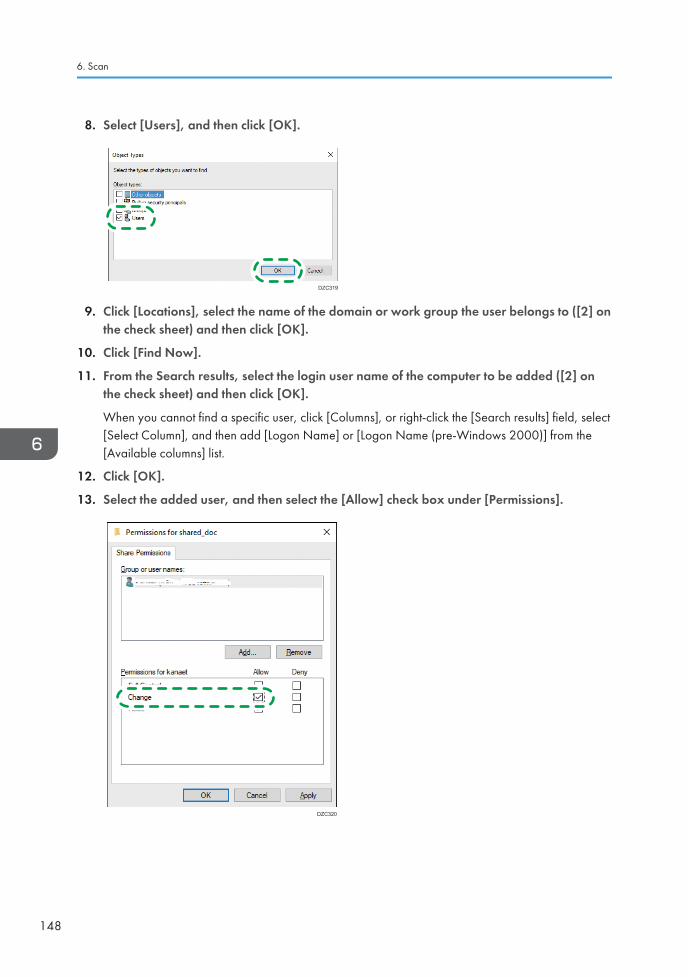
8. Select [Users], and then click [OK].
DZC319
9. Click [Locations], select the name of the domain or work group the user belongs to ([2] onthe check sheet) and then click [OK].
10. Click [Find Now].
11. From the Search results, select the login user name of the computer to be added ([2] onthe check sheet) and then click [OK].
When you cannot find a specific user, click [Columns], or right-click the [Search results] field, select[Select Column], and then add [Logon Name] or [Logon Name (pre-Windows 2000)] from the[Available columns] list.
12. Click [OK].
13. Select the added user, and then select the [Allow] check box under [Permissions].
DZC320
6. Scan
148
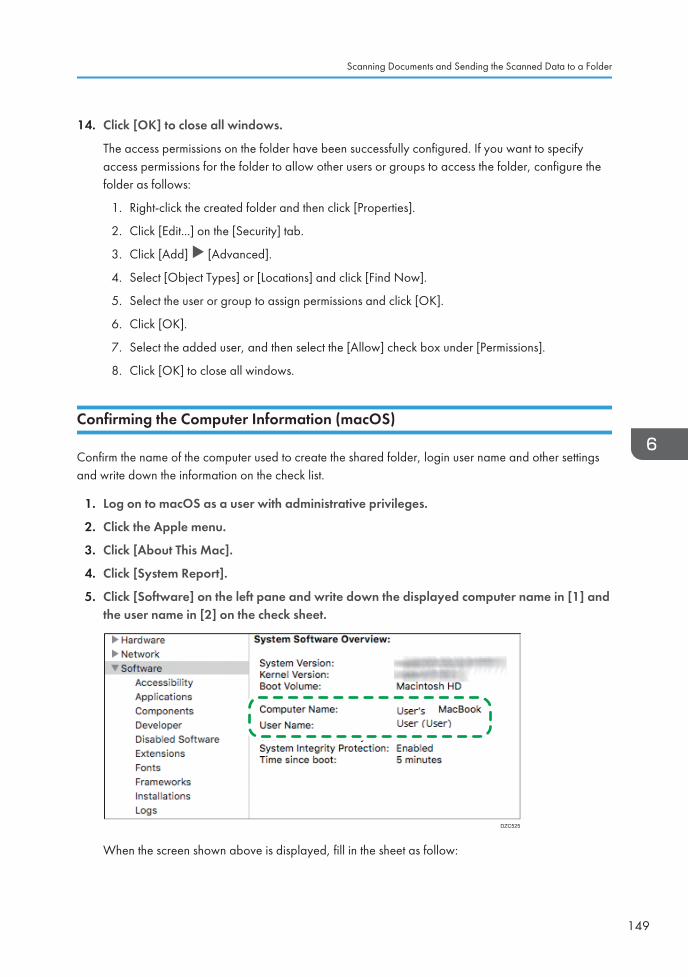
14. Click [OK] to close all windows.
The access permissions on the folder have been successfully configured. If you want to specifyaccess permissions for the folder to allow other users or groups to access the folder, configure thefolder as follows:
1. Right-click the created folder and then click [Properties].
2. Click [Edit...] on the [Security] tab.
3. Click [Add] [Advanced].
4. Select [Object Types] or [Locations] and click [Find Now].
5. Select the user or group to assign permissions and click [OK].
6. Click [OK].
7. Select the added user, and then select the [Allow] check box under [Permissions].
8. Click [OK] to close all windows.
Confirming the Computer Information (macOS)
Confirm the name of the computer used to create the shared folder, login user name and other settingsand write down the information on the check list.
1. Log on to macOS as a user with administrative privileges.
2. Click the Apple menu.
3. Click [About This Mac].
4. Click [System Report].
5. Click [Software] on the left pane and write down the displayed computer name in [1] andthe user name in [2] on the check sheet.
DZC525
When the screen shown above is displayed, fill in the sheet as follow:
Scanning Documents and Sending the Scanned Data to a Folder
149
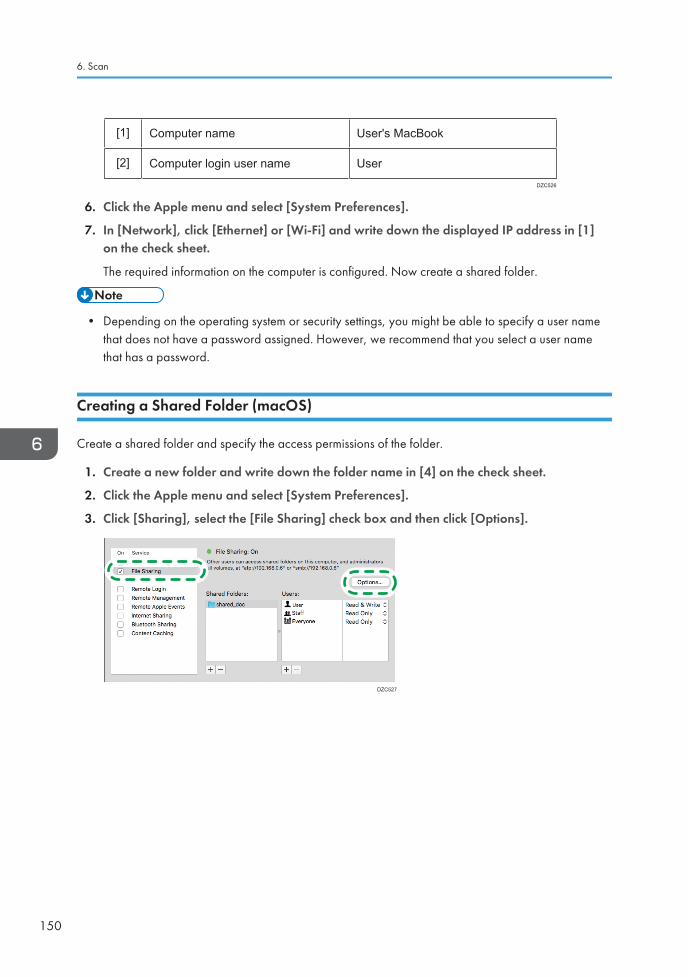
Computer name[1]
Computer login user name
User's MacBook
User[2]
DZC526
6. Click the Apple menu and select [System Preferences].
7. In [Network], click [Ethernet] or [Wi-Fi] and write down the displayed IP address in [1]on the check sheet.
The required information on the computer is configured. Now create a shared folder.
• Depending on the operating system or security settings, you might be able to specify a user namethat does not have a password assigned. However, we recommend that you select a user namethat has a password.
Creating a Shared Folder (macOS)
Create a shared folder and specify the access permissions of the folder.
1. Create a new folder and write down the folder name in [4] on the check sheet.
2. Click the Apple menu and select [System Preferences].
3. Click [Sharing], select the [File Sharing] check box and then click [Options].
DZC527
6. Scan
150
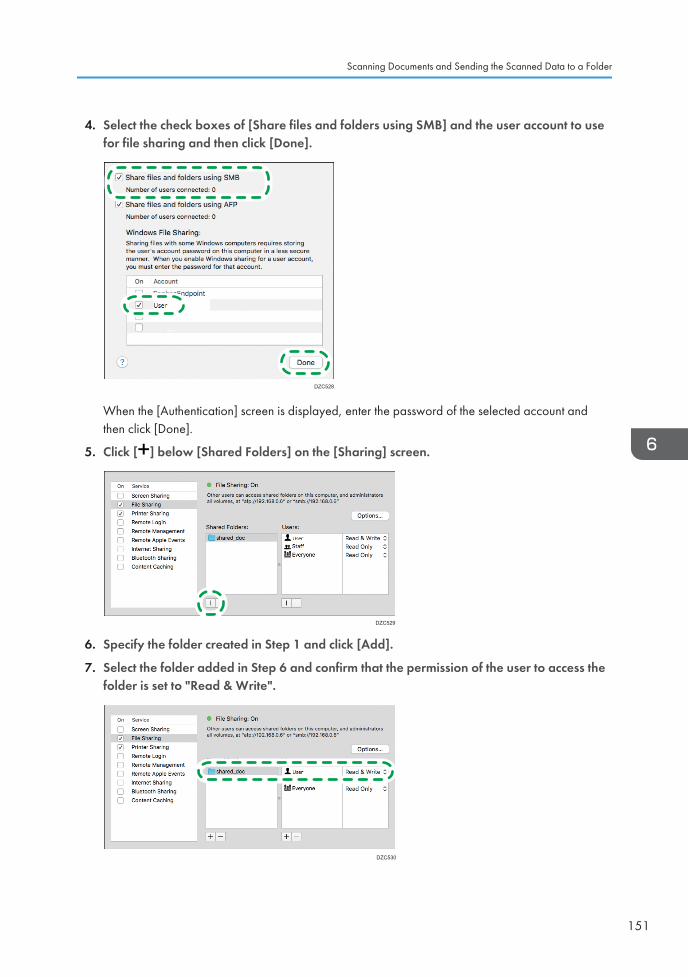
4. Select the check boxes of [Share files and folders using SMB] and the user account to usefor file sharing and then click [Done].
DZC528
When the [Authentication] screen is displayed, enter the password of the selected account andthen click [Done].
5. Click [ ] below [Shared Folders] on the [Sharing] screen.
DZC529
6. Specify the folder created in Step 1 and click [Add].
7. Select the folder added in Step 6 and confirm that the permission of the user to access thefolder is set to "Read & Write".
DZC530
Scanning Documents and Sending the Scanned Data to a Folder
151
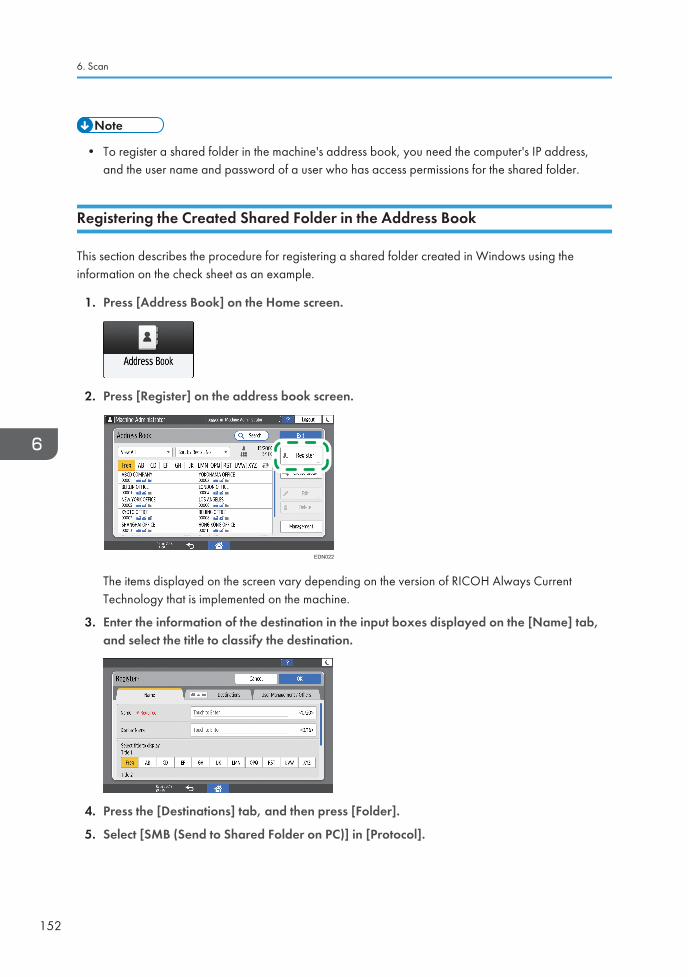
• To register a shared folder in the machine's address book, you need the computer's IP address,and the user name and password of a user who has access permissions for the shared folder.
Registering the Created Shared Folder in the Address Book
This section describes the procedure for registering a shared folder created in Windows using theinformation on the check sheet as an example.
1. Press [Address Book] on the Home screen.
2. Press [Register] on the address book screen.
EDN022
The items displayed on the screen vary depending on the version of RICOH Always CurrentTechnology that is implemented on the machine.
3. Enter the information of the destination in the input boxes displayed on the [Name] tab,and select the title to classify the destination.
4. Press the [Destinations] tab, and then press [Folder].
5. Select [SMB (Send to Shared Folder on PC)] in [Protocol].
6. Scan
152
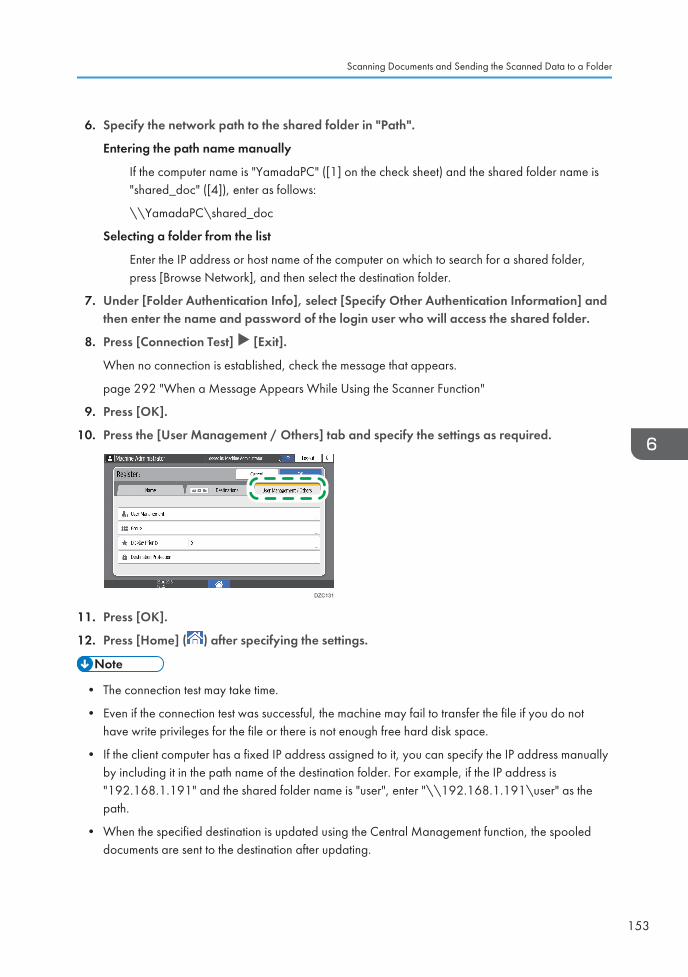
6. Specify the network path to the shared folder in "Path".
Entering the path name manually
If the computer name is "YamadaPC" ([1] on the check sheet) and the shared folder name is"shared_doc" ([4]), enter as follows:
\\YamadaPC\shared_doc
Selecting a folder from the list
Enter the IP address or host name of the computer on which to search for a shared folder,press [Browse Network], and then select the destination folder.
7. Under [Folder Authentication Info], select [Specify Other Authentication Information] andthen enter the name and password of the login user who will access the shared folder.
8. Press [Connection Test] [Exit].
When no connection is established, check the message that appears.
page 292 "When a Message Appears While Using the Scanner Function"
9. Press [OK].
10. Press the [User Management / Others] tab and specify the settings as required.
DZC131
11. Press [OK].
12. Press [Home] ( ) after specifying the settings.
• The connection test may take time.
• Even if the connection test was successful, the machine may fail to transfer the file if you do nothave write privileges for the file or there is not enough free hard disk space.
• If the client computer has a fixed IP address assigned to it, you can specify the IP address manuallyby including it in the path name of the destination folder. For example, if the IP address is"192.168.1.191" and the shared folder name is "user", enter "\\192.168.1.191\user" as thepath.
• When the specified destination is updated using the Central Management function, the spooleddocuments are sent to the destination after updating.
Scanning Documents and Sending the Scanned Data to a Folder
153
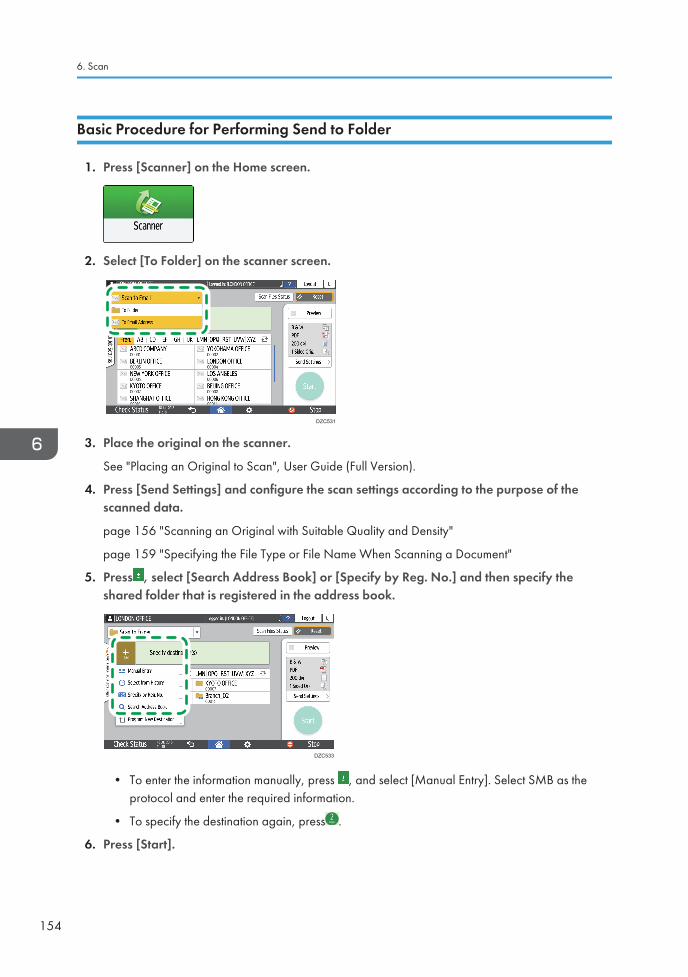
Basic Procedure for Performing Send to Folder
1. Press [Scanner] on the Home screen.
2. Select [To Folder] on the scanner screen.
DZC531
3. Place the original on the scanner.
See "Placing an Original to Scan", User Guide (Full Version).
4. Press [Send Settings] and configure the scan settings according to the purpose of thescanned data.
page 156 "Scanning an Original with Suitable Quality and Density"
page 159 "Specifying the File Type or File Name When Scanning a Document"
5. Press , select [Search Address Book] or [Specify by Reg. No.] and then specify theshared folder that is registered in the address book.
DZC533
• To enter the information manually, press , and select [Manual Entry]. Select SMB as theprotocol and enter the required information.
• To specify the destination again, press .
6. Press [Start].
6. Scan
154
• If any of the machine's security functions are enabled, select the destination from the registeredfolder only when you send files by Scan to Folder.
• If the firewall of an antivirus program is active, you may not be able to specify a shared folder onthe computer as a folder destination. If this is the case, see the antivirus program's Help.
• If Windows firewall is active and you cannot specify a shared folder on the computer as a folderdestination, the machine may be able to communicate with the computer by changing theexceptions of the Windows firewall. For details, see Windows Help.
• After scan files are sent, the destination and file name fields will be automatically cleared. If youwant to preserve the information in these fields, contact your local dealer.
• When the specified destination is updated using the Central Management function, the spooleddocuments are sent to the destination after updating.
Scanning Documents and Sending the Scanned Data to a Folder
155
Scanning an Original with Suitable Qualityand DensitySpecify the quality and density to scan on the [Send Settings] screen.
1. Press [Scanner] on the Home screen.
2. Place the original on the scanner.
See "Placing an Original to Scan", User Guide (Full Version).
3. Press [Send Settings] on the scanner screen and specify the original type (quality), densityand resolution.
When specifying the original type
Original Type Appropriate for
Black & White: Text A document mainly composed of text in black and white. Theoriginal is scanned in two tones of black and white.
• Dropout Color
The machine scans the original while erasing the specifiedcolor (Chromatic Color, Red, Green, Blue). To specify acolor to erase more precisely, move toward [Narrow]in the color range to erase.
Black & White: Text /Photo
A document with text and photos in black and white. The originalis scanned in two tones of black and white.
Black & White: Text /Line Art
A document with text and figures in black and white. The originalis scanned in two tones of black and white.
Black & White: Photo A document with figures and photos in black and white. Theoriginal is scanned in two tones of black and white.
Gray Scale A document with figures and photos in black and white. Theoriginal is scanned as an image comprising many shades ofgray.
6. Scan
156
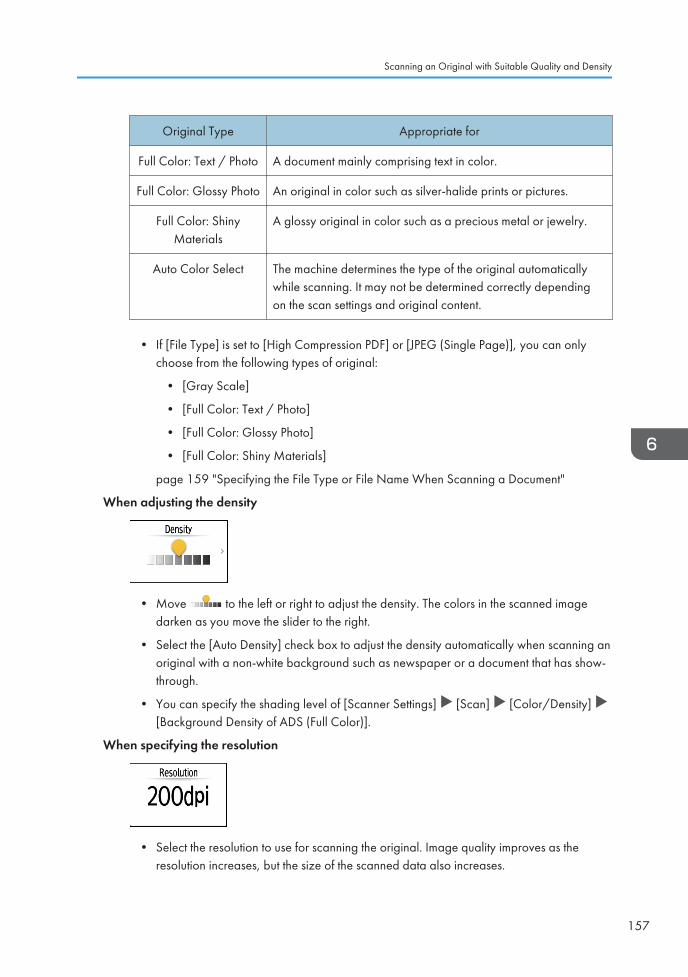
Original Type Appropriate for
Full Color: Text / Photo A document mainly comprising text in color.
Full Color: Glossy Photo An original in color such as silver-halide prints or pictures.
Full Color: ShinyMaterials
A glossy original in color such as a precious metal or jewelry.
Auto Color Select The machine determines the type of the original automaticallywhile scanning. It may not be determined correctly dependingon the scan settings and original content.
• If [File Type] is set to [High Compression PDF] or [JPEG (Single Page)], you can onlychoose from the following types of original:
• [Gray Scale]
• [Full Color: Text / Photo]
• [Full Color: Glossy Photo]
• [Full Color: Shiny Materials]
page 159 "Specifying the File Type or File Name When Scanning a Document"
When adjusting the density
• Move to the left or right to adjust the density. The colors in the scanned imagedarken as you move the slider to the right.
• Select the [Auto Density] check box to adjust the density automatically when scanning anoriginal with a non-white background such as newspaper or a document that has show-through.
• You can specify the shading level of [Scanner Settings] [Scan] [Color/Density] [Background Density of ADS (Full Color)].
When specifying the resolution
• Select the resolution to use for scanning the original. Image quality improves as theresolution increases, but the size of the scanned data also increases.
Scanning an Original with Suitable Quality and Density
157
• To ensure the quality of scanned data, [100 dpi] or [150 dpi] cannot be selected in thefollowing cases:
• [High Compression PDF] is specified in [PDF Type] under [File Type]
page 159 "Specifying the File Type or File Name When Scanning a Document"
• [OCR Settings] in [File Type] is set to [On]
See "Scanning an Original as a PDF File with Embedded Text Data", User Guide(Full Version).
4. To send the scanned document to an e-mail address, press [Sender] and then specify thesender.
5. Specify the destination, and press [Start].
6. Scan
158
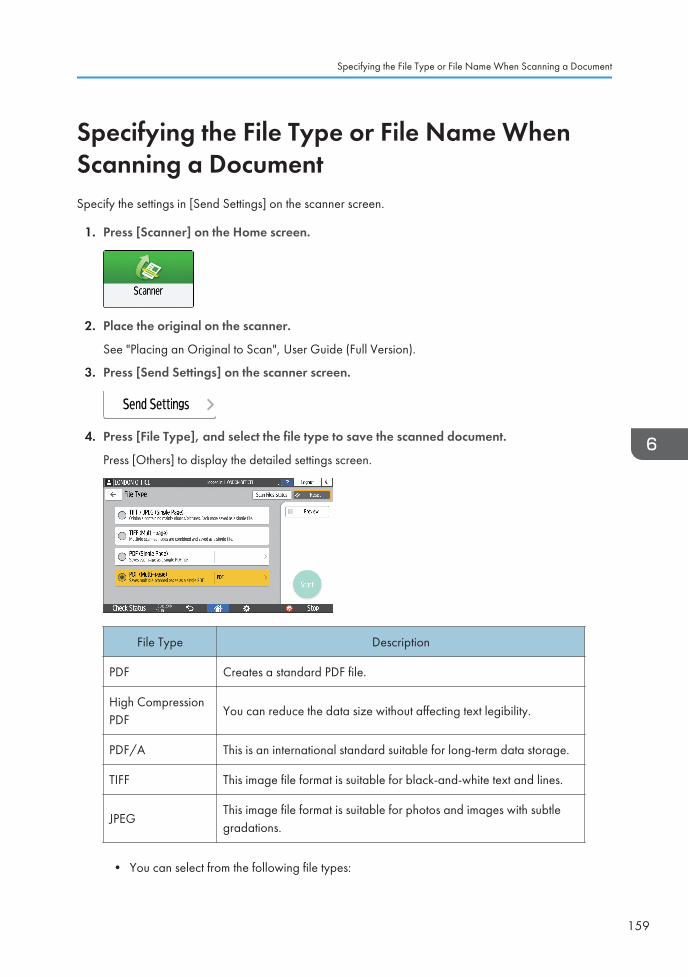
Specifying the File Type or File Name WhenScanning a DocumentSpecify the settings in [Send Settings] on the scanner screen.
1. Press [Scanner] on the Home screen.
2. Place the original on the scanner.
See "Placing an Original to Scan", User Guide (Full Version).
3. Press [Send Settings] on the scanner screen.
4. Press [File Type], and select the file type to save the scanned document.
Press [Others] to display the detailed settings screen.
File Type Description
PDF Creates a standard PDF file.
High CompressionPDF
You can reduce the data size without affecting text legibility.
PDF/A This is an international standard suitable for long-term data storage.
TIFF This image file format is suitable for black-and-white text and lines.
JPEGThis image file format is suitable for photos and images with subtlegradations.
• You can select from the following file types:
Specifying the File Type or File Name When Scanning a Document
159

• Single Page: PDF, High Compression PDF, PDF/A, TIFF, JPEG
If you select a single-page file type when scanning multiple originals, one file is createdfor each single page and the number of files sent is the same as the number of pagesscanned.
• Multi-page: PDF, High Compression PDF, PDF/A, TIFF
If you select a multi-page file type when scan multiple originals, scanned pages arecombined and sent as a single file.
• Selectable file types differ depending on the scan settings and other conditions.
page 161 "Notes about and limitations of file types"
5. To specify the file name, press [File Name] and enter the file name.
The file name is generated by combining the following three items:
• File Name: Enter the string to use at the beginning of the file name.
• Start Number: Specify the starting number of a serial number that will be appended at the endof each file name when specifying a file format comprising a single page per file.
• Add Date & Time: Select this check box to add the "year, month, day, hour, and minute" thescanning is performed at the end of the file name.
6. Specify the scan settings according to the purpose of the scanned data.
page 156 "Scanning an Original with Suitable Quality and Density"
7. Specify the destination to send the scanned document and then press [Start].
• You can also embed the security and digital signature settings, and text information in the PDF file.
• See "Scanning an Original as a PDF with Security Setting Specified", User Guide (Full Version).
• See "Scanning an Original as a PDF File with Embedded Text Data", User Guide (Full Version).
• You can change the number of digits in [Scanner Settings] [Sending Settings] [File Name] [Number of Digits for Single Page Files].
• The version of the created PDF files is 1.4/1.5.
6. Scan
160
Notes about and limitations of file types
Depending on the file format you select, the following limitations will apply:
TIFF
If you select TIFF as the file format, the data is not compressed and thus results in larger files.
High Compression PDF
You cannot select [High Compression PDF] in the following cases:
• [Black & White: Text], [Black & White: Text / Line Art], [Black & White: Text / Photo], [Black& White: Photo], or [Auto Color Select] is selected in [Original Type].
• [Reduce / Enlarge] is selected.
• [100 dpi] or [150 dpi] is selected as the resolution.
• [Preview] is selected.
• If [System Settings] [Administrator Tools] [File Management] [PDF File Type: PDF/AFixed] is set to [On], neither [High Compression PDF] nor [PDF] can be selected.
• Adobe Acrobat Reader 5.0/Adobe Reader 6.0 and later versions support High CompressionPDF.
• If [High Compression PDF] is selected as the file type for scanning, areas of uneven densitymay appear in the scan file. If this happens, change the PDF File setting to [PDF/A] or [PDF].
Specifying the File Type or File Name When Scanning a Document
161

6. Scan
162

7. Document Server
Storing Documents in Document ServerYou can store documents scanned by the machine in the document server.
You can also store them using the printer driver.
See "Storing Documents to Print in the Machine", User Guide (Full Version).
• Documents stored in the document server are deleted after three days (72 hours) in the factory-default configuration. Change the settings in [Auto Delete File in Document Server] to change theperiod until documents are deleted or to specify not to delete documents automatically.
• See "Changing the Storage Period of Document Server or Specifying an Indefinite Period", UserGuide (Full Version).
1. On the Home screen, press [Document Server].
2. On the document server screen, press [To Scanning Screen].
DZX233
3. Specify the folder to store documents, the document name, and other settings.
D0CMPC5067
163
• Target Fldr. to Store: Select the "Shared Folder" created in the factory default configuration ora user folder created by a user to store the document. To select a user folder, create it inadvance.
See "Organizing Document Server Using Folders", User Guide (Full Version).
• User Name: Specify the user name displayed as the owner of the document. Select a userfrom the address book or enter the name.
• File Name: Specify the name of the scanned document. If you do not specify the file name, aname such as "COPY0001" or "COPY0002" is assigned automatically.
• Password: Specify the password required for printing the document.
4. Place the original.
Place the original in the same way as in the Copy function.
See "Placing an Original on the Scanner", User Guide (Full Version).
5. Specify the scanning conditions such as color or size.
6. Press [Start].
• When you place the original on the Auto Document Feeder (ADF), the folder list screen isdisplayed after scanning the original.
• When you place the original on the exposure glass, press [Finish Scanning] after scanning alloriginals to print to display the folder list screen.
• The machine stores the documents with the size and orientation specified for the tray you selected,regardless of the actual size or orientation of the original.
• You can specify whether to allow other users to read or edit the stored document.
• See "Accessing Documents in Document Server from a Web Browser", User Guide (Full Version).
• When you do not want to delete stored documents, specify [Auto Delete File in Document Server]to [Off], and then store the documents. When [Specify Days] or [Specify Hours] is selected afterdocuments have been stored, the documents will not be deleted. Only the documents stored after asetting change are deleted automatically.
7. Document Server
164
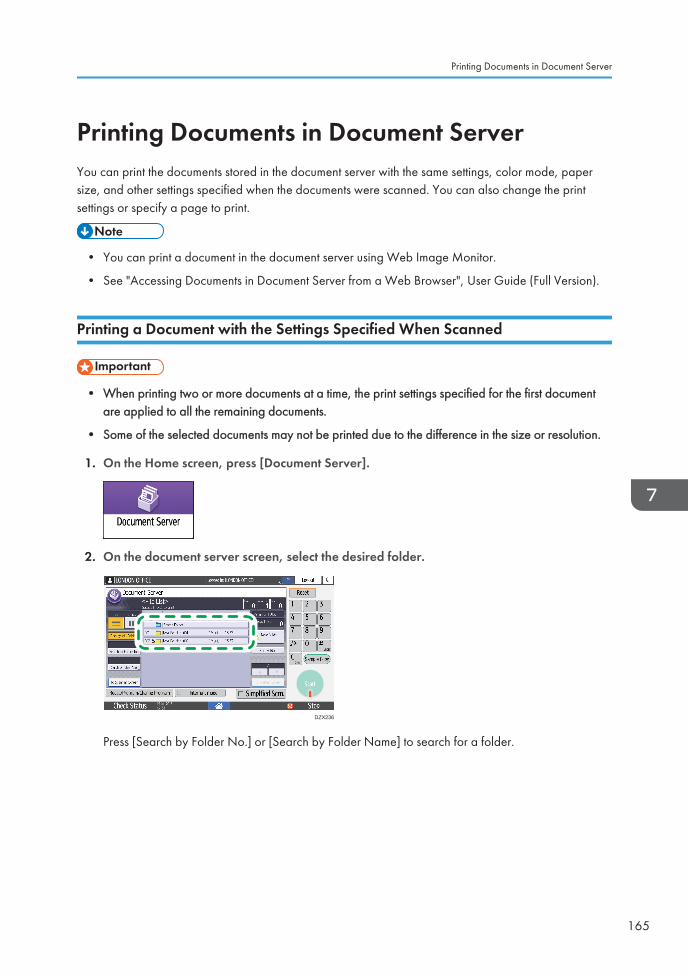
Printing Documents in Document ServerYou can print the documents stored in the document server with the same settings, color mode, papersize, and other settings specified when the documents were scanned. You can also change the printsettings or specify a page to print.
• You can print a document in the document server using Web Image Monitor.
• See "Accessing Documents in Document Server from a Web Browser", User Guide (Full Version).
Printing a Document with the Settings Specified When Scanned
• When printing two or more documents at a time, the print settings specified for the first documentare applied to all the remaining documents.
• Some of the selected documents may not be printed due to the difference in the size or resolution.
1. On the Home screen, press [Document Server].
2. On the document server screen, select the desired folder.
DZX236
Press [Search by Folder No.] or [Search by Folder Name] to search for a folder.
Printing Documents in Document Server
165
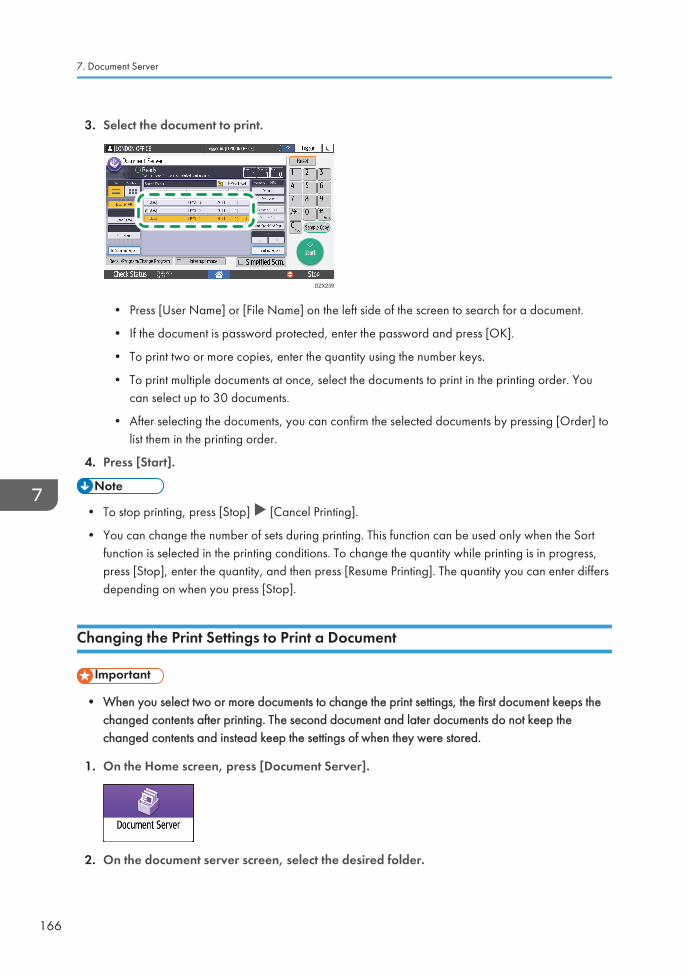
3. Select the document to print.
DZX239
• Press [User Name] or [File Name] on the left side of the screen to search for a document.
• If the document is password protected, enter the password and press [OK].
• To print two or more copies, enter the quantity using the number keys.
• To print multiple documents at once, select the documents to print in the printing order. Youcan select up to 30 documents.
• After selecting the documents, you can confirm the selected documents by pressing [Order] tolist them in the printing order.
4. Press [Start].
• To stop printing, press [Stop] [Cancel Printing].
• You can change the number of sets during printing. This function can be used only when the Sortfunction is selected in the printing conditions. To change the quantity while printing is in progress,press [Stop], enter the quantity, and then press [Resume Printing]. The quantity you can enter differsdepending on when you press [Stop].
Changing the Print Settings to Print a Document
• When you select two or more documents to change the print settings, the first document keeps thechanged contents after printing. The second document and later documents do not keep thechanged contents and instead keep the settings of when they were stored.
1. On the Home screen, press [Document Server].
2. On the document server screen, select the desired folder.
7. Document Server
166

3. Select the document to print.
• If the document is password protected, enter the password and press [OK].
• To print two or more copies, enter the quantity using the number keys.
4. Press [To Printing Screen].
5. Change the print settings.
• When specifying Sort, you can make a partial print as a test and proceed to print the rest ofthe quantity by pressing [Sample Copy].
• Press [Back to File List] to return to the screen for selecting documents.
6. Press [Start].
Specifying a Page to Print
1. On the Home screen, press [Document Server].
2. On the document server screen, select the desired folder.
3. Select the document to print and press [Print Specified Page].
• If the document is password protected, enter the password and press [OK].
• To print two or more copies, enter the quantity using the number keys.
Printing Documents in Document Server
167
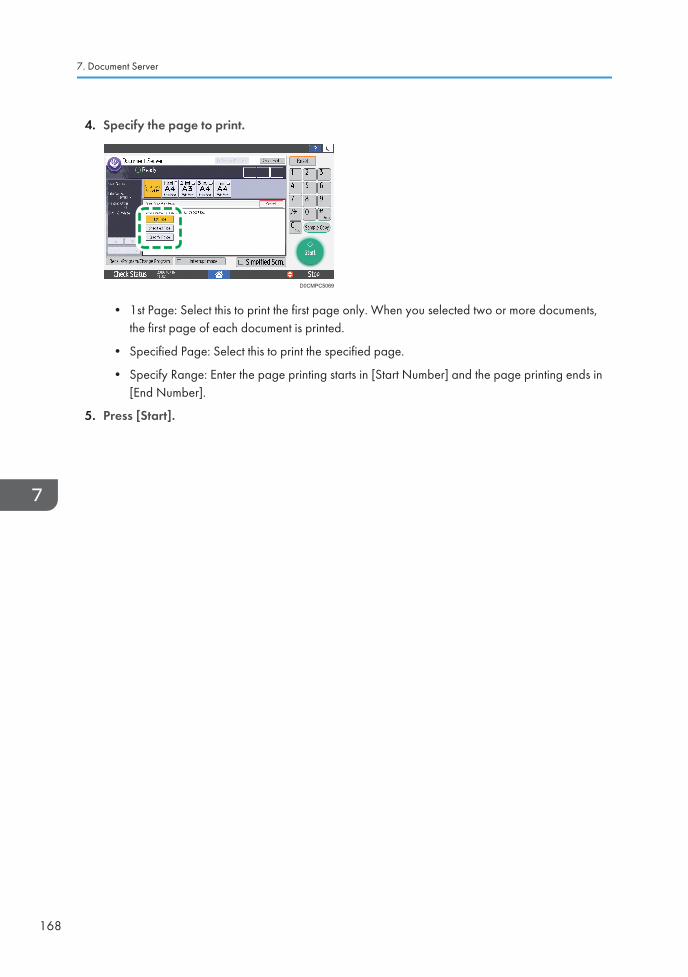
4. Specify the page to print.
D0CMPC5069
• 1st Page: Select this to print the first page only. When you selected two or more documents,the first page of each document is printed.
• Specified Page: Select this to print the specified page.
• Specify Range: Enter the page printing starts in [Start Number] and the page printing ends in[End Number].
5. Press [Start].
7. Document Server
168
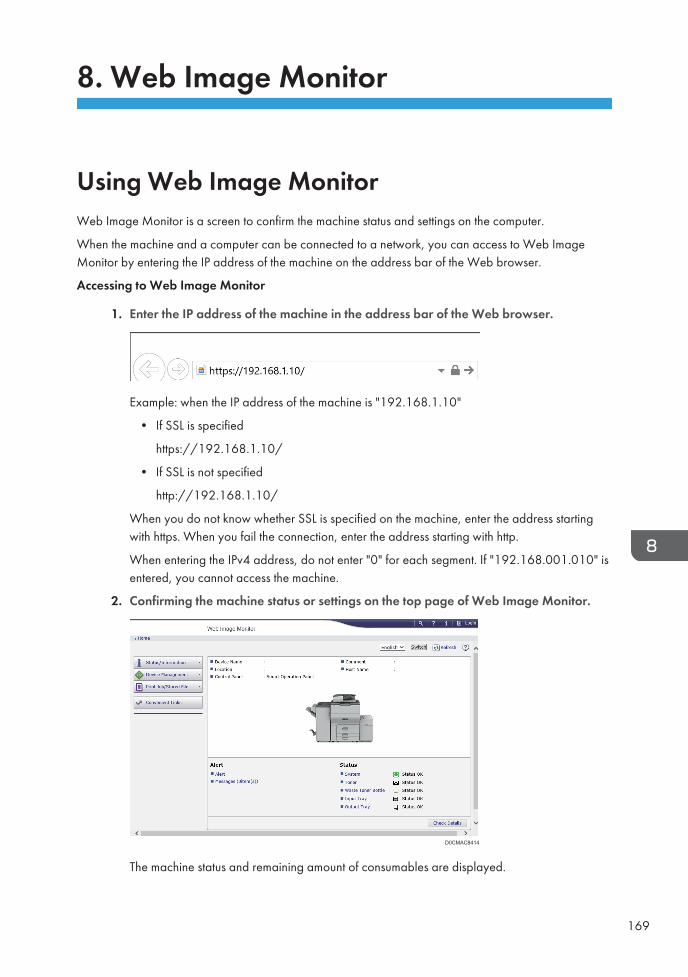
8. Web Image Monitor
Using Web Image MonitorWeb Image Monitor is a screen to confirm the machine status and settings on the computer.
When the machine and a computer can be connected to a network, you can access to Web ImageMonitor by entering the IP address of the machine on the address bar of the Web browser.
Accessing to Web Image Monitor
1. Enter the IP address of the machine in the address bar of the Web browser.
Example: when the IP address of the machine is "192.168.1.10"
• If SSL is specified
https://192.168.1.10/
• If SSL is not specified
http://192.168.1.10/
When you do not know whether SSL is specified on the machine, enter the address startingwith https. When you fail the connection, enter the address starting with http.
When entering the IPv4 address, do not enter "0" for each segment. If "192.168.001.010" isentered, you cannot access the machine.
2. Confirming the machine status or settings on the top page of Web Image Monitor.
D0CMAC8414
The machine status and remaining amount of consumables are displayed.
169
You can access Web Image Monitor more quickly by registering the machine's URL as abookmark. Note that the URL you register must be the URL of the top page, which is the pagethat appears before login. If you register the URL of a page that appears after login, WebImage Monitor will not open properly from the bookmark.
To change the settings, click [Login] at the top right on the screen and enter the User Nameand Password.
Recommended Web Browser
Windows macOS
Internet Explorer 11 or later Safari 3.0 or later
Firefox 52 or later Firefox 52 or later
Google Chrome version 50 or later Google Chrome version 50 or later
Microsoft Edge 20 or later -
• You can use the screen reader software JAWS 7.0 or later on Internet Explorer.
• When you use a DNS server or WINS server, you can use Host Name instead of IP address toconnect the server.
• When the screen is distorted or the operation is unstable, confirm that "JavaScript" or "UseCookies" is specified to Active on the computer.
• When using Host Name under Windows Server 2008 or later in the IPv6 environment, resolveHost Name in the external DNS server. You cannot use the host file.
• When specifying the settings from Web Image Monitor, do not log in to the machine from thecontrol panel. The setting value may not be reflected.
• If you are using a proxy server, change the web browser settings so that no data goes through theproxy server to connect to this machine. Contact your administrator for information about thesettings.
• If you click your browser's back button but the previous page does not appear, click the browser'srefresh button and try again.
What You Can Do on the Web Image Monitor
Items displayed on the Web Image Monitor and settings depend whether the machine is logged in.
• When not logged in
8. Web Image Monitor
170
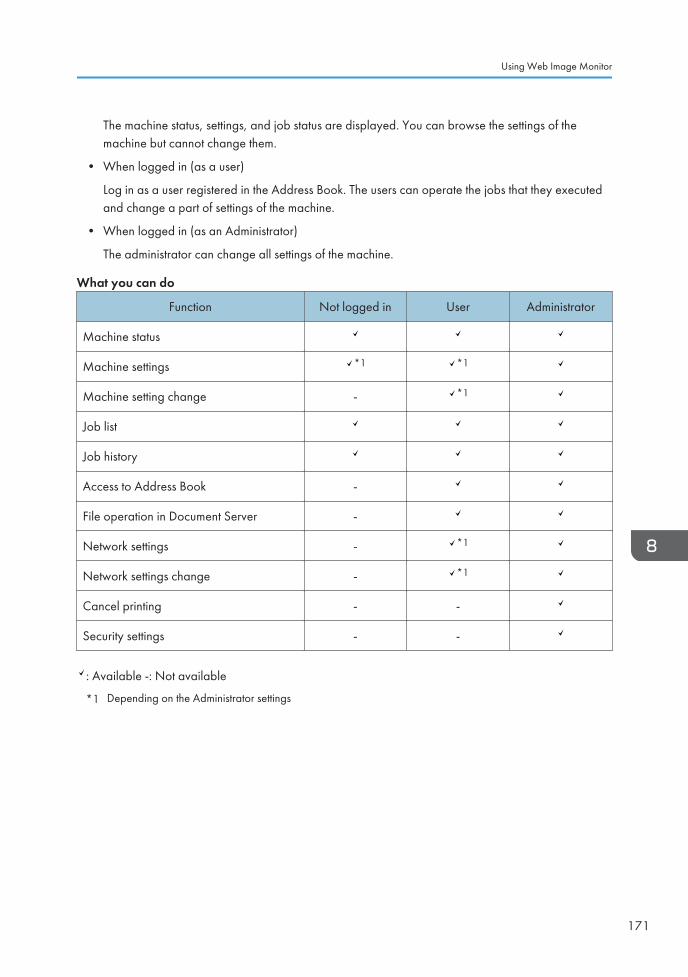
The machine status, settings, and job status are displayed. You can browse the settings of themachine but cannot change them.
• When logged in (as a user)
Log in as a user registered in the Address Book. The users can operate the jobs that they executedand change a part of settings of the machine.
• When logged in (as an Administrator)
The administrator can change all settings of the machine.
What you can do
Function Not logged in User Administrator
Machine status
Machine settings *1 *1
Machine setting change - *1
Job list
Job history
Access to Address Book -
File operation in Document Server -
Network settings - *1
Network settings change - *1
Cancel printing - -
Security settings - -
: Available -: Not available
*1 Depending on the Administrator settings
Using Web Image Monitor
171
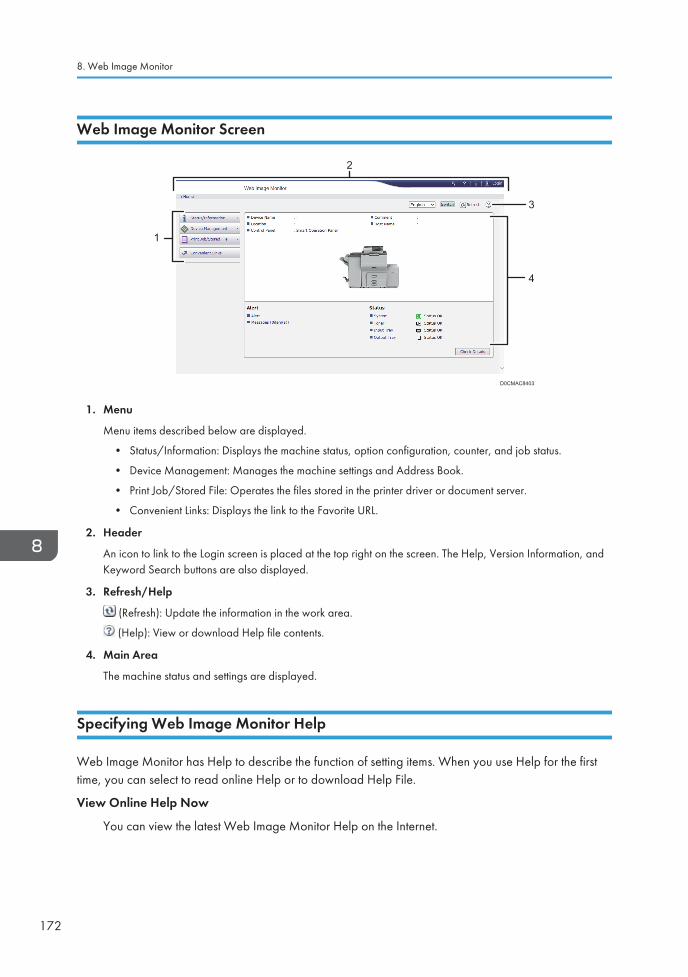
Web Image Monitor Screen
D0CMAC8403
1
2
3
4
1. Menu
Menu items described below are displayed.
• Status/Information: Displays the machine status, option configuration, counter, and job status.
• Device Management: Manages the machine settings and Address Book.
• Print Job/Stored File: Operates the files stored in the printer driver or document server.
• Convenient Links: Displays the link to the Favorite URL.
2. Header
An icon to link to the Login screen is placed at the top right on the screen. The Help, Version Information, andKeyword Search buttons are also displayed.
3. Refresh/Help
(Refresh): Update the information in the work area.
(Help): View or download Help file contents.
4. Main Area
The machine status and settings are displayed.
Specifying Web Image Monitor Help
Web Image Monitor has Help to describe the function of setting items. When you use Help for the firsttime, you can select to read online Help or to download Help File.
View Online Help Now
You can view the latest Web Image Monitor Help on the Internet.
8. Web Image Monitor
172
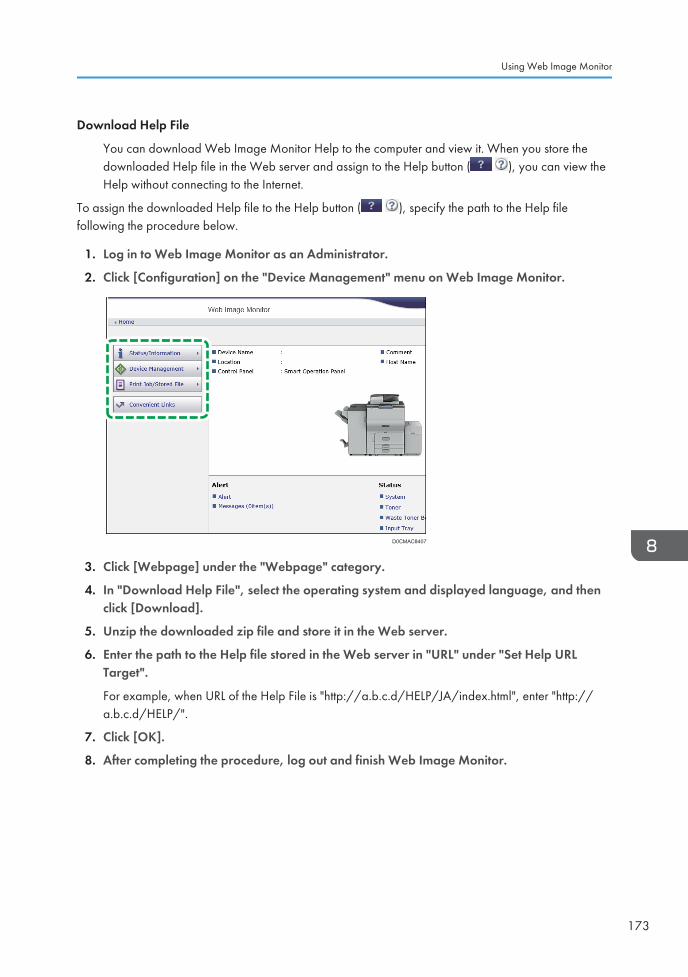
Download Help File
You can download Web Image Monitor Help to the computer and view it. When you store thedownloaded Help file in the Web server and assign to the Help button ( ), you can view theHelp without connecting to the Internet.
To assign the downloaded Help file to the Help button ( ), specify the path to the Help filefollowing the procedure below.
1. Log in to Web Image Monitor as an Administrator.
2. Click [Configuration] on the "Device Management" menu on Web Image Monitor.
D0CMAC8407
3. Click [Webpage] under the "Webpage" category.
4. In "Download Help File", select the operating system and displayed language, and thenclick [Download].
5. Unzip the downloaded zip file and store it in the Web server.
6. Enter the path to the Help file stored in the Web server in "URL" under "Set Help URLTarget".
For example, when URL of the Help File is "http://a.b.c.d/HELP/JA/index.html", enter "http://a.b.c.d/HELP/".
7. Click [OK].
8. After completing the procedure, log out and finish Web Image Monitor.
Using Web Image Monitor
173
8. Web Image Monitor
174
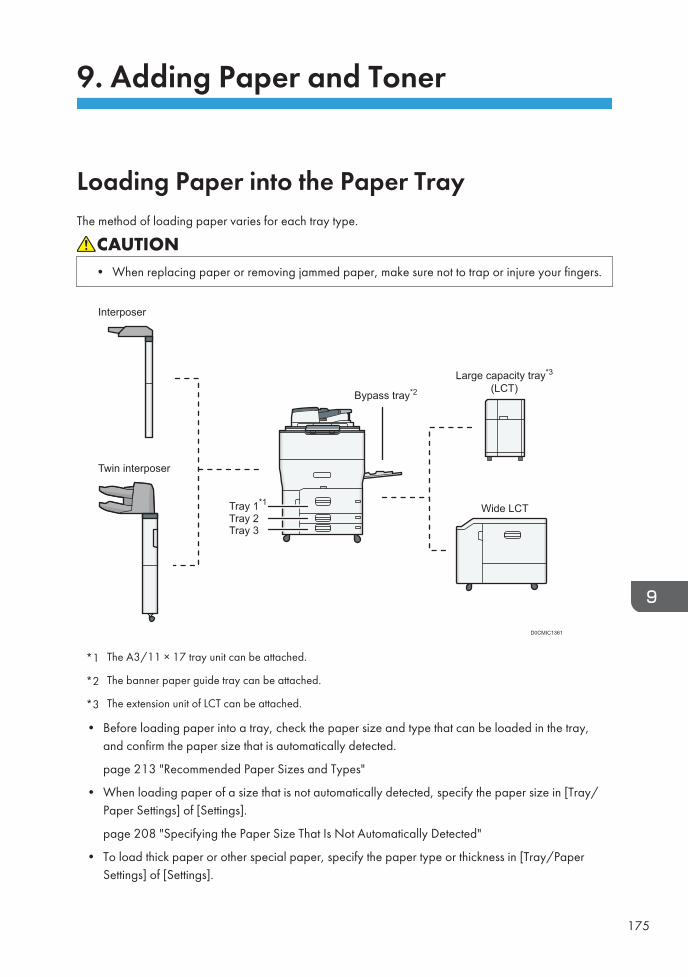
9. Adding Paper and Toner
Loading Paper into the Paper TrayThe method of loading paper varies for each tray type.
• When replacing paper or removing jammed paper, make sure not to trap or injure your fingers.
D0CMIC1361
Tray 1*1
Tray 2Tray 3
Bypass tray*2
Twin interposer
Interposer
Wide LCT
Large capacity tray*3
(LCT)
*1 The A3/11 × 17 tray unit can be attached.
*2 The banner paper guide tray can be attached.
*3 The extension unit of LCT can be attached.
• Before loading paper into a tray, check the paper size and type that can be loaded in the tray,and confirm the paper size that is automatically detected.
page 213 "Recommended Paper Sizes and Types"
• When loading paper of a size that is not automatically detected, specify the paper size in [Tray/Paper Settings] of [Settings].
page 208 "Specifying the Paper Size That Is Not Automatically Detected"
• To load thick paper or other special paper, specify the paper type or thickness in [Tray/PaperSettings] of [Settings].
175
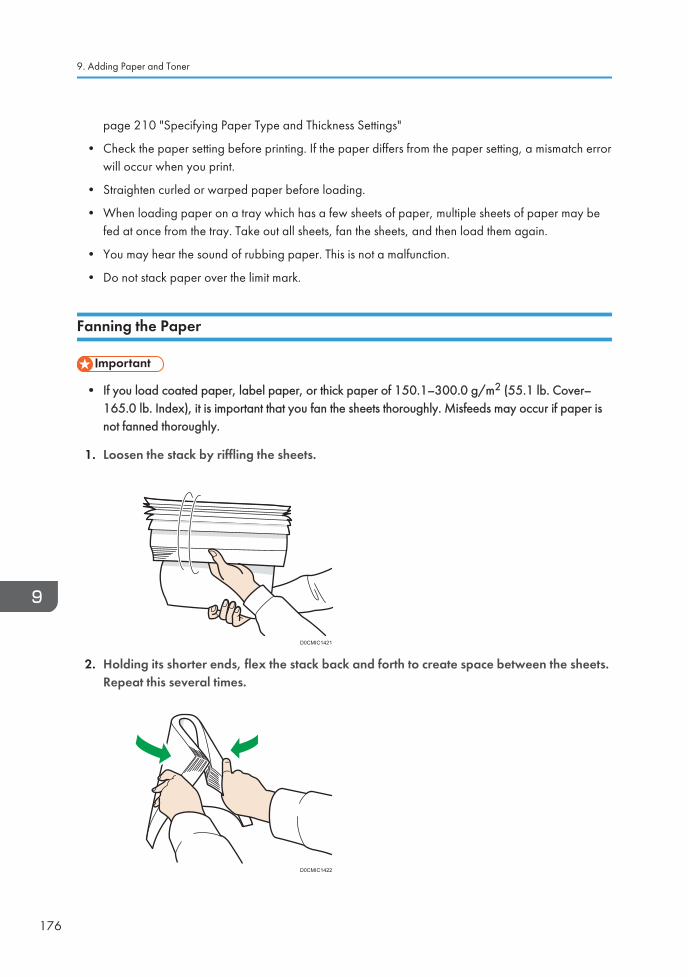
page 210 "Specifying Paper Type and Thickness Settings"
• Check the paper setting before printing. If the paper differs from the paper setting, a mismatch errorwill occur when you print.
• Straighten curled or warped paper before loading.
• When loading paper on a tray which has a few sheets of paper, multiple sheets of paper may befed at once from the tray. Take out all sheets, fan the sheets, and then load them again.
• You may hear the sound of rubbing paper. This is not a malfunction.
• Do not stack paper over the limit mark.
Fanning the Paper
• If you load coated paper, label paper, or thick paper of 150.1–300.0 g/m2 (55.1 lb. Cover–165.0 lb. Index), it is important that you fan the sheets thoroughly. Misfeeds may occur if paper isnot fanned thoroughly.
1. Loosen the stack by riffling the sheets.
D0CMIC1421
2. Holding its shorter ends, flex the stack back and forth to create space between the sheets.Repeat this several times.
D0CMIC1422
9. Adding Paper and Toner
176
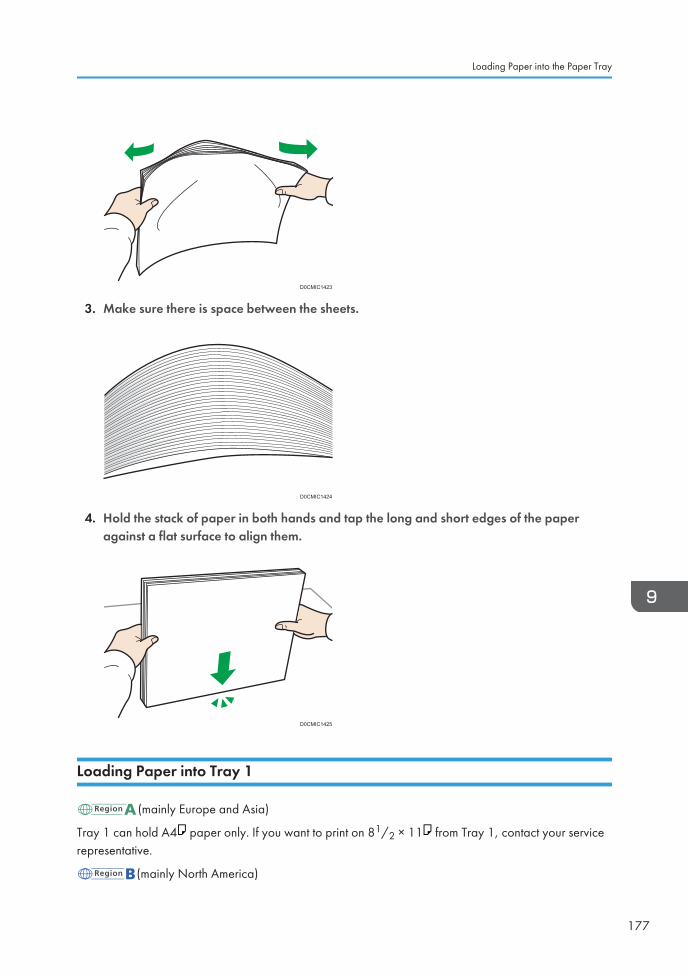
D0CMIC1423
3. Make sure there is space between the sheets.
D0CMIC1424
4. Hold the stack of paper in both hands and tap the long and short edges of the paperagainst a flat surface to align them.
D0CMIC1425
Loading Paper into Tray 1
(mainly Europe and Asia)
Tray 1 can hold A4 paper only. If you want to print on 81/2 × 11 from Tray 1, contact your servicerepresentative.
(mainly North America)
Loading Paper into the Paper Tray
177
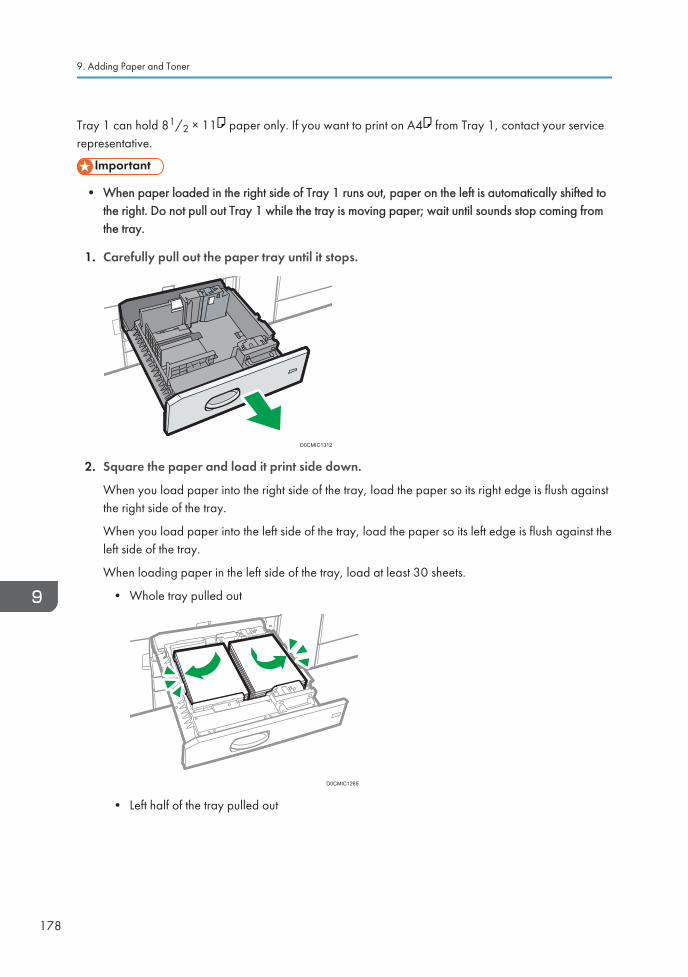
Tray 1 can hold 81/2 × 11 paper only. If you want to print on A4 from Tray 1, contact your servicerepresentative.
• When paper loaded in the right side of Tray 1 runs out, paper on the left is automatically shifted tothe right. Do not pull out Tray 1 while the tray is moving paper; wait until sounds stop coming fromthe tray.
1. Carefully pull out the paper tray until it stops.
D0CMIC1312
2. Square the paper and load it print side down.
When you load paper into the right side of the tray, load the paper so its right edge is flush againstthe right side of the tray.
When you load paper into the left side of the tray, load the paper so its left edge is flush against theleft side of the tray.
When loading paper in the left side of the tray, load at least 30 sheets.
• Whole tray pulled out
D0CMIC1265
• Left half of the tray pulled out
9. Adding Paper and Toner
178
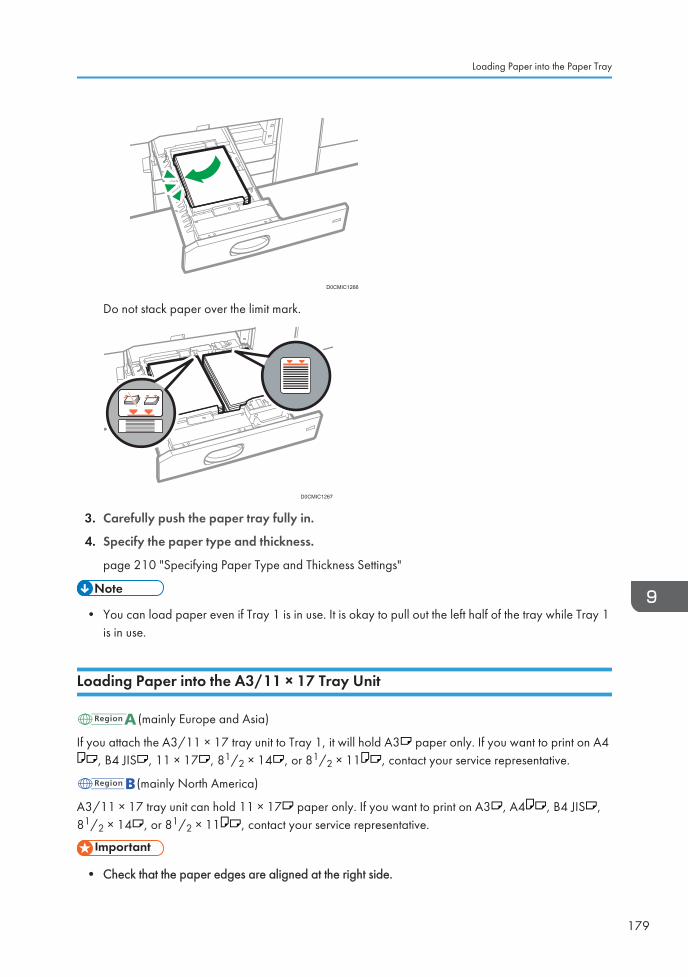
D0CMIC1266
Do not stack paper over the limit mark.
D0CMIC1267
3. Carefully push the paper tray fully in.
4. Specify the paper type and thickness.
page 210 "Specifying Paper Type and Thickness Settings"
• You can load paper even if Tray 1 is in use. It is okay to pull out the left half of the tray while Tray 1is in use.
Loading Paper into the A3/11 × 17 Tray Unit
(mainly Europe and Asia)
If you attach the A3/11 × 17 tray unit to Tray 1, it will hold A3 paper only. If you want to print on A4, B4 JIS , 11 × 17 , 81/2 × 14 , or 81/2 × 11 , contact your service representative.
(mainly North America)
A3/11 × 17 tray unit can hold 11 × 17 paper only. If you want to print on A3 , A4 , B4 JIS ,81/2 × 14 , or 81/2 × 11 , contact your service representative.
• Check that the paper edges are aligned at the right side.
Loading Paper into the Paper Tray
179
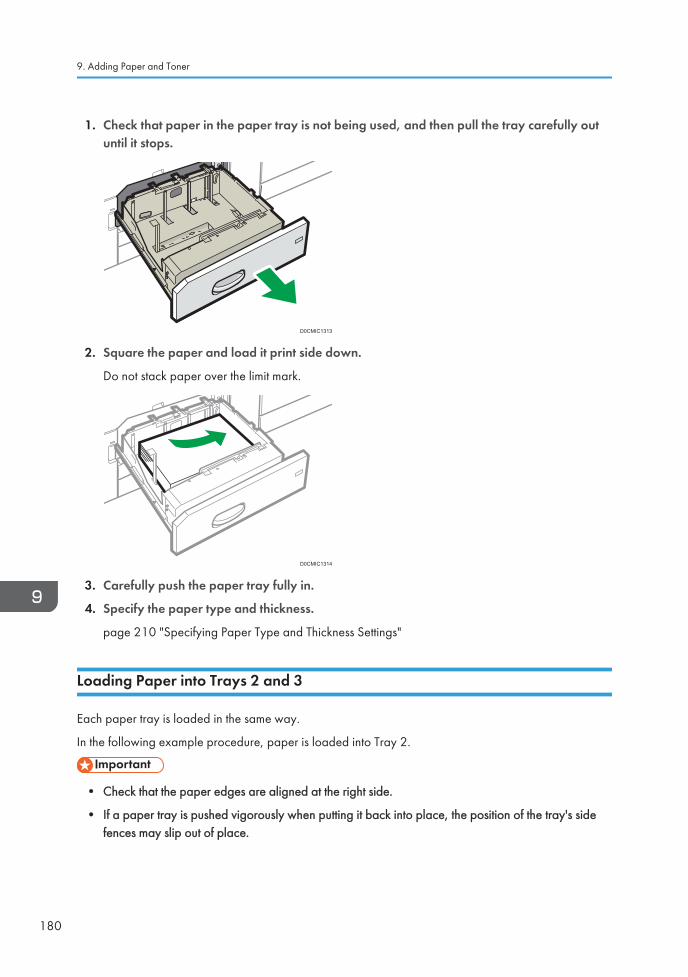
1. Check that paper in the paper tray is not being used, and then pull the tray carefully outuntil it stops.
D0CMIC1313
2. Square the paper and load it print side down.
Do not stack paper over the limit mark.
D0CMIC1314
3. Carefully push the paper tray fully in.
4. Specify the paper type and thickness.
page 210 "Specifying Paper Type and Thickness Settings"
Loading Paper into Trays 2 and 3
Each paper tray is loaded in the same way.
In the following example procedure, paper is loaded into Tray 2.
• Check that the paper edges are aligned at the right side.
• If a paper tray is pushed vigorously when putting it back into place, the position of the tray's sidefences may slip out of place.
9. Adding Paper and Toner
180
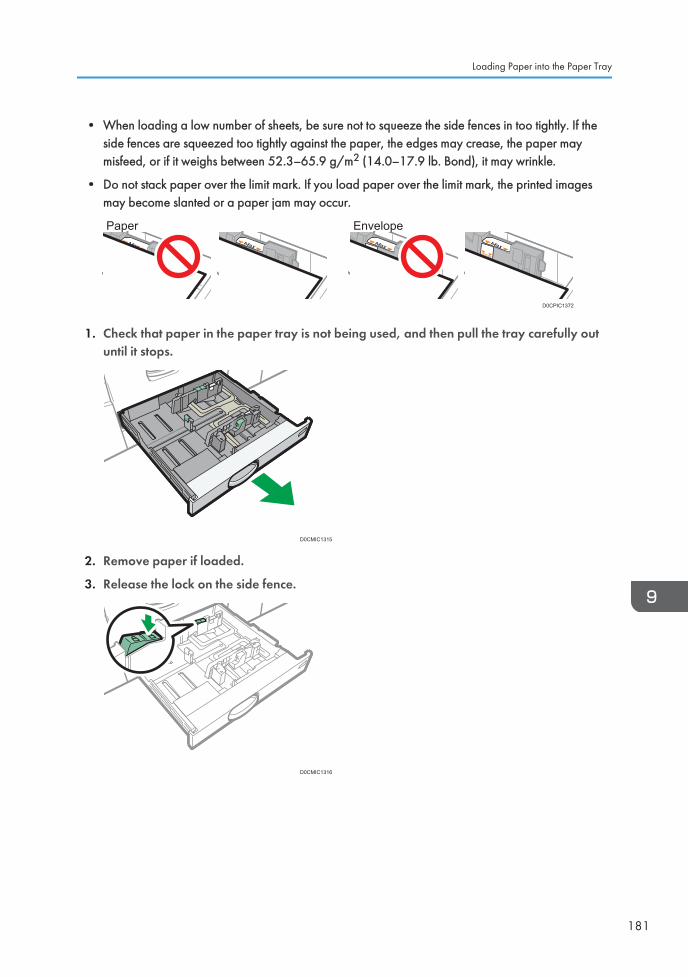
• When loading a low number of sheets, be sure not to squeeze the side fences in too tightly. If theside fences are squeezed too tightly against the paper, the edges may crease, the paper maymisfeed, or if it weighs between 52.3–65.9 g/m2 (14.0–17.9 lb. Bond), it may wrinkle.
• Do not stack paper over the limit mark. If you load paper over the limit mark, the printed imagesmay become slanted or a paper jam may occur.
Paper Envelope
D0CPIC1372
1. Check that paper in the paper tray is not being used, and then pull the tray carefully outuntil it stops.
D0CMIC1315
2. Remove paper if loaded.
3. Release the lock on the side fence.
D0CMIC1316
Loading Paper into the Paper Tray
181
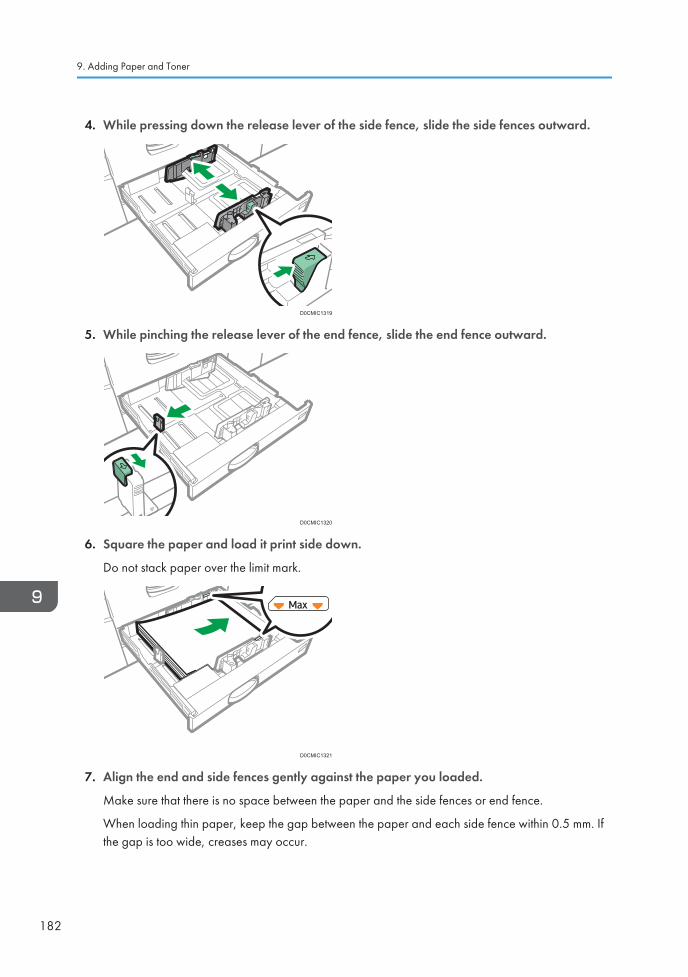
4. While pressing down the release lever of the side fence, slide the side fences outward.
D0CMIC1319
5. While pinching the release lever of the end fence, slide the end fence outward.
D0CMIC1320
6. Square the paper and load it print side down.
Do not stack paper over the limit mark.
D0CMIC1321
7. Align the end and side fences gently against the paper you loaded.
Make sure that there is no space between the paper and the side fences or end fence.
When loading thin paper, keep the gap between the paper and each side fence within 0.5 mm. Ifthe gap is too wide, creases may occur.
9. Adding Paper and Toner
182
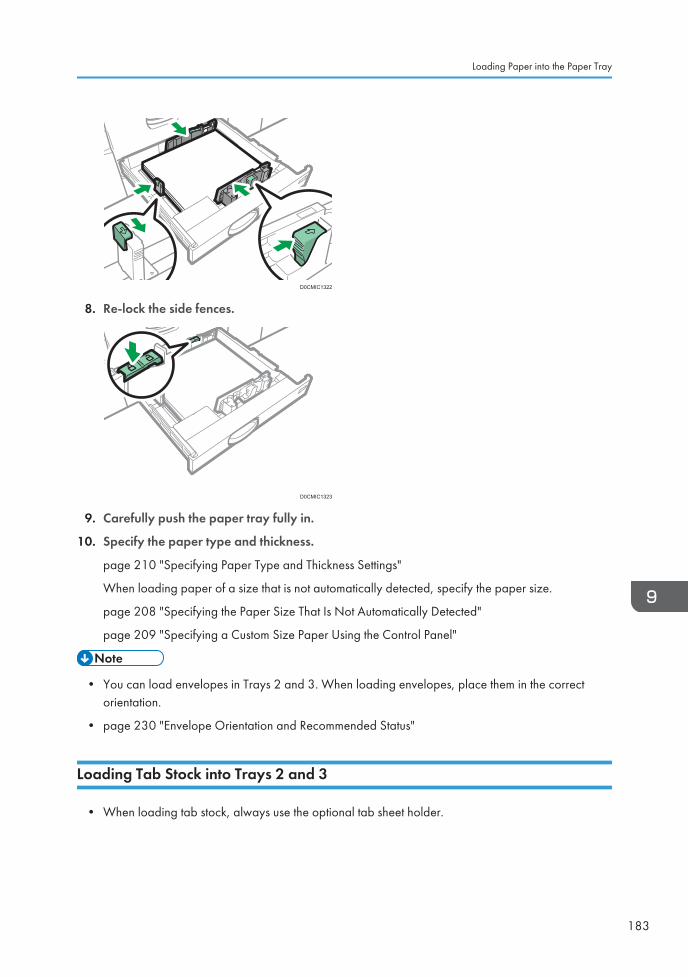
D0CMIC1322
8. Re-lock the side fences.
D0CMIC1323
9. Carefully push the paper tray fully in.
10. Specify the paper type and thickness.
page 210 "Specifying Paper Type and Thickness Settings"
When loading paper of a size that is not automatically detected, specify the paper size.
page 208 "Specifying the Paper Size That Is Not Automatically Detected"
page 209 "Specifying a Custom Size Paper Using the Control Panel"
• You can load envelopes in Trays 2 and 3. When loading envelopes, place them in the correctorientation.
• page 230 "Envelope Orientation and Recommended Status"
Loading Tab Stock into Trays 2 and 3
• When loading tab stock, always use the optional tab sheet holder.
Loading Paper into the Paper Tray
183

D0CMIC1317
• Load tab stock so that the side with the tab faces the tab sheet holder.
• Pressing the release lever, adjust the end fence position so that the tab sheet holder fits against thetab stock.
D0CMIC1318
Specify the paper type and thickness before you start printing.
page 210 "Specifying Paper Type and Thickness Settings"
When loading paper of a size that is not automatically detected, specify the paper size.
page 208 "Specifying the Paper Size That Is Not Automatically Detected"
page 209 "Specifying a Custom Size Paper Using the Control Panel"
Loading Paper into the Bypass Tray
Use the bypass tray to use adhesive labels, translucent paper, and paper that cannot be loaded in thepaper trays.
The maximum number of sheets you can load at the same time depends on paper type.
page 213 "Recommended Paper Sizes and Types"
• Do not stack paper over the limit mark. If you load paper over the limit mark, the print image maybe slanted or the paper may be jammed.
9. Adding Paper and Toner
184
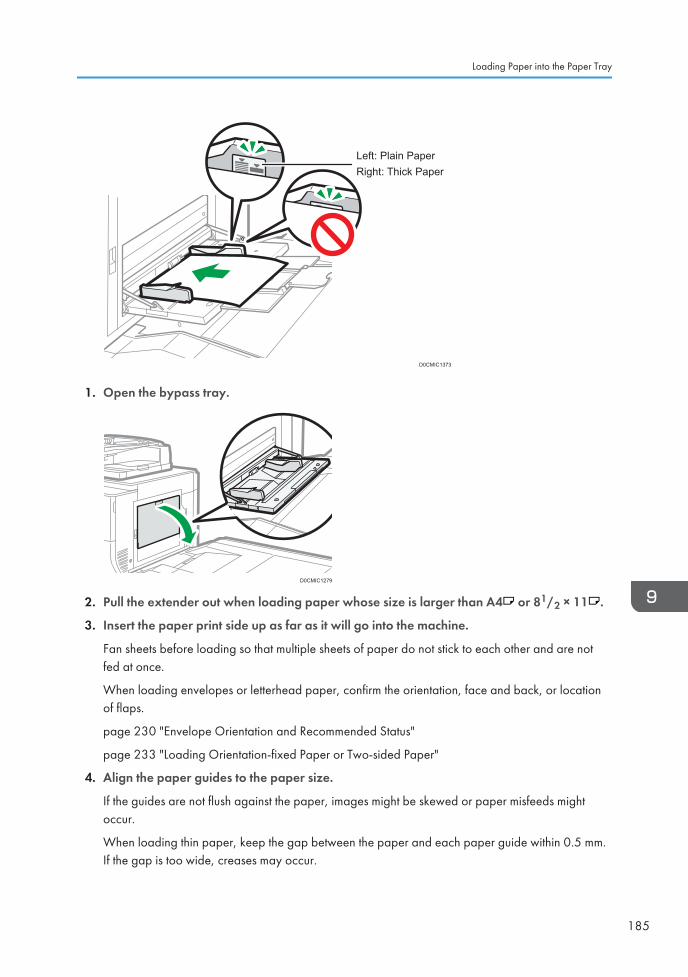
D0CMIC1373
Left: Plain PaperRight: Thick Paper
1. Open the bypass tray.
D0CMIC1279
2. Pull the extender out when loading paper whose size is larger than A4 or 81/2 × 11 .
3. Insert the paper print side up as far as it will go into the machine.
Fan sheets before loading so that multiple sheets of paper do not stick to each other and are notfed at once.
When loading envelopes or letterhead paper, confirm the orientation, face and back, or locationof flaps.
page 230 "Envelope Orientation and Recommended Status"
page 233 "Loading Orientation-fixed Paper or Two-sided Paper"
4. Align the paper guides to the paper size.
If the guides are not flush against the paper, images might be skewed or paper misfeeds mightoccur.
When loading thin paper, keep the gap between the paper and each paper guide within 0.5 mm.If the gap is too wide, creases may occur.
Loading Paper into the Paper Tray
185
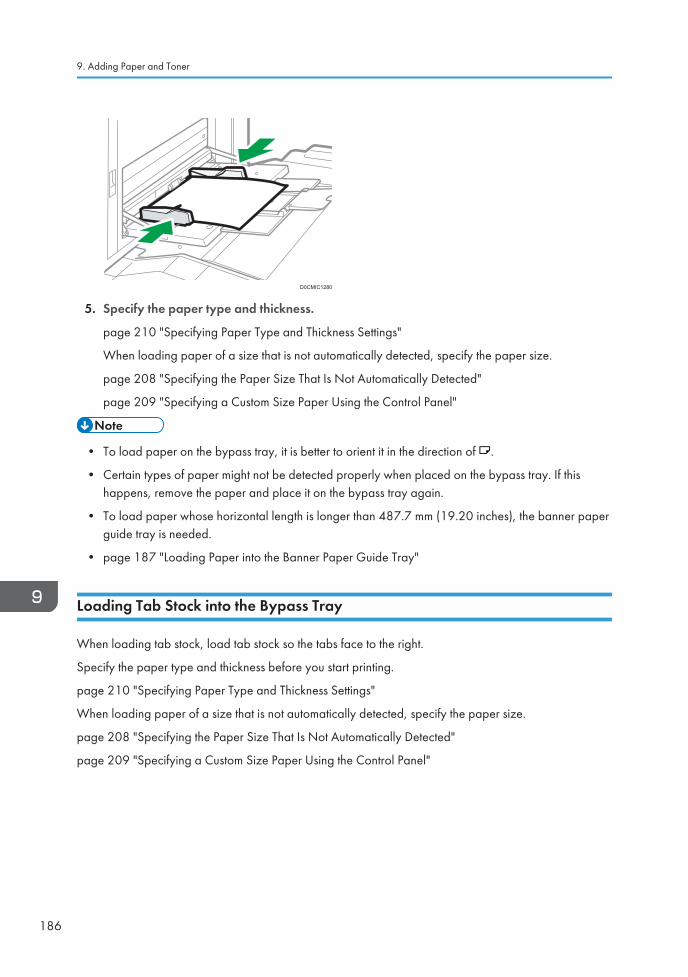
D0CMIC1280
5. Specify the paper type and thickness.
page 210 "Specifying Paper Type and Thickness Settings"
When loading paper of a size that is not automatically detected, specify the paper size.
page 208 "Specifying the Paper Size That Is Not Automatically Detected"
page 209 "Specifying a Custom Size Paper Using the Control Panel"
• To load paper on the bypass tray, it is better to orient it in the direction of .
• Certain types of paper might not be detected properly when placed on the bypass tray. If thishappens, remove the paper and place it on the bypass tray again.
• To load paper whose horizontal length is longer than 487.7 mm (19.20 inches), the banner paperguide tray is needed.
• page 187 "Loading Paper into the Banner Paper Guide Tray"
Loading Tab Stock into the Bypass Tray
When loading tab stock, load tab stock so the tabs face to the right.
Specify the paper type and thickness before you start printing.
page 210 "Specifying Paper Type and Thickness Settings"
When loading paper of a size that is not automatically detected, specify the paper size.
page 208 "Specifying the Paper Size That Is Not Automatically Detected"
page 209 "Specifying a Custom Size Paper Using the Control Panel"
9. Adding Paper and Toner
186
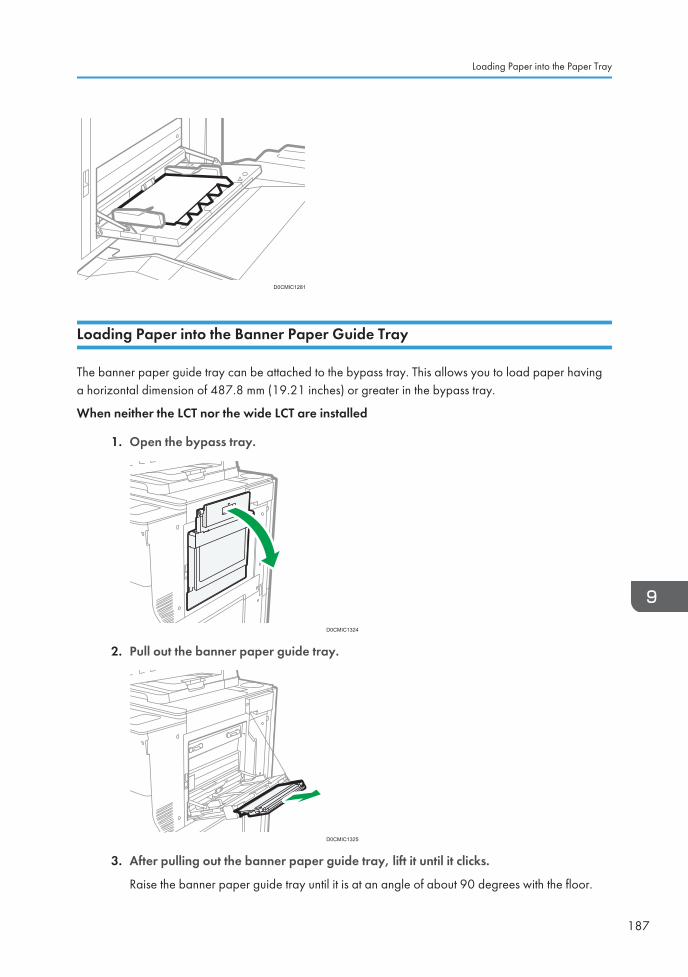
D0CMIC1281
Loading Paper into the Banner Paper Guide Tray
The banner paper guide tray can be attached to the bypass tray. This allows you to load paper havinga horizontal dimension of 487.8 mm (19.21 inches) or greater in the bypass tray.
When neither the LCT nor the wide LCT are installed
1. Open the bypass tray.
D0CMIC1324
2. Pull out the banner paper guide tray.
D0CMIC1325
3. After pulling out the banner paper guide tray, lift it until it clicks.
Raise the banner paper guide tray until it is at an angle of about 90 degrees with the floor.
Loading Paper into the Paper Tray
187
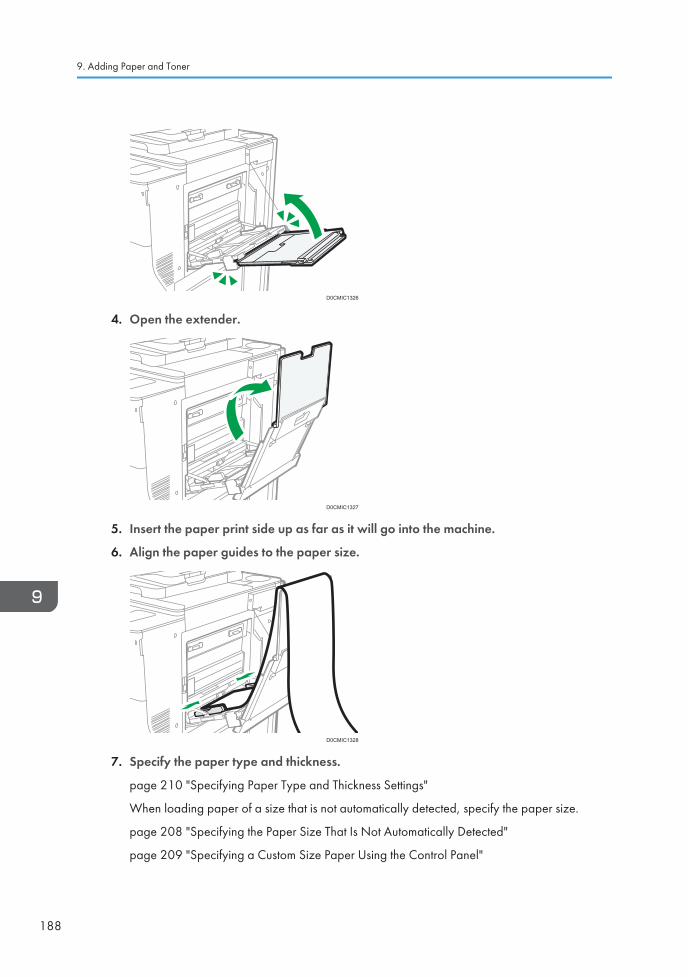
D0CMIC1326
4. Open the extender.
D0CMIC1327
5. Insert the paper print side up as far as it will go into the machine.
6. Align the paper guides to the paper size.
D0CMIC1328
7. Specify the paper type and thickness.
page 210 "Specifying Paper Type and Thickness Settings"
When loading paper of a size that is not automatically detected, specify the paper size.
page 208 "Specifying the Paper Size That Is Not Automatically Detected"
page 209 "Specifying a Custom Size Paper Using the Control Panel"
9. Adding Paper and Toner
188
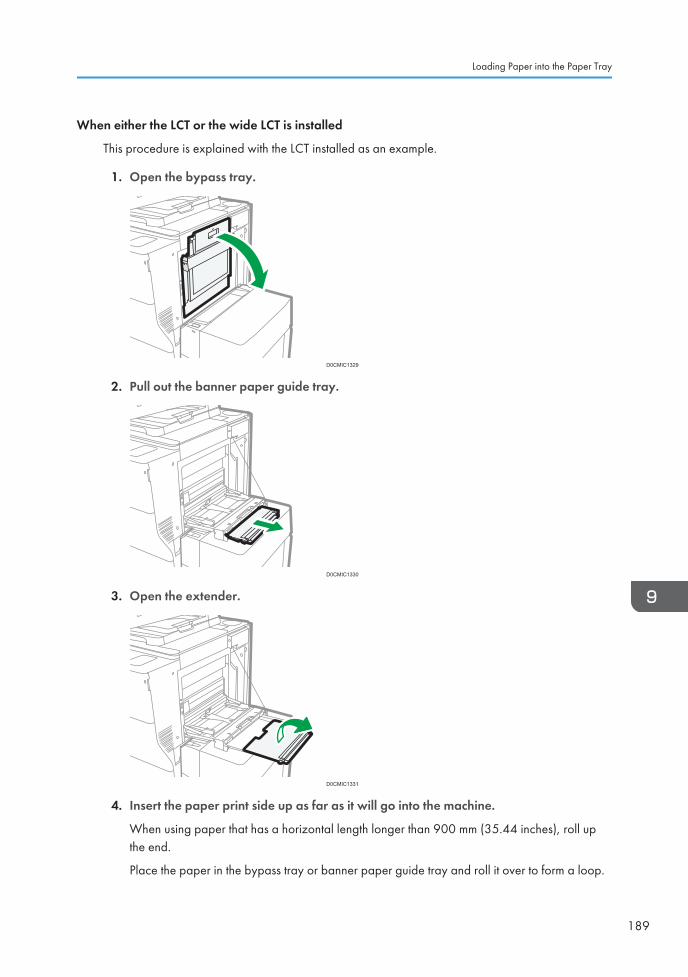
When either the LCT or the wide LCT is installed
This procedure is explained with the LCT installed as an example.
1. Open the bypass tray.
D0CMIC1329
2. Pull out the banner paper guide tray.
D0CMIC1330
3. Open the extender.
D0CMIC1331
4. Insert the paper print side up as far as it will go into the machine.
When using paper that has a horizontal length longer than 900 mm (35.44 inches), roll upthe end.
Place the paper in the bypass tray or banner paper guide tray and roll it over to form a loop.
Loading Paper into the Paper Tray
189
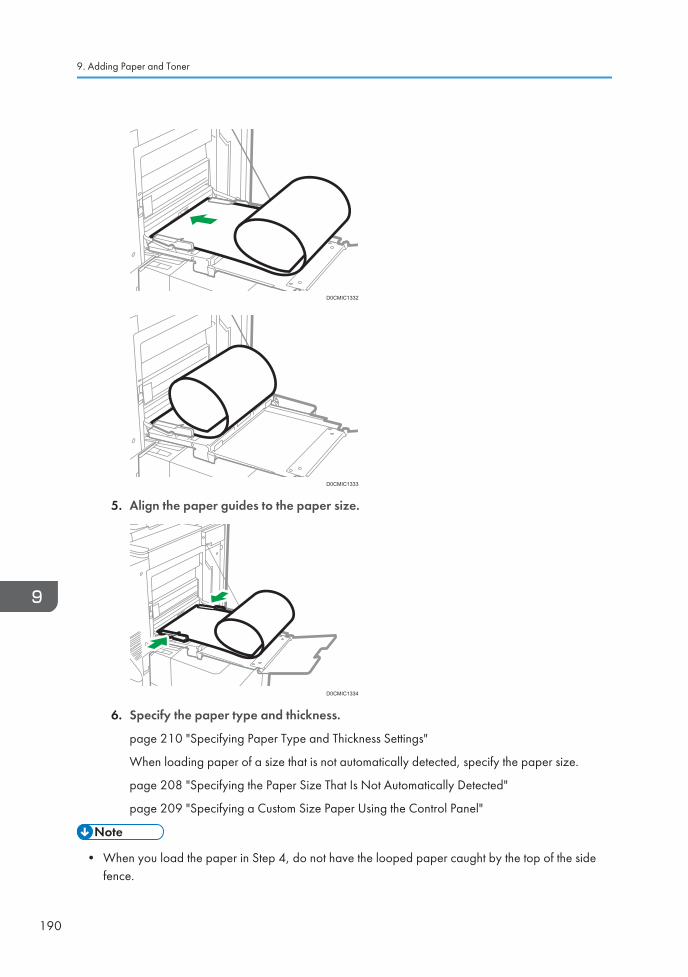
D0CMIC1332
D0CMIC1333
5. Align the paper guides to the paper size.
D0CMIC1334
6. Specify the paper type and thickness.
page 210 "Specifying Paper Type and Thickness Settings"
When loading paper of a size that is not automatically detected, specify the paper size.
page 208 "Specifying the Paper Size That Is Not Automatically Detected"
page 209 "Specifying a Custom Size Paper Using the Control Panel"
• When you load the paper in Step 4, do not have the looped paper caught by the top of the sidefence.
9. Adding Paper and Toner
190

D0CMIC1335
D0CMIC1336
Closing the Banner Paper Guide Tray
When neither the LCT nor the wide LCT are installed
1. Lightly pull up the extender, and then fold it into the machine.
D0CMIC1337
Loading Paper into the Paper Tray
191
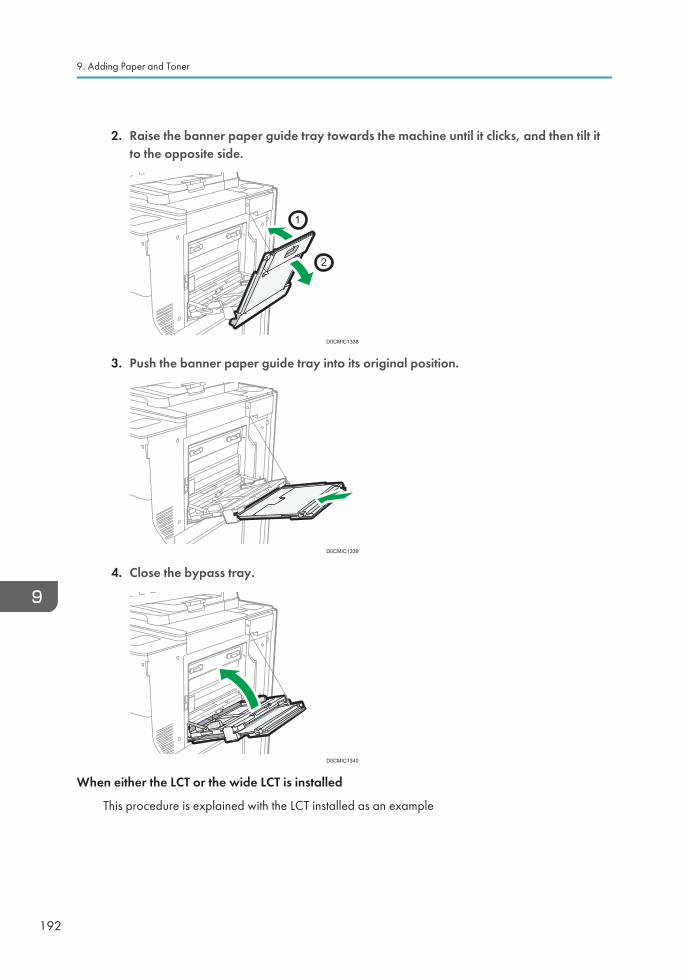
2. Raise the banner paper guide tray towards the machine until it clicks, and then tilt itto the opposite side.
D0CMIC1338
1
2
3. Push the banner paper guide tray into its original position.
D0CMIC1339
4. Close the bypass tray.
D0CMIC1340
When either the LCT or the wide LCT is installed
This procedure is explained with the LCT installed as an example
9. Adding Paper and Toner
192
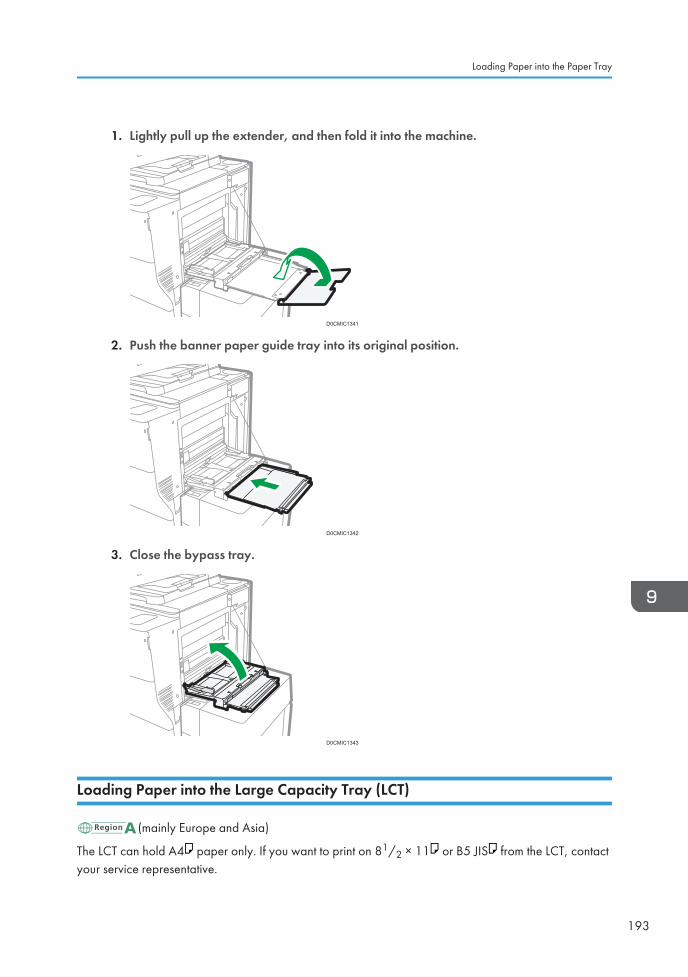
1. Lightly pull up the extender, and then fold it into the machine.
D0CMIC1341
2. Push the banner paper guide tray into its original position.
D0CMIC1342
3. Close the bypass tray.
D0CMIC1343
Loading Paper into the Large Capacity Tray (LCT)
(mainly Europe and Asia)
The LCT can hold A4 paper only. If you want to print on 81/2 × 11 or B5 JIS from the LCT, contactyour service representative.
Loading Paper into the Paper Tray
193
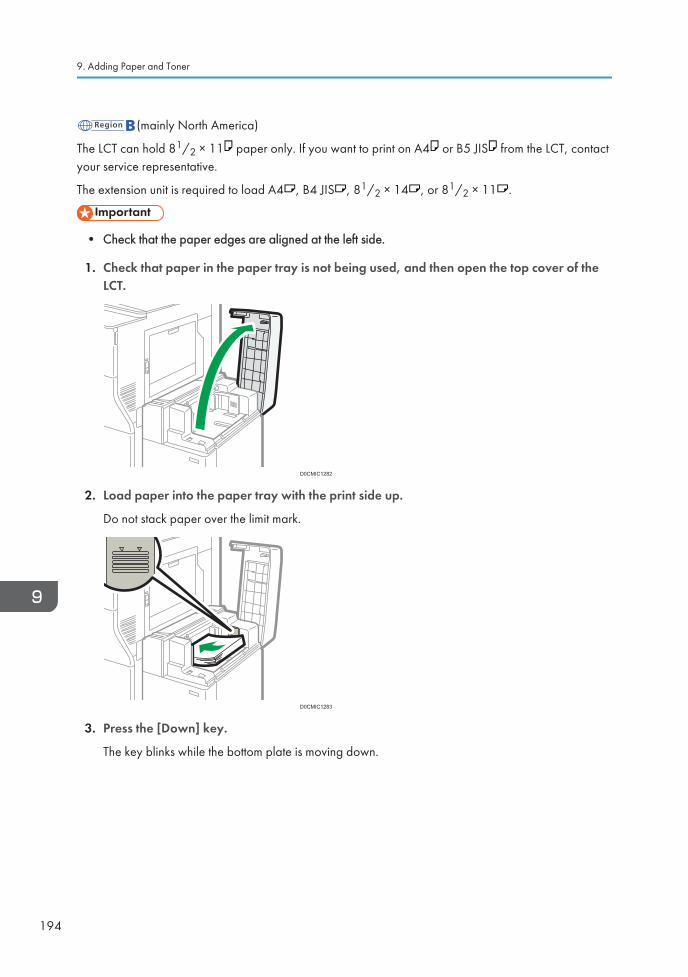
(mainly North America)
The LCT can hold 81/2 × 11 paper only. If you want to print on A4 or B5 JIS from the LCT, contactyour service representative.
The extension unit is required to load A4 , B4 JIS , 81/2 × 14 , or 81/2 × 11 .
• Check that the paper edges are aligned at the left side.
1. Check that paper in the paper tray is not being used, and then open the top cover of theLCT.
D0CMIC1282
2. Load paper into the paper tray with the print side up.
Do not stack paper over the limit mark.
D0CMIC1283
3. Press the [Down] key.
The key blinks while the bottom plate is moving down.
9. Adding Paper and Toner
194
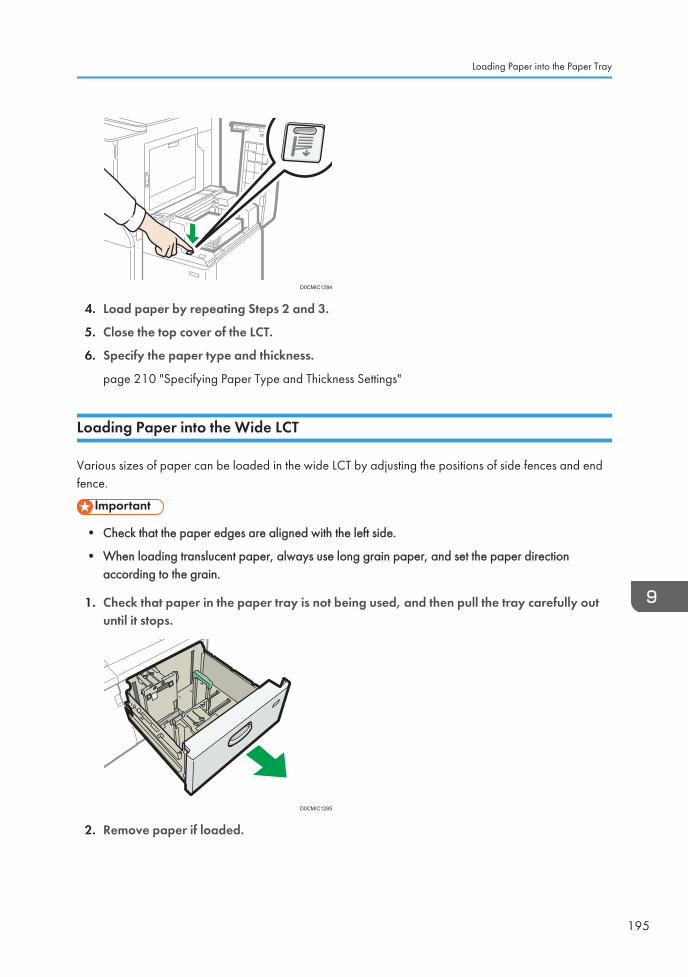
D0CMIC1284
4. Load paper by repeating Steps 2 and 3.
5. Close the top cover of the LCT.
6. Specify the paper type and thickness.
page 210 "Specifying Paper Type and Thickness Settings"
Loading Paper into the Wide LCT
Various sizes of paper can be loaded in the wide LCT by adjusting the positions of side fences and endfence.
• Check that the paper edges are aligned with the left side.
• When loading translucent paper, always use long grain paper, and set the paper directionaccording to the grain.
1. Check that paper in the paper tray is not being used, and then pull the tray carefully outuntil it stops.
D0CMIC1285
2. Remove paper if loaded.
Loading Paper into the Paper Tray
195
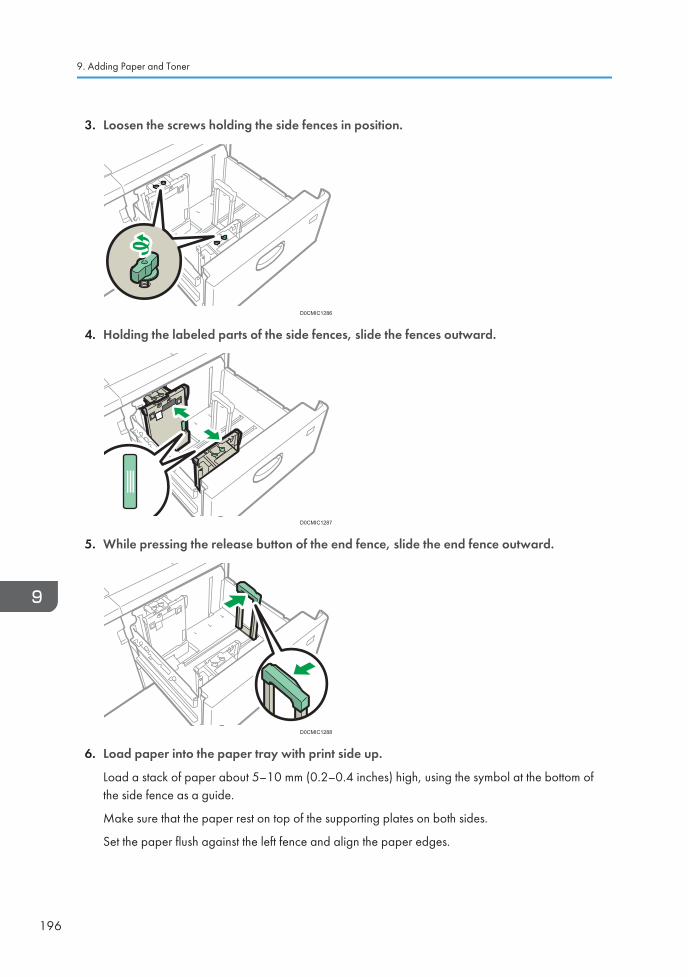
3. Loosen the screws holding the side fences in position.
D0CMIC1286
4. Holding the labeled parts of the side fences, slide the fences outward.
D0CMIC1287
5. While pressing the release button of the end fence, slide the end fence outward.
D0CMIC1288
6. Load paper into the paper tray with print side up.
Load a stack of paper about 5–10 mm (0.2–0.4 inches) high, using the symbol at the bottom ofthe side fence as a guide.
Make sure that the paper rest on top of the supporting plates on both sides.
Set the paper flush against the left fence and align the paper edges.
9. Adding Paper and Toner
196
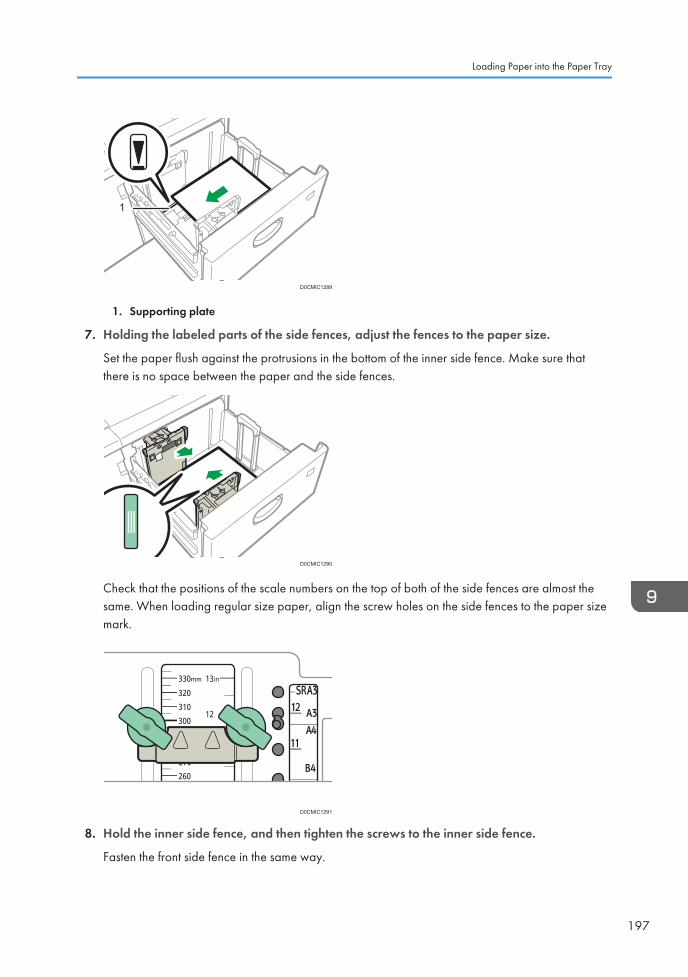
11
D0CMIC1289
1. Supporting plate
7. Holding the labeled parts of the side fences, adjust the fences to the paper size.
Set the paper flush against the protrusions in the bottom of the inner side fence. Make sure thatthere is no space between the paper and the side fences.
D0CMIC1290
Check that the positions of the scale numbers on the top of both of the side fences are almost thesame. When loading regular size paper, align the screw holes on the side fences to the paper sizemark.
D0CMIC1291
8. Hold the inner side fence, and then tighten the screws to the inner side fence.
Fasten the front side fence in the same way.
Loading Paper into the Paper Tray
197
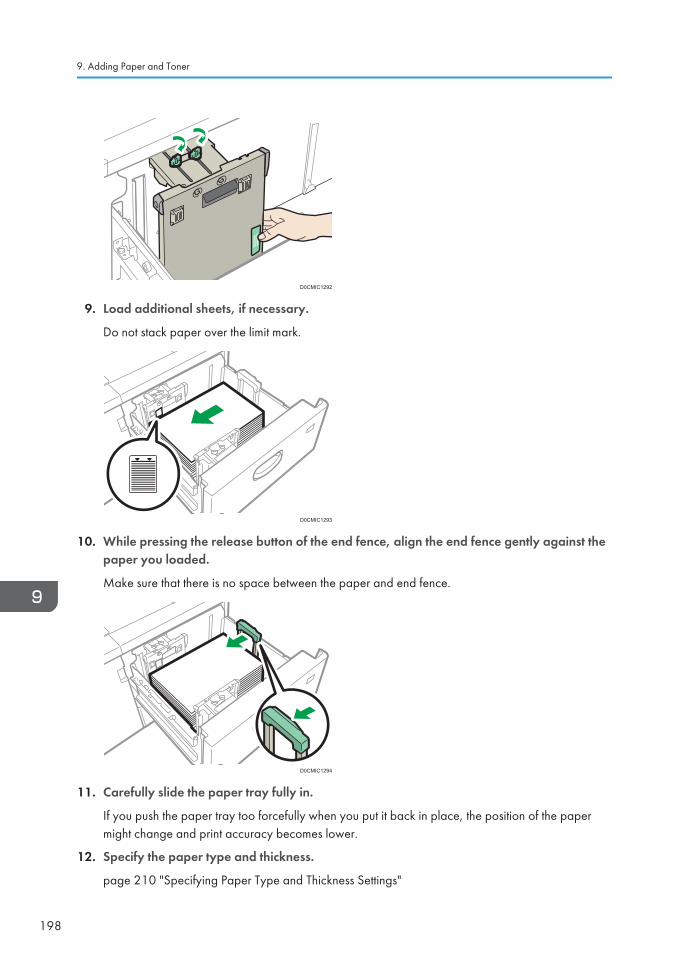
D0CMIC1292
9. Load additional sheets, if necessary.
Do not stack paper over the limit mark.
D0CMIC1293
10. While pressing the release button of the end fence, align the end fence gently against thepaper you loaded.
Make sure that there is no space between the paper and end fence.
D0CMIC1294
11. Carefully slide the paper tray fully in.
If you push the paper tray too forcefully when you put it back in place, the position of the papermight change and print accuracy becomes lower.
12. Specify the paper type and thickness.
page 210 "Specifying Paper Type and Thickness Settings"
9. Adding Paper and Toner
198
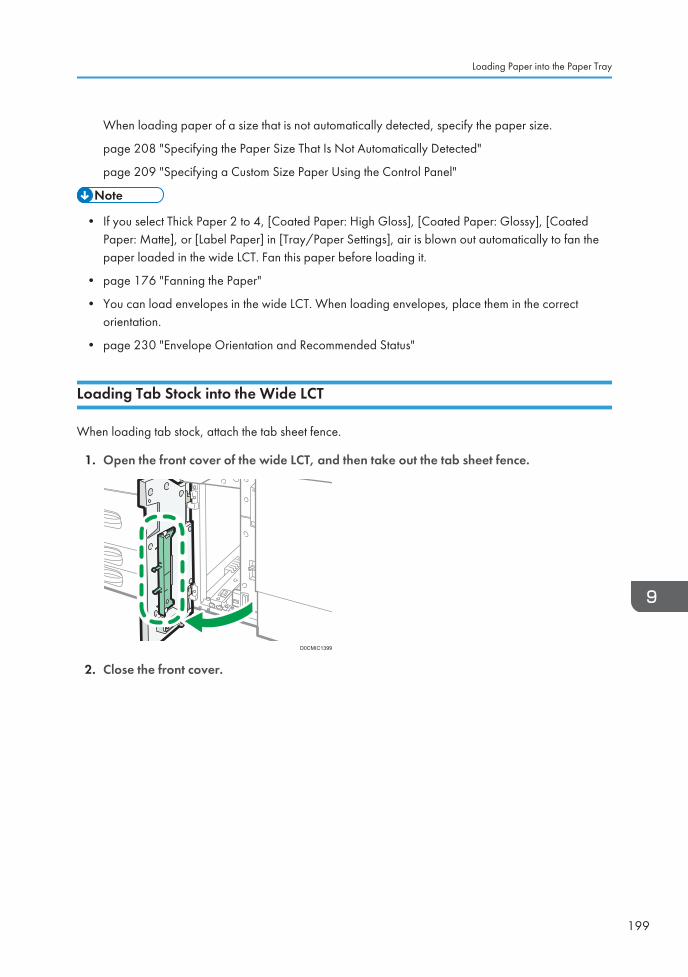
When loading paper of a size that is not automatically detected, specify the paper size.
page 208 "Specifying the Paper Size That Is Not Automatically Detected"
page 209 "Specifying a Custom Size Paper Using the Control Panel"
• If you select Thick Paper 2 to 4, [Coated Paper: High Gloss], [Coated Paper: Glossy], [CoatedPaper: Matte], or [Label Paper] in [Tray/Paper Settings], air is blown out automatically to fan thepaper loaded in the wide LCT. Fan this paper before loading it.
• page 176 "Fanning the Paper"
• You can load envelopes in the wide LCT. When loading envelopes, place them in the correctorientation.
• page 230 "Envelope Orientation and Recommended Status"
Loading Tab Stock into the Wide LCT
When loading tab stock, attach the tab sheet fence.
1. Open the front cover of the wide LCT, and then take out the tab sheet fence.
D0CMIC1399
2. Close the front cover.
Loading Paper into the Paper Tray
199
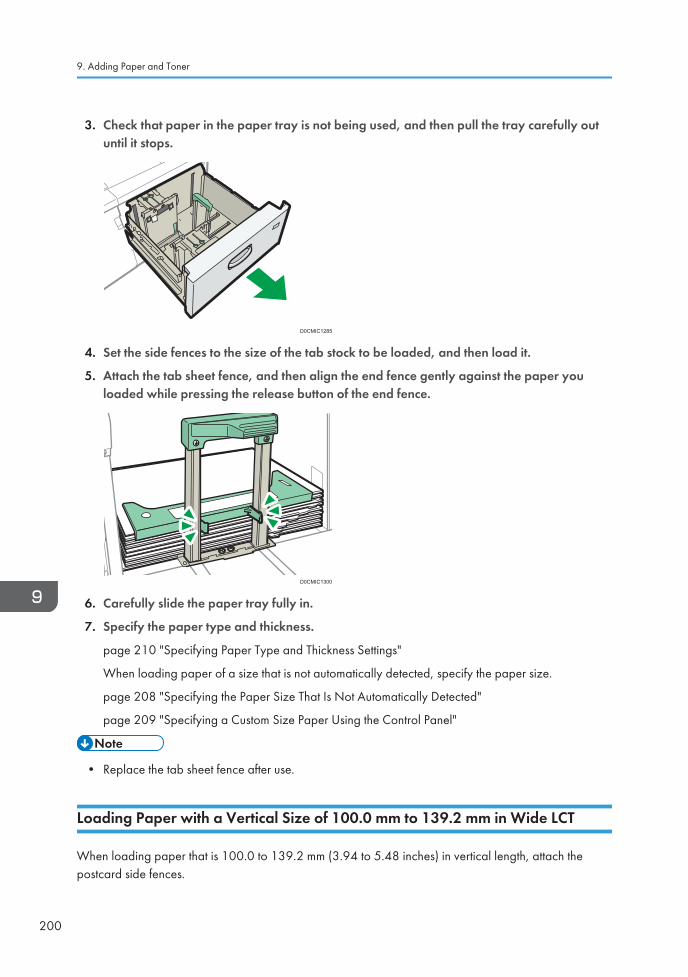
3. Check that paper in the paper tray is not being used, and then pull the tray carefully outuntil it stops.
D0CMIC1285
4. Set the side fences to the size of the tab stock to be loaded, and then load it.
5. Attach the tab sheet fence, and then align the end fence gently against the paper youloaded while pressing the release button of the end fence.
D0CMIC1300
6. Carefully slide the paper tray fully in.
7. Specify the paper type and thickness.
page 210 "Specifying Paper Type and Thickness Settings"
When loading paper of a size that is not automatically detected, specify the paper size.
page 208 "Specifying the Paper Size That Is Not Automatically Detected"
page 209 "Specifying a Custom Size Paper Using the Control Panel"
• Replace the tab sheet fence after use.
Loading Paper with a Vertical Size of 100.0 mm to 139.2 mm in Wide LCT
When loading paper that is 100.0 to 139.2 mm (3.94 to 5.48 inches) in vertical length, attach thepostcard side fences.
9. Adding Paper and Toner
200
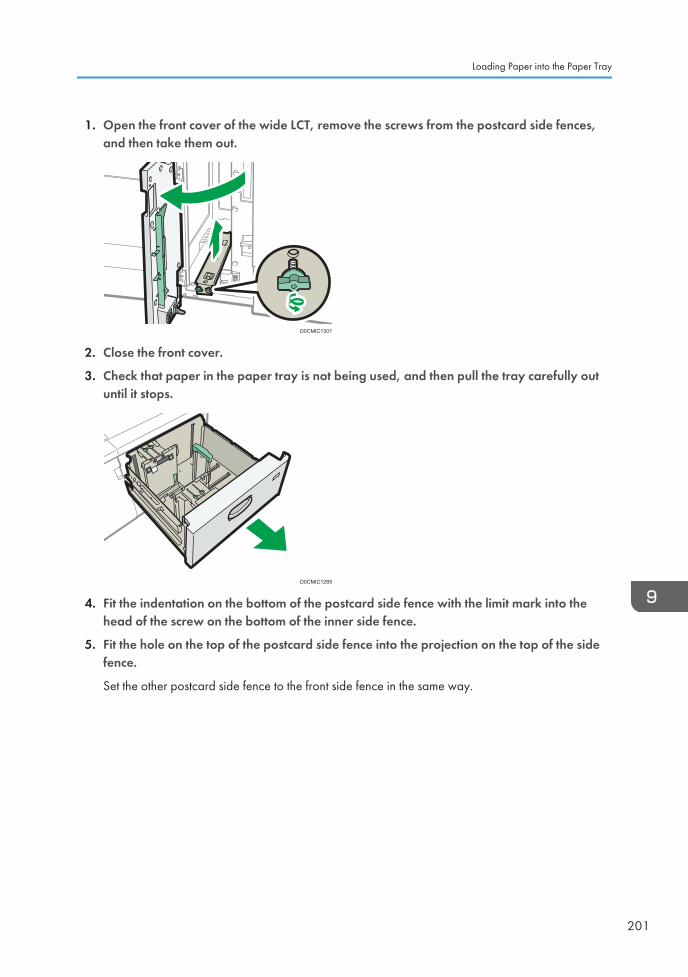
1. Open the front cover of the wide LCT, remove the screws from the postcard side fences,and then take them out.
D0CMIC1301
2. Close the front cover.
3. Check that paper in the paper tray is not being used, and then pull the tray carefully outuntil it stops.
D0CMIC1285
4. Fit the indentation on the bottom of the postcard side fence with the limit mark into thehead of the screw on the bottom of the inner side fence.
5. Fit the hole on the top of the postcard side fence into the projection on the top of the sidefence.
Set the other postcard side fence to the front side fence in the same way.
Loading Paper into the Paper Tray
201
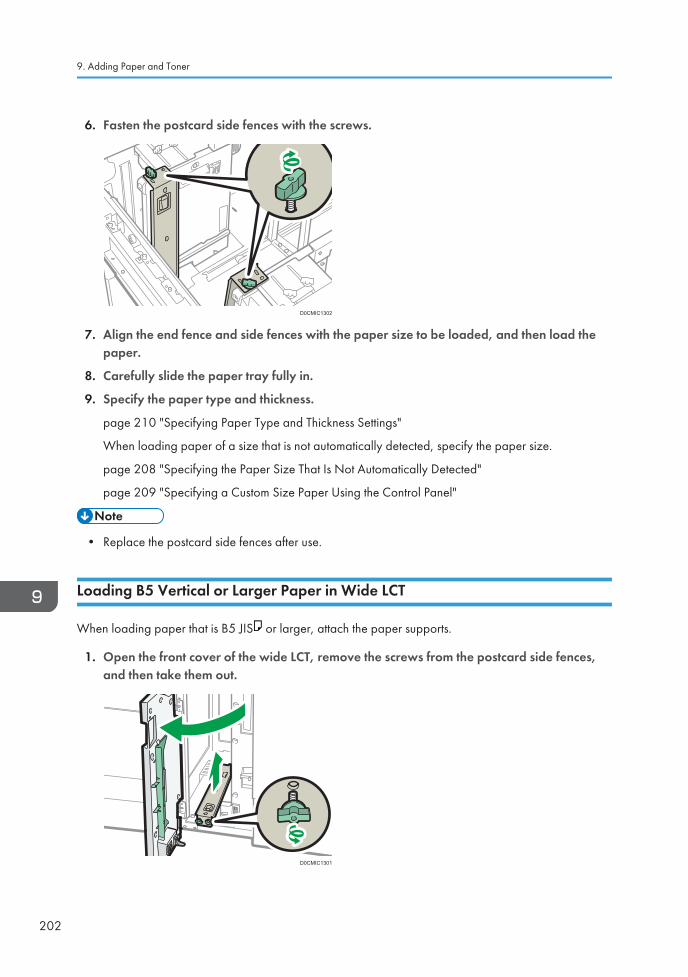
6. Fasten the postcard side fences with the screws.
D0CMIC1302
7. Align the end fence and side fences with the paper size to be loaded, and then load thepaper.
8. Carefully slide the paper tray fully in.
9. Specify the paper type and thickness.
page 210 "Specifying Paper Type and Thickness Settings"
When loading paper of a size that is not automatically detected, specify the paper size.
page 208 "Specifying the Paper Size That Is Not Automatically Detected"
page 209 "Specifying a Custom Size Paper Using the Control Panel"
• Replace the postcard side fences after use.
Loading B5 Vertical or Larger Paper in Wide LCT
When loading paper that is B5 JIS or larger, attach the paper supports.
1. Open the front cover of the wide LCT, remove the screws from the postcard side fences,and then take them out.
D0CMIC1301
9. Adding Paper and Toner
202
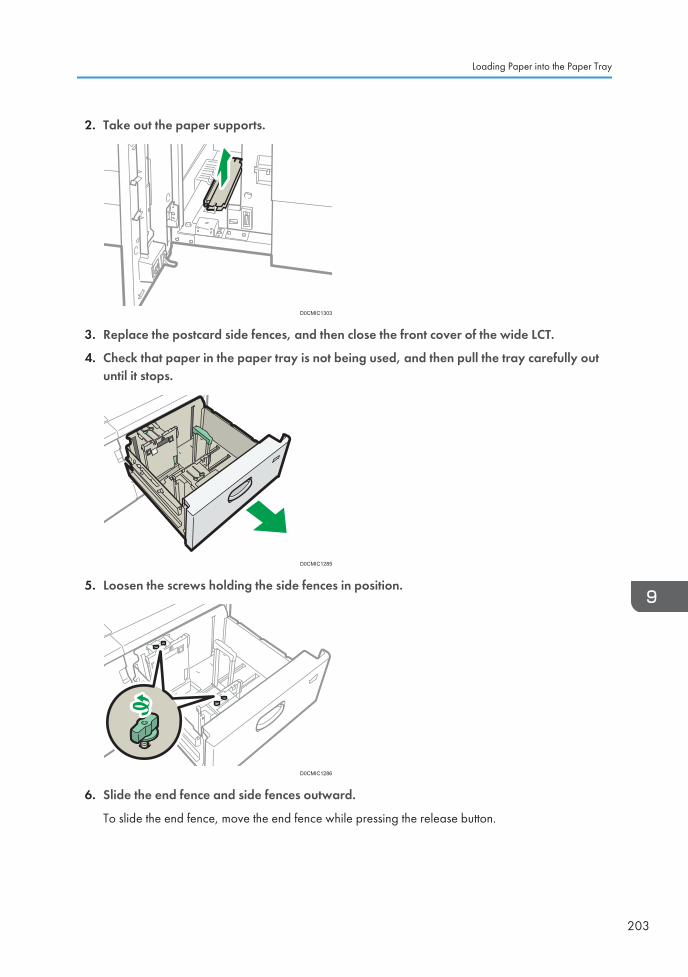
2. Take out the paper supports.
D0CMIC1303
3. Replace the postcard side fences, and then close the front cover of the wide LCT.
4. Check that paper in the paper tray is not being used, and then pull the tray carefully outuntil it stops.
D0CMIC1285
5. Loosen the screws holding the side fences in position.
D0CMIC1286
6. Slide the end fence and side fences outward.
To slide the end fence, move the end fence while pressing the release button.
Loading Paper into the Paper Tray
203
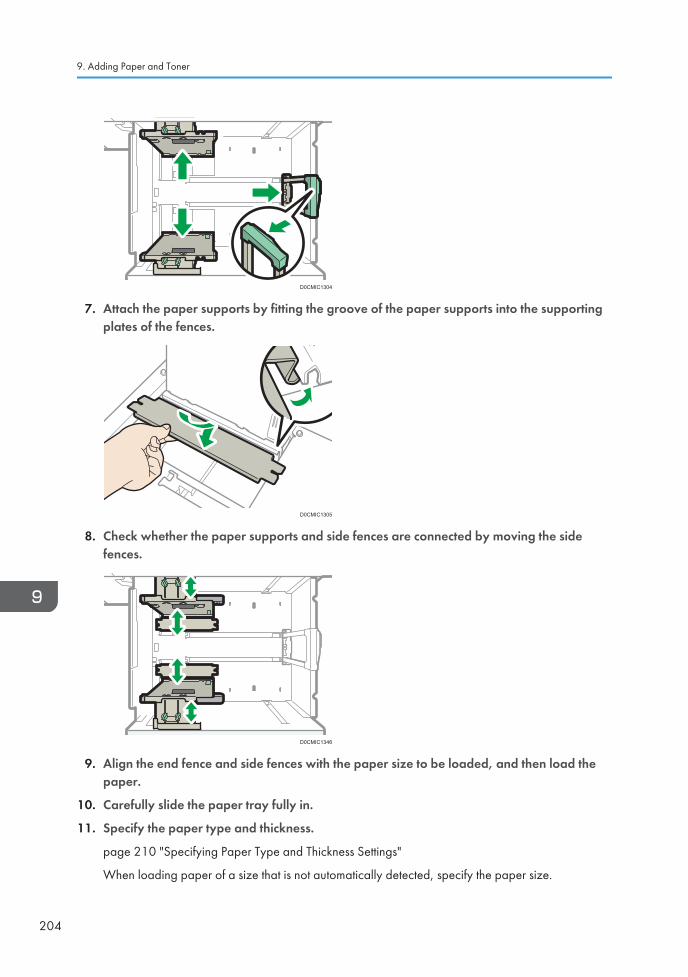
D0CMIC1304
7. Attach the paper supports by fitting the groove of the paper supports into the supportingplates of the fences.
D0CMIC1305
8. Check whether the paper supports and side fences are connected by moving the sidefences.
D0CMIC1346
9. Align the end fence and side fences with the paper size to be loaded, and then load thepaper.
10. Carefully slide the paper tray fully in.
11. Specify the paper type and thickness.
page 210 "Specifying Paper Type and Thickness Settings"
When loading paper of a size that is not automatically detected, specify the paper size.
9. Adding Paper and Toner
204
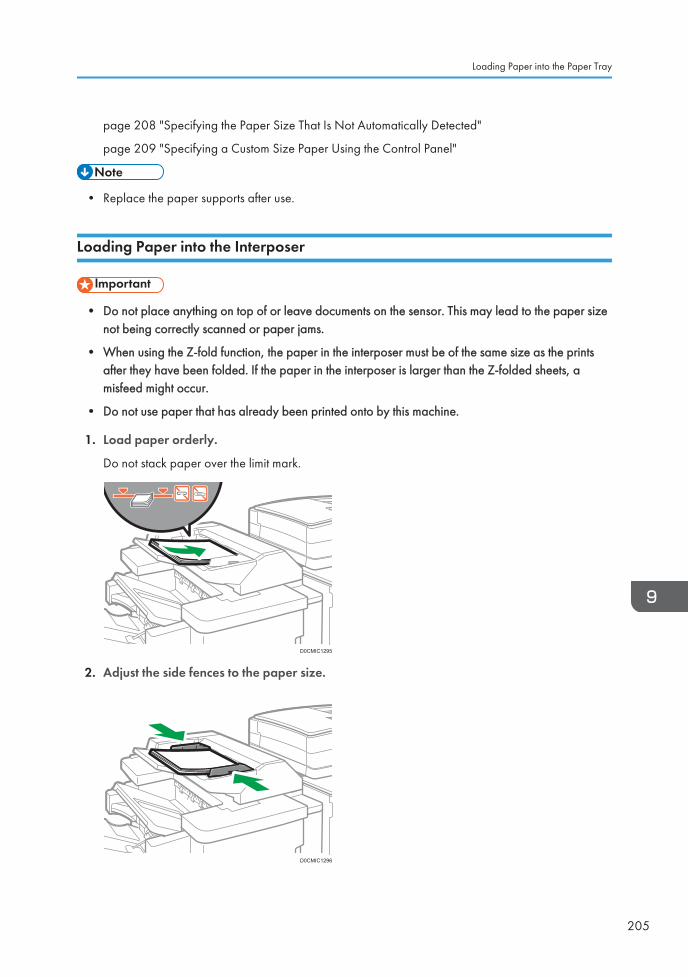
page 208 "Specifying the Paper Size That Is Not Automatically Detected"
page 209 "Specifying a Custom Size Paper Using the Control Panel"
• Replace the paper supports after use.
Loading Paper into the Interposer
• Do not place anything on top of or leave documents on the sensor. This may lead to the paper sizenot being correctly scanned or paper jams.
• When using the Z-fold function, the paper in the interposer must be of the same size as the printsafter they have been folded. If the paper in the interposer is larger than the Z-folded sheets, amisfeed might occur.
• Do not use paper that has already been printed onto by this machine.
1. Load paper orderly.
Do not stack paper over the limit mark.
D0CMIC1295
2. Adjust the side fences to the paper size.
D0CMIC1296
Loading Paper into the Paper Tray
205
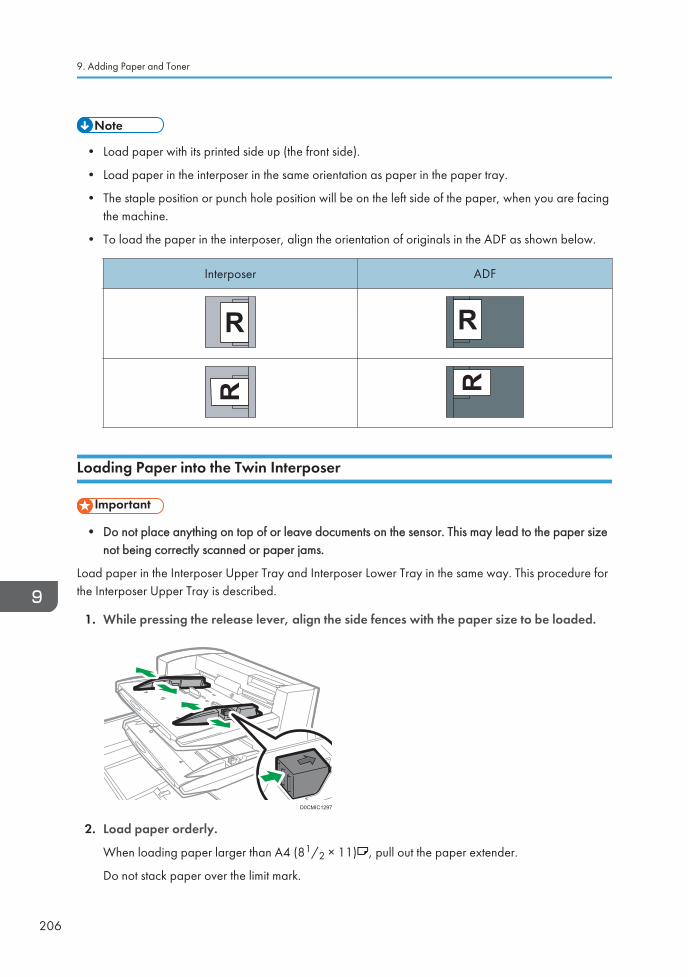
• Load paper with its printed side up (the front side).
• Load paper in the interposer in the same orientation as paper in the paper tray.
• The staple position or punch hole position will be on the left side of the paper, when you are facingthe machine.
• To load the paper in the interposer, align the orientation of originals in the ADF as shown below.
Interposer ADF
Loading Paper into the Twin Interposer
• Do not place anything on top of or leave documents on the sensor. This may lead to the paper sizenot being correctly scanned or paper jams.
Load paper in the Interposer Upper Tray and Interposer Lower Tray in the same way. This procedure forthe Interposer Upper Tray is described.
1. While pressing the release lever, align the side fences with the paper size to be loaded.
D0CMIC1297
2. Load paper orderly.
When loading paper larger than A4 (81/2 × 11) , pull out the paper extender.
Do not stack paper over the limit mark.
9. Adding Paper and Toner
206
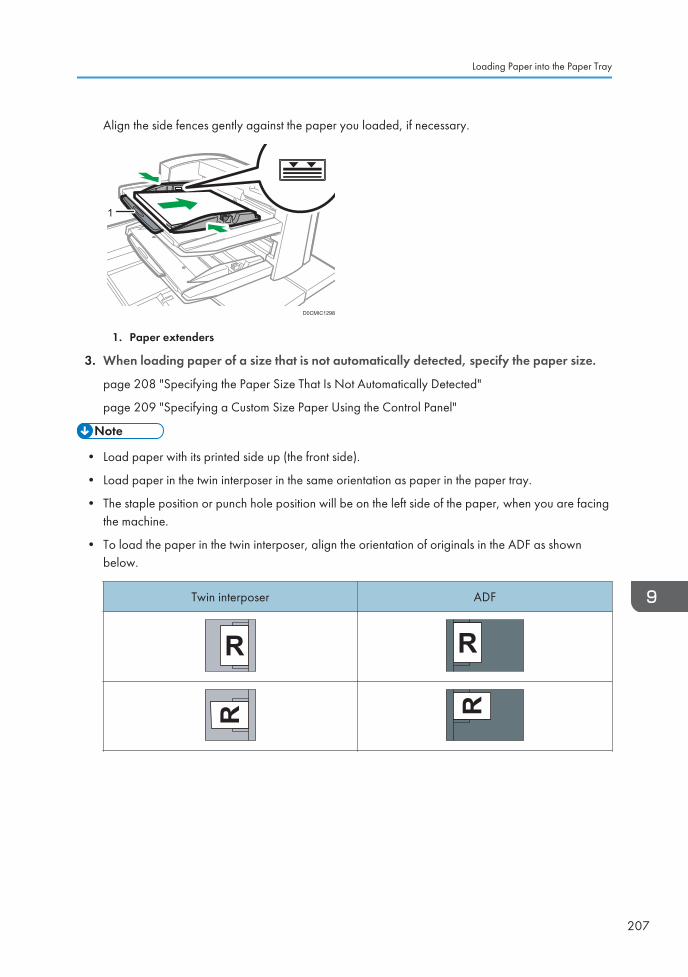
Align the side fences gently against the paper you loaded, if necessary.
D0CMIC1298
11
1. Paper extenders
3. When loading paper of a size that is not automatically detected, specify the paper size.
page 208 "Specifying the Paper Size That Is Not Automatically Detected"
page 209 "Specifying a Custom Size Paper Using the Control Panel"
• Load paper with its printed side up (the front side).
• Load paper in the twin interposer in the same orientation as paper in the paper tray.
• The staple position or punch hole position will be on the left side of the paper, when you are facingthe machine.
• To load the paper in the twin interposer, align the orientation of originals in the ADF as shownbelow.
Twin interposer ADF
Loading Paper into the Paper Tray
207
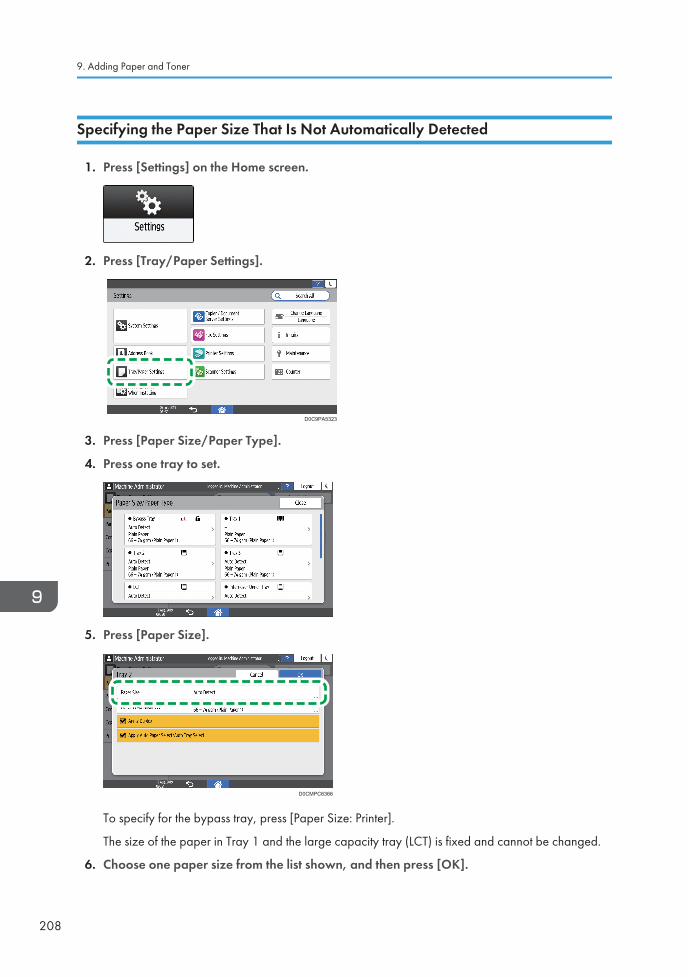
Specifying the Paper Size That Is Not Automatically Detected
1. Press [Settings] on the Home screen.
2. Press [Tray/Paper Settings].
D0C9PA5323
3. Press [Paper Size/Paper Type].
4. Press one tray to set.
5. Press [Paper Size].
D0CMPC6366
To specify for the bypass tray, press [Paper Size: Printer].
The size of the paper in Tray 1 and the large capacity tray (LCT) is fixed and cannot be changed.
6. Choose one paper size from the list shown, and then press [OK].
9. Adding Paper and Toner
208
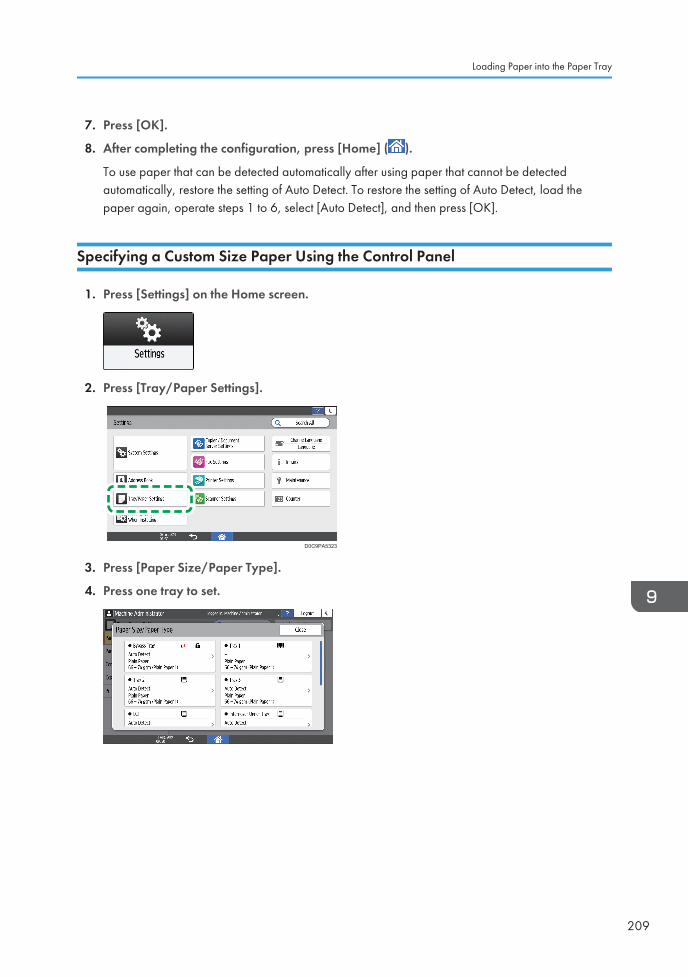
7. Press [OK].
8. After completing the configuration, press [Home] ( ).
To use paper that can be detected automatically after using paper that cannot be detectedautomatically, restore the setting of Auto Detect. To restore the setting of Auto Detect, load thepaper again, operate steps 1 to 6, select [Auto Detect], and then press [OK].
Specifying a Custom Size Paper Using the Control Panel
1. Press [Settings] on the Home screen.
2. Press [Tray/Paper Settings].
D0C9PA5323
3. Press [Paper Size/Paper Type].
4. Press one tray to set.
Loading Paper into the Paper Tray
209

5. Press [Paper Size].
D0CMPC6366
To specify for the bypass tray, press [Paper Size: Printer].
The size of the paper in Tray 1 and the large capacity tray (LCT) is fixed and cannot be changed.
6. Press [Custom] from the list shown.
7. Press the value in the "A" or "B" field, and then enter the new value.
Specify the values within the numbers of "< >", and then press [Done].
8. Press [OK] three times.
9. After completing the configuration, press [Home] ( ).
Specifying Paper Type and Thickness Settings
If the print settings and the loaded paper that are used for a print job do not match, a mismatch erroroccurs.
Check and specify the paper settings before you start printing.
9. Adding Paper and Toner
210

• Before you change the settings, confirm the priority of the paper settings for printing (priority to theprinter driver or to the control panel).
• [Settings] [Printer Settings] [System] [Paper In/Out] [Tray Setting Priority]
On the printer driver
Check the settings of paper tray and paper type on the printer driver and make sure the settingsmatch the loaded paper.
On the control panel
1. Press [Settings] on the Home screen.
2. Press [Tray/Paper Settings].
D0C9PA5323
3. Press [Paper Size/Paper Type].
4. Press one tray to set.
Loading Paper into the Paper Tray
211
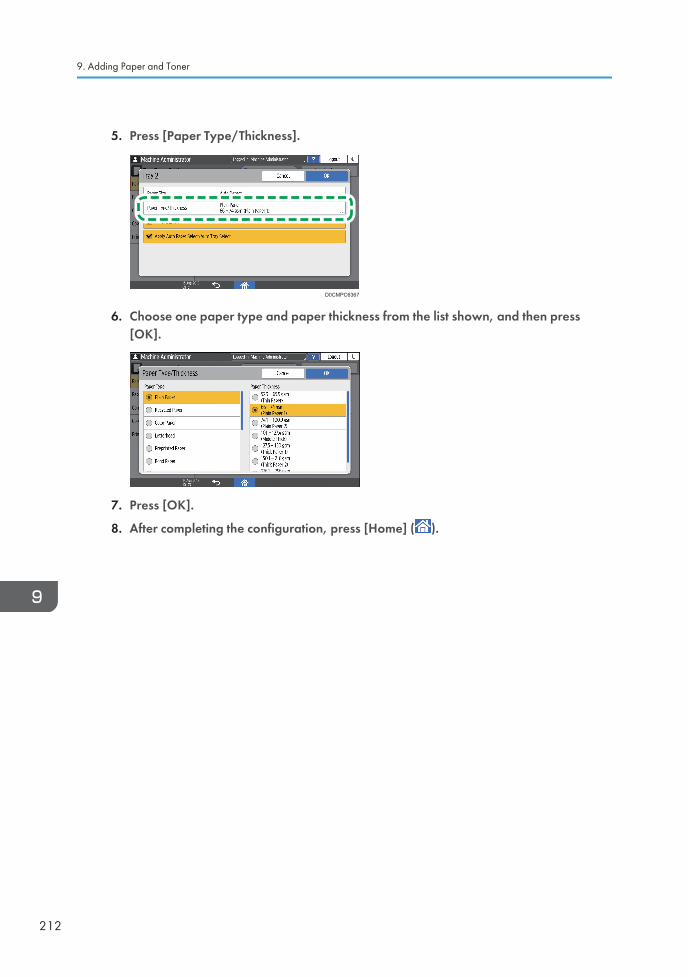
5. Press [Paper Type/Thickness].
D0CMPC6367
6. Choose one paper type and paper thickness from the list shown, and then press[OK].
7. Press [OK].
8. After completing the configuration, press [Home] ( ).
9. Adding Paper and Toner
212
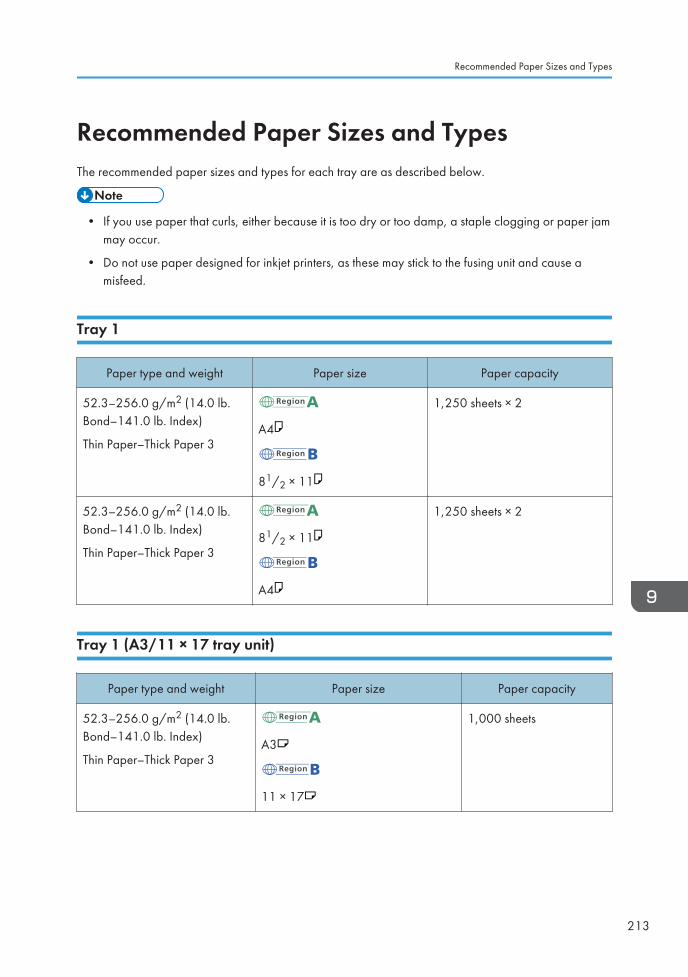
Recommended Paper Sizes and TypesThe recommended paper sizes and types for each tray are as described below.
• If you use paper that curls, either because it is too dry or too damp, a staple clogging or paper jammay occur.
• Do not use paper designed for inkjet printers, as these may stick to the fusing unit and cause amisfeed.
Tray 1
Paper type and weight Paper size Paper capacity
52.3–256.0 g/m2 (14.0 lb.Bond–141.0 lb. Index)
Thin Paper–Thick Paper 3A4
81/2 × 11
1,250 sheets × 2
52.3–256.0 g/m2 (14.0 lb.Bond–141.0 lb. Index)
Thin Paper–Thick Paper 381/2 × 11
A4
1,250 sheets × 2
Tray 1 (A3/11 × 17 tray unit)
Paper type and weight Paper size Paper capacity
52.3–256.0 g/m2 (14.0 lb.Bond–141.0 lb. Index)
Thin Paper–Thick Paper 3A3
11 × 17
1,000 sheets
Recommended Paper Sizes and Types
213
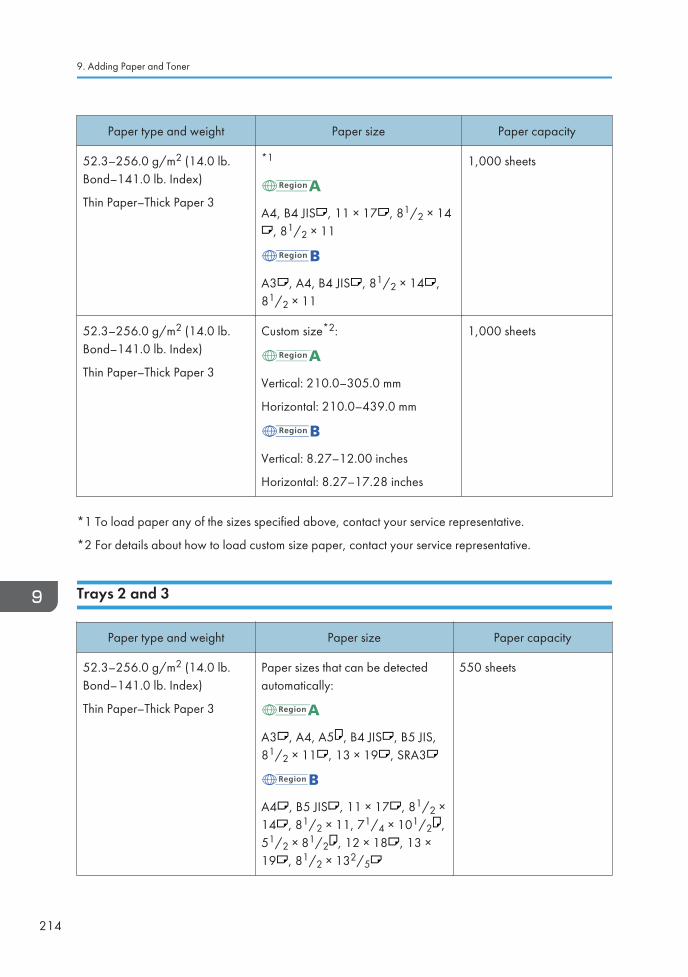
Paper type and weight Paper size Paper capacity
52.3–256.0 g/m2 (14.0 lb.Bond–141.0 lb. Index)
Thin Paper–Thick Paper 3
*1
A4, B4 JIS , 11 × 17 , 81/2 × 14, 81/2 × 11
A3 , A4, B4 JIS , 81/2 × 14 ,81/2 × 11
1,000 sheets
52.3–256.0 g/m2 (14.0 lb.Bond–141.0 lb. Index)
Thin Paper–Thick Paper 3
Custom size*2:
Vertical: 210.0–305.0 mm
Horizontal: 210.0–439.0 mm
Vertical: 8.27–12.00 inches
Horizontal: 8.27–17.28 inches
1,000 sheets
*1 To load paper any of the sizes specified above, contact your service representative.
*2 For details about how to load custom size paper, contact your service representative.
Trays 2 and 3
Paper type and weight Paper size Paper capacity
52.3–256.0 g/m2 (14.0 lb.Bond–141.0 lb. Index)
Thin Paper–Thick Paper 3
Paper sizes that can be detectedautomatically:
A3 , A4, A5 , B4 JIS , B5 JIS,81/2 × 11 , 13 × 19 , SRA3
A4 , B5 JIS , 11 × 17 , 81/2 ×14 , 81/2 × 11, 71/4 × 101/2 ,51/2 × 81/2 , 12 × 18 , 13 ×19 , 81/2 × 132/5
550 sheets
9. Adding Paper and Toner
214
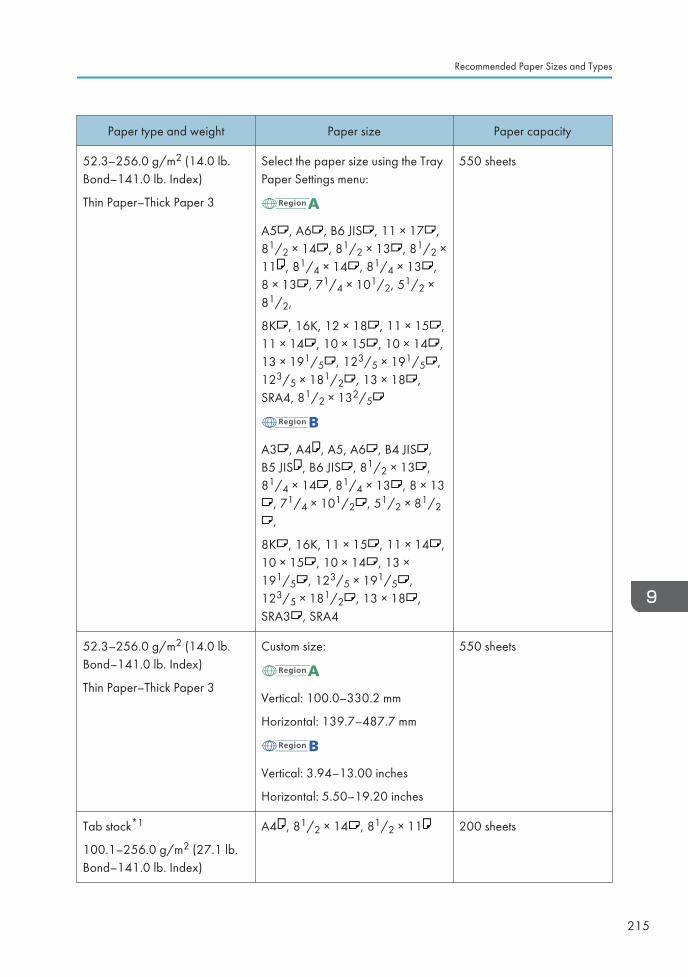
Paper type and weight Paper size Paper capacity
52.3–256.0 g/m2 (14.0 lb.Bond–141.0 lb. Index)
Thin Paper–Thick Paper 3
Select the paper size using the TrayPaper Settings menu:
A5 , A6 , B6 JIS , 11 × 17 ,81/2 × 14 , 81/2 × 13 , 81/2 ×11 , 81/4 × 14 , 81/4 × 13 ,8 × 13 , 71/4 × 101/2, 51/2 ×81/2,
8K , 16K, 12 × 18 , 11 × 15 ,11 × 14 , 10 × 15 , 10 × 14 ,13 × 191/5 , 123/5 × 191/5 ,123/5 × 181/2 , 13 × 18 ,SRA4, 81/2 × 132/5
A3 , A4 , A5, A6 , B4 JIS ,B5 JIS , B6 JIS , 81/2 × 13 ,81/4 × 14 , 81/4 × 13 , 8 × 13
, 71/4 × 101/2 , 51/2 × 81/2,
8K , 16K, 11 × 15 , 11 × 14 ,10 × 15 , 10 × 14 , 13 ×191/5 , 123/5 × 191/5 ,123/5 × 181/2 , 13 × 18 ,SRA3 , SRA4
550 sheets
52.3–256.0 g/m2 (14.0 lb.Bond–141.0 lb. Index)
Thin Paper–Thick Paper 3
Custom size:
Vertical: 100.0–330.2 mm
Horizontal: 139.7–487.7 mm
Vertical: 3.94–13.00 inches
Horizontal: 5.50–19.20 inches
550 sheets
Tab stock*1
100.1–256.0 g/m2 (27.1 lb.Bond–141.0 lb. Index)
A4 , 81/2 × 14 , 81/2 × 11 200 sheets
Recommended Paper Sizes and Types
215
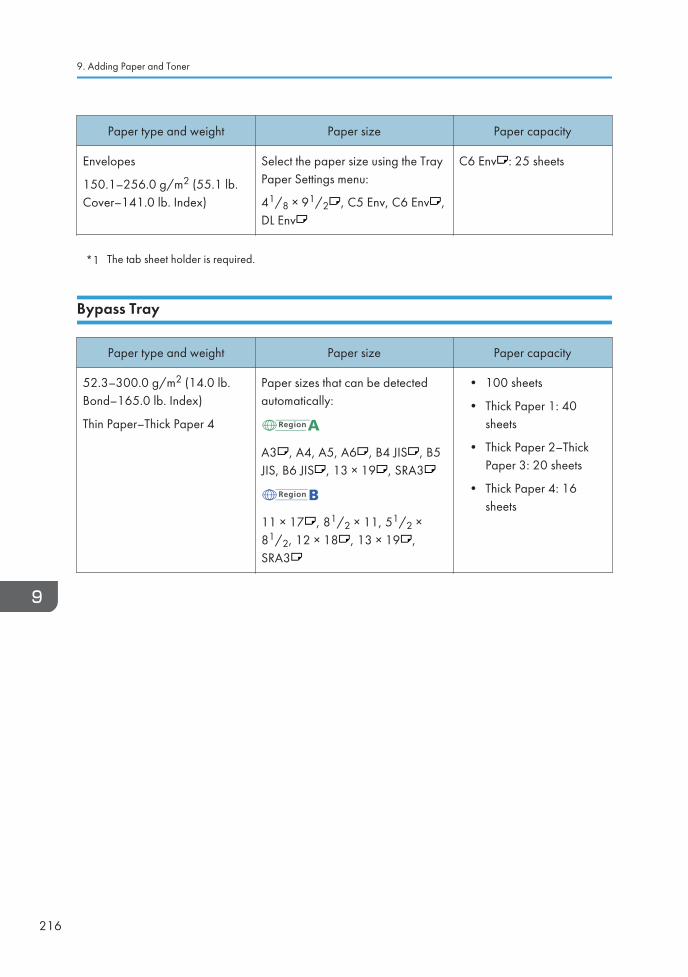
Paper type and weight Paper size Paper capacity
Envelopes
150.1–256.0 g/m2 (55.1 lb.Cover–141.0 lb. Index)
Select the paper size using the TrayPaper Settings menu:
41/8 × 91/2 , C5 Env, C6 Env ,DL Env
C6 Env : 25 sheets
*1 The tab sheet holder is required.
Bypass Tray
Paper type and weight Paper size Paper capacity
52.3–300.0 g/m2 (14.0 lb.Bond–165.0 lb. Index)
Thin Paper–Thick Paper 4
Paper sizes that can be detectedautomatically:
A3 , A4, A5, A6 , B4 JIS , B5JIS, B6 JIS , 13 × 19 , SRA3
11 × 17 , 81/2 × 11, 51/2 ×81/2, 12 × 18 , 13 × 19 ,SRA3
• 100 sheets
• Thick Paper 1: 40sheets
• Thick Paper 2–ThickPaper 3: 20 sheets
• Thick Paper 4: 16sheets
9. Adding Paper and Toner
216
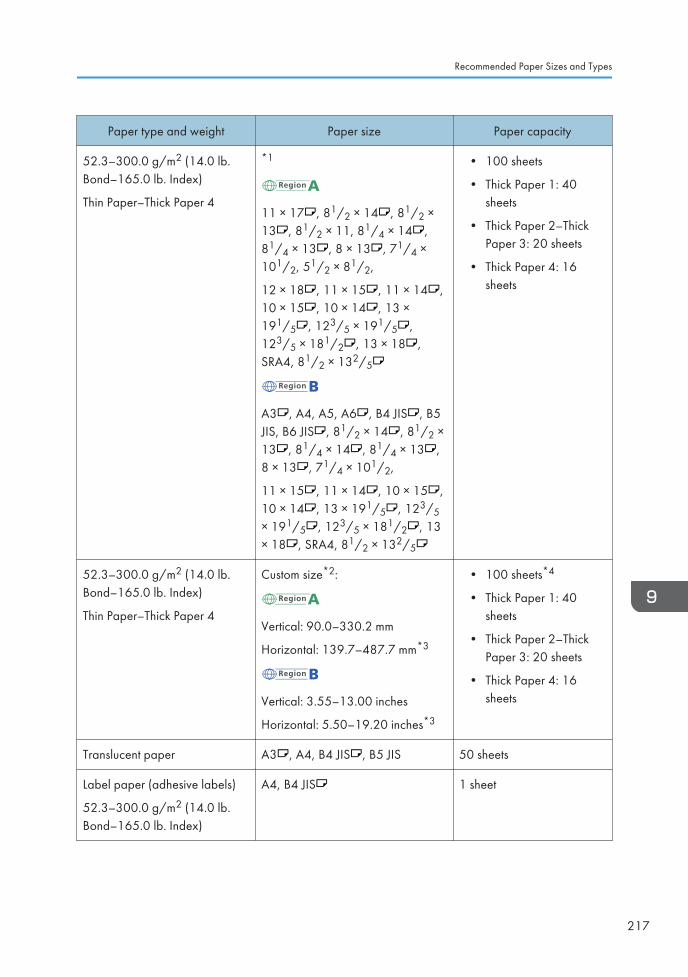
Paper type and weight Paper size Paper capacity
52.3–300.0 g/m2 (14.0 lb.Bond–165.0 lb. Index)
Thin Paper–Thick Paper 4
*1
11 × 17 , 81/2 × 14 , 81/2 ×13 , 81/2 × 11, 81/4 × 14 ,81/4 × 13 , 8 × 13 , 71/4 ×101/2, 51/2 × 81/2,
12 × 18 , 11 × 15 , 11 × 14 ,10 × 15 , 10 × 14 , 13 ×191/5 , 123/5 × 191/5 ,123/5 × 181/2 , 13 × 18 ,SRA4, 81/2 × 132/5
A3 , A4, A5, A6 , B4 JIS , B5JIS, B6 JIS , 81/2 × 14 , 81/2 ×13 , 81/4 × 14 , 81/4 × 13 ,8 × 13 , 71/4 × 101/2,
11 × 15 , 11 × 14 , 10 × 15 ,10 × 14 , 13 × 191/5 , 123/5× 191/5 , 123/5 × 181/2 , 13× 18 , SRA4, 81/2 × 132/5
• 100 sheets
• Thick Paper 1: 40sheets
• Thick Paper 2–ThickPaper 3: 20 sheets
• Thick Paper 4: 16sheets
52.3–300.0 g/m2 (14.0 lb.Bond–165.0 lb. Index)
Thin Paper–Thick Paper 4
Custom size*2:
Vertical: 90.0–330.2 mm
Horizontal: 139.7–487.7 mm*3
Vertical: 3.55–13.00 inches
Horizontal: 5.50–19.20 inches*3
• 100 sheets*4
• Thick Paper 1: 40sheets
• Thick Paper 2–ThickPaper 3: 20 sheets
• Thick Paper 4: 16sheets
Translucent paper A3 , A4, B4 JIS , B5 JIS 50 sheets
Label paper (adhesive labels)
52.3–300.0 g/m2 (14.0 lb.Bond–165.0 lb. Index)
A4, B4 JIS 1 sheet
Recommended Paper Sizes and Types
217
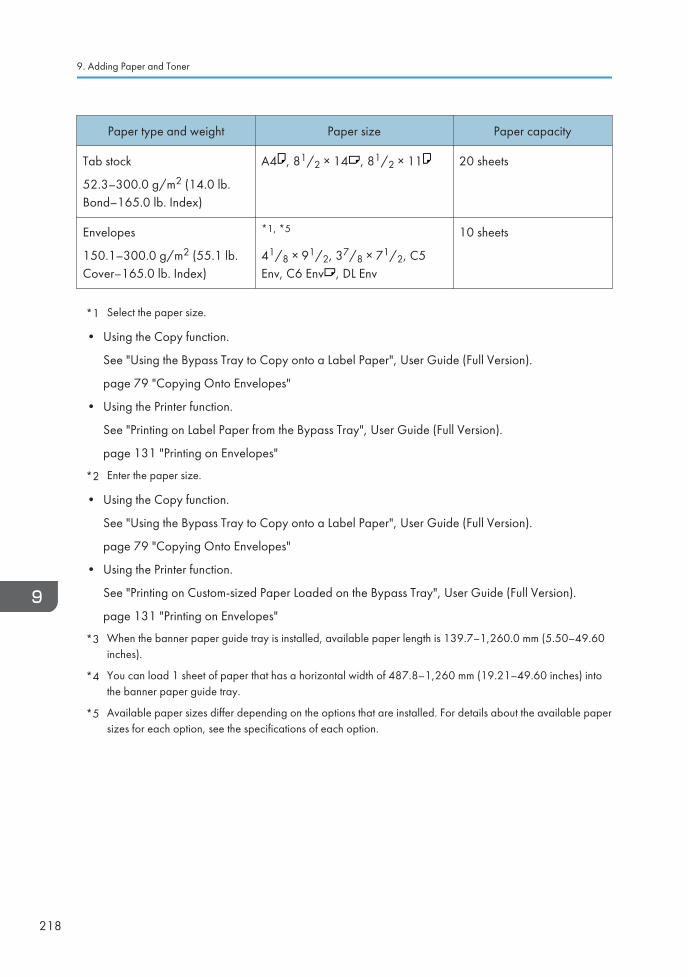
Paper type and weight Paper size Paper capacity
Tab stock
52.3–300.0 g/m2 (14.0 lb.Bond–165.0 lb. Index)
A4 , 81/2 × 14 , 81/2 × 11 20 sheets
Envelopes
150.1–300.0 g/m2 (55.1 lb.Cover–165.0 lb. Index)
*1, *5
41/8 × 91/2, 37/8 × 71/2, C5Env, C6 Env , DL Env
10 sheets
*1 Select the paper size.
• Using the Copy function.
See "Using the Bypass Tray to Copy onto a Label Paper", User Guide (Full Version).
page 79 "Copying Onto Envelopes"
• Using the Printer function.
See "Printing on Label Paper from the Bypass Tray", User Guide (Full Version).
page 131 "Printing on Envelopes"
*2 Enter the paper size.
• Using the Copy function.
See "Using the Bypass Tray to Copy onto a Label Paper", User Guide (Full Version).
page 79 "Copying Onto Envelopes"
• Using the Printer function.
See "Printing on Custom-sized Paper Loaded on the Bypass Tray", User Guide (Full Version).
page 131 "Printing on Envelopes"
*3 When the banner paper guide tray is installed, available paper length is 139.7–1,260.0 mm (5.50–49.60inches).
*4 You can load 1 sheet of paper that has a horizontal width of 487.8–1,260 mm (19.21–49.60 inches) intothe banner paper guide tray.
*5 Available paper sizes differ depending on the options that are installed. For details about the available papersizes for each option, see the specifications of each option.
9. Adding Paper and Toner
218
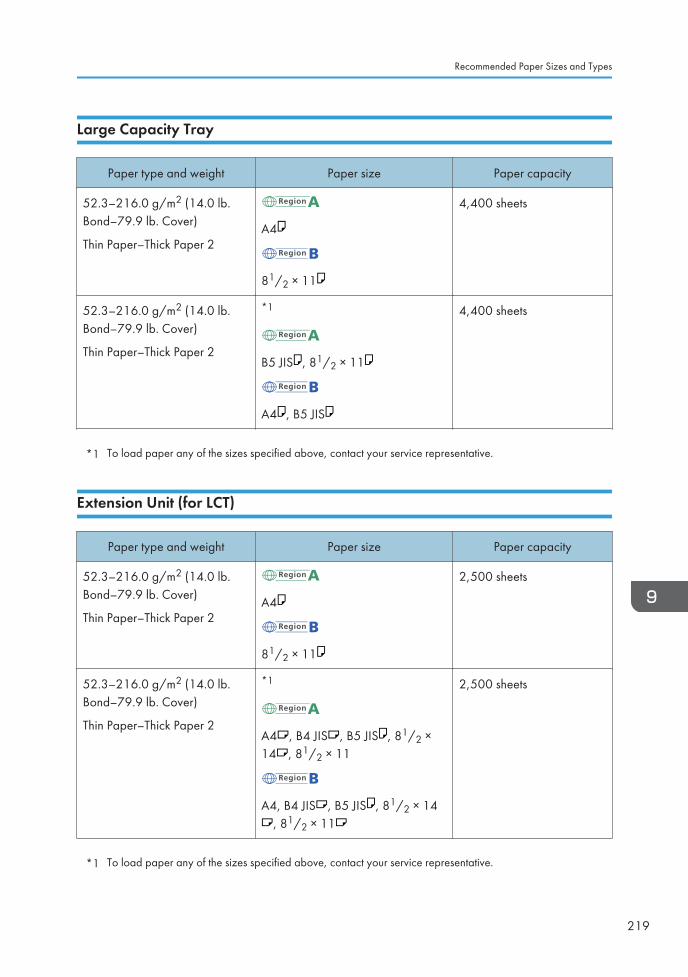
Large Capacity Tray
Paper type and weight Paper size Paper capacity
52.3–216.0 g/m2 (14.0 lb.Bond–79.9 lb. Cover)
Thin Paper–Thick Paper 2A4
81/2 × 11
4,400 sheets
52.3–216.0 g/m2 (14.0 lb.Bond–79.9 lb. Cover)
Thin Paper–Thick Paper 2
*1
B5 JIS , 81/2 × 11
A4 , B5 JIS
4,400 sheets
*1 To load paper any of the sizes specified above, contact your service representative.
Extension Unit (for LCT)
Paper type and weight Paper size Paper capacity
52.3–216.0 g/m2 (14.0 lb.Bond–79.9 lb. Cover)
Thin Paper–Thick Paper 2A4
81/2 × 11
2,500 sheets
52.3–216.0 g/m2 (14.0 lb.Bond–79.9 lb. Cover)
Thin Paper–Thick Paper 2
*1
A4 , B4 JIS , B5 JIS , 81/2 ×14 , 81/2 × 11
A4, B4 JIS , B5 JIS , 81/2 × 14, 81/2 × 11
2,500 sheets
*1 To load paper any of the sizes specified above, contact your service representative.
Recommended Paper Sizes and Types
219
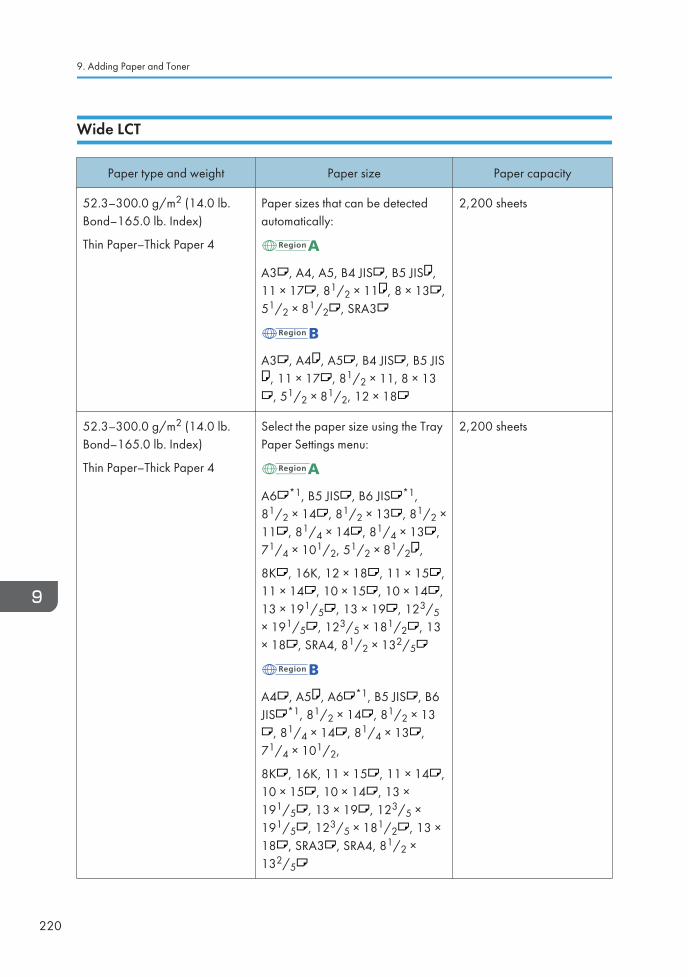
Wide LCT
Paper type and weight Paper size Paper capacity
52.3–300.0 g/m2 (14.0 lb.Bond–165.0 lb. Index)
Thin Paper–Thick Paper 4
Paper sizes that can be detectedautomatically:
A3 , A4, A5, B4 JIS , B5 JIS ,11 × 17 , 81/2 × 11 , 8 × 13 ,51/2 × 81/2 , SRA3
A3 , A4 , A5 , B4 JIS , B5 JIS, 11 × 17 , 81/2 × 11, 8 × 13, 51/2 × 81/2, 12 × 18
2,200 sheets
52.3–300.0 g/m2 (14.0 lb.Bond–165.0 lb. Index)
Thin Paper–Thick Paper 4
Select the paper size using the TrayPaper Settings menu:
A6 *1, B5 JIS , B6 JIS *1,81/2 × 14 , 81/2 × 13 , 81/2 ×11 , 81/4 × 14 , 81/4 × 13 ,71/4 × 101/2, 51/2 × 81/2 ,
8K , 16K, 12 × 18 , 11 × 15 ,11 × 14 , 10 × 15 , 10 × 14 ,13 × 191/5 , 13 × 19 , 123/5× 191/5 , 123/5 × 181/2 , 13× 18 , SRA4, 81/2 × 132/5
A4 , A5 , A6 *1, B5 JIS , B6JIS *1, 81/2 × 14 , 81/2 × 13
, 81/4 × 14 , 81/4 × 13 ,71/4 × 101/2,
8K , 16K, 11 × 15 , 11 × 14 ,10 × 15 , 10 × 14 , 13 ×191/5 , 13 × 19 , 123/5 ×191/5 , 123/5 × 181/2 , 13 ×18 , SRA3 , SRA4, 81/2 ×132/5
2,200 sheets
9. Adding Paper and Toner
220
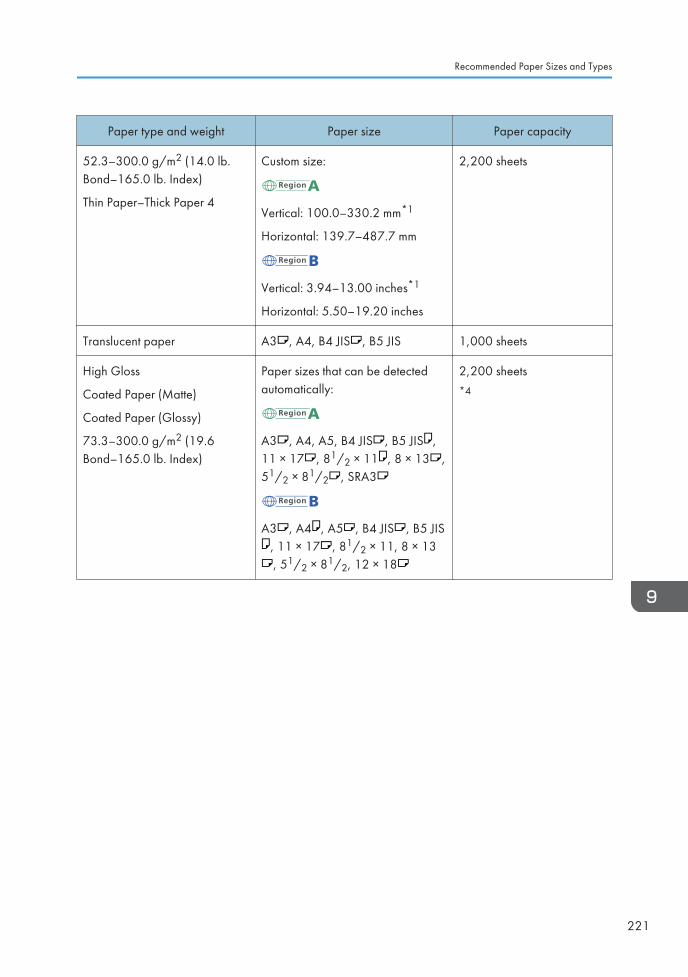
Paper type and weight Paper size Paper capacity
52.3–300.0 g/m2 (14.0 lb.Bond–165.0 lb. Index)
Thin Paper–Thick Paper 4
Custom size:
Vertical: 100.0–330.2 mm*1
Horizontal: 139.7–487.7 mm
Vertical: 3.94–13.00 inches*1
Horizontal: 5.50–19.20 inches
2,200 sheets
Translucent paper A3 , A4, B4 JIS , B5 JIS 1,000 sheets
High Gloss
Coated Paper (Matte)
Coated Paper (Glossy)
73.3–300.0 g/m2 (19.6Bond–165.0 lb. Index)
Paper sizes that can be detectedautomatically:
A3 , A4, A5, B4 JIS , B5 JIS ,11 × 17 , 81/2 × 11 , 8 × 13 ,51/2 × 81/2 , SRA3
A3 , A4 , A5 , B4 JIS , B5 JIS, 11 × 17 , 81/2 × 11, 8 × 13, 51/2 × 81/2, 12 × 18
2,200 sheets*4
Recommended Paper Sizes and Types
221
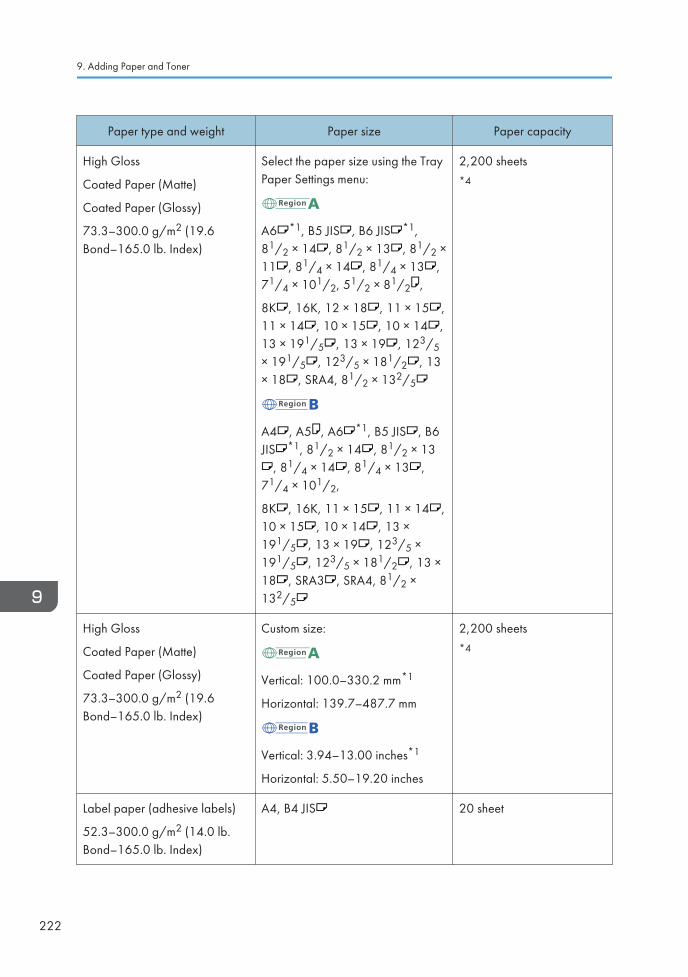
Paper type and weight Paper size Paper capacity
High Gloss
Coated Paper (Matte)
Coated Paper (Glossy)
73.3–300.0 g/m2 (19.6Bond–165.0 lb. Index)
Select the paper size using the TrayPaper Settings menu:
A6 *1, B5 JIS , B6 JIS *1,81/2 × 14 , 81/2 × 13 , 81/2 ×11 , 81/4 × 14 , 81/4 × 13 ,71/4 × 101/2, 51/2 × 81/2 ,
8K , 16K, 12 × 18 , 11 × 15 ,11 × 14 , 10 × 15 , 10 × 14 ,13 × 191/5 , 13 × 19 , 123/5× 191/5 , 123/5 × 181/2 , 13× 18 , SRA4, 81/2 × 132/5
A4 , A5 , A6 *1, B5 JIS , B6JIS *1, 81/2 × 14 , 81/2 × 13
, 81/4 × 14 , 81/4 × 13 ,71/4 × 101/2,
8K , 16K, 11 × 15 , 11 × 14 ,10 × 15 , 10 × 14 , 13 ×191/5 , 13 × 19 , 123/5 ×191/5 , 123/5 × 181/2 , 13 ×18 , SRA3 , SRA4, 81/2 ×132/5
2,200 sheets*4
High Gloss
Coated Paper (Matte)
Coated Paper (Glossy)
73.3–300.0 g/m2 (19.6Bond–165.0 lb. Index)
Custom size:
Vertical: 100.0–330.2 mm*1
Horizontal: 139.7–487.7 mm
Vertical: 3.94–13.00 inches*1
Horizontal: 5.50–19.20 inches
2,200 sheets*4
Label paper (adhesive labels)
52.3–300.0 g/m2 (14.0 lb.Bond–165.0 lb. Index)
A4, B4 JIS 20 sheet
9. Adding Paper and Toner
222
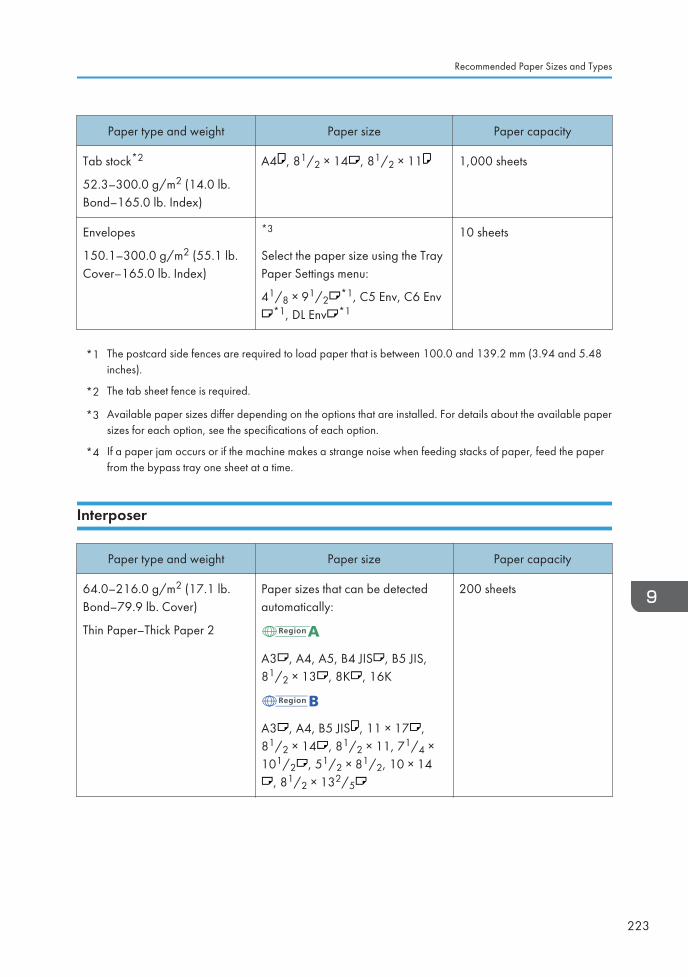
Paper type and weight Paper size Paper capacity
Tab stock*2
52.3–300.0 g/m2 (14.0 lb.Bond–165.0 lb. Index)
A4 , 81/2 × 14 , 81/2 × 11 1,000 sheets
Envelopes
150.1–300.0 g/m2 (55.1 lb.Cover–165.0 lb. Index)
*3
Select the paper size using the TrayPaper Settings menu:
41/8 × 91/2*1, C5 Env, C6 Env
*1, DL Env *1
10 sheets
*1 The postcard side fences are required to load paper that is between 100.0 and 139.2 mm (3.94 and 5.48inches).
*2 The tab sheet fence is required.
*3 Available paper sizes differ depending on the options that are installed. For details about the available papersizes for each option, see the specifications of each option.
*4 If a paper jam occurs or if the machine makes a strange noise when feeding stacks of paper, feed the paperfrom the bypass tray one sheet at a time.
Interposer
Paper type and weight Paper size Paper capacity
64.0–216.0 g/m2 (17.1 lb.Bond–79.9 lb. Cover)
Thin Paper–Thick Paper 2
Paper sizes that can be detectedautomatically:
A3 , A4, A5, B4 JIS , B5 JIS,81/2 × 13 , 8K , 16K
A3 , A4, B5 JIS , 11 × 17 ,81/2 × 14 , 81/2 × 11, 71/4 ×101/2 , 51/2 × 81/2, 10 × 14
, 81/2 × 132/5
200 sheets
Recommended Paper Sizes and Types
223
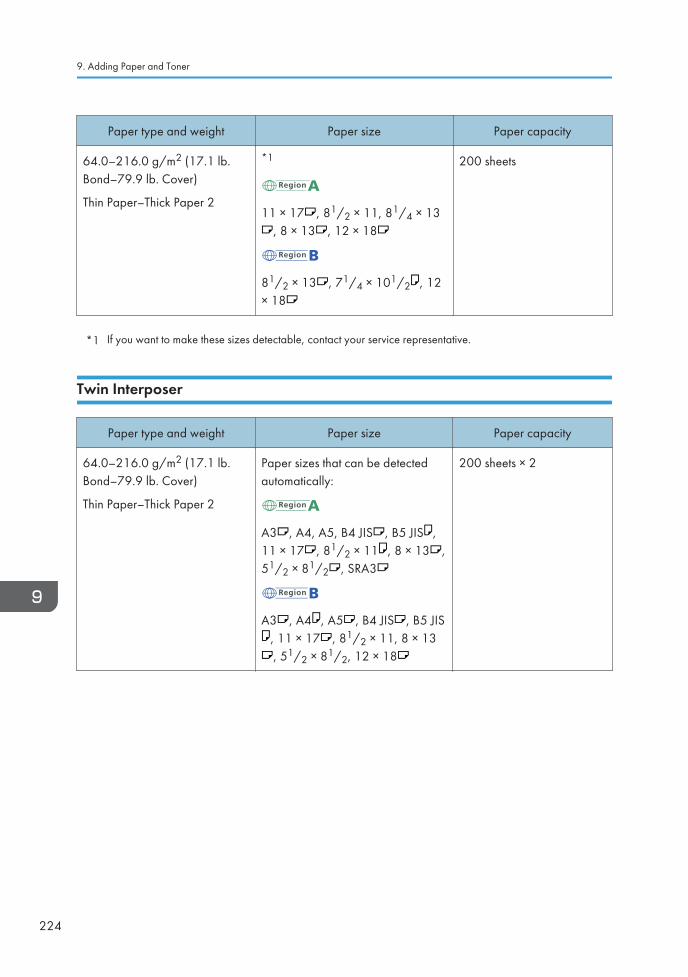
Paper type and weight Paper size Paper capacity
64.0–216.0 g/m2 (17.1 lb.Bond–79.9 lb. Cover)
Thin Paper–Thick Paper 2
*1
11 × 17 , 81/2 × 11, 81/4 × 13, 8 × 13 , 12 × 18
81/2 × 13 , 71/4 × 101/2 , 12× 18
200 sheets
*1 If you want to make these sizes detectable, contact your service representative.
Twin Interposer
Paper type and weight Paper size Paper capacity
64.0–216.0 g/m2 (17.1 lb.Bond–79.9 lb. Cover)
Thin Paper–Thick Paper 2
Paper sizes that can be detectedautomatically:
A3 , A4, A5, B4 JIS , B5 JIS ,11 × 17 , 81/2 × 11 , 8 × 13 ,51/2 × 81/2 , SRA3
A3 , A4 , A5 , B4 JIS , B5 JIS, 11 × 17 , 81/2 × 11, 8 × 13, 51/2 × 81/2, 12 × 18
200 sheets × 2
9. Adding Paper and Toner
224
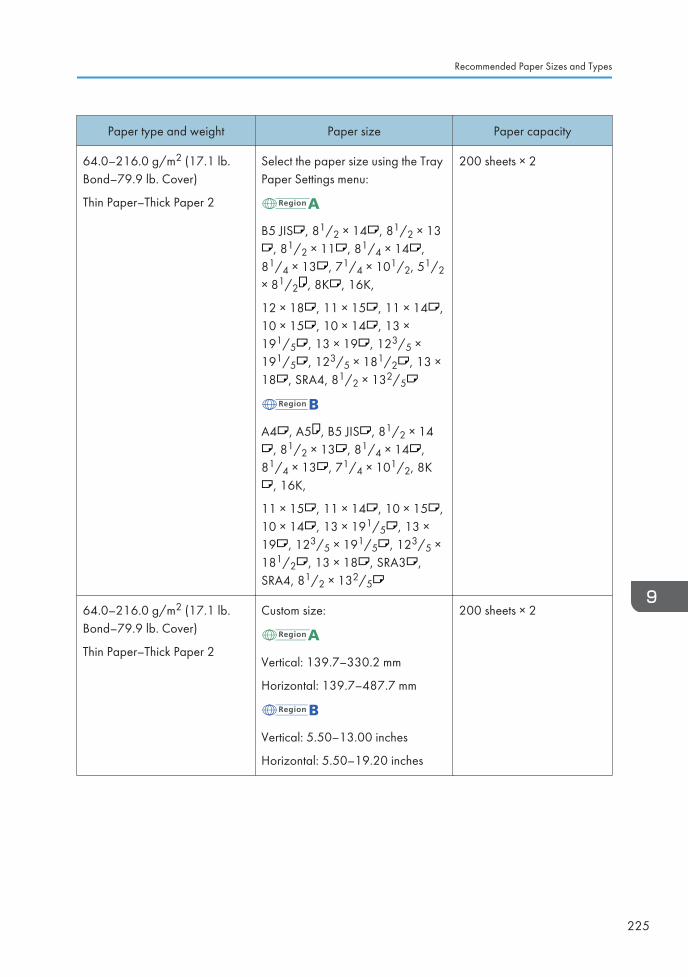
Paper type and weight Paper size Paper capacity
64.0–216.0 g/m2 (17.1 lb.Bond–79.9 lb. Cover)
Thin Paper–Thick Paper 2
Select the paper size using the TrayPaper Settings menu:
B5 JIS , 81/2 × 14 , 81/2 × 13, 81/2 × 11 , 81/4 × 14 ,
81/4 × 13 , 71/4 × 101/2, 51/2× 81/2 , 8K , 16K,
12 × 18 , 11 × 15 , 11 × 14 ,10 × 15 , 10 × 14 , 13 ×191/5 , 13 × 19 , 123/5 ×191/5 , 123/5 × 181/2 , 13 ×18 , SRA4, 81/2 × 132/5
A4 , A5 , B5 JIS , 81/2 × 14, 81/2 × 13 , 81/4 × 14 ,
81/4 × 13 , 71/4 × 101/2, 8K, 16K,
11 × 15 , 11 × 14 , 10 × 15 ,10 × 14 , 13 × 191/5 , 13 ×19 , 123/5 × 191/5 , 123/5 ×181/2 , 13 × 18 , SRA3 ,SRA4, 81/2 × 132/5
200 sheets × 2
64.0–216.0 g/m2 (17.1 lb.Bond–79.9 lb. Cover)
Thin Paper–Thick Paper 2
Custom size:
Vertical: 139.7–330.2 mm
Horizontal: 139.7–487.7 mm
Vertical: 5.50–13.00 inches
Horizontal: 5.50–19.20 inches
200 sheets × 2
Recommended Paper Sizes and Types
225
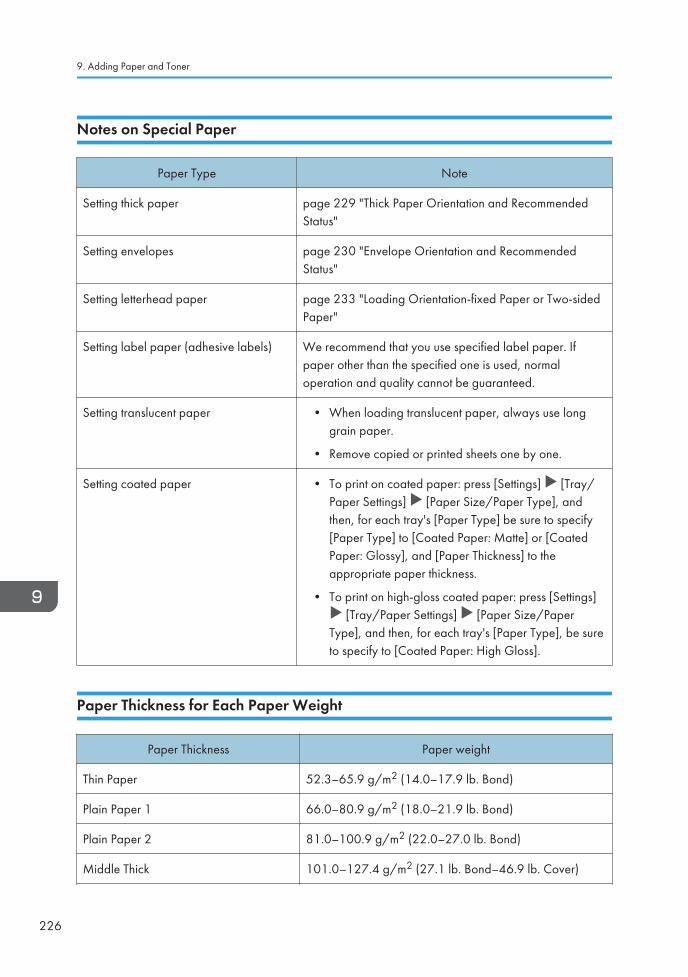
Notes on Special Paper
Paper Type Note
Setting thick paper page 229 "Thick Paper Orientation and RecommendedStatus"
Setting envelopes page 230 "Envelope Orientation and RecommendedStatus"
Setting letterhead paper page 233 "Loading Orientation-fixed Paper or Two-sidedPaper"
Setting label paper (adhesive labels) We recommend that you use specified label paper. Ifpaper other than the specified one is used, normaloperation and quality cannot be guaranteed.
Setting translucent paper • When loading translucent paper, always use longgrain paper.
• Remove copied or printed sheets one by one.
Setting coated paper • To print on coated paper: press [Settings] [Tray/Paper Settings] [Paper Size/Paper Type], andthen, for each tray's [Paper Type] be sure to specify[Paper Type] to [Coated Paper: Matte] or [CoatedPaper: Glossy], and [Paper Thickness] to theappropriate paper thickness.
• To print on high-gloss coated paper: press [Settings] [Tray/Paper Settings] [Paper Size/Paper
Type], and then, for each tray's [Paper Type], be sureto specify to [Coated Paper: High Gloss].
Paper Thickness for Each Paper Weight
Paper Thickness Paper weight
Thin Paper 52.3–65.9 g/m2 (14.0–17.9 lb. Bond)
Plain Paper 1 66.0–80.9 g/m2 (18.0–21.9 lb. Bond)
Plain Paper 2 81.0–100.9 g/m2 (22.0–27.0 lb. Bond)
Middle Thick 101.0–127.4 g/m2 (27.1 lb. Bond–46.9 lb. Cover)
9. Adding Paper and Toner
226
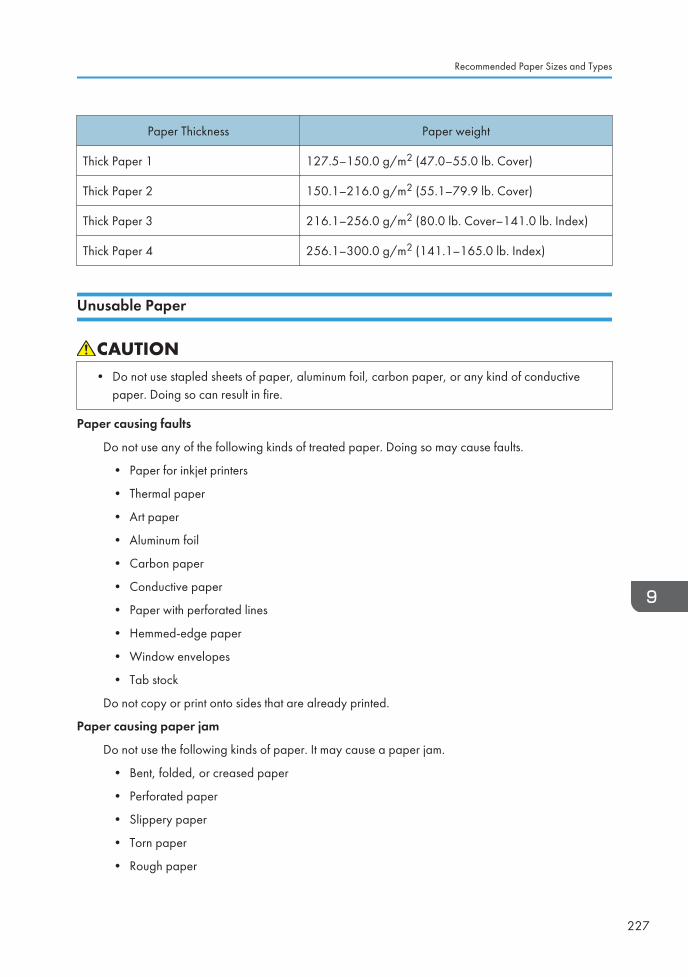
Paper Thickness Paper weight
Thick Paper 1 127.5–150.0 g/m2 (47.0–55.0 lb. Cover)
Thick Paper 2 150.1–216.0 g/m2 (55.1–79.9 lb. Cover)
Thick Paper 3 216.1–256.0 g/m2 (80.0 lb. Cover–141.0 lb. Index)
Thick Paper 4 256.1–300.0 g/m2 (141.1–165.0 lb. Index)
Unusable Paper
• Do not use stapled sheets of paper, aluminum foil, carbon paper, or any kind of conductivepaper. Doing so can result in fire.
Paper causing faults
Do not use any of the following kinds of treated paper. Doing so may cause faults.
• Paper for inkjet printers
• Thermal paper
• Art paper
• Aluminum foil
• Carbon paper
• Conductive paper
• Paper with perforated lines
• Hemmed-edge paper
• Window envelopes
• Tab stock
Do not copy or print onto sides that are already printed.
Paper causing paper jam
Do not use the following kinds of paper. It may cause a paper jam.
• Bent, folded, or creased paper
• Perforated paper
• Slippery paper
• Torn paper
• Rough paper
Recommended Paper Sizes and Types
227
• Thin paper with little stiffness
• Paper with a dusty surface
Do not use the copied or printed paper again. It may cause paper jam.
If you use paper curled by humidity or drying, the paper or staple may jam.
Do not load sheets that have already been printed onto by another machine. Doing so mayinterfere with loading of paper because the powder for preventing offset may attach to the paperroller.
• A paper jam may occur depending on the condition of the paper even when using therecommended paper.
Paper Storage
When storing paper, the following precautions should always be followed:
• Do not store paper where it will be exposed to direct sunlight.
• Store all your paper in the same environment - a room where the temperature is 20–25°C (68–77°F) and the humidity is 30–65%.
• Store on a flat surface.
• Do not store paper vertically.
• Once opened, store paper in a plastic bag.
Saving Printouts
• Prints will fade if exposed to strong light or dampness and humidity for extended periods of time.Preserve the quality of your copies by storing them in a binder in a dark, dry place.
• When folding prints, toner in the folds will come off.
• If the prints are stored in the conditions described below, toner may melt:
• When a print and a half-dried print are put on top of each other
• When solvent-type adhesive agents are used for pasting prints
• When prints are placed on mats made of chlorinated plastic in locations of high temperaturefor long periods of time
• When prints are placed in locations of extremely high temperatures, such as near a heater
9. Adding Paper and Toner
228
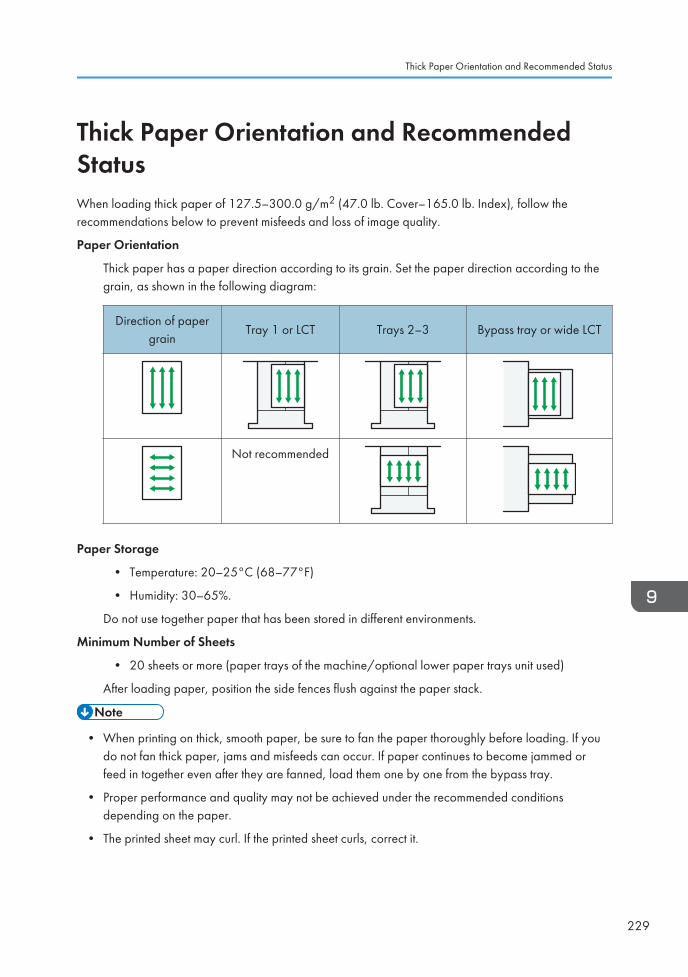
Thick Paper Orientation and RecommendedStatusWhen loading thick paper of 127.5–300.0 g/m2 (47.0 lb. Cover–165.0 lb. Index), follow therecommendations below to prevent misfeeds and loss of image quality.
Paper Orientation
Thick paper has a paper direction according to its grain. Set the paper direction according to thegrain, as shown in the following diagram:
Direction of papergrain
Tray 1 or LCT Trays 2–3 Bypass tray or wide LCT
Not recommended
Paper Storage
• Temperature: 20–25°C (68–77°F)
• Humidity: 30–65%.
Do not use together paper that has been stored in different environments.
Minimum Number of Sheets
• 20 sheets or more (paper trays of the machine/optional lower paper trays unit used)
After loading paper, position the side fences flush against the paper stack.
• When printing on thick, smooth paper, be sure to fan the paper thoroughly before loading. If youdo not fan thick paper, jams and misfeeds can occur. If paper continues to become jammed orfeed in together even after they are fanned, load them one by one from the bypass tray.
• Proper performance and quality may not be achieved under the recommended conditionsdepending on the paper.
• The printed sheet may curl. If the printed sheet curls, correct it.
Thick Paper Orientation and Recommended Status
229

Envelope Orientation and RecommendedStatusThe way to place an original on the exposure glass and load envelopes varies depending on the shapeand orientation of the envelopes.
• Do not print on the following envelopes:
• Window envelopes
• Envelopes with moisture
Before setting envelopes
• To load envelopes with the flaps opened, use only envelopes that are at least 148 mm (5.9inches) long including the open flap. Set the envelopes with the flaps fully open. A paper jammay occur depending on the length or shape of the envelope flap.
• Before loading envelopes, press down on them to remove any air from inside and flatten outall four edges. If they are bent or curled, flatten their leading edges (the edge going into themachine) by running a pencil or ruler across them.
• For information about recommended envelopes, contact your local dealer.
• The Duplex function cannot be used with envelopes.
• To get better output quality, it is recommended that you set the margins of the four sides, to at leastthe following values:
• Leading edge: 4 mm (0.16 inches)
• Trailing edge: 4 mm (0.16 inches)
• Right/Left edge: 2 mm (0.08 inches)
• An image may not be printed clearly on a sheet whose thickness is uneven. Print a few sheets andcheck the result.
• The printing result may not be adequate or the envelope may become wrinkled when thetemperature or humidity is high.
• The printing result may not be adequate or output envelopes may become wrinkled depending onthe printing environment even when using the recommended envelopes.
9. Adding Paper and Toner
230
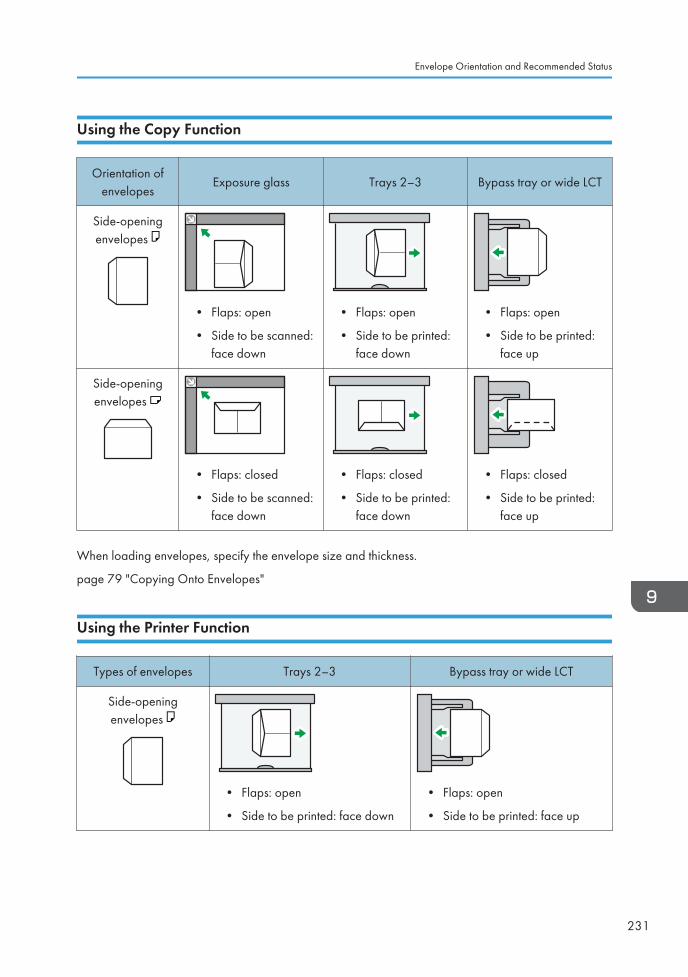
Using the Copy Function
Orientation ofenvelopes
Exposure glass Trays 2–3 Bypass tray or wide LCT
Side-openingenvelopes
• Flaps: open
• Side to be scanned:face down
• Flaps: open
• Side to be printed:face down
• Flaps: open
• Side to be printed:face up
Side-openingenvelopes
• Flaps: closed
• Side to be scanned:face down
• Flaps: closed
• Side to be printed:face down
• Flaps: closed
• Side to be printed:face up
When loading envelopes, specify the envelope size and thickness.
page 79 "Copying Onto Envelopes"
Using the Printer Function
Types of envelopes Trays 2–3 Bypass tray or wide LCT
Side-openingenvelopes
• Flaps: open
• Side to be printed: face down
• Flaps: open
• Side to be printed: face up
Envelope Orientation and Recommended Status
231
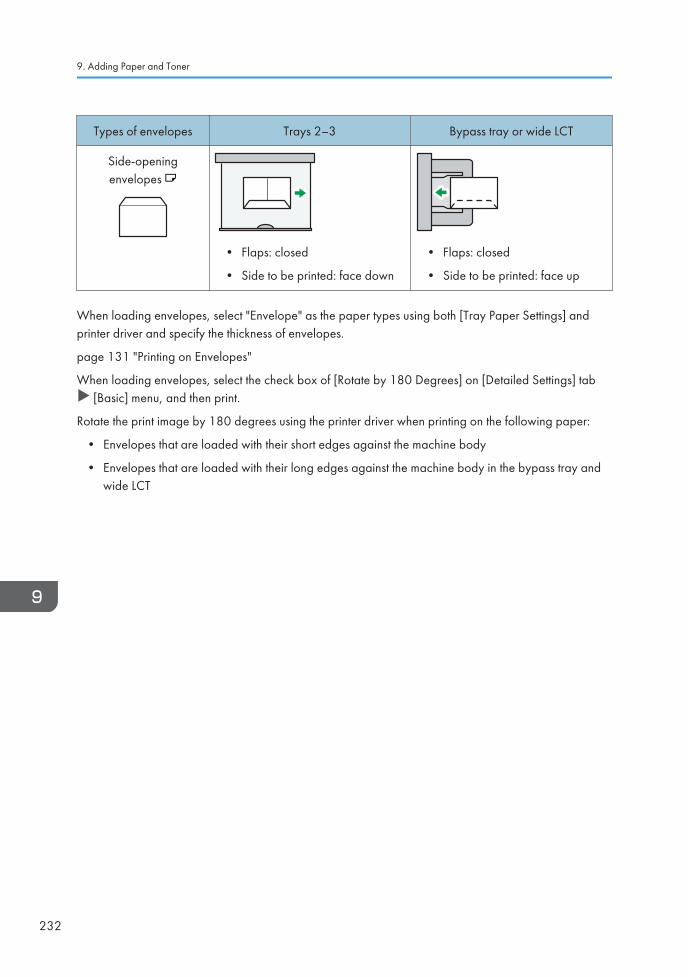
Types of envelopes Trays 2–3 Bypass tray or wide LCT
Side-openingenvelopes
• Flaps: closed
• Side to be printed: face down
• Flaps: closed
• Side to be printed: face up
When loading envelopes, select "Envelope" as the paper types using both [Tray Paper Settings] andprinter driver and specify the thickness of envelopes.
page 131 "Printing on Envelopes"
When loading envelopes, select the check box of [Rotate by 180 Degrees] on [Detailed Settings] tab [Basic] menu, and then print.
Rotate the print image by 180 degrees using the printer driver when printing on the following paper:
• Envelopes that are loaded with their short edges against the machine body
• Envelopes that are loaded with their long edges against the machine body in the bypass tray andwide LCT
9. Adding Paper and Toner
232
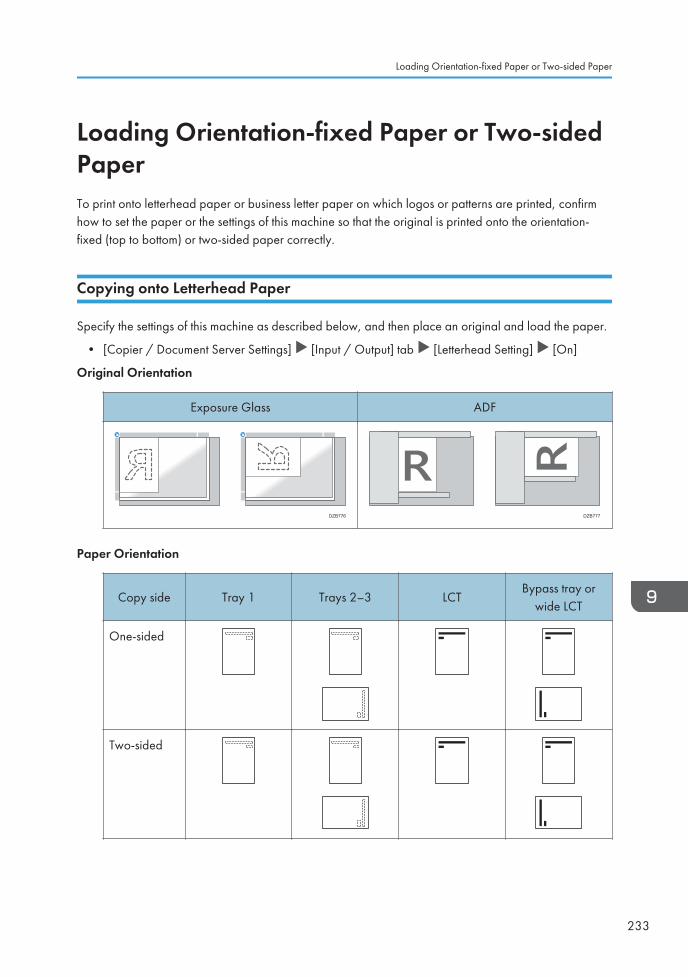
Loading Orientation-fixed Paper or Two-sidedPaperTo print onto letterhead paper or business letter paper on which logos or patterns are printed, confirmhow to set the paper or the settings of this machine so that the original is printed onto the orientation-fixed (top to bottom) or two-sided paper correctly.
Copying onto Letterhead Paper
Specify the settings of this machine as described below, and then place an original and load the paper.
• [Copier / Document Server Settings] [Input / Output] tab [Letterhead Setting] [On]
Original Orientation
Exposure Glass ADF
DZB776 DZB777
Paper Orientation
Copy side Tray 1 Trays 2–3 LCTBypass tray or
wide LCT
One-sided
Two-sided
Loading Orientation-fixed Paper or Two-sided Paper
233
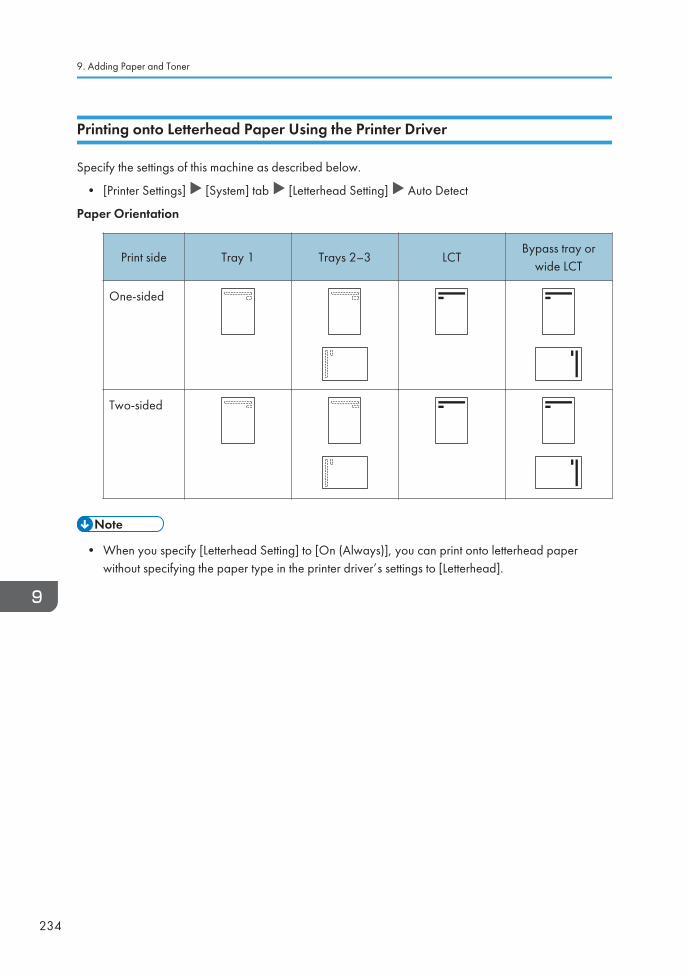
Printing onto Letterhead Paper Using the Printer Driver
Specify the settings of this machine as described below.
• [Printer Settings] [System] tab [Letterhead Setting] Auto Detect
Paper Orientation
Print side Tray 1 Trays 2–3 LCTBypass tray or
wide LCT
One-sided
Two-sided
• When you specify [Letterhead Setting] to [On (Always)], you can print onto letterhead paperwithout specifying the paper type in the printer driver’s settings to [Letterhead].
9. Adding Paper and Toner
234
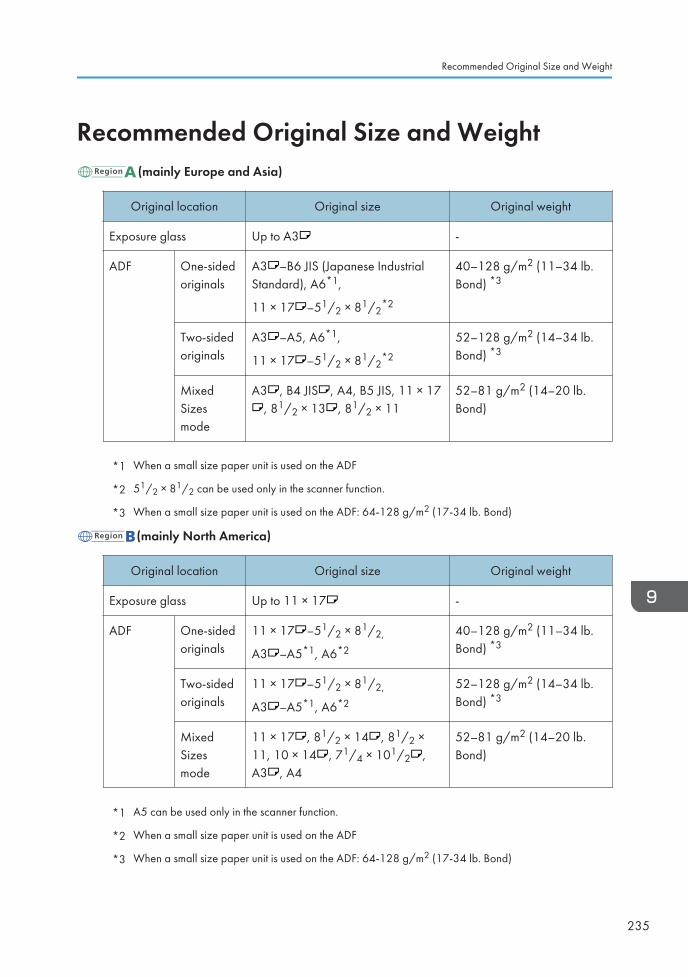
Recommended Original Size and Weight(mainly Europe and Asia)
Original location Original size Original weight
Exposure glass Up to A3 -
ADF One-sidedoriginals
A3 –B6 JIS (Japanese IndustrialStandard), A6*1,
11 × 17 –51/2 × 81/2*2
40–128 g/m2 (11–34 lb.Bond) *3
Two-sidedoriginals
A3 –A5, A6*1,
11 × 17 –51/2 × 81/2*2
52–128 g/m2 (14–34 lb.Bond) *3
MixedSizesmode
A3 , B4 JIS , A4, B5 JIS, 11 × 17, 81/2 × 13 , 81/2 × 11
52–81 g/m2 (14–20 lb.Bond)
*1 When a small size paper unit is used on the ADF
*2 51/2 × 81/2 can be used only in the scanner function.
*3 When a small size paper unit is used on the ADF: 64-128 g/m2 (17-34 lb. Bond)
(mainly North America)
Original location Original size Original weight
Exposure glass Up to 11 × 17 -
ADF One-sidedoriginals
11 × 17 –51/2 × 81/2,
A3 –A5*1, A6*2
40–128 g/m2 (11–34 lb.Bond) *3
Two-sidedoriginals
11 × 17 –51/2 × 81/2,
A3 –A5*1, A6*2
52–128 g/m2 (14–34 lb.Bond) *3
MixedSizesmode
11 × 17 , 81/2 × 14 , 81/2 ×11, 10 × 14 , 71/4 × 101/2 ,A3 , A4
52–81 g/m2 (14–20 lb.Bond)
*1 A5 can be used only in the scanner function.
*2 When a small size paper unit is used on the ADF
*3 When a small size paper unit is used on the ADF: 64-128 g/m2 (17-34 lb. Bond)
Recommended Original Size and Weight
235
• An original whose size is within the range of the maximum original scan area can be placed.
• page 320 "List of Specifications for Standard Functions"
• On all sides of the original, there is a missing image area. Even if you place originals on theexposure glass or in the ADF correctly, the missing image area on all four sides of the originalmight not be copied.
• page 320 "List of Specifications for Standard Functions"
• You can place originals of two different sizes only in Mixed Sizes mode.
9. Adding Paper and Toner
236
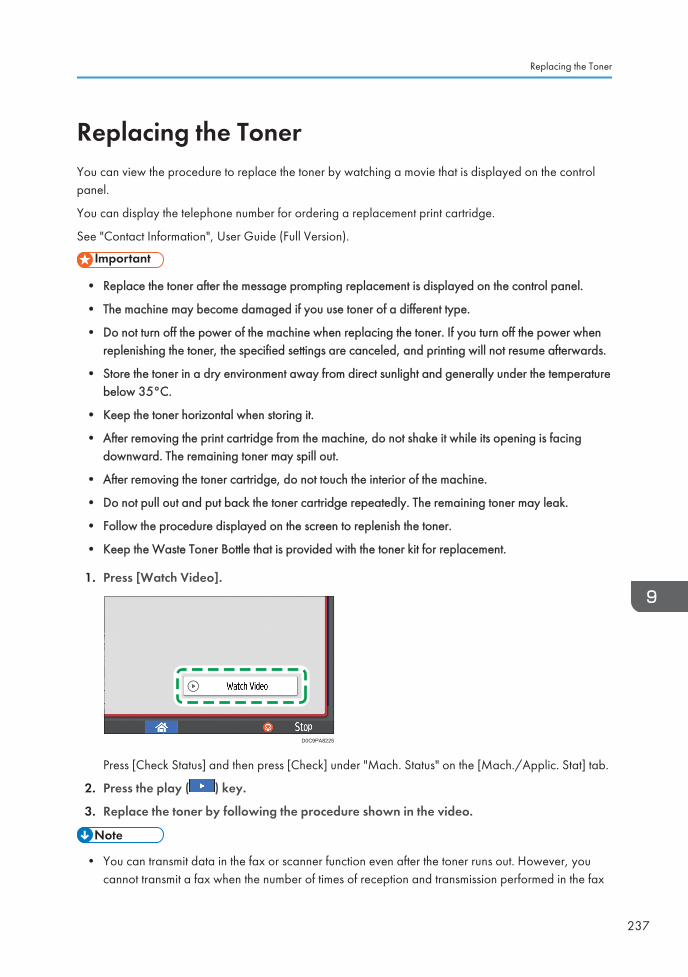
Replacing the TonerYou can view the procedure to replace the toner by watching a movie that is displayed on the controlpanel.
You can display the telephone number for ordering a replacement print cartridge.
See "Contact Information", User Guide (Full Version).
• Replace the toner after the message prompting replacement is displayed on the control panel.
• The machine may become damaged if you use toner of a different type.
• Do not turn off the power of the machine when replacing the toner. If you turn off the power whenreplenishing the toner, the specified settings are canceled, and printing will not resume afterwards.
• Store the toner in a dry environment away from direct sunlight and generally under the temperaturebelow 35°C.
• Keep the toner horizontal when storing it.
• After removing the print cartridge from the machine, do not shake it while its opening is facingdownward. The remaining toner may spill out.
• After removing the toner cartridge, do not touch the interior of the machine.
• Do not pull out and put back the toner cartridge repeatedly. The remaining toner may leak.
• Follow the procedure displayed on the screen to replenish the toner.
• Keep the Waste Toner Bottle that is provided with the toner kit for replacement.
1. Press [Watch Video].
D0C9PA8225
Press [Check Status] and then press [Check] under "Mach. Status" on the [Mach./Applic. Stat] tab.
2. Press the play ( ) key.
3. Replace the toner by following the procedure shown in the video.
• You can transmit data in the fax or scanner function even after the toner runs out. However, youcannot transmit a fax when the number of times of reception and transmission performed in the fax
Replacing the Toner
237
function after the toner has run out and the number of times of communication not recorded in theRecords exceeds a total of 1000. Replace the toner earlier.
• While the message prompting you to replace the toner is displayed, Memory Storage Report forMemory Transmission will not be printed.
• If appears when there is a lot of toner, hold the cartridge with the opening upward, shake itwell, and then reinstall it.
Precautions When Storing Toner
• Do not store toner (new or used) or toner containers while toner is inside in a place with an openflame. The toner can ignite and result in burns or fire.
• Do not leave the following items in a place where children can reach them:
• Toner (new or used)
• Toner containers while toner is inside
• Toner-attached parts
Precautions When Replacing the Toner
• Do not dispose of the following items into a fire. Toner will ignite on contact with naked flameand burns can result.
• Toner (new or used)
• Toner containers while toner is inside
• Toner-attached parts
• Do not absorb spilled toner (including used toner) using a vacuum cleaner. Absorbed toner maycause ignition or explosion due to electric contact sparks inside the vacuum cleaner. However,you can use a toner-compatible industrial vacuum cleaner. When toner is spilled, remove thespilled toner using a wet cloth so that the toner is not scattered.
9. Adding Paper and Toner
238
• The following explains the warning messages on the plastic bag used in this product'spackaging:
• Do not leave the polythene materials (bags, etc.) supplied with this machine close to babiesand small children. Suffocation can result if polythene materials are brought into contactwith the mouth or nose.
• When the following occurs while toner is handled, receive emergency measures first, and thenconsult a doctor if necessary.
• When inhaling toner, gargle with a large amount of water and move into a fresh airenvironment.
• When swallowing toner, dilute gastric contents with a large amount of water.
• When getting toner into your eyes, flush them with a large amount of water.
• When removing jammed paper, replenishing or replacing toner (new or used), make sure not toinhale toner.
• When removing jammed paper, replenishing or replacing toner (new or used), be careful not tohave toner dirt your skin or clothes.
• If toner (new or used) comes into contact with your skin or clothes and smears them, take thefollowing actions:
• If toner comes into contact with your skin, wash the affected area thoroughly with soap andwater.
• If toner comes into contact with your clothes, wash the stained area with cold water.Heating the stained area by applying hot water will set the toner into the fabric andremoving the stain may become impossible.
• When replacing a container with toner (including used toner) or consumables with toner, becareful that the toner does not splatter. After removing used consumables and shutting the lid ofthe container if the lid is available, put them in a bag.
• Do not open toner containers forcibly while toner is inside, crush or squeeze them. Tonerspillage can cause accidental ingestion or dirtying of clothes, hands, or floor.
Disposing Exhausted Toners
You cannot reuse exhausted toners.
Replacing the Toner
239
When disposing a depleted print cartridge, place the cartridge in a box or plastic bag while payingattention not to spill any toner powder.
(mainly Europe and Asia)
If you want to discard your used toner container, please contact your local sales office. If you discard itby yourself, treat it as general plastic waste material.
(mainly North America)
Please see our local company website for information on the recycling of supply products, or you canrecycle items according to the requirements of your local municipalities or private recyclers.
9. Adding Paper and Toner
240
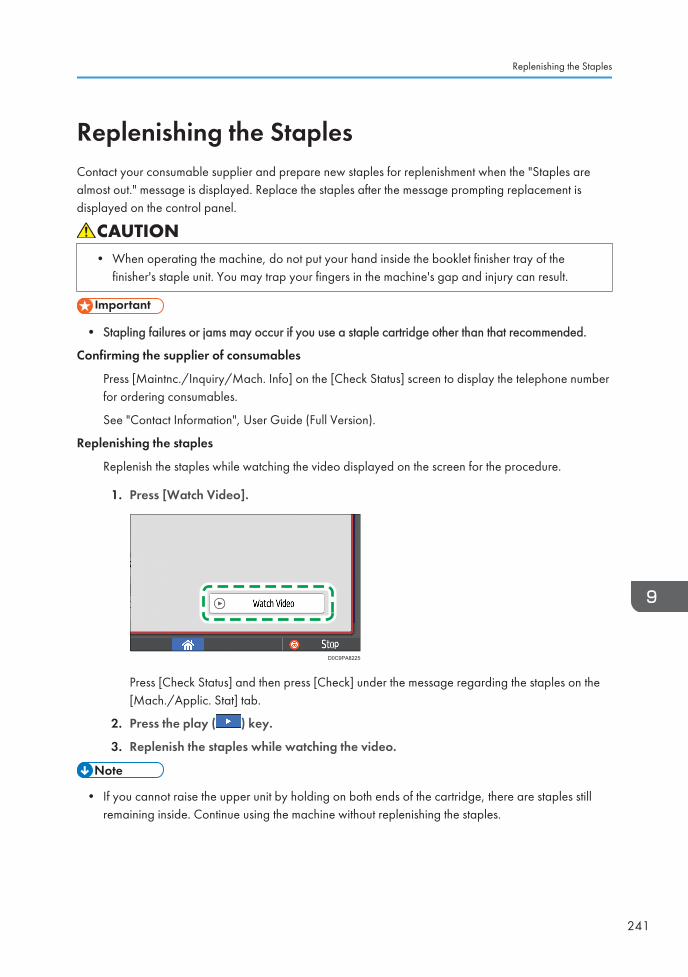
Replenishing the StaplesContact your consumable supplier and prepare new staples for replenishment when the "Staples arealmost out." message is displayed. Replace the staples after the message prompting replacement isdisplayed on the control panel.
• When operating the machine, do not put your hand inside the booklet finisher tray of thefinisher's staple unit. You may trap your fingers in the machine's gap and injury can result.
• Stapling failures or jams may occur if you use a staple cartridge other than that recommended.
Confirming the supplier of consumables
Press [Maintnc./Inquiry/Mach. Info] on the [Check Status] screen to display the telephone numberfor ordering consumables.
See "Contact Information", User Guide (Full Version).
Replenishing the staples
Replenish the staples while watching the video displayed on the screen for the procedure.
1. Press [Watch Video].
D0C9PA8225
Press [Check Status] and then press [Check] under the message regarding the staples on the[Mach./Applic. Stat] tab.
2. Press the play ( ) key.
3. Replenish the staples while watching the video.
• If you cannot raise the upper unit by holding on both ends of the cartridge, there are staples stillremaining inside. Continue using the machine without replenishing the staples.
Replenishing the Staples
241
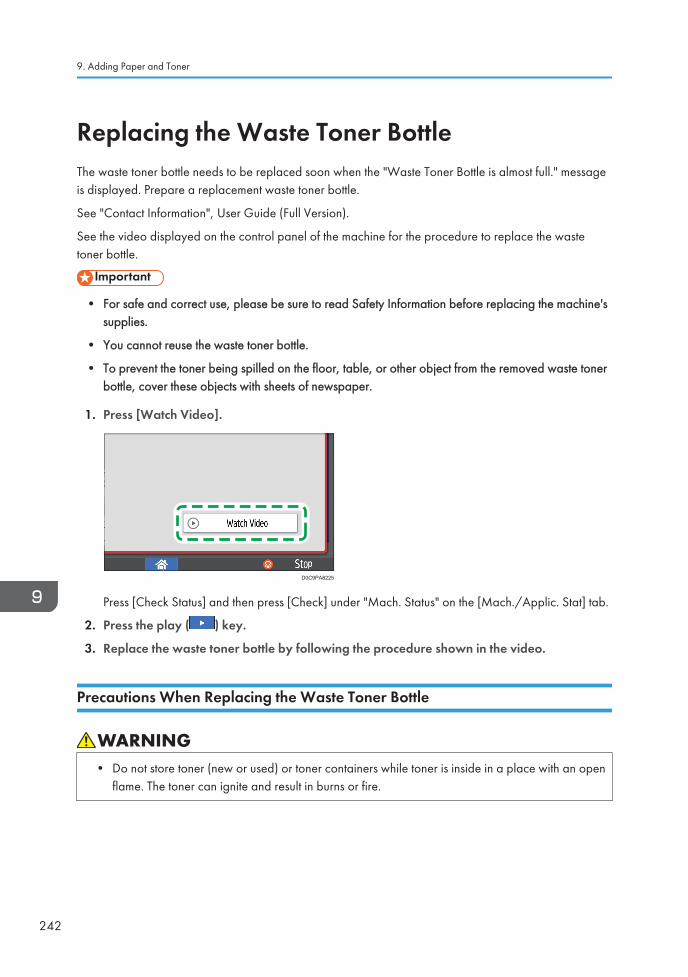
Replacing the Waste Toner BottleThe waste toner bottle needs to be replaced soon when the "Waste Toner Bottle is almost full." messageis displayed. Prepare a replacement waste toner bottle.
See "Contact Information", User Guide (Full Version).
See the video displayed on the control panel of the machine for the procedure to replace the wastetoner bottle.
• For safe and correct use, please be sure to read Safety Information before replacing the machine'ssupplies.
• You cannot reuse the waste toner bottle.
• To prevent the toner being spilled on the floor, table, or other object from the removed waste tonerbottle, cover these objects with sheets of newspaper.
1. Press [Watch Video].
D0C9PA8225
Press [Check Status] and then press [Check] under "Mach. Status" on the [Mach./Applic. Stat] tab.
2. Press the play ( ) key.
3. Replace the waste toner bottle by following the procedure shown in the video.
Precautions When Replacing the Waste Toner Bottle
• Do not store toner (new or used) or toner containers while toner is inside in a place with an openflame. The toner can ignite and result in burns or fire.
9. Adding Paper and Toner
242
• Do not dispose of the following items into a fire. Toner will ignite on contact with naked flameand burns can result.
• Toner (new or used)
• Toner containers while toner is inside
• Toner-attached parts
• Do not absorb spilled toner (including used toner) using a vacuum cleaner. Absorbed toner maycause ignition or explosion due to electric contact sparks inside the vacuum cleaner. However,you can use a toner-compatible industrial vacuum cleaner. When toner is spilled, remove thespilled toner using a wet cloth so that the toner is not scattered.
• The following explains the warning messages on the plastic bag used in this product'spackaging:
• Do not leave the polythene materials (bags, etc.) supplied with this machine close to babiesand small children. Suffocation can result if polythene materials are brought into contactwith the mouth or nose.
• Do not leave the following items in a place where children can reach them:
• Toner (new or used)
• Toner containers while toner is inside
• Toner-attached parts
• When the following occurs while toner is handled, receive emergency measures first, and thenconsult a doctor if necessary.
• When inhaling toner, gargle with a large amount of water and move into a fresh airenvironment.
• When swallowing toner, dilute gastric contents with a large amount of water.
• When getting toner into your eyes, flush them with a large amount of water.
• When removing jammed paper, replenishing or replacing toner (new or used), make sure not toinhale toner.
• When removing jammed paper, replenishing or replacing toner (new or used), be careful not tohave toner dirt your skin or clothes.
Replacing the Waste Toner Bottle
243
• If toner (new or used) comes into contact with your skin or clothes and smears them, take thefollowing actions:
• If toner comes into contact with your skin, wash the affected area thoroughly with soap andwater.
• If toner comes into contact with your clothes, wash the stained area with cold water.Heating the stained area by applying hot water will set the toner into the fabric andremoving the stain may become impossible.
• When replacing a container with toner (including used toner) or consumables with toner, becareful that the toner does not splatter. After removing used consumables and shutting the lid ofthe container if the lid is available, put them in a bag.
• Do not open toner containers forcibly while toner is inside, crush or squeeze them. Tonerspillage can cause accidental ingestion or dirtying of clothes, hands, or floor.
Disposing the Used Waste Toner Bottle
When disposing the used waste toner bottle, place the bottle in a box or plastic bag while payingattention not to spill any toner powder.
(mainly Europe and Asia)
If you want to discard your used waste toner bottle, please contact your local sales office. If you discardit by yourself, treat it as general plastic waste material.
(mainly North America)
Please see our local company website for information on the recycling of supply products, or you canrecycle items according to the requirements of your local municipalities or private recyclers.
9. Adding Paper and Toner
244
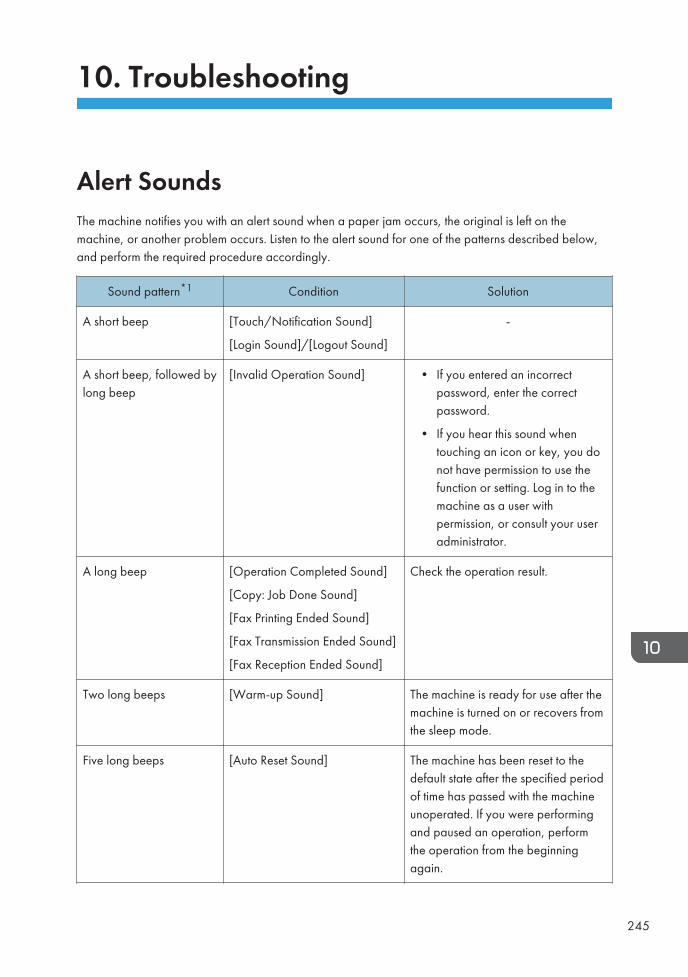
10. Troubleshooting
Alert SoundsThe machine notifies you with an alert sound when a paper jam occurs, the original is left on themachine, or another problem occurs. Listen to the alert sound for one of the patterns described below,and perform the required procedure accordingly.
Sound pattern*1 Condition Solution
A short beep [Touch/Notification Sound]
[Login Sound]/[Logout Sound]
-
A short beep, followed bylong beep
[Invalid Operation Sound] • If you entered an incorrectpassword, enter the correctpassword.
• If you hear this sound whentouching an icon or key, you donot have permission to use thefunction or setting. Log in to themachine as a user withpermission, or consult your useradministrator.
A long beep [Operation Completed Sound]
[Copy: Job Done Sound]
[Fax Printing Ended Sound]
[Fax Transmission Ended Sound]
[Fax Reception Ended Sound]
Check the operation result.
Two long beeps [Warm-up Sound] The machine is ready for use after themachine is turned on or recovers fromthe sleep mode.
Five long beeps [Auto Reset Sound] The machine has been reset to thedefault state after the specified periodof time has passed with the machineunoperated. If you were performingand paused an operation, performthe operation from the beginningagain.
245
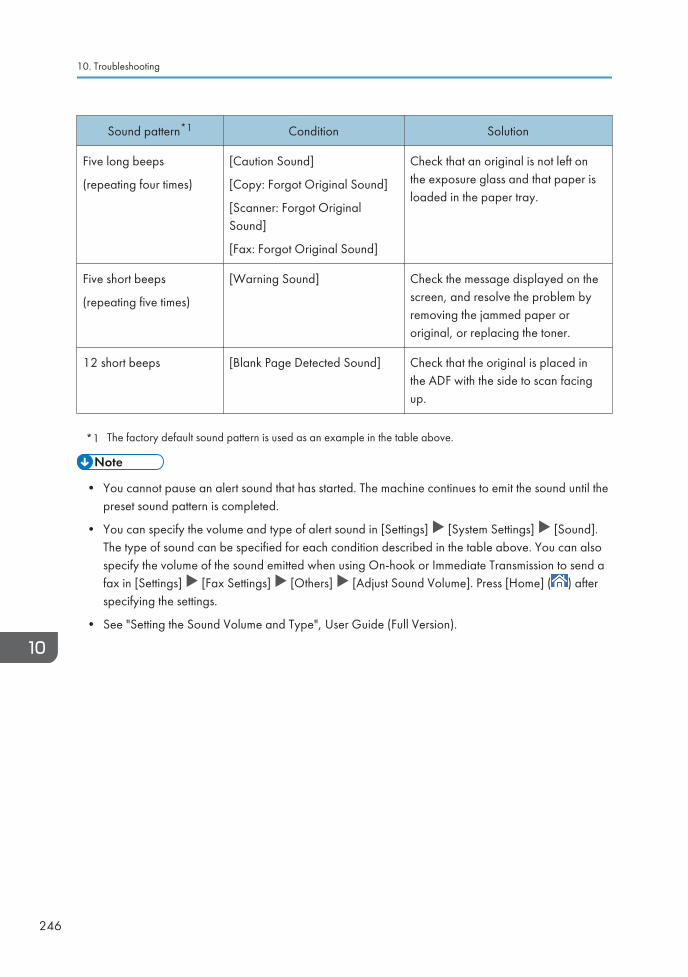
Sound pattern*1 Condition Solution
Five long beeps
(repeating four times)
[Caution Sound]
[Copy: Forgot Original Sound]
[Scanner: Forgot OriginalSound]
[Fax: Forgot Original Sound]
Check that an original is not left onthe exposure glass and that paper isloaded in the paper tray.
Five short beeps
(repeating five times)
[Warning Sound] Check the message displayed on thescreen, and resolve the problem byremoving the jammed paper ororiginal, or replacing the toner.
12 short beeps [Blank Page Detected Sound] Check that the original is placed inthe ADF with the side to scan facingup.
*1 The factory default sound pattern is used as an example in the table above.
• You cannot pause an alert sound that has started. The machine continues to emit the sound until thepreset sound pattern is completed.
• You can specify the volume and type of alert sound in [Settings] [System Settings] [Sound].The type of sound can be specified for each condition described in the table above. You can alsospecify the volume of the sound emitted when using On-hook or Immediate Transmission to send afax in [Settings] [Fax Settings] [Others] [Adjust Sound Volume]. Press [Home] ( ) afterspecifying the settings.
• See "Setting the Sound Volume and Type", User Guide (Full Version).
10. Troubleshooting
246
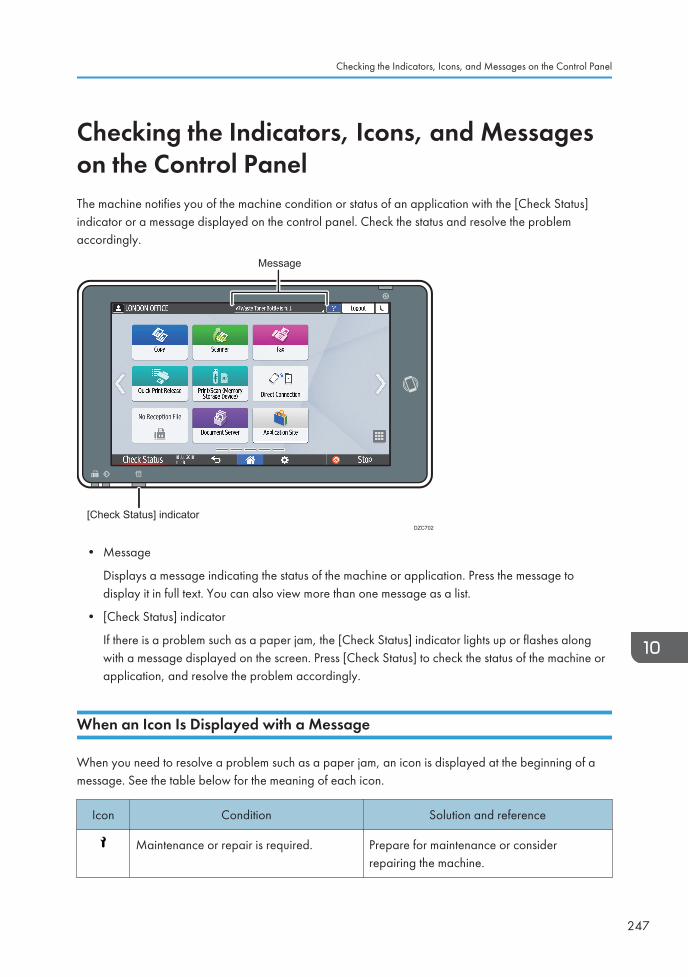
Checking the Indicators, Icons, and Messageson the Control PanelThe machine notifies you of the machine condition or status of an application with the [Check Status]indicator or a message displayed on the control panel. Check the status and resolve the problemaccordingly.
DZC702
Message
[Check Status] indicator
• Message
Displays a message indicating the status of the machine or application. Press the message todisplay it in full text. You can also view more than one message as a list.
• [Check Status] indicator
If there is a problem such as a paper jam, the [Check Status] indicator lights up or flashes alongwith a message displayed on the screen. Press [Check Status] to check the status of the machine orapplication, and resolve the problem accordingly.
When an Icon Is Displayed with a Message
When you need to resolve a problem such as a paper jam, an icon is displayed at the beginning of amessage. See the table below for the meaning of each icon.
Icon Condition Solution and reference
Maintenance or repair is required. Prepare for maintenance or considerrepairing the machine.
Checking the Indicators, Icons, and Messages on the Control Panel
247
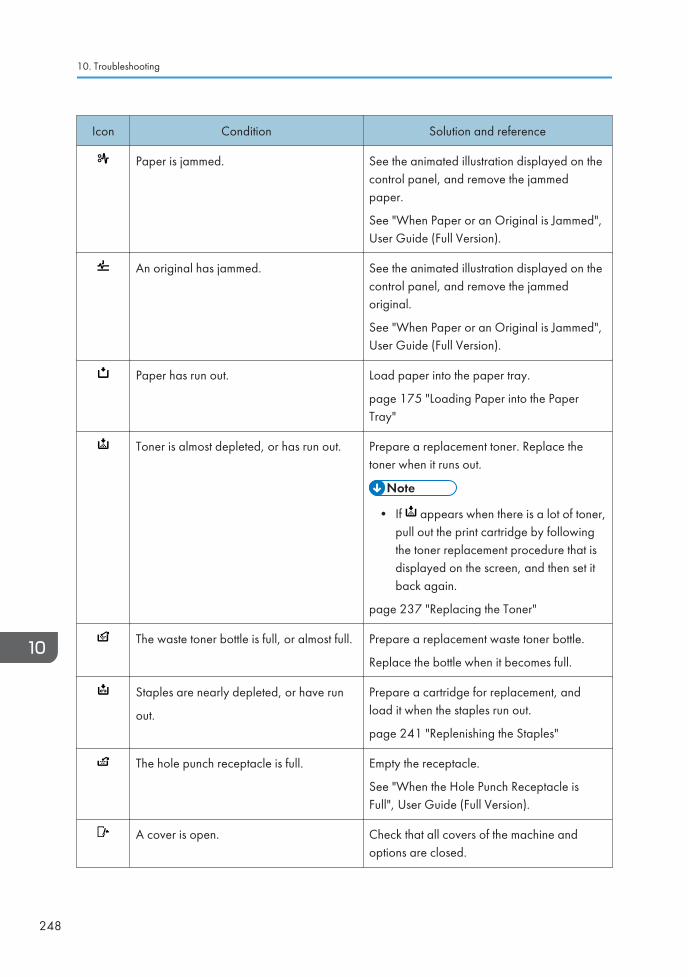
Icon Condition Solution and reference
Paper is jammed. See the animated illustration displayed on thecontrol panel, and remove the jammedpaper.
See "When Paper or an Original is Jammed",User Guide (Full Version).
An original has jammed. See the animated illustration displayed on thecontrol panel, and remove the jammedoriginal.
See "When Paper or an Original is Jammed",User Guide (Full Version).
Paper has run out. Load paper into the paper tray.
page 175 "Loading Paper into the PaperTray"
Toner is almost depleted, or has run out. Prepare a replacement toner. Replace thetoner when it runs out.
• If appears when there is a lot of toner,pull out the print cartridge by followingthe toner replacement procedure that isdisplayed on the screen, and then set itback again.
page 237 "Replacing the Toner"
The waste toner bottle is full, or almost full. Prepare a replacement waste toner bottle.
Replace the bottle when it becomes full.
Staples are nearly depleted, or have run
out.
Prepare a cartridge for replacement, andload it when the staples run out.
page 241 "Replenishing the Staples"
The hole punch receptacle is full. Empty the receptacle.
See "When the Hole Punch Receptacle isFull", User Guide (Full Version).
A cover is open. Check that all covers of the machine andoptions are closed.
10. Troubleshooting
248
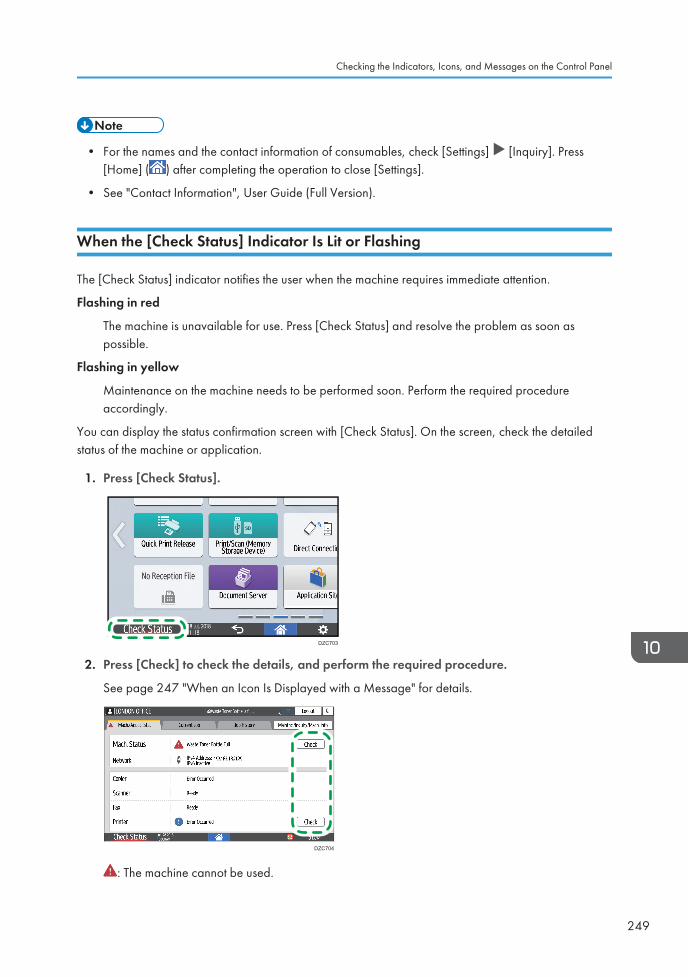
• For the names and the contact information of consumables, check [Settings] [Inquiry]. Press[Home] ( ) after completing the operation to close [Settings].
• See "Contact Information", User Guide (Full Version).
When the [Check Status] Indicator Is Lit or Flashing
The [Check Status] indicator notifies the user when the machine requires immediate attention.
Flashing in red
The machine is unavailable for use. Press [Check Status] and resolve the problem as soon aspossible.
Flashing in yellow
Maintenance on the machine needs to be performed soon. Perform the required procedureaccordingly.
You can display the status confirmation screen with [Check Status]. On the screen, check the detailedstatus of the machine or application.
1. Press [Check Status].
DZC703
2. Press [Check] to check the details, and perform the required procedure.
See page 247 "When an Icon Is Displayed with a Message" for details.
DZC704
: The machine cannot be used.
Checking the Indicators, Icons, and Messages on the Control Panel
249
: Some of the functions cannot be used, or the toner is almost depleted.
• Depending on the machine condition, such as a paper jam or open cover, the status confirmationscreen may be displayed automatically without pressing [Check Status].
10. Troubleshooting
250
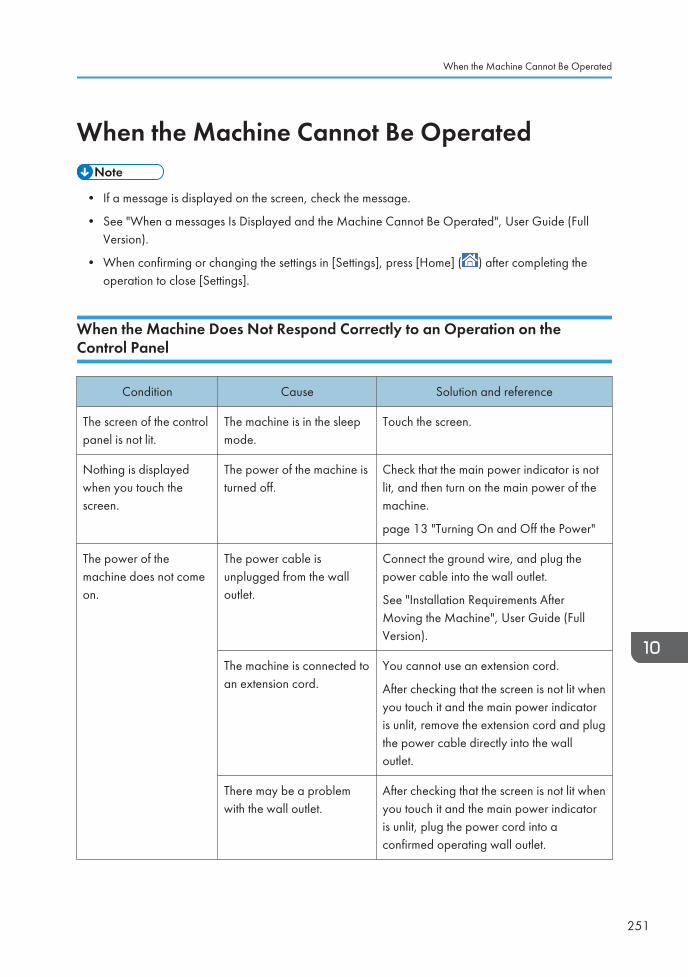
When the Machine Cannot Be Operated
• If a message is displayed on the screen, check the message.
• See "When a messages Is Displayed and the Machine Cannot Be Operated", User Guide (FullVersion).
• When confirming or changing the settings in [Settings], press [Home] ( ) after completing theoperation to close [Settings].
When the Machine Does Not Respond Correctly to an Operation on theControl Panel
Condition Cause Solution and reference
The screen of the controlpanel is not lit.
The machine is in the sleepmode.
Touch the screen.
Nothing is displayedwhen you touch thescreen.
The power of the machine isturned off.
Check that the main power indicator is notlit, and then turn on the main power of themachine.
page 13 "Turning On and Off the Power"
The power of themachine does not comeon.
The power cable isunplugged from the walloutlet.
Connect the ground wire, and plug thepower cable into the wall outlet.
See "Installation Requirements AfterMoving the Machine", User Guide (FullVersion).
The machine is connected toan extension cord.
You cannot use an extension cord.
After checking that the screen is not lit whenyou touch it and the main power indicatoris unlit, remove the extension cord and plugthe power cable directly into the walloutlet.
There may be a problemwith the wall outlet.
After checking that the screen is not lit whenyou touch it and the main power indicatoris unlit, plug the power cord into aconfirmed operating wall outlet.
When the Machine Cannot Be Operated
251
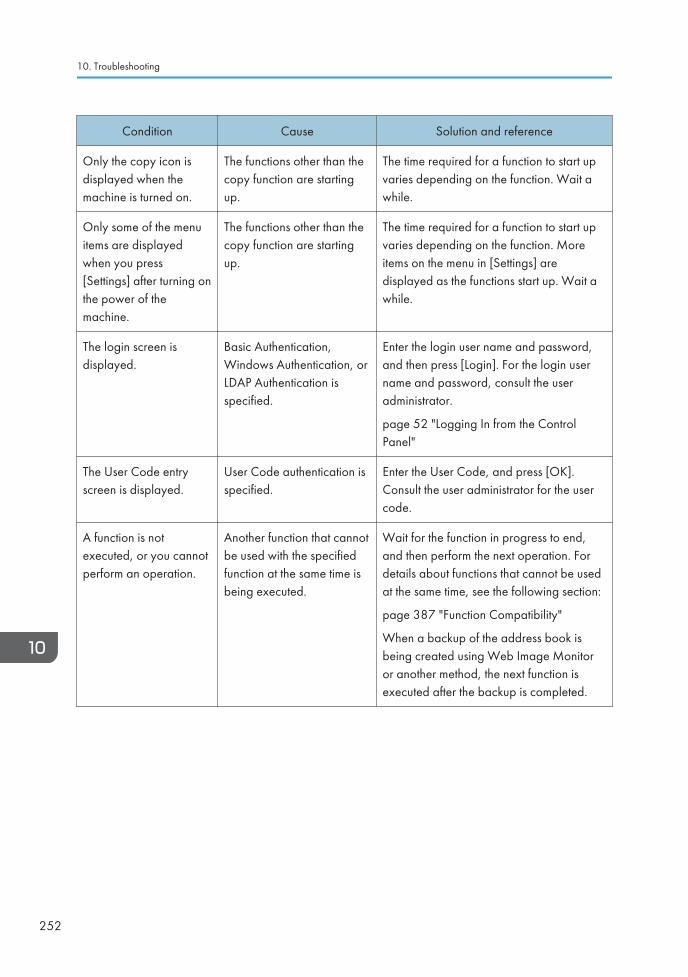
Condition Cause Solution and reference
Only the copy icon isdisplayed when themachine is turned on.
The functions other than thecopy function are startingup.
The time required for a function to start upvaries depending on the function. Wait awhile.
Only some of the menuitems are displayedwhen you press[Settings] after turning onthe power of themachine.
The functions other than thecopy function are startingup.
The time required for a function to start upvaries depending on the function. Moreitems on the menu in [Settings] aredisplayed as the functions start up. Wait awhile.
The login screen isdisplayed.
Basic Authentication,Windows Authentication, orLDAP Authentication isspecified.
Enter the login user name and password,and then press [Login]. For the login username and password, consult the useradministrator.
page 52 "Logging In from the ControlPanel"
The User Code entryscreen is displayed.
User Code authentication isspecified.
Enter the User Code, and press [OK].Consult the user administrator for the usercode.
A function is notexecuted, or you cannotperform an operation.
Another function that cannotbe used with the specifiedfunction at the same time isbeing executed.
Wait for the function in progress to end,and then perform the next operation. Fordetails about functions that cannot be usedat the same time, see the following section:
page 387 "Function Compatibility"
When a backup of the address book isbeing created using Web Image Monitoror another method, the next function isexecuted after the backup is completed.
10. Troubleshooting
252
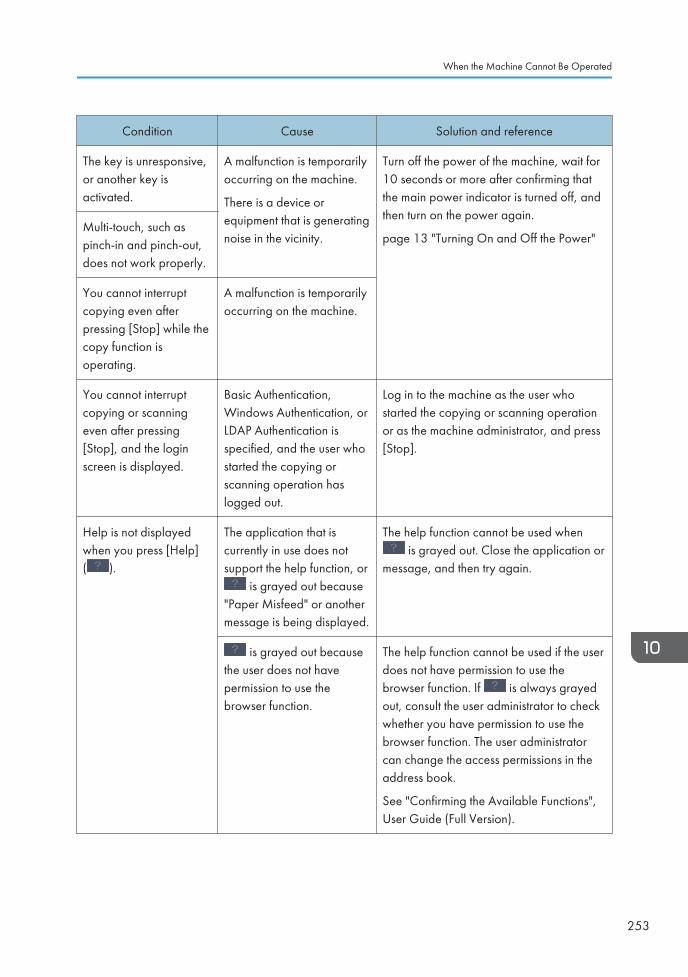
Condition Cause Solution and reference
The key is unresponsive,or another key isactivated.
A malfunction is temporarilyoccurring on the machine.
There is a device orequipment that is generatingnoise in the vicinity.
Turn off the power of the machine, wait for10 seconds or more after confirming thatthe main power indicator is turned off, andthen turn on the power again.
page 13 "Turning On and Off the Power"Multi-touch, such aspinch-in and pinch-out,does not work properly.
You cannot interruptcopying even afterpressing [Stop] while thecopy function isoperating.
A malfunction is temporarilyoccurring on the machine.
You cannot interruptcopying or scanningeven after pressing[Stop], and the loginscreen is displayed.
Basic Authentication,Windows Authentication, orLDAP Authentication isspecified, and the user whostarted the copying orscanning operation haslogged out.
Log in to the machine as the user whostarted the copying or scanning operationor as the machine administrator, and press[Stop].
Help is not displayedwhen you press [Help]( ).
The application that iscurrently in use does notsupport the help function, or
is grayed out because"Paper Misfeed" or anothermessage is being displayed.
The help function cannot be used when is grayed out. Close the application or
message, and then try again.
is grayed out becausethe user does not havepermission to use thebrowser function.
The help function cannot be used if the userdoes not have permission to use thebrowser function. If is always grayedout, consult the user administrator to checkwhether you have permission to use thebrowser function. The user administratorcan change the access permissions in theaddress book.
See "Confirming the Available Functions",User Guide (Full Version).
When the Machine Cannot Be Operated
253
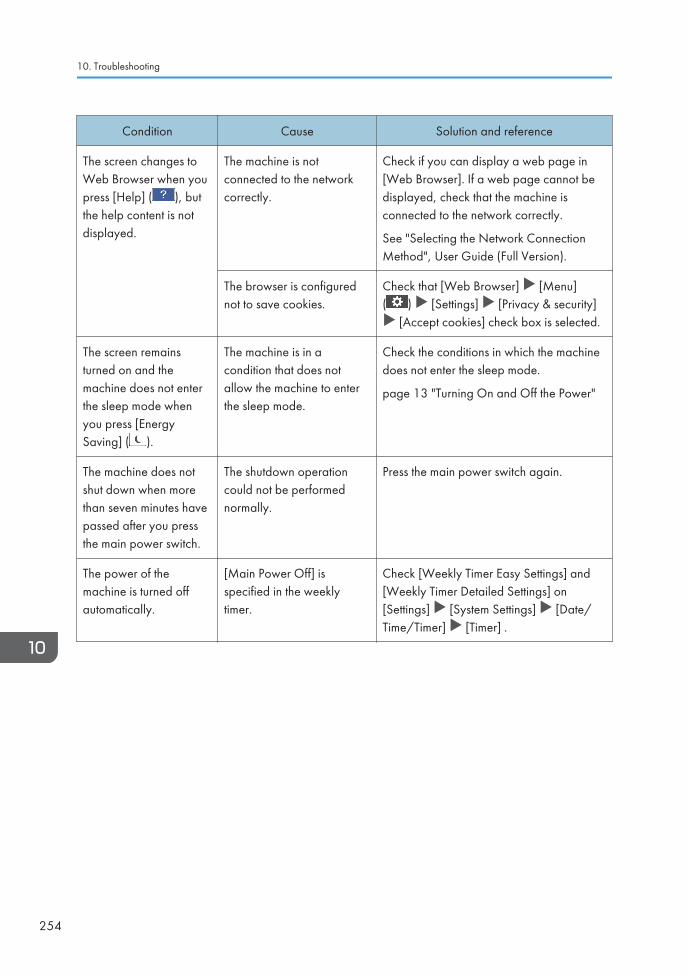
Condition Cause Solution and reference
The screen changes toWeb Browser when youpress [Help] ( ), butthe help content is notdisplayed.
The machine is notconnected to the networkcorrectly.
Check if you can display a web page in[Web Browser]. If a web page cannot bedisplayed, check that the machine isconnected to the network correctly.
See "Selecting the Network ConnectionMethod", User Guide (Full Version).
The browser is configurednot to save cookies.
Check that [Web Browser] [Menu]( ) [Settings] [Privacy & security]
[Accept cookies] check box is selected.
The screen remainsturned on and themachine does not enterthe sleep mode whenyou press [EnergySaving] ( ).
The machine is in acondition that does notallow the machine to enterthe sleep mode.
Check the conditions in which the machinedoes not enter the sleep mode.
page 13 "Turning On and Off the Power"
The machine does notshut down when morethan seven minutes havepassed after you pressthe main power switch.
The shutdown operationcould not be performednormally.
Press the main power switch again.
The power of themachine is turned offautomatically.
[Main Power Off] isspecified in the weeklytimer.
Check [Weekly Timer Easy Settings] and[Weekly Timer Detailed Settings] on[Settings] [System Settings] [Date/Time/Timer] [Timer] .
10. Troubleshooting
254

When the Machine Does Not Respond Correctly to an Operation from aComputer
Condition Cause Solution and reference
When using the addressbook from DeviceManager NX, anincorrect password erroris displayed even whenyou enter the correctlogin user name andpassword.
A certificate is not installedon the computer whenSSL/TLS is enabled on themachine.
Install the certificate on the computer.Consult your network administrator for thecertificate.
An item other than [SimpleEncryption] is specified in"Driver EncryptionKey:Encryption Strength".
Specify [Simple Encryption] in "DriverEncryption Key:Encryption Strength" in[Settings] [System Settings] [Settingsfor Administrator] [Security] [Extended Security Settings].
You cannot access themachine using WebImage Monitor.
There is a problem with theconnection between themachine and the computer.
Check the cable connecting the machineand the computer, and disconnect and thenconnect the cable again. Also, check theconnection to the hub or router, and turn offand on the power of the device if possible.Next, turn off the power of the machine,wait for 10 seconds or more afterconfirming that the main power indicator isturned off, and then turn on the power.
page 13 "Turning On and Off the Power"
A proxy server is specified. In the proxy setting of the Web browser,specify the IP address of the machine as anexception. You can check the IP address in[Check Status] "Network".
When the Machine Cannot Be Operated
255
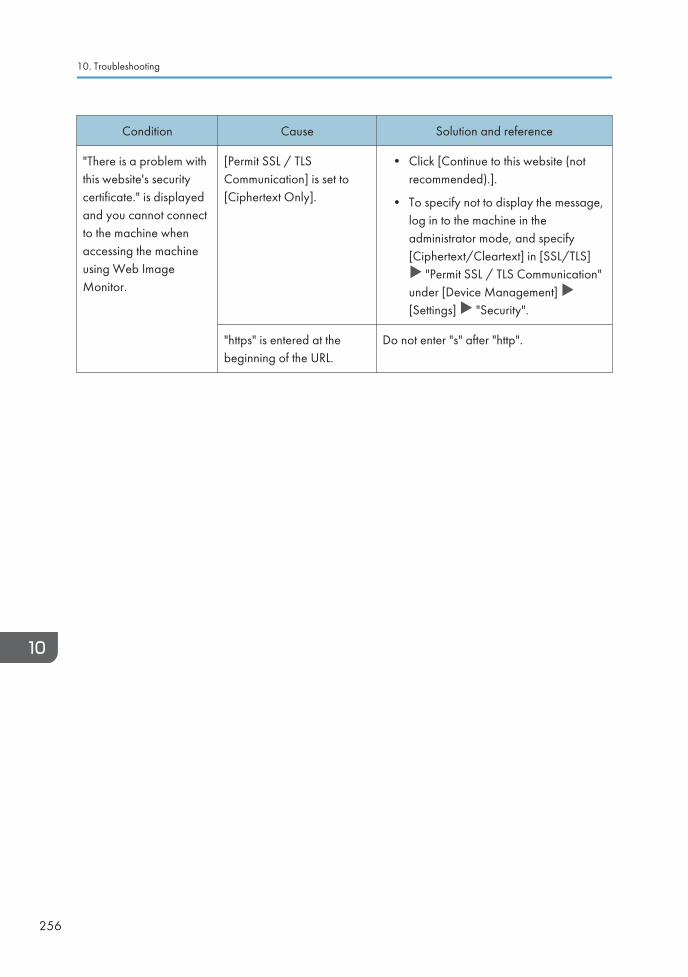
Condition Cause Solution and reference
"There is a problem withthis website's securitycertificate." is displayedand you cannot connectto the machine whenaccessing the machineusing Web ImageMonitor.
[Permit SSL / TLSCommunication] is set to[Ciphertext Only].
• Click [Continue to this website (notrecommended).].
• To specify not to display the message,log in to the machine in theadministrator mode, and specify[Ciphertext/Cleartext] in [SSL/TLS]
"Permit SSL / TLS Communication"under [Device Management] [Settings] "Security".
"https" is entered at thebeginning of the URL.
Do not enter "s" after "http".
10. Troubleshooting
256
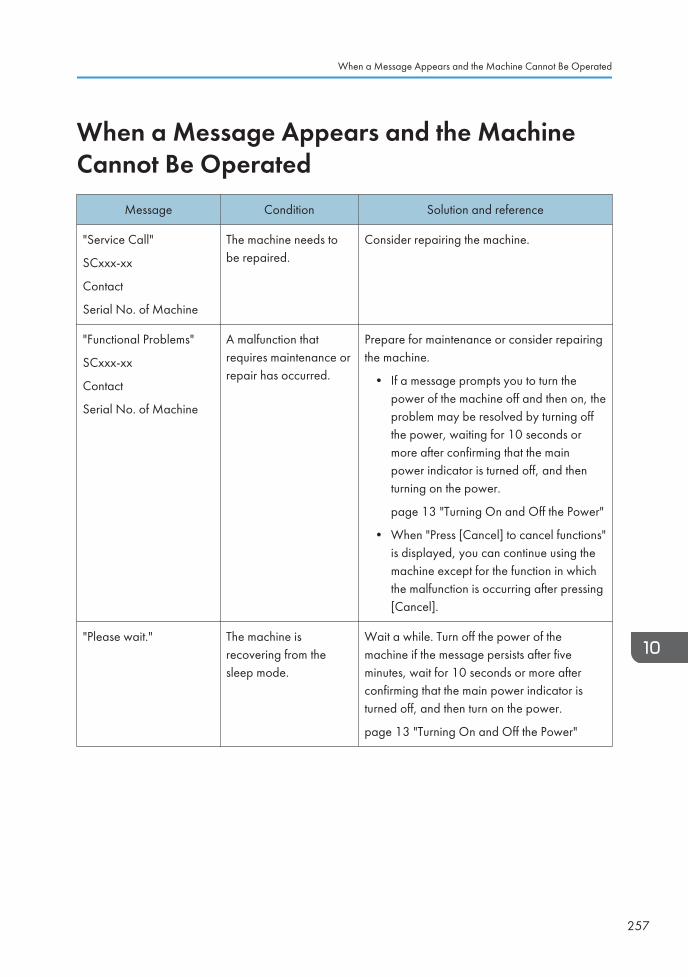
When a Message Appears and the MachineCannot Be Operated
Message Condition Solution and reference
"Service Call"
SCxxx-xx
Contact
Serial No. of Machine
The machine needs tobe repaired.
Consider repairing the machine.
"Functional Problems"
SCxxx-xx
Contact
Serial No. of Machine
A malfunction thatrequires maintenance orrepair has occurred.
Prepare for maintenance or consider repairingthe machine.
• If a message prompts you to turn thepower of the machine off and then on, theproblem may be resolved by turning offthe power, waiting for 10 seconds ormore after confirming that the mainpower indicator is turned off, and thenturning on the power.
page 13 "Turning On and Off the Power"
• When "Press [Cancel] to cancel functions"is displayed, you can continue using themachine except for the function in whichthe malfunction is occurring after pressing[Cancel].
"Please wait." The machine isrecovering from thesleep mode.
Wait a while. Turn off the power of themachine if the message persists after fiveminutes, wait for 10 seconds or more afterconfirming that the main power indicator isturned off, and then turn on the power.
page 13 "Turning On and Off the Power"
When a Message Appears and the Machine Cannot Be Operated
257
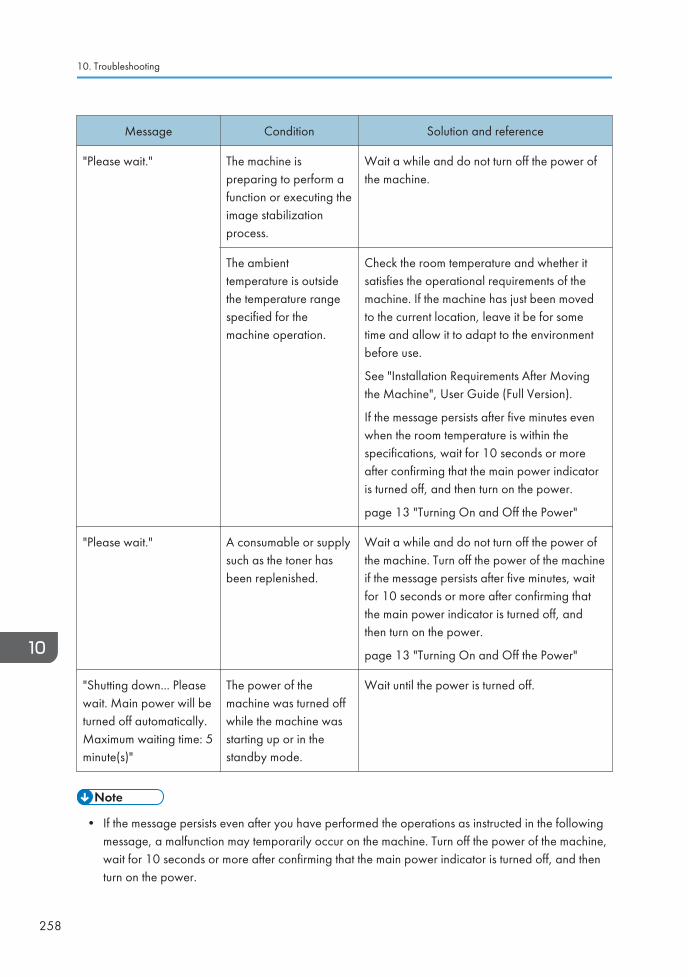
Message Condition Solution and reference
"Please wait." The machine ispreparing to perform afunction or executing theimage stabilizationprocess.
Wait a while and do not turn off the power ofthe machine.
The ambienttemperature is outsidethe temperature rangespecified for themachine operation.
Check the room temperature and whether itsatisfies the operational requirements of themachine. If the machine has just been movedto the current location, leave it be for sometime and allow it to adapt to the environmentbefore use.
See "Installation Requirements After Movingthe Machine", User Guide (Full Version).
If the message persists after five minutes evenwhen the room temperature is within thespecifications, wait for 10 seconds or moreafter confirming that the main power indicatoris turned off, and then turn on the power.
page 13 "Turning On and Off the Power"
"Please wait." A consumable or supplysuch as the toner hasbeen replenished.
Wait a while and do not turn off the power ofthe machine. Turn off the power of the machineif the message persists after five minutes, waitfor 10 seconds or more after confirming thatthe main power indicator is turned off, andthen turn on the power.
page 13 "Turning On and Off the Power"
"Shutting down... Pleasewait. Main power will beturned off automatically.Maximum waiting time: 5minute(s)"
The power of themachine was turned offwhile the machine wasstarting up or in thestandby mode.
Wait until the power is turned off.
• If the message persists even after you have performed the operations as instructed in the followingmessage, a malfunction may temporarily occur on the machine. Turn off the power of the machine,wait for 10 seconds or more after confirming that the main power indicator is turned off, and thenturn on the power.
10. Troubleshooting
258
• page 13 "Turning On and Off the Power"
• "Cover Open"
• "Add Toner" / "Add Staples"
• "Replace Waste Toner Bottle" / "Hole Punch Receptacle Full"
• "Original left on exposure glass."
• "No paper."
• "Proof tray"
• "Shift Tray"
When a Message Appears and the Machine Cannot Be Operated
259
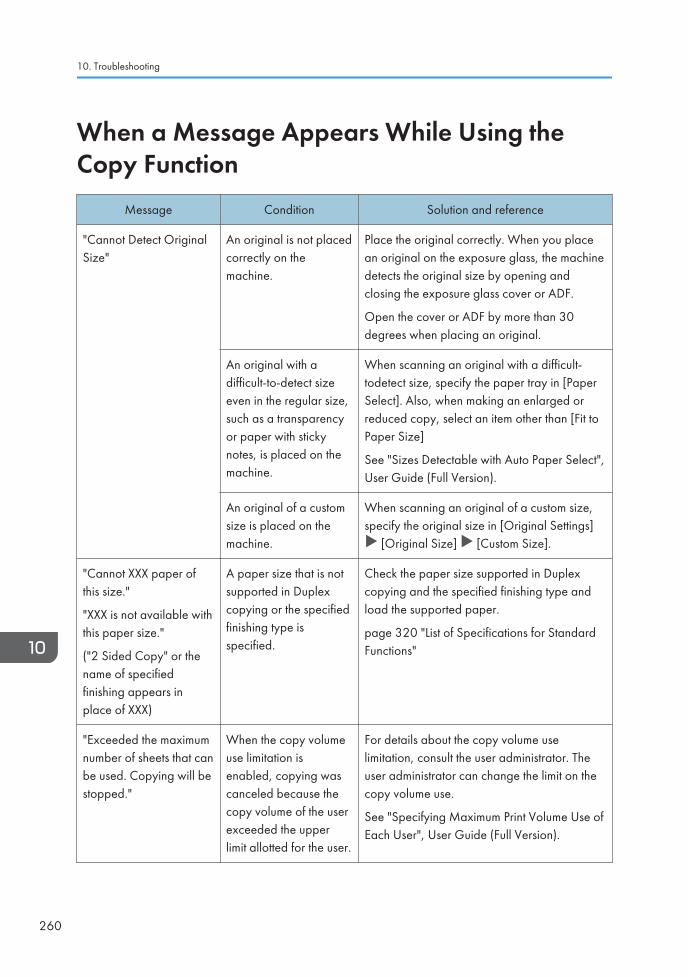
When a Message Appears While Using theCopy Function
Message Condition Solution and reference
"Cannot Detect OriginalSize"
An original is not placedcorrectly on themachine.
Place the original correctly. When you placean original on the exposure glass, the machinedetects the original size by opening andclosing the exposure glass cover or ADF.
Open the cover or ADF by more than 30degrees when placing an original.
An original with adifficult-to-detect sizeeven in the regular size,such as a transparencyor paper with stickynotes, is placed on themachine.
When scanning an original with a difficult-todetect size, specify the paper tray in [PaperSelect]. Also, when making an enlarged orreduced copy, select an item other than [Fit toPaper Size]
See "Sizes Detectable with Auto Paper Select",User Guide (Full Version).
An original of a customsize is placed on themachine.
When scanning an original of a custom size,specify the original size in [Original Settings]
[Original Size] [Custom Size].
"Cannot XXX paper ofthis size."
"XXX is not available withthis paper size."
("2 Sided Copy" or thename of specifiedfinishing appears inplace of XXX)
A paper size that is notsupported in Duplexcopying or the specifiedfinishing type isspecified.
Check the paper size supported in Duplexcopying and the specified finishing type andload the supported paper.
page 320 "List of Specifications for StandardFunctions"
"Exceeded the maximumnumber of sheets that canbe used. Copying will bestopped."
When the copy volumeuse limitation isenabled, copying wascanceled because thecopy volume of the userexceeded the upperlimit allotted for the user.
For details about the copy volume uselimitation, consult the user administrator. Theuser administrator can change the limit on thecopy volume use.
See "Specifying Maximum Print Volume Use ofEach User", User Guide (Full Version).
10. Troubleshooting
260
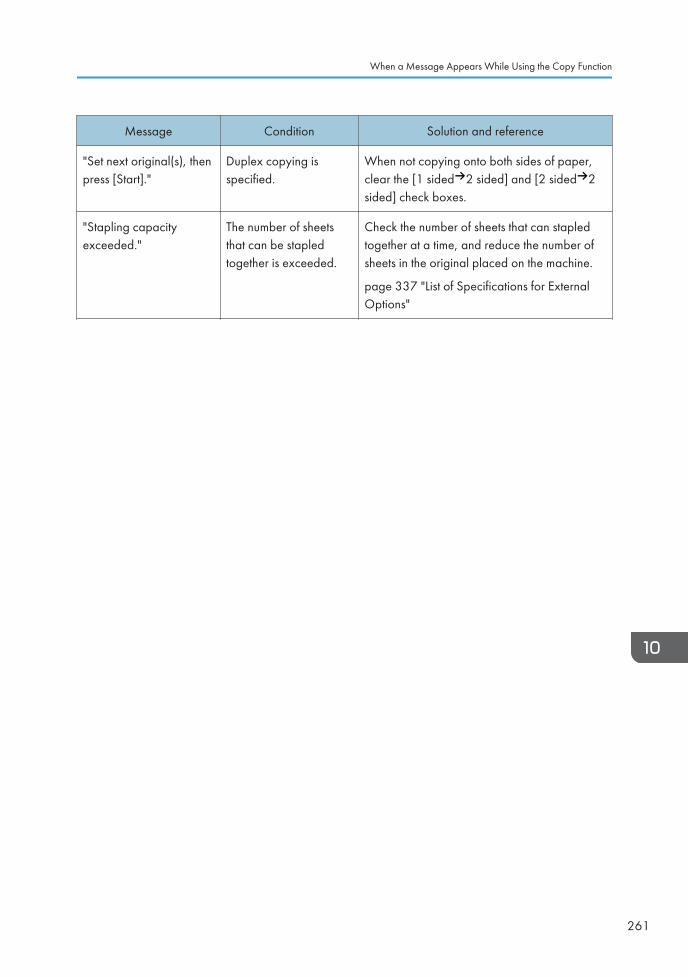
Message Condition Solution and reference
"Set next original(s), thenpress [Start]."
Duplex copying isspecified.
When not copying onto both sides of paper,clear the [1 sided 2 sided] and [2 sided 2sided] check boxes.
"Stapling capacityexceeded."
The number of sheetsthat can be stapledtogether is exceeded.
Check the number of sheets that can stapledtogether at a time, and reduce the number ofsheets in the original placed on the machine.
page 337 "List of Specifications for ExternalOptions"
When a Message Appears While Using the Copy Function
261
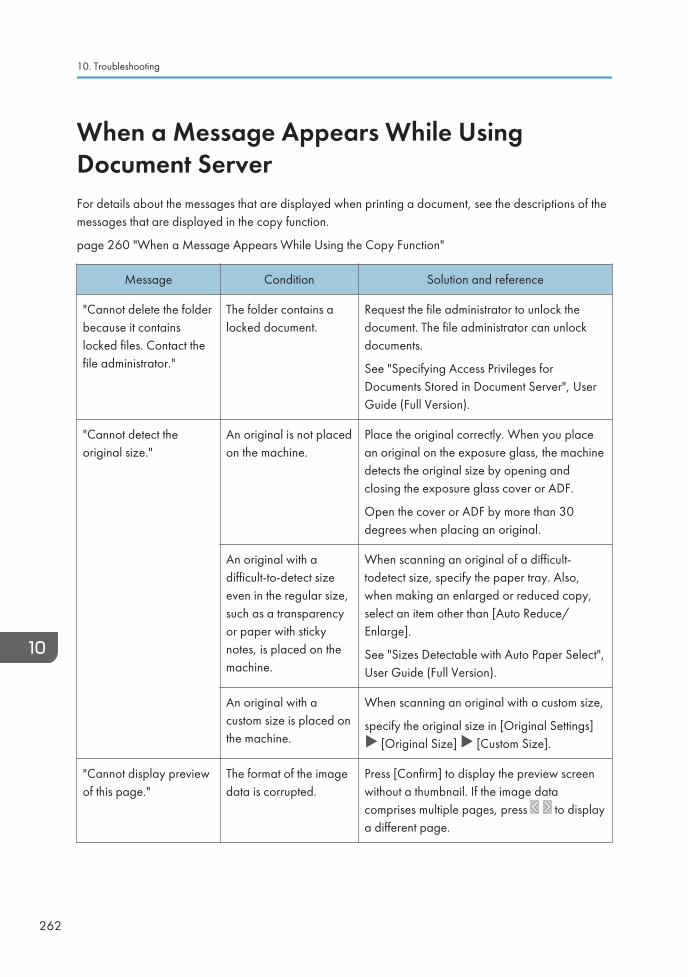
When a Message Appears While UsingDocument ServerFor details about the messages that are displayed when printing a document, see the descriptions of themessages that are displayed in the copy function.
page 260 "When a Message Appears While Using the Copy Function"
Message Condition Solution and reference
"Cannot delete the folderbecause it containslocked files. Contact thefile administrator."
The folder contains alocked document.
Request the file administrator to unlock thedocument. The file administrator can unlockdocuments.
See "Specifying Access Privileges forDocuments Stored in Document Server", UserGuide (Full Version).
"Cannot detect theoriginal size."
An original is not placedon the machine.
Place the original correctly. When you placean original on the exposure glass, the machinedetects the original size by opening andclosing the exposure glass cover or ADF.
Open the cover or ADF by more than 30degrees when placing an original.
An original with adifficult-to-detect sizeeven in the regular size,such as a transparencyor paper with stickynotes, is placed on themachine.
When scanning an original of a difficult-todetect size, specify the paper tray. Also,when making an enlarged or reduced copy,select an item other than [Auto Reduce/Enlarge].
See "Sizes Detectable with Auto Paper Select",User Guide (Full Version).
An original with acustom size is placed onthe machine.
When scanning an original with a custom size,
specify the original size in [Original Settings] [Original Size] [Custom Size].
"Cannot display previewof this page."
The format of the imagedata is corrupted.
Press [Confirm] to display the preview screenwithout a thumbnail. If the image datacomprises multiple pages, press to displaya different page.
10. Troubleshooting
262
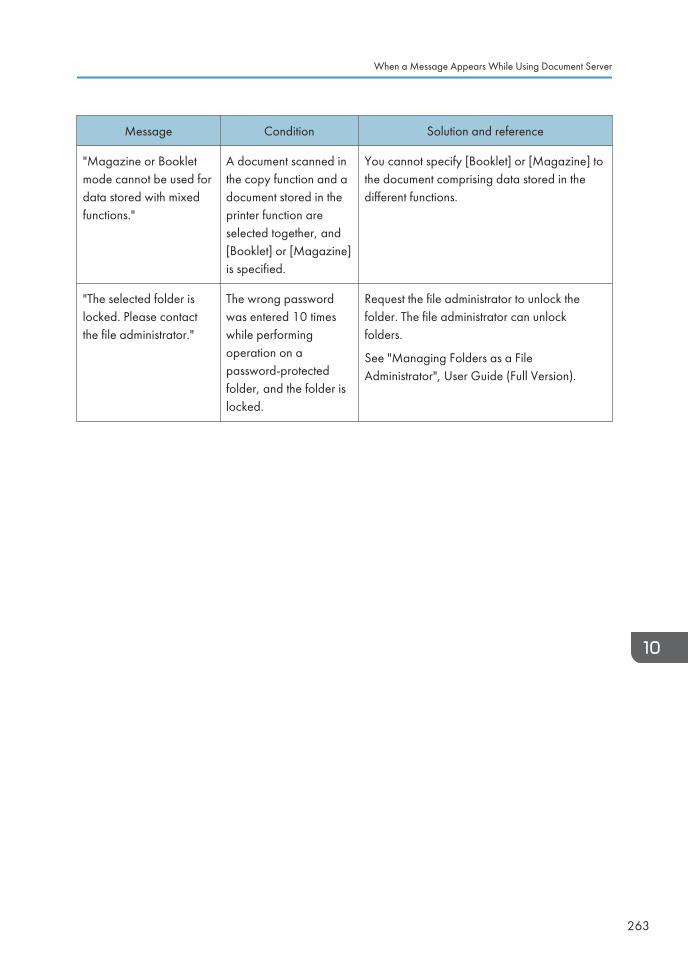
Message Condition Solution and reference
"Magazine or Bookletmode cannot be used fordata stored with mixedfunctions."
A document scanned inthe copy function and adocument stored in theprinter function areselected together, and[Booklet] or [Magazine]is specified.
You cannot specify [Booklet] or [Magazine] tothe document comprising data stored in thedifferent functions.
"The selected folder islocked. Please contactthe file administrator."
The wrong passwordwas entered 10 timeswhile performingoperation on apassword-protectedfolder, and the folder islocked.
Request the file administrator to unlock thefolder. The file administrator can unlockfolders.
See "Managing Folders as a FileAdministrator", User Guide (Full Version).
When a Message Appears While Using Document Server
263
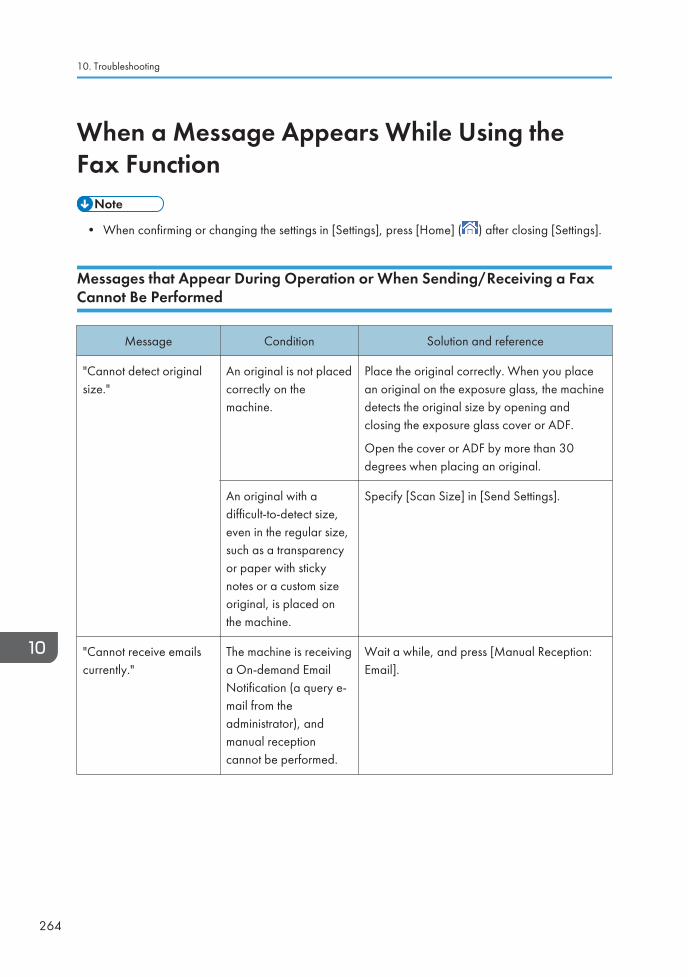
When a Message Appears While Using theFax Function
• When confirming or changing the settings in [Settings], press [Home] ( ) after closing [Settings].
Messages that Appear During Operation or When Sending/Receiving a FaxCannot Be Performed
Message Condition Solution and reference
"Cannot detect originalsize."
An original is not placedcorrectly on themachine.
Place the original correctly. When you placean original on the exposure glass, the machinedetects the original size by opening andclosing the exposure glass cover or ADF.
Open the cover or ADF by more than 30degrees when placing an original.
An original with adifficult-to-detect size,even in the regular size,such as a transparencyor paper with stickynotes or a custom sizeoriginal, is placed onthe machine.
Specify [Scan Size] in [Send Settings].
"Cannot receive emailscurrently."
The machine is receivinga On-demand EmailNotification (a query e-mail from theadministrator), andmanual receptioncannot be performed.
Wait a while, and press [Manual Reception:Email].
10. Troubleshooting
264
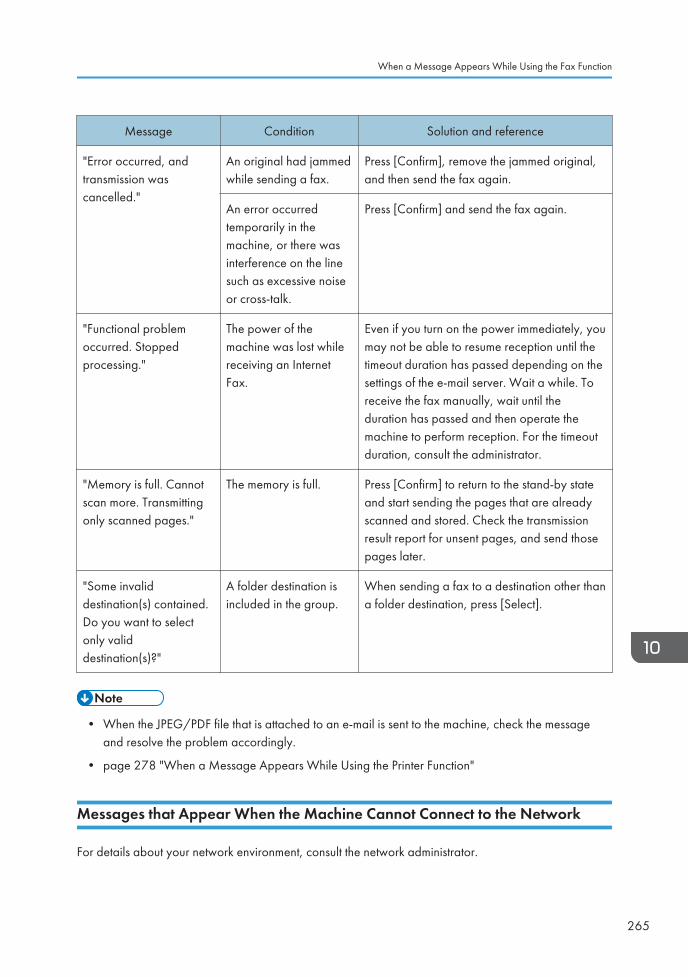
Message Condition Solution and reference
"Error occurred, andtransmission wascancelled."
An original had jammedwhile sending a fax.
Press [Confirm], remove the jammed original,and then send the fax again.
An error occurredtemporarily in themachine, or there wasinterference on the linesuch as excessive noiseor cross-talk.
Press [Confirm] and send the fax again.
"Functional problemoccurred. Stoppedprocessing."
The power of themachine was lost whilereceiving an InternetFax.
Even if you turn on the power immediately, youmay not be able to resume reception until thetimeout duration has passed depending on thesettings of the e-mail server. Wait a while. Toreceive the fax manually, wait until theduration has passed and then operate themachine to perform reception. For the timeoutduration, consult the administrator.
"Memory is full. Cannotscan more. Transmittingonly scanned pages."
The memory is full. Press [Confirm] to return to the stand-by stateand start sending the pages that are alreadyscanned and stored. Check the transmissionresult report for unsent pages, and send thosepages later.
"Some invaliddestination(s) contained.Do you want to selectonly validdestination(s)?"
A folder destination isincluded in the group.
When sending a fax to a destination other thana folder destination, press [Select].
• When the JPEG/PDF file that is attached to an e-mail is sent to the machine, check the messageand resolve the problem accordingly.
• page 278 "When a Message Appears While Using the Printer Function"
Messages that Appear When the Machine Cannot Connect to the Network
For details about your network environment, consult the network administrator.
When a Message Appears While Using the Fax Function
265
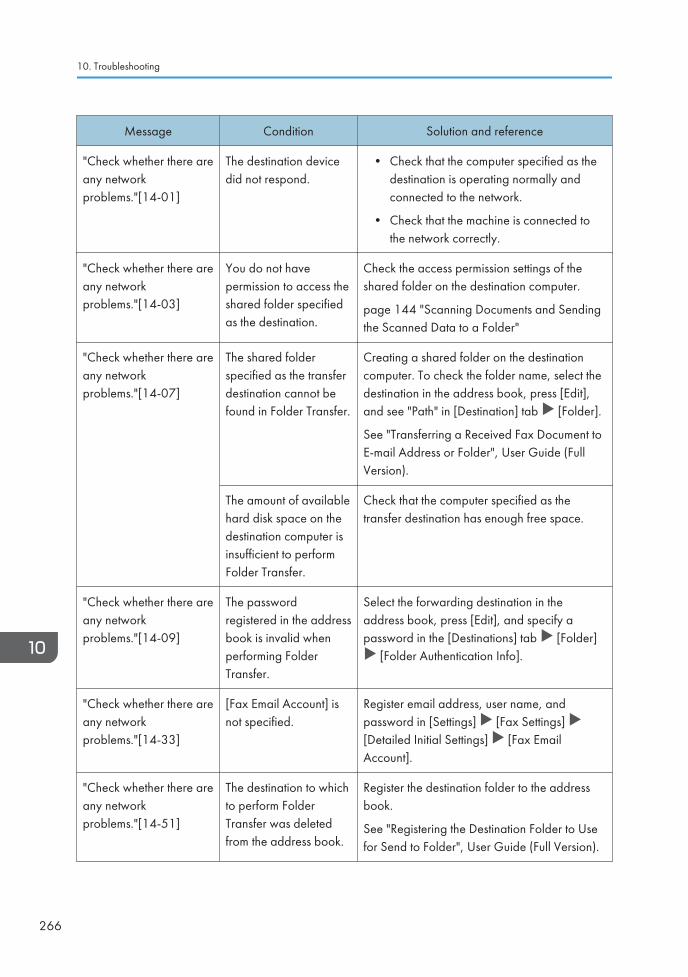
Message Condition Solution and reference
"Check whether there areany networkproblems."[14-01]
The destination devicedid not respond.
• Check that the computer specified as thedestination is operating normally andconnected to the network.
• Check that the machine is connected tothe network correctly.
"Check whether there areany networkproblems."[14-03]
You do not havepermission to access theshared folder specifiedas the destination.
Check the access permission settings of theshared folder on the destination computer.
page 144 "Scanning Documents and Sendingthe Scanned Data to a Folder"
"Check whether there areany networkproblems."[14-07]
The shared folderspecified as the transferdestination cannot befound in Folder Transfer.
Creating a shared folder on the destinationcomputer. To check the folder name, select thedestination in the address book, press [Edit],and see "Path" in [Destination] tab [Folder].
See "Transferring a Received Fax Document toE-mail Address or Folder", User Guide (FullVersion).
The amount of availablehard disk space on thedestination computer isinsufficient to performFolder Transfer.
Check that the computer specified as thetransfer destination has enough free space.
"Check whether there areany networkproblems."[14-09]
The passwordregistered in the addressbook is invalid whenperforming FolderTransfer.
Select the forwarding destination in theaddress book, press [Edit], and specify apassword in the [Destinations] tab [Folder]
[Folder Authentication Info].
"Check whether there areany networkproblems."[14-33]
[Fax Email Account] isnot specified.
Register email address, user name, andpassword in [Settings] [Fax Settings] [Detailed Initial Settings] [Fax EmailAccount].
"Check whether there areany networkproblems."[14-51]
The destination to whichto perform FolderTransfer was deletedfrom the address book.
Register the destination folder to the addressbook.
See "Registering the Destination Folder to Usefor Send to Folder", User Guide (Full Version).
10. Troubleshooting
266
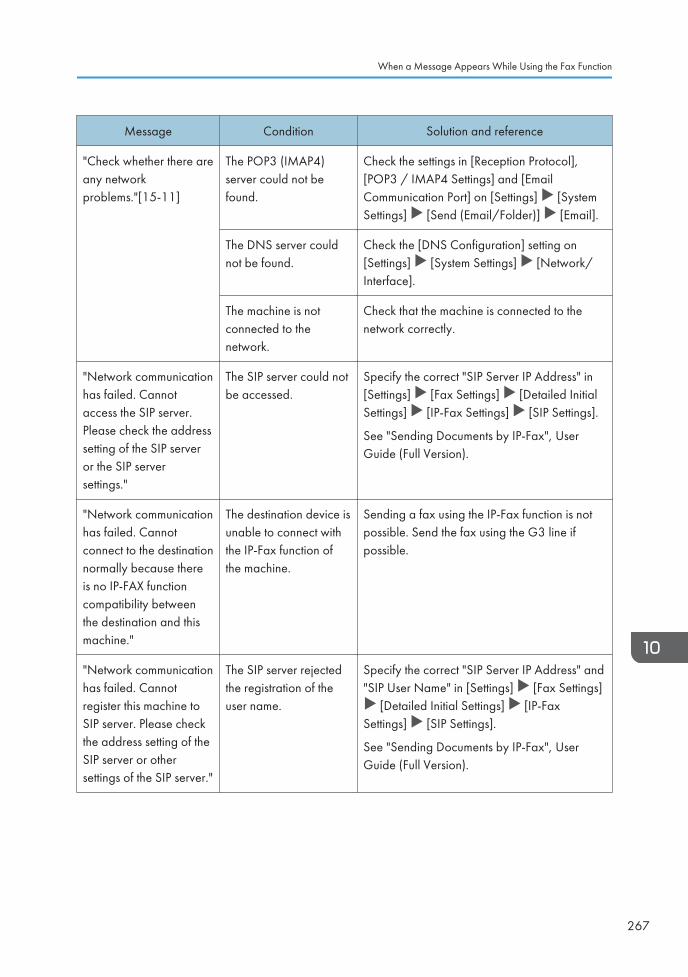
Message Condition Solution and reference
"Check whether there areany networkproblems."[15-11]
The POP3 (IMAP4)server could not befound.
Check the settings in [Reception Protocol],[POP3 / IMAP4 Settings] and [EmailCommunication Port] on [Settings] [SystemSettings] [Send (Email/Folder)] [Email].
The DNS server couldnot be found.
Check the [DNS Configuration] setting on[Settings] [System Settings] [Network/Interface].
The machine is notconnected to thenetwork.
Check that the machine is connected to thenetwork correctly.
"Network communicationhas failed. Cannotaccess the SIP server.Please check the addresssetting of the SIP serveror the SIP serversettings."
The SIP server could notbe accessed.
Specify the correct "SIP Server IP Address" in[Settings] [Fax Settings] [Detailed InitialSettings] [IP-Fax Settings] [SIP Settings].
See "Sending Documents by IP-Fax", UserGuide (Full Version).
"Network communicationhas failed. Cannotconnect to the destinationnormally because thereis no IP-FAX functioncompatibility betweenthe destination and thismachine."
The destination device isunable to connect withthe IP-Fax function ofthe machine.
Sending a fax using the IP-Fax function is notpossible. Send the fax using the G3 line ifpossible.
"Network communicationhas failed. Cannotregister this machine toSIP server. Please checkthe address setting of theSIP server or othersettings of the SIP server."
The SIP server rejectedthe registration of theuser name.
Specify the correct "SIP Server IP Address" and"SIP User Name" in [Settings] [Fax Settings]
[Detailed Initial Settings] [IP-FaxSettings] [SIP Settings].
See "Sending Documents by IP-Fax", UserGuide (Full Version).
When a Message Appears While Using the Fax Function
267
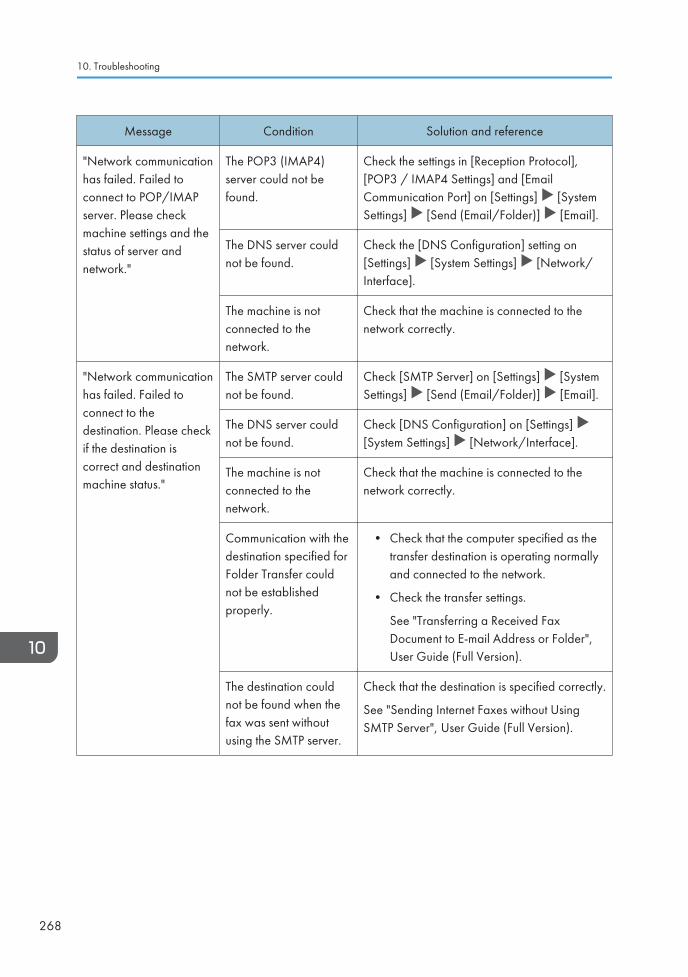
Message Condition Solution and reference
"Network communicationhas failed. Failed toconnect to POP/IMAPserver. Please checkmachine settings and thestatus of server andnetwork."
The POP3 (IMAP4)server could not befound.
Check the settings in [Reception Protocol],[POP3 / IMAP4 Settings] and [EmailCommunication Port] on [Settings] [SystemSettings] [Send (Email/Folder)] [Email].
The DNS server couldnot be found.
Check the [DNS Configuration] setting on[Settings] [System Settings] [Network/Interface].
The machine is notconnected to thenetwork.
Check that the machine is connected to thenetwork correctly.
"Network communicationhas failed. Failed toconnect to thedestination. Please checkif the destination iscorrect and destinationmachine status."
The SMTP server couldnot be found.
Check [SMTP Server] on [Settings] [SystemSettings] [Send (Email/Folder)] [Email].
The DNS server couldnot be found.
Check [DNS Configuration] on [Settings] [System Settings] [Network/Interface].
The machine is notconnected to thenetwork.
Check that the machine is connected to thenetwork correctly.
Communication with thedestination specified forFolder Transfer couldnot be establishedproperly.
• Check that the computer specified as thetransfer destination is operating normallyand connected to the network.
• Check the transfer settings.
See "Transferring a Received FaxDocument to E-mail Address or Folder",User Guide (Full Version).
The destination couldnot be found when thefax was sent withoutusing the SMTP server.
Check that the destination is specified correctly.
See "Sending Internet Faxes without UsingSMTP Server", User Guide (Full Version).
10. Troubleshooting
268
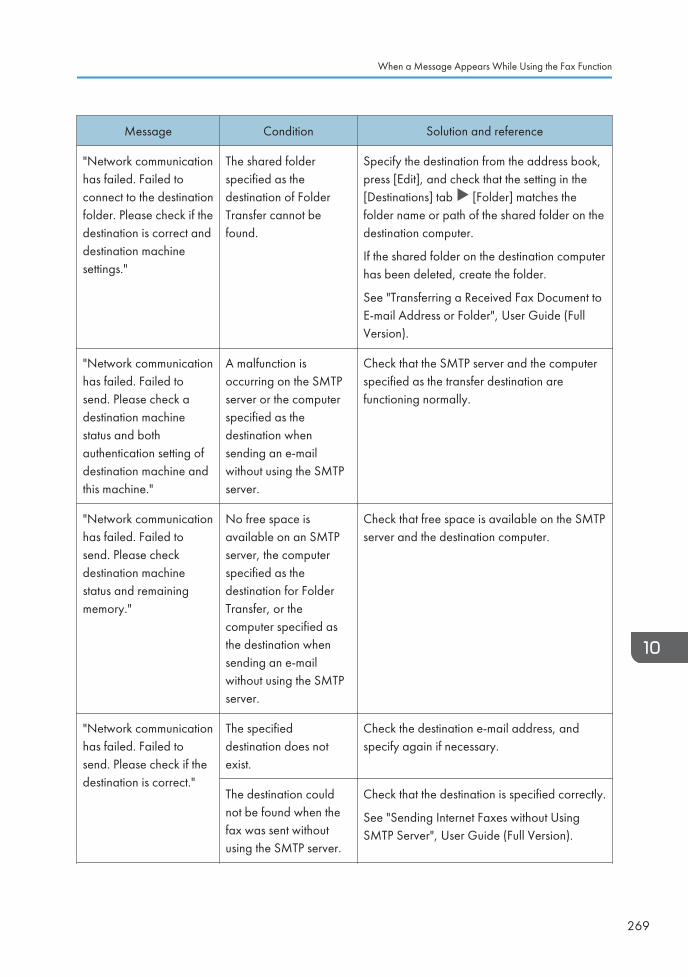
Message Condition Solution and reference
"Network communicationhas failed. Failed toconnect to the destinationfolder. Please check if thedestination is correct anddestination machinesettings."
The shared folderspecified as thedestination of FolderTransfer cannot befound.
Specify the destination from the address book,press [Edit], and check that the setting in the[Destinations] tab [Folder] matches thefolder name or path of the shared folder on thedestination computer.
If the shared folder on the destination computerhas been deleted, create the folder.
See "Transferring a Received Fax Document toE-mail Address or Folder", User Guide (FullVersion).
"Network communicationhas failed. Failed tosend. Please check adestination machinestatus and bothauthentication setting ofdestination machine andthis machine."
A malfunction isoccurring on the SMTPserver or the computerspecified as thedestination whensending an e-mailwithout using the SMTPserver.
Check that the SMTP server and the computerspecified as the transfer destination arefunctioning normally.
"Network communicationhas failed. Failed tosend. Please checkdestination machinestatus and remainingmemory."
No free space isavailable on an SMTPserver, the computerspecified as thedestination for FolderTransfer, or thecomputer specified asthe destination whensending an e-mailwithout using the SMTPserver.
Check that free space is available on the SMTPserver and the destination computer.
"Network communicationhas failed. Failed tosend. Please check if thedestination is correct."
The specifieddestination does notexist.
Check the destination e-mail address, andspecify again if necessary.
The destination couldnot be found when thefax was sent withoutusing the SMTP server.
Check that the destination is specified correctly.
See "Sending Internet Faxes without UsingSMTP Server", User Guide (Full Version).
When a Message Appears While Using the Fax Function
269
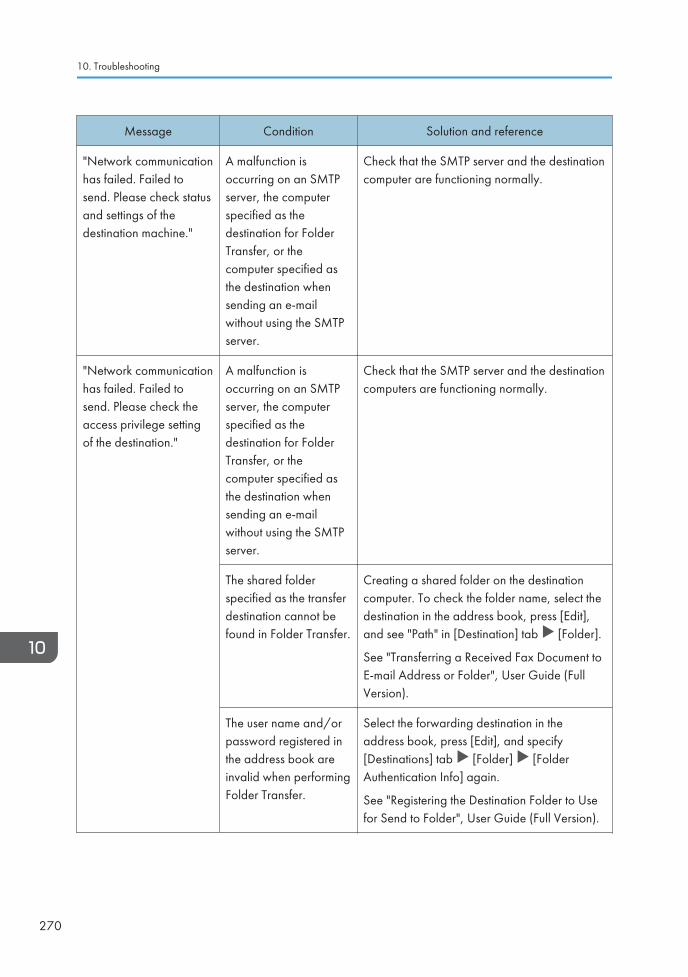
Message Condition Solution and reference
"Network communicationhas failed. Failed tosend. Please check statusand settings of thedestination machine."
A malfunction isoccurring on an SMTPserver, the computerspecified as thedestination for FolderTransfer, or thecomputer specified asthe destination whensending an e-mailwithout using the SMTPserver.
Check that the SMTP server and the destinationcomputer are functioning normally.
"Network communicationhas failed. Failed tosend. Please check theaccess privilege settingof the destination."
A malfunction isoccurring on an SMTPserver, the computerspecified as thedestination for FolderTransfer, or thecomputer specified asthe destination whensending an e-mailwithout using the SMTPserver.
Check that the SMTP server and the destinationcomputers are functioning normally.
The shared folderspecified as the transferdestination cannot befound in Folder Transfer.
Creating a shared folder on the destinationcomputer. To check the folder name, select thedestination in the address book, press [Edit],and see "Path" in [Destination] tab [Folder].
See "Transferring a Received Fax Document toE-mail Address or Folder", User Guide (FullVersion).
The user name and/orpassword registered inthe address book areinvalid when performingFolder Transfer.
Select the forwarding destination in theaddress book, press [Edit], and specify[Destinations] tab [Folder] [FolderAuthentication Info] again.
See "Registering the Destination Folder to Usefor Send to Folder", User Guide (Full Version).
10. Troubleshooting
270
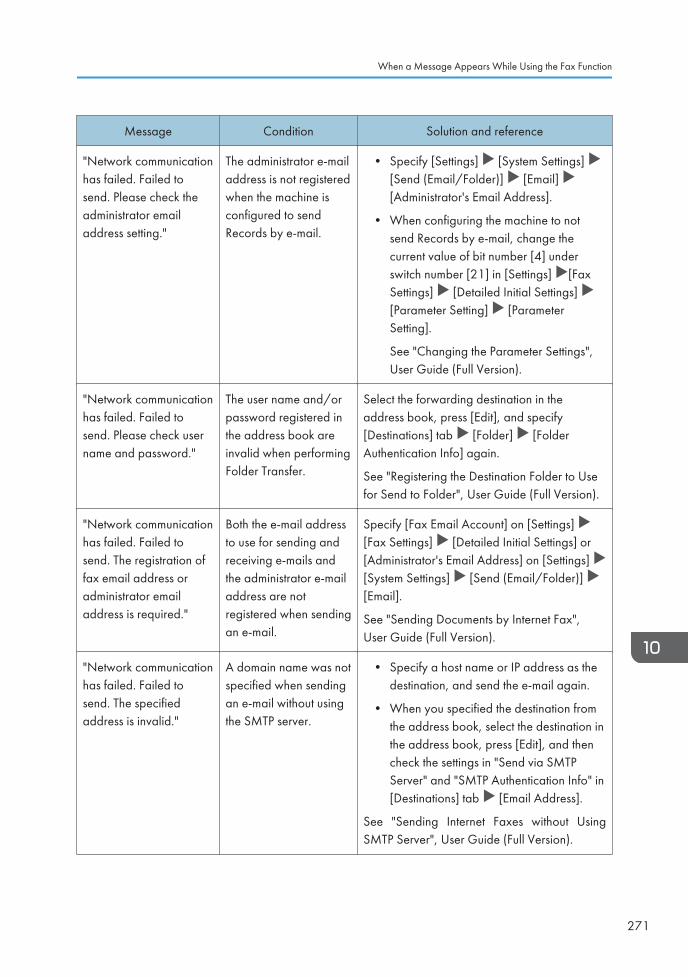
Message Condition Solution and reference
"Network communicationhas failed. Failed tosend. Please check theadministrator emailaddress setting."
The administrator e-mailaddress is not registeredwhen the machine isconfigured to sendRecords by e-mail.
• Specify [Settings] [System Settings] [Send (Email/Folder)] [Email] [Administrator's Email Address].
• When configuring the machine to notsend Records by e-mail, change thecurrent value of bit number [4] underswitch number [21] in [Settings] [FaxSettings] [Detailed Initial Settings] [Parameter Setting] [ParameterSetting].
See "Changing the Parameter Settings",User Guide (Full Version).
"Network communicationhas failed. Failed tosend. Please check username and password."
The user name and/orpassword registered inthe address book areinvalid when performingFolder Transfer.
Select the forwarding destination in theaddress book, press [Edit], and specify[Destinations] tab [Folder] [FolderAuthentication Info] again.
See "Registering the Destination Folder to Usefor Send to Folder", User Guide (Full Version).
"Network communicationhas failed. Failed tosend. The registration offax email address oradministrator emailaddress is required."
Both the e-mail addressto use for sending andreceiving e-mails andthe administrator e-mailaddress are notregistered when sendingan e-mail.
Specify [Fax Email Account] on [Settings] [Fax Settings] [Detailed Initial Settings] or[Administrator's Email Address] on [Settings] [System Settings] [Send (Email/Folder)] [Email].
See "Sending Documents by Internet Fax",User Guide (Full Version).
"Network communicationhas failed. Failed tosend. The specifiedaddress is invalid."
A domain name was notspecified when sendingan e-mail without usingthe SMTP server.
• Specify a host name or IP address as thedestination, and send the e-mail again.
• When you specified the destination fromthe address book, select the destination inthe address book, press [Edit], and thencheck the settings in "Send via SMTPServer" and "SMTP Authentication Info" in[Destinations] tab [Email Address].
See "Sending Internet Faxes without UsingSMTP Server", User Guide (Full Version).
When a Message Appears While Using the Fax Function
271
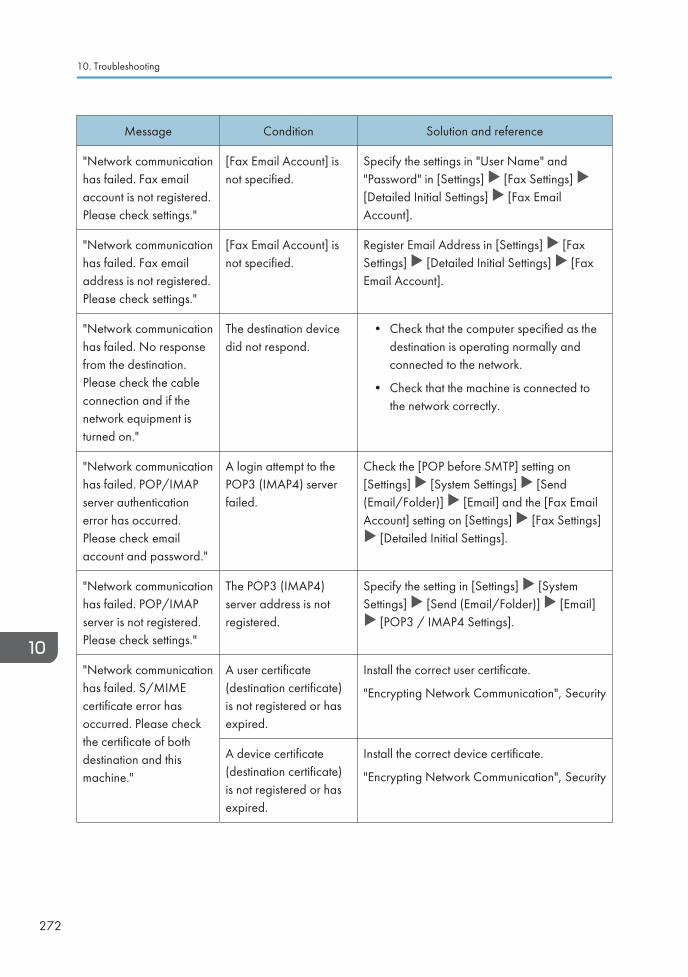
Message Condition Solution and reference
"Network communicationhas failed. Fax emailaccount is not registered.Please check settings."
[Fax Email Account] isnot specified.
Specify the settings in "User Name" and"Password" in [Settings] [Fax Settings] [Detailed Initial Settings] [Fax EmailAccount].
"Network communicationhas failed. Fax emailaddress is not registered.Please check settings."
[Fax Email Account] isnot specified.
Register Email Address in [Settings] [FaxSettings] [Detailed Initial Settings] [FaxEmail Account].
"Network communicationhas failed. No responsefrom the destination.Please check the cableconnection and if thenetwork equipment isturned on."
The destination devicedid not respond.
• Check that the computer specified as thedestination is operating normally andconnected to the network.
• Check that the machine is connected tothe network correctly.
"Network communicationhas failed. POP/IMAPserver authenticationerror has occurred.Please check emailaccount and password."
A login attempt to thePOP3 (IMAP4) serverfailed.
Check the [POP before SMTP] setting on[Settings] [System Settings] [Send(Email/Folder)] [Email] and the [Fax EmailAccount] setting on [Settings] [Fax Settings]
[Detailed Initial Settings].
"Network communicationhas failed. POP/IMAPserver is not registered.Please check settings."
The POP3 (IMAP4)server address is notregistered.
Specify the setting in [Settings] [SystemSettings] [Send (Email/Folder)] [Email]
[POP3 / IMAP4 Settings].
"Network communicationhas failed. S/MIMEcertificate error hasoccurred. Please checkthe certificate of bothdestination and thismachine."
A user certificate(destination certificate)is not registered or hasexpired.
Install the correct user certificate.
"Encrypting Network Communication", Security
A device certificate(destination certificate)is not registered or hasexpired.
Install the correct device certificate.
"Encrypting Network Communication", Security
10. Troubleshooting
272
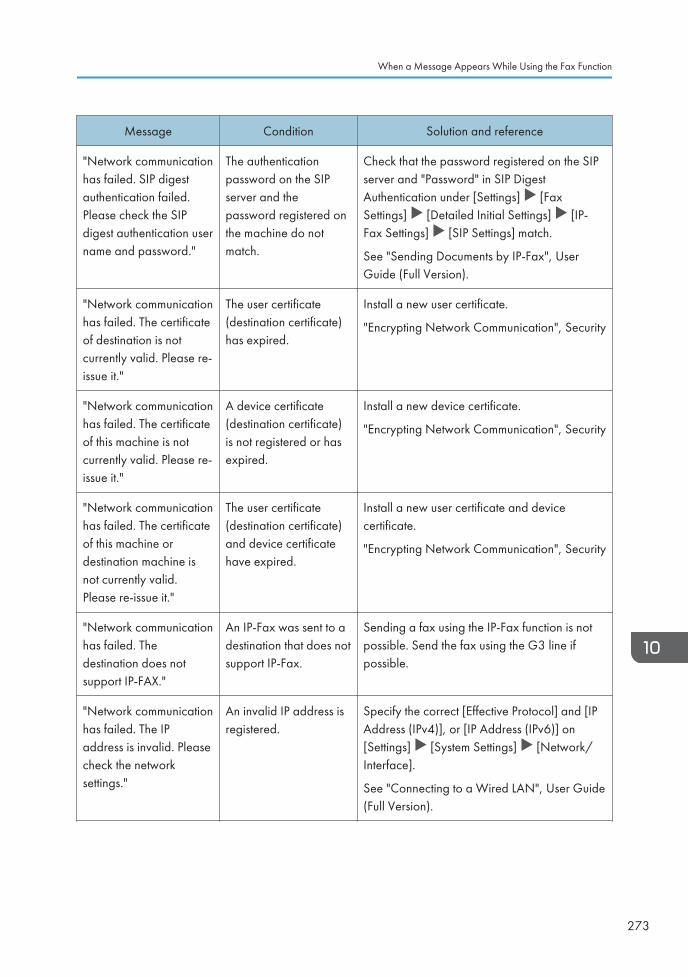
Message Condition Solution and reference
"Network communicationhas failed. SIP digestauthentication failed.Please check the SIPdigest authentication username and password."
The authenticationpassword on the SIPserver and thepassword registered onthe machine do notmatch.
Check that the password registered on the SIPserver and "Password" in SIP DigestAuthentication under [Settings] [FaxSettings] [Detailed Initial Settings] [IP-Fax Settings] [SIP Settings] match.
See "Sending Documents by IP-Fax", UserGuide (Full Version).
"Network communicationhas failed. The certificateof destination is notcurrently valid. Please re-issue it."
The user certificate(destination certificate)has expired.
Install a new user certificate.
"Encrypting Network Communication", Security
"Network communicationhas failed. The certificateof this machine is notcurrently valid. Please re-issue it."
A device certificate(destination certificate)is not registered or hasexpired.
Install a new device certificate.
"Encrypting Network Communication", Security
"Network communicationhas failed. The certificateof this machine ordestination machine isnot currently valid.Please re-issue it."
The user certificate(destination certificate)and device certificatehave expired.
Install a new user certificate and devicecertificate.
"Encrypting Network Communication", Security
"Network communicationhas failed. Thedestination does notsupport IP-FAX."
An IP-Fax was sent to adestination that does notsupport IP-Fax.
Sending a fax using the IP-Fax function is notpossible. Send the fax using the G3 line ifpossible.
"Network communicationhas failed. The IPaddress is invalid. Pleasecheck the networksettings."
An invalid IP address isregistered.
Specify the correct [Effective Protocol] and [IPAddress (IPv4)], or [IP Address (IPv6)] on[Settings] [System Settings] [Network/Interface].
See "Connecting to a Wired LAN", User Guide(Full Version).
When a Message Appears While Using the Fax Function
273
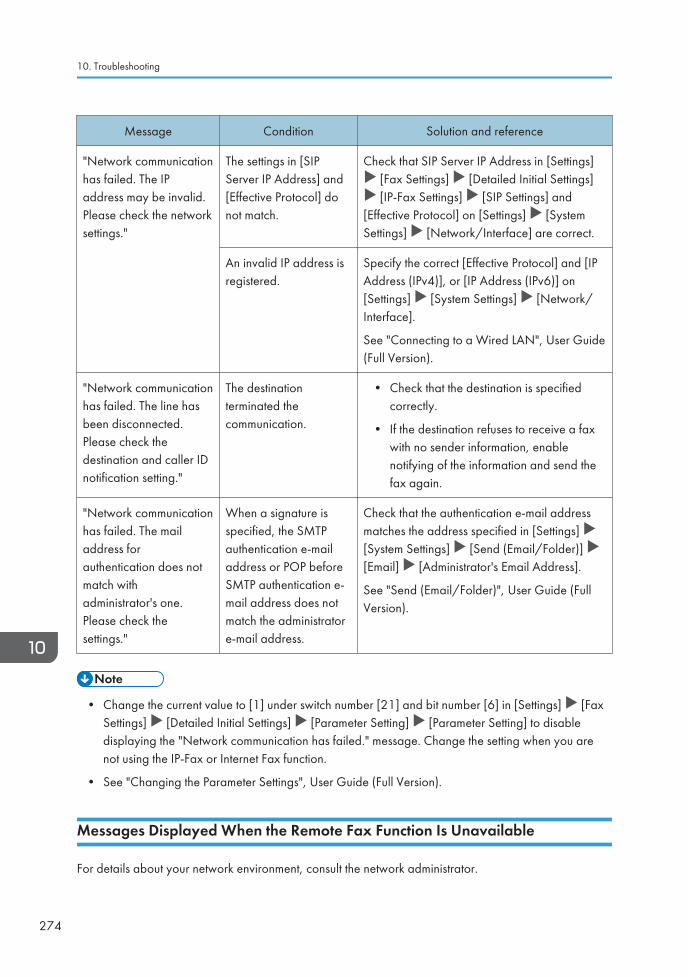
Message Condition Solution and reference
"Network communicationhas failed. The IPaddress may be invalid.Please check the networksettings."
The settings in [SIPServer IP Address] and[Effective Protocol] donot match.
Check that SIP Server IP Address in [Settings] [Fax Settings] [Detailed Initial Settings] [IP-Fax Settings] [SIP Settings] and
[Effective Protocol] on [Settings] [SystemSettings] [Network/Interface] are correct.
An invalid IP address isregistered.
Specify the correct [Effective Protocol] and [IPAddress (IPv4)], or [IP Address (IPv6)] on[Settings] [System Settings] [Network/Interface].
See "Connecting to a Wired LAN", User Guide(Full Version).
"Network communicationhas failed. The line hasbeen disconnected.Please check thedestination and caller IDnotification setting."
The destinationterminated thecommunication.
• Check that the destination is specifiedcorrectly.
• If the destination refuses to receive a faxwith no sender information, enablenotifying of the information and send thefax again.
"Network communicationhas failed. The mailaddress forauthentication does notmatch withadministrator's one.Please check thesettings."
When a signature isspecified, the SMTPauthentication e-mailaddress or POP beforeSMTP authentication e-mail address does notmatch the administratore-mail address.
Check that the authentication e-mail addressmatches the address specified in [Settings] [System Settings] [Send (Email/Folder)] [Email] [Administrator's Email Address].
See "Send (Email/Folder)", User Guide (FullVersion).
• Change the current value to [1] under switch number [21] and bit number [6] in [Settings] [FaxSettings] [Detailed Initial Settings] [Parameter Setting] [Parameter Setting] to disabledisplaying the "Network communication has failed." message. Change the setting when you arenot using the IP-Fax or Internet Fax function.
• See "Changing the Parameter Settings", User Guide (Full Version).
Messages Displayed When the Remote Fax Function Is Unavailable
For details about your network environment, consult the network administrator.
10. Troubleshooting
274
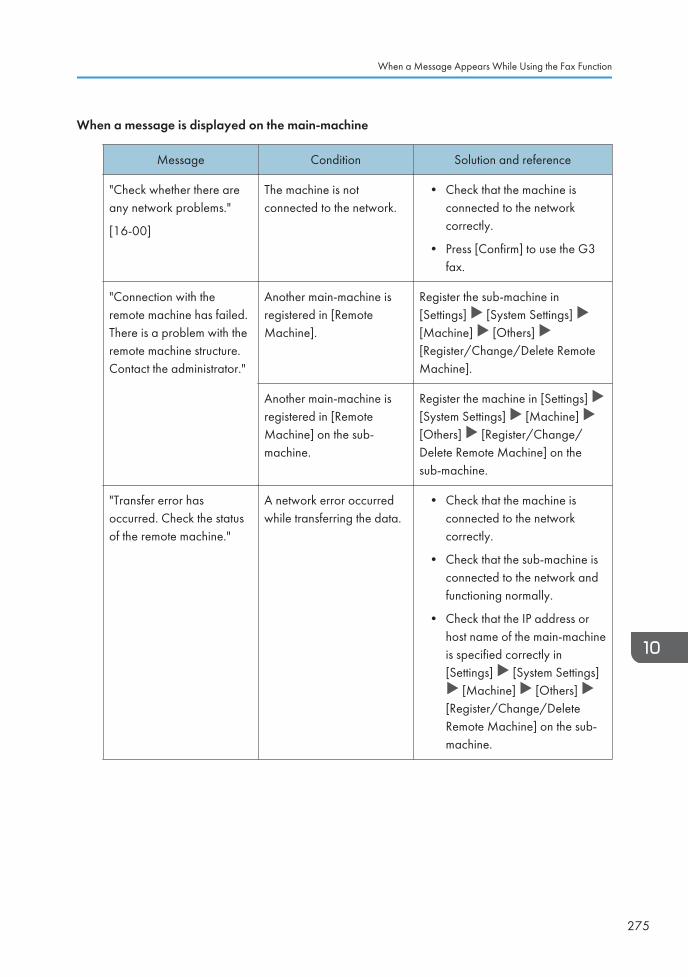
When a message is displayed on the main-machine
Message Condition Solution and reference
"Check whether there areany network problems."
[16-00]
The machine is notconnected to the network.
• Check that the machine isconnected to the networkcorrectly.
• Press [Confirm] to use the G3fax.
"Connection with theremote machine has failed.There is a problem with theremote machine structure.Contact the administrator."
Another main-machine isregistered in [RemoteMachine].
Register the sub-machine in[Settings] [System Settings] [Machine] [Others] [Register/Change/Delete RemoteMachine].
Another main-machine isregistered in [RemoteMachine] on the sub-machine.
Register the machine in [Settings] [System Settings] [Machine] [Others] [Register/Change/Delete Remote Machine] on thesub-machine.
"Transfer error hasoccurred. Check the statusof the remote machine."
A network error occurredwhile transferring the data.
• Check that the machine isconnected to the networkcorrectly.
• Check that the sub-machine isconnected to the network andfunctioning normally.
• Check that the IP address orhost name of the main-machineis specified correctly in[Settings] [System Settings]
[Machine] [Others] [Register/Change/DeleteRemote Machine] on the sub-machine.
When a Message Appears While Using the Fax Function
275
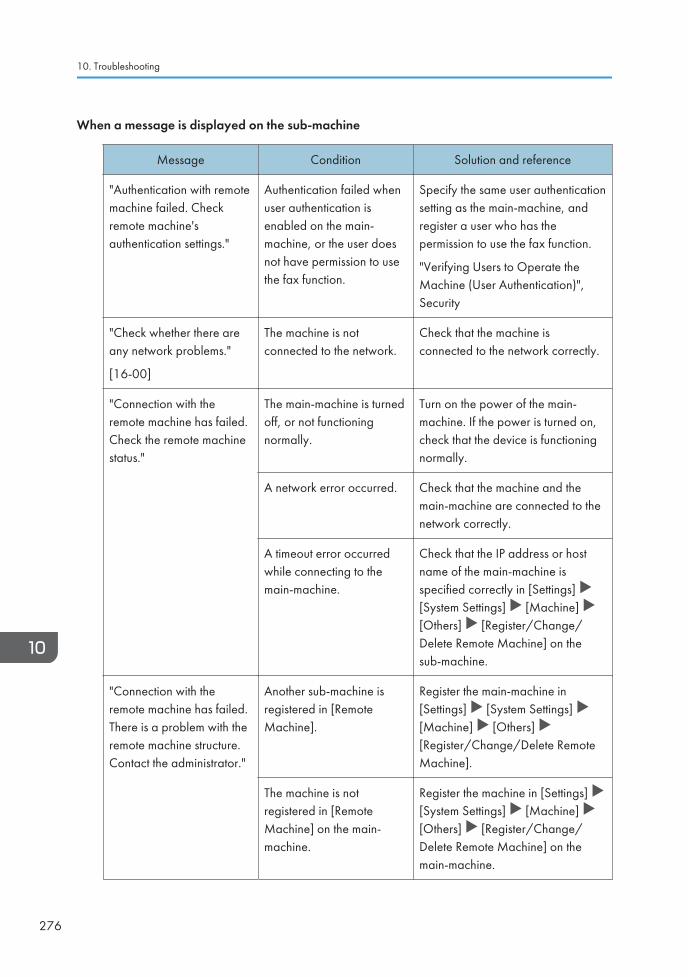
When a message is displayed on the sub-machine
Message Condition Solution and reference
"Authentication with remotemachine failed. Checkremote machine'sauthentication settings."
Authentication failed whenuser authentication isenabled on the main-machine, or the user doesnot have permission to usethe fax function.
Specify the same user authenticationsetting as the main-machine, andregister a user who has thepermission to use the fax function.
"Verifying Users to Operate theMachine (User Authentication)",Security
"Check whether there areany network problems."
[16-00]
The machine is notconnected to the network.
Check that the machine isconnected to the network correctly.
"Connection with theremote machine has failed.Check the remote machinestatus."
The main-machine is turnedoff, or not functioningnormally.
Turn on the power of the main-machine. If the power is turned on,check that the device is functioningnormally.
A network error occurred. Check that the machine and themain-machine are connected to thenetwork correctly.
A timeout error occurredwhile connecting to themain-machine.
Check that the IP address or hostname of the main-machine isspecified correctly in [Settings] [System Settings] [Machine] [Others] [Register/Change/Delete Remote Machine] on thesub-machine.
"Connection with theremote machine has failed.There is a problem with theremote machine structure.Contact the administrator."
Another sub-machine isregistered in [RemoteMachine].
Register the main-machine in[Settings] [System Settings] [Machine] [Others] [Register/Change/Delete RemoteMachine].
The machine is notregistered in [RemoteMachine] on the main-machine.
Register the machine in [Settings] [System Settings] [Machine] [Others] [Register/Change/Delete Remote Machine] on themain-machine.
10. Troubleshooting
276
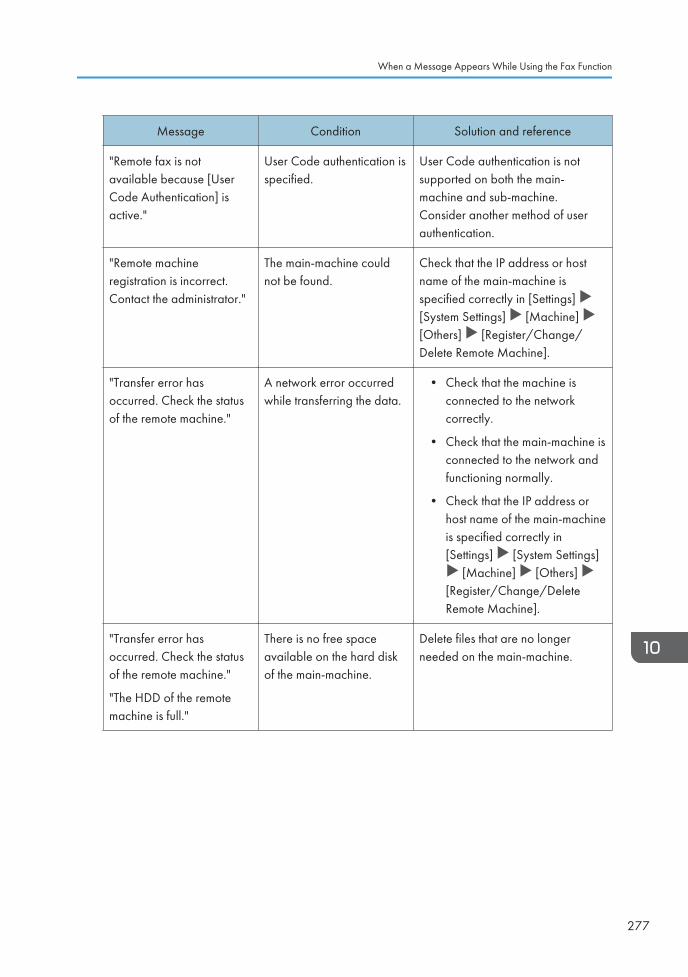
Message Condition Solution and reference
"Remote fax is notavailable because [UserCode Authentication] isactive."
User Code authentication isspecified.
User Code authentication is notsupported on both the main-machine and sub-machine.Consider another method of userauthentication.
"Remote machineregistration is incorrect.Contact the administrator."
The main-machine couldnot be found.
Check that the IP address or hostname of the main-machine isspecified correctly in [Settings] [System Settings] [Machine] [Others] [Register/Change/Delete Remote Machine].
"Transfer error hasoccurred. Check the statusof the remote machine."
A network error occurredwhile transferring the data.
• Check that the machine isconnected to the networkcorrectly.
• Check that the main-machine isconnected to the network andfunctioning normally.
• Check that the IP address orhost name of the main-machineis specified correctly in[Settings] [System Settings]
[Machine] [Others] [Register/Change/DeleteRemote Machine].
"Transfer error hasoccurred. Check the statusof the remote machine."
"The HDD of the remotemachine is full."
There is no free spaceavailable on the hard diskof the main-machine.
Delete files that are no longerneeded on the main-machine.
When a Message Appears While Using the Fax Function
277
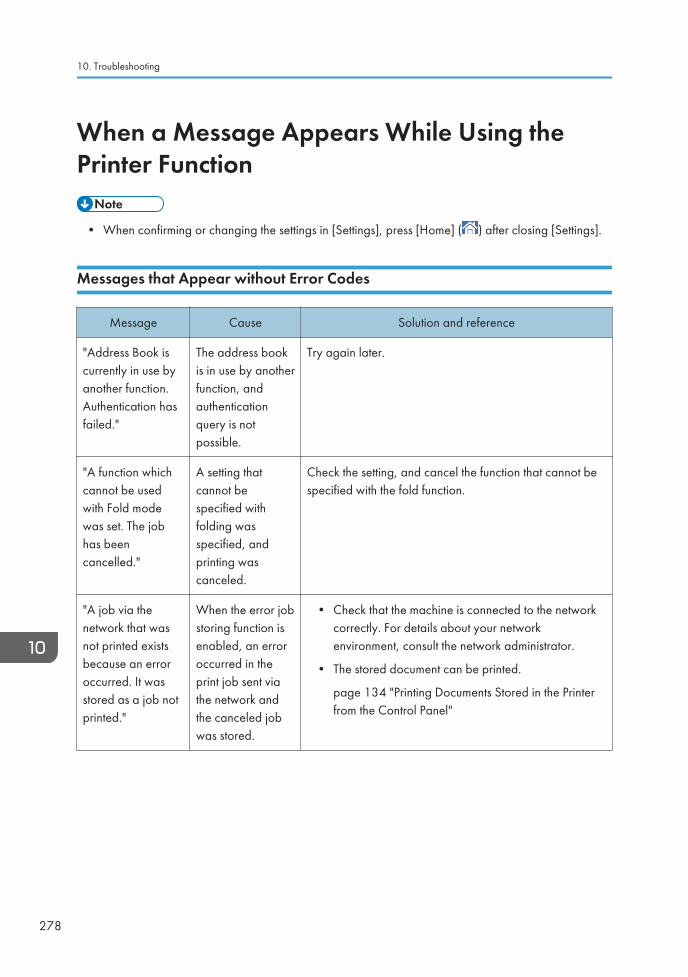
When a Message Appears While Using thePrinter Function
• When confirming or changing the settings in [Settings], press [Home] ( ) after closing [Settings].
Messages that Appear without Error Codes
Message Cause Solution and reference
"Address Book iscurrently in use byanother function.Authentication hasfailed."
The address bookis in use by anotherfunction, andauthenticationquery is notpossible.
Try again later.
"A function whichcannot be usedwith Fold modewas set. The jobhas beencancelled."
A setting thatcannot bespecified withfolding wasspecified, andprinting wascanceled.
Check the setting, and cancel the function that cannot bespecified with the fold function.
"A job via thenetwork that wasnot printed existsbecause an erroroccurred. It wasstored as a job notprinted."
When the error jobstoring function isenabled, an erroroccurred in theprint job sent viathe network andthe canceled jobwas stored.
• Check that the machine is connected to the networkcorrectly. For details about your networkenvironment, consult the network administrator.
• The stored document can be printed.
page 134 "Printing Documents Stored in the Printerfrom the Control Panel"
10. Troubleshooting
278
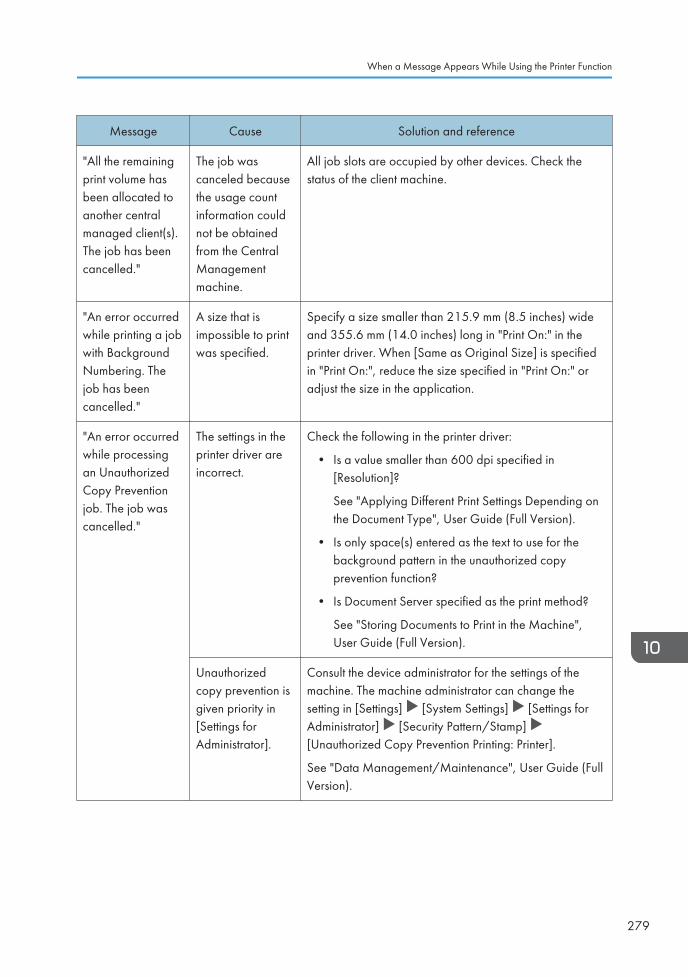
Message Cause Solution and reference
"All the remainingprint volume hasbeen allocated toanother centralmanaged client(s).The job has beencancelled."
The job wascanceled becausethe usage countinformation couldnot be obtainedfrom the CentralManagementmachine.
All job slots are occupied by other devices. Check thestatus of the client machine.
"An error occurredwhile printing a jobwith BackgroundNumbering. Thejob has beencancelled."
A size that isimpossible to printwas specified.
Specify a size smaller than 215.9 mm (8.5 inches) wideand 355.6 mm (14.0 inches) long in "Print On:" in theprinter driver. When [Same as Original Size] is specifiedin "Print On:", reduce the size specified in "Print On:" oradjust the size in the application.
"An error occurredwhile processingan UnauthorizedCopy Preventionjob. The job wascancelled."
The settings in theprinter driver areincorrect.
Check the following in the printer driver:
• Is a value smaller than 600 dpi specified in[Resolution]?
See "Applying Different Print Settings Depending onthe Document Type", User Guide (Full Version).
• Is only space(s) entered as the text to use for thebackground pattern in the unauthorized copyprevention function?
• Is Document Server specified as the print method?
See "Storing Documents to Print in the Machine",User Guide (Full Version).
Unauthorizedcopy prevention isgiven priority in[Settings forAdministrator].
Consult the device administrator for the settings of themachine. The machine administrator can change thesetting in [Settings] [System Settings] [Settings forAdministrator] [Security Pattern/Stamp] [Unauthorized Copy Prevention Printing: Printer].
See "Data Management/Maintenance", User Guide (FullVersion).
When a Message Appears While Using the Printer Function
279
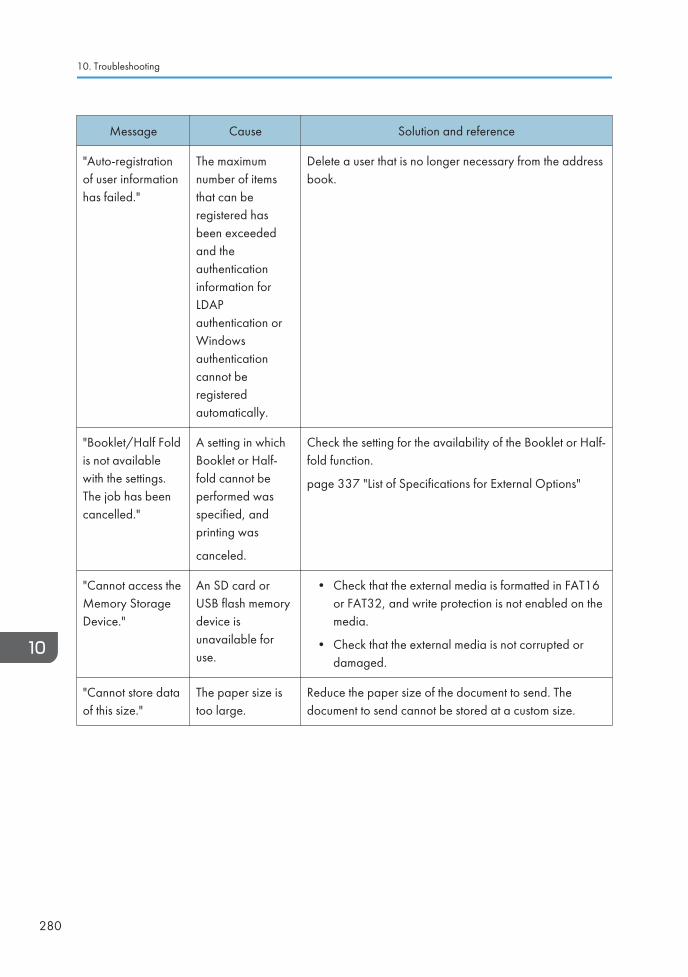
Message Cause Solution and reference
"Auto-registrationof user informationhas failed."
The maximumnumber of itemsthat can beregistered hasbeen exceededand theauthenticationinformation forLDAPauthentication orWindowsauthenticationcannot beregisteredautomatically.
Delete a user that is no longer necessary from the addressbook.
"Booklet/Half Foldis not availablewith the settings.The job has beencancelled."
A setting in whichBooklet or Half-fold cannot beperformed wasspecified, andprinting was
canceled.
Check the setting for the availability of the Booklet or Half-fold function.
page 337 "List of Specifications for External Options"
"Cannot access theMemory StorageDevice."
An SD card orUSB flash memorydevice isunavailable foruse.
• Check that the external media is formatted in FAT16or FAT32, and write protection is not enabled on themedia.
• Check that the external media is not corrupted ordamaged.
"Cannot store dataof this size."
The paper size istoo large.
Reduce the paper size of the document to send. Thedocument to send cannot be stored at a custom size.
10. Troubleshooting
280
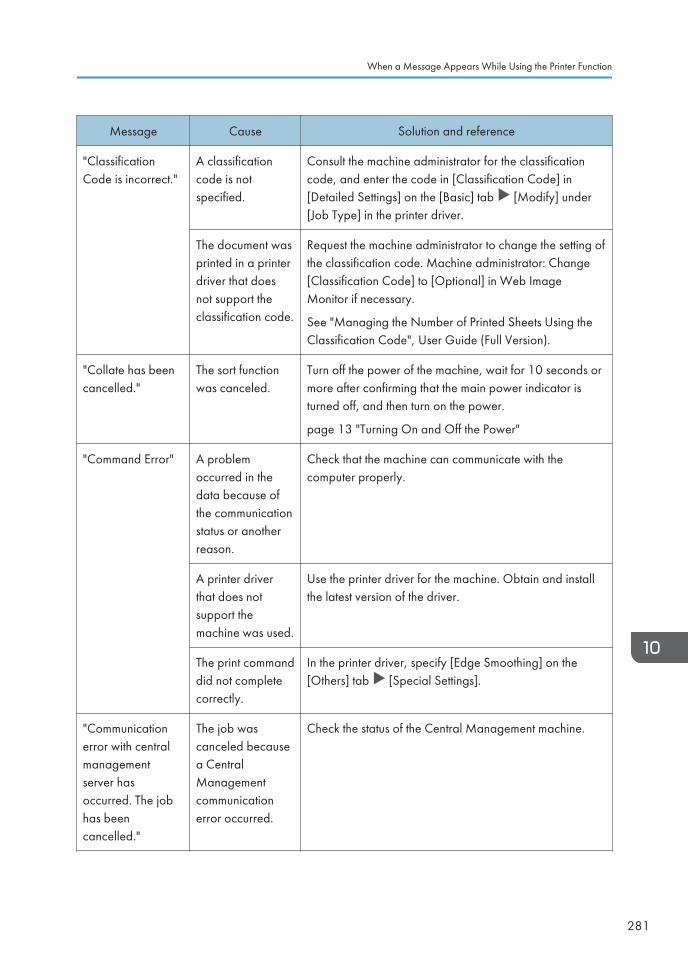
Message Cause Solution and reference
"ClassificationCode is incorrect."
A classificationcode is notspecified.
Consult the machine administrator for the classificationcode, and enter the code in [Classification Code] in[Detailed Settings] on the [Basic] tab [Modify] under[Job Type] in the printer driver.
The document wasprinted in a printerdriver that doesnot support theclassification code.
Request the machine administrator to change the setting ofthe classification code. Machine administrator: Change[Classification Code] to [Optional] in Web ImageMonitor if necessary.
See "Managing the Number of Printed Sheets Using theClassification Code", User Guide (Full Version).
"Collate has beencancelled."
The sort functionwas canceled.
Turn off the power of the machine, wait for 10 seconds ormore after confirming that the main power indicator isturned off, and then turn on the power.
page 13 "Turning On and Off the Power"
"Command Error" A problemoccurred in thedata because ofthe communicationstatus or anotherreason.
Check that the machine can communicate with thecomputer properly.
A printer driverthat does notsupport themachine was used.
Use the printer driver for the machine. Obtain and installthe latest version of the driver.
The print commanddid not completecorrectly.
In the printer driver, specify [Edge Smoothing] on the[Others] tab [Special Settings].
"Communicationerror with centralmanagementserver hasoccurred. The jobhas beencancelled."
The job wascanceled becausea CentralManagementcommunicationerror occurred.
Check the status of the Central Management machine.
When a Message Appears While Using the Printer Function
281
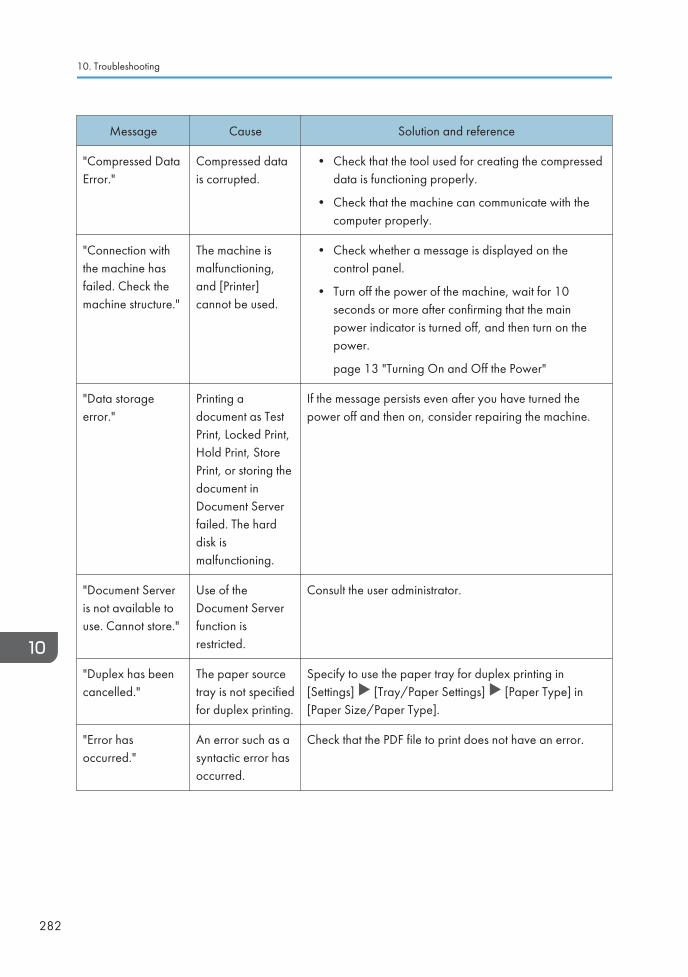
Message Cause Solution and reference
"Compressed DataError."
Compressed datais corrupted.
• Check that the tool used for creating the compresseddata is functioning properly.
• Check that the machine can communicate with thecomputer properly.
"Connection withthe machine hasfailed. Check themachine structure."
The machine ismalfunctioning,and [Printer]cannot be used.
• Check whether a message is displayed on thecontrol panel.
• Turn off the power of the machine, wait for 10seconds or more after confirming that the mainpower indicator is turned off, and then turn on thepower.
page 13 "Turning On and Off the Power"
"Data storageerror."
Printing adocument as TestPrint, Locked Print,Hold Print, StorePrint, or storing thedocument inDocument Serverfailed. The harddisk ismalfunctioning.
If the message persists even after you have turned thepower off and then on, consider repairing the machine.
"Document Serveris not available touse. Cannot store."
Use of theDocument Serverfunction isrestricted.
Consult the user administrator.
"Duplex has beencancelled."
The paper sourcetray is not specifiedfor duplex printing.
Specify to use the paper tray for duplex printing in[Settings] [Tray/Paper Settings] [Paper Type] in[Paper Size/Paper Type].
"Error hasoccurred."
An error such as asyntactic error hasoccurred.
Check that the PDF file to print does not have an error.
10. Troubleshooting
282
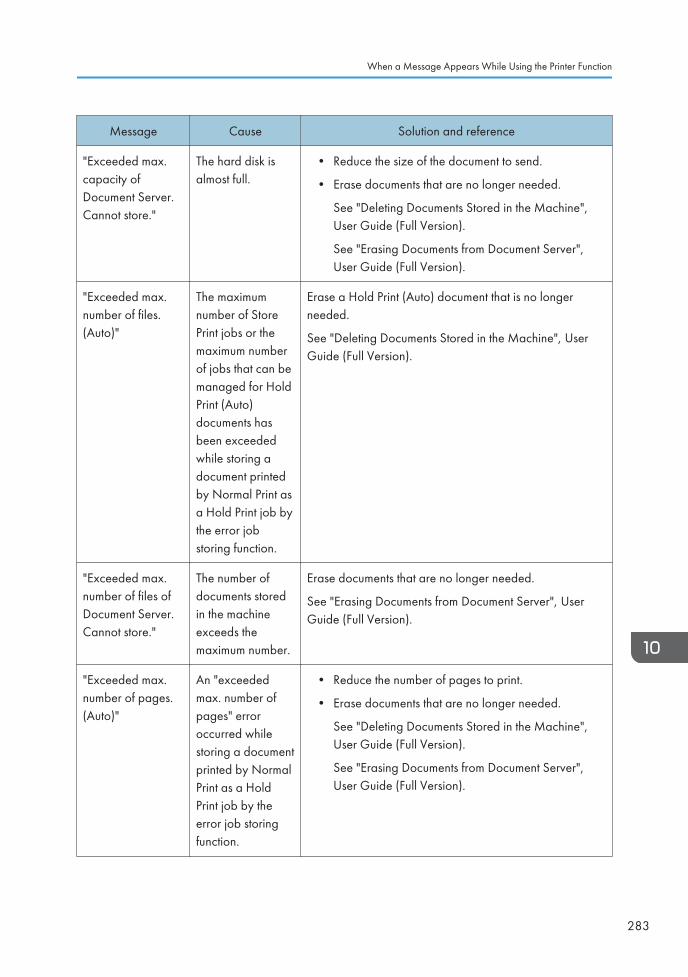
Message Cause Solution and reference
"Exceeded max.capacity ofDocument Server.Cannot store."
The hard disk isalmost full.
• Reduce the size of the document to send.
• Erase documents that are no longer needed.
See "Deleting Documents Stored in the Machine",User Guide (Full Version).
See "Erasing Documents from Document Server",User Guide (Full Version).
"Exceeded max.number of files.(Auto)"
The maximumnumber of StorePrint jobs or themaximum numberof jobs that can bemanaged for HoldPrint (Auto)documents hasbeen exceededwhile storing adocument printedby Normal Print asa Hold Print job bythe error jobstoring function.
Erase a Hold Print (Auto) document that is no longerneeded.
See "Deleting Documents Stored in the Machine", UserGuide (Full Version).
"Exceeded max.number of files ofDocument Server.Cannot store."
The number ofdocuments storedin the machineexceeds themaximum number.
Erase documents that are no longer needed.
See "Erasing Documents from Document Server", UserGuide (Full Version).
"Exceeded max.number of pages.(Auto)"
An "exceededmax. number ofpages" erroroccurred whilestoring a documentprinted by NormalPrint as a HoldPrint job by theerror job storingfunction.
• Reduce the number of pages to print.
• Erase documents that are no longer needed.
See "Deleting Documents Stored in the Machine",User Guide (Full Version).
See "Erasing Documents from Document Server",User Guide (Full Version).
When a Message Appears While Using the Printer Function
283
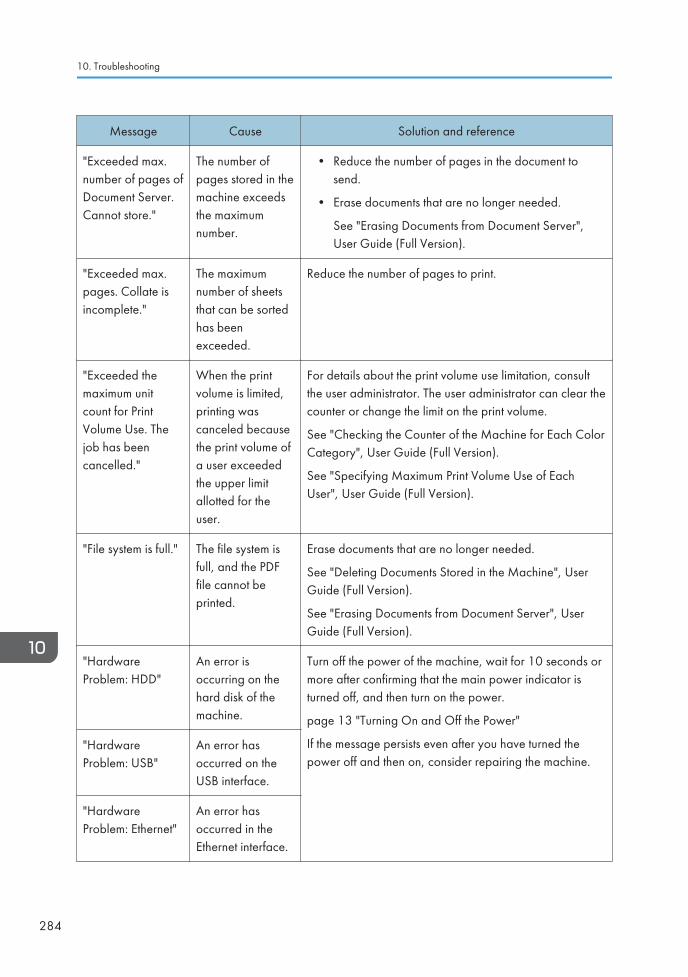
Message Cause Solution and reference
"Exceeded max.number of pages ofDocument Server.Cannot store."
The number ofpages stored in themachine exceedsthe maximumnumber.
• Reduce the number of pages in the document tosend.
• Erase documents that are no longer needed.
See "Erasing Documents from Document Server",User Guide (Full Version).
"Exceeded max.pages. Collate isincomplete."
The maximumnumber of sheetsthat can be sortedhas beenexceeded.
Reduce the number of pages to print.
"Exceeded themaximum unitcount for PrintVolume Use. Thejob has beencancelled."
When the printvolume is limited,printing wascanceled becausethe print volume ofa user exceededthe upper limitallotted for theuser.
For details about the print volume use limitation, consultthe user administrator. The user administrator can clear thecounter or change the limit on the print volume.
See "Checking the Counter of the Machine for Each ColorCategory", User Guide (Full Version).
See "Specifying Maximum Print Volume Use of EachUser", User Guide (Full Version).
"File system is full." The file system isfull, and the PDFfile cannot beprinted.
Erase documents that are no longer needed.
See "Deleting Documents Stored in the Machine", UserGuide (Full Version).
See "Erasing Documents from Document Server", UserGuide (Full Version).
"HardwareProblem: HDD"
An error isoccurring on thehard disk of themachine.
Turn off the power of the machine, wait for 10 seconds ormore after confirming that the main power indicator isturned off, and then turn on the power.
page 13 "Turning On and Off the Power"
If the message persists even after you have turned thepower off and then on, consider repairing the machine.
"HardwareProblem: USB"
An error hasoccurred on theUSB interface.
"HardwareProblem: Ethernet"
An error hasoccurred in theEthernet interface.
10. Troubleshooting
284
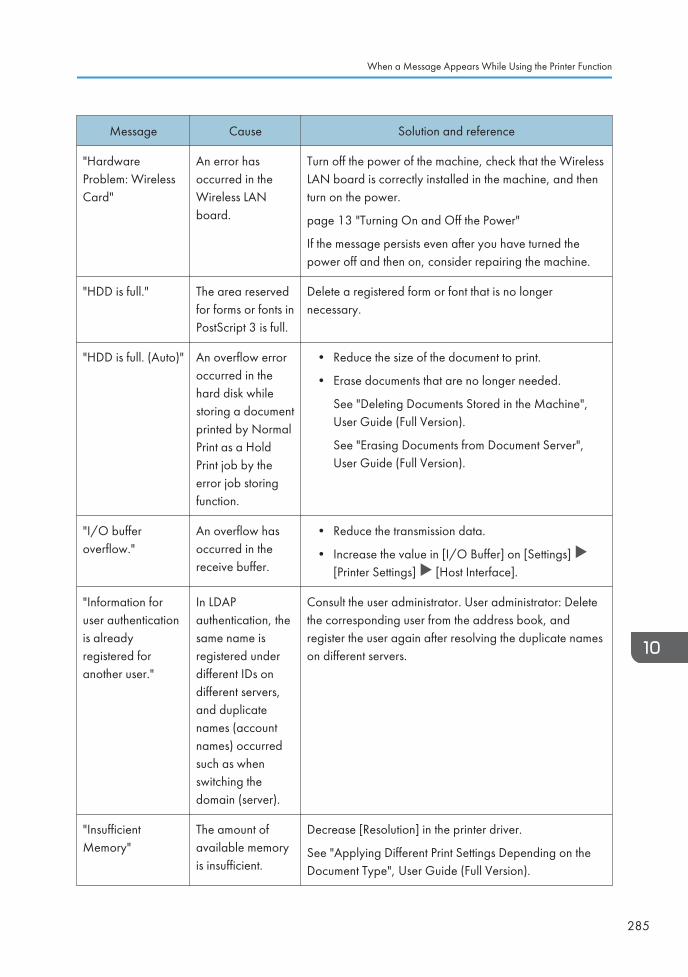
Message Cause Solution and reference
"HardwareProblem: WirelessCard"
An error hasoccurred in theWireless LANboard.
Turn off the power of the machine, check that the WirelessLAN board is correctly installed in the machine, and thenturn on the power.
page 13 "Turning On and Off the Power"
If the message persists even after you have turned thepower off and then on, consider repairing the machine.
"HDD is full." The area reservedfor forms or fonts inPostScript 3 is full.
Delete a registered form or font that is no longernecessary.
"HDD is full. (Auto)" An overflow erroroccurred in thehard disk whilestoring a documentprinted by NormalPrint as a HoldPrint job by theerror job storingfunction.
• Reduce the size of the document to print.
• Erase documents that are no longer needed.
See "Deleting Documents Stored in the Machine",User Guide (Full Version).
See "Erasing Documents from Document Server",User Guide (Full Version).
"I/O bufferoverflow."
An overflow hasoccurred in thereceive buffer.
• Reduce the transmission data.
• Increase the value in [I/O Buffer] on [Settings] [Printer Settings] [Host Interface].
"Information foruser authenticationis alreadyregistered foranother user."
In LDAPauthentication, thesame name isregistered underdifferent IDs ondifferent servers,and duplicatenames (accountnames) occurredsuch as whenswitching thedomain (server).
Consult the user administrator. User administrator: Deletethe corresponding user from the address book, andregister the user again after resolving the duplicate nameson different servers.
"InsufficientMemory"
The amount ofavailable memoryis insufficient.
Decrease [Resolution] in the printer driver.
See "Applying Different Print Settings Depending on theDocument Type", User Guide (Full Version).
When a Message Appears While Using the Printer Function
285
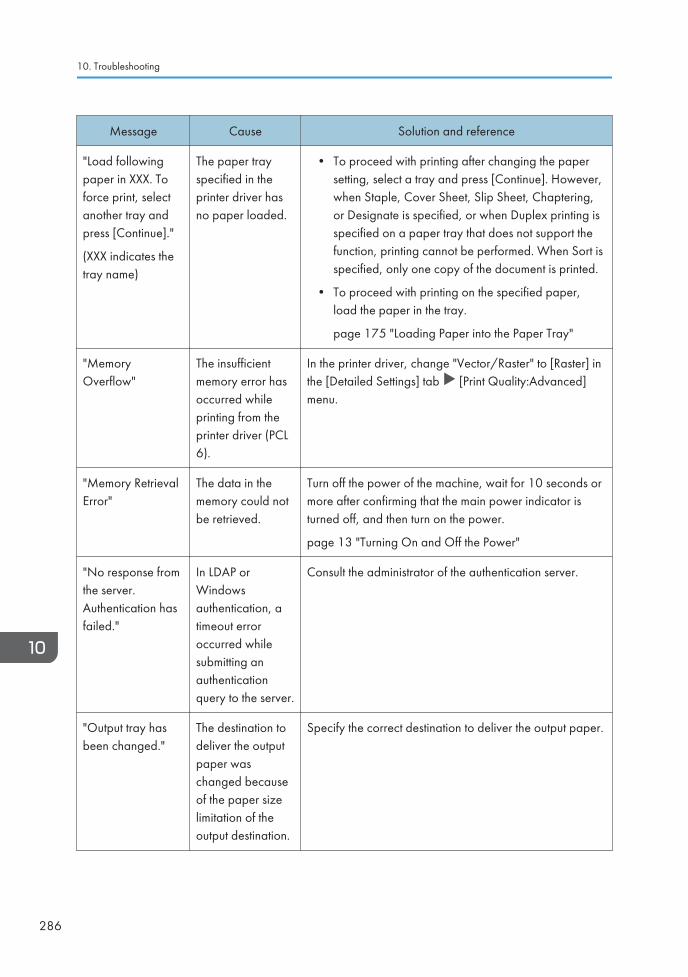
Message Cause Solution and reference
"Load followingpaper in XXX. Toforce print, selectanother tray andpress [Continue]."
(XXX indicates thetray name)
The paper trayspecified in theprinter driver hasno paper loaded.
• To proceed with printing after changing the papersetting, select a tray and press [Continue]. However,when Staple, Cover Sheet, Slip Sheet, Chaptering,or Designate is specified, or when Duplex printing isspecified on a paper tray that does not support thefunction, printing cannot be performed. When Sort isspecified, only one copy of the document is printed.
• To proceed with printing on the specified paper,load the paper in the tray.
page 175 "Loading Paper into the Paper Tray"
"MemoryOverflow"
The insufficientmemory error hasoccurred whileprinting from theprinter driver (PCL6).
In the printer driver, change "Vector/Raster" to [Raster] inthe [Detailed Settings] tab [Print Quality:Advanced]menu.
"Memory RetrievalError"
The data in thememory could notbe retrieved.
Turn off the power of the machine, wait for 10 seconds ormore after confirming that the main power indicator isturned off, and then turn on the power.
page 13 "Turning On and Off the Power"
"No response fromthe server.Authentication hasfailed."
In LDAP orWindowsauthentication, atimeout erroroccurred whilesubmitting anauthenticationquery to the server.
Consult the administrator of the authentication server.
"Output tray hasbeen changed."
The destination todeliver the outputpaper waschanged becauseof the paper sizelimitation of theoutput destination.
Specify the correct destination to deliver the output paper.
10. Troubleshooting
286
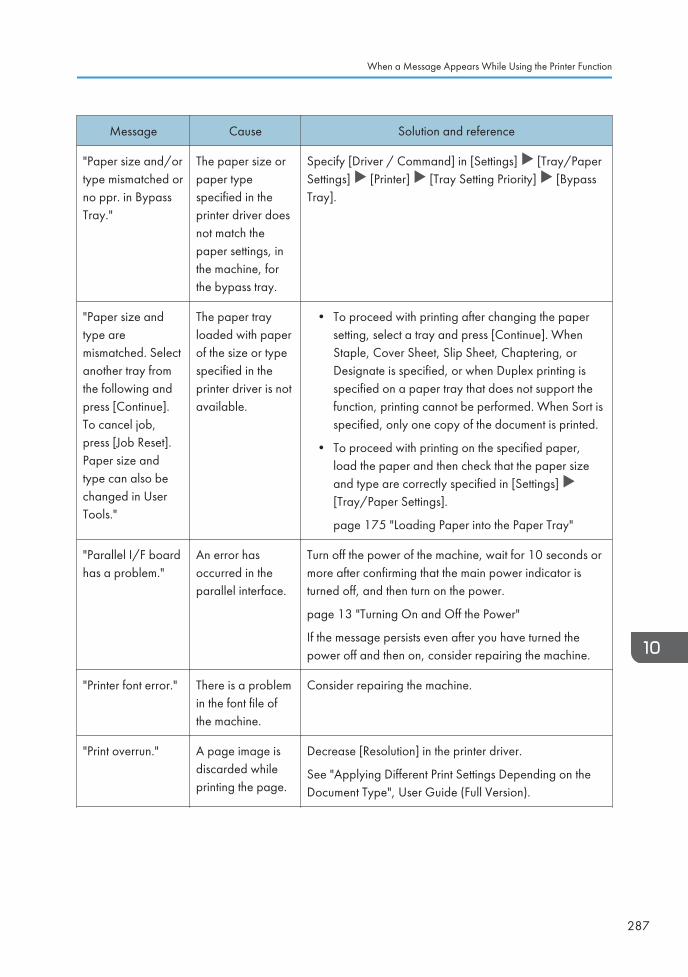
Message Cause Solution and reference
"Paper size and/ortype mismatched orno ppr. in BypassTray."
The paper size orpaper typespecified in theprinter driver doesnot match thepaper settings, inthe machine, forthe bypass tray.
Specify [Driver / Command] in [Settings] [Tray/PaperSettings] [Printer] [Tray Setting Priority] [BypassTray].
"Paper size andtype aremismatched. Selectanother tray fromthe following andpress [Continue].To cancel job,press [Job Reset].Paper size andtype can also bechanged in UserTools."
The paper trayloaded with paperof the size or typespecified in theprinter driver is notavailable.
• To proceed with printing after changing the papersetting, select a tray and press [Continue]. WhenStaple, Cover Sheet, Slip Sheet, Chaptering, orDesignate is specified, or when Duplex printing isspecified on a paper tray that does not support thefunction, printing cannot be performed. When Sort isspecified, only one copy of the document is printed.
• To proceed with printing on the specified paper,load the paper and then check that the paper sizeand type are correctly specified in [Settings] [Tray/Paper Settings].
page 175 "Loading Paper into the Paper Tray"
"Parallel I/F boardhas a problem."
An error hasoccurred in theparallel interface.
Turn off the power of the machine, wait for 10 seconds ormore after confirming that the main power indicator isturned off, and then turn on the power.
page 13 "Turning On and Off the Power"
If the message persists even after you have turned thepower off and then on, consider repairing the machine.
"Printer font error." There is a problemin the font file ofthe machine.
Consider repairing the machine.
"Print overrun." A page image isdiscarded whileprinting the page.
Decrease [Resolution] in the printer driver.
See "Applying Different Print Settings Depending on theDocument Type", User Guide (Full Version).
When a Message Appears While Using the Printer Function
287
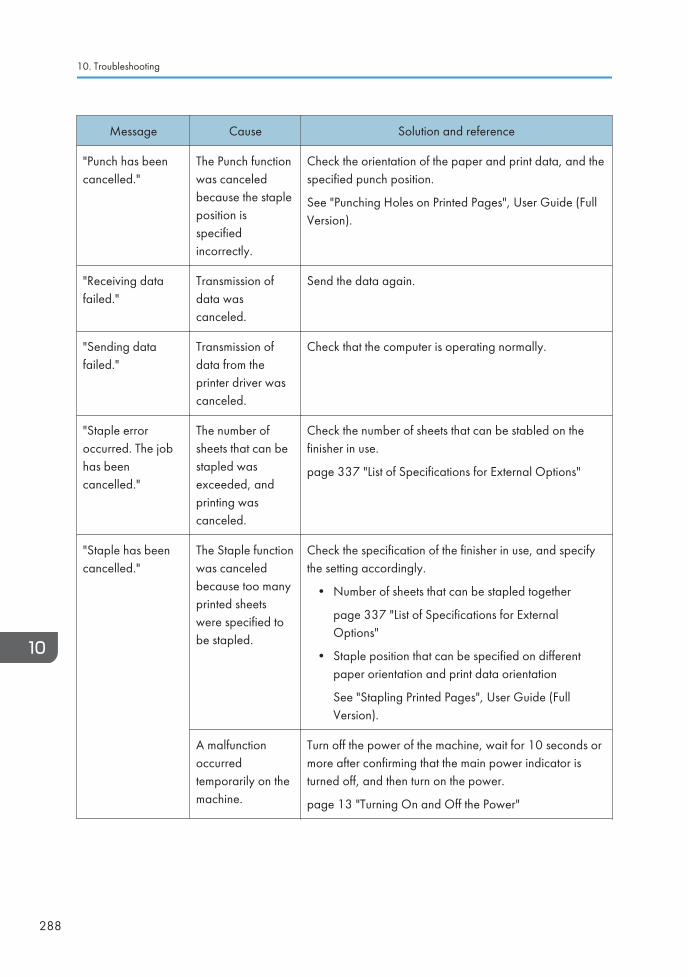
Message Cause Solution and reference
"Punch has beencancelled."
The Punch functionwas canceledbecause the stapleposition isspecifiedincorrectly.
Check the orientation of the paper and print data, and thespecified punch position.
See "Punching Holes on Printed Pages", User Guide (FullVersion).
"Receiving datafailed."
Transmission ofdata wascanceled.
Send the data again.
"Sending datafailed."
Transmission ofdata from theprinter driver wascanceled.
Check that the computer is operating normally.
"Staple erroroccurred. The jobhas beencancelled."
The number ofsheets that can bestapled wasexceeded, andprinting wascanceled.
Check the number of sheets that can be stabled on thefinisher in use.
page 337 "List of Specifications for External Options"
"Staple has beencancelled."
The Staple functionwas canceledbecause too manyprinted sheetswere specified tobe stapled.
Check the specification of the finisher in use, and specifythe setting accordingly.
• Number of sheets that can be stapled together
page 337 "List of Specifications for ExternalOptions"
• Staple position that can be specified on differentpaper orientation and print data orientation
See "Stapling Printed Pages", User Guide (FullVersion).
A malfunctionoccurredtemporarily on themachine.
Turn off the power of the machine, wait for 10 seconds ormore after confirming that the main power indicator isturned off, and then turn on the power.
page 13 "Turning On and Off the Power"
10. Troubleshooting
288
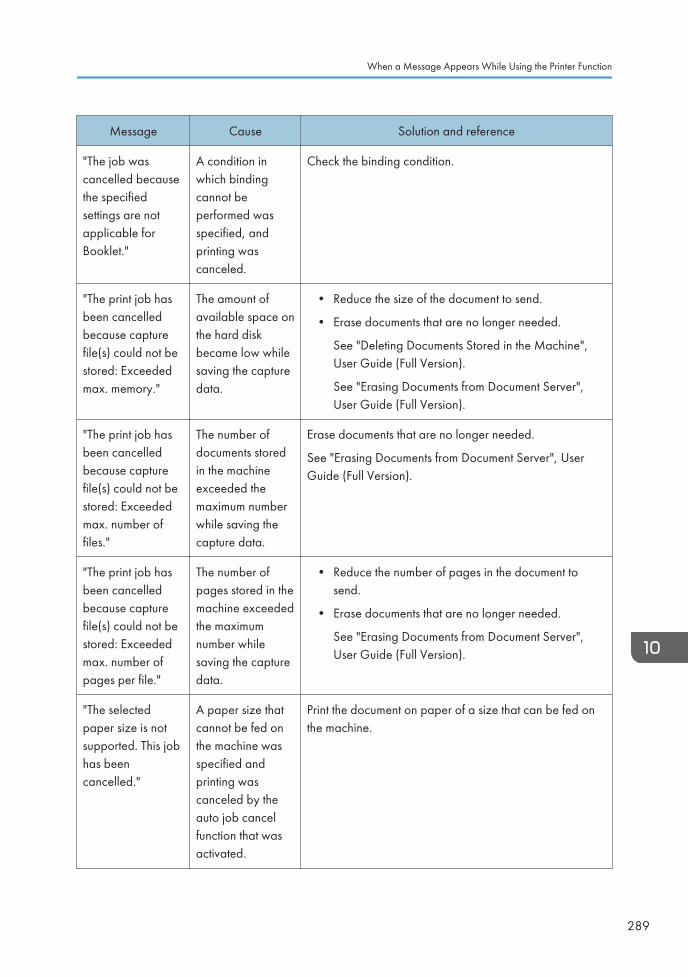
Message Cause Solution and reference
"The job wascancelled becausethe specifiedsettings are notapplicable forBooklet."
A condition inwhich bindingcannot beperformed wasspecified, andprinting wascanceled.
Check the binding condition.
"The print job hasbeen cancelledbecause capturefile(s) could not bestored: Exceededmax. memory."
The amount ofavailable space onthe hard diskbecame low whilesaving the capturedata.
• Reduce the size of the document to send.
• Erase documents that are no longer needed.
See "Deleting Documents Stored in the Machine",User Guide (Full Version).
See "Erasing Documents from Document Server",User Guide (Full Version).
"The print job hasbeen cancelledbecause capturefile(s) could not bestored: Exceededmax. number offiles."
The number ofdocuments storedin the machineexceeded themaximum numberwhile saving thecapture data.
Erase documents that are no longer needed.
See "Erasing Documents from Document Server", UserGuide (Full Version).
"The print job hasbeen cancelledbecause capturefile(s) could not bestored: Exceededmax. number ofpages per file."
The number ofpages stored in themachine exceededthe maximumnumber whilesaving the capturedata.
• Reduce the number of pages in the document tosend.
• Erase documents that are no longer needed.
See "Erasing Documents from Document Server",User Guide (Full Version).
"The selectedpaper size is notsupported. This jobhas beencancelled."
A paper size thatcannot be fed onthe machine wasspecified andprinting wascanceled by theauto job cancelfunction that wasactivated.
Print the document on paper of a size that can be fed onthe machine.
When a Message Appears While Using the Printer Function
289
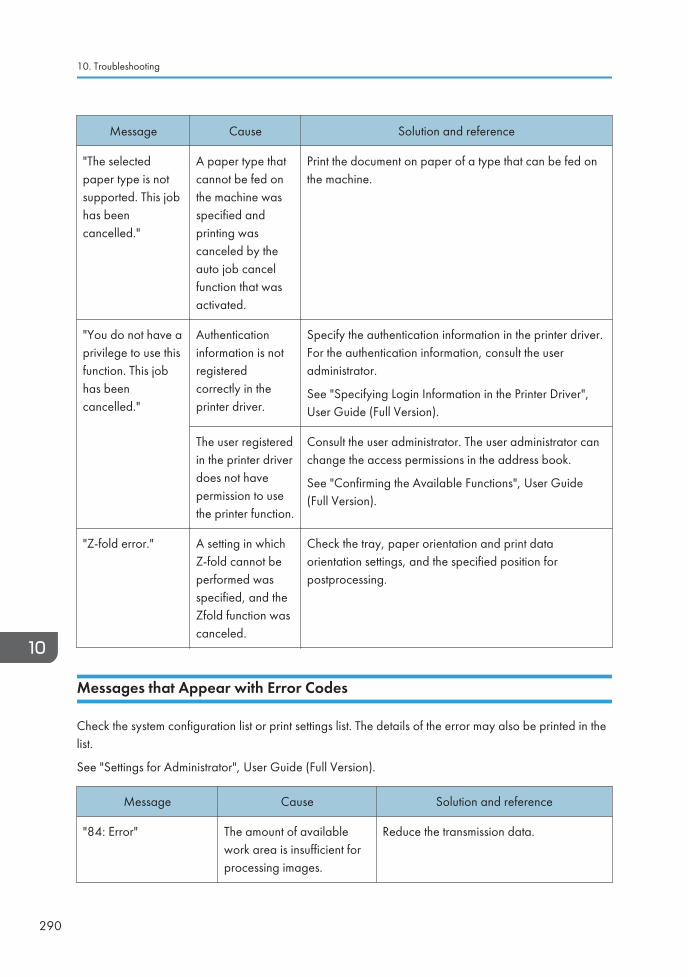
Message Cause Solution and reference
"The selectedpaper type is notsupported. This jobhas beencancelled."
A paper type thatcannot be fed onthe machine wasspecified andprinting wascanceled by theauto job cancelfunction that wasactivated.
Print the document on paper of a type that can be fed onthe machine.
"You do not have aprivilege to use thisfunction. This jobhas beencancelled."
Authenticationinformation is notregisteredcorrectly in theprinter driver.
Specify the authentication information in the printer driver.For the authentication information, consult the useradministrator.
See "Specifying Login Information in the Printer Driver",User Guide (Full Version).
The user registeredin the printer driverdoes not havepermission to usethe printer function.
Consult the user administrator. The user administrator canchange the access permissions in the address book.
See "Confirming the Available Functions", User Guide(Full Version).
"Z-fold error." A setting in whichZ-fold cannot beperformed wasspecified, and theZfold function wascanceled.
Check the tray, paper orientation and print dataorientation settings, and the specified position forpostprocessing.
Messages that Appear with Error Codes
Check the system configuration list or print settings list. The details of the error may also be printed in thelist.
See "Settings for Administrator", User Guide (Full Version).
Message Cause Solution and reference
"84: Error" The amount of availablework area is insufficient forprocessing images.
Reduce the transmission data.
10. Troubleshooting
290
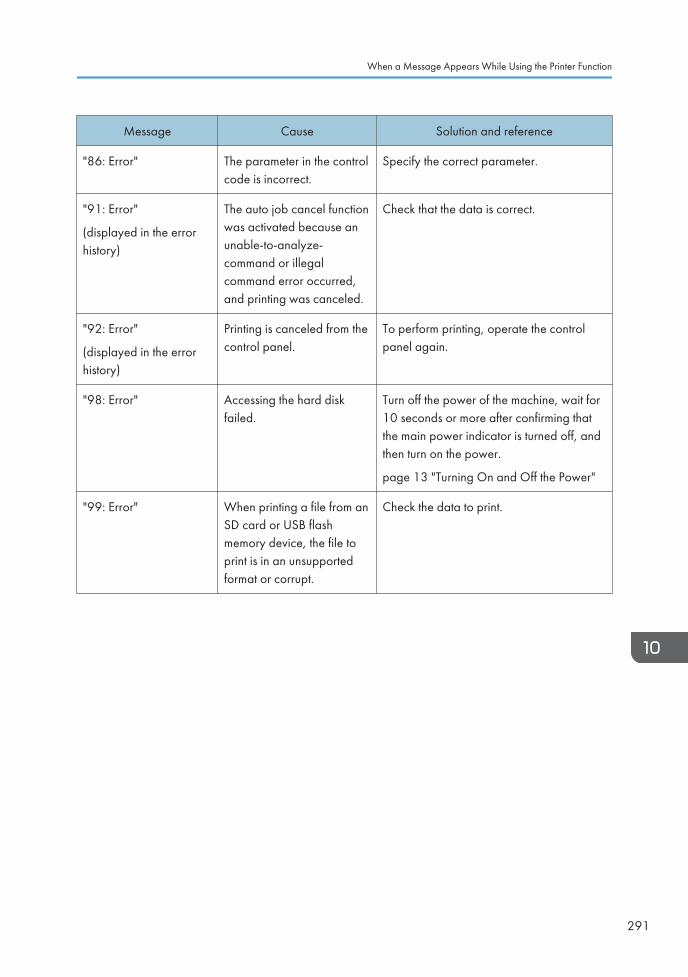
Message Cause Solution and reference
"86: Error" The parameter in the controlcode is incorrect.
Specify the correct parameter.
"91: Error"
(displayed in the errorhistory)
The auto job cancel functionwas activated because anunable-to-analyze-command or illegalcommand error occurred,and printing was canceled.
Check that the data is correct.
"92: Error"
(displayed in the errorhistory)
Printing is canceled from thecontrol panel.
To perform printing, operate the controlpanel again.
"98: Error" Accessing the hard diskfailed.
Turn off the power of the machine, wait for10 seconds or more after confirming thatthe main power indicator is turned off, andthen turn on the power.
page 13 "Turning On and Off the Power"
"99: Error" When printing a file from anSD card or USB flashmemory device, the file toprint is in an unsupportedformat or corrupt.
Check the data to print.
When a Message Appears While Using the Printer Function
291
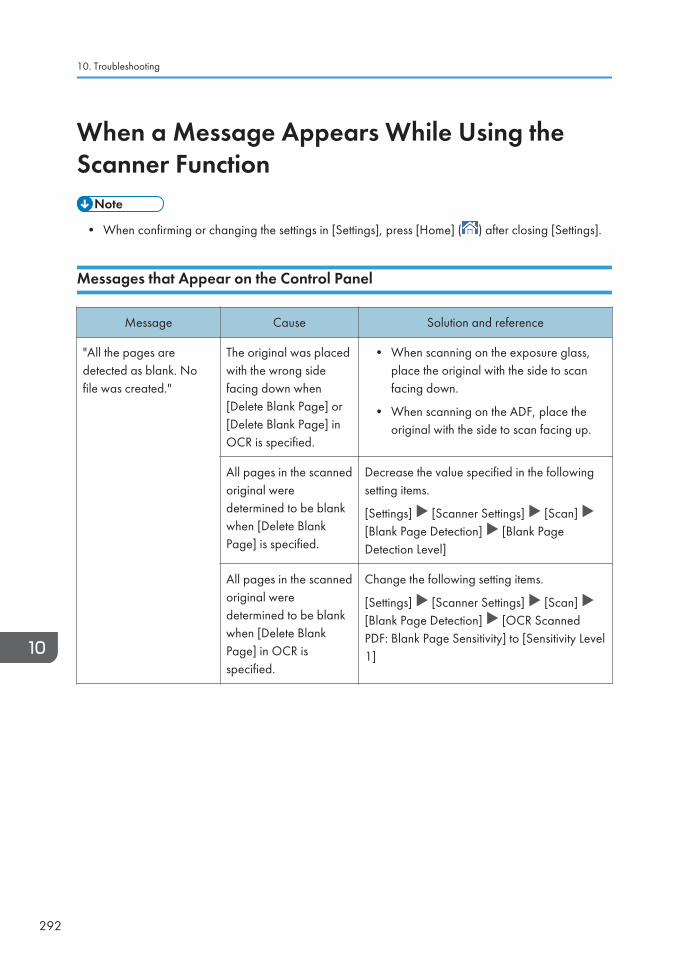
When a Message Appears While Using theScanner Function
• When confirming or changing the settings in [Settings], press [Home] ( ) after closing [Settings].
Messages that Appear on the Control Panel
Message Cause Solution and reference
"All the pages aredetected as blank. Nofile was created."
The original was placedwith the wrong sidefacing down when[Delete Blank Page] or[Delete Blank Page] inOCR is specified.
• When scanning on the exposure glass,place the original with the side to scanfacing down.
• When scanning on the ADF, place theoriginal with the side to scan facing up.
All pages in the scannedoriginal weredetermined to be blankwhen [Delete BlankPage] is specified.
Decrease the value specified in the followingsetting items.
[Settings] [Scanner Settings] [Scan] [Blank Page Detection] [Blank PageDetection Level]
All pages in the scannedoriginal weredetermined to be blankwhen [Delete BlankPage] in OCR isspecified.
Change the following setting items.
[Settings] [Scanner Settings] [Scan] [Blank Page Detection] [OCR ScannedPDF: Blank Page Sensitivity] to [Sensitivity Level1]
10. Troubleshooting
292
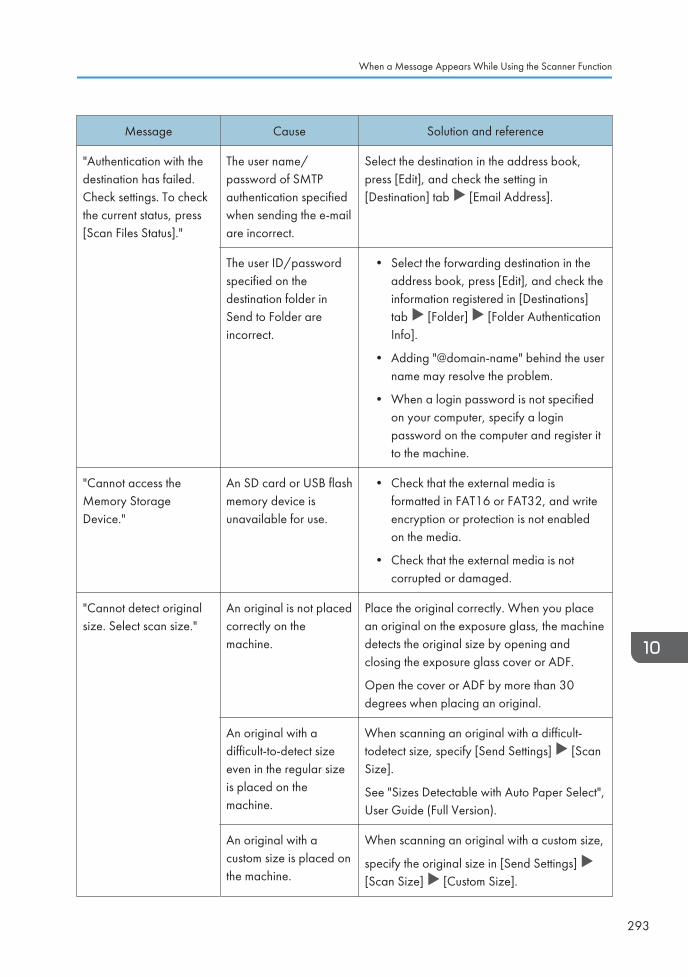
Message Cause Solution and reference
"Authentication with thedestination has failed.Check settings. To checkthe current status, press[Scan Files Status]."
The user name/password of SMTPauthentication specifiedwhen sending the e-mailare incorrect.
Select the destination in the address book,press [Edit], and check the setting in[Destination] tab [Email Address].
The user ID/passwordspecified on thedestination folder inSend to Folder areincorrect.
• Select the forwarding destination in theaddress book, press [Edit], and check theinformation registered in [Destinations]tab [Folder] [Folder AuthenticationInfo].
• Adding "@domain-name" behind the username may resolve the problem.
• When a login password is not specifiedon your computer, specify a loginpassword on the computer and register itto the machine.
"Cannot access theMemory StorageDevice."
An SD card or USB flashmemory device isunavailable for use.
• Check that the external media isformatted in FAT16 or FAT32, and writeencryption or protection is not enabledon the media.
• Check that the external media is notcorrupted or damaged.
"Cannot detect originalsize. Select scan size."
An original is not placedcorrectly on themachine.
Place the original correctly. When you placean original on the exposure glass, the machinedetects the original size by opening andclosing the exposure glass cover or ADF.
Open the cover or ADF by more than 30degrees when placing an original.
An original with adifficult-to-detect sizeeven in the regular sizeis placed on themachine.
When scanning an original with a difficult-todetect size, specify [Send Settings] [ScanSize].
See "Sizes Detectable with Auto Paper Select",User Guide (Full Version).
An original with acustom size is placed onthe machine.
When scanning an original with a custom size,
specify the original size in [Send Settings] [Scan Size] [Custom Size].
When a Message Appears While Using the Scanner Function
293
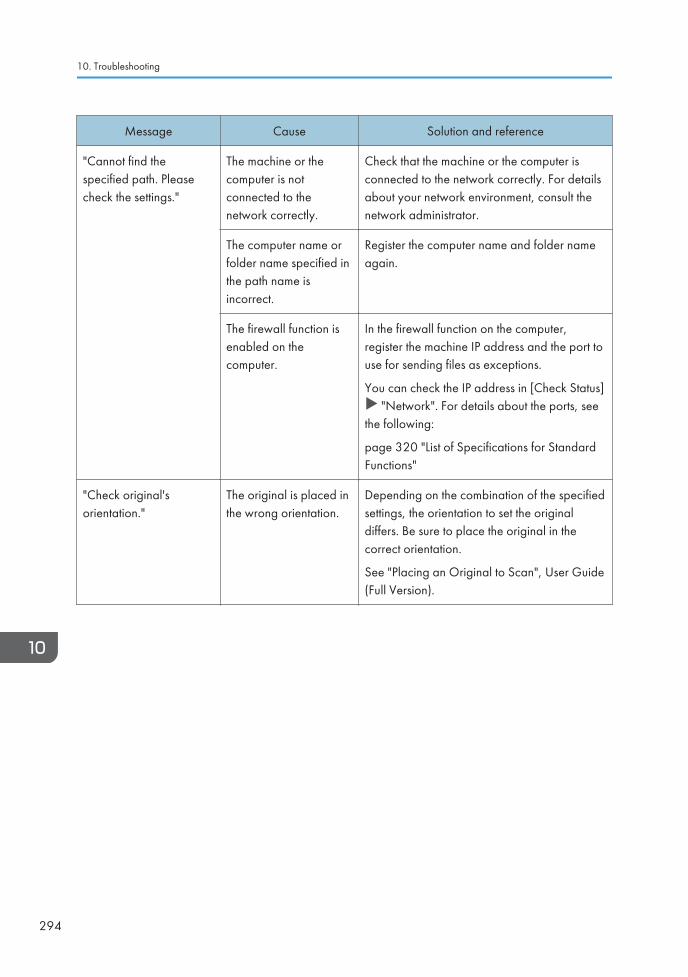
Message Cause Solution and reference
"Cannot find thespecified path. Pleasecheck the settings."
The machine or thecomputer is notconnected to thenetwork correctly.
Check that the machine or the computer isconnected to the network correctly. For detailsabout your network environment, consult thenetwork administrator.
The computer name orfolder name specified inthe path name isincorrect.
Register the computer name and folder nameagain.
The firewall function isenabled on thecomputer.
In the firewall function on the computer,register the machine IP address and the port touse for sending files as exceptions.
You can check the IP address in [Check Status] "Network". For details about the ports, see
the following:
page 320 "List of Specifications for StandardFunctions"
"Check original'sorientation."
The original is placed inthe wrong orientation.
Depending on the combination of the specifiedsettings, the orientation to set the originaldiffers. Be sure to place the original in thecorrect orientation.
See "Placing an Original to Scan", User Guide(Full Version).
10. Troubleshooting
294
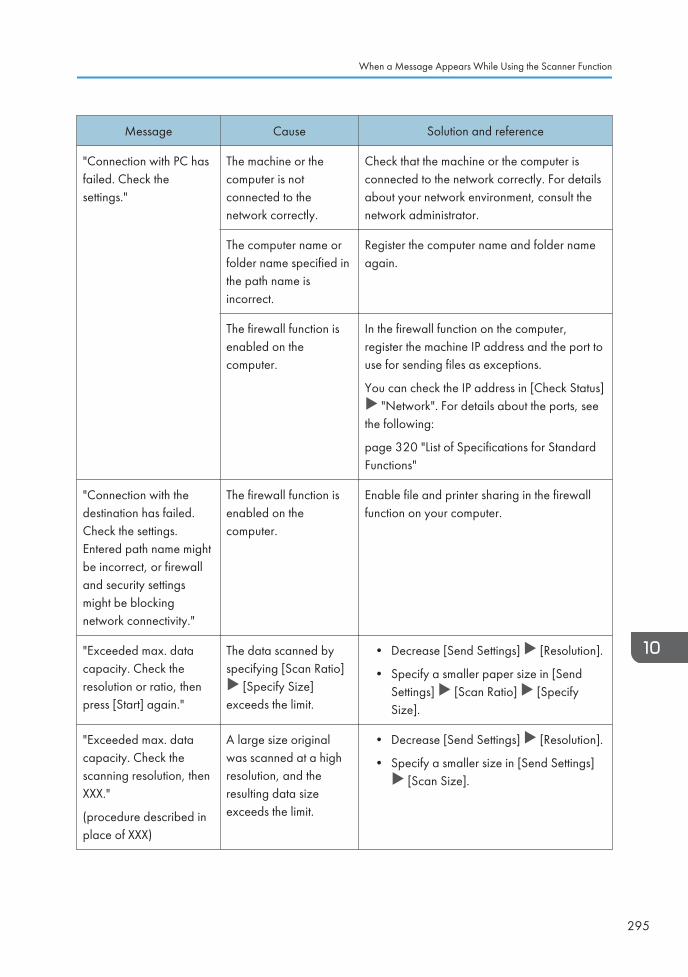
Message Cause Solution and reference
"Connection with PC hasfailed. Check thesettings."
The machine or thecomputer is notconnected to thenetwork correctly.
Check that the machine or the computer isconnected to the network correctly. For detailsabout your network environment, consult thenetwork administrator.
The computer name orfolder name specified inthe path name isincorrect.
Register the computer name and folder nameagain.
The firewall function isenabled on thecomputer.
In the firewall function on the computer,register the machine IP address and the port touse for sending files as exceptions.
You can check the IP address in [Check Status] "Network". For details about the ports, see
the following:
page 320 "List of Specifications for StandardFunctions"
"Connection with thedestination has failed.Check the settings.Entered path name mightbe incorrect, or firewalland security settingsmight be blockingnetwork connectivity."
The firewall function isenabled on thecomputer.
Enable file and printer sharing in the firewallfunction on your computer.
"Exceeded max. datacapacity. Check theresolution or ratio, thenpress [Start] again."
The data scanned byspecifying [Scan Ratio]
[Specify Size]exceeds the limit.
• Decrease [Send Settings] [Resolution].
• Specify a smaller paper size in [SendSettings] [Scan Ratio] [SpecifySize].
"Exceeded max. datacapacity. Check thescanning resolution, thenXXX."
(procedure described inplace of XXX)
A large size originalwas scanned at a highresolution, and theresulting data sizeexceeds the limit.
• Decrease [Send Settings] [Resolution].
• Specify a smaller size in [Send Settings] [Scan Size].
When a Message Appears While Using the Scanner Function
295
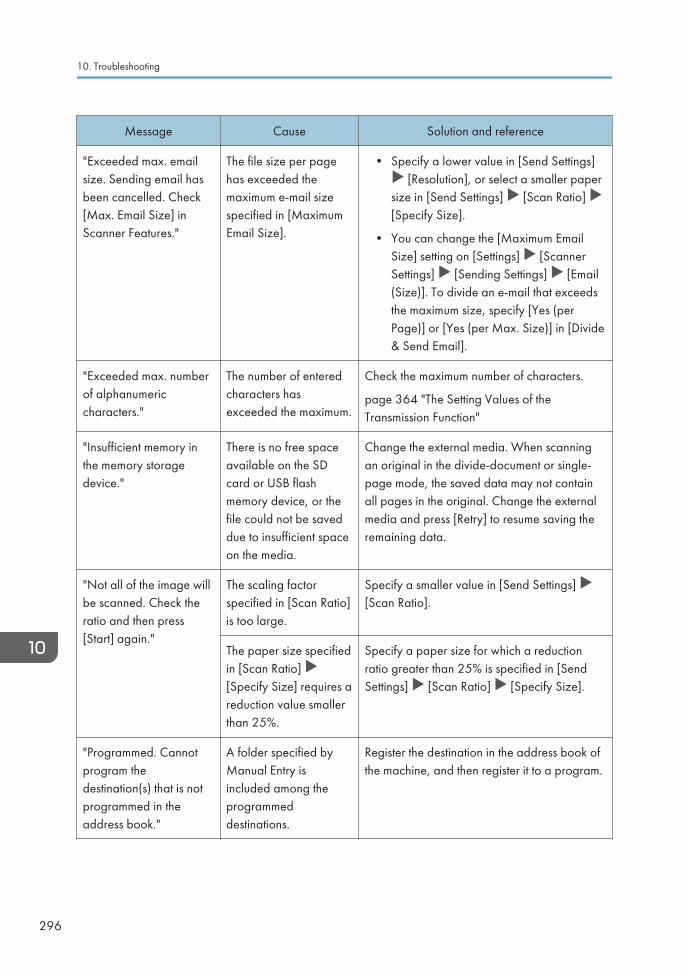
Message Cause Solution and reference
"Exceeded max. emailsize. Sending email hasbeen cancelled. Check[Max. Email Size] inScanner Features."
The file size per pagehas exceeded themaximum e-mail sizespecified in [MaximumEmail Size].
• Specify a lower value in [Send Settings] [Resolution], or select a smaller paper
size in [Send Settings] [Scan Ratio] [Specify Size].
• You can change the [Maximum EmailSize] setting on [Settings] [ScannerSettings] [Sending Settings] [Email(Size)]. To divide an e-mail that exceedsthe maximum size, specify [Yes (perPage)] or [Yes (per Max. Size)] in [Divide& Send Email].
"Exceeded max. numberof alphanumericcharacters."
The number of enteredcharacters hasexceeded the maximum.
Check the maximum number of characters.
page 364 "The Setting Values of theTransmission Function"
"Insufficient memory inthe memory storagedevice."
There is no free spaceavailable on the SDcard or USB flashmemory device, or thefile could not be saveddue to insufficient spaceon the media.
Change the external media. When scanningan original in the divide-document or single-page mode, the saved data may not containall pages in the original. Change the externalmedia and press [Retry] to resume saving theremaining data.
"Not all of the image willbe scanned. Check theratio and then press[Start] again."
The scaling factorspecified in [Scan Ratio]is too large.
Specify a smaller value in [Send Settings] [Scan Ratio].
The paper size specifiedin [Scan Ratio] [Specify Size] requires areduction value smallerthan 25%.
Specify a paper size for which a reductionratio greater than 25% is specified in [SendSettings] [Scan Ratio] [Specify Size].
"Programmed. Cannotprogram thedestination(s) that is notprogrammed in theaddress book."
A folder specified byManual Entry isincluded among theprogrammeddestinations.
Register the destination in the address book ofthe machine, and then register it to a program.
10. Troubleshooting
296
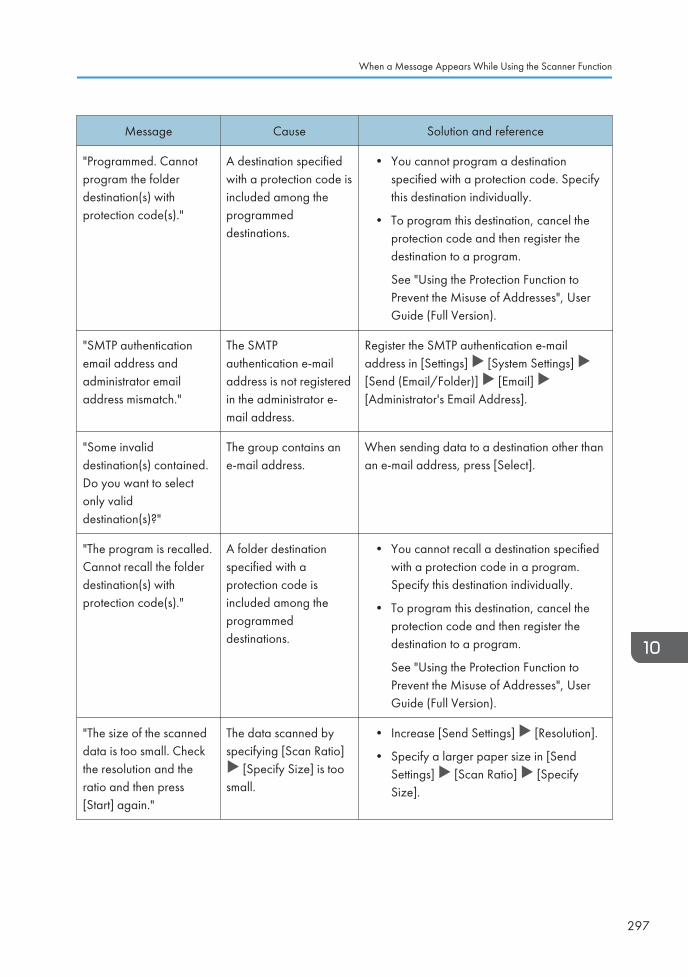
Message Cause Solution and reference
"Programmed. Cannotprogram the folderdestination(s) withprotection code(s)."
A destination specifiedwith a protection code isincluded among theprogrammeddestinations.
• You cannot program a destinationspecified with a protection code. Specifythis destination individually.
• To program this destination, cancel theprotection code and then register thedestination to a program.
See "Using the Protection Function toPrevent the Misuse of Addresses", UserGuide (Full Version).
"SMTP authenticationemail address andadministrator emailaddress mismatch."
The SMTPauthentication e-mailaddress is not registeredin the administrator e-mail address.
Register the SMTP authentication e-mailaddress in [Settings] [System Settings] [Send (Email/Folder)] [Email] [Administrator's Email Address].
"Some invaliddestination(s) contained.Do you want to selectonly validdestination(s)?"
The group contains ane-mail address.
When sending data to a destination other thanan e-mail address, press [Select].
"The program is recalled.Cannot recall the folderdestination(s) withprotection code(s)."
A folder destinationspecified with aprotection code isincluded among theprogrammeddestinations.
• You cannot recall a destination specifiedwith a protection code in a program.Specify this destination individually.
• To program this destination, cancel theprotection code and then register thedestination to a program.
See "Using the Protection Function toPrevent the Misuse of Addresses", UserGuide (Full Version).
"The size of the scanneddata is too small. Checkthe resolution and theratio and then press[Start] again."
The data scanned byspecifying [Scan Ratio]
[Specify Size] is toosmall.
• Increase [Send Settings] [Resolution].
• Specify a larger paper size in [SendSettings] [Scan Ratio] [SpecifySize].
When a Message Appears While Using the Scanner Function
297
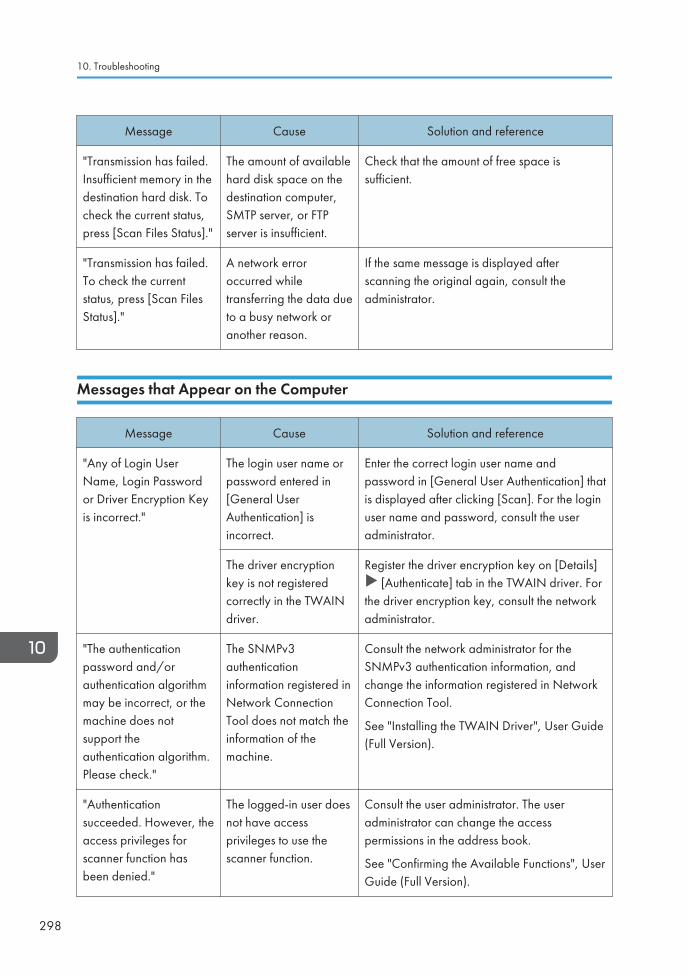
Message Cause Solution and reference
"Transmission has failed.Insufficient memory in thedestination hard disk. Tocheck the current status,press [Scan Files Status]."
The amount of availablehard disk space on thedestination computer,SMTP server, or FTPserver is insufficient.
Check that the amount of free space issufficient.
"Transmission has failed.To check the currentstatus, press [Scan FilesStatus]."
A network erroroccurred whiletransferring the data dueto a busy network oranother reason.
If the same message is displayed afterscanning the original again, consult theadministrator.
Messages that Appear on the Computer
Message Cause Solution and reference
"Any of Login UserName, Login Passwordor Driver Encryption Keyis incorrect."
The login user name orpassword entered in[General UserAuthentication] isincorrect.
Enter the correct login user name andpassword in [General User Authentication] thatis displayed after clicking [Scan]. For the loginuser name and password, consult the useradministrator.
The driver encryptionkey is not registeredcorrectly in the TWAINdriver.
Register the driver encryption key on [Details] [Authenticate] tab in the TWAIN driver. For
the driver encryption key, consult the networkadministrator.
"The authenticationpassword and/orauthentication algorithmmay be incorrect, or themachine does notsupport theauthentication algorithm.Please check."
The SNMPv3authenticationinformation registered inNetwork ConnectionTool does not match theinformation of themachine.
Consult the network administrator for theSNMPv3 authentication information, andchange the information registered in NetworkConnection Tool.
See "Installing the TWAIN Driver", User Guide(Full Version).
"Authenticationsucceeded. However, theaccess privileges forscanner function hasbeen denied."
The logged-in user doesnot have accessprivileges to use thescanner function.
Consult the user administrator. The useradministrator can change the accesspermissions in the address book.
See "Confirming the Available Functions", UserGuide (Full Version).
10. Troubleshooting
298
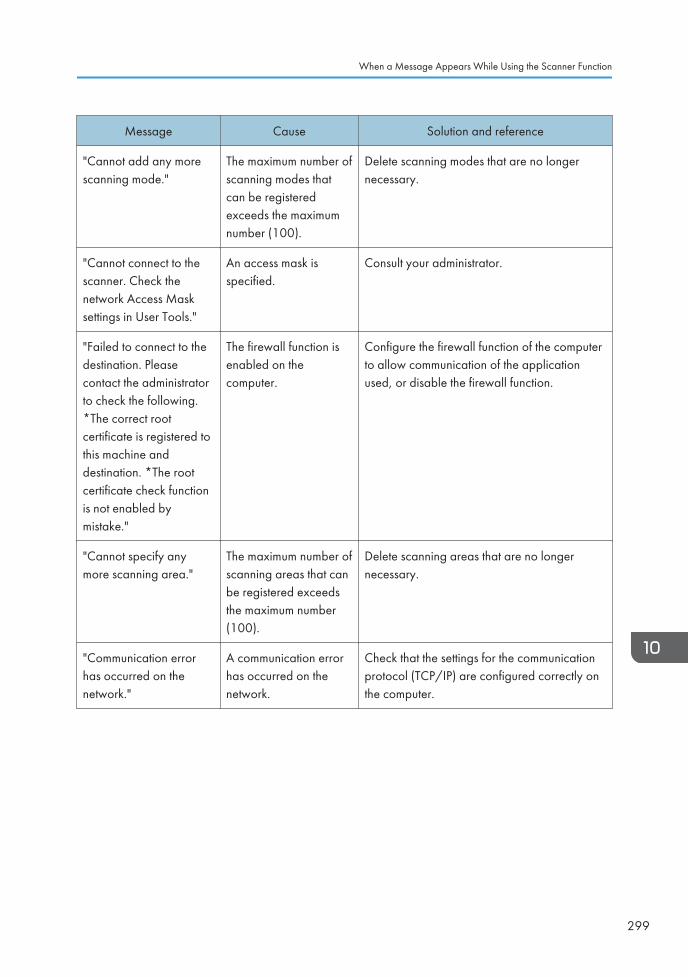
Message Cause Solution and reference
"Cannot add any morescanning mode."
The maximum number ofscanning modes thatcan be registeredexceeds the maximumnumber (100).
Delete scanning modes that are no longernecessary.
"Cannot connect to thescanner. Check thenetwork Access Masksettings in User Tools."
An access mask isspecified.
Consult your administrator.
"Failed to connect to thedestination. Pleasecontact the administratorto check the following.*The correct rootcertificate is registered tothis machine anddestination. *The rootcertificate check functionis not enabled bymistake."
The firewall function isenabled on thecomputer.
Configure the firewall function of the computerto allow communication of the applicationused, or disable the firewall function.
"Cannot specify anymore scanning area."
The maximum number ofscanning areas that canbe registered exceedsthe maximum number(100).
Delete scanning areas that are no longernecessary.
"Communication errorhas occurred on thenetwork."
A communication errorhas occurred on thenetwork.
Check that the settings for the communicationprotocol (TCP/IP) are configured correctly onthe computer.
When a Message Appears While Using the Scanner Function
299
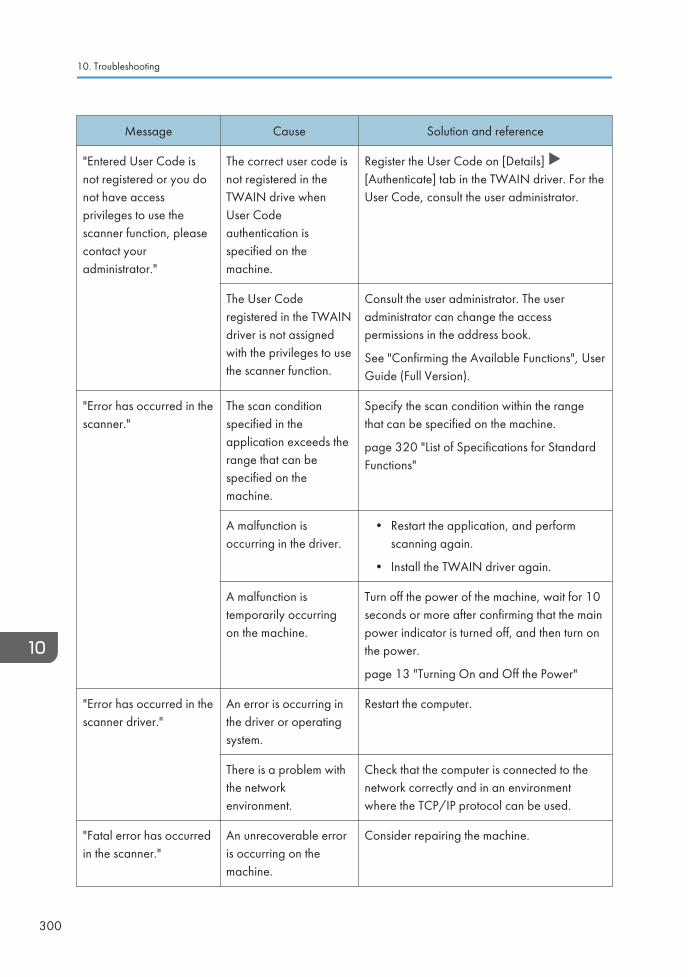
Message Cause Solution and reference
"Entered User Code isnot registered or you donot have accessprivileges to use thescanner function, pleasecontact youradministrator."
The correct user code isnot registered in theTWAIN drive whenUser Codeauthentication isspecified on themachine.
Register the User Code on [Details] [Authenticate] tab in the TWAIN driver. For theUser Code, consult the user administrator.
The User Coderegistered in the TWAINdriver is not assignedwith the privileges to usethe scanner function.
Consult the user administrator. The useradministrator can change the accesspermissions in the address book.
See "Confirming the Available Functions", UserGuide (Full Version).
"Error has occurred in thescanner."
The scan conditionspecified in theapplication exceeds therange that can bespecified on themachine.
Specify the scan condition within the rangethat can be specified on the machine.
page 320 "List of Specifications for StandardFunctions"
A malfunction isoccurring in the driver.
• Restart the application, and performscanning again.
• Install the TWAIN driver again.
A malfunction istemporarily occurringon the machine.
Turn off the power of the machine, wait for 10seconds or more after confirming that the mainpower indicator is turned off, and then turn onthe power.
page 13 "Turning On and Off the Power"
"Error has occurred in thescanner driver."
An error is occurring inthe driver or operatingsystem.
Restart the computer.
There is a problem withthe networkenvironment.
Check that the computer is connected to thenetwork correctly and in an environmentwhere the TCP/IP protocol can be used.
"Fatal error has occurredin the scanner."
An unrecoverable erroris occurring on themachine.
Consider repairing the machine.
10. Troubleshooting
300
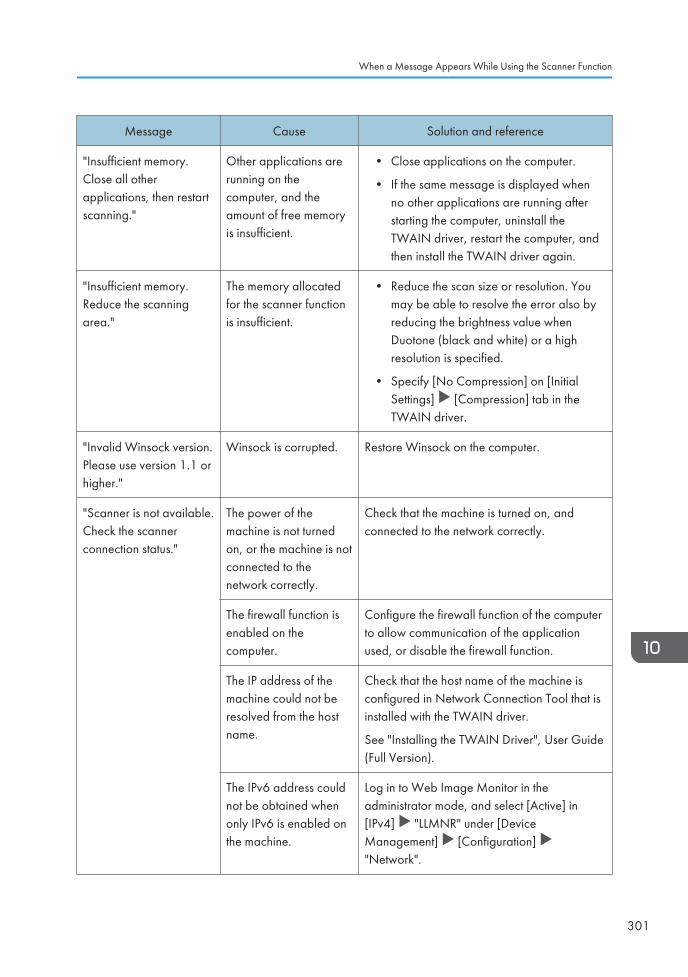
Message Cause Solution and reference
"Insufficient memory.Close all otherapplications, then restartscanning."
Other applications arerunning on thecomputer, and theamount of free memoryis insufficient.
• Close applications on the computer.
• If the same message is displayed whenno other applications are running afterstarting the computer, uninstall theTWAIN driver, restart the computer, andthen install the TWAIN driver again.
"Insufficient memory.Reduce the scanningarea."
The memory allocatedfor the scanner functionis insufficient.
• Reduce the scan size or resolution. Youmay be able to resolve the error also byreducing the brightness value whenDuotone (black and white) or a highresolution is specified.
• Specify [No Compression] on [InitialSettings] [Compression] tab in theTWAIN driver.
"Invalid Winsock version.Please use version 1.1 orhigher."
Winsock is corrupted. Restore Winsock on the computer.
"Scanner is not available.Check the scannerconnection status."
The power of themachine is not turnedon, or the machine is notconnected to thenetwork correctly.
Check that the machine is turned on, andconnected to the network correctly.
The firewall function isenabled on thecomputer.
Configure the firewall function of the computerto allow communication of the applicationused, or disable the firewall function.
The IP address of themachine could not beresolved from the hostname.
Check that the host name of the machine isconfigured in Network Connection Tool that isinstalled with the TWAIN driver.
See "Installing the TWAIN Driver", User Guide(Full Version).
The IPv6 address couldnot be obtained whenonly IPv6 is enabled onthe machine.
Log in to Web Image Monitor in theadministrator mode, and select [Active] in[IPv4] "LLMNR" under [DeviceManagement] [Configuration] "Network".
When a Message Appears While Using the Scanner Function
301
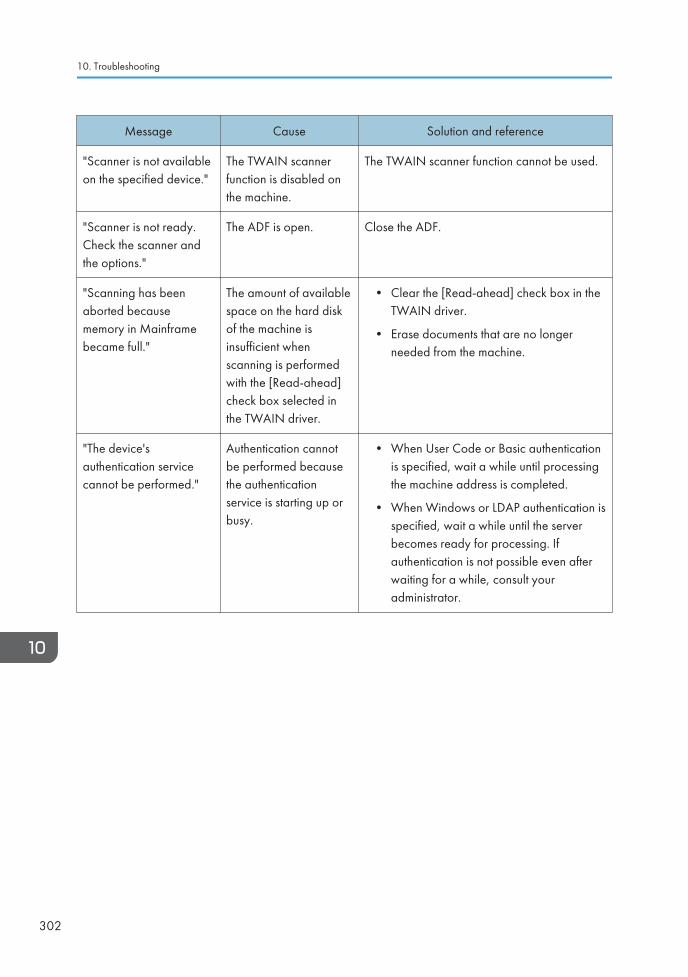
Message Cause Solution and reference
"Scanner is not availableon the specified device."
The TWAIN scannerfunction is disabled onthe machine.
The TWAIN scanner function cannot be used.
"Scanner is not ready.Check the scanner andthe options."
The ADF is open. Close the ADF.
"Scanning has beenaborted becausememory in Mainframebecame full."
The amount of availablespace on the hard diskof the machine isinsufficient whenscanning is performedwith the [Read-ahead]check box selected inthe TWAIN driver.
• Clear the [Read-ahead] check box in theTWAIN driver.
• Erase documents that are no longerneeded from the machine.
"The device'sauthentication servicecannot be performed."
Authentication cannotbe performed becausethe authenticationservice is starting up orbusy.
• When User Code or Basic authenticationis specified, wait a while until processingthe machine address is completed.
• When Windows or LDAP authentication isspecified, wait a while until the serverbecomes ready for processing. Ifauthentication is not possible even afterwaiting for a while, consult youradministrator.
10. Troubleshooting
302
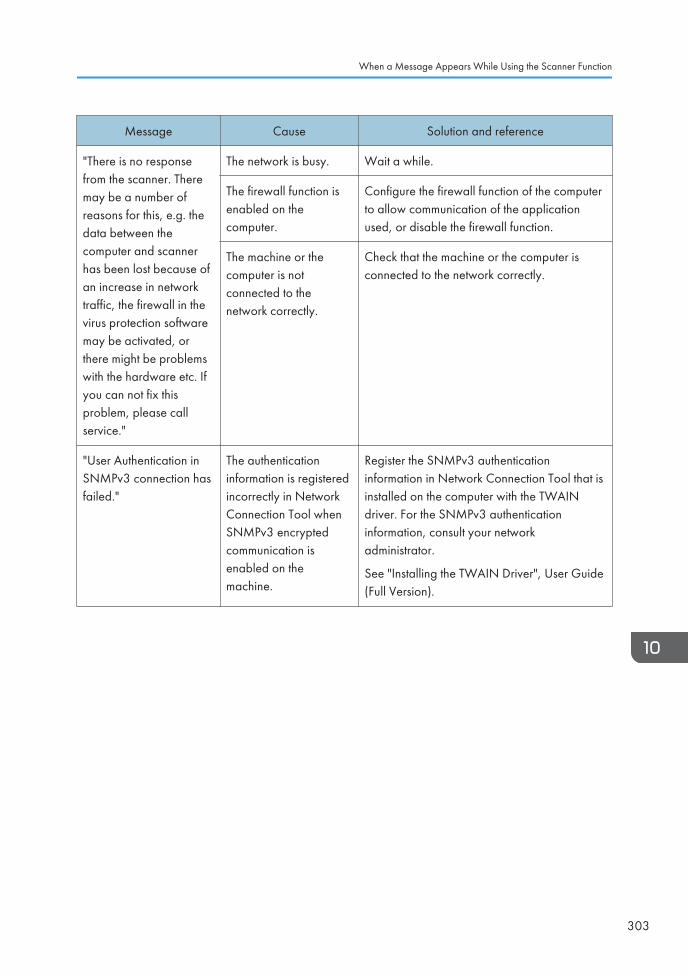
Message Cause Solution and reference
"There is no responsefrom the scanner. Theremay be a number ofreasons for this, e.g. thedata between thecomputer and scannerhas been lost because ofan increase in networktraffic, the firewall in thevirus protection softwaremay be activated, orthere might be problemswith the hardware etc. Ifyou can not fix thisproblem, please callservice."
The network is busy. Wait a while.
The firewall function isenabled on thecomputer.
Configure the firewall function of the computerto allow communication of the applicationused, or disable the firewall function.
The machine or thecomputer is notconnected to thenetwork correctly.
Check that the machine or the computer isconnected to the network correctly.
"User Authentication inSNMPv3 connection hasfailed."
The authenticationinformation is registeredincorrectly in NetworkConnection Tool whenSNMPv3 encryptedcommunication isenabled on themachine.
Register the SNMPv3 authenticationinformation in Network Connection Tool that isinstalled on the computer with the TWAINdriver. For the SNMPv3 authenticationinformation, consult your networkadministrator.
See "Installing the TWAIN Driver", User Guide(Full Version).
When a Message Appears While Using the Scanner Function
303
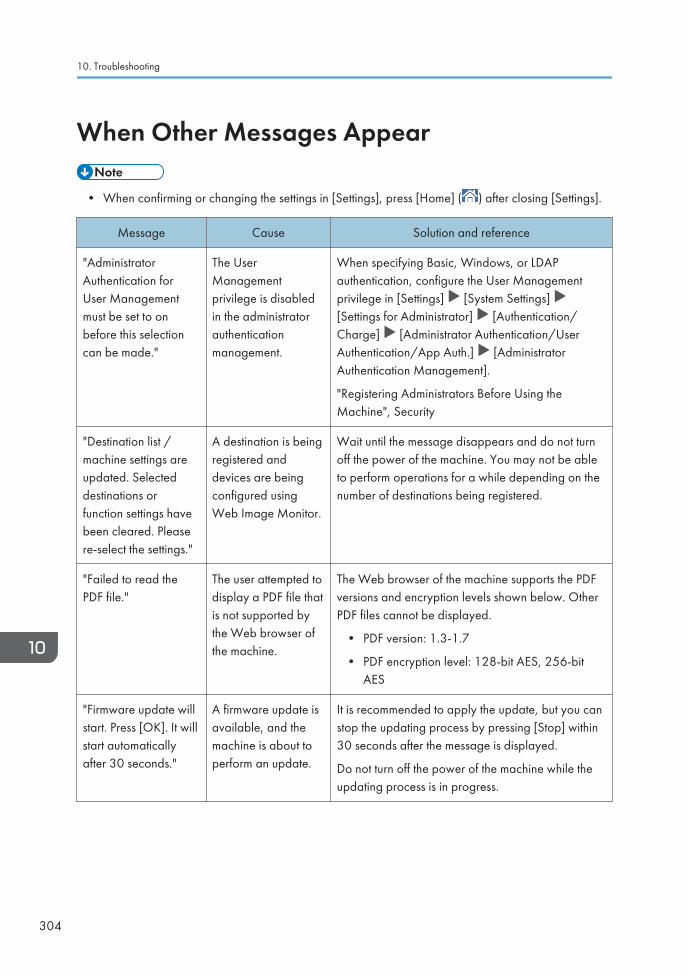
When Other Messages Appear
• When confirming or changing the settings in [Settings], press [Home] ( ) after closing [Settings].
Message Cause Solution and reference
"AdministratorAuthentication forUser Managementmust be set to onbefore this selectioncan be made."
The UserManagementprivilege is disabledin the administratorauthenticationmanagement.
When specifying Basic, Windows, or LDAPauthentication, configure the User Managementprivilege in [Settings] [System Settings] [Settings for Administrator] [Authentication/Charge] [Administrator Authentication/UserAuthentication/App Auth.] [AdministratorAuthentication Management].
"Registering Administrators Before Using theMachine", Security
"Destination list /machine settings areupdated. Selecteddestinations orfunction settings havebeen cleared. Pleasere-select the settings."
A destination is beingregistered anddevices are beingconfigured usingWeb Image Monitor.
Wait until the message disappears and do not turnoff the power of the machine. You may not be ableto perform operations for a while depending on thenumber of destinations being registered.
"Failed to read thePDF file."
The user attempted todisplay a PDF file thatis not supported bythe Web browser ofthe machine.
The Web browser of the machine supports the PDFversions and encryption levels shown below. OtherPDF files cannot be displayed.
• PDF version: 1.3-1.7
• PDF encryption level: 128-bit AES, 256-bitAES
"Firmware update willstart. Press [OK]. It willstart automaticallyafter 30 seconds."
A firmware update isavailable, and themachine is about toperform an update.
It is recommended to apply the update, but you canstop the updating process by pressing [Stop] within30 seconds after the message is displayed.
Do not turn off the power of the machine while theupdating process is in progress.
10. Troubleshooting
304
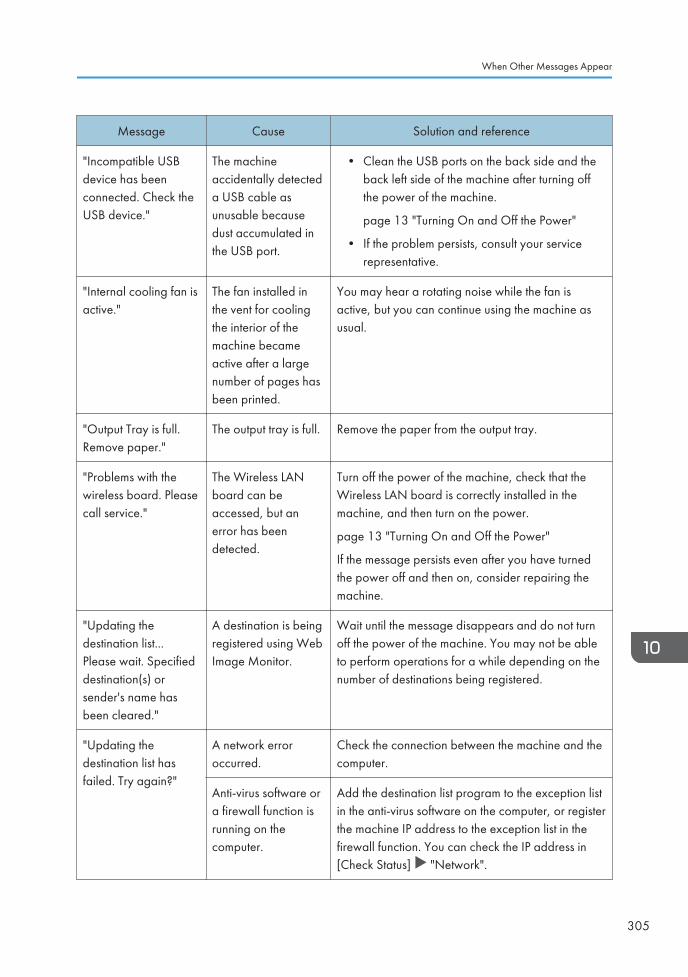
Message Cause Solution and reference
"Incompatible USBdevice has beenconnected. Check theUSB device."
The machineaccidentally detecteda USB cable asunusable becausedust accumulated inthe USB port.
• Clean the USB ports on the back side and theback left side of the machine after turning offthe power of the machine.
page 13 "Turning On and Off the Power"
• If the problem persists, consult your servicerepresentative.
"Internal cooling fan isactive."
The fan installed inthe vent for coolingthe interior of themachine becameactive after a largenumber of pages hasbeen printed.
You may hear a rotating noise while the fan isactive, but you can continue using the machine asusual.
"Output Tray is full.Remove paper."
The output tray is full. Remove the paper from the output tray.
"Problems with thewireless board. Pleasecall service."
The Wireless LANboard can beaccessed, but anerror has beendetected.
Turn off the power of the machine, check that theWireless LAN board is correctly installed in themachine, and then turn on the power.
page 13 "Turning On and Off the Power"
If the message persists even after you have turnedthe power off and then on, consider repairing themachine.
"Updating thedestination list...Please wait. Specifieddestination(s) orsender's name hasbeen cleared."
A destination is beingregistered using WebImage Monitor.
Wait until the message disappears and do not turnoff the power of the machine. You may not be ableto perform operations for a while depending on thenumber of destinations being registered.
"Updating thedestination list hasfailed. Try again?"
A network erroroccurred.
Check the connection between the machine and thecomputer.
Anti-virus software ora firewall function isrunning on thecomputer.
Add the destination list program to the exception listin the anti-virus software on the computer, or registerthe machine IP address to the exception list in thefirewall function. You can check the IP address in[Check Status] "Network".
When Other Messages Appear
305
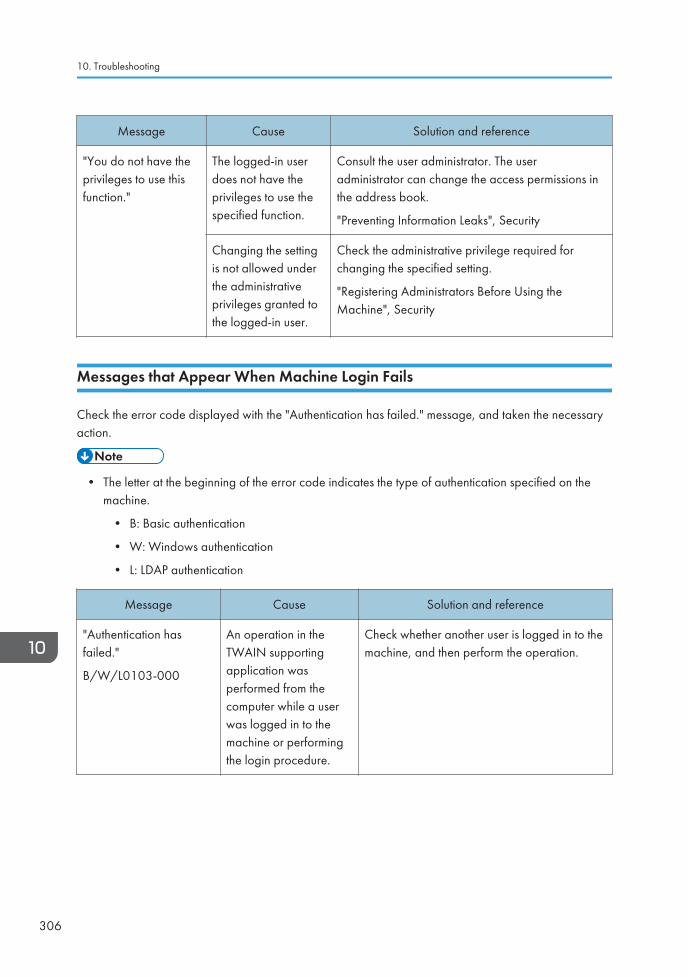
Message Cause Solution and reference
"You do not have theprivileges to use thisfunction."
The logged-in userdoes not have theprivileges to use thespecified function.
Consult the user administrator. The useradministrator can change the access permissions inthe address book.
"Preventing Information Leaks", Security
Changing the settingis not allowed underthe administrativeprivileges granted tothe logged-in user.
Check the administrative privilege required forchanging the specified setting.
"Registering Administrators Before Using theMachine", Security
Messages that Appear When Machine Login Fails
Check the error code displayed with the "Authentication has failed." message, and taken the necessaryaction.
• The letter at the beginning of the error code indicates the type of authentication specified on themachine.
• B: Basic authentication
• W: Windows authentication
• L: LDAP authentication
Message Cause Solution and reference
"Authentication hasfailed."
B/W/L0103-000
An operation in theTWAIN supportingapplication wasperformed from thecomputer while a userwas logged in to themachine or performingthe login procedure.
Check whether another user is logged in to themachine, and then perform the operation.
10. Troubleshooting
306
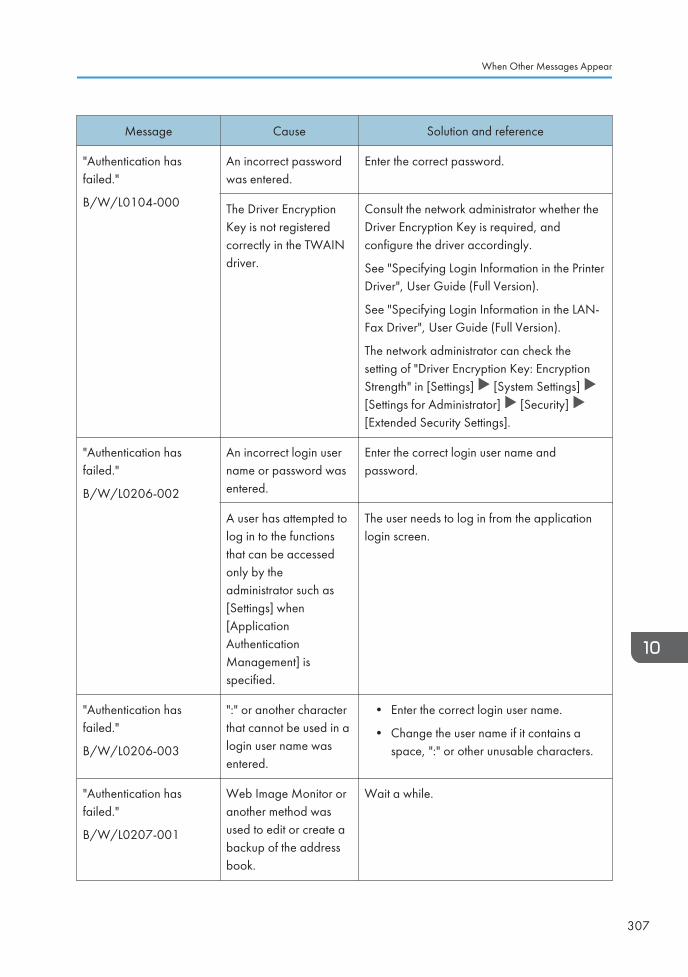
Message Cause Solution and reference
"Authentication hasfailed."
B/W/L0104-000
An incorrect passwordwas entered.
Enter the correct password.
The Driver EncryptionKey is not registeredcorrectly in the TWAINdriver.
Consult the network administrator whether theDriver Encryption Key is required, andconfigure the driver accordingly.
See "Specifying Login Information in the PrinterDriver", User Guide (Full Version).
See "Specifying Login Information in the LAN-Fax Driver", User Guide (Full Version).
The network administrator can check thesetting of "Driver Encryption Key: EncryptionStrength" in [Settings] [System Settings] [Settings for Administrator] [Security] [Extended Security Settings].
"Authentication hasfailed."
B/W/L0206-002
An incorrect login username or password wasentered.
Enter the correct login user name andpassword.
A user has attempted tolog in to the functionsthat can be accessedonly by theadministrator such as[Settings] when[ApplicationAuthenticationManagement] isspecified.
The user needs to log in from the applicationlogin screen.
"Authentication hasfailed."
B/W/L0206-003
":" or another characterthat cannot be used in alogin user name wasentered.
• Enter the correct login user name.
• Change the user name if it contains aspace, ":" or other unusable characters.
"Authentication hasfailed."
B/W/L0207-001
Web Image Monitor oranother method wasused to edit or create abackup of the addressbook.
Wait a while.
When Other Messages Appear
307
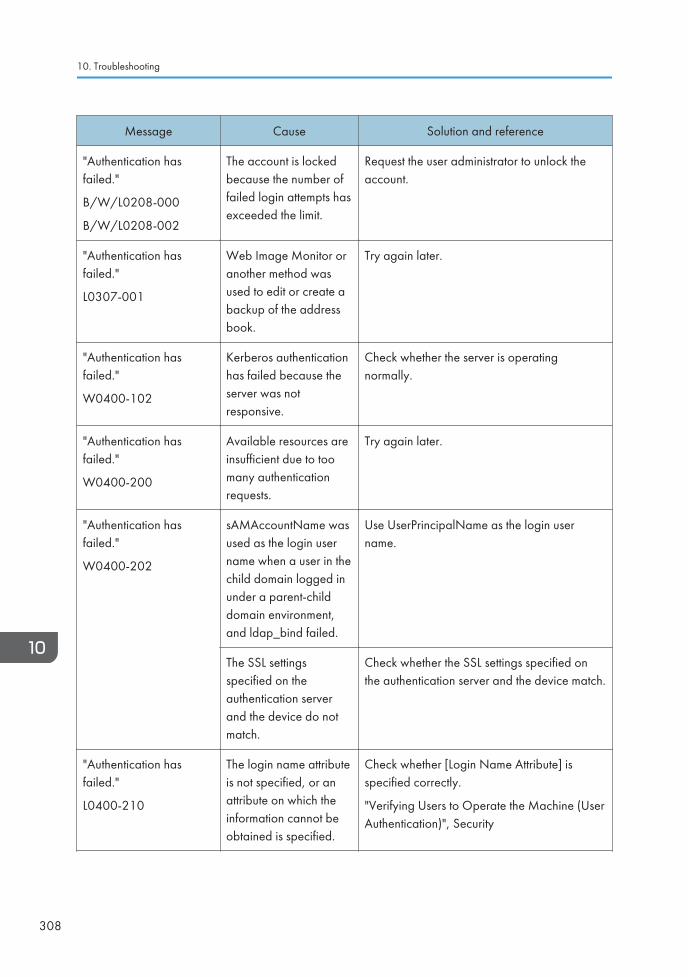
Message Cause Solution and reference
"Authentication hasfailed."
B/W/L0208-000
B/W/L0208-002
The account is lockedbecause the number offailed login attempts hasexceeded the limit.
Request the user administrator to unlock theaccount.
"Authentication hasfailed."
L0307-001
Web Image Monitor oranother method wasused to edit or create abackup of the addressbook.
Try again later.
"Authentication hasfailed."
W0400-102
Kerberos authenticationhas failed because theserver was notresponsive.
Check whether the server is operatingnormally.
"Authentication hasfailed."
W0400-200
Available resources areinsufficient due to toomany authenticationrequests.
Try again later.
"Authentication hasfailed."
W0400-202
sAMAccountName wasused as the login username when a user in thechild domain logged inunder a parent-childdomain environment,and ldap_bind failed.
Use UserPrincipalName as the login username.
The SSL settingsspecified on theauthentication serverand the device do notmatch.
Check whether the SSL settings specified onthe authentication server and the device match.
"Authentication hasfailed."
L0400-210
The login name attributeis not specified, or anattribute on which theinformation cannot beobtained is specified.
Check whether [Login Name Attribute] isspecified correctly.
"Verifying Users to Operate the Machine (UserAuthentication)", Security
10. Troubleshooting
308
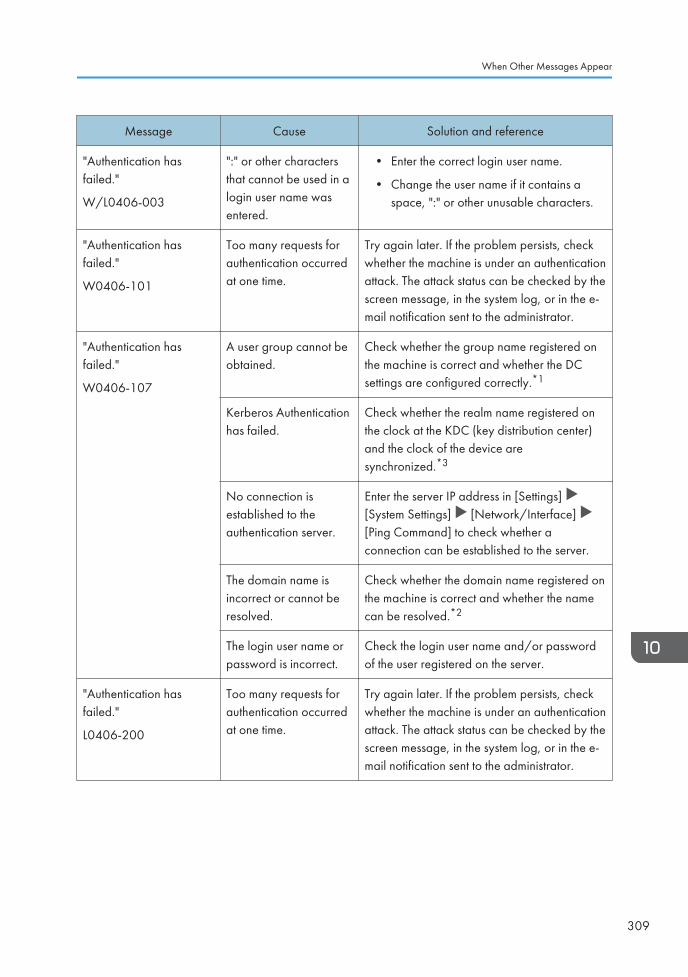
Message Cause Solution and reference
"Authentication hasfailed."
W/L0406-003
":" or other charactersthat cannot be used in alogin user name wasentered.
• Enter the correct login user name.
• Change the user name if it contains aspace, ":" or other unusable characters.
"Authentication hasfailed."
W0406-101
Too many requests forauthentication occurredat one time.
Try again later. If the problem persists, checkwhether the machine is under an authenticationattack. The attack status can be checked by thescreen message, in the system log, or in the e-mail notification sent to the administrator.
"Authentication hasfailed."
W0406-107
A user group cannot beobtained.
Check whether the group name registered onthe machine is correct and whether the DCsettings are configured correctly.*1
Kerberos Authenticationhas failed.
Check whether the realm name registered onthe clock at the KDC (key distribution center)and the clock of the device aresynchronized.*3
No connection isestablished to theauthentication server.
Enter the server IP address in [Settings] [System Settings] [Network/Interface] [Ping Command] to check whether aconnection can be established to the server.
The domain name isincorrect or cannot beresolved.
Check whether the domain name registered onthe machine is correct and whether the namecan be resolved.*2
The login user name orpassword is incorrect.
Check the login user name and/or passwordof the user registered on the server.
"Authentication hasfailed."
L0406-200
Too many requests forauthentication occurredat one time.
Try again later. If the problem persists, checkwhether the machine is under an authenticationattack. The attack status can be checked by thescreen message, in the system log, or in the e-mail notification sent to the administrator.
When Other Messages Appear
309
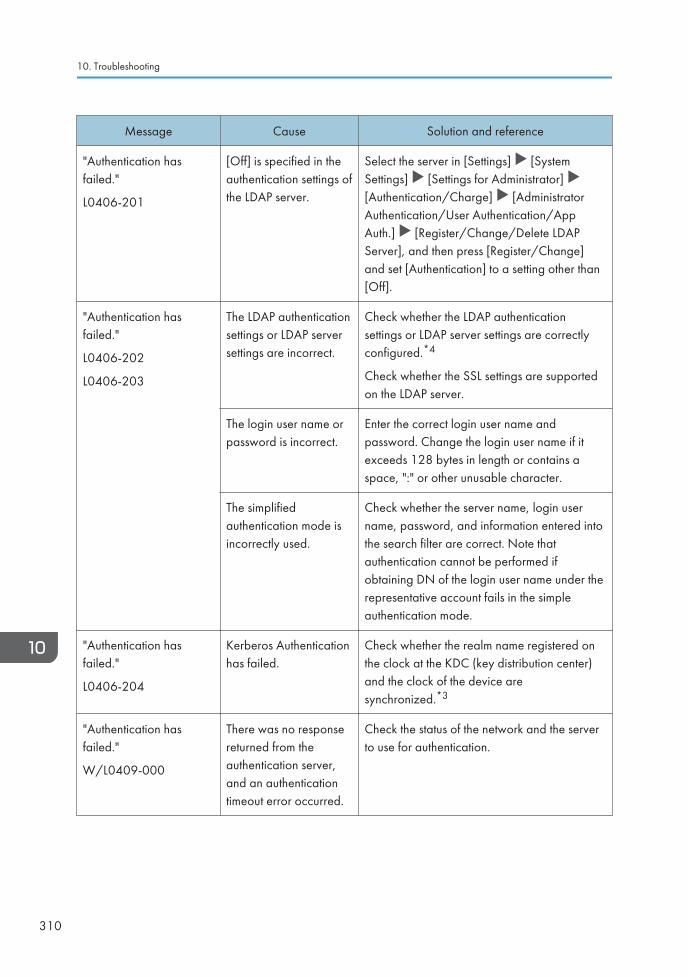
Message Cause Solution and reference
"Authentication hasfailed."
L0406-201
[Off] is specified in theauthentication settings ofthe LDAP server.
Select the server in [Settings] [SystemSettings] [Settings for Administrator] [Authentication/Charge] [AdministratorAuthentication/User Authentication/AppAuth.] [Register/Change/Delete LDAPServer], and then press [Register/Change]and set [Authentication] to a setting other than[Off].
"Authentication hasfailed."
L0406-202
L0406-203
The LDAP authenticationsettings or LDAP serversettings are incorrect.
Check whether the LDAP authenticationsettings or LDAP server settings are correctlyconfigured.*4
Check whether the SSL settings are supportedon the LDAP server.
The login user name orpassword is incorrect.
Enter the correct login user name andpassword. Change the login user name if itexceeds 128 bytes in length or contains aspace, ":" or other unusable character.
The simplifiedauthentication mode isincorrectly used.
Check whether the server name, login username, password, and information entered intothe search filter are correct. Note thatauthentication cannot be performed ifobtaining DN of the login user name under therepresentative account fails in the simpleauthentication mode.
"Authentication hasfailed."
L0406-204
Kerberos Authenticationhas failed.
Check whether the realm name registered onthe clock at the KDC (key distribution center)and the clock of the device aresynchronized.*3
"Authentication hasfailed."
W/L0409-000
There was no responsereturned from theauthentication server,and an authenticationtimeout error occurred.
Check the status of the network and the serverto use for authentication.
10. Troubleshooting
310
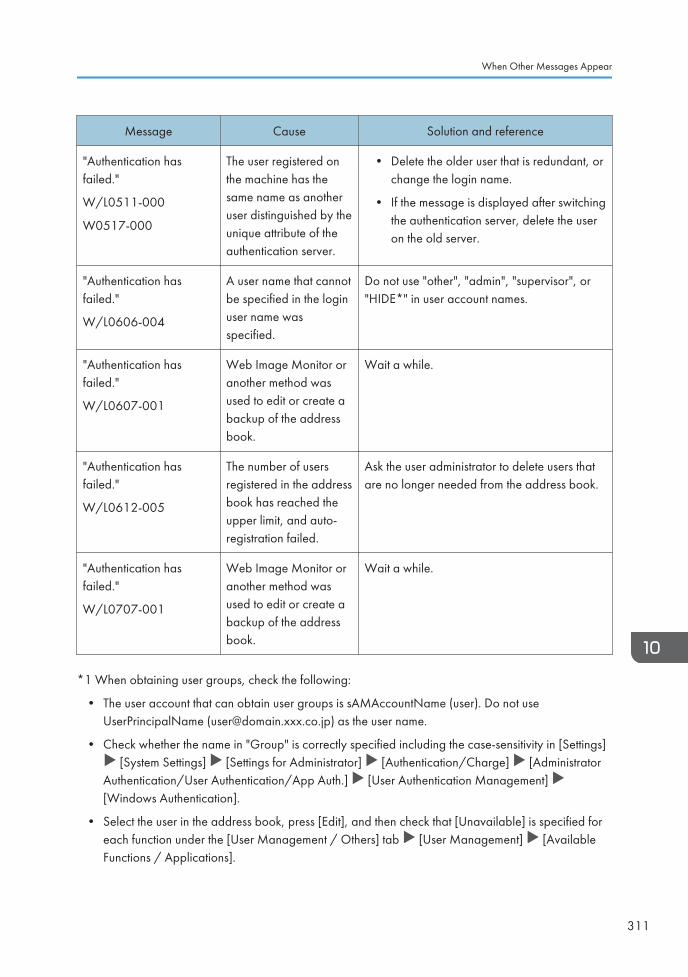
Message Cause Solution and reference
"Authentication hasfailed."
W/L0511-000
W0517-000
The user registered onthe machine has thesame name as anotheruser distinguished by theunique attribute of theauthentication server.
• Delete the older user that is redundant, orchange the login name.
• If the message is displayed after switchingthe authentication server, delete the useron the old server.
"Authentication hasfailed."
W/L0606-004
A user name that cannotbe specified in the loginuser name wasspecified.
Do not use "other", "admin", "supervisor", or"HIDE*" in user account names.
"Authentication hasfailed."
W/L0607-001
Web Image Monitor oranother method wasused to edit or create abackup of the addressbook.
Wait a while.
"Authentication hasfailed."
W/L0612-005
The number of usersregistered in the addressbook has reached theupper limit, and auto-registration failed.
Ask the user administrator to delete users thatare no longer needed from the address book.
"Authentication hasfailed."
W/L0707-001
Web Image Monitor oranother method wasused to edit or create abackup of the addressbook.
Wait a while.
*1 When obtaining user groups, check the following:
• The user account that can obtain user groups is sAMAccountName (user). Do not useUserPrincipalName ([email protected]) as the user name.
• Check whether the name in "Group" is correctly specified including the case-sensitivity in [Settings] [System Settings] [Settings for Administrator] [Authentication/Charge] [Administrator
Authentication/User Authentication/App Auth.] [User Authentication Management] [Windows Authentication].
• Select the user in the address book, press [Edit], and then check that [Unavailable] is specified foreach function under the [User Management / Others] tab [User Management] [AvailableFunctions / Applications].
When Other Messages Appear
311
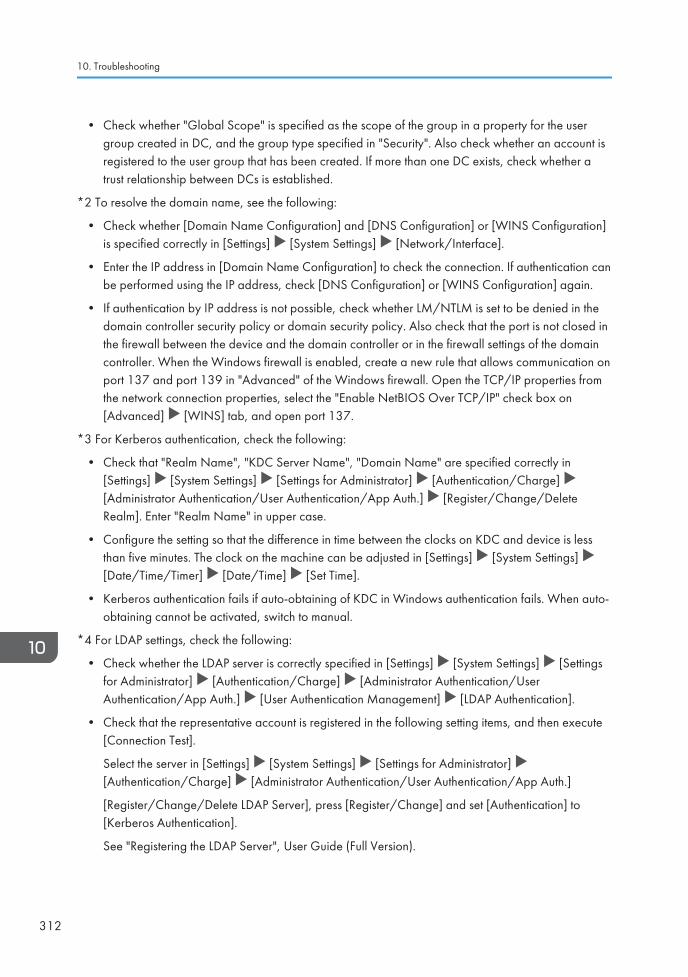
• Check whether "Global Scope" is specified as the scope of the group in a property for the usergroup created in DC, and the group type specified in "Security". Also check whether an account isregistered to the user group that has been created. If more than one DC exists, check whether atrust relationship between DCs is established.
*2 To resolve the domain name, see the following:
• Check whether [Domain Name Configuration] and [DNS Configuration] or [WINS Configuration]is specified correctly in [Settings] [System Settings] [Network/Interface].
• Enter the IP address in [Domain Name Configuration] to check the connection. If authentication canbe performed using the IP address, check [DNS Configuration] or [WINS Configuration] again.
• If authentication by IP address is not possible, check whether LM/NTLM is set to be denied in thedomain controller security policy or domain security policy. Also check that the port is not closed inthe firewall between the device and the domain controller or in the firewall settings of the domaincontroller. When the Windows firewall is enabled, create a new rule that allows communication onport 137 and port 139 in "Advanced" of the Windows firewall. Open the TCP/IP properties fromthe network connection properties, select the "Enable NetBIOS Over TCP/IP" check box on[Advanced] [WINS] tab, and open port 137.
*3 For Kerberos authentication, check the following:
• Check that "Realm Name", "KDC Server Name", "Domain Name" are specified correctly in[Settings] [System Settings] [Settings for Administrator] [Authentication/Charge] [Administrator Authentication/User Authentication/App Auth.] [Register/Change/DeleteRealm]. Enter "Realm Name" in upper case.
• Configure the setting so that the difference in time between the clocks on KDC and device is lessthan five minutes. The clock on the machine can be adjusted in [Settings] [System Settings] [Date/Time/Timer] [Date/Time] [Set Time].
• Kerberos authentication fails if auto-obtaining of KDC in Windows authentication fails. When auto-obtaining cannot be activated, switch to manual.
*4 For LDAP settings, check the following:
• Check whether the LDAP server is correctly specified in [Settings] [System Settings] [Settingsfor Administrator] [Authentication/Charge] [Administrator Authentication/UserAuthentication/App Auth.] [User Authentication Management] [LDAP Authentication].
• Check that the representative account is registered in the following setting items, and then execute[Connection Test].
Select the server in [Settings] [System Settings] [Settings for Administrator] [Authentication/Charge] [Administrator Authentication/User Authentication/App Auth.]
[Register/Change/Delete LDAP Server], press [Register/Change] and set [Authentication] to[Kerberos Authentication].
See "Registering the LDAP Server", User Guide (Full Version).
10. Troubleshooting
312

• If the connection test fails, check whether [Domain Name Configuration] and [DNS Configuration]or [WINS Configuration] is specified correctly on [Settings] [System Settings] [Network/Interface].
Messages that Appear When Logging in to the Machine Using an IC Card Fails
Message Cause Solution and reference
"Authentication hasfailed."
*0150-401
The card is lockedbecause the number oftimes an incorrect PINcode was enteredexceeds the limit.
Unlock the card.
"Authentication hasfailed."
*0151-401
An incorrect PIN codewas entered.
Enter the correct PIN.
"Authentication hasfailed."
*0153-402
The card authenticationdevice has beenremoved or is notconnected properly.
Connect the card authentication device again.Connect the card authentication device to theUSB2.0 Interface Type A on the back left sideof the machine.
"Authentication hasfailed."
*0154-402
Reading of an IC cardhas failed.
Set the IC card on the authentication devicecorrectly and for a longer duration.
"Authentication hasfailed."
*0156-401
An incorrect user nameor password wasentered.
Enter the correct user name and password.
"The card authenticationdevice is not connected."
The card authenticationdevice has beenremoved or is notconnected properly.
Connect the card authentication device again.Connect the card authentication device to theUSB2.0 Interface Type A on the back left sideof the machine.
A malfunction istemporarily occurringon the machine.
Turn off the power of the machine, wait for 10seconds or more after confirming that the mainpower indicator is turned off, and then turn onthe power.
page 13 "Turning On and Off the Power"
When Other Messages Appear
313
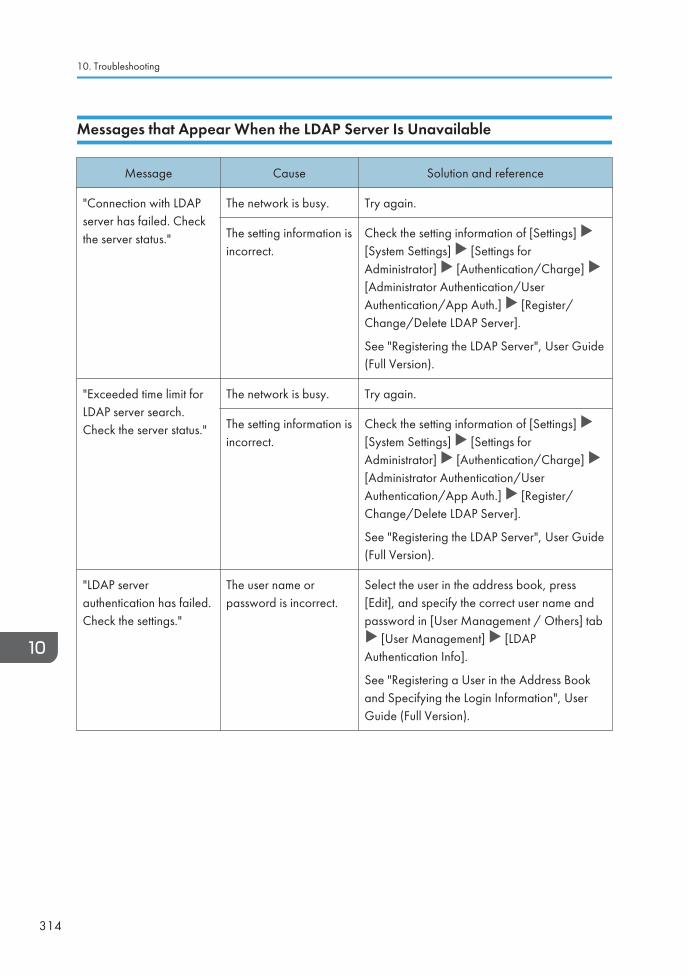
Messages that Appear When the LDAP Server Is Unavailable
Message Cause Solution and reference
"Connection with LDAPserver has failed. Checkthe server status."
The network is busy. Try again.
The setting information isincorrect.
Check the setting information of [Settings] [System Settings] [Settings forAdministrator] [Authentication/Charge] [Administrator Authentication/UserAuthentication/App Auth.] [Register/Change/Delete LDAP Server].
See "Registering the LDAP Server", User Guide(Full Version).
"Exceeded time limit forLDAP server search.Check the server status."
The network is busy. Try again.
The setting information isincorrect.
Check the setting information of [Settings] [System Settings] [Settings forAdministrator] [Authentication/Charge] [Administrator Authentication/UserAuthentication/App Auth.] [Register/Change/Delete LDAP Server].
See "Registering the LDAP Server", User Guide(Full Version).
"LDAP serverauthentication has failed.Check the settings."
The user name orpassword is incorrect.
Select the user in the address book, press[Edit], and specify the correct user name andpassword in [User Management / Others] tab
[User Management] [LDAPAuthentication Info].
See "Registering a User in the Address Bookand Specifying the Login Information", UserGuide (Full Version).
10. Troubleshooting
314
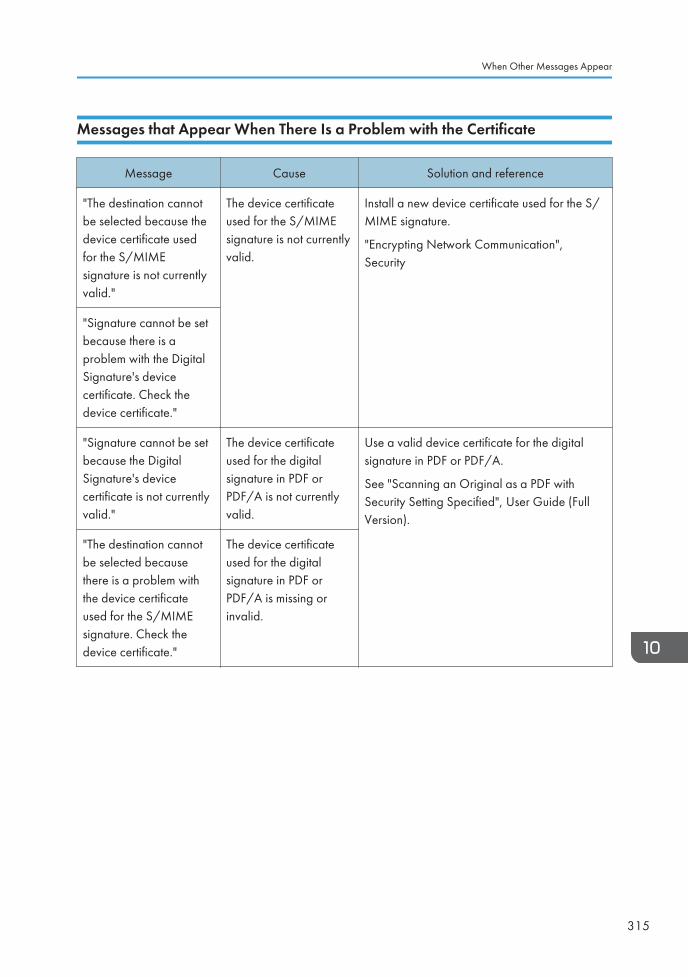
Messages that Appear When There Is a Problem with the Certificate
Message Cause Solution and reference
"The destination cannotbe selected because thedevice certificate usedfor the S/MIMEsignature is not currentlyvalid."
The device certificateused for the S/MIMEsignature is not currentlyvalid.
Install a new device certificate used for the S/MIME signature.
"Encrypting Network Communication",Security
"Signature cannot be setbecause there is aproblem with the DigitalSignature's devicecertificate. Check thedevice certificate."
"Signature cannot be setbecause the DigitalSignature's devicecertificate is not currentlyvalid."
The device certificateused for the digitalsignature in PDF orPDF/A is not currentlyvalid.
Use a valid device certificate for the digitalsignature in PDF or PDF/A.
See "Scanning an Original as a PDF withSecurity Setting Specified", User Guide (FullVersion).
"The destination cannotbe selected becausethere is a problem withthe device certificateused for the S/MIMEsignature. Check thedevice certificate."
The device certificateused for the digitalsignature in PDF orPDF/A is missing orinvalid.
When Other Messages Appear
315
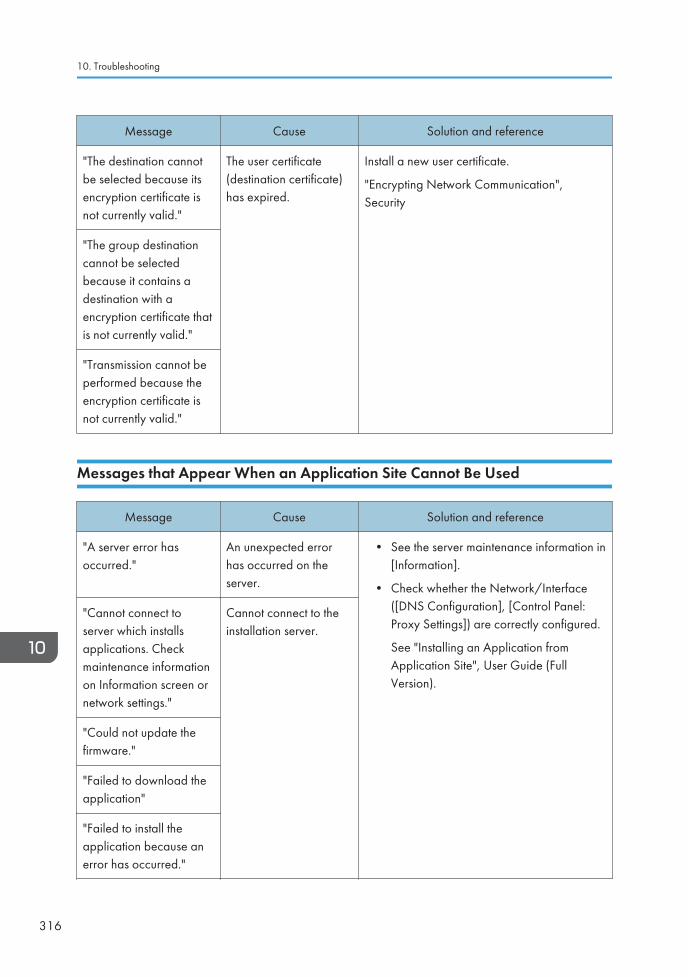
Message Cause Solution and reference
"The destination cannotbe selected because itsencryption certificate isnot currently valid."
The user certificate(destination certificate)has expired.
Install a new user certificate.
"Encrypting Network Communication",Security
"The group destinationcannot be selectedbecause it contains adestination with aencryption certificate thatis not currently valid."
"Transmission cannot beperformed because theencryption certificate isnot currently valid."
Messages that Appear When an Application Site Cannot Be Used
Message Cause Solution and reference
"A server error hasoccurred."
An unexpected errorhas occurred on theserver.
• See the server maintenance information in[Information].
• Check whether the Network/Interface([DNS Configuration], [Control Panel:Proxy Settings]) are correctly configured.
See "Installing an Application fromApplication Site", User Guide (FullVersion).
"Cannot connect toserver which installsapplications. Checkmaintenance informationon Information screen ornetwork settings."
Cannot connect to theinstallation server.
"Could not update thefirmware."
"Failed to download theapplication"
"Failed to install theapplication because anerror has occurred."
10. Troubleshooting
316
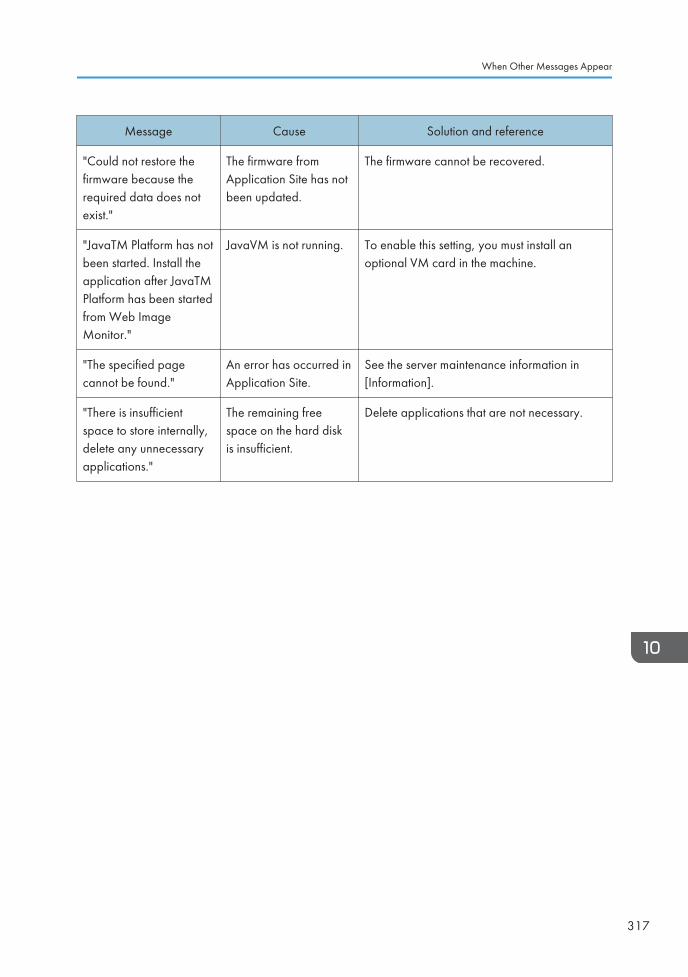
Message Cause Solution and reference
"Could not restore thefirmware because therequired data does notexist."
The firmware fromApplication Site has notbeen updated.
The firmware cannot be recovered.
"JavaTM Platform has notbeen started. Install theapplication after JavaTMPlatform has been startedfrom Web ImageMonitor."
JavaVM is not running. To enable this setting, you must install anoptional VM card in the machine.
"The specified pagecannot be found."
An error has occurred inApplication Site.
See the server maintenance information in[Information].
"There is insufficientspace to store internally,delete any unnecessaryapplications."
The remaining freespace on the hard diskis insufficient.
Delete applications that are not necessary.
When Other Messages Appear
317

10. Troubleshooting
318
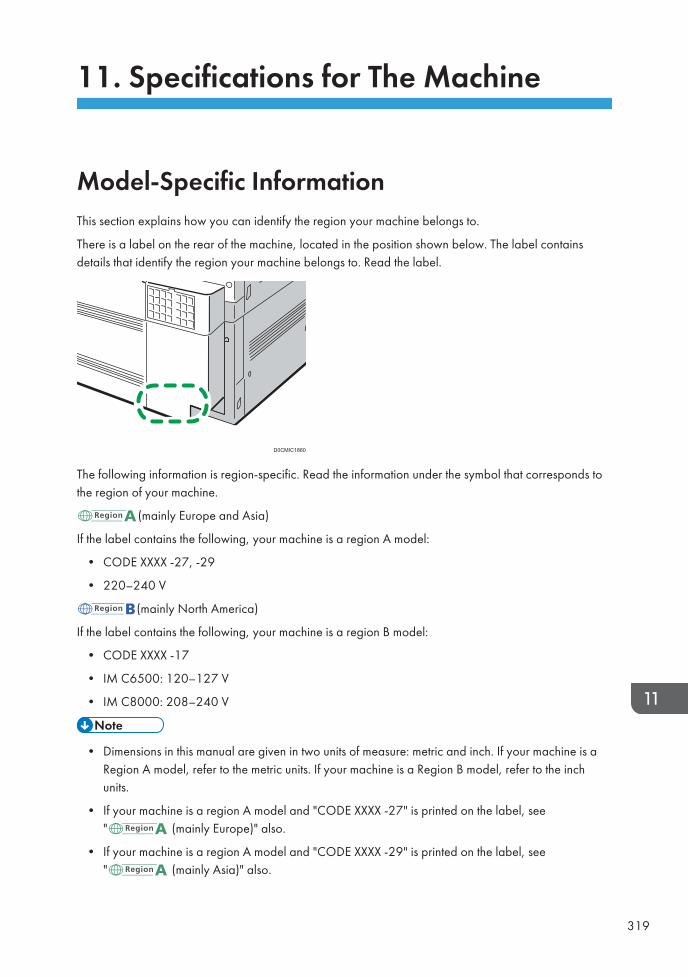
11. Specifications for The Machine
Model-Specific InformationThis section explains how you can identify the region your machine belongs to.
There is a label on the rear of the machine, located in the position shown below. The label containsdetails that identify the region your machine belongs to. Read the label.
D0CMIC1860
The following information is region-specific. Read the information under the symbol that corresponds tothe region of your machine.
(mainly Europe and Asia)
If the label contains the following, your machine is a region A model:
• CODE XXXX -27, -29
• 220–240 V
(mainly North America)
If the label contains the following, your machine is a region B model:
• CODE XXXX -17
• IM C6500: 120–127 V
• IM C8000: 208–240 V
• Dimensions in this manual are given in two units of measure: metric and inch. If your machine is aRegion A model, refer to the metric units. If your machine is a Region B model, refer to the inchunits.
• If your machine is a region A model and "CODE XXXX -27" is printed on the label, see" (mainly Europe)" also.
• If your machine is a region A model and "CODE XXXX -29" is printed on the label, see" (mainly Asia)" also.
319
List of Specifications for Standard Functions
• We have licenses from the authors to use their software including open sources. Refer to the files inthe Licenses folder included in the supplied CD-ROM for statements requested from the authors.
Specifications for the Main Unit
Item Specifications
Configuration Desktop
Memory 4 GB
Hard disk size 320 GB× 2
Color Full Color
Copy process Laser beam scanning and electro-photographic printing
Exposure glass Stationary original exposure type
Scan method CMOS integrated type Md method
Warm-up time
(23°C (73.4°F), ratedvoltage)
(mainly Europe and Asia)
• IM C6500/C8000
• Normal mode: 45 seconds
• Quick mode: 38 seconds
(mainly North America)
• IM C6500
• Normal mode: 45 seconds
• Quick mode: 43 seconds
• IM C8000
• Normal mode: 45 seconds
• Quick mode: 38 seconds
11. Specifications for The Machine
320
Item Specifications
First copy time • IM C6500
• Full color: 7.5 seconds or less*1
• B&W: 5.5 seconds or less*1
• IM C8000
• Full color: 6.4 seconds or less*1
• B&W: 4.8 seconds or less*1
*1 The first copy/print time may differ depending on the conditions andenvironment of the machine.
Copy/print speed (perminute)
• IM C6500: 65 sheets/minute
• IM C8000: 80 sheets/minute
(A4 , 81/2 × 11 , Paper Weight 2)
Maximum original size (mainly Europe and Asia)
A3
(mainly North America)
11×17
List of Specifications for Standard Functions
321
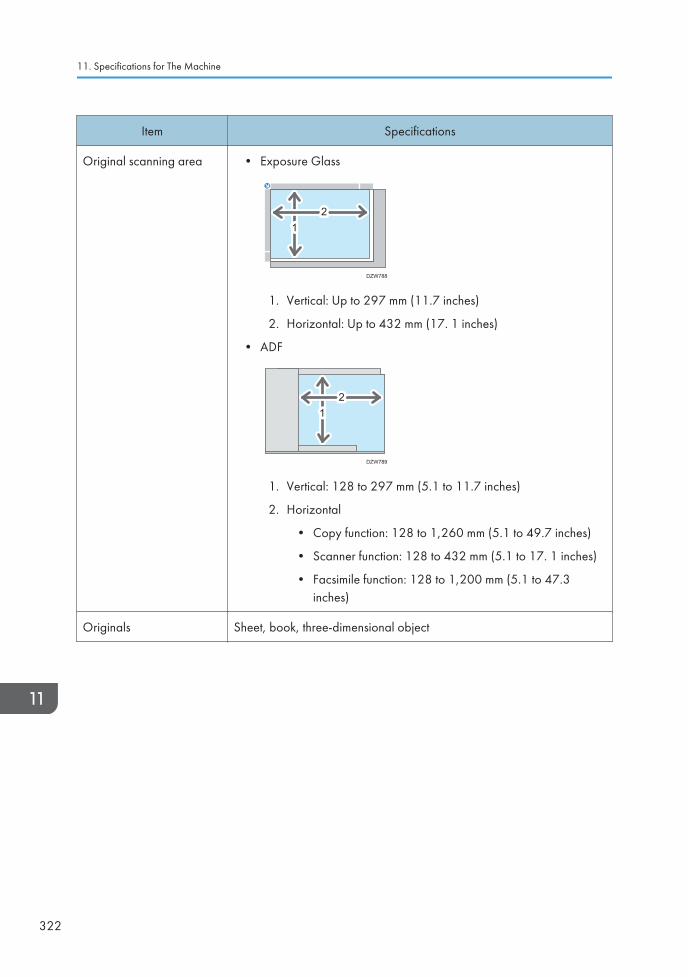
Item Specifications
Original scanning area • Exposure Glass
DZW788
1122
1. Vertical: Up to 297 mm (11.7 inches)
2. Horizontal: Up to 432 mm (17. 1 inches)
• ADF
DZW789
1122
1. Vertical: 128 to 297 mm (5.1 to 11.7 inches)
2. Horizontal
• Copy function: 128 to 1,260 mm (5.1 to 49.7 inches)
• Scanner function: 128 to 432 mm (5.1 to 17. 1 inches)
• Facsimile function: 128 to 1,200 mm (5.1 to 47.3inches)
Originals Sheet, book, three-dimensional object
11. Specifications for The Machine
322

Item Specifications
Copy size • Trays 1–3 and the bypass tray:
page 213 "Recommended Paper Sizes and Types"
• Duplex:
A3 , A4, A5, A6 , B4 JIS , B5 JIS, B6 JIS ,
11 × 17 , 81/2 × 14 , 81/2 × 13 , 81/2 × 11, 81/4 × 14 ,81/4 × 13 , 8 × 13 , 71/4 × 101/2, 51/2 × 81/2, 8K , 16K,
12 × 18 , 11 × 15 , 11 × 14 , 10 × 15 , 10 × 14 , 13 ×191/5 , 13 × 19 , 123/5 × 191/5 , 123/5 × 181/2 , 13 ×18 , SRA3 , SRA4, 81/2 × 132/5
• Duplex (Custom Size):
Vertical: 100.0–330.2 mm (3.94–13.00 inches)
Horizontal: 139.7–487.7 mm (5.50–19.20 inches)
Paper weight • Trays 1–3 and the bypass tray:
page 213 "Recommended Paper Sizes and Types"
• Duplex:
52.3–256.0 g/m2 (14.0 lb. Bond–141.0 lb. Index)
For details about and recommendations concerning thick paper,see page 229 "Thick Paper Orientation and RecommendedStatus".
List of Specifications for Standard Functions
323
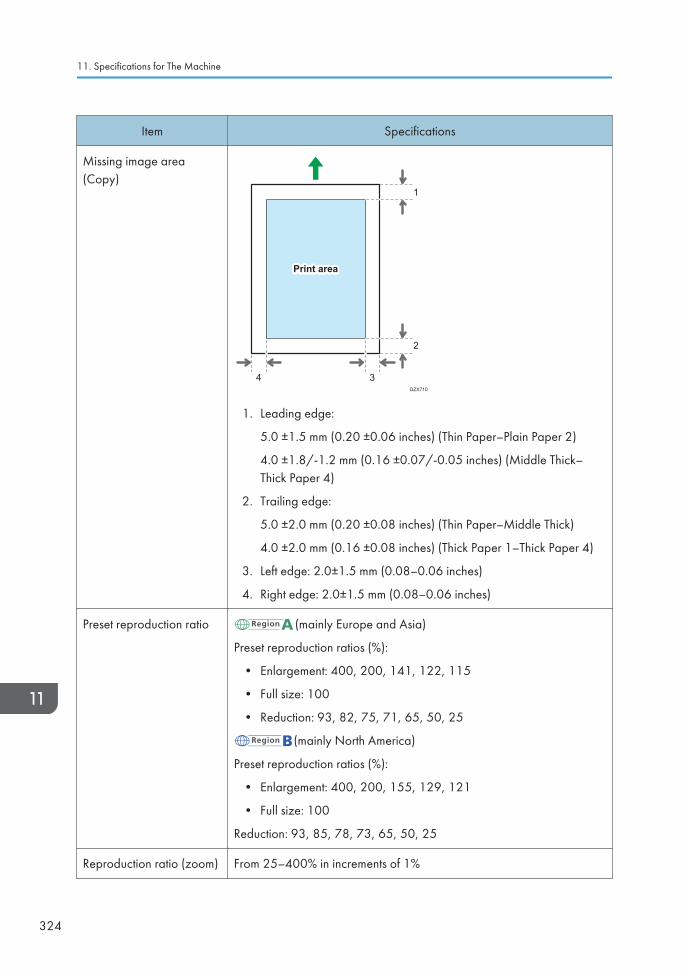
Item Specifications
Missing image area(Copy)
Print area
DZX710
11
22
3344
1. Leading edge:
5.0 ±1.5 mm (0.20 ±0.06 inches) (Thin Paper–Plain Paper 2)
4.0 ±1.8/-1.2 mm (0.16 ±0.07/-0.05 inches) (Middle Thick–Thick Paper 4)
2. Trailing edge:
5.0 ±2.0 mm (0.20 ±0.08 inches) (Thin Paper–Middle Thick)
4.0 ±2.0 mm (0.16 ±0.08 inches) (Thick Paper 1–Thick Paper 4)
3. Left edge: 2.0±1.5 mm (0.08–0.06 inches)
4. Right edge: 2.0±1.5 mm (0.08–0.06 inches)
Preset reproduction ratio (mainly Europe and Asia)
Preset reproduction ratios (%):
• Enlargement: 400, 200, 141, 122, 115
• Full size: 100
• Reduction: 93, 82, 75, 71, 65, 50, 25
(mainly North America)
Preset reproduction ratios (%):
• Enlargement: 400, 200, 155, 129, 121
• Full size: 100
Reduction: 93, 85, 78, 73, 65, 50, 25
Reproduction ratio (zoom) From 25–400% in increments of 1%
11. Specifications for The Machine
324
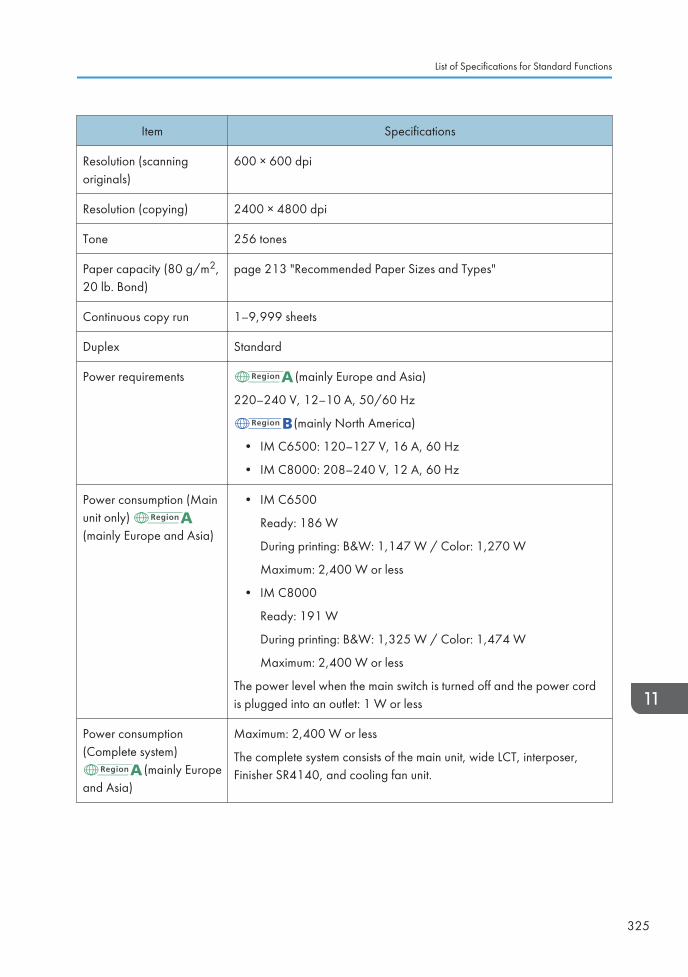
Item Specifications
Resolution (scanningoriginals)
600 × 600 dpi
Resolution (copying) 2400 × 4800 dpi
Tone 256 tones
Paper capacity (80 g/m2,20 lb. Bond)
page 213 "Recommended Paper Sizes and Types"
Continuous copy run 1–9,999 sheets
Duplex Standard
Power requirements (mainly Europe and Asia)
220–240 V, 12–10 A, 50/60 Hz
(mainly North America)
• IM C6500: 120–127 V, 16 A, 60 Hz
• IM C8000: 208–240 V, 12 A, 60 Hz
Power consumption (Mainunit only) (mainly Europe and Asia)
• IM C6500
Ready: 186 W
During printing: B&W: 1,147 W / Color: 1,270 W
Maximum: 2,400 W or less
• IM C8000
Ready: 191 W
During printing: B&W: 1,325 W / Color: 1,474 W
Maximum: 2,400 W or less
The power level when the main switch is turned off and the power cordis plugged into an outlet: 1 W or less
Power consumption(Complete system)
(mainly Europeand Asia)
Maximum: 2,400 W or less
The complete system consists of the main unit, wide LCT, interposer,Finisher SR4140, and cooling fan unit.
List of Specifications for Standard Functions
325
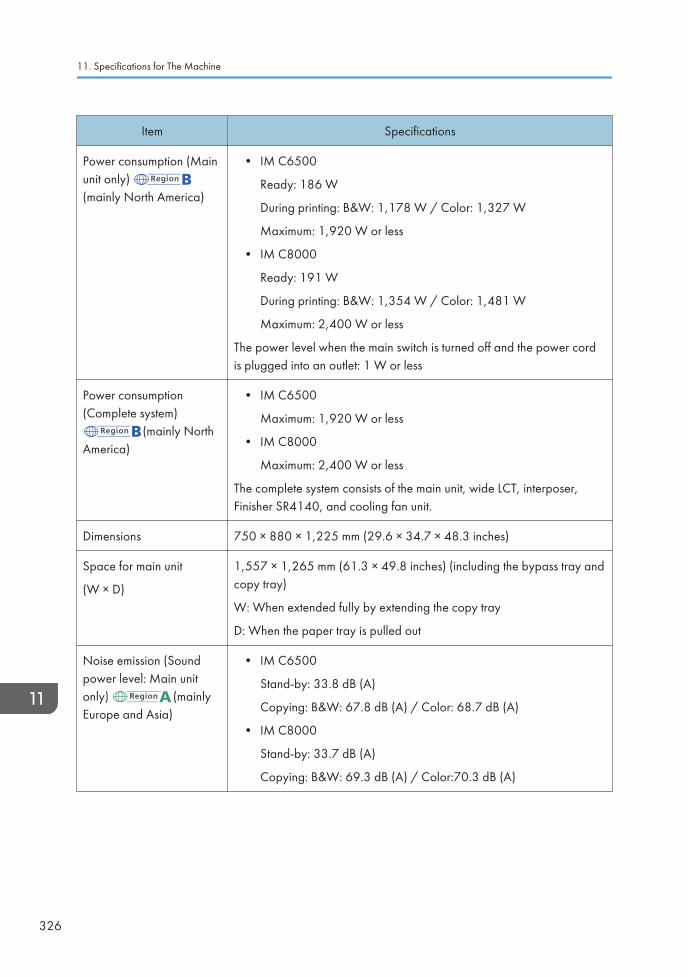
Item Specifications
Power consumption (Mainunit only) (mainly North America)
• IM C6500
Ready: 186 W
During printing: B&W: 1,178 W / Color: 1,327 W
Maximum: 1,920 W or less
• IM C8000
Ready: 191 W
During printing: B&W: 1,354 W / Color: 1,481 W
Maximum: 2,400 W or less
The power level when the main switch is turned off and the power cordis plugged into an outlet: 1 W or less
Power consumption(Complete system)
(mainly NorthAmerica)
• IM C6500
Maximum: 1,920 W or less
• IM C8000
Maximum: 2,400 W or less
The complete system consists of the main unit, wide LCT, interposer,Finisher SR4140, and cooling fan unit.
Dimensions 750 × 880 × 1,225 mm (29.6 × 34.7 × 48.3 inches)
Space for main unit
(W × D)
1,557 × 1,265 mm (61.3 × 49.8 inches) (including the bypass tray andcopy tray)
W: When extended fully by extending the copy tray
D: When the paper tray is pulled out
Noise emission (Soundpower level: Main unitonly) (mainlyEurope and Asia)
• IM C6500
Stand-by: 33.8 dB (A)
Copying: B&W: 67.8 dB (A) / Color: 68.7 dB (A)
• IM C8000
Stand-by: 33.7 dB (A)
Copying: B&W: 69.3 dB (A) / Color:70.3 dB (A)
11. Specifications for The Machine
326
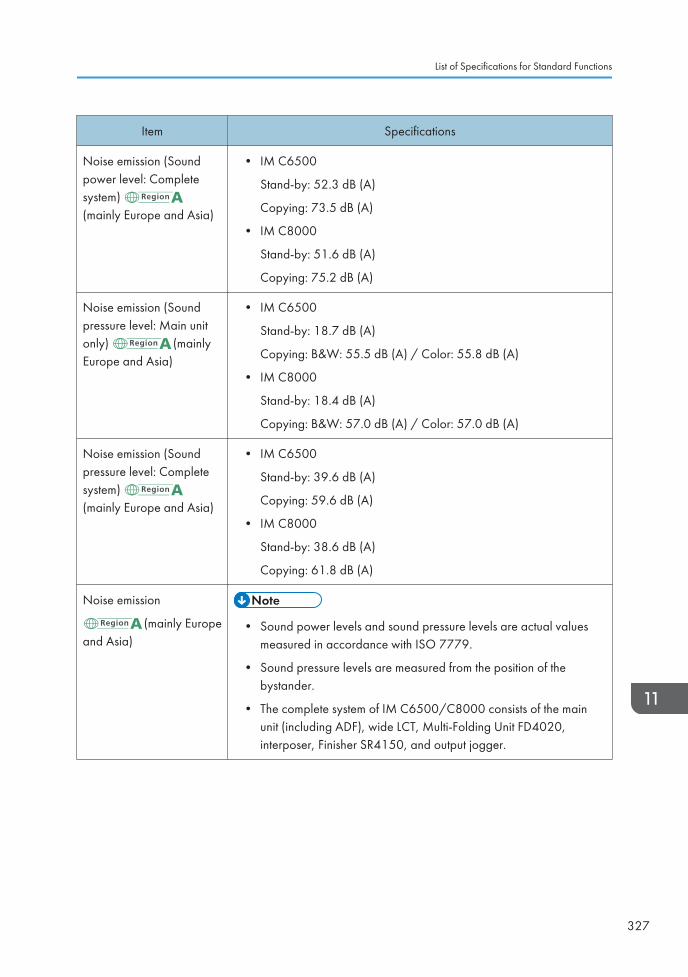
Item Specifications
Noise emission (Soundpower level: Completesystem) (mainly Europe and Asia)
• IM C6500
Stand-by: 52.3 dB (A)
Copying: 73.5 dB (A)
• IM C8000
Stand-by: 51.6 dB (A)
Copying: 75.2 dB (A)
Noise emission (Soundpressure level: Main unitonly) (mainlyEurope and Asia)
• IM C6500
Stand-by: 18.7 dB (A)
Copying: B&W: 55.5 dB (A) / Color: 55.8 dB (A)
• IM C8000
Stand-by: 18.4 dB (A)
Copying: B&W: 57.0 dB (A) / Color: 57.0 dB (A)
Noise emission (Soundpressure level: Completesystem) (mainly Europe and Asia)
• IM C6500
Stand-by: 39.6 dB (A)
Copying: 59.6 dB (A)
• IM C8000
Stand-by: 38.6 dB (A)
Copying: 61.8 dB (A)
Noise emission
(mainly Europeand Asia)
• Sound power levels and sound pressure levels are actual valuesmeasured in accordance with ISO 7779.
• Sound pressure levels are measured from the position of thebystander.
• The complete system of IM C6500/C8000 consists of the mainunit (including ADF), wide LCT, Multi-Folding Unit FD4020,interposer, Finisher SR4150, and output jogger.
List of Specifications for Standard Functions
327
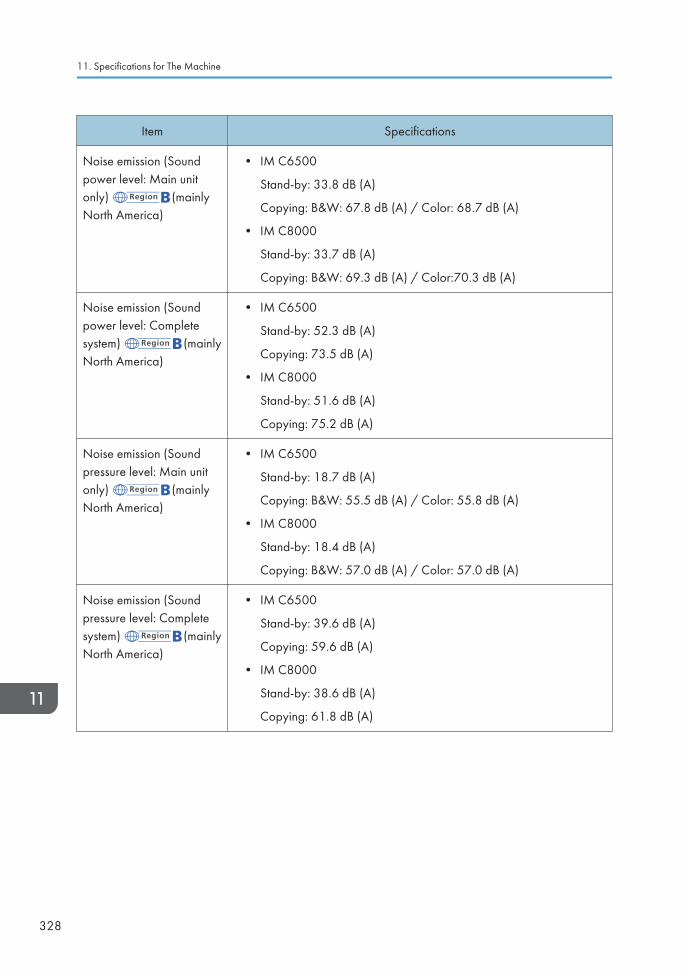
Item Specifications
Noise emission (Soundpower level: Main unitonly) (mainlyNorth America)
• IM C6500
Stand-by: 33.8 dB (A)
Copying: B&W: 67.8 dB (A) / Color: 68.7 dB (A)
• IM C8000
Stand-by: 33.7 dB (A)
Copying: B&W: 69.3 dB (A) / Color:70.3 dB (A)
Noise emission (Soundpower level: Completesystem) (mainlyNorth America)
• IM C6500
Stand-by: 52.3 dB (A)
Copying: 73.5 dB (A)
• IM C8000
Stand-by: 51.6 dB (A)
Copying: 75.2 dB (A)
Noise emission (Soundpressure level: Main unitonly) (mainlyNorth America)
• IM C6500
Stand-by: 18.7 dB (A)
Copying: B&W: 55.5 dB (A) / Color: 55.8 dB (A)
• IM C8000
Stand-by: 18.4 dB (A)
Copying: B&W: 57.0 dB (A) / Color: 57.0 dB (A)
Noise emission (Soundpressure level: Completesystem) (mainlyNorth America)
• IM C6500
Stand-by: 39.6 dB (A)
Copying: 59.6 dB (A)
• IM C8000
Stand-by: 38.6 dB (A)
Copying: 61.8 dB (A)
11. Specifications for The Machine
328
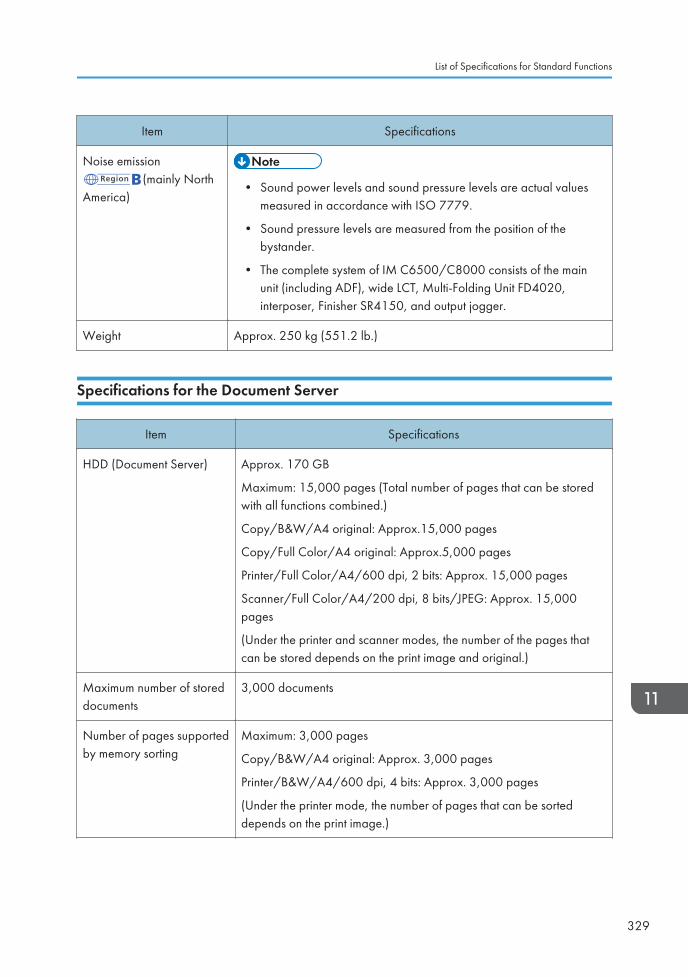
Item Specifications
Noise emission(mainly North
America)• Sound power levels and sound pressure levels are actual values
measured in accordance with ISO 7779.
• Sound pressure levels are measured from the position of thebystander.
• The complete system of IM C6500/C8000 consists of the mainunit (including ADF), wide LCT, Multi-Folding Unit FD4020,interposer, Finisher SR4150, and output jogger.
Weight Approx. 250 kg (551.2 lb.)
Specifications for the Document Server
Item Specifications
HDD (Document Server) Approx. 170 GB
Maximum: 15,000 pages (Total number of pages that can be storedwith all functions combined.)
Copy/B&W/A4 original: Approx.15,000 pages
Copy/Full Color/A4 original: Approx.5,000 pages
Printer/Full Color/A4/600 dpi, 2 bits: Approx. 15,000 pages
Scanner/Full Color/A4/200 dpi, 8 bits/JPEG: Approx. 15,000pages
(Under the printer and scanner modes, the number of the pages thatcan be stored depends on the print image and original.)
Maximum number of storeddocuments
3,000 documents
Number of pages supportedby memory sorting
Maximum: 3,000 pages
Copy/B&W/A4 original: Approx. 3,000 pages
Printer/B&W/A4/600 dpi, 4 bits: Approx. 3,000 pages
(Under the printer mode, the number of pages that can be sorteddepends on the print image.)
List of Specifications for Standard Functions
329
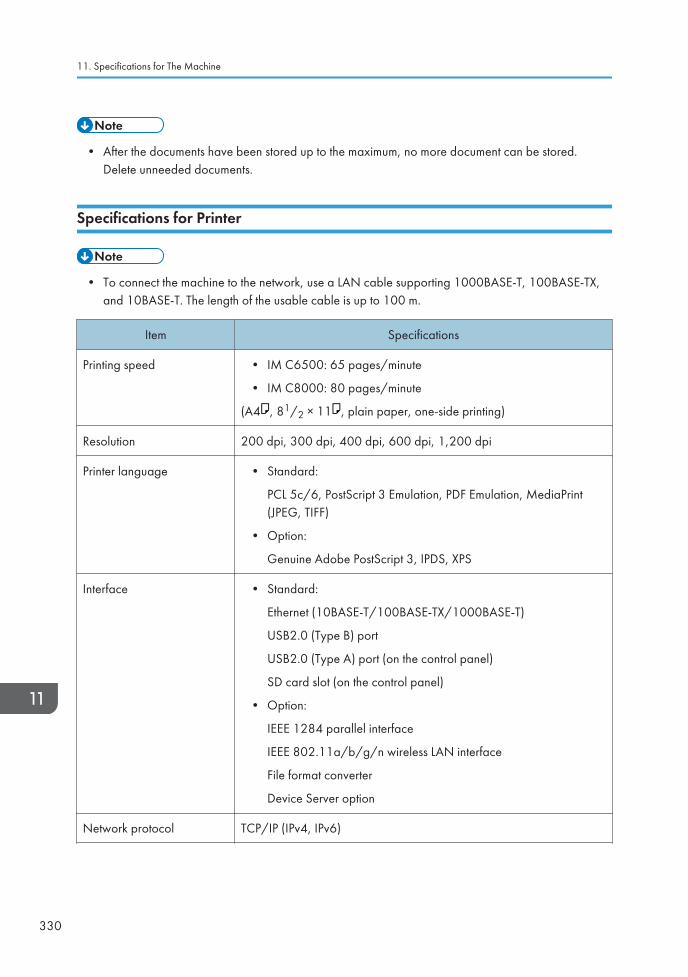
• After the documents have been stored up to the maximum, no more document can be stored.Delete unneeded documents.
Specifications for Printer
• To connect the machine to the network, use a LAN cable supporting 1000BASE-T, 100BASE-TX,and 10BASE-T. The length of the usable cable is up to 100 m.
Item Specifications
Printing speed • IM C6500: 65 pages/minute
• IM C8000: 80 pages/minute
(A4 , 81/2 × 11 , plain paper, one-side printing)
Resolution 200 dpi, 300 dpi, 400 dpi, 600 dpi, 1,200 dpi
Printer language • Standard:
PCL 5c/6, PostScript 3 Emulation, PDF Emulation, MediaPrint(JPEG, TIFF)
• Option:
Genuine Adobe PostScript 3, IPDS, XPS
Interface • Standard:
Ethernet (10BASE-T/100BASE-TX/1000BASE-T)
USB2.0 (Type B) port
USB2.0 (Type A) port (on the control panel)
SD card slot (on the control panel)
• Option:
IEEE 1284 parallel interface
IEEE 802.11a/b/g/n wireless LAN interface
File format converter
Device Server option
Network protocol TCP/IP (IPv4, IPv6)
11. Specifications for The Machine
330
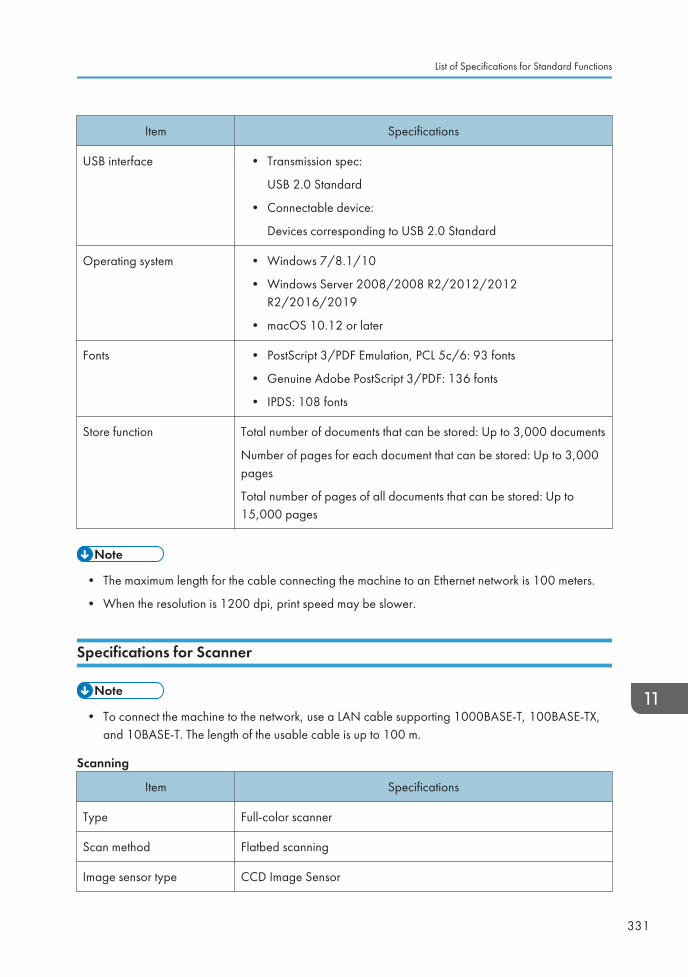
Item Specifications
USB interface • Transmission spec:
USB 2.0 Standard
• Connectable device:
Devices corresponding to USB 2.0 Standard
Operating system • Windows 7/8.1/10
• Windows Server 2008/2008 R2/2012/2012R2/2016/2019
• macOS 10.12 or later
Fonts • PostScript 3/PDF Emulation, PCL 5c/6: 93 fonts
• Genuine Adobe PostScript 3/PDF: 136 fonts
• IPDS: 108 fonts
Store function Total number of documents that can be stored: Up to 3,000 documents
Number of pages for each document that can be stored: Up to 3,000pages
Total number of pages of all documents that can be stored: Up to15,000 pages
• The maximum length for the cable connecting the machine to an Ethernet network is 100 meters.
• When the resolution is 1200 dpi, print speed may be slower.
Specifications for Scanner
• To connect the machine to the network, use a LAN cable supporting 1000BASE-T, 100BASE-TX,and 10BASE-T. The length of the usable cable is up to 100 m.
Scanning
Item Specifications
Type Full-color scanner
Scan method Flatbed scanning
Image sensor type CCD Image Sensor
List of Specifications for Standard Functions
331
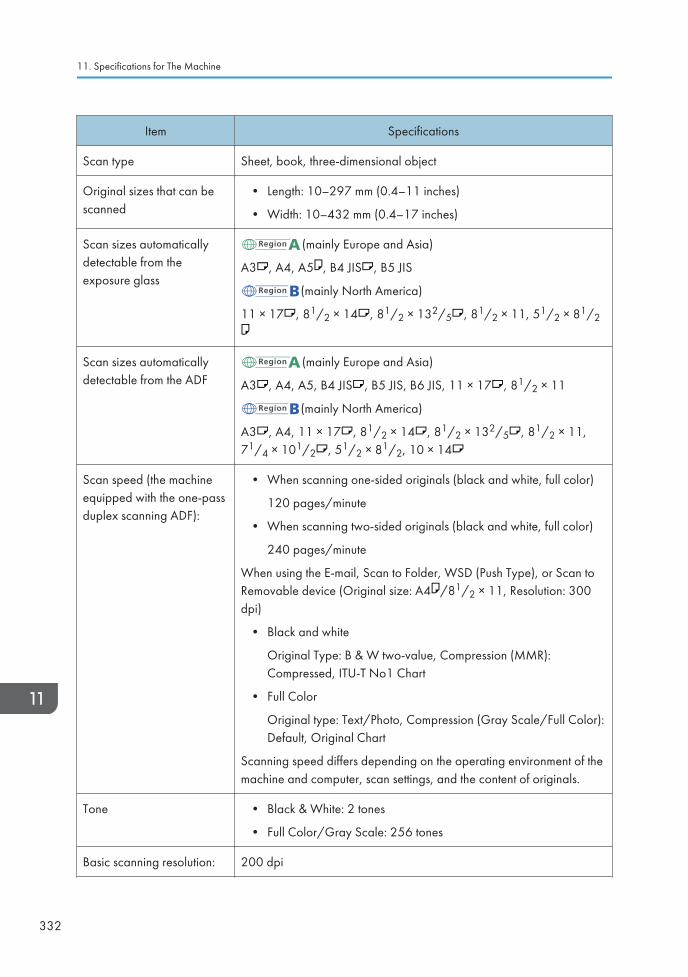
Item Specifications
Scan type Sheet, book, three-dimensional object
Original sizes that can bescanned
• Length: 10–297 mm (0.4–11 inches)
• Width: 10–432 mm (0.4–17 inches)
Scan sizes automaticallydetectable from theexposure glass
(mainly Europe and Asia)
A3 , A4, A5 , B4 JIS , B5 JIS
(mainly North America)
11 × 17 , 81/2 × 14 , 81/2 × 132/5 , 81/2 × 11, 51/2 × 81/2
Scan sizes automaticallydetectable from the ADF
(mainly Europe and Asia)
A3 , A4, A5, B4 JIS , B5 JIS, B6 JIS, 11 × 17 , 81/2 × 11
(mainly North America)
A3 , A4, 11 × 17 , 81/2 × 14 , 81/2 × 132/5 , 81/2 × 11,71/4 × 101/2 , 51/2 × 81/2, 10 × 14
Scan speed (the machineequipped with the one-passduplex scanning ADF):
• When scanning one-sided originals (black and white, full color)
120 pages/minute
• When scanning two-sided originals (black and white, full color)
240 pages/minute
When using the E-mail, Scan to Folder, WSD (Push Type), or Scan toRemovable device (Original size: A4 /81/2 × 11, Resolution: 300dpi)
• Black and white
Original Type: B & W two-value, Compression (MMR):Compressed, ITU-T No1 Chart
• Full Color
Original type: Text/Photo, Compression (Gray Scale/Full Color):Default, Original Chart
Scanning speed differs depending on the operating environment of themachine and computer, scan settings, and the content of originals.
Tone • Black & White: 2 tones
• Full Color/Gray Scale: 256 tones
Basic scanning resolution: 200 dpi
11. Specifications for The Machine
332
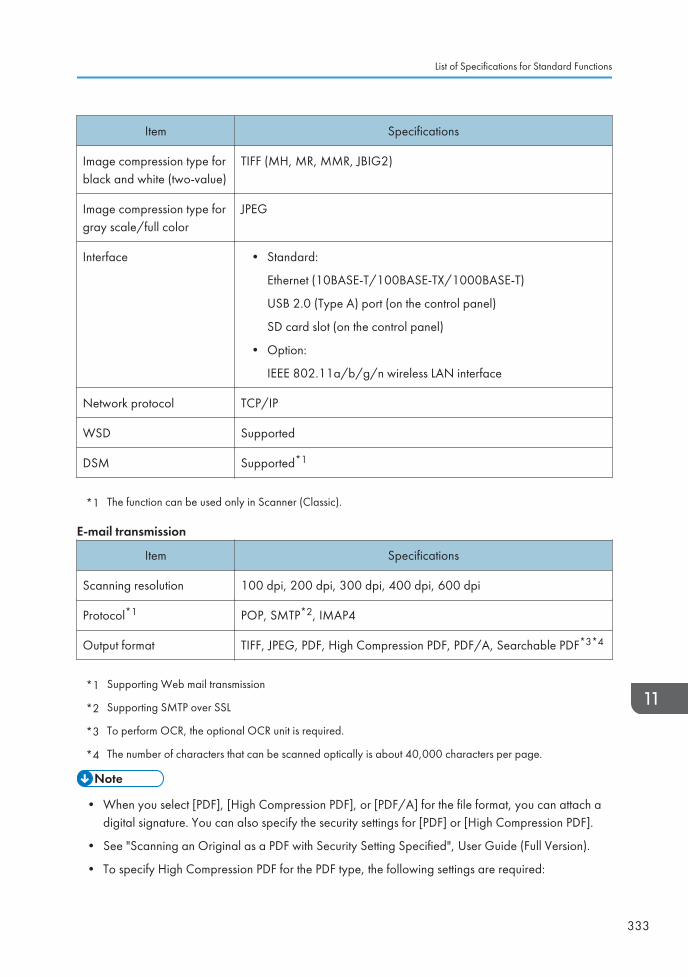
Item Specifications
Image compression type forblack and white (two-value)
TIFF (MH, MR, MMR, JBIG2)
Image compression type forgray scale/full color
JPEG
Interface • Standard:
Ethernet (10BASE-T/100BASE-TX/1000BASE-T)
USB 2.0 (Type A) port (on the control panel)
SD card slot (on the control panel)
• Option:
IEEE 802.11a/b/g/n wireless LAN interface
Network protocol TCP/IP
WSD Supported
DSM Supported*1
*1 The function can be used only in Scanner (Classic).
E-mail transmission
Item Specifications
Scanning resolution 100 dpi, 200 dpi, 300 dpi, 400 dpi, 600 dpi
Protocol*1 POP, SMTP*2, IMAP4
Output format TIFF, JPEG, PDF, High Compression PDF, PDF/A, Searchable PDF*3*4
*1 Supporting Web mail transmission
*2 Supporting SMTP over SSL
*3 To perform OCR, the optional OCR unit is required.
*4 The number of characters that can be scanned optically is about 40,000 characters per page.
• When you select [PDF], [High Compression PDF], or [PDF/A] for the file format, you can attach adigital signature. You can also specify the security settings for [PDF] or [High Compression PDF].
• See "Scanning an Original as a PDF with Security Setting Specified", User Guide (Full Version).
• To specify High Compression PDF for the PDF type, the following settings are required:
List of Specifications for Standard Functions
333
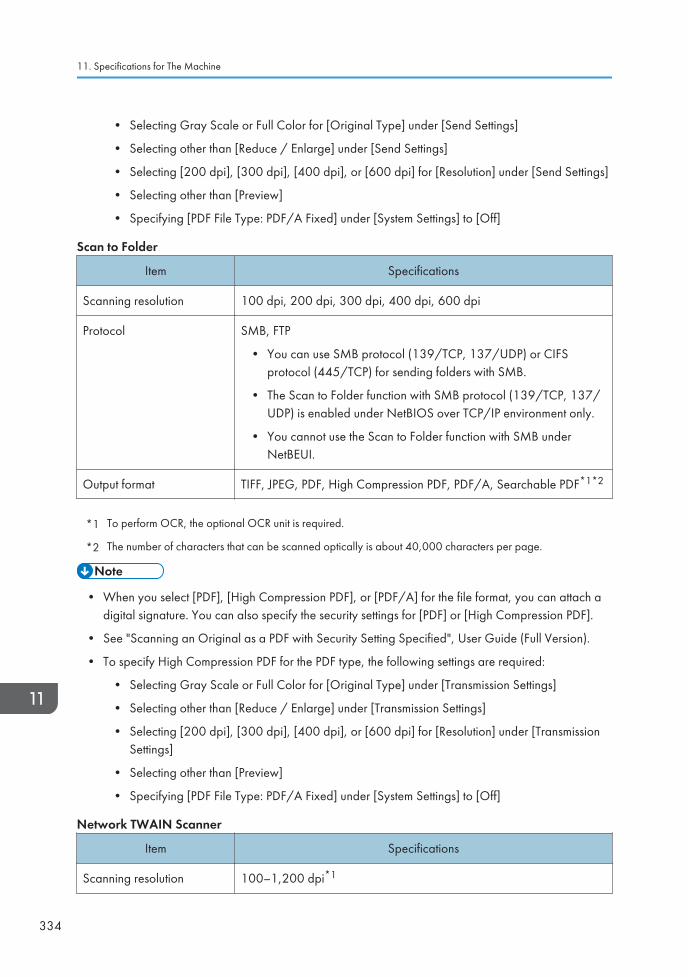
• Selecting Gray Scale or Full Color for [Original Type] under [Send Settings]
• Selecting other than [Reduce / Enlarge] under [Send Settings]
• Selecting [200 dpi], [300 dpi], [400 dpi], or [600 dpi] for [Resolution] under [Send Settings]
• Selecting other than [Preview]
• Specifying [PDF File Type: PDF/A Fixed] under [System Settings] to [Off]
Scan to Folder
Item Specifications
Scanning resolution 100 dpi, 200 dpi, 300 dpi, 400 dpi, 600 dpi
Protocol SMB, FTP
• You can use SMB protocol (139/TCP, 137/UDP) or CIFSprotocol (445/TCP) for sending folders with SMB.
• The Scan to Folder function with SMB protocol (139/TCP, 137/UDP) is enabled under NetBIOS over TCP/IP environment only.
• You cannot use the Scan to Folder function with SMB underNetBEUI.
Output format TIFF, JPEG, PDF, High Compression PDF, PDF/A, Searchable PDF*1*2
*1 To perform OCR, the optional OCR unit is required.
*2 The number of characters that can be scanned optically is about 40,000 characters per page.
• When you select [PDF], [High Compression PDF], or [PDF/A] for the file format, you can attach adigital signature. You can also specify the security settings for [PDF] or [High Compression PDF].
• See "Scanning an Original as a PDF with Security Setting Specified", User Guide (Full Version).
• To specify High Compression PDF for the PDF type, the following settings are required:
• Selecting Gray Scale or Full Color for [Original Type] under [Transmission Settings]
• Selecting other than [Reduce / Enlarge] under [Transmission Settings]
• Selecting [200 dpi], [300 dpi], [400 dpi], or [600 dpi] for [Resolution] under [TransmissionSettings]
• Selecting other than [Preview]
• Specifying [PDF File Type: PDF/A Fixed] under [System Settings] to [Off]
Network TWAIN Scanner
Item Specifications
Scanning resolution 100–1,200 dpi*1
11. Specifications for The Machine
334

Item Specifications
Protocol TCP/IP
Operating system • Windows 7/8.1/10
• Windows Server 2008/2008 R2/2012/2012R2/2016/2019
(TWAIN scanner runs in 32-bit compatible mode on a 64-bitoperating system, so TWAIN scanner is not compatible with 64-bitapplications. Use 32-bit applications. IC card Authentication System isnot compatible with 64-bit operating system.)
*1 The maximum resolution depends on the scan size.
WIA scanner
Item Specifications
Scanning resolution
(Main scanning × Sub-scanning)
100–1,200 dpi*1
Protocol TCP/IP
Operating system • Windows 7/8.1/10
• Windows Server 2008/2008 R2/2012/2012R2/2016/2019
(WIA scanner can function under both 32- and 64-bit operatingsystems.)
*1 The maximum resolution depends on the scan size.
Specifications for Auto Document Feeder
Item Specifications
Mode Batch mode, SADF mode, Mixed Sizes mode, Custom Sizeoriginals mode, Original Orientation mode
List of Specifications for Standard Functions
335
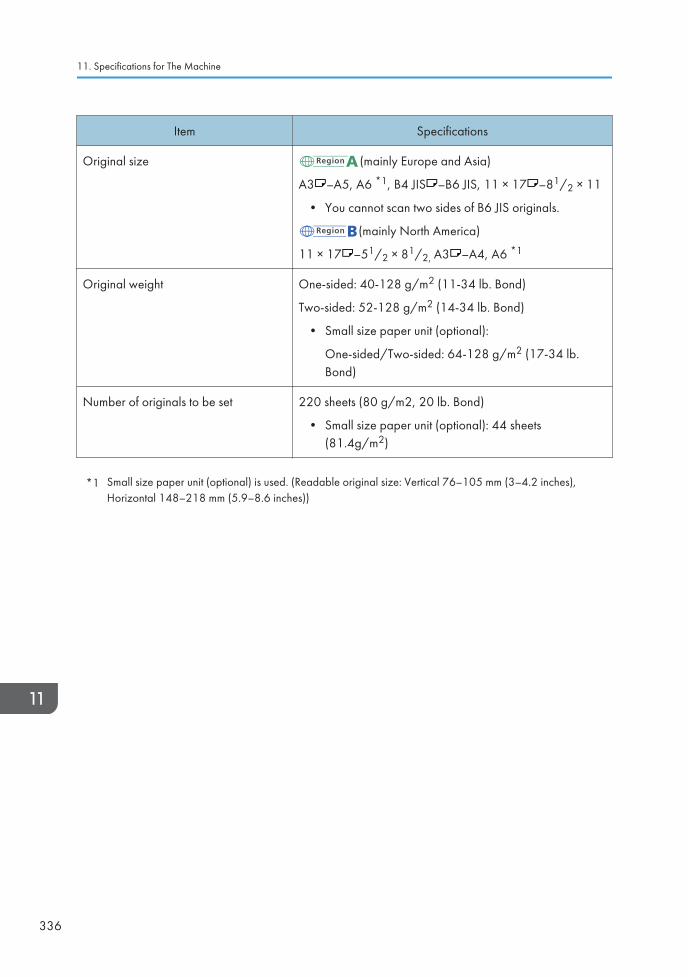
Item Specifications
Original size (mainly Europe and Asia)
A3 –A5, A6 *1, B4 JIS –B6 JIS, 11 × 17 –81/2 × 11
• You cannot scan two sides of B6 JIS originals.
(mainly North America)
11 × 17 –51/2 × 81/2, A3 –A4, A6 *1
Original weight One-sided: 40-128 g/m2 (11-34 lb. Bond)
Two-sided: 52-128 g/m2 (14-34 lb. Bond)
• Small size paper unit (optional):
One-sided/Two-sided: 64-128 g/m2 (17-34 lb.Bond)
Number of originals to be set 220 sheets (80 g/m2, 20 lb. Bond)
• Small size paper unit (optional): 44 sheets(81.4g/m2)
*1 Small size paper unit (optional) is used. (Readable original size: Vertical 76–105 mm (3–4.2 inches),Horizontal 148–218 mm (5.9–8.6 inches))
11. Specifications for The Machine
336
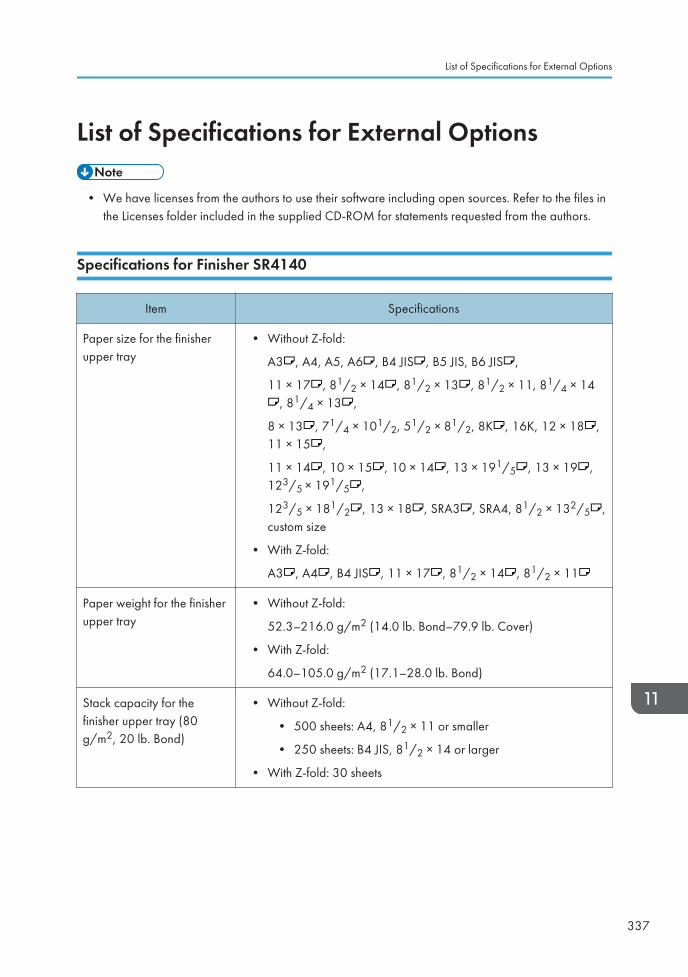
List of Specifications for External Options
• We have licenses from the authors to use their software including open sources. Refer to the files inthe Licenses folder included in the supplied CD-ROM for statements requested from the authors.
Specifications for Finisher SR4140
Item Specifications
Paper size for the finisherupper tray
• Without Z-fold:
A3 , A4, A5, A6 , B4 JIS , B5 JIS, B6 JIS ,
11 × 17 , 81/2 × 14 , 81/2 × 13 , 81/2 × 11, 81/4 × 14, 81/4 × 13 ,
8 × 13 , 71/4 × 101/2, 51/2 × 81/2, 8K , 16K, 12 × 18 ,11 × 15 ,
11 × 14 , 10 × 15 , 10 × 14 , 13 × 191/5 , 13 × 19 ,123/5 × 191/5 ,
123/5 × 181/2 , 13 × 18 , SRA3 , SRA4, 81/2 × 132/5 ,custom size
• With Z-fold:
A3 , A4 , B4 JIS , 11 × 17 , 81/2 × 14 , 81/2 × 11
Paper weight for the finisherupper tray
• Without Z-fold:
52.3–216.0 g/m2 (14.0 lb. Bond–79.9 lb. Cover)
• With Z-fold:
64.0–105.0 g/m2 (17.1–28.0 lb. Bond)
Stack capacity for thefinisher upper tray (80g/m2, 20 lb. Bond)
• Without Z-fold:
• 500 sheets: A4, 81/2 × 11 or smaller
• 250 sheets: B4 JIS, 81/2 × 14 or larger
• With Z-fold: 30 sheets
List of Specifications for External Options
337
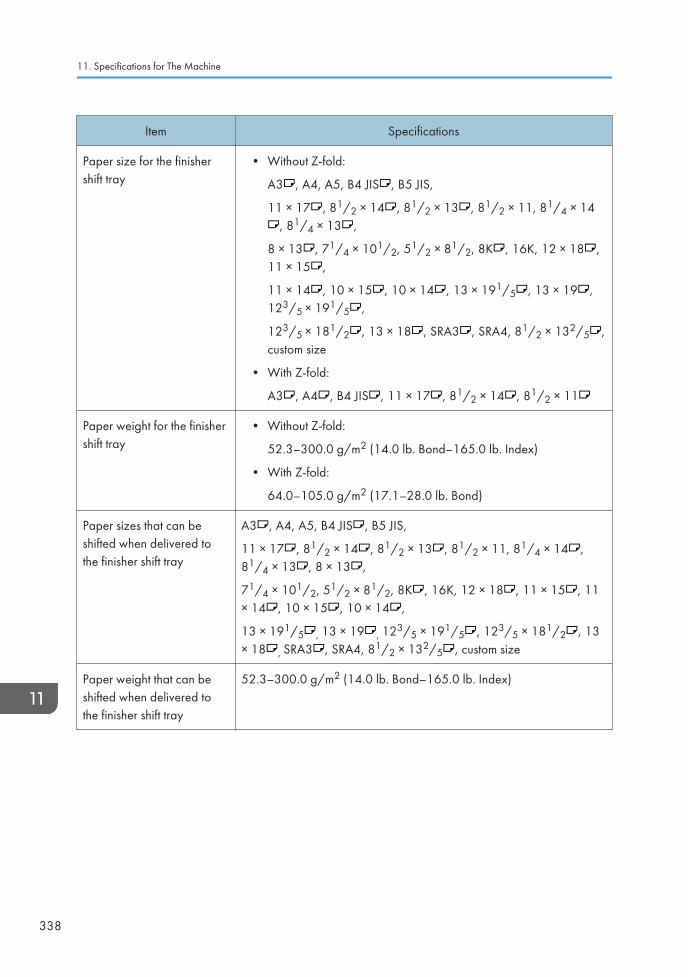
Item Specifications
Paper size for the finishershift tray
• Without Z-fold:
A3 , A4, A5, B4 JIS , B5 JIS,
11 × 17 , 81/2 × 14 , 81/2 × 13 , 81/2 × 11, 81/4 × 14, 81/4 × 13 ,
8 × 13 , 71/4 × 101/2, 51/2 × 81/2, 8K , 16K, 12 × 18 ,11 × 15 ,
11 × 14 , 10 × 15 , 10 × 14 , 13 × 191/5 , 13 × 19 ,123/5 × 191/5 ,
123/5 × 181/2 , 13 × 18 , SRA3 , SRA4, 81/2 × 132/5 ,custom size
• With Z-fold:
A3 , A4 , B4 JIS , 11 × 17 , 81/2 × 14 , 81/2 × 11
Paper weight for the finishershift tray
• Without Z-fold:
52.3–300.0 g/m2 (14.0 lb. Bond–165.0 lb. Index)
• With Z-fold:
64.0–105.0 g/m2 (17.1–28.0 lb. Bond)
Paper sizes that can beshifted when delivered tothe finisher shift tray
A3 , A4, A5, B4 JIS , B5 JIS,
11 × 17 , 81/2 × 14 , 81/2 × 13 , 81/2 × 11, 81/4 × 14 ,81/4 × 13 , 8 × 13 ,
71/4 × 101/2, 51/2 × 81/2, 8K , 16K, 12 × 18 , 11 × 15 , 11× 14 , 10 × 15 , 10 × 14 ,
13 × 191/5 , 13 × 19 , 123/5 × 191/5 , 123/5 × 181/2 , 13× 18 , SRA3 , SRA4, 81/2 × 132/5 , custom size
Paper weight that can beshifted when delivered tothe finisher shift tray
52.3–300.0 g/m2 (14.0 lb. Bond–165.0 lb. Index)
11. Specifications for The Machine
338
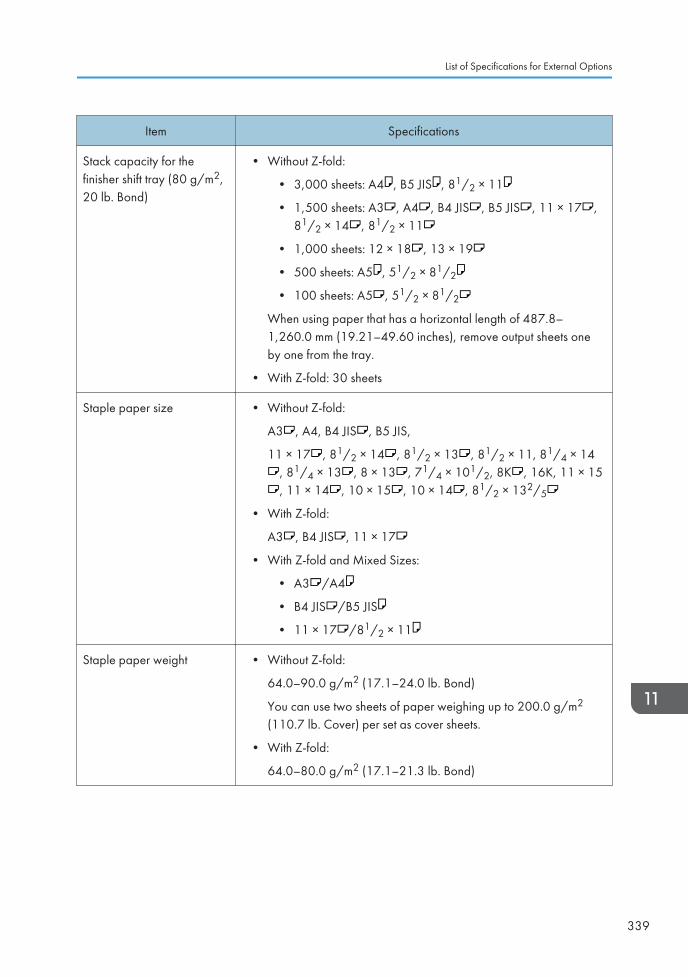
Item Specifications
Stack capacity for thefinisher shift tray (80 g/m2,20 lb. Bond)
• Without Z-fold:
• 3,000 sheets: A4 , B5 JIS , 81/2 × 11
• 1,500 sheets: A3 , A4 , B4 JIS , B5 JIS , 11 × 17 ,81/2 × 14 , 81/2 × 11
• 1,000 sheets: 12 × 18 , 13 × 19
• 500 sheets: A5 , 51/2 × 81/2
• 100 sheets: A5 , 51/2 × 81/2
When using paper that has a horizontal length of 487.8–1,260.0 mm (19.21–49.60 inches), remove output sheets oneby one from the tray.
• With Z-fold: 30 sheets
Staple paper size • Without Z-fold:
A3 , A4, B4 JIS , B5 JIS,
11 × 17 , 81/2 × 14 , 81/2 × 13 , 81/2 × 11, 81/4 × 14, 81/4 × 13 , 8 × 13 , 71/4 × 101/2, 8K , 16K, 11 × 15, 11 × 14 , 10 × 15 , 10 × 14 , 81/2 × 132/5
• With Z-fold:
A3 , B4 JIS , 11 × 17
• With Z-fold and Mixed Sizes:
• A3 /A4
• B4 JIS /B5 JIS
• 11 × 17 /81/2 × 11
Staple paper weight • Without Z-fold:
64.0–90.0 g/m2 (17.1–24.0 lb. Bond)
You can use two sheets of paper weighing up to 200.0 g/m2
(110.7 lb. Cover) per set as cover sheets.
• With Z-fold:
64.0–80.0 g/m2 (17.1–21.3 lb. Bond)
List of Specifications for External Options
339
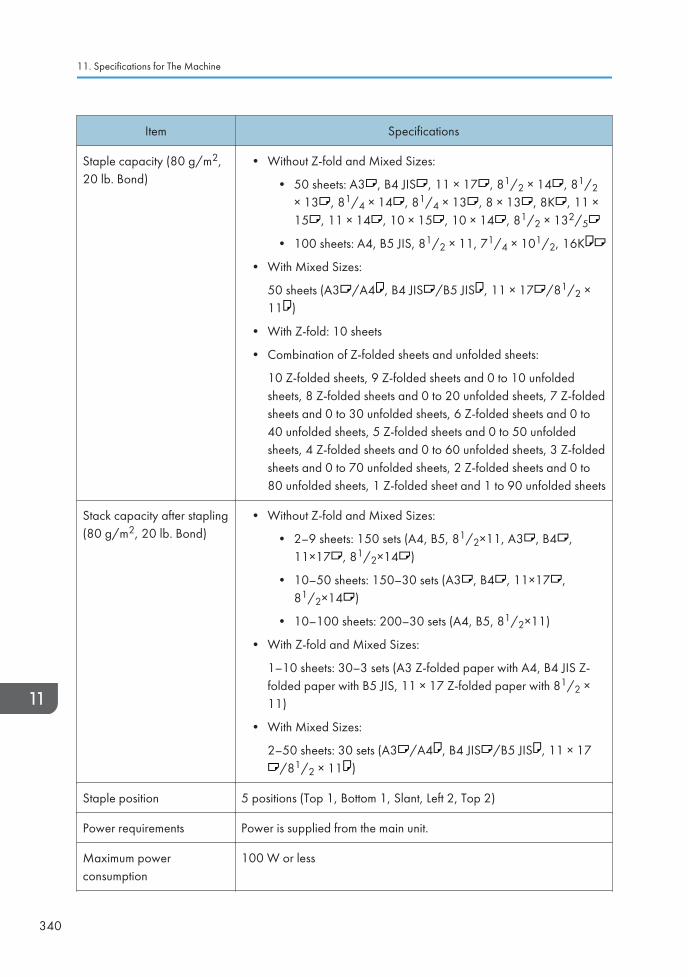
Item Specifications
Staple capacity (80 g/m2,20 lb. Bond)
• Without Z-fold and Mixed Sizes:
• 50 sheets: A3 , B4 JIS , 11 × 17 , 81/2 × 14 , 81/2× 13 , 81/4 × 14 , 81/4 × 13 , 8 × 13 , 8K , 11 ×15 , 11 × 14 , 10 × 15 , 10 × 14 , 81/2 × 132/5
• 100 sheets: A4, B5 JIS, 81/2 × 11, 71/4 × 101/2, 16K
• With Mixed Sizes:
50 sheets (A3 /A4 , B4 JIS /B5 JIS , 11 × 17 /81/2 ×11 )
• With Z-fold: 10 sheets
• Combination of Z-folded sheets and unfolded sheets:
10 Z-folded sheets, 9 Z-folded sheets and 0 to 10 unfoldedsheets, 8 Z-folded sheets and 0 to 20 unfolded sheets, 7 Z-foldedsheets and 0 to 30 unfolded sheets, 6 Z-folded sheets and 0 to40 unfolded sheets, 5 Z-folded sheets and 0 to 50 unfoldedsheets, 4 Z-folded sheets and 0 to 60 unfolded sheets, 3 Z-foldedsheets and 0 to 70 unfolded sheets, 2 Z-folded sheets and 0 to80 unfolded sheets, 1 Z-folded sheet and 1 to 90 unfolded sheets
Stack capacity after stapling(80 g/m2, 20 lb. Bond)
• Without Z-fold and Mixed Sizes:
• 2–9 sheets: 150 sets (A4, B5, 81/2×11, A3 , B4 ,11×17 , 81/2×14 )
• 10–50 sheets: 150–30 sets (A3 , B4 , 11×17 ,81/2×14 )
• 10–100 sheets: 200–30 sets (A4, B5, 81/2×11)
• With Z-fold and Mixed Sizes:
1–10 sheets: 30–3 sets (A3 Z-folded paper with A4, B4 JIS Z-folded paper with B5 JIS, 11 × 17 Z-folded paper with 81/2 ×11)
• With Mixed Sizes:
2–50 sheets: 30 sets (A3 /A4 , B4 JIS /B5 JIS , 11 × 17/81/2 × 11 )
Staple position 5 positions (Top 1, Bottom 1, Slant, Left 2, Top 2)
Power requirements Power is supplied from the main unit.
Maximum powerconsumption
100 W or less
11. Specifications for The Machine
340
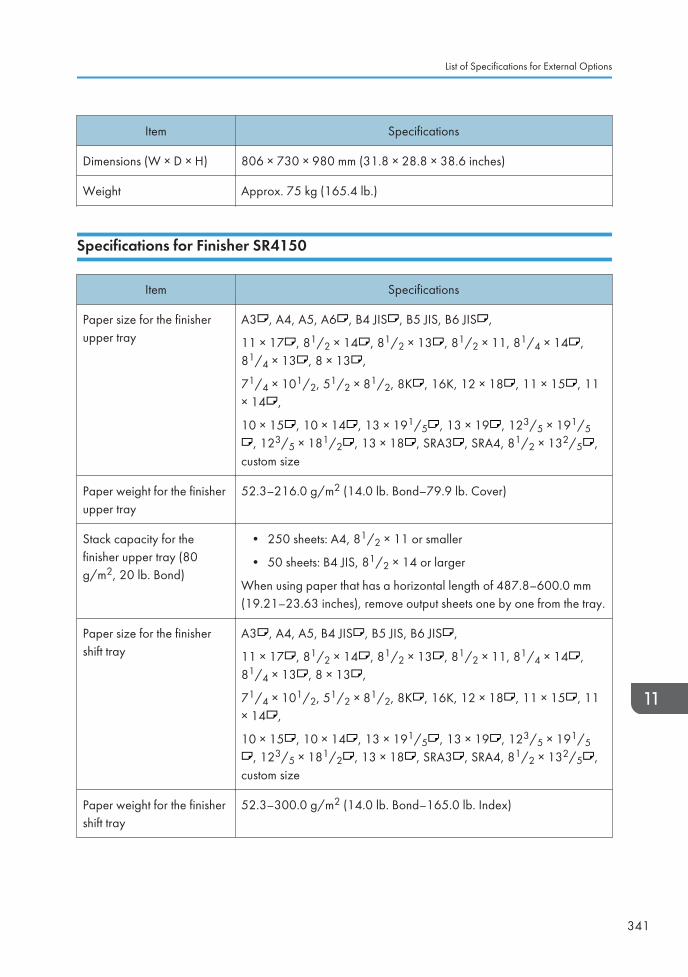
Item Specifications
Dimensions (W × D × H) 806 × 730 × 980 mm (31.8 × 28.8 × 38.6 inches)
Weight Approx. 75 kg (165.4 lb.)
Specifications for Finisher SR4150
Item Specifications
Paper size for the finisherupper tray
A3 , A4, A5, A6 , B4 JIS , B5 JIS, B6 JIS ,
11 × 17 , 81/2 × 14 , 81/2 × 13 , 81/2 × 11, 81/4 × 14 ,81/4 × 13 , 8 × 13 ,
71/4 × 101/2, 51/2 × 81/2, 8K , 16K, 12 × 18 , 11 × 15 , 11× 14 ,
10 × 15 , 10 × 14 , 13 × 191/5 , 13 × 19 , 123/5 × 191/5, 123/5 × 181/2 , 13 × 18 , SRA3 , SRA4, 81/2 × 132/5 ,
custom size
Paper weight for the finisherupper tray
52.3–216.0 g/m2 (14.0 lb. Bond–79.9 lb. Cover)
Stack capacity for thefinisher upper tray (80g/m2, 20 lb. Bond)
• 250 sheets: A4, 81/2 × 11 or smaller
• 50 sheets: B4 JIS, 81/2 × 14 or larger
When using paper that has a horizontal length of 487.8–600.0 mm(19.21–23.63 inches), remove output sheets one by one from the tray.
Paper size for the finishershift tray
A3 , A4, A5, B4 JIS , B5 JIS, B6 JIS ,
11 × 17 , 81/2 × 14 , 81/2 × 13 , 81/2 × 11, 81/4 × 14 ,81/4 × 13 , 8 × 13 ,
71/4 × 101/2, 51/2 × 81/2, 8K , 16K, 12 × 18 , 11 × 15 , 11× 14 ,
10 × 15 , 10 × 14 , 13 × 191/5 , 13 × 19 , 123/5 × 191/5, 123/5 × 181/2 , 13 × 18 , SRA3 , SRA4, 81/2 × 132/5 ,
custom size
Paper weight for the finishershift tray
52.3–300.0 g/m2 (14.0 lb. Bond–165.0 lb. Index)
List of Specifications for External Options
341
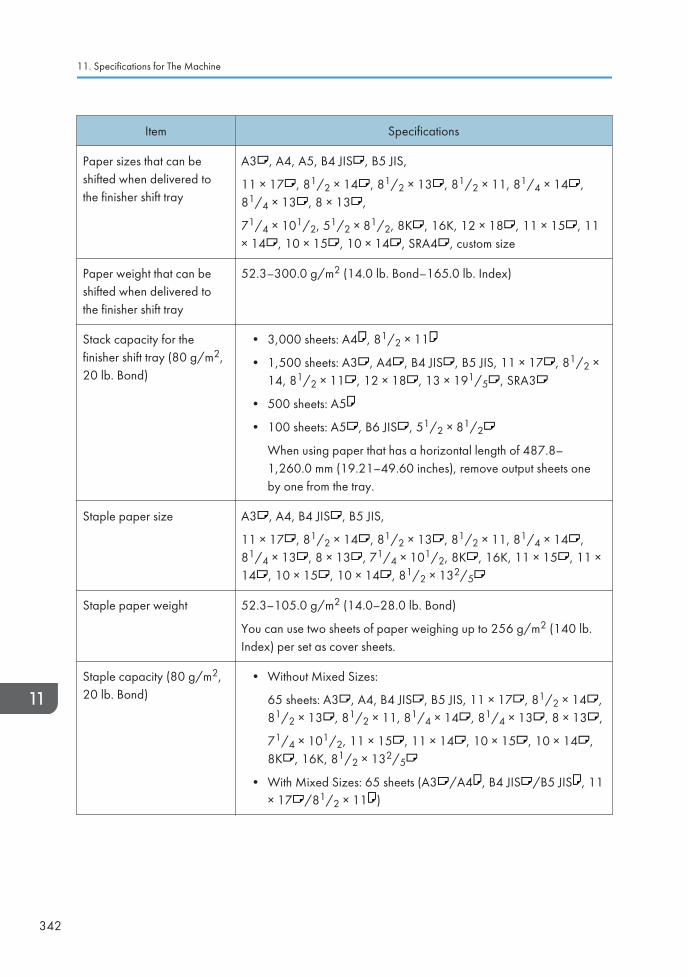
Item Specifications
Paper sizes that can beshifted when delivered tothe finisher shift tray
A3 , A4, A5, B4 JIS , B5 JIS,
11 × 17 , 81/2 × 14 , 81/2 × 13 , 81/2 × 11, 81/4 × 14 ,81/4 × 13 , 8 × 13 ,
71/4 × 101/2, 51/2 × 81/2, 8K , 16K, 12 × 18 , 11 × 15 , 11× 14 , 10 × 15 , 10 × 14 , SRA4 , custom size
Paper weight that can beshifted when delivered tothe finisher shift tray
52.3–300.0 g/m2 (14.0 lb. Bond–165.0 lb. Index)
Stack capacity for thefinisher shift tray (80 g/m2,20 lb. Bond)
• 3,000 sheets: A4 , 81/2 × 11
• 1,500 sheets: A3 , A4 , B4 JIS , B5 JIS, 11 × 17 , 81/2 ×14, 81/2 × 11 , 12 × 18 , 13 × 191/5 , SRA3
• 500 sheets: A5
• 100 sheets: A5 , B6 JIS , 51/2 × 81/2
When using paper that has a horizontal length of 487.8–1,260.0 mm (19.21–49.60 inches), remove output sheets oneby one from the tray.
Staple paper size A3 , A4, B4 JIS , B5 JIS,
11 × 17 , 81/2 × 14 , 81/2 × 13 , 81/2 × 11, 81/4 × 14 ,81/4 × 13 , 8 × 13 , 71/4 × 101/2, 8K , 16K, 11 × 15 , 11 ×14 , 10 × 15 , 10 × 14 , 81/2 × 132/5
Staple paper weight 52.3–105.0 g/m2 (14.0–28.0 lb. Bond)
You can use two sheets of paper weighing up to 256 g/m2 (140 lb.Index) per set as cover sheets.
Staple capacity (80 g/m2,20 lb. Bond)
• Without Mixed Sizes:
65 sheets: A3 , A4, B4 JIS , B5 JIS, 11 × 17 , 81/2 × 14 ,81/2 × 13 , 81/2 × 11, 81/4 × 14 , 81/4 × 13 , 8 × 13 ,
71/4 × 101/2, 11 × 15 , 11 × 14 , 10 × 15 , 10 × 14 ,8K , 16K, 81/2 × 132/5
• With Mixed Sizes: 65 sheets (A3 /A4 , B4 JIS /B5 JIS , 11× 17 /81/2 × 11 )
11. Specifications for The Machine
342
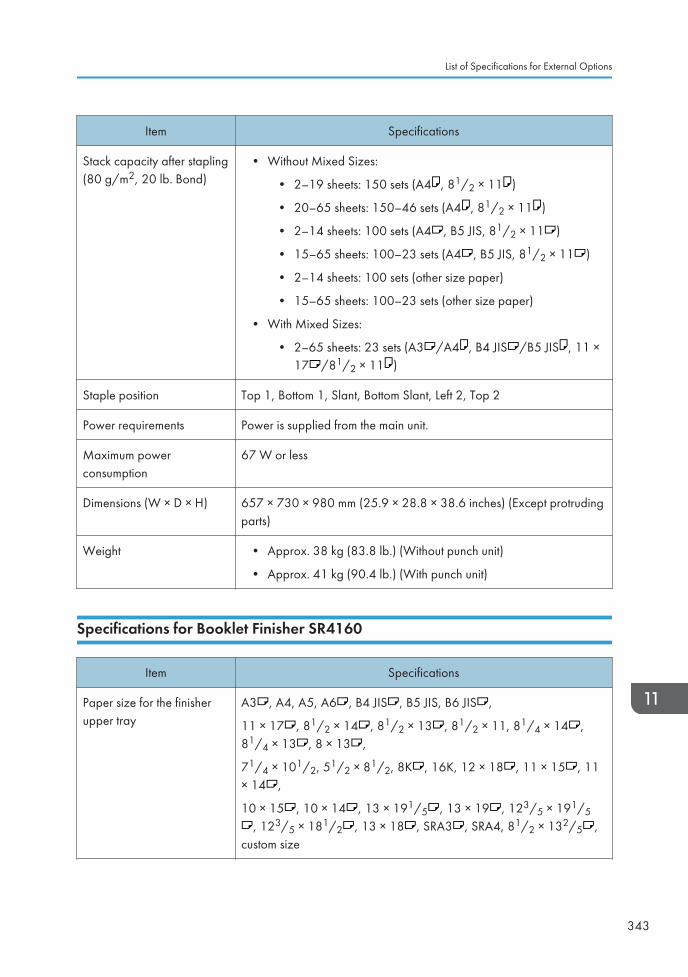
Item Specifications
Stack capacity after stapling(80 g/m2, 20 lb. Bond)
• Without Mixed Sizes:
• 2–19 sheets: 150 sets (A4 , 81/2 × 11 )
• 20–65 sheets: 150–46 sets (A4 , 81/2 × 11 )
• 2–14 sheets: 100 sets (A4 , B5 JIS, 81/2 × 11 )
• 15–65 sheets: 100–23 sets (A4 , B5 JIS, 81/2 × 11 )
• 2–14 sheets: 100 sets (other size paper)
• 15–65 sheets: 100–23 sets (other size paper)
• With Mixed Sizes:
• 2–65 sheets: 23 sets (A3 /A4 , B4 JIS /B5 JIS , 11 ×17 /81/2 × 11 )
Staple position Top 1, Bottom 1, Slant, Bottom Slant, Left 2, Top 2
Power requirements Power is supplied from the main unit.
Maximum powerconsumption
67 W or less
Dimensions (W × D × H) 657 × 730 × 980 mm (25.9 × 28.8 × 38.6 inches) (Except protrudingparts)
Weight • Approx. 38 kg (83.8 lb.) (Without punch unit)
• Approx. 41 kg (90.4 lb.) (With punch unit)
Specifications for Booklet Finisher SR4160
Item Specifications
Paper size for the finisherupper tray
A3 , A4, A5, A6 , B4 JIS , B5 JIS, B6 JIS ,
11 × 17 , 81/2 × 14 , 81/2 × 13 , 81/2 × 11, 81/4 × 14 ,81/4 × 13 , 8 × 13 ,
71/4 × 101/2, 51/2 × 81/2, 8K , 16K, 12 × 18 , 11 × 15 , 11× 14 ,
10 × 15 , 10 × 14 , 13 × 191/5 , 13 × 19 , 123/5 × 191/5, 123/5 × 181/2 , 13 × 18 , SRA3 , SRA4, 81/2 × 132/5 ,
custom size
List of Specifications for External Options
343
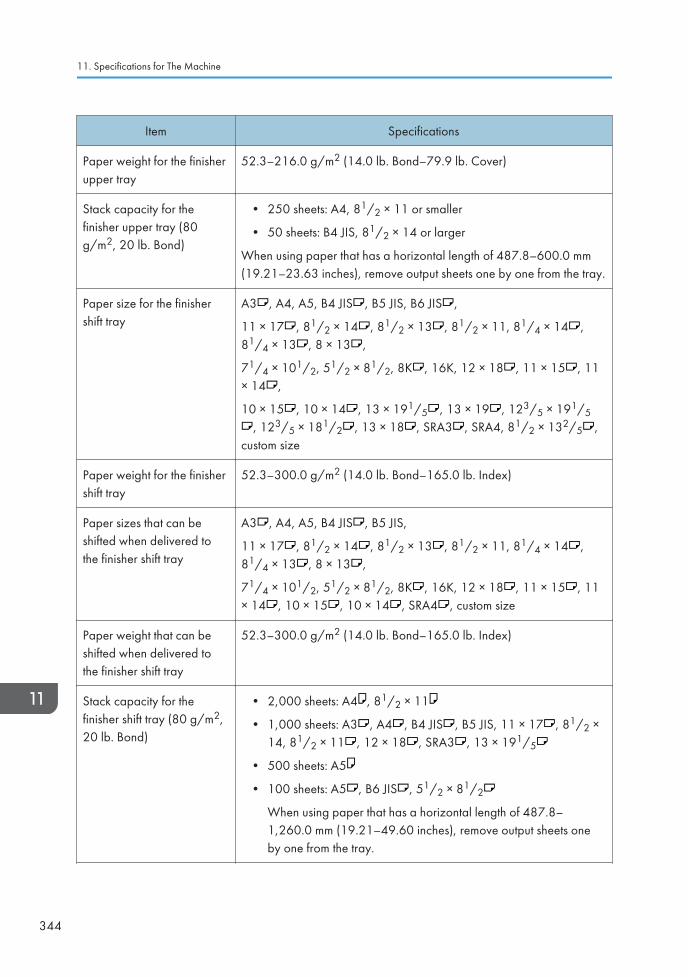
Item Specifications
Paper weight for the finisherupper tray
52.3–216.0 g/m2 (14.0 lb. Bond–79.9 lb. Cover)
Stack capacity for thefinisher upper tray (80g/m2, 20 lb. Bond)
• 250 sheets: A4, 81/2 × 11 or smaller
• 50 sheets: B4 JIS, 81/2 × 14 or larger
When using paper that has a horizontal length of 487.8–600.0 mm(19.21–23.63 inches), remove output sheets one by one from the tray.
Paper size for the finishershift tray
A3 , A4, A5, B4 JIS , B5 JIS, B6 JIS ,
11 × 17 , 81/2 × 14 , 81/2 × 13 , 81/2 × 11, 81/4 × 14 ,81/4 × 13 , 8 × 13 ,
71/4 × 101/2, 51/2 × 81/2, 8K , 16K, 12 × 18 , 11 × 15 , 11× 14 ,
10 × 15 , 10 × 14 , 13 × 191/5 , 13 × 19 , 123/5 × 191/5, 123/5 × 181/2 , 13 × 18 , SRA3 , SRA4, 81/2 × 132/5 ,
custom size
Paper weight for the finishershift tray
52.3–300.0 g/m2 (14.0 lb. Bond–165.0 lb. Index)
Paper sizes that can beshifted when delivered tothe finisher shift tray
A3 , A4, A5, B4 JIS , B5 JIS,
11 × 17 , 81/2 × 14 , 81/2 × 13 , 81/2 × 11, 81/4 × 14 ,81/4 × 13 , 8 × 13 ,
71/4 × 101/2, 51/2 × 81/2, 8K , 16K, 12 × 18 , 11 × 15 , 11× 14 , 10 × 15 , 10 × 14 , SRA4 , custom size
Paper weight that can beshifted when delivered tothe finisher shift tray
52.3–300.0 g/m2 (14.0 lb. Bond–165.0 lb. Index)
Stack capacity for thefinisher shift tray (80 g/m2,20 lb. Bond)
• 2,000 sheets: A4 , 81/2 × 11
• 1,000 sheets: A3 , A4 , B4 JIS , B5 JIS, 11 × 17 , 81/2 ×14, 81/2 × 11 , 12 × 18 , SRA3 , 13 × 191/5
• 500 sheets: A5
• 100 sheets: A5 , B6 JIS , 51/2 × 81/2
When using paper that has a horizontal length of 487.8–1,260.0 mm (19.21–49.60 inches), remove output sheets oneby one from the tray.
11. Specifications for The Machine
344
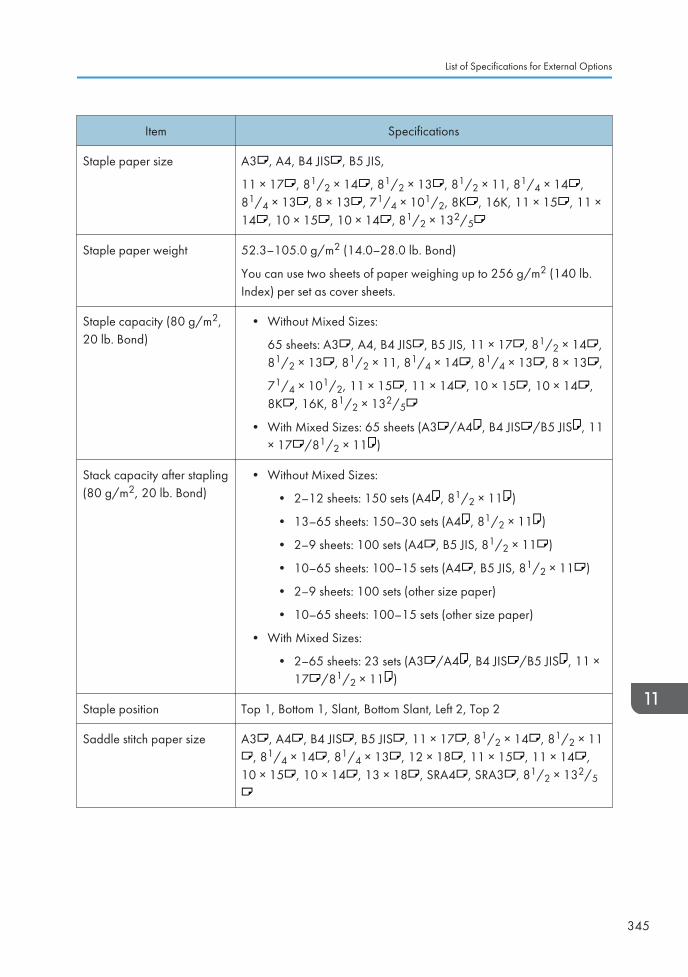
Item Specifications
Staple paper size A3 , A4, B4 JIS , B5 JIS,
11 × 17 , 81/2 × 14 , 81/2 × 13 , 81/2 × 11, 81/4 × 14 ,81/4 × 13 , 8 × 13 , 71/4 × 101/2, 8K , 16K, 11 × 15 , 11 ×14 , 10 × 15 , 10 × 14 , 81/2 × 132/5
Staple paper weight 52.3–105.0 g/m2 (14.0–28.0 lb. Bond)
You can use two sheets of paper weighing up to 256 g/m2 (140 lb.Index) per set as cover sheets.
Staple capacity (80 g/m2,20 lb. Bond)
• Without Mixed Sizes:
65 sheets: A3 , A4, B4 JIS , B5 JIS, 11 × 17 , 81/2 × 14 ,81/2 × 13 , 81/2 × 11, 81/4 × 14 , 81/4 × 13 , 8 × 13 ,
71/4 × 101/2, 11 × 15 , 11 × 14 , 10 × 15 , 10 × 14 ,8K , 16K, 81/2 × 132/5
• With Mixed Sizes: 65 sheets (A3 /A4 , B4 JIS /B5 JIS , 11× 17 /81/2 × 11 )
Stack capacity after stapling(80 g/m2, 20 lb. Bond)
• Without Mixed Sizes:
• 2–12 sheets: 150 sets (A4 , 81/2 × 11 )
• 13–65 sheets: 150–30 sets (A4 , 81/2 × 11 )
• 2–9 sheets: 100 sets (A4 , B5 JIS, 81/2 × 11 )
• 10–65 sheets: 100–15 sets (A4 , B5 JIS, 81/2 × 11 )
• 2–9 sheets: 100 sets (other size paper)
• 10–65 sheets: 100–15 sets (other size paper)
• With Mixed Sizes:
• 2–65 sheets: 23 sets (A3 /A4 , B4 JIS /B5 JIS , 11 ×17 /81/2 × 11 )
Staple position Top 1, Bottom 1, Slant, Bottom Slant, Left 2, Top 2
Saddle stitch paper size A3 , A4 , B4 JIS , B5 JIS , 11 × 17 , 81/2 × 14 , 81/2 × 11, 81/4 × 14 , 81/4 × 13 , 12 × 18 , 11 × 15 , 11 × 14 ,
10 × 15 , 10 × 14 , 13 × 18 , SRA4 , SRA3 , 81/2 × 132/5
List of Specifications for External Options
345
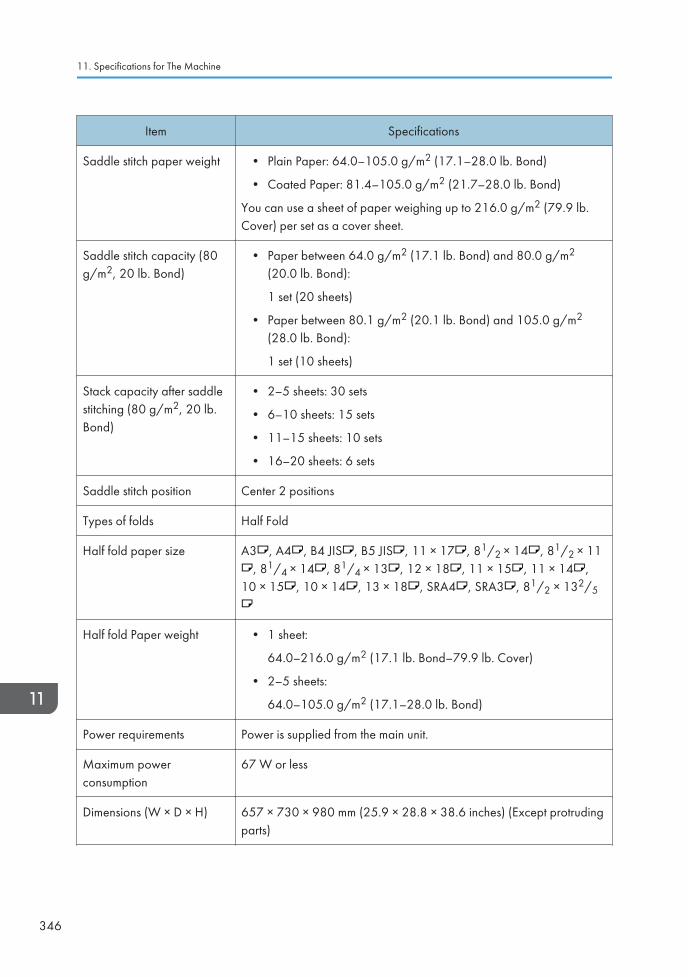
Item Specifications
Saddle stitch paper weight • Plain Paper: 64.0–105.0 g/m2 (17.1–28.0 lb. Bond)
• Coated Paper: 81.4–105.0 g/m2 (21.7–28.0 lb. Bond)
You can use a sheet of paper weighing up to 216.0 g/m2 (79.9 lb.Cover) per set as a cover sheet.
Saddle stitch capacity (80g/m2, 20 lb. Bond)
• Paper between 64.0 g/m2 (17.1 lb. Bond) and 80.0 g/m2
(20.0 lb. Bond):
1 set (20 sheets)
• Paper between 80.1 g/m2 (20.1 lb. Bond) and 105.0 g/m2
(28.0 lb. Bond):
1 set (10 sheets)
Stack capacity after saddlestitching (80 g/m2, 20 lb.Bond)
• 2–5 sheets: 30 sets
• 6–10 sheets: 15 sets
• 11–15 sheets: 10 sets
• 16–20 sheets: 6 sets
Saddle stitch position Center 2 positions
Types of folds Half Fold
Half fold paper size A3 , A4 , B4 JIS , B5 JIS , 11 × 17 , 81/2 × 14 , 81/2 × 11, 81/4 × 14 , 81/4 × 13 , 12 × 18 , 11 × 15 , 11 × 14 ,
10 × 15 , 10 × 14 , 13 × 18 , SRA4 , SRA3 , 81/2 × 132/5
Half fold Paper weight • 1 sheet:
64.0–216.0 g/m2 (17.1 lb. Bond–79.9 lb. Cover)
• 2–5 sheets:
64.0–105.0 g/m2 (17.1–28.0 lb. Bond)
Power requirements Power is supplied from the main unit.
Maximum powerconsumption
67 W or less
Dimensions (W × D × H) 657 × 730 × 980 mm (25.9 × 28.8 × 38.6 inches) (Except protrudingparts)
11. Specifications for The Machine
346
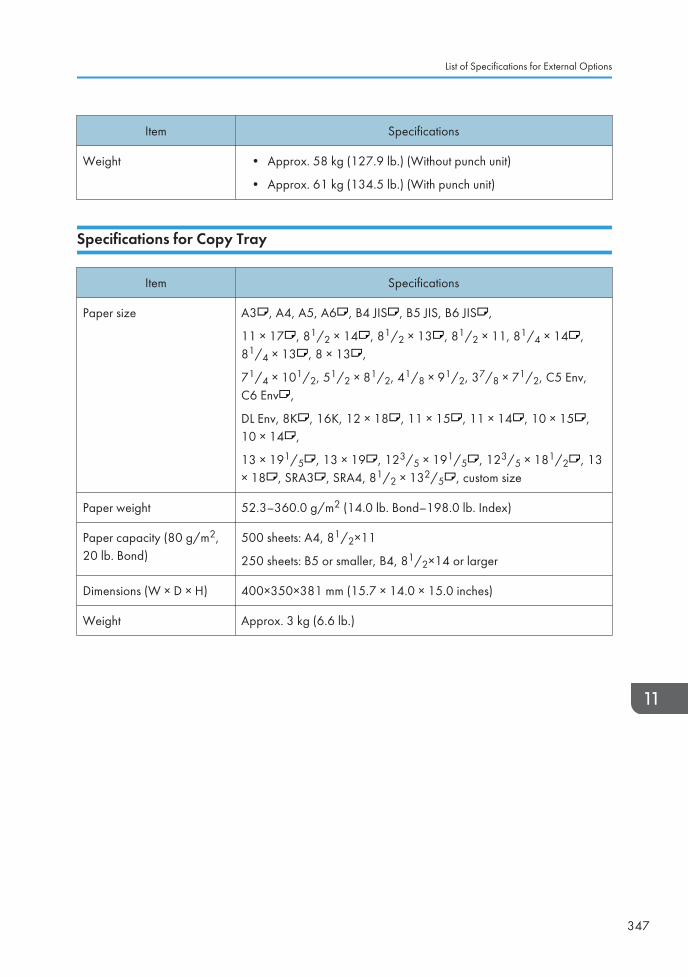
Item Specifications
Weight • Approx. 58 kg (127.9 lb.) (Without punch unit)
• Approx. 61 kg (134.5 lb.) (With punch unit)
Specifications for Copy Tray
Item Specifications
Paper size A3 , A4, A5, A6 , B4 JIS , B5 JIS, B6 JIS ,
11 × 17 , 81/2 × 14 , 81/2 × 13 , 81/2 × 11, 81/4 × 14 ,81/4 × 13 , 8 × 13 ,
71/4 × 101/2, 51/2 × 81/2, 41/8 × 91/2, 37/8 × 71/2, C5 Env,C6 Env ,
DL Env, 8K , 16K, 12 × 18 , 11 × 15 , 11 × 14 , 10 × 15 ,10 × 14 ,
13 × 191/5 , 13 × 19 , 123/5 × 191/5 , 123/5 × 181/2 , 13× 18 , SRA3 , SRA4, 81/2 × 132/5 , custom size
Paper weight 52.3–360.0 g/m2 (14.0 lb. Bond–198.0 lb. Index)
Paper capacity (80 g/m2,20 lb. Bond)
500 sheets: A4, 81/2×11
250 sheets: B5 or smaller, B4, 81/2×14 or larger
Dimensions (W × D × H) 400×350×381 mm (15.7 × 14.0 × 15.0 inches)
Weight Approx. 3 kg (6.6 lb.)
List of Specifications for External Options
347
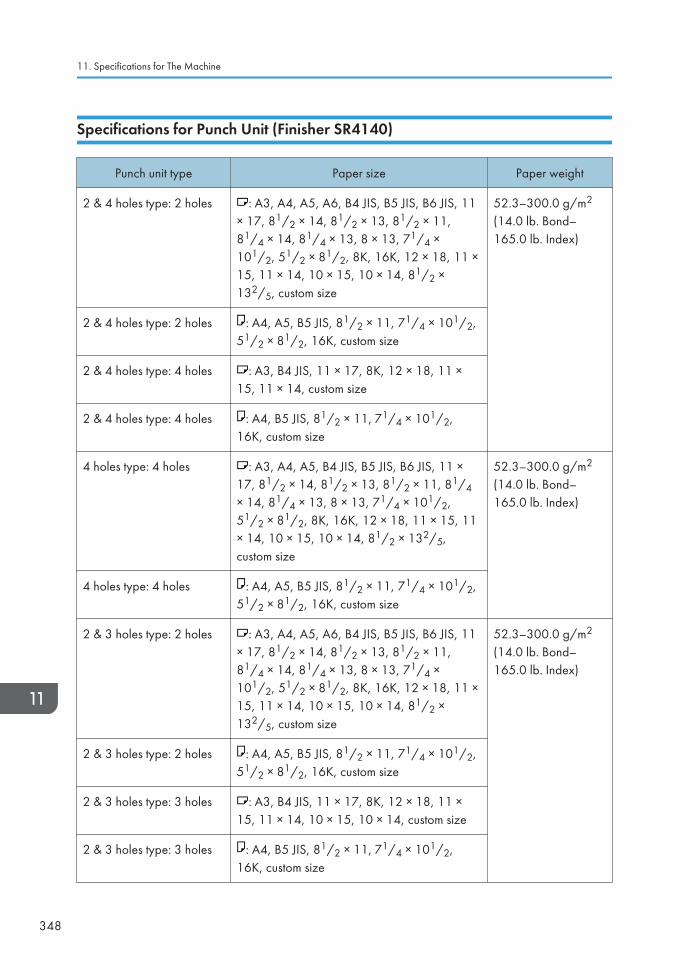
Specifications for Punch Unit (Finisher SR4140)
Punch unit type Paper size Paper weight
2 & 4 holes type: 2 holes : A3, A4, A5, A6, B4 JIS, B5 JIS, B6 JIS, 11× 17, 81/2 × 14, 81/2 × 13, 81/2 × 11,81/4 × 14, 81/4 × 13, 8 × 13, 71/4 ×101/2, 51/2 × 81/2, 8K, 16K, 12 × 18, 11 ×15, 11 × 14, 10 × 15, 10 × 14, 81/2 ×132/5, custom size
52.3–300.0 g/m2
(14.0 lb. Bond–165.0 lb. Index)
2 & 4 holes type: 2 holes : A4, A5, B5 JIS, 81/2 × 11, 71/4 × 101/2,51/2 × 81/2, 16K, custom size
2 & 4 holes type: 4 holes : A3, B4 JIS, 11 × 17, 8K, 12 × 18, 11 ×15, 11 × 14, custom size
2 & 4 holes type: 4 holes : A4, B5 JIS, 81/2 × 11, 71/4 × 101/2,16K, custom size
4 holes type: 4 holes : A3, A4, A5, B4 JIS, B5 JIS, B6 JIS, 11 ×17, 81/2 × 14, 81/2 × 13, 81/2 × 11, 81/4× 14, 81/4 × 13, 8 × 13, 71/4 × 101/2,51/2 × 81/2, 8K, 16K, 12 × 18, 11 × 15, 11× 14, 10 × 15, 10 × 14, 81/2 × 132/5,custom size
52.3–300.0 g/m2
(14.0 lb. Bond–165.0 lb. Index)
4 holes type: 4 holes : A4, A5, B5 JIS, 81/2 × 11, 71/4 × 101/2,51/2 × 81/2, 16K, custom size
2 & 3 holes type: 2 holes : A3, A4, A5, A6, B4 JIS, B5 JIS, B6 JIS, 11× 17, 81/2 × 14, 81/2 × 13, 81/2 × 11,81/4 × 14, 81/4 × 13, 8 × 13, 71/4 ×101/2, 51/2 × 81/2, 8K, 16K, 12 × 18, 11 ×15, 11 × 14, 10 × 15, 10 × 14, 81/2 ×132/5, custom size
52.3–300.0 g/m2
(14.0 lb. Bond–165.0 lb. Index)
2 & 3 holes type: 2 holes : A4, A5, B5 JIS, 81/2 × 11, 71/4 × 101/2,51/2 × 81/2, 16K, custom size
2 & 3 holes type: 3 holes : A3, B4 JIS, 11 × 17, 8K, 12 × 18, 11 ×15, 11 × 14, 10 × 15, 10 × 14, custom size
2 & 3 holes type: 3 holes : A4, B5 JIS, 81/2 × 11, 71/4 × 101/2,16K, custom size
11. Specifications for The Machine
348
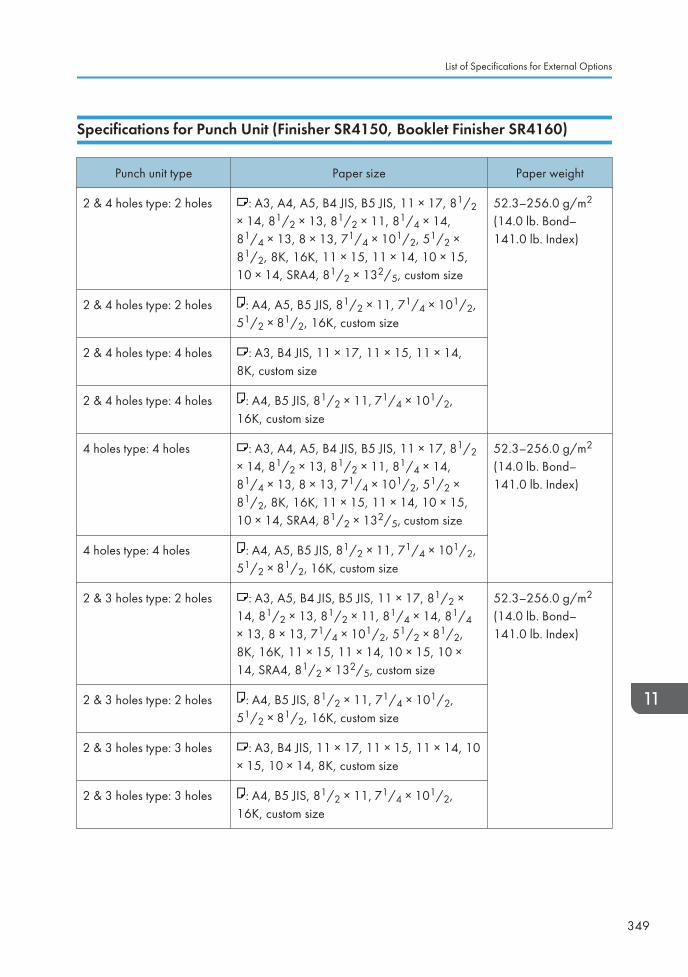
Specifications for Punch Unit (Finisher SR4150, Booklet Finisher SR4160)
Punch unit type Paper size Paper weight
2 & 4 holes type: 2 holes : A3, A4, A5, B4 JIS, B5 JIS, 11 × 17, 81/2× 14, 81/2 × 13, 81/2 × 11, 81/4 × 14,81/4 × 13, 8 × 13, 71/4 × 101/2, 51/2 ×81/2, 8K, 16K, 11 × 15, 11 × 14, 10 × 15,10 × 14, SRA4, 81/2 × 132/5, custom size
52.3–256.0 g/m2
(14.0 lb. Bond–141.0 lb. Index)
2 & 4 holes type: 2 holes : A4, A5, B5 JIS, 81/2 × 11, 71/4 × 101/2,51/2 × 81/2, 16K, custom size
2 & 4 holes type: 4 holes : A3, B4 JIS, 11 × 17, 11 × 15, 11 × 14,8K, custom size
2 & 4 holes type: 4 holes : A4, B5 JIS, 81/2 × 11, 71/4 × 101/2,16K, custom size
4 holes type: 4 holes : A3, A4, A5, B4 JIS, B5 JIS, 11 × 17, 81/2× 14, 81/2 × 13, 81/2 × 11, 81/4 × 14,81/4 × 13, 8 × 13, 71/4 × 101/2, 51/2 ×81/2, 8K, 16K, 11 × 15, 11 × 14, 10 × 15,10 × 14, SRA4, 81/2 × 132/5, custom size
52.3–256.0 g/m2
(14.0 lb. Bond–141.0 lb. Index)
4 holes type: 4 holes : A4, A5, B5 JIS, 81/2 × 11, 71/4 × 101/2,51/2 × 81/2, 16K, custom size
2 & 3 holes type: 2 holes : A3, A5, B4 JIS, B5 JIS, 11 × 17, 81/2 ×14, 81/2 × 13, 81/2 × 11, 81/4 × 14, 81/4× 13, 8 × 13, 71/4 × 101/2, 51/2 × 81/2,8K, 16K, 11 × 15, 11 × 14, 10 × 15, 10 ×14, SRA4, 81/2 × 132/5, custom size
52.3–256.0 g/m2
(14.0 lb. Bond–141.0 lb. Index)
2 & 3 holes type: 2 holes : A4, B5 JIS, 81/2 × 11, 71/4 × 101/2,51/2 × 81/2, 16K, custom size
2 & 3 holes type: 3 holes : A3, B4 JIS, 11 × 17, 11 × 15, 11 × 14, 10× 15, 10 × 14, 8K, custom size
2 & 3 holes type: 3 holes : A4, B5 JIS, 81/2 × 11, 71/4 × 101/2,16K, custom size
List of Specifications for External Options
349
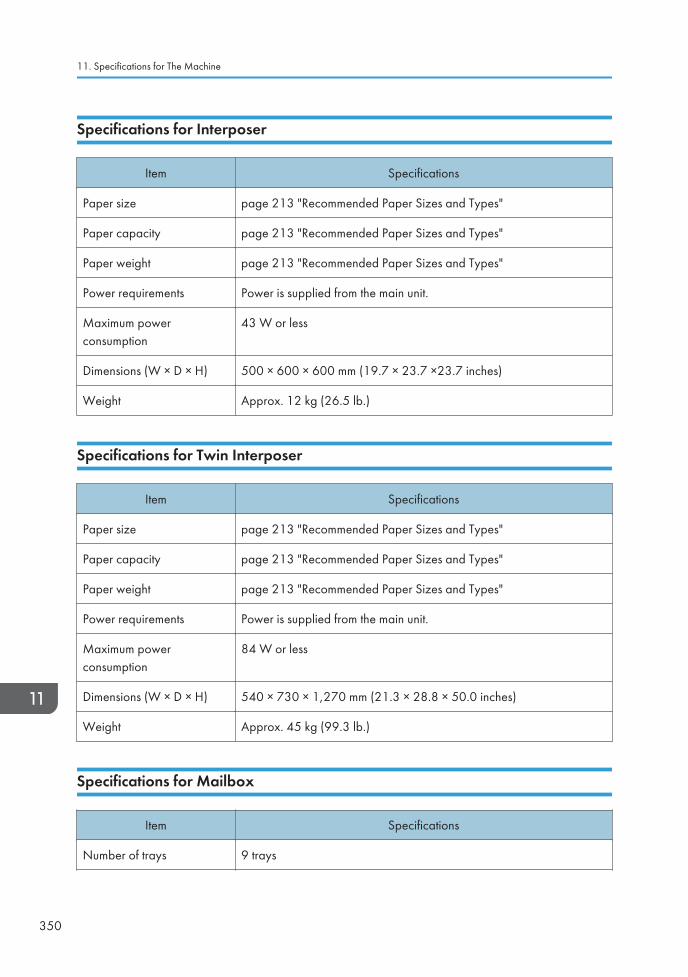
Specifications for Interposer
Item Specifications
Paper size page 213 "Recommended Paper Sizes and Types"
Paper capacity page 213 "Recommended Paper Sizes and Types"
Paper weight page 213 "Recommended Paper Sizes and Types"
Power requirements Power is supplied from the main unit.
Maximum powerconsumption
43 W or less
Dimensions (W × D × H) 500 × 600 × 600 mm (19.7 × 23.7 ×23.7 inches)
Weight Approx. 12 kg (26.5 lb.)
Specifications for Twin Interposer
Item Specifications
Paper size page 213 "Recommended Paper Sizes and Types"
Paper capacity page 213 "Recommended Paper Sizes and Types"
Paper weight page 213 "Recommended Paper Sizes and Types"
Power requirements Power is supplied from the main unit.
Maximum powerconsumption
84 W or less
Dimensions (W × D × H) 540 × 730 × 1,270 mm (21.3 × 28.8 × 50.0 inches)
Weight Approx. 45 kg (99.3 lb.)
Specifications for Mailbox
Item Specifications
Number of trays 9 trays
11. Specifications for The Machine
350
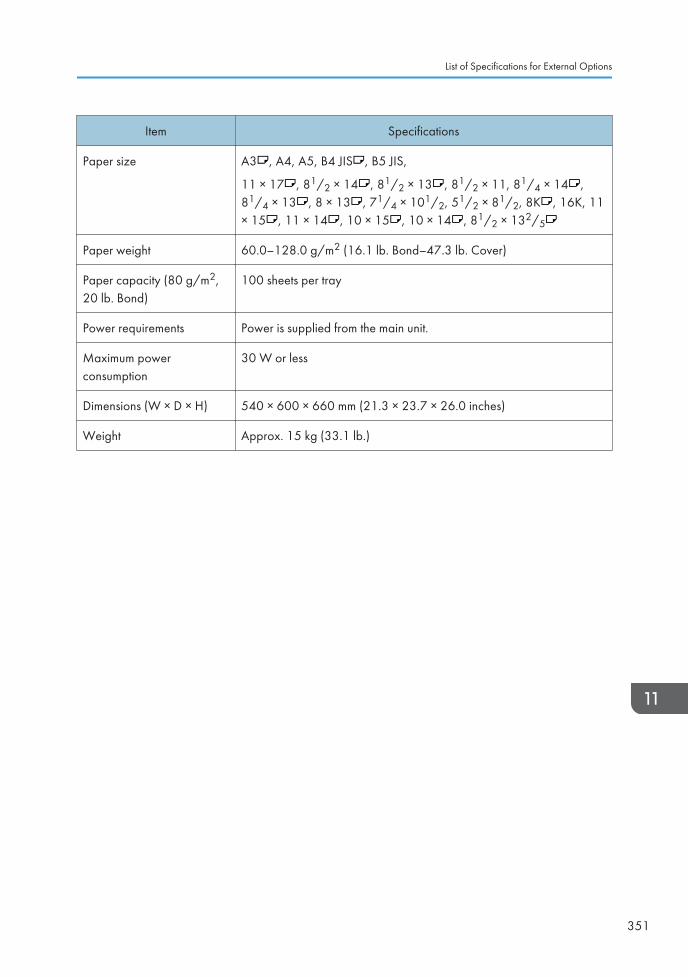
Item Specifications
Paper size A3 , A4, A5, B4 JIS , B5 JIS,
11 × 17 , 81/2 × 14 , 81/2 × 13 , 81/2 × 11, 81/4 × 14 ,81/4 × 13 , 8 × 13 , 71/4 × 101/2, 51/2 × 81/2, 8K , 16K, 11× 15 , 11 × 14 , 10 × 15 , 10 × 14 , 81/2 × 132/5
Paper weight 60.0–128.0 g/m2 (16.1 lb. Bond–47.3 lb. Cover)
Paper capacity (80 g/m2,20 lb. Bond)
100 sheets per tray
Power requirements Power is supplied from the main unit.
Maximum powerconsumption
30 W or less
Dimensions (W × D × H) 540 × 600 × 660 mm (21.3 × 23.7 × 26.0 inches)
Weight Approx. 15 kg (33.1 lb.)
List of Specifications for External Options
351
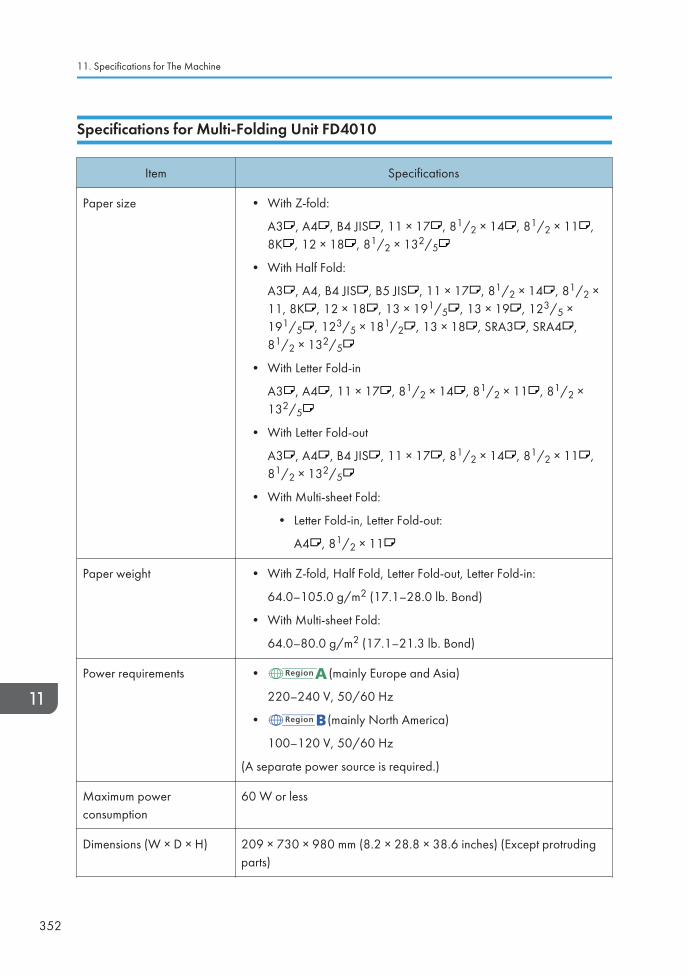
Specifications for Multi-Folding Unit FD4010
Item Specifications
Paper size • With Z-fold:
A3 , A4 , B4 JIS , 11 × 17 , 81/2 × 14 , 81/2 × 11 ,8K , 12 × 18 , 81/2 × 132/5
• With Half Fold:
A3 , A4, B4 JIS , B5 JIS , 11 × 17 , 81/2 × 14 , 81/2 ×11, 8K , 12 × 18 , 13 × 191/5 , 13 × 19 , 123/5 ×191/5 , 123/5 × 181/2 , 13 × 18 , SRA3 , SRA4 ,81/2 × 132/5
• With Letter Fold-in
A3 , A4 , 11 × 17 , 81/2 × 14 , 81/2 × 11 , 81/2 ×132/5
• With Letter Fold-out
A3 , A4 , B4 JIS , 11 × 17 , 81/2 × 14 , 81/2 × 11 ,81/2 × 132/5
• With Multi-sheet Fold:
• Letter Fold-in, Letter Fold-out:
A4 , 81/2 × 11
Paper weight • With Z-fold, Half Fold, Letter Fold-out, Letter Fold-in:
64.0–105.0 g/m2 (17.1–28.0 lb. Bond)
• With Multi-sheet Fold:
64.0–80.0 g/m2 (17.1–21.3 lb. Bond)
Power requirements • (mainly Europe and Asia)
220–240 V, 50/60 Hz
• (mainly North America)
100–120 V, 50/60 Hz
(A separate power source is required.)
Maximum powerconsumption
60 W or less
Dimensions (W × D × H) 209 × 730 × 980 mm (8.2 × 28.8 × 38.6 inches) (Except protrudingparts)
11. Specifications for The Machine
352
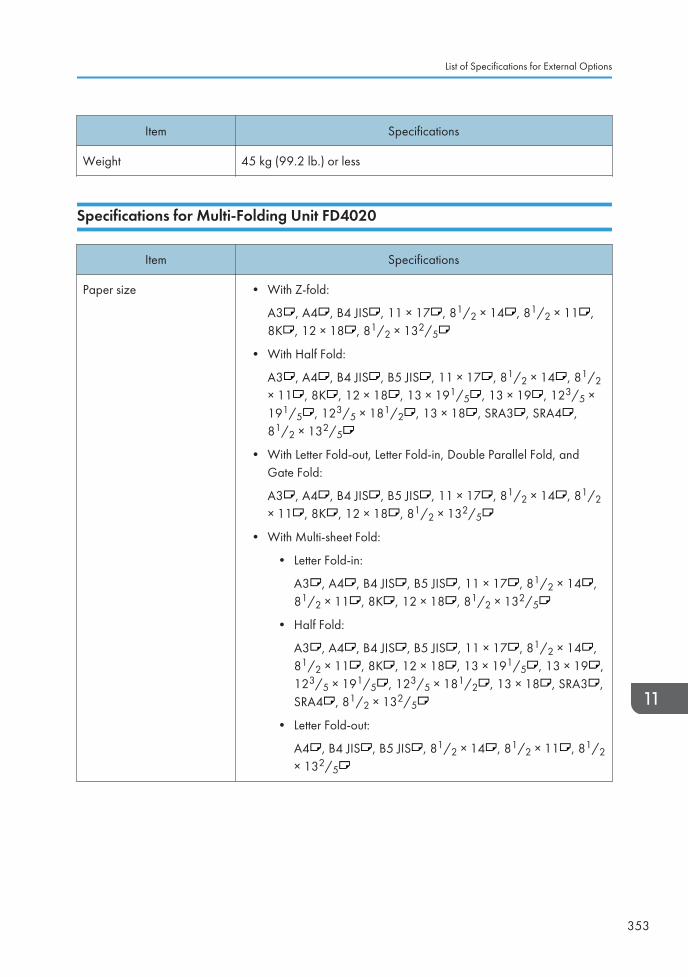
Item Specifications
Weight 45 kg (99.2 lb.) or less
Specifications for Multi-Folding Unit FD4020
Item Specifications
Paper size • With Z-fold:
A3 , A4 , B4 JIS , 11 × 17 , 81/2 × 14 , 81/2 × 11 ,8K , 12 × 18 , 81/2 × 132/5
• With Half Fold:
A3 , A4 , B4 JIS , B5 JIS , 11 × 17 , 81/2 × 14 , 81/2× 11 , 8K , 12 × 18 , 13 × 191/5 , 13 × 19 , 123/5 ×191/5 , 123/5 × 181/2 , 13 × 18 , SRA3 , SRA4 ,81/2 × 132/5
• With Letter Fold-out, Letter Fold-in, Double Parallel Fold, andGate Fold:
A3 , A4 , B4 JIS , B5 JIS , 11 × 17 , 81/2 × 14 , 81/2× 11 , 8K , 12 × 18 , 81/2 × 132/5
• With Multi-sheet Fold:
• Letter Fold-in:
A3 , A4 , B4 JIS , B5 JIS , 11 × 17 , 81/2 × 14 ,81/2 × 11 , 8K , 12 × 18 , 81/2 × 132/5
• Half Fold:
A3 , A4 , B4 JIS , B5 JIS , 11 × 17 , 81/2 × 14 ,81/2 × 11 , 8K , 12 × 18 , 13 × 191/5 , 13 × 19 ,123/5 × 191/5 , 123/5 × 181/2 , 13 × 18 , SRA3 ,SRA4 , 81/2 × 132/5
• Letter Fold-out:
A4 , B4 JIS , B5 JIS , 81/2 × 14 , 81/2 × 11 , 81/2× 132/5
List of Specifications for External Options
353
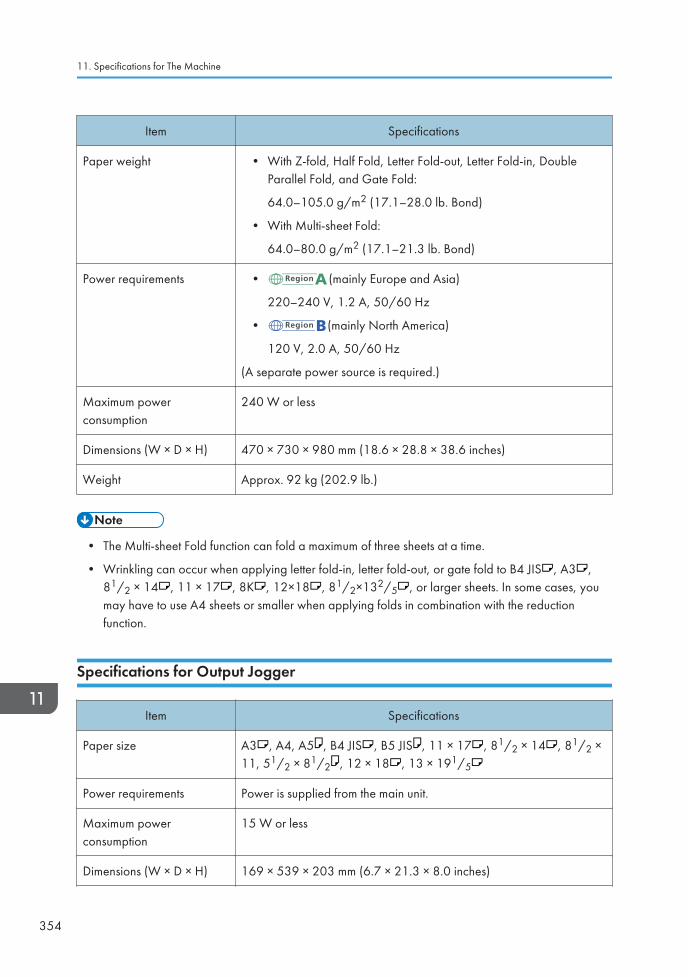
Item Specifications
Paper weight • With Z-fold, Half Fold, Letter Fold-out, Letter Fold-in, DoubleParallel Fold, and Gate Fold:
64.0–105.0 g/m2 (17.1–28.0 lb. Bond)
• With Multi-sheet Fold:
64.0–80.0 g/m2 (17.1–21.3 lb. Bond)
Power requirements • (mainly Europe and Asia)
220–240 V, 1.2 A, 50/60 Hz
• (mainly North America)
120 V, 2.0 A, 50/60 Hz
(A separate power source is required.)
Maximum powerconsumption
240 W or less
Dimensions (W × D × H) 470 × 730 × 980 mm (18.6 × 28.8 × 38.6 inches)
Weight Approx. 92 kg (202.9 lb.)
• The Multi-sheet Fold function can fold a maximum of three sheets at a time.
• Wrinkling can occur when applying letter fold-in, letter fold-out, or gate fold to B4 JIS , A3 ,81/2 × 14 , 11 × 17 , 8K , 12×18 , 81/2×132/5 , or larger sheets. In some cases, youmay have to use A4 sheets or smaller when applying folds in combination with the reductionfunction.
Specifications for Output Jogger
Item Specifications
Paper size A3 , A4, A5 , B4 JIS , B5 JIS , 11 × 17 , 81/2 × 14 , 81/2 ×11, 51/2 × 81/2 , 12 × 18 , 13 × 191/5
Power requirements Power is supplied from the main unit.
Maximum powerconsumption
15 W or less
Dimensions (W × D × H) 169 × 539 × 203 mm (6.7 × 21.3 × 8.0 inches)
11. Specifications for The Machine
354
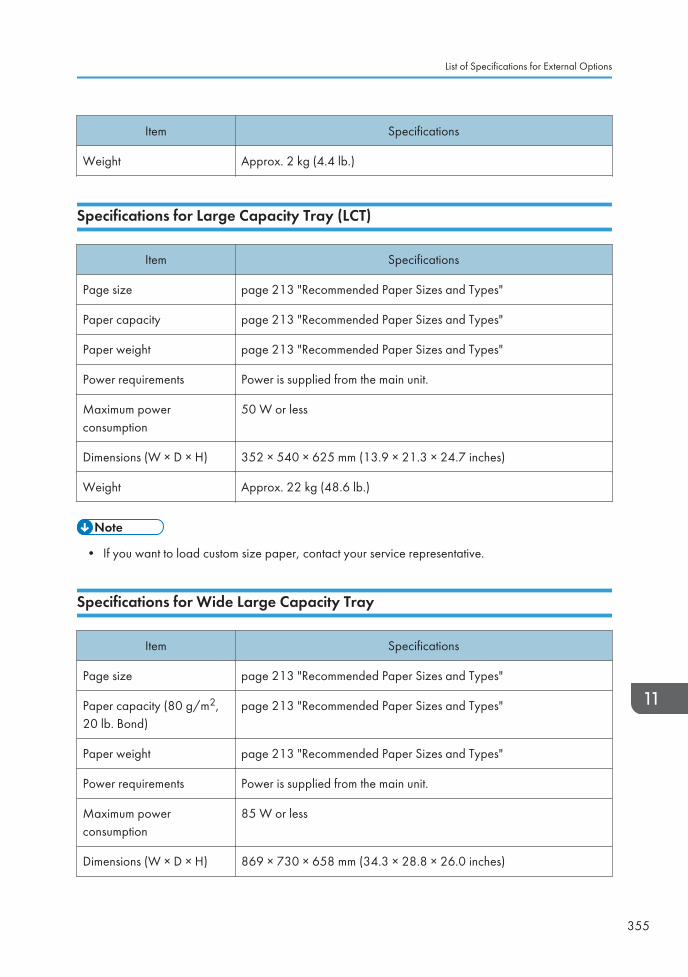
Item Specifications
Weight Approx. 2 kg (4.4 lb.)
Specifications for Large Capacity Tray (LCT)
Item Specifications
Page size page 213 "Recommended Paper Sizes and Types"
Paper capacity page 213 "Recommended Paper Sizes and Types"
Paper weight page 213 "Recommended Paper Sizes and Types"
Power requirements Power is supplied from the main unit.
Maximum powerconsumption
50 W or less
Dimensions (W × D × H) 352 × 540 × 625 mm (13.9 × 21.3 × 24.7 inches)
Weight Approx. 22 kg (48.6 lb.)
• If you want to load custom size paper, contact your service representative.
Specifications for Wide Large Capacity Tray
Item Specifications
Page size page 213 "Recommended Paper Sizes and Types"
Paper capacity (80 g/m2,20 lb. Bond)
page 213 "Recommended Paper Sizes and Types"
Paper weight page 213 "Recommended Paper Sizes and Types"
Power requirements Power is supplied from the main unit.
Maximum powerconsumption
85 W or less
Dimensions (W × D × H) 869 × 730 × 658 mm (34.3 × 28.8 × 26.0 inches)
List of Specifications for External Options
355
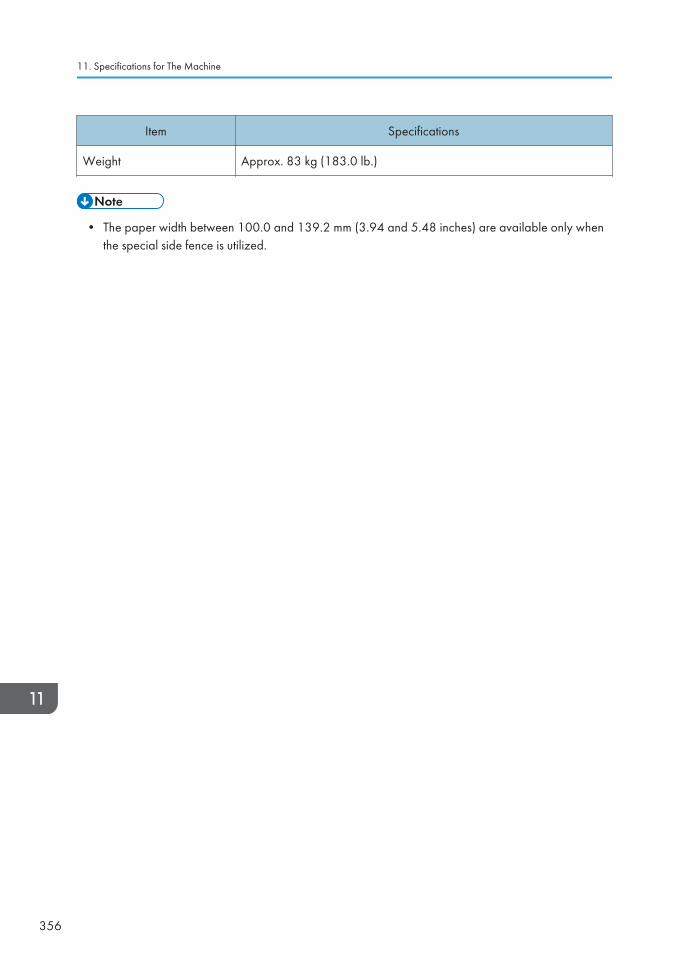
Item Specifications
Weight Approx. 83 kg (183.0 lb.)
• The paper width between 100.0 and 139.2 mm (3.94 and 5.48 inches) are available only whenthe special side fence is utilized.
11. Specifications for The Machine
356
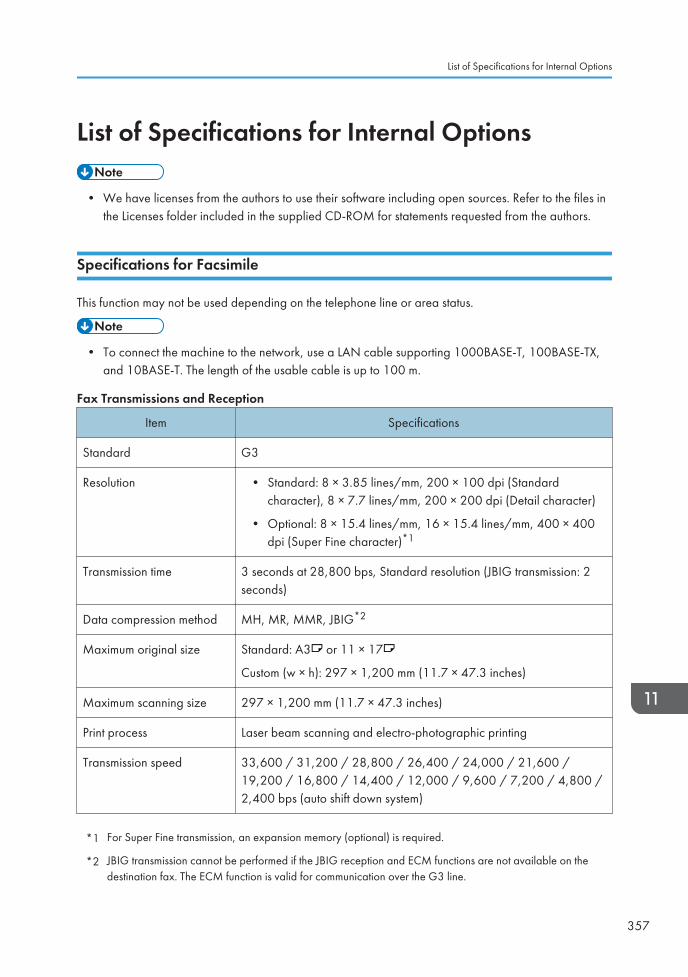
List of Specifications for Internal Options
• We have licenses from the authors to use their software including open sources. Refer to the files inthe Licenses folder included in the supplied CD-ROM for statements requested from the authors.
Specifications for Facsimile
This function may not be used depending on the telephone line or area status.
• To connect the machine to the network, use a LAN cable supporting 1000BASE-T, 100BASE-TX,and 10BASE-T. The length of the usable cable is up to 100 m.
Fax Transmissions and Reception
Item Specifications
Standard G3
Resolution • Standard: 8 × 3.85 lines/mm, 200 × 100 dpi (Standardcharacter), 8 × 7.7 lines/mm, 200 × 200 dpi (Detail character)
• Optional: 8 × 15.4 lines/mm, 16 × 15.4 lines/mm, 400 × 400dpi (Super Fine character)*1
Transmission time 3 seconds at 28,800 bps, Standard resolution (JBIG transmission: 2seconds)
Data compression method MH, MR, MMR, JBIG*2
Maximum original size Standard: A3 or 11 × 17
Custom (w × h): 297 × 1,200 mm (11.7 × 47.3 inches)
Maximum scanning size 297 × 1,200 mm (11.7 × 47.3 inches)
Print process Laser beam scanning and electro-photographic printing
Transmission speed 33,600 / 31,200 / 28,800 / 26,400 / 24,000 / 21,600 /19,200 / 16,800 / 14,400 / 12,000 / 9,600 / 7,200 / 4,800 /2,400 bps (auto shift down system)
*1 For Super Fine transmission, an expansion memory (optional) is required.
*2 JBIG transmission cannot be performed if the JBIG reception and ECM functions are not available on thedestination fax. The ECM function is valid for communication over the G3 line.
List of Specifications for Internal Options
357
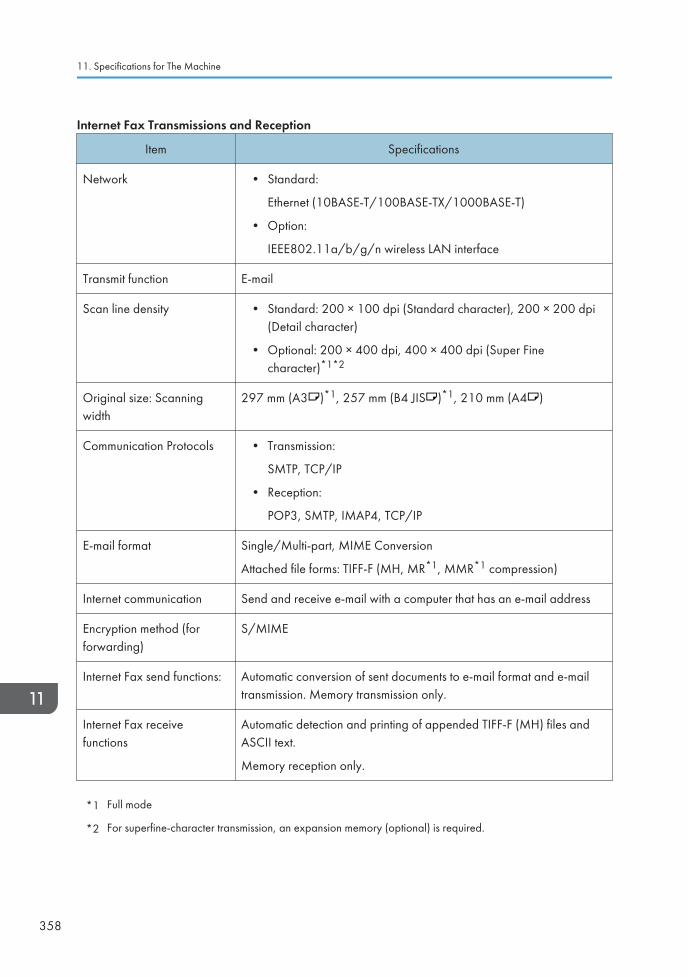
Internet Fax Transmissions and Reception
Item Specifications
Network • Standard:
Ethernet (10BASE-T/100BASE-TX/1000BASE-T)
• Option:
IEEE802.11a/b/g/n wireless LAN interface
Transmit function E-mail
Scan line density • Standard: 200 × 100 dpi (Standard character), 200 × 200 dpi(Detail character)
• Optional: 200 × 400 dpi, 400 × 400 dpi (Super Finecharacter)*1*2
Original size: Scanningwidth
297 mm (A3 )*1, 257 mm (B4 JIS )*1, 210 mm (A4 )
Communication Protocols • Transmission:
SMTP, TCP/IP
• Reception:
POP3, SMTP, IMAP4, TCP/IP
E-mail format Single/Multi-part, MIME Conversion
Attached file forms: TIFF-F (MH, MR*1, MMR*1 compression)
Internet communication Send and receive e-mail with a computer that has an e-mail address
Encryption method (forforwarding)
S/MIME
Internet Fax send functions: Automatic conversion of sent documents to e-mail format and e-mailtransmission. Memory transmission only.
Internet Fax receivefunctions
Automatic detection and printing of appended TIFF-F (MH) files andASCII text.
Memory reception only.
*1 Full mode
*2 For superfine-character transmission, an expansion memory (optional) is required.
11. Specifications for The Machine
358
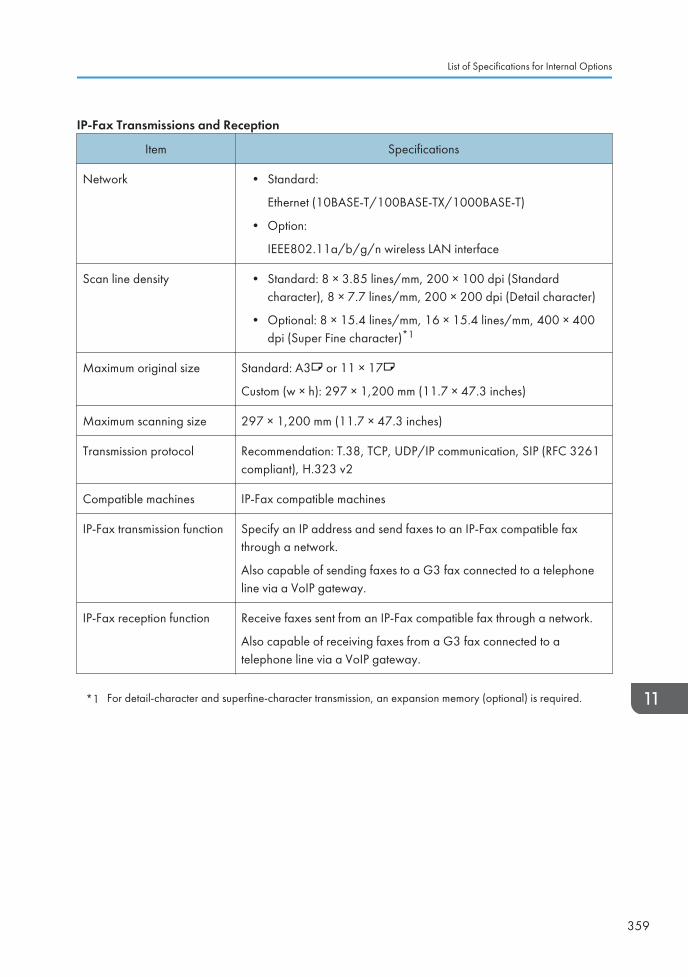
IP-Fax Transmissions and Reception
Item Specifications
Network • Standard:
Ethernet (10BASE-T/100BASE-TX/1000BASE-T)
• Option:
IEEE802.11a/b/g/n wireless LAN interface
Scan line density • Standard: 8 × 3.85 lines/mm, 200 × 100 dpi (Standardcharacter), 8 × 7.7 lines/mm, 200 × 200 dpi (Detail character)
• Optional: 8 × 15.4 lines/mm, 16 × 15.4 lines/mm, 400 × 400dpi (Super Fine character)*1
Maximum original size Standard: A3 or 11 × 17
Custom (w × h): 297 × 1,200 mm (11.7 × 47.3 inches)
Maximum scanning size 297 × 1,200 mm (11.7 × 47.3 inches)
Transmission protocol Recommendation: T.38, TCP, UDP/IP communication, SIP (RFC 3261compliant), H.323 v2
Compatible machines IP-Fax compatible machines
IP-Fax transmission function Specify an IP address and send faxes to an IP-Fax compatible faxthrough a network.
Also capable of sending faxes to a G3 fax connected to a telephoneline via a VoIP gateway.
IP-Fax reception function Receive faxes sent from an IP-Fax compatible fax through a network.
Also capable of receiving faxes from a G3 fax connected to atelephone line via a VoIP gateway.
*1 For detail-character and superfine-character transmission, an expansion memory (optional) is required.
List of Specifications for Internal Options
359
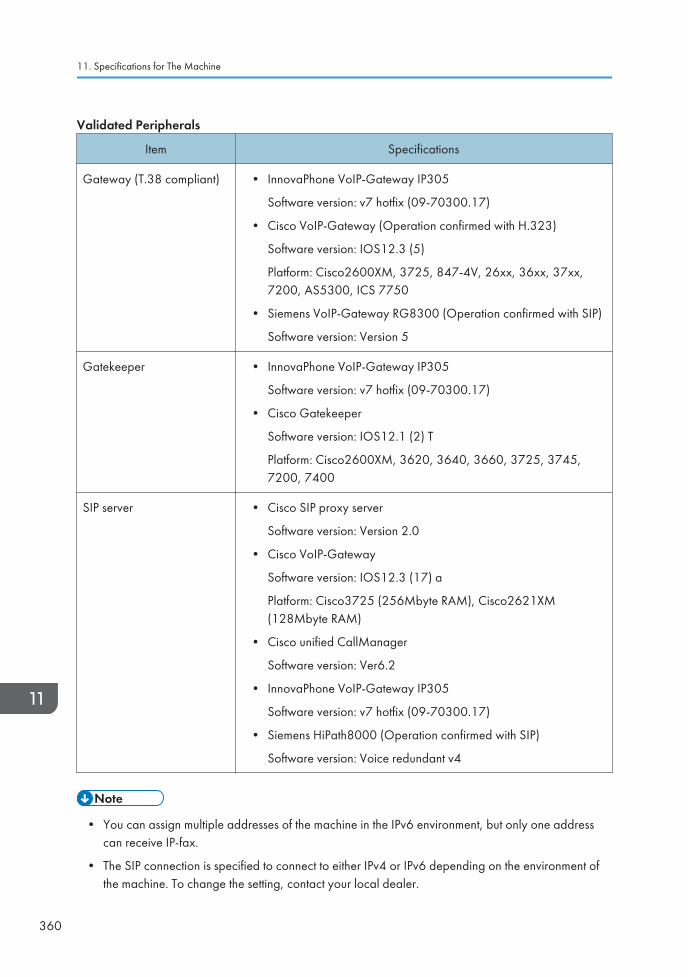
Validated Peripherals
Item Specifications
Gateway (T.38 compliant) • InnovaPhone VoIP-Gateway IP305
Software version: v7 hotfix (09-70300.17)
• Cisco VoIP-Gateway (Operation confirmed with H.323)
Software version: IOS12.3 (5)
Platform: Cisco2600XM, 3725, 847-4V, 26xx, 36xx, 37xx,7200, AS5300, ICS 7750
• Siemens VoIP-Gateway RG8300 (Operation confirmed with SIP)
Software version: Version 5
Gatekeeper • InnovaPhone VoIP-Gateway IP305
Software version: v7 hotfix (09-70300.17)
• Cisco Gatekeeper
Software version: IOS12.1 (2) T
Platform: Cisco2600XM, 3620, 3640, 3660, 3725, 3745,7200, 7400
SIP server • Cisco SIP proxy server
Software version: Version 2.0
• Cisco VoIP-Gateway
Software version: IOS12.3 (17) a
Platform: Cisco3725 (256Mbyte RAM), Cisco2621XM(128Mbyte RAM)
• Cisco unified CallManager
Software version: Ver6.2
• InnovaPhone VoIP-Gateway IP305
Software version: v7 hotfix (09-70300.17)
• Siemens HiPath8000 (Operation confirmed with SIP)
Software version: Voice redundant v4
• You can assign multiple addresses of the machine in the IPv6 environment, but only one addresscan receive IP-fax.
• The SIP connection is specified to connect to either IPv4 or IPv6 depending on the environment ofthe machine. To change the setting, contact your local dealer.
11. Specifications for The Machine
360
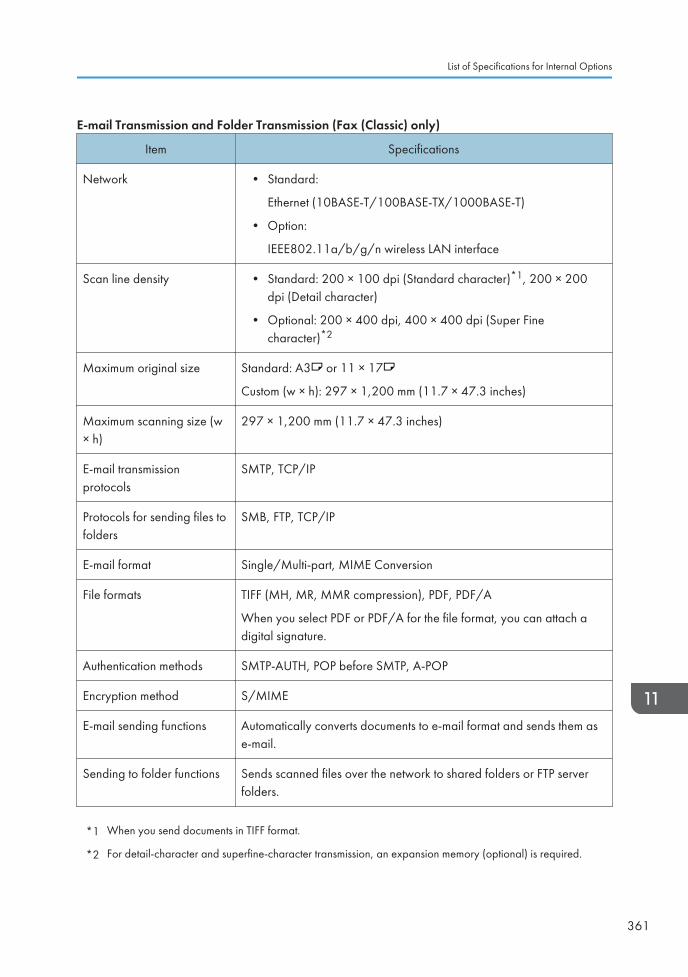
E-mail Transmission and Folder Transmission (Fax (Classic) only)
Item Specifications
Network • Standard:
Ethernet (10BASE-T/100BASE-TX/1000BASE-T)
• Option:
IEEE802.11a/b/g/n wireless LAN interface
Scan line density • Standard: 200 × 100 dpi (Standard character)*1, 200 × 200dpi (Detail character)
• Optional: 200 × 400 dpi, 400 × 400 dpi (Super Finecharacter)*2
Maximum original size Standard: A3 or 11 × 17
Custom (w × h): 297 × 1,200 mm (11.7 × 47.3 inches)
Maximum scanning size (w× h)
297 × 1,200 mm (11.7 × 47.3 inches)
E-mail transmissionprotocols
SMTP, TCP/IP
Protocols for sending files tofolders
SMB, FTP, TCP/IP
E-mail format Single/Multi-part, MIME Conversion
File formats TIFF (MH, MR, MMR compression), PDF, PDF/A
When you select PDF or PDF/A for the file format, you can attach adigital signature.
Authentication methods SMTP-AUTH, POP before SMTP, A-POP
Encryption method S/MIME
E-mail sending functions Automatically converts documents to e-mail format and sends them ase-mail.
Sending to folder functions Sends scanned files over the network to shared folders or FTP serverfolders.
*1 When you send documents in TIFF format.
*2 For detail-character and superfine-character transmission, an expansion memory (optional) is required.
List of Specifications for Internal Options
361
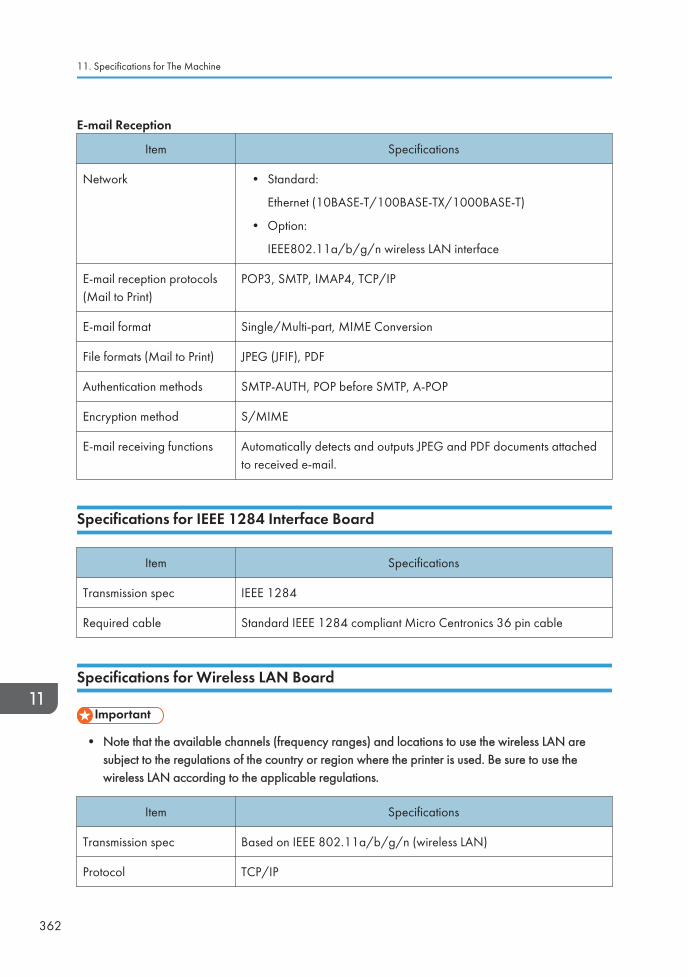
E-mail Reception
Item Specifications
Network • Standard:
Ethernet (10BASE-T/100BASE-TX/1000BASE-T)
• Option:
IEEE802.11a/b/g/n wireless LAN interface
E-mail reception protocols(Mail to Print)
POP3, SMTP, IMAP4, TCP/IP
E-mail format Single/Multi-part, MIME Conversion
File formats (Mail to Print) JPEG (JFIF), PDF
Authentication methods SMTP-AUTH, POP before SMTP, A-POP
Encryption method S/MIME
E-mail receiving functions Automatically detects and outputs JPEG and PDF documents attachedto received e-mail.
Specifications for IEEE 1284 Interface Board
Item Specifications
Transmission spec IEEE 1284
Required cable Standard IEEE 1284 compliant Micro Centronics 36 pin cable
Specifications for Wireless LAN Board
• Note that the available channels (frequency ranges) and locations to use the wireless LAN aresubject to the regulations of the country or region where the printer is used. Be sure to use thewireless LAN according to the applicable regulations.
Item Specifications
Transmission spec Based on IEEE 802.11a/b/g/n (wireless LAN)
Protocol TCP/IP
11. Specifications for The Machine
362
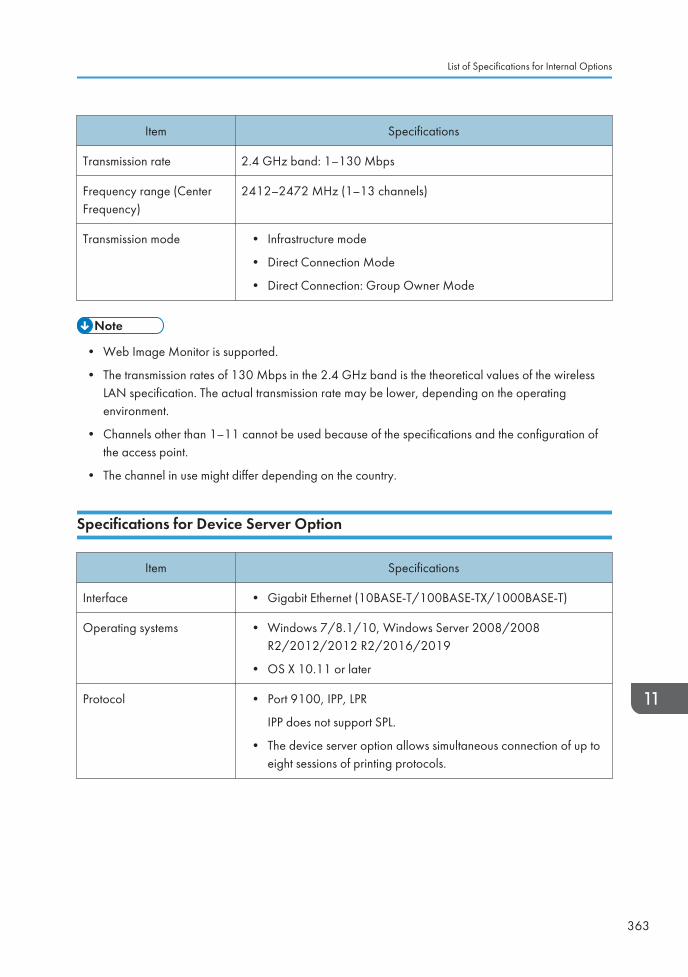
Item Specifications
Transmission rate 2.4 GHz band: 1–130 Mbps
Frequency range (CenterFrequency)
2412–2472 MHz (1–13 channels)
Transmission mode • Infrastructure mode
• Direct Connection Mode
• Direct Connection: Group Owner Mode
• Web Image Monitor is supported.
• The transmission rates of 130 Mbps in the 2.4 GHz band is the theoretical values of the wirelessLAN specification. The actual transmission rate may be lower, depending on the operatingenvironment.
• Channels other than 1–11 cannot be used because of the specifications and the configuration ofthe access point.
• The channel in use might differ depending on the country.
Specifications for Device Server Option
Item Specifications
Interface • Gigabit Ethernet (10BASE-T/100BASE-TX/1000BASE-T)
Operating systems • Windows 7/8.1/10, Windows Server 2008/2008R2/2012/2012 R2/2016/2019
• OS X 10.11 or later
Protocol • Port 9100, IPP, LPR
IPP does not support SPL.
• The device server option allows simultaneous connection of up toeight sessions of printing protocols.
List of Specifications for Internal Options
363
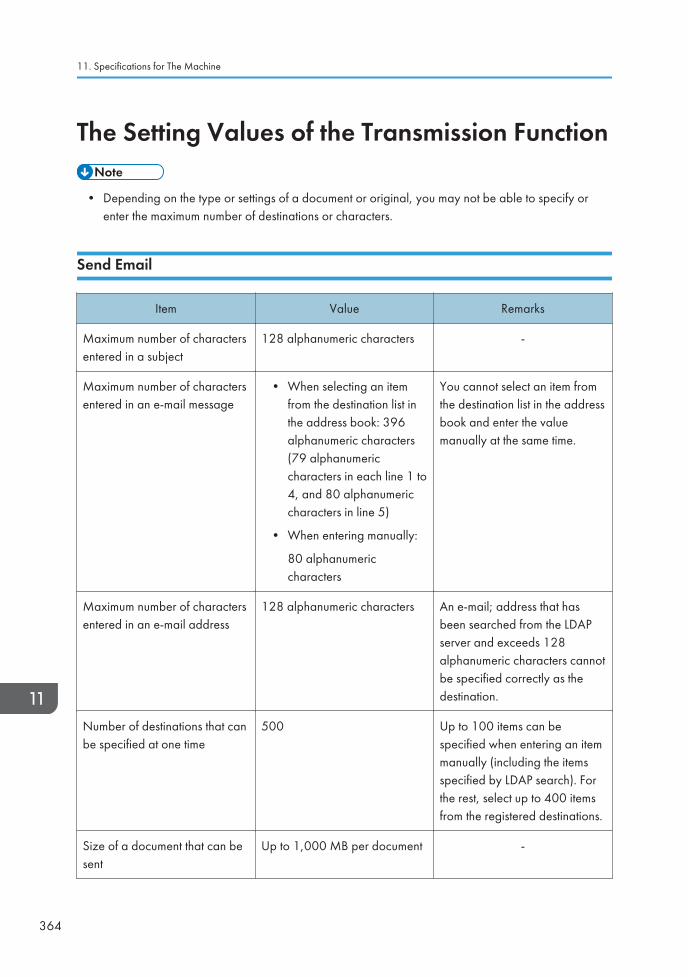
The Setting Values of the Transmission Function
• Depending on the type or settings of a document or original, you may not be able to specify orenter the maximum number of destinations or characters.
Send Email
Item Value Remarks
Maximum number of charactersentered in a subject
128 alphanumeric characters -
Maximum number of charactersentered in an e-mail message
• When selecting an itemfrom the destination list inthe address book: 396alphanumeric characters(79 alphanumericcharacters in each line 1 to4, and 80 alphanumericcharacters in line 5)
• When entering manually:
80 alphanumericcharacters
You cannot select an item fromthe destination list in the addressbook and enter the valuemanually at the same time.
Maximum number of charactersentered in an e-mail address
128 alphanumeric characters An e-mail; address that hasbeen searched from the LDAPserver and exceeds 128alphanumeric characters cannotbe specified correctly as thedestination.
Number of destinations that canbe specified at one time
500 Up to 100 items can bespecified when entering an itemmanually (including the itemsspecified by LDAP search). Forthe rest, select up to 400 itemsfrom the registered destinations.
Size of a document that can besent
Up to 1,000 MB per document -
11. Specifications for The Machine
364
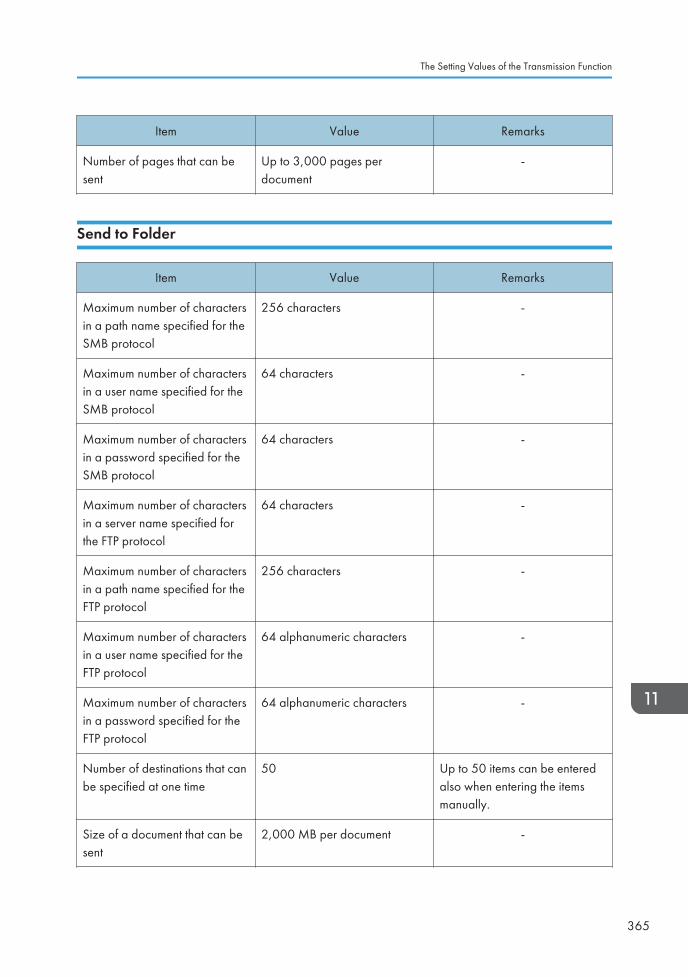
Item Value Remarks
Number of pages that can besent
Up to 3,000 pages perdocument
-
Send to Folder
Item Value Remarks
Maximum number of charactersin a path name specified for theSMB protocol
256 characters -
Maximum number of charactersin a user name specified for theSMB protocol
64 characters -
Maximum number of charactersin a password specified for theSMB protocol
64 characters -
Maximum number of charactersin a server name specified forthe FTP protocol
64 characters -
Maximum number of charactersin a path name specified for theFTP protocol
256 characters -
Maximum number of charactersin a user name specified for theFTP protocol
64 alphanumeric characters -
Maximum number of charactersin a password specified for theFTP protocol
64 alphanumeric characters -
Number of destinations that canbe specified at one time
50 Up to 50 items can be enteredalso when entering the itemsmanually.
Size of a document that can besent
2,000 MB per document -
The Setting Values of the Transmission Function
365
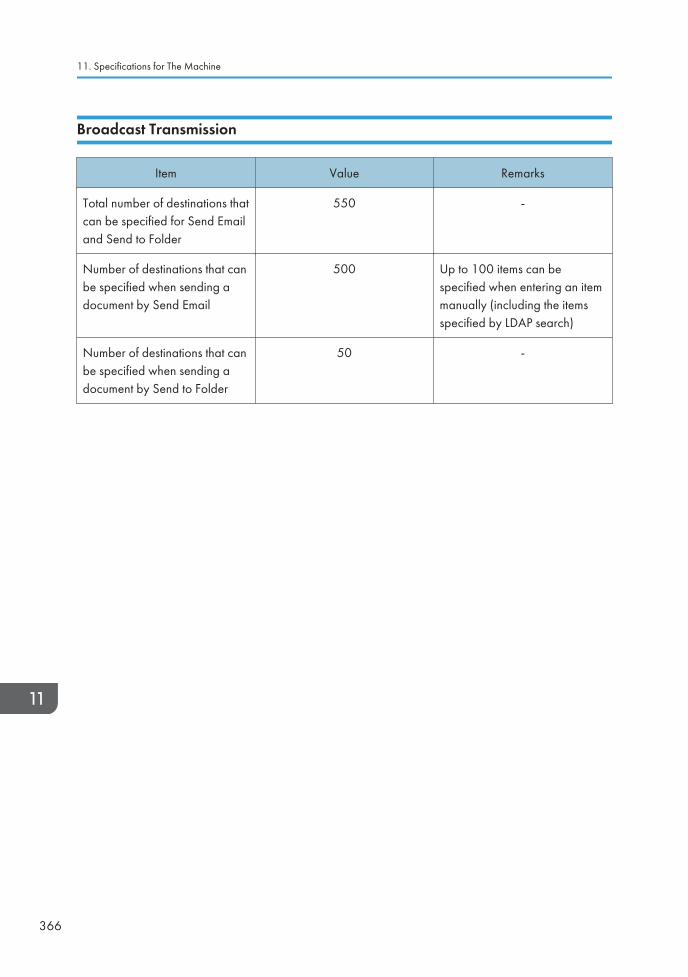
Broadcast Transmission
Item Value Remarks
Total number of destinations thatcan be specified for Send Emailand Send to Folder
550 -
Number of destinations that canbe specified when sending adocument by Send Email
500 Up to 100 items can bespecified when entering an itemmanually (including the itemsspecified by LDAP search)
Number of destinations that canbe specified when sending adocument by Send to Folder
50 -
11. Specifications for The Machine
366
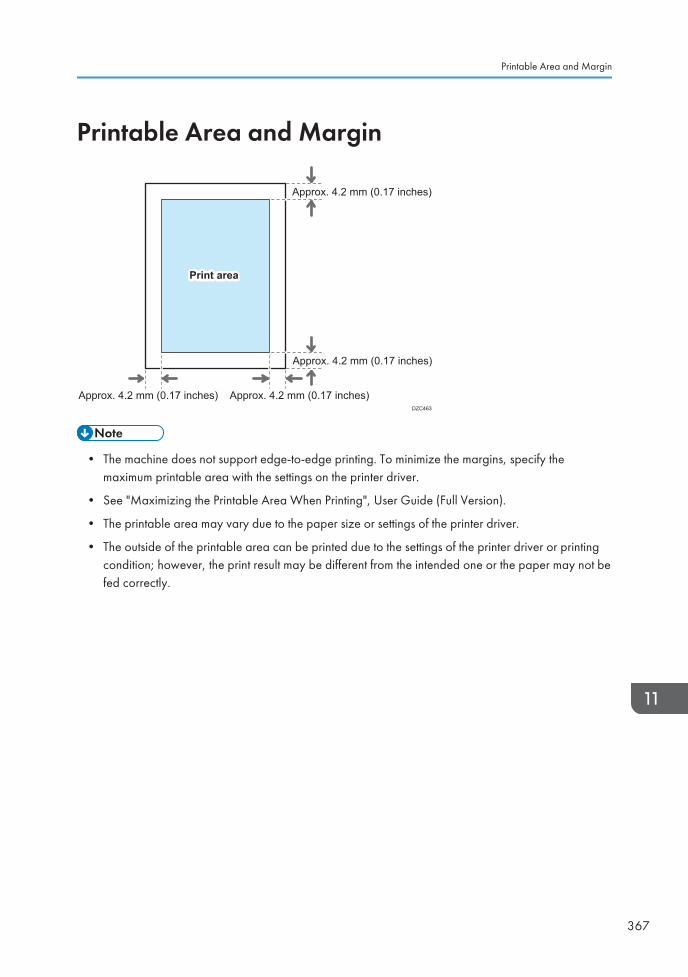
Printable Area and Margin
Approx. 4.2 mm (0.17 inches)
DZC463
Approx. 4.2 mm (0.17 inches) Approx. 4.2 mm (0.17 inches)
Approx. 4.2 mm (0.17 inches)
Print area
• The machine does not support edge-to-edge printing. To minimize the margins, specify themaximum printable area with the settings on the printer driver.
• See "Maximizing the Printable Area When Printing", User Guide (Full Version).
• The printable area may vary due to the paper size or settings of the printer driver.
• The outside of the printable area can be printed due to the settings of the printer driver or printingcondition; however, the print result may be different from the intended one or the paper may not befed correctly.
Printable Area and Margin
367
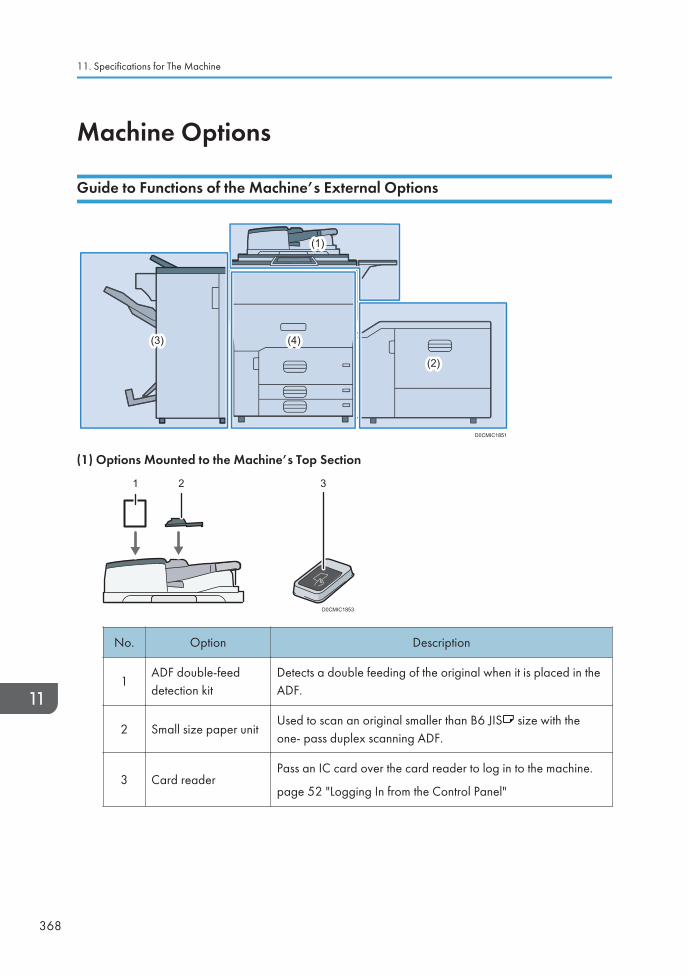
Machine Options
Guide to Functions of the Machine’s External Options
D0CMIC1851
(1)(1)
(4)(3) (5)(4)
(3)(2)
(1) Options Mounted to the Machine’s Top Section
D0CMIC1853
21 3
No. Option Description
1ADF double-feeddetection kit
Detects a double feeding of the original when it is placed in theADF.
2 Small size paper unitUsed to scan an original smaller than B6 JIS size with theone- pass duplex scanning ADF.
3 Card readerPass an IC card over the card reader to log in to the machine.
page 52 "Logging In from the Control Panel"
11. Specifications for The Machine
368
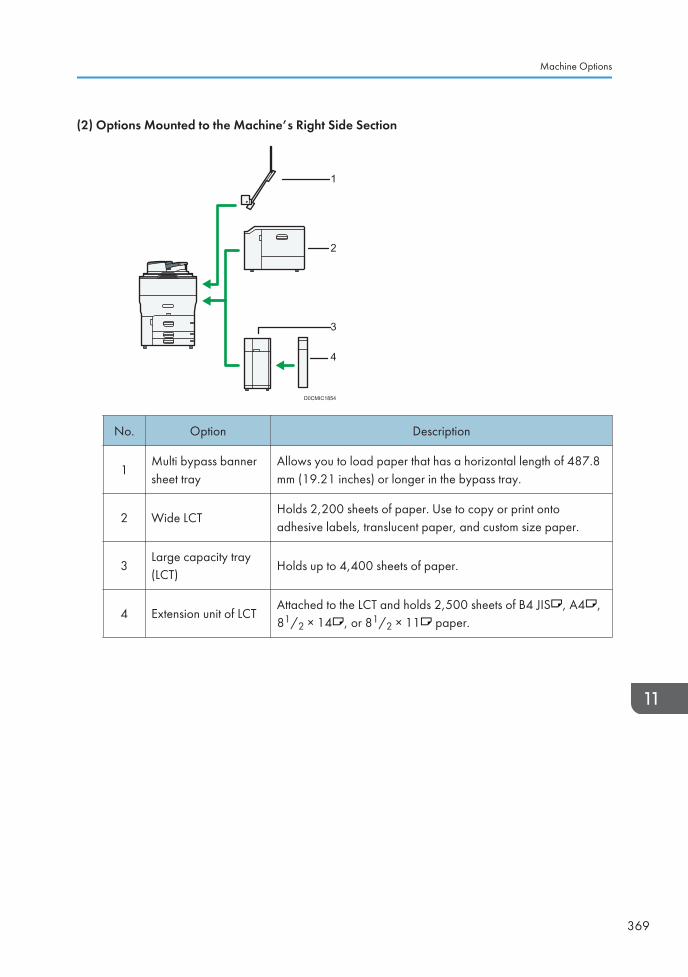
(2) Options Mounted to the Machine’s Right Side Section
D0CMIC1854
1
2
3
4
No. Option Description
1Multi bypass bannersheet tray
Allows you to load paper that has a horizontal length of 487.8mm (19.21 inches) or longer in the bypass tray.
2 Wide LCTHolds 2,200 sheets of paper. Use to copy or print ontoadhesive labels, translucent paper, and custom size paper.
3Large capacity tray(LCT)
Holds up to 4,400 sheets of paper.
4 Extension unit of LCTAttached to the LCT and holds 2,500 sheets of B4 JIS , A4 ,81/2 × 14 , or 81/2 × 11 paper.
Machine Options
369
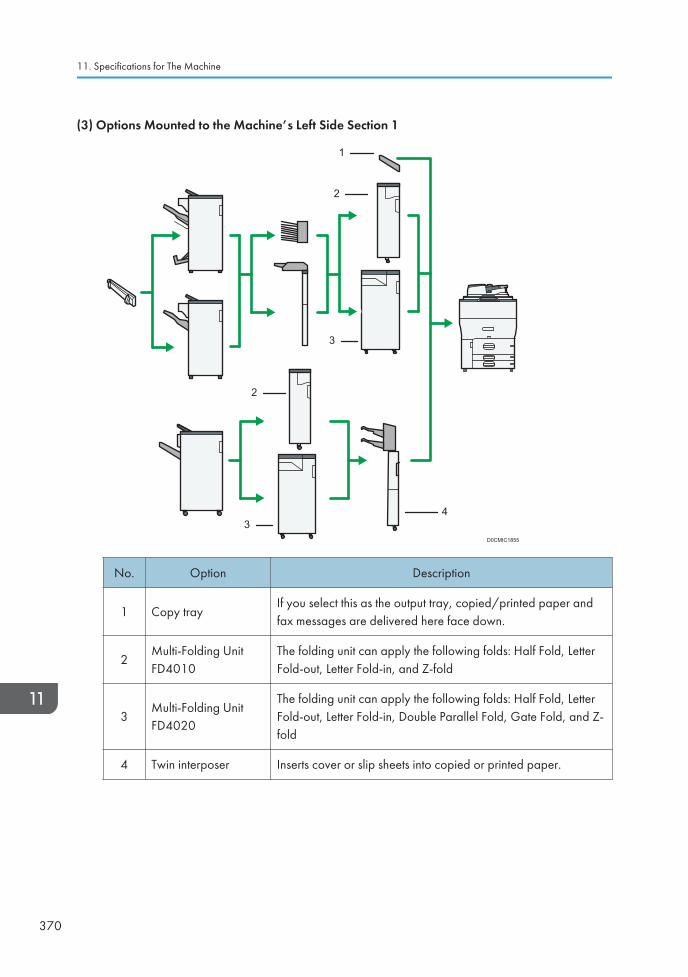
(3) Options Mounted to the Machine’s Left Side Section 1
1
4
2
3
2
3D0CMIC1855
No. Option Description
1 Copy trayIf you select this as the output tray, copied/printed paper andfax messages are delivered here face down.
2Multi-Folding UnitFD4010
The folding unit can apply the following folds: Half Fold, LetterFold-out, Letter Fold-in, and Z-fold
3Multi-Folding UnitFD4020
The folding unit can apply the following folds: Half Fold, LetterFold-out, Letter Fold-in, Double Parallel Fold, Gate Fold, and Z-fold
4 Twin interposer Inserts cover or slip sheets into copied or printed paper.
11. Specifications for The Machine
370
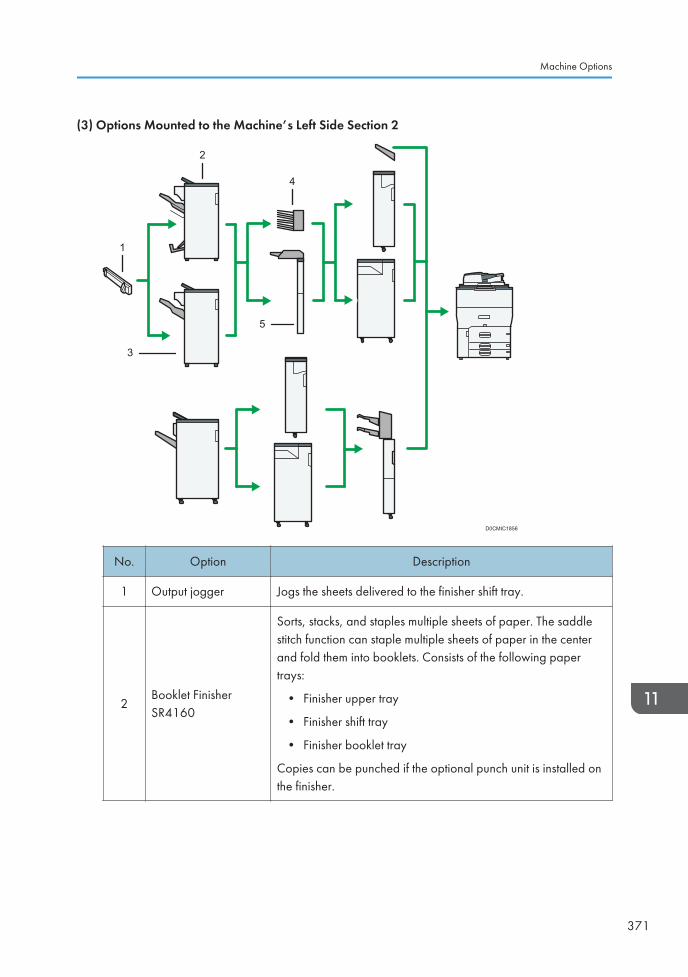
(3) Options Mounted to the Machine’s Left Side Section 2
4
2
3
1
5
D0CMIC1856
No. Option Description
1 Output jogger Jogs the sheets delivered to the finisher shift tray.
2Booklet FinisherSR4160
Sorts, stacks, and staples multiple sheets of paper. The saddlestitch function can staple multiple sheets of paper in the centerand fold them into booklets. Consists of the following papertrays:
• Finisher upper tray
• Finisher shift tray
• Finisher booklet tray
Copies can be punched if the optional punch unit is installed onthe finisher.
Machine Options
371
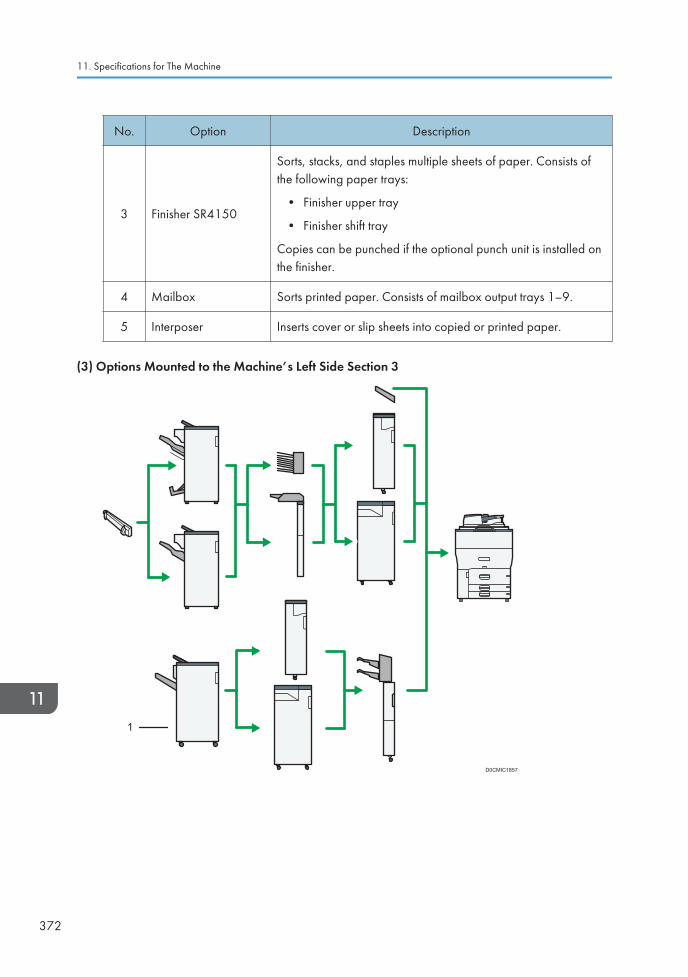
No. Option Description
3 Finisher SR4150
Sorts, stacks, and staples multiple sheets of paper. Consists ofthe following paper trays:
• Finisher upper tray
• Finisher shift tray
Copies can be punched if the optional punch unit is installed onthe finisher.
4 Mailbox Sorts printed paper. Consists of mailbox output trays 1–9.
5 Interposer Inserts cover or slip sheets into copied or printed paper.
(3) Options Mounted to the Machine’s Left Side Section 3
1
D0CMIC1857
11. Specifications for The Machine
372
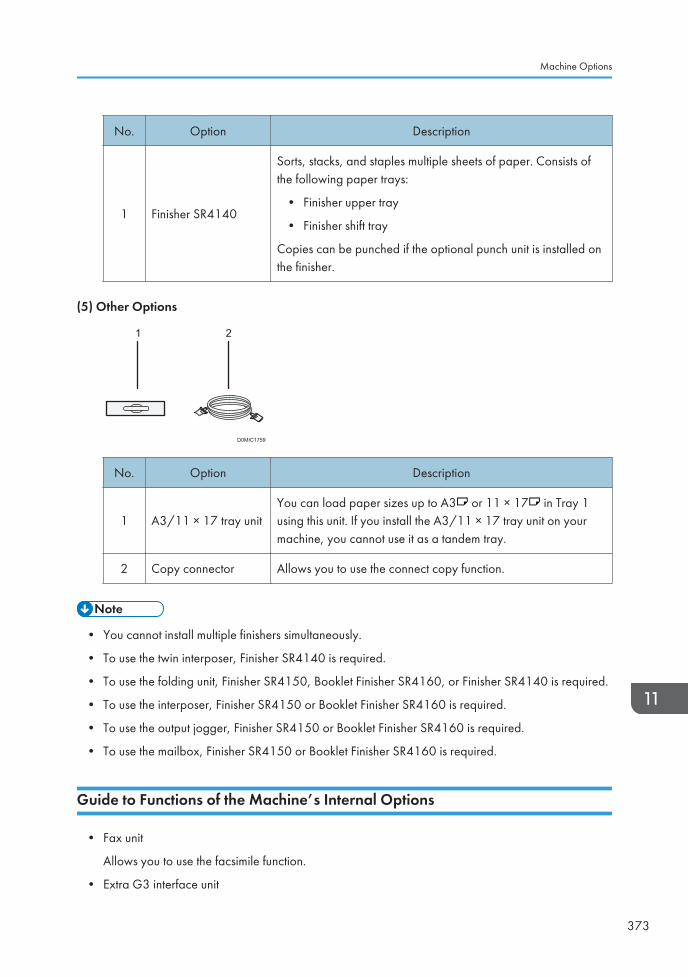
No. Option Description
1 Finisher SR4140
Sorts, stacks, and staples multiple sheets of paper. Consists ofthe following paper trays:
• Finisher upper tray
• Finisher shift tray
Copies can be punched if the optional punch unit is installed onthe finisher.
(5) Other Options
D0MIC1759
1 2
No. Option Description
1 A3/11 × 17 tray unitYou can load paper sizes up to A3 or 11 × 17 in Tray 1using this unit. If you install the A3/11 × 17 tray unit on yourmachine, you cannot use it as a tandem tray.
2 Copy connector Allows you to use the connect copy function.
• You cannot install multiple finishers simultaneously.
• To use the twin interposer, Finisher SR4140 is required.
• To use the folding unit, Finisher SR4150, Booklet Finisher SR4160, or Finisher SR4140 is required.
• To use the interposer, Finisher SR4150 or Booklet Finisher SR4160 is required.
• To use the output jogger, Finisher SR4150 or Booklet Finisher SR4160 is required.
• To use the mailbox, Finisher SR4150 or Booklet Finisher SR4160 is required.
Guide to Functions of the Machine’s Internal Options
• Fax unit
Allows you to use the facsimile function.
• Extra G3 interface unit
Machine Options
373
This lets you add a G3 fax line. A maximum of two G3 interface units can be installed.
• Expansion memory
Provides 60 MB of additional memory for the facsimile function. (Standard 4 MB)
This allows you to send and receive fax documents at high resolution (Super Fine), and also toreceive fax documents at high resolution (Fine). This enables you to increase the number of sheetsof originals that can be stored in memory.
• PostScript 3 unit
Allows you to output using Genuine Adobe PostScript 3.
• OCR unit
Recognizes the scanned originals optically, and creates a PDF with the text data embedded.
• IPDS unit
Allows you to print using Intelligent Printer Data Stream (IPDS).
• XPS card
Allows you to directly output XPS files.
• Device server option
Allows you to add an Ethernet port to the printer. Allows you to print using the printer function via anetwork other than that connected to the machine.
• IEEE 1284 interface board
Allows you to connect to an IEEE 1284 cable.
• Wireless LAN board
Allows you to communicate over wireless LAN.
• File format converter
Allows you to download documents that are stored in the Document Server to the computer.
• Enhanced Security HDD ( (mainly Europe)/ (mainly North America))
Allows you to enhance the security of the hard disk by using an encryption function that iscompliant with FIPS 140-2.
• Fax connection unit
Allows you to send and receive faxes via a different machine that has the fax unit installed.
• VM card
Allows you to install applications compatible with the "Embedded Software Architecture" platform.
To expand the function of this machine, various applications written in Java language can beadded.
• Only one of the following can be installed: IEEE 1284 interface board, wireless LAN board, fileformat converter, or device server option.
11. Specifications for The Machine
374

• Only one of the following options can be installed on the machine at any one time: HDD andEnhanced Security HDD.
• The Ethernet interface and wireless LAN board cannot be used simultaneously.
Machine Options
375
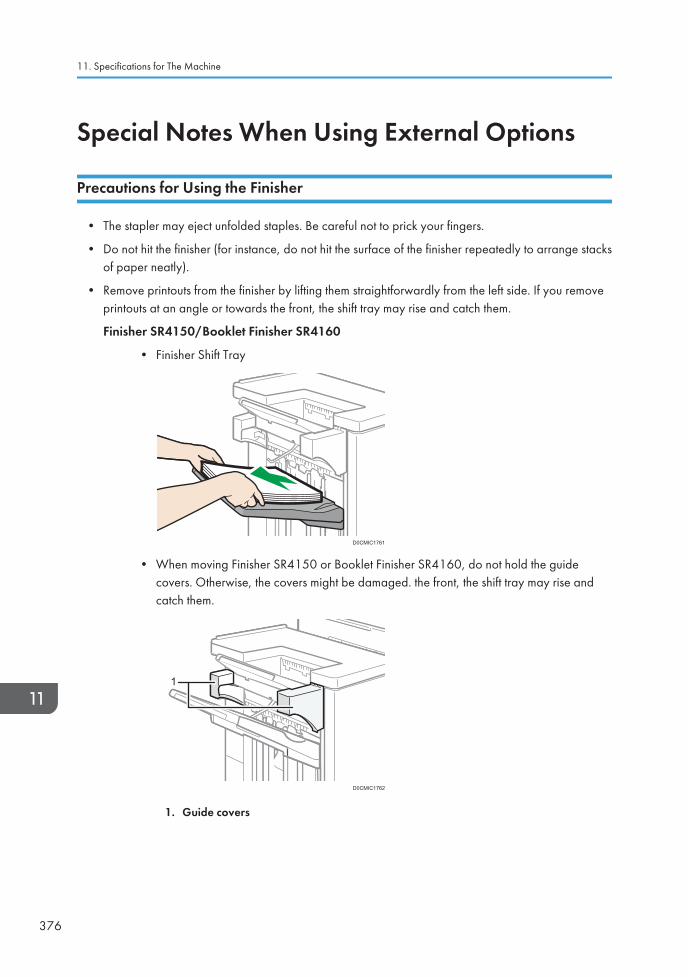
Special Notes When Using External Options
Precautions for Using the Finisher
• The stapler may eject unfolded staples. Be careful not to prick your fingers.
• Do not hit the finisher (for instance, do not hit the surface of the finisher repeatedly to arrange stacksof paper neatly).
• Remove printouts from the finisher by lifting them straightforwardly from the left side. If you removeprintouts at an angle or towards the front, the shift tray may rise and catch them.
Finisher SR4150/Booklet Finisher SR4160
• Finisher Shift Tray
D0CMIC1761
• When moving Finisher SR4150 or Booklet Finisher SR4160, do not hold the guidecovers. Otherwise, the covers might be damaged. the front, the shift tray may rise andcatch them.
D0CMIC1762
1
1. Guide covers
11. Specifications for The Machine
376
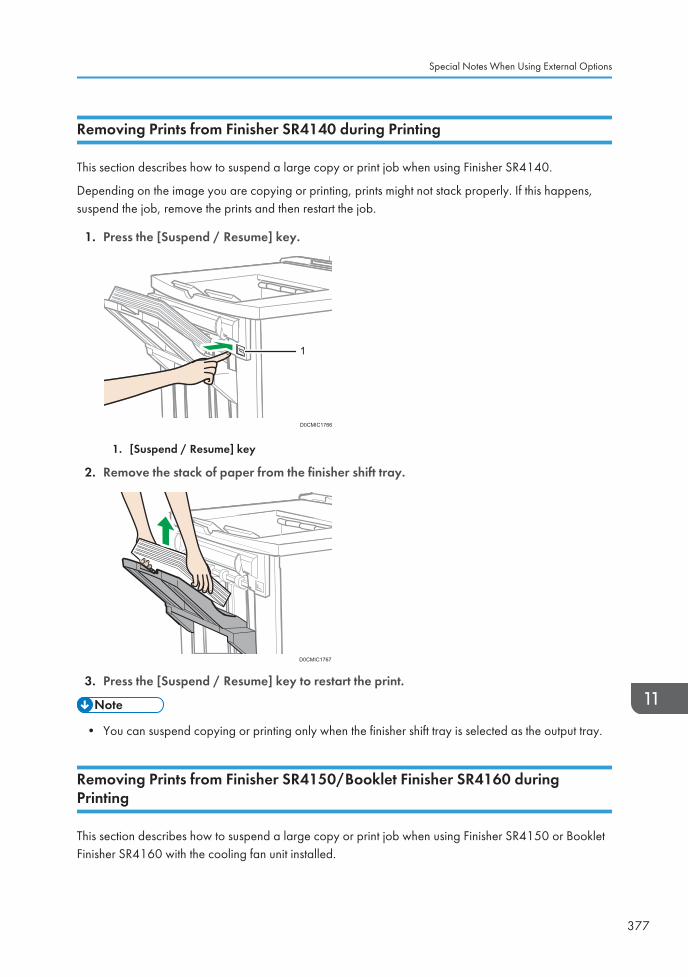
Removing Prints from Finisher SR4140 during Printing
This section describes how to suspend a large copy or print job when using Finisher SR4140.
Depending on the image you are copying or printing, prints might not stack properly. If this happens,suspend the job, remove the prints and then restart the job.
1. Press the [Suspend / Resume] key.
11
D0CMIC1766
1. [Suspend / Resume] key
2. Remove the stack of paper from the finisher shift tray.
D0CMIC1767
3. Press the [Suspend / Resume] key to restart the print.
• You can suspend copying or printing only when the finisher shift tray is selected as the output tray.
Removing Prints from Finisher SR4150/Booklet Finisher SR4160 duringPrinting
This section describes how to suspend a large copy or print job when using Finisher SR4150 or BookletFinisher SR4160 with the cooling fan unit installed.
Special Notes When Using External Options
377
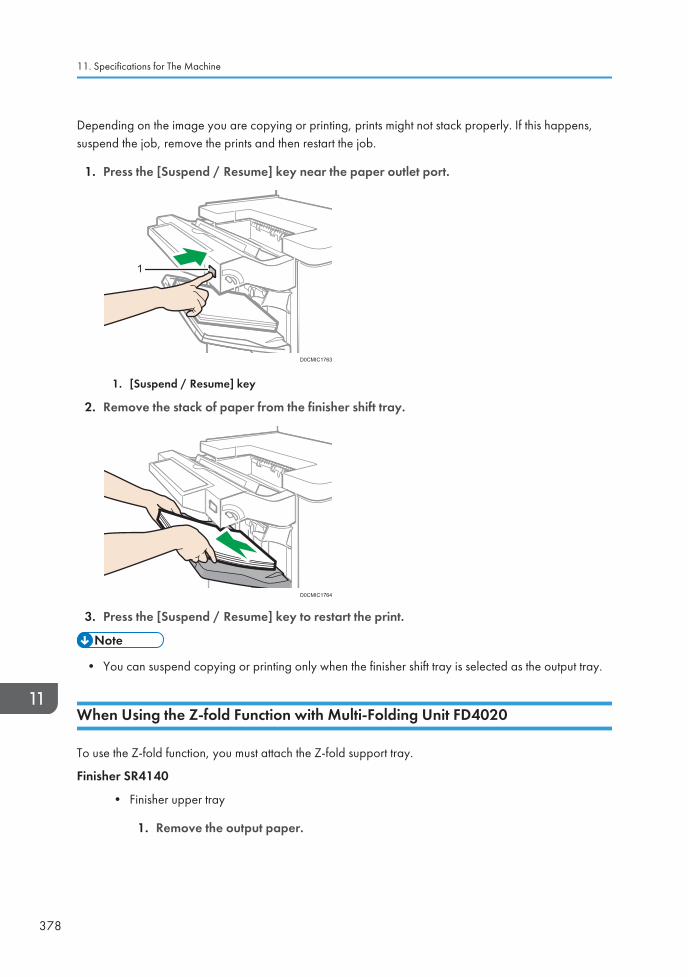
Depending on the image you are copying or printing, prints might not stack properly. If this happens,suspend the job, remove the prints and then restart the job.
1. Press the [Suspend / Resume] key near the paper outlet port.
D0CMIC1763
11
1. [Suspend / Resume] key
2. Remove the stack of paper from the finisher shift tray.
D0CMIC1764
3. Press the [Suspend / Resume] key to restart the print.
• You can suspend copying or printing only when the finisher shift tray is selected as the output tray.
When Using the Z-fold Function with Multi-Folding Unit FD4020
To use the Z-fold function, you must attach the Z-fold support tray.
Finisher SR4140
• Finisher upper tray
1. Remove the output paper.
11. Specifications for The Machine
378
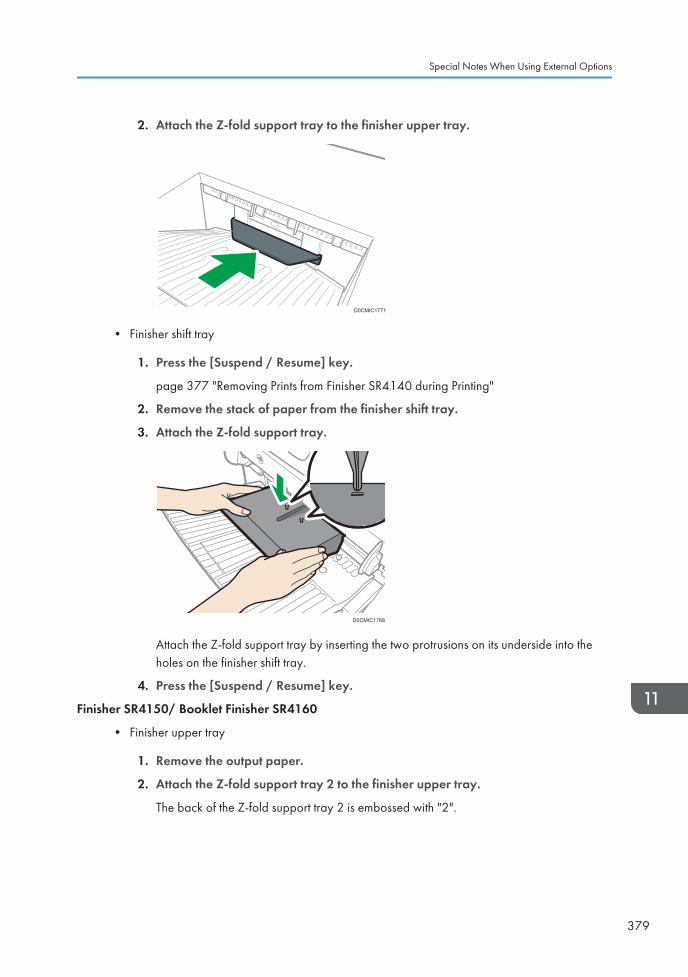
2. Attach the Z-fold support tray to the finisher upper tray.
D0CMIC1771
• Finisher shift tray
1. Press the [Suspend / Resume] key.
page 377 "Removing Prints from Finisher SR4140 during Printing"
2. Remove the stack of paper from the finisher shift tray.
3. Attach the Z-fold support tray.
D0CMIC1768
Attach the Z-fold support tray by inserting the two protrusions on its underside into theholes on the finisher shift tray.
4. Press the [Suspend / Resume] key.
Finisher SR4150/ Booklet Finisher SR4160
• Finisher upper tray
1. Remove the output paper.
2. Attach the Z-fold support tray 2 to the finisher upper tray.
The back of the Z-fold support tray 2 is embossed with "2".
Special Notes When Using External Options
379
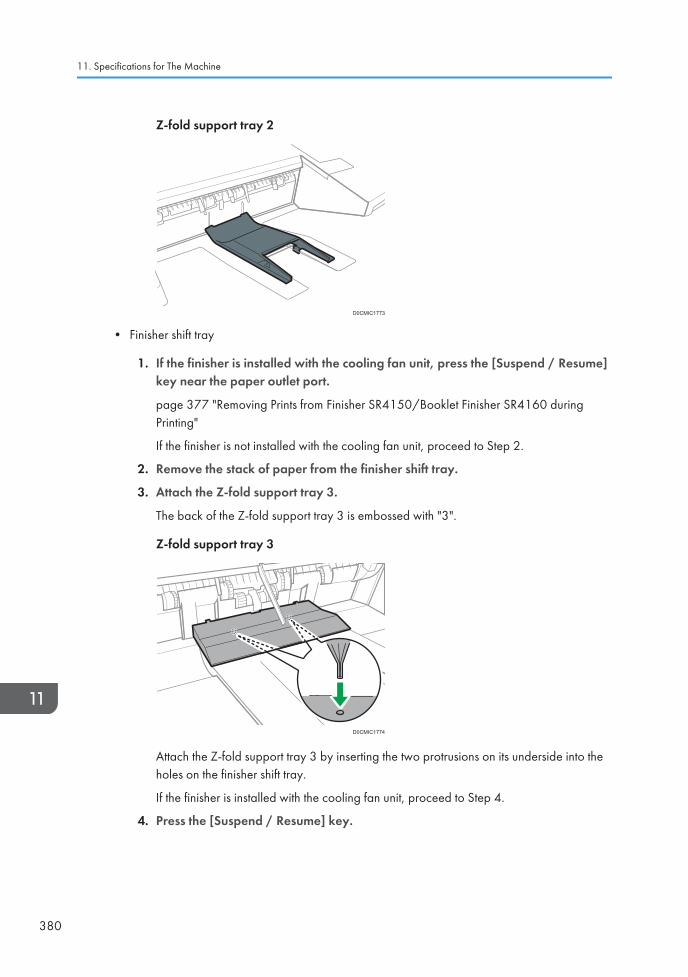
Z-fold support tray 2
D0CMIC1773
• Finisher shift tray
1. If the finisher is installed with the cooling fan unit, press the [Suspend / Resume]key near the paper outlet port.
page 377 "Removing Prints from Finisher SR4150/Booklet Finisher SR4160 duringPrinting"
If the finisher is not installed with the cooling fan unit, proceed to Step 2.
2. Remove the stack of paper from the finisher shift tray.
3. Attach the Z-fold support tray 3.
The back of the Z-fold support tray 3 is embossed with "3".
Z-fold support tray 3
D0CMIC1774
Attach the Z-fold support tray 3 by inserting the two protrusions on its underside into theholes on the finisher shift tray.
If the finisher is installed with the cooling fan unit, proceed to Step 4.
4. Press the [Suspend / Resume] key.
11. Specifications for The Machine
380
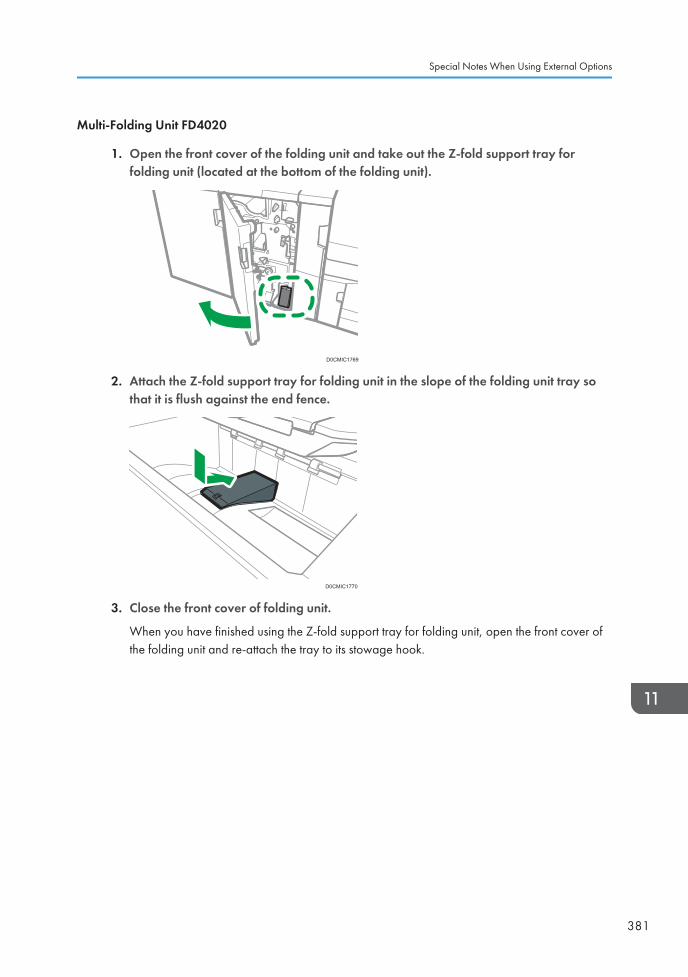
Multi-Folding Unit FD4020
1. Open the front cover of the folding unit and take out the Z-fold support tray forfolding unit (located at the bottom of the folding unit).
D0CMIC1769
2. Attach the Z-fold support tray for folding unit in the slope of the folding unit tray sothat it is flush against the end fence.
D0CMIC1770
3. Close the front cover of folding unit.
When you have finished using the Z-fold support tray for folding unit, open the front cover ofthe folding unit and re-attach the tray to its stowage hook.
Special Notes When Using External Options
381

Functions Requiring Optional ConfigurationsWhen options are installed, the functions and interface of this machine can be expanded.
• The options that can be installed differ depending on the models.
page 368 "Machine Options"
Copy Function
Function/Reference Option
Shift Sort
page 82 "Copying in Page Order or for EachPage Number"
One of the following options is required:
• Finisher SR4140
• Finisher SR4150
• Booklet Finisher SR4160Stack
page 82 "Copying in Page Order or for EachPage Number"
Punch
See "Punching Holes on the Copied Pages", UserGuide (Full Version).
One of the following combinations of options isrequired:
• Finisher SR4140 and punch unit
• Finisher SR4150 or Booklet FinisherSR4160 and punch unit
Staple
See "Stapling Copied Pages", User Guide (FullVersion).
One of the following options is required:
• Finisher SR4140
• Finisher SR4150
• Booklet Finisher SR4160
Staple (Center)
See "Stapling Copied Pages", User Guide (FullVersion).
Booklet Finisher SR4160
Half Fold
See "Folding Copied Sheets", User Guide (FullVersion).
One of the following options is required:
• Either Finisher SR4140 or Finisher SR4150and either Multi-Folding Unit FD4010 orMulti-Folding Unit FD4020
• Booklet Finisher SR4160
11. Specifications for The Machine
382
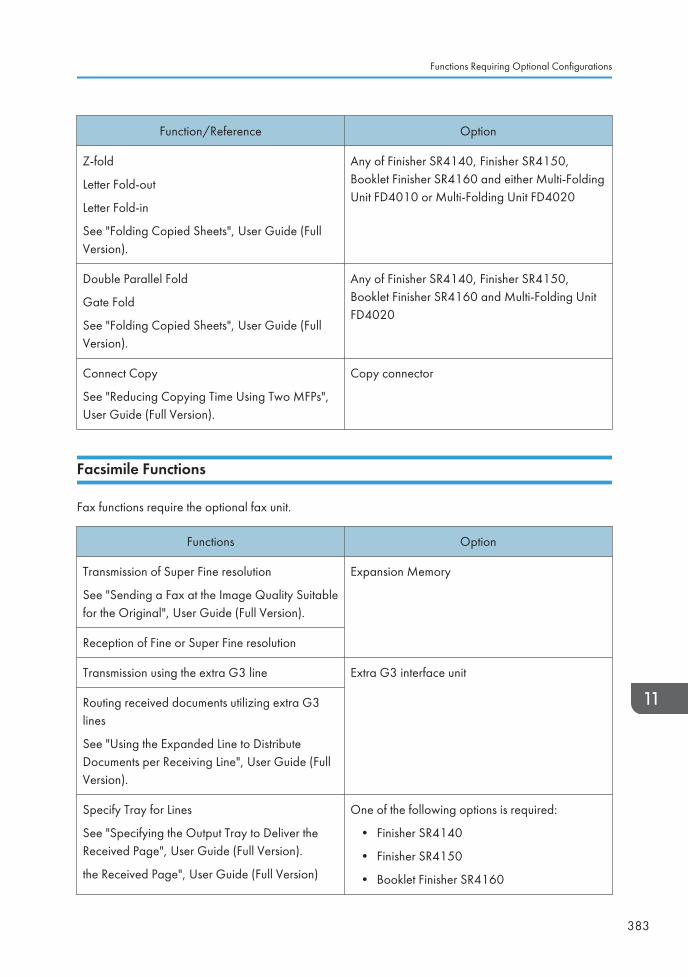
Function/Reference Option
Z-fold
Letter Fold-out
Letter Fold-in
See "Folding Copied Sheets", User Guide (FullVersion).
Any of Finisher SR4140, Finisher SR4150,Booklet Finisher SR4160 and either Multi-FoldingUnit FD4010 or Multi-Folding Unit FD4020
Double Parallel Fold
Gate Fold
See "Folding Copied Sheets", User Guide (FullVersion).
Any of Finisher SR4140, Finisher SR4150,Booklet Finisher SR4160 and Multi-Folding UnitFD4020
Connect Copy
See "Reducing Copying Time Using Two MFPs",User Guide (Full Version).
Copy connector
Facsimile Functions
Fax functions require the optional fax unit.
Functions Option
Transmission of Super Fine resolution
See "Sending a Fax at the Image Quality Suitablefor the Original", User Guide (Full Version).
Expansion Memory
Reception of Fine or Super Fine resolution
Transmission using the extra G3 line Extra G3 interface unit
Routing received documents utilizing extra G3lines
See "Using the Expanded Line to DistributeDocuments per Receiving Line", User Guide (FullVersion).
Specify Tray for Lines
See "Specifying the Output Tray to Deliver theReceived Page", User Guide (Full Version).
the Received Page", User Guide (Full Version)
One of the following options is required:
• Finisher SR4140
• Finisher SR4150
• Booklet Finisher SR4160
Functions Requiring Optional Configurations
383
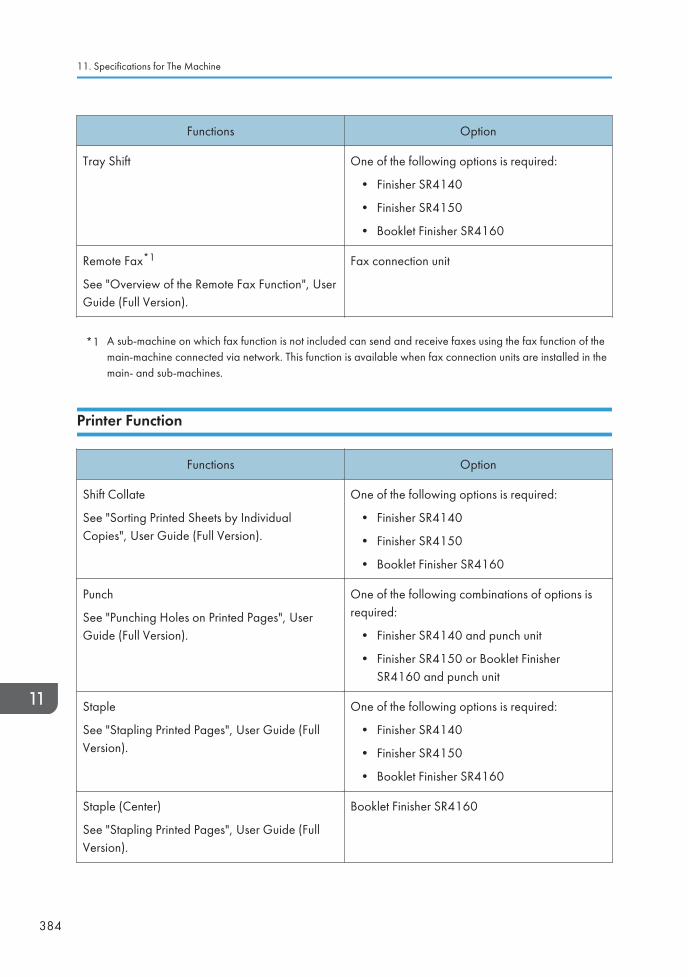
Functions Option
Tray Shift One of the following options is required:
• Finisher SR4140
• Finisher SR4150
• Booklet Finisher SR4160
Remote Fax*1
See "Overview of the Remote Fax Function", UserGuide (Full Version).
Fax connection unit
*1 A sub-machine on which fax function is not included can send and receive faxes using the fax function of themain-machine connected via network. This function is available when fax connection units are installed in themain- and sub-machines.
Printer Function
Functions Option
Shift Collate
See "Sorting Printed Sheets by IndividualCopies", User Guide (Full Version).
One of the following options is required:
• Finisher SR4140
• Finisher SR4150
• Booklet Finisher SR4160
Punch
See "Punching Holes on Printed Pages", UserGuide (Full Version).
One of the following combinations of options isrequired:
• Finisher SR4140 and punch unit
• Finisher SR4150 or Booklet FinisherSR4160 and punch unit
Staple
See "Stapling Printed Pages", User Guide (FullVersion).
One of the following options is required:
• Finisher SR4140
• Finisher SR4150
• Booklet Finisher SR4160
Staple (Center)
See "Stapling Printed Pages", User Guide (FullVersion).
Booklet Finisher SR4160
11. Specifications for The Machine
384
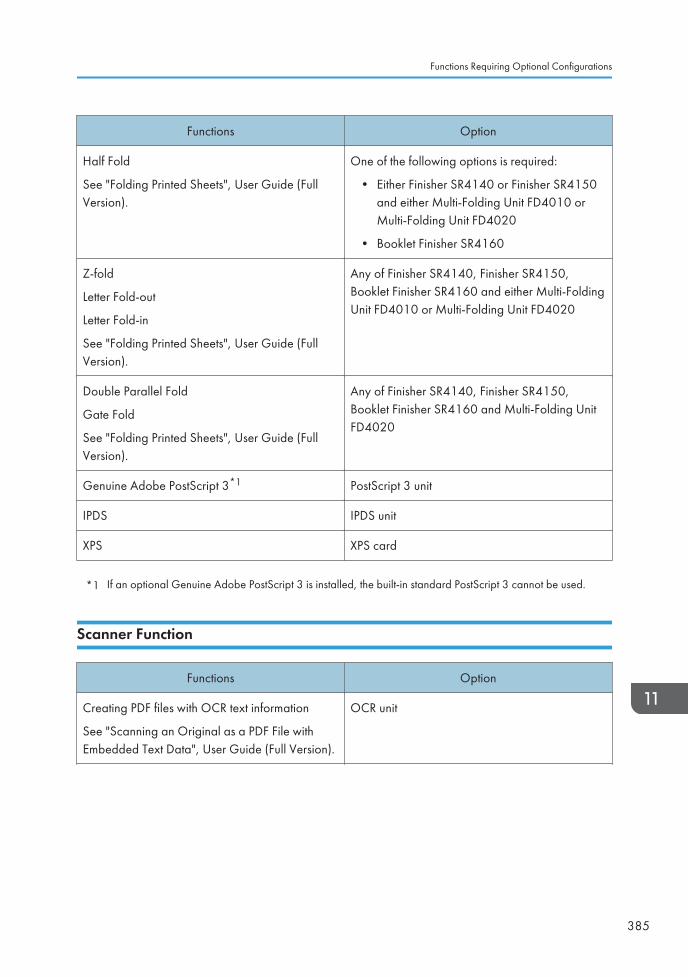
Functions Option
Half Fold
See "Folding Printed Sheets", User Guide (FullVersion).
One of the following options is required:
• Either Finisher SR4140 or Finisher SR4150and either Multi-Folding Unit FD4010 orMulti-Folding Unit FD4020
• Booklet Finisher SR4160
Z-fold
Letter Fold-out
Letter Fold-in
See "Folding Printed Sheets", User Guide (FullVersion).
Any of Finisher SR4140, Finisher SR4150,Booklet Finisher SR4160 and either Multi-FoldingUnit FD4010 or Multi-Folding Unit FD4020
Double Parallel Fold
Gate Fold
See "Folding Printed Sheets", User Guide (FullVersion).
Any of Finisher SR4140, Finisher SR4150,Booklet Finisher SR4160 and Multi-Folding UnitFD4020
Genuine Adobe PostScript 3*1 PostScript 3 unit
IPDS IPDS unit
XPS XPS card
*1 If an optional Genuine Adobe PostScript 3 is installed, the built-in standard PostScript 3 cannot be used.
Scanner Function
Functions Option
Creating PDF files with OCR text information
See "Scanning an Original as a PDF File withEmbedded Text Data", User Guide (Full Version).
OCR unit
Functions Requiring Optional Configurations
385
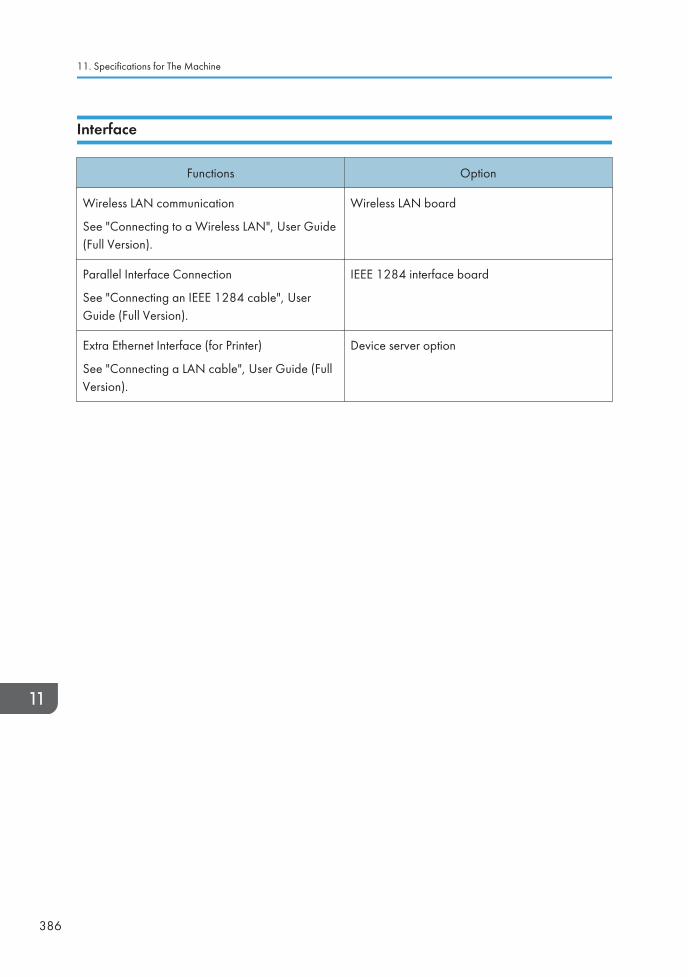
Interface
Functions Option
Wireless LAN communication
See "Connecting to a Wireless LAN", User Guide(Full Version).
Wireless LAN board
Parallel Interface Connection
See "Connecting an IEEE 1284 cable", UserGuide (Full Version).
IEEE 1284 interface board
Extra Ethernet Interface (for Printer)
See "Connecting a LAN cable", User Guide (FullVersion).
Device server option
11. Specifications for The Machine
386
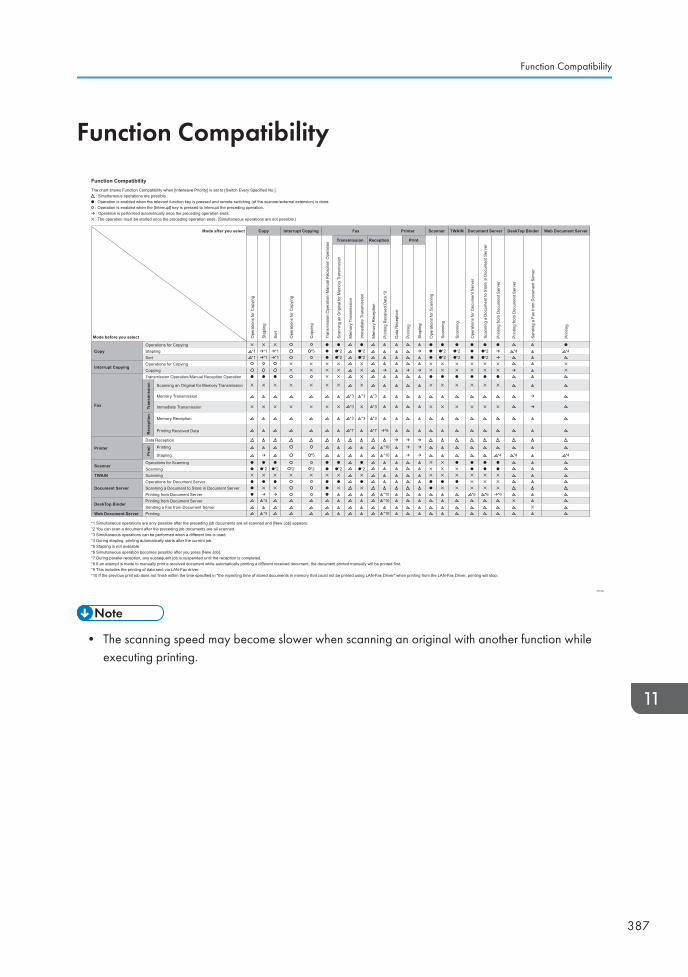
Function Compatibility
Function Compatibility
The chart shows Function Compatibility when [Interleave Priority] is set to [Switch Every Specified No.]. : Simultaneous operations are possible. : Operation is enabled when the relevant function key is pressed and remote switching (of the scanner/external extension) is done. : Operation is enabled when the [Interrupt] key is pressed to interrupt the preceding operation. : Operation is performed automatically once the preceding operation ends. : The operation must be started once the preceding operation ends. (Simultaneous operations are not possible.)
*1 Simultaneous operations are only possible after the preceding job documents are all scanned and [New Job] appears.*2 You can scan a document after the preceding job documents are all scanned.*3 Simultaneous operations can be performed when a different line is used.*4 During stapling, printing automatically starts after the current job.*5 Stapling is not available.*6 Simultaneous operation becomes possible after you press [New Job].*7 During parallel reception, any subsequent job is suspended until the reception is completed.*8 If an attempt is made to manually print a received document while automatically printing a different received document, the document printed manually will be printed first.*9 This includes the printing of data sent via LAN-Fax driver.*10 If the previous print job does not finish within the time specified in "the reprinting time of stored documents in memory that could not be printed using LAN-Fax Driver" when printing from the LAN-Fax Driver, printing will stop.
DRC602
Mode after you select
Mode before you select
Copy Interrupt Copying Fax Printer Scanner TWAIN Document Server DeskTop Binder Web Document Server
Ope
ratio
ns fo
r Cop
ying
Sta
plin
g
Sor
t
Ope
ratio
ns fo
r Cop
ying
Cop
ying
Tran
smis
sion
Ope
ratio
n/ M
anua
l Rec
eptio
n O
pera
tion Transmission Reception
Dat
a R
ecep
tion
Ope
ratio
ns fo
r Sca
nnin
g
Sca
nnin
g
Sca
nnin
g
Ope
ratio
ns fo
r Doc
umen
t Ser
ver
Sca
nnin
g a
Doc
umen
t to
Sto
re in
Doc
umen
t Ser
ver
Prin
ting
from
Doc
umen
t Ser
ver
Prin
ting
from
Doc
umen
t Ser
ver
Sen
ding
a F
ax fr
om D
ocum
ent S
erve
r
Prin
ting
Scan
ning
an
Orig
inal
for M
emor
y Tr
ansm
issi
on
Mem
ory
Tran
smis
sion
Imm
edia
te T
rans
mis
sion
Mem
ory
Rec
eptio
n
Prin
ting
Rec
eive
d D
ata
*9
Prin
ting
Sta
plin
g
CopyOperations for CopyingStapling *1 *1 *1 *5 *2 *2 *2 *2 *2 *4 *4Sort *1 *1 *1 *2 *2 *2 *2 *2
Interrupt CopyingOperations for CopyingCopying
Fax
Transmission Operation/Manual Reception Operation
Tran
smis
sion Scanning an Original for Memory Transmission
Memory Transmission *3 *3 *3
Immediate Transmission *3 *3
Rec
eptio
n
Memory Reception *3 *3 *3
Printing Received Data *7 *7 *8
Printer
Data Reception
Prin
t Printing *10
Stapling *5 *10 *4 *4 *4
ScannerOperations for ScanningScanning *2 *2 *2 *2 *2 *2
TWAIN Scanning
Document ServerOperations for Document ServerScanning a Document to Store in Document ServerPrinting from Document Server *10 *6 *6 *6
DeskTop BinderPrinting from Document Server *4 *10Sending a Fax from Document Server
Web Document Server Printing *4 *10
• The scanning speed may become slower when scanning an original with another function whileexecuting printing.
Function Compatibility
387
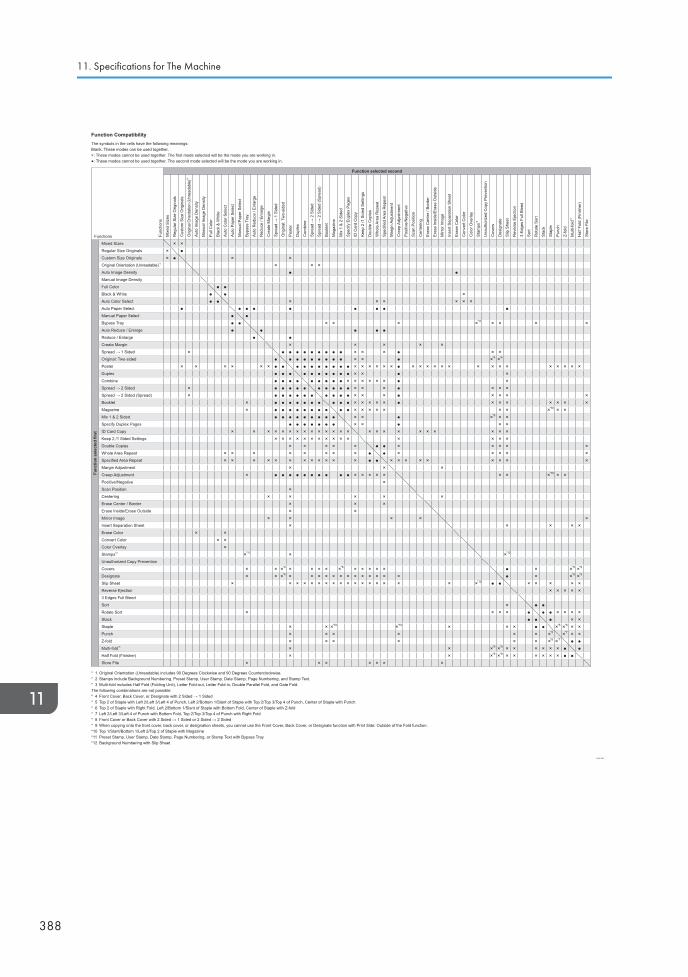
Functions Func
tions
Function selected secondM
ixed
Siz
es
Reg
ular
Siz
e O
rigin
als
Cus
tom
Siz
e O
rigin
als
Orig
inal
Orie
ntat
ion
(Unr
eada
ble)
*1
Aut
o Im
age
Den
sity
Man
ual I
mag
e D
ensi
ty
Full
Col
or
Bla
ck &
Whi
te
Aut
o C
olor
Sel
ect
Aut
o P
aper
Sel
ect
Man
ual P
aper
Sel
ect
Byp
ass
Tray
Aut
o R
educ
e / E
nlar
ge
Red
uce
/ Enl
arge
Cre
ate
Mar
gin
Spr
ead
� 1
Sid
ed
Orig
inal
: Tw
o-si
ded
Pos
ter
Dup
lex
Com
bine
Spr
ead
� 2
Sid
ed
Spr
ead
� 2
Sid
ed (S
prea
d)
Boo
klet
Mag
azin
e
Mix
1 &
2 S
ided
Spe
cify
Dup
lex
Pag
es
ID C
ard
Cop
y
Kee
p 2
/1 S
ided
Set
tings
Dou
ble
Cop
ies
Who
le A
rea
Rep
eat
Spe
cifie
d A
rea
Rep
eat
Mar
gin
Adj
ustm
ent
Cre
ep A
djus
tmen
t
Pos
itive
/Neg
ativ
e
Sca
n P
ositi
on
Cen
terin
g
Era
se C
ente
r / B
orde
r
Era
se In
side
/Era
se O
utsi
de
Mirr
or Im
age
Inse
rt S
epar
atio
n S
heet
Era
se C
olor
Con
vert
Col
or
Col
or O
verla
y
Sta
mps
*2
Una
utho
rized
Cop
y P
reve
ntio
n
Cov
ers
Des
igna
te
Slip
She
et
Rev
erse
Eje
ctio
n
3 E
dges
Ful
l Ble
ed
Sor
t
Rot
ate
Sor
t
Sta
ck
Sta
ple
Pun
ch
Z-fo
ld
Mul
ti-fo
ld*3
Hal
f Fol
d (F
inis
her)
Sto
re F
ile
Func
tion
sele
cted
firs
t
Mixed Sizes × ×Regular Size Originals × �Custom Size Originals × � × ×Original Orientation (Unreadable)*1 × × ×Auto Image Density � �Manual Image Density
Full Color � �Black & White � � ×Auto Color Select � � × × × × × ×Auto Paper Select � � � � � � � � �Manual Paper Select � �Bypass Tray � � × × × ×*11 × × × ×Auto Reduce / Enlarge � � � � �Reduce / Enlarge � �Create Margin × × × × ×Spread � 1 Sided × � � � � � � � � � × × × � × ×Original: Two-sided � � � � � � � � � × × � ×*4 ×*4
Poster × × × × × × � � � � � � � � � � × × × × × × � × × × × × × × × × × × × × × ×Duplex � � � � � � � � � � × × � ×Combine � � � � � � � � � × × × × × × � ×Spread � 2 Sided × � � � � � � � � � � × × × � × × ×Spread � 2 Sided (Spread) × � � � � � � � � � � × × × � × × × ×Booklet × � � � � � � � � � � × × × × × � × × × × × × ×Magazine × � � � � � � � � � � × × × × × × × ×*10 × ×Mix 1 & 2 Sided � � � � � � � � � × × � ×*8 × ×Specify Duplex Pages � � � � � � � × × � × ×ID Card Copy × × × × × × × × × × × × × × × × × × × × × × × ×Keep 2 /1 Sided Settings × × × × × × × × × × × × × × ×Double Copies × × × × × � � × × × × ×Whole Area Repeat × × × × × × × × � � × × × × ×Specified Area Repeat × × × × × × × × × × × × � � × × × × × × × × ×Margin Adjustment × × ×Creep Adjustment × � � � � � � � � � � × × × × × × × ×*10 × ×Positive/Negative ×Scan Position ×Centering × × × × ×Erase Center / Border × × ×Erase Inside/Erase Outside × ×Mirror Image × × × × ×Insert Separation Sheet × × × × ×Erase Color × ×Convert Color × ×Color Overlay ×Stamps*2 ×*11 × ×*12
Unauthorized Copy Prevention
Covers × × ×*4 × × × × ×*8 × × × × × � × ×*9 ×*9
Designate × × ×*4 × × × × × × × × × × × × × � × ×*9 ×*9
Slip Sheet × × × × × × × × × × × × × × × × × ×*12 � � × × × × ×Reverse Ejection × × × × ×3 Edges Full Bleed
Sort × � �Rotate Sort × × × × � � � × × × ×Stack � � � × ×Staple × × ×*10 ×*10 × × × � � ×*5 ×*6 × ×Punch × × × × × × ×*5 ×*7 × ×Z-fold × × × × × × ×*6 ×*7 � �Multi-fold*3 × × ×*9 ×*9 × × × × × × � �Half Fold (Finisher) × × ×*9 ×*9 × × × × × × � �Store File × × × × × × ×
* 1 Original Orientation (Unreadable) includes 90 Degrees Clockwise and 90 Degrees Counterclockwise.* 2 Stamps include Background Numbering, Preset Stamp, User Stamp, Date Stamp, Page Numbering, and Stamp Text.* 3 Multi-fold includes Half Fold (Folding Unit), Letter Fold-out, Letter Fold-in, Double Parallel Fold, and Gate Fold.The following combinations are not possible:* 4 Front Cover, Back Cover, or Designate with 2 Sided � 1 Sided* 5 Top 2 of Staple with Left 2/Left 3/Left 4 of Punch, Left 2/Bottom 1/Slant of Staple with Top 2/Top 3/Top 4 of Punch, Center of Staple with Punch* 6 Top 2 of Staple with Right Fold, Left 2/Bottom 1/Slant of Staple with Bottom Fold, Center of Staple with Z-fold* 7 Left 2/Left 3/Left 4 of Punch with Bottom Fold, Top 2/Top 3/Top 4 of Punch with Right Fold* 8 Front Cover or Back Cover with 2 Sided � 1 Sided or 2 Sided � 2 Sided* 9 When copying onto the front cover, back cover, or designation sheets, you cannot use the Front Cover, Back Cover, or Designate function with Print Side: Outside of the Fold function.*10 Top 1/Slant/Bottom 1/Left 2/Top 2 of Staple with Magazine*11 Preset Stamp, User Stamp, Date Stamp, Page Numbering, or Stamp Text with Bypass Tray*12 Background Numbering with Slip Sheet
DRC202
Function CompatibilityThe symbols in the cells have the following meanings:Blank: These modes can be used together.×: These modes cannot be used together. The first mode selected will be the mode you are working in.�: These modes cannot be used together. The second mode selected will be the mode you are working in.
11. Specifications for The Machine
388

12. Legal and Contact Information
Environmental Regulations
ENERGY STAR Program (mainly North America)
ENERGY STAR® Program Requirements for Imaging Equipment
This company is a participant in the ENERGY STAR® Program.
This machine is compliant with the regulations specified by theENERGY STAR® Program.
The ENERGY STAR® Program Requirements for Imaging Equipment encourage energy conservationby promoting energy efficient computers and other office equipment.
The program backs the development and dissemination of products that feature energy savingfunctions.
It is an open program in which manufacturers participate voluntarily.
Targeted products are computers, monitors, printers, facsimiles, copiers, scanners, and multi-functiondevices. Energy Star standards and logos are internationally uniform.
Energy Saving Functions
If this machine remains idle for a specified period of time or when [Energy Save] ( ) is pressed, itenters Sleep mode to further reduce its electrical consumption. This is called "Sleep Mode".
• (mainly Europe)
The default delay time the machine waits before entering Sleep mode is 45 minutes.
• (mainly Asia)
The default delay time the machine waits before entering Sleep mode is 60 minutes.
• (mainly North America)
The default delay time the machine waits before entering Sleep mode is 40 minutes.
389
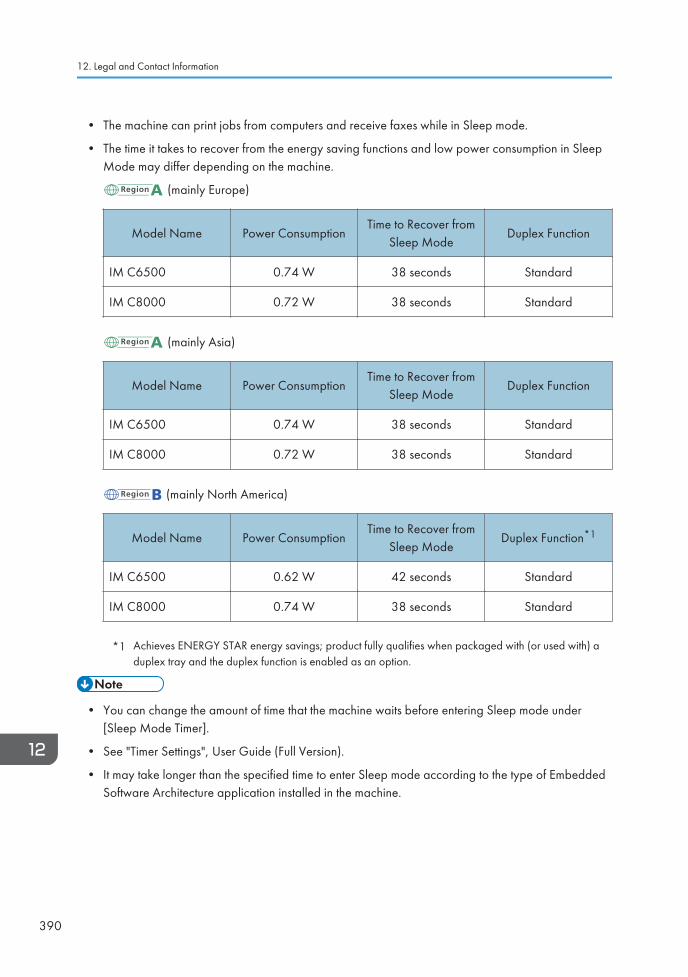
• The machine can print jobs from computers and receive faxes while in Sleep mode.
• The time it takes to recover from the energy saving functions and low power consumption in SleepMode may differ depending on the machine.
(mainly Europe)
Model Name Power ConsumptionTime to Recover from
Sleep ModeDuplex Function
IM C6500 0.74 W 38 seconds Standard
IM C8000 0.72 W 38 seconds Standard
(mainly Asia)
Model Name Power ConsumptionTime to Recover from
Sleep ModeDuplex Function
IM C6500 0.74 W 38 seconds Standard
IM C8000 0.72 W 38 seconds Standard
(mainly North America)
Model Name Power ConsumptionTime to Recover from
Sleep ModeDuplex Function*1
IM C6500 0.62 W 42 seconds Standard
IM C8000 0.74 W 38 seconds Standard
*1 Achieves ENERGY STAR energy savings; product fully qualifies when packaged with (or used with) aduplex tray and the duplex function is enabled as an option.
• You can change the amount of time that the machine waits before entering Sleep mode under[Sleep Mode Timer].
• See "Timer Settings", User Guide (Full Version).
• It may take longer than the specified time to enter Sleep mode according to the type of EmbeddedSoftware Architecture application installed in the machine.
12. Legal and Contact Information
390
User Information on Electrical and Electronic Equipment (mainlyEurope)
Users in the countries where this symbol shown in this section has been specified innational law on collection and treatment of E-waste
Our Products contain high quality components and are designed to facilitate recycling.
Our products or product packaging are marked with the symbol below.
The symbol indicates that the product must not be treated as municipal waste. It must be disposed ofseparately via the appropriate return and collection systems available. By following these instructionsyou ensure that this product is treated correctly and help to reduce potential impacts on the environmentand human health, which could otherwise result from inappropriate handling. Recycling of productshelps to conserve natural resources and protect the environment.
For more detailed information on collection and recycling systems for this product, please contact theshop where you purchased it, your local dealer or sales/service representatives.
All Other Users
If you wish to discard this product, please contact your local authorities, the shop where you bought thisproduct, your local dealer or sales/service representatives.
For Turkey only
Environmental Regulations
391
Note for the Battery and/or Accumulator Symbol (For EU countries only)(mainly Europe)
In accordance with the Battery Directive 2006/66/EC Article 20 Information for end-users Annex II,the above symbol is printed on batteries and accumulators.
This symbol means that in the European Union, used batteries and accumulators should be disposed ofseparately from your household waste.
In the EU, there are separate collection systems for not only used electrical and electronic products butalso batteries and accumulators.
Please dispose of them correctly at your local community waste collection/recycling centre.
Contact your sales or service representative to change the battery.
Environmental Advice for Users (mainly Europe)
Users in the EU, Switzerland and Norway
Consumables yield
Please refer to either the User's Manual for this information or the packaging of the consumable.
Recycled paper
The machine can use recycled paper which is produced in accordance with European standardEN 12281:2002 or DIN 19309. For products using EP printing technology, the machine can printon 64 g/m2 paper, which contains less raw materials and represents a significant resourcereduction.
Duplex printing (if applicable)
Duplex printing enables both sides of a sheet of paper to be used. This saves paper and reducesthe size of printed documents so that fewer sheets are used. We recommend that this feature isenabled whenever you print.
Toner and ink cartridge return program
Toner and ink cartridge for recycling will be accepted free of charge from users in accordance withlocal regulations.
For details about the return program, please refer to the Web page below or consult your serviceperson.
https://www.ricoh-return.com/
12. Legal and Contact Information
392
Energy efficiency
The amount of electricity a machine consumes depends as much on its specifications as it does onthe way you use it. The machine is designed to allow you to reduce electricity costs by switching toReady mode after it prints the last page. If required, it can immediately print again from this mode.If no additional prints are required and a specified period of time passes, the device switches to anenergy saving mode.
In these modes, the machine consumes less power (watts). If the machine is to print again, it needsa little longer to return from an energy saving mode than from Ready mode.
For maximum energy savings, we recommend that the default setting for power management isused.
Notes to users in the state of California (Notes to Users in USA) (mainly North America)
Perchlorate Material - special handling may apply. See: www.dtsc.ca.gov/hazardouswaste/perchlorate
Environmental Regulations
393
Trademarks (User Guide)Adobe, Acrobat, PostScript, and PostScript 3 are either registered trademarks or trademarks of AdobeSystems Incorporated in the United States and/or other countries.
The Bluetooth® word mark and logos are registered trademarks owned by Bluetooth SIG, Inc. and anyuse of such marks by Ricoh Company, Ltd. is under license.
Firefox is registered trademarks of the Mozilla Foundation.
Dropbox is a registered trademark or trademark of Dropbox, Inc.
Google, Android, Google Drive, and Chrome are trademarks of Google Inc.
Java is a registered trademark of Oracle and/or its affiliates.
JAWS® is a registered trademark of Freedom Scientific, Inc., St. Petersburg, Florida and/or othercountries.
Kerberos is a trademark of the Massachusetts Institute of Technology (MIT).
macOS, OS X, Bonjour, and Safari are trademarks of Apple Inc., registered in the U.S. and othercountries.
Microsoft, Windows, Windows Server, Edge, and Internet Explorer are either registered trademarks ortrademarks of Microsoft Corp. in the United States and/or other countries.
QR Code is a registered trademark of DENSO WAVE INCORPORATED in Japan and in other countries.
The SD and SD logo are trademarks of SD-3C, LLC.
This product includes RSA BSAFE® Cryptographic software of EMC Corporation. RSA and BSAFE areregistered trademarks or trademarks of EMC Corporation in the United States and other countries.
The proper name of Edge is Microsoft® EdgeTM.
The proper names of Internet Explorer 11 is Internet Explorer® 11.
The proper names of the Windows operating systems are as follows:
• The product names of Windows 7 are as follows:
Microsoft® Windows® 7 Home Premium
Microsoft® Windows® 7 Professional
Microsoft® Windows® 7 Ultimate
Microsoft® Windows® 7 Enterprise
• The product names of Windows 8.1 are as follows:
12. Legal and Contact Information
394
Microsoft® Windows® 8.1
Microsoft® Windows® 8.1 Pro
Microsoft® Windows® 8.1 Enterprise
• The product names of Windows 10 are as follows:
Microsoft® Windows® 10 Home Premium
Microsoft® Windows® 10 Pro
Microsoft® Windows® 10 Enterprise
Microsoft® Windows® 10 Education
• The product names of Windows Server 2003 are as follows:
Microsoft® Windows Server® 2003 Standard Edition
Microsoft® Windows Server® 2003 Enterprise Edition
• The product names of Windows Server 2003 R2 are as follows:
Microsoft® Windows Server® 2003 R2 Standard Edition
Microsoft® Windows Server® 2003 R2 Enterprise Edition
• The product names of Windows Server 2008 are as follows:
Microsoft® Windows Server® 2008 Standard
Microsoft® Windows Server® 2008 Enterprise
• The product names of Windows Server 2008 R2 are as follows:
Microsoft® Windows Server® 2008 R2 Standard
Microsoft® Windows Server® 2008 R2 Enterprise
• The product names of Windows Server 2012 are as follows:
Microsoft® Windows Server® 2012 Foundation
Microsoft® Windows Server® 2012 Essentials
Microsoft® Windows Server® 2012 Standard
• The product names of Windows Server 2012 R2 are as follows:
Microsoft® Windows Server® 2012 R2 Foundation
Microsoft® Windows Server® 2012 R2 Essentials
Microsoft® Windows Server® 2012 R2 Standard
• The product names of Windows Server 2016 R2 are as follows:
Microsoft® Windows Server® 2016 R2 Essentials
Microsoft® Windows Server® 2016 R2 Standard
• The product names of Windows Server 2019 are as follows:
Microsoft® Windows Server® 2019 Datacenter
Trademarks (User Guide)
395

Microsoft® Windows Server® 2019 Standard
Microsoft® Windows Server® 2019 Essentials
Wi-Fi® and Wi-Fi Direct® are registered trademarks of Wi-Fi Alliance.
Other product names used herein are for identification purposes only and might be trademarks of theirrespective companies. We disclaim any and all rights to those marks.
Microsoft product screen shots reprinted with permission from Microsoft Corporation.
12. Legal and Contact Information
396 EN GB EN US EN AU D0CM-7046

© 2019

D0CM-7046AUENUSENGBEN
Related Documents