Okken high dependability switchboard for power distribution up to 6300A and motor control Installation Guide Get more with the world’s Power & Control specialist

Welcome message from author
This document is posted to help you gain knowledge. Please leave a comment to let me know what you think about it! Share it to your friends and learn new things together.
Transcript

Okken high dependability switchboard
for power distribution up to 6300A and motor control
Installation Guide
Get more with the world’s Power & Control specialist

Okken Contents
pages General ■ introduction 5 ❑ introduction 5 ❑ safety recommendations 5
Equipment receiving ■ packing 6 ❑ general 6 ❑ packing 6 ■ handling 7 ❑ general 7 ❑ handling by the bottom 7 ❑ handling by the top 8 ❑ handling by the top of 230 cubicles 9 ■ storage 10 ❑ precautions 10
Installation ■ tools 11 ❑ tools required 11 ❑ assembly types 11 ❑ tightening torque 12 ❑ marking vernish 12 ■ preparing the site 13 ❑ general 13 ❑ column floor fi xing points 13 ❑ front connection 14 ❑ rear connection 15 ❑ top connection 16 ❑ bottom connection 17 ■ panelling the columns 18 ❑ side panels 18 ❑ rear panels 18 ❑ doors 18 ❑ roofs 19 ❑ IP42 cover plates and grids 19 ■ installing the columns 20 ❑ identifying columns 20 ❑ fitting the columns 20 ❑ fixing and assembling 21 ❑ Internal arc withstand complements 22 ■ electrical connections 23 ❑ fishplating the main busbar 23 ❑ linking the protective conductors 24 ❑ equipment protection 24
Connection ■ connecting the power cables 25 ❑ general 25 ❑ connection through the top 26 ❑ connection through the bottom 26 ❑ effective zone of cables run 26 ❑ connection to connection bars in Form 4 box 27 ❑ connection directly to device terminals 27 ❑ form 4 by case 28 ❑ form 4 by sleeve 28 ❑ connection to connection bars inf 630A 29 ■ connecting by KT busbar trunking 34 ❑ general 34-36
Okken Schneider Electric 3

Okken Contents
pages ■ connecting the auxiliary circuits 37 ❑ cable routing 37 ❑ connection 37 ■ finishing 38 ❑ finishing 38 ❑ cleaning 38
Commissioning ■ instruments 39 ❑ measuring and of monitoring switchgear required 39 ■ Masterpact NW, NT, Compact NS 40 ❑ mounting and installation 40 ■ FU up to 630A 41 ❑ plug-in Polyfast 41 ❑ disconnectable Polyfast 41 ❑ disconnectable mounting plate 41 ❑ fixed and plug-in on mounting plate 41 ❑ drawers 42-44 ■ checking and testing 45 ❑ checks 45 ❑ energising equipment for the fi rst time 46 ❑ precautions to be taken when switchboard has been 46
switched off for a long period
4 Okken Schneider Electric

General Introduction
Introduction
Safety recommendations
Okken is a switchboard made up of a number of modular sections. Such a design facilitates transportation,installation and maintenance. The horizontal busbars are connected between sections by splicing. Prior to shipping, every Okken switchboard has been submitted to the 3 routine tests, as per IEC 60439-1 (wiring and electrical working, protective measures and insulation) and inspected visually, mechanically and electrically by a trained technician of the Quality Inspection department.
Correct operation of Okken switchboards requires that handling, installation and operation be carried out exclusively by qualified personnel: ❑ qualified to work near live equipment ❑ trained to all applicable safety practices.
During the installation and connecting operations, the switchboard must be de-energised so as not to expose personnel to electric shock hazards. Failure to comply with these instructions and with those recalled in this guide may result in very serious or even fatal accidents of operators or in damage to the switch-board.
Okken Schneider Electric 5

Equipment receiving Packing
General
Packing
Standard packing
Sea packing
Some precautions must be taken when receiving the switch-board: ❑ on receipt of the equipment and before handling it, check that the cases and packing materials used for transportation have not been damaged and that all items on the packing list have been effectively delivered ❑ even if the packing appears to be in good condition, do not hesitate to unpack the equipment in the presence of an authorised transport agent ❑ check consignment contents and weight. Thoroughly check the equipment to make sure that no damage or shocks have occurred which may impair insulation or operation ❑ if necessary, check that the information given on the switchboard nameplate, located on the incoming section, conforms to that given on the delivery slip ❑ in case of damage or missing parts, inform the transport agent by registered mail. ❑ After this inspection, put back the plastic protection cover.
The Okken switchboards are normally dispatched column by column, or in sections of 2 juxtaposed columns. Exceptionally, they may be made of sections of 3 columns, in the case of coupling with 2 incomer columns for example. Each parcel is identified by marking giving: ❑ the project number ❑ the weight ❑ the packing (parcel number and number of parcels) ❑ the position of the centre of gravity ❑ the storage and handling instructions.
Standard packing The column(s) are protected by a plastic cover in a crate. The lower ventilation grids are delivered separately. They are not mounted so as to allow handling of the column by the bottom. In the same way, the withdrawable devices >= 3200A are usually packed separately.
Sea packing The column(s) are protected by a heat-welded cover containing desiccant bags and are installed in a ventilated wooden or plywood crate. As a rule the sea crates do not weigh more than 5 tons.
6 Okken Schneider Electric

Equipment receiving Handling
General
Handling by the bottom
Final unpacking of the equipment will preferably take place just before the switchboard is installed, as close as possible to its final installation site. The dimensions, weight and handling instructions for the columns are marked on the packing. As a guideline, the average weight of a column is 650 kg but the 6300A columns (L=1150, D=1400) can weight from 1500 kg to 2000 kg) Sections should always be handled in the upright position with care. There is a risk of toppling of the column due to the high position of the centre of gravity. Avoid any column movement by making them swivel jerkily.
The columns are designed with a built-in plinth and can be moved by the front or the rear using a pallet truck or a adaped fork-lift truck. In this case, the columns must be lifted with care and held in place during transport, either manually or by strapping them onto the handling machine, if movement is over large distances or bumpy.
Okken Schneider Electric 7

Equipment receiving Handling
Handling by the top ❑ if cranes or travelling cranes are used, you must use slings that are sufficiently resistant and in good condition ❑ latching must be on the 4 column lifting lugs ❑ adjust sling length according to switchboard dimensions so that their orientation is in the prolongation of that of the lifting rings. the angle compared to the vertical is of 20° ± 5° (see sketch) ❑ do not tilt the column during transportation. ❑ take care to equally distribute the load on the 4 rings.
Implementations of the lifting lugs and slings length L (mm)
slings: 1500 ≤ L≤ 2300 or lifting beam: L=650 with slings 700 ≤ L≤ 1000
slings: 800 ≤ L≤ 1100
slings: 700 ≤ L≤ 1000
slings: 1500 ≤ L≤ 2300 or lifting beam: L=650x400 or 600 with slings 700 ≤ L≤ 1000
In the special case of an assembly with more than 2 columns, you must : ❑ bring the switchboard as close as possible to its installation site in its original packing ❑ use a lifting beam with slings supporting the switchboard by the bottom
8 Okken Schneider Electric

Equipment receiving Handling
Handling by the top of 230 Implementations of the lifting lugs and slings length L (mm) columns (4000 - 6300A)
2 double-strand slings (minimum strength per sling=1200 kg) : 1300 <= L <= 1900 + compulsory lifting beam, installed across the column’s depth: 600 <= L <= 1000
1300 <= L <= 1900 + compulsory lifting beam, installed across the column’s depth: 1000 <= L <= 1500 NB: this way of lifting is also appropriate for the 6300A coupling compartments W650 - D1400
Column 230
2 double-strand slings (minimum strength per sling = 1200 kg):
D1000 (mm) D1400 (mm)
B 600/1000 1000/1500
C 1300/1900 1300/1900
A : lifting strength = 1500/3000 kg C : lifting strength = 1200 kg for 2 slings
The 4 slings must have an equal length
Okken Schneider Electric 9

Equipment receiving Storage
Precautions Precautions to be taken for Okken storage: ❑ Okken is intended for use indoors. The equipment must therefore be stored upright in a dry and ventilated location, protected from rain, extreme temperatures, streaming, dust and chemical agents ❑ never store Okken outside, even under a tarpaulin ❑ the columns must preferably remain packed until they are installed. Should work be in progress nearby or on the premises, cover the columns with a cover protecting them efficiently against dust, gravel, paint and cement ❑ acceptable storage temperature is -10°C to +40°C ❑ to ensure easy, risk-free handling, the columns, in view of their great weight, must be stored on a stable, rigid fl oor.
10 Okken Schneider Electric

Installation Tools
Tools required ❑ torque wrench ❑ bush ratchet ❑ bush of 10 ❑ bush of 13 ❑ bush of 16 ❑ bush of 17 ❑ bush of 18 ❑ bush of 19 ❑ Torx 8 bit ❑ Torx 10 bit ❑ Torx (8 and 10) and recess screwdriver or screwing/unscrewing machine, with appropriate bits ❑ clamps for column alignment ❑ rubber mallet ❑ hydraulic jacks that can operate in horizontal position and are used to lift the columns and, if necessary, move them sideways.
Specifi c tools Torque wrench � torque wrench features - strength: 75 N.m - reduced thickness for some tightenings on the busbars
� FACOM torque wrench A type of torque wrench (FACOM brand) have the strength and the features needed for not very accessible tightenings (fi shplates ...) Tool’s references: - SP3723 = wrench’s shaft, essential - SP3721 = extra-thin pawl adapter, indispensable - SP3722 = pawl for ordinary sockets, optional (to be fitted
on the SP3723 shaft) SP3721 pawl extra-thin sockets references + SP3723 shaft: - SP2709 = 13 mm extra-thin low socket - SP2709A = 13 mm extra-thin high socket - SP4369 = 16 mm extra-thin low socket - SP4370 = 16 mm extra-thin high socket - SP2710 = 17 mm extra-thin low socket - SP4371 = 19 mm extra-thin high socket - SP4372 = 19 mm extra-thin low socket
BBT conversion modules special tip � 87808 : indispensable extended tip for tightening the conversion modules on the BBT junction blocks It fits on an ordinary torque wrench
Assembly types � splicing: busbars ❑ bush of 16 and 17 for M10 screw � assembling: columns ❑ bush of 10 for M6 screw ❑ bush of 16 and 17 for M10 screw � floor fixing: ❑ bush of 16 and 17 for M10 screw � fitting the roofs and lifting lugs: ❑ bush of 19 for M12 screw.
11 Okken Schneider Electric

Installation Tools
Tightening torque � recommended tightening torque for mechanical and electrical connections with 8.8 class screws.
Diameter of screw Tightening torque (N.m)(with nut + contac washer)
M4 3.5
M5 7
M6 13
M8 28
M10 50
M12 75
Marking varnish �After tightening each electrical connection to the appropriate torque, apply some varnish between the nut and the screw (or else, between the screw’s head and the copper bar or the device for tightening on a threaded part) �The varnish isn’t supposed to block the screw It allows operator inspection, to check that the nut has been tightened, but also facilitates the identification of any loose nuts during the switchboard’s lifetime �Varnish features: coloured acrylic varnish, indelible and able to resist a 150°C temperature Schneider Electric recommends a red varnish as a standard to identify the panelbuilder’s work. Other colours can be used by the contractor or any operators entitled to work on the switchboard after its commissioning.
12 Okken Schneider Electric

Installation Preparing the site
General The place of installation of the switchboard must be clean. We recommend that the floor is even: + or - 2 mm/m (in this case the columns can be fixed using studs). For floors with evenness > 2 mm/m, you must provide U, T, I sectioned supports, whose straightness and level must be checked in both directions. Systematic use of sectioned supports is recommended to simplify mechanical assembly between columns and fishplating of busbars. If possible, apply a dust-proof paint on the floor to limit pollution inside the switchboard. Also provide the necessary space if future extensions are foreseen.
Column floor fi xing points
A B C D E F G H I J
650 600 565 262.5 262.5 42.5 42.5 37.5 37.5
650 400 565 325 42.5 42.5 37.5 37.5
450 600 365 265.5 262.5 42.5 42.5 37.5 37.5
450 400 365 325 42.5 42.5 37.5 37.5
350 600 265 262.5 262.5 42.5 42.5 37.5 37.5
350 400 265 325 42.5 42.5 37.5 37.5
250 600 165 262.5 262.5 42.5 42.5 37.5 37.5
250 400 165 325 42.5 42.5 37.5 37.5
� Columns should always be handled in the upright position with care. There is a risk of toppling due to the high position of the centre of gravity. � the fixing points to be used are specified depending on the connection direction (front or rear)
Okken Schneider Electric 13
Installation Preparing the site
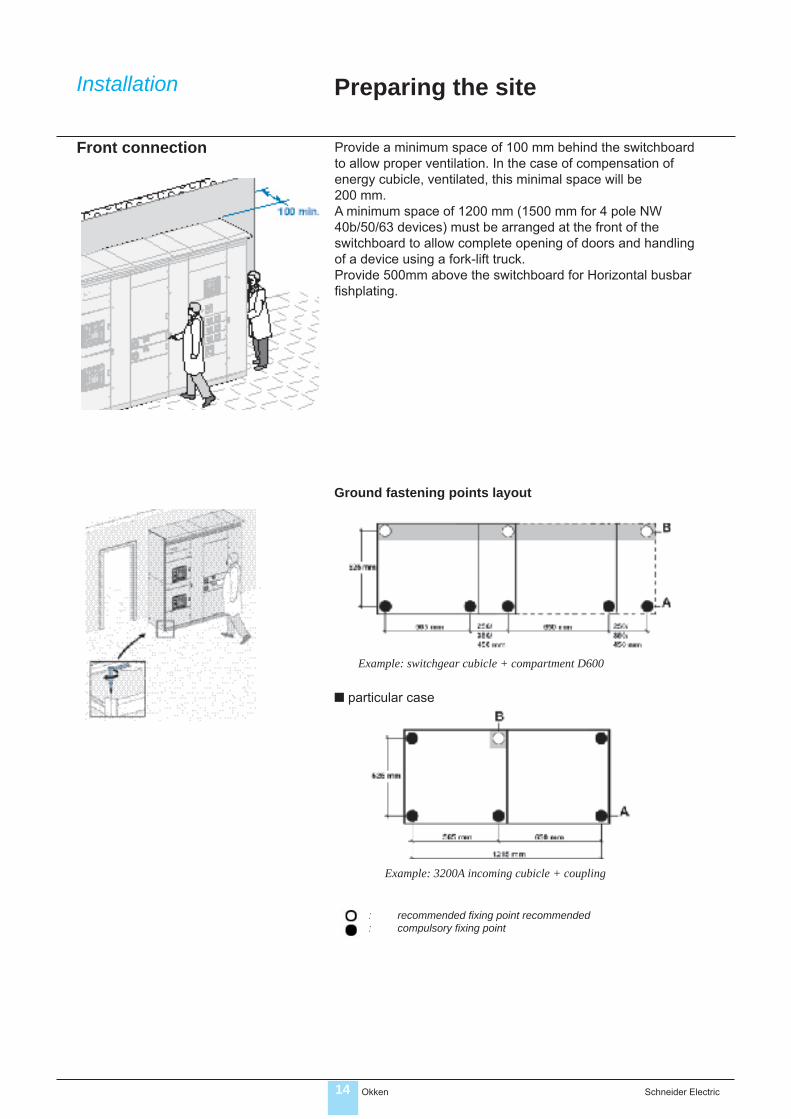
Front connection Provide a minimum space of 100 mm behind the switchboard to allow proper ventilation. In the case of compensation of energy cubicle, ventilated, this minimal space will be 200 mm. A minimum space of 1200 mm (1500 mm for 4 pole NW 40b/50/63 devices) must be arranged at the front of the switchboard to allow complete opening of doors and handling of a device using a fork-lift truck. Provide 500mm above the switchboard for Horizontal busbar fishplating.
Ground fastening points layout
Example: switchgear cubicle + compartment D600
■ particular case
Example: 3200A incoming cubicle + coupling
: recommended fixing point recommended : compulsory fi xing point
14 Okken Schneider Electric

Installation Preparing the site
Rear connection Provide a minimum space of 1200 mm behind the switch-board to allow complete opening of the rear doors and the intervention of an operator. A minimum space of 1200 mm (1500 mm for 4 pole NW 40b/50/63 devices) must be arranged at the front of the switchboard to allow complete opening of doors and handling of a device using a fork-lift truck. Provide 500mm above the switchboard for Horizontal busbar fishplating.
Ground fastening points layout ■ rear connection depth 1000/1200
Example: switchgear cubicle + compartment
■ rear connection depth 1400
Example: switchgear cubicle L650 D600 + 2 rear compartments L650 D400
: recommended fi xing point : compulsory fi xing point
15 Okken Schneider Electric

Installation Preparing the site
Top connection Provide a minimum space of 500 mm above the switchboard for connection by cables or busbar trunking and fishplating of the bus-bar.
Cable entry from the top without busbar
A B C D E F G H
tment : zone (1) compar
650 600 570 560 40 40 20 20
650 400 570 360 40 40 20 20
450 600 370 560 40 40 20 20
450 400 370 360 40 40 20 20
350 600 270 560 40 40 20 20
350 400 270 360 40 40 20 20
250 600 170 560 40 40 20 20
250 400 170 360 40 40 20 20
Cable entry from the top with busbar
1
2 3
1
A B C D E F G H
cubicle 115* : zone (2)
650 600 460 210 120 70 335 55
cubicle 70* : zone (2)
650 600 290 200 110 250 360 40
compartment : zone (3)
650 600 570 260 40 40 320 20
450 600 370 260 40 40 320 20
350 600 270 260 40 40 320 20
250 600 170 260 40 40 320 20
cable entry
various zones inside the switchboard
*cubicle 115: distance between axes of busbar 115 mm. Equipped with Masterpact NW/NT and Compact NS 630b/1600
*cubicle 70: distance between axes of busbar 70 mm. Equipped with functional units ≤ 630A and, in some cases, with Masterpact NT/Compact NS 630b/1600
16 Okken Schneider Electric

Installation Preparing the site
Bottom connection The connection cables will be routed: - either in a duct fitted under the columns - or under a false fl oor.
In the first case, the duct will have a width inferior to the column’s depth, or fitted with rails or transverse sections (these are compulsory for columns fitted with rear compartments).
In the latter case, the switchboard must be installed on a metal chassis designed to support column weight (650 kg on average for a column < 4000 A). The slabs of the false floors will be adjusted so as to respect the degree of protection of the switchboard.
In both cases, provide a minimum depth of 500 mm (600 mm recommended) to respect the bending radius of the cables.
Provide a 500 mm space above the switchboard to allow the H-BB fishplating.
Cable entry from the bottom
A B C D E F G H
cubicle 115*
650 600 450 170 140 60 355 75
cubicle 70*
650 600 530 240 60 60 340 20
compartment
650 600 530 560 60 60 20 20
650 400 530 360 60 60 20 20
450 600 330 560 60 60 20 20
450 400 330 360 60 60 20 20
350 600 230 560 60 60 20 20
350 400 230 360 60 60 20 20
250 600 130 560 60 60 20 20
250 400 130 360 60 60 20 20
cable entry
*cubicle 115 : distance between axes of busbar 115 mm. Equipped with Masterpact NW/NT and Compact NS 630b/1600
*cubicle 70 : distance between axes of busbar 70 mm. Equipped with functional units ≤ 630A and, in some cases, with Master pact NT/ Compact NS 630b/1600
17 Okken Schneider Electric

Installation Panelling the columns
Side panels
Rear panels
Doors
■ disassembly ❑ disassemble the upper 1/2 panel by unscrewing the 4
screws ❑ disassemble the lower 1/2 panel by unscrewing the 4
screws ❑ store the 1/2 panels to protect them from impacts. ■ assembly ❑ store the lower 1/2 panel ❑ screw but do not tighten 4 screws beginning with the top
screws ❑ permanently tighten when all the screws have been fitted ❑ store the uppper 1/2 panel ❑ screw but do not tighten 4 screws beginning with the top
screws ❑ permanently tighten when all the screws have been fitted � the edging sections should be sticked on the cubicle after the panel assembly on the site. All contact areas must be perfectly clean.
■ disassembly ❑ unscrew the 6 screws starting with the bottom screws ❑ remove the panel and store it so it is protected from impacts ■ assembly ❑ store the panel ❑ screw but do not tighten the 6 screws beginning with the top screws ❑ permanently tighten when all the screws have been fitted
■ disassembly ❑ remove the earth braid if the doors are fitted with one ❑ disassemble the door pins beginning with the bottom one, then, if applicable, the middle one ❑ disassemble the top door pin. In the case of a partial door, the top pin is fitted upside down (head downwards). It is held in place by a clip ❑ remove the door and install it so that it is protected from impacts. ■ assembly ❑ position the door on the hinge pins ❑ fit the door pins, beginning with the top one. In the case of a partial door, the top pin is fitted upside down (head downwards). It is held in place by a clip ❑ fit the other door pins ❑ if necessary, put back the earth braid ❑ check proper operation of the handle and its locking system.
18 Okken Schneider Electric

Installation Panelling the columns
Roofs ■ disassembly ❑ unscrew the 6 screws and remove the lifting lugs ❑ remove the roof and store it sheltered from impacts ■ assembly ❑ position the roof ❑ screw it on (with or without lifting lugs (hex-head screw 12 x 25 + waterproofing washer + contact washer per fi xing point)
IP42 cover plates and grids ■ securing the bottom supports and the grids or cover plates - M6x13 TF screw (87182 : 1000 screws) ■ In order to ease handling the columns by the bottom, and avoid damage during transportation, the fixing supports and grids (or IP42 strips) at the bottom of the columns have to be mounted on the site after the switchboard’s installation They aren’t mounted on the switchboard at the delivery (supplied separately)
Okken Schneider Electric 19

Installation Installing the columns
Identifying columns
Fitting the columns
Each column is identified by a digit or a letter at the top of the column. It corresponds to the serial number assigned to each column switchboard drawing. Some devices are too heavy to be dispatched in their column. They will be sent separately and are identifi ed by: ❑ the number of the column in which they will be installed ❑ the reference of their position in this column.
The layout consists of juxtaposing the columns in a logic order. The first column positioned may be the right or left one or even the middle one of the switchboard.
� bring up the columns to the site in the chosen assembly order � remove the containers and the protection boards if necessary � remove the panels to allow access to the cubicle assembly points and to the connection points � disassemble the roof � if necessary, disassemble the ventilation grids or bands (the bottom grids are delivered unmounted to allow handling of columns using a pallet truck).
115 cubicle particular case : As the fishplates stick out at the right of the column, install the columns beginning from the left. Distance between axes of busbar 115 mm. Equipped with Masterpact NW/NT and Compact NS 630b/1600)
20 Okken Schneider Electric

Installation Installing the columns
Fixing and assembling ■ fi t the fi rst column ■ fix it to the floor using three M10 bolts having first checked its vertical position and support ■ bring the second column up beside the fi rst one ■ adjust the position of the associated column (wedging at the right height, alignment of front panels) ■ assemble the columns with one another: ❑ 4 coupling kits, ref. 87171 on the top of frameworks ❑ 2 M10 bolts on the plinths ❑ 2 holding plates, ref. 87170 on the frameworks in the middle part. These plates are clipped on forcibly and are held in place by diameter 6 plastic rivets. Position of rivets with respect to the bottom of the top crossmember: - for a column H = 2350mm: 1294 mm - for a column H = 2200mm: 1219 mm If plate installation causes problems, they can be replaced by coupling kits, ref. 87171. ■ identify the routing of strands or auxiliary wiring between columns. Take all necessary measures to avoid jamming or deterioration of wires when installing the columns ■ protect the auxiliary wiring when it is routed near sharp edges by means of sheaths or grommets.
coupling kit ref. 87171 holding plate ref. 87170
■ install all associated columns in the same way
compulsory binding by coupling kit ref. 87171
compulsory binding by holding plate ref. 87170
M10 bolt
Okken Schneider Electric 21

Installation Installing the columns
Internal arc withstand complements
� this item is compulsory for the arcing withstanding inside the column It comes in addition with the parts installed by the panelbuilder � the bottom plate delivered with the switchboard (part of the reference 87723) should be installed only at the bottom of the switchgear cubicles type 115, 70, 185 (W 650 mm) It is needless for cubicle 230 ( W 1150 mm) � slide the plate on the 2 plinths bends up to stop against the rear cross-member of the switchgear cubicle
� screw the plate to the ground, using the 2 holes A ahead the cubicle The B holes are used for the column ground fastening
22 Okken Schneider Electric

Installation Electrical connections
Fishplating the main busbar Once the roof is disassembled, connect the bars to each other as described below: ❑ disassemble the top cross-pieces at each column juxtaposition so as to simplify access to the horizontal busbar ❑ loosen the fishplates positioned on the first column (assembled in workshop) and make them slide between the bars to be assembled. For better access to the tightening points, we recommend that you begin by fishplating the bottom bars (Neutral, Phase 1), followed by the top bars (Phase 3 and finally Phase 2). For busbars with 4 or 6 bars per phase, use a 5 mm max. thick bar or a screwdriver to slide the middle plate of the fishplate ❑ a visual reference ((1)notch) lets you check that the fishplate is properly centred with respect to the bars to be assembled ❑ tighten the nuts using a torque wrench to the recommended tightening torque (50 N.m), ensuring that the base of the screw head is properly positioned in the square recess of the washer ❑ mark all nuts with a dot of varnish. note: If the fishplate has to be completely removed, ensure, when putting it back, that the tightening nuts are towards the inside of the busbar in order to guarantee clearances.
disassembling cross-pieces
(1)
sliding the fishplate
Okken Schneider Electric 23

Installation Electrical connections
Linking the protective The earthing bars of the various sections are connected together using M10 class 8.8 nuts and bolts equipped withconductors contact washers ❑ set the bolts ❑ tighten the nuts at the required torque (50 N.m) using a torque wrench ❑ mark each nut with a drop of varnish
Equipment protection Should the connection not be performed immediately after installation, the following precautions will prevent any dust or foreign material penetration: ❑ close all the doors ❑ reassemble the side and rear panels ❑ reassemble the roofs and top and bottom ventilation grids ❑ plug in the circuit-breakers and drawers ❑ seal temporary openings (cable entries) ❑ in case of woks involving water drops or splashing (cement, welding...), it is necessary to put a cover on the switchboards.
24 Okken Schneider Electric

Connection Connecting the power cables
General ❑ for protection of persons, first connect the switchboard’s protective conductor to the earth connection ❑ flange cables as close as possible to the connections so as not to create excessive mechanical stresses on the device connection pads. If cable glands are not used, also flange the cables as close as possible to the column entry point ❑ cables must never be routed in contact with or between live conductors (copper bars, etc.) ❑ the sharp edges of the framework placed on the cable route must be protected so as not to damage conductors ❑ comply with a minimum bending radius of 6 to 8 times cable outer diameter ❑ all the power connections must be made using class 8.8 bolts and nuts and tightened to the recommended torque (see chapter Installation) ❑ in the event of connection of aluminium cables on copper pads, use bimetal lugs or interfaces ❑ make strands circuit by circuit and fasten them on provided cable tie bars . The number of cables per strand depends on cable cross-section.
Cable cross-section Number of cables (mm²) per strand
≤10 8
16 < S ≤ 50 4
> 50 tie individually
❑ the strands are made using cable ties. The distance between them depends on electrodynamic stresses and on the type of tie used.
Type of tie (mm)
width : 4,5 mm load : 80 kg
Maximum Icw (kA/rms 1s)
10
Distance between ties (mm)
200
15 100
20 50
width : 9 mm load : 80 kg
20
25
35
350
200
100
45 70
Okken Schneider Electric 25

Connection Connecting the power cables
connection through the top
Connection through the bottom
Effective zone of cables run
❑ remove the roof ❑ drill the holes required to install cable glands or grommets ❑ install the cable glands or grommets. They must comply with the required protection degree (IP) ❑ install the roof back ❑ run the cables through the glands or grommets ❑ run the cables in the intended compartments and secured them to cable tie-bars every 400 mm ❑ crimp the lugs and connect ❑ when tightness does not call for cable glands or when it is achieved by means of foam, cables can be routed in a rectangular cut-out in the roof. The removable beam then simplifies insertion of cables in the connection compartment.
removable cross-member to simplify connection
❑ remove the bottom plate ❑ drill the holes required to install cable glands or grommets ❑ install the cable glands or grommets. They must comply with the required protection degree (IP) ❑ fit the bottom plate back ❑ run the cables through the glands or grommets ❑ run the cables in the intended compartments and secured them to cable tie-bars every 400 mm ❑ if cable glands are not used, it may be easier to prepare the cable heads outside the switchboard (e.g. lug crimping) and then to topple them inside the column having fi rst disassembled the bottom removable beam, as well as the ventilation grid or the strip.
removable cross-member to simplify connection
❑ see chapter «Installation)
26 Okken Schneider Electric

Connection Connecting the power cables
Connection to connection bars in Form 4 box
Connection directly to device terminals
Use lugs to connect to copper connection bars ❑ check the consistence between circuit and switchgear identifications ❑ when connections are made to several bars for each phase, position the lugs opposite one another and insert copper spacers ❑ comply with the insulation distances between phases of 14 mm min. ❑ mark all nuts with a dot of varnish after tightening to the recommended torque.
Rear connection Top direct connection
Bottom direct connection Side connection
❑ when connections are made directly to the terminals of devices (disconnectable Polyfast), comply with the tightening torque recommended by the device manufacturer ❑ check that the length of the screws delivered with the apparatus is compatible with the lugs thickness ❑ comply with the safety perimeter around the apparatuses, defined by the manufacturer to guarantee their correct operation ❑ if necessary, position back after connection the phases separators and the terminal covers ❑ in the particular case of connection with armoured wires, please consult us.
27 Okken Schneider Electric

Connection Connecting the power cables
Form 4 box
Form 4 partitioning, Masterpact rear connection
Form 4 partitioning, FU ≤ 630A rear connection
■ for Masterpact NW/NT/NS 630b-1600 ❑ disassemble the cover plate allowing access to the device connection bars ❑ connect, conforming with the insulation distances ❑ cut out the part of the cover disassembled in order to let cables pass through, while preserving the necessary degree of protection IP2X mini ❑ reassemble all the covering ■ for FU≤ 630A ❑ disassemble the Form 4 box to access the device connection bars ❑ connect, conforming with the insulation distances ❑ reassemble the Form 4 box without the insulating removable and cuttable plate ❑ cut out the insulating plate in order to let cables pass through, while preserving the necessary degree of protection ❑ put back the insulating plate.
Form 4 partitioning, FU ≤ 630A
Form 4 sleeves, FU ≤ 630A front connection
front connection Form 4 by sleeve ❑ position the sleeve on the cable before crimping the lug
❑ crimp the lug ❑ connect the cable ❑ slide the sleeve on the cable so that all the live parts are protected.
28 Okken Schneider Electric

Connection Connecting the power cables
Connection to connection bars inf 630A
Plug-in FU <= 630A in Polyfast drawer(70-2) Connection principles : �use anti-rotation plates (87188 : 100 plates) to ease accessing to and tightening the lugs on the connection pads. They allow the use of a single tool. �comply with insulation distances near metallic parts: 14mm for Ue<=690V - place the bolt’s head on the plate’s side every time there
is a risk of no respecting the insulation distance
Drilling the cable plate : �dismount the F4 boxes 2 insulating plates �drill the cable plate on the marked location as shown in the drawings on the next pages, following the indications given in the facing tables, which indicate : - the drilling diameter, depending on the cable section ± 1 mm. The holes leave sufficient clearance for an easy operating and ensures an IP2 after the cable connection - the drillings’ position, from case to case
Drilling diameter Cable (mm²) Drilling ± 1 mm
95 27 120 29 150 31 185 32 240 34 300 37
Drilling the 3P SC cable plate
Cable plate drilling nr Nr of
Mod. In max
Nr
1 Cable
Nr
2 Cables 5 250A - 3P Sans TC 3 3 - 4 (1) 6 250A - 3P 1 TC RS 2G 1 6 250A - 3P 1 TC RS 2P 2 6 250A - 3P Sans TC 3 3 - 4 (1) 8 630A - 3P 1 TC RS 2G 1 8 630A - 3P 1 TC RS 2P 2 8 630A - 3P Sans TC 3 3 - 4 (1)
(1) : 95 mm² max, CU lug
� 300 mm² cables are connected only with CU lugs
29 Okken Schneider Electric

Connection Connecting the power cables
Drilling the 4P SC cable plate :
Cable plate drilling nr. Nr of
Mod. In max
Nr
1 Cable
Nr
2 Cables 7 250A - 4P Sans TC 1 7 250A - 4P 1 TC RS 2G 2 7 250A - 4P 1 TC RS 2P 3 3 - 4 (1) 9 630A - 4P Sans TC 1 9 630A - 4P 1 TC RS 2G 2 9 630A - 4P 1 TC RS 2P 3 3 - 4 (1)
(1) : 95 mm² max, CU lug
� 300 mm² cables are connected only with CU lugs
� drawing : 6-8M 3 poles and 7-9M 4 poles cable plate drilling
SC connections examples Cutout after drilling
Example of SC connection with F4
� connection without CT ≤ 9M
� connection with CT 12/14M
�the copper pads, except from those held by the insulating bushings, must be studied and manufactured by the panelbuilder
30 Okken Schneider Electric

Connection Connecting the power cables
Drilling the 3P RC cable plate :
Cable plate drilling nr Nr of
Mod. In max
Nr
1 Cable
Nr
2 Cables 5 250A - 3P Sans TC 3 3 - 4 (2) 6 250A - 3P 1 TC RS 2G 1 1 - 2 (2) 6 250A - 3P 1 TC RS 2P 2
6 250A - 3P Sans TC 3 3 - 4 (2) 8 630A - 3P 1 TC RS 2G 1 1 -2 (2) 8 630A - 3P 1 TC RS 2P 2
8 630A - 3P Sans TC 3 3 - 4 (3)
(2) : 150 mm² max
(3) : 240 mm² max
� 300 mm² cables are connected only with CU lugs
Drilling the 4P RC cable plate :
Cable plate drilling nr Nr of
Mod. In max
Nr
1 Cable
Nr
2 Cables 7 250A - 4P Sans TC 1 1 - 2 (2) 7 250A - 4P 1 TC RS 2G 2
7 250A - 4P 1 TC RS 2P 3 3 - 4 (1) 9 630A - 4P Sans TC 1 1 - 2 (2) 9 630A - 4P 1 TC RS 2G 2
9 630A - 4P Sans TC 3 3 - 4 (3)
(2) : 150 mm² max
(3) : 240 mm² max � 300 mm² cables are connected only with CU lugs
� drawing : 6-8M 3 poles and 7-9M 4 poles cable plate drilling
Okken Schneider Electric 31

Connection Connecting the power cables
Example of RC connection with F4
� connection without CT ≤ 9M
� connection with 12/14M
� the copper pads, except from those held by the insulating bushings, must be studied and manufactured by the panelbuilder
32 Okken Schneider Electric

Connection Connecting the power cables
SC and RC connections :
Plates re-assembly Cutout after drilling
� after drillings, cutout each plate following the explanatory drawings. Each plate is cut in 2 parts which are mounted on the F4 boxes after the cables connection. � put back the cut off plates after drilling : - slide the first part at the back of connected cables - slide and screw the second part at the front of cables - put back the other insulating plate
� drawing for 1 cable per phase
� drawing for 2 cables per phase
� The anti-rotation plates are indispensable for the contractor: they allow the cable tightening with only on tool Quantity : 1 plate per bolt at the connection point, to be delivered with the switchboard 87188 : 100 anti-rotation plates
Okken Schneider Electric 33

Connection Connection by KT busbar trunking
General �connection by BBT KT needs roof drilling according to the drawing enclosed in the waterproofing kit. The BBT waterproofing kit is compulsory and must be ordered together with the BBT. �the drawings show : - switchgear position in depth (D 600/1000/1200/1400) - switchgear position in height (T, M, B) - position of the junction axle, from the roof from the front edge of the roof (Æ) - position of the roof drilling gauge axle
TDC - D600 - BBT interface <= 4000 A � switchgear position: T
RC - D1000 - BBT interface <= 3200 A � switchgear position: T
RC - D1000 - BBT interface <= 3200 A � switchgear position: M
34 Okken Schneider Electric

Connection Connection by KT busbar trunking
Généralités
RC - D1400 - BBT interface 3200 A �switchgear position: B
RC - D1200 - BBT interface 4000 A � switchgear position: T
RC - D1200 - BBT interface 4000 A � switchgear position: T
Okken Schneider Electric 35

Connection Connection by KT busbar trunking
General � connection of the KT BBT is made through the junction block, installed in the switchboard<br> � in 115-1/115-2 RC (junction block <=3200A), mount the blanking plates supplied by the panelbuilder (they are provided with the junction block’s installation)<br>
Connection of Busbar trunking � connect the KT BBT on the junction block’s installed in the switchboard Drawing : mounted set
� mount the 2 lateral blanking plates, cutting out the central parts according the the BBT’s width � mount the 4 front and rear blanking plates, cutting out the right and left part as per general drawing The oblong holes allows to fit as well to 3P BBT as to 4P BBT � after mounting the blanking plates, the IP2x must be ensured
36 Okken Schneider Electric

Connection Connecting the auxiliary circuits
Cable routing ■ cabletrays The auxiliary cables are routed on metal cabletrays. They must be flanged according to proper procedures.
A: trunking panelbuilder side B: trunking contractor side C: auxiliary busducts D: rail for auxiliary terminal blocks E: 1 or 2 rails for power terminal blocks
■ trunkings The following rules must be complied with in traditional trunkings: ❑ trunking must be secured at least every 600 mm ❑ trunking must not be filled to more than 70% of capacity ❑ cables must not be tied inside trunking ❑ trunking must be secured using plastic screws to avoid any risk of damaging cables ❑ avoid routing auxiliary cables directly in contact with power cables.
Connection ■ general ❑ all strands of a conductor must be inserted in the hole of the terminal ❑ tighten securely, taking care not to cut strands ❑ identify cables using references consistent with switch-board references in order to simplify future intervention. ■ connection of the auxiliary blocks of the Polyfast functional units ❑ front connection: direct connection on the fixed part of the block ❑ in rear connection: connection on a terminal block placed in the rear compartment.
Okken Schneider Electric 37

Connection Finishing
Finishing
edging sections position
roof gasket mounting
Cleaning
■ reassemble: ❑ the roofs, without forgetting the seal and the cornice end covers
❑ the ventilation grids ❑ the rear panels ❑ the side panels ❑ the edging sections (ref. 87141 for columns H=2200 mm and ref. 87140 for columns H=2350 mm) delivered separately. They are stuck on side panels bend, situated on the front side of the switchboard
❑ the doors ■ do not forget, if necessary, to create the equipotential bonding of the doors by means of an earth braid.
detail of the roof gasket mounting: ❑ check the installation of the roofs and the side panels ❑ cut out lengths of gasket corresponding to the depth of the column ❑ install the gasket «in rider» on the jointed sheet sections ❑ check its good installation by a pressure of the hand over all its length.
Practical rules Cleaning the switchboard before packing ■ remove dust from the inside using a vacuum cleaner : do not use blow cleaning as this may cause shavings and detritus to accumulate in a live area ■ dust the outside ■ if necessary, use a neutral dissolvent that will not damage the paint ■ touch up paintwork if necessary ■ check absence of foreign matter inside the switchboard (tools, screws and bolts) that could prevent it from operating properly
38 Okken Schneider Electric

Commissioning Instruments
Measuring and of monitoringswitchgear required
The following items are required for energising the switchboards: ❑ a magneto-electric generator ❑ a dielectric measuring unit (optional) ❑ a phase tester ❑ a phase sequence tester: rotophase ❑ a multimeter ❑ a vibrotest for locating poor auxiliary circuit connections ❑ a variable current source (AC, DC, recommended power 20A) ❑ a simulator (optional) with push-buttons, lights, measuring instruments.
Okken switchboards commissioning must be carried out by qualified personnel, entitled to work in the proximity of the voltage and trained with the safety instructions.
Okken Schneider Electric 39

Commissioning Masterpact NW, NT, Compact NS
Mounting and installation ■ Putting into position ❑ unpack the devices, if they are packed separately ❑ check that they have suffered no damage that might inhibit correct operation ❑ before racking in the Masterpact, check that the chassis corresponds to the device ❑ press the release tabs and pull the rails out ❑ position Masterpact on the rails ❑ make sure the device rests on all four supports ❑ push the circuit-breaker into the chassis, taking care not to push on the control unit.
■ adjustments and operations - refer to device leaflets
40 Okken Schneider Electric

Commissioning FU up to 630A
Plug-in Polyfast
Disconnectable Polyfast
Disconnectable mounting plate
Fixed and plug-in on mounting plate
❑ check that greasing of functianal units clamps is effective ❑ check the correct fixing of Polyfast on its base plate (4 screws) ❑ check the presence of the terminal covers on the apparatus ❑ if necessary proceed with adjustment of the control unit ❑ close the apparatus: «ON» position.
■ removal ❑ open the apparatus: «OFF» position ❑ unscrew the 4 fastening screws of Polyfast on its base ❑ extract Polyfast by means of the 2 handles, holding it horizontal in order to maintain the fastening screws in position.
❑ check that greasing of functianal units clamps is effective ❑ check the correct fixing of Polyfast on its base plate (4 screws) ❑ check the presence of the terminal covers on the apparatus ❑ if necessary proceed with adjustment of the control unit ❑ close the apparatus: «ON» position.
■ removal ❑ open the apparatus: «OFF» position ❑ remove the downstream terminal cover ❑ disconnect power cables ❑ unscrew the 4 fastening screws of Polyfast on its base ❑ extract Polyfast by means of the 2 handles, holding it horizontal in order to maintain the fastening screws in position.
❑ check that greasing of functianal units clamps is effective ❑ check the correct fixing of the moving part on its base plate (2 screws) ❑ if necessary proceed with adjustment of the control unit ❑ close the apparatus: «ON» position.
■ removal ❑ open the apparatus: «OFF» position ❑ disconnect the power terminal block ❑ disconnect the auxiliary terminal block ❑ unscrew the 2 fastening screws of the mounting plate on its base ❑ extract the mounting plate, holding it horizontal in order to maintain the fastening screws in position.
❑ check that greasing of functianal units clamps is effective ❑ if necessary open the door to proceed with adjustment of the control unit ❑ close the apparatus: «ON» position.
■ removal of an apparatus from its base (refer to the apparatus leaflet).
Okken Schneider Electric 41

Commissioning FU up to 630A
Drawers ■ general: passing from one position to another ❑ operation of the drawer impossible apparatus closed: open the apparatus ❑ seize the drawer by the handles and press and hold the red release button. The positions are visible on the indicator B located under the release button A
- plug-in: red - test: yellow - draw-out: green.
■ withdrawing ❑ pass from the «connected» to the «test» position, then to the «disconnected» position ❑ the positioning mechanism locks the drawer in the selected position. ■ removal ❑ pull the drawer with the handles to the pre-extraction hard point ❑ position the hands as indicated on the diagrams and extract the drawer ❑ be careful with grease present on the mechanisms.
drawer implemented in the lower side of the column
drawer implemented in the upper side of the column
■ putting into position ❑ engage the drawer in its cell, positioning the hands as indicated on the diagrams ❑ check that the apparatus is in open position ❑ using the two handles, push the drawer to the «disconnected» position note: if the drawers are equipped with mismatching device, check the consistence of drawer and cell.
42 Okken Schneider Electric

Commissioning FU up to 630A
Drawers ■ racking ❑ seize the drawer by the handles ❑ press and hold the red release button ❑ push the drawer fully home to the «connected» position ❑ the racking is correct if the positioning mechanism is locked
notes: 1 it is possible to go directly to the «connected» position when putting the drawer into position 2 the drawers equal or more than 12 modules need a more important stress on racking. Curtly impart a firm motion of wrists at full stroke.
disconnected position
connected position
test position
■ operation
❑ when the drawer is in the «test» or «connected» position, actuate the apparatus rotary handles or the control devices (push-buttons, selector switches) according to the electrical diagram ❑ rotary handle on Compact or GV: - turn clockwise toward «ON» to close - turn counter-clockwise toward «OFF» to open - marks placed on the rotary handle indicate the position:
white / ON: closed green / OFF: open
tripped: fault.
■ check that greasing of functianal units clamps is effective
Okken Schneider Electric 43

Commissioning FU up to 630A
Drawers Adjustments The front face of the drawer is swivelling and gives access to the devices adjustments. ❑ introduce a tool inside the left handle, press moderately in order to compress the leaf spring A and open the front panel using the red release button ❑ in the case of a drawer higher than 6 modules, remove the screw on the front panel ❑ open the door ❑ carry out the adjustments ❑ close again the gate. The spring goes back automatically in position.
note: When the apparatus is closed, the voluntary opening of the door is possible if the «door closed locking» mechanism of rotary handle has been inhibited or removed.
44 Okken Schneider Electric

Commissioning Checking and testing
Checking �check the insulation of auxiliary circuits using an electromagnetic generator
�check operation of the auxiliary in the switchboards: energise and carry out operating tests for the various sequences
�carry out overall insulation measurements.
If a TNC earthing system is used, carry out the insulation measurements on the phases only. Measurements should be carried out using an insulation tester and with the system supplied by a voltage of at least 500V DC. The insulation-resistance value must be equal to at least 1000 ohm/V. If the overall insulation value is low, preheat the swichboard using a source of heat (resistor, light bulb) for at least 24 hours to remove humidity, then carry out the overall insulation measurements again.
�dielectric tests have already been carried out in the factory (see the factory test report). Knowing that such tests subject the equipment to certain stresses (ageing, etc...) it is advisable not to repeat them If another test is expressly required by the customer, apply a coefficient of 0,8 to the factory test value
�final connections and checks: - reconnect the earth electrodes disconnected for the insulation and dielectric measurements<br> - check the electrical continuity of the protective conductors of the assembly (presence of contact washers, presence of equipotential connectors for doors, etc...) -check all the tightenings made on the site, except if already marked with varnish : * electrical connections, using a torque wrench * mechanical connections * ground fasteningg - miscellaneous checks: * mechanical locking of switchgear * markings on the switchboard, on power and control conductors * visual inspection of outside surfaces and paint. Touch up any scratches or other defects.
�check that original greasing of functional units clamps is effective. If necessary, lightly grease their electrical contacts (grease ref. 87635).
Okken Schneider Electric 45

Commissioning Checking and testing
Energising equipment for the fi rst time
Precautions to be taken when switchboard has been switched off for a long period
■ rack in the Masterpact devices (see Masterpact handbook) ■ plug-in removable circuit-breakers (see relevant leaflet) ■ plug-in drawers, if any ■ check that all protective circuit-breakers are in the open (OFF) position ■ set the Masterpact control units (see Masterpact handbook) to protect the network and, if applicable, the low-voltage distribution outgoers ■ set the thermal-magnetic or electronic trip units of the protective circuit-breakers ■ for motor-control feeders, set the motor-protection circuit breakers magnetic releases and the thermal relays, or the «motor» circuit-breakers and motor protective relays, according to the nameplate of the motor to protect ■ check that the phase rotation or index is consistent with the supplies one ■ one after the other, energise the power circuits in the switchboard, checking each time that the loads are supplied and operate correctly ■ carry out the operating tests: ❑ operating sequence ❑ controls, indications, measurements, protection ❑ remote-control mechanism ❑ electrical interlocks.
note: the first energising of the switchboard is potentially dangerous, due to the faults undetected during the preliminary checks. It must be carried out by a qualified technician. Before any intervention switch-off the equipment. A hazard of electric shock, burns or explosion are inherent in use of electrical equipment. Failure to observe these instructions may result in severe bodily injury, death or damage to the switchboard.
❑ check that nothing has been left inside the board (especially if modifications have been carried out) ❑ clean all components ❑ check the insulation (if the value is below 4 megaohms, preheat the board to get rid of humidity and condensation) ❑ before applying voltage make sure that all outgoing circuits are in «open» position to avoid a too high current surge when closing the main circuit-breaker ❑ progressively close the breakers.
46 Okken Schneider Electric

Okken Schneider Electric 47

Schneider Electric Industries SAS As standards, specifications and designs change from time to Postal address: time, please ask for confirmation of the information given in BP 18 this publication. F-73804 Montmélian Cedex Tél : +33 (0)4 79 75 48 00 Fax : +33 (0)4 79 84 28 36 www.schneider-electric.com
Publication: Schneider Electric Industries SAS Design: Schneider Electric Industries SAS SBSED001025EN Printing: Imprimerie des Deux-Ponts ART. 033408 01/2007
Related Documents


![Triplett 630A Meter Manual[1]](https://static.cupdf.com/doc/110x72/5571f8cc49795991698e1d11/triplett-630a-meter-manual1.jpg)