Need for Speed™ Carbon Operation Manual 040-0178-01 Rev. A www.globalvr.com http://service.globalvr.com [email protected] Phone: 408.597.3435 Fax: 408.597.3437 ¾ Read this manual before use. ¾ Keep this manual with the machine at all times.

Welcome message from author
This document is posted to help you gain knowledge. Please leave a comment to let me know what you think about it! Share it to your friends and learn new things together.
Transcript

Need for Speed™ Carbon
Operation Manual
040-0178-01 Rev. A
www.globalvr.com http://service.globalvr.com [email protected] Phone: 408.597.3435 Fax: 408.597.3437
Read this manual before use. Keep this manual with the machine at all times.
Preface
Need for Speed™ Carbon Operation Manual Page 2 of 32 040-0178-01 Rev. A 6/11/2008
Table of Contents
Preface ...................................................................3 Safety .................................................................3
Warnings .........................................................3 Environmental Conditions ..............................3
FCC Notices (United States) ..............................4 Chapter 1 — Introduction..................................5
Linking Cabinets ................................................5 Linking Errors.................................................6
Checking the Game Dongle ...............................6 Maintenance Restart Feature..............................7
Chapter 2 — Driving a Race .............................8 Logging In ......................................................9 Career Mode ...................................................9 Additional Race Options.................................9 Driving Controls .............................................9
Amusement Race Screen .................................10 Chapter 3 — Operator Menu and Game
Setup .........................................................11 Navigating the Operator Menu.........................11 Machine Settings: Info Screen ........................13 Machine Settings: Settings Menu....................14 Machine Settings: Errors Screen.....................15 Error Messages.................................................15
Game Settings: Settings Menu ....................... 16 Backing Up and Restoring Player Data........ 17 Backing Up Player Data............................... 17 Restoring Player Data................................... 18 Installing a USB Extension Cable ................ 18
Game Settings: Disable Tracks Menu ............ 18 Game Settings: Game Resets Menu ............... 19 Coin Settings: Configuration Menu................ 20 Coin Settings: Pricing Menu........................... 21 Collections Screens ......................................... 22 Statistics Screens ............................................. 23 Diagnostics: Play Control Test ....................... 25 Diagnostics: Card Reader Test........................ 26 Diagnostics: Card Dispenser Test ................... 26 Diagnostics: Sound Test ................................. 27 Diagnostics: Monitor Test Screens ................. 28
Chapter 4 — Software Restoration ................. 29 Run the System Recovery CD......................... 29 Run the Game Install CDs............................... 29 Test and Set Up................................................ 30 Cabinet Linking Troubleshooting.................... 30
Technical Support ............................................... 32
List of Figures
Figure 1. Linking Cabinets .............................5 Figure 2. USB Game Dongle..........................7 Figure 3. Operator Menu Flowchart .............12 Figure 4. Machine Info Screen .....................13 Figure 5. Machine Settings Menu.................14 Figure 6. Game Settings Menu .....................16
Figure 7. Game Resets Menu .......................19 Figure 8. Coin Settings: Configuration
Menu ....................................................20 Figure 9. Coin Setting: Pricing Menu...........21 Figure 10. Collections Screens.....................22

Preface
©2008 Global VR, Inc. 040-0178-01 Rev. A 6/11/2008 Page 3 of 32
Preface
Safety Please read this page before preparing your arcade cabinet for game play.
The following safety instructions apply to all game operators and service personnel. Specific warnings and cautions will be included throughout this manual. Use the following safety guidelines to help protect the system from potential damage and to ensure your personal safety: • Electronic components in the game cabinet run on 115 VAC. The voltage switch on the back of the computer must
be set to 115. If you power up the computer outside of the cabinet, set the switch to match the local AC voltage:
− 115 volts / 60Hz in most of North and South America and some Far Eastern countries such as Japan, South Korea and Taiwan
− 230 volts / 50Hz in most of Europe, the Middle East and the Far East • To help prevent electric shock, plug the system into a properly grounded power source. These cables are equipped
with 3-prong plugs to help ensure proper grounding. Do not use adapter plugs or remove the grounding prong from a cable. If you must use an extension cable, use a 3-wire cable with properly grounded plugs.
• To help protect your system from sudden increases and decreases in electrical power, use a surge suppressor, line conditioner or Uninterruptible Power Supply (UPS).
• Be sure nothing rests on the system's cables and that the cables are not located where they can be stepped on or tripped over.
• Keep your system far away from radiators and other heat sources.
• Do not block cooling vents.
Precautions for Game Operation GLOBAL VR® assumes no liability for injuries incurred while playing our games. Operators should be aware that certain health and physical conditions may make people susceptible to injury when playing video games, particularly when the game moves or creates a sense of motion.
Warnings
To avoid electrical shock, unplug the cabinet before performing installation or service procedures.
If the power cord is damaged, it must be replaced by the equivalent power cord available from GLOBAL VR or your distributor.
GLOBAL VR assumes no liability for any damages or injuries incurred while setting up or servicing the cabinet. Only qualified service personnel should perform installation or service procedures!
Environmental Conditions Cabinet is intended for indoor use only. Be sure to keep the cabinet dry and maintain operating temperatures of 59°-86° F (15°-30° C).
Preface
Need for Speed™ Carbon Operation Manual Page 4 of 32 040-0178-01 Rev. A 6/11/2008
FCC Notices (United States) Electromagnetic Interference (EMI) is any signal or emission radiated in free space or conducted along power or signal leads, that endangers the functioning of radio navigation or other safety service, or that seriously degrades, obstructs, or repeatedly interrupts a licensed radio communications service. Radio communications services include, but are not limited to, AM/FM commercial broadcast, television, cellular services, radar, air-traffic control, pager, and Personal Communication Services (PCS). These licensed services, along with unintentional radiators such as digital devices (including computer systems) contribute to the electromagnetic environment. Electromagnetic Compatibility (EMC) is the ability of items of electronic equipment to function properly together in the electronic environment. While this computer system has been designed and determined to be compliant with regulatory agency limits for EMI, there is no guarantee that interference will not occur in a particular installation. If this equipment does cause interference with radio communications services, which can be determined by turning the equipment off and on, you are encouraged to try to correct the interference by one or more of the following measures: • Re-orient the receiving antenna.
• Relocate the cabinet relative to the receiver.
• Plug the game into a different outlet so that the computer and the receiver are on different branch circuits.
If necessary, consult a Regulatory EMC representative of GLOBAL VR® or an experienced radio/television technician for additional suggestions. You may find the FCC Interference Handbook, to be helpful. It is available from the U.S. Government Print Office, Washington, DC 20402. This device has been tested and complies with the limits for a Class A digital device pursuant to Part 15 of the FCC Rules. These limits are designed to provide reasonable protection against harmful interference when the equipment is operated in a commercial environment. This equipment generates, uses, and can radiate radio frequency energy. If not installed and used in accordance with the instruction manual, it may cause harmful interference with radio communications. Operation of this equipment in a residential area is likely to cause harmful interference, in which case you will be required to correct the interference at your own expense. Operation is subject to the following conditions: • This device may not cause harmful interference.
• This device must accept any interference received, including interference that may cause undesired operation.
Chapter 1 — Introduction
©2008 Global VR, Inc. 040-0178-01 Rev. A 6/11/2008 Page 5 of 32
Chapter 1 — Introduction
Need for Speed™ Carbon Conversion Kits are available for all Need for Speed™ cabinets
• New racing environments let players defend their reputation on urban street tracks and insane drift tracks
• Start your career and earn more cars…and more prestige
• Select Tuner, American Muscle, or Exotic cars then customize them to make 'em your own
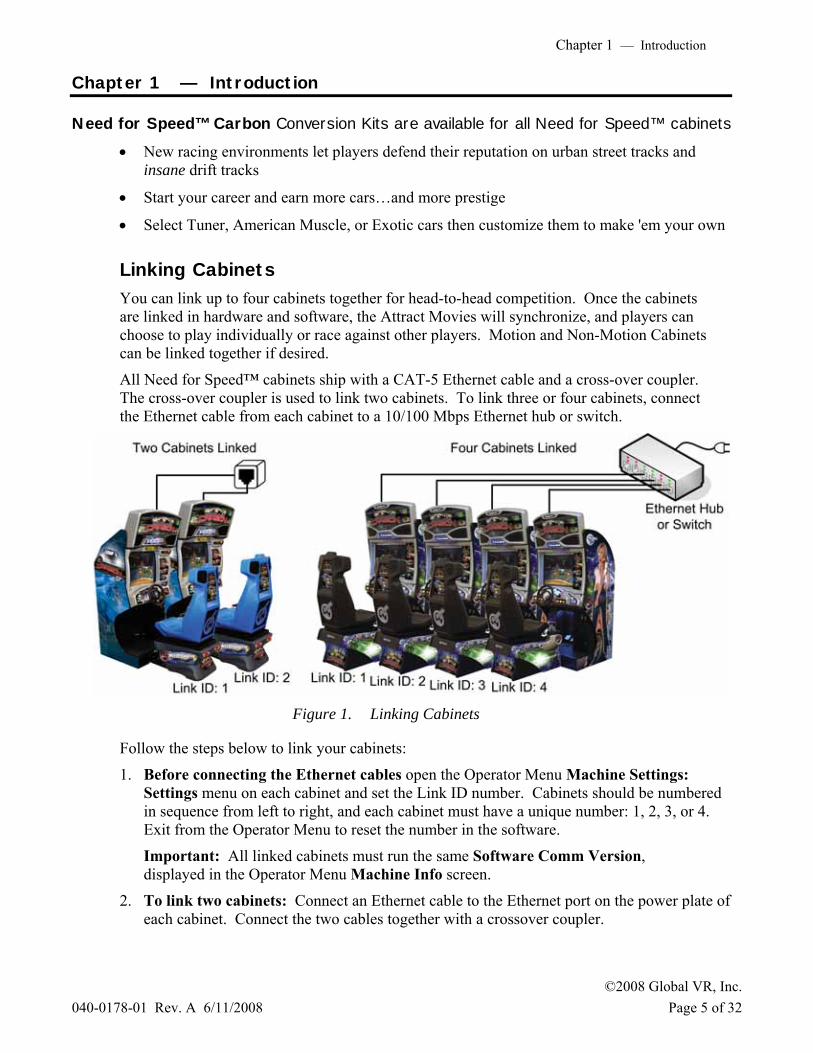
Linking Cabinets You can link up to four cabinets together for head-to-head competition. Once the cabinets are linked in hardware and software, the Attract Movies will synchronize, and players can choose to play individually or race against other players. Motion and Non-Motion Cabinets can be linked together if desired.
All Need for Speed™ cabinets ship with a CAT-5 Ethernet cable and a cross-over coupler. The cross-over coupler is used to link two cabinets. To link three or four cabinets, connect the Ethernet cable from each cabinet to a 10/100 Mbps Ethernet hub or switch.
Figure 1. Linking Cabinets
Follow the steps below to link your cabinets:
1. Before connecting the Ethernet cables open the Operator Menu Machine Settings: Settings menu on each cabinet and set the Link ID number. Cabinets should be numbered in sequence from left to right, and each cabinet must have a unique number: 1, 2, 3, or 4. Exit from the Operator Menu to reset the number in the software.
Important: All linked cabinets must run the same Software Comm Version, displayed in the Operator Menu Machine Info screen.
2. To link two cabinets: Connect an Ethernet cable to the Ethernet port on the power plate of each cabinet. Connect the two cables together with a crossover coupler.
Chapter 1 — Introduction
Need for Speed™ Carbon Operation Manual Page 6 of 32 040-0178-01 Rev. A 6/11/2008
3. To link three or four cabinets: Connect an Ethernet cable from the Ethernet port on the power plate of each cabinet to an Ethernet hub or switch (not included) that supports 100 Mbps connection speed. Connect the Hub or Switch to AC power. DO NOT use a crossover coupler with a hub or switch.
Linking Errors
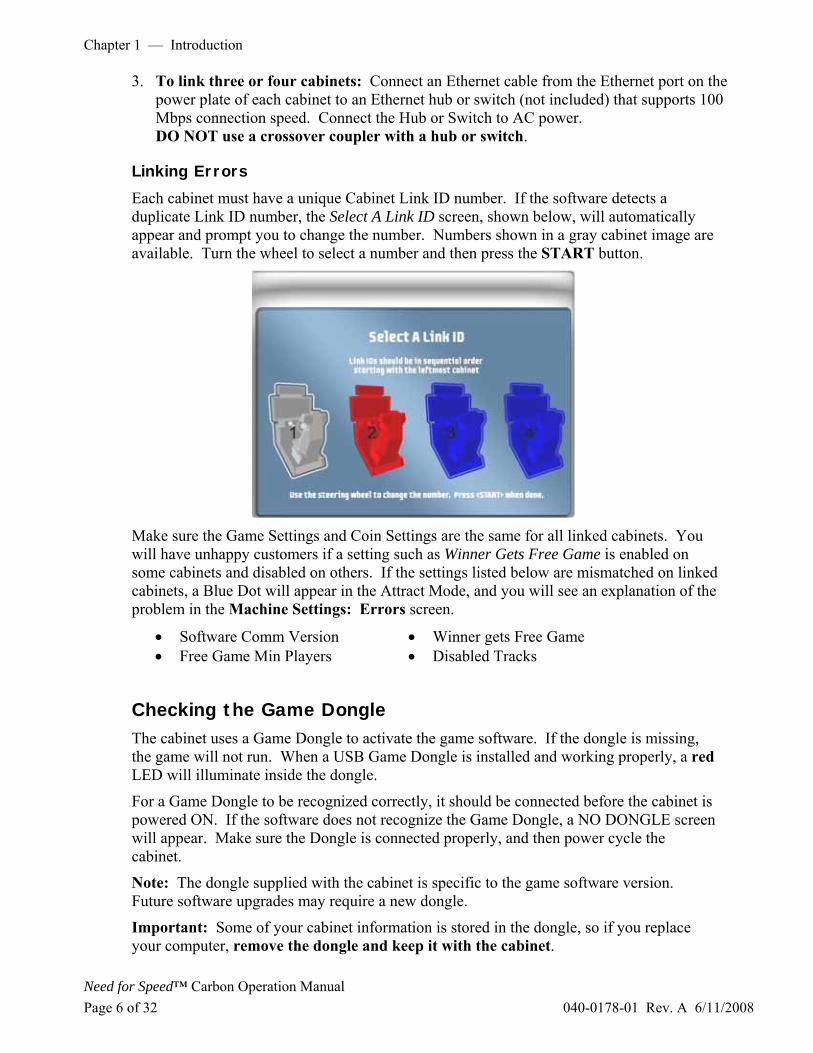
Each cabinet must have a unique Cabinet Link ID number. If the software detects a duplicate Link ID number, the Select A Link ID screen, shown below, will automatically appear and prompt you to change the number. Numbers shown in a gray cabinet image are available. Turn the wheel to select a number and then press the START button.
Make sure the Game Settings and Coin Settings are the same for all linked cabinets. You will have unhappy customers if a setting such as Winner Gets Free Game is enabled on some cabinets and disabled on others. If the settings listed below are mismatched on linked cabinets, a Blue Dot will appear in the Attract Mode, and you will see an explanation of the problem in the Machine Settings: Errors screen.
• Software Comm Version • Free Game Min Players
• Winner gets Free Game • Disabled Tracks
Checking the Game Dongle The cabinet uses a Game Dongle to activate the game software. If the dongle is missing, the game will not run. When a USB Game Dongle is installed and working properly, a red LED will illuminate inside the dongle.
For a Game Dongle to be recognized correctly, it should be connected before the cabinet is powered ON. If the software does not recognize the Game Dongle, a NO DONGLE screen will appear. Make sure the Dongle is connected properly, and then power cycle the cabinet.
Note: The dongle supplied with the cabinet is specific to the game software version. Future software upgrades may require a new dongle.
Important: Some of your cabinet information is stored in the dongle, so if you replace your computer, remove the dongle and keep it with the cabinet.

Chapter 1 — Introduction
©2008 Global VR, Inc. 040-0178-01 Rev. A 6/11/2008 Page 7 of 32
Figure 2. USB Game Dongle
Maintenance Restart Feature To keep the software running optimally, the cabinet will restart itself every 24 hours. The automatic restart will not occur if the operator turns the cabinet off every day. The maintenance restart occurs according to the following conditions:
1. If the game has been running continuously for at least 24 hours, and the game has been in Attract Mode (not played) for at least 15 minutes, then the following screen will be displayed:
2. The screen will count down for 30 seconds.
If a user presses the START button, the screen will not appear again until the next time the Attract Mode has been running for 15 minutes.
If nobody presses the START button, the game will shut down and restart, which will take about 3 minutes.
3. After the cabinet completes the Restart, the next Restart will be scheduled for 24 hours later. If the initial Restart happens to be scheduled during a busy time for your location, the action of players pressing START to postpone will move the restart to a time that is not busy.
Hint: To force the restart to happen at a certain time (such as after closing time), power cycle the cabinet at that time. The next restart will be scheduled for 24 hours later.
To see how much time is left before the next maintenance restart, check the Machine Settings: Info screen in the Operator Menu (see page 13). This screen also tells you how much time has passed since the last power cycle and the last maintenance restart.

Chapter 2 — Driving a Race
Need for Speed™ Carbon Operation Manual Page 8 of 32 040-0178-01 Rev. A 6/11/2008
Chapter 2 — Driving a Race
Insert coins and press the START button.
The Select Track screen will appear first. Turn the wheel to highlight a Circuit, Drift, or Career Mode (see page 9 for more on Career Mode). Tracks are rated Easy, Medium, or Hard; Kings Park Drift is rated Insane. Press the gas pedal to select a track. If the operator has locked out expert tracks (Career and Drift) press and hold ♪ while selecting to unlock an expert track.
Once you coin up and press START, all other linked cabinets in Attract Mode will display the "Join Now" screen. Players who coin up and press START will automatically join the race, and skip the Select Track screen. (If you want to race solo or Career on another cabinet, wait for the race to begin before you press START.)
The Select Car screen will appear next. Turn the wheel to see the available cars, and press the gas pedal to select. You can also select the Additional Race Options described on page 9.
Next, the customization screen appears. Use the wheel and gas pedal to pick your paint color, vinyl, and wheels. If you prefer, you can press VIEW to instantly customize your car, and then press the gas pedal to accept.
When the Select Transmission screen appears, use the wheel and gas pedal to select either Automatic or Manual Transmission.
If you are on a linked cabinet, the Waiting for Drivers screen will appear after you select your Transmission. Otherwise, the game will load, and hint screens will appear while the game loads.
Note: If you select Drift there are no AI Cars. You race against a ghost and any players on linked cabinets. Drift mode is tuned to simulate a real drifting experience.
Chapter 2 — Driving a Race
©2008 Global VR, Inc. 040-0178-01 Rev. A 6/11/2008 Page 9 of 32
Logging In
If you select Career, the Login screen will open. (You can only create a new account from Career.) Do the following to create your account from the Career Login screen: a. Follow the onscreen instructions to enter a PIN. b. Optional: Insert a magnetic-stripe card (such as credit card or library card) or a
GLOBAL VR Players' SmartCard, in the card reader. The software will use the card to identify you. No data is copied from the card. Remove your card when prompted.
c. Enter the nickname you want to use. When you come back to the same cabinet, or a cabinet linked to it, you can login with either your PIN or your card. Your Career Data is stored in the game, not on your card. To login to your account, either select Career or press LOOK BACK from the Select Car screen to open the Login screen. If you login, your nickname will be displayed in the Race Results, and you can use cars earned in Career Mode to drive in Race Mode. Using a GLOBAL VR Players' SmartCard in Race Mode rewards you with an additional car. If a card dispenser is installed, you can buy a card from the Career Login screen.
Career Mode
In Career Mode, players drive a series of races. After a certain number of races, they can win additional cars to add to their garage. If a player selects Career, the Login screen automatically appears. Press the E-Brake to return to Select Track without logging in. Career Mode cars and stats are saved on the System Computer and shared with other cabinets linked to it at the location. When players login, their data is retrieved from the computer. No data is written to the cards. A career is made up of three sets of cars, Exotic, Tuner, and Muscle. Each set has 25 races. When you complete all three sets, the bonus Extreme set is unlocked. Players can complete two careers. Each career has different cars to earn. Players can use their special cars in Race Mode. Additional Race Options
• Press NOS to turn AI on or off. Turning AI off removes computer-controlled cars from the track. In a linked race, any player can turn AI off for all cabinets in the race. (In a four-player linked race, AI is off by default and cannot be turned on.) For a driver racing solo, turning AI off activates Time Attack Mode, in which the driver races against a shadow of the track leader.
• Press ♪ to toggle the Steering Force-Feedback level between Lite and Medium.
Driving Controls
As in any driving game, use the Steering Wheel, Gas, Brake, and Shifter (if you selected Manual Transmission) to control the car. Additional controls are described below: • The Look Back button lets you look behind the car. • The View button toggles the view between inside and outside the car. • Tap the ♪ button to turn the music off; tap it again to change songs. • Press the NOS button for an extra burst of speed. NOS recharges throughout the race. • Tap the E-Brake button to aid in navigating sharp turns.
Chapter 2 — Driving a Race
Need for Speed™ Carbon Operation Manual Page 10 of 32 040-0178-01 Rev. A 6/11/2008
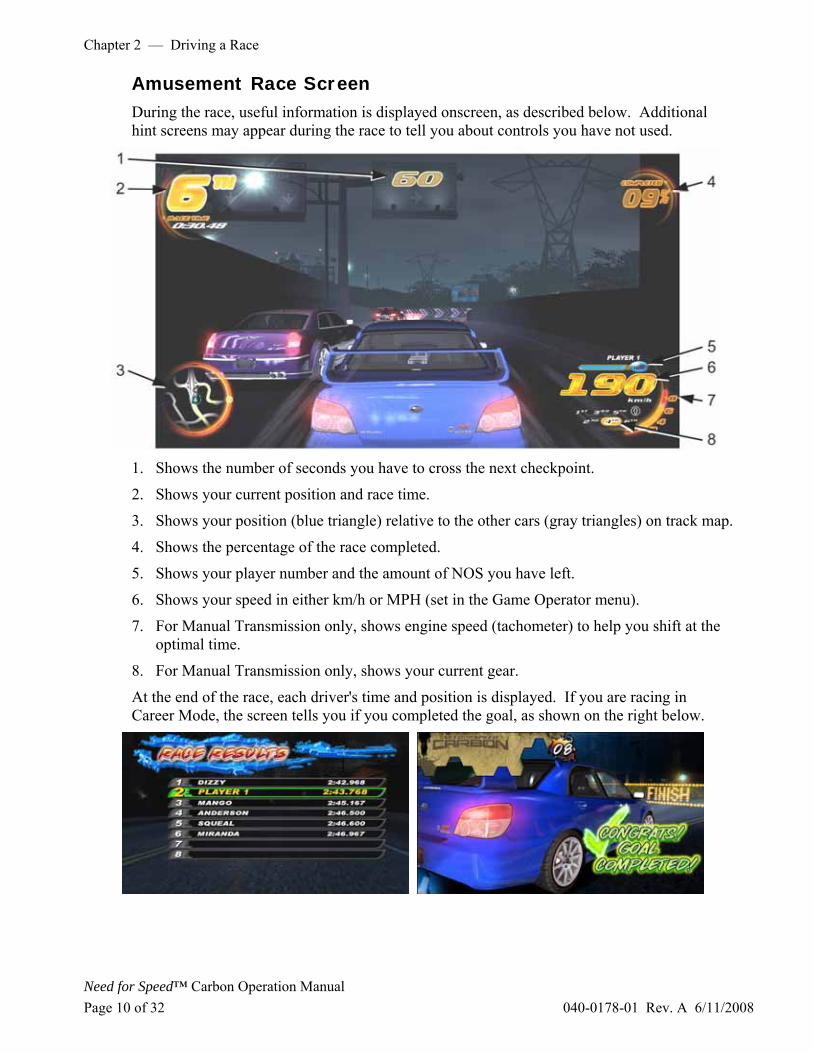
Amusement Race Screen During the race, useful information is displayed onscreen, as described below. Additional hint screens may appear during the race to tell you about controls you have not used.
1. Shows the number of seconds you have to cross the next checkpoint.
2. Shows your current position and race time.
3. Shows your position (blue triangle) relative to the other cars (gray triangles) on track map.
4. Shows the percentage of the race completed.
5. Shows your player number and the amount of NOS you have left.
6. Shows your speed in either km/h or MPH (set in the Game Operator menu).
7. For Manual Transmission only, shows engine speed (tachometer) to help you shift at the optimal time.
8. For Manual Transmission only, shows your current gear.
At the end of the race, each driver's time and position is displayed. If you are racing in Career Mode, the screen tells you if you completed the goal, as shown on the right below.

Chapter 3 — Operator Menu and Game Setup
©2008 Global VR, Inc. 040-0178-01 Rev. A 6/11/2008 Page 11 of 32
Chapter 3 — Operator Menu and Game Setup
This chapter describes how to use the Game Operator menu to set up the game, diagnose problems, and view gameplay and earnings statistics.
Navigating the Operator Menu
1. With the game running in Attract Mode, open the coin door to locate the Operator Button Panel. Upgrade cabinets have a single Operator Button that opens the menus. Dedicated cabinets have four buttons; press the TEST/BACK button to open the menus.
2. Once you enter the Operator Menu, use the VIEW and ♪ buttons to move up and down through the main list on the left side of the screen. Pause over a menu item to open the submenu below it, and then use the VIEW and ♪ buttons to move through the submenu items.
3. When you move over a submenu item, a blue highlight will appear around the item. Press the START button to open the associated menu or screen.
4. Once you open a menu, use the VIEW and ♪ buttons to navigate through the menu items. Press START to select an item and change its setting
5. Some menu items, such as volume levels (see Figure 5 on page 14) use sliders to set numeric values. A slider, as shown below, will appear when you highlight the item and press START. To set the slider, press the VIEW and ♪ buttons to increase or decrease the value, and then press START again to save the selected value.
6. Some items use popup menus to select settings, as shown below. The popup menu will
appear when you highlight the item and press START. Press the VIEW and ♪ buttons to select from the popup menu, and then press START again to save the selected value.
7. When you finish with a menu, press the LOOK BACK button to return to the main menu
list on the left side of the screen. 8. To exit from the Operator Menu, highlight Resume Game at the bottom of the menu list
(press LOOK BACK to instantly highlight Resume Game) and press START.
Chapter 3 — Operator Menu and Game Setup
Need for Speed™ Carbon Operation Manual Page 12 of 32 040-0178-01 Rev. A 6/11/2008
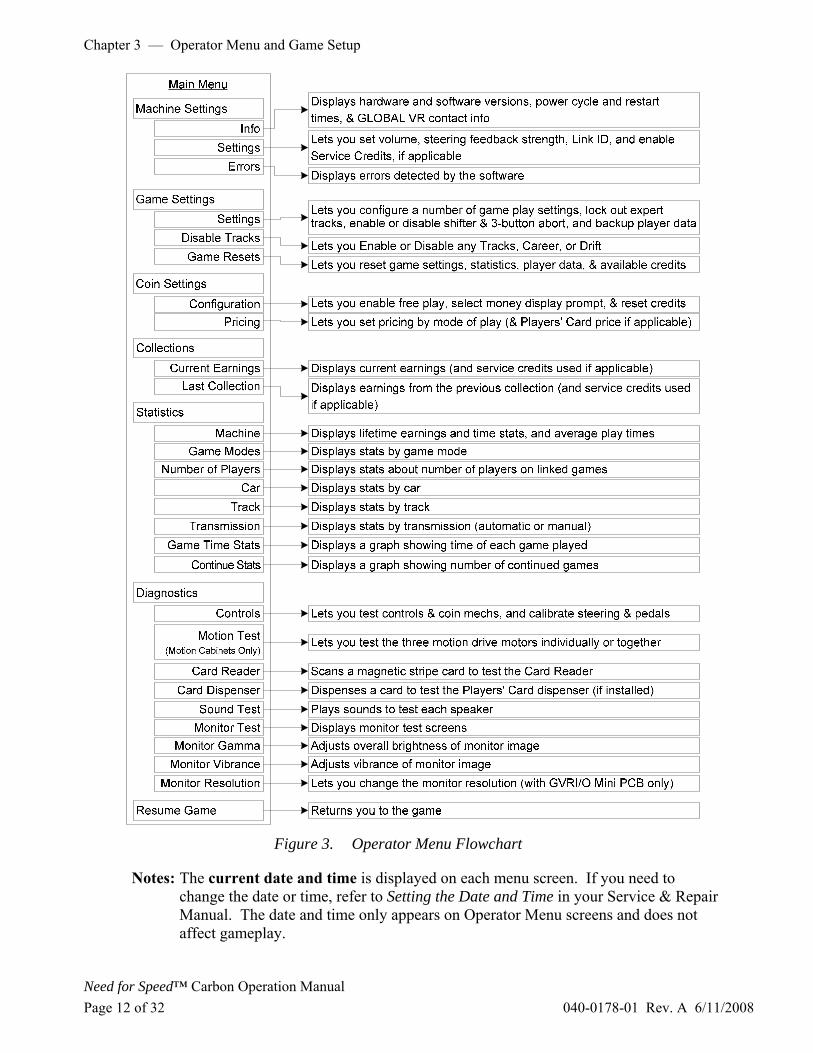
Figure 3. Operator Menu Flowchart
Notes: The current date and time is displayed on each menu screen. If you need to change the date or time, refer to Setting the Date and Time in your Service & Repair Manual. The date and time only appears on Operator Menu screens and does not affect gameplay.
Chapter 3 — Operator Menu and Game Setup
©2008 Global VR, Inc. 040-0178-01 Rev. A 6/11/2008 Page 13 of 32
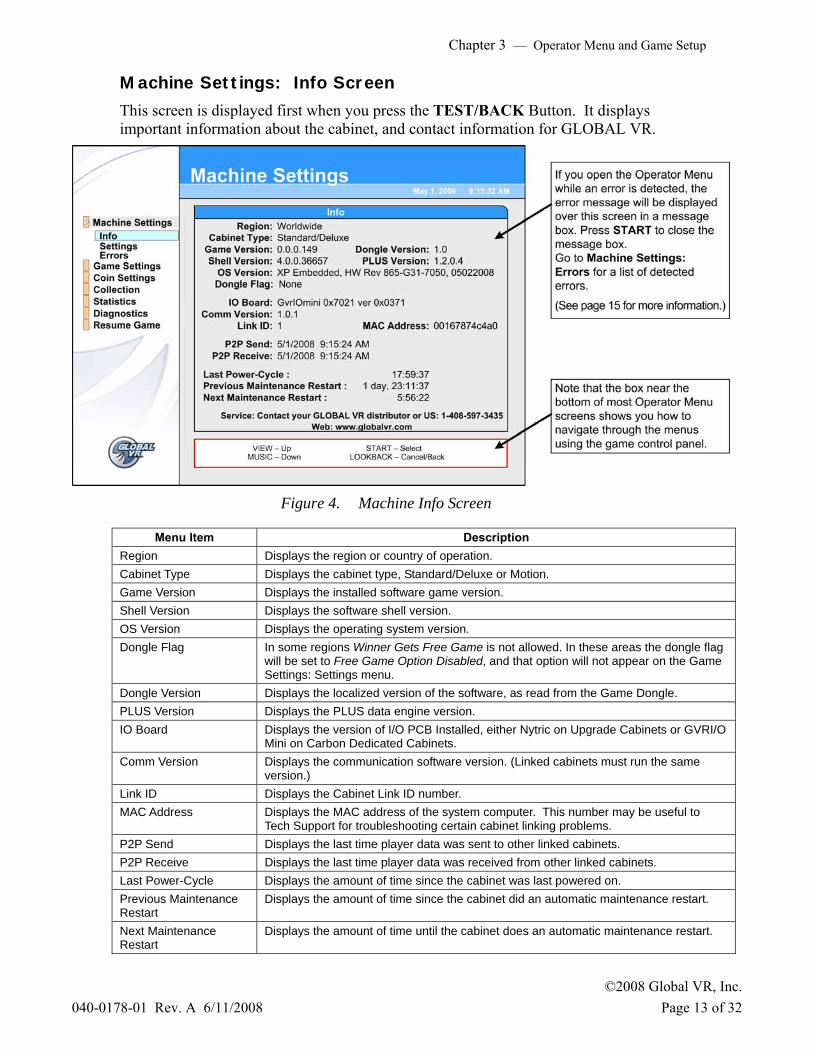
Machine Settings: Info Screen
This screen is displayed first when you press the TEST/BACK Button. It displays important information about the cabinet, and contact information for GLOBAL VR.
Figure 4. Machine Info Screen
Menu Item Description Region Displays the region or country of operation. Cabinet Type Displays the cabinet type, Standard/Deluxe or Motion. Game Version Displays the installed software game version. Shell Version Displays the software shell version. OS Version Displays the operating system version. Dongle Flag In some regions Winner Gets Free Game is not allowed. In these areas the dongle flag
will be set to Free Game Option Disabled, and that option will not appear on the Game Settings: Settings menu.
Dongle Version Displays the localized version of the software, as read from the Game Dongle. PLUS Version Displays the PLUS data engine version. IO Board Displays the version of I/O PCB Installed, either Nytric on Upgrade Cabinets or GVRI/O
Mini on Carbon Dedicated Cabinets. Comm Version Displays the communication software version. (Linked cabinets must run the same
version.) Link ID Displays the Cabinet Link ID number. MAC Address Displays the MAC address of the system computer. This number may be useful to
Tech Support for troubleshooting certain cabinet linking problems. P2P Send Displays the last time player data was sent to other linked cabinets. P2P Receive Displays the last time player data was received from other linked cabinets. Last Power-Cycle Displays the amount of time since the cabinet was last powered on. Previous Maintenance Restart
Displays the amount of time since the cabinet did an automatic maintenance restart.
Next Maintenance Restart
Displays the amount of time until the cabinet does an automatic maintenance restart.
Chapter 3 — Operator Menu and Game Setup
Need for Speed™ Carbon Operation Manual Page 14 of 32 040-0178-01 Rev. A 6/11/2008
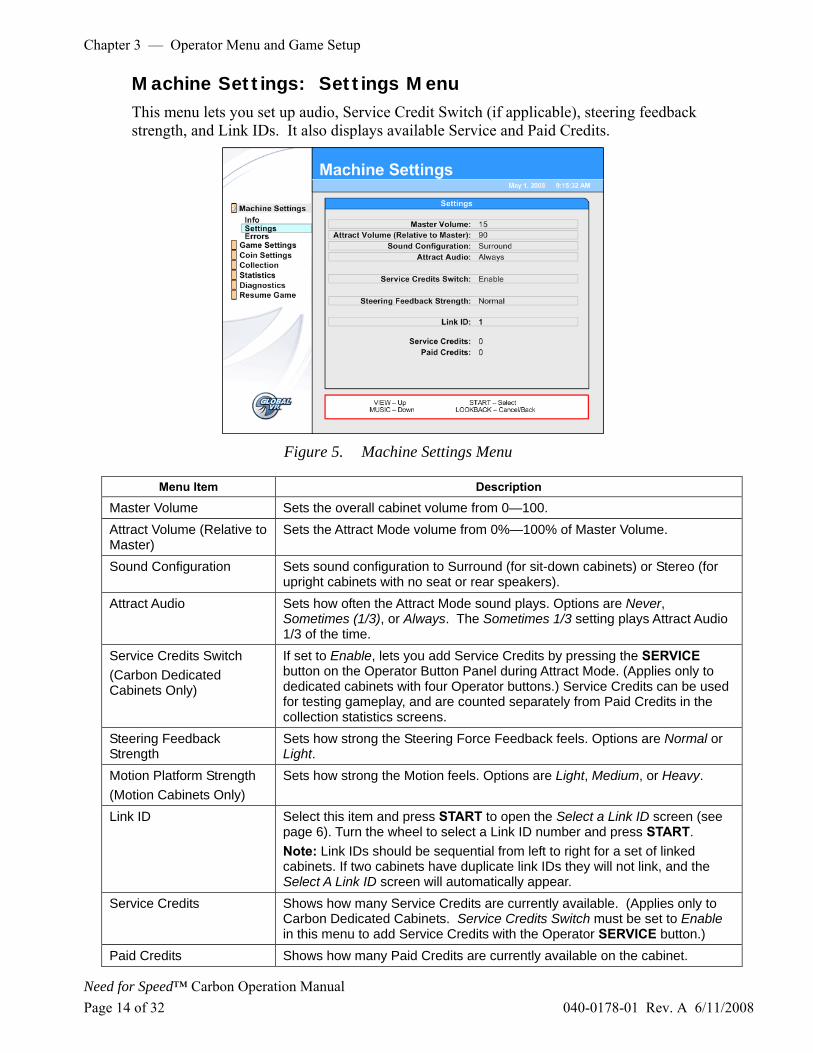
Machine Settings: Settings Menu This menu lets you set up audio, Service Credit Switch (if applicable), steering feedback strength, and Link IDs. It also displays available Service and Paid Credits.
Figure 5. Machine Settings Menu
Menu Item Description
Master Volume Sets the overall cabinet volume from 0—100. Attract Volume (Relative to Master)
Sets the Attract Mode volume from 0%—100% of Master Volume.
Sound Configuration Sets sound configuration to Surround (for sit-down cabinets) or Stereo (for upright cabinets with no seat or rear speakers).
Attract Audio Sets how often the Attract Mode sound plays. Options are Never, Sometimes (1/3), or Always. The Sometimes 1/3 setting plays Attract Audio 1/3 of the time.
Service Credits Switch (Carbon Dedicated Cabinets Only)
If set to Enable, lets you add Service Credits by pressing the SERVICE button on the Operator Button Panel during Attract Mode. (Applies only to dedicated cabinets with four Operator buttons.) Service Credits can be used for testing gameplay, and are counted separately from Paid Credits in the collection statistics screens.
Steering Feedback Strength
Sets how strong the Steering Force Feedback feels. Options are Normal or Light.
Motion Platform Strength (Motion Cabinets Only)
Sets how strong the Motion feels. Options are Light, Medium, or Heavy.
Link ID Select this item and press START to open the Select a Link ID screen (see page 6). Turn the wheel to select a Link ID number and press START. Note: Link IDs should be sequential from left to right for a set of linked cabinets. If two cabinets have duplicate link IDs they will not link, and the Select A Link ID screen will automatically appear.
Service Credits Shows how many Service Credits are currently available. (Applies only to Carbon Dedicated Cabinets. Service Credits Switch must be set to Enable in this menu to add Service Credits with the Operator SERVICE button.)
Paid Credits Shows how many Paid Credits are currently available on the cabinet.

Chapter 3 — Operator Menu and Game Setup
©2008 Global VR, Inc. 040-0178-01 Rev. A 6/11/2008 Page 15 of 32
Machine Settings: Errors Screen The Errors screen displays errors detected by the system software. Some errors cause a message to be displayed at boot. Non-critical boot error messages, such as Card Reader Missing will time-out after 30 seconds. Critical errors, such as Dongle Missing or Invalid, will prevent the game from booting.
If you open the Operator Menu while an error is detected, a message box will appear with the error message. Press START to close the message box. Open the Errors Screen for a list of any detected errors.
Error Messages This table lists error messages that you may see at boot or on the Errors screen.
Error Message Explanation and Solution
No Dongle Make sure the USB Game Dongle is firmly connected. Try a different USB port if the dongle is not detected after a reboot.
Invalid Dongle: Incorrect Game Version
Dongle does not match game version. If you upgrade the software, be sure to connect the corresponding Game Dongle.
There is a CD in the Drive Eject the CD from the drive. Press the START button to continue to boot the game if you see this message at boot.
Error Detected with IO Board The Nytric USBI/O PCB is either disconnected or malfunctioning.
Error Detected with GVRIO Board (Dedicated cabinets only)
The GVRI/O Mini PCB is either disconnected or malfunctioning. Make sure jumpers are installed in positions 1 & 3 of J5—Mode Select (see your Service & Repair Manual for more information). Check all connections to the PCB. Replace the PCB if faulty.
Incorrect GVRIO Board (Dedicated cabinets only)
The screen will display the revision numbers of the GVRI/O Mini PCB installed, and the one required. Contact your distributor to order the correct GVRI/O Mini PCB.
Select a Link ID (Screen appears if a duplicate Link ID is detected)
The cabinet has the same Link ID as another cabinet. Turn the wheel to select a different Link ID from the screen and press START. Number the cabinets in sequence from left to right.
Steering Auto Calibration failed. Please turn the wheel all he way to the left and all the way to the right
The software detected a problem with steering. Once you turn the wheel, the software will determine whether the problem is with the steering pot or the force-feedback. If the problem is with the force feedback, you will be given the option to start the system without force feedback. If the steering pot is not working, the game cannot be started. See your Service & Repair Manual for steering service procedures.
Card Dispenser is Empty Message will appear at boot on upgrade cabinet with a Players' Card Dispenser if the dispenser is empty. Card sales are automatically disabled when the dispenser is empty.
Card Reader Missing Message will appear at boot if the card reader is not detected.
Attract Mode Error Messages Explanation and Solution
A Red Dot appears in the lower right corner of the Attract Screen
Indicates a hardware error, usually with a button, gas or brake pot, or steering. An explanation is displayed in the Errors screen.
A Blue Dot appears in the lower right corner of the Attract Screen
Indicates a Cabinet Mismatch in linked cabinets. An explanation is displayed in the Errors screen. The following conditions will cause a Blue Dot error message: • Winner Gets Free Game not set the same on all cabinets • Free Game Min Players not set the same on all cabinets • Different Software Comm Version on one or more cabinets • Different Tracks Disabled on one or more cabinets

Chapter 3 — Operator Menu and Game Setup
Need for Speed™ Carbon Operation Manual Page 16 of 32 040-0178-01 Rev. A 6/11/2008
Game Settings: Settings Menu This menu lets you set up game-play options and backup player data.
Figure 6. Game Settings Menu
Menu Item Description
Play Again/Continue If set to Enable, allows you to set different pricing to start playing or continue (play again). Set the pricing from Coin Settings: Pricing.
Play Again Max Times Lets you set the maximum number of times a player can use Continue. Options are 1, 2, or Unlimited.
Winner Gets Free Game* If set to Enable, the winner of a race gets a free game. Free Game Min Players* If Winner Gets Free Game is enabled, this sets the minimum number of
players required for the free game to be awarded. Options are 1—4. Solo Free Game Max in Row*
If Winner Gets Free Game is enabled, and Free Game Min Players is set to 1, this sets the maximum number of times in a row the free game can be awarded. Options are 1—3 Times.
Expert Track Lockout If set to Enable, players have to press the ♪ button to select an Expert track. This prevents novice players from selecting an Expert track (Drift or Career) accidentally from the Track Select screen.
3 Button Game Abort If set to Enable, a solo race can be aborted by pressing the VIEW, ♪, and NOS buttons at the same time.
Shifter Control Set to Disable to remove the Select Transmission screen and default to Automatic Transmission. Useful if 6-speed shifter is not installed or broken.
Speed Units Sets speed units to display in MPH or km/h. Attract High Score Screens Sets whether to display high scores during Attract Mode. Backup Drive Selects drive letter for USB backup drive. See page 16 for details. Backup Player Data Writes player data to a USB drive. (See next page for details.) Restore Player Data Restores player data saved to a USB drive. (See next page for details.)
* These settings may be unavailable in some areas due to local regulations.

Chapter 3 — Operator Menu and Game Setup
©2008 Global VR, Inc. 040-0178-01 Rev. A 6/11/2008 Page 17 of 32
Backing Up and Restoring Player Data
Need for Speed™ Carbon saves all player data for Career Mode, custom cars, and miles, in the System Computer. If cabinets are linked, player data is shared between the cabinets. No data is written to Players' Cards.
To keep Player Data safe, you can back it up on any standard USB Flash Drive that works with Windows®. (Do not use a Flash Drive that requires special drivers to be installed on the computer.)
Important: GLOBAL VR recommends that you have at least 64 MB of free space on your drive before you back up data. The data will be stored in a folder called "CARBON_BACKUP". You can copy the folder to a computer for safe keeping if you wish. The folder will contain the six files listed below:
gameresult_backup.log gameresult.tbl careerprofilecard_backup.log careerprofilecard.tbl careerprofile.tbl
Since Player Data is shared between linked cabinets, you only need to back up the data from one cabinet in a linked set. If you wish, you can install a USB Extension Cable, as described on page 18, to make it easier to connect the drive.
When you Restore Player Data, the data from the USB drive will replace the data on the cabinet. If the cabinet is not linked, the existing data is lost. If the cabinet is linked, the data is merged with the data on the other cabinets, and no data is lost.
Important: Always backup the player data before installing software. When you run the System Recovery Disk you will erase all player data.
Backing Up Player Data
1. Open Game Settings: Settings in the Operator Menu. If your Flash Drive is not connected, you will see the Drive Not Connected message onscreen.
2. If your Flash Drive has more than one partition, scroll down to Backup Drive: and select the drive letter to use. (If you are not sure whether your drive has partitions, try using the default Drive E: first.)
3. Connect the USB Flash Drive to the computer, if not already done.
Note: If you connect the drive when the Game Settings: Settings menu is open, the Drive Not Connected message will remain onscreen, but the drive will still work normally. To clear the message, exit from the Game Settings: Settings menu and then return.
4. Use the ♪ button to highlight the Backup Player Data button, and press START.
5. When the dialog box appears, use the ♪ button to highlight Yes, Backup Player Data, and press START. When the backup is finished, "Done, Successful Backup" will appear onscreen. Press START to close the message box.
If you see an error message, make sure write-protection is off for the drive (if applicable), and try a different letter under Backup Drive:.
6. Remove the drive and keep the data in a safe place.

Chapter 3 — Operator Menu and Game Setup
Need for Speed™ Carbon Operation Manual Page 18 of 32 040-0178-01 Rev. A 6/11/2008
Restoring Player Data
1. Open Game Settings: Settings in the Operator Menu.
2. Connect the USB drive with the data files to the computer, if not already done.
3. Use the ♪ button to highlight Restore Player Data, and press START.
4. When the dialog box appears, use the ♪ button to highlight the Yes, Restore Player Data button, and press START. When restore is finished, "Done, Successful Restore" will appear onscreen. Press START to close the message box.
5. You can safely remove the drive now. The player data is now restored. If the cabinet is linked, the data will be merged with the existing data on the linked cabinets shortly.
Installing a USB Extension Cable
For your convenience, you can run a USB cable from the computer to the area inside the coin door and use it to backup player data. Use a standard USB "A" Extension Cable, 3' or longer. Either USB 1.1 or 2.0 is fine.
Connect one end of the cable to the computer and run the other into the area inside the coin door. Secure it in a convenient location with a cable tie or adhesive Velcro®. Make sure the cable won't get caught in the door or interfere with the coin mechs.
Now you can open the coin door and easily backup player data.
Game Settings: Disable Tracks Menu This screen allows you to disable or enable any tracks or Career Mode. Disabled tracks do not show up in the Select Track screen.
Note: If linked cabinets do not have the same tracks available, a blue dot will appear in the lower right corner of the Attract screen on each cabinet, to indicate a Cabinet Mismatch.
Chapter 3 — Operator Menu and Game Setup
©2008 Global VR, Inc. 040-0178-01 Rev. A 6/11/2008 Page 19 of 32
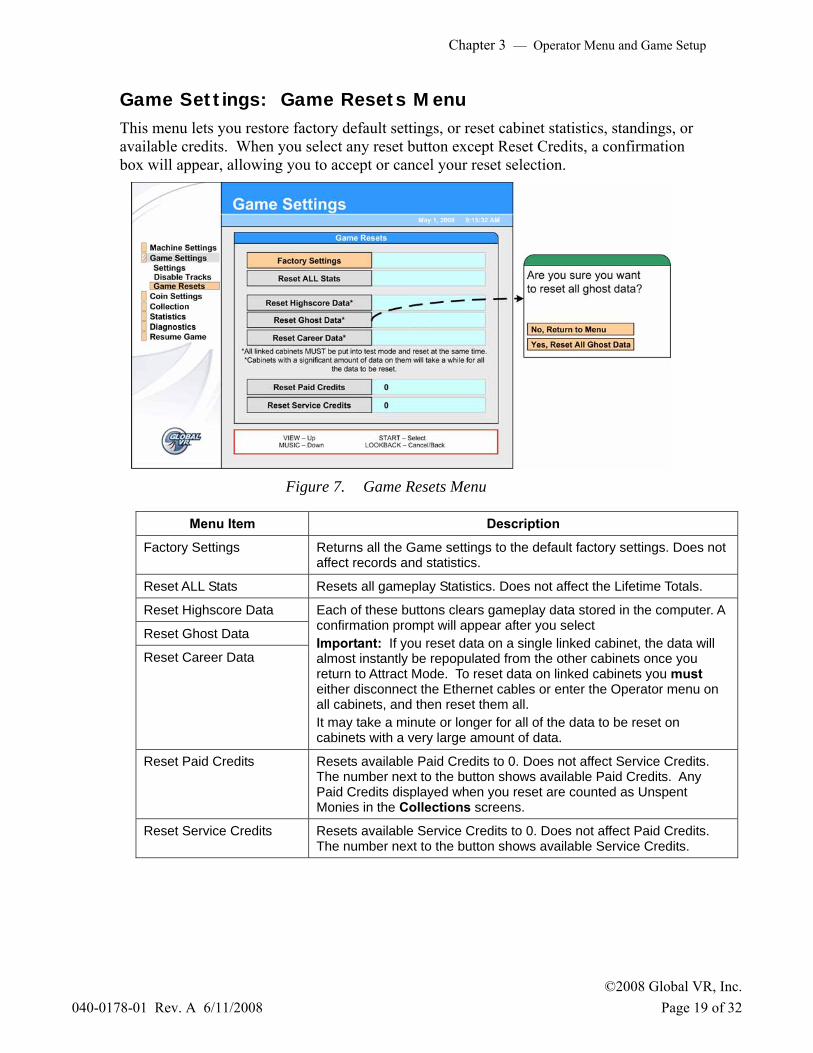
Game Settings: Game Resets Menu This menu lets you restore factory default settings, or reset cabinet statistics, standings, or available credits. When you select any reset button except Reset Credits, a confirmation box will appear, allowing you to accept or cancel your reset selection.
Figure 7. Game Resets Menu
Menu Item Description
Factory Settings Returns all the Game settings to the default factory settings. Does not affect records and statistics.
Reset ALL Stats Resets all gameplay Statistics. Does not affect the Lifetime Totals.
Reset Highscore Data
Reset Ghost Data
Reset Career Data
Each of these buttons clears gameplay data stored in the computer. A confirmation prompt will appear after you select Important: If you reset data on a single linked cabinet, the data will almost instantly be repopulated from the other cabinets once you return to Attract Mode. To reset data on linked cabinets you must either disconnect the Ethernet cables or enter the Operator menu on all cabinets, and then reset them all. It may take a minute or longer for all of the data to be reset on cabinets with a very large amount of data.
Reset Paid Credits Resets available Paid Credits to 0. Does not affect Service Credits. The number next to the button shows available Paid Credits. Any Paid Credits displayed when you reset are counted as Unspent Monies in the Collections screens.
Reset Service Credits Resets available Service Credits to 0. Does not affect Paid Credits. The number next to the button shows available Service Credits.
Chapter 3 — Operator Menu and Game Setup
Need for Speed™ Carbon Operation Manual Page 20 of 32 040-0178-01 Rev. A 6/11/2008
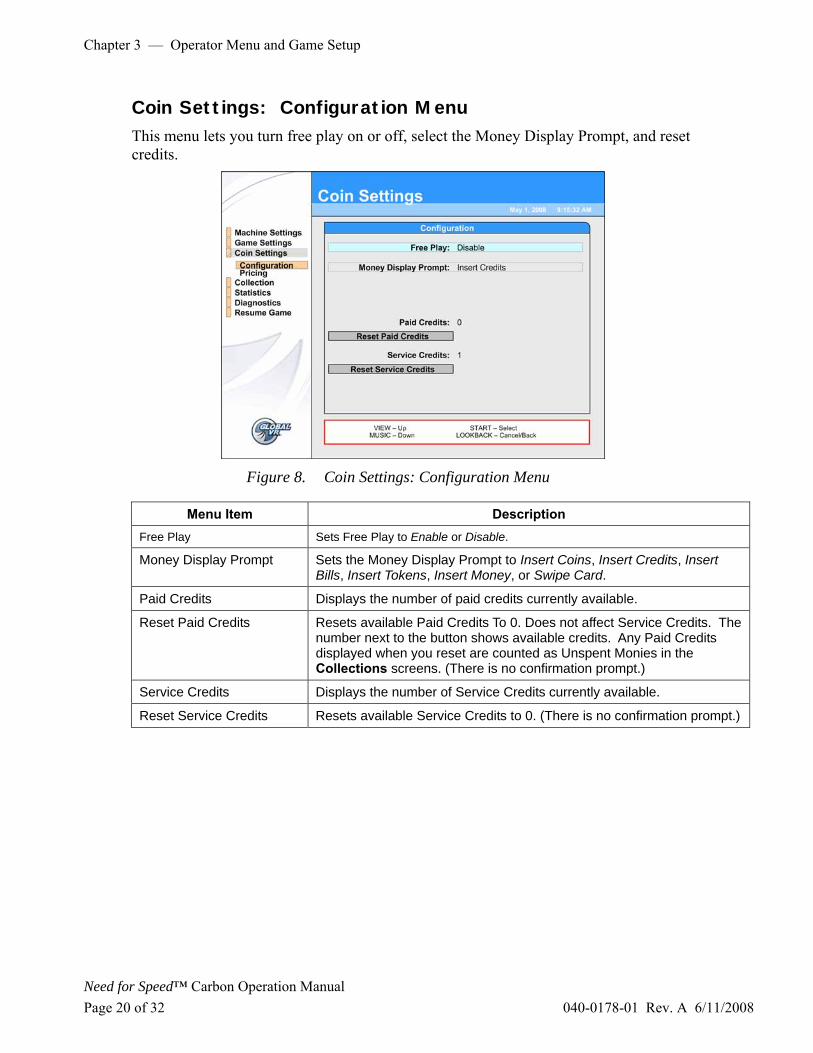
Coin Settings: Configuration Menu This menu lets you turn free play on or off, select the Money Display Prompt, and reset credits.
Figure 8. Coin Settings: Configuration Menu
Menu Item Description Free Play Sets Free Play to Enable or Disable.
Money Display Prompt Sets the Money Display Prompt to Insert Coins, Insert Credits, Insert Bills, Insert Tokens, Insert Money, or Swipe Card.
Paid Credits Displays the number of paid credits currently available.
Reset Paid Credits Resets available Paid Credits To 0. Does not affect Service Credits. The number next to the button shows available credits. Any Paid Credits displayed when you reset are counted as Unspent Monies in the Collections screens. (There is no confirmation prompt.)
Service Credits Displays the number of Service Credits currently available.
Reset Service Credits Resets available Service Credits to 0. (There is no confirmation prompt.)

Chapter 3 — Operator Menu and Game Setup
©2008 Global VR, Inc. 040-0178-01 Rev. A 6/11/2008 Page 21 of 32
Coin Settings: Pricing Menu This menu lets you set the number of credits required to start or continue a game, and to buy a Players' Card if a dispenser is installed.
Figure 9. Coin Setting: Pricing Menu
Menu Item Default Description Race
4 Lets you set the number of credits required to start a new game. Options are 1—50.
Race Continue
4
Lets you set the number of credits required to continue a game (play again). Options are 1—50. Play Again/Continue must be set to Enable in the Game Settings: Settings menu to use this feature.
Dispensed Smart Card (Upgrade Cabinets Only) 12
If a Players' Card Dispenser is installed, this lets you set the number of credits to purchase a card. Note: Card Dispensers can only be installed on upgrade cabinets with a Nytric USBI/O PCB.
Chapter 3 — Operator Menu and Game Setup
Need for Speed™ Carbon Operation Manual Page 22 of 32 040-0178-01 Rev. A 6/11/2008
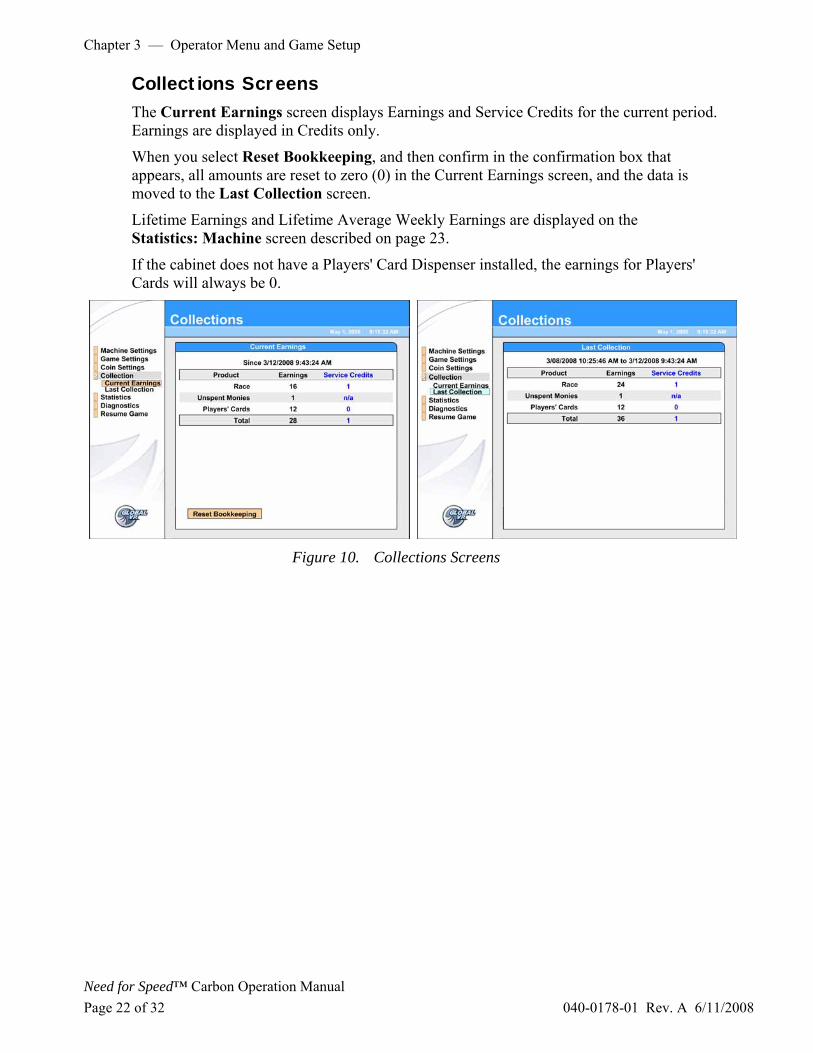
Collections Screens The Current Earnings screen displays Earnings and Service Credits for the current period. Earnings are displayed in Credits only.
When you select Reset Bookkeeping, and then confirm in the confirmation box that appears, all amounts are reset to zero (0) in the Current Earnings screen, and the data is moved to the Last Collection screen.
Lifetime Earnings and Lifetime Average Weekly Earnings are displayed on the Statistics: Machine screen described on page 23.
If the cabinet does not have a Players' Card Dispenser installed, the earnings for Players' Cards will always be 0.
Figure 10. Collections Screens
Chapter 3 — Operator Menu and Game Setup
©2008 Global VR, Inc. 040-0178-01 Rev. A 6/11/2008 Page 23 of 32
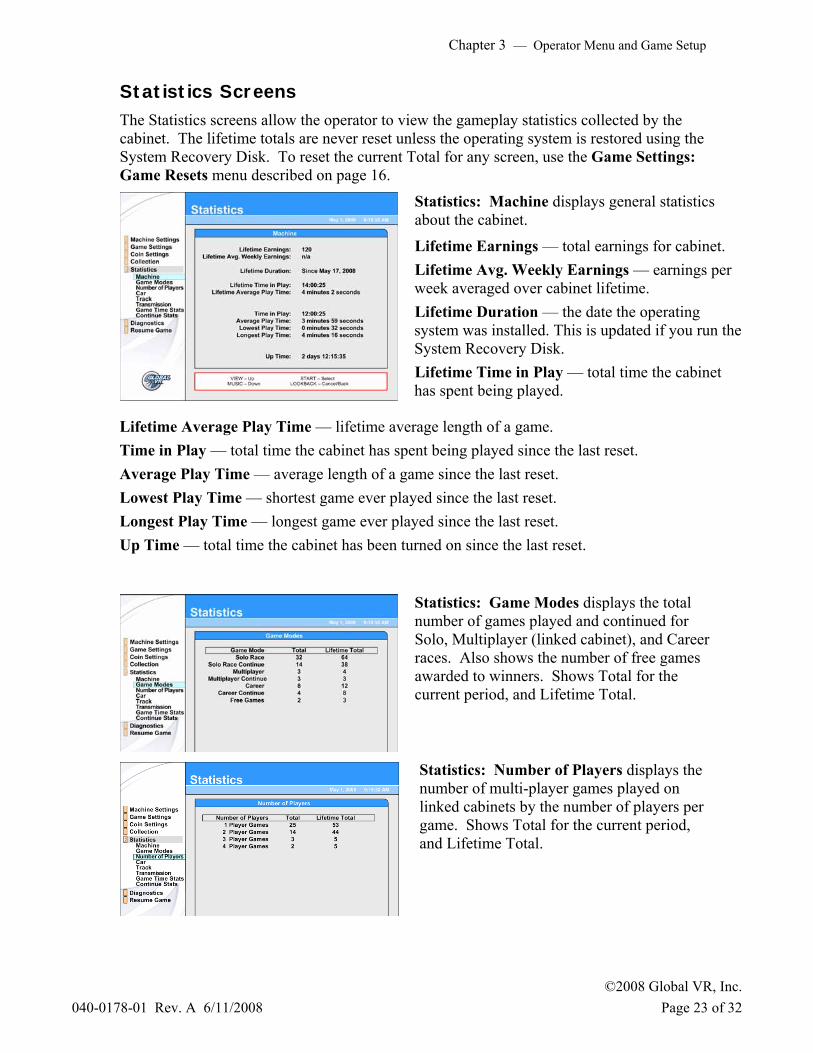
Statistics Screens The Statistics screens allow the operator to view the gameplay statistics collected by the cabinet. The lifetime totals are never reset unless the operating system is restored using the System Recovery Disk. To reset the current Total for any screen, use the Game Settings: Game Resets menu described on page 16.
Statistics: Machine displays general statistics about the cabinet.
Lifetime Earnings — total earnings for cabinet. Lifetime Avg. Weekly Earnings — earnings per week averaged over cabinet lifetime. Lifetime Duration — the date the operating system was installed. This is updated if you run the System Recovery Disk. Lifetime Time in Play — total time the cabinet has spent being played.
Lifetime Average Play Time — lifetime average length of a game. Time in Play — total time the cabinet has spent being played since the last reset. Average Play Time — average length of a game since the last reset. Lowest Play Time — shortest game ever played since the last reset. Longest Play Time — longest game ever played since the last reset. Up Time — total time the cabinet has been turned on since the last reset.
Statistics: Game Modes displays the total number of games played and continued for Solo, Multiplayer (linked cabinet), and Career races. Also shows the number of free games awarded to winners. Shows Total for the current period, and Lifetime Total.
Statistics: Number of Players displays the number of multi-player games played on linked cabinets by the number of players per game. Shows Total for the current period, and Lifetime Total.
Chapter 3 — Operator Menu and Game Setup
Need for Speed™ Carbon Operation Manual Page 24 of 32 040-0178-01 Rev. A 6/11/2008
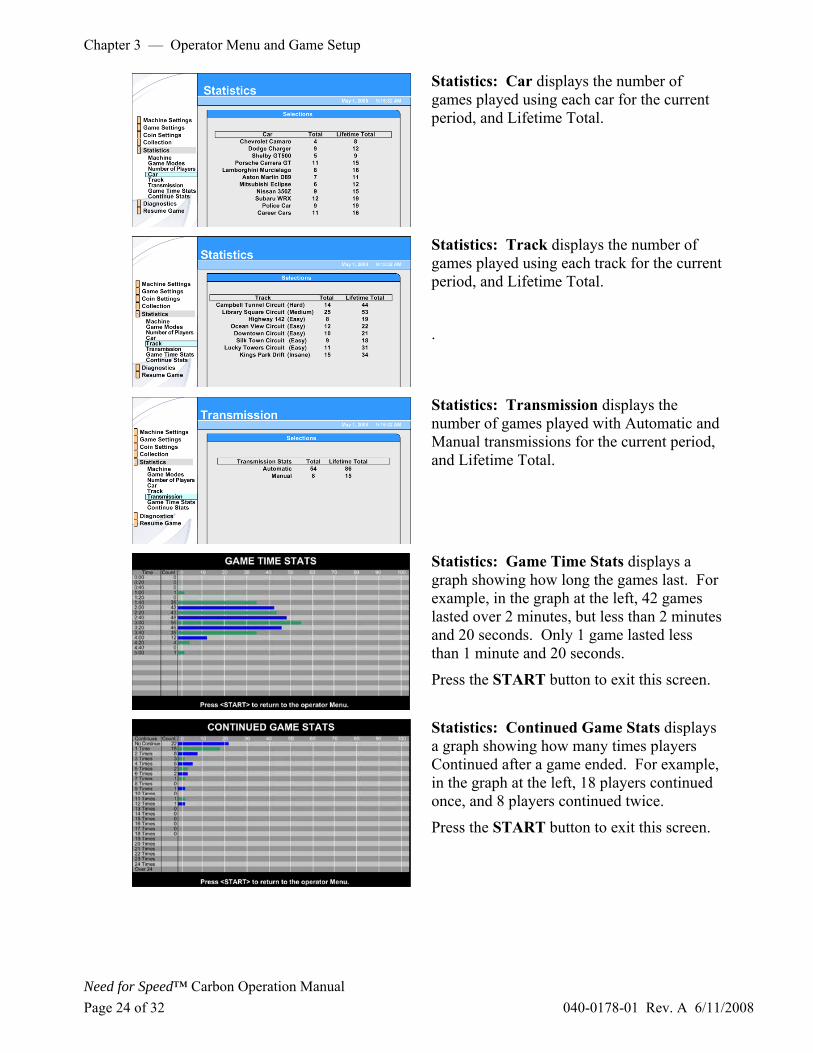
Statistics: Car displays the number of games played using each car for the current period, and Lifetime Total.
Statistics: Track displays the number of games played using each track for the current period, and Lifetime Total.
.
Statistics: Transmission displays the number of games played with Automatic and Manual transmissions for the current period, and Lifetime Total.
Statistics: Game Time Stats displays a graph showing how long the games last. For example, in the graph at the left, 42 games lasted over 2 minutes, but less than 2 minutes and 20 seconds. Only 1 game lasted less than 1 minute and 20 seconds.
Press the START button to exit this screen.
Statistics: Continued Game Stats displays a graph showing how many times players Continued after a game ended. For example, in the graph at the left, 18 players continued once, and 8 players continued twice.
Press the START button to exit this screen.
Chapter 3 — Operator Menu and Game Setup
©2008 Global VR, Inc. 040-0178-01 Rev. A 6/11/2008 Page 25 of 32
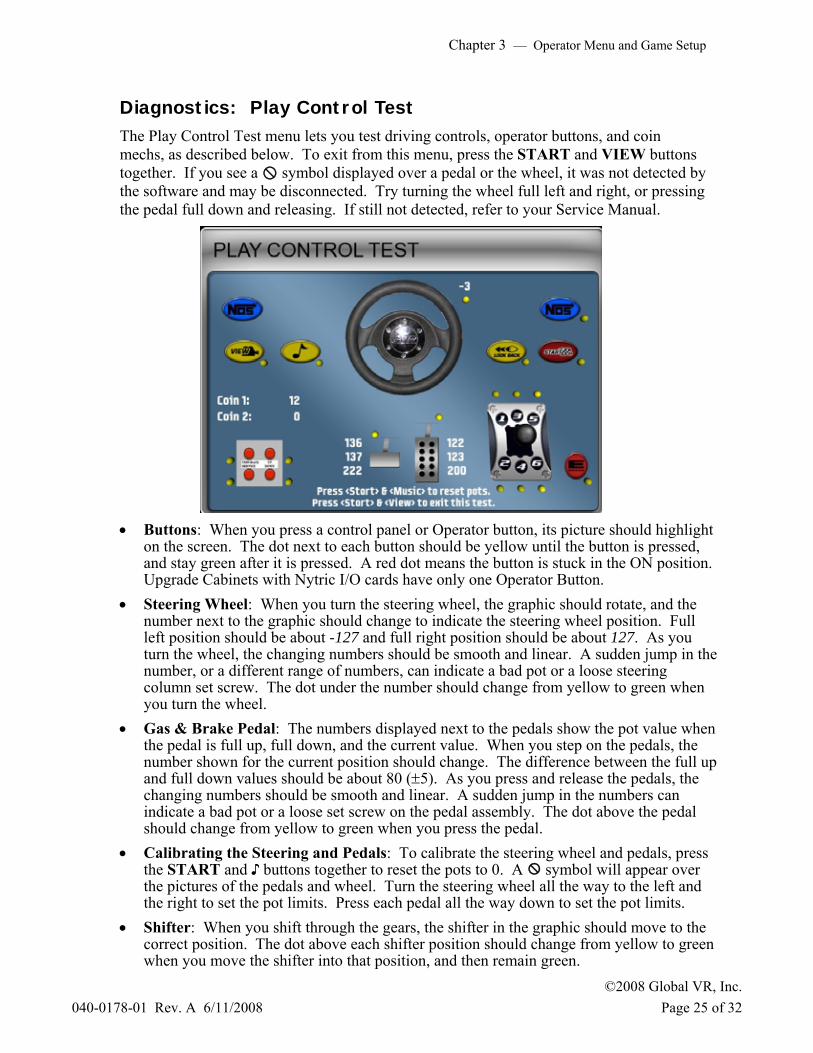
Diagnostics: Play Control Test The Play Control Test menu lets you test driving controls, operator buttons, and coin mechs, as described below. To exit from this menu, press the START and VIEW buttons together. If you see a symbol displayed over a pedal or the wheel, it was not detected by the software and may be disconnected. Try turning the wheel full left and right, or pressing the pedal full down and releasing. If still not detected, refer to your Service Manual.
• Buttons: When you press a control panel or Operator button, its picture should highlight on the screen. The dot next to each button should be yellow until the button is pressed, and stay green after it is pressed. A red dot means the button is stuck in the ON position. Upgrade Cabinets with Nytric I/O cards have only one Operator Button.
• Steering Wheel: When you turn the steering wheel, the graphic should rotate, and the number next to the graphic should change to indicate the steering wheel position. Full left position should be about -127 and full right position should be about 127. As you turn the wheel, the changing numbers should be smooth and linear. A sudden jump in the number, or a different range of numbers, can indicate a bad pot or a loose steering column set screw. The dot under the number should change from yellow to green when you turn the wheel.
• Gas & Brake Pedal: The numbers displayed next to the pedals show the pot value when the pedal is full up, full down, and the current value. When you step on the pedals, the number shown for the current position should change. The difference between the full up and full down values should be about 80 (±5). As you press and release the pedals, the changing numbers should be smooth and linear. A sudden jump in the numbers can indicate a bad pot or a loose set screw on the pedal assembly. The dot above the pedal should change from yellow to green when you press the pedal.
• Calibrating the Steering and Pedals: To calibrate the steering wheel and pedals, press the START and ♪ buttons together to reset the pots to 0. A symbol will appear over the pictures of the pedals and wheel. Turn the steering wheel all the way to the left and the right to set the pot limits. Press each pedal all the way down to set the pot limits.
• Shifter: When you shift through the gears, the shifter in the graphic should move to the correct position. The dot above each shifter position should change from yellow to green when you move the shifter into that position, and then remain green.
Chapter 3 — Operator Menu and Game Setup
Need for Speed™ Carbon Operation Manual Page 26 of 32 040-0178-01 Rev. A 6/11/2008
• Coin Mechs: When you activate a coin mech, its name (Coin 1 or Coin 2) should turn from white to green, and the number should increment to indicate the number of credits inserted. If the name of the mech stays green, this indicates it is stuck in the ON position. (Note: Typically, Coin 1 is both coin mechs, and Coin 2 is the optional bill validator.)
• START Button and Leader Light: The START button and Leader Light should blink while the Play Control Test menu is open. If either one fails to blink, check the bulb and wiring.
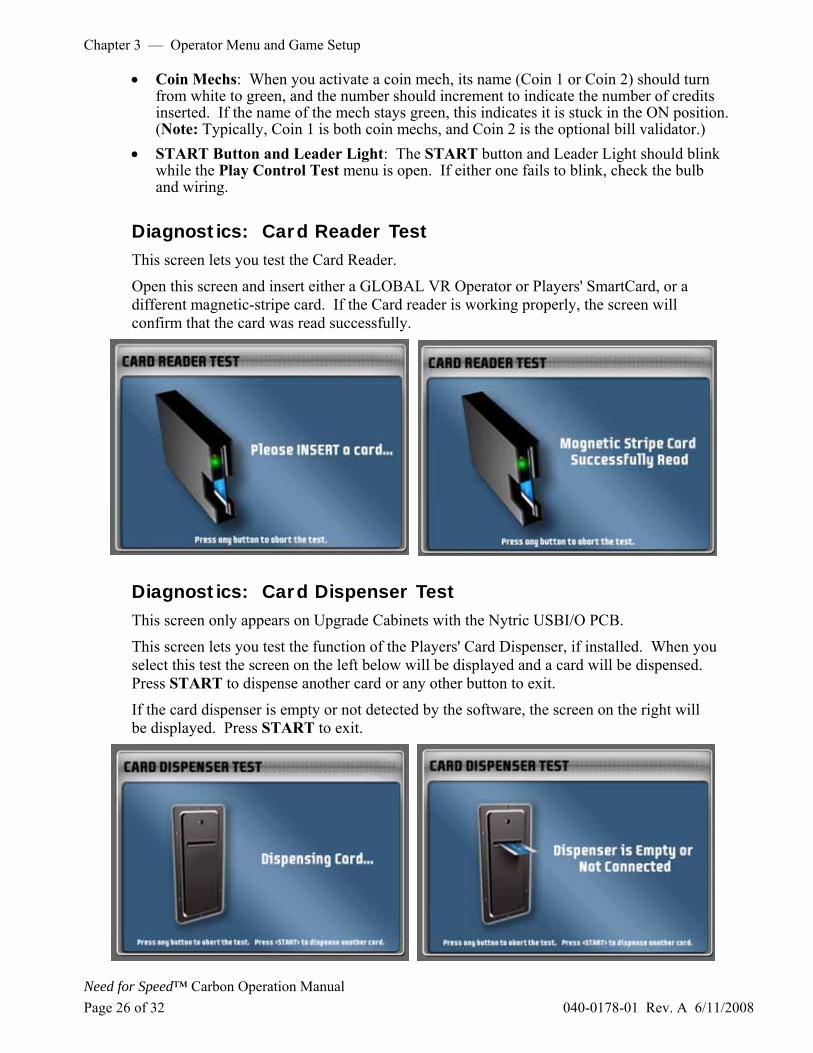
Diagnostics: Card Reader Test This screen lets you test the Card Reader.
Open this screen and insert either a GLOBAL VR Operator or Players' SmartCard, or a different magnetic-stripe card. If the Card reader is working properly, the screen will confirm that the card was read successfully.
Diagnostics: Card Dispenser Test This screen only appears on Upgrade Cabinets with the Nytric USBI/O PCB.
This screen lets you test the function of the Players' Card Dispenser, if installed. When you select this test the screen on the left below will be displayed and a card will be dispensed. Press START to dispense another card or any other button to exit.
If the card dispenser is empty or not detected by the software, the screen on the right will be displayed. Press START to exit.

Chapter 3 — Operator Menu and Game Setup
©2008 Global VR, Inc. 040-0178-01 Rev. A 6/11/2008 Page 27 of 32
Diagnostics: Sound Test This screen tests the speakers and subwoofer.
Once you enter the sound test, each speaker will play a sound while the graphic indicates the speaker that should be playing, and the onscreen text displays the name of the speaker. The screen on the left is displayed on sit-down cabinets with surround sound. The screen on the right is displayed on upright cabinets with no seat or rear speakers once you change the Sound Configuration to Stereo in the Machine Settings: Settings menu.
Press the ♪ button at any time to pause or resume the test. The test will repeat until you press the START button to exit.
If any sound comes from the wrong speaker, or any speakers are not working, check the connections to the speakers, audio amp, and PC. Please see your Service Manual for more information on fixing audio problems.

Chapter 3 — Operator Menu and Game Setup
Need for Speed™ Carbon Operation Manual Page 28 of 32 040-0178-01 Rev. A 6/11/2008
Diagnostics: Monitor Test Screens The game has various screens to assist you with fine tuning the monitor.
• Monitor Test: When you select this menu item, it opens a series of screens designed to help you check monitor performance. Press any control panel button to cycle through a series of screens to test color and geometric alignment. Press the Operator TEST/BACK button to exit.
• Adjust Monitor Gamma: This screen lets you adjust the overall screen brightness. Press VIEW or ♪ to raise or lower the gamma value. To exit without making changes, press LOOK BACK. To exit and keep the new setting, press START.
• Adjust Monitor Digital Vibrance: This screen lets you adjust the overall vividness, or saturation, of the colors. Press VIEW or ♪ to raise or lower the vibrance level. To exit without making changes, press LOOK BACK. To exit and keep the new setting, press START.
• Adjust Monitor Resolution: (Appears only on dedicated cabinets with GVRI/O Mini PCBs.) This screen lets you change the monitor resolution. This feature is provided to enhance compatibility with a variety of monitors. In most cases, the software detects and sets up the optimal monitor resolution automatically.
To change the resolution, press ♪ or VIEW to cycle through the available options, and then press START to test the selected resolution. You will be prompted to press START again to keep the setting. Press LOOK BACK to exit without making any changes.

Chapter 4 — Software Restoration
©2008 Global VR, Inc. 040-0178-01 Rev. A 6/11/2008 Page 29 of 32
Chapter 4 — Software Restoration
Important: When you run the System Recovery Disk, you will erase all game settings and audits. Open the Operator Menu and write down anything that you want to remember.
Total software installation time is typically 30—45 minutes.
Run the System Recovery CD 1. If the cabinet is linked, disconnect the Ethernet cable from the back of the cabinet.
2. Insert the System Recovery Disk in the CD-ROM drive and power the cabinet OFF and then ON. When the computer reboots, the CD should run automatically (wait about 30 seconds). You will see messages onscreen as files are copied to the hard drive.
3. After about 5 minutes, you will be prompted to remove the CD and reboot the computer. Do not insert a Game CD yet! Wait for about 6 minutes while the software finishes the installation. When the Operating System installation is complete, you will be prompted to insert Game Disk 1. Proceed to Run the Game Install CDs.
Run the Game Install CDs Important: All linked cabinets must run the same software Comm version displayed in the Machine Info screen of the Operator Menu. (For best results, install the same software version on all linked cabinets.)
For best results, open the CD Drive and inspect the tray. If it is dirty, gently wipe it with a clean, soft cloth. It is a good idea to use a CD Laser Lens Cleaner, available at electronics and music stores, and even drugstores, to clean the lens in the CD drive to help ensure it reads the software disks properly. If you have continued problems, you can replace the drive with a plug-and-play compliant IDE CD or DVD-ROM drive.
Note: If you get a CRC Error message during the install, you will have to start over with the System Recovery CD.
1. With the cabinet powered ON, insert the CD labeled Game Install Disk 1 of 5. The CD will automatically run (wait about 30 seconds). You will see a series of onscreen messages as the software copies components and files to the hard drive.
Chapter 4 — Software Restoration
Need for Speed™ Carbon Operation Manual Page 30 of 32 040-0178-01 Rev. A 6/11/2008
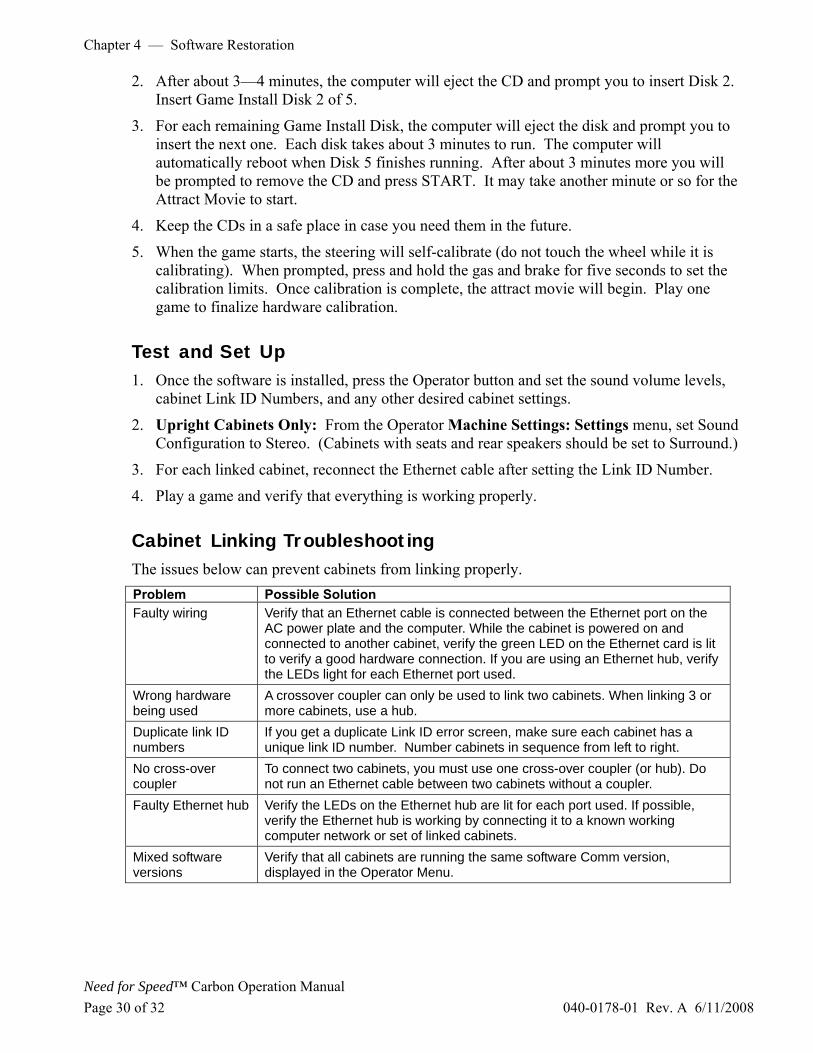
2. After about 3—4 minutes, the computer will eject the CD and prompt you to insert Disk 2. Insert Game Install Disk 2 of 5.
3. For each remaining Game Install Disk, the computer will eject the disk and prompt you to insert the next one. Each disk takes about 3 minutes to run. The computer will automatically reboot when Disk 5 finishes running. After about 3 minutes more you will be prompted to remove the CD and press START. It may take another minute or so for the Attract Movie to start.
4. Keep the CDs in a safe place in case you need them in the future.
5. When the game starts, the steering will self-calibrate (do not touch the wheel while it is calibrating). When prompted, press and hold the gas and brake for five seconds to set the calibration limits. Once calibration is complete, the attract movie will begin. Play one game to finalize hardware calibration.
Test and Set Up 1. Once the software is installed, press the Operator button and set the sound volume levels,
cabinet Link ID Numbers, and any other desired cabinet settings.
2. Upright Cabinets Only: From the Operator Machine Settings: Settings menu, set Sound Configuration to Stereo. (Cabinets with seats and rear speakers should be set to Surround.)
3. For each linked cabinet, reconnect the Ethernet cable after setting the Link ID Number.
4. Play a game and verify that everything is working properly.
Cabinet Linking Troubleshooting The issues below can prevent cabinets from linking properly. Problem Possible Solution Faulty wiring Verify that an Ethernet cable is connected between the Ethernet port on the
AC power plate and the computer. While the cabinet is powered on and connected to another cabinet, verify the green LED on the Ethernet card is lit to verify a good hardware connection. If you are using an Ethernet hub, verify the LEDs light for each Ethernet port used.
Wrong hardware being used
A crossover coupler can only be used to link two cabinets. When linking 3 or more cabinets, use a hub.
Duplicate link ID numbers
If you get a duplicate Link ID error screen, make sure each cabinet has a unique link ID number. Number cabinets in sequence from left to right.
No cross-over coupler
To connect two cabinets, you must use one cross-over coupler (or hub). Do not run an Ethernet cable between two cabinets without a coupler.
Faulty Ethernet hub Verify the LEDs on the Ethernet hub are lit for each port used. If possible, verify the Ethernet hub is working by connecting it to a known working computer network or set of linked cabinets.
Mixed software versions
Verify that all cabinets are running the same software Comm version, displayed in the Operator Menu.

Chapter 4 — Software Restoration
©2008 Global VR, Inc. 040-0178-01 Rev. A 6/11/2008 Page 31 of 32
Legal Notices
© 2008 Electronic Arts Inc. Electronic Arts, EA, the EA logo and Need for Speed are trademarks or registered trademarks of Electronic Arts Inc. in the U.S. and/or other countries. All Rights Reserved. RenderWare is a trademark or registered trademark of Criterions Software Ltd. Portions of this software are Copyright 1998-2008 Criterion Software Ltd. and its Licensors. Aston Martin, DB9 and the Aston Martin logo are trademarks owned and licensed by Aston Martin Lagonda © 2008 Aston Martin Lagonda. Trademarks, design patents and copyrights are used with the approval of the owner AUDI AG. The BMW logo, wordmark and model designations are trademarks of BMW AG and are used under license. DaimlerChrysler, Three Pointed Star in a Ring and Three Pointed Star in a Laurel Wreath and Mercedes-Benz are Trademarks of and licensed courtesy of DaimlerChrysler AG and are used under license to Electronic Arts. Dodge and HEMI are trademarks of Chrysler LLC. Dodge Viper SRT10, Dodge Challenger Concept, Dodge Challenger, Dodge Charger SRT8, Dodge Charger R/T and their trade dress are used under license by Electronic Arts © Chrysler LLC 2008. Chrysler® Hemi® 300C® SRT8 and its trade dress are trademarks of Chrysler LLC and are used under license. © Chrysler LLC 2008 Chrysler® is a registered trademark of Chrysler LLC. Plymouth® Hemi® Cuda, Road Runner and their trade dresses are used under license from Chrysler. © Chrysler LLC 2008. Alfa Romeo is a registered trademark owned by Fiat Auto S.p.A. Under license from Fiat Auto S.p.A. Ford Oval and nameplates are registered trademarks owned and licensed by Ford Motor Company. Shelby® and GT-500® are registered trademarks and intellectual property of Carroll Shelby and Carroll Shelby Licensing Inc. and are used under license. Jaguar, XK and the Leaper Device are trademarks owned and licensed by Jaguar Cars Limited © 2008 Jaguar Cars Limited. General Motors Trademarks used under license to Electronic Arts. The trademarks Lamborghini, Gallardo, Murciélago and all associated logos are used under license of Lamborghini ArtiMarca S.p.A., Italy. Elise, Europa S, Lotus and Lotus Round Device are registered trade marks of Group Lotus plc. Mazda, Mazdaspeed, RX-8, RX-7, Mazdaspeed3 and all other associated marks, emblems and designs are used under approval of Mazda Motor Corporation. The McLaren name and logo are trademarks of McLaren Group Limited. Mitsubishi, Eclipse, and Lancer Evolution names, emblems and body designs are trademarks and/or intellectual property rights of MITSUBISHI MOTORS CORPORATION and used under license to Electronic Arts Inc. "NISSAN" and the names, logos, marks and designs of the NISSAN products are trademarks and/or intellectual property rights of NISSAN MOTOR CO., LTD. and used under license to Electronic Arts Inc. Pagani, Zonda F and designs are trademarks and/or other intellectual property of Pagani Automobili and are used under license to Electronic Arts. Porsche, the Porsche crest, 911, Carrera are registered trademarks of Dr. Ing. h.c. F. Porsche AG. Licensed under certain patents. RENAULT Official License Products are vehicle models and trademarks protected by intellectual property laws. Used with permission from RENAULT. All rights reserved. SUBARU trademarks and body designs are properties of FUJI HEAVY INDUSTRIES, LTD. and used under license to ELECTRONIC ARTS INC. Trademarks, design patents and copyrights are used with the permission of the owner VOLKSWAGEN AG. Toyota, Lexus, Supra, Corolla, MR2, Altezza, Sprinter TRUENO, IS300 and associated symbols, emblems and designs are intellectual property of Toyota Motor Corporation and used with permission. Koenigsegg CCX names, emblems & body designs are trademark and/or intellectual property rights of Koenigsegg Automotive AB and used under license to EA. Vauxhall, Monaro, all related Emblems, and vehicle model body design are Vauxhall Motor Company Limited Trademarks used under license to Electronic Arts Inc. The names and logos of all after market car part companies are trademarks of their respective owners and are used by permission. CASTROL, SYNTEC, UNLOCK THE POWER, GTX, MAXIMUM PROTECTION AGAINST SLUDGE BUILD UP and SYNTEC BLEND are trademarks of Castrol Ltd. Cooper and the Cooper Tires logo are trademarks of Cooper Tire & Rubber Company. © 2008 Progressive Direct Insurance Company. All rights reserved. All other trademarks are the property of their respective owners. EA™ is an Electronic Arts™ brand. GLOBAL VR and the GLOBAL VR logo are registered trademarks of Global VR, Inc. All other trademarks are the property of their respective owners. U.S. Patent Nos. 5,269,687; 5,354,202; and 5,577,913 used under license from Midway Games West Inc.
Technical Support
Service & Parts
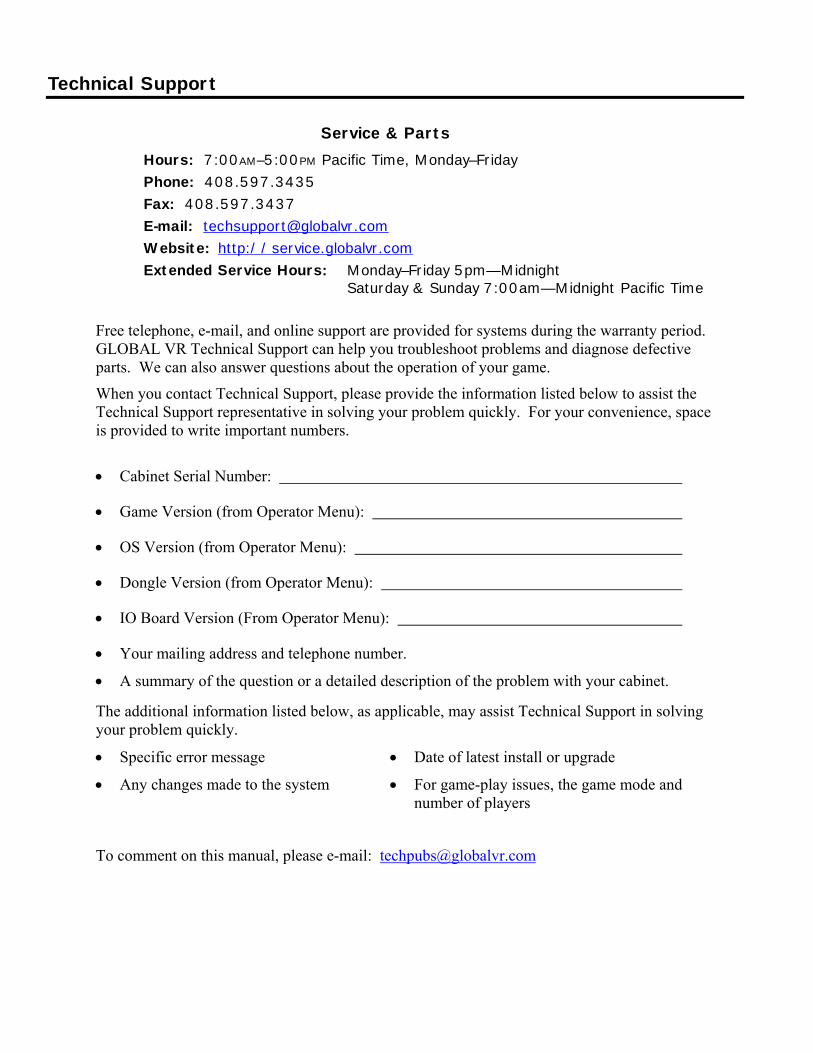
Hours: 7:00AM–5:00PM Pacific Time, Monday–Friday Phone: 408.597.3435 Fax: 408.597.3437 E-mail: [email protected] Website: http://service.globalvr.com Extended Service Hours: Monday–Friday 5pm—Midnight Saturday & Sunday 7:00am—Midnight Pacific Time
Free telephone, e-mail, and online support are provided for systems during the warranty period. GLOBAL VR Technical Support can help you troubleshoot problems and diagnose defective parts. We can also answer questions about the operation of your game.
When you contact Technical Support, please provide the information listed below to assist the Technical Support representative in solving your problem quickly. For your convenience, space is provided to write important numbers.
• Cabinet Serial Number:
• Game Version (from Operator Menu):
• OS Version (from Operator Menu):
• Dongle Version (from Operator Menu):
• IO Board Version (From Operator Menu):
• Your mailing address and telephone number.
• A summary of the question or a detailed description of the problem with your cabinet.
The additional information listed below, as applicable, may assist Technical Support in solving your problem quickly.
• Specific error message
• Any changes made to the system
• Date of latest install or upgrade
• For game-play issues, the game mode and number of players
To comment on this manual, please e-mail: [email protected]
Related Documents