Manual

Monark Manual English
Dec 01, 2015
Native Instruments manuals monark
Welcome message from author
This document is posted to help you gain knowledge. Please leave a comment to let me know what you think about it! Share it to your friends and learn new things together.
Transcript

Manual
The information in this document is subject to change without notice and does not represent acommitment on the part of Native Instruments GmbH. The software described by this docu-ment is subject to a License Agreement and may not be copied to other media. No part of thispublication may be copied, reproduced or otherwise transmitted or recorded, for any purpose,without prior written permission by Native Instruments GmbH, hereinafter referred to as NativeInstruments.
“Native Instruments”, “NI” and associated logos are (registered) trademarks of Native Instru-ments GmbH.
Mac, Mac OS, GarageBand, Logic, iTunes and iPod are registered trademarks of Apple Inc.,registered in the U.S. and other countries.Windows, Windows Vista and DirectSound are registered trademarks of Microsoft Corporationin the United States and/or other countries.All other trade marks are the property of their respective owners and use of them does not im-ply any affiliation with or endorsement by them.
Document authored by: Maximilian Zagler, David Gover and Mike Daliot
Software version: 1.0 (12/2012)
Special thanks to the Beta Test Team, who were invaluable not just in tracking down bugs, butin making this a better product.
Disclaimer
Germany
Native Instruments GmbHSchlesische Str. 29-30D-10997 BerlinGermanywww.native-instruments.de
USA
Native Instruments North America, Inc.6725 Sunset Boulevard5th FloorLos Angeles, CA 90028USAwww.native-instruments.com
© Native Instruments GmbH, 2012. All rights reserved.
Contact
Table of Contents1 Welcome to MONARK ................................................................................................6
1.1 Basic Information ....................................................................................................................... 6
2 What is MONARK? .....................................................................................................8
3 Installation and Activation .........................................................................................9
3.1 Installing MONARK ..................................................................................................................... 9
3.2 Activating MONARK .................................................................................................................... 9
4 How to Use MONARK .................................................................................................11
4.1 How to Open MONARK ................................................................................................................. 11
4.2 Exploring Factory-set Snapshots ................................................................................................ 13
4.2.1 Loading a Snapshot from the Sidepane ..................................................................... 15
4.2.2 Loading a Snapshot from the Header ........................................................................ 15
4.3 Saving a Snapshot ..................................................................................................................... 15
4.4 Selecting MONARK A and B Panel Views .................................................................................... 16
5 Overview of MONARK Ensemble ..................................................................................18
5.1 Overview of Signal Flow .............................................................................................................. 19
5.2 View A—Overview of MONARK User Interface ............................................................................. 20
5.2.1 OSCILLATORS Section ................................................................................................ 21
5.2.2 MIXER Section ........................................................................................................... 24
5.2.3 FILTER & AMP Section ................................................................................................ 27
5.2.4 CONTROL Section ....................................................................................................... 34
5.3 View B─Overview of MONARK User Interface .............................................................................. 38
5.3.1 GENERAL Section ....................................................................................................... 40
5.3.2 KEYBOARD Section .................................................................................................... 41
5.3.3 PITCH BEND Section .................................................................................................. 44
5.3.4 MOD WHEEL Section .................................................................................................. 44
5.3.5 OSCILLATORS Section ................................................................................................ 46
Table of Contents
MONARK - Manual - 4
5.3.6 FILTER Section ........................................................................................................... 47
5.3.7 GLOBAL Section ......................................................................................................... 47
6 Credits ......................................................................................................................49
Table of Contents
MONARK - Manual - 5
1 Welcome to MONARK
1.1 Basic Information
Thank you very much for downloading this REAKTOR ensemble from Native Instruments.MONARK is a faithful replication of a classic analog synthesizer which can be used either withthe free REAKTOR PLAYER, or the full version of REAKTOR 5.8 (or above). On behalf of theentire NATIVE INSTRUMENTS team, we hope this product will inspire you.
To get the best from this instrument please read the manual in its entirety.
Manual Conventions
This manual uses particular formatting to point out special facts and to warn you of potentialissues. The icons introducing the following notes let you see what kind of information is to beexpected:
Whenever this exclamation mark icon appears, you should read the corresponding notecarefully and follow the instructions and hints given there if applicable.
This light bulb icon indicates that a note contains useful extra information. This informa-tion may often help you to solve a task more efficiently, but does not necessarily apply tothe setup or operating system you are using; however, it's always worth a look.
Furthermore, the following formatting is used:
▪ Text appearing in (drop-down) menus (such as Open…, Save as… etc.) and paths to loca-tions on your hard drive or other storage devices is printed in italics.
▪ Text appearing elsewhere (labels of buttons, controls, text next to checkboxes, etc.) isprinted in light blue. Whenever you see this formatting applied, you will find the sametext appearing somewhere on the screen.
▪ Important names and concepts are printed in bold.
► Single instructions are introduced by this play button type arrow.
Welcome to MONARK
Basic Information
MONARK - Manual - 6

→ Results of actions are introduced by this smaller arrow.
Welcome to MONARK
Basic Information
MONARK - Manual - 7
2 What is MONARK?
MONARK faithfully replicates an iconic monophonic synthesizer from the 70's. It embraces thedirt and impurities and even the limitations that come with analog circuits and acknowledgesthem as being crucial to the character of analog synthesizers. MONARK puts special focus ona single analog voice with maximum impact; a clear layout and smooth controls providing ac-cess to three oscillators, a warm and potent filter, a feedback path and envelopes with lots ofattitude. MONARK is a tribute to analog subtractive synthesis and brings all these qualities toREAKTOR.
What is MONARK?
MONARK - Manual - 8
3 Installation and Activation
3.1 Installing MONARK
The following section explains how to install and activate MONARK. Although this process isstraightforward, please take a minute to read these instructions, as doing so might preventsome common problems.
► To install MONARK, double-click the installer application and follow the instructions onthe screen. The installer application automatically places the new ensemble file into aREAKTOR directory. Alternatively, during the installation process, choose the directorywhere you would like to have MONARK installed.
The full version of REAKTOR (5.8 or later) or the free REAKTOR PLAYER is required toplay REAKTOR Instruments and Effects. You can download the free REAKTOR PLAYERfrom the Native Instruments website.
3.2 Activating MONARK
When installation is finished, start the Service Center application, which was installed withMONARK. It will connect your computer to the Internet and activate your MONARK installa-tion. In order to activate your copy of MONARK, you have to perform the following steps withinthe Service Center:
Log in: Enter your Native Instruments user account name and password on the initial page.This is the same account information you used in the Native Instruments Online Shop, whereyou bought your REAKTOR Instrument, and for other Native Instruments product activations.
Select products: The Service Center detects all products that have not yet been activated andlists them. You can activate multiple products at once—for example, several REAKTOR Instru-ments.
Activate: After proceeding to the next page, the Service Center connects to the Native Instru-ments server and activates your products.
Installation and Activation
Installing MONARK
MONARK - Manual - 9
Download updates: When the server has confirmed the activation, the Service Center automati-cally displays the Update Manager with a list of all available updates for your installed prod-ucts. Please make sure that you always use the latest version of your Native Instruments prod-ucts to ensure they function correctly.
Downloading updates is optional. After activation is complete, you can always quit theService Center.
Installation and Activation
Activating MONARK
MONARK - Manual - 10
4 How to Use MONARK
The following sections will give you a brief overview over some basic operations: you will learnhow to open MONARK, how to explore the factory-set Snapshots and how to load and playMONARK Snapshots from the REAKTOR Header and Sidepane.
For the latest information on REAKTOR PLAYER files and using Snapshots please refer tothe REAKTOR Getting Started Guide.
4.1 How to Open MONARK
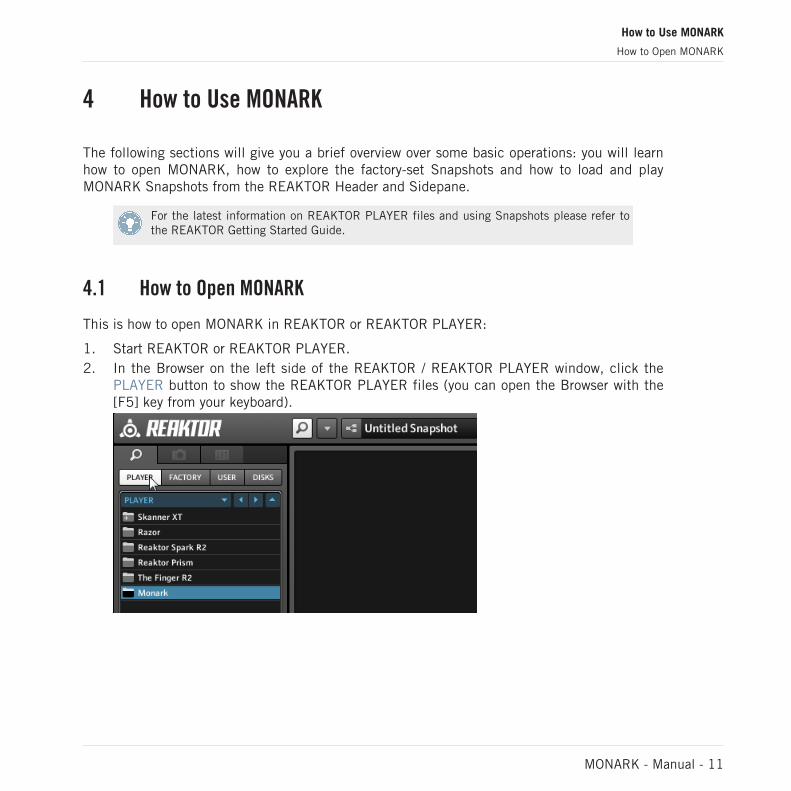
This is how to open MONARK in REAKTOR or REAKTOR PLAYER:
1. Start REAKTOR or REAKTOR PLAYER.2. In the Browser on the left side of the REAKTOR / REAKTOR PLAYER window, click the
PLAYER button to show the REAKTOR PLAYER files (you can open the Browser with the[F5] key from your keyboard).
How to Use MONARK
How to Open MONARK
MONARK - Manual - 11
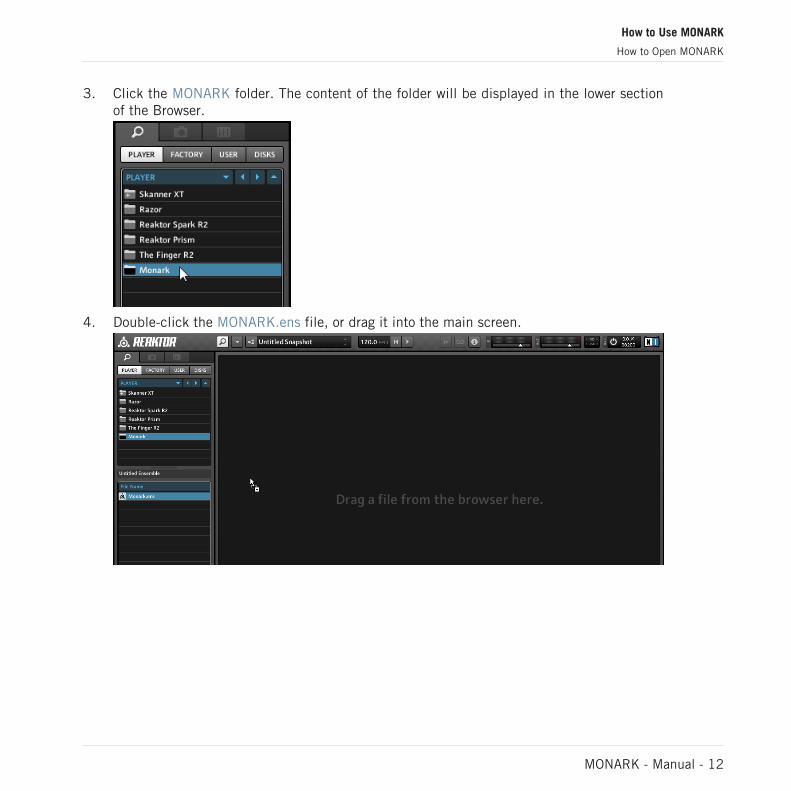
3. Click the MONARK folder. The content of the folder will be displayed in the lower sectionof the Browser.
4. Double-click the MONARK.ens file, or drag it into the main screen.
How to Use MONARK
How to Open MONARK
MONARK - Manual - 12
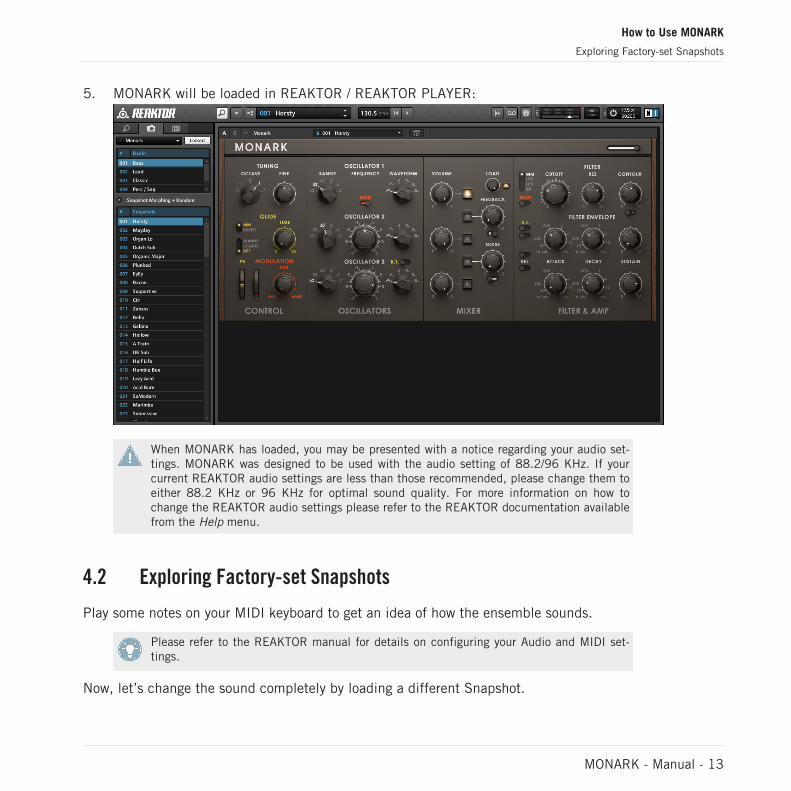
5. MONARK will be loaded in REAKTOR / REAKTOR PLAYER:
When MONARK has loaded, you may be presented with a notice regarding your audio set-tings. MONARK was designed to be used with the audio setting of 88.2/96 KHz. If yourcurrent REAKTOR audio settings are less than those recommended, please change them toeither 88.2 KHz or 96 KHz for optimal sound quality. For more information on how tochange the REAKTOR audio settings please refer to the REAKTOR documentation availablefrom the Help menu.
4.2 Exploring Factory-set Snapshots
Play some notes on your MIDI keyboard to get an idea of how the ensemble sounds.
Please refer to the REAKTOR manual for details on configuring your Audio and MIDI set-tings.
Now, let’s change the sound completely by loading a different Snapshot.
How to Use MONARK
Exploring Factory-set Snapshots
MONARK - Manual - 13
A Snapshot is REAKTOR’s notion for a sound, preset, or patch. MONARK can hold banks ofSnapshots, and loading any of these Snapshots will set each control of that Instrument to aspecific value, and re-create a particular sound.
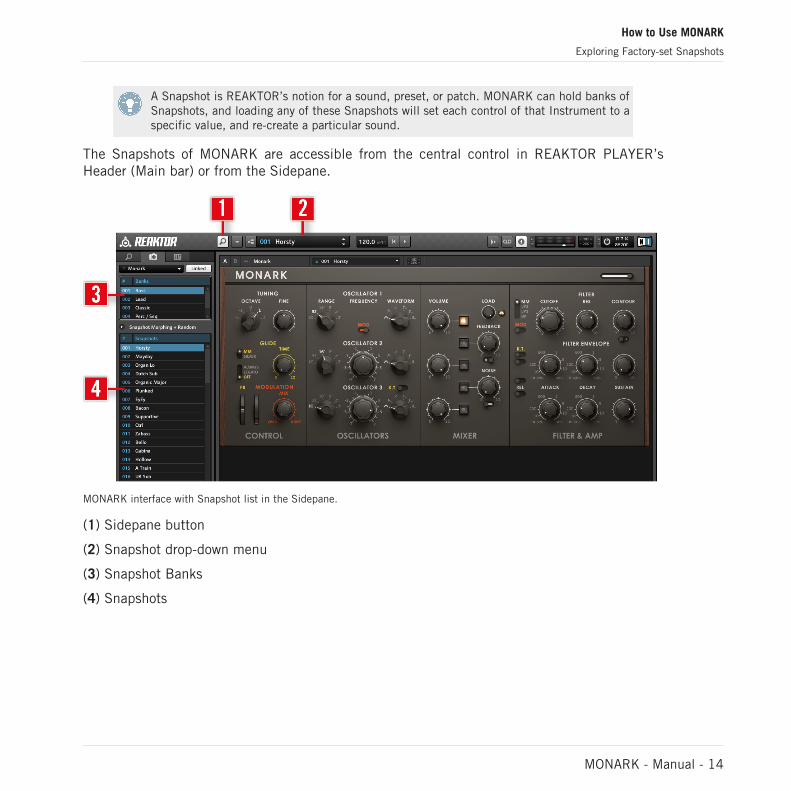
The Snapshots of MONARK are accessible from the central control in REAKTOR PLAYER’sHeader (Main bar) or from the Sidepane.
MONARK interface with Snapshot list in the Sidepane.
(1) Sidepane button
(2) Snapshot drop-down menu
(3) Snapshot Banks
(4) Snapshots
How to Use MONARK
Exploring Factory-set Snapshots
MONARK - Manual - 14
4.2.1 Loading a Snapshot from the Sidepane
If it is not already visible after startup, you need to open the Sidepane. The Sidepane holds afull overview of REAKTOR's Snapshot Banks and Snapshots from the currently selected Snap-shot Bank.
1. Click the Sidepane button (1) in the Header to open the Sidepane.2. Select a Snapshot Bank (3).3. Select the name of a Snapshot entry (4).The name of the selected Snapshot will be highlighted in the Sidepane, and the Snapshotloaded and ready in MONARK.
4.2.2 Loading a Snapshot from the Header
Loading a Snapshot from the REAKTOR PLAYER drop-down menu in the Header is the sim-plest way to interact with Snapshots.
1. Click the Snapshot drop-down menu (2). The menu holds all Snapshots and Banks of theInstrument.
2. Click an entry to select it.
4.3 Saving a Snapshot
Snapshots can only be saved when using the full version of REAKTOR; however, all your set-tings will be recalled perfectly in a host if you are using REAKTOR PLAYER, so you can tweaka sound perfectly for your song. All parameter settings made in MONARK will be saved as partof your DAW project. Please read the REAKTOR documentation for more information on plug-inmode.
For the latest information on REAKTOR PLAYER please refer to the REAKTOR GettingStarted Guide. This is available from the Help menu within the application itself.
How to Use MONARK
Exploring Factory-set Snapshots
MONARK - Manual - 15
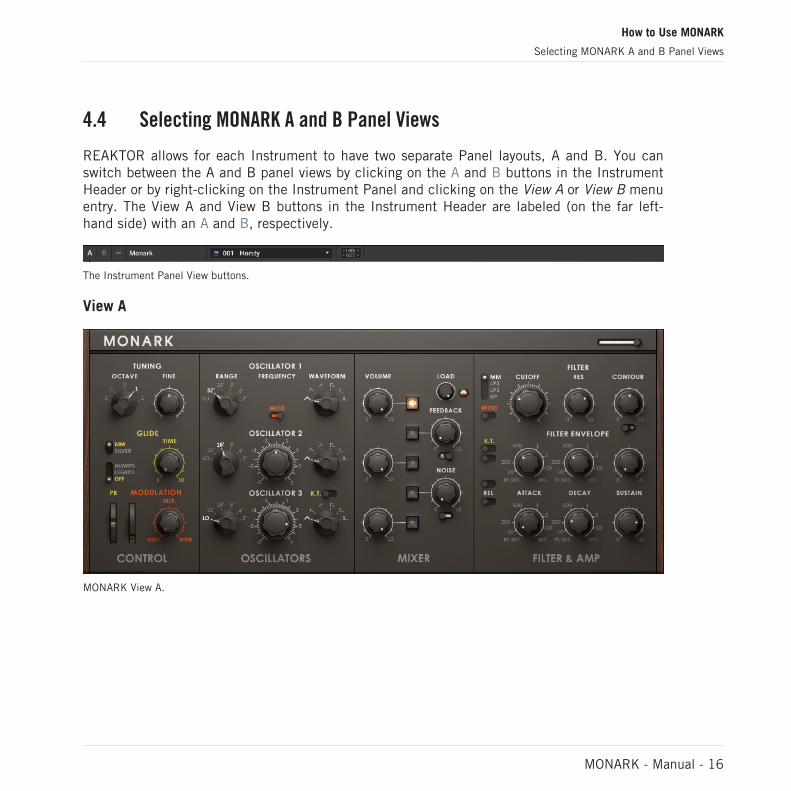
4.4 Selecting MONARK A and B Panel Views
REAKTOR allows for each Instrument to have two separate Panel layouts, A and B. You canswitch between the A and B panel views by clicking on the A and B buttons in the InstrumentHeader or by right-clicking on the Instrument Panel and clicking on the View A or View B menuentry. The View A and View B buttons in the Instrument Header are labeled (on the far left-hand side) with an A and B, respectively.
The Instrument Panel View buttons.
View A
MONARK View A.
How to Use MONARK
Selecting MONARK A and B Panel Views
MONARK - Manual - 16
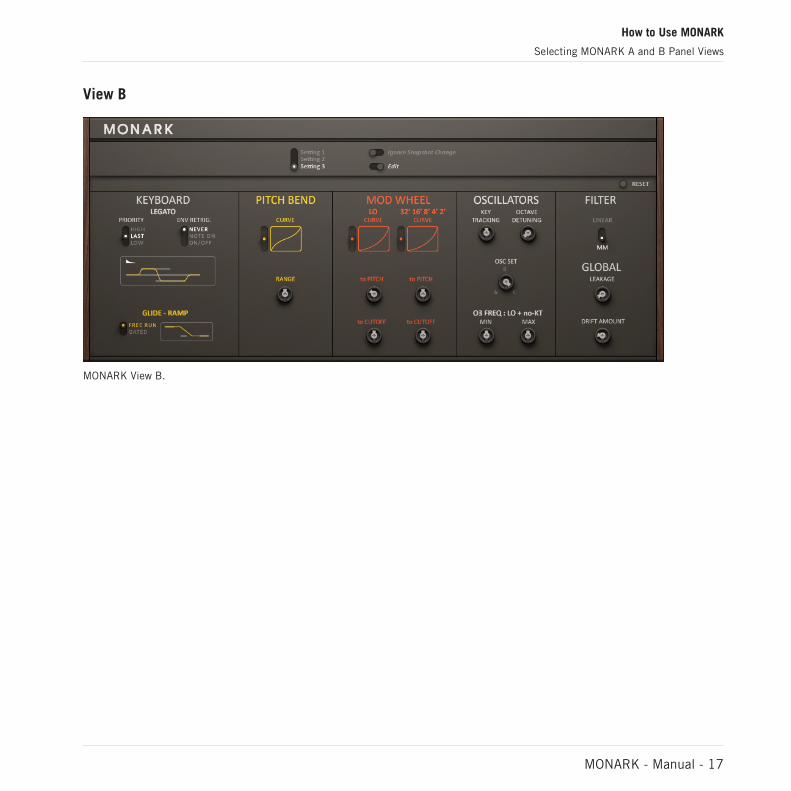
View B
MONARK View B.
How to Use MONARK
Selecting MONARK A and B Panel Views
MONARK - Manual - 17
5 Overview of MONARK Ensemble
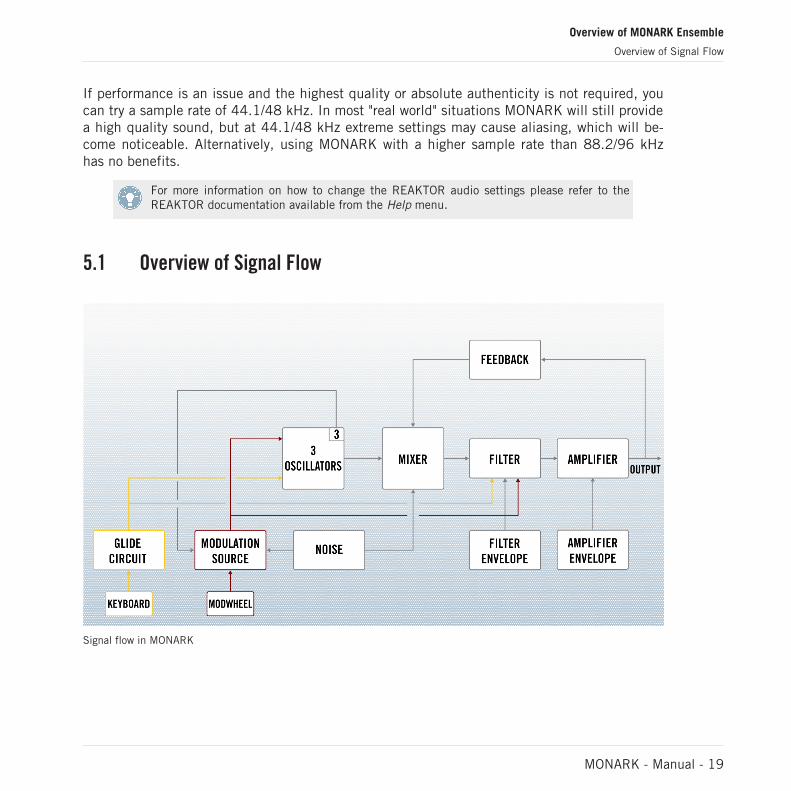
MONARK provides three oscillators with a selection of waveforms based on the classic analogwaveforms triangle, saw and pulse as well as a white/pink-noise generator as the basic soundmaterial. The output signals of these sources are then mixed and processed by a filter with fouravailable filter types, each derived from the same classic 4-pole ladder structure and capableof extreme self-oscillation. The filter cutoff can be modulated by the filter's own envelope gen-erator. Finally the signal reaches the output amplifier, where amplitude over time is shaped bya second envelope generator. From the output a feedback path leads back into the filter.
MONARK provides oscillator and filter modulation by a variable combination of the output sig-nal of the noise generator and OSCILLATOR 3, which for this purpose can also be decoupledfrom key-tracking to function as a low frequency oscillator (LFO). There are also different glidetypes available and many options to adjust the keyboard settings.
View A and View B Panels
MONARK's user interface is distributed over the View A and View B panels. The two panelviews offer different levels of interaction: You'll find the synthesizer controls in View A of theinstrument. View B on the other hand provides access to fine-tuning parameters that allow youto tailor MONARK to your personal needs. This includes details about the keyboard behavior,pitch-bend and modulation wheel ranges but also parameters that deal with the specific tuningand built-in analog imperfections of MONARK.
There is another very important difference between View A and View B: All parameters inView A are stored with a Snapshot but fine-tuning in View B is generally an instrument wideoperation affecting all Snapshots. Please consult ↑5.3.1, GENERAL Section for important de-tails on this!
Sample Rate
MONARK was designed to be used with a sample rate of 88.2/96 KHz. It is with that samplerate that MONARK delivers optimal results, so it is generally not recommended that youchange the default sample rate setting.
Overview of MONARK Ensemble
MONARK - Manual - 18
If performance is an issue and the highest quality or absolute authenticity is not required, youcan try a sample rate of 44.1/48 kHz. In most "real world" situations MONARK will still providea high quality sound, but at 44.1/48 kHz extreme settings may cause aliasing, which will be-come noticeable. Alternatively, using MONARK with a higher sample rate than 88.2/96 kHzhas no benefits.
For more information on how to change the REAKTOR audio settings please refer to theREAKTOR documentation available from the Help menu.
5.1 Overview of Signal Flow
Signal flow in MONARK
Overview of MONARK Ensemble
Overview of Signal Flow
MONARK - Manual - 19
5.2 View A—Overview of MONARK User Interface
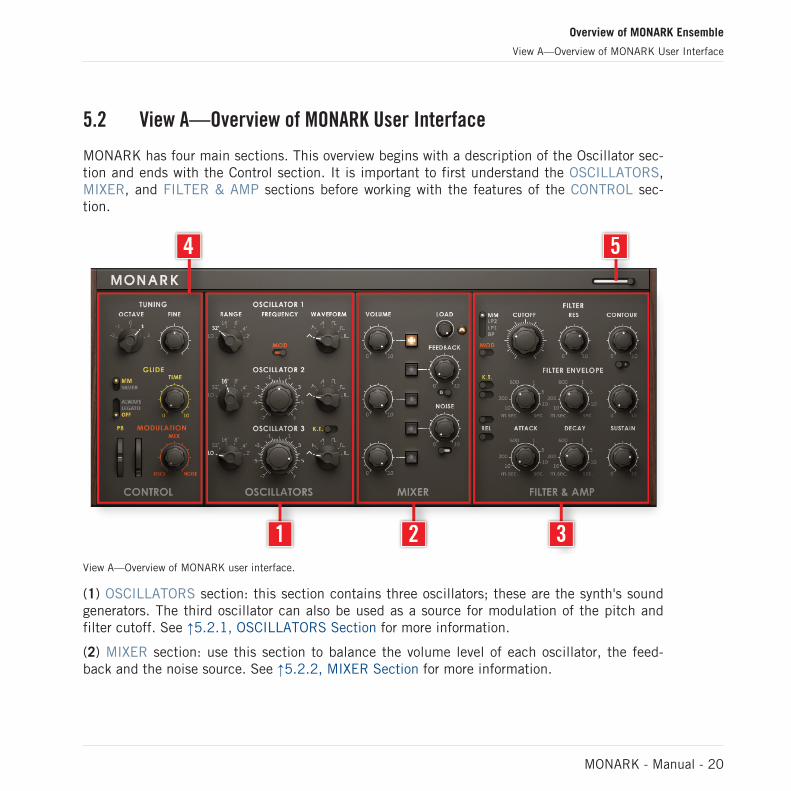
MONARK has four main sections. This overview begins with a description of the Oscillator sec-tion and ends with the Control section. It is important to first understand the OSCILLATORS,MIXER, and FILTER & AMP sections before working with the features of the CONTROL sec-tion.
View A—Overview of MONARK user interface.
(1) OSCILLATORS section: this section contains three oscillators; these are the synth's soundgenerators. The third oscillator can also be used as a source for modulation of the pitch andfilter cutoff. See ↑5.2.1, OSCILLATORS Section for more information.
(2) MIXER section: use this section to balance the volume level of each oscillator, the feed-back and the noise source. See ↑5.2.2, MIXER Section for more information.
Overview of MONARK Ensemble
View A—Overview of MONARK User Interface
MONARK - Manual - 20
(3) FILTER & AMP section: Select filter type and adjust filter settings including the filter enve-lope (how the filter changes over time) and the amp envelope (how the amplitude changes overtime). It is also possible to add modulation and key-tracking to the filter. See ↑5.2.3, FILTER& AMP Section for more information.
(4) CONTROL section: this section contains parameters for global tuning, glide and modula-tion. See ↑5.2.4, CONTROL Section for more information.
(5) Master volume: This is the master level of MONARK.
5.2.1 OSCILLATORS Section
MONARK offers three independent oscillators that each provides six classic analog waveformsas the source material for your sounds. These can be selected with the waveform knobs:
▪ Triangle
▪ Triange/sawtooth (reverse sawtooth on OSCILLATOR 3)
▪ Sawtooth
▪ Square
▪ Narrow pulse
▪ Very narrow pulse
Each waveform of each oscillator has been independently tuned for the most authentic an-alog results, and so all triangles for example produce slightly different overtones!
The base octave tuning of each oscillator can be set over 5 octaves with the RANGE selector,and to a special LO mode that puts the oscillator into a frequency range far below what wouldusually be perceived as musical pitch. The significance of the LO setting will be explainedshortly. For detailed control of the oscillator tuning, OSCILLATOR 2 and 3 each offers a FRE-QUENCY knob that allows you to tune the oscillators between a range of -7.5 to 7.5 semitones.
The marked pitches of the range parameter are octave standards based on organ stops, the' symbol means "footage" which originally relates to the length of organ pipes. At the settingof 16’ MIDI Note number 93 is A440 (this is equivalent to the “A” key above middle C).
Overview of MONARK Ensemble
View A—Overview of MONARK User Interface
MONARK - Manual - 21
In addition to that each Oscillator receives slightly different key-tracking information, whichmeans that even if all oscillators should be perfectly in tune for one note, they may be a littlebit off on another note. This may sound like a flaw but it is actually absolutely crucial to ana-log sound. It has such a huge impact on the sound that there are many options to fine-tunethis behavior in View B. See ↑5.3.5, OSCILLATORS Section for more information.
OSCILLATOR 3 is also used for modulation purposes in MONARK. For this reason it can bedecoupled from key-tracking and function as an LFO (Low Frequency Oscillator) or providedrones. In this case, it only uses its RANGE and FREQUENCY parameters for tuning. If used asa modulation source the LO setting in the range parameters suddenly makes a lot of sense be-cause this is its main purpose, e.g. to provide vibrato. The oscillators can be modulated by theMODULATION source if the MOD (modulation) switch is on. The amount of modulation can becontrolled using the modulation wheel. For more information on modulation see ↑5.2.4, CON-TROL Section.
Advanced Oscillator Information
While MONARK offers a small selection of different pulse widths for the pulse wave, pulsewidth modulation seems to be a noticeable omission. Here's a little trick, though: since thethird oscillator has a reversed sawtooth you can create pulse width modulation by combining itwith a sawtooth of any of the remaining two oscillators. Set the oscillators to the same range,and make sure that they have an equal output level. If you detune the oscillators slightly youget a result similar to pulse width modulation.
The output of an analog synthesizer sometimes contains signals that shouldn't be there, con-trary to the signal flow. For example, if the volume of an oscillator is turned all the way down inthe MIXER section or even off (see ↑5.2.2, MIXER Section) probably you'd expect it to be si-lent but you will notice that you can still hear a small portion of the oscillator's signal. If you'rebothered by inactive oscillators leaking into the output it is possible to reduce these signals:set the waveform to triangle and the range to LO. That should do it!
Oscillators in analog synthesizers don't stay perfectly in tune. There are fluctuations in thepower supply, the temperature may change the behavior of some components and of coursesometimes you just look at the instrument the wrong way and it will go out of tune! This drift-ing and detuning of the oscillators is one of the little things that add to the analog sound andis therefore modeled by MONARK. For some users these drifting and leakage signals can beannoying and therefore in View B it is possible to turn down the leakage as well as the driftingof the instrument. See ↑5.3.5, OSCILLATORS Section for more details.
Overview of MONARK Ensemble
View A—Overview of MONARK User Interface
MONARK - Manual - 22
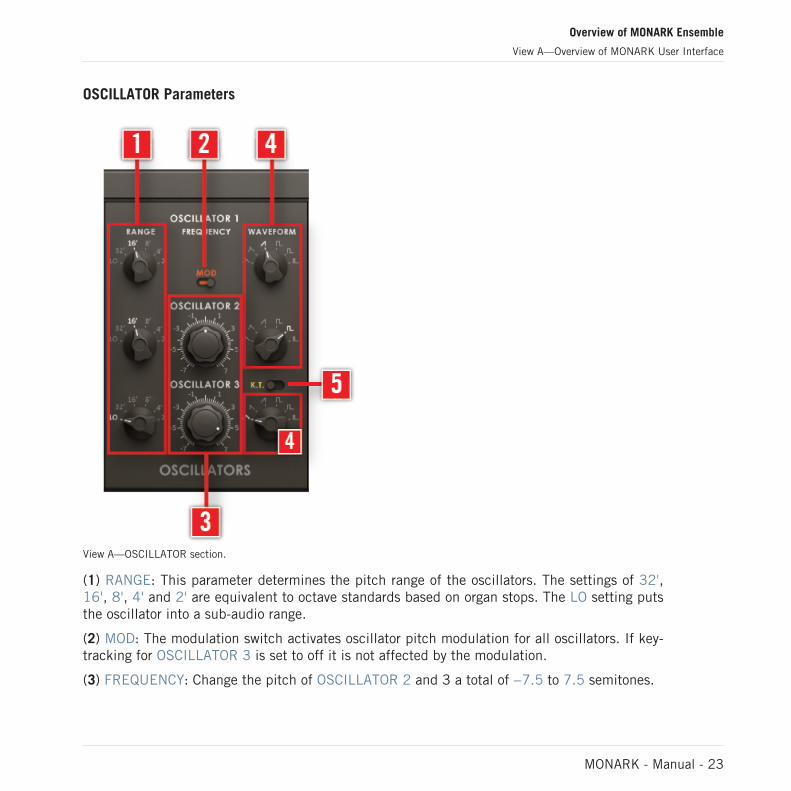
OSCILLATOR Parameters
View A—OSCILLATOR section.
(1) RANGE: This parameter determines the pitch range of the oscillators. The settings of 32',16', 8', 4' and 2' are equivalent to octave standards based on organ stops. The LO setting putsthe oscillator into a sub-audio range.
(2) MOD: The modulation switch activates oscillator pitch modulation for all oscillators. If key-tracking for OSCILLATOR 3 is set to off it is not affected by the modulation.
(3) FREQUENCY: Change the pitch of OSCILLATOR 2 and 3 a total of −7.5 to 7.5 semitones.
Overview of MONARK Ensemble
View A—Overview of MONARK User Interface
MONARK - Manual - 23
OSCILLATOR 1 does not have a FREQUENCY control because it is designed to serve as areference for OSCILLATOR 2 and OSCILLATOR 3.
(4) WAVEFORM: Selects the oscillator waveform. Available waveforms are triangle, sawtooth,sawtooth triangular (reverse sawtooth on OSCILLATOR 3), square, narrow pulse and a very nar-row pulse.
(5) K.T.: The key-tracking switch enables key-tracking of OSCILLATOR 3. If key-tracking is dis-abled, the amount by which the oscillator FREQUENCY knob changes OSCILLATOR 3’s fre-quency is increased.
5.2.2 MIXER Section
The MIXER section of MONARK combines the output of the oscillators and adds the NOISEsource to the signal. Each sound source in the mixer has a dedicated on/off switch and volumecontrol. The audio output of the mixer is routed to the filter. In addition, it's possible increasethe signal to the filter using the LOAD parameter and add one of the two different types offeedback. Please refer to the mixer signal flow diagram for details.
Overview of MONARK Ensemble
View A—Overview of MONARK User Interface
MONARK - Manual - 24
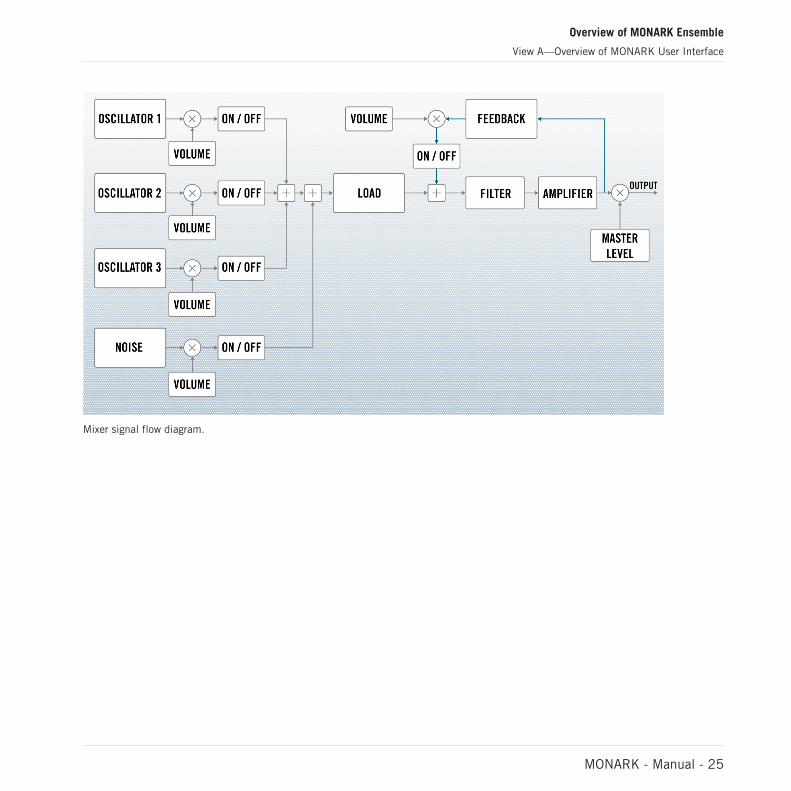
Mixer signal flow diagram.
Overview of MONARK Ensemble
View A—Overview of MONARK User Interface
MONARK - Manual - 25
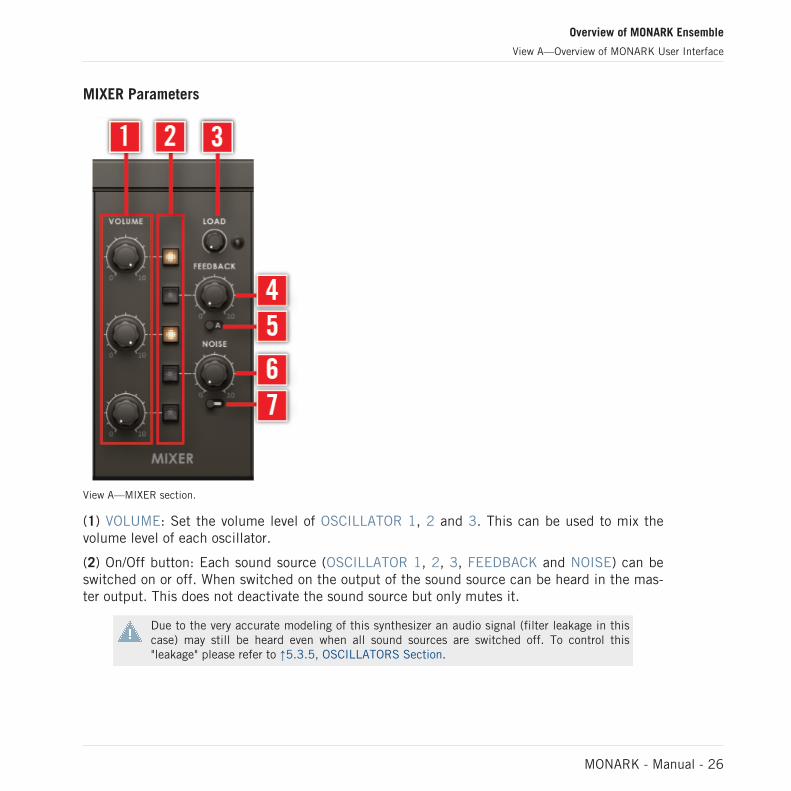
MIXER Parameters
View A—MIXER section.
(1) VOLUME: Set the volume level of OSCILLATOR 1, 2 and 3. This can be used to mix thevolume level of each oscillator.
(2) On/Off button: Each sound source (OSCILLATOR 1, 2, 3, FEEDBACK and NOISE) can beswitched on or off. When switched on the output of the sound source can be heard in the mas-ter output. This does not deactivate the sound source but only mutes it.
Due to the very accurate modeling of this synthesizer an audio signal (filter leakage in thiscase) may still be heard even when all sound sources are switched off. To control this"leakage" please refer to ↑5.3.5, OSCILLATORS Section.
Overview of MONARK Ensemble
View A—Overview of MONARK User Interface
MONARK - Manual - 26
(3) LOAD: Load increases the signal level of the oscillator and noise generator. The authenticsound of the synthesizer can be heard with the knob in the left position. When the LOAD knobis turned clockwise more overdrive is introduced by the filter. For nostalgic reasons the lampnext to the LOAD parameter will light up as the level of overdrive is increased.
(4) FEEDBACK: This is the volume knob for the feedback path. See signal flow diagram in sec-tion ↑5.1, Overview of Signal Flow for insert point of the feedback path and section ↑5.2.3,FILTER & AMP Section for detailed information on MONARK's feedback path.
(5) A/B: Select between the two feedback types.
(6) NOISE: Use this to mix noise with the oscillators.
(7) Noise color switch: Use this switch to select between white noise and pink noise.
5.2.3 FILTER & AMP Section
The MONARK filter is a faithful replication of the classic 4 pole ladder low-pass filter thatmade music history! All of MONARK's filter types are derived from this ladder structure andwere carefully fine-tuned to offer high quality over the full frequency range. The filters allow forbeautiful and potent resonance up to self-oscillation like you'd expect to get from a fully ana-log synthesizer.
There are four filter types available:
▪ MM: 24 dB/Octave Low-pass
▪ LP2: 12 dB/Octave Low-pass
▪ LP1: 6 dB/Octave Low-pass
▪ BP: 12 dB/Octave Band-pass
The two crucial parameters for a filter are cutoff frequency and resonance. The cutoff frequen-cy is the frequency at which the filter begins dampening the incoming audio (reducing the lev-el). The dampening is not happening abruptly but with a certain slope, depending on the filtertype. The CUTOFF knob determines the basic cutoff frequency of the filter. The three low-passfilters basically differ in the brightness of their output at equal cutoff frequency. The band-pass sticks out in that it reduces both the high and frequency content.
Overview of MONARK Ensemble
View A—Overview of MONARK User Interface
MONARK - Manual - 27
Filter resonance causes the emphasis of frequencies around the cutoff frequency. So while thefilter usually reduces the level in a specific frequency range, the level of frequencies close tothe cutoff frequency is actually increased by filter resonance. In extreme settings, this reso-nance causes the filter to self-oscillate, basically becoming a more or less pure sine oscillatorwith the pitch determined by the cutoff frequency. The RES knob allows you to set the amountof filter resonance.
Each filter type has its moment where it shines and you should experiment with all of them!Due to its nonlinear nature MONARK's filter reacts beautifully with different input levels. Thefilter can sound very clean and neutral with reduced input signal and "warms up" with an in-creasing input signal level, which can be exaggerated by driving the filter into soft and pleas-ant distortion, e.g. by utilizing the LOAD parameter. There are a lot of subtleties in the balanceof input signal and the resonating filter worth exploring.
Filter Modulation
The filter provides the most interesting results, of course, when the cutoff frequency is notstatic but in some way evolving during a performance or sequenced playback. MONARK offersa few ways to achieve that:
▪ Filter cutoff modulation by the filter envelope
▪ Filter cutoff from key-tracking
▪ Filter cutoff modulation by MONARK's modulation source
As with the oscillator pitch, the filter cutoff in an analog synthesizer doesn't really stay con-stant over time but fluctuates. MONARK also models this behavior and allows access to theamount of fluctuation globally for the instrument from View B (see ↑5.3.7, GLOBAL Sec-tion for details).
Filter Modulation by the Envelope
Most prominently the FILTER section has its own ADS (Attack, Decay, Sustain) envelope tomodulate the filter cutoff (see ↑5.2.3, FILTER & AMP Section for details about the envelope).The amount of envelope modulation can be controlled with the CONTOUR parameter.
Overview of MONARK Ensemble
View A—Overview of MONARK User Interface
MONARK - Manual - 28
MONARK implements ADS envelopes instead of the more common ADSR (Attack, Decay, Sus-tain, Release) type. The envelope basically behaves like the well known ADSR envelope,though: During the attack phase the envelope will rise until its peak value is reached, whichstarts the envelope's decay phase. In the decay phase the envelope drops to the sustain level.In the release phase (when the note is released) the envelope will fall to its minimum value.
While MONARK doesn't offer a dedicated parameter to set the release time there is a releasebutton that, if active, applies the decay time in the release phase. Otherwise, the release timeis basically a small fraction of the decay rate. The envelope times range from milliseconds toseveral seconds.
The envelopes always continue from their current internal state. So, if you retrigger the enve-lope during a long release they do not jump to an initial value to start off the attack phase butcontinue smoothly from the current state. This envelope implementation in MONARK comeswith an interesting side effect relevant to playing that somewhat makes up for the lack of re-sponsiveness to velocity sensitivity: With a short attack and long release times MONARK's en-velopes will keep building on top of themselves and actually keep rising. So notes playedquickly in succession get more and more accentuated. You can either increase the attack ordecrease the release time to avoid this behavior.
To allow more flexibility the filter section was extended with a polarity switch to allow for nega-tive filter cutoff modulation by the envelope in addition to the more common positive filtermodulation. With negative polarity the effect of the envelope on the filter cutoff is inverted: Itwill fall during the attack and rise in the decay and release phase.
When you switch from positive to negative modulation, remember that you might now haveto raise the filter cutoff, to be able to hear the effect of the negative envelope modulation!
Filter Modulation by the Modulation Source
The filter can be modulated by the same modulation source it shares with the oscillators, sothe filter can be modulated by OSCILLATOR 3 or the noise source or a variable combination ofboth. Filter cutoff modulation is activated by the MOD switch and the modulation amount isset by the modulation wheel. Jump to section ↑5.2.4, CONTROL Section for more details onthe modulation capabilities of MONARK.
Overview of MONARK Ensemble
View A—Overview of MONARK User Interface
MONARK - Manual - 29
Key-tracking
Lower notes naturally have more low frequency energy than high notes. If the filter is set in alow-pass mode, of course higher notes will experience stronger dampening than low notes. Of-ten it is required to have the cutoff frequency follow the pitch of the notes that are played, sothat high notes keep their brightness.
MONARK offers two key-tracking switches to allow just this. Each switch, if activated adds afraction of the keyboard pitch to the cutoff of the filter. The higher the note played, the higherthe cutoff frequency.
In combination the two key-tracking switches offer 4 key-tracking strengths:
▪ K.T.1 on / K.T.2 on: Full key-tracking, the filter follows the keyboard 1/1. This allows thefilter to be played in tune with the oscillators and in the case of self-oscillation gives youanother signal source!
▪ K.T.1 on / K.T.2 off: 1/3 key-tracking.
▪ K.T.1 off / K.T.2 on: 2/3 key-tracking.
▪ K.T.1 off / K.T.2 off: No key-tracking. The keyboard pitch does not affect the filter fre-quency.
With full key-tracking, the filter can be played like an additional oscillator. Use full key-tracking if you want to play the self oscillating filter or to give the noise a defined pitchwith a resonating filter.
Amplifier
In the final amplifier stage another ADS (Attack, Decay, Sustain) envelope shapes the loudnessof the output signal over time.
The amplifier always creates a very low level leakage signal, even when no note is played.Control the leakage amount with the leakage parameter in View B. See ↑5.3.7, GLOBALSection for more details.
Feedback
Of all the parameters of MONARK this function probably is the most unusual... but it's somuch fun! Analog synthesizers often provide an external audio input to allow for the processingof arbitrary signals. With analog synthesizers, where you can basically patch anything into any-
Overview of MONARK Ensemble
View A—Overview of MONARK User Interface
MONARK - Manual - 30
thing one of the more interesting "accidents" you can make is feeding the output of the synthback into the input. Think about that: the instrument takes its own output as an input signal!This can result in a variety of effects ranging from adding warmth to the sound over distortingit to complete transistor mayhem.
MONARK offers two different feedback algorithms. In both cases the feedback signal is pickedat the output of the amplifier, just before the master level and inserted right before the filter,after the "load" stage. Please refer to the MIXER section (↑5.2.2, MIXER Section) diagram foran illustration of the feedback path. Between the pickup and insert points of the signal there isa distortion circuit. The two feedback types mainly differ in the signal levels before and afterthis distortion unit.
Type A goes straight into overdrive mode and pushes into dying transistor territory. Use it todestroy any sound. It's an authentic reproduction of one of the feedback paths available on theinstrument MONARK was modeled from. In general feedback type B is more subtle but greatfor adding some warmth and still capable of heavy distortion.
Sound Design with Feedback
Let's look at the consequences of using feedback in your sound design. First we need to take astep back, though: As you recall, filter resonance emphasizes the harmonics (the overtones)around the cutoff frequency of the filter. (Now there's a simple and beautiful phenomenon thathas been exciting crowds over decades. As a matter of fact, even human language is based onthe emphasis of overtones, so there is a strong relationship to human nature, indeed.) So, howdoes this relate to the FEEDBACK parameter? Well, filter resonance is actually achieved by afeedback path within the filter, subtracting the filter's output signal from its input signal! TheRESONANCE parameter is basically not more than a volume knob for this negative feedback.
The actual FEEDBACK parameter of MONARK controls a second, but this time positive feed-back path around the filter and the amplifier stage. If resonance is the "yin," this positive feed-back is its (often overlooked) "yang" counterpart. Being of opposite polarity they will fight eachother, with the stronger of the two dictating the outcome.
Try this: Allow the filter to self-oscillate without any input signal and be sure that the note isable to sustain. Now turn on FEEDBACK A and slowly increase its volume. At a certain pointyou will hear... nothing! Yin and yang are in balance, so to speak. If you further increase thefeedback this will result in a crazy noise orgy due to nonlinearities in the signal path (the dis-tortion circuit in the feedback path, but also the saturation in the filter and amplifier stages).
Overview of MONARK Ensemble
View A—Overview of MONARK User Interface
MONARK - Manual - 31
The picture changes when you provide a periodic signal from the oscillators. It will merge withthe feedback energy and dominate the tone. The interplay of resonance, feedback and the sig-nal level of the oscillators will really open a new dimension you might not expect from a syn-thesizer with such seemingly simple layout.
This is actually true to much of the classic analog gear, where minute differences in parametersettings can make dramatic changes to the sound, with the energy stabilizing on a new level orunpredictably wandering between different states. A lot of focus was put onto capturing thiskind of behavior with MONARK.
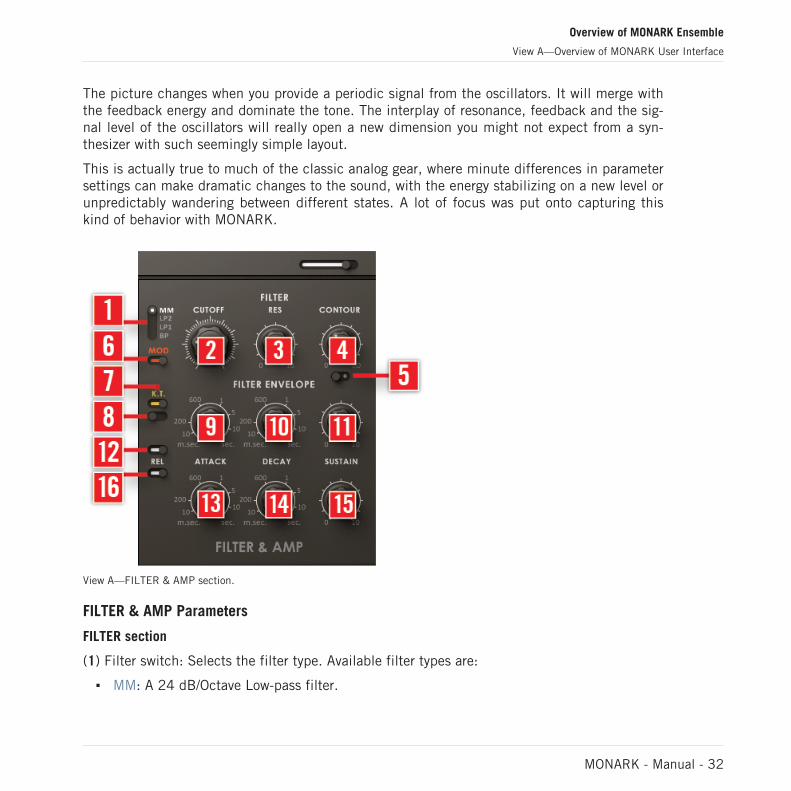
View A—FILTER & AMP section.
FILTER & AMP Parameters
FILTER section
(1) Filter switch: Selects the filter type. Available filter types are:
▪ MM: A 24 dB/Octave Low-pass filter.
Overview of MONARK Ensemble
View A—Overview of MONARK User Interface
MONARK - Manual - 32
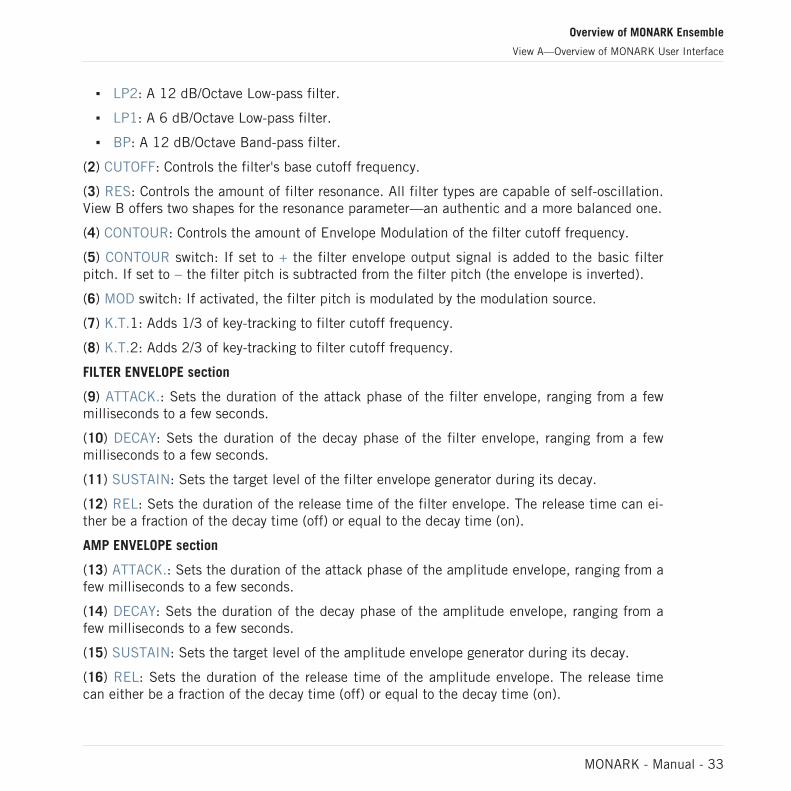
▪ LP2: A 12 dB/Octave Low-pass filter.
▪ LP1: A 6 dB/Octave Low-pass filter.
▪ BP: A 12 dB/Octave Band-pass filter.
(2) CUTOFF: Controls the filter's base cutoff frequency.
(3) RES: Controls the amount of filter resonance. All filter types are capable of self-oscillation.View B offers two shapes for the resonance parameter—an authentic and a more balanced one.
(4) CONTOUR: Controls the amount of Envelope Modulation of the filter cutoff frequency.
(5) CONTOUR switch: If set to + the filter envelope output signal is added to the basic filterpitch. If set to − the filter pitch is subtracted from the filter pitch (the envelope is inverted).
(6) MOD switch: If activated, the filter pitch is modulated by the modulation source.
(7) K.T.1: Adds 1/3 of key-tracking to filter cutoff frequency.
(8) K.T.2: Adds 2/3 of key-tracking to filter cutoff frequency.
FILTER ENVELOPE section
(9) ATTACK.: Sets the duration of the attack phase of the filter envelope, ranging from a fewmilliseconds to a few seconds.
(10) DECAY: Sets the duration of the decay phase of the filter envelope, ranging from a fewmilliseconds to a few seconds.
(11) SUSTAIN: Sets the target level of the filter envelope generator during its decay.
(12) REL: Sets the duration of the release time of the filter envelope. The release time can ei-ther be a fraction of the decay time (off) or equal to the decay time (on).
AMP ENVELOPE section
(13) ATTACK.: Sets the duration of the attack phase of the amplitude envelope, ranging from afew milliseconds to a few seconds.
(14) DECAY: Sets the duration of the decay phase of the amplitude envelope, ranging from afew milliseconds to a few seconds.
(15) SUSTAIN: Sets the target level of the amplitude envelope generator during its decay.
(16) REL: Sets the duration of the release time of the amplitude envelope. The release timecan either be a fraction of the decay time (off) or equal to the decay time (on).
Overview of MONARK Ensemble
View A—Overview of MONARK User Interface
MONARK - Manual - 33
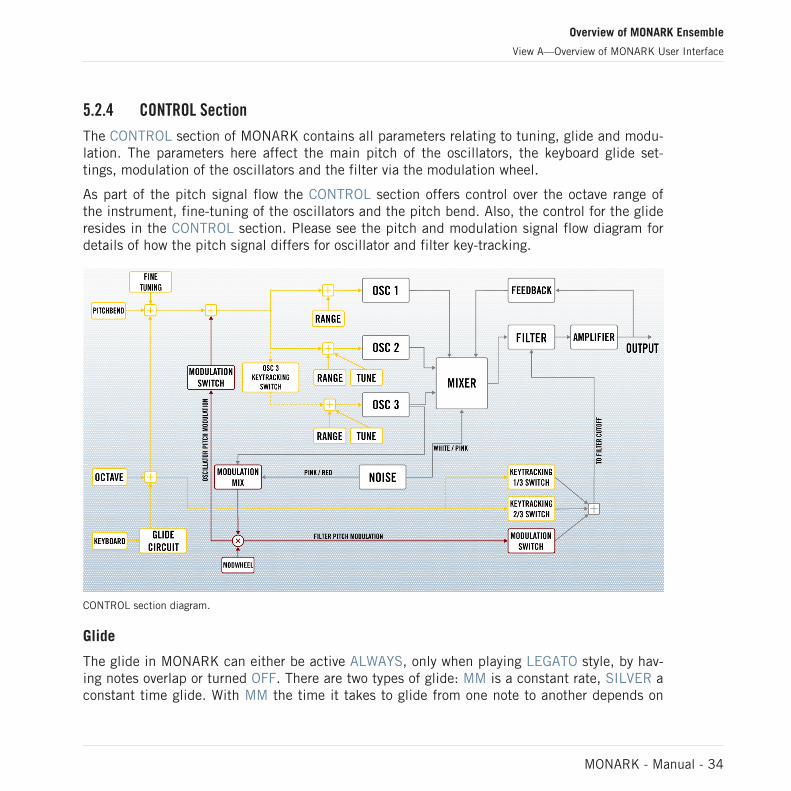
5.2.4 CONTROL Section
The CONTROL section of MONARK contains all parameters relating to tuning, glide and modu-lation. The parameters here affect the main pitch of the oscillators, the keyboard glide set-tings, modulation of the oscillators and the filter via the modulation wheel.
As part of the pitch signal flow the CONTROL section offers control over the octave range ofthe instrument, fine-tuning of the oscillators and the pitch bend. Also, the control for the glideresides in the CONTROL section. Please see the pitch and modulation signal flow diagram fordetails of how the pitch signal differs for oscillator and filter key-tracking.
CONTROL section diagram.
Glide
The glide in MONARK can either be active ALWAYS, only when playing LEGATO style, by hav-ing notes overlap or turned OFF. There are two types of glide: MM is a constant rate, SILVER aconstant time glide. With MM the time it takes to glide from one note to another depends on
Overview of MONARK Ensemble
View A—Overview of MONARK User Interface
MONARK - Manual - 34
their distance. SILVER is independent of the note distance. One consequence of this differ-ence is that when switching between glide types you might have to tune the time parameter aswell. Also, MM has a significantly more (though not perfectly) linear glide curve than SILVER,which means that the glide speed doesn't change much during the glide. Both glide types areuseful, e.g. SILVER might be the better suited for bubbly acid sequences and MM for keyboardsolos. But for a specific sound or for your tastes it may just be the other way round. Experi-ment with it!
Modulation
MONARK has two modulation destinations and one modulation source.
The pitch of all oscillators as well as the filter cutoff frequency can be modulated by a signalcomposed of the output signal of OSCILLATOR 3 and the noise generator. For either modula-tion destination, modulation can be active or inactive. This can be selected with the MOD but-tons in their respective sections. Furthermore, the amount of modulation is controlled by themodulation wheel. It affects the modulation of both destinations simultaneously. (Please see↑5.3.4, MOD WHEEL Section for Modulation wheel fine-tuning options in View B).
The modulation signal is generated by a combination of the output signal of OSCILLATOR 3and the noise generator. The ratio can be adjusted by the MIX knob.
The OSCILLATOR 3 component of the composed modulation signal is the direct output of OS-CILLATOR 3 but the noise component of the composed modulation signal is somewhat pecu-liar:
If the noise in the mixer section is set to generate white noise, pink noise is used as a modula-tion signal. If the noise source is set to generate pink noise, though, a strongly filtered noise(red noise) is used as the modulation signal.
All oscillators are equally affected by the oscillator pitch modulation, with the exception of OS-CILLATOR 3 if oscillator key-tracking is inactive. OSCILLATOR 3 is not modulated in this caseand acts in LFO mode. In this case you might want to remove its audio from the audio mixusing the On/Off button in the MIXER section. See ↑5.2.2, MIXER Section for details on howto switch oscillators on and off.
Overview of MONARK Ensemble
View A—Overview of MONARK User Interface
MONARK - Manual - 35
While the switch to enable oscillator pitch modulation is placed in the FREQUENCY section,the form of modulation available in MONARK is technically not frequency but pitch modula-tion (which is also true for the modulation of the filter cutoff). Pitch modulation differs fromfrequency modulation in that the frequency of the target is modulated in a logarithmic and notlinear fashion.
Pitch modulation does something odd to the sound: the target oscillator gets distorted in a waythat the perceived fundamental pitch of the sound changes! In other words, the sound is de-tuning. This is not a mistake but immanent to the method!
The amount of detuning is dependent on the amount of modulation, the modulation wheel set-ting. To correct the tuning of the oscillators, you can use the global fine-tuning knob, thoughkeep in mind that this correction is only true for one specific position of the modulation wheel.
Sound Design with the Modulation Section
The typical application of modulation is the well known vibrato—oscillator pitch modulation bya very slow oscillator. Vibrato can be achieved by putting OSCILLATOR 3, the modulation os-cillator, into a sort of vibrato mode. Set the RANGE selector to LO and deactivate the key-tracking (K.T.) for OSCILLATOR 3. The vibrato speed can now be dialed in with the FREQUEN-CY knob, the triangle waveform is normally a good choice for vibrato. With filter pitch modula-tion this setting might also satisfy your wobble needs!
The ranges of OSCILLATOR 3's FREQUENCY knob in this vibrato setting can be set globally forthe instrument (not per Snapshot!) in View B (see ↑5.3.5, OSCILLATORS Section for details).
When the oscillation of the modulation oscillator is increased to audio range frequencies, theeffect is no longer vibrato or wobble but a dramatic change in the spectral quality of thesound. Audio rate oscillator pitch modulation can animate the sound in a subtle way, especial-ly if the oscillators are tuned to nearly the same pitch, or it may completely enter inharmonicterritory: Take for example snapshot "Metallurg" (Snapshot 25) in the "Perc/Seq" Bank and playwith the FREQUENCY knob of OSCILLATOR 3. As you can hear, oscillator pitch modulation iscapable of creating a variety of metallic sounds.
With filter pitch modulation (especially with high amount of resonance) we can have a setupthat is close to oscillator pitch modulation, with the difference that it still can process incom-ing audio signals from the mixer. Some interesting voice like sounds can be achieved that way!
Overview of MONARK Ensemble
View A—Overview of MONARK User Interface
MONARK - Manual - 36
The "Formant Thang" Snapshot in the "Lead" Bank (Snapshot 80) is a perfect example (try ex-perimenting with the cutoff knob). Another example is "Escapade" (Snapshot 29) in the "FX"bank, in which there is only a self oscillating filter, modulated by OSCILLATOR 3. Turn OSCIL-LATOR 3's RANGE selector to make an even stronger FX sound. What you're hearing by theway is not aliasing, but some kind of inter-modulation distortion!
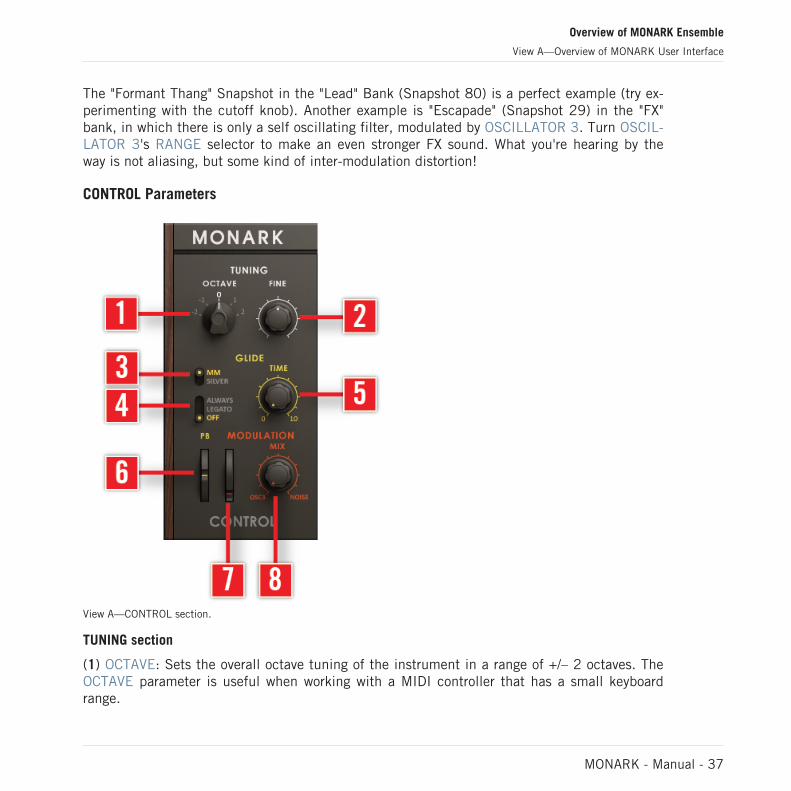
CONTROL Parameters
View A—CONTROL section.
TUNING section
(1) OCTAVE: Sets the overall octave tuning of the instrument in a range of +/– 2 octaves. TheOCTAVE parameter is useful when working with a MIDI controller that has a small keyboardrange.
Overview of MONARK Ensemble
View A—Overview of MONARK User Interface
MONARK - Manual - 37
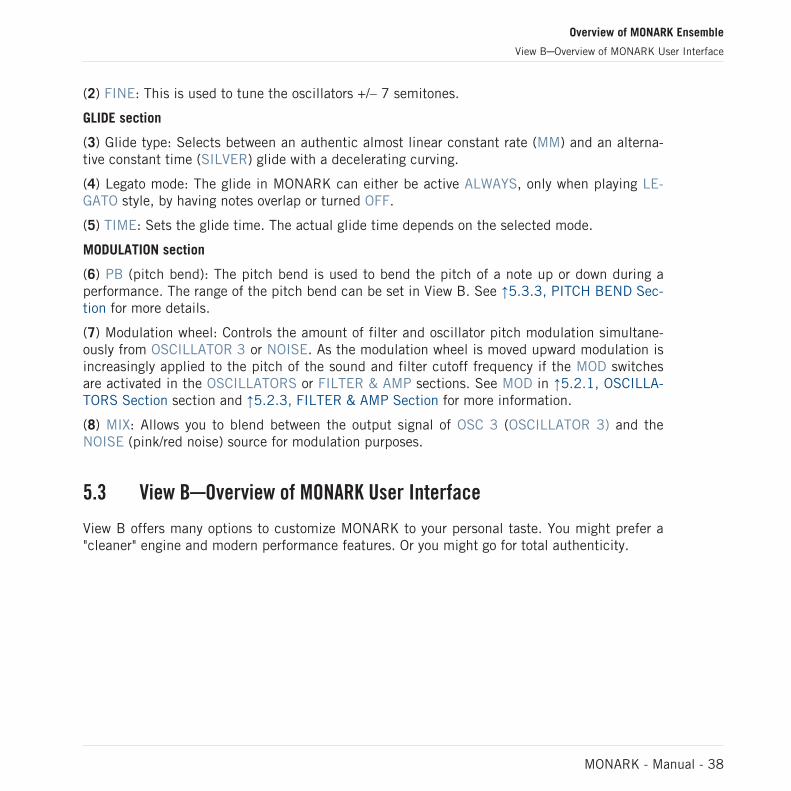
(2) FINE: This is used to tune the oscillators +/– 7 semitones.
GLIDE section
(3) Glide type: Selects between an authentic almost linear constant rate (MM) and an alterna-tive constant time (SILVER) glide with a decelerating curving.
(4) Legato mode: The glide in MONARK can either be active ALWAYS, only when playing LE-GATO style, by having notes overlap or turned OFF.
(5) TIME: Sets the glide time. The actual glide time depends on the selected mode.
MODULATION section
(6) PB (pitch bend): The pitch bend is used to bend the pitch of a note up or down during aperformance. The range of the pitch bend can be set in View B. See ↑5.3.3, PITCH BEND Sec-tion for more details.
(7) Modulation wheel: Controls the amount of filter and oscillator pitch modulation simultane-ously from OSCILLATOR 3 or NOISE. As the modulation wheel is moved upward modulation isincreasingly applied to the pitch of the sound and filter cutoff frequency if the MOD switchesare activated in the OSCILLATORS or FILTER & AMP sections. See MOD in ↑5.2.1, OSCILLA-TORS Section section and ↑5.2.3, FILTER & AMP Section for more information.
(8) MIX: Allows you to blend between the output signal of OSC 3 (OSCILLATOR 3) and theNOISE (pink/red noise) source for modulation purposes.
5.3 View B─Overview of MONARK User Interface
View B offers many options to customize MONARK to your personal taste. You might prefer a"cleaner" engine and modern performance features. Or you might go for total authenticity.
Overview of MONARK Ensemble
View B─Overview of MONARK User Interface
MONARK - Manual - 38

View B—Overview of MONARK User Interface.
(1) General section: This section allows you to select the setting slots that can be used to fine-tune MONARK. See ↑5.3.1, GENERAL Section for more information.
(2) KEYBOARD: The section allows detailed setting of keyboard behavior. See ↑5.3.2, KEY-BOARD Section for more information.
(3) PITCH BEND: This section allows fine-tuning of the pitch bend. See ↑5.3.3, PITCH BENDSection for more information.
(4) MOD WHEEL: This section allows fine-tuning of curve and range of the modulation wheel.See ↑5.3.4, MOD WHEEL Section for more information.
(5) OSCILLATORS: This section allows fine-tuning of oscillator key-tracking, detuning and thefrequency range of OSCILLATOR 3. See ↑5.3.5, OSCILLATORS Section for more information.
(6) FILTER: The section allows fine-tuning of the filter settings. See ↑5.3.6, FILTER Sectionfor more information.
(7) GLOBAL: This section allows fine-tuning of oscillator leakage and drift amounts. See↑5.3.7, GLOBAL Section for more information.
Overview of MONARK Ensemble
View B─Overview of MONARK User Interface
MONARK - Manual - 39
5.3.1 GENERAL Section
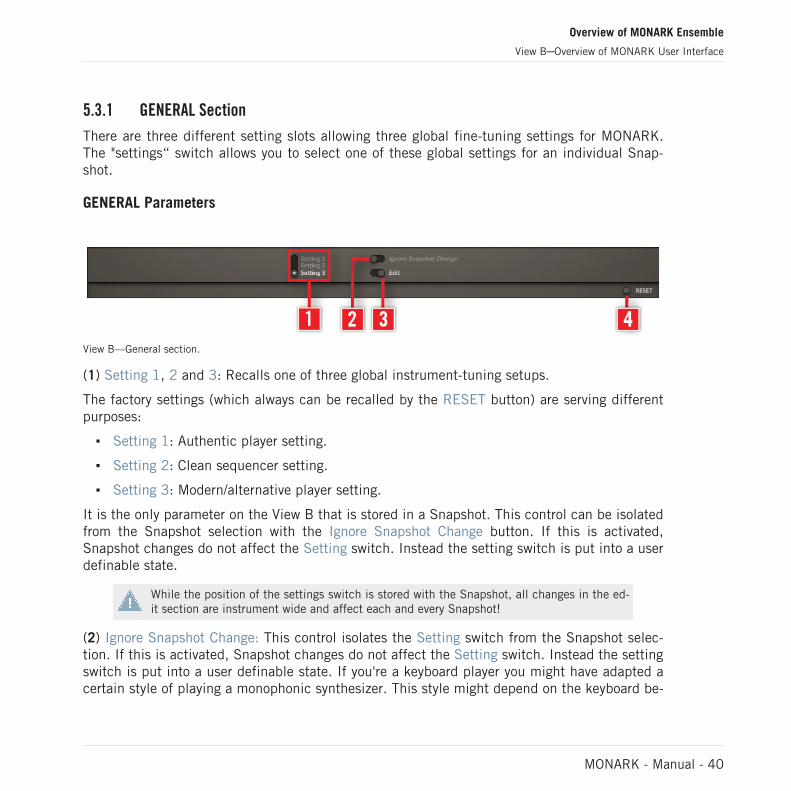
There are three different setting slots allowing three global fine-tuning settings for MONARK.The "settings“ switch allows you to select one of these global settings for an individual Snap-shot.
GENERAL Parameters
View B—General section.
(1) Setting 1, 2 and 3: Recalls one of three global instrument-tuning setups.
The factory settings (which always can be recalled by the RESET button) are serving differentpurposes:
▪ Setting 1: Authentic player setting.
▪ Setting 2: Clean sequencer setting.
▪ Setting 3: Modern/alternative player setting.
It is the only parameter on the View B that is stored in a Snapshot. This control can be isolatedfrom the Snapshot selection with the Ignore Snapshot Change button. If this is activated,Snapshot changes do not affect the Setting switch. Instead the setting switch is put into a userdefinable state.
While the position of the settings switch is stored with the Snapshot, all changes in the ed-it section are instrument wide and affect each and every Snapshot!
(2) Ignore Snapshot Change: This control isolates the Setting switch from the Snapshot selec-tion. If this is activated, Snapshot changes do not affect the Setting switch. Instead the settingswitch is put into a user definable state. If you're a keyboard player you might have adapted acertain style of playing a monophonic synthesizer. This style might depend on the keyboard be-
Overview of MONARK Ensemble
View B─Overview of MONARK User Interface
MONARK - Manual - 40
havior that you have become accustomed to, like, the note priority. When browsing throughSnapshots it might be irritating to have this, what used to be, instrument wide behavior changeunder your fingers. For this MONARK allows you to isolate the settings switch from the Snap-shot selection.
(3) Edit: Opens the edit section, providing access to the tuning parameters.
(4) RESET: Loads the default parameter setting for the selected settings slot. Each of the threesetting slots has its individual default setting.
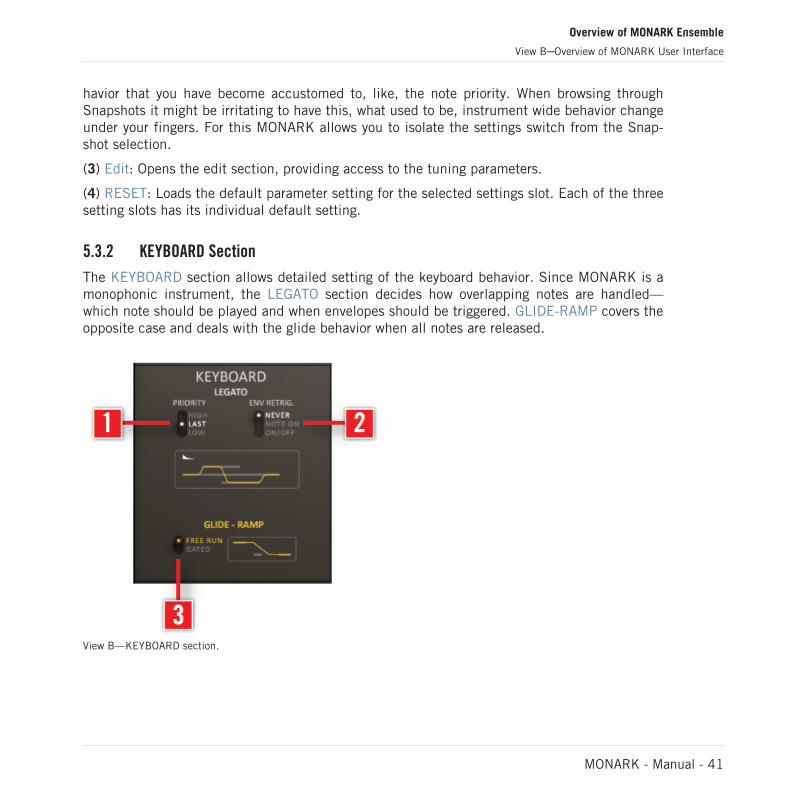
5.3.2 KEYBOARD Section
The KEYBOARD section allows detailed setting of the keyboard behavior. Since MONARK is amonophonic instrument, the LEGATO section decides how overlapping notes are handled—which note should be played and when envelopes should be triggered. GLIDE-RAMP covers theopposite case and deals with the glide behavior when all notes are released.
View B—KEYBOARD section.
Overview of MONARK Ensemble
View B─Overview of MONARK User Interface
MONARK - Manual - 41
LEGATO Parameters
The Legato section allows detailed settings of the keyboard behavior.
(1) PRIORITY: With a monophonic synthesizer whenever two or more notes are played at thesame time a decision has to be made of which of the notes should be generated by the audioengine.
MONARK provides three different schemes for this: LOW, HIGH and LAST note priority. InLOW or HIGH note priority mode, when more than one note is played simultaneously the lowestor highest note respectively is processed by MONARK's audio engine. In LAST note prioritymode MONARK keeps track of the order in which the notes were played and always switchesprocessing to the last (or newest) note.
Last-note priority has become the de-facto standard behavior for monophonic synthesizers. Inthe predigital or computer controller era monophonic synthesizers usually offered either low orhigh note priority since these modes were easy to realize. So for authentic playing you maywant to give e.g. LOW priority a try. Really, it makes a huge difference!
All three modes have in common that as soon as you let go of a key (generate a MIDI NoteOff), while at least one key is still pressed, the current keyboard state and the note priority isreevaluated, and the pitch will change accordingly.
(2) ENV RETRIG.: The envelope retrigger section determines the envelope behavior when twoor more notes overlap and the note priority evaluation switches the audio engine to a new note.
MONARK offers three different envelope retrigger behaviors:
In the NEVER setting, overlapping notes don't cause MONARK's envelopes to be triggered.This is the classic legato behavior and authentic to how the instrument MONARK was inspiredby handles overlapping notes.
Alternatively, the NOTE ON option allows the envelopes to be retriggered with a new note. Thisis another classic mode. Since it allows separating notes more clearly it can be useful for play-ing (or sequencing) typical sequencer sounds.
The third and possibly most unusual is the ON/OFF option, which is to restart the envelopesnot only when a new note is being played but also when a note is released.
Overview of MONARK Ensemble
View B─Overview of MONARK User Interface
MONARK - Manual - 42
The envelope retrigger evaluation only ever happens after the note priority evaluation hasdetermined that the audio engine has to switch to processing a different note. So any key-board action that doesn't cause the audio engine to switch to a different note will not causeany note retriggering either!
Please consult the display for an illustration of the current keyboard setting. It shows the inter-play between note priority and envelope retrigger modes on a hypothetical three note sequencewith pitch depicted as yellow curve and moments of envelope triggering as small envelopesymbols on top of the sequence:
View B—LEGATO display.
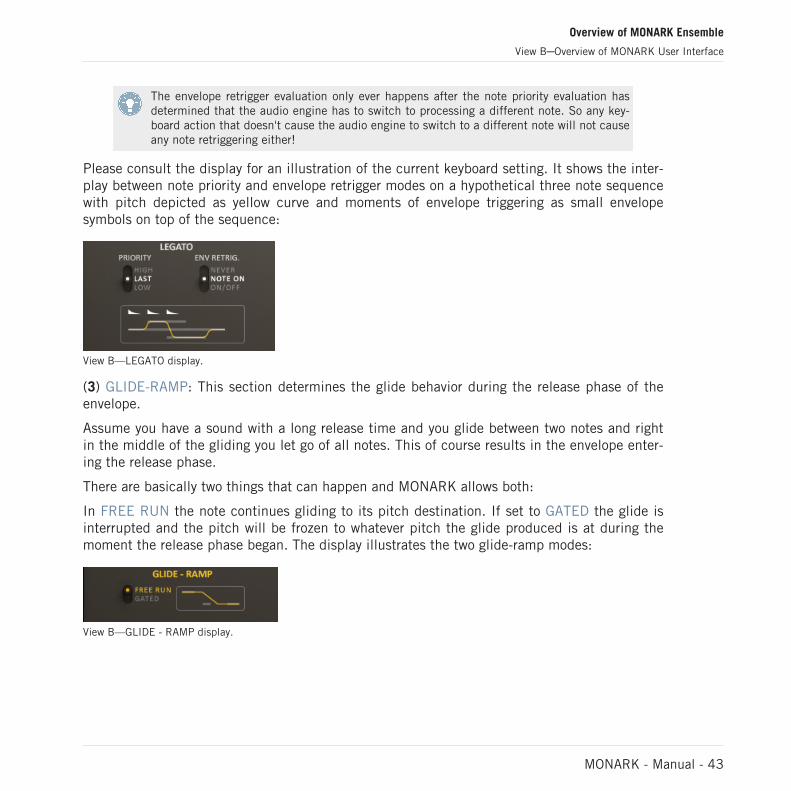
(3) GLIDE-RAMP: This section determines the glide behavior during the release phase of theenvelope.
Assume you have a sound with a long release time and you glide between two notes and rightin the middle of the gliding you let go of all notes. This of course results in the envelope enter-ing the release phase.
There are basically two things that can happen and MONARK allows both:
In FREE RUN the note continues gliding to its pitch destination. If set to GATED the glide isinterrupted and the pitch will be frozen to whatever pitch the glide produced is at during themoment the release phase began. The display illustrates the two glide-ramp modes:
View B—GLIDE - RAMP display.
Overview of MONARK Ensemble
View B─Overview of MONARK User Interface
MONARK - Manual - 43
5.3.3 PITCH BEND Section
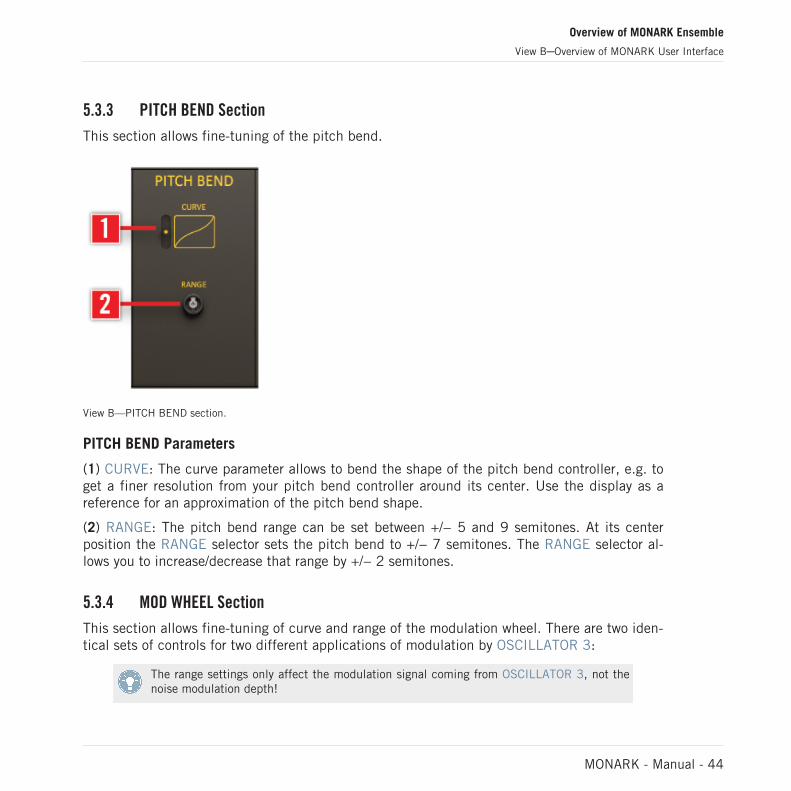
This section allows fine-tuning of the pitch bend.
View B—PITCH BEND section.
PITCH BEND Parameters
(1) CURVE: The curve parameter allows to bend the shape of the pitch bend controller, e.g. toget a finer resolution from your pitch bend controller around its center. Use the display as areference for an approximation of the pitch bend shape.
(2) RANGE: The pitch bend range can be set between +/− 5 and 9 semitones. At its centerposition the RANGE selector sets the pitch bend to +/− 7 semitones. The RANGE selector al-lows you to increase/decrease that range by +/− 2 semitones.
5.3.4 MOD WHEEL Section
This section allows fine-tuning of curve and range of the modulation wheel. There are two iden-tical sets of controls for two different applications of modulation by OSCILLATOR 3:
The range settings only affect the modulation signal coming from OSCILLATOR 3, not thenoise modulation depth!
Overview of MONARK Ensemble
View B─Overview of MONARK User Interface
MONARK - Manual - 44
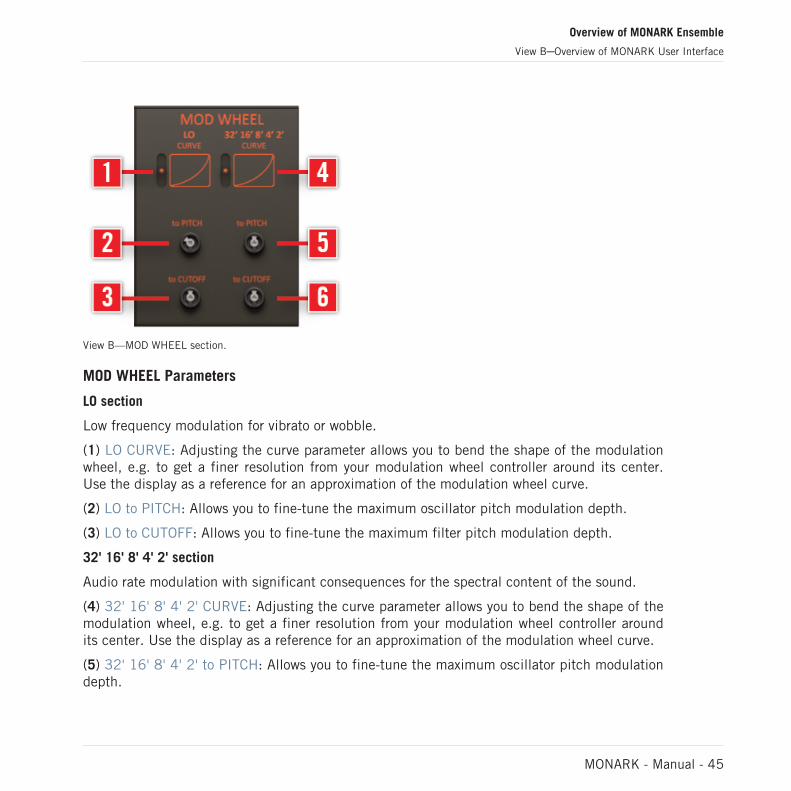
View B—MOD WHEEL section.
MOD WHEEL Parameters
LO section
Low frequency modulation for vibrato or wobble.
(1) LO CURVE: Adjusting the curve parameter allows you to bend the shape of the modulationwheel, e.g. to get a finer resolution from your modulation wheel controller around its center.Use the display as a reference for an approximation of the modulation wheel curve.
(2) LO to PITCH: Allows you to fine-tune the maximum oscillator pitch modulation depth.
(3) LO to CUTOFF: Allows you to fine-tune the maximum filter pitch modulation depth.
32' 16' 8' 4' 2' section
Audio rate modulation with significant consequences for the spectral content of the sound.
(4) 32' 16' 8' 4' 2' CURVE: Adjusting the curve parameter allows you to bend the shape of themodulation wheel, e.g. to get a finer resolution from your modulation wheel controller aroundits center. Use the display as a reference for an approximation of the modulation wheel curve.
(5) 32' 16' 8' 4' 2' to PITCH: Allows you to fine-tune the maximum oscillator pitch modulationdepth.
Overview of MONARK Ensemble
View B─Overview of MONARK User Interface
MONARK - Manual - 45
(6) 32' 16' 8' 4' 2' to CUTOFF: Allows you to fine-tune the maximum filter pitch modulationdepth.
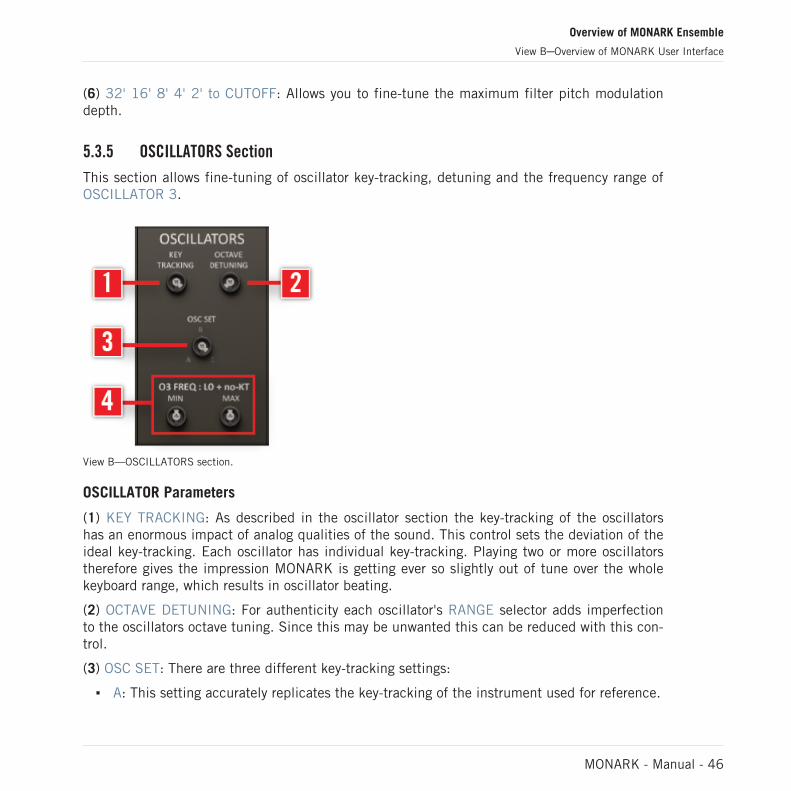
5.3.5 OSCILLATORS Section
This section allows fine-tuning of oscillator key-tracking, detuning and the frequency range ofOSCILLATOR 3.
View B—OSCILLATORS section.
OSCILLATOR Parameters
(1) KEY TRACKING: As described in the oscillator section the key-tracking of the oscillatorshas an enormous impact of analog qualities of the sound. This control sets the deviation of theideal key-tracking. Each oscillator has individual key-tracking. Playing two or more oscillatorstherefore gives the impression MONARK is getting ever so slightly out of tune over the wholekeyboard range, which results in oscillator beating.
(2) OCTAVE DETUNING: For authenticity each oscillator's RANGE selector adds imperfectionto the oscillators octave tuning. Since this may be unwanted this can be reduced with this con-trol.
(3) OSC SET: There are three different key-tracking settings:
▪ A: This setting accurately replicates the key-tracking of the instrument used for reference.
Overview of MONARK Ensemble
View B─Overview of MONARK User Interface
MONARK - Manual - 46
▪ B: OSCILLATOR 1 has perfectly linear key-tracking. OSCILLATOR 2 and OSCILLATOR 3converge to ideal key-tracking with higher note pitch.
▪ C: OSCILLATOR 3 has perfectly linear key-tracking. OSCILLATOR 1 and OSCILLATOR 2converge to ideal key-tracking with higher note pitch.
(4) O3 FREQ: LO + no-KT (OSCILLATOR 3 FREQUENCY in LO RANGE mode with no key-tracking): OSCILLATOR 3 is in vibrato mode when the RANGE selector is set to LO and whenthe key-tracking for OSCILLATOR 3 is off. The MIN and MAX knobs allow you to fine-tune therange of the FREQUENCY (tune) knob of OSCILLATOR 3.
5.3.6 FILTER Section
Selects between an authentic (MM) or a more balanced resonance shaping, with the resonanceevenly distributed around the whole parameter range.
View B—FILTER section.
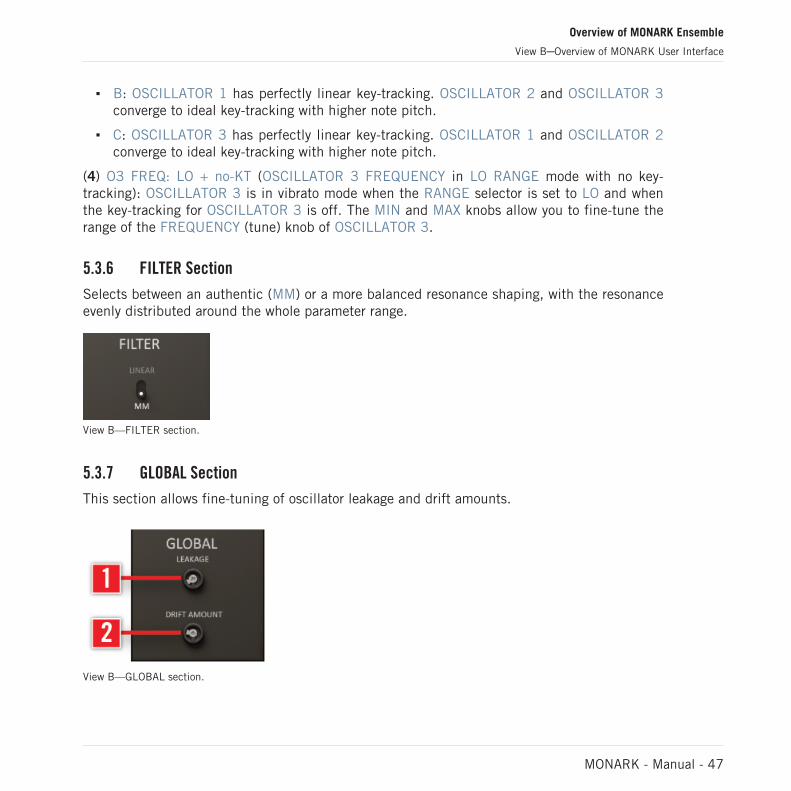
5.3.7 GLOBAL Section
This section allows fine-tuning of oscillator leakage and drift amounts.
View B—GLOBAL section.
Overview of MONARK Ensemble
View B─Overview of MONARK User Interface
MONARK - Manual - 47
GLOBAL Parameters
(1) LEAKAGE: This parameter controls the amount of oscillator and general noise leakage (see↑5.2.1, OSCILLATORS Section and ↑5.2.3, FILTER & AMP Section sections for details).
(2) DRIFT AMOUNT: This parameter controls the drifting of the three oscillators as well as thefilter frequency (see ↑5.2.1, OSCILLATORS Section and ↑5.2.3, FILTER & AMP Section sec-tions for details).
Overview of MONARK Ensemble
View B─Overview of MONARK User Interface
MONARK - Manual - 48

6 Credits
REAKTOR Ensemble: Mike Daliot and Maximilian Zagler.
Product Design: Mike Daliot, Maximilian Zagler and Efflam Le Bivic.
Graphic Design: Efflam Le Bivic.
Sound Design: Jamil Samad, Robert Linke, Mike Daliot, Maximilian Zagler, Angelos Liaros, An-tonio de Spirt, Thanos Kazakos, Justin Myracks, Daniel Vester, Tommaso De Donatis / Noise-factory, Nori Ubukata, Tasmodia, Summa, Matthias Fuchs, Artemiy Pavlov, Jeremy Janzen,Uwe G. Hoenig, John Cohen, Kevin Lamb, Hecq.
Manual: Maximilian Zagler, David Gover and Mike Daliot.
Credits
MONARK - Manual - 49
Related Documents