Design Certified By: Printed in U.S.A. Copyright 1999 The Broaster Company Broaster®, Broasted®, Broasted Chicken®, Broaster Foods®. and Broasterie® are registered trademarks. Usage is available only to licensed opertors with written authorization from The Broaster Comany. The Broaster Company 2855 Cranston Road, Beloit, WI 53511-3991 608/365-0193 www.broaster.com NSF, UL and CUL MODEL HDM-4 AND HDM-6 PERFECT HOLD™ DELI CASE INSTALLATION/OPERATION MANUAL 14494 11/99 Rev 3/06 Be sure ALL installers read, understand, and have access to this manual at all times. “An American Tradition Since 1954!”

Welcome message from author
This document is posted to help you gain knowledge. Please leave a comment to let me know what you think about it! Share it to your friends and learn new things together.
Transcript
Design Certified By:Printed in U.S.A. Copyright 1999 The Broaster Company
Broaster®, Broasted®, Broasted Chicken®, Broaster Foods®. and Broasterie® are registered trademarks. Usage is available only to licensed opertors with written authorization from The Broaster Comany.
The Broaster Company2855 Cranston Road, Beloit, WI 53511-3991
608/365-0193 www.broaster.comNSF, UL and CUL
MODEL HDM-4 AND HDM-6PERFECT HOLD™ DELI CASE
INSTALLATION/OPERATION MANUAL
14494 11/99 Rev 3/06
Be sure ALL installers read, understand, and have access to this manual at all times.
“An American Tradition Since 1954!”


FOR YOUR SAFETYDo not use or store gasoline or other flammable vaporsor liquids in the vicinity of this or any other appliance.
WARNING: Improper installation, adjustments, alteration, service or maintenance can cause property damage, injury or death. Read the installation, operating and mainte-nance instructions thoroughly before installing or servicing this equipment.
All adjustments and repairs shall be made by an authorized Broaster Company repre-sentative.
If there is a power failure, turn power switch OFF. DO NOT attempt to operate unit dur-ing a power failure.
WARNING: Failure to read and understand this manual completely
could result in serious injury or death. Be sure ALL operators read, understand and have access to this manual at all times.
WARNING: Rags or papers containing cooking oil can catch fire if exposed to
heat. Laundering will not remove the oil. Dis-pose of all oil-soiled papers and rags in a trash container that is in a ventilated area away from all cooking equipment or other heat sources such as direct sunlight.
Manual #14494 11/99 Rev: 3/06
For the sake of safety and clarity, the following words used in this manual are defined as follows:
DANGER: Indicates an imminently hazardous situation which, if not avoided, could result in serious injury or death.
WARNING: Indicates a potentially hazardous situation which, if not avoided, could result in serious injury or death.
CAUTION: Indicates a potentially hazardous situation which, if not avoided, could result in minor injury, property damage or both.


Manual #14494 11/99
TABLE OF CONTENTS
1 - INTRODUCTION............................................................................................................ 1 - 1DESCRIPTION............................................................................................................ 1 - 1FEATURES ................................................................................................................. 1 - 1
2 - OWNER’S RESPONSIBILITY....................................................................................... 2 - 1
3 - UNCRATING..................................................................................................................3 - 1LIST OF PARTS.......................................................................................................... 3 - 1
Base Mounted Unit.............................................................................................. 3 - 1Countertop Unit ................................................................................................... 3 - 1
INSTALLATION OF LOOSE PARTS ........................................................................... 3 - 1Side Glass........................................................................................................... 3 - 1Back Doors.......................................................................................................... 3 - 2Heat Guard.......................................................................................................... 3 - 2Pan Dividers (HDM-4 Shown) .............................................................................3 - 3
4 - ELECTRICAL REQUIREMENTS .................................................................................. 4 - 1ELECTRICAL REQUIREMENTS ................................................................................ 4 - 1ELECTRICAL CHARACTERISTICS ........................................................................... 4 - 1ELECTRICAL CONNECTIONS .................................................................................. 4 - 1
Model HDM-4 Wiring Diagram ............................................................................ 4 - 2Model HDM-6 Single Phase Wiring Diagram...................................................... 4 - 3Model HDM-6 Three Phase Wiring Diagram....................................................... 4 - 4
5 - GETTING TO KNOW YOUR DELI CASE ..................................................................... 5 - 1Upper Control Panel (HDM-4 Shown)......................................................................... 5 - 2Lower Control Panel (HDM-4 Shown)......................................................................... 5 - 2Zones ..........................................................................................................................5 - 2
6 - OPERATION..................................................................................................................6 - 1SETTING CONTROLS................................................................................................ 6 - 1CLEANING.................................................................................................................. 6 - 1
7 - MERCHANDISING HINTS............................................................................................. 7 - 1
8- WARRANTY ................................................................................................................... 8 - 1


1 - INTRODUCTION
The Perfect Hold Deli Case is widely used in supermarkets, convenience stores and deli’s for reliable food holding and display.
This manual has been produced to provide persons responsible for the operation and maintenance of the equipment with a simple but thorough understanding of its proper use. We urge that this manual be thor-oughly read and understood prior to placing the deli case in operation.
As with any unit of food service equipment, the deli case does require a minimum of care and maintenance. Suggestions for maintenance and cleaning are contained in this manual and should become a regular part of the operation of the unit.
Note: Before using, the deli case should be thoroughly cleaned in accordance with the instructions contained in this manual.
Manual #14494 11/99 1 - 1
Should repair or adjustment of the unit become necessary, we suggest that proce-dures described in this manual be followed. Or, if preferred, you may contact your local Broaster Company representative or service organization. You may also contact our home office located in Beloit, Wisconsin.
It is our sincere desire that you obtain the maximum benefit from your Perfect Hold Deli Case. If at any time you have ques-tions or require assistance, please do not hesitate to contact us.
DESCRIPTION
The Perfect Hold Deli Case allows for food products to be held at required tempera-tures while maintaining their freshness and quality. The deli case features “clear-view” glass around the complete perimeter of the serving area allowing for full view by the customer.
FEATURES
• Holds a variety of pan configurations.
• Stainless steel trim.
• Easily accessible control panel.
• Main power switch.
• Recessed controls (HDM-4 only).
• Holding timers.


2 - OWNER’S RESPONSIBILITY
It is the owner’s responsibility to:
• Insure the deli case is properly main-tained.
• Insure all warning signs are in their origi-nal location and are legible.
• Allow only properly trained personnel to operate, clean and maintain the warmer.
• Retain this manual for future reference.
• Insure main power supply is discon-nected before the unit is serviced.
• Insure that all warning signs are intact and legible and this manual is included with the unit, when you sell, trade, dis-pose of or give away your warmer.
Manual #14494 11/99 2 - 1
If you need replacement warning signs or manuals, contact an authorized Broaster Company representative or The Broaster Company at 608/365-0193.

3 - UNCRATING
It is advisable to place the Perfect Hold Deli Case as close as possible to its permanent location prior to uncrating.
Each Broaster Perfect Hold Deli Case is wood crated for protection during ship-ment. Remove the top part of the crate first. Next, remove the side crating panels. The glass side panels and rear doors are wrapped in cardboard and packed sepa-rately and must be installed.
After the top panel and side panels have been removed, it is necessary to remove the warmer from the skid which it was shipped on. Cut the strapping to free the unit from the skid.
LIST OF PARTS
Base Mounted Unit:HDM-4 HDM-6 DESCRIPTION
1 1 Base1 1 Perfect Hold™ deli case2 2 Side glasses2 3 Long pan dividers (with holes)6 8 Short pan dividers2 2 Back doors6 10 Display lamps1 1 Operator Manual1 1 Heat Guard1 1 Heat Guard Retainer
Countertop Unit:HDM-4 HDM-6 DESCRIPTION
1 1 Perfect Hold™ deli case2 2 Side glasses2 3 Long pan dividers (with holes)6 8 Short pan dividers2 2 Back doors6 10 Display lamps1 1 Operator Manual
Manual #14494 11/99 3 - 1
INSTALLATION OF LOOSE PARTS
All glass on this unit is certified tempered safety glass. The edges of this type of glass are the most vulnerable to fracture. The glass should be handled with extreme care when installing.
Note: Glass panels should never be placed with edges coming in contact with concrete or other hard surfaces. The glass may chip or break.
Clean all components and unit surfaces. See CLEANING.
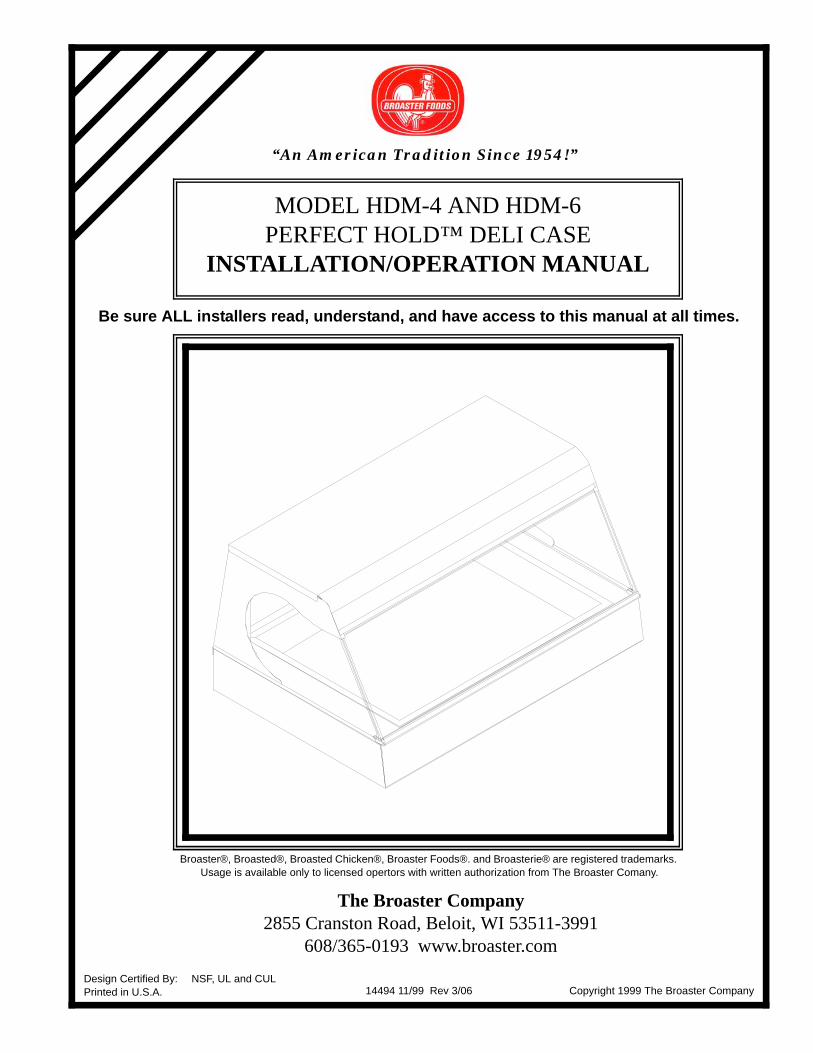
Side Glass:
1. Remove side cover (A) by pulling out-ward on tab (B) then slide cover toward the rear of the unit.
Continued:

WARNING: DO NOT push side glass too far toward the front of the unit.
Front door may open causing glass to break. Broken glass can cause serious injury.
2. Install side glass (C).
3. Reinstall side covers.
4. Repeat to install other side glass.
Back Doors:
1. Insert left hand door into the inner channel at the top of the door opening.
2. Swing door bottom onto inner rail so door rides on the rail. Slide this door to the left.
3. Install right hand door into the outer channel at the top of the door opening.
4. Swing door bottom onto outer rail so door rides on the rail. Slide this door to the right.
Manual #14494 11/99 3 - 2
Heat Guard:
DO NOT install heat guard until unit has been connected to electrical power supply and checked for proper operation.
1. Pull cutting board out and swing down.
2. Remove plastic coating from heat guard retainer.
3. Insert long side into gap between bot-tom of the deli case and top of base along the back side of the unit. Push in only far enough for it to stay in position.
4. Insert flange on heat guard into gap between the bottom of deli case and top of base along the front side of the unit.
5. Swing heat guard up against the bot-tom of deli case.
6. Push heat guard retainer in until heat guard is secured in place.
7. Swing cutting board up and push in to secure in place.

Pan Dividers (HDM-4 Shown):
Long dividers (5) and short dividers (6) can be used in the well (7) for many pan configu-rations. Below are two examples.
Manual #14494 11/99 3 - 3


4 - ELECTRICAL REQUIREMENTS
ELECTRICAL REQUIREMENTS
The Perfect Hold HDM-4 Deli Case is fac-tory wired for 120/208 or 120/240 volt single phase operation. The Perfect Hold HDM-6 Deli Case is factory wired for 120/208/240 volt single phase, 120/208 volt three phase or 120/240 volt three phase operation. The overhead display lamps operate on 120 volts. The heating elements operate on 208 or 240 volts respectively.
CAUTION: Prior to connecting to the power source, verify the voltage and
phase of the power source to which the unit will be connected. Make sure that the power source is identical to the power requirements identified on the data plate on the deli case.
Note: Connection of the deli case to the power source should only be done by a qualified, licensed electrician.
Refer to the wiring diagram contained in these directions when connecting to the power source. The deli case must be ade-quately and safely grounded. Refer to local electrical codes and national electrical code for correct grounding procedures.
ELECTRICAL CHARACTERISTICS
Be sure to check the wiring diagram. It shows electrical circuits and connections.
• When installing or servicing the unit, always check the dataplate to make cer-tain proper parts are used and the cor-rect service rendered. DO NOT apply a voltage to the unit other than that shown on the dataplate. If in doubt, consult your local power company.
Manual #14494 11/99 4 - 1
• The Model HDM-4 is available for 120/208, 17 amp or 120/240 volt, 16 amp electrical connection.
• The Model HDM-6 is available for 120/208/240 volt, 26 amp single phase, 120/208 volt, 19 amp three phase or 120/240 volt, 16 amp three phase operation.
ELECTRICAL CONNECTIONS
• Turn unit OFF and disconnect main power supply.
• A remote circuit breaker or fuse should be installed in the main power supply located in a path of exit and clearly iden-tified.
• When installed, the unit must be electri-cally grounded in accordance with local codes, or in the absence of local codes, with the National Electrical Code, ANSI/NFPA 70, or for Canada, the Canadian Electrical Code, CSA C22.2, as applica-ble.
• Use copper wire only for connections.
• If power run is over 50 feet, use next larger size wire.
• If no component operates, check main power supply. Be sure main circuit breaker is ON and main fuses are good.

Model HDM-4 Wiring Diagram:
Manual #14494 11/99 4 - 2
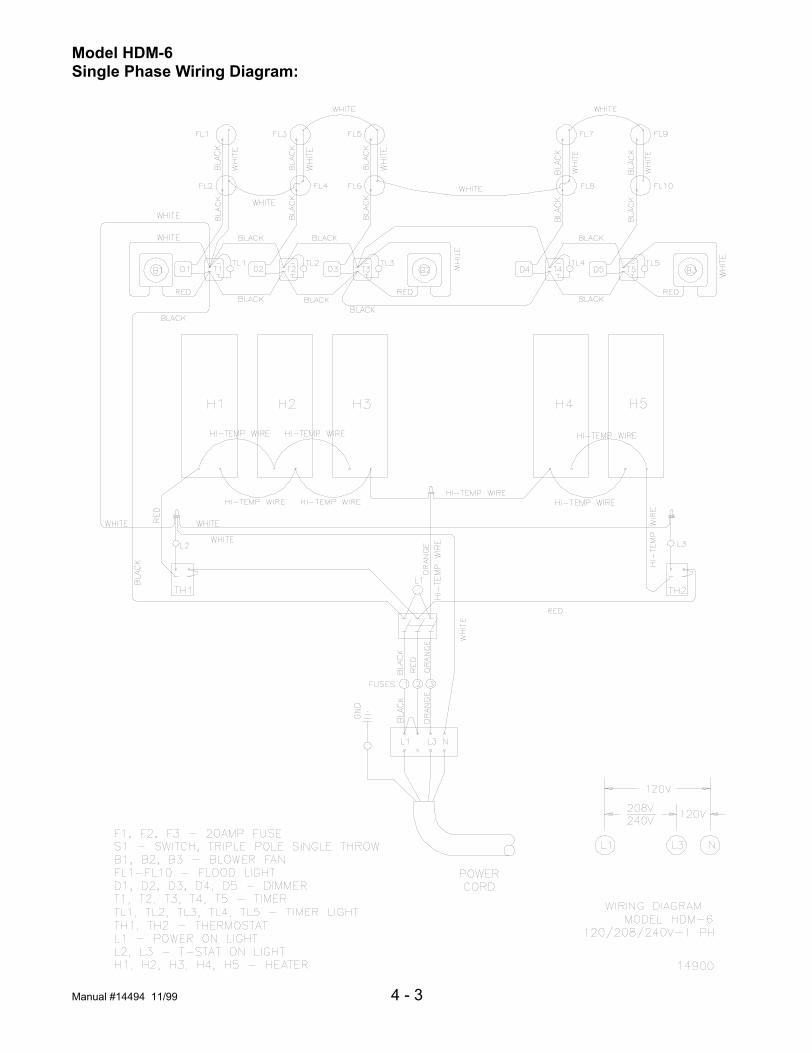
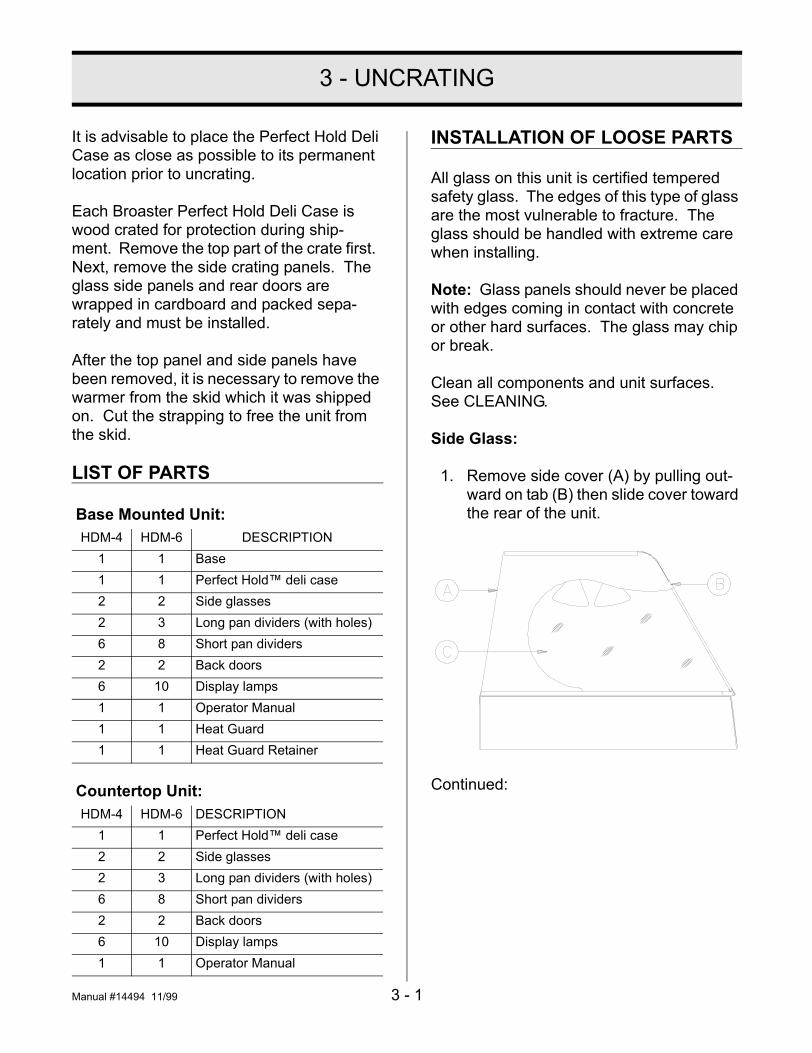
Model HDM-6Single Phase Wiring Diagram:
Manual #14494 11/99 4 - 3
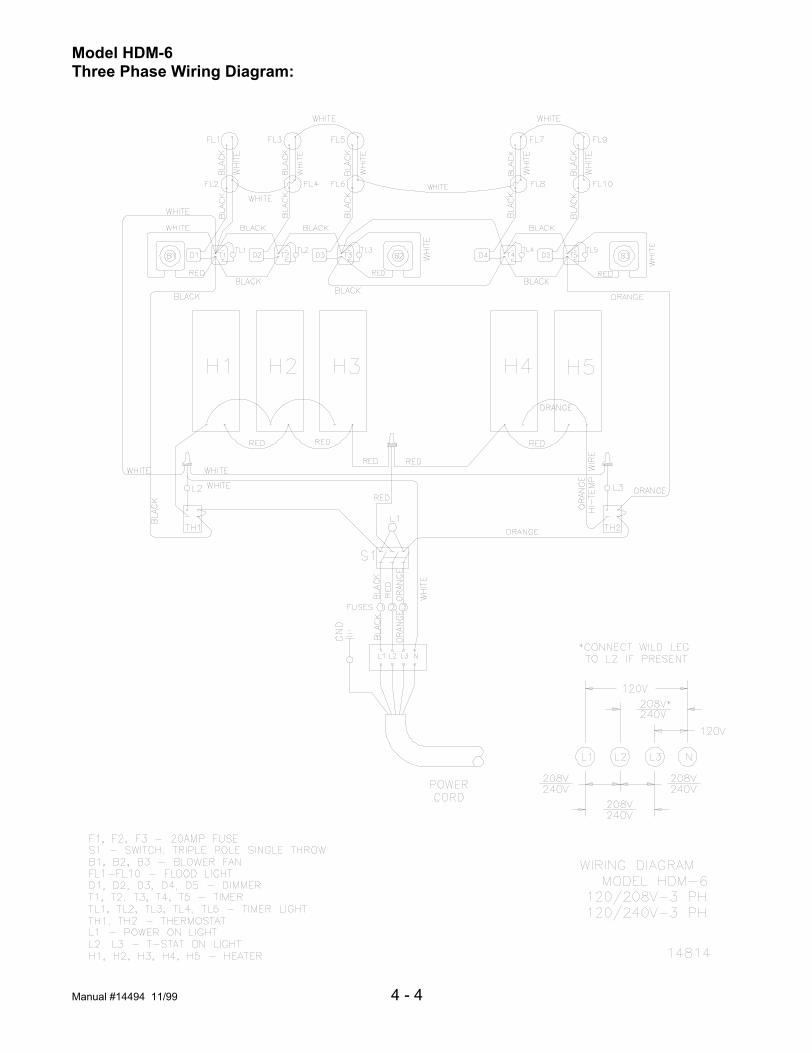
Model HDM-6Three Phase Wiring Diagram:
Manual #14494 11/99 4 - 4

5 - GETTING TO KNOW YOUR DELI CASE
1. Side Cover: Retains side glass. Remove for cleaning.
2. Front Window: Rotate out and down for easy cleaning.
3. Well: Supports pan rails and food pans. Catches drop off from food pans.
4. Display Lamp: Illuminates food in food pans.
5. Side Glass: Removable for cleaning.
Manual #14494 11/99 5 - 1
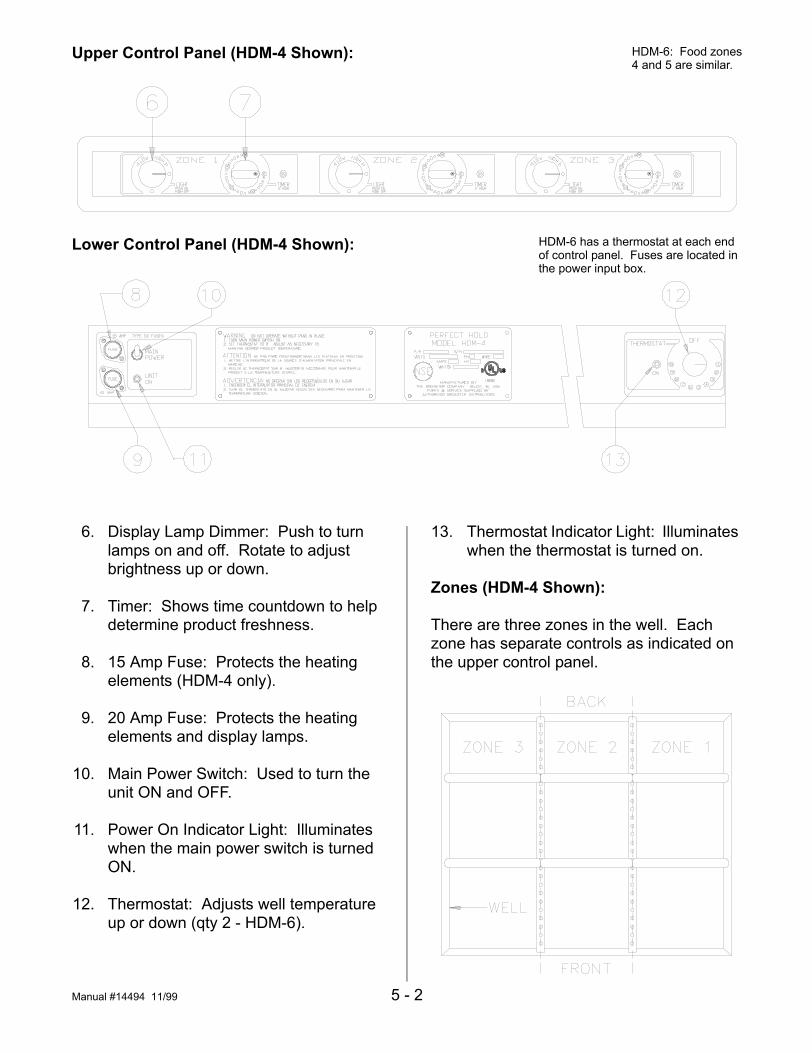
Upper Control Panel (HDM-4 Shown):
Lower Control Panel (HDM-4 Shown):
HDM-6: Food zones4 and 5 are similar.
HDM-6 has a thermostat at each endof control panel. Fuses are located inthe power input box.
6. Display Lamp Dimmer: Push to turn lamps on and off. Rotate to adjust brightness up or down.
7. Timer: Shows time countdown to help determine product freshness.
8. 15 Amp Fuse: Protects the heating elements (HDM-4 only).
9. 20 Amp Fuse: Protects the heating elements and display lamps.
10. Main Power Switch: Used to turn the unit ON and OFF.
11. Power On Indicator Light: Illuminates when the main power switch is turned ON.
12. Thermostat: Adjusts well temperature up or down (qty 2 - HDM-6).
Manual #14494 11/99 5 - 2
13. Thermostat Indicator Light: Illuminates when the thermostat is turned on.
Zones (HDM-4 Shown):
There are three zones in the well. Each zone has separate controls as indicated on the upper control panel.

Zones (cont’d)
As with most equipment of this type there are areas that keep food hotter than other areas.
The figure on page 5-2 shows the holding area divided into Zones 1, 2 & 3. The fol-lowing diagram shows the zones divided into smaller areas designated from “A” to “D” with “A” being the hottest area.
The above picture represents the heat level areas in the HDM-4. Zones 4 and 5 would be similar for the HDM-6. The hottest area would be in the middle of each zone and cooler near the front and back.
Knowing where these areas are allows you to place foods that are hard to keep warm in areas that are hotter and those foods that are easy to keep warm in areas that are not as hot.
Manual #14494 11/99 5 - 3


6 - OPERATION
SETTING CONTROLS
WARNING: The bottom of this equip-ment is hot. Touching it could result in
a burn injury and allowing a flammable material to touch it could result in a fire.
1. Turn main power ON.
2. Place empty pans in all open slots. Set thermostat(s) to 8 then let unit warm up for 20 minutes.
3. Turn dimmer switches to desired set-ting for illumination.
4. Place food in food pans, to a 4 inch maximum depth, then into the warmer.
5. Monitor internal food temperature with a non-mercury thermometer. An inter-nal food temperature of 150 degrees or above is recommended. (see local health codes). Adjust thermostat as necessary.
Note: For your convenience, once you have set the dimmers and thermostat(s), use the main power switch to turn the unit on and off.
6 - 1Manual #14494 11/
CLEANING
WARNING: Wait for unit to cool before cleaning. Hot surfaces could
cause serious burns. DO NOT attempt to clean hot glass. Glass may break causing serious cuts.
Clean once daily using a mild household non-abrasive detergent.
1. Remove side glass. See Side Glass under INSTALLING REMOVABLE PARTS. DO NOT use abrasive clean-ers.
2. Pull outward on tab (A) then rotate front window (B) out and down for cleaning.
3. Wipe unit interior and exterior.
WARNING: Rags or papers contain-ing cooking oil can catch fire if
exposed to heat. Laundering will not remove the oil. Dispose of all oil-soiled papers and rags in a trash container that is in a ventilated area away from all cooking equipment or other heat sources such as direct sunlight.
99 Rev 3/06


7 - MERCHANDISING HINTS
It’s true what they say, “appearance is everything”. And the appearance and mer-chandising of your hot food is no exception.
Great presentation of cooked products can create impulse sales and draw customers away from competing products. In the same respect, a poor presentation can turn con-sumers away and hurt everyone.
Following are some tips to ensure that your hot food is always looking and tasting its best!
• Be aware of how food is placed in the warmer. Always display with the best side of the product face up.
• Adjust the lighting to best complement the food. This can vary depending on the lighting in the room.
• Check the internal meat temperature periodically to ensure that it does not drop below a minimum of 150 degrees.
Manual #14494 11/99 7 - 1
• Keep the warmer clean. Dirty pans and glass are an instant turn-off.
• Always try to keep the warmer at least 2/3 full.
Tip: If this is difficult, put some empty carry-out boxes in the warmer to take up space.
• Remember FIFO (first-in-first-out). Always serve the product that has been in the warmer the longest first.
• For optimal quality, do not hold product for more than 60 minutes. If you still have product in the warmer past the rec-ommended holding time, use in leftover recipes. DO NOT sell old product at a discount or give away - even to employ-ees. The taste of that lesser product will remain with those who tasted it regard-less of the price paid for it. That dis-counted product could cost hundreds of dollars in lost sales.


Manual #14494 11/99 8 - 1
8 - LIMITED WARRANTY
Subject to the terms and conditions of this warranty, The Broaster Company (Company) war-rants that all equipment and parts manufactured or sold by the Company and purchased new from an authorized Company distributor are free from defects in material and workmanship for a period of one year from the date of installation, if installation is made by a qualified installer under supervision by an authorized distributor in accordance with applicable laws and regula-tions. Warranty coverage is extended to the original purchaser only and is void if the equipment is resold. If an authorized Company distributor is notified of a warranty claim during the war-ranty period, the Company will at its option replace, recondition or repair at its factory any part or parts of the equipment which the Company judges defective, provided the equipment has been subjected to normal usage, properly installed, operated and serviced in accordance with Company operating instructions, and there is no evidence of accident, alteration or abuse of the equipment or the use of unauthorized repair methods. All parts replaced under this warranty carry only the unexpired term of the warranty.
Service under this warranty shall be furnished only by an authorized Company distributor. The Company does not send service representatives to furnish warranty service. Your authorized Company distributor should be contacted for warranty service.
This warranty covers parts only and does not cover labor charges, transportation charges or other expenses in connection with warranty service, which are the obligation of the owner unless otherwise specified in the original sales contract between the purchaser and the autho-rized Company distributor from which the equipment is purchased. Please refer to that contract for coverage as to those charges.
This warranty does not apply to consumable items and supplies such as bulbs, gaskets and lamps.
The foregoing warranty is made in lieu of all other warranties, express or implied, and the Company specifically disclaims any implied warranties of merchantability or fitness for a particular purpose. The Company’s full obligation under this warranty, and the pur-chaser’s sole remedy shall be limited to replacement, reconditioning or repair as specified above.
IN NO EVENT SHALL THE COMPANY BE LIABLE TO THE ORIGINAL OWNER OR ANY OTHER PERSON FOR ANY INCIDENTAL, CONSEQUENTIAL OR SPECIAL DAMAGES RESULTING FROM THE USE OR INABILITY TO USE THE EQUIPMENT COVERED HEREBY, WHETHER ARISING FROM BREACH OF WARRANTY, STRICT LIABILITY OR OTHERWISE.
The Company reserves the right to change or improve its products in any way without obligation to alter products previously manufactured.
Used Company equipment or Company equipment not purchased from an authorized distribu-tor carries no warranty express or implied.


Related Documents