Media Upgrade Kit Installation Instructions 10 April 2009 Part Number: 530-020330-01 Revision 2 This document explains how to install the media upgrade kit for a Juniper Networks routing platform. Contents Media Upgrade Kit Description ........................................................................2 Routing Engine Description .............................................................................2 Boot Devices .............................................................................................2 Boot Sequence ..........................................................................................2 Installing or Upgrading the Internal Compact Flash Disk in a Routing Engine ......................................................................................................3 Tools and Parts Required ..........................................................................3 Manually Switching from Master to Backup Routing Engine .....................3 Removing a Routing Engine ......................................................................5 Removing or Inserting the Compact Flash Disk Secured by a Clasp ..........6 Removing the Internal Compact Flash Disk ........................................6 Inserting the Internal Compact Flash Disk ..........................................7 Removing or Inserting the Compact Flash Disk Secured by a Screw .........8 Removing the Internal Compact Flash Disk ........................................9 Inserting the Internal Compact Flash Disk ........................................10 Installing the Routing Engine ..................................................................11 Configuring the Internal Compact Flash Disk ..........................................12 JUNOS Documentation and Release Notes ....................................................13 Requesting Technical Support .......................................................................14 Self-Help Online Tools and Resources .....................................................15 Opening a Case with JTAC ......................................................................15 Revision History ............................................................................................15 ■ 1

Welcome message from author
This document is posted to help you gain knowledge. Please leave a comment to let me know what you think about it! Share it to your friends and learn new things together.
Transcript
Media Upgrade Kit InstallationInstructions
10 April 2009Part Number: 530-020330-01Revision 2
This document explains how to install the media upgrade kit for a Juniper Networksrouting platform.
Contents Media Upgrade Kit Description ........................................................................2Routing Engine Description .............................................................................2
Boot Devices .............................................................................................2Boot Sequence ..........................................................................................2
Installing or Upgrading the Internal Compact Flash Disk in a RoutingEngine ......................................................................................................3Tools and Parts Required ..........................................................................3Manually Switching from Master to Backup Routing Engine .....................3Removing a Routing Engine ......................................................................5Removing or Inserting the Compact Flash Disk Secured by a Clasp ..........6
Removing the Internal Compact Flash Disk ........................................6Inserting the Internal Compact Flash Disk ..........................................7
Removing or Inserting the Compact Flash Disk Secured by a Screw .........8Removing the Internal Compact Flash Disk ........................................9Inserting the Internal Compact Flash Disk ........................................10
Installing the Routing Engine ..................................................................11Configuring the Internal Compact Flash Disk ..........................................12
JUNOS Documentation and Release Notes ....................................................13Requesting Technical Support .......................................................................14
Self-Help Online Tools and Resources .....................................................15Opening a Case with JTAC ......................................................................15
Revision History ............................................................................................15
■ 1
Media Upgrade Kit Description
This media upgrade kit can be used to install or upgrade the internal compact flashdisk in a Routing Engine.
The media upgrade kit includes a compact flash disk and needlenose pliers withgrooved jaws.
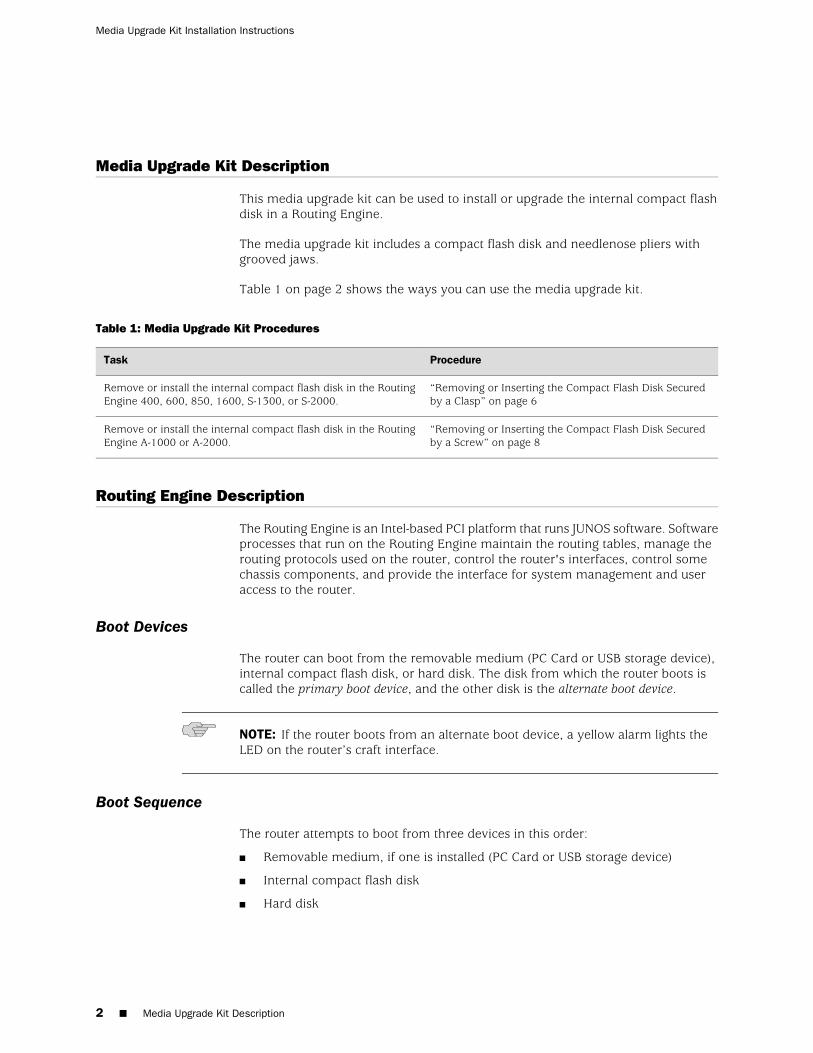
Table 1 on page 2 shows the ways you can use the media upgrade kit.
Table 1: Media Upgrade Kit Procedures
ProcedureTask
“Removing or Inserting the Compact Flash Disk Securedby a Clasp” on page 6
Remove or install the internal compact flash disk in the RoutingEngine 400, 600, 850, 1600, S-1300, or S-2000.
“Removing or Inserting the Compact Flash Disk Securedby a Screw” on page 8
Remove or install the internal compact flash disk in the RoutingEngine A-1000 or A-2000.
Routing Engine Description
The Routing Engine is an Intel-based PCI platform that runs JUNOS software. Softwareprocesses that run on the Routing Engine maintain the routing tables, manage therouting protocols used on the router, control the router's interfaces, control somechassis components, and provide the interface for system management and useraccess to the router.
Boot Devices
The router can boot from the removable medium (PC Card or USB storage device),internal compact flash disk, or hard disk. The disk from which the router boots iscalled the primary boot device, and the other disk is the alternate boot device.
NOTE: If the router boots from an alternate boot device, a yellow alarm lights theLED on the router’s craft interface.
Boot Sequence
The router attempts to boot from three devices in this order:
■ Removable medium, if one is installed (PC Card or USB storage device)
■ Internal compact flash disk
■ Hard disk
2 ■ Media Upgrade Kit Description
Media Upgrade Kit Installation Instructions
NOTE: To reinstall the JUNOS software, you boot the router from the removablemedia. Do not insert the removable media during normal operations. The routerdoes not operate normally when it is booted from the removable media.
When the router boots from the storage media (removable media, internal compactflash disk, or hard disk) it expands its search in the /config directory of the routingplatform for the following files in the following order: juniper.conf (the mainconfiguration file), rescue.conf (the rescue configuration file), and juniper.conf.1 (thefirst rollback configuration file). When the search finds the first configuration file thatcan be loaded properly, the file loads and the search ends. If none of the files canbe loaded properly, the routing platform does not function properly. If the routerboots from an alternate boot device, the JUNOS software displays a message indicatingthis when you log in to the router.
Installing or Upgrading the Internal Compact Flash Disk in a Routing Engine
To install or upgrade the internal compact flash disk in a Routing Engine, performthe procedures in the following sections:
■ Tools and Parts Required on page 3
■ Manually Switching from Master to Backup Routing Engine on page 3
■ Removing a Routing Engine on page 5
■ Removing or Inserting the Compact Flash Disk Secured by a Clasp on page 6
■ Removing or Inserting the Compact Flash Disk Secured by a Screw on page 8
■ Installing the Routing Engine on page 11
■ Configuring the Internal Compact Flash Disk on page 12
Tools and Parts Required
To replace hardware components, you need the following tools and parts:
■ Electrostatic bag or antistatic mat
■ Electrostatic discharge (ESD) grounding wrist strap
■ Phillips (+) screwdrivers, numbers 1 and 2
■ Flat-blade (–) screwdrivers, 3/16-in. and 1/4-in.
■ Needlenose pliers with grooved jaws (included in the media upgrade kit)
Manually Switching from Master to Backup Routing Engine
On routers with two Routing Engines, one Routing Engine is the master and one isthe backup. By default, the Routing Engine in slot 0 is the master and the one in slot1 is the backup. If you are upgrading the master Routing Engine, you can switchmastership so that routing can continue during the upgrade.
Installing or Upgrading the Internal Compact Flash Disk in a Routing Engine ■ 3
Installing or Upgrading the Internal Compact Flash Disk in a Routing Engine
To switch Routing Engine mastership:
1. Enter CLI operational mode, and issue the following command to copy thecurrently running and active file system partitions on the router to standbypartitions on the internal compact flash disk.
user@host> request system snapshot
Wait until a message appears on the console confirming that the procedure iscomplete.
For more information about the command, see the JUNOS System Basics andServices Command Reference.
2. To determine which Routing Engine is the master, issue the following CLIcommand. The master Routing Engine is marked as Master in the Current statefield:
user@host> show chassis routing-engine
3. If the Routing Engine you are removing is the master, issue the following CLIcommand to switch mastership to the standby host module:
user@host> request chassis routing-engine master switch
If the Routing Engines are running JUNOS Release 6.0 or later and are configuredfor graceful switchover, the standby Routing Engine immediately assumes RoutingEngine functions and there is no interruption to packet forwarding. Otherwise,packet forwarding halts while the standby Routing Engine becomes the masterand the Packet Forwarding Engine components reset and connect to the newmaster Routing Engine. For information about configuring graceful switchover,see the section about Routing Engine redundancy in the JUNOS System BasicsConfiguration Guide.
NOTE: Router performance might change if the standby Routing Engine'sconfiguration differs from the former master's configuration. For the most predictableperformance, configure the two Routing Engines identically, except for parametersunique to a Routing Engine, such as the hostname defined at the [edit system]hierarchy level and the management interface (fxp0 or equivalent) defined at the[edit interfaces] hierarchy level.
To configure Routing Engine-specific parameters and still use the same configurationon both Routing Engines, include the appropriate configuration statements underthe re0 and re1 statements at the [edit groups] hierarchy level and use the apply-groupsstatement. For instructions, see the JUNOS System Basics Configuration Guide.
4 ■ Installing or Upgrading the Internal Compact Flash Disk in a Routing Engine
Media Upgrade Kit Installation Instructions
Removing a Routing Engine
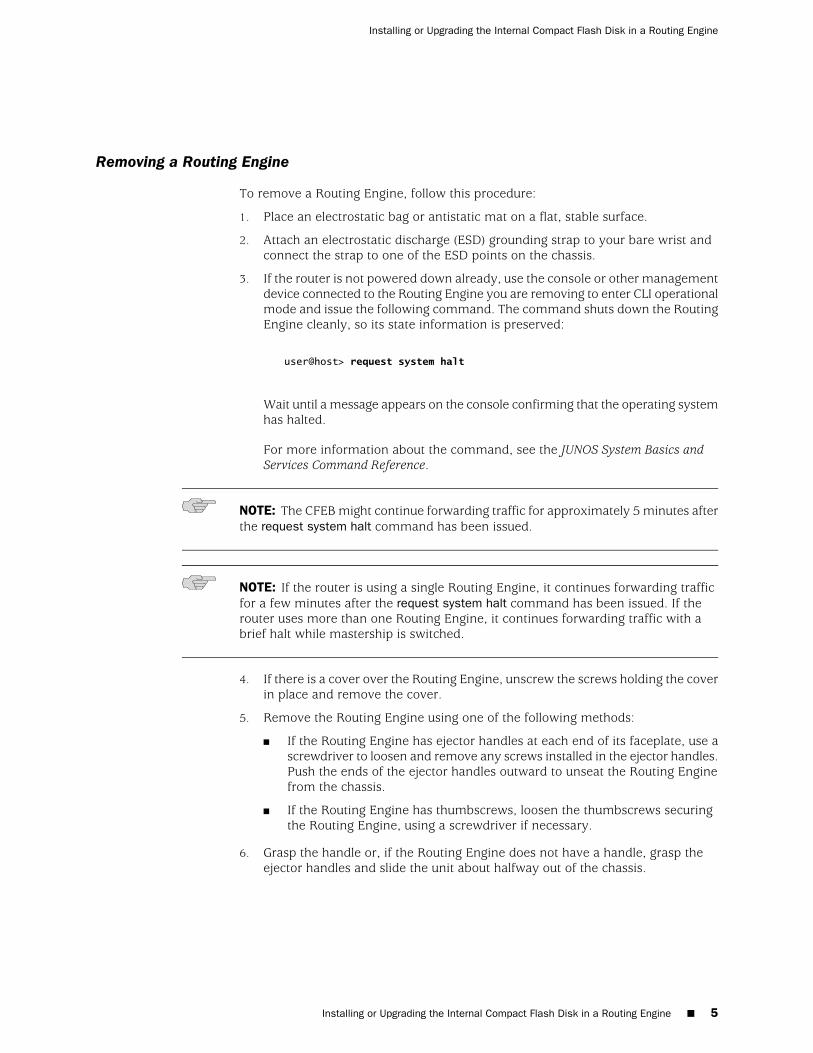
To remove a Routing Engine, follow this procedure:
1. Place an electrostatic bag or antistatic mat on a flat, stable surface.
2. Attach an electrostatic discharge (ESD) grounding strap to your bare wrist andconnect the strap to one of the ESD points on the chassis.
3. If the router is not powered down already, use the console or other managementdevice connected to the Routing Engine you are removing to enter CLI operationalmode and issue the following command. The command shuts down the RoutingEngine cleanly, so its state information is preserved:
user@host> request system halt
Wait until a message appears on the console confirming that the operating systemhas halted.
For more information about the command, see the JUNOS System Basics andServices Command Reference.
NOTE: The CFEB might continue forwarding traffic for approximately 5 minutes afterthe request system halt command has been issued.
NOTE: If the router is using a single Routing Engine, it continues forwarding trafficfor a few minutes after the request system halt command has been issued. If therouter uses more than one Routing Engine, it continues forwarding traffic with abrief halt while mastership is switched.
4. If there is a cover over the Routing Engine, unscrew the screws holding the coverin place and remove the cover.
5. Remove the Routing Engine using one of the following methods:
■ If the Routing Engine has ejector handles at each end of its faceplate, use ascrewdriver to loosen and remove any screws installed in the ejector handles.Push the ends of the ejector handles outward to unseat the Routing Enginefrom the chassis.
■ If the Routing Engine has thumbscrews, loosen the thumbscrews securingthe Routing Engine, using a screwdriver if necessary.
6. Grasp the handle or, if the Routing Engine does not have a handle, grasp theejector handles and slide the unit about halfway out of the chassis.
Installing or Upgrading the Internal Compact Flash Disk in a Routing Engine ■ 5
Installing or Upgrading the Internal Compact Flash Disk in a Routing Engine

CAUTION: Be careful to slide the Routing Engine straight out of the chassis. Damagecan result if it gets lodged because of uneven movement.
7. Place one hand under the Routing Engine to support it, slide it completely outof the chassis, and place it on the antistatic mat or in the electrostatic bag.
Removing or Inserting the Compact Flash Disk Secured by a Clasp
The internal compact flash disk is located in a slot on the Routing Engine board andis secured by a plastic or wire clasp on the following Routing Engines:
■ RE-400
■ RE-600 (located beneath the hard drive)
■ RE-850
■ RE-1600 (located beneath the hard drive)
■ RE-S-1300
■ RE-S-2000
For more information on removing or inserting the compact flash disk for theseRouting Engines, see the following procedures:
■ Removing the Internal Compact Flash Disk on page 6
■ Inserting the Internal Compact Flash Disk on page 7
Removing the Internal Compact Flash Disk
To remove the internal compact flash disk, follow this procedure (see Figure 1 onpage 7 or Figure 2 on page 7):
NOTE: Depending on your configuration, the router might not have an internalcompact flash disk. If there is no internal compact flash disk installed, you can proceeddirectly to the next section, “Inserting the Internal Compact Flash Disk” on page 7.
1. Place an electrostatic bag or antistatic mat on a flat, stable surface.
2. Attach an electrostatic discharge (ESD) grounding strap to your bare wrist andconnect the strap to one of the ESD points on the chassis.
3. Remove the Routing Engine as described in “Removing a Routing Engine” onpage 5.
6 ■ Installing or Upgrading the Internal Compact Flash Disk in a Routing Engine
Media Upgrade Kit Installation Instructions
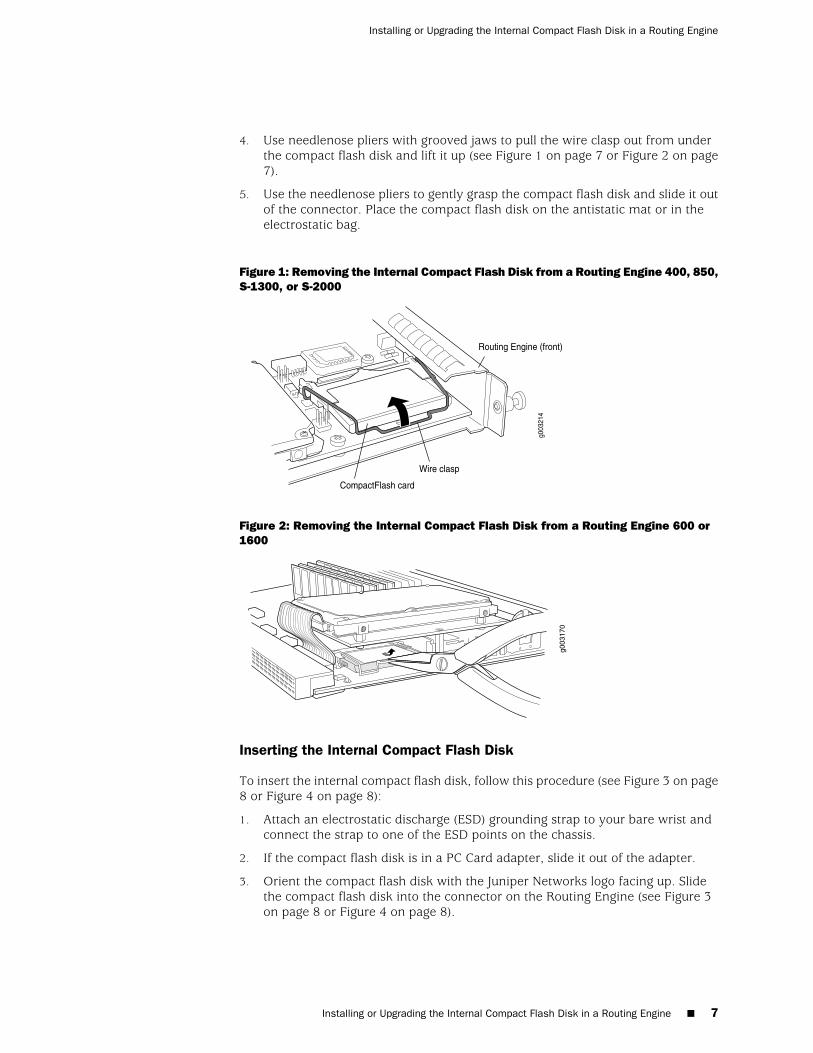
4. Use needlenose pliers with grooved jaws to pull the wire clasp out from underthe compact flash disk and lift it up (see Figure 1 on page 7 or Figure 2 on page7).
5. Use the needlenose pliers to gently grasp the compact flash disk and slide it outof the connector. Place the compact flash disk on the antistatic mat or in theelectrostatic bag.
Figure 1: Removing the Internal Compact Flash Disk from a Routing Engine 400, 850,S-1300, or S-2000
Routing Engine (front)
Wire clasp
CompactFlash card
g003
214
Figure 2: Removing the Internal Compact Flash Disk from a Routing Engine 600 or1600
Inserting the Internal Compact Flash Disk
To insert the internal compact flash disk, follow this procedure (see Figure 3 on page8 or Figure 4 on page 8):
1. Attach an electrostatic discharge (ESD) grounding strap to your bare wrist andconnect the strap to one of the ESD points on the chassis.
2. If the compact flash disk is in a PC Card adapter, slide it out of the adapter.
3. Orient the compact flash disk with the Juniper Networks logo facing up. Slidethe compact flash disk into the connector on the Routing Engine (see Figure 3on page 8 or Figure 4 on page 8).
Installing or Upgrading the Internal Compact Flash Disk in a Routing Engine ■ 7
Installing or Upgrading the Internal Compact Flash Disk in a Routing Engine
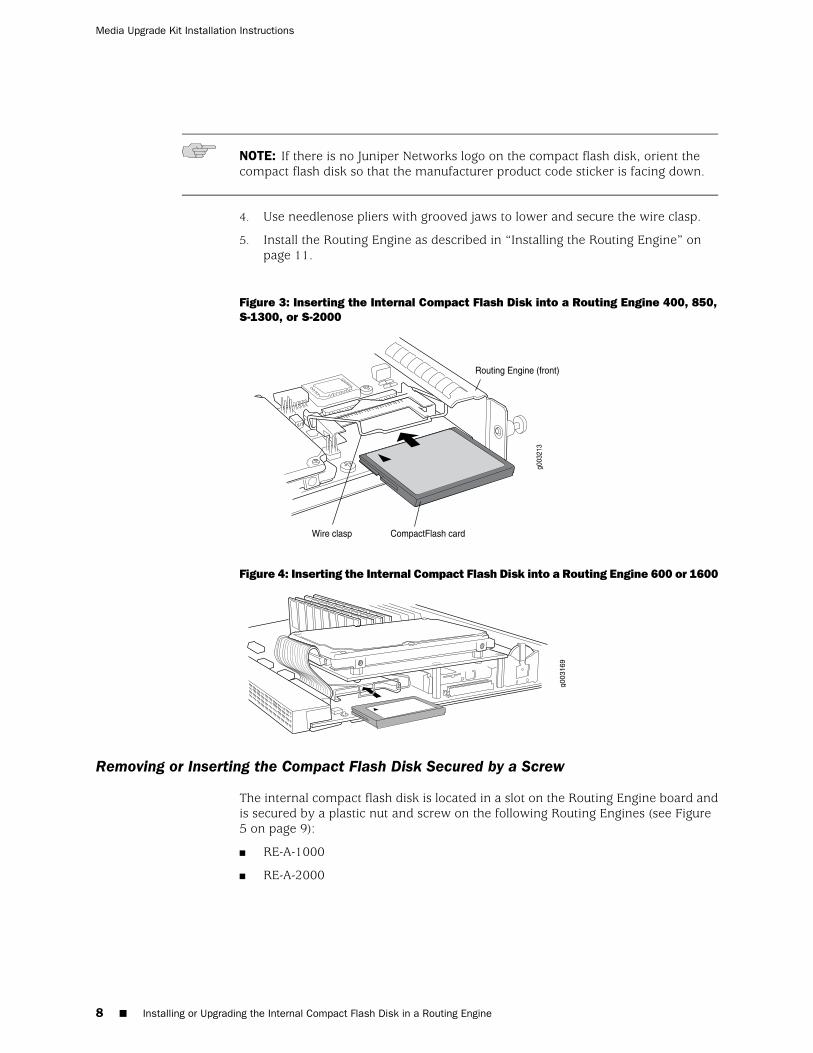
NOTE: If there is no Juniper Networks logo on the compact flash disk, orient thecompact flash disk so that the manufacturer product code sticker is facing down.
4. Use needlenose pliers with grooved jaws to lower and secure the wire clasp.
5. Install the Routing Engine as described in “Installing the Routing Engine” onpage 11.
Figure 3: Inserting the Internal Compact Flash Disk into a Routing Engine 400, 850,S-1300, or S-2000
g003
213
Wire clasp CompactFlash card
Routing Engine (front)
Figure 4: Inserting the Internal Compact Flash Disk into a Routing Engine 600 or 1600
Removing or Inserting the Compact Flash Disk Secured by a Screw
The internal compact flash disk is located in a slot on the Routing Engine board andis secured by a plastic nut and screw on the following Routing Engines (see Figure5 on page 9):
■ RE-A-1000
■ RE-A-2000
8 ■ Installing or Upgrading the Internal Compact Flash Disk in a Routing Engine
Media Upgrade Kit Installation Instructions

Figure 5: Routing Engine A-1000 and A-2000 Compact Flash Components
For more information on how to remove or insert the compact flash disk for theseRouting Engines, see the following procedures:
■ Removing the Internal Compact Flash Disk on page 9
■ Inserting the Internal Compact Flash Disk on page 10
Removing the Internal Compact Flash Disk
To remove the internal compact flash disk, follow this procedure:
1. Place an electrostatic bag or antistatic mat on a flat, stable surface.
2. Attach an electrostatic discharge (ESD) grounding strap to your bare wrist andconnect the strap to one of the ESD points on the chassis.
3. Remove the Routing Engine as described in “Removing a Routing Engine” onpage 5.
4. Use needlenose pliers with grooved jaws to hold the plastic nut in place.
5. With your other hand, use a 3/16–in flat-blade screwdriver to remove the plasticscrew (see Figure 6 on page 10).
Installing or Upgrading the Internal Compact Flash Disk in a Routing Engine ■ 9
Installing or Upgrading the Internal Compact Flash Disk in a Routing Engine
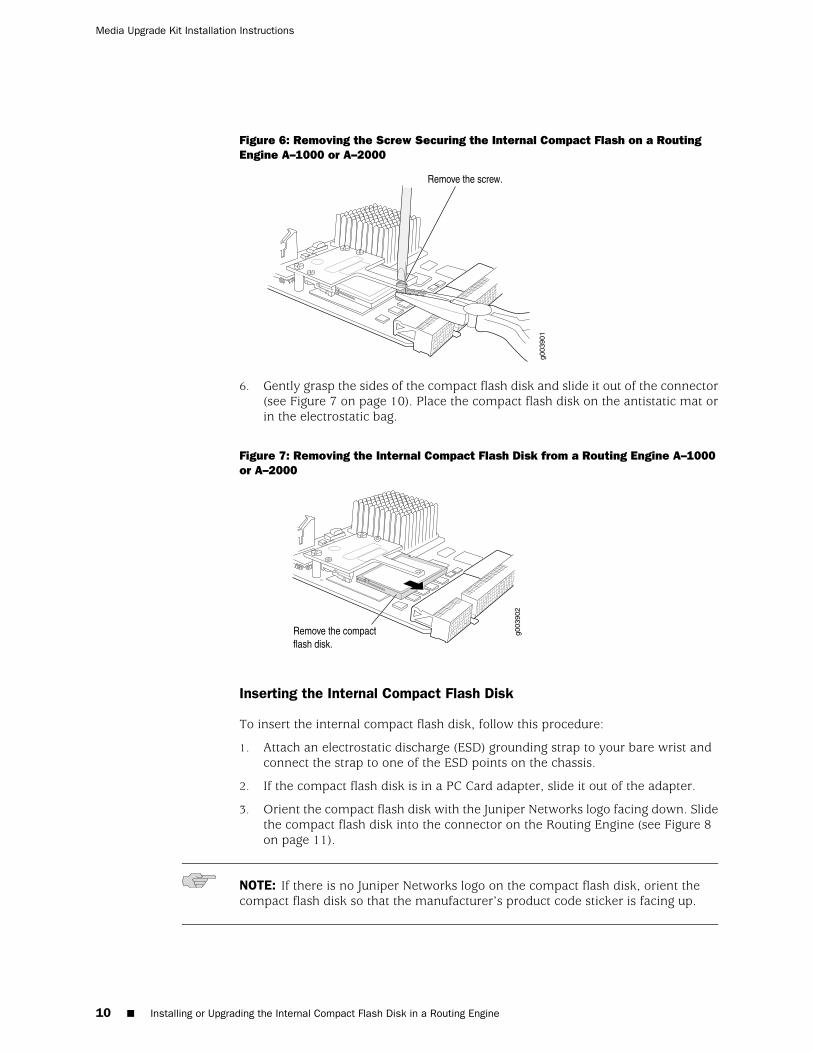
Figure 6: Removing the Screw Securing the Internal Compact Flash on a RoutingEngine A–1000 or A–2000
6. Gently grasp the sides of the compact flash disk and slide it out of the connector(see Figure 7 on page 10). Place the compact flash disk on the antistatic mat orin the electrostatic bag.
Figure 7: Removing the Internal Compact Flash Disk from a Routing Engine A–1000or A–2000
Inserting the Internal Compact Flash Disk
To insert the internal compact flash disk, follow this procedure:
1. Attach an electrostatic discharge (ESD) grounding strap to your bare wrist andconnect the strap to one of the ESD points on the chassis.
2. If the compact flash disk is in a PC Card adapter, slide it out of the adapter.
3. Orient the compact flash disk with the Juniper Networks logo facing down. Slidethe compact flash disk into the connector on the Routing Engine (see Figure 8on page 11).
NOTE: If there is no Juniper Networks logo on the compact flash disk, orient thecompact flash disk so that the manufacturer’s product code sticker is facing up.
10 ■ Installing or Upgrading the Internal Compact Flash Disk in a Routing Engine
Media Upgrade Kit Installation Instructions
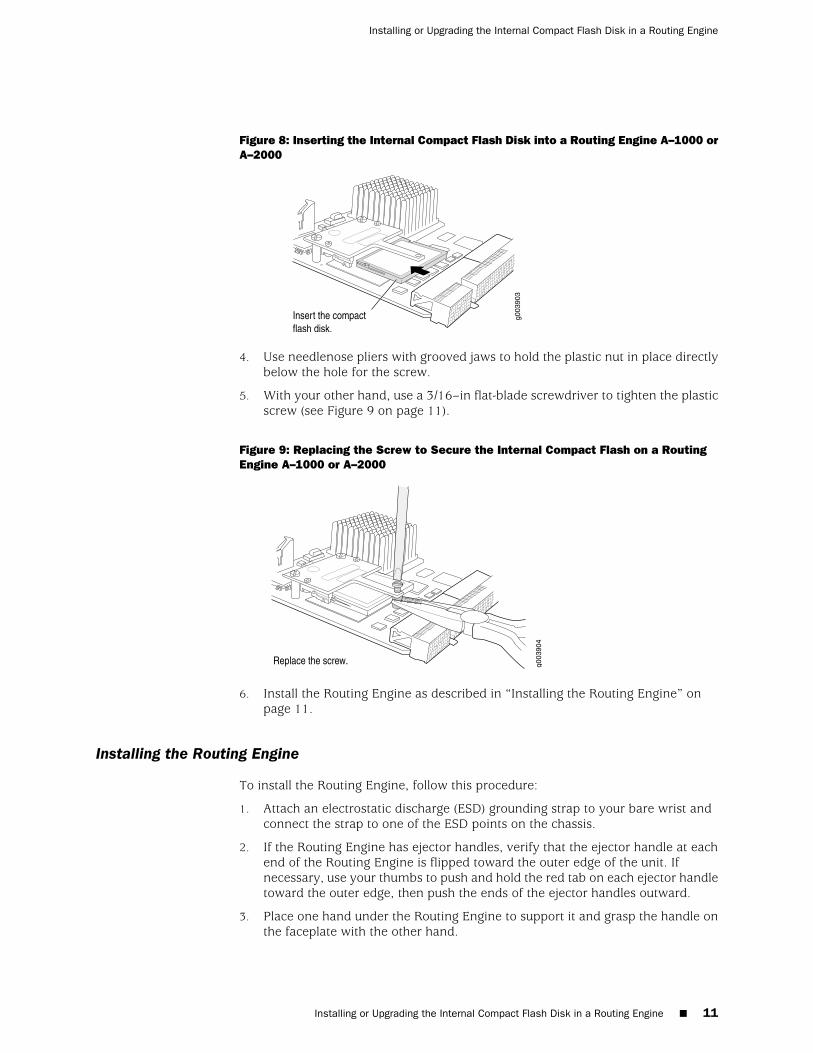
Figure 8: Inserting the Internal Compact Flash Disk into a Routing Engine A–1000 orA–2000
4. Use needlenose pliers with grooved jaws to hold the plastic nut in place directlybelow the hole for the screw.
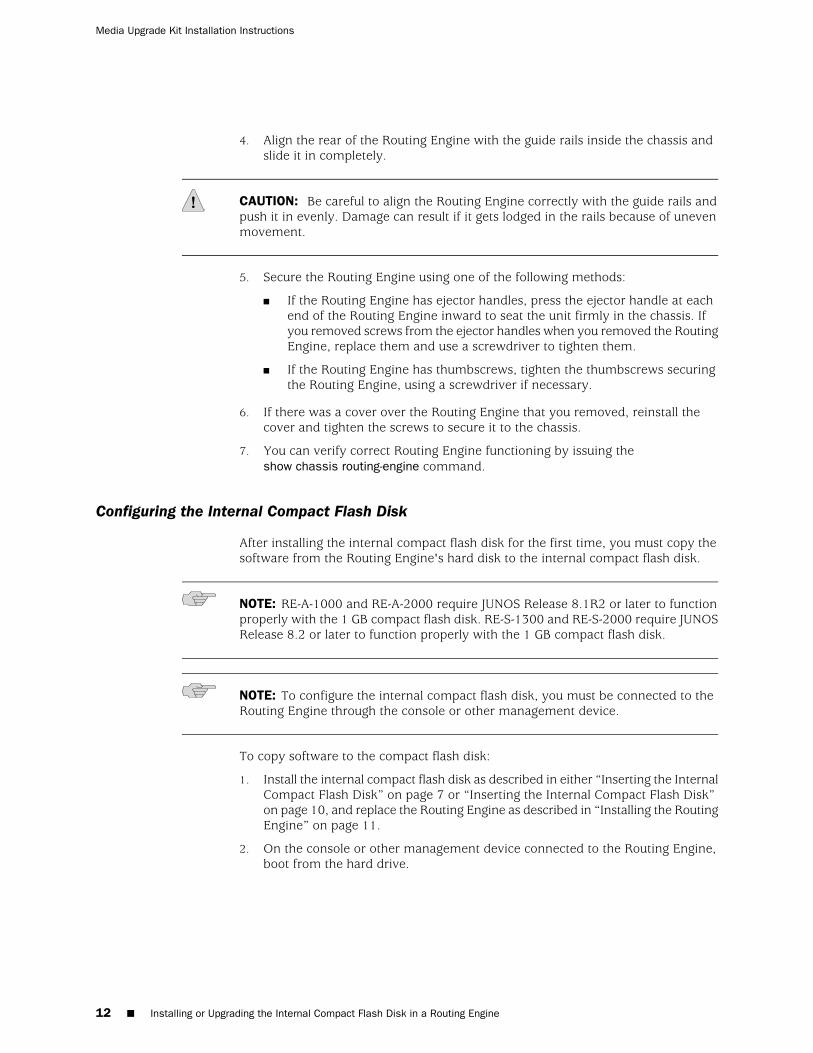
5. With your other hand, use a 3/16–in flat-blade screwdriver to tighten the plasticscrew (see Figure 9 on page 11).
Figure 9: Replacing the Screw to Secure the Internal Compact Flash on a RoutingEngine A–1000 or A–2000
6. Install the Routing Engine as described in “Installing the Routing Engine” onpage 11.
Installing the Routing Engine
To install the Routing Engine, follow this procedure:
1. Attach an electrostatic discharge (ESD) grounding strap to your bare wrist andconnect the strap to one of the ESD points on the chassis.
2. If the Routing Engine has ejector handles, verify that the ejector handle at eachend of the Routing Engine is flipped toward the outer edge of the unit. Ifnecessary, use your thumbs to push and hold the red tab on each ejector handletoward the outer edge, then push the ends of the ejector handles outward.
3. Place one hand under the Routing Engine to support it and grasp the handle onthe faceplate with the other hand.
Installing or Upgrading the Internal Compact Flash Disk in a Routing Engine ■ 11
Installing or Upgrading the Internal Compact Flash Disk in a Routing Engine
4. Align the rear of the Routing Engine with the guide rails inside the chassis andslide it in completely.
CAUTION: Be careful to align the Routing Engine correctly with the guide rails andpush it in evenly. Damage can result if it gets lodged in the rails because of unevenmovement.
5. Secure the Routing Engine using one of the following methods:
■ If the Routing Engine has ejector handles, press the ejector handle at eachend of the Routing Engine inward to seat the unit firmly in the chassis. Ifyou removed screws from the ejector handles when you removed the RoutingEngine, replace them and use a screwdriver to tighten them.
■ If the Routing Engine has thumbscrews, tighten the thumbscrews securingthe Routing Engine, using a screwdriver if necessary.
6. If there was a cover over the Routing Engine that you removed, reinstall thecover and tighten the screws to secure it to the chassis.
7. You can verify correct Routing Engine functioning by issuing theshow chassis routing-engine command.
Configuring the Internal Compact Flash Disk
After installing the internal compact flash disk for the first time, you must copy thesoftware from the Routing Engine's hard disk to the internal compact flash disk.
NOTE: RE-A-1000 and RE-A-2000 require JUNOS Release 8.1R2 or later to functionproperly with the 1 GB compact flash disk. RE-S-1300 and RE-S-2000 require JUNOSRelease 8.2 or later to function properly with the 1 GB compact flash disk.
NOTE: To configure the internal compact flash disk, you must be connected to theRouting Engine through the console or other management device.
To copy software to the compact flash disk:
1. Install the internal compact flash disk as described in either “Inserting the InternalCompact Flash Disk” on page 7 or “Inserting the Internal Compact Flash Disk”on page 10, and replace the Routing Engine as described in “Installing the RoutingEngine” on page 11.
2. On the console or other management device connected to the Routing Engine,boot from the hard drive.
12 ■ Installing or Upgrading the Internal Compact Flash Disk in a Routing Engine
Media Upgrade Kit Installation Instructions
NOTE: If the compact flash disk has not yet been partitioned with JUNOS software,you may get an error message and prompted for a keystroke. If after pressing thekeystroke, the Routing Engine does not immediately boot from the hard drive, itmay take up to 10 minutes for the Watchdog timer to reset the Routing Engine andboot from the hard drive.
3. Enter CLI operational mode, and issue the following command to copy thecurrently running and active file system partitions on the router to standbypartitions on the internal compact flash disk.
user@host> request system snapshot partition
Wait until a message appears on the console confirming that the procedure iscomplete.
For more information about the command, see the JUNOS System Basics andServices Command Reference.
4. Issue the following command to reboot the router's software:
user@host> request system reboot
The internal compact flash disk will now be the primary boot device.
5. You can verify correct boot order by issuing the show system boot-messagescommand. The output lists the devices mounted. The internal compact flash diskis located at ad0.
For more information about the command, see the JUNOS System Basics andServices Command Reference.
JUNOS Documentation and Release Notes
For a list of related JUNOS documentation, seehttp://www.juniper.net/techpubs/software/junos/.
If the information in the latest JUNOS Release Notes differs from the information inthe documentation, follow the JUNOS Release Notes.
To obtain the most current version of all Juniper Networks technical documentation,see the product documentation page on the Juniper Networks Web site athttp://www.juniper.net/.
Table 2 on page 14 lists additional books on Juniper Networks solutions that you canorder through your bookstore. A complete list of such books is available athttp://www.juniper.net/books.
JUNOS Documentation and Release Notes ■ 13
JUNOS Documentation and Release Notes
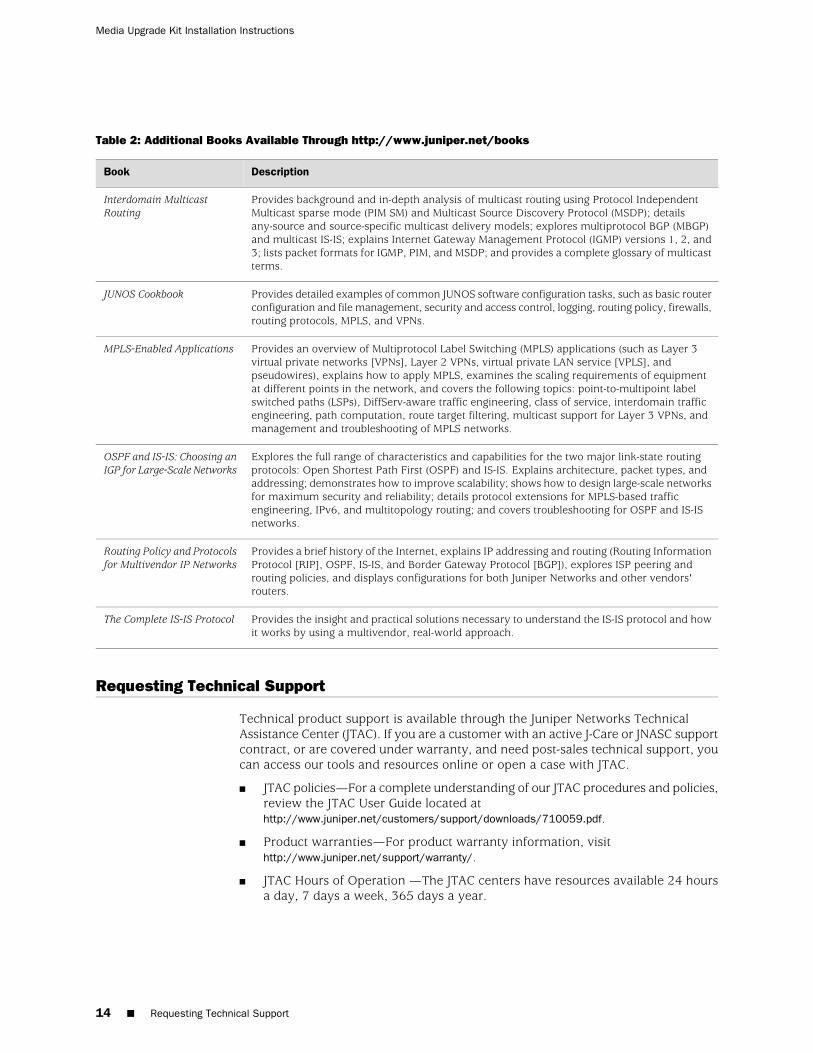
Table 2: Additional Books Available Through http://www.juniper.net/books
DescriptionBook
Provides background and in-depth analysis of multicast routing using Protocol IndependentMulticast sparse mode (PIM SM) and Multicast Source Discovery Protocol (MSDP); detailsany-source and source-specific multicast delivery models; explores multiprotocol BGP (MBGP)and multicast IS-IS; explains Internet Gateway Management Protocol (IGMP) versions 1, 2, and3; lists packet formats for IGMP, PIM, and MSDP; and provides a complete glossary of multicastterms.
Interdomain MulticastRouting
Provides detailed examples of common JUNOS software configuration tasks, such as basic routerconfiguration and file management, security and access control, logging, routing policy, firewalls,routing protocols, MPLS, and VPNs.
JUNOS Cookbook
Provides an overview of Multiprotocol Label Switching (MPLS) applications (such as Layer 3virtual private networks [VPNs], Layer 2 VPNs, virtual private LAN service [VPLS], andpseudowires), explains how to apply MPLS, examines the scaling requirements of equipmentat different points in the network, and covers the following topics: point-to-multipoint labelswitched paths (LSPs), DiffServ-aware traffic engineering, class of service, interdomain trafficengineering, path computation, route target filtering, multicast support for Layer 3 VPNs, andmanagement and troubleshooting of MPLS networks.
MPLS-Enabled Applications
Explores the full range of characteristics and capabilities for the two major link-state routingprotocols: Open Shortest Path First (OSPF) and IS-IS. Explains architecture, packet types, andaddressing; demonstrates how to improve scalability; shows how to design large-scale networksfor maximum security and reliability; details protocol extensions for MPLS-based trafficengineering, IPv6, and multitopology routing; and covers troubleshooting for OSPF and IS-ISnetworks.
OSPF and IS-IS: Choosing anIGP for Large-Scale Networks
Provides a brief history of the Internet, explains IP addressing and routing (Routing InformationProtocol [RIP], OSPF, IS-IS, and Border Gateway Protocol [BGP]), explores ISP peering androuting policies, and displays configurations for both Juniper Networks and other vendors'routers.
Routing Policy and Protocolsfor Multivendor IP Networks
Provides the insight and practical solutions necessary to understand the IS-IS protocol and howit works by using a multivendor, real-world approach.
The Complete IS-IS Protocol
Requesting Technical Support
Technical product support is available through the Juniper Networks TechnicalAssistance Center (JTAC). If you are a customer with an active J-Care or JNASC supportcontract, or are covered under warranty, and need post-sales technical support, youcan access our tools and resources online or open a case with JTAC.
■ JTAC policies—For a complete understanding of our JTAC procedures and policies,review the JTAC User Guide located athttp://www.juniper.net/customers/support/downloads/710059.pdf.
■ Product warranties—For product warranty information, visithttp://www.juniper.net/support/warranty/.
■ JTAC Hours of Operation —The JTAC centers have resources available 24 hoursa day, 7 days a week, 365 days a year.
14 ■ Requesting Technical Support
Media Upgrade Kit Installation Instructions
Self-Help Online Tools and Resources
For quick and easy problem resolution, Juniper Networks has designed an onlineself-service portal called the Customer Support Center (CSC) that provides you withthe following features:
■ Find CSC offerings: http://www.juniper.net/customers/support/
■ Search for known bugs: http://www2.juniper.net/kb/
■ Find product documentation: http://www.juniper.net/techpubs/
■ Find solutions and answer questions using our Knowledge Base:http://kb.juniper.net/
■ Download the latest versions of software and review release notes:http://www.juniper.net/customers/csc/software/
■ Search technical bulletins for relevant hardware and software notifications:https://www.juniper.net/alerts/
■ Join and participate in the Juniper Networks Community Forum:http://www.juniper.net/company/communities/
■ Open a case online in the CSC Case Management tool: http://www.juniper.net/cm/
To verify service entitlement by product serial number, use our Serial NumberEntitlement (SNE) Tool located at https://tools.juniper.net/SerialNumberEntitlementSearch/.
Opening a Case with JTAC
You can open a case with JTAC on the Web or by telephone.
■ Use the Case Management tool in the CSC at http://www.juniper.net/cm/ .
■ Call 1-888-314-JTAC (1-888-314-5822 toll-free in the USA, Canada, and Mexico).
For international or direct-dial options in countries without toll-free numbers, seehttp://www.juniper.net/support/requesting support.html
Revision History
10 April 2009—530-020330-01. Revision 2. Added information about installing andconfiguring the internal compact flash disk.
1 March 2007—530-020330-01. Revision 1.
16 May 2005—530-013693-01. Revision 1.
2 April 2004—530-009918-01. Revision 1.
Copyright © 2009, Juniper Networks, Inc. All rights reserved.
Juniper Networks, the Juniper Networks logo, JUNOS, NetScreen, ScreenOS, and Steel-Belted Radius are registered trademarks of Juniper Networks, Inc. inthe United States and other countries. JUNOSe is a trademark of Juniper Networks, Inc. All other trademarks, service marks, registered trademarks, orregistered service marks are the property of their respective owners.
Requesting Technical Support ■ 15
Requesting Technical Support

Juniper Networks assumes no responsibility for any inaccuracies in this document. Juniper Networks reserves the right to change, modify, transfer, orotherwise revise this publication without notice.
Products made or sold by Juniper Networks or components thereof might be covered by one or more of the following patents that are owned by or licensedto Juniper Networks: U.S. Patent Nos. 5,473,599, 5,905,725, 5,909,440, 6,192,051, 6,333,650, 6,359,479, 6,406,312, 6,429,706, 6,459,579, 6,493,347,6,538,518, 6,538,899, 6,552,918, 6,567,902, 6,578,186, and 6,590,785.
16 ■ Requesting Technical Support
Media Upgrade Kit Installation Instructions
Related Documents