Skil ls © Paradigm Publishing, Inc. 1 Marquee Series Microsoft PowerPoint 2016

Welcome message from author
This document is posted to help you gain knowledge. Please leave a comment to let me know what you think about it! Share it to your friends and learn new things together.
Transcript

Skills© Paradigm Publishing, Inc. 1
Marquee Series Microsoft PowerPoint 2016

Skills© Paradigm Publishing, Inc. 2
SECTION 1 SKILLSPreparing a Presentation
1.1 Open a Template
1.1 PowerPoint Window
1.1 Run a Slide Show
1.1 Save and Close a Presentation
1.2 Apply a Design Theme
1.2 Insert Text
1.3 Open an Existing Presentation
1.3 Navigate in a Presentation
1.3 Insert a New Slide
1.3 Choose a Slide Layout
CHECKPOINT 1
1.4 Change Views
1.5 Change the Slide Layout
1.5 Select and Move a Placeholder
1.6Rearrange, Delete, and Hide Slides
CHECKPOINT 2
1.7Use the Tell Me and Help Features
1.8 Check Spelling
1.8 Use Thesaurus
1.9 Run a Slide Show
1.9 Use the Pen During a Slide Show
1.10 Add Transition and Sound
1.11Print and Preview a Presentation
CHECKPOINT 3

Skills© Paradigm Publishing, Inc. 3
Open a TemplateTo create a presentation with an installed template:1. From the Windows 10 desktop, click the Start button and then
click the PowerPoint 2016 tile at the Start menu.2. Click the File tab.3. Click the New option.4. Click the desired template file.5. Click the Create button.
templates

Skills© Paradigm Publishing, Inc. 4
PowerPoint WindowQuick Access toolbar tabs
File tab
slide thumbnails pane
placeholderStatus bar View area
ribbon
scroll box
vertical scroll bar
Slide pane
insertion point
Tell Me feature
Skills© Paradigm Publishing, Inc. 5
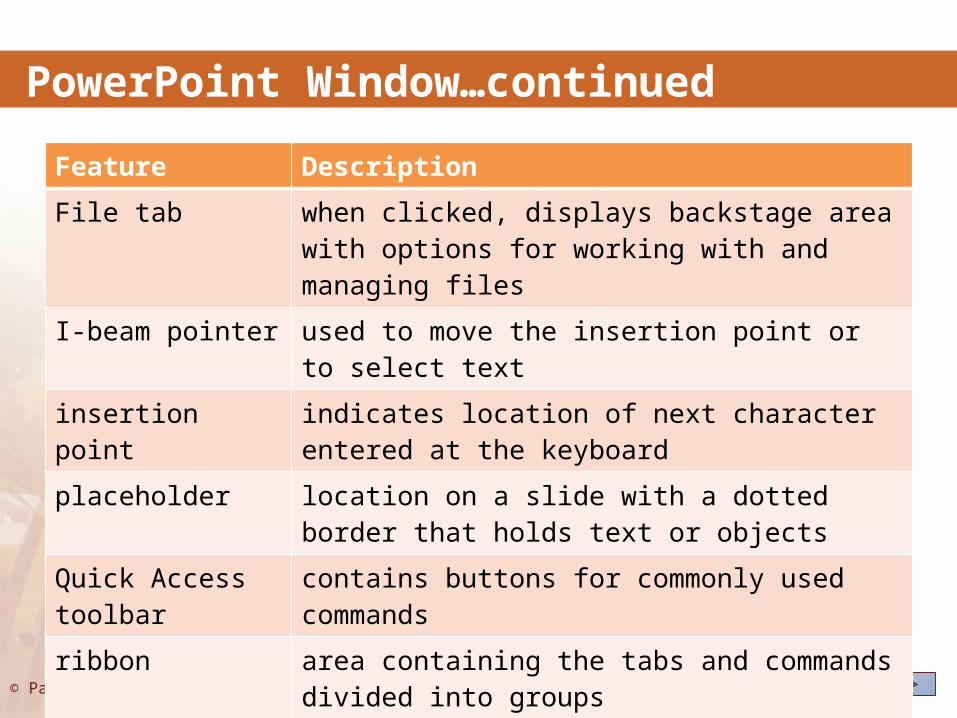
PowerPoint Window…continued
Feature DescriptionFile tab when clicked, displays backstage area with options for
working with and managing filesI-beam pointer used to move the insertion point or to select textinsertion point indicates location of next character entered at the
keyboardplaceholder location on a slide with a dotted border that holds text
or objectsQuick Access toolbar contains buttons for commonly used commandsribbon area containing the tabs and commands divided into
groupsslide pane displays the slide and slide contents

Skills© Paradigm Publishing, Inc. 6
PowerPoint Window…continued
Feature Descriptionslide thumbnails pane
left side of the screen that displays slide thumbnails
Status bar displays slide number, design theme, view buttons, and Zoom slider bar
tabs contain commands and features organized into groupsTitle bar displays file name followed by program namevertical scroll bar displays specific slidesview area toward right side of Status bar; contains buttons for
changing the presentation view

Skills© Paradigm Publishing, Inc. 7
Run a Slide ShowTo run a slide show: Click the Start From Beginning button on the Quick Access
Toolbar.
Start From Beginning button

Skills© Paradigm Publishing, Inc. 8
Save and Close a PresentationTo save a presentation:1. Click the Save button on the
Quick Access Toolbar.2. At the Save As backstage
area, click location in the middle panel.
3. Click the Browse button.4. Navigate to folder.5. Type file name at the Save As
dialog box.6. Click Save or press Enter.
Save button

Skills© Paradigm Publishing, Inc. 9
Apply a Design ThemeTo choose a slide design:1. Click the Design tab.2. Click the More button at the right side of the themes
thumbnails in the Themes group.3. Click theme at the drop-down gallery.
More button

Skills© Paradigm Publishing, Inc. 10
Insert Text
To move insertion point Pressone character left Left Arrowone character right Right Arrowone line up Up Arrowone line down Down Arrowone word to the left Ctrl + Left Arrowone word to the right Ctrl + Right Arrow

Skills© Paradigm Publishing, Inc. 11
Insert Text…continued
To move insertion point Pressto end of a line of text Endto beginning of a line of text Hometo beginning of current paragraph in placeholder
Ctrl + Up Arrow
to beginning of previous paragraph in placeholder
Ctrl + Up Arrow twice
to beginning of next paragraph in placeholder
Ctrl + Down Arrow
to beginning of text in placeholder Ctrl + Hometo end of text in placeholder Ctrl + End

Skills© Paradigm Publishing, Inc. 12
Open an Existing PresentationTo open a presentation:1. Click the File tab.2. Click the Open option.3. At the Open backstage area, click location in the middle
panel.4. Click the Browse option.5. At the Open dialog box, double-click the desired
presentation.

Skills© Paradigm Publishing, Inc. 13
Navigate in a PresentationTo navigate in a presentation using the mouse:1. Click the Next Slide button
or Previous Slide button on the vertical scroll bar.
To navigate in a presentation using the slide thumbnails pane:2. Click slide in the slide
thumbnails pane.
slide thumbnails pane
Previous Slide button
Next Slide button

Skills© Paradigm Publishing, Inc. 14
Insert a New SlideTo insert a new slide:1. Click the Home tab.2. Click the New Slide
button in the Slides group.
New Slide button

Skills© Paradigm Publishing, Inc. 15
Choose a Slide LayoutTo choose a slide layout:1. Make the slide active.2. Click the Home tab.3. Click the New Slide button
arrow in the Slides group.4. Click layout.
New Slide button arrow

Skills© Paradigm Publishing, Inc. 16
CHECKPOINT 11) This tab displays a backstage area
with options for working with and managing files.a. Fileb. Homec. Insertd. Design
3) The New Slide button is on which tab?a. Fileb. Homec. Designd. View
2) One method to save a document is to use this button on the Quick Access Toolbar.a. Saveb. Save Asc. Opend. New
4) To open a presentation, click this option on the File tab.a. Saveb. Save Asc. Opend. New
Next Question
Next Question
Next Question
Next Slide
Answer
Answer
Answer
Answer

Skills© Paradigm Publishing, Inc. 17
Change ViewsTo change the view:1. Click the View tab.2. Click view button in the
Presentation Views group.
OR
3. Click view button in the view area on the Status bar.
view buttons
Presentation Views group

Skills© Paradigm Publishing, Inc. 18
Change Views…continuedTo insert text in the outline pane:1. Click the View tab.2. Click the Outline View button in
the Presentation Views group.3. Click in the outline pane.4. Type text.
outline pane

Skills© Paradigm Publishing, Inc. 19
Change Views…continuedTo increase the Zoom:1. Click the View tab.2. Click the Zoom button in the
Zoom group.3. Click or type percentage at the
Zoom dialog box.4. Click OK.OR5. Position the mouse pointer on
the Zoom slider bar.6. Click and hold down the left
mouse button.7. Drag to the new percentage.8. Release the mouse button.
Zoom dialog box

Skills© Paradigm Publishing, Inc. 20
Change the Slide LayoutTo change the slide layout:1. Make the slide active.2. Click the Home tab.3. Click the Layout button in the Slides group.4. Click layout.
Layout button

Skills© Paradigm Publishing, Inc. 21
Select and Move a PlaceholderTo size a placeholder:1. Click inside the placeholder.2. Click and hold down the left mouse button and then drag a
sizing handle to increase or decrease the size.
sizing handle

Skills© Paradigm Publishing, Inc. 22
Select and Move a Placeholder…continuedTo use AutoFit options:1. Decrease the size of a
placeholder so the existing text does not fit within it.
2. Click anywhere in the text.3. Click the AutoFit Options
button.4. Select from the list of
choices.
AutoFit Options button

Skills© Paradigm Publishing, Inc. 23
Rearrange, Delete, and Hide SlidesTo move a slide:1. Click the Slide Sorter button in the view area on the Status bar.2. Click slide.3. Drag the slide to the new position.
Slide Sorter view
Skills© Paradigm Publishing, Inc. 24
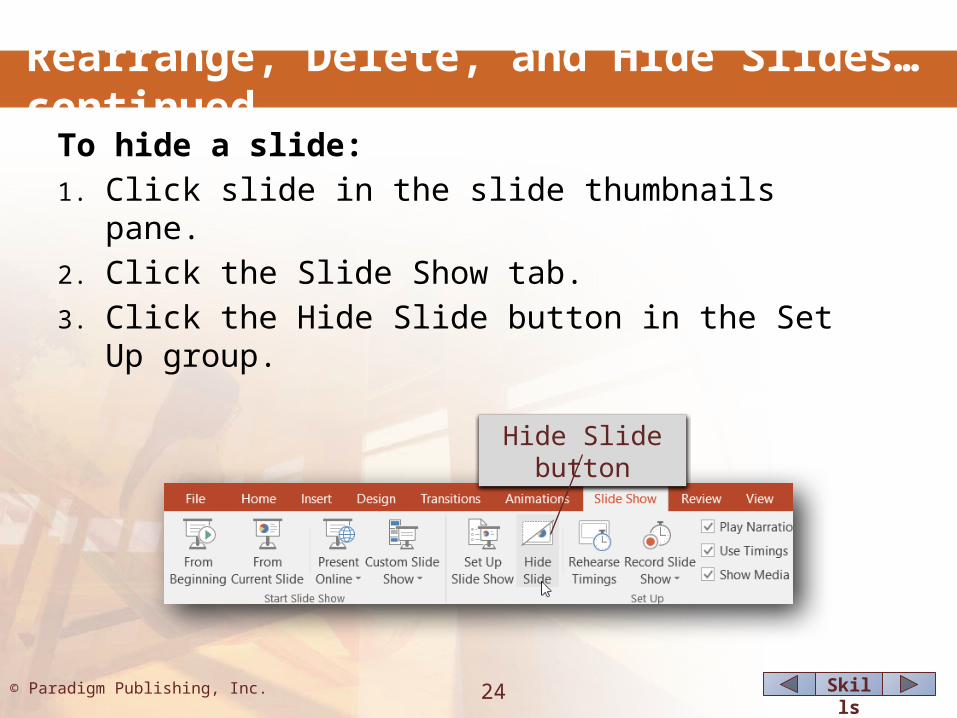
Rearrange, Delete, and Hide Slides…continuedTo hide a slide:1. Click slide in the slide thumbnails pane.2. Click the Slide Show tab.3. Click the Hide Slide button in the Set Up group.
Hide Slide button

Skills© Paradigm Publishing, Inc. 25
CHECKPOINT 21) Change the view using buttons on
this tab.a. Viewb. Insertc. Designd. Slide Show
3) To copy a slide, press and hold down this key while dragging the slide.a. Shiftb. Ctrlc. Altd. F1
2) Objects in a slide are generally positioned in these.a. templatesb. stylesc. themesd. placeholders
4) The Hide Slide button is on which tab?a. Viewb. Insertc. Designd. Slide Show
Next Question
Next Question
Next Question
Next Slide
Answer
Answer
Answer
Answer

Skills© Paradigm Publishing, Inc. 26
Use the Tell Me and Help FeaturesTo use Tell Me:1. Click in the Tell Me text
box.2. Type the function for
which you want help.3. Choose from the drop
down-down list that displays with options for displaying more information or completing the function.
Help option
Tell Me feature

Skills© Paradigm Publishing, Inc. 27
Use the Tell Me and Help Features…continuedTo use Help:1. Press the F1 function key
to display the PowerPoint Help window.
PowerPoint Help window

Skills© Paradigm Publishing, Inc. 28
Check SpellingTo complete a spelling check:1. Click the Review tab.2. Click the Spelling button in the Proofing group.3. Change, ignore, or delete highlighted words in the Spelling
task pane.4. When the spelling check is complete, click OK.
Change button

Skills© Paradigm Publishing, Inc. 29
Check Spelling…continuedButton FunctionIgnore skips that occurrence of the word and leaves currently
selected text as writtenIgnore All skips that occurrence of the word and all other
occurrences of the word in the presentationDelete deletes the currently selected word(s)Change replaces selected word in sentence with selected word
in the suggestions list boxChange All replaces selected word with selected word in
suggestions list box and all other occurrences of the word in the presentation
Add adds selected word to the main spelling check dictionary

Skills© Paradigm Publishing, Inc. 30
Use ThesaurusTo use the Thesaurus:1. Click in the word.2. Click the Review tab.3. Click the Thesaurus button in
the Proofing group.4. Position the mouse pointer on
replacement word in the Thesaurus task pane.
5. Click the down-pointing arrow at the right of the word.
6. Click Insert.Thesaurus task pane

Skills© Paradigm Publishing, Inc. 31
Use Thesaurus…continuedTo use the shortcut menu to display synonyms:1. Right-click in the word.2. Point to Synonyms at the
shortcut menu.3. Click synonym.
shortcut menu

Skills© Paradigm Publishing, Inc. 32
Run a Slide ShowTo run a slide show:1. Click the Start From
Beginning button on the Quick Access Toolbar.
OR2. Click the Slide Show tab.3. Click the From Beginning button
or the From Current Slide button in the Start Slide Show group.
OR4. Click the Slide Show button in
the view area on the Status bar.
From Beginning button
From Current Slide button

Skills© Paradigm Publishing, Inc. 33
Run a Slide Show…continuedTo use options in Slide Show view:1. Move the mouse pointer until
the Slide Show toolbar displays in the lower left of the slide.
2. Click button.OR3. Click the right mouse button to
display the shortcut menu.4. Click option.
shortcut menu
Slide Show toolbar

Skills© Paradigm Publishing, Inc. 34
Run a Slide Show…continuedTo display the Slide Show Help window:1. Move the mouse pointer
until the Slide Show toolbar displays in the lower left of the slide.
2. Click the More slide show options button.
3. Click the Help option.
Slide Show Help dialog box

Skills© Paradigm Publishing, Inc. 35
Use the Pen During a Slide ShowTo use the pen when running a slide show:1. Run the slide show.2. At the desired slide, move the
mouse pointer until the Slide Show toolbar displays in the lower left of the slide.
3. Click the Pen button on the Slide Show toolbar.
4. Click Pen.5. Draw in the slide with the pen.
pen drawingsPen button

Skills© Paradigm Publishing, Inc. 36
Use the Pen During a Slide Show…continuedTo use the highlighter when running a slide show:1. Run the slide show.2. At the desired slide, move the
mouse pointer until the Slide Show toolbar displays in the lower left of the slide.
3. Click the Pen button on the Slide Show toolbar.
4. Click Highlighter.5. Highlight on the slide.
highlighting

Skills© Paradigm Publishing, Inc. 37
Use the Pen During a Slide Show…continuedTo change the color of the ink:1. Run the slide show.2. At the desired slide, move
the mouse pointer until the Slide Show toolbar displays in the lower left of the slide.
3. Click the Pen button on the Slide Show toolbar.
4. Click Pen.5. Click the Pen button on the
Slide Show toolbar again.6. Select color in the palette.
ink color

Skills© Paradigm Publishing, Inc. 38
Use the Pen During a Slide Show…continuedTo erase the pen markings:1. Run the slide show.2. At the desired slide, move the
mouse pointer until the Slide Show toolbar displays in the lower left of the slide.
3. Click the Pen button on the Slide Show toolbar.
4. Click the Erase All Ink on Slide option.
Erase All Ink on Slide option

Skills© Paradigm Publishing, Inc. 39
Add Transition and SoundTo add transition to all slides:1. Click the Transitions tab.2. Click the More button at
the right side of the transition thumbnails in the Transition to This Slide group.
3. Click transition at the drop-down gallery.
4. Click the Apply To All button in the Timing group.
Transitions tab

Skills© Paradigm Publishing, Inc. 40
Add Transition and Sound…continuedTo change transition effect options to all slides:1. Click the Transitions tab.2. Click the Effect Options button in
the Transition to This Slide group.3. Click effect option.4. Click the Apply To All button in
the Timing group.
Effect Options button

Skills© Paradigm Publishing, Inc. 41
Add Transition and Sound…continuedTo add transition sound to all slides:1. Click the Transitions tab.2. Click the Sound button arrow.3. Click option at the drop-down
list.4. Click the Apply To All button in
the Timing group.
Sound button arrow

Skills© Paradigm Publishing, Inc. 42
Add Transition and Sound…continuedTo apply transition timings to all slides:1. Click the Transitions tab.2. Click in the Duration
measurement box in the Timing group.
3. Type duration time.4. Press Enter.5. Click the Apply To All
button in the Timing group.
Duration measurement box

Skills© Paradigm Publishing, Inc. 43
Print and Preview a PresentationTo print a presentation:1. Click the File tab.2. Click the Print option.3. At the Print backstage
area, specify how you want the presentation printed.
Print option

Skills© Paradigm Publishing, Inc. 44
Print and Preview a Presentation…continuedTo preview a presentation:1. Click the File tab.2. Click the Print option.3. View the preview in the
right panel of the Print backstage area.
Zoom to Page button
Next Page buttonPrevious Page button

Skills© Paradigm Publishing, Inc. 45
Print and Preview a Presentation…continuedTo change page setup options:1. Click the Design tab.2. Click the Slide Size button in
the Customize group.3. Click Custom Slide Size.4. Make changes in the Slide
Size dialog box.5. Click OK.
Slide Size dialog box

Skills© Paradigm Publishing, Inc. 46
CHECKPOINT 31) Click this button to replace the
selected word with the word in the suggestions list box.a. Ignoreb. Deletec. Changed. Change All
3) Add sounds with options on this tab.a. Fileb. Homec. Transitionsd. View
2) Clicking the Pen button in the Slide Show toolbar and then clicking Pen turns the mouse pointer into this.a. circleb. trianglec. squared. plus sign
4) The Print option is on this tab.a. Fileb. Homec. Transitionsd. View
Next Question
Next Question
Next Question
Next Slide
Answer
Answer
Answer
Answer
Related Documents