Skil ls © Paradigm Publishing, Inc. 1 Marquee Series Microsoft Word 2016

Welcome message from author
This document is posted to help you gain knowledge. Please leave a comment to let me know what you think about it! Share it to your friends and learn new things together.
Transcript

Skills© Paradigm Publishing, Inc. 1
Marquee Series Microsoft Word 2016
Skills© Paradigm Publishing, Inc. 2
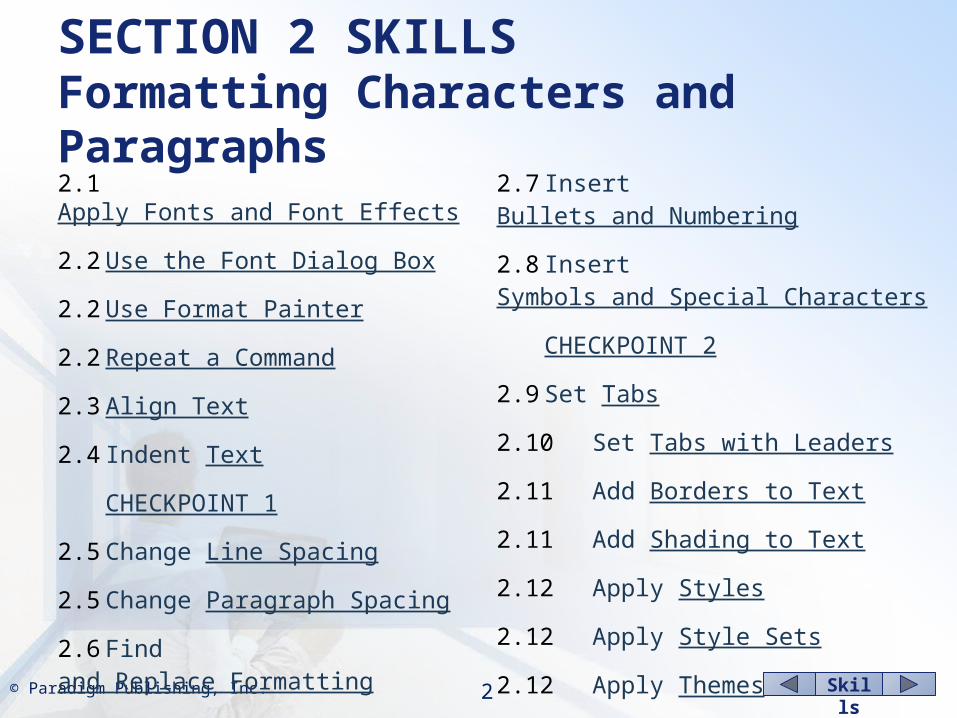
SECTION 2 SKILLSFormatting Characters and Paragraphs2.1 Apply Fonts and Font Effects
2.2 Use the Font Dialog Box
2.2 Use Format Painter
2.2 Repeat a Command
2.3 Align Text
2.4 Indent Text
CHECKPOINT 1
2.5 Change Line Spacing
2.5 Change Paragraph Spacing
2.6 Find and Replace Formatting
2.7 Insert Bullets and Numbering
2.8 Insert Symbols and Special Characters
CHECKPOINT 2
2.9 Set Tabs
2.10 Set Tabs with Leaders
2.11 Add Borders to Text
2.11 Add Shading to Text
2.12 Apply Styles
2.12 Apply Style Sets
2.12 Apply Themes
2.12 Format Style Sets and Themes
CHECKPOINT 3
Skills© Paradigm Publishing, Inc. 3
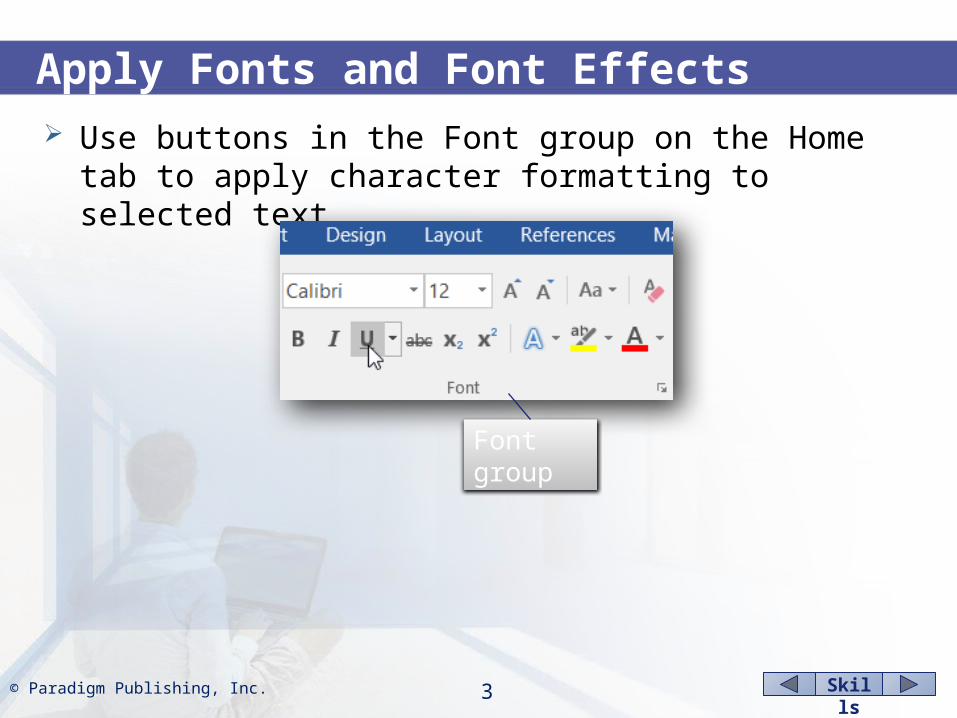
Apply Fonts and Font Effects Use buttons in the Font group on the Home tab to apply
character formatting to selected text.
Font group

Skills© Paradigm Publishing, Inc. 4
Apply Fonts and Font Effects…continued The Mini toolbar displays above selected text. The toolbar
disappears when you move the mouse pointer away from it.
Mini toolbar
Skills© Paradigm Publishing, Inc. 5
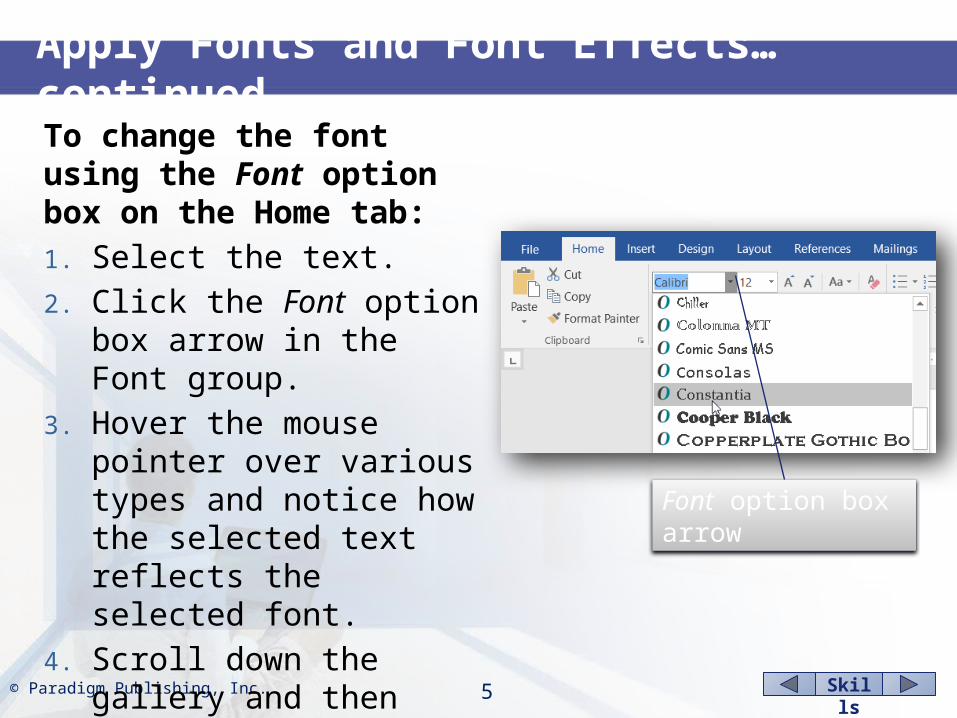
To change the font using the Font option box on the Home tab:1. Select the text.2. Click the Font option box
arrow in the Font group.3. Hover the mouse pointer over
various types and notice how the selected text reflects the selected font.
4. Scroll down the gallery and then click font.
5. Deselect the text by clicking anywhere in the document.
Apply Fonts and Font Effects…continued
Font option box arrow
Skills© Paradigm Publishing, Inc. 6
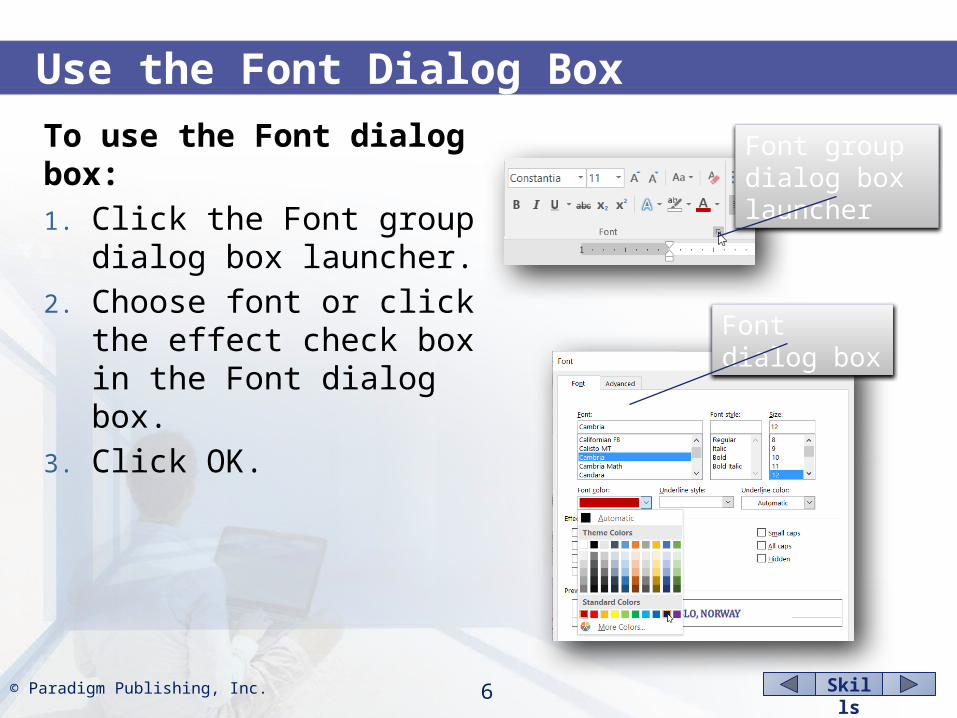
To use the Font dialog box:1. Click the Font group dialog
box launcher.2. Choose font or click the
effect check box in the Font dialog box.
3. Click OK.
Use the Font Dialog Box
Font group dialog box launcher
Font dialog box
Skills© Paradigm Publishing, Inc. 7
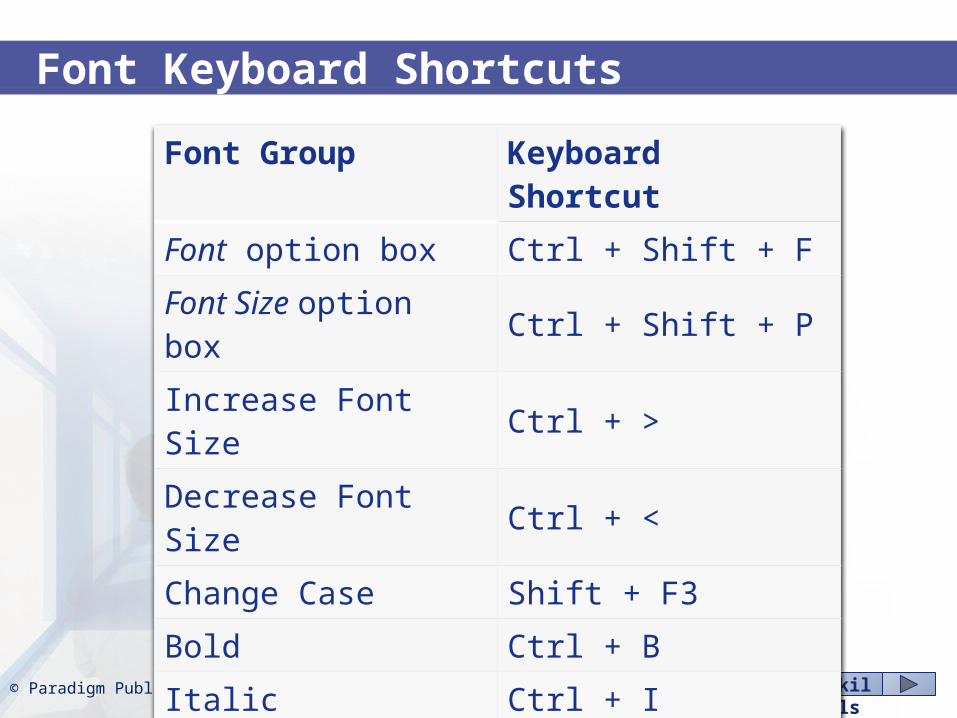
Font Keyboard Shortcuts
Font Group Keyboard ShortcutFont option box Ctrl + Shift + FFont Size option box Ctrl + Shift + PIncrease Font Size Ctrl + >Decrease Font Size Ctrl + <Change Case Shift + F3Bold Ctrl + BItalic Ctrl + IUnderline Ctrl + USubscript Ctrl + =Superscript Ctrl + Shift + +
Skills© Paradigm Publishing, Inc. 8
Use Format Painter
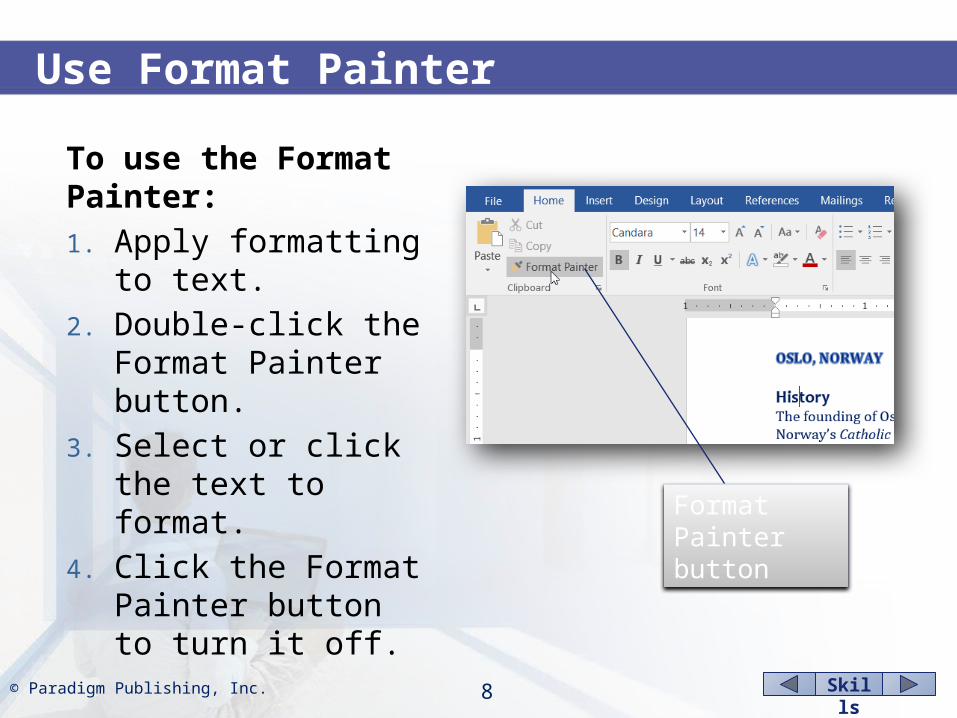
To use the Format Painter:1. Apply formatting to
text.2. Double-click the Format
Painter button.3. Select or click the text
to format.4. Click the Format Painter
button to turn it off. Format Painter button
Skills© Paradigm Publishing, Inc. 9
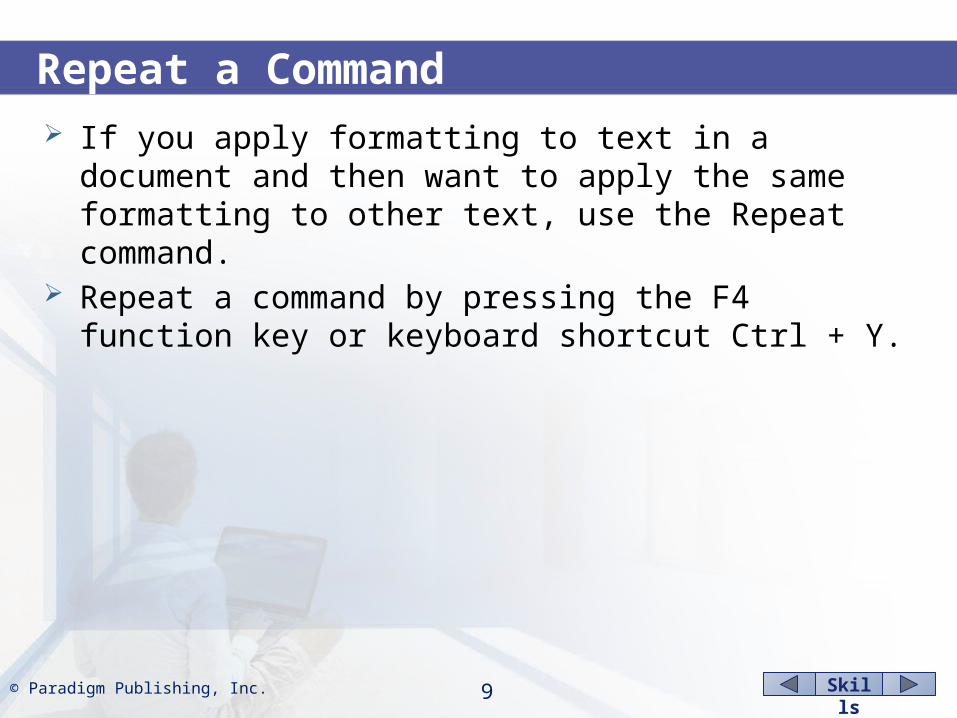
Repeat a Command If you apply formatting to text in a document and then want to
apply the same formatting to other text, use the Repeat command.
Repeat a command by pressing the F4 function key or keyboard shortcut Ctrl + Y.

Skills© Paradigm Publishing, Inc. 10
Align Text Change paragraph alignment with buttons in the Paragraph
group on the Home tab.
alignment buttons
Skills© Paradigm Publishing, Inc. 11
Align Text…continued
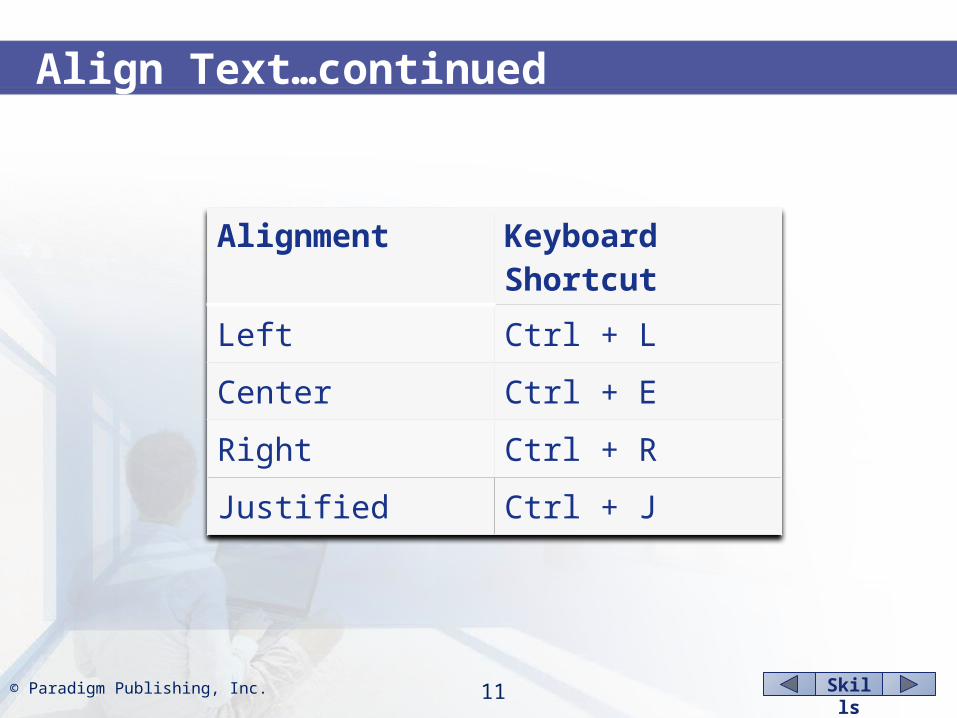
Alignment Keyboard Shortcut
Left Ctrl + L
Center Ctrl + E
Right Ctrl + R
Justified Ctrl + J
Skills© Paradigm Publishing, Inc. 12
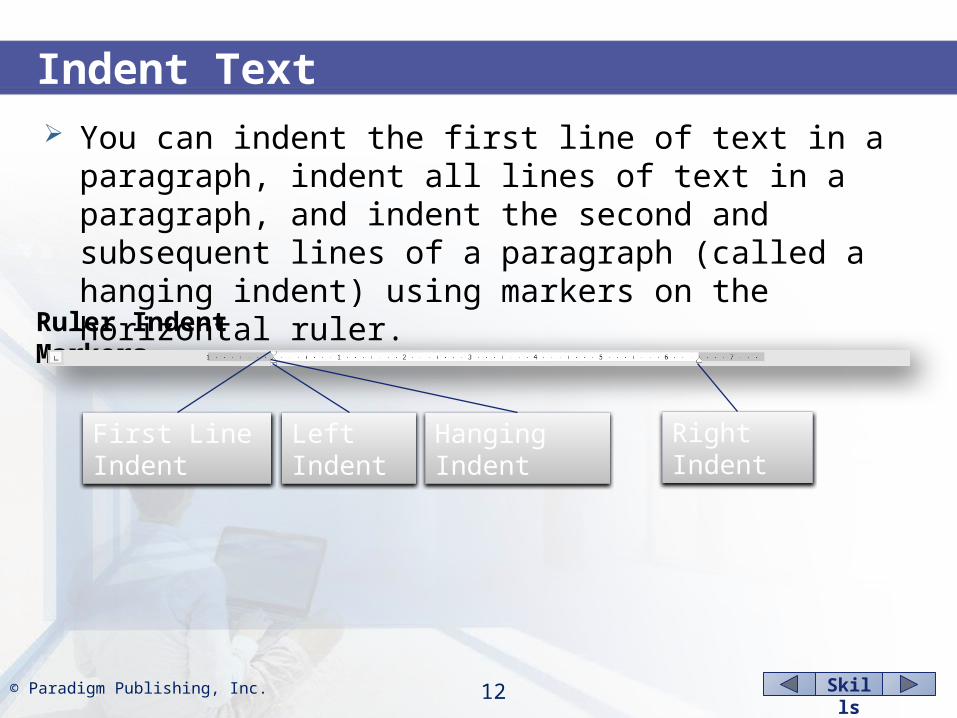
Indent Text You can indent the first line of text in a paragraph, indent all
lines of text in a paragraph, and indent the second and subsequent lines of a paragraph (called a hanging indent) using markers on the horizontal ruler.
Right Indent
Ruler Indent Markers
First Line Indent Left Indent Hanging Indent

Skills© Paradigm Publishing, Inc. 13
To indent the first line of a paragraph using the horizontal ruler:1. Position the mouse pointer
on the First Line Indent marker on the horizontal ruler.
2. Hold down the left mouse button.
3. Drag the marker on the ruler.
Indent Text…continued
First Line Indent marker
Skills© Paradigm Publishing, Inc. 14
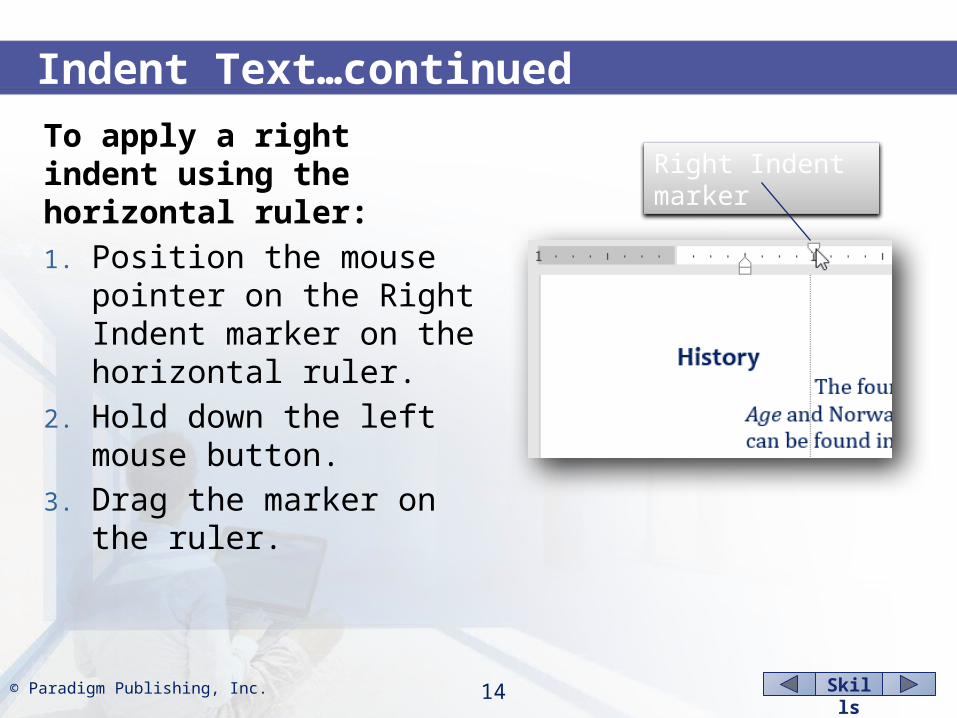
To apply a right indent using the horizontal ruler:1. Position the mouse pointer
on the Right Indent marker on the horizontal ruler.
2. Hold down the left mouse button.
3. Drag the marker on the ruler.
Indent Text…continued
Right Indent marker
Skills© Paradigm Publishing, Inc. 15
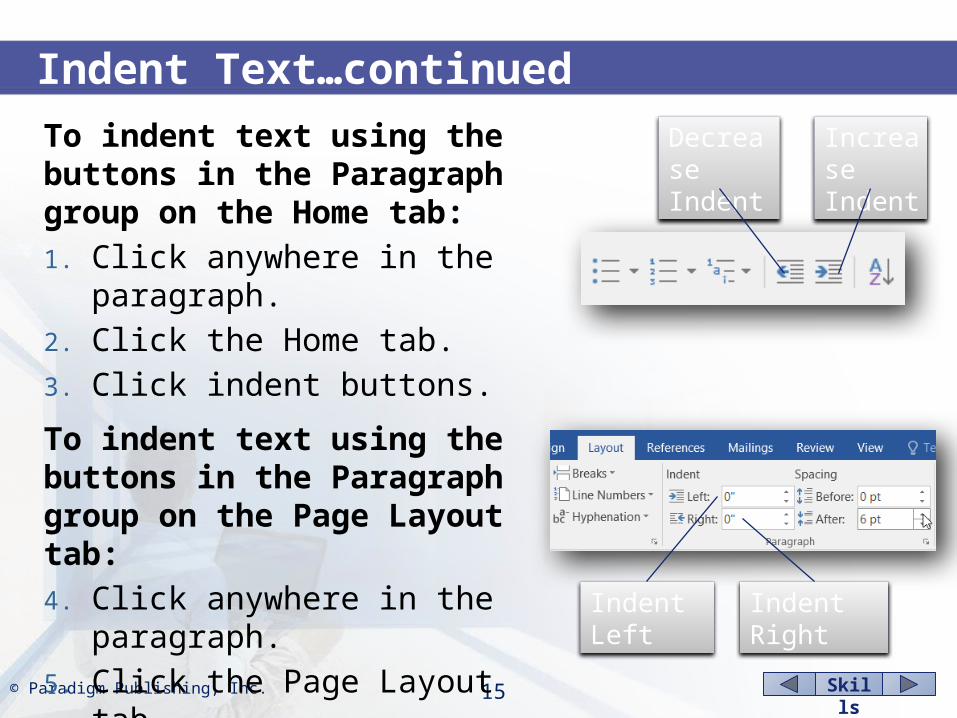
To indent text using the buttons in the Paragraph group on the Home tab:1. Click anywhere in the paragraph.2. Click the Home tab.3. Click indent buttons.
To indent text using the buttons in the Paragraph group on the Page Layout tab:4. Click anywhere in the paragraph.5. Click the Page Layout tab.6. Click in indent box.7. Type the measurement.
Indent Text…continuedDecrease Indent
Increase Indent
Indent Left Indent Right
Skills© Paradigm Publishing, Inc. 16
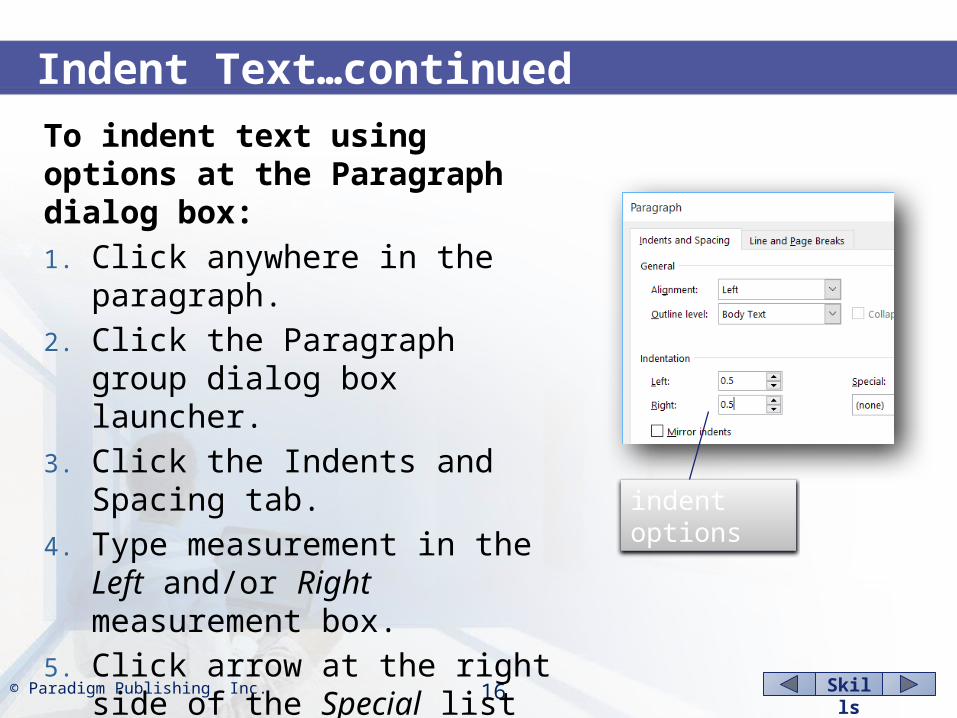
To indent text using options at the Paragraph dialog box:1. Click anywhere in the paragraph.2. Click the Paragraph group dialog box
launcher.3. Click the Indents and Spacing tab.4. Type measurement in the Left
and/or Right measurement box.5. Click arrow at the right side of the
Special list box.6. Click setting.7. Click OK.
Indent Text…continued
indent options
Skills© Paradigm Publishing, Inc. 17
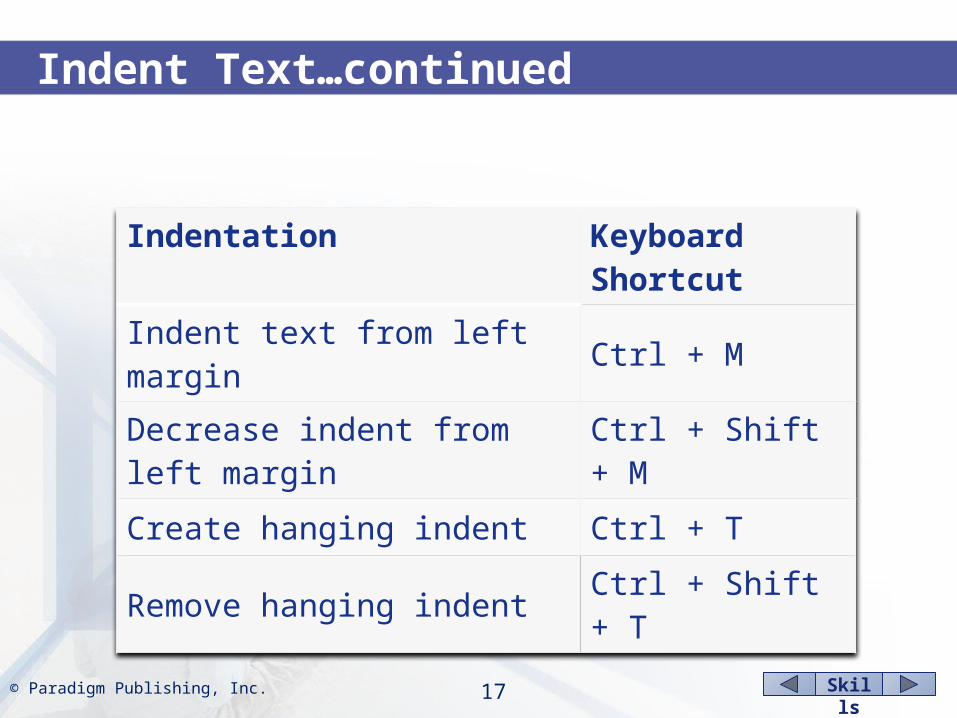
Indent Text…continued
Indentation Keyboard Shortcut
Indent text from left margin Ctrl + M
Decrease indent from left margin Ctrl + Shift + M
Create hanging indent Ctrl + T
Remove hanging indent Ctrl + Shift + T
Skills© Paradigm Publishing, Inc. 18
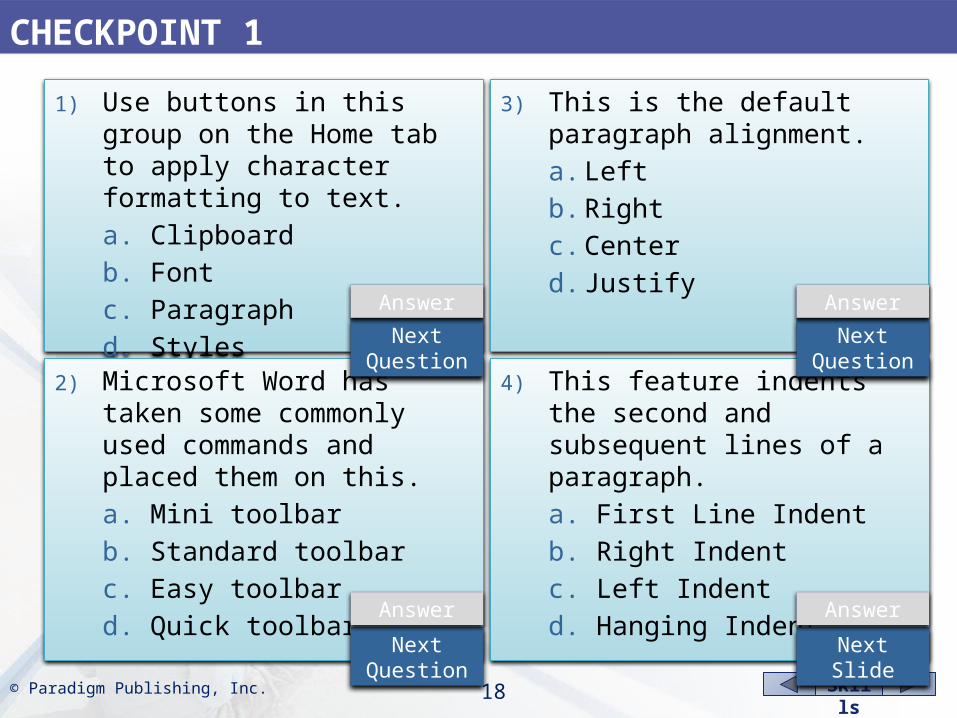
1) Use buttons in this group on the Home tab to apply character formatting to text.a. Clipboardb. Fontc. Paragraphd. Styles
3) This is the default paragraph alignment.a. Leftb. Rightc. Centerd. Justify
2) Microsoft Word has taken some commonly used commands and placed them on this. a. Mini toolbarb. Standard toolbarc. Easy toolbard. Quick toolbar
4) This feature indents the second and subsequent lines of a paragraph. a. First Line Indentb. Right Indentc. Left Indentd. Hanging Indent
CHECKPOINT 1
Next Question
Next Question
Next Question
Next Slide
Answer
Answer
Answer
Answer
Skills© Paradigm Publishing, Inc. 19
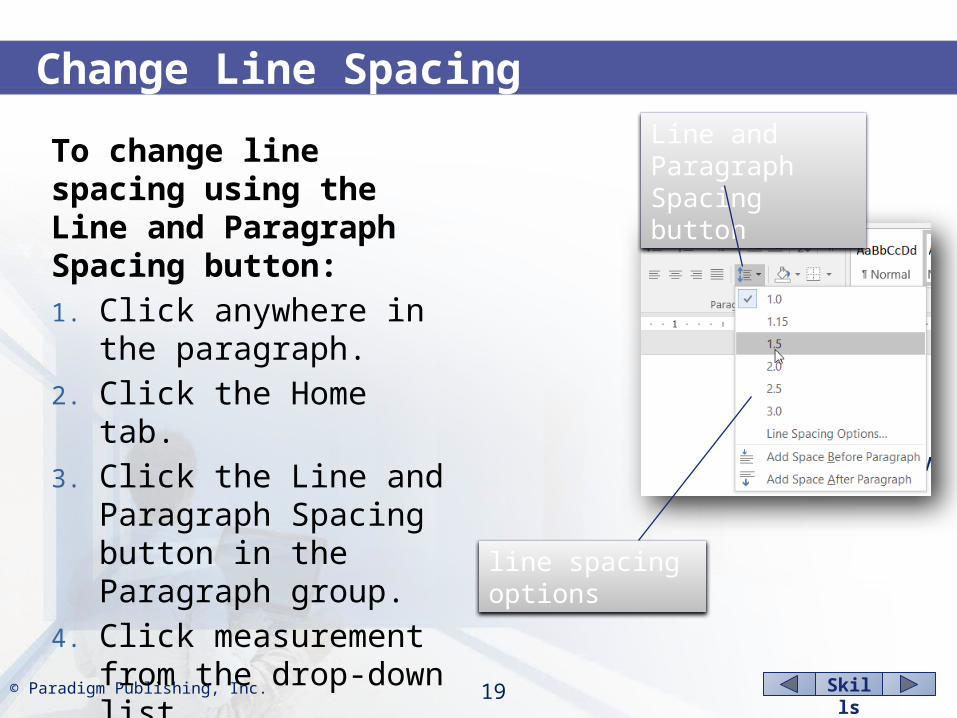
Change Line Spacing
line spacing options
Line and Paragraph Spacing buttonTo change line spacing using
the Line and Paragraph Spacing button:1. Click anywhere in the
paragraph.2. Click the Home tab.3. Click the Line and
Paragraph Spacing button in the Paragraph group.
4. Click measurement from the drop-down list.

Skills© Paradigm Publishing, Inc. 20
Change Line Spacing…continuedTo change line spacing using the Paragraph dialog box:1. Click anywhere in the paragraph.2. Click the Home tab.3. Click the Paragraph group dialog box
launcher.4. Click the Indents and Spacing tab.5. Click the box arrow at the right side
of the Line spacing option.6. Select a spacing choice from the list.7. Type a measurement in the At text
box.8. Click OK.
Line spacing options
Skills© Paradigm Publishing, Inc. 21
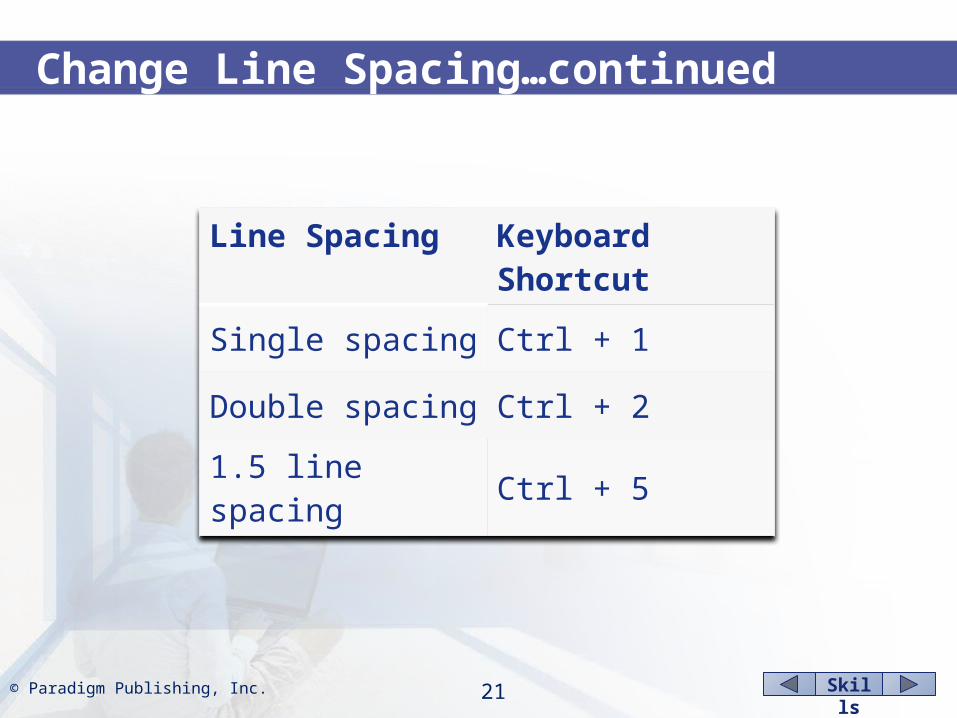
Change Line Spacing…continued
Line Spacing Keyboard Shortcut
Single spacing Ctrl + 1
Double spacing Ctrl + 2
1.5 line spacing Ctrl + 5
Skills© Paradigm Publishing, Inc. 22
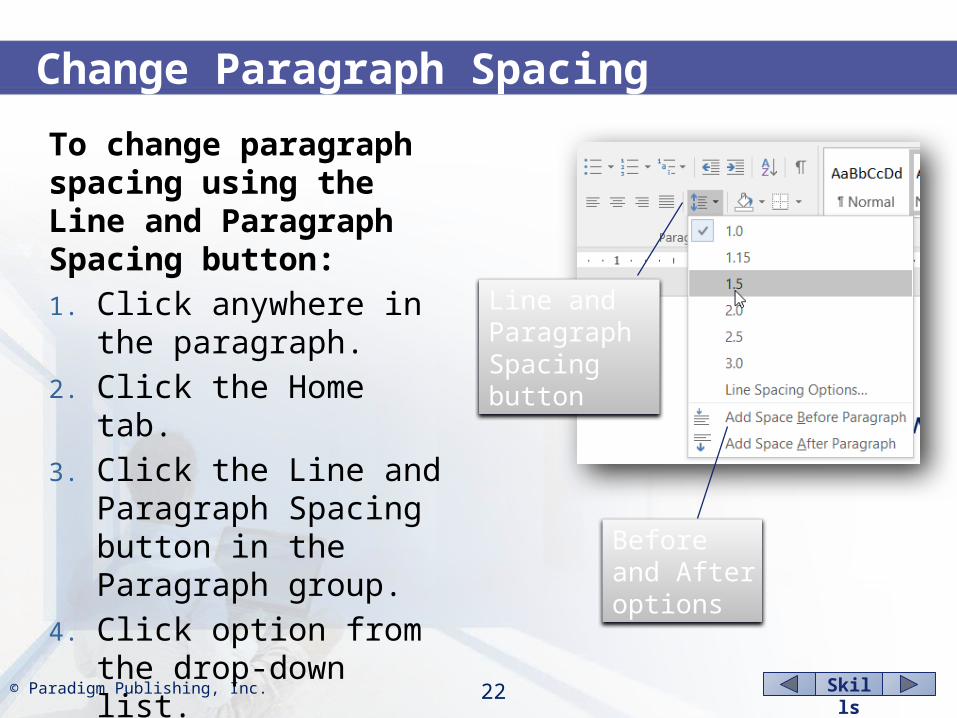
Change Paragraph Spacing
Before and After options
Line and Paragraph Spacing button
To change paragraph spacing using the Line and Paragraph Spacing button:1. Click anywhere in the
paragraph.2. Click the Home tab.3. Click the Line and
Paragraph Spacing button in the Paragraph group.
4. Click option from the drop-down list.
Skills© Paradigm Publishing, Inc. 23
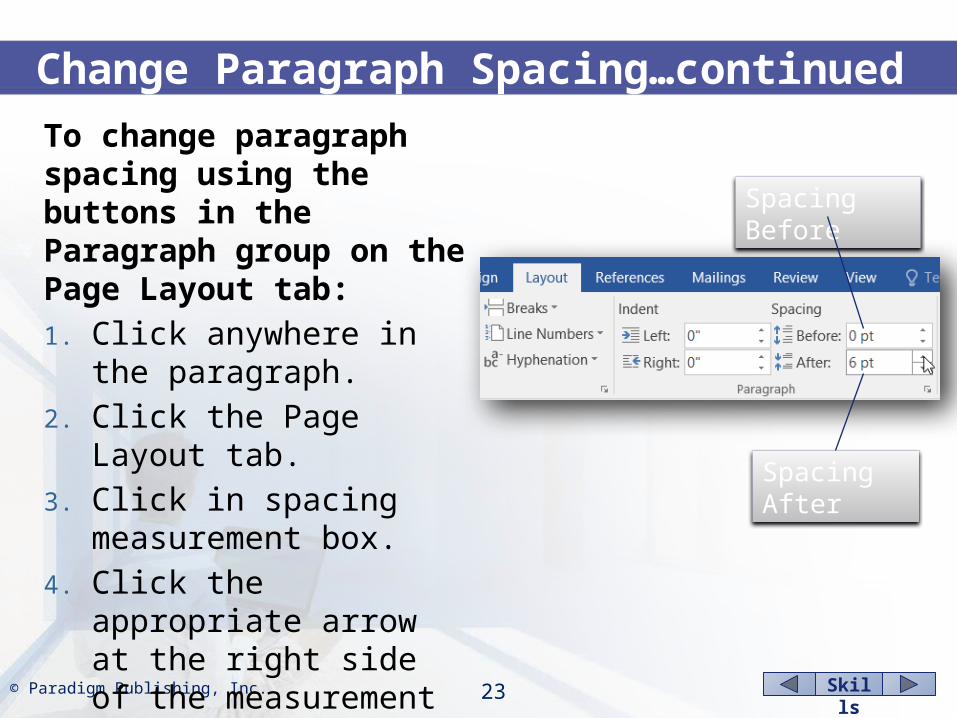
To change paragraph spacing using the buttons in the Paragraph group on the Page Layout tab:1. Click anywhere in the
paragraph.2. Click the Page Layout tab.3. Click in spacing
measurement box.4. Click the appropriate arrow
at the right side of the measurement box.
Change Paragraph Spacing…continued
Spacing Before
Spacing After

Skills© Paradigm Publishing, Inc. 24
Change Paragraph Spacing…continuedTo change paragraph spacing using the Paragraph dialog box:1. Click anywhere in the
paragraph.2. Click the Home tab.3. Click the Paragraph group
dialog box launcher.4. Click the Indents and Spacing
tab.5. Type a measurement in the
Before and/or After measurement box.
6. Click OK.
Spacing AfterSpacing Before

Skills© Paradigm Publishing, Inc. 25
Find and Replace FormattingTo find and replace formatting:1. Position the insertion point at the
beginning of the document.2. Click the Replace button in the Editing
group on the Home tab.3. Click the More button.4. With the insertion point positioned in the
Find what text box, click the Format button at the bottom of the dialog box and then click the options for the find formats.
5. Click OK.steps continued on next slide…
select format to find

Skills© Paradigm Publishing, Inc. 26
Find and Replace Formatting…continued6. With the insertion point positioned
in the Replace with text box, click the Format button at the bottom of the dialog box and then click the options for the replacement formats.
7. Click OK.8. Click the Replace All button.9. Click OK at the message telling you
that the search of the document is complete and how many replacements were made.
select format to replace
Skills© Paradigm Publishing, Inc. 27
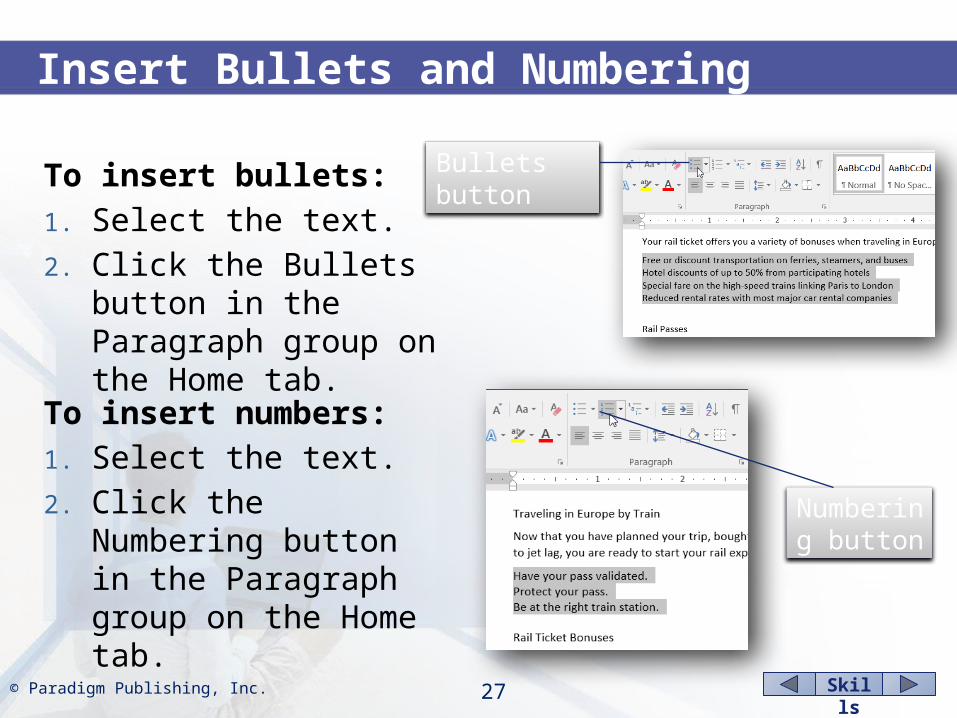
Insert Bullets and Numbering
To insert bullets:1. Select the text.2. Click the Bullets button in
the Paragraph group on the Home tab.
To insert numbers:1. Select the text.2. Click the Numbering
button in the Paragraph group on the Home tab.
Numbering button
Bullets button
Skills© Paradigm Publishing, Inc. 28
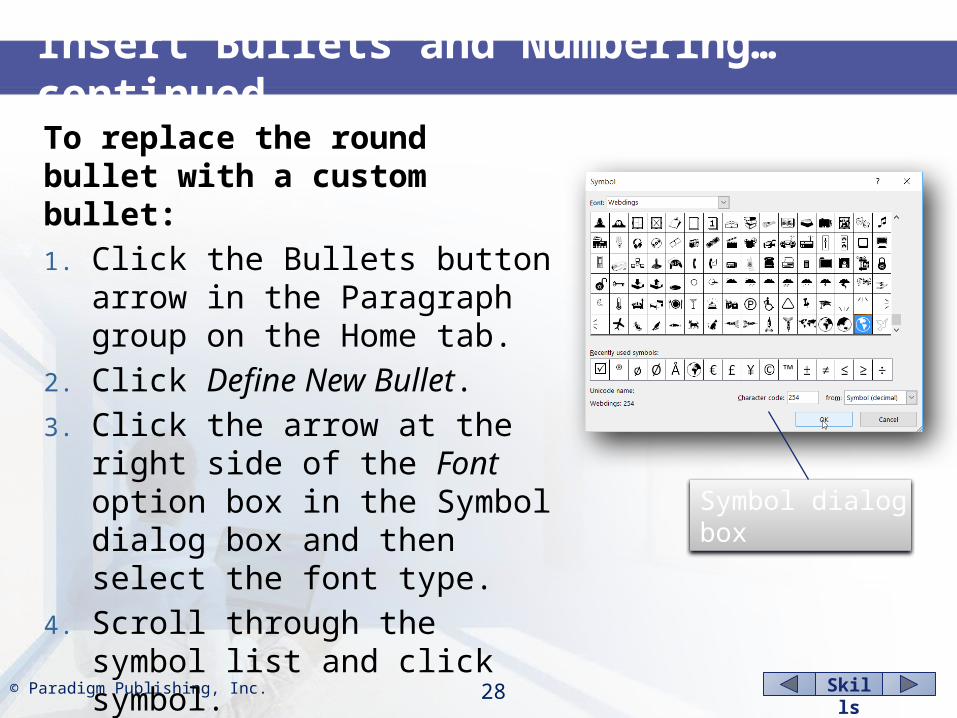
Insert Bullets and Numbering…continuedTo replace the round bullet with a custom bullet:1. Click the Bullets button arrow in the
Paragraph group on the Home tab.2. Click Define New Bullet.3. Click the arrow at the right side of
the Font option box in the Symbol dialog box and then select the font type.
4. Scroll through the symbol list and click symbol.
5. Click the Insert button.6. Click the Close button.
Symbol dialog box
Skills© Paradigm Publishing, Inc. 29
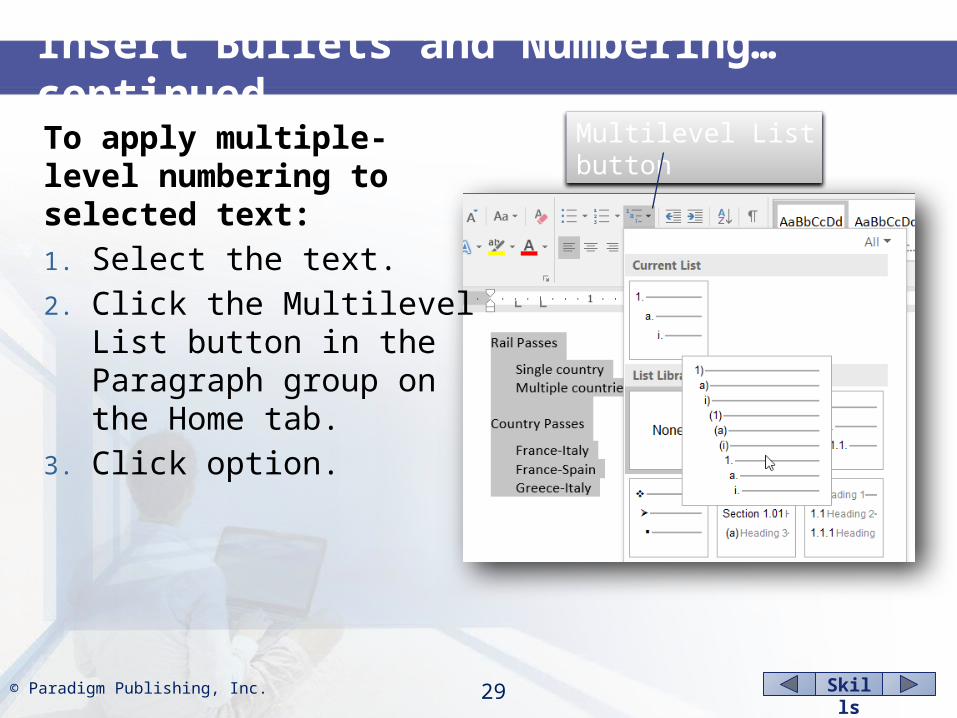
Insert Bullets and Numbering…continuedTo apply multiple-level numbering to selected text:1. Select the text.2. Click the Multilevel List
button in the Paragraph group on the Home tab.
3. Click option.
Multilevel List button
Skills© Paradigm Publishing, Inc. 30
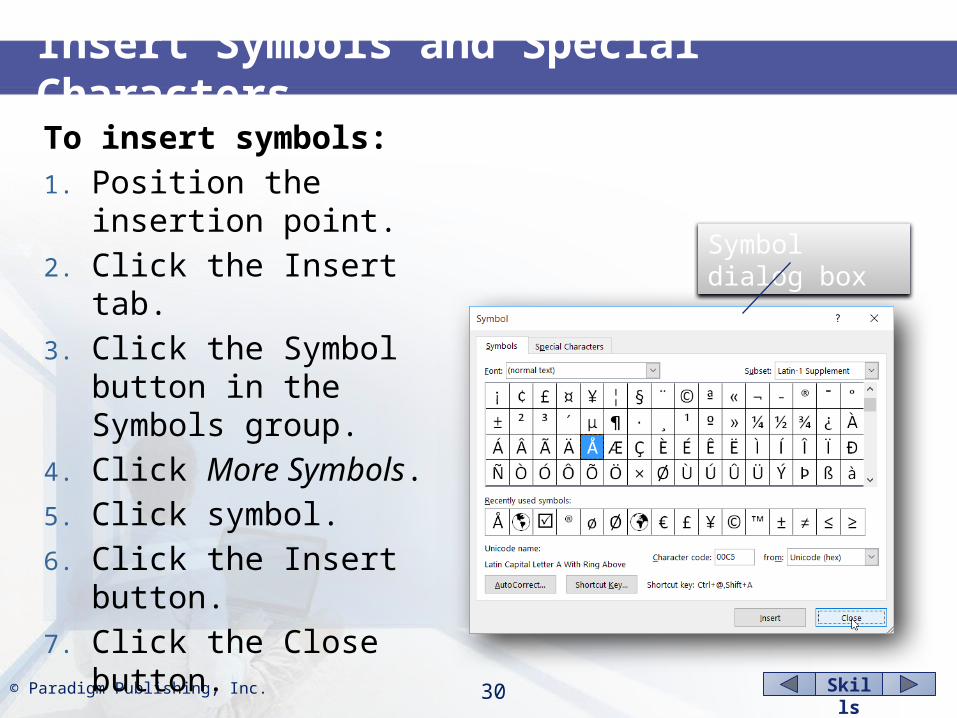
Insert Symbols and Special CharactersTo insert symbols:1. Position the insertion point.2. Click the Insert tab.3. Click the Symbol button in the
Symbols group.4. Click More Symbols.5. Click symbol.6. Click the Insert button.7. Click the Close button.
Symbol dialog box

Skills© Paradigm Publishing, Inc. 31
Insert Symbols and Special Characters…continuedTo insert special characters:1. Position the insertion point.2. Click the Insert tab.3. Click the Symbol button in the
Symbols group.4. Click More Symbols.5. Click the Special Characters tab.6. Click the desired character.7. Click the Insert button.8. Click the Close button.
Symbol dialog box
Skills© Paradigm Publishing, Inc. 32
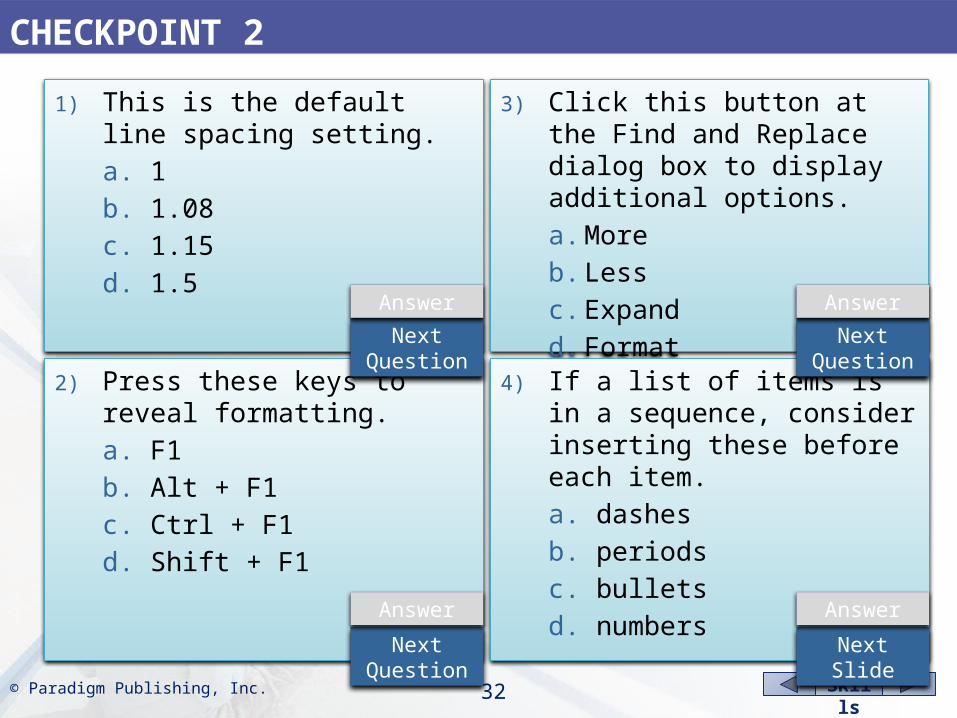
1) This is the default line spacing setting.a. 1b. 1.08c. 1.15d. 1.5
3) Click this button at the Find and Replace dialog box to display additional options. a. Moreb. Lessc. Expandd. Format
2) Press these keys to reveal formatting.a. F1b. Alt + F1c. Ctrl + F1d. Shift + F1
4) If a list of items is in a sequence, consider inserting these before each item. a. dashesb. periodsc. bulletsd. numbers
CHECKPOINT 2
Next Question
Next Question
Next Question
Next Slide
Answer
Answer
Answer
Answer

Skills© Paradigm Publishing, Inc. 33
Set TabsTo set a tab on the horizontal ruler:1. Click the Alignment button to
display the desired alignment symbol.
2. Click on the horizontal ruler at the desired position.
Alignment button desired position
Skills© Paradigm Publishing, Inc. 34
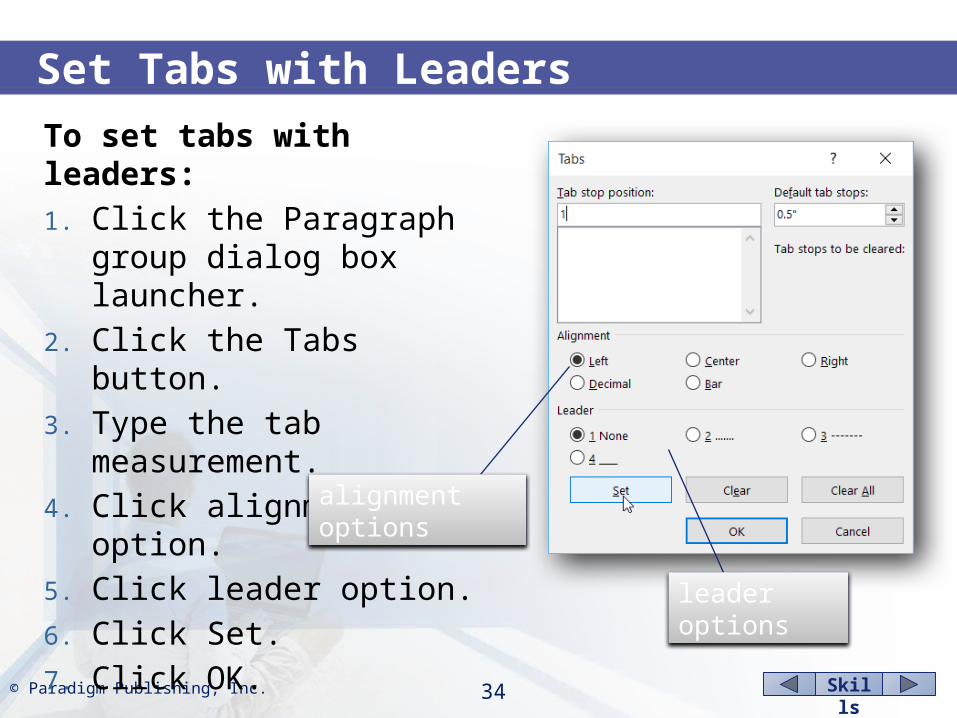
To set tabs with leaders:1. Click the Paragraph group
dialog box launcher.2. Click the Tabs button.3. Type the tab measurement.4. Click alignment option.5. Click leader option.6. Click Set.7. Click OK.
Set Tabs with Leaders
alignment options
leader options
Skills© Paradigm Publishing, Inc. 35
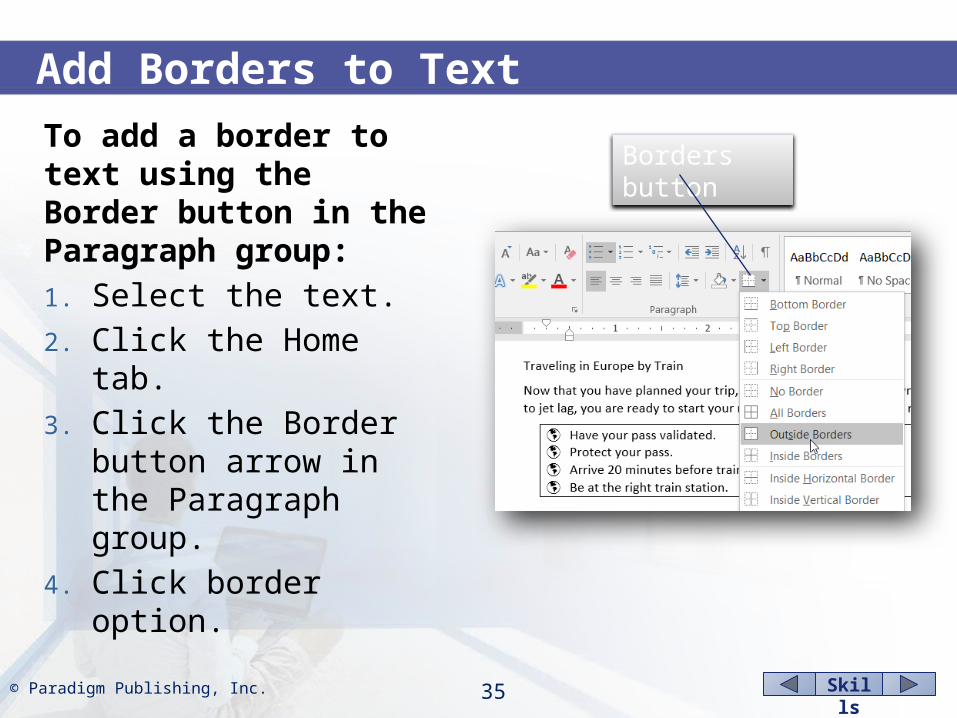
Add Borders to Text
Borders buttonTo add a border to text using the Border button in the Paragraph group:1. Select the text.2. Click the Home tab.3. Click the Border button
arrow in the Paragraph group.
4. Click border option.
Skills© Paradigm Publishing, Inc. 36
Add Borders to Text…continued
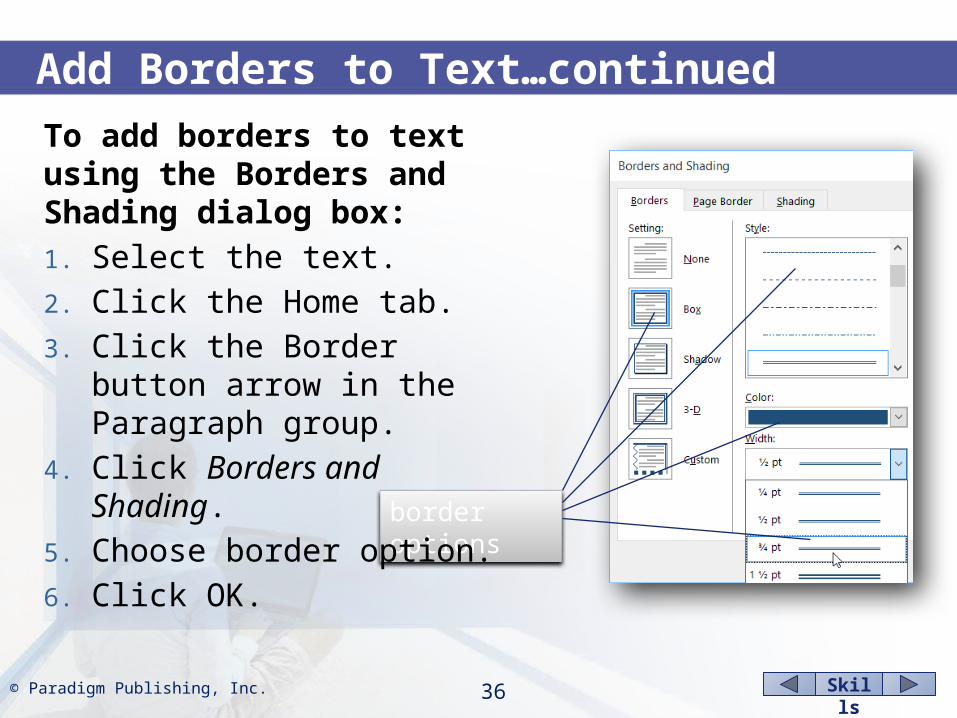
border options
To add borders to text using the Borders and Shading dialog box:1. Select the text.2. Click the Home tab.3. Click the Border button arrow
in the Paragraph group.4. Click Borders and Shading.5. Choose border option.6. Click OK.

Skills© Paradigm Publishing, Inc. 37
Add Shading to Text
Shading buttonTo add shading to text using the Shading button in the Paragraph group:1. Select the text.2. Click the Home tab.3. Click the Shading button
arrow in the Paragraph group.
4. Click color option.

Skills© Paradigm Publishing, Inc. 38
Add Shading to Text…continued
shading options
To add shading to text using the Borders and Shading dialog box:1. Select the text.2. Click the Home tab.3. Click the Border button arrow
in the Paragraph group.4. Click Borders and Shading.5. Click the Shading tab.6. Choose options.7. Click OK.

Skills© Paradigm Publishing, Inc. 39
Add a Page BorderTo add a page border:1. Click the Home tab.2. Click the Border button arrow
in the Paragraph group.3. Click Borders and Shading.4. Click the Page Border tab.5. Choose options.6. Click OK. page border
options
Skills© Paradigm Publishing, Inc. 40
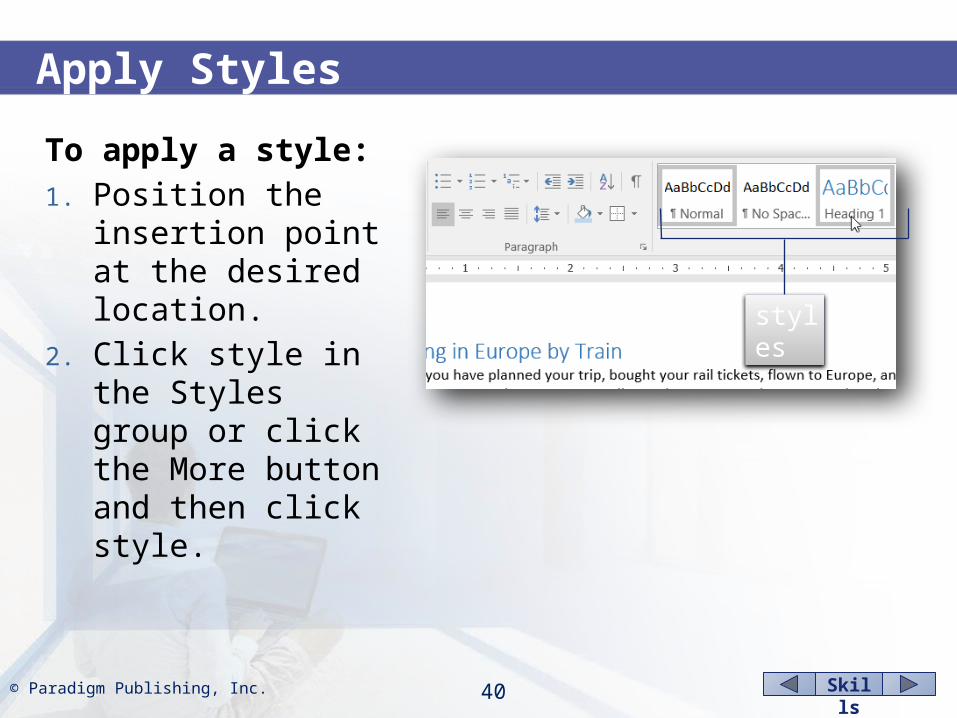
Apply Styles
To apply a style:1. Position the insertion
point at the desired location.
2. Click style in the Styles group or click the More button and then click style.
styles

Skills© Paradigm Publishing, Inc. 41
Apply Style Sets
To apply a style set:1. Click the Design tab.2. Click style set in the
Document Formatting group.
style set options
Skills© Paradigm Publishing, Inc. 42
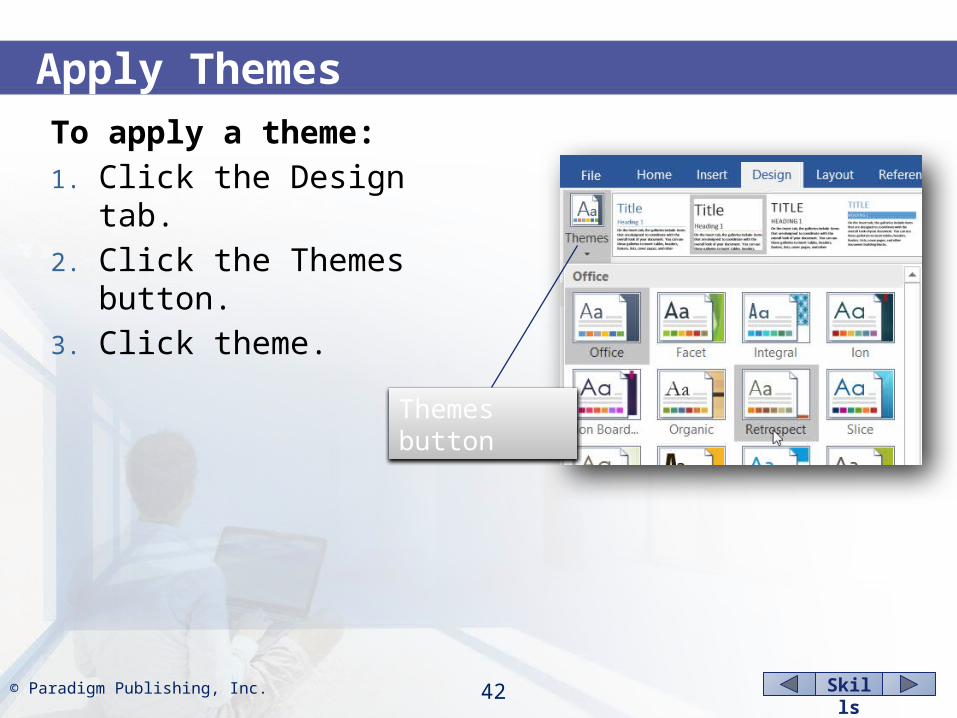
Apply Themes
Themes button
To apply a theme:1. Click the Design tab.2. Click the Themes button.3. Click theme.
Skills© Paradigm Publishing, Inc. 43
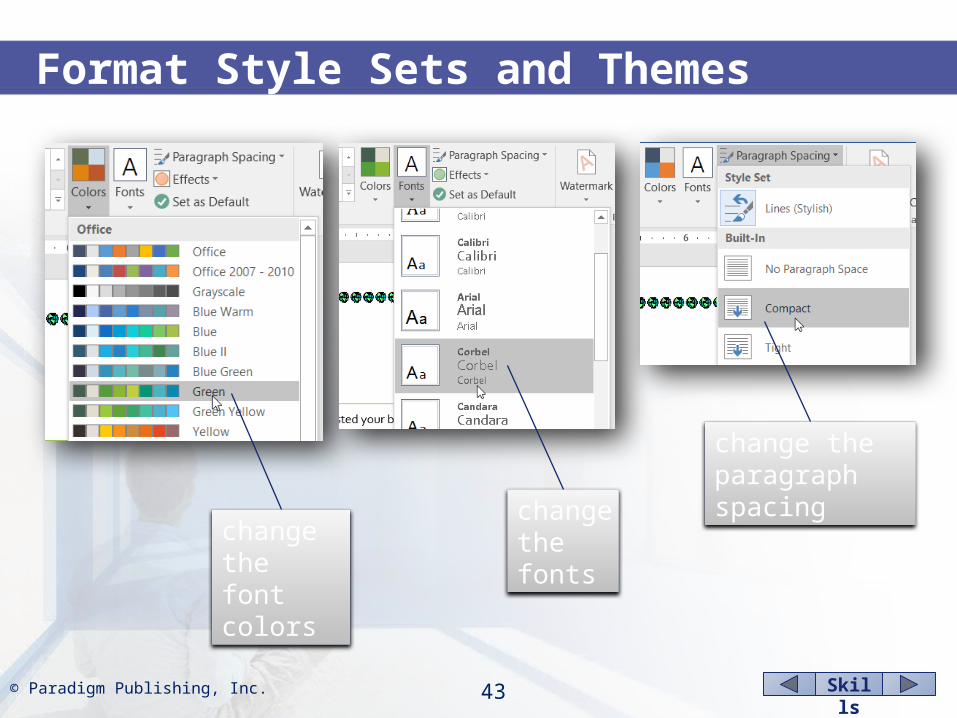
Format Style Sets and Themes
change the fonts
change the paragraph spacing
change the font colors

Skills© Paradigm Publishing, Inc. 44
1) What are the default tabs set?a. every 0.1”b. every 0.5”c. every 1.0”d. every 1.15”
3) The Borders and Shading button may be used to add what to a document?a. text shadingb. text borderc. page borderd. all of the above
2) These can be added to a tab to help guide the reader’s eyes across the page.a. leadersb. pointersc. dottersd. guiders
4) Apply a theme with the Themes button in this group on the Design tab.a. Page Backgroundb. Document Formattingc. Stylesd. Font
CHECKPOINT 3
Next Question
Next Question
Next Question
Next Slide
Answer
Answer
Answer
Answer
Related Documents