Making glues - Student sheet Nuffield Practical Work for Learning: Science in the workplace • Making glues • Student sheet page 1 of 8 © Nuffield Foundation 2013 • downloaded from www.nuffieldfoundation.org Video question sheet Use the boxes below to help you record what you learn about product development from the film. Questions Thoughts New information Write down any questions you have about any of the science that you did not understand, or that you want to learn more about. Write down what you thought about the information in the video, the people, the places, what those careers might be like Write down any information, ideas or events that you learned about for the first time.

Welcome message from author
This document is posted to help you gain knowledge. Please leave a comment to let me know what you think about it! Share it to your friends and learn new things together.
Transcript

Making glues - Student sheet
Nuffield Practical Work for Learning: Science in the workplace • Making glues • Student sheet page 1 of 8 © Nuffield Foundation 2013 • downloaded from www.nuffieldfoundation.org
Video question sheet Use the boxes below to help you record what you learn about product development from the film. Questions Thoughts New information Write down any questions you have about any of the science that you did not understand, or that you want to learn more about.
Write down what you thought about the information in the video, the people, the places, what those careers might be like
Write down any information, ideas or events that you learned about for the first time.
Making glues - Student sheet
Nuffield Practical Work for Learning: Science in the workplace • Making glues • Student sheet page 2 of 8 © Nuffield Foundation 2013 • downloaded from www.nuffieldfoundation.org
Making glue from milk Your task is to develop the strongest glue you can, starting from milk. You will use each of your glues to stick two lolly sticks together and then test its strength. In order to complete this task in the time available, you will need to share out the work amongst your team. Equipment available Spatula Stirring rod Measuring cylinder, 100 cm3 Measuring cylinder, 25 cm3 Beaker, 250 cm3
Beaker, 100 cm3 Filter funnel and paper Lolly sticks Indicator paper Pens or other for labelling
To make the glues SAFETY: Wear eye protection
1 Measure 100 cm3 of milk and 20 cm3 of vinegar into a beaker. Stir constantly with a stirring rod until small lumps start to form. Keep stirring until no more lumps form.
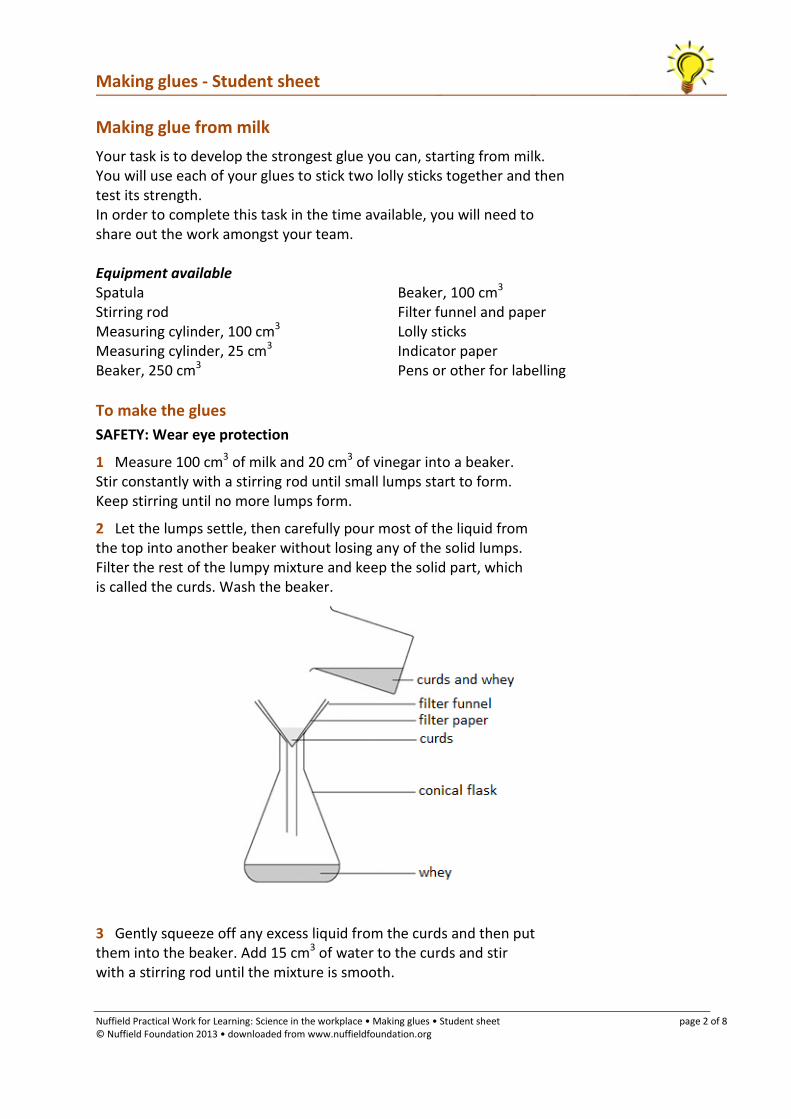
2 Let the lumps settle, then carefully pour most of the liquid from the top into another beaker without losing any of the solid lumps. Filter the rest of the lumpy mixture and keep the solid part, which is called the curds. Wash the beaker.
3 Gently squeeze off any excess liquid from the curds and then put them into the beaker. Add 15 cm3 of water to the curds and stir with a stirring rod until the mixture is smooth.
Making glues - Student sheet
Nuffield Practical Work for Learning: Science in the workplace • Making glues • Student sheet page 3 of 8 © Nuffield Foundation 2013 • downloaded from www.nuffieldfoundation.org
4 Divide the mixture into 3 or 4 portions and neutralise each with about ¼ spatula of base. Use a different base with each portion and stir it in.
5 Check that each portion is neutral using indicator paper. If it isn’t, add a little more base until it is. These are your glues.
6 Make other glues by following steps 1-4 but using different milks and bases.
Milks available: whole milk, semi-skimmed, skimmed Bases available: sodium hydrogen carbonate, magnesium carbonate, calcium carbonate, milk of magnesia
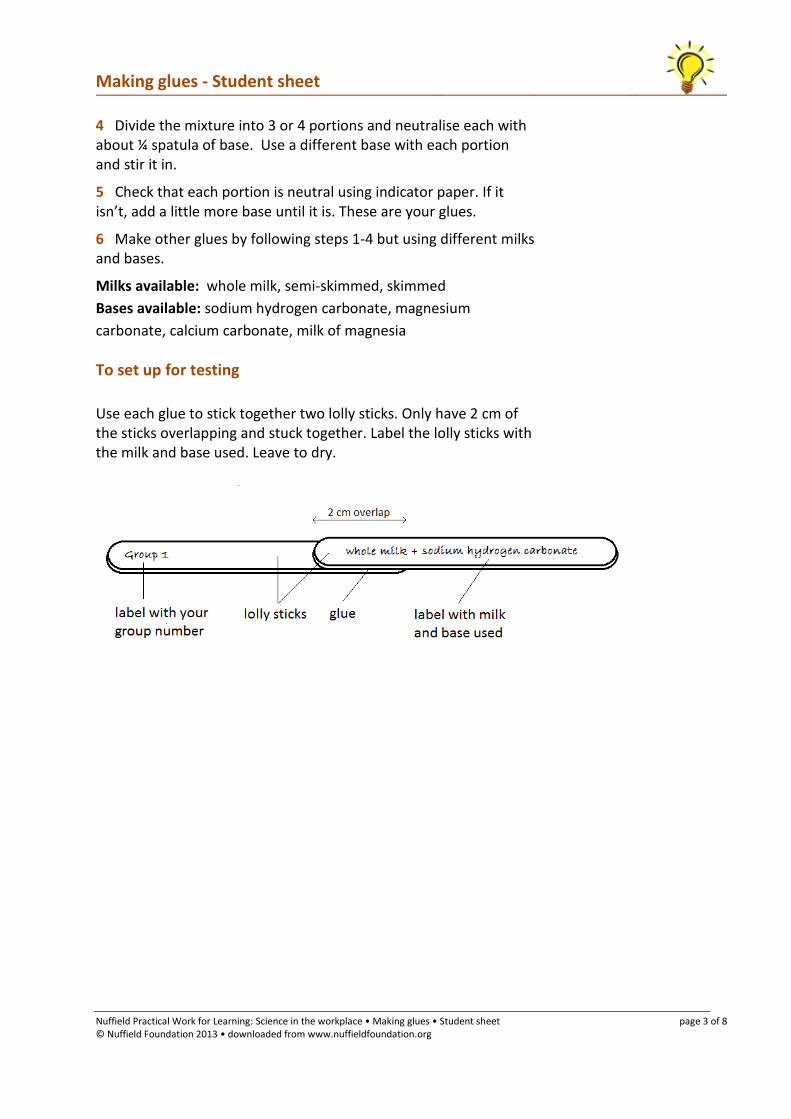
To set up for testing Use each glue to stick together two lolly sticks. Only have 2 cm of the sticks overlapping and stuck together. Label the lolly sticks with the milk and base used. Leave to dry.

Making glues - Student sheet
Nuffield Practical Work for Learning: Science in the workplace • Making glues • Student sheet page 4 of 8 © Nuffield Foundation 2013 • downloaded from www.nuffieldfoundation.org
Testing the glues
To do SAFETY: Wear eye protection
1 Arrange two tables or chairs about 10 cm apart. Lay your glued lolly sticks so that they form a bridge between the two.
SAFETY: Ensure that there is a box of sand or scrunched up newspaper underneath the weights. Ensure that you keep your feet away from where the weights will fall.
2 Hang a weights hook onto the lower of the two lolly sticks as close to the glued join as you can. Add weights about 10 N at a time and record the force required to break the glue.
To record Record your results in a table like the one below:
Milk Base Force required to break glue
Making glues - Student sheet
Nuffield Practical Work for Learning: Science in the workplace • Making glues • Student sheet page 5 of 8 © Nuffield Foundation 2013 • downloaded from www.nuffieldfoundation.org
Which is the best glue for sticking wood? – Writing a report
In industry it is no good carrying out research if the research cannot be communicated to the people who need the results.
The results are often communicated in a report.
You are going to write a report to describe what you did and what you found out about glues for sticking wood.
You should include:
• The question you were trying to answer: ‘Which glue is best for sticking wood?’
• A short description of how you made the glue • Which different glues you made – a table would show this clearly • How you tested the glues – a well-labelled diagram would show
this clearly • The results of your testing the glues – a table is the best way to
display the results • Your conclusions – which glue should the company make?
You should make sure:
• That you write clearly and concisely – you do not need to write a lot, just enough to communicate what you did
• That you use good English – spelling and grammar are important • That someone who was not involved in your research can
understand what you did and what you found out from what you have written.
Extension In your report you could also include:
• A comparison of what you found out with what was found out by the other teams. Did you get similar results or different?
• If the results were different why do you think this might be?
• How reliable do you think the results are, and how repeatable do you think they would be?
• Are you confident in your conclusions about which glue the company should make? What further research might be needed to give you greater confidence in your results?
Making glues - Student sheet
Nuffield Practical Work for Learning: Science in the workplace • Making glues • Student sheet page 6 of 8 © Nuffield Foundation 2013 • downloaded from www.nuffieldfoundation.org
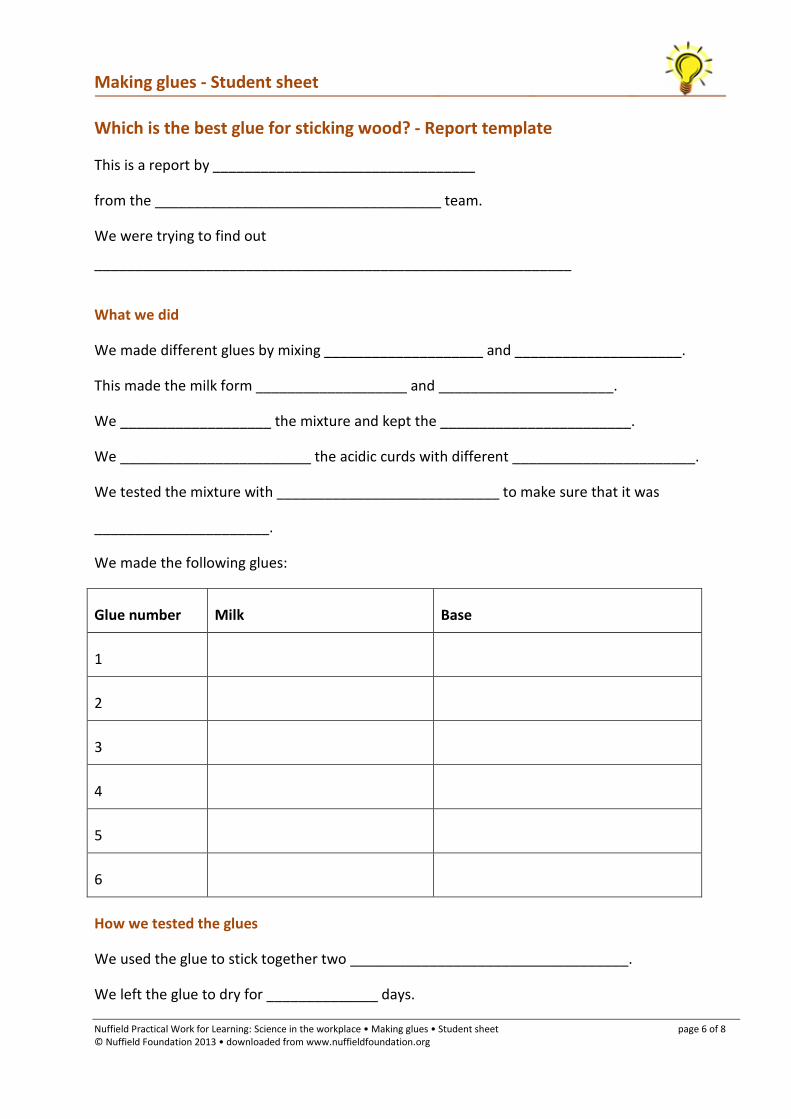
Which is the best glue for sticking wood? - Report template
This is a report by _________________________________
from the ____________________________________ team.
We were trying to find out
____________________________________________________________
What we did
We made different glues by mixing ____________________ and _____________________.
This made the milk form ___________________ and ______________________.
We ___________________ the mixture and kept the ________________________.
We ________________________ the acidic curds with different _______________________.
We tested the mixture with ____________________________ to make sure that it was
______________________.
We made the following glues:
Glue number Milk Base
1
2
3
4
5
6
How we tested the glues
We used the glue to stick together two ___________________________________.
We left the glue to dry for ______________ days.
Making glues - Student sheet
Nuffield Practical Work for Learning: Science in the workplace • Making glues • Student sheet page 7 of 8 © Nuffield Foundation 2013 • downloaded from www.nuffieldfoundation.org
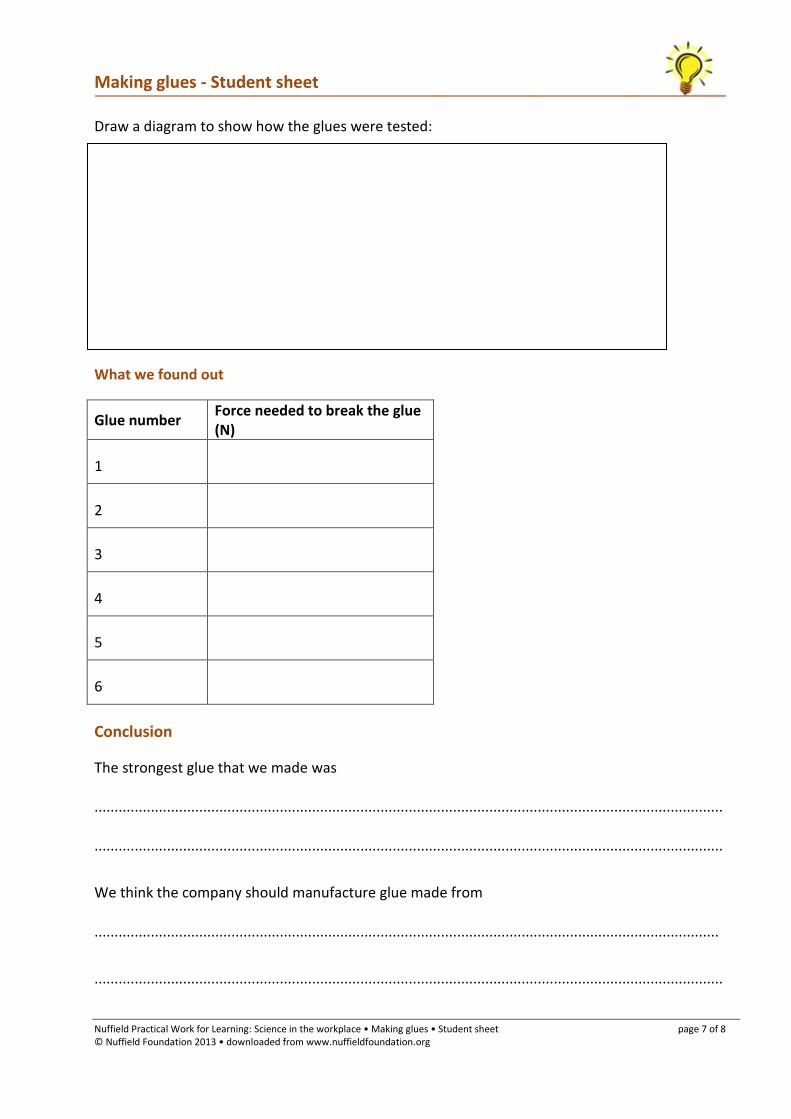
Draw a diagram to show how the glues were tested:
What we found out
Glue number Force needed to break the glue (N)
1
2
3
4
5
6
Conclusion
The strongest glue that we made was
............................................................................................................................................................
............................................................................................................................................................
We think the company should manufacture glue made from
...........................................................................................................................................................
............................................................................................................................................................

Making glues - Student sheet
Nuffield Practical Work for Learning: Science in the workplace • Making glues • Student sheet page 8 of 8 © Nuffield Foundation 2013 • downloaded from www.nuffieldfoundation.org
Making glues – Assessing Learning
Roles in development industry There are many different people involved in getting a product such as a new glue to the market. Some of the roles involved are shown below. Match the job to the correct place on the timeline.
• Sales and marketing • Product development chemist • Formulation chemist to get the product into
the best formulation for customers to use • Post sales advisory chemist • Technician to carry out testing • Manufacturing
Match the roles to the images on the timeline.
Making glues – Teacher guidance
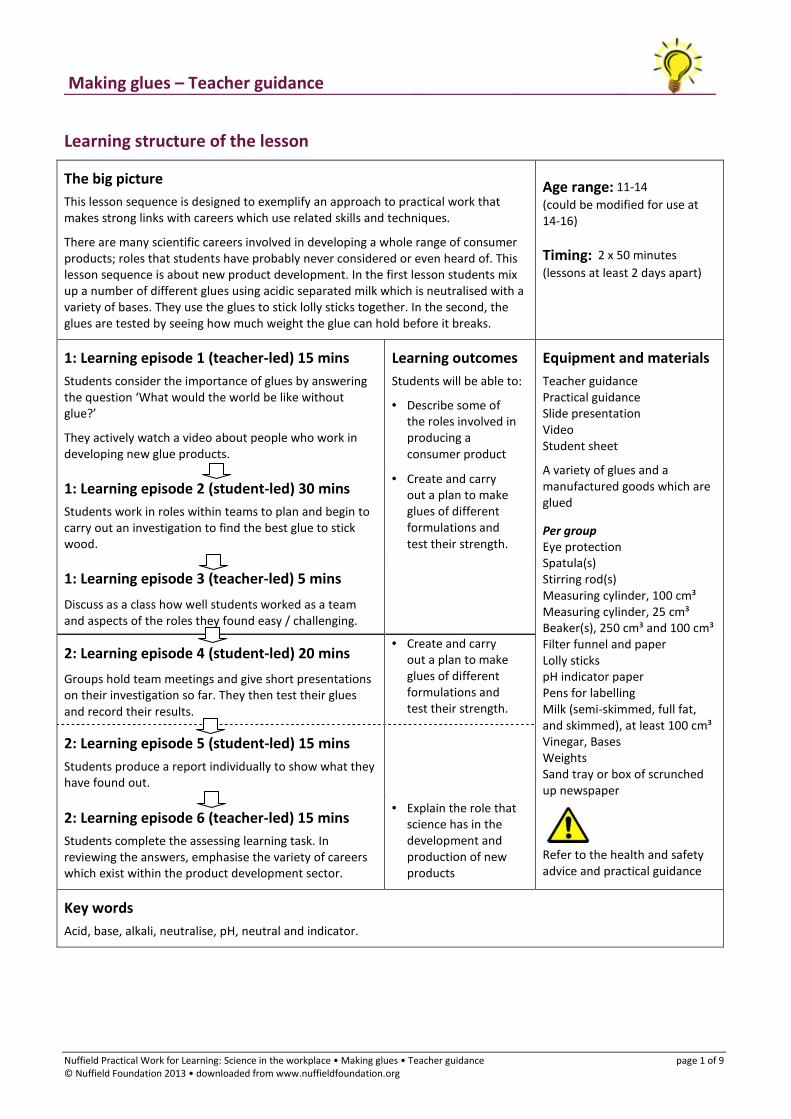
Nuffield Practical Work for Learning: Science in the workplace • Making glues • Teacher guidance page 1 of 9 © Nuffield Foundation 2013 • downloaded from www.nuffieldfoundation.org
Learning structure of the lesson
The big picture
This lesson sequence is designed to exemplify an approach to practical work that makes strong links with careers which use related skills and techniques.
There are many scientific careers involved in developing a whole range of consumer products; roles that students have probably never considered or even heard of. This lesson sequence is about new product development. In the first lesson students mix up a number of different glues using acidic separated milk which is neutralised with a variety of bases. They use the glues to stick lolly sticks together. In the second, the glues are tested by seeing how much weight the glue can hold before it breaks.
Age range: 11-14 (could be modified for use at 14-16) Timing: 2 x 50 minutes (lessons at least 2 days apart)
1: Learning episode 1 (teacher-led) 15 mins Students consider the importance of glues by answering the question ‘What would the world be like without glue?’
They actively watch a video about people who work in developing new glue products.
Learning outcomes Students will be able to: • Describe some of
the roles involved in producing a consumer product
Equipment and materials Teacher guidance Practical guidance Slide presentation Video Student sheet
A variety of glues and a manufactured goods which are glued
Per group Eye protection Spatula(s) Stirring rod(s) Measuring cylinder, 100 cm³ Measuring cylinder, 25 cm³ Beaker(s), 250 cm³ and 100 cm³ Filter funnel and paper Lolly sticks pH indicator paper Pens for labelling Milk (semi-skimmed, full fat, and skimmed), at least 100 cm³ Vinegar, Bases Weights Sand tray or box of scrunched up newspaper
Refer to the health and safety advice and practical guidance
1: Learning episode 2 (student-led) 30 mins Students work in roles within teams to plan and begin to carry out an investigation to find the best glue to stick wood.
• Create and carry out a plan to make glues of different formulations and test their strength.
1: Learning episode 3 (teacher-led) 5 mins Discuss as a class how well students worked as a team and aspects of the roles they found easy / challenging.
2: Learning episode 4 (student-led) 20 mins Groups hold team meetings and give short presentations on their investigation so far. They then test their glues and record their results.
• Create and carry out a plan to make glues of different formulations and test their strength.
2: Learning episode 5 (student-led) 15 mins Students produce a report individually to show what they have found out.
2: Learning episode 6 (teacher-led) 15 mins Students complete the assessing learning task. In reviewing the answers, emphasise the variety of careers which exist within the product development sector.
• Explain the role that science has in the development and production of new products
Key words Acid, base, alkali, neutralise, pH, neutral and indicator.

Making glues – Teacher guidance
Nuffield Practical Work for Learning: Science in the workplace • Making glues • Teacher guidance page 2 of 9 © Nuffield Foundation 2013 • downloaded from www.nuffieldfoundation.org
Prior knowledge It is assumed that students know the following.
• Acids can be neutralised by alkalis.
• Indicators can be used to test for acidity or alkalinity.
Background information The glue produced in this practical consists of particles of the protein casein that are precipitated from the milk by the adding the acid. It is the polymerisation of these protein molecules that forms the glue. The fat in the milk can get in the way of these polymer chains – lubricating them like oil does in a bicycle chain – and preventing them from sticking together as effectively. Skimmed milk contains less fat and so tends to give the best glues.
In addition to being consumed in milk, casein is used to manufacture adhesives, binders, protective coatings, plastics (such as for knife handles and knitting needles), fabrics, food additives, and many other products. It is commonly used by bodybuilders as a slow-digesting source of amino acids.
Further information on how the glues work can be found in the practical chemistry link above.
Terminology acid – a chemical with a pH below 7
base – a base can be thought of as the chemical opposite of an acid; a base will neutralise an acid
alkali – a soluble base; an alkali dissolves in water to give a solution with a pH above 7
neutralise – to mix an acid and an alkali together to make a neutral solution with a pH of 7
pH – a measure of the acidity or alkalinity of a chemical
neutral – a pH of 7
indicator – a solution or paper used to show the pH of a chemical
Differentiation For older students these lessons can be used to emphasise concepts such as repeatability, reliability, accuracy of results. For other groups it may be more appropriate to focus on the planning and team work aspects of the task.
Optional extension activities
After students have written their reports, collate all the teams’ results and hold another team meeting to look at the spread of results, even if this is just by ordering the glues according to which is the most effective. Discuss as a class the importance of repeatability, reliability and how a homemade product will naturally vary compared to a commercially produced one.

Making glues – Teacher guidance
Nuffield Practical Work for Learning: Science in the workplace • Making glues • Teacher guidance page 3 of 9 © Nuffield Foundation 2013 • downloaded from www.nuffieldfoundation.org
Students could include in their reports how their results compared with the results from the other teams, and comment on the reliability of the results in the light of what other teams found out. How confident are they that the glue that they found to be the best really is better than the others?
Related practical activities on Practical Chemistry This type of approach could also be used for the following practical activities:
Making esters, acids and alcohols: www.nuffieldfoundation.org/practical-chemistry/making-esters-alcohols-and-acids (for older students)
PVA polymer slime: www.nuffieldfoundation.org/practical-chemistry/pva-polymer-slime
Developing glue: www.nuffieldfoundation.org/practical-chemistry/developing-glue
Useful weblinks This activity, from the RSC publication ‘Inspirational Chemistry’, puts making new glues into a wider context: www.rsc.org/education/teachers/Resources/inspirational/resources/3.4.3.pdf
This information from the RSC publication ‘Inspirational Chemistry’, is about making new glue for the ATLAS detector in the Large Hadron Collider. It is slightly out of date as it was written before the LHC was working but the information is all correct. www.rsc.org/education/teachers/Resources/inspirational/resources/3.4.2.pdf
For information on formulation chemistry: www.docbrown.info/page01/ExIndChem/FormulationChemistry.htm
For information on general product chemistry portal.acs.org/portal/acs/corg/content?_nfpb=true&_pageLabel=PP_ARTICLEMAIN&node_id=1188&content_id=CTP_003387&use_sec=true&sec_url_var=region1&__uuid=3631be2a-2d53-46d6-a03c-96aa18874198
For careers profiles of a range of Industry careers including some product development chemists www.rsc.org/Education/courses-and-careers/profiles/Industry.asp
The Procter and Gamble careers website is not aimed particularly at school students, but does show the huge variety of roles which are available within the products sector. www.pgcareers.com/GraduatedRoles
An article from Catalyst magazine about a formulation chemist in the pharmaceutical industry: www.catalyststudent.org.uk/dl/0c89f48ccdbb4c5bd9a9616f11c09a11863869b1/74-catalyst_20_1_432.pdf

Making glues – Teacher guidance
Nuffield Practical Work for Learning: Science in the workplace • Making glues • Teacher guidance page 4 of 9 © Nuffield Foundation 2013 • downloaded from www.nuffieldfoundation.org
Glue Role Cards Lab Technician
Your role:
Measure and weigh out the chemicals
Label the chemicals
Label the glues which have been made
Lab Technician
Your role:
Measure and weigh out the chemicals
Label the chemicals
Label the glues which have been made
Product Development Chemist
Your role:
Use the chemicals weighed out by the lab technician to separate the milk into curds and whey
Neutralise the curds to make the glue
Liaise with the lab technician so that the glues are labelled correctly
Product Development Chemist
Your role:
Use the chemicals weighed out by the lab technician to separate the milk into curds and whey
Neutralise the curds to make the glue
Liaise with the lab technician so that the glues are labelled correctly
Product Development Manager
Your role:
Design the work you do to ensure that a variety of glues are made
Oversee the smooth running of your team
Ensure everyone is busy
Product Development Manager
Your role:
Design the work you do to ensure that a variety of glues are made
Oversee the smooth running of your team
Ensure everyone is busy
Product Testing Technician
Your role:
Set up the glues for testing
Ensure that the tests will be fair
Label everything for testing
Product Testing Technician
Your role:
Set up the glues for testing
Ensure that the tests will be fair
Label everything for testing
Making glues – Teacher guidance
Nuffield Practical Work for Learning: Science in the workplace • Making glues • Teacher guidance page 5 of 9 © Nuffield Foundation 2013 • downloaded from www.nuffieldfoundation.org
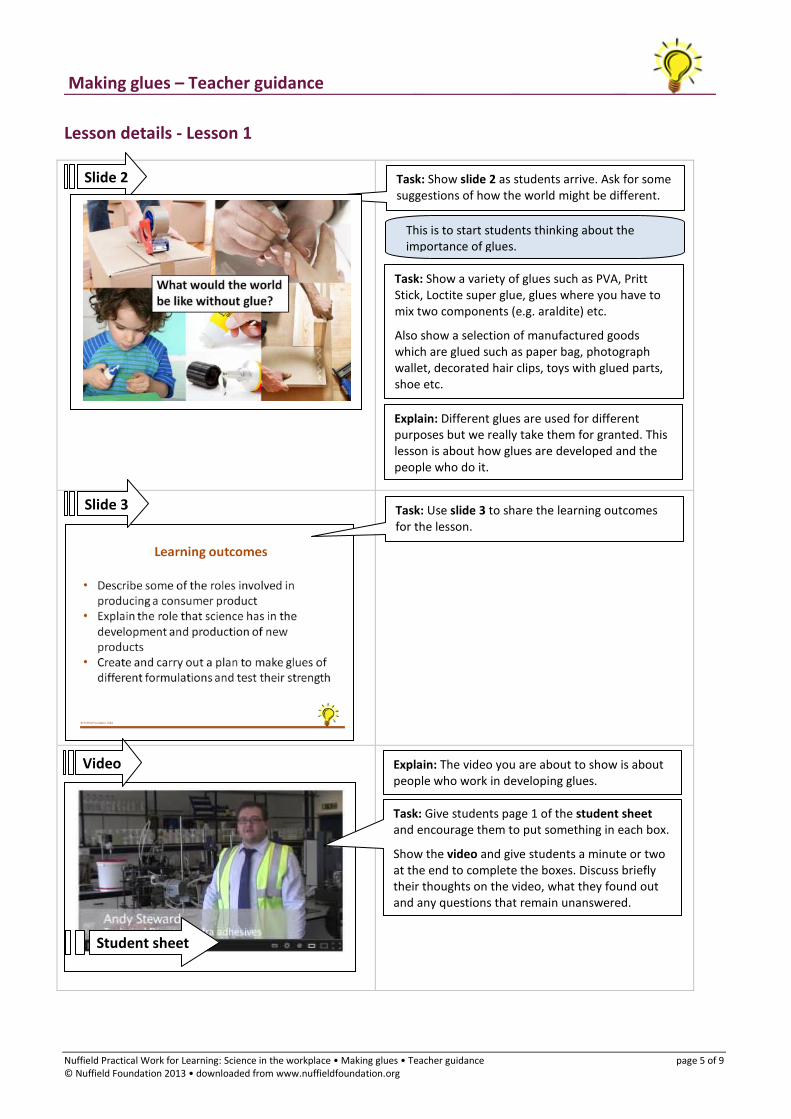
Lesson details - Lesson 1
Task: Show a variety of glues such as PVA, Pritt Stick, Loctite super glue, glues where you have to mix two components (e.g. araldite) etc.
Also show a selection of manufactured goods which are glued such as paper bag, photograph wallet, decorated hair clips, toys with glued parts, shoe etc.
Task: Show slide 2 as students arrive. Ask for some suggestions of how the world might be different.
This is to start students thinking about the importance of glues.
Slide 2
Slide 3
Explain: Different glues are used for different purposes but we really take them for granted. This lesson is about how glues are developed and the people who do it.
Task: Use slide 3 to share the learning outcomes for the lesson.
Explain: The video you are about to show is about people who work in developing glues.
Task: Give students page 1 of the student sheet and encourage them to put something in each box.
Show the video and give students a minute or two at the end to complete the boxes. Discuss briefly their thoughts on the video, what they found out and any questions that remain unanswered.
Student sheet
Video

Making glues – Teacher guidance
Nuffield Practical Work for Learning: Science in the workplace • Making glues • Teacher guidance page 6 of 9 © Nuffield Foundation 2013 • downloaded from www.nuffieldfoundation.org
Explain: For the next 2 lessons the students are going to imagine that they are a team of researchers in a glue manufacturing company. They will work in teams of four and need to assign each member a role as shown on the role cards.
In their teams they will make a basic glue mix from milk and vinegar. They will divide this into portions, and neutralise each portion with a different base to form the different glues. They use each of their different glues to stick lolly sticks together for testing..
The teams can think of a name for their ‘Glue company’ if they wish.
You may want to assign roles to particular students. (In a team of 5 a second chemist can be appointed; in a team of 3 the lab technician can also be in charge of testing)
Role cards
Explain: They have been asked to find the best new glue to stick wood. Each role will need to be carried out carefully for the team as a whole to succeed.
Slides 4-6 Task: Introduce the practical activity using slides 4-6.
Differentiation: For younger or less able students it may be necessary to demonstrate how to make the first glue and neutralise a portion with a base.
Explain: The glues will need to set (or cure) before they can be tested so the testing will take place next lesson.
Explain: They will need to think about how to make it a reliable and accurate investigation and keep a record of what they have done so they know what their formulations are and can repeat the process of making the glue.

Making glues – Teacher guidance
Nuffield Practical Work for Learning: Science in the workplace • Making glues • Teacher guidance page 7 of 9 © Nuffield Foundation 2013 • downloaded from www.nuffieldfoundation.org
Lesson details - Lesson 2
Task: In their assigned roles, students plan and then carry out the practical work. (See practical guidance)
Task: Discuss with students how well they worked as a team. Ask ’What aspects of their roles did they find easy/challenging?’.
Student sheet
Task: Tell students at what time they will finish so that they can organise their work accordingly.
Students who are not busy at any point can step in and help any team member who is struggling. The Product Development Manager can help to ensure that this is happening.
This is an opportunity for pupils to reflect on their role and how well they have taken on their role.
Slide 8 Task: Use slide 8 to remind students of the learning outcomes from the previous lesson.
Practical
Making glues – Teacher guidance
Nuffield Practical Work for Learning: Science in the workplace • Making glues • Teacher guidance page 8 of 9 © Nuffield Foundation 2013 • downloaded from www.nuffieldfoundation.org
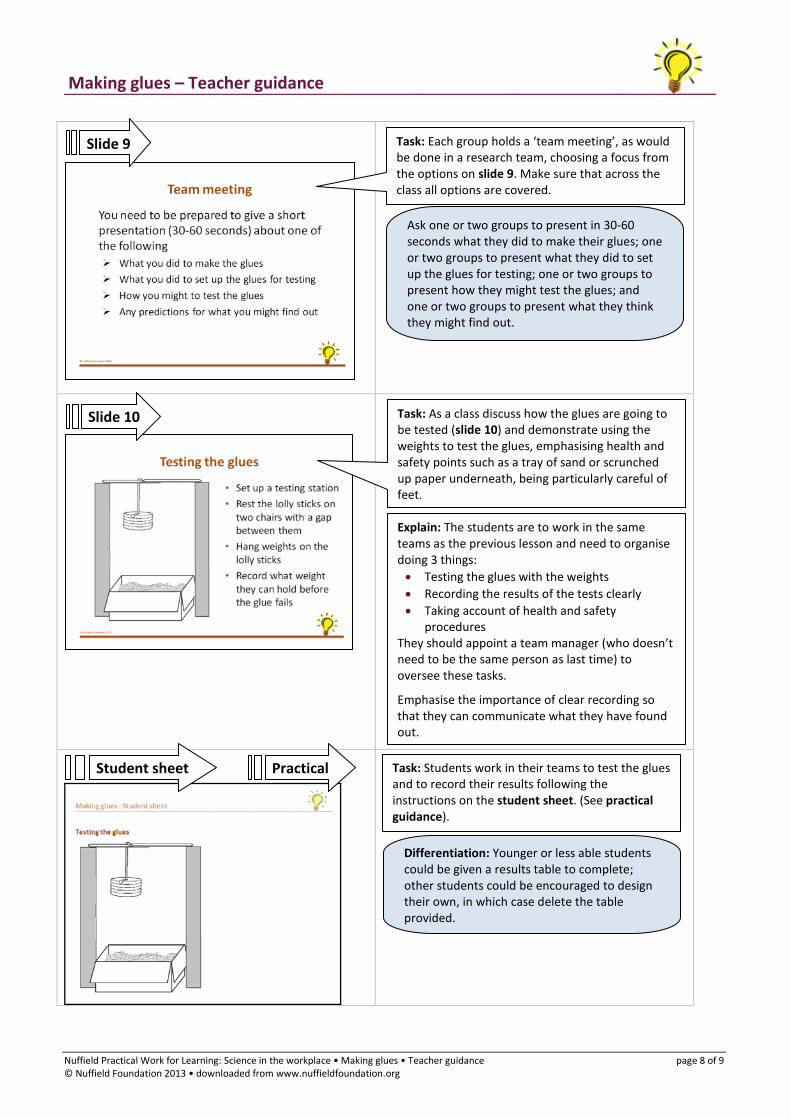
Slide 9
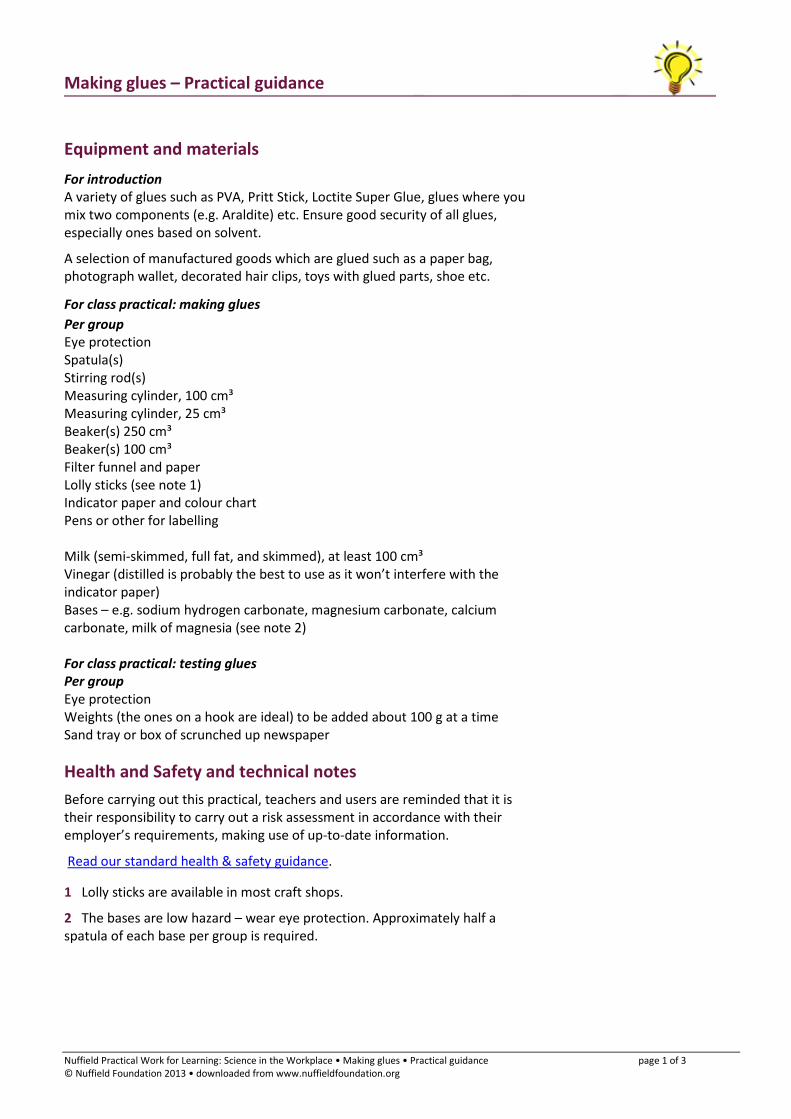
Slide 10
Task: Each group holds a ‘team meeting’, as would be done in a research team, choosing a focus from the options on slide 9. Make sure that across the class all options are covered.
Task: As a class discuss how the glues are going to be tested (slide 10) and demonstrate using the weights to test the glues, emphasising health and safety points such as a tray of sand or scrunched up paper underneath, being particularly careful of feet.
Ask one or two groups to present in 30-60 seconds what they did to make their glues; one or two groups to present what they did to set up the glues for testing; one or two groups to present how they might test the glues; and one or two groups to present what they think they might find out.
Explain: The students are to work in the same teams as the previous lesson and need to organise doing 3 things: • Testing the glues with the weights • Recording the results of the tests clearly • Taking account of health and safety
procedures They should appoint a team manager (who doesn’t need to be the same person as last time) to oversee these tasks.
Emphasise the importance of clear recording so that they can communicate what they have found out.
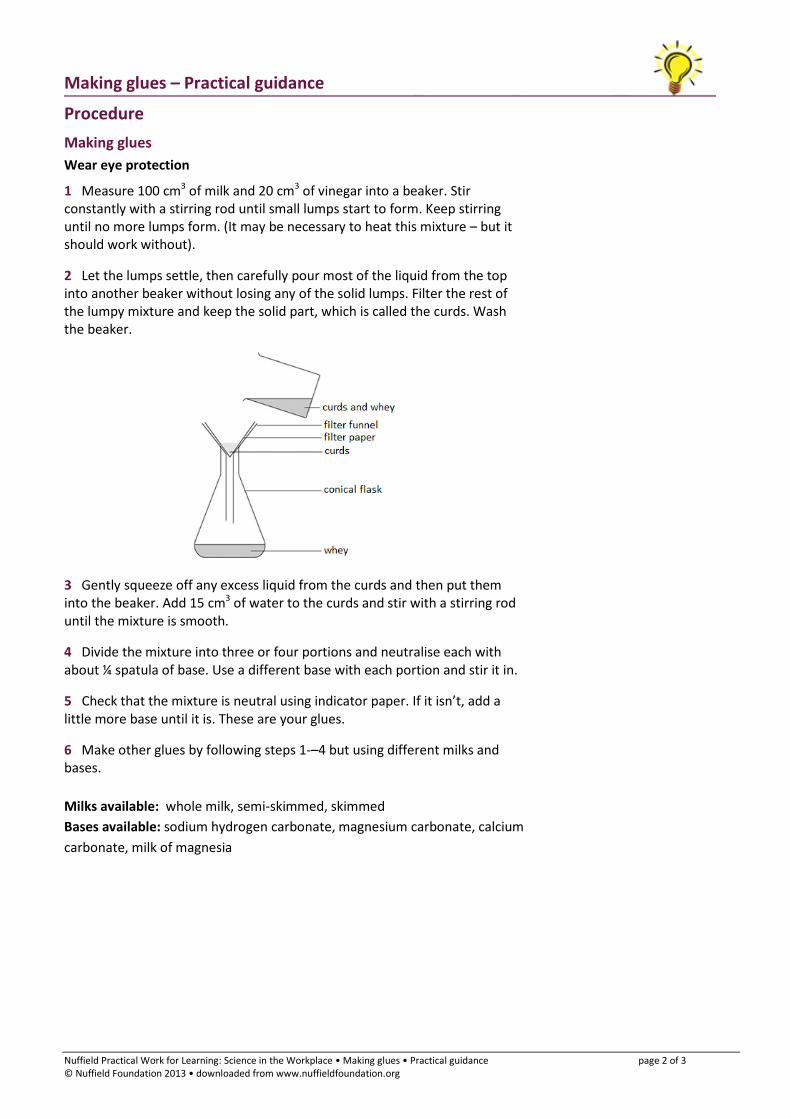
Practical Task: Students work in their teams to test the glues and to record their results following the instructions on the student sheet. (See practical guidance).
Differentiation: Younger or less able students could be given a results table to complete; other students could be encouraged to design their own, in which case delete the table provided.
Student sheet

Making glues – Teacher guidance
Nuffield Practical Work for Learning: Science in the workplace • Making glues • Teacher guidance page 9 of 9 © Nuffield Foundation 2013 • downloaded from www.nuffieldfoundation.org
Slide 11
Task: Discuss the importance of communication skills, and when students have had to use these skills to complete their tasks.
Task: Students produce a report individually. The student sheet lists what should be included.
Link back to the original problem – ‘What is the best glue to stick wood?’
Differentiation: For students needing literacy support a report template is available on student sheet pages 6-7 to show what they have found out.
The report could be finished for homework.
Student sheet
Task: Give students the ‘Assessing learning’ task on the student sheet and slide 11. They could work on this in pairs. They should consider both what they think is represented in the image and what order they think the different activities take place.
The purpose of the assessing learning activity emphasise the variety of roles and careers available in product development.
Task: Use slide 12 to review the answers to the assessing learning activity. Emphasise the wide variety of roles and careers which exist within the product development sector.
Slide 12
Making glues – Practical guidance
Nuffield Practical Work for Learning: Science in the Workplace • Making glues • Practical guidance page 1 of 3 © Nuffield Foundation 2013 • downloaded from www.nuffieldfoundation.org
Equipment and materials For introduction A variety of glues such as PVA, Pritt Stick, Loctite Super Glue, glues where you mix two components (e.g. Araldite) etc. Ensure good security of all glues, especially ones based on solvent.
A selection of manufactured goods which are glued such as a paper bag, photograph wallet, decorated hair clips, toys with glued parts, shoe etc.
For class practical: making glues Per group Eye protection Spatula(s) Stirring rod(s) Measuring cylinder, 100 cm³ Measuring cylinder, 25 cm³ Beaker(s) 250 cm³ Beaker(s) 100 cm³ Filter funnel and paper Lolly sticks (see note 1) Indicator paper and colour chart Pens or other for labelling Milk (semi-skimmed, full fat, and skimmed), at least 100 cm³ Vinegar (distilled is probably the best to use as it won’t interfere with the indicator paper) Bases – e.g. sodium hydrogen carbonate, magnesium carbonate, calcium carbonate, milk of magnesia (see note 2) For class practical: testing glues Per group Eye protection Weights (the ones on a hook are ideal) to be added about 100 g at a time Sand tray or box of scrunched up newspaper
Health and Safety and technical notes Before carrying out this practical, teachers and users are reminded that it is their responsibility to carry out a risk assessment in accordance with their employer’s requirements, making use of up-to-date information.
Read our standard health & safety guidance.
1 Lolly sticks are available in most craft shops.
2 The bases are low hazard – wear eye protection. Approximately half a spatula of each base per group is required.
Making glues – Practical guidance
Nuffield Practical Work for Learning: Science in the Workplace • Making glues • Practical guidance page 2 of 3 © Nuffield Foundation 2013 • downloaded from www.nuffieldfoundation.org
Procedure Making glues Wear eye protection
1 Measure 100 cm3 of milk and 20 cm3 of vinegar into a beaker. Stir constantly with a stirring rod until small lumps start to form. Keep stirring until no more lumps form. (It may be necessary to heat this mixture – but it should work without).
2 Let the lumps settle, then carefully pour most of the liquid from the top into another beaker without losing any of the solid lumps. Filter the rest of the lumpy mixture and keep the solid part, which is called the curds. Wash the beaker.
3 Gently squeeze off any excess liquid from the curds and then put them into the beaker. Add 15 cm3 of water to the curds and stir with a stirring rod until the mixture is smooth.
4 Divide the mixture into three or four portions and neutralise each with about ¼ spatula of base. Use a different base with each portion and stir it in.
5 Check that the mixture is neutral using indicator paper. If it isn’t, add a little more base until it is. These are your glues.
6 Make other glues by following steps 1-–4 but using different milks and bases. Milks available: whole milk, semi-skimmed, skimmed Bases available: sodium hydrogen carbonate, magnesium carbonate, calcium carbonate, milk of magnesia

Making glues – Practical guidance
Nuffield Practical Work for Learning: Science in the Workplace • Making glues • Practical guidance page 3 of 3 © Nuffield Foundation 2013 • downloaded from www.nuffieldfoundation.org
7 Use each glue to stick together two lolly sticks. Only have 2 cm of the sticks overlapping and stuck together. Label the lolly sticks with the milk and base used. Leave to dry.
Testing the glues 1 Arrange two tables or chairs about 10 cm apart. Lay your glued lolly sticks so that they form a bridge between the two.
SAFETY: Ensure that there is a box of sand or scrunched up newspaper underneath the weights. Ensure that you keep your feet away from where the weights will fall.
2 Hang a weights hook onto the lower of the two lolly sticks as close to the glued join as you can. Add weights about 10 N at a time and record the force required to break the glue.
Related Documents