Lockbox.doc Page: 1 of 25 Oracle Receivables Overview of AutoLockbox Phanilatha Tota , Sr. Tech Analyst Oracle Gold Applications Support Document Intent: The intent of this paper is to give an overview of AutoLockbox and provide all the setups required to test Autolockbox. Introduction AutoLockbox is a service that commercial banks offer corporate customers to enable them to outsource their accounts receivable payment processing. AutoLockbox eliminates manual data entry by automatically processing receipts that are sent directly to your bank. You can also use AutoLockbox for historical data conversion. For example, you can use AutoLockbox to transfer receipts from your previous accounting system into Receivables. AutoLockbox ensures that the receipts are accurate and valid before transferring them into Receivables. AutoLockbox is a three step process: 1. Import: During this step, Lockbox reads and formats the data from your bank file into interface table AR_PAYMENTS_INTERFACE_ALL using a SQL *Loader script. 2. Validation: The validation program checks data in this interface table for compatibility with Receivables. Once validated, the data is transferred into QuickCash tables (AR_INTERIM_CASH_RECEIPTS_ALL and AR_INTERIM_CASH_RCPT_LINES_ALL) . At this point, you can optionally query your receipts in the QuickCash window and change how they will be applied before submitting the final step, Post QuickCash. 3. Post QuickCash: This step applies the receipts and updates your customer’s balances. These steps can be submitted individually or at the same time from the submit Lockbox Processing window. After you run Post QuickCash, Receivables treats the receipts like any other receipts, you can reverse and reapply them and apply any unapplied, unidentified, or on-account amounts.

Welcome message from author
This document is posted to help you gain knowledge. Please leave a comment to let me know what you think about it! Share it to your friends and learn new things together.
Transcript

Lockbox.doc Page: 1 of 25
Oracle ReceivablesOverview of AutoLockbox
Phanilatha Tota , Sr. Tech AnalystOracle Gold Applications Support
Document Intent: The intent of this paper is to give an overview of AutoLockbox andprovide all the setups required to test Autolockbox.
Introduction
AutoLockbox is a service that commercial banks offer corporate customers to enablethem to outsource their accounts receivable payment processing. AutoLockbox eliminatesmanual data entry by automatically processing receipts that are sent directly to your bank.You can also use AutoLockbox for historical data conversion. For example, you can useAutoLockbox to transfer receipts from your previous accounting system into Receivables.AutoLockbox ensures that the receipts are accurate and valid before transferring theminto Receivables.
AutoLockbox is a three step process:
1. Import: During this step, Lockbox reads and formats the data from your bank fileinto interface table AR_PAYMENTS_INTERFACE_ALL using a SQL *Loaderscript.
2. Validation: The validation program checks data in this interface table forcompatibility with Receivables. Once validated, the data is transferred intoQuickCash tables (AR_INTERIM_CASH_RECEIPTS_ALL andAR_INTERIM_CASH_RCPT_LINES_ALL) . At this point, you can optionallyquery your receipts in the QuickCash window and change how they will be appliedbefore submitting the final step, Post QuickCash.
3. Post QuickCash: This step applies the receipts and updates your customer’sbalances.
These steps can be submitted individually or at the same time from the submit LockboxProcessing window. After you run Post QuickCash, Receivables treats the receipts likeany other receipts, you can reverse and reapply them and apply any unapplied,unidentified, or on-account amounts.

Lockbox.doc Page: 2 of 25
Importing Data from the data file provided by Bank
Bank File(Submit Import)
AR_PAYMENTS_INTERFACE_ALL(Submit Validation)
AR_INTERIM_CASH_RECEIPTS_ALLAR_INTERIM_CASH_RCPT_LINES_ALL
(Submit Post Quickcash)
AR_CASH_RECEIPTS_ALLAR_CASH_RECEIPT_HISTORY_ALL
AR_DISTRIBUTIONS_ALLAR_RECEIVABLE_APPLICATIONS_ALL
AR_PAYMENT_SCHEDULES_ALL

Lockbox.doc Page: 3 of 25
Setup
♦ Define Banks (Pg# 5)⇒ Define Remittance Bank with Account use Internal where checks from
customer are deposited.♦ Define Receipt Class (Pg# 8)
⇒ Define a Receipt class to determine the required processing steps for receiptsto which you assign payment methods with this class.
♦ Define Payment Methods (Pg# 8)⇒ Define a payment method with all receipt accounts.
♦ Define Receipt Source (Pg# 10)⇒ Define Receipt Batch Source and attach receipt class, payment method and
remittance bank account information to the Receipt Source.♦ Define Lockbox (Pg# 11)
⇒ Define Lockboxes to use the Receivables Autolockbox program.♦ Define Transmission Format (Pg# 15)
⇒ Define the Transmission Format which Auto Lockbox uses when importingdata into Receivables.
♦ Define AutoCash Rule Sets (Pg# 20)⇒ Define AutoCash Rule Sets to determine the sequence of rules that Post
QuickCash uses to update Customer’s account balances.♦ Control file (Pg# 21)
⇒ Create a control file which is used by SQL * Loader to import the data intointerface table.
⇒ Place this control file in the directory $AR_TOP/bin⇒ Extension of this file should be .ctl
♦ Data file (Pg# 21)
How AutoLockbox Identifies Customers for a ReceiptAutoLockbox can validate your customer data based on the following attributes . If nomatch is found, the receipt is imported as Unidentified receipt. This unidentified receiptscan be identified and then applied from the Quick cash window or the receipt window.
1. Customer Number: If you provide a customer number for receipts that you importthrough AutoLockbox, Receivables can identify the customer to which the receiptbelongs .
2. MICR Number: The MICR (Magnetic Ink Character Recognition) number thatappears on each receipt relates the customer to a bank. Lockbox only uses MICRnumbers to associate a customer with a receipt if both of the following are true:
1. The customer number is not included in the transmission format2. The MICR number is passed

Lockbox.doc Page: 4 of 25
A MICR number consists of two segments. The first segment is the Transit Routingnumber, this identifies the bank from which your customer draws their check. The secondsegment identifies your customer’s account at that bank.
3. AutoAssociate: If the customer cannot be identified from either the MICR number orthe customer number (for example, if the transmission does not include this information),you can use AutoAssociate to determine the customer using matching numbers. Amatching number can be a transaction number, consolidated billing invoice number, salesorder number, purchase order number or another custom defined number.
4. Associate Receipts with Billing Locations: Receivables also lets you track receiptsfor each of your customer’s billing locations. To use this feature, you must include abilling location in your transmission format, data file and the flag Require BillingLocation should be set to Yes. This option should be set to yes both at system optionsand at the setup of Lockbox. If the box is checked at the Lockbox, the receipt will bevalidated only if the billing location is provided. The setting at the system options leveldetermines whether PostQuickCash can process receipts with / without billing locations.
How AutoLockbox Applies Receipts
If Lockbox is able to identify the customer for a receipt and the transaction number isprovided , Lockbox applies the receipt to this transaction. If the transaction number is notprovided and Autoassociate is set to Yes, Post QuickCash uses the matching rules definedfor the customer site, customer or Lockbox to apply the receipt. The setting of MatchReceipts By Option tells what type of matching number is passed in the transmission. IfMatching Rules fail, Post QuickCash applies the receipt using the AutoCash rules set . IfAutoCash rules also fail, Lockbox assigns the receipt a status of Unapplied.
If the transaction number is not provided and Autoassociate is set to No, Post QuickCashassigns the receipt a status of Unapplied.
Running AutoLockbox (Pg# 22) Run AutoLockbox to submit your lockbox transmission processes and transfer paymentinformation from your bank files into Receivables. You can import, validate, and runAutoLockbox all in one step, or perform the steps separately using the same window.
Maintain Transmission Data (Pg# 24)Use the Lockbox Transmission Data window to delete and edit transmission dataimported into Receivables from your bank using Lockbox. You can correct your lockboxdata in this window for receipts that fail validation, then resubmit the validation stepagain .

Lockbox.doc Page: 5 of 25
Remittance Bank
Nav => Setup => Receipts => Banks
Define Internal bank and bank accounts with Account Use as ‘Internal’. This is the bankwhich sends the data file for lockbox transmission.

Lockbox.doc Page: 6 of 25
Remittance Bank Account
Nav => Setup => Receipts => BanksClick on Bank Accounts.Alt Region: GL Accounts
Enter a cash account.
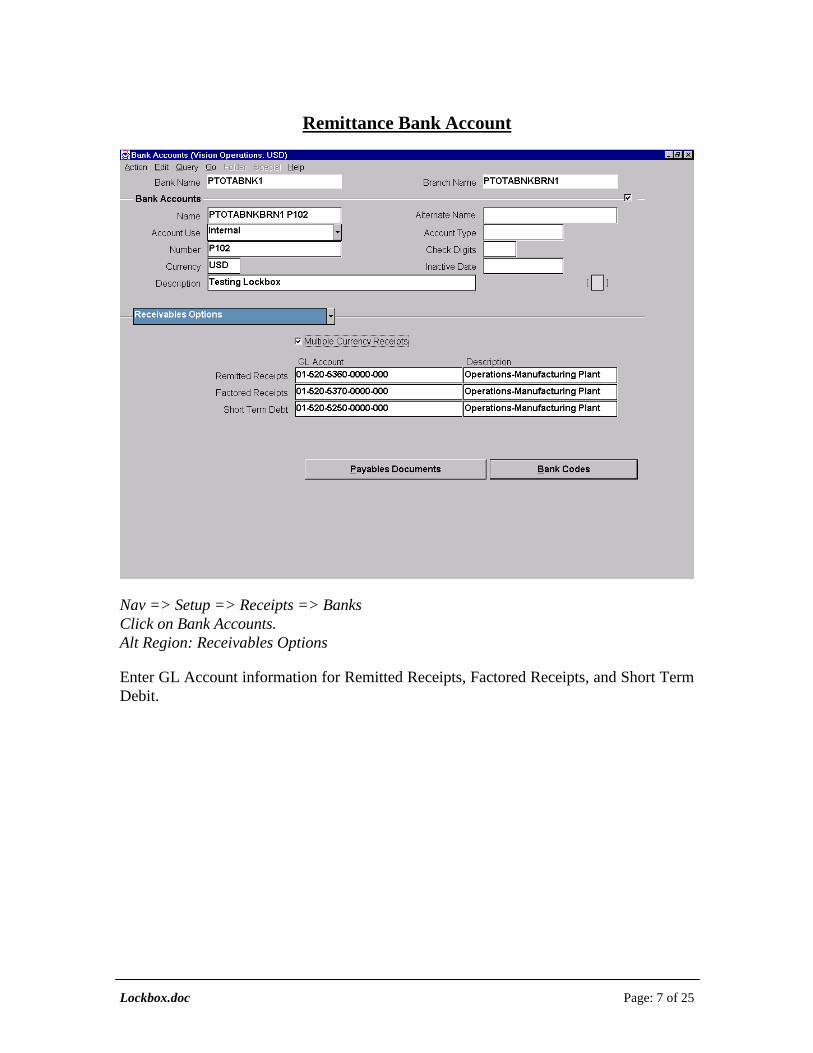
Lockbox.doc Page: 7 of 25
Remittance Bank Account
Nav => Setup => Receipts => BanksClick on Bank Accounts.Alt Region: Receivables Options
Enter GL Account information for Remitted Receipts, Factored Receipts, and Short TermDebit.

Lockbox.doc Page: 8 of 25
Receipt Classes & Payment Methods
Nav => Setup => Receipts => Receipt Classes
Define Receipt classes to determine the required processing steps for receipts to whichyou assign payment methods with this class. Enter the Payment Method to assign to thisreceipt class.

Lockbox.doc Page: 9 of 25
Assign Bank Account to Payment Method
Nav => Setup => Receipts => Receipt ClassesEnter payment method, click on Bank Accounts.Alt region: GL Accounts
Receivables uses payment methods to account for the receipt entries. One can assignmultiple banks to each payment method, but only one bank account can be primaryaccount for each currency.
Assign the payment method to the customer against whose invoice the receipt is going tobe applied to.

Lockbox.doc Page: 10 of 25
Receipt Source
Nav => Setup => Receipts => Receipt Sources
Define receipt batch sources and assign the receipt class, payment method, and remittancebank account fields to this source.
• Receipt batch source type should be Manual.• Receipt batch sources can use either automatic or manual batch numbering. (Should
be Automatic Batch numbering if to be used for Lockbox process).

Lockbox.doc Page: 11 of 25
Lockbox
Nav => Setup => Receipts => Lockboxes => LockboxesAlt region: Bank
Define Lockbox:
• Enter the lockbox Number provided by your bank.• Enter the receipt Batch Source for this lockbox. You must enter a batch source that
uses automatic numbering.• Enter the Bank Origination Number provided by your bank. This number uniquely
identifies the bank branch that sends you lockbox information.

Lockbox.doc Page: 12 of 25
Lockbox
Nav => Setup => Receipts => Lockboxes => LockboxesAlt region: Receipts
• Enter the Batch Size you want the Lockbox Validation program to assign to eachreceipt batch.
• Enter your GL Date Source. This can be -Constant Date: Receivables uses the date you enter in the GL Date field of the
Submit Lockbox Processing window.Deposit Date: Receivables uses the date that your bank deposits your receipts.Import Date: Receivables uses the date on which you import your receipts.
• If you are using this lockbox to transfer foreign currency receipts and you did notspecify exchange rate type in the bank file, enter an Exchange Rate Type.
• Enter the Receipt Method to assign to this lockbox. The default is the paymentmethod associated with the receipt batch source you entered.
• If you want AutoLockbox to be able to transfer receipts without billing locations intoReceivables, uncheck the Require Billing Location check box. If this box is checked,AutoLockbox will only validate the receipt if the billing location is provided

Lockbox.doc Page: 13 of 25
• Choose a Match Receipts By method. (If Autoassosciate is set to Yes)1) Transaction Number2) Consolidated Billing Number3) Sales Order4) Purchase Order5) Hook
• Choose whether to Match on Corresponding Date for transactions in this Lockboxtransmission.
1. Always: Always verify that the date for the transaction or other matched itemis the same as the date specified in this transmission.
2. Duplicates Only: Only verify that the matching date and the specified date arethe same if duplicate matching number were found and Lockbox needs todetermine which is correct.
3. Never: Ignore the specified date. This is the default value.

Lockbox.doc Page: 14 of 25
Lockbox
Nav => Setup => Receipts => Lockboxes => LockboxesAlt region: Transactions
If the customer cannot be identified from either the MICR number or the customernumber (for example, if the transmission does not include this information), you can useAutoAssociate to determine the customer using matching numbers.• Auto Associate: Check the AutoAssociate check box. (Note: Ensure that all invoices to which any single receipt will be applied belong to thesame customer. And also ensure that the matching numbers within the transmission areunique.)• Choose how Lockbox will handle Invalid Transaction Number: If the receipt record is
associated with multiple invoices, but one of the invoices is invalid. Depending onhow you set this option, Lockbox will:1. Post Partial Amount as Unapplied: Apply the receipt to the valid transactions,
then import the remaining receipt amount with a status of Unapplied.2. Reject Entire Receipt: Do not import the receipt (it will remain in the
AR_PAYMENTS_INTERFACE table). You need to edit the invalid record(s) inthe Lockbox Transmission Data window, then resubmit the Validation step for thereceipt before Lockbox can import it into Receivables.

Lockbox.doc Page: 15 of 25
Transmission Formats
Nav => Setup => Receipts => Lockboxes => Transmission Formats
Following are valid record types:
1. Batch Header: A Batch Header marks the beginning of a specific batch. BatchHeaders usually contain information such as batch number, deposit date, andlockbox number.
2. Batch Trailer: A Batch Trailer marks the end of a specific batch. Batch Trailersusually contain information such as batch number, lockbox number, batch recordcount, and batch amount.
3. Lockbox Header: A Lockbox Header marks the beginning of a specific lockbox.Lockbox Headers usually contain information such as destination account andorigination number.
4. Lockbox Trailer: A Lockbox Trailer marks the end of a specific lockbox.Lockbox Trailers usually contain information such as lockbox number, depositdate, lockbox amount, and lockbox record count.

Lockbox.doc Page: 16 of 25
5. Overflow Receipt: An Overflow Payment usually contains invoice informationfor a specific payment such as batch number, item number, sequence number,overflow indicator, invoice number. This record stores additional receiptinformation that could not fit on the receipt record. Each Overflow record musthave a receipt record as a parent.
6. Receipt: A Payment usually contains information such as MICR number, batchnumber, item number, check number, and remittance amount.
7. Service Header: Service Header records contain general information about yourtransmission.
8. Transmission Header: A Transmission Header marks the beginning of a specificdata file. Transmission Headers usually contain information such as destinationaccount, origination number, deposit date, and deposit time.

Lockbox.doc Page: 17 of 25
Lockbox Header:
Nav => Setup => Receipts => Lockboxes => Transmission FormatsSelect a record type , click on Transmission Fields.
• Record Identifier: This identifies the kind of transmission record.• Lockbox Number: The identification number for a specific lockbox.• Origination: The bank origination number provided by your bank. This number
uniquely identifies the bank branch that sends you lockbox information.

Lockbox.doc Page: 18 of 25
Receipt Record:
Nav => Setup => Receipts => Lockboxes => Transmission FormatsSelect a record type , click on Transmission Fields.
• Record Identifier: This identifies the kind of transmission record.• Lockbox Number: The identification number for a specific lockbox.• Batch Name: The name of the batch.• Transit Routing Number: The number that uniquely identifies your customer’s bank.
The transit routing number and the customer account number make up yourcustomer’s MICR number.
• Account: Your customer’s bank account.• Receipt Number: The identification number of a payment.• Deposit Date: The date the bank receives and deposits your customer’s payment.• Item Number: A sequence number that your bank assigns to a specific payment. This
is unique for each receipt. And this number associates an invoice with a receipt.• Currency Code: The currency of the payment.• Deposit Time: The time at which the bank receives and deposits your customer’s
payment.

Lockbox.doc Page: 19 of 25
Overflow Record:
Nav => Setup => Receipts => Lockboxes => Transmission FormatsSelect a record type , click on Transmission Fields.
• Invoice 1 to 8: The invoices to which you apply your payment.• Amount Applied 1 to 8: The amount applied to each of the invoices.• Overflow Sequence : This is a sequential number to indicate the order of overflow
record. Within each receipt, the overflow sequence usually begins with 1.• Overflow indicator: This column indicates whether there are further overflow records
for this receipt. The value is 0. That means, for any overflow record having this valueas 0 indicates that there are further more overflow records associated with this receiptand if has non - zero ex: 9 indicates that it is the last overflow record for that receipt.

Lockbox.doc Page: 20 of 25
AutoCash Rule Sets
Nav => Setup => Receipts => AutoCash Rule Sets
Define AutoCash Rule Sets to determine the sequence of rules that Post QuickCash usesto update customer’s account balances. If none of the AutoCash Rules apply,Receivables enters the remaining amount as either Unapplied or On-Account. (Based onthe value for Remaining Remittance Amount).

Lockbox.doc Page: 21 of 25
Sample Control File:
LOAD DATAAPPEND
-- Type P2 - Overflow Receipt
INTO TABLE AR_PAYMENTS_INTERFACE_ALLWHEN RECORD_TYPE = ’P2’(STATUS CONSTANT ’AR_PLB_NEW_RECORD’, RECORD_TYPE POSITION(01:02) CHAR, LOCKBOX_NUMBER POSITION(03:05) CHAR, INVOICE1 POSITION(06:19) CHAR, AMOUNT_APPLIED1 POSITION(20:30) CHAR, OVERFLOW_SEQUENCE POSITION(31:34) CHAR, OVERFLOW_INDICATOR POSITION(35:35) CHAR, ITEM_NUMBER POSITION(36:38) CHAR, CURRENCY_CODE POSITION(39:41) CHAR)
-- Type P1 - Payment
INTO TABLE AR_PAYMENTS_INTERFACE_ALLWHEN RECORD_TYPE = ’P1’(STATUS CONSTANT ’AR_PLB_NEW_RECORD’, RECORD_TYPE POSITION(01:02) CHAR, LOCKBOX_NUMBER POSITION(03:05) CHAR, BATCH_NAME POSITION(06:08) CHAR, TRANSIT_ROUTING_NUMBER POSITION(09:18) CHAR, ACCOUNT POSITION(19:36) CHAR, CHECK_NUMBER POSITION(37:46) CHAR, REMITTANCE_AMOUNT POSITION(47:56) CHAR, DEPOSIT_DATE POSITION(57:62) DATE ’RRMMDD’, ITEM_NUMBER POSITION(63:65) CHAR, CURRENCY_CODE POSITION(66:68) CHAR, DEPOSIT_TIME POSITION(69:72) CHAR)
-- Type P0 - Lockbox Header
INTO TABLE AR_PAYMENTS_INTERFACE_ALLWHEN RECORD_TYPE = ’P0’(STATUS CONSTANT ’AR_PLB_NEW_RECORD’, RECORD_TYPE POSITION(01:02) CHAR, LOCKBOX_NUMBER POSITION(03:05) CHAR, ORIGINATION POSITION(06:14) CHAR)
Sample Data File:
P0P14043000096P1P1400002130937 612955 20002914640005587025990901018USD2003P2P142424068 0000102900000010018USDP2P142424069 0000066600000020018USDP2P142424070 0000072377500030018USDP2P142424071 0000100052500040018USDP2P142424072 0000132862500059018USD

Lockbox.doc Page: 22 of 25
Running Lockbox
Nav => Interfaces => Lockbox
Import:• If you are importing a new bank file, check the New Transmission check box, then
enter a new Transmission Name. If you are resubmitting an existing lockboxtransmission, you can select a name from the list of values.
• Enter the name of the datafile along with path and extension.• Enter the name of the control file with out extension. Make sure that the control file
in $AR_TOP/bin directory.• Select the transmission Format from list of values.
Validation:• Check the Submit Validation Check box.• You must enter a lockbox number if Submit Validation is Yes and the lockbox
number is not specified in your bank file.• To apply receipts to transactions belonging to unrelated customers, check the Allow
Payment of Unrelated Invoices check box.

Lockbox.doc Page: 23 of 25
• If you defined your GL Date as ’Constant Date’ in the Lockboxes window, you mustenter a GL Date; if you specified a GL Date of ’Deposit Date’ or ’Import Date’,Receivables uses this as the GL date.
• Enter a Report Format. Enter ’All’ to include all records processed in thistransmission. Enter ’Rejects Only’ to include only records that failed validation.
• To transfer only the lockbox batches in which all records pass the validation step tothe QuickCash tables, check the Complete Batches Only check box. If you do notcheck this check box, Receivables will transfer any receipts within a batch that passvalidation, even if others are rejected.
Post Quick Cash:• To apply the receipts and update your Customer’s balances, check Submit post
QuickCash check box.• Choose how lockbox should handle invalid transaction numbers.
Post Partial Amounts as Unapplied or Reject Entire Receipt
Save your work. Receivables displays the Request ID of your concurrent process andgenerates the Lockbox Execution report.

Lockbox.doc Page: 24 of 25
Maintain Transmission Data
Nav => Receipts => Lockbox => Maintain Transmission Data
Use the Lockbox Maintain Transmission Data window to delete and edit transmissiondata imported into Receivables from your bank using Lockbox. You can correct yourlockbox data in this window for receipts that fail validation, then resubmit the validationstep for these receipts. If the error is contained in the control, receipt, or applicationinformation, you can make changes to the invalid records by selecting the record, thenchoosing one of the following:• Control: Choose this button to review the lockbox transmission control information
that corresponds to this transmission record.• Receipt: Choose this button to review and edit specific receipt information. You can
change the values of fields that are included in your transmission format.• Receipt Attributes: Choose this button to review and maintain receipt descriptive
flexfield information imported with your lockbox transmission.

Lockbox.doc Page: 25 of 25
Maintain Transmission Data
Nav =>Receipts => Lockbox => Maintain Transmission DataSelect a record (Overflow record), click on Applications.
• Applications: Choose this button to review and maintain application information foreach receipt within this transmission. Use the Status field to review errors for specificreceipt applications.
Related Documents