LEGO® Education WeDo™ Teacher’s Guide 2009580 LEGO, the LEGO logo and WEDO are trademarks of the/sont des marques decommerce de/son marcas registradas de LEGO Group. ©2009 The LEGO Group.

Welcome message from author
This document is posted to help you gain knowledge. Please leave a comment to let me know what you think about it! Share it to your friends and learn new things together.
Transcript
LEGO® Education WeDo™Teacher’s Guide
2009580
LEGO, the LEGO logo and WEDO are trademarks of the/sont des marques decommerce de/son marcas registradas de LEGO Group. ©2009 The LEGO Group.

LEGO, the LEGO logo and WEDO are trademarks of the/sont des marques de commerce de/son marcas registradas de LEGO Group. ©2009 The LEGO Group.
Table of Contents
Introduction . . . . . . . . . . . . . . . . . . . . . . . . . . . . . . . . . . . . . . . . . . . . . . . . . . . . . 3 Who is it for? . . . . . . . . . . . . . . . . . . . . . . . . . . . . . . . . . . . . . . . . . . . . . . . . . . . . . . . . . . . . . . . . . . . . 3 What is it for? . . . . . . . . . . . . . . . . . . . . . . . . . . . . . . . . . . . . . . . . . . . . . . . . . . . . . . . . . . . . . . . . . . . . 3 What is in the box? . . . . . . . . . . . . . . . . . . . . . . . . . . . . . . . . . . . . . . . . . . . . . . . . . . . . . . . . . . . . . . . 4 The 4C Learning Process . . . . . . . . . . . . . . . . . . . . . . . . . . . . . . . . . . . . . . . . . . . . . . . . . . . . . . . . . 6 Organizing the Classroom . . . . . . . . . . . . . . . . . . . . . . . . . . . . . . . . . . . . . . . . . . . . . . . . . . . . . . . . 7 Lesson Planning Routes . . . . . . . . . . . . . . . . . . . . . . . . . . . . . . . . . . . . . . . . . . . . . . . . . . . . . . . . . . 8
Curriculum . . . . . . . . . . . . . . . . . . . . . . . . . . . . . . . . . . . . . . . . . . . . . . . . . . . . . . 12 Highlights . . . . . . . . . . . . . . . . . . . . . . . . . . . . . . . . . . . . . . . . . . . . . . . . . . . . . . . . . . . . . . . . . . . . . . . 12 Themes . . . . . . . . . . . . . . . . . . . . . . . . . . . . . . . . . . . . . . . . . . . . . . . . . . . . . . . . . . . . . . . . . . . . . . . . 13 Curriculum Grids . . . . . . . . . . . . . . . . . . . . . . . . . . . . . . . . . . . . . . . . . . . . . . . . . . . . . . . . . . . . . . . . . 15
LEGO® Education WeDo™ Software . . . . . . . . . . . . . . . . . . . . . . . . . . . . . . . . . 17 Overview . . . . . . . . . . . . . . . . . . . . . . . . . . . . . . . . . . . . . . . . . . . . . . . . . . . . . . . . . . . . . . . . . . . . . . . . 17 Vocabulary List . . . . . . . . . . . . . . . . . . . . . . . . . . . . . . . . . . . . . . . . . . . . . . . . . . . . . . . . . . . . . . . . . . 18 Sound List . . . . . . . . . . . . . . . . . . . . . . . . . . . . . . . . . . . . . . . . . . . . . . . . . . . . . . . . . . . . . . . . . . . . . . . 21 Background List . . . . . . . . . . . . . . . . . . . . . . . . . . . . . . . . . . . . . . . . . . . . . . . . . . . . . . . . . . . . . . . . . 22 Shortcut List . . . . . . . . . . . . . . . . . . . . . . . . . . . . . . . . . . . . . . . . . . . . . . . . . . . . . . . . . . . . . . . . . . . . . 23
Getting Started . . . . . . . . . . . . . . . . . . . . . . . . . . . . . . . . . . . . . . . . . . . . . . . . . . 24 Overview . . . . . . . . . . . . . . . . . . . . . . . . . . . . . . . . . . . . . . . . . . . . . . . . . . . . . . . . . . . . . . . . . . . . . . . . 24 Teacher Notes for Getting Started 1. Motor and Axle . . . . . . . . . . . . . . . . . . . . . . . . . . . . . . . . . . . . . . . . . . . . . . . . . . . . . . . . . . . . 28 2. Gears . . . . . . . . . . . . . . . . . . . . . . . . . . . . . . . . . . . . . . . . . . . . . . . . . . . . . . . . . . . . . . . . . . . . 29 3. Idler Gear . . . . . . . . . . . . . . . . . . . . . . . . . . . . . . . . . . . . . . . . . . . . . . . . . . . . . . . . . . . . . . . . 30 4. Gearing Down . . . . . . . . . . . . . . . . . . . . . . . . . . . . . . . . . . . . . . . . . . . . . . . . . . . . . . . . . . . . . 31 5. Gearing Up . . . . . . . . . . . . . . . . . . . . . . . . . . . . . . . . . . . . . . . . . . . . . . . . . . . . . . . . . . . . . . . 32 6. Tilt Sensor . . . . . . . . . . . . . . . . . . . . . . . . . . . . . . . . . . . . . . . . . . . . . . . . . . . . . . . . . . . . . . . . 33 7. Pulleys and Belt . . . . . . . . . . . . . . . . . . . . . . . . . . . . . . . . . . . . . . . . . . . . . . . . . . . . . . . . . . . 34 8. Crossed Belt . . . . . . . . . . . . . . . . . . . . . . . . . . . . . . . . . . . . . . . . . . . . . . . . . . . . . . . . . . . . . . 35 9. Decrease Speed . . . . . . . . . . . . . . . . . . . . . . . . . . . . . . . . . . . . . . . . . . . . . . . . . . . . . . . . . . 36 10. Increase Speed . . . . . . . . . . . . . . . . . . . . . . . . . . . . . . . . . . . . . . . . . . . . . . . . . . . . . . . . . . 37 11. Motion Sensor . . . . . . . . . . . . . . . . . . . . . . . . . . . . . . . . . . . . . . . . . . . . . . . . . . . . . . . . . . . . 38 12. Crown Gear . . . . . . . . . . . . . . . . . . . . . . . . . . . . . . . . . . . . . . . . . . . . . . . . . . . . . . . . . . . . . . 39 13. Worm Gear . . . . . . . . . . . . . . . . . . . . . . . . . . . . . . . . . . . . . . . . . . . . . . . . . . . . . . . . . . . . . . . 40 14. Cam . . . . . . . . . . . . . . . . . . . . . . . . . . . . . . . . . . . . . . . . . . . . . . . . . . . . . . . . . . . . . . . . . . . . . 41 15. Lever . . . . . . . . . . . . . . . . . . . . . . . . . . . . . . . . . . . . . . . . . . . . . . . . . . . . . . . . . . . . . . . . . . . . 42 16. Repeat Block . . . . . . . . . . . . . . . . . . . . . . . . . . . . . . . . . . . . . . . . . . . . . . . . . . . . . . . . . . . . . 43 17. Add to Display . . . . . . . . . . . . . . . . . . . . . . . . . . . . . . . . . . . . . . . . . . . . . . . . . . . . . . . . . . . . 44 18. Subtract from Display . . . . . . . . . . . . . . . . . . . . . . . . . . . . . . . . . . . . . . . . . . . . . . . . . . . . . 45 19. Start On Message . . . . . . . . . . . . . . . . . . . . . . . . . . . . . . . . . . . . . . . . . . . . . . . . . . . . . . . . 46 20. Labeling . . . . . . . . . . . . . . . . . . . . . . . . . . . . . . . . . . . . . . . . . . . . . . . . . . . . . . . . . . . . . . . . . 47
2
Table of Contents
LEGO, the LEGO logo and WEDO are trademarks of the/sont des marques de commerce de/son marcas registradas de LEGO Group. ©2009 The LEGO Group.
Teacher Notes for the Activities . . . . . . . . . . . . . . . . . . . . . . . . . . . . . . . . . . . 48 Overview . . . . . . . . . . . . . . . . . . . . . . . . . . . . . . . . . . . . . . . . . . . . . . . . . . . . . . . . . . . . . . . . . . . . . . . . 48 Amazing Mechanisms . . . . . . . . . . . . . . . . . . . . . . . . . . . . . . . . . . . . . . . . . . . . . . . . . . . . . . . . . . . . 52 1. Dancing Birds . . . . . . . . . . . . . . . . . . . . . . . . . . . . . . . . . . . . . . . . . . . . . . . . . . . . . . . . . . . . . 53 2. Smart Spinner . . . . . . . . . . . . . . . . . . . . . . . . . . . . . . . . . . . . . . . . . . . . . . . . . . . . . . . . . . . . . 61 3. Drumming Monkey . . . . . . . . . . . . . . . . . . . . . . . . . . . . . . . . . . . . . . . . . . . . . . . . . . . . . . . . 70 Wild Animals . . . . . . . . . . . . . . . . . . . . . . . . . . . . . . . . . . . . . . . . . . . . . . . . . . . . . . . . . . . . . . . . . . . . 79 4. Hungry Alligator . . . . . . . . . . . . . . . . . . . . . . . . . . . . . . . . . . . . . . . . . . . . . . . . . . . . . . . . . . . 80 5. Roaring Lion . . . . . . . . . . . . . . . . . . . . . . . . . . . . . . . . . . . . . . . . . . . . . . . . . . . . . . . . . . . . . . 88 6. Flying Bird . . . . . . . . . . . . . . . . . . . . . . . . . . . . . . . . . . . . . . . . . . . . . . . . . . . . . . . . . . . . . . . . 97 Play Soccer . . . . . . . . . . . . . . . . . . . . . . . . . . . . . . . . . . . . . . . . . . . . . . . . . . . . . . . . . . . . . . . . . . . . . 106 7. Goal Kicker . . . . . . . . . . . . . . . . . . . . . . . . . . . . . . . . . . . . . . . . . . . . . . . . . . . . . . . . . . . . . . . 107 8. Goal Keeper . . . . . . . . . . . . . . . . . . . . . . . . . . . . . . . . . . . . . . . . . . . . . . . . . . . . . . . . . . . . . . 115 9. Cheerful Fans . . . . . . . . . . . . . . . . . . . . . . . . . . . . . . . . . . . . . . . . . . . . . . . . . . . . . . . . . . . . . 124 Adventure Stories . . . . . . . . . . . . . . . . . . . . . . . . . . . . . . . . . . . . . . . . . . . . . . . . . . . . . . . . . . . . . . . . 132 10. Airplane Rescue . . . . . . . . . . . . . . . . . . . . . . . . . . . . . . . . . . . . . . . . . . . . . . . . . . . . . . . . . . 133 11. Giant Escape . . . . . . . . . . . . . . . . . . . . . . . . . . . . . . . . . . . . . . . . . . . . . . . . . . . . . . . . . . . . . 141 12. Sailboat Storm . . . . . . . . . . . . . . . . . . . . . . . . . . . . . . . . . . . . . . . . . . . . . . . . . . . . . . . . . . . 151
Resources . . . . . . . . . . . . . . . . . . . . . . . . . . . . . . . . . . . . . . . . . . . . . . . . . . . . . 160 Be Inspired! Programs to Explore . . . . . . . . . . . . . . . . . . . . . . . . . . . . . . . . . . . . . . . . . . . . . . . . . . 161 Activity Data Tables: Amazing Mechanisms 1. Dancing Birds . . . . . . . . . . . . . . . . . . . . . . . . . . . . . . . . . . . . . . . . . . . . . . . . . . . . . . . . . . . . . 164 2. Smart Spinner . . . . . . . . . . . . . . . . . . . . . . . . . . . . . . . . . . . . . . . . . . . . . . . . . . . . . . . . . . . . . 165 3. Drumming Monkey . . . . . . . . . . . . . . . . . . . . . . . . . . . . . . . . . . . . . . . . . . . . . . . . . . . . . . . . 166 Activity Data Tables: Play Soccer 7. Goal Kicker . . . . . . . . . . . . . . . . . . . . . . . . . . . . . . . . . . . . . . . . . . . . . . . . . . . . . . . . . . . . . . . 167 8. Goal Keeper . . . . . . . . . . . . . . . . . . . . . . . . . . . . . . . . . . . . . . . . . . . . . . . . . . . . . . . . . . . . . . 168 9. Cheerful Fans . . . . . . . . . . . . . . . . . . . . . . . . . . . . . . . . . . . . . . . . . . . . . . . . . . . . . . . . . . . . . 169 Glossary . . . . . . . . . . . . . . . . . . . . . . . . . . . . . . . . . . . . . . . . . . . . . . . . . . . . . . . . . . . . . . . . . . . . . . . . 170 LEGO® Element Survey for 9580 . . . . . . . . . . . . . . . . . . . . . . . . . . . . . . . . . . . . . . . . . . . . . . . . . . . 172
3LEGO, the LEGO logo and WEDO are trademarks of the/sont des marques de commerce de/son marcas registradas de LEGO Group. ©2009 The LEGO Group.
IntroductionLEGO® Education is pleased to introduce the 2009580 LEGO Education WeDo™ Activity Pack which includes this LEGO Education WeDo Teacher’s Guide.
Who is it for? The material is designed for teachers in elementary school, especially second through fourth grade, although it can be used in higher grades as well. Working individually, in pairs or teams, students of any academic background from seven years and up can learn by building and programming the models and by investigating, writing about, and discussing ideas they encounter using the models in these activities.
What is it for?The WeDo Activity Pack enables students to work as young scientists, engineers, mathematicians and creative writers providing them with the settings, tools and tasks for completing cross-curricular projects.
Using these materials, students are encouraged to build and program a working model and then use the model for different purposes, depending upon the theme of the activity and its focused subject matter in science, technology, mathematics or language.
The WeDo Activity Pack enables teachers to provide learning opportunities for developing these broader learning goals:
∑ Think creatively to make a working model∑ Develop vocabulary and communication skills to explain how the model works∑ Establish links between cause and effect∑ Reflect on how to find answers and imagine new possibilities∑ Brainstorm ideas and endeavor to bring some of them to fruition∑ Make fair tests by changing one factor and observing or measuring the effect∑ Make systematic observations and measurements∑ Display and communicate data using tables∑ Follow 2D drawings to build a 3D model∑ Think logically and create a program to produce a specific behavior∑ Write and present creative stories using models for visual and dramatic effects
See the Curriculum section for an overview of the highlights, a description of the themes around which the activities are organized, and curriculum grids showing how objectives in science, technology, engineering, mathematics and language are met by each activity.

4
Introduction
LEGO, the LEGO logo and WEDO are trademarks of the/sont des marques de commerce de/son marcas registradas de LEGO Group. ©2009 The LEGO Group.
What is in the box?
9580 LEGO® Education WeDo™ Construction SetThe 9580 LEGO® Education WeDo™ Construction Set enables students to build LEGO® models that attach to the LEGO® USB Hub and then control the models using computer programs. The set contains 158 elements including a LEGO Hub, motor, tilt sensor and a motion sensor that add movement and intelligence to the model.
LEGO® USB HubThe LEGO® USB Hub controls sensors and motors from the 2000095 LEGO® Education WeDo™ Software. Power and data are transmitted from the LEGO motors and sensors to and from the computer using the two LEGO Hub ports. The WeDo Software automatically detects the LEGO Hub and any motors and sensors attached to it. Up to three LEGO Hubs can be attached.
MotorThe motor can be programmed to turn this way or that way and to move at different power levels. Power for the motor is supplied through voltage from the computer’s USB port (5V). Axles or other LEGO elements can be attached to the motor.
Tilt SensorThe tilt sensor reports the direction it is tilted. The tilt sensor detects changes within six different positions: Tilt This Way, Tilt That Way, Tilt Up, Tilt Down, No Tilt and Any Tilt.
Motion SensorThe motion sensor detects objects within a range of 15 centimeters (or about 6 inches) depending on the design of the object.
5
Introduction
LEGO, the LEGO logo and WEDO are trademarks of the/sont des marques de commerce de/son marcas registradas de LEGO Group. ©2009 The LEGO Group.
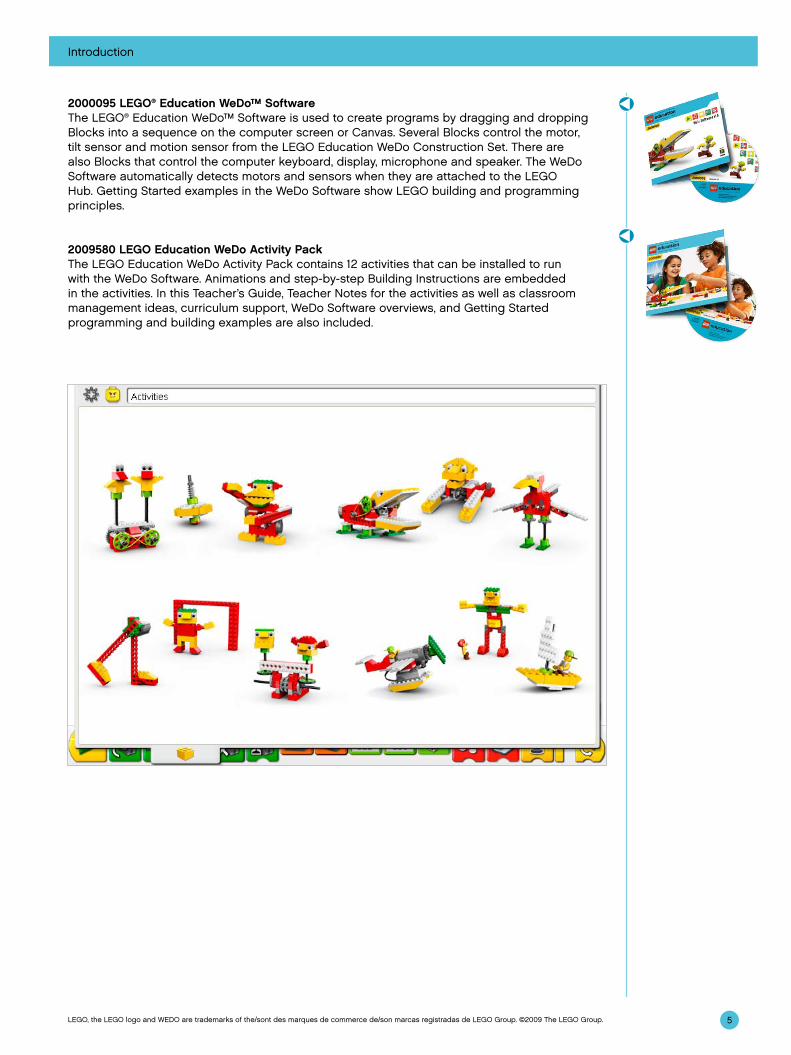
2000095 LEGO® Education WeDo™ Software The LEGO® Education WeDo™ Software is used to create programs by dragging and dropping Blocks into a sequence on the computer screen or Canvas. Several Blocks control the motor, tilt sensor and motion sensor from the LEGO Education WeDo Construction Set. There are also Blocks that control the computer keyboard, display, microphone and speaker. The WeDo Software automatically detects motors and sensors when they are attached to the LEGO Hub. Getting Started examples in the WeDo Software show LEGO building and programming principles.
2009580 LEGO Education WeDo Activity PackThe LEGO Education WeDo Activity Pack contains 12 activities that can be installed to run with the WeDo Software. Animations and step-by-step Building Instructions are embedded in the activities. In this Teacher’s Guide, Teacher Notes for the activities as well as classroom management ideas, curriculum support, WeDo Software overviews, and Getting Started programming and building examples are also included.

(IO/X)LO)/X (IO/X)LO)/X (IO/X)LO)/X
6
Introduction
LEGO, the LEGO logo and WEDO are trademarks of the/sont des marques de commerce de/son marcas registradas de LEGO Group. ©2009 The LEGO Group.
The 4C Learning Process
All LEGO® Education materials support a process of learning that includes four phases: Connect, Construct, Contemplate, and Continue.
ConnectYou add to your brain’s knowledge when you connect a new learning experience to those you already have or when an initial learning experience is the seed stimulating the growth of new knowledge. Each LEGO Education WeDo™ activity presents an animated situation with minifigures, Mia and Max. Use these animations to illustrate, inspire, and stimulate discussion about the activity topic. Other ways to Connect are also suggested in the Teacher Notes for each activity.
ConstructLearning is best when hands and minds are engaged. LEGO Education involves learning by making: the construction of models and of ideas. The WeDo activities include step-by-step instructions embedded directly into the Construct phase. Just click to see the next step. If you prefer, plan time for modifying this model or building and programming something of your own design.
ContemplateWhen you contemplate what you have done, you have the opportunity to deepen your understanding. As you reflect, you develop connections between previous knowledge and new experiences. In the Contemplate section, students observe and report how specific changes in the pulleys, gears, or cams affects the movement of the model; they research and make presentations about the behavior of their “animals;” they count, take measurements and rate the performance of their soccer models; and they create different types of stories and act them out using their models for visual and sound effects. This phase offers a good opportunity for evaluating the learning and progress of each student.
ContinueLearning is always more enjoyable and creative when it is adequately challenging. Maintaining this challenge and the pleasure of accomplishment naturally inspires the continuation of more advanced work. The Continue phase of each activity includes a challenge to build and program more behavior or complex interaction with the model.
Construct
Contemplate
Connect
Continue
7
Introduction
LEGO, the LEGO logo and WEDO are trademarks of the/sont des marques de commerce de/son marcas registradas de LEGO Group. ©2009 The LEGO Group.
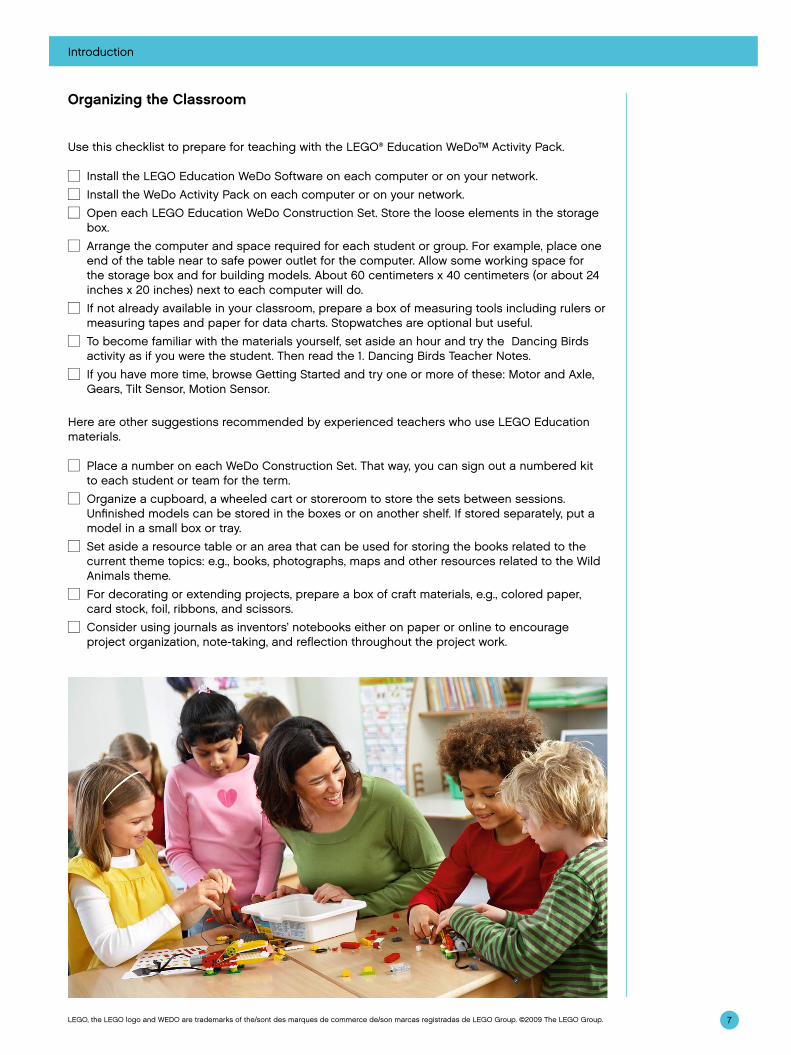
Organizing the Classroom
Use this checklist to prepare for teaching with the LEGO® Education WeDo™ Activity Pack.
☐ Install the LEGO Education WeDo Software on each computer or on your network.
☐ Install the WeDo Activity Pack on each computer or on your network.
☐ Open each LEGO Education WeDo Construction Set. Store the loose elements in the storage box.
☐ Arrange the computer and space required for each student or group. For example, place one end of the table near to safe power outlet for the computer. Allow some working space for the storage box and for building models. About 60 centimeters x 40 centimeters (or about 24 inches x 20 inches) next to each computer will do.
☐ If not already available in your classroom, prepare a box of measuring tools including rulers or measuring tapes and paper for data charts. Stopwatches are optional but useful.
☐ To become familiar with the materials yourself, set aside an hour and try the Dancing Birds activity as if you were the student. Then read the 1. Dancing Birds Teacher Notes.
☐ If you have more time, browse Getting Started and try one or more of these: Motor and Axle, Gears, Tilt Sensor, Motion Sensor.
Here are other suggestions recommended by experienced teachers who use LEGO Education materials.
☐ Place a number on each WeDo Construction Set. That way, you can sign out a numbered kit to each student or team for the term.
☐ Organize a cupboard, a wheeled cart or storeroom to store the sets between sessions. Unfinished models can be stored in the boxes or on another shelf. If stored separately, put a model in a small box or tray.
☐ Set aside a resource table or an area that can be used for storing the books related to the current theme topics: e.g., books, photographs, maps and other resources related to the Wild Animals theme.
☐ For decorating or extending projects, prepare a box of craft materials, e.g., colored paper, card stock, foil, ribbons, and scissors.
☐ Consider using journals as inventors’ notebooks either on paper or online to encourage project organization, note-taking, and reflection throughout the project work.
8
Introduction
LEGO, the LEGO logo and WEDO are trademarks of the/sont des marques de commerce de/son marcas registradas de LEGO Group. ©2009 The LEGO Group.
Lesson Planning Routes
There are many ways to use the LEGO® Education WeDo™ materials in your classroom. Here are two different ways to plan your class schedule.
Each activity can take one or more class periods, depending upon the time spent on discussion, the building and computer skills of your students, and the time you allow for experimentation.
Activities can be completed by an individual or a small team or group, depending upon the number of computers and LEGO Education WeDo Construction Sets available.
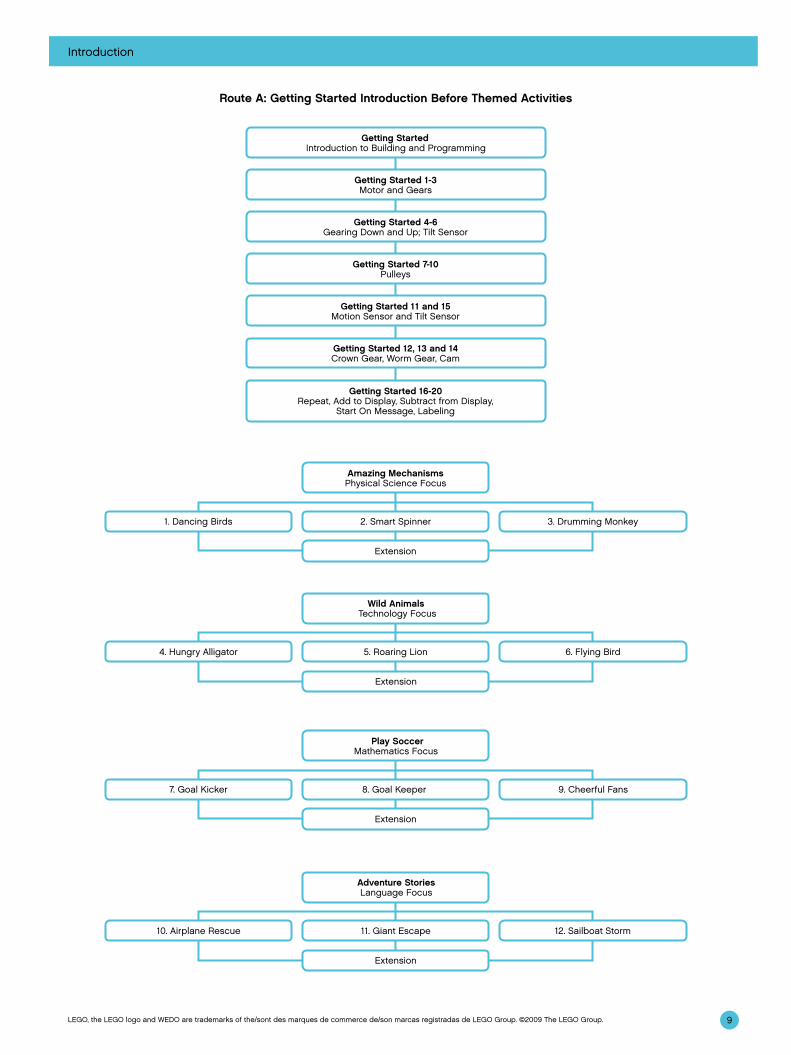
Route A: Getting Started Introduction Before Themed Activities
Introduce the building and programming ideas first to help the students become familiar with LEGO building using the WeDo Construction Set and with the LEGO Education WeDo Software. Then start on the themed activities.
You can have the students choose one of the three themed activities for each theme as this chart shows, or if you have more time, you can have the students try all of the activities. Some groups will be faster than others and may be able to complete all three in the same time as others complete one or two.
Extension ideas are suggested in the Teacher Notes for each activity. Some of the activity extensions involve combining models from other projects so extensions are recommended as useful ways to encourage cooperation.
You may wish to organize a class exhibition as a finale for the unit.
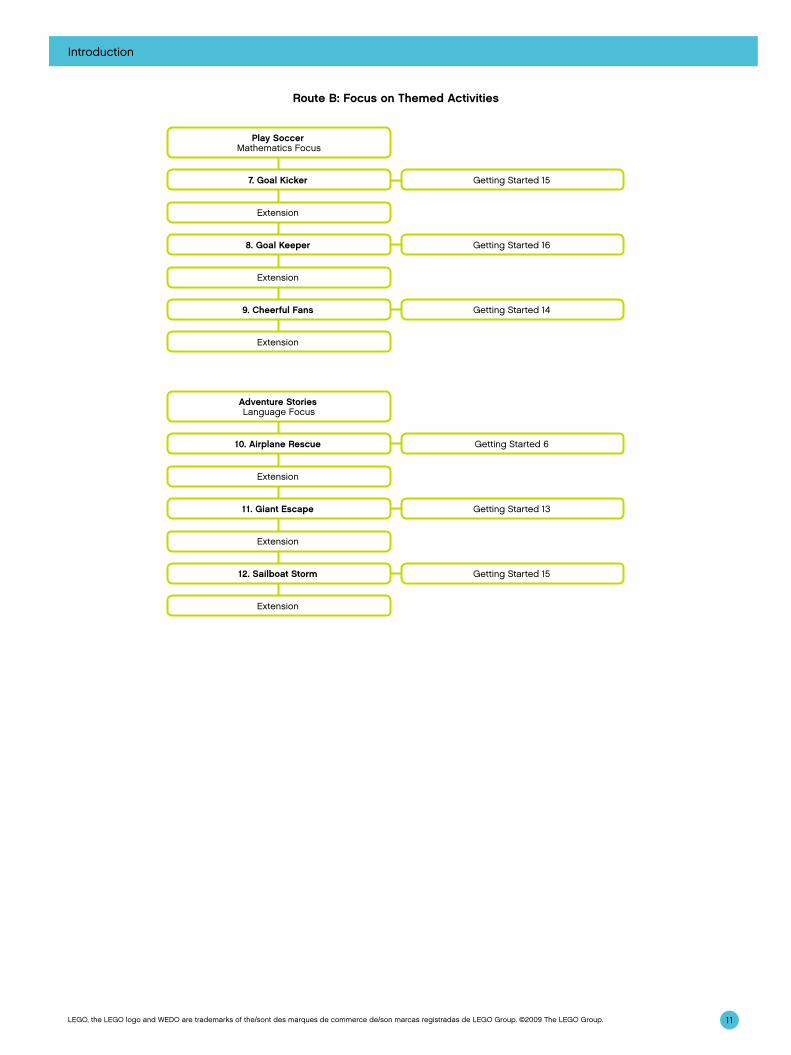
Route B: Focus on Themed Activities
Start with the themed activities, spending more time with them as projects to encourage experimentation.
You can have the students try all of the activities as this chart shows, or if you have less time, you can have the students choose one activity from each theme. Some groups will be faster than others and may be able to complete all three in the same time as others complete one or two.
Use the Getting Started materials as a reference. Extension ideas are suggested in the Teacher Notes for each activity.
You may wish to organize a class exhibition as a finale for the unit.
9
Introduction
LEGO, the LEGO logo and WEDO are trademarks of the/sont des marques de commerce de/son marcas registradas de LEGO Group. ©2009 The LEGO Group.
Amazing MechanismsPhysical Science Focus
2. Smart Spinner
Extension
1. Dancing Birds 3. Drumming Monkey
Getting StartedIntroduction to Building and Programming
Getting Started 1-3Motor and Gears
Getting Started 4-6Gearing Down and Up; Tilt Sensor
Getting Started 7-10 Pulleys
Getting Started 11 and 15Motion Sensor and Tilt Sensor
Getting Started 16-20Repeat, Add to Display, Subtract from Display,
Start On Message, Labeling
Getting Started 12, 13 and 14Crown Gear, Worm Gear, Cam
Wild Animals Technology Focus
5. Roaring Lion4. Hungry Alligator 6. Flying Bird
Extension
Adventure StoriesLanguage Focus
11. Giant Escape10. Airplane Rescue 12. Sailboat Storm
Extension
Play SoccerMathematics Focus
8. Goal Keeper7. Goal Kicker 9. Cheerful Fans
Extension
Route A: Getting Started Introduction Before Themed Activities

10
Introduction
LEGO, the LEGO logo and WEDO are trademarks of the/sont des marques de commerce de/son marcas registradas de LEGO Group. ©2009 The LEGO Group.
Amazing MechanismsPhysical Science Focus
1. Dancing Birds Getting Started 7, 8, 9, 10
Extension
2. Smart Spinner Getting Started 4, 5
Extension
3. Drumming Monkey Getting Started 14, 15
Extension
Wild AnimalsTechnology Focus
4. Hungry Alligator Getting Started 10
Extension
5. Roaring Lion Getting Started 12
Extension
6. Flying Bird Getting Started 15
Extension
Route B: Focus on Themed Activities
11
Introduction
LEGO, the LEGO logo and WEDO are trademarks of the/sont des marques de commerce de/son marcas registradas de LEGO Group. ©2009 The LEGO Group.
Adventure StoriesLanguage Focus
10. Airplane Rescue
Extension
11. Giant Escape
Extension
12. Sailboat Storm
Getting Started 6
Getting Started 13
Getting Started 15
Extension
Route B: Focus on Themed Activities
Play SoccerMathematics Focus
7. Goal Kicker Getting Started 15
Extension
8. Goal Keeper Getting Started 16
Extension
9. Cheerful Fans Getting Started 14
Extension
12LEGO, the LEGO logo and WEDO are trademarks of the/sont des marques de commerce de/son marcas registradas de LEGO Group. ©2009 The LEGO Group.
Curriculum
HighlightsThe process of students actively building, programming, investigating, writing, and communicating benefits their development in numerous ways. The opportunity to integrate subject matter across the curriculum in projects provides a range of contexts for applying concepts, learning new skills, and broadening interests. Specific subject matter is also addressed in the activities. Here are the highlights. For more information, see the Themes and Curriculum Grids sections.
ScienceTrace the transmission of motion and transfer of energy through the machine. Identify the simple machines mechanisms at work in the models, including levers, gears, and pulleys. Become familiar with complex motion using a cam, worm gear, and crown gear. Understand that friction can affect the movement of the model. Understand and discuss criteria for a fair test. Consider the needs of living animals.
TechnologyProgram and create a working model. Interpret 2D and 3D illustrations and models. Understand that animals use parts of their bodies as tools. Compare natural systems with mechanical systems. Use software media to acquire information. Demonstrate the knowledge and operation of digital tools and technological systems.
EngineeringBuild, program, and test the models. Modify a model’s behavior by changing the mechanical system or by adding a sensor to provide feedback. Brainstorm to find creative alternative solutions. Learn to share ideas and work together.
MathematicsMeasure time in seconds and tenths of a second. Estimate and measure the distance in centimeters or inches. Understand the concept of randomness. Compare the diameter and rotational speed. Understand and use numbers to represent the type of sounds played and the amount of time the motor turns on. Understand and use the distance between an object and to activate the motion sensor. Understand how the position of the model is measured by the tilt sensor. Understand and use numbers to measure and score qualitative characteristics.
LanguageCommunicate in spoken or written forms using appropriate vocabulary. Prepare and deliver a demonstration using a model. Use interview questions to find out information and write a story. Write a script with a dialogue. Write a logical sequence of events and create a story including main characters and dramatizing with visual and sound effects. Use technology to create and communicate ideas. Participate as knowledgeable, reflective members of the group and class.
13
Curriculum
LEGO, the LEGO logo and WEDO are trademarks of the/sont des marques de commerce de/son marcas registradas de LEGO Group. ©2009 The LEGO Group.
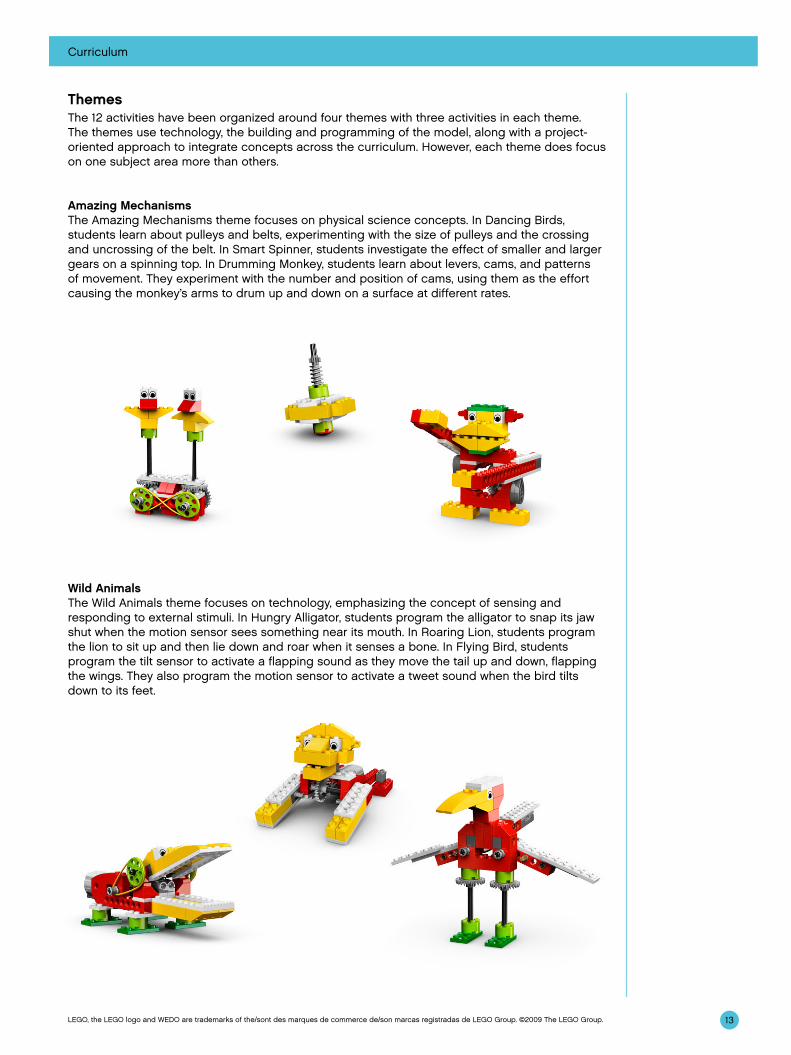
ThemesThe 12 activities have been organized around four themes with three activities in each theme. The themes use technology, the building and programming of the model, along with a project-oriented approach to integrate concepts across the curriculum. However, each theme does focus on one subject area more than others.
Amazing MechanismsThe Amazing Mechanisms theme focuses on physical science concepts. In Dancing Birds, students learn about pulleys and belts, experimenting with the size of pulleys and the crossing and uncrossing of the belt. In Smart Spinner, students investigate the effect of smaller and larger gears on a spinning top. In Drumming Monkey, students learn about levers, cams, and patterns of movement. They experiment with the number and position of cams, using them as the effort causing the monkey’s arms to drum up and down on a surface at different rates.
Wild AnimalsThe Wild Animals theme focuses on technology, emphasizing the concept of sensing and responding to external stimuli. In Hungry Alligator, students program the alligator to snap its jaw shut when the motion sensor sees something near its mouth. In Roaring Lion, students program the lion to sit up and then lie down and roar when it senses a bone. In Flying Bird, students program the tilt sensor to activate a flapping sound as they move the tail up and down, flapping the wings. They also program the motion sensor to activate a tweet sound when the bird tilts down to its feet.
14
Curriculum
LEGO, the LEGO logo and WEDO are trademarks of the/sont des marques de commerce de/son marcas registradas de LEGO Group. ©2009 The LEGO Group.
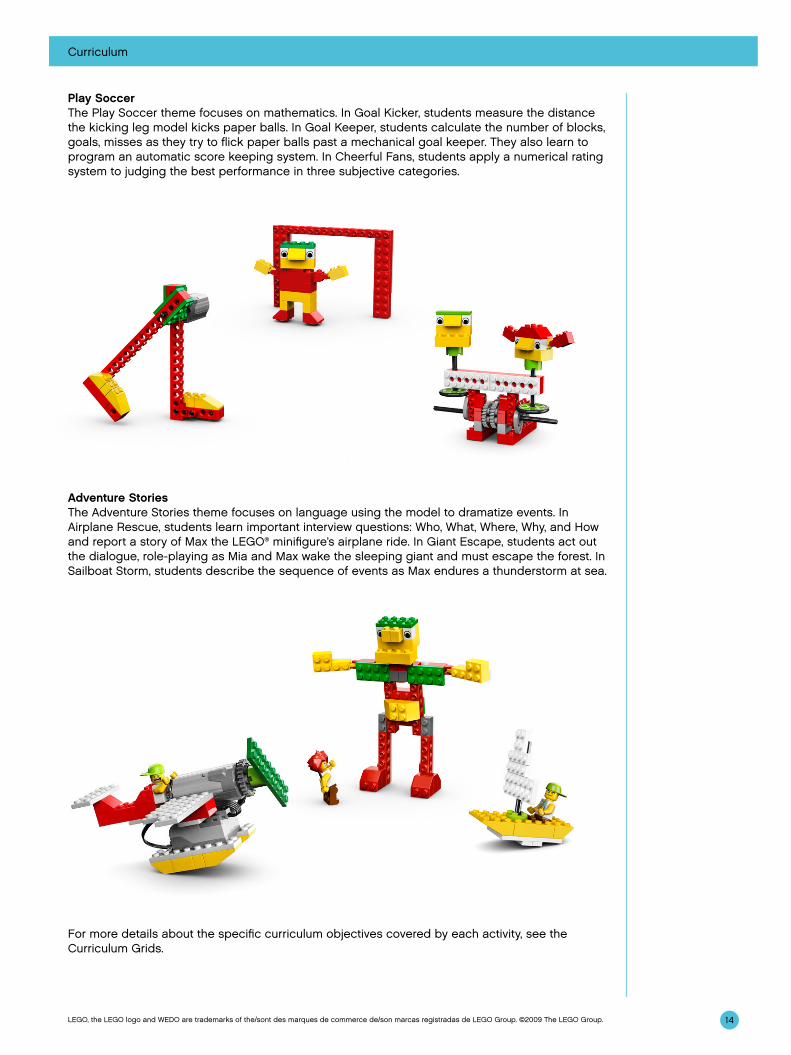
Play SoccerThe Play Soccer theme focuses on mathematics. In Goal Kicker, students measure the distance the kicking leg model kicks paper balls. In Goal Keeper, students calculate the number of blocks, goals, misses as they try to flick paper balls past a mechanical goal keeper. They also learn to program an automatic score keeping system. In Cheerful Fans, students apply a numerical rating system to judging the best performance in three subjective categories.
Adventure StoriesThe Adventure Stories theme focuses on language using the model to dramatize events. In Airplane Rescue, students learn important interview questions: Who, What, Where, Why, and How and report a story of Max the LEGO® minifigure’s airplane ride. In Giant Escape, students act out the dialogue, role-playing as Mia and Max wake the sleeping giant and must escape the forest. In Sailboat Storm, students describe the sequence of events as Max endures a thunderstorm at sea.
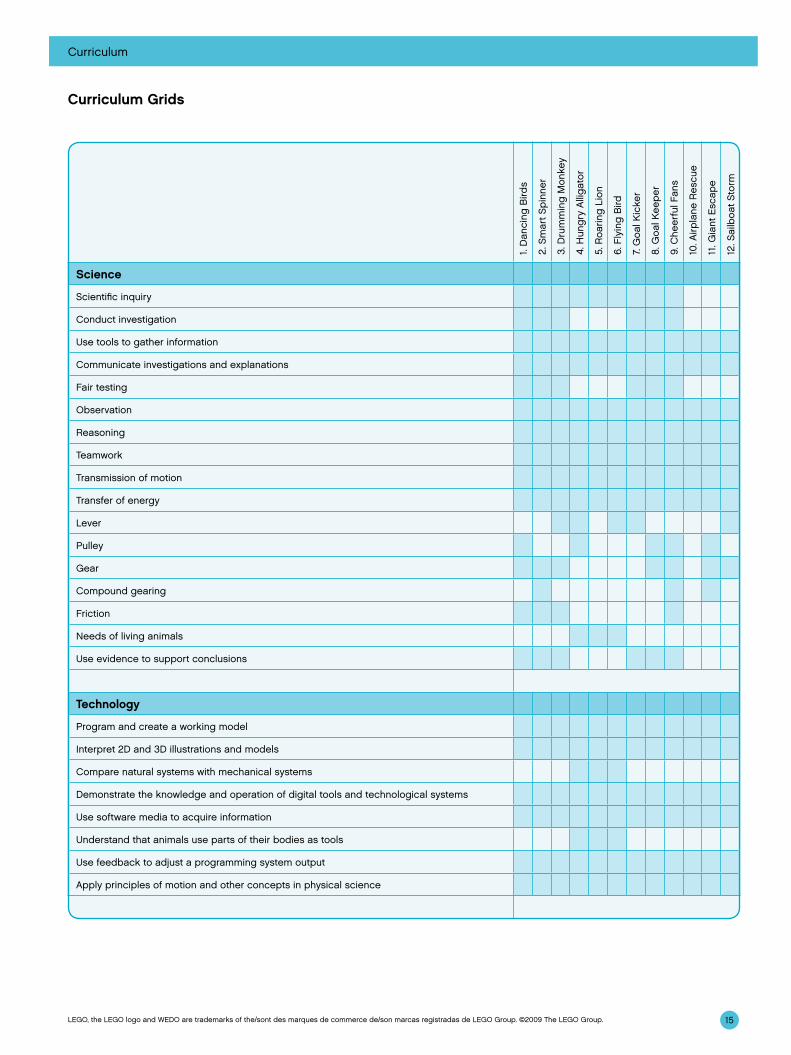
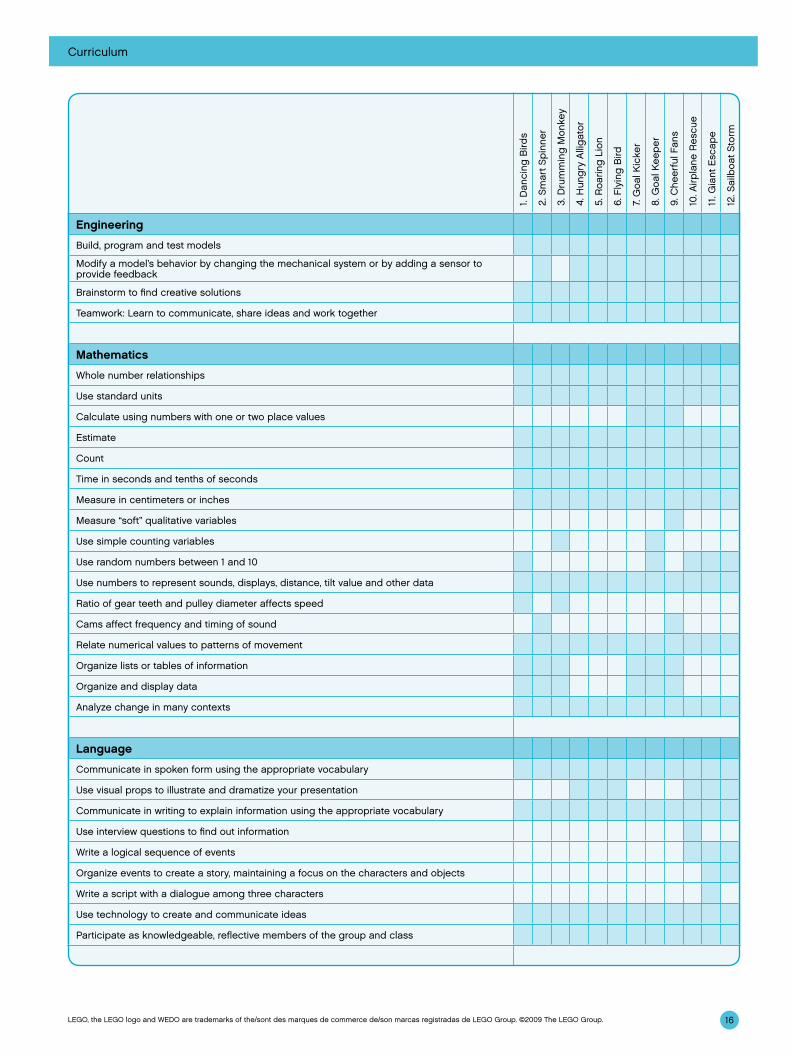
For more details about the specific curriculum objectives covered by each activity, see the Curriculum Grids.
15
Curriculum
LEGO, the LEGO logo and WEDO are trademarks of the/sont des marques de commerce de/son marcas registradas de LEGO Group. ©2009 The LEGO Group.
1. D
anci
ng B
irds
2. S
mar
t Sp
inne
r
3. D
rum
min
g M
onke
y
4. H
ung
ry A
llig
ator
5. R
oarin
g L
ion
6. F
lyin
g B
ird
7. G
oal K
icke
r
8. G
oal K
eep
er
9. C
heer
ful F
ans
10. A
irpla
ne R
escu
e
11. G
iant
Esc
ape
12. S
ailb
oat
Stor
m
Science
Scientific inquiry
Conduct investigation
Use tools to gather information
Communicate investigations and explanations
Fair testing
Observation
Reasoning
Teamwork
Transmission of motion
Transfer of energy
Lever
Pulley
Gear
Compound gearing
Friction
Needs of living animals
Use evidence to support conclusions
Technology
Program and create a working model
Interpret 2D and 3D illustrations and models
Compare natural systems with mechanical systems
Demonstrate the knowledge and operation of digital tools and technological systems
Use software media to acquire information
Understand that animals use parts of their bodies as tools
Use feedback to adjust a programming system output
Apply principles of motion and other concepts in physical science
Curriculum Grids
16
Curriculum
LEGO, the LEGO logo and WEDO are trademarks of the/sont des marques de commerce de/son marcas registradas de LEGO Group. ©2009 The LEGO Group.
1. D
anci
ng B
irds
2. S
mar
t Sp
inne
r
3. D
rum
min
g M
onke
y
4. H
ung
ry A
llig
ator
5. R
oarin
g L
ion
6. F
lyin
g B
ird
7. G
oal K
icke
r
8. G
oal K
eep
er
9. C
heer
ful F
ans
10. A
irpla
ne R
escu
e
11. G
iant
Esc
ape
12. S
ailb
oat
Stor
m
Engineering
Build, program and test models
Modify a model’s behavior by changing the mechanical system or by adding a sensor to provide feedback
Brainstorm to find creative solutions
Teamwork: Learn to communicate, share ideas and work together
Mathematics
Whole number relationships
Use standard units
Calculate using numbers with one or two place values
Estimate
Count
Time in seconds and tenths of seconds
Measure in centimeters or inches
Measure “soft” qualitative variables
Use simple counting variables
Use random numbers between 1 and 10
Use numbers to represent sounds, displays, distance, tilt value and other data
Ratio of gear teeth and pulley diameter affects speed
Cams affect frequency and timing of sound
Relate numerical values to patterns of movement
Organize lists or tables of information
Organize and display data
Analyze change in many contexts
Language
Communicate in spoken form using the appropriate vocabulary
Use visual props to illustrate and dramatize your presentation
Communicate in writing to explain information using the appropriate vocabulary
Use interview questions to find out information
Write a logical sequence of events
Organize events to create a story, maintaining a focus on the characters and objects
Write a script with a dialogue among three characters
Use technology to create and communicate ideas
Participate as knowledgeable, reflective members of the group and class
17LEGO, the LEGO logo and WEDO are trademarks of the/sont des marques de commerce de/son marcas registradas de LEGO Group. ©2009 The LEGO Group.
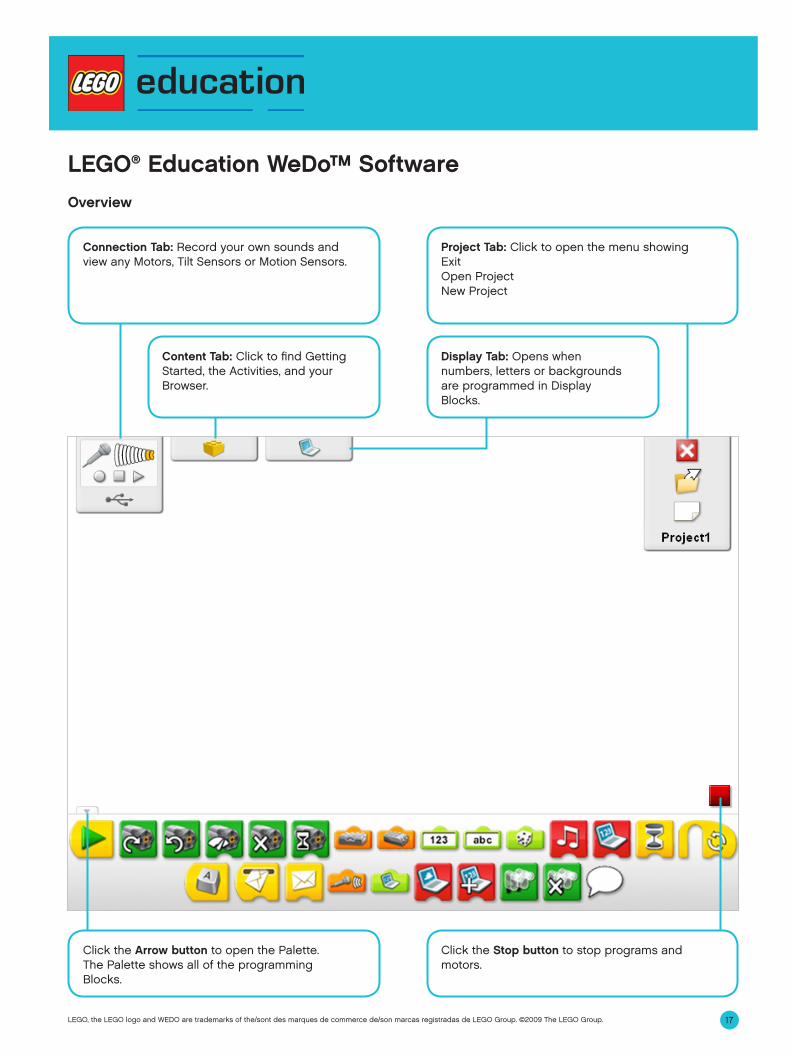
Click the Arrow button to open the Palette. The Palette shows all of the programming Blocks.
Click the Stop button to stop programs and motors.
Connection Tab: Record your own sounds and view any Motors, Tilt Sensors or Motion Sensors.
Project Tab: Click to open the menu showingExitOpen ProjectNew Project
Content Tab: Click to find Getting Started, the Activities, and your Browser.
Display Tab: Opens when numbers, letters or backgrounds are programmed in Display Blocks.
LEGO® Education WeDo™ SoftwareOverview
18
LEGO® Education WeDo™ Software
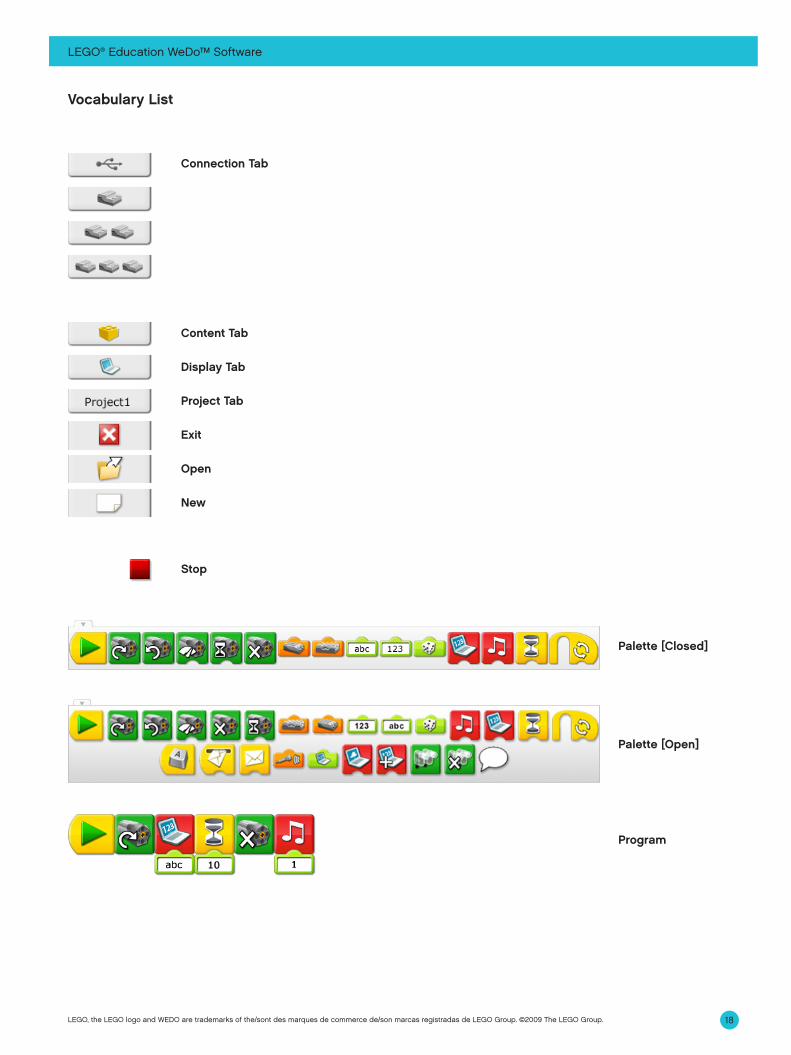
LEGO, the LEGO logo and WEDO are trademarks of the/sont des marques de commerce de/son marcas registradas de LEGO Group. ©2009 The LEGO Group.
Connection Tab
Content Tab
Display Tab
Project Tab
Exit
Open
New
Palette [Closed]
Palette [Open]
Program
Stop
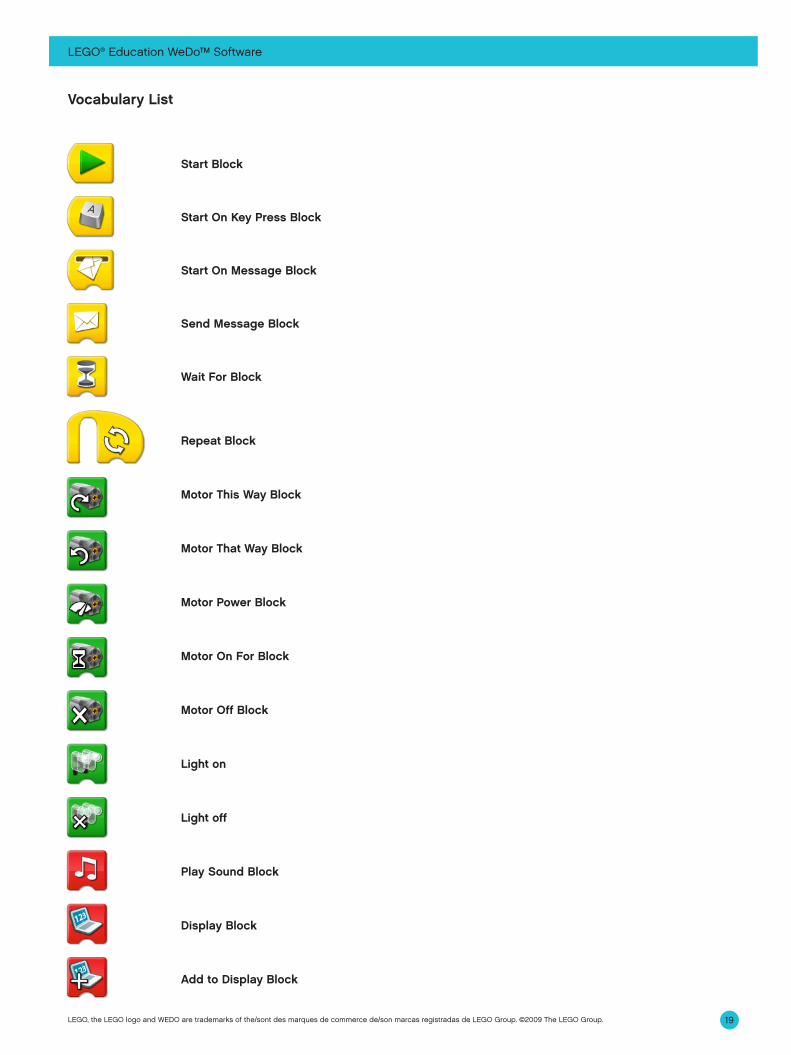
Vocabulary List
19
LEGO® Education WeDo™ Software
LEGO, the LEGO logo and WEDO are trademarks of the/sont des marques de commerce de/son marcas registradas de LEGO Group. ©2009 The LEGO Group.
Start Block
Start On Key Press Block
Start On Message Block
Send Message Block
Wait For Block
Repeat Block
Motor This Way Block
Motor That Way Block
Motor Power Block
Motor On For Block
Motor Off Block
Light on
Light off
Play Sound Block
Display Block
Add to Display Block
Vocabulary List

20
LEGO® Education WeDo™ Software
LEGO, the LEGO logo and WEDO are trademarks of the/sont des marques de commerce de/son marcas registradas de LEGO Group. ©2009 The LEGO Group.
Vocabulary List
Subtract from Display Block
Multiply by Display Block
Divide by Display Block
Display Background Block
Record Stop Play
Text Input
Number Input
Random Input
Display Input
Motion Sensor Input
Tilt Sensor Input
Tilt Up
Tilt Down
Tilt This Way
Tilt That Way
Any Tilt
Sound Sensor Input
Bubble
21
LEGO® Education WeDo™ Software
LEGO, the LEGO logo and WEDO are trademarks of the/sont des marques de commerce de/son marcas registradas de LEGO Group. ©2009 The LEGO Group.
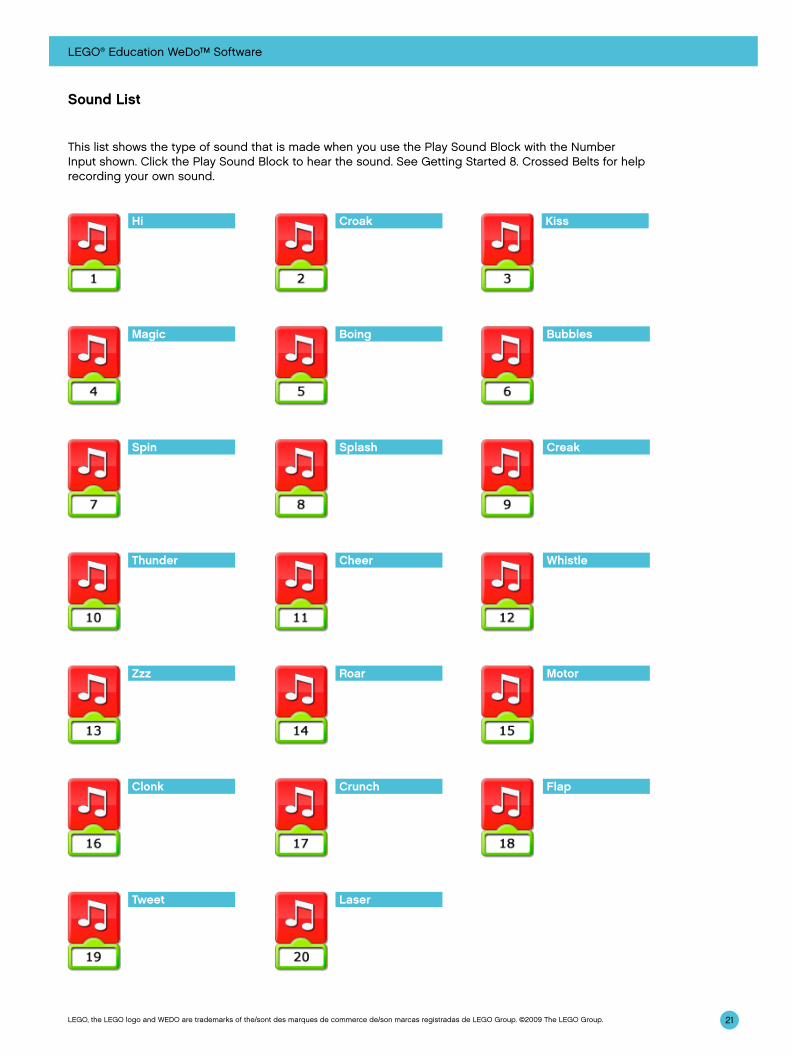
Sound List
This list shows the type of sound that is made when you use the Play Sound Block with the Number Input shown. Click the Play Sound Block to hear the sound. See Getting Started 8. Crossed Belts for help recording your own sound.
Croak
Magic Bubbles
Thunder Cheer
Hi Kiss
Boing
Spin Creak
Whistle
Motor
Flap
Tweet Laser
Clonk Crunch
Zzz Roar
Splash
22
LEGO® Education WeDo™ Software
LEGO, the LEGO logo and WEDO are trademarks of the/sont des marques de commerce de/son marcas registradas de LEGO Group. ©2009 The LEGO Group.
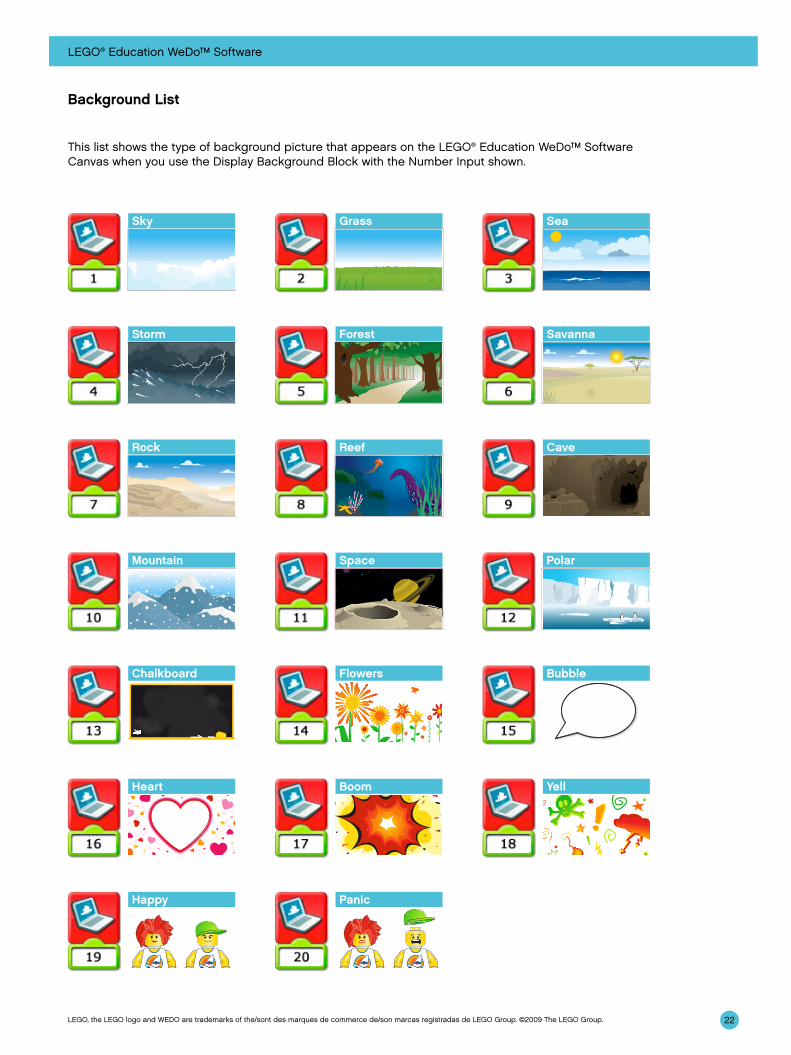
Background List
This list shows the type of background picture that appears on the LEGO® Education WeDo™ Software Canvas when you use the Display Background Block with the Number Input shown.
Sea
Forest
Grass
Rock
Space Polar
Sky
Storm Savanna
Reef
Mountain
Chalkboard
Heart
Happy Panic
Boom Yell
Flowers Bubble
Cave
23
LEGO® Education WeDo™ Software
LEGO, the LEGO logo and WEDO are trademarks of the/sont des marques de commerce de/son marcas registradas de LEGO Group. ©2009 The LEGO Group.
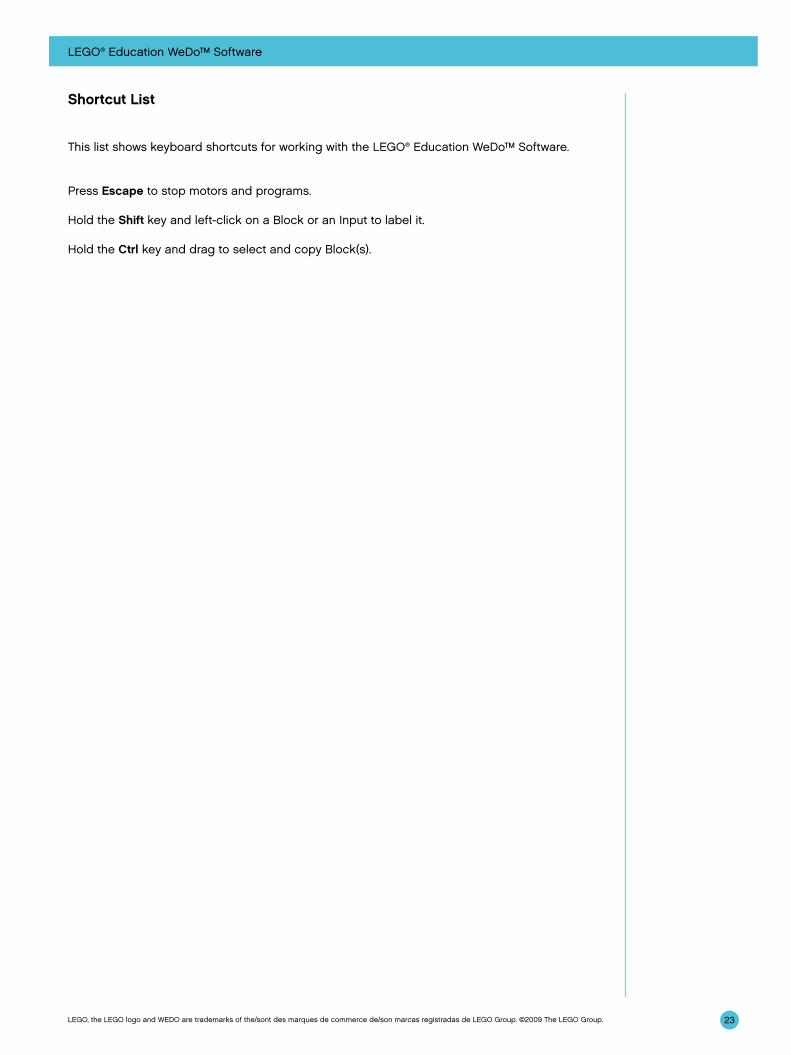
Shortcut List
This list shows keyboard shortcuts for working with the LEGO® Education WeDo™ Software.
Press Escape to stop motors and programs.
Hold the Shift key and left-click on a Block or an Input to label it.
Hold the Ctrl key and drag to select and copy Block(s).
24LEGO, the LEGO logo and WEDO are trademarks of the/sont des marques de commerce de/son marcas registradas de LEGO Group. ©2009 The LEGO Group.
Getting Started
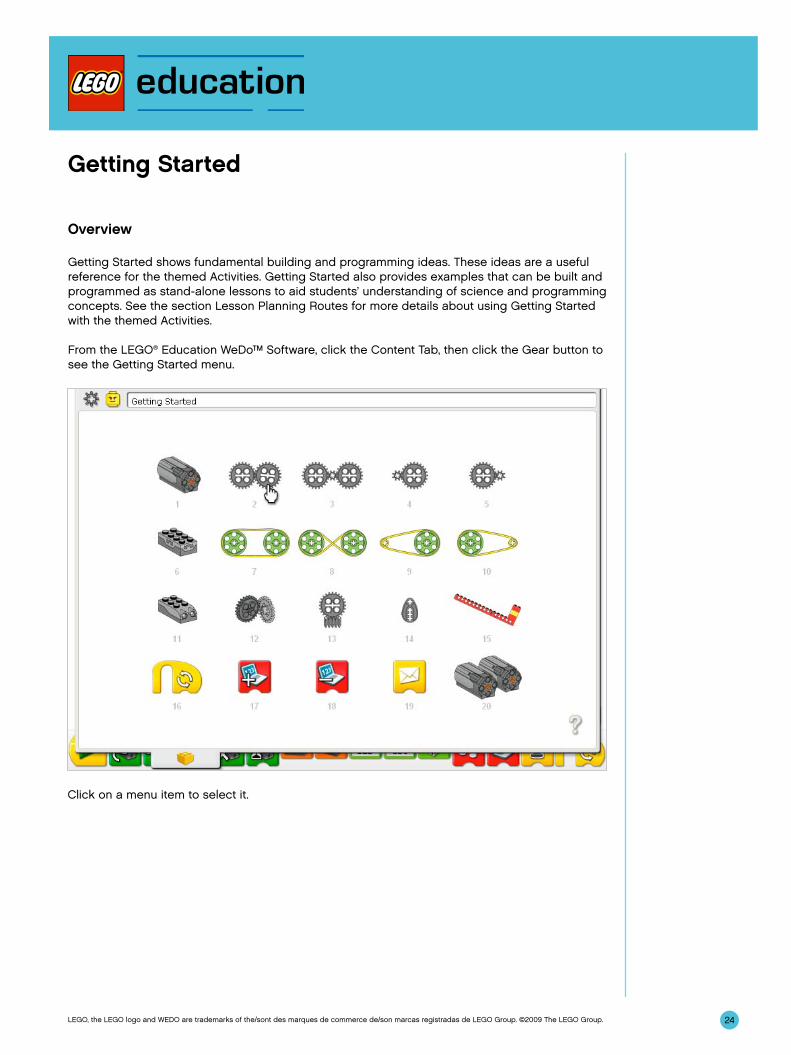
Overview
Getting Started shows fundamental building and programming ideas. These ideas are a useful reference for the themed Activities. Getting Started also provides examples that can be built and programmed as stand-alone lessons to aid students’ understanding of science and programming concepts. See the section Lesson Planning Routes for more details about using Getting Started with the themed Activities.
From the LEGO® Education WeDo™ Software, click the Content Tab, then click the Gear button to see the Getting Started menu.
Click on a menu item to select it.
25
Getting Started
LEGO, the LEGO logo and WEDO are trademarks of the/sont des marques de commerce de/son marcas registradas de LEGO Group. ©2009 The LEGO Group.
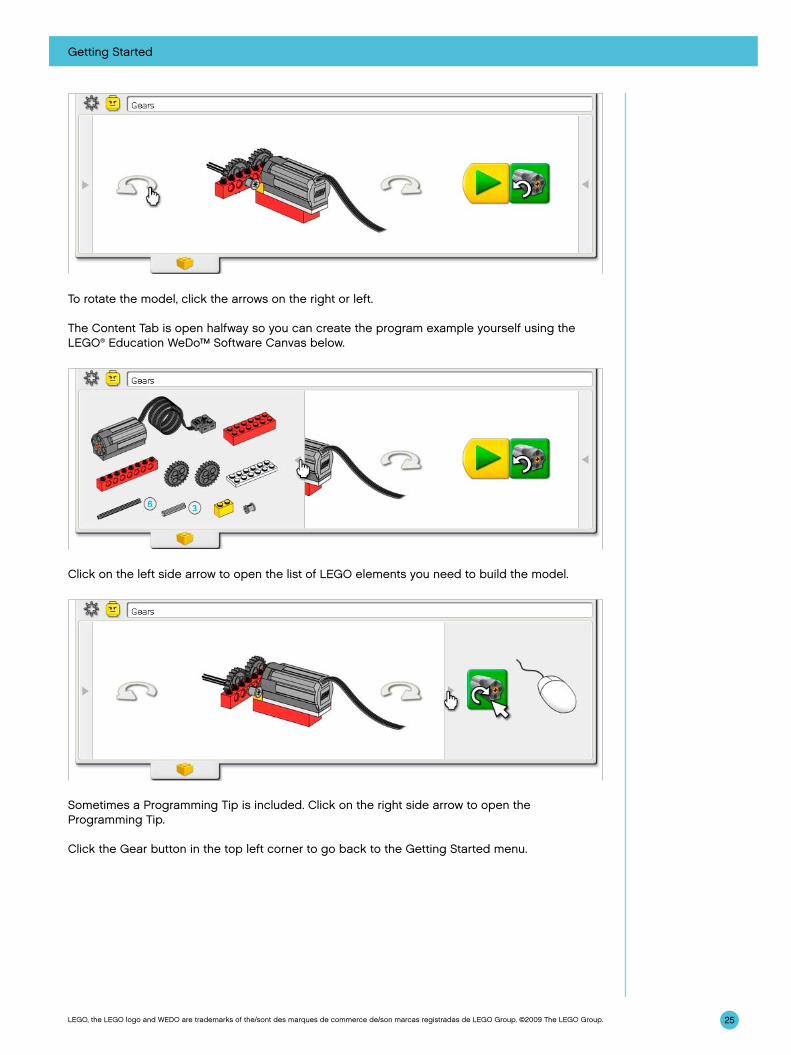
Click on the left side arrow to open the list of LEGO elements you need to build the model.
To rotate the model, click the arrows on the right or left.
The Content Tab is open halfway so you can create the program example yourself using the LEGO® Education WeDo™ Software Canvas below.
Sometimes a Programming Tip is included. Click on the right side arrow to open the Programming Tip.
Click the Gear button in the top left corner to go back to the Getting Started menu.
Getting Started
26LEGO, the LEGO logo and WEDO are trademarks of the/sont des marques de commerce de/son marcas registradas de LEGO Group. ©2009 The LEGO Group.
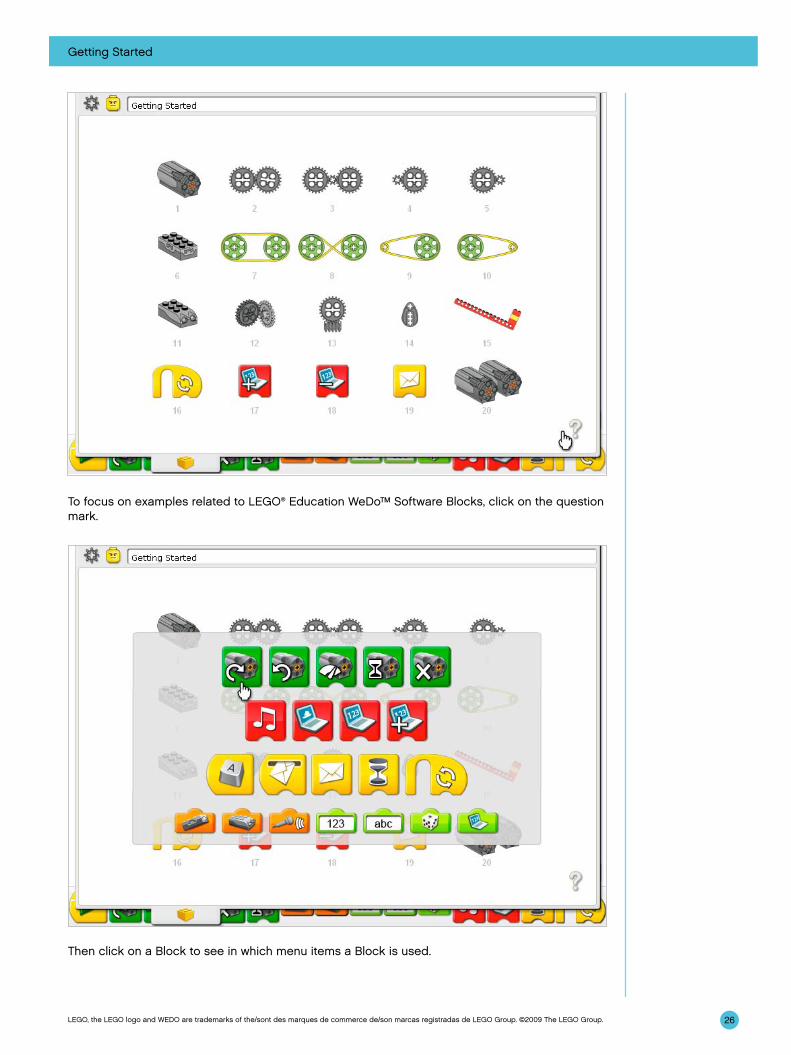
To focus on examples related to LEGO® Education WeDo™ Software Blocks, click on the question mark.
Then click on a Block to see in which menu items a Block is used.
Getting Started
27LEGO, the LEGO logo and WEDO are trademarks of the/sont des marques de commerce de/son marcas registradas de LEGO Group. ©2009 The LEGO Group.
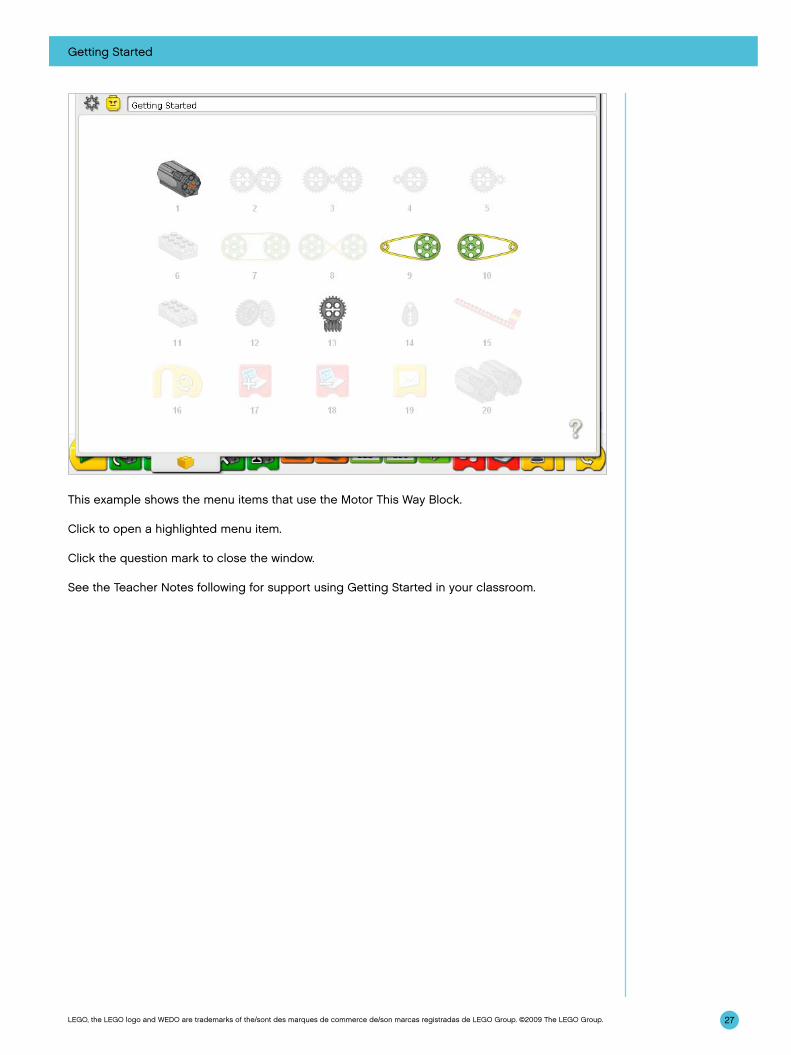
This example shows the menu items that use the Motor This Way Block.
Click to open a highlighted menu item.
Click the question mark to close the window.
See the Teacher Notes following for support using Getting Started in your classroom.
28
Getting Started
LEGO, the LEGO logo and WEDO are trademarks of the/sont des marques de commerce de/son marcas registradas de LEGO Group. ©2009 The LEGO Group.
If nothing happened...Is the motor wire attached to the LEGO Hub?Is the LEGO Hub attached to the computer USB port?Are the Blocks on the Canvas connected?
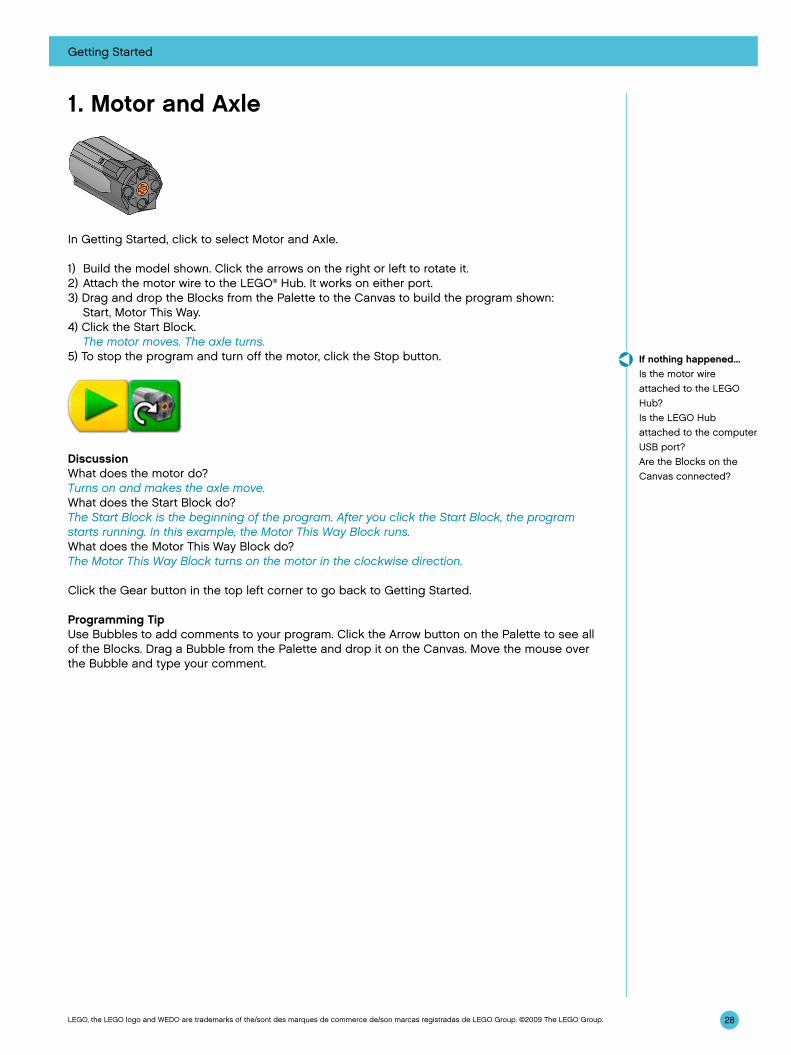
1. Motor and Axle
In Getting Started, click to select Motor and Axle.
1) Build the model shown. Click the arrows on the right or left to rotate it.2) Attach the motor wire to the LEGO® Hub. It works on either port.3) Drag and drop the Blocks from the Palette to the Canvas to build the program shown:
Start, Motor This Way.4) Click the Start Block. The motor moves. The axle turns.5) To stop the program and turn off the motor, click the Stop button.
DiscussionWhat does the motor do?Turns on and makes the axle move.What does the Start Block do?The Start Block is the beginning of the program. After you click the Start Block, the program starts running. In this example, the Motor This Way Block runs.What does the Motor This Way Block do?The Motor This Way Block turns on the motor in the clockwise direction.
Click the Gear button in the top left corner to go back to Getting Started.
Programming TipUse Bubbles to add comments to your program. Click the Arrow button on the Palette to see all of the Blocks. Drag a Bubble from the Palette and drop it on the Canvas. Move the mouse over the Bubble and type your comment.
29
Getting Started
LEGO, the LEGO logo and WEDO are trademarks of the/sont des marques de commerce de/son marcas registradas de LEGO Group. ©2009 The LEGO Group.
2. Gears
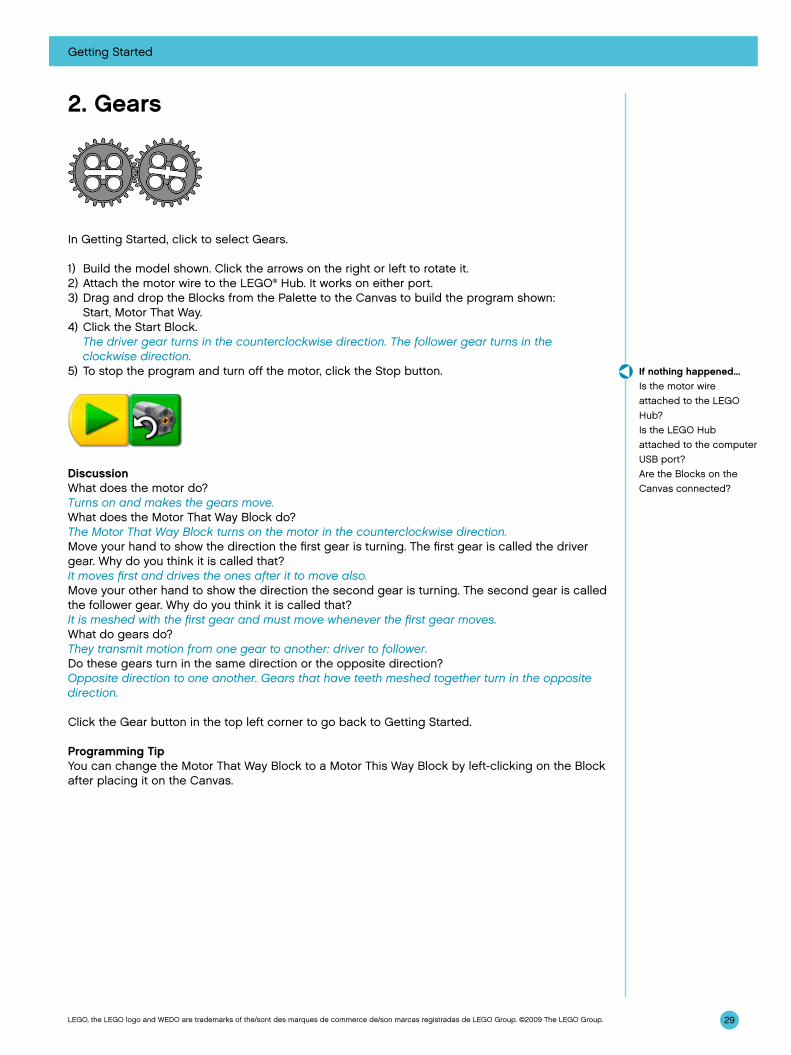
In Getting Started, click to select Gears.
1) Build the model shown. Click the arrows on the right or left to rotate it.2) Attach the motor wire to the LEGO® Hub. It works on either port.3) Drag and drop the Blocks from the Palette to the Canvas to build the program shown:
Start, Motor That Way.4) Click the Start Block. The driver gear turns in the counterclockwise direction. The follower gear turns in the
clockwise direction. 5) To stop the program and turn off the motor, click the Stop button.
DiscussionWhat does the motor do?Turns on and makes the gears move.What does the Motor That Way Block do?The Motor That Way Block turns on the motor in the counterclockwise direction.Move your hand to show the direction the first gear is turning. The first gear is called the driver gear. Why do you think it is called that?It moves first and drives the ones after it to move also.Move your other hand to show the direction the second gear is turning. The second gear is called the follower gear. Why do you think it is called that?It is meshed with the first gear and must move whenever the first gear moves.What do gears do?They transmit motion from one gear to another: driver to follower.Do these gears turn in the same direction or the opposite direction?Opposite direction to one another. Gears that have teeth meshed together turn in the opposite direction.
Click the Gear button in the top left corner to go back to Getting Started.
Programming TipYou can change the Motor That Way Block to a Motor This Way Block by left-clicking on the Block after placing it on the Canvas.
If nothing happened...Is the motor wire attached to the LEGO Hub?Is the LEGO Hub attached to the computer USB port?Are the Blocks on the Canvas connected?
30
Getting Started
LEGO, the LEGO logo and WEDO are trademarks of the/sont des marques de commerce de/son marcas registradas de LEGO Group. ©2009 The LEGO Group.
3. Idler Gear
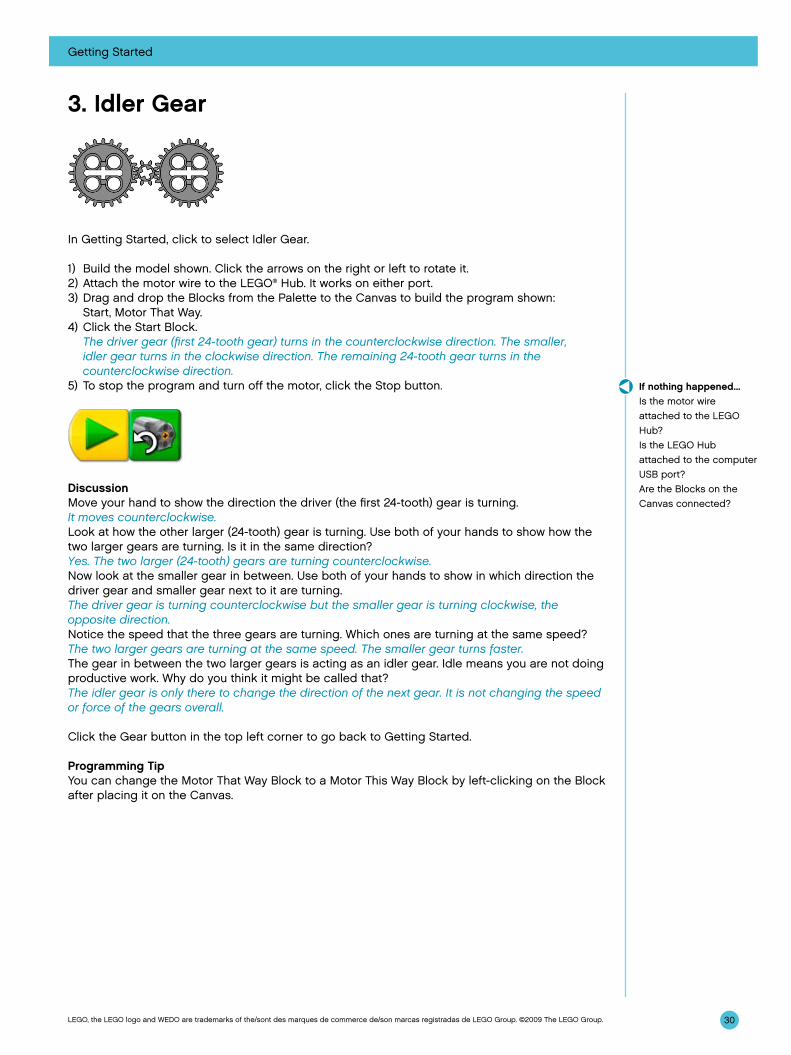
In Getting Started, click to select Idler Gear.
1) Build the model shown. Click the arrows on the right or left to rotate it.2) Attach the motor wire to the LEGO® Hub. It works on either port.3) Drag and drop the Blocks from the Palette to the Canvas to build the program shown:
Start, Motor That Way.4) Click the Start Block. The driver gear (first 24-tooth gear) turns in the counterclockwise direction. The smaller,
idler gear turns in the clockwise direction. The remaining 24-tooth gear turns in the counterclockwise direction.
5) To stop the program and turn off the motor, click the Stop button.
DiscussionMove your hand to show the direction the driver (the first 24-tooth) gear is turning.It moves counterclockwise. Look at how the other larger (24-tooth) gear is turning. Use both of your hands to show how the two larger gears are turning. Is it in the same direction? Yes. The two larger (24-tooth) gears are turning counterclockwise.Now look at the smaller gear in between. Use both of your hands to show in which direction the driver gear and smaller gear next to it are turning.The driver gear is turning counterclockwise but the smaller gear is turning clockwise, the opposite direction.Notice the speed that the three gears are turning. Which ones are turning at the same speed? The two larger gears are turning at the same speed. The smaller gear turns faster.The gear in between the two larger gears is acting as an idler gear. Idle means you are not doing productive work. Why do you think it might be called that?The idler gear is only there to change the direction of the next gear. It is not changing the speed or force of the gears overall.
Click the Gear button in the top left corner to go back to Getting Started.
Programming TipYou can change the Motor That Way Block to a Motor This Way Block by left-clicking on the Block after placing it on the Canvas.
If nothing happened...Is the motor wire attached to the LEGO Hub?Is the LEGO Hub attached to the computer USB port?Are the Blocks on the Canvas connected?
31
Getting Started
LEGO, the LEGO logo and WEDO are trademarks of the/sont des marques de commerce de/son marcas registradas de LEGO Group. ©2009 The LEGO Group.
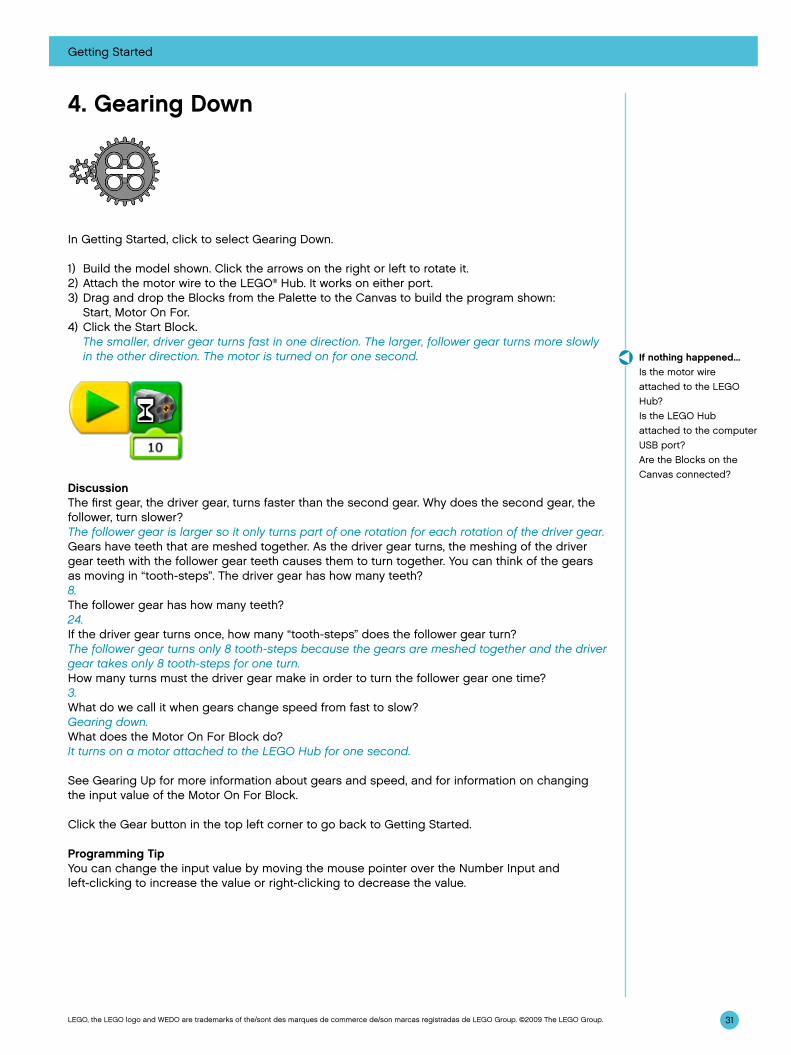
4. Gearing Down
In Getting Started, click to select Gearing Down.
1) Build the model shown. Click the arrows on the right or left to rotate it.2) Attach the motor wire to the LEGO® Hub. It works on either port.3) Drag and drop the Blocks from the Palette to the Canvas to build the program shown:
Start, Motor On For.4) Click the Start Block. The smaller, driver gear turns fast in one direction. The larger, follower gear turns more slowly
in the other direction. The motor is turned on for one second.
DiscussionThe first gear, the driver gear, turns faster than the second gear. Why does the second gear, the follower, turn slower?The follower gear is larger so it only turns part of one rotation for each rotation of the driver gear.Gears have teeth that are meshed together. As the driver gear turns, the meshing of the driver gear teeth with the follower gear teeth causes them to turn together. You can think of the gears as moving in “tooth-steps”. The driver gear has how many teeth?8.The follower gear has how many teeth?24.If the driver gear turns once, how many “tooth-steps” does the follower gear turn?The follower gear turns only 8 tooth-steps because the gears are meshed together and the driver gear takes only 8 tooth-steps for one turn.How many turns must the driver gear make in order to turn the follower gear one time?3.What do we call it when gears change speed from fast to slow?Gearing down.What does the Motor On For Block do?It turns on a motor attached to the LEGO Hub for one second.
See Gearing Up for more information about gears and speed, and for information on changing the input value of the Motor On For Block.
Click the Gear button in the top left corner to go back to Getting Started.
Programming TipYou can change the input value by moving the mouse pointer over the Number Input and left-clicking to increase the value or right-clicking to decrease the value.
If nothing happened...Is the motor wire attached to the LEGO Hub?Is the LEGO Hub attached to the computer USB port?Are the Blocks on the Canvas connected?
32
Getting Started
LEGO, the LEGO logo and WEDO are trademarks of the/sont des marques de commerce de/son marcas registradas de LEGO Group. ©2009 The LEGO Group.
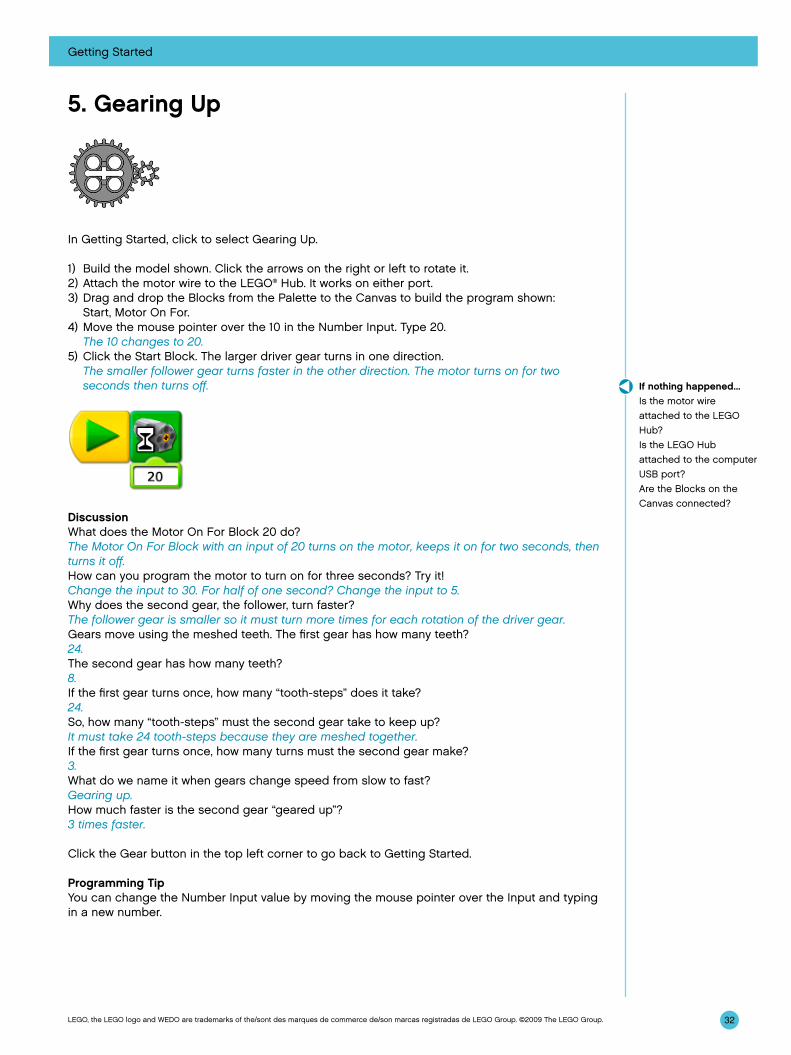
5. Gearing Up
In Getting Started, click to select Gearing Up.
1) Build the model shown. Click the arrows on the right or left to rotate it.2) Attach the motor wire to the LEGO® Hub. It works on either port. 3) Drag and drop the Blocks from the Palette to the Canvas to build the program shown:
Start, Motor On For.4) Move the mouse pointer over the 10 in the Number Input. Type 20. The 10 changes to 20.5) Click the Start Block. The larger driver gear turns in one direction. The smaller follower gear turns faster in the other direction. The motor turns on for two
seconds then turns off.
DiscussionWhat does the Motor On For Block 20 do?The Motor On For Block with an input of 20 turns on the motor, keeps it on for two seconds, then turns it off.How can you program the motor to turn on for three seconds? Try it!Change the input to 30. For half of one second? Change the input to 5. Why does the second gear, the follower, turn faster?The follower gear is smaller so it must turn more times for each rotation of the driver gear.Gears move using the meshed teeth. The first gear has how many teeth?24.The second gear has how many teeth?8.If the first gear turns once, how many “tooth-steps” does it take?24.So, how many “tooth-steps” must the second gear take to keep up?It must take 24 tooth-steps because they are meshed together.If the first gear turns once, how many turns must the second gear make?3.What do we name it when gears change speed from slow to fast?Gearing up.How much faster is the second gear “geared up”?3 times faster.
Click the Gear button in the top left corner to go back to Getting Started.
Programming TipYou can change the Number Input value by moving the mouse pointer over the Input and typing in a new number.
If nothing happened...Is the motor wire attached to the LEGO Hub?Is the LEGO Hub attached to the computer USB port?Are the Blocks on the Canvas connected?

33
Getting Started
LEGO, the LEGO logo and WEDO are trademarks of the/sont des marques de commerce de/son marcas registradas de LEGO Group. ©2009 The LEGO Group.
6. Tilt Sensor
In Getting Started, click to select Tilt Sensor.
1) Build the model shown. Click the arrows on the right or left to rotate it.2) Attach the tilt sensor wire to the LEGO® Hub. It works on either port.3) Click the Arrow button on the Palette to see all of the Blocks.4) Drag and drop the Blocks from the Palette to the Canvas to build the program shown:
Start, Display Background, Wait For, Display Background.5) On the Wait For Block, drag and drop a Tilt Sensor Input on top of the Number Input. The Tilt Sensor Input replaces the Number Input. 6) On the second Display Background Block, move the mouse pointer over the Number Input and
type 2. The Input changes to the number 2.7) Click the Start Block. The program opens the Display Tab and shows the first background. Then the program waits
until you tilt the sensor upward and the Display Tab shows the second background.
DiscussionWhat does the tilt sensor do?The tilt sensor tells the computer when it is pointed up, down or in other directions.Which Blocks did you use to program the tilt sensor?Wait For with a Tilt Sensor Input.How does this program work?The program shows a background in the Display Tab and then waits for someone to tilt the sensor upward. When the tilt sensor tilts upward, the program shows another background.The tilt sensor can also be pointed in other directions. Click on the Tilt Sensor Input in your program to find out how many ways it can be tilted.Six ways: Up, Down, This Way, That Way, No Tilt, Any Tilt.Change your program to use a different Tilt Sensor Input.Change the Tilt Sensor Input to any of these other options. Then when the program runs again, it will wait for the new tilt input direction before changing to another background.
For other ways to use the Display Block, see ideas in Lever and Motion Sensor.
See the LEGO Education WeDo™ Software section for the Background List showing the Backgrounds that are available.
Click the Gear button in the top left corner to go back to Getting Started.
Programming TipYou can change the Tilt Sensor Input to one of six positions: Up, Down, This Way, That Way, No Tilt, Any Tilt. Left-click on the Tilt Sensor Input to cycle through the six options.
If nothing happened...Is the tilt sensor wire attached to the LEGO Hub?Is the LEGO Hub attached to the computer USB port?Are the Blocks on the Canvas connected? Did you tilt the tilt sensor upward?
34
Getting Started
LEGO, the LEGO logo and WEDO are trademarks of the/sont des marques de commerce de/son marcas registradas de LEGO Group. ©2009 The LEGO Group.
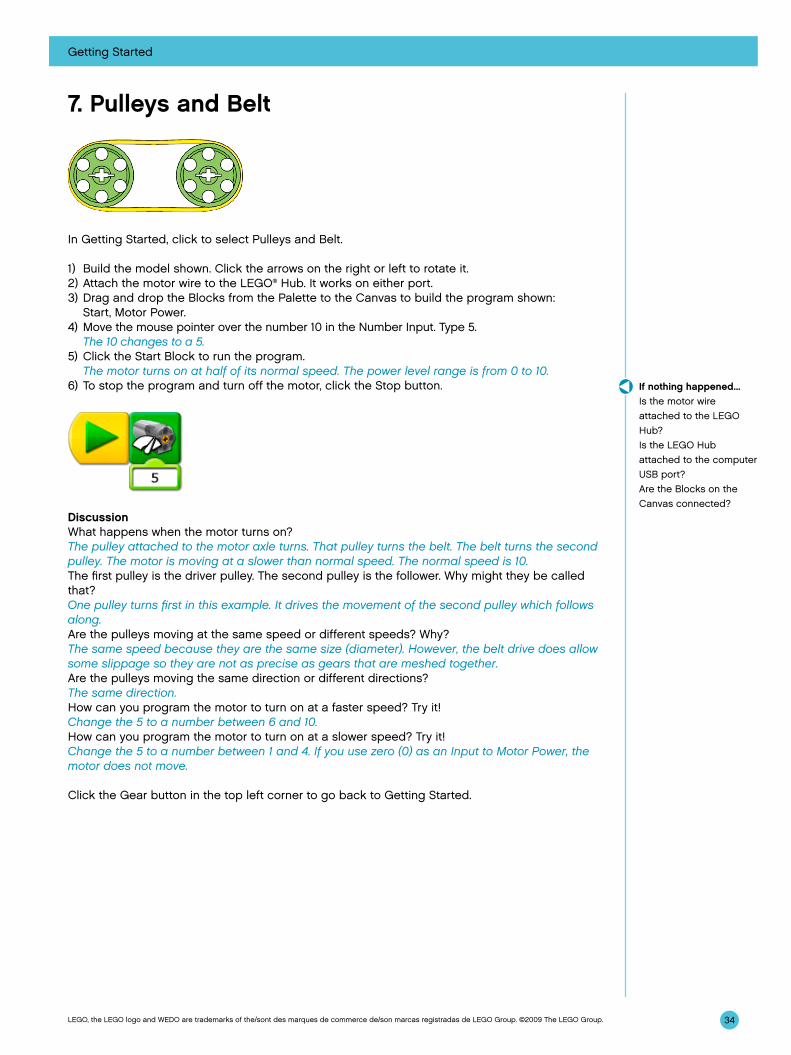
7. Pulleys and Belt
In Getting Started, click to select Pulleys and Belt.
1) Build the model shown. Click the arrows on the right or left to rotate it.2) Attach the motor wire to the LEGO® Hub. It works on either port.3) Drag and drop the Blocks from the Palette to the Canvas to build the program shown:
Start, Motor Power.4) Move the mouse pointer over the number 10 in the Number Input. Type 5. The 10 changes to a 5.5) Click the Start Block to run the program. The motor turns on at half of its normal speed. The power level range is from 0 to 10.6) To stop the program and turn off the motor, click the Stop button.
DiscussionWhat happens when the motor turns on?The pulley attached to the motor axle turns. That pulley turns the belt. The belt turns the second pulley. The motor is moving at a slower than normal speed. The normal speed is 10.The first pulley is the driver pulley. The second pulley is the follower. Why might they be called that?One pulley turns first in this example. It drives the movement of the second pulley which follows along.Are the pulleys moving at the same speed or different speeds? Why?The same speed because they are the same size (diameter). However, the belt drive does allow some slippage so they are not as precise as gears that are meshed together. Are the pulleys moving the same direction or different directions?The same direction.How can you program the motor to turn on at a faster speed? Try it!Change the 5 to a number between 6 and 10.How can you program the motor to turn on at a slower speed? Try it!Change the 5 to a number between 1 and 4. If you use zero (0) as an Input to Motor Power, the motor does not move.
Click the Gear button in the top left corner to go back to Getting Started.
If nothing happened...Is the motor wire attached to the LEGO Hub?Is the LEGO Hub attached to the computer USB port?Are the Blocks on the Canvas connected?
35
Getting Started
LEGO, the LEGO logo and WEDO are trademarks of the/sont des marques de commerce de/son marcas registradas de LEGO Group. ©2009 The LEGO Group.
8. Crossed Belt
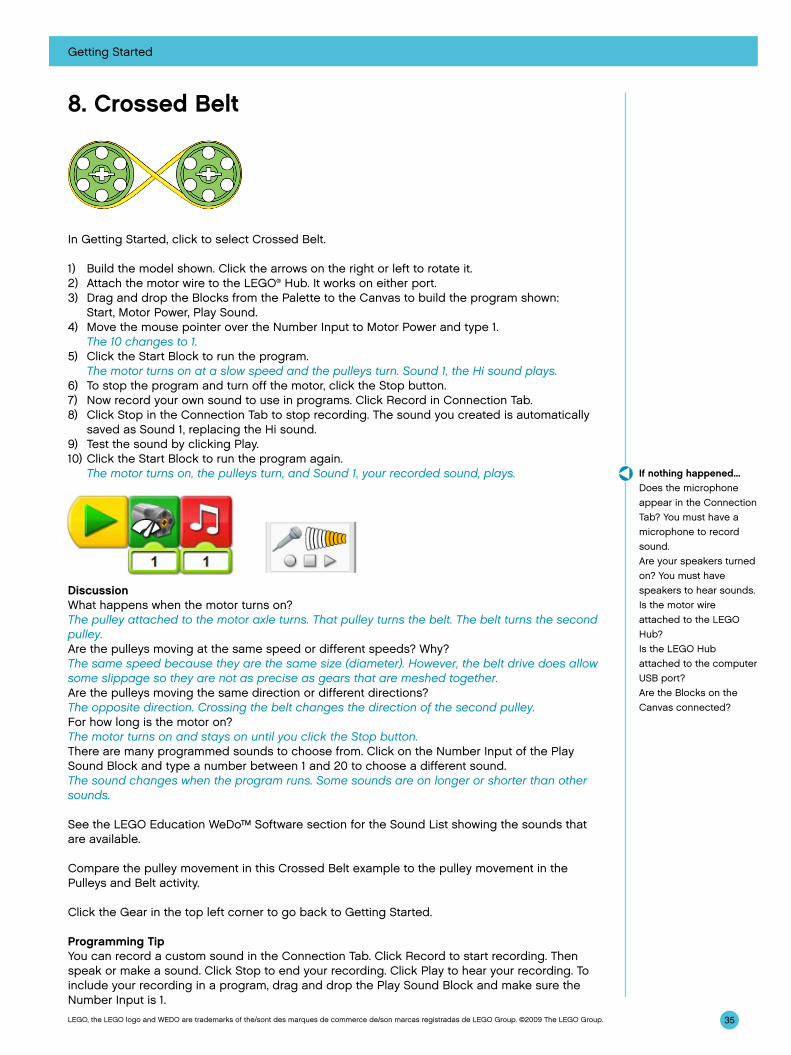
In Getting Started, click to select Crossed Belt.
1) Build the model shown. Click the arrows on the right or left to rotate it.2) Attach the motor wire to the LEGO® Hub. It works on either port.3) Drag and drop the Blocks from the Palette to the Canvas to build the program shown:
Start, Motor Power, Play Sound.4) Move the mouse pointer over the Number Input to Motor Power and type 1. The 10 changes to 1.5) Click the Start Block to run the program. The motor turns on at a slow speed and the pulleys turn. Sound 1, the Hi sound plays.6) To stop the program and turn off the motor, click the Stop button.7) Now record your own sound to use in programs. Click Record in Connection Tab. 8) Click Stop in the Connection Tab to stop recording. The sound you created is automatically
saved as Sound 1, replacing the Hi sound.9) Test the sound by clicking Play. 10) Click the Start Block to run the program again. The motor turns on, the pulleys turn, and Sound 1, your recorded sound, plays.
DiscussionWhat happens when the motor turns on?The pulley attached to the motor axle turns. That pulley turns the belt. The belt turns the second pulley.Are the pulleys moving at the same speed or different speeds? Why?The same speed because they are the same size (diameter). However, the belt drive does allow some slippage so they are not as precise as gears that are meshed together. Are the pulleys moving the same direction or different directions?The opposite direction. Crossing the belt changes the direction of the second pulley.For how long is the motor on?The motor turns on and stays on until you click the Stop button.There are many programmed sounds to choose from. Click on the Number Input of the Play Sound Block and type a number between 1 and 20 to choose a different sound.The sound changes when the program runs. Some sounds are on longer or shorter than other sounds.
See the LEGO Education WeDo™ Software section for the Sound List showing the sounds that are available.
Compare the pulley movement in this Crossed Belt example to the pulley movement in the Pulleys and Belt activity.
Click the Gear in the top left corner to go back to Getting Started.
Programming TipYou can record a custom sound in the Connection Tab. Click Record to start recording. Then speak or make a sound. Click Stop to end your recording. Click Play to hear your recording. To include your recording in a program, drag and drop the Play Sound Block and make sure the Number Input is 1.
If nothing happened...Does the microphone appear in the Connection Tab? You must have a microphone to record sound.Are your speakers turned on? You must have speakers to hear sounds.Is the motor wire attached to the LEGO Hub?Is the LEGO Hub attached to the computer USB port?Are the Blocks on the Canvas connected?
36
Getting Started
LEGO, the LEGO logo and WEDO are trademarks of the/sont des marques de commerce de/son marcas registradas de LEGO Group. ©2009 The LEGO Group.
9. Decrease Speed
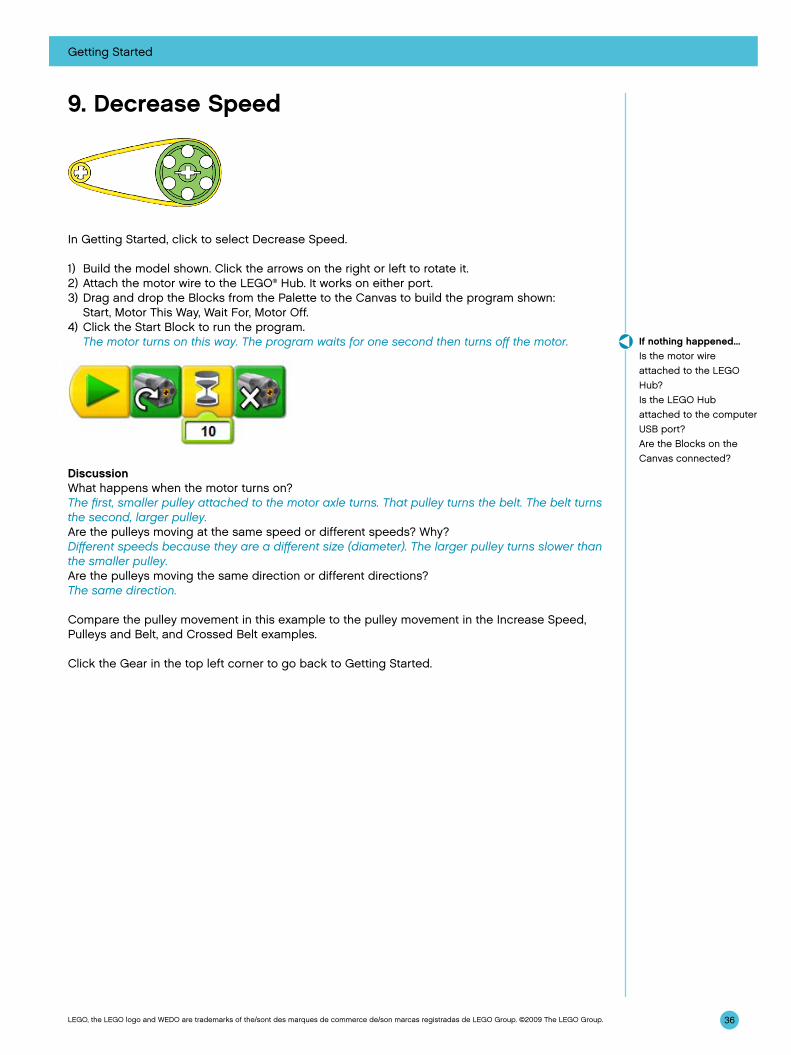
In Getting Started, click to select Decrease Speed.
1) Build the model shown. Click the arrows on the right or left to rotate it.2) Attach the motor wire to the LEGO® Hub. It works on either port.3) Drag and drop the Blocks from the Palette to the Canvas to build the program shown:
Start, Motor This Way, Wait For, Motor Off.4) Click the Start Block to run the program. The motor turns on this way. The program waits for one second then turns off the motor.
DiscussionWhat happens when the motor turns on?The first, smaller pulley attached to the motor axle turns. That pulley turns the belt. The belt turns the second, larger pulley.Are the pulleys moving at the same speed or different speeds? Why?Different speeds because they are a different size (diameter). The larger pulley turns slower than the smaller pulley.Are the pulleys moving the same direction or different directions?The same direction.
Compare the pulley movement in this example to the pulley movement in the Increase Speed, Pulleys and Belt, and Crossed Belt examples.
Click the Gear in the top left corner to go back to Getting Started.
If nothing happened...Is the motor wire attached to the LEGO Hub?Is the LEGO Hub attached to the computer USB port?Are the Blocks on the Canvas connected?
37
Getting Started
LEGO, the LEGO logo and WEDO are trademarks of the/sont des marques de commerce de/son marcas registradas de LEGO Group. ©2009 The LEGO Group.
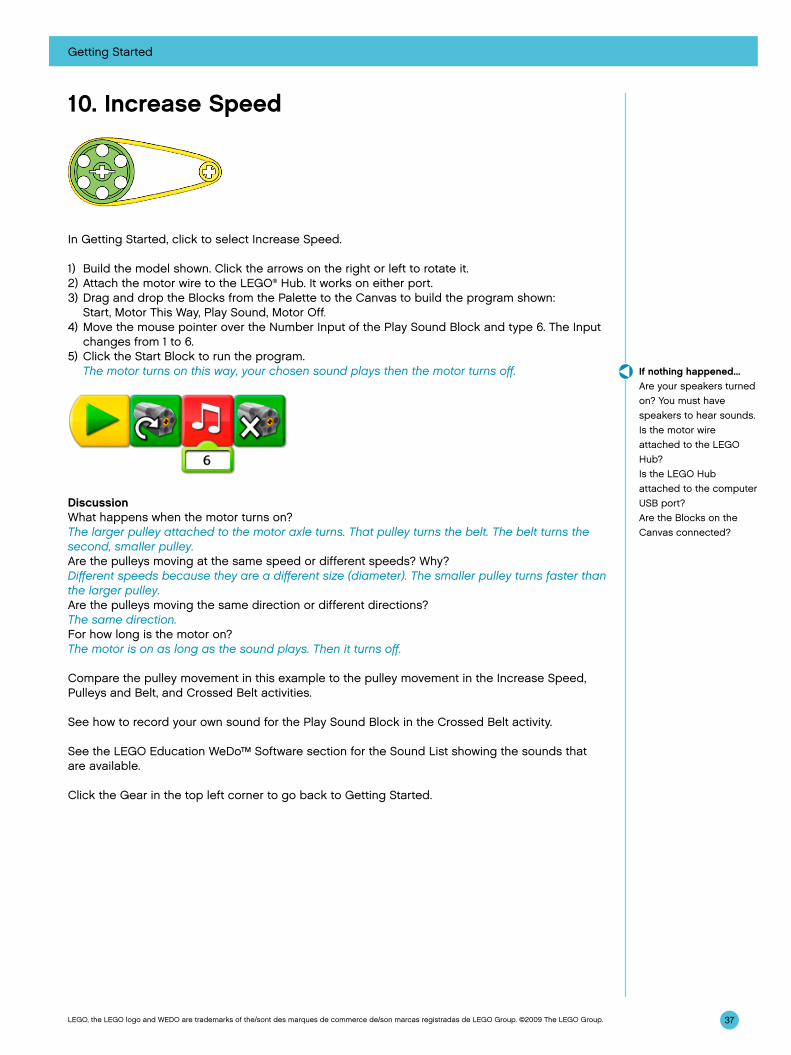
10. Increase Speed
In Getting Started, click to select Increase Speed.
1) Build the model shown. Click the arrows on the right or left to rotate it.2) Attach the motor wire to the LEGO® Hub. It works on either port.3) Drag and drop the Blocks from the Palette to the Canvas to build the program shown:
Start, Motor This Way, Play Sound, Motor Off.4) Move the mouse pointer over the Number Input of the Play Sound Block and type 6. The Input
changes from 1 to 6. 5) Click the Start Block to run the program. The motor turns on this way, your chosen sound plays then the motor turns off.
DiscussionWhat happens when the motor turns on?The larger pulley attached to the motor axle turns. That pulley turns the belt. The belt turns the second, smaller pulley. Are the pulleys moving at the same speed or different speeds? Why?Different speeds because they are a different size (diameter). The smaller pulley turns faster than the larger pulley.Are the pulleys moving the same direction or different directions?The same direction. For how long is the motor on?The motor is on as long as the sound plays. Then it turns off.
Compare the pulley movement in this example to the pulley movement in the Increase Speed, Pulleys and Belt, and Crossed Belt activities.
See how to record your own sound for the Play Sound Block in the Crossed Belt activity.
See the LEGO Education WeDo™ Software section for the Sound List showing the sounds that are available.
Click the Gear in the top left corner to go back to Getting Started.
If nothing happened...Are your speakers turned on? You must have speakers to hear sounds.Is the motor wire attached to the LEGO Hub?Is the LEGO Hub attached to the computer USB port?Are the Blocks on the Canvas connected?
38
Getting Started
LEGO, the LEGO logo and WEDO are trademarks of the/sont des marques de commerce de/son marcas registradas de LEGO Group. ©2009 The LEGO Group.
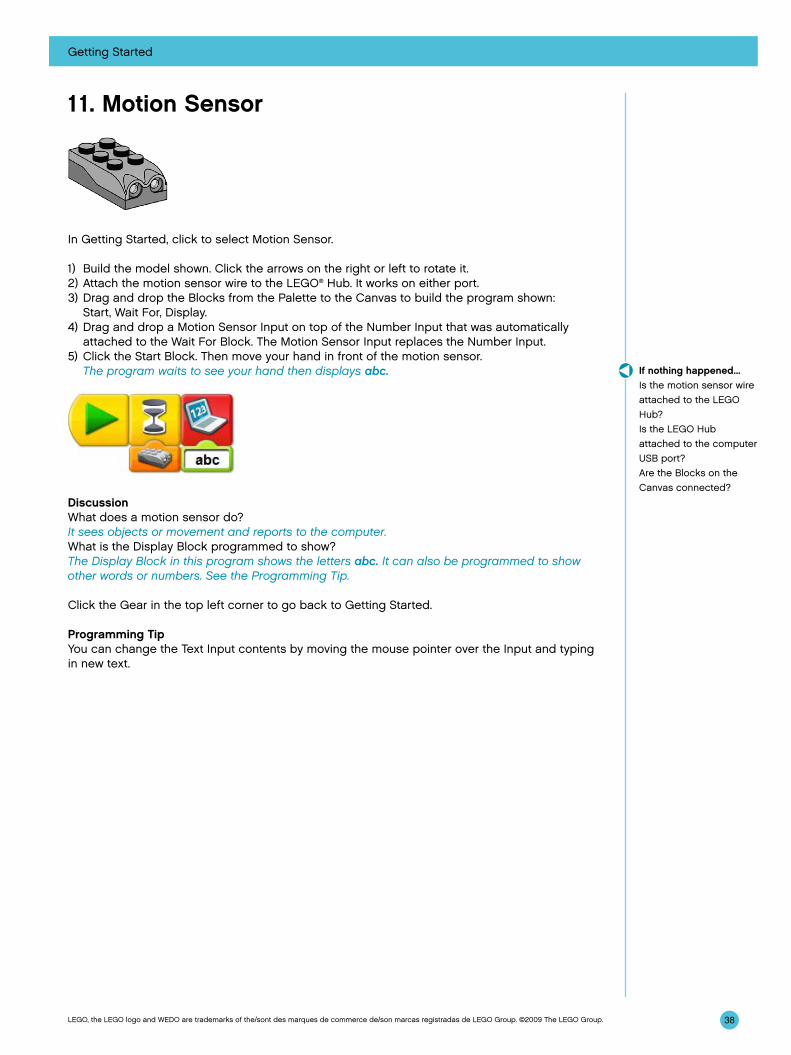
11. Motion Sensor
In Getting Started, click to select Motion Sensor.
1) Build the model shown. Click the arrows on the right or left to rotate it.2) Attach the motion sensor wire to the LEGO® Hub. It works on either port.3) Drag and drop the Blocks from the Palette to the Canvas to build the program shown:
Start, Wait For, Display.4) Drag and drop a Motion Sensor Input on top of the Number Input that was automatically
attached to the Wait For Block. The Motion Sensor Input replaces the Number Input.5) Click the Start Block. Then move your hand in front of the motion sensor. The program waits to see your hand then displays abc.
DiscussionWhat does a motion sensor do?It sees objects or movement and reports to the computer.What is the Display Block programmed to show?The Display Block in this program shows the letters abc. It can also be programmed to show other words or numbers. See the Programming Tip.
Click the Gear in the top left corner to go back to Getting Started.
Programming TipYou can change the Text Input contents by moving the mouse pointer over the Input and typing in new text.
If nothing happened...Is the motion sensor wire attached to the LEGO Hub?Is the LEGO Hub attached to the computer USB port?Are the Blocks on the Canvas connected?
39
Getting Started
LEGO, the LEGO logo and WEDO are trademarks of the/sont des marques de commerce de/son marcas registradas de LEGO Group. ©2009 The LEGO Group.
12. Crown Gear
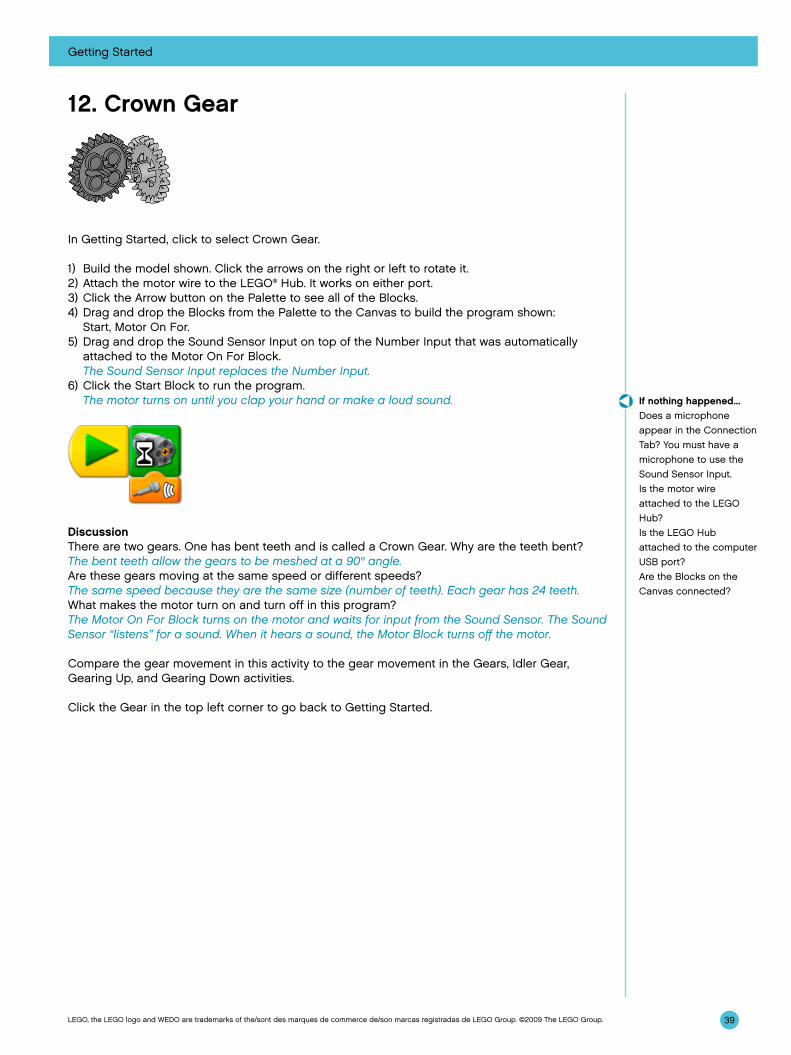
In Getting Started, click to select Crown Gear.
1) Build the model shown. Click the arrows on the right or left to rotate it.2) Attach the motor wire to the LEGO® Hub. It works on either port.3) Click the Arrow button on the Palette to see all of the Blocks. 4) Drag and drop the Blocks from the Palette to the Canvas to build the program shown:
Start, Motor On For.5) Drag and drop the Sound Sensor Input on top of the Number Input that was automatically
attached to the Motor On For Block. The Sound Sensor Input replaces the Number Input.6) Click the Start Block to run the program. The motor turns on until you clap your hand or make a loud sound.
DiscussionThere are two gears. One has bent teeth and is called a Crown Gear. Why are the teeth bent?The bent teeth allow the gears to be meshed at a 90° angle. Are these gears moving at the same speed or different speeds?The same speed because they are the same size (number of teeth). Each gear has 24 teeth.What makes the motor turn on and turn off in this program?The Motor On For Block turns on the motor and waits for input from the Sound Sensor. The Sound Sensor “listens” for a sound. When it hears a sound, the Motor Block turns off the motor.
Compare the gear movement in this activity to the gear movement in the Gears, Idler Gear, Gearing Up, and Gearing Down activities.
Click the Gear in the top left corner to go back to Getting Started.
If nothing happened...Does a microphone appear in the Connection Tab? You must have a microphone to use the Sound Sensor Input.Is the motor wire attached to the LEGO Hub?Is the LEGO Hub attached to the computer USB port?Are the Blocks on the Canvas connected?

40
Getting Started
LEGO, the LEGO logo and WEDO are trademarks of the/sont des marques de commerce de/son marcas registradas de LEGO Group. ©2009 The LEGO Group.
13. Worm Gear
In Getting Started, click to select Worm Gear.
1) Build the model shown. Click the arrows on the right or left to rotate it.2) Attach the motor wire to the LEGO® Hub. It works on either port.3) Click the Arrow button on the Palette to see all of the Blocks.4) Drag and drop the Blocks from the Palette to the Canvas to build both of the programs shown:
Start On Key Press, Motor This Way, Start On Key Press, Motor That Way.5) Move the mouse pointer over the second Start On Key Press Block and type B.6) Press A on the keyboard to run one program. Press B on the keyboard to run the other.
Pressing A turns on the motor clockwise. Pressing B turns on the motor counterclockwise.7) To stop the program and turn off the motor, click the Stop button.
DiscussionThis model combines a 24-tooth gear and a worm gear inside a clear housing. Which gear is moving faster? (You may wish to add a green 2x2 round brick on the end of the worm gear axle to more easily see it turn.)The worm gear is moving much faster than the 24-tooth gear.The worm gear is like a 1-tooth gear. For each complete rotation of the worm gear the 24-tooth gear advances by one tooth. How many times must the worm gear rotate in order to make the other gear rotate one time?The worm gear must rotate 24 times in order to make the 24-tooth gear rotate once.Notice also that the 24-tooth gear axle is perpendicular to the worm gear axle. So what two changes do the worm gear make in this machine?The worm gear slows the speed and changes direction of any gear meshed with it.What controls the motor in this program?The Start On Key Press Blocks act as Start Blocks that only start a program when a specific key on the keyboard is pressed. The Start On Key Press A Block turns on the motor clockwise when A is pressed. The Start On Key Press B Block turns on the motor counterclockwise when the B key is pressed.
Compare the gear movement in this example to the gear movement in the Gears, Idler Gear, Gearing Up, Gearing Down, and Crown Gear examples.
Click the Gear in the top left corner to go back to Getting Started.
Programming TipYou can change the character used with the Start On Key Press Block. Move the mouse pointer over the Start On Key Press Block and type the character you want to use. Number keys and arrow keys can also be used.
If nothing happened...Is the motor wire attached to the LEGO Hub?Is the LEGO Hub attached to the computer USB port?Are the Blocks on the Canvas connected?

41
Getting Started
LEGO, the LEGO logo and WEDO are trademarks of the/sont des marques de commerce de/son marcas registradas de LEGO Group. ©2009 The LEGO Group.
14. Cam
In Getting Started, click to select Cam.
1) Build the model shown. Click the arrows on the right or left to rotate it.2) Attach the motor wire to the LEGO® Hub. It works on either port.3) Drag and drop the Blocks from the Palette to the Canvas to build the program shown:
Start, Repeat, Motor Power, Motor On For. The Repeat Block automatically expands to fit the Motor Power and Motor On For Blocks.4) Drag and drop a Random Input on top of the Number Input that was automatically attached to
the Motor Power Block. The Random Input replaces the Number Input.5) Click the Start Block to run the program. The motor turns at a random power level between 1 and 10 for one second.
Then it repeats and the power level changes again.6) To stop the program and turn off the motor, click the Stop button.
DiscussionThis model and program show two ways to design surprising behavior. First, the model uses a cam. The cam is not round — it is shaped like an egg (an ellipse). Look at the model as it moves. What happens to the wheel on top of the cam each time the cam rotates?As the cam turns, the wheel that is resting on top of it moves up and down following the cam’s shape. So the cam creates a bobbing movement up and down in the other wheel and axle as the cam turns. A second surprising behavior can be programmed. Random Input varies from one to ten. How is the Random Input used to program your model?The program changes the power level of the motor using the Random Input. So the motor speed goes up and down based on a random number between 1 and 10. The change in speed causes the cam movement to speed up or slow down every second.
Click the Gear in the top left corner to go back to Getting Started.
If nothing happened...Is the motor wire attached to the LEGO Hub?Is the LEGO Hub attached to the computer USB port?Are the Blocks on the Canvas connected?
42
Getting Started
LEGO, the LEGO logo and WEDO are trademarks of the/sont des marques de commerce de/son marcas registradas de LEGO Group. ©2009 The LEGO Group.
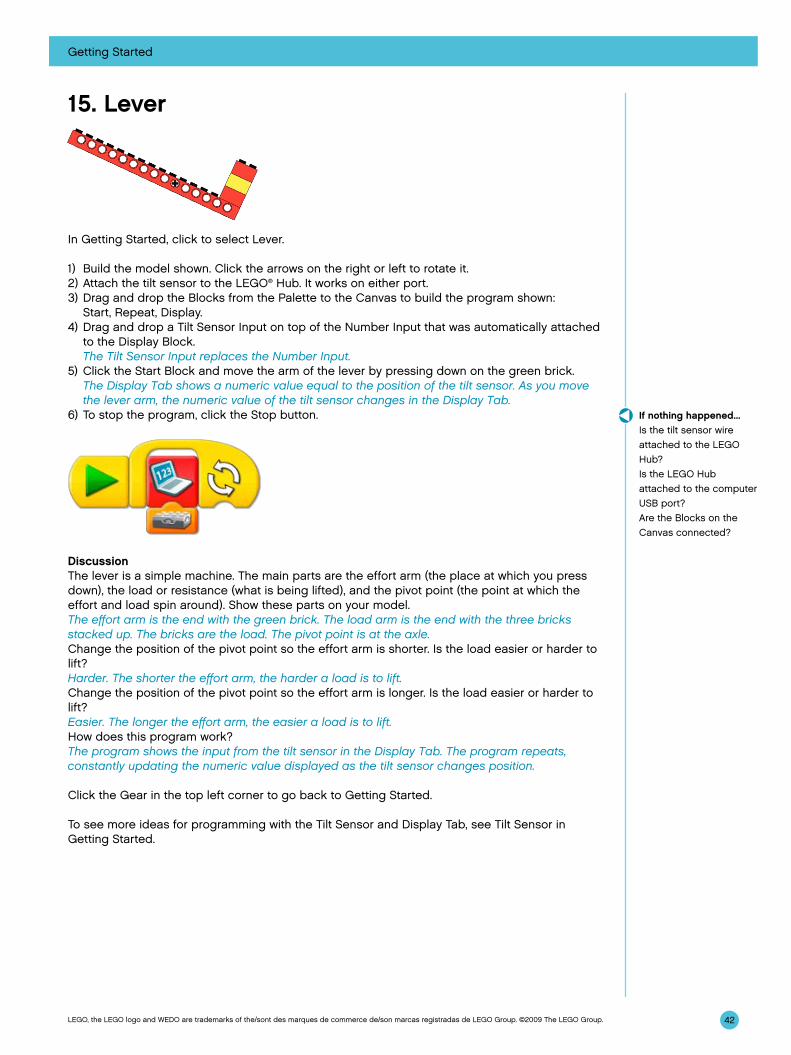
15. Lever
In Getting Started, click to select Lever.
1) Build the model shown. Click the arrows on the right or left to rotate it.2) Attach the tilt sensor to the LEGO® Hub. It works on either port.3) Drag and drop the Blocks from the Palette to the Canvas to build the program shown:
Start, Repeat, Display.4) Drag and drop a Tilt Sensor Input on top of the Number Input that was automatically attached
to the Display Block. The Tilt Sensor Input replaces the Number Input.5) Click the Start Block and move the arm of the lever by pressing down on the green brick. The Display Tab shows a numeric value equal to the position of the tilt sensor. As you move
the lever arm, the numeric value of the tilt sensor changes in the Display Tab.6) To stop the program, click the Stop button.
DiscussionThe lever is a simple machine. The main parts are the effort arm (the place at which you press down), the load or resistance (what is being lifted), and the pivot point (the point at which the effort and load spin around). Show these parts on your model.The effort arm is the end with the green brick. The load arm is the end with the three bricks stacked up. The bricks are the load. The pivot point is at the axle.Change the position of the pivot point so the effort arm is shorter. Is the load easier or harder to lift?Harder. The shorter the effort arm, the harder a load is to lift. Change the position of the pivot point so the effort arm is longer. Is the load easier or harder to lift?Easier. The longer the effort arm, the easier a load is to lift. How does this program work?The program shows the input from the tilt sensor in the Display Tab. The program repeats, constantly updating the numeric value displayed as the tilt sensor changes position.
Click the Gear in the top left corner to go back to Getting Started.
To see more ideas for programming with the Tilt Sensor and Display Tab, see Tilt Sensor in Getting Started.
If nothing happened...Is the tilt sensor wire attached to the LEGO Hub?Is the LEGO Hub attached to the computer USB port?Are the Blocks on the Canvas connected?
43
Getting Started
LEGO, the LEGO logo and WEDO are trademarks of the/sont des marques de commerce de/son marcas registradas de LEGO Group. ©2009 The LEGO Group.
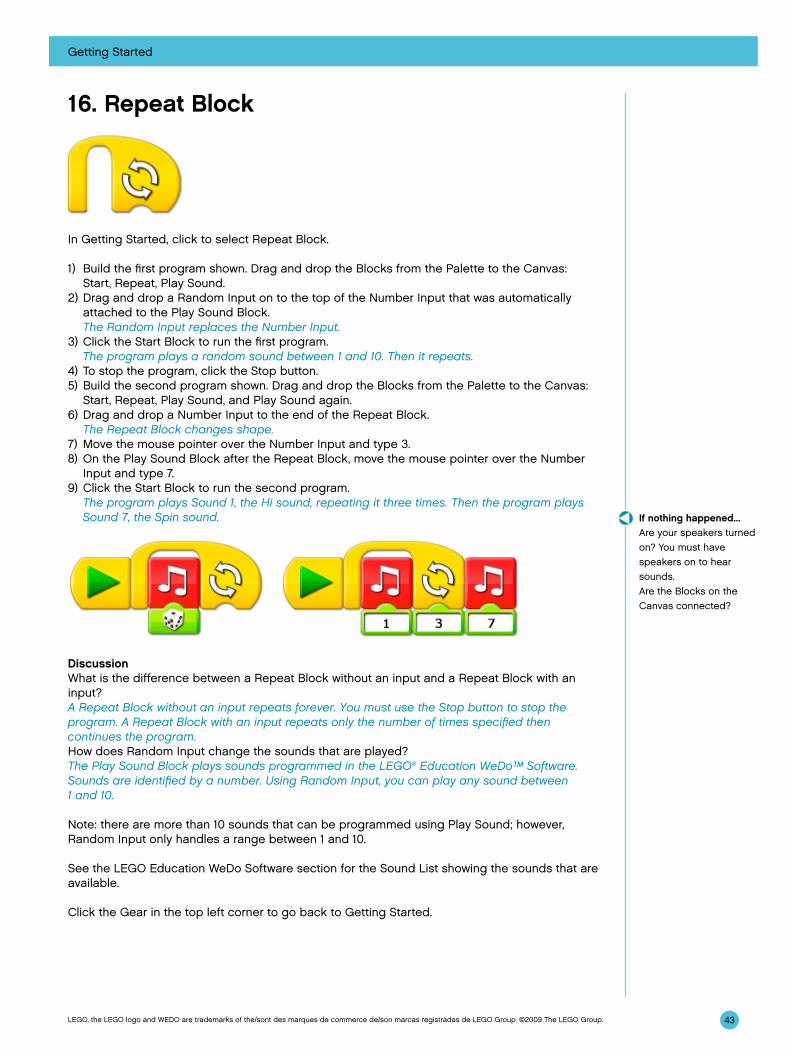
16. Repeat Block
In Getting Started, click to select Repeat Block.
1) Build the first program shown. Drag and drop the Blocks from the Palette to the Canvas: Start, Repeat, Play Sound.
2) Drag and drop a Random Input on to the top of the Number Input that was automatically attached to the Play Sound Block.
The Random Input replaces the Number Input.3) Click the Start Block to run the first program. The program plays a random sound between 1 and 10. Then it repeats.4) To stop the program, click the Stop button.5) Build the second program shown. Drag and drop the Blocks from the Palette to the Canvas:
Start, Repeat, Play Sound, and Play Sound again.6) Drag and drop a Number Input to the end of the Repeat Block. The Repeat Block changes shape.7) Move the mouse pointer over the Number Input and type 3.8) On the Play Sound Block after the Repeat Block, move the mouse pointer over the Number
Input and type 7.9) Click the Start Block to run the second program. The program plays Sound 1, the Hi sound, repeating it three times. Then the program plays
Sound 7, the Spin sound.
DiscussionWhat is the difference between a Repeat Block without an input and a Repeat Block with an input?A Repeat Block without an input repeats forever. You must use the Stop button to stop the program. A Repeat Block with an input repeats only the number of times specified then continues the program.How does Random Input change the sounds that are played?The Play Sound Block plays sounds programmed in the LEGO® Education WeDo™ Software. Sounds are identified by a number. Using Random Input, you can play any sound between 1 and 10.
Note: there are more than 10 sounds that can be programmed using Play Sound; however, Random Input only handles a range between 1 and 10.
See the LEGO Education WeDo Software section for the Sound List showing the sounds that are available.
Click the Gear in the top left corner to go back to Getting Started.
If nothing happened...Are your speakers turned on? You must have speakers on to hear sounds.Are the Blocks on the Canvas connected?

44
Getting Started
LEGO, the LEGO logo and WEDO are trademarks of the/sont des marques de commerce de/son marcas registradas de LEGO Group. ©2009 The LEGO Group.
17. Add to Display
In Getting Started, click to select Add to Display.
1) Click the Arrow button on the Palette to see all of the Blocks.2) Drag and drop the Blocks from the Palette to the Canvas to build the program shown:
Start, Display, Repeat, Wait For, Add to Display.3) Click the Start Block to run the program. The program resets the Display to 0. The program waits for 1 second. Then the Add to Display
Block adds 1 to the Display. The program repeats, adding 1 to the Display each time it repeats.4) To stop the program, click the Stop button.
DiscussionThis program counts up by 1s. How can you program it to count up by 2s? Or 5s? Or 10s? Try it!Change the Add to Display Input from 1 to 2, or 5, or 10.What does the Display Block with the Number Input 0 do? What happens if you don’t have it in the program?When you run the program, it resets the Display to 0. If it is not in the program, the counting will never restart at 0.Why does the program need to repeat in order to count up?Each time the program repeats, it adds 1 to the Display. If it doesn’t repeat, the count stays at 1.What are some ways to use a counting program?E.g., a scoreboard for a game, a tally for people entering a door.
Note: You can set the program to repeat a specific number of times. See Getting Started Repeat Block for an example.
Click the Gear in the top left corner to go back to Getting Started.
If nothing happened...Are the Blocks on the Canvas connected?Is the Display Block with zero input outside the Repeat Block?
45
Getting Started
LEGO, the LEGO logo and WEDO are trademarks of the/sont des marques de commerce de/son marcas registradas de LEGO Group. ©2009 The LEGO Group.
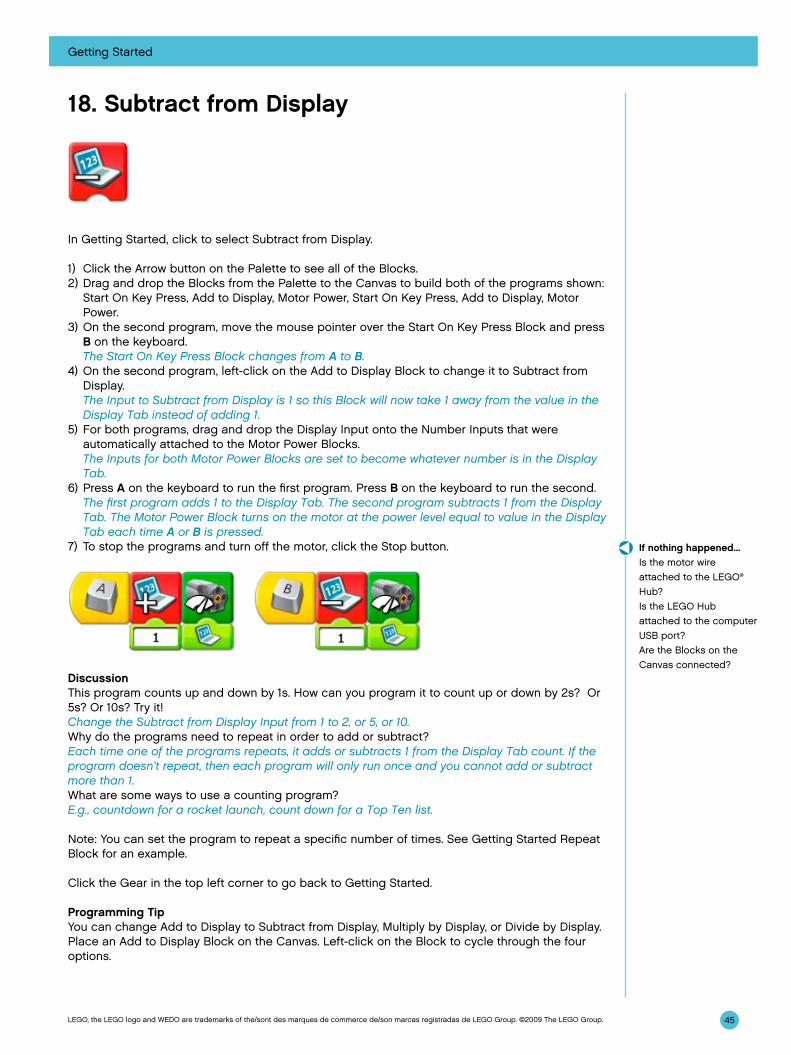
18. Subtract from Display
In Getting Started, click to select Subtract from Display.
1) Click the Arrow button on the Palette to see all of the Blocks.2) Drag and drop the Blocks from the Palette to the Canvas to build both of the programs shown:
Start On Key Press, Add to Display, Motor Power, Start On Key Press, Add to Display, Motor Power.
3) On the second program, move the mouse pointer over the Start On Key Press Block and press B on the keyboard.
The Start On Key Press Block changes from A to B.4) On the second program, left-click on the Add to Display Block to change it to Subtract from
Display. The Input to Subtract from Display is 1 so this Block will now take 1 away from the value in the
Display Tab instead of adding 1.5) For both programs, drag and drop the Display Input onto the Number Inputs that were
automatically attached to the Motor Power Blocks. The Inputs for both Motor Power Blocks are set to become whatever number is in the Display
Tab.6) Press A on the keyboard to run the first program. Press B on the keyboard to run the second. The first program adds 1 to the Display Tab. The second program subtracts 1 from the Display
Tab. The Motor Power Block turns on the motor at the power level equal to value in the Display Tab each time A or B is pressed.
7) To stop the programs and turn off the motor, click the Stop button.
DiscussionThis program counts up and down by 1s. How can you program it to count up or down by 2s? Or 5s? Or 10s? Try it!Change the Subtract from Display Input from 1 to 2, or 5, or 10.Why do the programs need to repeat in order to add or subtract?Each time one of the programs repeats, it adds or subtracts 1 from the Display Tab count. If the program doesn’t repeat, then each program will only run once and you cannot add or subtract more than 1.What are some ways to use a counting program?E.g., countdown for a rocket launch, count down for a Top Ten list.
Note: You can set the program to repeat a specific number of times. See Getting Started Repeat Block for an example.
Click the Gear in the top left corner to go back to Getting Started.
Programming TipYou can change Add to Display to Subtract from Display, Multiply by Display, or Divide by Display. Place an Add to Display Block on the Canvas. Left-click on the Block to cycle through the four options.
If nothing happened...Is the motor wire attached to the LEGO® Hub?Is the LEGO Hub attached to the computer USB port?Are the Blocks on the Canvas connected?

46
Getting Started
LEGO, the LEGO logo and WEDO are trademarks of the/sont des marques de commerce de/son marcas registradas de LEGO Group. ©2009 The LEGO Group.
19. Start On Message
In Getting Started, click to select Start On Message.
1) Build the model shown. Click the arrows on the right or left to rotate it.2) Attach the motor to the LEGO® Hub. It works on either port.3) Click the Arrow button on the Palette to see all of the Blocks.4) Drag and drop the Blocks from the Palette to the Canvas to build both of the programs shown:
Start, Send Message, Play Sound, Start On Message, Motor On For.5) On the Motor On For Block, move the mouse pointer over the Number Input and type 20. The Input changes from 10 to 20.6) On the Play Sound Block, move the mouse pointer over the Number Input and type 14, the
Roar sound. The input changes from 1 to 14.7) Click the Start Block to run the first program. The first program sends the message abc and plays a sound. The second program receives
the message abc and turns on the motor for two seconds.
DiscussionWhy is Start On Message useful?Start On Message can be used as a “remote” start for another program. It can also be used to run several different programs at the same time.What can be sent as a message? Try some ideas!Both numbers and letters can be included in the message sent.
Click the Gear in the top left corner to go back to Getting Started.
Programming TipYou can also send messages from your computer to other computers. On your computer, use the Send Message Block to send a message. Make sure the other computers have Start On Message Blocks programmed to receive the same message.
If nothing happened...Are the motor wires attached to the LEGO Hub?Is the LEGO Hub attached to the computer USB port?Are the Blocks on the Canvas connected?Is your Send Message the same as your Receive Message?
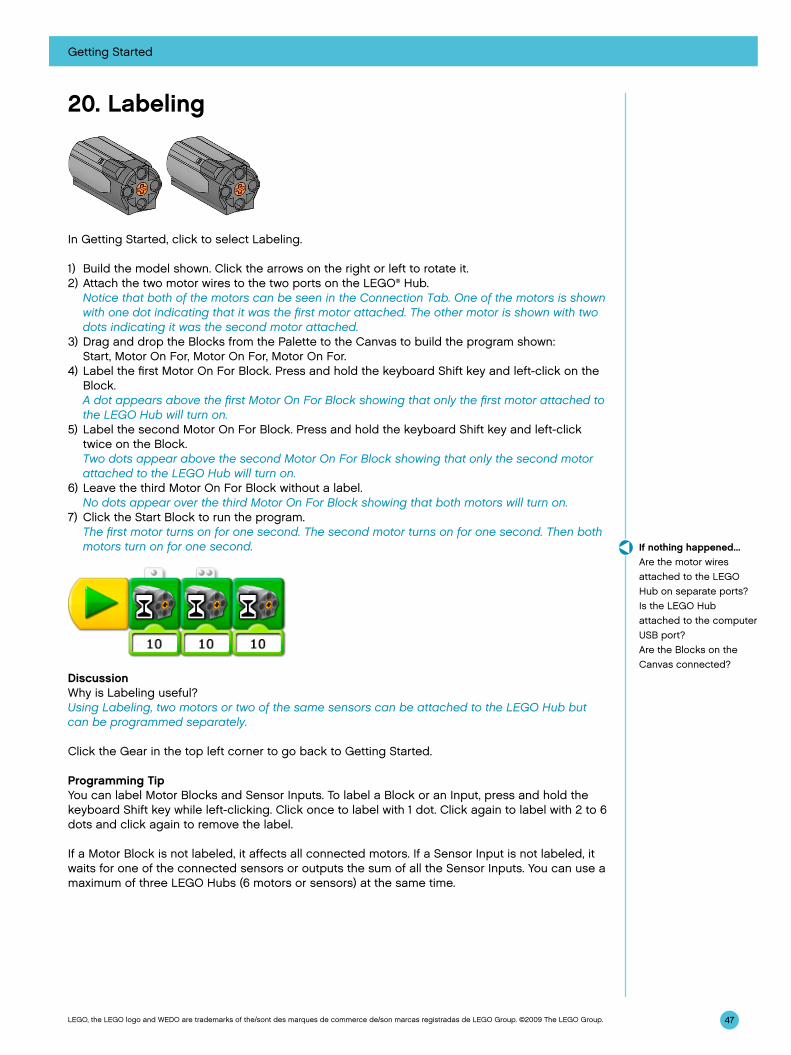
47
Getting Started
LEGO, the LEGO logo and WEDO are trademarks of the/sont des marques de commerce de/son marcas registradas de LEGO Group. ©2009 The LEGO Group.
20. Labeling
In Getting Started, click to select Labeling.
1) Build the model shown. Click the arrows on the right or left to rotate it.2) Attach the two motor wires to the two ports on the LEGO® Hub. Notice that both of the motors can be seen in the Connection Tab. One of the motors is shown
with one dot indicating that it was the first motor attached. The other motor is shown with two dots indicating it was the second motor attached.
3) Drag and drop the Blocks from the Palette to the Canvas to build the program shown: Start, Motor On For, Motor On For, Motor On For.
4) Label the first Motor On For Block. Press and hold the keyboard Shift key and left-click on the Block.
A dot appears above the first Motor On For Block showing that only the first motor attached to the LEGO Hub will turn on.
5) Label the second Motor On For Block. Press and hold the keyboard Shift key and left-click twice on the Block.
Two dots appear above the second Motor On For Block showing that only the second motor attached to the LEGO Hub will turn on.
6) Leave the third Motor On For Block without a label. No dots appear over the third Motor On For Block showing that both motors will turn on.7) Click the Start Block to run the program. The first motor turns on for one second. The second motor turns on for one second. Then both
motors turn on for one second.
DiscussionWhy is Labeling useful?Using Labeling, two motors or two of the same sensors can be attached to the LEGO Hub but can be programmed separately.
Click the Gear in the top left corner to go back to Getting Started.
Programming TipYou can label Motor Blocks and Sensor Inputs. To label a Block or an Input, press and hold the keyboard Shift key while left-clicking. Click once to label with 1 dot. Click again to label with 2 to 6 dots and click again to remove the label.
If a Motor Block is not labeled, it affects all connected motors. If a Sensor Input is not labeled, it waits for one of the connected sensors or outputs the sum of all the Sensor Inputs. You can use a maximum of three LEGO Hubs (6 motors or sensors) at the same time.
If nothing happened...Are the motor wires attached to the LEGO Hub on separate ports?Is the LEGO Hub attached to the computer USB port?Are the Blocks on the Canvas connected?
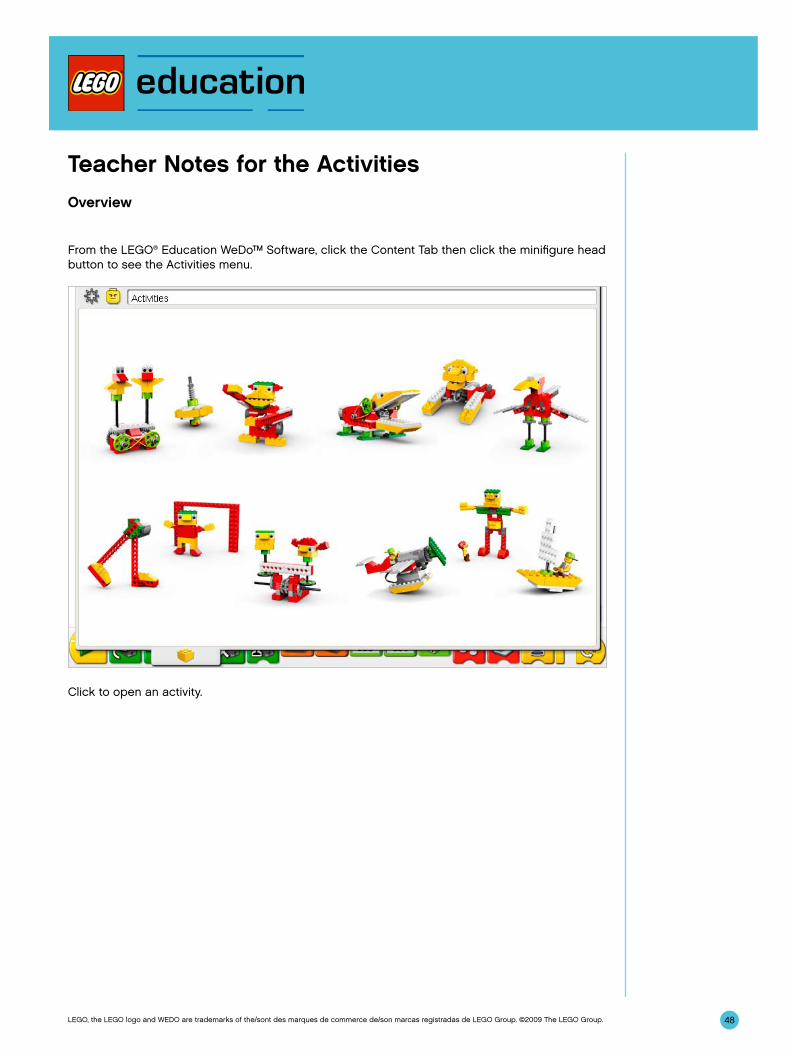
48LEGO, the LEGO logo and WEDO are trademarks of the/sont des marques de commerce de/son marcas registradas de LEGO Group. ©2009 The LEGO Group.
Teacher Notes for the ActivitiesOverview
From the LEGO® Education WeDo™ Software, click the Content Tab then click the minifigure head button to see the Activities menu.
Click to open an activity.
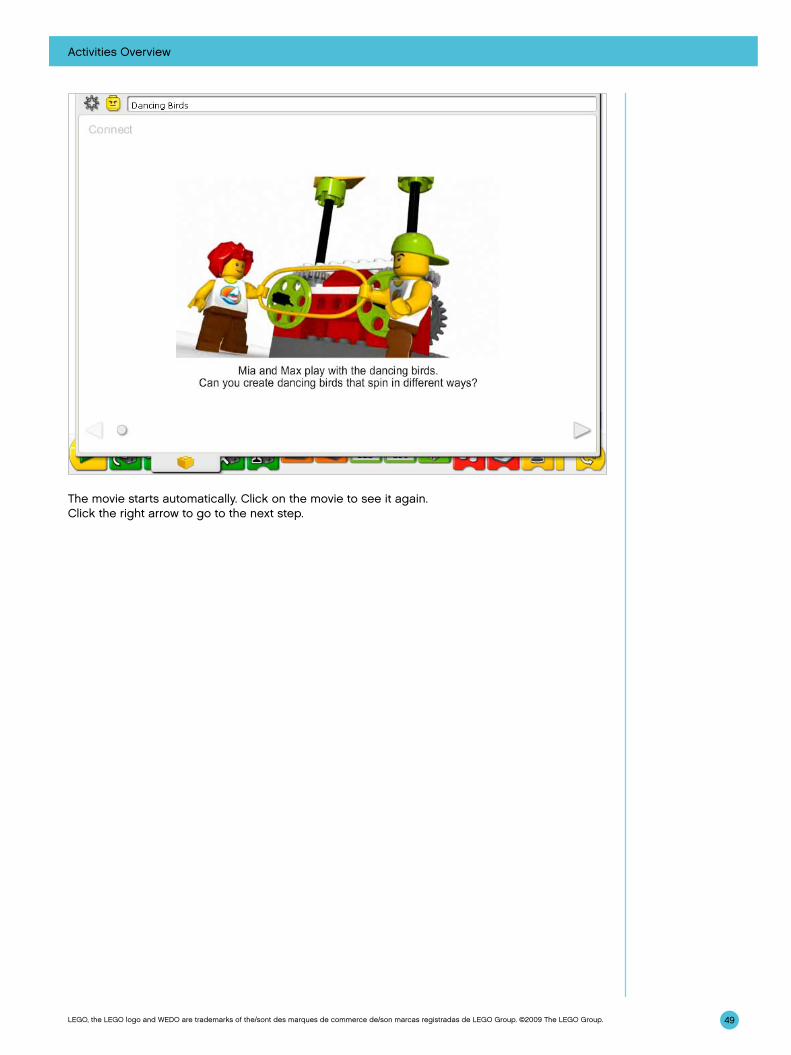
49
Activities Overview
LEGO, the LEGO logo and WEDO are trademarks of the/sont des marques de commerce de/son marcas registradas de LEGO Group. ©2009 The LEGO Group.
The movie starts automatically. Click on the movie to see it again.Click the right arrow to go to the next step.
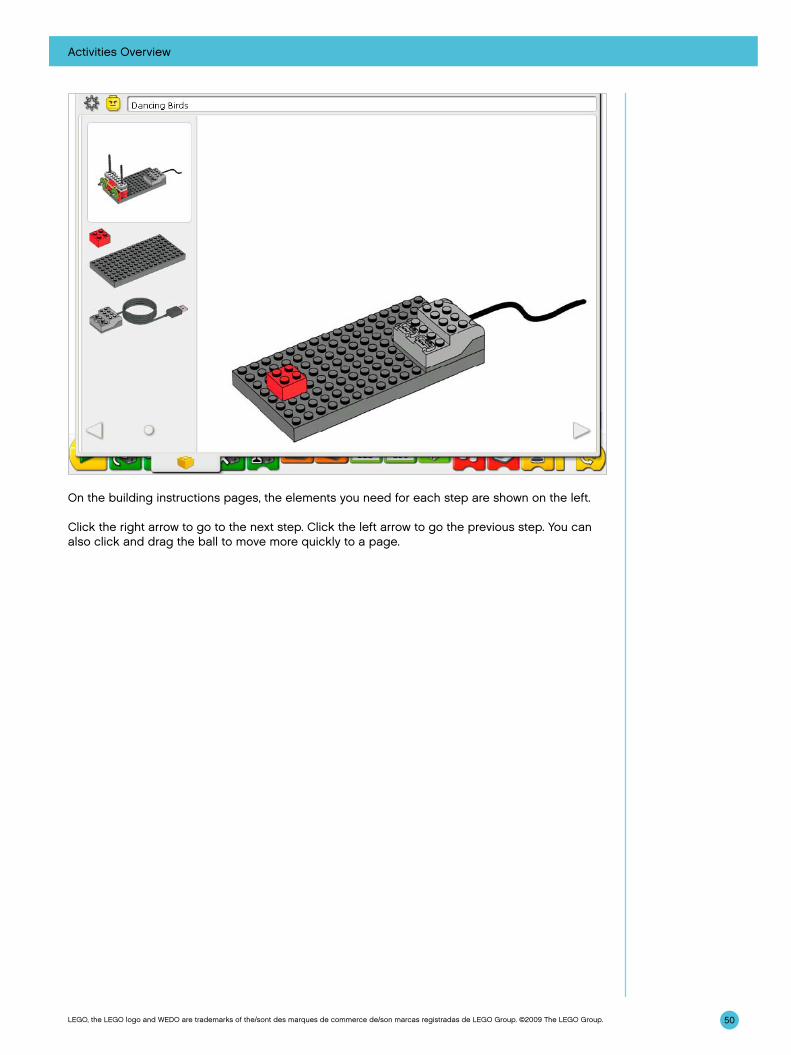
50
Activities Overview
LEGO, the LEGO logo and WEDO are trademarks of the/sont des marques de commerce de/son marcas registradas de LEGO Group. ©2009 The LEGO Group.
On the building instructions pages, the elements you need for each step are shown on the left.
Click the right arrow to go to the next step. Click the left arrow to go the previous step. You can also click and drag the ball to move more quickly to a page.

51
Activities Overview
LEGO, the LEGO logo and WEDO are trademarks of the/sont des marques de commerce de/son marcas registradas de LEGO Group. ©2009 The LEGO Group.
On the programming instructions pages, the Content Tab is open halfway so you can create the program example yourself using the LEGO® Education WeDo™ Software Canvas below.
Move the pointer over a Block to see a description of what that Block does in the program.
See the Teacher Notes following for support using the Activities in your classroom.
Click the minifigure head button to go back to the Activities menu.

52LEGO, the LEGO logo and WEDO are trademarks of the/sont des marques de commerce de/son marcas registradas de LEGO Group. ©2009 The LEGO Group.
Teacher Notes for the Activities:
Amazing Mechanisms
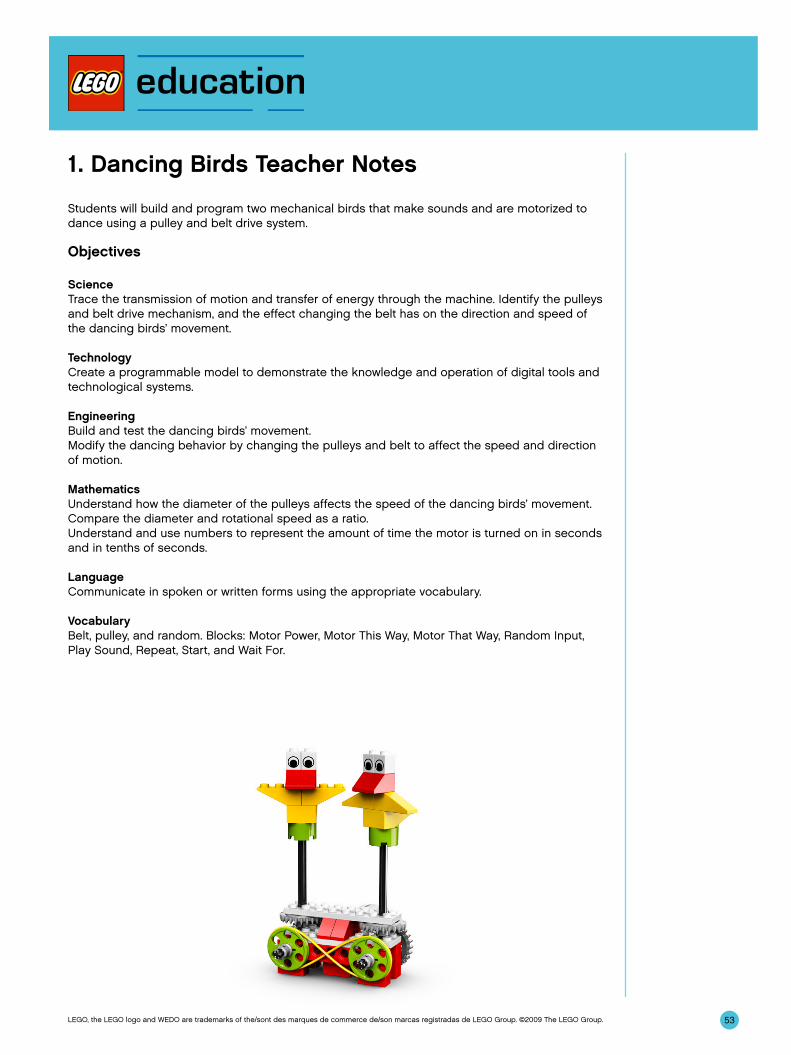
53LEGO, the LEGO logo and WEDO are trademarks of the/sont des marques de commerce de/son marcas registradas de LEGO Group. ©2009 The LEGO Group.
1. Dancing Birds Teacher Notes
Students will build and program two mechanical birds that make sounds and are motorized to dance using a pulley and belt drive system.
Objectives
ScienceTrace the transmission of motion and transfer of energy through the machine. Identify the pulleys and belt drive mechanism, and the effect changing the belt has on the direction and speed of the dancing birds’ movement.
TechnologyCreate a programmable model to demonstrate the knowledge and operation of digital tools and technological systems.
EngineeringBuild and test the dancing birds’ movement.Modify the dancing behavior by changing the pulleys and belt to affect the speed and direction of motion.
MathematicsUnderstand how the diameter of the pulleys affects the speed of the dancing birds’ movement.Compare the diameter and rotational speed as a ratio.Understand and use numbers to represent the amount of time the motor is turned on in seconds and in tenths of seconds.
LanguageCommunicate in spoken or written forms using the appropriate vocabulary.
VocabularyBelt, pulley, and random. Blocks: Motor Power, Motor This Way, Motor That Way, Random Input, Play Sound, Repeat, Start, and Wait For.
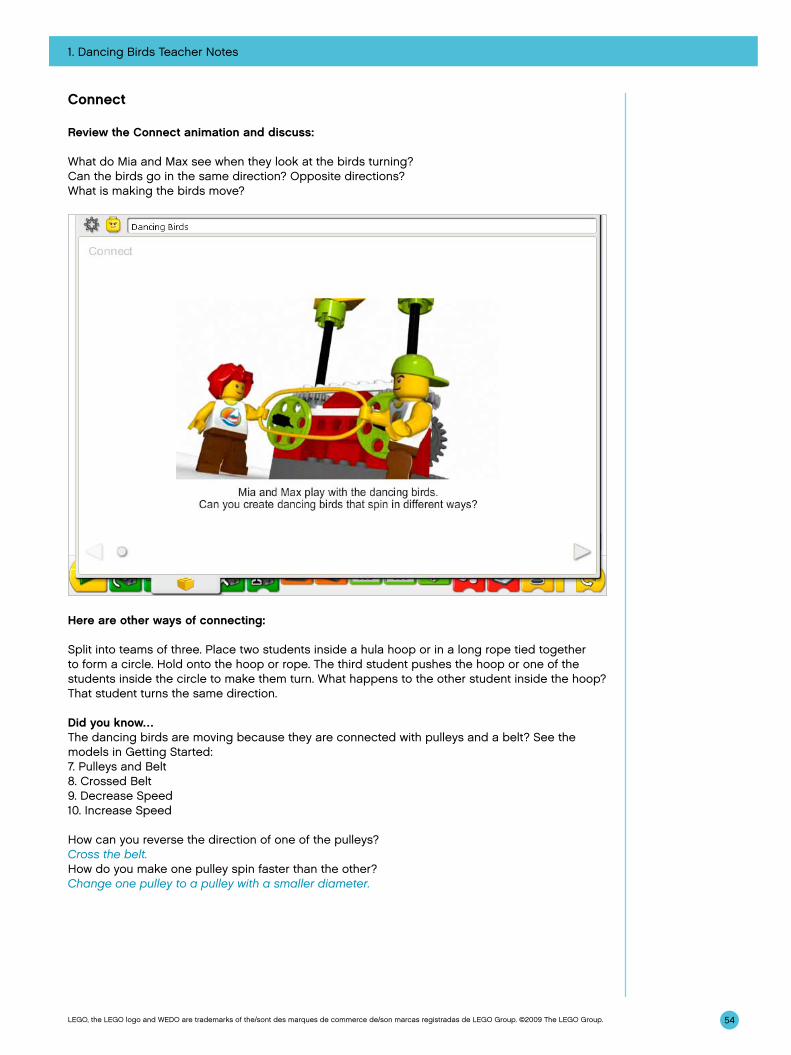
54
1. Dancing Birds Teacher Notes
LEGO, the LEGO logo and WEDO are trademarks of the/sont des marques de commerce de/son marcas registradas de LEGO Group. ©2009 The LEGO Group.
Connect
Review the Connect animation and discuss:
What do Mia and Max see when they look at the birds turning? Can the birds go in the same direction? Opposite directions?What is making the birds move?
Here are other ways of connecting:
Split into teams of three. Place two students inside a hula hoop or in a long rope tied together to form a circle. Hold onto the hoop or rope. The third student pushes the hoop or one of the students inside the circle to make them turn. What happens to the other student inside the hoop?That student turns the same direction.
Did you know…The dancing birds are moving because they are connected with pulleys and a belt? See the models in Getting Started:7. Pulleys and Belt8. Crossed Belt9. Decrease Speed10. Increase Speed
How can you reverse the direction of one of the pulleys?Cross the belt.How do you make one pulley spin faster than the other?Change one pulley to a pulley with a smaller diameter.

1. Dancing Birds Teacher Notes
55LEGO, the LEGO logo and WEDO are trademarks of the/sont des marques de commerce de/son marcas registradas de LEGO Group. ©2009 The LEGO Group.
Construct
Build the model following step-by-step instructions or create your own dancing birds. If you create your own, you may need to change the example program.
To operate the dancing birds best, make sure the pulleys and belt on the front of the model can move freely.
The energy transfers from the computer powering the motor to the small gear. The small gear turns a large gear. The large gear is connected on the same axle as a pulley so the pulley turns also. The pulley has a bird mechanism on top that turns as the pulley turns. Also connected to the pulley is a belt. As the pulley turns, the belt turns. The belt then turns another pulley with another bird on top. The speed of the birds can be changed by shifting the belt from the larger pulley to the smaller pulley on one side or the other. The direction of the birds can be changed by crossing or uncrossing the belt.
The energy changes from electrical (the computer and motor) to mechanical (physical movement of the gears, pulleys and belts, and axles).
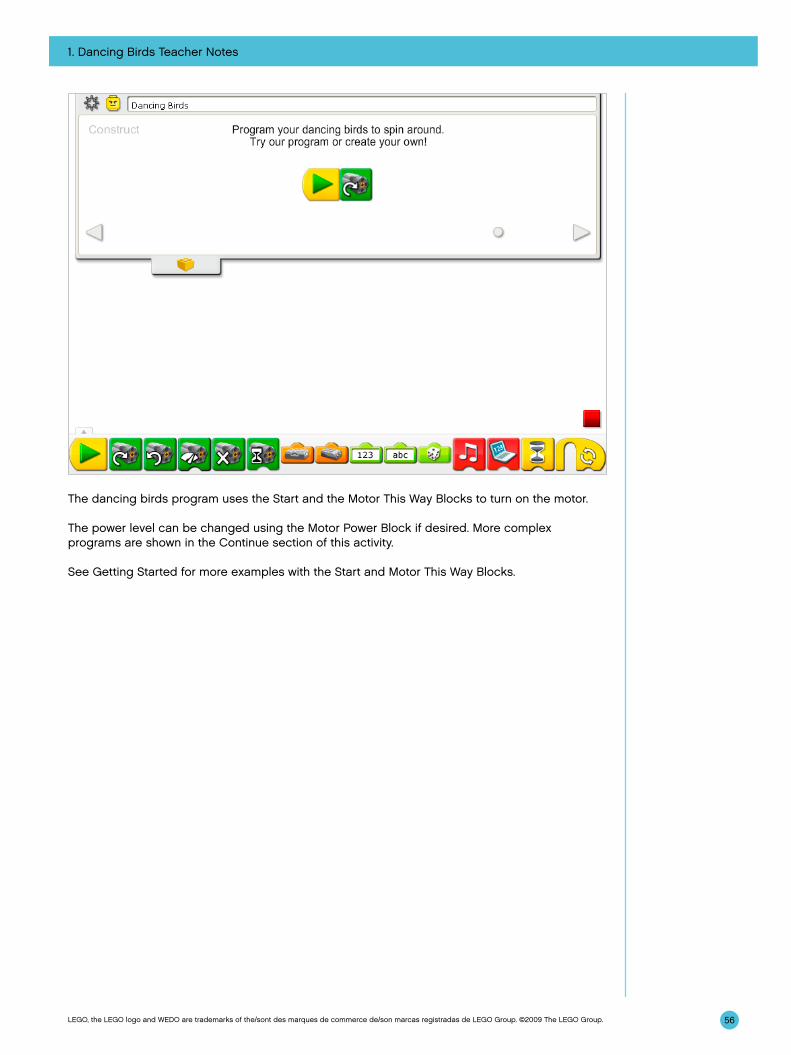
1. Dancing Birds Teacher Notes
56LEGO, the LEGO logo and WEDO are trademarks of the/sont des marques de commerce de/son marcas registradas de LEGO Group. ©2009 The LEGO Group.
The dancing birds program uses the Start and the Motor This Way Blocks to turn on the motor.
The power level can be changed using the Motor Power Block if desired. More complex programs are shown in the Continue section of this activity.
See Getting Started for more examples with the Start and Motor This Way Blocks.

1. Dancing Birds Teacher Notes
57LEGO, the LEGO logo and WEDO are trademarks of the/sont des marques de commerce de/son marcas registradas de LEGO Group. ©2009 The LEGO Group.
Contemplate
Set up enough space to experiment with the pulleys and belt and make notes of your observations.
Draw a data table on a separate sheet of paper.
Use the data table to record the changes in the pulley and belt positions and the effect on the speed and direction of the dancing birds.
After investigating the pulleys and belt, discuss conclusions to the data tables.
Use your hands to show how the birds move when the large pulleys are connected and the belt is not crossed as shown in the first line of the chart.The birds turn the same direction and move the same speed.What happens when you move the belt from one large pulley to the smaller pulley as shown in the second line of the chart? The speed of the smaller pulley increases and so does the speed of the dancing bird connected to the smaller pulley.What happens when you cross the belt so that it looks like a sideways figure 8 around the two pulleys as shown in the third line of the chart?The pulleys and the two birds connected to the pulleys spin in opposite directions.
Alternative ideas…How much faster do the birds dance when they are on the small pulley compared to the large pulley? Work in pairs so that one person counts the rotations of one bird and the other person counts the rotations of the other bird. How much faster is the bird on the smaller pulley? About 3-4 times faster. You can also measure the diameter of the pulleys. The ratio of the small to large pulley is about 1:3.8.
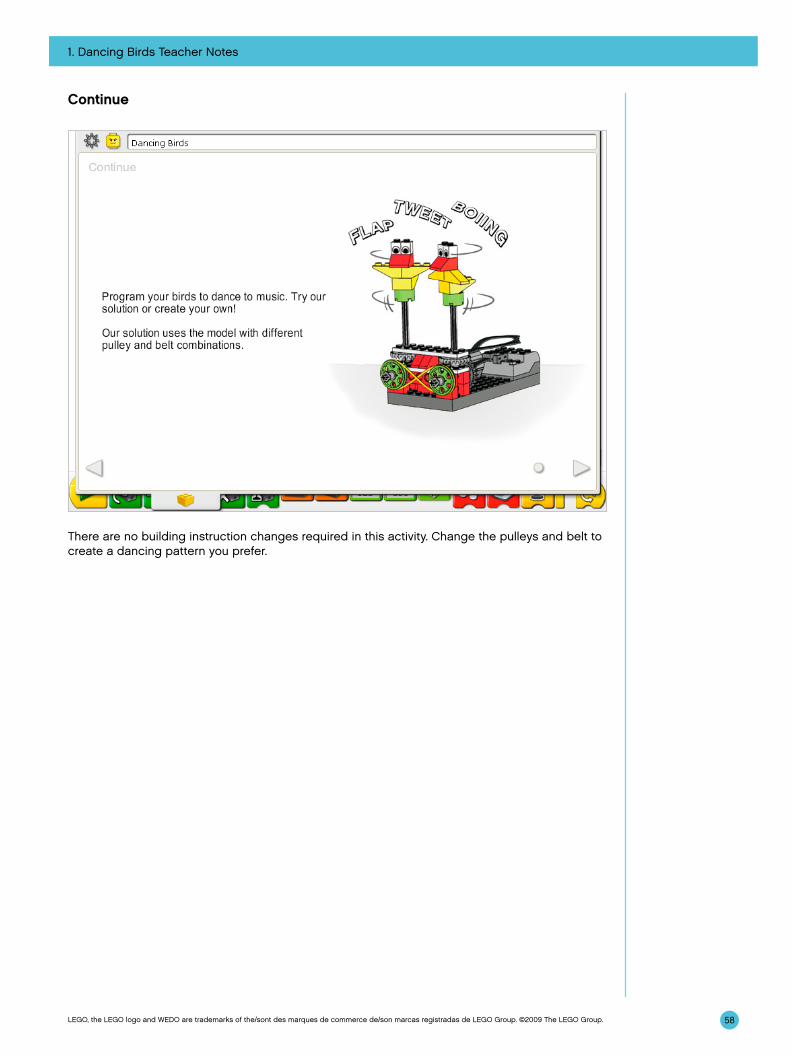
1. Dancing Birds Teacher Notes
58LEGO, the LEGO logo and WEDO are trademarks of the/sont des marques de commerce de/son marcas registradas de LEGO Group. ©2009 The LEGO Group.
Continue
There are no building instruction changes required in this activity. Change the pulleys and belt to create a dancing pattern you prefer.
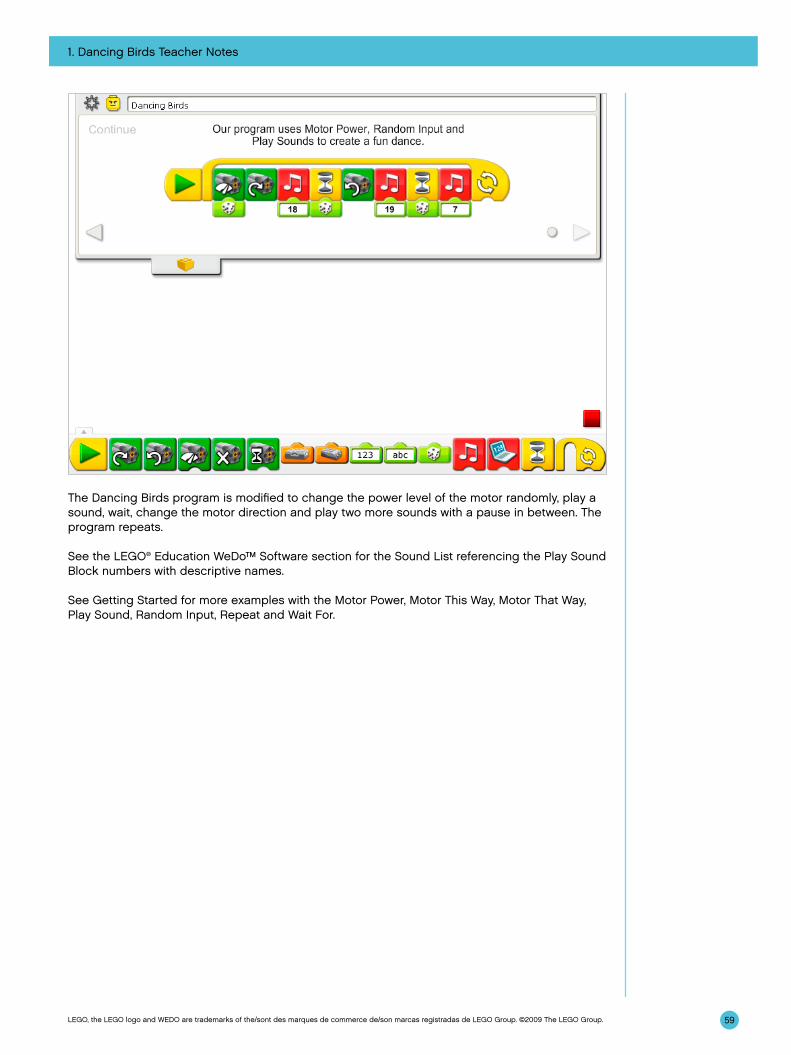
1. Dancing Birds Teacher Notes
59LEGO, the LEGO logo and WEDO are trademarks of the/sont des marques de commerce de/son marcas registradas de LEGO Group. ©2009 The LEGO Group.
The Dancing Birds program is modified to change the power level of the motor randomly, play a sound, wait, change the motor direction and play two more sounds with a pause in between. The program repeats.
See the LEGO® Education WeDo™ Software section for the Sound List referencing the Play Sound Block numbers with descriptive names.
See Getting Started for more examples with the Motor Power, Motor This Way, Motor That Way, Play Sound, Random Input, Repeat and Wait For.

1. Dancing Birds Teacher Notes
60LEGO, the LEGO logo and WEDO are trademarks of the/sont des marques de commerce de/son marcas registradas de LEGO Group. ©2009 The LEGO Group.
ExtensionJoin with another team that has a drumming monkey model. Program the monkey and the dancing birds to play and dance together.
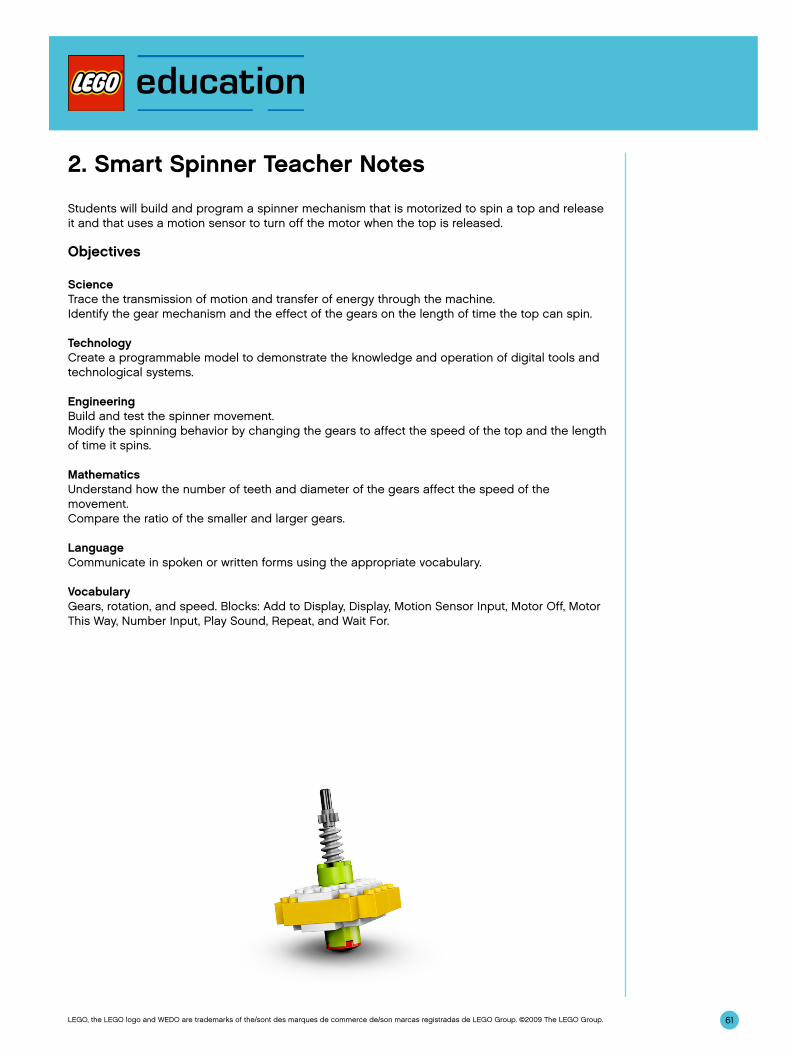
61LEGO, the LEGO logo and WEDO are trademarks of the/sont des marques de commerce de/son marcas registradas de LEGO Group. ©2009 The LEGO Group.
2. Smart Spinner Teacher Notes
Students will build and program a spinner mechanism that is motorized to spin a top and release it and that uses a motion sensor to turn off the motor when the top is released.
Objectives
ScienceTrace the transmission of motion and transfer of energy through the machine.Identify the gear mechanism and the effect of the gears on the length of time the top can spin.
TechnologyCreate a programmable model to demonstrate the knowledge and operation of digital tools and technological systems.
EngineeringBuild and test the spinner movement.Modify the spinning behavior by changing the gears to affect the speed of the top and the length of time it spins.
MathematicsUnderstand how the number of teeth and diameter of the gears affect the speed of the movement.Compare the ratio of the smaller and larger gears.
LanguageCommunicate in spoken or written forms using the appropriate vocabulary.
VocabularyGears, rotation, and speed. Blocks: Add to Display, Display, Motion Sensor Input, Motor Off, Motor This Way, Number Input, Play Sound, Repeat, and Wait For.

62
2. Smart Spinner Teacher Notes
LEGO, the LEGO logo and WEDO are trademarks of the/sont des marques de commerce de/son marcas registradas de LEGO Group. ©2009 The LEGO Group.
Connect
Review the Connect animation and discuss:
What do Mia and Max see?What are they doing when they set up the top?What happens after they set up the top?
Here are some other ways of connecting:
Take a coin, a pen, or other objects and try to spin it on your table or desk. How can you spin it? How long does it spin?Most objects are not stable enough to spin for long and quickly fall down. The friction of the table or other surface slows and stops the movement. To keep the object spinning, the spinning force must be applied evenly to the center of the object; otherwise, the object will not be balanced and will not spin but move off in another direction.
Pretend you are a top and spin in place. What do you do with your body to spin a long time? What do you do to try to spin faster?You can stand tall and hold your arms to stabilize your body as you spin. Keep your feet together as much as possible to have a “point” in the center of the spinning movement.
Did you know…Gears can speed up and slow down motion? See the models in Getting Started:4. Gearing Down5. Gearing Up
How do the gears work?They mesh which means they fit their teeth together so as one moves, the other also moves.How do you make something move slower using gears?Make sure the movement is transferred from a smaller gear to a larger gear. Motion transmitted from a smaller (8-tooth) gear to a larger (24-tooth) gear is called gearing down because speed is reduced.How do you make something move faster using gears?Make sure the movement is transferred from a larger gear to a smaller gear. Motion transmitted from a larger (24-tooth) gear to a smaller (8-tooth) gear is called gearing up because speed is increased.
63
2. Smart Spinner Teacher Notes
LEGO, the LEGO logo and WEDO are trademarks of the/sont des marques de commerce de/son marcas registradas de LEGO Group. ©2009 The LEGO Group.
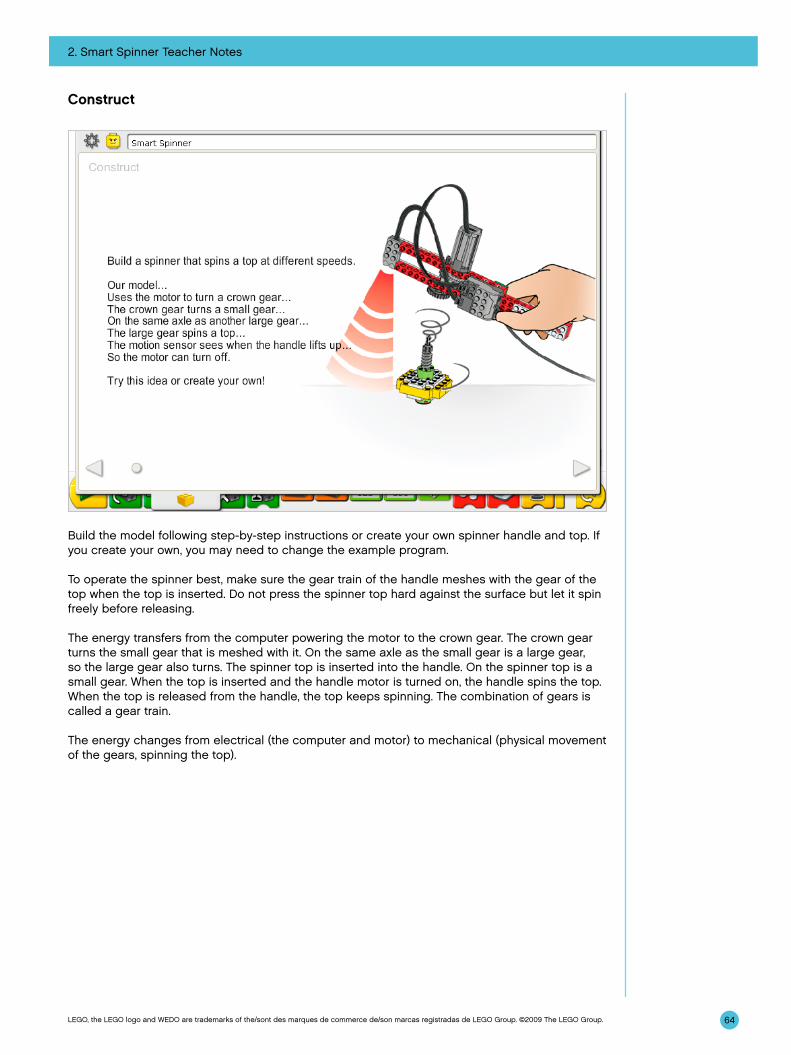
2. Smart Spinner Teacher Notes
64LEGO, the LEGO logo and WEDO are trademarks of the/sont des marques de commerce de/son marcas registradas de LEGO Group. ©2009 The LEGO Group.
Construct
Build the model following step-by-step instructions or create your own spinner handle and top. If you create your own, you may need to change the example program.
To operate the spinner best, make sure the gear train of the handle meshes with the gear of the top when the top is inserted. Do not press the spinner top hard against the surface but let it spin freely before releasing.
The energy transfers from the computer powering the motor to the crown gear. The crown gear turns the small gear that is meshed with it. On the same axle as the small gear is a large gear, so the large gear also turns. The spinner top is inserted into the handle. On the spinner top is a small gear. When the top is inserted and the handle motor is turned on, the handle spins the top. When the top is released from the handle, the top keeps spinning. The combination of gears is called a gear train.
The energy changes from electrical (the computer and motor) to mechanical (physical movement of the gears, spinning the top).
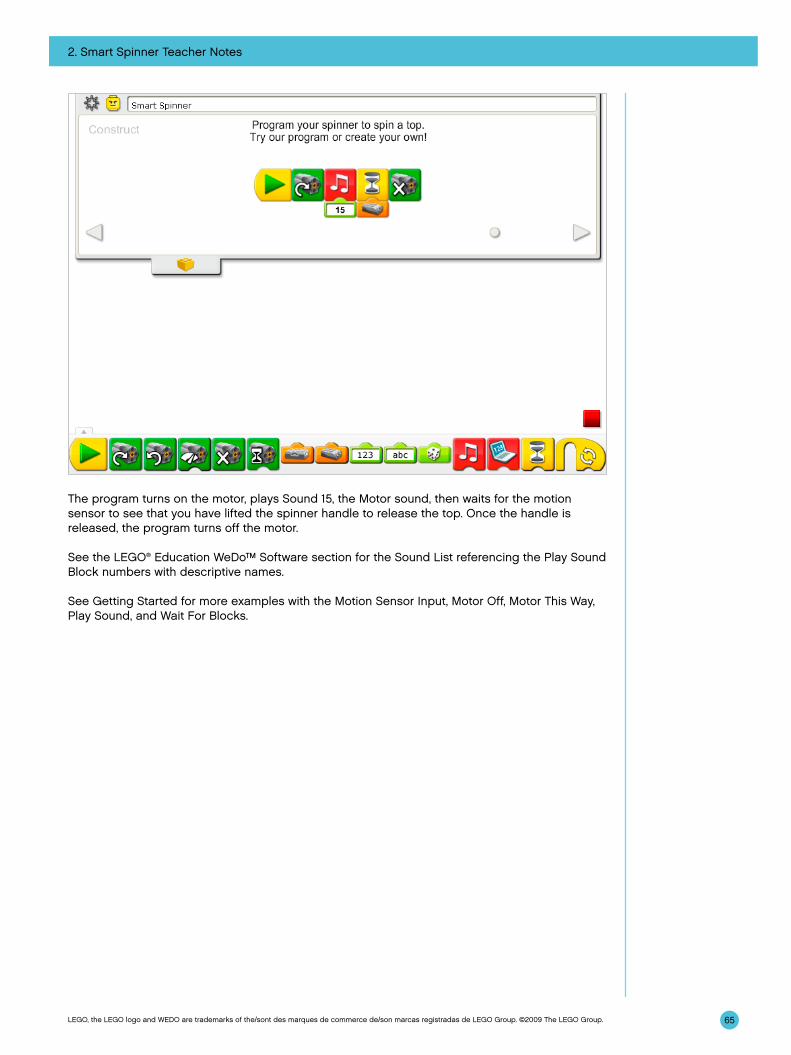
2. Smart Spinner Teacher Notes
65LEGO, the LEGO logo and WEDO are trademarks of the/sont des marques de commerce de/son marcas registradas de LEGO Group. ©2009 The LEGO Group.
The program turns on the motor, plays Sound 15, the Motor sound, then waits for the motion sensor to see that you have lifted the spinner handle to release the top. Once the handle is released, the program turns off the motor.
See the LEGO® Education WeDo™ Software section for the Sound List referencing the Play Sound Block numbers with descriptive names.
See Getting Started for more examples with the Motion Sensor Input, Motor Off, Motor This Way, Play Sound, and Wait For Blocks.
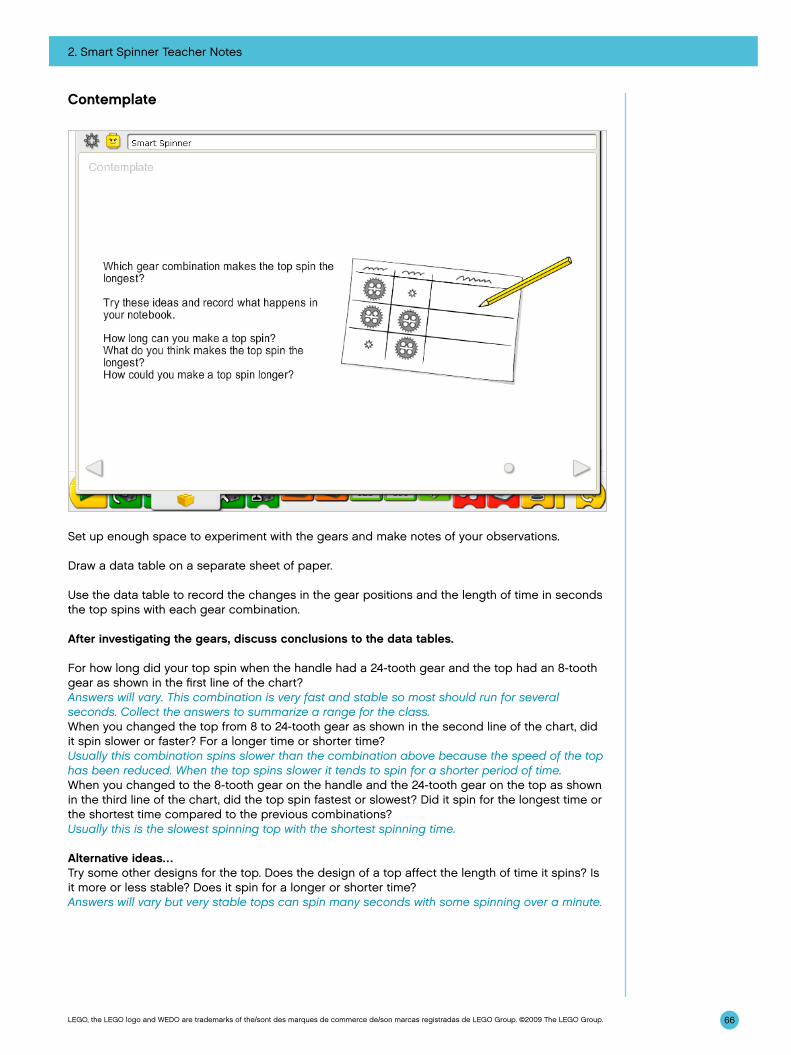
2. Smart Spinner Teacher Notes
66LEGO, the LEGO logo and WEDO are trademarks of the/sont des marques de commerce de/son marcas registradas de LEGO Group. ©2009 The LEGO Group.
Contemplate
Set up enough space to experiment with the gears and make notes of your observations.
Draw a data table on a separate sheet of paper.
Use the data table to record the changes in the gear positions and the length of time in seconds the top spins with each gear combination.
After investigating the gears, discuss conclusions to the data tables.
For how long did your top spin when the handle had a 24-tooth gear and the top had an 8-tooth gear as shown in the first line of the chart?Answers will vary. This combination is very fast and stable so most should run for several seconds. Collect the answers to summarize a range for the class.When you changed the top from 8 to 24-tooth gear as shown in the second line of the chart, did it spin slower or faster? For a longer time or shorter time?Usually this combination spins slower than the combination above because the speed of the top has been reduced. When the top spins slower it tends to spin for a shorter period of time.When you changed to the 8-tooth gear on the handle and the 24-tooth gear on the top as shown in the third line of the chart, did the top spin fastest or slowest? Did it spin for the longest time or the shortest time compared to the previous combinations?Usually this is the slowest spinning top with the shortest spinning time.
Alternative ideas…Try some other designs for the top. Does the design of a top affect the length of time it spins? Is it more or less stable? Does it spin for a longer or shorter time? Answers will vary but very stable tops can spin many seconds with some spinning over a minute.
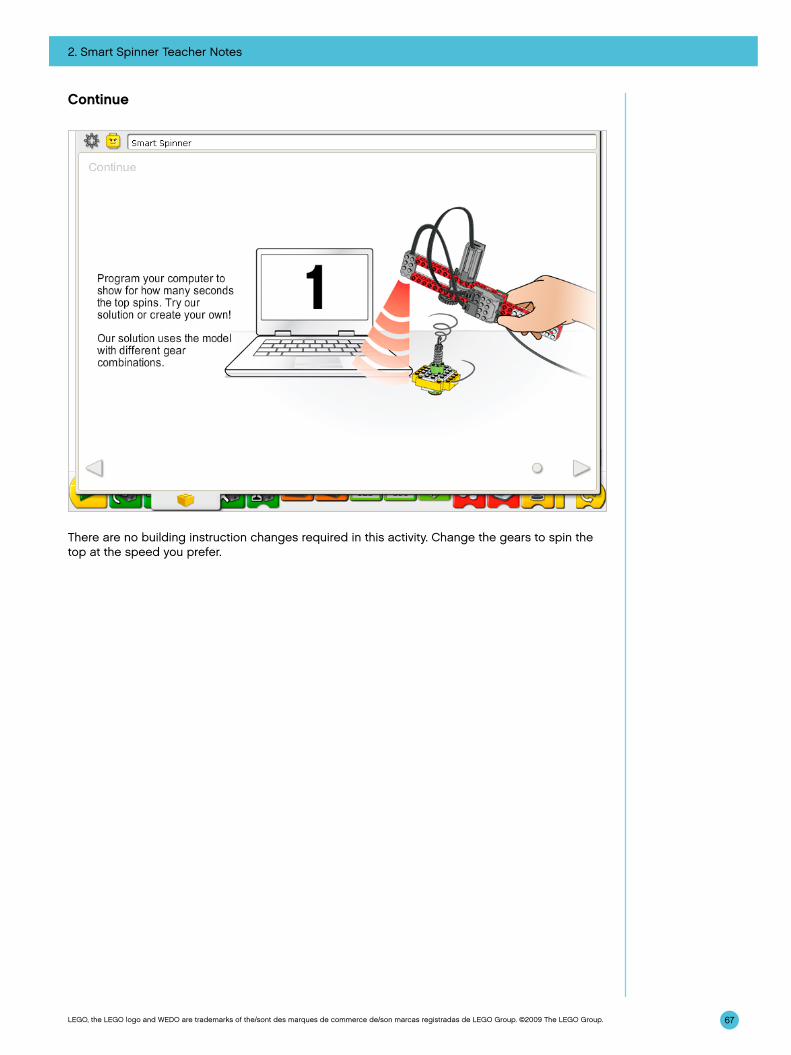
2. Smart Spinner Teacher Notes
67LEGO, the LEGO logo and WEDO are trademarks of the/sont des marques de commerce de/son marcas registradas de LEGO Group. ©2009 The LEGO Group.
Continue
There are no building instruction changes required in this activity. Change the gears to spin the top at the speed you prefer.
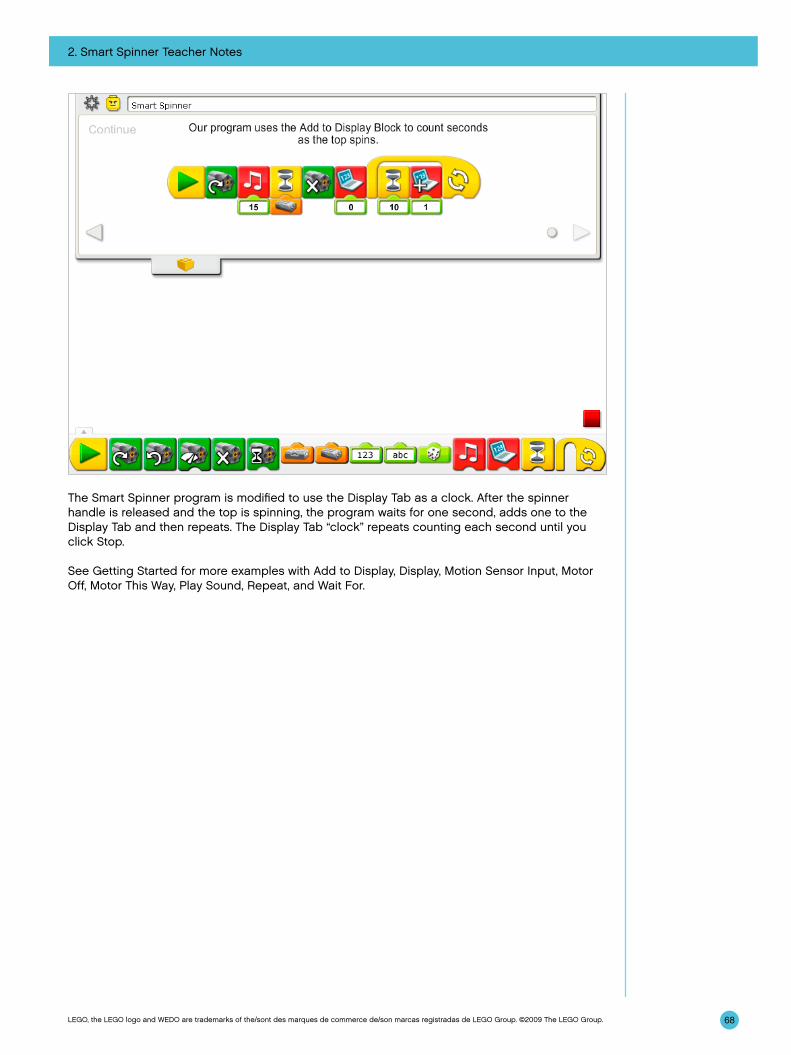
2. Smart Spinner Teacher Notes
68LEGO, the LEGO logo and WEDO are trademarks of the/sont des marques de commerce de/son marcas registradas de LEGO Group. ©2009 The LEGO Group.
The Smart Spinner program is modified to use the Display Tab as a clock. After the spinner handle is released and the top is spinning, the program waits for one second, adds one to the Display Tab and then repeats. The Display Tab “clock” repeats counting each second until you click Stop.
See Getting Started for more examples with Add to Display, Display, Motion Sensor Input, Motor Off, Motor This Way, Play Sound, Repeat, and Wait For.
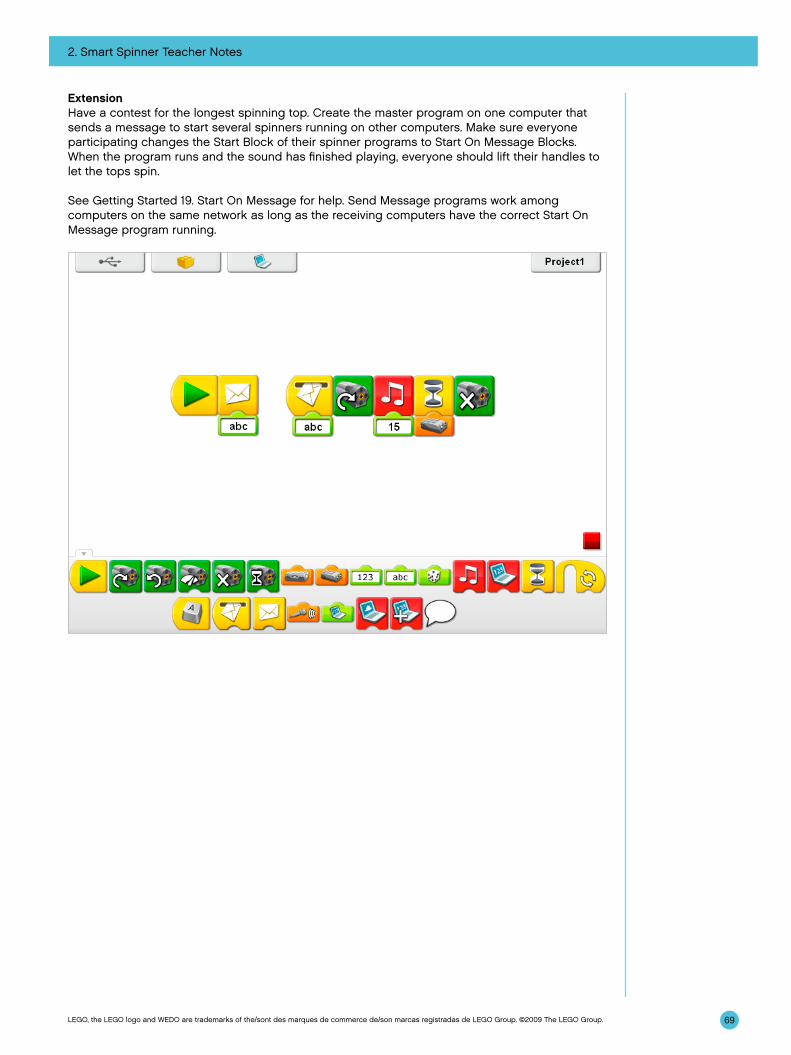
2. Smart Spinner Teacher Notes
69LEGO, the LEGO logo and WEDO are trademarks of the/sont des marques de commerce de/son marcas registradas de LEGO Group. ©2009 The LEGO Group.
ExtensionHave a contest for the longest spinning top. Create the master program on one computer that sends a message to start several spinners running on other computers. Make sure everyone participating changes the Start Block of their spinner programs to Start On Message Blocks. When the program runs and the sound has finished playing, everyone should lift their handles to let the tops spin.
See Getting Started 19. Start On Message for help. Send Message programs work among computers on the same network as long as the receiving computers have the correct Start On Message program running.

70LEGO, the LEGO logo and WEDO are trademarks of the/sont des marques de commerce de/son marcas registradas de LEGO Group. ©2009 The LEGO Group.
3. Drumming Monkey Teacher Notes
Students will build and program a mechanical monkey with motorized arms that tap up and down drumming on a surface.
Objectives
ScienceTrace the transmission of motion and transfer of energy through the machine.Identify the lever mechanism and the effect of the cams on the rhythm or timing of the lever arm movement.
TechnologyCreate a programmable model to demonstrate the knowledge and operation of digital tools and technological systems.
EngineeringBuild and test the drumming monkey movement.Modify the drumming behavior by changing the cams to affect the pattern of tapping and program sound effects to make the patterns more interesting.
MathematicsUnderstand how the number and position of the cams affects the frequency and timing of the beat pattern (rhythm).Understand and use numbers to represent the type of sounds played and the amount of time the motor turns on.
LanguageCommunicate in spoken or written forms using the appropriate vocabulary.
VocabularyCam, crown gear, lever, pattern. Blocks: Motor This Way, Number Input, Play Sound, Start, and Start On Key Press.
Other Materials Drumming surfaces such as cardboard, plastic or metal containers.
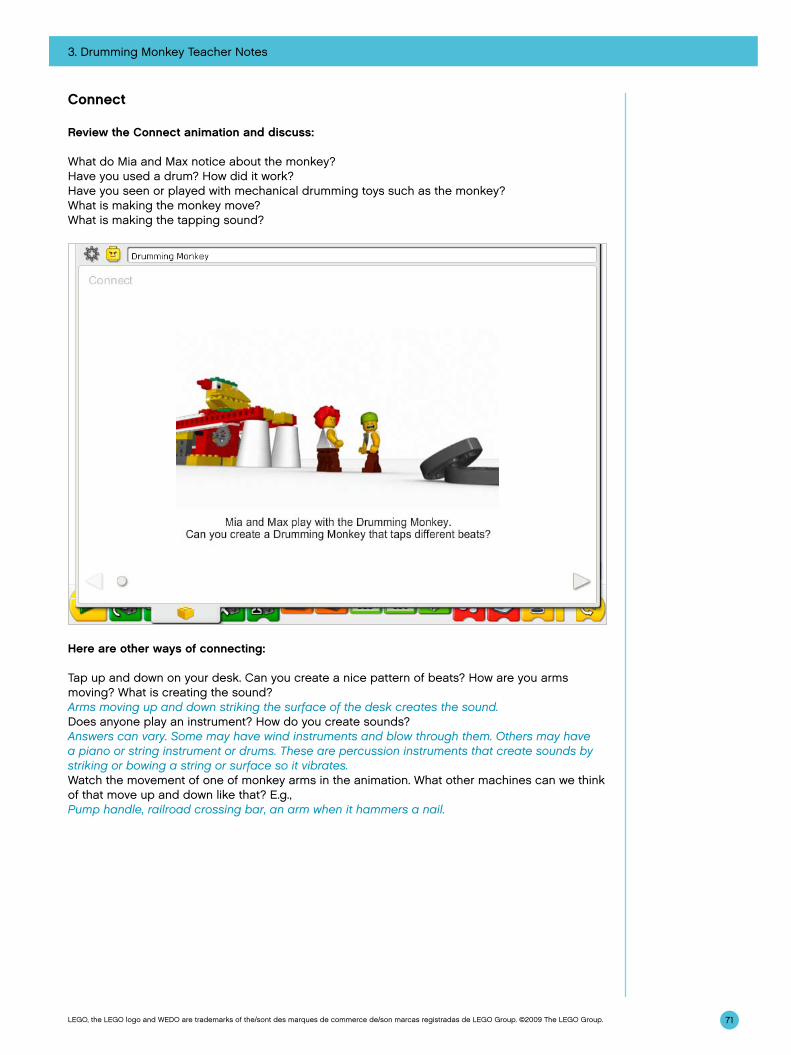
71
3. Drumming Monkey Teacher Notes
LEGO, the LEGO logo and WEDO are trademarks of the/sont des marques de commerce de/son marcas registradas de LEGO Group. ©2009 The LEGO Group.
Connect
Review the Connect animation and discuss:
What do Mia and Max notice about the monkey?Have you used a drum? How did it work?Have you seen or played with mechanical drumming toys such as the monkey?What is making the monkey move?What is making the tapping sound?
Here are other ways of connecting:
Tap up and down on your desk. Can you create a nice pattern of beats? How are you arms moving? What is creating the sound?Arms moving up and down striking the surface of the desk creates the sound.Does anyone play an instrument? How do you create sounds?Answers can vary. Some may have wind instruments and blow through them. Others may have a piano or string instrument or drums. These are percussion instruments that create sounds by striking or bowing a string or surface so it vibrates.Watch the movement of one of monkey arms in the animation. What other machines can we think of that move up and down like that? E.g.,Pump handle, railroad crossing bar, an arm when it hammers a nail.

72
3. Drumming Monkey Teacher Notes
LEGO, the LEGO logo and WEDO are trademarks of the/sont des marques de commerce de/son marcas registradas de LEGO Group. ©2009 The LEGO Group.
Did you know…The drummer’s arms are levers? They move up and down around a fulcrum. The drumming monkey moves the arms up and down to create a pattern or rhythm. You can use levers to move up and down and cams to create surprising movement.See the models in Getting Started:14. Cam15. Lever
How can you change the lever arm to make the load arm shorter? Or longer? Adjust the position of the fulcrum by moving the axle into another beam hole. How does a cam work? The cam is shaped like an egg so as it turns, it creates a bobbing movement when something is attached or on top of it.
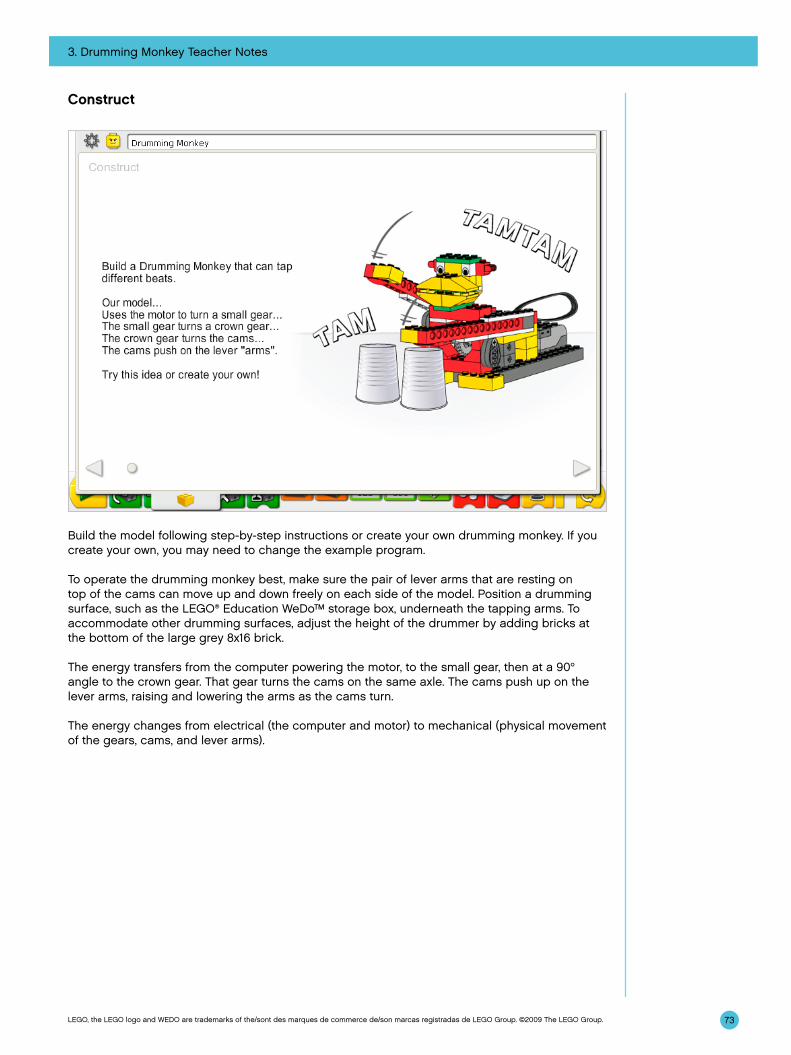
3. Drumming Monkey Teacher Notes
73LEGO, the LEGO logo and WEDO are trademarks of the/sont des marques de commerce de/son marcas registradas de LEGO Group. ©2009 The LEGO Group.
Construct
Build the model following step-by-step instructions or create your own drumming monkey. If you create your own, you may need to change the example program.
To operate the drumming monkey best, make sure the pair of lever arms that are resting on top of the cams can move up and down freely on each side of the model. Position a drumming surface, such as the LEGO® Education WeDo™ storage box, underneath the tapping arms. To accommodate other drumming surfaces, adjust the height of the drummer by adding bricks at the bottom of the large grey 8x16 brick.
The energy transfers from the computer powering the motor, to the small gear, then at a 90° angle to the crown gear. That gear turns the cams on the same axle. The cams push up on the lever arms, raising and lowering the arms as the cams turn.
The energy changes from electrical (the computer and motor) to mechanical (physical movement of the gears, cams, and lever arms).

3. Drumming Monkey Teacher Notes
74LEGO, the LEGO logo and WEDO are trademarks of the/sont des marques de commerce de/son marcas registradas de LEGO Group. ©2009 The LEGO Group.
The Drumming Monkey program uses the Start and the Motor This Way Blocks to turn on the motor.
The power level can be changed using the Motor Power Block if desired. More complex programs are shown in the Continue section of this activity.
See Getting Started for more examples with the Start and Motor This Way Blocks.

3. Drumming Monkey Teacher Notes
75LEGO, the LEGO logo and WEDO are trademarks of the/sont des marques de commerce de/son marcas registradas de LEGO Group. ©2009 The LEGO Group.
Contemplate
Set up enough space to experiment with the cams and make notes of your observations.
Draw a data table on a separate sheet of paper.
Use the data table to record the changes in the cam positions and the type of tapping pattern created by each cam combination.
After investigating the cams, discuss conclusions to the data table.
Can you describe what you see or hear with one cam up and one cam down as shown in the first line of the chart?The arms go up and down at opposite times. There is a regular tap, tap sound at about two beats per second.What happens when you change the position of the cam on the right as shown in the second line of the chart?Each arm still goes up and down at different times but the beat pattern changes to a quick tap-tap, pause. There are still about two beats per second but each tap is faster before the “rest” or pause.What do you see or hear when you add another cam on the right as shown in the third line of the chart? The right side moves twice as fast and taps twice as often as the left side. The beat pattern is faster now at about three beats per second with a tap-tap-tap-pause sound.What do you see or hear when you add another cam on the left as well? The arms are back to moving up and down at opposite times but twice as fast as the first example. There is a regular tap-tap-tap-tap at about four beats per second now.
Alternative ideas…Place the pivot point of the arms in another hole position to change the length of the effort arm and the height at which the arm lifts up. The result is an audible change in the force at which the tapping ends (load of the lever) strike the surface.
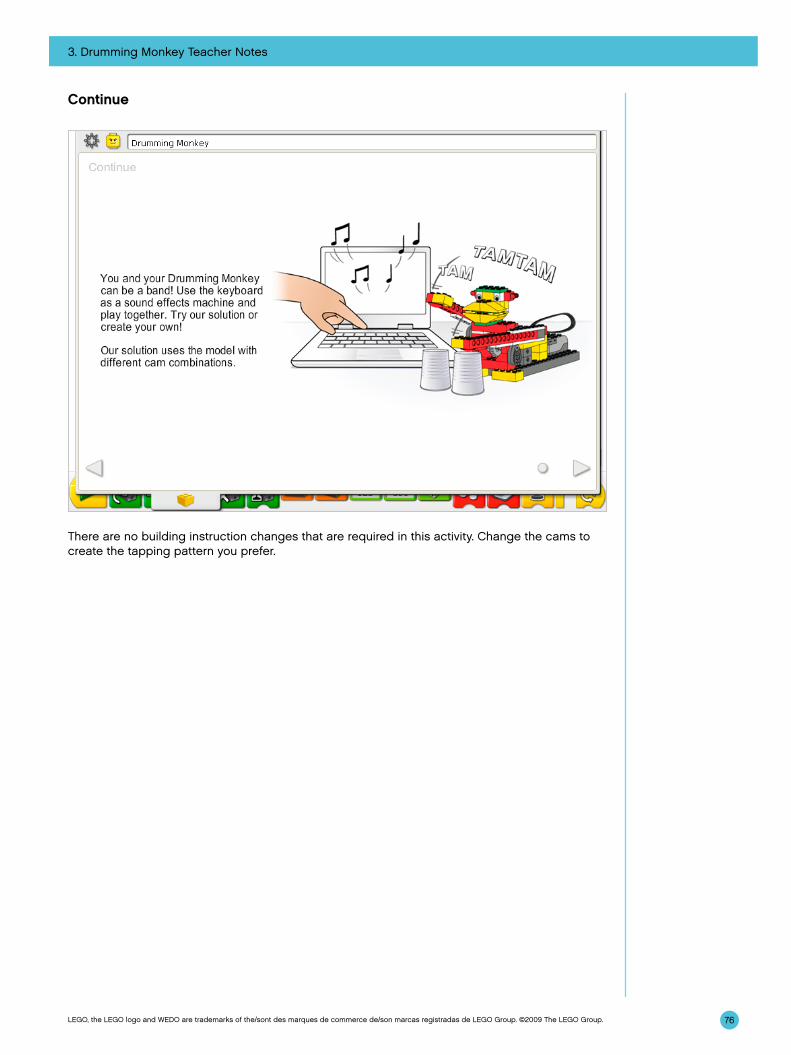
3. Drumming Monkey Teacher Notes
76LEGO, the LEGO logo and WEDO are trademarks of the/sont des marques de commerce de/son marcas registradas de LEGO Group. ©2009 The LEGO Group.
Continue
There are no building instruction changes that are required in this activity. Change the cams to create the tapping pattern you prefer.
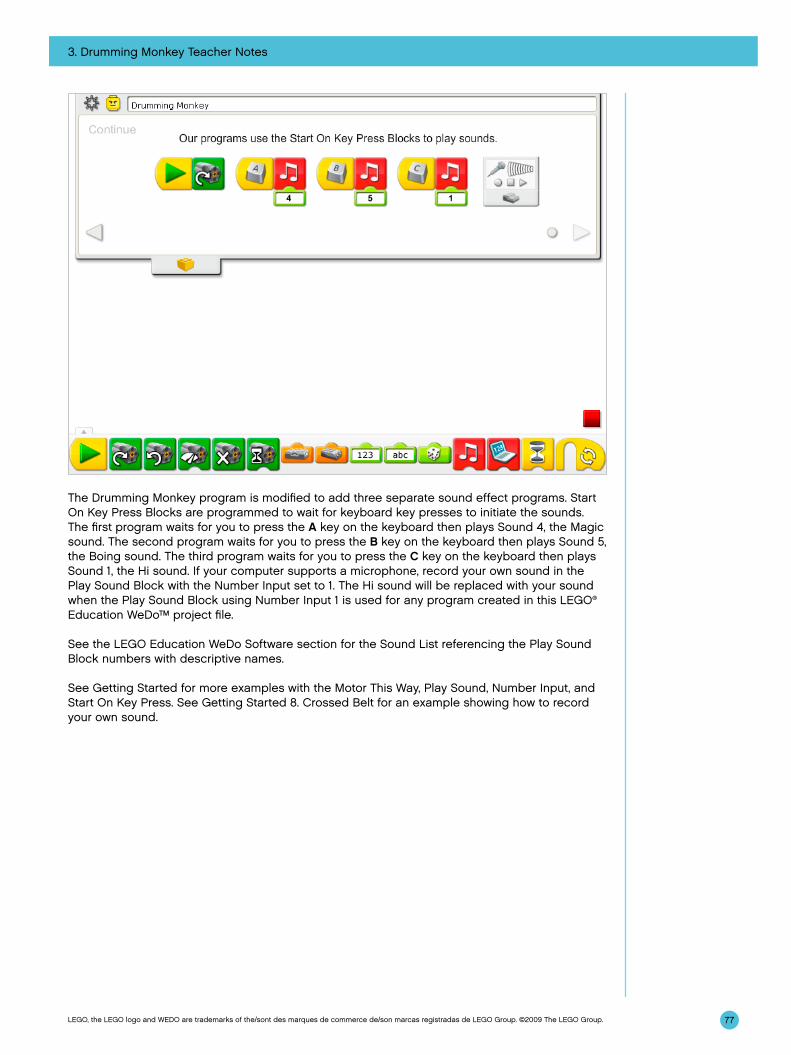
3. Drumming Monkey Teacher Notes
77LEGO, the LEGO logo and WEDO are trademarks of the/sont des marques de commerce de/son marcas registradas de LEGO Group. ©2009 The LEGO Group.
The Drumming Monkey program is modified to add three separate sound effect programs. Start On Key Press Blocks are programmed to wait for keyboard key presses to initiate the sounds. The first program waits for you to press the A key on the keyboard then plays Sound 4, the Magic sound. The second program waits for you to press the B key on the keyboard then plays Sound 5, the Boing sound. The third program waits for you to press the C key on the keyboard then plays Sound 1, the Hi sound. If your computer supports a microphone, record your own sound in the Play Sound Block with the Number Input set to 1. The Hi sound will be replaced with your sound when the Play Sound Block using Number Input 1 is used for any program created in this LEGO® Education WeDo™ project file.
See the LEGO Education WeDo Software section for the Sound List referencing the Play Sound Block numbers with descriptive names.
See Getting Started for more examples with the Motor This Way, Play Sound, Number Input, and Start On Key Press. See Getting Started 8. Crossed Belt for an example showing how to record your own sound.
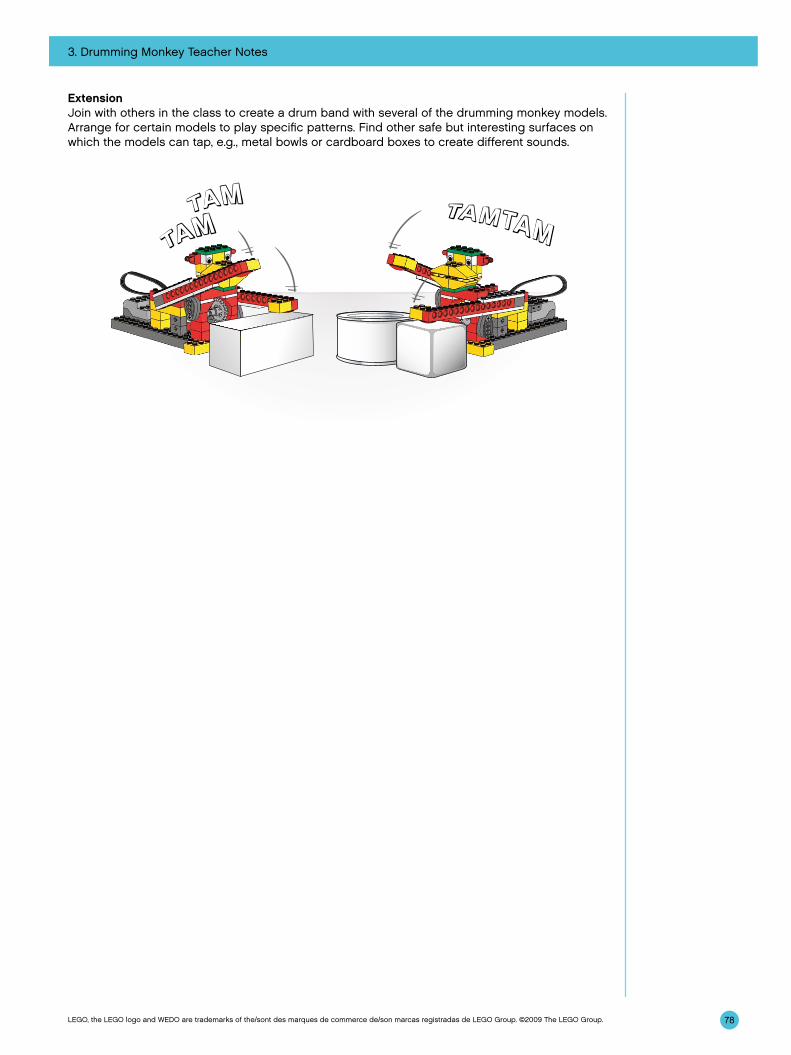
3. Drumming Monkey Teacher Notes
78LEGO, the LEGO logo and WEDO are trademarks of the/sont des marques de commerce de/son marcas registradas de LEGO Group. ©2009 The LEGO Group.
ExtensionJoin with others in the class to create a drum band with several of the drumming monkey models. Arrange for certain models to play specific patterns. Find other safe but interesting surfaces on which the models can tap, e.g., metal bowls or cardboard boxes to create different sounds.
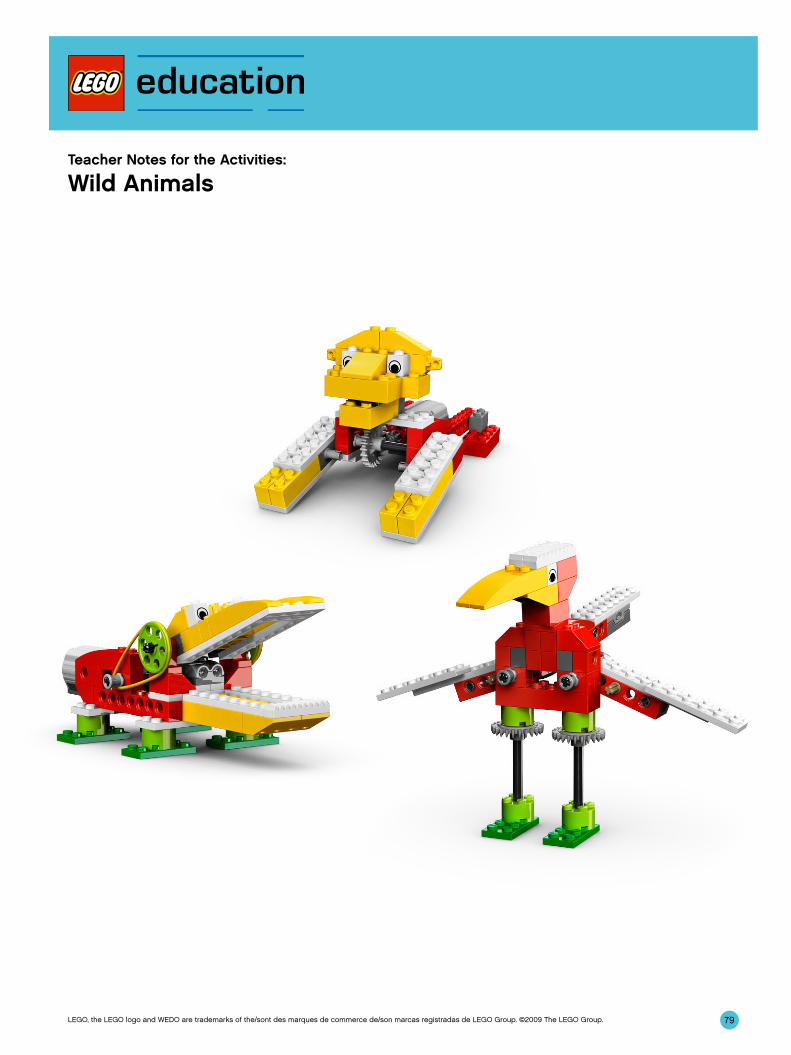
79LEGO, the LEGO logo and WEDO are trademarks of the/sont des marques de commerce de/son marcas registradas de LEGO Group. ©2009 The LEGO Group.
Teacher Notes for the Activities:
Wild Animals
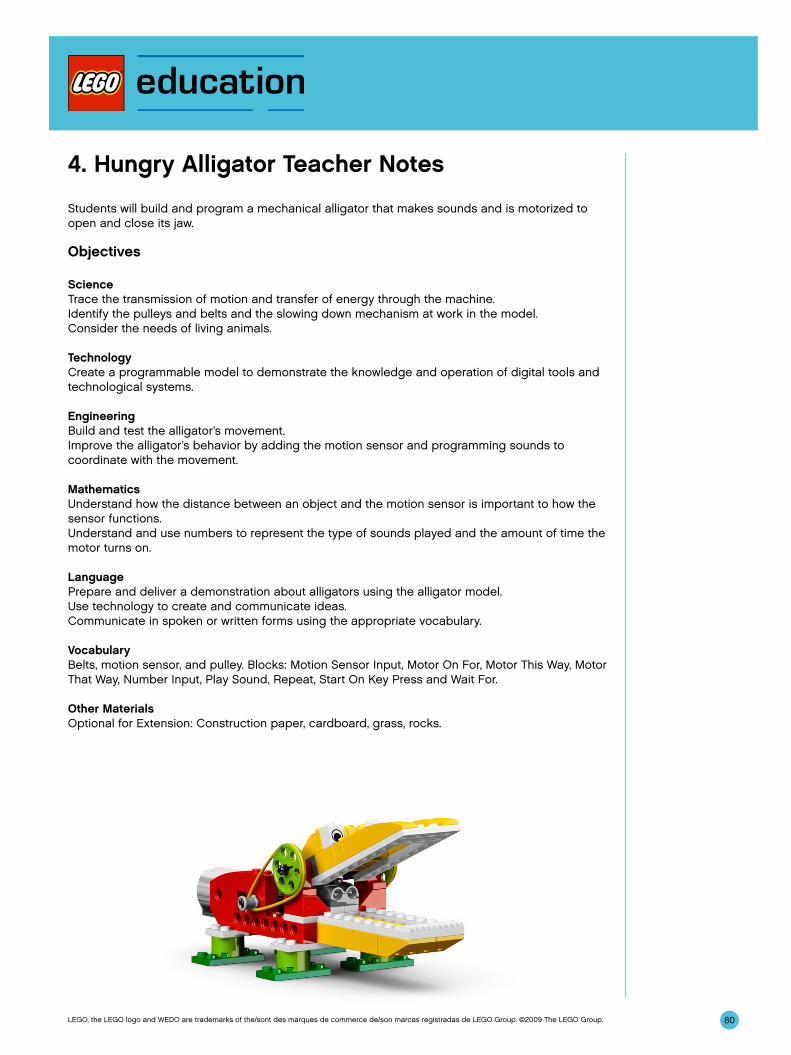
80LEGO, the LEGO logo and WEDO are trademarks of the/sont des marques de commerce de/son marcas registradas de LEGO Group. ©2009 The LEGO Group.
4. Hungry Alligator Teacher Notes
Students will build and program a mechanical alligator that makes sounds and is motorized to open and close its jaw.
Objectives
ScienceTrace the transmission of motion and transfer of energy through the machine.Identify the pulleys and belts and the slowing down mechanism at work in the model.Consider the needs of living animals.
TechnologyCreate a programmable model to demonstrate the knowledge and operation of digital tools and technological systems.
EngineeringBuild and test the alligator’s movement.Improve the alligator’s behavior by adding the motion sensor and programming sounds to coordinate with the movement.
MathematicsUnderstand how the distance between an object and the motion sensor is important to how the sensor functions.Understand and use numbers to represent the type of sounds played and the amount of time the motor turns on.
LanguagePrepare and deliver a demonstration about alligators using the alligator model.Use technology to create and communicate ideas.Communicate in spoken or written forms using the appropriate vocabulary.
VocabularyBelts, motion sensor, and pulley. Blocks: Motion Sensor Input, Motor On For, Motor This Way, Motor That Way, Number Input, Play Sound, Repeat, Start On Key Press and Wait For.
Other MaterialsOptional for Extension: Construction paper, cardboard, grass, rocks.
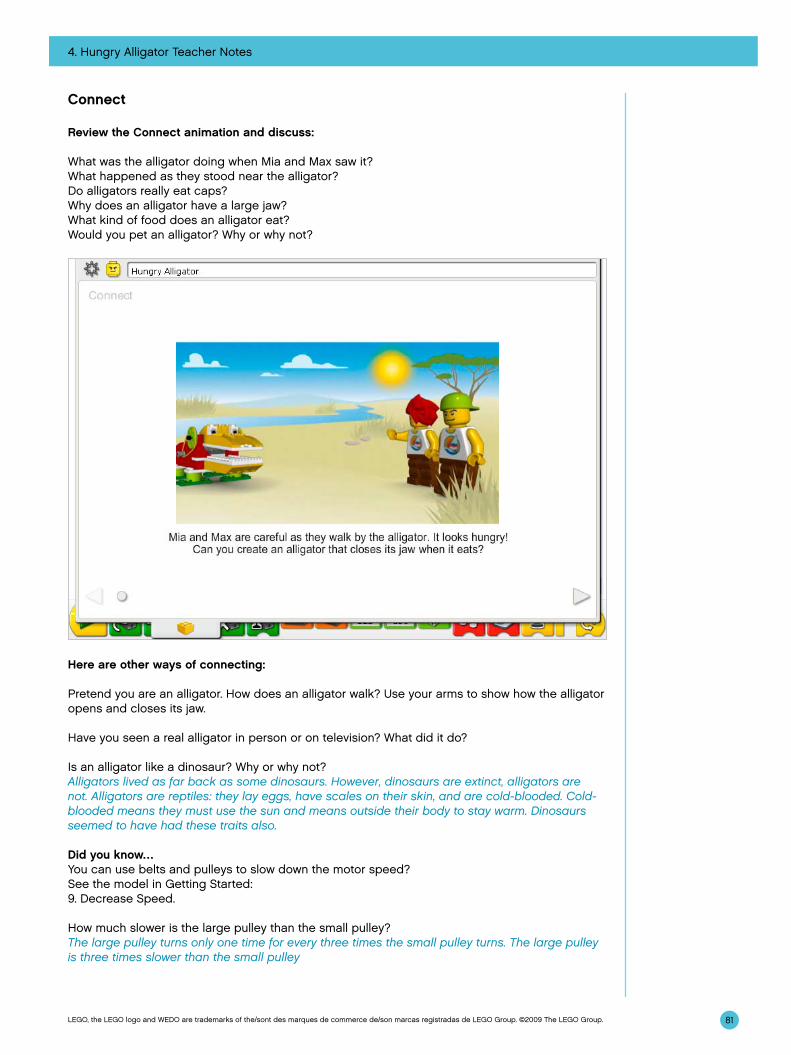
81
4. Hungry Alligator Teacher Notes
LEGO, the LEGO logo and WEDO are trademarks of the/sont des marques de commerce de/son marcas registradas de LEGO Group. ©2009 The LEGO Group.
Connect
Review the Connect animation and discuss:
What was the alligator doing when Mia and Max saw it?What happened as they stood near the alligator?Do alligators really eat caps?Why does an alligator have a large jaw?What kind of food does an alligator eat?Would you pet an alligator? Why or why not?
Here are other ways of connecting:
Pretend you are an alligator. How does an alligator walk? Use your arms to show how the alligator opens and closes its jaw.
Have you seen a real alligator in person or on television? What did it do?
Is an alligator like a dinosaur? Why or why not?Alligators lived as far back as some dinosaurs. However, dinosaurs are extinct, alligators are not. Alligators are reptiles: they lay eggs, have scales on their skin, and are cold-blooded. Cold-blooded means they must use the sun and means outside their body to stay warm. Dinosaurs seemed to have had these traits also.
Did you know…You can use belts and pulleys to slow down the motor speed?See the model in Getting Started:9. Decrease Speed.
How much slower is the large pulley than the small pulley?The large pulley turns only one time for every three times the small pulley turns. The large pulley is three times slower than the small pulley
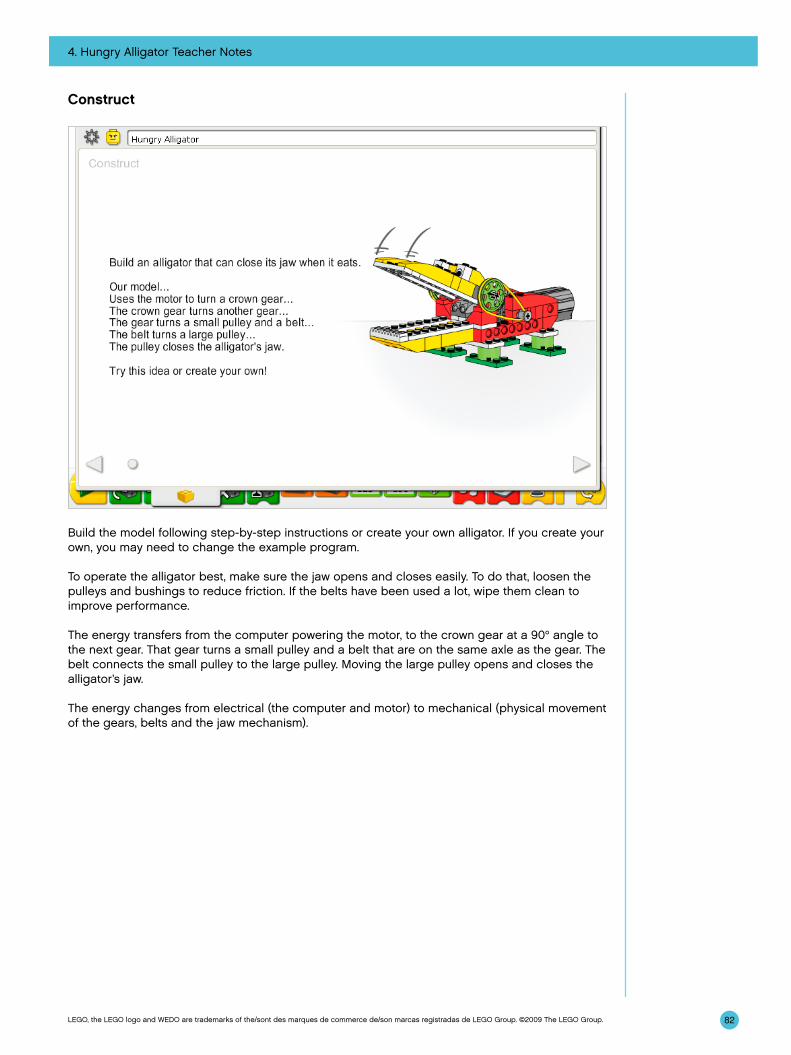
4. Hungry Alligator Teacher Notes
82LEGO, the LEGO logo and WEDO are trademarks of the/sont des marques de commerce de/son marcas registradas de LEGO Group. ©2009 The LEGO Group.
Construct
Build the model following step-by-step instructions or create your own alligator. If you create your own, you may need to change the example program.
To operate the alligator best, make sure the jaw opens and closes easily. To do that, loosen the pulleys and bushings to reduce friction. If the belts have been used a lot, wipe them clean to improve performance.
The energy transfers from the computer powering the motor, to the crown gear at a 90° angle to the next gear. That gear turns a small pulley and a belt that are on the same axle as the gear. The belt connects the small pulley to the large pulley. Moving the large pulley opens and closes the alligator’s jaw.
The energy changes from electrical (the computer and motor) to mechanical (physical movement of the gears, belts and the jaw mechanism).
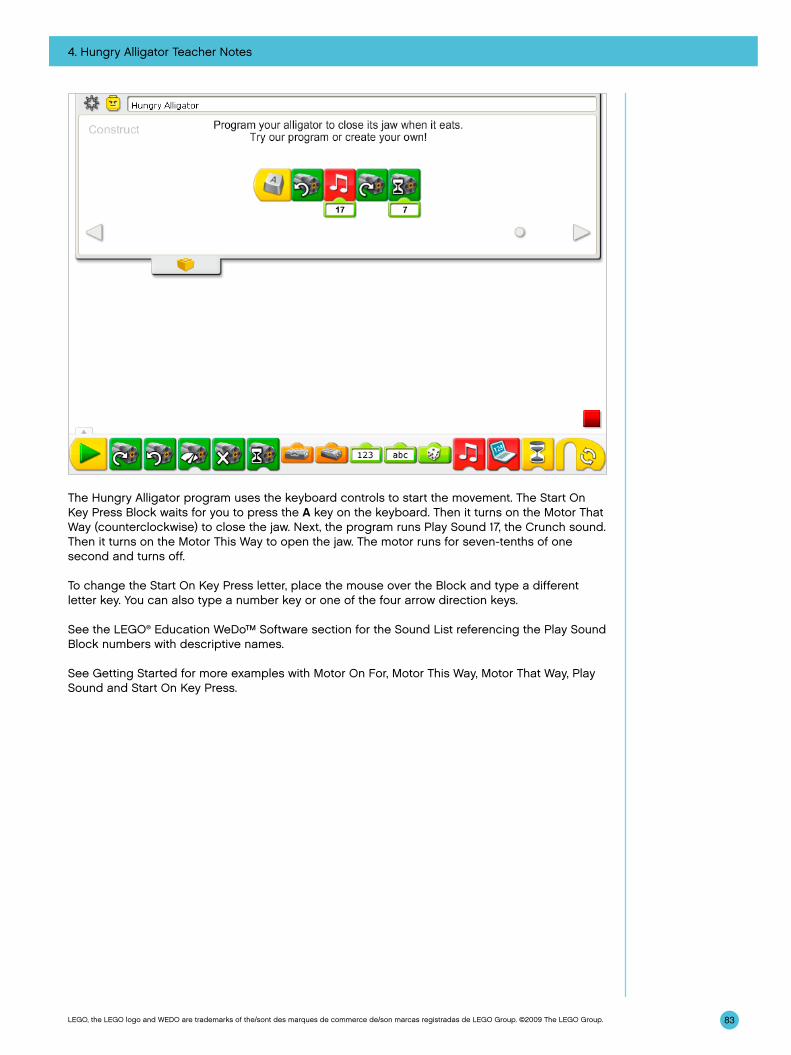
4. Hungry Alligator Teacher Notes
83LEGO, the LEGO logo and WEDO are trademarks of the/sont des marques de commerce de/son marcas registradas de LEGO Group. ©2009 The LEGO Group.
The Hungry Alligator program uses the keyboard controls to start the movement. The Start On Key Press Block waits for you to press the A key on the keyboard. Then it turns on the Motor That Way (counterclockwise) to close the jaw. Next, the program runs Play Sound 17, the Crunch sound. Then it turns on the Motor This Way to open the jaw. The motor runs for seven-tenths of one second and turns off.
To change the Start On Key Press letter, place the mouse over the Block and type a different letter key. You can also type a number key or one of the four arrow direction keys.
See the LEGO® Education WeDo™ Software section for the Sound List referencing the Play Sound Block numbers with descriptive names.
See Getting Started for more examples with Motor On For, Motor This Way, Motor That Way, Play Sound and Start On Key Press.
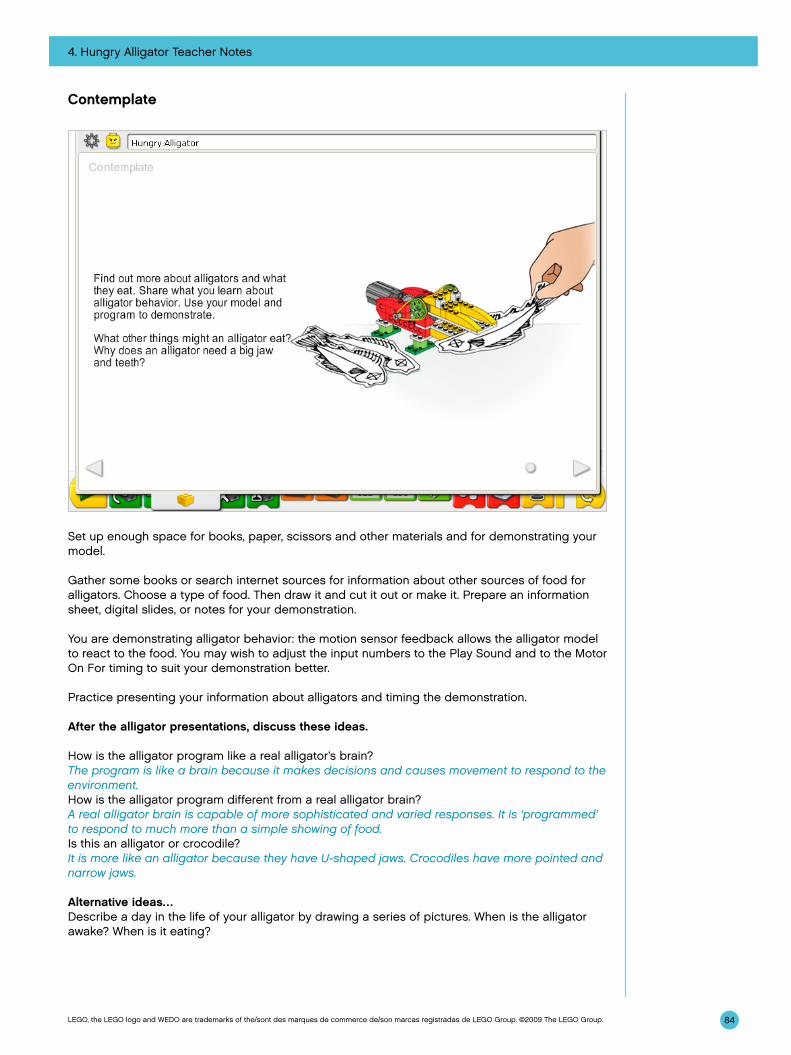
4. Hungry Alligator Teacher Notes
84LEGO, the LEGO logo and WEDO are trademarks of the/sont des marques de commerce de/son marcas registradas de LEGO Group. ©2009 The LEGO Group.
Contemplate
Set up enough space for books, paper, scissors and other materials and for demonstrating your model.
Gather some books or search internet sources for information about other sources of food for alligators. Choose a type of food. Then draw it and cut it out or make it. Prepare an information sheet, digital slides, or notes for your demonstration.
You are demonstrating alligator behavior: the motion sensor feedback allows the alligator model to react to the food. You may wish to adjust the input numbers to the Play Sound and to the Motor On For timing to suit your demonstration better.
Practice presenting your information about alligators and timing the demonstration.
After the alligator presentations, discuss these ideas.
How is the alligator program like a real alligator’s brain?The program is like a brain because it makes decisions and causes movement to respond to the environment.How is the alligator program different from a real alligator brain?A real alligator brain is capable of more sophisticated and varied responses. It is ‘programmed’ to respond to much more than a simple showing of food.Is this an alligator or crocodile?It is more like an alligator because they have U-shaped jaws. Crocodiles have more pointed and narrow jaws.
Alternative ideas…Describe a day in the life of your alligator by drawing a series of pictures. When is the alligator awake? When is it eating?
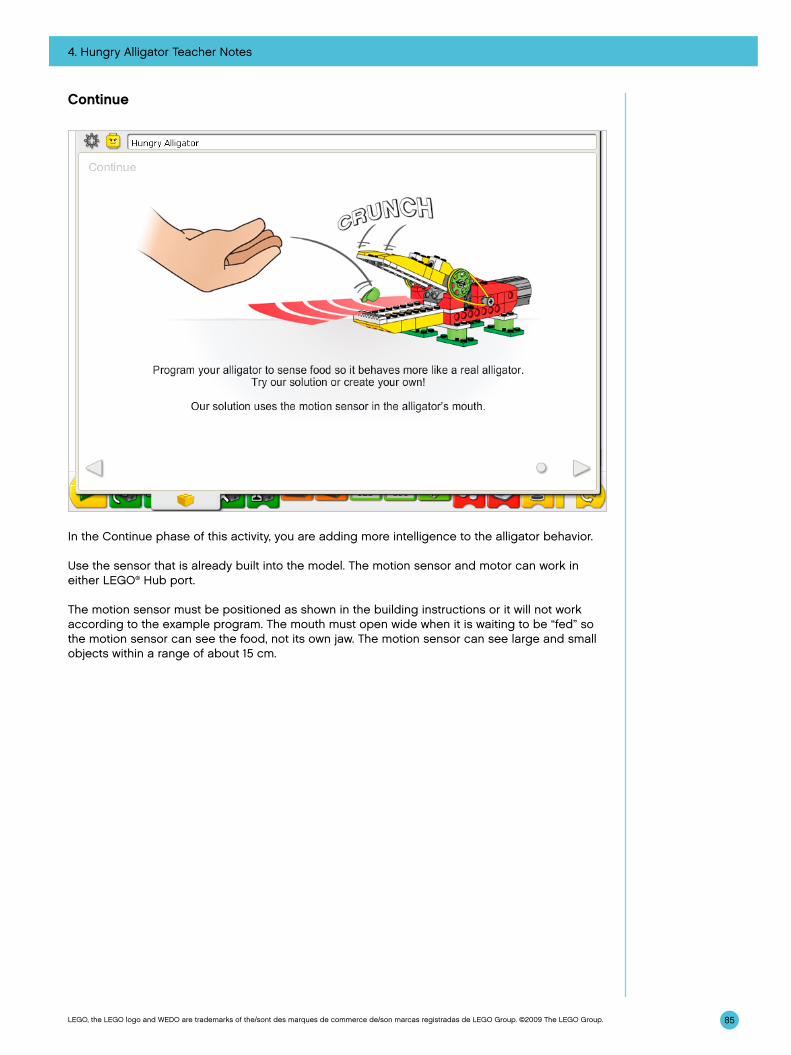
4. Hungry Alligator Teacher Notes
85LEGO, the LEGO logo and WEDO are trademarks of the/sont des marques de commerce de/son marcas registradas de LEGO Group. ©2009 The LEGO Group.
Continue
In the Continue phase of this activity, you are adding more intelligence to the alligator behavior.
Use the sensor that is already built into the model. The motion sensor and motor can work in either LEGO® Hub port.
The motion sensor must be positioned as shown in the building instructions or it will not work according to the example program. The mouth must open wide when it is waiting to be “fed” so the motion sensor can see the food, not its own jaw. The motion sensor can see large and small objects within a range of about 15 cm.

4. Hungry Alligator Teacher Notes
86LEGO, the LEGO logo and WEDO are trademarks of the/sont des marques de commerce de/son marcas registradas de LEGO Group. ©2009 The LEGO Group.
The Hungry Alligator program is modified to change the Start On Key Press to a Start Block and to add the motion sensor input. After you click the Start Block, the program waits for the motion sensor to see something. Then it turns on the Motor That Way to close the jaw and plays Sound 17, the Crunch sound. Then the motor turns on this way to open the jaw. The motor runs for seven-tenths of one second and turns off. The program repeats.
To repeat the program a specific number of times, add a number and text input to the Repeat Block.
See Getting Started for more examples with the Motion Sensor, Motor On For, Motor This Way, Motor That Way, Play Sound, Repeat, and Wait For.
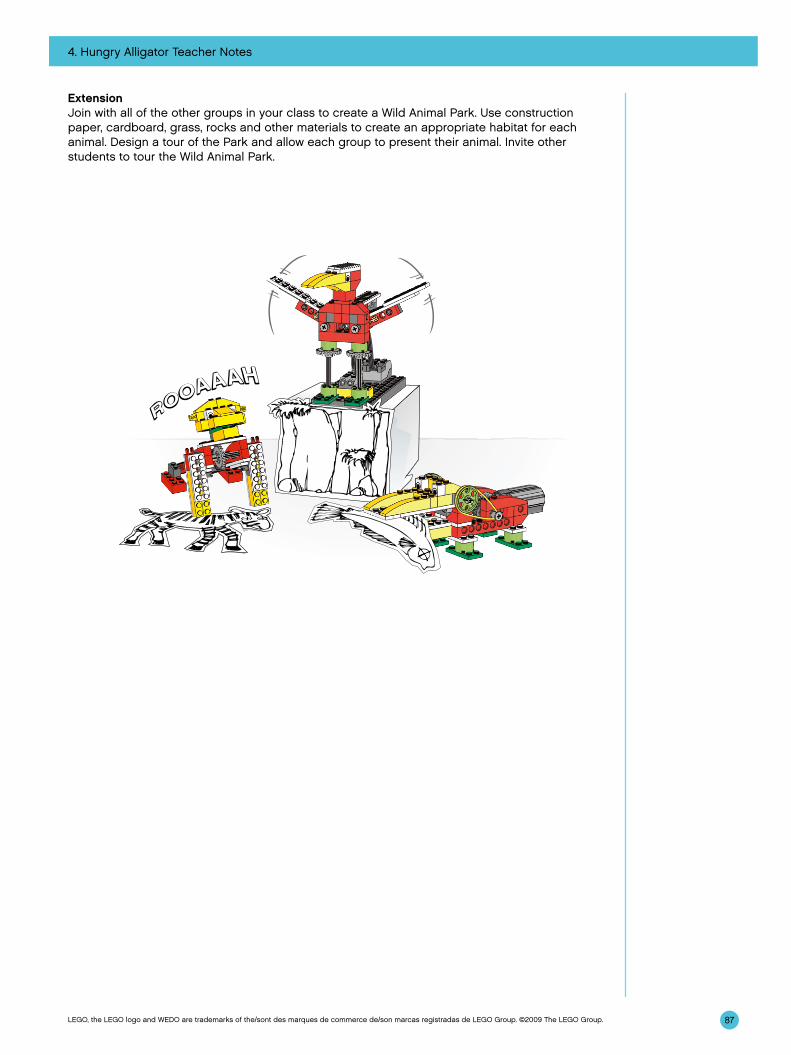
4. Hungry Alligator Teacher Notes
87LEGO, the LEGO logo and WEDO are trademarks of the/sont des marques de commerce de/son marcas registradas de LEGO Group. ©2009 The LEGO Group.
ExtensionJoin with all of the other groups in your class to create a Wild Animal Park. Use construction paper, cardboard, grass, rocks and other materials to create an appropriate habitat for each animal. Design a tour of the Park and allow each group to present their animal. Invite other students to tour the Wild Animal Park.
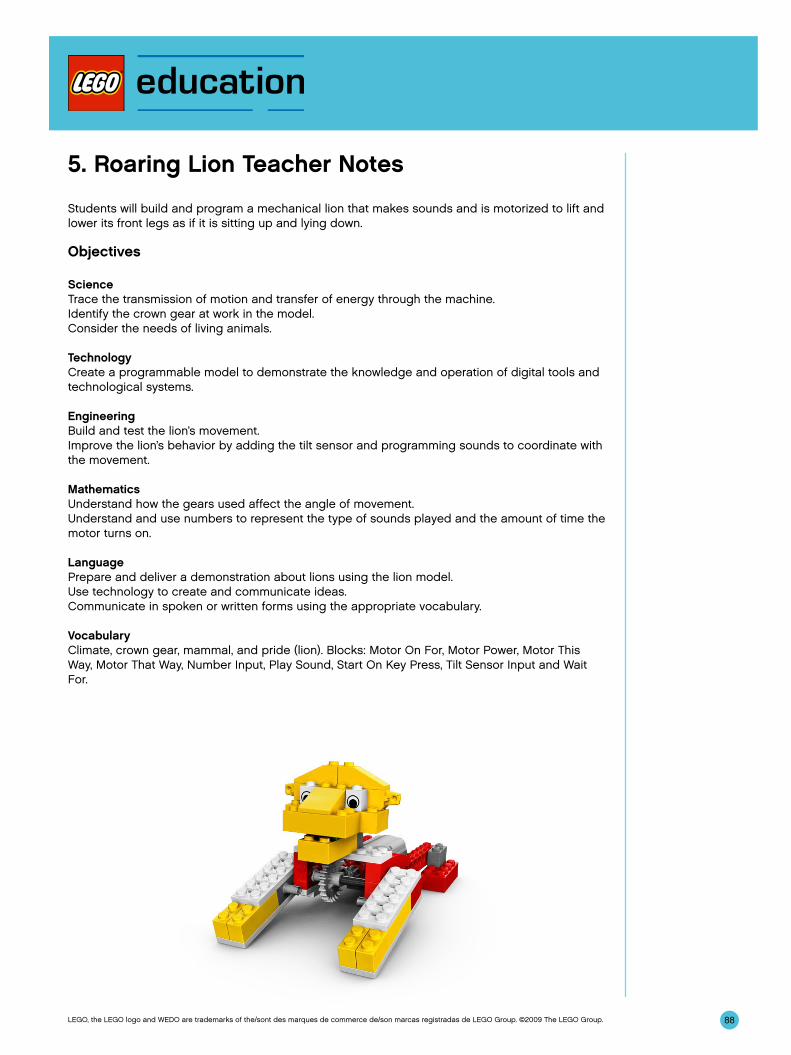
88LEGO, the LEGO logo and WEDO are trademarks of the/sont des marques de commerce de/son marcas registradas de LEGO Group. ©2009 The LEGO Group.
5. Roaring Lion Teacher Notes
Students will build and program a mechanical lion that makes sounds and is motorized to lift and lower its front legs as if it is sitting up and lying down.
Objectives
ScienceTrace the transmission of motion and transfer of energy through the machine.Identify the crown gear at work in the model.Consider the needs of living animals.
TechnologyCreate a programmable model to demonstrate the knowledge and operation of digital tools and technological systems.
EngineeringBuild and test the lion’s movement.Improve the lion’s behavior by adding the tilt sensor and programming sounds to coordinate with the movement.
MathematicsUnderstand how the gears used affect the angle of movement.Understand and use numbers to represent the type of sounds played and the amount of time the motor turns on.
LanguagePrepare and deliver a demonstration about lions using the lion model.Use technology to create and communicate ideas.Communicate in spoken or written forms using the appropriate vocabulary.
VocabularyClimate, crown gear, mammal, and pride (lion). Blocks: Motor On For, Motor Power, Motor This Way, Motor That Way, Number Input, Play Sound, Start On Key Press, Tilt Sensor Input and Wait For.
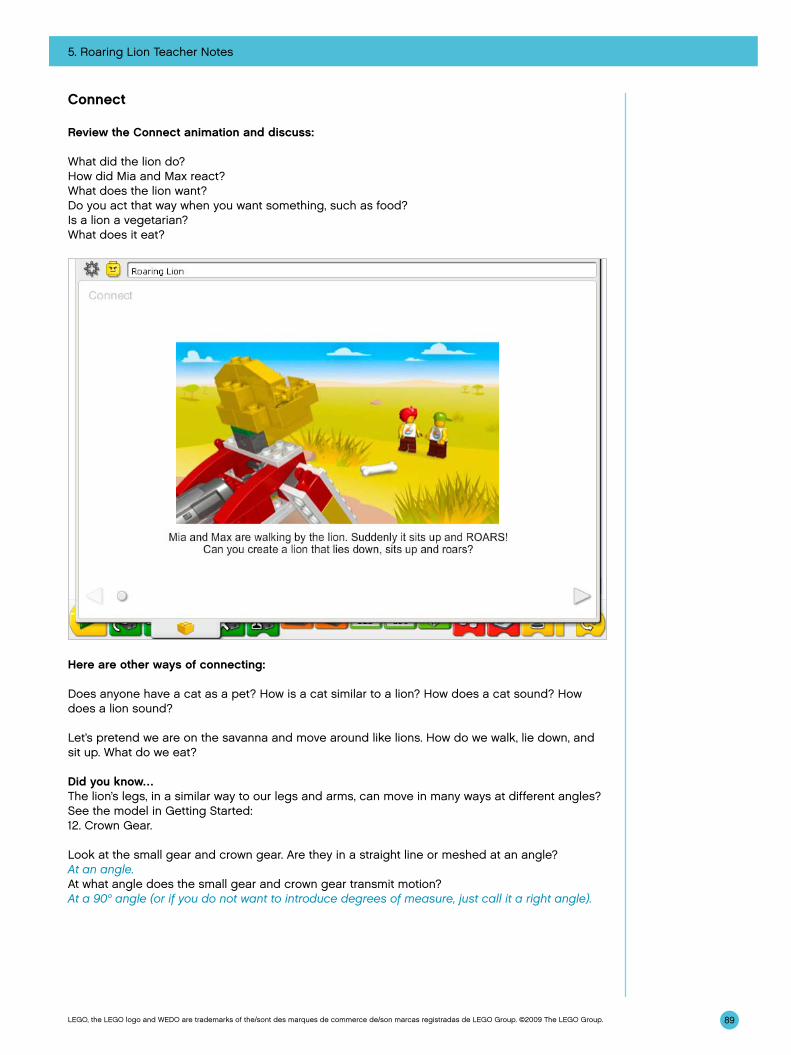
89
5. Roaring Lion Teacher Notes
LEGO, the LEGO logo and WEDO are trademarks of the/sont des marques de commerce de/son marcas registradas de LEGO Group. ©2009 The LEGO Group.
Connect
Review the Connect animation and discuss:
What did the lion do?How did Mia and Max react?What does the lion want?Do you act that way when you want something, such as food?Is a lion a vegetarian?What does it eat?
Here are other ways of connecting:
Does anyone have a cat as a pet? How is a cat similar to a lion? How does a cat sound? How does a lion sound?
Let’s pretend we are on the savanna and move around like lions. How do we walk, lie down, and sit up. What do we eat?
Did you know…The lion’s legs, in a similar way to our legs and arms, can move in many ways at different angles?See the model in Getting Started:12. Crown Gear.
Look at the small gear and crown gear. Are they in a straight line or meshed at an angle? At an angle.At what angle does the small gear and crown gear transmit motion? At a 90° angle (or if you do not want to introduce degrees of measure, just call it a right angle).
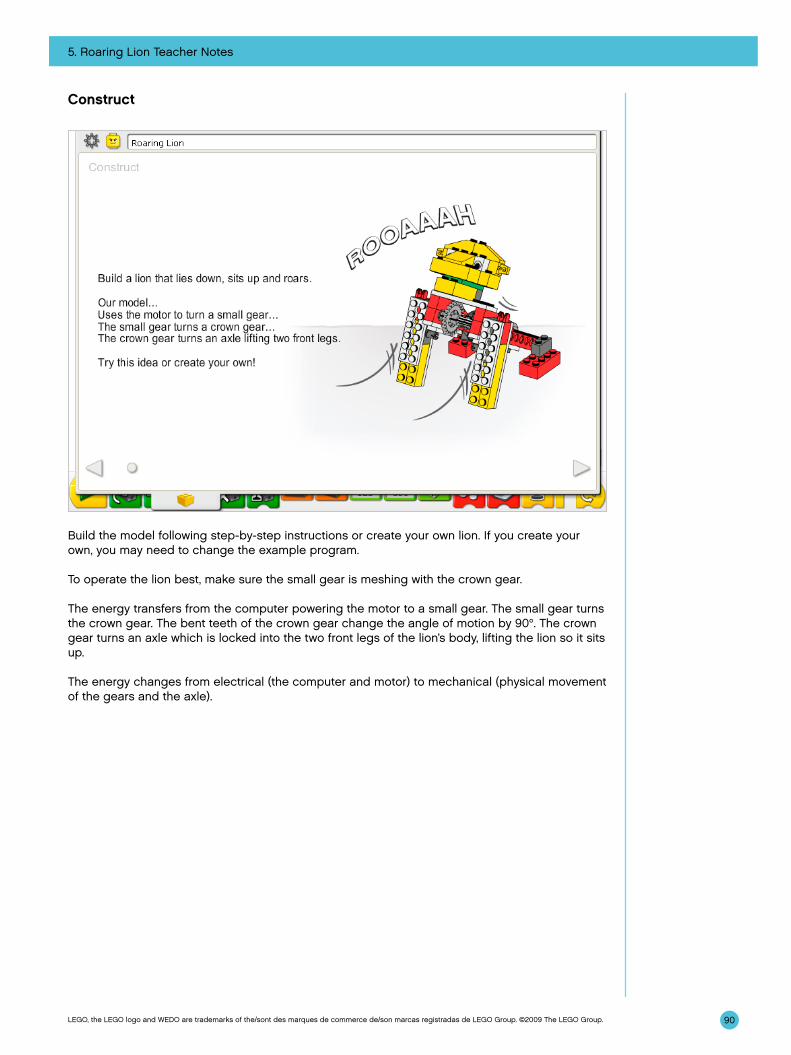
5. Roaring Lion Teacher Notes
90LEGO, the LEGO logo and WEDO are trademarks of the/sont des marques de commerce de/son marcas registradas de LEGO Group. ©2009 The LEGO Group.
Construct
Build the model following step-by-step instructions or create your own lion. If you create your own, you may need to change the example program.
To operate the lion best, make sure the small gear is meshing with the crown gear.
The energy transfers from the computer powering the motor to a small gear. The small gear turns the crown gear. The bent teeth of the crown gear change the angle of motion by 90°. The crown gear turns an axle which is locked into the two front legs of the lion’s body, lifting the lion so it sits up.
The energy changes from electrical (the computer and motor) to mechanical (physical movement of the gears and the axle).
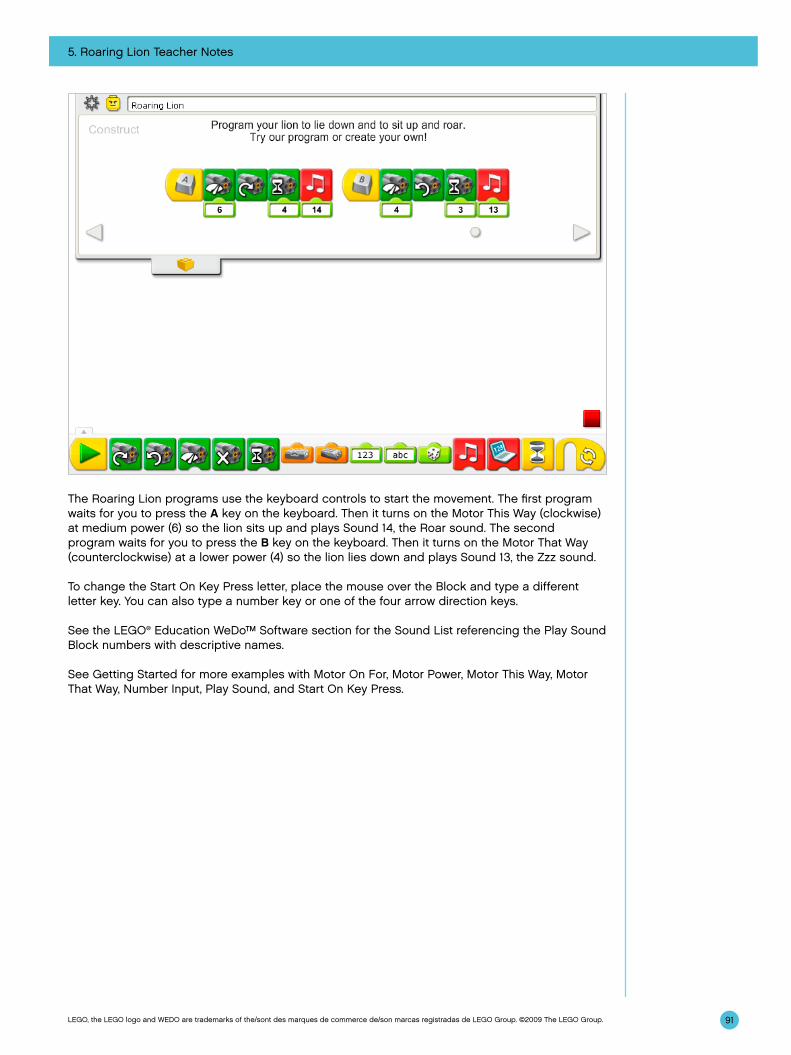
5. Roaring Lion Teacher Notes
91LEGO, the LEGO logo and WEDO are trademarks of the/sont des marques de commerce de/son marcas registradas de LEGO Group. ©2009 The LEGO Group.
The Roaring Lion programs use the keyboard controls to start the movement. The first program waits for you to press the A key on the keyboard. Then it turns on the Motor This Way (clockwise) at medium power (6) so the lion sits up and plays Sound 14, the Roar sound. The second program waits for you to press the B key on the keyboard. Then it turns on the Motor That Way (counterclockwise) at a lower power (4) so the lion lies down and plays Sound 13, the Zzz sound.
To change the Start On Key Press letter, place the mouse over the Block and type a different letter key. You can also type a number key or one of the four arrow direction keys.
See the LEGO® Education WeDo™ Software section for the Sound List referencing the Play Sound Block numbers with descriptive names.
See Getting Started for more examples with Motor On For, Motor Power, Motor This Way, Motor That Way, Number Input, Play Sound, and Start On Key Press.
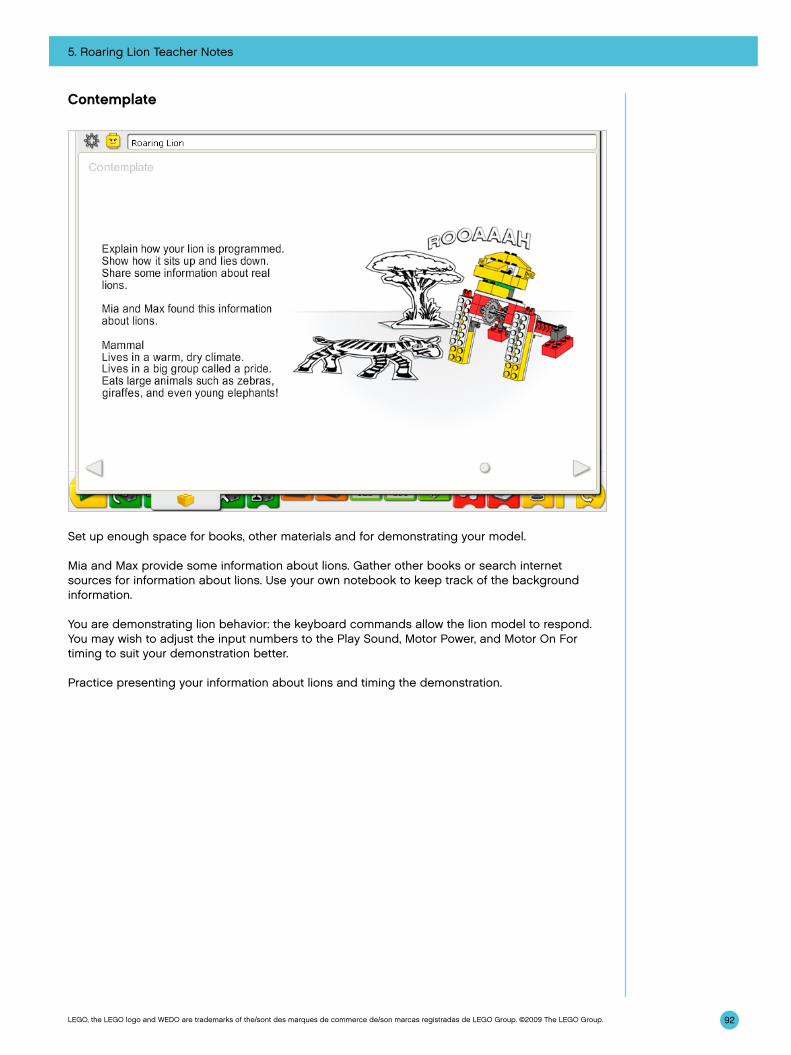
5. Roaring Lion Teacher Notes
92LEGO, the LEGO logo and WEDO are trademarks of the/sont des marques de commerce de/son marcas registradas de LEGO Group. ©2009 The LEGO Group.
Contemplate
Set up enough space for books, other materials and for demonstrating your model.
Mia and Max provide some information about lions. Gather other books or search internet sources for information about lions. Use your own notebook to keep track of the background information.
You are demonstrating lion behavior: the keyboard commands allow the lion model to respond. You may wish to adjust the input numbers to the Play Sound, Motor Power, and Motor On For timing to suit your demonstration better.
Practice presenting your information about lions and timing the demonstration.

5. Roaring Lion Teacher Notes
93LEGO, the LEGO logo and WEDO are trademarks of the/sont des marques de commerce de/son marcas registradas de LEGO Group. ©2009 The LEGO Group.
After the lion presentations, discuss these ideas.
What is a mammal? Are you a mammal? Name other animals that are mammals.They are warm-blooded, give birth live to their young, provide milk to their young. E.g, Dog, cat, horse, mouse, human being.The crown gear changes the movement of the motor to the legs of the model by 90° or at a right angle. Compare the movement of the lion to your legs and arms. What do you notice?Human arms and legs can move many more directions and angles than the lion. Our legs and arms can rotate and move up and down. The lion can only lift up and lower down.Notice that the lion needs more power to move up than down. Why is that? How does the program provide the intelligence to control the lion movement?Gravity pulls down on the lion so it needs more energy to move up and less to move down. When you jump up, you come down. That is the effect of gravity. The program changes the power level of the motor to provide more power when the lion is sitting up and acting against gravity and to provide less power when the lion is lying down and acting with gravity.
Alternative ideas…Program the lion to show its behavior as a wild animal. Then pretend it is a domestic cat instead. Then change the program to make it act and sound like a domestic cat. You can record your own sound in the Play Sound Block using Number Input 1, replacing the Hi sound. How are the lion and cat alike? How are they different?
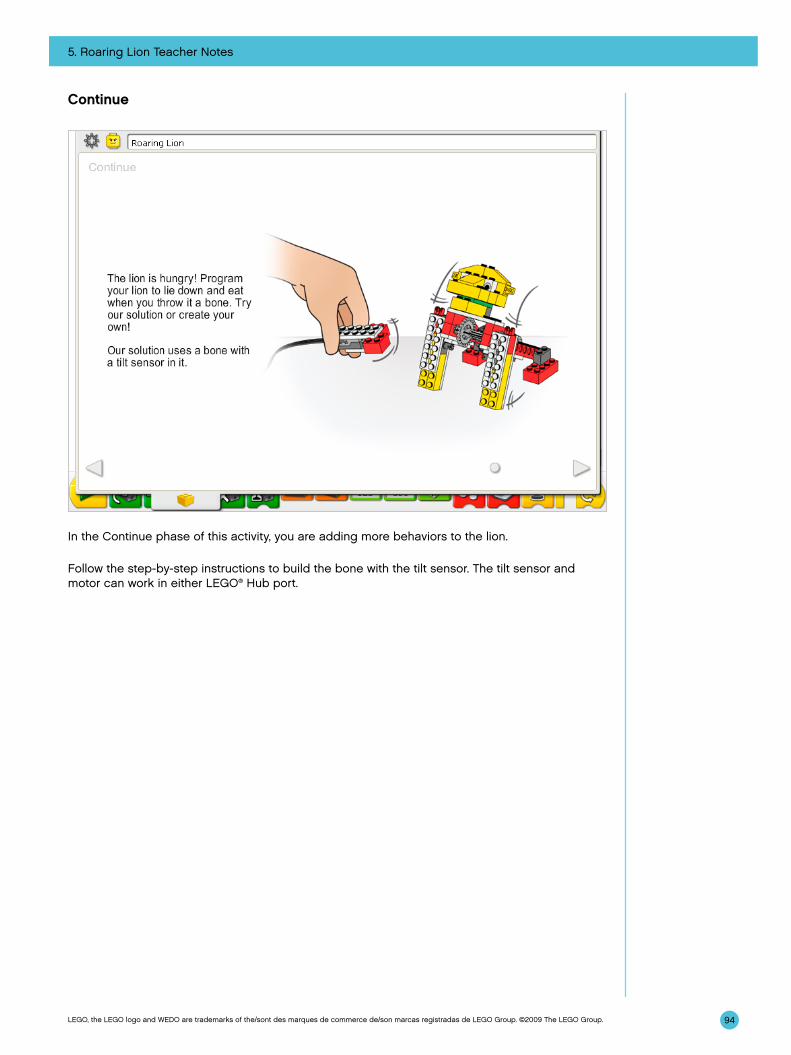
5. Roaring Lion Teacher Notes
94LEGO, the LEGO logo and WEDO are trademarks of the/sont des marques de commerce de/son marcas registradas de LEGO Group. ©2009 The LEGO Group.
Continue
In the Continue phase of this activity, you are adding more behaviors to the lion.
Follow the step-by-step instructions to build the bone with the tilt sensor. The tilt sensor and motor can work in either LEGO® Hub port.

5. Roaring Lion Teacher Notes
95LEGO, the LEGO logo and WEDO are trademarks of the/sont des marques de commerce de/son marcas registradas de LEGO Group. ©2009 The LEGO Group.
The Roaring Lion program is modified to combine behaviors and add the tilt sensor input. After you press the A key on the keyboard, the motor turns on the Motor This Way, at a power level 6, for four-tenths of one second and plays Sound 14, the Roar sound. The program waits for you to tilt the bone in any direction then it lowers the motor power to level 4, reverses the Motor That Way, turns on the motor for two-tenths of one second, and plays Sound 17, the Crunch sound.
See Getting Started for more examples with the Motor On For, Motor Power, Motor This Way, Motor That Way, Play Sound, Tilt Sensor Input, and Wait For.
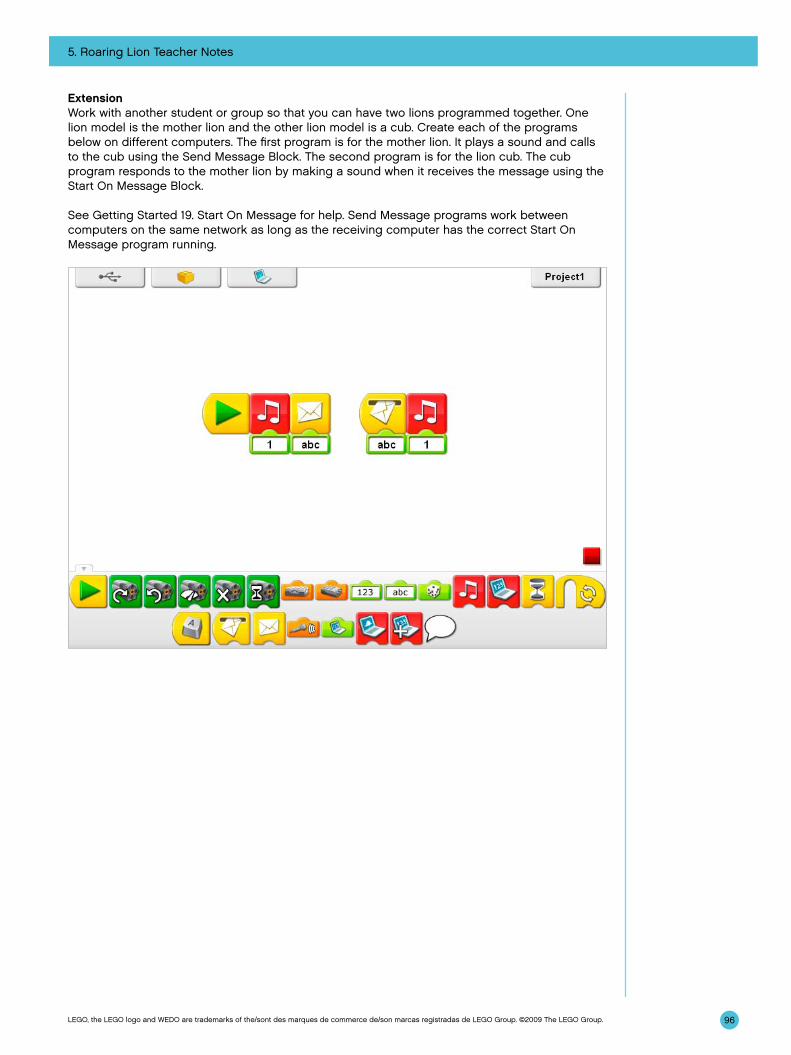
5. Roaring Lion Teacher Notes
96LEGO, the LEGO logo and WEDO are trademarks of the/sont des marques de commerce de/son marcas registradas de LEGO Group. ©2009 The LEGO Group.
ExtensionWork with another student or group so that you can have two lions programmed together. One lion model is the mother lion and the other lion model is a cub. Create each of the programs below on different computers. The first program is for the mother lion. It plays a sound and calls to the cub using the Send Message Block. The second program is for the lion cub. The cub program responds to the mother lion by making a sound when it receives the message using the Start On Message Block.
See Getting Started 19. Start On Message for help. Send Message programs work between computers on the same network as long as the receiving computer has the correct Start On Message program running.
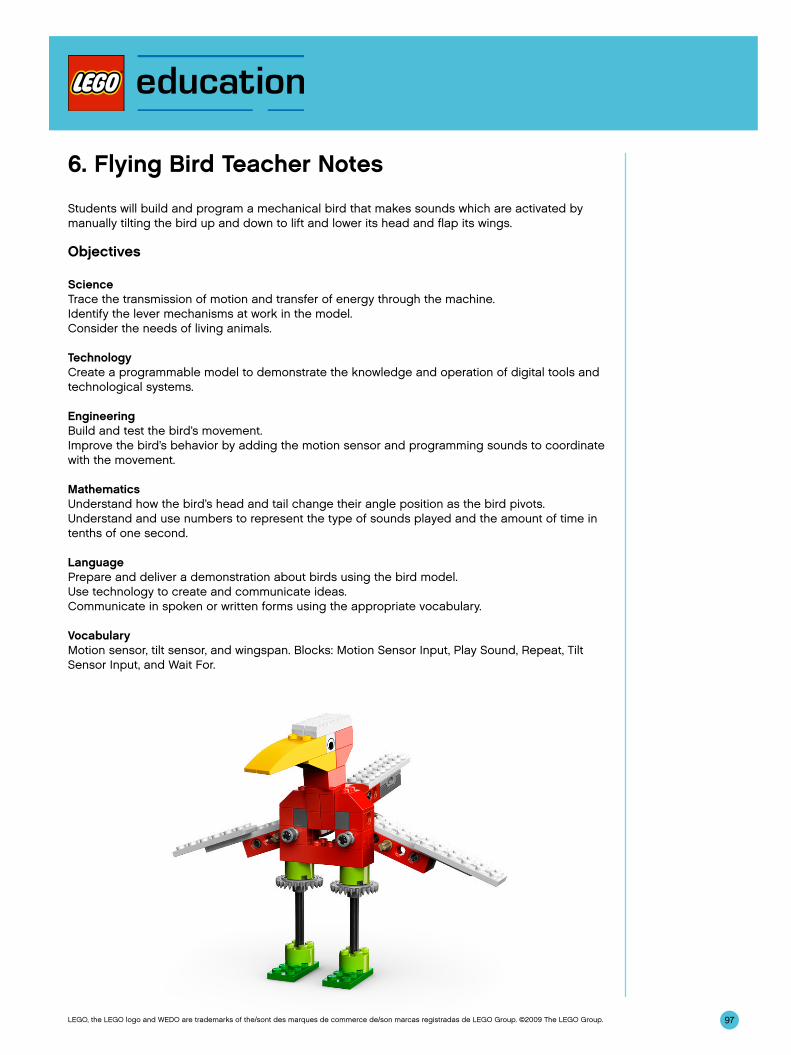
97LEGO, the LEGO logo and WEDO are trademarks of the/sont des marques de commerce de/son marcas registradas de LEGO Group. ©2009 The LEGO Group.
6. Flying Bird Teacher Notes
Students will build and program a mechanical bird that makes sounds which are activated by manually tilting the bird up and down to lift and lower its head and flap its wings.
Objectives
ScienceTrace the transmission of motion and transfer of energy through the machine.Identify the lever mechanisms at work in the model.Consider the needs of living animals.
TechnologyCreate a programmable model to demonstrate the knowledge and operation of digital tools and technological systems.
EngineeringBuild and test the bird’s movement.Improve the bird’s behavior by adding the motion sensor and programming sounds to coordinate with the movement.
MathematicsUnderstand how the bird’s head and tail change their angle position as the bird pivots.Understand and use numbers to represent the type of sounds played and the amount of time in tenths of one second.
LanguagePrepare and deliver a demonstration about birds using the bird model.Use technology to create and communicate ideas.Communicate in spoken or written forms using the appropriate vocabulary.
VocabularyMotion sensor, tilt sensor, and wingspan. Blocks: Motion Sensor Input, Play Sound, Repeat, Tilt Sensor Input, and Wait For.

98
6. Flying Bird Teacher Notes
LEGO, the LEGO logo and WEDO are trademarks of the/sont des marques de commerce de/son marcas registradas de LEGO Group. ©2009 The LEGO Group.
Connect
Review the Connect animation and discuss:
What do Mia and Max see the bird doing?What does a bird have that you don’t?
Here are other ways of connecting:
There are many sizes of birds. What sort of birds have you seen? How big were they? What was the largest bird you have seen in person or on television? What is the smallest bird you have seen?
Pretend you are a hawk or an eagle. Act out the way the bird moves. Hawks and eagles hold their wings out and glide along the air currents. Pretend you are a hummingbird. They are tiny birds that flap their wings so fast we can see only a blur. Show how a hummingbird flies.
Did you know...Many birds have specific songs they repeat to communicate with other birds?To see an example of how to create a program that repeats sounds, see Getting Started:16. Repeat
What do birds sound like when they sing or call? Can anyone sing or call like a bird?Answers will vary but a rooster or chicken sound can be used if bird songs are not known. Bird songs are usually repetitive and can involve a call and response.
A bird wing is a kind of lever?See the model in Getting Started:15. Lever
If a bird wing is a lever, what pushes on the wing to move it?Inside the bird’s body, muscles and ligaments move the wing up and down. Move your own arm up and down and feel your muscles and ligaments.
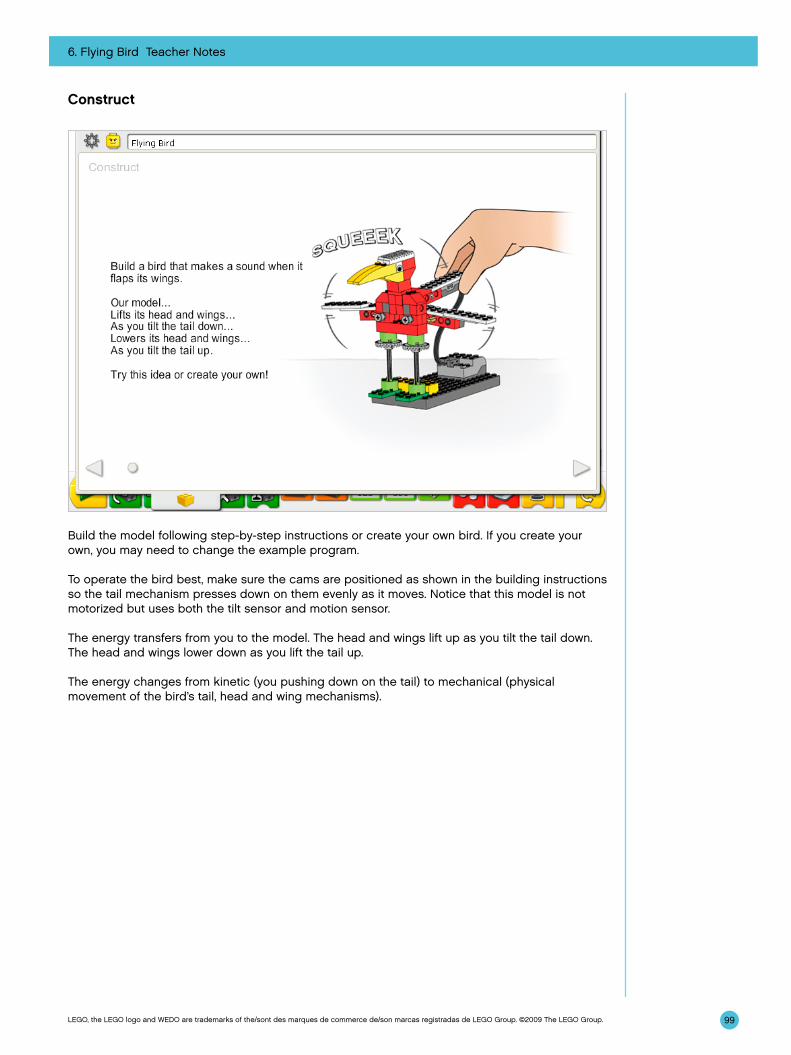
6. Flying Bird Teacher Notes
99LEGO, the LEGO logo and WEDO are trademarks of the/sont des marques de commerce de/son marcas registradas de LEGO Group. ©2009 The LEGO Group.
Construct
Build the model following step-by-step instructions or create your own bird. If you create your own, you may need to change the example program.
To operate the bird best, make sure the cams are positioned as shown in the building instructions so the tail mechanism presses down on them evenly as it moves. Notice that this model is not motorized but uses both the tilt sensor and motion sensor.
The energy transfers from you to the model. The head and wings lift up as you tilt the tail down. The head and wings lower down as you lift the tail up.
The energy changes from kinetic (you pushing down on the tail) to mechanical (physical movement of the bird’s tail, head and wing mechanisms).
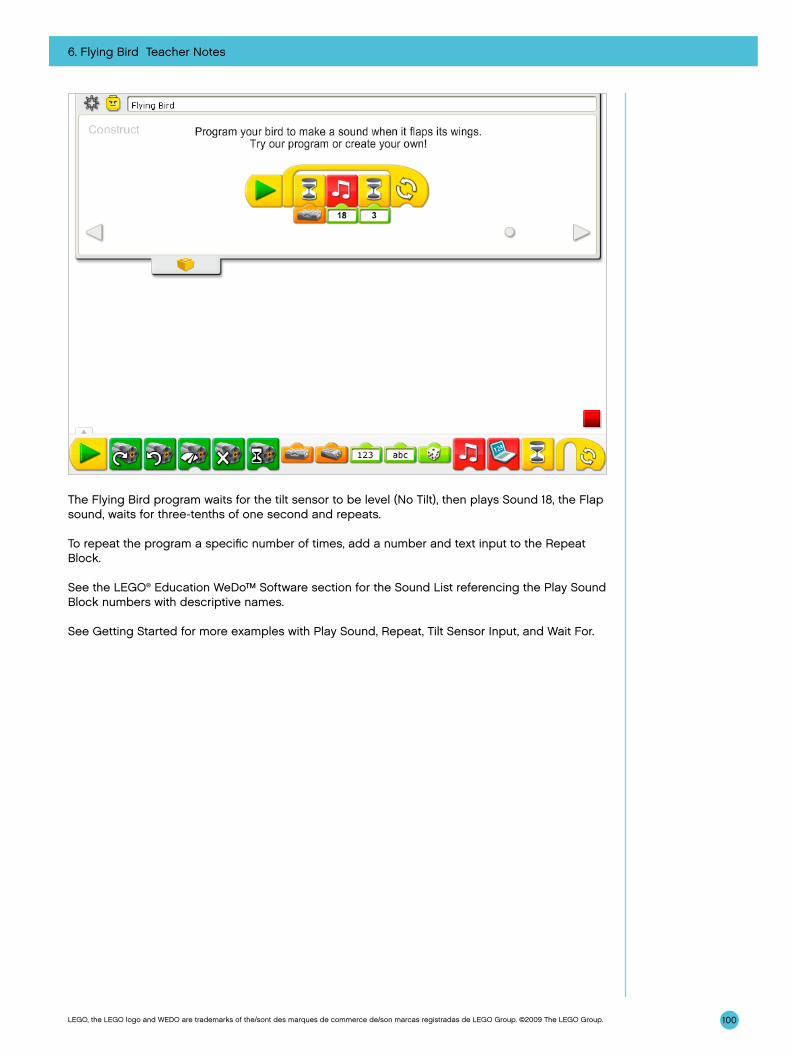
6. Flying Bird Teacher Notes
100LEGO, the LEGO logo and WEDO are trademarks of the/sont des marques de commerce de/son marcas registradas de LEGO Group. ©2009 The LEGO Group.
The Flying Bird program waits for the tilt sensor to be level (No Tilt), then plays Sound 18, the Flap sound, waits for three-tenths of one second and repeats.
To repeat the program a specific number of times, add a number and text input to the Repeat Block.
See the LEGO® Education WeDo™ Software section for the Sound List referencing the Play Sound Block numbers with descriptive names.
See Getting Started for more examples with Play Sound, Repeat, Tilt Sensor Input, and Wait For.
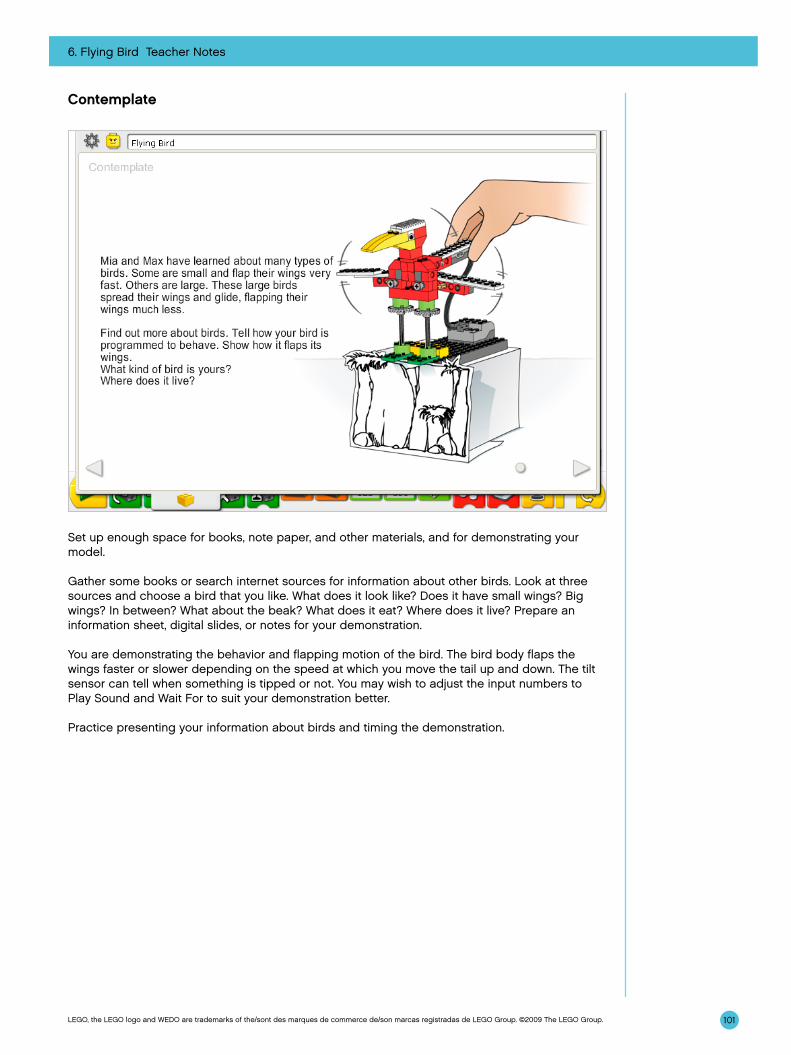
6. Flying Bird Teacher Notes
101LEGO, the LEGO logo and WEDO are trademarks of the/sont des marques de commerce de/son marcas registradas de LEGO Group. ©2009 The LEGO Group.
Contemplate
Set up enough space for books, note paper, and other materials, and for demonstrating your model.
Gather some books or search internet sources for information about other birds. Look at three sources and choose a bird that you like. What does it look like? Does it have small wings? Big wings? In between? What about the beak? What does it eat? Where does it live? Prepare an information sheet, digital slides, or notes for your demonstration.
You are demonstrating the behavior and flapping motion of the bird. The bird body flaps the wings faster or slower depending on the speed at which you move the tail up and down. The tilt sensor can tell when something is tipped or not. You may wish to adjust the input numbers to Play Sound and Wait For to suit your demonstration better.
Practice presenting your information about birds and timing the demonstration.
6. Flying Bird Teacher Notes
102LEGO, the LEGO logo and WEDO are trademarks of the/sont des marques de commerce de/son marcas registradas de LEGO Group. ©2009 The LEGO Group.
After the bird presentations, discuss these ideas.
How is the bird’s body like a lever?The main body of the bird, the head and tail, pivot up and down around axles in the center. A second set of levers moves along with the up and down motion of the tail: as the tail moves up and down, the effort from that movement forces each wing to pivot around an axle. So, each wing is a lever also.The bird’s tail lifts up and down at different angles. Describe or show some of the different angles the bird tail moves as it pivots. Show the tail at 45°? 90°? 180°?The tail can lift up to 90° and pivot down to -90° or 270°.What other senses might you program in the bird?Answers to this will vary. The motion sensor has been built into the model near the birds’ feet. The Continue activity shows how to use it.
Alternative ideas…The bird can fly over land and see the world from a different point of view. Consider the type of bird you have. Draw a picture from the bird’s perspective. What does it see? What type of land is below? Is there salt or fresh water nearby?
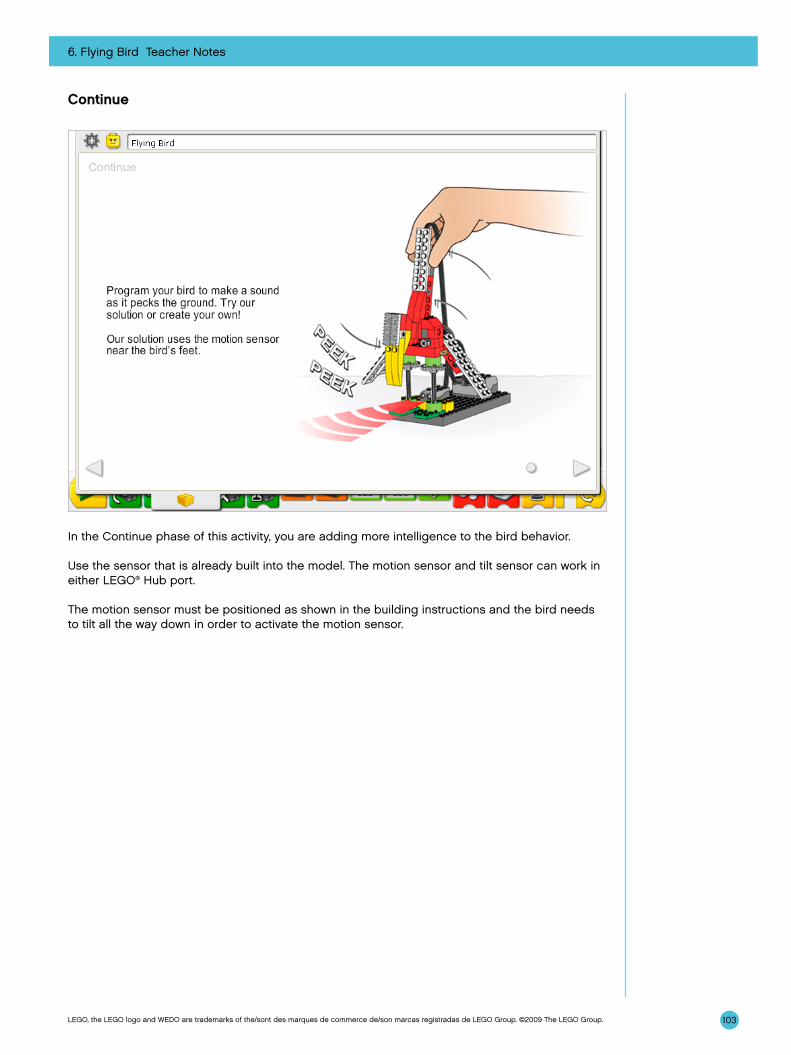
6. Flying Bird Teacher Notes
103LEGO, the LEGO logo and WEDO are trademarks of the/sont des marques de commerce de/son marcas registradas de LEGO Group. ©2009 The LEGO Group.
Continue
In the Continue phase of this activity, you are adding more intelligence to the bird behavior.
Use the sensor that is already built into the model. The motion sensor and tilt sensor can work in either LEGO® Hub port.
The motion sensor must be positioned as shown in the building instructions and the bird needs to tilt all the way down in order to activate the motion sensor.
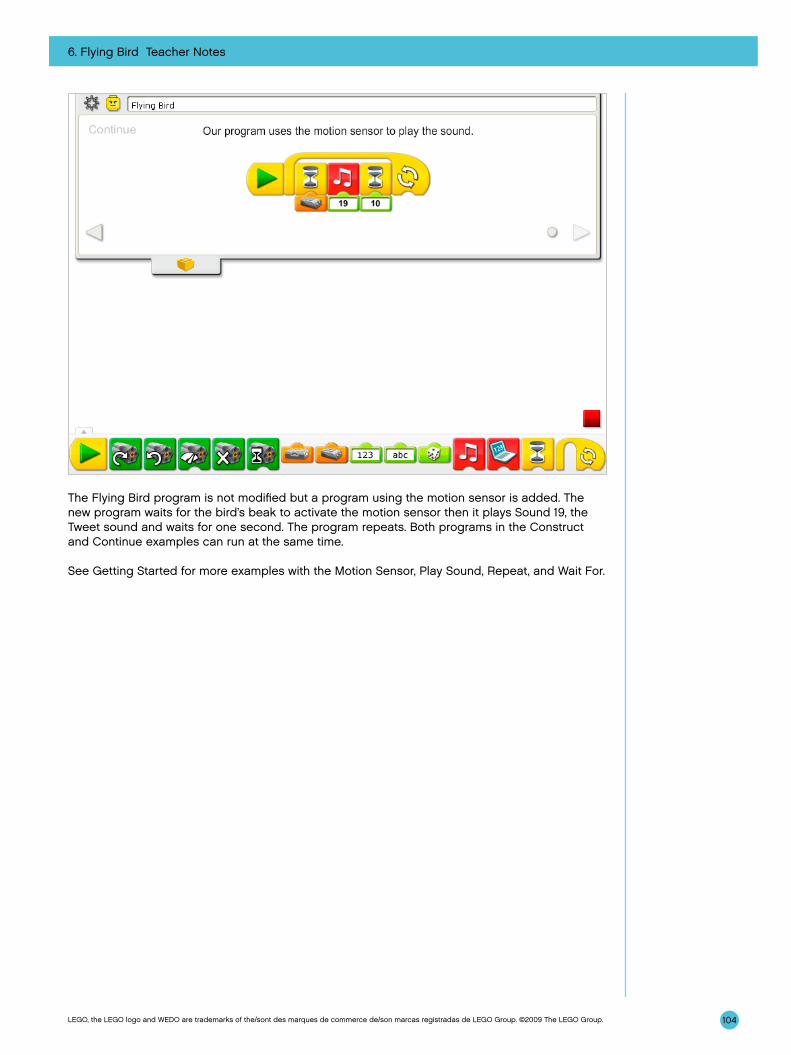
6. Flying Bird Teacher Notes
104LEGO, the LEGO logo and WEDO are trademarks of the/sont des marques de commerce de/son marcas registradas de LEGO Group. ©2009 The LEGO Group.
The Flying Bird program is not modified but a program using the motion sensor is added. The new program waits for the bird’s beak to activate the motion sensor then it plays Sound 19, the Tweet sound and waits for one second. The program repeats. Both programs in the Construct and Continue examples can run at the same time.
See Getting Started for more examples with the Motion Sensor, Play Sound, Repeat, and Wait For.
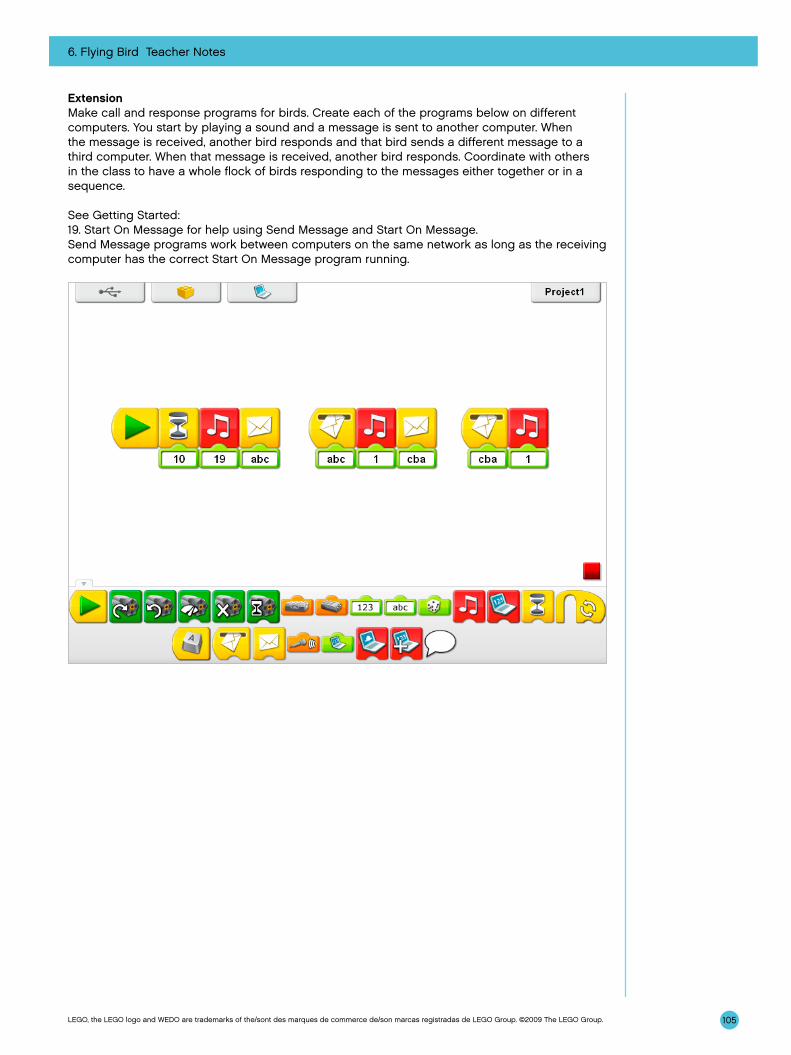
6. Flying Bird Teacher Notes
105LEGO, the LEGO logo and WEDO are trademarks of the/sont des marques de commerce de/son marcas registradas de LEGO Group. ©2009 The LEGO Group.
ExtensionMake call and response programs for birds. Create each of the programs below on different computers. You start by playing a sound and a message is sent to another computer. When the message is received, another bird responds and that bird sends a different message to a third computer. When that message is received, another bird responds. Coordinate with others in the class to have a whole flock of birds responding to the messages either together or in a sequence.
See Getting Started:19. Start On Message for help using Send Message and Start On Message.Send Message programs work between computers on the same network as long as the receiving computer has the correct Start On Message program running.
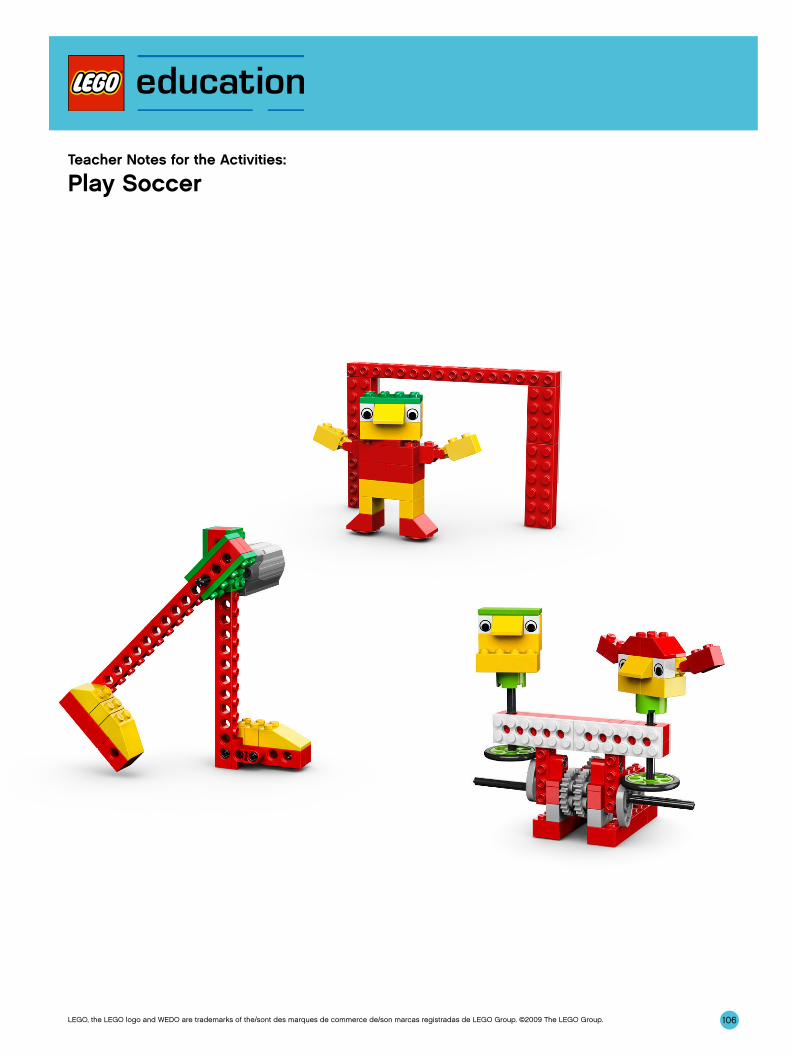
106LEGO, the LEGO logo and WEDO are trademarks of the/sont des marques de commerce de/son marcas registradas de LEGO Group. ©2009 The LEGO Group.
Teacher Notes for the Activities:
Play Soccer
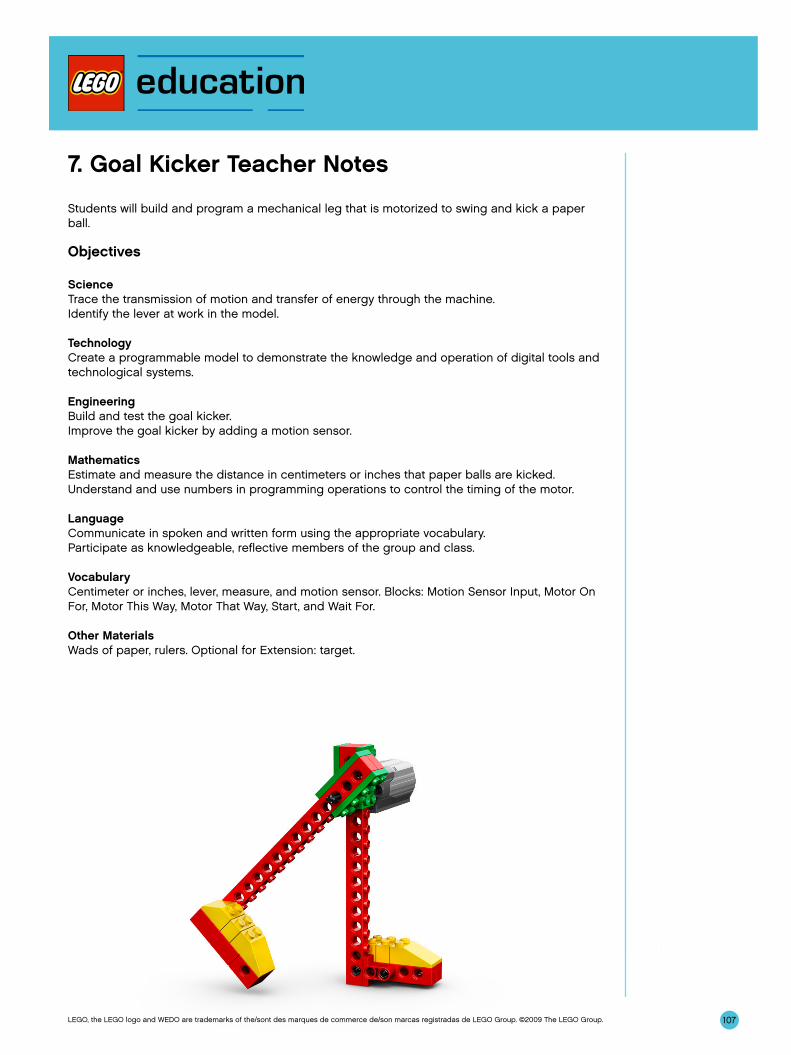
107LEGO, the LEGO logo and WEDO are trademarks of the/sont des marques de commerce de/son marcas registradas de LEGO Group. ©2009 The LEGO Group.
7. Goal Kicker Teacher Notes
Students will build and program a mechanical leg that is motorized to swing and kick a paper ball.
Objectives
ScienceTrace the transmission of motion and transfer of energy through the machine.Identify the lever at work in the model.
Technology Create a programmable model to demonstrate the knowledge and operation of digital tools and technological systems.
EngineeringBuild and test the goal kicker.Improve the goal kicker by adding a motion sensor.
MathematicsEstimate and measure the distance in centimeters or inches that paper balls are kicked. Understand and use numbers in programming operations to control the timing of the motor.
LanguageCommunicate in spoken and written form using the appropriate vocabulary.Participate as knowledgeable, reflective members of the group and class.
VocabularyCentimeter or inches, lever, measure, and motion sensor. Blocks: Motion Sensor Input, Motor On For, Motor This Way, Motor That Way, Start, and Wait For.
Other MaterialsWads of paper, rulers. Optional for Extension: target.
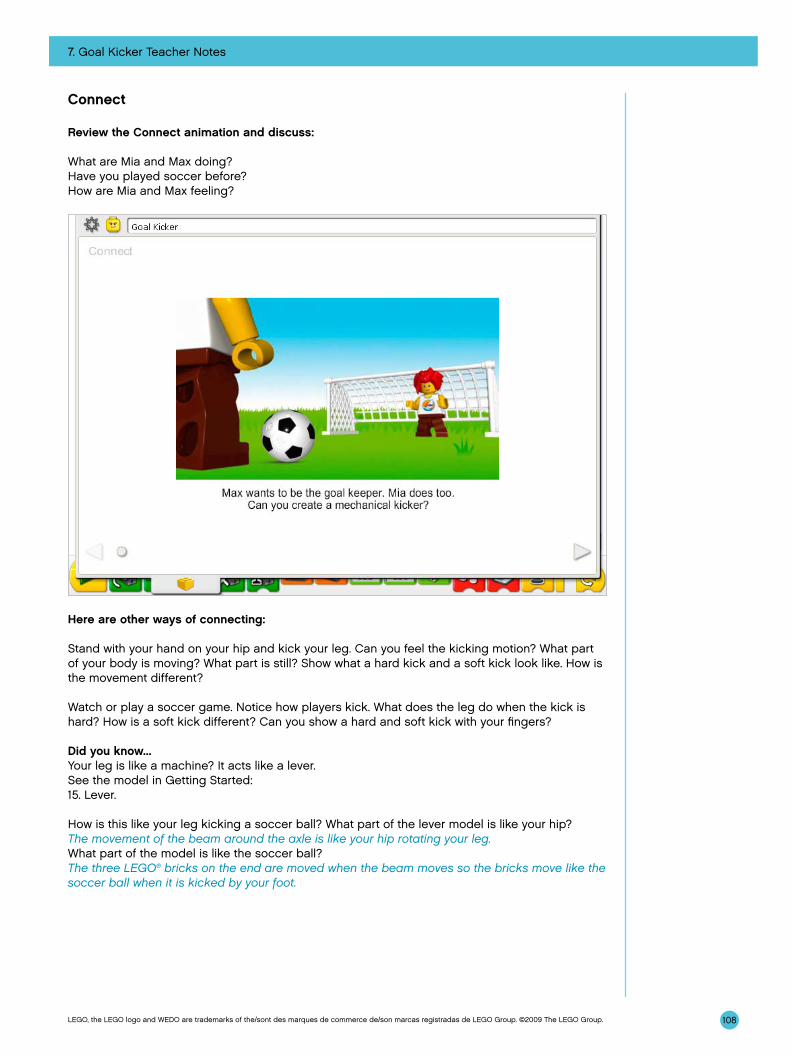
108
7. Goal Kicker Teacher Notes
LEGO, the LEGO logo and WEDO are trademarks of the/sont des marques de commerce de/son marcas registradas de LEGO Group. ©2009 The LEGO Group.
Connect
Review the Connect animation and discuss:
What are Mia and Max doing?Have you played soccer before?How are Mia and Max feeling?
Here are other ways of connecting:
Stand with your hand on your hip and kick your leg. Can you feel the kicking motion? What part of your body is moving? What part is still? Show what a hard kick and a soft kick look like. How is the movement different?
Watch or play a soccer game. Notice how players kick. What does the leg do when the kick is hard? How is a soft kick different? Can you show a hard and soft kick with your fingers?
Did you know...Your leg is like a machine? It acts like a lever.See the model in Getting Started:15. Lever.
How is this like your leg kicking a soccer ball? What part of the lever model is like your hip?The movement of the beam around the axle is like your hip rotating your leg.What part of the model is like the soccer ball?The three LEGO® bricks on the end are moved when the beam moves so the bricks move like the soccer ball when it is kicked by your foot.
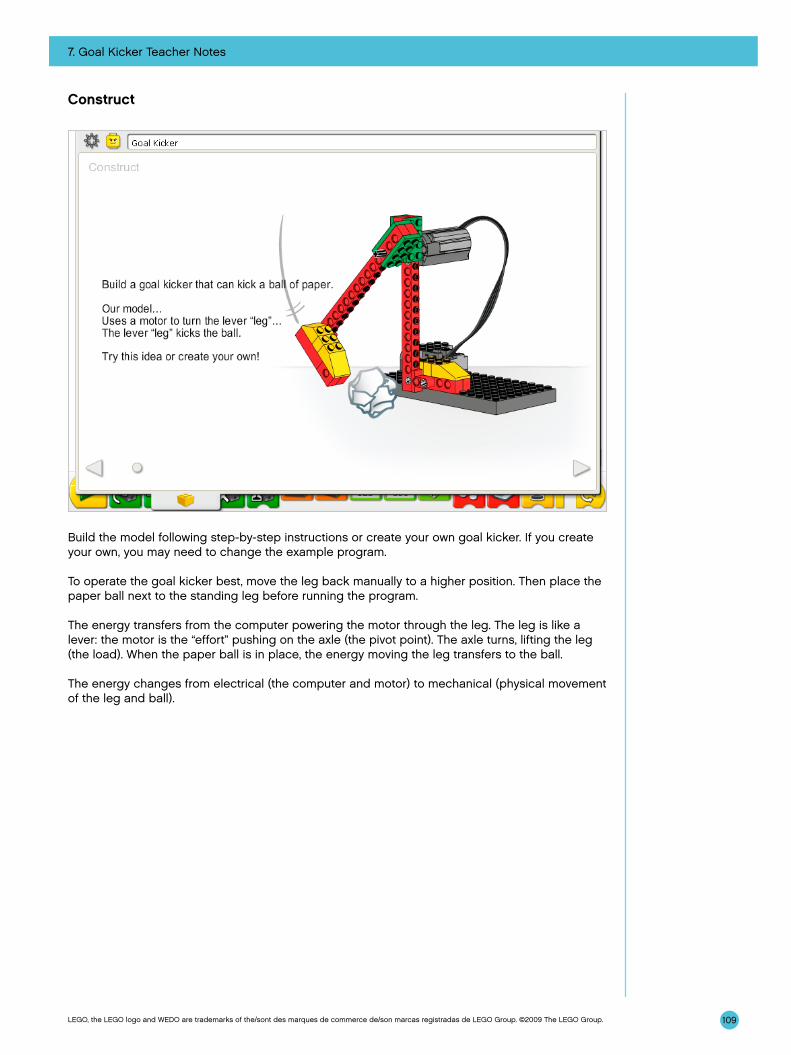
7. Goal Kicker Teacher Notes
109LEGO, the LEGO logo and WEDO are trademarks of the/sont des marques de commerce de/son marcas registradas de LEGO Group. ©2009 The LEGO Group.
Construct
Build the model following step-by-step instructions or create your own goal kicker. If you create your own, you may need to change the example program.
To operate the goal kicker best, move the leg back manually to a higher position. Then place the paper ball next to the standing leg before running the program.
The energy transfers from the computer powering the motor through the leg. The leg is like a lever: the motor is the “effort” pushing on the axle (the pivot point). The axle turns, lifting the leg (the load). When the paper ball is in place, the energy moving the leg transfers to the ball.
The energy changes from electrical (the computer and motor) to mechanical (physical movement of the leg and ball).

7. Goal Kicker Teacher Notes
110LEGO, the LEGO logo and WEDO are trademarks of the/sont des marques de commerce de/son marcas registradas de LEGO Group. ©2009 The LEGO Group.
The Goal Kicker program turns on the Motor That Way (counterclockwise) and runs it for two-tenths of one second. Then the motor turns off.
Left-click on the Motor That Way Block to change it to a Motor This Way Block. The motor then moves the opposite direction (clockwise).
To change the Number Input to Motor On For, mouse over the Input Block and type a new number or change it by pressing the up or down arrow keys.
See Getting Started for more examples with Motor This Way, Motor That Way, and Motor On For.
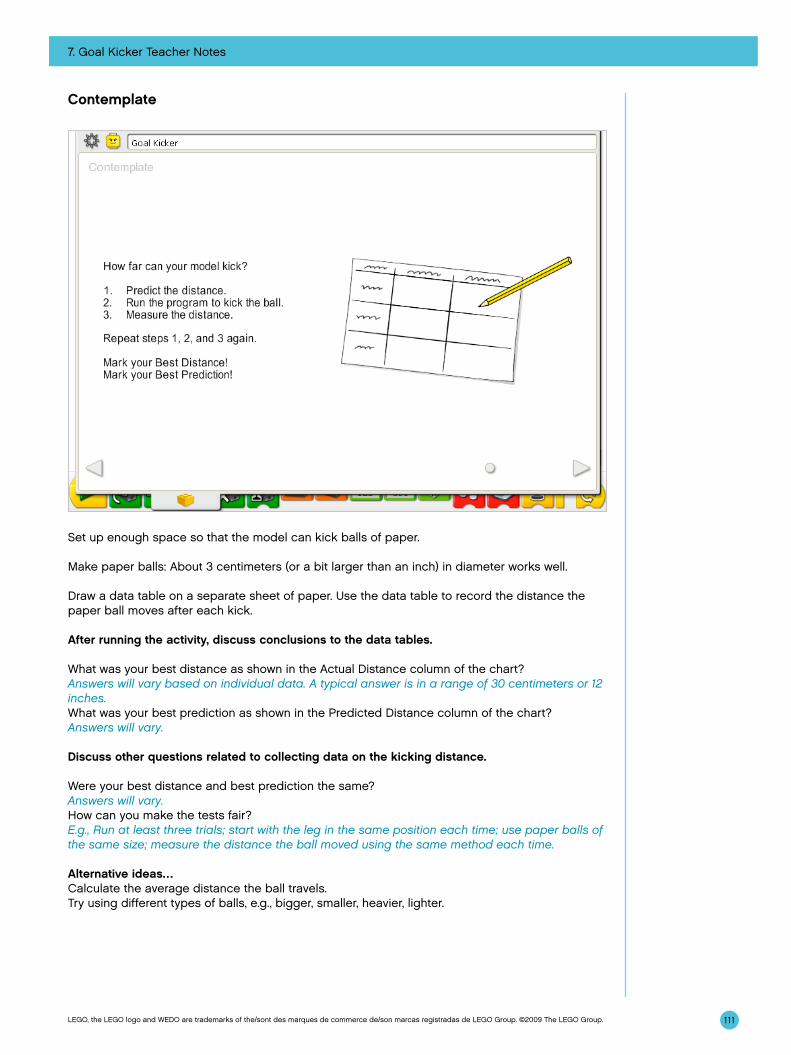
7. Goal Kicker Teacher Notes
111LEGO, the LEGO logo and WEDO are trademarks of the/sont des marques de commerce de/son marcas registradas de LEGO Group. ©2009 The LEGO Group.
Contemplate
Set up enough space so that the model can kick balls of paper.
Make paper balls: About 3 centimeters (or a bit larger than an inch) in diameter works well.
Draw a data table on a separate sheet of paper. Use the data table to record the distance the paper ball moves after each kick.
After running the activity, discuss conclusions to the data tables.
What was your best distance as shown in the Actual Distance column of the chart?Answers will vary based on individual data. A typical answer is in a range of 30 centimeters or 12 inches.What was your best prediction as shown in the Predicted Distance column of the chart?Answers will vary.
Discuss other questions related to collecting data on the kicking distance.
Were your best distance and best prediction the same?Answers will vary.How can you make the tests fair?E.g., Run at least three trials; start with the leg in the same position each time; use paper balls of the same size; measure the distance the ball moved using the same method each time.
Alternative ideas…Calculate the average distance the ball travels.Try using different types of balls, e.g., bigger, smaller, heavier, lighter.
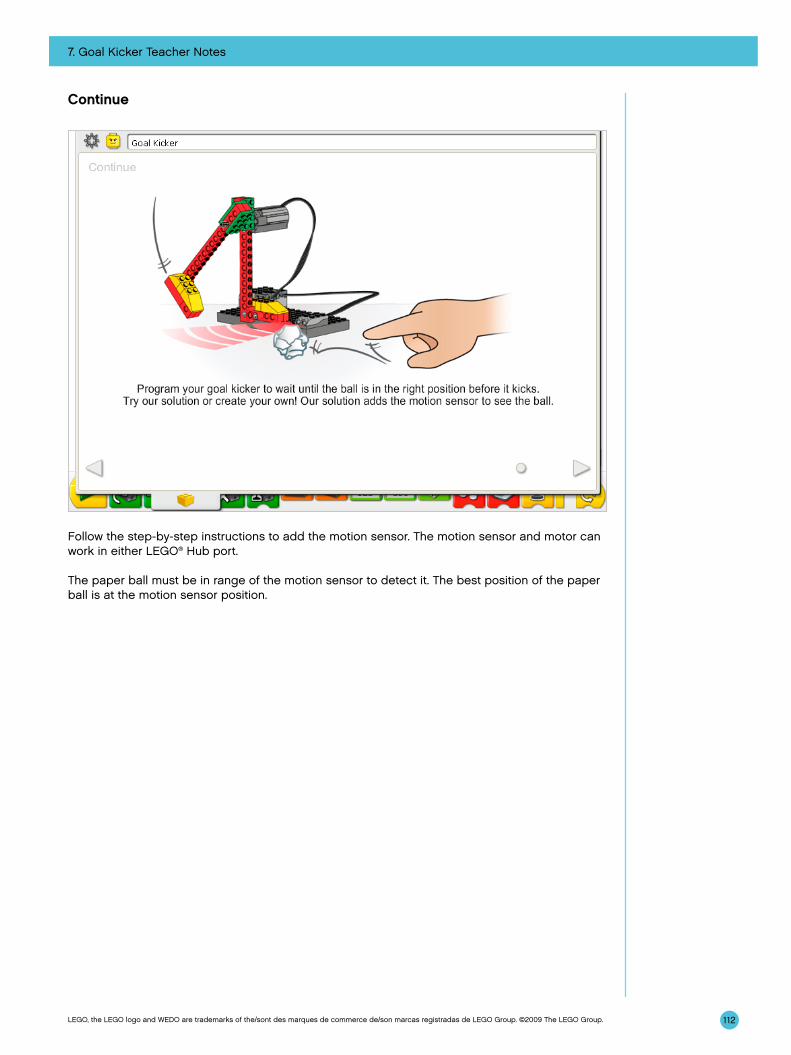
7. Goal Kicker Teacher Notes
112LEGO, the LEGO logo and WEDO are trademarks of the/sont des marques de commerce de/son marcas registradas de LEGO Group. ©2009 The LEGO Group.
Continue
Follow the step-by-step instructions to add the motion sensor. The motion sensor and motor can work in either LEGO® Hub port.
The paper ball must be in range of the motion sensor to detect it. The best position of the paper ball is at the motion sensor position.
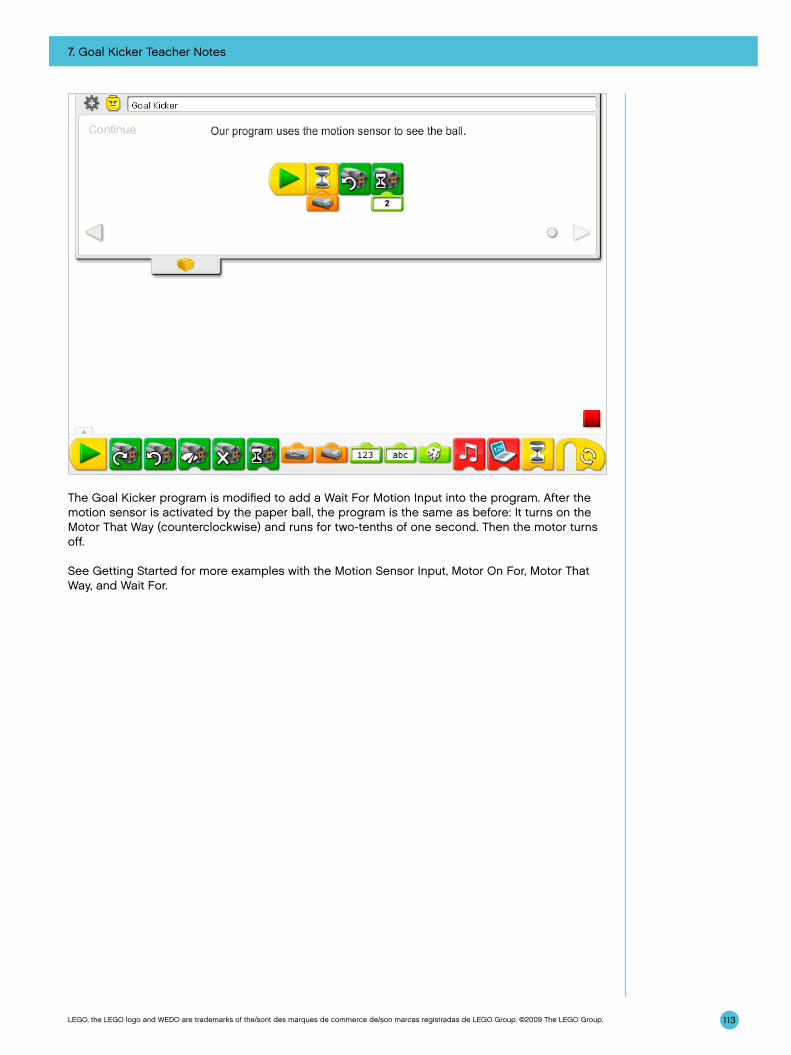
7. Goal Kicker Teacher Notes
113LEGO, the LEGO logo and WEDO are trademarks of the/sont des marques de commerce de/son marcas registradas de LEGO Group. ©2009 The LEGO Group.
The Goal Kicker program is modified to add a Wait For Motion Input into the program. After the motion sensor is activated by the paper ball, the program is the same as before: It turns on the Motor That Way (counterclockwise) and runs for two-tenths of one second. Then the motor turns off.
See Getting Started for more examples with the Motion Sensor Input, Motor On For, Motor That Way, and Wait For.
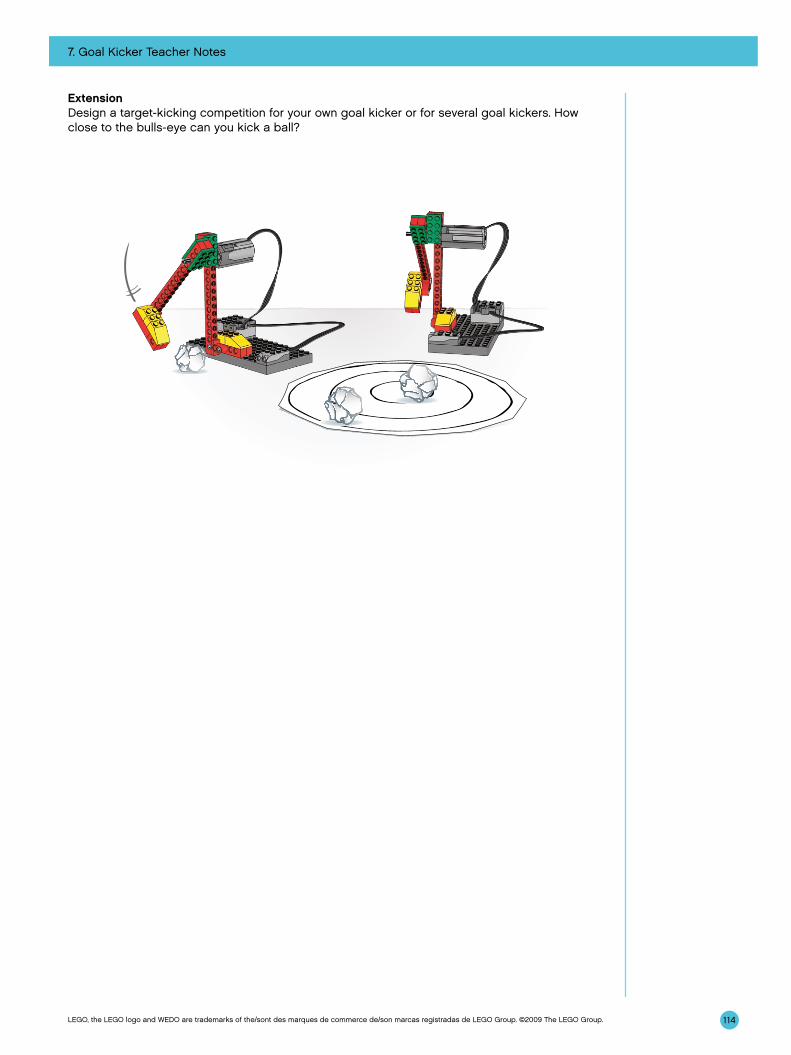
7. Goal Kicker Teacher Notes
114LEGO, the LEGO logo and WEDO are trademarks of the/sont des marques de commerce de/son marcas registradas de LEGO Group. ©2009 The LEGO Group.
ExtensionDesign a target-kicking competition for your own goal kicker or for several goal kickers. How close to the bulls-eye can you kick a ball?
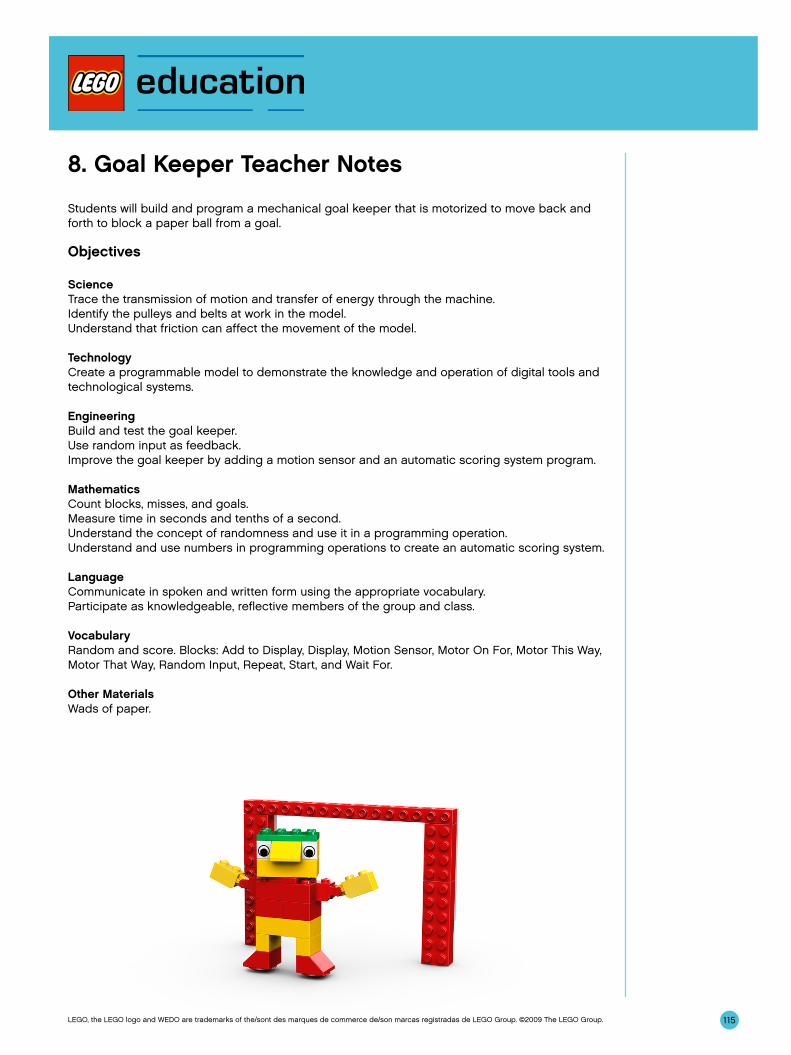
115LEGO, the LEGO logo and WEDO are trademarks of the/sont des marques de commerce de/son marcas registradas de LEGO Group. ©2009 The LEGO Group.
8. Goal Keeper Teacher Notes
Students will build and program a mechanical goal keeper that is motorized to move back and forth to block a paper ball from a goal.
Objectives
ScienceTrace the transmission of motion and transfer of energy through the machine.Identify the pulleys and belts at work in the model.Understand that friction can affect the movement of the model.
Technology Create a programmable model to demonstrate the knowledge and operation of digital tools and technological systems.
EngineeringBuild and test the goal keeper.Use random input as feedback.Improve the goal keeper by adding a motion sensor and an automatic scoring system program.
MathematicsCount blocks, misses, and goals.Measure time in seconds and tenths of a second.Understand the concept of randomness and use it in a programming operation.Understand and use numbers in programming operations to create an automatic scoring system.
LanguageCommunicate in spoken and written form using the appropriate vocabulary.Participate as knowledgeable, reflective members of the group and class.
VocabularyRandom and score. Blocks: Add to Display, Display, Motion Sensor, Motor On For, Motor This Way, Motor That Way, Random Input, Repeat, Start, and Wait For.
Other MaterialsWads of paper.
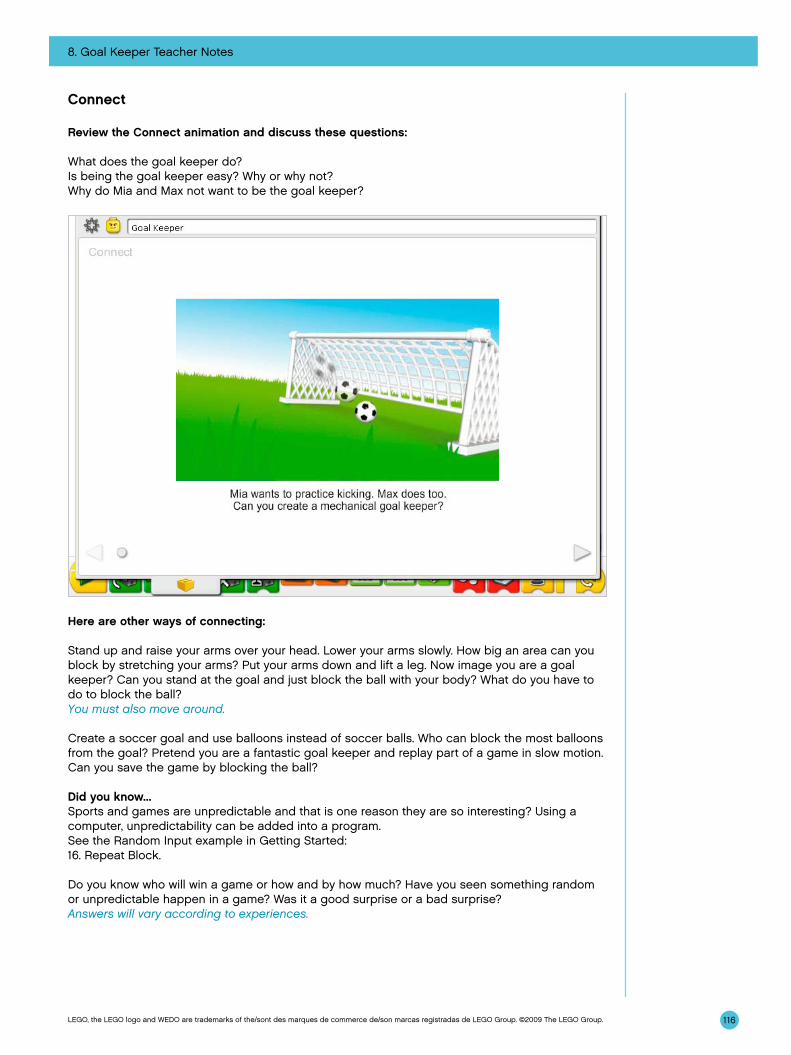
116
8. Goal Keeper Teacher Notes
LEGO, the LEGO logo and WEDO are trademarks of the/sont des marques de commerce de/son marcas registradas de LEGO Group. ©2009 The LEGO Group.
Connect
Review the Connect animation and discuss these questions:
What does the goal keeper do?Is being the goal keeper easy? Why or why not?Why do Mia and Max not want to be the goal keeper?
Here are other ways of connecting:
Stand up and raise your arms over your head. Lower your arms slowly. How big an area can you block by stretching your arms? Put your arms down and lift a leg. Now image you are a goal keeper? Can you stand at the goal and just block the ball with your body? What do you have to do to block the ball?You must also move around.
Create a soccer goal and use balloons instead of soccer balls. Who can block the most balloons from the goal? Pretend you are a fantastic goal keeper and replay part of a game in slow motion. Can you save the game by blocking the ball?
Did you know...Sports and games are unpredictable and that is one reason they are so interesting? Using a computer, unpredictability can be added into a program.See the Random Input example in Getting Started:16. Repeat Block.
Do you know who will win a game or how and by how much? Have you seen something random or unpredictable happen in a game? Was it a good surprise or a bad surprise?Answers will vary according to experiences.
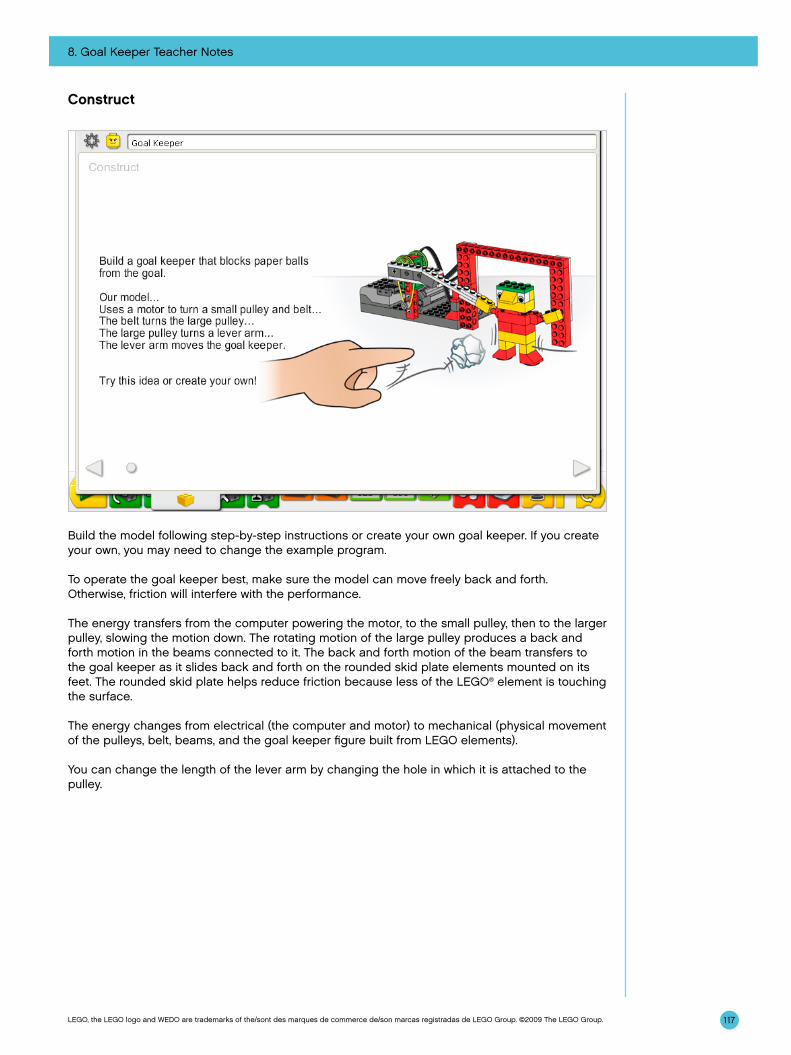
8. Goal Keeper Teacher Notes
117LEGO, the LEGO logo and WEDO are trademarks of the/sont des marques de commerce de/son marcas registradas de LEGO Group. ©2009 The LEGO Group.
Construct
Build the model following step-by-step instructions or create your own goal keeper. If you create your own, you may need to change the example program.
To operate the goal keeper best, make sure the model can move freely back and forth. Otherwise, friction will interfere with the performance.
The energy transfers from the computer powering the motor, to the small pulley, then to the larger pulley, slowing the motion down. The rotating motion of the large pulley produces a back and forth motion in the beams connected to it. The back and forth motion of the beam transfers to the goal keeper as it slides back and forth on the rounded skid plate elements mounted on its feet. The rounded skid plate helps reduce friction because less of the LEGO® element is touching the surface.
The energy changes from electrical (the computer and motor) to mechanical (physical movement of the pulleys, belt, beams, and the goal keeper figure built from LEGO elements).
You can change the length of the lever arm by changing the hole in which it is attached to the pulley.
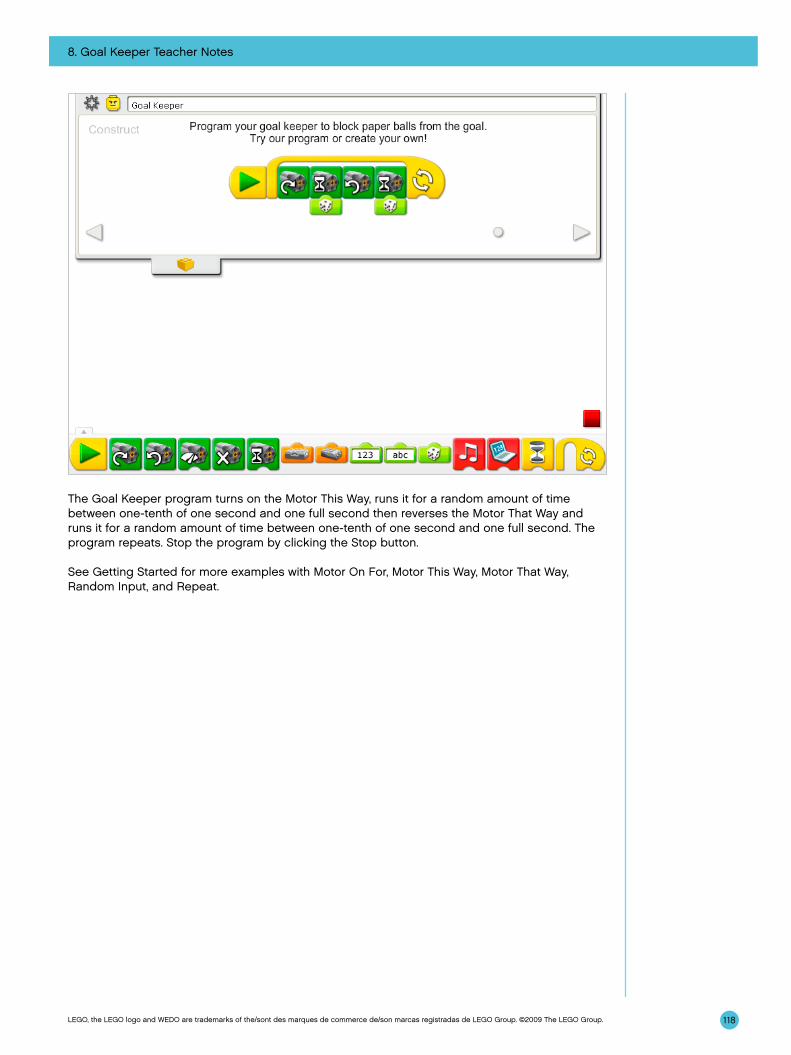
8. Goal Keeper Teacher Notes
118LEGO, the LEGO logo and WEDO are trademarks of the/sont des marques de commerce de/son marcas registradas de LEGO Group. ©2009 The LEGO Group.
The Goal Keeper program turns on the Motor This Way, runs it for a random amount of time between one-tenth of one second and one full second then reverses the Motor That Way and runs it for a random amount of time between one-tenth of one second and one full second. The program repeats. Stop the program by clicking the Stop button.
See Getting Started for more examples with Motor On For, Motor This Way, Motor That Way, Random Input, and Repeat.
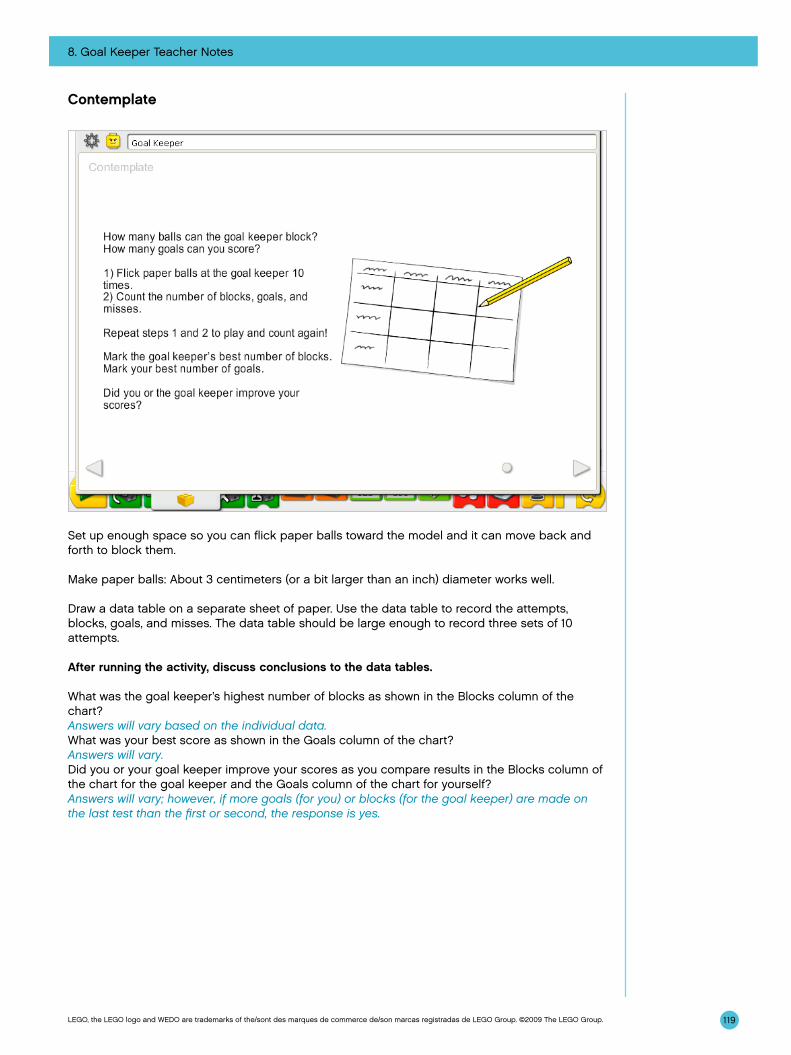
8. Goal Keeper Teacher Notes
119LEGO, the LEGO logo and WEDO are trademarks of the/sont des marques de commerce de/son marcas registradas de LEGO Group. ©2009 The LEGO Group.
Contemplate
Set up enough space so you can flick paper balls toward the model and it can move back and forth to block them.
Make paper balls: About 3 centimeters (or a bit larger than an inch) diameter works well.
Draw a data table on a separate sheet of paper. Use the data table to record the attempts, blocks, goals, and misses. The data table should be large enough to record three sets of 10 attempts.
After running the activity, discuss conclusions to the data tables.
What was the goal keeper’s highest number of blocks as shown in the Blocks column of the chart?Answers will vary based on the individual data.What was your best score as shown in the Goals column of the chart?Answers will vary.Did you or your goal keeper improve your scores as you compare results in the Blocks column of the chart for the goal keeper and the Goals column of the chart for yourself? Answers will vary; however, if more goals (for you) or blocks (for the goal keeper) are made on the last test than the first or second, the response is yes.
8. Goal Keeper Teacher Notes
120LEGO, the LEGO logo and WEDO are trademarks of the/sont des marques de commerce de/son marcas registradas de LEGO Group. ©2009 The LEGO Group.
Discuss other questions related to collecting data with the goal keeper.
From how far away were you when you flicked the paper balls? Answers will vary but generally 15 to 30 centimeters or 6 to 12 inches is a good distance. Do you think that your scores would improve if you moved closer or farther away? What do you predict?Answers will vary. It is likely that the closer to the goal, the more goals are scored and fewer missed or blocked.
Alternative ideas…Test your prediction. Did you score more goals when you were closer or farther away? Was your prediction correct or not?
Collect the data on the number of blocks, goals and misses. What is the average number of blocks per attempt (total of blocks, goals and misses) by the goal keeper? Which goal keeper in class has the best average?

Continue
8. Goal Keeper Teacher Notes
121LEGO, the LEGO logo and WEDO are trademarks of the/sont des marques de commerce de/son marcas registradas de LEGO Group. ©2009 The LEGO Group.
There are no building instruction changes required in this activity.
Use the motion sensor that is already built into the model. The motion sensor and motor can work in either LEGO® Hub port.
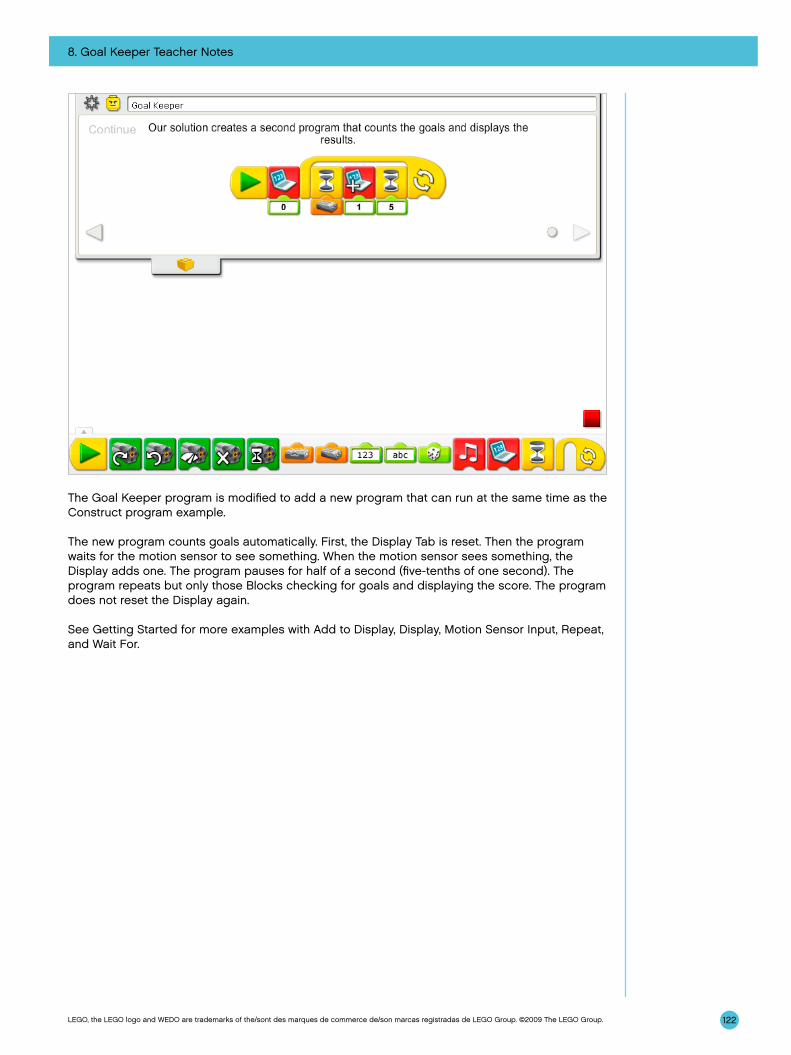
8. Goal Keeper Teacher Notes
122LEGO, the LEGO logo and WEDO are trademarks of the/sont des marques de commerce de/son marcas registradas de LEGO Group. ©2009 The LEGO Group.
The Goal Keeper program is modified to add a new program that can run at the same time as the Construct program example.
The new program counts goals automatically. First, the Display Tab is reset. Then the program waits for the motion sensor to see something. When the motion sensor sees something, the Display adds one. The program pauses for half of a second (five-tenths of one second). The program repeats but only those Blocks checking for goals and displaying the score. The program does not reset the Display again.
See Getting Started for more examples with Add to Display, Display, Motion Sensor Input, Repeat, and Wait For.
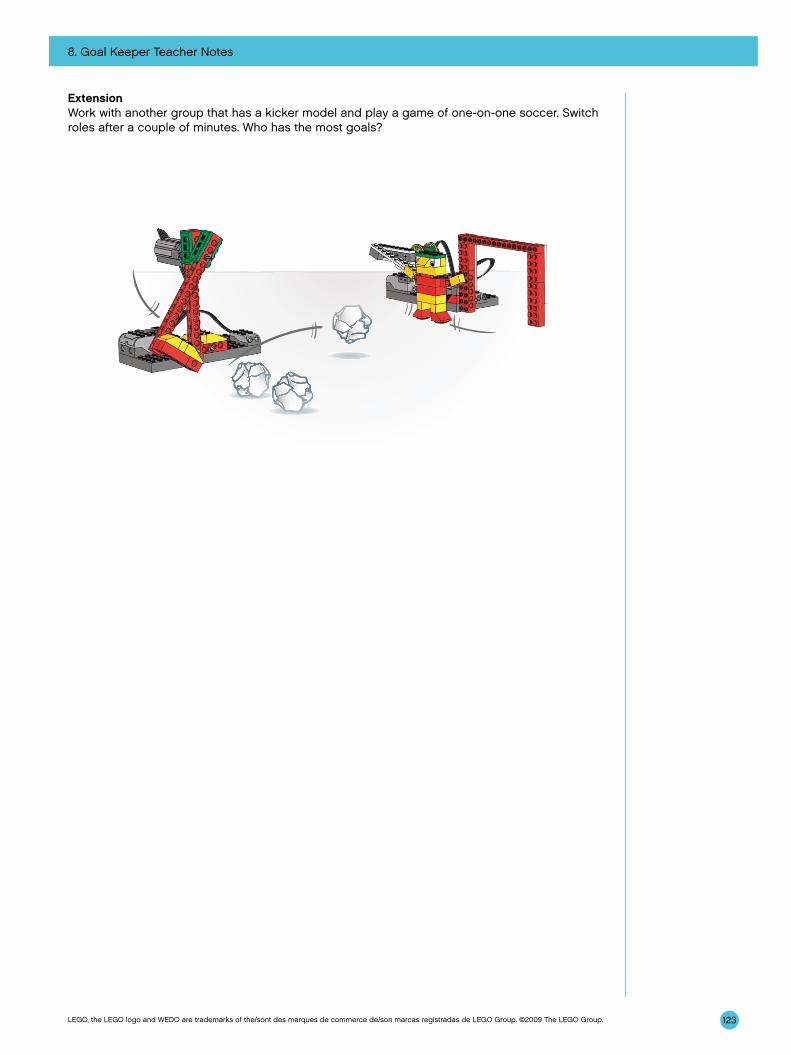
8. Goal Keeper Teacher Notes
123LEGO, the LEGO logo and WEDO are trademarks of the/sont des marques de commerce de/son marcas registradas de LEGO Group. ©2009 The LEGO Group.
ExtensionWork with another group that has a kicker model and play a game of one-on-one soccer. Switch roles after a couple of minutes. Who has the most goals?

124LEGO, the LEGO logo and WEDO are trademarks of the/sont des marques de commerce de/son marcas registradas de LEGO Group. ©2009 The LEGO Group.
9. Cheerful Fans Teacher Notes
Students will build and program mechanical soccer fans that make cheering sounds and are motorized to jump up and down.
Objectives
ScienceTrace the transmission of motion and transfer of energy through the machine.Identify the cams at work in the model.Understand and discuss criteria for a fair test.
Technology Create a programmable model to demonstrate the knowledge and operation of digital tools and technological systems.
EngineeringBuild and test the cheerful fans.Improve the cheerful fans by adding a motion sensor.
MathematicsMeasure time in seconds and tenths of a second.Understand and use numbers to measure and score qualitative characteristics.
LanguageCommunicate in spoken and written form using the appropriate vocabulary.Participate as knowledgeable, reflective members of the group and class.
VocabularyCam, crown gear, motion sensor, and performance. Blocks: Motion Sensor Input, Motor Off, Motor This Way, Play Sound, Start, and Wait For.
Other MaterialsOptional for Extension: paper, yarn, pom-poms.
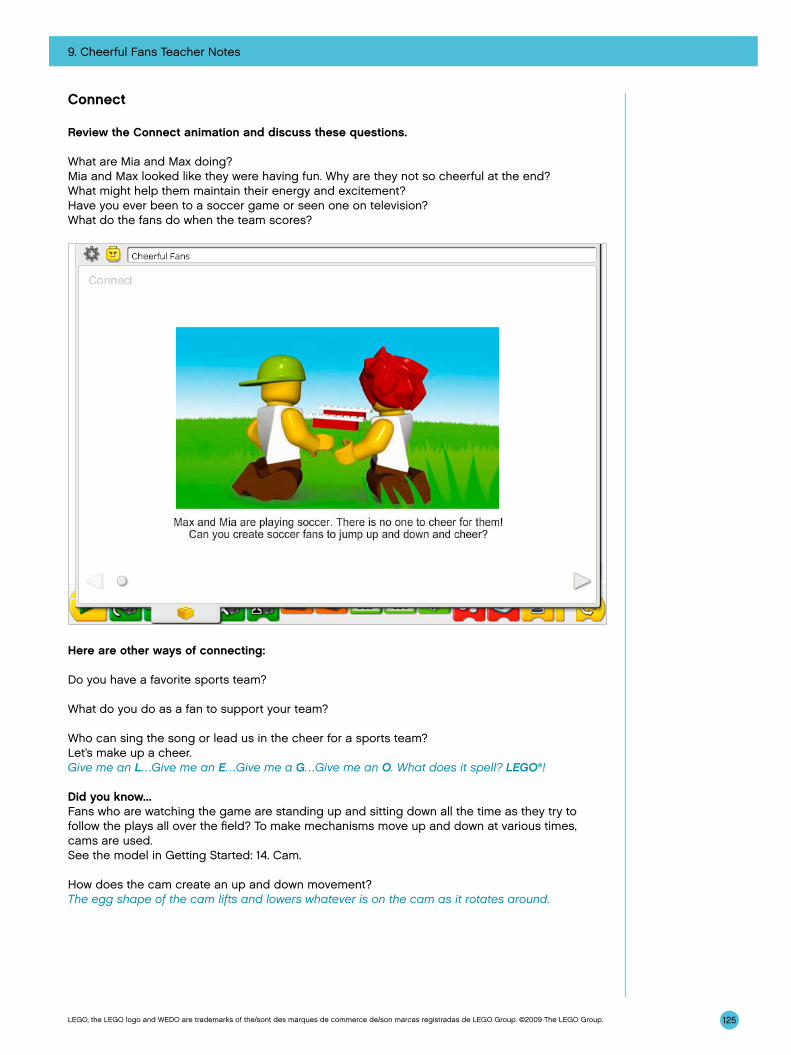
125
9. Cheerful Fans Teacher Notes
LEGO, the LEGO logo and WEDO are trademarks of the/sont des marques de commerce de/son marcas registradas de LEGO Group. ©2009 The LEGO Group.
Connect
Review the Connect animation and discuss these questions.
What are Mia and Max doing?Mia and Max looked like they were having fun. Why are they not so cheerful at the end?What might help them maintain their energy and excitement?Have you ever been to a soccer game or seen one on television?What do the fans do when the team scores?
Here are other ways of connecting:
Do you have a favorite sports team?
What do you do as a fan to support your team?
Who can sing the song or lead us in the cheer for a sports team?Let’s make up a cheer.Give me an L…Give me an E…Give me a G…Give me an O. What does it spell? LEGO®!
Did you know...Fans who are watching the game are standing up and sitting down all the time as they try to follow the plays all over the field? To make mechanisms move up and down at various times, cams are used.See the model in Getting Started: 14. Cam.
How does the cam create an up and down movement?The egg shape of the cam lifts and lowers whatever is on the cam as it rotates around.
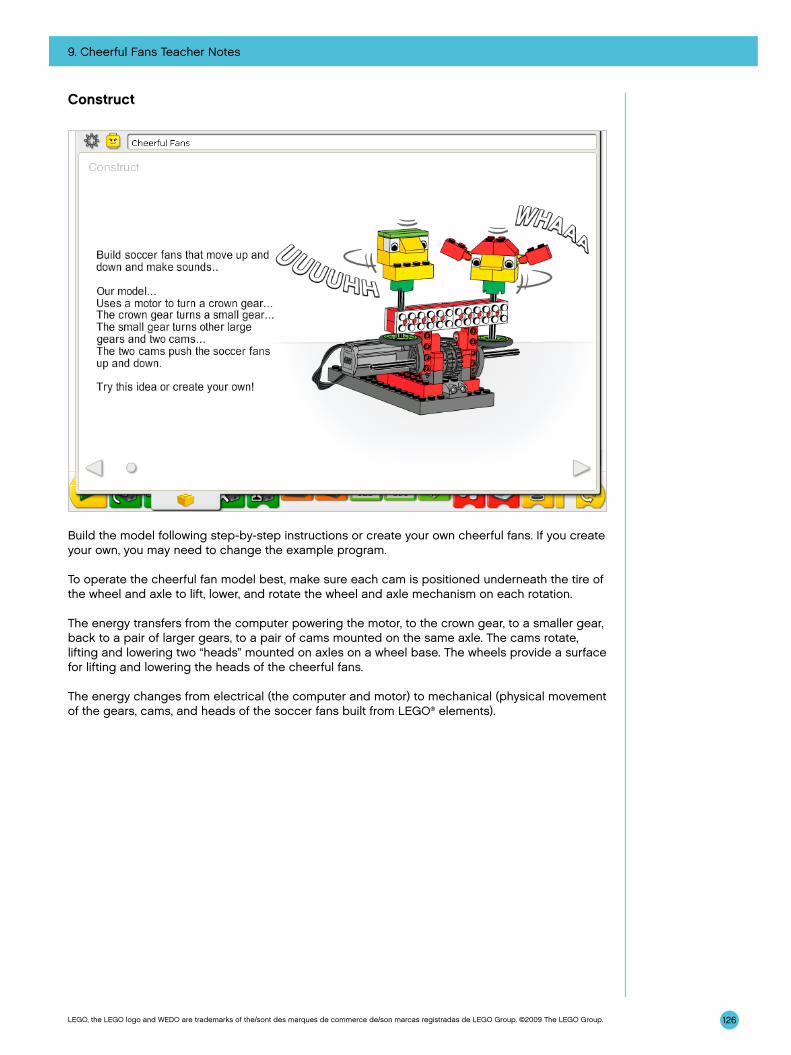
9. Cheerful Fans Teacher Notes
126LEGO, the LEGO logo and WEDO are trademarks of the/sont des marques de commerce de/son marcas registradas de LEGO Group. ©2009 The LEGO Group.
Construct
Build the model following step-by-step instructions or create your own cheerful fans. If you create your own, you may need to change the example program.
To operate the cheerful fan model best, make sure each cam is positioned underneath the tire of the wheel and axle to lift, lower, and rotate the wheel and axle mechanism on each rotation.
The energy transfers from the computer powering the motor, to the crown gear, to a smaller gear, back to a pair of larger gears, to a pair of cams mounted on the same axle. The cams rotate, lifting and lowering two “heads” mounted on axles on a wheel base. The wheels provide a surface for lifting and lowering the heads of the cheerful fans.
The energy changes from electrical (the computer and motor) to mechanical (physical movement of the gears, cams, and heads of the soccer fans built from LEGO® elements).
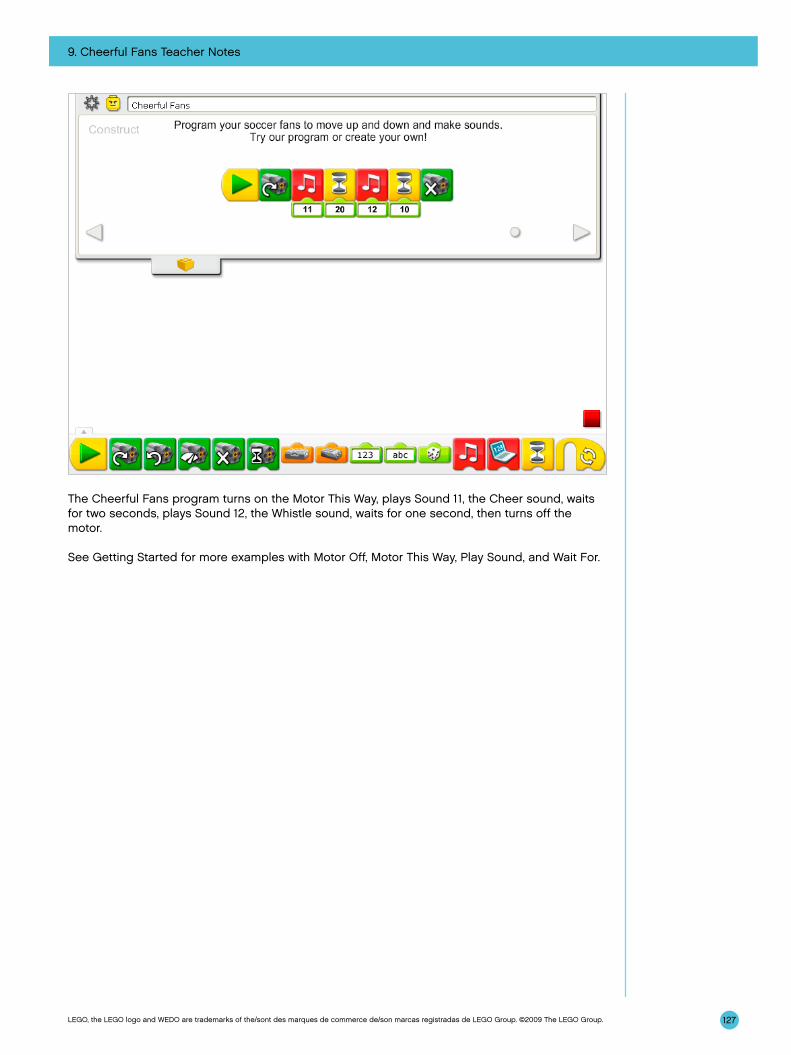
9. Cheerful Fans Teacher Notes
127LEGO, the LEGO logo and WEDO are trademarks of the/sont des marques de commerce de/son marcas registradas de LEGO Group. ©2009 The LEGO Group.
The Cheerful Fans program turns on the Motor This Way, plays Sound 11, the Cheer sound, waits for two seconds, plays Sound 12, the Whistle sound, waits for one second, then turns off the motor.
See Getting Started for more examples with Motor Off, Motor This Way, Play Sound, and Wait For.
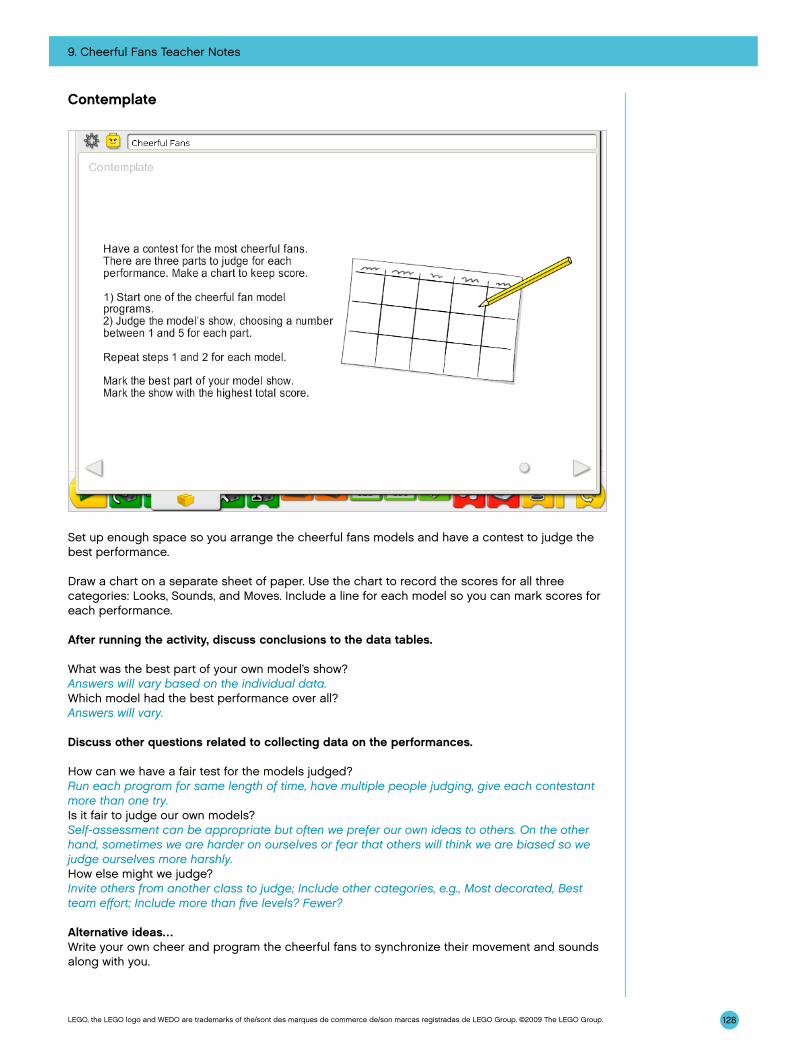
9. Cheerful Fans Teacher Notes
128LEGO, the LEGO logo and WEDO are trademarks of the/sont des marques de commerce de/son marcas registradas de LEGO Group. ©2009 The LEGO Group.
Contemplate
Set up enough space so you arrange the cheerful fans models and have a contest to judge the best performance.
Draw a chart on a separate sheet of paper. Use the chart to record the scores for all three categories: Looks, Sounds, and Moves. Include a line for each model so you can mark scores for each performance.
After running the activity, discuss conclusions to the data tables.
What was the best part of your own model’s show?Answers will vary based on the individual data.Which model had the best performance over all?Answers will vary.
Discuss other questions related to collecting data on the performances.
How can we have a fair test for the models judged?Run each program for same length of time, have multiple people judging, give each contestant more than one try.Is it fair to judge our own models?Self-assessment can be appropriate but often we prefer our own ideas to others. On the other hand, sometimes we are harder on ourselves or fear that others will think we are biased so we judge ourselves more harshly.How else might we judge?Invite others from another class to judge; Include other categories, e.g., Most decorated, Best team effort; Include more than five levels? Fewer?
Alternative ideas…Write your own cheer and program the cheerful fans to synchronize their movement and sounds along with you.
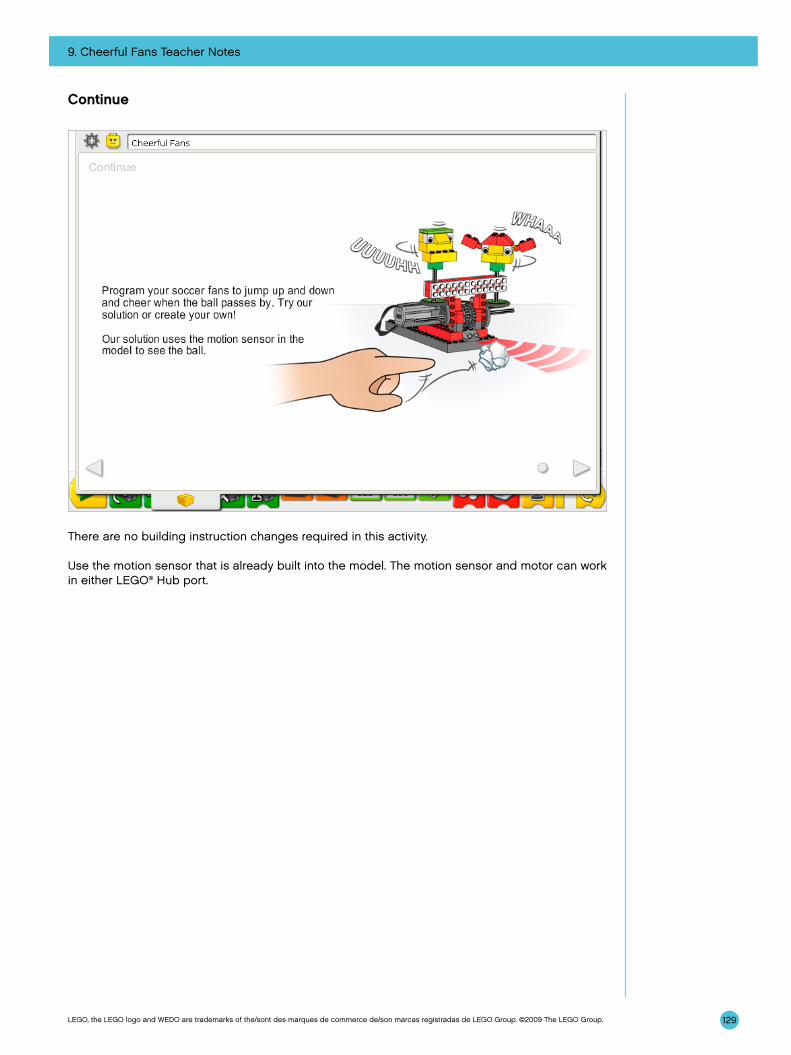
9. Cheerful Fans Teacher Notes
129LEGO, the LEGO logo and WEDO are trademarks of the/sont des marques de commerce de/son marcas registradas de LEGO Group. ©2009 The LEGO Group.
Continue
There are no building instruction changes required in this activity.
Use the motion sensor that is already built into the model. The motion sensor and motor can work in either LEGO® Hub port.
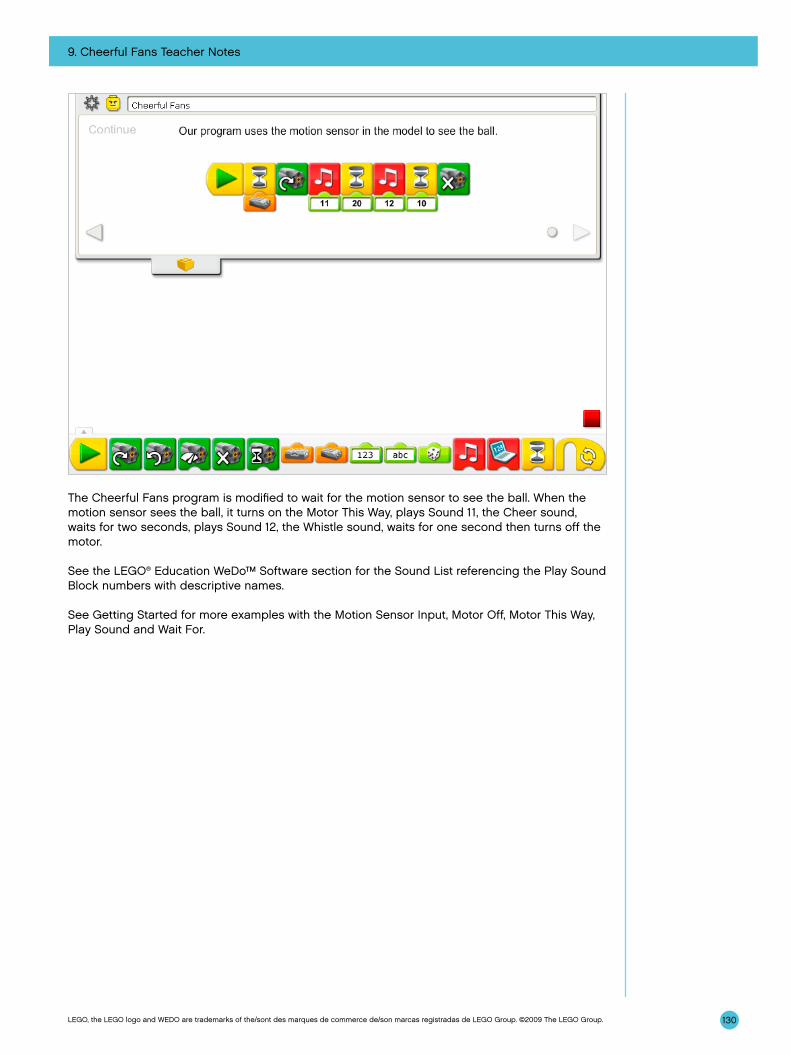
9. Cheerful Fans Teacher Notes
130LEGO, the LEGO logo and WEDO are trademarks of the/sont des marques de commerce de/son marcas registradas de LEGO Group. ©2009 The LEGO Group.
The Cheerful Fans program is modified to wait for the motion sensor to see the ball. When the motion sensor sees the ball, it turns on the Motor This Way, plays Sound 11, the Cheer sound, waits for two seconds, plays Sound 12, the Whistle sound, waits for one second then turns off the motor.
See the LEGO® Education WeDo™ Software section for the Sound List referencing the Play Sound Block numbers with descriptive names.
See Getting Started for more examples with the Motion Sensor Input, Motor Off, Motor This Way, Play Sound and Wait For.
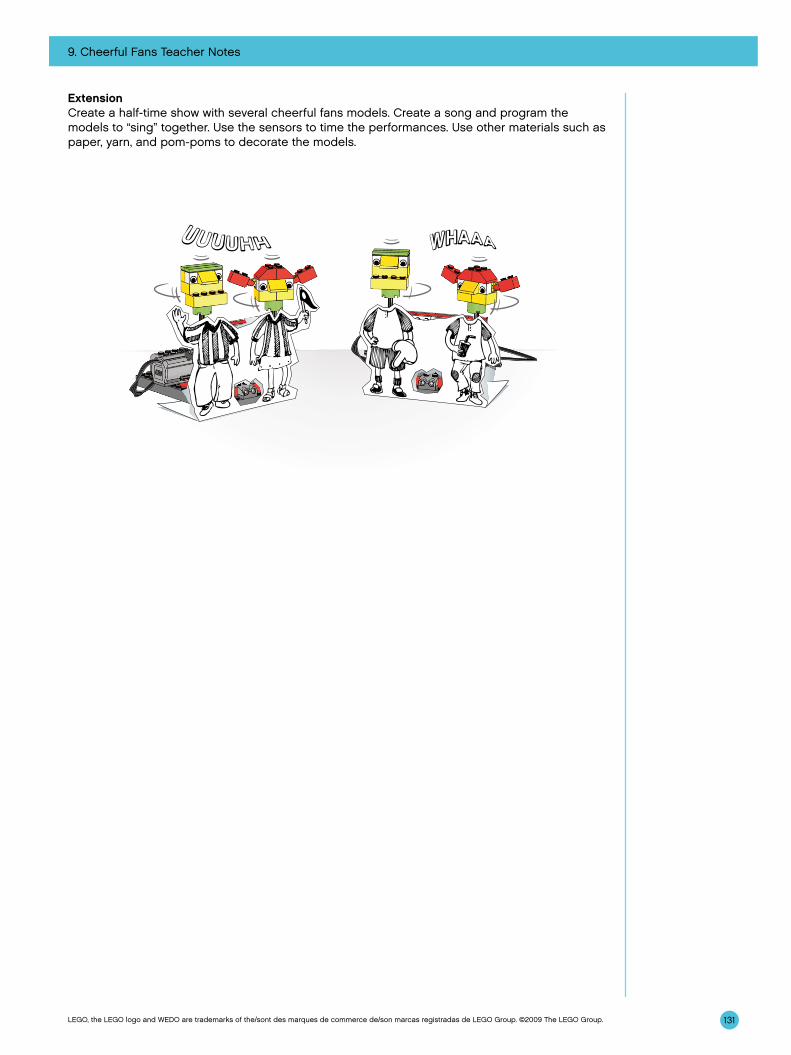
9. Cheerful Fans Teacher Notes
131LEGO, the LEGO logo and WEDO are trademarks of the/sont des marques de commerce de/son marcas registradas de LEGO Group. ©2009 The LEGO Group.
ExtensionCreate a half-time show with several cheerful fans models. Create a song and program the models to “sing” together. Use the sensors to time the performances. Use other materials such as paper, yarn, and pom-poms to decorate the models.
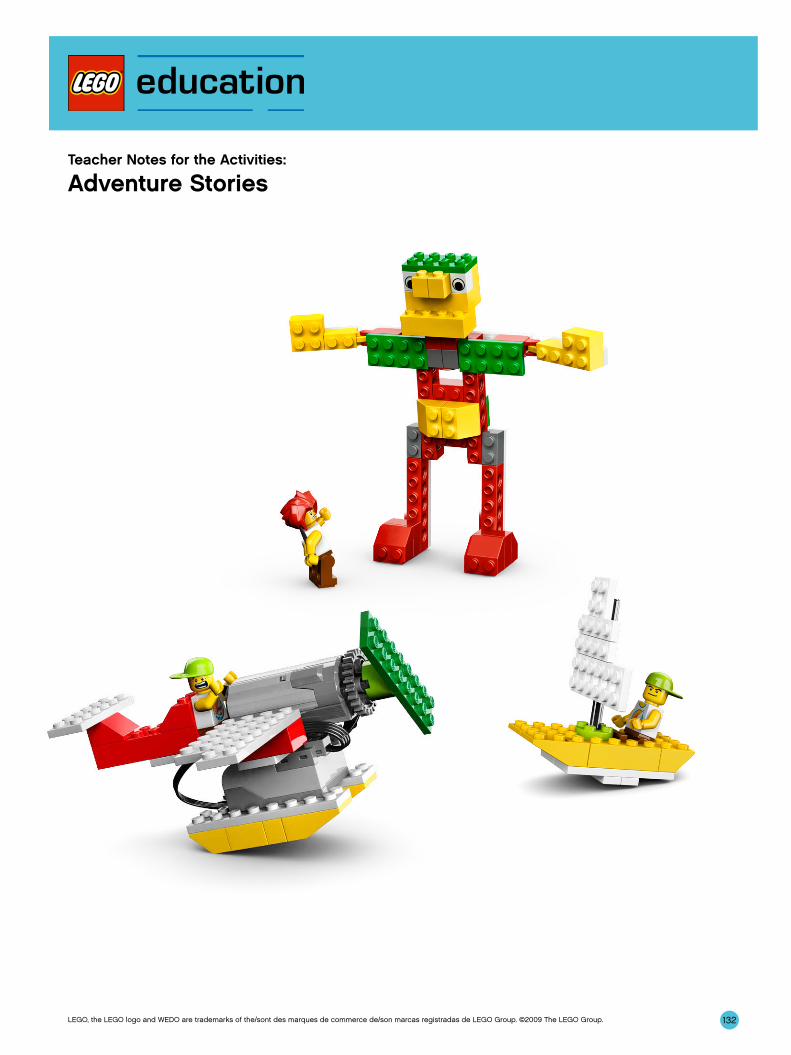
132LEGO, the LEGO logo and WEDO are trademarks of the/sont des marques de commerce de/son marcas registradas de LEGO Group. ©2009 The LEGO Group.
Teacher Notes for the Activities:
Adventure Stories
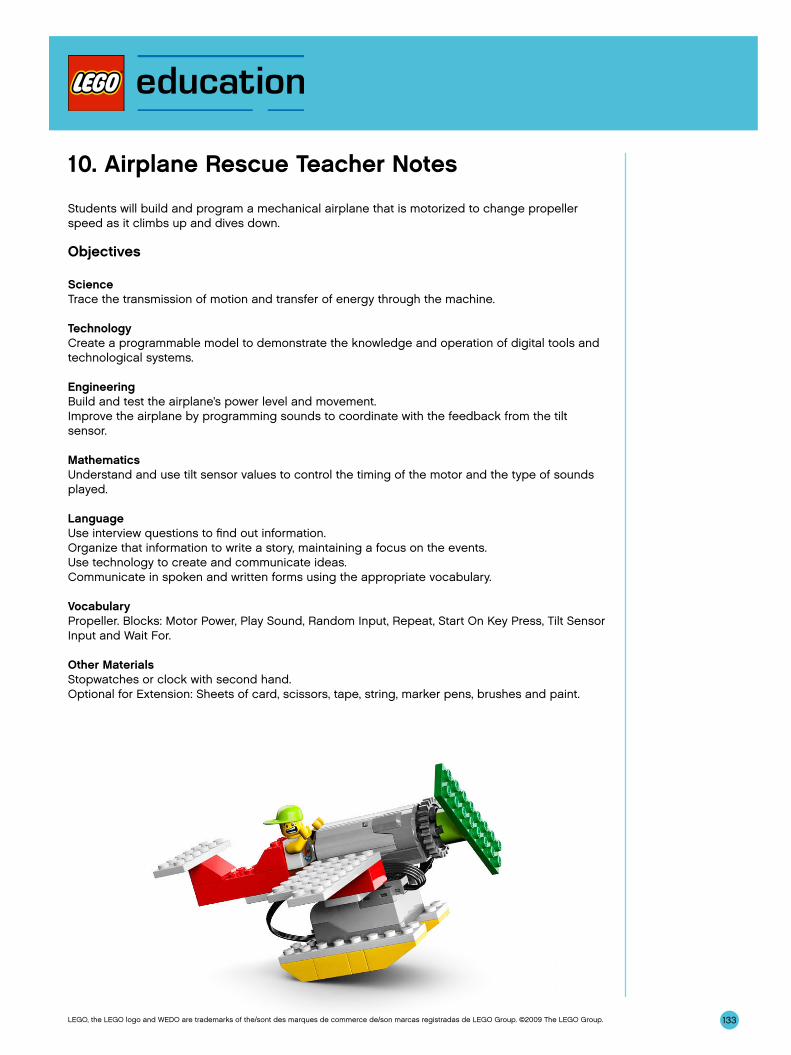
133LEGO, the LEGO logo and WEDO are trademarks of the/sont des marques de commerce de/son marcas registradas de LEGO Group. ©2009 The LEGO Group.
10. Airplane Rescue Teacher Notes
Students will build and program a mechanical airplane that is motorized to change propeller speed as it climbs up and dives down.
Objectives
ScienceTrace the transmission of motion and transfer of energy through the machine.
TechnologyCreate a programmable model to demonstrate the knowledge and operation of digital tools and technological systems.
EngineeringBuild and test the airplane’s power level and movement.Improve the airplane by programming sounds to coordinate with the feedback from the tilt sensor.
MathematicsUnderstand and use tilt sensor values to control the timing of the motor and the type of sounds played.
LanguageUse interview questions to find out information.Organize that information to write a story, maintaining a focus on the events.Use technology to create and communicate ideas.Communicate in spoken and written forms using the appropriate vocabulary.
VocabularyPropeller. Blocks: Motor Power, Play Sound, Random Input, Repeat, Start On Key Press, Tilt Sensor Input and Wait For.
Other MaterialsStopwatches or clock with second hand.Optional for Extension: Sheets of card, scissors, tape, string, marker pens, brushes and paint.

134
10. Airplane Rescue Teacher Notes
LEGO, the LEGO logo and WEDO are trademarks of the/sont des marques de commerce de/son marcas registradas de LEGO Group. ©2009 The LEGO Group.
Connect
Review the Connect animation and discuss these questions.
What happened to Max as he was flying along?What did the plane do when the engine stopped?What did the plane do when the engine started again?Where do you think Max was going?
Here are other ways of connecting:
Look at a map or a globe. Find your location. Choose another location far away. Pretend you are on an airplane flying from one location to another. As you take your journey, what are you flying over? What might you see if you could look out the window of the airplane? Are there mountains? Farms? Rivers? Oceans?
Why do we have airplanes to go from one place to another?
Did you know...To fly properly, a pilot needs to know the position of the airplane in the air. Is it tilted up, tilted down, or in some other direction?See the model in Getting Started: 6. Tilt Sensor.
How many different ways does the tilt sensor report its position?The tilt sensor can report its position in six ways: Up, Down, This Way, That Way, No Tilt, Any Tilt.
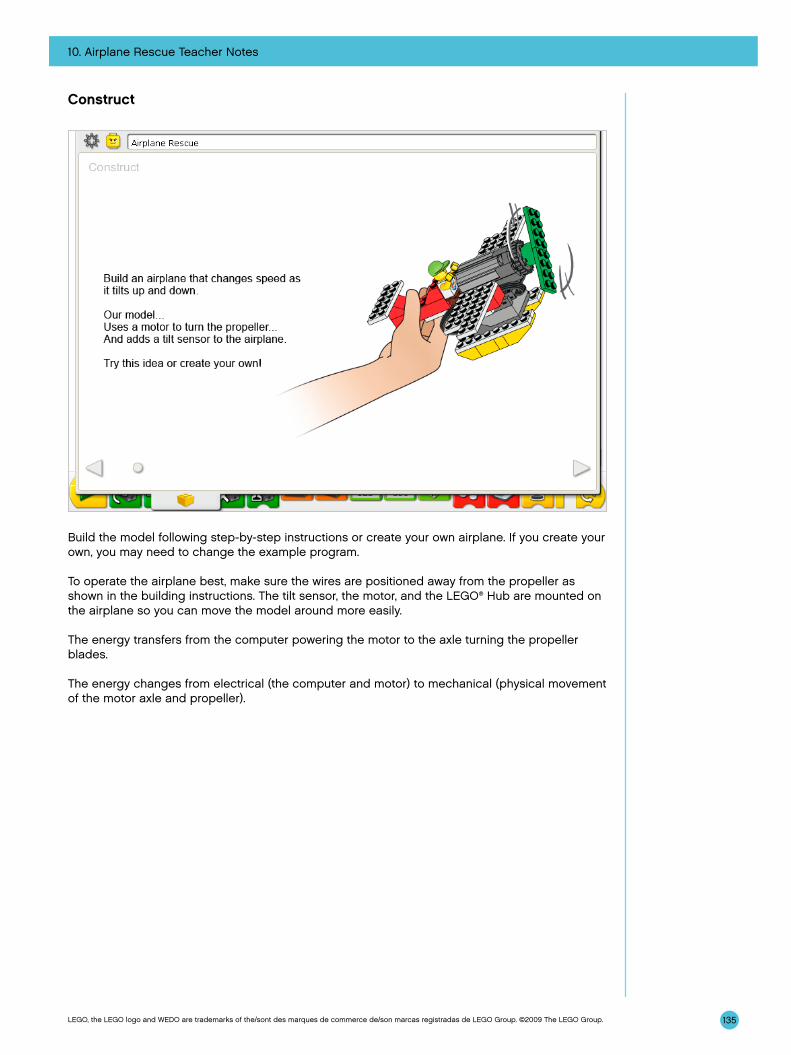
10. Airplane Rescue Teacher Notes
135LEGO, the LEGO logo and WEDO are trademarks of the/sont des marques de commerce de/son marcas registradas de LEGO Group. ©2009 The LEGO Group.
Construct
Build the model following step-by-step instructions or create your own airplane. If you create your own, you may need to change the example program.
To operate the airplane best, make sure the wires are positioned away from the propeller as shown in the building instructions. The tilt sensor, the motor, and the LEGO® Hub are mounted on the airplane so you can move the model around more easily.
The energy transfers from the computer powering the motor to the axle turning the propeller blades.
The energy changes from electrical (the computer and motor) to mechanical (physical movement of the motor axle and propeller).

10. Airplane Rescue Teacher Notes
136LEGO, the LEGO logo and WEDO are trademarks of the/sont des marques de commerce de/son marcas registradas de LEGO Group. ©2009 The LEGO Group.
There are two airplane programs. Both of these programs start when you press the A key on the keyboard. The first program waits for the airplane to tilt up then turns on the motor at power level 10. The program repeats. The second program waits for the airplane to tilt down then turns on the motor at a random speed between 1 and 10. The program repeats. To stop the programs, click the Stop button.
Running two or more programs at the same time is called multitasking but this term is not introduced directly to the students.
See Getting Started for more examples with the Motor Power, Random Input, Repeat, Start On Key Press, Tilt Sensor Input, and Wait For.
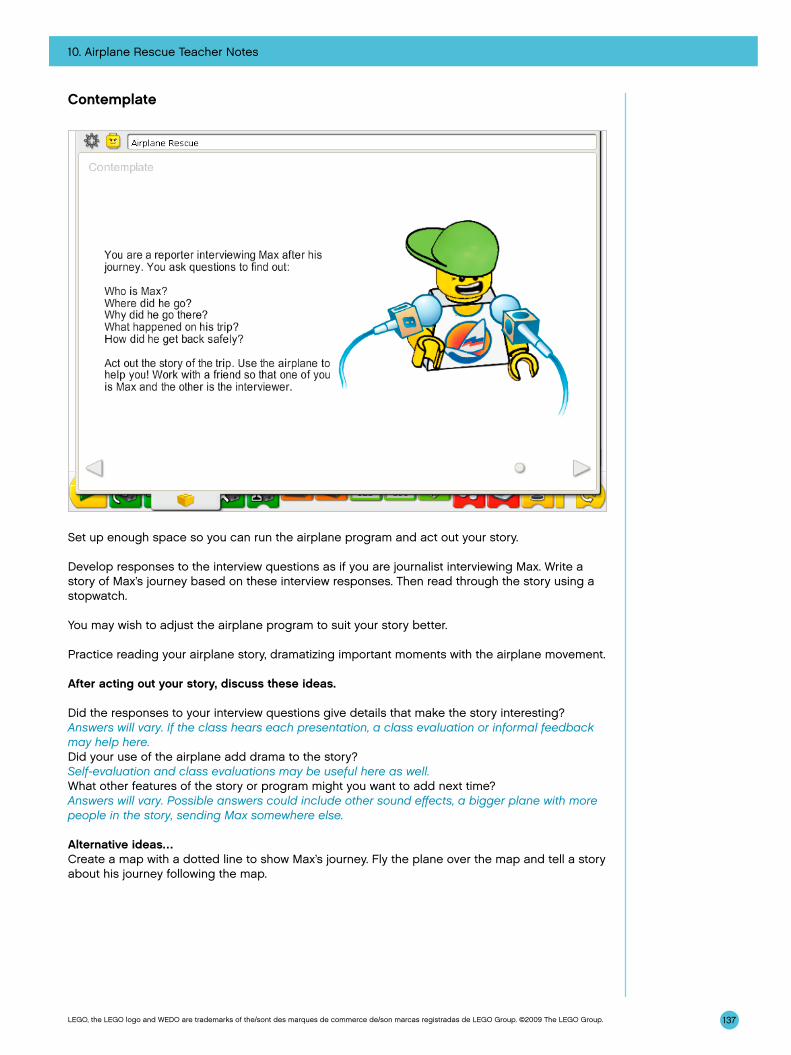
10. Airplane Rescue Teacher Notes
137LEGO, the LEGO logo and WEDO are trademarks of the/sont des marques de commerce de/son marcas registradas de LEGO Group. ©2009 The LEGO Group.
Contemplate
Set up enough space so you can run the airplane program and act out your story.
Develop responses to the interview questions as if you are journalist interviewing Max. Write a story of Max’s journey based on these interview responses. Then read through the story using a stopwatch.
You may wish to adjust the airplane program to suit your story better.
Practice reading your airplane story, dramatizing important moments with the airplane movement.
After acting out your story, discuss these ideas.
Did the responses to your interview questions give details that make the story interesting?Answers will vary. If the class hears each presentation, a class evaluation or informal feedback may help here.Did your use of the airplane add drama to the story?Self-evaluation and class evaluations may be useful here as well.What other features of the story or program might you want to add next time?Answers will vary. Possible answers could include other sound effects, a bigger plane with more people in the story, sending Max somewhere else.
Alternative ideas…Create a map with a dotted line to show Max’s journey. Fly the plane over the map and tell a story about his journey following the map.

10. Airplane Rescue Teacher Notes
138LEGO, the LEGO logo and WEDO are trademarks of the/sont des marques de commerce de/son marcas registradas de LEGO Group. ©2009 The LEGO Group.
Continue
There are no building instruction changes required in this activity.
The tilt sensor is already part of the model. The tilt sensor and motor can work in either LEGO® Hub port.
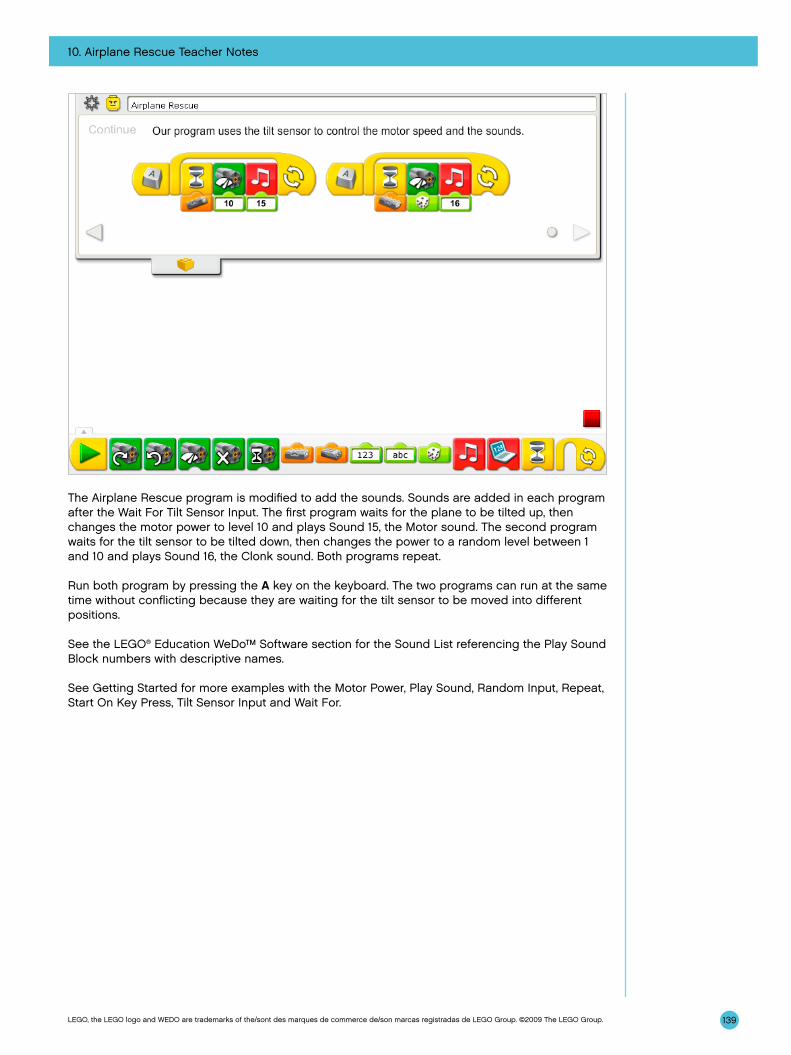
10. Airplane Rescue Teacher Notes
139LEGO, the LEGO logo and WEDO are trademarks of the/sont des marques de commerce de/son marcas registradas de LEGO Group. ©2009 The LEGO Group.
The Airplane Rescue program is modified to add the sounds. Sounds are added in each program after the Wait For Tilt Sensor Input. The first program waits for the plane to be tilted up, then changes the motor power to level 10 and plays Sound 15, the Motor sound. The second program waits for the tilt sensor to be tilted down, then changes the power to a random level between 1 and 10 and plays Sound 16, the Clonk sound. Both programs repeat.
Run both program by pressing the A key on the keyboard. The two programs can run at the same time without conflicting because they are waiting for the tilt sensor to be moved into different positions.
See the LEGO® Education WeDo™ Software section for the Sound List referencing the Play Sound Block numbers with descriptive names.
See Getting Started for more examples with the Motor Power, Play Sound, Random Input, Repeat, Start On Key Press, Tilt Sensor Input and Wait For.
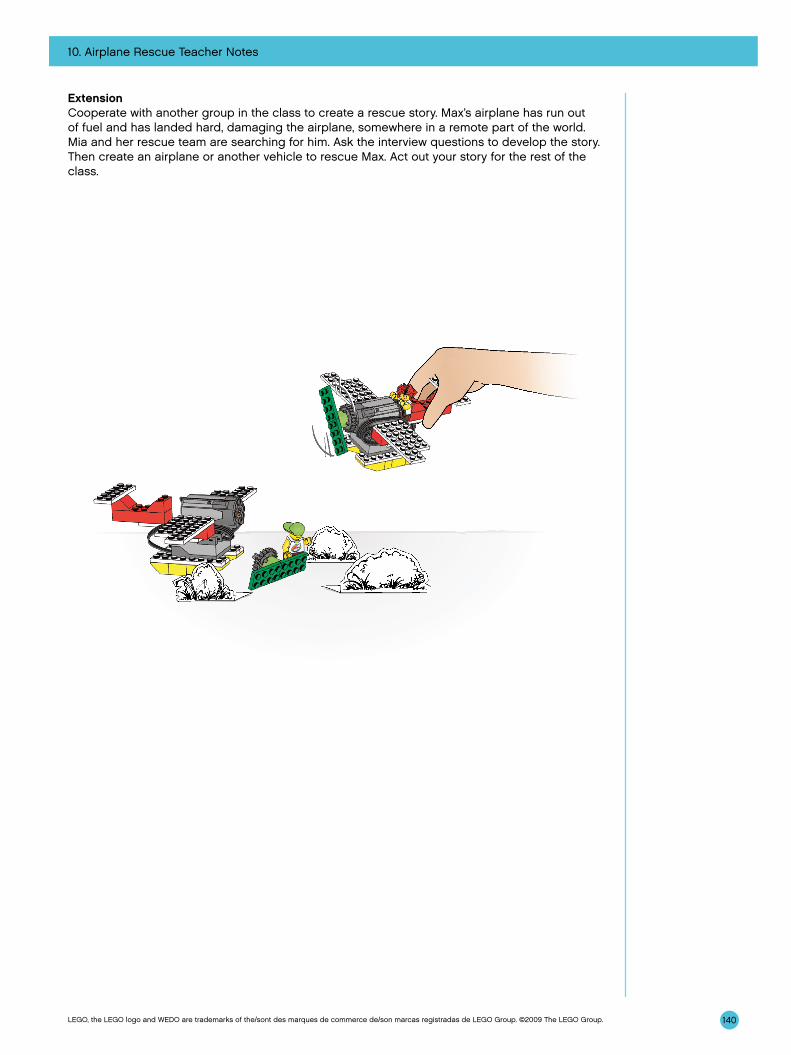
10. Airplane Rescue Teacher Notes
140LEGO, the LEGO logo and WEDO are trademarks of the/sont des marques de commerce de/son marcas registradas de LEGO Group. ©2009 The LEGO Group.
ExtensionCooperate with another group in the class to create a rescue story. Max’s airplane has run out of fuel and has landed hard, damaging the airplane, somewhere in a remote part of the world. Mia and her rescue team are searching for him. Ask the interview questions to develop the story. Then create an airplane or another vehicle to rescue Max. Act out your story for the rest of the class.
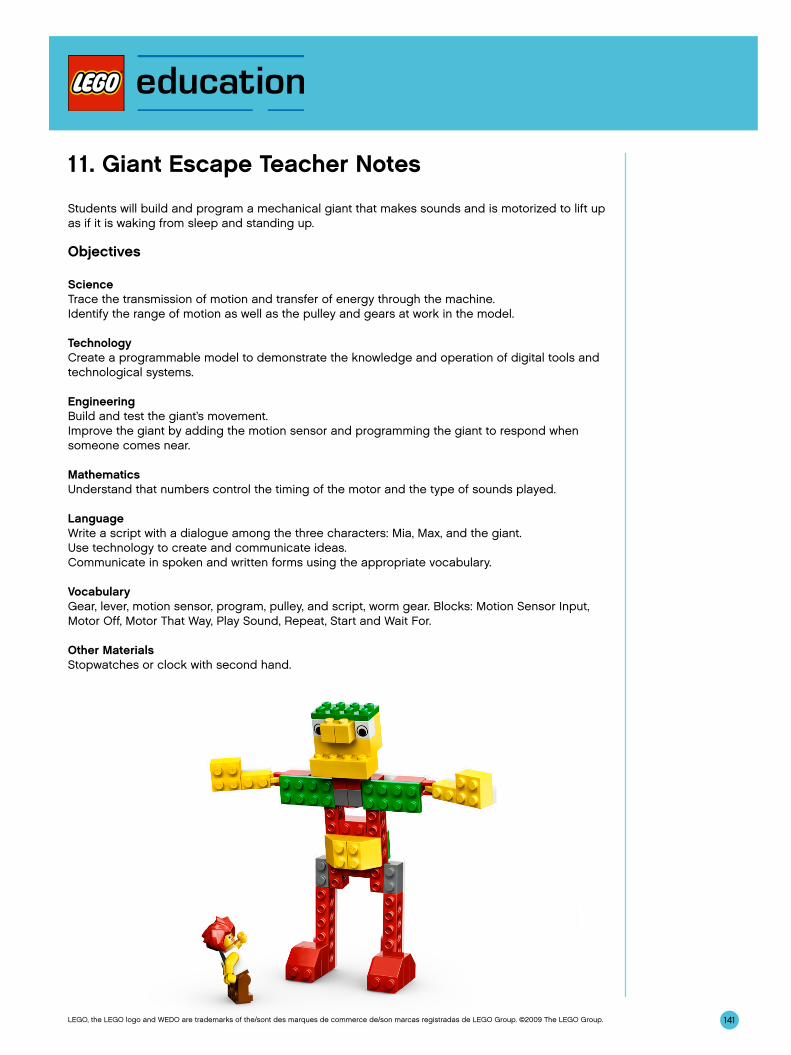
141LEGO, the LEGO logo and WEDO are trademarks of the/sont des marques de commerce de/son marcas registradas de LEGO Group. ©2009 The LEGO Group.
11. Giant Escape Teacher Notes
Students will build and program a mechanical giant that makes sounds and is motorized to lift up as if it is waking from sleep and standing up.
Objectives
ScienceTrace the transmission of motion and transfer of energy through the machine.Identify the range of motion as well as the pulley and gears at work in the model.
TechnologyCreate a programmable model to demonstrate the knowledge and operation of digital tools and technological systems.
EngineeringBuild and test the giant’s movement.Improve the giant by adding the motion sensor and programming the giant to respond when someone comes near.
MathematicsUnderstand that numbers control the timing of the motor and the type of sounds played.
LanguageWrite a script with a dialogue among the three characters: Mia, Max, and the giant.Use technology to create and communicate ideas.Communicate in spoken and written forms using the appropriate vocabulary.
VocabularyGear, lever, motion sensor, program, pulley, and script, worm gear. Blocks: Motion Sensor Input, Motor Off, Motor That Way, Play Sound, Repeat, Start and Wait For.
Other MaterialsStopwatches or clock with second hand.
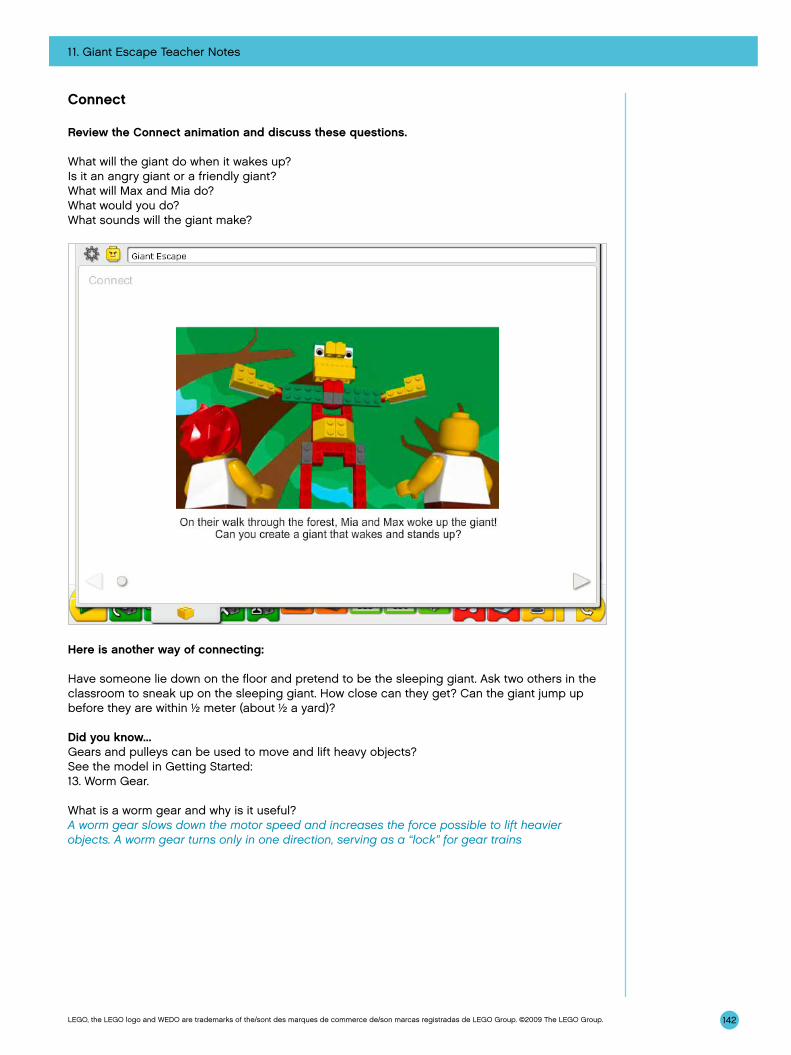
142
11. Giant Escape Teacher Notes
LEGO, the LEGO logo and WEDO are trademarks of the/sont des marques de commerce de/son marcas registradas de LEGO Group. ©2009 The LEGO Group.
Connect
Review the Connect animation and discuss these questions.
What will the giant do when it wakes up?Is it an angry giant or a friendly giant?What will Max and Mia do?What would you do?What sounds will the giant make?
Here is another way of connecting:
Have someone lie down on the floor and pretend to be the sleeping giant. Ask two others in the classroom to sneak up on the sleeping giant. How close can they get? Can the giant jump up before they are within ½ meter (about ½ a yard)?
Did you know...Gears and pulleys can be used to move and lift heavy objects?See the model in Getting Started:13. Worm Gear.
What is a worm gear and why is it useful?A worm gear slows down the motor speed and increases the force possible to lift heavier objects. A worm gear turns only in one direction, serving as a “lock” for gear trains
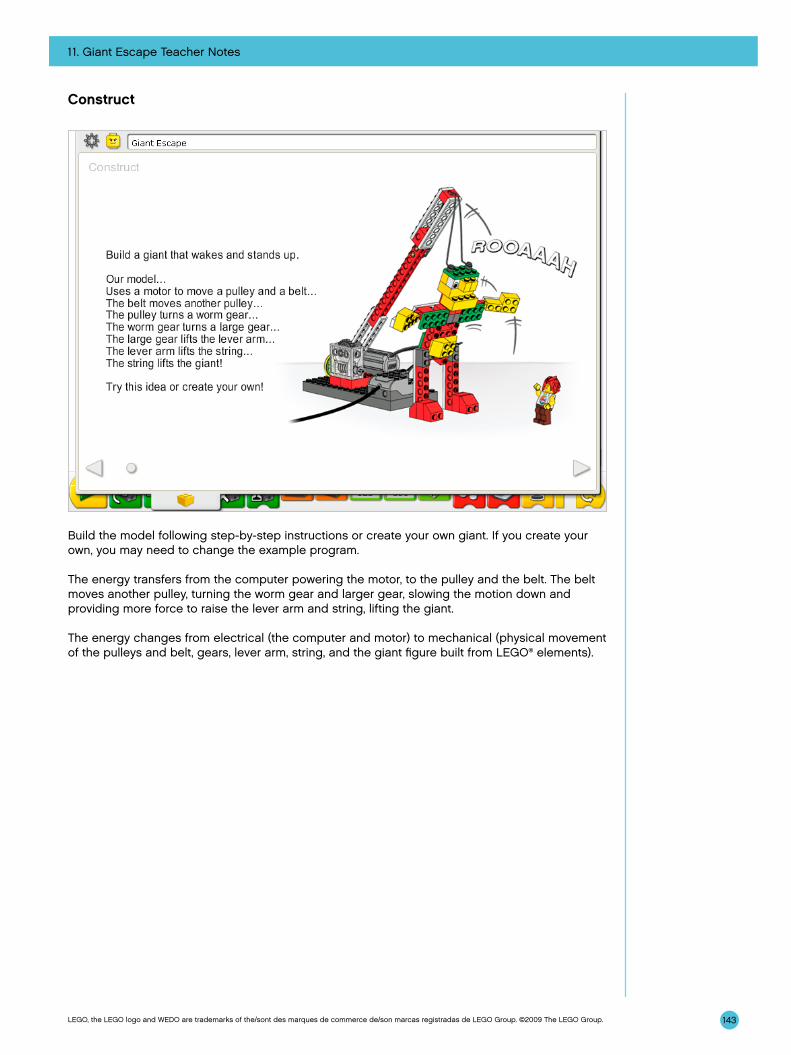
11. Giant Escape Teacher Notes
143LEGO, the LEGO logo and WEDO are trademarks of the/sont des marques de commerce de/son marcas registradas de LEGO Group. ©2009 The LEGO Group.
Construct
Build the model following step-by-step instructions or create your own giant. If you create your own, you may need to change the example program.
The energy transfers from the computer powering the motor, to the pulley and the belt. The belt moves another pulley, turning the worm gear and larger gear, slowing the motion down and providing more force to raise the lever arm and string, lifting the giant.
The energy changes from electrical (the computer and motor) to mechanical (physical movement of the pulleys and belt, gears, lever arm, string, and the giant figure built from LEGO® elements).

11. Giant Escape Teacher Notes
144LEGO, the LEGO logo and WEDO are trademarks of the/sont des marques de commerce de/son marcas registradas de LEGO Group. ©2009 The LEGO Group.
To operate the giant best, lay it down and test the motor direction to make sure the pulley and gears are lifting and lowering the giant properly. Here are two test programs to raise and lower the giant. The programs start when you press the arrow up key or arrow down key on the keyboard.
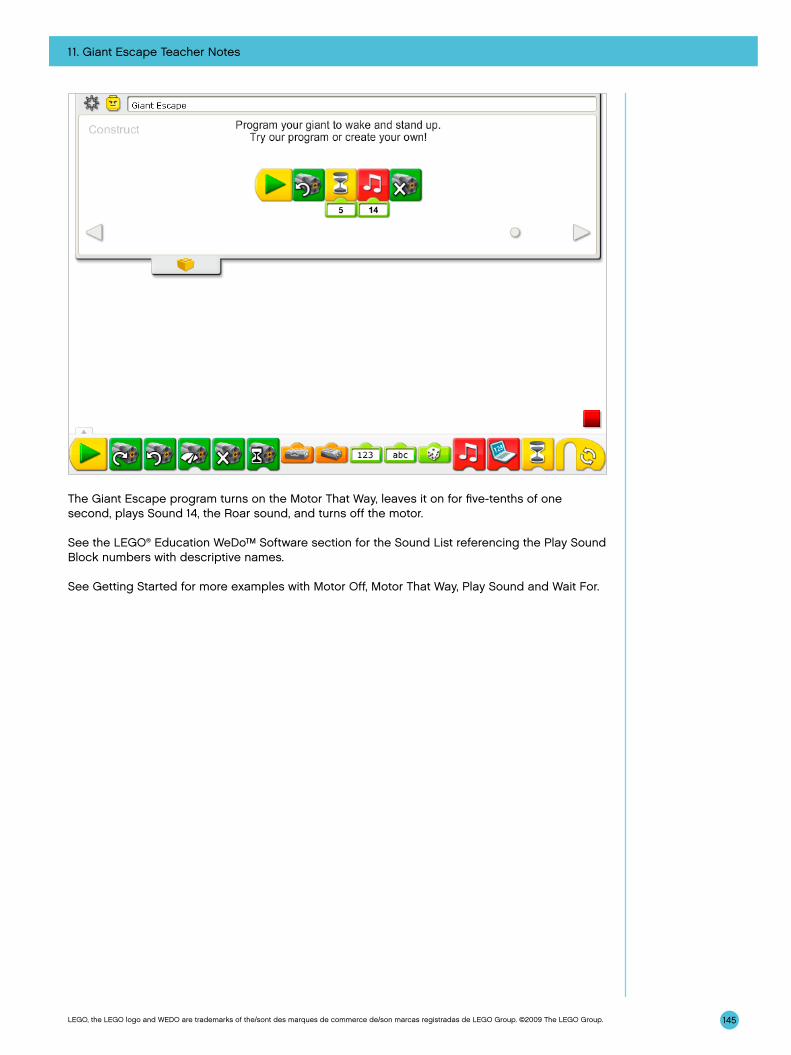
11. Giant Escape Teacher Notes
145LEGO, the LEGO logo and WEDO are trademarks of the/sont des marques de commerce de/son marcas registradas de LEGO Group. ©2009 The LEGO Group.
The Giant Escape program turns on the Motor That Way, leaves it on for five-tenths of one second, plays Sound 14, the Roar sound, and turns off the motor.
See the LEGO® Education WeDo™ Software section for the Sound List referencing the Play Sound Block numbers with descriptive names.
See Getting Started for more examples with Motor Off, Motor That Way, Play Sound and Wait For.
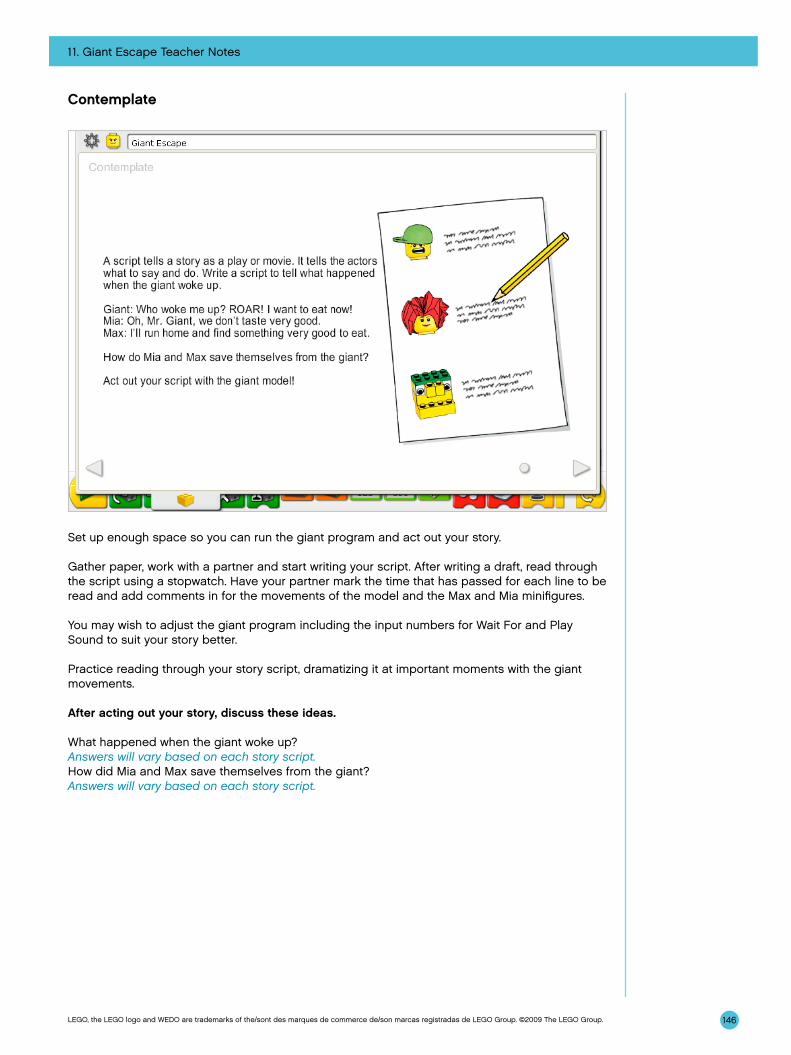
11. Giant Escape Teacher Notes
146LEGO, the LEGO logo and WEDO are trademarks of the/sont des marques de commerce de/son marcas registradas de LEGO Group. ©2009 The LEGO Group.
Contemplate
Set up enough space so you can run the giant program and act out your story.
Gather paper, work with a partner and start writing your script. After writing a draft, read through the script using a stopwatch. Have your partner mark the time that has passed for each line to be read and add comments in for the movements of the model and the Max and Mia minifigures.
You may wish to adjust the giant program including the input numbers for Wait For and Play Sound to suit your story better.
Practice reading through your story script, dramatizing it at important moments with the giant movements.
After acting out your story, discuss these ideas.
What happened when the giant woke up?Answers will vary based on each story script.How did Mia and Max save themselves from the giant?Answers will vary based on each story script.
11. Giant Escape Teacher Notes
147LEGO, the LEGO logo and WEDO are trademarks of the/sont des marques de commerce de/son marcas registradas de LEGO Group. ©2009 The LEGO Group.
Discuss other questions related to the giant story.
What type of characters are Mia and Max? Are they young, old, brave, cowardly, smart?Answers will vary based on each story script; however, you may want to focus on specific words or actions in each script and relate them to character traits.
Adventure stories usually have a great deal of action and an exotic location. Is your story an adventure story? If so, what are the actions in the story? What is the location? If not, what actions could you add? In what location would you place your story?Answers will vary based on each story script.
Alternative ideas…Act out the story using gestures and facial expressions rather than words. Are you able to convey the same thoughts and feelings? Why or why not?
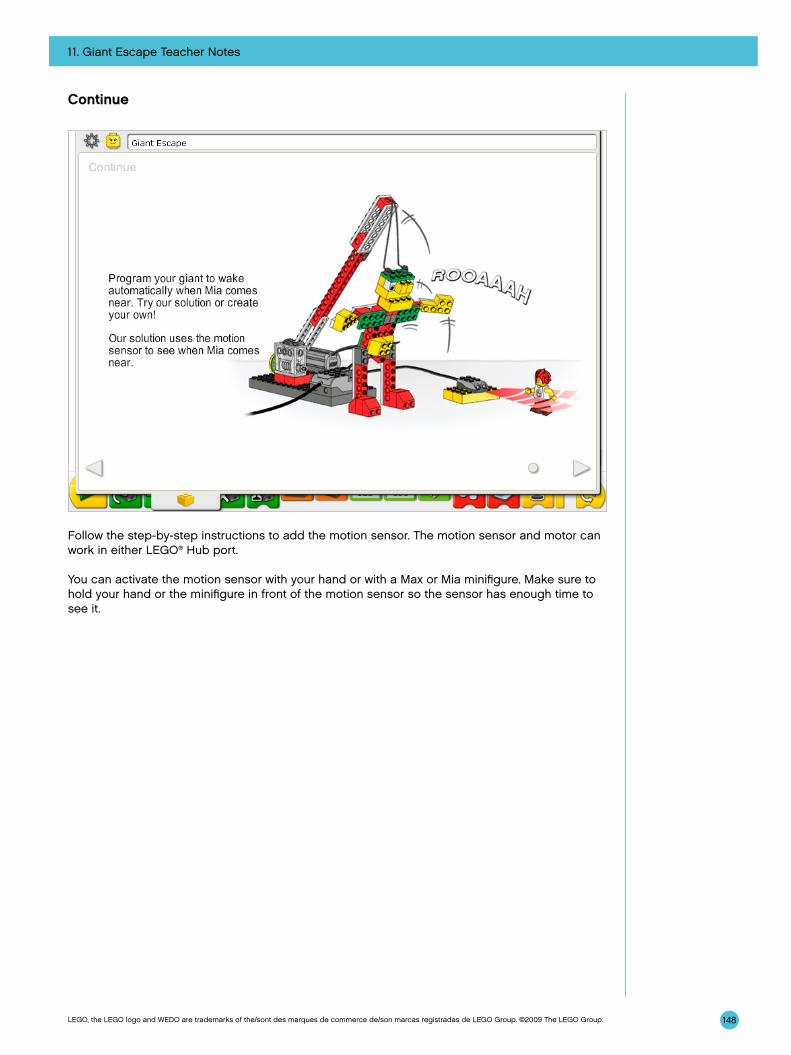
11. Giant Escape Teacher Notes
148LEGO, the LEGO logo and WEDO are trademarks of the/sont des marques de commerce de/son marcas registradas de LEGO Group. ©2009 The LEGO Group.
Continue
Follow the step-by-step instructions to add the motion sensor. The motion sensor and motor can work in either LEGO® Hub port.
You can activate the motion sensor with your hand or with a Max or Mia minifigure. Make sure to hold your hand or the minifigure in front of the motion sensor so the sensor has enough time to see it.
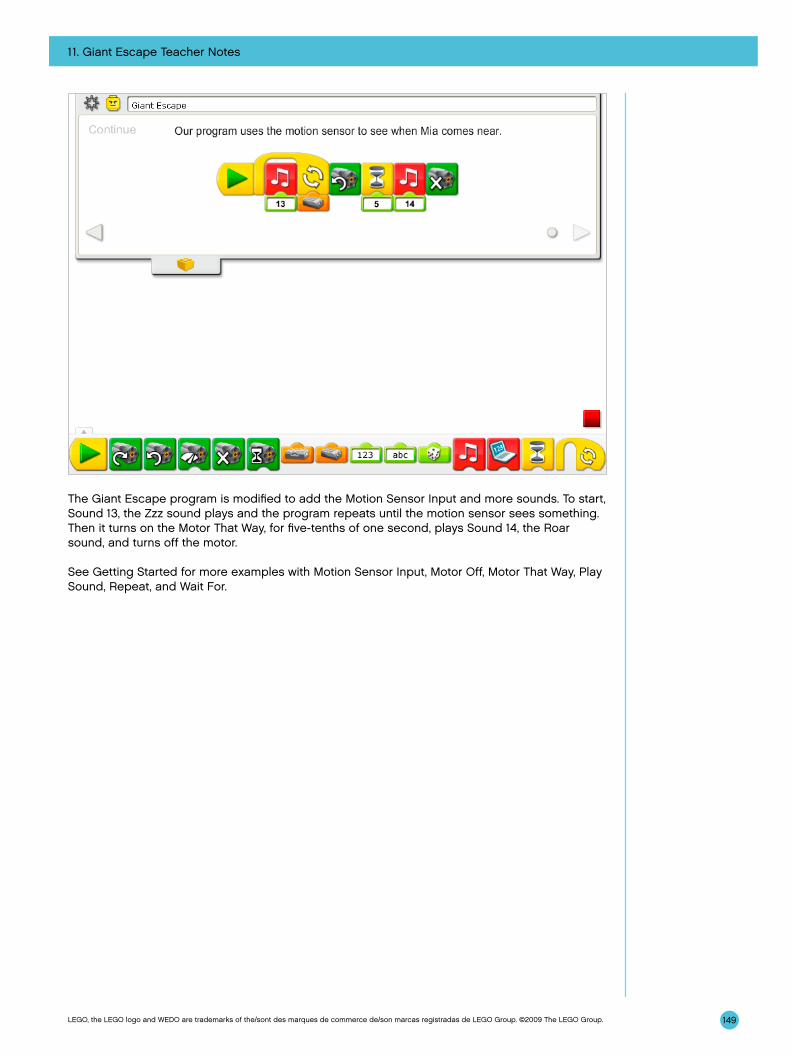
11. Giant Escape Teacher Notes
149LEGO, the LEGO logo and WEDO are trademarks of the/sont des marques de commerce de/son marcas registradas de LEGO Group. ©2009 The LEGO Group.
The Giant Escape program is modified to add the Motion Sensor Input and more sounds. To start, Sound 13, the Zzz sound plays and the program repeats until the motion sensor sees something. Then it turns on the Motor That Way, for five-tenths of one second, plays Sound 14, the Roar sound, and turns off the motor.
See Getting Started for more examples with Motion Sensor Input, Motor Off, Motor That Way, Play Sound, Repeat, and Wait For.
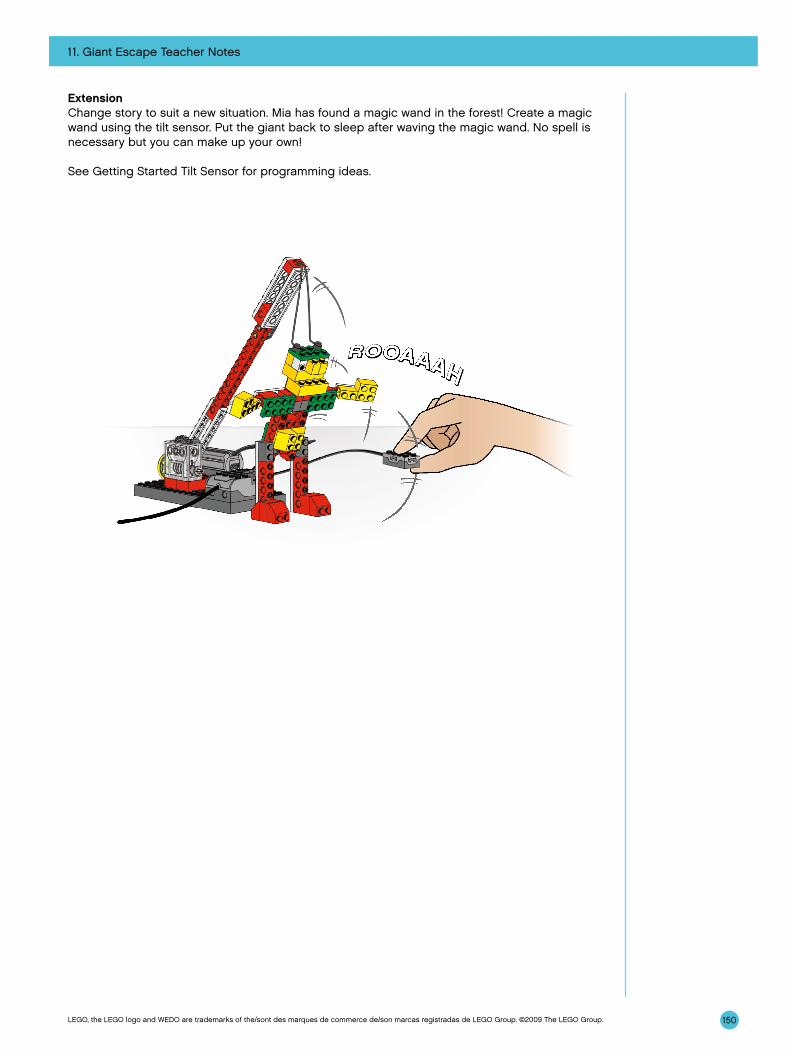
11. Giant Escape Teacher Notes
150LEGO, the LEGO logo and WEDO are trademarks of the/sont des marques de commerce de/son marcas registradas de LEGO Group. ©2009 The LEGO Group.
ExtensionChange story to suit a new situation. Mia has found a magic wand in the forest! Create a magic wand using the tilt sensor. Put the giant back to sleep after waving the magic wand. No spell is necessary but you can make up your own!
See Getting Started Tilt Sensor for programming ideas.
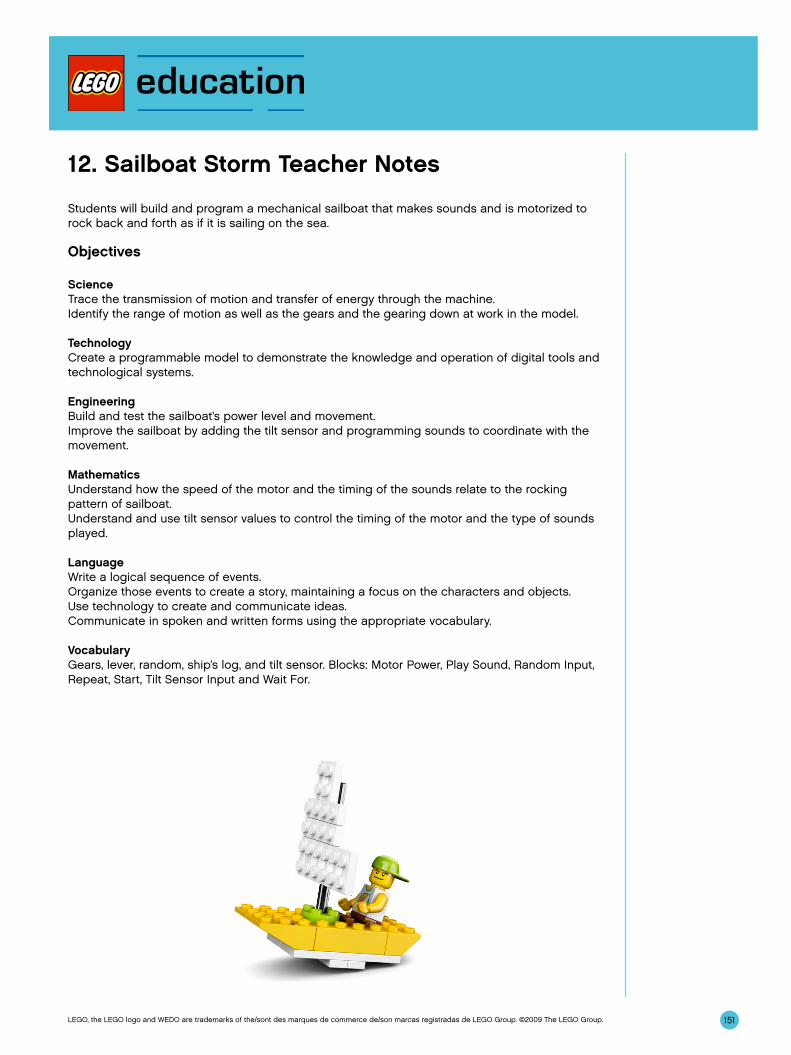
151LEGO, the LEGO logo and WEDO are trademarks of the/sont des marques de commerce de/son marcas registradas de LEGO Group. ©2009 The LEGO Group.
12. Sailboat Storm Teacher Notes
Students will build and program a mechanical sailboat that makes sounds and is motorized to rock back and forth as if it is sailing on the sea.
Objectives
ScienceTrace the transmission of motion and transfer of energy through the machine.Identify the range of motion as well as the gears and the gearing down at work in the model.
TechnologyCreate a programmable model to demonstrate the knowledge and operation of digital tools and technological systems.
EngineeringBuild and test the sailboat’s power level and movement.Improve the sailboat by adding the tilt sensor and programming sounds to coordinate with the movement.
MathematicsUnderstand how the speed of the motor and the timing of the sounds relate to the rocking pattern of sailboat.Understand and use tilt sensor values to control the timing of the motor and the type of sounds played.
LanguageWrite a logical sequence of events.Organize those events to create a story, maintaining a focus on the characters and objects.Use technology to create and communicate ideas.Communicate in spoken and written forms using the appropriate vocabulary.
VocabularyGears, lever, random, ship’s log, and tilt sensor. Blocks: Motor Power, Play Sound, Random Input, Repeat, Start, Tilt Sensor Input and Wait For.
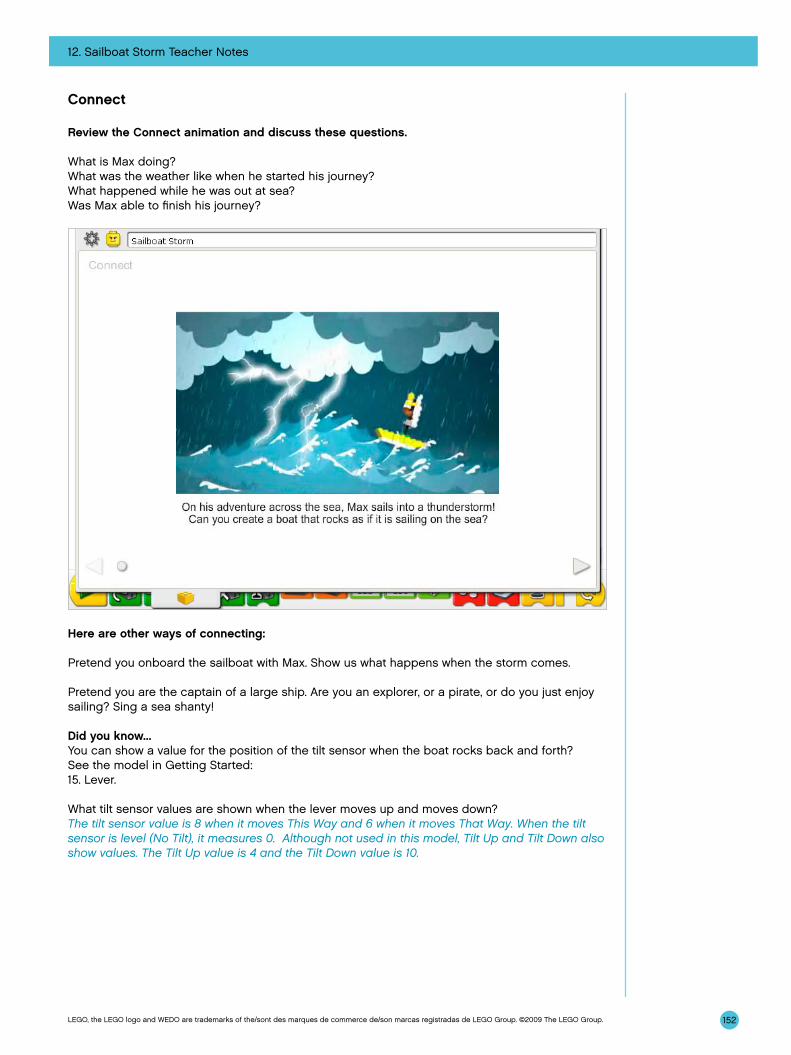
152
12. Sailboat Storm Teacher Notes
LEGO, the LEGO logo and WEDO are trademarks of the/sont des marques de commerce de/son marcas registradas de LEGO Group. ©2009 The LEGO Group.
Connect
Review the Connect animation and discuss these questions.
What is Max doing? What was the weather like when he started his journey?What happened while he was out at sea?Was Max able to finish his journey?
Here are other ways of connecting:
Pretend you onboard the sailboat with Max. Show us what happens when the storm comes.
Pretend you are the captain of a large ship. Are you an explorer, or a pirate, or do you just enjoy sailing? Sing a sea shanty!
Did you know...You can show a value for the position of the tilt sensor when the boat rocks back and forth?See the model in Getting Started:15. Lever.
What tilt sensor values are shown when the lever moves up and moves down?The tilt sensor value is 8 when it moves This Way and 6 when it moves That Way. When the tilt sensor is level (No Tilt), it measures 0. Although not used in this model, Tilt Up and Tilt Down also show values. The Tilt Up value is 4 and the Tilt Down value is 10.
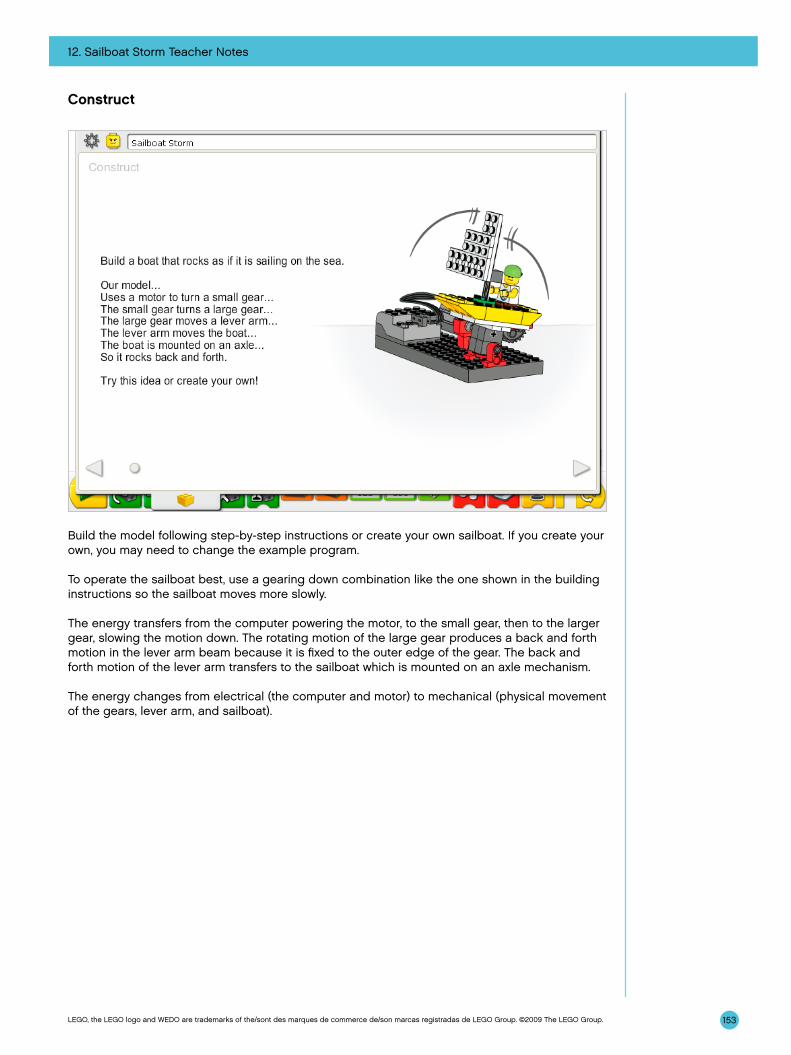
12. Sailboat Storm Teacher Notes
153LEGO, the LEGO logo and WEDO are trademarks of the/sont des marques de commerce de/son marcas registradas de LEGO Group. ©2009 The LEGO Group.
Construct
Build the model following step-by-step instructions or create your own sailboat. If you create your own, you may need to change the example program.
To operate the sailboat best, use a gearing down combination like the one shown in the building instructions so the sailboat moves more slowly.
The energy transfers from the computer powering the motor, to the small gear, then to the larger gear, slowing the motion down. The rotating motion of the large gear produces a back and forth motion in the lever arm beam because it is fixed to the outer edge of the gear. The back and forth motion of the lever arm transfers to the sailboat which is mounted on an axle mechanism.
The energy changes from electrical (the computer and motor) to mechanical (physical movement of the gears, lever arm, and sailboat).
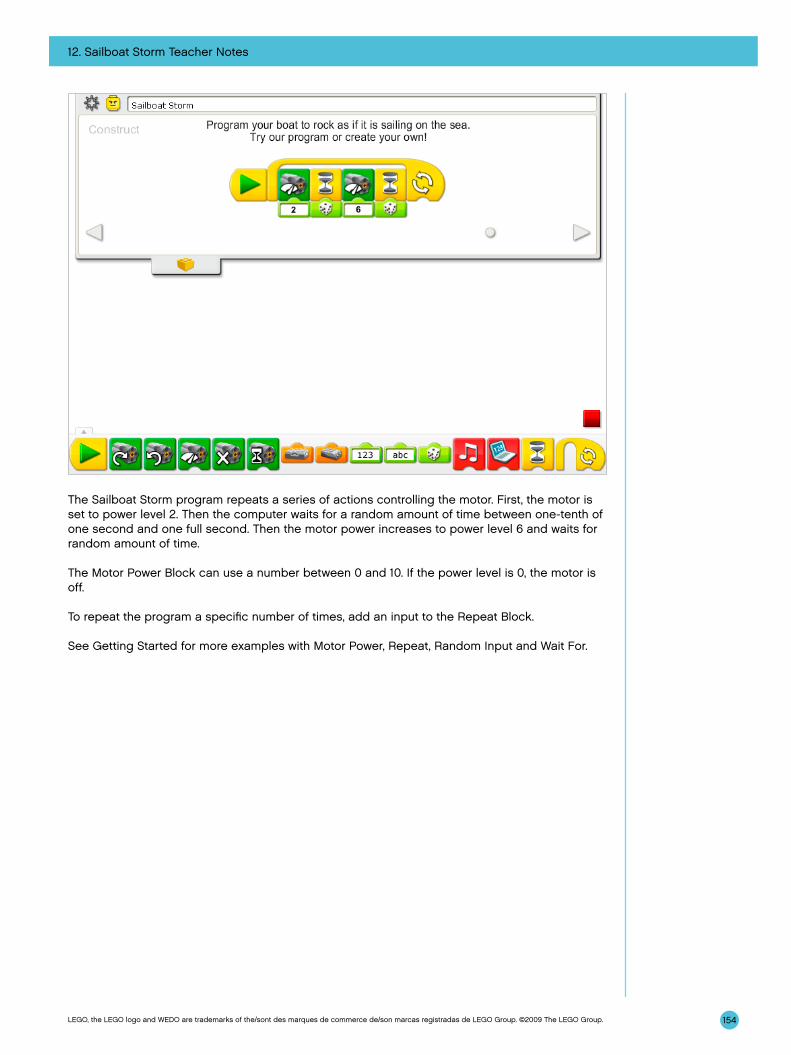
12. Sailboat Storm Teacher Notes
154LEGO, the LEGO logo and WEDO are trademarks of the/sont des marques de commerce de/son marcas registradas de LEGO Group. ©2009 The LEGO Group.
The Sailboat Storm program repeats a series of actions controlling the motor. First, the motor is set to power level 2. Then the computer waits for a random amount of time between one-tenth of one second and one full second. Then the motor power increases to power level 6 and waits for random amount of time.
The Motor Power Block can use a number between 0 and 10. If the power level is 0, the motor is off.
To repeat the program a specific number of times, add an input to the Repeat Block.
See Getting Started for more examples with Motor Power, Repeat, Random Input and Wait For.
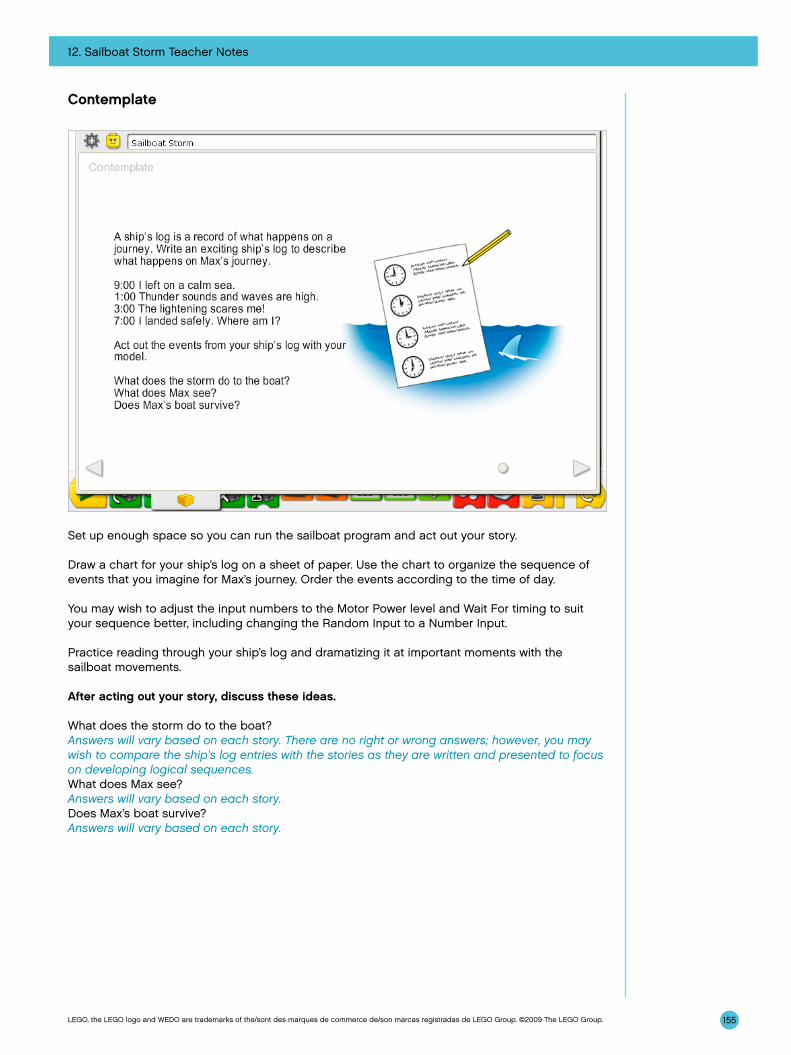
12. Sailboat Storm Teacher Notes
155LEGO, the LEGO logo and WEDO are trademarks of the/sont des marques de commerce de/son marcas registradas de LEGO Group. ©2009 The LEGO Group.
Contemplate
Set up enough space so you can run the sailboat program and act out your story.
Draw a chart for your ship’s log on a sheet of paper. Use the chart to organize the sequence of events that you imagine for Max’s journey. Order the events according to the time of day.
You may wish to adjust the input numbers to the Motor Power level and Wait For timing to suit your sequence better, including changing the Random Input to a Number Input.
Practice reading through your ship’s log and dramatizing it at important moments with the sailboat movements.
After acting out your story, discuss these ideas.
What does the storm do to the boat?Answers will vary based on each story. There are no right or wrong answers; however, you may wish to compare the ship’s log entries with the stories as they are written and presented to focus on developing logical sequences.What does Max see?Answers will vary based on each story.Does Max’s boat survive?Answers will vary based on each story.
12. Sailboat Storm Teacher Notes
156LEGO, the LEGO logo and WEDO are trademarks of the/sont des marques de commerce de/son marcas registradas de LEGO Group. ©2009 The LEGO Group.
Discuss other questions related to the sailboat story.
How can you add details to improve the story?Answers will vary, e.g., tell more details about Max’s character; tell more about the plot such as where Max is going and why; describe what Max sees.How can you make the plot more interesting?Answers will vary. Create some tension in the story to add excitement. For example, create a time constraint so Max has only a small amount of time to fix something or get somewhere. You can also create an exciting plot twist. For example, introduce another character such as Mia and have her rescue Max using a plane or another sailboat.
Alternative ideas…Create a storyboard to show a visual sequence of events illustrating your ship’s log.
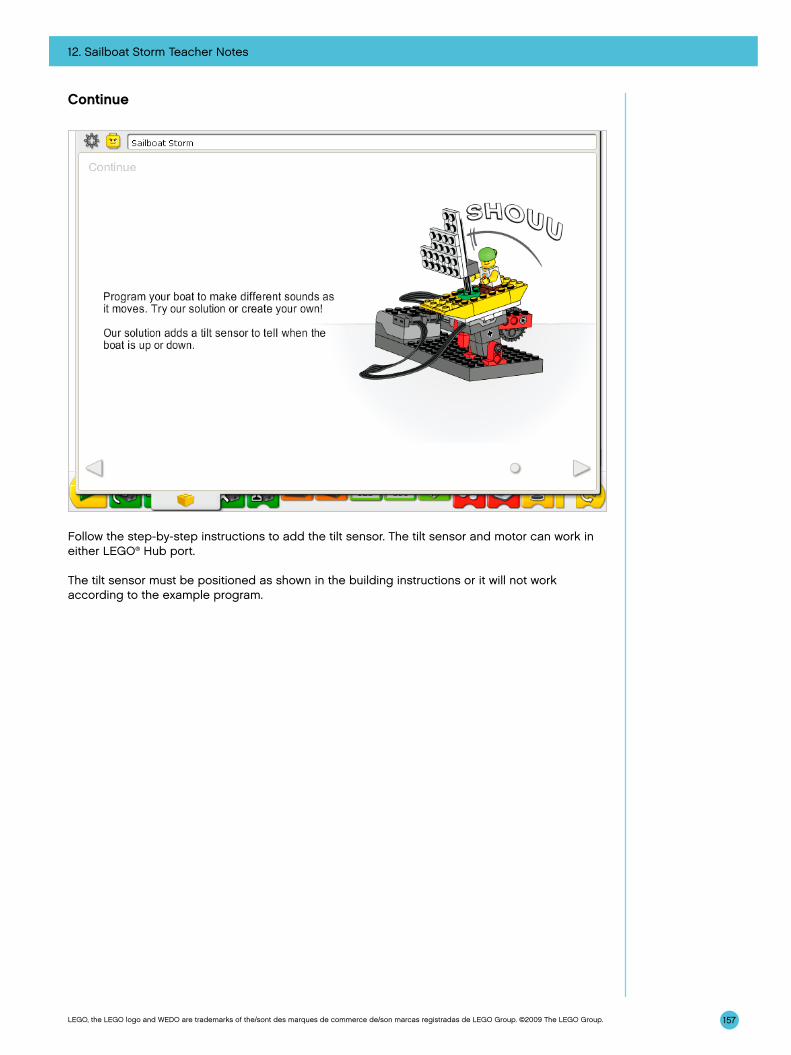
12. Sailboat Storm Teacher Notes
157LEGO, the LEGO logo and WEDO are trademarks of the/sont des marques de commerce de/son marcas registradas de LEGO Group. ©2009 The LEGO Group.
Continue
Follow the step-by-step instructions to add the tilt sensor. The tilt sensor and motor can work in either LEGO® Hub port.
The tilt sensor must be positioned as shown in the building instructions or it will not work according to the example program.
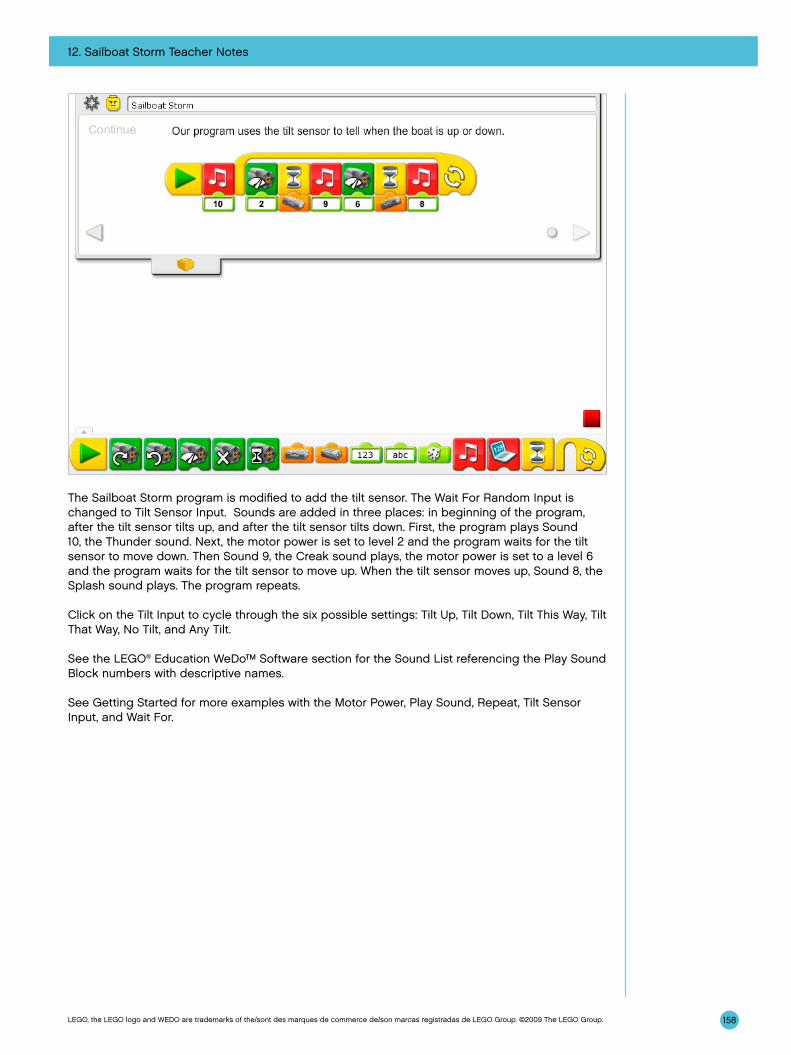
12. Sailboat Storm Teacher Notes
158LEGO, the LEGO logo and WEDO are trademarks of the/sont des marques de commerce de/son marcas registradas de LEGO Group. ©2009 The LEGO Group.
The Sailboat Storm program is modified to add the tilt sensor. The Wait For Random Input is changed to Tilt Sensor Input. Sounds are added in three places: in beginning of the program, after the tilt sensor tilts up, and after the tilt sensor tilts down. First, the program plays Sound 10, the Thunder sound. Next, the motor power is set to level 2 and the program waits for the tilt sensor to move down. Then Sound 9, the Creak sound plays, the motor power is set to a level 6 and the program waits for the tilt sensor to move up. When the tilt sensor moves up, Sound 8, the Splash sound plays. The program repeats.
Click on the Tilt Input to cycle through the six possible settings: Tilt Up, Tilt Down, Tilt This Way, Tilt That Way, No Tilt, and Any Tilt.
See the LEGO® Education WeDo™ Software section for the Sound List referencing the Play Sound Block numbers with descriptive names.
See Getting Started for more examples with the Motor Power, Play Sound, Repeat, Tilt Sensor Input, and Wait For.

12. Sailboat Storm Teacher Notes
159LEGO, the LEGO logo and WEDO are trademarks of the/sont des marques de commerce de/son marcas registradas de LEGO Group. ©2009 The LEGO Group.
ExtensionWork with other groups that have the airplane model and the giant model from these Adventure Stories activities. Create a story that combines all three models. For example, create a story in which Mia flies in on her seaplane and rescues Max whose sailboat is drifting too close to the giant sea creature!

160LEGO, the LEGO logo and WEDO are trademarks of the/sont des marques de commerce de/son marcas registradas de LEGO Group. ©2009 The LEGO Group.
Resources
This section includes print or copymasters for inspirational programs, data tables needed in the Amazing Mechanisms and Play Soccer activities, glossary of important terms, and LEGO® elements included in the LEGO Education WeDo™ Construction Set.
These materials are provided for supporting the WeDo projects in your classroom.
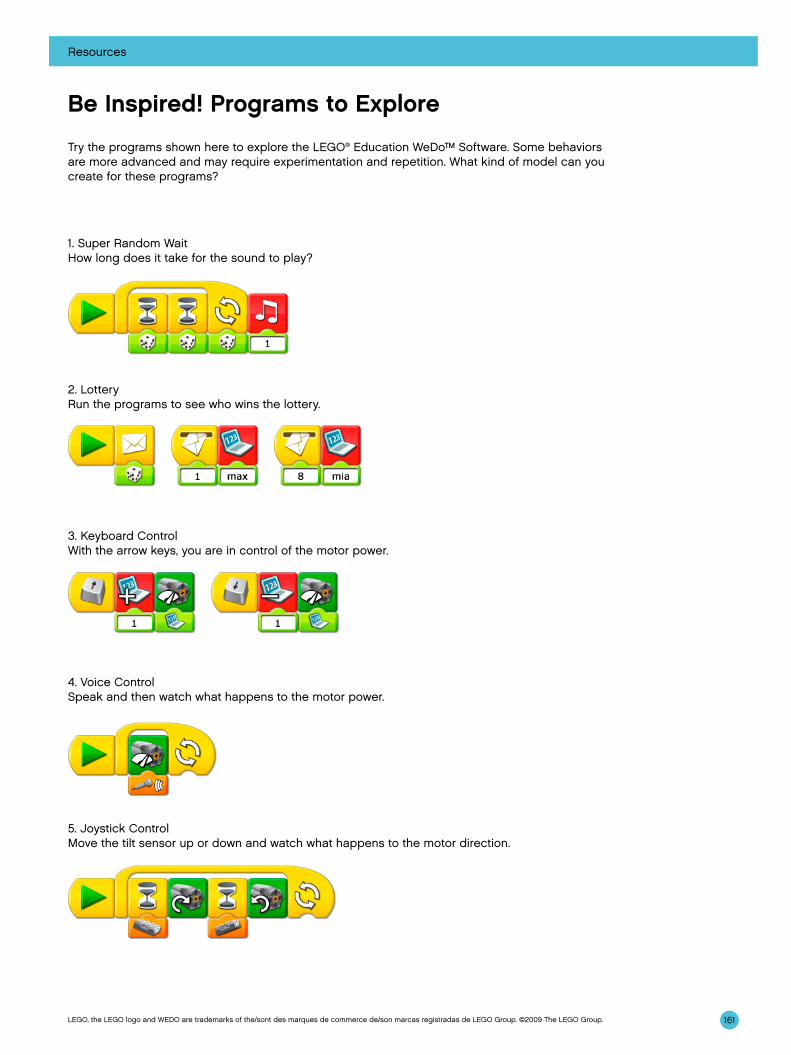
161
Resources
LEGO, the LEGO logo and WEDO are trademarks of the/sont des marques de commerce de/son marcas registradas de LEGO Group. ©2009 The LEGO Group.
Be Inspired! Programs to Explore
Try the programs shown here to explore the LEGO® Education WeDo™ Software. Some behaviors are more advanced and may require experimentation and repetition. What kind of model can you create for these programs?
1. Super Random WaitHow long does it take for the sound to play?
2. LotteryRun the programs to see who wins the lottery.
3. Keyboard ControlWith the arrow keys, you are in control of the motor power.
4. Voice ControlSpeak and then watch what happens to the motor power.
5. Joystick Control Move the tilt sensor up or down and watch what happens to the motor direction.
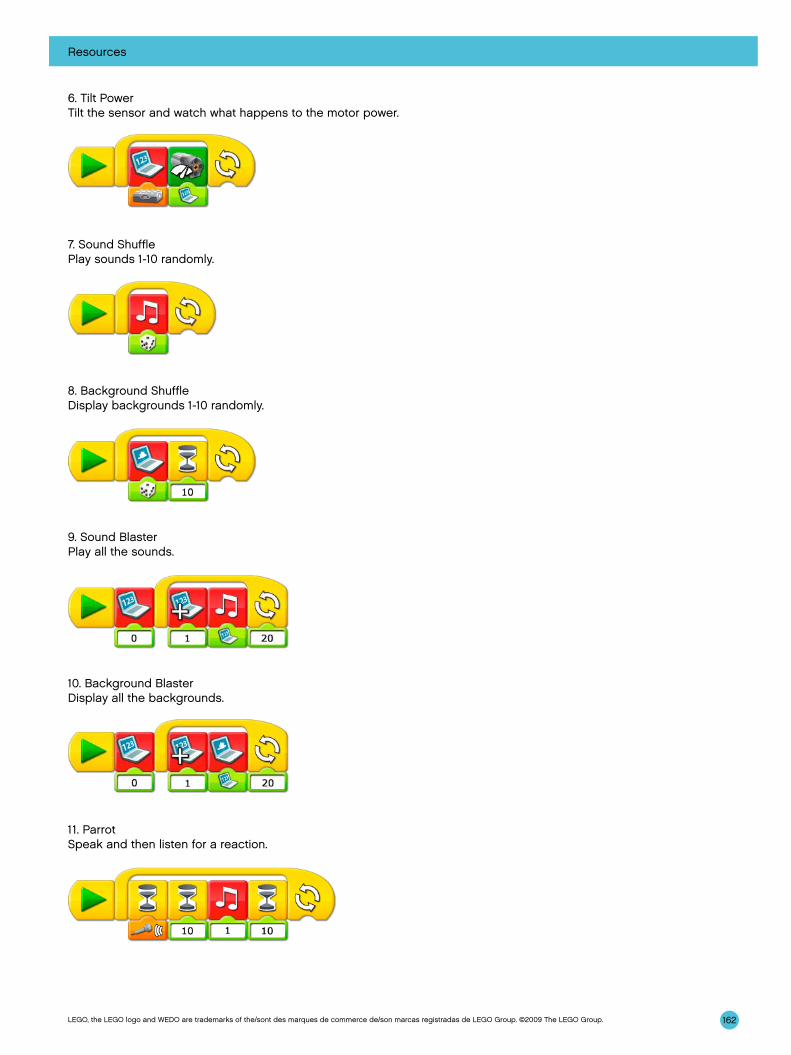
162
Resources
LEGO, the LEGO logo and WEDO are trademarks of the/sont des marques de commerce de/son marcas registradas de LEGO Group. ©2009 The LEGO Group.
6. Tilt Power Tilt the sensor and watch what happens to the motor power.
7. Sound ShufflePlay sounds 1-10 randomly.
8. Background ShuffleDisplay backgrounds 1-10 randomly.
9. Sound BlasterPlay all the sounds.
10. Background BlasterDisplay all the backgrounds.
11. ParrotSpeak and then listen for a reaction.
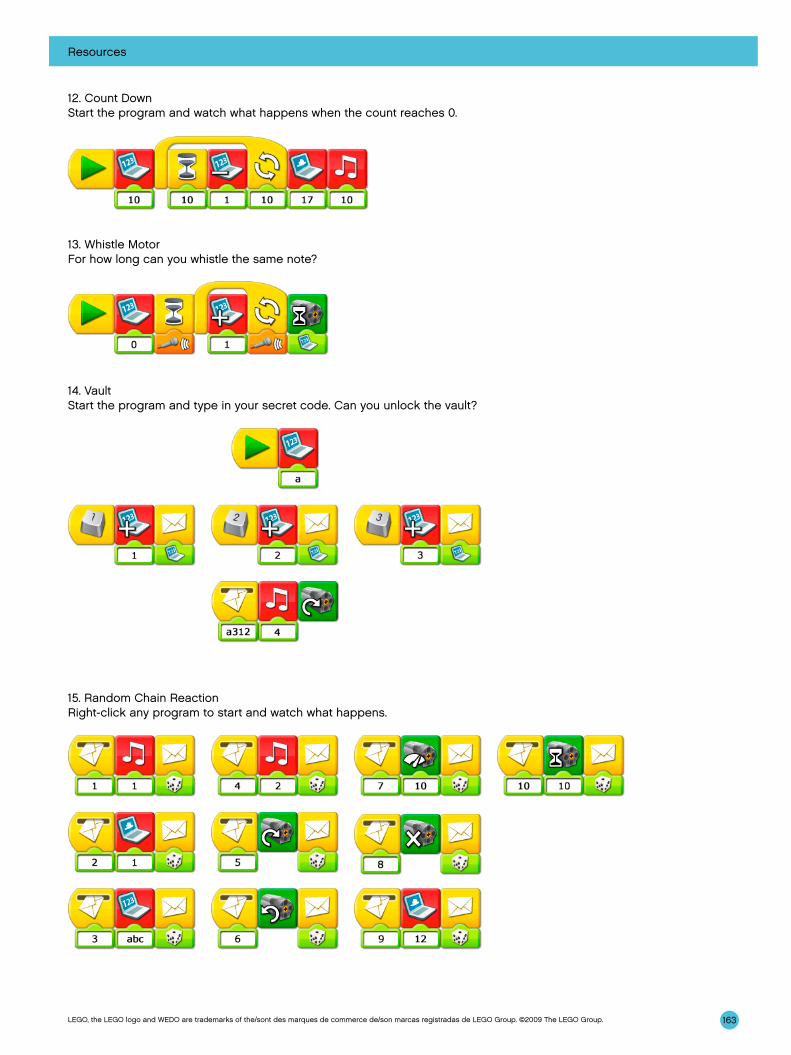
163
Resources
LEGO, the LEGO logo and WEDO are trademarks of the/sont des marques de commerce de/son marcas registradas de LEGO Group. ©2009 The LEGO Group.
12. Count DownStart the program and watch what happens when the count reaches 0.
13. Whistle MotorFor how long can you whistle the same note?
14. VaultStart the program and type in your secret code. Can you unlock the vault?
15. Random Chain ReactionRight-click any program to start and watch what happens.

164
Resources
LEGO, the LEGO logo and WEDO are trademarks of the/sont des marques de commerce de/son marcas registradas de LEGO Group. ©2009 The LEGO Group.
Activity Data TablesAmazing Mechanisms: 1. Dancing Birds
Bel
tH
ow B
ird
1 T
urns
How
Bir
d 2
Tur
ns
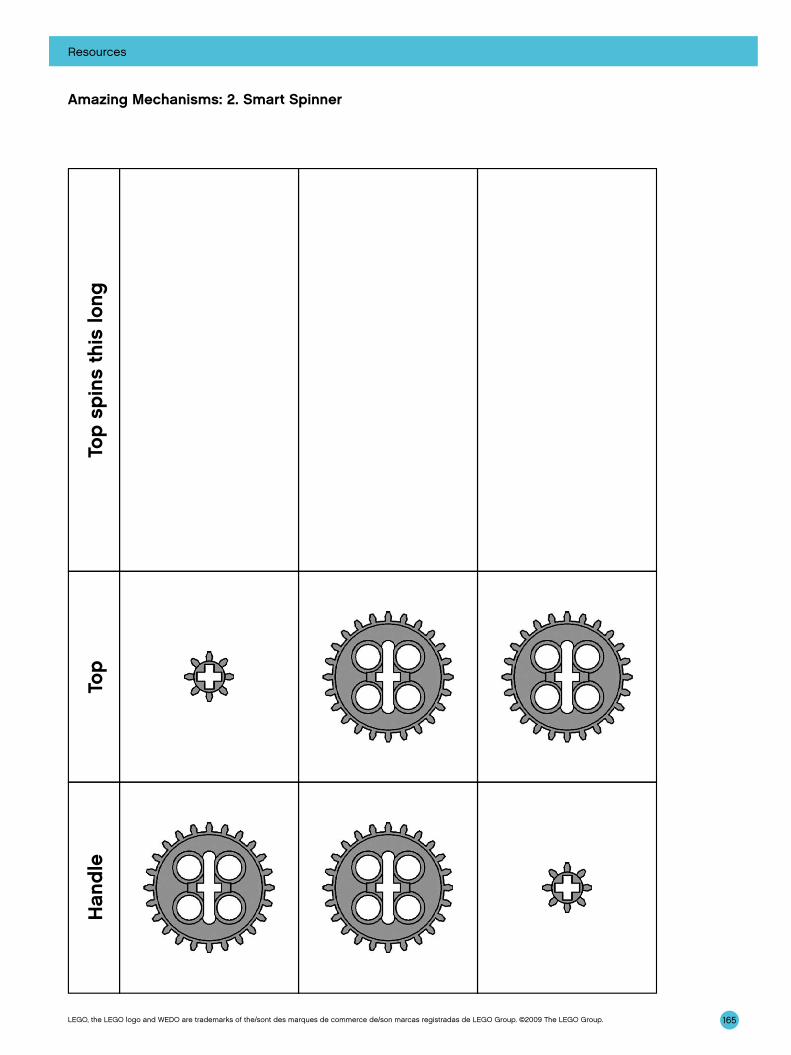
165
Resources
LEGO, the LEGO logo and WEDO are trademarks of the/sont des marques de commerce de/son marcas registradas de LEGO Group. ©2009 The LEGO Group.
Amazing Mechanisms: 2. Smart SpinnerH
and
leTo
pTo
p s
pin
s th
is lo
ng
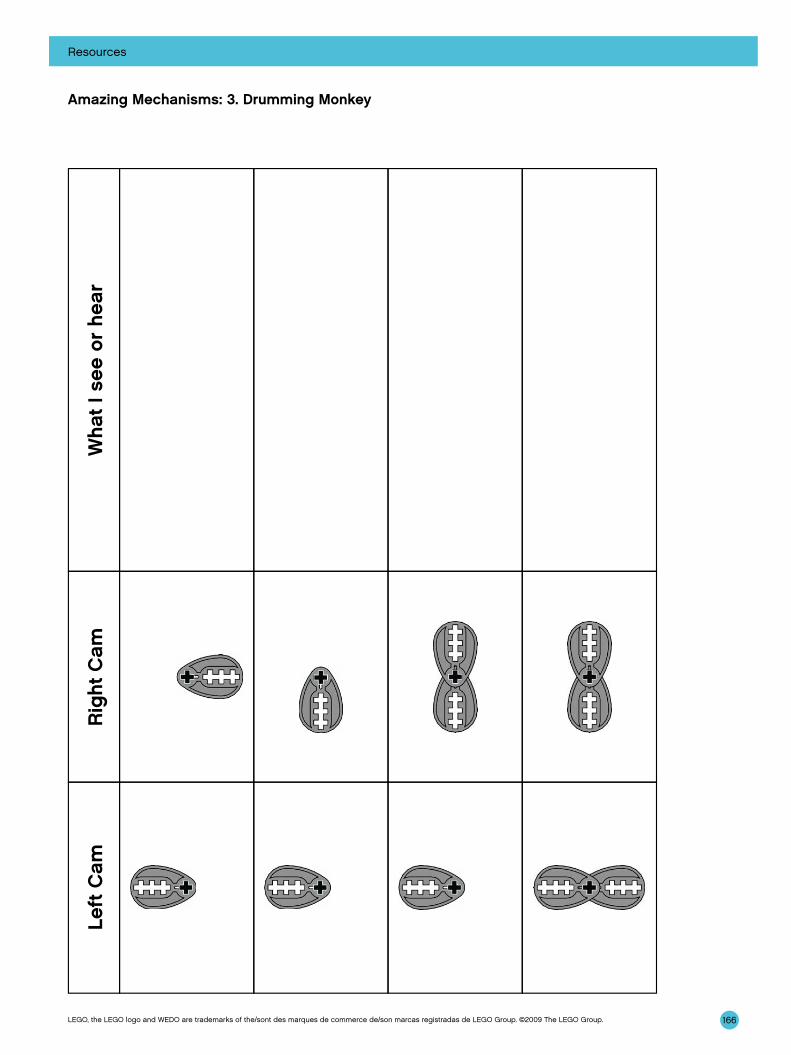
166
Resources
LEGO, the LEGO logo and WEDO are trademarks of the/sont des marques de commerce de/son marcas registradas de LEGO Group. ©2009 The LEGO Group.
Amazing Mechanisms: 3. Drumming MonkeyLe
ft C
amR
ight
Cam
Wha
t I s
ee o
r he
ar

167
Resources
LEGO, the LEGO logo and WEDO are trademarks of the/sont des marques de commerce de/son marcas registradas de LEGO Group. ©2009 The LEGO Group.
Play Soccer: 7. Goal KickerK
icke
r
Test
1
Test
2
Test
3
Pre
dic
ted
Dis
tanc
eA
ctua
l Dis
tanc
e
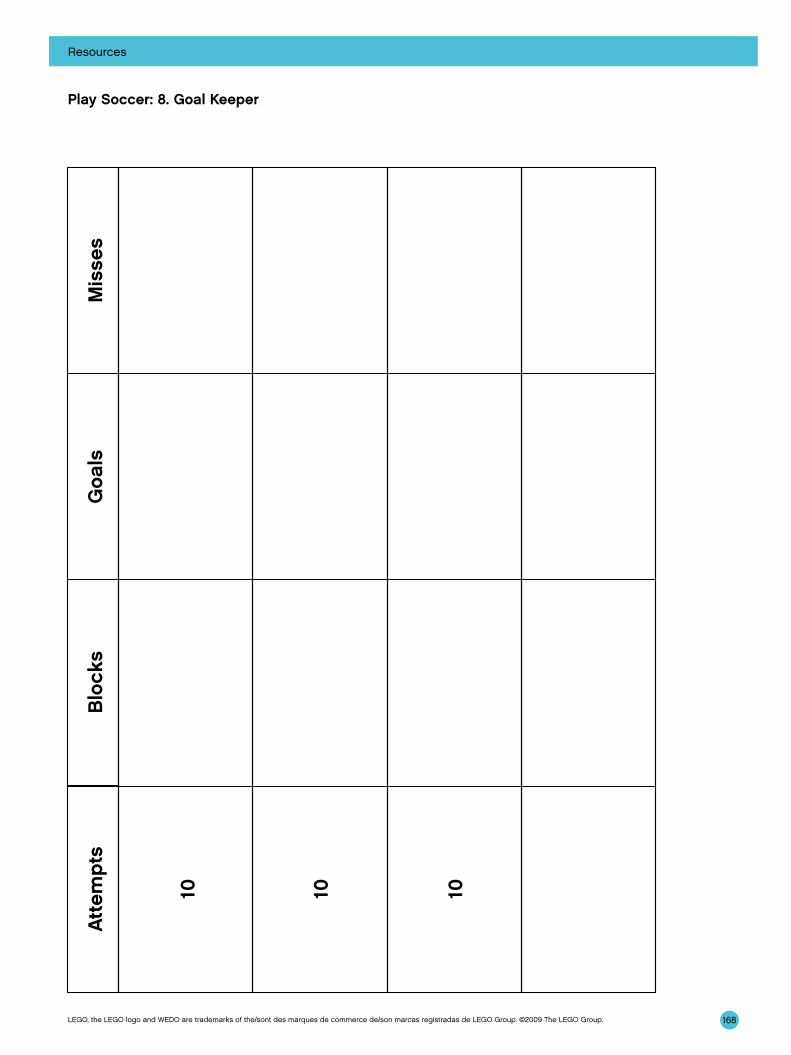
168
Resources
LEGO, the LEGO logo and WEDO are trademarks of the/sont des marques de commerce de/son marcas registradas de LEGO Group. ©2009 The LEGO Group.
Play Soccer: 8. Goal KeeperA
ttem
pts
10 10 10
Blo
cks
Goa
lsM
isse
s
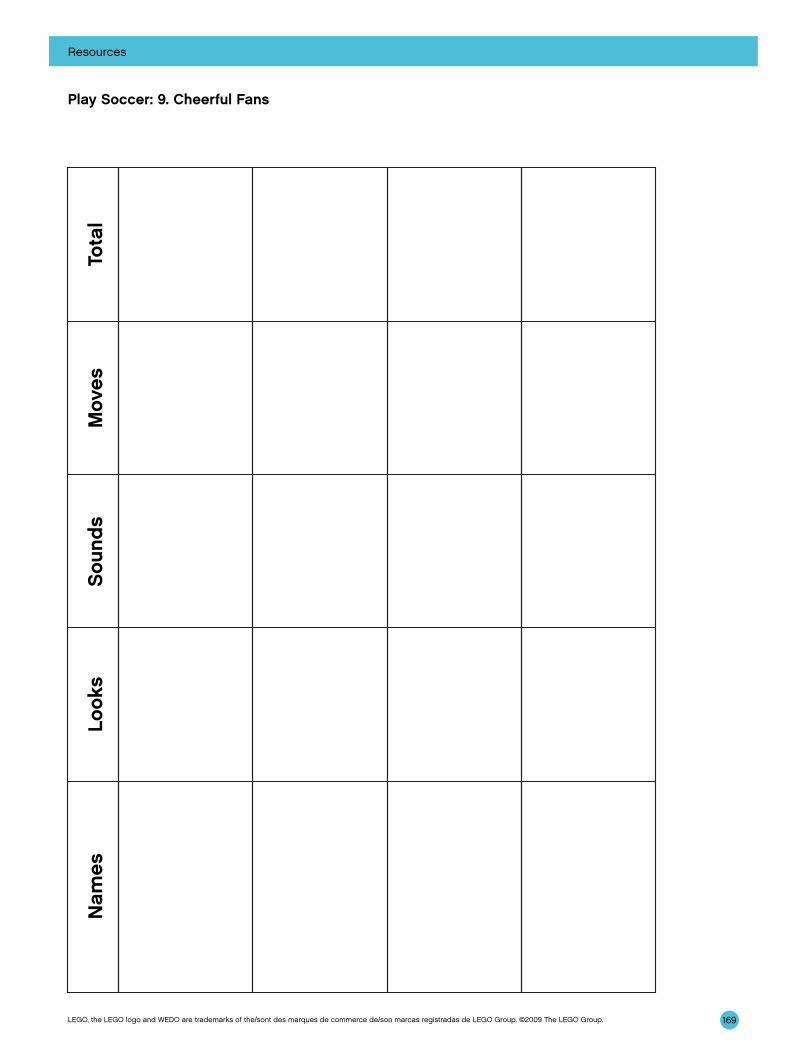
169
Resources
LEGO, the LEGO logo and WEDO are trademarks of the/sont des marques de commerce de/son marcas registradas de LEGO Group. ©2009 The LEGO Group.
Play Soccer: 9. Cheerful FansN
ames
Look
sS
ound
sM
oves
Tota
l
170
Resources
LEGO, the LEGO logo and WEDO are trademarks of the/sont des marques de commerce de/son marcas registradas de LEGO Group. ©2009 The LEGO Group.
Glossary
The Glossary includes specific terms from student pages in the Activities that may require definition. See the LEGO® Education WeDo™ Software Vocabulary List for names of the Blocks. See the LEGO Element Survey for the names elements in the LEGO Education WeDo Construction Set. An explanation of the motors and sensors can be found in the What is in the box? section.
Belt A continuous band stretched around two pulleys so that one pulley can turn the other.
Cam A non-circular, egg-shaped wheel that rotates and converts circular motion into reciprocating (repeating up and down) or oscillating (repeating a path such as backward and forward) motion by the follower.
Centimeter A unit of length in the metric system equal to 0.01 or one hundredth of one meter.
Climate A region of Earth having particular temperature, humidity, air pressure, and other conditions.
Gear A toothed wheel or cog. The teeth of the gears mesh together to transmit movement. Often called a spur gear.
Gear, crown A toothed wheel that has teeth out to one side looking like a crown. When meshed with a regular gear, a crown gear transfers the motion through a 90° angle, or perpendicular to the original direction of motion.
Gear, worm A gear with one spiral tooth resembling a screw. When meshed with a regular gear, the worm gear acts as a one-tooth gear, reducing speed and increasing force.
Inch A unit of measure from the US Customary and British Imperial systems equal to 1 12 of one foot.
Lever A bar that pivots about a fixed point when an effort is applied to it.
Mammal Animals with backbones (vertebrates) who are have hair or fur, give birth to live young, and feed the young milk through mammary glands.
Measure 1. A unit or standard of measurement such as weight, distance, volume, area.
2. The act of gathering the dimensions or quantity of something.
Pattern A repeatable sequence.
171
Resources
LEGO, the LEGO logo and WEDO are trademarks of the/sont des marques de commerce de/son marcas registradas de LEGO Group. ©2009 The LEGO Group.
Performance Entertainment presented before an audience.
Pride A group of lions living together.
Program A set of instructions created on a computer.
Propeller A rotating hub with blades for causing an airplane, boat or other device to move.
Pulley A wheel with a grooved rim used with a belt, chain, or rope.
Random Choosing or occurring without a specific reason or pattern. Equally likely to be chosen or having the same probability of occurrence.
Rotation Turning on an axis.
Score The record of points in a game.
Script The text of a play, film, video, or radio or television broadcast.
Ship’s log The record of events during a ship’s journey.
Speed The distance traveled within a specific amount of time. Rotational speed is described in rotations per minute or RPM. The speed of other objects is described in distance over time, e.g., kilometers per hour, miles per hour, or centimeters per second.
Wingspan The distance from one wingtip on a bird to the other wingtip when the wings are fully extended.
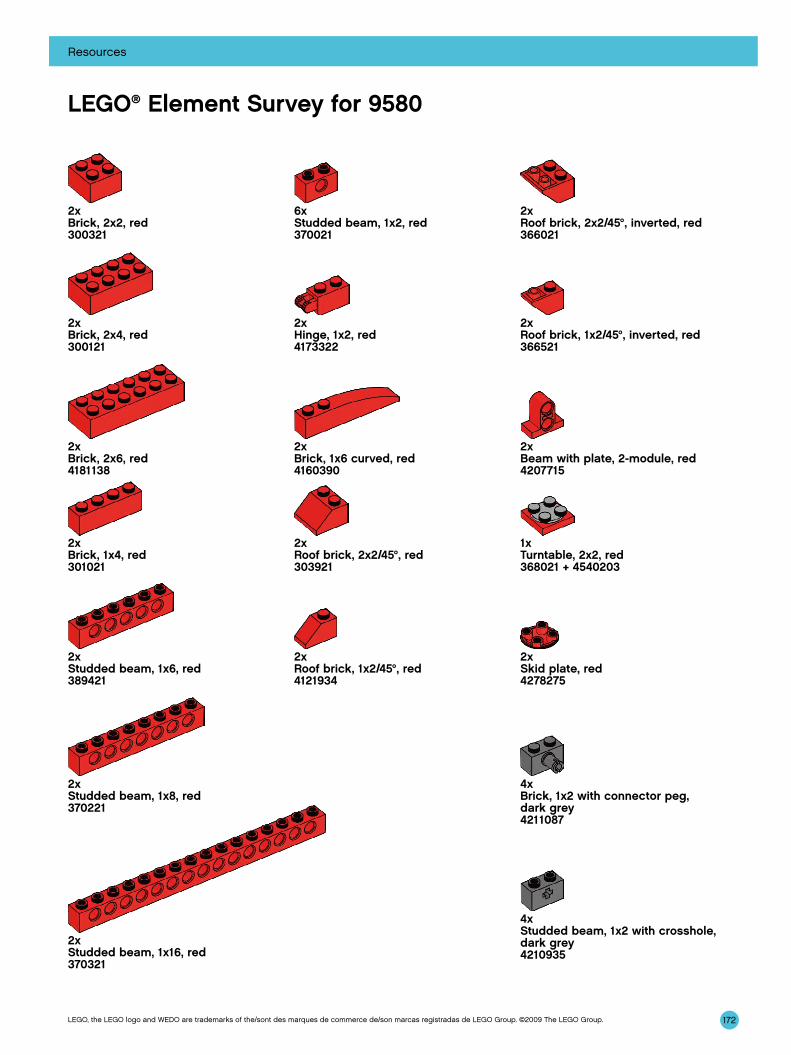
172
Resources
LEGO, the LEGO logo and WEDO are trademarks of the/sont des marques de commerce de/son marcas registradas de LEGO Group. ©2009 The LEGO Group.
2x Brick, 1x4, red 301021
2x Roof brick, 1x2/45°, red 4121934
1x Turntable, 2x2, red 368021 + 4540203
2x Brick, 2x6, red 4181138
2x Brick, 1x6 curved, red 4160390
2x Beam with plate, 2-module, red 4207715
2x Studded beam, 1x6, red 389421
2x Roof brick, 1x2/45°, inverted, red 366521
2x Skid plate, red 4278275
2x Studded beam, 1x8, red 370221
2x Studded beam, 1x16, red 370321
4x Brick, 1x2 with connector peg, dark grey 4211087
4x Studded beam, 1x2 with crosshole, dark grey 4210935
2x Brick, 2x2, red 300321
6x Studded beam, 1x2, red 370021
2x Roof brick, 2x2/45°, inverted, red 366021
2x Brick, 2x4, red 300121
2x Hinge, 1x2, red 4173322
2x Roof brick, 2x2/45°, red 303921
LEGO® Element Survey for 9580
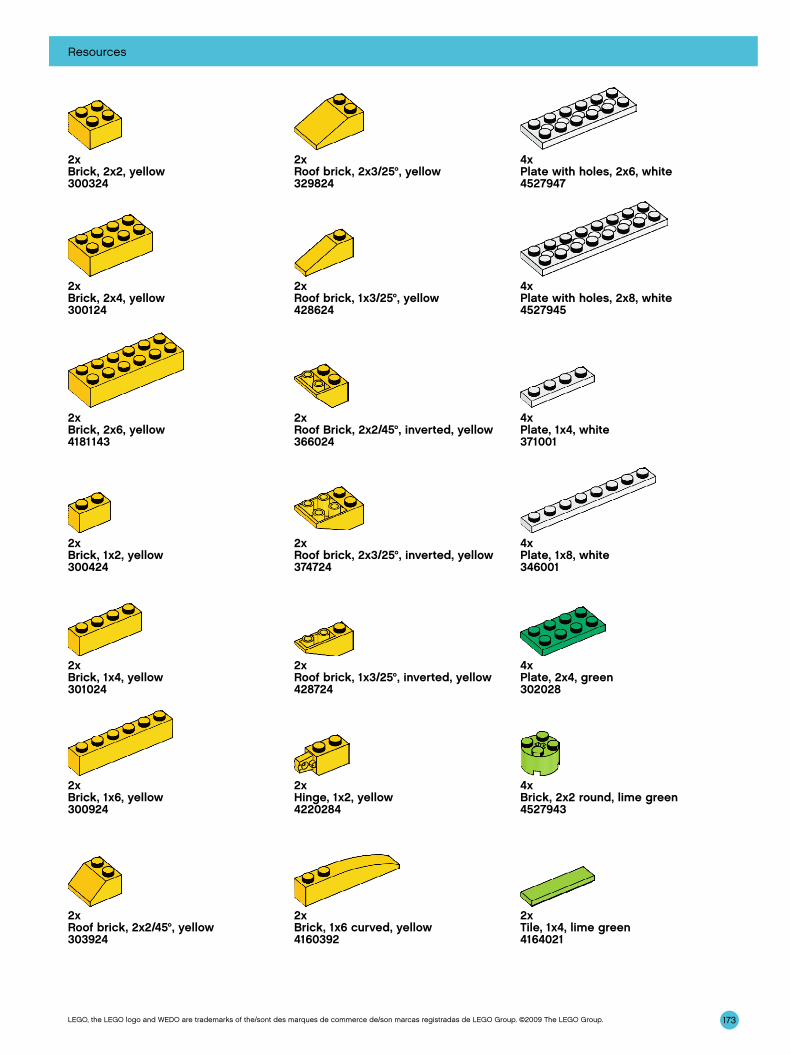
173
Resources
LEGO, the LEGO logo and WEDO are trademarks of the/sont des marques de commerce de/son marcas registradas de LEGO Group. ©2009 The LEGO Group.
2x Roof brick, 2x3/25°, yellow 329824
2x Brick, 1x2, yellow 300424
4x Plate, 1x4, white 371001
2x Brick, 2x6, yellow 4181143
2x Tile, 1x4, lime green 4164021
2x Roof brick, 2x2/45°, yellow 303924
2x Brick, 1x4, yellow 301024
4x Plate, 1x8, white 346001
2xRoof Brick, 2x2/45°, inverted, yellow366024
2x Roof brick, 1x3/25°, inverted, yellow 428724
2x Roof brick, 2x3/25°, inverted, yellow 374724
2x Hinge, 1x2, yellow 4220284
2x Roof brick, 1x3/25°, yellow 428624
2x Brick, 2x2, yellow 300324
4x Plate, 2x4, green 302028
2x Brick, 2x4, yellow 300124
4x Brick, 2x2 round, lime green 4527943
4x Plate with holes, 2x8, white 4527945
2x Brick, 1x6, yellow 300924
4x Plate with holes, 2x6, white 4527947
2x Brick, 1x6 curved, yellow 4160392
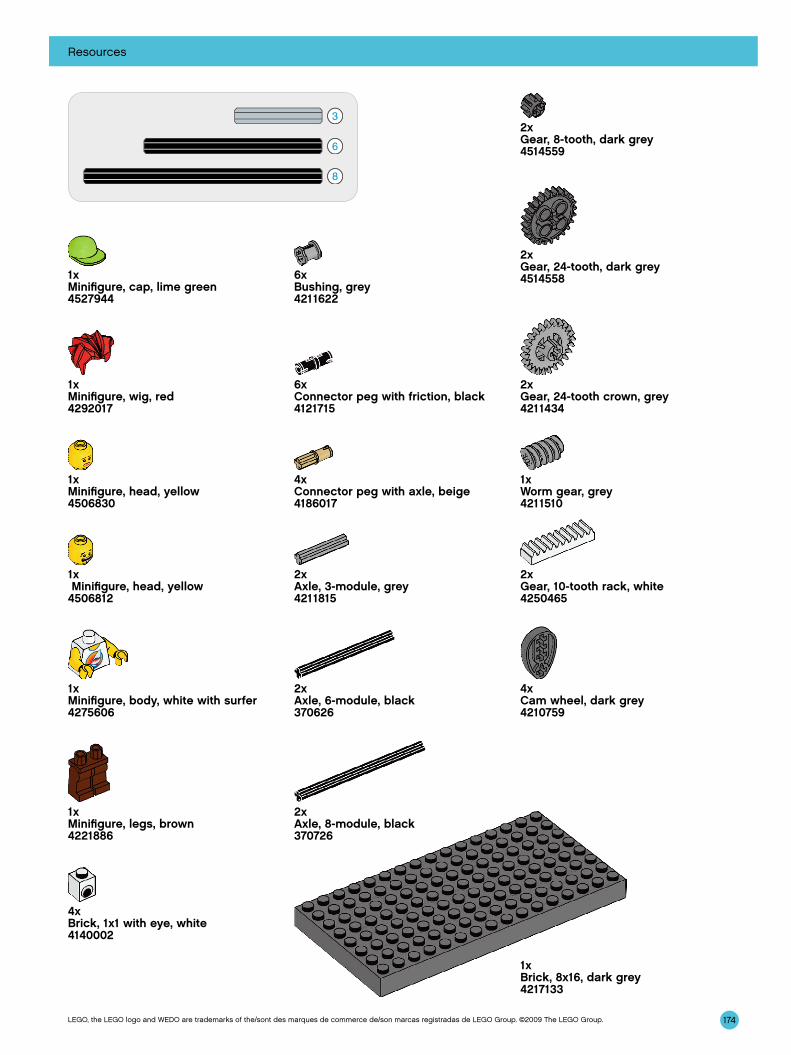
174
Resources
LEGO, the LEGO logo and WEDO are trademarks of the/sont des marques de commerce de/son marcas registradas de LEGO Group. ©2009 The LEGO Group.
1x Minifigure, cap, lime green 4527944
6x Bushing, grey 4211622
2x Gear, 8-tooth, dark grey 4514559
4x Cam wheel, dark grey 4210759
1x Minifigure, wig, red 4292017
6x Connector peg with friction, black 4121715
2x Gear, 24-tooth, dark grey 4514558
1x Minifigure, head, yellow 4506830
4x Connector peg with axle, beige 4186017
2x Gear, 24-tooth crown, grey 4211434
1x Minifigure, head, yellow 4506812
2x Axle, 3-module, grey 4211815
1x Worm gear, grey 4211510
1x Minifigure, body, white with surfer 4275606
2x Axle, 6-module, black 370626
2x Gear, 10-tooth rack, white 4250465
1x Minifigure, legs, brown 4221886
2x Axle, 8-module, black 370726
1x Brick, 8x16, dark grey 4217133
4x Brick, 1x1 with eye, white 4140002

175
Resources
LEGO, the LEGO logo and WEDO are trademarks of the/sont des marques de commerce de/son marcas registradas de LEGO Group. ©2009 The LEGO Group.
1x String, 30-module with knobs, black 4528334
1x Motion Sensor, grey 4535734
1x Tilt Sensor, grey 4535729
1x Motor, grey 4506083
1x LEGO® USB Hub, grey 4535710
2x Tire, 30, 4x4, black 281526
2x Hub, 24x4, lime green 4494219
2x Belt, 33mm, yellow 4544151
1x Gear block, transparent 4142824

. LEGO® Education reserves the right to make changes to the product assortment and packaging. LEGO, the LEGO logo and WEDO are trademarks of the/sont des marques decommerce de/son marcas registradas de LEGO Group. ©2009 The LEGO Group.
Related Documents