Lotus® Lotus Connections 1.0.1 Installation Guide GI11-7976-01

Welcome message from author
This document is posted to help you gain knowledge. Please leave a comment to let me know what you think about it! Share it to your friends and learn new things together.
Transcript

Lotus®
Lotus Connections 1.0.1 Installation Guide
GI11-7976-01
���

This edition applies to version 1, release 0, modification 1 of IBM Lotus Connections (product number 5724-S68)
and to all subsequent releases and modifications until otherwise indicated in new editions.
© Copyright International Business Machines Corporation 2007, 2007. All rights reserved.
US Government Users Restricted Rights – Use, duplication or disclosure restricted by GSA ADP Schedule Contract
with IBM Corp.

Contents
Chapter 1. IBM Lotus Connections
installation overview . . . . . . . . . 1
Product overview . . . . . . . . . . . . . 1
Audience . . . . . . . . . . . . . . . 1
Planning a production installation . . . . . . . 2
Installation checklist . . . . . . . . . . . . 4
Chapter 2. Pilot installation overview . . 5
Creating a user information file . . . . . . . . 5
Installing a pilot server . . . . . . . . . . . 7
Adding authentic users to the pilot . . . . . . 10
Administering the pilot . . . . . . . . . . 12
Removing a pilot installation . . . . . . . . 13
Chapter 3. Hardware and software
requirements . . . . . . . . . . . . 15
Hardware requirements . . . . . . . . . . 15
Software requirements . . . . . . . . . . . 17
Chapter 4. Preinstallation tasks . . . . 21
Preparing the LDAP server to communicate with
IBM WebSphere Application Server . . . . . . 21
Installing IBM WebSphere Application Server . . . 21
Setting up profiles and server processes on
WebSphere Application Server . . . . . . . 22
Setting up federated repositories . . . . . . 25
Configuring the IBM HTTP Server for SSL . . . 28
Adding certificates to the IBM HTTP Server . . 28
Defining the IBM HTTP Server for a profile . . 29
Registering the DB2 product license key . . . . . 30
Creating the feature databases . . . . . . . . 31
Creating IBM DB2 databases for the features . . 31
Creating Oracle database tables for the features 34
Creating the Profiles database . . . . . . . 36
Chapter 5. Setting up a stand-alone
deployment . . . . . . . . . . . . . 55
Installing a Lotus Connections feature . . . . . 56
Installing Activities . . . . . . . . . . . 61
Installing Blogs . . . . . . . . . . . . 68
Installing Communities . . . . . . . . . 74
Installing Dogear . . . . . . . . . . . 76
Installing Profiles . . . . . . . . . . . 81
Adding a new feature after an update . . . . . 85
Administering a stand-alone deployment . . . . 86
Linking features . . . . . . . . . . . . 86
Chapter 6. Setting up a network
deployment . . . . . . . . . . . . . 91
Preinstallation tasks for a network deployment . . 91
Setting up Java 2 security . . . . . . . . . 91
Creating a cluster . . . . . . . . . . . . 92
Installing the first node . . . . . . . . . 93
Installing a subsequent node . . . . . . . 96
Defining the IBM HTTP Server for a node . . . 97
Chapter 7. Mapping the features to the
IBM HTTP Server . . . . . . . . . . 99
Mapping multiple profiles to a single IBM HTTP
Server . . . . . . . . . . . . . . . . 102
Chapter 8. Installing updates . . . . . 109
Using the Lotus Connections update installer . . . 109
updateLC command . . . . . . . . . . 110
Lotus Connections version 1.0.1 . . . . . . . 114
Bringing down Lotus Connections for
maintenance work . . . . . . . . . . . 115
Updating a stand-alone server . . . . . . . 115
Updating a network deployment . . . . . . 117
Updating Profiles feature data . . . . . . . 122
Uninstalling updates . . . . . . . . . . 123
Installing an interim fix . . . . . . . . . . 124
Chapter 9. Uninstalling Lotus
Connections . . . . . . . . . . . . 127
Uninstalling a stand-alone deployment of Lotus
Connections . . . . . . . . . . . . . . 128
Uninstalling a Lotus Connections cluster . . . . 132
Chapter 10. Performing a silent
installation . . . . . . . . . . . . 135
InstallResponse.txt file . . . . . . . . . . 135
Chapter 11. Troubleshooting . . . . . 141
Lotus Connections log file . . . . . . . . . 142
Error messages . . . . . . . . . . . . . 143
Notices . . . . . . . . . . . . . . 197
Trademarks . . . . . . . . . . . . . . 198
© Copyright IBM Corp. 2007, 2007 iii

iv IBM Lotus Lotus Connections 1.0.1 Installation Guide

Chapter 1. IBM Lotus Connections installation overview
Before installing IBM® Lotus® Connections, review the hardware and software requirements, planning
considerations, and the installation checklist.
Before you install Lotus Connections make sure that you are familiar with the product features, review
the hardware and software requirements, and select an installation type: stand-alone or network. The
hardware and software resources you will need and administrative personnel that will have to be
involved in the process differ depending on the type of installation you choose to perform.
There are two types of installations available:
v Pilot : Use this type of installation to evaluate Lotus Connections. This installation type does not
support the heavy loads and usage common in an enterprise production environment. You can install
the pilot quickly. The software required to run Lotus Connections is installed and configured on a
single server as part of the basic installation. This includes WebSphere® Application Server
pre-configured for use with Lotus Connections and DB2® Express pre-configured with the databases
required for each feature installed. Use a pilot installation to become familiar with Lotus Connections
and the benefits it provides in your enterprise. See Pilot installation overview for more information about
this installation type.
v Production: Use this type of installation to install a version of Lotus Connections that provides
enterprise scalability and robust performance. This installation type requires that you install and
configure WebSphere Application Server and database software before installing the product itself. See
Planning a production installation for more information about this installation type.
Any data your users create with a pilot installation (activities, bookmarks, blog postings, etc.) can be
migrated to a Lotus Connections production environment. See Migrating a pilot to a production installation.
Product overview
IBM Lotus Connections is social networking software that consists of five features: Activities, Blogs,
Communities, Dogear, and Profiles.
Lotus Connections is made up of the following set of features:
v Activities – Collaboration tool for collecting, organizing, sharing, and reusing work that is related to a
project goal.
v Blogs – Online journals that you can use to deliver timely information with a personal touch.
v Communities – A Web site that you create so that people who share a common interest can interact
with one another and share resources.
v Dogear – Social bookmarking tool that you can use to save, organize, and share Internet and intranet
bookmarks.
v Profiles – Directory of the people in your organization that includes the information you need to form
and encourage effective networks.
Used together, these tools help employees interact more effectively.
Audience
This Installation Guide assumes that you have some prior experience with products that support
enterprise Web applications.
© Copyright IBM Corp. 2007, 2007 1

Lotus Connections has dependencies on a number of other products. This guide assumes that you have a
basic knowledge of those products, including how to:
v Install, configure, secure, and administer IBM WebSphere Application Server
v Install IBM HTTP Server, and then configure it to interact with IBM WebSphere Application Server
over HTTP and HTTPS
v Install the IBM Tivoli® Directory Server or Microsoft® Active Directory LDAP directory, and then
configure the LDAP directory with federated repositories
v Create, populate, manage, and drop IBM DB2 or Oracle databases
Planning a production installation
Before you install Lotus Connections, decide which of its features you want to install, and then select the
type of production installation that you want: stand-alone or network.
Lotus Connections features
You can install all of the Lotus Connections features or choose fewer to implement. Before you begin the
installation, determine which features – Activites, Blogs, Communities, Dogear, or Profiles – that you
want to implement.
Deployment options
Lotus Connections is hosted by IBM WebSphere Application Server. When you install the product, you
must determine how you want to configure it on WebSphere Application Server. WebSphere Application
Server identifies an application as an application server process. You can group server processes so that
you can administer them as a unit; WebSphere Application Server refers to such a group of server
processes as a profile.
Note: The term profiles, when used in relation to WebSphere Application Server is a different concept
from the term Profiles, which is the name of one of the Lotus Connections features.When planning the installation, you must decide whether you want to install:
v Each feature on its own profile on the default server process
v All five features on a single profile, but each feature on its own server process
Note: Installing all five features on a single profile and single server process is not supported.
Stand-alone deployment – An installation of one or more features on one or more systems that are
administered separately. This option requires a minimum of two dedicated systems to be hosted
successfully.
The easiest way to administer the product is to install the Websphere Application Server Network
Deployment Manager and use it to federate the multiple profiles into a single cell. Adding the profiles to
a cell enables you to administer them centrally. If you do not want to buy and install the WebSphere
Application Server Network Deployment Manager, you have the following options:
v A single profile with five server processes – In this configuration you must use the wsadmin tool to
create a new server process for each feature. The WebSphere Application Server Integrated Solutions
Console is available on the default server process for the profile (server1) only, which means that you
can administer only one feature using the WebSphere Application Server Integrated Solutions Console.
You must use the wsadmin tool to administer the other features. The advantages of this configuration
are:
– You do not have to edit the feature configuration files to link the features together after the
installation. If you do not set up a network deployment and you install the features to separate
profiles, you must edit the configuration file created for each feature profile to include information
about the other features.
2 IBM Lotus Lotus Connections 1.0.1 Installation Guide

– You can map all five features to a single instance of the IBM HTTP Server.
This configuration is a good choice if you do not plan to set up a network deployment.
v Five profiles, one for each feature – In this configuration, you can make changes to one feature, such as
apply an update or a fix, or you can remove the feature, without affecting the other features. While
you can access the Integrated Solutions Console for each feature, it can be difficult to administer this
configuration because each profile must be accessed through a different port and the multiple ports can
be difficult to keep track of. You cannot map all five features to one IBM HTTP Server instance; instead
you must map each feature to a separate instance of the IBM HTTP Server, and then you can merge
the multiple plugin.xml files to effectively map the features to one instance. In addition, you must
update the configuration file (LotusConnections-config.xml) for each feature after you complete the
installation to inform each feature of the existence of the other features. This configuration is a good
choice if you are planning to install the Deployment Manager and create at least a single cell.
v Mix and match – You can choose to set up a combination of the two deployment options listed above.
Consider the best deployment scenario per feature based on the network and hardware resources
available to you and the amount of use you anticipate for each feature.
See the Administering Lotus Connections section of the Lotus Connections information center for more
information about the wsadmin tool.
Network deployment – An installation on two or more sets of servers that are grouped to share the
product’s workload. A advantage of a network deployment of Lotus Connections is that it provides the
administrator with a central management facility, and it ensures that users have constant access to data. It
balances the workload between servers, improves server performance, and facilitates the maintenance of
performance when the number of users increases. The added reliability also requires a larger number of
systems and the experienced administrative personnel who can manage them. Each instance of Lotus
Connections requires a set of two dedicated systems, and you must also configure an additional system
with the WebSphere Application Server Network Deployment Manager, which enables you to build,
manage, and tune the clustered servers.
You have the following options:
v One profile per feature, each on a separate system – This deployment requires a lot of hardware and
requires a strong network infrastructure. It also provides the best failover capability. As demand for the
services grows, you can increase the number of features hosted by each system.
v One profile per feature on a single system – This deployment is the most flexible; you can uninstall or
upgrade individual features.
v A single profile with one server process per feature on a single system – This deployment has limited
flexibility because you cannot uninstall or upgrade individual features. All features must be handled
the same because they all reside in a single profile.
Note: If you use this configuration, you must install all the features before you can add any of them to
the cluster. Lotus Connections does not support running the installer on a managed node. A managed
node is an application server that has been federated into a Deployment Manager cell. For example, if
you installed Activities and Profiles in two separate server processes in the same profile, and then
completed the steps in the topic, Installing the first node, to add them to a cell, you would not be able to
then install another feature, like Dogear, in a separate server process in the same profile.
v Mix and match – You can choose to set up a combination of these options. Determine the best
deployment scenario per feature based on the network and hardware resources available to you and
the amount of use you anticipate each feature to experience. Related tasks
“Mapping multiple profiles to a single IBM HTTP Server” on page 102You can map five profiles to one IBM HTTP Server by defining a Web server for each profile,
mapping each profile separately, and then merging the resulting configuration files.
Chapter 1. IBM Lotus Connections installation overview 3

“Linking features” on page 86After you have installed the Lotus Connections features that you want to use, configure the features to
work together. Doing so enables features to share information, and allows you to easily navigate
among them.
“Creating WebSphere Application Server processes” on page 22If you want to install multiple features on a single profile in WebSphere Application Server, you can
do so using a JACL script.
Installation checklist
The installation checklist describes the steps and the order in which to perform them.
1. Decide whether to set up a stand-alone or network deployment of Lotus Connections.
2. Review the hardware requirements for the systems that will host Lotus Connections. See “Hardware
requirements” on page 15
3. Install the required software. In the following cases, more than one product is supported. You must
choose an option.
v Operating system
v Database server
v Directory serverSee “Software requirements” on page 17.
4. Chapter 4, “Preinstallation tasks,” on page 21
5. Install Lotus Connections by completing one of the following steps:
v If you are setting up a stand-alone deployment, see Chapter 5, “Setting up a stand-alone
deployment,” on page 55.
v If you are setting up a network deployment, see Chapter 6, “Setting up a network deployment,” on
page 91.
4 IBM Lotus Lotus Connections 1.0.1 Installation Guide

Chapter 2. Pilot installation overview
A pilot installation provides a quick and easy way for you to preview the features and benefits of Lotus
Connections.
A pilot installation supports the quick and easy deployment of Lotus Connections. A pilot installation
includes all the ancillary software required to run Lotus Connections, including WebSphere Application
Server and DB2 Express. A pilot installation is not capable of supporting production environment usage
or loads. It does not support clustering or failover, and it must be contained on a single server instance.
A pilot installation makes all five Lotus Connections features available for evaluation and use. Features
are installed on the same WebSphere Application Server server process. This basic environment provides
you with an opportunity to learn which of the Lotus Connections features might be most appropriate in
your enterprise, and also gives insight into how you might deploy each feature.
After you decide to move from a pilot installation to a production deployment, you can easily migrate
data created during the pilot installation phase (activities, bookmarks, blog postings, communities entries,
etc.) to the production environment.
What’s included in a pilot installation
A pilot installation is designed to minimize the administrator input and simplify configuration. Pilot
installation software performs the following tasks:
v Installs WebSphere Application Server 6.1.0.3 and all required fixpacks
v Installs DB2 V9.1 Express
v Installs one or more Lotus Connections features (Activities, Blogs, Communities, Dogear, Profiles)
v Creates pre-configured DB2 databases for each installed feature
v Creates a pre-populated Profiles database incorporating structured user data
Hardware and software requirements
The hardware requirements of a pilot installation are the same as those of a single-server production
installation. Please refer to production installation documentation for specifics. See Installing a pilot server
for disk space requirements.
Adding features to an existing pilot installation
A pilot installation allows you to install one, several or all five Lotus Connections features. However, if
you install some but not all features, and later decide you want to install additional features, you cannot
simply add them to an existing pilot installation. Instead, you must remove the existing pilot installation
and perform a new pilot installation that includes the additional features you want.
This means that you will lose all user data created in the initial installation. For this reason, it is
recommended that you install all five features at the outset, and deploy only the features you need
during the course of your product evaluation. Doing so gives you the option to easily activate and use an
additional feature at a later time.
Creating a user information file
The pilot installation supports the use of real user identifies and data. Before you can register real users,
you must create a user information file.
© Copyright IBM Corp. 2007, 2007 5

The best way to find out how Lotus Connections will benefit your enterprise when it is subsequently
implemented is to get real users interacting with the Lotus Connections pilot. To support real users, you
must provide authentic user credentials to Lotus Connections. The pilot installation uses the WebSphere
Application Server Identity Manager (WIM) to provide a basic user repository. The user information file
is a text file that contains attributes which define the users who will be using the installed Lotus
Connections features. After creating this file, you can populate the pilot user repository with the authentic
user data it provides by specifying this file during the initial pilot installation or after installing using a
wsadmin command.
Note: This procedure is optional. You can also use the sample data provided with the pilot installation to
test out the features. However, if you plan to migrate from the pilot installation to a production
installation, you must complete this procedure because the pilot users must have user IDs that will be
recognized by the LDAP directory you will use in the production installation.
To create a user information file, complete the following steps:
1. Open a text editor program.
2. Enter information related to a single user on each line on this file in the following format:
<attribute1_name>=<attribute1_value>,<attribute2_name>=<attribute2_value>
Be sure to separate each attribute name/value pair with a comma character.
3. For each user you want to add to the system, provide the following attributes:
a. uid: Specifies the unique ID for the user. Users will use the uid value to log into the features.
Example: uid=jdoe
b. pwd: Specifies the password for the user. The value is encrypted in the WIM file for security.
Example: pwd=passw0rd
c. cn: Specifies the common (first and last) name of the user. Example: cn=John Doe
d. sn: Specifies the surname (last name or family name) of the user. Example: sn= Doe
e. mail: Specifies the e-mail address of the user. Example: [email protected]
For example, the full entry for the user defined in the previous examples would look as follows:
uid=jdoe,pwd=passw0rd,cn=John Doe,sn=Doe,[email protected]
4. Optional: If you intend to use the Profiles feature, add the following attributes to each user entry in
addition to the standard set of attributes:
a. mobile: String representing phone number. Example: mobile=12345678
b. manager: The uid of the specific user. Example: manager=jane_doe
c. secretary: The uid of the user. Example: secretary=bob_doe5. Optional: For each user you include in the file, you can add one or more of the following additional
attributes to expand the amount of information available:
Option Description
preferredLanguage Preferred or primary spoken language
displayName Screen name
initials Initials used in a name
labeledURI Uniform Resource Locator with an optional label. For
example: http://www.ibm.com/developerworks/lotus/documentation/ Lotus Documentation
carLicense Automobile registration plate number
telephoneNumber Business phone number
facsimileTelephoneNumber Business FAX number
pager Business pager number
6 IBM Lotus Lotus Connections 1.0.1 Installation Guide

Option Description
homePostalAddress Residence mailing address
postalAddress Business street address
roomNumber Office or cubical identification number
localityName Two-letter Country code
stateOrProvinceName For U.S. and Canada only
postalCode Numerical postal code
employeeNumber Employee identification number
departmentNumber Employee department identification number
title Job title
countryName Employee country assignment
givenName employee first name
homeAddress Employee residence address
businessAddress Employee business address
description Employee job responsibility description
businessCategory Employee division assignment
6. Save and close the text file. Make a note of its location.
A typical user data text file might look as follows:
# ** Lotus Connections pilot installation user data text file **
uid=jdoe,pwd=passw0rd,cn=John Doe,sn=Doe,[email protected],preferredLanguage=German
uid=mdoe,pwd=f00bar,cn=Mary Doe,sn=Doe,[email protected],roomNumber=967
uid=bdoe,pwd=barf00,cn=Bob Doe,sn=Doe,[email protected],businessCategory=marketing
uid=jgreen,pwd=pword1,cn=John Green,sn=Green,[email protected],countryName=China
uid=jbrown,pwd=secretpword,cn=John Brown,sn=Brown,[email protected],manager=psmith
...
uid=jblack,pwd=apw0rd,cn=John Black,sn= Black,[email protected],telephoneNumber=1234567890
Related tasks
“Installing a pilot server”Installing a pilot server allows you to quickly and easily deploy Lotus Connection in a single server
environment. This type of installation is suitable for product evaluation purposes only and is not
intended for use in a production environment.
Installing a pilot server
Installing a pilot server allows you to quickly and easily deploy Lotus Connection in a single server
environment. This type of installation is suitable for product evaluation purposes only and is not
intended for use in a production environment.
If you want to provide real user data to be used during the evaluation, create a user information file
before you begin the pilot installation. Providing real user data is recommended if you plan to migrate
from the pilot installation to a production installation. You can also create the user data file and add it to
the pilot user repository after the installation.
The pilot installation places any Lotus Connections features you choose to install onto a single machine.
It also installs the following supporting software packages:
v DB2 Express – Database repository; it is pre-populated with sample data.
v IBM WebSphere Application Server – Web application server.
Chapter 2. Pilot installation overview 7

Make sure that the system on which you will install the pilot meets the following space requirements:
v Disk on which you are going to install the pilot – At least 3 gigabytes
v Windows operating system drive on which you are going to install the pilot – 1 gigabyte
To install a Lotus Connections pilot server, complete the following steps:
1. Remove any existing copies of WebSphere Application Server from the system on which you are
installing the pilot.
2. Remove any existing copies of DB2 and all DB2-related user or group IDs.
3. Microsoft Windows 2003 Server only: You must disable the DisableMsi policy setting in the registry
before running the pilot installer to enable DB2 to be set up correctly. To do so, complete the
following steps:
a. Open the registry editor by opening a command prompt and entering the following command:
regedit
b. Browse to the following key:
HKEY_LOCAL_MACHINE\Software\Policies\Microsoft\Windows\Installer
c. Right-click the directory background, and then select New → DWORD Value from the menu.
d. Name it DisableMsi , and set its value to zero.
e. Close the registry editor. 4. Before installing the pilot, you must grant administrative access to the user ID that you will use to
install the pilot and therefore to create the DB2 database. To do so, make sure the user ID that you
plan to log in with to perform the installation is a member of the Administrators group. From the
Control Panel, select Administrative Tools → Computer Management → System Tools → Local Users
and Groups → Groups, and then right-click Administrators and click Properties. If the user ID is not
displayed in the Members list, ask your system administrator to add it.
5. If you log in as a domain user, before you begin the installation you must add the domain user ID
to a DB2 administrator group. To do so, from the Control Panel, select Administrative Tools →
Computer Management → System Tools → Local Users and Groups, and then right-click Groups and
click New Group. Add a group named DB2ADMNS. After creating it, right-click the group, select
Properties → Add, and then add the domain user ID to the group.
6. Optional:
v If you are downloading the product, download the Lotus Connections installer executable file
from the Lotus Connection Web site, and then do the following:
– Microsoft Windows®:
From the directory to which you downloaded the EXE file, double-click the EXE file to extract
its contents to a folder on your system. This creates a folder named
Lotus_Connections_Pilot_Install.v If you are installing the product from the DVD, copy the Lotus_Connections_Pilot_Install
directory from the DVD to a temporary location on your local system. From the temporary
directory, right-click the Lotus_Connections_Pilot_Install directory, and from the menu, select
Properties. Deselect the Read-only check box in the Properties box, and then click Apply. Apply
the change to the current folder, subfolders, and all files. Click OK. 7. Run the installer by doing the following:
v Microsoft Windows:
Expand the Lotus_Connections_Pilot_Install directory, and then double-click the install.bat file
to start the installer. 8. Select the language to use for the installer.
9. Click Next on the Welcome page.
10. Review and accept the Lotus Connections license agreement.
11. Review the location to which Lotus Connections will be installed. If you want to install it to a
different directory, click Browse to select a different directory, and then click Next. Otherwise, click
8 IBM Lotus Lotus Connections 1.0.1 Installation Guide

Next to accept the default location. All the prerequisite software including WebSphere Application
Server and DB2, will be installed into this directory.
12. Type an administrative user ID and password for the WebSphere Application Server that you are
about to install, and then click Next.
Note: This user ID is used to access WebSphere Application Server only. Remember what you
specify here. You can subsequently use these credentials to log into the WebSphere Application
Server Integrated Solutions Console to configure and manage Lotus Connections features.
13. Type an ID to use as the administrative user ID for IBM DB2 Express Edition and a corresponding
password into the appropriate fields. Type the password again to confirm it, and then click Next.
Note: The installer creates a new user in the operating system user registry with these credentials.
This ID will have DB2 administrative privileges. Do not specify a user ID that already exists; this
must be a new and unique user ID. Remember what you specify here. You will subsequently use
this user ID to administer DB2 instances, create schema definitions, and set up access to the
databases for Lotus Connections features.
14. Select the check boxes next to the features you want to install from the following options:
v Activities
v Blogs
v Communities
v Dogear
v Profiles
Note: You cannot add a feature to an existing pilot installation. You can, however, install all the
features and only implement those you want to use now. Doing so ensures that all the features are
available should you subsequently decide to evaluate the full suite. Otherwise, you would have to
uninstall and reinstall the pilot to access any features that you did not install initially.Click Next.
15. Accept the default host name for the WebSphere Application Server. Make a note of the default host
name; it forms the Web address that you will use to access the features later. Click Next.
16. Review the installation summary to ensure that the values you entered on previous screens are
correct. If you want to make a change, click Back to edit a value. Otherwise, click Next to begin the
installation.
17. After the installation is completed successfully, click Next.
18. On the user registration panel, you can either accept the default users.txt file to use sample user data
or click Browse to retrieve the user information file containing real user data that you created
previously. Click Next.
See Creating a user information file for details about how to provide real user data.
19. Click Finish to close the installation wizard and start the server that hosts the features.
20. To access and use a feature, open a Web browser and go to the following Web address:
v Activities:
http://<WebSphere_Application_Server_hostname>:9080/activities
v Blogs:
http://<WebSphere_Application_Server_hostname>:9080/blogs
v Communities:
http://<WebSphere_Application_Server_hostname>:9080/communities
v Dogear:
http://<WebSphere_Application_Server_hostname>:9080/dogear
v Profiles:
http://<WebSphere_Application_Server_hostname>:9080/profiles
Chapter 2. Pilot installation overview 9

where <WebSphere_Application_Server_hostname> is the default host name that you wrote down in
Step 11. Log in using one of the user IDs and passwords you provided in the user information file or
using the credentials of one of the sample users provided with the product, such as:
v User ID: test1
v Password: passw0rd
See Administering the pilot for information about how to get a list of pilot users and how to manage
their IDs.
21. If you plan to use the Blogs feature, create an administrative user for the Blogs. See “Creating a
Blogs administrative user” on page 71 for details.
The content stores for each feature are created in the following file locations:
v Activities:
– Content store:
C:\Program Files\IBM\LotusConnections\Data\Activities\AppSrv01\contentstore
– Statistics:
C:\Program Files\IBM\LotusConnections\Data\Activities\AppSrv01_server1\
statistics
v Blogs:
– Index file:
C:\Program Files\IBM\LotusConnections\Data\Blogs\AppSrv01_server1\
index
– Uploaded files:
C:\Program Files\IBM\LotusConnections\Data\Blogs\roller_data\uploads
v Communities index file:
C:\Program Files\IBM\LotusConnections\Data\Communities\AppSrv01_server1\index
v Dogear:
– Index file:
C:\Program Files\IBM\LotusConnections\Data\Dogear\AppSrv01_server1\index
– Favorite icons:
C:\Program Files\IBM\LotusConnections\Data\Dogear\favicons
v Profiles index file:
C:\Program Files\IBM\LotusConnections\Data\Profiles\AppSrv01_server1\index
Related tasks
“Creating a user information file” on page 5The pilot installation supports the use of real user identifies and data. Before you can register real
users, you must create a user information file.
Adding authentic users to the pilot
You can add real users to the user repository of the pilot installation after initially installing it with
sample users. Defining authentic user identities is required if you want to migrate user data from a pilot
installation to a production installation of Lotus Connections 1.0.1.
Perform this procedure if you have already installed the pilot version of Lotus Connections 1.0.1 and did
not use a user information file to register users during the initial installation.
You must create a user information file before you can complete this procedure.
To add authentic users to the pilot’s user repository after installing it, complete the following steps:
10 IBM Lotus Lotus Connections 1.0.1 Installation Guide

1. Run the wsadmin client by opening a command prompt, changing to the directory to which you
installed the pilot, and then typing the following command:
C:\Program Files\IBM\WebSphere\AppServer\profiles\AppSrv01\bin\wsadmin.bat
-user <admin_user_id> -password <admin_password>
-f \populate\parseText.jacl <user_info_file_path>
where:
v <admin_user_id> is the user name of the WebSphere Application Server administrator
v <admin_password> is the password of the WebSphere Application Server administrator
v <user_info_file_path> is the file path to the directory in which you stored the user information file
you created.2. Optional: Required if you are implementing the Profiles feature: If you are enabling Profiles, update
the value of the PROF_GUID property in the map_dbrepos_from_source.properties file to reflect the
globally unique identifier in the production LDAP system. See Mapping fields for more details.
3. Optional: Required if you are implementing the Profiles feature: Do one of the following:
v If the value of the PROF_SOURCE_UID property in the EMPLOYEE table in the Profiles database is
the same as the distinguished name (DN) specified in the production LDAP directory, complete the
following steps:
– Run the following file:
Microsoft Windows:
collect_guid_updates.bat
This program collects each database entry that contains PROF_SOURCE_UID and compares the
values of the PROF_GUID property in the Profiles database with the value returned by mapping
the production LDAP values. If the GUID values do not match, it writes the UID and globally
unique ID (GUID) values that are different to the collect_employees.in file.
– Run the following file to replace any incorrect globally unique identifiers in the Profiles database
with the correct values from the production LDAP directory:
Microsoft Windows:
update_employees_from_file.bat
v If the value of the PROF_SOURCE_UID property in the EMPLOYEE table is not the same as the
distinguished name specified in the production LDAP directory, but the corporate e-mail address is
unique and the same in both the Profiles database and production LDAP directory, complete the
following steps:
– Update the value of the PROF_SOURCE_UID property in the
map_dbrepos_from_source.properties file to be equal to the distinguished name (DN) value in
the production LDAP directory by setting it equal to $dn. Update the value of the PROF_GUID
property in the map_dbrepos_from_source.properties file to contain the globally unique identifier
defined in the production LDAP directory. See Mapping fields for information on the specific
values to use; this differs depending on the LDAP directory you are using.
– Run the following file:
Microsoft Windows:
collect_guid_and_source_uid_updates.bat
This program collects each database entry that contains an e-mail value and compares the value
of the PROF_GUID and PROF_SOURCE_UID properties in the Profiles database with the values
returned by the production LDAP directory. If one or both of the values are not the same, it
writes the UID and the values that are different to the collect_employees.in file.
– Run the following file to replace the globally unique identifiers in the Profiles database with
values from the production LDAP directory:
Microsoft Windows:
update_employees_from_file.bat
Chapter 2. Pilot installation overview 11

Administering the pilot
Use the WebSphere Application Server Integrated Solutions Console to make configuration changes.
To administer a feature from the WebSphere Application Server Integrated Solutions Console, access it
from the following Web site:
http://<WebSphere_Application_Server_hostname>:9060/admin
where <WebSphere_Application_Server_hostname> is the name of the pilot server. Log in using the
administrative user ID and password that you specified during the pilot installation.
Refer to Administering Lotus Connections for additional information about administering Lotus Connections
features.
Using Secure Socket Layer (SSL) encryption
The Blogs and Dogear features support SSL operations. However, if you want to force login credentials
for these features to be submitted over a secure channel, you must install the IBM HTTP Server and Web
server plug-ins.
After you install the IBM HTTP Server and the Web server plug-ins, configure the IBM HTTP Server to
support encrypted traffic. See Configuring the IBM HTTP Server for SSL for more information.
Managing users
Whether you populate the user repository with names provided from a user information file or choose to
use the sample names provided with the product, you can view a list of the pilot users, edit their
passwords, and add new users from the WebSphere Application Server Integrated Solutions Console.
To manage the pilot users, complete the following steps:
1. Go to the WebSphere Application Server Integrated Solutions Console for the server that is hosting
the pilot installation by accessing the following address in a Web browser:
http://<WebSphere_Application_Server_hostname>:9060/admin
2. Log in using the administrative user ID and password that you specified during the pilot installation.
3. Expand Users and Groups, and then select Manage Users.
4. Click Search to view a list of pilot users.
5. From this page, you can edit user passwords or add new users.
The user names are also listed in the fileRegistry.xml file stored in the following directory of the system
hosting the pilot server:
v Microsoft Windows:
C:\IBM\LotusConnections\WebSphere\AppServer\profiles\AppSrv01\config\cells\
<cell_name>\
Changing passwords
As an administrator, you can change a pilot user’s password from the WebSphere Application Server
Integrated Solutions Console as described above. In addition, pilot users can change their own passwords
using a Web application. This functionality minimizes the administrative load and empowers users. To
change a password, the user of a feature can access the following Web address:
http://<WebSphere_Application_Server_hostname>:9080/password
Password changes take effect immediately and do not require a restart of the server.
Related tasks
12 IBM Lotus Lotus Connections 1.0.1 Installation Guide

“Configuring the IBM HTTP Server for SSL” on page 28Enable the IBM HTTP Server to use the Secure Sockets Layer protocol.
Removing a pilot installation
You can remove the artifacts created by a pilot installation while preserving the user data to be migrated
to a production installation.
Use the uninstall program to remove the artifacts of a pilot installation. This program removes Lotus
Connections, its related features, and the WebSphere Application Server. It also removes DB2 Express
Edition, but leaves the feature databases on the system. The databases must be explicitly removed by you
after you have either migrated to a production installation or determined that you no longer need the
data.
If you choose to migrate from a pilot installation to a production installation, perform the migration
before completing this procedure. See Migrating a pilot installation in the Administering Lotus Connections
section of the Lotus Connections information center for more information.
Note: Do not remove the WebSphere Application Server and DB2 or their supporting files before using
the uninstall program to remove the Lotus Connections features installed as part of the pilot. You may
have difficulty removing the pilot features from the system if these supporting software products are no
longer installed.
To remove the pilot installation, complete the following steps:
1. Stop the server instance of WebSphere Application Server that is hosting the pilot installation.
2. Stop all DB2-related processes that are running on the server by doing the following:
v Microsoft Windows:
From the Start menu, select Control Panel → Administrative Tools → Services, and then look for
DB2-related processes. To stop a process, right-click the service, and then click Stop. 3. Start the pilot software removal program.
v Microsoft Windows:
From the directory to which you installed the pilot, expand the uninstall folder, and then
double-click the following file:
uninstall.bat
4. Specify the language you want to use for the uninstallation wizard, and then click OK.
5. On the Welcome page, click Next.
6. Select the check boxes next to the features you want to remove. If you are removing all of the
features, select the prerequisite software check box as well, and then click Next.
Note: If you are not removing all of the features, do not select the prerequisite software check box.
This software must be installed on the machine for any remaining features to continue to function
properly.
7. When prompted for the WebSphere Application Server administrative user ID and password,
provide them, and then click Next.
8. Review the summary screen. Click Back to return to previous pages and make changes, or click Next
to continue.
9. After the features are removed, click Next.
If you are removing all of the features, the prerequisite software is removed next.
You can access the message log from the specified directory to see if any warning messages were
generated during the removal process.
10. Click Finish.
Chapter 2. Pilot installation overview 13

11. Do one of the following:
v If you migrated the pilot installation to a production installation, complete the following steps:
Note: Be sure you have complete the migration before you perform these steps.
– Remove the files that enable users to change their passwords from the system by deleting the
changePassword.ear and changePassword.war files from the following directory:
C:\Program Files\IBM\LotusConnections\installableApps
– Remove the IBM DB2 Express Edition license file from the system by deleting the db2exp_o.lic
file from the following directory:
C:\Program Files\IBM\LotusConnections\DB2.License\
v If you are not migrating to a production installation, complete the following steps:
– Remove the Lotus Connections pilot installation directory from the system:
C:\Program Files\IBM\Lotus Connections
– Remove DB2 Express and each feature database created by the pilot installation from the
system. Follow these steps to do so:a. Remove each feature database created by the pilot installation. See Uninstalling a stand-alone
deployment of Lotus Connections for information about manually removing feature databases.
b. Remove the Windows operating system administrative user ID for IBM DB2 Express Edition that
you created during the installation from the system.
c. Remove the C:\DB2 directory from the system.12. You must restart the machine after running the uninstall program before the features you uninstalled
will be removed fully.
Related tasks
“Uninstalling a stand-alone deployment of Lotus Connections” on page 128You can uninstall the entire Lotus Connections product, or individual Lotus Connections features, by
running the uninstaller program. Follow this procedure to remove a stand-alone deployment of Lotus
Connections from your system.
14 IBM Lotus Lotus Connections 1.0.1 Installation Guide

Chapter 3. Hardware and software requirements
Review the prerequisites for the product.
Related tasks
“Installing a Lotus Connections feature” on page 56When installing Lotus Connections, you install only one Lotus Connections feature at a time. The
steps defined in this section are common to all the features. After you perform the common
installation steps described below, you will complete the installation by performing feature-specific
installation procedures.
“Hardware requirements”The following hardware is required for the systems that host IBM Lotus Connections services.
“Software requirements” on page 17The following software is required to run IBM Lotus Connections.
Hardware requirements
The following hardware is required for the systems that host IBM Lotus Connections services.
v At least two Intel® 64 or IA-32 based server machines
Note: See Planning and Software requirements to determine how many systems you need.
v Two CPUs per server, 2.6 GHz cpu speed or higher
v Minimum 4 GB of memory per machine
v 80 GB of available disk space after installation and configuration of the base operating system
v Make sure the servers are connected to an IP network that can be accessed by users.
Detailed space requirements
The systems that host Lotus Connections must have the following amount of disk space:
v The temporary directory of the operating system on which you plan to run the installer must have at
least 150 MB of space.
v The Lotus Connections installer creates a directory in the following file path of WebSphere Application
Server:
– Linux®:
/opt/IBM/WebSphere/LotusConnections
– Windows:
C:\IBM\WebSphere\LotusConnections
This directory requires 110 MB of available space.
In addition, each Lotus Connections feature requires the following amounts of disk space for the initial
installation:
– Activities – 40 MB
– Blogs – 60 MB
– Communities – 40 MB
– Dogear – 60 MB
– Profiles – 40 MB
© Copyright IBM Corp. 2007, 2007 15

v Each feature requires the following amount of disk space for content stores and other files:
Table 1. Feature space requirement details
Feature Space requirements
Activities At least 5 GB initially to support the content store, which
holds all the files, images, and other content that activity
users add to their activities. This size will increase
quickly as the number of users increases and the number
of files and messages that users add to their activities
increases. You can limit the size of files that are added to
an activity by editing the <sizeLimits> element found in
the <objectStore> element of the oa-config.xml file. See
the Administration Guide for information on how to edit
this element.
Blogs At least 4.5 GB. Blogs supports the following items:
v Index file directory – Local directory on which the
full-text index that users access when they search for
terms in blogs is stored. This should have at least 1 GB
of space.
v File upload directory – Directory in which Blogs stores
any files that are uploaded to people’s blogs. This
directory must added to a shared drive if you are
setting up a network deployment. You can set a
maximum file size for uploaded files per blog by
editing the Max Directory Size (MB) setting in the
File Upload Settings section of the Blogs
Administration page. (You can access the
Administration page from the Blogs site that you
created if you log in using the administrative user ID
and password for the site.) The default value for this
setting is 4 MB. So, if you do not change the default,
the maximum space you will need for the file upload
directory is 4 MB times the number of blogs you are
hosting. This directory should have at least 400® MB of
space initially.
v Snapshot directory – When you implement a network
deployment, you must create this shared directory.
This directory keeps the index files on the nodes
up-to-date. It must be 3 times larger than the index
file. This directory should have at least 3 GB of space.
Communities At least 75 MB to support the index file directory, which
stores the full-text index that users access when they
search Communities.
Dogear At least 600 MB. Dogear supports the following items:
v Index file directory – Stores the full-text index that
users access when they search for terms in bookmark
titles and descriptions. This directory should have at
least 450 MB of space. This number is an estimate
devised based on an implementation that uses 150 MB
for a full text index of 250,000 bookmarks. The space
available must be 3 times larger than the index file.
v Favicons file location – Stores the icons that are
displayed on bookmarks to help identify them. This
directory must have at least 150 MB of space for a
deployment with 250,000 bookmarks.
16 IBM Lotus Lotus Connections 1.0.1 Installation Guide

Table 1. Feature space requirement details (continued)
Feature Space requirements
Profiles At least 300 MB. Profiles supports the following items:
v Index file directory – Stores the full-text index that
users access when they search for text strings in
people’s profiles. This directory should have at least
270 MB of space.
v Cache file – Caches data that is accessed often. This
file requires at least 30 MB of space.
Note: The sizes of these directories, especially those that store indexes and objects, must grow as the
number of users grows and the longer the deployment is running. Take steps to optimize the full text
indexes that you use and to monitor the space availability, so you will know when an increase in capacity
is needed. See the Administration section of the Lotus Connections information center for more
information.
Related tasks
“Installing Activities” on page 61Follow these steps to finish installing the Activities feature.
“Installing Blogs” on page 68Follow these steps to finish installing the Blogs feature.
“Installing Communities” on page 74Follow these steps to finish installing the Communities feature.
“Installing Dogear” on page 76Perform the following steps to finish installing the Dogear feature.
“Installing Profiles” on page 81Follow these steps to finish installing the Profiles feature.
Chapter 3, “Hardware and software requirements,” on page 15
Software requirements
The following software is required to run IBM Lotus Connections.
Table 2. Software Requirements
Item Details
Operating system (server-side) The following operating systems are supported:
v Red Hat Enterprise Linux ES release 4 (Nahant Update 4)
v Microsoft Windows 2003 Server - Standard Edition
v Microsoft Windows 2003 Server - Enterprise Edition
Operating system (client-side) The following operating systems are supported:
v Microsoft Windows XP Pro SP2
v SUSE Linux Enterprise Desktop 10 XGL
Web browser The following Web browsers are supported:
v Microsoft Internet Explorer 6.0 and later.
v Mozilla Firefox 2.0 (Windows and Linux)
Chapter 3. Hardware and software requirements 17

Table 2. Software Requirements (continued)
Item Details
Lightweight Directory Access Protocol (LDAP) server v IBM Tivoli Directory Server 6.0.0.3
Note: For more information, download the IBM Tivoli
Directory Server 6.0 Installation and Configuration Guide.
Go to the IBM Publications Center site, and search on
publication number SC32-1673-00.http://www.elink.ibmlink.ibm.com/publications/servlet/pbi.wss
v Microsoft Active Directory 2003
Note: Profiles requires IBM Tivoli Directory Integrator 6.1.0
with fix pack 1 (version 6.1.0.1, not version 6.1.1) in addition
to a directory server.
Database software
Note: The database must be installed on a system
running one of the supported server-side operating
systems listed above.
The following databases are supported:
v IBM DB2 9.1
Requires fix pack DB2 - Daylight Saving Time), available
at: http://www.ibm.com/support/docview.wss?rs=71&uid=swg21248542
v Oracle Database 10g 10.2.
Requires the 2007 Daylight Saving time patch. For more
information, go to the Oracle Web site:
http://www.oracle.com/support/daylight-savings.html
Note: For best performance, install the database server on a
separate system from the system that hosts WebSphere
Application Server.
18 IBM Lotus Lotus Connections 1.0.1 Installation Guide

Table 2. Software Requirements (continued)
Item Details
Application server IBM WebSphere Application Server 6.1.0.3.
Note: For product documentation, go to the following Web
site:http://publib.boulder.ibm.com/infocenter/wasinfo/v6r1/index.jsp
The fix pack for 6.1.0.3 is available from the following Web
site:http://www-1.ibm.com/support/docview.wss?rs=180&uid=swg24013772
Note: If you are planning to install the Communities and
Profiles features, edit the Java™ Virtual Machine settings to
increase the initial and maximum heap sizes. The size
required depends on the size of your directory and whether
or not you plan to enable the display of report-to
information. For information on editing the Java Virtual
Machine settings in WebSphere Application Server, go to the
following Web site: http://publib.boulder.ibm.com/infocenter/wsphelp/index.jsp?topic=/com.ibm.websphere.nd.doc/info/ae/ae/urun_rconfproc_jvm.html
Additional fix packs for WebSphere Application Server:
v PK38815 -- Prevents stack dumps in the log on
unsuccessful authentication attempts by users. The fix is
available at the following Web site: http://www.ibm.com/support/docview.wss?rs=0&uid=swg24015415
v PK34390 -- Only required if you are installing the
Activities service. WebSphere Application Server has
defective support for customized authentication modules;
without this fix you cannot successfully authenticate with
WebSphere Application Server using the Activities login.
The fix is available at the following Web site:
http://www.ibm.com/support/docview.wss?rs=180&context=SSEQTP&dc=DB550&uid=swg1PK34390&loc=en_US&cs=UTF-8&lang=en&rss=ct180websphere
v PK37124 -- This ifix is not currently required by any of
the Lotus Connections services. If Java 5 is introduced,
this ifix will be necessary. To obtain the ifix, go to the
following Web site: http://www.ibm.com/support/docview.wss?rs=180&uid=swg24014603
v PK33090 – This fix prevents the error message,
″OutputStream already obtained,″ from displaying when
using Blogs. For more information, go to the following
Web site:http://www-1.ibm.com/support/docview.wss?uid=swg24014758
v PK41516 – This fix enables people who have an
apostrophe in their names, such as John O’Doe, that is
included in their e-mail addresses
(john_o’[email protected]), to log into WebSphere
Application server when it is configured to use federated
repositories (as it is for Lotus Connections). For more
information, go to the following Web
site:http://www.ibm.com/support/docview.wss?uid=swg24015879
Chapter 3. Hardware and software requirements 19

Table 2. Software Requirements (continued)
Item Details
HTTP server IBM HTTP Server for WebSphere Application Server 6.1.0.3
Note: For product documentation, go to the following Web
site:http://publib.boulder.ibm.com/infocenter/wasinfo/v6r1/topic/com.ibm.websphere.base.doc/info/aes/ae/tins_webserver.html
Note: Install the Web server plug-ins. When you install IBM
HTTP Server on a Microsoft Windows system, the Web
server plug-ins are installed as part of the installation. On a
Linux system, you must install the Web server plug-ins
separately. For documentation, go to the following Web site:
http://publib.boulder.ibm.com/infocenter/wasinfo/v6r1/topic/com.ibm.websphere.base.doc/info/aes/ae/cins_webserver.html
Feed reader software Any feed reader that supports the Atom protocol
Caching and load balancing software
Note: Not required.
IBM WebSphere Edge Components
For product information, go to the following Web site:
http://www-306.ibm.com/software/webservers/appserv/was/network/edge.html
Virus detection software
Note: Not required.
Any product supporting Internet Content Adaptation
Protocol (ICAP) 1.0.
Service-specific software prerequisites
Profiles v IBM Tivoli Directory Integrator 6.1.0 with fix pack 1
(version 6.1.0.1, not version 6.1.1)
v To enable presence awareness in Profiles:IBM Lotus
Sametime® 7.5 or later.
For product documentation, go to the following Web
site:http://www-12.lotus.com/ldd/doc/sametime/7.5/sthelpad.nsf
Related tasks
Chapter 3, “Hardware and software requirements,” on page 15
20 IBM Lotus Lotus Connections 1.0.1 Installation Guide

Chapter 4. Preinstallation tasks
Perform the following tasks before installing Lotus Connections.
Related concepts
“Preinstallation tasks for a network deployment” on page 91Perform the following tasks in addition to the standard Preinstallation tasks before setting up a network
deployment of Lotus Connections.
Preparing the LDAP server to communicate with IBM WebSphere
Application Server
Install the Lightweight Directory Access Protocol (LDAP) server, and then prepare it to communicate with
WebSphere Application Server.
Install the LDAP server before WebSphere Application Server.
To prepare the LDAP server to communicate with WebSphere Application Server, complete the following
steps:
1. Install a supported LDAP server.
2. Populate the LDAP directory with user data.
Note: The mail attribute is required for all users.
3. Note the values of the following LDAP properties; you must provide these values when you
configure WebSphere Application Server:
v Directory Type
v Primary host name
v Port
v Bind distinguished name
v Bind password
v Login properties. For example: mail
v Certificate Mapping
v Certificate Filter, if applicable.
v LDAP Entity types or classes. For example: Group, OrgContainer, PersonAccount, or inetOrgPerson
v Search base4. You are now ready to install WebSphere Application Server.
After installing Websphere Application Server, verify that you can communicate with the LDAP server
machine from the WebSphere Application Server machine through the desired port (for example, 636)
without firewall interference.
Installing IBM WebSphere Application Server
Install IBM WebSphere Application Server, which supports Lotus Connections.
To install WebSphere Application Server, complete the following tasks:
1. Install WebSphere Application Server version 6.1.0.3.
For product documentation, go to the following Web site:http://publib.boulder.ibm.com/infocenter/wasinfo/v6r1/index.jsp
© Copyright IBM Corp. 2007, 2007 21

2. Apply the available fix packs. See Software requirements for details.
3. If you are planning to install the Communities and Profiles features on this server, edit the Java
Virtual Machine settings to increase the initial and maximum heap sizes. The size required depends
on the size of your directory and whether or not you plan to enable the display of report-to
information in Profiles.
For information on editing the Java Virtual Machine settings in WebSphere Application Server, go to
the following Web site: http://publib.boulder.ibm.com/infocenter/wsphelp/index.jsp?topic=/com.ibm.websphere.nd.doc/info/ae/ae/urun_rconfproc_jvm.html
Setting up profiles and server processes on WebSphere Application
Server
Create profiles and server processes on WebSphere Application Server to support the Lotus Connections
features you plan to install.
You must prepare the WebSphere Application Server to host Lotus Connections before you begin the
Lotus Connections installation.
To prepare WebSphere Application Server to host your Lotus Connections deployment, complete the
following steps:
1. To create a profile on WebSphere Application Server, see Creating a WebSphere Application Server profile.
2. If you choose to install multiple features into a single profile, create a separate server process for each
feature. See Creating WebSphere Application Server processes.
Creating a WebSphere Application Server profile
Use the Profiles Management tool provided with WebSphere Application Server to create a profile to
contain one or more Lotus Connections features.
A profile is a concept introduced with version 6.1 of WebSphere Application Server. It enables you to
group together server processes that you want to manage as a unit. For more information, see the
WebSphere Application Server information center: http://publib.boulder.ibm.com/infocenter/wasinfo/v6r1/topic/com.ibm.websphere.base.doc/info/aes/ae/cpro_overview.html
To create a profile, complete the following steps:
1. Start the Profiles Management tool by opening a command prompt and changing to the following
directory:
v Linux:
opt/IBM/WebSphere/AppServer/bin/ProfileManagement
v Windows:
C:\IBM\WebSphere\AppServer\bin\ProfileManagement
2. Type the following command to start the tool:
pmt
3. When asked to choose an environment, select Application server, and then click Next.
4. Choose Typical profile creation, and then click Next.
5. Make sure that Enable administrative security check box is not selected. You will configure security
when you complete the procedure described in the topic, Setting up federated repositories.
6. Click Create to create the profile.
Creating WebSphere Application Server processes
If you want to install multiple features on a single profile in WebSphere Application Server, you can do
so using a JACL script.
You must write the script, and then run it to create the server processes.
22 IBM Lotus Lotus Connections 1.0.1 Installation Guide

To create WebSphere Application Server process, complete the following steps:
1. Create a JACL file named createConnectionsServer.jacl and include the commands that create server
processes for each feature you want to include in the profile. See the information provided in the
WebSphere Application Server information center for more details. http://publib.boulder.ibm.com/infocenter/wasinfo/v6r1/topic/com.ibm.websphere.base.doc/info/aes/ae/txml_createserver.html The
following sample JACL file creates a server process for each of the Lotus Connections features.
###
### *** PLEASE READ THIS IMPORTANT NOTE REGARDING FOLLOWING CODE ***
### In lines of code below, the characters \r identify a carriage return.
### These visual carriage returns were added to this document to prevent
### long lines of text from running off the printed page.
###
### DO NOT not include the \r in your file; instead, remove it and
### add the line it identifies as a broken line to your file as a single
### line.
### Create a server using the supplied server name and node
### createConnectionsServer.jacl
###
### Create the servers for Lotus Connections
### About:
### This script uses the given node and server arguments to create
### Lotus Connections servers on a Webphere Application Server.
###
### Usage:
### wsadmin.sh -username system \
### -password password \
### -f /createConnectionsServer.jacl server
###
### Parameters:
### arg1 - server to create
###
### Servers:
### Activities - ActivitiesServer
### Blogs - BlogServer
### Communities - CommunitiesServer
### Dogear - DogearServer
### Profiles - ProfilesServer
###
proc createserver {serverArg} {
###
### Globals
###
global AdminConfig
global AdminControl
global AdminApp
set node [$AdminConfig list Node]
set nodeName [$AdminConfig showAttribute $node name]
###
### Is a server by this name already running on the node?
###
puts "createConnectionsServer: Checking to see if server $serverArg is \r
Chapter 4. Preinstallation tasks 23

already running on node $nodeName"
set runningServer [$AdminControl completeObjectName \r
type=Server,node=$nodeName,process=$serverArg,*]
if {[llength $runningServer] > 0} {
puts "createConnectionsServer: Error -- Server $serverArg \r
already running on node $nodeName"
puts "createConnectionsServer: Error -- exiting script"
return
}
puts "createConnectionsServer: Creating the server $serverArg on \r
node $nodeName..."
set name_attribute [list name $serverArg]
set attributes [list $name_attribute]
set server [$AdminConfig create Server $node $attributes]
###
### Save the change
###
puts "createConnectionsServer: Saving the configuration"
$AdminConfig save
}
###
### Main
###
puts "createConnectionsServer: Starting - Lotus Connections server creation"
if { !($argc == 1) } {
puts "createConnectionsServer: This script requires a parameter: \r
the server to create"
puts "e.g.: createConnectionsServer.jacl ActivitiesServer"
puts " createConnectionsServer.jacl BlogsServer"
puts " createConnectionsServer.jacl CommunitiesServer"
puts " createConnectionsServer.jacl DogearServer"
puts " createConnectionsServer.jacl ProfilesServer"
} else {
set serverArg [lindex $argv 0]
createserver $serverArg
}
puts "createConnectionsServer: Finished - Lotus Connections server creation"
2. Copy the createConnectionsServer.jacl file you created into the bin subdirectory of the profile. For
example:
v Linux:
opt/IBM/WebSphere/AppServer/profiles/AppSrv01/bin
v Microsoft Windows:
C:\IBM\WebSphere\AppServer\profiles\AppSrv01\bin
3. Start the WebSphere Application Server profile to which you want to add the server processes. For
example:
startServer server1
4. Run the JACL file by typing the following command:
v Linux:
24 IBM Lotus Lotus Connections 1.0.1 Installation Guide
/opt/IBM/WebSphere/AppServer/profiles/AppSrv01/bin>
./wsadmin.sh -username <username>
-password <password>
-f createConnectionsServer.jacl <servername>
v Microsoft Windows:
C:\IBM\WebSphere\AppServer\profiles\AppSrv01\bin\wsadmin.bat
-username <username> -password <password>
-f createConnectionsServer.jacl <servername>
Setting up federated repositories
Use the federated repositories functionality of IBM WebSphere Application Server to take advantage of
the user and group management capabilities it provides, and then secure the server.
If you already have WebSphere Application Server configured to use a Standalone LDAP User Registry,
you must change the configuration to use federated repositories instead. To do so, you must set up a
sub-tree of the LDAP repository which combines all the existing LDAP parameters under a single
Federated Repository realm. Lotus Connections currently supports a single sub-tree of LDAP within the
Federated Repository realm only. WebSphere Application Server will let you add more than one LDAP
directory to the realm, but this is not supported by Lotus Connections. For more information, go to the
following external Web site to see the Websphere Application Server information center:
http://publib.boulder.ibm.com/infocenter/wasinfo/v6r1/topic/com.ibm.websphere.base.doc/info/aes/ae/cwim_fedrepos.html
To set up federated repositories in a WebSphere Application Server, complete the following steps:
1. After you install the WebSphere Application Server, make sure the server is started, and then log on
to the WebSphere Application Server Integrated Solutions Console by going to the following Web
address in a browser:
http://<Websphere_Application_Server_host_name>:9060/ibm/console
2. Click Log in to log in to the Welcome page. Security must be disabled on the WebSphere Application
Server.
3. Click Security → Secure Administration, applications and infrastructure.
4. Select Federated Repositories from the Available realm definitions field, and then click Configure.
5. On the Federated repositories page, do not change the default Realm name. Add an administrative
user ID (wasadmin, for example) to the Primary administrative user name field.
Note: This administrative user ID must be unique, and must not already exist in the LDAP
repository to be federated. When you save the user ID, you must provide a password.
6. Select Automatically generated server identity if it is not selected by default as the server user
identity.
7. Click Apply, and then click Save to save this setting.
8. Click Add Base entry to Realm, and then click Add Repository from the Repository reference page.
9. On the New page, provide values for the required fields.
v Repository identifier – Type a repository identifier, such as ″myFavoriteRepository.″
v Directory type – Specify one of the following options:
– IBM Tivoli Directory Server
– Microsoft Windows Server 2003 Active Directoryv Primary host name – Host name of the primary LDAP server. The host name is either an IP
address or a domain name service (DNS) name.
v Login properties – LDAP property to use for login authentication. Be sure to specify a set of
properties that has a unique value per user.
Chapter 4. Preinstallation tasks 25

– If you are installing Profiles and using Tivoli Directory Server, specify either mail, which
represents the user’s e-mail address, or uid, which represents the user’s ID, as the value for this
property. Or you can specify other unique LDAP attributes that you want to use to log in.
– If you are installing Profiles and using Active Directory, and you use an e-mail address as the
login, specify mail as the value for this property. If you use samAccountName as the login, specify
uid as the value for this property. Or you can specify other unique LDAP attributes that you
want to use to log in.
Note: The Bind distinguished name and Bind password are only required when your specific J2EE
application requires LDAP attributes that cannot be searched anonymously.
10. Click Apply, and then click Save to save this setting.
11. On the Repository reference page, type the distinguished name values in the following fields:
v Distinguished name of a base entry that uniquely identifies this set of entries in the realm
v Distinguished name of a base entry in this repository
The entries in these fields are the LDAP attribute type and attribute value pairs for the base element
in the realm and the LDAP repository separated by an equal sign, for example: o=acme. They may be
the same value when a single LDAP repository is configured for the realm or may be different in a
multiple LDAP repository configuration. The first field identifies entries in the realm and the second
field identifies entries in the LDAP repository.
12. Click Apply, click Save to save this setting, and then click OK to return the Federated Repositories
page.
13. Click Apply, and then click Save to save this setting.
14. Click the Repository Identifier link for the repository you just added in the repository table.
15. Click Apply, and then click Save to save this setting.
16. Click the LDAP entity types link, and then click the Group and PersonAccount entity types and
modify the default object classes mappings, and optionally, the search bases and search filters. Set up
LDAP parameters that are suitable for your LDAP server. Click Apply, and then click Save to save
this setting.
17. Click the Repository name in the navigation links at the top of the page to return to the Repository
page.
18. If your applications rely on group membership from LDAP, click the Group attribute definition
link, and then click the Member attributes link. Set up a proper group membership attribute type
and object class, and then click Apply, and then click Save to save this setting. For example, the
group membership attribute is required for using groups in Activities. For Activities, the member
attribute type is used by the groupOfNames object class, and the uniqueMember attribute type is
used by groupOfUniqueNames.
19. Select Secure Administration, applications and infrastructure → Web Security and then click
General settings. Select the Use available authentication data when an unprotected URI is
accessed check box.
20. Click Apply, and then click Save to save this setting.
21. Enable Administrative Security and Application Security. If you want to restrict your application
access to local resources, you can also select the Java 2 security check box.
22. Click Apply, and then click Save to save this setting.
23. Log out of the WebSphere Application Server Integrated Solutions Console, and then restart the
WebSphere Application Server.
Note: The administrative user name and password are now required because you set up security on
the server.
24. Log in to the WebSphere Application Server Integrated Solutions Console using your Primary
administrative user name and password after the server restarts. You have successfully configured
WebSphere Application Server with federated repositories.
26 IBM Lotus Lotus Connections 1.0.1 Installation Guide

25. Optional: Test the setup by adding some LDAP users into the WebSphere Application Server with
Administrative user roles.
26. If you are using SSL for LDAP, add a signer certificate to your trust store. From the WebSphere
Application Server Integrated Solutions Console, select Security → SSL Certificate and key
management → Key Stores and certificates → CellDefaultTrustStore → Signer Certificate → Retrieve
from port. Type the DNS name of the LDAP server in the Host Name field, type the secure LDAP
port in the Port field (typically 636), type an alias name, such as LDAPSSLCertificate, in the Alias
field, and then click Apply.
Specifying a different global unique ID
Lotus Connections expects you to use specific LDAP attributes as the global unique ID to identify users
and groups in the directory server. However, your enterprise may use a different value for its globally
unique ID. You can configure Lotus Connections to recognize this custom global unique ID.
Note: The attribute you use as the global unique ID must be an ID that is unique and will never change.By default, Lotus Connections expects you to use the following LDAP attributes as the global unique ID
to identify users and groups from the directory:
v IBM Tivoli Directory Server:
ibm-entryUUID
v Microsoft Active Directory:
objectGUID
To get Lotus Connections to recognize a different global unique ID, you must edit the wimconfig.xml
configuration file on the WebSphere Application Server. There is currently no facility for editing this file
using the Integrated Solutions Console, so you must edit the file directly.
Note: Be careful when editing the wimconfig.xml file; use the correct XML syntax and do not change or
remove any other elements in this file.
To specify an attribute other than the defaults as the global unique ID, complete the following steps:
1. From the following directory, open the wimconfig.xml file in a text editor.
v Linux:
opt/IBM/WebSphere/AppServer/profiles/<profile_name>/config/cells/
<cell_name>/wim/config
v Windows:
C:\IBM\WebSphere\AppServer\profiles\<profile_name>\config\cells\
<cell_name>\wim\config
2. Find the <config:repositories> element, and then add the following line within the
<config:attributeConfiguration> element block:
<config:externalIdAttributes name="<custom_attribute>"
syntax="<attribute_syntax>"/>
where <custom_attribute> is the customer LDAP attribute you want to use and <attribute_syntax>
identifies the syntax. The syntax is optional; you should include the syntax attribute if the syntax is
something other than String.
For example, to configure Lotus Connections to use an existing attribute that is the global ID for your
enterprise and is a String value, such as enterpriseid, as the internal identifier, edit the file to include
the following element:
<config:externalIdAttributes name="enterpriseid"/>
If the attribute was not a String, you would identify its syntax as well. For example:
<config:externalIdAttributes name="enterpriseid" syntax="octetString"/>
3. Save and close the wimconfig.xml file.
Chapter 4. Preinstallation tasks 27

Configuring the IBM HTTP Server for SSL
Enable the IBM HTTP Server to use the Secure Sockets Layer protocol.
The Blogs and Dogear features require that you install the IBM HTTP Server and Web server plug-ins if
you want to configure the features to force login credentials to be submitted over a secure channel. After
you install the IBM HTTP Server and Web server plug-ins, you must then configure the IBM HTTP
Server to support encrypted traffic by configuring it to support SSL.
See the following external Web site for detailed information about securing IBM Websphere Application
Server: http://www.redbooks.ibm.com/abstracts/sg246316.html
To configure the IBM HTTP Server for SSL, complete the following steps:
1. Use the IBM HTTP Server Key Management Utility to create a key file and a stash file.
2. Import the WebSphere Application Server key. If you are setting up a network deployment, import the
WebSphere Application Server key for the server hosting the node. This key is a self-signed certificate
that is automatically generated for the server.
Note: This is not the only option you have; you can use other types of keys to encrypt traffic. See the
IBM HTTP Server information center for information about other options:
http://publib.boulder.ibm.com/infocenter/wasinfo/v6r1/topic/com.ibm.websphere.base.doc/info/aes/ae/tsec_securecomm.html
3. Open the httpd.conf configuration file from the /opt/IBM/HTTPServer/conf directory, and then edit it
as follows:
RewriteEngine on
LoadModule ibm_ssl_module modules/mod_ibm_ssl.so
Listen 0.0.0.0:443
<VirtualHost *:443>
ServerName <server_name>
#DocumentRoot C:\IBM\HTTPServer\htdocs
SSLEnable
#SSLClientAuth required
</VirtualHost>
SSLDisable
Keyfile "<path_to_key_file>"
SSLStashFile "<path_to_stash_file>"
where <path_to_key_file> represents the file path to the KDB file and <path_to_stash_file> represents the
file path to associated stash file. For example, the paths may look like this:
Keyfile "C:\IBM\HTTPServer\Plugins\config\<web_server>\plugin-key.kdb"
SSLStashFile "C:\IBM\HTTPServer\Plugins\config\<web_server>\plugin-key.sth"
4. Save and close the file.
5. Restart the IBM HTTP Server to apply the changes.
After you configure the server for SSL, you can access the home page of the Lotus Connections features
over both HTTP and HTTPS.
Related concepts
“Administering the pilot” on page 12Use the WebSphere Application Server Integrated Solutions Console to make configuration changes.
Adding certificates to the IBM HTTP Server
After you secure the channel between the IBM HTTP Server and the WebSphere Application Server, you
must secure the channel between the IBM HTTP Server and the Web browsers that will be used to access
Lotus Connections.
Configure the IBM HTTP Server to support SSL before you complete this procedure.
28 IBM Lotus Lotus Connections 1.0.1 Installation Guide
To secure the connection between the IBM HTTP Server and a requesting Web browser, you must import
certificates into the IBM HTTP Server key store. There are different types of certificates that you can use.
This procedure describes how to import the self-signed certificate that is shipped with the IBM
Websphere Application Server into the IBM HTTP Server. This is just one of the methods you can use.
You could also import a certificate purchased from a third-party Certificate Authority, or create and use a
new self-signed certificate. See the IBM HTTP Server documentation to determine which key strategy is
best for your environment. The IBM HTTP Server information center is accessible from the following
external Web site: http://publib.boulder.ibm.com/infocenter/wasinfo/v6r1/topic/com.ibm.websphere.ihs.doc/info/ihs/ihs/welc6topsecureihs.html
To import the public IBM WebSphere Application Server certificate into the IBM HTTP Server, complete
the following steps:
1. From the IBM WebSphere Application Server Integrated Solutions Console, select SSL certificate and
key management → Key Stores and certificates, and then select NodeDefaultKeyStore for a
stand-alone deployment or CellDefaultKeyStore for a network deployment.
2. Click Personal Certificates, select the default check box, and then click Extract.
3. Give the extracted file a name and save it in a place you will remember.
Note: The convention is to give the file an ARM extension.
4. Leave encoding set to Base64.
5. Click OK.
6. Open the httpd.conf configuration file from the /opt/IBM/HTTPServer/conf directory, and then edit it
as follows:
a. Find the directory in which the plugin-cfg.xml file is stored by searching for the
WebSpherePluginConfig line. It should look something like this:
WebSpherePluginConfig "C:\IBM\HTTPServer\Plugins\config\
webserver1\plugin-cfg.xml"
b. Find the directory in which the plugin-key.kdb file is stored by searching for the term
plugin-key.kdb in the plugin-cfg.xml file. For example:
<Property
Name="keyring"
Value="c:\IBM\HTTPServer\Plugins\config\webserver1\plugin-key.kdb" />
7. From the bin directory of the IBM HTTP server, execute the ikeyman.bat file.
8. Click KeyDatabaseFile → Open, and then select a key database type of CMS. Specify plugin-key.kdb
as the file name. Specify the file path to the KDB file. For example:
C:\IBM\HTTPServer\Plugins\config\webserver1\plugin-key.kdb
9. Click OK, and then enter the password.
Note: The default password from WebSphere Application Server is WebAS (case sensitive).
10. Click Personal Certificates, and then select Signer Certificates.
11. Click Add.
12. Find the file you exported with the *.arm extension, select it, and then click OK.
13. Save and exit.
14. Restart the IBM HTTP Server to apply the changes.
Defining the IBM HTTP Server for a profile
When you use the IBM HTTP Server, you can administer it from the IBM WebSphere Application Server
if you define the IBM HTTP Server in the WebSphere Application Server Integrated Solutions Console of
the associated profile.
Chapter 4. Preinstallation tasks 29

Stand-alone deployment: You must define one Web server per profile. If you are installing all the
features into one profile (each running in a separate server process), you can define one Web server for
that profile. If you are installing each feature to a separate profile, you must define five Web servers –
one for each profile. This does not mean you have to use multiple IBM HTTP Servers; you can later map
the five profiles to a single IBM HTTP Server. See Mapping multiple profiles to a single IBM HTTP Server for
details.
Network deployment: Do not complete this procedure. Define one or more Web servers for the nodes in
the cluster after you create it by completing the steps described in Defining the IBM HTTP Server for a node
instead.
Note: This procedure describes how to create a Web server using the Integrated Solutions Console. There
are other ways to create the Web server. See the IBM WebSphere Application Server information center:
http://publib.boulder.ibm.com/infocenter/wasinfo/v6r1/topic/com.ibm.websphere.base.doc/info/aes/ae/twsv_plugin.html
To define the IBM HTTP Server, complete the following steps:
1. Make sure the IBM HTTP Server is installed and running.
2. From the WebSphere Application Server Integrated Solutions Console for the profile, select Servers →
Web servers, and then click New.
3. Provide values for the following fields:
Server name
Type webserver1.
Type Choose the IBM HTTP Server.
Host Name
Type the fully qualified DNS host name. For example: enterprise.acme.com.
Platform
Choose the operating system.4. Click Next.
5. Select the default Web server template listed, and then click Next.
6. On the Enter the properties for the new Web server page, check the paths and make adjustments if
necessary, and then enter the IBM Administration Server user name and password. Confirm the
password, and then click Next.
7. Confirm the new Web server, click Finish, and then click Save.
After you define the IBM HTTP Server in the WebSphere Application Server, you can map application
servers to it and stop and start the IBM HTTP Server using the WebSphere Application Server Integrated
Solutions Console.
Related tasks
Chapter 7, “Mapping the features to the IBM HTTP Server,” on page 99After you install the features, map them to the IBM HTTP Server. This task updates the plugin-cfg.xml
file on the IBM HTTP Server, which is the configuration file that defines how the IBM HTTP Server
should access the features when they are requested from a Web browser.
Registering the DB2 product license key
Register a DB2 product license key for the version of DB2 that is bundled with Lotus Connections.
30 IBM Lotus Lotus Connections 1.0.1 Installation Guide

Only perform this procedure if you are using the version of DB2 that was bundled with the Lotus
Connections product to be used exclusively with Lotus Connections. You do not need to complete this
procedure if you are installing the pilot version of the product; the version of DB2 provided with the
pilot is registered automatically.
Note: Install DB2 before beginning this procedure. Do not create feature databases until after you have
completed these steps.
See the DB2 information center for more information about the registering a product key:
http://publib.boulder.ibm.com/infocenter/db2luw/v9/topic/com.ibm.db2.udb.uprun.doc/doc/t0006749.htm
To register the DB2 product license key, complete the following steps:
1. Log into DB2 using an ID with SYSADM authority.
2. Open a command prompt, and then execute the following command:
db2licm -a <path_to_lic_file>
where the <path_to_lic_file> is the directory in which the db2ese_o.lic file is stored.
v If you downloaded the product and extracted the files, the license file is stored in the following
directory:
– Linux:
Lotus_Connections_Install/DB2.License
– Microsoft Windows:
<Lotus_Connections_Installation_directory>\DB2.License
v On the DVD image, it is stored in the DB2.License directory.
Creating the feature databases
Create an IBM DB2 or Oracle database to store feature data using the scripts that are provided with the
product. For the Profiles feature, use IBM Tivoli Directory Integrator to populate and manage the
database.
Creating IBM DB2 databases for the features
Each IBM Lotus Connections feature requires a database to store data.
This procedure describes how to use the script files, which are included with the product, to create DB2
databases for all of the features, except Profiles. To create the Profiles database, which includes first
installing the Tivoli Directory Integrator, see Creating the Profiles database.
To create the feature databases, complete the following steps:
1. If the DB2 database server and WebSphere Application Server are on different machines, copy the
database creation scripts to the DB2 machine. If the database server resides on the host machine or the
DB2 client is installed on the host machine, copy the database creation scripts to a directory on the
host machine. The database creation scripts are in the following subdirectory:
v Linux:
/Lotus_Connections_Install/connections.sql/
<feature_subdirectory>/db2
v Windows:
\Lotus_Connections_Install\connections.sql\
<feature_subdirectory>\db2
where <feature_subdirectory> is the script file storage directory of the feature for which you are
creating the database. Choose one of the following subdirectories:
v activities
Chapter 4. Preinstallation tasks 31

v blogs
v communities
v dogear
Run the database scripts for one feature at a time.
2. On the DB2 machine, open a DB2 command line processor. Use an account that has privileges to
create a database, tablespace, tables, and indexes. You can use the db2admin user ID or an existing ID
that has extensive administrative privileges.
3. Start the database manager by typing the following command:
db2start
4. Microsoft Windows Only: Type the following command:
quit
5. Change to the directory where the database creation script files for the feature are stored, and then
type the following command to run the script:
db2 -tvf createDb.sql
6. Repeat the previous steps to create a database for each feature you are installing.
7. Close the DB2 command line processor.
8. Optional: When you install Lotus Connections, the JDBC configuration page of the installation wizard
asks you to provide a user ID and password for the Application User. The user ID that you specify on
this page needs read and write access to the database. You can provide the user ID of an
administrative user or you can create a dedicated ID with fewer privileges. See Creating a dedicated
DB2 database user for more information.
Creating a dedicated DB2 database user
Create a dedicated DB2 database user named lcuser, and then run the scripts provided with Lotus
Connections to grant that user only the rights needed to work with the Lotus Connections databases.
This is an optional procedure; perform it only if you want to create a database user with a more limited
set of privileges. Also, only perform this procedure if you are using a DB2 database.
When you create the new user, name it lcuser. The scripts that are provided with Lotus Connections,
which grant the appropriate rights to the user, are written with the assumption that the user name is
lcuser.
To create a dedicated DB2 database user named lcuser, complete the following steps:
1. Do one of the following:
v Linux:
– Log into the DB2 server as the root user, and then type the following commands to create a new
user:
useradd lcuser
passwd lcuser
When prompted for the new password, type it, and then confirm it.
– Change to the home directory for lcuser, and then add the following lines to the appropriate
shell file. For bash, add the following lines to the .bashrc file:
# The following three lines have been added for UDB DB2.
if [ -f <path_to_home_directory_of_DB2_instance_user>/
sqllib/db2profile ]; then
. <path_to_home_directory_of_DB2_instance_user>/sqllib/
db2profile
fi
where <path_to_home_directory_of_DB2_instance_user> is the path to the home directory of lcuser.
For bourne or korn shell:
32 IBM Lotus Lotus Connections 1.0.1 Installation Guide

.profile
<path_to_home_directory_of_DB2_instance_user>/sqllib/
db2profile
For csh:
.login
source <path_to_home_directory_of_DB2_instance_user>/
sqllib/db2cshrc
A sample value of the <path_to_home_directory_of_DB2_instance_user> variable is /home/lcuser.v Windows:
Note: These steps apply to Windows XP; the steps may vary slightly for other versions of
Windows.
– Select StartSettingsControl PanelUser Accounts, and then select the Advanced tab.
– Press the Advanced button, right-click Users, and then select New User.
– In the User name and Full name fields, type lcuser.
– Deselect the Must change password at first login check box, and then click Create.
– Click Close. Right-click lcuser, and then from the Local Users and Groups dialog, select
Properties from the menu.
– Click the Member Of pane, and then click the Add button. Type DB2USERS in the Enter object
name to select box, and then click OK.
–
Note: If the object name is not found, extended security for DB2 on Windows may not be enabled.
The default is for it to be enabled. Consider enabling it. See the DB2 documentation for information
about Extended Windows security using DB2ADMNS and DB2USERS groups. Alternatively, assign
lcuser the appropriate system rights by selecting Local Security Settings → User Rights
Assignment, and then selecting the following rights:
– Access this computer from the network
– Create global objects
To see the DB2 information center, go to the following external Web site: http://publib.boulder.ibm.com/infocenter/db2luw/v8/index.jsp?topic=/com.ibm.db2.udb.cc.doc/db2_udb/usergroupdialog2.htm
2. Grant the lcuser ID the required privileges to edit the Lotus Connections databases by logging into
DB2 using the lcuser ID, and then typing the following command:
db2 -tvf <path_to_file>/appGrants.sql
where <path_to_file> is the path to the directory in which the appGrants.sql file is stored per feature;
each feature has its own SQL file and you must run each separately. The SQL scripts are stored in the
following directory:
v Linux:
/Lotus_Connections_Install/connections.sql/
<feature_subdirectory>/db2
v Windows:
\Lotus_Connections_Install\connections.sql\
<feature_subdirectory>\db2
where <feature_subdirectory> is the script file storage directory of the feature for which you are
creating a dedicated user. Choose one of the following subdirectories:
v activities
v blogs
v communities
Chapter 4. Preinstallation tasks 33

v dogear3. Repeat Step 2 for each feature that you plan to install.
Creating Oracle database tables for the features
Each IBM Lotus Connections feature requires a database to store data.
This procedure describes how to use the script files, which are included with the product, to create
Oracle database tables for all of the features, except Profiles. To create the Profiles database, which
includes first installing the Tivoli Directory Integrator, see Creating the Profiles database.
To create the feature database tables, complete the following steps:
1. Log in using the same user ID you used to install the Oracle database.
2. Optional: If you do not have an existing Oracle database, you can create a new one named LSCONN
by copying the oracle folder from the connections.sql/install/oracle directory to the Oracle
database host machine, and then, using the same user ID you used to install the Oracle database,
running the following file.
v Linux:
./createDb.sh <password>
v Windows:
createDb.bat <password>
Note: If you have an existing database that you want to use, you can do so. When you run the
database creation scripts for the features, tables are added to that existing database.
3. If the Oracle database server and WebSphere Application Server are on different machines, copy the
database creation scripts to the Oracle machine. If the database server resides on the host machine or
the Oracle client is installed on the host machine, copy the database creation scripts to a directory on
the host machine. The database table creation scripts in the following subdirectory:
v Linux:
/Lotus_Connections_Install/connections.sql/
<feature_subdirectory>/oracle
v Windows:
\Lotus_Connections_Install\connections.sql\
<feature_subdirectory>\oracle
where <feature_subdirectory> is the script file storage directory of the feature for which you are
creating the database. Choose one of the following subdirectories:
v activities
v blogs
v communities
v dogear
You must run the database scripts for one feature at a time.
4. Create an Oracle user ID with system database administrator privileges that you can use to manage
the database tables or use an existing ID that has administrative privileges, such as sys.
5. Run SQL Plus by typing the following command:
sqlplus /NOLOG
6. Type the following command to log in as an administrator with the sysdba role:
connect as sysdba
7. Enter the sysdba user ID and password.
8. Type the following command to create the feature database tables:
Note: Begin the command with the @ sign.
34 IBM Lotus Lotus Connections 1.0.1 Installation Guide

@<path_to_the_copied_sql_file>/createDb.sql <password>
9. Close the SQL Plus window.
Note: The createDB script creates a dedicated User ID for each feature that has a narrower set of
privileges than an administrative user would. When you run the installation program, you are asked
to provide a user ID for the JDBC provider. You can specify one of these dedicated user IDs. The
options are as follows:
v Activities: ACTIVITIES
v Blogs: BLOGS
v Communities: SNCOMM
v Dogear: DOGEAR10. Dogear only: Run the createHistogramStatsJob.sql script included with the Dogear scripts to create
a job that collects histogram statistics. This helps improve the performance of Dogear.
a. Run SQL Plus by typing the following command:
sqlplus /NOLOG
b. Type the following command to log in as an administrator with the sysdba role:
connect as sysdba
c. When asked to enter a user name, type the sysdba user ID, and then provide the associated
password.
d. Run the following command:
@<path_to_copied_sql_file>\createHistogramStatsJob.sql
e. Close the SQL Plus window.
Creating the Oracle database listener
After using the database creation script provided with the product to create the database, you must create
a listener for the database.
Before completing this procedure, see if a listener has already been defined for Oracle as follows:
v Linux: From $ORACLE_HOME/bin, run the lsnrctl command, and then type status to see a list of
running services.
v Microsoft Windows: From the Start menu, select Control Panel → Administrative Tools → Services.
Look for a process named OracleOraDb_10g_home1TNSListener or one with a name that ends with the
TNSListener suffix. If there is a TNSListener process running, you do not need to complete this task. If
no TNSListener process is running, complete this task.
A listener is software that listens for requests to connect to the database, and then connects the requesting
applications to the appropriate database tables.
To create the Oracle database listener, complete the following steps:
1. Open the Oracle Net Configuration Assistant:
v Linux:
From a command prompt, change to the $ORACLE_HOME/bin directory, and then type the
following command:
netca
v Windows:
From the Start menu, select Programs → Oracle_OraDb10g_home1 → Configuration and Migration
Tools → Net Configuration Assistant.2. Select Listener Configuration, and then select Add.
3. Do not change the default Listener selection, nor the default selections for the available protocols.
Chapter 4. Preinstallation tasks 35

4. Use the standard port 1521.
5. When asked to configure another listener, click No, and then click Next.
6. Click Next, and then click Finish.
7. Stop the following Oracle services in the following order:
a. OracleDBConsole
b. OracleService
c. OracleOraDb10g_home1TNSListener
Use the following commands:
v Linux:
From $ORACLE_HOME/bin, run the following commands:
su - oracle
emctl stop dbconsole
lsnrctl stop
v Microsoft Windows:
From the Start menu, select Control Panel → Administrative Tools → Services, right-click one
service at a time, and then click Stop.8. Start the following Oracle services in the following order:
a. OracleOraDb10g_home1TNSListener
b. OracleService
c. OracleDBConsole
Use the following commands:
v Linux:
From $ORACLE_HOME/bin, run the following commands:
su - oracle
lsnrctl start
emctl start dbconsole
v Microsoft Windows:
From the Start menu, select Control Panel → Administrative Tools → Services, right-click one
service at a time, and then click Start.
Creating the Profiles database
Unlike the other features, Profiles requires you to create a database using the Tivoli Directory Integrator.
To create a database for the Profiles feature, you must install the IBM Tivoli Directory Integrator, and
then configure and populate the database.
Installing Tivoli Directory Integrator
Tivoli Directory Integrator (TDI) synchronizes and exchanges information between applications and
directory sources. You use it to initially populate the profiles database repository from a source LDAP
system, and keep the database up-to-date as LDAP changes are made.
Be sure you have installed all the required software, including a database server, before you begin this
procedure.
To install and configure Tivoli Directory Integrator, complete the following steps:
1. Install IBM Tivoli Directory Integrator 6.1.0 on the same system that you are using to host the
database for the Profiles feature.
When prompted for the Solution directory location, select Do not specify. Use the current working
directory at startup time.
36 IBM Lotus Lotus Connections 1.0.1 Installation Guide

2. Install fix pack 1 for version 6.1.0. Do not use version 6.1.1. Version 6.1.0 with fix pack 1 is version
6.1.0.1 and is not equivalent to version 6.1.1.
3. On the machine hosting your Tivoli Directory Integrator installation, create a subdirectory in which to
store the Tivoli Directory Integrator solution directory, and then find the tdisol file, which contains
profiles-specific Tivoli Directory Integrator information.
The tdisol file is stored in the following subdirectory of the files you installed for Lotus Connections:
Lotus_Connections_Install\TDISOL
Note: Move the contents of this directory to the system on which you installed theTivoli Directory
Integrator using a file transfer mechanism, such as FTP.
4. Install the tdisol file, by doing one of the following:
v Linux:
Extract the tdisol.tar file into the directory you just created, and then, in the TDI directory, execute
the following commands to ensure that the script files in it are all executable:
– chmod +x *.sh
– chmod +x netstore
v Windows:
Extract the supplied tdisol.zip file into the directory you just created.
This creates a Tivoli Directory Integrator solution directory called TDI in the subdirectory you
created.
5. Make the database libraries available to the Tivoli Directory Integrator by doing one of the following:
v If you are using DB2, copy the db2jcc_license_cu.jar file from the java subdirectory of the directory
to which you installed the database and paste it into the jvm/jre/lib/ext subdirectory of the
directory in which you installed Tivoli Directory Integrator.
For example, if you installed Tivoli Directory Integrator on a Linux system at /opt/IBM/TDI/V6.1,
the path would be /opt/IBM/TDI/V6.1/jvm/jre/lib/ext.
v If you are using Oracle, copy the ojdbc14.jar file from the jdbc/lib subdirectory of the directory to
which you installed the database and paste it into the lib subdirectory of the TDI source directory
that was created when you extracted the contents of the tdisol file.6. Increase the runtime memory by adding -Xms256M and -Xmx1024M as arguments to the Java
invocation command in the following file stored in the Tivoli Directory Integrator installation
directory:
v Linux: ibmdisrv
After you add the memory arguments, the Java invocation should start like this:
"$JRE_PATH/java" -Xms256M -Xmx1024M
v Windows: ibmdisrv.bat
After you add the memory arguments, the Java invocation should start like this:
"D:\IBM\TDI\V6.1\jvm\jre\bin\java" -Xms256M -Xmx1024M
7. Linux only: Ensure that there is a localhost entry to the /etc/hosts file. For example:
127.0.0.1 localhost
8. From the TDI directory, open the tdienv file in a text editor to make sure that the path for the Tivoli
Directory Integrator installation directory is specified correctly in the TDIPATH variable. If the path is
not correct, edit the TDIPATH environment variable.
v Linux: tdienv.sh
The default value is:
export TDIPATH=/opt/IBM/TDI/V6.1
v Windows: tdienv.bat
The default value is:
Chapter 4. Preinstallation tasks 37

SET TDIPATH=C:\Program Files\IBM\TDI\V6.1
Other scripts in the solution directory use this variable to find Tivoli Directory Integrator files.
Mapping fields
Populate the properties database repository with data from the enterprise LDAP directory by mapping
the content of the fields in one with fields in the other.
You can find the product documentation for the Tivoli Directory Integrator at the following Web address:
http://publib.boulder.ibm.com/infocenter/tivihelp/v2r1/topic/com.ibm.IBMDI.doc_6.1/welcome.htm
Consider using LDAP viewer software to help you map the fields.
The properties in the map_dbrepos_from_source.properties file have the default values defined in the
table below. Many of them are null. You must determine which LDAP fields to map to your database
fields and edit this file to specify values that apply to your configuration. Any values you omit or set to
null will not be populated in the database.
Table 3. Default values for properties in the map_dbrepos_from_source.properties file
Property Default value
PROF_ALTERNATE_LAST_NAME null
PROF_BLOG_URL null
PROF_BUILDING_IDENTIFIER null
PROF_CALENDAR_URL null
PROF_COURTESY_TITLE null
PROF_DEPARTMENT_NUMBER null
PROF_DESCRIPTION null
PROF_DISPLAY_NAME cn
PROF_EMPLOYEE_NUMBER employeenumber
PROF_EMPLOYEE_TYPE employeetype
PROF_EXPERIENCE null
PROF_FAX_TELEPHONE_NUMBER facsimiletelephonenumber
PROF_FREEBUSY_URL null
PROF_FLOOR null
PROF_GROUPWARE_EMAIL null
PROF_GUID See Note.
PROF_IP_TELEPHONE_NUMBER null
PROF_ISO_COUNTRY_CODE c
PROF_IS_MANAGER null
PROF_JOB_RESPONSIBILITIES null
PROF_MAIL mail
PROF_MANAGER_UID $manager_uid (This represents a lookup of the UID of
the manager using DN in manager field)
PROF_MOBILE mobile
PROF_NATIVE_FIRST_NAME null
PROF_NATIVE_LAST_NAME null
PROF_ORGANIZATION_IDENTIFIER ou
38 IBM Lotus Lotus Connections 1.0.1 Installation Guide

Table 3. Default values for properties in the map_dbrepos_from_source.properties file (continued)
Property Default value
PROF_PAGER null
PROF_PAGER_ID null
PROF_PAGER_SERVICE_PROVIDER null
PROF_PAGER_TYPE null
PROF_PHYSICAL_DELIVERY_OFFICE physicaldeliveryofficename
PROF_PREFERRED_FIRST_NAME null
PROF_PREFERRED_LANGUAGE preferredlanguage
PROF_PREFERRED_LAST_NAME null
PROF_SECRETARY_UID null
PROF_SHIFT null
PROF_SOURCE_UID $dn
PROF_TELEPHONE_NUMBER telephonenumber
PROF_TIMEZONE null
PROF_TITLE null
PROF_UID See Note.
PROF_WORK_LOCATION postallocation
Note: The PROF_GUID identifies the global unique ID of a user. This is a complex values that never
changes. The mapping of the PROF_GUID property must be handled differently depending on the LDAP
server you are using:
v IBM Directory Server
PROF_GUID=ibm-entryUuid
v Active Directory
PROF_GUID={function_map_from_objectGUID}
You must use a Javascript function to define the value for Active Directory because objectGUID is
stored in Active Directory as a binary value, but is mapped to PROF_GUID, which is stored as a string
in the Profiles database.
Note: If you edited the wimconfig.xml file to use a custom global unique ID, be sure to specify that
custom ID here.
Note: The PROF_UID property, not to be confused with the PROF_GUID property, defines the unique ID
of a user. The PROF_UID is a critical field in the Profiles database. The value in it is used to link together
entries for a given person across multiple tables. The value you map to PROF_UID must meet the
following requirements:
v It must be present in every entry which is to be added to the database.
v It must be unique.
v It must be 36 characters or fewer in length.
In Microsoft Active Directory, although there often is a UID field available, this is not always the best
choice for mapping to PROF_UID because it is not guaranteed to be present for all entries. A better
choice is sAMAccountName because it usually does exist for all entries. Other values are acceptable also,
as long as they meet the requirements.
Chapter 4. Preinstallation tasks 39

Note: If you are mapping the PROF_UID from a LDAP field unchanged, specify the name of the field.
However, if you need to parse it out of the distinguished name (DN) and it is in the DN in the form of
uid=value, use the following mapping function to specify the value:
{func_map_to_db_UID}
Note: PROF_IS_MANAGER property must have a Y or N value in the database. Y identifies the person
as a manager.
You can map fields in the following ways:
1. To define the mappings used when populating the database repository from the enterprise directory,
from the TDI directory, open the map_dbrepos_from_source.properties file in a text editor.
2. Add or modify the field values in one of the following ways:
v 1:1 mapping – If one field in the local repository matches one field in the enterprise directory, type
the name of the field in the profiles database repository and set it equal to the associated source
database LDAP property. For example:
PROF_BUILDING_IDENTIFIER=buildingname
v Complex mapping – If there is a more complex relationship between the fields in the local
repository and enterprise directory, such as, for example, the content of the property in the
enterprise LDAP directory must be split into multiple fields in the local repository, use a Javascript
function to define the relationship. Define the function in profiles_functions.js and wrap the name
of the Javascript function in curly brackets {}. Begin function names with ″func_″ so you can more
easily identify them. For example:
PROF_BUILDING_IDENTIFIER={func_map_to_db_PROF_BUILDING_IDENTIFIER}
3. To define mappings from the database repository to the enterprise directory, from the TDI directory,
open the map_dbrepos_to_source.properties file in a text editor. When a field that is marked as
draft=″true″ on the editableAttribute element in profiles-config.xml file of the Profiles web application,
is edited, the new value is passed back to the enterprise directory.
4. Add or modify the field values in one of the following ways:
v 1:1 mapping – If one field in the local repository matches one field in the enterprise LDAP
directory, type the name of the source LDAP property and set it equal to the field in the profiles
database repository. For example:
buildingname=PROF_BUILDING_IDENTIFIER
v Complex mapping – If there is a more complex relationship between the fields in the local
repository and enterprise directory, such as, for example, the content of the property must be split
into multiple fields in the local repository, use a Javascript function to define the relationship.
Define the function in profiles_functions.js and wrap the name of the Javascript function in curly
brackets {}. Begin function names with ″func_″ so you can more easily identify them. For example:
buildingname={func_map_from_db_PROF_BUILDING_IDENTIFIER}
5. Save and close the properties files.
Validating mapped fields:
Edit the validate_dbrepos_fields.properties file to include validation information to be used during the
mapping process to validate field values before they are added to profiles repository fields.
You can perform the following types of field validation:
v Define length limits for fields – For example, the UID field allows for values of up to 36 characters in
length. If your organization only uses IDs that are no more than 10 characters long, you can use length
limits to limit the number of characters a user can enter into the UID field to 10. Note that if you wish
to support a longer length, you cannot just change the length in the property file. You would have to
make a corresponding change to the maximum length in the database as well.
40 IBM Lotus Lotus Connections 1.0.1 Installation Guide

v Reject records that do not contain a value for a key field – For example, if you use the e-mail address
value for authentication, you can specify that validation should fail for any record that does not
contain a value for this field. Such records are logged as having failed validation for that reason.
You can find the product documentation for the Tivoli Directory Integrator at the following Web address:
http://publib.boulder.ibm.com/infocenter/tivihelp/v2r1/topic/com.ibm.IBMDI.doc_6.1/welcome.htm
See the topic Mapping fields for information about mapping fields from the enterprise LDAP directory to
the local Profiles database repository.
To validate mapped fields, complete the following steps:
1. From the TDI directory, open the validate_dbrepos_fields.properties file in a text editor.
2. Edit the value to include validation information specific to your enterprise. Use the following syntax:
v Integer length – The value is checked and if not null, it cannot be longer than the given length. For
example:
PROF_BUILDING_NAME=15
At validation time, if the value mapped to this field is longer than 15, the entire LDAP record will
be rejected. It will not be added to the database repository and the rejection, which documents the
reason it failed to be added, will be logged.
v Javascript expression – An expression that indicates what constitutes a valid value. Write the
expression in terms of x. For example, the following expression verifies that the userid field exists
and is not longer than 10 characters in length:
userid=(x != null) && (x.length() < 10)
At validation time, if the userid field does not exist or is longer than 10 characters, the entire LDAP
record will be rejected. It will not be added to the database repository and the rejection, which
documents the reason it failed to be added, will be logged.
v Javascript function – A function that indicates what constitutes a valid value. Define the function
in profiles_functions.js and wrap the name of the Javascript function in curly brackets {}. It is
recommended that you begin the function name with ″func_″. For example:
PROF_BUILDING_IDENTIFIER={func_validate_PROF_BUILDING_IDENTIFIER}
At validation time, if the function does not return true, the entire LDAP record will be rejected. It
will not be added to the database repository and the rejection, which documents the reason it failed
to be added, will be logged.3. Save and close the properties file.
Creating a local database repository
Profiles requires a local database repository to store user information. Follow the procedures here to
create this database.
To create and populate the local database repository, complete the following steps:
1. DB2 only: Use a text editor to modify the file paths of table spaces in the file system which are
specified in the peopledb.db2 DDL file that is stored in the TDI directory.
For example, you could add a peopledb subdirectory under the db2inst1 user’s home directory to
store the PEOPLEDB information. The resulting content of the peopledb.db2 file might look as
follows:
CREATE LARGE TABLESPACE USERSPACE4K IN DATABASE PARTITION GROUP
IBMDEFAULTGROUP
PAGESIZE 4096 MANAGED BY DATABASE
USING (FILE ’/home/db2inst1/peopledb/peopletabspace4k’ 19200)
AUTORESIZE YES
INCREASESIZE 20 M
MAXSIZE NONE
EXTENTSIZE 32
Chapter 4. Preinstallation tasks 41

PREFETCHSIZE AUTOMATIC
BUFFERPOOL BPOOL4K
NO FILE SYSTEM CACHING
DROPPED TABLE RECOVERY ON;
Or you can specify a relative path to create the file in a data area in a subdirectory of the directory
to which the db2 instance is installed. For example, to specify a relative path, use the syntax: FILE
’peopletabspace4k’
2. Create the PEOPLEDB database and tables by doing one of the following:
v If you are using DB2, do the following:
– Linux:
a. Be sure that you are logged in as a DB2 instance user. db2inst1 is typically the default name
for the first instance user.
b. Change to the DB2 sqllib/bnd directory under the DB2 instance directory.
c. Type the following command into the command line processor:
db2 -tvf <path_to_tdi_directory>/peopledb.db2
where <path_to_tdi_directory> is the path to the TDI directory where the peopledb.db2 file is
located.– Windows:
a. Change to the DB2 sqllib\bnd directory. For example, C:\Program Files\IBM\SQLLIB\bnd
Note: It is critical that you change to the directory specified in this step. If you do not, the
database bindings will fail, causing the Profiles application to have problems accessing the
database information.
b. Open the command line processor using the db2cmd command, and then type the following
command:
db2 -tvf <path_to_tdi_directory>\peopledb.db2
where <path_to_tdi_directory> is the path to the TDI directory where the peopledb.db2 file is
located.v If you are using Oracle, from the TDI solution directory and using the same user ID you used to
install the Oracle database, run the following commands:
– Linux:
./createOracleDb.sh <password>
export ORACLE_SID=PEOPLEDB
./createOracleSchema.sh <password>
– Windows:
createOracleDb.bat <password>
set oracle_sid=PEOPLEDB
createOracleSchema.bat <password>
The SQL statements used for defining the tables, indexes, and triggers for Oracle are stored in the
peopledb.oracle.sql file. 3. DB2 only: Create the explain tables for DB2 by locating the EXPLAIN.DDL file which is provided
with DB2 and is typically stored in the misc subdirectory of the DB2 installation directory. Type the
following commands to run it:
db2 connect to PEOPLEDB
db2 -tvf <path_to_explain_ddl_file>
where <path_to_explain_ddl_file> is the path to the EXPLAIN.DDL file. For example:
/opt/ibm/db2/V9.1/misc/EXPLAIN.DDL
4. Update the profiles_tdi.properties file in the TDI directory to specify values for the properties.
42 IBM Lotus Lotus Connections 1.0.1 Installation Guide

The following list contains properties that you must review. Edit any property values that require
editing for your configuration.
source_ldap_url
Universal resource locator of the LDAP directory which enables programs to access the
LDAP directory. Use the following syntax to specify the value:
source_ldap_url=ldap://myldap.enterprise.acme.com:389
source_ldap_user_login
A user login name is required if you cannot use Anonymous search. Use the following
syntax to specify the value:
source_ldap_user_login=uid=wpsbind,cn=users,l=Bedford Falls,
st=New York,c=US,ou=Enterprise,o=Sales Division,dc=acme,dc=com
source_ldap_user_password
A user password is required (along with user login name) if you cannot use anonymous
search. Use the following syntax to specify the value:
{protect}-source_ldap_user_password=wpsbind
source_ldap_search_base
A portion of the LDAP DN that should be part of all entries processed. Typically this
contains the expected organization (o) value, such as source_ldap_search_base=o=ibm.com.
Use the following syntax to specify the value:
source_ldap_search_base=l=Bedford Falls,st=New York,c=US,
ou=Enterprise,o=Sales Division,dc=acme,dc=com
source_ldap_search_filter
A search filter to further refine the entries used. A typical value might be
source_ldap_search_filter=cn=*. Use the following syntax to specify the value:
source_ldap_search_filter=(&(uid=*)(objectclass=inetOrgPerson))
source_ldap_use_ssl
Required only if you are using SSL to authenticate. Specifies whether to use Secure Sockets
Layer for the connection. Options are true or false.
source_ldap_sort_attribute
Instructs the LDAP server to sort entries matching the search base on the specified field
name. This is usually only needed in special circumstances.
source_ldap_sort_page_size
This is a special field currently used only by Services personnel.
source_ldap_escape_dns
Indicates that special characters have not been escaped properly and identifies them so the
processor can find those characters and escape them. Special characters are:
v , (comma)
v = (equals)
v + (plus)
v < (less than)
v > (greater than)
v # (number sign)
v ; (semicolon)
v \ (backslash)
v ″ (quotation mark)
The backslash is used to escape special characters. A plus sign is represented by \+ and a
backslash is represented by \\. The code will not escape commas, so if you have DNs
containing commas (as part of a name, not separating fields in the DN), you must make sure
Chapter 4. Preinstallation tasks 43

your DNs are already escaped. Typically, if you use the collect_ldap_dns script with IBM
Tivoli Directory Server, you will not need to set this property to true since the data will be
escaped properly. If you use collect_ldap_dns with Active Directory or enter the data
manually, you may need to set this property to true.
dbrepos_jdbc_url
Universal resource locator of the database that you created. This should specify the peopledb
database, and should include the port number. For example: jdbc:db2://localhost:50000/peopledb.
dbrepos_username
The user name used to authenticate to the database that you created. Use the following
syntax to specify the value:
dbrepos_username=<db_admin_id>
dbrepos_password
The password used to authenticate to the database that you created. Use the following
syntax to specify the value:
{protect}-dbrepos_password=act1vities
tds_changelog_ldap_url
Universal resource locator of the TDS change log which ensures that any changes made to
the LDAP directory are communicated to the database repository, so that they can be made
there also. This can wait until you decide to start TDS changelog processing.
tds_changelog_ldap_user_login
Required after you run the process_tds_changes file. Login user name to be used for
authentication for the LDAP system that was updated. This can be left blank if no
authentication is needed.
tds_changelog_ldap_user_password
Required after you run the process_tds_changes file. Login user name to be used for
authentication for the LDAP that was updated.
monitor_changes_dsml_server_url
Required only if you are transmitting user changes back to the source repository. Web
address of the DSML server that the DSML update requests should be sent to.
monitor_changes_dsml_server_username
Required only if you are transmitting user changes back to the source repository. User name
used for authentication to the DSML server that the DSML update requests should be sent
to.
monitor_changes_dsml_server_password
Required only if you are transmitting user changes back to the source repository. Password
used for authentication to DSML server that the DSML update requests should be sent to.You can provide values for additional properties if it makes sense for your configuration. See the
Profiles properties topic for more information.
5. Update the map_dbrepos_from_source.properties file to reflect the mapping from your LDAP source
directory to the database properties. See the topic, Mapping fields, for more details.
6. Update the validate_dbrepos_fields.properties file to reflect the validation of fields added to the
database repository. See the topic, Validating mapped fields, for more details.
Note: Make sure that the values do not exceed the maximum length of their destination database
fields or errors will be logged and the entire record will be omitted from the database when it is
populated.
7. Optional: You must perform either this step or Step 10. If you are setting the PROF_IS_MANAGER
field using a 1:1 mapping, be sure you specified how to set the field in the
map_dbrepos_from_source.properties file.
44 IBM Lotus Lotus Connections 1.0.1 Installation Guide
For example, if your LDAP has an ″ismanager″ field that is set to a value of Y or N, your
map_dbrespos_from_source.properties file could specify the following:
PROF_IS_MANAGER=ismanager
Note: If your source LDAP system uses a value other than Y or N to indicate whether the person is
a manager, write a Javascript function to map the value into a Y or N, and then provide a reference
to that function here.
Note: If you are setting the PROF_IS_MANAGER field based on PROF_MANAGER_UID references
in other employees’ records, perform Step 10 instead of this step.
8. Required: Run the following script to create a file containing the distinguished names (DNs) to be
processed from the source LDAP directory.
v Linux: collect_dns.sh
v Windows: collect_dns.bat
The file created is named collect.dns by default. After the script runs, it creates a log file called
ibmdi.log in the /logs subdirectory of the TDI directory. Check this file to find out how many
entries were populated and whether there were any errors encountered during the process.
9. Required: Populate the database repository from the source LDAP directory by running the
following script:
v Linux: populate_from_dn_file.sh
v Windows: populate_from_dn_file.bat
Depending on how many records you are processing, this step could take many hours. For example,
5,000 records might take a few minutes, while half a million records could take over 12 hours. Tivoli
Database Integrator prints a message to the screen after every 1,000 iterations to inform you of its
progress.
Note: If a failure occurs during processing, such as loss of the network connection to the LDAP
directory server, start processing the names from where it left off. Check the
PopulateDBFromDNFile.log file in the logs subdirectory to find out which distinguished name was
last successfully processed. (The ibmdi.log file also keeps track of the tasks that you run.) Edit the
DNS file generated in the previous step, which is named collect.dns by default, to remove all entries
up to and including the last successfully processed entry. Start the task again. This can be repeated
as many times as necessary until all of the distinguished names are processed.
10. Optional: You must perform either this step or Step 7. If you are setting the PROF_IS_MANAGER
field based on PROF_MANAGER_UID references in other employees’ records, run the following
script:
v Linux: mark_managers.sh
v Windows: mark_managers.bat
The acceptable values for the PROF_IS_MANAGER field are Y or N. Y indicated that the person is a
manager. Manager identification is not done as part of the previous record population step because it
must run across all the records and it is possible that the initial record population step may not
complete in a single pass for large organizations.
You must perform either this Step or Step 7.
11. Run the following script file to populate the Country table from the isocc.csv file:
v Linux: fill_country.sh
v Windows: fill_country.bat
12. Optional: Create any of the following tables that are relevant for your organization, and then
populate the local database repository with that information:
Department codes
If your organization uses department codes, create a table that contains one line per entry. In
each entry, include a department code, followed by a separator (such as a semicolon), and
Chapter 4. Preinstallation tasks 45

then a department description. Name the table deptinfo.csv and store it in the solution
directory. After building the table, run the following script file:
v Linux: fill_department.sh
v Windows: fill_department.bat
Employee type codes
If your organization uses employee type codes, create a table that contains one line per entry.
In each entry, include an employee type code, followed by a separator, such as a semicolon,
and then an employee type description. Name the table emptype.csv and store it in the
solution directory. After building the table, run the following script file:
v Linux: fill_emp_type.sh
v Windows: fill_emp_type.bat
Organization codes
If you use organization codes, create a table that contains one line per entry. In each entry,
include an organization code, followed by a separator, such as a semicolon, and then an
organization description. Name the table orginfo.csv and store it in the solution directory.
After building the table, run the following script file:
v Linux: fill_organization.sh
v Windows: fill_organization.bat
Work location codes
If your organization uses work location codes, create a table that contains one line per entry.
In each entry, include a work location code, followed by a separator, such as a semicolon,
and then a location description. Name the table workloc.csv and store it in the solution
directory. After building the table, run the following script file:
v Linux: fill_workloc.sh
v Windows: fill_workloc.bat
13. DB2 only: Run the runstats script. Runstats is a DB2 utility that updates catalog statistics used by
the optimizer to determine the fastest path to your data.
v Linux: runstats_db2.sh
v Windows: runstats_db2.bat
This script uses the runstats commands in the runstats.db2 file.
14. The database should now be fully populated. Test it by querying some names.
a. Create a query_name.in file that contains one name per line. The names can contain first and last
names, last names only, or the beginning of a name. The case of the letters does not matter.
b. Run the following script to write the existing fields for all matching entries to the console.
v Linux: query_names.sh
v Windows: query_names.bat
You have finished creating and populating the database.
15. The following tasks are ones that you should perform on an ongoing basis.
a. To synchronize changes between the draft table and the LDAP server, you must run a script that
initializes a server (daemon) process which monitors the local database for updates, and, when
one is made, formats the update as a DSML request and transmits it to a configured DSML
server. The draft table stores values that you edit and for which you specify ’draft=″true″’ on the
editableAttribute element in profiles-config.xml file for Profiles. These editable fields are sent
back to LDAP instead of being updated into the database immediately. You must have a DSML
server service configured to receive the update requests. Profiles does not provide this service
because each implementation of an LDAP server is unique. No one knows the process you use to
handle updates to your source LDAP better than you do. If you want to implement
46 IBM Lotus Lotus Connections 1.0.1 Installation Guide

synchronization, you must define values for the DSML server-related properties, which are the
properties with names that begin with “monitor_changes.” Typically, the properties that you
must update are:
v monitor_changes_dsml_server_url
v monitor_changes_dsml_server_username
v monitor_changes_dsml_server_password
After providing values for the necessary properties, start the synchronization server process by
running the following scripts:
v Linux: process_draft_updates.sh
v Windows:process_draft_updates.batb. The process_tds_changes task keeps track of the changelog number in a persistent field. If your
LDAP is reset, you can do one of the following:
v Delete the changelog number value using the following script:
– Linux:
reset_changelog_state.sh
– Windows:
reset_changelog_state.bat
v Set a particular value using the following script and passing it the count value to set:
– Linux:
set_changelog_count.sh
– Windows:
set_changelog_count.bat
c. After initial database population, you can do one of the following:
v For Tivoli Directory Server, you can use the following script to process changes made to LDAP
and have those changes made to the corresponding records in your database repository:
– Linux:
process_tds_changes.sh
– Windows:
process_tds_changes.bat
v For Active Directory, you can use the following script to process changes made since the initial
population:
– Linux:
process_ad_changes.sh
– Windows:
process_ad_changes.bat
Tivoli Directory Integrator Properties:
This topic defines the Tivoli Directory Integrator properties associated with the LDAP directory. Most, but
not all of the properties in the profiles_tdi.properties file map to configuration parameters used in Tivoli
Directory Integrator.
Chapter 4. Preinstallation tasks 47

The following properties are associated with the source LDAP repository.
Table 4. LDAP Properties
Property
Tivoli Directory Integrator
Configuration Parameter Definition
source_ldap_authentication_method
Authentication Method Options are:
Anonymous
This method provides
minimal security.
Simple This method uses a login
user name and password to
authenticate. It is treated as
anonymous if no user name
and password are provided.
CRAM-MD5
Challenge/Response
Authentication Mechanism
using Message Digest 5. This
method provides reasonable
security against various
attacks, including replay.
SASL Simple Authentication and
Security Layer. This method
adds authentication support
to connection-based
protocols. Specify
parameters for this type of
authentication using the
Extra Provider Parameters
option.
source_ldap_collect_dns_file Name of the file used to collect
distinguished names (DNs) from the
source LDAP, and then used during
the population processes to look up
entries to add to the database
repository. The default value is
collect.dns.
source_ldap_debug Flag used by Profiles processing
which indicates whether to print
additional debug information to the
log. Use this to capture problem
information when the number of
input records being processed has
been limited (for example, by
specifying a much more specific
search filter). It also sets the detailed
log setting of the connectors that are
used as part of the processing of
source to the database repository.
Options are true and false.
source_ldap_escape_dns
48 IBM Lotus Lotus Connections 1.0.1 Installation Guide

Table 4. LDAP Properties (continued)
Property
Tivoli Directory Integrator
Configuration Parameter Definition
source_ldap_required_dn_regex
Allows a regular expression to be
used to limit the distinguished names
(DNs) which are processed by
providing a regular expression which
must be matched. If the regular
expression is not matched, that
particular record is skipped.
Although the search filter property
gives some flexibility, in case this is
not sufficient, you can use a more
powerful regular expression.
source_ldap_search_base Search Base Required. The search base used
when iterating the directory. This
should be a distinguished name.
Some directories enable you to
specify a blank string which defaults
to whatever the server is configured
to do. Other directory services
require this to be a valid
distinguished name in the directory.
source_ldap_search_filter Search Filter Required. Search filter used when
iterating the directory.
source_ldap_sort_attribute Search Filter Instructs the LDAP server to sort
entries matching the search base on
the specified field name.
source_ldap_sort_page_size Currently used only by Services
personnel.
source_ldap_url LDAP URL Required. The LDAP Web address
used to access the source LDAP
system. For example:
ldap://host:port
source_ldap_use_ssl Use SSL Required if you are using SSL to
authenticate. Set this to ″true″ if you
are using SSL (typically port 636 in
the LDAP URL). Options are true
and false.
source_ldap_user_login Login user name Required. Login user name used for
authentication. You can leave this
blank if no authentication is required.
source_ldap_user_password Login password Required. Login password used for
authentication. You can leave this
blank if no authentication is required.
The value will be encrypted in the
file the next time it is loaded.
Chapter 4. Preinstallation tasks 49

The following properties are associated with the Profiles database repository.
Table 5. Profiles Database Properties
Property
Tivoli Directory Integrator
Configuration Parameter Definition
dbrepos_jdbc_driver JDBC Driver Required. JDBC driver used to access
the Profiles database repository. The
default value of the properties file
references the DB2 database provided
with Profiles as follows:
dbrepos_jdbc_driver=
com.ibm.db2.jcc.
DB2Driver
If you are using DB2, you do not
need to modify this value. If you are
using an Oracle database, change the
value to reference an Oracle database.
The following values are example
values:
dbrepos_jdbc_driver=
oracle.jdbc.driver.
OracleDriver
or
oracle.jdbc.pool.
OracleConnectionPool
DataSource
dbrepos_jdbc_url JDBC URL Required. JDBC Web address used to
access the Profiles database
repository. You must modify the
hostname portion and port number
to reference your server information.
Note: You can find this information
by accessing the WebSphere
Application Server Administration
Console (http://yourhost:9060), and
then selecting Resources → JDBC →
Data sources → profiles. The default
value uses the syntax for a DB2
database. If you are using an Oracle
database, use the following syntax:
jdbc:oracle:thin:
@<host_name>:1521:
PEOPLEDB
dbrepos_username User name Required. User name under which
the database tables, which are part of
the Profiles database repository, are
accessed.
dbrepos_password Password Required. Password associated with
the username under which the
database tables, which are part of the
Profiles database repository, are
accessed.
The following properties are associated with the task that monitors the Profiles employee draft table for
changes and transmits them through a DSML v2 connector.
50 IBM Lotus Lotus Connections 1.0.1 Installation Guide

Table 6. Change Monitoring Properties
Property
Tivoli Directory Integrator
Configuration Parameter Definition
monitor_changes_debug Flag used by Profiles to monitor
changelog processing, which prompts
the Tivoli Directory Integrator to
print additional debug information to
the log. Use this when debugging
issues arise. This property also sets
the detailed log setting of the
connectors used as part of the
monitor change log processing.
Options are true and false.
monitor_changes_dsml_server_authentication
Type of authentication used by the
DSML server update requests.
Options are
HTTP basic authentication
A method designed to allow
a web browser, or other
client program, to provide
credentials – in the form of a
user name and password –
when making a request.
Anonymous
This method provides
minimal security.
monitor_changes_dsml_server_url
Required if you are transmitting
user changes back to the source
repository. Web address of the DSML
server to which the DSML update
requests should be sent.
monitor_changes_dsml_server_username
Required if you are transmitting
user changes back to the source
repository. User name used for
authentication to the DSML server.
monitor_changes_dsml_server_password
Required if you are transmitting
user changes back to the source
repository. Password used for
authentication to the DSML server.
monitor_changes_map_functions_file
Path to the file containing mapping
functions for mapping from a
changed database field to a source
(for example LDAP field). This is
only needed if changes made to the
source based on database repository
field changes are not mapped simply
one-to-one. You can use the same file
you use to map from source to
database repository fields, assuming
the functions are named
appropriately.
monitor_changes_sleep_interval
Polling interval (in seconds) between
checks for additional changes when
no changes exist.
Chapter 4. Preinstallation tasks 51

The following properties are associated with the Tivoli Directory Integrator processing that reads a Tivoli
Directory Server change log and subsequently updates the database repository with those changes.
Table 7. Tivoli Directory Server Change Log Properties
Property
Tivoli Directory Integrator
Configuration Parameter Definition
ad_changelog_debug Flag used by Active Directory
Change Log Server processing which
prints additional debug information
to the log. Use this when you
encounter debugging issues. This
property also sets the detailed log
setting of the connectors used as part
of the monitor changelog processing.
Options are true and false.
ad_changelog_ldap_url Required. LDAP Web address used
to access the LDAP system that was
updated. For example:
ldap://host:port
ad_changelog_ldap_user_login
Required. Login user name to use to
authenticate with an LDAP system
that has been updated. You can leave
this blank if no authentication is
needed.
ad_changelog_ldap_user_password
Required. Login user name to use to
authenticate with an LDAP that has
been updated. You can leave this
blank if no authentication is needed.
The value will be encrypted in the
file the next time it is loaded.
ad_changelog_ldap_search_base
ad_changelog_ldap_use_ssl
Defines whether or not to use SSL in
authenticating with an LDAP system
that was updated. Options are true
and false.
ad_changelog_timeout
ad_changelog_sleep_interval
Polling interval (in seconds) between
checks for additional changes when
no changes exist.
ad_changelog_use_notifications
Indicates whether to use changelog
notifications rather than polling. If
true, the
tds_changelog_sleep_interval is not
applicable since polling is not used.
Options are true and false.
ad_changelog_ldap_page_size
ad_changelog_start_at Change number in the Active
Directory changelog to start at.
Typically this is an integer, while the
special value ″EOD″ means start at
the end of the changelog.
ad_changelog_ldap_required_dn_regex.
52 IBM Lotus Lotus Connections 1.0.1 Installation Guide

Table 7. Tivoli Directory Server Change Log Properties (continued)
Property
Tivoli Directory Integrator
Configuration Parameter Definition
tds_changelog_debug Flag used by Tivoli Directory Server
Change Log Server processing which
prints additional debug information
to the log. Use this when you
encounter debugging issues. This
property also sets the detailed log
setting of the connectors used as part
of the monitor changelog processing.
Options are true and false.
tds_changelog_ldap_authentication_method
Authentication Method Authentication method used to
connect to LDAP to read records.
Options are:
Anonymous
This method provides
minimal security.
Simple This method uses a login
user name and password to
authenticate. It is treated as
anonymous if no user name
and password are provided.
CRAM-MD5
Challenge/Response
Authentication Mechanism
using Message Digest 5. This
method provides reasonable
security against various
attacks, including replay.
SASL Simple Authentication and
Security Layer. This method
adds authentication support
to connection-based
protocols. Specify
parameters for this type of
authentication using the
Extra Provider Parameters
option.
tds_changelog_ldap_changelog_base
ChangelogBase Changelog base to use when iterating
through the changes. This is typically
cn=changelog.
tds_changelog_ldap_time_limit_seconds
Time Limit Searching for entries must take no
more than this number of seconds (0
means no limit).
tds_changelog_ldap_url LDAP URL Required. LDAP Web address used
to access the LDAP system that was
updated. For example:
ldap://host:port
tds_changelog_ldap_use_ssl Use SSL Defines whether or not to use SSL in
authenticating with an LDAP system
that was updated. Options are true
and false.
Chapter 4. Preinstallation tasks 53

Table 7. Tivoli Directory Server Change Log Properties (continued)
Property
Tivoli Directory Integrator
Configuration Parameter Definition
tds_changelog_ldap_user_login
Login user name Required. Login user name to use to
authenticate with an LDAP system
that has been updated. You can leave
this blank if no authentication is
needed.
tds_changelog_ldap_user_password
Login password Required. Login user name to use to
authenticate with an LDAP that has
been updated. You can leave this
blank if no authentication is needed.
The value will be encrypted in the
file the next time it is loaded.
tds_changelog_sleep_interval Polling interval (in seconds) between
checks for additional changes when
no changes exist.
tds_changelog_start_at_changenumber
Change number in the Tivoli
Directory Server changelog to start at.
Typically this is an integer, while the
special value ″EOD″ means start at
the end of the changelog.
tds_changelog_use_notifications
Indicates whether to use changelog
notifications rather than polling. If
true, the
tds_changelog_sleep_interval is not
applicable since polling is not used.
Options are true and false.
The following property is associated with the query utilities.
Table 8. Query Utility Properties
Property
Tivoli Directory Integrator
Configuration Parameter Definition
query_db_by_name_file Name of the file used by
query_input_by_name as the source
of names to query. The default value
is query_name.in.
54 IBM Lotus Lotus Connections 1.0.1 Installation Guide

Chapter 5. Setting up a stand-alone deployment
Install all of the Lotus Connections features or a select set on one or more servers that are not centrally
administered. You can later set up a network deployment of Lotus Connections to optimize its
performance.
© Copyright IBM Corp. 2007, 2007 55

Installing a Lotus Connections feature
When installing Lotus Connections, you install only one Lotus Connections feature at a time. The steps
defined in this section are common to all the features. After you perform the common installation steps
described below, you will complete the installation by performing feature-specific installation procedures.
Be sure you have installed all the prerequisite software and that the system or systems you are installing
the features onto meet the system requirements. Also, be sure you have completed the preinstallation
tasks.
To install a Lotus Connection feature, complete the following steps:
1. Optional: If you are downloading the product, download the Lotus Connections installer executable
file, which has a .EXE extension for Microsoft Windows systems and a .TAR extension for Linux
systems, from the Lotus Connection Web site, and then do one of the following:
v Linux:
Change to the directory to which you downloaded the TAR file, and then type the following
command to extract the files from it:
tar -xvf Lotus_Connections_Install.tar
This command creates a Lotus_Connections_Install directory.
v Windows:
From the directory to which you downloaded the EXE file, double-click the EXE file to extract its
contents to a folder on your system. This creates a Lotus_Connections_Install folder.
If you are installing the product from the DVD, skip this step.
2. If the WebSphere Application Server on which you plan to install Lotus Connections is running, stop
it.
3. Run the installer by doing the following:
v Linux: From the directory in which the install.sh file is stored, start the installer by typing the
following command:
./install.sh
v Windows: Double-click the install.bat file to start the installer. 4. Click Next on the Welcome page.
5. Review and accept the Lotus Connections license agreement.
6. Select Save the settings in a response file if you want the installer to store the values you type into
the fields during the installation. This is useful if you plan to set up a network deployment because
instead of subsequently running the installer for each feature on another system, you can edit the
response files to customize them for the next installation, and then reference them when you
perform a silent installation of the features.
Note: Change the name of the response file to identify the feature you are installing or the response
file will get overwritten the next time you use it during an installation. For example, you could edit
the response file name using these options depending on the feature you are installing:
v Activities – InstallResponseA.txt
v Blogs – InstallResponseB.txt
v Communities – InstallResponseC.txt
v Dogear – InstallResponseD.txt
v Profiles – InstallResponseP.txt 7. Select one feature to install from the following options:
v Activities
v Blogs
56 IBM Lotus Lotus Connections 1.0.1 Installation Guide
v Communities
v Dogear
v Profiles
Click Next.
8. When asked for the location of the WebSphere Application Server instance that you want to use,
select the location of the server to use to host the feature, and then click Next. For example:
v Linux:
/opt/IBM/WebSphere/AppServer
v Windows:
C:\Program Files\IBM\WebSphere\AppServer
After you identify the location of the WebSphere Application Server instance, the installer will check
to make sure security is enabled on that server.
Note: If the location of the server you want to use is not displayed, click the Cancel button to cancel
out of the installation, and then complete the following steps:
a. Open a command prompt on the system on which you installed WebSphere Application Server.
b. Change to the directory which contains the Lotus Connections install executable file or shell
script, and then type the following command:
v Linux:
./install.sh -W installedWasLocation.undetectedWas=
/<file_path_to_AppServer_directory>
v Windows:
install -W installedWasLocation.undetectedWas=
<file_path_to_AppServer_directory>
where <file_path_to_AppServer_directory> is the file path to the AppServer directory of the
WebSphere Application Server you want to use. For example:
v Linux:
/opt/IBM/WebSphere/AppServer
v Windows:
C:\Progra~\IBM\WebSphere\AppServer
Note: Use Progra~ to represent the Program Files directory name; the install command does
not recognize file path parameters that contain spaces.
Note: The last directory specified in the path should be AppServer.
c. When the installation wizard begins again, repeat Steps 4-7. When you are asked to choose the
server, the server you specified is now included in the list. Select it from the list, and then click
Next. 9. Optional: A screen asking you to specify a profile is displayed only if your WebSphere
Application Server is configured with more than one profile. Select the WebSphere Application
Server profile you want to use to host the feature, and then click Next.
For example:
AppSrv01
Note: If you are installing multiple features onto a single system, you can either install all the
features within a single profile, or create a separate profile for each feature. See Chapter 4,
“Preinstallation tasks,” on page 21 for information about how to create profiles.
10. Optional: A screen asking you to specify a server process is displayed only if your profile has
more than one server process associated with it. Select the application server you want to use to
host the feature, and then click Next.
Chapter 5. Setting up a stand-alone deployment 57

For example:
server1
Note: If you are installing multiple features onto a single machine and within a single profile, you
must install each feature to a separate server process. See Chapter 4, “Preinstallation tasks,” on page
21 for information about how to create server processes.
11. Type the WebSphere Application Server Administrative user ID and password, and then click Next.
12. Confirm the server hostname. For example: appserver.enterprise.acme.com. Click Next.
13. Select the database product you used to create the feature databases:
v DB2 Universal Database™
v Oracle Enterprise EditionClick Next.
14. Provide Java Database Connectivity (JDBC) connector information for the database.
Table 9. Java Database Connectivity (JDBC) connector information
Field Name Description
Host name Host name of the database server.
Port The port number for the database connection. By default,
the port number for a DB2 database is 50000 and the
port number for an Oracle database is 1521.
Database name Specify the name of the database for the feature you are
installing from the following list of options:
v DB2:
– Activities: OPNACT
– Blogs: BLOGS
– Communities: SNCOMM
– Dogear: DOGEAR
– Profiles: PEOPLEDB
v Oracle:
– For Profiles, type PEOPLEDB.
– For all other features:
- If you are using an existing Oracle database and
adding the feature tables to it, type the name of
that database.
- If you ran the script provided with Lotus
Connections to create a new database, type
LSCONN.
58 IBM Lotus Lotus Connections 1.0.1 Installation Guide

Table 9. Java Database Connectivity (JDBC) connector information (continued)
Field Name Description
JDBC driver library location Fully qualified file path to the directory in which the JAR
files that are used for the database JDBC connection are
stored.
If you have an existing remote database server, you must
copy the JAR files that support the JDBC driver from
that server to the machine hosting the WebSphere
Application Server instance you are using.
If the database server resides on the host machine, you
do not need to copy over any files.
DB2: Specify one of the following JAR files that support
the DB2 JDBC driver:
v db2jcc.jar – The DB2 universal driver file.
v db2jcc_license_cu.jar – This license file permits a
connection to the Cloudscape™ server and all DB2
Database for Linux and Windows servers.
Note: Lotus Connections does not support Cloudscape,
DB2 for z/OS®, nor DB2 Universal Database for iSeries™.
For example: The following file path is the path to a DB2
server that is on the same machine as WebSphere
Application Server:
v Linux:
/opt/ibm/db2/V9.1/java/
v Windows:
C:\IBM\SQLLIB\java\
Oracle: The JAR file that supports the Oracle JDBC
driver is ojdbc14.jar.
For example, the following file path is the path to an
Oracle server that is on the same machine as WebSphere
Application Server:
v Linux:
/opt/oracle/product/10.2.0/db_1/jdbc/
lib
v Windows:
C:\oracle\product\10.2.0\db_1\jdbc\
lib
Chapter 5. Setting up a stand-alone deployment 59

Table 9. Java Database Connectivity (JDBC) connector information (continued)
Field Name Description
User ID Account that will be used by Lotus Connections to access
the database.
DB2: Type either an administrative-level user ID, similar
to the one you used to create the databases or, if you
created a dedicated user account, type LCUSER.
Oracle: Type an existing user ID that has administrative
privileges, such as sys, or type the dedicated user ID
associated with the feature that was automatically
created when you created the tables. The user IDs that
were created for the features are named as follows:
v Activities: ACTIVITIES
v Blogs: BLOGS
v Communities: SNCOMM
v Dogear: DOGEAR
v Profiles: EMPINST
Password Password associated with the user account specified
above.
Click Next. You have now completed the Lotus Connections common installation procedures.
15. Refer to the related section in this Installation Guide for the steps to complete the installation of one
of the following Lotus Connections features:
v Activities
v Blogs
v Communities
v Dogear
v Profiles
Related reference
Chapter 3, “Hardware and software requirements,” on page 15
60 IBM Lotus Lotus Connections 1.0.1 Installation Guide

Installing Activities
Follow these steps to finish installing the Activities feature.
1. When asked for the statistics directory, type the file path to a local directory in which you like to
store statistics files. For example:
v Linux:
/opt/Activities/statistics
v Windows:
C:\Activities\statistics
Click Next.
2. When asked to select a location for the content store, do one of the following:
v Select Network or operating system file system.
v Select Domino database to specify that you want to use a Domino database (NSF file) to store
files that users add to Activities.
Click Next.
3. Do one of the following:
v If you selected a network or operating system file system, do one of the following:
– For stand-alone deployments, type the file path to a directory on a local drive that has adequate
disk space to store all the files uploaded to Activities by your users. For example:
- Linux:
/opt/Activities/objectstore
- Windows:
C:\Activities\objectstore
– For network deployments, type the file path to a network share directory using the Universal
Naming Convention (UNC) format (\\server_name\share_name). Specify the same directory
on each node that you install Activities to.v If you selected a Domino database as the file store, specify the database to use by typing values
into the following fields:
– Server name – Name of the server that hosts the database. Select a server that has the HTTP
task running on it.
– Database name – File name of the database. For example, activitiesObjects.nsf.
– User ID – The User ID must be a Notes ID that represents a user who is identified as a Person,
has Editor access and ″Delete documents″ privileges to the database.
– Password – Associated password for the User ID.
If you want to use SSL to connect to the Domino database, select Encrypt Activities traffic to the
Domino server over the network using SSL.
In the Port field, type one of the following values:
– 80 – Supports HTTP.
– 443 – Supports SSL.Click Next.
4. Indicate whether you want to enable SMTP, and then click Next. If you choose not to enable SMTP,
skip the next step.
SMTP supports outbound mail. If you enable SMTP, activity members send e-mail notifications when
they create an activity and add people as a members.
5. To support outbound e-mail, provide values for the following fields:
Fill out one of the following fields to identify the mail server for Activities to use to send e-mail:
v Host name of the SMTP messaging server – Type the host name of the mail server.
v Domain name of the DNS server – Type the name of your mail domain.
Chapter 5. Setting up a stand-alone deployment 61

User ID
If SMTP authentication is required, type the administrative user ID for the SMTP server.
Password
If SMTP authentication is required, type the password for the administrative user of the
SMTP server.
Encrypt outgoing mail traffic to the SMTP messaging server using SSL
Optional: Select the check box if you want to use the Secure Sockets Layer (SSL) when
connecting to the SMTP server.
Port Specify the port number to use for the SMTP server connection. The default port number for
the SMTP protocol is 25. The default port number for SMTP over SSL is 465.Click Next.
6. When asked to enter the fully qualified domain name for the feature, in the HTTP URL field, type
the Web address that users will type into a Web browser location bar to access the feature after it is
installed. If you are using an HTTP server, do not specify a port number and remove the default
port number provided by the installer. Select the Enable SSL server check box, and then type the
Web address users will type into a Web browser location bar to access the feature over SSL into the
HTTPS URL field. Click Next.
Note: Do not deselect the Enable HTTP server check box. Doing so could cause the features to be
inaccessible from the navigation bar.
7. Review the Summary screen to make sure the values you entered on previous screens are correct. If
you want to make a change, click Back to edit a value. If the values are correct, on the installation
summary screen, click Install to begin the installation.
8. Click Finish.
9. Optional: If you indicated that you would like to use a Domino database as the content store, you
must create the database before starting Activities. See Creating a Domino database content store.
10. Start the WebSphere Application Server instance to which you installed the feature, such as server1,
by typing the following commands:
Note: If you are migrating data from a pilot to production installation, skip this step and the next
step. You will not start the servers until after the migration is complete.
v Linux:
cd opt/IBM/WebSphere/AppServer/profiles/<profile_name>/bin
startServer.sh <server_instance>
v Windows:
cd C:\IBM\WebSphere\AppServer\profiles\<profile_name>\bin
startServer.bat <server_instance>
Note: If the server fails to start, start it again by repeating the above commands. If it continues to
fail, look at the error log to see if there is a problem with your set up. The error log file is stored in
the following directory:
v Linux:
opt/IBM/WebSphere/AppServer/profiles/<profile_name>/logs/
<server_instance>/SystemOut.log
v Windows:
C:\IBM\WebSphere\AppServer\profiles\<profile_name>\logs\
<server_instance>\SystemOut.log
11. Open a Web browser and access the feature directly from the WebSphere Application Server by
going to the Web address you specified for the Activities feature.
For example:
http://appserver.enterprise.acme.com:<port_number>/activities
62 IBM Lotus Lotus Connections 1.0.1 Installation Guide

where the <port_number> is the port number on the WebSphere Application Server that the feature
is available from. This is usually:
v 9080 – Standard port number for the default server process, server1. This is probably the server
process that you installed the feature on if you are installing each feature to its own profile.
v 9081-9085 – These are the port numbers that are usually assigned to features that are installed into
a single profile. The first server process you create is assigned the port 9081, the next 9082, and
each subsequent feature is assigned a port number incremented by one.
The serverindex.xml file stored in the node directory contains port assignment information. See
Mapping the features to the IBM HTTP Server for information about setting up a server that sits in front
of the WebSphere Application Server and directs requests (which are not required to specify port
numbers) to the appropriate features. If the Activities login screen is displayed, you have successfully
installed the Activities feature. If it is not, see the Troubleshooting section of this document.
12. Optional: If you plan to install additional features on the same system and want to be able to refer to
the log file generated by the installer, copy the lcinstalllog.txt file from the following directory:
v Linux:
/tmp/lcinstalllog.txt
v Windows:
c:\Documents and Settings\<user_name>\Local Settings\temp\lcinstalllog.txt
into this directory:
v Linux:
/opt/IBM/WebSphere/LotusConnections/Activities/lcinstalllog.txt
v Windows:
c:\Program Files\IBM\WebSphere\AppServer\LotusConnections\Activities\
lcinstalllog.txt
The lcinstalllog.txt log file stored in the temporary directory is overwritten by subsequent feature
installations.
Much of the information you specify during the installation is stored in XML-based configuration files
associated with the product. For information about making changes to those values, see the
Administering Lotus Connections section of the Lotus Connections information center. For example, if
you change HTTP servers, you can use a wsadmin command to change the service location settings
defined in the configuration files for the feature.
Related tasks
Chapter 7, “Mapping the features to the IBM HTTP Server,” on page 99After you install the features, map them to the IBM HTTP Server. This task updates the plugin-cfg.xml
file on the IBM HTTP Server, which is the configuration file that defines how the IBM HTTP Server
should access the features when they are requested from a Web browser. Related reference
“Hardware requirements” on page 15The following hardware is required for the systems that host IBM Lotus Connections services.
Creating a Domino database content store
When a user posts a file or a message to an activity, the file is stored in the Activities content store. Any
part of a message entry that exceeds two kilobytes is also placed in the content store. By default,
Activities uses the file system as its content store. If you are using Lotus Notes® and Domino® in your
enterprise, you can configure Activities to use a Domino database as the content store instead.
To use a Domino database as the content store, you must create a database and specify the ID that can
access the database on behalf of Activities. When you indicate that you want to use a Domino database
as the content store for Activities during the installation process, the Activities server uses HTTP to
communicate with the Domino server.
Chapter 5. Setting up a stand-alone deployment 63

To create a Domino content store database, complete the following actions:
1. Decide what you want to use as the database name and determine which server you want to use to
host the database.
Note: To enable Domino to process HTTP requests from the Activities server, the HTTP task must be
running on the Domino server that is hosting the content store database.
2. During the installation of Activities, indicate that you want to use a Domino database as the content
store and provide the names of the server and database you decided on in the previous step.
3. After installing Activities and before starting Activities for the first time, you must create the content
store database. Copy the ActivitiesObjectStore.ntf template file to the designated Domino server
running the HTTP task that will host the content store. The content store template is located in the
following directory:
v Linux:
opt/IBM/WebSphere/LotusConnections/activities/activities/activities/templates
v Windows:
C:\IBM\WebSphere\LotusConnections\activities\activities\activities\templates
4. Create a new Notes® database on the server using the content store template.
5. In the access control list for the database, add the name of the user identity that will authenticate with
the Domino server on behalf of the Activities server. Add this user as a Person Editor who has Delete
documents privileges for the database. These access privileges allow the user to save, retrieve, and
delete documents in the activities database on behalf of Activities members.
6. For security purposes, create a dedicated user ID to access the Activities database. Also, consider
enforcing HTTP authentication and preventing anonymous access to the server by configuring settings
in the server’s Web Site document.
Securing Activities data
With Activities, you can implement different levels of security depending on the needs of your enterprise.
By default, the login credentials that you enter into a Web browser to access the Activities feature are
transferred over a secure channel.
Additionally, you can secure:
v All data – Forces all data to be transferred over a secure channel. This configuration provides the
greatest security, but may slow down the server. It is not necessary unless you are dealing with
sensitive or confidential information.
v Public API methods – Forces the public API methods, which transfer user names and passwords over
the network with each request, to be sent over a secure channel. Public API methods are used by
non-Web browser clients, such as RSS feed readers.
Securing all Activities data:
You can configure Activities to encrypt all network traffic between the browser and the server.
Configuring Activities for encrypted traffic is optional and is only recommended if you are working with
sensitive data.
To secure all Activities data, complete the following steps:
1. Add a <user-data-constraint> element to the <security-constraint> element of the web.xml
configuration file for Activities. The web.xml file is stored in the following directory:
v Linux:
<app_server_root>/profiles/profile_name/installedApps/cell_name/
Activities.ear/oawebui.war/WEB-INF/web.xml
v Windows:
<app_server_root>\profiles\profile_name\installedApps\cell_name/
Activities.ear\oawebui.war\WEB-INF\web.xml
64 IBM Lotus Lotus Connections 1.0.1 Installation Guide

For example, the modified <security-contraint> element should look as follows:
<security-constraint>
<web-resource-collection>
<web-resource-name>Activities</web-resource-name>
<url-pattern>/service/*</url-pattern>
</web-resource-collection>
<auth-constraint>
<role-name>person</role-name>
</auth-constraint>
<user-data-constraint>
<transport-guarantee>CONFIDENTIAL</transport-guarantee>
</user-data-constraint>
</security-constraint>
2. After you modify the web.xml file, reload it in the WebSphere Application Server by opening the
WebSphere Application Server Administration Console, and then navigating to the Applications →
Enterprise Applications page.
3. Select the Activities application, and then click Update.
4. Select Replace or add a single file, and then type oawebui.war/WEB-INF/web.xml in the field
provided.
5. Select Local file system, and in the Full path field, browse to the following directory and then click
OK to add it to the field:
v Linux:
<app_server_root>/profiles/<profile_name>/
installedApps/<cell_name>/Activities.ear/oawebui.war/
WEB-INF/web.xml
v Windows:
<app_server_root>\profiles\<profile_name>\
installedApps\<cell_name>\Activities.ear\oawebui.war\
WEB-INF\web.xml
Click Next.
6. Click OK, and then click Save to save the changes to the master configuration.
7. Restart Activities from the WebSphere Application Server Integrated Solutions Console by navigating
to Applications → Enterprise Applications and then select Activities. Click Stop, select Activities
again, and then click Start.
Securing the Activities public API methods:
Activities does not automatically redirect API calls to transmit the data over a secure channel. You can
force the data to be secured by editing the httpd.conf file to define rewrite rules for the IBM HTTP Server.
Be sure you have mapped the feature to the IBM HTTP Server before you perform this task.
Note: This procedure assumes that you have completed the steps to configure the Secure Socket Layer
protocol on the IBM HTTP Server described in the topic, Configuring the IBM HTTP Server for SSL.
To secure the Activities public API methods, complete the following steps:
1. With a text editor, open the httpd.conf file from the /opt/IBM/HTTPServer/conf directory, and then
edit it as follows:
a. Uncomment the following lines if they are commented out:
LoadModule rewrite_module modules/mod_rewrite.so
LoadModule headers_module modules/mod_headers.so
b. Locate the following comment:
# Redirect allows you to tell clients about documents which used to exist in
# your server’s namespace, but do not anymore. This allows you to tell the
# clients where to look for the relocated document.
Chapter 5. Setting up a stand-alone deployment 65

Immediately below this comment add the following lines:
RewriteEngine On
#RewriteLog "logs/rewrite.log"
#RewriteLogLevel 9
# keep API over https
RewriteCond %{SERVER_PORT} !^443$
RewriteCond %{REQUEST_URI} ^/activities/service/atom(.*)
RewriteRule /activities/(.*) https://<server.name>/
activities/$1 [noescape,L,R]
where <server.name> is the hostname of the server that hosts the Activities feature.
c. Look for the SSL virtual host reference. Below SSLEnable and inside the <VirtualHost> block, add
the following:
RewriteEngine on
#RewriteLog "logs/rewrite.log"
#RewriteLogLevel 9
# keep website (/html) on http for perf.
RewriteRule ^/activities/html(.*) http://<server.name>/
activities/html$1 [noescape,L,R]
where <server.name> is the hostname of the server that hosts the Activities feature.
d. Make sure the non-SSL ServerName property is set to your server name and port.
For example:
ServerName <server.name>.com:80
Save and close the file.
2. Restart the IBM HTTP Server.
3. From the WebSphere Application Server Integrated Solutions Console, select Environment → Virtual
Hosts → default_host → Host Aliases, click New, and then add the following values to the fields:
v Hostname – *
v Port – 443
v
Click OK, Save, and then Restart.
The following excerpt is from a httpd.conf file that forces authentication attempts and API calls in Blogs
and Dogear and forces API calls in Activities to be sent over a secure channel:
#LoadModule mime_magic_module modules/mod_mime_magic.so
LoadModule proxy_module modules/mod_proxy.so
LoadModule proxy_connect_module modules/mod_proxy_connect.so
LoadModule proxy_http_module modules/mod_proxy_http.so
#LoadModule proxy_ftp_module modules/mod_proxy_ftp.so
LoadModule rewrite_module modules/mod_rewrite.so
LoadModule setenvif_module modules/mod_setenvif.so
#LoadModule speling_module modules/mod_speling.so
...
<IfModule !mod_afpa_cache.c>
Listen 0.0.0.0:80
# Use Win32DisableAcceptEx to downgrade to use winsock 1.1 network APIs.
# Note: You can use Win32DisableAcceptEx only if mod_afpa_cache.so is disabled.
# Win32DisableAcceptEx
</IfModule>
LoadModule ibm_ssl_module modules/mod_ibm_ssl.so
<IfModule mod_ibm_ssl.c>
Listen 0.0.0.0:443
<VirtualHost *:443>
66 IBM Lotus Lotus Connections 1.0.1 Installation Guide

SSLEnable
SSLProxyEngine on
RewriteEngine On
#RewriteLog "logs/rewrite.log"
#RewriteLogLevel 9
# keep website (/html) on http for perf.
RewriteRule ^/dogear/html(.*) http://example.acme.com/dogear/html$1
[noescape,L,R]
# keep website (/html) on http for perf.
RewriteRule ^/activities/html(.*) http://example.acme.com/activities/html$1
[noescape,L,R]
# put everything but login and api back on http
RewriteCond %{REQUEST_URI} !^/blogs/services/atom(.*)
RewriteCond %{REQUEST_URI} !^/blogs/roller-ui/login.do
RewriteCond %{REQUEST_URI} !^/blogs/j_security_check
RewriteRule ^/blogs/(.*) http://example.acme.com/blogs/$1 [noescape,L,R]
</VirtualHost>
</IfModule>
SSLDisable
KeyFile "c:/IBM/HTTPServer/bin/key.kdb"
SSLStashFile "c:/IBM/HTTPServer/bin/key.sth
...
# Redirect allows you to tell clients about documents which used to exist in
# your server’s namespace, but do not anymore. This allows you to tell the
# clients where to look for the relocated document.
RewriteEngine On
#RewriteLog "logs/rewrite.log"
#RewriteLogLevel 9
# when doing form based authentication, ensure user/pwd is sent over https
RewriteCond %{SERVER_PORT} !^443$
RewriteRule ^/dogear/auth(.*) https://example.acme.com/dogear/auth$1
[noescape,L,R]
# keep API over https
RewriteCond %{SERVER_PORT} !^443$
RewriteCond %{REQUEST_URI} /dogear/api(.*)
RewriteRule /dogear/(.*) https://example.acme.com/dogear/$1 [noescape,L,R]
# keep API over https
RewriteCond %{SERVER_PORT} !^443$
RewriteCond %{REQUEST_URI} ^/activities/service/atom(.*)
RewriteRule /activities/(.*) https://example.acme.com/activities/$1 [noescape,L,R]
# when doing form based authentication, ensure user/pwd is sent over https
RewriteCond %{SERVER_PORT} !^443$
RewriteRule ^/blogs/roller-ui/login.do https://example.acme.com/blogs/
roller-ui/login.do [noescape,L,R]
# keep API over https
RewriteCond %{SERVER_PORT} !^443$
RewriteCond %{REQUEST_URI} /services/atom(.*)
RewriteRule /blogs/(.*) https://example.acme.com/blogs/$1 [noescape,L,R]
# Example:
# Redirect permanent /foo http://www.example.com/bar
Chapter 5. Setting up a stand-alone deployment 67

Installing Blogs
Follow these steps to finish installing the Blogs feature.
1. In the Index file directory field, type the file path to a local directory in which to store the index files
used by Blogs to perform full-text searches of Blog entries.
Alternatively, click Browse to navigate to a directory.
Make sure the directories you specify are large enough to hold the content. See the Hardware
Requirements topic for details about disk space requirements for the features.
2. In the File upload location field, specify the file path to the directory in which to store the files that
users upload to their Web logs by doing one of the following:
v For stand-alone deployments, type the file path to a local directory.
v For network deployments, type the file path to a network share directory using the Universal
Naming Convention (UNC) format (\\server_name\share_name). Specify the same directory on
each node that you install Blogs to.Alternatively, click Browse to navigate to a directory.
Make sure the directories you specify are large enough to hold the content. See the Hardware
Requirements topic for details about disk space requirements for the features.
Click Next.
3. When asked to enter the fully qualified domain name for the feature, in the HTTP URL field, type the
Web address that users will type into a Web browser location bar to access the feature after it is
installed. If you are using an HTTP server, do not specify a port number and remove the default port
number provided by the installer. Select the Enable SSL server check box, and then type the Web
address users will type into a Web browser location bar to access the feature over SSL into the HTTPS
URL field. Click Next.
Note: Do not deselect the Enable HTTP server check box. Doing so could cause the features to be
inaccessible from the navigation bar.
4. Review the Summary screen to make sure the values you entered on previous screens are correct. If
you want to make a change, click Back to edit a value. If the values are correct, on the installation
summary screen, click Install to begin the installation.
5. Click Finish.
6. Start the WebSphere Application Server instance in which you installed the feature by typing the
following commands:
Note: If you are migrating data from a pilot to production installation, skip this step and the next
step. You will not start the servers until after the migration is complete.
v Linux:
cd opt/IBM/WebSphere/AppServer/profiles/<profile_name>/bin
startServer.sh <server_instance>
v Windows:
cd C:\IBM\WebSphere\AppServer\profiles\<profile_name>\bin
startServer.bat <server_instance>
Note: If the server fails to start, start it again by repeating the above commands. If it continues to fail,
look at the error log to see if there is a problem with your set up. The error log file is stored in the
following directory:
v Linux:
opt/IBM/WebSphere/AppServer/profiles/<profile_name>/logs/
<server_instance>/SystemOut.log
v Windows:
C:\IBM\WebSphere\AppServer\profiles\<profile_name>\logs\
<server_instance>\SystemOut.log
68 IBM Lotus Lotus Connections 1.0.1 Installation Guide

7. Verify that the feature was installed successfully by opening a Web browser and accessing the feature
directly from the WebSphere Application Server. Go to the Web address you specified for the Blogs
feature. For example:
http://appserver.enterprise.acme.com:<port_number>/blogs
where the <port_number> is the port number on the WebSphere Application Server that the feature is
available from. This is usually:
v 9080 – Standard port number for the default server process, server1. This is probably the server
process that you installed the feature on if you are installing each feature to its own profile.
v 9081-9085 – These are the port numbers that are usually assigned to features that are installed into
a single profile. The first server process you create is assigned the port 9081, the next 9082, and
each subsequent feature is assigned a port number incremented by one.
The serverindex.xml file stored in the node directory contains port assignment information.
If you see the Welcome to Blogs page, the installation was successful. If you do not, go to the
Troubleshooting section.
Do not log into Blogs yet. You must map Blogs to the IBM HTTP Server, and then edit the
configuration file for the IBM HTTP Server to protect your user name and password during login. See
Mapping the features to the IBM HTTP Server
8. Optional: If you plan to install additional features on the same system and want to be able to refer to
the log file generated by the installer, copy the lcinstalllog.txt file from the following directory:
v Linux:
/tmp/lcinstalllog.txt
v Windows:
c:\Documents and Settings\<user_name>\Local Settings\temp\lcinstalllog.txt
into this directory:
v Linux:
/opt/IBM/WebSphere/LotusConnections/Blogs/lcinstalllog.txt
v Windows:
c:\Program Files\IBM\WebSphere\AppServer\LotusConnections\Blogs\
lcinstalllog.txt
The lcinstalllog.txt log file stored in the temporary directory is overwritten by subsequent feature
installations.
Related tasks
Chapter 7, “Mapping the features to the IBM HTTP Server,” on page 99After you install the features, map them to the IBM HTTP Server. This task updates the plugin-cfg.xml
file on the IBM HTTP Server, which is the configuration file that defines how the IBM HTTP Server
should access the features when they are requested from a Web browser. Related reference
“Hardware requirements” on page 15The following hardware is required for the systems that host IBM Lotus Connections services.
Securing the Blogs login
Blogs does not automatically redirect the login page nor API calls to transmit their data over a secure
channel. Edit the httpd.conf file to define rewrite rules for the IBM HTTP Server.
Be sure you have mapped the feature to the IBM HTTP Server before you perform this task.
Note: This step assumes that you have completed the step to configure SSL on the IBM HTTP Server
described in the topic, Configuring the IBM HTTP Server for SSL.
To secure login and API requests, complete the following steps:
Chapter 5. Setting up a stand-alone deployment 69

1. With a text editor, open the httpd.conf file from the /opt/IBM/HTTPServer/conf directory, and then
edit it as follows:
a. Make sure the following line is not commented out:
LoadModule rewrite_module modules/mod_rewrite.so
b. In the SSL Virtual host section, if the following lines are not already present, add them:
Listen 0.0.0.0:443
<VirtualHost <host_name>:443>
SSLEnable
SSLProxyEngine on
RewriteEngine on
and below this line, add the following:
# put everything but login and api back on http
RewriteCond %{REQUEST_URI} !^/blogs/services/atom(.*)
RewriteCond %{REQUEST_URI} !^/blogs/roller-ui/login.do
RewriteCond %{REQUEST_URI} !^/blogs/j_security_check
RewriteRule ^/blogs/(.*) http://<host_name>/blogs/$1 [noescape,L,R]
</VirtualHost>
SSLDisable
c. Look for the Rewrite rules section. If the following line is not already present, add it:
RewriteEngine On
After this line, add the following:
# when doing form based authentication, ensure user/pwd is sent over https
RewriteCond %{SERVER_PORT} !^443$
RewriteRule ^/blogs/roller-ui/login.do https://<host_name>/blogs/
roller-ui/login.do [noescape,L,R]
# keep API over https
RewriteCond %{SERVER_PORT} !^443$
RewriteCond %{REQUEST_URI} /services/atom(.*)
RewriteRule /blogs/(.*) https://<host_name>/blogs/$1 [noescape,L,R]
where <host_name> is the name of the server you have set up.2. Save and close the file.
3. Restart the IBM HTTP Server.
The following excerpt is from a httpd.conf file that forces authentication attempts and API calls in Blogs
and Dogear and forces API calls in Activities to be sent over a secure channel:
#LoadModule mime_magic_module modules/mod_mime_magic.so
LoadModule proxy_module modules/mod_proxy.so
LoadModule proxy_connect_module modules/mod_proxy_connect.so
LoadModule proxy_http_module modules/mod_proxy_http.so
#LoadModule proxy_ftp_module modules/mod_proxy_ftp.so
LoadModule rewrite_module modules/mod_rewrite.so
LoadModule setenvif_module modules/mod_setenvif.so
#LoadModule speling_module modules/mod_speling.so
...
<IfModule !mod_afpa_cache.c>
Listen 0.0.0.0:80
# Use Win32DisableAcceptEx to downgrade to use winsock 1.1 network APIs.
# Note: You can use Win32DisableAcceptEx only if mod_afpa_cache.so is disabled.
# Win32DisableAcceptEx
</IfModule>
LoadModule ibm_ssl_module modules/mod_ibm_ssl.so
<IfModule mod_ibm_ssl.c>
Listen 0.0.0.0:443
70 IBM Lotus Lotus Connections 1.0.1 Installation Guide

<VirtualHost *:443>
SSLEnable
SSLProxyEngine on
RewriteEngine On
#RewriteLog "logs/rewrite.log"
#RewriteLogLevel 9
# keep website (/html) on http for perf.
RewriteRule ^/dogear/html(.*) http://example.acme.com/dogear/html$1
[noescape,L,R]
# keep website (/html) on http for perf.
RewriteRule ^/activities/html(.*) http://example.acme.com/activities/html$1
[noescape,L,R]
# put everything but login and api back on http
RewriteCond %{REQUEST_URI} !^/blogs/services/atom(.*)
RewriteCond %{REQUEST_URI} !^/blogs/roller-ui/login.do
RewriteCond %{REQUEST_URI} !^/blogs/j_security_check
RewriteRule ^/blogs/(.*) http://example.acme.com/blogs/$1 [noescape,L,R]
</VirtualHost>
</IfModule>
SSLDisable
KeyFile "c:/IBM/HTTPServer/bin/key.kdb"
SSLStashFile "c:/IBM/HTTPServer/bin/key.sth
...
# Redirect allows you to tell clients about documents which used to exist in
# your server’s namespace, but do not anymore. This allows you to tell the
# clients where to look for the relocated document.
RewriteEngine On
#RewriteLog "logs/rewrite.log"
#RewriteLogLevel 9
# when doing form based authentication, ensure user/pwd is sent over https
RewriteCond %{SERVER_PORT} !^443$
RewriteRule ^/dogear/auth(.*) https://example.acme.com/dogear/auth$1
[noescape,L,R]
# keep API over https
RewriteCond %{SERVER_PORT} !^443$
RewriteCond %{REQUEST_URI} /dogear/api(.*)
RewriteRule /dogear/(.*) https://example.acme.com/dogear/$1 [noescape,L,R]
# keep API over https
RewriteCond %{SERVER_PORT} !^443$
RewriteCond %{REQUEST_URI} /service/atom(.*)
RewriteRule /activities/(.*) https://example.acme.com/activities/$1 [noescape,L,R]
# when doing form based authentication, ensure user/pwd is sent over https
RewriteCond %{SERVER_PORT} !^443$
RewriteRule ^/blogs/roller-ui/login.do https://example.acme.com/blogs/
roller-ui/login.do [noescape,L,R]
# keep API over https
RewriteCond %{SERVER_PORT} !^443$
RewriteCond %{REQUEST_URI} /services/atom(.*)
RewriteRule /blogs/(.*) https://example.acme.com/blogs/$1 [noescape,L,R]
# Example:
# Redirect permanent /foo http://www.example.com/bar
Creating a Blogs administrative user
You cannot configure a home page blog for the Blogs feature until you have administrative access to
Blogs. Use the WebSphere Application Server Integrated Solutions Console to grant yourself and anyone
else you want to designate as an administrator administrative access to Blogs.
Chapter 5. Setting up a stand-alone deployment 71

To give a person administrative access to Blogs, complete the following steps:
1. From the WebSphere Application Server Integrated Solutions Console, select Applications →
Enterprise Applications, and then find and click the Blogs link.
2. Click the Security role to user/group mapping link.
3. To map a user to the administrative role, select the check box beside the admin role, and then click
the Look up users or groups button.
4. In the Search String box, type the name of the person you would like to set as a Blogs administrator,
and then click Search. If the user exists in the LDAP directory, it is found and displayed in the
Available list.
5. Select the name from the Available box, and then move it into the Selected column by clicking the
right arrow button.
6. Repeat Steps 4 and 5 until you have added one or more users to the administrative role.
7. Click OK.
8. From the Enterprise Applications → Blogs → Security role to user/group mapping page, click OK, and
then click Save to save the changes.
Configuring Blogs
You must configure the Blogs feature before you and others can use it.
After you have successfully installed the Blogs feature and given yourself administrative access to the
Blogs feature using the WebSphere Application Server, follow these steps to configure it for use:
1. Open a Web browser and go to the Blogs Web address that you specified for the Blogs feature.
2. From the Welcome to Blogs page, click the New Blogs Creation Page link, and then log in using the
credentials of the Blog site administrator.
Note: You must be a user with administrative level access to the Blog site to be able to create a page.
3. Fill out a the new blog form to create the Blog site’s home page. Include the following information:
v Name – Type a name for the Blogs home page. For example: home.
v Description – Type a description of the Blogs home page.
v Handle – Type a value to use as the keyword for the home page. For example, home.
Note: Remember the value you specify here; you will need this information later.
v Theme – Choose homepage.
Note: This value must be changed from its default of blogs to homepage or any blogs that users
subsequently create will not be visible on the Blogs site.4. Click Create Blog.
5. In the Actions section of the Edit My Blog tab, click Server administration to open the site
configuration settings document, and then type the value you specified for the handle into the
Handle of blog to serve as frontpage blog field; this is the value you entered in the Handle field in
Step 3.
You can optionally provide values for the following site settings:
v Site name – Type a name for the blog site which will be displayed on the home page of the blog
site.
v Short name – Type a short name for the blog which will be displayed in the blog site banner.
v Site Description – Type a description which will be displayed below the site name on the home
page and will be provided as the feed description.
For information about other configuration options, see the Administration Guide.
6. Click Save.
7. If you are installing the Blog site with the default configuration, Blogs is ready to be used.
72 IBM Lotus Lotus Connections 1.0.1 Installation Guide

When you click Blogs Home, the default Blog Site configuration is displayed. This is what users will
see when they access the site. Initially, there are no Blog entries. After users create Blogs and Blog
entries, they will be displayed on the Blogs Home page. All users can read the blog entries, but users
must log in before they can edit or comment on an entry, or create another blog. Click the Help link
to access documentation that describes how to post entries and create a blog.
8. Blogs can send e-mail notifications to blog owners when someone adds a comment to their blog.
Blogs uses the mail services provided by WebSphere Application Server to do this. To configure Blogs
for mail notifications, complete the following steps:
a. Log into the WebSphere Application Server Integrated Solutions Console by going to the following
Web address in a browser:
http://<application_server_host_name>:9060/ibm/console
b. Set up a mail service for Blogs by selecting Resources → Mail → Mail Sessions.
c. Change the scope to Cell, click the New button, and then type values in the following fields:
v Provider – Built-in Mail Provider.
v Name – Type a descriptive name for the service, such as BlogCommentNotifications.
v JNDI name – mail/Session
v Mail transport host – <fully_qualified_smtp_server_host_name>d. Click Apply, and then click Save.
For more information about creating the mail service, go to the following Web page in the
WebSphere Application Server information center:http://publib.boulder.ibm.com/infocenter/wasinfo/v6r1/index.jsp?topic=/com.ibm.websphere.nd.doc/info/ae/ae/tmai_jovr.html
e. Blogs accesses mail by calling a mail server resource named mail/Session. Map that resource name
to the mail service you just created in the previous steps by selecting Applications → Enterprise
Applications → Blogs → [References] Resource Referenced
f. In the javax.mail.Session section, click the Browse button, and then in the Select column, click the
radio button beside the Name you supplied when you created the mail service above.
g. Click Apply, click OK, and then click Save.
For more information on mapping the mail service, go to the following Web page in the
WebSphere Application Server information center:
http://publib.boulder.ibm.com/infocenter/wasinfo/v6r1/index.jsp?topic=/com.ibm.websphere.nd.doc/info/ae/ae/tree_resenventries.html
h. Restart the WebSphere Application Server.
i. Return to the Blogs site, click the Administration link, and then click the Server administration
link in the Action section to open the Administration page.
j. In the Comment and Trackback Settings section, select the Email notification of comments check
box.
The Blogs site is now running with a default configuration. For details on other configuration options,
and how to implement them, refer to the Administration Guide.
Chapter 5. Setting up a stand-alone deployment 73

Installing Communities
Follow these steps to finish installing the Communities feature.
1. In the Index file directory field, specify the file path to a local directory in which to store the index
files used by Communities to perform full-text searches.
Alternatively, click Browse to navigate to a directory.
Do not share index file directories between different Communities servers. Make sure the directories
you specify are large enough to hold the content. See the Hardware Requirements topic for details about
disk space requirements for the features.
Click Next.
2. Optional: A page that states, ″An existing Java security policy file on the WebSphere Application
Server was found″ is displayed if a security policy file exists on the WebSphere Application Server
server process you are installing the Communities feature onto.. As part of the installation process,
the installer enables Java 2 security on the profile in which the feature is being installed. It then adds
a Java virtual machine (JVM) custom property called java.security.auth.policy, which defines the
location of this policy file, to the server process definition if no other policy file is defined for it. If a
policy file already exists for the current server process, the installer does not change the value of the
custom property to reference the new policy file. Instead, you must edit the existing policy file to set
up the permissions for the Communities feature. Make a note of the directory in which the existing
security policy file is stored, so you can edit it after the installation is complete, and then click Next.
3. When asked to enter the fully qualified domain name for the feature, in the HTTP URL field, type the
Web address that users will type into a Web browser location bar to access the feature after it is
installed. If you are using an HTTP server, do not specify a port number and remove the default port
number provided by the installer. Select the Enable SSL server check box, and then type the Web
address users will type into a Web browser location bar to access the feature over SSL into the HTTPS
URL field. Click Next.
Note: Do not deselect the Enable HTTP server check box. Doing so could cause the features to be
inaccessible from the navigation bar.
4. Review the Summary screen to make sure the values you entered on previous screens are correct. If
you want to make a change, click Back to edit a value. If the values are correct, on the installation
summary screen, click Install to begin the installation.
5. Click Finish.
6. Start the WebSphere Application Server instance to which you installed the feature, such as server1,
by typing the following commands:
Note: If you are migrating data from a pilot to production installation, skip this step and the next
step. You will not start the servers until after the migration is complete.
v Linux:
cd opt/IBM/WebSphere/AppServer/profiles/<profile_name>/bin
startServer.sh <server_instance>
v Windows:
cd C:\IBM\WebSphere\AppServer\profiles\<profile_name>\bin
startServer.bat <server_instance>
Note: If the server fails to start, start it again by repeating the above commands. If it continues to fail,
look at the error log to see if there is a problem with your set up. The error log file is stored in the
following directory:
v Linux:
opt/IBM/WebSphere/AppServer/profiles/<profile_name>/logs/
<server_instance>/SystemOut.log
v Windows:
74 IBM Lotus Lotus Connections 1.0.1 Installation Guide

C:\IBM\WebSphere\AppServer\profiles\<profile_name>\logs\
<server_instance>\SystemOut.log
7. Open a Web browser and access the feature directly from the WebSphere Application Server by going
to the Web address you specified for the Communities feature.
For example:
http://appserver.enterprise.acme.com:<port_number>/communities
where <port_number> is the port number on the WebSphere Application Server that the feature is
available from. This is usually:
v 9080 – Standard port number for the default server process, server1. This is probably the server
process that you installed the feature on if you are installing each feature to its own profile.
v 9081-9085 – These are the port numbers that are usually assigned to features that are installed into
a single profile. The first server process you create is assigned the port 9081, the next 9082, and
each subsequent feature is assigned a port number incremented by one.
The serverindex.xml file stored in the node directory contains port assignment information.
See Mapping the features to the IBM HTTP Server for information about setting up a server that sits in
front of the WebSphere Application Server and directs requests (which are not required to specify port
numbers) to the appropriate features. If the Communities login screen is displayed, you have
successfully installed the Communities feature. If it is not, see the Troubleshooting section of this
document.
8. Optional: If you plan to install additional features on the same system and want to be able to refer to
the log file generated by the installer, copy the lcinstalllog.txt file from the following directory:
v Linux:
/tmp/lcinstalllog.txt
v Windows:
c:\Documents and Settings\<user_name>\Local Settings\temp\lcinstalllog.txt
into this directory:
v Linux:
/opt/IBM/WebSphere/LotusConnections/Communities/lcinstalllog.txt
v Windows:
c:\Program Files\IBM\WebSphere\AppServer\LotusConnections\Communities\
lcinstalllog.txt
The lcinstalllog.txt log file stored in the temporary directory is overwritten by subsequent feature
installations.
Much of the information you specify during the installation is stored in XML-based configuration files
associated with the product. For information about making changes to those values, see the
Administering Lotus Connections section of the Lotus Connections information center. For example, if
you change HTTP servers, you can use a wsadmin command to change the service location settings
defined in the configuration files for the feature.
Related tasks
Chapter 7, “Mapping the features to the IBM HTTP Server,” on page 99After you install the features, map them to the IBM HTTP Server. This task updates the plugin-cfg.xml
file on the IBM HTTP Server, which is the configuration file that defines how the IBM HTTP Server
should access the features when they are requested from a Web browser. Related reference
“Hardware requirements” on page 15The following hardware is required for the systems that host IBM Lotus Connections services.
Chapter 5. Setting up a stand-alone deployment 75

Installing Dogear
Perform the following steps to finish installing the Dogear feature.
Note: In the following procedures, change all references to ″servername.com″ to the external facing
server name in your deployment.
1. In the Index file directory field, specify the file path to a local directory in which to store the index
files used by Dogear to perform full-text searches of bookmark titles and descriptions.
Alternatively, click Browse to navigate to a directory.
Do not share index file directories between different Dogear servers. Make sure the directories you
specify are large enough to hold the content. See the Hardware Requirements topic for details about
disk space requirements for the features.
Click Next.
2. In the Favicons file location field, type the file path to a local directory in which to store favorite
icons. Favorite icons are images associated with a bookmark that are displayed with the bookmark to
help identify its source.
Alternatively, click Browse to navigate to a directory.
Make sure the directories you specify are large enough to hold the content. See the Hardware
Requirements topic for details about disk space requirements for the features.
Click Next.
3. When asked to enter the fully qualified domain name for the feature, in the HTTP URL field, type the
Web address that users will type into a Web browser location bar to access the feature after it is
installed. If you are using an HTTP server, do not specify a port number and remove the default port
number provided by the installer. Select the Enable SSL server check box, and then type the Web
address users will type into a Web browser location bar to access the feature over SSL into the HTTPS
URL field. Click Next.
Note: Do not deselect the Enable HTTP server check box. Doing so could cause the features to be
inaccessible from the navigation bar.
4. Review the Summary screen to make sure the values you entered on previous screens are correct. If
you want to make a change, click Back to edit a value. If the values are correct, on the installation
summary screen, click Install to begin the installation.
5. Click Finish.
6. Open a Web browser and access the feature directly from the WebSphere Application Server by going
to the Web address you specified for the Dogear feature.
For example:
http://appserver.enterprise.acme.com:<port_number>/dogear
where the <port_number> is the port number on the WebSphere Application Server that the feature is
available from. This is usually:
v 9080 – Standard port number for the default server process, server1. This is probably the server
process that you installed the feature on if you are installing each feature to its own profile.
v 9081-9085 – These are the port numbers that are usually assigned to features that are installed into
a single profile. The first server process you create is assigned the port 9081, the next 9082, and
each subsequent feature is assigned a new port number in increments of one.
The serverindex.xml file stored in the node directory contains port assignment information.
7. If the Dogear login screen displays, the installation was successful. If it does not, see the
Troubleshooting section. Do not log into Dogear. You must map the feature to the IBM HTTP Server
and then edit the IBM HTTP Server configuration to protect your login credentials before you log in.
See Mapping the features to the IBM HTTP Server.
8. Optional: If you plan to install additional features on the same system and want to be able to refer to
the log file generated by the installer, copy the lcinstalllog.txt file from the following directory:
76 IBM Lotus Lotus Connections 1.0.1 Installation Guide

v Linux:
/tmp/lcinstalllog.txt
v Windows:
c:\Documents and Settings\<user_name>\Local Settings\temp\lcinstalllog.txt
into this directory:
v Linux:
/opt/IBM/WebSphere/LotusConnections/Dogear/lcinstalllog.txt
v Windows:
c:\Program Files\IBM\WebSphere\AppServer\LotusConnections\Dogear\
lcinstalllog.txt
The lcinstalllog.txt log file stored in the temporary directory is overwritten by subsequent feature
installations.
9. Specify a set of IP-ranges for your deployment so that Dogear can detect which Web addresses are
intranet sites versus Internet sites, and mark them accordingly. In the intranet IP Range table, add the
intranet IP ranges for your company. See the Administering Lotus Connections section of the information
center for details on how to specify IP ranges.
Related tasks
Chapter 7, “Mapping the features to the IBM HTTP Server,” on page 99After you install the features, map them to the IBM HTTP Server. This task updates the plugin-cfg.xml
file on the IBM HTTP Server, which is the configuration file that defines how the IBM HTTP Server
should access the features when they are requested from a Web browser. Related reference
“Hardware requirements” on page 15The following hardware is required for the systems that host IBM Lotus Connections services.
Securing the Dogear login
Dogear does not automatically redirect the login page nor API calls to transmit their data over a secure
channel. Edit the httpd.conf file to define rewrite rules for the IBM HTTP Server.
Be sure you have mapped the feature to the IBM HTTP Server before you perform this task.
Note: This procedure assumes that you have completed the step to configure SSL on the IBM HTTP
Server described in the topic, Configuring the IBM HTTP Server for SSL.
To secure login and API requests, complete the following steps:
1. With a text editor, open the httpd.conf file from the /opt/IBM/HTTPServer/conf directory, and then
edit it as follows:
a. Uncomment the following lines if they are commented out:
LoadModule rewrite_module modules/mod_rewrite.so
LoadModule headers_module modules/mod_headers.so
b. Locate the following comment:
# Redirect allows you to tell clients about documents which used to exist in
# your server’s namespace, but do not anymore. This allows you to tell the
# clients where to look for the relocated document.
Immediately below this comment add the following lines:
RewriteEngine On
#RewriteLog "logs/rewrite.log"
#RewriteLogLevel 9
# when doing form based authentication, ensure user/pwd is sent over https
RewriteCond %{SERVER_PORT} !^443$
RewriteRule ^/dogear/auth(.*) https://servername.com/dogear/auth$1 [noescape,L,R]
Chapter 5. Setting up a stand-alone deployment 77

# keep API over https
RewriteCond %{SERVER_PORT} !^443$
RewriteCond %{REQUEST_URI} ^/dogear/api(.*)
RewriteRule ^/dogear/(.*) https://servername.com/dogear/$1 [noescape,L,R]
c. Look for the SSL virtual host reference. Below SSLEnable and inside the <VirtualHost> block, add
the following:
RewriteEngine on
#RewriteLog "logs/rewrite.log"
#RewriteLogLevel 9
# keep website (/html) on http for perf.
RewriteRule ^/dogear/html(.*) http://servername.com/dogear/html$1
[noescape,L,R]
d. Make sure the non-SSL ServerName property is set to your server name and port.
For example:
ServerName <server_name>.com:80
e. Add the following lines to the end of the file (just before the LoadModule was_ap20_module
directive):
# cache static content for 24 hours. Ensure that this
# is not available for 24 hours prior to upgrading dogear.
# This will ensure static content is refreshed along with
# new build.
<LocationMatch "/*\.(gif|jpe?g|png|js|css|html)$">
Header add Cache-Control "max-age=86400"
</LocationMatch>
2. Save and close the file.
3. Restart the IBM HTTP Server.
4. From the WebSphere Application Server Integrated Solutions Console, select Environment → Virtual
Hosts → default_host → Host Aliases, click New, and then add the following values to the fields:
v Hostname – *
v Port – 443
v
Click OK, Save, and then Restart.
The following excerpt is from a httpd.conf file that forces authentication attempts and API calls in Blogs
and Dogear and forces API calls in Activities to be sent over a secure channel:
#LoadModule mime_magic_module modules/mod_mime_magic.so
LoadModule proxy_module modules/mod_proxy.so
LoadModule proxy_connect_module modules/mod_proxy_connect.so
LoadModule proxy_http_module modules/mod_proxy_http.so
#LoadModule proxy_ftp_module modules/mod_proxy_ftp.so
LoadModule rewrite_module modules/mod_rewrite.so
LoadModule setenvif_module modules/mod_setenvif.so
#LoadModule speling_module modules/mod_speling.so
...
<IfModule !mod_afpa_cache.c>
Listen 0.0.0.0:80
# Use Win32DisableAcceptEx to downgrade to use winsock 1.1 network APIs.
# Note: You can use Win32DisableAcceptEx only if mod_afpa_cache.so is disabled.
# Win32DisableAcceptEx
</IfModule>
LoadModule ibm_ssl_module modules/mod_ibm_ssl.so
<IfModule mod_ibm_ssl.c>
Listen 0.0.0.0:443
<VirtualHost *:443>
SSLEnable
SSLProxyEngine on
78 IBM Lotus Lotus Connections 1.0.1 Installation Guide

RewriteEngine On
#RewriteLog "logs/rewrite.log"
#RewriteLogLevel 9
# keep website (/html) on http for perf.
RewriteRule ^/dogear/html(.*) http://example.acme.com/dogear/html$1
[noescape,L,R]
# keep website (/html) on http for perf.
RewriteRule ^/activities/html(.*) http://example.acme.com/activities/html$1
[noescape,L,R]
# put everything but login and api back on http
RewriteCond %{REQUEST_URI} !^/blogs/services/atom(.*)
RewriteCond %{REQUEST_URI} !^/blogs/roller-ui/login.do
RewriteCond %{REQUEST_URI} !^/blogs/j_security_check
RewriteRule ^/blogs/(.*) http://example.acme.com/blogs/$1 [noescape,L,R]
</VirtualHost>
</IfModule>
SSLDisable
KeyFile "c:/IBM/HTTPServer/bin/key.kdb"
SSLStashFile "c:/IBM/HTTPServer/bin/key.sth
...
# Redirect allows you to tell clients about documents which used to exist in
# your server’s namespace, but do not anymore. This allows you to tell the
# clients where to look for the relocated document.
RewriteEngine On
#RewriteLog "logs/rewrite.log"
#RewriteLogLevel 9
# when doing form based authentication, ensure user/pwd is sent over https
RewriteCond %{SERVER_PORT} !^443$
RewriteRule ^/dogear/auth(.*) https://example.acme.com/dogear/auth$1
[noescape,L,R]
# keep API over https
RewriteCond %{SERVER_PORT} !^443$
RewriteCond %{REQUEST_URI} /dogear/api(.*)
RewriteRule /dogear/(.*) https://example.acme.com/dogear/$1 [noescape,L,R]
# keep API over https
RewriteCond %{SERVER_PORT} !^443$
RewriteCond %{REQUEST_URI} /service/atom(.*)
RewriteRule /activities/(.*) https://example.acme.com/activities/$1 [noescape,L,R]
# when doing form based authentication, ensure user/pwd is sent over https
RewriteCond %{SERVER_PORT} !^443$
RewriteRule ^/blogs/roller-ui/login.do https://example.acme.com/blogs/
roller-ui/login.do [noescape,L,R]
# keep API over https
RewriteCond %{SERVER_PORT} !^443$
RewriteCond %{REQUEST_URI} /services/atom(.*)
RewriteRule /blogs/(.*) https://example.acme.com/blogs/$1 [noescape,L,R]
# Example:
# Redirect permanent /foo http://www.example.com/bar
Note: If you are upgrading from a previous version of Dogear, complete the procedure, Updating the
httpd.conf file when upgrading Dogear, in addition to this procedure.
Updating the httpd.conf file when upgrading Dogear
If you have a previous version of Dogear installed, there are some additional edits you must make to the
httpd.conf file of the IBM HTTP Server.
Chapter 5. Setting up a stand-alone deployment 79

To update the httpd.conf file, complete the following steps:
1. Open the httpd.conf configuration file from the /opt/IBM/HTTPServer/conf directory.
2. Remove the following rewrite rules. You were instructed to add these rules to the httpd.conf file to
support a previous version of Dogear:
# when feed format or api is over https, force basic authentication
RewriteCond %{REQUEST_URI} /dogear/atom(.*) [OR]
RewriteCond %{REQUEST_URI} /dogear/json(.*) [OR]
RewriteCond %{REQUEST_URI} /dogear/snippet(.*) [OR]
RewriteCond %{REQUEST_URI} /dogear/lisnippet(.*) [OR]
RewriteCond %{REQUEST_URI} /dogear/count(.*) [OR]
RewriteCond %{REQUEST_URI} /dogear/tagsets(.*) [OR]
RewriteCond %{REQUEST_URI} /dogear/tags(.*) [OR]
RewriteCond %{REQUEST_URI} /dogear/tagslike(.*) [OR]
RewriteCond %{REQUEST_URI} /dogear/peoplelike(.*) [OR]
RewriteCond %{REQUEST_URI} /dogear/api(.*)
RewriteRule /dogear/(.*) https://servername.com/dogear.basicauth/$1 [P,L]
ProxyPassReverse /dogear https://servername.com/dogear.basicauth
3. Remove the following rewrite rules. You were instructed to add these rewrite rules to the file to
support a previous version of Dogear.
# keep basic auth over https
RewriteCond %{SERVER_PORT} !^443$
RewriteCond %{REQUEST_URI} /dogear.basicauth(.*)
RewriteRule /dogear.basicauth/(.*) https://servername.com/dogear.basicauth/
$1 [noescape,L,R]
4. Save and close the httpd.conf file, and then restart the IBM HTTP Server.
80 IBM Lotus Lotus Connections 1.0.1 Installation Guide

Installing Profiles
Follow these steps to finish installing the Profiles feature.
1. In the Index file directory field, specify the file path to a local directory in which to store the index
files used by Profiles to perform full-text searches.
Alternatively, click Browse to navigate to a directory.
Do not share index file directories between different Profiles servers. Make sure the directories you
specify are large enough to hold the content. See the Hardware Requirements topic for details about
disk space requirements for the features.
Click Next.
2. When asked to enter the fully qualified domain name for the feature, in the HTTP URL field, type the
Web address that users will type into a Web browser location bar to access the feature after it is
installed. If you are using an HTTP server, do not specify a port number and remove the default port
number provided by the installer. Select the Enable SSL server check box, and then type the Web
address users will type into a Web browser location bar to access the feature over SSL into the HTTPS
URL field. Click Next.
Note: Do not deselect the Enable HTTP server check box. Doing so could cause the features to be
inaccessible from the navigation bar.
3. Review the Summary screen to make sure the values you entered on previous screens are correct. If
you want to make a change, click Back to edit a value. If the values are correct, on the installation
summary screen, click Install to begin the installation.
4. Click Finish.
5. Optional: Determine whether you want to display organizational chart information in the Profile
pages, and then edit the following file to make the required changes. Alternatively, you can use
wsadmin commands to edit the values in these files later. See the Lotus Connections information
center for more details.
v Linux:
/opt/IBM/WebSphere/AppServer/profiles/<profile_name>/config/
cells/<cell_name>/nodes/<node_name>/LotusConnections-config/
profiles-config.xml
v Windows:
C:\IBM\WebSphere\AppServer\profiles\<profile_name>\config\
cells\<cell_name>\nodes\<node_name>\LotusConnections-config\
profiles-config.xml
v To display organizational chart information in profile pages, make the following changes to the
profiles-config.xml file:
– In the <fullReportsToChainCache> tag, type the UID of the CEO or whoever is at the top of
the reporting chain as the value of the ceouid attribute.
– In the size attribute of the <miniReportsToChainCache> tag, type the number of employees
included in the Profiles database.v If you do not want organization chart information to be displayed in the profile pages, change the
setting for the <organizationalStructureEnabled> tag to false.
Note: Implementing report-to information increases the demand on the server. If you implement this,
be sure to increase the size of the initial and maximum heap settings of the Java Virtual Machine in
WebSphere Application Server before running Profiles. Go to the WebSphere Application Server
information center at the following Web site for more information: http://publib.boulder.ibm.com/infocenter/wasinfo/v6r1/index.jsp?topic=/com.ibm.websphere.nd.doc/info/ae/ae/urun_rconfproc_jvm.html
6. Start the WebSphere Application Server on which you installed the feature by executing the following
commands:
Chapter 5. Setting up a stand-alone deployment 81

Note: If you are migrating data from a pilot to production installation, skip this step and the next
step. You will not start the servers until after the migration is complete.
v Linux:
cd opt/IBM/WebSphere/AppServer/profiles/<profile_name>/bin
startServer.sh <server_name>
v Windows:
cd C:\IBM\WebSphere\AppServer\profiles\<profile_name>\bin
startServer.bat <server_name>
Note: If the server fails to start, start it again by repeating the above commands. If it continues to fail,
look at the error log to see if there is a problem with your set up. The error log file is stored in the
following directory:
v Linux:
opt/IBM/WebSphere/AppServer/profiles/<profile_name>/logs/<server_name>/
SystemOut.log.
v Windows:
C:\IBM\WebSphere\AppServer\profiles\<profile_name>\logs\<server_name\
SystemOut.log.
7. Open a Web browser and access the feature directly from the WebSphere Application Server by going
to the Web address you specified for the Profiles feature.
For example:
http://appserver.enterprise.acme.com:<port_number>/profiles
where the <port_number> is the port number on the WebSphere Application Server that the feature is
available from. This is usually:
v 9080 – Standard port number for the default server process, server1. This is probably the server
process that you installed the feature on if you are installing each feature to its own profile.
v 9081-9085 – These are the port numbers that are usually assigned to features that are installed into
a single profile. The first server process you create is assigned the port 9081, the next 9082, and
each subsequent feature is assigned a port number incremented by one.
The serverindex.xml file stored in the node directory contains port assignment information. See
Mapping the features to the IBM HTTP Server for information about setting up a server that sits in front
of the WebSphere Application Server and directs requests (which are not required to specify port
numbers) to the appropriate features. If the Profiles login screen displays, you have successfully
installed the Profiles feature. If it does not, see the Troubleshooting section.
8. Optional: If you plan to install additional features on the same system and want to be able to refer to
the log file generated by the installer, copy the lcinstalllog.txt file from the following directory:
v Linux:
/tmp/lcinstalllog.txt
v Windows:
c:\Documents and Settings\<user_name>\Local Settings\temp\lcinstalllog.txt
into this directory:
v Linux:
/opt/IBM/WebSphere/LotusConnections/Profiles/lcinstalllog.txt
v Windows:
c:\Program Files\IBM\WebSphere\AppServer\LotusConnections\Profiles\
lcinstalllog.txt
The lcinstalllog.txt log file stored in the temporary directory is overwritten by subsequent feature
installations.
82 IBM Lotus Lotus Connections 1.0.1 Installation Guide

Much of the information you specify during the installation is stored in XML-based configuration files
associated with the product. For information about making changes to those values, see the
Administering Lotus Connections section of the Lotus Connections information center. For example, if
you change HTTP servers, you can use a wsadmin command to change the service location settings
defined in the configuration files for the feature.
Related tasks
Chapter 7, “Mapping the features to the IBM HTTP Server,” on page 99After you install the features, map them to the IBM HTTP Server. This task updates the plugin-cfg.xml
file on the IBM HTTP Server, which is the configuration file that defines how the IBM HTTP Server
should access the features when they are requested from a Web browser. Related reference
“Hardware requirements” on page 15The following hardware is required for the systems that host IBM Lotus Connections services.
Adding presence awareness to Profiles
If you have Sametime 7.5 or later deployed, you can configure Lotus Connections to display presence
awareness in Profiles.
Note: This is an optional configuration.
When you enable presence awareness in Profiles, a person’s online status is indicated by a set of icons
and an associated status message. Presence awareness tells you whether the person is available to chat,
busy in a meeting, or away from their computer.
To bring the Sametime presence awareness capability into Profiles, you must do one of the following:
v Configure single sign-on between the Domino Sametime server and the WebSphere Application Server
hosting Profiles – If users explicitly log into Profiles or access Profiles after logging into another
WebSphere Application Server-based feature hosted in the same single sign-on domain, presence
awareness appears in Profiles.
v Configure the anonymous login capability in Sametime – Users do not have to log in before they can
see presence awareness in Profiles.
You must have the following software enabled to be able to add presence awareness to Profiles:
v Domino 7.0.1 server or later configured with Sametime 7.5 or later services and configured to use one
of the LDAP directories supported by Lotus Connections. In addition, the Directory Assistance feature
of the Domino server must be enabled. Lotus Connections does not support Lotus Domino as an LDAP
directory; using the Directory Assistance feature of Lotus Domino enables you to include the
directories being used by the Lotus Connections services, in directory operations.
v The Profiles feature must be deployed on a WebSphere Application Server instance that is configured
to use the same directory or directories that Domino is configured to use and that contains records for
the Lotus Connections users. In addition to being able to use the Directory Assistance feature in
Domino, the support in WebSphere for Federated Repositories may also be used. One or more
directories must be shared between the Domino and WebSphere servers and that set of users may take
advantage of the Sametime integration in Profiles. If the Domino deployment is configured to encrypt
traffic between the server and the LDAP directory or directories in use, the WebSphere Application
Server deployment must be configured to do the same.
v The WebSphere Application Server, Domino, and Sametime deployments must all exist in the same
domain because their integration depends on the single sign-on facility provided by the LTPA tokens.
To add presence awareness to Profiles, complete the following tasks:
1. Enable single sign-on between Domino and WebSphere Application Server by completing the
following steps:
Chapter 5. Setting up a stand-alone deployment 83

a. Access the WebSphere Application Server Integrated Solutions Console, select Secure
administration, applications, and infrastructure, and then select single sign-on. Ensure that the
correct domain name is specified in the Domain name field and enable the Interoperability Mode
so that WebSphere Application Server will return a LTPA v1 cookie upon successful authentication.
Note: The LTPA facility in Domino does not support the newer LTPA v2 specification.
b. Select Authentication mechanisms and expiration, and in the Cross-cell single sign-on section,
type a password and the location to which you want the LTPA key to be exported.
Note: This key must be available to the Domino server so that it may decrypt any LTPA tokens
forwarded to it by the Connections Profiles service.
c. Open the Domino Administrator client and access the Server document for the Domino server.
Select Create Web → SSO Configuration. Select Keys, and then select Import WebSphere LTPA
Keys.
d. Type the following values into the specified fields:
v Configuration Name – LtpaToken
v Organization – Optional. You can type the organization name.
v DNS Domain – Type the DNS Domain associated with your Domino and WebSphere
Application Server deployments. For example:
.acme.example.com
Note: A period precedes the domain name. This syntax is required.
v Map names in LTPA tokens – Enabled.
Note: This is necessary to reconcile the different ways in which WebSphere Application Server
and Domino format names.
v Domino Server Names – Type the name of your Domino server.
v LDAP Realm and LTPA Version – These fields are populated when you import the LTPA key.
Ensure that the realm name matches the domain name used on WebSphere Application Server.
For example, if the port identified in the realm is 389, then this means WebSphere Application
Server was configured to not encrypt traffic between itself and the directory. Configure Domino
in the same way to ensure a matching realm name.
Save the Web SSO Configuration document.
e. Return to the Server document. Select the Internet Protocols tab, and then select the Domino Web
Engine tab. For Session authentication, select Multiple Servers (SSO), and then for Web SSO
Configuration, verify that the name of the newly created LtpaToken is listed there. If it is not, add
it.
f. Restart the Domino Server and look for a message indicating the Web SSO Configuration was
successfully applied.
g. You can test whether single sign-on is configured correctly by accessing a WebSphere Application
Server-based application that is protected. After authenticating successfully, you can then try to
access a Domino application that has also been protected and does not allow anonymous access. If
the server challenges you to authenticate, single sign-on is not configured correctly between the
Domino server and WebSphere Application Server. If it does not challenge you, it is.2. For web pages that have STLinks integrated in them to function on Mozilla-based browsers, STLinks
resources must be available on the Web server that is fronting the WebSphere Application Server
which hosts Profiles. Also, the STLinks applet that makes Sametime functionality available to
browser-based applications must be signed. To enable STLinks access for Mozilla-based browsers and
sign the applet, complete the following steps:
a. Find the stlinks.jar file, which contains the ST Links resources, on the Domino server in the
following directory:
<Domino data directory>\domino\html\sametime\stlinks
84 IBM Lotus Lotus Connections 1.0.1 Installation Guide

Replace the stlinks.jar file in this directory with the same file in the signed directory.
b. Copy the entire stlinks directory to the root of the Web server that hosts the Profiles application.
3. Use the wsadmin client to edit the LotusConnections-config.xml file, which is the configuration file for
Lotus Connections, to include information about Sametime Links resources. Use the following
commands to edit the settings:
<WAS_HOME>/profiles/<profile_name>/bin>wsadmin -lang jython
-user wsadmin -password wsadmin
execfile("<WAS_HOME>/profiles/<profile_name>/bin/connectionsConfig.py")
LCConfigService.checkOutConfig("/wsadminoutput", "<cell_name>")
LCConfigService.updateConfig("sametimeLinks.href",
"http://example.acme.com/sametime/stlinks")
LCConfigService.updateConfig("sametimeLinks.enabled","true")
LCConfigService.updateConfig("sametimeLinks.ssl.href",
"https://example.acme.com/sametime/stlinks")
LCConfigService.updateConfig("sametimeLinks.ssl.enabled","true")
LCConfigService.showConfig()
LCConfigService.checkInConfig()
quit
See the Administration section of the Lotus Connections information center for information on using
wsadmin commands to edit feature settings.
4. Restart the Profiles application on the WebSphere Application Server to apply your changes and
enable presence awareness.
Adding a new feature after an update
Before you can use the 1.0.1 installer to perform a first-time installation of a feature to a system on which
a set of other Lotus Connections features were previously installed and then updated to version 1.0.1, you
must edit the system’s Vital Product Data registry file.
For example, if you installed version 1.0 of all the Lotus Connections features, except Blogs, to a system,
then updated the four installed features to version 1.0.1, and now would like to add Blogs to the system
for the first time, you must edit the Vital Product Data registry file named vpd.properties. The
vpd.properties file identifies product version numbers, but does not get updated to reflect the version
number change to features updated using the update installer. The installer for Lotus Connections 1.0.1
will not install a 1.0.1 version of a feature to a system that is hosting features that the vpd.properties file
identifies as having a version number earlier than 1.0.1. Therefore, before you can run the 1.0.1 installer
to add the Blogs feature, you must edit the vpd.properties file to change the version numbers of the
previously updated features from 1.0 to 1.0.1.
1. Before you edit the vpd.properties file, make a backup copy of it. A vpd.properties file is stored in the
root directory of the system hosting the WebSphere Application Server instance associated with a
Lotus Connections installation:
For example:
v Linux:
/root/vpd.properties
v Windows:
<root>\vpd.properties
where <root> is the Microsoft Windows installation directory. For example:
Chapter 5. Setting up a stand-alone deployment 85

C:\Documents and Settings\Adminstrator\Windows
2. Open the file in a text editor and search for the LotusConnections software key, and then edit the
entry as follows:
v Linux:
Change the following value:
LotusConnections|1|0|0|0| |1=Lotus Connections|
Wrapper Product| |IBM| | |/opt/IBM/WebSphere/LotusConnections|
0|0|1|LotusConnections|1|0|0|0| |1|0
|false|"uninstall" "uninstall.jar" "uninstall.dat"
""|true|3|LotusConnections|1|0|0|0| |1
to this:
LotusConnections|1|0|0|1|1.0.1.0|1=Lotus Connections|
Wrapper Product| |IBM| | |/opt/IBM/WebSphere/LotusConnections|
0|0|1|LotusConnections|1|0|0|1|1.0.1.0|1|0
|false|"uninstall" "uninstall.jar" "uninstall.dat"
""|true|3|LotusConnections|1|0|0|1|1.0.1.0|1
v Windows:
Change the following value:
LotusConnections|1|0|0|0| |1=Lotus Connections|
Wrapper Product| |IBM| | |C:\IBM\WebSphere\LotusConnections|
0|0|1|LotusConnections|1|0|0|0| |1|0
|false|"uninstall" "uninstall.jar" "uninstall.dat"
""|true|3|LotusConnections|1|0|0|0| |1
to this:
LotusConnections|1|0|0|1|1.0.1.0|1=Lotus Connections|
Wrapper Product| |IBM| | |C:\IBM\WebSphere\LotusConnections|
0|0|1|LotusConnections|1|0|0|1|1.0.1.0|1|0
|false|"uninstall" "uninstall.jar" "uninstall.dat"
""|true|3|LotusConnections|1|0|0|1|1.0.1.0|1
3. Save and close the vpd.properties file.
Related tasks
“Lotus Connections version 1.0.1” on page 114Use the update installer to update Lotus Connections version 1.0 to Lotus Connections version 1.0.1.
Administering a stand-alone deployment
If you do not want to set up a cluster, but want the benefits of being able to centrally manage the servers
hosting Lotus Connections, create a cluster with only a single node.
When you set up a stand-alone deployment of Lotus Connections, after you have installed the features
you want to implement, do one of the following:
v Link the features together – Edit the configuration file in each profile to include information about the
features installed on different profiles. Follow the instructions in the following topic:“Linking features”
v Create a single-node cluster – Install a deployment manager and create a cluster that contains a single
node. This enables you to centrally administer features installed on different profiles. It also make it
easier to upgrade to a multiple node cluster in the future, if your enterprise expands and the need for
a cluster arises. Complete Steps 1-8 in the following topic:“Creating a cluster” on page 92
Linking features
After you have installed the Lotus Connections features that you want to use, configure the features to
work together. Doing so enables features to share information, and allows you to easily navigate among
them.
86 IBM Lotus Lotus Connections 1.0.1 Installation Guide
Lotus Connections features use a cell-level configuration file, called LotusConnections-config.xml, to
retrieve information about available features. When you do not set up a network deployment, if you
install the features on separate profiles, this configuration file is not shared across the features. The
features installed to a single profile have a single copy of the LotusConnections-config.xml file, but if you
want the features installed to different profiles to interact correctly, you must edit each of the
configuration files to add feature location and enablement information. In essence, you must duplicate a
section of each profile’s configuration file information into every other installed profile’s configuration
file.
For example, during the installation of the features, you are asked to provide server host name
information. The installer uses the information you provide to populate the <sloc:serviceReference
serviceName="<feature_name>"/> element in the LotusConnections-config.xml file on the server. If, on
another server, you install a second feature on a separate profile, a second LotusConnections-config.xml
file is created and populated with information that pertains to the second feature. Because the features
are not federated into a single cell, they run independently and cannot interact with one another. The
navigation bar in each feature lists only the current feature, and users cannot navigate from one feature to
another.
The LotusConnections-config.xml file is stored in the following directory:
Windows:
C:\IBM\WebSphere\AppServer\profiles\<profile_name>\config\cells\
<cell_name>\LotusConnections-config\LotusConnections-config.xml
Linux:
/opt/IBM/WebSphere/AppServer/profiles/<profile_name>/config/cells/
<cell_name>/LotusConnections-config/LotusConnections-config.xml
where <profile_name> is the name of the WebSphere Application Server profile and <cell_name> is the
WebSphere Application Server cell in which you installed the feature.
First link two features together, test that each feature recognizes the other one, and then link additional
features one at a time.
To link features, perform the following steps:
1. Stop the WebSphere Server process in which you have installed the first feature.
2. Stop the WebSphere Server process in which you have installed the second feature.
3. On the server hosting the first feature, use the wsadmin tool to edit the LotusConnections-config.xml
file to include information about the second feature. See the Administering Lotus Connections section
of the Lotus Connections information center for more information on specifying configuration settings
for Lotus Connections.
4. Now make the second feature aware of the first by using the wsadmin tool to edit the
LotusConnections-config.xml file on the server hosting the second feature.
5. Restart the WebSphere Application Server processes for both features.
6. Open a Web browser and start the first feature to check to see if you can now access the second
feature. For example, if the first feature is Activities and the second Dogear, open a Web browser and
go to: http://activities.server.acme.com/activities. The Activities navigation bar should now
include a Dogear link. Click the link to open the Dogear feature. An Activities link should exist in the
Dogear feature navigation bar that forwards you to the Activities feature.
Note: On some Web browsers, you might need to clear the browser cache to see this effect.
7. Repeat these steps for each feature you have installed, one at a time.
8. If you are enabling the Profiles feature, to reference it, you must edit both the profiles and personTag
sloc:serviceReference elements.
Chapter 5. Setting up a stand-alone deployment 87

If you installed all the features, the five LotusConnections-config.xml should look as follows when you
are finished, with the text in bold representing text you added.
Note: Values for the ssl_href and ssl_enabled attributes only need to be specified for features that you
are configuring to run over SSL.<config
id="LotusConnections"
xmlns="http://www.ibm.com/LotusConnections-config"
xmlns:tns="http://www.ibm.com/LotusConnections-config"
xmlns:sloc="http://www.ibm.com/service-location"
xmlns:xsi="http://www.w3.org/2001/XMLSchema-instance"
xsi:schemaLocation="http://www.ibm.com/LotusConnections-config
LotusConnections-config.xsd">
<sloc:serviceReference serviceName="personTag"
href="http://<full_host_dns_name>/ibm_semanticTagServlet"
enabled="true"
ssl_href="https://<full_host_dns_name>/ibm_semanticTagServlet"
ssl_enabled="true"/>
//Note: If the service for which you are editing this version of the
//configuration file is set up to use SSL, this ssl_enabled attribute
//must be set to true or users may see security warning messages when
//they access pages using Microsoft Internet Explorer.
<sloc:serviceReference serviceName="sametimeLinks"
href="admin_replace"
enabled="false"
ssl_href="admin_replace"
ssl_enabled="false">
<anonymousLogin enabled="false" />
</sloc:serviceReference>
<sloc:serviceReference serviceName="profiles"
href="http://<full_host_dns_name>/profiles"
enabled="true"
ssl_href="https://<full_host_dns_name>/profiles"
ssl_enabled="true"
feed_href="admin_replace"
feed_enabled="false"
ssl_feed_href="admin_replace"
ssl_feed_enabled="false"
provider_use_feed_enabled="false"/>
<sloc:serviceReference serviceName="communities"
href="http://<full host dns name and port (if applicable),
such as appserver.enterprise.acme.com>:80/communities"
enabled="true"
ssl_href="https://<full host dns name and port (if applicable),
such as appserver.enterprise.acme.com>:443/communities"
ssl_enabled="true" />
<sloc:serviceReference serviceName="blogs"
href="http://<full host dns name and port (if applicable),
such as appserver.enterprise.acme.com>/blogs"
enabled="true" />
<sloc:serviceReference serviceName="dogear"
href="http://<full host dns name, such as
appserver.enterprise.acme.com>/dogear"
enabled="true" />
ssl_href="https://<full host dns name, such as
appserver.enterprise.acme.com>/dogear"
ssl_enabled="true" />
<sloc:serviceReference serviceName="activities"
href="http://<full host dns name, such as
appserver.enterprise.acme.com>/activities"
enabled="true" />
<style enabled="false">
<header url="admin_replace" />
<css url="admin_replace" />
88 IBM Lotus Lotus Connections 1.0.1 Installation Guide

<images url="{{root}}/images/" />
<caching value="private, max-age=3601" />
</style>
</config>
Chapter 5. Setting up a stand-alone deployment 89

90 IBM Lotus Lotus Connections 1.0.1 Installation Guide

Chapter 6. Setting up a network deployment
Installing Lotus Connections in a network deployment provides better performance and improved
availability of features.
A Lotus Connections network deployment consists of the following components:
v System on which Lotus Connections has been installed that has been added to a cluster as the primary
node = Node 1
v One or more systems on which Lotus Connections has been installed that have been added to the
cluster and identified as additional nodes = Node 2, Node 3, Node x.
v System with IBM WebSphere Application Server Network Deployment Manager installed
v System with database installed
v System with IBM HTTP Server installed
Preinstallation tasks for a network deployment
Perform the following tasks in addition to the standard Preinstallation tasks before setting up a network
deployment of Lotus Connections.
Related concepts
Chapter 4, “Preinstallation tasks,” on page 21Perform the following tasks before installing Lotus Connections.
Setting up Java 2 security
If you are installing Communities on any of the servers in a network deployment, you must enable Java 2
security on the server hosting the deployment manager.
When you install Communities in a stand-alone deployment of Lotus Connections, the installer sets up
Java 2 security for the feature automatically. Java 2 security provides a policy-based access control
mechanism that increases overall system integrity by checking for permissions before allowing access to
certain protected system resources. When you install Communities on a node and federate it into a Lotus
Connections cell, you must enable Java 2 security on the deployment manager as well. If you do not, the
Java 2 security settings on the node will be overwritten during clustering. Without Java 2 security
enabled, users can log into all Communities, including those to which they are not members.
To enable Java 2 security, complete the following steps:
1. Log on to the WebSphere Application Server Integrated Solutions Console by going to the following
Web address in a browser:
http://sales.enterprise.acme.com:9060/ibm/console
2. Click OK to log in to the Welcome page.
3. Click Security → Secure Administration, applications and infrastructure.
4. Select the Use Java 2 security to restrict application access to local resources check box, and then
click Apply. Save your changes.
© Copyright IBM Corp. 2007, 2007 91

Creating a cluster
Create a cluster to add redundancy to the deployment and achieve better performance.
You must review and meet the software and hardware requirements for each system you plan to
configure in the deployment before you can begin the network deployment installation. Also, be sure to
complete the preinstallation tasks for a network deployment.
To create a cluster, complete the following steps:
1. Do one of the following:
v If you are changing to a network deployment from a stand-alone deployment of Lotus
Connections, review the possible configurations of WebSphere Application Server profiles and
server processes. See “Planning a production installation” on page 2.
v If you are creating a network deployment of Lotus Connections from scratch, install Lotus
Connections. See “Installing a Lotus Connections feature” on page 56. Consider creating a
response file for each feature you install. You can use the response files later to perform silent
installations of Lotus Connections on subsequent nodes, which will save you time.
Note: If you decide to create or upgrade a configuration that has one profile with five server
processes, you must install all five features before you add any of them to the cluster. Lotus
Connections does not support running the installer on a managed node. A managed node is an
application server that has been federated into a Deployment Manager cell.
2. Install WebSphere Application Server Network Deployment on a separate system from the one to
which you installed Lotus Connections. See the WebSphere Application Server information center at
the following external Web site for more information: http://publib.boulder.ibm.com/infocenter/wasinfo/v6r1/index.jsp?topic=/com.ibm.websphere.nd.doc/info/ae/ae/welcclusters.html
3. Create a Deployment Manager profile, and then enable Global Security.
4. Set up federated repositories on the WebSphere Application Server hosting the Deployment Manager.
See “Setting up federated repositories” on page 25.
5. Communities only: If you plan to install the Communities feature as part of the cluster, enable Java
2 security on the system that hosts the Deployment Manager. See “Preinstallation tasks for a network
deployment” on page 91 for more details.
Note: Java 2 security will be enabled on all the nodes federated into this cell.
6. Edit the security settings for the system that is already hosting Lotus Connections to have the same
security settings as the Deployment Manager profile of the cell you are planning to federate into.
7. Configure the security settings for each additional system to which you will install Lotus
Connections to have the same security settings as the Deployment Manager profile of the cell you
are planning to federate into.
8. Add the first node to the cluster. See “Installing the first node” on page 93.
9. If you have set up a node that has Blogs enabled, you must create a snapshot directory for the
feature. See “Creating a snapshot directory for Blogs” on page 95
10. To add subsequent nodes to this feature cluster, install another instance of the same Lotus
Connections feature on a separate system. See “Installing a Lotus Connections feature” on page 56.
Alternatively, consider running a silent installation, which enables you to reuse the values you
provided during the previous installation.
11. Add another node to the cluster. See “Installing a subsequent node” on page 96.
12. You can add additional nodes by installing another instance of Lotus Connections, and then
repeating the previous step and replacing any references to the node or the server hosting the Lotus
Connections features with the appropriate information.
Related tasks
92 IBM Lotus Lotus Connections 1.0.1 Installation Guide

Chapter 7, “Mapping the features to the IBM HTTP Server,” on page 99After you install the features, map them to the IBM HTTP Server. This task updates the plugin-cfg.xml
file on the IBM HTTP Server, which is the configuration file that defines how the IBM HTTP Server
should access the features when they are requested from a Web browser. Related reference
“InstallResponse.txt file” on page 135When you install a Lotus Connections feature, you can record your selections in a response file. After
the initial installation, you can perform similar installations by starting the installer from the
command line and passing the response file in as an argument. The installer uses the values in the
response file rather than requiring you to interact with it.
Installing the first node
To install the first node, complete the following steps:
1. Make sure the servers that you will add to the cluster and the deployment manager server are up and
running. To start the server on which you installed the Deployment Manager, change to the bin
subdirectory of the Deployment Manager’s profile directory, and then run the startManager
command.
2. Make sure that the time on the Deployment Manager system and Lotus Connections features systems
are within five minutes of each other.
3. Edit the properties files for the Lotus Connections features to include information about the
Deployment Manager profile that contains the cell you are planning to federate into. You can find the
Deployment Manager properties file in the following directory:
v Linux:
opt/IBM/WebSphere/LotusConnections/ConfigEngine/profiles/
<profile_name>/wkplc_comp.properties
v Windows:
C:\IBM\WebSphere\LotusConnections\ConfigEngine\profiles\
<profile_name>\wkplc_comp.properties
Edit the following properties to reflect your installation:
<feature_name>.PrimaryNode=true
<feature_name>.ClusterName=<cluster_name>
<feature_name>.ClusterMemberName=<server_name>
<feature_name>.DMgrHostName=<server_host_name>
<feature_name>.DMgrSoapPort=<port_number>
<feature_name>.DMgrCellName=<cell_name>
<feature_name>.DMgrProfileName=<profile_name>
where <feature_name> is specified using the following names:
v Activities – activities
v Blogs – blogs
v Communities – communities
v Dogear – dogear
v Profiles – profiles
For example:
activities.PrimaryNode=true
activities.ClusterName=ActivitiesCluster
activities.ClusterMemberName=server1
activities.DMgrHostName=wpsdmgr1.enterprise.acme.com
activities.DMgrSoapPort=8879
activities.DMgrCellName=wpsdmgr1Cell01
activities.DMgrProfileName=Dmgr01
Chapter 6. Setting up a network deployment 93
Note: Make sure there are no extra spaces at the end of these property values in the properties file.
The installation scripts use these values to build directory paths.
4. Run the following commands to add the node:
v Windows:
cd c:\IBM\WebSphere\LotusConnections\ConfigEngine
v Linux:
cd opt/IBM/WebSphere/LotusConnections/ConfigEngine
Then, enter the following command (without carriage returns):
– Linux:
./ConfigEngine action-cluster-setup-<feature_name>
-DprofileName=<profile_name>
-DWasPassword=<WasAdminPassword>
-Dforce=true >
action-cluster-setup-<feature_name>.log 2>&1
– Windows:
ConfigEngine action-cluster-setup-<feature_name>
-DprofileName=<profile_name>
-DWasPassword=<WasAdminPassword>
-Dforce=true >
action-cluster-setup-<feature_name>.log 2>&1
5. Check the following file for the node to make sure that the node was federated successfully:
v Linux:
/opt/IBM/WebSphere/LotusConnections/ConfigEngine/log/ConfigTrace.log
/opt/IBM/WebSphere/LotusConnections/ConfigEngine/
action-cluster-setup-<feature_name>.log
v Windows:
C:\IBM\WebSphere\LotusConnections\ConfigEngine\log\ConfigTrace.log
C:\IBM\WebSphere\LotusConnections\ConfigEngine\
action-cluster-setup-<feature_name>.log
6. From a command prompt, change to the following directory of the system on which you installed the
primary node:
<WebSphere_Application_Server_Home>\<AppServer>\profiles\
<primaryNodeProfile>\bin
and then run the following commands (without the carriage returns):
v Linux:
– wsadmin -lang jython -conntype soap -host <dmhost> -port <dmsoapport>
-user <dmadminuser> -password <password> -f connectionsConfig.py
checkOutConfig <dmCell> <LotusConnectionsHome>/<feature_name>/
<feature_name>/<feature_name>
– wsadmin -lang jython -conntype soap -host <dmhost> -port <dmsoapport>
-user <dmadminuser> -password <password> -f connectionsConfig.py
updateConfig <dmCell> <LotusConnectionsHome>/<feature_name>/
<feature_name>/<feature_name>
updateConfig.properties
– wsadmin -lang jython -conntype soap -host <dmhost> -port <dmsoapport>
-user <dmadminuser> -password <password> -f connectionsConfig.py
checkInConfig <dmCell> <LotusConnectionsHome>/<feature_name>
/<feature_name>/<feature_name>
v Microsoft Windows:
– wsadmin -lang jython -conntype soap -host <dmhost> -port <dmsoapport>
-user <dmadminuser> -password <password> -f connectionsConfig.py
checkOutConfig <dmCell> <LotusConnectionsHome>\\<feature_name>\\
<feature_name>\\<feature_name>
94 IBM Lotus Lotus Connections 1.0.1 Installation Guide

– wsadmin -lang jython -conntype soap -host <dmhost> -port <dmsoapport>
-user <dmadminuser> -password <password> -f connectionsConfig.py
updateConfig <dmCell> <LotusConnectionsHome>\\<feature_name>\\
<feature_name>\\<feature_name>
updateConfig.properties
– wsadmin -lang jython -conntype soap -host <dmhost> -port <dmsoapport>
-user <dmadminuser> -password <password> -f connectionsConfig.py
checkInConfig <dmCell> <LotusConnectionsHome>\\<feature_name>
\\<feature_name>\\<feature_name>
7. Configure the Deployment Manager by completing the following steps:
a. Log in to the WebSphere Application Server Integrated Solutions Console for the Deployment
Manager.
b. Expand System administration → Nodes. Select the name of the primary node, and then click Full
Resynchronize.
c. From the main Integrated Solutions Console page, select Servers → Clusters. Select the check box
beside the cluster you created, and then click Start.
Note: When the cluster starts, it first starts the application server. If this does not occur, start the
application server by selecting Servers → Application servers, and then selecting the check box
next to the Web server for the feature, such as server1. Click Start.8. You have set up the primary node of the cluster. Access Lotus Connections to make sure the node is
functioning. Go to the following Web address, and make sure you can log in successfully.
http://firsthostname.domainname:9080/<feature_name>
Note: 9080 is the HTTP port number for the server you have added a cluster member.
9. Copy PY files from one directory to another on the Deployment Manager system. Copy the files from
the following directory:
<WebSphere_Application_Server>\AppServer\profiles\<Deployment_Manager_profile>\
config\bin_lc_admin
to the following directory on the same system:
<WebSphere_Application_Server>/AppServer/profiles/<Deployment_Manager_profile>/
bin
Note: Overwrite the existing files if there are any.
Creating a snapshot directory for Blogs
When you set up a cluster for the Blogs feature, you must create a shared directory that Blogs can use to
copy the search indexes from the nodes to keep them consistent.
You must have added Blogs to the primary node of the cluster before you can perform this procedure.
To create a snapshot directory for Blogs in a cluster, complete the following steps:
1. Designate a shared directory as a snapshot directory that Blogs can use to copy search indexes. See
the Hardware Requirements topic for details about disk space requirements for the features.
2. Start the Blogs feature by opening a Web browser, and then going to the Web address you specified
for the Blogs feature. For example:
http://<http_server_name>/blogs
3. In the Actions section of the Edit your Blog tab, click Administration → Server Administration to
open the Administration page.
4. In the Search snapshot directory field, type the file path of the shared directory that you designated
in Step 1.
All subsequent nodes of the Blogs feature that you add will use this shared directory as the snapshot
directory automatically.
Chapter 6. Setting up a network deployment 95

Installing a subsequent node
To install the subsequent node, complete the following steps:
1. Make sure the servers that will make up the cluster and the Deployment Manager server are up and
running.
2. Make sure that the time on the Deployment Manager system and Lotus Connections feature systems
are within five minutes of each other.
3. Edit the properties files for the Lotus Connections features to include information about the
Deployment Manager profile that contains the cell you are planning to federate into and the cluster
you are planning to add this node to:
v Linux:
opt/IBM/WebSphere/LotusConnections/ConfigEngine/profiles/
<profile_name>/wkplc_comp.properties
v Windows:
C:\IBM\WebSphere\LotusConnections\ConfigEngine\profiles\
<profile_name>\wkplc_comp.properties
Edit the following properties to refer to your installation:
<feature_name>.PrimaryNode=false
<feature_name>.ClusterName=<cluster_member_name>
<feature_name>.ClusterMemberName=<server_name>
IMPORTANT: The cluster member name must be unique within the cluster. Otherwise,
clustering will not work. If you named the first cluster member server1,
name this cluster member server2, for example.
<feature_name>.DMgrHostName=<server_host_name>
<feature_name>.DMgrSoapPort=<soap_port_number>
<feature_name>.DMgrCellName=<cell_name>
<feature_name>.DMgrProfileName=<profile_name>
where <feature_name> is specified using the following names:
v Activities – activities
v Blogs – blogs
v Communities – communities
v Dogear – dogear
v Profiles – profiles
For example:
activities.PrimaryNode=false
activities.ClusterName=ActivitiesCluster
activities.ClusterMemberName=server2
Note: This cluster member name is different from the cluster member
name for the first node.
activities.DMgrHostName=wpsdmgr1.enterprise.acme.com
activities.DMgrSoapPort=8879
activities.DMgrCellName=wpsdmgr1Cell01
activities.DMgrProfileName=Dmgr01
Note: Make sure there are no extra spaces at the end of these property values in the properties file.
The installation scripts use these values to build directory paths.
4. Run the following commands to add the node:
v Windows:
cd c:\IBM\WebSphere\LotusConnections\ConfigEngine
v Linux:
cd opt/IBM/WebSphere/LotusConnections/ConfigEngine
Then, enter the following command (without carriage returns):
96 IBM Lotus Lotus Connections 1.0.1 Installation Guide

– Linux:
./ConfigEngine action-cluster-setup-<feature_name>
-DprofileName=<profile>
-DWasPassword=<WasAdminPassword>
-Dforce=true >
action-cluster-setup-<feature_name>.log 2>&1
– Windows:
ConfigEngine action-cluster-setup-<feature_name>
-DprofileName=<profile>
-DWasPassword=<WasAdminPassword>
-Dforce=true >
action-cluster-setup-<feature_name>.log 2>&1
5. Check the following file for the node to make sure that the node was federated successfully:
v Linux:
/opt/IBM/WebSphere/LotusConnections/ConfigEngine/log/ConfigTrace.log
/opt/IBM/WebSphere/LotusConnections/ConfigEngine/
action-cluster-setup-<feature_name>.log
v Windows:
C:\IBM\WebSphere\LotusConnections\ConfigEngine\log\ConfigTrace.log
C:\IBM\WebSphere\LotusConnections\ConfigEngine\
action-cluster-setup-<feature_name>.log
6. Configure the Deployment Manager by completing the following steps:
a. Log in to the WebSphere Application Server Integrated Solutions Console for the Deployment
Manager.
b. Expand System administration → Nodes. Select the name of the secondary node, and then click
Full Resynchronize.
c. Restart the cluster. From the main WebSphere Application Server Integrated Solutions Console
page, select Servers → Clusters. Select the check box beside the cluster name, click Stop, and then
click Start.
Note: When the cluster starts, it first starts the application servers. If this does not occur, start the
application servers by selecting Servers → Application servers, and then selecting the check box
next to the Web server for the first node, such as server1 and the check box next to the Web server
for the subsequent node, such as server2. Click Start.7. You have set up a Lotus Connections cluster with two nodes. Access Lotus Connections to make sure
the node is functioning. Go to the following Web addresses, and make sure you can log in
successfully.
http://firsthostname.domainname:<port_number>/<feature_name>
http://secondhostname.domainname:<port_number>/<feature_name>
where the port number for the first node is likely 9080 and the second is likely 9081.
Defining the IBM HTTP Server for a node
When you use the IBM HTTP Server, you can administer it from IBM WebSphere Application Server if
you define the IBM HTTP Server in the WebSphere Application Server Integrated Solutions Console of
the Network Deployment Manager.
Network deployment: Define one or more Web servers for the nodes in the cluster.
Stand-alone deployment: Do not complete this procedure. Define a Web server for each profile included
in your deployment by completing the steps described in Defining the IBM HTTP Server for a profile
instead.
Note: This procedure describes how to create a Web server using the Integrated Solutions Console. There
are other ways to create the Web server. See the IBM WebSphere Application Server information center:
Chapter 6. Setting up a network deployment 97

http://publib.boulder.ibm.com/infocenter/wasinfo/v6r1/topic/com.ibm.websphere.base.doc/info/aes/ae/twsv_plugin.html
To define the IBM HTTP Server for a node, complete the following steps:
1. Make sure the IBM HTTP Server is installed and running.
2. From the WebSphere Application Server Integrated Solutions Console for the Network Deployment
Manager, select System administration → Nodes → Add Node.
3. Select Unmanaged node, and then click Next.
4. Specify the properties of the node by providing values in the following fields:
v Name – Name of the node.
v Host Name – Host name of the IBM HTTP Server.
v Platform Type – Operating system on the system that hosts the IBM HTTP Server.
Click OK.
5. Select Servers → Web servers, and then click New.
6. Provide values for the following fields:
Select node
Choose the node you just created.
Type Choose the IBM HTTP Server.
Host Name
Type the fully qualified DNS host name. For example: enterprise.acme.com.
Platform
Choose the operating system. 7. Click Next.
8. Select the default Web server template listed, and then click Next.
9. On the Enter the properties for the new Web server page, check the paths and make adjustments if
necessary, and then enter the IBM Administration Server user name and password. Confirm the
password, and then click Next.
10. Confirm the new Web server, click Finish, and then click Save.
98 IBM Lotus Lotus Connections 1.0.1 Installation Guide

Chapter 7. Mapping the features to the IBM HTTP Server
After you install the features, map them to the IBM HTTP Server. This task updates the plugin-cfg.xml
file on the IBM HTTP Server, which is the configuration file that defines how the IBM HTTP Server
should access the features when they are requested from a Web browser.
Complete the procedures to create a Web server for each profile or node that you want to map before you
begin this task.
Any features that are configured behind the IBM HTTP Server must be mapped to it. If you do not install
the HTTP server, users must include the correct port number in the Web address that they type into the
Web browser to access the feature. The Blogs and Dogear features require that you install the IBM HTTP
Server and Web server plug-in because they use the HTTP server to force login credentials to be
submitted over a secure channel. When you use the IBM HTTP Server, it monitors all traffic sent over
HTTP. By mapping all the features to the IBM HTTP Server, you tell it which ports to use to access each
feature and it can redirect requests to the appropriate features.
Each Lotus Connections feature is made up of one or more modules. You must map each module to the
IBM HTTP Server. The following steps describe how to map all of the modules for all of the features. If
you are not installing all of the features, perform the steps that pertain only to those features you are
installing.
To map the features to the IBM HTTP Server, complete the following steps:
1. Make sure the IBM HTTP Server you plan to map the feature to is installed and running.
2. Do one of the following steps:
v If you have set up a network deployment, open the WebSphere Application Server Integrated
Solutions Console on the system to which you installed the Deployment Manager, and then
complete the steps below.
v If you are mapping multiple features that you installed into separate server processes in a single
profile, open the WebSphere Application Server Integrated Solutions Console of the system on
which you installed the single profile, and then complete the steps below on that same system.
v If you are mapping features that you installed to individual profiles, you must open the
WebSphere Application Server Integrated Solutions Console associated with each profile and
perform the steps described per feature below on the associated consoles. After completing this
procedure, perform the steps described in Mapping multiple profiles to a single IBM HTTP Server. 3. Select Applications → Enterprise Applications.
4. Do one of the following steps:
Note: This step instructs you to select webserver1. Be sure that you have defined this Web server
before you attempt to complete these steps. See Defining the IBM HTTP Server.
v Activities:
– Select Activities → Manage Modules.
– In the Clusters and Servers box, select both of the following servers:
Note: Use the Ctrl key to select more than one server at a time.
- <server_name>
where <server_name> is the name of the profile on which you installed the feature.
- webserver1
– Select the Activities Web UI and Connections Navigation check boxes, and then click Apply.
© Copyright IBM Corp. 2007, 2007 99

– Review the Server details to make sure both servers are now listed there. Click OK, and then
click Save.v Blogs:
– Select Blogs → Manage Modules.
– In the Clusters and Servers box, select both of the following servers:
Note: Use the Ctrl key to select more than one server at a time.
- <server_name>
where <server_name> is the name of the profile on which you installed the feature.
- webserver1
– Select the Roller Weblogger and Connections Navigation check boxes, and then click Apply.
– Review the Server details to make sure both servers are now listed there. Click OK, and then
click Save.v Communities:
– Select Communities → Manage Modules.
– In the Clusters and Servers box, select both of the following servers:
Note: Use the Ctrl key to select more than one server at a time.
- <server_name>
where <server_name> is the name of the profile on which you installed the feature.
- webserver1
– Select the Communities Web UI and Connections Navigation check boxes, and then click
Apply.
– Review the Server details to make sure both servers are now listed there. Click OK, and then
click Save.v Dogear:
– Select Dogear → Manage Modules.
– In the Clusters and Servers box, select both of the following servers:
Note: Use the Ctrl key to select more than one server at a time.
- <server_name>
where <server_name> is the name of the profile on which you installed the feature.
- webserver1
– Select the Dogear Application and Connections Navigation check boxes, and then click Apply.
– Review the Server details to make sure both servers are now listed there. Click OK, and then
click Save.v Profiles:
– Select Profiles → Manage Modules.
– In the Clusters and Servers box, select both of the following servers:
Note: Use the Ctrl key to select more than one server at a time.
- <server_name>
where <server_name> is the name of the profile on which you installed the feature.
- webserver1
– Select the Profiles, Connections Navigation, and Semantic Tag Service check boxes, and then
click Apply.
100 IBM Lotus Lotus Connections 1.0.1 Installation Guide

– Review the Server details to make sure both servers are now listed there. Click OK, and then
click Save. 5. If you are installing multiple features to a single profile, you must explicitly specify a virtual host for
the port from which each feature can be accessed. To specify a virtual host, complete the following
steps:
Note: This step is only required if you are installing multiple features to a single WebSphere
Application Server profile.
a. From the WebSphere Application Server Integrated Solutions Console of the server which hosts
the profile, expand Environment, and then select Virtual Hosts.
b. Click default_host → Host Aliases, click New, and then add the following values to the fields:
v Host Name – <feature_name>
v Port – <port_number_for_feature>
Refer to the serverindex.xml file stored in the node directory to discover port assignments if you
did not make a note of them during the installation. For example, if you installed all five features
to a single profile, and Profiles was assigned the port number 9085, you would specify the
following values here:
v Host Name – profiles
v Port – 9085
c. Click OK, and then click Save.
d. Repeat these steps to add a virtual host for each feature in the profile. 6. From the WebSphere Application Server Integrated Solutions Console, select Servers → Web servers,
select the check box beside the Web server (webserver1), and then click Generate Plug-in.
7. Select the check box beside your web server again, and then click Propagate Plug-in.
Note: If you have trouble propagating the plug-in on Linux, restart the IBM HTTP Server using the
following commands:
./adminctl start
./apachectl -k stop
./apachectl -k start
8. Communities only: Select Environment → Update global Web Server plug-in configuration, and
then click OK to update the plug-in.
9. Stop, and then start the Web server.
10. Restart the feature servers by doing the following:
a. From the WebSphere Application Server Integrated Solutions Console, select Applications →
Enterprise Applications.
b. Select the check box beside each feature you want to restart.
c. Click Stop.
d. Select the check boxes again, and then click Start.11. Log out of the WebSphere Application Server Integrated Solutions Console.
12. Test the mapping by opening a Web browser and trying to access each of the features by specifying
the following:
http://<hostname>/<feature_name>
where <hostname> is the host name of the Web server to which you mapped the feature and
<feature_name> is the name of the feature. Do not specify the port number.
Related tasks
“Creating a cluster” on page 92Create a cluster to add redundancy to the deployment and achieve better performance.
Chapter 7. Mapping the features to the IBM HTTP Server 101

“Installing Activities” on page 61Follow these steps to finish installing the Activities feature.
“Installing Blogs” on page 68Follow these steps to finish installing the Blogs feature.
“Installing Communities” on page 74Follow these steps to finish installing the Communities feature.
“Installing Dogear” on page 76Perform the following steps to finish installing the Dogear feature.
“Installing Profiles” on page 81Follow these steps to finish installing the Profiles feature.
“Defining the IBM HTTP Server for a profile” on page 29When you use the IBM HTTP Server, you can administer it from the IBM WebSphere Application
Server if you define the IBM HTTP Server in the WebSphere Application Server Integrated Solutions
Console of the associated profile.
Mapping multiple profiles to a single IBM HTTP Server
You can map five profiles to one IBM HTTP Server by defining a Web server for each profile, mapping
each profile separately, and then merging the resulting configuration files.
Complete this procedure if you installed each Lotus Connections feature to a separate profile, but want to
use a single IBM HTTP Server with the product. Do not complete this procedure if you are planning to
add the multiple profiles to a node in a network deployment. In that case, you can define a Web server
for the node and map only the node to the IBM HTTP Server.
To map multiple profiles to a single IBM HTTP Server, complete the following steps:
1. Follow the steps in Mapping the features to the IBM HTTP Server to map only one of the profiles.
2. Copy the plugin-cfg.xml file, and then name the copy to associate the file with the profile you just
mapped, for example: plugin-cfg-Activities.xml.
3. Repeat Steps 1 and 2 for each profile.
4. Merge the multiple copies of the plugin-cfg.xml file into a single file, name it plugin-cfg.xml and
replace the file in the IBM HTTP Server directory with the edited version you just created.
To merge the files, capture the following values:
a. Add the <VirtualHost> elements from each feature profile configuration file into the
<VirtualHostGroup Name=″default_host″> element block in the merged file. For example, the
following set of virtual host values represent the set for a single feature profile. Your port numbers
will differ based on your configuration:
<VirtualHostGroup Name="default_host">
<VirtualHost Name="*:9084"/>
<VirtualHost Name="*:80"/>
<VirtualHost Name="*:9447"/>
<VirtualHost Name="*:5069"/>
<VirtualHost Name="*:5068"/>
<VirtualHost Name="*:443"/>
</VirtualHostGroup>
b. Copy the <ServerCluster> element from the configuration file for each feature profile into the
merged file. For example:
<ServerCluster
CloneSeparatorChange="false"
IgnoreAffinityRequests="true"
LoadBalance="Round Robin"
Name="server1_Node05_Cluster"
PostBufferSize="64"
PostSizeLimit="-1"
RemoveSpecialHeaders="true"
102 IBM Lotus Lotus Connections 1.0.1 Installation Guide

RetryInterval="60">
<Server
ConnectTimeout="0"
ExtendedHandshake="false"
MaxConnections="-1"
Name="my_server1"
ServerIOTimeout="0"
WaitForContinue="false">
<Transport
Hostname="example.acme.com"
Port="9084"
#Port number is based on your configuration, so may differ
Protocol="http"/>
<Transport
Hostname="example.acme.com"
Port="9447"
#Port number is based on your configuration, so may differ
Protocol="https">
<Property
Name="keyring"
Value="C:\IBM\HTTPServer\Plugins/config/webserver1/
plugin-key.kdb"/>
<Property
Name="stashfile"
Value="C:\IBM\HTTPServer\Plugins/config/webserver1/
plugin-key.sth"/>
</Transport>
</Server>
</ServerCluster>
c. Copy the <UriGroup> element from the configuration file for each feature profile into the merged
file. For example:
<UriGroup
Name="default_host_server1_Node05_Cluster_URIs">
<Uri
AffinityCookie="JSESSIONID"
AffinityURLIdentifier="jsessionid"
Name="/profiles/*"/>
#The URI will differ based on your configuration; this example is
for Profiles
<Uri
AffinityCookie="JSESSIONID"
AffinityURLIdentifier="jsessionid"
Name="/ibm_semanticTagServlet/*"/>
#The URI will differ based on your configuration; this example is
for profiles
<Uri
AffinityCookie="JSESSIONID"
AffinityURLIdentifier="jsessionid"
Name="/profiles/nav/*"/>
#The URI will differ based on your configuration; this example is
for profiles
</UriGroup>
d. Copy the <Route> element from the configuration file for each feature profile into the merged file.
For example:
<Route
ServerCluster="server1_Node05_Cluster"
UriGroup="default_host_server1_Node05_Cluster_URIs"
VirtualHostGroup="default_host"/>
5. Do not map any more profiles to the IBM HTTP Server, or you will overwrite the file you just edited.
Example of a merged plugin-cfg.xml file for two nodes, one on which Activities has been installed and a
another on which Blogs has been installed.
Chapter 7. Mapping the features to the IBM HTTP Server 103

<?xml version="1.0" encoding="ISO-8859-1"?>
<!--HTTP server plugin config file for the webserver
acme1Node01Cell.acme1Node01.webserver1 -->
<Config
ASDisableNagle="false"
AcceptAllContent="false"
AppServerPortPreference="HostHeader"
ChunkedResponse="false"
FIPSEnable="false"
IISDisableNagle="false"
IISPluginPriority="High"
IgnoreDNSFailures="false"
RefreshInterval="60"
ResponseChunkSize="64"
VHostMatchingCompat="false">
<Log
LogLevel="Error"
Name="e:\IBM\HTTPServer\Plugins\logs\webserver1\http_plugin.log"/>
<Property Name="ESIEnable" Value="true"/>
<Property Name="ESIMaxCacheSize" Value="1024"/>
<Property Name="ESIInvalidationMonitor" Value="false"/>
<VirtualHostGroup Name="default_host">
<VirtualHost Name="*:9080"/>
<VirtualHost Name="*:80"/>
<VirtualHost Name="*:9443"/>
<VirtualHost Name="*:5060"/>
<VirtualHost Name="*:5061"/>
<VirtualHost Name="*:443"/>
<VirtualHost Name="*:9081"/>
<VirtualHost Name="*:9444"/>
<VirtualHost Name="*:5063"/>
<VirtualHost Name="*:5062"/>
</VirtualHostGroup>
<ServerCluster
CloneSeparatorChange="false"
IgnoreAffinityRequests="true"
LoadBalance="Round Robin"
Name="server1_acme1Node02_Cluster"
PostBufferSize="64"
PostSizeLimit="-1"
RemoveSpecialHeaders="true"
RetryInterval="60">
<Server
ConnectTimeout="0"
ExtendedHandshake="false"
MaxConnections="-1"
Name="acme1Node02_server1"
ServerIOTimeout="0"
WaitForContinue="false">
<Transport
Hostname="acme1.sales.acmecorp.com"
Port="9081"
Protocol="http"/>
<Transport
Hostname="acme1.sales.acmecorp.com"
Port="9444"
Protocol="https">
<Property Name="keyring" Value="e:\IBM\HTTPServer\Plugins\key.kdb"/>
<Property Name="stashfile" Value="e:\IBM\HTTPServer\Plugins\key.sth"/>
</Transport>
</Server>
</ServerCluster>
<ServerCluster
CloneSeparatorChange="false"
IgnoreAffinityRequests="true"
LoadBalance="Round Robin"
104 IBM Lotus Lotus Connections 1.0.1 Installation Guide

Name="server1_acme1Node01_Cluster"
PostBufferSize="64"
PostSizeLimit="-1"
RemoveSpecialHeaders="true"
RetryInterval="60">
<Server
ConnectTimeout="0"
ExtendedHandshake="false"
MaxConnections="-1"
Name="acme1Node01_server1"
ServerIOTimeout="0"
WaitForContinue="false">
<Transport
Hostname="acme1.sales.acmecorp.com"
Port="9080"
Protocol="http"/>
<Transport
Hostname="acme1.sales.acmecorp.com"
Port="9443"
Protocol="https">
<Property Name="keyring" Value="e:\IBM\HTTPServer\key.kdb"/>
<Property Name="stashfile" Value="e:\IBM\HTTPServer\key.sth"/>
</Transport>
</Server>
</ServerCluster>
<UriGroup
Name="default_host_server1_acme1Node01_Cluster_URIs">
<Uri
AffinityCookie="JSESSIONID"
AffinityURLIdentifier="jsessionid"
Name="/snoop/*"/>
<Uri
AffinityCookie="JSESSIONID"
AffinityURLIdentifier="jsessionid"
Name="/hello"/>
<Uri
AffinityCookie="JSESSIONID"
AffinityURLIdentifier="jsessionid"
Name="/hitcount"/>
<Uri
AffinityCookie="JSESSIONID"
AffinityURLIdentifier="jsessionid"
Name="*.jsp"/>
<Uri
AffinityCookie="JSESSIONID"
AffinityURLIdentifier="jsessionid"
Name="*.jsv"/>
<Uri
AffinityCookie="JSESSIONID"
AffinityURLIdentifier="jsessionid"
Name="*.jsw"/>
<Uri
AffinityCookie="JSESSIONID"
AffinityURLIdentifier="jsessionid"
Name="/j_security_check"/>
<Uri
AffinityCookie="JSESSIONID"
AffinityURLIdentifier="jsessionid"
Name="/ibm_security_logout"/>
<Uri
AffinityCookie="JSESSIONID"
AffinityURLIdentifier="jsessionid"
Name="/servlet/*"/>
<Uri
AffinityCookie="JSESSIONID"
AffinityURLIdentifier="jsessionid"
Chapter 7. Mapping the features to the IBM HTTP Server 105

Name="/activities/*"/>
<Uri
AffinityCookie="JSESSIONID"
AffinityURLIdentifier="jsessionid"
Name="/activities/nav/*"/>
<Uri
AffinityCookie="JSESSIONID"
AffinityURLIdentifier="jsessionid"
Name="/ivt/*"/>
</UriGroup>
<UriGroup Name="default_host_server1_acme1Node02_Cluster_URIs">
<Uri
AffinityCookie="JSESSIONID"
AffinityURLIdentifier="jsessionid"
Name="/blogs/*"/>
<Uri
AffinityCookie="JSESSIONID"
AffinityURLIdentifier="jsessionid"
Name="/blogs/nav/*"/>
<Uri
AffinityCookie="JSESSIONID"
AffinityURLIdentifier="jsessionid"
Name="/snoop/*"/>
<Uri
AffinityCookie="JSESSIONID"
AffinityURLIdentifier="jsessionid"
Name="/hello"/>
<Uri
AffinityCookie="JSESSIONID"
AffinityURLIdentifier="jsessionid"
Name="/hitcount"/>
<Uri
AffinityCookie="JSESSIONID"
AffinityURLIdentifier="jsessionid"
Name="*.jsp"/>
<Uri
AffinityCookie="JSESSIONID"
AffinityURLIdentifier="jsessionid"
Name="*.jsv"/>
<Uri
AffinityCookie="JSESSIONID"
AffinityURLIdentifier="jsessionid"
Name="*.jsw"/>
<Uri
AffinityCookie="JSESSIONID"
AffinityURLIdentifier="jsessionid"
Name="/j_security_check"/>
<Uri
AffinityCookie="JSESSIONID"
AffinityURLIdentifier="jsessionid"
Name="/ibm_security_logout"/>
<Uri
AffinityCookie="JSESSIONID"
AffinityURLIdentifier="jsessionid"
Name="/servlet/*"/>
<Uri
AffinityCookie="JSESSIONID"
AffinityURLIdentifier="jsessionid"
Name="/ivt/*"/>
</UriGroup>
<Route
ServerCluster="server1_acme1Node01_Cluster"
UriGroup="default_host_server1_acme1Node01_Cluster_URIs"
VirtualHostGroup="default_host"/>
<Route
ServerCluster="server1_acme1Node02_Cluster"
106 IBM Lotus Lotus Connections 1.0.1 Installation Guide

UriGroup="default_host_server1_acme1Node02_Cluster_URIs"
VirtualHostGroup="default_host"/>
<RequestMetrics
armEnabled="false"
loggingEnabled="false"
rmEnabled="false"
traceLevel="HOPS">
<filters enable="false" type="URI">
<filterValues enable="false" value="/snoop"/>
<filterValues enable="false" value="/hitcount"/>
</filters>
<filters enable="false" type="SOURCE_IP">
<filterValues enable="false" value="255.255.255.255"/>
<filterValues enable="false" value="254.254.254.254"/>
</filters>
<filters enable="false" type="JMS">
<filterValues enable="false" value="destination=aaa"/>
</filters>
<filters enable="false" type="WEB_SERVICES">
<filterValues enable="false" value="wsdlPort=aaa:op=bbb:nameSpace=ccc"/>
</filters>
</RequestMetrics>
</Config>
Chapter 7. Mapping the features to the IBM HTTP Server 107

108 IBM Lotus Lotus Connections 1.0.1 Installation Guide

Chapter 8. Installing updates
Install updates to the product.
Update to Lotus Connections are delivered in fix packs. You can find the latest fixes and fix packs
available for download from the IBM Fix Central Web site:
http://www.ibm.com/eserver/support/fixes/
Updates can include the following types of fixes:
v Interim fix – An interim fix is a noncumulative fix that is tested by IBM and made available to all
customers.
v Cumulative fix – A cumulative fix is made available to all customers and is tested by IBM. A
cumulative fix contains multiple interim fixes and other identified updates.
What version is currently installed?
Click the About link from a feature’s home page to display a product page which specifies the feature
build number.
Using the Lotus Connections update installer
Use the update installer to install updates to Lotus Connections.
To use the Lotus Connections update installer, complete the following steps:
1. Download the download.updii.1010.multi.ia.zip file which contains the Lotus Connections Update
Installer application from the IBM Fix Central Web site. To do so, go to the following Web page:
http://www.ibm.com/eserver/support/fixes/
Select the product family Lotus, and product name Lotus Connections, and then search by the Fix ID
1.0.1.0-LC-Multi-IFLO23494.
Save the file to a temporary directory, and then extract its contents to add the following directories to
your temporary directory:
download.updii.1010.multi.ia/LO23494/lc101-pui
2. From the lc101-pui directory, find the LotusConnectionsUpdateInstaller.zip file, and then extract its
contents into the following directory:
v Linux:
/opt/IBM/WebSphere/LotusConnections/update
v Microsoft Windows:
C:\IBM\WebSphere\LotusConnections\update
Note: This copies a file named LotusConnectionsUpdateInstaller.html into a doc\en\readme
subdirectory of the update directory. To learn more about the update installer, open the
LotusConnectionsUpdateInstaller.html file in a Web browser.
3. Linux only: From the update directory, check the permissions of the updateLC.sh file. If it does not
have execute permission, run the following command to give it execute permission:
chmod 777 updateLC.sh
4. Set up the Java™ environment for the update installer by opening a command prompt, changing to
the bin directory of the WebSphere Application Server that is associated with Lotus Connections, and
then entering the following command:
© Copyright IBM Corp. 2007, 2007 109

v Linux:
source setupCmdLine.sh
v Microsoft Windows:
setupCmdLine.bat
v UNIX:
.(space)./setupCmdLine.sh
Note: When running this command in a UNIX shell, be sure to use the syntax
.(space)./setupCmdLine.sh. If you do not precede the command with the period and space, the Java
environment will not be properly set for the active shell.5. To run the update installer, enter the following command:
v Linux:
/opt/IBM/WebSphere/LotusConnections/update>
./updateLC.sh -<parameters>
v Microsoft Windows:
C:\IBM\WebSphere\LotusConnections\update>
updateLC.bat -<parameters>
where <parameters> are the parameters you pass to the update installer command to specify what
you want the command to do. See updateLC command for more details.
Related tasks
“Updating a network deployment” on page 117In a network deployment, you must first plan the update, then perform the update, and finally
synchronize the changes between servers.
“Updating a stand-alone server” on page 115Use the update installer to install a fix pack to update a stand-alone deployment of Lotus Connections
version 1.0 to version 1.0.1.
“Installing an interim fix” on page 124An interim fix is a noncumulative fix that is tested by IBM and made available to all customers.
updateLC command
The updateLC command can install or uninstall interim or cumulative fixes or fix packs to Lotus
Connections and provide information about the update state of applied interim or cumulative fixes or fix
packs.
Purpose
This command:
v Installs fixes and fix packs.
v Uninstalls fixes and fix packs.
v Reports on the current state of applied fixes and fix packs.
updateLC.{sh|bat}
Parameters
-? Displays command usage information.
/?
Displays command usage information.
-configProperties <propertyFile>.properties
Specifies an externally supplied properties file containing Lotus Connections properties and values.
When specifying properties in a file, use the following conventions:
110 IBM Lotus Lotus Connections 1.0.1 Installation Guide

v Do not include trailing spaces after property values
v Do not enclose values in quotation marks
v When typing directory paths, use a forward slash (/) instead of a backward slash (\) regardless of
the operating system
-fix
Interim fix only. Identifies the update as an interim fix update.
-fixDetails
Interim fix only. Instructs the command to display interim fix detail information.
-fixDir <directory>
Interim fix only. Specifies the fully qualified directory to which you downloaded the interim fixes. By
default, this directory is LotusConnections_Root/update/fixes.
-fixes <fix1> <fix2>
Interim fix only. Specifies a list of space-delimited interim fixes to install or uninstall.
-fixJars <JAR_file1> <JAR_file2>
Interim fix only. Specifies a list of space-delimited interim fix JAR files to install or uninstall. Each
JAR file has one or more interim fixes.
-fixpack
Fix pack only. Identifies the update as a fix pack update.
-fixpackDetails
Fix pack only. Instructs the command to display fix pack detail information.
-fixpackDir <directory>
Fix pack only. Specifies the fully qualified directory to which you downloaded the fix packs. By
default, this directory is LotusConnections_Root/update/fixpacks.
-fixpackID <fixpack_ID>
Fix pack only. Specifies the ID of a fix pack to install or uninstall. The value you specify does not
include the .jar extension. The value is not the fully qualified package file name, but is the name of
the individual fix pack within the JAR file. The current Lotus Connections strategy for fix pack JAR
files is to use one JAR file per fix pack. The fix pack ID is the name of the JAR file before the Jar
extension. For example, if the fix pack JAR file is named LC_PTF_101.jar, the fix pack ID is
LC_PTF_101.
-help
Displays command usage information.
/help
Displays command usage information.
-install
Installs the update, either interim fix or fixpack
-installDir <directory>
Specifies the fully qualified installation root of the Lotus Connections product.
-uninstall
Uninstalls the identified fix.
-uninstallAll
Interim fix only. Specifies to uninstall all applied interim fixes.
-usage
Displays command usage information.
-wasPassword <password>
Identifies the succeeding text as a WebSphere Application Server administrative user password.
Chapter 8. Installing updates 111

Syntax
Use the specified syntax to perform the following common tasks:
v To display command usage information:
updateLC -help | -? | /help | /? | -usage
v To process a fix:
updateLC -installDir "Lotus Connections installation directory"
-fix
-fixDir "fully qualified fix repository root"
usually LotusConnections_Root/update/fixes
-install | -uninstall | uninstallAll
-fixes space-delimited list of fixes
-fixJars space-delimited list of fix JAR files
-wasPassword
[-configProperties "property file name and path"]
[-fixDetails]
v To display a list of applied fixes:
updateLC -fix
-installDir "Lotus Connections installation directory"
v To display a list of available fixes:
updateLC -fix
-installDir "Lotus Connections installation directory"
-fixDir "fully qualified fix repository root"
usually LotusConnections_Root/update/fixes
v To process a fix pack:
updateLC -installDir "Lotus Connections installation directory"
-fixpack
-fixpackDir "fully qualified fix pack repository root"
usually LotusConnections_Root/update/fixpacks
-install | -uninstall
-fixPackID fix pack ID
-wasPassword
[-configProperties "property file name and path"]
[-fixpackDetails]
v To display a list of applied fix packs:
updateLC -fixpack
-installDir "Lotus Connections installation directory"
v To display a list of available fix packs:
updateLC -fixpack
-installDir "Lotus Connections installation directory"
-fixpackDir "fully qualified fix pack repository root"
usually LotusConnections_Root/update/fixpacks
Examples
The following examples demonstrate how to perform common tasks. They assume the following:
v The Lotus Connections installation root is:
C:\IBM\WebSphere\LotusConnections
v The fix repository is:
C:\IBM\WebSphere\LotusConnections\update\fixes
v The fix pack repository is:
C:\IBM\WebSphere\LotusConnections\update\fixpacks
Note: The examples include carriage returns after each parameter to make the example easier to
understand. When using the command, do not add carriage returns after the parameters.
112 IBM Lotus Lotus Connections 1.0.1 Installation Guide

To install a collections of interim fixes:
C:\IBM\WebSphere\LotusConnections\update>
updateLC -fix
-installDir "C:\IBM\WebSphere\LotusConnections"
-fixDir "C:\IBM\WebSphere\LotusConnections\update\
fixes"
-install
-fixes Fix1 Fix2
-wasPassword wasadminpassword
To install a collection of interim fixes and display interim fix details:
C:\IBM\WebSphere\LotusConnections\update>
updateLC -fix
-installDir "C:\IBM\WebSphere\LotusConnections"
-fixDir "C:\IBM\WebSphere\LotusConnections\update\
fixes"
-install
-fixes Fix1 Fix2
-fixDetails
-wasPassword wasadminpassword
To install a collection of interim fixes using a custom properties file:
C:\IBM\WebSphere\LotusConnections\update>
updateLC -fix
-installDir "C:\IBM\WebSphere\LotusConnections"
-fixDir "C:\IBM\WebSphere\LotusConnections\update\
fixes"
-install
-fixes Fix1 Fix2
-wasPassword wasadminpassword
-configProperties .\myProp.properties
To install interim fixes from a Java archive (JAR) file:
C:\IBM\WebSphere\LotusConnections\update>
updateLC -fix
-installDir "C:\IBM\WebSphere\LotusConnections"
-fixDir "C:\IBM\WebSphere\LotusConnections\update\
fixes"
-install
-fixJar Fix1
-wasPassword wasadminpassword
To uninstall a collection of interim fixes:
C:\IBM\WebSphere\LotusConnections\update>
updateLC -fix
-installDir "C:\IBM\WebSphere\LotusConnections"
-fixDir "C:\IBM\WebSphere\LotusConnections\update\
fixes"
-uninstall
-fixes Fix1 Fix2
-wasPassword wasadminpassword
To display a list of interim fixes:
C:\IBM\WebSphere\LotusConnections\update>
updateLC -fix
-installDir "C:\IBM\WebSphere\LotusConnections"
To display a list of interim fixes available in the repository:
Chapter 8. Installing updates 113

C:\IBM\WebSphere\LotusConnections\update>
updateLC -fix
-installDir "C:\IBM\WebSphere\LotusConnections"
-fixDir "C:\IBM\WebSphere\LotusConnections\update\
fixes"
To install a fix pack:
C:\IBM\WebSphere\LotusConnections\update>
updateLC -fixpack
-installDir "C:\IBM\WebSphere\LotusConnections"
-fixpackDir "C:\IBM\WebSphere\LotusConnections\
update\fixpacks"
-install
-fixpackID Fixpack1
-wasPassword wasadminpassword
To uninstall a fix pack:
C:\IBM\WebSphere\LotusConnections\update>
updateLC -fixpack
-installDir "C:\IBM\WebSphere\LotusConnections"
-uninstall
-fixpackID Fixpack1
-wasPassword wasadminpassword
To display a list of installed fix packs:
C:\IBM\WebSphere\LotusConnections\update>
updateLC -fixpack
-installDir "C:\IBM\WebSphere\LotusConnections"
To display a list of fix packs available in the repository:
C:\IBM\WebSphere\LotusConnections\update>
updateLC -fixpack
-installDir "C:\IBM\WebSphere\LotusConnections"
-fixpackDir "C:\IBM\WebSphere\LotusConnections\
update\fixpacks"
Related tasks
“Updating a network deployment” on page 118Use the update installer to install a fix pack that updates Lotus Connections version 1.0 to version
1.0.1 in a network deployment.
“Updating a stand-alone server” on page 115Use the update installer to install a fix pack to update a stand-alone deployment of Lotus Connections
version 1.0 to version 1.0.1.
Lotus Connections version 1.0.1
Use the update installer to update Lotus Connections version 1.0 to Lotus Connections version 1.0.1.
Perform the appropriate update for your deployment.
Related tasks
“Updating a network deployment” on page 117In a network deployment, you must first plan the update, then perform the update, and finally
synchronize the changes between servers.
“Updating a stand-alone server” on page 115Use the update installer to install a fix pack to update a stand-alone deployment of Lotus Connections
version 1.0 to version 1.0.1.
“Adding a new feature after an update” on page 85Before you can use the 1.0.1 installer to perform a first-time installation of a feature to a system on
114 IBM Lotus Lotus Connections 1.0.1 Installation Guide

which a set of other Lotus Connections features were previously installed and then updated to version
1.0.1, you must edit the system’s Vital Product Data registry file.
“Installing an interim fix” on page 124An interim fix is a noncumulative fix that is tested by IBM and made available to all customers.
Bringing down Lotus Connections for maintenance work
Before you bring down Lotus Connections to apply feature updates, you must let your users know about
the planned maintenance work.
To bring down Lotus Connection for maintenance, complete the following steps:
1. Let your users know how long the product will be unavailable and when the maintenance work will
begin. You can send e-mail notifications to community members or inform users of the planned
outage by posting a message to an area of the product that is used to provide site status information.
2. Drop all connections from the applications to the database servers to ensure that there are no
processes still connected to the servers.
3. Perform one of the following steps:
v Stop the IBM HTTP Server – Only do this if no other applications are using the IBM HTTP Server.
v Create a rewrite rule in the configuration file for the IBM HTTP Server (httpd.conf ) that redirects
requests for Lotus Connections features to a maintenance page explaining that the product is
temporarily unavailable due to scheduled maintenance work.4. Stop each server that is hosting a Lotus Connections feature to ensure that there are no remaining
open sessions. You can do this by either using the WebSphere Application Server Integrated Solutions
Console, or, if your configuration includes profiles that have multiple server processes and you cannot
access each feature using the WebSphere Application Server Integrated Solutions Console, use the
wsadmin client to stop them.
Related tasks
“Updating a network deployment” on page 118Use the update installer to install a fix pack that updates Lotus Connections version 1.0 to version
1.0.1 in a network deployment.
“Updating a stand-alone server”Use the update installer to install a fix pack to update a stand-alone deployment of Lotus Connections
version 1.0 to version 1.0.1.
Updating a stand-alone server
Use the update installer to install a fix pack to update a stand-alone deployment of Lotus Connections
version 1.0 to version 1.0.1.
Before you can begin this procedure, install the update installer. See Using the Lotus Connections update
installer for more details.
To update a stand-alone deployment of Lotus Connections version 1.0 to version 1.0.1, complete the
following steps:
1. The update installer does not currently support 24x7 updates; you must apply the updates at a time
when no one is logged into the product. See Bringing down Lotus Connections for maintenance work.
2. Make sure all systems are stopped, and then back up the system files. You can do this by archiving
the WebSphere Application Server root directory.
v Linux:
/opt/IBM/WebSphere/
v Microsoft Windows:
C:\IBM\WebSphere\
Chapter 8. Installing updates 115

3. Create the following directory if it does not already exist; you will use it to store the update fix pack.
For example:
v Linux:
/opt/IBM/WebSphere/LotusConnections/update/fixpacks
v Microsoft Windows:
C:\IBM\WebSphere\LotusConnections\update\fixpacks
4. Download the fix pack file named 1.0.1.0-LC-Multi-FP00001.zip from the IBM Fix Central Web site.
To do so, go to the following Web page:
http://www.ibm.com/eserver/support/fixes/
Select the product family Lotus, and product name Lotus Connections, and then search by the Fix
ID 1.0.1.0-LC-Multi-FP00001.
5. Save the file to a temporary directory, and then extract its contents to add the following directories
to the temporary directory:
FP00001/lc101-ptf
Copy the LC101_Fixpack.jar file from the lc101-ptf directory into the fixpacks directory.
6. If you have not done so already, set up the Java environment for the update installer by opening a
command prompt, changing to the bin directory of the WebSphere Application Server that is
associated with Lotus Connections, and then entering the following command:
v Linux:
source setupCmdLine.sh
v Microsoft Windows:
setupCmdLine.bat
v UNIX®:
.(space)./setupCmdLine.sh
Note: When running this command in a UNIX shell, be sure to use the syntax
.(space)./setupCmdLine.sh. If you do not precede the command with the period and space, the
Java environment will not be properly set for the active shell. 7. Use the update installer to install the fix pack. To perform a basic installation, from a command
prompt, enter the following commands (without the carriage returns):
v Linux:
/opt/IBM/WebSphere/LotusConnections/update>
./updateLC.sh -installDir /opt/IBM/WebSphere/LotusConnections
-fixpack -install
-fixpackDir /opt/IBM/WebSphere/LotusConnections/update/fixpacks
-fixpackID LC101_Fixpack -wasPassword <AdminPassword>
v Microsoft Windows:
C:\IBM\WebSphere\LotusConnections\update>
updateLC.bat
-installDir C:\IBM\WebSphere\LotusConnections -fixpack -install
-fixpackDir C:\IBM\WebSphere\LotusConnections\update\fixpacks
-fixpackID LC101_Fixpack -wasPassword <AdminPassword>
where <AdminPassword> is the password associated with the WebSphere Application Server
administrative ID.
See updateLC command for information about additional command options.
8. After applying the updates, use the WebSphere Application Server Integrated Solutions Console or
the wsadmin client to start each server that hosts a Lotus Connections feature.
9. Check to make sure the updates were installed properly. Access each feature by opening a Web
browser and typing the Web address using the following syntax:
<was_server_host_name>:<port_number>/
<feature_name>
116 IBM Lotus Lotus Connections 1.0.1 Installation Guide

where <was_server_host_name> is the host name of the Websphere Application Server and
<port_number> is the port number on the WebSphere Application Server from which the feature is
available. Refer to the WebSphere Application Server configuration file, named serverindex.xml, for
the node to find port number assignments. The following Web address opens the Activities feature
directly from the WebSphere Application Server:
http://appserver.acme.com:9080/activities
You can also check the logs. There is one log created for each feature installed. The files are named
LC101_Fixpack_<feature_name>_install.log and are stored in the following directory:
v Linux:
/opt/IBM/WebSphere/LotusConnections/version/log
v Windows:
C:\IBM\WebSphere\LotusConnections\version\log
10. Click the About link for the feature and look for the build information. It should display a build
number that begins with 1.0.1.
11. Start the IBM HTTP Server if you stopped it or if you added rewrite rules to the httpd.conf file for
the IBM HTTP Server, remove them so that users can once again access the features through the IBM
HTTP Server.
12. Access the features again, this time using their public Web addresses. Click the About links for each
feature to make sure the correct build number is displayed.
13. Validate the security settings for Lotus Connections. Changes you may have made to the settings
could be overwritten by the update. For example, the update enables the All Authenticated role by
default. If you previously disabled it, you must explicitly disable it again.
14. If you are using the Profiles feature, you must update the Tivoli Directory Integrator support files.
See Updating Profiles feature data.
Related tasks
“Lotus Connections version 1.0.1” on page 114Use the update installer to update Lotus Connections version 1.0 to Lotus Connections version 1.0.1.
“Bringing down Lotus Connections for maintenance work” on page 115Before you bring down Lotus Connections to apply feature updates, you must let your users know
about the planned maintenance work.
“Using the Lotus Connections update installer” on page 109Use the update installer to install updates to Lotus Connections.
“Updating Profiles feature data” on page 122When you install the Profiles feature as part of the Lotus Connections product, you must also install a
set of files that support the interaction between Profiles and the Tivoli Directory Integrator, which is a
product that initially populates the Profiles database repository from a source LDAP system, and
keeps the database up-to-date as LDAP changes are made. If you decide to update the Profiles feature,
you must also update the supporting files for Tivoli Directory Integrator. Related reference
“updateLC command” on page 110The updateLC command can install or uninstall interim or cumulative fixes or fix packs to Lotus
Connections and provide information about the update state of applied interim or cumulative fixes or
fix packs.
Updating a network deployment
In a network deployment, you must first plan the update, then perform the update, and finally
synchronize the changes between servers.
Before completing this procedure, you must download the update installer. See Using the Lotus
Connections update installer for more details.
Chapter 8. Installing updates 117

To update a network deployment, complete these procedures.
Related tasks
“Using the Lotus Connections update installer” on page 109Use the update installer to install updates to Lotus Connections.
Planning a network deployment update
Before you apply the update to a network deployment, determine the order in which to install the
updates on the WebSphere Application Server installations configured for your enterprise.
You must install the update on the servers in the following order:
v Install the update on the WebSphere Application Server installation that represents the primary
member of a cluster.
v Use the Deployment Manager to synchronize the primary member with all the secondary members of
that cluster.
v Run the update on each secondary member system (that is not also a primary member). This step is
required because there are some files that need to be updated that the Deployment Manager cannot
edit; you must run the update directly on the secondary member servers to be sure that those files are
updated.
If the primary cluster members for the features are hosted on different systems, this process can become
confusing, so it is best to write down a diagram of your configuration and plan the order of operations.
For example, given the following configuration:
v Activities is installed on server1 on system X, server2 on system Y, and server3 on system Z, all under
the default profile AppSrv01. These three servers are added into a cluster named clusterA to which
system X is added as the primary member and systems Y (server2) and Z (server3) as secondary
members.
v Blogs is installed on a second server named blogsServer and on system X and on server blogsServer2
system Y, both under the default profile AppSrv01. These two systems are added into a cluster named
clusterB to which system X is added as the primary node and system Y (blogsServer2) as the secondary
node.
The following steps are required to install the update:
v Install the update on system X first because the primary members of both clusterA and clusterB are
hosted by it.
v Synchronize the secondary members on system Y and system Z.
This step synchronizes the primary members of the Activities and Blogs features (on system X) with
the secondary members of the features on systems Y and Z, specifically, Activities on systems Y and Z,
and Blogs on system Y.
v Install the update on system Y to update the files not edited by the Deployment Manager.
v Install the update on system Z to update the files not edited by the Deployment Manager.
Note: After updating the product, you will have run the update installer once and only once on each
WebSphere Application Server installation.
Updating a network deployment
Use the update installer to install a fix pack that updates Lotus Connections version 1.0 to version 1.0.1 in
a network deployment.
When you update Lotus Connections, you update the primary member of a cluster first. Before you
perform the update, determine which systems in your deployment host primary members and which
host secondary members. See Planning a network deployment update for more details.
118 IBM Lotus Lotus Connections 1.0.1 Installation Guide

You must update all the features in a network deployment; you cannot update one feature and not
another.
To update a network deployment of Lotus Connections version 1.0 to version 1.0.1, complete the
following steps:
1. The update installer does not currently support 24x7 updates; you must apply the updates at a time
when no one is logged into the product. See Bringing down Lotus Connections for maintenance work.
2. Make sure all systems are stopped, and then back up the system files. You can do this by archiving
the WebSphere Application Server root directory.
v Linux:
/opt/IBM/WebSphere/
v Microsoft Windows:
C:\IBM\WebSphere\
3. Create the following directory if it does not already exist; you will use it to store the update fix pack.
v Linux:
/opt/IBM/WebSphere/LotusConnections/update/fixpacks
v Microsoft Windows:
C:\IBM\WebSphere\LotusConnections\update\fixpacks
4. Download the fix pack file named 1.0.1.0-LC-Multi-FP00001.zip from the IBM Fix Central Web site.
To do so, go to the following Web page:
http://www.ibm.com/eserver/support/fixes/
Select the product family Lotus, and product name Lotus Connections, and then search by the Fix
ID 1.0.1.0-LC-Multi-FP00001.
5. Save the file to a temporary directory, and then extract its contents to add the following directories
to the temporary directory:
FP00001/lc101-ptf
Copy the LC101_Fixpack.jar file from the lc101-ptf directory to the fixpacks directory.
6. Start each server that hosts a Lotus Connections feature using the WebSphere Application Server
Integrated Solutions Console for the Deployment Manager system.
7. Check the Deployment Manager to make sure that Automatic synchronization is selected for all
nodes. If it is not on, turn it on. See Synchronizing updated nodes.
8. Install the update on the WebSphere Application Server installation that represents the primary
member of the cluster by completing the following steps:
a. Refer to the list you compiled of primary and secondary cluster members, and then use the
Deployment Manager to turn off both automatic and startup synchronization for the secondary
nodes. See Synchronizing updated nodes for more details.
b. If you have not done so already, set up the Java environment for the update installer by opening
a command prompt, changing to the bin directory of the WebSphere Application Server that is
associated with Lotus Connections, and then entering the following command:
v Linux:
source setupCmdLine.sh
v Microsoft Windows:
setupCmdLine.bat
v UNIX:
.(space)./setupCmdLine.sh
Note: When running this command in a UNIX shell, be sure to use the syntax
.(space)./setupCmdLine.sh. If you do not precede the command with the period and space, the
Java environment will not be properly set for the active shell.
Chapter 8. Installing updates 119

c. Enter the following command to run the update installer on the system hosting the primary
node:
v Linux:
/opt/IBM/WebSphere/LotusConnections/update>
./updateLC.sh -installDir opt/IBM/WebSphere/LotusConnections
-fixpack -install
-fixpackDir /opt/IBM/WebSphere/LotusConnections/update/fixpacks
-fixpackID LC101_Fixpack -wasPassword <AdminPassword>
v Microsoft Windows:
C:\IBM\WebSphere\LotusConnections\update>
updateLC.bat -installDir C:\IBM\WebSphere\LotusConnections
-fixpack -install
-fixpackDir C:\IBM\WebSphere\LotusConnections\update\
fixpacks
-fixpackID LC101_Fixpack -wasPassword <AdminPassword>
where <AdminPassword> is the password associated with the WebSphere Application Server
administrative ID.
See updateLC command for information about additional command options.
d. Force the update to be applied to the other members of the cluster by performing a full
synchronization. See Synchronizing updated nodes for more details. 9. If a different system serves as the primary member of another cluster, repeat the previous step to
install the update to the primary member system and synchronize it to the secondary members. Be
sure to first update all systems that serve as primary nodes; do not continue to the next Step until
you have done so.
10. Install the update on each secondary node system that does not host a primary member to ensure
that the files that cannot be edited by the Deployment Manager are also updated. On each secondary
node system, open a command prompt, and then enter the following command:
v Linux:
/opt/IBM/WebSphere/LotusConnections/update>
./updateLC.sh -installDir /opt/IBM/WebSphere/LotusConnections
-fixpack -install
-fixpackDir /opt/IBM/WebSphere/LotusConnections/update/fixpacks
-fixpackID LC101_Fixpack -wasPassword <AdminPassword>
v Microsoft Windows:
C:\IBM\WebSphere\LotusConnections\update>
updateLC.bat -installDir C:\IBM\WebSphere\LotusConnections
-fixpack -install
-fixpackDir C:\IBM\WebSphere\LotusConnections\update\fixpacks
-fixpackID LC101_Fixpack -wasPassword <AdminPassword>
where <AdminPassword> is the password associated with the WebSphere Application Server
administrative ID.
See updateLC command for information about additional command options.
11. After applying the updates, make sure the features were updated properly. Access each feature from
the system that hosts the primary node of the features, by opening a Web browser and typing the
Web address using the following syntax:
<was_server_host_name>:<port_number>/<feature_name>
where the <port_number> is the port number on the WebSphere Application Server that the feature
is available from. Refer to the WebSphere Application Server configuration file, named
serverindex.xml, for the node to find port number assignments. The following Web address opens
the Activities feature directly from the WebSphere Application Server:
http://appserver.acme.com:9080/activities
You can also check the logs. There is one log created for each feature installed. The files are named
LC101_Fixpack_<feature_name>_install.log and are stored in the following directory:
120 IBM Lotus Lotus Connections 1.0.1 Installation Guide

v Linux:
/opt/IBM/WebSphere/LotusConnections/version/log
v Windows:
C:\IBM\WebSphere\LotusConnections\version\log
12. Click the About link for the feature and look for the build information. It should display a build
number of 1.0.1.
13. Start the IBM HTTP Server if you stopped it or if you added rewrite rules to the httpd.conf file for
the IBM HTTP Server, remove them so that users can once again access the features.
14. Access the features again, this time using their public Web addresses. Click the About links for each
feature to make sure the correct build number is displayed.
15. Validate the security settings for Lotus Connections. Changes you may have made to the settings
could be overwritten by the update. For example, the update enables the All Authenticated role by
default. If you previously disabled it, you must explicitly disable it again.
16. If you are using the Profiles feature, you must update the Tivoli Directory Integrator support files.
See Updating Profiles feature data.
Related tasks
“Bringing down Lotus Connections for maintenance work” on page 115Before you bring down Lotus Connections to apply feature updates, you must let your users know
about the planned maintenance work.
“Updating Profiles feature data” on page 122When you install the Profiles feature as part of the Lotus Connections product, you must also install a
set of files that support the interaction between Profiles and the Tivoli Directory Integrator, which is a
product that initially populates the Profiles database repository from a source LDAP system, and
keeps the database up-to-date as LDAP changes are made. If you decide to update the Profiles feature,
you must also update the supporting files for Tivoli Directory Integrator. Related reference
“updateLC command” on page 110The updateLC command can install or uninstall interim or cumulative fixes or fix packs to Lotus
Connections and provide information about the update state of applied interim or cumulative fixes or
fix packs.
Synchronizing updated nodes
When you install an update to WebSphere Application Server installation in a network deployment, you
must install the update to the primary cluster member first, and then synchronize the update to the
secondary nodes.
You can enable the following types of synchronization from the Deployment Manager:
v Automatic synchronization – Updates occur on a schedule. This type of synchronization is on by
default in network deployments
v Startup synchronization – Updates occur each time the server is started.
To enable and disable synchronization when installing updates, complete the following steps:
1. Open the WebSphere Application Server Integrated Solutions Console for the Deployment Manager
system, and then click System Administration → Node agents.
2. Click the nodeagent link for the node for which you are enabling or disabling synchronization.
3. In the Additional Properties section, click File synchronization service.
4. Perform one of the following actions:
v To turn on synchronization, select the Automatic synchronization and Startup synchronization
check boxes.
v To turn off synchronization, deselect the Automatic synchronization and Startup synchronization
check boxes.
Chapter 8. Installing updates 121

5. Click Save.
6. Click System Administration → Node agents again.
7. Select the check box of the node for which you are enabling or disabling synchronization, and then
click Restart. If you are turning synchronization on or off for more than one node, perform this step
for each node separately.
8. Restart the Deployment Manager.
To perform a full synchronization, which copies an update applied to the primary cluster member
application to all secondary cluster members associated with it, complete these steps:
v Open the WebSphere Application Server Integrated Solutions Console for the Deployment Manager
system, and then click System Administration → Nodes.
v Select the check boxes for the secondary nodes, and then click the Full Resynchronize button.
Updating Profiles feature data
When you install the Profiles feature as part of the Lotus Connections product, you must also install a set
of files that support the interaction between Profiles and the Tivoli Directory Integrator, which is a
product that initially populates the Profiles database repository from a source LDAP system, and keeps
the database up-to-date as LDAP changes are made. If you decide to update the Profiles feature, you
must also update the supporting files for Tivoli Directory Integrator.
Only perform this procedure if you installed a previous version of the Profiles feature.
To update the Profiles feature data, complete the following steps:
1. Log into the system that hosts the Tivoli Directory Integration solution directory using the same user
ID that was used to create the directory originally.
2. Create a subdirectory named savev1 in the original TDI directory by opening a command prompt,
changing to the TDI directory, and then entering the following command:
mkdir savev1
3. Copy any files that you have modified since installing the previous version of the product to the
savev1 directory you just created. If you are not sure which files have been changed, compare the files
in the TDI directory against the files in the archive subdirectory. Typically users modify the following
files:
v tdienv
v profiles_tdi.properties
v map_dbrepos_from_source.properties
v map_dbrepos_to_source.properties
v validate_dbrepos_fields.properties
v profiles_functions.js
v mytest.js4. Download the fix pack file named 1.0.1.0-LC-Multi-IFLO23394.zip from the IBM Fix Central Web site.
This file contains the 1.0.1 version of the Tivoli Directory Integrator support files. To download it, go
to the following Web page:
http://www.ibm.com/eserver/support/fixes/
Select the product family Lotus, and product name Lotus Connections, and then search by the Fix ID
1.0.1.0-LC-Multi-IFLO23394.
5. Save the file to a temporary directory, and then extract its contents to add the following directories to
the temporary directory:
/LO23394/TDISOL
6. Install the 1.0.1 version of the TDI support files by completing the following steps:
122 IBM Lotus Lotus Connections 1.0.1 Installation Guide

a. From the TDISOL directory just created, extract the contents of the following file into the parent
directory of the TDI directory on the system on which the Profiles feature data is stored:
Note: You must extract the contents to the parent directory because during the extraction a TDI
directory is created. The extracted TDI directory replaces the existing TDI directory on the system.
v Linux: tdisol.tar
v Microsoft Windows: tdisol.zip
b. Copy the files you saved to the savev1 directory back into the TDI directory.
c. Using a text editor, open the profiles_tdi.properties from the TDI directory, and add the following
properties to it:
v source_ldap_compute_function_for_givenName=
v source_ldap_compute_function_for_sn=
v sync_updates_show_summary_only=true
Save and close the file.
d. Linux only: Execute the following commands on the TDI directory:
chmod +x netstore
chmod +x *.sh
7. Some of the files that are commonly modified by users were updated in version 1.0.1. If you replaced
any of the updated versions of the following files with the files you saved to the savev1 directory,
make the following edits by opening the files with a text editor and changing the specified values:
v map_dbrepos_from_source.properties
The default setting for PROF_SECRETARY_UID has been changed from null to the following:
PROF_SECRETARY_UID=$secretary_uid
where $secretary_uid specifies to do a lookup of the UID using the DN value in the secretary field.
v validate_dbrepos_fields.properties
The default setting for PROF_MAIL has been changed from 64 to the following:
PROF_MAIL=(x != null) && (x.length() > 0) && (x.length() <= 64)
This new formula indicates that a value for this property is required.
Related tasks
“Updating a network deployment” on page 118Use the update installer to install a fix pack that updates Lotus Connections version 1.0 to version
1.0.1 in a network deployment.
“Updating a stand-alone server” on page 115Use the update installer to install a fix pack to update a stand-alone deployment of Lotus Connections
version 1.0 to version 1.0.1.
Uninstalling updates
You must uninstall fixes and fix packs in the reverse order from that used to install them. For example, if
you installed fix 1, fix 2, and fix 3 and want to remove fix 2, you must uninstall fix 3 before you can
uninstall fix 2.
If you are planning to uninstall a fix because you ran into a problem with the installation and want to
start over, you may not need to uninstall the fix. If you zipped up the system files before you began the
installation, you can instead revert back to the files you backed up, and start again.
To uninstall an update, complete the following tasks:
1. You can determine which fixes are installed on a system by entering the following command in a
command prompt:
Chapter 8. Installing updates 123

v Linux:
/opt/IBM/WebSphere/LotusConnections/update>
./updateLC.sh -fixpack -installDir /opt/IBM/WebSphere/LotusConnections
v Microsoft Windows:
C:\Program Files\IBM\WebSphere\LotusConnections\update>
updateLC.bat -fixpack
-installDir C:\Program Files\IBM\WebSphere\LotusConnections
2. To uninstall a fix, use the following command:
v Linux:
/opt/IBM/WebSphere/LotusConnections/update>
./updateLC.sh -fixpack
-installDir /opt/IBM/WebSphere/LotusConnections -uninstall
-fixpackID LC101_Fixpack -wasPassword <AdminPassword>
v Microsoft Windows:
C:\Program Files\IBM\WebSphere\LotusConnections\update>
updateLC.bat -fixpack
-installDir C:\Program Files\IBM\WebSphere\LotusConnections -uninstall
-fixpackID LC101_Fixpack -wasPassword <AdminPassword>
Installing an interim fix
An interim fix is a noncumulative fix that is tested by IBM and made available to all customers.
You must have the Lotus Connections update installer installed before you can perform this procedure.
See Using the Lotus Connections update installer.
This topic describes the steps to install an ifix only; it does not include information about how to prepare
the production environment before applying the fix nor does it identify things to consider if you are
installing the fix to a network deployment of Lotus Connections. See the Lotus Connections version 1.0.1
section for more detailed information about the preinstallation and post-installation steps involved in
applying a fix to the product.
To install an interim fix (ifix), complete the following steps:
1. Interim fixes are posted to the IBM Fix Central Web site:
http://www.ibm.com/eserver/support/fixes/
2. To find available fixes, select the product family Lotus, the product name Lotus Connections, and
then click Continue.
3. Optional: Next to the All fixes radio button, select a version number and a platform. Or, if you know
the Authorized Program Analysis Report (APAR) number associated with the fix, select the APAR
radio button, and then enter the APAR number in the field.
4. Click Continue to search for fixes.
5. Download the fix you want to install and save it to a temporary directory.
6. Extract the contents of the fix file, and then copy the fix JAR file to the following directory:
Note: If a fixes subdirectory does not exist in the update directory, create one.
v Linux:
/opt/IBM/WebSphere/LotusConnections/update/fixes
v Microsoft Windows:
C:\IBM\WebSphere\LotusConnections\update\fixes
7. Use the update installer to install the fix. To perform a basic installation, from a command prompt,
enter the following commands (without the carriage returns):
v Linux:
124 IBM Lotus Lotus Connections 1.0.1 Installation Guide

/opt/IBM/WebSphere/LotusConnections/update>
./updateLC.sh -fix -installDir /opt/IBM/WebSphere/LotusConnections
-fixDir /opt/IBM/WebSphere/LotusConnections/update/fixes
-install -fixes <APAR_number_of_fix>
-wasPassword <AdminPassword>
v Microsoft Windows:
C:\IBM\WebSphere\LotusConnections\update>
updateLC.bat -fix
-installDir "C:\IBM\WebSphere\LotusConnections"
-fixDir "C:\IBM\WebSphere\LotusConnections\update\fixes"
-install -fixes <APAR_number_of_fix>
-wasPassword <AdminPassword>
where <AdminPassword> is the password associated with the WebSphere Application Server
administrative ID.
Note: If you do not know the APAR number of the fix, look in the readme.txt file that is downloaded
to the temporary directory with the fix.
See updateLC command for information about additional command options.
Related tasks
“Using the Lotus Connections update installer” on page 109Use the update installer to install updates to Lotus Connections.
“Lotus Connections version 1.0.1” on page 114Use the update installer to update Lotus Connections version 1.0 to Lotus Connections version 1.0.1.
Chapter 8. Installing updates 125

126 IBM Lotus Lotus Connections 1.0.1 Installation Guide

Chapter 9. Uninstalling Lotus Connections
There are some additional steps you must take to uninstall a network deployment of Lotus Connections.
© Copyright IBM Corp. 2007, 2007 127

Uninstalling a stand-alone deployment of Lotus Connections
You can uninstall the entire Lotus Connections product, or individual Lotus Connections features, by
running the uninstaller program. Follow this procedure to remove a stand-alone deployment of Lotus
Connections from your system.
To uninstall a Lotus Connections feature:
1. Stop the WebSphere Application Server if it is running.
2. Run the uninstaller.
v Linux:
Change to the following directory:
/opt/IBM/WebSphere/LotusConnections/uninstall
Enter the following command:
./uninstall.sh
v Microsoft Windows:
Open a command prompt, and then change to the following directory:
\IBM\WebSphere\LotusConnections\uninstall
Enter the following command:
uninstall.bat
3. On the Welcome page of the wizard, click Next.
4. Select the features you want to uninstall, and then click Next.
5. Type the WebSphere Application Server Administrative user ID and password, and then click Next
to complete the uninstallation.
6. If no other nodes use it, delete the following directory:
v Linux:
– /opt/IBM/WebSphere/LotusConnections
v Microsoft Windows:
– C:\Program Files\IBM\WebSphere\LotusConnections
Note: If you plan to reinstall Lotus Connections and you would like to retain some of the preference
settings you configured for the previous installation, delete all of the files and subdirectories in the
LotusConnections directory except the lastSessionDefaults.properties file, which is stored in this
directory.
7. Activities only: Delete the following items if no other nodes use them:
v All operating systems:
– If you do not want to keep the statistical data that was collected about the performance of the
Activities feature, delete the statistics directory that you created during the Activities
installation.
By default, the statistics directory is stored in the following subdirectory:
IBM/LotusConnections/Data/Activities/
<profile_name>_<server_name>/statistics
– If you are using a file system directory store and do not want to keep the data that users have
added to Activities during previous sessions of the Activities feature, delete the contentstore
directory that you created during the Activities installation.
By default, the contentstore directory is stored in the following subdirectory:
IBM/LotusConnections/Data/Activities/<profile_name>/
contentstore
v Linux:
– From /opt/IBM/WebSphere/AppServer/lib/ext, delete the files commons-codec-1.3-minus-mp.jar
and oatai.jar.
128 IBM Lotus Lotus Connections 1.0.1 Installation Guide
– If other features or nodes still require the LotusConnections subdirectory, so you could not
delete it, delete the files oa-config.xml and oa-config.xsd from the following directory:
opt/IBM/WebSphere/AppServer/profiles/<profile_name>/config/cells/
<cell_name>/LotusConnections
v Microsoft Windows:
– From C:\IBM\WebSphere\AppServer\lib\ext, delete the files commons-codec-1.3-minus-mp.jar
and oatai.jar.
– If other features or nodes still require the LotusConnections subdirectory, so you could not
delete it, delete the files oa-config.xml and oa-config.xsd from the following directory:
C:\Program Files\IBM\WebSphere\AppServer\profiles\<profile_name>
\config\cells\<cell_name>\LotusConnections
8. Blogs only: If you are uininstalling the Blogs feature and do not want to keep the files uploaded by
users, delete the following directories:
v Linux:
– /opt/IBM/LotusConnections/Data/Blogs/
<profile_name>_<server_name>/index
/opt/IBM/LotusConnections/Data/Blogs/roller_data/uploads
v Microsoft Windows:
– C\IBM\Program Files\LotusConnections\Data\Blogs\
<profile_name>_<server_name>\index
C:\Program Files\IBM\LotusConnections\Data\Blogs\roller_data\uploads
9. Communities only: To finish uninstalling the Communities feature, complete the following steps:
v If you are uininstalling the Communities feature and do not want to keep the index file, delete the
following directory:
– Linux:
/opt/IBM/LotusConnections/Data/Communities/
<profile_name>_<server_name>/index
– Microsoft Windows:
C:\Program Files\IBM\LotusConnections\Data\Communities\
<profile_name>_<server_name>\index
v Remove the communities.policy file. This file is created during the installation to enable Java 2
security in the Communities feature. After the installer creates the file, it sets the Java Virtual
Machine Property, java.security.auth.policy equal to this value. Delete the setting, and then the file
itself by completing the following steps:
Note: If you edited the communities.policy file to include values for other applications that you
use or if a policy file already existed on the system when you installed Communities and you
added the communities policy file values to it, do not delete the policy file. Instead, remove any
Communities-specific values from the policy file and continue to reference it in the
java.security.auth.policy property.a. From the WebSphere Application Server Integrated Solutions Console, select Application servers
→ <server_name>, and then under Server infrastructure, expand Java Process Management to
find Process Definition.
b. Select Process Definition → Java Virtual Machine → Custom Properties.
c. Select the check box next to java.security.auth.policy and then click Delete. Save your changes.
d. Stop and start WebSphere Application Server.
e. Delete the Communities.policy file from the following directory:
v Linux:
opt/IBM/WebSphere/AppServer/profiles/<profile_name>/
properties
v Windows:
Chapter 9. Uninstalling Lotus Connections 129

C:\Program Files\IBM\WebSphere\AppServer\profiles\
<profile_name>\properties
10. Dogear only: If you are uininstalling the Dogear feature and do not want to keep the icons collected
by users, delete the following directories:
v Linux:
– /opt/IBM/LotusConnections/Data/Dogear/
<profile_name>_<server_name>/index
/opt/IBM/LotusConnections/Data/Dogear/favicons
v Microsoft Windows:
– C:\Program Files\IBM\LotusConnections\Data\Dogear\
<profile_name>_<server_name>\index
C:\Program Files\IBM\LotusConnections\Data\Dogear\favicons
11. Profiles only: To finish uninstalling the Profiles feature, complete the following steps:
v If you are uininstalling the Profiles feature and do not want to keep the index files, delete the
following directory:
– Linux:
/opt/IBM/LotusConnections/Data/Profiles/
<profile_name>_<server_name>/index
– Microsoft Windows:
C:\Program Files\IBM\LotusConnections\Data\Profiles\
<profile_name>_<server_name>\index
v If no other nodes use them, remove the files in the TDI subdirectory that was created when you
extracted files from the tdisol file, with the exception of the following files if you made any
modification to them that you want to use in a later installation:
– profiles_tdi.properties
– map_dbrepos_from_source.properties
– map_dbrepos_to_source.properties
– profiles_functions.js
– Any custom tables that you created, such as emptype.csv12. The lastSessionDefaults.properties file is left on the system to provide preferred settings that are
used if you reinstall a feature. If you do not plan to reinstall any Lotus Connections features, you
can delete it from the following directory.
v Linux:
opt/IBM/WebSphere/LotusConnections
v Windows:
C:\IBM\WebSphere\LotusConnections
13. Optional: Now that the features are uninstalled, it is a good time to drop and recreate the databases
if you want to clean out the data. To drop a DB2 database for a feature, complete the following
steps:
a. Open the DB2 Control Center with a user ID that has db2admin privileges by doing the
following steps:
v Linux:
– Change to the bin subdirectory of DB2. For example: /opt/ibm/db2/V9.1/bin.
– Type the following command:
db2cc
v Windows:
– Select Start → All Programs → IBM DB2 → <DB_instance_name> → Control Center.b. Click Cancel.
c. Expand the list of databases by clicking the plus sign (+) beside ALL DATABASES.
d. Right-click the database you want to drop from the following list of options:
130 IBM Lotus Lotus Connections 1.0.1 Installation Guide
v Activities: OPNACT
v Blogs: BLOGS
v Communities: SNCOMM
v Dogear: DOGEAR
v Profiles: PEOPLEDB
Then select DROP from the menu.
e. Repeat the previous step for each database that you want to drop.
f. After you finish, select Control Center → Exit from the menu.14. To drop an Oracle database for a feature, complete the following steps:
a. Explicitly set the following Oracle environment variables:
v Linux:
– export ORACLE_HOME=<path_to_the_Oracle_installation_directory>
For example, export ORACLE_HOME=/opt/oracle/home/OraHome_1
– export ORACLE_SID=LSCONNv Windows:
– set ORACLE_HOME=<path_to_the_Oracle_installation_directory>
For example, set ORACLE_HOME=C:\oracle\product\10.2.0\db_1
– set ORACLE_SID=LSCONN
where LSCONN is the name of the database if you created one from scratch; replace this with the
name of your database if you are using an existing database to store the Lotus Connections
tables.
b. Run SQL Plus using the SYSDBA role by typing the following command:
sqlplus SYS/<your_password>@LSCONN AS SYSDBA
where <your_password> is the password associated with your SYSDBA account. LSCONN is the
name of the database if you created one from scratch; replace this with the name of your
database if you are using an existing database to store the Lotus Connections tables.
c. Type one of the following sets of commands to drop the associated feature database tables:
Note: Ignore the forced carriage returns; each line should end in a semicolon.
v Activities:
DROP USER OAUSER CASCADE;
DROP USER ACTIVITIES CASCADE;
DROP ROLE OAUSER_ROLE;
DROP TABLESPACE OAREGTABSPACE INCLUDING CONTENTS AND DATAFILES
CASCADE CONSTRAINTS;
DROP TABLESPACE OAINDEXTABSPACE INCLUDING CONTENTS AND DATAFILES
CASCADE CONSTRAINTS;
v Blogs:
DROP USER BLOGS CASCADE;
DROP TABLESPACE BLOGSREGTABSPACE INCLUDING CONTENTS AND DATAFILES
CASCADE CONSTRAINTS;
DROP TABLESPACE BLOGSINDEXTABSPACE INCLUDING CONTENTS AND
DATAFILES CASCADE CONSTRAINTS;
v Communities:
DROP USER SNCOMM CASCADE;
DROP TABLESPACE SNCOMMREGTABSPACE INCLUDING CONTENTS AND
DATAFILES CASCADE CONSTRAINTS;
DROP TABLESPACE SNCOMMINDEXTABSPACE INCLUDING CONTENTS AND
DATAFILES CASCADE CONSTRAINTS;
DROP ROLE SNCOMM_ROLE;
Chapter 9. Uninstalling Lotus Connections 131

v Dogear:
DROP USER DOGEAR CASCADE;
DROP TABLESPACE DOGEARREGTABSPACE INCLUDING CONTENTS AND
DATAFILES CASCADE CONSTRAINTS;
DROP TABLESPACE DOGEARINDEXTABSPACE INCLUDING CONTENTS AND
DATAFILES CASCADE CONSTRAINTS;
v Profiles:
DROP USER EMPINST CASCADE;
DROP TABLESPACE PROFREGTABSPACE INCLUDING CONTENTS AND DATAFILES
CASCADE CONSTRAINTS;
DROP TABLESPACE PROFINDEXTABSPACE INCLUDING CONTENTS AND DATAFILES
CASCADE CONSTRAINTS;
Related tasks
“Removing a pilot installation” on page 13You can remove the artifacts created by a pilot installation while preserving the user data to be
migrated to a production installation.
Uninstalling a Lotus Connections cluster
Uninstall the nodes in the reverse order that you installed them in. Uninstall the subsequent nodes first,
and then uninstall the primary node.
To uninstall a Lotus Connections cluster, complete the following steps:
1. Stop all the clusters you configured by completing the following steps:
a. Log in to the WebSphere Application Server Integrated Solutions Console by going to the
following Web address in a browser:
http://deployment_manager_server_host_name:9060/ibm/console
b. Select Servers → Clusters.
c. Select the check boxes beside the cluster for each feature that you installed, and then click Stop.2. Uninstall and remove the secondary and any subsequent nodes that you may have configured on the
Deployment Manager by opening a command prompt and changing to the following directory on the
system hosting the node that you most recently added to the cluster:
v Linux:
opt/IBM/WebSphere/LotusConnections/ConfigEngine
Then, enter the following command (without carriage returns):
./ConfigEngine.sh action-uninstall-cluster-setup-<feature_name>
-DprofileName=<profile_name> -DisLastNode=true|false
-DWasPassword=<Was_Admin_Password>
-Dforce=true >
action-uninstall-cluster-setup-<feature_name>.log 2>&1
v Windows:
C:\IBM\WebSphere\LotusConnections\ConfigEngine
Then, enter the following command (without carriage returns):
ConfigEngine action-uninstall-cluster-setup-<feature_name>
-DprofileName=<profile_name> -DisLastNode=true|false
-DWasPassword=<Was_Admin_Password>
-Dforce=true >
action-uninstall-cluster-setup-<feature_name>.log 2>&1
For the command -DisLastNode, specify true if this is the last node that you are uninstalling.
Otherwise, specify false. For <feature_name>, specify the name of the feature you are uninstalling
from the node. Use the correct syntax to specify the <feature_name>. Specify the features as follows:
v Activities – activities
v Blogs – blogs
132 IBM Lotus Lotus Connections 1.0.1 Installation Guide

v Communities – communities
v Dogear – dogear
v Profiles – profiles
Uninstalling the feature from the cluster automatically uninstalls all the features in that profile from
the cluster.
3. Follow the steps in the following procedure to uninstall Lotus Connections from the node:
“Uninstalling a stand-alone deployment of Lotus Connections” on page 128
4. Repeat Steps 2 and 3 for each node you installed, beginning from the most recently installed until you
uninstall the primary node of the cluster.
5. Remove the clusters that contain the features you removed from the nodes by completing the
following steps:
a. Log in to the WebSphere Application Server Integrated Solutions Console by going to the
following Web address in a browser:
http://deployment_manager_server_host_name:9060/ibm/console
b. Select Servers → Clusters.
c. Select the check boxes beside the cluster for each feature that you installed, and then click Delete.6. Remove the applications corresponding to the features from the Deployment Manager by completing
the following steps:
a. Log in to the WebSphere Application Server Integrated Solutions Console of the system on which
you installed the Deployment Manager by opening a Web browser, and then going to the
following Web address:
http://dm_server_host_name:9060/ibm/console
b. Select Applications → Enterprise Applications. Select the check boxes beside the applications you
want to remove from the cell. The applications are named as follows:
v Activities – activities
v Blogs – blogs
v Communities – communities
v Dogear – dogear
v Profiles – profiles
c. Click Uninstall.7. Delete the LotusConnections-config directory from the system hosting the Deployment Manager. It is
stored in the following file path location:
v Linux:
opt/IBM/WebSphere/AppServer/profiles/Dmgr01/config/cells/cellname
v Windows:
C:\IBM\WebSphere\AppServer\profiles\Dmgr01\config\cells\cellname
8. The uninstaller does not automatically remove the user IDs for Java 2 security, so you must remove
the ID created for each feature after you run the uninstaller. Perform this step only after you have
removed all the nodes for the related feature from the Deployment Manager. Open the WebSphere
Application Server Integrated Solutions Console of the system on which the Deployment Manager is
installed, and then select Secure administration, applications, and infrastructure → JAAS → J2C
authentication data. Select the check boxes that represent the IDs created for the feature you are
removing:
v Activities:
– activitiesJAASAuth
– dominoAdmin
– smtpAdmin
v Blogs – blogsJAASAuth
Chapter 9. Uninstalling Lotus Connections 133

v Communities – communitiesJAASAuth
v Dogear – dogearJAASAuth
v Profiles – profilesJAASAuth
9. Click Delete, and then save your changes.
134 IBM Lotus Lotus Connections 1.0.1 Installation Guide
Chapter 10. Performing a silent installation
A silent installation uses a response file to automate feature installation. Use a silent installation when
you need to perform an identical installation on several servers.
You must create a response file during a standard installation before you can use that file to perform a
silent installation.
To perform a silent installation, complete the following steps:
1. While installing a feature using the standard installer, specify that you would like to create a response
file. Specify a feature-specific name for the response file, and make a note of it so you can reference it
later.
2. After completing the installation, use a text editor to open the response file that was created, and
change the value of the following property to false.
-W responseFilePanel.enableResponseFile="true"
3. Change any other values that do not apply to the subsequent installation of the feature. Common
changes that you may need to make include specifying a different server, an alternate server profile,
or a different user name.
4. To use the response file to perform a silent installation, open a command prompt, and then change to
the directory in which the installer is located.
5. Enter the following command:
v Linux:
./install.sh -options <response_file> -silent
v Windows:
install.bat -options <response_file> -silent
Replace <response_file> with the file path location of the response file. By default, the location
is:C:\DOCUME~1\db2admin\LOCALS~1\Temp\1\InstallResponse.txt. If you saved it to a different file path
or renamed the response file to identify which feature you were installing when you used it, be sure
to specify the appropriate response file information here.
6. After the installation is complete, see the sections of this Guide that describe how to configure the
features.
InstallResponse.txt file
When you install a Lotus Connections feature, you can record your selections in a response file. After the
initial installation, you can perform similar installations by starting the installer from the command line
and passing the response file in as an argument. The installer uses the values in the response file rather
than requiring you to interact with it.
During the installation, the path and name of the default file are displayed:
C:\DOCUME~1\db2admin\LOCALS~1\Temp\1\InstallResponse.txt
The Installing a Lotus Connections feature topic instructs you to edit the default name of the response file to
identify which feature installation instructions it contains. If you do not change the file name, several
common properties are overwritten if you install a subsequent feature to the same machine.
Whether or not you rename it, the response file collects a specific set of property values. Those values are
described in the following tables.
© Copyright IBM Corp. 2007, 2007 135

Table 10. InstallResponse.txt file common properties
Property Description
-G licenseAccepted=true Identifies whether you accept the license agreement.
Options are true or false.
-W responseFilePanel.enableResponseFile=″true″ Identifies whether to collect and store the selections you
make while using the installer. Options are true and
false.
-W responseFilePanel.responseFileLocation=
″D:\InstallResponse.txt″
Location in which to store the response file.
-W productOfferingsPanel.poffering=″activities″ The feature you are installing. Options are:
v activities
v blogs
v communities
v dogear
v profiles
-W was.location=″D:\WebSphere\AppServer″ Location of the WebSphere Application Server instance
on which to install Lotus Connections.
-W installedWasLocation.value= ″D:\WebSphere\AppServer″
Location of the WebSphere Application Server instance
on which to install Lotus Connections. Providing values
for both this property and the previous property is
required.
-W profile.name=″AppSrv01″ Name of the profile to use.
-W server.name=″server1″ Name of the server process within the profile to use.
-W wasAdmin.user=″wasadmin″ Administrative user ID for the Websphere Application
Server.
-W wasAdmin.password=″Lz4sLChvLTs=″ Password associated with the administrative user ID.
This value is base64 encoded to encrypt the real
password when it is stored in this file. Do not edit this
value.
-W host.name=″$W(getFullHostname.hostName)″ Host name of the WebSphere Application Server.
-W dbTypePanel.dbTypeControl=″db2″ Specifies which database product you want to use.
Options are db2 and oracle.
-W jdbcProviderPanelSeparate.jdbcHostField=″localhost″ Host name of the database server.
-W jdbcProviderPanelSeparate.jdbcPortField=″50000″ The port number for the database connection. By default,
the port number for a DB2 database is 50000 and the
port number for an Oracle database is 1521.
136 IBM Lotus Lotus Connections 1.0.1 Installation Guide

Table 10. InstallResponse.txt file common properties (continued)
Property Description
-W jdbcProviderPanelSeparate.jdbcDatabaseField=
″OPNACT″
Name of the database for the feature you are installing.
The options are:
v DB2:
– Activities: OPNACT
– Blogs: BLOGS
– Communities: SNCOMM
– Dogear: DOGEAR
– Profiles: PEOPLED
v Oracle:
– For Profiles, type PEOPLEDB.
– For all other features, if you are using an existing
Oracle database and adding the feature tables to it,
type the name of that database. If you ran the script
provided with Lotus Connections to create a new
database, type LSCONN.
-W jdbcProviderPanelSeparate.jdbcLibraryPathField=
″C:/program files/IBM/SQLLIB/java″
Fully qualified file path to the directory in which the JAR
files that are used for the database JDBC connection are
stored.
DB2: Specify one of the following JAR files that support
the DB2 JDBC driver:
v db2jcc.jar – The DB2 universal driver file.
v db2jcc_license_cu.jar – This license file permits a
connection to the Cloudscape server and all DB2
Database for Linux and Windows servers.
Note: Lotus Connections does not support Cloudscape,
DB2 for z/OS, nor DB2 Universal Database for iSeries.
For example: The following file path is the path to a DB2
server that is on the same machine as WebSphere
Application Server:
v Linux:
/opt/ibm/db2/V9.1/java/
v Windows:
C:\IBM\SQLLIB\java\
Oracle: The JAR file that supports the Oracle JDBC
driver is ojdbc14.jar.
For example, the following file path is the path to an
Oracle server that is on the same machine as WebSphere
Application Server:
v Linux:
/opt/oracle/product/10.2.0/db_1/jdbc/
lib
v Windows:
C:\oracle\product\10.2.0\db_1\jdbc\
lib
Chapter 10. Performing a silent installation 137

Table 10. InstallResponse.txt file common properties (continued)
Property Description
-W jdbcProviderPanelSeparate.appUserField=″db2admin″ Account that will be used by Lotus Connections to access
the database.
DB2: Type either an administrative-level user ID, similar
to the one you used to create the databases or, if you
created a dedicated user account, type LCUSER.
Oracle: Type an existing user ID that has administrative
privileges, such as sys, or type the dedicated user ID
associated with the feature that was automatically
created when you created the tables. The user IDs that
were created for the features are named as follows:
v Activities: ACTIVITIES
v Blogs: BLOGS
v Communities: SNCOMM
v Dogear: DOGEAR
v Profiles: EMPINST
-W jdbcProviderPanelSeparate.appUserPasswordField=
″Lz4sLChvLTs=″
Password associated with the user ID. This value is
base64 encoded to encrypt the real password when it is
stored in this file. Do not edit this value.
Table 11. Activities-specific settings
Property Description
-W statisticFileLocationPanel.statisticStoreDirectory=
″C:\Program Files\IBM\LotusConnections\Data\
Activities\AppSrv01_server1\statistics″
Location in which to store the Activities statistics files.
-W objectStoreSelectionPanel.objectStoreRadiobutton=
″fileSystem″
Specifies where you would like to store Activities
content. Options are fileSystem or dominoDatabase.
-W fileSystemConfigurationPanel.fileSystemDirectory=
″$N($D(install)/IBM/LotusConnections/Data/
Activities/$W(profile.name)/contentstore)″
File path of the content store if you choose to store
Activities content in the file system.
-W
dominoDatabaseConfigurationPanel.dominoServerField=
″dominoserver.your_company.com″
Name of the Domino server to host the Domino database
to use as the content store.
-W dominoDatabaseConfigurationPanel.dominoDbField=
″activitiesObjectStore.nsf″
Name of the Domino database to use as the Activities
content store.
-W
dominoDatabaseConfigurationPanel.dominoUserField=″″
User ID you created and added to the database ACL as
an Editor.
-W
dominoDatabaseConfigurationPanel.dominoPassword=″″
Password associated with the Domino database user ID.
This value is base64 encoded to encrypt the real
password when it is stored in this file. Do not edit this
value.
-W dominoDatabaseConfigurationPanel.
dominoSslCheckbox=″″
Specifies whether you want to send data to the Domino
database over the Secure Socket Layer for enhanced
security. Options are true or false.
-W dominoDatabaseConfigurationPanel.
dominoHttpServerPort=″80″
Port number to use for communicating with the Domino
database. Options are 80 for HTTP and 443 for HTTPS.
-W configurationTypeSelectionPanel.
additionalConfigTypesCheckbox=″outgoing″
Specifies whether you want to enable mail notifications
in Activities. Options are outgoing or ″ ″ (null).
138 IBM Lotus Lotus Connections 1.0.1 Installation Guide
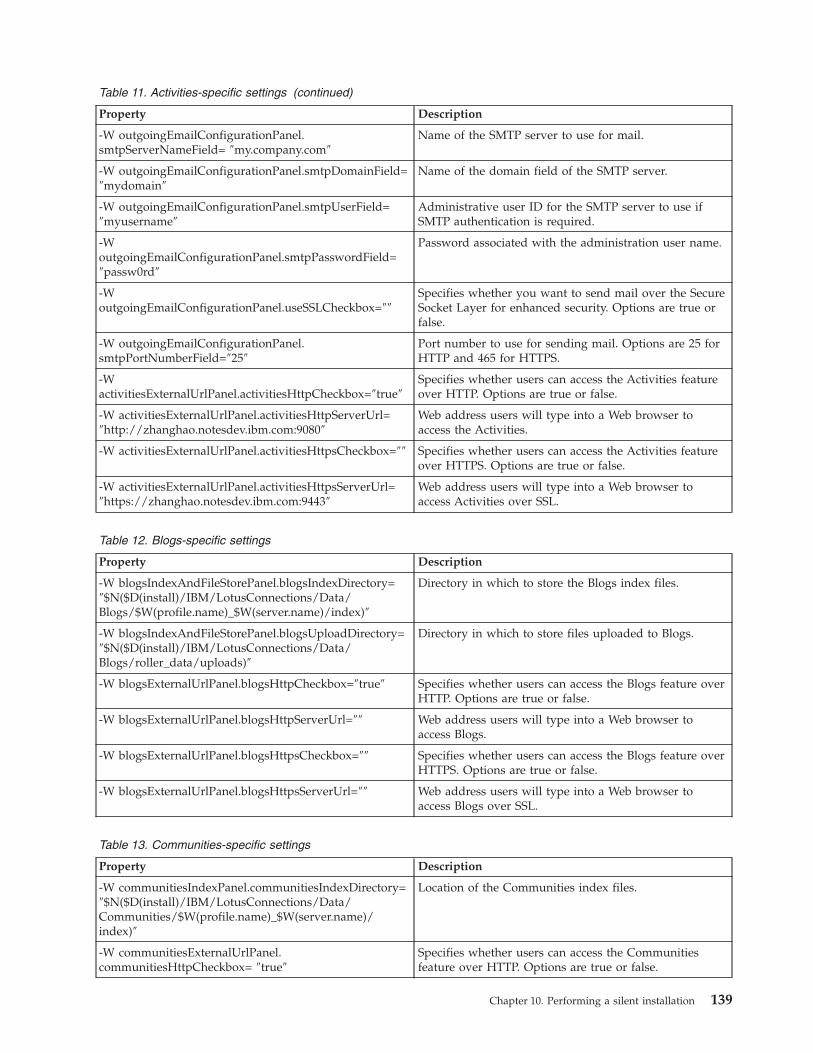
Table 11. Activities-specific settings (continued)
Property Description
-W outgoingEmailConfigurationPanel.
smtpServerNameField= ″my.company.com″
Name of the SMTP server to use for mail.
-W outgoingEmailConfigurationPanel.smtpDomainField=
″mydomain″
Name of the domain field of the SMTP server.
-W outgoingEmailConfigurationPanel.smtpUserField=
″myusername″
Administrative user ID for the SMTP server to use if
SMTP authentication is required.
-W
outgoingEmailConfigurationPanel.smtpPasswordField=
″passw0rd″
Password associated with the administration user name.
-W
outgoingEmailConfigurationPanel.useSSLCheckbox=″″
Specifies whether you want to send mail over the Secure
Socket Layer for enhanced security. Options are true or
false.
-W outgoingEmailConfigurationPanel.
smtpPortNumberField=″25″
Port number to use for sending mail. Options are 25 for
HTTP and 465 for HTTPS.
-W
activitiesExternalUrlPanel.activitiesHttpCheckbox=″true″
Specifies whether users can access the Activities feature
over HTTP. Options are true or false.
-W activitiesExternalUrlPanel.activitiesHttpServerUrl=
″http://zhanghao.notesdev.ibm.com:9080″
Web address users will type into a Web browser to
access the Activities.
-W activitiesExternalUrlPanel.activitiesHttpsCheckbox=″″ Specifies whether users can access the Activities feature
over HTTPS. Options are true or false.
-W activitiesExternalUrlPanel.activitiesHttpsServerUrl=
″https://zhanghao.notesdev.ibm.com:9443″
Web address users will type into a Web browser to
access Activities over SSL.
Table 12. Blogs-specific settings
Property Description
-W blogsIndexAndFileStorePanel.blogsIndexDirectory=
″$N($D(install)/IBM/LotusConnections/Data/
Blogs/$W(profile.name)_$W(server.name)/index)″
Directory in which to store the Blogs index files.
-W blogsIndexAndFileStorePanel.blogsUploadDirectory=
″$N($D(install)/IBM/LotusConnections/Data/
Blogs/roller_data/uploads)″
Directory in which to store files uploaded to Blogs.
-W blogsExternalUrlPanel.blogsHttpCheckbox=″true″ Specifies whether users can access the Blogs feature over
HTTP. Options are true or false.
-W blogsExternalUrlPanel.blogsHttpServerUrl=″″ Web address users will type into a Web browser to
access Blogs.
-W blogsExternalUrlPanel.blogsHttpsCheckbox=″″ Specifies whether users can access the Blogs feature over
HTTPS. Options are true or false.
-W blogsExternalUrlPanel.blogsHttpsServerUrl=″″ Web address users will type into a Web browser to
access Blogs over SSL.
Table 13. Communities-specific settings
Property Description
-W communitiesIndexPanel.communitiesIndexDirectory=
″$N($D(install)/IBM/LotusConnections/Data/
Communities/$W(profile.name)_$W(server.name)/index)″
Location of the Communities index files.
-W communitiesExternalUrlPanel.
communitiesHttpCheckbox= ″true″
Specifies whether users can access the Communities
feature over HTTP. Options are true or false.
Chapter 10. Performing a silent installation 139

Table 13. Communities-specific settings (continued)
Property Description
-W communitiesExternalUrlPanel.
communitiesHttpServerUrl=″″
Web address users will type into a Web browser to
access Communities.
-W communitiesExternalUrlPanel.
communitiesHttpsCheckbox=″″
Specifies whether users can access the Communities
feature over HTTPS. Options are true or false.
-W communitiesExternalUrlPanel.
communitiesHttpsServerUrl=″″
Web address users will type into a Web browser to
access Communities over SSL.
Table 14. Dogear-specific settings
Property Description
-W dogearIndexAndFlavicons.dogearIndexDirectory=
″$N($D(install)/IBM/LotusConnections/Data/
Dogear/$W(profile.name)_$W(server.name)/index)″
Location of Dogear index files.
-W dogearIndexAndFlavicons.dogearUploadDirectory=
″$N($D(install)/IBM/LotusConnections/Data/
Dogear/favicons)″
Location in which Dogear favorite icons are stored.
-W dogearExternalUrlPanel.dogearHttpCheckbox=″true″ Specifies whether users can access the Dogear feature
over HTTP. Options are true or false.
-W dogearExternalUrlPanel.dogearHttpServerUrl=″″ Web address users will type into a Web browser to
access Dogear.
-W dogearExternalUrlPanel.dogearHttpsCheckbox=″″ Specifies whether users can access the Dogear feature
over HTTPS. Options are true or false.
-W dogearExternalUrlPanel.dogearHttpsServerUrl=″″ Web address users will type into a Web browser to
access Dogear over SSL.
Table 15. Profiles-specific settings
Property Description
-W ProfilesIndexPanel.profilesIndexDirectory=
″$N($D(install)/IBM/LotusConnections/Data/
Profiles/$W(profile.name)_$W(server.name)/index)″
Location of Profiles index files.
-W profilesExternalUrlPanel.profilesHttpCheckbox=″true″ Specifies whether users can access the Profiles feature
over HTTP. Options are true or false.
-W profilesExternalUrlPanel.profilesHttpServerUrl=″″ Web address users will type into a Web browser to
access Profiles.
-W profilesExternalUrlPanel.profilesHttpsCheckbox=″″ Specifies whether users can access the Profiles feature
over HTTPS. Options are true or false.
-W profilesExternalUrlPanel.profilesHttpsServerUrl=″″ Web address users will type into a Web browser to
access Profiles over SSL.
Related tasks
“Creating a cluster” on page 92Create a cluster to add redundancy to the deployment and achieve better performance.
140 IBM Lotus Lotus Connections 1.0.1 Installation Guide

Chapter 11. Troubleshooting
You can correct installation problems that are caused by configuration errors or database connection
problems.
GSK_ERROR
If you see a 500 error when using HTTPS over the IBM HTTP Server to get to an application, HTTPS
might not be configured correctly with the WebSphere Application Server plug-in. If this error occurs,
check both your IBM HTTP Server and WebSphere Application Server logs to see if there is a
GSK_ERROR. If the logs do not contain errors, examine the plug-in logs located in the following
directory:
C:\ibm\HTTPServer\Plugins\logs\webserver1\http_plugin.log
The following error is generated if the WebSphere Application Server SSL certificate is not trusted by the
WebSphere Application Server plug-in configured for the IBM HTTP Server:
ERROR: lib_stream: openStream: Failed in r_gsk_secure_soc_init:
GSK_ERROR_BAD_CERT(gsk rc = 414)
To fix this error, follow the instructions in the topic, Configuring the IBM HTTP Server for SSL.
Database connection problems
A faulty JDBC driver or data source can prevent you from accessing a Lotus Connection feature. Here’s
how to test the connections and correct problems.
If you encounter a HTTP 500 - Internal Server Error when attempting to access a Lotus Connections
feature for the first time, make sure that you are using the Web address. If the Web address is correct, test
the validity of your database connection, by performing the following steps from the WebSphere
Application Server Integrated Solutions Console:
v Verify the database connections by selecting Resources → JDBC → JDBC Providers →
<feature_name>JDBC → Data Source.
v Select a Lotus Connections data source, and then click Test Connection.
v If the connections fails, use one of the following approaches to locate and resolve the problem:
– Data source problems – Select the data source and review the database server values to ensure they
are correct. Check the port number, server name, and database name. If you discover an error,
change the value, click OK and Save, and then retest the database connection.
– JDBC driver path problems – Check to ensure the path assigned to a feature’s JDBC driver is correct.
Select Environment → WebSphereVariables, and then review the path for the JDBC driver variable
to make sure it is correct. The driver path is named using the syntax:
<FEATURE>_JDBC_DRIVER_HOME. Note that on Linux this path is case-sensitive. If the path is
incorrect, change it, and then click OK and Save.
– JAAS credential problems – Check the JAAS J2C authentication settings by selecting Resources →
JDBC → JDBC Providers → DogearJDBC → datasource → <Feature_name> → JAAS-J2C authentication
data. Select <Feature_name> JAASAauth, and then view the user ID and password credentials you
entered during installation to verify that they are correct. If they are not correct, make any required
changes.
© Copyright IBM Corp. 2007, 2007 141

Lotus Connections log file
Lotus Connections writes messages to the SystemOut.log file. Refer to this file if you encounter errors
after installing a Lotus Connections feature or if you encounter unexpected behavior in a feature.
The SystemOut.log file is stored in the following directory:
v Linux:
/opt/IBM/WebSphere/AppServer/profiles/<profile_name>/logs/<server_name>
v Microsoft Windows:
C:\IBM\WebSphere\AppServer\profiles\<profile_name>\logs\<server_name>
Messages written to the log use the following syntax:
<Feature prefix><Error code><Message level code>
where:
v Feature prefix – Identifies the application that wrote the message. The following prefixes are used to
identify Lotus Connections features and components:
Table 16. Error message prefixes
Lotus Connections feature or component Prefix
Activities
Note: The Quartz Scheduler, a component of Activities
does not use the Activities prefix, but its messages do
include the string org.quartz.
CLFRA
Blogs Blogs messages do not use a prefix.
Communities CLFRM
Dogear CLFRL
Lotus Connections Configuration CLFRO
Lotus Connections Installer EJPIC
Lotus Connections Multi-Service Portlet CLFNF
Profiles CLFRN
Waltz (A common directory service for the Lotus
Connections features)
CLFRK
v Error code – A 4-digit code assigned to the error message to identify it. Code numbers make it easier to
search for information about the message. See Error messages to see a list of the error codes and what
they mean.
v Message level code – Identifies the level of the message written to the log. The following levels are
supported:
Table 17. Message level codes
Message level code Message level
I INFO
E ERROR
A AUDIT
W WARN
For example:
CLFRA0299I
142 IBM Lotus Lotus Connections 1.0.1 Installation Guide

CLFRA identifies the message as coming from the Activities feature; 0299 is the error code; I indicates
that the message is an Info level message.
Error messages
Use the codes included in the error messages generated by IBM Lotus Connections to identify problems
and find their solutions.
The following error messages are generated by Lotus Connections:
Table 18. Lotus Connections error messages with codes
Message Cause Solution
CLFNF6001E: Could not store portlet
preferences
The portlet failed to save preferences
to portal preferences store. It may be
caused by incorrect permission
settings granted by the administrator.
Check if the user has permission to
store preferences.
CLFNF6002E: Error storing slot id The portlet failed to store user
credentials in the portal credential
vault.
Check your portal credential vault
configuration.
CLFNF6003E: There was an error
with a name
Caused by:
javax.naming.NamingException when
the portlet is trying to lookup Portal
services. (i.e. Puma service or
Identification service )
Check your portal configuration to
make sure puma services and Portal
Identification service are available.
CLFNF6004E: JSONTranslator could
not modify portlet preferences
The portlet failed to save preferences
to portal preferences store. It may be
caused by incorrect permission
settings granted by the administrator.
Check if the user has permission to
store preferences.
CLFNF6005E: There was an error
with the portlet service
The server encountered an error
when using Portal Puma services.
Check your portal configuration to
make sure puma services function
correctly.
CLFNF6006E: Error creating
credential
The portlet failed to create a private
credential slot.
Check your portal credential vault
configuration.
CLFNF6007E: Name not found The portlet failed to locate portal
services. (i.e. Puma or Identification)
Check your portal configuration to
make sure puma services and Portal
Identification are available.
CLFNF6008E: There was an error
serializing an id
The portlet failed to serialize portlet
window ID.
Reinstall the portlet instance on the
page, if the problem is consistent,
check your portal configuration.
CLFNF6009E: Could not get custom
views
The portlet failed to change the value
for a read-only preference attribute.
Check if the user has permission to
store preferences.
CLFNF6010E: Query was stored in a
bad format: {0}
The user used the character “|” in a
custom search query or in a custom
tag filter.
Do not use “|” in a custom search
query or in a custom tag filter
CLFNF6011E: Error getting user
credentials
The portlet encountered an error
when attempting to retrieve user
credentials from the Portal credential
vault.
Check the portal credential vault
configuration.
CLFRA0001E: Viral content replaced The virus scanner removed a virus
from added content.
No action necessary.
CLFRA0003E: Virus detected -
<error>
The virus scanner received the error
<error> scanning content.
No action necessary. The content was
not added to Activities
Chapter 11. Troubleshooting 143

Table 18. Lotus Connections error messages with codes (continued)
Message Cause Solution
CLFRA0006E: Unable to find CMAPI
provider ″<providerName>″
Unable to find a suitable CMAPI
provider.
Check the <objectStore> settings in
oa-config.xml and provide a correct
<providerName> for the class
property of the store element.
CLFRA0007E: Unable to store object.
URL = <url> HTTP status = <error>
An error occurred while attempting
to store activity’s content in the
Domino content store.
Verify that the Domino server is
responding and that the URL is
accessible. The HTTP response code
may give additional information as to
the reason for the failure.
CLFRA0008E: Unrecognized URI:
<url> for this ObjectStore: <storeId>
An invalid URL or URL syntax was
used to access the Domino content
store.
Verify that the Domino server is
responding and that the URI is
accessible. Contact customer support
for additional information.
CLFRA0009E: Unable to access:
<url>, the HTTP response code =
<error>
An error occurred while attempting
to retrieve an activity’s content from
the Domino content store.
Verify that the Domino server is
responding. The HTTP response code
may give additional information as to
the reason for the failure.
CLFRA0010E: Notes UNID could not
be retrieved. Make certain the
database has the correct design.
An error occurred while attempting
to store or update an activity in the
Domino content store.
Verify that the Domino server is
responding. Verify that the Domino
object store is using the correct NSF
design.
CLFRA0011W: Content does not have
a name, the generated name <url>
will be used.
A warning that the content being
saved did not have a name while
attempting to store or update an
activity in the Domino content store.
No action is required. The system has
generated a name automatically.
CLFRA0012E: Unable to delete object.
URL = <url> HTTP status = <error>
An error occurred while attempting
to delete an activity from the Domino
content store.
Verify that the Domino server is
responding and that the URL is
accessible. The HTTP response code
may give additional information as to
the reason for the failure.
CLFRA0013E: unable to delete file
<fileName>
An error occurred while deleting a
file from the Activities content store.
Additional information relating to the
failure may be found in the
SystemOut.log file.
Verify that the directory and file
information is correct.
CLFRA0014E: unable to create file
upload directory <directoryName>
The directory given in oa-config.xml
for the element property name
″root.directory″ either could not be
found or created. This directory is
used for file uploads to the Activities
content store.
Check that the directory exists; create
it if it does not exist.
CLFRA0015E: error encountered
deleting content: <directoryName>
<fileName>
An error occurred while deleting the
contents of a file from the Activities
content store. Additional information
relating to the failure may be found
in the SystemOut.log file.
Verify that the directory and file
information is correct.
CLFRA0016E: unable to upload file:
<directoryName> <fileName>
An error occurred while retrieving or
uploading a file to the Activities
content store. Additional information
relating to the failure may be found
in the SystemOut.log file.
Verify that the directory and file
information is correct.
144 IBM Lotus Lotus Connections 1.0.1 Installation Guide

Table 18. Lotus Connections error messages with codes (continued)
Message Cause Solution
CLFRA0017E: Error closing statistics
file.
A file system error occurred closing
one of the files used for Activities
statistics persistence.
Verify that the file system directory
containing the statistics files is
writeable and has available space.
CLFRA0019E: Error creating statistics
file.
A file system error occurred creating
one of the files used for Activities
statistics persistence.
Verify that the file system directory
containing the statistics files is
writeable and has available space.
CLFRA0020E: Error parsing statistics
file.
The format of one of the files used
for Activities statistics persistence is
inconsistent with the expected
format.
Remove the existing files in the file
system directory containing the
statistics files.
CLFRA0021E: Activities statistics
persistence cannot create directory
<directory>
A file system error occurred creating
the file system directory <directory>
for containing the Activities statistics
files.
Verify that the server level
WebSphere Application Server
variable ACTIVITIES_STATS_DIR is
set to a valid directory location on
the server’s file system; create the
directory <directory> on the file
system.
CLFRA0022E: Error saving to
statistics file.
A file system error occurred saving
data one of the files used for
Activities statistics persistence.
Verify that the file system directory
containing the statistics files is
writeable and has available space.
CLFRA0023E: Error saving summary
information.
A file system error occurred saving
data one of the files used for
Activities statistics persistence.
Verify that the file system directory
containing the statistics files is
writeable and has available space.
CLFRA0026E: Error fetching profiles The MemberService wsadmin object
received an exception executing a
fetchMembers command.
Verify that the parameter to the
fetchMembers command is valid.
Additional information relating to the
failure may be found in the
SystemOut.log file.
CLFRA0028E: Error updating acl The AccessControlService wsadmin
object received an exception
executing an access modification
command.
Verify that the parameter to the
command is valid. Additional
information relating to the failure
may be found in the SystemOut.log
file.
CLFRA0029E: Error fetching activities The ActivityService wsadmin object
received an exception executing a
command to fetch Activities.
Verify that the parameter to the
command is valid. Additional
information relating to the failure
may be found in the SystemOut.log
file.
CLFRA0030E: Error fetching acl The AccessControlService wsadmin
object received an exception
executing a fetchAccess command.
Verify that the parameter to the
command is valid. Additional
information relating to the failure
may be found in the SystemOut.log
file.
CLFRA0032E: Error updating profile The MemberService wsadmin object
received an exception executing a
updateMember command.
Verify that the parameter to the
updateMember command is valid.
Additional information relating to the
failure may be found in the
SystemOut.log file.
CLFRA0033E: Error purging trash The TrashCollectionService wsadmin
object received an exception
executing a purgeTrash command.
Verify that the parameter to the
purgeTrash command is valid.
Additional information relating to the
failure may be found in the
SystemOut.log file.
Chapter 11. Troubleshooting 145

Table 18. Lotus Connections error messages with codes (continued)
Message Cause Solution
CLFRA0034E: Error fetching trash The TrashCollectionService wsadmin
object received an exception
executing a fetchTrash command.
Verify that the parameter to the
fetchTrash command is valid.
Additional information relating to the
failure may be found in the
SystemOut.log file.
CLFRA0035E: Error undeleting trash The TrashCollectionService wsadmin
object received an exception
executing a undeleteTrash command.
Verify that the parameter to the
undeleteTrash command is valid.
Additional information relating to the
failure may be found in the
SystemOut.log file.
CLFRA0036E: Error locating
MBeanServer, no Activity
Administration MBeans registered
An exception was generated when
Activities tried to locate MBean
server needed to register the
Activities Administration MBeans.
Report this problem to Support.
Additional information relating to the
failure may be found in the
SystemOut.log file.
CLFRA0038E: Error registering
mbean
An exception was generated when
Activities tried to register the
Activities Administration MBeans.
Report this problem to Support.
Additional information relating to the
failure may be found in the
SystemOut.log file.
CLFRA0042E: <className> error
parsing generic properties into a
Properties object
An exception was generated when
the Event Broker tried to parse its
configuration from oa-config.xml.
Ensure the properties and elements
for the <eventBroker> element in
oa-config.xml are valid. Additional
information relating to the failure
may be found in the SystemOut.log
file.
CLFRA0043E: subscriber did not
start: <className>
The Event Broker service is
attempting to initialize a subscriber
to server-generated events, but the
subscriber initialization process
failed.
Check that the <eventBroker>
configuration specified in
oa-config.xml for the subscriber
reporting this error is valid.
Additionally, you may want to
pursue the exception thrown by the
subscriber in the SystemOut.log file.
CLFRA0044E: the class
″<className>″ was not found. Check
the configuration file, under the class
attribute of the service for the correct
Java classname. Or, check the
classpath to make sure the class is
visible
The Event Broker service tried to
load a Java class that did not exist in
the current classpath.
Check to see whether the class
specified in the <eventBroker>
configuration has been spelled
correctly. Also check to see that the
class file is visible in the current
classpath scope. Additional
information relating to the failure
may be found in the SystemOut.log
file.
CLFRA0045E: the class
″<className>″ could not be
instantiated
The classloader could not instantiate
the class requested by the Event
Broker service.
Investigate whether something is
wrong with the classloader or the
class specified in the <eventBroker>
configuration itself. Additional
information relating to the failure
may be found in the SystemOut.log
file.
CLFRA0046E: illegal access exception
for the class ″<className>″
The Event Broker service is trying to
access fields or methods in the class
discovered via reflection that it can’t
normally see. Additional information
relating to the failure may be found
in the SystemOut.log file.
Examine the class for methods that
should be exposed have been hidden.
146 IBM Lotus Lotus Connections 1.0.1 Installation Guide

Table 18. Lotus Connections error messages with codes (continued)
Message Cause Solution
CLFRA0047E: {0} error initializing
adapter: classname= ″{1}″
Double-check the config settings for
this specific adapter for correct/valid
values
The Event Broker service is
attempting to initializer a subscriber
to server-generated events, but the
subscriber initialization process
failed.
Check that the <eventBroker>
configuration specified in
oa-config.xml for the subscriber
reporting this error is valid.
Additionally, you may want to
pursue the exception thrown by the
subscriber in the SystemOut.log file.
CLFRA0048E: could not inform a
subscriber of event: <eventName>
The Event Broker service passed an
event to a subscriber of that event,
and the subscriber issued an
exception.
To fix this class of exception, you
need to determine what is failing in
this particular subscriber. Additional
information relating to the failure
may be found in the SystemOut.log
file.
CLFRA0050E: Invalid oa-config.xml
file. Check the XML format and
ensure that all required settings are
complete.
The format of oa-config.xml does not
have correct XML syntax.
Load the oa-config.xml into a
browser or editor that will display
syntax errors; fix the error and save
the file.
CLFRA0051E: Error decoding
passwords. If passwords are encoded,
some functionality may fail.
Should not see this error message.
Feature is not enabled.
Should not see this error message.
Feature is not enabled.
CLFRA0068E:
OpenActivitiesException while
updating node content ref
uuid=<uuid>
An error occurred while updating the
content of the specified activity.
Check that the content stores are
available and accessible and that the
referenced item exists in the content
store. The item may have been
deleted by an external process.
CLFRA0070E: illegal access exception
for the class ″<className>″
An error occurred while processing
the Activities content store
configuration. Additional information
relating to the failure may be found
in the SystemOut.log file.
Verify that the <objectStore>
configuration information in
oa-config.xml is correct. If the
problem persists after restarting the
Activities feature, contact Customer
Support to report the incident.
CLFRA0071E: DaoException while
updating node content ref
uuid=<uuid>
An error occurred while updating the
content of the specified activity.
Check that the content stores are
available and accessible and that the
referenced item exists in the content
store. The item may have been
deleted by an external process.
CLFRA0072E: activities object store
did not start: <className>
The Activities Object Store service
implemented by <className> did
not start. Additional information
relating to the failure may be found
in the SystemOut.log file.
Verify that the <objectStore>
configuration information in
oa-config.xml is correct. If the
problem persists after restarting the
Activities feature, contact Customer
Support to report the incident.
CLFRA0073E: Destination ObjectStore
ID=″<id>″ not found in ObjectStore
registry. Double-check the
oa-config.xml file.
An error occurred while transferring
Activities content from one content
store to another. The requested
destination object store identifier was
not found.
Check the spelling of the ID used
and compare it with the available
object stores listed in the
oa-config.xml file.
CLFRA0074E: ObjectStoreFilter: error
during activities object store content
filtering ″<error>″
An error occurred while processing
Activities content. Additional
information relating to the failure
may be found in the SystemOut.log
file.
Depending on the additional error
information given, it may be possible
to correct the data and re-process it.
Chapter 11. Troubleshooting 147
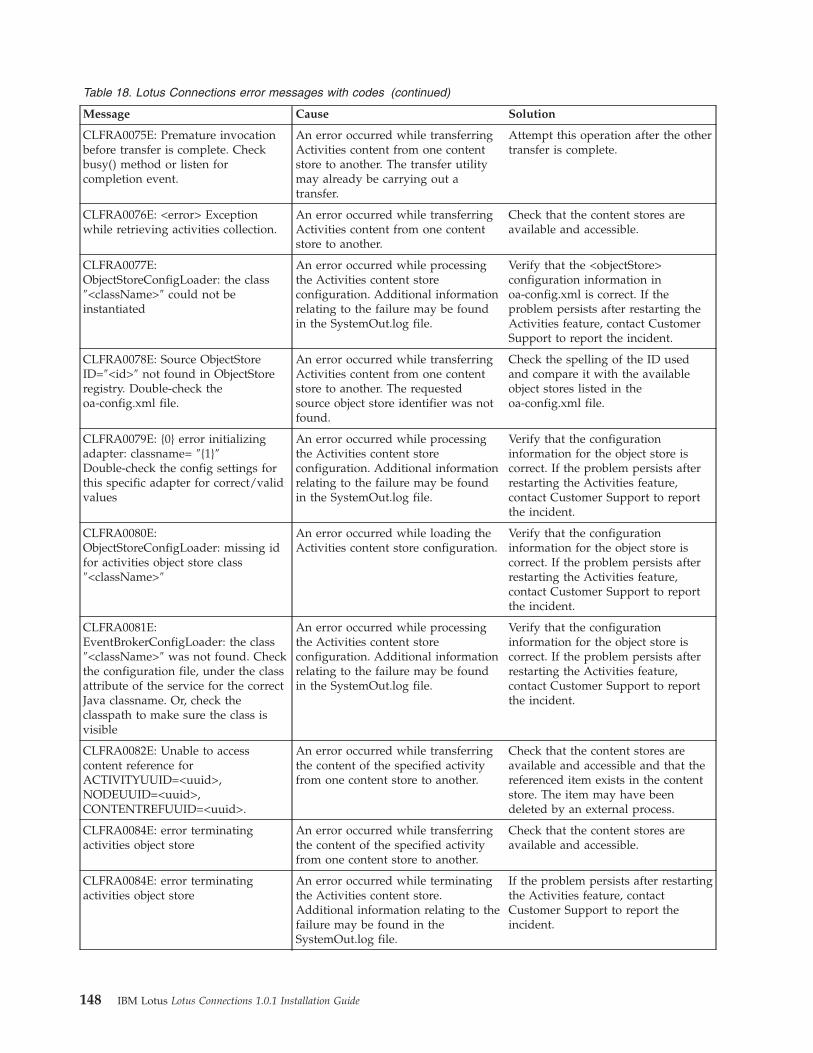
Table 18. Lotus Connections error messages with codes (continued)
Message Cause Solution
CLFRA0075E: Premature invocation
before transfer is complete. Check
busy() method or listen for
completion event.
An error occurred while transferring
Activities content from one content
store to another. The transfer utility
may already be carrying out a
transfer.
Attempt this operation after the other
transfer is complete.
CLFRA0076E: <error> Exception
while retrieving activities collection.
An error occurred while transferring
Activities content from one content
store to another.
Check that the content stores are
available and accessible.
CLFRA0077E:
ObjectStoreConfigLoader: the class
″<className>″ could not be
instantiated
An error occurred while processing
the Activities content store
configuration. Additional information
relating to the failure may be found
in the SystemOut.log file.
Verify that the <objectStore>
configuration information in
oa-config.xml is correct. If the
problem persists after restarting the
Activities feature, contact Customer
Support to report the incident.
CLFRA0078E: Source ObjectStore
ID=″<id>″ not found in ObjectStore
registry. Double-check the
oa-config.xml file.
An error occurred while transferring
Activities content from one content
store to another. The requested
source object store identifier was not
found.
Check the spelling of the ID used
and compare it with the available
object stores listed in the
oa-config.xml file.
CLFRA0079E: {0} error initializing
adapter: classname= ″{1}″
Double-check the config settings for
this specific adapter for correct/valid
values
An error occurred while processing
the Activities content store
configuration. Additional information
relating to the failure may be found
in the SystemOut.log file.
Verify that the configuration
information for the object store is
correct. If the problem persists after
restarting the Activities feature,
contact Customer Support to report
the incident.
CLFRA0080E:
ObjectStoreConfigLoader: missing id
for activities object store class
″<className>″
An error occurred while loading the
Activities content store configuration.
Verify that the configuration
information for the object store is
correct. If the problem persists after
restarting the Activities feature,
contact Customer Support to report
the incident.
CLFRA0081E:
EventBrokerConfigLoader: the class
″<className>″ was not found. Check
the configuration file, under the class
attribute of the service for the correct
Java classname. Or, check the
classpath to make sure the class is
visible
An error occurred while processing
the Activities content store
configuration. Additional information
relating to the failure may be found
in the SystemOut.log file.
Verify that the configuration
information for the object store is
correct. If the problem persists after
restarting the Activities feature,
contact Customer Support to report
the incident.
CLFRA0082E: Unable to access
content reference for
ACTIVITYUUID=<uuid>,
NODEUUID=<uuid>,
CONTENTREFUUID=<uuid>.
An error occurred while transferring
the content of the specified activity
from one content store to another.
Check that the content stores are
available and accessible and that the
referenced item exists in the content
store. The item may have been
deleted by an external process.
CLFRA0084E: error terminating
activities object store
An error occurred while transferring
the content of the specified activity
from one content store to another.
Check that the content stores are
available and accessible.
CLFRA0084E: error terminating
activities object store
An error occurred while terminating
the Activities content store.
Additional information relating to the
failure may be found in the
SystemOut.log file.
If the problem persists after restarting
the Activities feature, contact
Customer Support to report the
incident.
148 IBM Lotus Lotus Connections 1.0.1 Installation Guide
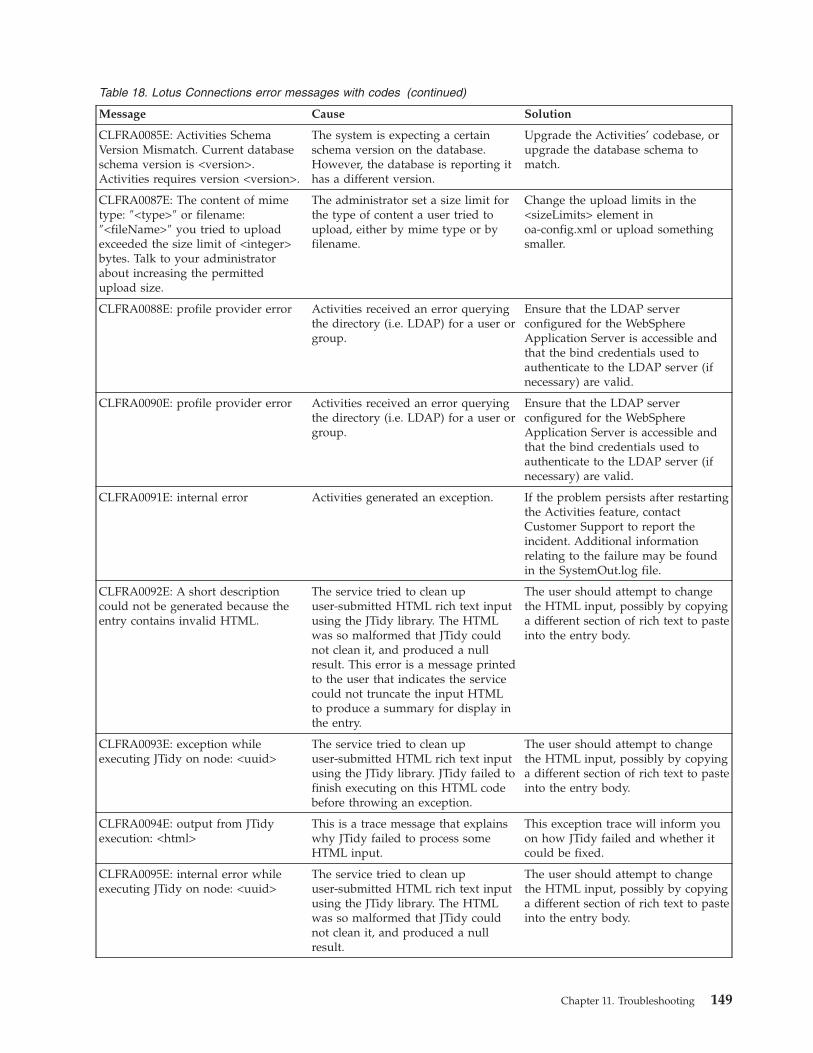
Table 18. Lotus Connections error messages with codes (continued)
Message Cause Solution
CLFRA0085E: Activities Schema
Version Mismatch. Current database
schema version is <version>.
Activities requires version <version>.
The system is expecting a certain
schema version on the database.
However, the database is reporting it
has a different version.
Upgrade the Activities’ codebase, or
upgrade the database schema to
match.
CLFRA0087E: The content of mime
type: ″<type>″ or filename:
″<fileName>″ you tried to upload
exceeded the size limit of <integer>
bytes. Talk to your administrator
about increasing the permitted
upload size.
The administrator set a size limit for
the type of content a user tried to
upload, either by mime type or by
filename.
Change the upload limits in the
<sizeLimits> element in
oa-config.xml or upload something
smaller.
CLFRA0088E: profile provider error Activities received an error querying
the directory (i.e. LDAP) for a user or
group.
Ensure that the LDAP server
configured for the WebSphere
Application Server is accessible and
that the bind credentials used to
authenticate to the LDAP server (if
necessary) are valid.
CLFRA0090E: profile provider error Activities received an error querying
the directory (i.e. LDAP) for a user or
group.
Ensure that the LDAP server
configured for the WebSphere
Application Server is accessible and
that the bind credentials used to
authenticate to the LDAP server (if
necessary) are valid.
CLFRA0091E: internal error Activities generated an exception. If the problem persists after restarting
the Activities feature, contact
Customer Support to report the
incident. Additional information
relating to the failure may be found
in the SystemOut.log file.
CLFRA0092E: A short description
could not be generated because the
entry contains invalid HTML.
The service tried to clean up
user-submitted HTML rich text input
using the JTidy library. The HTML
was so malformed that JTidy could
not clean it, and produced a null
result. This error is a message printed
to the user that indicates the service
could not truncate the input HTML
to produce a summary for display in
the entry.
The user should attempt to change
the HTML input, possibly by copying
a different section of rich text to paste
into the entry body.
CLFRA0093E: exception while
executing JTidy on node: <uuid>
The service tried to clean up
user-submitted HTML rich text input
using the JTidy library. JTidy failed to
finish executing on this HTML code
before throwing an exception.
The user should attempt to change
the HTML input, possibly by copying
a different section of rich text to paste
into the entry body.
CLFRA0094E: output from JTidy
execution: <html>
This is a trace message that explains
why JTidy failed to process some
HTML input.
This exception trace will inform you
on how JTidy failed and whether it
could be fixed.
CLFRA0095E: internal error while
executing JTidy on node: <uuid>
The service tried to clean up
user-submitted HTML rich text input
using the JTidy library. The HTML
was so malformed that JTidy could
not clean it, and produced a null
result.
The user should attempt to change
the HTML input, possibly by copying
a different section of rich text to paste
into the entry body.
Chapter 11. Troubleshooting 149

Table 18. Lotus Connections error messages with codes (continued)
Message Cause Solution
CLFRA0096E: Error fetching deleted
items to purge.
The scheduled TrashAutoPurge job
received an exception fetching the
items to purge.
Restart the Activities feature.
Additional information relating to the
failure may be found in the
SystemOut.log file. If the problem
persists after restarting the Activities
feature, contact Customer Support to
report the incident.
CLFRA0102E: Error closing email
connections.
Should not see this error message.
Feature is not enabled.
Should not see this error message.
Feature is not enabled.
CLFRA0105E: Error purging deleted
items.
The scheduled TrashAutoPurge job
received an exception purging items.
Restart the Activities feature.
Additional information relating to the
failure may be found in the
SystemOut.log file. If the problem
persists after restarting the Activities
feature, contact Customer Support to
report the incident.
CLFRA0106E: Error sending notify
message.
Error when trying to send an e-mail
notification.
Ensure that SMTP server
configuration in the <email> element
of oa-config.xml is valid and that the
server is accessible. Additional
information relating to the failure
may be found in the SystemOut.log
file.
CLFRA0107E: Error composing
HTML email message
Error received when trying to create
an outbound e-mail message from
the server.
Restart the Activities feature.
Additional information relating to the
failure may be found in the
SystemOut.log file. If the problem
persists after restarting the Activities
feature, contact Customer Support to
report the incident.
CLFRA0108E: EmailNotifier:
problems sending email. Most
probable cause is due to using an
invalid recipient email address. Or,
the connection to the host is down.
Or, there could also be authentication
problems -check the user/password
settings-
Error received when trying to send
outbound emails.
Ensure that SMTP server
configuration in the <email> element
of oa-config.xml is valid and that the
server is accessible. Additional
information relating to the failure
may be found in the SystemOut.log
file.
CLFRA0109E: Malformed email
template, url=<url>
The Web address specified is in an
invalid URL syntax/format
Check oa-config.xml,
email/outbound/templates/url and
make sure the URLs are valid. You
can validate them by typing the
URLs directly into a browser.
CLFRA0110E: Error sending error
message.
Error received when trying to send
an e-mail error notification.
Ensure that SMTP server
configuration in the <email> element
of oa-config.xml is valid and that the
server is accessible. Additional
information relating to the failure
may be found in the SystemOut.log
file.
150 IBM Lotus Lotus Connections 1.0.1 Installation Guide

Table 18. Lotus Connections error messages with codes (continued)
Message Cause Solution
CLFRA0105E: Error purging deleted
items.
The scheduled TrashAutoPurge job
received an exception purging items.
Restart the Activities feature.
Additional information relating to the
failure may be found in the
SystemOut.log file. If the problem
persists after restarting the Activities
feature, contact Customer Support to
report the incident.
CLFRA0106E: Error sending notify
message.
Error when trying to send an e-mail
notification.
Ensure that SMTP server
configuration in the <email> element
of oa-config.xml is valid and that the
server is accessible. Additional
information relating to the failure
may be found in the SystemOut.log
file.
CLFRA0107E: Error composing
HTML email message
Error received when trying to create
an outbound e-mail message from
the server.
Restart the Activities feature.
Additional information relating to the
failure may be found in the
SystemOut.log file. If the problem
persists after restarting the Activities
feature, contact Customer Support to
report the incident.
CLFRA0108E: EmailNotifier:
problems sending email. Most
probable cause is due to using an
invalid recipient email address. Or,
the connection to the host is down.
Or, there could also be authentication
problems -check the user/password
settings-
Error received when trying to send
outbound emails.
Ensure that SMTP server
configuration in the <email> element
of oa-config.xml is valid and that the
server is accessible. Additional
information relating to the failure
may be found in the SystemOut.log
file.
CLFRA0109E: Malformed email
template, url=<url>
The URL specified is in an invalid
URL syntax/format
Check oa-config.xml,
email/outbound/templates/url and
make sure the URLs are valid. You
can validate them by typing the
URLs directly into a browser.
CLFRA0110E: Error sending error
message.
Error received when trying to send
an e-mail error notification.
Ensure that SMTP server
configuration in the <email> element
of oa-config.xml is valid and that the
server is accessible. Additional
information relating to the failure
may be found in the SystemOut.log
file.
CLFRA0111E: Unable to connect to
any of the <number> SMTP servers
found on the MX records of the DNS
server
The SMTP server is down,
unreachable, or not responding.
Ensure that the SMTP and DNS
servers configured in the <email>
element of oa-config.xml are
reachable
CLFRA0112E: Unable to get email
template from url= <url>
Error trying to retrieve an e-mail
template from the given URL.
Check oa-config.xml,
email/outbound/templates/url and
make sure the URLs are valid. You
can validate them by typing the
URLs directly into a browser.
Chapter 11. Troubleshooting 151

Table 18. Lotus Connections error messages with codes (continued)
Message Cause Solution
CLFRA0114E: The email from
″<sender>″ with subject ″<subject>″
did not match either the create or
add-to matching address expressions.
The email will be deleted and not
processed.
Should not see this error message.
Feature is not enabled.
Should not see this error message.
Feature is not enabled.
CLFRA0115E: The email
address=″<emailAddress>″ was not
found in the directory. Unable to
process the message.
Should not see this error message.
Feature is not enabled.
Should not see this error message.
Feature is not enabled.
CLFRA0116E: Unable to find a
member profile for the email
″<emailAddress>″. This user will not
be added to the activity membership.
Should not see this error message.
Feature is not enabled.
Should not see this error message.
Feature is not enabled.
CLFRA0117E: The activity you tried
to email into (id=<uuid>) is deleted
or no longer exists.
Should not see this error message.
Feature is not enabled.
Should not see this error message.
Feature is not enabled.
CLFRA0118E: You need to update
your configuration file version. Make
sure you are not trying to use an old
config file on a newer server or
vice-versa.
The version of oa-config.xml on the
server differs from the version
expected by the Activities
Application.
Ensure the version property of the
<config> element in oa-config.xml
matches the version expected by the
Activities Application.
CLFRA0119E: ExecutionContext leak
detected
The Activities feature has detected a
resource leak.
Restart the Activities feature.
Additional information relating to the
failure may be found in the
SystemOut.log file. If the problem
persists after restarting the Activities
feature, contact Customer Support to
report the incident.
CLFRA0120E: Internal Error, EC
Count is null
The Activities feature has detected a
resource leak.
Restart the Activities feature.
Additional information relating to the
failure may be found in the
SystemOut.log file. If the problem
persists after restarting the Activities
feature, contact Customer Support to
report the incident.
CLFRA0121E: Error publishing event
<event>
The Activities feature received an
error from the Event Broker service.
Check that the <eventBroker>
configuration specified in
oa-config.xml is valid. Correct an
invalid configuration. Additional
information relating to the failure
may be found in the SystemOut.log
file. If the problem persists after
restarting the Activities feature,
contact Customer Support to report
the incident.
152 IBM Lotus Lotus Connections 1.0.1 Installation Guide

Table 18. Lotus Connections error messages with codes (continued)
Message Cause Solution
CLFRA0122E: Cannot find credentials
for <name>
The system is configured to use J2C
Authentication Aliases to store
authentication data. The entry for
<name> is missing.
Go to Secure administration,
applications, and infrastructure →
JAAS → J2C authentication data in
the WebSphere Application Server
Integrated Solutions Console, and
check whether there is an entry for
<name>. If there is no entry, create
an Authentication Alias for <name>
by completing these steps:
1. Shutdown the WebSphere
Application Server.
2. Edit the security.xml file in
<APPServer_HOME>/profiles/AppSrv01/config/cells/<cell>
3. Find the authDataEntries entry
with an alias that includes
<name>. For example:
<authDataEntries
alias=″text/name″> 2.5
4. Replace ″text/name″ with ″name″
5. Save the security.xml file.
6. Restart the WebSphere
Application Server.
If there is an entry for <name>,
verify that the user credentials are
correct. If these steps do not fix the
problem, then contact support.
CLFRA0123E: profile provider error Activities received an error querying
the directory (i.e. LDAP) for a user or
group.
Ensure that the LDAP server
configured for the WebSphere
Application Server is accessible and
that the bind credentials used to
authenticate to the LDAP server (if
necessary) are valid.
CLFRA0127W: Activities can not
determine host name
An error occurred while initializing
the Statistics collection service. There
was a problem with the server host
name. Additional information
relating to the failure may be found
in the SystemOut.log file.
If the problem persists after restarting
the Activities feature, contact
Customer Support to report the
incident.
CLFRA0131E: Activities Task
Scheduler initialization error: <error>
Reason: An error occurred while
initializing the Quartz scheduler.
Additional information relating to the
failure may be found in the
SystemOut.log file.
If the problem persists after restarting
the Activities feature, contact
Customer Support to report the
incident.
CLFRA0135E: Error executing event
notification.
Error received in the event broker.
Additional information relating to the
failure may be found in the
SystemOut.log file.
If the problem persists after restarting
the Activities feature, contact
Customer Support to report the
incident.
CLFRA0136E: Exiting the Aynch
Notification Thread: event processing
has been halted.
Error received when the event broker
thread is halted. Additional
information relating to the failure
may be found in the SystemOut.log
file.
If the problem persists after restarting
the Activities feature, contact
Customer Support to report the
incident.
Chapter 11. Troubleshooting 153

Table 18. Lotus Connections error messages with codes (continued)
Message Cause Solution
CLFRA0137E: Error encountered
processing events.
Error received in the event broker
when dispatching events. Additional
information relating to the failure
may be found in the SystemOut.log
file.
If the problem persists after restarting
the Activities feature, contact
Customer Support to report the
incident.
CLFRA0138E: The invoker should not
be interrupted.
Another thread interrupted the
internal event broker. Additional
information relating to the failure
may be found in the SystemOut.log
file.
If the problem persists after restarting
the Activities feature, contact
Customer Support to report the
incident.
CLFRA0142E: Incorrect number of
arguments. Please specify the
configuration file to process.
Should not see this error message.
Feature is not enabled.
Should not see this error message.
Feature is not enabled.
CLFRA0143E: Can not locate
configuration file {0}
Should not see this error message.
Feature is not enabled.
Should not see this error message.
Feature is not enabled.
CLFRA0144E: ConfigurationParser:
Bad configuration. Config section
defines more properties than values,
or vice versa. Possible errant
<property> element(s) without a
″name″ attribute(s)
A configuration element in
oa-config.xml or oa-jobs.xml is
invalid.
Enable debug tracing for
com.ibm.openactivities.util, restart the
feature, and determine the invalid
element from the trace.log output.
Correct the element and restart the
Activities feature.
CLFRA0146E: Unable to refresh
cached list of groups
Activities received an exception
refreshing its group cache. Additional
information relating to the failure
may be found in the SystemOut.log
file.
If the problem persists after restarting
the Activities feature, contact
Customer Support to report the
incident.
CLFRA0147E: Error initializing
Activities
The Activities feature received an
error trying to start.
The cause of the error will be found
in the SystemOut.log file. Correct the
error cause and restart the Activities
feature.
CLFRA0269E: Unable to connect to
Domino database at url= <url>
An error occurred while attempting
to connect to Activity’s Domino
content store.
Verify that the Domino server is
responding and that the URL is
accessible.
CLFRA0270E: Error getting server
URL for <name>.
There was an error reading the server
URL for the <name> service.
1. Find the LotusConnections-config.xml file (in <App server
home>/profiles/<name>/config/cells/<cell name>/LotusConnections-config)
2. Make sure the files exists and is
readable by the WebSphere
Application Server process.
3. Make sure the files contains the
correct entry for the <name>
service.
CLFRA0271E: Cannot find config
variable directory <directory>.
There was a problem reading
variables that can be used in the
oa-config.xml file.
Make sure the directory exists and is
readable by the WebSphere
Application Server.
CLFRA0272E: Cannot find <file> for
config variables.
There was a problem opening a file
getting configuration variables.
Make sure the file exists and is
readable by the WebSphere
Application Server.
154 IBM Lotus Lotus Connections 1.0.1 Installation Guide

Table 18. Lotus Connections error messages with codes (continued)
Message Cause Solution
CLFRA0273W: Missing system setting
for <name>.
The Lotus Connections configuration
cannot find a definition for a variable
named ″name″.
Either, check the installation
documentation for the variable to
find the correct value for the variable,
or add the variable with its correct
value in the WebSphere Application
Server Integrated Solutions Console,
Environment/Websphere Variables
page.
CLFRA0275E: Error loading config
variables from <file>.
There was a failure parsing variables
in file.
1. Make sure the file exists and is
readable by the WebSphere
Application Server.
2. Replace the current copy with a
back-up copy of the file.
CLFRA0276E: Too many errors
encountered sending Activity Auto
Completion notices, auto complete
aborted.
The server has given up trying to
keep sending any more auto
complete e-mail notices.
Ensure that SMTP server
configuration in the <email> element
of oa-config.xml is valid and that the
server is accessible. Additional
information relating to the failure
may be found in the SystemOut.log
file.
CLFRA0277W: Warning, invalid
parameter specified for the Activity
Auto Completion notification max
errors ({0})
Should not see this error message.
Feature is not enabled.
Should not see this error message.
Feature is not enabled.
CLFRA0278E: Error generating list of
activities eligible for auto
completetion.
Error received querying the database
to obtain a list of activities that
qualify to be autocompleted.
Additional information relating to the
failure may be found in the
SystemOut.log file.
If the problem persists after restarting
the Activities feature, contact
Customer Support to report the
incident.
CLFRA0279E: Error sending auto
complete notification for activity
UUID <uuid>.
Error received when sending e-mail
about an auto complete notification.
Additional information relating to the
failure may be found in the
SystemOut.log file.
Ensure that SMTP server
configuration in the <email> element
of oa-config.xml is valid and that the
server is accessible. Additional
information relating to the failure
may be found in the SystemOut.log
file.
CLFRA0280E: Error initializing the
Activities Administrator email
address. Some email functionality
will be unavailable.
No administrator e-mail address was
configured in oa-config.xml
Edit oa-config.xml and provide an
administrator e-mail address in the
<activities-administrative-email-address> element,
CLFRA0281E: The content of mime
type: ″<mimeType>″ or filename:
″<fileName>″ you tried to upload is
not allowed by your administrator.
The administrator set a size limit of
zero bytes for the type of content a
user tried to upload, either by mime
type or by filename.
Change the upload limits in the
<sizeLimits> element in
oa-config.xml.
CLFRA0282E: profile provider could
not find member for <uuid>
The Activities profile feature did not
find a member by the given member
ID.
Contact Customer Support to report
the incident
Chapter 11. Troubleshooting 155
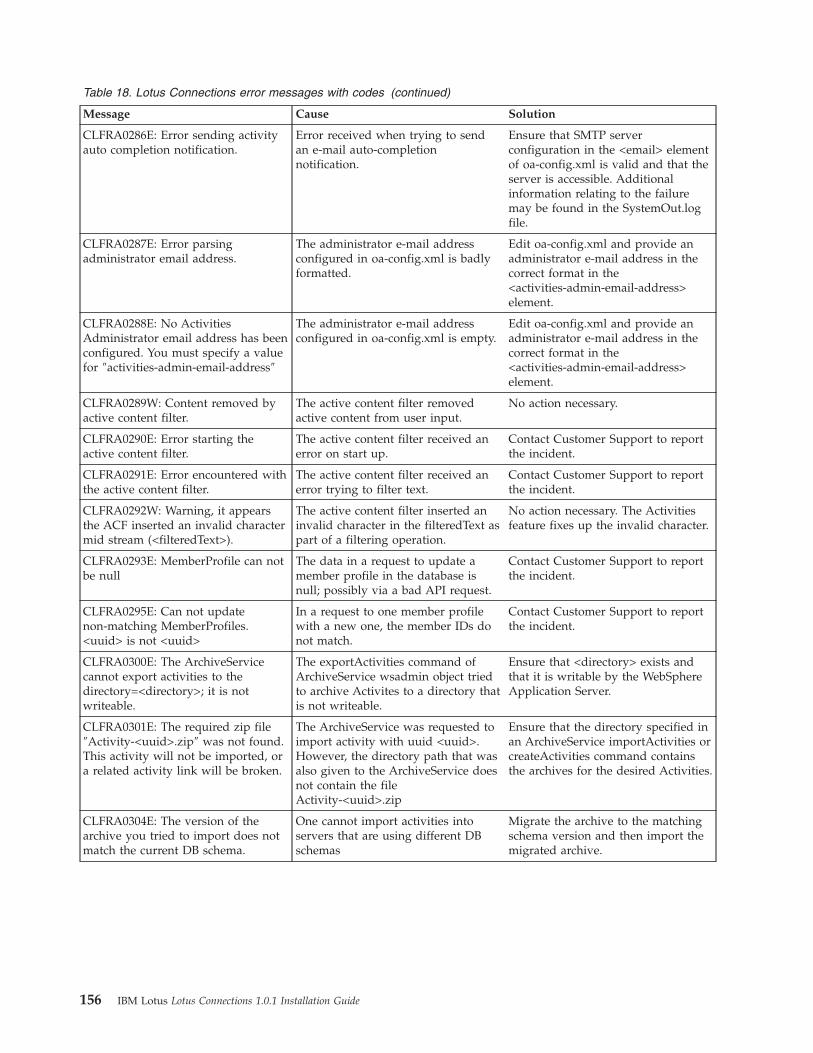
Table 18. Lotus Connections error messages with codes (continued)
Message Cause Solution
CLFRA0286E: Error sending activity
auto completion notification.
Error received when trying to send
an e-mail auto-completion
notification.
Ensure that SMTP server
configuration in the <email> element
of oa-config.xml is valid and that the
server is accessible. Additional
information relating to the failure
may be found in the SystemOut.log
file.
CLFRA0287E: Error parsing
administrator email address.
The administrator e-mail address
configured in oa-config.xml is badly
formatted.
Edit oa-config.xml and provide an
administrator e-mail address in the
correct format in the
<activities-admin-email-address>
element.
CLFRA0288E: No Activities
Administrator email address has been
configured. You must specify a value
for ″activities-admin-email-address″
The administrator e-mail address
configured in oa-config.xml is empty.
Edit oa-config.xml and provide an
administrator e-mail address in the
correct format in the
<activities-admin-email-address>
element.
CLFRA0289W: Content removed by
active content filter.
The active content filter removed
active content from user input.
No action necessary.
CLFRA0290E: Error starting the
active content filter.
The active content filter received an
error on start up.
Contact Customer Support to report
the incident.
CLFRA0291E: Error encountered with
the active content filter.
The active content filter received an
error trying to filter text.
Contact Customer Support to report
the incident.
CLFRA0292W: Warning, it appears
the ACF inserted an invalid character
mid stream (<filteredText>).
The active content filter inserted an
invalid character in the filteredText as
part of a filtering operation.
No action necessary. The Activities
feature fixes up the invalid character.
CLFRA0293E: MemberProfile can not
be null
The data in a request to update a
member profile in the database is
null; possibly via a bad API request.
Contact Customer Support to report
the incident.
CLFRA0295E: Can not update
non-matching MemberProfiles.
<uuid> is not <uuid>
In a request to one member profile
with a new one, the member IDs do
not match.
Contact Customer Support to report
the incident.
CLFRA0300E: The ArchiveService
cannot export activities to the
directory=<directory>; it is not
writeable.
The exportActivities command of
ArchiveService wsadmin object tried
to archive Activites to a directory that
is not writeable.
Ensure that <directory> exists and
that it is writable by the WebSphere
Application Server.
CLFRA0301E: The required zip file
″Activity-<uuid>.zip″ was not found.
This activity will not be imported, or
a related activity link will be broken.
The ArchiveService was requested to
import activity with uuid <uuid>.
However, the directory path that was
also given to the ArchiveService does
not contain the file
Activity-<uuid>.zip
Ensure that the directory specified in
an ArchiveService importActivities or
createActivities command contains
the archives for the desired Activities.
CLFRA0304E: The version of the
archive you tried to import does not
match the current DB schema.
One cannot import activities into
servers that are using different DB
schemas
Migrate the archive to the matching
schema version and then import the
migrated archive.
156 IBM Lotus Lotus Connections 1.0.1 Installation Guide

Table 18. Lotus Connections error messages with codes (continued)
Message Cause Solution
CLFRA0306W: The user by email (or
display name if it’’s a group)
<member> was not found in the
LDAP or the database! This means
the activity being imported has a
reference to a user that has changed
emails, or has been removed from the
LDAP. In other words, this email
address is stale, and the activity is
carrying around incongruent data
A member that was included in the
imported activity cannot be found
anymore. This might happen when
switching LDAP servers, and the
membership list is different.
No action necessary. The imported
activity will be imported, the missing
member e-mail address (or display
name if a group) will be rewritten to
″NOT_FOUND_<original emal>″. If
this behavior is unexpected, you
might want to investigate why
members are missing in the new
LDAP.
CLFRA0309E: The ArchiveService
cannot export activities to the
directory=<directory>; it is not a
directory.
The exportActivities command of
ArchiveService wsadmin object tried
to archive Activities to a directory
that is not writeable.
Ensure that <directory> exists and
that it is writable by the WebSphere
Application Server.
CLFRA0310E: Error writing activity
entry #<uuid> to the database
An ArchiveService import error
received at the point where the Node
of the Activity is written. Additional
information relating to the failure
may be found in the SystemOut.log
file.
If the error reported in the
SystemOut.log file cannot be
resolved, contact Customer Support
to report the incident.
CLFRA0312E: Error writing activity
node to the database
An ArchiveService import error
received at the point where one of
the nodes (entries) of the Activity is
written. Additional information
relating to the failure may be found
in the SystemOut.log file.
If the error reported in the
SystemOut.log file cannot be
resolved, contact Customer Support
to report the incident.
CLFRA0315E: The ArchiveService
cannot create the
directory=<directory> for exporting
activities.
In an ArchiveService exportActivities
command one specifies a directory
where all the archive files will be
written. In this case, the system
cannot write out the specified
directory to the file system.
Manually create the <directory> on
the file system and ensure it is
writeable by the WebSphere
Application Server.
CLFRA0318E: The related activity
with UUID=<uuid> already exists in
the system. It is unclear whether the
intention is to overwrite that activity
with old data or not. Thus, it will be
not imported.
When an activity has a related
activity link in it, the ArchiveService
will automatically try to import the
related activity. However, if the
ArchiveService is being run with
″importActivities″ which overwrites
activities rather than creating copies,
then, it is unclear to the system
whether the administrator also
intentionally meant to overwrite
related activities since that related
activity it was not explicitly passed in
to be imported.
If the administrator wishes to
overwrite the related activity, he can
use the ArchiveService
importActivites command to
overwrite the related Activity.
CLFRA0319E: Error writing activity
content entry ″<name>″
An ArchiveService import error
received at the point where the
content (files, attachments, etc) of one
of the nodes (entries) of the activity
is written. Additional information
relating to the failure may be found
in the SystemOut.log file.
If the error reported in the
SystemOut.log file cannot be
resolved, contact Customer Support
to report the incident.
Chapter 11. Troubleshooting 157

Table 18. Lotus Connections error messages with codes (continued)
Message Cause Solution
CLFRA0320E: Error importing
activity with UUID=<uuid>
An ArchiveService import error.
Additional information relating to the
failure may be found in the
SystemOut.log file.
If the error reported in the
SystemOut.log file cannot be
resolved, contact Customer Support
to report the incident.
CLFRA0321E: Error unpacking the
archive
An ArchiveService import error
received when unmarshalling the Zip
archive.
The Zip archive has been corrupted.
If the cause of the corruption cannot
be determined, contact Customer
Support to report the incident.
CLFRA0328W: The <name>
scheduler is not enabled in config.
Check spelling.
An attempt was made to start or stop
a scheduler that is not enabled in the
oa-config.xml file or is named
differently than the name given in
oa-config.xml.
Enable the scheduler by changing the
’enabled’ true/false setting. Ensure
the scheduler name is spelled
correctly.
CLFRA0329E: The attempt to start
the <name> scheduler failed
The Quartz scheduler did not start.
Additional information relating to the
failure may be found in the
SystemOut.log file.
If the problem persists after restarting
the Activities feature, contact
Customer Support to report the
incident.
CLFRA0330W: The <name>
scheduler has already been stopped
An attempt was made to stop a
scheduler that is already stopped.
Ensure that the scheduler is started
before attempting to stop it.
CLFRA0332W: The job <name> is not
valid for the {1} scheduler
An attempt was made to carry out an
action on a job that is not running.
Ensure that the job name is spelled
correctly and that job name is known
to the system.
CLFRA0335W: The job <name> is
already running on the {1} scheduler
An attempt was made to resume a
job that is already running on a
scheduler.
Ensure that the job is paused before
attempting to resume it.
CLFRA0337W: The <name>
scheduler has already been started
An attempt was made to start a
scheduler that is already started.
Ensure that the scheduler is stopped
before attempting to start it.
CLFRA0339W: The <name>
scheduler is disabled in config
An attempt was made to start or stop
a scheduler that is disabled in the
oa-config.xml file.
Enable the scheduler by changing the
’enabled’ true/false setting.
CLFRA0340W: The request to pause
job <name> failed
An error occurred while attempting
to pause a job. Additional
information relating to the failure
may be found in the SystemOut.log
file.
No action is required.
CLFRA0341W: The job <name>} has
already been paused on the {1}
scheduler
An attempt was made to pause a job
that is already paused on a scheduler.
Ensure that the job is running before
attempting to pause it.
CLFRA0343W: The request to resume
job <name> failed
An error occurred while attempting
to resume a previously paused job.
Additional information relating to the
failure may be found in the
SystemOut.log file.
No action is required.
CLFRA0345E: The attempt to stop the
<name> scheduler failed
The Quartz scheduler did not stop.
Additional information relating to the
failure may be found in the
SystemOut.log file.
If the problem persists after restarting
the Activities feature, contact
Customer Support to report the
incident.
CLFRA0285W: Purge expiration
period (days) either not specified or
invalid (<integer>). Defaulting to {1}
days.
The trashRetentionInDays configured
for the TrashAutoPurgeJob in
oa-jobs.xml is invalid.
Add a value greater than 0 for the
trashRetentionInDays configuration.
Otherwise, trash older than 1 day
will be purged when the job runs.
158 IBM Lotus Lotus Connections 1.0.1 Installation Guide

Table 18. Lotus Connections error messages with codes (continued)
Message Cause Solution
CLFRA0327I: Status Informational message; no solution is
needed.
CLFRA0328W: The {0} scheduler is
not enabled in config. Check spelling.
The specified scheduler is not
enabled in the oa-config.xml file.
Check the oa-config.xml file to make
sure that the scheduler is enabled
(change the ’enabled’ attribute to
true) and that the scheduler name is
spelled correctly.
CLFRA0329E: The attempt to start
the {0} scheduler failed
The attempt to start the specified
scheduler failed.
Try to start the scheduler again.
CLFRA0330W: The {0} scheduler has
already been stopped
The specified scheduler has already
been stopped.
No action required.
CLFRA0331I: The request to resume
job {0} has been submitted
The request to resume the specified
job has been submitted.
Informational message; no solution is
needed.
CLFRA0332W: The job {0} is not valid
for the {1} scheduler
The job you are trying to run cannot
be run on the specified scheduler.
Run the job on the appropriate
scheduler.
CLFRA0333I: The job {0} was
removed
The specified job was removed from
the scheduler.
Informational message; no solution is
needed.
CLFRA0334I: The {0} scheduler is
running
The specified job is running. Informational message; no solution is
needed.
CLFRA0335W: The job {0} is already
running on the {1} scheduler
The specified job is already running
on the specified scheduler.
No action required.
CLFRA0336I: The request to pause
job {0} has been submitted
The request to pause the specified job
has been submitted.
Informational message; no solution is
needed.
CLFRA0337W: The {0} scheduler has
already been started
The specified scheduler has already
been started.
No action required.
CLFRA0338I: The {0} scheduler was
stopped successfully
The specified scheduler was stopped
successfully.
Informational message; no solution is
needed.
CLFRA0339W: The {0} scheduler is
disabled in config
The specified scheduler is not
enabled in the oa-config.xml file.
Enable the scheduler by changing the
the ’enabled’ attribute for the
scheduler to true in the oa-config.xml
file.
CLFRA0340W: The request to pause
job {0} failed
The request to pause the specified job
failed.
Try to pause the job again.
CLFRA0341W: The job {0} has
already been paused on the {1}
scheduler
The specified job has already been
paused on the specified scheduler.
No action required.
CLFRA0342I: The {0} scheduler is in
standby mode
The specified scheduler is in standby
mode.
Informational message; no solution is
needed.
CLFRA0343W: The request to resume
job {0} failed
The request to resume the specified
job failed.
Try to resume the job again.
CLFRA0344I: The {0} scheduler was
started successfully
The specified scheduler started
successfully.
Informational message; no solution is
needed.
CLFRA0345E: The attempt to stop the
{0} scheduler failed
The attempt to stop the specified
scheduler failed.
Try to stop the scheduler again.
CLFRA0346I: The job {0} on the {1}
scheduler has been paused
The specified job on the specified
scheduler has been paused.
Informational message; no solution is
needed.
CLFRA0347E: Error exporting activity
UUID={0}
Chapter 11. Troubleshooting 159
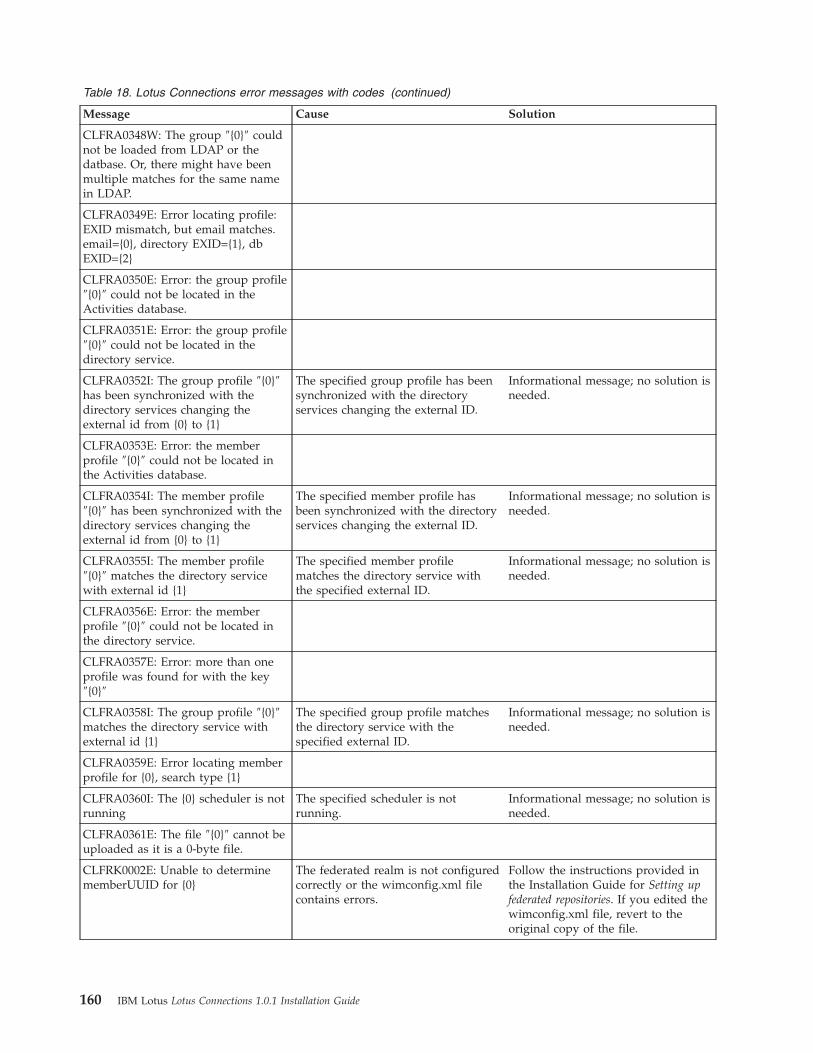
Table 18. Lotus Connections error messages with codes (continued)
Message Cause Solution
CLFRA0348W: The group ″{0}″ could
not be loaded from LDAP or the
datbase. Or, there might have been
multiple matches for the same name
in LDAP.
CLFRA0349E: Error locating profile:
EXID mismatch, but email matches.
email={0}, directory EXID={1}, db
EXID={2}
CLFRA0350E: Error: the group profile
″{0}″ could not be located in the
Activities database.
CLFRA0351E: Error: the group profile
″{0}″ could not be located in the
directory service.
CLFRA0352I: The group profile ″{0}″
has been synchronized with the
directory services changing the
external id from {0} to {1}
The specified group profile has been
synchronized with the directory
services changing the external ID.
Informational message; no solution is
needed.
CLFRA0353E: Error: the member
profile ″{0}″ could not be located in
the Activities database.
CLFRA0354I: The member profile
″{0}″ has been synchronized with the
directory services changing the
external id from {0} to {1}
The specified member profile has
been synchronized with the directory
services changing the external ID.
Informational message; no solution is
needed.
CLFRA0355I: The member profile
″{0}″ matches the directory service
with external id {1}
The specified member profile
matches the directory service with
the specified external ID.
Informational message; no solution is
needed.
CLFRA0356E: Error: the member
profile ″{0}″ could not be located in
the directory service.
CLFRA0357E: Error: more than one
profile was found for with the key
″{0}″
CLFRA0358I: The group profile ″{0}″
matches the directory service with
external id {1}
The specified group profile matches
the directory service with the
specified external ID.
Informational message; no solution is
needed.
CLFRA0359E: Error locating member
profile for {0}, search type {1}
CLFRA0360I: The {0} scheduler is not
running
The specified scheduler is not
running.
Informational message; no solution is
needed.
CLFRA0361E: The file ″{0}″ cannot be
uploaded as it is a 0-byte file.
CLFRK0002E: Unable to determine
memberUUID for {0}
The federated realm is not configured
correctly or the wimconfig.xml file
contains errors.
Follow the instructions provided in
the Installation Guide for Setting up
federated repositories. If you edited the
wimconfig.xml file, revert to the
original copy of the file.
160 IBM Lotus Lotus Connections 1.0.1 Installation Guide

Table 18. Lotus Connections error messages with codes (continued)
Message Cause Solution
CLFRK0003E: Unable to locate VMM
Profile Service {0}
The VMM component is not
functioning properly.
Ensure that the system is configured
as a ’federated realm’ by following
the instructions provided in the
Installation Guide for Setting up
federated repositories.
CLFRK0004E: Unable to locate LDAP
Profile Service {0}
The LDAP component is not
functioning properly.
You may be trying to implement a
configuration that is not currently
supported by Lotus Connections. To
prevent this error, you would have to
configure the system as a ’standalone
LDAP user registry,’ which is
currently not supported.
CLFRK0005E: Unable to locate
Persona Profile Service {0}
The Profiles Service Atom feed
component is not functioning
properly.
You may be trying to implement a
configuration that is not currently
supported by Lotus Connections. To
prevent this error, you would have to
configure the system to rely on the
Profiles service Atom feed, which is
not currently supported.
CLFRK0006E: Unable to locate
Memory Profile Service {0}
The memory model service of the
Waltz component is not functioning
properly.
You may be trying to implement a
configuration that is not currently
supported by Lotus Connections. To
prevent this error, you would have to
configure Tomcat as the memory
model, which is an unsupported
configuration.
CLFRK0007E: Unable to access
directory settings for Lotus
Connections {0}
Lotus Connections cannot find the
LotusConnection-config.xml file.
Make sure the LotusConnection-config.xml file is installed on the
system.
CLFRL0001E Error getting person for
email <email>
The e-mail tag is used as a key when
query person in database. This error
is encountered if a SQL exception
occurs when querying database.
Check the detailed exception message
below this error message in the log
file to find the root cause and make
sure the database connection is ready.
Use the “Test Connections” in
WebSphere Application Server to
verify the database connection.
CLFRL0003E Dogear servlet error. This error is encountered when
Dogear servlet failed to handle the
user requests.
Check the detailed exception message
below this error massages in the log
file to find the root cause. If this error
occurs for all requests then it is likely
a down-stream error condition from a
previous configuration error. Check
the logs from server startup for the
first error condition.
Chapter 11. Troubleshooting 161

Table 18. Lotus Connections error messages with codes (continued)
Message Cause Solution
CLFRL0011E Unable to parse atom
post entry sent by user <user>
Dogear received an Atom Publishing
request that we could not parse
because of invalid syntax
No action is required if this error
does not persist. The requesting client
will receive an error 400 code
notifying that it sent a bad request. If
this error continues, it is likely that a
client continues to send bad requests.
Examine the HTTP server logs to
determine the source of the requests
and report the problem to the
application developer creating these
requests.
CLFRL0014E Internal error updating
memberids from file with email
<link_line><message>Check the
detailed exception message below
this error massages in the log file to
find the root cause. See the dogear
admin guide for more details.
This error is encountered if an
unexpected exception occurs when
updating a batch of memberids by
e-mail from a file in administrative
service.
Check the detailed exception message
below this error massages in the log
file to find the root cause. See the
Administering Lotus Connections
section of the information center for
more details.
CLFRL0015E Internal error retrieving
task by node id <message>
This error is encountered if an
unexpected exception occurs when
Dogear is trying to retrieve a task in
the administrative service.
Check the detailed exception message
below this error massages in the log
file to find the root cause. See the
Administering Lotus Connections
section of the information center for
more details.
CLFRL0016W Failed to submit for
person: <user>
This warning is encountered if an
unexpected IO exception occurs
when trying to submit browser
bookmarks for the specified user.
If this warning only occurs on some
browser import actions, then no
action is required. Check the detailed
exception message below this error
message in the log file to find the
root cause.
CLFRL0019E Error getting person for
member id <member_id>
This error is encountered if an
unexpected SQL exception occurs
when trying to get the person with
the specified member ID from the
database.
Check the detailed exception message
below this error message in the log
file to find the root cause and make
sure the database connection is ready.
Use the “Test Connections” in
WebSphere Application Server to
verify the database connection.
CLFRL0022E Error updating url for
id <id>
This error is encountered if an
unexpected SQL exception occurs
when trying to retrieve a Web
address with the specified ID.
Check the detailed exception message
below this error message in the log
file to find the root cause and make
sure the database connection is ready.
Use the “Test Connections” in
WebSphere Application Server to
verify the database connection.
162 IBM Lotus Lotus Connections 1.0.1 Installation Guide

Table 18. Lotus Connections error messages with codes (continued)
Message Cause Solution
CLFRL0023E An error occurred while
closing the index modifier during a
commit
Dogear runs the indexing service as a
background task. This error is
encountered if an unexpected
exception occurs when trying to close
the index modifier during a commit.
No action is required if this error
does not persist. If this error
continues, you may check the
detailed exception message below
this error massages in the log file to
find the root cause. If restarting the
feature does not resolve and the
index appears corrupt or is unusable
you may use the Dogear
administrative service to reset the
indexing task. See the Administering
Lotus Connections section of the
information center for more details.
CLFRL0024E Error deleting link
<link_id>
This error is encountered if an
unexpected SQL exception occurs
when trying to delete the specified
link from the database.
Check the detailed exception message
below this error message in the log
file to find the root cause and make
sure the database connection is ready.
Use the “Test Connections” in
WebSphere Application Server to
verify the database connection.
CLFRL0026E Error finding file <file> This error is encountered if Dogear
can not find the specified file when
trying to perform batch operations in
the administrative service.
See the Administering Lotus
Connections section of the
information center for more details
on how to specify a file with the
administrative service. Ensure the
administrative process has proper file
permissions.
CLFRL0029E An error occurred
release lockfile <file>
This error is encountered if an
unexpected IO exception occurs
when trying to release the lockfile.
No action is required if this error
does not persist. If this error
continues, you may need to stop the
effected node, delete the file by hand,
and restart the node. This file is
located in the same directory as your
full text index. See the Administering
Lotus Connections section of the
information center for help
determining that location. If the
problem still continues, check disk
permissions for the WebSphere
Application Server process, also
check the detailed exception message
below this error massage in the log
file to find the root cause.
CLFRL0030E Attempty by <user> to
create subscription for <subscriber>
This error is encountered when a
user is trying to create watchlist entry
as another user.
This action is not allowed and the
watchlist entry will not get created. If
it is a malicious user, you can contact
or restrict the user.
CLFRL0032E Attempt by <user> to
update or delete <link>
This error is encountered if a user
attempts to delete another user’s link.
The link will not get deleted.
If the delete action was performed
for administrative purpose, please see
the Administering Lotus Connections
section of the information center. If it
was performed by a malicious user,
you can contact or restrict the user.
Chapter 11. Troubleshooting 163

Table 18. Lotus Connections error messages with codes (continued)
Message Cause Solution
CLFRL0034E Failed to rollback
<task> will continue to rollback other
tasks.
Dogear runs some background tasks
periodically. This error is encountered
if an unexpected exception occurs
when one is doing a rollback of the
specified task.
No action is required if this error
does not persist. If this error persists,
check the detailed exception message
below this error massages in the log
file to find the root cause.
CLFRL0036E Error updating
subscription <subscription_id>
This error is encountered if an
unexpected SQL exception occurs
when trying to delete the specified
watchlist entry.
Check the detailed exception message
below this error message in the log
file to find the root cause and make
sure the database connection is ready.
Use the “Test Connections” in
WebSphere Application Server to
verify the database connection.
CLFRL0039W An error occurred
loading task <task>, skipping
Dogear runs a background link
processing task periodically. This
error is encountered if an unexpected
exception occurs when initializing the
link processing task.
Check the detailed exception message
below this error massages in the log
file to find the root cause.
CLFRL0043E Error getting tag counts
for url <url>
This error is encountered if an
unexpected SQL exception occurs
when trying to get tag counts for the
specified URL.
Check the detailed exception message
below this error message in the log
file to find the root cause and make
sure the database connection is ready.
Use the “Test Connections” in
WebSphere Application Server to
verify the database connection.
CLFRL0048E Error updating Url This error is encountered if an
unexpected SQL exception occurs
when trying to update a URL.
Check the detailed exception message
below this error message in the log
file to find the root cause and make
sure the database connection is ready.
Use the “Test Connections” in
WebSphere Application Server to
verify the database connection.
CLFRL0050W Failed to transform
URL encoder from <string>
This warning is encountered if UTF-8
encoding is not supported on the
server. Dogear will use default
encoding to encode the strings.
Check the encoding settings of the
system and make sure UTF-8 is
supported by the system.
CLFRL0051EInternal error deleting
link with UID <link_uid>_<message>
This error is encountered if an
unexpected exception occurs when
Dogear is trying to delete a link with
the specified UID in the
administrative service.
Check if the UID provided is correct.
Check the detailed exception message
below this error massages in the log
file to find the root cause. See the
Administering Lotus Connections
section of the information center for
more details.
CLFRL0052E Error getting
subscription on person <person>
This error is encountered if an
unexpected SQL exception occurs
when trying to get a list of people
who have a specified person in their
watchlist
Check the detailed exception message
below this error message in the log
file to find the root cause and make
sure the database connection is ready.
Use the “Test Connections” in
WebSphere Application Server to
verify the database connection.
164 IBM Lotus Lotus Connections 1.0.1 Installation Guide

Table 18. Lotus Connections error messages with codes (continued)
Message Cause Solution
CLFRL0055E Error getting url ids This error is encountered if an
unexpected SQL exception occurs
when trying to get a batch of URL
ids.
Check the detailed exception message
below this error message in the log
file to find the root cause and make
sure the database connection is ready.
Use the “Test Connections” in
WebSphere Application Server to
verify the database connection.
CLFRL0056EDogear JSP tag error.
Error message: <message>
This error is encountered if an
unexpected exception is propagated
to the UI tier of the feature.
Check the detailed exception message
below this error message in the log
file to find the root cause.
CLFRL0057EError getting tag set
counts person <person>
This error is encountered if an
unexpected SQL exception occurs
when trying to get tag set counts for
the specified person.
Check the detailed exception message
below this error message in the log
file to find the root cause and make
sure the database connection is ready.
Use the “Test Connections” in
WebSphere Application Server to
verify the database connection.
CLFRL0058E Error getting link count
for person <person>
This error is encountered if an
unexpected SQL exception occurs
when trying to get link count for the
specified person in the database.
Check the detailed exception message
below this error message in the log
file to find the root cause and make
sure the database connection is ready.
Use the “Test Connections” in
WebSphere Application Server to
verify the database connection.
CLFRL0061E Error getting link count This error is encountered if an
unexpected SQL exception occurs
when trying to get link count in the
database.
Check the detailed exception message
below this error message in the log
file to find the root cause and make
sure the database connection is ready.
Use the “Test Connections” in
WebSphere Application Server to
verify the database connection.
CLFRL0062E Error registering MBean This error is encountered if an
unexpected JMX exception occurs
when trying to register MBean
during Dogear feature initialization.
Check the detailed exception message
in the log file to find the root cause.
See the Administering Lotus
Connections section of the
information center for more details.
CLFRL0063W Unable to retrieve a
favicon from <icon_location>
This warning is encountered if
Dogear fails to retrieve a favicon
from the specified location.
Check the location and make sure the
favicon exists. If it does not exists,
check your favicon settings in the
dogear-config-node.xml or try restart
the node. If the warning persists,
reset the favicons storage. See the
Administering Lotus Connections
section of the information center for
more details.
CLFRL0066E Error getting inbox
links for subscriptions
<subscriptions>
This error is encountered if an
unexpected SQL exception occurs
when trying to get link for a user’s
watchlist in the database.
Check the detailed exception message
below this error message in the log
file to find the root cause and make
sure the database connection is ready.
Use the “Test Connections” in
WebSphere Application Server to
verify the database connection.
Chapter 11. Troubleshooting 165
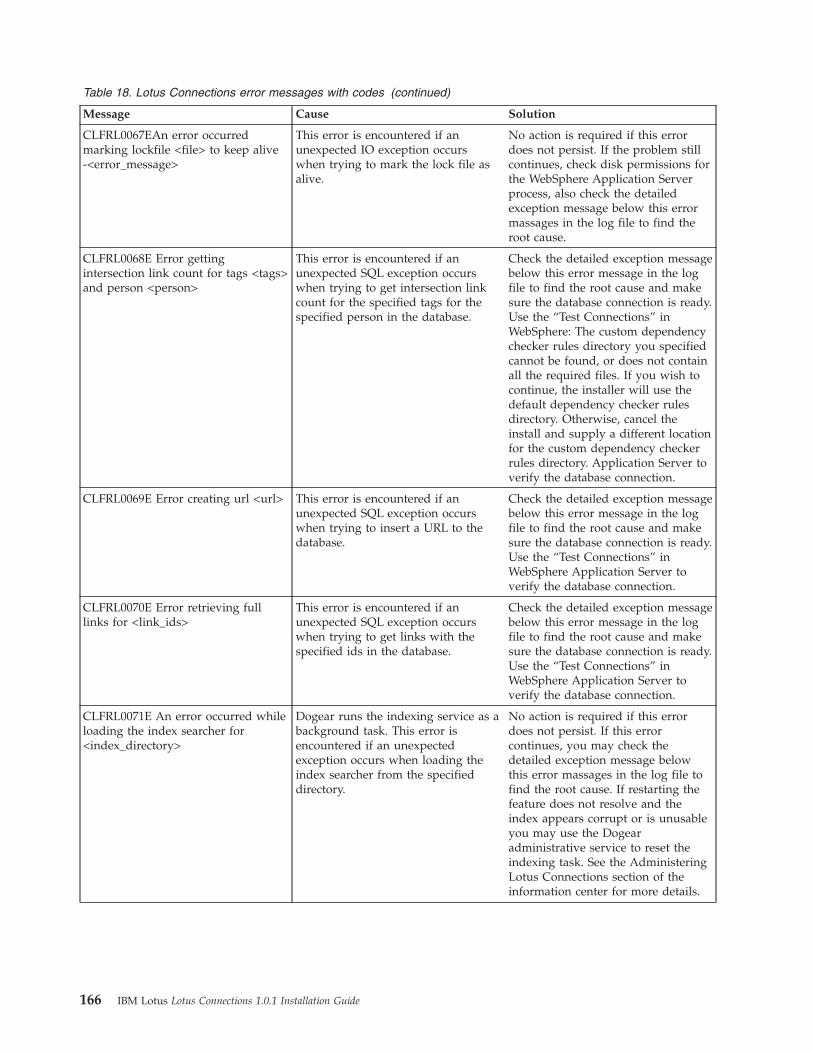
Table 18. Lotus Connections error messages with codes (continued)
Message Cause Solution
CLFRL0067EAn error occurred
marking lockfile <file> to keep alive
-<error_message>
This error is encountered if an
unexpected IO exception occurs
when trying to mark the lock file as
alive.
No action is required if this error
does not persist. If the problem still
continues, check disk permissions for
the WebSphere Application Server
process, also check the detailed
exception message below this error
massages in the log file to find the
root cause.
CLFRL0068E Error getting
intersection link count for tags <tags>
and person <person>
This error is encountered if an
unexpected SQL exception occurs
when trying to get intersection link
count for the specified tags for the
specified person in the database.
Check the detailed exception message
below this error message in the log
file to find the root cause and make
sure the database connection is ready.
Use the “Test Connections” in
WebSphere: The custom dependency
checker rules directory you specified
cannot be found, or does not contain
all the required files. If you wish to
continue, the installer will use the
default dependency checker rules
directory. Otherwise, cancel the
install and supply a different location
for the custom dependency checker
rules directory. Application Server to
verify the database connection.
CLFRL0069E Error creating url <url> This error is encountered if an
unexpected SQL exception occurs
when trying to insert a URL to the
database.
Check the detailed exception message
below this error message in the log
file to find the root cause and make
sure the database connection is ready.
Use the “Test Connections” in
WebSphere Application Server to
verify the database connection.
CLFRL0070E Error retrieving full
links for <link_ids>
This error is encountered if an
unexpected SQL exception occurs
when trying to get links with the
specified ids in the database.
Check the detailed exception message
below this error message in the log
file to find the root cause and make
sure the database connection is ready.
Use the “Test Connections” in
WebSphere Application Server to
verify the database connection.
CLFRL0071E An error occurred while
loading the index searcher for
<index_directory>
Dogear runs the indexing service as a
background task. This error is
encountered if an unexpected
exception occurs when loading the
index searcher from the specified
directory.
No action is required if this error
does not persist. If this error
continues, you may check the
detailed exception message below
this error massages in the log file to
find the root cause. If restarting the
feature does not resolve and the
index appears corrupt or is unusable
you may use the Dogear
administrative service to reset the
indexing task. See the Administering
Lotus Connections section of the
information center for more details.
166 IBM Lotus Lotus Connections 1.0.1 Installation Guide

Table 18. Lotus Connections error messages with codes (continued)
Message Cause Solution
CLFRL0074E Error getting links for ft
index queue, startpos=<start_pos>
and count of <count>
This error is encountered if an
unexpected SQL exception occurs
when trying to get links in the link
processing queue from the specified
start position with the specified
count.
Check the detailed exception message
below this error message in the log
file to find the root cause and make
sure the database connection is ready.
Use the “Test Connections” in
WebSphere Application Server to
verify the database connection.
CLFRL0077E Error getting tag counts
for prefix <prefix> and limit <limit>
This error is encountered if an
unexpected SQL exception occurs
when trying to get tag counts for the
specified prefix with the specified
limit.
Check the detailed exception message
below this error message in the log
file to find the root cause and make
sure the database connection is ready.
Use the “Test Connections” in
WebSphere Application Server to
verify the database connection.
CLFRL0080EError getting union links
for tags <tags> and person <person>
This error is encountered if an
unexpected SQL exception occurs
when trying to get union links for the
specified tags for the specified person
in the database.
Check the detailed exception message
below this error message in the log
file to find the root cause and make
sure the database connection is ready.
Use the “Test Connections” in
WebSphere Application Server to
verify the database connection.
CLFRL0081W Failed to get favicon
for host {0}. Use blank image.
This warning is encountered if the
server had trouble caching a favicon
for the specified URL.
If this warning only occurs on some
URLs, then no action is required -
this is normal. If this warning occurs
on all URLs, check that the server
can make outbound HTTP requests.
You may need to setup an outbound
proxy if the server is in a protected
zone. Also check that the server
process can write to the favicon cache
storage on disk.
CLFRL0083E An error occurred
detecting or removing an obsolete
lock file <file> - <error_message>
This error is encountered if an
unexpected IO exception occurs
when checking if a lock file is active
and/or removing it if obsolete.
No action is required if this error
does not persist. If this error
continues, you may need to stop the
effected node, delete the file by hand,
and restart the node. This file is
located in the same directory as your
full text index. See the Administering
Lotus Connections section of the
information center for help
determining that location. If the
problem still continues, check disk
permissions for the WebSphere
Application Server process, also
check the detailed exception message
below this error massage in the log
file to find the root cause.
CLFRL0084E Error getting person
counts for url
This error is encountered if an
unexpected SQL exception occurs
when trying to get person counts for
a URL.
Check the detailed exception message
below this error message in the log
file to find the root cause and make
sure the database connection is ready.
Use the “Test Connections” in
WebSphere Application Server to
verify the database connection.
Chapter 11. Troubleshooting 167

Table 18. Lotus Connections error messages with codes (continued)
Message Cause Solution
CLFRL0085E Error getting popular
tag for url <url>
This error is encountered if an
unexpected SQL exception occurs
when trying to get popular tags for
the specified URL.
Check the detailed exception message
below this error message in the log
file to find the root cause and make
sure the database connection is ready.
Use the “Test Connections” in
WebSphere Application Server to
verify the database connection.
CLFRL0086E Attempt by <user> to
create link for <person>
This error is encountered when a
user is trying to create a link for
another person.
This action is not allowed and the
link will not get created. If it is a
malicious user, you can contact or
restrict the user.
CLFRL0087E Error updating link
<link_id>
This error is encountered if an
unexpected SQL exception occurs
when trying to update the specified
link in the database.
Check the detailed exception message
below this error message in the log
file to find the root cause and make
sure the database connection is ready.
Use the “Test Connections” in
WebSphere Application Server to
verify the database connection.
CLFRL0090EError getting intersection
links for tags <tags> and person
<person>
This error is encountered if an
unexpected SQL exception occurs
when trying to get intersection links
for the specified tags for the specified
person in the database.
Check the detailed exception message
below this error message in the log
file to find the root cause and make
sure the database connection is ready.
Use the “Test Connections” in
WebSphere Application Server to
verify the database connection.
CLFRL0091E An Error occurrred
while releasing the write lock during
a commit.
Dogear runs the indexing service as a
background task. The task requires a
write lock to ensure exclusive write
access to the index file. This error is
encountered if an unexpected
exception occurs when trying to
release the write lock during a
commit.
No action is required if this error
does not persist. If this error persists,
you may need to stop the effected
node, delete the file by hand, and
restart the node. This file is located in
the same directory as your full text
index. See the Administering Lotus
Connections section of the
information center for help
determining that location. If the
problem still continues, check disk
permissions for the WebSphere
Application Server process, also
check the detailed exception message
below this error massage in the log
file to find the root cause.
168 IBM Lotus Lotus Connections 1.0.1 Installation Guide

Table 18. Lotus Connections error messages with codes (continued)
Message Cause Solution
CLFRL0092E An error occurred while
releasing the write lock during a
rollback
Dogear runs the indexing service as a
background task. The task requires a
write lock to ensure exclusive write
access to the index file. This error is
encountered if an unexpected
exception occurs when trying to
release the write lock during a
rollback.
No action is required if this error
does not persist. If this error persists,
you may need to stop the effected
node, delete the file by hand, and
restart the node. This file is located in
the same directory as your full text
index. See the Administering Lotus
Connections section of the
information center for help
determining that location. If the
problem still persists, check disk
permissions for the WebSphere
Application Server process, also
check the detailed exception message
below this error massage in the log
file to find the root cause.
CLFRL0093E Error getting
subscription for person: <person>
This error is encountered if an
unexpected SQL exception occurs
when trying to get the watchlist for a
specified person.
Check the detailed exception message
below this error message in the log
file to find the root cause and make
sure the database connection is ready.
Use the “Test Connections” in
WebSphere Application Server to
verify the database connection.
CLFRL0095E Internal error
recalculating intranet ranges for url
<url> <message>
This error is encountered if an
unexpected exception occurs when
trying to update the ip address for a
URL in the administrative service.
Check the detailed exception message
below this error massages in the log
file to find the root cause. See the
Administering Lotus Connections
section of the information center for
more details.
CLFRL0096E Error updating
memberid <member_id>
This error is encountered if an
unexpected SQL exception occurs
when trying to update a user’s
member ID in the database.
Check the detailed exception message
below this error message in the log
file to find the root cause and make
sure the database connection is ready.
Use the “Test Connections” in
WebSphere Application Server to
verify the database connection.
CLFRL0097E Error getting links for
urls <url>
This error is encountered if an
unexpected SQL exception occurs
when trying to get links for the
specified URL in the database.
Check the detailed exception message
below this error message in the log
file to find the root cause and make
sure the database connection is ready.
Use the “Test Connections” in
WebSphere Application Server to
verify the database connection.
CLFRL0098W Failed to check
authentication status of <url>
This warning is encountered when
trying to check the authentication
status of the specified URL
If this warning only occurs on some
URLs, then no action is required -
this is normal. If all URLs when
bookmarked are producing this
warning, check that the server can
make outbound HTTP requests. You
may need to setup an outbound
proxy if the server is in a protected
zone.
Chapter 11. Troubleshooting 169

Table 18. Lotus Connections error messages with codes (continued)
Message Cause Solution
CLFRL0101E Error getting link for
person <person>
This error is encountered if an
unexpected SQL exception occurs
when trying to get links for the
specified person in the database.
Check the detailed exception message
below this error message in the log
file to find the root cause and make
sure the database connection is ready.
Use the “Test Connections” in
WebSphere Application Server to
verify the database connection.
CLFRL0102E Error reading file <file> This error is encountered if an
unexpected IO exception occurs
when Dogear is trying to read the
specified file when trying to perform
batch operations in the administrative
service.
Check the detailed exception message
below this error massages in the log
file to find the root cause. Ensure the
administrative process has proper file
permissions. See the Administering
Lotus Connections section of the
information center for more details.
CLFRL0104E Error getting active tag
counts since <since_when>
This error is encountered if an
unexpected SQL exception occurs
when trying to get active tag counts
since the specified time.
Check the detailed exception message
below this error message in the log
file to find the root cause and make
sure the database connection is ready.
Use the “Test Connections” in
WebSphere Application Server to
verify the database connection.
CLFRL0105E Using default icon
cache <favicon_locations>
Dogear stores favicons in the location
which is determined at installation.
This error is encountered when the
favicon store location is not defined
in dogear-config-node.xml. When this
error occurs, Dogear creates temp
favicons store location in the temp
folder.
Open <WAS_Home>\profiles\<profile>\config\cells\<cell>\nodes\<node>\LotusConnections-config\dogear-config-node.xml and
correct the <property
name=″favicon.directory″> values in
<favIconService>
CLFRL0106E An error occurred while
optomizing the ft index during a
commit.
Dogear runs the indexing service as a
background task. This error is
encountered if an unexpected
exception occurs when the index
modifier is optimizing the full text
indexing during a commit.
No action is required if this error
does not persist. If this error
continues, you may check the
detailed exception message below
this error massages in the log file to
find the root cause. If restarting the
feature does not resolve and the
index appears corrupt or is unusable
you may use the Dogear
administrative service to reset the
indexing task. See the Administering
Lotus Connections section of the
information center for more details.
CLFRL0107E ip address <ip_addr> is
an unkown or invalid host
Dogear has different behavior on
intranet bookmarks and on internet
bookmarks. The ip range for intranet
is defined in dogear-config-cell.xml.
This error is encountered if any ip
address in the ip range definition is
not a valid host .
Open <WAS_Home>\profiles\<profile>\config\cells\<cell>\LotusConnections-config\dogear-config-cell.xml and correct the values
in <privateIntranetAllocationTable>
170 IBM Lotus Lotus Connections 1.0.1 Installation Guide

Table 18. Lotus Connections error messages with codes (continued)
Message Cause Solution
CLFRL0109W Failed to run import
job.
This warning is encountered if an
unexpected exception occurs when
running job to import browser
bookmarks.
If this warning only occurs on some
browser import actions, then no
action is required. It is likely the user
imported an invalid bookmark file.
Check the detailed exception message
below this error message in the log
file to find the root cause.
CLFRL0110E Error getting active
links
This error is encountered if an
unexpected SQL exception occurs
when trying to get active links in the
database.
Check the detailed exception message
below this error message in the log
file to find the root cause and make
sure the database connection is ready.
Use the “Test Connections” in
WebSphere Application Server to
verify the database connection.
CLFRL0111E Error creating
subscription (<subscribee>,<tag>) for
person <subscriber>
This error is encountered if an
unexpected SQL exception occurs
when trying to create a watch list
entry to the subscribee on the
specified tag for the subscriber.
Check the detailed exception message
below this error message in the log
file to find the root cause and make
sure the database connection is ready.
Use the “Test Connections” in
WebSphere Application Server to
verify the database connection.
CLFRL0114E Error creating person
<person>
This error is encountered if an
unexpected SQL exception occurs
when trying to insert the person to
the database.
Check the detailed exception message
below this error message in the log
file to find the root cause and make
sure the database connection is ready.
Use the “Test Connections” in
WebSphere Application Server to
verify the database connection.
CLFRL0116E Error getting subscribers
to tag <tag>
This error is encountered if an
unexpected SQL exception occurs
when trying to get watchlist entries
on the specified tag.
Check the detailed exception message
below this error message in the log
file to find the root cause and make
sure the database connection is ready.
Use the “Test Connections” in
WebSphere Application Server to
verify the database connection.
CLFRL0119E Error updating person
<person_id>
This error is encountered if an
unexpected SQL exception occurs
when trying to update the specified
person in the database.
Check the detailed exception message
below this error message in the log
file to find the root cause and make
sure the database connection is ready.
Use the “Test Connections” in
WebSphere Application Server to
verify the database connection.
CLFRL0120EError getting recent tag
counts for person <person>
This error is encountered if an
unexpected SQL exception occurs
when trying to get recent tag counts
for the specified person.
Check the detailed exception message
below this error message in the log
file to find the root cause and make
sure the database connection is ready.
Use the “Test Connections” in
WebSphere Application Server to
verify the database connection.
Chapter 11. Troubleshooting 171

Table 18. Lotus Connections error messages with codes (continued)
Message Cause Solution
CLFRL0123E Failed to initialize
DaoConfig
Dogear uses the IBatis Dao
framework. This error is encountered
if an unexpected exception occurs
when trying to initialize DaoConfig.
The cause may be one of the
following issues:
v Dogear configuration file is
missing or corrupted
v Database connections is not
available
v A downstream error from a
previous initialization problem
Check that directory.profile.xml and
directory.profile.xsd are in
<WAS_Home>\profiles\<profile>\config\cells\<cell>\\LotusConnections-config\ folder and
the files are not corrupted. Check the
database connections. Make sure the
connection works fine by using ″Test
Connections″ function in WebSphere
Application Server. If this is likely a
downstream error, scroll to the top of
the log file after server startup and
identify the first error in the logs.
CLFRL0124E Error getting tag counts
for tags <tags> and person <person>
This error is encountered if an
unexpected SQL exception occurs
when trying to get associated tag
counts for the specified tags and
person.
Check the detailed exception message
below this error message in the log
file to find the root cause and make
sure the database connection is ready.
Use the “Test Connections” in
WebSphere Application Server to
verify the database connection.
CLFRL0125E An exception occurred
while processing background tasks.
will continue on next cycle:
Dogear runs some background tasks
periodically. This error is encountered
if an unexpected exception when
processing a background task, but the
task will continue on next cycle.
No action is required if this error
does not persist. If this error
continues, you may check the
detailed exception message below
this error massages in the log file to
find the root cause.
CLFRL0126E Internal error deleting
link <link>
This error is encountered if an
unexpected exception occurs when
Dogear is trying to delete the
specified link in the administrative
service.
Check the detailed exception message
below this error massages in the log
file to find the root cause. See the
Administering Lotus Connections
section of the information center for
more details.
CLFRL0127E Internal error retrieving
user by email <email>
This error is encountered if an
unexpected exception occurs when
trying to find a person by e-mail
address in the administrative service.
Check the detailed exception message
below this error massages in the log
file to find the root cause. See the
Administering Lotus Connections
section of the information center for
more details.
CLFRL0128E Internal error updating
memberid
This error is encountered if an
unexpected exception occurs when
updating memberids by e-mail in
administrative service.
Check the detailed exception message
below this error massages in the log
file to find the root cause. See the
Administering Lotus Connections
section of the information center for
more details.
CLFRL0130E Error getting active
count
This error is encountered if an
unexpected SQL exception occurs
when trying to get active count in the
database.
Check the detailed exception message
below this error message in the log
file to find the root cause and make
sure the database connection is ready.
Use the “Test Connections” in
WebSphere Application Server to
verify the database connection.
172 IBM Lotus Lotus Connections 1.0.1 Installation Guide

Table 18. Lotus Connections error messages with codes (continued)
Message Cause Solution
CLFRL0133E Internal error deleting
link from file <file>
This error is encountered if an
unexpected exception occurs when
Dogear is trying to delete link from
the specified file in the administrative
service.
Check the detailed exception message
below this error massages in the log
file to find the root cause. See the
Administering Lotus Connections
section of the information center for
more details.
CLFRL0137E Error getting link for id
<link_id>
This error is encountered if an
unexpected SQL exception occurs
when trying to get a link with the
specified ID in the database.
Check the detailed exception message
below this error message in the log
file to find the root cause and make
sure the database connection is ready.
Use the “Test Connections” in
WebSphere Application Server to
verify the database connection.
CLFRL0138E Internal error updating
url <url> from file <message>
This error is encountered if an
unexpected exception occurs when
trying to update the ip address for a
URL or update its intranet/internet
status in the administrative service.
Check the detailed exception message
below this error massages in the log
file to find the root cause. See the
Administering Lotus Connections
section of the information center for
more details.
CLFRL0139E Error getting tag counts
for person <person>
This error is encountered if an
unexpected SQL exception occurs
when trying to get tag counts for the
specified person.
Check the detailed exception message
below this error message in the log
file to find the root cause and make
sure the database connection is ready.
Use the “Test Connections” in
WebSphere Application Server to
verify the database connection.
CLFRL0141E Error deleting link by
person and url <message>
This error is encountered if an
unexpected exception occurs when
Dogear is trying to delete link by
person and URL in the administrative
service.
Check the detailed exception message
below this error massages in the log
file to find the root cause. See the
Administering Lotus Connections
section of the information center for
more details.
CLFRL0142E Error loading jndi
context for databse resource
Dogear loads JNDI context for
database resource at startup. This
error is encountered if the Dogear
fails to load JNDI.
Login to WebSphere Application
Server Integrated Solutions Console
and verify the JNDI configure for
Dogear. If settings previously
worked, check for an expired
password or locked db administrative
account. Use the ″Test Connections″
in WebSphere Application Server to
verify the database connection.
CLFRL0144E An error occurred while
closing the index modifier during a
rollback
Dogear runs the indexing service as a
background task. This error is
encountered if an unexpected
exception occurs when trying to close
the index modifier during a rollback.
No action is required if this error
does not persist. If this error
continues, you may check the
detailed exception message below
this error massages in the log file to
find the root cause. If restarting the
feature does not resolve and the
index appears corrupt or is unusable
you may use the Dogear
administrative service to reset the
indexing task. See the Administering
Lotus Connections section of the
information center for more details.
Chapter 11. Troubleshooting 173

Table 18. Lotus Connections error messages with codes (continued)
Message Cause Solution
CLFRL0145E Error retrieving search
result links <link_ids>
This error is encountered if an
unexpected SQL exception occurs
when trying to get search result links
with the specified link ids.
Check the detailed exception message
below this error message in the log
file to find the root cause and make
sure the database connection is ready.
Use the “Test Connections” in
WebSphere Application Server to
verify the database connection.
CLFRL0147E Error getting url for:
<url>
This error is encountered if an
unexpected SQL exception occurs
when trying to retrieve a URL object
by URL string.
Check the detailed exception message
below this error message in the log
file to find the root cause and make
sure the database connection is ready.
Use the “Test Connections” in
WebSphere Application Server to
verify the database connection.
CLFRL0148E An error occurred while
processing background tasks.
Aborting.
Dogear runs some background tasks
periodically. This error is encountered
if an unexpected exception when
processing a background task. The
task is aborted.
Check the detailed exception message
below this error massages in the log
file to find the root cause.
CLFRL0151W An error occurred
loading a task, skipping.
Dogear runs a background link
processing task periodically. This
error is encountered if the implement
class for this task can not be loaded.
This value should never change from
the default value shipped with the
product. Open <WAS_Home>\profiles\<profile>\config\cells\<cell>\nodes\<node>\LotusConnections-config\dogear-config-node.xml and check the value
of class attribute of <task> in
<linkProcessingTasks> to see if it was
modified from the default value.
CLFRL0153E Error creating link for
person <person> and url <url>
This error is encountered if an
unexpected SQL exception occurs
when trying to create a link for the
specified person with the specified
URL in the database.
Check the detailed exception message
below this error message in the log
file to find the root cause and make
sure the database connection is ready.
Use the “Test Connections” in
WebSphere Application Server to
verify the database connection.
CLFRL0154E Verbiage size of
<length> or html verbiage size of
<length> was too large when creating
a link for user <person> for <url>
This error is encountered if the
verbiage length exceeds the
maximum length threshold when
trying to create a link for the
specified user.
Not Available
CLFRL0155E Error getting url
intersection counts for people who
have same url as <person>
This error is encountered if an
unexpected SQL exception occurs
when trying to get URL intersection
counts for people who have same
URL as the person.
Check the detailed exception message
below this error message in the log
file to find the root cause and make
sure the database connection is ready.
Use the “Test Connections” in
WebSphere Application Server to
verify the database connection.
174 IBM Lotus Lotus Connections 1.0.1 Installation Guide

Table 18. Lotus Connections error messages with codes (continued)
Message Cause Solution
CLFRL0157E Unable to get ATOM
payload from servlet request
Dogear was unable to retrieve the
payload from a PUT or POST request
from the Atom Publishing API.
No action is required if this error
does not persist. The requesting client
will receive an error 400 code
notifying that it sent a bad request. If
this error continues, it is likely that a
client continues to send bad requests.
Examine the HTTP server logs to
determine the source of the requests
and report the problem to the
application developer creating these
requests.
CLFRL0158E Error getting person
from directory profile for email {0}
Dogear uses Waltz to retrieve person
information from LDAP server. This
error is encountered if an unexpected
exception occurs when trying to get
person from directory profile with
the specified e-mail address.
Check the detailed exception message
below this error message in the log
file to find the root cause and make
sure the connection to LDAP server
is available and the signer certificate
is valid. See the Administering Lotus
Connections section of the
information center for more details.
CLFRL0159EError getting person
from directory profile for email
<email>
Dogear uses Waltz to retrieve person
information from LDAP server. This
error is encountered if an unexpected
exception occurs when trying to get
person from directory profile with
the specified e-mail address.
Check the detailed exception message
below this error message in the log
file to find the root cause and make
sure the connection to LDAP server
is available and the signer certificate
is valid. See the Administering Lotus
Connections section of the
information center for more details.
CLFRL0160E Internal error with task
reset <message>
This error is encountered if an
unexpected exception occurs when
Dogear is trying to reset a task in the
administrative service.
Check the detailed exception message
below this error massages in the log
file to find the root cause. See the
Administering Lotus Connections
section of the information center for
more details.
CLFRL0163EError getting link count
for url <url>
This error is encountered if an
unexpected SQL exception occurs
when trying to get link count for the
specified URL in the database.
Check the detailed exception message
below this error message in the log
file to find the root cause and make
sure the database connection is ready.
Use the “Test Connections” in
WebSphere Application Server to
verify the database connection.
CLFRL0165E An error occurred while
obtaining a write lock.
Dogear runs the indexing service as a
background task. The task requires a
write lock to ensure exclusive write
access to the index file. This error is
encountered if an unexpected
exception occurs when trying to
write this file.
No action is required if this error
does not persist. If the error
continues, check disk permissions for
the WebSphere Application Server
process, also check the detailed
exception message below this error
massages in the log file to find the
root cause.
CLFRL0168W The value for property
<property_name> in the link
processing service config was not an
integer, skipping config param
Dogear runs a background link
processing task periodically. Dogear
defines the task running parameters
in configure files. This error is
encountered if the value of an integer
property is not an integer.
Open <WAS_Home>\profiles\<profile>\config\cells\<cell>\nodes\<node>\LotusConnections-config\dogear-config-node.xml and
correct the values in
<linkProcessingTasks>
Chapter 11. Troubleshooting 175

Table 18. Lotus Connections error messages with codes (continued)
Message Cause Solution
CLFRL0170E Error deleting links
prior to <date>
This error is encountered if an
unexpected SQL exception occurs
when trying to delete links prior to
the specified date from the database.
Check the detailed exception message
below this error message in the log
file to find the root cause and make
sure the database connection is ready.
Use the “Test Connections” in
WebSphere Application Server to
verify the database connection.
CLFRL0173E Error getting all people This error is encountered if an
unexpected SQL exception occurs
when trying to get all person in the
database.
Check the detailed exception message
below this error message in the log
file to find the root cause and make
sure the database connection is ready.
Use the “Test Connections” in
WebSphere Application Server to
verify the database connection.
CLFRL0174W Failed to get URL
string: <url_string>
This warning is encountered if the
server is having trouble resolving
URL redirects.
If this warning only occurs on some
URLs, then no action is required -
this is normal. If all URLs when
bookmarked are producing this
warning, check that the server can
make outbound HTTP requests. You
may need to setup an outbound
proxy if the server is in a protected
zone.
CLFRL0177E Error getting most
active person counts since
<since_when>
This error is encountered if an
unexpected SQL exception occurs
when trying to list the most active
Dogear users in the database.
Check the detailed exception message
below this error message in the log
file to find the root cause and make
sure the database connection is ready.
Use the “Test Connections” in
WebSphere Application Server to
verify the database connection.
CLFRL0178E Internal error retrieving
url
This error is encountered if an
unexpected exception occurs when
trying to get a URL in the
administrative service.
Check the detailed exception message
below this error massages in the log
file to find the root cause. See the
Administering Lotus Connections
section of the information center for
more details.
CLFRL0179E Error getting inbox link
count for subscriptions
<subscriptions>
This error is encountered if an
unexpected SQL exception occurs
when trying to get a link count for a
user’s watchlist in the database.
Check the detailed exception message
below this error message in the log
file to find the root cause and make
sure the database connection is ready.
Use the “Test Connections” in
WebSphere Application Server to
verify the database connection.
CLFRL0181E Error init Dogear
config.
This error is encountered if Dogear is
unable to properly load all required
configuration files.
Check the detailed exception message
of the exception. It will show which
configuration file is corrupted or
missing. Edit the configure file to fix
the error. See the Administering
Lotus Connections section of the
information center for more details.
176 IBM Lotus Lotus Connections 1.0.1 Installation Guide

Table 18. Lotus Connections error messages with codes (continued)
Message Cause Solution
CLFRL0182E Error getting person
counts for tag intersection <tags> and
person <person>
This error is encountered if an
unexpected SQL exception occurs
when trying to get person counts for
tag intersection for the specified
person with the specified tags.
Check the detailed exception message
below this error message in the log
file to find the root cause and make
sure the database connection is ready.
Use the “Test Connections” in
WebSphere Application Server to
verify the database connection.
CLFRL0183E Error getting person
profile from ldap for id: <login_id>
Dogear uses Waltz to retrieve person
information from LDAP server. This
error is encountered if an unexpected
exception occurs when trying to get
person profile from directory profile
with the specified login ID.
Check the detailed exception message
below this error message in the log
file to find the root cause and make
sure the connection to LDAP server
is available and the signer certificate
is valid. See the Administering Lotus
Connections section of the
information center for more details.
CLFRL0185E Attempt by <user> to
update or delete <person>
This error is encountered when a
user is trying to update or delete an
entry form another user’s watchlist
This action is not allowed and the
entry will not change. If it is a
malicious user, you can contact or
restrict the user.
CLFRL0186E Error getting link for
person <person> and url <url>
This error is encountered if an
unexpected SQL exception occurs
when trying to get a link for a
specified user with a specified URL
in the database.
Check the detailed exception message
below this error message in the log
file to find the root cause and make
sure the database connection is ready.
Use the “Test Connections” in
WebSphere Application Server to
verify the database connection.
CLFRL0187E An error occurred
reloading the search index during a
commit
Dogear runs the indexing service as a
background task. This error is
encountered if an unexpected
exception occurs when reloading the
index searcher during a commit.
No action is required if this error
does not persist. If this error
continues, you may check the
detailed exception message below
this error massages in the log file to
find the root cause. If restarting the
feature does not resolve and the
index appears corrupt or is unusable
you may use the Dogear
administrative service to reset the
indexing task. See the Administering
Lotus Connections section of the
information center for more details.
CLFRL0190E An error occurred
creating a lockfile <file> -
<error_message>
This error is encountered if an
unexpected IO exception occurs
when trying to create the lock file.
No action is required if this error
does not persist. If the problem still
continues, check disk permissions for
the WebSphere Application Server
process, also check the detailed
exception message below this error
massages in the log file to find the
root cause.
CLFRL0191E Internal error retrieving
batch from database <message>
This error is encountered if an
unexpected exception occurs when
retrieving a batch of URLs when
trying to updated their ip addresses
or update their intranet/internet
settings in administrative service.
Check the detailed exception message
below this error massages in the log
file to find the root cause. See the
Administering Lotus Connections
section of the information center for
more details.
Chapter 11. Troubleshooting 177

Table 18. Lotus Connections error messages with codes (continued)
Message Cause Solution
CLFRL0193E Error getting tag counts
for subscriptions <subscriptions>
This error is encountered if an
unexpected SQL exception occurs
when trying to get tag counts for the
specified watchlist entries.
Check the detailed exception message
below this error message in the log
file to find the root cause and make
sure the database connection is ready.
Use the “Test Connections” in
WebSphere Application Server to
verify the database connection.
CLFRL0196E Error getting union link
count for tags <tags> and person
<person>
This error is encountered if an
unexpected SQL exception occurs
when trying to get union link count
for the specified tags for the specified
person in the database.
Check the detailed exception message
below this error message in the log
file to find the root cause and make
sure the database connection is ready.
Use the “Test Connections” in
WebSphere Application Server to
verify the database connection.
CLFRL0197W Unable to generate
UTF-8 bytes.
This error is encountered if Dogear
can not convert the input strings to
UTF-8 encoded bytes. Dogear will
use default encoding to convert the
strings.
Check the encoding settings of the
system and make sure UTF-8 is
supported by the system.
CLFRL0198E Error getting links This error is encountered if an
unexpected SQL exception occurs
when trying to get links in the
database.
Check the detailed exception message
below this error message in the log
file to find the root cause and make
sure the database connection is ready.
Use the “Test Connections” in
WebSphere Application Server to
verify the database connection.
CLFRL0201E An error occurred while
shutting down index searcher for
<index_directory>
Dogear runs the indexing service as a
background task. This error is
encountered if an unexpected
exception occurs when shutting
down the index searcher from the
specified directory.
No action is required if this error
does not persist. If this error
continues, you may check the
detailed exception message below
this error massages in the log file to
find the root cause. If restarting the
feature does not resolve and the
index appears corrupt or is unusable
you may use the Dogear
administrative service to reset the
indexing task. See the Administering
Lotus Connections section of the
information center for more details.
CLFRL0216E Internal error
reprocessing intranet address for url
<url> <message>
This error is encountered if an
unexpected exception occurs when
reprocessing intranet address for URL
in administrative service.
Check the detailed exception message
below this error massages in the log
file to find the root cause. See the
Administering Lotus Connections
section of the information center for
more details.
CLFRL0219W Authorization failed
for <user> while invoking <method>
on <servlet_path>, not granted any of
the required roles: <role>
This warning is encountered if basic
authentication succeeds but the user
is not authorized to use the Dogear
feature.
Not Available
CLFRL0220W Basic Authentication
failed for <user> while invoking
<method> on <servlet_path>
This warning is encountered if basic
authentication fails for the user. This
is usually a wrong username or
password.
Not Available
178 IBM Lotus Lotus Connections 1.0.1 Installation Guide
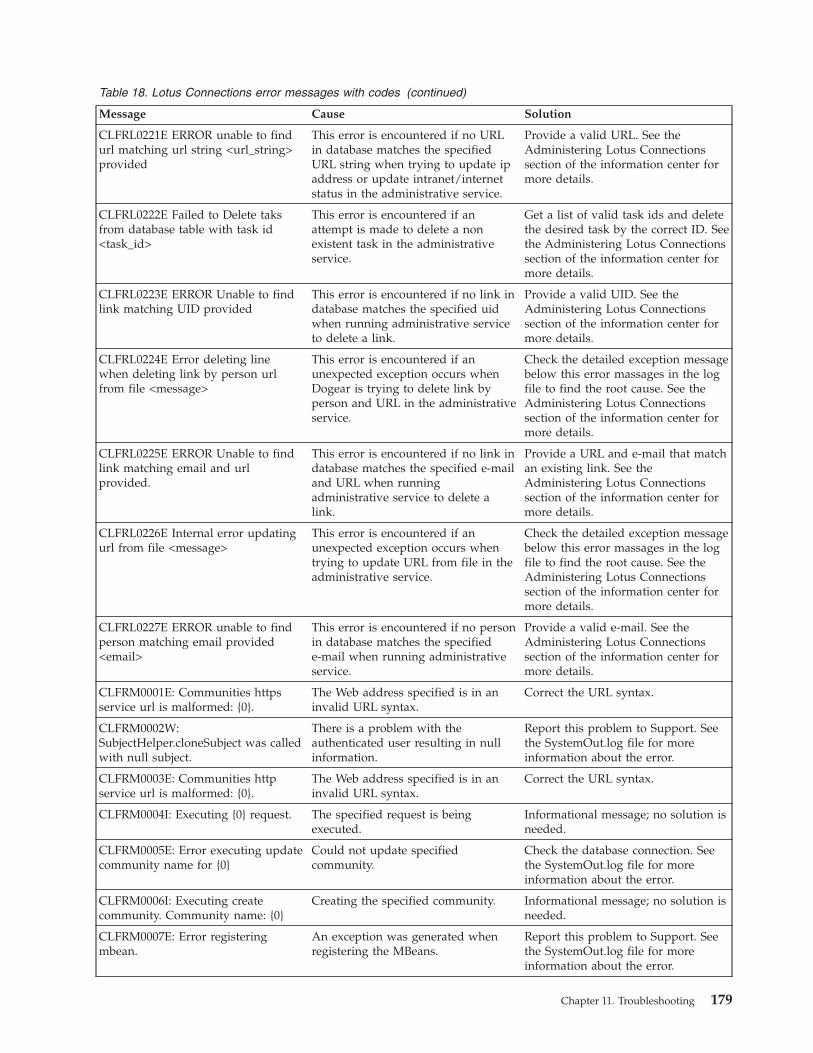
Table 18. Lotus Connections error messages with codes (continued)
Message Cause Solution
CLFRL0221E ERROR unable to find
url matching url string <url_string>
provided
This error is encountered if no URL
in database matches the specified
URL string when trying to update ip
address or update intranet/internet
status in the administrative service.
Provide a valid URL. See the
Administering Lotus Connections
section of the information center for
more details.
CLFRL0222E Failed to Delete taks
from database table with task id
<task_id>
This error is encountered if an
attempt is made to delete a non
existent task in the administrative
service.
Get a list of valid task ids and delete
the desired task by the correct ID. See
the Administering Lotus Connections
section of the information center for
more details.
CLFRL0223E ERROR Unable to find
link matching UID provided
This error is encountered if no link in
database matches the specified uid
when running administrative service
to delete a link.
Provide a valid UID. See the
Administering Lotus Connections
section of the information center for
more details.
CLFRL0224E Error deleting line
when deleting link by person url
from file <message>
This error is encountered if an
unexpected exception occurs when
Dogear is trying to delete link by
person and URL in the administrative
service.
Check the detailed exception message
below this error massages in the log
file to find the root cause. See the
Administering Lotus Connections
section of the information center for
more details.
CLFRL0225E ERROR Unable to find
link matching email and url
provided.
This error is encountered if no link in
database matches the specified e-mail
and URL when running
administrative service to delete a
link.
Provide a URL and e-mail that match
an existing link. See the
Administering Lotus Connections
section of the information center for
more details.
CLFRL0226E Internal error updating
url from file <message>
This error is encountered if an
unexpected exception occurs when
trying to update URL from file in the
administrative service.
Check the detailed exception message
below this error massages in the log
file to find the root cause. See the
Administering Lotus Connections
section of the information center for
more details.
CLFRL0227E ERROR unable to find
person matching email provided
<email>
This error is encountered if no person
in database matches the specified
e-mail when running administrative
service.
Provide a valid e-mail. See the
Administering Lotus Connections
section of the information center for
more details.
CLFRM0001E: Communities https
service url is malformed: {0}.
The Web address specified is in an
invalid URL syntax.
Correct the URL syntax.
CLFRM0002W:
SubjectHelper.cloneSubject was called
with null subject.
There is a problem with the
authenticated user resulting in null
information.
Report this problem to Support. See
the SystemOut.log file for more
information about the error.
CLFRM0003E: Communities http
service url is malformed: {0}.
The Web address specified is in an
invalid URL syntax.
Correct the URL syntax.
CLFRM0004I: Executing {0} request. The specified request is being
executed.
Informational message; no solution is
needed.
CLFRM0005E: Error executing update
community name for {0}
Could not update specified
community.
Check the database connection. See
the SystemOut.log file for more
information about the error.
CLFRM0006I: Executing create
community. Community name: {0}
Creating the specified community. Informational message; no solution is
needed.
CLFRM0007E: Error registering
mbean.
An exception was generated when
registering the MBeans.
Report this problem to Support. See
the SystemOut.log file for more
information about the error.
Chapter 11. Troubleshooting 179

Table 18. Lotus Connections error messages with codes (continued)
Message Cause Solution
CLFRM0008E: Error executing
remove tags from {0}.
Could not remove tags from specified
community.
Check the database connection. See
the SystemOut.log file for more
information about the error.
CLFRM0009E: Unknown role
assignment in createCommunity call:
role must be either OWNER or
MEMBER.
Invalid role parameter used in
administrative command.
Correct the syntax and retry the
command.
CLFRM0010I: Executing add
members to {0}
Adding members to the specified
community.
Informational message; no solution is
needed.
CLFRM0011E: Error initializing
Communities JMX support: failed to
register {0}
The Web address specified is in an
invalid URL syntax.
Correct the URL syntax.
CLFRM0012I: Executing remove tags
from {0}
Executing the specified command. Informational message; no solution is
needed.
CLFRM0013E: Error purging index An error occurred while purging the
full text index.
Shut down and restart the server. If
the error persists, report this problem
to Support.
CLFRM0014E: Error locating
MBeanServer, no Community
Administration MBeans registered
An exception was generated when
locating the MBean server needed to
register the MBeans.
Report this problem to Support. See
the SystemOut.log file for more
information about the error.
CLFRM0015E: User {0} was not
found.
The specified user was not found in
the directory. The command cannot
be executed.
Check the spelling of the user name
and the directory configuration.
CLFRM0016E: Error executing {0} There was an error executing the
specified request.
Report this problem to Support. See
the SystemOut.log file for more
information about the error.
CLFRM0017E: Error executing update
community description for {0}
The description of the specified
community could not be updated.
Check the database connection. See
the SystemOut.log file for more
information about the error.
CLFRM0018I: Executing update
community name. Changing {0} to {1}
Updating community name as
specified.
Informational message; no solution is
needed.
CLFRM0019E: Error initiating
indexing operation
An error initializing the full text
index.
Shut down and restart the server. If
the error persists, report this problem
to Support.
CLFRM0020E: Error executing add
members to {0}
Could not add members to specified
community.
Check the database connection. See
the SystemOut.log file for more
information about the error.
CLFRM0021E: Error executing
remove references by URI from {0}.
Could not remove references from
specified community.
Check the database connection. See
the SystemOut.log file for more
information about the error.
CLFRM0022E: Error executing create
community. Community name: {0}
Could not create a community with
specified name.
Check the database connection. See
the SystemOut.log file for more
information about the error.
CLFRM0023I: Executing start
indexing request.
The index is being started. Informational message; no solution is
needed.
CLFRM0024I: Executing remove
references by URI from {0}
Removing requested references from
specified community.
Informational message; no solution is
needed.
CLFRM0025I: Executing purge index
request.
The index is being purged. Informational message; no solution is
needed.
180 IBM Lotus Lotus Connections 1.0.1 Installation Guide

Table 18. Lotus Connections error messages with codes (continued)
Message Cause Solution
CLFRM0026I: Executing update
community description for {0}
The community description is being
updated.
Informational message; no solution is
needed.
CLFRM0027E: Community not found:
{0}
The community specified was not
found.
Informational message; no solution is
needed.
CLFRM0028E: Cannot create
reference with duplicate URI: {0}
Cannot create a reference with the
specified name.
A reference with the specified name
already exists within this community
and cannot be duplicated. Please
select a different name and execute
the command again.
CLFRM0029I: Finished writing index
at: {0}
The full text index task finished
updating the index at the specified
time.
Informational message; no solution is
needed.
CLFRM0030E: Error: Index may be
corrupted. Please re-run the indexing
task to build a new index.
The full text index may be corrupted.
Full text search will not function.
Use the administrative tasks to purge
and reload the index.
CLFRM0031E: Error retrieving
IndexWriter
The server cannot update the full text
index.
If the error persists, stop, and then
restart the server.
CLFRM0032E: Error deleting
community documents from the
index.
The server was unable to delete the
documents from the full text index.
Try again to delete the documents or
use the administrative tasks to purge
and reload the full text index.
CLFRM0033I: Initializing
Communities Management
The communities management
feature is initializing.
Informational message; no solution is
needed.
CLFRM0034E: Error writing last
update to {0}
The server encountered an error
when writing the full text index last
update time to the file system.
If the error persists, stop and then
restart the server.
CLFRM0035I: Full-text search was
started at: {0}
The full text search was started at the
specified time.
Informational message; no solution is
needed.
CLFRM0036E: Unable to find
reference with id: {0}
A reference with the specified
identifier was not found.
Check the parameter value and try
again. If the problem persists, check
the database connection. See the
SystemOut.log file for more
information about the error.
CLFRM0037E: User is not authorized
to perform the indexing task on
communities
The indexing task is not running
under an authorized user account.
Stop and then restart the server. If
the error persists, report the problem
to Support.
CLFRM0038E: Error retrieving the
last update from {0}
The server encountered an error
when retrieving the full text index
last update time from the file system.
If the error persists, stop and then
restart the server.
CLFRM0039E: internal error An internal error has occurred. See the SystemOut.log file for more
information about the error.
CLFRM0040I: Starting to write the
index at: {0}
The full text index task started to
update the index at the specified
time.
Informational message; no solution is
needed.
CLFRM0041E: Unable to find
community with id: {0}
The community with the specified
identifier was not found.
Check the parameter value and try
again. If the problem persists, check
the database connection. See the
SystemOut.log file for more
information about the error.
CLFRM0042E: Schema Version
Mismatch
The database schema does not match
the feature version.
Upgrade the database using the
specified procedure.
Chapter 11. Troubleshooting 181

Table 18. Lotus Connections error messages with codes (continued)
Message Cause Solution
CLFRM0043E: Cannot create
community with duplicate name: {0}
Cannot create a community with the
specified name.
A community with the specified
name already exists and cannot be
duplicated. Please select a different
name and execute the command
again.
CLFRM0044E: Error retrieving the
full-text index. Stopping scheduled
full-text indexing for Communities.
The server could not initialize the full
text indexing service. The indexing
service is disabled.
Stop, and then restart the server. If
the error persists, report the problem
to Support.
CLFRM0045E: Error parsing the
search query
The search query syntax was invalid. Correct the syntax and issue the
command again.
CLFRM0046I: Stopping Communities
Management
The communities management
feature is stopping.
Informational message; no solution is
needed.
CLFRM0047E: User passed NULL
directory member profile to
getCurrentMemberProfile() method.
The member profile parameter is
invalid; a non-null value is required.
Specify appropriate parameters for
the request.
CLFRM0048E: Error retrieving
communities for indexing.
An error occurred searching the full
text index.
Stop and then restart the server. If
the error persists, report the problem
to Support.
CLFRM0049E: NOT IMPLEMENTED This function is not implemented. See the SystemOut.log file for more
information about the error.
CLFRN1001E: Exception raised while
intializing resource caching service
name <cache service>: <exception>
The server encountered an error
while initializing the resource caching
service.
Report this problem to Support.
CLFRN1002E: Initialization options
for resource RSIVD do not contain
’resourceIdRequestParameter’
specification.
The server encountered an error in
the reverse proxy filter.
Report this problem to Support.
CLFRN1007I: Unknown invalidator
type: <invalidator type>.
The reverse proxy filter does not
understand the invalidator type.
Check the type.
CLFRN1008I: Invalid time to live
value: <time to live>.
The reverse proxy filter does not
understand the time to live value.
Check the value.
CLFRN1009E: Exception raised while
accessing cache service for id <id>:
<exception>
The server encountered an error
when accessing the cache service.
Report this problem to Support.
CLFRN1010W: Unable to find config
file <file>.
The server cannot find the reverse
proxy configuration file.
Make sure the configuration file is
present and valid.
CLFRN1011E: Exception raised while
parsing config file (<file>):
<exception>.
There is a problem with the reverse
proxy configuration file.
Report this problem to Support.
CLFRN1013E: Exception raised while
retrieving resource id: <id>:
<exception>
The server encountered an error
when attempting to retrieve the
resource.
Check the database connection.
CLFRN1014I: Unknown response
setter type: <type>.
The server does not understand the
response setter type.
Informational message; no solution is
needed.
CLFRN1016I: Matching string
[<string>], request headers are:
<headers>.
The reverse proxy filter found a
match. The request headers are as
specified.
Informational message; no solution is
needed.
CLFRN1057E: An error occurred
querying the employee table
The server could not retrieve data
from the EMPLOYEE table.
Check the database connection.
182 IBM Lotus Lotus Connections 1.0.1 Installation Guide

Table 18. Lotus Connections error messages with codes (continued)
Message Cause Solution
CLFRN1058I: MiniReportChainCache
size = <size>
The mini report to chain cache is of
the specified size.
Informational message; no solution is
needed.
CLFRN1059I: Loading
MiniReportChainCache from file
The server is loading the mini report
to chain cache from the file.
Informational message; no solution is
needed.
CLFRN1060E: An error occurred
querying the photo table
The server could not retrieve the
image from the PHOTO table.
Check the database connection.
CLFRN1061E: An error occurred
deleting the profile tag
The server could not delete the tag
from the PEOPLE_TAG table.
Check the database connection.
CLFRN1062E: An error occurred
querying the employee type table
The server could not retrieve data
from the EMP_TYPE table.
Check the database connection.
CLFRN1063E: An error occurred
deleting the pronunciation file
The server could not delete the audio
file from the PRONUNCIATION
table.
Check the database connection.
CLFRN1064E: An error occurred
querying the database
The server could not retrieve data
from the database.
Check the database connection.
CLFRN1065E: Error retrieving
IndexWriter
The server cannot update the full text
index.
If the error continues, shut down the
server and restart.
CLFRN1066E: An error occurred
querying the organization table
The server could not retrieve data
from the ORGANIZATION table.
Check the database connection.
CLFRN1067E: An error occurred
inserting the pronunciation file
The server could not insert the audio
file into the PRONUNCIATION table.
Check the database connection.
CLFRN1068E: An error occurred
querying the work location table
The server could not retrieve data
from the WORKLOC table.
Check the database connection.
CLFRN1069E: An error occurred
inserting the photo
The server could not insert the photo
into the PHOTO table.
Check the database connection.
CLFRN1070I: Elapsed time to load
FullRprtToChainCache: <time>
The full reports to chain cache was
loaded in the specified amount of
time.
Informational message; no solution is
needed.
CLFRN1071I:
FullReportsToChainCache disabled
The full reports to chain cache is
disabled.
Informational message; no solution is
needed.
CLFRN1072I:
MiniReportsToChainCache disabled
The mini reports to chain cache is
disabled.
Informational message; no solution is
needed.
CLFRN1073I: Full reporting chain
cache size = <size>
The full reports to chain cache has
the specified number of entries.
Informational message; no solution is
needed.
CLFRN1074E: An error occurred
querying the profiles extensions table
The server could not retrieve data
from the PROFILE_EXTENSIONS
table.
Check the database connection.
CLFRN1075E: An error occurred
updating the employee record
The server could not update the
profile in the EMPLOYEE table.
Check the database connection.
CLFRN1076I: Elapsed time to load
MiniRprtToChainCache: <time>
The server took the specified time to
load the mini reports to chain cache.
Informational message; no solution is
needed.
CLFRN1077I: <number> entries
expected in MiniReportChainCache
The configuration indicates the
specified number of entries expected
in the mini reports to chain cache.
Informational message; no solution is
needed.
CLFRN1078E: An error occurred
updating the profile tags
The server could not update the tag
in the PEOPLE_TAG table.
Check the database connection.
Chapter 11. Troubleshooting 183

Table 18. Lotus Connections error messages with codes (continued)
Message Cause Solution
CLFRN1079E: Error creating or
retrieving PeopleIndexFactory
implementation class
The server could not connect to the
full text indexing service. Full text
search will not function properly.
Shut down the server and restart. If
the error continues, report this
problem to service.
CLFRN1080E: Error retrieving
lastUpdate from {0} : String is not
formatted correctly: yyyy-mm-dd
The full text index last update value
saved to the file system has an
invalid format.
If the error continues, use the
administrative tasks to purge and
reload the full text index.
CLFRN1081E: failed on parsing The server failed to parse the mini
report to chain cache file.
Use the administrative tasks to force
a reload of the cache or shut down
the server and restart.
CLFRN1082E: An error occurred
updating the photo
The server could not update the
photo in the PHOTO table.
Check the database connection.
CLFRN1083E: An error occurred
deleting the photo
The server could not delete the photo
from the PHOTO table.
Check the database connection.
CLFRN1084E: Error retrieving
PeopleIndex. Stopping Indexing
schedule. Disabling full-text indexing.
The server could not initialize the full
text indexing service. The indexing
service is disabled.
Shut down and restart the server. If
the error continues, report this
problem to Support.
CLFRN1085I: FullTextIndexingTask
completed at <time>
The full text index finished reloading
at the specified time.
Informational message; no solution is
needed.
CLFRN1086E: Error searching
full-text index.
An error occurred searching the full
text index.
Shut down and restart the server. If
the error continues, report this
problem to Support.
CLFRN1087E: FAILED: Reports to
chain reload: <error>
The server failed to reload the reports
to chain cache.
Use the administrative tasks to force
a reload of the cache or shut down
the server and restart.
CLFRN1088E: Error creating or
retrieving PeopleIndexFactory
implementation class. Skipping
full-text search
An error occurred connecting to the
full text index. The full text search
was skipped.
Shut down and restart the server.
CLFRN1089E: An error occurred
querying the pronunciation table
The server could not retrieve the
audio file from the
PRONUNCIATION table.
Check the database connection.
CLFRN1090E: An error occurred
querying the country table
The server could not retrieve data
from the COUNTRY table.
Check the database connection.
CLFRN1091E: Error with the active
content filter
An error occurred when filtering
content entered by a user. The
content was not filtered and was
stored as entered by the user.
If the error continues, report the
problem to Support.
CLFRN1092E: An error occurred
updating the pronunciation file
The server could not delete the audio
file from the PRONUNCIATION
table.
Check the database connection.
CLFRN1093E: Error retrieving
IndexReader
The server can not read the full text
index. Full text search may not
function properly.
Shut down the server and restart.
CLFRN1094E: An error occurred
querying the draft table
The server could not retrieve data
from the EMP_DRAFT table.
Check the database connection.
CLFRN1095I: Reading in reports to
chain data from <file>
The server is loading the mini reports
to chain cache from the specified file.
Informational message; no solution is
needed.
CLFRN1096I: Loading
MiniReportChainCache from DB
The server is loading the mini reports
to chain cache from the database.
Informational message; no solution is
needed.
184 IBM Lotus Lotus Connections 1.0.1 Installation Guide

Table 18. Lotus Connections error messages with codes (continued)
Message Cause Solution
CLFRN1097I:
MiniReportsToChainCache enabled
The mini reports to chain cache is
enabled.
Informational message; no solution is
needed.
CLFRN1098E: An error occurred
inserting the profile tag
The server could not insert the tag
into the PEOPLE_TAG table.
Check the database connection.
CLFRN1099I: Organizational
Structure functions are enabled. Init
Report to chain caches if enabled.
Organization structure features are
enabled in the configuration. If the
report to chain caches are enabled
they will be initialized.
Informational message; no solution is
needed.
CLFRN1100I: MiniReportChainCache
will be initialized to <size>
The server is initializing the mini
report to chain cache to the specified
size.
Informational message; no solution is
needed.
CLFRN1101I: Elapsed time to write
MiniRprtToChainCache to file:
<time>
The server took the specified amount
of time writing the mini report to
chain cache to the file system.
Informational message; no solution is
needed.
CLFRN1102E: An error occurred
updating the draft profiles extension
The server could not write data into
the PROFILE_EXT_DRAFT table.
Check the database connection.
CLFRN1103E: Error: index may be
corrupted
The full text index may be corrupted.
Full text search will not function.
Use the administrative tasks to purge
and reload the index.
CLFRN1104I:
MiniReportsToChainCache scheduled
for <time>
The mini reports to chain cache is
scheduled to load at the specified
time.
Informational message; no solution is
needed.
CLFRN1105I: FullTextIndexingTask
starting at <time>
The full text index refresh started at
the specified time.
Informational message; no solution is
needed.
CLFRN1106E: Error writing
lastUpdate value to <file>
The server encountered an error
when writing the full text index last
update time to the file system.
If the error continues, shut down and
restart the server.
CLFRN1107E: Error parsing query The server could not parse the full
text query.
Try the search again. If the error
continues, report the problem to
Support.
CLFRN1108I:
FullReportsToChainCache scheduled
for <time>
The full reports to chain cache will be
loaded at the specified time.
Informational message; no solution is
needed.
CLFRN1109E: An error occurred
querying the draft profiles extensions
table
The server could not retrieve data
from the PROFILE_EXT_DRAFT
table.
Check the database connection.
CLFRN1111I:
FullReportsToChainCache enabled
The full reports to chain cache is
enabled.
Informational message; no solution is
needed.
CLFRN1112E: An error occurred
inserting into the draft profiles
extension table
The server could not write data into
the PROFILE_EXT_DRAFT table.
Check the database connection.
CLFRN1113I:
MiniReportsToChainCache file =
<file>
The mini reports to chain cache will
be loaded from the specified file.
Informational message; no solution is
needed.
CLFRN1114E: An error occurred
writing to the draft table
The server could not write data into
the EMP_DRAFT table.
Check the database connection.
CLFRN1115E: An error occurred
updating the profiles extension
The server could not update the data
in the PROFILE_EXTENSIONS table.
Check the database connection.
Chapter 11. Troubleshooting 185

Table 18. Lotus Connections error messages with codes (continued)
Message Cause Solution
CLFRN1116I: Organizational
Structure functions are disabled. Do
not init Report to chain caches.
Organization structure features are
disabled in the configuration. The
report to chain caches will not be
initialized.
Informational message; no solution is
needed.
CLFRN1117E: An error occurred
querying the profile tags table
The server could not retrieve data
from the PEOPLE_TAG table.
Check the database connection.
CLFRN1118I: Error deleting doc The server was unable to delete the
document from the full text index.
Try to delete the document again or
use the administrative tasks to purge
and reload the full text index.
CLFRN1119E: An error occurred
retrieving profile data.
The server was unable retrieve profile
data from the database.
Check the database connection.
CLFRN1120E: An error occurred. The server encountered an error
when processing the Atom request.
Check the logs for more information.
CLFRN1121E: The requested Atom
feed could not be built.
The server encountered an error
when processing the Atom request.
Check the logs for more information.
CLFRN1122E: No parameters were
specified.
The issued request requires
parameters.
See the product documentation for a
listing of valid parameters.
CLFRN1123E: No valid parameters
were specified.
No valid parameters were supplied
with the request.
See the product documentation for a
listing of valid parameters.
CLFRN1124I: ProfileLMCache
enabled
The profile last modified cache is
enabled.
Informational message; no solution is
needed.
CLFRN1125I: ProfileLMCache
disabled
The profile last modified cache is
disabled.
Informational message; no solution is
needed.
CLFRN1126I: ProfileLMCache refresh
scheduled for <time>
The profile last modified cache
refresh is scheduled for the specified
time.
Informational message; no solution is
needed.
CLFRN1127E: Error retrieving
ProfileLMCache.
The server encountered an error with
the profile last modified cache.
Shut down the server and restart.
CLFRO2001E: Error processing config
file: <path>, <filename>
The server encountered an error
while parsing the specified
configuration file.
Ensure that XML configuration files
in the LotusConnections-config
folders are valid.
CLFRO2002E: Unable to find
configuration with id: <config_id>
The server could not retrieve an XML
configuration file with the requested
ID in the LotusConnections-config
folder hierarchy.
Report this problem to Support.
CLFRO2003E: Error processing global
configuration file
The server could not retrieve or
successfully parse a
LotusConnections-config.xml
configuration file from the
LotusConnections-config folder
hierarchy.
Report this problem to Support.
CLFRO2004E: Error: <filename> does
not have an id attribute in its config
element
The specified XML configuration file
does not have a value defined for the
required id attribute of the <config>
element.
Report this problem to Support.
CLFRO2006E: href attribute in
<filename> service element
The specified XML configuration file
does not have a valid value defined
for the href attribute; it should be a
value that can be converted into a
URL.
Update the value of the href
attribute to be a properly formed
URL string.
186 IBM Lotus Lotus Connections 1.0.1 Installation Guide

Table 18. Lotus Connections error messages with codes (continued)
Message Cause Solution
CLFRO2009E: Entry for service
<service_name> does not exist in
global config file <file_name>
The global configuration file does not
have a service reference for the
requested service name.
Report this problem to Support.
CLFRO2010E: Cannot locate schema
file <filename>
The server cannot find an xsd file
required to validate the schema
validation in the folder
<app_server_profile>/config/cells/
<cell_name>/LotusConnections-config
Report this problem to Support.
EJPIC0001E: Lotus Connections
cannot use the WebSphere
Application Server in: <WebSphere
Location> Please refer to the
following message log for additional
information: <Log Location>
Lotus Connections requires specific
WebSphere Application Server
features and component levels. Refer
to the message log file to determine
why the WebSphere Application
Server is insufficient for Lotus
Connections.
Apply WebSphere Application Server
changes as required to satisfy Lotus
Connections requirements.
EJPIC0060E: There were no profiles
detected for the installed WAS and
managed node selected.
There must be at least one profile on
the existing managed node to
continue.
Retrieve the install logs for errors.
Try the installer again.
EJPIC0007E: Operating System
prerequisite check failed. Refer to the
message log file {0} for additional
information.
The operating system is not
supported.
For the 1.0 and 1.0.1 release only the
Linux and Windows operating
systems are supported.
EJPIC0032E: Silent validation failure.
Exiting install.
One of many validation routines in
the installer has failed. It displays
after the critical error has taken place.
Refer to the prior error message to
determine he cause of the error.
EJPIC0061E: The profile selected
cannot be validated. Please refer to
the following logs for additional
information <log location>.
The profile selected may not be in the
WebSphere Application Server profile
registry, or may be an invalid profile.
Make sure the WebSphere
Application Server profile is valid.
Please refer to the logs for additional
information.
EJPIC0061W: WebSphere Application
Server security must be enabled.
WebSphere Application Server
security must be enabled.
Pick another profile or enable
security and run the installer again.
EJPIC0062E: There were no servers
detected for the installed WebSphere
Application Server.
There must be at least one server on
the existing WebSphere Application
Server.
See the logs for more details and try
again. Verify the WebSphere
Application Server configuration.
EJPIC0063E: The server selected
cannot be validated. Please refer to
the following logs for additional
information: <log location>
The server selected cannot be
validated.
Make sure the WebSphere AppServer
server is valid.
EJPIC0214E: The custom dependency
checker rules directory you specified
cannot be found, or does not contain
all the required files. You must
supply a different location for the
custom dependency checker rules
directory. The installer will now exit.
Check the value you supplied for the
custom dependency checker rules
directory. Also make sure all the
required dependency checker files
exist in that directory. Look at the
logs for the files that are required by
the installer.
The error condition must be
corrected.
Chapter 11. Troubleshooting 187

Table 18. Lotus Connections error messages with codes (continued)
Message Cause Solution
EJPIC0215W: The custom dependency
checker rules directory you specified
cannot be found, or does not contain
all the required files. If you wish to
continue, the installer will use the
default dependency checker rules
directory. Otherwise, cancel the
install and supply a different location
for the custom dependency checker
rules directory.
Check the value you supplied for the
custom dependency checker rules
directory. Also make sure all of the
required dependency checker files
exist in that directory. Look at the
logs for the files that are required by
the installer.
The error condition should be
corrected.
Table 19. Blogs error messages
Message Cause Solution
Calendar tag exception Not identifiable without more
information.
Report this problem to Support.
Closing stream Not identifiable without more
information.
Report this problem to Support.
Content-Type Problem Can not parse content type header. Report this problem to Support.
Couldn’t find renderer for page
<page>
Not identifiable without more
information.
Report this problem to Support.
Couldn’t find renderer for rsd
template
Not identifiable without more
information.
Report this problem to Support.
Error adding a media-link entry to the
collection feed
Not identifiable without more
information.
Report this problem to Support.
Error adding an entry to the
collection feed″
Not identifiable without more
information.
Report this problem to Support.
ERROR adding doc to index Not identifiable without more
information.
Report this problem to Support.
Error adding new docs to index Not identifiable without more
information.
Report this problem to Support.
Error batch delete docs from index for
re-indexing
Not identifiable without more
information.
Report this problem to Support.
ERROR: building aggregation for:
<group>
Not identifiable without more
information.
Report this problem to Support.
Error calling Roller.release() Not identifiable without more
information.
Report this problem to Support.
Error calling Roller.shutdown() Not identifiable without more
information.
Report this problem to Support.
Error checking user authorization
level for blog
Not identifiable without more
information.
Report this problem to Support.
ERROR closing reader Not identifiable without more
information.
Report this problem to Support.
ERROR closing writer Not identifiable without more
information.
Report this problem to Support.
ERROR committing referrer Not identifiable without more
information.
Report this problem to Support.
188 IBM Lotus Lotus Connections 1.0.1 Installation Guide

Table 19. Blogs error messages (continued)
Message Cause Solution
Error committing transaction will be
rolled back
SQL Transaction commit failed. This could be database SQL
execution error. Please wait and try
again later.
ERROR creating authenticator, using
default
Not identifiable without more
information.
Report this problem to Support.
error creating preview request Not identifiable without more
information.
Report this problem to Support.
ERROR: creating URL Not identifiable without more
information.
Report this problem to Support.
ERROR creating writer Not identifiable without more
information.
Report this problem to Support.
Error deleting doc from index Not identifiable without more
information.
Report this problem to Support.
Error deleting the entry Not identifiable without more
information.
Report this problem to Support.
Error deleting the resource Not identifiable without more
information.
Report this problem to Support.
ERROR: determining URL of site Not identifiable without more
information.
Report this problem to Support.
Error during rendering for page
<page>
Not identifiable without more
information.
Report this problem to Support.
Error during rendering for rsd
template
Not identifiable without more
information.
Report this problem to Support.
Error ending transaction SQL Transaction abort failed. This could be database SQL
execution error. Please wait and try
again later.
Error executing operation Not identifiable without more
information.
Report this problem to Support.
ERROR: fetching categories Not identifiable without more
information.
Report this problem to Support.
ERROR: fetching comment list Not identifiable without more
information.
Report this problem to Support.
ERROR: fetching commented weblog
list
Not identifiable without more
information.
Report this problem to Support.
ERROR: fetching entry Not identifiable without more
information.
Report this problem to Support.
ERROR: fetching folder for weblog Not identifiable without more
information.
Report this problem to Support.
ERROR: fetching hot weblog list Not identifiable without more
information.
Report this problem to Support.
Error fetching last update timestamp
from index
Not identifiable without more
information.
Report this problem to Support.
ERROR: fetching pinned weblog
entries
Not identifiable without more
information.
Report this problem to Support.
ERROR: fetching site tags list Not identifiable without more
information.
Report this problem to Support.
ERROR: fetching username letter map Not identifiable without more
information.
Report this problem to Support.
Chapter 11. Troubleshooting 189

Table 19. Blogs error messages (continued)
Message Cause Solution
ERROR: fetching user list Not identifiable without more
information.
Report this problem to Support.
ERROR: fetching users by letter Not identifiable without more
information.
Report this problem to Support.
ERROR: fetching weblog handle letter
map
Not identifiable without more
information.
Report this problem to Support.
ERROR: fetching weblog list Not identifiable without more
information.
Report this problem to Support.
ERROR: fetching weblog tags list Not identifiable without more
information.
Report this problem to Support.
ERROR forming Struts URL Not identifiable without more
information.
Report this problem to Support.
ERROR: get aggregation Not identifiable without more
information.
Report this problem to Support.
ERROR: get ranked blogs Not identifiable without more
information.
Report this problem to Support.
Error getting child Folders Not identifiable without more
information.
Report this problem to Support.
Error getting default page for preview Not identifiable without more
information.
Report this problem to Support.
ERROR: getting entry month map Not identifiable without more
information.
Report this problem to Support.
Error getting managers Not identifiable without more
information.
Report this problem to Support.
ERROR: getting recent comments Not identifiable without more
information.
Report this problem to Support.
ERROR: getting recent entries Not identifiable without more
information.
Report this problem to Support.
Error getting thread manager Not identifiable without more
information.
Report this problem to Support.
ERROR getting user in menu model Not identifiable without more
information.
Report this problem to Support.
ERROR: getting user object Not identifiable without more
information.
Report this problem to Support.
Error getting weblog category
<weblogCategoryName>
Not identifiable without more
information.
Report this problem to Support.
Error getting weblogs default page Not identifiable without more
information.
Report this problem to Support.
Error getting weblog entry
<weblogAnchor>
Not identifiable without more
information.
Report this problem to Support.
Error getting weblog page
<weblogPageName>
Not identifiable without more
information.
Report this problem to Support.
ERROR: importing bookmarks Not identifiable without more
information.
Report this problem to Support.
ERROR in addUser Not identifiable without more
information.
Report this problem to Support.
190 IBM Lotus Lotus Connections 1.0.1 Installation Guide

Table 19. Blogs error messages (continued)
Message Cause Solution
ERROR in createWebsite Not identifiable without more
information.
Report this problem to Support.
ERROR in newUser Not identifiable without more
information.
Report this problem to Support.
ERROR: initializing calendar tag Not identifiable without more
information.
Report this problem to Support.
Error initializing IBatis The IBatis configuration file, which is
stored in the directory:
“org/apache/roller/business/ibatis/sqlMapConfig.xml” does not exist or
it is not well-formed.
Reinstall Lotus Connections Blogs.
ERROR: initializing plugins Not identifiable without more
information.
Report this problem to Support.
Error instantiating <roller_classname> Can not find specified class. Make sure all libraries are available
or reinstall Lotus Connections Blogs.
Error instantiating task Not identifiable without more
information.
Report this problem to Support.
ERROR internal error validating user Not identifiable without more
information.
Report this problem to Support.
ERROR loading model for page Not identifiable without more
information.
Report this problem to Support.
Error loading model objects for page Not identifiable without more
information.
Report this problem to Support.
Error loading weblog custom models Not identifiable without more
information.
Report this problem to Support.
Error looking up weblog
<weblogHandle>
Specified weblog handle may have
been deleted.
Report this problem to Support.
Error looking up website object The blog specified does not exist. Informational message. No solution
is needed.
error occured initing messageModel Not identifiable without more
information.
Report this problem to Support.
Error optimizing index Not identifiable without more
information.
Report this problem to Support.
Error parsing
referrer.robotCheck.userAgentPattern
value <robotPatternStr>. Robots will
not be filtered
Can not parse the robot string
pattern using regular expression.
Report this problem to Support.
Error parsing runtime config defs The Blogs configuration file, stored
in the directory:
“rollerRuntimeConfigDefs.xml” may
not be well-formed or may contain
illegal data.
Report this problem to Support.
Error persisting updated hit counts Failed to access Blogs database
tables.
Report this problem to Support.
ERROR: plugin not found: Emoticons Not identifiable without more
information.
Report this problem to Support.
ERROR: plugin not found: <key> Not identifiable without more
information.
Report this problem to Support.
Chapter 11. Troubleshooting 191

Table 19. Blogs error messages (continued)
Message Cause Solution
Error posting the new entry Not identifiable without more
information.
Report this problem to Support.
Error posting the new media-link
entry
Not identifiable without more
information.
Report this problem to Support.
ERROR processing subscription entry Not identifiable without more
information.
Report this problem to Support.
ERROR removing invalid MediaCast
attributes
Not identifiable without more
information.
Report this problem to Support.
ERROR refreshing entries Not identifiable without more
information.
Report this problem to Support.
Error rendering for weblog
<weblogHandle>
Specified weblog handle may have
been deleted.
Report this problem to Support.
Error retrieving accepted content type
ranges
Not identifiable without more
information.
Report this problem to Support.
Error retrieving listing of categories
for weblog
Not identifiable without more
information.
Report this problem to Support.
Error retrieving listing of collections
for user
Not identifiable without more
information.
Report this problem to Support.
ERROR: retrieving monthMap Not identifiable without more
information.
Report this problem to Support.
Error retrieving the entry Not identifiable without more
information.
Report this problem to Support.
Error retrieving the resource Not identifiable without more
information.
Report this problem to Support.
Error retrieving the resource to delete Not identifiable without more
information.
Report this problem to Support.
Error saving comment Not identifiable without more
information.
Report this problem to Support.
Error saving website Not identifiable without more
information.
Report this problem to Support.
Error scheduling task Not identifiable without more
information.
Report this problem to Support.
Error searching index Not identifiable without more
information.
Report this problem to Support.
ERROR setting default editor page for
weblog
Not identifiable without more
information.
Report this problem to Support.
Error setting the links for the
collection feed
Not identifiable without more
information.
Report this problem to Support.
ERROR: sorting folders Not identifiable without more
information.
Report this problem to Support.
ERROR: subforward specified in XML
menu file not found: <subforwards>
Not identifiable without more
information.
Report this problem to Support.
ERROR updating comments Not identifiable without more
information.
Report this problem to Support.
Error updating the entry Not identifiable without more
information.
Report this problem to Support.
192 IBM Lotus Lotus Connections 1.0.1 Installation Guide

Table 19. Blogs error messages (continued)
Message Cause Solution
Error updating the resource Not identifiable without more
information.
Report this problem to Support.
Error while checking for referer
turnover
Not identifiable without more
information.
Report this problem to Support.
Error while processing ping queue Not identifiable without more
information.
Report this problem to Support.
Error while updating master search
index
Failed to access Blogs database
tables.
Report this problem to Support.
Error with the active content filter Not identifiable without more
information.
Report this problem to Support.
Error writing resource file Not identifiable without more
information.
Report this problem to Support.
EXCEPTION getting weblog entry Not identifiable without more
information.
Report this problem to Support.
IllegalAccessException for <plugin> Not identifiable without more
information.
Report this problem to Support.
Initialization of XML-RPC servlet
failed
Not identifiable without more
information.
Report this problem to Support.
InstantiationException for <plugin> Not identifiable without more
information.
Report this problem to Support.
It appears that your factory does not
implement <″CacheFactory interface>
Can not find specified class. Make sure all libraries are available
or reinstall Lotus Connections Blogs.
It appears that your mapper does not
implement <RequestMapper
interface>
Can not find specified class. Make sure all libraries are available
or reinstall Lotus Connections Blogs.
NamingException during Websphere
InitialContext retrieval
Not identifiable without more
information.
Report this problem to Support.
Parsing Exception Not identifiable without more
information.
Report this problem to Support.
Problem accessing read index
directory
Not identifiable without more
information.
Report this problem to Support.
Problem reading theme <theme> Can not read Blogs theme files from
disk
Report this problem to Support.
Problems adding doc to index Not identifiable without more
information.
Report this problem to Support.
Problems updating last modified date
to index
Not identifiable without more
information.
Report this problem to Support.
Processing linkback Not identifiable without more
information.
Report this problem to Support.
rollerversion.properties not found The Blogs configuration file,
“rollerversion.properties,” does not
exist.
Recover this file or reinstall Lotus
Connections Blogs.
Toggling linkback display Not identifiable without more
information.
Report this problem to Support.
Unable to create planet cache
directory
Not identifiable without more
information.
Report this problem to Support.
Unable to instantiate cache factory
<classname> falling back on default
Can not find specified class. Make sure all libraries are available
or reinstall Lotus Connections Blogs.
Chapter 11. Troubleshooting 193

Table 19. Blogs error messages (continued)
Message Cause Solution
Unable to instantiate cache handler
<Handler>
Can not find specified class. Make sure all libraries are available
or reinstall Lotus Connections Blogs.
Unable to instantiate renderer factory
<Factories>
Not identifiable without more
information.
Report this problem to Support.
Unable to instantiate request mapper
<mapper>
Can not find specified class. : Make sure all libraries are available
or reinstall Lotus Connections Blogs.
Unable to load smileys.properties Specified file does not exist. Recover this file or reinstall Lotus
Connections Blogs.
Unable to lookup mail session. Check
configuration.
Can not find JavaMail JNDI resource. Check WebSphere Application Server
Blogs configuration to make sure the
JNDI resource has been configured.
Unknown exception creating renderer
for <template>
Not identifiable without more
information.
Report this problem to Support.
Table 20. Installation error messages without codes
Message Cause Solution
At least one feature must be selected
for install.
The installer requires the selection of
at least one feature for both
production and pilot installations.
Please choose at least one feature.
At least one feature must be selected
for uninstall.
The installer requires the selection of
at least one feature for both
production and pilot uninstallations.
Please choose at least one feature.
Cannot connect to database using
provided settings, please check again!
The installer validates a JDBC
connection to ensure that the
Connections application installed will
be able to communicate with the
database. This connection has the
following requirements:
1. JDBC Driver Library: A valid path
to the jars that provide JDBC
connectivity.
2. Application User Account: A valid
user account for the database that
hosts the Connections application
data. This is the user that the
Connections application will use.
3. Application User Account
password: The password for the
application user account.
4. Host: Host name of the machine
that has the database server.
5. Port: Port number used to connect
to the database.
6. Database name: The name of the
database.
Make sure the correct values have
been provided.
194 IBM Lotus Lotus Connections 1.0.1 Installation Guide

Table 20. Installation error messages without codes (continued)
Message Cause Solution
db2jcc_license_cu.jar and db2jcc.jar
does not exists in <directory path>
The installer validates a JDBC
connection to ensure that the
Connections application installed will
be able to communicate with the
database. This error message is
stating that a valid JDBC connection
is not possible as the required DB2
jars are not located at the location
specified.
In the install panel requesting JDBC
connection information, ensure that
the path leading to the
db2jcc_license_cu and db2jcc jars is
valid.
ojdbc14.jar does not exists in
<directory path>
The installer validates a JDBC
connection to ensure that the
Connections application installed will
be able to communicate with the
database. This error message is
stating that a valid JDBC connection
is not possible as a required Oracle
jar is not located at the location
specified.
In the install panel requesting JDBC
connection information, ensure that
the path leading to the ojdbc14.jar is
correct.
Uninstall of the component:
<Connections offering name> has
failed or this component has already
been uninstalled.
The process of removing a
Connections application has failed.
Please retrieve the uninstall log,
lcuninstalllog.txt, from the temp
directory. Locate errors and contact
support.
Chapter 11. Troubleshooting 195

196 IBM Lotus Lotus Connections 1.0.1 Installation Guide

Notices
This information was developed for products and services offered in the U.S.A.
IBM may not offer the products, services, or features discussed in this document in other countries.
Consult your local IBM representative for information on the products and services currently available in
your area. Any reference to an IBM product, program, or service is not intended to state or imply that
only that IBM product, program, or service may be used. Any functionally equivalent product, program,
or service that does not infringe any IBM intellectual property right may be used instead. However, it is
the user’s responsibility to evaluate and verify the operation of any non-IBM product, program, or
service.
IBM may have patents or pending patent applications covering subject matter described in this
document. The furnishing of this document does not grant you any license to these patents. You can send
license inquiries, in writing, to:
IBM Director of Licensing IBM Corporation North Castle Drive Armonk, NY 10504-1785 U.S.A.
For license inquiries regarding double-byte (DBCS) information, contact the IBM Intellectual Property
Department in your country or send inquiries, in writing, to:IBM World Trade Asia Corporation Licensing
2-31 Roppongi 3-chome, Minato-ku Tokyo 106-0032, Japan
The following paragraph does not apply to the United Kingdom or any other country where such
provisions are inconsistent with local law: INTERNATIONAL BUSINESS MACHINES CORPORATION
PROVIDES THIS PUBLICATION ″AS IS″ WITHOUT WARRANTY OF ANY KIND, EITHER EXPRESS OR
IMPLIED, INCLUDING, BUT NOT LIMITED TO, THE IMPLIED WARRANTIES OF
NON-INFRINGEMENT, MERCHANTABILITY OR FITNESS FOR A PARTICULAR PURPOSE. Some
states do not allow disclaimer of express or implied warranties in certain transactions, therefore, this
statement may not apply to you.
This information could include technical inaccuracies or typographical errors. Changes are periodically
made to the information herein; these changes will be incorporated in new editions of the publication.
IBM may make improvements and/or changes in the product(s) and/or the program(s) described in this
publication at any time without notice.
Any references in this information to non-IBM Web sites are provided for convenience only and do not in
any manner serve as an endorsement of those Web sites. The materials at those Web sites are not part of
the materials for this IBM product and use of those Web sites is at your own risk.
IBM may use or distribute any of the information you supply in any way it believes appropriate without
incurring any obligation to you.
Licensees of this program who wish to have information about it for the purpose of enabling: (i) the
exchange of information between independently created programs and other programs (including this
one) and (ii) the mutual use of the information which has been exchanged, should contact:
Lotus Software
IBM Software Group
One Rogers Street
Cambridge, MA 02142 USA
Such information may be available, subject to appropriate terms and conditions, including in some cases,
payment of a fee.
© Copyright IBM Corp. 2007, 2007 197

The licensed program described in this document and all licensed material available for it are provided
by IBM under terms of the IBM Customer Agreement, IBM International Program License Agreement or
any equivalent agreement between us.
Any performance data contained herein was determined in a controlled environment. Therefore, the
results obtained in other operating environments may vary significantly. Some measurements may have
been made on development-level systems and there is no guarantee that these measurements will be the
same on generally available systems. Furthermore, some measurements may have been estimated through
extrapolation. Actual results may vary. Users of this document should verify the applicable data for their
specific environment.
Information concerning non-IBM products was obtained from the suppliers of those products, their
published announcements or other publicly available sources. IBM has not tested those products and
cannot confirm the accuracy of performance, compatibility or any other claims related to non-IBM
products. Questions on the capabilities of non-IBM products should be addressed to the suppliers of
those products.
All statements regarding IBM’s future direction or intent are subject to change or withdrawal without
notice, and represent goals and objectives only.
This information contains examples of data and reports used in daily business operations. To illustrate
them as completely as possible, the examples include the names of individuals, companies, brands, and
products. All of these names are fictitious and any similarity to the names and addresses used by an
actual business enterprise is entirely coincidental.
COPYRIGHT LICENSE:
This information contains sample application programs in source language, which illustrate programming
techniques on various operating platforms. You may copy, modify, and distribute these sample programs
in any form without payment to IBM, for the purposes of developing, using, marketing or distributing
application programs conforming to the application programming interface for the operating platform for
which the sample programs are written. These examples have not been thoroughly tested under all
conditions. IBM, therefore, cannot guarantee or imply reliability, serviceability, or function of these
programs.
Trademarks
The following terms are trademarks of International Business Machines Corporation in the United States,
other countries, or both:
400
Cloudscape
DB2
DB2 Universal Database
Domino
IBM
iSeries
Lotus
Lotus Notes
Notes
Sametime
the IBM logo
Tivoli
WebSphere
z/OS
198 IBM Lotus Lotus Connections 1.0.1 Installation Guide

Additional IBM copyright information can be found at: http://www.ibm.com/legal/copytrade.shtml
Adobe, Acrobat, Portable Document Format (PDF), PostScript, and all Adobe-based trademarks are either
registered trademarks or trademarks of Adobe Systems Incorporated in the United States, other countries,
or both.
Intel, Intel logo, Intel Inside, Intel Inside logo, Intel Centrino, Intel Centrino logo, Celeron, Intel Xeon,
Intel SpeedStep, Itanium, and Pentium are trademarks or registered trademarks of Intel Corporation or its
subsidiaries in the United States and other countries.
IT Infrastructure Library is a registered trademark of the Central Computer and Telecommunications
Agency which is now part of the Office of Government Commerce.
ITIL is a registered trademark, and a registered community trademark of the Office of Government
Commerce, and is registered in the U.S. Patent and Trademark Office
Microsoft, Windows, Windows NT, and the Windows logo are trademarks of Microsoft Corporation in the
United States, other countries, or both.
Java and all Java-based trademarks are trademarks of Sun Microsystems, Inc. in the United States, other
countries, or both.
Linux is a registered trademark of Linus Torvalds in the United States, other countries, or both.
UNIX is a registered trademark of The Open Group in the United States and other countries.
Other company, product, or service names may be trademarks or service marks of others.
Notices 199
Related Documents