U S E R ’ S G U I D E G U I T A R A M P L I F I E R ™ KITCHEN SINK 6VEL ™

Welcome message from author
This document is posted to help you gain knowledge. Please leave a comment to let me know what you think about it! Share it to your friends and learn new things together.
Transcript

U S E R ’ S G U I D E
G U I T A R A M P L I F I E R
™
KITCHEN SINK 6VEL™

2
Your 3RD POWER Amplifier is a professional musical instrument amplifier. The information contained herein is current at the time of publication. However, specifications are subject to change without prior notice.
PRECAUTIONS & WARNINGS
• READ THESE INSTRUCTIONS.• KEEP THESE INSTRUCTIONS.• HEED ALL WARNINGS.• FOLLOW ALL INSTRUCTIONS.• YOUR AMPLIFIER IS LOUD!
EXPOSURE TO HIGH SOUND VOLUMES MAY CAUSE PERMANENT HEARING DAMAGE ! Practice “safe listening.”
• No user serviceable parts inside. Refer service to qualified personnel. Always unplug AC power before removing chassis.
• IF YOU INTEND ON OPERATING THIS EQUIPMENT OUTSIDE OF THE USA: Always insure that unit is wired for proper voltage. Make certain all connections and grounding conforms with local standards. Make certain that you have obtained authorization to operate prior to connecting to power supply.
• WARNING: Vacuum tube amplifiers generate heat. To insure proper ventilation always make certain there is at least four inches (100mm) of space behind the rear of the amplifier cabinet.
• Keep away from curtains or any flammable objects.• WARNING: Do not block any ventilation openings on the rear or top of the amplifier. Do
not impede ventilation by placing objects on top of the amplifier which extend past the rear edge of its cabinet.
• WARNING: Do not expose the amplifier to rain, moisture, dripping or splashing water. Do not place objects filled with liquids on or nearby the amplifier.
• WARNING: Always make certain proper load is connected before operating the amplifier. Failure to do so could pose a shock hazard and may result in damage to the amplifier.
• Do not expose amplifier to direct sunlight or extremely high temperatures.• Always insure that amplifier is properly grounded. Always unplug AC power cord before
changing fuse or any tubes. When replacing fuse, use only same type and rating.• Avoid direct contact with heated tubes. Keep amplifier away from children.• Be sure to connect to an AC power supply that meets the power supply specifications
listed on the rear of the unit. Remove the power plug from the AC mains socket if the unit is to be stored for an extended period of time. If there is any danger of lightning occurring nearby, remove the power plug from the wall socket in advance.
• To avoid damaging your speakers and other music equipment, turn off the power of all related equipment before making the connections.
• Do not use excessive force in handling control buttons, switches and controls. Do not use solvents such as benzene or paint thinner to clean the unit. Wipe off the exterior with soft cloth.
3
Special Features of the Kitchen Sink 6VEL™:• Two Foot-switchable Channels (Clean and Dirty)• Clean Channel: Black/Brownface, AC and Top Boost• “Big Knob” Blend Control on CH.1• Dirty Channel: Multi-voiced Plexi (JTM, JMP, SoCal)• Preamp Gain Boost (foot switchable)• 6V6 (20W) or EL34 (40W) Operation (also 6L6, 5881)• Back-panel Bias Test Points and Adjustment Pot• Switchable Solid State or Tube Power Supply Rectifier (5AR4/GZ34, 5U4GB)• Tube FX Loop (foot switchable)• Tube Reverb (channel assignable)• Foot-switchable Solo Boost• Variable Speaker-simulated Slave Output• Hybrid-Master™ Volume Control• Foot switch Included• Limited Lifetime Warranty
Foot-switchable Hybrid-MASTER Bypass (boost function)Create custom volume level presets perfect for setting up a rhythm and lead volume scene changes and recalling them via foot-switch.
Options:Standard packages come with a 2 button foot switch. Pro and Deluxe packages come with a 4 button foot switch. A ‘Break-out’ box is available separately in order to bring the amp’s foot switchable features under remote control of third party switching systems.
Dimensions & Weights:Subject to change anytime. Please measure your amp carefully if a custom case is being made. These measurements do not include handle and rubber feet.
Kitchen Sink Amp Head: Dimensions (WxHxD): 24 x 10.5 x 9.33 in.Weight: 29.5 lb.
112 Combo: Dimensions (WxHxD): 25 x 20.75 x 11 in.Weight: 57 lb.

4
Preparing to Operate your Kitchen Sink 6VEL™Make certain that all connections are made prior to operating your amplifier including power cable, speaker connection, instrument cable and instrument connection. Make certain that all tubes are installed.
Power Switch (1)The POWER switch, when placed in the DOWN position, provides AC wall power to the amplifier.
Standby Switch (2) The STANDBY switch, when placed in the CENTER position, puts the amplifier in ‘standby mode’ allowing the tubes to warm up. When this switch is place in the UP position, the tube circuitry is fully functional and operating in diode rectified mode. In the DOWN position, the amplifier is operating in tube rectified mode.
Hybrid-MASTER™ Control (3)The MAIN control is always active and sets the absolute volume ceiling. The foot-switchable HM bypass control will be covered later in the manual. HybridMASTER is a patented by 3rd Power.
Push Control (4)The global PUSH control affects both channels and allows you to adjust the low frequency character of your sound. Low settings create focused tones, whereas higher settings create a ‘punchier’ low frequency kick/thump or ‘push’ to your sound.
Presence Control (5)The global PRESENCE control affects both channels and allows you to adjust the high frequency character of your sound. Low settings create ‘darker’ tones, whereas higher settings create a ‘brilliant’ or crisp sound.
Front Panel:
1 2 3 4 5

5
Reverb Control (6)The REVERB control is used to add/blend in the perfect amount of ambience to your sound. The reverb effect in this amplifier features pure Class A vacuum tube drive and recovery circuitry to deliver an authentic, vintage sounding spring reverb effect.
Reverb Assign Switch (7)The Reverb Assign switch allows you to assign the tube/spring reverb effect to both channels (up position) or clean channel only. (down position).
Front Panel: Reverb Level and Assignment
6 7
Input Jack (8)The INPUT jack is where you connect instrument level signals.
Channel Selector Switch (9)The middle position selects the Clean channel. The left position selects the Dirty channel. The right position places the amplifier in Foot Switch mode and allows remote channel changing. The Channel Indicator Light (10) will glow a bright red color indicating that you are on the Dirty channel.
Front Panel: Input and Channel Selection
810 9

6
Volume Control (10)The VOLUME control allows you to adjust the signal level as well as the temperament and overall character of your instrument’s sound, from clean to edge of breakup.
Brown/Blackface Switch (11)The Brownface/Blackface toggle switch allows you to select the preamp operating mode for a variety of tonal options. • Brown Position: Wide and warm with special emphasis on the midrange frequencies. Clean tones
are earthy. Focused overdrive tones when pushed.• Black Position: Tight and spanky with clean headroom. Clean tones are fast and punchy with a
nice American chime to the high frequencies. Big, edgy overdrive tones when pushed.
The “BIG” Knob (12)The BIG Knob allows you to select or blend the preamp voicing of your tone. When rotated fully clock-wise, you will hear American tones. when rotated fully counter clock-wise, you will hear the distinct chime of a mid-60’s British AC tones. All other knob positions are available to you to explore and create your own unique blended preamp tones.
Top Boost Switch (13)The TOP BOOST switch allows you to adjust the character of the British AC tones only and has no effect on the American voicing.
Tone Controls (14)The TREBLE control allows you to adjust the character of the higher frequency range. The BASS control allows you to adjust the depth of your lower frequencies.
Front Panel: Clean Channel
12 11 101314

7
Channel Indicator Light (10)When selecting channel two, this LED will glow a bright red color indicating that you have selected the Dirty channel for operation. When in this mode, only the Dirty channel controls will be active.
Gain Control (15)The GAIN control allows you to adjust the signal gain level as well as the temperament and overall character of your instrument’s sound. Clean tones are at the lower end of the control dial. Preamp saturation, distortion and compression increase as you go higher on the dial.
+Gain Assign Switch (SoCal Mode) (16)The +GAIN switch allows you to adjust the response and feel of the preamp. The associated circuitry is simultaneously switching additional gain as well as clipping diodes in and out of the circuit. These diodes are preset to create an excellent compression effect as well as overall tightness and response. More aggressive, faster playing styles (double-picking, sweep-picking) will appreciate the +Gain setting. This feature can also be assigned to the Foot-switch Bus and remote controlled by foot switch.
NOTE: This circuit has been enhanced to allow for clean guitar tones by simply rolling back on your guitar’s volume knob.
Volume Control (17)The VOLUME control allows you to adjust the signal level that feeds the FX Loop circuitry. When you have the GAIN control at lower settings, you will tend to run this control higher up (1 to 2 o’clock). When you have the GAIN control at higher settings, you will tend to run this control in the mid to lower setting range (10 to 11 o’clock). Use this control to set your final volume balance between the Clean channel when going back and forth.
Front Panel: Dirty Channel
17 16 15 10

8
Treble Control (17)The TREBLE control allows you to adjust the character of the higher frequency range.
Middle Control (18)The MIDDLE control allows you to adjust the emphasis of the mid-range frequencies.
Tone Stack Selector (19)The TONE STACK SELECTOR switch allows you to adjust the response and feel of the EQ section. The associated circuitry is selecting from different tone stack circuits to help capture the tone and feel of different rock guitar eras.
• JTM: Classic ‘bassman’ or ’65 ‘plexi JTM’ EQ curve. The mids are scooped giving way to an exciting emphasis of low and high frequencies. This is often referenced as a “smooth” tone.
• JMP: Classic ’68 plexi ‘super-lead’ EQ curve. The mids are punchy and woody with that classic growl you’d expect from this style of amplifier.
Bass Control (20)The BASS control allows you to adjust the depth of your lower frequencies.
Front Panel: Dirty Channel - Tone Controls
1720 1819

9
AC Fused Input (21)The AC FUSED INPUT socket (TYPE IEC Grounded) is a required connection for operating your KITCHEN SINK 6VEL at 120V (standard USA household electrical power). The MAINS FUSE requires a 2.5 AMP slow blow fuse. This fuse protects your amplifier from voltage peaks from your power outlet.
H.T. Fuse (22)The H.T. FUSE requires a 0.25 AMP (250 milliamp) slow-blow fuse. The H.T. FUSE usually blows if your power tubes are bad to protect the circuit from being damaged.
SAFETY NOTES:• Always plug your amp into a properly grounded 3 prong AC outlet. • Never plug your amp into an ungrounded outlet. • Never remove or break off the 3rd prong safety ground pin from the power cord. • Never use a damaged or ungrounded power cord.• Always use the proper value and type fuse according to the rear-panel markings.• Never attempt to replace the fuse while the amplifier is still plugged into the power source. The
fuse should only be replaced when the power cord has been disconnected from its power source.
Back Panel:
2122
10
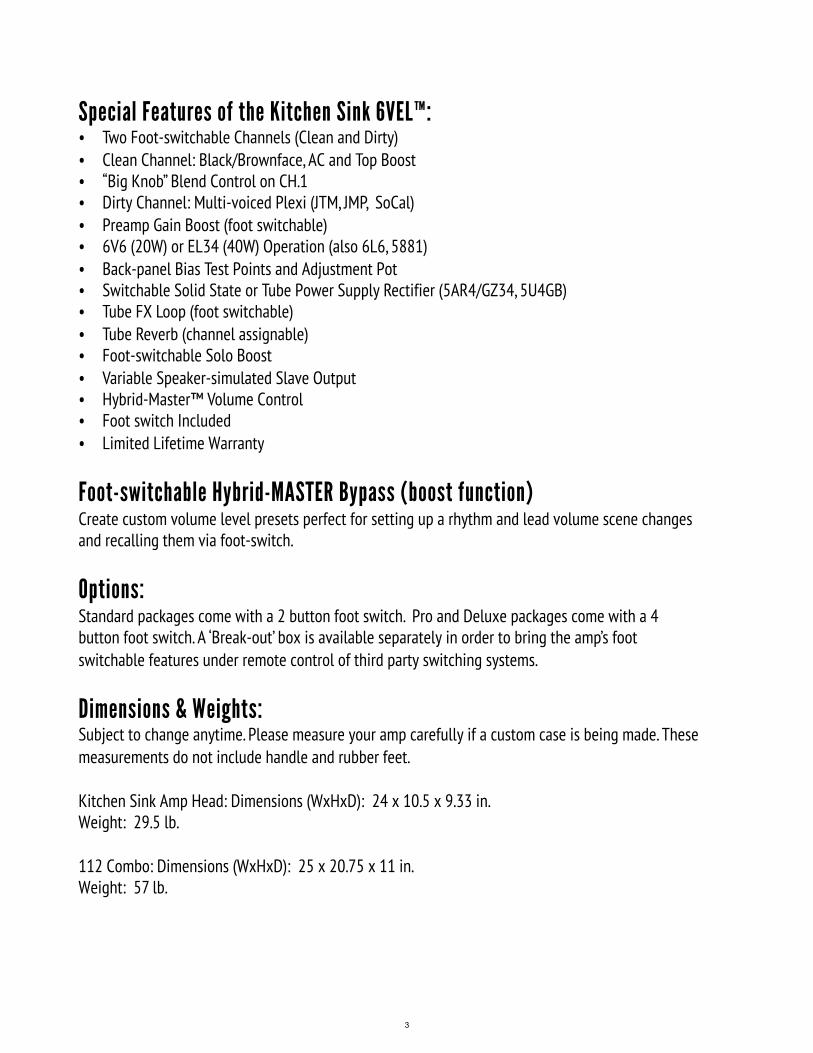
16-OHM Speaker Output (23)The 16-OHM SPEAKER OUTPUT is provided for connecting your amplifier to standard 16 OHM speaker cabinet.
8-OHM Speaker Outputs (24)The 8-OHM SPEAKER OUTPUTS are wired in parallel. They are provided for connecting your amplifier to a single 8-OHM, or two 16-OHM speaker cabinets.
4-OHM Speaker Outputs (25)The 8-OHM SPEAKER OUTPUTS are wired in parallel. They are provided for connecting your amplifier to a single 4-OHM, or two 8-OHM speaker cabinets.
SAFETY NOTES:• Never operate your amplifier without a connected speaker cabinet. This will damage your tubes
or transformers - or both. • Always operate your amplifier with the proper impedance output that matches your speaker
cabinet(s). • In all cases, always use a good quality heavy gauge speaker cable (not a shielded instrument
cable) to connect your KITCHEN SINK 6VEL to the speaker cabinet(s).
Back Panel: Speaker Outputs
232425

11
Line or Slave Out Level Control (26)Controls the signal level of the line or slave output. Start at zero and adjust clock-wise to optimize your signal level feeding the next piece of audio equipment in your signal chain. The audio signal for the Line/Slave Output originates from the output transformer of your amplifier. When you adjust your amp’s volume, you may need to readjust your Line/Slave Out level too.
Line or Slave Output Jack (27) The audio signal for the Line/Slave Output originates from the output transformer of your amplifier capturing the full detail of every tone crafting decision you’ve made within the amplifier. However, the output transformer can transmit audio signals that go far beyond what is useable for pleasing guitar tone. Fortunately, most guitar speakers roll off the harsh higher frequencies that exist beyond 5 - 8 kHz.
The Kitchen Sink 6VEL features a pleasing circuit that replicates the type of high frequency roll off you’d expect from a high quality mic’d speaker cabinet. It’s not invasive, it’s voiced ‘just right’ leaving your downstream audio devices, such as digital multi-effects and power amplifiers, to only receive useable signal and not the ‘ratty/fizzy’ signal that typically emanates from output transformer sourced outputs.
Back Panel: Line/Slave Output
27 26
12
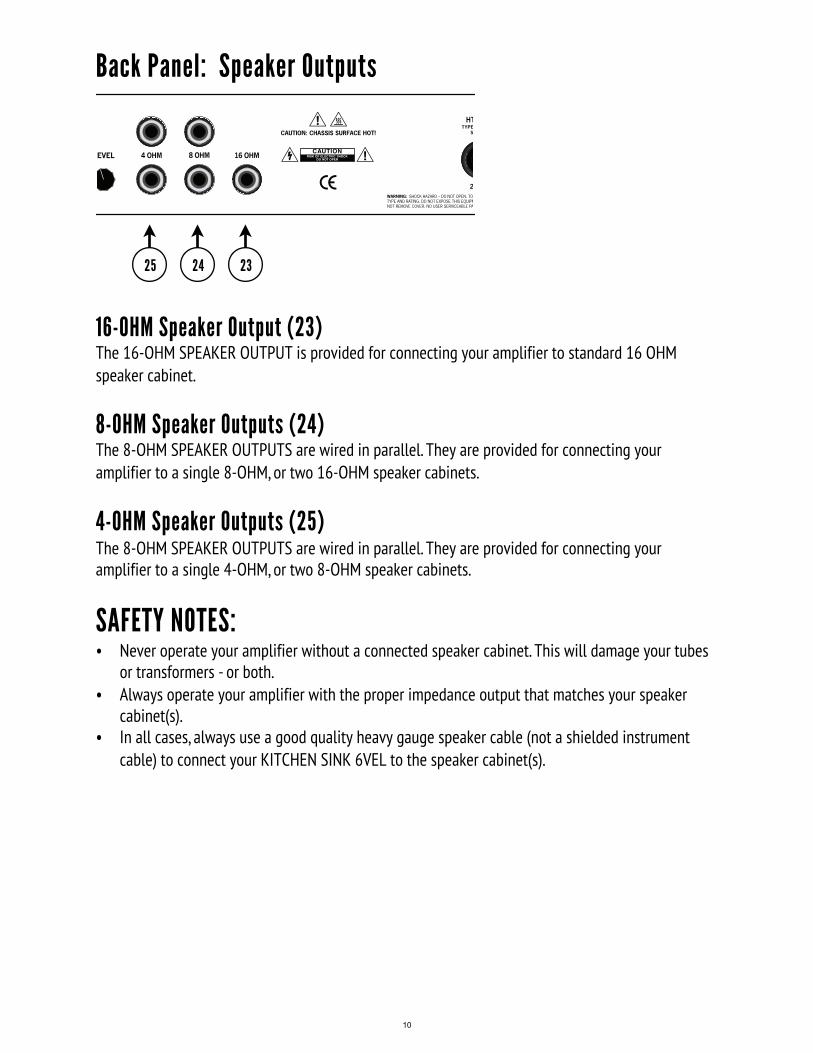
Tube Effects LoopExperience STUDIO QUALITY TONE from your pedals or multi-effects units by running them through the loop. The loop on your Kitchen Sink 6VEL can also be placed under foot switch control.
FX Loop Operation Switch (28)Choose LOCAL to retain the loop in the signal chain at all times. Choose FTSW to place the loop under command of your foot switch controller (either the included foot switch or a 3rd party switching system).
FX Send Jack (29)This 1/4” mono Tip/Sleeve jack feeds signal to your effects device.
FX Return Jack (30)This 1/4” mono Tip/Sleeve jack accepts the return signal from your effects device.
OPERATION NOTES:• Signal levels at the FX SEND jack are a nominal -10dBV (just under 1V p-p) matching the levels
most vintage and modern effect pedals want to see. • The FX RETURN path brings your signal back into the amplifier with a tremendous amount of
headroom (accepting signals as low as -10dBV and as high as +4dBU before the onset of compression).
• It can also be a gig-saver too. If your pedal board ever goes down during a performance, you can plug your guitar straight into the FX RETURN jack and get through a song with quality tone.
CAUTION: Avoid “hot swap” any cables connected to the loop while the amplifier is operational. Before breaking any connections, make sure that your amp is on Standby. Failure to do so may result in a loud pop, hum or buzz that could potentially damage your speaker.
Back Panel: Tube Effects Loop
30 29
28

FS B
13
Foot Switch Connector (31)To remotely control channel selection, preamp gain boost, FX loop on/off and Hybrid-Master bypass (lead boost), connect the foot pedal with the 7-pin DIN cable (both the pedal and cable are included with purchase). Base 20 and 40 packages receive the 2 Button Pro foot switch. Pro and Deluxe packages receive the 4 Button Pro foot switch.
Back Panel: Foot Switch System
31
+ GAIN !"#$%%& '%$%#(%%')(FS BUS)
FS BUSASSIGN
FS BUSASSIGN
!"#"$%""!&(FS BUS)
2 Button Pro Foot SwitchThe 2 Button Pro foot switch ships with the Base 20 and 40 package. It’s designed to give you complex scene changes at the press of a button. Button one is assigned to toggle between the Chl. 1 and 2. Button 2 is for the Foot Switch Bus giving you control over whichever feature or combination of features you assign to it.
4 Button Pro Foot SwitchThe 4 Button Pro ships with the Pro and Deluxe package. It gives you total command over Channel Selection, Preamp Gain, FX Loop Bypass and Solo Boost with a single button assigned to each feature. Should you feel the urge to stack features on one button, the on-board toggle switches let you assign those parameters over to the FS Bus button (far right).
FS B
14
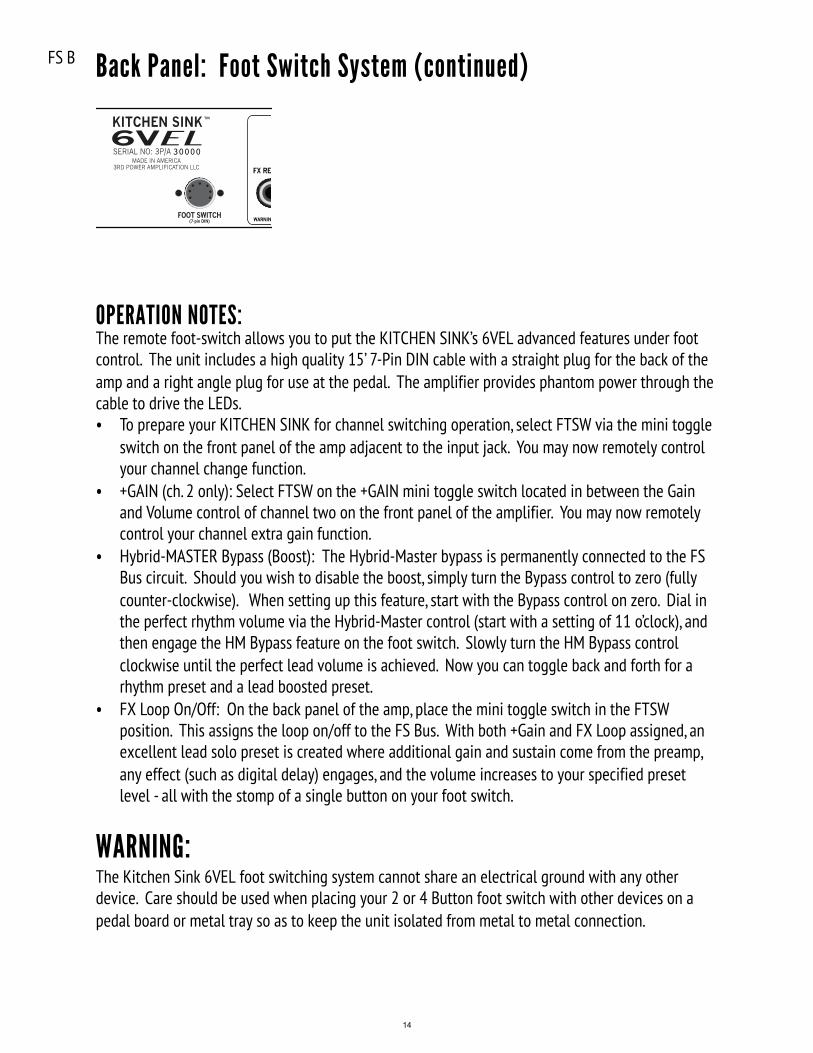
Back Panel: Foot Switch System (continued)
OPERATION NOTES:The remote foot-switch allows you to put the KITCHEN SINK’s 6VEL advanced features under foot control. The unit includes a high quality 15’ 7-Pin DIN cable with a straight plug for the back of the amp and a right angle plug for use at the pedal. The amplifier provides phantom power through the cable to drive the LEDs.• To prepare your KITCHEN SINK for channel switching operation, select FTSW via the mini toggle
switch on the front panel of the amp adjacent to the input jack. You may now remotely control your channel change function.
• +GAIN (ch. 2 only): Select FTSW on the +GAIN mini toggle switch located in between the Gain and Volume control of channel two on the front panel of the amplifier. You may now remotely control your channel extra gain function.
• Hybrid-MASTER Bypass (Boost): The Hybrid-Master bypass is permanently connected to the FS Bus circuit. Should you wish to disable the boost, simply turn the Bypass control to zero (fully counter-clockwise). When setting up this feature, start with the Bypass control on zero. Dial in the perfect rhythm volume via the Hybrid-Master control (start with a setting of 11 o’clock), and then engage the HM Bypass feature on the foot switch. Slowly turn the HM Bypass control clockwise until the perfect lead volume is achieved. Now you can toggle back and forth for a rhythm preset and a lead boosted preset.
• FX Loop On/Off: On the back panel of the amp, place the mini toggle switch in the FTSW position. This assigns the loop on/off to the FS Bus. With both +Gain and FX Loop assigned, an excellent lead solo preset is created where additional gain and sustain come from the preamp, any effect (such as digital delay) engages, and the volume increases to your specified preset level - all with the stomp of a single button on your foot switch.
WARNING:The Kitchen Sink 6VEL foot switching system cannot share an electrical ground with any other device. Care should be used when placing your 2 or 4 Button foot switch with other devices on a pedal board or metal tray so as to keep the unit isolated from metal to metal connection.
15
CAUTION: NEVER touch hot tubes!!! Temperatures can exceed 500˚F and cause severe burns!
CAUTION: Read all of the information and procedures in this section before attempting to modify the factory bias settings of your amplifier.
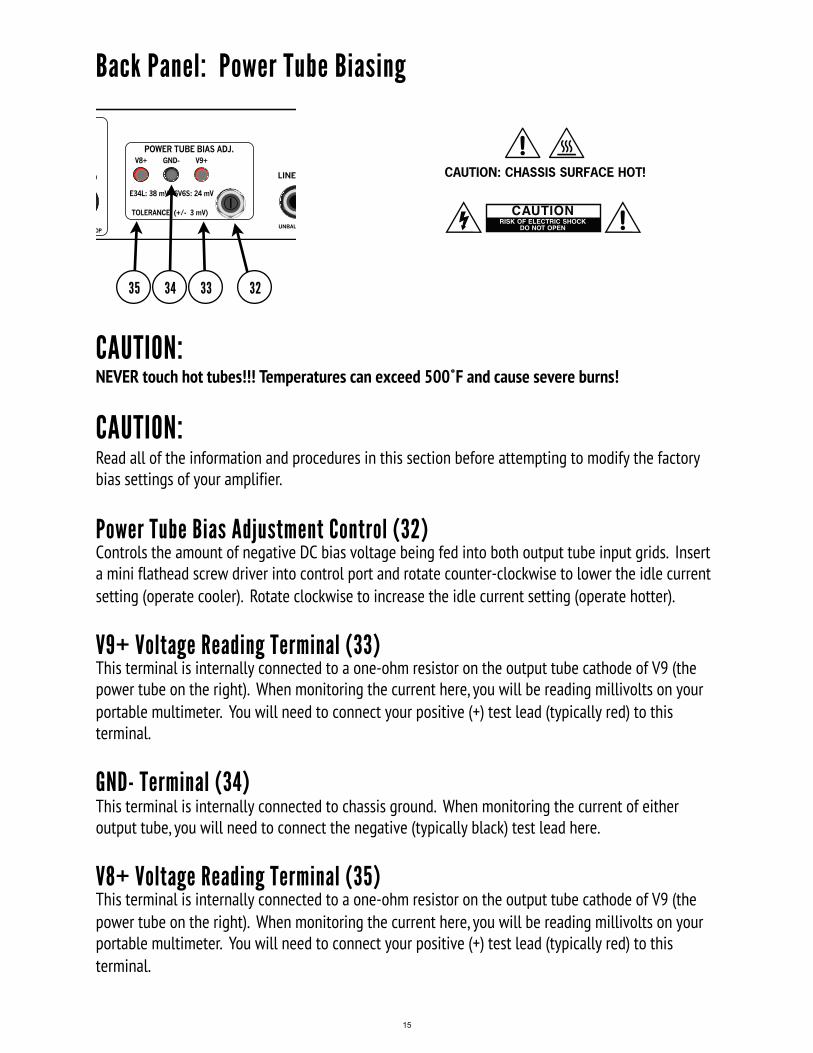
Power Tube Bias Adjustment Control (32)Controls the amount of negative DC bias voltage being fed into both output tube input grids. Insert a mini flathead screw driver into control port and rotate counter-clockwise to lower the idle current setting (operate cooler). Rotate clockwise to increase the idle current setting (operate hotter).
V9+ Voltage Reading Terminal (33) This terminal is internally connected to a one-ohm resistor on the output tube cathode of V9 (the power tube on the right). When monitoring the current here, you will be reading millivolts on your portable multimeter. You will need to connect your positive (+) test lead (typically red) to this terminal.
GND- Terminal (34) This terminal is internally connected to chassis ground. When monitoring the current of either output tube, you will need to connect the negative (typically black) test lead here.
V8+ Voltage Reading Terminal (35) This terminal is internally connected to a one-ohm resistor on the output tube cathode of V9 (the power tube on the right). When monitoring the current here, you will be reading millivolts on your portable multimeter. You will need to connect your positive (+) test lead (typically red) to this terminal.
Back Panel: Power Tube Biasing
32333435

16
CAUTION: NEVER touch hot tubes!!! Temperatures can exceed 500˚F and cause severe burns!
Biasing your tube amplifier need not be a scary endeavor as the process is pretty straightforward. Heed all warnings, cautions and instructions and you should do fine. If you’re unsure or unclear on the process, do not attempt to manipulate the bias from factory settings. If, during the biasing process, you hear a loud “pop” or see a tube “flash” immediately power down the unit and seek a qualified tube amplifier repair/service technician.
CAUTION: DO NOT attempt to load a rectifier tube in a power socket and vice-versa!!!
The Kitchen Sink 6VEL has a logical tube layout with the audio and power tubes located in a cluster near the back corner (see page 19). The rectifier tube is isolated and located in a corner on the opposite end of the chassis. Take care to only install proper tubes in the correct locations. Not doing so will damage your amplifier and could void your warranty.
OPERATION NOTES:• Monitor your output tube bias at idle current. To achieve idle current, your amp must be turned
on and operating at idle (no audio signal being fed into the input or the FX loop return). Make sure that your speaker is plugged in.
• Attach the negative test lead from your multimeter to the GND- terminal (black) on the back panel of the amp.
• One at a time, attach the red (positive) test lead from your multimeter to either V8+ or V9+ terminals (red) and note the reading on your meter. Then read the voltage on the other tube. The resulting numbers should be within 6mv of each other. Note that your maximum bias setting must be based off of the higher number.
• To optimize your output tube bias, adjust the control screw by inserting a mini flathead screw driver into control port (see diagram and description for item number (28)). Turn clockwise to bias your tubes ‘hotter’ (increasing the idle current) and counter-clockwise to bias your tubes ‘cooler’ (decreasing the idle current).
• Cooler settings (lower idle current) can increase the life of your tubes. Too cool and the sound will tend to be brash and one dimensional.
• Optimal tone and feel can be found when the bias range is around 50% - 70% of your tube’s maximum operating range. This will vary between the types of tubes you choose to operate your amp with.
Power Tube Biasing:

17
Proper Power & Rectifier Tube Use:
CAUTION (once again): NEVER touch hot tubes!!! Temperatures can exceed 500˚F and cause severe burns!
Your amplifier ships with the bias settings optimized for maximum flexibility and safety. During QC and final testing, the bias is set maximum safe power dissipation (approximately 60% of a given tube’s performance rating). Factory bias setting will be noted on the back panel of all units.
Base 40 amplifiers are equipped at the factory with JJ E34L power tubes and a JJ GZ34 rectifier tube. You may swap out the GZ34 with a 5U4GB rectifier tube WITHOUT re-biasing your amp. You can safely operate in SS or Tube Rectifier Mode as selected via the Standby Switch.
Base 20 amplifiers are equipped at the factory with JJ 6V6GC power tubes and a JJ 5U4 rectifier tube. You may swap out the 5U4GB with a GZ34 rectifier tube WITHOUT re-biasing your amp. You can safely operate in SS or Tube Rectifier Mode as selected via the Standby Switch.
Pro and Deluxe amplifiers are equipped at the factory with JJ E34L power tubes and a JJ GZ34 rectifier tube unless an alternate tube complement has been specified by the customer or dealer. They also ship with a full set of the alternate power and rectifier tubes. If loaded with E34L/GZ34 set, a boxed set of 6V6GT/5U4GB are included.
Should you wish to swap to the other set of tubes, you must do so in like-kind pairs as mixed tubes will not operate correctly and may be hazardous to your amplifier. You can safely substitute either rectifier tube. Again, use caution to mount the correct tubes in the appropriate tube sockets.
OPERATION NOTES:Please refer to the chassis/tube layout on page 19 when attempting to swap any tube.
18
Proper Power & Rectifier Tube Use: Continued
ABOUT POWER SUPPLY RECTIFIERS:The job performed by the power supply is complex and starts with the rectifier. It takes incoming electrical power in the form of alternating current (AC) wall at a voltage unique to various regions in the world and converts it to direct current (DC) power to be utilized by the amplification circuitry. The primary component for this conversion is called a diode.
Diodes only allow current to flow in only one direction. Modern diodes are made of a semiconductor materials such as silicon, are efficient with low insertion loss, can cost a few cents and last for years. Vacuum tubes as diodes on the other hand, are lossy, expensive and can wear out in a few short years. So why all the fuss? Tube rectifiers have a pleasing effect on the feel and the sound!
WHAT ABOUT THE ‘BROWN SOUND’?:It’s reported to the point of legendary status that the ‘brown sound’ was achieved by biasing a 60s Plexi-type amplifier up to 80% dissipation and then bringing the operating voltage down to ~90VAC on a variable AC power supply (often called a ‘variac’).
This does a few things: • Lowers DC operation voltage throughout the amplifier• Lowers the heater supply starving the tubes of heater current limiting their efficiency• Lowers the perceived loudness of the amplifier• Modifies the performance and increases the distortion characteristics of every single gain stage
We tested a ‘brown sound’ scenario here at our shop and came up with the following tangible and repeatable values:• ~30V Lower DC operating voltage• Idle bias current at 27ma yielding 22W or 44% max dissipation
By using a tube rectifier, your amplifier will indeed operate with a lower DC voltage throughout. The perceived loudness will reduce as well. With this reduction in voltage and power, every single gain stage will enter a more ‘brown’ operating range.
Through our tone testing at the factory, we have found a very pleasing ‘brown sound’ effect can be achieved when operating the Kitchen Sink 6VEL loaded with E34L power tubes, a JJ 5U4GB rectifier tube installed, and selecting Tube Rectifier Mode.

19
Tube Layout and Requirements:V1: JJ ECC83S (Clean Preamp)V2: JJ ECC83S (Gain Preamp)V3: JJ ECC83S (Gain EQ)V4: JJ ECC83S (Clean EQ)V5: JJ 12AX7 (FX Loop Send and Return)V6: Sovtek 12AX7LPS (Reverb)V7: Sovtek 12AX7LPS (Phase Inverter)V8 - V9: Output tubes, (Base 20: JJ 6V6S, Base 40: JJ E34L) V10: Rectifier Tube, (Base 20: JJ 5U4GB, Base 40: JJ GZ34)
Swapping Tubes and Bias AdjustmentYour KITCHEN SINK 6VEL comes from the factory biased for safe operation of the factory provided tubes. Limited bias adjustments are available to the user via the back panel bias terminals. Follow the recommended procedures and bias settings at all times and note the highlighted warning and caution alerts as your safety as well as the safe operation of your amplifier depend on it.
The operating range of the user bias circuit has been limited as a precaution while retaining enough adjustment potential in order to provide the necessary flexibility to operate a wide range of compatible tubes available on the market.
Under no circumstances should you open your amplifier and attempt to modify the circuitry in order to increase operating range. Attempting to do so will potentially expose you to very dangerous high-voltage electricity that can kill you. DO NOT ATTEMPT TO DO THIS YOURSELF.
Tube ReplacementTHE SAFEST WAY TO CHANGE YOUR TUBES WOULD BE TO TAKE YOUR AMPLIFIER TO A QUALIFIED TECHNICIAN FOR SERVICING. To safely change your own tubes at home: Make certain the amplifier is turned off and has been allowed ample time to cool down.
WARNING:Never touch the tubes while the amplifier is turned on or has recently been turned ON. You can severely burn your fingers and hands. Tubes are made of glass and can break if mishandled.
WARNING: Do not touch the tube pins as you remove the tube. Even after turning your amp off and unplugging it from the power outlet there could be enough voltage stored in the capacitors to give you a lethal electrical shock.
Tube Layout/Socket Location:TUBE CHART for KITCHEN SINK 6VEL
V1V7
V2
V3V4
V6
V5
V9 V8
phase inverter cln pre
dirty pre
dirty EQcln EQ
reverb
fx loop
power power
V10rectifier
20
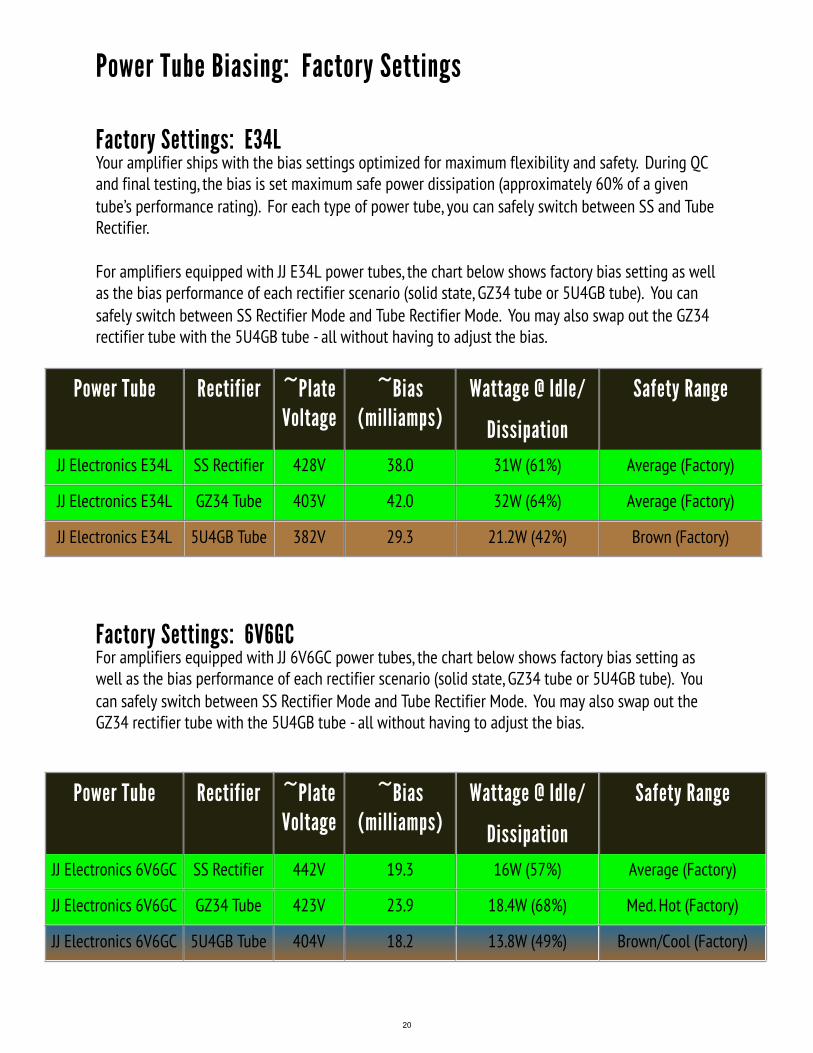
Factory Settings: 6V6GCFor amplifiers equipped with JJ 6V6GC power tubes, the chart below shows factory bias setting as well as the bias performance of each rectifier scenario (solid state, GZ34 tube or 5U4GB tube). You can safely switch between SS Rectifier Mode and Tube Rectifier Mode. You may also swap out the GZ34 rectifier tube with the 5U4GB tube - all without having to adjust the bias.
Power Tube Biasing: Factory Settings
Power Tube Rectifier ~Plate Voltage
~Bias(milliamps)
Wattage @ Idle/
Dissipation
Safety Range
JJ Electronics E34L SS Rectifier 428V 38.0 31W (61%) Average (Factory)
JJ Electronics E34L GZ34 Tube 403V 42.0 32W (64%) Average (Factory)
JJ Electronics E34L 5U4GB Tube 382V 29.3 21.2W (42%) Brown (Factory)
Power Tube Rectifier ~Plate Voltage
~Bias(milliamps)
Wattage @ Idle/
Dissipation
Safety Range
JJ Electronics 6V6GC SS Rectifier 442V 19.3 16W (57%) Average (Factory)
JJ Electronics 6V6GC GZ34 Tube 423V 23.9 18.4W (68%) Med. Hot (Factory)
JJ Electronics 6V6GC 5U4GB Tube 404V 18.2 13.8W (49%) Brown/Cool (Factory)
Factory Settings: E34L Your amplifier ships with the bias settings optimized for maximum flexibility and safety. During QC and final testing, the bias is set maximum safe power dissipation (approximately 60% of a given tube’s performance rating). For each type of power tube, you can safely switch between SS and Tube Rectifier.
For amplifiers equipped with JJ E34L power tubes, the chart below shows factory bias setting as well as the bias performance of each rectifier scenario (solid state, GZ34 tube or 5U4GB tube). You can safely switch between SS Rectifier Mode and Tube Rectifier Mode. You may also swap out the GZ34 rectifier tube with the 5U4GB tube - all without having to adjust the bias.

21
Custom Bias Settings: JJ E34L We’re confident that you’ll find pleasing guitar tones at factory settings. However, your Kitchen Sink 6VEL does provide back panel access to the output tube bias circuit for optimization. To optimize your tube bias settings and to keep your amplifier operating in a safe range, we recommend you do not exceed the following settings under any circumstance.
Power Tube Biasing: Custom Settings
CAUTION: Operating your power tubes outside of their intended range can damage or destroy your tubes as well as your amplifier.
WARNING: Intentionally operating your amplifier out of range will limit or terminate your lifetime warranty.
Tube Type Rectifier Type ~Plate Voltage
~Bias(milliamps)
Dissipation Safety Range
JJ Electronics E34L SS Rectifier 428V 38.0 61% Average (Factory)
JJ Electronics E34L SS Rectifier 433V 29.2 50% Cool
JJ Electronics E34L SS Rectifier 423V 41.4 70% Hot (max safe)
JJ Electronics E34L GZ34 Tube 403V 42.0 64% Average (Factory)
JJ Electronics E34L GZ34 Tube 407V 31.0 50% Cool
JJ Electronics E34L GZ34 Tube 392V 27.0 70% Hot (max safe)
JJ Electronics E34L 5U4GB Tube 382V 29.3 42% Brown (Factory)
JJ Electronics E34L 5U4GB Tube 380V 32.7 50% Cool
JJ Electronics E34L 5U4GB Tube 377V 39.3 60% Average Safe
JJ Electronics E34L 5U4GB Tube 377V 45.8 70% Hot (max safe)
22
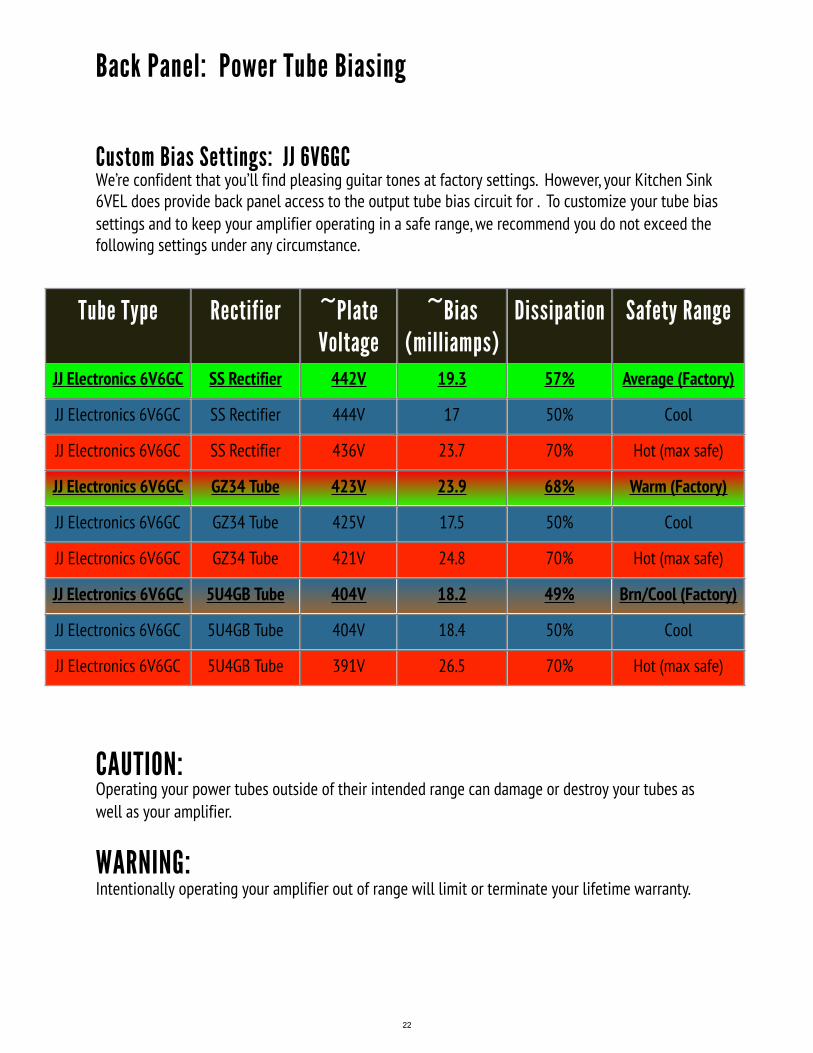
Custom Bias Settings: JJ 6V6GCWe’re confident that you’ll find pleasing guitar tones at factory settings. However, your Kitchen Sink 6VEL does provide back panel access to the output tube bias circuit for . To customize your tube bias settings and to keep your amplifier operating in a safe range, we recommend you do not exceed the following settings under any circumstance.
Back Panel: Power Tube Biasing
CAUTION: Operating your power tubes outside of their intended range can damage or destroy your tubes as well as your amplifier.
WARNING: Intentionally operating your amplifier out of range will limit or terminate your lifetime warranty.
Tube Type Rectifier ~Plate Voltage
~Bias(milliamps)
Dissipation Safety Range
JJ Electronics 6V6GC SS Rectifier 442V 19.3 57% Average (Factory)
JJ Electronics 6V6GC SS Rectifier 444V 17 50% Cool
JJ Electronics 6V6GC SS Rectifier 436V 23.7 70% Hot (max safe)
JJ Electronics 6V6GC GZ34 Tube 423V 23.9 68% Warm (Factory)
JJ Electronics 6V6GC GZ34 Tube 425V 17.5 50% Cool
JJ Electronics 6V6GC GZ34 Tube 421V 24.8 70% Hot (max safe)
JJ Electronics 6V6GC 5U4GB Tube 404V 18.2 49% Brn/Cool (Factory)
JJ Electronics 6V6GC 5U4GB Tube 404V 18.4 50% Cool
JJ Electronics 6V6GC 5U4GB Tube 391V 26.5 70% Hot (max safe)

23
Accessories:
Channel Select (1)The optional “Breakout” box lets you seamlessly merge your amplifier switching parameters into an external switching system. The “Breakout” takes the 7-pin DIN outlet from the amp and places each foot switchable parameter onto a separate 1/4″ TS jack for connecting to your external switching system.
WARNING:Whichever remote foot switching system you use with the Break-out Box, it must feature isolated ground connection. The Kitchen Sink 6VEL foot switching system cannot share an electrical ground with any other device. Care should be used when placing your Break-out Box with other devices on a pedal board or metal tray so as to keep the unit isolated from metal to metal connection.

24
LIMITED LIFETIME WARRANTYThank you for choosing 3RD POWER Amplification. 3RD POWER takes great pride in producing high-quality tube amplifiers and speaker cabinets. Each product is thoroughly tested prior to shipment.
Your amplifier is warranted to the original purchaser to be free from defects in material and workmanship for as long as you own it. An original sales receipt will establish coverage under this warranty. This warranty does not cover service or parts to repair damage caused by accident, neglect, abuse, normal wear, disaster, misuse, over-powering, negligence, inadequate packing or shipping procedures and service, repair or modifications to the product which have not been authorized by 3RD POWER. If this product is defective in materials or workmanship as warranted above, your sole remedy shall be repair or replacement as provided below.
Tubes: 3RD POWER warrants the original purchaser that the tubes used in the unit will be free from defects in material and workmanship for a period of 30 days from the original purchase date. A dated sales receipt will establish coverage under this warranty. This warranty is in lieu of all other expressed warranties. If tubes fail within the initial 30 day period your sole remedy shall be the replacement of tubes as provided below.
Return Procedures: In the unlikely event that a defect should occur, follow the procedure outlined below. Defective products must be shipped, together with proof of purchase, freight pre-paid and insured directly to 3RD POWER. A Return Authorization Number must be obtained prior to shipping the product. Contact 3RD POWER to obtain this RA number. Products must be shipped in their original packaging or equivalent. In any case, the risk of loss or damage in transit is borne by the purchaser. The RA number must appear in large print directly below the shipping address. Always include a brief description of the defect, along with your correct return address and telephone number.
When calling to inquire about a returned product, always refer to the RA number. If 3RD POWER determines that the unit was defective in materials or workmanship at any time during the warranty period, 3RD POWER has the option of repairing or replacing the product at no additional charge, except as set forth below. All replaced parts become property of 3RD POWER. Products replaced or repaired under this warranty will be returned via ground shipping within the United States, freight prepaid. 3RD POWER is not responsible for costs associated with expedited shipping, either to 3RD POWER or returned of the product to the customer.
Incidental or Consequential Damage: In no event will 3RD POWER be liable for any incidental or consequential damages arising out of the use or inability to use any 3RD POWER product, even if a 3RD POWER dealer has been advised of the possibility of such damages or any other claim by any other party. Some states do not allow the exclusion or limitation of consequential damages, so the above limitation and exclusion may not apply to you. This warranty gives you specific legal rights and you may also have other rights which may vary from state to state.
For your protection: Please complete and mail the Purchase Information Card within (10) ten days of the date of purchase so that we may contact you directly in the event a safety notification issued in the accordance with the 1972 Consumer Product Safety Act.
Customer Support: Our dedicated staff is ready to assist you should you have any questions with regard to your product. Please call: (615) 945-3393 (9:00 AM to 5:00 PM Monday through Friday, Central Standard Time).

3RD POWER Amplification LLC1307 Jewel Street
Nashville, TN 37207Phone: (615) 945-3393
Web Sitewww.3rdPower.com
Sunday, August 23, 2020
™
Related Documents