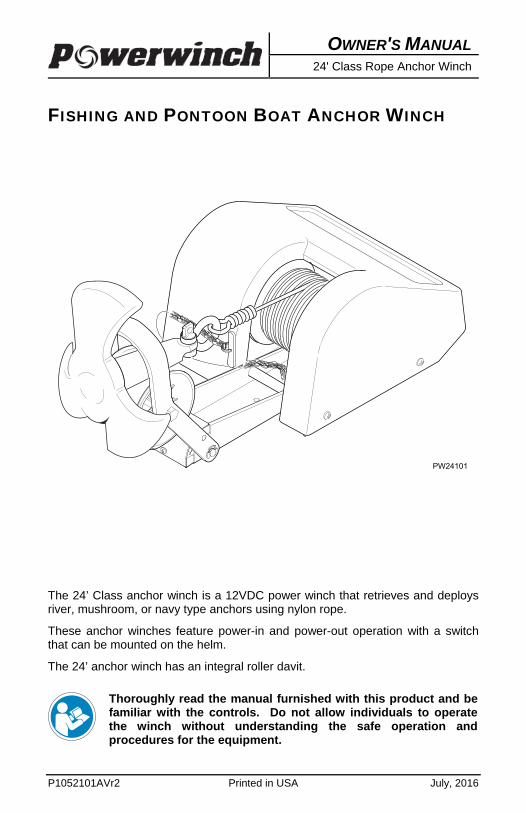
P1052101AVr2 Printed in USA July, 2016 OWNER'S MANUAL 24' Class Rope Anchor Winch FISHING AND PONTOON BOAT ANCHOR WINCH PW24101 The 24’ Class anchor winch is a 12VDC power winch that retrieves and deploys river, mushroom, or navy type anchors using nylon rope. These anchor winches feature power-in and power-out operation with a switch that can be mounted on the helm. The 24’ anchor winch has an integral roller davit. Thoroughly read the manual furnished with this product and be familiar with the controls. Do not allow individuals to operate the winch without understanding the safe operation and procedures for the equipment.

Welcome message from author
This document is posted to help you gain knowledge. Please leave a comment to let me know what you think about it! Share it to your friends and learn new things together.
Transcript
P1052101AVr2 Printed in USA July, 2016
OWNER'S MANUAL
24' Class Rope Anchor Winch
FISHING AND PONTOON BOAT ANCHOR WINCH
PW24101
The 24’ Class anchor winch is a 12VDC power winch that retrieves and deploys river, mushroom, or navy type anchors using nylon rope.
These anchor winches feature power-in and power-out operation with a switch that can be mounted on the helm.
The 24’ anchor winch has an integral roller davit.
Thoroughly read the manual furnished with this product and be familiar with the controls. Do not allow individuals to operate the winch without understanding the safe operation and procedures for the equipment.
PROPRIETARY STATEMENT The Powerwinch Anchor Winch is a product of Carefree of Colorado, located in Broomfield, Colorado, USA. The information contained in or disclosed in this document is consideRED proprietary to Carefree of Colorado. Every effort has been made to ensure that the information presented in the document is accurate and complete. However, Carefree of Colorado assumes no liability for errors or for any damages that result from the use of this document.
The information contained in this manual pertains to the current configuration of the models listed on the title page. Earlier model configurations may differ from the information given. Carefree of Colorado reserves the right to cancel, change, alter or add any parts and assemblies, described in this manual, without prior notice.
Carefree of Colorado agrees to allow the reproduction of this document for use with Carefree of Colorado products only. Any other reproduction or translation of this document in whole or part is strictly prohibited without prior written approval from Carefree of Colorado.
TABLE OF CONTENTS Safety Information ................................................................................... 1
Specifications .......................................................................................... 2 Required Materials (not included with winch) ................................................ 2
Mounting the Unit .................................................................................... 3
Wiring the Unit ......................................................................................... 5 Testing the Unit ............................................................................................. 6
Loading the Rope .................................................................................... 6
Attaching the Anchor .............................................................................. 6
Operating the Winch ............................................................................... 7 Safety Chain .................................................................................................. 7 Maintenance .................................................................................................. 7 Troubleshooting Guide .................................................................................. 7
Replacement Parts List .......................................................................... 8
Warranty ................................................................................................... 9
Powerwinch 2145 W. 6th Avenue Broomfield, CO 80020 by Carefree of Colorado www.powerwinch.com
POWERWINCH 24' CLASS ROPE ANCHOR WINCH
1
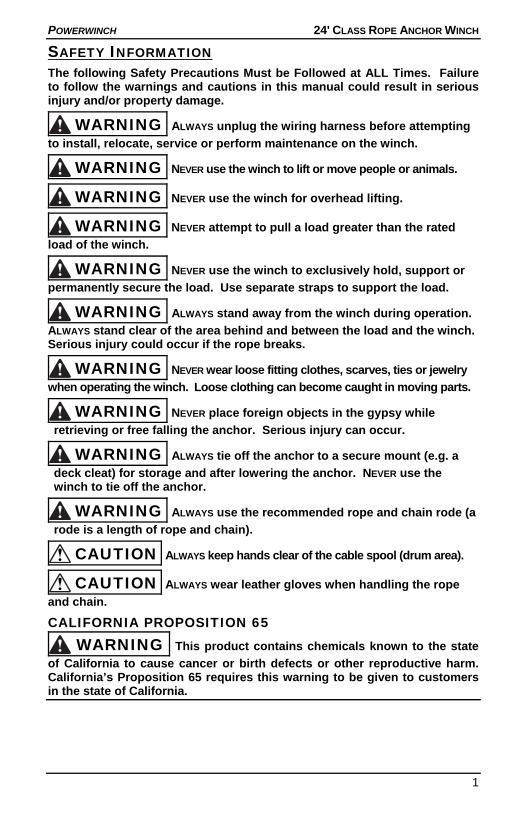
SAFETY INFORMATION The following Safety Precautions Must be Followed at ALL Times. Failure to follow the warnings and cautions in this manual could result in serious injury and/or property damage.
WARNING ALWAYS unplug the wiring harness before attempting
to install, relocate, service or perform maintenance on the winch.
WARNING NEVER use the winch to lift or move people or animals.
WARNING NEVER use the winch for overhead lifting.
WARNING NEVER attempt to pull a load greater than the rated
load of the winch.
WARNING NEVER use the winch to exclusively hold, support or
permanently secure the load. Use separate straps to support the load.
WARNING ALWAYS stand away from the winch during operation.
ALWAYS stand clear of the area behind and between the load and the winch. Serious injury could occur if the rope breaks.
WARNING NEVER wear loose fitting clothes, scarves, ties or jewelry
when operating the winch. Loose clothing can become caught in moving parts.
WARNING NEVER place foreign objects in the gypsy while
retrieving or free falling the anchor. Serious injury can occur.
WARNING ALWAYS tie off the anchor to a secure mount (e.g. a
deck cleat) for storage and after lowering the anchor. NEVER use the winch to tie off the anchor.
WARNING ALWAYS use the recommended rope and chain rode (a
rode is a length of rope and chain).
CAUTION ALWAYS keep hands clear of the cable spool (drum area).
CAUTION ALWAYS wear leather gloves when handling the rope
and chain.
CALIFORNIA PROPOSITION 65 WARNING This product contains chemicals known to the state
of California to cause cancer or birth defects or other reproductive harm. California’s Proposition 65 requires this warning to be given to customers in the state of California.
24' CLASS ROPE ANCHOR WINCH POWERWINCH
2
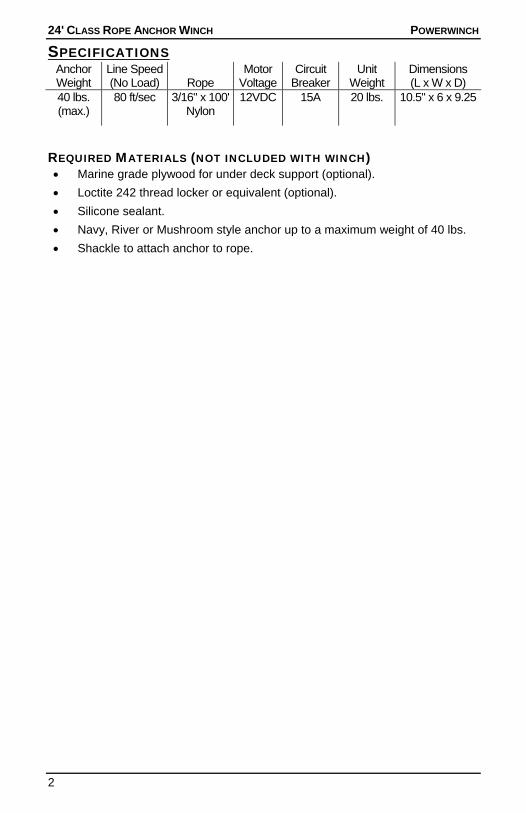
SPECIFICATIONS Anchor Weight
Line Speed (No Load) Rope
Motor Voltage
Circuit Breaker
Unit Weight
Dimensions (L x W x D)
40 lbs. (max.)
80 ft/sec 3/16" x 100' Nylon
12VDC 15A 20 lbs. 10.5" x 6 x 9.25
REQUIRED MATERIALS (NOT INCLUDED WITH WINCH) Marine grade plywood for under deck support (optional).
Loctite 242 thread locker or equivalent (optional).
Silicone sealant.
Navy, River or Mushroom style anchor up to a maximum weight of 40 lbs.
Shackle to attach anchor to rope.
POWERWINCH 24' CLASS ROPE ANCHOR WINCH
3
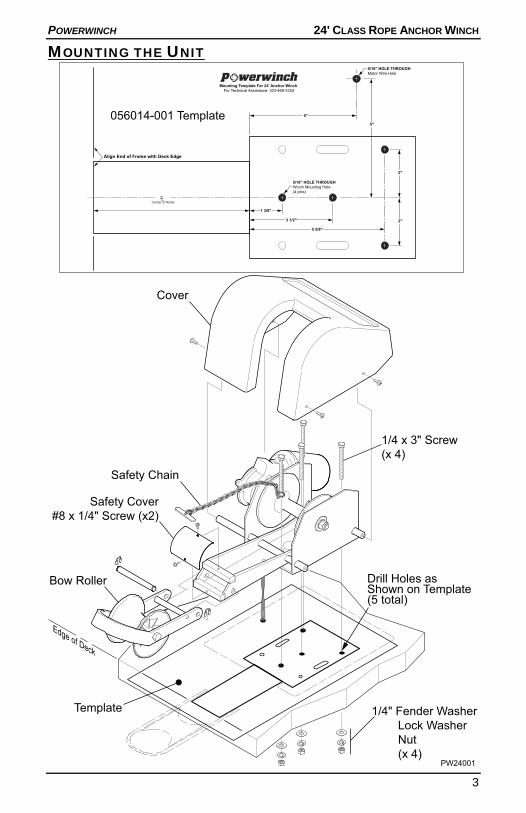
MOUNTING THE UNIT
Bow Roller
Safety Cover#8 x 1/4" Screw (x2)
Safety Chain
Cover
1/4 x 3" Screw(x 4)
PW24001
1/4" Fender Washer Lock Washer Nut (x 4)
Template
Drill Holes asShown on Template(5 total)
Edge of Deck
Align End of Frame with Deck Edge
Center of Roller
Mounting Template For 24' Anchor Winch For Technical Assistance: 303-469-3324
5/16" HOLE THROUGHWinch Mounting Hole(4 plcs)
5/16" HOLE THROUGHMotor Wire Hole
1 3/8"
3 1/2"
5 5/8"
2"
2"
5"
5"056014-001 Template
24' CLASS ROPE ANCHOR WINCH POWERWINCH
4
1. If not previously done, remove the 4 screws and cover and set aside.
2. Place the mounting template on the deck in the desired location and secure with tape.
2.1. The winch may be mounted on the fore (front) or aft (rear) of the boat.
2.2. When mounted, the roller assembly must extend past the deck to allow anchor to clear the deck when retrieving or when the anchor is docked in the roller.
3. Drill the holes as marked on the template.
4. Remove the template.
5. Assemble the safety chain.
5.1. Place one split ring at one end of the chain.
5.2. Attach the safety bar to the other end of the chain using a split ring.
NOTE: It may be necessary to remove links after the anchor has been attached and drawn up. The chain should be tight when attached to the anchor.
6. Place a bead of silicone sealant around the base of the winch and the around the newly drilled mounting holes.
7. Set the anchor on the deck and align the holes in the frame with the holes drilled in the deck.
8. Secure the winch to the deck using four (4) each of 1/4 x 3" bolt, fender washer, lock washer and nut. On the forward bolt, slide the bolt through the open split ring of the safety chain then slide the bolt through the frame and deck hole.
9. Attach the davit roller assembly to the frame as shown.
10. Attach the safety cover using two (2) #8 x 1/4" pan head screws.
POWERWINCH 24' CLASS ROPE ANCHOR WINCH
5
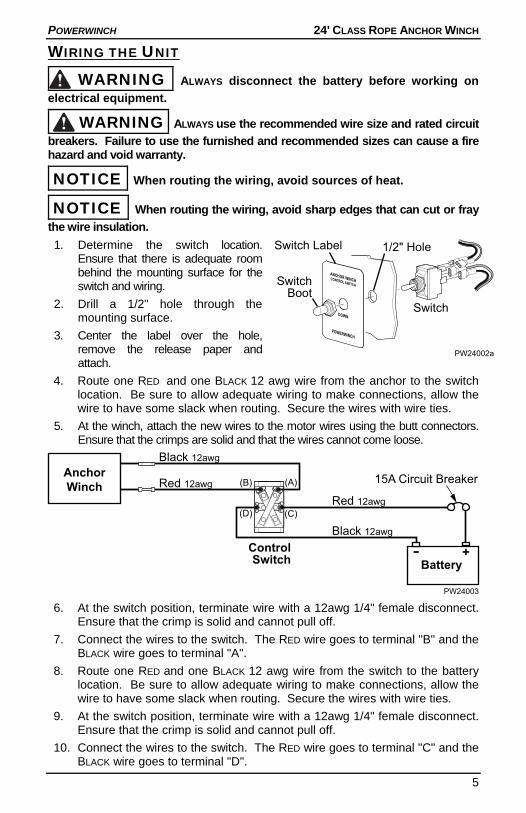
WIRING THE UNIT
WARNING ALWAYS disconnect the battery before working on
electrical equipment.
WARNING ALWAYS use the recommended wire size and rated circuit
breakers. Failure to use the furnished and recommended sizes can cause a fire hazard and void warranty.
NOTICE When routing the wiring, avoid sources of heat.
NOTICE When routing the wiring, avoid sharp edges that can cut or fray
the wire insulation.
1. Determine the switch location. Ensure that there is adequate room behind the mounting surface for the switch and wiring.
2. Drill a 1/2" hole through the mounting surface.
3. Center the label over the hole, remove the release paper and attach.
4. Route one RED and one BLACK 12 awg wire from the anchor to the switch location. Be sure to allow adequate wiring to make connections, allow the wire to have some slack when routing. Secure the wires with wire ties.
5. At the winch, attach the new wires to the motor wires using the butt connectors. Ensure that the crimps are solid and that the wires cannot come loose.
AnchorWinch
ControlSwitch
(D) (C)
(B) (A) 15A Circuit Breaker
Battery
Black 12awg
Red 12awg
Black 12awg
Red 12awg
PW24003 6. At the switch position, terminate wire with a 12awg 1/4" female disconnect.
Ensure that the crimp is solid and cannot pull off.
7. Connect the wires to the switch. The RED wire goes to terminal "B" and the BLACK wire goes to terminal "A".
8. Route one RED and one BLACK 12 awg wire from the switch to the battery location. Be sure to allow adequate wiring to make connections, allow the wire to have some slack when routing. Secure the wires with wire ties.
9. At the switch position, terminate wire with a 12awg 1/4" female disconnect. Ensure that the crimp is solid and cannot pull off.
10. Connect the wires to the switch. The RED wire goes to terminal "C" and the BLACK wire goes to terminal "D".
ANCHOR WINCHCONTROL SWITCH
DOWN
POWERWINCH
Switch
SwitchBoot
PW24002a
1/2" HoleSwitch Label
24' CLASS ROPE ANCHOR WINCH POWERWINCH
6
11. Push the switch through the switch mounting hole. Secure the switch with the switch boot.
12. At the battery, terminate the BLACK wire with a 5/16 ring terminal. Connect wire to the negative post of the battery.
13. Terminate the RED wire with a #10 ring terminal. Attach the wire to the 15A circuit breaker on the post opposite the buss bar.
14. Attach the circuit breaker to the positive (+) post of the battery.
TESTING THE UNIT 1. Ensure that all connections are secure and correct.
2. Without rope, press and hold switch in upward position. If wiring to switch terminals is correct, the spool will spin counterclockwise (toward the rear of the winch).
If the motor runs in the wrong direction, switch is incorrectly wired. To correct, switch the anchor red and black wires on back of the switch.
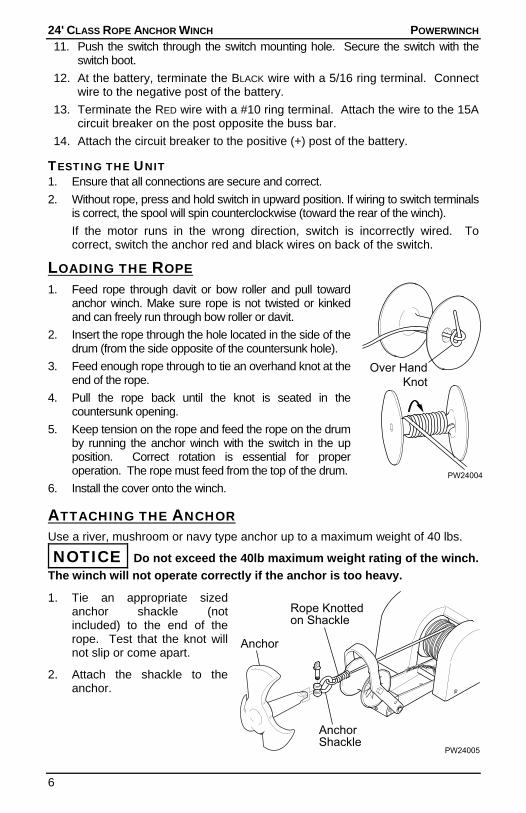
LOADING THE ROPE 1. Feed rope through davit or bow roller and pull toward
anchor winch. Make sure rope is not twisted or kinked and can freely run through bow roller or davit.
2. Insert the rope through the hole located in the side of the drum (from the side opposite of the countersunk hole).
3. Feed enough rope through to tie an overhand knot at the end of the rope.
4. Pull the rope back until the knot is seated in the countersunk opening.
5. Keep tension on the rope and feed the rope on the drum by running the anchor winch with the switch in the up position. Correct rotation is essential for proper operation. The rope must feed from the top of the drum.
6. Install the cover onto the winch.
ATTACHING THE ANCHOR Use a river, mushroom or navy type anchor up to a maximum weight of 40 lbs.
NOTICE Do not exceed the 40lb maximum weight rating of the winch.
The winch will not operate correctly if the anchor is too heavy.
1. Tie an appropriate sized anchor shackle (not included) to the end of the rope. Test that the knot will not slip or come apart.
2. Attach the shackle to the anchor.
AnchorShackle
Rope Knottedon Shackle
Anchor
PW24005
PW24004
Over HandKnot
POWERWINCH 24' CLASS ROPE ANCHOR WINCH
7
OPERATING THE WINCH The anchor winch is simple to operate.
To Lower: Press the switch in the down position to lower the anchor.
To Raise: Press the switch in the up position.
NOTICE Do not pull the boat to the anchor point with the anchor winch.
This can cause damage to the winch motor. Always use the boat motor to move toward the anchor point.
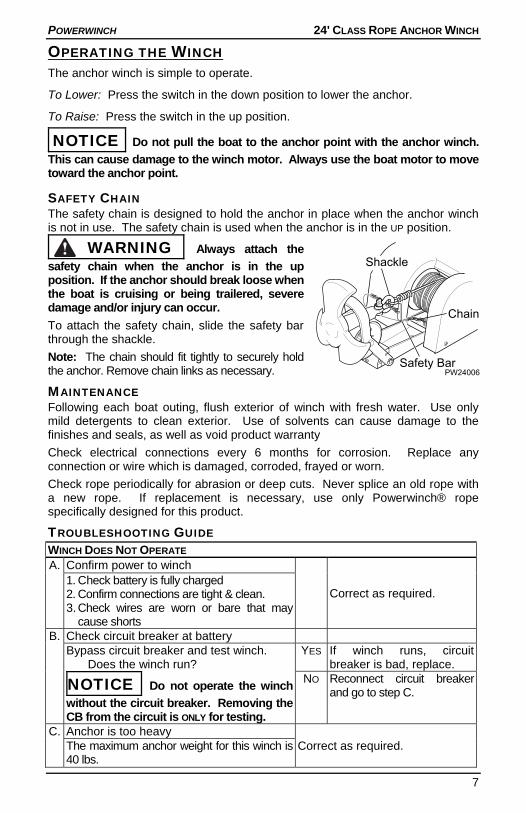
SAFETY CHAIN The safety chain is designed to hold the anchor in place when the anchor winch is not in use. The safety chain is used when the anchor is in the UP position.
WARNING Always attach the
safety chain when the anchor is in the up position. If the anchor should break loose when the boat is cruising or being trailered, severe damage and/or injury can occur.
To attach the safety chain, slide the safety bar through the shackle.
Note: The chain should fit tightly to securely hold the anchor. Remove chain links as necessary.
MAINTENANCE Following each boat outing, flush exterior of winch with fresh water. Use only mild detergents to clean exterior. Use of solvents can cause damage to the finishes and seals, as well as void product warranty
Check electrical connections every 6 months for corrosion. Replace any connection or wire which is damaged, corroded, frayed or worn.
Check rope periodically for abrasion or deep cuts. Never splice an old rope with a new rope. If replacement is necessary, use only Powerwinch® rope specifically designed for this product.
TROUBLESHOOTING GUIDE WINCH DOES NOT OPERATE
A. Confirm power to winch
Correct as required. 1. Check battery is fully charged 2. Confirm connections are tight & clean. 3. Check wires are worn or bare that may
cause shorts B. Check circuit breaker at battery
Bypass circuit breaker and test winch. Does the winch run?
NOTICE Do not operate the winch
without the circuit breaker. Removing the CB from the circuit is ONLY for testing.
YES If winch runs, circuit breaker is bad, replace.
NO Reconnect circuit breaker and go to step C.
C. Anchor is too heavy Correct as required. The maximum anchor weight for this winch is
40 lbs.
PW24006Safety Bar
Chain
Shackle
24' CLASS ROPE ANCHOR WINCH POWERWINCH
8
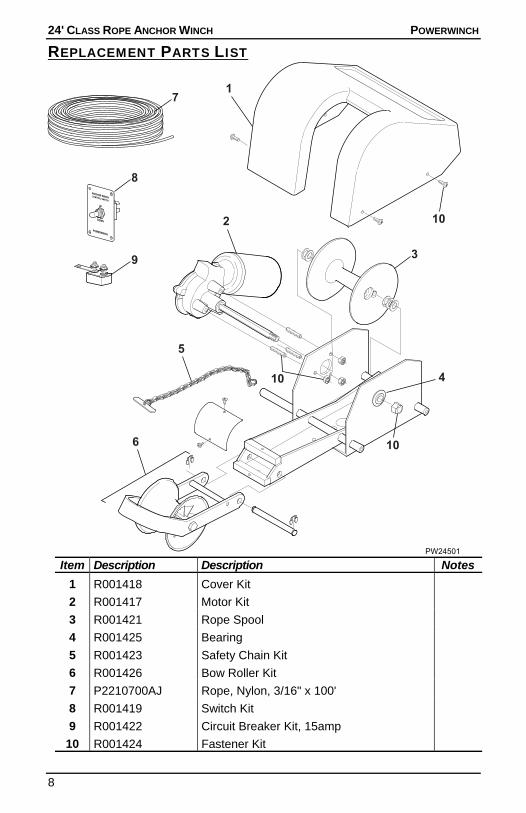
REPLACEMENT PARTS LIST
ANCHOR WINCHCONTROL SWITCH
UP
DOWN
POWERWINCH
PW24501
1
2
3
4
5
6
7
8
9
10
10
10
Item Description Description Notes
1 R001418 Cover Kit
2 R001417 Motor Kit
3 R001421 Rope Spool
4 R001425 Bearing
5 R001423 Safety Chain Kit
6 R001426 Bow Roller Kit
7 P2210700AJ Rope, Nylon, 3/16" x 100'
8 R001419 Switch Kit
9 R001422 Circuit Breaker Kit, 15amp
10 R001424 Fastener Kit
POWERWINCH 24' CLASS ROPE ANCHOR WINCH
9
WARRANTY Carefree of Colorado (hereafter referred to as Carefree) warrants to the FIRST retail Purchaser that the Powerwinch Product described in this manual is free of defects in material and workmanship within the terms and conditions as set forth below. Carefree’s obligation under this warranty is limited to the repair or replacement, at Carefree’s option, of any defective component within the stated warranty period. THIS WARRANTY IS NOT TRANSFERABLE.
1. DURATION a) 2 years on parts and labor. b) Carefree will pay the transportation charges for return shipment to the purchaser of any
product received for legitimate warranty repair.
Warranty duration is not extended by the length of time the product is not in use or the time that the purchaser is deprived the use of the product. The duration of coverage is determined by the date of the original product purchase, not the date of repairs.
2. WHAT IS COVERED UNDER THIS WARRANTY Defects in the manufacturer’s material and workmanship of product under normal use, and which occur within the duration of the warranty period.
3. WHAT IS NOT COVERED UNDER THIS WARRANTY a) Improper installation and/or any consequent damage or failure that results from improper
installation of the product. b) Normal wear. c) Conditions that are not related to the material or workmanship of the product: including
any failure that results from an accident, wind, rain, or other acts of God. d) Purchaser’s abuse, including but not limited to neglect; failure to operate, use or maintain
the product in accordance with the instructions provided with the product. e) Any component not sold or manufactured by Carefree. f) Any failure that results from the use of another manufacturer’s product with a Carefree
product that is not specifically approved by Carefree. g) Any incidental, indirect, or consequential loss, damage or expense that may result from
any defect, failure or malfunction of the product. h) The removal or alteration of any product component or device. In the event of such
removal or alteration, this warranty is void. i) Any expense related to delivery or pick-up of product to/from the service dealer.
4. RESPONSIBILITIES OF THE PURCHASER IN ORDER FOR THE WARRANTY TO BE HONORED, THE PURCHASER MUST HAVE PROOF OF
PURCHASE. FAILURE TO PROVIDE THE REQUIRED DOCUMENTATION MAY DELAY OR VOID ANY
WARRANTY CLAIM. a) Retain dated proof of purchase for the product, and provide it as requested. b) Perform “Periodic Maintenance” as specified in Owners Manual. c) Use reasonable care in maintenance, operation, use and storage of the product in
accordance with the instructions contained in the owner’s manual.
THIS WARRANTY GIVES THE OWNER SPECIFIC LEGAL RIGHTS. THE LAWS OF CERTAIN JURISDICTIONS MAY
GRANT THE OWNER ADDITIONAL RIGHTS AND PRIVILEGES. Except as set forth above; Carefree makes no warranty, whether statutory or otherwise, including without limitation, any warranty of merchantability or fitness for a particular purpose. Carefree shall have no liability except to repair, replace or adjust defective products and parts. Carefree specifically excludes any liability, whether in contract, tort or otherwise, for personal injury, property damage, economic or consequential losses. Carefree has not authorized any person or company to alter the terms of this warranty.
It is Carefree of Colorado’s policy and practice to continuously improve the company’s products and services. Therefore, Carefree reserves the right to make changes in design and components, without notice, whenever it is believed the quality of the product will be improved, but without incurring any obligation to incorporate such improvements in any product which has been shipped or in service.

24' CLASS ROPE ANCHOR WINCH POWERWINCH
10
FOR YOUR RECORDS: DEALER/INSTALLER
NAME:
ADDRESS:
PHONE:
PURCHASE DATE:
PART NUMBER:
SERIAL NUMBER:
PRODUCT NAME OR DESCRIPTION:
Retain your original proof of purchase. It is requiRED for all warranty repairs and returns.
NOTES:
Related Documents