Xtreme Imaging Table of Contents Preface………………………………………………………1 Main features ……………………………………………...... 1 Computer operating system requirements..…………….....1 Prestart Guide …………………………………........... 3 Basic installation…………………………………………….3 Video mo de………………………………………………..... 6 Settings…………………………………………………13 Photo mode... …………………………………………….... 17 Settings…………………………………………………24 Playback mode.. …………………………………………...28 Specifications ………………………………………………29 Notes: This manual contains important safety and operating information. Please read all the information carefully before you use the device to avoid accidents and keep it for future referen ce.

Welcome message from author
This document is posted to help you gain knowledge. Please leave a comment to let me know what you think about it! Share it to your friends and learn new things together.
Transcript

8/11/2019 Intova Sport HD - English
http://slidepdf.com/reader/full/intova-sport-hd-english 1/31
0
Xtreme Imaging
Table of Contents
Preface………………………………………………………1 Main features …………………………………………… ......1
Computer operating system requirements ..…………… .....1Prestart Guide ………………………………… ...........3Basic installation …………………………………………… .3Video mo de……………………………………………… .....6Settings…………………………………………………13 Photo mode... …………………………………………… ....17Settings…………………………………………………24 Playback mode.. ………………………………………… ...28
Specifications ……………………………………………… 29Notes: This manual contains important safety and operating information. Please read allthe information carefully before you use the device to avoid accidents and keep it forfuture reference.

8/11/2019 Intova Sport HD - English
http://slidepdf.com/reader/full/intova-sport-hd-english 2/31
8/11/2019 Intova Sport HD - English
http://slidepdf.com/reader/full/intova-sport-hd-english 3/31
2
Macintosh computer operating system requirements for playback of 1080p and 720pvideo:
Mac OSX (version 10.4.11 or later) 1 GB of system RAM minimum 2.0 GHz Intel Core Duo or faster Video card with 256MB of RAM minimum Recommended screen resolution 1600x900 (minimum 1024x768 )
Computer operating system requirements for playback of VGA video.Windows 2000/XP :
●128 MB RAM, more than 125 MB free disk space .●Available USB Interface .●Recommended screen resolution 1024 × 768 pixels or higher . ●16-bit color or higher display adaptor .
Windows Vista :●800MHz proce ssor and 512 MB of system memory .●20GB hard drive with at least 15GB of available space .●Support for Super VGA graphics. ●Available USB Interface.
Windows 7 :●1 GHz or faster 32-bit(x86) or 64-bit (x64) processor.●1GB RAM (32 -bit) or 2GB RAM (64-bit).●16GB available system RAM(32-bit), 20GB(64-bit) .
●WDDM1.0 or higher version driver ’
s Direct X9 graphics device .Macintosh :●Power Macintosh G3 500 MHz or higher .●Mac OS X version 10.2.6 or later . ●128 MB or more available system RAM (256 MB recommended), 150 MB free disk
space .●800 x 600 or higher-resolution monitor displaying millions of colors .
Handling notice before use
• Do not attempt to take apart the camera as there are high voltage parts and dangerouselectric shock can occur.
• If the camera is dropped or smashed and internal parts are exposed, do not touch as there isa danger of electric shock.
• Do not leave the camera in direct sunlight or near heat sources as these can damage thecamera.
• If camera becomes hot during use, turn off the power immediately.
• For storage, remove the memory card and keep camera in a cool, dry place with housingdoor slightly open.• SPI floats. Intova flotation strap (optional accessory) is recommended as extra precaution forwater use.

8/11/2019 Intova Sport HD - English
http://slidepdf.com/reader/full/intova-sport-hd-english 4/31
3
Product Structure
Basic
Open the housing
Follow the indicated directions in the figure below to open the housing. Sometimes avacuum seal may occur, use thumb press system to open.

8/11/2019 Intova Sport HD - English
http://slidepdf.com/reader/full/intova-sport-hd-english 5/31
4
Insert memory card
Follow the indicated direction in the figure below to insert Micro SD memory card.After the card is inserted, the icon will be shown on the LCD.* Please turn off the power when inserting or removing the memory card.
Notice
1. Format the memory card before use
2. If the Sport HD does not work with the memory card, please try a new card.
3. The Sport HD can ’t record video or take photos without a properly inserted memory card.
USB charging and transferring
Connect your computer to Sport HD with USB cable. After connection, press the
power button, and then use Up/Down buttons to select MDSC/CHARGE/OPEN.
MDSC Enter to download video or image files.CHARGE Charge or recharge the battery power. Full charging time is around 6 hours.OPEN: Recharge the battery power and operate the camera
TV OUT
Connect Sport HD and TV with the TV cable to display the files on TV.

8/11/2019 Intova Sport HD - English
http://slidepdf.com/reader/full/intova-sport-hd-english 6/31
5
Basic operations
Video Mode- Idle Recording Video Picture Mode
FUNCTIONS:
VideoPhoto
Playback
POWER
Short Press “POWER ” button to turn on, and long press “POWER ” button to turn off.
MODE SWITCH
Press the “ MODE ” button to switch between VIDEO/PHOTO.
VIDEO/CAMERA: Press “SHUTTER” button to begin video recording or to snap photo.
Picture in VIDEO: Press “DOWN” button to take a photo while in video recording mode.
PLAYBACK
Press the “OK ” button to enter Playback mode to view video and image files.
DISPLAY
When in either video or picture mode, press “UP” button to turn off LCD to save the battery power.
RESET
If Sport HD shuts down and/or is unresponsive, use a tooth pick or sharp tool to insertinto “R ESET” hole to restart the camera

8/11/2019 Intova Sport HD - English
http://slidepdf.com/reader/full/intova-sport-hd-english 7/31

8/11/2019 Intova Sport HD - English
http://slidepdf.com/reader/full/intova-sport-hd-english 8/31

8/11/2019 Intova Sport HD - English
http://slidepdf.com/reader/full/intova-sport-hd-english 9/31
8
1. VIDEO*QUALITY: This option adjusts the quality of the picture between normal and super fine.Use the “UP / DOWN ” buttons to select “QUALITY ”, and press “OK ” button to enter intothe setting. There are SUPER FINE/FINE/NORMAL/. After selection, press “OK button” to
confirm, then press “MENU ” button twice to return to main screen.
*RESOLUTION: This option adjusts the resolution of the video between 1080P, 720P,WVGA and VGA. Use the “UP/DOWN” buttons to select “RESOLUTION”, and press“OK” button to enter into the setting. There are 1080P 30 / 720P60 / 720P30 / WVGAP60 /WVGAP30 / VGA. After selection, press “OK” button to confirm, then press “MENU”
button twice to return to main screen.
*MOTION DETECTION: This option automatically detects motion and begins recording.Use the “UP / DOWN ” buttons to select “MOTION DETECTION ”, and press “OK ” buttonto enter into the setting. Options are OFF and ON. After selection, press “OK” button toconfirm, then press “MENU ” button twice to return to main screen.

8/11/2019 Intova Sport HD - English
http://slidepdf.com/reader/full/intova-sport-hd-english 10/31
9
*VIDEO DURATION: This option adjusts the duration of each video file recorded. Use the“UP / DOWN ” buttons to select “VIDEO DURATION ”, and press “OK ” button to enter thesetting. There are ANY DURATION / 3MIN / 5MIN / 10MIN / 15MIN. After selection,
press “OK button” to confirm, then press “MENU ” button twice to return to main screen.
*LOOP VIDEO: This option disables or enables video files to be recorded over when theSD card memory is full. Use the “UP / DOWN ” buttons to select “LOOP VIDEO ”, and press“OK ” button to enter into the setting. These are ON and OFF. After selection, press “OK
button” to confirm, then press “MENU ” button twice to return to main screen.
* UPSIDE DOWN (Video Flip): In the setting list, use the “UP / DOWN ” buttons to select
“upside down ”, and press “OK” button to enter into the setting. Choose ON or OFF, and press “OK” button to confirm the selection, then press “MENU ” button twice to return tomain screen.

8/11/2019 Intova Sport HD - English
http://slidepdf.com/reader/full/intova-sport-hd-english 11/31
8/11/2019 Intova Sport HD - English
http://slidepdf.com/reader/full/intova-sport-hd-english 12/31
11
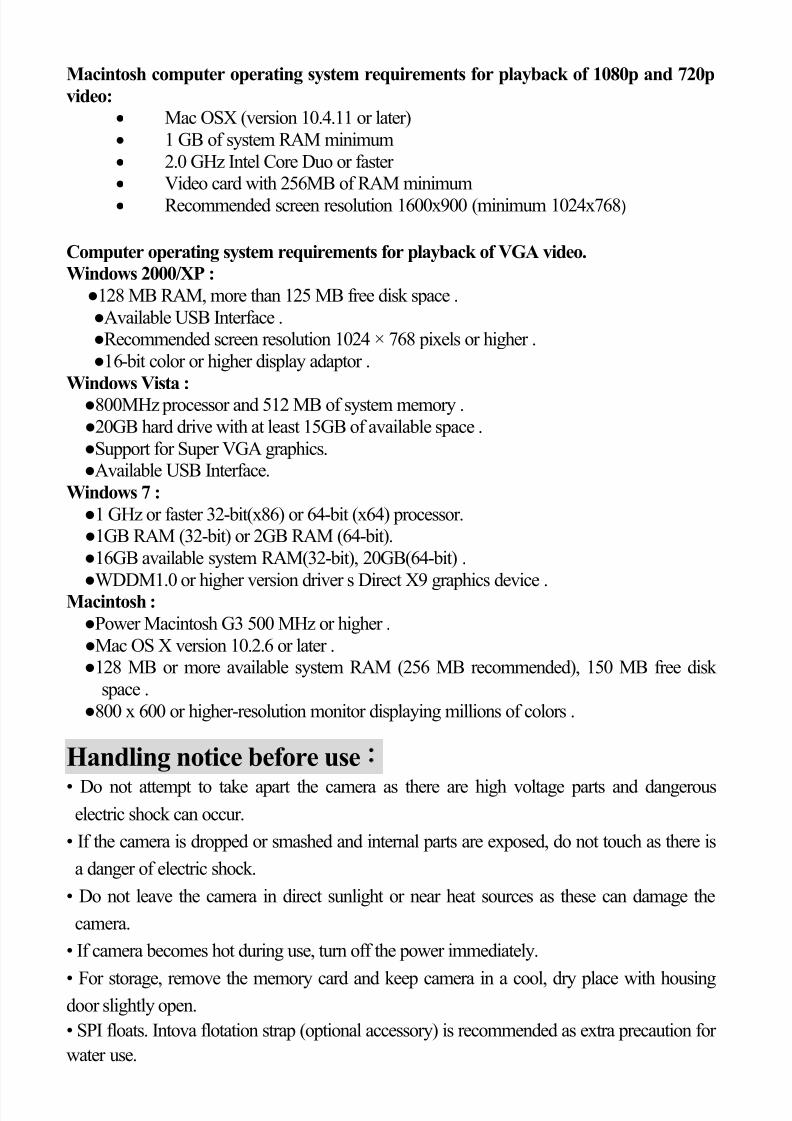
*FLICKER: This option adjusts the video between 60 Hz and 50 Hz. use the “UP / DOWN ” buttons to select “Flicker ”, and press “OK ” button to enter into the setting. There are50Hz/60Hz. After selection, press “OK button” to confirm, then press “MENU ” button twiceto return to main screen.
*CONTRAST: This option adjusts the contrast of the video recording. In the setting list,use the “ UP / DOWN” buttons to select “CONTRAST”, and press “OK” button to enter intothe setting. There are STANDARD/ENHANCE/SOFT. After selection, press “OK button”to confirm, then press “MENU” button twice to return to main screen.
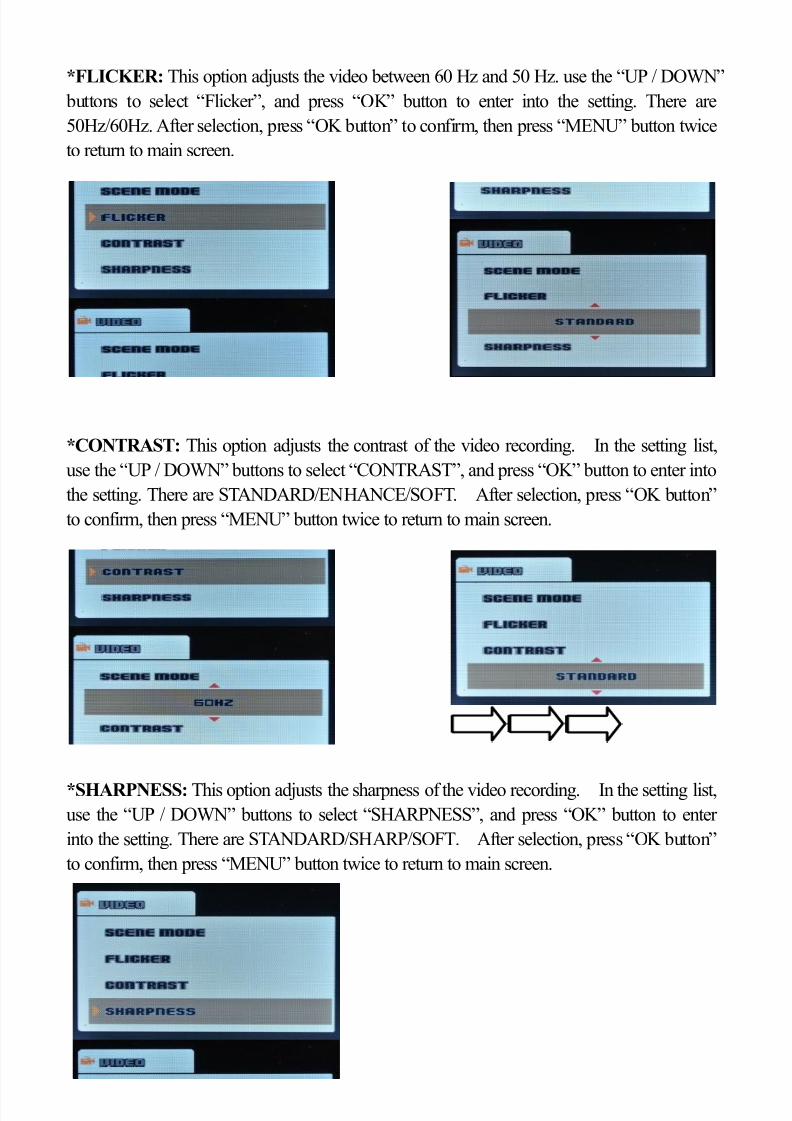
*SHARPNESS: This option adjusts the sharpness of the video recording. In the setting list,use the “ UP / DOWN” buttons to select “SHARPNESS”, and press “OK” button to enterinto the setting. There are STANDARD/SHARP/SOFT. After selection, press “OK button”to confirm, then press “MENU” button twice to return to main screen.

8/11/2019 Intova Sport HD - English
http://slidepdf.com/reader/full/intova-sport-hd-english 13/31
12
*ISO: This option adjusts the sensitivity of the sensor. The higher the value the brighter andgrainier the video. In the setting list, use the “ UP / DOWN” buttons to select “ISO”, and
press “OK” button to enter into the setting. There are AUTO/100/200/400/800. Afterselection, press “OK button” to confirm, then press “MENU” button twice to return to mainscreen.
*WHITE BALANCE: This option adjusts the white balance of the video. Use the “UP /DOWN ” buttons to select “White Balance ”, and press “OK ” button to enter into the setting.There are AUTO/SUNNY/CLOUDY/FLUORESCENT/INCANDESCENT/MANUAL.After selection, press “OK” button to confirm, then press “MENU ” button twice to return tomain screen.
When selecting MANUAL white balance mode and exiting menu, monitor will show blinkingmanual white balance icon. Aim camera at white balance board and press shutter button to set.To reset manual white balance again, turn camera on and off to get blinking icon.
EXPOSURE VALUE: This option adjusts the brightness and darkness of the video. In thesetting list, use the “ UP / DOWN” buttons to select “EXPOSURE VALUE”, and press “OK”
button to enter into the setting. The range is -2.0 to 2.0. After selection, press “OK button”to confirm, then press “MENU” button twice to return to main screen.

8/11/2019 Intova Sport HD - English
http://slidepdf.com/reader/full/intova-sport-hd-english 14/31
13
*AF MODE: use the “UP / DOWN ” buttons to select “AF MODE ”, and press “OK ” buttonto enter into the setting. There are CENTER/AVERAGE/SPOT. After selection, press “OK
button” to confirm, then press “MENU ” button twice to return to main screen.
SETTINGS:In the Video mode, press “MENU” button, and use the “UP / DOWN ” buttons to select theoption of the desired adjustment setting.
*LCD OFF: This option adjusts the time it takes for the LCD to automatically turn off. Inthe setting list, use the “ UP / DOWN” buttons to select “LCD OFF”, and press “OK” buttonto enter into the setting. There are OFF/30 sec/1 min/3 min . After selection, press “OK
button” to confirm, then press “MENU” button twice to return to main screen.
8/11/2019 Intova Sport HD - English
http://slidepdf.com/reader/full/intova-sport-hd-english 15/31
14
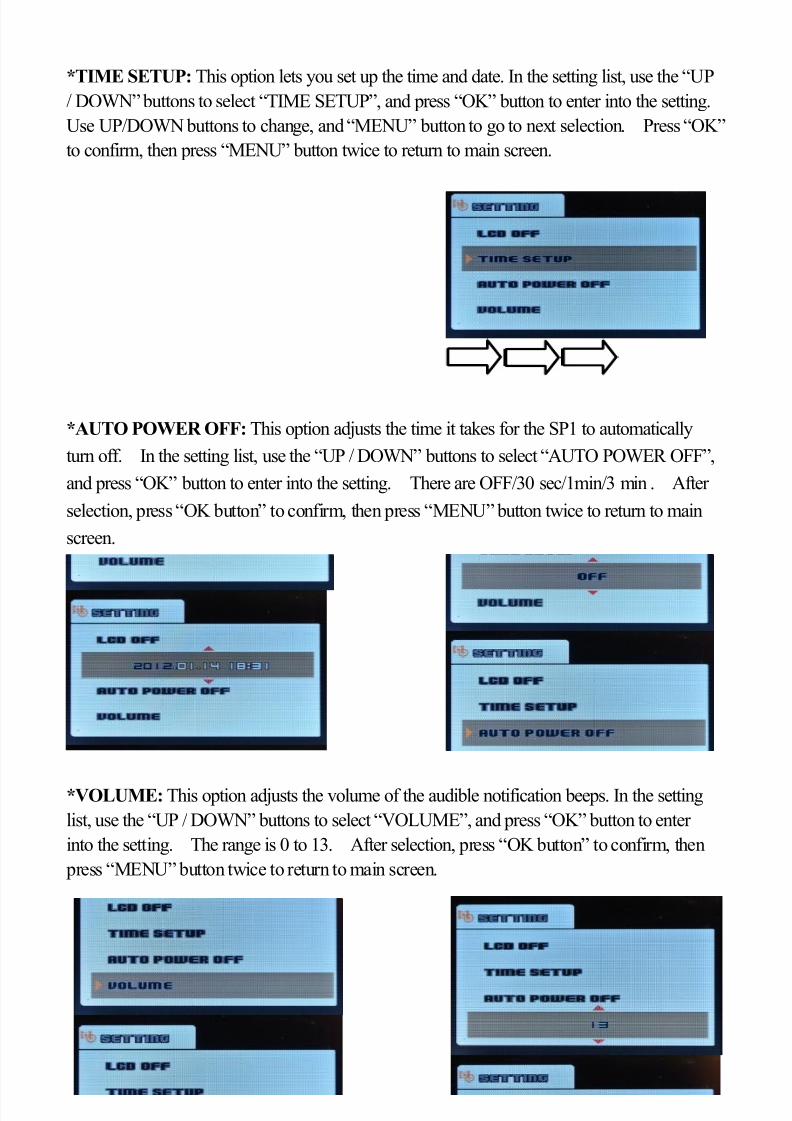
*TIME SETUP: This option lets you set up the time and date. In the setting list, use the “ UP/ DOWN” buttons to select “TIME SETUP”, and press “OK” button to enter into the setting.Use UP/DOWN buttons to change, and “MENU” button to go to next selection. Press “OK”to confirm, then press “MENU” button twice to return to main screen.
*AUTO POWER OFF: This option adjusts the time it takes for the SP1 to automaticallyturn off. In the setting list, use the “ UP / DOWN” buttons to select “AUTO POWER OFF”,and press “OK” button to enter into the setting. There are OFF/30 sec/1min/3 min . Afterselection, press “OK button” to confirm, then press “MENU” b utton twice to return to mainscreen.
*VOLUME: This option adjusts the volume of the audible notification beeps. In the settinglist, use the “ UP / DOWN” buttons to select “VOLUME”, and press “OK” button to enterinto the setting. The range is 0 to 13. After selection, press “OK button” to confirm, then
press “MENU” button twice to return to main screen.
8/11/2019 Intova Sport HD - English
http://slidepdf.com/reader/full/intova-sport-hd-english 16/31
15
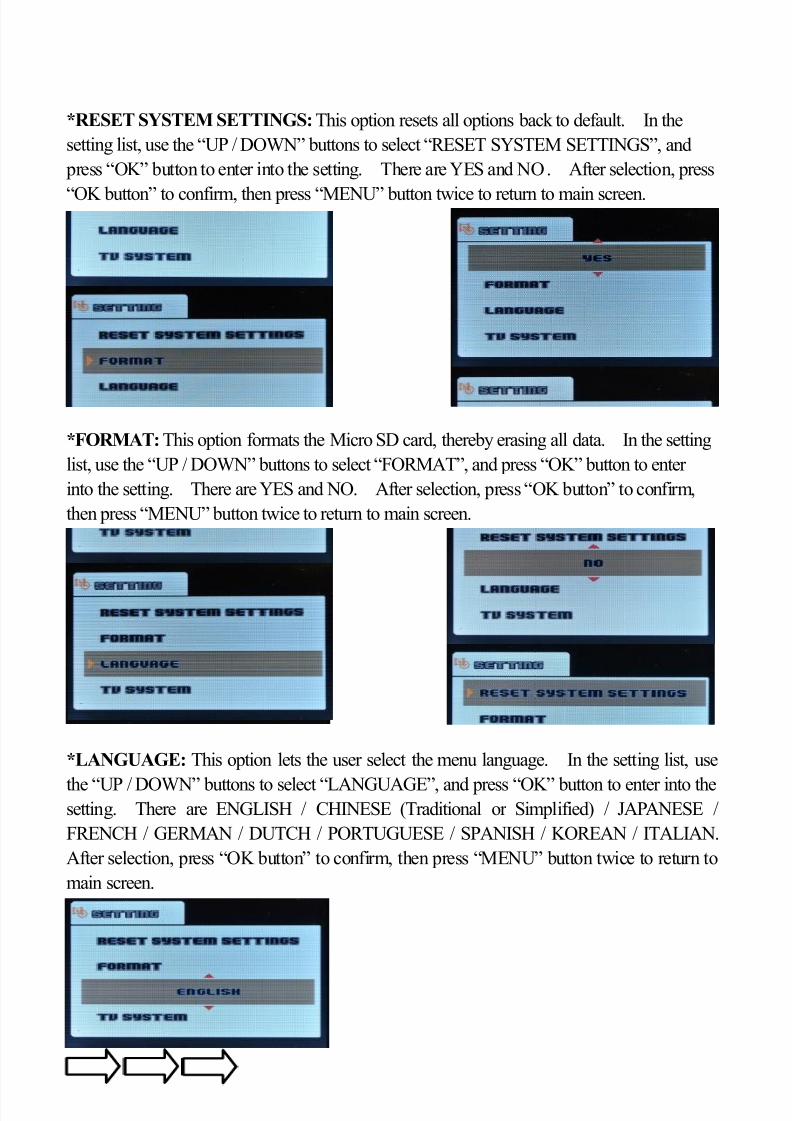
*RESET SYSTEM SETTINGS: This option resets all options back to default. In thesetting list, use the “ UP / DOWN” buttons to select “RESET SYSTEM SETTINGS”, and
press “OK” button to enter into the setting. There are YES and NO . After selection, press
“OK button” to confirm, then press “MENU” button twice to return to main screen.
*FORMAT: This option formats the Micro SD card, thereby erasing all data. In the settinglist, use the “ UP / DOWN” buttons to select “FORMAT”, and press “OK” button to enterinto the setting. There are YES and NO. After selection, press “OK button” to confirm,then press “MENU” button twice to retur n to main screen.
*LANGUAGE: This option lets the user select the menu language. In the setting list, use
the “ UP / DOWN” buttons to select “LANGUAGE”, and press “OK” button to enter into thesetting. There are ENGLISH / CHINESE (Traditional or Simplified) / JAPANESE /FRENCH / GERMAN / DUTCH / PORTUGUESE / SPANISH / KOREAN / ITALIAN.After selection, press “OK button” to confirm, then press “MENU” button twice to return tomain screen.

8/11/2019 Intova Sport HD - English
http://slidepdf.com/reader/full/intova-sport-hd-english 17/31
16
*TV SYSTEM: use the UP / DOWN buttons to select “TV SYSTEM ”, and press “OK ” button to enter into the setting. There are NTSC and PAL. After selection, press “OK button”to confirm, then press “MENU ” button twice to return to main screen.
*STAMP: This option turns on or off the time stamp while recording the video. In thesetting list, use the “ UP / DOWN” buttons to select “STAMP”, and press “OK” button toenter into the setting. There are DATE/TIME or OFF. After selection, press “OK button”to confirm, then press “MENU” button twice to return to main screen.
*BEEP SOUND: This option enables or disables the audible notification beeps. In thesetting list, use the “ UP / DOWN” buttons to select “BEEP SOUND”, and press “OK” buttonto enter into the setting. There are ON or OFF. After selection, press “OK button” toconfirm, then press “MENU” button twice to return to main screen.

8/11/2019 Intova Sport HD - English
http://slidepdf.com/reader/full/intova-sport-hd-english 18/31
17
*FIRMWARE VERSION: This option checks the firmware version of the camera.
Photo mode
Press the MODE button to enter the Photo mode. Adjust the SP1 to take photos of theobjects (viewed from the LCD), press the Shutter button to take photos.
Digital zoom
Use the “Down” button to zoom in on the scene while selecting subjects. The zoomfactor will be displayed on the LCD, and can be increased to a maximum of 4X (the
resolution drops as an image is magnified).
Photo Mode Display
The following icons show the various icon settings displayed on the LCD in Photomode.

8/11/2019 Intova Sport HD - English
http://slidepdf.com/reader/full/intova-sport-hd-english 19/31
18
Settings
In the Photo mode, press the “MENU Button ”, and use the UP / DOWN buttons toselect the option of the desired adjustment setting.
The following icons represent all of the functional settings in the Photo mode. They includeQUALITY / SIZE / SELF CAPTURE / CONTINUOUS / TIME LAPSE / UPSIDE DOWN/ IMAGE EFFECT / SCENE MODE / FLICKER / CONTRAST / SHARPNESS / ISO /WHITE BALANCE / EXPOSURE VALUE / AF MODE.

8/11/2019 Intova Sport HD - English
http://slidepdf.com/reader/full/intova-sport-hd-english 20/31
19
*QUALITY: This option adjusts the compression of the JPEG picture. Use the “UP /DOWN” buttons to select “QUALITY ”, and press “OK ” button to enter into the setting.There are SUPER FINE/FINE/NORMAL/. After selection, press “OK button” to confirm,then press “MENU” button twice to return to main screen.
*SIZE: This option adjusts the resolution of the picture between 3-12 megapixel. Use the“UP / DOWN ” buttons to select “SIZE” , and press “OK button” to enter into the setting.There are 12MP / 8MP / 5MP / 3MP. After selection, press “OK button” to confirm, then
press MENU button twice to return to main screen.
*SELF CAPTURE: use the “UP / DOWN ” buttons to select “SELF CAPTURE ”, and press“OK button” to enter into the setting. There are OFF and ON. After selection, press “OK
button” to confirm, then press MENU button twice to return to main screen.

8/11/2019 Intova Sport HD - English
http://slidepdf.com/reader/full/intova-sport-hd-english 21/31
20
*CONTINUOUS: use the “UP / DOWN ” buttons to select “CONTINUOUS ”, and press“OK button” ” to enter into the setting. There are OFF and ON. P ress “OK button” toconfirm, then p ress “MENU” button twice to return to main screen.
*TIME LAPSE: use the “ UP / DOWN” buttons to select “TIME LAPSE ”, and press “OK button” ” to enter into the setting. U se the “UP / DOWN ” buttons to select 60 sec /30 sec/10 sec/ 5 sec / 3 sec / 2 sec / OFF , and press “OK button” to confirm, then p ress “MENU ”
button twice to return to main screen.
*UPSIDE DOWN: use the “UP / DOWN ” buttons to select “UPSIDE DOWN ”, and press“OK button” ” to enter into the setting. There are OFF and ON. After selection, press“OK button” to confirm , then press MENU button twice to return to main screen.

8/11/2019 Intova Sport HD - English
http://slidepdf.com/reader/full/intova-sport-hd-english 22/31
21
*IMAGE EFFECT: use the UP / DOWN buttons to select “DIGITAL EFFECT ”, and press“OK button” to enter into the setting. There are OFF/ VIVID / BLACK-WHITE /
NEGATIVE / SEPIA / ART. After selection, press “OK button” to confirm , then pressMENU button twice to return to main screen.
*SCENE MODE: use the UP / DOWN buttons to select “SCENE MODE ”, and press “OK button” ”, and press “OK button” to enter into the setting. There are AUTO/ NIGHT SCENE/SPORTS / LANDSCAPE / SUNSET / SAND, SNOW / SPOTLIGHT / DIVING /. Afterselection, press “OK button” to confirm , then press MENU button twice to return to mainscreen.
*FLICKER: This option adjusts the video between 60 Hz and 50 Hz. use the “UP / DOWN” buttons to select “Flicker ”, and press “OK ” button to enter into the setting. There are50Hz/60Hz. After selection, press “OK button” to confirm, then press “MENU” button twiceto return to main screen.
8/11/2019 Intova Sport HD - English
http://slidepdf.com/reader/full/intova-sport-hd-english 23/31
22
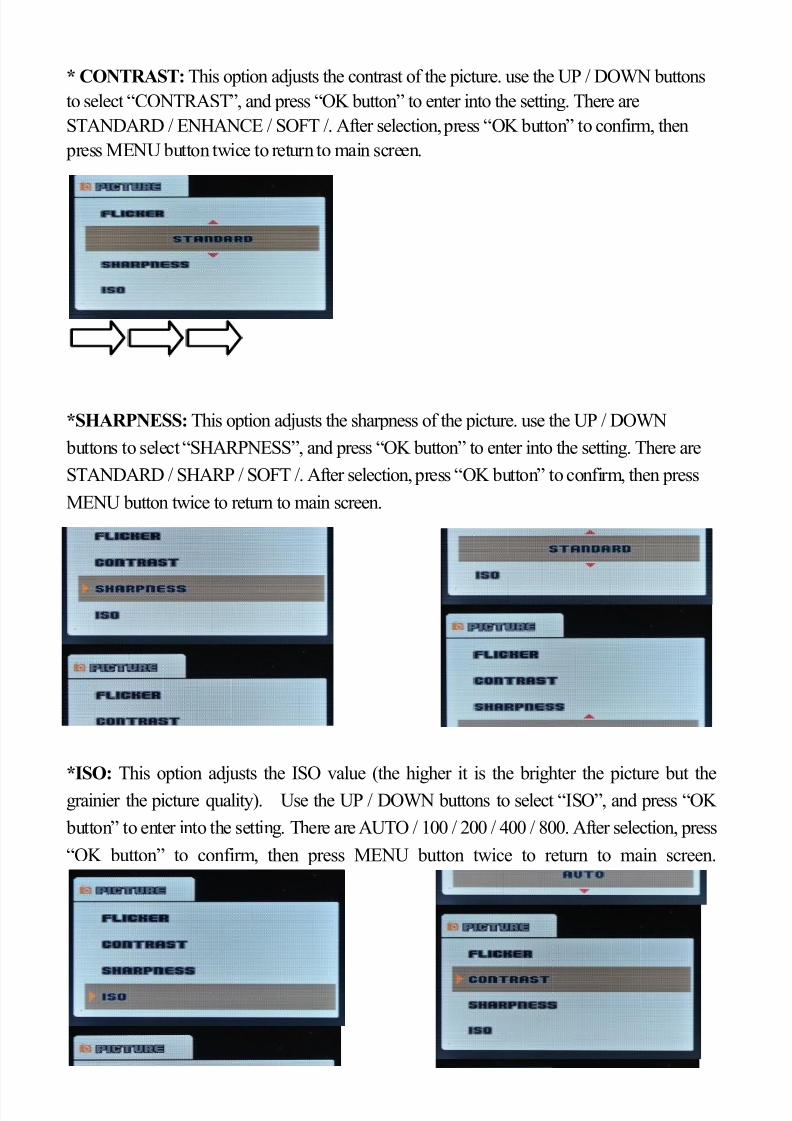
* CONTRAST: This option adjusts the contrast of the picture. use the UP / DOWN buttonsto select “CONTRAST ”, and press “OK button” to enter into the setting. There areSTANDARD / ENHANCE / SOFT /. After selection, press “OK button” to confirm, then
press MENU button twice to return to main screen.
*SHARPNESS: This option adjusts the sharpness of the picture. use the UP / DOWN buttons to select “SHARPNESS ”, and press “OK button” to enter into the setting. There areSTANDARD / SHARP / SOFT /. After selection, press “OK button” to confirm , then pressMENU button twice to return to main screen.
*ISO: This option adjusts the ISO value (the higher it is the brighter the picture but thegrainier the picture quality). Use the UP / DOWN buttons to select “ISO”, and press “OK
button” to enter into the setting. There are AUTO / 100 / 200 / 400 / 800. After selection, press“OK button” to confirm , then press MENU button twice to return to main screen.

8/11/2019 Intova Sport HD - English
http://slidepdf.com/reader/full/intova-sport-hd-english 24/31
23
*WHITE BALANCE: This option adjusts the white balance of the picture. Use the “UP /DOWN” buttons to select “White Balance ”, and press “OK ” button to enter into the setting.There are AUTO / SUNNY/ CLOUDY / FLUORESCENT / INCANDESCENT /MANUAL. After selection, press “OK” button to confirm, then press “MENU” button twiceto return to main screen.
When selecting MANUAL white balance mode and exiting menu, monitor will show blinkingmanual white balance icon. Aim camera at white balance board and press shutter button to set.To reset manual white balance again, turn camera on and off to get blinking icon.
*EXPOSURE VALUE: This option adjusts exposure of the picture (changing it betweendark and bright). The higher the value, the brighter the picture becomes. In the setting list,use the “ UP / DOWN” buttons to select “EXPOSURE VALUE”, and press “OK” button toenter into the setting. The range is -2.0 to 2.0. After selection, press “OK button” to confirm,then press “MENU” button twice to return to main screen.
* AF MODE: use the UP / DOWN buttons to select “AF MODE ”, and press “OK ” button toenter into the setting. There are CENTER/AVERAGE/SPOT/. After selection, press “OK
button” to confirm, then press MENU button twice to return to main screen.

8/11/2019 Intova Sport HD - English
http://slidepdf.com/reader/full/intova-sport-hd-english 25/31
24
SETTINGS: use the UP / DOWN buttons to select “setting ”, and press “OK ” button to enterinto the setting.
*LCD OFF: This option adjusts the time it takes for the LCD to automatically turn off. Inthe setting list, use the “ UP / DOWN” buttons to select “LCD OFF”, and press “OK” buttonto enter into the setting. There are OFF/30 sec/1 min/3 min . After selection, press “OK
button” to confirm, then press “MENU” button twice to return to main screen.
*TIME SETUP: This option lets you set the time and date. In the setting list, use the “ UP /DOWN” buttons to select “TIME SETUP”, and press “OK” button to enter into the setting.
Use UP/DOWN buttons to change and “MENU” button to go to next selection. Press “OK”to confirm, then press “MENU” button twice to return to main screen.

8/11/2019 Intova Sport HD - English
http://slidepdf.com/reader/full/intova-sport-hd-english 26/31
25
*AUTO POWER OFF: This option adjusts the time it takes for the DV to automaticallyturn off. In the setting list, use the “ UP / DOWN” buttons to select “AUTO POWER OFF”,and press “OK” button to enter into the setting. There are OFF / 30 sec / 1min / 3 min .After selection, press “OK button” to confirm, then press “MENU” button twice to return tomain screen.
*VOLUME: This option adjusts the volume of the audible notification beeps. In thesetting list, use the “ UP / DOWN” buttons to select “VOLUME”, and press “OK” button toenter into the setting. The range is 0 to 13. After selection, press “OK button” to confirm,then press “MENU” button twice to return to ma in screen.
*RESET SYSTEM SETTINGS: This option resets all options back to default. In thesetting list, use the “ UP / DOWN” buttons to select “RESET SYSTEM SETTINGS”, and press “OK” button to enter into the setting. There are YES and NO . After selection, press“OK button” to confirm, then press “MENU” button twice to return to main screen.

8/11/2019 Intova Sport HD - English
http://slidepdf.com/reader/full/intova-sport-hd-english 27/31
26
*FORMAT: This option formats the Micro SD card, thereby erasing all data. In the settinglist, use the “ UP / DOWN” buttons to select “FORMAT”, and press “OK” button to enterinto the setting. There are YES and NO. After selection, press “OK button” to confirm,then press “MENU” button twice to return to main screen.
*LANGUAGE: This option lets the user select the menu language. In the setting list, usethe “ UP / DOWN” buttons to select “LANGUAGE”, and press “OK” button to enter into thesetting. There are ENGLISH / CHINESE (Traditional or Simplified) / JAPANESE /FRENCH / GERMAN / DUTCH / PORTUGUESE / SPANISH / KOREAN / ITALIAN.After selection, press “OK button” to confirm, then press “MENU” button twice to return tomain screen.
*TV SYSTEM: use the UP / DOWN buttons to select “TV SYSTEM ”, and press “OK ”
button to enter into the setting. There are NTSC and PAL. After selection, press “OK button”to confirm, then press MENU button twice to return to main screen.

8/11/2019 Intova Sport HD - English
http://slidepdf.com/reader/full/intova-sport-hd-english 28/31

8/11/2019 Intova Sport HD - English
http://slidepdf.com/reader/full/intova-sport-hd-english 29/31
28
Playback mode
*VIDEO PLAYBACK
Under video mode, press “OK ” button to enter into playback mode. Use “UP/DOWN ” buttons to scroll and pres s “OK” button to select the video to be viewed. Press “OK ” buttonto play it. Also, press “OK ” button once again to stop the video, or press “DOWN” button
to fast forward and “UP” button to slow down the file.
*PHOTO VIEWING AND SLIDESHOW
Under photo mode, press “OK ” button to enter into view photo mode. Use “UP/DOWN ” buttons to scroll and press “OK” button to select the picture to be viewed. Press“UP/DOWN” buttons to scroll through pictures or press “OK” button to begin slideshow.When v iewing slide show, press “OK” button to stop slideshow. Press “MODE” button toreturn to selection screen. Press “MODE ” button again to return to main screen.
* DELETE In either the video or picture selection screen, use “UP/DOWN ” buttons toselect the video or photo to be deleted, and press “MENU ” button. Use “UP/DOWN ”
buttons to select YES (Single image), ALL (deletes either all videos or all pictures) or NO.Press “OK” button to confirm.
8/11/2019 Intova Sport HD - English
http://slidepdf.com/reader/full/intova-sport-hd-english 30/31
29
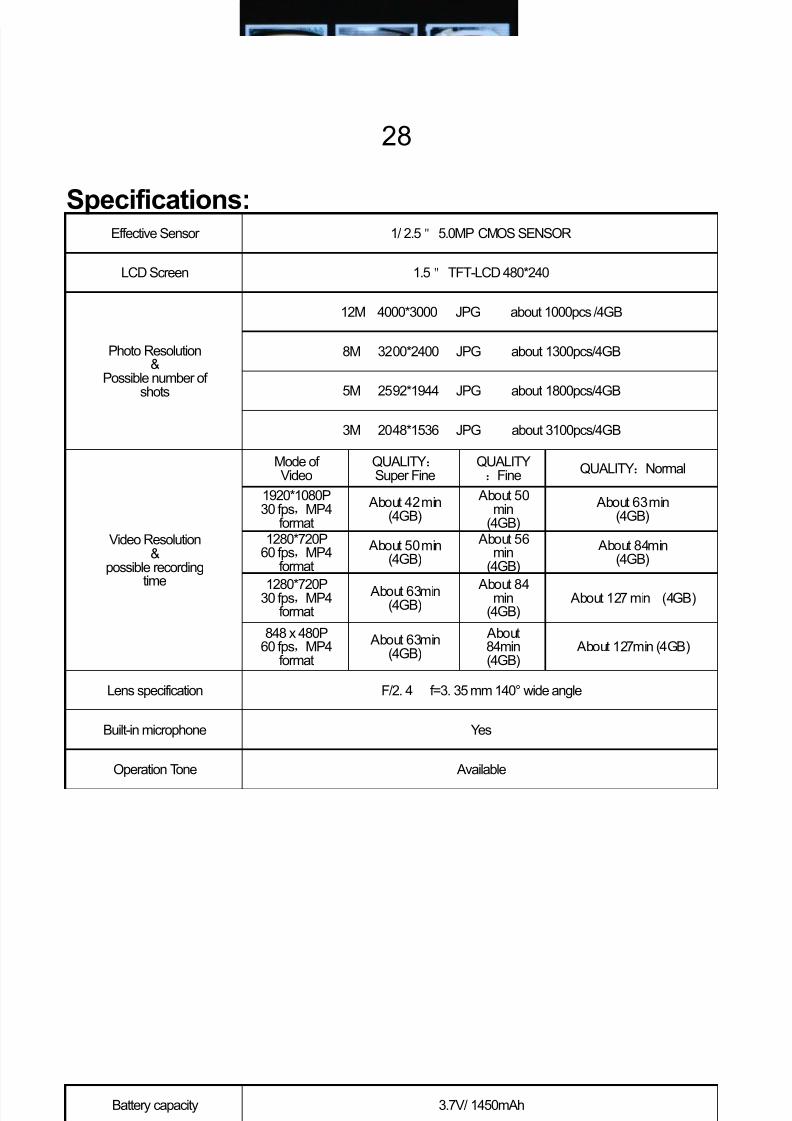
Specifications:
Effective Sensor 1/ 2.5 5.0MP CMOS SENSOR
LCD Screen 1.5 TFT-LCD 480*240
Photo Resolution&
Possible number ofshots
12M 4000*3000 JPG about 1000pcs /4GB
8M 3200*2400 JPG about 1300pcs/4GB
5M 2592*1944 JPG about 1800pcs/4GB
3M 2048*1536 JPG about 3100pcs/4GB
Video Resolution&
possible recordingtime
Mode ofVideo
QUALITYSuper Fine
QUALITYFine QUALITY Normal
1920*1080P30 fps MP4
format About 42 min
(4GB) About 50
min(4GB)
About 63 min(4GB)
1280*720P60 fps MP4
format About 50 min
(4GB) About 56
min(4GB)
About 84min(4GB)
1280*720P30 fps MP4
format
About 63min(4GB)
About 84min
(4GB)
About 127 min (4GB)
848 x 480P60 fps MP4
format About 63min
(4GB) About84min(4GB)
About 127min (4GB)
Lens specification F/2. 4 f=3. 35 mm 140° wide angle
Built-in microphone Yes
Operation Tone Available
Battery capacity 3.7V/ 1450mAh

8/11/2019 Intova Sport HD - English
http://slidepdf.com/reader/full/intova-sport-hd-english 31/31
Power consumption 1.6W
Continuous recording About 2.5 hrs (LCD on), 3 hrs (LCD off)
Charging spec. DC5V 1A or above
Charging time About 5 hrs
USB port USB2.0 High Speed
Type of Memory Micro SD card (class 6 or above)
Capacity of Memory 2GB-32GB
Depth rating Waterproof to 200 ft / 60M
Weight 6 oz / 170g
Dimension (2.8x3.3x2.4)in / (7x8.4x6)cm
Standard Accessories USB Cable AV Cable User Manual, Lens cap
NOTE: As a result of continual improvements, the design and specifications
of the product within may differ slightly to the unit illustrated on the packaging.
Related Documents