Thank you for choosing Merlyn. Please familiarise yoursel f with the fitting instructions before commencing fitting. 1. Check that you have the tools required. 2 that the installation site is compatible . Check with size of door supplied 3. Check all the enclosure components. 4 that the installation kit is complete . Check DO NOT attempt to install the product unless you can tick ALL 4 boxes as satisfactory. The wall plugs supplied with the installation kit are for use in solid walls. Hollow or ' s tud-partition’ walls will require alternative fixings. Please consult a hardware supplier for the correct type. It may also be necessary to consult your tiling supplier about the correct method for drilling your tiles. IMPORTANT Any parts missing or damaged must be reported to your supplier within 5 days of purchase. Inspect shower enclosure before fitting. N o claims will be acceptable after product has been installed. USE SAFETY EYEWEAR WHEN DRILLING INSTALLATION GUIDE Sliding Door

Welcome message from author
This document is posted to help you gain knowledge. Please leave a comment to let me know what you think about it! Share it to your friends and learn new things together.
Transcript

Thank you for choosing Merlyn.Please familiarise yourself
with the fitting instructions before commencing fitting.
1. Check that you have the tools required.
2 that the installation site is compatible . Check with size of door supplied3. Check all the enclosure components.
4 that the installation kit is complete. Check
DO NOT attempt to install the product unless you can
tick ALL 4 boxes as satisfactory.
The wall plugs supplied with the installation kit are for
use in solid walls. Hollow or 'stud-partition’ walls will
require alternative fixings. Please consult a hardware
supplier for the correct type.
It may also be necessary to consult your tiling supplier
about the correct method for drilling your tiles.
VIVID
10 IMPORTANT
Any parts missing or damaged must be reported to your supplier within 5 days of purchase.
Inspect shower enclosure before fitting. No claims will be acceptable after product has been installed.
USE SAFETY EYEWEAR WHEN DRILLING
2 DOOR QUADRANT
INSTALLATION GUIDE
Sliding Door

COMPONENTS AND BOX CONTENTS 1
V3211
S6LL8059
A
B
magnetic upright profile
S6LC84351871
V4110

Tools Required
- 6mm masonry drill bit
- Power drill
- Quality Silicone
- Pencil
- Tape Measure
- #2 Philips Head screw driver
- Spirit level with horizontal and vertical level indicators
IMPORTANT - Installation site
1. Ensure the top surface of the shower tray on which the enclosure will be installed is level in every direction.
2. The tiles or other wall finishing should be effectively sealed at the tray edges.
3. Tiles should extend at least to the corners of the tray and a minimum of 2.0 metres from the top of the tray.
Spanner-
FIXING KIT COMPONENTS, TOOLS REQUIRED, SITE 2
V2104 ×2
S6HDLE 2×
S6HDLEP2 1×
S6HDLEP3 2×
S6HDLEP4 2×
S6HDLEP1 1×
S6LL8059 2×
S6LL8060 2×
S6HDLEP5 2×
S6HDLEP5 1×
S6HDLEP5 2× V2115 12×
V2114 12×
V6113×6
V6115× 1
V4111×14
V4110×6
V2101L 1×
V2101R 1×
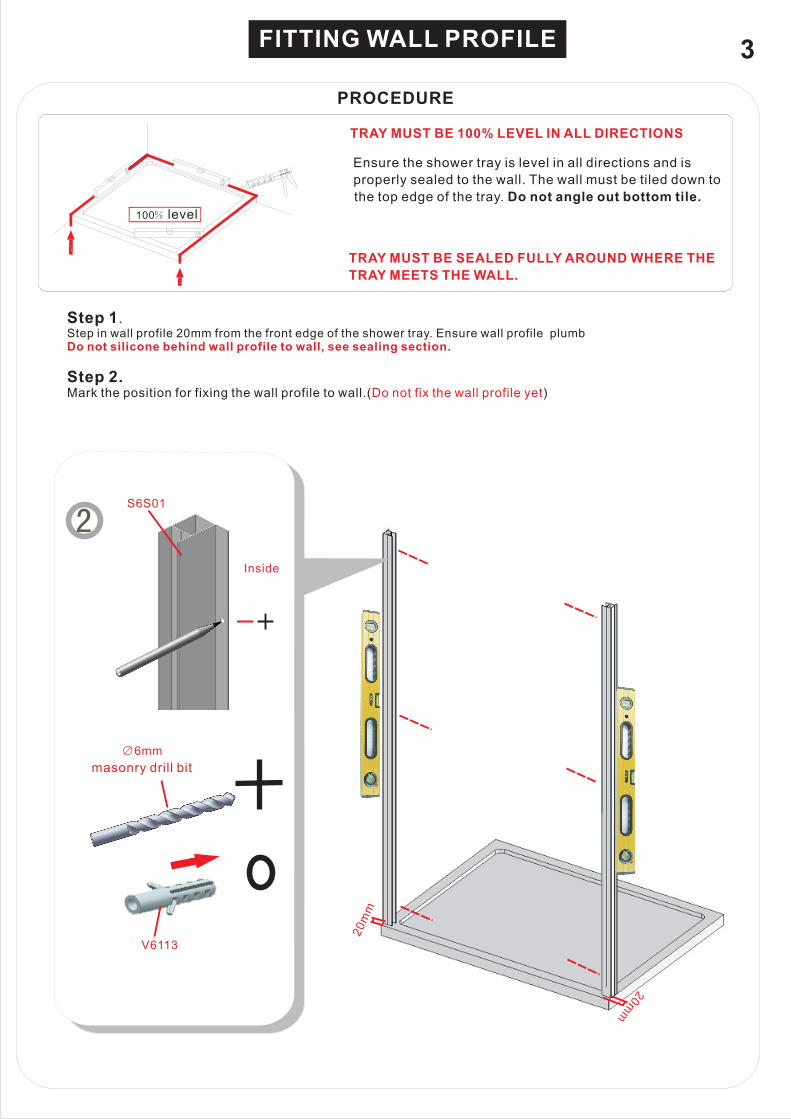
FITTING WALL PROFILE 3
Step 1.Step in wall profile 20mm from the front edge of the shower tray. Ensure wall profile plumbDo not silicone behind wall profile to wall, see sealing section.
Step 2.Mark the position for fixing the wall profile to wall.( )Do not fix the wall profile yet
V6113
2Inside
S6S01
100%
Level !
TRAY MUST BE 100% LEVEL IN ALL DIRECTIONS
Ensure the shower tray is level in all directions and is
properly sealed to the wall. The wall must be tiled down to
the top edge of the tray. Do not angle out bottom tile.
TRAY MUST BE SEALED FULLY AROUND WHERE THE
TRAY MEETS THE WALL.
PROCEDURE
100% level
∅6mm
masonry drill bit
20mm
20m
m

FITTING RAILS 4
Step 3.Loosen fixed glass panel clips.Do not remove the screw.
V4111
S6S03ABottom rail
Top rail
S6S01
6
3
7
Step 6. Tighten the glass clips.
8
Step 4.Place fixed panel U seal onto top & bottom edge of glass.
Step 7.Fix magnetic upright profile S6S03A using V4111.
5V4111
V4111
V3211 U seal ( flush with glass edge)
4

FITTING DOOR PANELS AND ROLLERS 5
Step 8.Position the assembled frame onto the shower tray, and fix the frame to the marked position on wall using V4111 flat head screw.
Tip: If you are not close to the minimum adjustment, fix the wall profile to the wall on the magnetic upright profile side first.
Outside
Ensure the rollers are fitted in the correct position.
Bottom roller
Bottomrail
Top rollerTop rail
push down
11
Step 9.Assemble the top rollers using spanner.Ensure you can see top adjusting screw.
Step 10.Assemble the bottom rollers using
.Rollers have spring for
easy clean function.
screw driverIMPORTANT:
Step 11.Hang the moving panel to the top rail, then push the bottom rollers into bottom rail.
Ensure handle is towards the magnetic profile.NOTE:
V2114
V4111
8
9Adjusting screw
Top roller
10
Bottom roller

6FINISHING
S6HDLEP2
S6HDLEP5
S6HDLEP1
S6HDLEP4S6HDLEP3
S6HDLEP6
S6HDLEP7
12
13
V2114
V6DRIBIT
Step 13.Drill through upright and wall profile in 3 places top to bottom as shown.
Drill 10mm from the back of the upright profile.Note:
Step 14.If the moving panels are not closing correctly, or there is any gap between the magnets, adjust the roller by first loosening the nut behind the roller slightly (max half turn). Then adjust screw at the top of the roller and tighten nut. Ensure bottom rollers are running properly in the bottom track.
V2115
V2104
Inside
S6LC84351871
S6LC83291805
Ensure the top rail is levelthen go on to step 13
15 16V2101L/R
Inside
Loosen nut ½ turn to adjust
14
V4110
10mm
Outside
If not closing correctly.
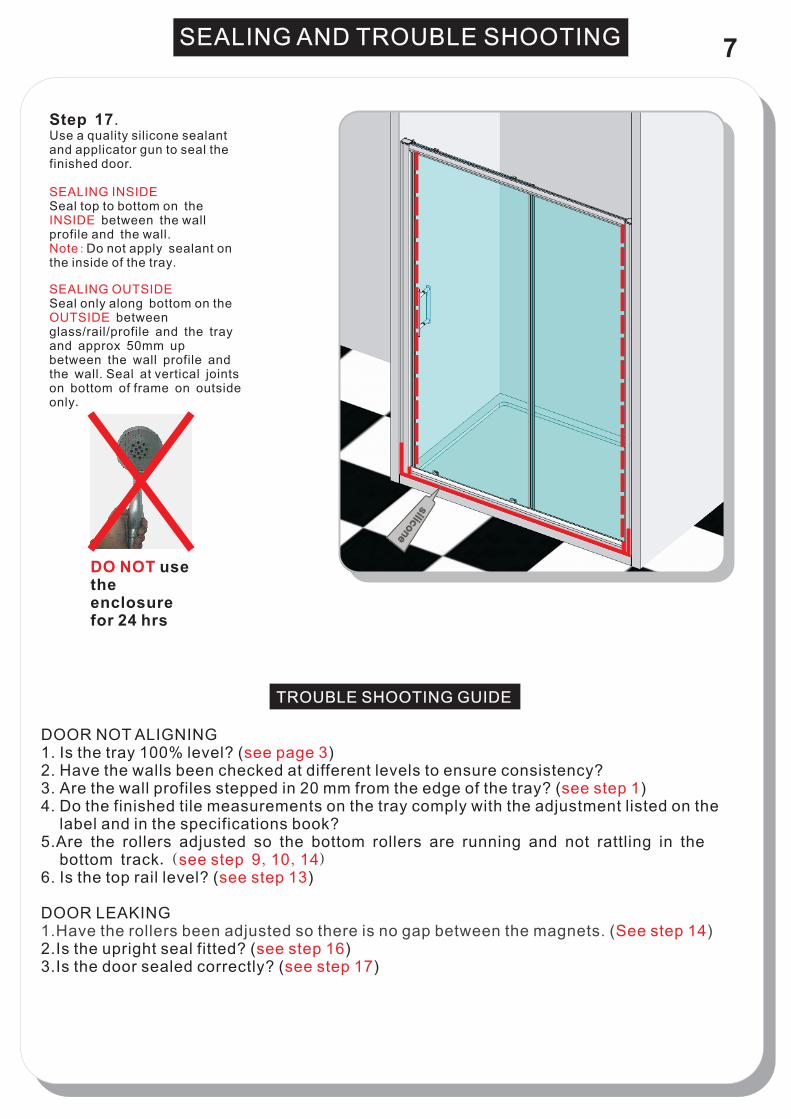
SEALING AND TROUBLE SHOOTING
DO NOT use the enclosure for 24 hrs
TROUBLE SHOOTING GUIDE
Step 17. Use a quality silicone sealant and applicator gun to seal the finished door.
Seal top to bottom on the between the wall
profile and the wall.Do not apply sealant on
the inside of the tray.
Seal only along bottom on the between
glass/rail/profile and the tray and approx 50mm up between the wall profile and the wall.
SEALING INSIDE
INSIDE
Note:
SEALING OUTSIDE
OUTSIDE
Seal at vertical joints on bottom of frame on outside only.
DOOR NOT ALIGNING1. Is the tray 100% level? ( )2. Have the walls been checked at different levels to ensure consistency?3. Are the wall profiles stepped in 20 mm from the edge of the tray? ( )4. Do the finished tile measurements on the tray comply with the adjustment listed on the
label and in the specifications book?5.
6. Is the top rail level? ( )
DOOR LEAKING
2.Is the upright seal fitted? ( )3.Is the door sealed correctly? ( )
see page 3
see step 1
see see step 13
See step 14see step 16
see step 17
-----
Are the rollers adjusted so the bottom rollers are running and not rattling in the bottom track.( )--- step 9,10,14
1.Have the rollers been adjusted so there is no gap between the magnets. ( )
7
Related Documents