e Instructor inputs Project CG

Welcome message from author
This document is posted to help you gain knowledge. Please leave a comment to let me know what you think about it! Share it to your friends and learn new things together.
Transcript
e
Instructor inputs Pro
ject
CG
Databases are centric to all small and enterprise wide applications. Considering the volume and criticality of data that enterprises deal with, administration of databases has become a crucial and significant task for IT departments. Real-life case studies given in this project will help you to demonstrate the skills you have acquired in Oracle certification courses on database administration.
In this project, you will learn to:
Install Oracle 10g
Create and manage databases
Monitor databases
Implement security measures for databases
Tune the performance of the database instance and databases
Perform database backup
1.2 Project NIIT
Objectives

Project: Case Study 2.3 NIIT

Note
Explain to the students that for each case study, a suggestive set of guidelines has been provided to guide them on the development of the solution for the case study.
The Oracle scripts to be used in the case study solution to the fourth case study have been included in the TIRM CD. Please go through the complete solution to the fourth case study before discussing any of the other case studies with the students.
NIIT Project 1.5
Case Study Specific Guidelines
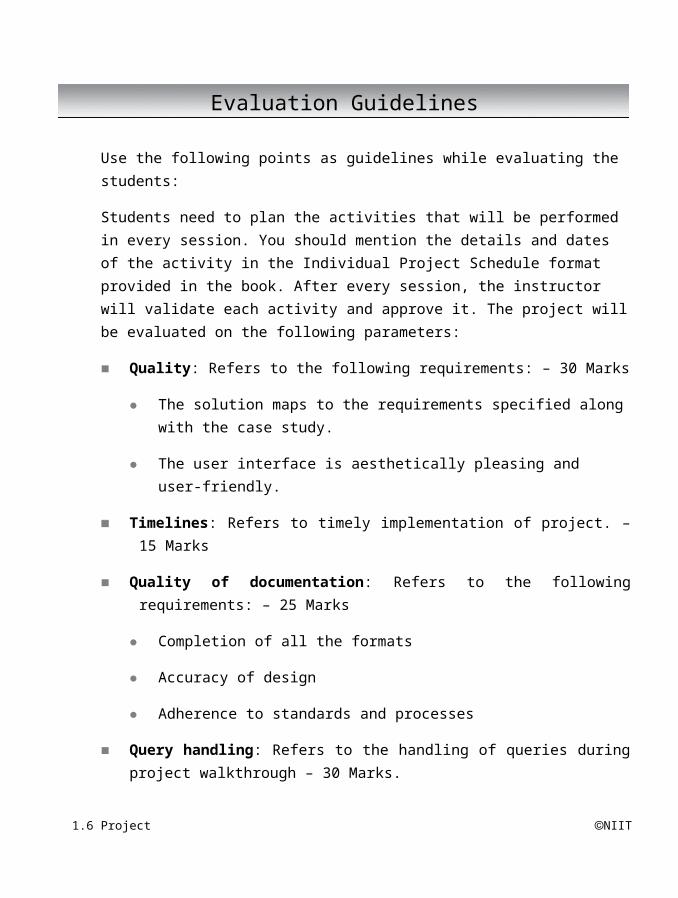
Use the following points as guidelines while evaluating the students:
Students need to plan the activities that will be performed in every session. You should mention the details and dates of the activity in the Individual Project Schedule format provided in the book. After every session, the instructor will validate each activity and approve it. The project will be evaluated on the following parameters:
Quality: Refers to the following requirements: – 30 Marks
The solution maps to the requirements specified along with the case study.
The user interface is aesthetically pleasing and user-friendly.
Timelines: Refers to timely implementation of project. – 15 Marks
Quality of documentation: Refers to the following requirements: – 25 Marks
Completion of all the formats
Accuracy of design
Adherence to standards and processes
Query handling: Refers to the handling of queries during project walkthrough – 30 Marks.
You will get 24 hours to complete the project. During project development, you need to work in groups of two on any one of the allocated projects. The following are the tasks that provide a suggested break-up of activities that you should perform in the project:
Analyze the case study.
Install the software.
1.6 Project NIIT
Evaluation Guidelines
Project Activities
Perform the listed tasks with proper documentation.
NIIT Project 1.7
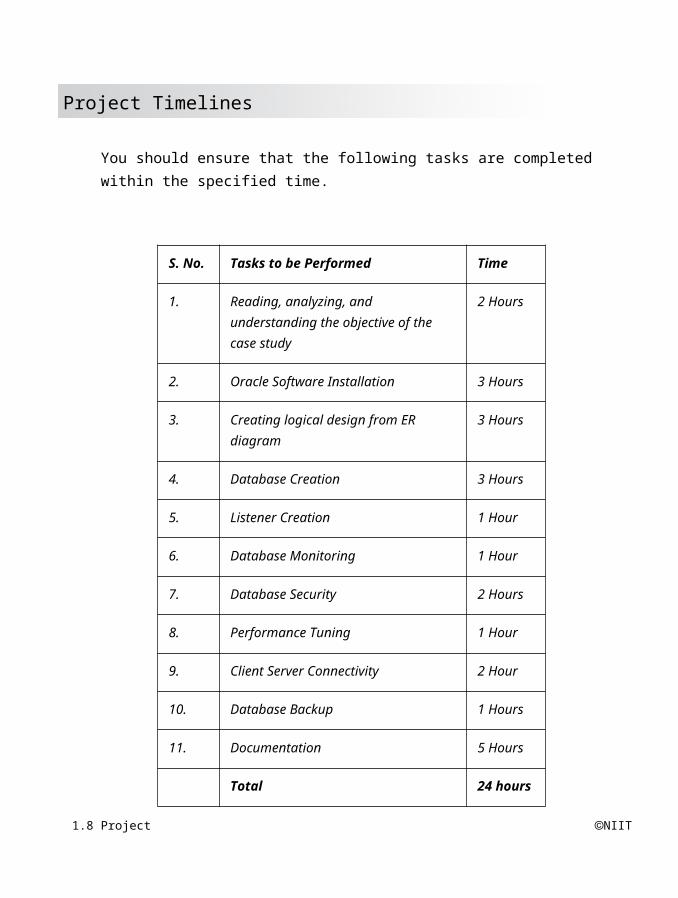
You should ensure that the following tasks are completed within the specified time.
S. No. Tasks to be Performed Time
1. Reading, analyzing, and understanding the objective of the case study
2 Hours
2. Oracle Software Installation 3 Hours
3. Creating logical design from ER diagram 3 Hours
4. Database Creation 3 Hours
5. Listener Creation 1 Hour
6. Database Monitoring 1 Hour
7. Database Security 2 Hours
8. Performance Tuning 1 Hour
9. Client Server Connectivity 2 Hour
10. Database Backup 1 Hours
11. Documentation 5 Hours
Total 24 hours
Tasks to be Performed
1.8 Project NIIT
Project Timelines

The Oracle scripts to be used in the case study solution for the fourth case study have been included in the PROJECT SOLUTION folder of the TIRM DVD.
Setup Requirements
2 Gb of RAM on the host PC
3.5Gb of free Hard Disk Space on the host machine
TIRM DVD containing the oel r5 u4.rar virtual machine archive
Prerequisites
VMware Player should be installed on the host PC
WinRAR should be installed on the host PC
To attach a Virtual Machine, you need to perform the following steps:
1. Copy the oel r5 u4.rar virtual machine RAR archive from the OEL folder in the TIRM DVD to the C: drive or any drive that has adequate free space.
NIIT Project 1.9
Solution to Case Study: FinLoans Database Implementation and Administration
Attaching a Virtual Machine to VMware Player

Note
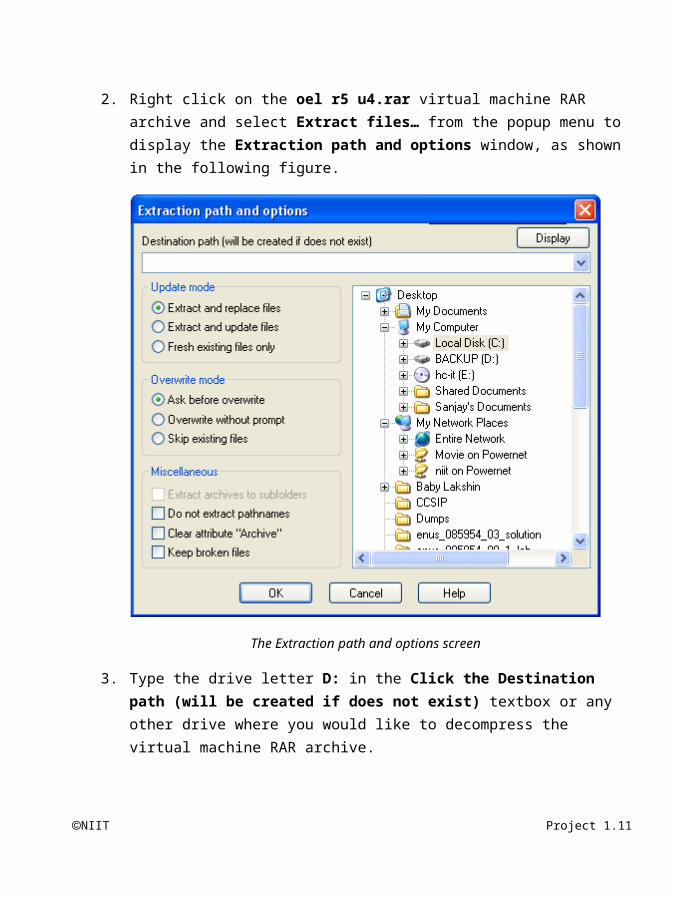
2. Right click on the oel r5 u4.rar virtual machine RAR archive and select Extract files… from the popup menu to display the Extraction path and options window, as shown in the following figure.
The Extraction path and options screen
3. Type the drive letter D: in the Click the Destination path (will be created if does not exist) textbox or any other drive where you would like to decompress the virtual machine RAR archive.
Wait till the decompression process is over.
1.10 Project NIIT
4. To attach the virtual machine to the VMware Player select StartAll ProgramsVMwareVMware Player. The VMware Player dialog box is displayed, as shown in the following figure.
VMware Player
NIIT Project 1.11

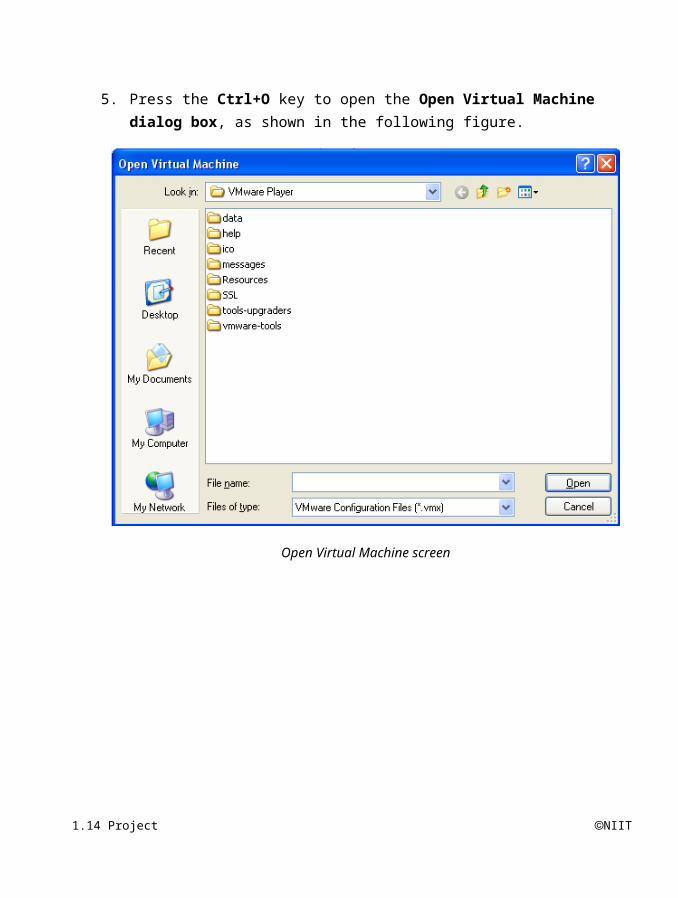
5. Press the Ctrl+O key to open the Open Virtual Machine dialog box, as shown in the following figure.
Open Virtual Machine screen
1.12 Project NIIT

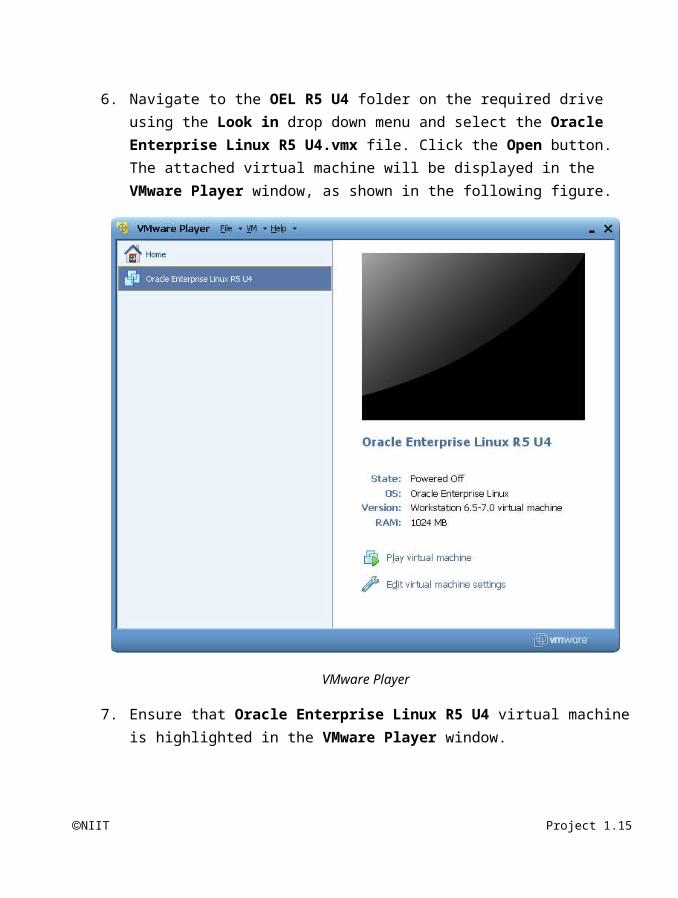
6. Navigate to the OEL R5 U4 folder on the required drive using the Look in drop down menu and select the Oracle Enterprise Linux R5 U4.vmx file. Click the Open button. The attached virtual machine will be displayed in the VMware Player window, as shown in the following figure.
VMware Player
7. Ensure that Oracle Enterprise Linux R5 U4 virtual machine is highlighted in the VMware Player window.
NIIT Project 1.13
Note
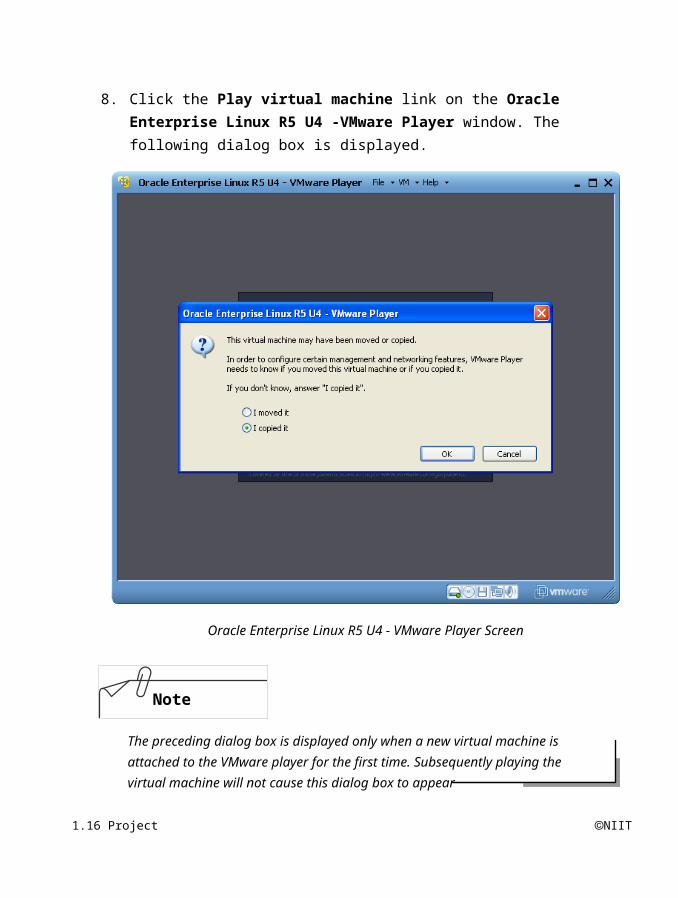
8. Click the Play virtual machine link on the Oracle Enterprise Linux R5 U4 -VMware Player window. The following dialog box is displayed.
Oracle Enterprise Linux R5 U4 - VMware Player Screen
The preceding dialog box is displayed only when a new virtual machine is attached to the VMware player for the first time. Subsequently playing the virtual machine will not cause this dialog box to appear
1.14 Project NIIT
9. Select the I copied it option. Click the OK button to start the virtual machine. This will boot Oracle Enterprise Linux Release 5, Update 4.
NIIT Project 1.15
Note
Setup Requirements
2 Gb of RAM on the host PC
4Gb of free Hard Disk Space on the host machine
Oracle 10g Release 2 CD disk
Prerequisites
Oracle Enterprise Linux should be running on VMware Player
Before installing Oracle 10g Release 2 database you need to perform the following steps to ensure that the installation prerequisites are met:
10. Ensure Oracle Enterprise Linux is running on VMware Player.
11. Click the Username textbox displayed in the X-Windows login screen.
12. Type root in the Username textbox. Press the Enter key.
13. Type oel#123 in the Password textbox. Press the Enter key.
14. Right click anywhere on the desktop and select Open Terminal in the popup to open a terminal window.
The Linux operating system provides for a command line interface to configure many of its applications. The terminal window is used as an interface to get command line access. After typing in any valid command at the # or $ prompt it is expected that the user press the <Enter> key to submit the command to the OS for processing.
1.16 Project NIIT
Installing Oracle 10g

Note
15. Type the following command at the # prompt to get the Linux kernel version:
uname -r
Ensure that the kernel version is higher than 2.6.9-XXX.XXX
NIIT Project 1.17
Note
Note
Note
16. Ensure that the following packages are installed by typing the following command at the # prompt:
rpm -q binutils control-center gcc gcc-c++ glibc glibc-common libstdc++ libstdc++-devel make libaio
Executing the preceding commands will display the existence of the packages in Linux OS with the version number. In case a package is not found a message is displayed stating that “package <Package-Name> is not installed”.
17. Type the following commands at the # prompt to determine the memory and swap space available to Oracle:
grep MemTotal /proc/meminfo
grep SwapTotal /proc/meminfo
The minimum memory requirements for Oracle 10g is 1024Mb. It is recommended that the amount of swap space should be twice that of the installed memory. So the recommended swap space should be around 2048Mb or higher.
18. Type the following command at the # prompt to determine the disk space required to install Oracle:
df -h /
1.18 Project NIIT
The disk space requirements for Oracle 10g is 2.5GB and another 1.2GB for the database. In addition to this you require around 400Mb for temporary decompression of installer files. In total you require around 4.1Gb of free space.
19. Type the following commands at the # prompt to create the operating system user groups oinstall, dba, and oper:
/usr/sbin/groupadd oinstall
/usr/sbin/groupadd dba
/usr/sbin/groupadd oper
20. Type the following command at the # prompt to create an operating system user with the name oracle and assign a home directory to the user:
/usr/sbin/useradd -g oinstall -G dba,oper -d /home/oracle oracle
NIIT Project 1.19
21. Type the following commands at the # prompt to create the directory for the Oracle 10g software installation and assign ownership to oracle:oinstall user and group:
mkdir -p /u01/app/oracle
chown -R oracle:oinstall /u01/app/oracle
chmod -R 775 /u01/app/oracle
22. Type the following command at the # prompt to set the password of the oracle user:
passwd oracle
23. Type oracle#123 at the New UNIX password prompt and press the Enter key.
24. Type oracle#123 at the Retype new UNIX password prompt and press the Enter key to confirm the password.
25. Press the Shift-Ctrl-Q key to close the terminal window.
26. Click Applications | Accessories | Text Editor in the desktop panel. This opens the gedit text editor.
27. Click the Open button. The Open files… window is displayed.
28. Double click the File System option under Places pane. This will display a list of folders on the right side of the Places pane.
29. Double click the courselab folder to display the contents.
30. Select the file kernel-parameters. Click the Open button to display the contents of the file.
31. Click the Open button. The Open files… window is displayed.
32. Double click the File System option under Places pane. This will display a list of folders on the right side of the Places pane.
33. Double click the etc folder in the right pane of the Open files… dialog box to display the contents.
34. Type sysctl.conf. This will temporarily open a text box and highlight the file sysctl.conf. Click the Open button to display the content of the file.
1.20 Project NIIT

Note
35. Press the Ctrl-A key to select the entire contents of the sysctl.conf file. Press the DEL key to delete the contents.
36. Select the kernel-parameters tab. Press the Ctrl-A key followed by the Ctrl-C key to select and copy the contents of the kernel-parameters file.
37. Select the *sysctl.conf tab. Press the Ctrl-V key to paste the contents into the sysctl.conf file. Click the Save button.
38. Close the gedit text editor window.
39. Right click anywhere on the desktop and select Open Terminal in the popup to open a terminal window.
40. Type the following command at the # prompt to apply the new settings made to the sysctl.conf file:
/sbin/sysctl -p
NIIT Project 1.21

Note
Certain parameters can be provided to the Linux kernel while booting to make changes to specific OS settings such as semaphores, number of ports etc. These parameters are provided to the kernel using the sysctl.conf file. The Linux OS is installed with a predefined set of kernel parameters. You have used step 17 through step 31 to make changes to some of the parameters, add new parameters and apply those changes. These changes are required to install and run Oracle 10g successfully. The changes and addition to the sysctl.conf file are as follows:
kernel.sem = 250 32000 100 128
kernel.shmall = 2097152
kernel.shmmax = 2147483648
kernel.shmmni = 4096
fs.file-max = 65536
net.ipv4.ip_local_port_range = 1024 65000
net.core.rmem_default = 262144
net.core.rmem_max = 262144
net.core.wmem_default = 262144
net.core.wmem_max = 262144
41. Copy and paste the following commands at the # prompt to set limits on the number of processes and open files each Linux account may use:
1.22 Project NIIT
You may copy the entire batch of command from the cat command till the EOF statement in the document and paste it at the # prompt and press the <Enter> key to add statements to the filename mentioned after the cat command. You may also alternatively type the cat >> filename << EOF statement at the # prompt and press the <Enter> key. This will give you the > prompt. You can continue typing one statement at a time per line and continue pressing <Enter> to continue the > prompt. To end the cat command just type EOF at the > prompt and press the <Enter> key.
cat >> /etc/security/limits.conf <<EOF
oracle soft nproc 2047
oracle hard nproc 16384
oracle soft nofile 1024
oracle hard nofile 65536
EOF
NIIT Project 1.23

cat >> /etc/pam.d/login <<EOF
session required /lib/security/pam_limits.so
EOF
cat >> /etc/profile <<EOFif [ \$USER = "oracle" ]; then if [ \$SHELL = "/bin/ksh" ]; then ulimit -p 16384 ulimit -n 65536 else ulimit -u 16384 -n 65536 fi umask 022fiEOF
42. Insert the Oracle Enterprise Linux Release 5 Update 4 disk in the DVD drive.
43. Type the following commands at the # prompt to update the libXp package for X-Windows:
mount /dev/cdrom /mnt
rpm -ivh /mnt/Server/libXp-1.0.0-8.1.el5.i386.rpm
umount /mnt
44. Right click on the Enterprise Linux dvd 20090908 cd-rom icon on the desktop and select Eject.
45. Take the disk out of the drive and close the DVD drive.
46. Click System | Logout Out root… in the desktop panel to logout from the root user account.
47. Click the Username textbox displayed in the X-Windows login screen.
1.24 Project NIIT

48. Type oracle in the Username textbox. Press the Enter key.
49. Type oracle#123 in the Password textbox. Press the Enter key.
50. Click Applications | Accessories | Text Editor in the desktop panel. This opens the gedit text editor. Maximize the editor window.
51. Click the Open button. The Open files… window is displayed.
52. Double click the File System option under Places pane. This will display a list of folders on the right side of the Places pane.
53. Double click the courselab folder to display the contents.
54. Select the file bash-parameters. Click the Open button to display the contents of the file.
55. Click the Open button. The Open files… window is displayed.
56. Double click the File System option under Places pane. This will display a list of folders on the right side of the Places pane.
57. Double click the home folder in the right pane of the Open files… dialog box to display the contents.
58. Double click the oracle folder in the right pane of the Open files… dialog box.
59. Right click anywhere on the right pane of the Open files… dialog box and select Show Hidden Files option from the popup menu. This will enable you to see the hidden files.
60. Type .bash_profile. This will temporarily open a text box and highlight the file .bash_profile. Click the Open button to display the content of the file.
61. Press the Ctrl-A key to select the entire contents of the .bash_profile file. Press the DEL key to delete the contents.
62. Select the bash-parameters tab. Press the Ctrl-A key followed by the Ctrl-C key to select and copy the contents of the bash-parameters file.
63. Select the *.bash_profile tab. Press Ctrl-V key to paste the contents into the .bash_profile file. Click the Save button.
NIIT Project 1.25
64. Press the Ctrl-Q key to close the gedit text editor window.
65. Click System | Logout Out oracle… in the desktop panel to logout from the oracle user account.
66. Click the Username textbox displayed in the X-Windows login screen.
67. Type oracle in the Username textbox. Press the Enter key.
1.26 Project NIIT
Note
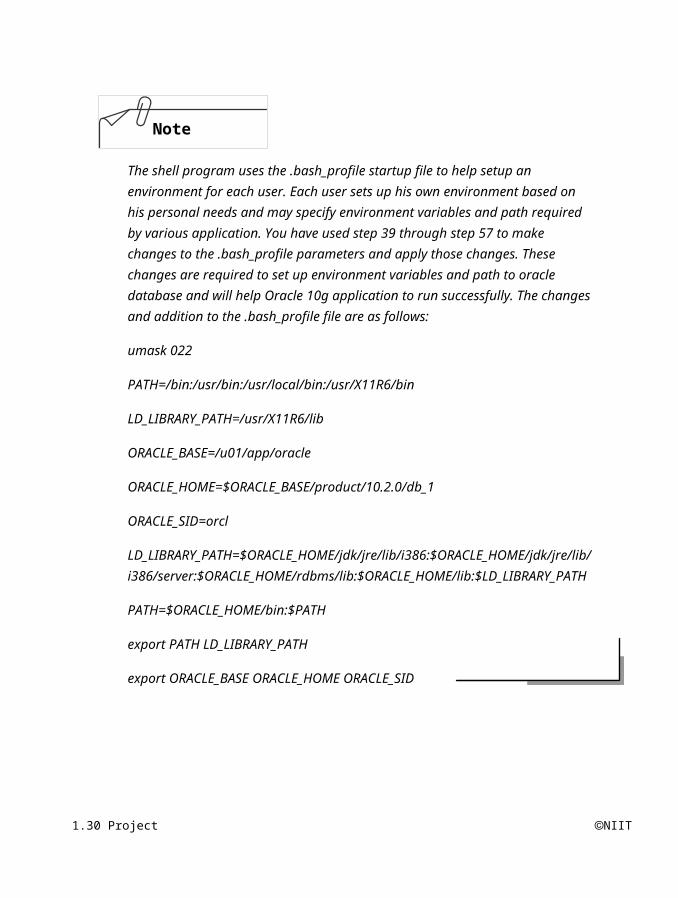
The shell program uses the .bash_profile startup file to help setup an environment for each user. Each user sets up his own environment based on his personal needs and may specify environment variables and path required by various application. You have used step 39 through step 57 to make changes to the .bash_profile parameters and apply those changes. These changes are required to set up environment variables and path to oracle database and will help Oracle 10g application to run successfully. The changes and addition to the .bash_profile file are as follows:
umask 022
PATH=/bin:/usr/bin:/usr/local/bin:/usr/X11R6/bin
LD_LIBRARY_PATH=/usr/X11R6/lib
ORACLE_BASE=/u01/app/oracle
ORACLE_HOME=$ORACLE_BASE/product/10.2.0/db_1
ORACLE_SID=orcl
LD_LIBRARY_PATH=$ORACLE_HOME/jdk/jre/lib/i386:$ORACLE_HOME/jdk/jre/lib/i386/server:$ORACLE_HOME/rdbms/lib:$ORACLE_HOME/lib:$LD_LIBRARY_PATH
PATH=$ORACLE_HOME/bin:$PATH
export PATH LD_LIBRARY_PATH
export ORACLE_BASE ORACLE_HOME ORACLE_SID
68. Type oracle#123 in the Password textbox. Press the Enter key. This will execute the .bash_profile to set the environment parameters for Oracle 10g installation process.
69. Right click anywhere on the desktop and select Open Terminal in the popup to open a terminal window.
NIIT Project 1.27
70. Type the following command at the $ prompt to change the ownership of a session to the root user:
su root
71. Type oel#123 at the Password prompt. This will change the ownership of the session to root thereby giving you administrative privileges.
72. Type the following command at the # prompt to configure the network card:
neat
1.28 Project NIIT

Note
73. The preceding command will open the Network Configuration dialog box, as shown in the following figure.
Network Configuration Dialog Box
74. Double click the first available Ethernet device eth0 with the nickname eth0 under the Devices tab. This will open the Ethernet Device window.
75. Click the Statically set IP addresses button. Type 192.168.0.100 as the IP address in the Address textbox.
You may also use any other IP address suitable to you internal network.
NIIT Project 1.29
Note
76. Type 255.255.255.0 in the Subnet mask textbox. Click Alt-O to save the changes.
77. Click the Deactivate button in the Network Configuration window to deactivate the Ethernet interface
78. Click the Yes button in the system-config-network dialog box.
79. Click the OK button in the system-config-network dialog box.
80. Click the Activate button in the Network Configuration window to restart the Ethernet interface.
81. Close the Network Configuration window.
82. Insert the Oracle 10g Release 2 for Linux (x86) disk in the DVD drive.
You need to wait for the Linux OS to detect the disk. You also need to close the Oracle10G window that will be automatically opened by the OS
83. Type the following commands at the $ prompt of the terminal window to mount the device:
mount /dev/cdrom /mnt
84. Type the following commands at the # prompt to return the ownership of the session to the oracle user:
exit
85. Type the following commands at the $ prompt to run the Oracle installer and begin the GUI installation process:
/mnt/runInstaller
1.30 Project NIIT
Related Documents


