PREPS Imposition Software Version 8.x Quick Reference Guide English

Welcome message from author
This document is posted to help you gain knowledge. Please leave a comment to let me know what you think about it! Share it to your friends and learn new things together.
Transcript

PREPSImposition Software
Version 8.x
Quick Reference GuideEnglish
1
Use this guide to start using the Kodak PREPS imposition software.For more information and instructions, go to:• The PREPS Help menu • https://partnerplace.kodak.com/
Getting started: The User Interface
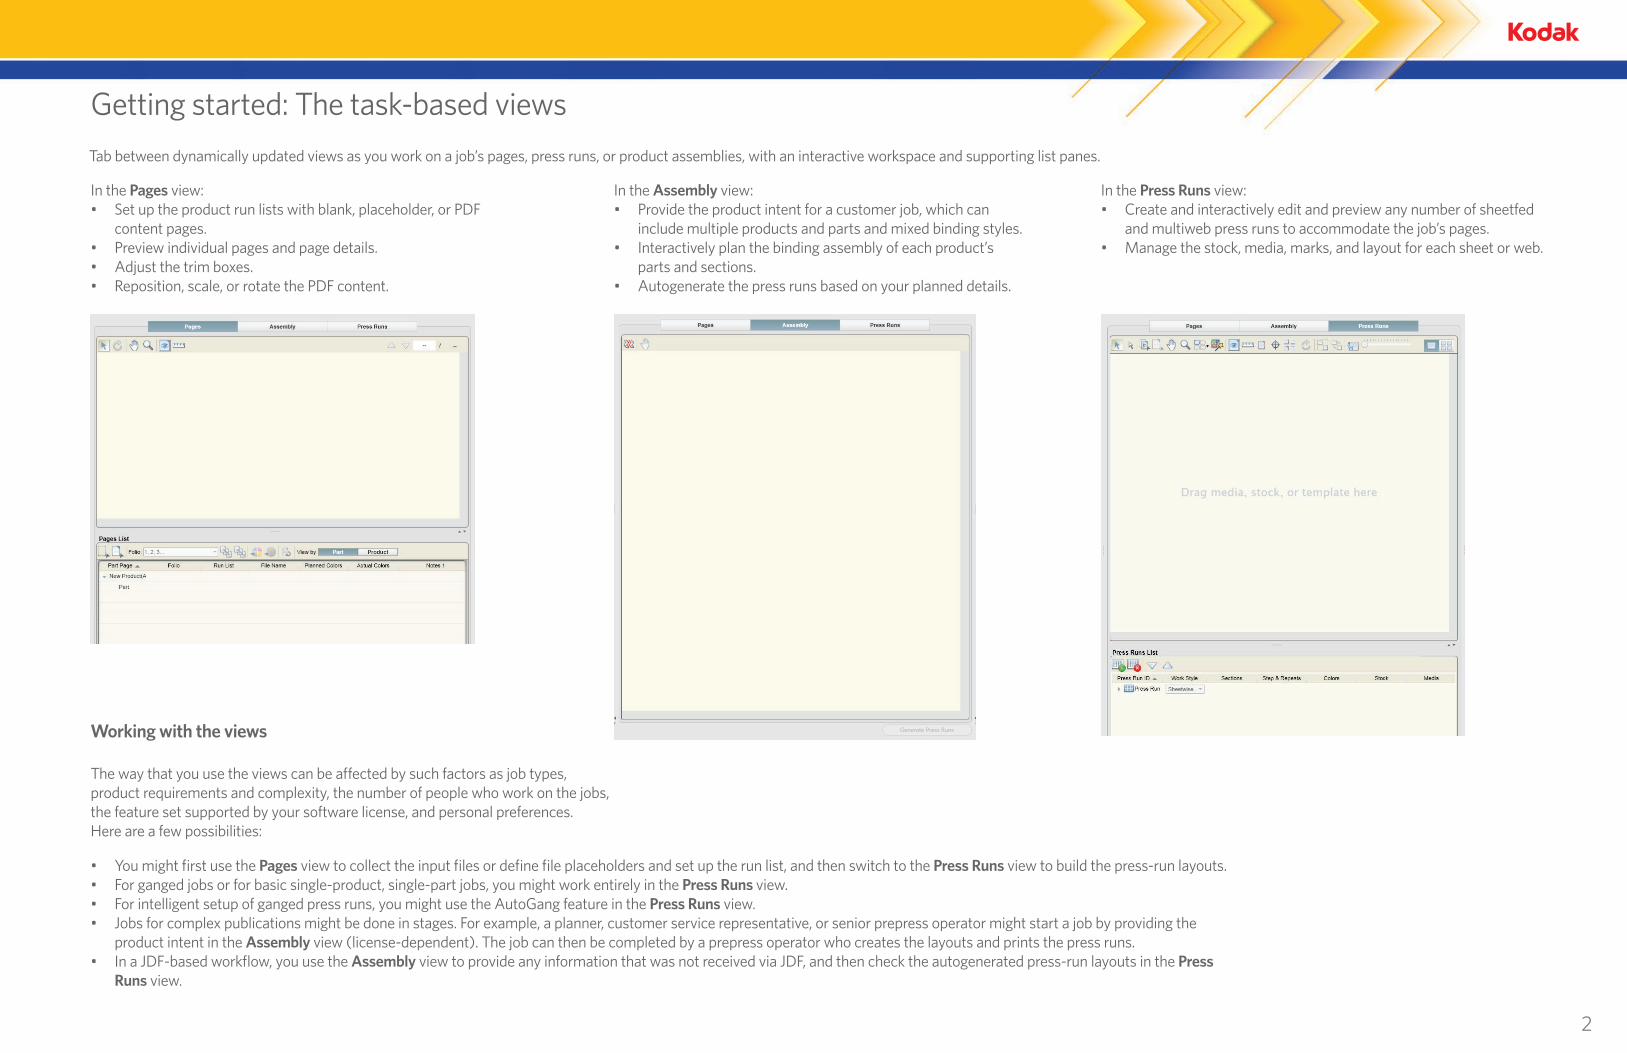
User interface viewing tools
Click the triangles and stretch the dividers to fit the window panes to your needs.
1 Click a triangle to expand or collapse a list tree. 2 Drag a divider to stretch or shrink a pane. 3 Expand a pane to hide the adjacent panes. 4 Click a tab to switch views. 5 Click the triangle to reverse a column’s sort order. 6 Drag the column edges to adjust their widths. 7 Drag the column headers to rearrange the columns. 8 Click a triangle to stretch or shrink a column.
1 Products Use the Products pane to view and manage the job structure.For manual layouts, you can select and drag sections to the Press Runs workspace.
2 Files In the Files list, you add customer PDF input files, create placeholder files, and select file pages to add to a run list or press-run layout.
3 Resources Use the Resources pane to select and manage your resources for building press runs.• Media list• Stock list• Marks list• Layouts pane: Templates list, Fold Patterns list, Step & Repeat Patterns list, Search tool
4 View tabs Toggle between views for primary aspects of a job: Pages view, Press Runs view, and Assembly view.5 Workspace Review, rearrange, and edit items in the workspace to dynamically update the properties. Use viewing
tools and menu options to control which details are displayed.• In the Pages view, preview pages and check trim boxes.• In the Assembly view, plan multiple products and parts.• In the Press Runs view, build and check press-run layouts.
6 Summary lists In each view, manage a list of all applicable job items. • You can arrange the rows and columns, change the sort order and width of columns, and expand or
collapse the rows.• Select an item in the Press Runs List or Pages List to display it in the workspace. In the Assembly
workspace, you can toggle between graphical and list formats.7 Properties Use the Properties pane to view and edit the settings of selected job items. All applicable panes and lists
are dynamically updated with your changes.Select an item in a workspace, summary list, or Products list to display its settings in the Properties pane.
User interface tools
• Drag-and-drop functionality for placing and moving items• Toolbars and keyboard shortcuts for most tasks• Context (right-click) menus for managing the resources• Triangle icons for expanding or collapsing the panes• Adjustable dividers for resizing the panes• Instant access to properties of items that you select in the workspace• Dynamic updating in all affected areas when edits are made in any area• Menus and dialog boxes for less-frequently performed tasks• Help menu for user information• Horizontal and vertical rulers and guides in the Pages and Press Run views,
enabling you to determine where to place content and align objects, as well as allowing detailed measuring capabilities
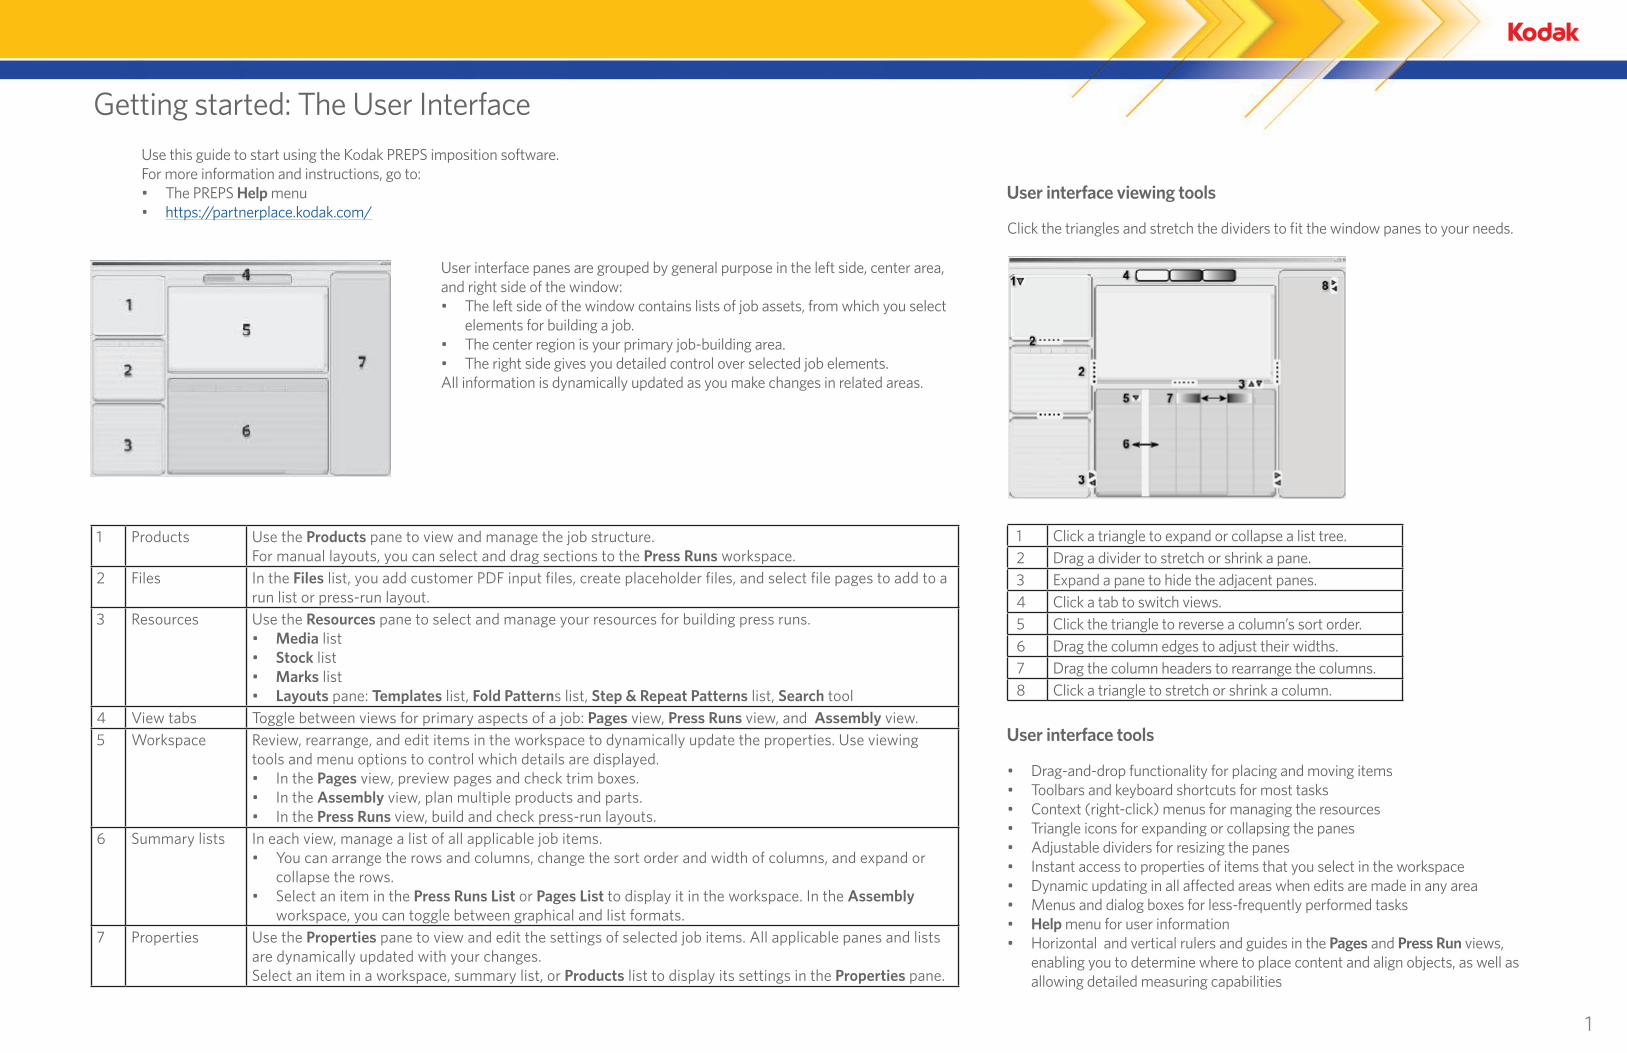
User interface panes are grouped by general purpose in the left side, center area, and right side of the window:• The left side of the window contains lists of job assets, from which you select
elements for building a job.• The center region is your primary job-building area.• The right side gives you detailed control over selected job elements.All information is dynamically updated as you make changes in related areas.
2
Getting started: The task-based views
Tab between dynamically updated views as you work on a job’s pages, press runs, or product assemblies, with an interactive workspace and supporting list panes.
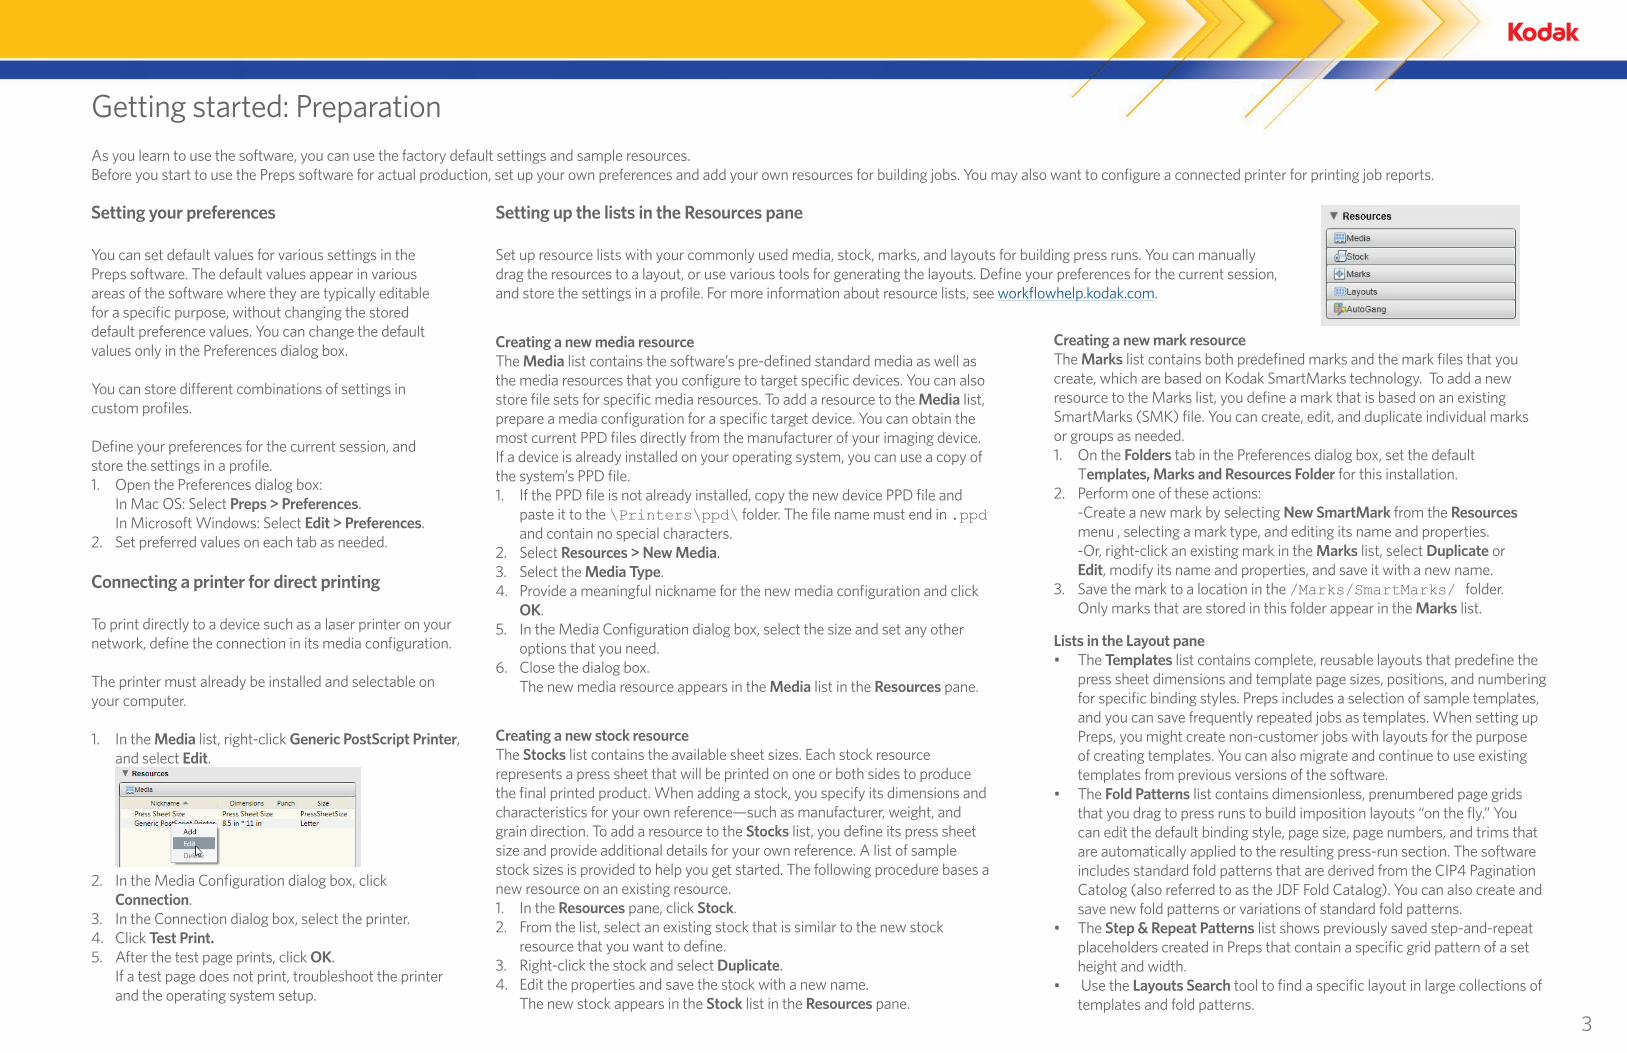
In the Pages view:• Set up the product run lists with blank, placeholder, or PDF
content pages.• Preview individual pages and page details.• Adjust the trim boxes.• Reposition, scale, or rotate the PDF content.
In the Press Runs view:• Create and interactively edit and preview any number of sheetfed
and multiweb press runs to accommodate the job’s pages. • Manage the stock, media, marks, and layout for each sheet or web.
In the Assembly view:• Provide the product intent for a customer job, which can
include multiple products and parts and mixed binding styles. • Interactively plan the binding assembly of each product’s
parts and sections.• Autogenerate the press runs based on your planned details.
Working with the views
The way that you use the views can be affected by such factors as job types, product requirements and complexity, the number of people who work on the jobs, the feature set supported by your software license, and personal preferences. Here are a few possibilities:
• You might first use the Pages view to collect the input files or define file placeholders and set up the run list, and then switch to the Press Runs view to build the press-run layouts.• For ganged jobs or for basic single-product, single-part jobs, you might work entirely in the Press Runs view.• For intelligent setup of ganged press runs, you might use the AutoGang feature in the Press Runs view.• Jobs for complex publications might be done in stages. For example, a planner, customer service representative, or senior prepress operator might start a job by providing the
product intent in the Assembly view (license-dependent). The job can then be completed by a prepress operator who creates the layouts and prints the press runs.• In a JDF-based workflow, you use the Assembly view to provide any information that was not received via JDF, and then check the autogenerated press-run layouts in the Press
Runs view.
3
Getting started: PreparationAs you learn to use the software, you can use the factory default settings and sample resources. Before you start to use the Preps software for actual production, set up your own preferences and add your own resources for building jobs. You may also want to configure a connected printer for printing job reports.
Setting your preferences
You can set default values for various settings in the Preps software. The default values appear in various areas of the software where they are typically editable for a specific purpose, without changing the stored default preference values. You can change the default values only in the Preferences dialog box.
You can store different combinations of settings in custom profiles.
Define your preferences for the current session, and store the settings in a profile.1. Open the Preferences dialog box:
In Mac OS: Select Preps > Preferences. In Microsoft Windows: Select Edit > Preferences.
2. Set preferred values on each tab as needed.
Connecting a printer for direct printing
To print directly to a device such as a laser printer on your network, define the connection in its media configuration.
The printer must already be installed and selectable on your computer.
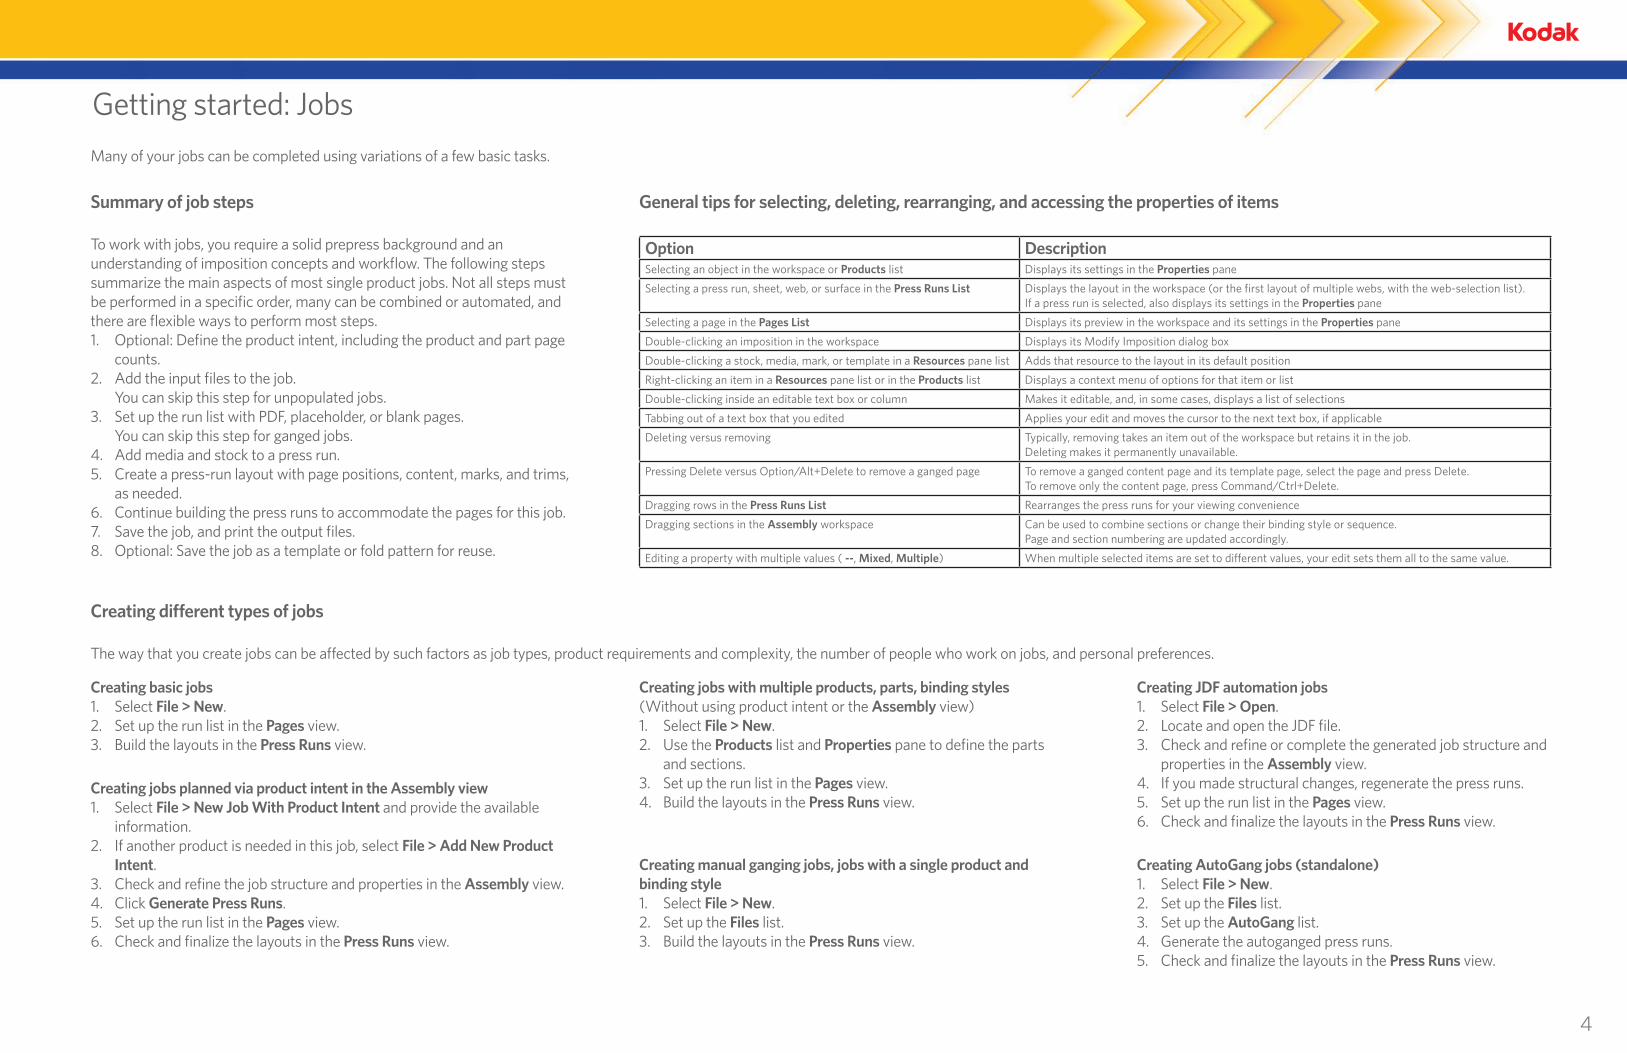
1. In the Media list, right-click Generic PostScript Printer, and select Edit.
2. In the Media Configuration dialog box, click Connection.
3. In the Connection dialog box, select the printer.4. Click Test Print.5. After the test page prints, click OK.
If a test page does not print, troubleshoot the printer and the operating system setup.
Setting up the lists in the Resources pane
Set up resource lists with your commonly used media, stock, marks, and layouts for building press runs. You can manually drag the resources to a layout, or use various tools for generating the layouts. Define your preferences for the current session, and store the settings in a profile. For more information about resource lists, see workflowhelp.kodak.com.
Creating a new mark resourceThe Marks list contains both predefined marks and the mark files that you create, which are based on Kodak SmartMarks technology. To add a new resource to the Marks list, you define a mark that is based on an existing SmartMarks (SMK) file. You can create, edit, and duplicate individual marks or groups as needed.1. On the Folders tab in the Preferences dialog box, set the default
Templates, Marks and Resources Folder for this installation.2. Perform one of these actions:
-Create a new mark by selecting New SmartMark from the Resources menu , selecting a mark type, and editing its name and properties. -Or, right-click an existing mark in the Marks list, select Duplicate or Edit, modify its name and properties, and save it with a new name.
3. Save the mark to a location in the /Marks/SmartMarks/ folder. Only marks that are stored in this folder appear in the Marks list.
Creating a new stock resourceThe Stocks list contains the available sheet sizes. Each stock resource represents a press sheet that will be printed on one or both sides to produce the final printed product. When adding a stock, you specify its dimensions and characteristics for your own reference—such as manufacturer, weight, and grain direction. To add a resource to the Stocks list, you define its press sheet size and provide additional details for your own reference. A list of sample stock sizes is provided to help you get started. The following procedure bases a new resource on an existing resource.1. In the Resources pane, click Stock. 2. From the list, select an existing stock that is similar to the new stock
resource that you want to define.3. Right-click the stock and select Duplicate.4. Edit the properties and save the stock with a new name.
The new stock appears in the Stock list in the Resources pane.
Creating a new media resourceThe Media list contains the software’s pre-defined standard media as well as the media resources that you configure to target specific devices. You can also store file sets for specific media resources. To add a resource to the Media list, prepare a media configuration for a specific target device. You can obtain the most current PPD files directly from the manufacturer of your imaging device. If a device is already installed on your operating system, you can use a copy of the system’s PPD file.1. If the PPD file is not already installed, copy the new device PPD file and
paste it to the \Printers\ppd\ folder. The file name must end in .ppd and contain no special characters.
2. Select Resources > New Media.3. Select the Media Type.4. Provide a meaningful nickname for the new media configuration and click
OK. 5. In the Media Configuration dialog box, select the size and set any other
options that you need.6. Close the dialog box.
The new media resource appears in the Media list in the Resources pane.
Lists in the Layout pane• The Templates list contains complete, reusable layouts that predefine the
press sheet dimensions and template page sizes, positions, and numbering for specific binding styles. Preps includes a selection of sample templates, and you can save frequently repeated jobs as templates. When setting up Preps, you might create non-customer jobs with layouts for the purpose of creating templates. You can also migrate and continue to use existing templates from previous versions of the software.
• The Fold Patterns list contains dimensionless, prenumbered page grids that you drag to press runs to build imposition layouts “on the fly.” You can edit the default binding style, page size, page numbers, and trims that are automatically applied to the resulting press-run section. The software includes standard fold patterns that are derived from the CIP4 Pagination Catolog (also referred to as the JDF Fold Catalog). You can also create and save new fold patterns or variations of standard fold patterns.
• The Step & Repeat Patterns list shows previously saved step-and-repeat placeholders created in Preps that contain a specific grid pattern of a set height and width.
• Use the Layouts Search tool to find a specific layout in large collections of templates and fold patterns.
4
Getting started: Jobs
Many of your jobs can be completed using variations of a few basic tasks.
Summary of job steps
To work with jobs, you require a solid prepress background and an understanding of imposition concepts and workflow. The following steps summarize the main aspects of most single product jobs. Not all steps must be performed in a specific order, many can be combined or automated, and there are flexible ways to perform most steps. 1. Optional: Define the product intent, including the product and part page
counts.2. Add the input files to the job.
You can skip this step for unpopulated jobs.3. Set up the run list with PDF, placeholder, or blank pages.
You can skip this step for ganged jobs.4. Add media and stock to a press run.5. Create a press-run layout with page positions, content, marks, and trims,
as needed.6. Continue building the press runs to accommodate the pages for this job.7. Save the job, and print the output files.8. Optional: Save the job as a template or fold pattern for reuse.
Creating different types of jobs
The way that you create jobs can be affected by such factors as job types, product requirements and complexity, the number of people who work on jobs, and personal preferences.
Creating basic jobs1. Select File > New.2. Set up the run list in the Pages view.3. Build the layouts in the Press Runs view.
Creating manual ganging jobs, jobs with a single product and binding style1. Select File > New.2. Set up the Files list.3. Build the layouts in the Press Runs view.
Creating jobs with multiple products, parts, binding styles (Without using product intent or the Assembly view)1. Select File > New.2. Use the Products list and Properties pane to define the parts
and sections.3. Set up the run list in the Pages view.4. Build the layouts in the Press Runs view.
Creating jobs planned via product intent in the Assembly view1. Select File > New Job With Product Intent and provide the available
information.2. If another product is needed in this job, select File > Add New Product
Intent.3. Check and refine the job structure and properties in the Assembly view.4. Click Generate Press Runs.5. Set up the run list in the Pages view.6. Check and finalize the layouts in the Press Runs view.
Creating JDF automation jobs1. Select File > Open.2. Locate and open the JDF file.3. Check and refine or complete the generated job structure and
properties in the Assembly view.4. If you made structural changes, regenerate the press runs.5. Set up the run list in the Pages view.6. Check and finalize the layouts in the Press Runs view.
Creating AutoGang jobs (standalone)1. Select File > New.2. Set up the Files list.3. Set up the AutoGang list.4. Generate the autoganged press runs.5. Check and finalize the layouts in the Press Runs view.
General tips for selecting, deleting, rearranging, and accessing the properties of items
Option DescriptionSelecting an object in the workspace or Products list Displays its settings in the Properties pane
Selecting a press run, sheet, web, or surface in the Press Runs List Displays the layout in the workspace (or the first layout of multiple webs, with the web-selection list). If a press run is selected, also displays its settings in the Properties pane
Selecting a page in the Pages List Displays its preview in the workspace and its settings in the Properties pane
Double-clicking an imposition in the workspace Displays its Modify Imposition dialog box
Double-clicking a stock, media, mark, or template in a Resources pane list Adds that resource to the layout in its default position
Right-clicking an item in a Resources pane list or in the Products list Displays a context menu of options for that item or list
Double-clicking inside an editable text box or column Makes it editable, and, in some cases, displays a list of selections
Tabbing out of a text box that you edited Applies your edit and moves the cursor to the next text box, if applicable
Deleting versus removing Typically, removing takes an item out of the workspace but retains it in the job. Deleting makes it permanently unavailable.
Pressing Delete versus Option/Alt+Delete to remove a ganged page To remove a ganged content page and its template page, select the page and press Delete. To remove only the content page, press Command/Ctrl+Delete.
Dragging rows in the Press Runs List Rearranges the press runs for your viewing convenience
Dragging sections in the Assembly workspace Can be used to combine sections or change their binding style or sequence. Page and section numbering are updated accordingly.
Editing a property with multiple values ( --, Mixed, Multiple) When multiple selected items are set to different values, your edit sets them all to the same value.
5
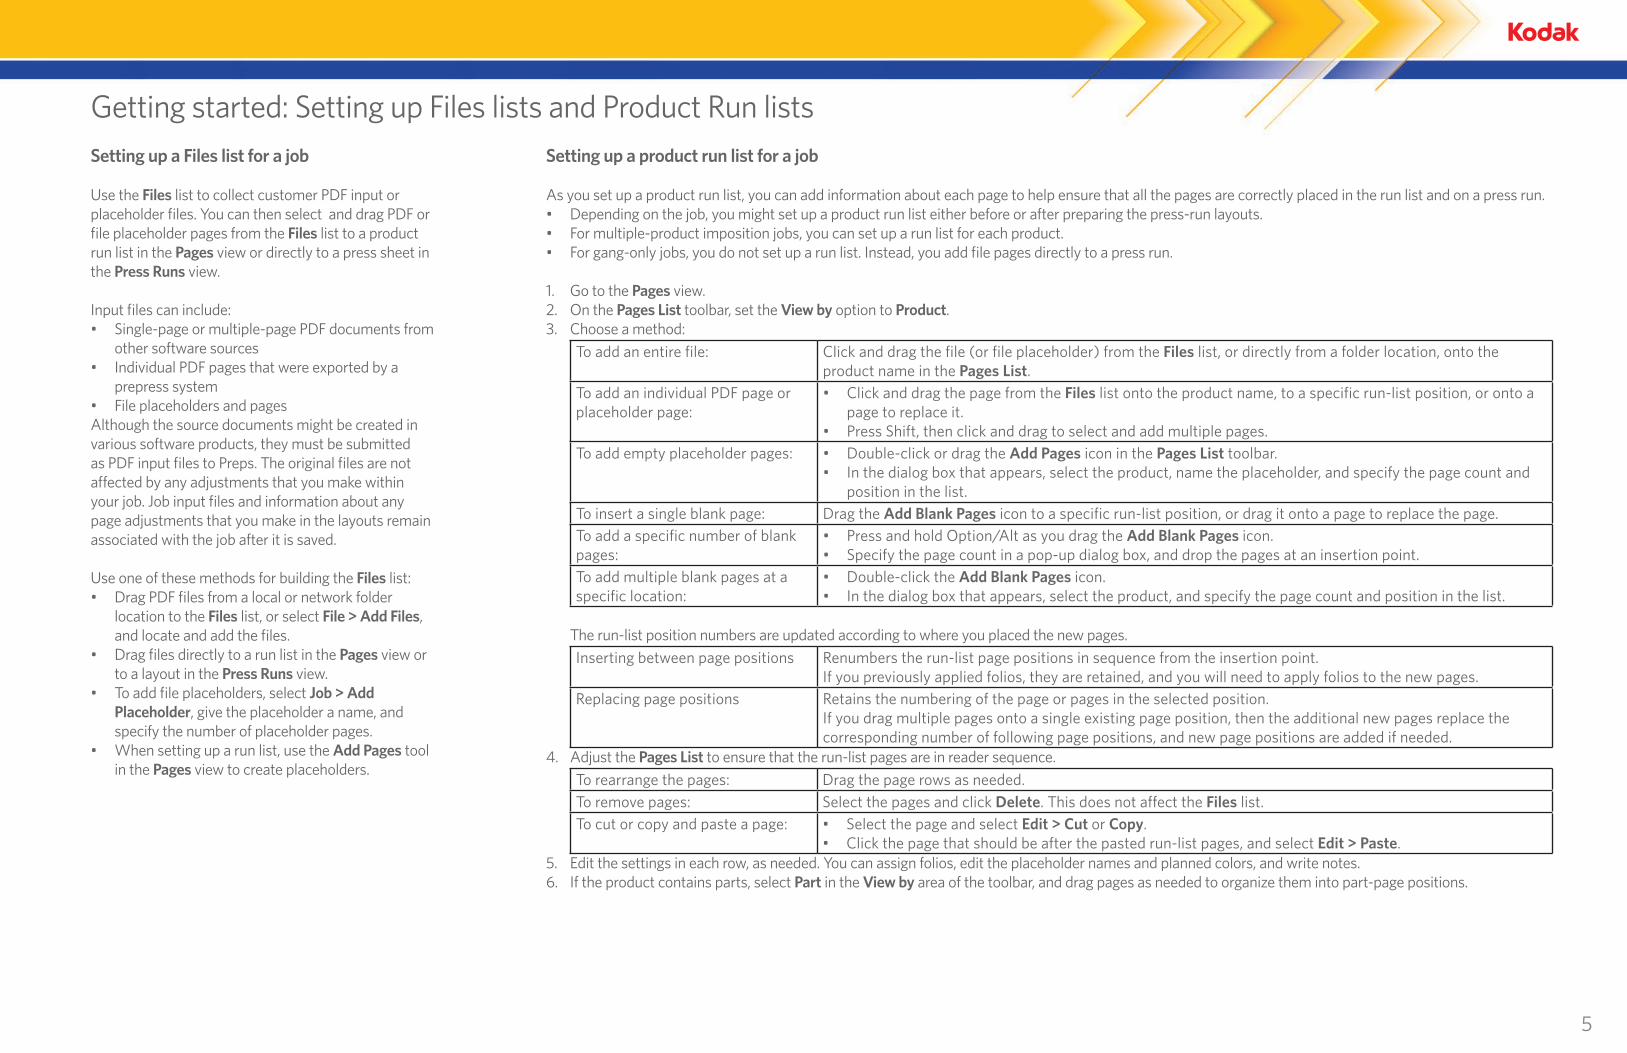
Getting started: Setting up Files lists and Product Run listsSetting up a Files list for a job
Use the Files list to collect customer PDF input or placeholder files. You can then select and drag PDF or file placeholder pages from the Files list to a product run list in the Pages view or directly to a press sheet in the Press Runs view.
Input files can include:• Single-page or multiple-page PDF documents from
other software sources• Individual PDF pages that were exported by a
prepress system• File placeholders and pagesAlthough the source documents might be created in various software products, they must be submitted as PDF input files to Preps. The original files are not affected by any adjustments that you make within your job. Job input files and information about any page adjustments that you make in the layouts remain associated with the job after it is saved.
Use one of these methods for building the Files list:• Drag PDF files from a local or network folder
location to the Files list, or select File > Add Files, and locate and add the files.
• Drag files directly to a run list in the Pages view or to a layout in the Press Runs view.
• To add file placeholders, select Job > Add Placeholder, give the placeholder a name, and specify the number of placeholder pages.
• When setting up a run list, use the Add Pages tool in the Pages view to create placeholders.
Setting up a product run list for a job
As you set up a product run list, you can add information about each page to help ensure that all the pages are correctly placed in the run list and on a press run.• Depending on the job, you might set up a product run list either before or after preparing the press-run layouts.• For multiple-product imposition jobs, you can set up a run list for each product.• For gang-only jobs, you do not set up a run list. Instead, you add file pages directly to a press run.
1. Go to the Pages view.2. On the Pages List toolbar, set the View by option to Product.3. Choose a method:
To add an entire file: Click and drag the file (or file placeholder) from the Files list, or directly from a folder location, onto the product name in the Pages List.
To add an individual PDF page or placeholder page:
• Click and drag the page from the Files list onto the product name, to a specific run-list position, or onto a page to replace it.
• Press Shift, then click and drag to select and add multiple pages.To add empty placeholder pages: • Double-click or drag the Add Pages icon in the Pages List toolbar.
• In the dialog box that appears, select the product, name the placeholder, and specify the page count and position in the list.
To insert a single blank page: Drag the Add Blank Pages icon to a specific run-list position, or drag it onto a page to replace the page.To add a specific number of blank pages:
• Press and hold Option/Alt as you drag the Add Blank Pages icon.• Specify the page count in a pop-up dialog box, and drop the pages at an insertion point.
To add multiple blank pages at a specific location:
• Double-click the Add Blank Pages icon.• In the dialog box that appears, select the product, and specify the page count and position in the list.
The run-list position numbers are updated according to where you placed the new pages. Inserting between page positions Renumbers the run-list page positions in sequence from the insertion point.
If you previously applied folios, they are retained, and you will need to apply folios to the new pages.Replacing page positions Retains the numbering of the page or pages in the selected position.
If you drag multiple pages onto a single existing page position, then the additional new pages replace the corresponding number of following page positions, and new page positions are added if needed.
4. Adjust the Pages List to ensure that the run-list pages are in reader sequence. To rearrange the pages: Drag the page rows as needed.To remove pages: Select the pages and click Delete. This does not affect the Files list.To cut or copy and paste a page: • Select the page and select Edit > Cut or Copy.
• Click the page that should be after the pasted run-list pages, and select Edit > Paste.5. Edit the settings in each row, as needed. You can assign folios, edit the placeholder names and planned colors, and write notes.6. If the product contains parts, select Part in the View by area of the toolbar, and drag pages as needed to organize them into part-page positions.
6
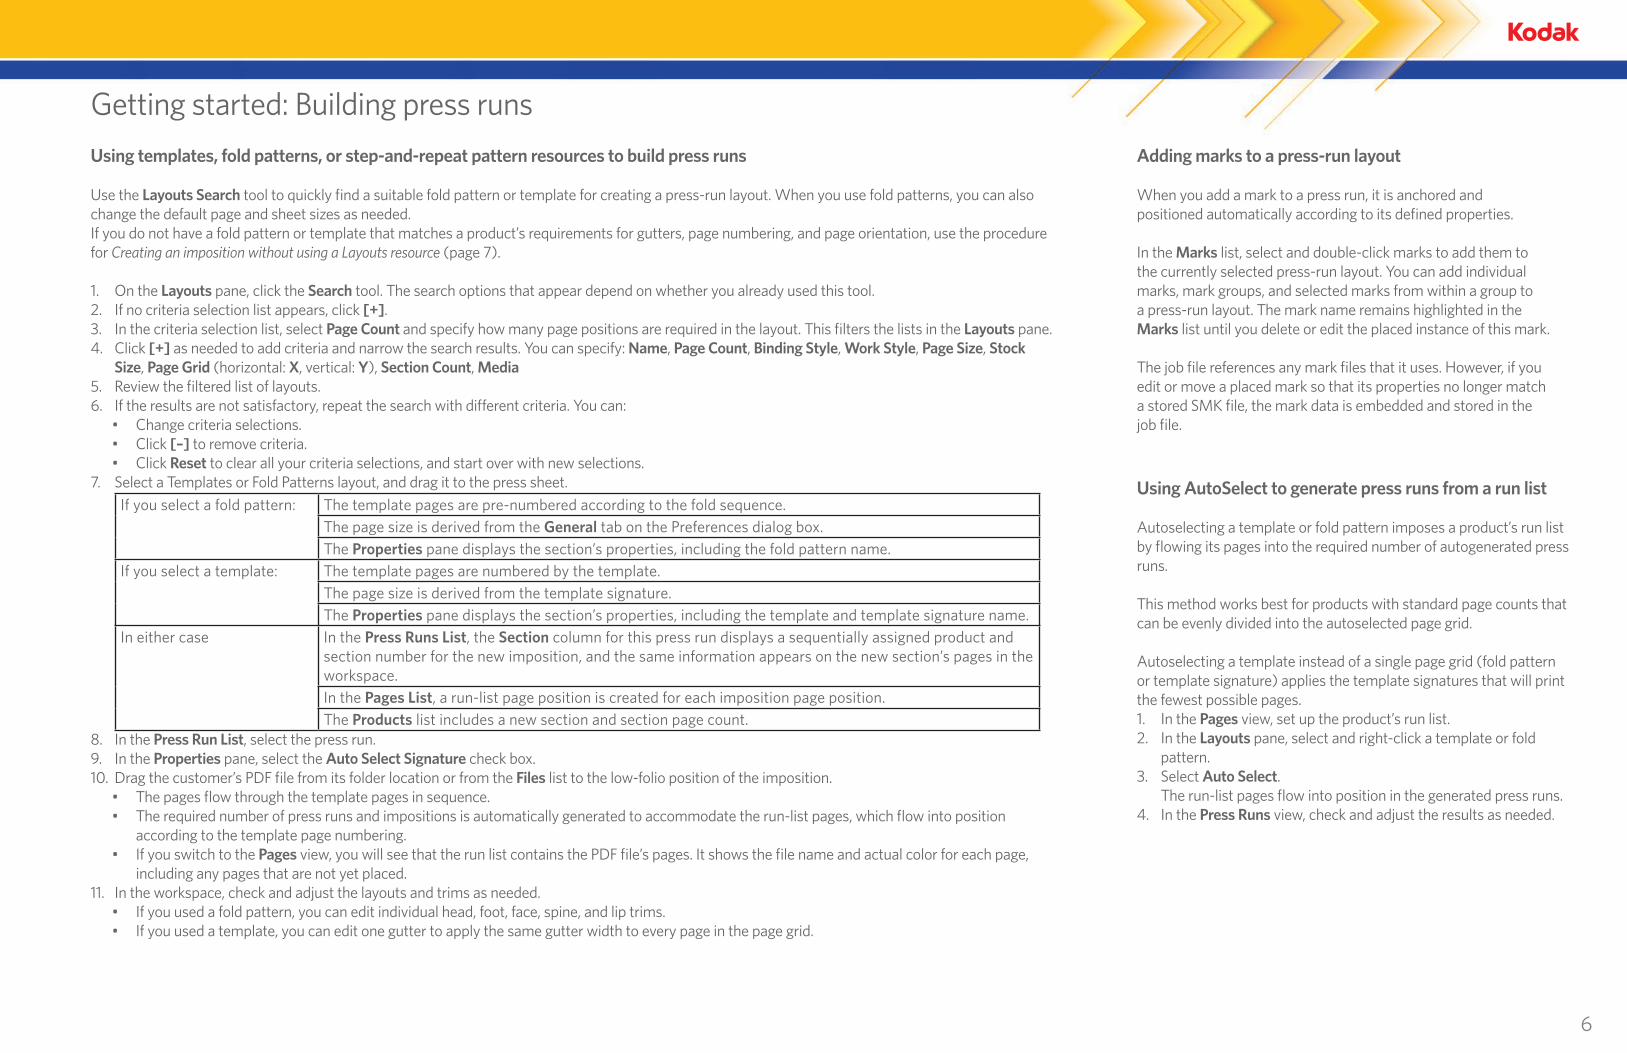
Getting started: Building press runs
Using templates, fold patterns, or step-and-repeat pattern resources to build press runs
Use the Layouts Search tool to quickly find a suitable fold pattern or template for creating a press-run layout. When you use fold patterns, you can also change the default page and sheet sizes as needed.If you do not have a fold pattern or template that matches a product’s requirements for gutters, page numbering, and page orientation, use the procedure for Creating an imposition without using a Layouts resource (page 7).
1. On the Layouts pane, click the Search tool. The search options that appear depend on whether you already used this tool.2. If no criteria selection list appears, click [+].3. In the criteria selection list, select Page Count and specify how many page positions are required in the layout. This filters the lists in the Layouts pane.4. Click [+] as needed to add criteria and narrow the search results. You can specify: Name, Page Count, Binding Style, Work Style, Page Size, Stock
Size, Page Grid (horizontal: X, vertical: Y), Section Count, Media5. Review the filtered list of layouts.6. If the results are not satisfactory, repeat the search with different criteria. You can:
• Change criteria selections.• Click [–] to remove criteria.• Click Reset to clear all your criteria selections, and start over with new selections.
7. Select a Templates or Fold Patterns layout, and drag it to the press sheet. If you select a fold pattern: The template pages are pre-numbered according to the fold sequence.
The page size is derived from the General tab on the Preferences dialog box.The Properties pane displays the section’s properties, including the fold pattern name.
If you select a template: The template pages are numbered by the template.The page size is derived from the template signature.The Properties pane displays the section’s properties, including the template and template signature name.
In either case In the Press Runs List, the Section column for this press run displays a sequentially assigned product and section number for the new imposition, and the same information appears on the new section’s pages in the workspace.In the Pages List, a run-list page position is created for each imposition page position.The Products list includes a new section and section page count.
8. In the Press Run List, select the press run.9. In the Properties pane, select the Auto Select Signature check box.10. Drag the customer’s PDF file from its folder location or from the Files list to the low-folio position of the imposition.
• The pages flow through the template pages in sequence.• The required number of press runs and impositions is automatically generated to accommodate the run-list pages, which flow into position
according to the template page numbering.• If you switch to the Pages view, you will see that the run list contains the PDF file’s pages. It shows the file name and actual color for each page,
including any pages that are not yet placed.11. In the workspace, check and adjust the layouts and trims as needed.
• If you used a fold pattern, you can edit individual head, foot, face, spine, and lip trims. • If you used a template, you can edit one gutter to apply the same gutter width to every page in the page grid.
Adding marks to a press-run layout
When you add a mark to a press run, it is anchored and positioned automatically according to its defined properties.
In the Marks list, select and double-click marks to add them to the currently selected press-run layout. You can add individual marks, mark groups, and selected marks from within a group to a press-run layout. The mark name remains highlighted in the Marks list until you delete or edit the placed instance of this mark.
The job file references any mark files that it uses. However, if you edit or move a placed mark so that its properties no longer match a stored SMK file, the mark data is embedded and stored in the job file.
Using AutoSelect to generate press runs from a run list
Autoselecting a template or fold pattern imposes a product’s run list by flowing its pages into the required number of autogenerated press runs.
This method works best for products with standard page counts that can be evenly divided into the autoselected page grid.
Autoselecting a template instead of a single page grid (fold pattern or template signature) applies the template signatures that will print the fewest possible pages.1. In the Pages view, set up the product’s run list.2. In the Layouts pane, select and right-click a template or fold
pattern.3. Select Auto Select.
The run-list pages flow into position in the generated press runs.4. In the Press Runs view, check and adjust the results as needed.
7
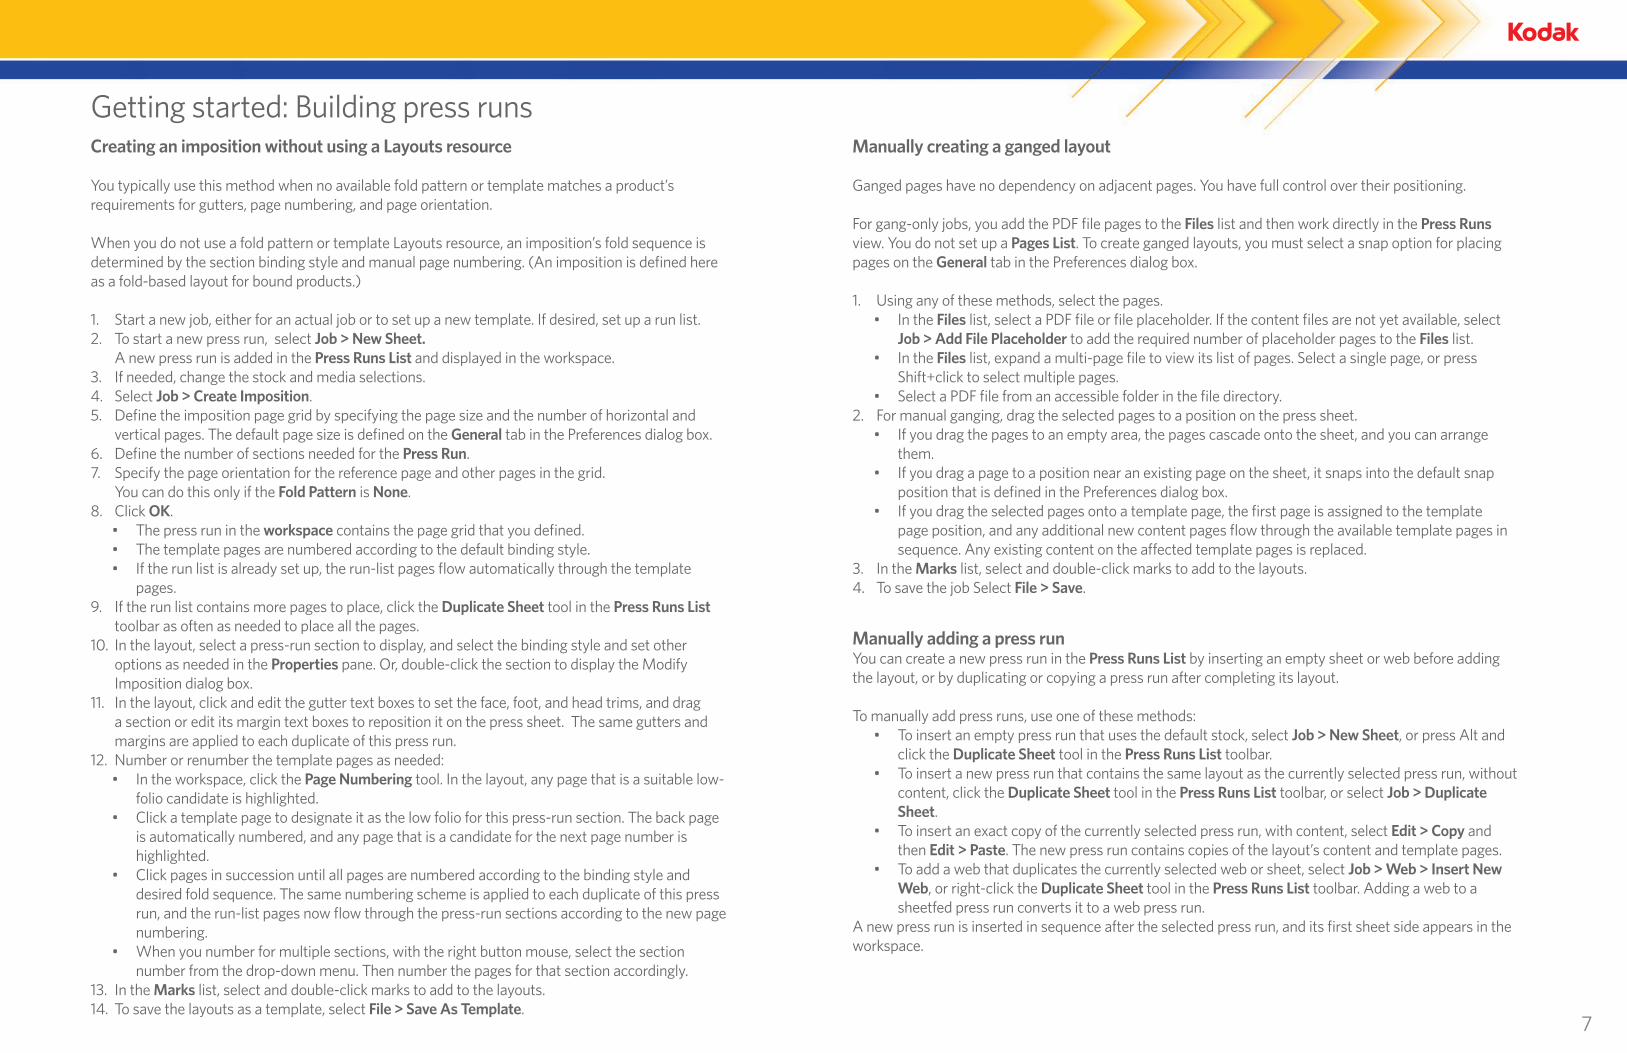
Getting started: Building press runsCreating an imposition without using a Layouts resource
You typically use this method when no available fold pattern or template matches a product’s requirements for gutters, page numbering, and page orientation.
When you do not use a fold pattern or template Layouts resource, an imposition’s fold sequence is determined by the section binding style and manual page numbering. (An imposition is defined here as a fold-based layout for bound products.)
1. Start a new job, either for an actual job or to set up a new template. If desired, set up a run list.2. To start a new press run, select Job > New Sheet.
A new press run is added in the Press Runs List and displayed in the workspace.3. If needed, change the stock and media selections. 4. Select Job > Create Imposition.5. Define the imposition page grid by specifying the page size and the number of horizontal and
vertical pages. The default page size is defined on the General tab in the Preferences dialog box.6. Define the number of sections needed for the Press Run.7. Specify the page orientation for the reference page and other pages in the grid.
You can do this only if the Fold Pattern is None.8. Click OK.
• The press run in the workspace contains the page grid that you defined.• The template pages are numbered according to the default binding style.• If the run list is already set up, the run-list pages flow automatically through the template
pages.9. If the run list contains more pages to place, click the Duplicate Sheet tool in the Press Runs List
toolbar as often as needed to place all the pages.10. In the layout, select a press-run section to display, and select the binding style and set other
options as needed in the Properties pane. Or, double-click the section to display the Modify Imposition dialog box.
11. In the layout, click and edit the gutter text boxes to set the face, foot, and head trims, and drag a section or edit its margin text boxes to reposition it on the press sheet. The same gutters and margins are applied to each duplicate of this press run.
12. Number or renumber the template pages as needed:• In the workspace, click the Page Numbering tool. In the layout, any page that is a suitable low-
folio candidate is highlighted.• Click a template page to designate it as the low folio for this press-run section. The back page
is automatically numbered, and any page that is a candidate for the next page number is highlighted.
• Click pages in succession until all pages are numbered according to the binding style and desired fold sequence. The same numbering scheme is applied to each duplicate of this press run, and the run-list pages now flow through the press-run sections according to the new page numbering.
• When you number for multiple sections, with the right button mouse, select the section number from the drop-down menu. Then number the pages for that section accordingly.
13. In the Marks list, select and double-click marks to add to the layouts. 14. To save the layouts as a template, select File > Save As Template.
Manually creating a ganged layout
Ganged pages have no dependency on adjacent pages. You have full control over their positioning.
For gang-only jobs, you add the PDF file pages to the Files list and then work directly in the Press Runs view. You do not set up a Pages List. To create ganged layouts, you must select a snap option for placing pages on the General tab in the Preferences dialog box.
1. Using any of these methods, select the pages.• In the Files list, select a PDF file or file placeholder. If the content files are not yet available, select
Job > Add File Placeholder to add the required number of placeholder pages to the Files list.• In the Files list, expand a multi-page file to view its list of pages. Select a single page, or press
Shift+click to select multiple pages.• Select a PDF file from an accessible folder in the file directory.
2. For manual ganging, drag the selected pages to a position on the press sheet.• If you drag the pages to an empty area, the pages cascade onto the sheet, and you can arrange
them.• If you drag a page to a position near an existing page on the sheet, it snaps into the default snap
position that is defined in the Preferences dialog box.• If you drag the selected pages onto a template page, the first page is assigned to the template
page position, and any additional new content pages flow through the available template pages in sequence. Any existing content on the affected template pages is replaced.
3. In the Marks list, select and double-click marks to add to the layouts.4. To save the job Select File > Save.
Manually adding a press runYou can create a new press run in the Press Runs List by inserting an empty sheet or web before adding the layout, or by duplicating or copying a press run after completing its layout.
To manually add press runs, use one of these methods:• To insert an empty press run that uses the default stock, select Job > New Sheet, or press Alt and
click the Duplicate Sheet tool in the Press Runs List toolbar.• To insert a new press run that contains the same layout as the currently selected press run, without
content, click the Duplicate Sheet tool in the Press Runs List toolbar, or select Job > Duplicate Sheet.
• To insert an exact copy of the currently selected press run, with content, select Edit > Copy and then Edit > Paste. The new press run contains copies of the layout’s content and template pages.
• To add a web that duplicates the currently selected web or sheet, select Job > Web > Insert New Web, or right-click the Duplicate Sheet tool in the Press Runs List toolbar. Adding a web to a sheetfed press run converts it to a web press run.
A new press run is inserted in sequence after the selected press run, and its first sheet side appears in the workspace.
8
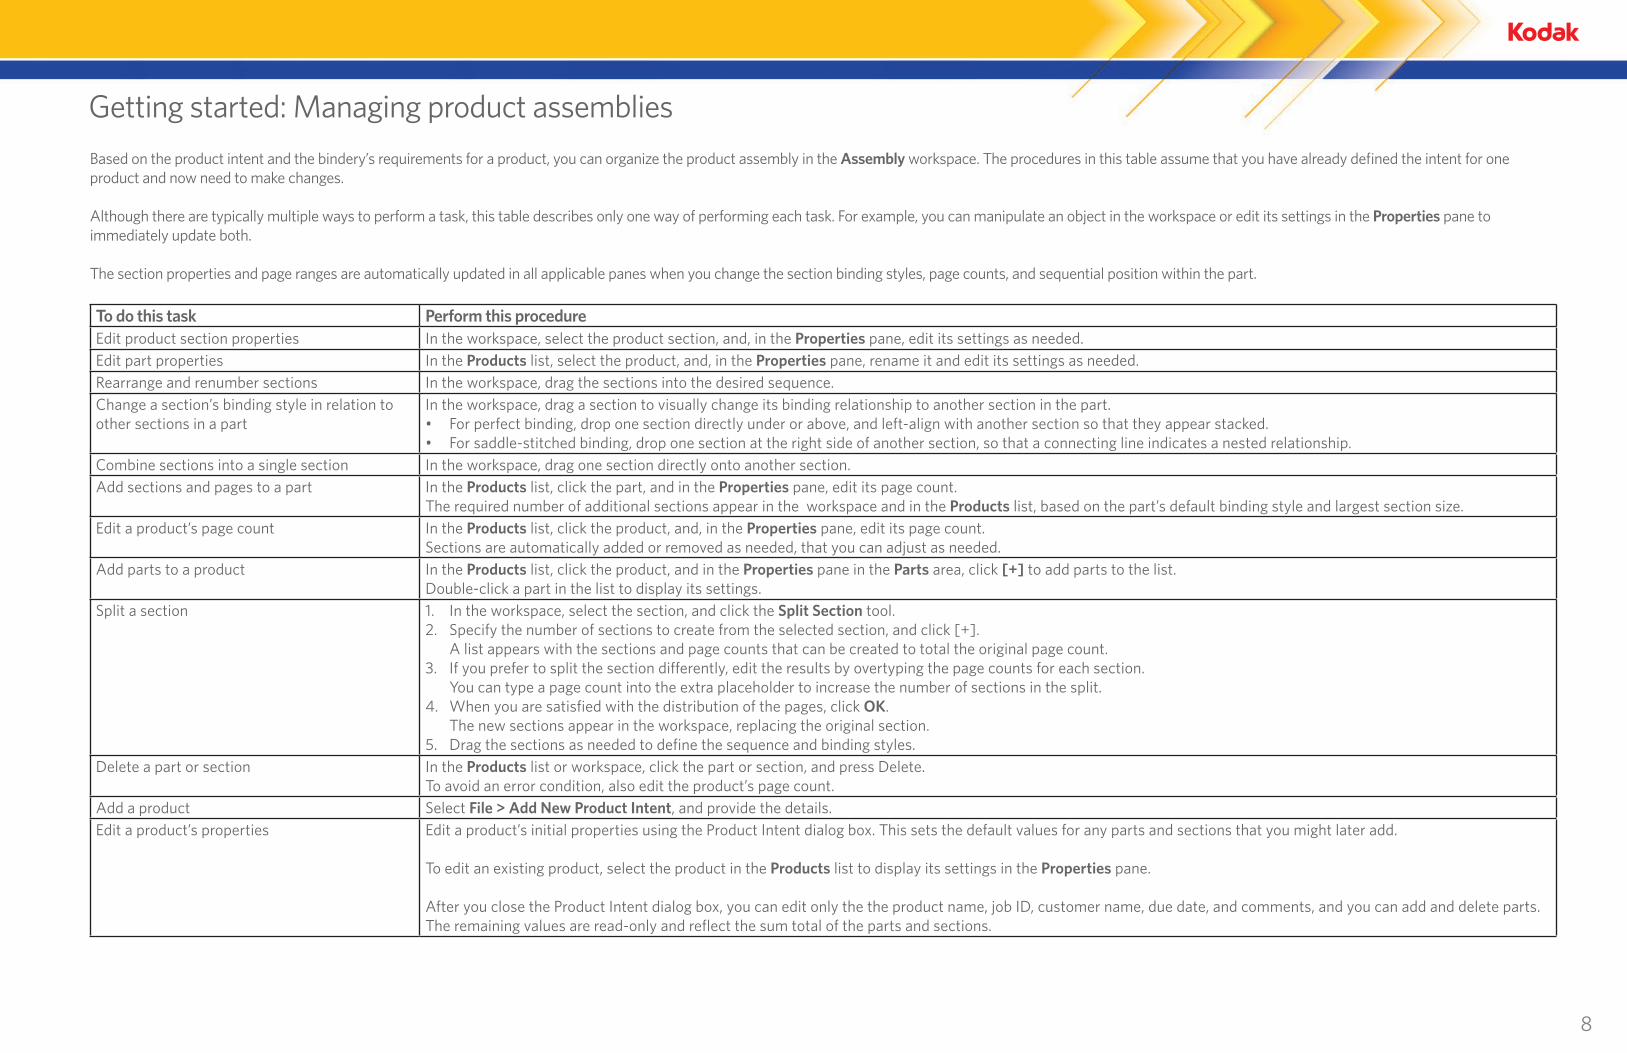
Getting started: Managing product assemblies
Based on the product intent and the bindery’s requirements for a product, you can organize the product assembly in the Assembly workspace. The procedures in this table assume that you have already defined the intent for one product and now need to make changes.
Although there are typically multiple ways to perform a task, this table describes only one way of performing each task. For example, you can manipulate an object in the workspace or edit its settings in the Properties pane to immediately update both.
The section properties and page ranges are automatically updated in all applicable panes when you change the section binding styles, page counts, and sequential position within the part.
To do this task Perform this procedureEdit product section properties In the workspace, select the product section, and, in the Properties pane, edit its settings as needed.Edit part properties In the Products list, select the product, and, in the Properties pane, rename it and edit its settings as needed.Rearrange and renumber sections In the workspace, drag the sections into the desired sequence.Change a section’s binding style in relation to other sections in a part
In the workspace, drag a section to visually change its binding relationship to another section in the part.• For perfect binding, drop one section directly under or above, and left-align with another section so that they appear stacked.• For saddle-stitched binding, drop one section at the right side of another section, so that a connecting line indicates a nested relationship.
Combine sections into a single section In the workspace, drag one section directly onto another section.Add sections and pages to a part In the Products list, click the part, and in the Properties pane, edit its page count.
The required number of additional sections appear in the workspace and in the Products list, based on the part’s default binding style and largest section size.Edit a product’s page count In the Products list, click the product, and, in the Properties pane, edit its page count.
Sections are automatically added or removed as needed, that you can adjust as needed.Add parts to a product In the Products list, click the product, and in the Properties pane in the Parts area, click [+] to add parts to the list.
Double-click a part in the list to display its settings.Split a section 1. In the workspace, select the section, and click the Split Section tool.
2. Specify the number of sections to create from the selected section, and click [+]. A list appears with the sections and page counts that can be created to total the original page count.
3. If you prefer to split the section differently, edit the results by overtyping the page counts for each section. You can type a page count into the extra placeholder to increase the number of sections in the split.
4. When you are satisfied with the distribution of the pages, click OK. The new sections appear in the workspace, replacing the original section.
5. Drag the sections as needed to define the sequence and binding styles.Delete a part or section In the Products list or workspace, click the part or section, and press Delete.
To avoid an error condition, also edit the product’s page count.Add a product Select File > Add New Product Intent, and provide the details.Edit a product’s properties Edit a product’s initial properties using the Product Intent dialog box. This sets the default values for any parts and sections that you might later add.
To edit an existing product, select the product in the Products list to display its settings in the Properties pane.
After you close the Product Intent dialog box, you can edit only the the product name, job ID, customer name, due date, and comments, and you can add and delete parts. The remaining values are read-only and reflect the sum total of the parts and sections.
9
Getting started: Printing output, closing and reopening jobs
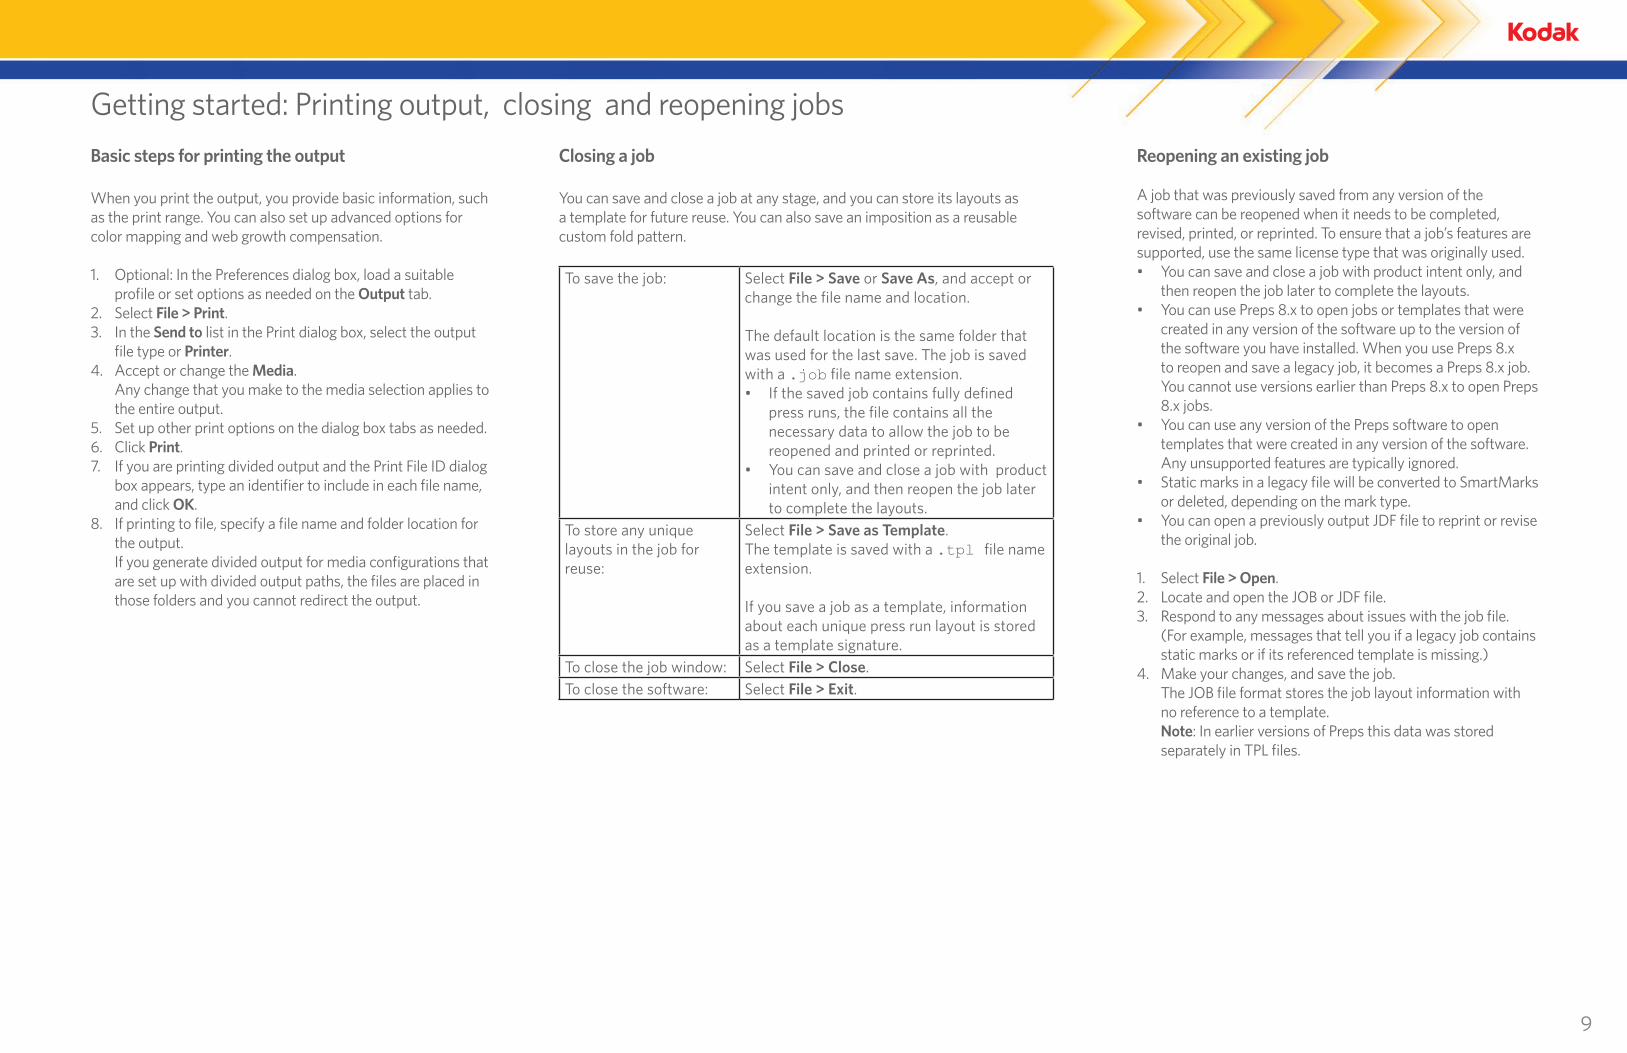
Basic steps for printing the output
When you print the output, you provide basic information, such as the print range. You can also set up advanced options for color mapping and web growth compensation.
1. Optional: In the Preferences dialog box, load a suitable profile or set options as needed on the Output tab.
2. Select File > Print.3. In the Send to list in the Print dialog box, select the output
file type or Printer.4. Accept or change the Media.
Any change that you make to the media selection applies to the entire output.
5. Set up other print options on the dialog box tabs as needed.6. Click Print.7. If you are printing divided output and the Print File ID dialog
box appears, type an identifier to include in each file name, and click OK.
8. If printing to file, specify a file name and folder location for the output. If you generate divided output for media configurations that are set up with divided output paths, the files are placed in those folders and you cannot redirect the output.
Closing a job
You can save and close a job at any stage, and you can store its layouts as a template for future reuse. You can also save an imposition as a reusable custom fold pattern.
To save the job: Select File > Save or Save As, and accept or change the file name and location.
The default location is the same folder that was used for the last save. The job is saved with a .job file name extension.• If the saved job contains fully defined
press runs, the file contains all the necessary data to allow the job to be reopened and printed or reprinted.
• You can save and close a job with product intent only, and then reopen the job later to complete the layouts.
To store any unique layouts in the job for reuse:
Select File > Save as Template.The template is saved with a .tpl file name extension.
If you save a job as a template, information about each unique press run layout is stored as a template signature.
To close the job window: Select File > Close.To close the software: Select File > Exit.
Reopening an existing job
A job that was previously saved from any version of the software can be reopened when it needs to be completed, revised, printed, or reprinted. To ensure that a job’s features are supported, use the same license type that was originally used. • You can save and close a job with product intent only, and
then reopen the job later to complete the layouts. • You can use Preps 8.x to open jobs or templates that were
created in any version of the software up to the version of the software you have installed. When you use Preps 8.x to reopen and save a legacy job, it becomes a Preps 8.x job. You cannot use versions earlier than Preps 8.x to open Preps 8.x jobs.
• You can use any version of the Preps software to open templates that were created in any version of the software. Any unsupported features are typically ignored.
• Static marks in a legacy file will be converted to SmartMarks or deleted, depending on the mark type.
• You can open a previously output JDF file to reprint or revise the original job.
1. Select File > Open. 2. Locate and open the JOB or JDF file.3. Respond to any messages about issues with the job file.
(For example, messages that tell you if a legacy job contains static marks or if its referenced template is missing.)
4. Make your changes, and save the job. The JOB file format stores the job layout information with no reference to a template. Note: In earlier versions of Preps this data was stored separately in TPL files.
10
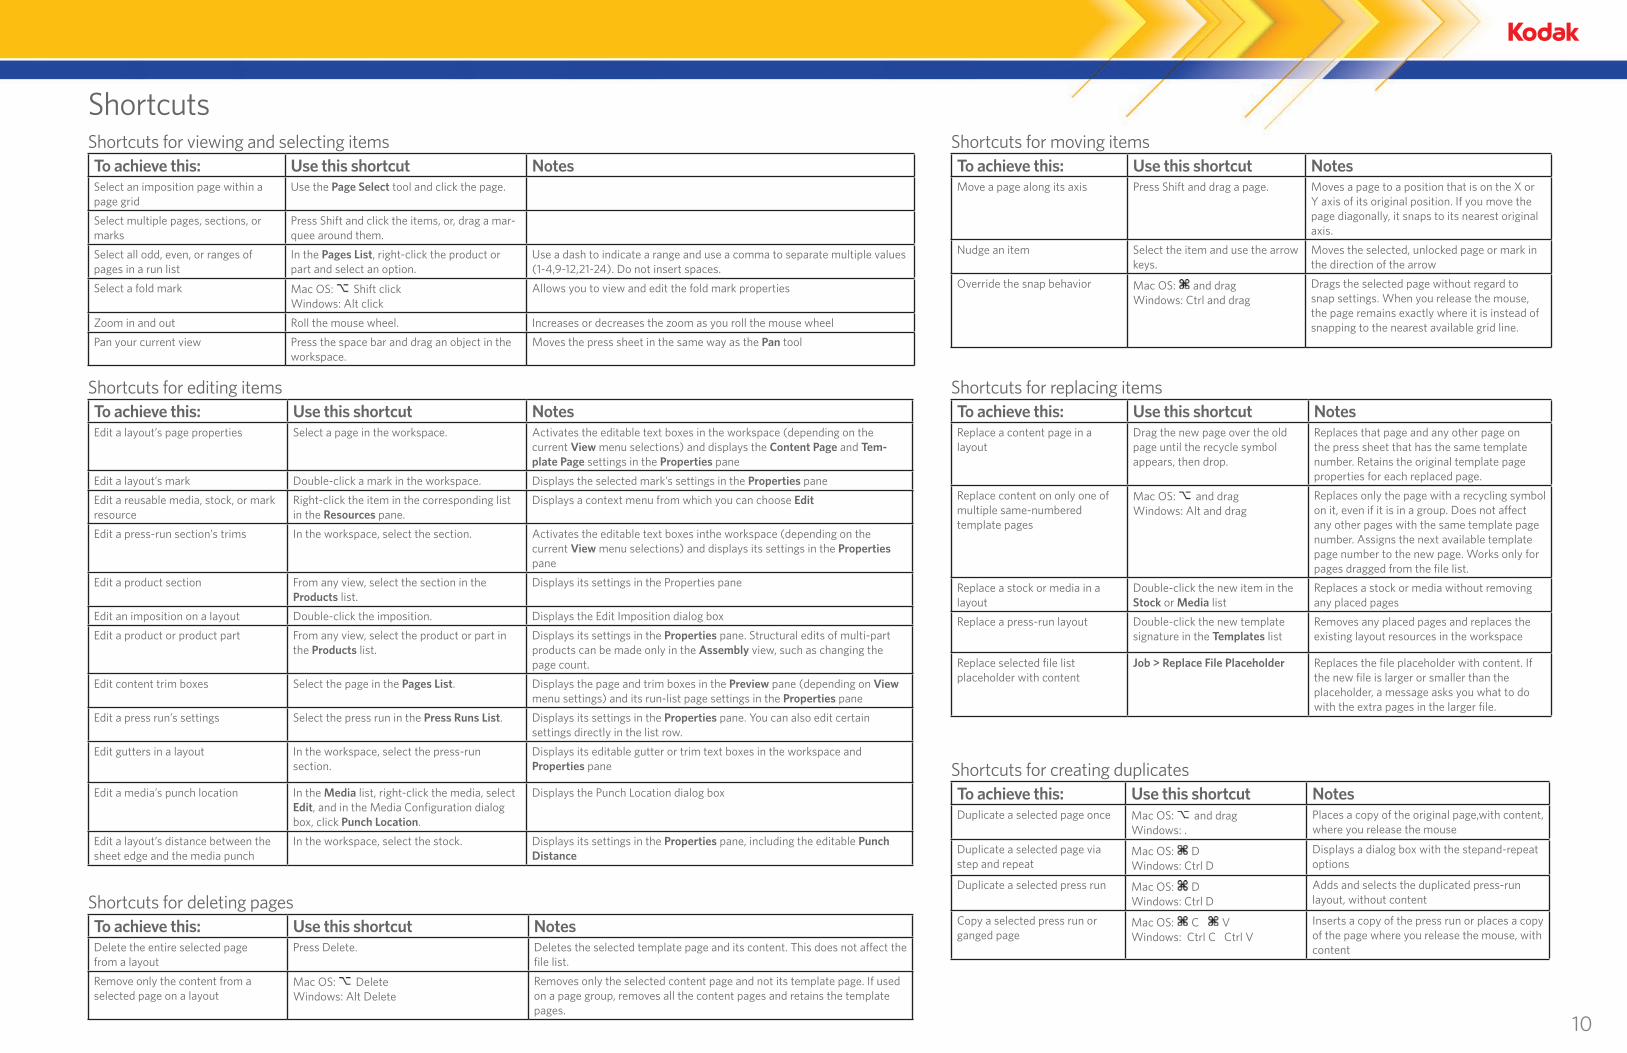
ShortcutsShortcuts for moving itemsTo achieve this: Use this shortcut NotesMove a page along its axis Press Shift and drag a page. Moves a page to a position that is on the X or
Y axis of its original position. If you move the page diagonally, it snaps to its nearest original axis.
Nudge an item Select the item and use the arrow keys.
Moves the selected, unlocked page or mark in the direction of the arrow
Override the snap behavior Mac OS: and dragWindows: Ctrl and drag
Drags the selected page without regard to snap settings. When you release the mouse, the page remains exactly where it is instead of snapping to the nearest available grid line.
Shortcuts for replacing itemsTo achieve this: Use this shortcut NotesReplace a content page in a layout
Drag the new page over the old page until the recycle symbol appears, then drop.
Replaces that page and any other page on the press sheet that has the same template number. Retains the original template page properties for each replaced page.
Replace content on only one of multiple same-numbered template pages
Mac OS: and dragWindows: Alt and drag
Replaces only the page with a recycling symbol on it, even if it is in a group. Does not affect any other pages with the same template page number. Assigns the next available template page number to the new page. Works only for pages dragged from the file list.
Replace a stock or media in a layout
Double-click the new item in the Stock or Media list
Replaces a stock or media without removing any placed pages
Replace a press-run layout Double-click the new template signature in the Templates list
Removes any placed pages and replaces the existing layout resources in the workspace
Replace selected file list placeholder with content
Job > Replace File Placeholder Replaces the file placeholder with content. If the new file is larger or smaller than the placeholder, a message asks you what to do with the extra pages in the larger file.
Shortcuts for creating duplicatesTo achieve this: Use this shortcut NotesDuplicate a selected page once Mac OS: and drag
Windows: .Places a copy of the original page,with content, where you release the mouse
Duplicate a selected page via step and repeat
Mac OS: DWindows: Ctrl D
Displays a dialog box with the stepand-repeat options
Duplicate a selected press run Mac OS: DWindows: Ctrl D
Adds and selects the duplicated press-run layout, without content
Copy a selected press run or ganged page
Mac OS: C VWindows: Ctrl C Ctrl V
Inserts a copy of the press run or places a copy of the page where you release the mouse, with content
Shortcuts for viewing and selecting itemsTo achieve this: Use this shortcut NotesSelect an imposition page within a page grid
Use the Page Select tool and click the page.
Select multiple pages, sections, or marks
Press Shift and click the items, or, drag a mar-quee around them.
Select all odd, even, or ranges of pages in a run list
In the Pages List, right-click the product or part and select an option.
Use a dash to indicate a range and use a comma to separate multiple values (1-4,9-12,21-24). Do not insert spaces.
Select a fold mark Mac OS: Shift clickWindows: Alt click
Allows you to view and edit the fold mark properties
Zoom in and out Roll the mouse wheel. Increases or decreases the zoom as you roll the mouse wheel
Pan your current view Press the space bar and drag an object in the workspace.
Moves the press sheet in the same way as the Pan tool
Shortcuts for editing itemsTo achieve this: Use this shortcut NotesEdit a layout’s page properties Select a page in the workspace. Activates the editable text boxes in the workspace (depending on the
current View menu selections) and displays the Content Page and Tem-plate Page settings in the Properties pane
Edit a layout’s mark Double-click a mark in the workspace. Displays the selected mark’s settings in the Properties pane
Edit a reusable media, stock, or mark resource
Right-click the item in the corresponding list in the Resources pane.
Displays a context menu from which you can choose Edit
Edit a press-run section’s trims In the workspace, select the section. Activates the editable text boxes inthe workspace (depending on the current View menu selections) and displays its settings in the Properties pane
Edit a product section From any view, select the section in the Products list.
Displays its settings in the Properties pane
Edit an imposition on a layout Double-click the imposition. Displays the Edit Imposition dialog box
Edit a product or product part From any view, select the product or part in the Products list.
Displays its settings in the Properties pane. Structural edits of multi-part products can be made only in the Assembly view, such as changing the page count.
Edit content trim boxes Select the page in the Pages List. Displays the page and trim boxes in the Preview pane (depending on View menu settings) and its run-list page settings in the Properties pane
Edit a press run’s settings Select the press run in the Press Runs List. Displays its settings in the Properties pane. You can also edit certain settings directly in the list row.
Edit gutters in a layout In the workspace, select the press-run section.
Displays its editable gutter or trim text boxes in the workspace and Properties pane
Edit a media’s punch location In the Media list, right-click the media, select Edit, and in the Media Configuration dialog box, click Punch Location.
Displays the Punch Location dialog box
Edit a layout’s distance between the sheet edge and the media punch
In the workspace, select the stock. Displays its settings in the Properties pane, including the editable Punch Distance
Shortcuts for deleting pagesTo achieve this: Use this shortcut NotesDelete the entire selected pagefrom a layout
Press Delete. Deletes the selected template page and its content. This does not affect the file list.
Remove only the content from aselected page on a layout
Mac OS: DeleteWindows: Alt Delete
Removes only the selected content page and not its template page. If used on a page group, removes all the content pages and retains the template pages.
11
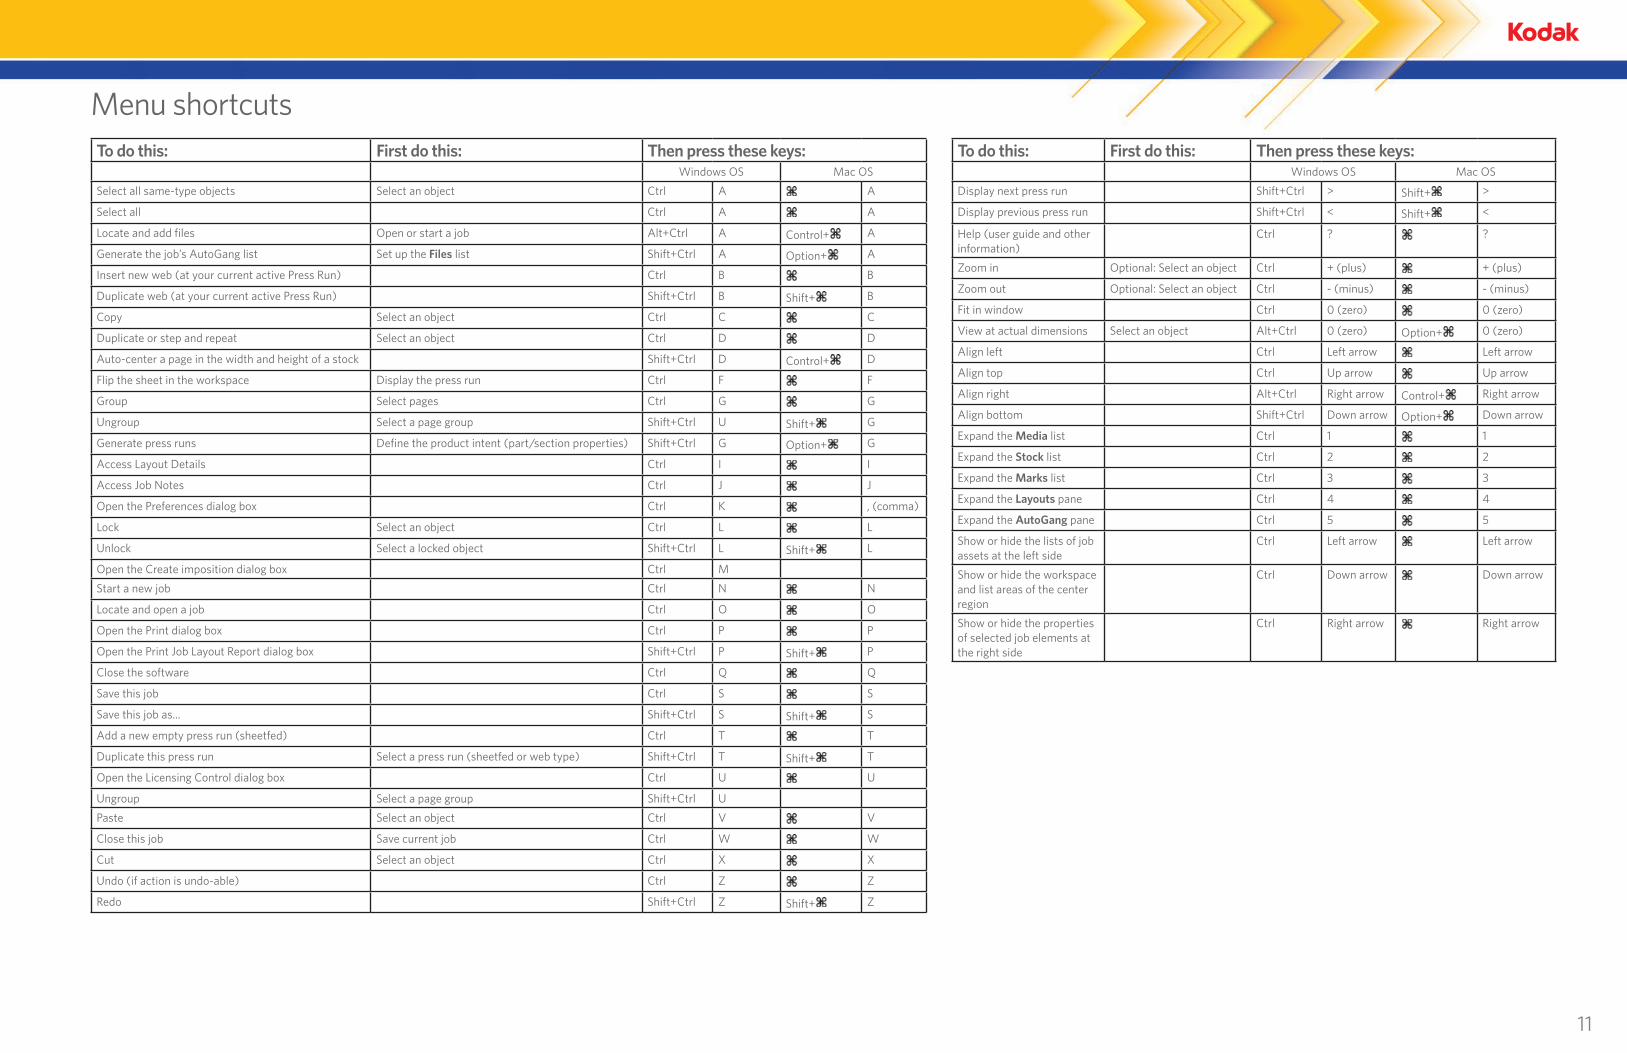
To do this: First do this: Then press these keys:Windows OS Mac OS
Display next press run Shift+Ctrl > Shift+ >
Display previous press run Shift+Ctrl < Shift+ <
Help (user guide and other information)
Ctrl ? ?
Zoom in Optional: Select an object Ctrl + (plus) + (plus)
Zoom out Optional: Select an object Ctrl - (minus) - (minus)
Fit in window Ctrl 0 (zero) 0 (zero)
View at actual dimensions Select an object Alt+Ctrl 0 (zero) Option+ 0 (zero)
Align left Ctrl Left arrow Left arrow
Align top Ctrl Up arrow Up arrow
Align right Alt+Ctrl Right arrow Control+ Right arrow
Align bottom Shift+Ctrl Down arrow Option+ Down arrow
Expand the Media list Ctrl 1 1
Expand the Stock list Ctrl 2 2
Expand the Marks list Ctrl 3 3
Expand the Layouts pane Ctrl 4 4
Expand the AutoGang pane Ctrl 5 5
Show or hide the lists of job assets at the left side
Ctrl Left arrow Left arrow
Show or hide the workspace and list areas of the center region
Ctrl Down arrow Down arrow
Show or hide the properties of selected job elements at the right side
Ctrl Right arrow Right arrow
Menu shortcutsTo do this: First do this: Then press these keys:
Windows OS Mac OS
Select all same-type objects Select an object Ctrl A A
Select all Ctrl A A
Locate and add files Open or start a job Alt+Ctrl A Control+ A
Generate the job’s AutoGang list Set up the Files list Shift+Ctrl A Option+ A
Insert new web (at your current active Press Run) Ctrl B B
Duplicate web (at your current active Press Run) Shift+Ctrl B Shift+ B
Copy Select an object Ctrl C C
Duplicate or step and repeat Select an object Ctrl D D
Auto-center a page in the width and height of a stock Shift+Ctrl D Control+ D
Flip the sheet in the workspace Display the press run Ctrl F F
Group Select pages Ctrl G G
Ungroup Select a page group Shift+Ctrl U Shift+ G
Generate press runs Define the product intent (part/section properties) Shift+Ctrl G Option+ G
Access Layout Details Ctrl I I
Access Job Notes Ctrl J J
Open the Preferences dialog box Ctrl K , (comma)
Lock Select an object Ctrl L L
Unlock Select a locked object Shift+Ctrl L Shift+ L
Open the Create imposition dialog box Ctrl M
Start a new job Ctrl N N
Locate and open a job Ctrl O O
Open the Print dialog box Ctrl P P
Open the Print Job Layout Report dialog box Shift+Ctrl P Shift+ P
Close the software Ctrl Q Q
Save this job Ctrl S S
Save this job as... Shift+Ctrl S Shift+ S
Add a new empty press run (sheetfed) Ctrl T T
Duplicate this press run Select a press run (sheetfed or web type) Shift+Ctrl T Shift+ T
Open the Licensing Control dialog box Ctrl U U
Ungroup Select a page group Shift+Ctrl U
Paste Select an object Ctrl V V
Close this job Save current job Ctrl W W
Cut Select an object Ctrl X X
Undo (if action is undo-able) Ctrl Z Z
Redo Shift+Ctrl Z Shift+ Z

Eastman Kodak Company 343 State Street Rochester, NY 14650 U.S.A.
© Kodak, 2016. All rights reserved. TM: Kodak
To learn more about solutions from Kodak, visit http://graphics.kodak.com.
Subject to technical change without notice.
Related Documents