iDimension ® Plus Static Dimensioning System UPS WorldShip ® Setup Manual PN 198019 November 4, 2019

Welcome message from author
This document is posted to help you gain knowledge. Please leave a comment to let me know what you think about it! Share it to your friends and learn new things together.
Transcript

iDimension® PlusStatic Dimensioning System
UPS WorldShip® Setup Manual
PN 198019November 4, 2019

An ISO 9001 registered company© Rice Lake Weighing Systems. All rights reserved.
Rice Lake Weighing Systems® is a registered trademark of Rice Lake Weighing Systems.
All other brand or product names within this publication are trademarks or registered trademarks of their respective companies.
All information contained within this publication is, to the best of our knowledge, complete and accurate at the time of publication. Rice Lake Weighing Systems reserves the right to make
changes to the technology, features, specifications and design of the equipment without notice.
The most current version of this publication, software, firmware and all other product updates can be found on our website:
www.ricelake.com

Contents
© Rice Lake Weighing Systems ● All Rights Reserved i
Contents
Technical training seminars are available through Rice Lake Weighing Systems. Course descriptions and dates can be viewed at www.ricelake.com/trainingor obtained by calling 715-234-9171 and asking for the training department.
1.0 Introduction . . . . . . . . . . . . . . . . . . . . . . . . . . . . . . . . . . . . . . . . . . . . . . . . . . . . . . . . . . . . . . . . . . . . . . . . . . . . 11.1 Regulatory Information . . . . . . . . . . . . . . . . . . . . . . . . . . . . . . . . . . . . . . . . . . . . . . . . . . . . . . . . . . . . . . . . . . . . . . . . . . . . . . . . 11.2 Safety . . . . . . . . . . . . . . . . . . . . . . . . . . . . . . . . . . . . . . . . . . . . . . . . . . . . . . . . . . . . . . . . . . . . . . . . . . . . . . . . . . . . . . . . . . . . . 2
2.0 Connections . . . . . . . . . . . . . . . . . . . . . . . . . . . . . . . . . . . . . . . . . . . . . . . . . . . . . . . . . . . . . . . . . . . . . . . . . . . . 32.1 Connect the iDimension Plus to the UPS WorldShip Computer . . . . . . . . . . . . . . . . . . . . . . . . . . . . . . . . . . . . . . . . . . . . . . . . . 32.2 USB Hub Connections . . . . . . . . . . . . . . . . . . . . . . . . . . . . . . . . . . . . . . . . . . . . . . . . . . . . . . . . . . . . . . . . . . . . . . . . . . . . . . . . 42.3 Connect the BenchPro to the USB Hub . . . . . . . . . . . . . . . . . . . . . . . . . . . . . . . . . . . . . . . . . . . . . . . . . . . . . . . . . . . . . . . . . . . 52.4 Connect the USB Hub to the iDimension Plus . . . . . . . . . . . . . . . . . . . . . . . . . . . . . . . . . . . . . . . . . . . . . . . . . . . . . . . . . . . . . . 62.5 Connect Computer to USB Hub . . . . . . . . . . . . . . . . . . . . . . . . . . . . . . . . . . . . . . . . . . . . . . . . . . . . . . . . . . . . . . . . . . . . . . . . . 6
2.5.1 RS-232 Serial Converter . . . . . . . . . . . . . . . . . . . . . . . . . . . . . . . . . . . . . . . . . . . . . . . . . . . . . . . . . . . . . . . . . . . . . . . 62.5.2 USB Serial Port . . . . . . . . . . . . . . . . . . . . . . . . . . . . . . . . . . . . . . . . . . . . . . . . . . . . . . . . . . . . . . . . . . . . . . . . . . . . . . 6
3.0 Configuration . . . . . . . . . . . . . . . . . . . . . . . . . . . . . . . . . . . . . . . . . . . . . . . . . . . . . . . . . . . . . . . . . . . . . . . . . . . 73.1 Computer Configuration . . . . . . . . . . . . . . . . . . . . . . . . . . . . . . . . . . . . . . . . . . . . . . . . . . . . . . . . . . . . . . . . . . . . . . . . . . . . . . . 7
3.1.1 Direct Connection. . . . . . . . . . . . . . . . . . . . . . . . . . . . . . . . . . . . . . . . . . . . . . . . . . . . . . . . . . . . . . . . . . . . . . . . . . . . . 73.1.2 Network Connection. . . . . . . . . . . . . . . . . . . . . . . . . . . . . . . . . . . . . . . . . . . . . . . . . . . . . . . . . . . . . . . . . . . . . . . . . . . 7
3.2 Device Manager . . . . . . . . . . . . . . . . . . . . . . . . . . . . . . . . . . . . . . . . . . . . . . . . . . . . . . . . . . . . . . . . . . . . . . . . . . . . . . . . . . . . 113.3 QubeVu® Configuration . . . . . . . . . . . . . . . . . . . . . . . . . . . . . . . . . . . . . . . . . . . . . . . . . . . . . . . . . . . . . . . . . . . . . . . . . . . . . . 12
4.0 UPS WorldShip Configuration . . . . . . . . . . . . . . . . . . . . . . . . . . . . . . . . . . . . . . . . . . . . . . . . . . . . . . . . . . . . 184.1 UPS WorldShip . . . . . . . . . . . . . . . . . . . . . . . . . . . . . . . . . . . . . . . . . . . . . . . . . . . . . . . . . . . . . . . . . . . . . . . . . . . . . . . . . . . . . 184.2 Optimize Performance . . . . . . . . . . . . . . . . . . . . . . . . . . . . . . . . . . . . . . . . . . . . . . . . . . . . . . . . . . . . . . . . . . . . . . . . . . . . . . . 20

iDimension Plus UPS Worldship
ii Visit our website www.RiceLake.com
Rice Lake continually offers web-based video training on a growing selection of product-related topics at no cost. Visit www.ricelake.com/webinars
Introduction
© Rice Lake Weighing Systems ● All Rights Reserved 1
1.0 IntroductionThis manual is intended to assist a user in the setup and configuration of the iDimension Plus to interface with UPS WorldShip.Ensure the iDimension Plus unit is fully assembled by following the instructions of the iDimension Plus Assembly Instructions (PN 197164).After assembly, ensure the iDimension Plus is fully setup and configured by following the iDimension Plus Setup and Operation Manual (PN 195439).When interfacing this device to third parties software, please reference the software manufacturer’s documentation for setup and configuration parameters as necessary.
Manuals and additional resources are available from the Rice Lake Weighing Systems website at www.ricelake.comWarranty information can be found on the website at www.ricelake.com/warranties
Additional Manual Resources• iDimension Plus Assembly Instructions (PN 197164). The iDimension Plus Assembly Instructions describes how to
assemble the iDimension Plus.• iDimension Plus Setup and Operation Manual (PN 195439). The iDimension Plus Setup and Operation Manual provides
an overview of the iDimension Plus setup and operation instructions.• iDimension Plus QubeVu Managers Guide (PN 195441). The iDimension Plus QubeVu Managers Guide is a detailed
overview of the QubeVu Manager, the embedded firmware of the iDimension Plus.
1.1 Regulatory InformationThis product is a Class 1 Laser Product according to IEC 60825-1:2007 Ed. 2.0 and complies with 21 CFR 1040.1 pursuant to Laser Notice No. 50. A laser source with a diffraction optical element is embedded in the product, which produces a maximum output power of 1.1 mW at the aperture with a maximum wavelength of 825 nm.FCCThis equipment has been tested and found to comply with the limits for a Class A digital device, pursuant to part 15 of the FCC Rules. These limits are designed to provide reasonable protection against harmful interference when the equipment is operated in a commercial environment. This equipment generates, uses, and can radiate radio frequency energy and, if not installed and used in accordance with the instruction manual, may cause harmful interference to radio communications. Operation of this equipment in a residential area is likely to cause harmful interference in which case the user will be required to correct the interference at their own expense. Changes or modifications not expressly approved by Postea, Inc. could void the user’s FCC granted authority to operate the equipment
iDimension Plus UPS WorldShip
2 Visit our website www.RiceLake.com
1.2 SafetySafety Signal Definitions:
Indicates an imminently hazardous situation that, if not avoided, will result in death or serious injury. Includes hazards that are exposed when guards are removed.Indicates a potentially hazardous situation that, if not avoided, could result in serious injury or death. Includes hazards that are exposed when guards are removed.
Indicates a potentially hazardous situation that, if not avoided, could result in minor or moderate injury.
Indicates information about procedures that, if not observed, could result in damage to equipment or corruption to and loss of data.
General SafetyDo not operate or work on this equipment unless this manual has been read and all instructions are understood. Failure to follow the instructions or heed the warnings could result in injury or death. Contact any Rice Lake Weighing Systems dealer for replacement manuals.
Failure to heed could result in serious injury or death.Electric shock hazard!There are no user serviceable parts. Refer to qualified service personnel for service.The unit has no power switch, to completely remove power from the unit, disconnect the power source at the AC outlet.For pluggable equipment the socket outlet must be installed near the equipment and must be easily accessible.When cycling power, use the in-line power cord at a power outlet, do not power at the base.Always disconnect from main power before performing work on the device.Do not allow minors (children) or inexperienced persons to operate this unit.Do not operate without all shields and guards in place.Do not place fingers into slots or possible pinch points.Do not use this product if any of the components are cracked.Do not make alterations or modifications to the unit.Do not remove or obscure warning labels.Do not use near water, avoid contact with excessive moisture.Keep the unit dry.Retain packaging. When transporting the unit, always disassemble and pack it in its original packaging.Use only supplied power adapter. Never short-circuit the power adapter or the device.Never remove the iDimension Plus head cover or the electrical connection panels at the base of the pole assembly.Never modify or attempt to repair the unit. Service must be performed by Rice Lake Weighing Systems only.Handle cables and cable connectors with care.Never use damaged power cords, plugs or loose electrical sockets.Never touch the power cord with wet hands.Ensure that the base plate, pole assembly and head unit are all securely attached before attempting to move the unit.Never lift the unit by grasping only the pole assembly.Always ensure that both sections of the pole assembly and the base plate are supported.Never drop or allow an impact to the head.Mount on a flat surface.Never use product for anything other than its intended purpose.
DANGER
WARNING
CAUTION
IMPORTANT
WARNING
Connections
© Rice Lake Weighing Systems ● All Rights Reserved 3
2.0 ConnectionsThis section provides instructions on how to connect the iDimension Plus, USB hub kit and the BenchPro scale.
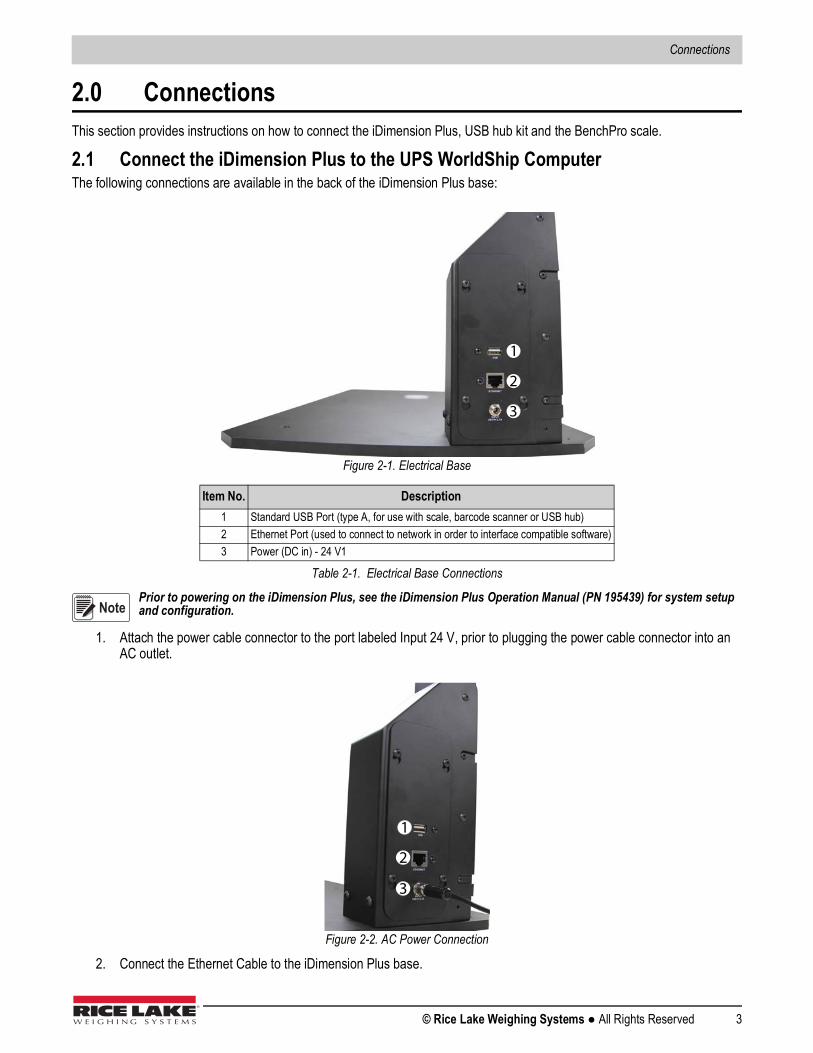
2.1 Connect the iDimension Plus to the UPS WorldShip ComputerThe following connections are available in the back of the iDimension Plus base:
Figure 2-1. Electrical Base
Prior to powering on the iDimension Plus, see the iDimension Plus Operation Manual (PN 195439) for system setup and configuration.
1. Attach the power cable connector to the port labeled Input 24 V, prior to plugging the power cable connector into an AC outlet.
Figure 2-2. AC Power Connection
2. Connect the Ethernet Cable to the iDimension Plus base.
Item No. Description1 Standard USB Port (type A, for use with scale, barcode scanner or USB hub)2 Ethernet Port (used to connect to network in order to interface compatible software)3 Power (DC in) - 24 V1
Table 2-1. Electrical Base Connections
1
2
3
Note
1
3
2
iDimension Plus UPS WorldShip
4 Visit our website www.RiceLake.com
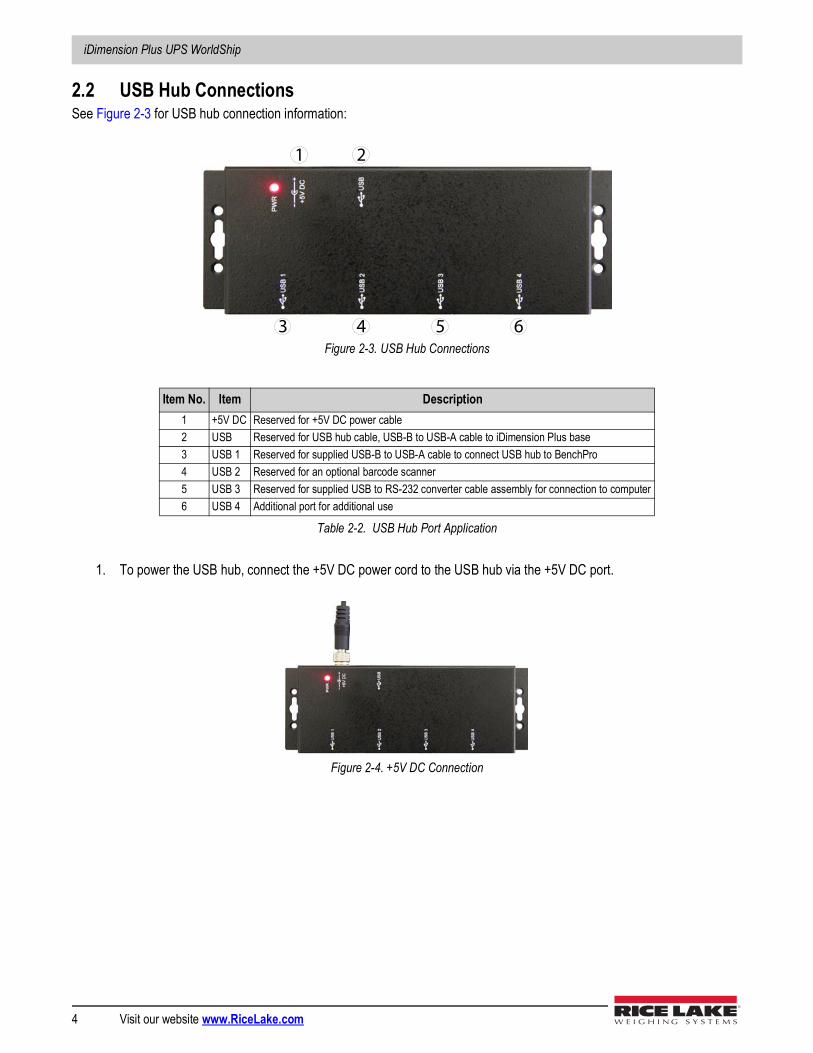
2.2 USB Hub ConnectionsSee Figure 2-3 for USB hub connection information:
Figure 2-3. USB Hub Connections
1. To power the USB hub, connect the +5V DC power cord to the USB hub via the +5V DC port.
Figure 2-4. +5V DC Connection
Item No. Item Description1 +5V DC Reserved for +5V DC power cable2 USB Reserved for USB hub cable, USB-B to USB-A cable to iDimension Plus base3 USB 1 Reserved for supplied USB-B to USB-A cable to connect USB hub to BenchPro4 USB 2 Reserved for an optional barcode scanner5 USB 3 Reserved for supplied USB to RS-232 converter cable assembly for connection to computer6 USB 4 Additional port for additional use
Table 2-2. USB Hub Port Application
3 4
1 2
5 6
Connections
© Rice Lake Weighing Systems ● All Rights Reserved 5
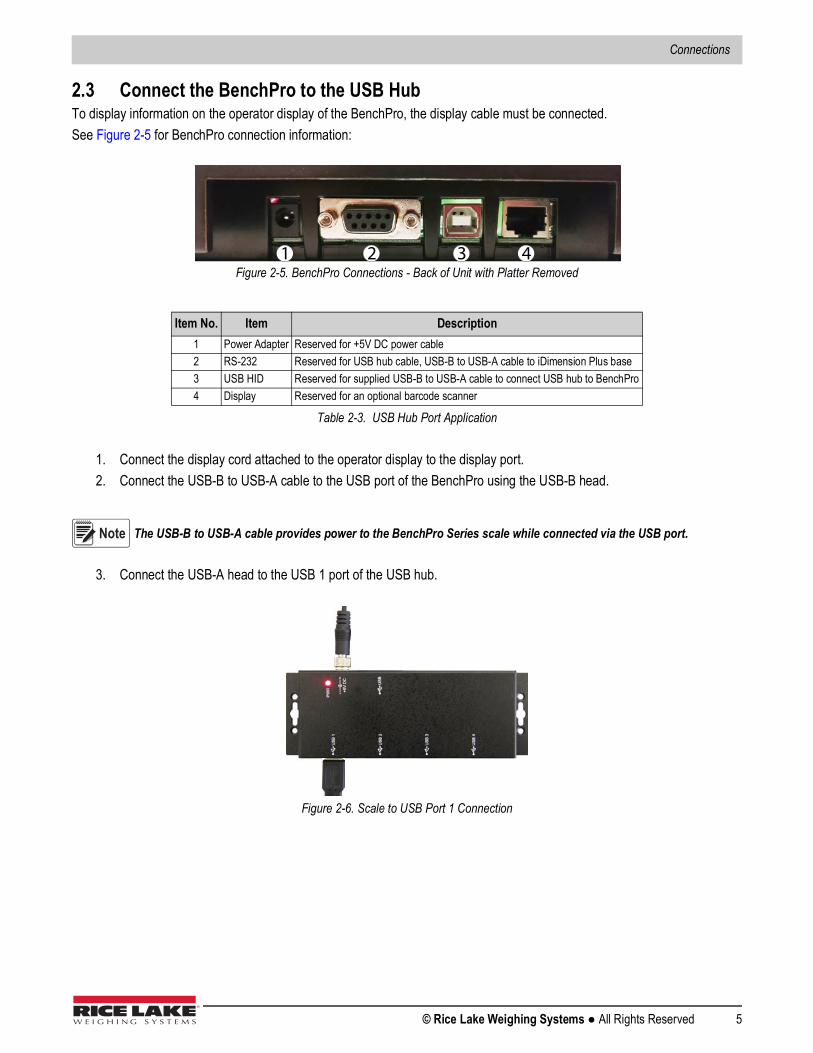
2.3 Connect the BenchPro to the USB HubTo display information on the operator display of the BenchPro, the display cable must be connected.See Figure 2-5 for BenchPro connection information:
Figure 2-5. BenchPro Connections - Back of Unit with Platter Removed
1. Connect the display cord attached to the operator display to the display port.2. Connect the USB-B to USB-A cable to the USB port of the BenchPro using the USB-B head.
The USB-B to USB-A cable provides power to the BenchPro Series scale while connected via the USB port.
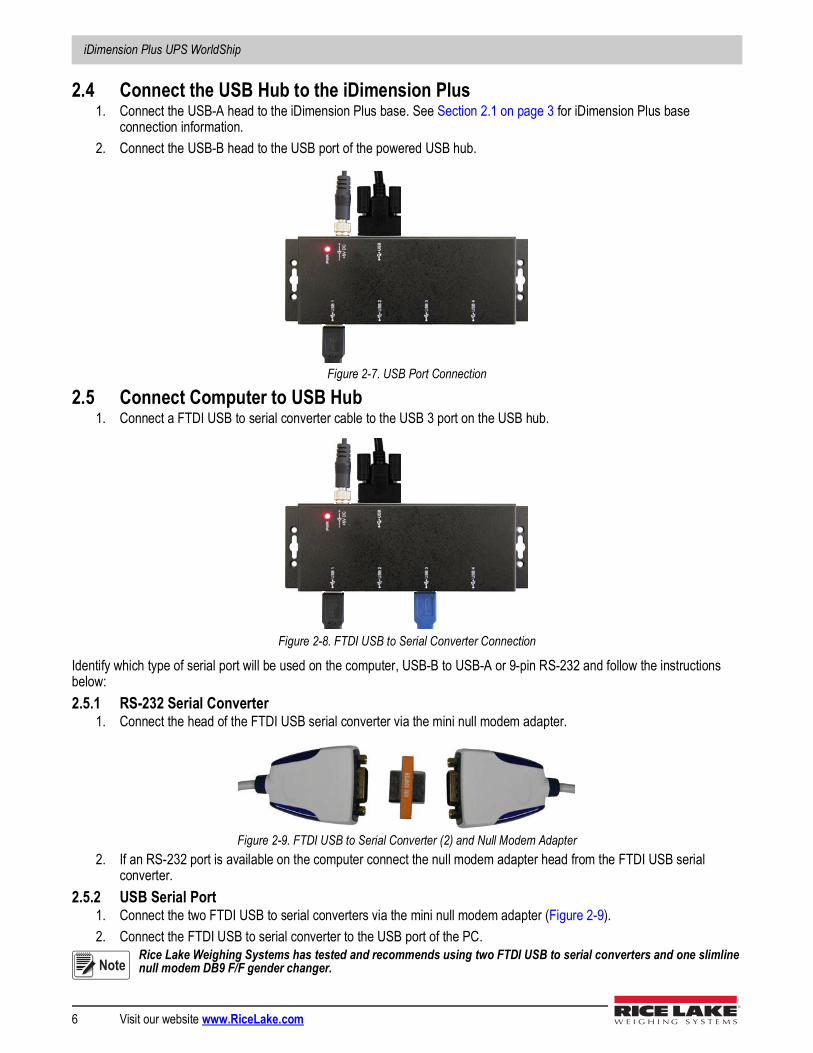
3. Connect the USB-A head to the USB 1 port of the USB hub.
Figure 2-6. Scale to USB Port 1 Connection
Item No. Item Description1 Power Adapter Reserved for +5V DC power cable2 RS-232 Reserved for USB hub cable, USB-B to USB-A cable to iDimension Plus base3 USB HID Reserved for supplied USB-B to USB-A cable to connect USB hub to BenchPro4 Display Reserved for an optional barcode scanner
Table 2-3. USB Hub Port Application
3 421
Note
iDimension Plus UPS WorldShip
6 Visit our website www.RiceLake.com
2.4 Connect the USB Hub to the iDimension Plus1. Connect the USB-A head to the iDimension Plus base. See Section 2.1 on page 3 for iDimension Plus base
connection information.2. Connect the USB-B head to the USB port of the powered USB hub.
Figure 2-7. USB Port Connection
2.5 Connect Computer to USB Hub1. Connect a FTDI USB to serial converter cable to the USB 3 port on the USB hub.
Figure 2-8. FTDI USB to Serial Converter Connection
Identify which type of serial port will be used on the computer, USB-B to USB-A or 9-pin RS-232 and follow the instructions below:2.5.1 RS-232 Serial Converter
1. Connect the head of the FTDI USB serial converter via the mini null modem adapter.
Figure 2-9. FTDI USB to Serial Converter (2) and Null Modem Adapter2. If an RS-232 port is available on the computer connect the null modem adapter head from the FTDI USB serial
converter.2.5.2 USB Serial Port
1. Connect the two FTDI USB to serial converters via the mini null modem adapter (Figure 2-9).2. Connect the FTDI USB to serial converter to the USB port of the PC.
Rice Lake Weighing Systems has tested and recommends using two FTDI USB to serial converters and one slimline null modem DB9 F/F gender changer.Note
Configuration
© Rice Lake Weighing Systems ● All Rights Reserved 7
3.0 ConfigurationThis section provides instructions on how to set up and configure the computer, QubeVu Manager and iDimension Plus for UPS WorldShip.
3.1 Computer ConfigurationConnect a computer to the iDimension with the Ethernet cable, either directly or over the network. Type the IP address of the iDimension into a browser to access the QubeVu Manager tools.
If this is the initial configuration, the computer must be connected directly to the iDimension.
3.1.1 Direct ConnectionConnect the iDimension directly to a computer with an Ethernet cable. If an Ethernet port is not available on the computer, contact Rice Lake Service for support using the USB to Ethernet adapter (PN 175621).3.1.2 Network ConnectionThe iDimension can be installed on the network with the Ethernet cable, and configured with a static IP address or using DHCP. Consult your network administrator to determine the best approach.
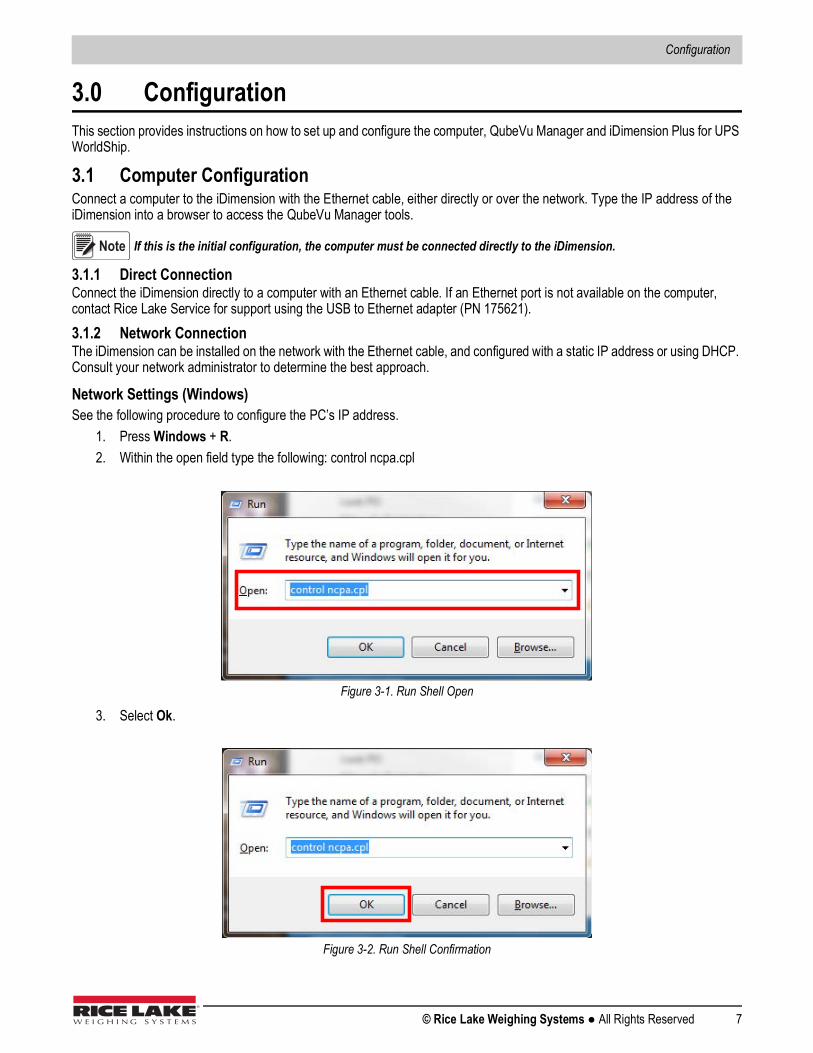
Network Settings (Windows)See the following procedure to configure the PC’s IP address.
1. Press Windows + R.2. Within the open field type the following: control ncpa.cpl
Figure 3-1. Run Shell Open
3. Select Ok.
Figure 3-2. Run Shell Confirmation
Note
iDimension Plus UPS WorldShip
8 Visit our website www.RiceLake.com
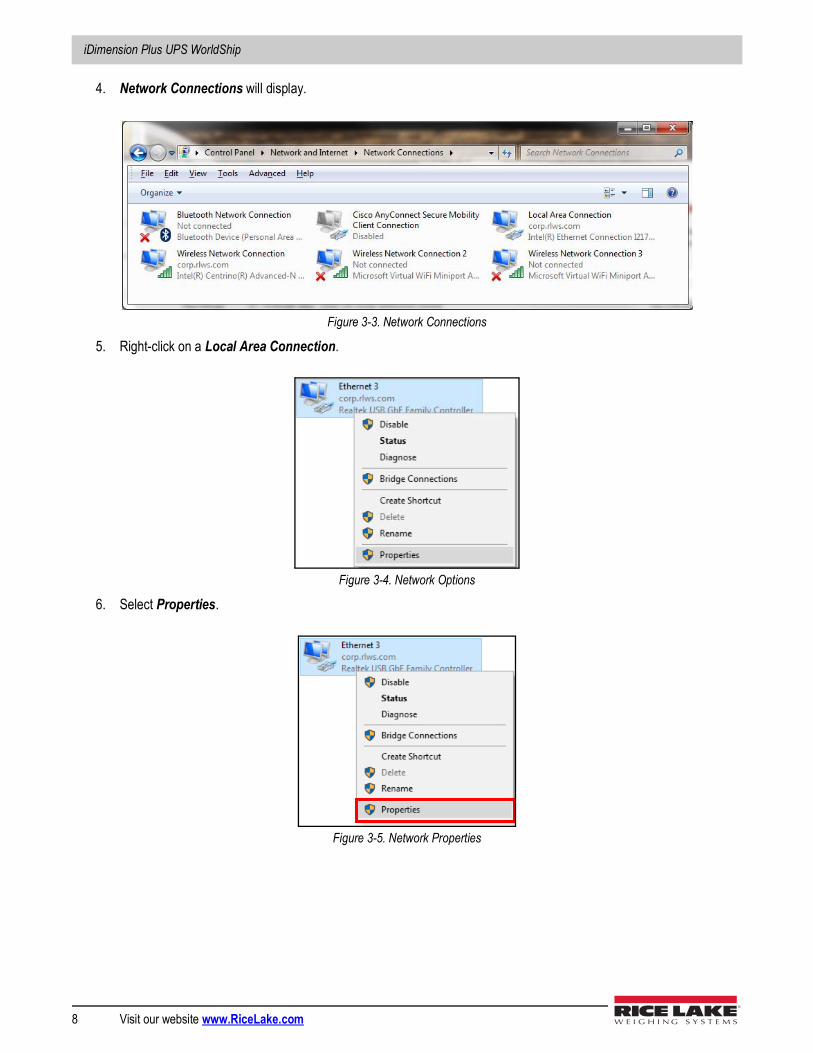
4. Network Connections will display.
Figure 3-3. Network Connections
5. Right-click on a Local Area Connection.
Figure 3-4. Network Options
6. Select Properties.
Figure 3-5. Network Properties
Configuration
© Rice Lake Weighing Systems ● All Rights Reserved 9
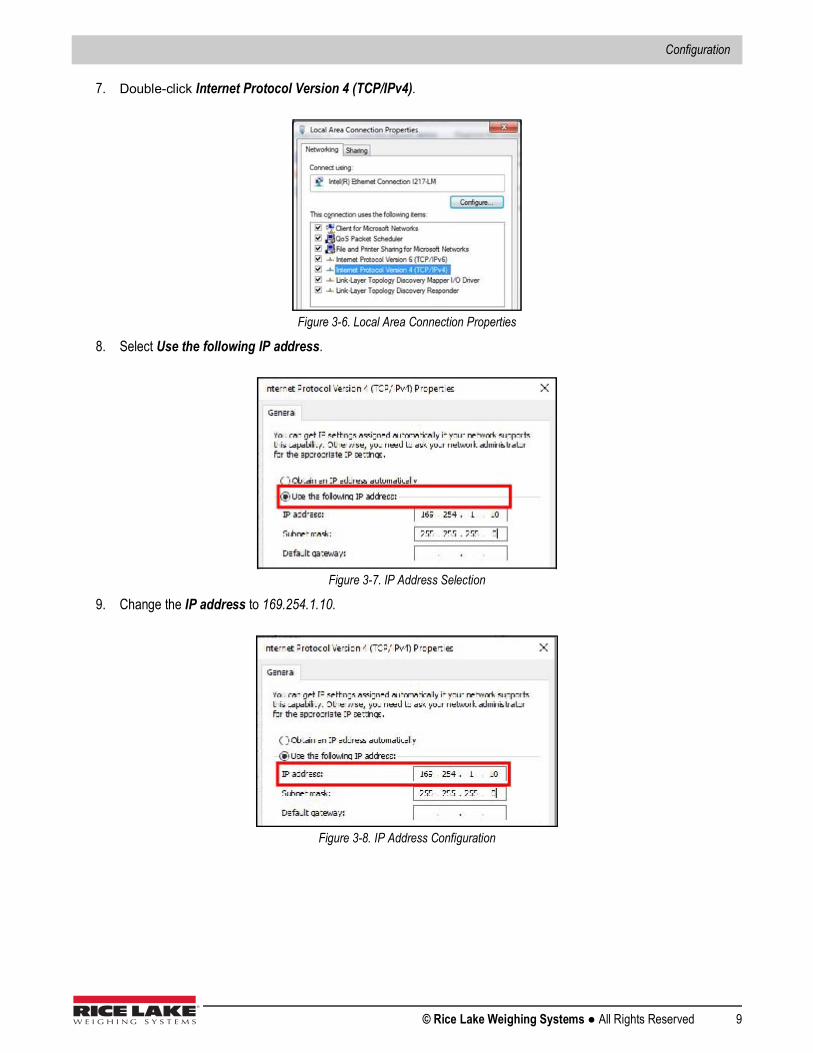
7. Double-click Internet Protocol Version 4 (TCP/IPv4).
Figure 3-6. Local Area Connection Properties
8. Select Use the following IP address.
Figure 3-7. IP Address Selection
9. Change the IP address to 169.254.1.10.
Figure 3-8. IP Address Configuration
iDimension Plus UPS WorldShip
10 Visit our website www.RiceLake.com
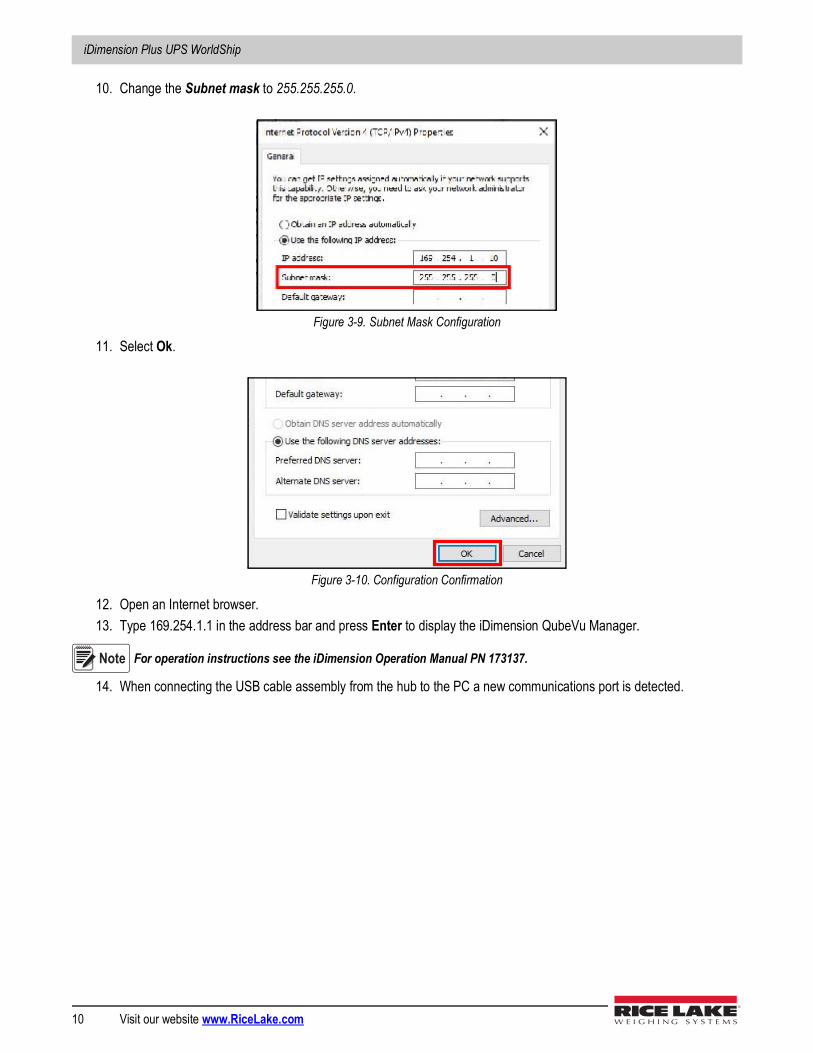
10. Change the Subnet mask to 255.255.255.0.
Figure 3-9. Subnet Mask Configuration
11. Select Ok.
Figure 3-10. Configuration Confirmation
12. Open an Internet browser.13. Type 169.254.1.1 in the address bar and press Enter to display the iDimension QubeVu Manager.
For operation instructions see the iDimension Operation Manual PN 173137.
14. When connecting the USB cable assembly from the hub to the PC a new communications port is detected.
Note
Configuration
© Rice Lake Weighing Systems ● All Rights Reserved 11
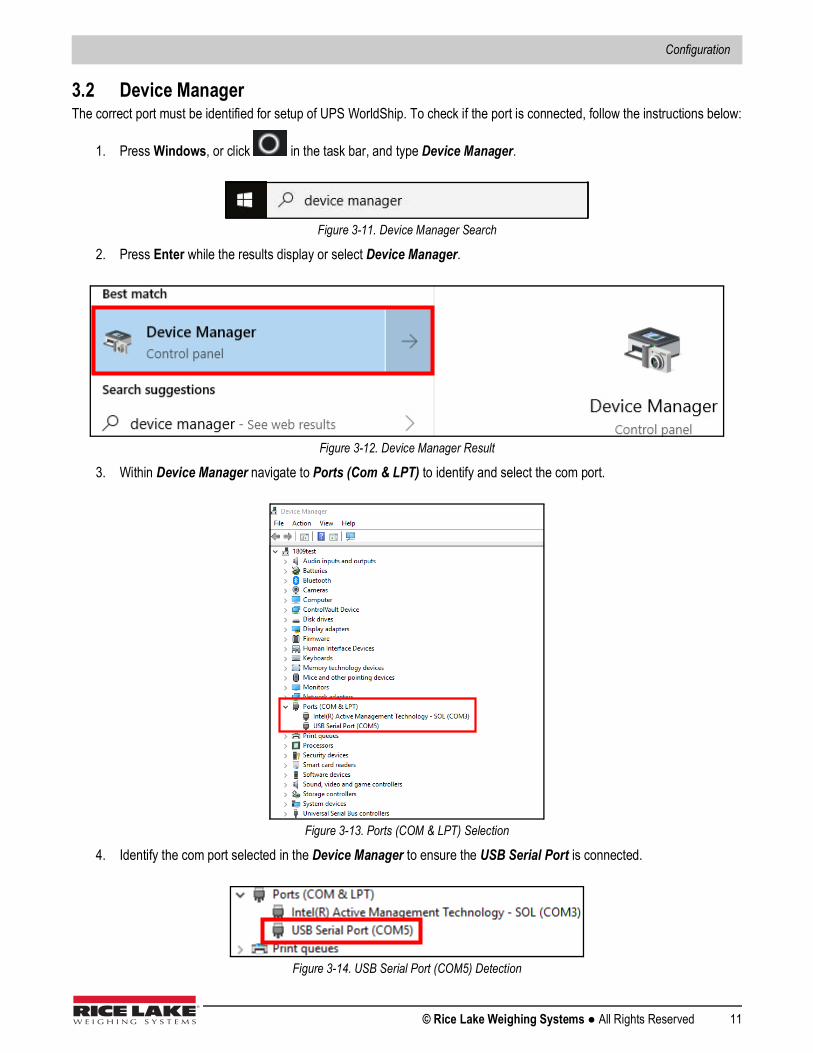
3.2 Device ManagerThe correct port must be identified for setup of UPS WorldShip. To check if the port is connected, follow the instructions below:
1. Press Windows, or click in the task bar, and type Device Manager.
Figure 3-11. Device Manager Search
2. Press Enter while the results display or select Device Manager.
Figure 3-12. Device Manager Result
3. Within Device Manager navigate to Ports (Com & LPT) to identify and select the com port.
Figure 3-13. Ports (COM & LPT) Selection
4. Identify the com port selected in the Device Manager to ensure the USB Serial Port is connected.
Figure 3-14. USB Serial Port (COM5) Detection
iDimension Plus UPS WorldShip
12 Visit our website www.RiceLake.com
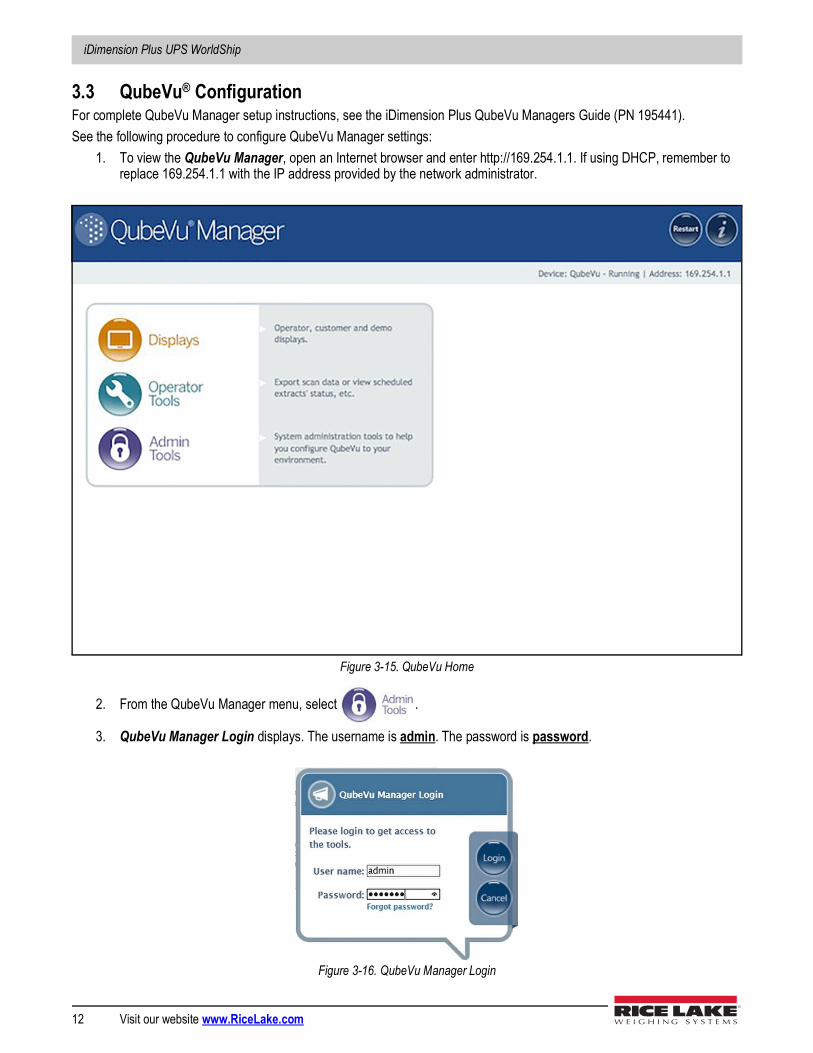
3.3 QubeVu® ConfigurationFor complete QubeVu Manager setup instructions, see the iDimension Plus QubeVu Managers Guide (PN 195441).See the following procedure to configure QubeVu Manager settings:
1. To view the QubeVu Manager, open an Internet browser and enter http://169.254.1.1. If using DHCP, remember to replace 169.254.1.1 with the IP address provided by the network administrator.
Figure 3-15. QubeVu Home
2. From the QubeVu Manager menu, select .
3. QubeVu Manager Login displays. The username is admin. The password is password.
Figure 3-16. QubeVu Manager Login
Configuration
© Rice Lake Weighing Systems ● All Rights Reserved 13
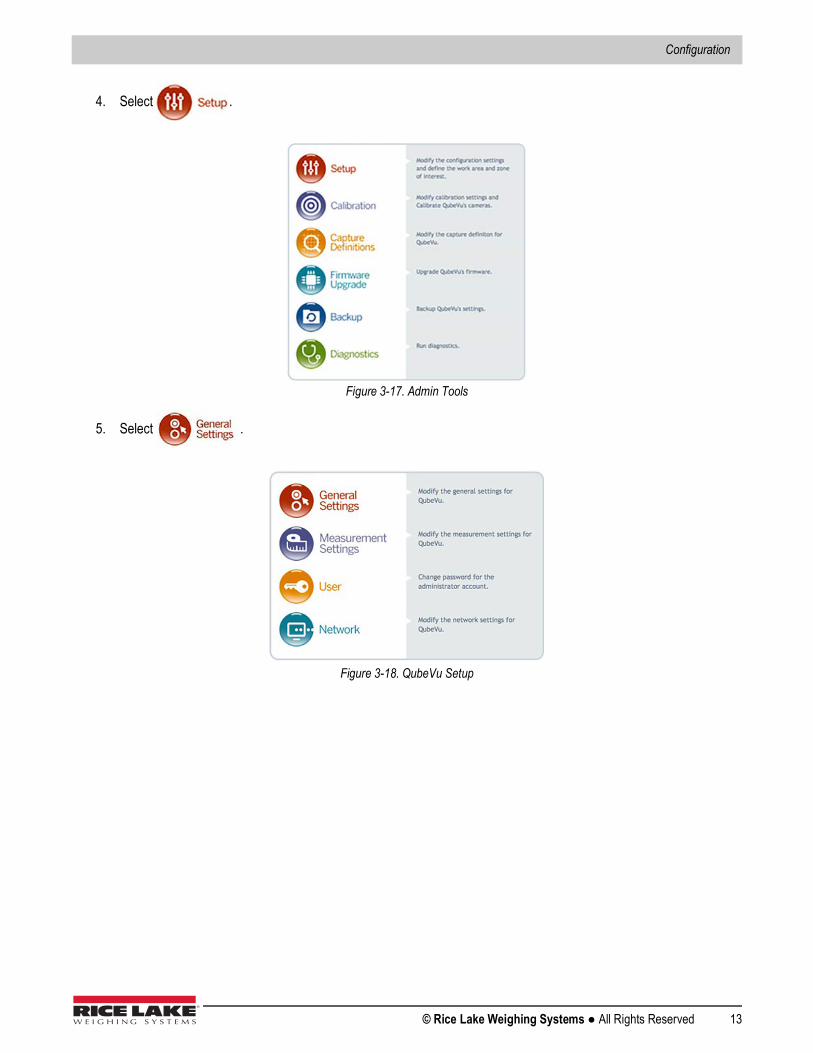
4. Select .
Figure 3-17. Admin Tools
5. Select .
Figure 3-18. QubeVu Setup

iDimension Plus UPS WorldShip
14 Visit our website www.RiceLake.com
6. Follow the procedure below to configure general settings.• iDimension provides additional external interfaces to facilitate integration with client applications and backend
systems
Figure 3-19. Setup – General Settings
7. Follow the procedure below for QubeVu General Settings external interface setup:
Figure 3-20. Configured General Settings
Configuration
© Rice Lake Weighing Systems ● All Rights Reserved 15
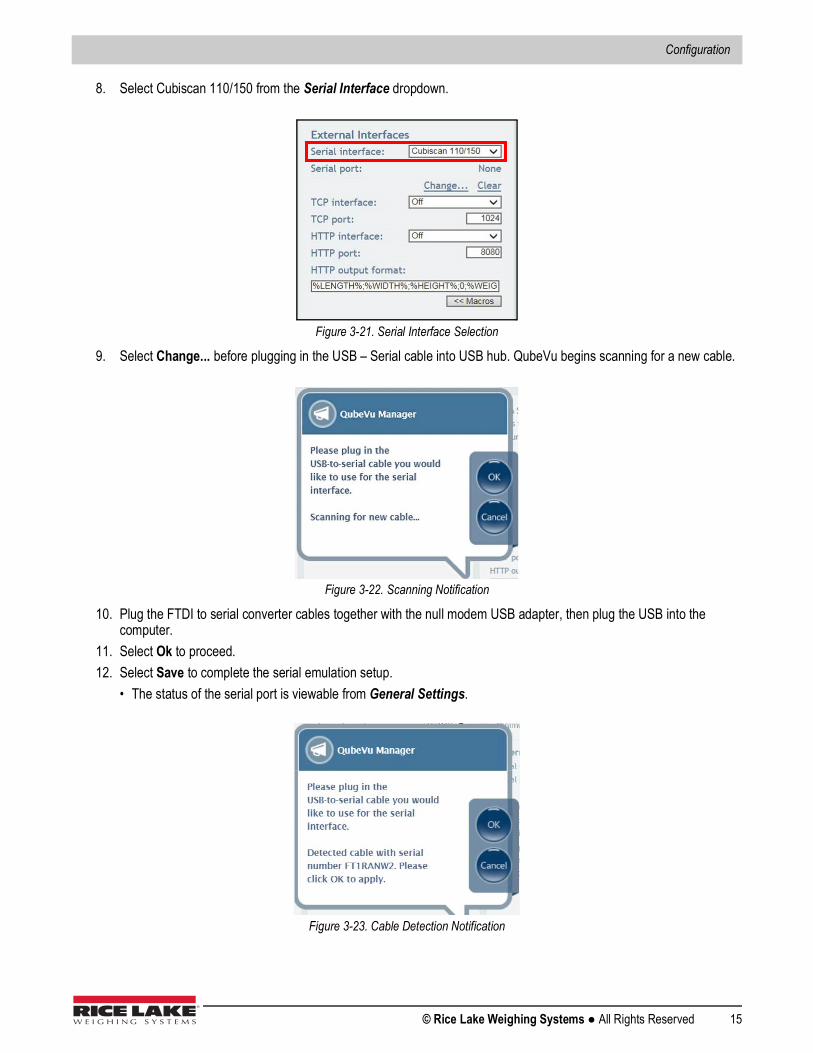
8. Select Cubiscan 110/150 from the Serial Interface dropdown.
Figure 3-21. Serial Interface Selection
9. Select Change... before plugging in the USB – Serial cable into USB hub. QubeVu begins scanning for a new cable.
Figure 3-22. Scanning Notification
10. Plug the FTDI to serial converter cables together with the null modem USB adapter, then plug the USB into the computer.
11. Select Ok to proceed.12. Select Save to complete the serial emulation setup.
• The status of the serial port is viewable from General Settings.
Figure 3-23. Cable Detection Notification
iDimension Plus UPS WorldShip
16 Visit our website www.RiceLake.com
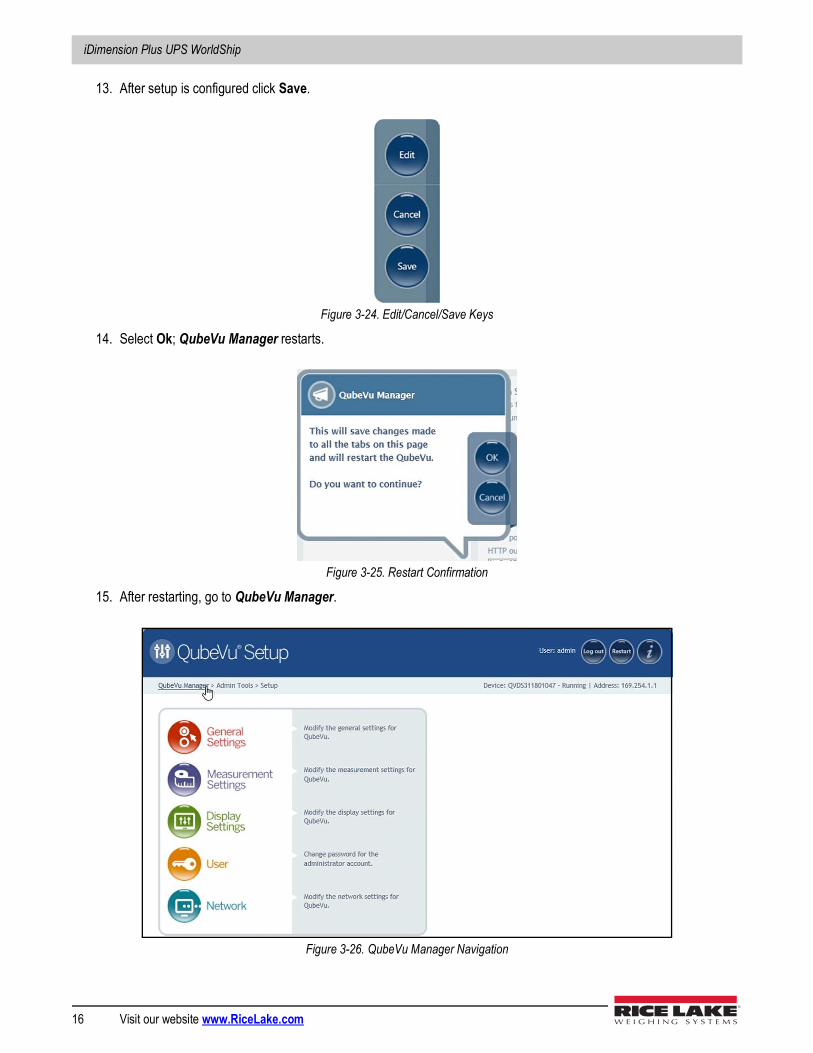
13. After setup is configured click Save.
Figure 3-24. Edit/Cancel/Save Keys
14. Select Ok; QubeVu Manager restarts.
Figure 3-25. Restart Confirmation
15. After restarting, go to QubeVu Manager.
Figure 3-26. QubeVu Manager Navigation
Configuration
© Rice Lake Weighing Systems ● All Rights Reserved 17
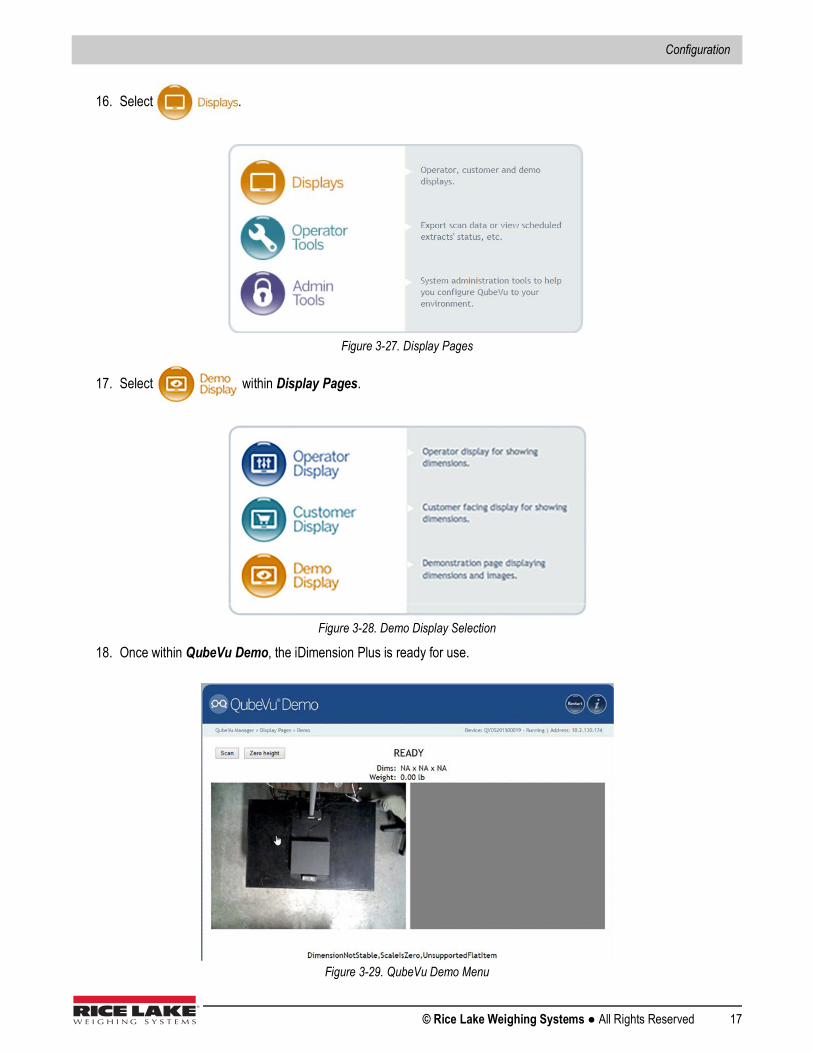
16. Select .
Figure 3-27. Display Pages
17. Select within Display Pages.
Figure 3-28. Demo Display Selection
18. Once within QubeVu Demo, the iDimension Plus is ready for use.
Figure 3-29. QubeVu Demo Menu
iDimension Plus UPS WorldShip
18 Visit our website www.RiceLake.com
4.0 UPS WorldShip ConfigurationThis section provides instructions on how to configure WorldShip settings from within the firmware.
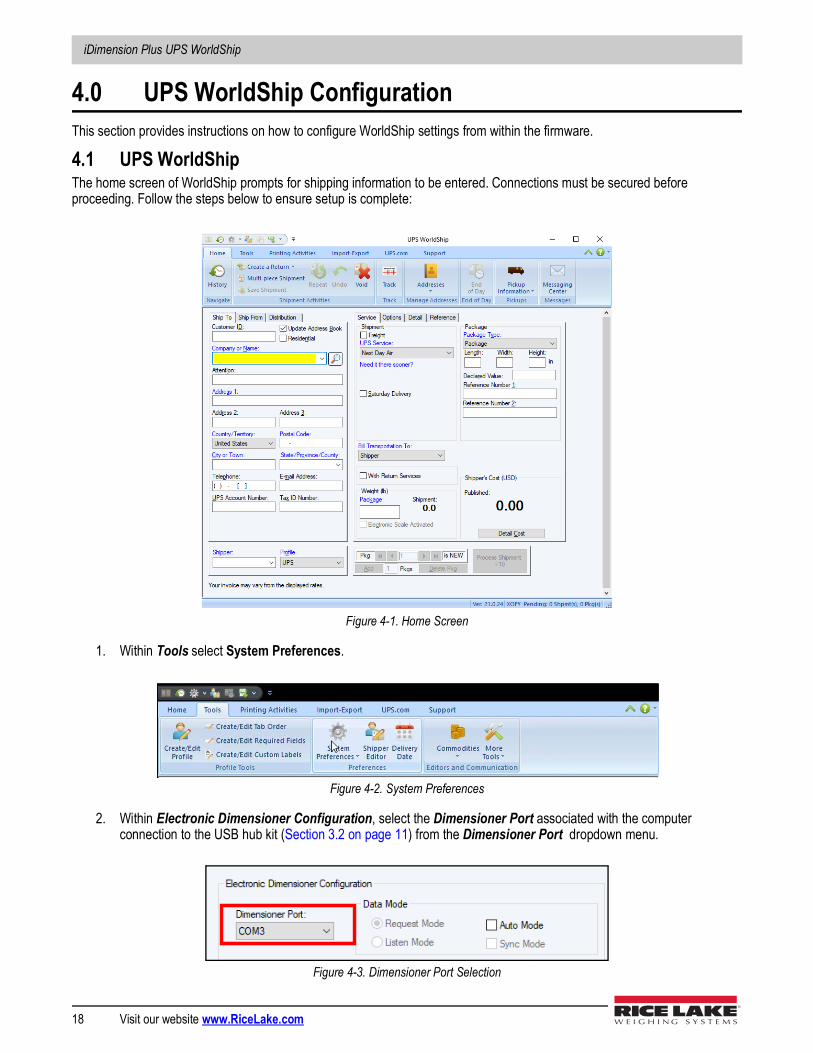
4.1 UPS WorldShipThe home screen of WorldShip prompts for shipping information to be entered. Connections must be secured before proceeding. Follow the steps below to ensure setup is complete:
Figure 4-1. Home Screen
1. Within Tools select System Preferences.
Figure 4-2. System Preferences
2. Within Electronic Dimensioner Configuration, select the Dimensioner Port associated with the computer connection to the USB hub kit (Section 3.2 on page 11) from the Dimensioner Port dropdown menu.
Figure 4-3. Dimensioner Port Selection

UPS WorldShip Configuration
© Rice Lake Weighing Systems ● All Rights Reserved 19
3. Select the Dimensioner Type from the dropdown then select Quantronix CubiScan 110.
Figure 4-4. Dimensioner Type Selection
4. Within Data Mode, check Auto Mode.
Figure 4-5. Auto Mode Selection
5. Once configuration is set, select Test Dimensioner.
Figure 4-6. Test Dimensioner
6. The dimensioner model will be tested. The process will be finished when the bar at the bottom fills.
Figure 4-7. Test Active Dimensioner
iDimension Plus UPS WorldShip
20 Visit our website www.RiceLake.com
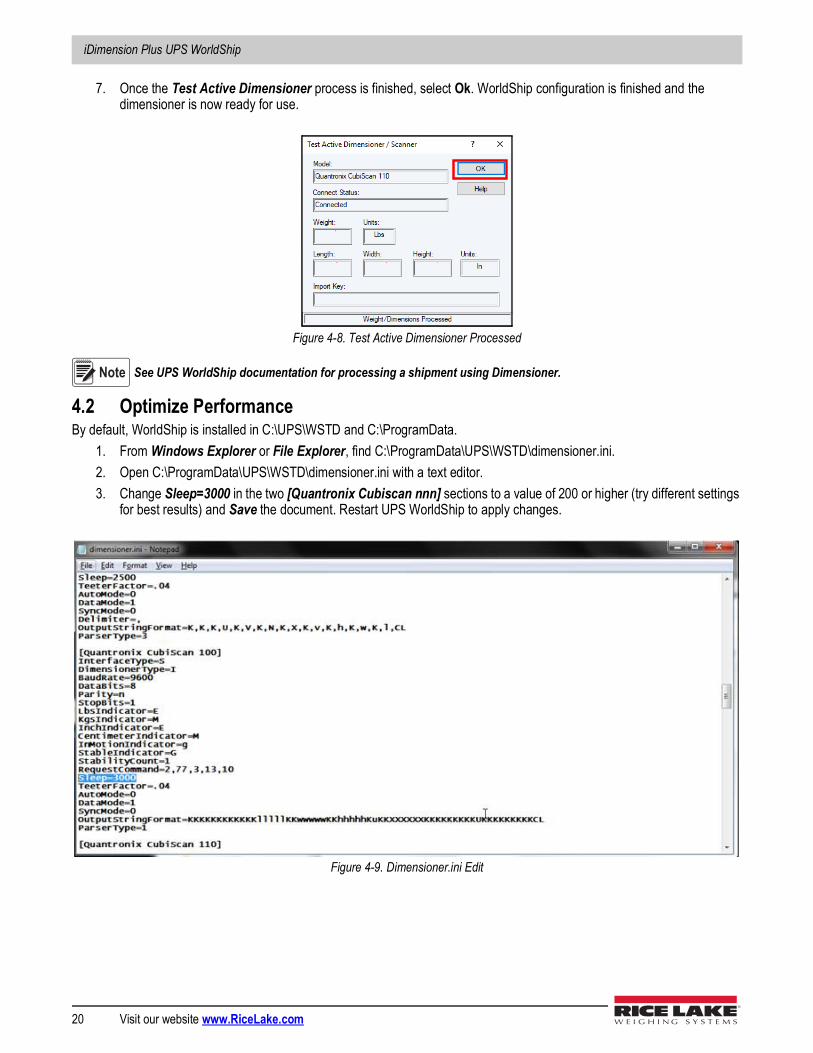
7. Once the Test Active Dimensioner process is finished, select Ok. WorldShip configuration is finished and the dimensioner is now ready for use.
Figure 4-8. Test Active Dimensioner Processed
See UPS WorldShip documentation for processing a shipment using Dimensioner.
4.2 Optimize PerformanceBy default, WorldShip is installed in C:\UPS\WSTD and C:\ProgramData.
1. From Windows Explorer or File Explorer, find C:\ProgramData\UPS\WSTD\dimensioner.ini.2. Open C:\ProgramData\UPS\WSTD\dimensioner.ini with a text editor.3. Change Sleep=3000 in the two [Quantronix Cubiscan nnn] sections to a value of 200 or higher (try different settings
for best results) and Save the document. Restart UPS WorldShip to apply changes.
Figure 4-9. Dimensioner.ini Edit
Note


230 W. Coleman St. • Rice Lake, WI 54868 • USAU.S. 800-472-6703 • Canada/Mexico 800-321-6703 • International 715-234-9171 • Europe +31 (0)26 472 1319
Rice Lake Weighing Systems is an ISO 9001 registered company. © Rice Lake Weighing Systems Specifications subject to change without notice.
www.ricelake.com PN 198019November 4, 2019
Related Documents