HP Color LaserJet CP2020 Series Lea esto primero EN Getting Started Guide Read me First FR Guide de mise en route Fichier LisezMoi DE Leitfaden zur Inbetriebnahme Bitte zuerst lesen IT Guida rapida Leggimi ES Guía de instalación inicial CA Manual de primers passos Llegiu-me NL Starthandleiding Lees mij eerst PT Guia de introdução Leia-me primeiro HE מדריך לתחילת העבודה קרא קודם מדריך זה

Welcome message from author
This document is posted to help you gain knowledge. Please leave a comment to let me know what you think about it! Share it to your friends and learn new things together.
Transcript
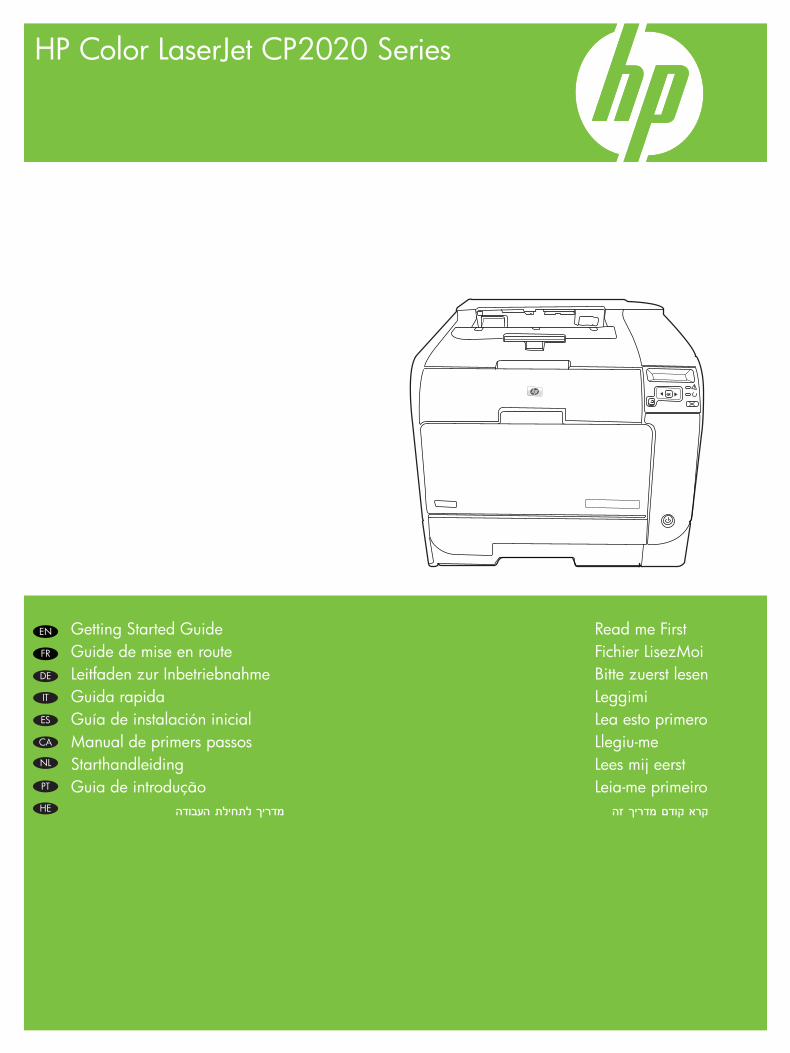
HP Color LaserJet CP2020 Series
Lea esto primero
EN Getting Started Guide Read me FirstFR Guide de mise en route Fichier LisezMoiDE Leitfaden zur Inbetriebnahme Bitte zuerst lesenIT Guida rapida LeggimiES Guía de instalación inicialCA Manual de primers passos Llegiu-meNL Starthandleiding Lees mij eerstPT Guia de introdução Leia-me primeiroHE העבודה לתחילת מדריך זה מדריך קודם קרא

Copyright and License© 2008 Copyright Hewlett-Packard Development Company, L.P.
Reproduction, adaptation or translation without prior written permission is prohibited, except as allowed under the copyright laws.
The information contained herein is subject to change without notice.
The only warranties for HP products and services are set forth in the express warranty statements accompanying such products and services. Nothing herein should be construed as constituting an additional warranty. HP shall not be liable for technical or editorial errors or omissions contained herein.
Part number: CB493-90902
FCC RegulationsThis equipment has been tested and found to comply with the limits for a Class B digital device, pursuant to Part 15 of the FCC rules. These limits are designed to provide reasonable protection against harmful interference in a residential installation. This equipment generates, uses, and can radiate radio-frequency energy. If this equipment is not installed and used in accordance with the instructions, it may cause harmful interference to radio communications. However, there is no guarantee that interference will not occur in a particular installation. If this equipment does cause harmful interference to radio or television reception, which can be determined by turning the equipment off and on, correct the interference by one or more of the following measures:
• Reorient or relocate the receiving antenna.
• Increase separation between equipment and receiver.
• Connect equipment to an outlet on a circuit different from that to which the receiver is located.
• Consult your dealer or an experienced radio/TV technician.
Any changes or modifications to the product that are not expressly approved by HP could void the user’s authority to operate this equipment. Use of a shielded interface cable is required to comply with the Class B limits of Part 15 of FCC rules. For more regulatory information, see the electronic user guide. Hewlett-Packard shall not be liable for any direct, indirect, incidental, consequential, or other damage alleged in connection with the furnishing or use of this information.
Trademark Credits Windows® is a U.S. registered trademark of Microsoft Corporation.
Copyright et licence© 2008 Copyright Hewlett-Packard Development Company, L.P.
Toute reproduction, adaptation ou traduction sans autorisation expresse par écrit est interdite, sauf dans les cas permis par les lois régissant les droits d’auteur.
Les informations contenues dans ce document peuvent être modifiées sans préavis.
Les seules garanties pour les produits et services HP sont décrites dans les déclarations de garantie expresses accompagnant ces mêmes produits et services. Les informations contenues dans ce document ne constituent en aucun cas une garantie supplémentaire. HP n’est pas responsable des erreurs d’ordre technique ou éditorial ou des omissions contenues dans ce document.
Référence : CB493-90902
Réglementations de la FCCLes tests effectués sur cet équipement ont déterminé qu’il est conforme aux prescriptions des unités numériques de classe B, telles que spécifiées à l’article 15 des normes de la FCC (Commission fédérale des communications). Ces limites sont destinées à assurer une protection suffisante contre les interférences produites dans une installation résidentielle. Cet équipement génère, utilise et peut émettre de l’énergie sous forme de fréquences radio. Si ce matériel n’est pas installé et utilisé conformément aux instructions, il peut causer des interférences nuisibles aux communications radio. Aucune garantie n’est néanmoins fournie quant à l’apparition d’interférences dans une installation particulière. Si cet appareil provoque des interférences nuisibles (qui peuvent être déterminées en éteignant et rallumant l’appareil) à des communications radio ou télévision, corrigez ce problème en appliquant une ou plusieurs des mesures suivantes :
• Réorientez ou déplacez l’antenne de réception.
• Augmentez la distance séparant l’équipement du récepteur.
• Connectez l’équipement à une prise située sur un circuit différent de celui sur lequel se trouve rle récepteur.
• Consultez votre revendeur ou un technicien radio/télévision expérimenté.
Toute modification apportée au produit sans le consentement de HP peut se traduire par la révocation du droit d’exploitation de l’équipement dont jouit l’utilisateur. Un câble d’interface blindé est requis afin de satisfaire aux stipulations de l’article 15 des réglementations de la FCC sur les appareils de classe B. Pour de plus amples informations sur les réglementations, reportez-vous au Guide de l’utilisateur au format électronique. Hewlett-Packard ne sera en aucun cas tenu responsable des dommages directs, indirects, accessoires, consécutifs ou autres pouvant résulter de la mise à disposition de ces informations ou de leur utilisation.
Marques commerciales et déposées Windows® est une marque déposée aux Etats-Unis de Microsoft Corporation.
Edition 2, 05/2008
Edition 2, 05/2008
1
2
322
mm
(12.
7 in
ches
)
1145 mm(45.1 inches)
EN
EN
1
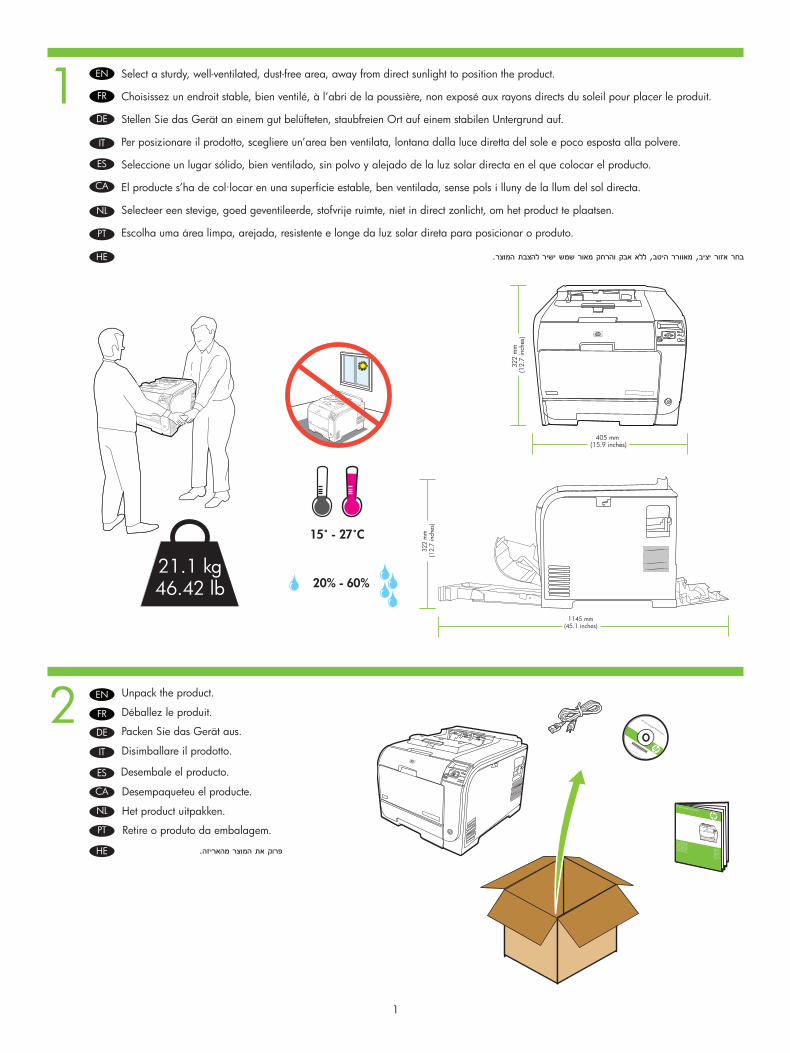
Select a sturdy, well-ventilated, dust-free area, away from direct sunlight to position the product.
Unpack the product.
FR
FR
Choisissez un endroit stable, bien ventilé, à l’abri de la poussière, non exposé aux rayons directs du soleil pour placer le produit.
Déballez le produit.
DE
DE
Stellen Sie das Gerät an einem gut belüfteten, staubfreien Ort auf einem stabilen Untergrund auf.
Packen Sie das Gerät aus.
IT
IT
Per posizionare il prodotto, scegliere un’area ben ventilata, lontana dalla luce diretta del sole e poco esposta alla polvere.
Disimballare il prodotto.
ES
ES
Seleccione un lugar sólido, bien ventilado, sin polvo y alejado de la luz solar directa en el que colocar el producto.
Desembale el producto.
CA
CA
El producte s’ha de col·locar en una superfície estable, ben ventilada, sense pols i lluny de la llum del sol directa.
Desempaqueteu el producte.
NL
NL
Selecteer een stevige, goed geventileerde, stofvrije ruimte, niet in direct zonlicht, om het product te plaatsen.
Het product uitpakken.
PT
PT
Escolha uma área limpa, arejada, resistente e longe da luz solar direta para posicionar o produto.
Retire o produto da embalagem.
HE
HE
המוצר. להצבת ישיר שמש מאור והרחק אבק היטב, ללא יציב, מאוורר אזור בחר
מהאריזה. המוצר את פרוק

4
5
3
4x
1 2 3
54
EN
EN
EN
2
Prepare the print cartridges.
Remove all orange shipping tape from the product.
Insert the CD and follow the instructions.
FR
FR
FR
Insérez le CD et suivez les instructions.
Retirez la bande d’expédition orange qui se trouve sur le produit.
Préparez les cartouches d’impression.
DE
DE
DE
Legen Sie die CD ein, und folgen Sie der Anleitung.
Bereiten Sie die Druckpatronen vor.
Entfernen Sie das gesamte orangefarbene Klebeband.
IT
IT
IT
Inserire il CD e seguire le istruzioni.
Rimuovere tutto il nastro arancione di confezionamento dal prodotto.
Preparare le cartucce di stampa.
ES
ES
ES
Inserte el CD y siga las instrucciones.
Retire toda la cinta de transporte naranja del producto.
Prepare los cartuchos de impresión.
CA
CA
CA
Inseriu el CD i seguiu les instruccions.
Traieu la cinta adhesiva d’embalatge de color taronja del producte.
Prepareu els cartutxos d’impressió.
NL
NL
NL
Plaats de cd en volg de instructies.
Verwijder de oranje verzendtape van het product.
Maak de printcartridges klaar.
PT
PT
PT
Insira o CD e siga as instruções.
Remova todas as fitas de transporte laranja do produto.
Prepare os cartuchos de impressão.
HE
HE
HE .להוראות בהתאם ופעל התקליטור את הכנס
מהמוצר. הכתום בצבע השילוח סרטי כל את הסר
ההדפסה. מחסניות את הכן

7
6
1
2
1 2 3
EN
EN
EN
EN
3
Optional: Load legal paper.
Adjust the paper guides against the paper and reinsert the tray.
Load paper.
Note: For legal-size paper, the tray extends from the front of the product.
FR
FR
FR
FR
Remarque : Pour charger du papier au format Legal, vous devez étendre le bac à l’avant du produit.
Réglez les guides papier de façon à ce qu’ils soient contre le papier et insérez à nouveau le bac.
Chargez du papier.
Facultatif : Chargez du papier au format Legal.
DE
DE
DE
DE
Hinweis: Wenn Papier im Format Legal eingelegt ist, ragt das Fach an der Vorderseite des Geräts heraus.
Passen Sie die Papierführungen an, und setzen Sie das Fach wieder ein.
Legen Sie Papier ein.
Optional: Legen Sie Papier im Format Legal ein.
IT
IT
IT
IT
Nota: Per la carta in formato Legal, il vassoio si estende sulla parte anteriore del prodotto.
Regolare le guide del vassoio in base alla carta e reinserire il vassoio.
Caricare la carta.
Opzionale: Caricare la carta in formato Legal.
ES
ES
ES
ES
Nota: Para papel tamaño Legal, la bandeja se extiende de la parte delantera del producto.
Ajuste las guías contra el papel y vuelva a introducir la bandeja.
Cargue el papel.
Opcional: Cargue papel tamaño Legal.
CA
CA
CA
CA
Nota: Per al paper de mida legal, la safata s’estén des de la part frontal del producte.
Col·loqueu el paper ben ajustat contra les guies de paper i inseriu la safata.
Carregueu-hi paper.
Opcional: Carregueu paper de mida Legal.
NL
NL
NL
NL Opmerking: Voor Legal-formaat steekt de lade uit vanaf de voorzijde van het product.
Schuif de geleiders tegen het papier aan en steek de lade er opnieuw in.
Plaats het papier.
Optioneel: Plaats Legal-papier.
PT
PT
PT
PT
Observação: para papéis de tamanho ofício, a bandeja se prolonga a partir da parte da frente do produto.
Ajuste as guias de papel e reinsira a bandeja.
Carregue papel.
Opções: carregue papel ofício.
HE
HE
HE
HE .המגש את מחדש והכנס לנייר הנייר מכווני את כוונן
המוצר. של הקדמי מחלקו המגש את להאריך Legal, ניתן נייר הערה: עבור
נייר. טען
.Legal נייר אופציונלי: טען
21 3 4

9
8
!
2
1
EN
EN
EN
4
Set the language and location on the control panel (if necessary). Use the control panel buttons <, >, and OK to select and confirm. See page 15 for more information on control panel buttons.
Connect the power cord. Turn on the product.
Caution: Do not connect the USB cable at this time.
FR
FR
FR Définissez la langue et le lieu sur le panneau de commande (si nécessaire). Utilisez le touches <, > du panneau de commande et appuyez sur OK pour sélectionner et confirmer. Reportez-vous à la page 15 pour plus d’informations sur les touches du panneau de commande.
Attention ! Ne branchez pas le câble USB maintenant.
Branchez le cordon d’alimentation. Mettez le produit sous tension.
DE
DE
DE Stellen Sie am Bedienfeld die Sprache und den Ort ein (falls erforderlich). Wechseln Sie mit der Taste < oder > zur gewünschten Option, und wählen Sie sie mit der Taste OK aus. Weitere Informationen zu den Tasten auf dem Bedienfeld finden Sie auf Seite 15.
Achtung: Schließen Sie das USB-Kabel jetzt noch nicht an.
Schließen Sie das Netzkabel an. Schalten Sie das Gerät ein.
IT
IT
IT Impostare la lingua e l’ubicazione sul pannello di controllo (se necessario). Utilizzare i pulsanti del pannello di controllo <, >, e il pulsante OK per selezionare e confermare. Per ulteriori informazioni sui pulsanti del pannello di controllo, vedere pagina 15.
Attenzione: Non collegare ora il cavo USB.
Collegare il cavo di alimentazione. Accendere il prodotto.
ES
ES
ES Establezca el idioma y la ubicación en el panel de control (si es necesario). Utilice los botones del panel de control <, > y OK para seleccionar y confirmar. Consulte la página 15 si desea obtener más información sobre los botones del panel de control.
Precaución: No conecte el cable USB por ahora.
Conecte el cable de alimentación. Encienda el producto.
CA
CA
CA Configureu l’idioma i la regió/país al tauler de control (si cal). Utilitzeu els botons del tauler de control <, >, i OK (D’acord) per seleccionar i confirmar. Consulteu la pàgina 15 per obtenir més informació sobre els botons del tauler de control.
Precaució: No connecteu el cable USB en aquest moment.
Connecteu el cable d’alimentació. Engegueu el producte.
NL
NL
NL Stel op het bedieningspaneel de taal en de locatie in (indien gewenst). Gebruik de knoppen op het configuratiescherm <, > en OK om te selecteren en te bevestigen. Zie pagina 15 voor meer informatie over de knoppen op het bedieningspaneel.
Voorzichtig: Sluit de USB-kabel nu nog niet aan.
Sluit het netsnoer aan. Schakel het product in.
PT
PT
PT Defina o idioma e o local no painel de controle (se necessário). Use os botões do painel de controle <, > e OK para selecionar e confirmar. Consulte a página 15 para obter informações sobre os botões do painel de controle.
Cuidado: não conecte o cabo USB neste momento.
Conecte o cabo de alimentação. Ligue o produto.
HE
HE
HE
זה. ה-USB בשלב כבל את תחבר אזהרה: אל
לוח לחצני אודות נוסף מידע ולאישור. לקבלת לבחירה הבקרה הגדר את language (שפה) ואת location (מיקום) בלוח הבקרה (בעת הצורך). היעזר בלחצנים <, > ו-OK (אישור) שבלוח .15 בעמוד הבקרה, עיין
המוצר. את המתח. הפעל כבל את חבר

10 EN
EN
EN
EN
5
USB: Go to step 11.
Network: Go to step 14.
Mac: Go to step 19.
Go to appropriate step based on your operating system and connection type.
FR
FR
FR
FR
Allez à l’étape correspondant à votre système d’exploitation et votre type de connexion.
Réseau : Passez à l’étape 14.
USB : Passez à l’étape 11.
Mac : Passez à l’étape 19.
DE
DE
DE
DE
Führen Sie den Schritt für Ihr Betriebssystem und für die Art der Verbindung durch.
Netzwerk: Fahren Sie mit Schritt 14 fort.
USB: Fahren Sie mit Schritt 11 fort.
Mac OS: Fahren Sie mit Schritt 19 fort.
IT
IT
IT
IT
A seconda del sistema operativo e al tipo di connessione, andare ai punti appropriati.
USB: Andare al punto 11.
Rete: Andare al punto 14.
Mac: Andare al punto 19.
ES
ES
ES
ES
Vaya al paso correspondiente en función de su sistema operativo y del tipo de conexión.
USB: Vaya al paso 11.
Red: Vaya al paso 14.
Mac: Vaya al paso 19.
CA
CA
CA
CA
Aneu al pas apropiat per al vostre sistema operatiu i el tipus de connexió.
USB: Aneu al pas 11.
Xarxa: Aneu al pas 14.
Mac: Aneu al pas 19.
NL
NL
NL
NL
Ga naar de juiste stap, afhankelijk van uw besturingssysteem en verbindingstype.
USB: Ga naar stap 11.
Netwerk: Ga naar stap 14.
Mac: Ga naar stap 19.
PT
PT
PT
PT Rede: vá para a etapa 14.
Mac: vá para a etapa 19.
Vá até a etapa apropriada, de acordo com o seu sistema operacional e o tipo de conexão.
USB: vá para a etapa 11.
HE
HE
HE
HE
שברשותך. החיבור ולסוג ההפעלה למערכת בהתאם הבא לשלב עבור
USB : עבור לשלב 11 .
רשת: עבור לשלב 14 .
Mac : עבור לשלב 19 .
12
13
11
HP LaserJet CP2020 Series
EN
EN
EN
EN
6
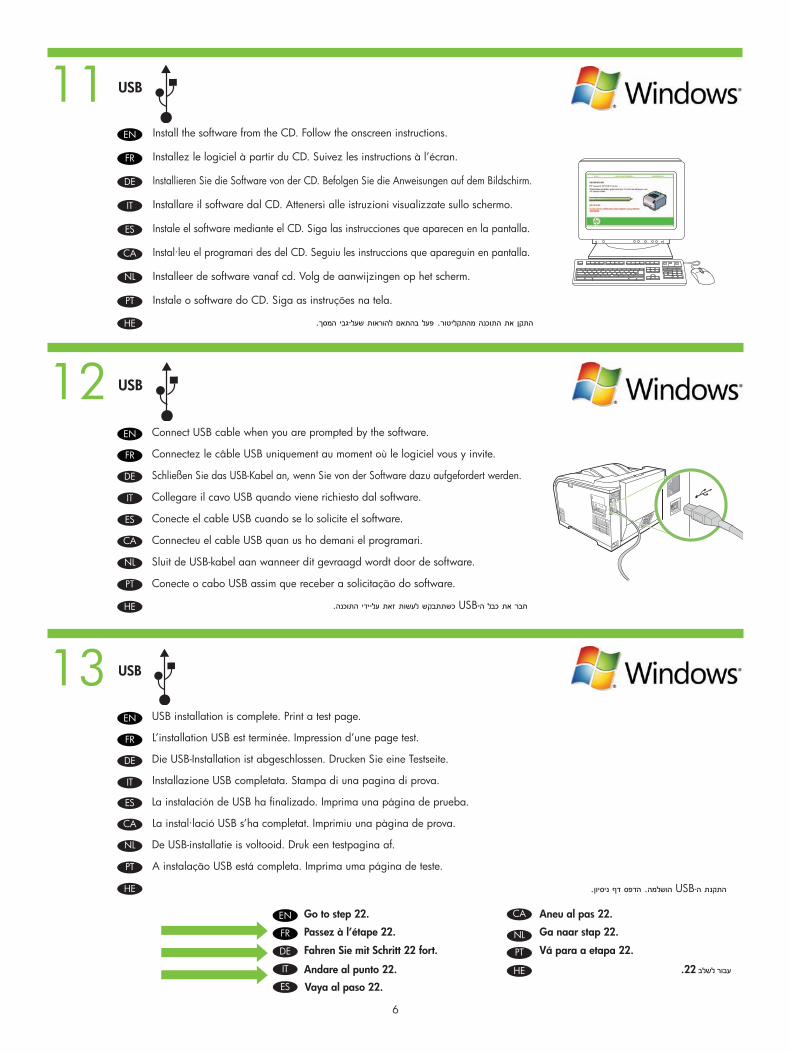
Connect USB cable when you are prompted by the software.
USB installation is complete. Print a test page.
Install the software from the CD. Follow the onscreen instructions.
Go to step 22.
FR
FR
FR
FR
Connectez le câble USB uniquement au moment où le logiciel vous y invite.
L’installation USB est terminée. Impression d’une page test.
Installez le logiciel à partir du CD. Suivez les instructions à l’écran.
Passez à l’étape 22.
DE
DE
DE
DE
Schließen Sie das USB-Kabel an, wenn Sie von der Software dazu aufgefordert werden.
Die USB-Installation ist abgeschlossen. Drucken Sie eine Testseite.
Installieren Sie die Software von der CD. Befolgen Sie die Anweisungen auf dem Bildschirm.
Fahren Sie mit Schritt 22 fort.
IT
IT
IT
IT
Collegare il cavo USB quando viene richiesto dal software.
Installazione USB completata. Stampa di una pagina di prova.
Installare il software dal CD. Attenersi alle istruzioni visualizzate sullo schermo.
Andare al punto 22.
ES
ES
ES
ES
Conecte el cable USB cuando se lo solicite el software.
La instalación de USB ha finalizado. Imprima una página de prueba.
Instale el software mediante el CD. Siga las instrucciones que aparecen en la pantalla.
Vaya al paso 22.
CA
CA
CA
CA
Connecteu el cable USB quan us ho demani el programari.
La instal·lació USB s’ha completat. Imprimiu una pàgina de prova.
Instal·leu el programari des del CD. Seguiu les instruccions que apareguin en pantalla.
Aneu al pas 22.
NL
NL
NL
NL
Sluit de USB-kabel aan wanneer dit gevraagd wordt door de software.
De USB-installatie is voltooid. Druk een testpagina af.
Installeer de software vanaf cd. Volg de aanwijzingen op het scherm.
Ga naar stap 22.
PT
PT
PT
PT
Conecte o cabo USB assim que receber a solicitação do software.
A instalação USB está completa. Imprima uma página de teste.
Instale o software do CD. Siga as instruções na tela.
Vá para a etapa 22.
HE
HE
HE
HE
המסך. שעל-גבי להוראות בהתאם מהתקליטור. פעל התוכנה את התקן
התוכנה. על-ידי זאת לעשות ה-USB כשתתבקש כבל את חבר
ניסיון. דף ה-USB הושלמה. הדפס התקנת
עבור לשלב 22 .

15
14EN
EN
7
Connect the network cable to the product.
Verify the network light is illuminated on the network port.
FR
FR
Branchez le câble réseau à l’imprimante.
Vérifiez si le voyant du réseau s’allume sur le port réseau.
DE
DE
Schließen Sie das Netzwerkkabel an das Gerät an.
Vergewissern Sie sich, dass die Netzwerkanzeige am Netzwerkanschluss leuchtet.
IT
IT
Collegare il cavo di rete al prodotto.
Verificare che la spia di rete sia accesa sulla porta di rete.
ES
ES
Conecte el cable de red al producto.
Compruebe que se enciende el indicador luminoso de red en el puerto de red.
CA
CA
Connecteu el cable de xarxa al producte.
Comproveu que el llum de la xarxa estigui il·luminat al port de xarxa.
NL
NL
Sluit de netwerkkabel op het apparaat aan.
Controleer of het netwerklichtje op de netwerkpoort brandt.
PT
PT
Conecte o cabo de rede ao produto.
Verifique se uma luz de rede está acesa na porta de rede.
HE
HE
למוצר. הרשת כבל את חבר
הרשת. ביציאת דולקת הרשת שנורית ודא

16EN
8
Print a Configuration page to get the IP address for network setup. At the product control-panel, press OK, select Setup Menu, and then press OK. Press the < or > buttons to select Config Report, and then press OK.
FR Imprimez une page de configuration pour obtenir l’adresse IP nécessaire à la configuration du réseau. Sur le panneau de commande du produit, appuyez sur OK, sélectionnez Menu Configurer, puis appuyez sur OK. Appuyez sur les touches < or > pour sélectionner Rapport config. et appuyez ensuite sur OK.
DE Drucken Sie eine Konfigurationsseite, um die IP-Adresse des Geräts zu ermitteln. Drücken Sie am Bedienfeld des Geräts die Taste OK, wählen Sie Menü Setup aus, und drücken Sie erneut OK. Markieren Sie mit der Taste < oder > die Option Konfig-Bericht, und drücken Sie OK.
IT Stampare una Pagina di configurazione per ottenere l’indirizzo IP per la configurazione di rete. Sul pannello di controllo del prodotto, premere OK, selezionare il menu Impostazione, quindi premere OK. Premere i pulsanti < o > per selezionare Report config., quindi premere OK.
ES Imprima una página de configuración para obtener la dirección IP a fin de configurar la red. Pulse OK en el panel de control del producto para seleccionar el Menú Configuración y a continuación vuelva a pulsar OK. Pulse los botones < o > para seleccionar Config. informe y, a continuación, pulse OK.
CA Imprimiu una pàgina de configuració per obtenir l’adreça IP per a la configuració de xarxa. Al tauler de control del producte, premeu OK (D’acord), seleccioneu Setup Menu (Menú de configuració) i, a continuació, premeu OK (D’acord). Premeu els botons < o > per seleccionar Config Report (Informe de la configuració) i, a continuació, premeu OK (D’acord).
NL Druk een configuratiepagina af om het IP-adres voor de netwerkinstelling te verkrijgen. Druk op het bedieningspaneel van het product op OK, selecteer het menu Instellingen, en druk op OK. Druk op de knoppen < of > om Config-rapport te selecteren en druk op OK.
PT Imprima uma página de Configuração para obter o endereço IP para a configuração de rede. No painel de controle do produto, pressione OK, selecione Menu de configuração e OK. Pressione os botões < ou > para selecionar Relatório de configuração e pressione OK.
HE על OK (אישור). לחץ על לחץ מכן הגדרות), ולאחר Setup Menu (תפריט הדפס דף תצורה לקבלת כתובת ה-IP עבור הגדרת הרשת. בלוח הבקרה של המוצר, לחץ על OK (אישור) בחר OK (אישור). על לחץ מכן תצורה) ולאחר הלחצן < או > כדי לבחור את Config Report (דוח

17EN
9
Optional: If you need to manually assign an IP address: at the product control-panel, press OK, select Setup Menu. Press the < or > buttons to select Network Config. and then press OK. Press the < or > buttons to select TCP/IP configuration, then Manual. Use the control-panel buttons to specify each digit of the IP address, and then press OK.
FR Facultatif : Si vous devez attribuer une adresse IP manuellement, sur le panneau de commande, appuyez sur OK, sélectionnez Menu Configurer. Appuyez sur les touches < ou > pour sélectionner Config. réseau et appuyez ensuite sur OK. Appuyez sur les touches < ou > pour sélectionner Configuration TCP/IP, puis Manuel. Utilisez les touches du panneau de commande pour spécifier les chiffres de l’adresse IP, puis appuyez sur OK..
DE Optional: Wenn Sie die IP-Adresse manuell zuweisen müssen, drücken Sie die Taste OK, und wählen Sie Menü Setup aus. Markieren Sie mit der Taste < oder > die Option Netzwerkkonf., und drücken Sie OK. Markieren Sie mit der Taste < oder > die Option TCP/IP-Konfiguration, und wählen Sie Manuell aus. Geben Sie jede Ziffer der IP-Adresse mit den Tasten am Bedienfeld ein, und drücken Sie anschließend OK..
IT Opzionale: Se è necessario assegnare manualmente un indirizzo IP: dal pannello di controllo del prodotto, premere OK, e selezionare il menu Impostazioni. Premere i pulsanti < o > per selezionare Config. rete, quindi premere OK. Premere i pulsanti < o > per selezionare la configurazione TCP/IP, quindi Manuale. Utilizzare i pulsanti del pannello di controllo per immettere i caratteri dell’indirizzo IP, quindi premere OK.
ES Opcional: Si tiene que asignar una dirección IP manualmente: en el panel de control del producto, pulse OK y seleccione Menú Configuración. Pulse los botones < o > para seleccionar Config. red y, a continuación, pulse OK. Pulse los botones < o > para seleccionar la configuración TCP/IP y a continuación pulse Manual. Use los botones del panel de control para introducir los dígitos de la dirección IP y, a continuación, pulse OK.
CA Opcional: Si heu d’assignar manualment una adreça IP: al tauler de control del producte, premeu OK (D’acord) i seleccioneu Setup Menu (Menú de configuració). Premeu els botons < o > per seleccionar Network Config (Configuració de la xarxa) i, a continuació, premeu OK (D’acord). Premeu els botons < o > per seleccionar la configuració de TCP/IP i, a continuació, premeu Manual (Manual). Premeu els botons del tauler de control per especificar cadascun dels dígits de l’adreça IP i, a continuació, premeu OK (D’acord).
NL Optioneel: Een IP-adres handmatig toewijzen: op het bedieningspaneel van het product drukt u op OK, vervolgens selecteert u het menu Instellingen. Druk op de knoppen < of > om Netwerk-config te selecteren en druk op OK. Druk op de knoppen < of > om TCP/IP-configuratie te selecteren en druk dan op Handmatig. Gebruik de knoppen op het bedieningspaneel om elk cijfer van het IP-adres op te geven en druk op OK.
PT Opções: se precisar atribuir manualmente um endereço IP: no painel de controle do produto, pressione OK e selecione Menu de configuração. Pressione os botões < ou > para selecionar Configuração de rede e pressione OK. Pressione os botões < ou > para selecionar a configuração TCP/IP e depois pressione Manual. Use os botões do painel de controle para especificar cada dígito do endereço IP e pressione OK.
HE Network את לבחור > כדי < או הלחצן על הגדרות). לחץ Setup Menu (תפריט אופציונלי: אם עליך להקצות כתובת IP באופן ידני: בלוח הבקרה של המוצר, לחץ על OK (אישור) בחר ספרה כל להגדיר כדי הבקרה לוח בלחצני Manual (ידני). היעזר מכן TCP/IP ולאחר תצורת לבחור > כדי < או הלחצן על OK (אישור). לחץ על לחץ מכן Config (תצורת רשת) ולאחר
בכתובת ה-IP ולאחר מכן לחץ על OK (אישור).

18EN
EN
10
Install the software from the CD and follow the onscreen instructions. When prompted, select Through the Network, and then click Next. The installer shows the available printers. Select the appropriate IP address from configuration page or manually assign, and then click Finish. If prompted, restart the computer.
Go to step 22.
FR
FR Passez à l’étape 22.
Installez le logiciel à partir du CD, puis suivez les instructions à l’écran. Lorsque vous y êtes invité, sélectionnez Dans tout le réseau, et cliquez sur Suivant. Le logiciel d’installation affiche les imprimantes disponibles. Sélectionnez l’adresse IP appropriée dans la page de configuration ou attribuez-en une manuellement et cliquez ensuite sur Terminer. A l’invite, redémarrez l’ordinateur.
DE
DE Fahren Sie mit Schritt 22 fort.
Installieren Sie die Software von der CD, und befolgen Sie die angezeigten Anweisungen. Wählen Sie bei entsprechender Aufforderung die Option Über das Netzwerk aus, und klicken Sie auf Weiter. Der Installationsassistent zeigt die verfügbaren Drucker an. Wählen Sie die IP-Adresse des Geräts aus (anhand der Konfigurationsseite oder manuellen Eingabe), und klicken Sie auf Fertig stellen. Starten Sie den Computer neu, wenn Sie dazu aufgefordert werden.
IT
IT Andare al punto 22.
Installare il software dal CD e seguire le istruzioni visualizzate. Quando richiesto, selezionare Tramite rete, quindi fare clic su Avanti. Il programma di installazione indica le stampanti disponibili. Selezionare l’indirizzo IP appropriato dalla pagina di configurazione oppure assegnarlo manualmente, quindi fare clic su Fine. Se richiesto, riavviare il computer.
ES
ES Vaya al paso 22.
Instale el software mediante el CD y siga las instrucciones que aparezcan en pantalla. Cuando se le solicite, seleccione A través de la red y, a continuación, haga clic en Siguiente. El instalador le muestra las impresoras disponibles. Seleccione la dirección IP adecuada de la página de configuración o asígnela manualmente y a continuación haga clic en Finalizar. Reinicie el equipo cuando se le solicite.
CA
CA Aneu al pas 22.
Instal·leu el programari des del CD i seguiu les instruccions que apareguin en pantalla. Quan se us demani, seleccioneu Through the Network (A través de la xarxa) i feu clic a Next (Següent). L’instal·lador mostra les impressores disponibles. Seleccioneu l’adreça IP adient a la pàgina de configuració o assigneu-la manualment i, a continuació, feu clic a Finish (Final). Si el sistema ho demana, torneu a iniciar l’ordinador.
NL
NL Ga naar stap 22.
Installeer de software vanaf de cd en volg de instructies op het scherm. Selecteer, wanneer dit wordt gevraagd, Via het netwerk, en klik op Volgende. Het installatieprogramma geeft de beschikbare printers weer. Selecteer het juiste IP-adres op de configuratiepagina of wijs dit handmatig toe, en klik vervolgens op Voltooien. Start de computer desgevraagd opnieuw op.
PT
PT Vá para a etapa 22.
Instale o software do CD e siga as instruções na tela. Se solicitado, selecione Pela rede e clique em Avançar. O instalador mostra as impressoras disponíveis. Selecione o endereço IP apropriado da página de configuração ou atribua manualmente, e depois clieque em Concluir. Se solicitado, reinicie o computador.
HE
HE . 22 עבור לשלב
ההתקנה Next (הבא). תוכנית על לחץ מכן הרשת), ולאחר התקן את התוכנה מהתקליטור ופעל בהתאם להוראות שעל-גבי המסך. כשתתבקש לעשות זאת, בחר Through the Network (דרך זאת. לעשות תתבקש אם המחשב את מחדש תציג את המדפסות הזמינות. בחר את כתובת ה-IP המתאימה מדף התצורה או הקצה אותה באופן ידני ולאחר מכן לחץ על Finish (סיום). הפעל

19
20
HP LaserJet CP2020 Series
EN
EN
11
Install the software from the CD.
Connect a USB or network cable when prompted by the software.
FR
FR Connectez le câble USB ou le câble réseau uniquement au moment où le logiciel vous y invite.
Installez le logiciel à partir du CD.
DE
DE Schließen Sie das USB- oder Netzwerkkabel an, wenn Sie dazu aufgefordert werden.
Installieren Sie die Software von der CD.
IT
IT Collegare un cavo USB o di rete quando viene richiesto dal software.
Installare il software dal CD.
ES
ES Conecte el cable USB o el cable de red cuando se lo solicite el software.
Instale el software mediante el CD.
CA
CA Connecteu un cable USB o de xarxa quan us ho demani el programari.
Instal·leu el programari des del CD.
NL
NL Sluit een USB-of netwerkkabel aan wanneer dit gevraagd wordt door de software.
Installeer de software vanaf de cd.
PT
PT Conecte um cabo USB ou de rede assim que receber a solicitação do software.
Instale o software do CD.
HE
HE .התוכנה על-ידי זאת לעשות כשתתבקש רשת כבל USB או כבל חבר
מהתקליטור. התוכנה את התקן
21
EN
12
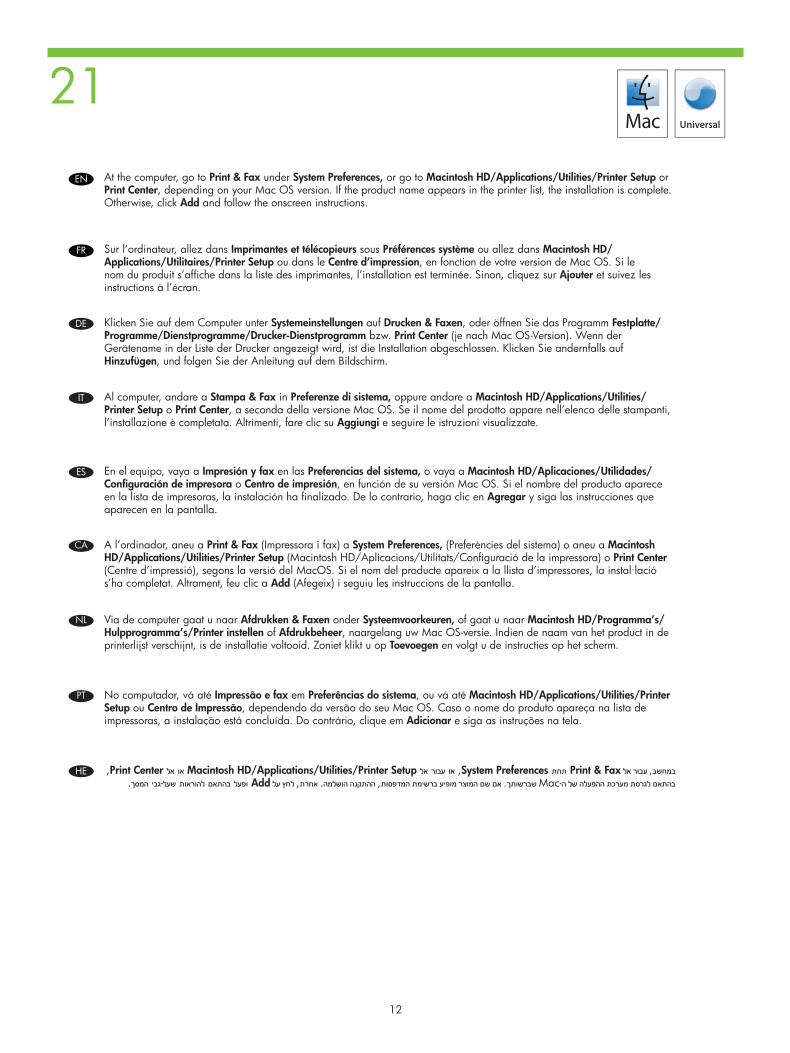
At the computer, go to Print & Fax under System Preferences, or go to Macintosh HD/Applications/Utilities/Printer Setup or Print Center, depending on your Mac OS version. If the product name appears in the printer list, the installation is complete. Otherwise, click Add and follow the onscreen instructions.
FR Sur l’ordinateur, allez dans Imprimantes et télécopieurs sous Préférences système ou allez dans Macintosh HD/Applications/Utilitaires/Printer Setup ou dans le Centre d’impression, en fonction de votre version de Mac OS. Si le nom du produit s’affiche dans la liste des imprimantes, l’installation est terminée. Sinon, cliquez sur Ajouter et suivez les instructions à l’écran.
DE Klicken Sie auf dem Computer unter Systemeinstellungen auf Drucken & Faxen, oder öffnen Sie das Programm Festplatte/Programme/Dienstprogramme/Drucker-Dienstprogramm bzw. Print Center (je nach Mac OS-Version). Wenn der Gerätename in der Liste der Drucker angezeigt wird, ist die Installation abgeschlossen. Klicken Sie andernfalls auf Hinzufügen, und folgen Sie der Anleitung auf dem Bildschirm.
IT Al computer, andare a Stampa & Fax in Preferenze di sistema, oppure andare a Macintosh HD/Applications/Utilities/Printer Setup o Print Center, a seconda della versione Mac OS. Se il nome del prodotto appare nell’elenco delle stampanti, l’installazione è completata. Altrimenti, fare clic su Aggiungi e seguire le istruzioni visualizzate.
ES En el equipo, vaya a Impresión y fax en las Preferencias del sistema, o vaya a Macintosh HD/Aplicaciones/Utilidades/Configuración de impresora o Centro de impresión, en función de su versión Mac OS. Si el nombre del producto aparece en la lista de impresoras, la instalación ha finalizado. De lo contrario, haga clic en Agregar y siga las instrucciones que aparecen en la pantalla.
CA A l’ordinador, aneu a Print & Fax (Impressora i fax) a System Preferences, (Preferències del sistema) o aneu a Macintosh HD/Applications/Utilities/Printer Setup (Macintosh HD/Aplicacions/Utilitats/Configuració de la impressora) o Print Center (Centre d’impressió), segons la versió del MacOS. Si el nom del producte apareix a la llista d’impressores, la instal·lació s’ha completat. Altrament, feu clic a Add (Afegeix) i seguiu les instruccions de la pantalla.
NL Via de computer gaat u naar Afdrukken & Faxen onder Systeemvoorkeuren, of gaat u naar Macintosh HD/Programma’s/Hulpprogramma’s/Printer instellen of Afdrukbeheer, naargelang uw Mac OS-versie. Indien de naam van het product in de printerlijst verschijnt, is de installatie voltooid. Zoniet klikt u op Toevoegen en volgt u de instructies op het scherm.
PT No computador, vá até Impressão e fax em Preferências do sistema, ou vá até Macintosh HD/Applications/Utilities/Printer Setup ou Centro de Impressão, dependendo da versão do seu Mac OS. Caso o nome do produto apareça na lista de impressoras, a instalação está concluída. Do contrário, clique em Adicionar e siga as instruções na tela.
HE ,Print Center אל Macintosh HD/Applications/Utilities/Printer Setup או אל עבור System Preferences , או במחשב, עבור אל Print & Fax תחת המסך. שעל-גבי להוראות בהתאם בהתאם לגרסת מערכת ההפעלה של ה-Mac שברשותך. אם שם המוצר מופיע ברשימת המדפסות, ההתקנה הושלמה. אחרת, לחץ על Add ופעל

22 EN
EN
13
Congratulations, your software setup is complete. The electronic user guide is on the CD-ROM that came with the product or is in the HP program folder on your desktop. • Detailed user instructions • Important safety notices • Troubleshooting information • Regulatory informationThis information is also available at www.hp.com/support/ljcp2020series
Product Documentation.
FR
FR Félicitations, l’installation du logiciel est terminée. Le Guide de l’utilisateur électronique se trouve sur le CD-ROM livré avec le produit ou dans le dossier de programmes HP sur votre ordinateur. • Instructions d’utilisation détaillées • Notices importantes de sécurité • Informations relatives au dépannage • Informations réglementairesCes informations sont également disponibles à l’adresse www.hp.com/support/ljcp2020series
Documentation du produit.
DE
DE Herzlichen Glückwunsch, Sie haben die Software erfolgreich installiert. Das elektronische Benutzerhandbuch befindet sich auf der mit dem Gerät gelieferten CD-ROM oder im HP Programmordner auf Ihrem Computer. • Ausführliche Anleitungen • Wichtige Sicherheitshinweise • Fehlerbehebungsinformationen • ZulassungsinformationenDiese Informationen sind auch auf der Website www.hp.com/support/ljcp2020series verfügbar.
Produktdokumentation
IT
IT Impostazione del software completata. La Guida per l’utente in formato elettronico è reperibile nel CD-ROM fornito con il prodotto o nella cartella dei programmi HP sul desktop. • Istruzioni dettagliate per l’utente • Note importanti sulla sicurezza • Informazioni per la risoluzione dei problemi. • Informazioni sulle normativeLe informazioni sono disponibili anche all’indirizzo www.hp.com/support/ljcp2020series
Documentazione del prodotto
ES
ES Enhorabuena, la configuración del software ha finalizado. Puede encontrar la guía del usuario electrónica en el CD-ROM incluido con el producto o en la carpeta de programas HP de su equipo. • Instrucciones detalladas para el usuario • Avisos de seguridad importantes • Información sobre solución de problemas • Información sobre normativasEsta información está también disponible en www.hp.com/support/ljcp2020series
Documentación del producto
CA
CA Enhorabona, s’ha completat la configuració del programari. Trobareu la guia de l’usuari electrònica al CD-ROM inclòs amb el producte o a la carpeta de programes d’HP del vostre escriptori. • Instruccions detallades per a l’usuari • Avisos importants sobre seguretat • Informació per a la solució de problemes • Informació sobre normativesTambé podeu trobar aquesta informació a www.hp.com/support/ljcp2020series
Documentació del producte.
NL De documentatie van het product.
PT Documentação do produto.
HE .תיעוד המוצר
La guia de missatges del tauler de control s’imprimeix automàticament. Conserveu-la per fer-la servir amb el tauler de control.

14
NL Gefeliciteerd, het instellen van uw software is voltooid. De elektronische gebruikershandleiding vindt u terug op de cd-rom die met het product werd meegeleverd of bevindt zich in de HP-programmamap op uw desktop. • Gedetailleerde gebruiksaanwijzingen • Belangrijke veiligheidsinformatie • Informatie over probleemoplossingen • Informatie over wettelijke voorschriftenDeze informatie is ook beschikbaar op www.hp.com/support/ljcp2020series
PT Parabéns, a instalação do software foi concluída. O guia eletrônico do usuário está no CD-ROM fornecido com o produto ou na pasta do programa HP no computador. • Instruções detalhadas do usuário • Aviso de segurança importante • Informações sobre solução de problemas • Informações regulamentaresEssas informações também estão disponíveis no endereço www.hp.com/support/ljcp2020series
HE .העבודה HP שבשולחן של התוכניות בתיקיית או למוצר המצורף בתקליטור נמצא למשתמש האלקטרוני הושלמה. המדריך התוכנה ברכותינו, הגדרת בטיחות בנושא חשובות • הודעות למשתמש מפורטות • הוראות
תקינה • מידע בעיות לפתרון • מידע www.hp.com/support/ljcp2020series בכתובת זמין זה כן, מידע כמו
הבקרה. בלוח שימוש לצורך אותו אוטומטי. שמור באופן מודפס הבקרה בלוח להודעות מדריך

8
7
6
5
4
3
2
1
2
1
EN
EN
EN
EN
EN
EN
EN
EN
EN
EN
EN
15
Control-panel overview:
Right arrow button
Attention light
Ready light
Cancel job button
OK button
Left arrow button
Back button
Control-panel display
Tray 2
Tray 1
FR
FR
FR
FR
FR
FR
FR
FR
FR
FR
FR
Présentation du panneau de commande :
Ecran du panneau de commande
Bouton Précédent
Bouton Flèche gauche
Bouton OK
Bouton Flèche droite
Bouton Annuler tâche
Voyant Prêt
Voyant Attention
Bac 1
Bac 2
DE
DE
DE
DE
DE
DE
DE
DE
DE
DE
DE
Überblick über das Bedienfeld:
Bedienfeldanzeige
Zurück-Taste
Linkspfeiltaste
OK-Taste
Rechtspfeiltaste
Abbrechen-Taste
Bereit-LED
Achtung-LED
Fach 1
Fach 2
IT
IT
IT
IT
IT
IT
IT
IT
IT
IT
IT
Panoramica del pannello di controllo.
Display del pannello di controllo
Pulsante Indietro
Pulsante freccia sinistra
Pulsante OK
Pulsante freccia destra
Pulsante Annulla processo
Spia Pronta
Spia Attenzione
Vassoio 1
Vassoio 2
ES
ES
ES
ES
ES
ES
ES
ES
ES
ES
ES
Descripción del panel de control:
Pantalla del panel de control
Botón Volver
Botón de flecha izquierda
Botón Aceptar
Botón de flecha derecha
Botón Cancelar trabajo
Luz Preparada
Luz Atención
Bandeja 1
Bandeja 2
CA
CA
CA
CA
CA
CA
CA
CA
CA
CA
CA
Descripció del tauler de control:
Pantalla del tauler de control
Botó d’endarrere
Botó de fletxa esquerra
Botó OK (D’acord)
Botó de fletxa dreta
Botó Cancel·la el treball
Llum A punt
Llum Atenció
Tray 1 (Safata 1)
Tray 2 (Safata 2)
NL
NL
NL
NL
NL
NL
NL
NL
NL
NL
NL
Overzicht bedieningspaneel:
Waarschuwingslampje
Klaar-lampje
Knop Taak annuleren
Pijl naar rechts
Knop OK
Pijl naar links
Pijl Terug
Display van het bedieningspaneel:
Lade 2
Lade 1
PT
PT
PT
PT
PT
PT
PT
PT
PT
PT
PT Visão geral do painel de controle:
Visor do painel de controle
Botão Voltar
Botão seta à esquerda
Botão OK
Botão seta à direita
Botão Cancelar trabalho
Luz de Pronto
Luz de Atenção
Bandeja 1
Bandeja 2
HE
HE
HE
HE
HE
HE
HE
HE
HE
HE
HE
הבקרה: לוח סקירת
הבקרה: לוח תצוגת
הקודם לחצן
שמאלה חץ לחצן
OK (אישור) לחצן
ימינה חץ לחצן
עבודה ביטול לחצן
מוכן נורית
התראה נורית
1 מגש
2 מגש

16

17
© 2008 Hewlett-Packard Development Company, L.P.
www.hp.com
*CB493-90902**CB493-90902*CB493-90902
Related Documents