HIKVISION EUROPE B.V. How to Restore Default Password User Manual (used for restore default password of DVR’s, NVR’s and IP Cameras) Name: SADP tool Publisher: HIKVISION EUROPE B.V. Type: Executable file Version: 2.00.00.03 Build20120503 File: SADP_Setup.exe Hikvision Europe B.V. www.hikvisioneurope.com

Welcome message from author
This document is posted to help you gain knowledge. Please leave a comment to let me know what you think about it! Share it to your friends and learn new things together.
Transcript
HIKVISION EUROPE B.V.
How to Restore Default Password
User Manual (used for restore default password of DVR’s, NVR’s and IP Cameras)
Name: SADP tool Publisher: HIKVISION EUROPE B.V. Type: Executable file Version: 2.00.00.03 Build20120503 File: SADP_Setup.exe
Hikvision Europe B.V.
www.hikvisioneurope.com

Restore Default Password
© Hikvision Digital Technology Co., Ltd. All Rights Reserved.
Introduction
The SADP tool and iVMS4200 client software (Fig. 1) can be used for restore default password (12345) of DVR’s, NVR’s and IP Cameras. In case of the administrator-admin password has been missed or forgotten you may contact us at [email protected] for a Security Code. Following instruction presents the method to restore device’s password. Please follow the steps below:
Fig. 1
*** This program is used for restore default password of DVR’s, NVR’s and IP Cameras.
Using SADP tool
Step n1. Power on the device and SADP will detect it (Fig. 2). Click in the Hide/Show option (yellow arrows) to show or hide more information regarding the Serial Number and Start Time.
Fig. 2
*** Power on the device and SADP will detect it. Click in the Hide/Show option.

Restore Default Password
© Hikvision Digital Technology Co., Ltd. All Rights Reserved.
Step n2. Please write down the Serial Number and Start Time information (Fig. 3) and send them to us via email at [email protected] so that we can provide you with the Security Code.
Fig. 3
*** Please write down the Serial Number and Start Time information.
Note: with the Device Serial No. and Start Time information we can create a particular Security Code for you. This is a series of characters combined by the Serial No. and the Start Time of the device. However for security reasons the Security Code will be only valid during the same day of Start Time. Step n3. After you get the Security Code from us, select the device you want to restore, Copy/Paste the code in the edit box Restore Default Password and click on the Confirm button (Fig. 4)
Fig. 4
*** Select the device, Copy/Paste the code in Restore Default Password box and click Confirm button.

Restore Default Password
© Hikvision Digital Technology Co., Ltd. All Rights Reserved.
Step n4. If all previous steps have been carried out correctly you will get a pop-up window with the following message: Password recovery success (Fig. 5). The device’s password has been restored to the default (12345) so now you can close the window.
Fig. 5
*** You will get the following message: Password recovery success.
Using iVMS4200 software
Step n. 1 You also can restore the password by using our iVMS4200 client software (Fig. 6). The procedure is very similar and is as follow:
1. Open iVMS4200 and click on Import Camera icon. 2. Select Add Device and click on Show Online Devices. 3. Please now you can refer to Step n2 and follow same instructions.
Fig. 6
*** Click on Import Camera, Add Devices and Show Online Devices.
Restore Default Password
© Hikvision Digital Technology Co., Ltd. All Rights Reserved.
Installing SADP tool
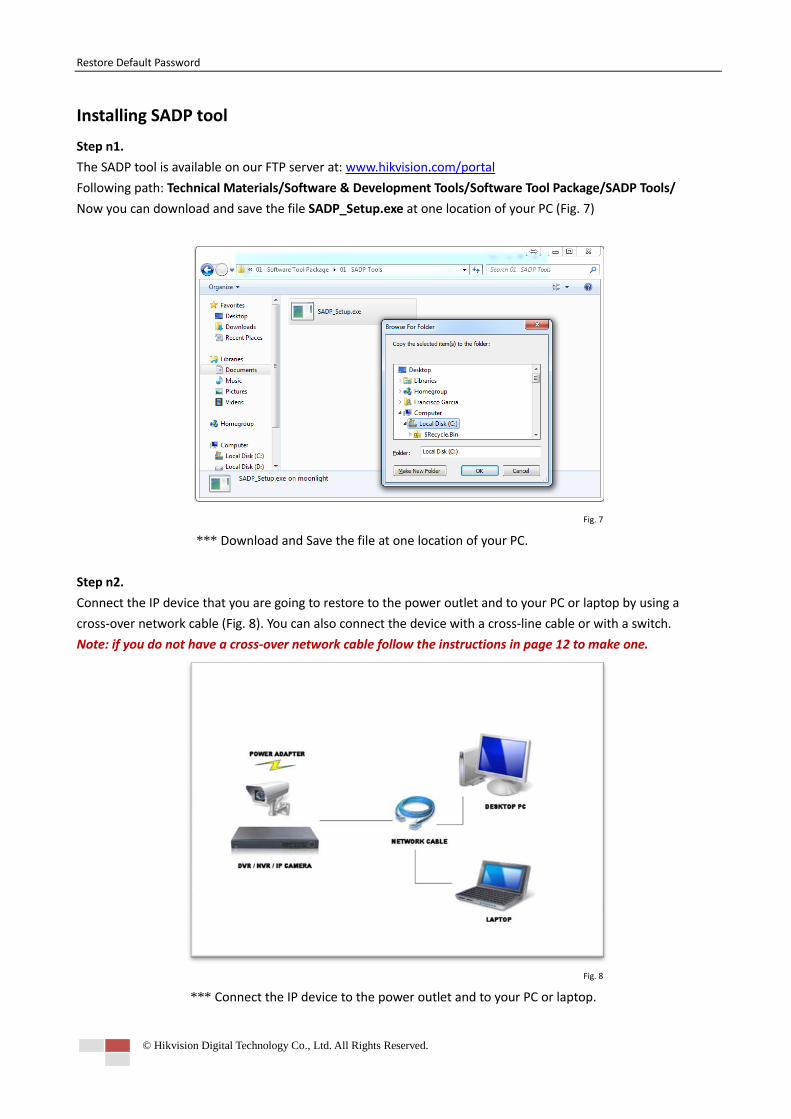
Step n1. The SADP tool is available on our FTP server at: www.hikvision.com/portal Following path: Technical Materials/Software & Development Tools/Software Tool Package/SADP Tools/ Now you can download and save the file SADP_Setup.exe at one location of your PC (Fig. 7)
Fig. 7
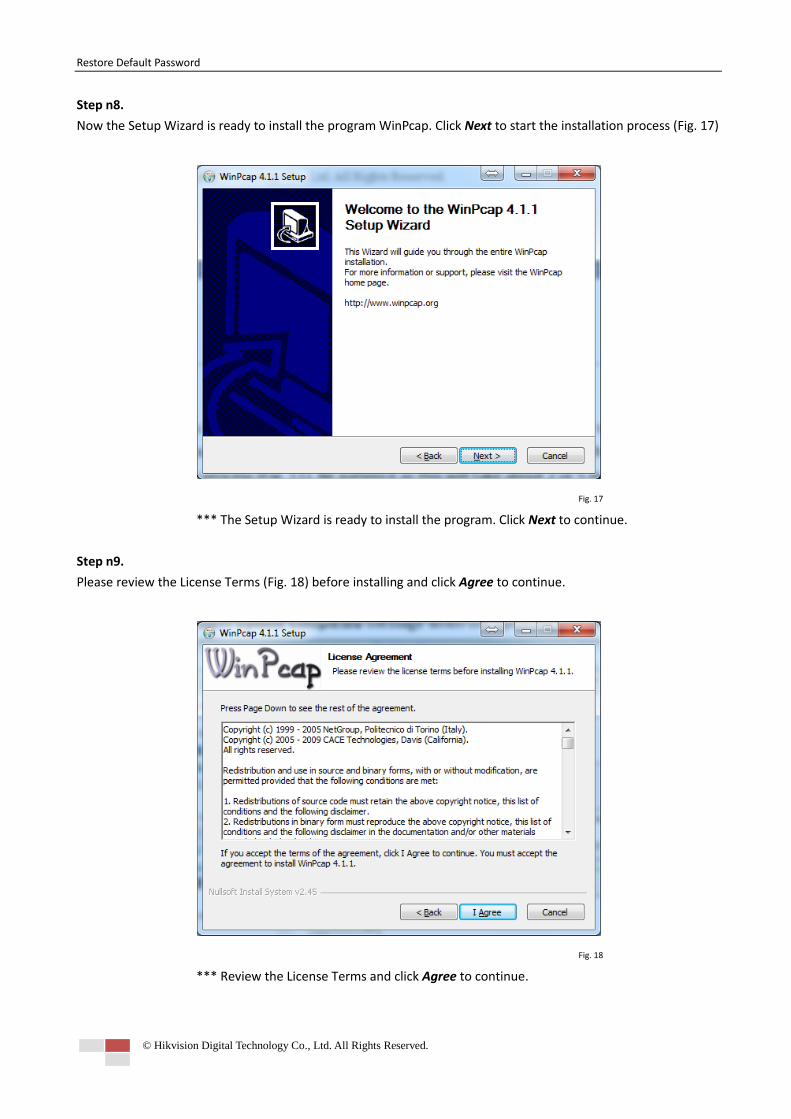
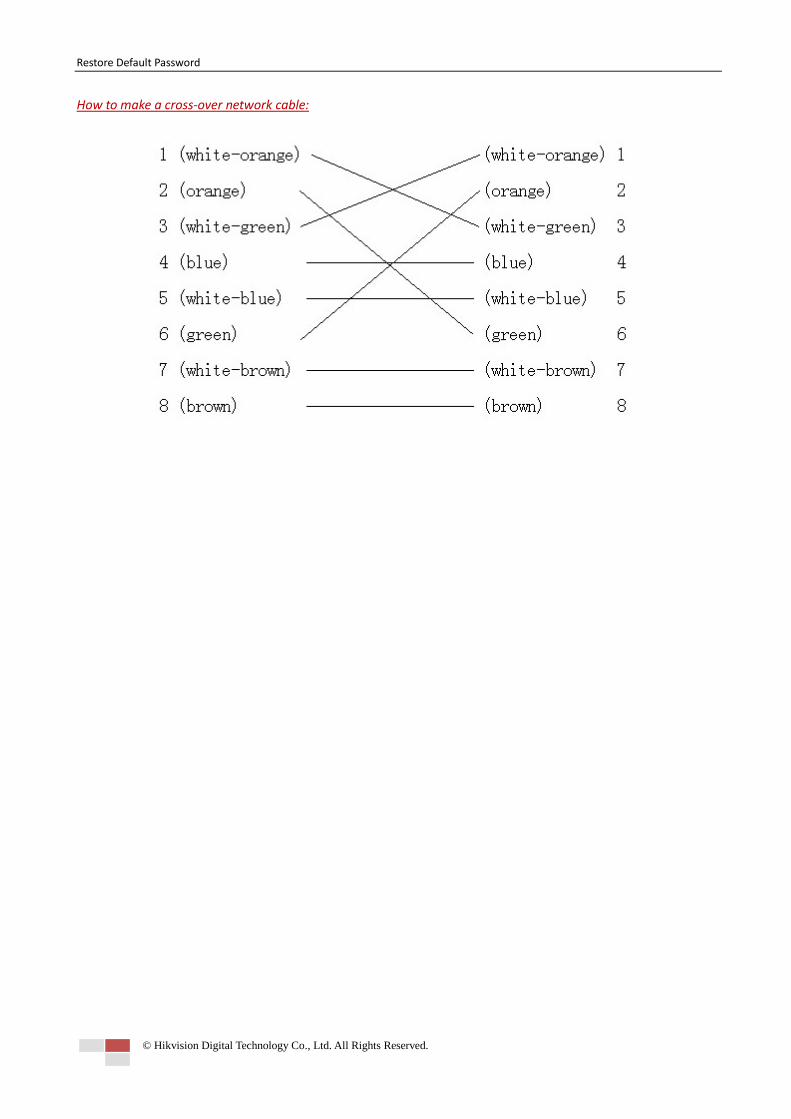
*** Download and Save the file at one location of your PC. Step n2. Connect the IP device that you are going to restore to the power outlet and to your PC or laptop by using a cross-over network cable (Fig. 8). You can also connect the device with a cross-line cable or with a switch. Note: if you do not have a cross-over network cable follow the instructions in page 12 to make one.
Fig. 8
*** Connect the IP device to the power outlet and to your PC or laptop.

Restore Default Password
© Hikvision Digital Technology Co., Ltd. All Rights Reserved.
Step n3. Double click the file <SADP_Setup.exe> to start the installation wizard (Fig. 9). Next screen allow the program to make changes on the computer by clicking Yes.
Fig. 9
*** Double click the file <SADP_Setup.exe>. Step n4. Click Next to continue with the wizard and follow on screen instructions (Fig. 10)
Fig. 10
*** Click Next to continue with the wizard.

Restore Default Password
© Hikvision Digital Technology Co., Ltd. All Rights Reserved.
Step n5. Now you can select the language you want to install and select Next to continue (Fig. 11)
Fig.11
*** Select the language you want to install and click Next. Step n6. Select the features you want to install and deselect the ones you do not need but we do recommend to have them all selected (recommended). Click Next to continue (Fig. 12)
Fig. 12
*** Select the features you want to install and click Next.

Restore Default Password
© Hikvision Digital Technology Co., Ltd. All Rights Reserved.
Note: You do need to install Microsoft Visual C++ 2008 Redistributable package. Otherwise you will get a new window with the installation wizard. If you already have it installed in your computer you can cancel it.
1. Click Next to continue (Fig. 13) 2. Select the option I have read and accept the license terms. 3. Click Install. 4. When setup is complete you can click Finish (Fig. 14) and WinPcap installation will begin.
Fig. 13 Fig. 14
Step n7. At this moment the WinPcap software installation will begin. Click Next to continue (Fig. 15) Note: This tool needs to be installed.
Fig. 15
*** The WinPcap software installation will begin. Click Next.
Restore Default Password
© Hikvision Digital Technology Co., Ltd. All Rights Reserved.
Step n8. Now the Setup Wizard is ready to install the program WinPcap. Click Next to start the installation process (Fig. 17)
Fig. 17
*** The Setup Wizard is ready to install the program. Click Next to continue.
Step n9. Please review the License Terms (Fig. 18) before installing and click Agree to continue.
Fig. 18
*** Review the License Terms and click Agree to continue.

Restore Default Password
© Hikvision Digital Technology Co., Ltd. All Rights Reserved.
Step n10. By default Automatically start the WinPcap driver at boot time option is Enabled (recommended). Please review the installation information and click Install to continue (Fig. 19).
Fig. 19
*** Automatically start the WinPcap driver at boot time is Enabled. Click Install to continue.
Step n11. Now the wizard has completed the installation. Click Finnish to close it and exit (Fig. 20)
Fig. 20
*** Click Finnish to close it and exit.

Restore Default Password
© Hikvision Digital Technology Co., Ltd. All Rights Reserved.
Step n12. Now the SADP wizard will continue and ask you to select a folder to install files. Click Next to continue (Fig. 21)
Fig. 21
*** Select a folder to install files. Click Next to continue.
Step n13. The wizard is ready to install the program. Click Install to begin the installation (Fig. 22)
Fig. 23
*** The wizard is ready to install the program. Click Install.

Restore Default Password
© Hikvision Digital Technology Co., Ltd. All Rights Reserved.
Step n14. Select the Setup Type that best suits your needs. Click Next to continue (Fig. 24)
Fig. 25
*** Select the Setup Type and click Next to continue.
Step n15. The Install Shield Wizard has successfully installed SADP. Click Finish to exit the wizard and execute the application (Fig. 26)
Fig. 26
*** The Install Shield Wizard has successfully installed SADP. Click Finish to exit.
Restore Default Password
© Hikvision Digital Technology Co., Ltd. All Rights Reserved.
How to make a cross-over network cable:
Related Documents