Welcome message from author
This document is posted to help you gain knowledge. Please leave a comment to let me know what you think about it! Share it to your friends and learn new things together.
Transcript

Welcome!
This help file contains an overview of Wavelore GLIDE Resonator Slide Guitar for Kontakt 4. Reading it carefully and familiarizing yourself with the interface and parameters offered will allow you the most control possible when using this highly versatile and flexible instrument.
Enjoy!
Table of ContentsBefore you Start: The Concept and Design of Wavelore GLIDE............................................................................... 3
I) What is a Resonator Guitar, and How Does it Work?............................................................................... 3
II) How Does All of That Translate to MIDI and Kontakt?............................................................................. 3
1) Quick Start................................................................................................................................................................. 6
1.1) The Instrument at a Glance.......................................................................................................................6
1.2) Enough Jargon! How Do I Play This Thing!? ........................................................................................ 8
2) Editing the Instrument's Setup.................................................................................................................................9
2.1) About the Main Controls Page..................................................................................................................9
2.2) About the Sequencer Page....................................................................................................................... 12
2.3) About the Humanize Advanced Page...................................................................................................... 17
2.4) About the Slide Scratch Advanced Page................................................................................................ 19
2.5) About the Vibrato Scratch Advanced Page............................................................................................ 20
2.6) About the Attack/Release Advanced Page.............................................................................................. 20
2.7) About the Room Advanced Page............................................................................................................. 22
2.8) About the Advanced Velocity Settings Page.......................................................................................... 23
2.9) About the Sustain Pedal Behavior Page..................................................................................................24
2.10) Saving your Changes.............................................................................................................................. 26
3) Where to Get More Help............................................................................................................................................26
Appendix A: Factory Sequencer Banks and Patches................................................................................................ 27
Before you Start: The Concept and Design of Wavelore GLIDE
GLIDE consists of a collection of instrument samples, a collection of impulse response samples (“IR's”), and a Kontakt instrument with extensive scripting to allow you a ridiculous degree of control over the playability and sound of the library. The instrument samples include the notes of the instrument, the sounds of the releases of each string (a slight buzz or click), and the sounds of the slide scratching on the strings during legato slides or vibrato. The IR samples include an impulse response from the body of the instrument and several modeled acoustic space impulses. The instrument itself contains all the programming necessary to make easy changes to its sound and behavior, and all the important aspects of the resonator slide guitar have been included, as well as several features and capabilities not present in the real instrument. Topping it off is a powerful sequencer engine that allows the creation of almost any imaginable picking pattern.
I) What is a Resonator Guitar, and How Does It Work?
The Resonator Guitar, commonly referred to as a “Dobro” (though that name specifically applies to instruments currently manufactured by Gibson), is a type of acoustic guitar which contains one of three possible variations of a “resonator” inside its body. This resonator typically takes the form of a metal cone upon which the bridge of the instrument rests, allowing the direct transmission of the strings' vibration into the cone, which significantly increases the instrument's volume. The resonator guitar was first designed by the Doperya brothers in the early twentieth century as a response to the need of guitarists to be better heard in ensemble settings.
The resonator guitar is typically played with a slide (worn on a finger, like a long ring) or a tone bar (held with the palm/fingers and laid on the strings with the guitar held flat in the lap). Strings are either played “open” (not using the slide), or “stopped”, in this case with the slide. The slide acts as a sort of movable fret, allowing the player to slide smoothly from one note or chord to another. The player uses the actual frets on the guitar neck as visual guides to the location of different notes, and makes finer corrections by ear. It is difficult to always produce a pure tone with a slide, so a characteristic part of the sound of the slide guitar is a relatively frequent “buzzing” sound, heard most often when notes or chords are played at loud dynamics.
Some other characteristic parts of the slide guitar sound include pick noise, slide scratching, and “pull offs”; Dobro players frequently use metal finger picks which can make a pronounced “chirp” noise just before a note is sounded, or a similar sound when the pick is used to mute a note. The player can also lift the slide off the strings while a note or chord is sounding, producing a buzzy transition from the stopped notes to the open strings of the instrument. This is called a “pull-off”.
Slide guitarists make use of a variety of open tunings, where the open strings are tuned to sound a chord such as open G, open D, open A, open E, and others. This library offers these tuning options and more.
As well as playing single note lines which display these elements and others, a dobro player, like any guitarist, makes frequent use of chords and arpeggios. Techniques can range from quickly strummed or picked chords (from two to six notes in density), to tremolos, to arpeggios in many tempi and styles.
One of the most notable things about slide guitar is the wide array of possible vibrato effects that can be achieved by shaking the slide over a stopped note. As in the act of sliding between notes, vibrato is never completely consistent in pitch or speed; Each cycle of a player's vibrato will be of slightly different width from the last, or will occur over a slightly shorter or longer time period. In addition to this indeterminacy, players can purposely vary speed and width, allowing techniques such as “progressive” vibrato, wherein the pitch variation and/or speed increases over time. Finally, vibrato also causes scratching noises of the slide (or palm of the hand holding the slide) on the strings.
II) How Does All of That Translate to MIDI and Kontakt?
Basically we had to think outside the box in order to program this instrument in a way that would offer all these little “chaotic” nuances; Notes and chords must play “humanly” out of tune, and vibrato simulation must act similarly human. The slide must scratch in a way that is both audible and un-intrusive, while still being highly adjustable to musical context. One must be able to play any combination of strings as a chord or arpeggio, and be able to do so at any speed, with or without sliding or vibrato. We also wanted to offer some other sounds possible on the dobro: The sound of a “pull-off”, performed with the slide, the sound of each note being stopped in a variety of ways (we've included three – more on this
later), and the sound of the pick clicking against the string before a note is sounded. All of these little chaotic elements are fused together in the instrument's script and control panel to give you incredible control over your dobro emulations. Here is a run-down of the features and how they work.
Vibrato: When you move your mod-wheel (CC#1, or other CC#, if you re-assign the factory vibrato controller) while playing a note on your keyboard, you will hear all sounding pitches shake with the same intensity. Increasing the mod-wheel value increases both the speed and the depth of the vibrato...but not exclusively: There is another factor that is changing the speed and width of vibrato with each new cycle of the pitch oscillation: Randomness.
A real slide-guitar player cannot perform a vibrato (which is a cyclical movement of shaking the slide back and forth over a given central pitch) without each cycle being slightly different in speed and physical width from the last. He/she will always stay within practical constraints, but removing the human indeterminacy from this sound leads to the vibrato we typically hear from synths and samplers: Constant, repetitive, and un-realistic. The width, speed, and randomization of both parameters are all fully configurable. See section 2.1 for info on configuring vibrato control.
Note also that you will hear a subtle scratching, scraping, or squeaking noise when using vibrato. This is an emulation of the sound of the slide moving on the strings, and is fully adjustable (or removable). See section 2.5 for info on configuring vibrato scratches.
Sliding from Note to Note (Portamento): Any key pressed within the range of G#2 to G3 will sound a note that can be “slid” to any other note within that range. In synthesis, as well as in classical music performance practice, this is called “portamento”. To create a portamento, simply hold the original note you struck while playing a new note in the given range, and your original note will “slide” to the new note. If both keys are held, releasing the newer note will allow the pitch to slide back to the original note. Please note the following:
• The factory setup allows you to control slide speed with two possible types of input: The first is velocity. That is, the harder you hit the new note, the faster the slide will execute. The softer, the slower. The second is the factory assigned MIDI CC#5. Regardless of this controller's setting, velocity will still access a range of speeds; The value of CC#5 simply allows access to faster or slower ranges of speeds. See section 2.1 for info on configuring portamento settings.
• You will hear a subtle scratching, scraping, or squeaking noise. This is the emulation of the sound of the slide moving on the strings, and is fully adjustable (or removable). See section 2.4 for info on configuring slide scratches.
• Both the original note and the new target note may sound slightly out of tune at first, and will correct themselves to a reasonable accuracy within a moment afterward. This phenomenon is not inherent in the samples themselves (they were recorded using a mechanical process that ensures their perfect tuning), but rather, is a result of an algorithm that causes the instrument to “miss”, just like a real human would, and then “correct by ear”. This feature of “Pitch Humanization” is also adjustable and removable. See section 2.3 for info on configuring pitch humanization.
Release Samples: Almost any acoustic instrument makes a distinct sound when a note is stopped, like a click or a buzz. Guitars often do both – well either, depending on how the note is stopped.
Wavelore GLIDE contains two different types of releases for the open strings, and three types for notes played with the slide: Open strings use “pick damping”, where a note is stopped with the pick, creating a slight click, and “palm damping”, where a note is stopped with the palm of the right hand, resulting in a brief “buzz” before the note stops. The slide notes use the same two types of damping plus a third, namely “slide damping”, where the slide is lifted off the string, which is then damped with the edge of the left hand palm. The effect is one of a slight rattle where the slide buzzes against the vibrating string as it loses contact, followed by a more gentle, lower pitch of the string's vibrations dying out against the palm. Controlling which type of release sounds for a given note is done with CC#11, which is re-assignable. See section 2.6 for info on configuring release samples.
Pick Noise: When a guitarist plucks a string, he or she must first bring their pick into contact with the string, apply a variable degree of force, the release the string from the pick to sound the note. There is always a slight time delay between the moment the contact is made and the moment that the note is first sounded. The contact itself very often makes a noise, which, though much quieter than the note, is still audible. We have programmed the instrument to make pick noises at random, but with programmable frequency (including never) and configurable timing and volume settings. See section 2.6 for info on configuring pick noise.
Pull-Offs: Lifting the slide off one or more sounding strings will cause those strings to rattle briefly against the slide
before continuing to sound, but at the pitch of the open string. Creating this effect on Wavelore GLIDE is similar to creating a downward slide: Play and hold a note in the range of G#2 to G3, then (instead of playing another in that range) play a G2 (which represents the open strings). Any sounding notes will “pull-off” to the corresponding open strings.
Sequencer: The sequencer is the beating heart of Wavelore GLIDE, and is what allows you as the player to perform a potentially infinite variety of licks with the instrument. Its presets contain all strings as individual “one-shots”, as well as chords, arpeggios, finger-picking patterns, and tremolos. Any pattern that can be created can be saved within a bank/preset, and can be assigned a keyswitch for activation. With banks and presets of patterns available at the touch of a MIDI key, you can recall any one at a time, and apply all of the above described techniques to the pattern itself. The sequencer is covered in detail in section 2.2..
Timbre and Slide Buzz: We recorded samples from three locations along the length of each guitar string, so you can select where along the string you'd like a note to be picked; closer to the bridge (brighter, CC#11 at 127), closer to the neck (mellower, CC#11 at 0), or in-between (CC#11 at 1-126). Further, every note using the slide was sampled once more with all these variations, but with the slide a little “loose”, to obtain a characteristic buzzing sound. The default buzz CC# is CC#1, your mod-wheel, but is, like all other controllers for this instrument, re-assignable. The buzz CC# must be set to a value of 127 in order to activate buzz samples.

1) Quick Start
1.1) The Instrument at a Glance
When you load Wavelore GLIDE into Kontakt, you will see the main page of its user interface:
This page gives you immediate access to some of the most common settings, and the “Advanced” buttons in various places allow navigation into deeper areas of the instrument's setup. For detailed info on all the controls, please see Section 2, “Editing the Instrument”. For now, the curious my get a lot from knowing that the controls have all been labeled and organized for intuitive navigation and use (Notice that they are divided into four major areas: “Slide Controls”, “Vibrato Controls”, “Pick/Release”, and “Room”), so this document may only be necessary if you find something in the interface to be less-than-clear.
Here are the factory settings for MIDI controllers used (these are re-assignable – again, see Section 2, “Editing the Instrument”, for details):
CC#1 (Mod-Wheel): Vibrato (1 - 126) / Buzz (127)
CC#5: Controls portamento speed range; Lower values will access faster portamento speeds, and higher values will access slower speeds. Within any given range, velocity of target notes will determine the speed selected, unless velocity response is set to zero.
CC#11 (Expression Pedal): Dynamics for patterns with CC# control of note velocities, tempo control, timbre control, dynamics control.
CC#64 (Sustain Pedal - Optional): Can be held at any time to “freeze” a pattern, or to invoke a number of other functions.
Banks, Patches, and Keyswitches:
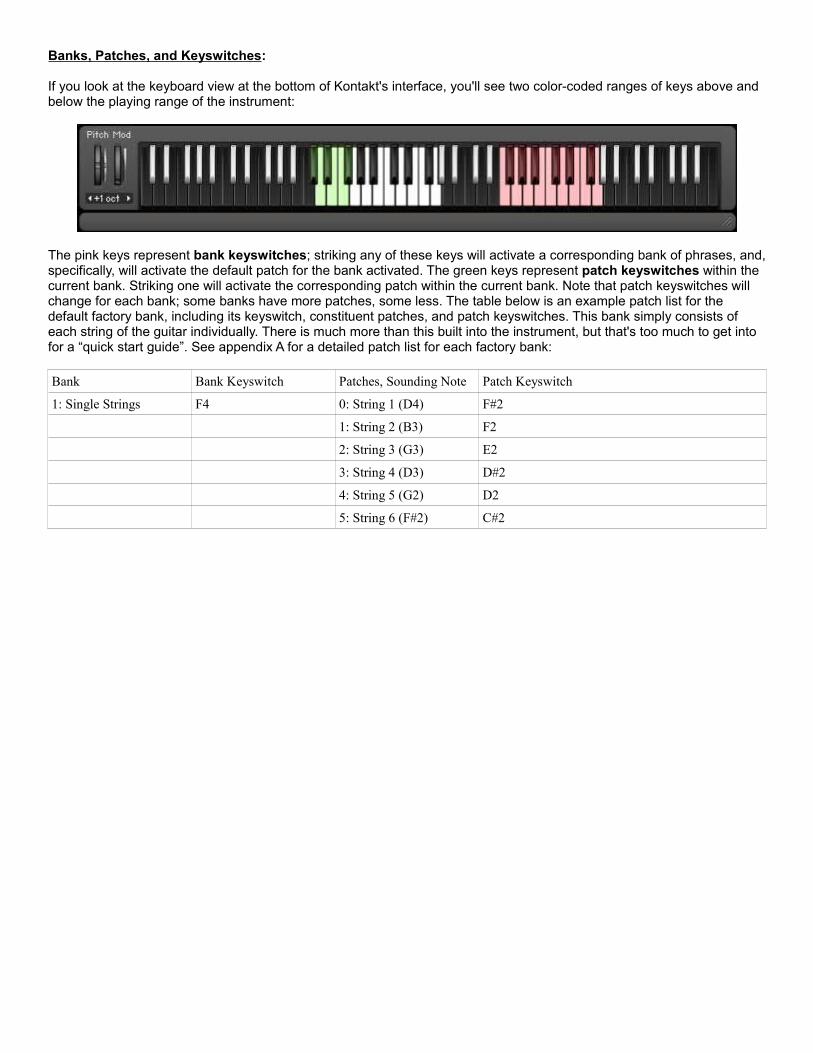
If you look at the keyboard view at the bottom of Kontakt's interface, you'll see two color-coded ranges of keys above and below the playing range of the instrument:
The pink keys represent bank keyswitches; striking any of these keys will activate a corresponding bank of phrases, and, specifically, will activate the default patch for the bank activated. The green keys represent patch keyswitches within the current bank. Striking one will activate the corresponding patch within the current bank. Note that patch keyswitches will change for each bank; some banks have more patches, some less. The table below is an example patch list for the default factory bank, including its keyswitch, constituent patches, and patch keyswitches. This bank simply consists of each string of the guitar individually. There is much more than this built into the instrument, but that's too much to get into for a “quick start guide”. See appendix A for a detailed patch list for each factory bank:
Bank Bank Keyswitch Patches, Sounding Note Patch Keyswitch
1: Single Strings F4 0: String 1 (D4) F#2
1: String 2 (B3) F2
2: String 3 (G3) E2
3: String 4 (D3) D#2
4: String 5 (G2) D2
5: String 6 (F#2) C#2
1.2) “Enough Jargon! How Do I Play This Thing!?”or
Understanding Wavelore GLIDE In 9 Easy Steps.
For all the mumbo-jumbo presented so far, playing Wavelore GLIDE is surprisingly easy. With the default bank/patch loaded (that is, load the instrument in its factory state), do the following.
1) Play G2 on your MIDI keyboard. This will sound a G one octave higher. Play it over and over at different velocities to get a sense of how it feels. Play it while moving the mod-wheel. Don't hear any effect? Good. That's because you shouldn't; The mod-wheel controls vibrato, which isn't possible on an open string. Since G2 plays the open G string, you can't apply vibrato to this note.
2) Repeat step one with C3. The vibrato should work now, since this is a note played with the slide as opposed to an open string.
3) Play C3 again, and hold it while playing A#2, a whole tone below. Hey - A slide! Do it again, but this time slide up to D3, holding both notes. Now repeat once more, then release D3 so that the note slides back down to C3. Sliding in this way will work between any two notes in the range of G#2 to G3, inclusive. Let's call this the “slide range” of the instrument.
4) Repeat step 3, adding vibrato with the mod-wheel any time you feel like it.
5) Play and hold any note in the slide range, then play a G2. Note how the instrument plays a legato transition down to the open string. This is what a “pull-off” sounds like, and it happens on the dobro whenever a player lifts his/her slide off the string(s) while a note or chord is sounding. As in step one, vibrato will not work on this articulation, since you are now playing an open string.
6) Play a G2, and hold it while playing a different note in the slide range. The open string is muted with a release sample, and the new note is sounded. Now repeat, but then release the second note. The instrument pulls off to the open string again.
7) Play any note repeatedly while moving CC#11 – Note how the tone of the instrument changes. CC#11 simulates a change in the location along a string's length where a note is picked. Changing pick location on a guitar has a noticeable effect on the tone.
8) Play any note in the slide range with the mod-wheel at full value. In addition to vibrato, you should also hear that the note now plays with a more buzzy sound. This is not possible on the open strings.
9) Play C4, and repeat the steps above. You'll see that playing the instrument now triggers a finger-picking pattern. More importantly, you'll see that all of the techniques outlined above will apply to the whole pattern. That is, while notes are being triggered and released, your portamento, vibrato, legato, timbre changes, and buzzes will all work the same way, except they affect every currently sounding string. Want to know which keyswitches call up which types of phrases? See appendix A.!

2) Editing the Instrument's SetupThere is always a possibility that a given instrument configuration will not behave in the way you may prefer. Given theenormous number of possible opinions on how any instrument should be configured, we’ve done everything possible tooffer the best out-of-the-box programming we can in this library, but you may still have certain reservations or differencesof opinion. These differences could be about a wide variety of choices, including:
● Choice of assigned controllers: Many may want, for example, to have the instrument use different controllers for
vibrato and buzz control, where our configuration uses the mod-wheel for both.
● Vibrato style: Our choice was one of a fairly aggressive vibrato. You may find a need for a less aggressive
vibrato.
● Slide speed ranges: You may only want your slides to vary from half a second in length to a full second,
whereas our original setup offers a range from very fast to very slow. You can configure bend speed ranges and
control sources in almost any variety you wish.
● Sequencer Presets: We've included a wide variety of factory banks and presets of picking patterns. Still we've also
made available 30 banks of 30 presets so you can edit our patterns, or create new ones from scratch, and save them
as your own presets.
In addition to these variables, there are countless other ways in which the instrument could be different, and some ofthose ways could be better, at least for certain people or projects. This section contains instructions on some of the manyways that you can customize the sounds in the library to suit different needs or tastes.
2.1) About the Main Page (Default View)
Concept:
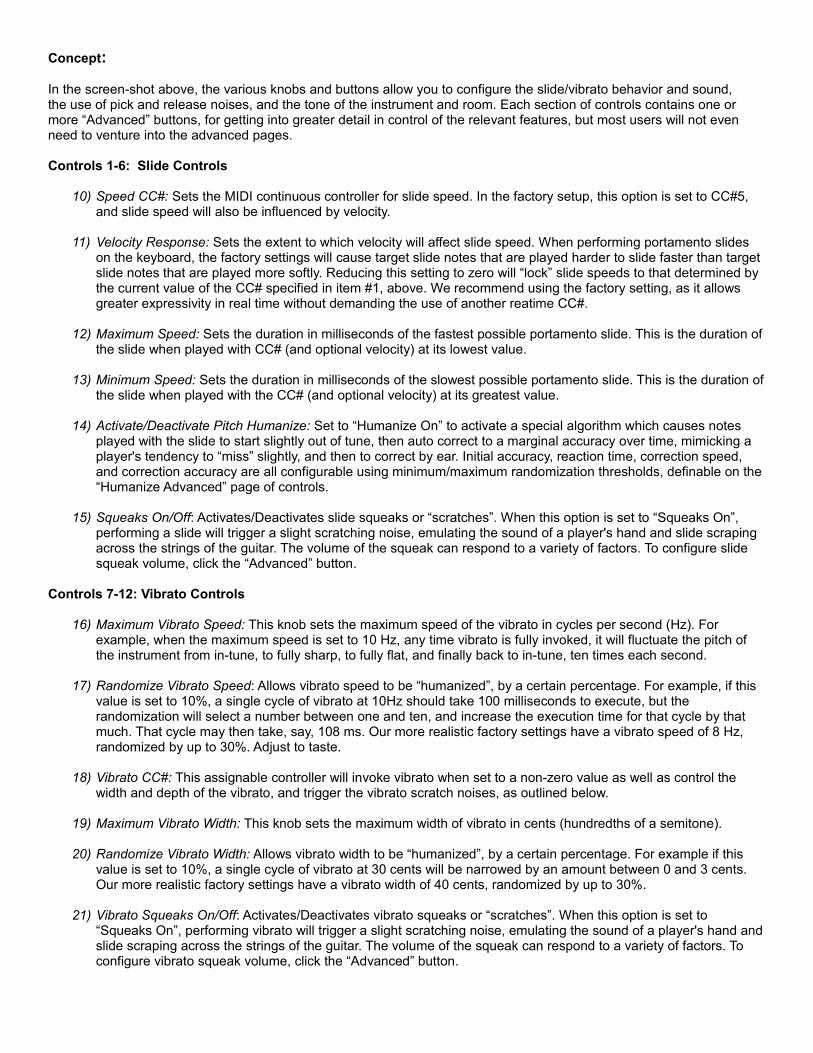
In the screen-shot above, the various knobs and buttons allow you to configure the slide/vibrato behavior and sound, the use of pick and release noises, and the tone of the instrument and room. Each section of controls contains one or more “Advanced” buttons, for getting into greater detail in control of the relevant features, but most users will not even need to venture into the advanced pages.
Controls 1-6: Slide Controls
10) Speed CC#: Sets the MIDI continuous controller for slide speed. In the factory setup, this option is set to CC#5, and slide speed will also be influenced by velocity.
11) Velocity Response: Sets the extent to which velocity will affect slide speed. When performing portamento slides on the keyboard, the factory settings will cause target slide notes that are played harder to slide faster than target slide notes that are played more softly. Reducing this setting to zero will “lock” slide speeds to that determined by the current value of the CC# specified in item #1, above. We recommend using the factory setting, as it allows greater expressivity in real time without demanding the use of another reatime CC#.
12) Maximum Speed: Sets the duration in milliseconds of the fastest possible portamento slide. This is the duration of the slide when played with CC# (and optional velocity) at its lowest value.
13) Minimum Speed: Sets the duration in milliseconds of the slowest possible portamento slide. This is the duration of the slide when played with the CC# (and optional velocity) at its greatest value.
14) Activate/Deactivate Pitch Humanize: Set to “Humanize On” to activate a special algorithm which causes notes played with the slide to start slightly out of tune, then auto correct to a marginal accuracy over time, mimicking a player's tendency to “miss” slightly, and then to correct by ear. Initial accuracy, reaction time, correction speed, and correction accuracy are all configurable using minimum/maximum randomization thresholds, definable on the “Humanize Advanced” page of controls.
15) Squeaks On/Off: Activates/Deactivates slide squeaks or “scratches”. When this option is set to “Squeaks On”, performing a slide will trigger a slight scratching noise, emulating the sound of a player's hand and slide scraping across the strings of the guitar. The volume of the squeak can respond to a variety of factors. To configure slide squeak volume, click the “Advanced” button.
Controls 7-12: Vibrato Controls
16) Maximum Vibrato Speed: This knob sets the maximum speed of the vibrato in cycles per second (Hz). For example, when the maximum speed is set to 10 Hz, any time vibrato is fully invoked, it will fluctuate the pitch of the instrument from in-tune, to fully sharp, to fully flat, and finally back to in-tune, ten times each second.
17) Randomize Vibrato Speed: Allows vibrato speed to be “humanized”, by a certain percentage. For example, if this value is set to 10%, a single cycle of vibrato at 10Hz should take 100 milliseconds to execute, but the randomization will select a number between one and ten, and increase the execution time for that cycle by that much. That cycle may then take, say, 108 ms. Our more realistic factory settings have a vibrato speed of 8 Hz, randomized by up to 30%. Adjust to taste.
18) Vibrato CC#: This assignable controller will invoke vibrato when set to a non-zero value as well as control the width and depth of the vibrato, and trigger the vibrato scratch noises, as outlined below.
19) Maximum Vibrato Width: This knob sets the maximum width of vibrato in cents (hundredths of a semitone).
20) Randomize Vibrato Width: Allows vibrato width to be “humanized”, by a certain percentage. For example if this value is set to 10%, a single cycle of vibrato at 30 cents will be narrowed by an amount between 0 and 3 cents. Our more realistic factory settings have a vibrato width of 40 cents, randomized by up to 30%.
21) Vibrato Squeaks On/Off: Activates/Deactivates vibrato squeaks or “scratches”. When this option is set to “Squeaks On”, performing vibrato will trigger a slight scratching noise, emulating the sound of a player's hand and slide scraping across the strings of the guitar. The volume of the squeak can respond to a variety of factors. To configure vibrato squeak volume, click the “Advanced” button.
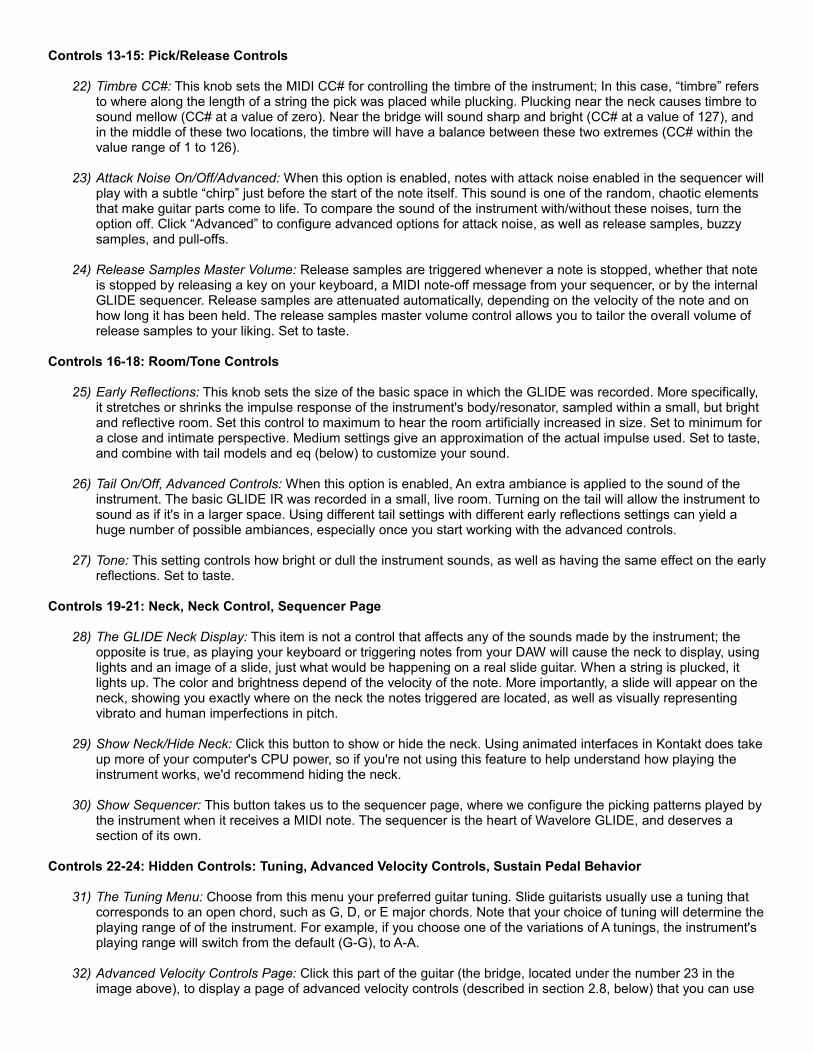
Controls 13-15: Pick/Release Controls
22) Timbre CC#: This knob sets the MIDI CC# for controlling the timbre of the instrument; In this case, “timbre” refers to where along the length of a string the pick was placed while plucking. Plucking near the neck causes timbre to sound mellow (CC# at a value of zero). Near the bridge will sound sharp and bright (CC# at a value of 127), and in the middle of these two locations, the timbre will have a balance between these two extremes (CC# within the value range of 1 to 126).
23) Attack Noise On/Off/Advanced: When this option is enabled, notes with attack noise enabled in the sequencer will play with a subtle “chirp” just before the start of the note itself. This sound is one of the random, chaotic elements that make guitar parts come to life. To compare the sound of the instrument with/without these noises, turn the option off. Click “Advanced” to configure advanced options for attack noise, as well as release samples, buzzy samples, and pull-offs.
24) Release Samples Master Volume: Release samples are triggered whenever a note is stopped, whether that note is stopped by releasing a key on your keyboard, a MIDI note-off message from your sequencer, or by the internal GLIDE sequencer. Release samples are attenuated automatically, depending on the velocity of the note and on how long it has been held. The release samples master volume control allows you to tailor the overall volume of release samples to your liking. Set to taste.
Controls 16-18: Room/Tone Controls
25) Early Reflections: This knob sets the size of the basic space in which the GLIDE was recorded. More specifically, it stretches or shrinks the impulse response of the instrument's body/resonator, sampled within a small, but bright and reflective room. Set this control to maximum to hear the room artificially increased in size. Set to minimum for a close and intimate perspective. Medium settings give an approximation of the actual impulse used. Set to taste, and combine with tail models and eq (below) to customize your sound.
26) Tail On/Off, Advanced Controls: When this option is enabled, An extra ambiance is applied to the sound of the instrument. The basic GLIDE IR was recorded in a small, live room. Turning on the tail will allow the instrument to sound as if it's in a larger space. Using different tail settings with different early reflections settings can yield a huge number of possible ambiances, especially once you start working with the advanced controls.
27) Tone: This setting controls how bright or dull the instrument sounds, as well as having the same effect on the early reflections. Set to taste.
Controls 19-21: Neck, Neck Control, Sequencer Page
28) The GLIDE Neck Display: This item is not a control that affects any of the sounds made by the instrument; the opposite is true, as playing your keyboard or triggering notes from your DAW will cause the neck to display, using lights and an image of a slide, just what would be happening on a real slide guitar. When a string is plucked, it lights up. The color and brightness depend of the velocity of the note. More importantly, a slide will appear on the neck, showing you exactly where on the neck the notes triggered are located, as well as visually representing vibrato and human imperfections in pitch.
29) Show Neck/Hide Neck: Click this button to show or hide the neck. Using animated interfaces in Kontakt does take up more of your computer's CPU power, so if you're not using this feature to help understand how playing the instrument works, we'd recommend hiding the neck.
30) Show Sequencer: This button takes us to the sequencer page, where we configure the picking patterns played by the instrument when it receives a MIDI note. The sequencer is the heart of Wavelore GLIDE, and deserves a section of its own.
Controls 22-24: Hidden Controls: Tuning, Advanced Velocity Controls, Sustain Pedal Behavior
31) The Tuning Menu: Choose from this menu your preferred guitar tuning. Slide guitarists usually use a tuning that corresponds to an open chord, such as G, D, or E major chords. Note that your choice of tuning will determine the playing range of of the instrument. For example, if you choose one of the variations of A tunings, the instrument's playing range will switch from the default (G-G), to A-A.
32) Advanced Velocity Controls Page: Click this part of the guitar (the bridge, located under the number 23 in the image above), to display a page of advanced velocity controls (described in section 2.8, below) that you can use

to tailor the instrument's dynamic and timbral response to your style and taste.
33) Sustain Pedal Behavior Page: This button takes us to the sustain pedal behavior page (described in section 2.9, below), where a variety of functions can be chosen for the sustain pedal to invoke when pressed or released.
2.2) About the Sequencer Page
Concept:
The Sequencer Page displays both the currently active picking pattern (what will be played if the instrument receives a MIDI note) as well as tools for editing and storing that pattern, and the specific parameters of the currently selected note(s). The view is based on the classic “piano roll” method of displaying musical/MIDI notes, but only contains six horizontal rows of notes. The lowest row represents the sixth (thickest, lowest) string, and the highest row represents the first string (thinnest, highest), while the horizontal axis marks time (displayed at the top in measures and beats). Placing a “note” on any of those strings will cause the pattern, when triggered via MIDI, to play a note at the time corresponding to the note's horizontal location, and behaving according to its own rules, as defined in the note parameter controls.
The note parameter controls allow you to tailor the ways in which each note will be played individually. Each note can have its own sources of control for its velocity (random, key velocity, CC#, and velocity range), as well as its own timing and randomization settings.
A number of global sequence parameters allows selection of tempo and loop factors, and users can recall sequences (stored in banks and presets) by saving them with the option of assigning keyswitches for instant recall.
Controls 1-4: Notes
10) Unselected Terminating Note: An unselected, terminating note is one which will end at the point on the timeline where the rightmost edge of the light red rectangle sits. By “terminating”, we mean that the note will end on its own, even if the key that triggered the sequence is held. When the note terminates, a release sample will be played. Terminating notes will also stop with a release sound when the key is released, if they haven't yet terminated on their own.
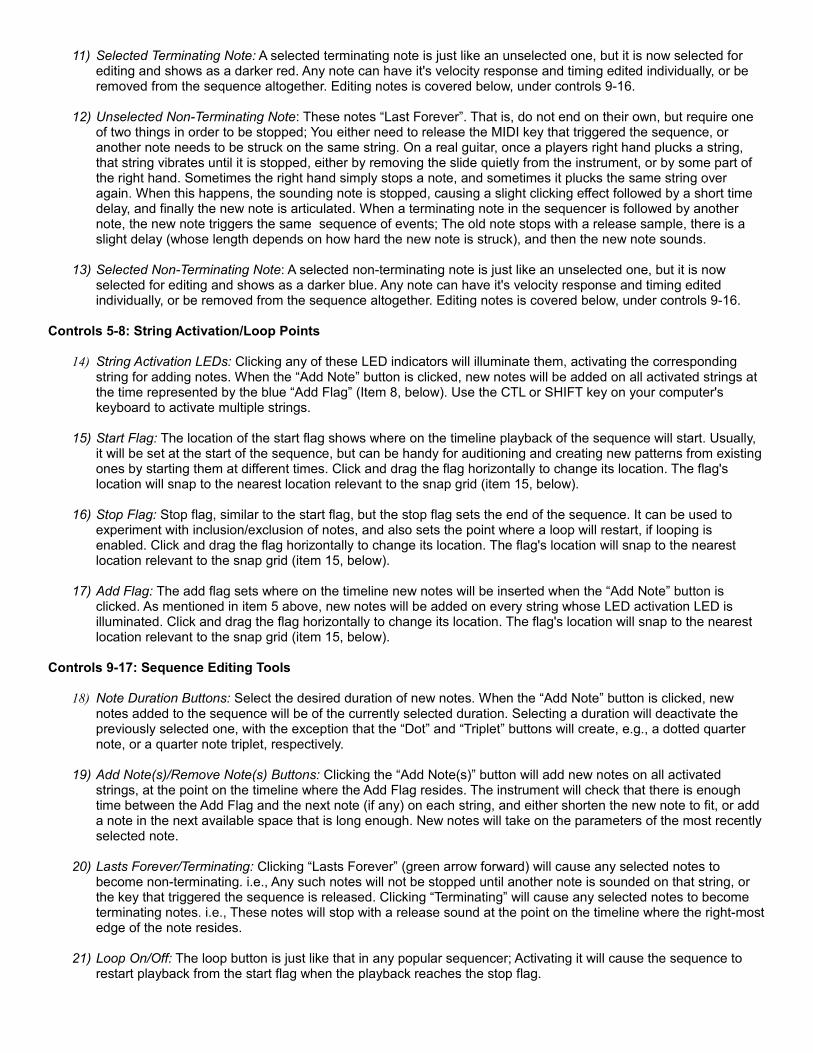
11) Selected Terminating Note: A selected terminating note is just like an unselected one, but it is now selected for editing and shows as a darker red. Any note can have it's velocity response and timing edited individually, or be removed from the sequence altogether. Editing notes is covered below, under controls 9-16.
12) Unselected Non-Terminating Note: These notes “Last Forever”. That is, do not end on their own, but require one of two things in order to be stopped; You either need to release the MIDI key that triggered the sequence, or another note needs to be struck on the same string. On a real guitar, once a players right hand plucks a string, that string vibrates until it is stopped, either by removing the slide quietly from the instrument, or by some part of the right hand. Sometimes the right hand simply stops a note, and sometimes it plucks the same string over again. When this happens, the sounding note is stopped, causing a slight clicking effect followed by a short time delay, and finally the new note is articulated. When a terminating note in the sequencer is followed by another note, the new note triggers the same sequence of events; The old note stops with a release sample, there is a slight delay (whose length depends on how hard the new note is struck), and then the new note sounds.
13) Selected Non-Terminating Note: A selected non-terminating note is just like an unselected one, but it is now selected for editing and shows as a darker blue. Any note can have it's velocity response and timing edited individually, or be removed from the sequence altogether. Editing notes is covered below, under controls 9-16.
Controls 5-8: String Activation/Loop Points
14) String Activation LEDs: Clicking any of these LED indicators will illuminate them, activating the corresponding string for adding notes. When the “Add Note” button is clicked, new notes will be added on all activated strings at the time represented by the blue “Add Flag” (Item 8, below). Use the CTL or SHIFT key on your computer's keyboard to activate multiple strings.
15) Start Flag: The location of the start flag shows where on the timeline playback of the sequence will start. Usually, it will be set at the start of the sequence, but can be handy for auditioning and creating new patterns from existing ones by starting them at different times. Click and drag the flag horizontally to change its location. The flag's location will snap to the nearest location relevant to the snap grid (item 15, below).
16) Stop Flag: Stop flag, similar to the start flag, but the stop flag sets the end of the sequence. It can be used to experiment with inclusion/exclusion of notes, and also sets the point where a loop will restart, if looping is enabled. Click and drag the flag horizontally to change its location. The flag's location will snap to the nearest location relevant to the snap grid (item 15, below).
17) Add Flag: The add flag sets where on the timeline new notes will be inserted when the “Add Note” button is clicked. As mentioned in item 5 above, new notes will be added on every string whose LED activation LED is illuminated. Click and drag the flag horizontally to change its location. The flag's location will snap to the nearest location relevant to the snap grid (item 15, below).
Controls 9-17: Sequence Editing Tools
18) Note Duration Buttons: Select the desired duration of new notes. When the “Add Note” button is clicked, new notes added to the sequence will be of the currently selected duration. Selecting a duration will deactivate the previously selected one, with the exception that the “Dot” and “Triplet” buttons will create, e.g., a dotted quarter note, or a quarter note triplet, respectively.
19) Add Note(s)/Remove Note(s) Buttons: Clicking the “Add Note(s)” button will add new notes on all activated strings, at the point on the timeline where the Add Flag resides. The instrument will check that there is enough time between the Add Flag and the next note (if any) on each string, and either shorten the new note to fit, or add a note in the next available space that is long enough. New notes will take on the parameters of the most recently selected note.
20) Lasts Forever/Terminating: Clicking “Lasts Forever” (green arrow forward) will cause any selected notes to become non-terminating. i.e., Any such notes will not be stopped until another note is sounded on that string, or the key that triggered the sequence is released. Clicking “Terminating” will cause any selected notes to become terminating notes. i.e., These notes will stop with a release sound at the point on the timeline where the right-most edge of the note resides.
21) Loop On/Off: The loop button is just like that in any popular sequencer; Activating it will cause the sequence to restart playback from the start flag when the playback reaches the stop flag.

22) Save Bank/Preset: clicking this button once will show a prompt at the top of the sequencer page to choose the bank and preset to which the current sequence will be stored. Clicking it a second time will overwrite the currently selected bank and preset. To overwrite the current bank/preset, simply click the button twice. To store the current sequence in a new bank/preset location, click it once, the use the bank and preset menus to select the desired bank. Then click the save button again to store your sequence.
23) Tempo Source: Possible sources of tempo control include: “Absolute/Tap”, “MIDI CC#”, and “Get From Host”.
“Absolute/Tap” is designed for playing the instrument live within Kontakt running in standalone mode. You can set an absolute tempo by manually entering the desired tempo (in beats per minute) into the tempo field (Item 16, below), or by using your mouse to tap the desired tempo on the “tap” button (item 17, below).
“MIDI CC#” allows you to control the speed of playback in realtime. To use it, first set a base tempo in “absolute/tap” mode, and then set the mode to “MIDI CC#”, choosing your desired minimum and maximum speeds in percentages relative to the absolute tempo. For example, if you want your sequence to play between 100 and 200 beats per minute, set the absolute tempo to 100 and the minimum to 50% (half the sequence duration, which is twice as fast), with the maximum set to 100% (no change). Assign a tempo controller using the CC# knob.
“Get From Host” is the preferred tempo mode for working with Wavelore GLIDE within your DAW. When this mode is enabled, the sequence will lock to the host's tempo.
24) Snap Grid: Also similar to a feature found in most sequencers, the snap grid allows your timeline edits to “snap” to specific grid points along the timeline. For example, to accurately drag the start flag to beat two of measure one, set the snap grid to “1/8” (Eighth note, one half beat duration), and drag the flag toward the second beat. Rather than moving pixel by pixel, the flag will jump by eighth notes. The same is true of changes you make to the start or end times of notes; the arrows will lock to the sanp grid, allowing precise setting of note locations and durations.
25) Tempo Field: Click this area to type the desired tempo in beats per minute. Alternatively, you can click and drag up or down, as well as click the arrows that appear on the field when the mouse hovers over it. Clicking the arrows will increment/decrement the tempo by integer values.
26) Tap Tempo Button: Click your mouse in time over this button to set a tempo. This control is useful for the tempo on the fly, e.g., for live performance.
Controls 18-21: Bank/Preset Menus
27) Factory Bank/Make Default Bank: Selecting a bank from this menu will activate that bank, including the default preset in the selected bank. Highlighting the “Default” button in the corner of the page will make that bank the default one which is loaded when the instrument is loaded into Kontakt. Setting the default bank will have no effect unless the preset is saved.
28) Factory Preset/Make Default Preset: Activates a preset within the current bank. With a specific preset open, not only will it play via MIDI input, but it is also editable and storable under a new bank/preset of your choice. Highlight the “default” LED below the menu before saving the preset to make it the default preset for the currently active bank.
29) User Bank: Selecting a bank from this menu will activate that bank, including the default preset in the selected bank. Also, use this menu to select the bank to which user presets will be stored when saving sequences as new presets. Select the “Default” LED at the bottom left of the page before saving the preset to make the current bank the default bank to load when the instrument is loaded into Kontakt.
30) User Preset: Activates a preset within the current bank. With a specific preset open, not only will it play via MIDI input, but it is also editable and store-able under a new bank/preset of your choice. Highlight the “default” LED below the menu before saving the preset to make it the default preset for the currently active bank.
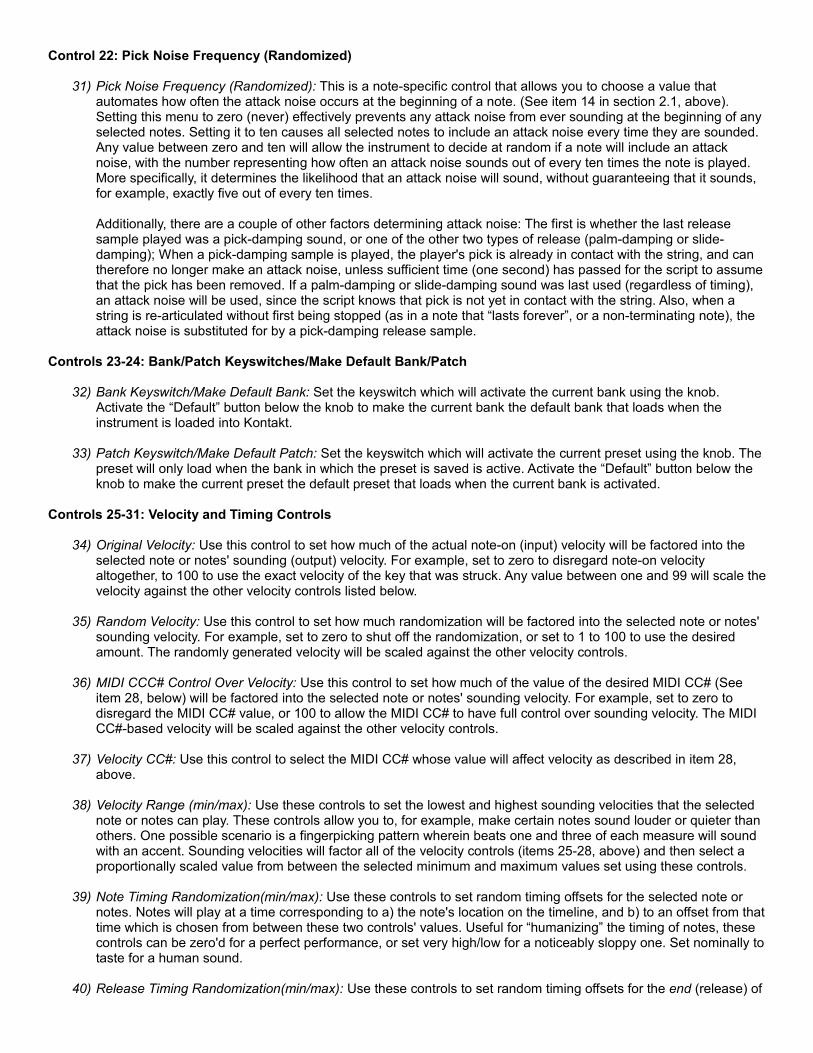
Control 22: Pick Noise Frequency (Randomized)
31) Pick Noise Frequency (Randomized): This is a note-specific control that allows you to choose a value that automates how often the attack noise occurs at the beginning of a note. (See item 14 in section 2.1, above). Setting this menu to zero (never) effectively prevents any attack noise from ever sounding at the beginning of any selected notes. Setting it to ten causes all selected notes to include an attack noise every time they are sounded. Any value between zero and ten will allow the instrument to decide at random if a note will include an attack noise, with the number representing how often an attack noise sounds out of every ten times the note is played. More specifically, it determines the likelihood that an attack noise will sound, without guaranteeing that it sounds, for example, exactly five out of every ten times.
Additionally, there are a couple of other factors determining attack noise: The first is whether the last release sample played was a pick-damping sound, or one of the other two types of release (palm-damping or slide-damping); When a pick-damping sample is played, the player's pick is already in contact with the string, and can therefore no longer make an attack noise, unless sufficient time (one second) has passed for the script to assume that the pick has been removed. If a palm-damping or slide-damping sound was last used (regardless of timing), an attack noise will be used, since the script knows that pick is not yet in contact with the string. Also, when a string is re-articulated without first being stopped (as in a note that “lasts forever”, or a non-terminating note), the attack noise is substituted for by a pick-damping release sample.
Controls 23-24: Bank/Patch Keyswitches/Make Default Bank/Patch
32) Bank Keyswitch/Make Default Bank: Set the keyswitch which will activate the current bank using the knob. Activate the “Default” button below the knob to make the current bank the default bank that loads when the instrument is loaded into Kontakt.
33) Patch Keyswitch/Make Default Patch: Set the keyswitch which will activate the current preset using the knob. The preset will only load when the bank in which the preset is saved is active. Activate the “Default” button below the knob to make the current preset the default preset that loads when the current bank is activated.
Controls 25-31: Velocity and Timing Controls
34) Original Velocity: Use this control to set how much of the actual note-on (input) velocity will be factored into the selected note or notes' sounding (output) velocity. For example, set to zero to disregard note-on velocity altogether, to 100 to use the exact velocity of the key that was struck. Any value between one and 99 will scale the velocity against the other velocity controls listed below.
35) Random Velocity: Use this control to set how much randomization will be factored into the selected note or notes' sounding velocity. For example, set to zero to shut off the randomization, or set to 1 to 100 to use the desired amount. The randomly generated velocity will be scaled against the other velocity controls.
36) MIDI CCC# Control Over Velocity: Use this control to set how much of the value of the desired MIDI CC# (See item 28, below) will be factored into the selected note or notes' sounding velocity. For example, set to zero to disregard the MIDI CC# value, or 100 to allow the MIDI CC# to have full control over sounding velocity. The MIDI CC#-based velocity will be scaled against the other velocity controls.
37) Velocity CC#: Use this control to select the MIDI CC# whose value will affect velocity as described in item 28, above.
38) Velocity Range (min/max): Use these controls to set the lowest and highest sounding velocities that the selected note or notes can play. These controls allow you to, for example, make certain notes sound louder or quieter than others. One possible scenario is a fingerpicking pattern wherein beats one and three of each measure will sound with an accent. Sounding velocities will factor all of the velocity controls (items 25-28, above) and then select a proportionally scaled value from between the selected minimum and maximum values set using these controls.
39) Note Timing Randomization(min/max): Use these controls to set random timing offsets for the selected note or notes. Notes will play at a time corresponding to a) the note's location on the timeline, and b) to an offset from that time which is chosen from between these two controls' values. Useful for “humanizing” the timing of notes, these controls can be zero'd for a perfect performance, or set very high/low for a noticeably sloppy one. Set nominally to taste for a human sound.
40) Release Timing Randomization(min/max): Use these controls to set random timing offsets for the end (release) of

selected note or notes. Releases will play at a time corresponding to a) the end of the note's location on the timeline, and b) to an offset from that time which is chosen from between these two controls' values. Useful for “humanizing” the timing of releases, these controls behave as described in item 30, above, and are only applicable to terminating notes, since non-terminating notes do not release until a key is released or another note sounds.
Control 32: Return to Main View
41) Main View: Click this button to return to the main page of Wavelore GLIDE's interface.

2.3) About the Humanize Advanced Page
Concept:
Wavelore GLIDE's internal script contains an algorithm that models the behavior of a real slide guitarist. In real life, there is practically no such thing as playing perfectly in tune, but software instruments typically do just that. This inaccuracy is part of what makes traditional sampled instruments sound false. We recorded our samples using a special method that allows perfect tuning of the samples themselves, and programmed a way for the instrument to randomly “miss” notes (like a real player would), and then, after a short delay, to automatically adjust the tuning to somewhere closer to the intended tuning. We call this “humanization” of pitch. Different behaviors can be used for “new” notes (when you first hit a key on your keyboard, for upward slides, and for downward slides. Please see the screen-shot above and the relevant explanations of the controls for a detailed understanding of how pitch humanization works.
Controls:
1-2) Miss-By-Between Minimum/Maximum – New Note. The flattest and sharpest that a new note will sound, in cents (hundredths of a semitone). In the image above, the range is set to +/- 25 cents. This means that when you hit a key on your keyboard, the note(s) sounded will start somewhere between ¼ semitone flat and ¼ semitone sharp; The instrument will pick an amount from within this range randomly each time.
3-4) Wait-Between Minimum/Maximum – New Note. These two values (in milliseconds) represent the possible range of the virtual guitarist's “reaction time”, or the time it takes the player to hear the tuning of the note, and begin to correct himself. As with the “miss-by-between” values described above, the script will choose a random time duration by which to delay correction from within the range defined by these controls.
5-6) Correct to Within Minimum/Maximum – New Note. These variables define the accuracy of the virtual player's correction of the initial pitch offset. Notice that their values can exceed 100% (perfect correction), meaning that the script actually over-corrects the tuning. For example, if the script chooses an initial offset of -25 cents (¼ semitone flat), an 80% accuracy will correct by +20 cents, landing the pitch at -5 cents (1/20 semitone flat), where an accuracy of 120% will over-correct by +5 cents, landing at 1/20 semitone sharp.
7-8) Over-A-Period_Between Minimum/Maximum – New Note. These variables define the speed at which the
instrument corrects the pitch, once the correction has begun.
9-16) Upward Slide Settings. These 8 controls are identical to controls 1-8, but they govern how notes are missed and corrected when the note is arrived at via an upward (ascending slide).
17-24) Downward Slide Settings. These 8 controls are identical to controls 1-8, but they govern how notes are missed and corrected when the note is arrived at via an downward (descending slide).
25) Preset Menu: Use this menu to choose a factory preset from “A+” to “F”. Presets are named as if a grading system were applied to the player's accuracy, A+ being near-perfect, and F being very out-of tune. Generally, the lower the grade, the greater the initial offset, the wait time, and the time taken to correct, and the lesser the accuracy.
26) Main View: Click this button to return to the main page of Wavelore GLIDE's interface.
2.4) About the Slide Squeaks Advanced Page
Concept:
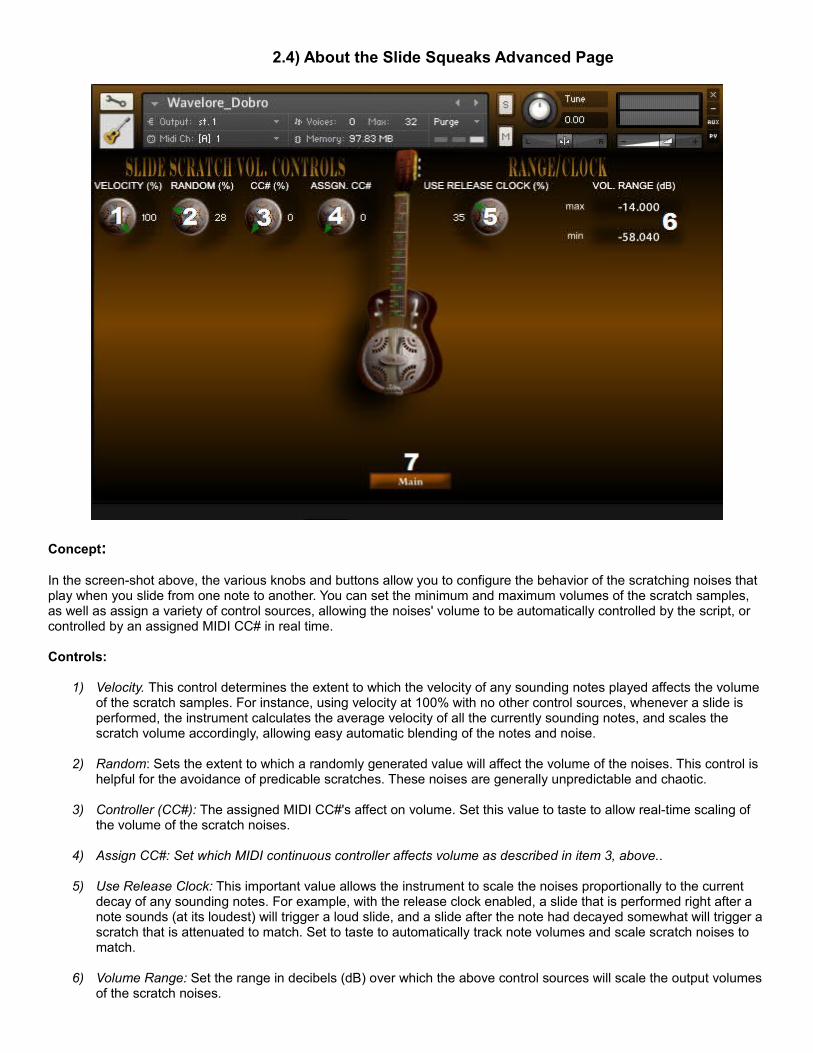
In the screen-shot above, the various knobs and buttons allow you to configure the behavior of the scratching noises that play when you slide from one note to another. You can set the minimum and maximum volumes of the scratch samples, as well as assign a variety of control sources, allowing the noises' volume to be automatically controlled by the script, or controlled by an assigned MIDI CC# in real time.
Controls:
1) Velocity. This control determines the extent to which the velocity of any sounding notes played affects the volume of the scratch samples. For instance, using velocity at 100% with no other control sources, whenever a slide is performed, the instrument calculates the average velocity of all the currently sounding notes, and scales the scratch volume accordingly, allowing easy automatic blending of the notes and noise.
2) Random: Sets the extent to which a randomly generated value will affect the volume of the noises. This control is helpful for the avoidance of predicable scratches. These noises are generally unpredictable and chaotic.
3) Controller (CC#): The assigned MIDI CC#'s affect on volume. Set this value to taste to allow real-time scaling of the volume of the scratch noises.
4) Assign CC#: Set which MIDI continuous controller affects volume as described in item 3, above..
5) Use Release Clock: This important value allows the instrument to scale the noises proportionally to the current decay of any sounding notes. For example, with the release clock enabled, a slide that is performed right after a note sounds (at its loudest) will trigger a loud slide, and a slide after the note had decayed somewhat will trigger a scratch that is attenuated to match. Set to taste to automatically track note volumes and scale scratch noises to match.
6) Volume Range: Set the range in decibels (dB) over which the above control sources will scale the output volumes of the scratch noises.

7) Main View: Click this button to return to the main page of Wavelore GLIDE's interface.
2.5) About the Vibrato Squeaks Advanced Page
This page looks nearly identical to the Slide Squeaks Advanced Page, but its parallel set of controls sets the behavior of the squeaks that trigger when you apply vibrato to any sounding notes. See section 2.4, above to review the elements of squeak behavior, and adjust vibrato squeak controls to taste in the same manner.
2.6) About the Pick/Release Advanced Page
Concept:
This page of controls gives greater access to specific ways in which attack and release noises are played. Here, you can set master release and pull-off volumes, assign controllers for release selection and buzzing samples, and set behavior of any attack noises that are triggered.
Controls:
1-4) Velocity, Random, and CC# settings for attack (pick) noise. These controls govern the volume scaling of pick noises in the same way that items 1-4 in section 2.4 above do so for scratch samples. See above.
5) Pick Noise Volume Range: These are the minimum and maximum volumes, defining the range in decibels (dB) over which the controls specified in items 1-4 will scale the volume of pick noises.
6) Wait Range: When a note is played softly, there is usually a longer delay between pick noise and the actual sounding of the note, where louder playing invokes a shorter delay. These controls specify the range of durations over which a note's velocity will scale the delay between noise and note.
NOTE: Long delays will likely introduce a sluggish feeling to the response of the instrument where a sequence

which uses a lot of pick noises is played. Keeping these values low will sound more realistic and feel more immediately responsive. You can also switch pick noise off altogether in the main page, or reduce the amount of pick noise by editing the sequence.
7) Release Master Volume: Set to taste to make release samples blend to your liking.
8) Release Selector CC#: Assign a MIDI continuous controller to allow real-time control over which type of release samples is played when a key is released, or a sequence is stopped. There are several cases in which a release is played, and each will use the CC# slightly differently:
• A sequenced note is “terminating”: This case assumes that other notes in the sequence are still playing, and therefore the only way the note can stop is by pick damping, where the pick stops the note without touching other strings. This means there is no control over the type of release sample when a note is given terminating status.
• The player releases the key that is triggering the sequence, and that key is G2, the open strings: This case gives two options for release type, pick damp and palm damp, since it's not possible to use a slide damp on an open string. CC# values below 64 will select a pick damp, values of 64 or higher will select a palm damp.
• The player releases the key that is triggering the sequence, and that key is not G2: This case gives three options for release type, pick damp and palm damp and slide damp, since non-open notes can release by lifting the slide, in addition to releasing by pick or palm. A CC# value of 0 will select a pick damp, values of 1-126 will select a palm damp, and a value of 127 will select a slide damp.
• Player plays legato from G2 upward: This case is the same as the second case, above, but the currently playing sequence is interrupted with releases of any wounding notes before the sequence is re-started from the beginning at the new pitch level. Pick damps (0-63) and palm damps (64-127) are the only possibility here, for the same reason as in case 2.
9) Buzz CC#: Assign your preferred MIDI CC# for triggering buzzy samples. When the selected CC# is set to a value of 127, any notes that sound with the slide (non-open strings) will buzz.
10) Pull-Off Master Volume: Like release master volume, above, but governs the overall level of pull-offs, which are sounded when playing legato from a non-open note (G#2 to G3) to G2. Set to taste.
11) Main View: Click this button to return to the main page of Wavelore GLIDE's interface.

2.7) About the Room Advanced Page
Concept:
The screen-shot above shows GLIDE's advanced controls for room sound and guitar tone. There are many possible combinations of room type, length, wet/dry mix, and equalization. Experiment freely, and re-save the instrument to keep your favorite settings (You only need to do so in standalone mode, as your DAW will save these settings when you save a project)
Controls:
1) Room Type: Offers three choices of room: Club (Small), Hall(Medium), and Bunker (Large).
2) Room Tone: Use this control to brighten or darken the tone of the reflections from the selected room.
3) Room Size: Use this control to scale the perceived size of the selected room. Together with the ER amount (below), room type, and wet/dry controls, this control allows a wide variety of perceived sizes and microphone distances.
4) Wet/Dry: Use this control to mix the room reflections with the dry sound of the guitar for even more spacial options.
5) ER Amount: this control sets the length of the early reflections, greatly influencing the perceived distance of the listener from the guitar. Set this control low for a close and intimate sound, higher for greater distance.
6) ER Tone: Reduce this control to values around 60-80 to apply a low-pass filter to the body of the guitar and the early reflections, resulting in a more mellow overall sound.
7) Low EQ: Use this control to attenuate low frequencies in the guitar for brightening the sound and reducing and unwanted “boom”

8) Mid EQ: Use this control to filter any unwanted mid-range frequencies from the guitar, resulting in a more “scooped” tone.
9) High EQ: Use this control to reduce high frequencies in the guitar, resulting in a more mellow tone – similar to item 6, above.
10) Notch 1: This is a narrow-band filter that is specially tune to a resonant low-frequency in the guitar. Pull this control down to taste, to reduce any unwanted boom. Specifically useful if you are playing a lot of samples close to the bridge, as these tend to contain a more of this frequency on their initial attack. Note that this feature is basically deprecated in version 1.1; You can tune this frequency individually for each articulation, as described in section 2.8: About the Advanced Velocity Settings Page.
11) Notch 2: This filter is similar to item 10, above, but is tuned to a specific high-mid frequency and is useful for reducing unwanted brightness without applying any of the other filters, which can possibly remove more high frequencies than desired.
12) Main View: Click this button to return to the main page of Wavelore GLIDE's interface.
2.8) About the Advanced Velocity Settings Page
Concept:
GLIDE contains samples picked from three different locations along the length of each guitar string, and each of these variations is reproduced with and without slide buzz, totaling six different articulations. Each of these articulations contains differing amounts of low-end emphasis due to the recording techniques used. While this phenomenon is natural, it caused, in version 1.0 of the instrument, some difficulty balancing the velocity response of all the articulations relative to one another.
Controls:
1) Global Velocity Curve: In addition to the ability to draw your own curve, which is automatically saved, there are a couple of hidden functions here: The first is that you can set a linear velocity response by holding SHIFT while

clicking anywhere in the table. Secondly, you can restore the factory slow curve by holding CTL while clicking anywhere in the table. Finally, you can restore your last hand-drawn curve by holding ALT while clicking anywhere in the table.
2) “Soft Tone” Max. Volume: The volume of the sample playback of a note that triggers at velocity 127 when CC#11 is set to zero. Reminder: This does not always mean key velocity, but what we call the “output velocity”, or the velocity that is chosen by the script for a given note in the on-board sequencer using that note's min/max, randomization, and CC settings.
3) “Soft Tone” Min Volume: The volume of the sample playback of a note that triggers at velocity 1. As above, the actual triggered velocity is sequencer dependent.
4) “Soft Tone” filter band attenuation: At zero, no attenuation is applied to the sample, as in the particular control labeled above. Looking across the row, you'll see an increase in the attenuation as we get nearer the bridge, and/or buzzier. The filter band attenuation for each articulation is independent of velocity.
5-9) Same as above three controls for the other articulations: That is, as above for “mid tone” and “hard tone” respectively, as well for the buzzy variations.
Control 10: Return to Main View
10) Main View: Click this button to return to the main page of Wavelore GLIDE's interface.
Note that all these controls' values are stored in an external array in your Data folder, and applied to any instrument from the collection on loading. This feature was implemented on the assumption that once you find settings you like, you'll want them applied to the instrument whether it has 1 round-robin, eight round-robins, or any number in between.
2.9) About the Sustain Pedal Behavior Page

Concept:
New in version 1.1 of GLIDE is the ability to choose what the sustain pedal will do when pressed or released. In version 1.0, the pedal would “freeze” a sequence, but now it can restart the same sequence, compile the whole pattern as a chord, mute notes while the sequence continues, make certain strings sound at open pitch (regardless of the others), or perform more traditional sustaining functions.
Controls:
1) Sustain Notes: With this box checked, releasing all keys while the pedal is held will cause any currently sounding notes to sustain until the pedal is released.
2) Non-Terminate → End: With this box checked, any notes set to never terminate in the sequencer will become notes that stop at their endpoints.
3) Terminate → Sustain: With this box checked, any notes set to terminate in the sequencer will become non-terminating notes.
4) Sustain Sequence: Check this box to allow the continuation of a sequence's playback when all keys are released with the pedal down. Note that this is not the same as continuing to hold a key, as you can no longer perform portamento; New notes struck will simply stop the current playback with release samples and invoke a new execution of the phrase/loop. That is, you still need to use two fingers to play a slide.
5) Stop All Notes: Any currently sounding notes will cut off with releases at the moment the pedal is depressed, but the sequence will continue to play regularly whether you continue to hold the pedal or not. Try playing a picking pattern sequence and tapping the pedal on 2+4 or 1+3; You'll hear the effect of the currently sounding samples cutting short for a staccato effect.
6) Freeze Sequence: Note that if a sequence is started with the pedal already depressed, the script will simply play the first note of the sequence and then freeze.
7) Compile As One Shot: This box allows the pedal to freeze playback, but also allows it to recompile the notes in the sequence without any time-line differences; Time randomization of notes still plays a role, so sequences that use such settings will have slight differences in note times, but this feature basically uses the pedal to transform patterns into chords. Note that when “compile as one shot” is invoke with the pedal, any CC control of note velocity is bypassed, since the script assumes a one-shot is something you would control via note-on velocity rather than continuous control. Try it on any arpeggio, pattern, or two-string tremolo.
8) Re-Trigger: Restarts the current sequence when the pedal is depressed. The same function can also be fulfilled (as in version 1.0) by re-striking the active key-switch while still holding the note that triggered playback, so this feature's main intention is for triggering playback of the recompiled sequence from 7), above.
9) Restart On Release: Originally intended for use in conjunction with the freeze and compile features, restarting a sequence on pedal release did not present a reason to make it exclusively available when those were enabled, so it can be used to the exclusion of any other feature.
10) Lock Strings To Open: With this option enabled, pressing your pedal will force any strings selected (see below) to play not at the current pitch level, but at the open string exclusively. Use this feature to add harmonic variation by injecting open strings into phrases played at non-open pitch levels.
11) Open Strings to Allow: Select from groups of adjacent strings to be selected for lock-to-open status in real-time by the open string CC#, below. For instance, if you choose “Strings 1-3”, your controller will select from three options (string 1, strings 1+2, strings 1+2+3).
12) Open String Selector CC#: Choose which controller is used for dynamically controlling which strings are locked to open on depression of the sustain pedal. For example, if “Open Strings To Allow” is set to strings 1-3, this controller will be split into three ranges, which will allow string one, strings one and two, or strings one, two, and three to lock to open position, respectively. See 13), below.
13) Lock-To-Open Display: This strip represents the range of your open string selector CC#, and is split up into colored zones depending on how many options are available (chosen from #11, above); For example, if you set the menu to strings 1-3, this means that the selector CC# can set the strings that can be locked to open as a)

string one, b) strings one and two, or c) strings one, two and three. In this case, the strip is divided into three ranges: CC value of 1, CC values 2-126, and CC value 127, where each range sets one of the three possible states. The uneven division allows the easiest access to all three settings. As you move your assigned controller, the pointer shows where the controller value currently resides along its range, and displays text that says which strings can be locked to open. Regardless of the CC# value, remember that no strings will lock to open unless a) the pedal is depressed, and b) the “Lock Strings to Open” check-box is enabled.
Control 14: Return to Main Page
14) Main View: Click this button to return to the main page of Wavelore GLIDE's interface.
2.10) Saving Your Changes
If you've gotten this far in the manual, you're probably familiar with all the controls available for this instrument and how to use them, and your probably discovered some sounds you like (We sure hope you have!). Once you've made changes that you like, you need to save the instrument in order to recall them! Saving the instrument is best done under a new filename (so you keep the factory settings, just in case), and is done from the “files” menu at the top of Kontakt's interface. Choose “Save As...”, type a new file name, and make sure you select “patch only” from the save mode option at the bottom of the save dialog – if you choose patch + samples, Kontakt will write a redundant set of identical samples to a new samples folder, doubling the size of the library.
Once you've saved the instrument, all your effects and performance configuration tweaks will be instantly recall-able!
3) Where to Get More Help
At Wavelore, we consider it our duty to ensure that you have the best possible experience with our products and support.
If you’re having trouble, e-mail us and we’ll help you!! We’re at:
There is also a support section on our website which will contain updates to the product as they become available, and currently contains links to a number of useful resources.
Appendix A: Factory Sequencer Banks and Patches
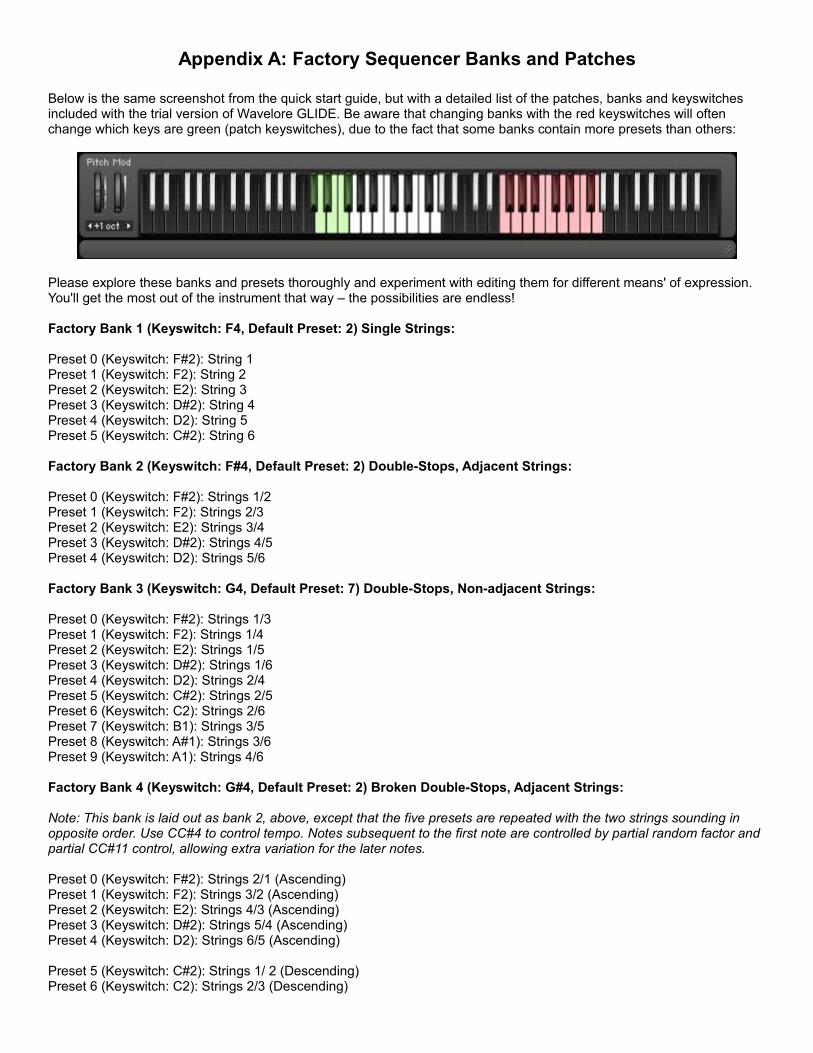
Below is the same screenshot from the quick start guide, but with a detailed list of the patches, banks and keyswitches included with the trial version of Wavelore GLIDE. Be aware that changing banks with the red keyswitches will often change which keys are green (patch keyswitches), due to the fact that some banks contain more presets than others:
Please explore these banks and presets thoroughly and experiment with editing them for different means' of expression. You'll get the most out of the instrument that way – the possibilities are endless!
Factory Bank 1 (Keyswitch: F4, Default Preset: 2) Single Strings:
Preset 0 (Keyswitch: F#2): String 1Preset 1 (Keyswitch: F2): String 2Preset 2 (Keyswitch: E2): String 3Preset 3 (Keyswitch: D#2): String 4Preset 4 (Keyswitch: D2): String 5Preset 5 (Keyswitch: C#2): String 6
Factory Bank 2 (Keyswitch: F#4, Default Preset: 2) Double-Stops, Adjacent Strings:
Preset 0 (Keyswitch: F#2): Strings 1/2Preset 1 (Keyswitch: F2): Strings 2/3Preset 2 (Keyswitch: E2): Strings 3/4Preset 3 (Keyswitch: D#2): Strings 4/5Preset 4 (Keyswitch: D2): Strings 5/6
Factory Bank 3 (Keyswitch: G4, Default Preset: 7) Double-Stops, Non-adjacent Strings:
Preset 0 (Keyswitch: F#2): Strings 1/3Preset 1 (Keyswitch: F2): Strings 1/4Preset 2 (Keyswitch: E2): Strings 1/5Preset 3 (Keyswitch: D#2): Strings 1/6Preset 4 (Keyswitch: D2): Strings 2/4Preset 5 (Keyswitch: C#2): Strings 2/5Preset 6 (Keyswitch: C2): Strings 2/6Preset 7 (Keyswitch: B1): Strings 3/5Preset 8 (Keyswitch: A#1): Strings 3/6Preset 9 (Keyswitch: A1): Strings 4/6
Factory Bank 4 (Keyswitch: G#4, Default Preset: 2) Broken Double-Stops, Adjacent Strings:
Note: This bank is laid out as bank 2, above, except that the five presets are repeated with the two strings sounding in opposite order. Use CC#4 to control tempo. Notes subsequent to the first note are controlled by partial random factor and partial CC#11 control, allowing extra variation for the later notes.
Preset 0 (Keyswitch: F#2): Strings 2/1 (Ascending)Preset 1 (Keyswitch: F2): Strings 3/2 (Ascending)Preset 2 (Keyswitch: E2): Strings 4/3 (Ascending)Preset 3 (Keyswitch: D#2): Strings 5/4 (Ascending)Preset 4 (Keyswitch: D2): Strings 6/5 (Ascending)
Preset 5 (Keyswitch: C#2): Strings 1/ 2 (Descending)Preset 6 (Keyswitch: C2): Strings 2/3 (Descending)

Preset 7 (Keyswitch: B1): Strings 3/4 (Descending)Preset 8 (Keyswitch: A#1): Strings 4/5 (Descending)Preset 9 (Keyswitch: A1): Strings 5/6 (Descending)
Factory Bank 5 (Keyswitch: A4, Default Preset: 7) Broken Double-Stops, Non-adjacent Strings:
Note: This bank is laid out as bank 3, above. Use CC#4 to control tempo. Since there are already 10 presets, there is no reversal of string order included, but you can edit the sequence and re-save if descending order is needed. Notes subsequent to the first note are controlled by partial random factor and partial CC#11 control, allowing extra variation for the later notes.
Preset 0 (Keyswitch: F#2): Strings 1/3Preset 1 (Keyswitch: F2): Strings 1/4Preset 2 (Keyswitch: E2): Strings 1/5Preset 3 (Keyswitch: D#2): Strings 1/6Preset 4 (Keyswitch: D2): Strings 2/4Preset 5 (Keyswitch: C#2): Strings 2/5Preset 6 (Keyswitch: C2): Strings 2/6Preset 7 (Keyswitch: B1): Strings 3/5Preset 8 (Keyswitch: A#1): Strings 3/6Preset 9 (Keyswitch: A1): Strings 4/6
Factory Bank 6 (Keyswitch: A#4, Default Preset: 2) Tremolos, Adjacent Strings:
Note: These tremolos use CC#11 to control both tempo and dynamics, in addition to the global factory control of picking timbre. You can reassign any or all of these three controllable elements for freer control of the overall expression. As they exist in their factory state, a great deal of expression is already available under a single CC#.
Preset 0 (Keyswitch: F#2): Strings 1/2Preset 1 (Keyswitch: F2): Strings 2/3Preset 2 (Keyswitch: E2): Strings 3/4Preset 3 (Keyswitch: D#2): Strings 4/5Preset 4 (Keyswitch: D2): Strings 5/6
Factory Bank 7 (Keyswitch: B4, Default Preset: 7) Tremolos, Non-adjacent Strings:
Note: This bank is laid out as bank 3 and 5, above. As in Bank 6, above, the tremolos use CC#11 to control both tempo and dynamics, in addition to the global factory control of picking timbre. You can reassign any or all of these three controllable elements for freer control of the overall expression. As they exist in their factory state, a great deal of expression is already available under a single CC#.
Preset 0 (Keyswitch: F#2): Strings 1/3Preset 1 (Keyswitch: F2): Strings 1/4Preset 2 (Keyswitch: E2): Strings 1/5Preset 3 (Keyswitch: D#2): Strings 1/6Preset 4 (Keyswitch: D2): Strings 2/4Preset 5 (Keyswitch: C#2): Strings 2/5Preset 6 (Keyswitch: C2): Strings 2/6Preset 7 (Keyswitch: B1): Strings 3/5Preset 8 (Keyswitch: A#1): Strings 3/6Preset 9 (Keyswitch: A1): Strings 4/6
Factory Bank 8 (Keyswitch: C5, Default Preset: 2) Chords with 3 Notes, Adjacent Strings: Preset 0 (Keyswitch: F#2): Strings 1/2/3Preset 1 (Keyswitch: F2): Strings 1/2/3Preset 2 (Keyswitch: E2): Strings 3/4/5Preset 3 (Keyswitch: D#2): Strings 4/5/6

Factory Bank 9 (Keyswitch: C#5, Default Preset: 0) Chords with 3 Notes, Mixed String Spacing:
Note: These presets consist of every possible 3-string combination, resulting in a mixture of adjacent and non-adjacent string usage. The lowest presets (keyswitches closest to the instrument's playing range) use string one, proceeding downward through all possible combinations using that string. Once all are exhausted, the presets proceed to all possible combinations using string two etc. Preset 0 (Keyswitch: F#2): Strings 1/2/4Preset 1 (Keyswitch: F2): Strings 1/2/5Preset 2 (Keyswitch: E2): Strings 1/2/6Preset 3 (Keyswitch: D#2): Strings 1/3/4Preset 4 (Keyswitch: D2): Strings 1/3/5Preset 5 (Keyswitch: C#2): Strings 1/3/6Preset 6 (Keyswitch: C2): Strings 1/4/5Preset 7 (Keyswitch: B1): Strings 1/4/6Preset 8 (Keyswitch: A#1): Strings 1/5/6Preset 9 (Keyswitch: A1): Strings 2/3/5Preset 10 (Keyswitch: G#1): Strings 2/3/6Preset 11 (Keyswitch: G1): Strings 2/4/5Preset 12 (Keyswitch: F#1): Strings 2/4/6Preset 13 (Keyswitch: F1): Strings 2/5/6Preset 14 (Keyswitch: E1): Strings 3/4/6Preset 15 (Keyswitch: D#1): Strings 3/5/6
Factory Bank 10 (Keyswitch: D5, Default Preset: 2) Broken Triple-Stops, Adjacent Strings: Note: This bank is laid out as bank 8, above. Use CC#4 to control tempo. Notes subsequent to the first note are controlled by partial random factor and partial CC#11 control, allowing extra variation for the later notes.
Preset 0 (Keyswitch: F#2): Strings 1/2/3Preset 1 (Keyswitch: F2): Strings 1/2/3Preset 2 (Keyswitch: E2): Strings 3/4/5Preset 3 (Keyswitch: D#2): Strings 4/5/6
Factory Bank 11 (Keyswitch: D#5, Default Preset: 0) Broken Triple-Stops, Mixed String Spacing: Note: This bank is laid out as bank 9, above. Use CC#4 to control tempo. Notes subsequent to the first note are controlled by partial random factor and partial CC#11 control, allowing extra variation for the later notes.
Preset 0 (Keyswitch: F#2): Strings 1/2/4Preset 1 (Keyswitch: F2): Strings 1/2/5Preset 2 (Keyswitch: E2): Strings 1/2/6Preset 3 (Keyswitch: D#2): Strings 1/3/4Preset 4 (Keyswitch: D2): Strings 1/3/5Preset 5 (Keyswitch: C#2): Strings 1/3/6Preset 6 (Keyswitch: C2): Strings 1/4/5Preset 7 (Keyswitch: B1): Strings 1/4/6Preset 8 (Keyswitch: A#1): Strings 1/5/6Preset 9 (Keyswitch: A1): Strings 2/3/5Preset 10 (Keyswitch: G#1): Strings 2/3/6Preset 11 (Keyswitch: G1): Strings 2/4/5Preset 12 (Keyswitch: F#1): Strings 2/4/6Preset 13 (Keyswitch: F1): Strings 2/5/6Preset 14 (Keyswitch: E1): Strings 3/4/6Preset 15 (Keyswitch: D#1): Strings 3/5/6
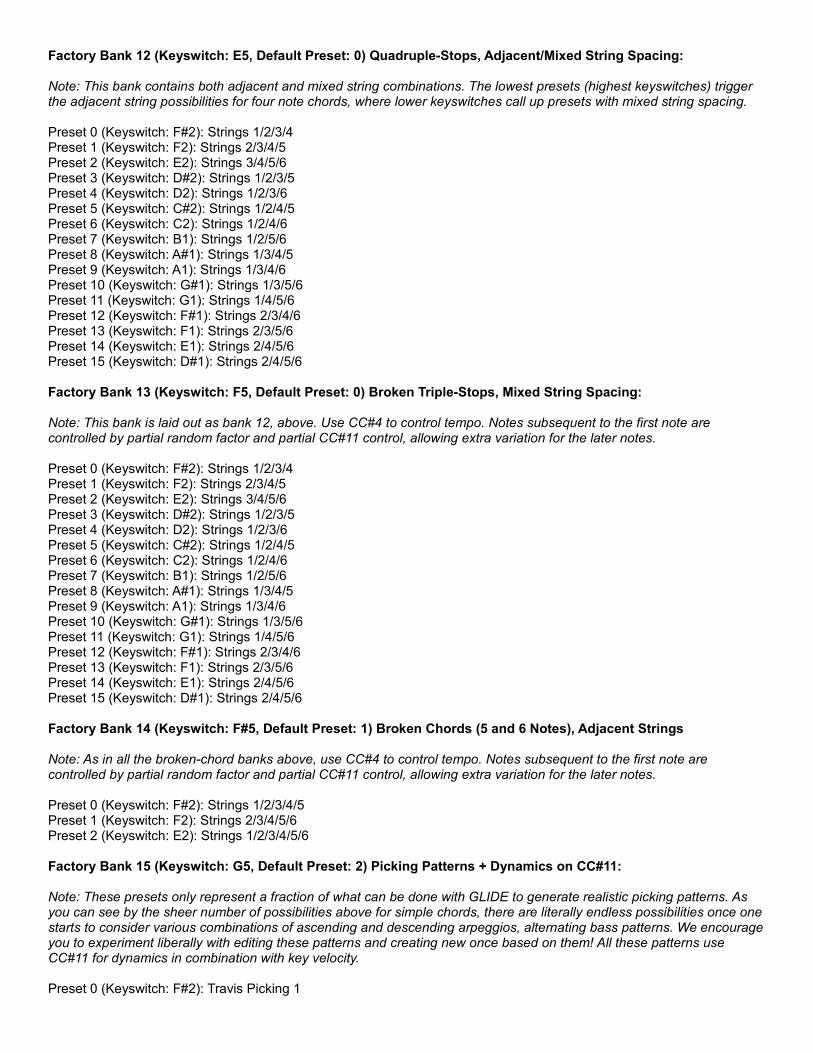
Factory Bank 12 (Keyswitch: E5, Default Preset: 0) Quadruple-Stops, Adjacent/Mixed String Spacing: Note: This bank contains both adjacent and mixed string combinations. The lowest presets (highest keyswitches) trigger the adjacent string possibilities for four note chords, where lower keyswitches call up presets with mixed string spacing.
Preset 0 (Keyswitch: F#2): Strings 1/2/3/4Preset 1 (Keyswitch: F2): Strings 2/3/4/5Preset 2 (Keyswitch: E2): Strings 3/4/5/6Preset 3 (Keyswitch: D#2): Strings 1/2/3/5Preset 4 (Keyswitch: D2): Strings 1/2/3/6Preset 5 (Keyswitch: C#2): Strings 1/2/4/5Preset 6 (Keyswitch: C2): Strings 1/2/4/6Preset 7 (Keyswitch: B1): Strings 1/2/5/6Preset 8 (Keyswitch: A#1): Strings 1/3/4/5Preset 9 (Keyswitch: A1): Strings 1/3/4/6Preset 10 (Keyswitch: G#1): Strings 1/3/5/6Preset 11 (Keyswitch: G1): Strings 1/4/5/6Preset 12 (Keyswitch: F#1): Strings 2/3/4/6Preset 13 (Keyswitch: F1): Strings 2/3/5/6Preset 14 (Keyswitch: E1): Strings 2/4/5/6Preset 15 (Keyswitch: D#1): Strings 2/4/5/6
Factory Bank 13 (Keyswitch: F5, Default Preset: 0) Broken Triple-Stops, Mixed String Spacing: Note: This bank is laid out as bank 12, above. Use CC#4 to control tempo. Notes subsequent to the first note are controlled by partial random factor and partial CC#11 control, allowing extra variation for the later notes.
Preset 0 (Keyswitch: F#2): Strings 1/2/3/4Preset 1 (Keyswitch: F2): Strings 2/3/4/5Preset 2 (Keyswitch: E2): Strings 3/4/5/6Preset 3 (Keyswitch: D#2): Strings 1/2/3/5Preset 4 (Keyswitch: D2): Strings 1/2/3/6Preset 5 (Keyswitch: C#2): Strings 1/2/4/5Preset 6 (Keyswitch: C2): Strings 1/2/4/6Preset 7 (Keyswitch: B1): Strings 1/2/5/6Preset 8 (Keyswitch: A#1): Strings 1/3/4/5Preset 9 (Keyswitch: A1): Strings 1/3/4/6Preset 10 (Keyswitch: G#1): Strings 1/3/5/6Preset 11 (Keyswitch: G1): Strings 1/4/5/6Preset 12 (Keyswitch: F#1): Strings 2/3/4/6Preset 13 (Keyswitch: F1): Strings 2/3/5/6Preset 14 (Keyswitch: E1): Strings 2/4/5/6Preset 15 (Keyswitch: D#1): Strings 2/4/5/6
Factory Bank 14 (Keyswitch: F#5, Default Preset: 1) Broken Chords (5 and 6 Notes), Adjacent Strings Note: As in all the broken-chord banks above, use CC#4 to control tempo. Notes subsequent to the first note are controlled by partial random factor and partial CC#11 control, allowing extra variation for the later notes.
Preset 0 (Keyswitch: F#2): Strings 1/2/3/4/5Preset 1 (Keyswitch: F2): Strings 2/3/4/5/6Preset 2 (Keyswitch: E2): Strings 1/2/3/4/5/6
Factory Bank 15 (Keyswitch: G5, Default Preset: 2) Picking Patterns + Dynamics on CC#11:
Note: These presets only represent a fraction of what can be done with GLIDE to generate realistic picking patterns. As you can see by the sheer number of possibilities above for simple chords, there are literally endless possibilities once one starts to consider various combinations of ascending and descending arpeggios, alternating bass patterns. We encourage you to experiment liberally with editing these patterns and creating new once based on them! All these patterns use CC#11 for dynamics in combination with key velocity.
Preset 0 (Keyswitch: F#2): Travis Picking 1
Preset 1 (Keyswitch: F2): Travis Picking 2Preset 2 (Keyswitch: E2): Latin Picking 1 (These next three are fun on a I-bII progression)Preset 3 (Keyswitch: Eb2): Latin Picking 2Preset 4 (Keyswitch: D2): Latin Picking 3Preset 5 (Keyswitch: C#2): Ala Taj Mahal (see: http://www.youtube.com/watch?v=5SHHxMNkMl4 )
Last Updated: May 9, 2012
Copyright 2011-2012 Wavelore Instruments. KONTAKT is a registered trademark of NATIVE INSTRUMENTS Software Synthesis GmbH.
Related Documents