HD-HTGL/R5 Series User Manual 3 Defaults and Internal Drives...... 26 1 Introduction.................................. 2 2 Advanced Configuration ............ 12 ™

Welcome message from author
This document is posted to help you gain knowledge. Please leave a comment to let me know what you think about it! Share it to your friends and learn new things together.
Transcript
HD-HTGL/R5 SeriesUser Manual
3Defaults and Internal Drives ...... 26
1Introduction ..................................2
2Advanced Configuration ............12
™
H o w t o U s e t h i s M a n u a lIncluded in this manual are both basic and advanced instructions and information on the setup and usage of the TeraStation. Visit us online at www.buffalo-technology.com for additional resources and software to help you get the most out of your TeraStation.
Basic Terminologies• When referring to Windows computers, drive configurations are referenced as: C: - Hard Drive where program files are installed D: - CD-ROM Drive• Microsoft Windows Millennium Edition is referred to as Windows ME.• Microsoft Windows 98 Second Edition is referred to as Windows 98SE.• HD-HTGL is referred to as TeraStation.• HD-HLAN is referred to as LinkStation
Product Addition NoticeBuffalo Technology has added the following products to the TeraStation Series.
HD-H0.6TGL/R5HD-H1.6TGL/R5
- The usage and warranty statements for these products are the same asthose of the HD-H1.0TGL/R5
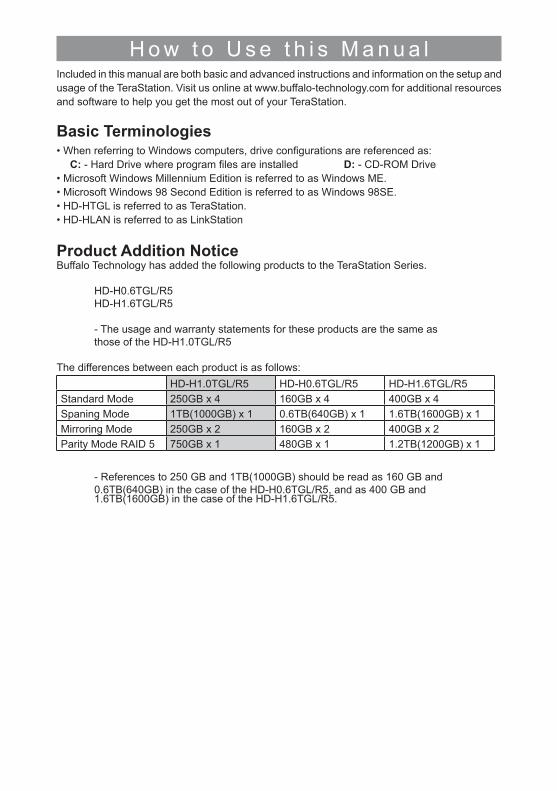
The differences between each product is as follows:HD-H1.0TGL/R5 HD-H0.6TGL/R5 HD-H1.6TGL/R5
Standard Mode 250GB x 4 160GB x 4 400GB x 4Spaning Mode 1TB(1000GB) x 1 0.6TB(640GB) x 1 1.6TB(1600GB) x 1Mirroring Mode 250GB x 2 160GB x 2 400GB x 2Parity Mode RAID 5 750GB x 1 480GB x 1 1.2TB(1200GB) x 1
- References to 250 GB and 1TB(1000GB) should be read as 160 GB and0.6TB(640GB) in the case of the HD-H0.6TGL/R5, and as 400 GB and1.6TB(1600GB) in the case of the HD-H1.6TGL/R5.

ContentsSpecial Notes ..................................................4Introduction ......................................................5Important Limitations .......................................7Launching the Browser Manager ..................12TeraStation Configurations ............................14Restoring Factory Defaults ............................25Factory Default Settings ................................26Protecting the RAID Array .............................27Should a Hard Drive Fail ...............................27Replacing a Hard Drive .................................28
Special Notes● The Gigabit Ethernet LAN interface is backward compatible with 1000BASE-T/100BASE-TX/
10BASE-T Ethernet LAN interfaces. It is not necessary to use only 1000BASE-T LAN hardware with the TeraStation.
● Group and User Level access can be customized for each Shared Folder you create on the TeraStation drives. By default, Shares will be created with full access to every user, so to maximize the security of a new Shared Folder, select Groups and Users that should be allowed access at the time the Share is created.
● Should there be no disk access over a 30 minute period of time, TeraStation will safely stop the revolution of the internal drives to preserve disk life. Should an access be requested, the drives will automatically begin operating again - creating a minimal delay to allow for safe start up of the disk.
● USB 2.0/1.1 ports are located on the front and rear panel of the TeraStation. External USB drives can be attached to expand the total capacity of network attached storage or be used as backup destinations for the contents of the internal hard drives. If a USB printer is attached, the TeraStation can act as a print server to make it available to other network devices.
● TeraStation offers four Disk Modes for the internal drives. The type of mode selected should cor-respond to the desired usage and capacity of the network available storage.Standard Mode (250GB×4)Each drive is recognized as a single 250 GB share. Should a drive failure occur, the contents of the drive will be lost. Therefore, in Standard Mode, it is vital to implement an effective backup pro-cedure to another TeraStation or USB drives if data loss due to drive failure is not acceptable.Spanning Mode (1TB×1)All four drives are recognized as a single 1000 GB share. Should a drive failure occur, the con-tents of all 4 drives will be lost. Therefore, in Spanning Mode, it is vital to implement an effective backup procedure to another TeraStation or USB drives if data loss due to drive failure is not acceptable.Mirroring Mode RAID 1 (250GB×2)Two pairs are created from the 4 drives as two separate 250 GB shares. Data stored on each pair is mirrored automatically to the drive it is paired with. Therefore, should a single drive fail, data is not lost as it is also located on the mirrored drive of the pair. Drive replacement and rebuilding of the Mirror should occur as soon as possible though.Parity Mode RAID 5 (750GB×1)All four drives are recognized as a single 750 GB share. Using parity and striping data across all four drives, data can be salvaged in the event of a disk failure, but a failed drive should be replaced as soon as possible.
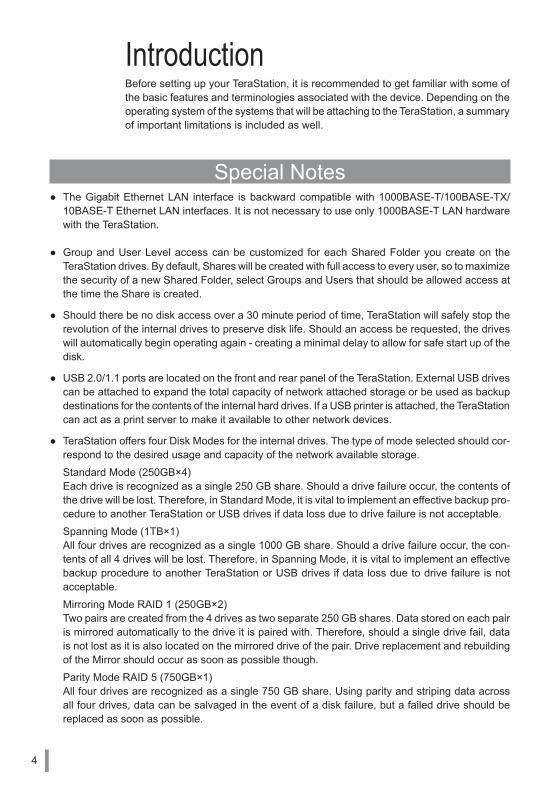
IntroductionBefore setting up your TeraStation, it is recommended to get familiar with some of the basic features and terminologies associated with the device. Depending on the operating system of the systems that will be attaching to the TeraStation, a summary of important limitations is included as well.
4
3
12
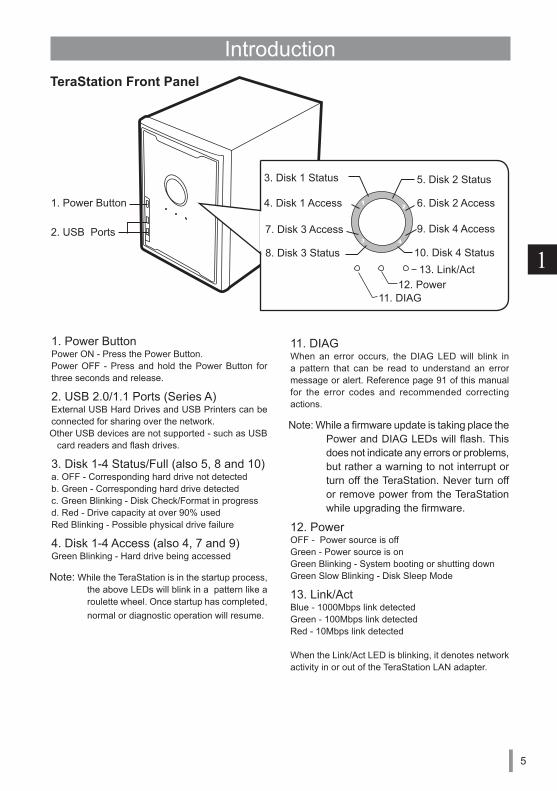
IntroductionTeraStation Front Panel
1. Power Button
2. USB Ports
11. DIAG When an error occurs, the DIAG LED will blink in a pattern that can be read to understand an error message or alert. Reference page 91 of this manual for the error codes and recommended correcting actions.
Note: While a firmware update is taking place the Power and DIAG LEDs will flash. This does not indicate any errors or problems, but rather a warning to not interrupt or turn off the TeraStation. Never turn off or remove power from the TeraStation while upgrading the firmware.
12. PowerOFF - Power source is offGreen - Power source is onGreen Blinking - System booting or shutting downGreen Slow Blinking - Disk Sleep Mode
13. Link/ActBlue - 1000Mbps link detectedGreen - 100Mbps link detectedRed - 10Mbps link detected
When the Link/Act LED is blinking, it denotes network activity in or out of the TeraStation LAN adapter.
1. Power ButtonPower ON - Press the Power Button.Power OFF - Press and hold the Power Button for three seconds and release.
2. USB 2.0/1.1 Ports (Series A)External USB Hard Drives and USB Printers can be connected for sharing over the network.Other USB devices are not supported - such as USB
card readers and flash drives.
3. Disk 1-4 Status/Full (also 5, 8 and 10)a. OFF - Corresponding hard drive not detectedb. Green - Corresponding hard drive detectedc. Green Blinking - Disk Check/Format in progressd. Red - Drive capacity at over 90% usedRed Blinking - Possible physical drive failure
4. Disk 1-4 Access (also 4, 7 and 9)Green Blinking - Hard drive being accessed
Note: While the TeraStation is in the startup process, the above LEDs will blink in a pattern like a roulette wheel. Once startup has completed, normal or diagnostic operation will resume.
12. Power13. Link/Act
3. Disk 1 Status
11. DIAG
4. Disk 1 Access
5. Disk 2 Status
6. Disk 2 Access
7. Disk 3 Access
8. Disk 3 Status
9. Disk 4 Access
10. Disk 4 Status
5

TeraStation Rear Panel
16. Internal Fan
14. Power Socket The connector for attaching the power cord to the TeraStation.
15. Power SwitchThe main power switch for the TeraStation. Once set to the ON position, the Power Button on the front panel of the TeraStation can be used for controlling the starting and shutdown of TeraStation.
Note: If the power switch is left in the OFF position for an extended period of time, the internal system clock of the TeraStation may reset to its default setting of November 1, 2004. The system time will need to be set again to keep the local system time accurate should this occur.
16. Internal Fan The internal fan will adjust its speed depending on the temperature of the TeraStation. To prevent possiible overheating, keep the fan clear and clean of any obstacles or dust accumulation.
17. INIT ButtonThe INIT switch is used to restore factory default settings on the TeraStation. Reference page 71 of this manual for further instructions on this process.
18. UPS InterfaceThe connector for attaching the TeraStation to a UPS Power Supply to allow safe shutdown of the TeraStation in the event of a power failure.
19. Gigabit LAN Port The connector for attaching the TeraStation to a network via Ethernet cable.
20. USB 2.0/1.1 Ports (Series A Connector) External USB Hard Drives and USB Printers can be connected for sharing over the network. Other USB devices are not supported - such as USB card readers and flash drives.
19. Gigabit LAN Port
20. USB 2.0/1.1 PortsSeries A Connector
18. UPS Interface
14. Power Socket
15. Power Switch
OFF
ON
17. INIT Button
6
3
12
Important LimitationsNote: The following information is based on the status of the latest released firmware for TeraStation.
Future updates will be reflected in updated manuals. For the latest firmware available, check our company website at www.buffalotech.com.
● The writing of files greater than or equal to 2 GB is prevented due to operating system limitations with Windows 98SE/98/95 and Mac (AppleTalk) operating systems.
● The writing of files greater than or equal to 4 GB is prevented due to operating system limitations with the Windows Millennium operating system.
● File names and folder names should not contain more than 120 characters in their entire directory path to prevent errors when attempting to copy to them.
● TeraStation does not support the Hidden File attribute.
● Over extended periods of time, the set time of the TeraStation may slip behind and require the clock to be reset. To circumvent this behavior, use the NTP client feature which is explained fully on page 50 of this manual.
● When using Chinese characters in a Shared Folder or Workgroup name, there may be occasional problems with the name properly displayed. To circumvent this behavior, use non-Chinese char-acters when the behavior is displayed.
● The following terms are not allowed to be used as names when creating Users or Groups on the TeraStation:
root,bin,daemon,sys,adm,tty,disk,lp,sync,shutdown,halt,operator,nobody,mail,news,uucp,ftp,kmem,utmp,shadow,users,nogroup,all,none,hdusers,admin,guest
● The following terms are not allowed to be used as names when creating Shared Folders on the TeraStation:
info,spool,usbdisk1,usbdisk2,usbdisk3,usbdisk4,lost+found,global,printers,homes,lp
● The following characters are not allowed to be included in the name used for a file or Shared Folder when using Mac OS (AppleTalk) devices with the TeraStation.
? [ ] / \ = + < > ; : ” , | *
7
● For Users that will be accessing the TeraStation Shared Folders from Windows 98SE/98/95 com-puters, do not create a password longer than 15 alphanumerical characters. For Users that will be accessing the TeraStation Shared Folders from Mac OS computers, do not create a password longer than 9 alphanumerical characters.
● Though the TeraStation uses a Journaling File System to prevent data loss in the event of a power failure, there is a remote possibility of the following phenomenon occurring during a power failure during a file copy:
•File attributes can be lost for a file that was midway through copying at the point of the power failure.
•A hard drive error may be indicated falsely that requires the TeraStation to be rebooted and a Disk Check run and a re build of any RAID arrays.
•A file that was midway through copying at the point of power failure may not be able to be deleted unless the TeraStation is restarted.
● The status of the internal drive capacities, capacity used and available space may not add up to the total size of the hard drive. This is due to some of the drive space being used for system information.
● When a Windows user name and password is used to log into a Windows computer or domain, the same user name and password should be used when creating the user’s account on the TeraStation. Otherwise, problems accessing Shared Folders may occur.
● When copying a file that uses superscript in its file name (common with some international character sets), the date and time attributes may not be properly set on the TeraStation for that particular file.
● The drive volume indicated from the TeraStation browser interface and the drive volume indicated by Windows may vary.
● When using Windows ME/98SE/98/95 operating system, do not use the Windows Family Logon with TeraStation. Instead, use the Windows Network Login service with an identical user name and password created for the user on the TeraStation.
● The Disk Backup and Disk Sleep services can not be used concurrently on the TeraStation. To avoid conflicts, only use one of these services on your TeraStation. The TeraStation will still stop the spinning of its internal disks if Disk Backup is used and there is 30 minutes of non-activity.
● If a Mac OS user logs on to a Microsoft Windows Domain, the same credentials can not be used for the user name and password to access a TeraStation.
● File and directory attributes can not be modified by an FTP client when the TeraStation FTP server is enabled. To modify attributes, use the browser management instructions shown on page 75 of this manual.
● When using Jumbo Frame, the switch must support the Jumbo Frame standard designated (4100 bytes/7418 bytes). For further information, reference page 79 of this manual.
● When backing up one TeraStation to another as shown on page 72, the same Ethernet frame size must be used on both TeraStations as shown on page 51 of this manual.
● If the Disk Sleep mode is enabled while a backup is in progress, the backup job in progress will complete and then be disabled. No further backups will occur unless Disk Sleep mode is dis-abled.
● If the Disk Mode or Shared Folders are moved or deleted after a backup has already been sched-uled, be sure to modify the scheduled backups to reflect the change to prevent loss of data due to failed backups.
8
3
12
Mac OS Limitations● When using Mac OS X (post 10.2 with AppleTalk) without SMB, do not use Japanese characters
in folder or file names to prevent errors accessing the data over a network.
● Mac OS 9 and Mac OS X can not see files on the network with names made up of over 32 char-acters.
● Occasionally, when a file is accessed by a Mac OS computer within a Shared Folder, an informa-tion file will be created in the same folder. If the file is then deleted by a Windows OS computer, the original file may no longer be accessible by Mac OS computers.
● Updating the TeraStation’s firmware from a Macintosh computer is not possible.
● The AppleZone given out by default by the AppleShare Server is used by the TeraStation. It is not possible to change the AppleZone that the TeraStation joins.
9
USB Limitations
● Only external USB hard drives and USB printers are supported by TeraStation.
● If a USB peripheral does not support Plug and Play, it may be necessary to turn the TeraStation off when plugging in or unplugging the USB peripheral and restarting.
● Up to four external USB hard drives can be connected to TeraStation concurrently. For best performance, use Buffalo external hard drives.
● If a USB hard drive has two partitions, only the first partition will be detected by TeraStation.
● If a USB hard drive is connected to TeraStation formatted as FAT16/32, the following restrictions apply:
• The drive can not be used as a Shared Folder. The available space can only be used as a backup destination target.• Backups of files greater than or equal to 2 GB can not be performed.• Files created by Mac OS X such as DS_Store can not be backed up to the FAT16/32 USB drive and errors may occur.
● Only one printer can be connected to the TeraStation via USB at a time.
● An attached printer can not use the following when being shared by TeraStation: • WPS (Windows Printing System) Printer • Non-PostScript Printer (Macintosh) • Duplex-only communication (Two-Way)
Errors may occur with some duplex printers, yet printing will still complete. Also some features such as the printer reporting low ink levels over the network may not function due to not sup-porting Two-Way communication.
● When a multi-function (all-in-one) printer is attached to the TeraStation, only the printing function will work. Features like fax or scanning will not function.
● Some attributes may not be included with files and folders when backed up to a USB drive for-matted with FAT32.
10
3
12
Microsoft Domain Limitations
● If TeraStation is to be part of a Windows Domain, the TeraStation should be added beforehand on the Domain Controller with a compute account in Server Manager.
● TeraStation does not support digitalized SMB packets. Depending on some settings with Windows 2003 Server, the TeraStation may not be able to join the domain.
● Macintosh users will not be able to verify the TeraStation as a domain member.
● FTP connections will not be able to verify the TeraStation as a domain member.
● If the TeraStation name is changed, the new name will need to be registered with the Domain Controller as a member of the domain by giving it a computer account.
● If the access certification of the TeraStation to a domain expires or becomes invalid, the process of joining the TeraStation to the domain will need to be redone.
● If a user name for a domain exceeds 20 characters, TeraStation will accept the user name as shortened to only 20 characters.
● TeraStation does not conform to domains after Windows 2000 native mode. Dynamic updates are not supported.
● Only 1000 user names can be acquired by TeraStation from a domain.
● Groups can not be acquired by TeraStation from a domain. Only user names can be acquired and used for access restrictions to TeraStation resources.
UPS Limitations
● TeraStation can not receive a shutdown signal from an attached UPS until at least 10 seconds have passed since it completed its startup process.
11
Advanced Confi gurationTeraStation is fully confi gurable from any browser. If the IP Address is known, it can be simply entered in the address bar of your browser. Otherwise, use the TeraStation Client Utility to launch your management session.
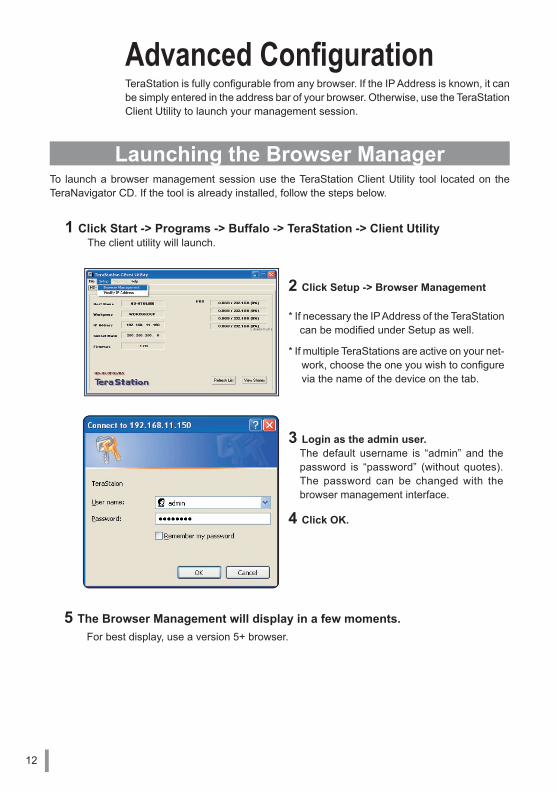
Launching the Browser ManagerTo launch a browser management session use the TeraStation Client Utility tool located on the TeraNavigator CD. If the tool is already installed, follow the steps below.
1 Click Start -> Programs -> Buffalo -> TeraStation -> Client UtilityThe client utility will launch.
3 Login as the admin user.The default username is “admin” and the password is “password” (without quotes). The password can be changed with the browser management interface.
4 Click OK.
* If necessary the IP Address of the TeraStation can be modifi ed under Setup as well.
2 Click Setup -> Browser Management
* If multiple TeraStations are active on your net-work, choose the one you wish to confi gure via the name of the device on the tab.
5 The Browser Management will display in a few moments.For best display, use a version 5+ browser.
12
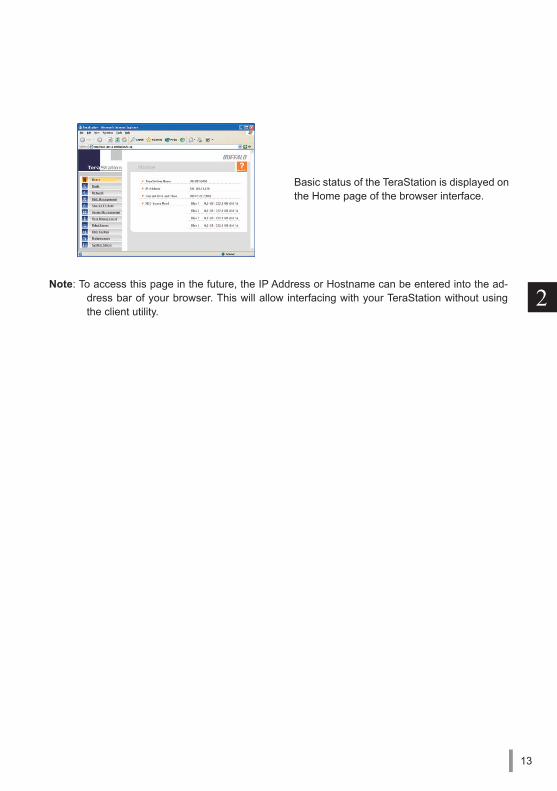
Note: To access this page in the future, the IP Address or Hostname can be entered into the ad-dress bar of your browser. This will allow interfacing with your TeraStation without using the client utility.
Basic status of the TeraStation is displayed on the Home page of the browser interface.
13
2
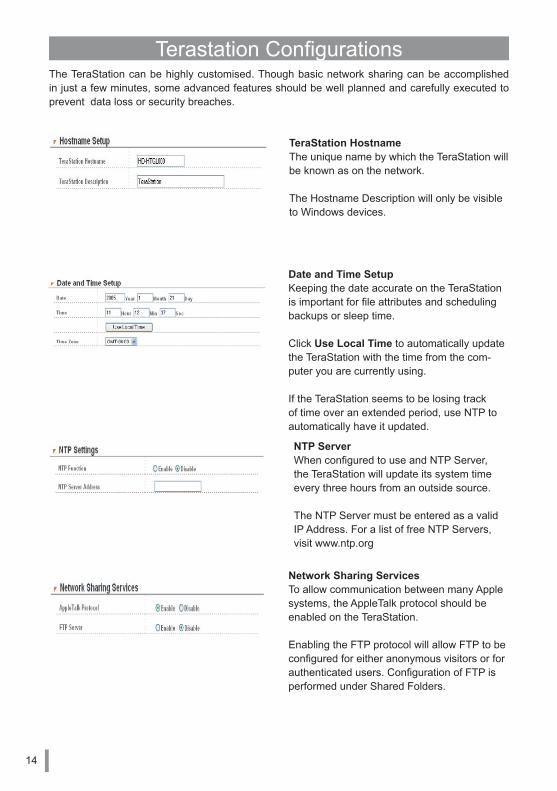
Terastation Confi gurationsThe TeraStation can be highly customised. Though basic network sharing can be accomplished in just a few minutes, some advanced features should be well planned and carefully executed to prevent data loss or security breaches.
Date and Time SetupKeeping the date accurate on the TeraStation is important for fi le attributes and scheduling backups or sleep time.
Click Use Local Time to automatically update the TeraStation with the time from the com-puter you are currently using.
If the TeraStation seems to be losing track of time over an extended period, use NTP to automatically have it updated.
Network Sharing ServicesTo allow communication between many Apple systems, the AppleTalk protocol should be enabled on the TeraStation.
Enabling the FTP protocol will allow FTP to be confi gured for either anonymous visitors or for authenticated users. Confi guration of FTP is performed under Shared Folders.
NTP ServerWhen confi gured to use and NTP Server, the TeraStation will update its system time every three hours from an outside source.
The NTP Server must be entered as a valid IP Address. For a list of free NTP Servers, visit www.ntp.org
TeraStation HostnameThe unique name by which the TeraStation will be known as on the network.
The Hostname Description will only be visible to Windows devices.
14
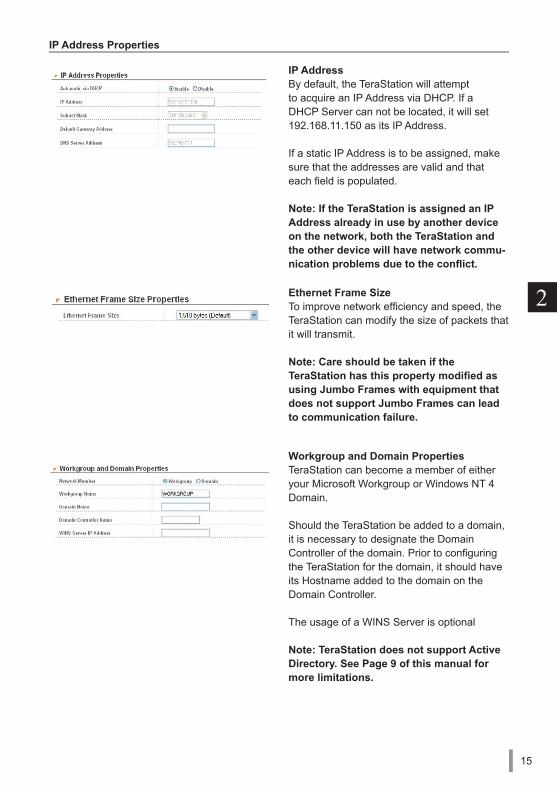
Ethernet Frame SizeTo improve network effi ciency and speed, the TeraStation can modify the size of packets that it will transmit.
Note: Care should be taken if the TeraStation has this property modifi ed as using Jumbo Frames with equipment that does not support Jumbo Frames can lead to communication failure.
IP Address Properties
IP AddressBy default, the TeraStation will attempt to acquire an IP Address via DHCP. If a DHCP Server can not be located, it will set 192.168.11.150 as its IP Address.
If a static IP Address is to be assigned, make sure that the addresses are valid and that each fi eld is populated.
Note: If the TeraStation is assigned an IP Address already in use by another device on the network, both the TeraStation and the other device will have network commu-nication problems due to the confl ict.
Workgroup and Domain PropertiesTeraStation can become a member of either your Microsoft Workgroup or Windows NT 4 Domain.
Should the TeraStation be added to a domain, it is necessary to designate the Domain Controller of the domain. Prior to confi guring the TeraStation for the domain, it should have its Hostname added to the domain on the Domain Controller.
The usage of a WINS Server is optional
Note: TeraStation does not support Active Directory. See Page 9 of this manual for more limitations.
15
2
Disk Management
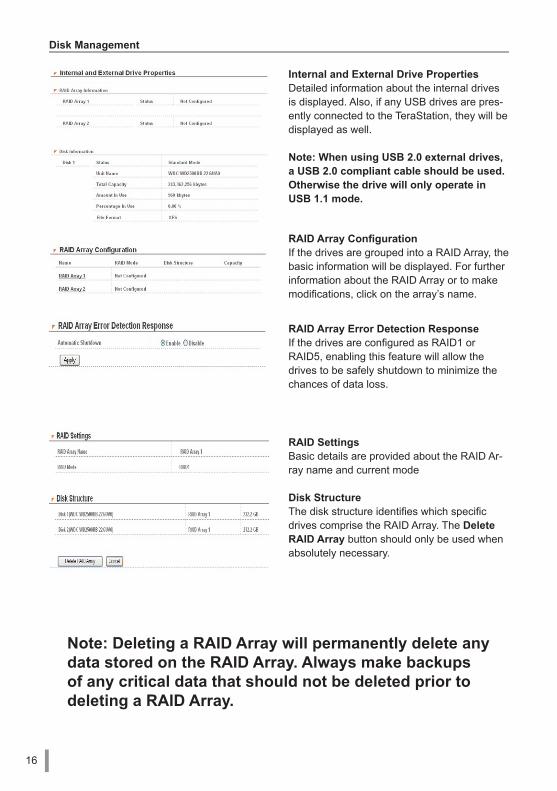
Internal and External Drive PropertiesDetailed information about the internal drives is displayed. Also, if any USB drives are pres-ently connected to the TeraStation, they will be displayed as well.
Note: When using USB 2.0 external drives, a USB 2.0 compliant cable should be used. Otherwise the drive will only operate in USB 1.1 mode.
RAID Array Confi gurationIf the drives are grouped into a RAID Array, the basic information will be displayed. For further information about the RAID Array or to make modifi cations, click on the array’s name.
RAID SettingsBasic details are provided about the RAID Ar-ray name and current mode
Disk StructureThe disk structure identifi es which specifi c drives comprise the RAID Array. The Delete RAID Array button should only be used when absolutely necessary.
RAID Array Error Detection ResponseIf the drives are confi gured as RAID1 or RAID5, enabling this feature will allow the drives to be safely shutdown to minimize the chances of data loss.
Note: Deleting a RAID Array will permanently delete any data stored on the RAID Array. Always make backups of any critical data that should not be deleted prior to deleting a RAID Array.
16
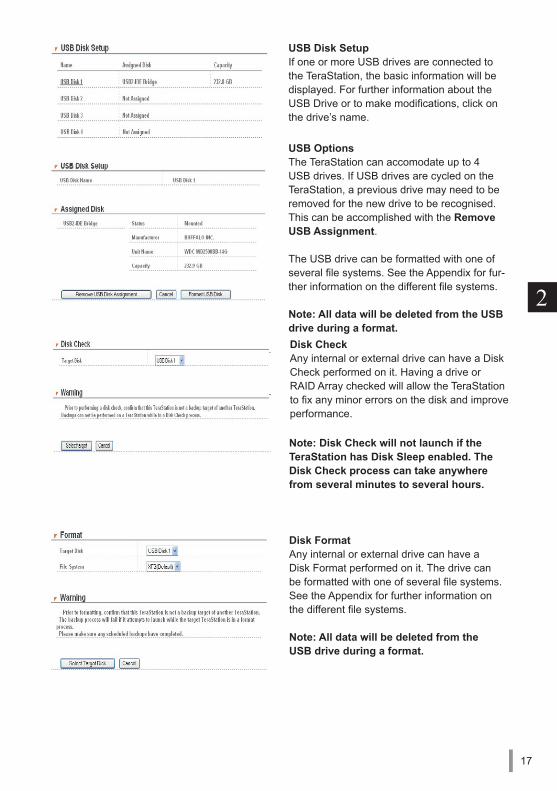
Disk CheckAny internal or external drive can have a Disk Check performed on it. Having a drive or RAID Array checked will allow the TeraStation to fi x any minor errors on the disk and improve performance.
USB Disk SetupIf one or more USB drives are connected to the TeraStation, the basic information will be displayed. For further information about the USB Drive or to make modifi cations, click on the drive’s name.
USB OptionsThe TeraStation can accomodate up to 4 USB drives. If USB drives are cycled on the TeraStation, a previous drive may need to be removed for the new drive to be recognised. This can be accomplished with the Remove USB Assignment.
The USB drive can be formatted with one of several fi le systems. See the Appendix for fur-ther information on the different fi le systems.
Note: All data will be deleted from the USB drive during a format.
Note: Disk Check will not launch if the TeraStation has Disk Sleep enabled. The Disk Check process can take anywhere from several minutes to several hours.
Disk FormatAny internal or external drive can have a Disk Format performed on it. The drive can be formatted with one of several fi le systems. See the Appendix for further information on the different fi le systems.
Note: All data will be deleted from the USB drive during a format.
17
2

Shared Folders SetupTo add a new Shared Folder to the TeraStation, Click the Add button. To delete a Shared Folder click the Delete button.
Note: All data stored in the Shared Folder will be deleted when the Delete button is pressed.
Shared Folders
Add New Shared FolderWhen a new Shared Folder is added, there are several setting options.
Shared Folder Name/DescriptionThe Name will be visible over the network to other devices. Only Windows based devices can view the Description.Disk SpaceThe drive or RAID Array can be selected where the Shared Folder will be created.OS SupportBesides designating which devices should have access to the Shared Folder by their operating system, the folder can be desig-nated as accessible via FTP or as a backup destination.
Access RestrictionsBy enabling Access Restrictions, a Shared Folder can be secured through group and user level permissions. Groups and users can be assigned either read-only or writable permissions to a Shared Folder. With Access Restrictions enabled, any groups or users not specifically given permission will be able to access the Shared Folder.
Shared Folder AttributesThe folder can be designated as read-only to prevent inadvertant deletion of critical files by non-admin users.
Recycle BinEnabling the Recycle Bin will allow deleted files to be placed into a temporary location until they are permanently deleted.
Remote Backup PasswordIf the Shared Folder is designated as a back-up target, it can have a Backup Password as-signed to it. This will allow other TeraStations to backup their data to the folder, however the data will be protected from being overwritten by non-authorized devices.
18
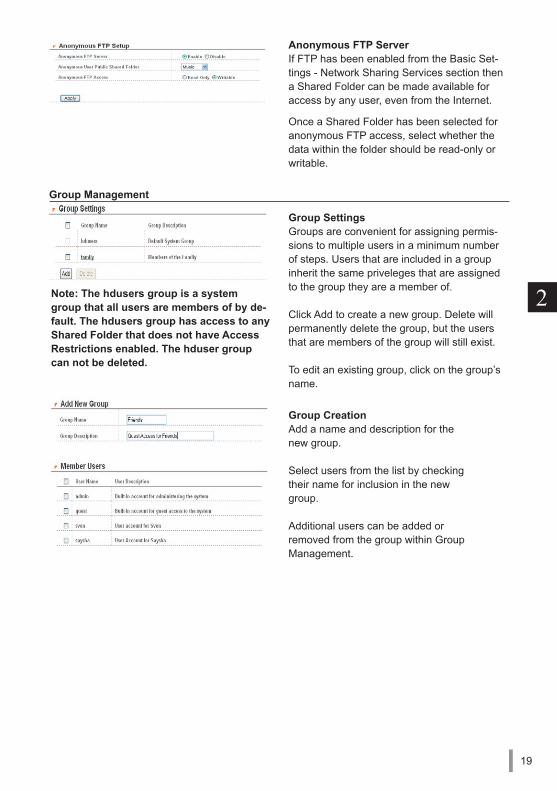
Group CreationAdd a name and description for the new group.
Select users from the list by checking their name for inclusion in the new group.
Additional users can be added or removed from the group within Group Management.
Group Management
Group SettingsGroups are convenient for assigning permis-sions to multiple users in a minimum number of steps. Users that are included in a group inherit the same priveleges that are assigned to the group they are a member of.
Click Add to create a new group. Delete will permanently delete the group, but the users that are members of the group will still exist.
To edit an existing group, click on the group’s name.
Anonymous FTP ServerIf FTP has been enabled from the Basic Set-tings - Network Sharing Services section then a Shared Folder can be made available for access by any user, even from the Internet.
Once a Shared Folder has been selected for anonymous FTP access, select whether the data within the folder should be read-only or writable.
Note: The hdusers group is a system group that all users are members of by de-fault. The hdusers group has access to any Shared Folder that does not have Access Restrictions enabled. The hduser group can not be deleted.
19
2
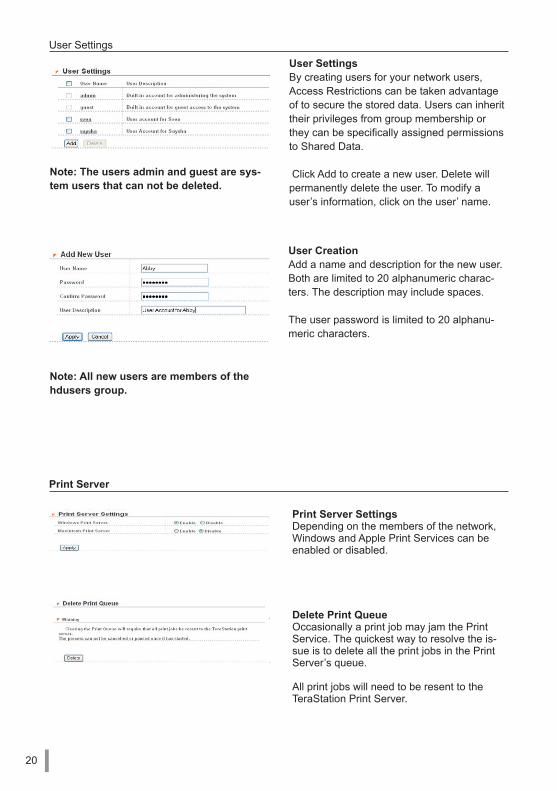
Print Server SettingsDepending on the members of the network, Windows and Apple Print Services can be enabled or disabled.
Print Server
Delete Print QueueOccasionally a print job may jam the Print Service. The quickest way to resolve the is-sue is to delete all the print jobs in the Print Server’s queue.
All print jobs will need to be resent to the TeraStation Print Server.
User CreationAdd a name and description for the new user. Both are limited to 20 alphanumeric charac-ters. The description may include spaces.
The user password is limited to 20 alphanu-meric characters.
User Settings
User SettingsBy creating users for your network users, Access Restrictions can be taken advantage of to secure the stored data. Users can inherit their privileges from group membership or they can be specifically assigned permissions to Shared Data.
Click Add to create a new user. Delete will permanently delete the user. To modify a user’s information, click on the user’ name.
Note: The users admin and guest are sys-tem users that can not be deleted.
Note: All new users are members of the hdusers group.
20
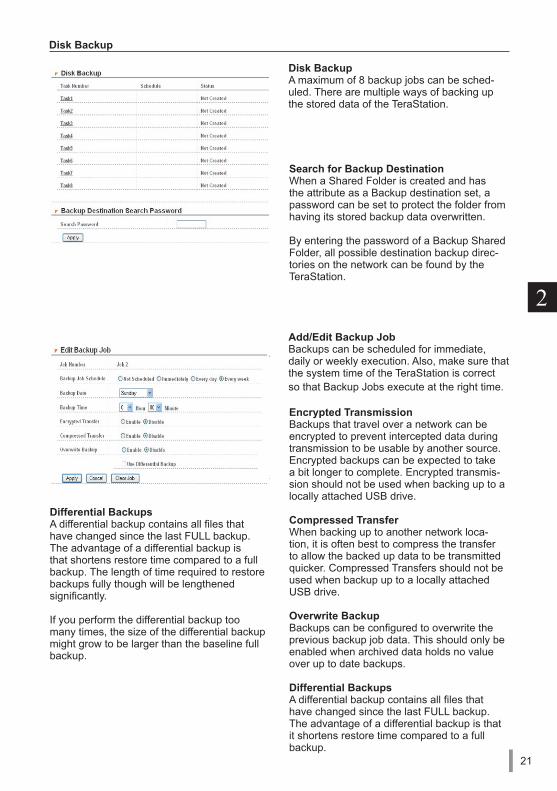
Disk BackupA maximum of 8 backup jobs can be sched-uled. There are multiple ways of backing up the stored data of the TeraStation.
Disk Backup
Add/Edit Backup JobBackups can be scheduled for immediate, daily or weekly execution. Also, make sure that the system time of the TeraStation is correct so that Backup Jobs execute at the right time.
Search for Backup DestinationWhen a Shared Folder is created and has the attribute as a Backup destination set, a password can be set to protect the folder from having its stored backup data overwritten.
By entering the password of a Backup Shared Folder, all possible destination backup direc-tories on the network can be found by the TeraStation.
Encrypted TransmissionBackups that travel over a network can be encrypted to prevent intercepted data during transmission to be usable by another source. Encrypted backups can be expected to take a bit longer to complete. Encrypted transmis-sion should not be used when backing up to a locally attached USB drive.
Compressed TransferWhen backing up to another network loca-tion, it is often best to compress the transfer to allow the backed up data to be transmitted quicker. Compressed Transfers should not be used when backup up to a locally attached USB drive.
Overwrite BackupBackups can be configured to overwrite the previous backup job data. This should only be enabled when archived data holds no value over up to date backups.
Differential BackupsA differential backup contains all files that have changed since the last FULL backup. The advantage of a differential backup is that it shortens restore time compared to a full backup.
Differential BackupsA differential backup contains all files that have changed since the last FULL backup. The advantage of a differential backup is that shortens restore time compared to a full backup. The length of time required to restore backups fully though will be lengthened significantly.
If you perform the differential backup too many times, the size of the differential backup might grow to be larger than the baseline full backup.
21
2
Maintenance
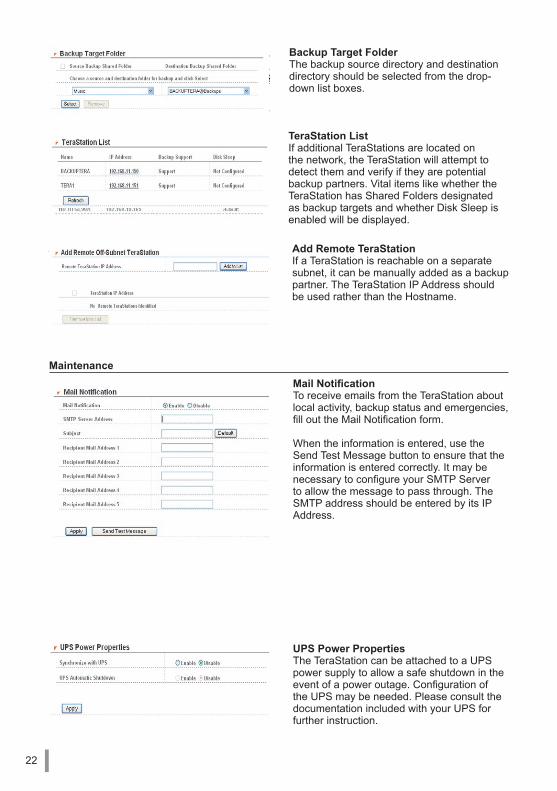
TeraStation ListIf additional TeraStations are located on the network, the TeraStation will attempt to detect them and verify if they are potential backup partners. Vital items like whether the TeraStation has Shared Folders designated as backup targets and whether Disk Sleep is enabled will be displayed.
Add Remote TeraStationIf a TeraStation is reachable on a separate subnet, it can be manually added as a backup partner. The TeraStation IP Address should be used rather than the Hostname.
Backup Target FolderThe backup source directory and destination directory should be selected from the drop-down list boxes.
Mail NotificationTo receive emails from the TeraStation about local activity, backup status and emergencies, fill out the Mail Notification form.
When the information is entered, use the Send Test Message button to ensure that the information is entered correctly. It may be necessary to configure your SMTP Server to allow the message to pass through. The SMTP address should be entered by its IP Address.
UPS Power PropertiesThe TeraStation can be attached to a UPS power supply to allow a safe shutdown in the event of a power outage. Configuration of the UPS may be needed. Please consult the documentation included with your UPS for further instruction.
22
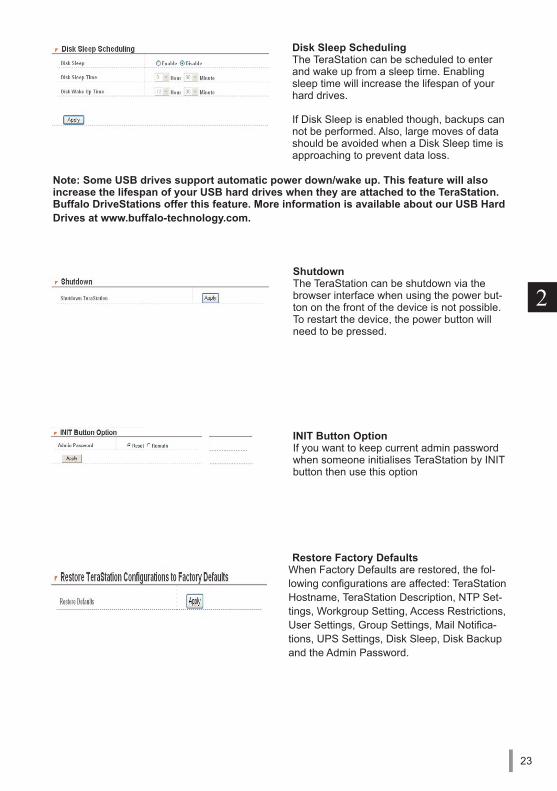
Disk Sleep SchedulingThe TeraStation can be scheduled to enter and wake up from a sleep time. Enabling sleep time will increase the lifespan of your hard drives.
If Disk Sleep is enabled though, backups can not be performed. Also, large moves of data should be avoided when a Disk Sleep time is approaching to prevent data loss.
Note: Some USB drives support automatic power down/wake up. This feature will also increase the lifespan of your USB hard drives when they are attached to the TeraStation. Buffalo DriveStations offer this feature. More information is available about our USB Hard Drives at www.buffalo-technology.com.
Restore Factory DefaultsWhen Factory Defaults are restored, the fol-lowing configurations are affected: TeraStation Hostname, TeraStation Description, NTP Set-tings, Workgroup Setting, Access Restrictions, User Settings, Group Settings, Mail Notifica-tions, UPS Settings, Disk Sleep, Disk Backup and the Admin Password.
ShutdownThe TeraStation can be shutdown via the browser interface when using the power but-ton on the front of the device is not possible. To restart the device, the power button will need to be pressed.
INIT Button OptionIf you want to keep current admin password when someone initialises TeraStation by INIT button then use this option
23
2
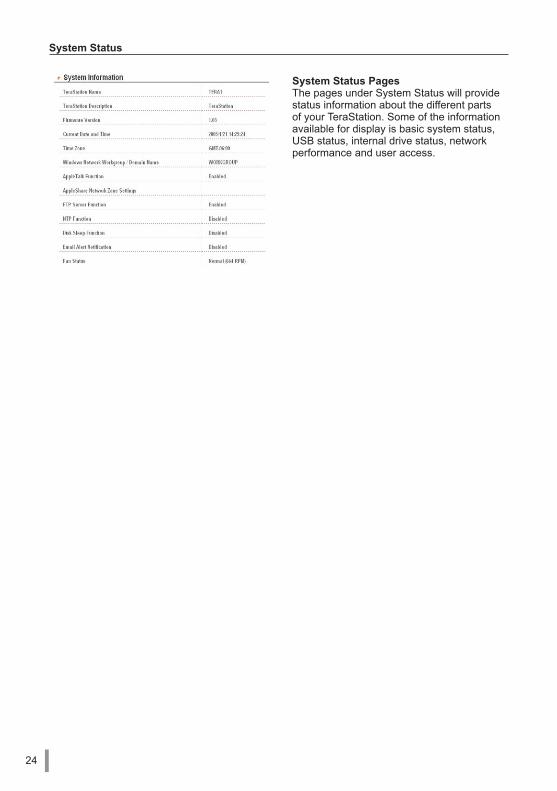
System Status PagesThe pages under System Status will provide status information about the different parts of your TeraStation. Some of the information available for display is basic system status, USB status, internal drive status, network performance and user access.
System Status
24
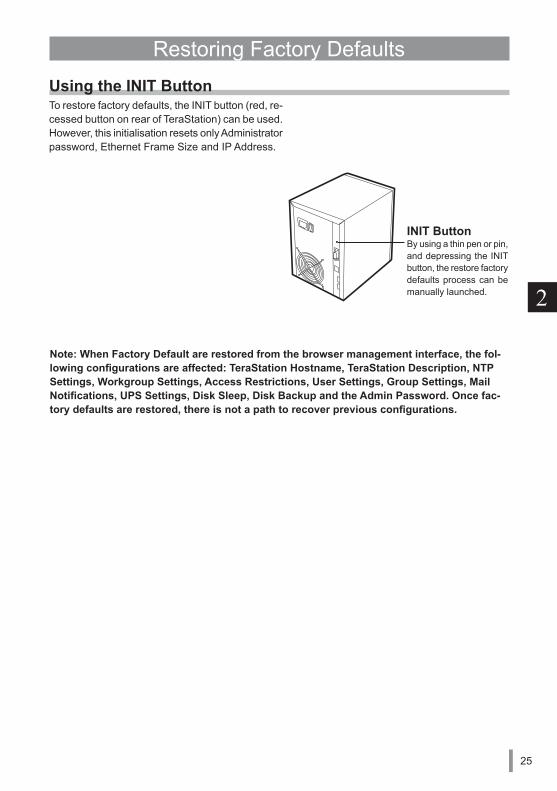
INIT ButtonBy using a thin pen or pin, and depressing the INIT button, the restore factory defaults process can be manually launched.
Restoring Factory DefaultsUsing the INIT ButtonTo restore factory defaults, the INIT button (red, re-cessed button on rear of TeraStation) can be used. However, this initialisation resets only Administrator password, Ethernet Frame Size and IP Address.
Note: When Factory Default are restored from the browser management interface, the fol-lowing configurations are affected: TeraStation Hostname, TeraStation Description, NTP Settings, Workgroup Settings, Access Restrictions, User Settings, Group Settings, Mail Notifications, UPS Settings, Disk Sleep, Disk Backup and the Admin Password. Once fac-tory defaults are restored, there is not a path to recover previous configurations.
25
2
Defaults and Internal Drives
Factory Default SettingsTeraStation comes with the following default settings:
● Administrator Username: admin● Administrator Password: password● Shared Folder: share
- Accessible- Recycle Bin not enabled
● DHCP Client enabled IP Address acquired automatically if DHCP Server is available If DHCP Server is unavailable, IP Address settings fallback by default to: IP Address 192.168.11.150 Subnet Mask 255.255.255.0● Groups Default Group: hdusers● Microsoft Windows Workgroup: WORKGROUP● Ethernet Frame Size: 1518 bytes● FTP Server not enabled● Local System Time: November 1, 2004● NTP Client not enabled● Print Server: Enabled● Disk Mode: RAID5 Mode
26
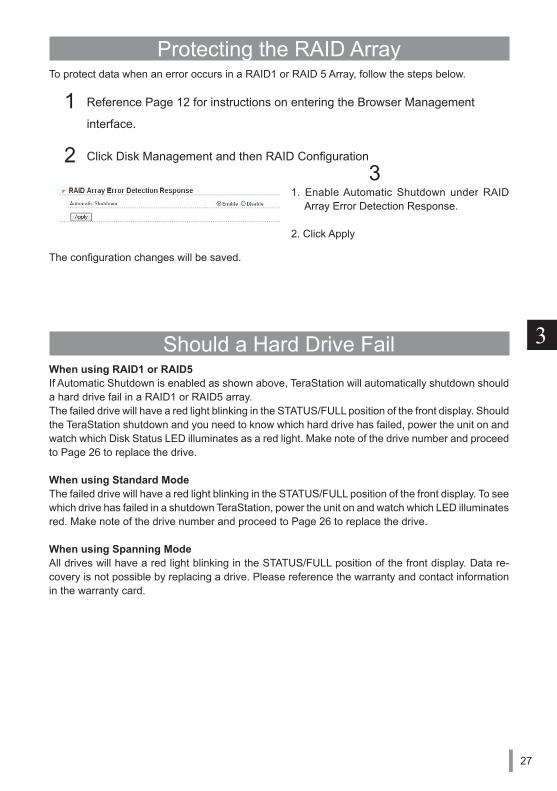
Protecting the RAID ArrayTo protect data when an error occurs in a RAID1 or RAID 5 Array, follow the steps below.
1 Reference Page 12 for instructions on entering the Browser Management
interface.
2 Click Disk Management and then RAID Configuration
3
The configuration changes will be saved.
2. Click Apply
1. Enable Automatic Shutdown under RAID Array Error Detection Response.
Should a Hard Drive FailWhen using RAID1 or RAID5If Automatic Shutdown is enabled as shown above, TeraStation will automatically shutdown should a hard drive fail in a RAID1 or RAID5 array.The failed drive will have a red light blinking in the STATUS/FULL position of the front display. Should the TeraStation shutdown and you need to know which hard drive has failed, power the unit on and watch which Disk Status LED illuminates as a red light. Make note of the drive number and proceed to Page 26 to replace the drive.
When using Standard ModeThe failed drive will have a red light blinking in the STATUS/FULL position of the front display. To see which drive has failed in a shutdown TeraStation, power the unit on and watch which LED illuminates red. Make note of the drive number and proceed to Page 26 to replace the drive.
When using Spanning ModeAll drives will have a red light blinking in the STATUS/FULL position of the front display. Data re-covery is not possible by replacing a drive. Please reference the warranty and contact information in the warranty card.
3
27
Replacing a Hard DriveIf a drive has a STATUS/FULL LED blinking red, make note of the drive number and carefully follow the procedure below.Please find a clean work area to replace the hard drive. Keep each screw that is removed in a safe place to aid in reassembly. Do not remove any screws or parts that are not removed in the instructions below. Failure to heed this warning could lead to unsafe operation or damage to the product.To reassemble the TeraStation, follow the instructions below in reverse order.
Note: The TeraStation is a sensitive piece of equipment. Please be gentle with the product to prevent damage. TeraStation weighs approxiamately 7.2Kg. Dropping the equip-ment could cause bodily harm. Some interior edges have sharp metal pieces, to prevent any cuts or abrasions, work carefully when accessing the internal areas of the TeraStation. Because the process of replacing a hard drive and any dam-age that may be inflicted on the TeraStation or yourself is beyond the scope of the warranty or responsibility of Buffalo, please work very carefully and acknowledge these two important items before beginning this process.
Note: Please work in a static free environment that is clear of any magnets. Static elec-tricity and magnets can damage the TeraStation and the internal drives.
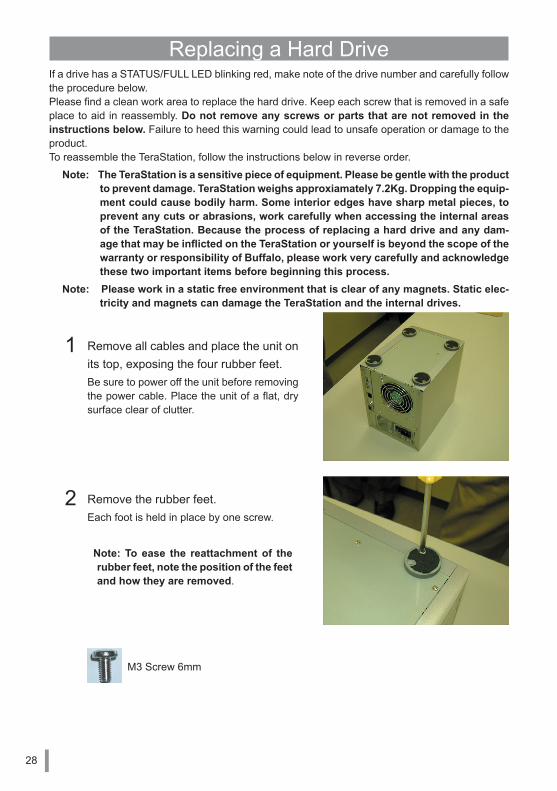
1 Remove all cables and place the unit on its top, exposing the four rubber feet.Be sure to power off the unit before removing the power cable. Place the unit of a flat, dry surface clear of clutter.
2 Remove the rubber feet.Each foot is held in place by one screw.
Note: To ease the reattachment of the rubber feet, note the position of the feet and how they are removed.
M3 Screw 6mm
28
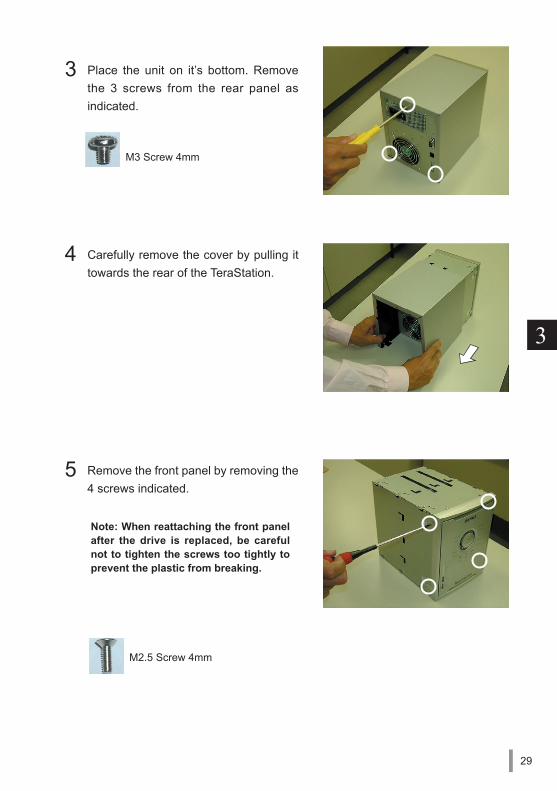
4 Carefully remove the cover by pulling it towards the rear of the TeraStation.
5 Remove the front panel by removing the 4 screws indicated.
3 Place the unit on it’s bottom. Remove the 3 screws from the rear panel as indicated.
Note: When reattaching the front panel after the drive is replaced, be careful not to tighten the screws too tightly to prevent the plastic from breaking.
M3 Screw 4mm
M2.5 Screw 4mm
3
29
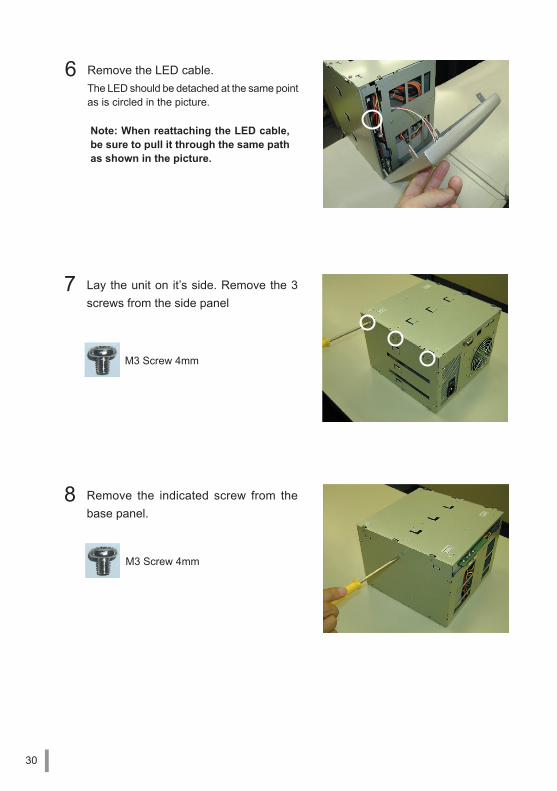
8 Remove the indicated screw from the base panel.
M3 Screw 4mm
7 Lay the unit on it’s side. Remove the 3 screws from the side panel
M3 Screw 4mm
6 Remove the LED cable.The LED should be detached at the same point as is circled in the picture.
Note: When reattaching the LED cable, be sure to pull it through the same path as shown in the picture.
30
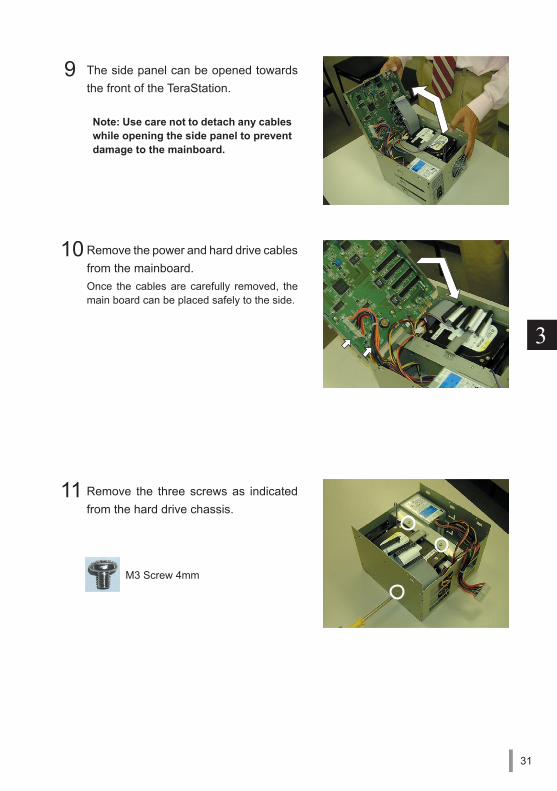
11 Remove the three screws as indicated from the hard drive chassis.
M3 Screw 4mm
9 The side panel can be opened towards the front of the TeraStation.
10 Remove the power and hard drive cables from the mainboard.Once the cables are carefully removed, the main board can be placed safely to the side.
Note: Use care not to detach any cables while opening the side panel to prevent damage to the mainboard.
3
31
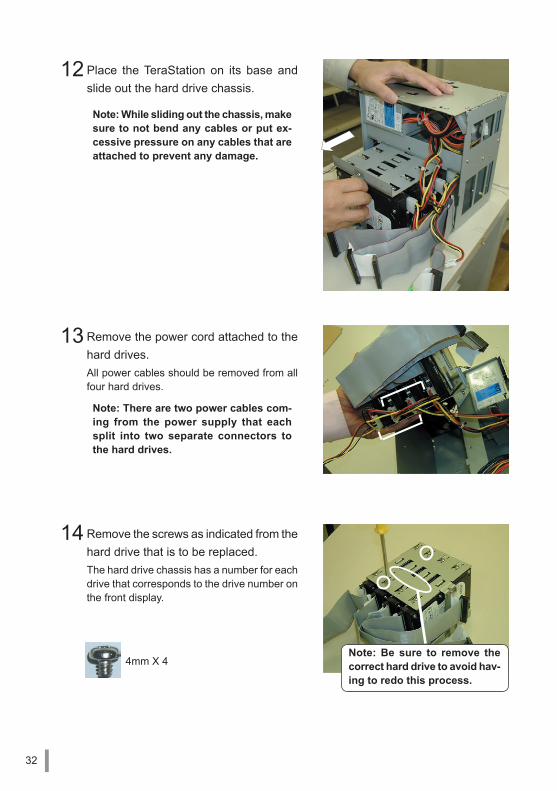
12 Place the TeraStation on its base and slide out the hard drive chassis.
13 Remove the power cord attached to the hard drives.All power cables should be removed from all four hard drives.
Note: While sliding out the chassis, make sure to not bend any cables or put ex-cessive pressure on any cables that are attached to prevent any damage.
Note: There are two power cables com-ing from the power supply that each split into two separate connectors to the hard drives.
14 Remove the screws as indicated from the hard drive that is to be replaced.The hard drive chassis has a number for each drive that corresponds to the drive number on the front display.
Note: Be sure to remove the correct hard drive to avoid hav-ing to redo this process.
4mm X 4
32
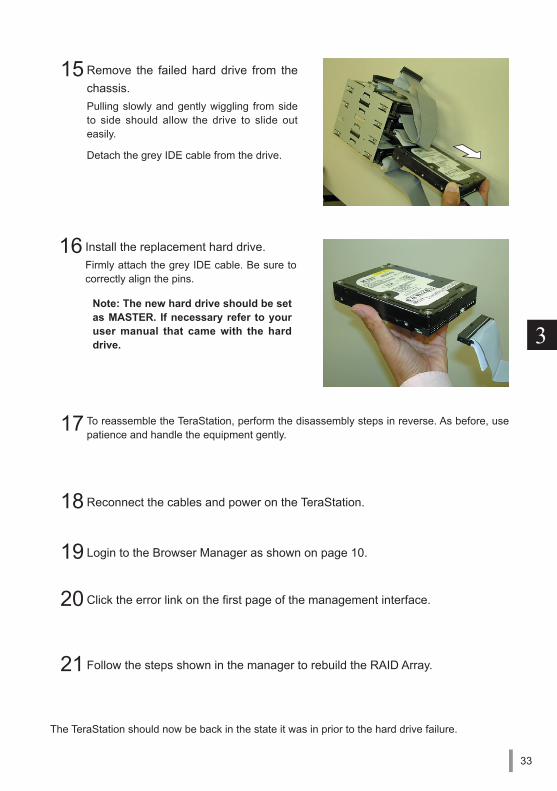
15 Remove the failed hard drive from the chassis.Pulling slowly and gently wiggling from side to side should allow the drive to slide out easily.
Detach the grey IDE cable from the drive.
16 Install the replacement hard drive.Firmly attach the grey IDE cable. Be sure to correctly align the pins.
Note: The new hard drive should be set as MASTER. If necessary refer to your user manual that came with the hard drive.
17 To reassemble the TeraStation, perform the disassembly steps in reverse. As before, use patience and handle the equipment gently.
18 Reconnect the cables and power on the TeraStation.
19 Login to the Browser Manager as shown on page 10.
20 Click the error link on the first page of the management interface.
21 Follow the steps shown in the manager to rebuild the RAID Array.
The TeraStation should now be back in the state it was in prior to the hard drive failure.
3
33
PY00-30047-DM20-03 3-01
HD-HTGL/R5 Series User ManualJuly 20, 2005 - Version 3.0
Related Documents