AllSportSystems® FlightPanel™ Technical Guide FlightPanel™ Flight Simulator Instrument Panels Page 1 of 32

Welcome message from author
This document is posted to help you gain knowledge. Please leave a comment to let me know what you think about it! Share it to your friends and learn new things together.
Transcript
AllSportSystems®
FlightPanel™ Technical Guide
FlightPanel™ Flight Simulator Instrument Panels
Page 1 of 32
AllSportSystems®
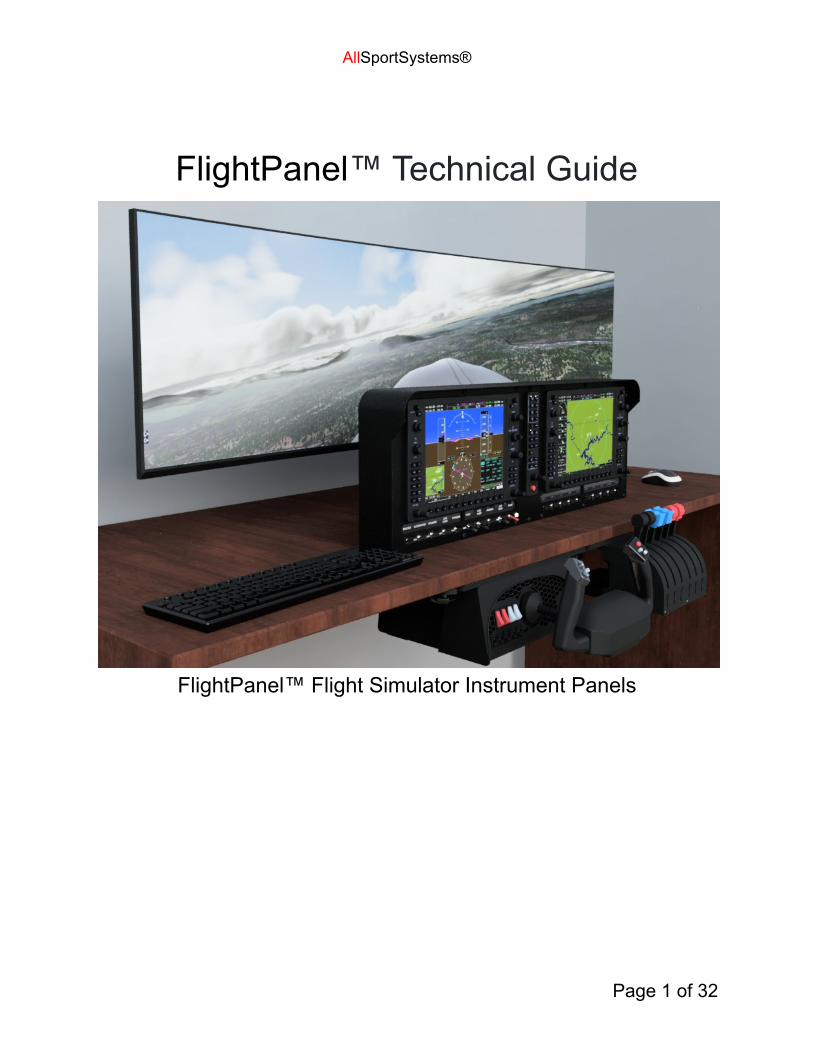
Introduction to FlightPanel™ Flight Simulator Instrument Panels 3
Powering the FlightPanel 4
Getting Familiar with FlightPanel™ 5The Red Mode Switch 5IntelliPress™ Command Repetition 6IntelliSpin™ Automatic Knob Acceleration 7SwitchSync™ Aircraft Harmonization (FLEX only) 8Configuring the Knobs, Push Buttons, and Switches 9Printing Labels 10
Optional PanelBuilder Software 11
Connecting Multiple Displays to your Computer 12
Tips for for X-Plane 11 21Disabling FlightPanel displays in X-Plane 11 23Mapping buttons and knobs in X-Plane 11 23Adjusting the Flight Camera 24
Installing and Using PanelBuilder 25Adding or Removing Instruments and Gauges 26Moving Instruments to the Correct Position 27
Recommended PC Hardware: 28Graphics Card (GPU) 28Processor (CPU) 2932GB of DDR4 Memory (RAM) 29500GB+ NVMe or SATA SSD 295x USB3.0 Ports 29
Drivers, Downloads, and More 30
Page 2 of 32

AllSportSystems®
Introduction to FlightPanel™ Flight SimulatorInstrument Panels
Thank you for purchasing a FlightPanel™ Flight Simulator InstrumentPanel! This user guide will explain how to make the best use of it with yourflight simulator.
The concepts behind the FlightPanel™ are simple:
1. Provide a generic airplane panel solution with knobs, buttons, andswitches that can easily be mapped to any function in any airplane.
2. Provide a generic instrumentation environment such that theinstruments you fly behind can be customized to any airplane.
3. Provide an intelligent solution that will work with any and all flightsimulators.
Page 3 of 32
AllSportSystems®
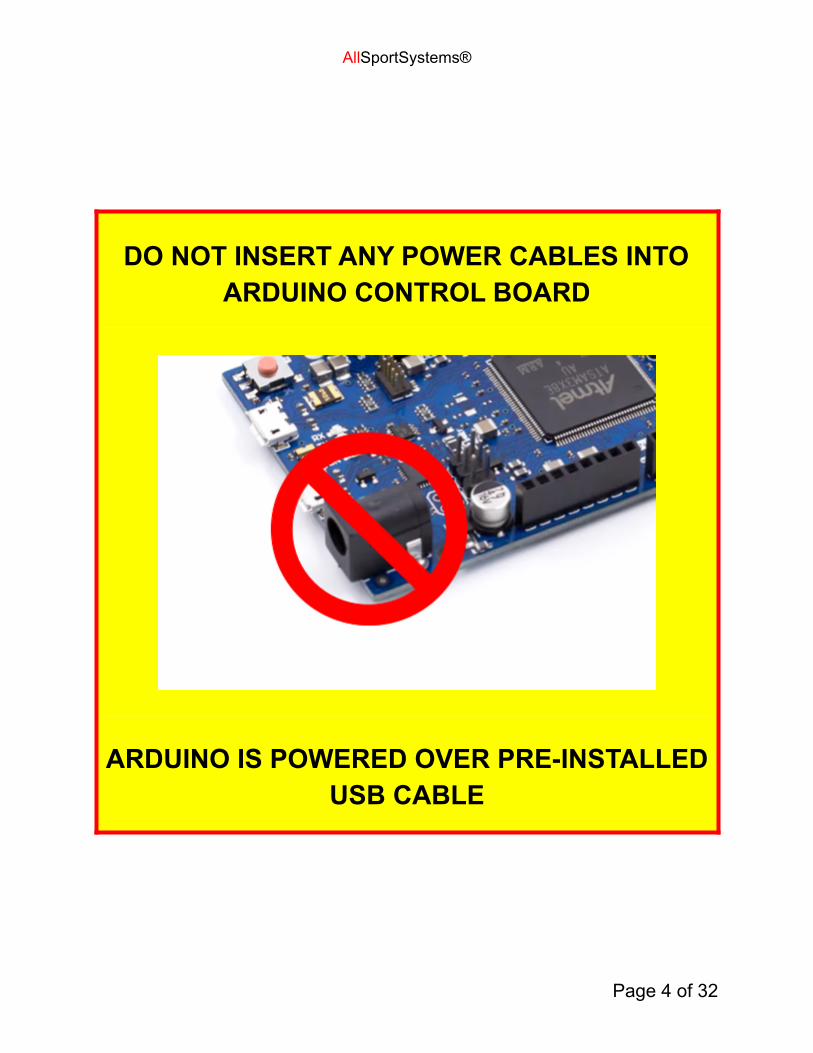
DO NOT INSERT ANY POWER CABLES INTOARDUINO CONTROL BOARD
ARDUINO IS POWERED OVER PRE-INSTALLEDUSB CABLE
Page 4 of 32
AllSportSystems®
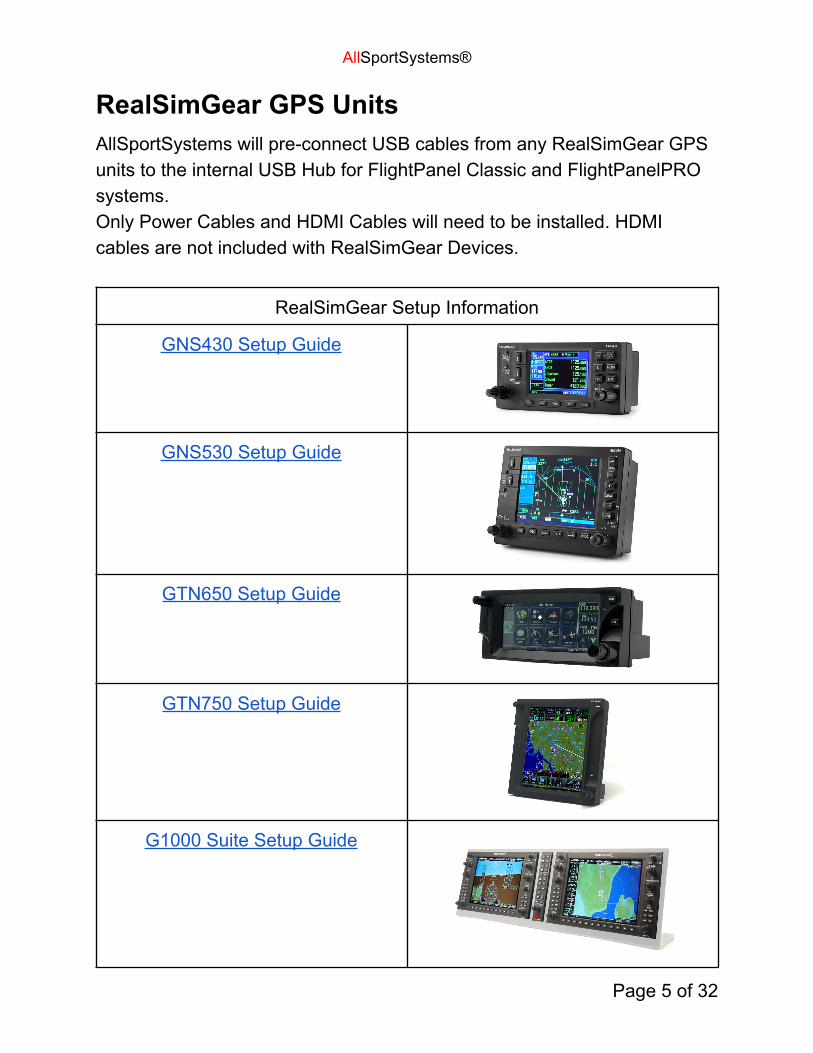
RealSimGear GPS UnitsAllSportSystems will pre-connect USB cables from any RealSimGear GPSunits to the internal USB Hub for FlightPanel Classic and FlightPanelPROsystems.Only Power Cables and HDMI Cables will need to be installed. HDMIcables are not included with RealSimGear Devices.
RealSimGear Setup Information
GNS430 Setup Guide
GNS530 Setup Guide
GTN650 Setup Guide
GTN750 Setup Guide
G1000 Suite Setup Guide
Page 5 of 32
AllSportSystems®
Powering the FlightPanelIf your FlightPanel includes internal screens or other accessories such asan internal USB Hub, GPS Navigator, etc, these will typically require powerand other connections (HDMI or USB).
● Remove the Rear Access Panels being careful not to disturb theinternal wiring.
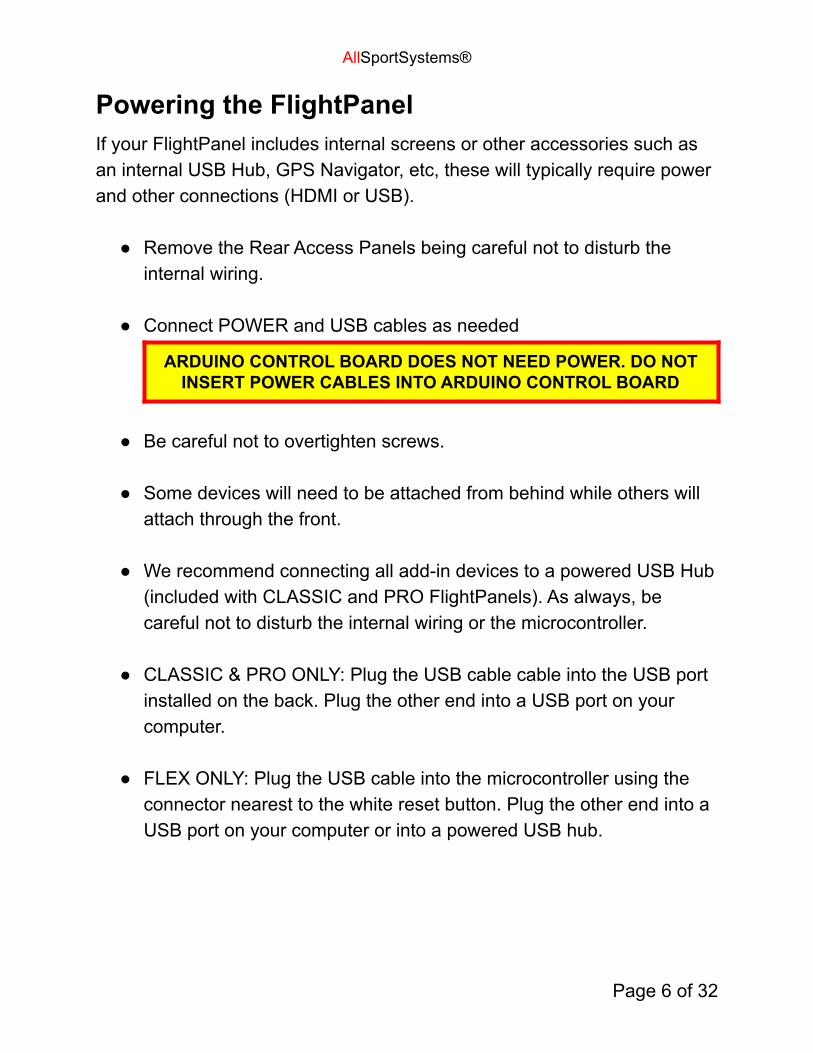
● Connect POWER and USB cables as needed
ARDUINO CONTROL BOARD DOES NOT NEED POWER. DO NOTINSERT POWER CABLES INTO ARDUINO CONTROL BOARD
● Be careful not to overtighten screws.
● Some devices will need to be attached from behind while others willattach through the front.
● We recommend connecting all add-in devices to a powered USB Hub(included with CLASSIC and PRO FlightPanels). As always, becareful not to disturb the internal wiring or the microcontroller.
● CLASSIC & PRO ONLY: Plug the USB cable cable into the USB portinstalled on the back. Plug the other end into a USB port on yourcomputer.
● FLEX ONLY: Plug the USB cable into the microcontroller using theconnector nearest to the white reset button. Plug the other end into aUSB port on your computer or into a powered USB hub.
Page 6 of 32
AllSportSystems®
Getting Familiar with FlightPanel™Once the FlightPanel™ is connected via a USB cable your computershould detect a new keyboard. Please note that FlightPanel™ will notbegin sending keystrokes to the computer for 10-20 seconds after it is firstpowered.
Open Notepad, or any other text editor, and begin turning the knobs andpressing the buttons on your FlightPanel™. You will observe a unique keybeing sent for each action.
The Red Mode SwitchThe red “Mode” switch will alter the keys sent, so that most controls canserve two purposes in your sim. On certain panels an LED is provided toalert you to the position of the Mode Switch.
Page 7 of 32
AllSportSystems®
IntelliPress™ Command RepetitionEach push button sends a single keystroke per press. This includes thepush button functions associated with the knobs. However, the pushbuttons can also send a constantly repeating keystroke if you press andhold. You must hold the button for approximately one second for this tobegin.
By design, IntelliPress™ Command Repetition operates slower than theIntelliSpin™ behavior described for knobs. This allows it to work well forthings like raising or lowering flaps on airplanes that require a handle to beheld while a motor slowly moves the object. It also allows you to use thebuttons for radio tuning, setting transponder codes, and many other “rotary”behaviors when desired.
Page 8 of 32

AllSportSystems®
IntelliSpin™ Automatic Knob AccelerationEach knob sends a single keystroke per detent, which you will feel whileturning the knob.
If you give the knob two quick short turns it will begin continuously sendingthe keystroke rapidly. One it’s started, you can maintain the fasterIntelliSpin™ action by maintaining steady unhurried movement of the knobin the same direction.
There are two ways to stop IntelliSpin™ Acceleration:
1. Stop turning the knob. IntelliSpin™ Acceleration will endapproximately ⅓ of a second later. This will result in 15-20 additionalkeystrokes being delivered after you stop turning the knob.
2. Moving the knob one or more detents in the opposite direction. Thiswill stop IntelliSpin™ Acceleration immediately.
Page 9 of 32
AllSportSystems®
SwitchSync™ Aircraft Harmonization (FLEX only)The FLEX panel includes silver toggle switches in addition to knobs andpush buttons. Note that these switches are not affected by the ModeSwitch. However, each time the Mode Switch is changed, the currentposition of each switch will be sent to the computer as a series ofkeystrokes. This allows you to quickly harmonize the switch positions withthe simulated airplane any time you like.
We recommend that you practice using SwitchSync™, IntelliSpin™, andIntelliPress™ in Notepad to get familiar with how they behave. You willsoon discover that these are very helpful features for your flight simulator!
Page 10 of 32
AllSportSystems®
Configuring the Knobs, Push Buttons, and SwitchesAs far as the computer is concerned, FlightPanel™ looks just like akeyboard. Each knob and switch will submit a unique keystroke to thecomputer when turned or pressed.
Simply access your flight sim “keyboard configuration” screen, select thecontrol you wish to configure, and then turn or press the selected knob,switch, or button to send the key.
Remember that the red Function Switch on your FlightPanel™ allows eachknob/button to serve two roles, so think carefully about the ideal position ofthe Mode Switch as you are making your assignments.
You will likely want to configure more frequently used controls, such asAltimeter, Landing Gear, Heading Bug, AutoPilot, OBS Rotation, Lights,Radio Tuning etc with the Mode Switch in its default/off position.
You can then assign less frequently used controls, such as Fuel TankSelector, Magnetos, Starter, Transponder Digits, etc to auxiliary roles withthe Mode Switch On.
Note: If you are using P3D or FSX you may need a third party softwaresuch as FSUIPC, in order to configure keystrokes for all of the aircraftcontrols. Other flight sim packages, such as XPlane and FS2020 providefull keystroke mapping without the need for third party software.
Page 11 of 32

AllSportSystems®
Printing LabelsSample labels for the various controls can be accessed from Google Drivehere:
https://drive.google.com/drive/folders/1tFYFYCxJFyeFC1VIexS7qF31l_RVjqqP?usp=sharing
You will need to copy the label templates and save copies in your ownGoogle Drive. You will then be able to edit the files to match yourassignments.
After printing, simply trim the labels and insert them into the channels onyour FlightPanel™.
Page 12 of 32
AllSportSystems®
Optional PanelBuilder SoftwareIf you ordered a license for PanelBuilder software it will be delivered as aspecial USB key resembling a memory stick. Make sure the USB key isconnected to a USB port. Then download the software here:
https://simplugins.com/html/downloads.html
Refer to the SimPlugins website for instructions on using PanelBuilder toreplicate your favorite airplane instrument panel.
Page 13 of 32
AllSportSystems®
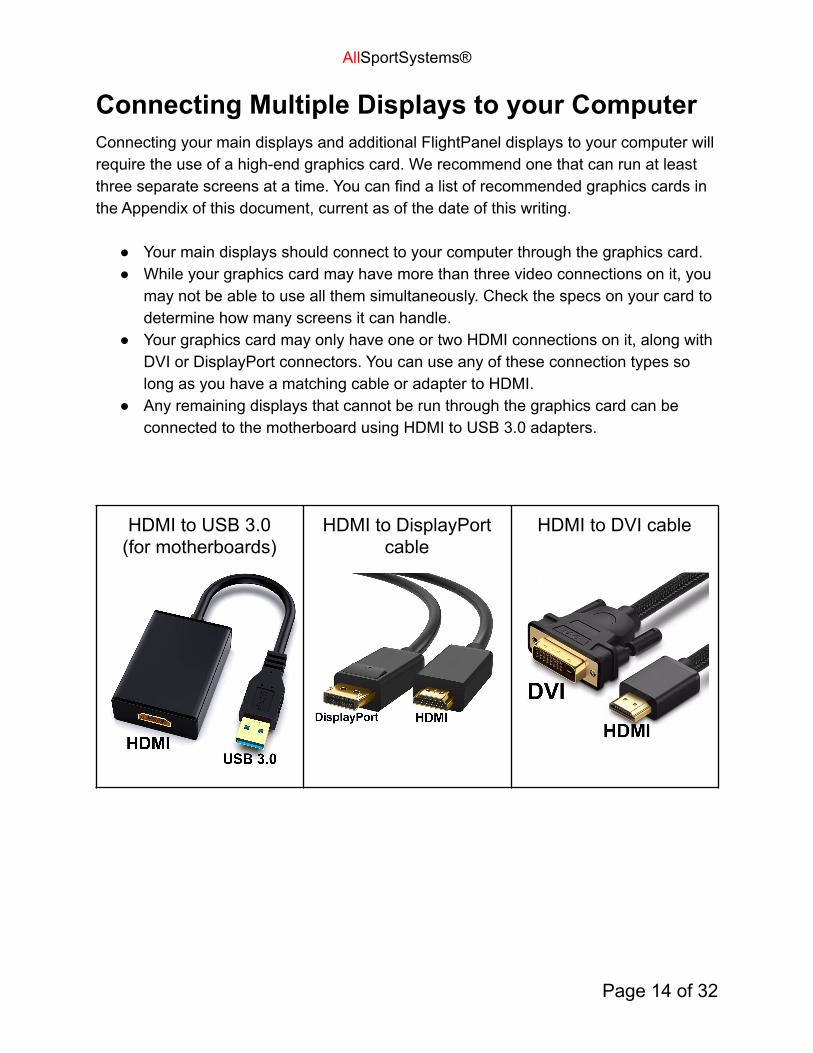
Connecting Multiple Displays to your ComputerConnecting your main displays and additional FlightPanel displays to your computer willrequire the use of a high-end graphics card. We recommend one that can run at leastthree separate screens at a time. You can find a list of recommended graphics cards inthe Appendix of this document, current as of the date of this writing.
● Your main displays should connect to your computer through the graphics card.● While your graphics card may have more than three video connections on it, you
may not be able to use all them simultaneously. Check the specs on your card todetermine how many screens it can handle.
● Your graphics card may only have one or two HDMI connections on it, along withDVI or DisplayPort connectors. You can use any of these connection types solong as you have a matching cable or adapter to HDMI.
● Any remaining displays that cannot be run through the graphics card can beconnected to the motherboard using HDMI to USB 3.0 adapters.
HDMI to USB 3.0(for motherboards)
HDMI to DisplayPortcable
HDMI to DVI cable
Page 14 of 32
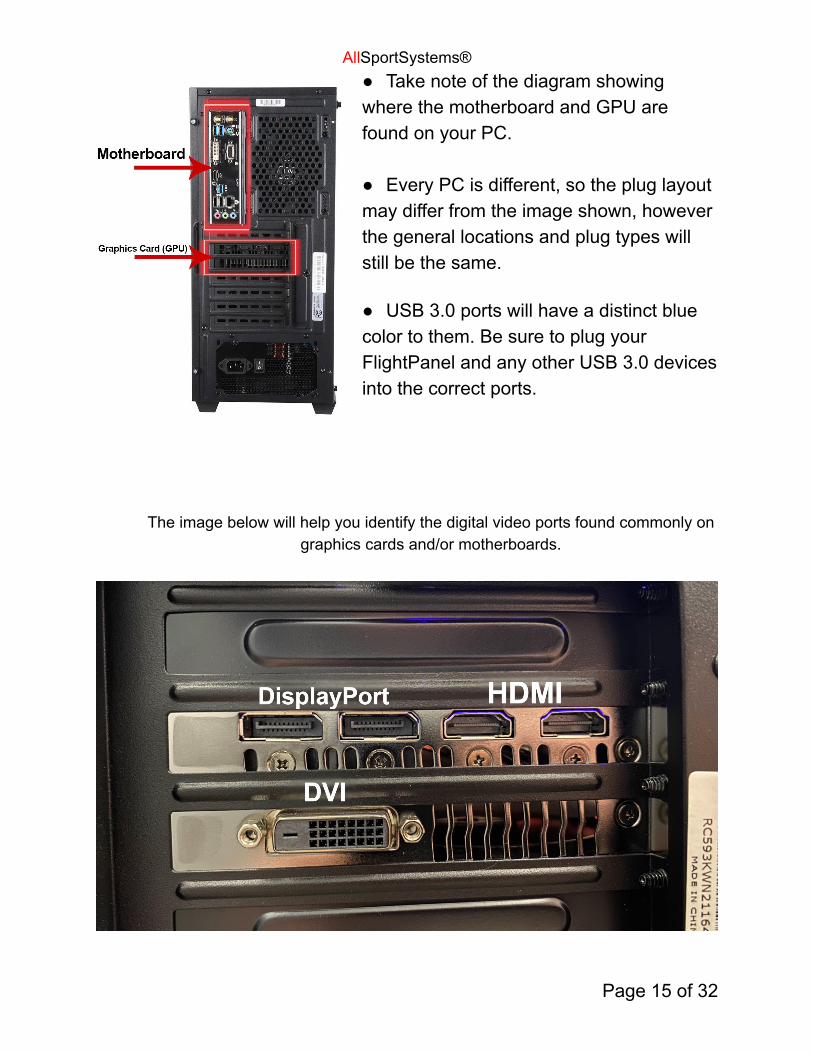
AllSportSystems®● Take note of the diagram showingwhere the motherboard and GPU arefound on your PC.
● Every PC is different, so the plug layoutmay differ from the image shown, howeverthe general locations and plug types willstill be the same.
● USB 3.0 ports will have a distinct bluecolor to them. Be sure to plug yourFlightPanel and any other USB 3.0 devicesinto the correct ports.
The image below will help you identify the digital video ports found commonly ongraphics cards and/or motherboards.
Page 15 of 32
AllSportSystems®
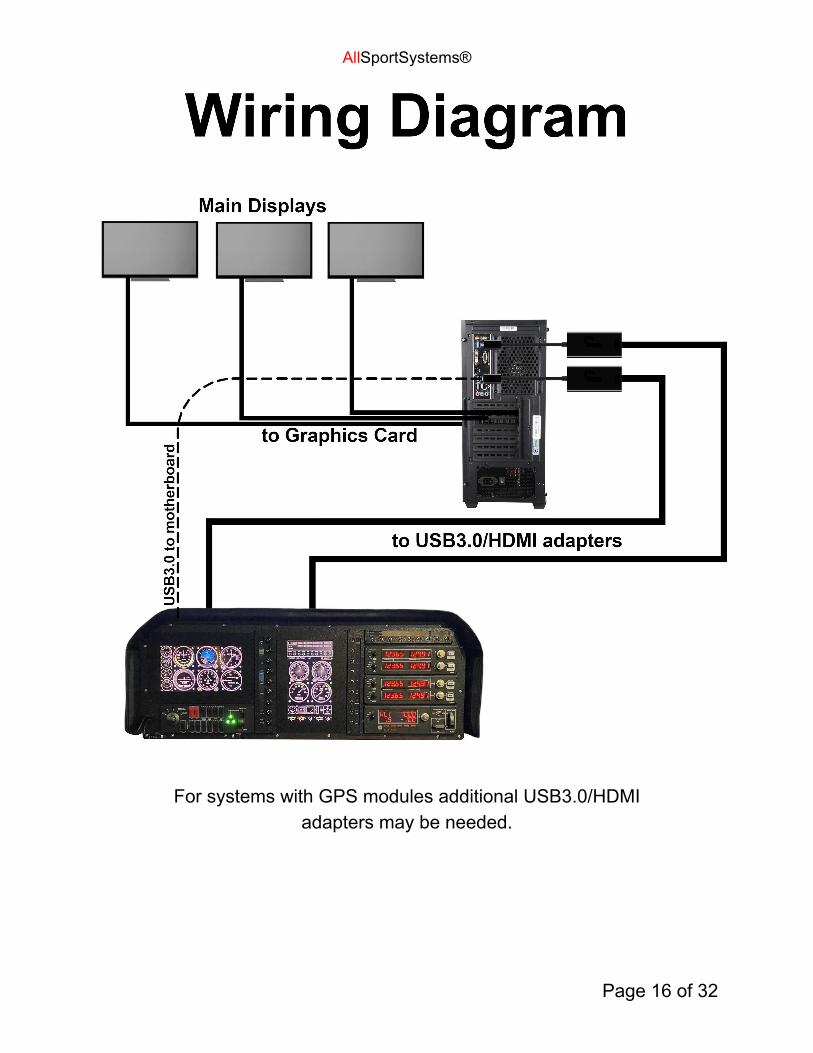
For systems with GPS modules additional USB3.0/HDMIadapters may be needed.
Page 16 of 32
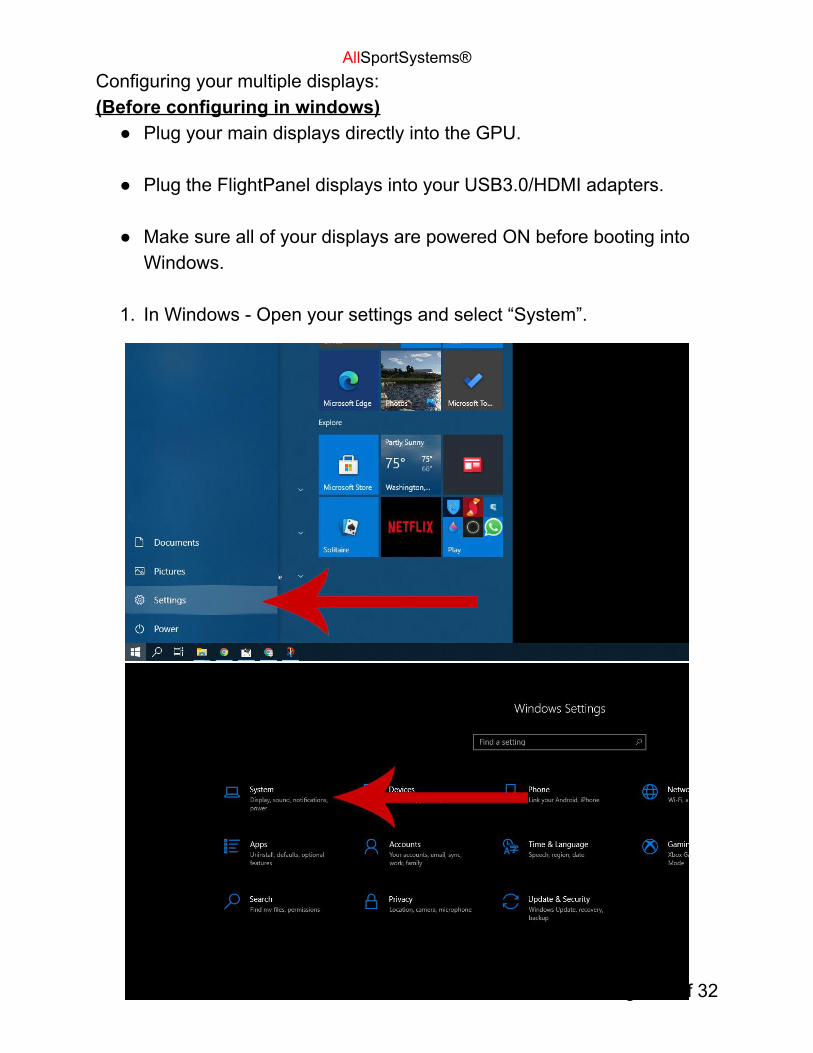
AllSportSystems®Configuring your multiple displays:(Before configuring in windows)
● Plug your main displays directly into the GPU.
● Plug the FlightPanel displays into your USB3.0/HDMI adapters.
● Make sure all of your displays are powered ON before booting intoWindows.
1. In Windows - Open your settings and select “System”.
Page 17 of 32
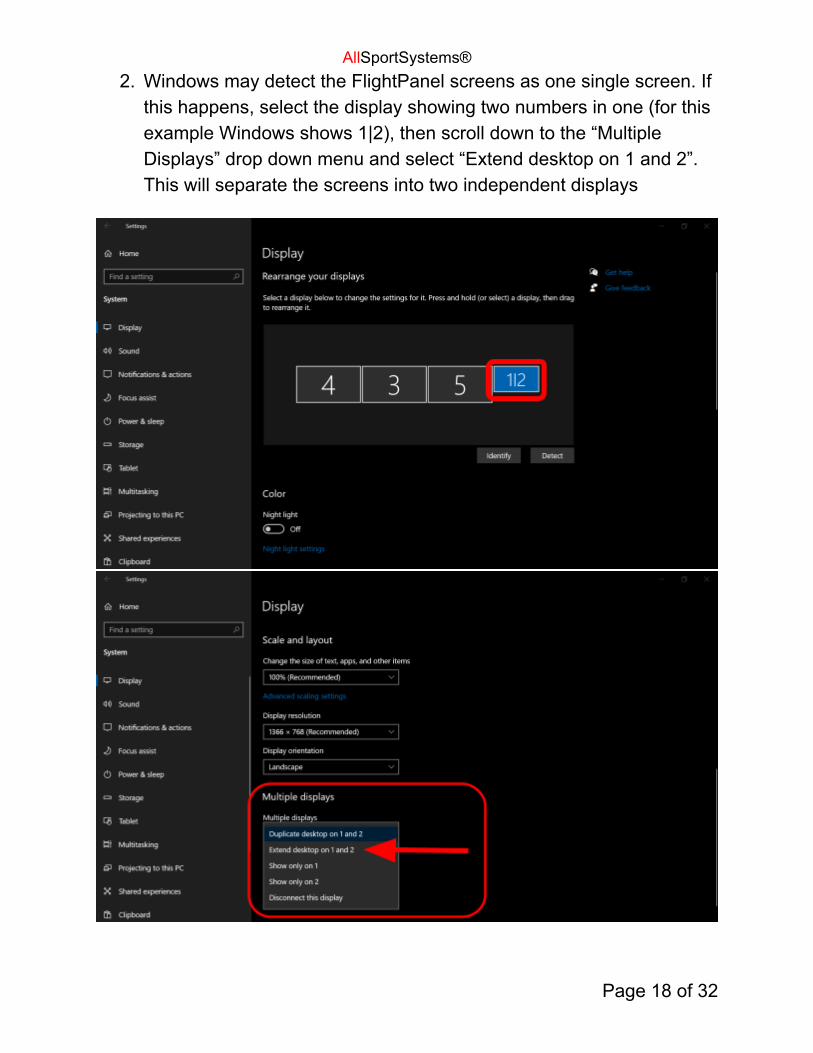
AllSportSystems®2. Windows may detect the FlightPanel screens as one single screen. If
this happens, select the display showing two numbers in one (for thisexample Windows shows 1|2), then scroll down to the “MultipleDisplays” drop down menu and select “Extend desktop on 1 and 2”.This will separate the screens into two independent displays
Page 18 of 32
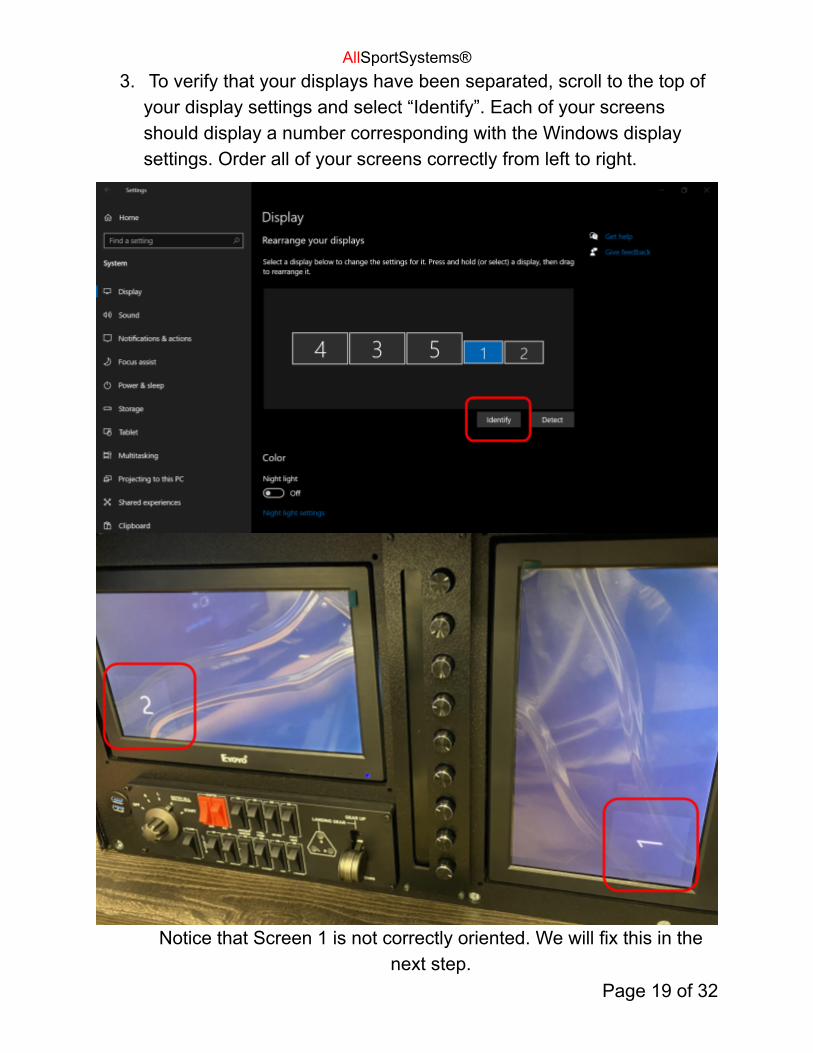
AllSportSystems®3. To verify that your displays have been separated, scroll to the top of
your display settings and select “Identify”. Each of your screensshould display a number corresponding with the Windows displaysettings. Order all of your screens correctly from left to right.
Notice that Screen 1 is not correctly oriented. We will fix this in thenext step.
Page 19 of 32
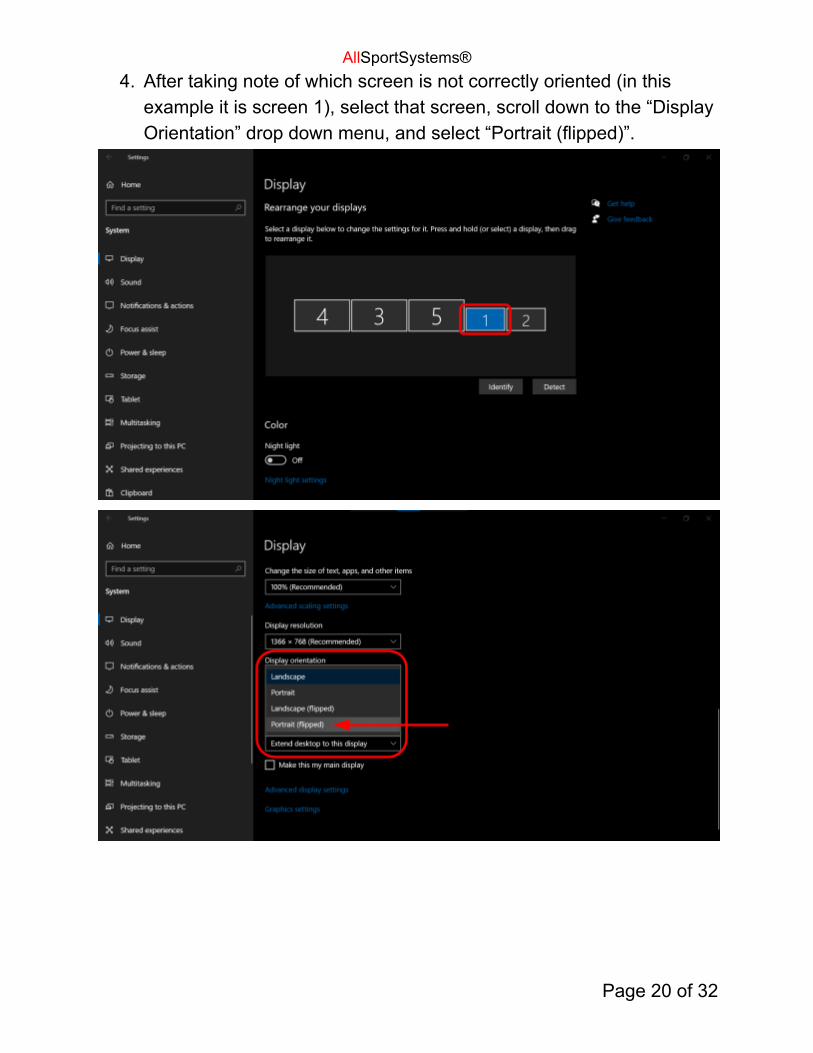
AllSportSystems®4. After taking note of which screen is not correctly oriented (in this
example it is screen 1), select that screen, scroll down to the “DisplayOrientation” drop down menu, and select “Portrait (flipped)”.
Page 20 of 32
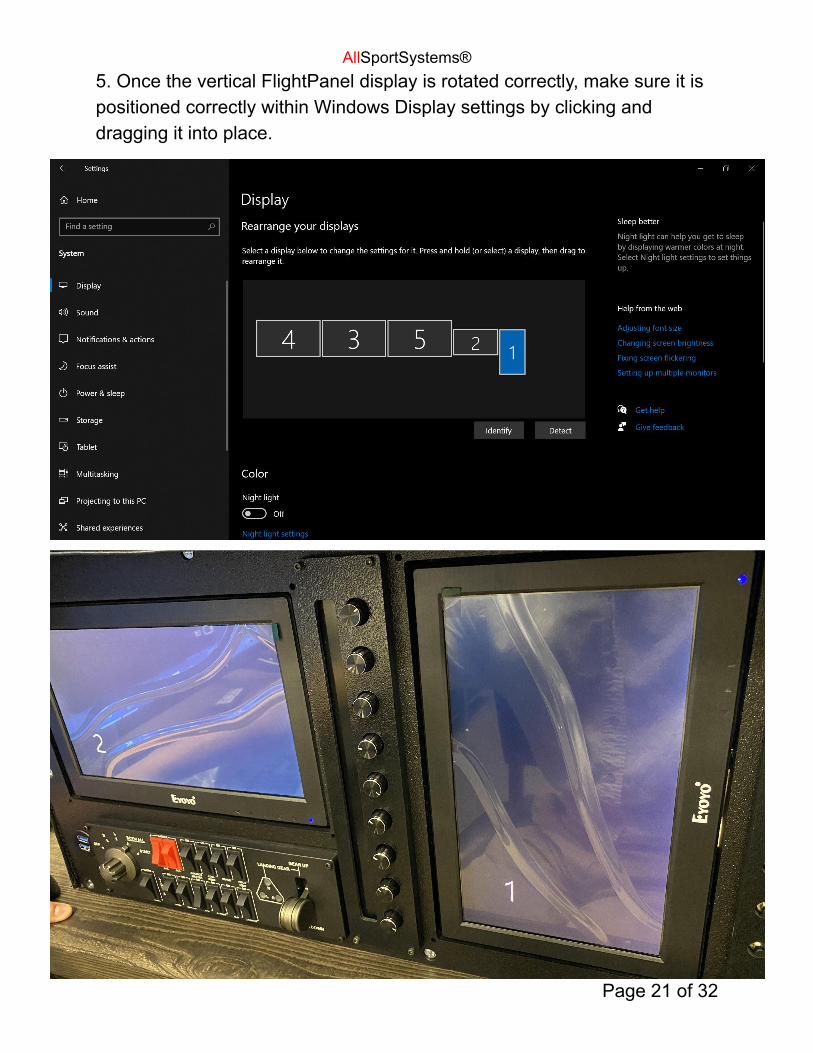
AllSportSystems®5. Once the vertical FlightPanel display is rotated correctly, make sure it ispositioned correctly within Windows Display settings by clicking anddragging it into place.
Page 21 of 32
AllSportSystems®
Please be aware…You MUST reboot your PC:
1. Any time you change the screen ordering2. Any time you disconnect/reconnect a screen’s HDMI cable
while your PC is running.3. Any time you power off/power on a screen while your PC is
running.
The screens must all be powered on and physically connected beforebooting Windows and running any flight sim software. Otherwise Windowswill not remember the display settings and/or orientation for your displays
and they will all need to be reset.
Page 22 of 32
AllSportSystems®
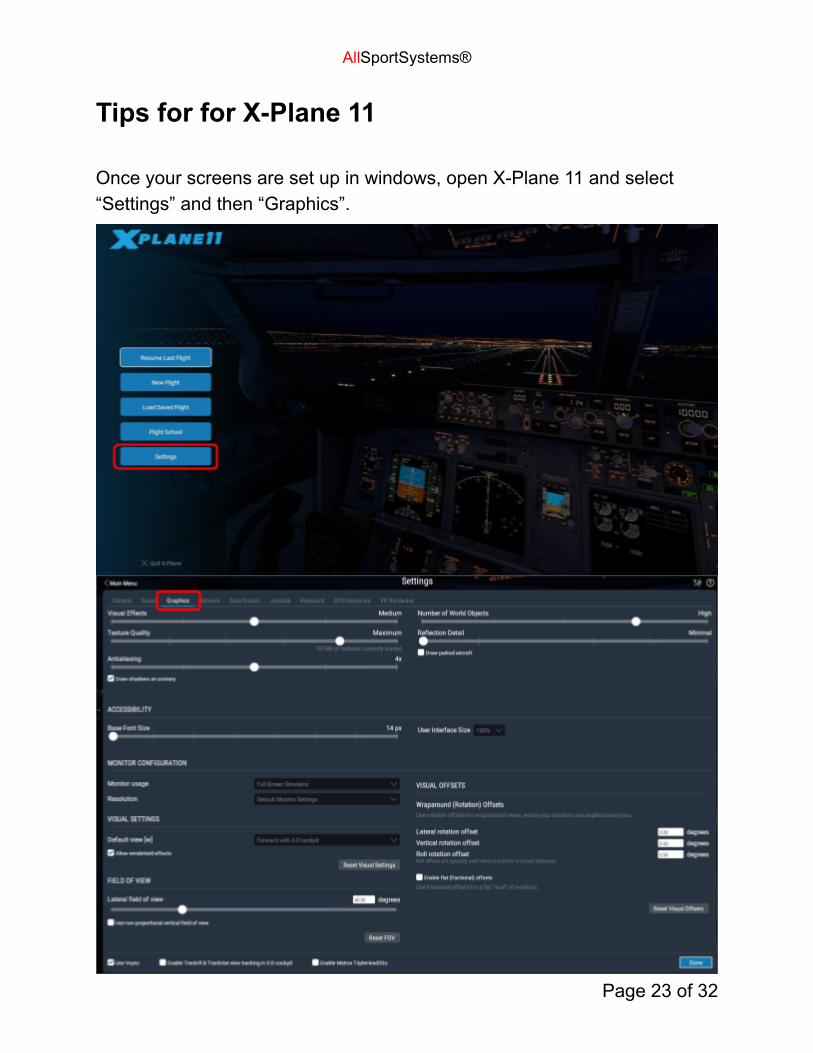
Tips for for X-Plane 11
Once your screens are set up in windows, open X-Plane 11 and select“Settings” and then “Graphics”.
Page 23 of 32
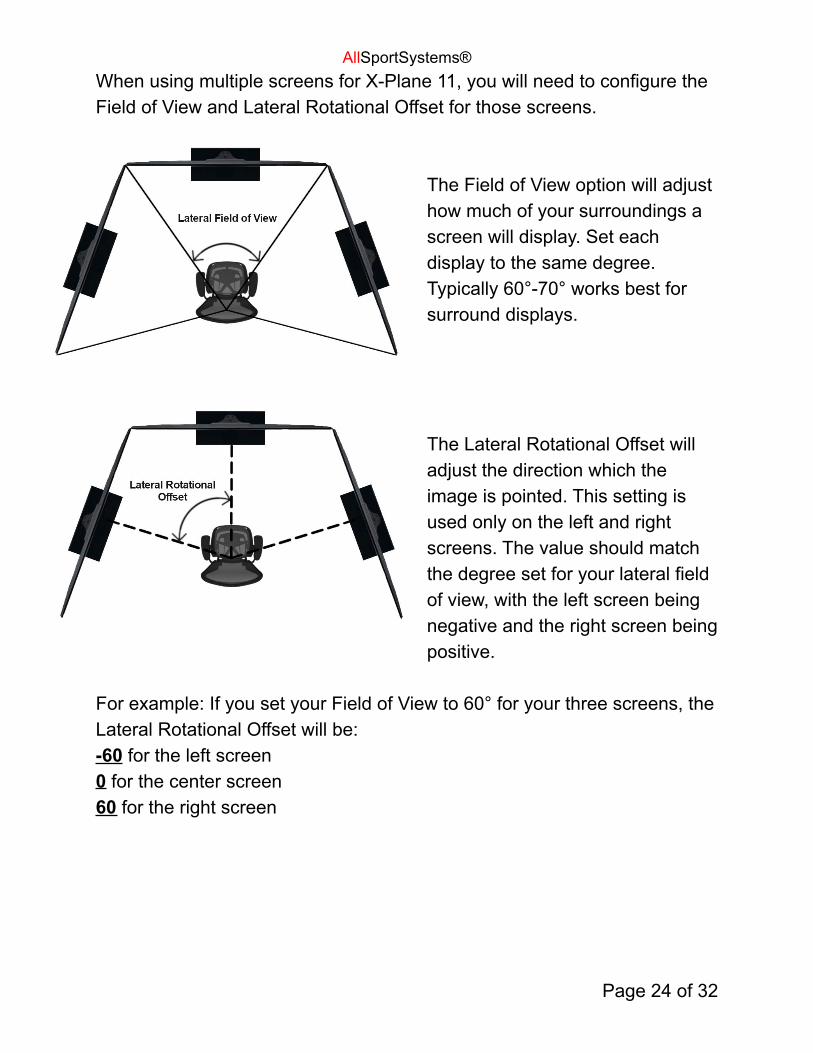
AllSportSystems®When using multiple screens for X-Plane 11, you will need to configure theField of View and Lateral Rotational Offset for those screens.
The Field of View option will adjusthow much of your surroundings ascreen will display. Set eachdisplay to the same degree.Typically 60°-70° works best forsurround displays.
The Lateral Rotational Offset willadjust the direction which theimage is pointed. This setting isused only on the left and rightscreens. The value should matchthe degree set for your lateral fieldof view, with the left screen beingnegative and the right screen beingpositive.
For example: If you set your Field of View to 60° for your three screens, theLateral Rotational Offset will be:-60 for the left screen0 for the center screen60 for the right screen
Page 24 of 32
AllSportSystems®
Disabling FlightPanel displays in X-Plane 11X-Plane 11 may attempt to display onto the two FlightPanel displaysinstead of your main sim display.
● In the X-Plane 11 graphics settings, scroll through the detecteddisplays and find the two FlightPanel displays.
● Change the “Monitor Usage” setting to “Unused”
Mapping buttons and knobs in X-Plane 11The switches and knobs are fully customizable for your simulator. Eachbutton and knob will need to be individually assigned to a function in theX-Plane 11 settings.
● Open “Settings” in X-Plane 11● Select the “Keyboard” tab● Search for your desired function● If that function is already assigned to a key, press the (-) button to
remove the key from that function.● Press the (+) button to begin detecting new key for that function● Once X-Plane has begun searching for a new key, use the desired
button or knob for the function you wish to assign it to.○ Knobs use two directions, so for functions which increment or
decrement, you will need to assign each direction of the knob tothe corresponding function.
● The bottom four knobs on the FlightPanel CLASSIC and PRO alsohave push button functionality.
● The red Mode Switch allows you to assign two completely uniquesets of actions for all of your buttons and knobs.
Page 25 of 32
AllSportSystems®
Adjusting the Flight CameraThe default view when you first load into a flight can be off from a realisticflying position, depending on which aircraft you choose.
● Use the arrow keys and Vertical Rotational Offset to position yourview more to the right and upwards in the cockpit, so that the frontcowling is just visible through the windows.
● This view can be saved by pressing CTRL+(num 0) in X-Plane 11, orby assigning the “Memorize 3-D cockpit location #1” function to abutton on your FlightPanel.
● When loading into a new flight, you can easily access the saved viewby pressing (num 0) on your keyboard, or by assigning the “Go tosave 3-D cockpit location #1” function to a button on your FlightPanel.
● Views are saved per airplane in X-Plane 11, so you will need to setyour desired view in each plane.
Page 26 of 32
AllSportSystems®
Installing and Using PanelBuilder
A USB drive with your license for PanelBuilder will be included with yourFlightPanel if you ordered one from us. The USB drive has the installationfile and license key for PanelBuilder built into it, so it is recommended tosimply leave the USB drive plugged into your PC.
● Install Analog PanelBuilder from the USB drive or download it fromthe SimPlugins website.
● (Optional) If you have purchased the EFIS Pack for PanelBuilder,install it second.
● Run PanelBuilder● In the “Operation” tab select “Edit Panel”
○ Under the “Background Size & Position” section select “NoBackground”
○ Select “OK”
Page 27 of 32

AllSportSystems®
Adding or Removing Instruments and Gauges● In the “Building” tab select “Add Instrument”
○ You can sort through the available instruments using the“Instrument Type” selection on the bottom right
○ Select the instruments you would like to add to your panel usingthe checkboxes, and add them by selecting “Add checkedinstruments”
● To remove an instrument, click the instrument from the mainPanelBuilder page and select “Remove” under the “Building” tab.
Page 28 of 32
AllSportSystems®
Moving Instruments to the Correct Position
It is VERY important that any time you reboot your PC you have all ofyour displays powered on, otherwise your instruments will not load inproperly.
● Once you have selected all of your desired instruments, select “Start”from the “Operation” tab
● After your instruments have loaded onto your screen, click and drageach one into place on your FlightPanel screens.
○ You may grow and shrink each instrument using the scrollwheel on your mouse
○ Once you have your instrument in place, you can lock it in placeby right-clicking the instrument and selecting “Lock”. This willkeep it from being unintentionally moved or resized.
○ Certain instruments can be customized. Right-click on aninstrument and select “Settings” to customize an instrument
● Pressing “Start” in PanelBuilder will minimize the PanelBuilderwindow to show all of your instruments.
○ To return to the PanelBuilder window, click the PanelBuildericon on your Windows Taskbar. Be sure to select PanelBuilderfrom the Windows Taskbar and not from your WindowsDesktop, as this will only launch a new PanelBuilder window.
○ Bringing PanelBuilder back up from the Windows Taskbar willclose the instruments that were running.
Page 29 of 32
AllSportSystems®
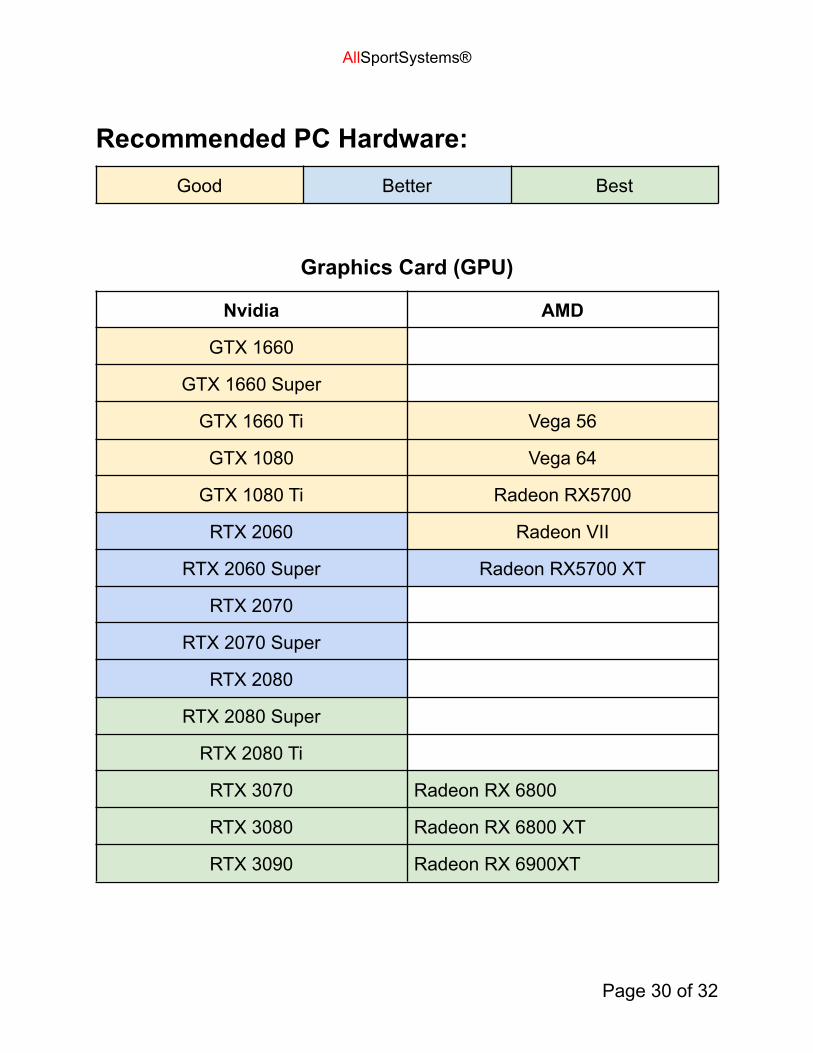
Recommended PC Hardware:Good Better Best
Graphics Card (GPU)
Nvidia AMD
GTX 1660
GTX 1660 Super
GTX 1660 Ti Vega 56
GTX 1080 Vega 64
GTX 1080 Ti Radeon RX5700
RTX 2060 Radeon VII
RTX 2060 Super Radeon RX5700 XT
RTX 2070
RTX 2070 Super
RTX 2080
RTX 2080 Super
RTX 2080 Ti
RTX 3070 Radeon RX 6800
RTX 3080 Radeon RX 6800 XT
RTX 3090 Radeon RX 6900XT
Page 30 of 32
AllSportSystems®
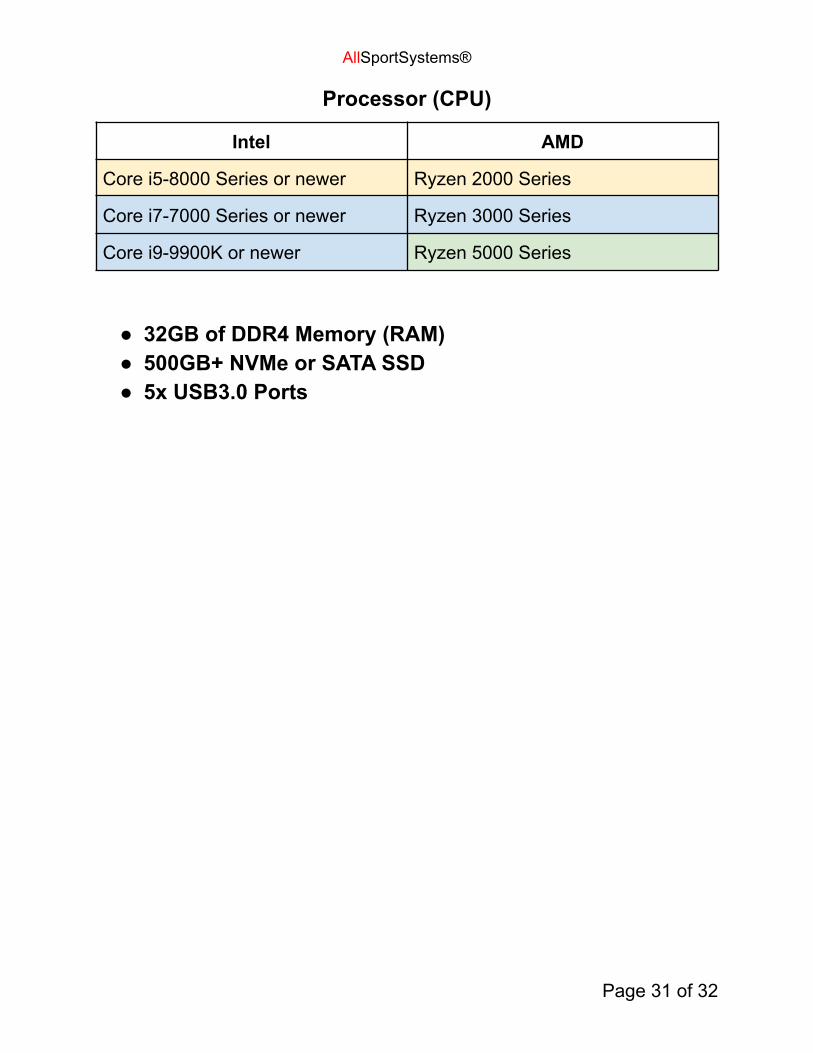
Processor (CPU)
Intel AMD
Core i5-8000 Series or newer Ryzen 2000 Series
Core i7-7000 Series or newer Ryzen 3000 Series
Core i9-9900K or newer Ryzen 5000 Series
● 32GB of DDR4 Memory (RAM)● 500GB+ NVMe or SATA SSD● 5x USB3.0 Ports
Page 31 of 32

AllSportSystems®
Drivers, Downloads, and MoreFor customers who are using their own computer systems, you will need toinstall a few drivers to get everything up and running.
X-Plane Plug-in forLogitech Devices
Allows X-Plane 11 to communicate with any Logitech Flight Panelcomponents.
Microsoft FlightSimulator Plug-in forLogitech Devices
Allows Microsoft Flight Simulator to communicate with any LogitechFlight Panel components.
Logitech Flight PanelTest Software(Optional)
An optional suite of test programs for Logitech Flight Panelcomponents.
USB Enhanced PowerManagement Disablerfor Logitech FlightPanel components(Optional)
(Copyright 2020Uraster GmbH)
An optional third-party software tool to disable Windows EnhancedPower Manager for any and all plugged in Logitech Flight Panelcomponents. This tool is helpful if the screens on your Logitechcomponents don’t light up.
Extract the file from the ZIP folder, run the file as an administrator,and press Enter to begin.
AllSportSystems is not the author of this third-party software tool.Use at your own risk.
RealSimGear GPSPlugins for X-Plane 11
Required only for FlightPanels that use any RealSimGear GPSdevices with X-Plane 11.
FlyWithLua Script andGuide for Dual YokeControl
For users who want to use two separate yokes and rudder pedals inX-Plane 11, this guide can walk you through the steps of installingthe proper plugins and configuring your controls.
AllSportSystems is not the author of this third-party software tool.Use at your own risk.
FluWithLua Plugin forX-Plane 11 (requiredfor Dual Yoke control)
This plugin is what runs the Dual-Yoke script. Be sure to follow theinstructions the author provides.
AllSportSystems is not the author of this third-party software tool.Use at your own risk.
Page 32 of 32
Related Documents