4D LABS, Simon Fraser University 8888 University Drive, Burnaby, B.C. V5A 1S6 E [email protected] T 778.782.8084 F 778.782.3765 W www.4dlabs.ca FEI Nova NanoSEM 430 SEM System Standard Operating Procedure Revision: 1.0 — Last Updated: Feb 12 2015, Revised by Xin Zhang Overview This document will provide a detailed operation procedure of the Nova NanoSEM 430 SEM Sys- tem. Formal Training is required for all users prior to using the system. Revision History # Revised by: Date Modification 1 2 3 4 5 Document No. 4DSOPSEM4

Welcome message from author
This document is posted to help you gain knowledge. Please leave a comment to let me know what you think about it! Share it to your friends and learn new things together.
Transcript

4D LABS, Simon Fraser University 8888 University Drive, Burnaby, B.C. V5A 1S6
E [email protected] T 778.782.8084 F 778.782.3765 W www.4dlabs.ca
FEI Nova NanoSEM 430 SEM System
Standard Operating Procedure
Revision: 1.0 — Last Updated: Feb 12 2015, Revised by Xin Zhang
Overview
This document will provide a detailed operation procedure of the Nova NanoSEM 430 SEM Sys-
tem. Formal Training is required for all users prior to using the system.
Revision History
# Revised by: Date Modification
1
2
3
4
5
Document No. 4DSOPSEM4

2
4D LABS, Simon Fraser University 8888 University Drive, Burnaby, B.C. V5A 1S6
E [email protected] T 778.782.8084 F 778.782.3765 W www.4dlabs.ca
Table of Contents
Overview.................................................................................................................................................. 1
Revision History ........................................................................................................................................ 1
Table of Contents ..................................................................................................................................... 2
General Information ................................................................................................................................. 3
Operation ................................................................................................................................................ 5
1. Tool layout ....................................................................................................................................... 5
2. Checklist .......................................................................................................................................... 6
3. (Optional) Restarting the Control PC and the xT microscope Server ................................................... 8
4. Sample Loading/Unloading ............................................................................................................. 10
5. Link Z to Free Working Distance (FWD) ........................................................................................... 11
6. Alignments and Optimizing Imaging Conditions .............................................................................. 15
7. SEM Imaging ................................................................................................................................. 16
8. EDX/EDS (Energy Dispersive X-ray Spectroscopy) Analysis ................................................................ 17
9. Using the Auxiliary (Low Vacuum) Detectors ................................................................................... 22
10. Completing work ......................................................................................................................... 25
References and Files ............................................................................................................................... 27
Contact Information ............................................................................................................................... 27

3
4D LABS, Simon Fraser University 8888 University Drive, Burnaby, B.C. V5A 1S6
E [email protected] T 778.782.8084 F 778.782.3765 W www.4dlabs.ca
General Information
The FEI Nova NanoSEM 430 system is a field emission scanning electron microscope with ultra-high-
resolution imaging, energy dispersive X-ray spectroscopy, beam deceleration imaging, and low-vacuum
imaging capabilities. The key features of the system are:
High stability Schottky field emission gun; Fast chamber evacuation: 2 min;
0.2 to 30 kV; beam deceleration with stage bias from -150 V to -4 kV; Lowest landing energy 50
V;
Optimal high vacuum image resolution: 1.6 nm at 1 kV; 1.0 nm at 15 kV;
High vacuum SED, in-lens (TLD), EDX, vCD (high sensitivity low kV BSE) detectors;
Optimal low vacuum image resolution: 2.0 nm;
Low vacuum LVD, LVD/Helix, GAD (TV-rate solid-state BSE), EDX, vCD (high sensitivity low kV BSE)
detectors;
5-axes motorized stage; z axis movable up to 60 mm; -5°/+70° tilt
The Nova NanoSEM 430 system is a complex tool with various functions that are unnecessarily compatible
under a given experimental condition. Not all the functions can be demonstrated in one scheduled training
session. Users qualified to work on the tool are unnecessarily qualified for all the functions. Therefore,
users are NOT allowed to try functions that have not been demonstrated. NanoSEM users need to sched-
ule additional training sessions to qualify for all tool functions.
Only advanced users are allowed to do low-vacuum imaging, which requires adding an auxiliary detector.
Two users (or a user and the tool owner) should be presented whenever an auxiliary detector piece is being
installed/un-installed.
To keep the machine in good working order for yourself and others, common courtesy and cleanliness are
a must. Any tool issue, incident, or misuse should be reported immediately to the tool owners to ensure the
fastest repair/remediation time.
-ALWAYS wear gloves when touching anything inside the vacuum system
-ALWAYS exercise extra care when working on and around the stage and pole piece
-ALWAYS secure samples on the holder/stage
-ALWAYS link stage Z to FWD (free working distance) at the highest surface of samples
4
4D LABS, Simon Fraser University 8888 University Drive, Burnaby, B.C. V5A 1S6
E [email protected] T 778.782.8084 F 778.782.3765 W www.4dlabs.ca
-NEVER prepare powder samples in the microscope room
-NEVER leave samples unattended
-NEVER image magnetic samples under the immersion mode
-NEVER put wet samples or loose powders in the system
-NEVER touch any part of the high vacuum system with bare hands
-NEVER re-link Z to FWD when stage is tilted
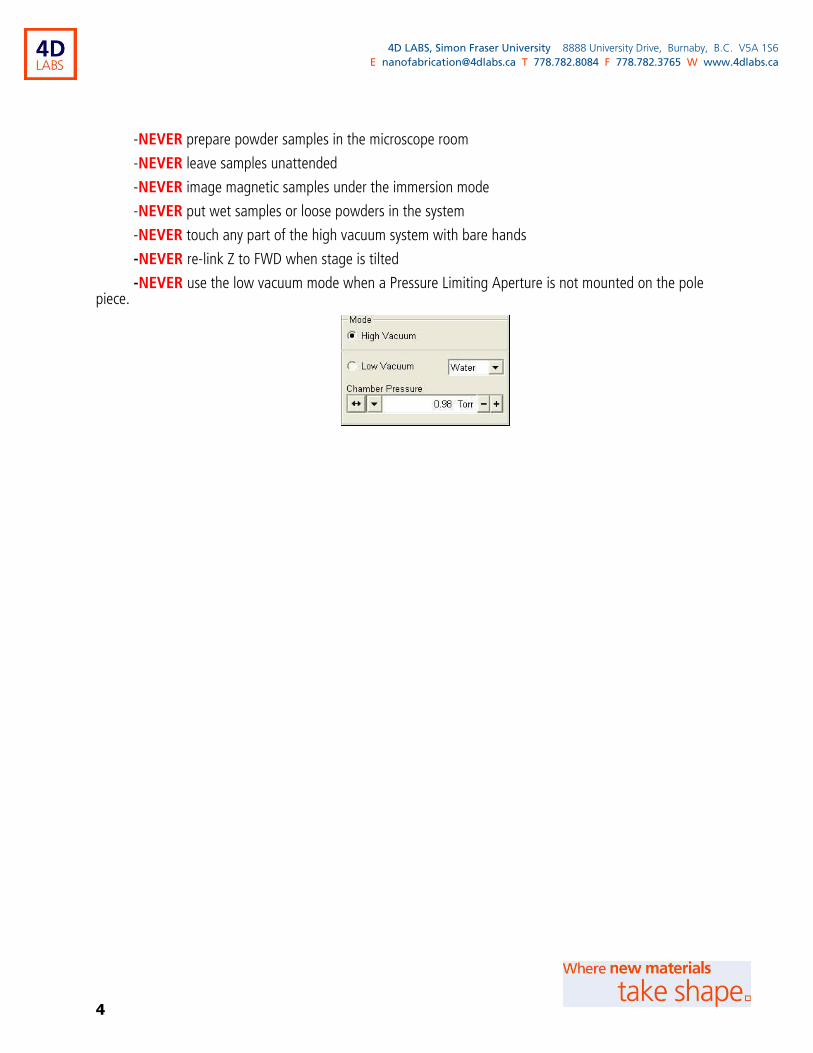
-NEVER use the low vacuum mode when a Pressure Limiting Aperture is not mounted on the pole piece.

5
4D LABS, Simon Fraser University 8888 University Drive, Burnaby, B.C. V5A 1S6
E [email protected] T 778.782.8084 F 778.782.3765 W www.4dlabs.ca
Operation
1. Tool layout
Data transfer is only allowed through the Support PC.
Power switch
EDAX PC monitor for EDS measurements
Support PC monitor for data transfer and Internet
Control PC monitor
Chamber door
EDAX detector
e-beam quadrant 1
Chamber view quadrant
Manual user interface
e-beam quadrant 2
e-beam quadrant 3
GEM switch box
Support PC
EDAX PC
Control PC
6
4D LABS, Simon Fraser University 8888 University Drive, Burnaby, B.C. V5A 1S6
E [email protected] T 778.782.8084 F 778.782.3765 W www.4dlabs.ca
2. Checklist
1. Green light on the system control panel should be on.
2. The xT microscope Server and User Interface (UI) are both running.
If you only see the UI, the xT microscope Server is minimized onto the Windows taskbar and you don’t need to worry about it.
When you only see the tiny view of the xT microscope Server, click on the Show UI button to bring up the User Interface.
If the User Interface is not on but the xT microscope Server is on, you need to perform step 3 to 9 in the “Restarting the Control PC and the xT microscope Server” sec-tion.
If the xT microscope Server is not on, you need to perform step 7 to 9 in the “Restart-ing the Control PC and the xT microscope Server” section.
3. Log on the User Interface with your username and password when necessary.
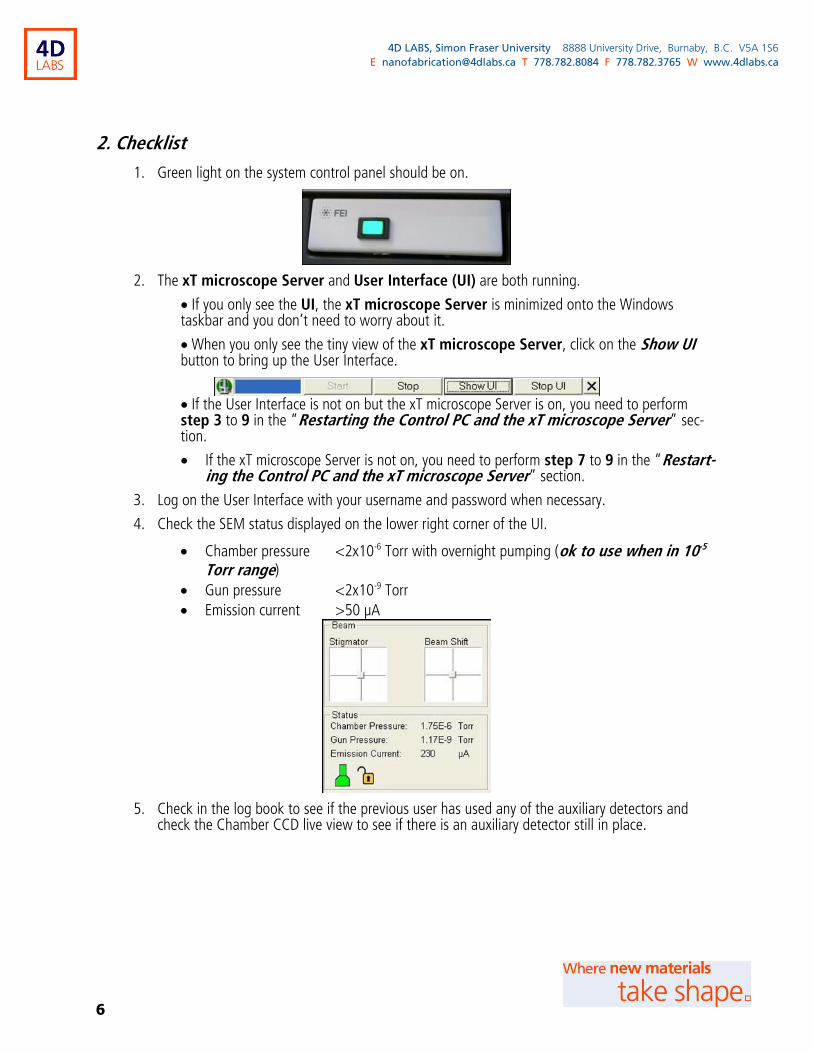
4. Check the SEM status displayed on the lower right corner of the UI.
Chamber pressure <2x10⁻⁶ Torr with overnight pumping (ok to use when in 10-5 Torr range)
Gun pressure <2x10⁻⁹ Torr
Emission current >50 µA
5. Check in the log book to see if the previous user has used any of the auxiliary detectors and check the Chamber CCD live view to see if there is an auxiliary detector still in place.
7
4D LABS, Simon Fraser University 8888 University Drive, Burnaby, B.C. V5A 1S6
E [email protected] T 778.782.8084 F 778.782.3765 W www.4dlabs.ca
Only advanced users are allowed to install, use, and remove the auxiliary detectors. If any of the auxiliary detectors is left mounted by the previous user, you should write a warning in the log book and may have to find the tool owner or an advanced user to remove it before you can use the system.
And if one of the auxiliary detectors was used by a previous user, the EDAX X-ray detector might not be left in the optimal working position. Therefore, you may need help from the tool owner or an advanced user to ensure the EDAX X-ray detector is put in the optimal working position.
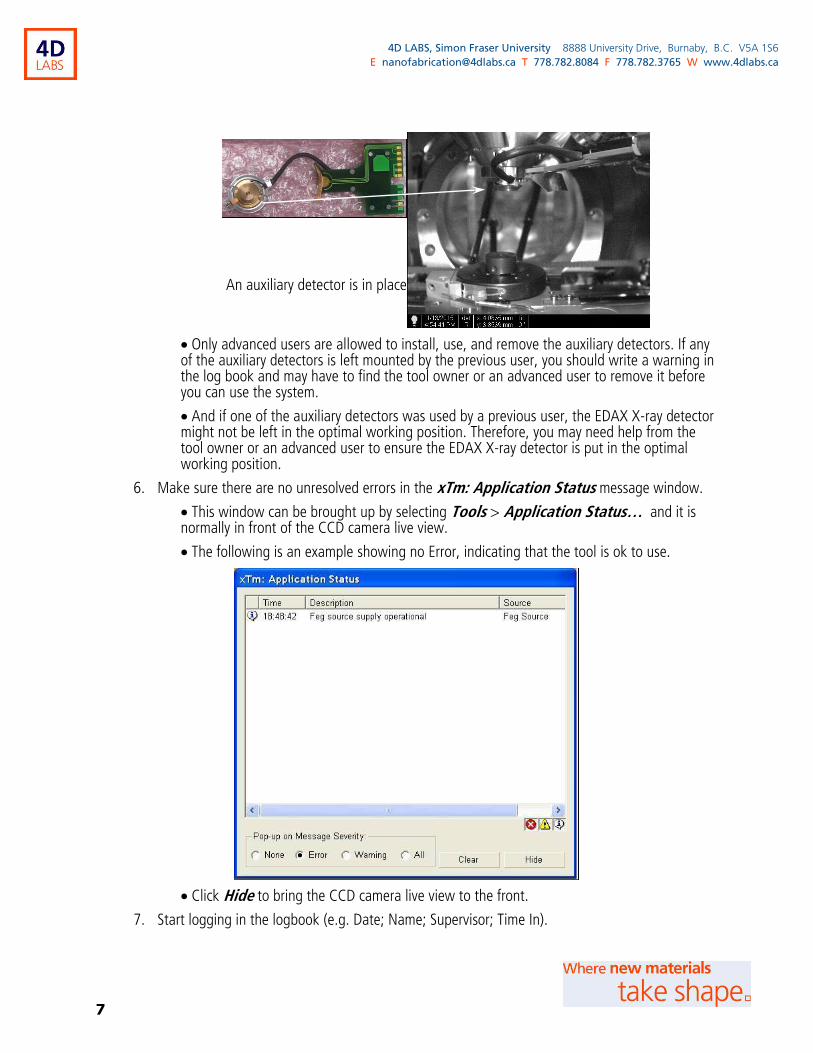
6. Make sure there are no unresolved errors in the xTm: Application Status message window.
This window can be brought up by selecting Tools > Application Status… and it is normally in front of the CCD camera live view.
The following is an example showing no Error, indicating that the tool is ok to use.
Click Hide to bring the CCD camera live view to the front.
7. Start logging in the logbook (e.g. Date; Name; Supervisor; Time In).
An auxiliary detector is in place
8
4D LABS, Simon Fraser University 8888 University Drive, Burnaby, B.C. V5A 1S6
E [email protected] T 778.782.8084 F 778.782.3765 W www.4dlabs.ca
8. Samples are well secured on the sample holder/stub.
3. (Optional) Restarting the Control PC and the xT microscope Server
Warning: ONLY advanced users are allowed to do this when necessary.
1. Make sure High Voltage is off and the SEM chamber is under vacuum.
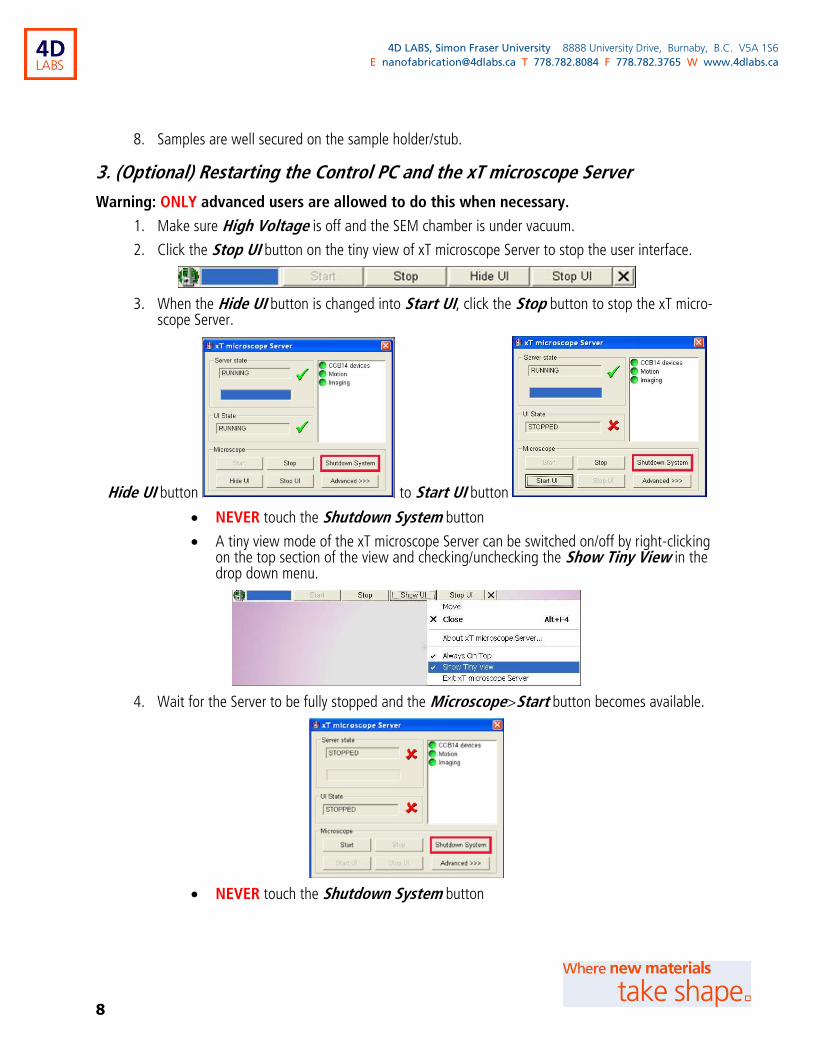
2. Click the Stop UI button on the tiny view of xT microscope Server to stop the user interface.
3. When the Hide UI button is changed into Start UI, click the Stop button to stop the xT micro-scope Server.
Hide UI button to Start UI button
NEVER touch the Shutdown System button
A tiny view mode of the xT microscope Server can be switched on/off by right-clicking on the top section of the view and checking/unchecking the Show Tiny View in the drop down menu.
4. Wait for the Server to be fully stopped and the Microscope>Start button becomes available.
NEVER touch the Shutdown System button

9
4D LABS, Simon Fraser University 8888 University Drive, Burnaby, B.C. V5A 1S6
E [email protected] T 778.782.8084 F 778.782.3765 W www.4dlabs.ca
5. Move cursor to the top blue section of the xT microscope Server normal view and right click. Click on Exit xT microscope Server in the drop down menu. Yes to the Do you really want to exit? dialog.
6. Restart the Control PC
7. Log on Windows with your username and password, and wait for a couple of minutes for the Windows to load files successfully.
8. Start the xT microscope Server by double clicking on the xT microscope server icon.
The xT microscope Server normal view will pop up.
Make sure the indicators for CCB14 devices, Motion and Imaging are all green, before clicking on the Start button to start both the Server and User Interface.
10
4D LABS, Simon Fraser University 8888 University Drive, Burnaby, B.C. V5A 1S6
E [email protected] T 778.782.8084 F 778.782.3765 W www.4dlabs.ca
Watch the checklist under the Administration status to make sure all indicators be-come green eventually.
9. Once the User Interface shows up, switch the xT microscope Server to its Tiny View.
4. Sample Loading/Unloading
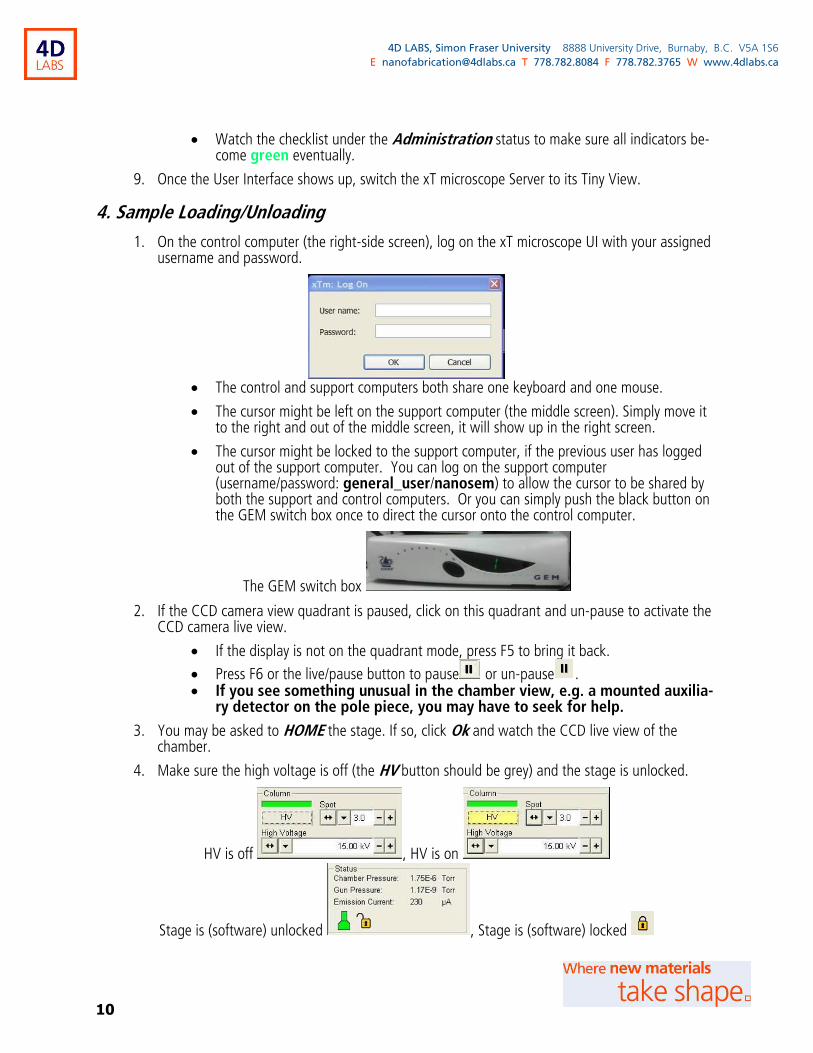
1. On the control computer (the right-side screen), log on the xT microscope UI with your assigned username and password.
The control and support computers both share one keyboard and one mouse.
The cursor might be left on the support computer (the middle screen). Simply move it to the right and out of the middle screen, it will show up in the right screen.
The cursor might be locked to the support computer, if the previous user has logged out of the support computer. You can log on the support computer (username/password: general_user/nanosem) to allow the cursor to be shared by both the support and control computers. Or you can simply push the black button on the GEM switch box once to direct the cursor onto the control computer.
The GEM switch box
2. If the CCD camera view quadrant is paused, click on this quadrant and un-pause to activate the CCD camera live view.
If the display is not on the quadrant mode, press F5 to bring it back.
Press F6 or the live/pause button to pause or un-pause . If you see something unusual in the chamber view, e.g. a mounted auxilia-
ry detector on the pole piece, you may have to seek for help.
3. You may be asked to HOME the stage. If so, click Ok and watch the CCD live view of the chamber.
4. Make sure the high voltage is off (the HV button should be grey) and the stage is unlocked.
HV is off , HV is on
Stage is (software) unlocked , Stage is (software) locked

11
4D LABS, Simon Fraser University 8888 University Drive, Burnaby, B.C. V5A 1S6
E [email protected] T 778.782.8084 F 778.782.3765 W www.4dlabs.ca
5. Press the Vent button to vent the chamber. Click Yes on the dialog that appears.
Vent and then Yes
6. After one minute of venting, the chamber door will hiss. When the chamber icon (displayed un-der Status) turns grey, the chamber door is ready to open. Open the door gently while watching the CCD live view.
7. Put on gloves! Carefully place the sample holder/stub in the hole on the Stage Adapter and gently tighten the locking screw. Make sure there is enough clearance above the sam-ple, so lower the stage further with a thicker sample.
8. Close the chamber door gently while watching the CCD display. Make sure there is enough clearance above the sample. Make sure the pin on the door fits into the hole on the cham-ber (as indicated by the arrow in the following image).
9. Press the Pump button to pump the chamber. Once the chamber is pumped out the chamber icon (displayed under Status) will turn green. You are now ready to turn on the high voltage for imaging.
5. Link Z to Free Working Distance (FWD)
Warning: NEVER move the 5 mm WD bar indicator in the CCD camera view quadrant.
1. Once the chamber vacuum is ready , i.e. 1X10⁻⁴ Torr or better, turn on the High Voltage by
clicking the HV button under the Beam Control tab . The HV button will appear yellow.
12
4D LABS, Simon Fraser University 8888 University Drive, Burnaby, B.C. V5A 1S6
E [email protected] T 778.782.8084 F 778.782.3765 W www.4dlabs.ca
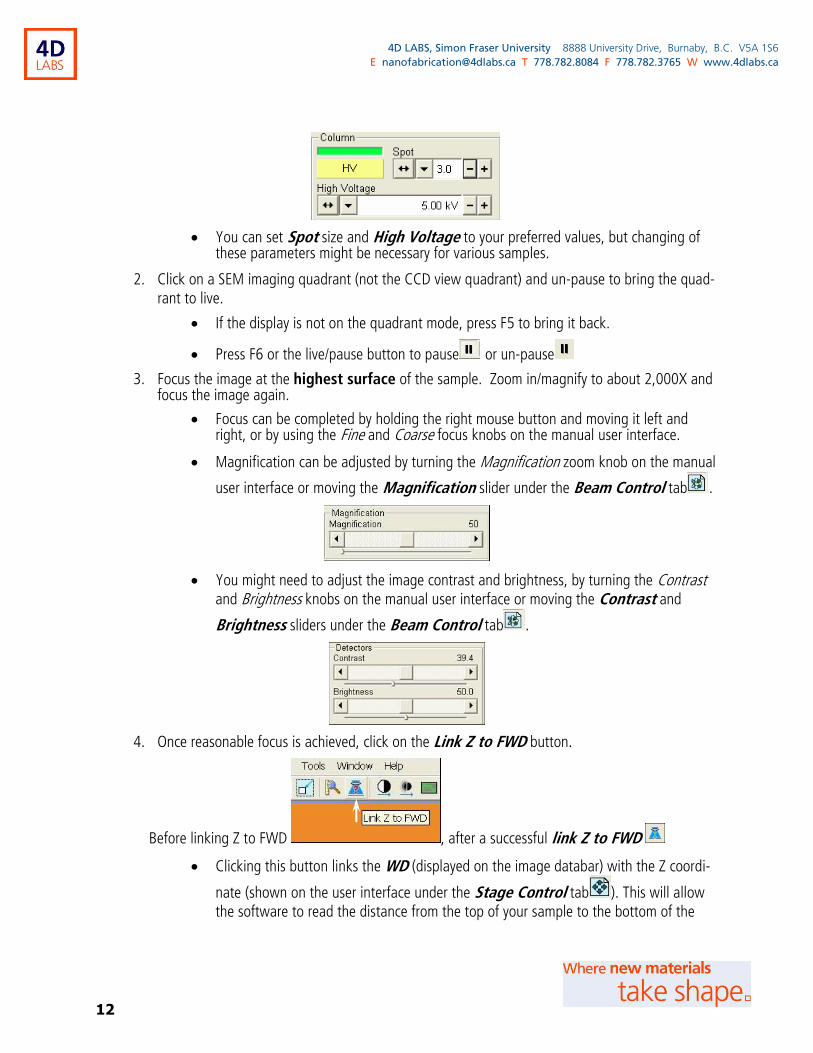
You can set Spot size and High Voltage to your preferred values, but changing of these parameters might be necessary for various samples.
2. Click on a SEM imaging quadrant (not the CCD view quadrant) and un-pause to bring the quad-rant to live.
If the display is not on the quadrant mode, press F5 to bring it back.
Press F6 or the live/pause button to pause or un-pause
3. Focus the image at the highest surface of the sample. Zoom in/magnify to about 2,000X and focus the image again.
Focus can be completed by holding the right mouse button and moving it left and right, or by using the Fine and Coarse focus knobs on the manual user interface.
Magnification can be adjusted by turning the Magnification zoom knob on the manual
user interface or moving the Magnification slider under the Beam Control tab .
You might need to adjust the image contrast and brightness, by turning the Contrast and Brightness knobs on the manual user interface or moving the Contrast and
Brightness sliders under the Beam Control tab .
4. Once reasonable focus is achieved, click on the Link Z to FWD button.
Before linking Z to FWD , after a successful link Z to FWD
Clicking this button links the WD (displayed on the image databar) with the Z coordi-
nate (shown on the user interface under the Stage Control tab ). This will allow the software to read the distance from the top of your sample to the bottom of the

13
4D LABS, Simon Fraser University 8888 University Drive, Burnaby, B.C. V5A 1S6
E [email protected] T 778.782.8084 F 778.782.3765 W www.4dlabs.ca
column, and also help prevent an accidental collision between the column and your sample.
Whenever the Link Z to FWD button (e.g. or ) doesn’t show a green double
arrow like this , you need redo the focus and Link Z to FWD.
The system can’t recognize the height variation of a sample. Therefore, user should always try to find the highest surface of the sample and re-do the focus and Link Z to FWD.
5. The sample now can be moved closer to the pole piece (e.g. 10 mm) if it is too far away.
The sample height can be raised by typing a number in the Z coordinate in the Stage>Coordinates window and click on the Goto button, or by holding the middle mouse button and dragging it up in un-paused CCD view quadrant. Watch the live CCD view of the Chamber to make sure there is enough clearance above the sample.
Before clicking the Goto button to raise the stage, make sure that only Z coordinate is selected for moving, i.e., ticked in the square box, to avoid unwanted stage moves.
The Stage can also be raised or lowered by holding the middle mouse button and moving it up or down in un-paused Chamber view quadrant. This method provides slower and safer Stage Z move.
10
14
4D LABS, Simon Fraser University 8888 University Drive, Burnaby, B.C. V5A 1S6
E [email protected] T 778.782.8084 F 778.782.3765 W www.4dlabs.ca
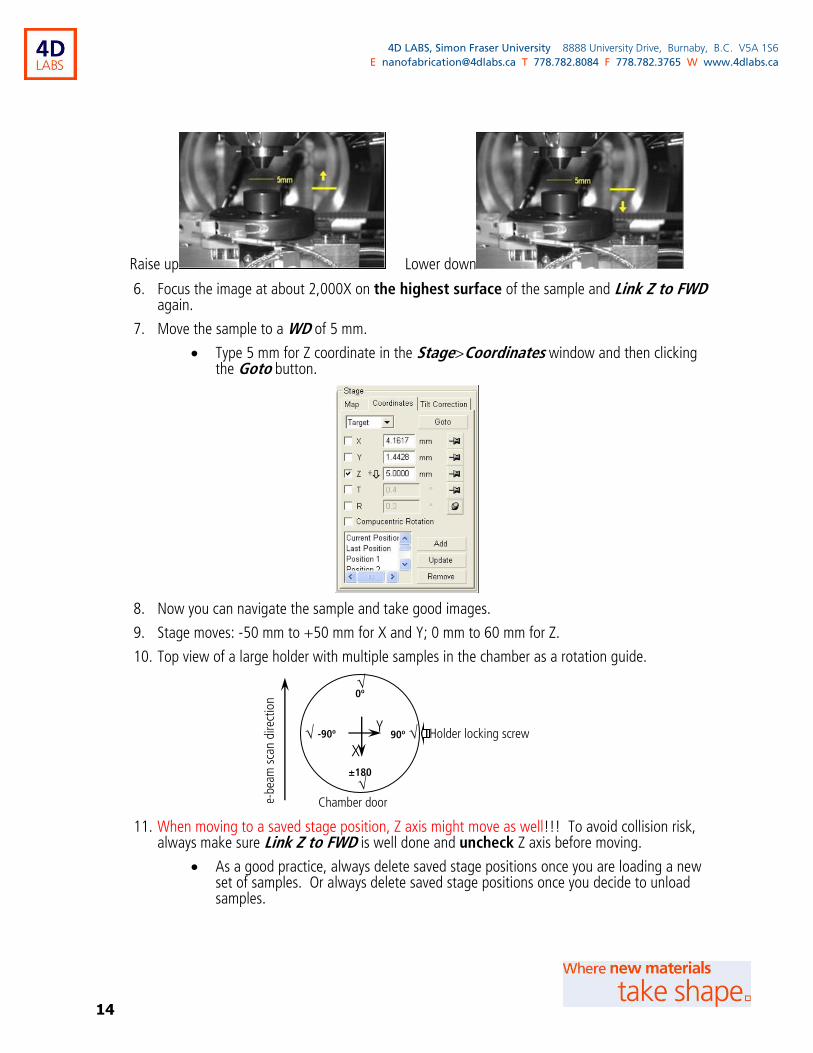
Raise up Lower down
6. Focus the image at about 2,000X on the highest surface of the sample and Link Z to FWD again.
7. Move the sample to a WD of 5 mm.
Type 5 mm for Z coordinate in the Stage>Coordinates window and then clicking the Goto button.
8. Now you can navigate the sample and take good images.
9. Stage moves: -50 mm to +50 mm for X and Y; 0 mm to 60 mm for Z.
10. Top view of a large holder with multiple samples in the chamber as a rotation guide.
11. When moving to a saved stage position, Z axis might move as well!!! To avoid collision risk, always make sure Link Z to FWD is well done and uncheck Z axis before moving.
As a good practice, always delete saved stage positions once you are loading a new set of samples. Or always delete saved stage positions once you decide to unload samples.
Chamber door
Holder locking screw 90o
0o √
√ -90o √
±180
o √
X
Y
e-be
am s
can
dire
ctio
n

15
4D LABS, Simon Fraser University 8888 University Drive, Burnaby, B.C. V5A 1S6
E [email protected] T 778.782.8084 F 778.782.3765 W www.4dlabs.ca
12. Tilting a sample in this system is tricky, it is highly suggested that users use the shortest Stage adaptor if tilt is needed.
There is NO eucentric height adjustment on Nova NanoSEM 430.
For taller Stage adaptor and larger samples, tilt angle should NOT be beyond -4~ 30o.
Perform tilting carefully with 2~5o increments and watch the CCD live view of Cham-ber to make sure there is sufficient gap between the sample and the pole piece.
If the area of interest moves off the view center, use Stage X, Y to move it back.
Re-focus after each small-step tilting and lower the Stage (larger Z) if the sample is very close to the pole piece.
NO rotation when Stage is tilted.
NO big move of Stage in X, Y, Z, and tilt when Stage is tilted
Do NOT Link Z to FWD when sample is tilted.
Do NOT use Beam Deceleration (Stage Bias) when sample is tilted.
The Stage can tilt to 70°, but it is only for small samples (< 5mm X 5mm) at taller mount.
6. Alignments and Optimizing Imaging Conditions
Warning: Do NOT make any adjustments to the Source Tilt!
1. Center a feature in the middle of the image and focus.
2. If the feature remains centered while changing the focus, move to next step. If the feature moves/shifts around apparently by changing the focus, Lens Align should be adjusted.
Click on the Modulator button under the Beam Control >Align>Lens Align 2D adjuster.
The image focus should wobble, and the feature will appear in and out of focus but should not move/shift in X and Y directions. If it does shift, minimize the shift by dragging the X and Y adjusters in the Lens Align box.
Use the Reduced Area mode and shorter dwell times for easy observation of image shift.
Click on the Modulator button again to deactivate the wobbling.
Don’t touch!

16
4D LABS, Simon Fraser University 8888 University Drive, Burnaby, B.C. V5A 1S6
E [email protected] T 778.782.8084 F 778.782.3765 W www.4dlabs.ca
3. If the feature becomes stretched in two perpendicular directions by changing focus, the beam stigmation needs to be adjusted.
Beam stigmation can be adjusted by turning the Stigmation X and Y knobs on the
manual user interface, or dragging the X and Y adjusters in the Beam Control>Align>Stigmator box.
Focus should be adjusted at the same time to achieve best image sharpness and clearness.
Ideally, when the image is in or out of focus, the feature expand or contract equally in all directions.
4. Adjust High Voltage and/or Spot size when necessary.
Re-adjustments of Lens Align and stigmation might be needed when changing High Voltage and Spot size.
For less-conductive samples, low HVs and small Spot sizes are better choices.
For BSE imaging or EDS analysis, high HVs and large Spot sizes are better choices.
For conductive samples, 10 kV to 20 kV and Spot size 3.0 or smaller are useful for best image quality and resolution.
7. SEM Imaging
1. Focus and stigmate on an area of interest at a higher magnification.
At low magnifications, the ETD detector, combined with the Field-Free imaging mode, is activated when un-pause an SEM imaging quadrant for the first time after sample loading.
At low magnifications, the Stage can be moved to area of interest by using the joystick or simply double-clicking the left mouse button in the live SEM image.
At high magnifications, Beam Shift needs to be used for moving to a different spot to image. Beam shit can be achieved by turning the Beam Shift X and Y knobs on the
manual user interface, or dragging the X and Y adjusters in the Beam Control>Align>Beam Shift box.
Change the beam dwell time to alter the image quality and frame refresh rate.
Don’t touch!

17
4D LABS, Simon Fraser University 8888 University Drive, Burnaby, B.C. V5A 1S6
E [email protected] T 778.782.8084 F 778.782.3765 W www.4dlabs.ca
Use the Reduced Area imaging mode to observe focus changes easier and faster.
2. After focus and stigmation adjustments, try moving to different areas on the sample before tak-ing a final image, charging and chemical effects in small areas can lead to distorted images.
3. Once acceptable imaging conditions are achieved, press F2 to start a slow scan for a high quali-ty image.
At the end of the slow scan, a Save Image dialogue will appear. Or go File>Save as to load the Save Image dialogue.
Save the image in your own folder in the SharedData_NanoSEM on NPE146-SPC (Npe146-spc), i.e, the Support PC.
No USB drive is allowed on the control computer.
4. For high resolution imaging, the through lens detector (TLD), combined with the Immersion mode, can be used.
Magnetic samples, or samples could be magnetized, e.g. steel, Ni or Fe, are NOT al-lowed for the Immersion imaging mode!!!
To enable the Immersion mode:
WD between 4.5-7 mm
High Voltage below 18 kV
Magnification above 3,000X
5. Switch to the Immersion mode by clicking on the SEM mode drop down arrow and selecting Mode 2: Immersion in the list.
The SEM mode drop down menu
6. Focus and stigmate the image. Press F2 for obtaining high quality image.
Link Z to FWD again
The Lens Align may need to be checked again.
For large stage movements, switch to the Field-Free mode and decrease magnifica-tion to move faster.
7. When done with the Immersion mode, switch to the Field-Free mode.
If the image quality becomes very poor, check under Detectors to see if ETD is ticked, as switching from the Immersion mode to the Field-free mode doesn’t al-ways lead to switching from TLD to ETD and TLD under the Field-free mode gives very bad imaging contrast.
8. EDX/EDS (Energy Dispersive X-ray Spectroscopy) Analysis
1. Before using the EDX function, you might need help from experienced users to make sure the EDAX X-ray detector is in the optimal position (50 mm).

18
4D LABS, Simon Fraser University 8888 University Drive, Burnaby, B.C. V5A 1S6
E [email protected] T 778.782.8084 F 778.782.3765 W www.4dlabs.ca
2. Move the sample to a WD between 7 and 8 mm for optimal EDX signal collection.
3. Find an area of interest on the sample for EDX analysis, switch to EDX imaging mode by clicking on the SEM mode drop down arrow and selecting Mode 3: EDX in the list.
Ok to do EDX analysis under Mode 1: Field-Free or Mode 2: Immersion mode. However, under Mode 1: Field-Free mode, there will be huge background noise from secondary electrons so that elemental X-ray peaks appear to be tiny bumps. Un-der Mode 2: Immersion mode, the EDX spectrum will probably show Al, Fe, Cr peaks that resulted from the pole piece and Chamber.
4. Re-focus the image and optimize the image quality by altering the brightness, contrast, HV, and/or spot size.
HV should be chosen such that it is 2~5 times of the peak energy of the interested el-ement.
The Spot size should be set between 4.0 and 7.0 for sufficient X-ray counts.
5. Switch to the External imaging mode by going to Scan>External. All live SEM images on the control computer will be paused and External is displayed in each of SEM quadrants.
6. Pause the CCD live view quadrant.
50 mm
Position
adjuster
EDAX detector
Mode 2: Immersion
19
4D LABS, Simon Fraser University 8888 University Drive, Burnaby, B.C. V5A 1S6
E [email protected] T 778.782.8084 F 778.782.3765 W www.4dlabs.ca
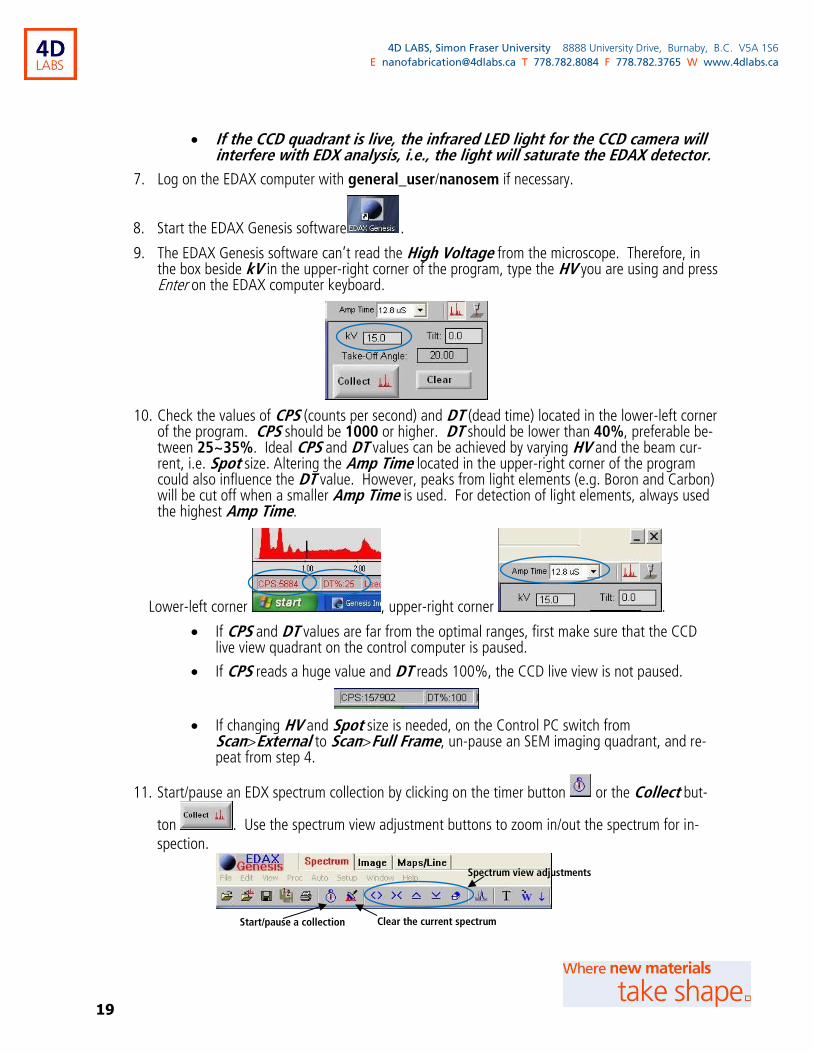
If the CCD quadrant is live, the infrared LED light for the CCD camera will interfere with EDX analysis, i.e., the light will saturate the EDAX detector.
7. Log on the EDAX computer with general_user/nanosem if necessary.
8. Start the EDAX Genesis software .
9. The EDAX Genesis software can’t read the High Voltage from the microscope. Therefore, in the box beside kV in the upper-right corner of the program, type the HV you are using and press Enter on the EDAX computer keyboard.
10. Check the values of CPS (counts per second) and DT (dead time) located in the lower-left corner of the program. CPS should be 1000 or higher. DT should be lower than 40%, preferable be-tween 25~35%. Ideal CPS and DT values can be achieved by varying HV and the beam cur-rent, i.e. Spot size. Altering the Amp Time located in the upper-right corner of the program could also influence the DT value. However, peaks from light elements (e.g. Boron and Carbon) will be cut off when a smaller Amp Time is used. For detection of light elements, always used the highest Amp Time.
Lower-left corner , upper-right corner .
If CPS and DT values are far from the optimal ranges, first make sure that the CCD live view quadrant on the control computer is paused.
If CPS reads a huge value and DT reads 100%, the CCD live view is not paused.
If changing HV and Spot size is needed, on the Control PC switch from Scan>External to Scan>Full Frame, un-pause an SEM imaging quadrant, and re-peat from step 4.
11. Start/pause an EDX spectrum collection by clicking on the timer button or the Collect but-
ton . Use the spectrum view adjustment buttons to zoom in/out the spectrum for in-spection.
Start/pause a collection Clear the current spectrum
Spectrum view adjustments

20
4D LABS, Simon Fraser University 8888 University Drive, Burnaby, B.C. V5A 1S6
E [email protected] T 778.782.8084 F 778.782.3765 W www.4dlabs.ca
12. Peak identification and fitting.
On the left-hand side control panel, click on the Peak ID button to label peaks with element symbols.
Click on the HPD button to fit the spectrum with background correction.
When unidentified peaks exist, click on the button to bring up the expanded view
of Peak ID panel. In the expanded view, click on the EPIC button to bring up the EDS Energy Table for finding out KLM energy lines for a specific element.
Click on a peak in the spectrum, Possible elements will be suggested in the expand-ed view. User can Add/Delete and selected elements to/from the spectrum.
Click on the button to collapse the expanded view to simplified view when neces-sary.
13. Click on the Quant button the left-hand side control panel to obtain EDAX ZAF Quanti-fication (Standardless) results.
14. Click on the button above the spectrum to produce a quick report in a Word document that includes both the spectrum and quantification results.
Make sure to click the Enable Content button in Word immediately after Word is loaded. Otherwise, report will not be produced.
Make sure to save all data in the SharedData_NanoSEM ‘NPE146-SPC’ folder on the Support PC. There is also a shortcut to this folder on the Desktop: UserData_SPC
Simplified view
Expanded view
21
4D LABS, Simon Fraser University 8888 University Drive, Burnaby, B.C. V5A 1S6
E [email protected] T 778.782.8084 F 778.782.3765 W www.4dlabs.ca
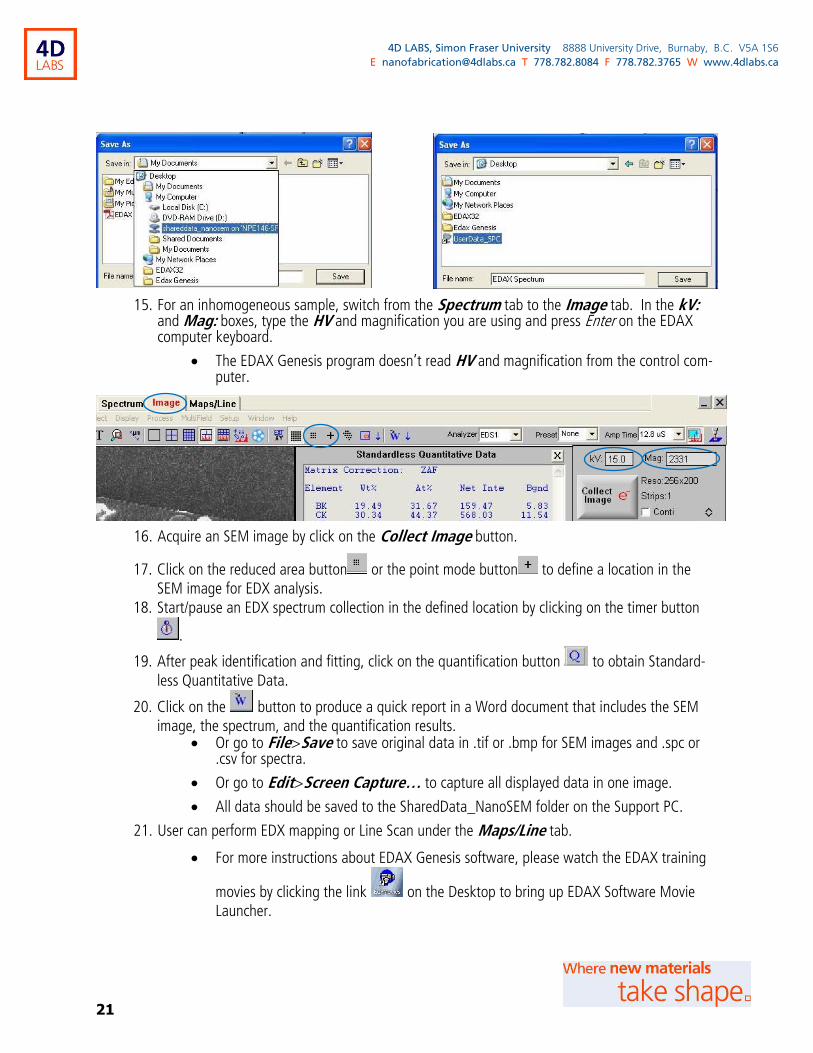
15. For an inhomogeneous sample, switch from the Spectrum tab to the Image tab. In the kV: and Mag: boxes, type the HV and magnification you are using and press Enter on the EDAX computer keyboard.
The EDAX Genesis program doesn’t read HV and magnification from the control com-puter.
16. Acquire an SEM image by click on the Collect Image button.
17. Click on the reduced area button or the point mode button to define a location in the SEM image for EDX analysis.
18. Start/pause an EDX spectrum collection in the defined location by clicking on the timer button
.
19. After peak identification and fitting, click on the quantification button to obtain Standard-less Quantitative Data.
20. Click on the button to produce a quick report in a Word document that includes the SEM image, the spectrum, and the quantification results.
Or go to File>Save to save original data in .tif or .bmp for SEM images and .spc or .csv for spectra.
Or go to Edit>Screen Capture… to capture all displayed data in one image.
All data should be saved to the SharedData_NanoSEM folder on the Support PC.
21. User can perform EDX mapping or Line Scan under the Maps/Line tab.
For more instructions about EDAX Genesis software, please watch the EDAX training
movies by clicking the link on the Desktop to bring up EDAX Software Movie Launcher.

22
4D LABS, Simon Fraser University 8888 University Drive, Burnaby, B.C. V5A 1S6
E [email protected] T 778.782.8084 F 778.782.3765 W www.4dlabs.ca
22. Once you are done with EDX analysis, close the EDAX Genesis program.
23. Un-pause the CCD live view quadrant on the Control computer.
24. Go to Scan>Full Frame and un-pause an SEM imaging quadrant.
25. Switch from the EDX mode to the Field Free mode, and change Spot size to 3.
26. Perform regular SEM imaging with the Control computer, or perform “Completing Work”.
9. Using the Auxiliary (Low Vacuum) Detectors
Users are NOT allowed to use auxiliary detectors without approval from the tool owners. Low vacuum mode can NOT be used for very long time. After a few hours of operation, the Gun vacuum will degrade. Users should watch the Gun vacuum and turn off HV when the Gun pressure is higher than 2E-9 torr.
Only the super users approved by the tool owners are allowed to install/uninstall auxiliary detectors. Users newly trained for the use of auxiliary detectors should always find a tool owner or super user when installing/uninstalling auxiliary detectors.
1. The low vacuum detectors are used for working with non-conducting samples. However, there might be still charging effect from the sample even when working under the low vacuum mode.
2. Retract the EDAX X-ray detector to a position 90 mm or further, to avoid accidentally touch-ing/damaging the detector window when mounting the auxiliary detectors.
3. Vent the SEM Chamber.
4. Put on gloves! You will hold detectors and work around the pole piece.
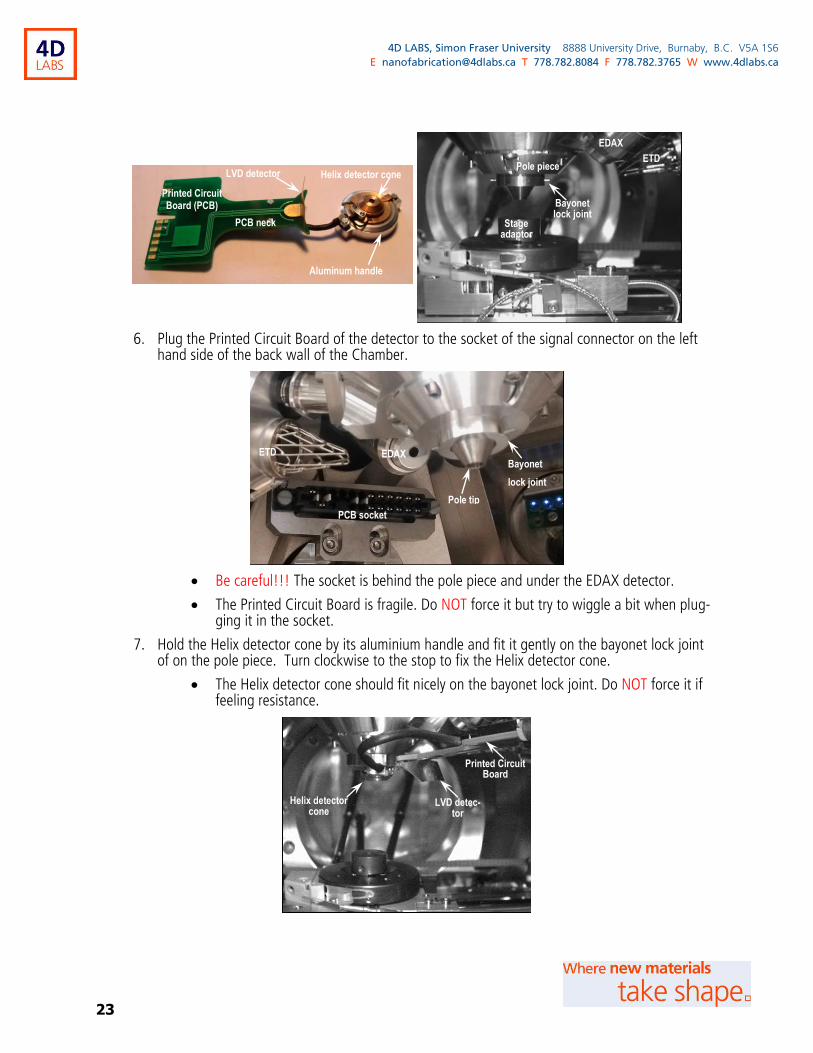
5. Find the appropriate auxiliary detector, e.g. the LVD/Helix detector, and take it out of its storage box by gently holding the sides of the PCB neck and the aluminum handle of the Helix detector cone.
23
4D LABS, Simon Fraser University 8888 University Drive, Burnaby, B.C. V5A 1S6
E [email protected] T 778.782.8084 F 778.782.3765 W www.4dlabs.ca
6. Plug the Printed Circuit Board of the detector to the socket of the signal connector on the left hand side of the back wall of the Chamber.
Be careful!!! The socket is behind the pole piece and under the EDAX detector.
The Printed Circuit Board is fragile. Do NOT force it but try to wiggle a bit when plug-ging it in the socket.
7. Hold the Helix detector cone by its aluminium handle and fit it gently on the bayonet lock joint of on the pole piece. Turn clockwise to the stop to fix the Helix detector cone.
The Helix detector cone should fit nicely on the bayonet lock joint. Do NOT force it if feeling resistance.
Printed Circuit Board (PCB)
Helix detector cone
Aluminum handle
PCB neck
LVD detector
Stage adaptor
Pole piece
Bayonet lock joint
EDAX
ETD
ETD EDAX
Pole tip
Bayonet
lock joint
PCB socket
LVD detec-tor
Helix detector cone
Printed Circuit Board

24
4D LABS, Simon Fraser University 8888 University Drive, Burnaby, B.C. V5A 1S6
E [email protected] T 778.782.8084 F 778.782.3765 W www.4dlabs.ca
8. The user interface will automatically switch to the low vacuum mode, and the related detectors (e.g. Detectors>LVD and Detectors>Helix) should become available if the connection is done correctly.
9. Mount samples on holder/stub to the Stage adaptor.
10. Pump down the Chamber.
11. The system will automatically flush the Chamber a few times with water vapor.
12. The Chamber icon will become green, once the Chamber Pressure is stabilized at a pre-selected value, e.g. 0.98 torr or a smaller value.
13. Turn on the High Voltage and un-pause an SEM imaging quadrant.
Under the low vacuum mode, the field of view is much smaller, <500µm.
Make sure the LVD detector (and the Field-Free mode) is selected for initial imaging.
Longer dwell time is needed for getting enough LVD signal.
Default LVD brightness and contrast are generally not good enough to show any im-age.
The Chamber Pressure can be altered (0.98 torr or a smaller value) to optimize LVD signal.
Adjust Detector Voltage slider if necessary to increase signal or stop possible dis-charges.
14. Once a reasonable LVD image is obtained on the highest surface of the sample, Link Z to FWD and move sample to 5 mm WD.
15. Switch to the Helix detector (and the Immersion mode) if high resolution imaging is needed.
16. Do NOT use Beam Deceleration (Stage Bias) under the low vacuum mode!!!
25
4D LABS, Simon Fraser University 8888 University Drive, Burnaby, B.C. V5A 1S6
E [email protected] T 778.782.8084 F 778.782.3765 W www.4dlabs.ca
17. If EDX analysis is needed, re-position the EDAX detector at 60 mm before EDX data collection. Retract the EDAX detector to 90 mm position if all low vacuum EDX analysis is done.
18. Once low vacuum imaging is done, switch to the Field-Free mode, and pause the live SEM im-aging quadrant.
19. Turn off the High Voltage.
20. Vent the SEM Chamber.
21. Put on gloves! Unload samples.
22. Hold the Helix detector cone by its aluminum handle, gently turn the cone counterclockwise to the stop, and pull it down and out from the pole piece.
23. Unplug the Printed Circuit Board from the socket on the back wall of the Chamber.
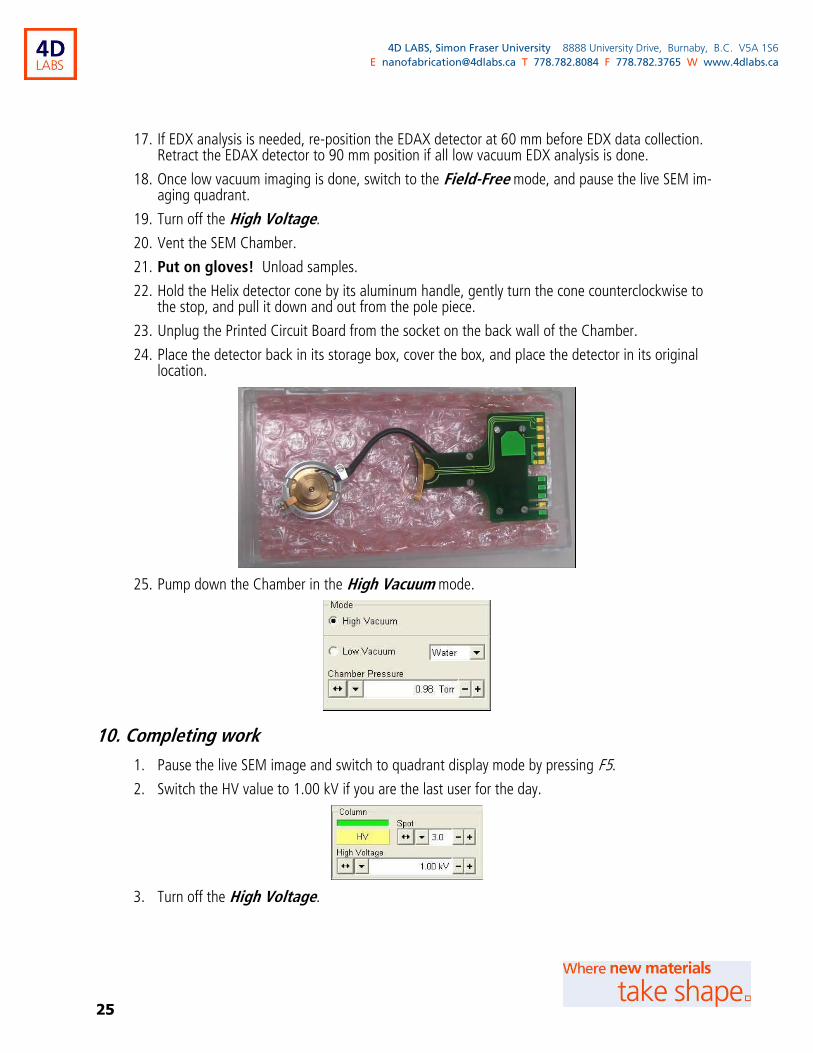
24. Place the detector back in its storage box, cover the box, and place the detector in its original location.
25. Pump down the Chamber in the High Vacuum mode.
10. Completing work
1. Pause the live SEM image and switch to quadrant display mode by pressing F5.
2. Switch the HV value to 1.00 kV if you are the last user for the day.
3. Turn off the High Voltage.
26
4D LABS, Simon Fraser University 8888 University Drive, Burnaby, B.C. V5A 1S6
E [email protected] T 778.782.8084 F 778.782.3765 W www.4dlabs.ca
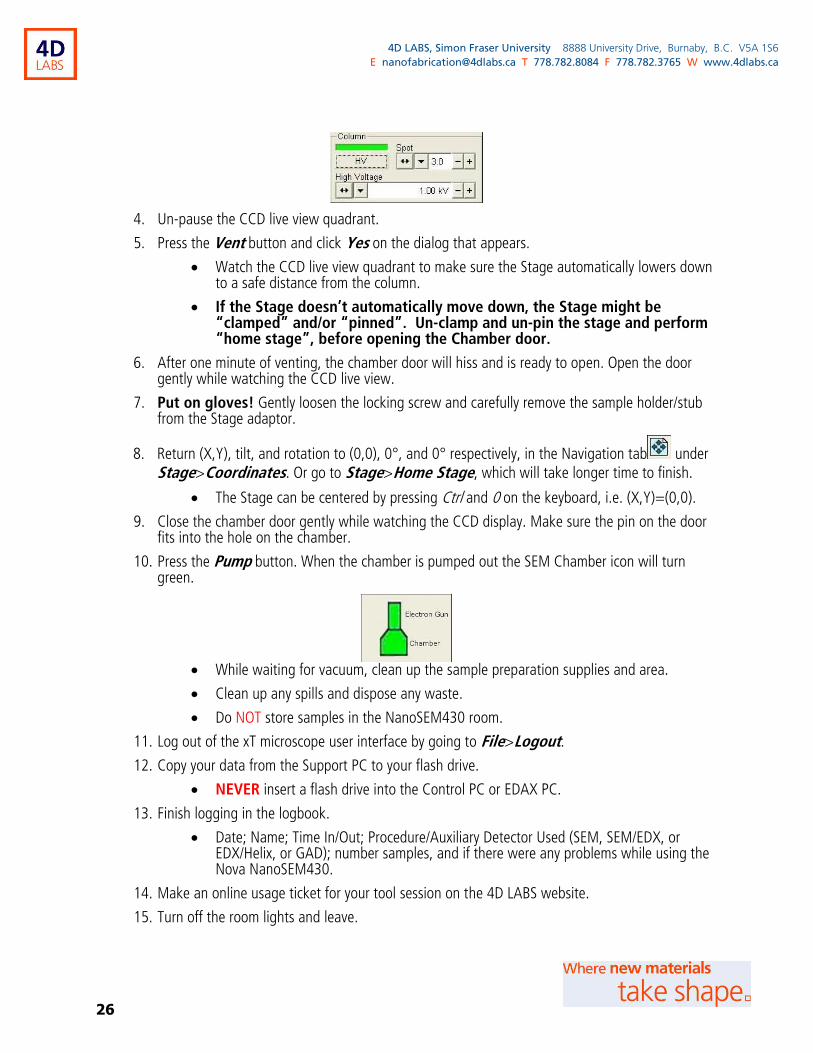
4. Un-pause the CCD live view quadrant.
5. Press the Vent button and click Yes on the dialog that appears.
Watch the CCD live view quadrant to make sure the Stage automatically lowers down to a safe distance from the column.
If the Stage doesn’t automatically move down, the Stage might be “clamped” and/or “pinned”. Un-clamp and un-pin the stage and perform “home stage”, before opening the Chamber door.
6. After one minute of venting, the chamber door will hiss and is ready to open. Open the door gently while watching the CCD live view.
7. Put on gloves! Gently loosen the locking screw and carefully remove the sample holder/stub from the Stage adaptor.
8. Return (X,Y), tilt, and rotation to (0,0), 0°, and 0° respectively, in the Navigation tab under Stage>Coordinates. Or go to Stage>Home Stage, which will take longer time to finish.
The Stage can be centered by pressing Ctrl and 0 on the keyboard, i.e. (X,Y)=(0,0).
9. Close the chamber door gently while watching the CCD display. Make sure the pin on the door fits into the hole on the chamber.
10. Press the Pump button. When the chamber is pumped out the SEM Chamber icon will turn green.
While waiting for vacuum, clean up the sample preparation supplies and area.
Clean up any spills and dispose any waste.
Do NOT store samples in the NanoSEM430 room.
11. Log out of the xT microscope user interface by going to File>Logout.
12. Copy your data from the Support PC to your flash drive.
NEVER insert a flash drive into the Control PC or EDAX PC.
13. Finish logging in the logbook.
Date; Name; Time In/Out; Procedure/Auxiliary Detector Used (SEM, SEM/EDX, or EDX/Helix, or GAD); number samples, and if there were any problems while using the Nova NanoSEM430.
14. Make an online usage ticket for your tool session on the 4D LABS website.
15. Turn off the room lights and leave.

27
4D LABS, Simon Fraser University 8888 University Drive, Burnaby, B.C. V5A 1S6
E [email protected] T 778.782.8084 F 778.782.3765 W www.4dlabs.ca
References and Files
FEI Nova NanoSEM 430 System training notes.
UC Davis FEI 430 NanoSEM Operating Procedure by A. Gusman, 2010
Nova NanoSEM User Operation Manual, 3rd Edition, FEI Company, 2008
Contact Information
Questions or comments in regard to this document or the Nova NanoSEM 430 System should be directed
towards Xin Zhang ([email protected], 778-782-8026) in 4D LABS at Simon Fraser University, Burnaby,
BC, Canada.
Related Documents