1 Exporting Files from 3Shape Ortho Analyzer | Great Lakes Orthodontics SMPI119Rev123113 Exporting Files from 3Shape Ortho Analyzer The following instructions will explain how to export, or save, models using 3Shape Ortho Analyzer. The process for exporting intraoral scans and models is identical. Regardless of whether you are working with intraoral skins or models you can export them at any time while working with the program. The first section will explain how to export individual model sets. The second section will explain how to export Virtual Setup (incremental and ideal) models. Once exported in the .stl format they may be forwarded for digital alterations, manufacturing, or appliance fabrication. Exporting models from Ortho Analyzer: This section will explain how to export intraoral skins and models from Ortho Analyzer. The process for both is identical despite the fact that only intraoral skins are pictured. 1. First you will need to open the model set you wish to export. Once the model/s are displayed on screen you will need to click on the “Export models as” icon. It is outlined in red below. 2. The pop up window pictured below will appear. The upper and lower models are listed individually. If you are working with only one model you will only see one file name. To choose the target location for the file/s click on either “Browse” button.

Welcome message from author
This document is posted to help you gain knowledge. Please leave a comment to let me know what you think about it! Share it to your friends and learn new things together.
Transcript

1 Exporting Files from 3Shape Ortho Analyzer | Great Lakes Orthodontics
SMPI119Rev123113
Exporting Files from 3Shape Ortho Analyzer
The following instructions will explain how to export, or save, models using 3Shape Ortho Analyzer. The
process for exporting intraoral scans and models is identical. Regardless of whether you are working with intraoral skins or models you can export them at any time while working with the program. The first section will explain how to export individual model sets. The second section will explain how to
export Virtual Setup (incremental and ideal) models. Once exported in the .stl format they may be forwarded for digital alterations, manufacturing, or appliance fabrication.
Exporting models from Ortho Analyzer:
This section will explain how to export intraoral skins and models from Ortho Analyzer. The process for both is identical despite the fact that only intraoral skins are pictured.
1. First you will need to open the model set you wish to export. Once the model/s are displayed
on screen you will need to click on the “Export models as” icon. It is outlined in red below.
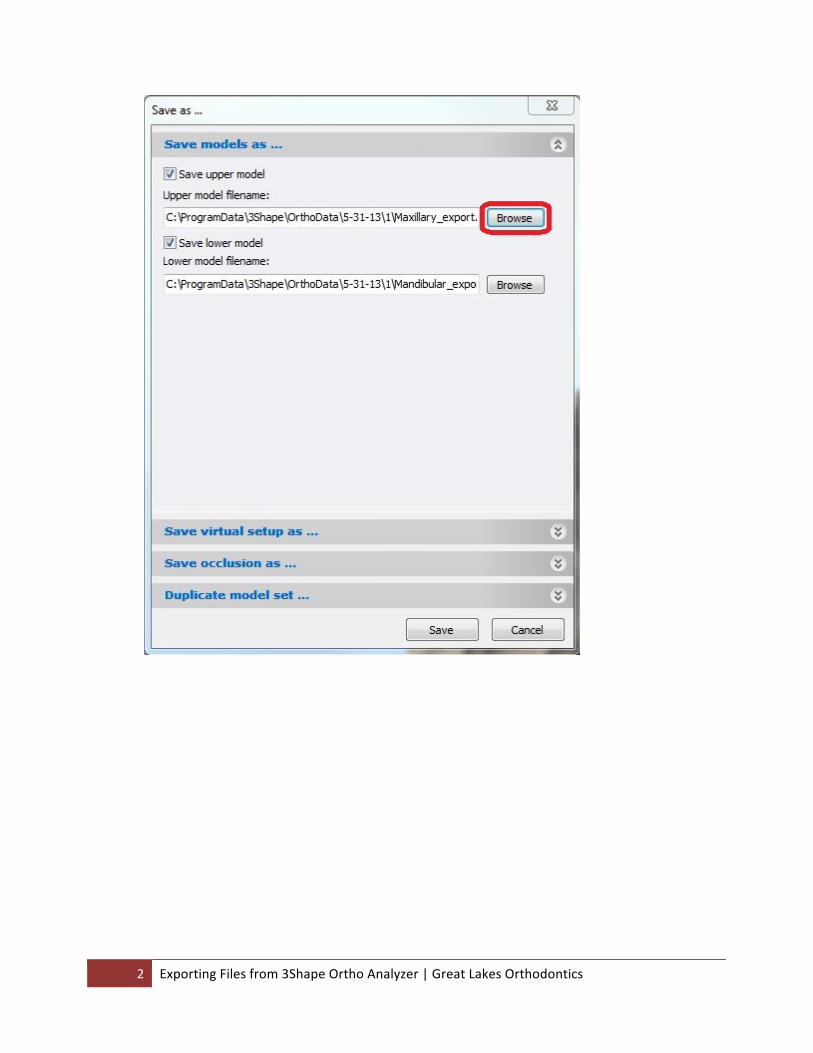
2. The pop up window pictured below will appear. The upper and lower models are listed individually. If you are working with only one model you will only see one file name. To choose the target location for the file/s click on either “Browse” button.
2 Exporting Files from 3Shape Ortho Analyzer | Great Lakes Orthodontics
3 Exporting Files from 3Shape Ortho Analyzer | Great Lakes Orthodontics
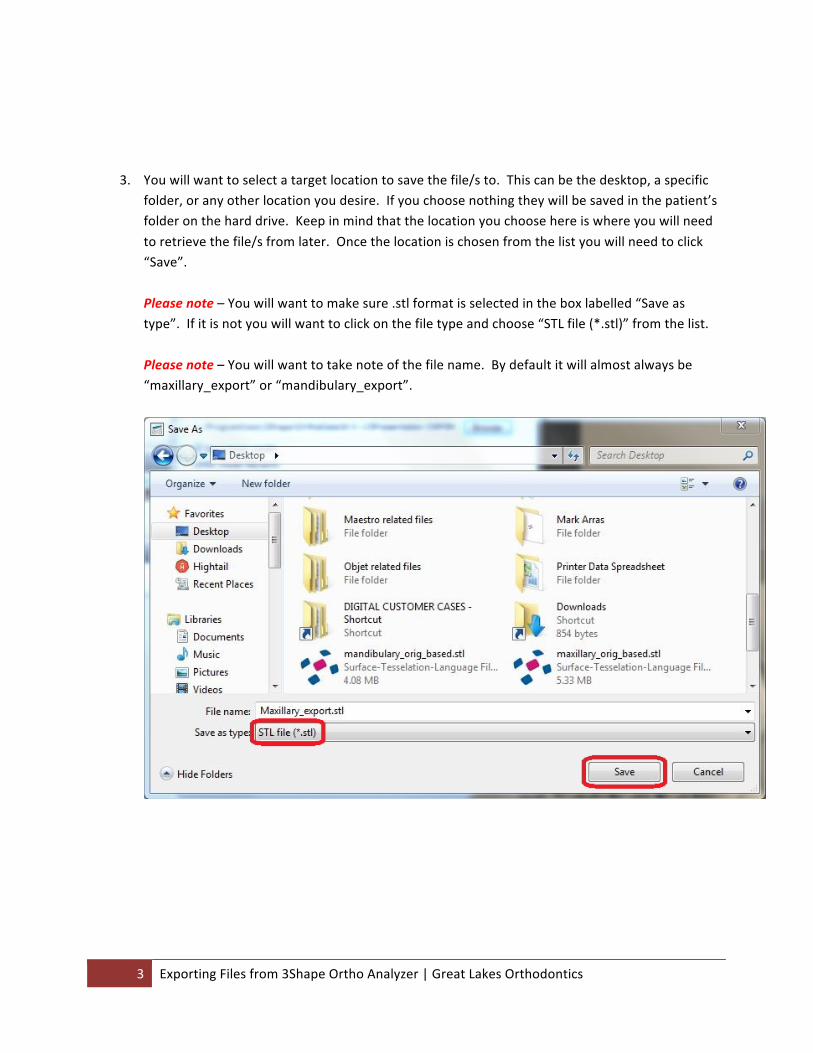
3. You will want to select a target location to save the file/s to. This can be the desktop, a specific folder, or any other location you desire. If you choose nothing they will be saved in the patient’s folder on the hard drive. Keep in mind that the location you choose here is where you will need
to retrieve the file/s from later. Once the location is chosen from the list you will need to click “Save”.
Please note – You will want to make sure .stl format is selected in the box labelled “Save as type”. If it is not you will want to click on the file type and choose “STL file (*.stl)” from the list.
Please note – You will want to take note of the file name. By default it will almost always be “maxillary_export” or “mandibulary_export”.

4 Exporting Files from 3Shape Ortho Analyzer | Great Lakes Orthodontics
4. Your target location of choice has now been saved. At this point you can choose which model/s you want to export. There is a check box next to “Save upper/lower model”. To exclude either
model simply deselect it leaving its check box blank. In the examples below you can see the lower model included and excluded. If excluded a model’s file name will appear in grey.
-‐Or-‐
5 Exporting Files from 3Shape Ortho Analyzer | Great Lakes Orthodontics
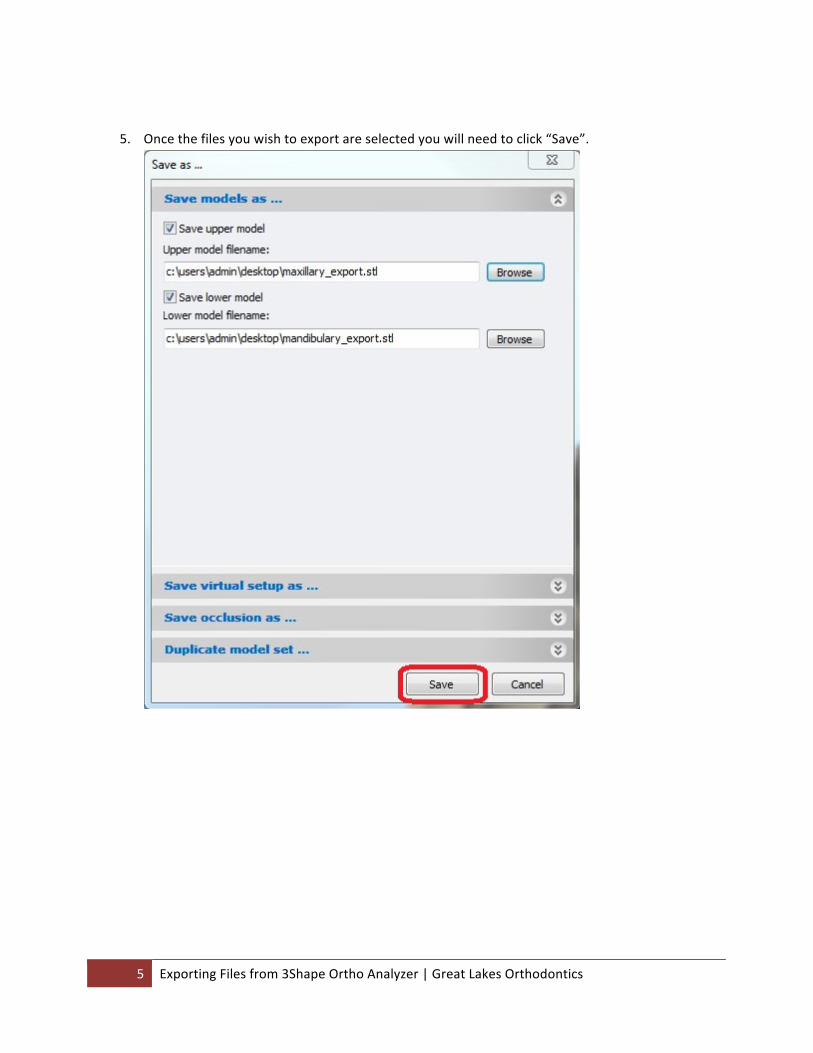
5. Once the files you wish to export are selected you will need to click “Save”.

6 Exporting Files from 3Shape Ortho Analyzer | Great Lakes Orthodontics
6. You will now need to locate the file/s that have been created in the target location of your choice. The file/s will have the name/s they were given by Ortho Analyzer. You can select the
file/s from this location during the upload process. Please note – Now is a good time to rename the file/s you have exported. Clicking on a file
name a second time after it is already selected will allow you to do this. Simply type something recognizable as the new name and click elsewhere to apply the change. If you choose not to do this you will end up with a bunch of files named “maxillary_export” or “mandibulary_export”
with no easy way to tell one from another. Please note – The icons for the files may not appear as shown on your PC. This will depend on
what software you have at your workstation and the settings on your PC.
7 Exporting Files from 3Shape Ortho Analyzer | Great Lakes Orthodontics
Exporting Virtual Setup models from Ortho Analyzer:
This section will explain how to export Virtual Setup (incremental or ideal) models from Ortho Analyzer.
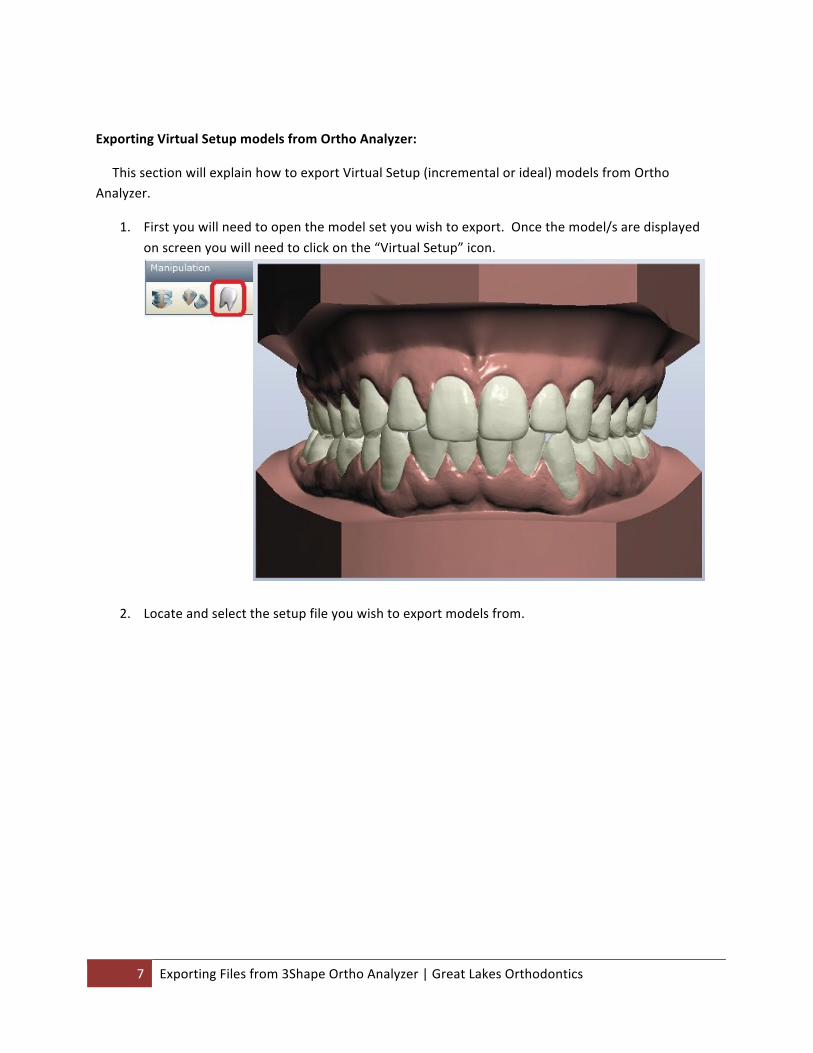
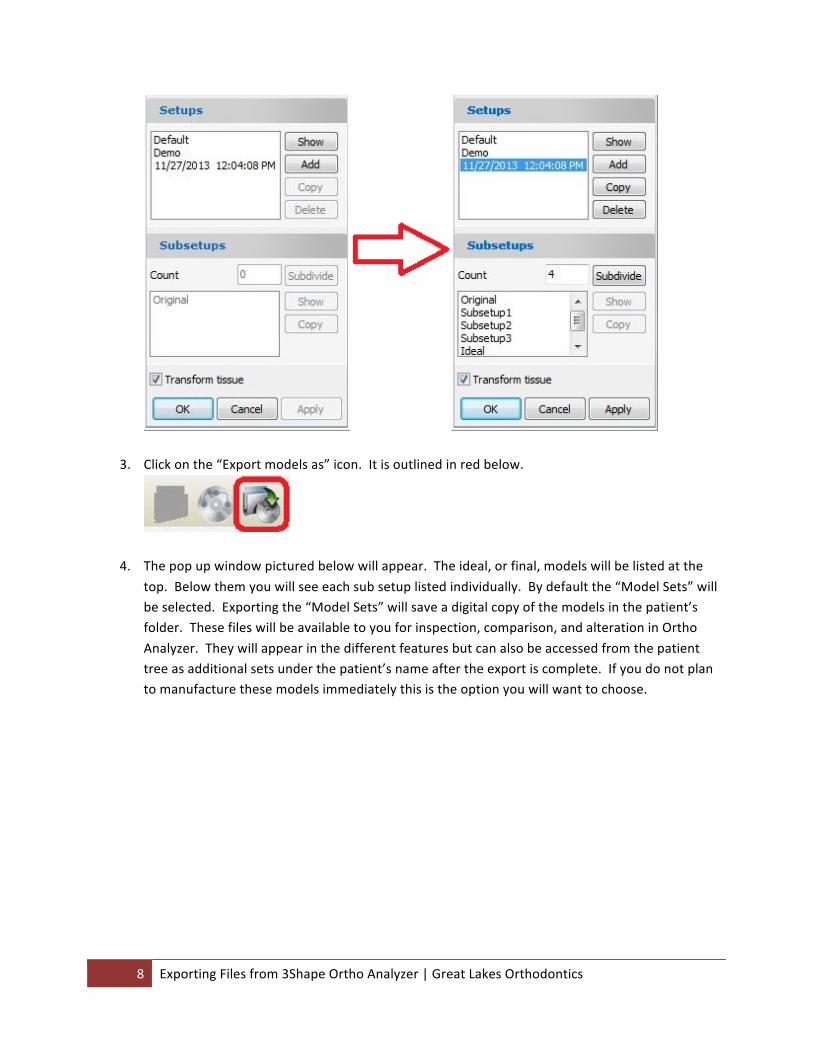
1. First you will need to open the model set you wish to export. Once the model/s are displayed
on screen you will need to click on the “Virtual Setup” icon.
2. Locate and select the setup file you wish to export models from.
8 Exporting Files from 3Shape Ortho Analyzer | Great Lakes Orthodontics
3. Click on the “Export models as” icon. It is outlined in red below.
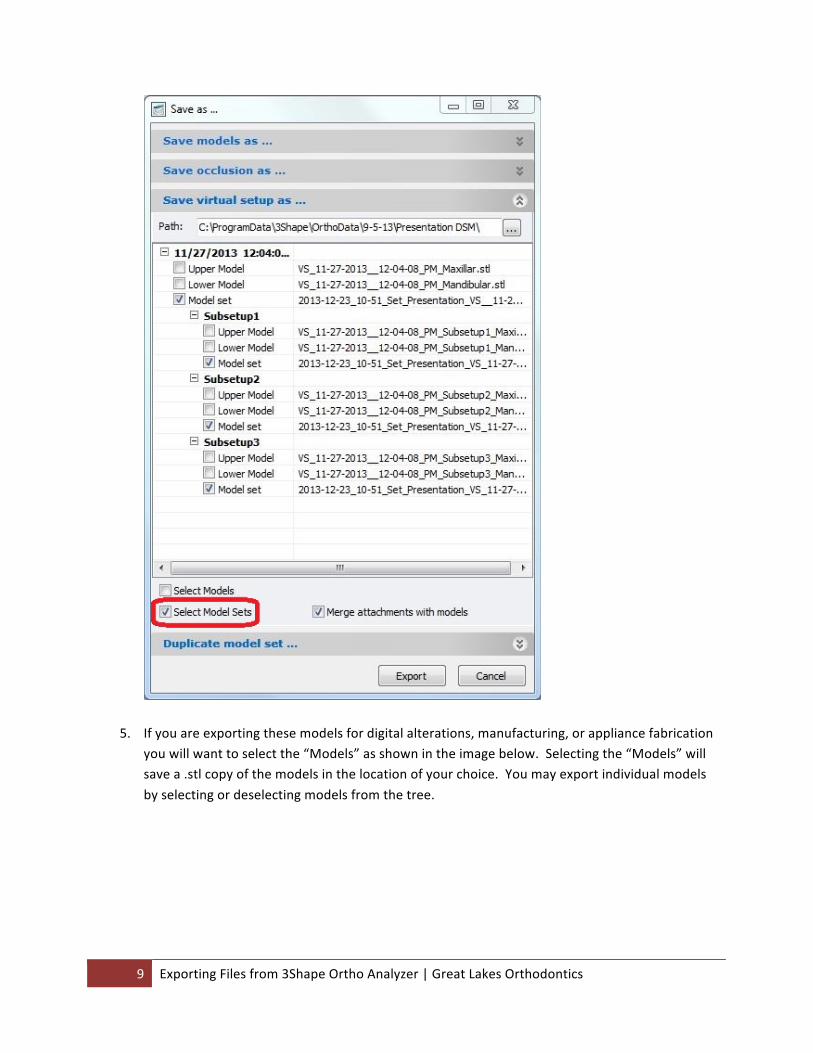
4. The pop up window pictured below will appear. The ideal, or final, models will be listed at the
top. Below them you will see each sub setup listed individually. By default the “Model Sets” will be selected. Exporting the “Model Sets” will save a digital copy of the models in the patient’s folder. These files will be available to you for inspection, comparison, and alteration in Ortho
Analyzer. They will appear in the different features but can also be accessed from the patient tree as additional sets under the patient’s name after the export is complete. If you do not plan to manufacture these models immediately this is the option you will want to choose.
9 Exporting Files from 3Shape Ortho Analyzer | Great Lakes Orthodontics
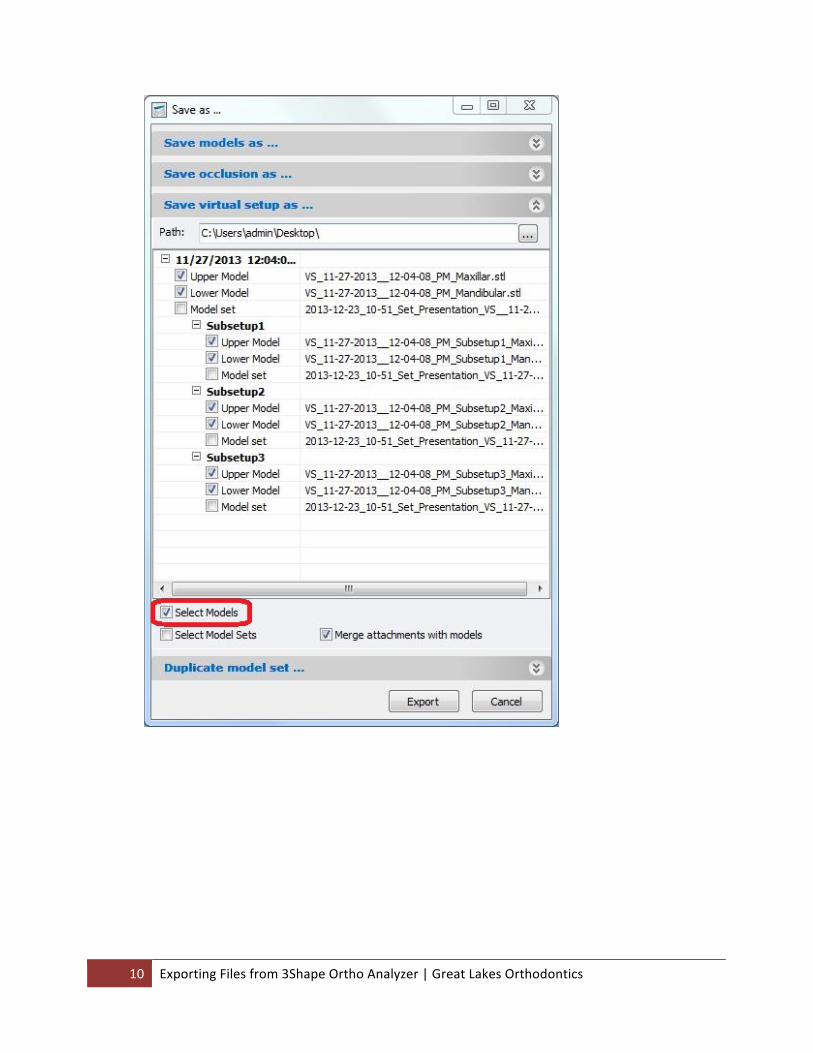
5. If you are exporting these models for digital alterations, manufacturing, or appliance fabrication you will want to select the “Models” as shown in the image below. Selecting the “Models” will save a .stl copy of the models in the location of your choice. You may export individual models
by selecting or deselecting models from the tree.
10 Exporting Files from 3Shape Ortho Analyzer | Great Lakes Orthodontics

11 Exporting Files from 3Shape Ortho Analyzer | Great Lakes Orthodontics
6. If desired you may export both the “Models” and “Model Sets” at the same time. The .stl “Models” will go to the location you choose. The “Model Sets” copies will be automatically
organized in the program and saved to the patient’s folder regardless of what location you select. To choose the target location for the file/s click on button outlined in red in the image below.

12 Exporting Files from 3Shape Ortho Analyzer | Great Lakes Orthodontics
7. You will want to select a target location to save the file/s to. This can be the desktop, a specific folder, or any other location you desire. If you choose nothing they will be saved in the patient’s
folder on the hard drive. Keep in mind that the location you choose here is where you will need to retrieve the file/s from later. Once the location is chosen from the list you will need to click “OK”.
Please note – You will want to make sure .stl format is selected in the Control Panel as your Ortho Analyzer output format. If it is not you will need to go into the Control Panel and change
it. Please note – You will want to take note of the file name. By default the ideal models will
always have “VS”, the date, the time, and the arch in the name. The incremental models will also have “Subsetup#” in the name.
13 Exporting Files from 3Shape Ortho Analyzer | Great Lakes Orthodontics
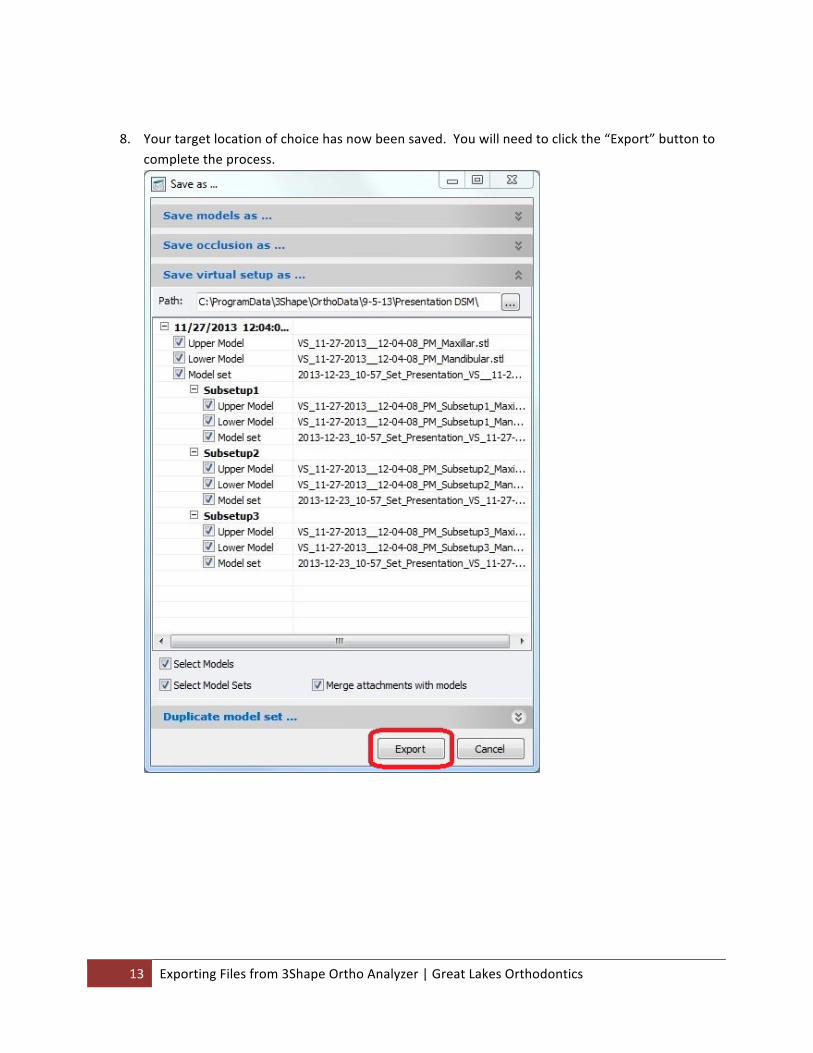
8. Your target location of choice has now been saved. You will need to click the “Export” button to complete the process.

14 Exporting Files from 3Shape Ortho Analyzer | Great Lakes Orthodontics
9. You will now need to locate the file/s that have been created in the target location of your choice. The file/s will have the name/s they were given by Ortho Analyzer. You can select the
file/s from this location during the upload process. Please note – Now is a good time to rename the file/s you have exported. Clicking on a file
name a second time after it is already selected will allow you to do this. Simply type something recognizable as the new name and click elsewhere to apply the change. If you choose not to do this you will end up with a bunch of similarly named files with no easy way to tell one from
another. Please note – The icons for the files may not appear as shown on your PC. This will depend on
what software you have at your workstation and the settings on your PC.
Related Documents


