Evony: The UnOfficial Strategy Guide Table of Contents Introduction . . . . . . . . . . . . . . . . . . . . . . . . . . . . . . . . . . . . . . . . . . . . . . . . . . . . . . . . . . . . . . . . . . . . . . . . . 3 Chapter I - The Basics of Evony . . . . . . . . . . . . . . . . . . . . . . . . . . . . . . . . . . . . . . . . . . . . . . . . . . . . . . . . .4 Chapter II - Resources & the Market. . . . . . . . . . . . . . . . . . . . . . . . . . . . . . . . . . . . . . . . . . . . . . . . . .. . 16 Chapter III - Buildings . . . . . . . . . . . . . . . . . . . . . . . . . . . . . . . . . . . . . . . . . . . . . . . . . . . . . . . . . . . . . . . .20 Chapter IV - Units & Technology . . . . . . . . . . . . . . . . . . . . . . . . . . . . . . . . . . . . . . . . . . . . . . . . . . . . . . 37 Chapter V - War & Diplomacy . . . . . . . . . . . . . . . . . . . . . . . . . . . . . . . . . . . . . . . . . . . . . . . . . . . . . . . . .50 Chapter VI - Barbarians & Promotions. . . . . . . . . . . . . . . . . . . . . . . . . . . . . . . . . . . . . . . . . . . . . . . . . .59 Chapter VII - Items & Heroes. . . . . . . . . . . . . . . . . . . . . . . . . . . . . . . . . . . . . . . . . . . . . . . . . . . . . . . . . . 67 Conclusion . . . . . . . . . . . . . . . . . . . . . . . . . . . . . . . . . . . . . . . . . . . . . . . . . . . . . . . . . . . . . . . . . . . . . . . . . .71

Welcome message from author
This document is posted to help you gain knowledge. Please leave a comment to let me know what you think about it! Share it to your friends and learn new things together.
Transcript

Evony: The UnOfficial Strategy Guide
Table of Contents
Introduction . . . . . . . . . . . . . . . . . . . . . . . . . . . . . . . . . . . . . . . . . . . . . . . . . . . . . . . . . . . . . . . . . . . . . . . . . 3
Chapter I - The Basics of Evony . . . . . . . . . . . . . . . . . . . . . . . . . . . . . . . . . . . . . . . . . . . . . . . . . . . . . . . . .4
Chapter II - Resources & the Market. . . . . . . . . . . . . . . . . . . . . . . . . . . . . . . . . . . . . . . . . . . . . . . . . .. . 16
Chapter III - Buildings . . . . . . . . . . . . . . . . . . . . . . . . . . . . . . . . . . . . . . . . . . . . . . . . . . . . . . . . . . . . . . . .20
Chapter IV - Units & Technology . . . . . . . . . . . . . . . . . . . . . . . . . . . . . . . . . . . . . . . . . . . . . . . . . . . . . . 37
Chapter V - War & Diplomacy . . . . . . . . . . . . . . . . . . . . . . . . . . . . . . . . . . . . . . . . . . . . . . . . . . . . . . . . .50
Chapter VI - Barbarians & Promotions. . . . . . . . . . . . . . . . . . . . . . . . . . . . . . . . . . . . . . . . . . . . . . . . . .59
Chapter VII - Items & Heroes. . . . . . . . . . . . . . . . . . . . . . . . . . . . . . . . . . . . . . . . . . . . . . . . . . . . . . . . . . 67
Conclusion . . . . . . . . . . . . . . . . . . . . . . . . . . . . . . . . . . . . . . . . . . . . . . . . . . . . . . . . . . . . . . . . . . . . . . . . . .71

2
Designed, edited, and produced by The Gamer's Academy.com.
Limits of Liability/Disclaimer of Warranty:
Both the writer and publisher have prepared this book to the best of their abilities. However, neither the writer nor the publisher makes any
representation or warranties as to the accuracy, applicability, or completeness of this book. They disclaim any warranties (expressed or implied),
merchantability, or appropriateness for a specific purpose. Neither the writer nor the publisher, under any circumstances, shall be held liable for
any loss or other damages of any kind. As always, please seek the advice of a competent legal, tax, accounting, or other professional. Neither the
writer nor the publisher warrant the performance, effectiveness or applicability of any sites listed in this book. This manual contains material
protected under International and Federal Copyright Laws and Treaties. Any unauthorized reprint or use of this material is prohibited.
All references to Evony, including screen shots and Evony logos are the property of Evony.com and are used for general references and
identification only.
Copyright:
Evony: The Unofficial Strategy Guide is Copyright 2009, The Gamer's Academy. All Rights Reserved.

3
Introduction
So, you have stumbled upon a new free browser game, it's sparked your interest
and now you want to learn how to be the best player possible. Well, I was once in
your shoes and I'm here to tell you this game is very addictive and will reward you
with many hours of fun. If you are willing to put the time into the game, I will
show you how to top the charts on your server. This guide will also show you all
the basics of the game from building your first city to acquiring the resources you
need for an army powerful enough that no one would dare attack you.
First, some information about the author of this guide. I started on Server 6 the
second day it opened and was able to build a solid start through my knowledge of
Civilization, a game I have played extensively. I spent many hours on the forums
researching methods and soaking up the knowledge base there. From this, I
started building techniques for a winning strategy. Within these pages, I have
compiled all of the knowledge and wisdom I used to get to this pinnacle. I present
it to you so that you too can climb the ladder of Evony success like a pro.

4
Chapter I
The Basics of Evony Evony uses a series of quests to teach you how to play the game and rewards you with
resources for each quest, which encourages new players to work though what amounts to a great
tutorial. We are going to go through some of this tutorial together and I am going to inform you
about the game mechanics and things you need to know to get your empire up and running.
After you have made an account and picked a server, choose a name for yourself and your first
city. Decide what region to start in - the map offered at the start up screen is not actually how the
game map is represented in the game. You can find a accurate look at how the map is actually
drawn out in the game below.
Unless you have friends that you want to start beside it really isn't important what region
you start in. As you become more involved in the game you will have chance to move your cities
around the map.

5
After picking your names and starting location you'll be thrust into the game and be brought to
your city screen with the quest page open. Here the game will ask you to build your first cottage.
Let's go ahead and build one and make it level two.
• Build a Cottage
1. Click on a building site and select the cottage from the list. Click Build.

6
Cottages provide population. At this point in the game, population will be a gold source in the
form of taxes. Also, your population is employed in your resource fields, which we will construct
next.
2. You can go ahead and speed up the building of the cottage, so it builds instantly. You
will be able to do this free because it takes less than five minutes to build. Buildings that take
longer than this will require you to use an item or coin to speed them up. Click on Speedup and
then click OK.
3. Now, click on the cottage and select upgrade
and speed it up once more.
4. Go back to your quest page and take the rewards.

7
There should be two rewards available to you at this time if your population has reached one
hundred. The rewards you get from these quests will help keep you stocked with resources so you
can continue to build and play while you are learning.
Next, click on your view tab, which will show you the fields outside your town
limits where you can build various resource producing structures. Build a farm, and make it Level
Two as well. Then continue with the an iron mine, a saw mill, and a quarry, making each Level
Two. Now go ahead and get all of the quest rewards from those actions.
Evony starts the production, at 80% of full capacity in your resources fields, but we want
the city producing as much as possible so go to the button below your avatar
picture, and select the production tab and make your production 100%. Keep in mind as you
build or capture new cities that the game will always start your production at 80% so always check
to make sure you adjust your rate accordingly. Now go to the quest page and grab your reward.

8
Your next quest will be to adjust your tax
rate to 20%, Click on the Overview
button again and under the Tax Rate
window, adjust your tax rate to 20% and
then adjust it again to 100%. This will
give you maximum taxes, dramatically increasing your gold production.
In the first stage of the game, you will want to keep a close eye on your Tax Rate and City
Loyalty. Loyalty is the first statistic in your City Status bar. It plays a major part in the game -
cities are won and lost based on this number. We will get into more on that in Chapter Five, but
for now what you need to know is that population is limited only by how many people your
cottages will hold and your City Loyalty. The higher your tax rate is the lower your loyalty will
go. The sum of your loyalty and your tax rate will equal 100, but loyalty will not automatically
adjust to this level. It takes time to find its balanced level. Since you just set your tax rate at 100%,
the city's loyalty will begin to move to zero. It takes hours to get there but if it ever does you will
have zero population, which leads to a ghost town. You don't want that, so you must remember to
move the tax rate back down. When to do this is going to be based on your population. You need
enough population to run your resource buildings plus some extra citizens left to be employed
when you expand your production.

9
The mathematical formula for figuring how much
population you can have based on your loyalty is
Maximum Population * (Loyalty / 100). Note: You can
see what your Population Limit (maximum possible
population) is by scrolling over the population icon.
There are two main strategies for your dealings with the
tax rate. The simple one is to just set it at 50% and let it
run. This is the best long term rate while still giving you a
decent population to work with, and you don't have to
worry about losing all of your population; if you forget to
change it. The other strategy is to set the rate very high while you're online, and then bring it
down when you're offline or you run out of population to work your resource fields. The latter
strategy will net you more gold in the long run.
Alright, so let's go to the quest page and collect your reward for adjusting the tax rate.
Next, it will ask you to change the city name. To do this go to the Overview screen again, open the
City Rename tab, and give your city a new name, then collect your reward.
Your next quest will be to change your flag. When you find and join an alliance they will
usually have a standard flag name that they will want you to use, so if you want to wait until you
are in an alliance to change your flag, you can do that. On the other hand, the quest is worth one
thousand gold immediately and you can always change it again later when you join an alliance.
To change your flag double click on your avatar, and you will be brought to the player info
screen.

10
You can see an overall summary of your empire here, as well as change your flag and your player
status. Changing your player status will allow you to come out of the seven day protection
granted to you when you begin the game early or change your status to into a truce mode where
you cannot attack or be attacked for twelve hours. If you wish to use all seven days of your
beginners protection make sure you keep your town hall below level five, because building any
higher will automatically end your protection.
Now that we are done with the basic administration we can move on to more important
things. While you read this next section you should be constructing more cottages and resource
buildings, and leveling them up. Keep doing as many quests as possible. Also, every day you will
receive an Aries Amulet as a reward from the game. In the lower left corner of
your map or city view, you will see an icon that looks like a roulette wheel.
That is the Wheel of Fortune, and you can trade in your Aries
Amulet for a spin of the wheel for free gifts.
For those of you who are veterans and wish to climb the prestige ranks, I have developed a
method to do so and this next section is devoted to that end. What you will need to do is start on
a fresh server, you can get notification by e-mail through EvonyAlerts. Start your build just like
explained above, but after you build your cottages build one of each resource farm and then
lumberyards. You will put a market up and start trading lumber for the highest prices you can
get. Usually lumber will sell for close the 3g per unit at the very earliest stages of the game. Always
stay just below the cheapest offer, it will keep your product first in line to sell while getting the
best price available. Upgrade your market to allow multiple trades and work to buy food, stone,
and iron at the lowest possible price. Remember you want to stay just above the lowest bidder to
receive the best bang for you buck. You will also want to levy resources from your population and
then pray for them. Levying lumber in the beginning will result in a profit as long as lumber stays

11
above 1g per unit, plus you will get prestige from it. After your market is up and running and you
have a lumber production of around 10k you will want to put down an Inn and a Feasting Hall,
and hire a high politics hero to assign as mayor and then cast wealth of nations on him, this will
boost your production substantially , and the quests associated with it that have good rewards.
Keep your Town Hall at the lowest level possible, and do not complete any of the promote
quests at all until you are ready to build a Second City. Usually its best to have all of your resource
farms at level nine before you upgrade to a level two Town Hall. Just keep in mind that the more
you build with your Town Hall at level one the more prestige you will gain, so take your time.
Wait until two or three days into the game before you start putting down barracks and walls, you
want to have all of those lumberyards finished before military is a concern. Of course its not
harmful to build one barracks and have some warriors so that you can take forests to boost your
lumber production, and earn medals.
After you level your Town Hall up to level two you can start research technologies, you
need to research lumbering to level six before you do anything else. After that set your sites on
construction and level it up to six as well, after this is done you need to head to level six archery
and level five Metal Casting so that you can begin to build Ballista and raid NPCs once out of
protection. To maintain a high rate of prestige earning you need to stay small and concentrate on
economics as much as possible. The more smart trades you make on the market the more gold
you will have to do research and build armies.
• Building Your Second City
As you go through quests, you will achieve milestones that allow you to build new cities.
The first of these will be when you achieve the title of Knight, and you will gain one new city slot
for every title you gain. Below I have provided you with a table that details what you will need to
gather to achieve the titles required for all ten city slots. I will explain in more detail how to go
about gaining the prerequisites for these titles in Chapter Six.

12
Ranks and TitlesRank Prerequisite Title Prerequisite
Lieutenant 10,000 GoldTown Hall (Level 2)5 Medals
Knight 2 City Maximum
20,000 GoldLieutenant Rank1,000 Prestige10 Cross Medals5 Rose Medals
Captain 20,000 GoldTown Hall (Level 4)5 Cross Medals
Baronet3 City Maximum
40,000 GoldCaptain Rank2,000 Prestige10 Rose Medals 5 Lion Medals
Major 30,000 GoldTown Hall (Level 6)5 Rose Medals
Baron 4 City Maximum
60,000 GoldMajor Rank4,000 Prestige10 Lion Medals5 Honor Medals
Colonel 40,000 Gold Town Hall (Level 8)5 Lion Medals
Viscount 5 City Maximum
80,000 GoldColonel Rank8,000 Prestige10 Honor Medals5 Courage Medals
General 50,000 GoldTown Hall (Level 10)5 Honor Medals
Earl6 City Maximum
100,000 GoldGeneral Rank16,000 Prestige10 Courage Medals5 Wisdom Medals
Marquis7 City Maximum
200,000 GoldGeneral Rank32,000 Prestige10 Wisdom Medals5 Freedom Medals
Duke8 City Maximum
300,000 GoldGeneral Rank64,000 Prestige10 Freedom Medals5 Justice Medals
Furstin9 City Maximum
400,000 GoldGeneral Rank128,000 Prestige10 Justice Medals5 Nation Medals
Prinzessin10 City Maximum
500,000 GoldGeneral Rank256,000 Prestige30 Justice Medals10 Nation Medals

13
If you haven't built a barracks yet you should do so now, you will first need to first build a
rally point. After you get the barracks built you will want to build 500 warriors and 250 workers.
This is the first step in constructing a new city after you have the title requirement met. You will
also need to have built an inn and a feasting hall so that you can recruit a hero. If you don't
already have 10,000 units of each resource, please halt your construction for a bit after you have
the units queued to train, this way you can save up the required resources. You will need to send
out 10,000 of each resource - food, gold, lumber, stone, and iron with the 250 workers to start the
construction process. The workers will transport these resources to the new location in the time it
takes them to travel to the building site.
But before we can send them out to found a new city we must first conquer a flat. Click on
the icon and find a suitable flat to conquer, at this stage you will want to take a level
one flat that is within ten miles of your city. After you spot a suitable flat, double-click on it and
make sure that the flat you select is not currently owned by another player. Then select attack
from the menu.
This will bring up the March screen. You will need to select the hero you hired from the inn to
lead the attack, and the 500 warriors you built to do the attacking. Usually you want to scout
before any attacks are made, but 500 warriors will be plenty to win against a level one flat and we

14
will go over scouting in a later section. After you make your selections, press ok and you will see a
message saying that your march is successful, and the army is on the way.
You can check the progress of your army by selecting the icon at the bottom of
your screen. There you will see a progress meter with the coordinates that the troops are
marching too and the time it will take them to get there.
When your troops arrive to the flat they will battle the barbarians that inhabit the lands
and you will receive a battle report. Click on the icon and select the army tab to see
how the battle unfolded. Now your remaining troops are stationed at the flat, and we
are ready to send the workers there to build a new city. If you look at the map you will now see
that there is a small flag located on the flat, this makes it easy to recognize what flats and valleys
you currently own. The number of flats and valleys you may own is equal to the level of your
town hall. Double click on your flat and you will that there is a new button on
the flat information screen. When you click on Build City, a screen will appear asking you if you
would like to recall the reinforcing troops that are in the flat.

15
This is asking you if you would like to bring the troops
back home that conquered the flat. In some cases this is
a great idea, because you will only have 10,000 food to
start the city with and you will need to use it to start
constructing new buildings there, and you don't want the troops eating up the food. So select OK
to this question and then your workers will be on their way.
As you build more and more cities you will want to spread them out so that you have a
large choice of valleys, flats, and enemy targets for each city to utilize. You can also do this by
teleporting a city to a new location, but you do want to keep cities somewhat close to your capital
until you get them advanced enough to take care of themselves. You will want to build all of the
basic buildings (stable, workshop, academy, ect.) in your new cities as you put in the first ones. In
your resource fields, you just may want to specialize in a particular resource instead of all of the
resources like you may have done in your first city.

16
Chapter II
Resources & the MarketResources in Evony are the heart and soul of the game. Everything, your military might,
prestige, honor and every other measure in the game is going to depend on how well you can
acquire resources. There are many different ways of getting what you need, but there is one
important thing to remember - You can never have enough resources.
The first and most obvious way of obtaining resources comes from your resource
buildings. The higher in level they are the more you will receive, and besides the act of upgrading
them this method is passive, meaning you will gain resources over time whether you are at the
computer playing the game or not. In your first city you're going to need to build one of each type
- Food, Sawmill, Quarry, and Iron Mill, as you have to ramp up enough resources to get going,
after you get one resource field of each kind you can specialize in one resource.
As you add new cities, it is wise to specialize each of them into one type of resource. You
can go two different ways here. You can specialize each city into a different type of resource and
then transport the goods between your cities, but this takes time and can be very cumbersome.
The better alternative is to build your marketplace, find the most expensive resource (usually
lumber or stone) and specialize it in all of cities. Then you can just sell off your excess and buy
those resources that you aren't producing. That way the resources come directly to your city and
you don't have to spend time transporting them yourself. This is also a great way to obtain the

17
gold you need for your research.
After you start bringing in enough resources to build, research, and still have leftovers, it's
going to be time to build up your fighting units. At this point you want to keep units queued in
your barracks twenty four hours a day if you have the resources to sustain such a training regime.
You can use these units to acquire valleys, which can be accomplished with the same method used
in attacking the flat in the previous chapter. The valleys that you will be conquering are going to
give you bonuses to your production, which will in turn help you grow. Resource fields by
themselves do not produce a whole lot of resources but once you combine them with the valleys
you will be surprised how much you can churn out.
This leads us to the second way to obtain resources. You can only own up to ten
valleys per city, one for each level of your Town Hall. After you cap your valley limit you will earn
resources for attacking a valley instead of the land itself. If you attack a forest you will bring back
lumber from the valley, the amount will vary depending on the level of the valley and your armies
load capacity. If you attack a grassland, lake, or swamp, you bring back food. You will always
bring back the resource type that the valley would usually grant a bonus to production had you
conquered it successfully.
Once your army gets big enough you can move on to attacking barbarian cities, which are
very lucrative. They also regenerate every eight hours to provide you with fresh plunder, so use
them to your advantage. I will cover the number of units needed to attack barbarian cities as well
as a few other tricks related to this method in Chapter Six.
The final and most fun way to get resources is through attacking and looting other
players. I will cover this in detail in Chapter Five.

18
I spoke earlier about the marketplace, and that using it brought resources
directly to your city. You will want to build your marketplace very early in
the game and I recommend upgrading it to at least Level Three as you will
be using it constantly. The reason you will need a higher level marketplace
is because you can only have one active order per level of the marketplace. When you go to the
market to buy or sell goods you will, more often than not, want to make more than one
transaction. Once you start conquering barbarian cities you're going to find that you have more
gold than you can use for research or upkeep and you should use this extra money to buy
resources on the market.
Remember how I said that you can't get enough resources? I really meant that! You can
use them to grow your fighting units, buildings, wall defenses, and to put towards research. The
enemy cannot plunder resources that are safely queued in your barracks and walls in the form of
building fighting units or defensive units, so turning your extra gold into resources and using
your queues to your advantage protects your gold from plunderers.
One other note about the marketplace - in previous versions of the game you could hide
resources away from attackers by putting them up on the market. This is no longer the case, so
you must hide them in other ways. If necessary, you can queue them in the barracks as discussed
above or transport them to other cities or to a flat that you own. A last ditch effort can be made
right before the enemy arrives at the gates by sending out as much as possible and then turning
the transports around after the battle has been fought.
The actual marketplace where resources are traded can be manipulated to allow you to
become very wealthy. It takes a lot of patience and gold but you can earn millions of gold by
cornering the resource market, but I wouldn't advise that you try this until you have a couple

19
hundred million in gold to utilize. What you must do is drive up the cost of a highly valued
resource on your server, you buy it up when it dips to a low price and then when the price is
jacked up (because of your buying), start selling it. Since you will own such a large amount of the
resource, you can control the price to an extent. Anything that is sold under the price you choose
you purchase, so only your goods sell at your price. As the old adage goes "money is the seed of
money." This is how you make your wealth work for you so you don't have to work for it.
20
Chapter III
BuildingsBuildings are a vital link between your resources and armies. In this chapter, I will provide
more detail on the buildings mentioned in Chapter One. I have already discussed the cottages,
resources buildings and market so we won't go over them again here.
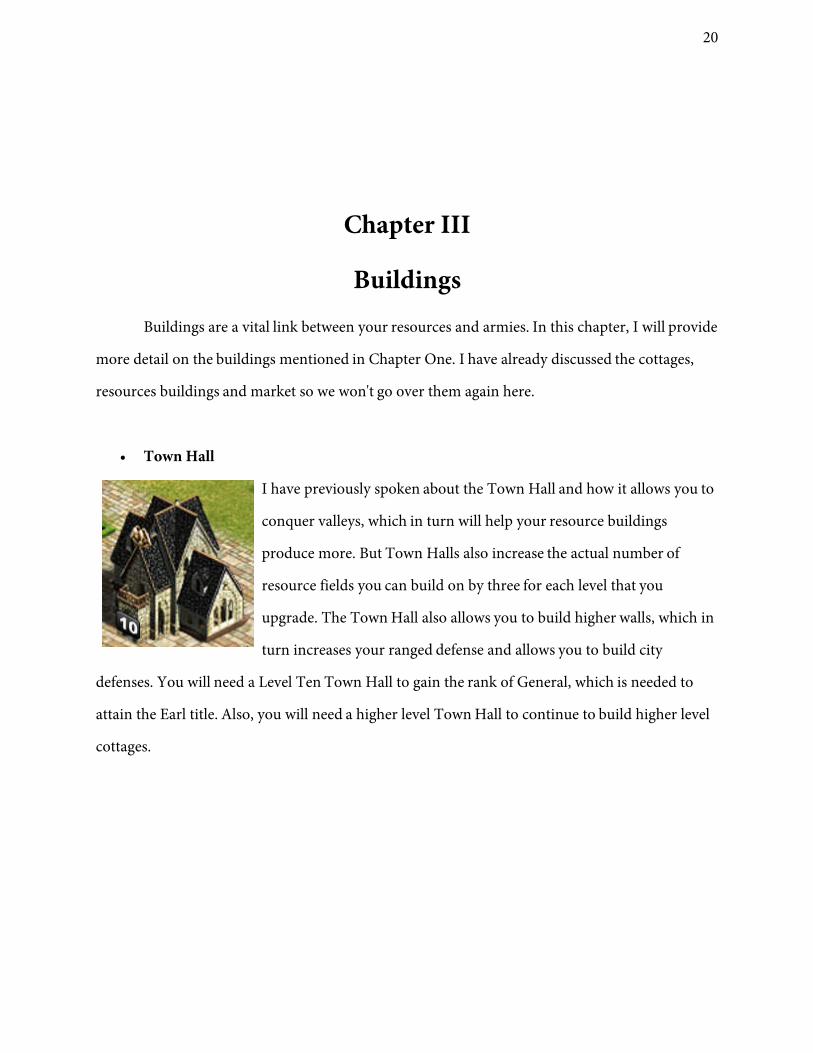
• Town Hall
I have previously spoken about the Town Hall and how it allows you to
conquer valleys, which in turn will help your resource buildings
produce more. But Town Halls also increase the actual number of
resource fields you can build on by three for each level that you
upgrade. The Town Hall also allows you to build higher walls, which in
turn increases your ranged defense and allows you to build city
defenses. You will need a Level Ten Town Hall to gain the rank of General, which is needed to
attain the Earl title. Also, you will need a higher level Town Hall to continue to build higher level
cottages.

21
Town Hall Statistics
Town Hall Level Prerequisite Base Building Speed Grants
Town Hall Level 2 400 Food, 6,000 Lumber, 5,000 Stone, 200 Iron
30m 00s 2 Valleys 16 Resource Fields
Town Hall Level 3 800 Food, 12,000 Lumber, 10,000 Stone, 400 Iron, Walls
Level 1
1h 00m 00s 3 Valleys 19 Resource Fields
Town Hall Level 4Grants Walls on
Map Screen
1,600 Food, 24,000 Lumber, 20,000 Stone, 800 Iron, Walls
Level 2
2h 00m 00s 4 Valleys 22 Resource Fields
Town Hall Level 5 3,200 Food, 48,000 Lumber, 40,000 Stone, 1,600 Iron,
Quarry Level 2, Workshop Level 1
4h 00m 00s 5 Valleys 25 Resource Fields
Ends Beginner Protection
Town Hall Level 6 6,400 Food, 96,000 Lumber, 80,000 Stone, 3,200 Iron,
Quarry Level 2, Workshop Level 1
8h 00m 00s 6 Valleys 28 Resource Fields
Town Hall Level 7 Grants Castle on
Map Screen
12,800 Food, 192,000 Lumber, 168,000 Stone, 6,400 Iron, Quarry Level 2, Workshop
Level 1
16h 00m 00s 7 Valleys 31 Resource Fields
Town Hall Level 8 25,600 Food, 384,000 Lumber, 336,000 Stone, 12,800 Iron, Quarry Level 2, Workshop
Level 1
32h 00m 00s 8 Valleys 34 Resource Fields
Town Hall Level 9 51,200 Food, 768,000 Lumber, 672,000 Stone, 25,600 Iron, Quarry Level 2, Workshop
Level 1
64h 00m 00s 9 Valleys 37 Resource Fields
Town Hall Level 10Grants Large Castle on the Map Screen
102,400 Food, 1,536,000 Lumber, 1,344,000 Stone,
51,200 Iron, Quarry Level 2, Workshop Level 1
1 Michelangelo's Script
128h 00m 00s 10 Valleys 40 Resource Fields
22
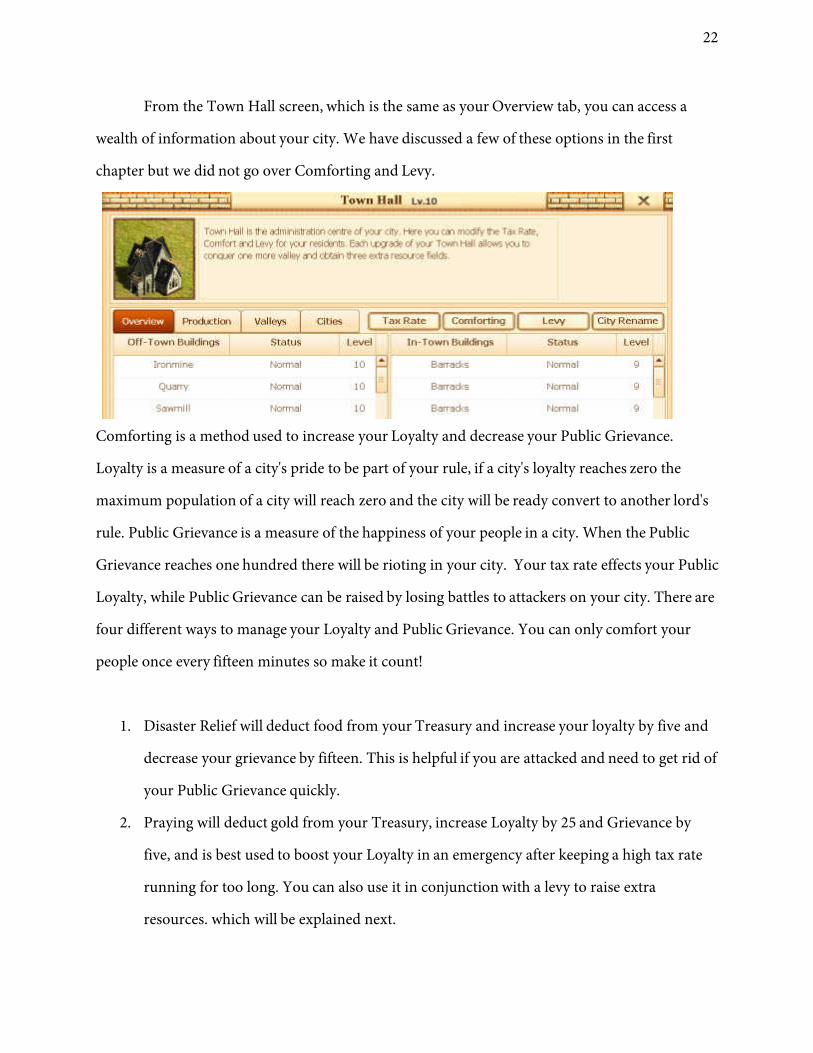
From the Town Hall screen, which is the same as your Overview tab, you can access a
wealth of information about your city. We have discussed a few of these options in the first
chapter but we did not go over Comforting and Levy.
Comforting is a method used to increase your Loyalty and decrease your Public Grievance.
Loyalty is a measure of a city's pride to be part of your rule, if a city's loyalty reaches zero the
maximum population of a city will reach zero and the city will be ready convert to another lord's
rule. Public Grievance is a measure of the happiness of your people in a city. When the Public
Grievance reaches one hundred there will be rioting in your city. Your tax rate effects your Public
Loyalty, while Public Grievance can be raised by losing battles to attackers on your city. There are
four different ways to manage your Loyalty and Public Grievance. You can only comfort your
people once every fifteen minutes so make it count!
1. Disaster Relief will deduct food from your Treasury and increase your loyalty by five and
decrease your grievance by fifteen. This is helpful if you are attacked and need to get rid of
your Public Grievance quickly.
2. Praying will deduct gold from your Treasury, increase Loyalty by 25 and Grievance by
five, and is best used to boost your Loyalty in an emergency after keeping a high tax rate
running for too long. You can also use it in conjunction with a levy to raise extra
resources. which will be explained next.

23
3. Blessing basically turns gold from your Treasury into food for your people. This is a great
save if you run out of food and need immediate assistance. If you run out of food, your
troops and people will start leaving your city. So make sure you keep enough around to
cover any times you may spend offline.
4. Population Raising will cost food but boost your population, a great tactic to use if you
need to train some extra troops or fill some employment spaces quickly.
Next to the Comforting tab is the Levy tab. Levying resources allow you to instantly gain
the resource of your choosing, and the amount raised will equal 10% of the current population of
the city, but it angers the population and will cost you 20 Loyalty. There are times when you will
want to do this, and with a large stash of gold, you can pull this off every 15 minutes by praying
afterward.
Under the Cities tab, you can also choose to abandon a city. You may ask, "but why would
I ever want to do that?" but there is good reason to do so, which will be explained later in Chapter
Six. Lastly, under the Valleys tab you can view your conquered valleys and abandon them as well
to make room for better ones or different types.
• Walls and Fortifications
Once you start leveling up your Town Hall you will be required to build
your walls up as well. A Level 2 Quarry and Level 1 Workshop are
required to build walls. The quest rewards for walls are very nice so your
first city's walls will be easy to construct with minimal costs. The main
purpose Walls serve is to defend your city against attack. As your Walls
gain levels, you will be able to construct fortifications in and around them that help to protect
your city. Also, each level of your Wall adds durability that must be overcome by the enemy to get

24
inside the city. This durability must be overcome within 100 rounds, otherwise your army will
march home defeated. The durability of your walls and the endurance of its fortifications can be
enhanced by the engineering technology, but the base values are displayed in the table below.
City Wall Statistics
Wall Level Prerequisite Base Building Speed Grants
Walls Level 1 3,000 Food, 1,500 Lumber, 10,000 Stone, 500 Iron
Quarry Level 2, Workshop Level 1
30m 00s 100,000 Durability 1,000 Fortified Spaces
Allows Traps
Walls Level 2 6,000 Food, 3,000 Lumber, 20,000 Stone, 1,000 Iron, Quarry Level 2,
Workshop Level 1
1h 00m 00s 300,000 Durability 3,000 Fortified Spaces
Allows Abatis
Walls Level 3 24,000 Food, 6,000 Lumber, 40,000 Stone, 2,000 Iron,
Quarry Level 2, Workshop Level 1
2h 00m 00s 600,000 Durability 6,000 Fortified SpacesAllows Archer Towers
Walls Level 4 24,000 Food, 12,000 Lumber, 80,000 Stone, 4,000 Iron, Quarry
Level 2, Workshop Level 1
4h 00m 00s 1,000,000 Durability 10,000 Fortified Spaces
Walls Level 5 48,000 Food, 24,000 Lumber, 160,000 Stone, 8,000 Iron, Quarry
Level 2, Workshop Level 1
8h 00m 00s 1,500,000 Durability 15,000 Fortified Spaces
Allows Rolling Log
Walls Level 6 96,000 Food, 48,000 Lumber, 320,000 Stone, 16,000 Iron,
Quarry Level 2, Workshop Level 1
16h 00m 00s 2,100,000 Durability 21,000 Fortified Spaces
Walls Level 7 192,000 Food, 96,000 Lumber, 640,000 Stone, 32,000 Iron,
Quarry Level 2, Workshop Level 1
32h 00m 00s 2,800,000 Durability 28,000 Fortified Spaces
Allows Defensive Trebuchet
Walls Level 8 384,000 Food, 192,000 Lumber, 1,280,000 Stone, 64,000 Iron,
Quarry Level 2, Workshop Level 1
64h 00m 00s 3,600,000 Durability 36,000 Fortified Spaces
Walls Level 9 768,000 Food, 384,000 Lumber, 2,560,000 Stone, 128,000 Iron,
Quarry Level 2, Workshop Level 1
128h 00m 00s 4,500,000 Durability 45,000 Fortified Spaces
Walls Level 10 1,536,000 Food, 768,000 Lumber, 5,120,000 Stone, 256,000 Iron,
Quarry Level 2, Workshop Level 11 Michelangelo's Script
256h 00m 00s 5,500,000 Durability 55,000 Fortified Spaces

25
There are five different defensive structures that you can build inside and around your
City Walls. This is done by double clicking on the Walls and queueing the fortifications just like
you would a troop in the barracks.
• Traps:
Traps are great against infantry and are cheap to build.
Used in great numbers, traps can be extremely helpful.
They are designed to distribute losses evenly across
attacking troops. The number of troops that they can defend against depends on the
proportion of armies versus the traps. For example, it has been discovered that if an
attacker sends 100 warriors at 100 traps, 100 warriors will die. However, if an attacker
sends 200 warriors then only about 90 warriors will die, and sending 300 will result in
even less losses. The only drawback to traps is the fact that they cost more to build than a
warrior so if they are attacked by warriors the defender will lose honor.
• Abatis:
Abatis defend against mounted units, such as Cavalry
or Cataphracts. Because an often used tactic for
attackers is to send cavalry to bring the loyalty of a city
down quickly, Abatis can be vital to keep someone from capturing your city. They work
very well when you plan to have the doors of your walls closed, meaning you are
protecting your city with only your wall defenses. If you plan to defend with your walls
and normal units (gates open), I recommend using Pikemen in conjunction with the
Abatis to deal with the mounted units, this will free up more room for more important

26
fortifications. But do not underestimate the power of the Abatis, their strongest selling
point is the fact that only mounted units can kill them, and mounted units cost more to
build than Abatis, therefore, mounted units that die as a result of Abatis defense will earn
honor in your favor.
• Archer Tower:
Archer Towers are ranged units that shower down attacks
from the height of your Walls. They should form the
majority of your wall defenses, and with higher level walls their range is increased. The
mathematical equation for the range increase is Archer Tower Range = ((.05 * Archery
level) + (.05 * Wall Level) * 1300) + 1300. Basically, you gain a 5% bonus for each level of
Archery technology and 5% bonus for each level of your City Walls. Archer Towers have
huge advantage against all other ranged units when they are fully utilized, their only major
weakness is the fact that they can be attacked by all units.
• Rolling Log:
Rolling logs will help against infantry units. They have an
attack of 500 and are a one time use fortification. Although they have a good range they
are very expensive, for a one time defense, so the space can be more effectively used
elsewhere. I recommend skipping this fortification and just build more Traps if your
looking for infantry defense because they are more cost effective.
• Defensive Trebuchet:

27
• The Defensive Trebuchet is basically just a trap for siege weapons. They are a one shot
defender but are very effective in keeping siege units from engaging your defenses from a
untouchable range. They have an attack of 800, but they have one major flaw. They can be
killed by warriors, and if warriors are sent ahead of an attacking force they can effectively
clear your Defensive Trebuchets away and get a very large amount of honor in the
process. Until their weakness is corrected these units are not safe to build, and the space
will be better utilized building Archer Towers.
• Forge
The forge only serves the purpose of meeting prerequisites for other
buildings and technologies, it is vital to the Military Science line of
technology. To Build it, you must have a Level 3 Iron Mine. Each level of
Military Science requires that you have a Forge of equal level., so you will
want a level 10 Forge in one city to research that technology's maximum level. Other than that
you won't need to build it past level 2 which is required to build a workshop. When you get your
workshop, you can go ahead and demolish it and build higher priority buildings because you
won't be needing it anymore.
• Workshop
The Workshop is very similar to the forge in that it only serves the purpose of
meeting prerequisites. A level 1 Workshop is need to upgrade the Town Hall
to the level of 5, and also to build City Walls. It is connected with the
technology of Metal Casting which plays a major part in allowing the
construction of mechanical units, which are extremely useful in combat. Just as in the case with
the Forge you will need one upgraded to level 10 to be able to research Metal Casting to it's
maximum.

28
• Inn
The Inn allows you to recruit Heroes. Heroes are used for many different
purposes and are very important. We will discuss Heroes in complete detail in
Chapter Seven. Constructing a higher level Inn offers a bigger selection of
Heroes for hire, and will also offer a higher level of Hero. Different Heroes will
arrive at your Inn each day, with a variety of levels and attributes. It is recommend that you use a
Level 1 Inn because you can simply hire a Hero, and then dismiss him, which will provide you
with another Hero in the Inn to select from. It may seem like a costly endeavor but with a Level 1
Inn you will get Heroes in the Level 1-6 range, and Heroes in this range are inexpensive to
maintain.
A Hero will cost you 1,000 gold per level to hire and 20 gold per level an hour in upkeep.
Recruit low level Heroes with high starting attributes because they have more room for growth,
and you can allocate the attribute points more effectively as they gain experience. This concept is
explained in more detail in Chapter Seven as well. The Inn is disposable after you upgrade your
Feasting Hall to Level 9 and fill it with Heroes, at which point you can demolish the Inn and
rebuild the space with higher priority buildings. If a Hero is captured and you find yourself in
need of another but have already demolished your Inn you can either recruit a hero from another
city that still has an Inn, or you can use a instant hero recruitment item, that are sometimes given
by the Wheel of Fortune.
• Feasting Hall

29
The Feasting Hall allows you to station Heroes in your cities. You can station
one Hero per level of the Feasting Hall. You need to have a Level 1 Inn to
upgrade your Feasting Hall, so again, don't destroy your Inn prematurely.
Inside the Feasting
Hall you have access to your Heroes. You
can appoint a Mayor of the town here, and
you will be using this ability very often as it
will pay off to switch out your Heroes when
completing different tasks in your city. For constructing buildings you would want a Hero with a
high politics attribute, for technology, a higher intelligence attribute, and to build troops you
want to have a Hero with a attack attribute. You can also recall marching Heroes from this screen.
The View tab allows you to
upgrade your Hero's level,
dismiss your Hero, or reward
your Hero so that you can
keep him loyal to your cause
or temporarily increase an attribute. You will see a Redistribute button as well - this option
requires you use one Holy Water for every ten levels the Hero possesses, but it allows you to
redistribute Hero attribute points evenly, this is explained in more detail in Chapter Seven.
You will also notice the green sign beside your Hero's experience bar. This button
will lead you to an Item screen where you can use certain items to give your Hero more
experience. Remember to your changes before exiting this screen or they
will be lost!
• Stables

30
Stables do two important things - they allow for Relief Stations to be built and
upgraded and also for the technology Horseback Riding to be researched.
Decide which city that you would like to research Horseback Riding and
upgrade that city's Stable to Level 9. Use that city only to do the Horseback
Riding research so that you only need to build a Level 1 Stable in the rest of your cities.
• Relief Station
Relief Stations reduce the travel time between two of your cities, and the
speed is determined by the level of the Relief Station in the city sending the
troops. There is a speed multiplier that takes effect when the Relief Station
reaches certain levels. For each of these thresholds the traveling speed of
reinforcements or transports will increase by 100%. The thresholds are at Levels 1, 4, 5, 8, and 10,
so with a Level 10 Relief Station your moving speed will be increased six-fold.
• Beacon Tower
The Beacon Tower is your city's eyes. It will warn you of impending attacks against
your city. The higher the level of the Beacon Tower, the more information you will
receive about the attacking army.
• Level 1 - You will only receive notice of the invasion.
• Level 2 - You can see whether the purpose of the army is a scout mission, or a conquering
army sent to plunder.
• Level 3 - You can see the arrival time of the approaching army.
• Level 4 - You will see the Lord's status of the enemy.
• Level 7 - You can see the actual head count of the enemy troops as opposed to general
figures like "Zounds" or "Hordes."

31
• Level 9 - You will be able to see the level of the Hero leading the enemy army.
Once you have notice that there is an enemy army on it's way you may need to call for help from
your alliance members. An alliance is setup through your city's Embassy.
• Embassy
Embassies host convoys from other players. With a Level 1 Embassy you will be
able to join alliances created by other players, and at Level 2 you can establish
an alliance yourself and combine forces for a common goal. The host of the
alliance can increase the limit of the members who can join the alliance by
upgrading his or her own Embassy, which can also be done with an Item called The Ritual of
Pact, it will be discussed further in Chapter Seven. Even if you do need help from other alliance
members in defending your city against attack, the Embassy also serves to station, or garrison, the
outside alliance armies. Once reinforce with alliance troops, you will be granted control of the
troops sent.
The level of the Embassy is equal to the number of armies that can be stationed in the
embassies city, no matter what size the army of your own may already be stationed there. Each
army that garrisons in your city sent by alliance members can be of infinite size, but keep in mind
you will have to feed the armies that are stationed there so plan to have plenty of food. Also to
have friendly armies stationed in a city you must check the box that allows allied members to
garrison there troops inside the Embassy.
You can also enter your alliance
page from the Embassy screen. This will allow you to view the other members of your alliance,
the current warring status of your alliance versus the other alliance, alliance events and war
reports.

32
• Academy
The Academy is where all your research is conducted. You must have a Town
Hall Level 2 as a prerequisite to build an Academy. The more Academies you
can accumulate, the more research you're going to be able to do at once. A Level
1 Academy allows for Agriculture. Lumbering, and Military Science to be
researched. Level 2 allows for Masonry, Mining, and Military Tradition. Level 3 allows for Metal
Casting, Informatics, and Iron Working. Level 4 allows for Archery, Logistics and Compass. Level
5 allows for Horseback Riding and Construction. Level 6 allows for Stockpile and Medicine.
Levels 8, 9, and 10 allow for Engineering, Machinery, and Privateering, respectively. I will break
each of these technologies down in the next chapter.
• Warehouse
The Warehouse is where you essentially hide your resources from attacking
armies. Armies cannot plunder resources stored in your Warehouse, although
they can reduce the effective storage space with the Privateering technology.
You can increase the amount of resources safely stored with the Stockpiling
technology. In the current state of the game, the Warehouse is pretty much useless and I don't
recommend using them. The total amount of resources they protect is very small compared to the
amount you will be dealing with, so they are really not worth the effort to build up. The only
method to effectively use the warehouse would be to devote an entire city to nothing but resource
storage. And considering the fact that we want to be constantly using our resources this is not a
viable option.

33
• Rally Spot
The Rally Spot is the place where your armies will gather before going
on a mission or attack, or to exercise before an attack is made. Each
level of the Rally Spot will allow you to send out 10,000 troops for a
maximum of 100,000. These numbers can be increased by 25% with a
War Ensign Item, but be forewarned that if you check the War Ensign
box, you must make sure that it is deselected before your next march or you will use another one,
that you might not need!
The Open gate option will allow troops garrisoned inside your city to take part in the
defense of the city. If your gates are closed, troops will stay behind the walls until your city's
loyalty declines to five. The exercise option is a calculator that allows you to pit hypothetical
armies against each other. It can be used as a rough guide on how a battle would turn out in the
field. It's most useful when dealing with smaller armies. You should use Exercise after scouting
out lower level valleys when you are new and only have a meager amount of troops to utilize. Plug
the scouted numbers in and weigh them against your own. Once you start getting more troops
you should stop using it for the most part and just follow the combat strategies that will be laid
out in the next chapter.
The Medic tab allows you to heal units, for a price who are hurt during battle. This
number will depend on your casualties during a battle (usually 10% of the number killed) and will
dwindle over time. so remember to visit it often. Remember you don't have to wait for your
troops to return to use the medics, they are available to heal troops immediately after the battle.
The amount of gold charged to heal the unit is based on the type of unit. After conquering a
player's city, you can also go in and heal the troops he lost and use them for yourself. This is a

34
good way to replenish troops you lost during the battle, and a nice trick to get Catapults from
people who got mechanics battalions as a Wheel of Fortune reward.
• Barracks
You must have a Rally spot to build a Barracks, and Barracks are the
absolute, hands down, most important building in the game, so I've save the
best for last. You will build all of your troops in your Barracks and the
troops you can build there corresponds to the level of the Barracks and the
Science that you have researched. You may also queue one group of units per level of your
Barracks so you can have more units ready to be built even if you will be offline. Also, instead of
building the maximum number of troops that you can build all at once, break your queues down
into several batches. Then you're hiding your resources and also have the option of pulling them
back off the queue a little at a time if you need them.
A Level 1 Barracks may build Workers and Warriors. Level 2 allows Scouts and Pikemen
to be built. At Level 3, Swordsman can be queued, Archers come from Level 4. Levels 5,6, and 7
will yield Cavalry, Transporters, and Cataphract, respectively. A Level 9 Barracks allows for
Ballista and Battering Rams, and lastly a Level 10 Barracks allows for the building of Catapults.
To build big armies you will need as many Barracks as can be fit into your cities while still
maintaining the other buildings you need. You can fit 14 to 20 Barracks in a single city depending
on the development of the city. For example, if you have maximized the level of your Feasting
Hall, City Walls, and have your Metal Casting research done, you no longer need a Inn or a
Workshop and those buildings can be destroyed to make room for a Barracks.
Your army size is only limited by three things - Resources, Population, and Time. We

35
have reviewed resources, but I want to mention that food is going to be the limiting reagent here.
Not only does it cost food to queue and build troops, but also it costs food to maintain them. Be
prepared to spend a lot of time and coin on food.
Population won't be a big problem. You will want to keep six to eight cottages so that you
have enough population to recruit the troops you need. Remember that once you're bringing in
millions of gold from Barbarian cities, you no longer need to tax your people. You can run a 1%
tax rate, your population will bloom and you'll see a flux of eager bodies ready to be trained into
the army. Your population will refresh itself in a matter of hours so that you can keep queuing
troops.
This brings me to a small note on canceling troop queues, by way of sharing a mistake I
have made many times myself. A Hero, appointed as Mayor, with a high Attack attribute will
decrease the time it takes to train troops. On several occasions, I have sent a high level Hero to a
city but forgot to actually appoint him or her as Mayor before queuing up massive troop builds.
Since the difference in time to train is substantial, it is best to cancel the troops in training,
appoint the Mayor, and queue them again with the correct Mayor. If the troops are waiting in line
behind other troop queues, you can cancel them and regain your resources, losing only the
population used to queue. If the troops are already being built, you will lose most of the resources
you committed to their training. Therefore, be very careful about not only moving your high level
hero to new cities but in remembering to also appoint the Hero as Mayor before you start
queueing.
The last limiting factor is time. I cannot relay to you how many times I've scouted a city,
and found only four or five Barracks, which dramatically limits how many troops can be built.
You will not make this mistake because with your city having 15 Barracks training units 24 hours

36
a day, you're going to be able to build three times as many units as the opponent. This is why you
will be able to start even on an established server and work your way to the top. And although
prestige is a moderate guidepost to how well developed a player might be, it is a player's army that
determines their true strength.
The other two factors that help with the speed of training units are the city Mayor's Attack
attribute and the Military Science technology. If for some reason, and I can't think of a good one,
the situation ever arises where you would need to dismiss some troops, there is a Dismiss icon by
the unit picture in the Barracks.
Now that we have a good idea of what role the Barracks plays in the game, let's discuss the
fighting units and their separate roles in combat.

37
Chapter IV
Units & TechnologiesThere are 19 technologies that you may research, and 10 of these directly effect your units.
Of the remainder, six of them affect the resources that you use to build and sustain your armies
and the other three relate to buildings and wall fortifications. Because research is so closely
related to your troops and combat, I will explain both the research and the impact on your troops
at the same time.
Two different types of units exist in the game; infantry and mechanic. The difference
between the two unit types relates to the way they interact with other units and wall defenses on
the battlefield. Transporters, Ballista, Battering Rams and Catapults are mechanical units, all the
other units are consider infantry. Beyond this there is a subdivision between mounted, melee and
ranged units. Archers, Ballista and Catapults are all ranged units, Cavalry and Cataphract are
mounted and all other units are considered melee.
All units have assigned attributes - Life, Attack, Defense, Load, Speed, and Range. Aside
from this they have resource and population cost to build and a food upkeep cost. The Life of a
unit is the same as its hit points how much damage the unit is able to take before it expires. The
Attack is how much damage the unit does each round if the unit is attacking. Defense is amount
of damage the unit does if it is defending. The Load is how many resources the unit can carry.
The Speed of the unit is how fast it moves over the field of battle and the world map. And the
Range of the unit is how far away the unit can engage other units or fortifications in combat.

38
The Worker serves three purposes, the main
one being to transport resources until you can build actual
Transporters. Workers will carry 200 units each. A Worker’s second purpose is to build new
cities, and you will need 250 of them to carry resources to the building site. Their third purpose is
cannon fodder, although in most cases they don't even do a very good job of that. Build only as
many Workers as you need to serve these purposes, and once you are able to use Transporters
don't bother with them anymore.
The Warrior is your bread and butter unit. They are
cheap and quick to build, have a decent amount of Life (200)
and they don't eat all that much food (3). I suggest you always keep some training in your queues.
Most often they are used in large numbers as a meat shield, and you will want to use them to
attack low level barbarian NPC cities for resources until you can get you on your feet. These units
are also amazing and earning honor as they can be sent into battle before your main attack strikes
to clear fortifications and soften the enemy's defenses.
The Scout is an informative unit designed to

39
gather information about enemy territory and armies. The Scout is the fastest unit in the game,
clocking in at a speed of 3000, but he has almost no Attack value at all (20). You do not need to
send a Hero to run a scout mission, although you do need the Informatics technology to gather
detailed information. If you are scouting a valley, you will want to have your Informatics one level
higher than the level of the valley you are scouting in order to obtain detailed information about
the valley. If your Informatics is at the same level
you will only get an estimate of the number of troops defending it. You can apply
the numbers to the estimates by using the table below. If you are scouting cities
you only need to have the Informatics at the same level as the city you’re scouting
(or higher) to gain the information needed. The important thing here to remember is the higher
your Informatics technology the better information you will be able to gather.
Amount Range
Few 1-24
Pack 25-49
Lots 50-99
Horde 100-249
Throng 250-499
Swarm 500-999
Zounds 1000-2499
Legion 2500-4999
Bulk 5000-9999
Giga >10,000
40
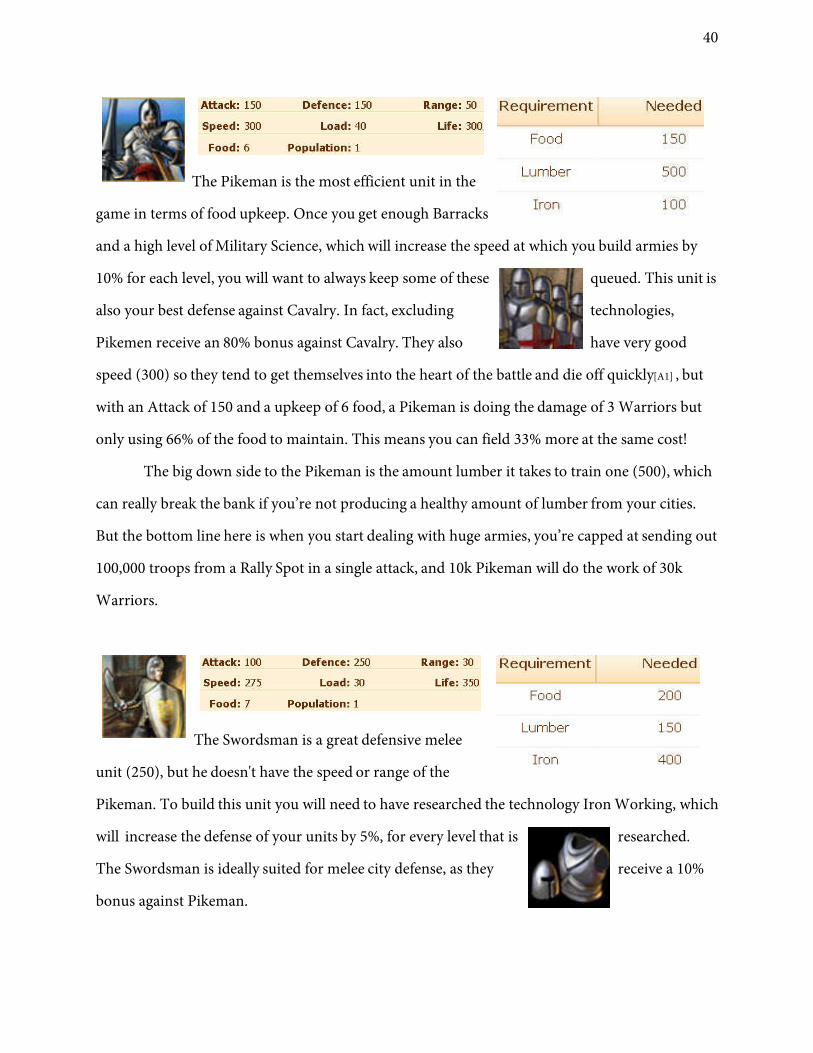
The Pikeman is the most efficient unit in the
game in terms of food upkeep. Once you get enough Barracks
and a high level of Military Science, which will increase the speed at which you build armies by
10% for each level, you will want to always keep some of these queued. This unit is
also your best defense against Cavalry. In fact, excluding technologies,
Pikemen receive an 80% bonus against Cavalry. They also have very good
speed (300) so they tend to get themselves into the heart of the battle and die off quickly[A1] , but
with an Attack of 150 and a upkeep of 6 food, a Pikeman is doing the damage of 3 Warriors but
only using 66% of the food to maintain. This means you can field 33% more at the same cost!
The big down side to the Pikeman is the amount lumber it takes to train one (500), which
can really break the bank if you’re not producing a healthy amount of lumber from your cities.
But the bottom line here is when you start dealing with huge armies, you’re capped at sending out
100,000 troops from a Rally Spot in a single attack, and 10k Pikeman will do the work of 30k
Warriors.
The Swordsman is a great defensive melee
unit (250), but he doesn't have the speed or range of the
Pikeman. To build this unit you will need to have researched the technology Iron Working, which
will increase the defense of your units by 5%, for every level that is researched.
The Swordsman is ideally suited for melee city defense, as they receive a 10%
bonus against Pikeman.

41
The game information says that the Swordsman is effective against Archers but this is not
the case if the Swordsman is alone. If pitted against an Archer alone in the exercise screen it
would take six Swordsman to kill one Archer even though the Swordsman has an extra 100 Life.
The fact that the Archer will get round after ranged round of attack against the Swordsman before
the Swordsman can close the gap makes it clear that the Swordsman will need some cover so that
he can bring his bonus against the Archer to bare. Archers will always attack other ranged units
first in battle, so in order to make the Swordsman effective you need to have a ranged unit that
will be close enough to the enemy archers so that they don't target the Swordsmen and mow them
down before they can get in a position to attack. Another tactic to use to get your Swordsman in
range of archers is to put a large amount of Pikeman in front of the Swordsman to absorb all the
ranged damage. The bottom line here is if you’re going to use Swordsman as an attack unit you
must pair them with Pikemen, Archers, or a combination of both so that they don't get shot down
before the Swordsmen can get within striking distance.
The Archer is arguably the most powerful unit
in the game. To build this unit, you will need the technology
Archery, which will also increase your Archery range by 5% per level. This is a
technology that you will want to upgrade early and often, as it is critical for
success in the game.
The Archer’s ability to attack from a distance is the key to its power. The unit has an
Attack of 120 and a range of 1200. Although there is a ranged damage modifier of .5, meaning it
does half the damage that melee units do, it is able to make up for this by getting four attacks in
on even the fastest melee unit before they can be reached and engaged in melee combat. They also

42
do double damage against Cavalry. Considering these attributes, the resource costs and build time
are relatively meager, so you should concentrate on building these units throughout your career
at Evony.
Because the Archer is so powerful, there are many defensive counters to them. Besides the
tactic that I explained in the Swordsman section, Archers will also have to contend with
mechanical ranged units, the Archer Tower, and the mounted unit types, all of which will always
target the Archer first.
In the case of the mounted units, you can always put melee units in front of your Archers to
defend them. For the rest, you can simply out number them, as Ballista, Catapults and Archer
Towers are rarely seen in mass numbers - they are expensive to build and in the case of Archer
towers, have a hard cap on how many can be built, depending on the Wall level.
When attacking with Archers, you must remember to use infantry with them, also known
as a meat shield. This will give you a buffer so that melee units must fight through the shield to
reach your archers, protecting them and making them more effective.
This brings us to the mounted units. Calvary are
the fastest attacking unit in the game (1000) and play a major role in the conquering of player
cities. Because so many attacks must be made on a player’s city to conquer it, this unit allows you
to vastly shorten the time from first attack to capture.

43
Cavalry require you to have researched the Horse Back Riding technology, which
enhances the speed of mounted and mechanical units by 5% per level researched.
Each level requires a Stable at the respective level of research level, so plan
accordingly.
One thing to note about this Horseback Riding while we are on the subject - your
Academy must be Level 5 to research this technology, and since it affects mechanical units as well
as mounted units, at higher levels Horseback Riding will cause your Ballista to be so fast that they
will begin to move into the range of Archer Towers and Mounted units before the battle is
over] and take more casualties while attacking, This is especially true during the siege of
Barbarian cities where only Ballista are used, so there is a trade off for the speed of certain units
on the world map versus the battlefield.
That being said, you will most certainly want to have Level 10 Horseback Riding - just be
sure to keep options open to have a city with a level 4 Academy so that you may take advantage of
the slower Ballistas in the scenarios that require them.
Cavalry receive a 20% bonus against Archers and can also carry a decent Load (100),
which makes the very good for plundering when sent on their own. By virtue of their speed
Cavalry get to move before combat begins. But they will not attack archers first if infantry are
present.
The counter to Cavalry are Pikeman and Abatis. We have already discussed the 80%
damage modifier Pikemen have against Cavalry, which means that technology excluded, Pikemen
only need a 1.3 to 1 ratio to defeat Cavalry as a defender. With this in mind, you will want to
avoid attacking Pikeman with Cavalry alone. Abatis defend against Cavalry as wall fortifications
44
and they do a pretty good job of it, so be aware of how many an opponent has in his arsenal
before you commit to an attack.
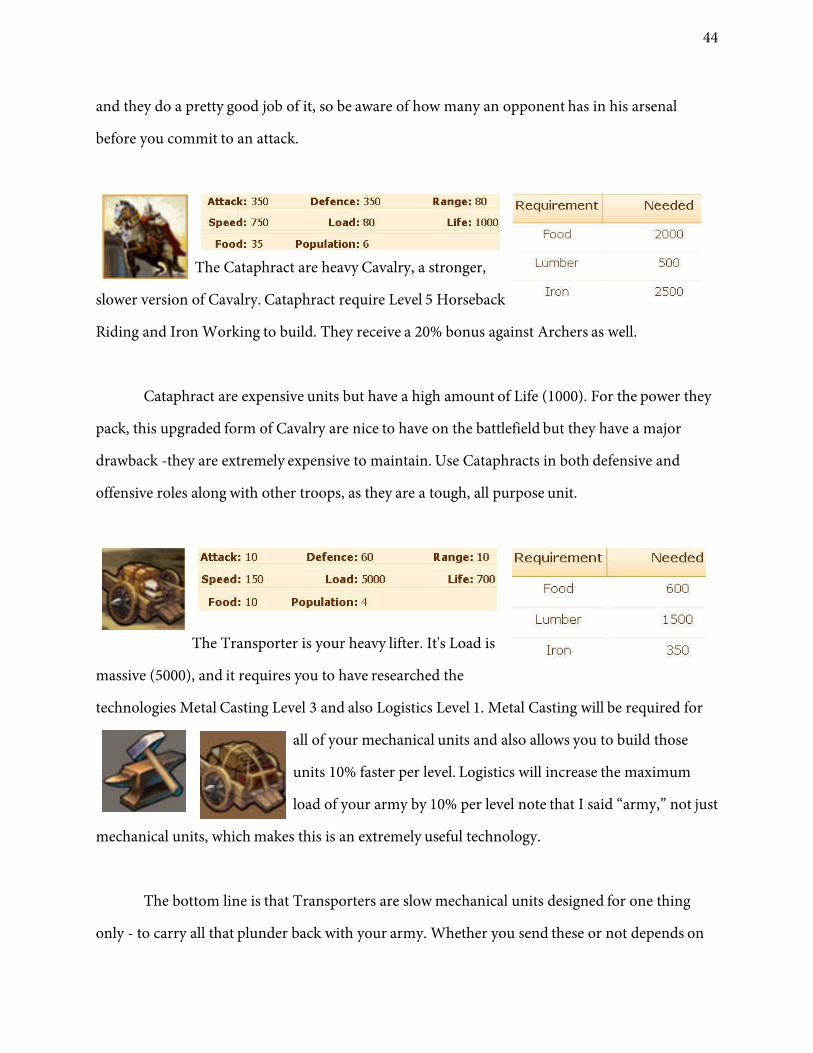
The Cataphract are heavy Cavalry, a stronger,
slower version of Cavalry. Cataphract require Level 5 Horseback
Riding and Iron Working to build. They receive a 20% bonus against Archers as well.
Cataphract are expensive units but have a high amount of Life (1000). For the power they
pack, this upgraded form of Cavalry are nice to have on the battlefield but they have a major
drawback -they are extremely expensive to maintain. Use Cataphracts in both defensive and
offensive roles along with other troops, as they are a tough, all purpose unit.
The Transporter is your heavy lifter. It's Load is
massive (5000), and it requires you to have researched the
technologies Metal Casting Level 3 and also Logistics Level 1. Metal Casting will be required for
all of your mechanical units and also allows you to build those
units 10% faster per level. Logistics will increase the maximum
load of your army by 10% per level note that I said “army,” not just
mechanical units, which makes this is an extremely useful technology.
The bottom line is that Transporters are slow mechanical units designed for one thing
only - to carry all that plunder back with your army. Whether you send these or not depends on

45
the army make up and how much loot you plan on bringing back with you. If you are attacking
solely for the purpose of making yourself richer, you'll want to use as many Transporters as it
takes to grab all the resources a city or valley has. If, on the other hand, you are looking for speed,
you may want to leave these units at home and go with Cavalry instead.
One huge advantage Transporters have over workers is they don't tend to die in battles.
They are targeted last in a battle and unless you lose the battle they will always be kept safe.
The Ballista is your best choice for a heavy
ranged unit and it only requires a Level nine Barracks, so you
can produce these in large numbers. This unit requires that you have the technology research of
Metal Casting Level 5 and Archery Level 6.
With a massive Range of 1400, these units are hard to kill if they have proper support.
They also boast an Attack of 450, which can be deadly for slower units that cannot get close to
melee range quick enough to kill them off.
These units are very important to the growth of your empire, with the proper technology
levels they can defeat up to Level 5 NPC cities on their own without any incurring losses, and in
this regard they will pay for themselves many times over. Ballistas have a double damage bonus
against Cavalry.
The counters to Ballistas are Archer Towers, Defensive Trebuchets, and sheer numbers of
troops to overcome the range. Mechanical units tend to be targeted late in the battle, so usually

46
you won't lose your Ballista unless you don't have enough infantry and archers at the front lines
taking the brunt of the damage. The one exception to this is Defensive Trebuchets, which will
target your mechanical units first and with a Range of 5000, they will always hit some of your
units. Be very careful when sending attacks against these fortifications because they can really put
a beating down on your Ballistas.
The Battering Ram is a mechanical melee unit, a
heavy duty tank used as meat shield. It has more Life (5000) than any other unit in the game.
To build a Battering Ram you will need to have researched the technologies Metal Casting
Level 7 and Iron Working Level 8. There is another technology that goes extremely well with this
unit and that is Medicine. This technology allows 5% extra life per level, and will
increase the life of your ram significantly.
The Ram is an extremely slow unit with a Speed of 120 so it won't make it into battle
before your infantry, but what it lacks in speed it makes up for in Range (600). The main purpose
of the Ram is to support your Archery units and bring down enemy fortifications, and it should
be used as such. If used in large numbers they are a very effective meat shield for your Archery
units.
The last unit available to build is the Catapult. This

47
unit is the best Archery unit in the game because it does the most Attack (600) and it has the
longest Range (1500). These units also receive a double damage bonus against Cavalry.
The Catapult requires that you to have researched the technologies Metal Casting Level 10
and Archery Level 10. It also requires a Level 10 Barracks, which means you have to either spend
a Michelangelo's Script to upgrade them to this level or capture cities that contain Level 10
Barracks already. This is a major drawback to the unit because without spending a lot of coin on
scripts, you will not be able to mass produce them.
If you can get your hands on the Barracks, always keep them queued because when you've
built up enough, they can be a special surprise for someone when you’re in need of an attack
boost to put you through an opponent’s defenses.
Another drawback to the Catapult is the fact that it's horribly slow (80) and it will take a
long time to travel to a distant location, but if you don't mind waiting, they get the job done when
they finally do get there.
Defensive Trebuchets are the number one enemy of the Catapult. Even with this unit’s
massive range, the Defensive Trebuchets will take out a large number of them. I suggest you steer
clear of using Catapults against cities with Defensive Trebuchets unless you are willing to take the
losses or clear out the Defensive Trebuchets first with warriors before your main attack strikes.
The bottom line is that Catapults are great but they are very difficult to acquire and have their
limitations. It’s great to have them but don't make it your number one priority to build them.
There are two technologies which have a major impact on battle that we have not
discussed yet - Compass and Military Tradition.

48
Compass is the infantry version of Metal Casting. It will allow your infantry units
to move 10% faster per Level.
Military Tradition will enhance your army’s Attack by 5% per level. Although
these two technologies are not required to build any units they are invaluable in
the field.
The remaining technologies are split into groups, City and Resource. The City technologies are
Construction, Engineering, and Machinery.
Construction enhances the speed at which you build buildings and fortifications
by 10% per level researched. It a very valuable technology and you will want to
reach Level 10 as soon as have an extra city to research it in.
Engineering improves the endurance of your walls by 10% per level reached. You
can reference the base numbers in Chapter 3 under the “Walls” section, so that if
your sending out a small attacking force you can make sure you have enough fire
power to overcome the enemies walls. The basic idea of this technology is to make it more
difficult for an attacker to overcome the base value of the walls, forcing them to attack you with a
higher minimum force to break inside your city and plunder your resources.
Machinery enhances the repairable rate of your fortifications by 100% per level.
This helps you keep your wall defenses in place - if only a small portion of your
wall defenses are destroyed and you have the resources in your city to repair them,
they will regenerate immediately after the battle. All of the resources required for repairing the

49
units must be in the city though, it’s an all or nothing with this technology. If you only have a
portion of the resources required to repair the fortification none will be repaired. If you suffer a
devastating attack where most or all of your fortifications are destroyed a smaller portion of the
walls will be repaired.
The Resource technologies are Agriculture, Lumbering, Masonry, Mining, Stockpile, and
Privateering. The first four technologies are bonuses to your cities base resource production
because each level will increase the amount produced by 10%.
I suggest you level Agriculture and Lumbering first as you will be in need of these resources early
on, then work Masonry and Mining up as needed. Stockpile and Privateering should be the last
technologies you research as they Do not have much practical use in the game. You will still want
to research them for prestige eventually, though.
Stockpiling will enhance the amount of resources protected from attackers by 10%
per level. Since even a Level 10 Warehouse only protects 550k resources,
maximizing this technology would mean you could still only protect 1.1 million
resources. By the time you get to a Level 10 Warehouse you will be dealing with resources that
number in the tens of millions so essentially you would only protect a tiny portion of your
resources.
The building’s one saving grace would be in the event that you are attacked and
completely plundered. Using my method of 1% tax rate you may be making a negative amount of
50
gold and in this case your Heroes would flee, so one Warehouse to store enough gold to keep
your Heroes paid in case of total plunder is a decent insurance policy.
If you are powerful enough to thwart most enemy attacks I suggest that you demolish any
Warehouses you have and put Barracks in their place. The Stockpiling technology itself is useful
to research after all others have been completed for its value in prestige, and the reason stated
above.
The Privateering technology can help you overcome people with large numbers of
Warehouses so that you can still plunder them on attacks. It will decrease the
defender’s Warehouse ability down by 3% for each level gained. Since most people
are not even using Warehouses because of their small storage place, this technology is pointless to
research except for prestige.
One last trick to use with technologies is before you abandon a conquered city, use the
academy to do research, Even though you no longer have the city the research will continue, You
can also use this method by just building cities for yourself, constructing an academy and then
abandoning the city and repeating the process.

51
Chapter V
War and DiplomacyNow that we have established what all the units and technologies do for our empire lets
take some time to discuss combat. The first thing you need to know about combat is the manner
in which it unfolds.
Imagine the combat area as a large football field. This field of battle is as large or small as
the greatest ranged attacking unit, so for example, it would start out at 5000 yards if a Trap or
Defensive Trebuchets are involved.
At the very beginning of the battle all units show up on the battlefield and combat begins
and it is assumed that any units that can attack will attack and all other units will proceed forward
according to their speed. For example, excluding variations for different technology levels, a troop
of Pikeman would move forward 300 yards after the traps hit them at the 5000 yard range. After
all troops have moved up by their speed the next round starts and combat is calculated again.
Cavalry are the exception to this rule, it seems that they will move before combat begins
advancing to the first troop they can engage, They are the spearhead of your forces and this
explains why your Cavalry seem to die so quickly in battle.
It is assumed that ranged units will always prioritize their attack on other ranged units
first, and after that units will attack the greatest threat in range when given a choice of targets.
One set of troops will always attack only one other set of troops per round meaning that a
troop of archers will use an entire round killing off just one Pikeman. This leads us to what has
been referred as Darwin's Maneuver named after the player who pioneered its use. In this method
you will send out a main force of attacking units, along with a single unit of complementary types

52
of troop to layer the attack and cause the enemy to use up rounds.
To illustrate you could send 10,000 Warriors and 10,000 archers, which is a fairly
common attack pair, against a players city, but you would also send one of each type of infantry
unit to pad your attack and keep the enemy Archers from whittling away at your Warriors as they
move into attacking range.
All of the specifics of the combat have not yet been fully realized, but strategies like this
are proven to work. From all the information that I have gathered it seems that there are many
idiosyncrasies within the combat system. And although it would be wonderful to know how to
make exact calculations until more research is done we are left with with the trial and error of
experience to guide us.
So lets tackle a few other examples of winning strategies to use against against other
players, both offensively and defensively. Below you will find actual attacks that took place in the
game. You can see how the attacker utilized Darwin's maneuver, and a solid warrior shield to
keep his Archers and Ballista from taking many casualties. And although the defender had a wide
range of units to guard his city, he was never able to kill the warriors fast enough to close the
ranged gap and prevent his own units from being destroyed in a hail of arrows. A successful
defense of this city could have included Archers, Swordsmen, Warriors, Archer Towers and
Traps in much larger numbers.

53
Despite the way this battle report makes things seem, the game is weighted toward a
defensive favor. Behind your walls, you can put as many units in your city as you can build, feed,
and have alliance members send to reinforce it. On the other and you can only send out a
maximum of 125,000 combat units to attack a city at once, this means it is fairly easy to thwart
attackers if you are online and have a responsive alliance to help you.

54
Lets look at a winning combination as a defender. In this example the attacker had the idea of
using his archers to stand back away from the walls and shoot the enemy. But it didn't turn out
the way he had hoped. Since the attacker did not use a infantry shield, nor utilize Darwin's
Maneuver the attack was doomed. The defenders mounted units and infantry had nothing
standing in their way and they closed the ranged gap quickly spelling certain death for the 90,000
archers.

55
As a defender, remember to fill your City Walls with large number Archer Towers. 15,000 of
these with a combination of Level 10 Archery and Level 10 City Walls will easily take out three
times their number in attacking archers on their own.
Another defensive strategy is to keep plenty of Scouts in your city with your gates open.
This makes it very difficult for the enemy to get information on your city and most competent
attackers will never attack blindly. The way around this is to send a smaller attack, (suicide
mission) to get an assessment of the enemies strength, this method is much slower and gives the
enemy more time to react to danger, also you must kill at least 10% of his troops to receive any
information. Often times people will build scout armies to either gain honor from killing scouts
or to gain valuable city information for alliance use. No matter how many scouts are defending a
city they can be killed if enough scout waves are sent to kill them off, deep in the game you will
start to see cities that will contain around 160k scouts to deter honor hunters. What usually
happens is the offender will send 100k scouts in the first wave, and these will be defeated by the
defender, losses with level 10 medicine will be around 55k scouts, Therefore the offender will
need to send another 100k which will also be defeated gaining the defender even more honor. So
anyone hunting for honor will lose a major portion to this scout defense, and the defense
numbers of are still reasonable enough to make it worth the trouble in terms of food demand.
In any case, Scouts on there own are not a good reason to keep your gates open, You want
to have a good Archer force as well as a hearty infantry corps. Warriors always work well in large
numbers, but Pikemen and Swordsmen are also ideal. You want to beware of keeping a large
force of Cavalry in your city with gates open as they will die quickly and since they are expensive
to build there is a potential for you to lose a large amount of honor when they defend your city
from attack.

56
The most important thing to remember when defending a city is timing. Just because you
know an attack is coming doesn't mean you need to reinforce your city right away. Most attackers
will scout a city many times as their attackers get closer to their destination. If you allow the
attacker to believe you are offline and then reinforce your city at the last moment you can lure
him into the attack and defeat him with the sudden appearance of reinforcements.
Another great maneuver to use against an enemy, if your extremely patient, is to build
your cities on Level 10 flats. If it looks as though you will be overwhelmed and your city may be
wiped out anyway you can always abandon the city right before the enemy arrives and this will
turn the city into a Level 10 barbarian city, effectively wiping out a large amount if not all of the
attackers forces.
With these defensive maneuvers in mind lets talk a little about offensive strategies more.
There are three different reasons to engage in player versus player attacks - to gain resources, to
build honor, and to destroy other players.
In the case of attacking for resources, there are times when real player cities will yield
many times more resources at a lower cost than will a barbarian city. Also it takes time for NPC
cities to repopulate resources, so if you require more resources but are waiting for barbarian cities
to replenish their stock, you can turn to attacking player cities.
The second reason you might attack a player would be to build honor and I will outline
some of the methods used to do this as well, but first let's discuss the main reason to attack
-destruction.

57
It is imperative that you work with your alliance members when attacking a city to
conquer it for following reason, attacks that are properly coordinated within your alliance have a
much better chance off success as they will take less time and effort. The end goal for the attacker
is to completely overrun a city, meaning that you are going to take the city and either use it for
your own needs or abandon it to destroy it from the world.
You will begin by scouting a enemy city with one Scout. This is called the James Bond
tactic for obvious reasons and it will save you many Scouts because if the enemies city gates are
open you will lose only that Scout and then on a following mission you can send the maximum
amount of Scouts you have built, giving you the best possible chance to win the battle, and obtain
the information. Using just one Scout on your first mission to a city is also all that is needed to
gain full information about a city assuming your Informatics is level is higher than your
opponents.
After you gain the information on a enemy city you want to calculate his defenses to
decide what you should send. If he has a bunch of Traps, Rolling Logs and Defensive Trebuchets
you will want to send a fodder attack that will hit before your main attack arrives at the city. This
should be filled with Warriors and layered with infantry troops, one unit per layer. This will allow
you to set off the Traps, Rolling Logs and Defensive Trebuchets and clear the way for your main
force to attack.
What you send in your main attack will be determined by the make up of his defending
force. Refer to the units section to decide what will work best, but a few good methods were given
as examples earlier in the Chapter. If they are heavily fortified you'll want to add in some
mechanical units, Ballista or Catapults, and even a large force Battering Rams because they soak
up damage very well.

58
Cavalry will come into play after the main defenses are taken out, you will save them in
reserve and once defensives are cleared they will be dispatched as a quick way to bring down the
cities loyalty and bring back any remaining resources. If your opponent has his walls stacked
heavily with Abatis use Warriors for this purpose instead.
Another option is to send in Warriors to clear out the traps completely before you begin
spamming your Cavalry attacks because traps will kill Cavalry and this will result in a loss of
honor.After that the only thing standing will be Abatis which will only die from mounted units.
If your opponent chooses to keep his gates closed you will have to wait until his loyalty
reaches 5 to kill the troops inside the city, this is when the gates are forced open so plan your
attacks accordingly. I have found that when your opponents city falls to 16 loyalty if you send
massive attack waves in the order of five or six waves the loyalty will drop to 12 immediately
otherwise it will take a lot longer for you to whittle him away.
When the city finally reaches a loyalty of 0 the city will be yours if you have an open city
slot. Then you can either use it as your own or abandon it, this will cause it to turn into a
barbarian city of the level of the flat used to build the city upon. Killing an opponent cities can be
devastating as he will not be able to build and field as many troops, and doing it quickly will bring
him to his knees.
If your alliance mates are close you can coordinate with them to send Cavalry attacks as
well greatly reducing the amount of time it takes to bring a city's loyalty to 0. The most efficient
method to do this would be to have your alliance mates teleport a city into the region you are
59
attacking in, get five or ten people in your alliance to do this and you will be able to all focus fire
city after city to the ground in a matter of hours. Just have the person closest to the enemy city
send the main wave of attacks and everyone else send the Cavalry or Warriors to clear the loyalty.
There have been circumstances of stronger alliances having problems getting close
enough to targets to start taking their cities. They would teleport into an area to start their attacks
and the enemy would teleport away to a different region to escape being attacked. To get around
this get your host to expel the members teleporting into the area from the alliance until everyone
gets into place, then you can add them back and start the attack. Its like using a bit of camouflage
to fool the enemy.
Use these same attacking strategies for resource farming other players, you just won't need
to bring the loyalty down.
Now for gaining honor things can be a little different. The amount of honor you get is
based on the relative resources expended in battle, so if you kill units that are of higher value than
you expend in your attack you will gain more honor in that battle, even if you lose the battle itself!
Warriors are going to be a major selling point when farming honor because they are so cheap.
When clearing a city of wall fortifications you will most likely lose all the Warriors you send while
doing it but if you notice you will gain honor in the process. So it is completely possible to just
send Warriors attacking wall fortifications to build massive amounts of honor.
Beware of Cavalry, in almost every attack they make they will lose honor for you, whether
defending or attacking. They have there uses, but as far as honor is concerned they should be
avoided. Also since seeing that most of your honor will be gained from wall fortifications because
they are so expensive to build, you can fall victim to this tactic as well. It is best to build Archer

60
towers because even though they can lose honor for you they are the most feared of the wall
fortifications and behind high walls with a high level of Archery they do their job very well. Abatis
are also wonderful because they hinder your opponent from using Cavalry to bring down your
loyalty and they are the only fortification that will actually gain honor for you in most cases.
Chapter VI
Barbarians & Promotions
Barbarian cities will end up being the mainstay of your economic prowess, you will want
depend on them heavily to fund every aspect of your civilization. They have a very high output of
food and gold which you can use to by other resources on the market.
Before we break down what each barbarian city rewards for its defeat and how to defeat
barbarian cities with minimum or even no loses lets talk about how to create your own barbarian
cities. I have hinted in the previous chapter how this works, you need to capture either a player
city or a empty flat. In either case you will want to have a extra city slot and that means you need
to have built up your title. After you build a new city you go into your city overview screen in a
city other than the one you have built and abandon the new city, this will create a barbarian city
that equals the level that the flat your city was abandoned on.

61
Once you have created a new barbarian city troops will spawn instantly but the resources
will not. It currently takes eight hours for a barbarian city to fully repopulate it's resource cache.
This means you want to attack as many as you can every eight hours. When you first start out you
won't be able to build Ballista so you will have to use Warriors and workers or Transporters to
plunder the barbarians. I will give a basic idea of how many to send but your numbers will vary
depending on the level of your technologies.
Ballista and Transporters can defeat barbarian cities on their own without any loses up to
Level 5. The debate of exactly how many Ballista to use is highly dependent on your Archery level
and the level of your Horseback Riding. Of course, you want to attack with the lowest amount of
units without losing any, so I present to you a helpful table of information to help you in that
quest. Darwin's Maneuver was utilized on attacks involving Level 6 and higher. Note that
technologies and Heroes attack attributes can drastically change the number of units needed to
successfully attack Barbarian Cities, as well as the number of loses that will be incurred. Although
the numbers presented here have been checked there are many combinations and variables not
shown here.
Barbarian City Level
Troops Required Approximate Losses
Recommended Technologies
Plunder
Level One 1000 Warriors800 Workers
or 50 Ballista
30 Transports
300 Warriors300 Workers
or0 Ballista
0 Transports
Military Tradition VLogistics IV
orArchery VI
Horseback Riding III
Food 100,000Wood 20,000Stone 20,000Iron 20,000Gold 55,000Total 215,000
Level Two 2000 Warriors1200 Workers
or100 Ballista
50 Transports
650 Warriors450 Workers
or 0 Ballista
0 Transports
Military Tradition VILogistics V
orArchery VII
Horseback Riding IV
Food 200,000Wood 30,000Stone 30,000Iron 30,000Gold 65,000Total 355,000

62
Level Three 150 Ballista160 Transports
0 Ballista0 Transports
Archery VIIIHorseback Riding V
Food 900,000Wood 75,000Stone 75,000Iron 75,000Gold 75,000Total 1,200,000
Level Four 400 Ballista265 Transports
0 Ballista0 Transports
Archery IXLogistics VII
Horseback Riding VII
Food 1,600,000Wood 120,000Stone 120,000Iron 120,000Gold 300,000Total 2,260,000
Level Five 500 Ballista430 Transports
0 Ballista0 Transports
Archery X Logistics X
Horseback Riding X
Food 3,000,000Wood 180,000Stone 180,000Iron 180,000Gold 450,000Total 3,990,000
Level Six 3,000 Warriors35,000 Archers8,000 Ballista
550 Transports
2,500 Warriors2,000 Archers
0 Ballista0 Transports
Archery X Logistics X
Horseback Riding X
Food 4,000,000Wood 200,000Stone 200,000Iron 200,000Gold 600,000Total 5,200,000
Level Seven 4,000 Warriors50,000 Archers10,000 Ballista725 Transports
4,000 Warriors2,500 Archers
0 Ballista0 Transports
Archery X Logistics X
Horseback Riding X
Food 4,500,000Wood 500,000Stone 500,000Iron 500,000Gold 800,000Total 6,800,000
Level Eight 5,000 Warriors70,000 Archers10,000 Ballista
1200 Transports
5,000 Warriors7,500 Archers
0 Ballista0 Transports
Archery X Logistics X
Horseback Riding X
Food 8,000,000Wood 800,000Stone 800,000Iron 800,000Gold 1,000,000Total 11,400,000
Level Nine 6000 Warriors78000 Archers10,000 Ballista
1800 Transports
6,000 Warriors9,500 Archers
0 Ballista0 Transports
Archery X Logistics X
Horseback Riding XLevel 10 Rally Spot
Food 14,000,000Wood 550,000Stone 550,000Iron 550,000Gold 1,200,000Total 16,850,000

63
Level Ten 85,490 Archers12,000 Ballista
2500 Transports
20,000 Archers0 Ballista
0 Transports
Archery X Logistics X
Horseback Riding XLevel 10 Rally Spot
Food 19,000,000Wood 600,000Stone 600,000Iron 600,000Gold 1,500,000Total 22,300,000
Another great way to utilize a barbarian city is to capture it outright, because all the
buildings inside the city will be the same level of the city. This will save you hundreds of hours of
building time.
Most people wait until they can attack a Level 10 barbarian city giving themselves the
equivalent of 72 Michelangelo's scripts, although some of the buildings will have to be scraped to
make room for Barracks since the city only gives you one. You do not have to wait for a Level 10
city, it is possible to capture one at a lower level, but you won't receive the Level 10 buildings so it
is more cost effective to wait. So I will go over the steps needed to conquer a Barbarian Level 10
city only.
The first thing you will want to have when conquering a barbarian city is an open city slot.
Not only so you can capture the city but you may need to make one to conquer unless you
happen to be lucky enough to have one within an expectable range. I have taken one at a distance
of 3.6 miles, and I believe that's about the maximum range you would want to try to complete the
undertaking. The basic reason for this is a barbarians troops will begin repopulate every six
minutes and in the case of a Level 10 city this means that you will need to send more and more
attacks on the city to keep deceasing the loyalty. If you are too far away you will not be able to
send enough attacks to accomplish this task or at best it will take you much longer than it would
if they city were close.

64
The way I go about conquering a Level 10 city is first I send out 86,000 Archers, 12,000
Ballista, the transports needed to bring back the resources plus one of every other unit. Then I
time an attack with 15,000 Warriors to hit 2 seconds before my main attack to clear out some of
the fortifications so I don't suffer as many loses on my main attack. With this strategy I only lose
around 13-16k archers depending on the level of the Hero in the town. After that I send one wave
of 25,000 archers and 15,000 Warriors because the city will respawn decent defenses after the
main attack.
Then I slowly bring down the number sent, third wave will be 20k archers and 10k
Warriors, and then 17,500 Archers and 10,000 Warriors. Six minutes later the Warriors will
respawn and then it is smooth sailing. I send 17,500 Archers and 10,000 Warriors to hit the six
minute respawn and 10,000 Pikeman or Archers and 10,000 Warriors to attack in between the six
minute respawn. Depending on how far the city is from me it only takes around one hour to
complete the conquer. Once the city is mine I use a speech text to bring the cities loyalty up to
100, and reinforce it with resources and units.
I mentioned earlier that you would need city slots to conquer and make barbarian cities.
You will be granted one new city slot for every title you gain. To get new titles you need to gain
ranks, and to do this you must gather a few things for the royal family of Evony. You are usually
asked to gather three different things. These are gold, prestige and medals. The gold is the easy
part as you can build it up attacking lower level barbarian cities that are already established on the
map. Prestige and medals are more difficult to come by and require more effort to achieve. The
ranking system, titles and what is required to achieve each level their prerequisites can be viewed
in Chapter One.

65
Prestige is gained throughout the game by doing three things. First, you can gain prestige
from building and upgrading your buildings, wall fortifications, and also by training units. It has
been said that the prestige you gain depends on your rank, title, and also the level of your Town
Hall. The higher level of these factors the less prestige you will gain from building or training
them.
Secondly, you can gain prestige from researching technologies, the higher the technology
level the more prestige you will gain. The third way to gain prestige is from winning close battles
over barbarians in battle. It works in the same basic way as honor, but on a smaller scale; the
more troops in resource value that are lost relative to the value of the resource value of the troops
or fortifications killed the more prestige you will gain. The only exception to this is you must win
the battle to get prestige.
On an alliance note if you wish to leave your alliance the game will remind you that it will
cost you 10% of your prestige to do so. You can get around this deduction by having an alliance
host or officer expel you from the alliance. Also, if you are over 400,000 prestige ahead of an
alliance mate you may not send them resources, if you try all of your resources and the units that
carry them will be stolen/destroyed.
Medals have two different uses, besides being needed for the ranking and title systems they
can also be awarded to your Heroes to boost their loyalty. One of the biggest questions that I
receive about the game is where to find certain medals. Although you need to acquire Cross and
Rose medals from valleys, all the other medals can be obtained through attacking barbarian cities.
For lower level medals you will want to use lower level NPC cities. For higher level medals you
will need to attack higher level NPC cities.

66
For the Cross and Rose medals just keep attacking level 1-3 valleys. The quickest way to
succeed in this endeavor is to build your rally spot and feasting all to level nine, then make sure
you have a open valley spot in your city. Send out nine attacks to an open valley separated by ten
seconds, then wait for each attack to hit making sure you abandon the valley each time. It is still a
slow process, but it is the quickest way in the game to find those tough to get Rose medals. For
Lion and Courage medals you will want to attack Level 1-3 barbarian cities. To gain Honor and
Wisdom medals attack Levels 4-8. Freedom and Wisdom medals drop from Level 9. Justice and
Nation medals only drop from Level 10 barbarian cities.
You will need a total of 45 justice medals for the last three titles, this means you will have
to make many attacks on Level 10 Barbarian cities to get the medals you need. The most efficient
way to go about this will be to make sure all your city slots are full. Then go about attacking a
Level 10 Barbarian city as if you were going to take it, since it will never flip you can keep the
attacks up as long as you need to until you have the medals you require.
The city will only drop medals on its 6 minute respawn when the Warriors regenerate so
you won't need to attack more than once every 6 minutes, although sending more attacks during
that time will keep the fortifications from building up and you'll take less losses over the long
haul. In a perfect world you would only have to make one main attack on the city, but since it will
take so long depending on your luck with the drop rate you may have to make more than one
main attack. The server will go down for maintenance at some point after all.

67
Chapter VII
Items & Heroes
Heroes have been mentioned throughout the guide so by now you should be fairly
familiar with them, but there are a few things that need to be said about Heroes that I have not yet
covered. When you start out, your Inn will be a low level and it won't offer any higher level
Heroes. This is perfectly fine because with higher level Heroes the computer automatically
allocates the extra points you would've been able to choose to allocate and it's out of your control
where they go. The one exception to this is the use of holy water, allowing you to reallocate the
points of a Hero to their base level, but holy water is best used on higher level Heroes, and I will
explain that in the items section.
When you select a Hero you want to look for one attribute that is over 60 and use that
Hero to specialize in that particular attribute. Heroes, of course, are required to spearhead attacks.
And as a Hero attacks and gains experience they will level up and you will be able to allocate this
experience toward one of three attributes.
Allocating a Hero's experience towards politics will allow the Hero to supervise the
construction of buildings and they will be built quicker. This is very useful throughout the game
and you will want to build up a good politician preferably in each city.
Allocating a Hero's experience towards attack will give a bonus to the units he leads in
combat making them more combat effective, it will also allow you to build units faster. Most of
your Heroes will be attackers, and you want to have as many as possible and use them constantly
to keep gaining more levels.

68
Allocating a Hero's experience to intelligence will allow the Hero to research technologies
more quickly. Remember though that the Hero needs to be Mayor of the town before the building
or research begins. So you may have to switch Heroes in your town often to gain the bonuses they
possess.
Items in the game can be won from the wheel of fortune, bought with Evony coin or won
through battles. You will also have chances to obtain items through your gift box. Items come in
very handy so remember to use them as needed. There are three different types of items in the
game: Items that effect your cities and buildings, items that effect your Heroes, and items that
effect your armies. I will outline each type of item.
First off the items that effect your cities are as follows:
• Civil Code will add 20% or 100 population to your maximum city
population if it is not already at its maximum. This is good to use when
you need extra population to build units or bring employment in line with
your resource buildings.
• The Speech Text is great to use after conquering a city because it brings
your city loyalty up to 100 instantly and clears your city of grievance. It
can also be used to thwart an enemy from conquering your city.
• Michelangelo's script will allow you to upgrade a building to Level 10
these are priceless items as you will want as many as you can get your
hands on, they do drop from battles, but they are very rare.
• The City Teleporter and it's advanced version will allow
you to change the location of your cities on the map. This
is one of the best items in the game as it will help you
refresh the targets near your city, or if you are having a bad time with an

69
enemy you can escape his grasp. With the regular teleporter you will not be able to choose
the exact place you teleport to, although you will be able to choose the region. The
advanced version does allow you teleport to the spot of your choosing, but to avoid the
exploit of teleporting right beside someone and attacking them immediately they have put
a twenty-four hour halt on all marches after you use this item.
• Truce Agreement will put you in a state of peace for twelve hours in
which time you cannot attack or be attacked, although it can only be used
once every twenty-four hours you will see this used many times when you
become a successful attacker. Just note that if you already have an army marching on a
city and someone uses a truce against you the army that is marching will still attack the
city the truce has been cast on. So don't turn your attacks around!
• The national flag is a very simple item that allows you to change the text
of your flag.
• The New ID item works in much the same way but you can change your
lord name.
• Dynamite is great for tearing down cottages after conquering an NPC city
you will use all of these for this purpose so don't waste them on lower
level buildings.
• The Ritual of Pact will instantly increase the alliance member limit to 100,
and the Speaker will allow you to send group message or messages in
world chat.

70
• The Tax Policy and it's Advanced version increase tax revenue by 100%
for 24 and 7 days respectively.
Items that will effect your Heroes are next.
• The Anabasis will increase a single Heroes experience by 1,000, or 8% of
the current level cap which ever is greater.
• The Epitome of Military Science will increase a single Heroes experience
by 10,000, or 30% of the current level cap which ever is greater.
• On War will increase a single Heroes experience by 100,000, or 100% of
the current level cap which ever is greater.
• The Wealth of Nations will increase the Heroes politics attribute by 25%
for 7 days.
• The Art of War will increase the intelligence attribute of a Hero by 25%
for 7 Days.
• Excalibur will increase attack attribute by 25% for 7 Days.

71
• Hero Hunting will refresh the recruitment list of Heroes in your Inn, there
are also the 3 other items that will grant you Heroes but you can only win
these from the wheel and they are not available to buy with coin, these are
the Leather Helm of Robin Hood, Chain Helm of Beowulf, and Holy Helm of Mars.
• Holy Water will allow you to reallocate a Hero's attribute by defaulting
them back to their base values, one Holy Water is used for every ten levels
the Hero has earned. Take note however that the computer will assign
points to a Hero's attributes automatically once the Hero enters the Inn. For example, if a
Hero is Level four in your Inn, four attributes have been assigned randomly by the
computer so the base attributes are not truly known until you use the water. For this
reason it makes sense to use Holy Water on high level Heroes that are generated from the
Inn, because you have a better chance to get a base value that is in the attribute range you
are hoping for, you will also have more points to allocate.
Lastly, the items that effect your army:
• War Ensign, allows you to send 25% more troops in a battle, use this item
from your Rally Spot, just make sure that you deselect it before you send
your next march or reinforcement because it will stay checked until you
change it.
• The War Horn and it's advanced version, the Ivory Horn
will increase your armies attack 20% for twenty-four and
seven days respectively.
• The Corselet and it's Ultra version are used in the same
way except they give you 20% defense but last the same
amount of time respectively.

72
• Penicillin will decrease your personnel losses up to 30% during battles for
7 Days. This is a great item to use while attacking Level 10 barbarian cities
to get your justice and nation medals.
This concludes the guide and I hope that it serves you well on your journey through the
world of Evony. Remember to check back for updates as this is a living world and new tricks and
strategies are constantly being uncovered and developed. The second age of Evony isn't too far off
and there will be so much more to learn, and conquer.
Related Documents