Euronda Aquafilter Ing Rev06
Nov 28, 2015
Manual instructiuni pentru filtrul de apa tip Euronda Aquafilter 06
Welcome message from author
This document is posted to help you gain knowledge. Please leave a comment to let me know what you think about it! Share it to your friends and learn new things together.
Transcript

Aquafilter
Aquafilter_Ing_rev06 – 11/04/11
1
Aquafilter
Dear Doctor,
thank you for purchasing our water deionizer Aquafilter.
Please do not hesitate to contact us at any time for further information or explanations about this product.
Please read this manual with great care before using the unit. Our products are designed in compliance with
current safety standards and are not hazardous for users provided that all the instructions are observed.
In wishing you all the best in your work, may we remind you that the reproduction of this manual in any form
is strictly prohibited, and that the technical features of the unit may be modified at any time and without prior
notice, in line with technological developments.
EURONDA S.p.A.
Aquafilter
Aquafilter_Ing_rev06 – 11/04/11
2
Aquafilter
INDEX
INTRODUCTION ............................................................................................................................................... 3
GENERAL NOTES ON DELIVERY .............................................................................................................. 3 GENERAL INSTRUCTIONS ......................................................................................................................... 3 EXPLANATION OF SYMBOLS..................................................................................................................... 4 GUARANTEE INFORMATION...................................................................................................................... 4
CHAPTER 1 ...................................................................................................................................................... 5
1.1 - OVERALL DIMENSIONS OF THE DEVICE AND OF ITS PACKAGING............................................. 5 1.2 - CONTENTS OF PACK.......................................................................................................................... 5
CHAPTER 2 ...................................................................................................................................................... 6
2.1 - DESCRIPTION OF THE DEIONIZER................................................................................................... 6 2.2 - CHARACTERISTICS OF THE DEIONIZER ......................................................................................... 8
CHAPTER 3 ...................................................................................................................................................... 9
3.1 - INSTALLING THE UNIT........................................................................................................................ 9 3.2 - SAFETY WARNINGS ......................................................................................................................... 14
CHAPTER 4 .................................................................................................................................................... 15
4.1 - CLEANING AND MAINTENANCE OF THE DEIONIZER................................................................... 15 4.2 - REPLACING THE ION EXCHANGE RESINS.................................................................................... 15 4.3 - TROUBLESHOOTING........................................................................................................................ 16
CHAPTER 5 .................................................................................................................................................... 17
5.1 - SCRAPPING INSTRUCTIONS........................................................................................................... 17
Aquafilter
Aquafilter_Ing_rev06 – 11/04/11
3
Aquafilter
INTRODUCTION
GENERAL NOTES ON DELIVERY
On receipt of the unit, check that the packaging is intact and keep it for future shipments.
Open the packaging and check that:
- the supply corresponds to the technical specifications;
- there is no evident damage.
If any damage or missing parts are discovered, give full details to the forwarder, dental depot or Euronda
S.p.A. immediately.
All of the dimensions shown in this manual are not binding.
The drawings and any other documents delivered with the unit are the property of Euronda S.p.A., which
reserves all rights to them. They may not be disclosed to third parties.
It is forbidden to reproduce all or part of the text or illustrations.
GENERAL INSTRUCTIONS
This manual contains instruction for:
- correct installation;
- the safe and efficient operation of the unit;
- continuous and regular maintenance.
The unit must be used according to the procedures contained in the manual and never for reasons other
than those specified therein.
The operator is the person who physically uses the apparatus for the purposes for which it has been
designed.
The responsible authority is the person or group responsible for the use and ordinary maintenance of the
unit and for operator training.
The responsible authority is legally responsible for the installation, operation and use of the unit.
The manufacturer cannot be held responsible for any breakage, damage or malfunctioning of the unit if the
machine has not been used correctly or not adequately maintained.
Intended use: this manual is an integral part of the product and must be kept near the unit for quick and
easy consultation. The unit is for professional use only and may only be used by qualified person. The unit
must only be used for the purpose it was designed for.
Aquafilter: device for producing deionized water to be used in the steam sterilizer.
ATTENTION: DEIONIZED WATER IS UNSUITABLE FOR HUMAN OR ANIMAL CONSUMPTION. DO NOT DRINK IT! ONLY USE FOR THE INDICATED PURPOSE.
Aquafilter
Aquafilter_Ing_rev06 – 11/04/11
4
Aquafilter
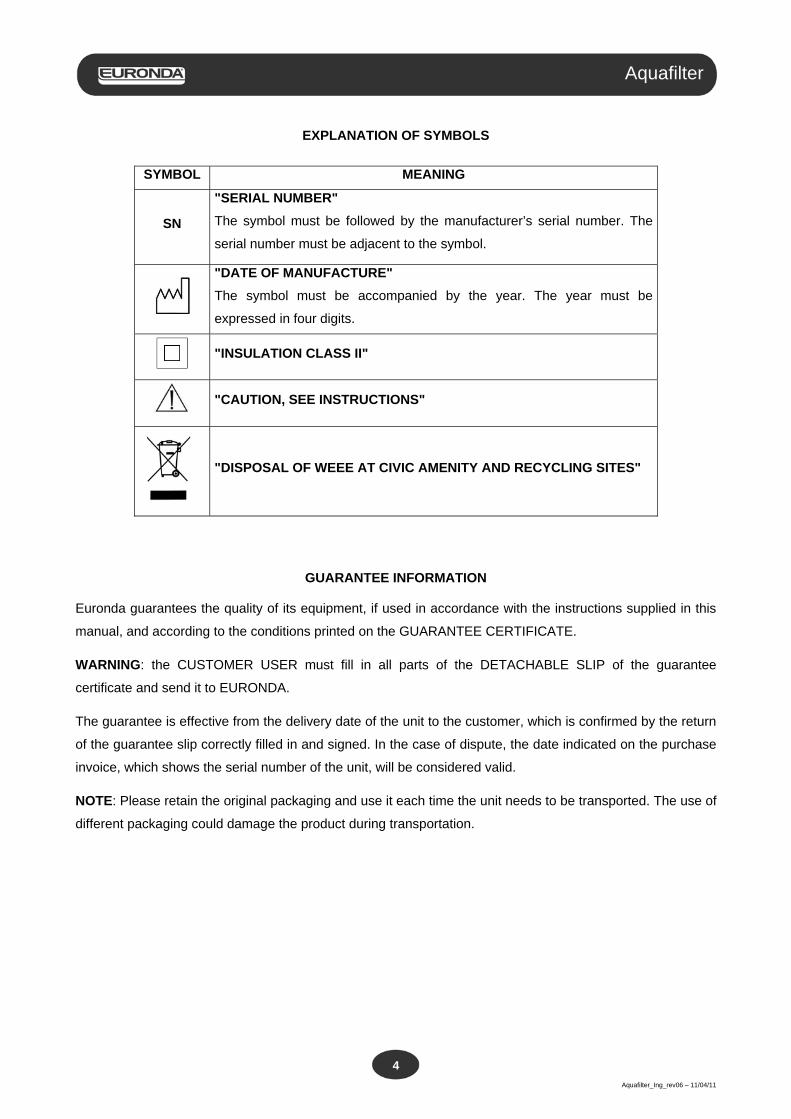
EXPLANATION OF SYMBOLS
SYMBOL MEANING
SN
"SERIAL NUMBER" The symbol must be followed by the manufacturer’s serial number. The
serial number must be adjacent to the symbol.
"DATE OF MANUFACTURE" The symbol must be accompanied by the year. The year must be
expressed in four digits.
"INSULATION CLASS II"
"CAUTION, SEE INSTRUCTIONS"
"DISPOSAL OF WEEE AT CIVIC AMENITY AND RECYCLING SITES"
GUARANTEE INFORMATION Euronda guarantees the quality of its equipment, if used in accordance with the instructions supplied in this
manual, and according to the conditions printed on the GUARANTEE CERTIFICATE.
WARNING: the CUSTOMER USER must fill in all parts of the DETACHABLE SLIP of the guarantee
certificate and send it to EURONDA.
The guarantee is effective from the delivery date of the unit to the customer, which is confirmed by the return
of the guarantee slip correctly filled in and signed. In the case of dispute, the date indicated on the purchase
invoice, which shows the serial number of the unit, will be considered valid.
NOTE: Please retain the original packaging and use it each time the unit needs to be transported. The use of
different packaging could damage the product during transportation.
Aquafilter
Aquafilter_Ing_rev06 – 11/04/11
5
Aquafilter
CHAPTER 1
1.1 - OVERALL DIMENSIONS OF THE DEVICE AND OF ITS PACKAGING
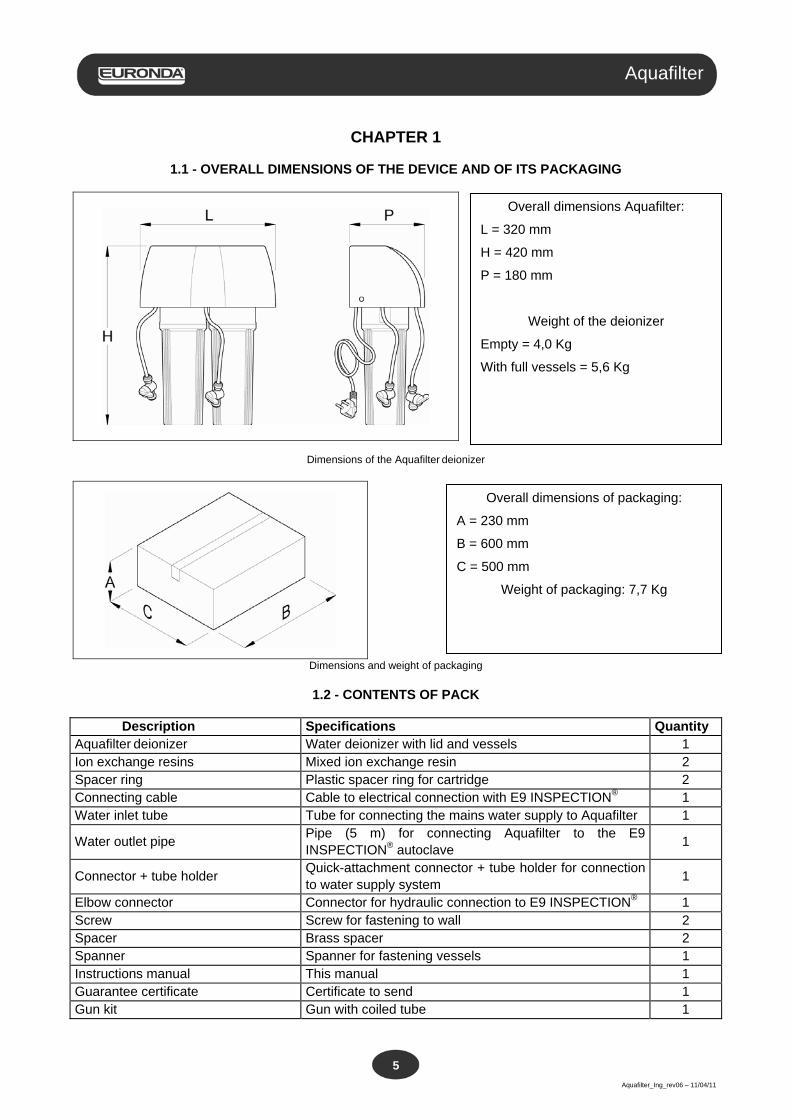
Dimensions of the Aquafilter deionizer
Dimensions and weight of packaging
1.2 - CONTENTS OF PACK Description Specifications Quantity Aquafilter deionizer Water deionizer with lid and vessels 1 Ion exchange resins Mixed ion exchange resin 2 Spacer ring Plastic spacer ring for cartridge 2 Connecting cable Cable to electrical connection with E9 INSPECTION® 1 Water inlet tube Tube for connecting the mains water supply to Aquafilter 1
Water outlet pipe Pipe (5 m) for connecting Aquafilter to the E9 INSPECTION® autoclave 1
Connector + tube holder Quick-attachment connector + tube holder for connection to water supply system 1
Elbow connector Connector for hydraulic connection to E9 INSPECTION® 1 Screw Screw for fastening to wall 2 Spacer Brass spacer 2 Spanner Spanner for fastening vessels 1 Instructions manual This manual 1 Guarantee certificate Certificate to send 1 Gun kit Gun with coiled tube 1
Overall dimensions Aquafilter:
L = 320 mm
H = 420 mm
P = 180 mm
Weight of the deionizer
Empty = 4,0 Kg
With full vessels = 5,6 Kg
Overall dimensions of packaging:
A = 230 mm
B = 600 mm
C = 500 mm
Weight of packaging: 7,7 Kg
Aquafilter
Aquafilter_Ing_rev06 – 11/04/11
6
Aquafilter
CHAPTER 2
2.1 - DESCRIPTION OF THE DEIONIZER
The Euronda Aquafilter deionizer makes it possible to reduce the amount of salts present in water, thus
enabling it to be used to feed steam sterilizers without causing damage to the sterilizers themselves that, in
some cases, may even be irreparable.
The system is based on the exchange of ions: the cation and anion groups linked to the resinous matrix
exchange H+ and OH- ions with the cations and anions present in the water, that are responsible for its
conductivity.
The unit of measure that makes it possible to evaluate the quality of the water produced is its specific
conductivity, normally expressed in µS/cm.
The deionizer is equipped with a probe that makes it possible to measure this parameter in the water
produced and, consequently, to inform the user when the water is characterised by a degree of salinity that is
no longer acceptable.
The volume of deionized water produced with a replacement of new resins amounts to approximately 240
litres (initial water conductivity: 370 µS/cm); bear in mind, however, that this value depends closely on the
conductivity value of the water to be treated.
The deionizer Euronda Aquafilter is unsuitable for treatment of water with high hardness and its use is not adequate if the water hardness is above 40°F. The deionizer has been designed to operate when connected to an Euronda E9 autoclave or to two Euronda
E9 autoclaves at the same time. The connecting kit for the second E9 autoclave is not included in the pack
and must be purchased separately. The gun is included in the pack.
Aquafilter
Aquafilter_Ing_rev06 – 11/04/11
7
Aquafilter
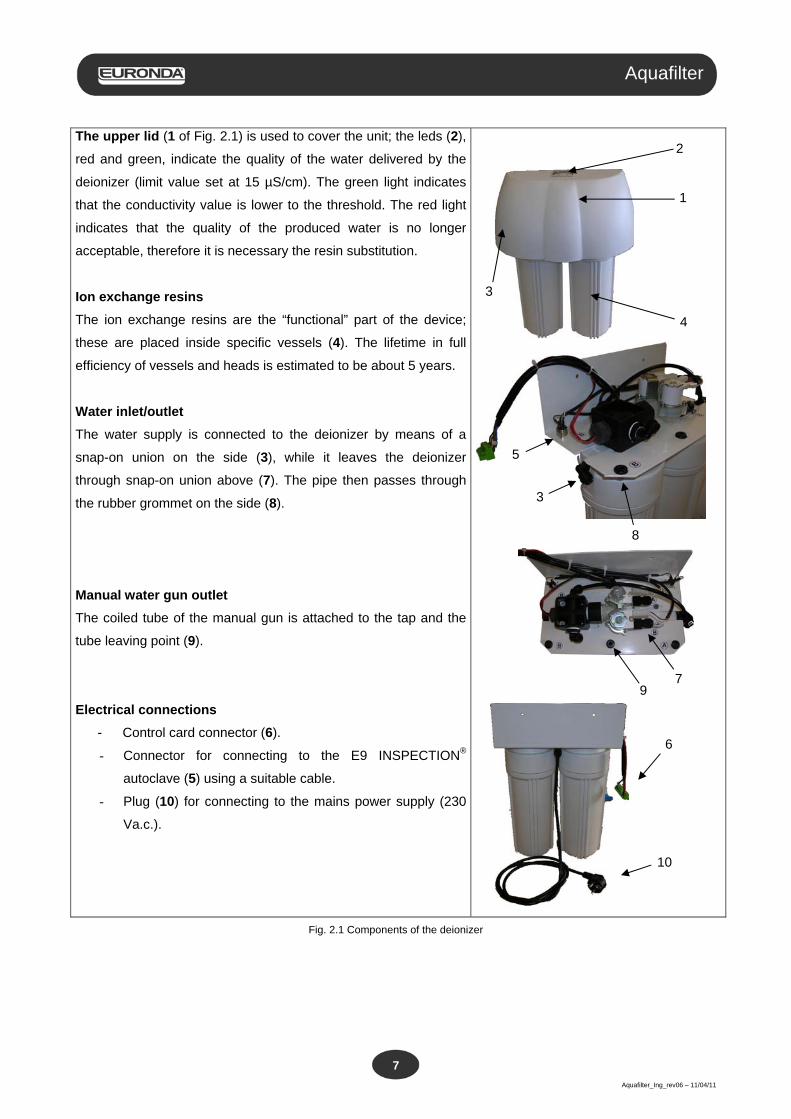
Fig. 2.1 Components of the deionizer
The upper lid (1 of Fig. 2.1) is used to cover the unit; the leds (2),
red and green, indicate the quality of the water delivered by the
deionizer (limit value set at 15 µS/cm). The green light indicates
that the conductivity value is lower to the threshold. The red light
indicates that the quality of the produced water is no longer
acceptable, therefore it is necessary the resin substitution.
Ion exchange resins The ion exchange resins are the “functional” part of the device;
these are placed inside specific vessels (4). The lifetime in full
efficiency of vessels and heads is estimated to be about 5 years.
Water inlet/outlet The water supply is connected to the deionizer by means of a
snap-on union on the side (3), while it leaves the deionizer
through snap-on union above (7). The pipe then passes through
the rubber grommet on the side (8).
Manual water gun outlet The coiled tube of the manual gun is attached to the tap and the
tube leaving point (9).
Electrical connections
- Control card connector (6).
- Connector for connecting to the E9 INSPECTION®
autoclave (5) using a suitable cable.
- Plug (10) for connecting to the mains power supply (230
Va.c.).
2
1
3
8
6
5
7
10
9
4
3
Aquafilter
Aquafilter_Ing_rev06 – 11/04/11
8
Aquafilter
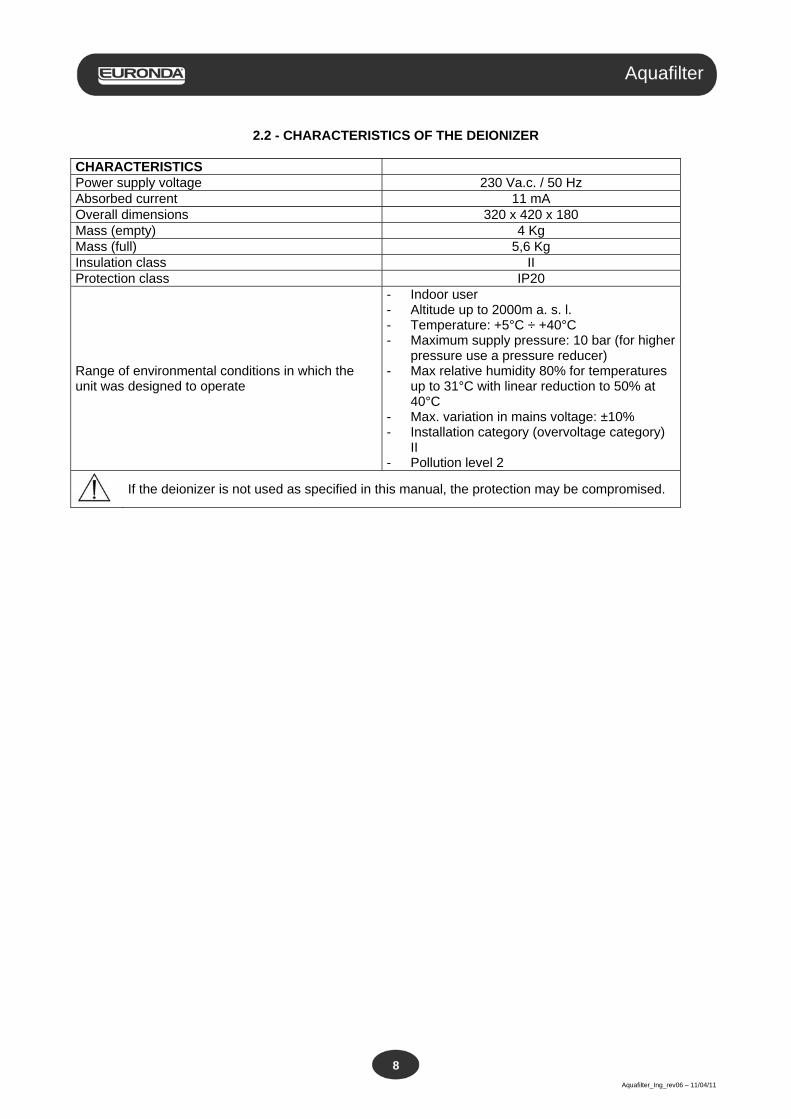
2.2 - CHARACTERISTICS OF THE DEIONIZER
CHARACTERISTICS Power supply voltage 230 Va.c. / 50 Hz Absorbed current 11 mA Overall dimensions 320 x 420 x 180 Mass (empty) 4 Kg Mass (full) 5,6 Kg Insulation class II Protection class IP20
Range of environmental conditions in which the unit was designed to operate
- Indoor user - Altitude up to 2000m a. s. l. - Temperature: +5°C ÷ +40°C - Maximum supply pressure: 10 bar (for higher
pressure use a pressure reducer) - Max relative humidity 80% for temperatures
up to 31°C with linear reduction to 50% at 40°C
- Max. variation in mains voltage: ±10% - Installation category (overvoltage category)
II - Pollution level 2
If the deionizer is not used as specified in this manual, the protection may be compromised.
Aquafilter
Aquafilter_Ing_rev06 – 11/04/11
9
Aquafilter
CHAPTER 3
3.1 - INSTALLING THE UNIT
Attention: installation must only be carried out by qualified technicians. Before proceeding with installation, if the deionizer is to be connected directly to the autoclave, turn it off and
remove the power supply cable from the outlet.
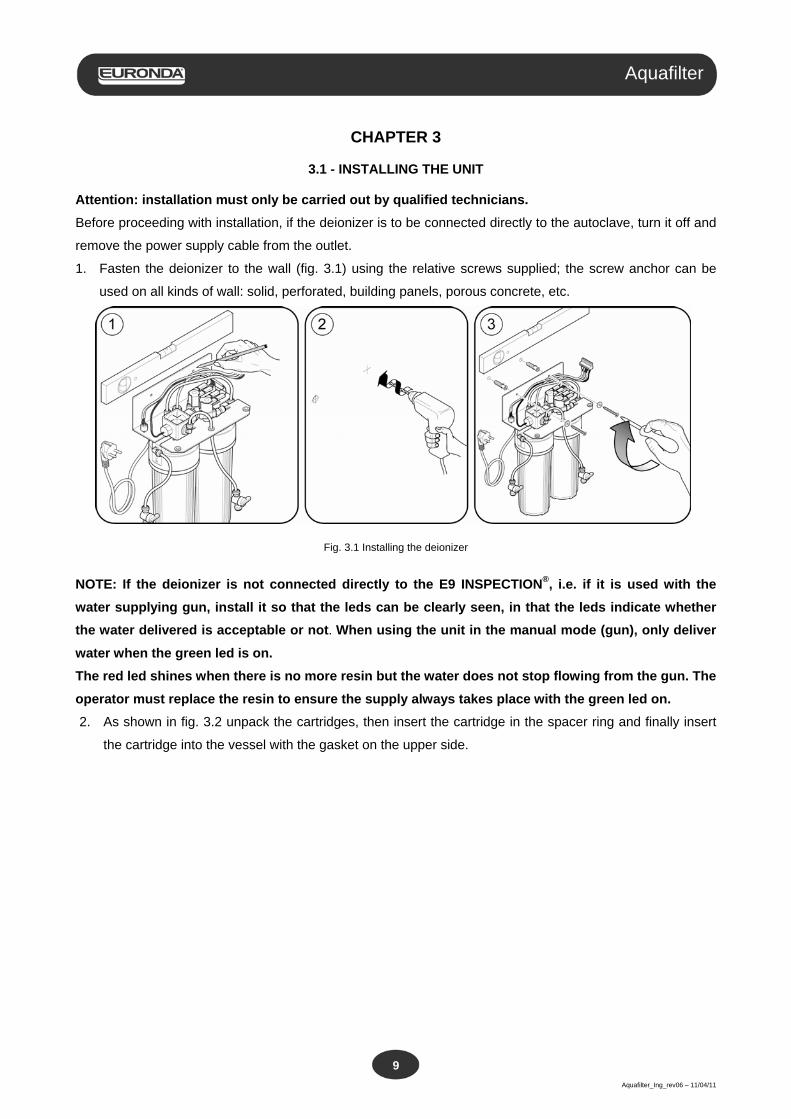
1. Fasten the deionizer to the wall (fig. 3.1) using the relative screws supplied; the screw anchor can be
used on all kinds of wall: solid, perforated, building panels, porous concrete, etc.
Fig. 3.1 Installing the deionizer
NOTE: If the deionizer is not connected directly to the E9 INSPECTION®, i.e. if it is used with the water supplying gun, install it so that the leds can be clearly seen, in that the leds indicate whether the water delivered is acceptable or not. When using the unit in the manual mode (gun), only deliver water when the green led is on. The red led shines when there is no more resin but the water does not stop flowing from the gun. The operator must replace the resin to ensure the supply always takes place with the green led on. 2. As shown in fig. 3.2 unpack the cartridges, then insert the cartridge in the spacer ring and finally insert
the cartridge into the vessel with the gasket on the upper side.

Aquafilter
Aquafilter_Ing_rev06 – 11/04/11
10
Aquafilter
Fig. 3.2 Inserting the ion exchange resins
3. Place the vessels in the head of the deionizer (fig. 3.2-2).
4. Fix the vessels in place by means of the spanner (fig. 3.2-3), turning them in the direction indicated by
the arrow (fig. 3.3-3). ONCE INSTALLED DO NOT REMOVE THE CARTRIDGES UNTIL THEY ARE EXHAUSTED, otherwise hydraulic leakage can occur.
5. Hydraulic connection: In connecting the tubes take care to not create any fold obstructing the water flow.
In connections with push-in fittings push in completely the tube and try to pull it to verify that accidental
disconnections cannot occur. If the tube must be removed, push in the collar of the push-in union, then
pull the tube.
Using the supplied connector connect the water supply attachment to the deionizer (fig. 3.3-1) using the
tube marked with a red plastic clamp; make sure the tube is fully inserted into the push-in connector
marked with a red collar. In the autoclave E9 INSPECTION® remove the closing screw with the size 3
hex spanner (fig. 3.3-2). With the tube, connect the deionizer to the autoclave, using the supplied elbow
union (fig. 3.3-3 and fig. 3.3-4).

Aquafilter
Aquafilter_Ing_rev06 – 11/04/11
11
Aquafilter
Fig. 3.3 Deionizer – autoclave hydraulic connection
To use the deionized water with the manual gun, insert the coiled tube, marked with a yellow plastic clamp,
into the central tap, marked with a yellow collar. (fig. 3.4).
Fig. 3.4 Installing the gun

Aquafilter
Aquafilter_Ing_rev06 – 11/04/11
12
Aquafilter
6. Electrical connection: Insert the connecting cable between the autoclave and the Aquafilter; make sure
that the water and electrical connectors of the autoclave are on the same side as the Aquafilter (fig. 3.5-
1), according to scheme A – A or B – B.
Note: Select “water supply mode On” in the autoclave menu (also see the E9 INSPECTION® manual).
Fig. 3.5 Deionizer – autoclave electrical connection

Aquafilter
Aquafilter_Ing_rev06 – 11/04/11
13
Aquafilter
7. Fasten the deionizer lid to the part of the deionizer previously fastened to the wall as shown in fig. 3.6-2.
Pay attention to not pull the cable connecting the lid to the solenoid valves. Fasten the lid on both
sides using the two screws supplied.
Fig. 3.6 Fastening the lid of the deionizer 8. Plug the power cord into a 230 Va.c. socket.
Position the Aquafilter so to make it easy to identify and reach the power socket.
Fig. 3.7 Plugging in the power cord
Aquafilter
Aquafilter_Ing_rev06 – 11/04/11
14
Aquafilter
9. Once installed, verify the unit functioning:
• open the water tap, drain some water by the water gun and verify that no water leakage occurs and the
green led shines;
• make the first autoclave load and verify that the system Aquafilter-autoclave works correctly.
NOTE: IF THE RED LED SHINES IMMEDIATELY AFTER INSTALLATION MAYBE SOME WATER OF HYDRAULIC PRODUCTION TEST IS STILL INTO THE DEIONIZER. In such a case drain some water by
the water gun (1-2 litres) until the green led shines.
3.2 - SAFETY WARNINGS
1. Install the deionizer on a flat and vertical surface, keeping it away from all sources of heat.
2. Do not expose the deionizer to direct sunlight.
3. Only use original Euronda spare parts.
4. After installing the deionizer, do not remove the upper lid.
5. Use an electrical outlet with a suitable voltage and do not share the same outlet with other electrical
appliances so as to avoid current overloads (if the deionizer is connected to the external feeder).
6. Do not immerge any of the parts of the deionizer in water to clean them.
7. Keep away from children.
8. We recommend the installation of an anti-flood valve between the tap of the water supply system
and the deionizer, to avoid flooding of the dental surgery in the event of breakage of the connecting
tube.
9. When replacing the internal resins, make sure to close the tap upline from the Aquafilter (marked
with a red collar).
10. To avoid accidental flooding, always close the tap of the water supply system in leaving the dental
surgery.

Aquafilter
Aquafilter_Ing_rev06 – 11/04/11
15
Aquafilter
CHAPTER 4
4.1 - CLEANING AND MAINTENANCE OF THE DEIONIZER
Clean the cover and the vessels of the deionizer using a soft cloth and, if need be, a non-abrasive and non-
aggressive (neutral pH) detergent.
If the deionizer is not used for 7 or more days, drain the water inside it completely, in order to prevent algae
or other deposits from forming. To drain the vessels close the supply tap (marked with a red collar), then
drain the water using the water gun, holding it under the Aquafilter’s level. DO NOT DISASSEMBLE THE VESSELS FOR WATER DRAINING. The responsible authority must carry out a periodical visual check on
tubes and overall good functioning of the device (suggested every six months). In case of malfunctioning call
the assistance service. Extraordinary maintenance must be executed by authorized technicians.
4.2 - REPLACING THE ION EXCHANGE RESINS
When the message to replace the resin appears on the autoclave display, or when the red light shines on
while water is being delivered, the resins must be replaced as illustrated in fig. 4.1. If necessary, replace the
vessel’s O-ring gasket.
Fig. 4.1 Replacing the ion exchange resins

Aquafilter
Aquafilter_Ing_rev06 – 11/04/11
16
Aquafilter
4.3 - TROUBLESHOOTING
Problem Probable cause Solution Water leakage in the joint between vessels and head of deionizer.
The resin vessel has not been properly tightened.
Screw in the vessels using the supplied spanner.
Water leakage from the inlet or outlet connections of deionizer.
The inlet or outlet tubes are not fully inserted into the push-in couplings.
Remove the tube from where the leakage occurs and insert it fully into the coupling.
The electrical connection between the deionizer and the autoclave is missing.
Make sure the connection between the deionizer and the autoclave is made correctly.
The water supply cock is closed.
Open the cock and wait for the vessels to be filled.
The deionizer-autoclave electronic interface card is faulty.
Contact an authorised technician.
The power supply is disconnected or faulty.
Check the power cable is effectively connected and, if it does not work properly, replace.
The deionizer does not supply the autoclave with water.
The gun is disconnected or faulty.
Check the gun connections. Contact an authorised technician.
Problems with the conductivity control card.
Try and disconnect power supply and then reconnect it. If the problem persists, contact an authorised technician. The red and green leds flash
intermittently.
The resin is running out.
Deionize another 1-2 litres of water, after which only the red light should remain on: at this point, replace the resins.
Aquafilter
Aquafilter_Ing_rev06 – 11/04/11
17
Aquafilter
CHAPTER 5
5.1 - SCRAPPING INSTRUCTIONS
The Aquafilter deionizer has been manufactured using ferrous materials and plastics.
No particular operations are required after demolition.
Do not dump the unit; take it to a disposal company.
Always comply with the current laws governing the scrapping of material in the country of use.
Dispose of the used resins as dangerous waste and, therefore, in centres that are authorised for the disposal
of such materials. To dispose of the used resins, always comply with the current laws in the country of use.
The symbol on the appliance means that it must be disposed of as “sorted waste”.
The user must therefore send (or instruct other people to send) the unit to one of the sorted waste collection
centres set up by the local councils, or send it to the dealer against the purchase of an equivalent unit
(European Union only).
Sorted waste collection and the subsequent treatment, recovery and disposal operations facilitate the
production of equipment using recycled materials and limit the negative environmental and health effects
that may be caused by improper waste management.
Abusive dumping by the user will be punished according to law.

Aquafilter
Aquafilter_Ing_rev06 – 11/04/11
18
Aquafilter
EURONDA S.p.A. Via dell'Artigianato, 7 - 36030 Montecchio Precalcino (VI) - ITALY Tel. +39 0445 329811 - Fax +39 0445 865246 - Internet: www.euronda.com - E-mail: [email protected]
Related Documents