Fingerprint Employee Time Clock User Guide (V1.0)

Welcome message from author
This document is posted to help you gain knowledge. Please leave a comment to let me know what you think about it! Share it to your friends and learn new things together.
Transcript

Fingerprint Employee Time Clock
User Guide (V1.0)
2
Feature
USA TI 300MHz high speed processor
USA BioNano core fingerprint algorithm of high speed and stability
New generation fully sealed, waterproof and dustproof fingerprint sensor
User name display and human voice prompt
Realtime data transfer and WEB online tracking
Identification method: FP, ID+FP, ID+PW
EP10: Standard (USB communication)
EP20: Portable (USB communication + high capacity Lithium battery)
EP30: TCP/IP (USB communication +TCP/IP)
EP300: Advanced (TCP/IP + high capacity Lithium battery)
Fingerprint capacity: 2000
Record capacity: 50000
Identification speed: 0.5 second
Size: 185(w)*130(h)*35(d)mm

3
Content
Safety Precautions...............................................................4
Illustration for placing fingerprint...........................................6Packing List...........................................................................7Appearance...........................................................................8System Menu.......................................................................11User--Enroll(Fingerprint).......................................................14User--Enroll(Psssword)........................................................15
User--Verify Mode................................................................17
User--Admin Setup..............................................................18User--Admin Clear................................................................19Setup--System......................................................................21Setup--System--Net..............................................................23Setup--Log Setup..................................................................24Setup--Hardware Test...........................................................25USB Flash--Record Backup.................................................27
System Info..........................................................................29USB Flash--User Backup/Recovery.....................................28
Glossary................................................................................5
User--Delete.........................................................................16
4
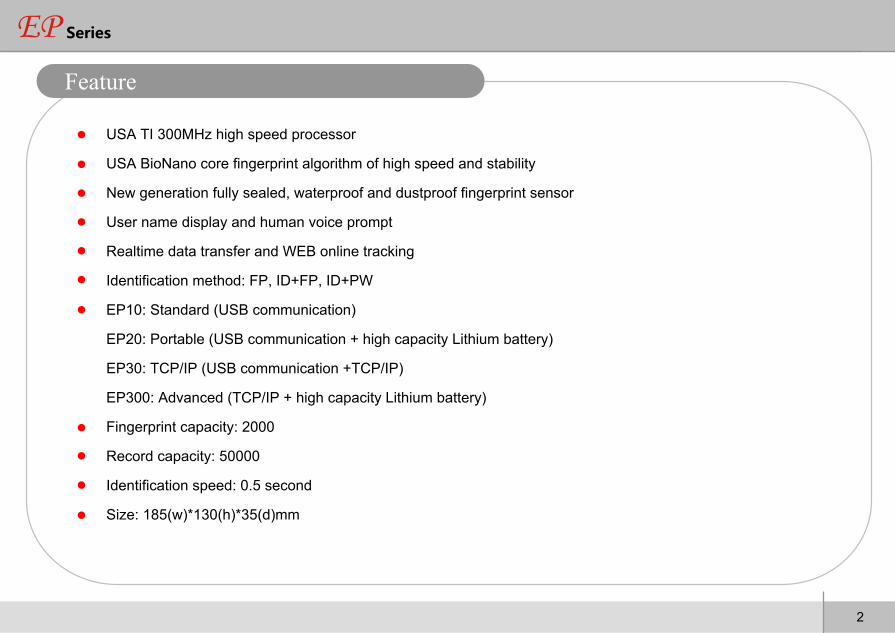
Safety Precautions
Please read it carefully first of all;
Don’t install the terminal under direct light, humid, dusty or sooty environment;
Don’t install the terminal near the magnetic field;
Don’t install the terminal near the calefaction device;
Don’t sprinkle the liquid (water, drink, chemistry) on the terminal;
Always keep the surface of the terminal clean;
Clear the terminal by towel when there is water on the surface;
Don’t break the terminal;
Don’t press two keys at the same time;
Don’t take down, repair or change the terminal without authorization;
Don’t allow children to touch the terminal;
This terminal is only used for fingerprint verification, don't use it for other purposes;
If in doubt, please contact the local distributor;
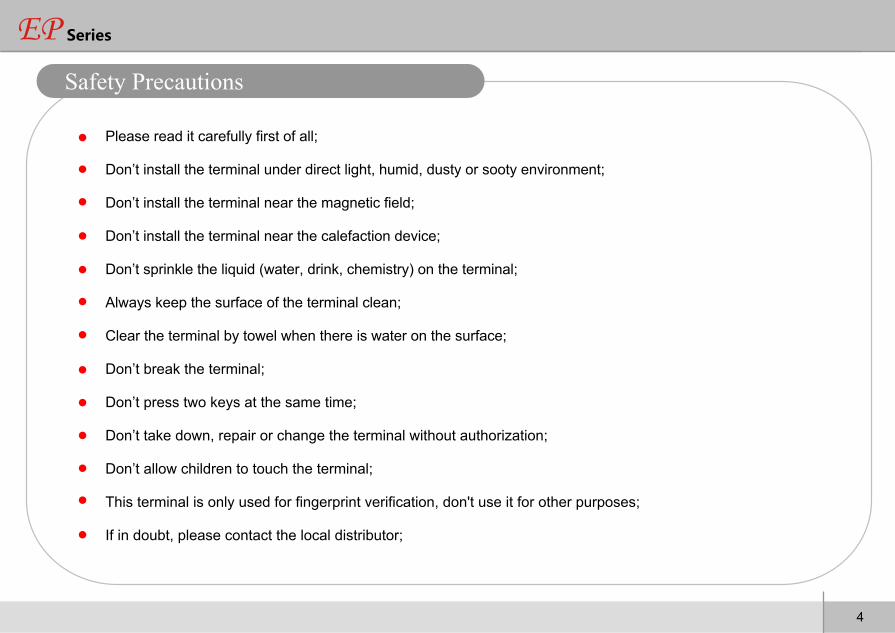
名词解释Interpretation for items and phrases
Administrator It is a special user who has the authorizations of setting the terminal system settings and user information.
The admin can add or delete the users, and the admin also can change the system settings of the terminal.
1:1 Identification If it is 1:1 identification mode, the user has to input the user ID firstly, then verify the fingerprint or enter the password to
make identification.
In this mode,the fingerprint sensor on the fingerprint template will identify with the one of the special user ID.
1:N Identification Under 1:N mode,the user need not enter any user ID. Just need place the fingerprint on the fingerprint sensor .
The terminal will automatically identify this fingerprint with the ones of all users registered in inside database.
Fingerprint Enrollment It is the process to capture the fingerprint image features got from the fingerprint sensor and save the inside memory into
the terminal.
5
Glossary
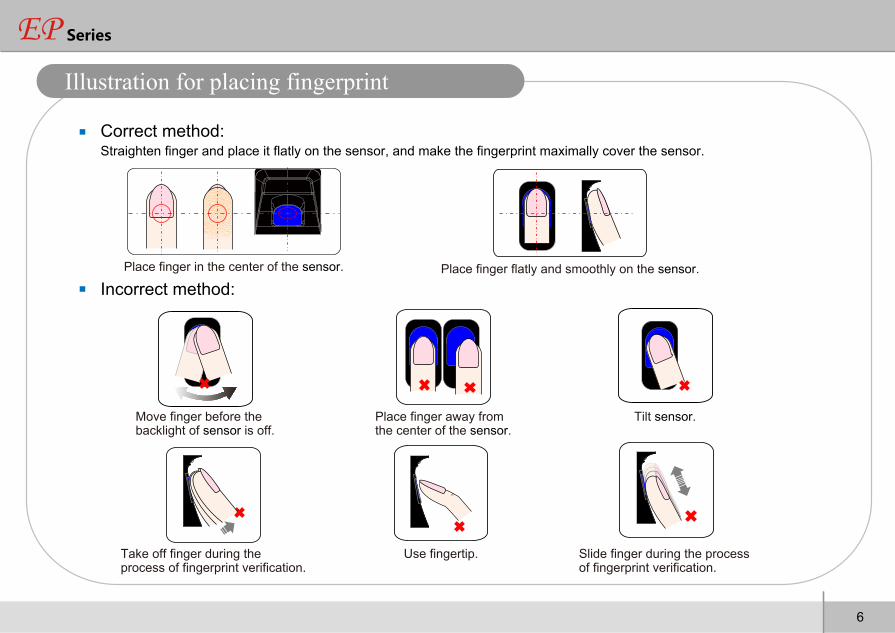
Place finger in the center of the sensor. Place finger flatly and smoothly on the sensor.
Move finger before the backlight of sensor is off.
Place finger away from the center of the sensor.
Tilt sensor.
Correct method: Straighten finger and place it flatly on the sensor, and make the fingerprint maximally cover the sensor.
Incorrect method:
Slide finger during the process of fingerprint verification.
Take off finger during the process of fingerprint verification.
Use fingertip.
6
Illustration for placing fingerprint

EP Series Fingerprint Empoyee Time Clock USB Cable (2 meters) USB Power Adapter
Software CD Quick Guide
7
Packing List
COMPACT
CD-ROM
EN CH
windowsFORWindows 98Windows 2000Windows XPWindows VistaWindows 7
...
8
Appearance
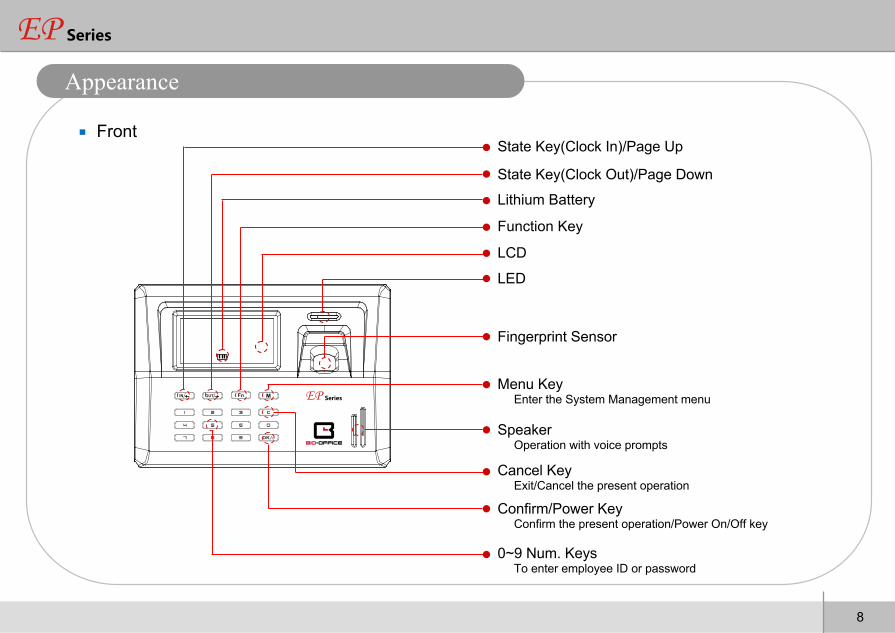
State Key(Clock In)/Page Up
State Key(Clock Out)/Page Down
Function Key
Lithium Battery
LCD
LED
Fingerprint Sensor
Menu Key Enter the System Management menu
Speaker Operation with voice prompts
Cancel Key Exit/Cancel the present operation
Confirm/Power Key Confirm the present operation/Power On/Off key
0~9 Num. Keys To enter employee ID or password
Front
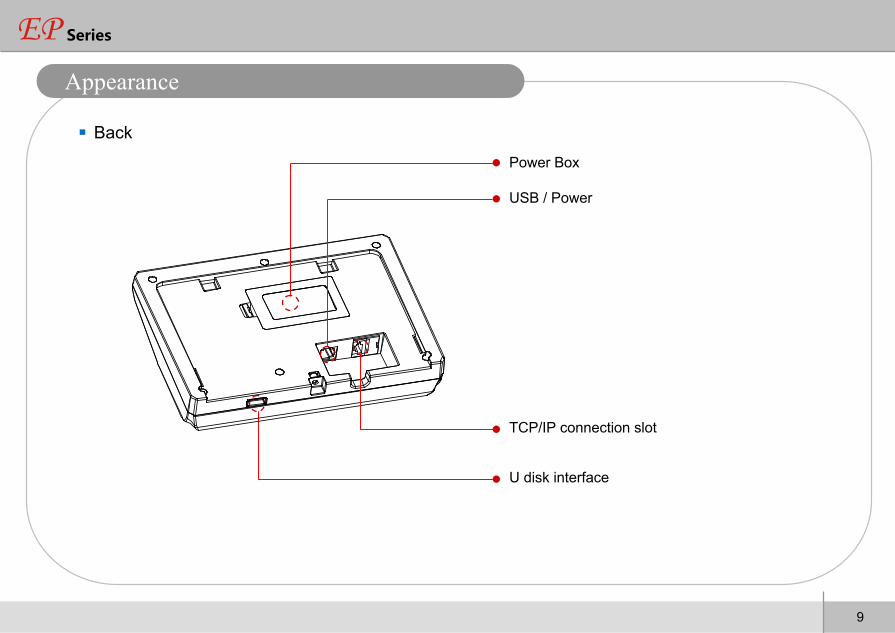
U disk interface
9
Appearance
TCP/IP connection slot
Power Box
USB / Power
Back
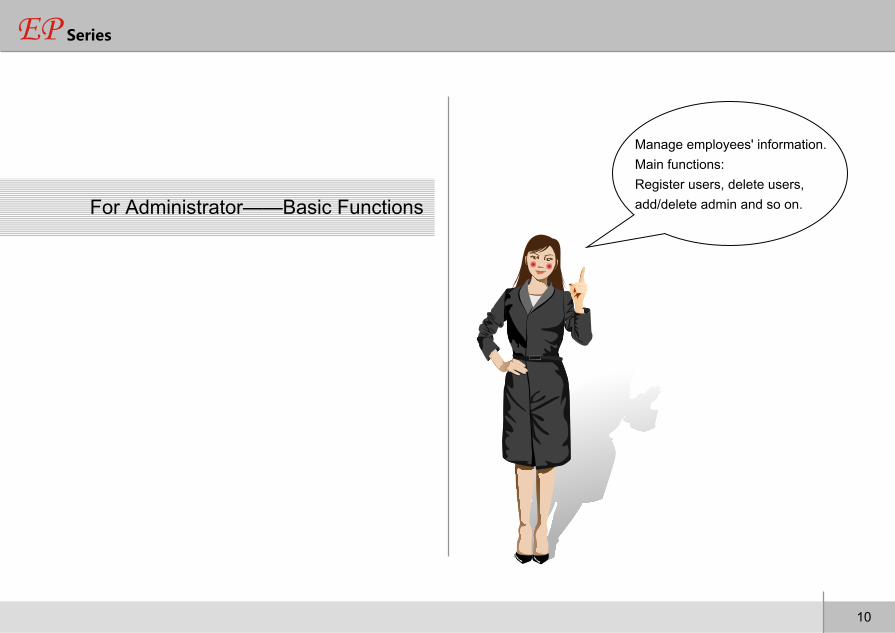
For Administrator——Basic Functions
Manage employees' information. Main functions:Register users, delete users, add/delete admin and so on.
10
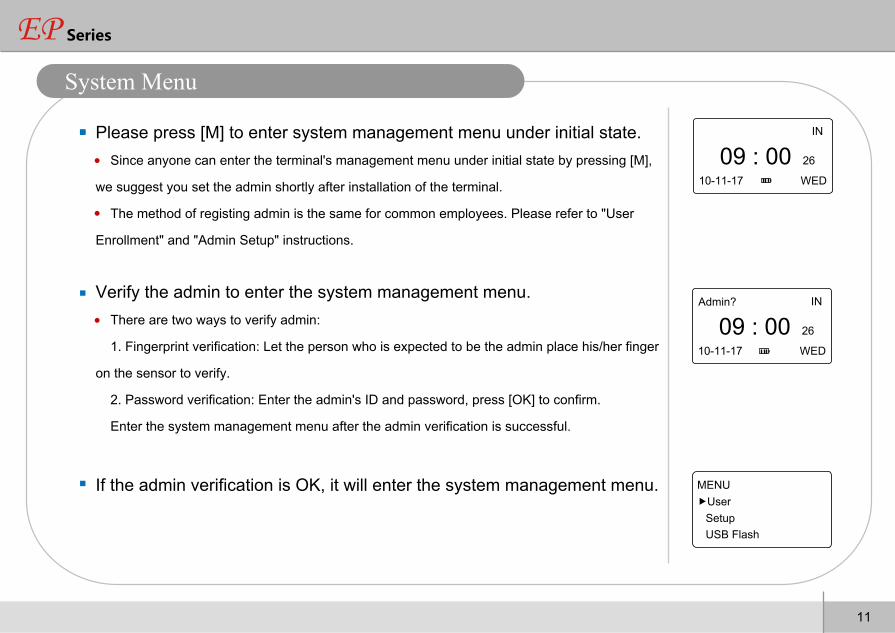
Please press [M] to enter system management menu under initial state. Since anyone can enter the terminal's management menu under initial state by pressing [M],
we suggest you set the admin shortly after installation of the terminal.
The method of registing admin is the same for common employees. Please refer to "User
Enrollment" and "Admin Setup" instructions.
Verify the admin to enter the system management menu. There are two ways to verify admin:
1. Fingerprint verification: Let the person who is expected to be the admin place his/her finger
on the sensor to verify.
2. Password verification: Enter the admin's ID and password, press [OK] to confirm.
Enter the system management menu after the admin verification is successful.
If the admin verification is OK, it will enter the system management menu.
IN
09 : 00 26
10-11-17 WED
MENUUser
SetupUSB Flash
IN
09 : 00 26
10-11-17 WED
Admin?
11
System Menu
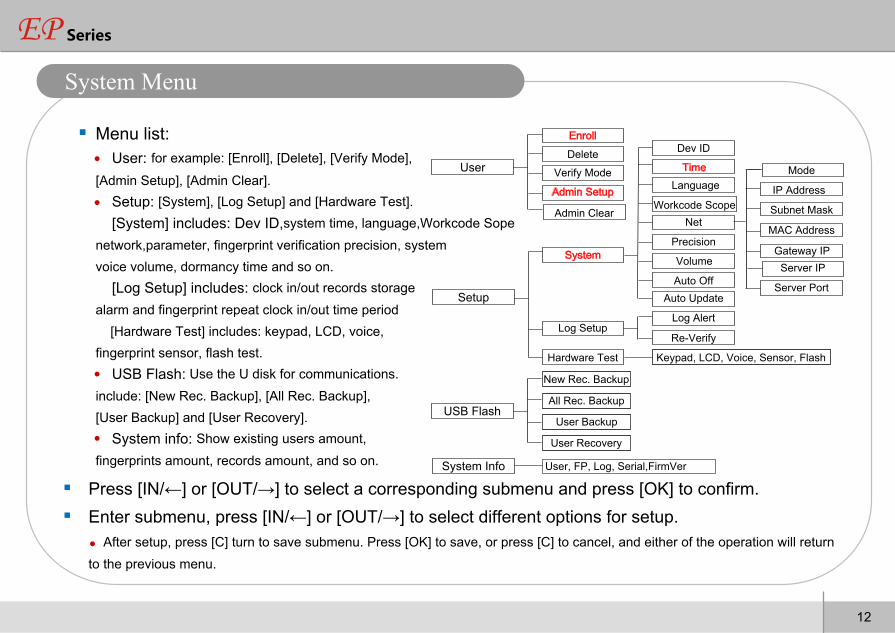
Menu list: User: for example: [Enroll], [Delete], [Verify Mode],
[Admin Setup], [Admin Clear]. Setup: [System], [Log Setup] and [Hardware Test]. [System] includes: Dev ID,system time, language,Workcode Sope network,parameter, fingerprint verification precision, system voice volume, dormancy time and so on. [Log Setup] includes: clock in/out records storage alarm and fingerprint repeat clock in/out time period [Hardware Test] includes: keypad, LCD, voice, fingerprint sensor, flash test. USB Flash: Use the U disk for communications.include: [New Rec. Backup], [All Rec. Backup], [User Backup] and [User Recovery]. System info: Show existing users amount, fingerprints amount, records amount, and so on.
Press [IN/←] or [OUT/→] to select a corresponding submenu and press [OK] to confirm. Enter submenu, press [IN/←] or [OUT/→] to select different options for setup. After setup, press [C] turn to save submenu. Press [OK] to save, or press [C] to cancel, and either of the operation will return to the previous menu.
12
System Menu
User
System Info User, FP, Log, Serial,FirmVer
Enroll
Delete
Admin Setup
Admin Clear
Setup
Hardware Test Keypad, LCD, Voice, Sensor, Flash
System
Dev ID
TimeLanguage
Net
Precision
Volume
Auto OffAuto Update
Log SetupLog Alert
Re-Verify
Verify Mode
USB Flash
New Rec. Backup
All Rec. Backup
User Recovery
User Backup
Workcode ScopeIP Address
Subnet Mask
Gateway IP
MAC Address
Mode
Server IP
Server Port

Press [C] to exit the system management menu. To ensure safety, the system management menu will automatically return to the default menu if no operations in a certain period.
13
System Menu
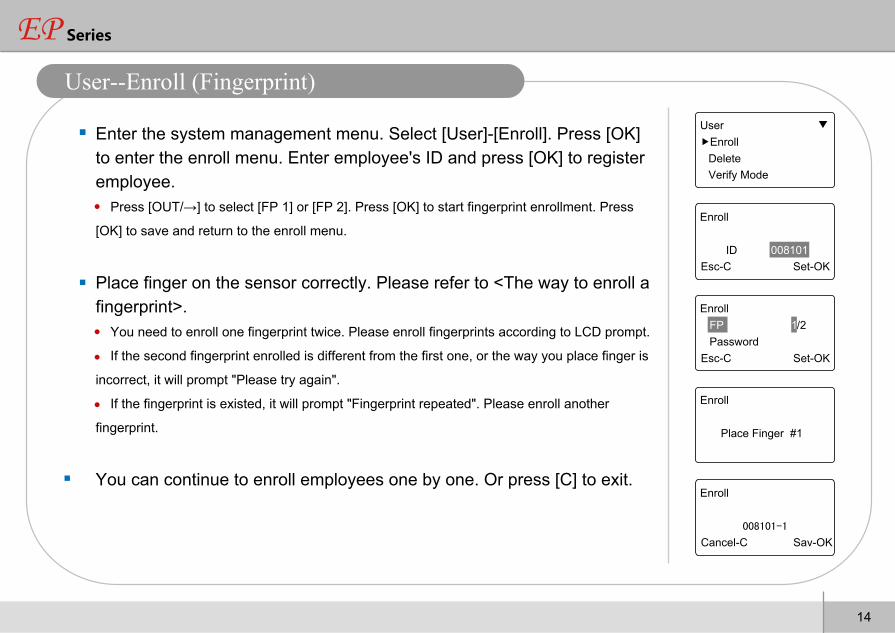
Enter the system management menu. Select [User]-[Enroll]. Press [OK] to enter the enroll menu. Enter employee's ID and press [OK] to register employee. Press [OUT/→] to select [FP 1] or [FP 2]. Press [OK] to start fingerprint enrollment. Press
[OK] to save and return to the enroll menu.
Place finger on the sensor correctly. Please refer to <The way to enroll a fingerprint>. You need to enroll one fingerprint twice. Please enroll fingerprints according to LCD prompt.
If the second fingerprint enrolled is different from the first one, or the way you place finger is
incorrect, it will prompt "Please try again".
If the fingerprint is existed, it will prompt "Fingerprint repeated". Please enroll another
fingerprint.
You can continue to enroll employees one by one. Or press [C] to exit.
User ▼
Enroll
Delete
Verify Mode
Enroll
ID 008101 Esc-C Set-OK
Enroll
Place Finger #1
Enroll
008101-1
Cancel-C Sav-OK
Enroll
FP 1/2
Password Esc-C Set-OK
14
User--Enroll (Fingerprint)
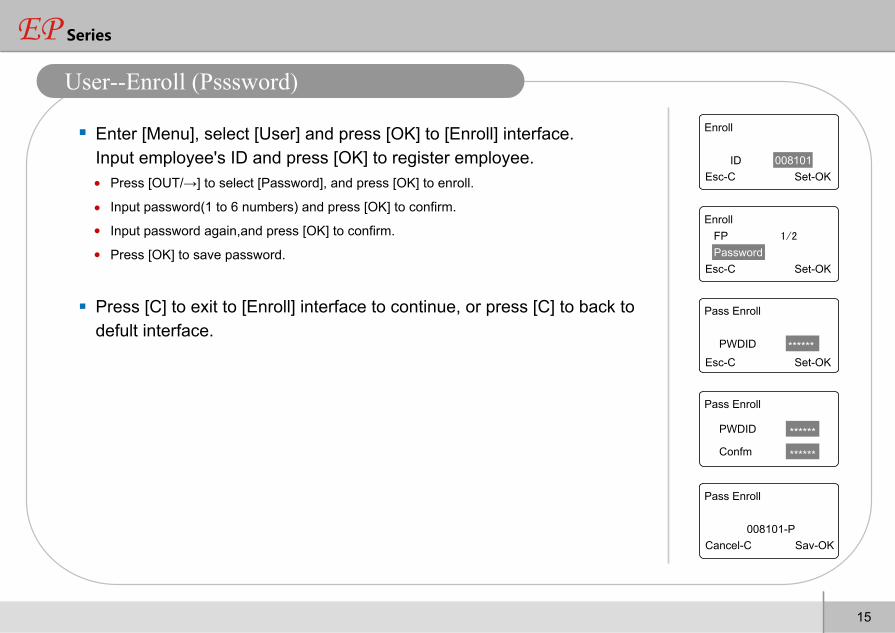
Enter [Menu], select [User] and press [OK] to [Enroll] interface. Input employee's ID and press [OK] to register employee. Press [OUT/→] to select [Password], and press [OK] to enroll.
Input password(1 to 6 numbers) and press [OK] to confirm.
Input password again,and press [OK] to confirm.
Press [OK] to save password.
Press [C] to exit to [Enroll] interface to continue, or press [C] to back to defult interface.
Pass Enroll
PWDID ******Esc-C Set-OK
Pass Enroll
008101-PCancel-C Sav-OK
Enroll
ID 008101 Esc-C Set-OK
Enroll
FP 1/2
Password
Esc-C Set-OK
Pass Enroll
PWDID ******
Confm ******
15
User--Enroll (Psssword)

16
When employees resign, we need delete the employee’s information in the terminal. Enter the management menu. Select [User]-[Delete] press [OK].
Enter the employee’s ID and press [OK], the system will prompt again whether to delete,
press [OK] again to confirm delete the employee information.
Continue to delete other employees after deleting successfully, or press [C] to back tothe
default interface.
Notice: Please caution with the action. All deleted information including employee's fingerprint, password, attendance records can not be recovered.
If deleted by mistake, please connect with the PC and upload the employee information
which has been backuped before to recover the employee information.
User ▼
EnrollDeleteVerify Mode
Delete
ID 008101 Esc-C Set-OK
Delete
008101No-C Yes-OK
名词解释Interpretation for items and phrasesUser--Delete
17
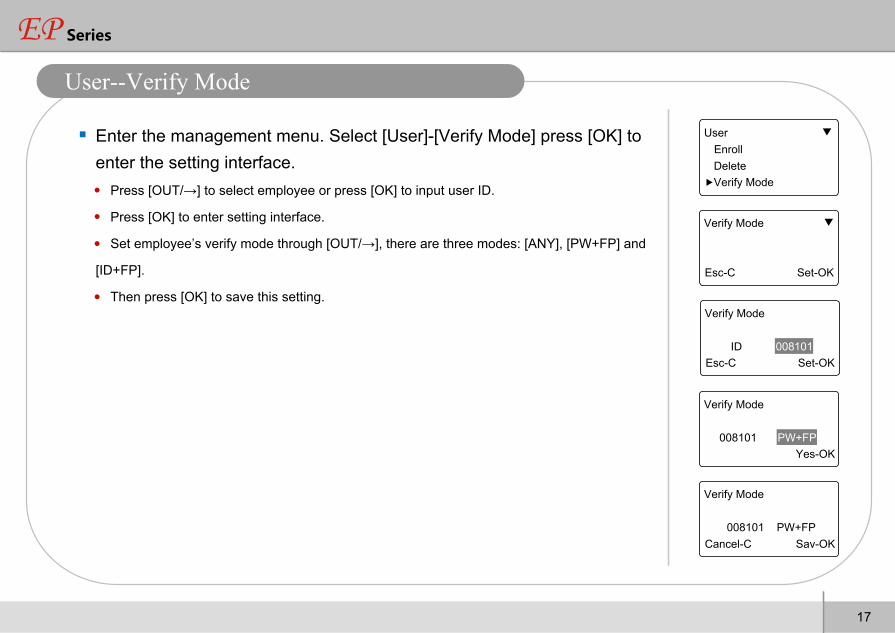
Enter the management menu. Select [User]-[Verify Mode] press [OK] to enter the setting interface. Press [OUT/→] to select employee or press [OK] to input user ID.
Press [OK] to enter setting interface.
Set employee’s verify mode through [OUT/→], there are three modes: [ANY], [PW+FP] and
[ID+FP].
Then press [OK] to save this setting.
User ▼
EnrollDeleteVerify Mode
Verify Mode ▼
Esc-C Set-OK
Verify Mode
ID 008101 Esc-C Set-OK
Verify Mode
008101 PW+FPYes-OK
Verify Mode
008101 PW+FPCancel-C Sav-OK
名词解释Interpretation for items and phrasesUser--Verify Mode
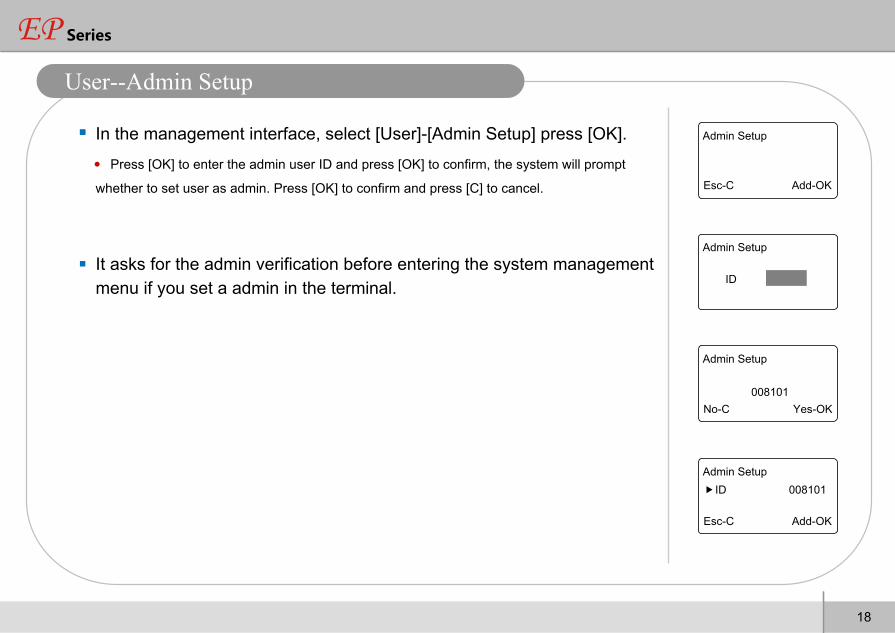
In the management interface, select [User]-[Admin Setup] press [OK].
Press [OK] to enter the admin user ID and press [OK] to confirm, the system will prompt
whether to set user as admin. Press [OK] to confirm and press [C] to cancel.
It asks for the admin verification before entering the system management menu if you set a admin in the terminal.
Admin Setup
Esc-C Add-OK
Admin Setup
ID
008101
Admin Setup
008101 No-C Yes-OK
Admin SetupID 008101
Esc-C Add-OK
名词解释Interpretation for items and phrases
18
User--Admin Setup

In the management interface, select [User]-[Admin Clear] press [OK].
Press [OUT/→] to select the admin ID press [OK] to confirm.
The admin ID will be showed on the LCD press [OK] to confirm.
The system prompt whether delete the admin. Press [OK] to confirm deletion.
Press [C] to cancel.
Notice: In the admin delete interface, press [OK] to enter the user ID interface directly, then enter the ID to delete admin.
Admin Clear
Admin Clear
008102ID
Admin ClearID 008101ID 008102
Esc-C Clr-OK
Admin Clear
008102
No-C Yes-OK
名词解释Interpretation for items and phrases
19
User--Admin Clear
ID 008101
Esc-C Clr-OK

For Administrator---Advanced Functions
Set the terminal parameters, include: System Setting, Record Setting Hardware Test and so on
20
21
Setup--System
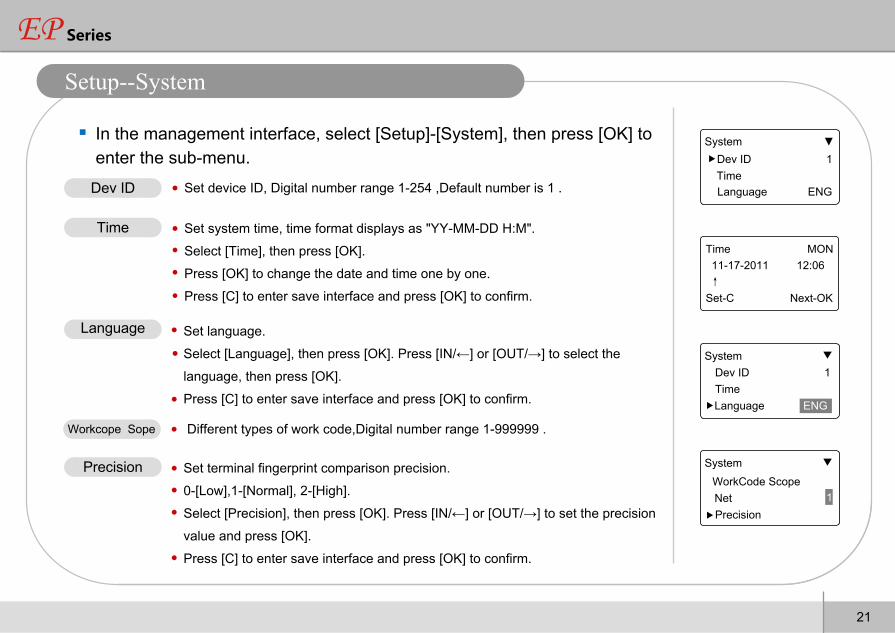
In the management interface, select [Setup]-[System], then press [OK] to enter the sub-menu.
Set system time, time format displays as "YY-MM-DD H:M".
Select [Time], then press [OK].
Press [OK] to change the date and time one by one.
Press [C] to enter save interface and press [OK] to confirm.
Set device ID, Digital number range 1-254 ,Default number is 1 .
Set language.
Select [Language], then press [OK]. Press [IN/←] or [OUT/→] to select the
language, then press [OK].
Press [C] to enter save interface and press [OK] to confirm.
Set terminal fingerprint comparison precision.
0-[Low],1-[Normal], 2-[High].
Select [Precision], then press [OK]. Press [IN/←] or [OUT/→] to set the precision
value and press [OK].
Press [C] to enter save interface and press [OK] to confirm.
System ▼Dev ID 1TimeLanguage ENG
Dev ID
Different types of work code,Digital number range 1-999999 .Workcope Sope
Time
Language
Precision
Time MON11-17-2011 12:06↑
Set-C Next-OK
System ▼
Dev ID 1Time
Language ENG
System ▼
WorkCode Scope
Net 1Precision

Set the time duration from the last operation to the dormant state.No-[Not Off], 250-[Max Time].Select [Auto Off], then press [OK]. Press [IN/←] or [OUT/→] to set [NO] or auto off time and press [OK] to confirm.Press [C] to enter save interface and press [OK] to confirm.
Auto update means the previous lower quality fingerprint template will be automatically replaced by the new higher quality one during fingerprint verification.Select [Auto Update], then press [OK]. Press [IN/←] or [OUT/→] to select [Yes] or [NO] and press [OK] to confirm.Press [C] to enter save interface and press [OK] to confirm.
Auto Off
Auto Update
System ▼
Auto Update NoAuto Off 10
名词解释Interpretation for items and phrases
22
Set the terminal voice volume. 0-[mute], 5-[Max].Select [Volume], then press [OK]. Press [IN/←] or [OUT/→] to set the volume value and press [OK] to confirm. Press [C] to enter save interface and press [OK] to confirm.
VolumeSystem ▼
Net
Precision 0Volume 5
Setup--System
System ▼
Auto Update NOAuto Off 10
13
Setup--System--Net
23
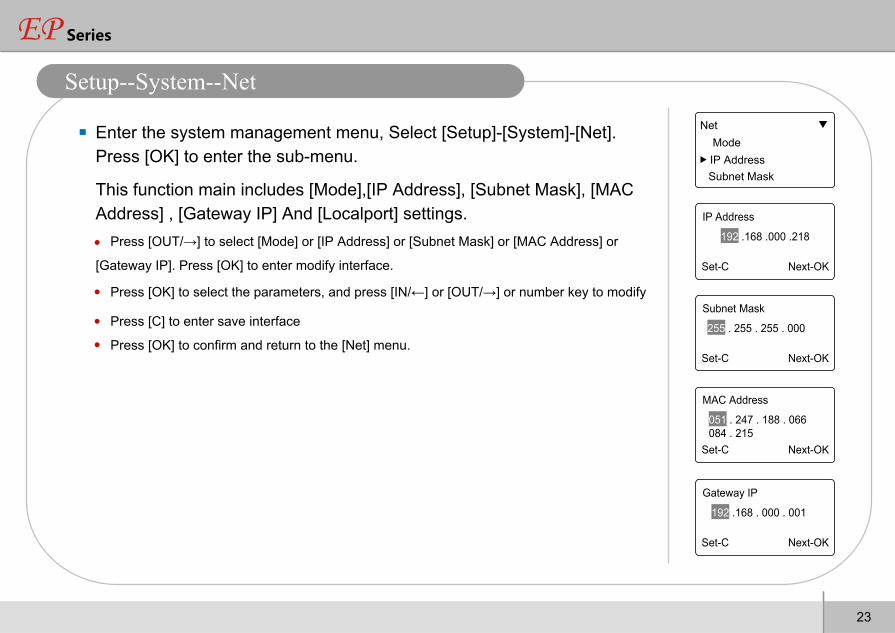
Enter the system management menu, Select [Setup]-[System]-[Net]. Press [OK] to enter the sub-menu.
This function main includes [Mode],[IP Address], [Subnet Mask], [MAC Address] , [Gateway IP] And [Localport] settings. Press [OUT/→] to select [Mode] or [IP Address] or [Subnet Mask] or [MAC Address] or
[Gateway IP]. Press [OK] to enter modify interface.
Press [OK] to select the parameters, and press [IN/←] or [OUT/→] or number key to modify
Press [C] to enter save interface
Press [OK] to confirm and return to the [Net] menu.
Net ▼
IP Address Subnet Mask
IP Address
192 .168 .000 .218
Set-C Next-OK
Subnet Mask
255 . 255 . 255 . 000
Set-C Next-OK
MAC Address
051 . 247 . 188 . 066084 . 215
Set-C Next-OK
Gateway IP
192 .168 . 000 . 001
Set-C Next-OK
Mode
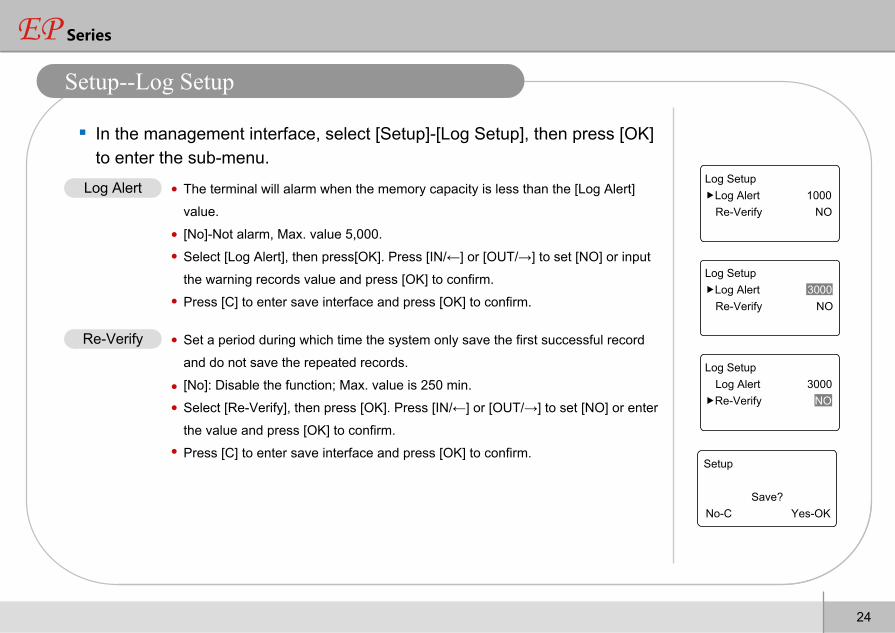
In the management interface, select [Setup]-[Log Setup], then press [OK] to enter the sub-menu.
Set a period during which time the system only save the first successful record
and do not save the repeated records.
[No]: Disable the function; Max. value is 250 min.
Select [Re-Verify], then press [OK]. Press [IN/←] or [OUT/→] to set [NO] or enter
the value and press [OK] to confirm.
Press [C] to enter save interface and press [OK] to confirm.
The terminal will alarm when the memory capacity is less than the [Log Alert]
value.
[No]-Not alarm, Max. value 5,000.
Select [Log Alert], then press[OK]. Press [IN/←] or [OUT/→] to set [NO] or input
the warning records value and press [OK] to confirm.
Press [C] to enter save interface and press [OK] to confirm.
Re-Verify
Log SetupLog Alert 1000
Re-Verify NO
Log SetupLog Alert 3000
Re-Verify NO
Log SetupLog Alert 3000
Re-Verify NO
Setup
Save?No-C Yes-OK
D100 DESKTOP SERIES
24
Setup--Log Setup
Log Alert
D100 DESKTOP SERIES
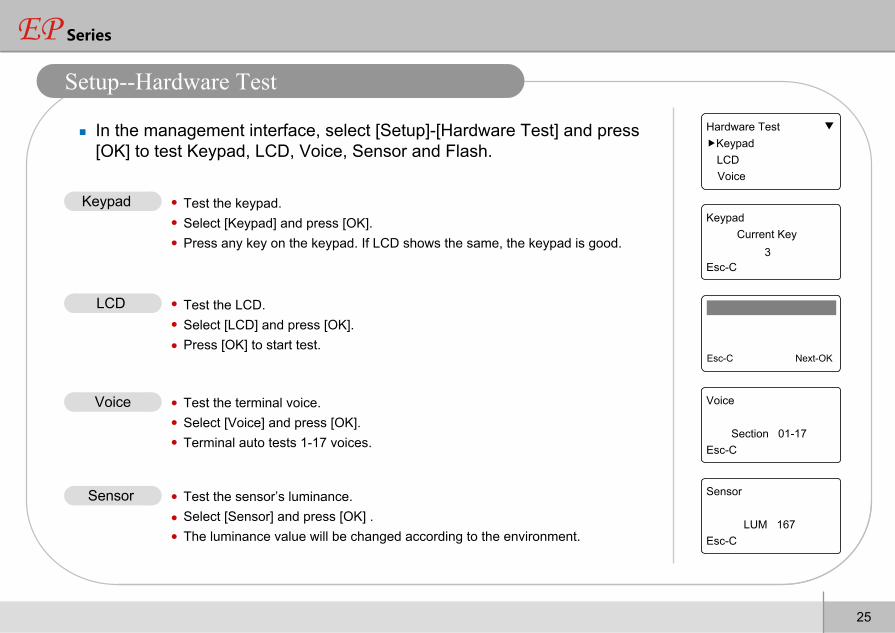
In the management interface, select [Setup]-[Hardware Test] and press [OK] to test Keypad, LCD, Voice, Sensor and Flash.
Test the LCD.Select [LCD] and press [OK].Press [OK] to start test.
Test the keypad.Select [Keypad] and press [OK].Press any key on the keypad. If LCD shows the same, the keypad is good.
Test the terminal voice.Select [Voice] and press [OK].Terminal auto tests 1-17 voices.
Hardware Test ▼
KeypadLCDVoice
KeypadCurrent Key
3Esc-C
Esc-C Next-OK
Voice
Section 01-17Esc-C
Sensor
LUM 167Esc-C
Keypad
LCD
Voice
Test the sensor’s luminance.Select [Sensor] and press [OK] .The luminance value will be changed according to the environment.
Sensor
25
Setup--Hardware Test
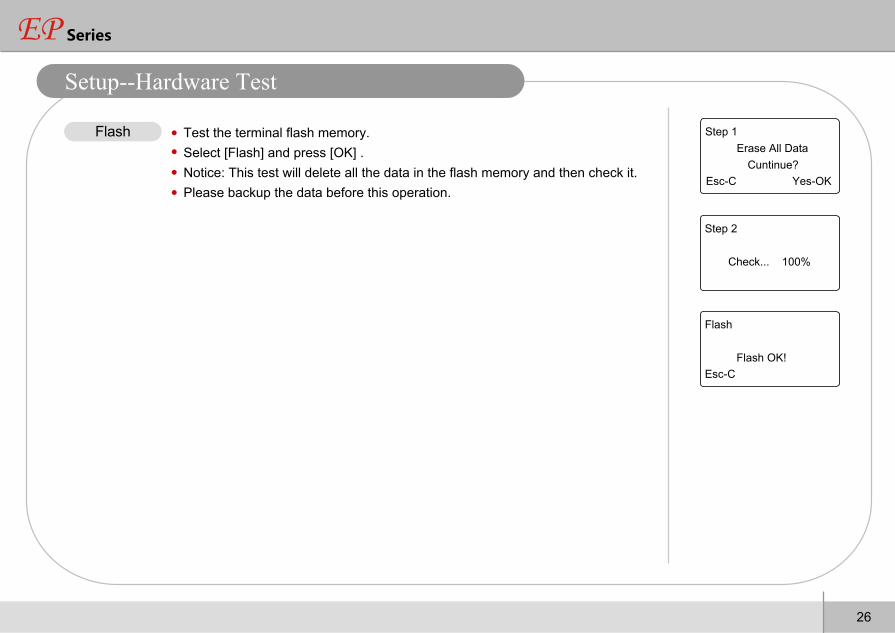
Test the terminal flash memory.Select [Flash] and press [OK] .Notice: This test will delete all the data in the flash memory and then check it.Please backup the data before this operation.
Step 1Erase All Data
Cuntinue?Esc-C Yes-OK
Step 2
Check... 100%
Flash
Flash OK!Esc-C
Flash
26
Setup--Hardware Test
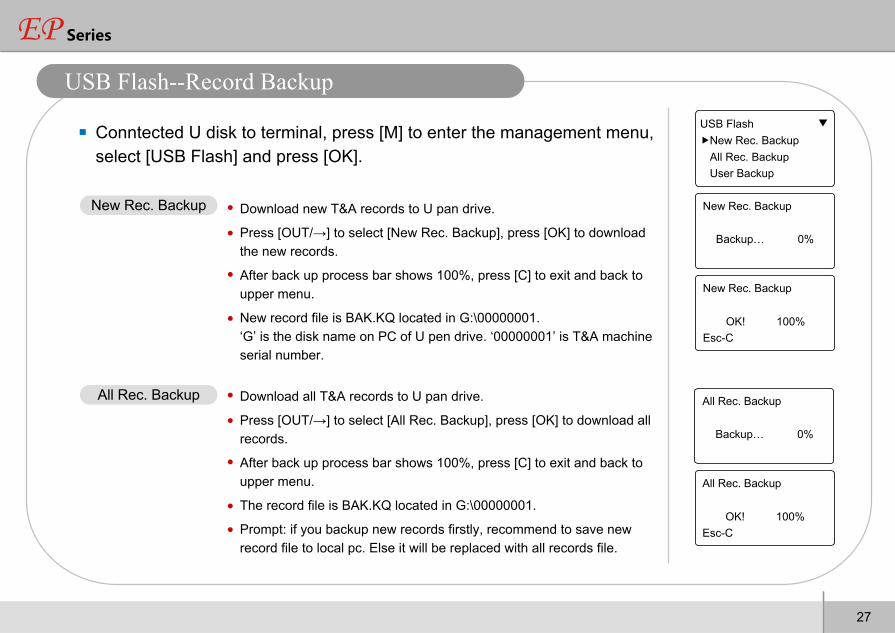
Conntected U disk to terminal, press [M] to enter the management menu, select [USB Flash] and press [OK].
名词解释Interpretation for items and phrases
13
USB Flash--Record Backup
27
USB Flash ▼
New Rec. BackupAll Rec. BackupUser Backup
New Rec. Backup
All Rec. Backup
Download new T&A records to U pan drive.
Press [OUT/→] to select [New Rec. Backup], press [OK] to download the new records.
After back up process bar shows 100%, press [C] to exit and back to upper menu.
New record file is BAK.KQ located in G:\00000001.‘G’ is the disk name on PC of U pen drive. ‘00000001’ is T&A machine serial number.
New Rec. Backup
Backup… 0%
New Rec. Backup
OK! 100% Esc-C
All Rec. Backup
Backup… 0%
All Rec. Backup
OK! 100% Esc-C
Download all T&A records to U pan drive.
Press [OUT/→] to select [All Rec. Backup], press [OK] to download all records.
After back up process bar shows 100%, press [C] to exit and back to upper menu.
The record file is BAK.KQ located in G:\00000001.
Prompt: if you backup new records firstly, recommend to save new record file to local pc. Else it will be replaced with all records file.

13
USB Flash--User Backup/Recovery
28
USB Flash ▼
New Rec. BackupAll Rec. BackupUser Backup
User Backup
User Recovery
Download employee’s records saved in device to U pen drive.
Press [OUT/→] to select [User Backup], press [OK] to download the employee information.
After backup process bar shows 100%, press [C] to exit and back to upper menu.
The backup file is BAK.YG and BAK.ZW located in G:\00000001.
User Backup
Backup… 0%
New Rec. Backup
OK! 100% Esc-C
User Recovery
Backup… 0%
User Recovery
OK! 100% Esc-C
Upload employee’s information saved in U pen drive to terminal.
There are two ways to recover employee information: 1. Copy BAK.YG and BAK.ZW to root directory, then plug U pen drive into time attendance machine and start user recovery. 2. Export employee information to U pen drive through U flash management software, then repeat step 1.
Press [OUT/→] to select [User Recovery], press [OK] to recovery all records.
After recovery process bar shows 100%, press [C] to exit and back to upper menu.
USB Flash ▼
User Recovery

In the management interface, select [System Info] and press [OK] to check the terminal information.
Press [C] back to the management interface.
MENUSystem Info
System Info ▼
User 2000 FP 2000 Log 50000
System Info ▼
User 1000 Password 500
Log 15000
User
Log
FP
FirmVer
Registered user number. Maximum 2,000 users.
Registered fingerprint number. Maximum 2,000 fingerprints.Press [OK] to view the number of users who registered a password.
The time attendance logs. Maximum 50,000 records.
The firmware version.
29
System Info
System Info ▲
FirmVer W1.75.B2
Serial
Serial Machine serial number.

Anviz Biometric Tech. Co., Ltd.ADD: 5th Floor, 4299 Jindu Road, Shanghai, China 201108TEL: 86-21-54833368FAX: 86-21-54831400EMAIL: [email protected]
Technical supportTEL: 86-21-54831112FAX: 86-21-54831400EMAIL: [email protected] : www.anviz.com
Related Documents