DCS800-EP Hardware Manual Supplement DCS800 Panel Drive (20-1000 Amps) A supplement to the DCS800 Hardware manual

Welcome message from author
This document is posted to help you gain knowledge. Please leave a comment to let me know what you think about it! Share it to your friends and learn new things together.
Transcript

DCS800-EP Hardware Manual Supplement
DCS800 Panel Drive (20-1000 Amps) A supplement to the DCS800 Hardware manual

2 DCS800-EP Installation and Start-Up Manual
Safety instructions
What this chapter containsThis chapter contains the safety instructions which you must follow when installing, operating and servicing the drive. If ignored, physical injury or death may follow, or damage may occur to the drive, the motor or driven equipment. Read the safety instructions before you work on the unit.
To which products this chapter appliesThis chapter applies to the DCS800-EP... Size D1 to D4.
Use of warnings and notesThere are two types of safety instructions throughout this manual: warnings and notes. Warnings caution you about conditions which can result in serious injury or death and/or damage to the equipment. They also tell you how to avoid the danger. Notes draw attention to a particular condition or fact, or give information on a subject. The warning symbols are used as follows:
Dangerous voltage warning warns of high voltage which can cause physical injury and/or damage to the equipment.General warning warns about conditions, other than those caused by electricity, which can result in physical injury and/or damage to the equipment.Electrostatic discharge warning warns of electrostatic discharge which can damage the equipment.
Installation and maintenance workThese warnings are intended for all who work on the drive, motor cable or motor. Ignoring the instructions can cause physical injury or death.
Only qualified electricians are allowed to install and maintain the drive.• Never work on the drive, motor cable or motor when main power is applied.
• Always ensure by measuring with a multimeter (impedance at least 1 Mohm) that:
1. Voltage between drive input phases U1, V1 and W1 and the frame is close to 0 V.
2. Voltage between terminals C1 and D1 and the frame is close to 0 V.
• Do not work on the control cables when power is applied to the drive or to the external control circuits. Externally supplied control circuits may cause dangerous voltages inside the drive even when the main power on the drive is switched off.

DCS800-EP Installation and Start-Up Manual 3
• Do not make any insulation or voltage withstand tests on the drive or drive modules.
• When reconnecting the motor cable, always check that the C1 and D1 terminal is correct.
Note:• The motor cable terminals on the drive are at a dangerously high voltage when the
input power is on, regardless of whether the motor is running or not.
• Depending on the external wiring, dangerous voltages (115 V, 220 V or 230 V) may be present on the terminals of relay outputs SDCS-IOB-2, RDIO.
• DCS800 with enclosure extension: Before working on the drive, isolate the whole drive from the supply.
Grounding
WARNING! Printed circuit boards contain components sensitive to electrostatic discharge. Wear a grounding wrist band when handling the boards. Do not touch the boards unnecessarily.
These instructions are intended for all who are responsible for the grounding of the drive. Incorrect grounding can cause physical injury, death or equipment malfunction and increase electromagnetic interference.
• Ground the drive, motor and adjoining equipment to ensure personnel safety in all circumstances, and to reduce electromagnetic emission and pick-up.
• Make sure that grounding conductors are adequately sized as required by safety regulations.
• In a multiple-drive installation, connect each drive separately to protective earth (PE).
• Minimize EMC emission and make a 360° high frequency grounding of screened cable entries at the cabinet lead-through.
• DonotinstalladrivewithEMCfilteronanungroundedpowersystemorahighresistance-grounded (over 30 ohms) power system.
Note:• Power cable shields are suitable for equipment grounding conductors only when
adequately sized to meet safety regulations.
• As the normal leakage current of the drive is higher than 3.5 mA AC or 10 mA DC (statedbyEN50178,5.2.11.1),afixedprotectiveearthconnectionisrequired.
4 DCS800-EP Installation and Start-Up Manual
Fiber optic cables
WARNING! Handle the fiber optic cables with care. When unplugging optic cables, always grab the connector, not the cable itself. Do not touch the ends of the fibers with bare hands as the fiber is extremely sensitive to dirt. The minimum allowed bend radius is 35 mm (1.4 in.).
Mechanical installationThese notes are intended for all who install the drive. Handle the unit carefully to avoid damage and injury.
• DCS800-EP Frames A and B: The drives are heavy and may require more than one person to lift. Use appropriate lifting techniques. Do not lift the unit by the front cover. Place the unit only on its back.
• DCS800-EP Frames C and D: The drive is heavy. Lift the drive by the lifting lugs only.
• Make sure that dust from drilling does not enter the drive when installing. Electrically conductive dust inside the unit may cause damage or lead to malfunction.
• Ensuresufficientcooling.
• Do not fasten the drive by riveting or welding.

DCS800-EP Installation and Start-Up Manual 5
OperationThese warnings are intended for all who plan the operation of the drive or operate the drive. Ignoring the instructions can cause physical injury or death or damage the equipment.
• Before adjusting the drive and putting it into service, make sure that the motor and all driven equipment are suitable for operation throughout the speed range provided by the drive. The drive can be adjusted to operate the motor at speeds above and below the base speed.
• Do not activate automatic fault reset functions of the Standard Application Program if dangerous situations can occur. When activated, these functions will reset the drive and resume operation after a fault.
• Do not control the motor with the disconnecting device (disconnecting switch); instead, use the control panel keys and / or commands via the I/O board of the drive.
• Mains connection You can use a switch disconnect in the power supply of the thyristor power converter to disconnect the electrical components of the unit from the power supply for installation and maintenance work. The type of disconnect used must be a switch disconnect as per EN 60947-3, Class B, so as to comply with EU regulations, or a circuit-breaker type which switches off the load circuit by means of an auxiliary contact causing the breaker’s main contacts to open. The mains disconnect must be locked in its “OPEN” position during any installation and maintenance work.
• EMERGENCY STOP buttons must be installed at each control desk and at all other control panels requiring an emergency stop function. Pressing the STOP button on the control panel of the thyristor power converter will neither cause an emergency motor stop, nor will the drive be disconnected from any dangerous potential.
To avoid unintentional operating states, or to shut the unit down in case of any imminent danger, according to the standards in the safety instructions it is not sufficienttomerelyshutdownthedriveviasignals“RUN”,“DriveOFF”or“Emergency Stop” with “Control Panel” or “PC Tool”.
• Intended use The operating instructions cannot take into consideration every possible system configuration,operationormaintenance.Thus,theymainlygivesuchadviceonly,whichisrequiredbyqualifiedpersonnelfornormaloperationofthemachinesanddevices in industrial installations.
If in special cases the electrical machines and devices are intended for use in non-industrial installations - which may require stricter safety regulations (e.g. protection against contact by children or similar). These additional safety measures for the installation must be provided by the customer during assembly.
Note:When the control location is not set to Local (L not shown in the PC tool status row), the Stop key on the control panel WILL NOT stop the drive.
6 DCS800-EP Installation and Start-Up Manual
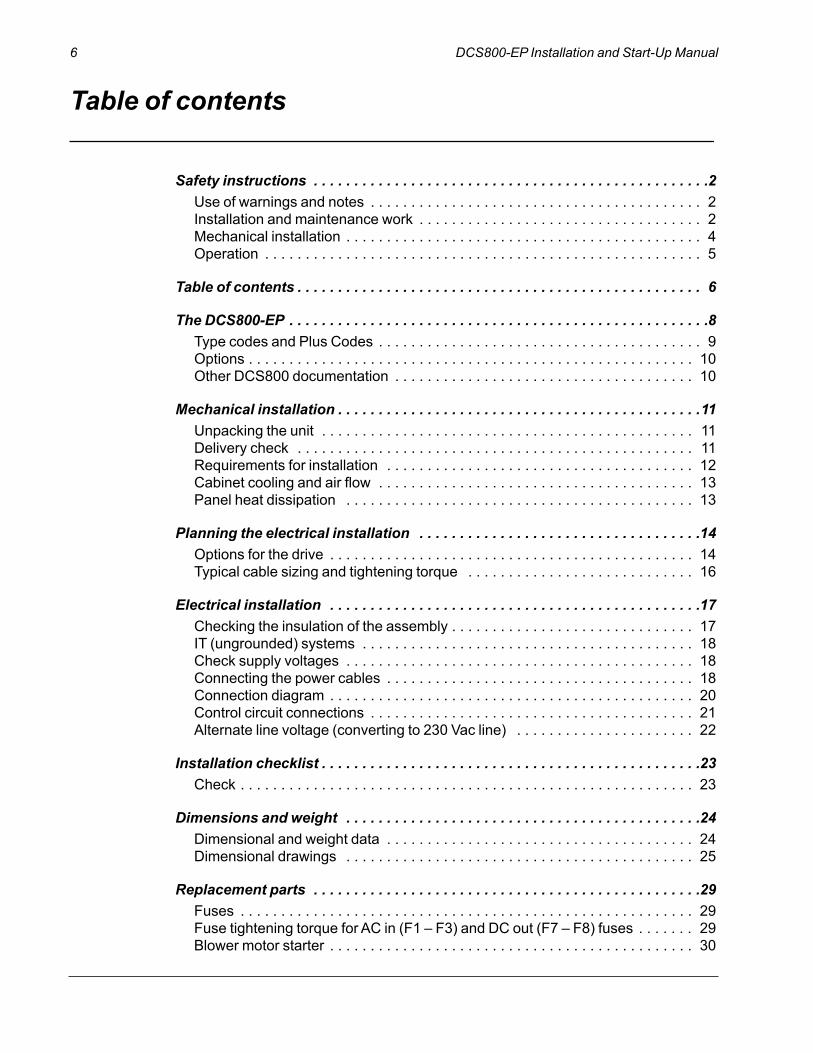
Table of contents
Safety instructions . . . . . . . . . . . . . . . . . . . . . . . . . . . . . . . . . . . . . . . . . . . . . . . . .2Use of warnings and notes . . . . . . . . . . . . . . . . . . . . . . . . . . . . . . . . . . . . . . . . . 2Installation and maintenance work . . . . . . . . . . . . . . . . . . . . . . . . . . . . . . . . . . . 2Mechanical installation . . . . . . . . . . . . . . . . . . . . . . . . . . . . . . . . . . . . . . . . . . . . 4Operation . . . . . . . . . . . . . . . . . . . . . . . . . . . . . . . . . . . . . . . . . . . . . . . . . . . . . . 5
Table of contents . . . . . . . . . . . . . . . . . . . . . . . . . . . . . . . . . . . . . . . . . . . . . . . . . . 6
The DCS800-EP . . . . . . . . . . . . . . . . . . . . . . . . . . . . . . . . . . . . . . . . . . . . . . . . . . . .8Type codes and Plus Codes . . . . . . . . . . . . . . . . . . . . . . . . . . . . . . . . . . . . . . . . 9Options . . . . . . . . . . . . . . . . . . . . . . . . . . . . . . . . . . . . . . . . . . . . . . . . . . . . . . . 10Other DCS800 documentation . . . . . . . . . . . . . . . . . . . . . . . . . . . . . . . . . . . . . 10
Mechanical installation . . . . . . . . . . . . . . . . . . . . . . . . . . . . . . . . . . . . . . . . . . . . .11Unpacking the unit . . . . . . . . . . . . . . . . . . . . . . . . . . . . . . . . . . . . . . . . . . . . . . 11Delivery check . . . . . . . . . . . . . . . . . . . . . . . . . . . . . . . . . . . . . . . . . . . . . . . . . 11Requirements for installation . . . . . . . . . . . . . . . . . . . . . . . . . . . . . . . . . . . . . . 12Cabinetcoolingandairflow . . . . . . . . . . . . . . . . . . . . . . . . . . . . . . . . . . . . . . . 13Panel heat dissipation . . . . . . . . . . . . . . . . . . . . . . . . . . . . . . . . . . . . . . . . . . . 13
Planning the electrical installation . . . . . . . . . . . . . . . . . . . . . . . . . . . . . . . . . . .14Options for the drive . . . . . . . . . . . . . . . . . . . . . . . . . . . . . . . . . . . . . . . . . . . . . 14Typical cable sizing and tightening torque . . . . . . . . . . . . . . . . . . . . . . . . . . . . 16
Electrical installation . . . . . . . . . . . . . . . . . . . . . . . . . . . . . . . . . . . . . . . . . . . . . .17Checking the insulation of the assembly . . . . . . . . . . . . . . . . . . . . . . . . . . . . . . 17IT (ungrounded) systems . . . . . . . . . . . . . . . . . . . . . . . . . . . . . . . . . . . . . . . . . 18Check supply voltages . . . . . . . . . . . . . . . . . . . . . . . . . . . . . . . . . . . . . . . . . . . 18Connecting the power cables . . . . . . . . . . . . . . . . . . . . . . . . . . . . . . . . . . . . . . 18Connection diagram . . . . . . . . . . . . . . . . . . . . . . . . . . . . . . . . . . . . . . . . . . . . . 20Control circuit connections . . . . . . . . . . . . . . . . . . . . . . . . . . . . . . . . . . . . . . . . 21Alternate line voltage (converting to 230 Vac line) . . . . . . . . . . . . . . . . . . . . . . 22
Installation checklist . . . . . . . . . . . . . . . . . . . . . . . . . . . . . . . . . . . . . . . . . . . . . . .23Check . . . . . . . . . . . . . . . . . . . . . . . . . . . . . . . . . . . . . . . . . . . . . . . . . . . . . . . . 23
Dimensions and weight . . . . . . . . . . . . . . . . . . . . . . . . . . . . . . . . . . . . . . . . . . . .24Dimensional and weight data . . . . . . . . . . . . . . . . . . . . . . . . . . . . . . . . . . . . . . 24Dimensional drawings . . . . . . . . . . . . . . . . . . . . . . . . . . . . . . . . . . . . . . . . . . . 25
Replacement parts . . . . . . . . . . . . . . . . . . . . . . . . . . . . . . . . . . . . . . . . . . . . . . . .29Fuses . . . . . . . . . . . . . . . . . . . . . . . . . . . . . . . . . . . . . . . . . . . . . . . . . . . . . . . . 29Fuse tightening torque for AC in (F1 – F3) and DC out (F7 – F8) fuses . . . . . . . 29Blower motor starter . . . . . . . . . . . . . . . . . . . . . . . . . . . . . . . . . . . . . . . . . . . . . 30

DCS800-EP Installation and Start-Up Manual 7
Other replacement parts . . . . . . . . . . . . . . . . . . . . . . . . . . . . . . . . . . . . . . . . . . 31
Technical data . . . . . . . . . . . . . . . . . . . . . . . . . . . . . . . . . . . . . . . . . . . . . . . . . . . .32Electrical and environmental data . . . . . . . . . . . . . . . . . . . . . . . . . . . . . . . . . . . 32Specifications . . . . . . . . . . . . . . . . . . . . . . . . . . . . . . . . . . . . . . . . . . . . . . . . . . 32
Accessories . . . . . . . . . . . . . . . . . . . . . . . . . . . . . . . . . . . . . . . . . . . . . . . . . . . . . .34Line reactors . . . . . . . . . . . . . . . . . . . . . . . . . . . . . . . . . . . . . . . . . . . . . . . . . . . 34
Diagrams . . . . . . . . . . . . . . . . . . . . . . . . . . . . . . . . . . . . . . . . . . . . . . . . . . . . . . . .35Power diagram . . . . . . . . . . . . . . . . . . . . . . . . . . . . . . . . . . . . . . . . . . . . . . . . . 35Control diagram . . . . . . . . . . . . . . . . . . . . . . . . . . . . . . . . . . . . . . . . . . . . . . . . 36
Appendix 1 — Operating instructions for blower motor thermal overload relay . . . . . . . . . . . . . . . . . . . . . . . . . . . . . . . . . . . . . . . . . . . . . . . . . . . 38
Index . . . . . . . . . . . . . . . . . . . . . . . . . . . . . . . . . . . . . . . . . . . . . . . . . . . . . . . . . . 44

8 DCS800-EP Installation and Start-Up Manual
The DCS800-EP
What this chapter containsThischapterbrieflydescribestheoperatingprincipleandconstructionoftheDCS800-EP Panel Drive.
The DCS800-EPThe DCS800-EP sizes A through D are intended as a pre-packaged or “panelized” solution for controlling DC motors.
Size D 400...600 hp
Size C 200...300 hp
Size B 75...150 hp
Size A 10...60 hp

DCS800-EP Installation and Start-Up Manual 9
Type codes and plus codesThetypecodecontainsinformationonthespecificationsandconfigurationof thedrive.Thefirstdigitsfromleftexpressthebasicconfiguration(e.g. DCS800-EP2-0050). The optional selections are given thereafter, on the name plate by plus code. The main selections are described below. Not all selections are available for all types.
Type code: D C S 8 0 0 - EP X - Y Y Y Y - Z Z - plus codeThe“P”inthetypecodedesignatesthepaneldriveconfiguration.Furtherexplanationof the type code can be found in the DCS800 Hardware Manual in the chapter “The DCS800.”
Non-Regenerative (2Q)
Regenerative (4Q)
ModuleFrame
PanelFrame
460Vac/500Vdc* 230Vac/240Vdc*HP IAC
(amps)IDC
(amps)HP IAC
(amps)IDC
(amps)
DCS800-EP1-0020-05 DCS800-EP2-0025-05 D1 A 10 14 17 5 16 20
DCS800-EP1-0045-05 DCS800-EP2-0050-05 D1 A 20 29 35 10 30 37
DCS800-EP1-0065-05 DCS800-EP2-0075-05 D1 A 30 43 53 15 44 54
DCS800-EP1-0090-05 DCS800-EP2-0100-05 D1 A 40 55 68 20 58 71
DCS800-EP1-0125-05 DCS800-EP2-0140-05 D1 A 60 85 104 30 85 104
DCS800-EP1-0180-05 – D2 B 75 102 125 35 102 125
– DCS800-EP2-0200-05 D2 B 100 134 164 50 143 175
DCS800-EP1-0230-05 DCS800-EP2-0260-05 D2 B 125 167 205 60 168 206
DCS800-EP1-0315-05 DCS800-EP2-0350-05 D3 B 150 200 245 75 208 255
DCS800-EP1-0405-05 – D3 C 200 265 325 100 278 341
– DCS800-EP2-0450-05 D3 C 200 265 325 100 278 341
DCS800-EP1-0470-05 DCS800-EP2-0520-05 D3 C 250 330 405 125 347 425
DCS800-EP1-0610-05 – D4 C 300 392 480 150 413 506
– DCS800-EP2-0680-05 D4 C 300 392 480 150 413 506
DCS800-EP1-0740-05 DCS800-EP2-0820-05 D4 D 400 522 640
DCS800-EP1-0900-05 DCS800-EP2-1000-05 D4 D 500 649 795
– DCS800-EP2-1010-05 D4 D 600 775 950
Power and current ratings above are based on Heavy Duty rating, 150% overload for 60 sec., except for 600 HP drive which is rated at 110% overload for 60 sec.
*DC Amps based on standard NEMA motor tables. AC Amps = DC Amps * 0.816
IMPORTANT: Do not exceed the continuous and overload current ratings shown above. The drive panel is not designed to withstand higher currents. Failure to adhere to this warning can result in personal injury and/or damage to equipment.

10 DCS800-EP Installation and Start-Up Manual
Options
Plus Code Option Kit
3. Circuit Breaker (All Sizes) +F278 NA
4. AC Line ReactorDCS800-EP1-0020-05 through DCS800-EP2-0350-05 +E213 NA
5. Without AC Line ContactorDCS800-EP1-0020-05 through DCS800-EP2-0680-05 +0F250 NA
6. 230 Vac supply voltage +S235 DCS800-EP 230VAC Supply-1
7. Fan/blower motor starters – panel frames A and B1.0 – 1.3 Amps 1.3 – 1.7 Amps1.7 – 2.3 Amps2.3 – 3.1 Amps3.1 – 4.2 Amps4.2 – 5.7 Amps5.7 – 7.6 Amps
+M635+M636+M637+M638+M639+M640+M641
NANANANANANANA
8. Fan/blower motor starters – panel frame C and D1.3 – 1.8 Amps 1.7 – 2.1 Amps2.2 – 3.1 Amps2.8 – 4.0 Amps3.5 – 5.0 Amps4.5 – 6.5 Amps 6.0 – 8.5 Amps7.5 – 11 Amps10 – 14 Amps13 – 19 Amps18 – 25 Amps24 – 32 Amps29 – 42 Amps
+M611+M612+M613+M614+M615+M616+M617+M618+M619+M620+M621+M622+M623
NANANANANANANANANANANANANA
Other DCS800 documentationThis manual describes the unique features of the DCS800-EP Panel Drive. For general information about the DCS800 module, please refer to the following:
DCS800 Quick Guide 3ADW000191 DCS800 Firmware Manual 3ADW000193 DCS800 Hardware Manual (modules) 3ADW000194 DCS800 Technical Catalog DCS800-PHTC01U-EN
Also see: DCS800-EP Replacement Guide for FlexPak® 3000 DCS800-PHTG01U-EN
*See the Firmware Manual or Hardware Manual for references to other DCS800 publications.
FlexPak® 3000 is a registered trademark of Rockwell Automation, Inc.

DCS800-EP Installation and Start-Up Manual 11
Mechanical installation
Unpacking the unit• Remove the corrugated paperboard box by
removing the shipping straps and lifting the box up and off of the shipping pallet.
• Remove the wrapper, plastic and other packing material. Retain the accessory kit!
• Remove the screws holding the drive to the wood pallet.
• For frame A, the drive can be lifted. All drives have lifting holes to allow for mechanical lift.
Delivery check• Check that there are no signs of damage.
• Before attempting installation and operation, check the information on the label of the drive to verify that the unit is of the correct size and type. A typical label is shown.
DCS800 PANEL DRIVE
781
775
See Hardware Manual
A (largest motor)
Amps Total
Model No.
Input (I1n)
SCCR
Output (I2n)
65
775
950
DCS800-EP1-0020-05+F278+E213+0F250+M602
Adc
A
KA RMS sym. @460V
Volts (U2)
Volts (U1)
240/500dc
230/460-3
Power (Pn)
Field (If)
Hz
600HP
6 Adc
50/60
450 kW
UL File #E165086
A
B C
D
E
F
G
A Input current for entire panelB Input current for the drive module onlyC Drive module rated input currentD Drive module rated output currentE Drive module rated input voltageF Drive module rated output voltageG Drive module rated power

12 DCS800-EP Installation and Start-Up Manual
Requirements for installation The drive must be installed in an upright position within a cabinet or other enclosure.
The cabinet size, heat dissipation capability and clearances must conform to the requirements below.
Refer to Dimensional drawings for frame details.
See Cabinet cooling and air flow for the allowed ambient conditions of the drive.
Minimum clearances When installing the panel in a cabinet, minimum clearances from the panel to the cabinet walls, top and bottom must be maintained. This space is required for proper cabling,coolingairflow,serviceandmaintenance.Ifonedriveismounteddirectlyabove another, see DCS800 Hardware Manual “Mechanical Installation” for additional information.
See chapter Dimensional drawings.
Frame X1 (side) X2 (top) X3 (bottom)A 0.5 in.
(13 mm)5.0 in.
(127 mm)4.0 in.
(102 mm)
B 0.5 in. (13 mm)
10.0 in. (254 mm)
5.0 in. (127 mm)
C 0.5 in. (13 mm)
10.0 in. (254 mm)
5.0 in. (127 mm)
D 2.0 in. (51 mm)
12.0 in. (305 mm)
5.0 in. (127 mm)
Frame D Depth: Frame D drives without circuit breaker have live lugs at the highest point on the drive. Sixteen inches of cabinet depth is required plus a minimum of 1/2" air gap between lugs and cabinet door or as required by applicable codes. REMEMBER: doormayflexinward!
USFMCCUSFMCC
Frame D side view

DCS800-EP Installation and Start-Up Manual 13
Cabinet cooling and air flowCabinets must be sized to accommodate minimum clearances as described in the previous section and in the DCS800 Hardware Manual.
The maximum interior cabinet ambient temperature must not exceed 40°C.
See table below for heat dissipation requirements. Cooling air enters the bottom of the drive module and exits at the top (see diagram at right).
Panel heat dissipation
HP
Non-Regenerative (2Q) Regenerative (4Q)
Total panel watts loss
Total panel watts loss
Type Code without inductor
with inductor Type Code without
inductorwith
inductor10 DCS800-EP1-0020-05 162 182 DCS800-EP2-0025-05 165 185
20 DCS800-EP1-0045-05 228 283 DCS800-EP2-0050-05 234 289
30 DCS800-EP1-0065-05 291 350 DCS800-EP2-0075-05 307 366
40 DCS800-EP1-0090-05 356 426 DCS800-EP2-0100-05 370 440
60 DCS800-EP1-0125-05 483 578 DCS800-EP2-0140-05 517 612
75 DCS800-EP1-0180-05 656 751
100 DCS800-EP2-0200-05 757 884
125 DCS800-EP1-0230-05 882 1017 DCS800-EP2-0260-05 939 1074
150 DCS800-EP1-0315-05 1074 1209 DCS800-EP2-0350-05 1143 1278
200 DCS800-EP1-0405-05 1320 – DCS800-EP2-0450-05 1342 –
250 DCS800-EP1-0470-05 1561 – DCS800-EP2-0520-05 1594 –
300 DCS800-EP1-0610-05 1975 – DCS800-EP2-0680-05 2002 –
400 DCS800-EP1-0740-05 2569 – DCS800-EP2-0820-05 2569 –
500 DCS800-EP1-0900-05 3123 – DCS800-EP2-1000-05 3108 –
600 DCS800-EP2-1010-05 3237 –

14 DCS800-EP Installation and Start-Up Manual
Planning the electrical installation
What this chapter containsThis chapter contains the instructions for selecting the cables, cable routing and line reactors for the drive panel. Always follow local regulations.
Note: If the recommendations given by ABB are not followed, the drive may experience problems that are not necessarily covered by the warranty.
Reference: Technical Guide – publ. no.: 3ADW000163
Options for the drive
Line reactorsWhen thyristor power converters operate, the line voltage is short-circuited during commutation from one thyristor to the next. This operation causes voltage dips in the mains PCC (point of common coupling). Some ACS800-EP Panel Drives are shipped with an internal 1.5% line reactor and some are not (as indicated by the drive’s Plus Code). For the connection of a power converter system to the mains, one of the followingconfigurationsshouldbeapplied:
Configuration A When using the power converter, a minimum of impedance is required to ensure proper performance of the snubber circuit. A line reactor can be used to meet this minimum impedance requirement. The value must therefore not drop below 1% uk (relative impedance voltage). It should not exceed 10% uk, due to considerable voltage drops at converter output.
Configuration B If special requirements have to be met at the PCC (standards like EN 61800-3, DC and AC drives at the same line, etc), different criteria must be applied for selecting a line reactor.Theserequirementsareoftendefinedasavoltagedipinpercentofthenominal supply voltage. The combined impedance of ZLine and ZL1 constitute the total series impedance of the installation. The ratio between the line impedance and the line reactor impedance determines the voltage dip at the connecting point. In such cases line chokes with an impedance around 4% are often used.
Example calculation with Uk Line=1%; Uk L1=4%; Voltage Dip = ZLine/(ZLine+ZL1)=20%. Detailed calculation see Technical Guide.

DCS800-EP Installation and Start-Up Manual 15
Line reactors (cont)
Configuration C If an isolation transformer is used, it is possible to comply with certain connecting conditionsperConfigurationBwithoutusinganadditionallinereactor.TheconditiondescribedinConfigurationAwillthenlikewisebesatisfied,sincetheuk is >1 %.
Configuration C1 If2ormoreconvertersaresuppliedbyonetransformer,thefinalconfiguration
depends on the number of drives in use and their power capability.
EitherconfigurationAorB(whicharebasedoncommutationchokes)hastobeused, if the drive system consists of any of the converters (D1, D2, D3, D4.)
With reference to the power converter:The line reactors are listed in the table on page 30. They:
• have been sized to the units nominal current
• are based on a duty cycle
For further information in this publication:
See chapter Accessories - Line reactors.

16 DCS800-EP Installation and Start-Up Manual
Typical cable sizing and tightening torqueBased on U.S. NEC Table 310.16. No more than three current carrying conductors per raceway. Maximum Ambient Temperature - 40°C, Conductor Temperature Rating - 75°C except where noted.
Drive Panel
460Vac/500Vdc 230Vac/240Vdc AC input L1, L2, L3
DC output C2, D2
Ground PE
Tightening Torque (ft-lb)
HP IAC (amps)
IDC (amps) HP IAC
(amps)IDC
(amps)Typical Cable
Typical Cable
Minimum Cable j
with breaker
without breaker
L1-L2-L3 L1-L2-L3 C2, D2 PE DCS800-EP1-0020-05 10 14 17 5 16 20 12 AWG1 10 AWG 12 AWG 35 in-lb 10 10DCS800-EP2-0025-05 10 14 17 5 16 20 12 AWG1 10 AWG 12 AWG 35-40 in-lb 10 10DCS800-EP1-0045-05 20 29 35 10 30 37 8 AWG 8 AWG1 10 AWG 45 in-lb 10 10DCS800-EP2-0050-05 20 29 35 10 30 37 8 AWG 8 AWG1 10 AWG 45 in-lb 10 10DCS800-EP1-0065-05 30 43 53 15 44 54 6 AWG 4 AWG 10 AWG 45-50 in-lb 10 10DCS800-EP2-0075-05 30 43 53 15 44 54 6 AWG 4 AWG 10 AWG 50 in-lb 10 10DCS800-EP1-0090-05 40 55 68 20 58 71 4 AWG 2 AWG 8 AWG 50 in-lb 10 10DCS800-EP2-0100-05 40 55 68 20 58 71 4 AWG 2 AWG 8 AWG 50 in-lb 10 10DCS800-EP1-0125-05 60 85 104 30 86 105 1 AWG 1/0 AWG 6 AWG 50 in-lb 10 10DCS800-EP2-0140-05 60 85 104 30 86 105 1 AWG 1/0 AWG 6 AWG 50 in-lb 10 10DCS800-EP1-0180-05 75 102 125 30 102 125 1/0 AWG 3/0 AWG 6 AWG 23 15 23 9DCS800-EP2-0200-05 100 134 164 50 143 175 3/0 AWG 250 MCM 6 AWG 23 21 23 9DCS800-EP1-0230-05 125 167 205 60 168 206 250 MCM 350 MCM 4 AWG 23 27 23 9DCS800-EP2-0260-05 125 167 205 60 168 206 250 MCM 350 MCM 4 AWG 23 27 23 9 DCS800-EP1-0315-05 150 200 245 75 208 255 300 MCM 2 350 MCM 2 4 AWG 23 27 23 9DCS800-EP2-0350-05 150 200 245 75 208 255 300 MCM 2 350 MCM 2 4 AWG 23 27 23 9DCS800-EP1-0405-05 200 265 325 100 278 341 500 MCM 3, 5 2 x 250 MCM 4 2 AWG 23 23 23 31DCS800-EP2-0450-05 200 265 325 100 278 341 500 MCM 3, 5 2 x 250 MCM 4 2 AWG 23 23 23 31DCS800-EP1-0470-05 250 330 405 125 347 425 2 x 250 MCM 3 2 x 350 MCM 4 2 AWG 23 23 23 31DCS800-EP2-0520-05 250 330 405 125 347 425 2 x 250 MCM 3 2 x 350 MCM 4 2 AWG 23 23 23 31DCS800-EP1-0610-05 300 392 480 150 413 506 2 x 300 MCM 1, 3 2 x 500 MCM 4 2 AWG 23 23 23 31DCS800-EP2-0680-05 300 392 480 150 413 506 2 x 300 MCM 1, 3 2 x 500 MCM 4 2 AWG 23 23 23 31DCS800-EP1-0740-05 400 522 640
NA
2 x 500 MCM 3 x 350 MCM 1/0 AWG 31 42 42 31DCS800-EP2-0820-05 400 522 640 2 x 500 MCM 3 x 350 MCM 1/0 AWG 31 42 42 31DCS800-EP1-0900-05 500 649 795 3 x 350 MCM 3 x 500 MCM 2/0 AWG 31 42 42 31DCS800-EP2-1000-05 500 649 795 3 x 350 MCM 3 x 500 MCM 2/0 AWG 31 42 42 31DCS800-EP2-1010-05 600 775 950 3 x 350 MCM 4 x 500 MCM 2/0 AWG 31 42 42 31
1 For 230V, use one size larger cable diameter2 Use 90°C wire3 UnlessCircuitBreakeroptionisselected,connectingcablesrequirecoppercompressionlugswithclosedholestofitthedrive’s10mmbolts(2perterminal).4 Connectingcablesrequirecoppercompressionlugswithclosedholetofitthedrive’s10mmbolt(2perterminal).5 For 230V, use (2) 250 MCM
For drives requiring compression lugs, use these Ilsco lugs or equivalents as shown below. Compression lugs to be installed according to the manufacture’s requirements.
Cable Size Recommended Lug
250 MCM CRA-250300 MCM CRA-300350 MCM CRA-350500 MCM CRA-500-12
NOTE: Cable size recommendations in this manual are different from what is shown in the DCS800 Hardware Manual. For DS800-EP, these recommendations should be followed. Wire sizing in the DCS800 Hardware Manual is at Continuous Duty ratings and in this manual, Heavy Duty ratings. At Heavy Duty ratings, the drive’s nominal current is lower due to derating so smaller wire could possibly be used.
j The minimum ground cable recommendation assumes that the overcurrent protection for each drive is selected to provide protection at 125% of the rated drive input current. If the overcurrent protection (e.g. circuit breaker) is sized larger than this, then larger ground cables will need to be determined manually.

DCS800-EP Installation and Start-Up Manual 17
Electrical installation
What this chapter containsThis chapter describes the electrical installation procedure of the drive.
WARNING! The work described in this chapter may only be carried out by a qualified electrician. Follow the Safety instructions on the first pages of this manual. Ignoring the safety instructions can cause injury or death.Make sure that the drive is disconnected from the mains (input power) during installation. If the drive was already connected to the mains, wait for 5 min. after disconnecting mains power.
Reference: Technical Guide - publ. no.: 3ADW000163
Checking the insulation of the assemblyEach drive is factory tested for insulation between the main circuit and the chassis (2500 V rms 50 Hz for 1 second). DO NOT make any voltage tolerance or insulation resistance tests (e.g. hi-pot or megger) on any part of the drive or drive damage will occur. Check the insulation of the assembly as follows.
WARNING! Check the insulation before connecting the drive to the mains. Make sure that the drive is disconnected from the mains (input power).1. Check that the motor cable is disconnected from the drive output terminals C2, D2, F+ and F-.2. Measure the insulation resistances of the motor cable and the motor between each circuit (C2, D2) or (F+, F-) and the Protective Earth by using a measuring voltage of 1 kV DC. The insulation resistance must be higher than 1 Mohm.

18 DCS800-EP Installation and Start-Up Manual
IT (ungrounded) systemsDon’tuseEMCfilters.
The screen winding of dedicated transformers must be grounded.
For installation without low voltage switch (e.g. contactor, air-circuit-breaker) use overvoltage protection.
The voltage shift of isolated supply must be limited of a range of an earth fault.
Check supply voltages• Aux X99
• Fan Terminals
• AC voltage for armature circuit U1, V1, W1
Connecting the power cablesGrounding and screening of power cables see manual Technical Guide, see Reference.
Cross sectional areas and tightening torques of power cable see chapter Planning the electrical installation.

DCS800-EP Installation and Start-Up Manual 19
Power/control connections
Typical location for input and output terminals.

20 DCS800-EP Installation and Start-Up Manual
Connection diagram
Customer connection
Optional drive feature
Legend
X99:
U1
W1
V1
PE
F1
T1
115V
AITAC
AI1
AI2
AI3
AI4
AO1
AO2
IACT
DI1
DI2
DI3
DI4
DI5
DI6
DI7
DI8
+24V
__
_+
++
++
M
10
…...
.
X5:
+ _
T
K2
MTR
Power supply
DCS800Converter
module
'on board' field exciter
* set by[50.12],[50.13]
CustomerBlowerMotor
(optional)
F5F4
F2
F3
F10
F11
F9
Optional Blower Motor Starter
OptionalLine
Reactor
Power Structure
Control Structure
115V
+10V
-10V
__
_+
M
0V
0V
X3:
X4:
X6:1
2
3
4
5
6
78
9
X7:
+
_
+ _
S156
F6
*
the polarities are shown
for motoring
if there are interm-ediate terminals
VoltagelevelsSee
Description
TT
Fan Acknowledge
E-Stop
Reset
On / OffStart / Stop
DO1
DO2
DO3
DO4
DO5
DO6
DO7
0V
1
2
3
4
5
6
78
1
10
10
1
2
4
5
6
78
9
3
0V
0V
10
1
2
4
5
6
78
9
3
Note: If Blower Motor Starter option has not been selected, DI2 must be programmed “Not Used”. See Parameter Settings Table
K2Optional Input
X96:
1
2DO8
K1
AC3Φ
Input
F8
F7C1
D1
K1
K2
OL2
OptionalBlower motor
Starter
OL2
2
1
K1-AUX43
3 Amps Max110Vac24 Vdc
F7 & F8on regenunits only
L1
L2
L3
PE
F+
F-
C2
D2
X6:
10
1
2
3
4
5
6
78
9
Fan Acknowledge
Coast Stop (Off2)
Reset
Start
Not Stop
K2
JogRev/Fwd
Auto/Manual
Optional I/O configuration if 3-wire jog macro is loaded (97.08, 97.07)
X10
Customer connection

DCS800-EP Installation and Start-Up Manual 21
Control circuit connectionsDCS800-EP drives are shipped with Factory Default parameter settings except as showninthetablebelow.Motoron/offcontrolisconfiguredfor2-wire(maintainedinput) control.
For parameter settings matching the FlexPak 3000, see ABB document: DCS800-PHTG01u-EN Replacement Guide, DCS800-EP replaces the Reliance FlexPak® 3000.
Parameter settings for I/O
Digital Inputs
Input Factory Default Function Parameter Setting Notes
1 Unused 10.20 NOT USED
2 Fan Acknowledge
10.06 DI2 Change to “not used” if optional blower
motor starter is not selected.
3 Unused 10.21 NOT USED
4 Unused 10.08 NOT USED
5 P E-Stop 10.09 DI5
6 P Reset 10.03 DI6
7 P On / Off 10.15 DI7
8 P Start / Stop 10.16 DI8
NOTE: Setting “On / Off” will command the drive to close the contactor and enable the SCRs tofireataneutralsetting.When“Start/Stop”isset,themotorwillacceleratetothereferencespeed.
Analog Inputs
Input Function Parameter Setting NotesAI1 Speed Reference 11.03
13.01 13.02 13.03
Dependent on type of reference
input
See 5.03 for actual AI1 value
Reliance Electric® and FlexPak® 3000 are registered trademarks of Rockwell Automation, Inc.

22 DCS800-EP Installation and Start-Up Manual
Alternate line voltage (converting to 230 Vac line)Drive panels as received from the factory, except if “+S235” is in the type code (see page 10), are wired for an input voltage of 460 V, 60 Hz. If the ac input line voltage is to be 230Vac,modificationsmustbemade.
230/460Vacrateddrivescanbeconfiguredforeither230or460Vacinputpower.Beforeapplyingpower,itisrequiredtoverifythecontroltransformerconfigurationmatchestheincoming power. This is done by checking the jumpers on the “H” side of the transformer or by following the test procedure shown below. Failure to follow this precaution could result in severe damage.
DCS800-EPx-020-05 thru DCS800-EPx-0680-05
Default 480V 230V Reconnect
230 Vac Modification Procedure1. Disconnect and lock out all incoming power to the drive.
2. Locate the control transformer. For panel frame A, drive module must be removed togainaccess.(CarefullyunpluggreenconnectorsX3-X7first.)Forpanelframe B, transformer is located below line fuses. For frame C, the transformer is in plain view or may be located below the circuit breaker mounting plate.
3. Remove the jumper between H2 and H3.
4. Reconnect new jumpers between H1 and H3 and between H2 and H4. Remount and reconnect the drive (frame A).
5. Remove and replace the primary fuses F4 and F5 with fuses shown in the table above.
Live Test Procedure1. Open the F6 fuse holder to disconnect control power to the drive and blower
motor starter (if present).2. Connect 3-phase power and close disconnect 1MCB.3. Measure voltage between fuse F6 and Terminal 2. If not 110 to 120 Vac,
disconnect3-phasepowerandopendisconnect1MCB.Reconfigurecontroltransformer jumpers. Repeat live test.
4. Close the F6 fuse holder. Control power to the drive should then be connected. Control Panel will light up.
5. The drive module itself must be reprogrammed for 230 Vac input by adjusting parameter 99.10 (Nominal AC mains voltage) to a value of “230.”
Input Power F4 and F5 Fuses DCS800-EPx-350-05 and below
230 Vac input 460 Vac input
Use (2) FNQR 2 Use (2) FNQR 1-1/8
DCS800-EPx-405-05 and above230 Vac input 460 Vac input
Use (2) FNQR 3 Use (2) FNQR 2

DCS800-EP Installation and Start-Up Manual 23
Installation checklist
Check the mechanical and electrical installation of the drive before start-up. Go through the checklist below together with another person. Read the Safety instructionsonthefirstpagesofthismanualbeforeyouworkontheunit.
CheckMechanical Installation
• The cabinet internal ambient temperature and the external ambient air temperature are within limits (See Mechanical installation and Technical data).
• Thecabinetisverticallymountedonanon-flammablesurface.
• Thecoolingaircanflowfreely.
• The motor and the driven equipment are ready for start. (See Planning the electrical installation)
• All shield and grounding connections are properly tightened.
• All cable connections are seated properly and tightened accordingtospecifiedtorque.(SeeTypicalcablesizingandtightening torque)
Electrical Installation (See Planning the electrical installation, Electrical installation)
• The drive is properly grounded.
• The AC input voltage matches the drive nominal input voltage.
• The AC input cables are properly seated and tightened to specifiedtorque.(SeeTypicalcablesizingandtighteningtorque)
• The motor cables (C1, D1 and F+, F-) are properly seated and tightenedtospecifiedtorque.(SeeTypicalcablesizingandtightening torque)
• Proper function of the E-Stop circuitry.
• Fan power wiring is connected.
• Control connections are properly made and logic is sound.
• There are no tools, foreign objects, dust or debris from drilling inside the drive.
• Covers are in place on the drive, motor and any connection boxes.

24 DCS800-EP Installation and Start-Up Manual
Dimensions and weight
Dimensional and weight dataAs Built
DSC800-EP Panel Drive
HP at 460 Vac
Weight - no reactor
lb. (kg)
Weight - with reactor
lb. (kg)Frame Size
Height in. (mm)
Width in. (mm)
Depth in. (mm)
10 54 (25) 61 (28)
A 18.79(477)
12.15(309)
14.40(366)
20 57 (26) 65 (30)30 59 (27) 67 (30)40 62 (28) 73 (33)60 62 (28) 88 (40)75 95 (43) 128 (58)
B 19.29(490)
20.00(508)
13.82*(351)
100 103 (47) 157 (71)125 103 (47) 163 (74)150 130 (59) 185 (84)200 231 (105) na
C 35.32(897)
23.58(599)
16.17(411)250 231 (105) na
300 260 (118) na400 355 (161) na
D 45.66(1160)
26.68(678)
16.00 (406) /19.65 (499)**500 355 (161) na
600 355 (161) na
*19.32 inch depth when internal reactor option is included**Depth without circuit breaker option / depth with circuit breaker option
As Shipped
DCS800-EP Panel Drive
HP at 460 Vac
Weight - no reactor
lb. (kg)
Weight - with reactor
lb. (kg)Frame Size
Height in. (mm)
Width in. (mm)
Depth in. (mm)
10 63 (29) 70 (32)
A 28(711)
31(787)
31(787)
20 66 (30) 74 (34)30 68 (31) 76 (35)40 71 (32) 82 (37)60 71 (32) 82 (37)75 104 (47) 137 (62)
B 28(711)
31(787)
31(787)
100 112 (51) 166 (75)125 112 (51) 166 (75)150 139 (63) 194 (88)200 247 (112) na
C 28(711)
55(1397)
31(787)250 247 (112) na
300 276 (125) na400 371 (169) na
D 28(711)
55(1397)
31(787)500 371 (169) na
600 371 (169) na

DCS800-EP Installation and Start-Up Manual 25
Dimensional drawings
Frame A
Frame B
Use M6 or 1/4 in. mounting hardware
Use M8 or 5/16 in. mounting hardware

26 DCS800-EP Installation and Start-Up Manual
Frame C
T5
A210A260A300
CONTA
CTO
R
Use M10 or 3/8" moun�ng hardware
35.32"
0.50"
2.66"
16.17"
33.50"
32.43"
0.57"
23.58"
2.41"9.45"9.06"

DCS800-EP Installation and Start-Up Manual 27
Frame D – without circuit breaker option
Use M10 or 3/8" mounting hardware

28 DCS800-EP Installation and Start-Up Manual
Frame D – with circuit breaker option
Use M10 or 3/8" mounting hardware

DCS800-EP Installation and Start-Up Manual 29
Replacement parts
FusesPanel Drive
Frame
Fuse
Non-Regenerative Regenerative
AC in (module) F1, F2, F3
Control Xfmr primary F4, F5
(2 Req’d)
Control Xfmr secondary
F6
DC Out (motor) F7, F8,
AC in (Blower motor starter) F9, F10, F11
Manufacturer Bussmann Bussmann Bussmann Bussmann BussmannDCS800-EP1-0020-05 DCS800-EP2-0025-05 A FWH-50B
For 480 Vac input voltage: FNQR-1-1/8
For 230 Vac input voltage
FNQR-2
FNM-2-8/10 (2) FWH-50B
See Table next page
DCS800-EP1-0045-05 DCS800-EP2-0050-05 A FWH-80B FNM-2-8/10 (2) FWH-80B
DCS800-EP1-0065-05 DCS800-EP2-0075-05 A FWH-80B FNM-2-8/10 (2) FWH-80B
DCS800-EP1-0090-05 DCS800-EP2-0100-05 A FWH-125B FNM-2-8/10 (2) FWH-125B
DCS800-EP1-0125-05 DCS800-EP2-0140-05 A FWH-125B FNM-2-8/10 (2) FWH-125B
DCS800-EP1-0180-05 – B FWH-200B FNM-2-8/10 (2) FWH-200B
– DCS800-EP2-0200-05 B FWH-200B FNM-2-8/10 (2) FWH-200B
DCS800-EP1-0230-05 DCS800-EP2-0260-05 B FWH-250A FNM-2-8/10 (2) FWH-250A
DCS800-EP1-0315-05 DCS800-EP2-0350-05 B FWH-300A FNM-2-8/10 (2) FWH-300A
DCS800-EP1-0405-05 DCS800-EP2-0450-05 C 170M6011
For 480 Vac input voltage:
FNQR-2FNM-4 (1) 170M6011
DCS800-EP1-0470-05 DCS800-EP2-0520-05 C 170M6011 For 230 Vac
input voltage: FNQR-3
FNM-4 (1) 170M6011
DCS800-EP1-0610-05 DCS800-EP2-0680-05 C 170M6013 FNM-4 (1) 170M6013
DCS800-EP1-0740-05 DCS800-EP2-0820-05 D 170M6013 FNQR-3 FNM-8 (2) 170M6013
DCS800-EP1-0900-05 DCS800-EP2-1000-05 D 170M6016 FNQR-3 FNM-8 (2) 170M6016
– DCS800-EP2-1010-05 D 170M6016 FNQR-3 FNM-8 (2) 170M6016
Fuse tightening torque for AC in (F1 – F3) and DC out (F7 – F8) fuses
HP at 460V Frame Size Tightening Torque ft-lb (Nm) Bolt Size
10 - 60 A 5 (7) 1/4"-20
75 - 150 B 16 (22) 3/8"-16
200 - 300 C 15 (20) M10
400 - 600 D 15 (20) M10

30 DCS800-EP Installation and Start-Up Manual
Blower motor starter
Plus Code Blower HP460Vac
Blower HP230Vac
Blower Amps460V/230V
Fuses F9, F10, F11 Contactor Overload
Bussmann ABB ABB
+M600 1/2 - 1.1 LP-CC-3 1/2
Mini Contactor 120VAC coil B7-30-10-84
T7DU1.6
+M600 3/4 - 1.6 LP-CC-5 T7DU1.6
+M601 1 1/2 2.1/2.2 LP-CC-5 T7DU2.4
+M602 1.5 3/4 3.0/3.2 LP-CC-8 T7DU4.0
+M602 2 - 3.4 LP-CC-10 T7DU4.0
+M602 - 1 4.2 LP-CC-15
Mini Contactor 120VAC coil B7-30-10-84
T7DU4.0
+M603 3 - 4.8 LP-CC-15 T7DU6.0
+M603 - 1 1/2 6.0 LP-CC-20 T7DU6.0
+M604 - 2 6.8 LP-CC-20 T7DU9.0
+M604 5 - 7.6 LP-CC-25 T7DU9.0
+M635 1/2 - 1.1 LP-CC-2
Mini contactor 120 Vac coilB7-30-10-84
T16-1.3
+M636 3/4 - 1.6 LP-CC-3.2 T16-1.7
+M637 1 1/2 2.1/2.2 LP-CC-4 T16-2.3
+M638 1.5 - 3.0 LP-CC-6 T16-3.1
+M639 2 3/4 3.4/3.2 LP-CC-6 T16-4.2
+M640 3 1 4.8/4.2 LP-CC-10 T16-5.7
+M641 - 1-1/2 6 LP-CC-10 T16-7.6
+M641 - 2 6.8 LP-CC-10 T16-7.6
+M641 5 - 7.6 LP-CC-15 T16-7.6
+M611 3/4 - 1.6 LPJ-3-2/10-SP
ABB contactor 120V coil
A26-30-10-84
TA25DU1.8-20
+M612 1 - 2.1 LPJ-4SP TA25DU2.1-20
+M613 1.5 - 3.0 LPJ-6SP TA25DU3.1-20
+M614 2 3/4 3.4/3.2 LPJ-6SP TA25DU4.0-20
+M615 3 1 4.8/4.2 LPJ-8SP TA25DU5.0-20
+M616 - 1-1/2 6 LPJ-10SP TA25DU6.5-20
+M617 5 2 7.6/6.8 LPJ-15SP TA25DU8.5-20
+M618 7.5 3 11/9.6 LPJ-20SP TA25DU11-20
+M619 10 14 LPJ-20SP TA25DU14-20
+M620 5 15.2 LPJ-25SP TA25DU19-20
+M621 15 7.5 21/22 LPJ-30SP TA25DU25-20
+M622 20 10 27/28 LPJ-40SP TA25DU32-20
+M623 25 - 30 15 34 - 40/42 LPJ-60SP A40-30-10-84 TA42DU42-20

DCS800-EP Installation and Start-Up Manual 31
Other replacement partsPanel Drive
FrameAC Input Contactor
K1 (1)Control Transformer
T1 (1)Circuit Breaker
1MCB (1)Line
Reactor (1)Non-Regenerative RegenerativeManufacturer ABB Micron ABB TCI
DCS800-EP1-0020-05 DCS800-EP2-0025-05 A A16-30-10-84 1B250BTZ13JKF T2H025E5W KLR16BTB
DCS800-EP1-0045-05 DCS800-EP2-0050-05 A A26-30-10-84 1B250BTZ13JKF T2H060E5W KLR35BTB
DCS800-EP1-0065-05 DCS800-EP2-0075-05 A A40-30-10-84 1B250BTZ13JKF T2H060E5W KLR45BTB
DCS800-EP1-0090-05 DCS800-EP2-0100-05 A A50-30-11-84 1B250BTZ13JKF T2H100E5W KLR55BCB
DCS800-EP1-0125-05 DCS800-EP2-0140-05 A A75-30-11-84 1B250BTZ13JKF T2HQ100BW KLR110BCB
DCS800-EP1-0180-05 – B A95-30-11-84 1B250BTZ13JKF T4H150E5W KLR110BCB
– DCS800-EP2-0200-05 B A145-30-11-84 1B250BTZ13JKF T4H250E5W KLR160BCB
DCS800-EP1-0230-05 DCS800-EP2-0260-05 B A145-30-11-84 1B250BTZ13JKF T4H250E5W KLR200BCB
DCS800-EP1-0315-05 DCS800-EP2-0350-05 B A145-30-11-84 1B250BTZ13JKF T4H250E5W KLR200BCB
DCS800-EP1-0405-05 DCS800-EP2-0450-05 C A260-30-11-84 B350BTZ13JKF T5H400E5W KLR300BCB
DCS800-EP1-0470-05 DCS800-EP2-0520-05 C A300-30-11-84 B350BTZ13JKF T5H600E5W KLR360BCB
DCS800-EP1-0610-05 DCS800-EP2-0680-05 C A300-30-11-84 B350BTZ13JKF T5H600E5W KLR420BCB
DCS800-EP1-0740-05 DCS800-EP2-0820-05 D AF400-30-11-70 B750BTZ13JKF T6H800E5W KLR600BCB
DCS800-EP1-0900-05 DCS800-EP2-1000-05 D AF460-30-11-70 B750BTZ13JKF T7H1200E5W KLR750BCB
– DCS800-EP2-1010-05 D AF750-30-11-70 B750BTZ13JKF T7H1200E5W KLR850BCB

32 DCS800-EP Installation and Start-Up Manual
Technical data
Electrical and environmental data
Specification Permitted ValueElectrical
Input Voltage, 3-Phase 230 / 460 Vac
Input voltage deviation ±10% continuous, ±15% short time
Note: Special consideration must be given to voltage deviation in regeneration mode.
Rated Frequency 50 Hz. or 60 Hz. ±2%
Environmental
Cabinet internal ambient temperature 0 to 40°C
Change of ambient temperature < 0.5°C
Relative humidity 5% to 95%, non-condensing
Site altitude < 1000 m above sea level at 100% current > 1000 m above sea level at reduced current
Storage temperature -40 to +55°C
Transportation temperature -40 to +70°C
Reference DSC800 Hardware Manual Technical Data
SpecificationsEnvironmental
Cabinet internal ambient temperature: 0 to 40 C Protection Class: UL Type Open / IP00
Overload150 pct of rated current for 60 seconds followed by 15 minutes at rated current or below NOTE: Cannot be rerated for higher continuous current since all system components are sized based on these ratings
Input reactance1.5 pct impedance when optional line reactor is included (available up to 150 hp) NOTE: All drives require line reactor or dedicated isolation transformer with input impedanceof1.5pctmin;4to10pctmaxdependingonsystemconfiguration.See“Line Reactors” in DCS800 Hardware Manual for details.
Fuse ProtectionAC input line fuses (3) DC output armature fuses, regen only (2)

DCS800-EP Installation and Start-Up Manual 33
Circuit breaker Protection (optional)Instantaneous trip: All Drives: Factory set at 300 pct of rated current
Thermal overload trip: 60 HP (DCS800-EP1-0125-05 and DCS800-EP2-0140-05) only: Factory set to 100 pct of rated current
Control transformer230/460 Vac primary; 120 Vac secondary
Unit Type (2 Quadrant) Unit Type (4 Quadrant)460V Motor
HP
Capacity
(VA)
Capacity @ 115V (Amps)
Drive Load
(Amps)
Blower Starter Load
(Amps)
- Available -
no Starter(Amps)
with Starter(Amps)
DCS800-S01-0020-05 DCS800-S02-0025-05 10
250 2.17
1.46
0.03
0.71 0.68
DCS800-S01-0045-05 DCS800-S02-0050-05 20 1.49 0.68 0.65
DCS800-S01-0065-05 DCS800-S02-0075-05 30 1.49 0.68 0.65
DCS800-S01-0090-05 DCS800-S02-0100-05 40 1.55 0.63 0.60
DCS800-S01-0125-05 DCS800-S02-0140-05 60 1.55 0.63 0.60
DCS800-S01-0180-05 — 75 1.62 0.56 0.53
— DCS800-S02-0200-05 100 1.74 0.44 0.41
DCS800-S01-0230-05 DCS800-S02-0260-05 125 1.74 0.44 0.41
DCS800-S01-0315-05 DCS800-S02-0350-05 150 1.74 0.44 0.41
DCS800-S01-0405-05 DCS800-S02-0450-05 200
350 3.04
2.3
0.11
0.75 0.64
DCS800-S01-0470-05 DCS800-S02-0520-05 250 2.3 0.75 0.64
DCS800-S01-0610-05+S171 DCS800-S02-0680-05+S171 300 1.85 1.19 1.08
DCS800-S01-0740-05+S171 DCS800-S02-0820-05+S171 400
750 6.52
1.85 4.67 4.56
DCS800-S01-0900-05+S171 DCS800-S02-1000-05+S171 500 2.59 3.93 3.82
— DCS800-S02-1010-05+S171 600 2.59 3.93 3.82
AC ContactorAC line contactor with (1) aux. N.O. contact for customer use: 6 Amps @ 24 – 127 Vac or 24 Vdc
Blower Motor Starter Thermal Overload RelayInom: Factorysettominimumrating.Mustbefieldadjustedtoactualblower
motor nominal current.
RESET: Factory set to MANUAL
RESET/STOP: Factory set to “R” (RESET)
See Appendix 1 for installation instructions.

34 DCS800-EP Installation and Start-Up Manual
Accessories
Line reactors
External Line Reactors
Non-Regenerative (2Q)
Regenerative (4Q) HP
Line Reactor for Configuration A
Line Reactor for Configuration B
Manufactured by TCI
1.5% impedance
Watts Loss
Weight (Lbs.)
5% impedance
Watts Loss
Weight (Lbs.)
DCS800-EP1-0020-05 DCS800-EP2-0025-05 10 KLR16BTB 20 7 KLR16CTB 58 12
DCS800-EP1-0045-05 DCS800-EP2-0050-05 20 KLR35BTB 55 8 KLR35CTB 97 22
DCS800-EP1-0065-05 DCS800-EP2-0075-05 30 KLR45BTB 59 8 KLR45CTB 118 24
DCS800-EP1-0090-05 DCS800-EP2-0100-05 40 KLR55BTB 70 11 KLR55CTB 150 32
DCS800-EP1-0125-05 DCS800-EP2-0140-05 60 KLR110BCB 95 26 KLR110CCB 191 50
DCS800-EP1-0180-05 – 75 KLR110BCB 95 26 KLR110CCB 191 50
– DCS800-EP2-0200-05 100 KLR160BCB 127 47 KLR160CCB 254 84
DCS800-EP1-0230-05 DCS800-EP2-0260-05 125 KLR200BCB 135 53 KLR200CCB 337 110
DCS800-EP1-0315-05 DCS800-EP2-0350-05 150 KLR200BCB 135 53 KLR200CCB 337 110
DCS800-EP1-0405-05 DCS800-EP2-0450-05 200 KLR300BCB 216 54 KLR300CCB 443 122
DCS800-EP1-0470-05 DCS800-EP2-0520-05 250 KLR360BCB 221 65 KLR360CCB 406 156
DCS800-EP1-0610-05 DCS800-EP2-0680-05 300 KLR420BCB 275 85 KLR420CCB 500 160
DCS800-EP1-0740-05 DCS800-EP2-0820-05 400 KLR600BCB 338 96 KLR600CCB 650 275
DCS800-EP1-0900-05 DCS800-EP2-1000-05 500 KLR750BCB 372 147 KLR750CCB 732 295
– DCS800-EP2-1010-05 600 KLR850BCB 389 150 KLR850CCB 850 300

DCS800-EP Installation and Start-Up Manual 35
Diagrams
Power diagram
T1 X1
115V
X3
H1
460V
H2
H3
H40V
F6
F4 F5
DR
IVE
CH
AS
SIS
GN
D
W1
V1
U1
DC
S80
0 P
OW
ER D
1
PE
C1
K1
12
34
56
K2
12
34
56
MO
TOR
MTR
1MC
B
21
43
65
PE
480V
/3P
H60
HZ
L3
CU
STO
ME
RS
UP
PLI
ED
L2L1
GN
D
+F27
8
F9 F10
F11
L3T3
OL2
L2L1
T2T1
GN
D
MO
TOR
MTR
PE
OP
TIO
N
F+ F-
CU
STO
ME
R
EX
CIT
ER
FIE
LDO
N-B
OA
RD
TB1
TB2
CU
STO
ME
R B
LOW
ER
OP
TIO
N+0
F250
- D
ELE
TES
K1
OP
TIO
N
LL1
LL2
(RE
D)
(RE
D/W
HT)
(WH
T)
PE
GN
D
FIE
LD
+M6x
x F1 F2 F3
L1 L2 L3
C1
A1
B1
A2
B2
C2
+E21
3O
PTI
ON
F7 F8
C2
D2
ON
LYR
EG
EN
UN
ITS

36 DCS800-EP Installation and Start-Up Manual
Control diagramControl Diagram C1 – 10 to 250 hp (DCS800-EP1-0020 through EP2-0520)
T1 X1
115V
X3
H1
460V
H2
H3
H40V
F6
DR
IVE
CO
NTA
CTO
RK
1
DR
IVE
CH
AS
SIS
1X961X99DC
S80
0 C
ON
TRO
L
2X99 2X96
D08
K1
OL2
9596
BLO
WE
R M
OTO
R S
TAR
TER
TB1
DR
IVE
FA
NS
TB2
K2
1314
A1
A2
A1
A2
2X6 9X6
K2
1314
TB 3TB 4
OP
TIO
N+M
6xx
(RE
D)
(RE
D/W
HT)
(RE
D/B
LK)
(RE
D/O
RN
)
(RE
D/Y
EL)
(RE
D/W
HT)
(BR
N)
(YE
L)
(WH
T)
(WH
T/B
LK)
(OR
N)
(WH
T/O
RN
)
(WH
T/Y
EL)
(BLU
)
(VIO
)
(WH
T/R
ED
)
1X2
4X2
2X2 3X2
FAN
FAN
(RE
D/B
LU)
3
(WH
T/R
ED
)

DCS800-EP Installation and Start-Up Manual 37
Control Diagram C2 – 300 to 600 hp (DCS800-EP1-0610 through EP2-1010)
T1 X1
115V
X3
H1
460V
H2
H3
H40V
F6
DR
IVE
CO
NTA
CTO
RK
1
DR
IVE
CH
AS
SIS
1X961X99DC
S80
0 C
ON
TRO
L
2X99 2X96
D08
K1
OL2
9596
BLO
WE
R M
OTO
R S
TAR
TER
TB1
DR
IVE
FA
NS
TB2
K2
1314
A1
A2
A1
A2
2X6 9X6
K2
1314
TB 3TB 4
OP
TIO
N+M
6xx
(RE
D)
(RE
D/W
HT)
(RE
D/B
LK)
(RE
D/O
RN
)
(RE
D/Y
EL)
(RE
D/W
HT)
(BR
N)
(YE
L)
(WH
T)
(WH
T/B
LK)
(OR
N)
(WH
T/O
RN
)
(WH
T/Y
EL)
(BLU
)
(VIO
)
(WH
T/R
ED
)
1X2
X2
3X2
FAN
2
3
(WH
T/R
ED
)

38 DCS800-EP Installation and Start-Up Manual
en Warning! The installation and the operation of this device and any maintenance must be carried out by a qualifi ed person in accordance with specifi c local standards and safety regulations. Before installing this device, read these operating instructions carefully. Don’t touch live parts. To avoid damages to persons and material the devices have to be replaced in case of mechanical and/or electrical damage. These operating and installation instructions cannot claim to contain all detailed information of this product and can even not consider every possi-ble application of the products. All statements serve exclusively to describe the product and have not to be understood as assured characteristics with legal force. Further information and data is obtainable from the catalogues and data sheets of this product, from the local ABB sales organisa-tions as well as on the ABB homepage http://www.abb.com. Subject to change without prior notice. The English text applies in cases of doubt
de Warnung! Die Installation und die Inbetriebnahme dieses Gerätes sowie jegliche Wartungsarbeiten müssen durch eine qualifi zierte Fachkraft durch-geführt werden. Dabei sind lokale Normen und Sicherheitsvorschriften zu beachten. Vor der Installation des Gerätes muss diese Betriebsanleitung aufmerksam gelesen werden. Spannung führende Teile nicht berühren. Um Personen- und Sachschäden auszuschließen, müssen die Geräte im Fall einer mechanischen und/oder elektrischen Beschädigung unbedingt ausgetauscht werden.Diese Betriebsanleitung enthält nicht sämtliche Detailinformationen zu der Produktreihe und kann auch nicht jeden Einsatzfall der Produkte berück-sichtigen. Alle Angaben dienen ausschließlich der Produktbeschreibung und sind nicht als zugesicherte Eigenschaften im Rechtssinne aufzufassen. Weiterführende Informationen und Daten erhalten Sie in den Katalogen und Datenblättern der Produkte, über die örtliche ABB-Niederlassung sowie auf der ABB Homepage unter http://www.abb.com. Technische Änderungen jederzeit vorbehalten. In Zweifelsfällen gilt der englische Text.
es ¡Advertencia! La instalación y la puesta en funcionamiento de este dispositivo, así como cualquier trabajo de mantenimiento, deberán ser ejecutados por una persona competente cualifi cada. En esto, deberán observarse las normas locales y las normas de seguridad. No tocar piezas que se encuentren bajo tensión. Para evitar daños personales y materiales, los dispositivos deberán se sustituidos al presentar cualquier daño mecánico y/o eléctrico. Este manual de usuario no contiene todos los datos detallados con respecto a la serie de productos, y tampoco podrá tener en cuenta cada uno de los casos de aplicación de los productos. Todas las indicaciones únicamente sirven para describir el producto y no deberán ser consideradas propiedades aseguradas en el sentido de la Ley. Información más detallada y demás datos pueden obtenerse de los catálogos y las hojas de datos de los productos, a través de la sucursal de ABB local, así como en la homepage de ABB en http://www.abb.com. Modifi caciones técnicas reservadas en cualquier momento. En casos de duda será válido el texto inglés.
fr Attention ! L’installation et la mise en service de cet appareil ainsi que toute opération de maintenance doivent être réalisées par une personne qualifi ée, dans le respect des normes locales et des dispositions en matière de sécurité. Avant d’installer cet appareil, lisez attentivement cette notice d’utilisation. Ne pas toucher les éléments sous tension. Afi n d’éviter des dommages corporels et matériels, les appareils doivent être remplacés en cas de dommage mécanique et/ou électrique. Cette notice d’utilisation et d’installation ne prétend pas contenir toutes les informations détaillées sur ce produit et ne peut en outre pas tenir compte de toutes les applications pouvant être faites des produits. Toutes les informations sont exclusivement destinées à décrire le produit et ne doivent pas être considérées comme des caractéristiques garanties d’un point de vue juridique. Vous trouverez des informations et des données supplémentaires dans les catalogues et les fi ches techniques de ce produit ainsi que dans les fi liales ABB locales ou encore sur le site Internet ABB : http://www.abb.com. Sous réserve de modifi cations techniques pouvant intervenir à tout moment. En cas de doute, c’est le texte anglais qui s’applique.
it Avvertenza! L’installazione e la messa in esercizio di questo apparecchio e tutti gli interventi di manutenzione dovranno essere eseguiti da tecnici qualifi cati, in osservazione delle norme di legge locali e delle disposizioni di sicurezza. Non toccare le parti in tensione! Per escludere lesioni a persone e danni materiali, sostituire gli apparecchi in caso di danneggiamento meccanico e/o elettrico. Le presenti istruzioni per l’uso non possono contenere tutte le informazioni di dettaglio relative alla serie di prodotti e non possono tenere conto di ogni singolo contesto applicativo. Le informazioni riportate hanno invece lo scopo esclusivo di descrivere il prodotto e non vanno interpretate come caratteristiche garantite in senso legale. Ulteriori informazioni e dati sono riportati nei cataloghi e nei fogli di dati relativi ai prodotti, ottenibili presso la fi liale ABB locale oppure dal sito internet ABB all’indirizzo http://www.abb.com. Con riserva di modifi che tecniche! Nel caso di dubbi di interpretazione ha validità il testo inglese.
sv Varning! Installation och drift av denna enhet och eventuellt underhåll måste utföras av en kvalifi cerad person i enlighet med specifi ka lokala be-stämmelser och säkerhetsföreskrifter. Innan denna enhet installeras ska bruksanvisningen läsas noga. Rör inte vid strömförande delar. För att undvika personskador och materiella skador måste enheten bytas vid mekanisk och/eller elektrisk skada. Det är inte något krav att denna bruks- och installationsanvisningar innehåller all detaljerad information om produkten och kan inte heller ta hänsyn till varje möjlig användning av produkterna. All information har endast som syfte att beskriva produkten och får inte förstås som någon garanterad karakteristik med laga kraft. Ytterligare information och data fi nns i kataloger och datablad för denna produkt och kan beställas från lokal ABB försäl-jningsorganisation samt på ABB:s hemsida http://www.abb.com. Information kan ändras utan föregående meddelande därom. Den engelska texten gäller vid ovisshet.
cn 警告!此设备的安装和运行以及任何保养工作必须由具备资格的专业人员进行,并遵守当地的有关标准和安全规则。在安装此设备前,请仔细阅读这些使用说明。不要触摸带电部件。为避免造成人员伤害和物质损坏,发生机械和/或电气损坏时必须更换设备。 这些使用和安装说明无法包含此产品的所有详细信息,也不能涵盖产品的全部应用情况。所有陈述均仅用来描述产品,不作为具备法律效力的属性保证。更多信息和数据请参阅该产品的目录册和数据表、当地ABB销售处以及ABB网站 http://www.abb.com。如有更改,恕不预先通知。有疑问时以英文版为准。
ru Предупреждение! Монтаж и ввод в эксплуатацию данного прибора, а также любые работы по техобслуживанию, должны производиться квалифицированными специалистами. При этом, необходимо соблюдать местные нормы и правила техники безопасности. Не прикасаться к деталям, которые находятся под напряжением. Чтобы исключить нанесение травм, а также материальные ущербы, в случае механических и/или электрических повреждений приборы необходимо заменить. Данное руководство не охватывает всю подробную информацию к типоряду и не может учитывать каждый отдельный случай применения изделия. Все данные служат лишь описанию изделия и не являются гарантированными свойствами в правовом смысле. Дальнейшие информация и данные содержатся в каталогах и технических паспортах изделий, которые Вы можете получить у местного представительства АВВ, а также найти на сайте АВВ http://www.abb.com. Оставляем за собой право на технические изменения. В случае сомнений действителен английский текст.
2CDC106031M6801 (a)en Installation instructionsde Montageanweisunges Instrucciones de montajefr Notice de montageit Istruzioni di montaggiosv Installation och skötselcn 安装说明书ru Инструкция по монтажу
Thermal overload relay TA25DUThermisches Überlastrelais TA25DURelé térmico de sobrecarga TA25DURelais thermique TA25DURelè termico TA25DUTermiskt överlastrelä TA25DU热过载继电器TA25DUТепловые реле защиты от перегрузки TA25DU
it Relé di sovraccarico termico con rilevamento della perdita di fase secondo la norma IEC/EN 60947-4-1.Temperatura ambiente -25 ... +55 °C.
sv Termiskt överbelastningsskydd med känslighet för fasbortfall i enlighet med IEC/EN 60947-4-1. Omgivningstemperatur -25 ... +55 °C.
cn 按照 IEC/EN 60947-4-1的带失相灵敏性的热过载继电器。 环境温度 -25 ... +55 °C.
ru Тепловое реле защиты от перегрузки с чувствительностью против выпадения фазы соответственно IEC/EN 60947-4-1.Температура окружающей среды -25 ... +55 °C.
en Thermal overload relay with phase loss sensitivity according to IEC/EN 60947-4-1. Ambient air temperature -25 ... +55 °C.
de Thermisches Überlastrelais mit Phasenausfallempfi ndlichkeit nach IEC/EN 60947-4-1.Umgebungstemperatur -25 ... +55 °C.
es Relé térmico de sobrecarga con sensibilidad de protección de fase según IEC/EN 60947-4-1. Temperatura ambiente: -25 ... +55 °C.
fr Relais de surcharge thermique sensible à la perte de phase conformément à la norme IEC/EN 60947-4-1. Température ambiante -25 ... +55 °C.
it Tenete conto dei dati riportati sulla targhetta conoscitiva a lato dell’apparecchio!
sv Beakta data på typskylten som fi nns på sidan av enheten.cn 请注意设备侧旁铭牌上的数据
ru Учитывайте данные на типовой табличке прибора сбоку
en Consider the data on the label at the side of the unit.de Beachten Sie die Daten auf dem seitlichen Typenschild des Gerätses Observar los datos en la placa de características lateral del dispositivo.fr Veuillez tenir compte des données indiquées sur la plaque signalétique
située sur le côté de l’appareil.
TA25DU
ABB STOTZ-KONTAKT GmbHEppelheimer Str. 82 Postfach 10168069123 Heidelberg 69006 HeidelbergGermany GermanyInternet http://www.abb.com/contacts
Appendix 1 — Operating instructions for blower motor thermal overload relay

DCS800-EP Installation and Start-Up Manual 39
��
� Inom en Setting the relay to rated current of the motor de Einstellung des Relais auf Motornennstrom es Ajuste del relé a la corriente nominal del motor fr Réglage du relais sur le courant nominal du moteur it Impostazione del relé alla corrente nominale del motore sv Ställa in reläet till motorns märkström cn 将继电器设置到马达额定电流上
ru Настройка реле на номинальный ток двигателя
3~1~
2CDC106031M6801a / 02.2012
mm
TA25DU-0.16 ...11
2/T14/T26/T3
M41.4 ... 2 Nm
12 Ib.in
� 6.5 mm Pozi-
driveNo. 2
1 x 0.75 ... 4.0 mm2
2 x 0.75 ... 4.0 mm2
1 x 0.75 ... 4.0 mm2
2 x 0.75 ... 4.0 mm2
1/2 x AWG 16 ...14
1 x 0.75 ... 4.0 mm2
2 x 0.75 ... 4.0 mm2
1 x 0.75 ... 4.0 mm2
2 x 0.75 ... 4.0 mm2 12 mm
95 - 9697 - 98
M3,50.8 ... 1.3 Nm
12 lb.in
� 5.5 mm
1/2 x 0.75 ... 4.0 mm2 1/2 x 0.75 ... 2.5 mm2
1/2 x AWG 18 ...141/2 x 0.75 ... 2.5 mm2 1/2 x 0.75 ... 2.5 mm2 9 mm
TA25DU-14 ... 25
2/T14/T26/T3
M41.4 ... 2 Nm
12 Ib.in
� 6.5 mm
1/2 x 1.5... 6.0 mm2 1/2 x 1.5 ... 4.0 mm2
1/2 x AWG 14 ...101/2 x 1.5 ... 4.0 mm2 1/2 x 1.5 ... 4.0 mm2 12 mm
95 - 9697 - 98
M3,50.8 ... 1.3 Nm
12 lb.in
� 5.5 mm
1/2 x 0.75 ... 4.0 mm2 1/2 x 0.75 ... 2.5 mm2
1/2 x AWG 18 ...141/2 x 0.75 ... 2.5 mm2 1/2 x 0.75 ... 2.5 mm2 9 mm
DX25 (TA25DU-32)
M52.5 ... 3.2 Nm
20 lb.in
� 6.5 mm
1 x 1.5 ... 10.0 mm2
1 x AWG 10 ... 81/2 x 1.5 ... 6.0 mm2
1 x AWG 10 ... 81/2 x 1.5 ... 6.0 mm2 1/2 x 1.5 ... 6.0 mm2 15 mm
en In case of adjusting “Aut”, which means automatic reset after tripping, the motor may restart automatically. This automatic restart could injure persons and damage material.
de Bei Einstellung “Aut”, d. h. automatische Rückstellung nach einer Auslösung kann der Motor automatisch wieder anlaufen. Dieser automatische Wiederanlauf kann Personen verletzen und zu Sachschäden führen.
es Con el ajuste “Aut”, es decir: restablecimiento automático después de una activación, el motor podrá volver a arrancar automáticamente. Este nuevo arranque automático podrá causar lesiones en personas y daños materiales.
fr En cas de réglage “Aut”, c.-à-d. réinitialisation automatique après un déclenchement, il se peut que le moteur redémar-re automatiquement. Ce redémarrage automatique peut engendrer des blessures corporelles ainsi que des dommages matériels.
it Vid inställning av „Aut“, d.v.s. automatisk återställning efter en utlösning, kan motorn starta automatiskt. Denna automatiska start kan orsaka skada på person och materiella skador.
sv Vid inställning av „Aut“, d.v.s. automatisk återställning efter en utlösning, kan motorn starta automatiskt. Denna automatiska start kan orsaka skada på person och materiella skador.
cn 设置为“Aut”时,即意为触发后自动复位,马达会自动重新起动。该自动重新起动可能会造成人员受伤和物质损坏。
ru В случае установки на “Aut”, т.е. автоматический сброс после срабатывания, может произойти автоматический запуск двигателя. Вследствие автоматического запуска возможны травмы, а также материальные ущербы.
� RESET
-Man
-Aut
9795
9896
9795
9896
9795
9896
9795
9896
� RESET-STOP
� RESET
�
�
�
�
�
9795
98962/T1 4/T2 6/T3
R
2CD
C23
2002
F001
1
� TEST 9795
9896
97
98
95
96
TEST
�
�

40 DCS800-EP Installation and Start-Up Manual
en Warning! The installation and the operation of this device and any maintenance must be carried out by a qualifi ed person in accordance with specifi c local standards and safety regulations. Before installing this device, read these operating instructions carefully. Don’t touch live parts. To avoid damages to persons and material the devices have to be replaced in case of mechanical and/or electrical damage. These operating and installation instructions cannot claim to contain all detailed information of this product and can even not consider every possi-ble application of the products. All statements serve exclusively to describe the product and have not to be understood as assured characteristics with legal force. Further information and data is obtainable from the catalogues and data sheets of this product, from the local ABB sales organisa-tions as well as on the ABB homepage http://www.abb.com. Subject to change without prior notice. The English text applies in cases of doubt
de Warnung! Die Installation und die Inbetriebnahme dieses Gerätes sowie jegliche Wartungsarbeiten müssen durch eine qualifi zierte Fachkraft durch-geführt werden. Dabei sind lokale Normen und Sicherheitsvorschriften zu beachten. Vor der Installation des Gerätes muss diese Betriebsanleitung aufmerksam gelesen werden. Spannung führende Teile nicht berühren. Um Personen- und Sachschäden auszuschließen, müssen die Geräte im Fall einer mechanischen und/oder elektrischen Beschädigung unbedingt ausgetauscht werden.Diese Betriebsanleitung enthält nicht sämtliche Detailinformationen zu der Produktreihe und kann auch nicht jeden Einsatzfall der Produkte berück-sichtigen. Alle Angaben dienen ausschließlich der Produktbeschreibung und sind nicht als zugesicherte Eigenschaften im Rechtssinne aufzufassen. Weiterführende Informationen und Daten erhalten Sie in den Katalogen und Datenblättern der Produkte, über die örtliche ABB-Niederlassung sowie auf der ABB Homepage unter http://www.abb.com. Technische Änderungen jederzeit vorbehalten. In Zweifelsfällen gilt der englische Text.
es ¡Advertencia! La instalación y la puesta en funcionamiento de este dispositivo, así como cualquier trabajo de mantenimiento, deberán ser ejecutados por una persona competente cualifi cada. En esto, deberán observarse las normas locales y las normas de seguridad. No tocar piezas que se encuentren bajo tensión. Para evitar daños personales y materiales, los dispositivos deberán se sustituidos al presentar cualquier daño mecánico y/o eléctrico. Este manual de usuario no contiene todos los datos detallados con respecto a la serie de productos, y tampoco podrá tener en cuenta cada uno de los casos de aplicación de los productos. Todas las indicaciones únicamente sirven para describir el producto y no deberán ser consideradas propiedades aseguradas en el sentido de la Ley. Información más detallada y demás datos pueden obtenerse de los catálogos y las hojas de datos de los productos, a través de la sucursal de ABB local, así como en la homepage de ABB en http://www.abb.com. Modifi caciones técnicas reservadas en cualquier momento. En casos de duda será válido el texto inglés.
fr Attention ! L’installation et la mise en service de cet appareil ainsi que toute opération de maintenance doivent être réalisées par une personne qualifi ée, dans le respect des normes locales et des dispositions en matière de sécurité. Avant d’installer cet appareil, lisez attentivement cette notice d’utilisation. Ne pas toucher les éléments sous tension. Afi n d’éviter des dommages corporels et matériels, les appareils doivent être remplacés en cas de dommage mécanique et/ou électrique. Cette notice d’utilisation et d’installation ne prétend pas contenir toutes les informations détaillées sur ce produit et ne peut en outre pas tenir compte de toutes les applications pouvant être faites des produits. Toutes les informations sont exclusivement destinées à décrire le produit et ne doivent pas être considérées comme des caractéristiques garanties d’un point de vue juridique. Vous trouverez des informations et des données supplémentaires dans les catalogues et les fi ches techniques de ce produit ainsi que dans les fi liales ABB locales ou encore sur le site Internet ABB : http://www.abb.com. Sous réserve de modifi cations techniques pouvant intervenir à tout moment. En cas de doute, c’est le texte anglais qui s’applique.
it Avvertenza! L’installazione e la messa in esercizio di questo apparecchio e tutti gli interventi di manutenzione dovranno essere eseguiti da tecnici qualifi cati, in osservazione delle norme di legge locali e delle disposizioni di sicurezza. Non toccare le parti in tensione! Per escludere lesioni a persone e danni materiali, sostituire gli apparecchi in caso di danneggiamento meccanico e/o elettrico. Le presenti istruzioni per l’uso non possono contenere tutte le informazioni di dettaglio relative alla serie di prodotti e non possono tenere conto di ogni singolo contesto applicativo. Le informazioni riportate hanno invece lo scopo esclusivo di descrivere il prodotto e non vanno interpretate come caratteristiche garantite in senso legale. Ulteriori informazioni e dati sono riportati nei cataloghi e nei fogli di dati relativi ai prodotti, ottenibili presso la fi liale ABB locale oppure dal sito internet ABB all’indirizzo http://www.abb.com. Con riserva di modifi che tecniche! Nel caso di dubbi di interpretazione ha validità il testo inglese.
sv Varning! Installation och drift av denna enhet och eventuellt underhåll måste utföras av en kvalifi cerad person i enlighet med specifi ka lokala be-stämmelser och säkerhetsföreskrifter. Innan denna enhet installeras ska bruksanvisningen läsas noga. Rör inte vid strömförande delar. För att undvika personskador och materiella skador måste enheten bytas vid mekanisk och/eller elektrisk skada. Det är inte något krav att denna bruks- och installationsanvisningar innehåller all detaljerad information om produkten och kan inte heller ta hänsyn till varje möjlig användning av produkterna. All information har endast som syfte att beskriva produkten och får inte förstås som någon garanterad karakteristik med laga kraft. Ytterligare information och data fi nns i kataloger och datablad för denna produkt och kan beställas från lokal ABB försäl-jningsorganisation samt på ABB:s hemsida http://www.abb.com. Information kan ändras utan föregående meddelande därom. Den engelska texten gäller vid ovisshet.
cn 警告!此设备的安装和运行以及任何保养工作必须由具备资格的专业人员进行,并遵守当地的有关标准和安全规则。在安装此设备前,请仔细阅读这些使用说明。不要触摸带电部件。为避免造成人员伤害和物质损坏,发生机械和/或电气损坏时必须更换设备。 这些使用和安装说明无法包含此产品的所有详细信息,也不能涵盖产品的全部应用情况。所有陈述均仅用来描述产品,不作为具备法律效力的属性保证。更多信息和数据请参阅该产品的目录册和数据表、当地ABB销售处以及ABB网站 http://www.abb.com。如有更改,恕不预先通知。有疑问时以英文版为准。
ru Предупреждение! Монтаж и ввод в эксплуатацию данного прибора, а также любые работы по техобслуживанию, должны производиться квалифицированными специалистами. При этом, необходимо соблюдать местные нормы и правила техники безопасности. Не прикасаться к деталям, которые находятся под напряжением. Чтобы исключить нанесение травм, а также материальные ущербы, в случае механических и/или электрических повреждений приборы необходимо заменить. Данное руководство не охватывает всю подробную информацию к типоряду и не может учитывать каждый отдельный случай применения изделия. Все данные служат лишь описанию изделия и не являются гарантированными свойствами в правовом смысле. Дальнейшие информация и данные содержатся в каталогах и технических паспортах изделий, которые Вы можете получить у местного представительства АВВ, а также найти на сайте АВВ http://www.abb.com. Оставляем за собой право на технические изменения. В случае сомнений действителен английский текст.
2CDC106049M6801 (a)en Installation instructionsde Montageanweisunges Instrucciones de montajefr Notice de montageit Istruzioni di montaggiosv Installation och skötselcn 安装说明书ru Инструкция по монтажу
Thermal overload relay TA42DU / TA75DUThermisches Überlastrelais TA42DU / TA75DURelé térmico de sobrecarga TA42DU / TA75DURelais thermique TA42DU / TA75DURelè termico TA42DU / TA75DUTermiskt överlastrelä TA42DU / TA75DU热过载继电器TA42DU / TA75DUТепловые реле защиты от перегрузки TA42DU / TA75DU
it Relé di sovraccarico termico con rilevamento della perdita di fase secondo la norma IEC/EN 60947-4-1.Temperatura ambiente -25 ... +55 °C.
sv Termiskt överbelastningsskydd med känslighet för fasbortfall i enlighet med IEC/EN 60947-4-1. Omgivningstemperatur -25 ... +55 °C.
cn 按照 IEC/EN 60947-4-1的带失相灵敏性的热过载继电器。 环境温度 -25 ... +55 °C.
ru Тепловое реле защиты от перегрузки с чувствительностью против выпадения фазы соответственно IEC/EN 60947-4-1.Температура окружающей среды -25 ... +55 °C.
en Thermal overload relay with phase loss sensitivity according to IEC/EN 60947-4-1. Ambient air temperature -25 ... +55 °C.
de Thermisches Überlastrelais mit Phasenausfallempfi ndlichkeit nach IEC/EN 60947-4-1.Umgebungstemperatur -25 ... +55 °C.
es Relé térmico de sobrecarga con sensibilidad de protección de fase según IEC/EN 60947-4-1. Temperatura ambiente: -25 ... +55 °C.
fr Relais de surcharge thermique sensible à la perte de phase conformément à la norme IEC/EN 60947-4-1. Température ambiante -25 ... +55 °C.
it Tenete conto dei dati riportati sulla targhetta conoscitiva a lato dell’apparecchio!
sv Beakta data på typskylten som fi nns på sidan av enheten.cn 请注意设备侧旁铭牌上的数据
ru Учитывайте данные на типовой табличке прибора сбоку
en Consider the data on the label at the side of the unit.de Beachten Sie die Daten auf dem seitlichen Typenschild des Gerätses Observar los datos en la placa de características lateral del dispositivo.fr Veuillez tenir compte des données indiquées sur la plaque signalétique
située sur le côté de l’appareil.
TA42DU / TA75DU
ABB STOTZ-KONTAKT GmbHEppelheimer Str. 82 Postfach 10168069123 Heidelberg 69006 HeidelbergGermany GermanyInternet http://www.abb.com/contacts

DCS800-EP Installation and Start-Up Manual 41
3~1~
9795
98962/T1 4/T2 6/T3
R
2CD
C23
2002
F001
1�
�
�
�
�
�
�
TA42DUTA75DU mm
2/T14/T26/T3
M64.5 Nm40 Ib.in
� 6.5 mm
PozidrivNo. 2
1 x 2.5 ... 25 mm2
2 x 2.5 ... 16.0 mm2
1 x 2.5 ... 25 mm2
2 x 2.5 ... 10.0 mm2
1/2 x AWG 8 ...114 mm
95 - 9697 - 98
M3,50.8 ... 1.3 Nm
12 lb.in
� 5.5 mm
1/2 x 0.75 ... 4.0 mm2 1/2 x 0.75 ... 2.5 mm2
1/2 x AWG 18 ...149 mm
2CDC106049M6801 (a) / 02.2012
� Inom en Setting the relay to rated current of the motor de Einstellung des Relais auf Motornennstrom es Ajuste del relé a la corriente nominal del motor fr Réglage du relais sur le courant nominal du moteur it Impostazione del relé alla corrente nominale del motore sv Ställa in reläet till motorns märkström cn 将继电器设置到马达额定电流上
ru Настройка реле на номинальный ток двигателя
en In case of adjusting “Aut”, which means automatic reset after tripping, the motor may restart automatically. This automatic restart could injure persons and damage material.
de Bei Einstellung “Aut”, d. h. automatische Rückstellung nach einer Auslösung kann der Motor automatisch wieder anlaufen. Dieser automatische Wiederanlauf kann Personen verletzen und zu Sachschäden führen.
es Con el ajuste “Aut”, es decir: restablecimiento automático después de una activación, el motor podrá volver a arrancar automáticamente. Este nuevo arranque automático podrá causar lesiones en personas y daños materiales.
fr En cas de réglage “Aut”, c.-à-d. réinitialisation automatique après un déclenchement, il se peut que le moteur redémar-re automatiquement. Ce redémarrage automatique peut engendrer des blessures corporelles ainsi que des dommages matériels.
it Vid inställning av „Aut“, d.v.s. automatisk återställning efter en utlösning, kan motorn starta automatiskt. Denna automatiska start kan orsaka skada på person och materiella skador.
sv Vid inställning av „Aut“, d.v.s. automatisk återställning efter en utlösning, kan motorn starta automatiskt. Denna automatiska start kan orsaka skada på person och materiella skador.
cn 设置为“Aut”时,即意为触发后自动复位,马达会自动重新起动。该自动重新起动可能会造成人员受伤和物质损坏。
ru В случае установки на “Aut”, т.е. автоматический сброс после срабатывания, может произойти автоматический запуск двигателя. Вследствие автоматического запуска возможны травмы, а также материальные ущербы.
� RESET
-Man
-Aut
9795
9896
9795
9896
9795
9896
9795
9896
� RESET-STOP
� RESET
� TEST9795
9896
97
98
95
96
TEST
� �

42 DCS800-EP Installation and Start-Up Manual
en Warning! The installation and the operation of this device and any maintenance must be carried out by a qualifi ed person in accordance with specifi c local standards and safety regulations. Before installing this device, read these operating instructions carefully. Don’t touch live parts. To avoid damages to persons and material the devices have to be replaced in case of mechanical and/or electrical damage. These operating and installation instructions cannot claim to contain all detailed information of this product and can even not consider every possible appli-cation of the products. All statements serve exclusively to describe the product and have not to be understood as assured characteristics with legal force. Further information and data is obtainable from the catalogues and data sheets of this product, from the local ABB sales organisations as well as on the ABB homepage http://www.abb.com. Subject to change without prior notice. The English text applies in cases of doubt
de Warnung! Die Installation und die Inbetriebnahme dieses Gerätes sowie jegliche Wartungsarbeiten müssen durch eine qualifi zierte Fachkraft durchgeführt werden. Dabei sind lokale Normen und Sicherheitsvorschriften zu beachten. Vor der Installation des Gerätes muss diese Betriebsanleitung aufmerksam gelesen werden. Spannung führende Teile nicht berühren. Um Personen- und Sachschäden auszuschließen, müssen die Geräte im Fall einer mechanischen und/oder elektrischen Beschädigung unbedingt ausgetauscht werden.Diese Betriebsanleitung enthält nicht sämtliche Detailinformationen zu der Produktreihe und kann auch nicht jeden Einsatzfall der Produkte berücksichtigen. Alle Angaben dienen ausschließlich der Produktbeschreibung und sind nicht als zugesicherte Eigenschaften im Rechtssinne aufzufassen. Weiterführende Informati-onen und Daten erhalten Sie in den Katalogen und Datenblättern der Produkte, über die örtliche ABB-Niederlassung sowie auf der ABB Homepage unter http://www.abb.com. Technische Änderungen jederzeit vorbehalten. In Zweifelsfällen gilt der englische Text.
es ¡Advertencia! La instalación y la puesta en funcionamiento de este dispositivo, así como cualquier trabajo de mantenimiento, deberán ser ejecutados por una persona competente cualifi cada. En esto, deberán observarse las normas locales y las normas de seguridad. No tocar piezas que se encuentren bajo tensión. Para evitar daños personales y materiales, los dispositivos deberán se sustituidos al presentar cualquier daño mecánico y/o eléctrico. Este manual de usuario no contiene todos los datos detallados con respecto a la serie de productos, y tampoco podrá tener en cuenta cada uno de los casos de aplica-ción de los productos. Todas las indicaciones únicamente sirven para describir el producto y no deberán ser consideradas propiedades aseguradas en el sentido de la Ley. Información más detallada y demás datos pueden obtenerse de los catálogos y las hojas de datos de los productos, a través de la sucursal de ABB local, así como en la homepage de ABB en http://www.abb.com. Modifi caciones técnicas reservadas en cualquier momento. En casos de duda será válido el texto inglés.
fr Attention ! L’installation et la mise en service de cet appareil ainsi que toute opération de maintenance doivent être réalisées par une personne qualifi ée, dans le respect des normes locales et des dispositions en matière de sécurité. Avant d’installer cet appareil, lisez attentivement cette notice d’utilisation. Ne pas toucher les éléments sous tension. Afi n d’éviter des dommages corporels et matériels, les appareils doivent être remplacés en cas de dommage mécanique et/ou électrique. Cette notice d’utilisation et d’installation ne prétend pas contenir toutes les informations détaillées sur ce produit et ne peut en outre pas tenir compte de toutes les applications pouvant être faites des produits. Toutes les informations sont exclusivement destinées à décrire le produit et ne doivent pas être considérées comme des caractéristiques garanties d’un point de vue juridique. Vous trouverez des informations et des données supplémentaires dans les ca-talogues et les fi ches techniques de ce produit ainsi que dans les fi liales ABB locales ou encore sur le site Internet ABB : http://www.abb.com. Sous réserve de modifi cations techniques pouvant intervenir à tout moment. En cas de doute, c’est le texte anglais qui s’applique.
it Avvertenza! L’installazione e la messa in esercizio di questo apparecchio e tutti gli interventi di manutenzione dovranno essere eseguiti da tecnici qualifi cati, in osservazione delle norme di legge locali e delle disposizioni di sicurezza. Non toccare le parti in tensione! Per escludere lesioni a persone e danni materiali, sostituire gli apparecchi in caso di danneggiamento meccanico e/o elettrico. Le presenti istruzioni per l’uso non possono contenere tutte le informazioni di dettaglio relative alla serie di prodotti e non possono tenere conto di ogni singolo contesto applicativo. Le informazioni riportate hanno invece lo scopo esclusivo di descrivere il prodotto e non vanno interpretate come caratteristiche garantite in senso legale. Ulteriori informazioni e dati sono riportati nei cataloghi e nei fogli di dati relativi ai prodotti, ottenibili presso la fi liale ABB locale op-pure dal sito internet ABB all’indirizzo http://www.abb.com. Con riserva di modifi che tecniche! Nel caso di dubbi di interpretazione ha validità il testo inglese.
sv Varning! Installation och drift av denna enhet och eventuellt underhåll måste utföras av en kvalifi cerad person i enlighet med specifi ka lokala bestämmelser och säkerhetsföreskrifter. Innan denna enhet installeras ska bruksanvisningen läsas noga. Rör inte vid strömförande delar. För att undvika personskador och materiel-la skador måste enheten bytas vid mekanisk och/eller elektrisk skada. Det är inte något krav att denna bruks- och installationsanvisningar innehåller all detaljerad information om produkten och kan inte heller ta hänsyn till varje möjlig användning av produkterna. All information har endast som syfte att beskriva produkten och får inte förstås som någon garanterad karakteristik med laga kraft. Ytterligare information och data fi nns i kataloger och datablad för denna produkt och kan beställas från lokal ABB försäljningsorganisation samt på ABB:s hemsi-da http://www.abb.com. Information kan ändras utan föregående meddelande därom. Den engelska texten gäller vid ovisshet.
cn 警告!此设备的安装和运行以及任何保养工作必须由具备资格的专业人员进行,并遵守当地的有关标准和安全规则。在安装此设备前,请仔细阅读这些使用说明。不要触摸带电部件。为避免造成人员伤害和物质损坏,发生机械和/或电气损坏时必须更换设备。 这些使用和安装说明无法包含此产品的所有详细信息,也不能涵盖产品的全部应用情况。所有陈述均仅用来描述产品,不作为具备法律效力的属性保证。更多信息和数据请参阅该产品的目录册和数据表、当地ABB销售处以及ABB网站 http://www.abb.com。如有更改,恕不预先通知。有疑问时以英文版为准。
ru Предупреждение! Монтаж и ввод в эксплуатацию данного прибора, а также любые работы по техобслуживанию, должны производиться квалифицированными специалистами. При этом, необходимо соблюдать местные нормы и правила техники безопасности. Не прикасаться к деталям, которые находятся под напряжением. Чтобы исключить нанесение травм, а также материальные ущербы, в случае механических и/или электрических повреждений приборы необходимо заменить. Данное руководство не охватывает всю подробную информацию к типоряду и не может учитывать каждый отдельный случай применения изделия. Все данные служат лишь описанию изделия и не являются гарантированными свойствами в правовом смысле. Дальнейшие информация и данные содержатся в каталогах и технических паспортах изделий, которые Вы можете получить у местного представительства АВВ, а также найти на сайте АВВ http://www.abb.com. Оставляем за собой право на технические изменения. В случае сомнений действителен английский текст.
2CDC106019M6801 (b)en Installation instructionsde Montageanweisunges Instrucciones de montajefr Notice de montageit Istruzioni di montaggiosv Installation och skötselcn 安装说明书ru Инструкция по монтажу
Thermal overload relay T16Thermisches Überlastrelais T16Relé térmico de sobrecarga T16Relais thermique T16Relè termico T16Termiskt överlastrelä T16热过载继电器T16Тепловые реле защиты от перегрузки Т16
ABB STOTZ-KONTAKT GmbHEppelheimer Str. 82 Postfach 10168069123 Heidelberg 69006 HeidelbergGermany GermanyInternet http://www.abb.com/contacts
it Relé di sovraccarico termico con rilevamento della perdita di fase secondo la norma IEC/EN 60947-4-1.Temperatura ambiente -25 ... +60 °C (B6/B7 -25 ... +50 °C).
sv Termiskt överbelastningsskydd med känslighet för fasbortfall i enlighet med IEC/EN 60947-4-1. Omgivningstemperatur -25 ... +60 °C (B6/B7 -25 ... +50 °C).
cn 按照 IEC/EN 60947-4-1的带失相灵敏性的热过载继电器。 环境温度 -25 ... +60 °C (B6/B7 -25 ... +50 °C).
ru Тепловое реле защиты от перегрузки с чувствительностью против выпадения фазы соответственно IEC/EN 60947-4-1.Температура окружающей среды -25 ... +60 °C (B6/B7 -25 ... +50 °C).
en Thermal overload relay with phase loss sensitivity according to IEC/EN 60947-4-1. Ambient air temperature -25 ... +60 °C (B6/B7 -25 ... +50 °C).
de Thermisches Überlastrelais mit Phasenausfallempfi ndlichkeit nach IEC/EN 60947-4-1.Umgebungstemperatur -25 ... +60 °C (B6/B7 -25 ... +50 °C).
es Relé térmico de sobrecarga con sensibilidad de protección de fase según IEC/EN 60947-4-1. Temperatura ambiente: -25 ... +60 °C (B6/B7 -25 ... +50 °C).
fr Relais de surcharge thermique sensible à la perte de phase conformément à la norme IEC/EN 60947-4-1. Température ambiante -25 ... +60 °C (B6/B7 -25 ... +50 °C).
it Tenete conto dei dati riportati sulla targhetta conoscitiva a lato dell’apparecchio!
sv Beakta data på typskylten som fi nns på sidan av enheten.cn 请注意设备侧旁铭牌上的数据
ru Учитывайте данные на типовой табличке прибора сбоку
en Consider the data on the label at the side of the unit.de Beachten Sie die Daten auf dem seitlichen Typenschild des Gerätses Observar los datos en la placa de características lateral del dispositivo.fr Veuillez tenir compte des données indiquées sur la plaque signalétique
située sur le côté de l’appareil.
T16

43 DCS800-EP Installation and Start-Up Manual
Numerics230 Vac operation ...............................22
AAccessories .........................................34Airflow ................................................13Analog inputs ......................................21
BBlower Motor Starter ...........................30, 33, 38
CCabinet mounting ................................12Cable sizing ........................................16Checklist .............................................23Clearances ..........................................12, 13Connector locations ............................19Connectors .........................................19Control circuit connections ..................21Control circuit inputs ............................21Control diagrams .................................36, 37Control transformer .............................22, 32Cooling air ...........................................12, 13
DDelivery check .....................................11Digital inputs .......................................21Dimensional data ................................24Dimensional drawings .........................25
EElectrical installation ...........................17Electricalspecifications .......................32Environmentalspecifications ..............32
FFactory options ....................................10Fuse tightening torque ........................29Fuses ...................................................29
GGrounding ...........................................3, 18
HHeat dissipation ..................................13
II/O programming .................................21Installation checklist ............................23Installation warnings ...........................2Insulation check ..................................17
LLine reactors .......................................14, 15Lowvoltageconfiguration ...................22
MMechanical installation ........................4, 11Mechanical installation warnings .........4
NNameplate ..........................................11
OOperation ............................................5
PPanel photographs ..............................8Parameter settings ..............................21Planning the electrical installation .......14Plus codes ..........................................10Power diagram ....................................35
RReactors .............................................14, 15Replacement parts ..............................29, 31
SSafety instructions ...............................2
TTable of contents .................................6Technical data .....................................32Tightening torque ................................16Type codes ..........................................9
UUngrounded systems ..........................18
VVoltagespecification ...........................32
WWarnings..............................................2Watts loss ............................................13Weight data .........................................24

DCS800-EP Installation and Start-Up Manual 44
� Inom en Setting the relay to rated current of the motor de Einstellung des Relais auf Motornennstrom es Ajuste del relé a la corriente nominal del motor fr Réglage du relais sur le courant nominal du moteur it Impostazione del relé alla corrente nominale del motore sv Ställa in reläet till motorns märkström cn 将继电器设置到马达额定电流上 ru Настройка реле на номинальный ток двигателя
� STOP 9795
9896
97
98
95
96
STOP
� TEST 9795
9896
TEST
ON
97
98
95
96
en In case of adjusting “RESET A”, which means automatic reset after tripping, the motor may restart automatically. This automatic restart could injure persons and damage material.
de Bei Einstellung “RESET A”, d. h. automatische Rückstellung nach einer Auslösung kann der Motor automatisch wieder anlaufen. Dieser automatische Wiederanlauf kann Personen verletzen und zu Sachschäden führen.
es Con el ajuste “RESET A”, es decir: restablecimiento automático después de una activación, el motor podrá volver a arrancar automáticamente. Este nuevo arranque automático podrá causar lesiones en personas y daños materiales.
fr En cas de réglage “RESET A”, c.-à-d. réinitialisation automatique après un déclenchement, il se peut que le moteur redémarre automatiquement. Ce redémarrage automatique peut engendrer des blessures corporelles ainsi que des dommages matériels.
it Vid inställning av „RESET A“, d.v.s. automatisk återställning efter en utlösning, kan motorn starta automatiskt. Denna automatiska start kan orsaka skada på person och materiella skador.
sv Vid inställning av „RESET A“, d.v.s. automatisk återställning efter en utlösning, kan motorn starta automatiskt. Denna automatiska start kan orsaka skada på person och materiella skador.
cn 设置为“RESET A”时,即意为触发后自动复位,马达会自动重新起动。该自动重新起动可能会造成人员受伤和物质损坏。
ru В случае установки на “RESET A”, т.е. автоматический сброс после срабатывания, может произойти автоматический запуск двигателя. Вследствие автоматического запуска возможны травмы, а также материальные ущербы.
3~1~
9795
98962T1 4T2 6T3
RESETA
M
TEST
STOP2CD
C23
2006
F000
9
� RESET
-M
-A
RESE
T
RESE
T
A M
RESE
T
A M
2CDC106019M6801 (b) / 02.2012
�
�
T16 mm
2T14T26T3
M41.1 ... 1.5 Nm9 ... 13 Ib.in
� 6.5 mm Pozi-
drivNo. 2
1/2 x 0.75 ... 1.5 mm2
1/2 x 1.5 ... 4.0 mm2
1/2 x AWG 18 ...10
1/2 x 0.75 ... 4.0 mm2
1/2 x AWG 18 ...101/2 x 0.75 ... 4.0 mm2 1/2 x 0.75 ... 4.0 mm2 12 mm
95 - 9697 - 98
M31.0 ... 1.5 Nm9 ... 13 lb.in
� 5.5 mm
1/2 x 0.75 ... 4.0 mm2
1/2 x AWG 18 ...12
1/2 x 0.75 ... 1.0 mm2
1/2 x 1.0 ... 2.5 mm2
1/2 x AWG 18 ...121/2 x 0.75 ... 2.5 mm2 1 x 0.75 ... 2.5 mm2
2 x 0.75 ... 1.5 mm2 9 mm
B6 / B7 M3
0.8 ... 1.1 Nm7 lb.in
� 5.5 mm
Pozi-driv
No. 11/2 x 1.0 ... 4.0 mm2 1/2 x 1.0 ... 2.5 mm2
1/2 x AWG 22 ...101/2 x 1.0 ... 2.5 mm2 1 x 1.0 ... 2.5 mm2 9 mm
AS M3
1.0 Nm9 Ib-inn
� 5.5 mm
Pozi-driv
No. 2
1/2 x 0.75 ... 4.0 mm2
1/2 x AWG 18 ...101/2 x 0.75 ... 2.5 mm2
1/2 x AWG 18 ...121/2 x 0.75 ... 2.5 mm2 1 x 0.75 ... 2.5 mm2
2 x 0.75 ... 1.5 mm2 10 mm
B6/B7
T16
� �
�
�
� �
�
�
�
�
T16 > B6 / B7
T16 > AS
35,6 1,4"
48,2 1,9"
36,9 1,45" 2,4 0,09"
53,5 2,11"
1,2 0,05"
9,1 0,36"8,6 0,34"
76,7
3,
02"
45 1,77"
8,1 0,32" 14,4 0,57"
12,35 0,49"9,1 0,36"
2CD
C23
2008
F000
8.ep
s


ABB Inc. Discrete Automation & MotionDrives and Controls16250 West Glendale DriveNew Berlin, WI 53151Telephone 262 785-3200Fax 262 780-5135Internet www.abb.us/drives www.abb.com
3AU
A00
0007
6338
RE
V E
Effe
ctiv
e 06
/23/
2014
Sub
ject
to c
hang
e w
ithou
t not
ice.
All
right
s re
serv
ed.
Related Documents


