D-33161 Hövelhof · Hansastr. 2- 5 D-33155 Hövelhof · Postfach 1126 Phone: + 49 - 52 57- 98 50 - 0 Fax: + 49 - 52 57- 98 50 - 590 E-Mail: [email protected] Internet: www.kaimann.de ❯ APPLICATION GUIDE

Welcome message from author
This document is posted to help you gain knowledge. Please leave a comment to let me know what you think about it! Share it to your friends and learn new things together.
Transcript

D-33161 Hövelhof · Hansastr. 2- 5D-33155 Hövelhof · Postfach 1126Phone: + 49 - 52 57- 98 50 - 0Fax: + 49 - 52 57- 98 50 - 590 E-Mail: [email protected]: www.kaimann.de
� A P P L I C AT I O N G U I D E
Insulating the piping of cooling,
heating or air-conditioning systems
requires a methodical and thorough
approach, as well as the right tools
to do the job properly.
KAIFLEX products are backed up by a
comprehensive range of accessories
specifically designed to help.
This manual contains a wealth of
information and practical tips, along
with clear, step-by-step illustrated
instructions to ensure you get
the best results quickly and easily.
GENERAL INFORMATION Page
KAIFLEX insulating products . . . . . . . . . . . . . . . . . . . . . . . . . . . . . . . . . . . . . . . . . . . . . . . . . . 4KAIFLEX accessories . . . . . . . . . . . . . . . . . . . . . . . . . . . . . . . . . . . . . . . . . . . . . . . . . . . . . . . . 5Using products and accessories . . . . . . . . . . . . . . . . . . . . . . . . . . . . . . . . . . . . . . . . . . . . . . . 6Tools . . . . . . . . . . . . . . . . . . . . . . . . . . . . . . . . . . . . . . . . . . . . . . . . . . . . . . . . . . . . . . . . . 7Practical tips . . . . . . . . . . . . . . . . . . . . . . . . . . . . . . . . . . . . . . . . . . . . . . . . . . . . . . . . . . . . . . 8
LAGGING PIPES UP TO 160 mm IN DIAMETER WITH KAIFLEX TUBINGPipes to be fitted . . . . . . . . . . . . . . . . . . . . . . . . . . . . . . . . . . . . . . . . . . . . . . . . . . . . . . . . . . . 12Fitted pipes . . . . . . . . . . . . . . . . . . . . . . . . . . . . . . . . . . . . . . . . . . . . . . . . . . . . . . . . . . . . . . . 1490º elbow fittings
Two-piece: pipes with same cross-section . . . . . . . . . . . . . . . . . . . . . . . . . . . . . . . . . 16Two-piece: pipes with different cross-section . . . . . . . . . . . . . . . . . . . . . . . . . . . . . . 19Segmented: pipes with same cross-section . . . . . . . . . . . . . . . . . . . . . . . . . . . . . . . . 20Segmented: pipes with different cross-section . . . . . . . . . . . . . . . . . . . . . . . . . . . . . . 23
T-fittingsAngled insert: pipes with same cross-section . . . . . . . . . . . . . . . . . . . . . . . . . . . . . . 24Angled insert: pipes with different cross-section . . . . . . . . . . . . . . . . . . . . . . . . . . . . 27
StopcocksWithout valve housing . . . . . . . . . . . . . . . . . . . . . . . . . . . . . . . . . . . . . . . . . . . . . . . . 28With separate valve housing . . . . . . . . . . . . . . . . . . . . . . . . . . . . . . . . . . . . . . . . . . . 28
Special applicationsCollars . . . . . . . . . . . . . . . . . . . . . . . . . . . . . . . . . . . . . . . . . . . . . . . . . . . . . . . . . . . . 30Pipe framework supports . . . . . . . . . . . . . . . . . . . . . . . . . . . . . . . . . . . . . . . . . . . . . . 32Blocking off ends of pipes . . . . . . . . . . . . . . . . . . . . . . . . . . . . . . . . . . . . . . . . . . . . . 34Y branches . . . . . . . . . . . . . . . . . . . . . . . . . . . . . . . . . . . . . . . . . . . . . . . . . . . . . . . . . 34Segmented curves . . . . . . . . . . . . . . . . . . . . . . . . . . . . . . . . . . . . . . . . . . . . . . . . . . . 35Elbow fittings (over 90°) . . . . . . . . . . . . . . . . . . . . . . . . . . . . . . . . . . . . . . . . . . . . . . . 36
Self-adhesive tubing . . . . . . . . . . . . . . . . . . . . . . . . . . . . . . . . . . . . . . . . . . . . . . . . . . . . . . . . 37
LAGGING PIPES OVER 160 mm IN DIAMETER USING KAIFLEX SHEET INSULATIONStraight pipes . . . . . . . . . . . . . . . . . . . . . . . . . . . . . . . . . . . . . . . . . . . . . . . . . . . . . . . . . . . . . 40Bends . . . . . . . . . . . . . . . . . . . . . . . . . . . . . . . . . . . . . . . . . . . . . . . . . . . . . . . . . . . . . . . . . 42Collars . . . . . . . . . . . . . . . . . . . . . . . . . . . . . . . . . . . . . . . . . . . . . . . . . . . . . . . . . . . . . . . . . 46Flanges . . . . . . . . . . . . . . . . . . . . . . . . . . . . . . . . . . . . . . . . . . . . . . . . . . . . . . . . . . . . . . . . . 48Stopcocks . . . . . . . . . . . . . . . . . . . . . . . . . . . . . . . . . . . . . . . . . . . . . . . . . . . . . . . . . . . . . . . . 52Angled stopcocks . . . . . . . . . . . . . . . . . . . . . . . . . . . . . . . . . . . . . . . . . . . . . . . . . . . . . . . . . . 62Tanks . . . . . . . . . . . . . . . . . . . . . . . . . . . . . . . . . . . . . . . . . . . . . . . . . . . . . . . . . . . . . . . . . 66Multi-layer insulation . . . . . . . . . . . . . . . . . . . . . . . . . . . . . . . . . . . . . . . . . . . . . . . . . . . . . . . 70Self-adhesive rolls . . . . . . . . . . . . . . . . . . . . . . . . . . . . . . . . . . . . . . . . . . . . . . . . . . . . . . . . . . 72
GUIDE TO SYMBOLS
A red line with an arrow indicates the direction for measuring or fitting.
Green lines and arrows indicate a dimension to be measured.
A blue arrow indicates parts or sections to be glued.
A yellow line represents a measurement and its position on a sheet to be cut to size.
CON
TEN
TS2-
3

KAIFLEX INSULATINGPRODUCTS
SELF-ADHESIVE SHEETS
ROLLS SELF-ADHESIVE ROLLS
SHEETS
SELF-ADHESIVETUBING
TUBING
KAIMANN produces flexible insulating tubing
and sheeting made of black synthetic,
vulcanized foam. Self-adhesive versions are
also available. A variety of product types,
from tubing to flat sheeting, is available with
specific technical characteristics for individual
applications. Where the tubing has to be cut
along its length, the thermal insulating
characteristics are maintained using
KAIFLEX K 414 glue. With large diameter
pipes or conduits, lagging is carried out using
elastomeric sheeting which can be cut to size.
For technical information on KAIFLEX products
and details of size available, please refer to
the individual specification sheets which are
available from the KAIMANN Technical Office.
KAIMANN recommends that fitting should be
carried out to the highest standards possible
to optimize the effectiveness of the insulation.
KAIFLEX ACCESSORIES
GEN
ERAL
INFO
RMAT
ION
KAIFLEX K 414 GLUEKAIFLEX K 414 glue is specifically designed for use with KAIFLEX products.Once glued the sections and surfaces are securely attached.The glue hardens on drying and is thus weatherproof and resistant to ageing.
KAIFLEX SELF-ADHESIVE STRIPSElastomeric foam strips are available in a selection of lengths,widths and thickness that can beused on surfaces where sheetswould normally be cut to measure,thus avoiding the waste of off-cuts from larger sheets.
KAIFLEX CUTTERIt features a special,anatomic grip and makes accurate longitudinal cuts easyin KAIFLEX insulating tubing, sothat they can be installed on fitted pipes.
KAIFLEX ADHESIVE INSULATING TAPESpecial, 3 mm-thick,self-adhesive, 5 cm wide insulating tape for covering gaps or sealing insulated sections.
KAIFLEX THINNERIt is recommended that surfaces to be lagged shouldfirst be cleaned with KAIFLEXthinner, which is suitable foruse with KAIFLEX K 414 glue.The glue will adhere perfectly tosurfaces cleaned with the proprietary thinner.KAIFLEX thinner can also be used to clean tools (brush,spatula, etc.).Shelf life: sealed unlimited.
KAIFINISH KAIFINISH is an acrylic paint thatcan be diluted in water to protect insulation both indoors and outdoors. The paint isenvironmentally safe and odourless, making it particularly suitable for use in confined spaces. It gives a professional, durable finish. Itdries rapidly and provides excellentcoverage.When used as a primer,subsequent layers of white paintretain their colour even in dark surroundings.Colours are fade resistant.
4-5

CLEANING SURFACESThe surfaces to be glued must be perfectly clean and free of grease (use KAIFLEX thinner).Ensure that the surface of the KAIFLEX insulating material is also clean, otherwise it willnot stick properly.
COATED SURFACESWhere surfaces have previously been painted, ensure that the glue will adhere to the paint.Do not use the glue on surfaces that have been treated with products containing asphalt,bitumen or linseed oil. Use only chrome-zinc rust inhibitors and removers.
USING THE GLUEPreparation and storage: Before use, stir the KAIFLEX K 414 glue thoroughly. To store the glue, close the lid tightly to avoid the solvents evaporating. If the glue should become too hard (e.g. when stored in contact with the air or in extreme temperatures), dilute with KAIFLEX thinner.Method of application: When using a large quantity (e.g. a tin of 2,2 litres), pour a small amount out into a separate container and top up when necessary. When applying KAIFLEX insulation to metallic or other surfaces, the K 414 glue must first be applied to the insulation material, then to the corresponding surface. Conditions for use. Do not apply to systems that are in use. Do not use in sunlight. The insulation should be left to dry for 36 hours before turning the system back on. The ideal working temperature of the glue is +20 °C. Do not use the glue at temperatures below + 5 °C as drying times are excessive.At temperatures above + 30 °C, the glue dries very rapidly.
HARDENING TIME : 36 hoursSTORAGE : in cool conditions, away from cold and heatSHELF LIFE : one yearQUANTITIES USED : with insulation sheets, from 0,2 to 0,3 litres per m2
CHOOSING KAIFLEX INSULATING MATERIALSBefore starting, choose the right type of KAIFLEX insulation for the parts to be lagged.Use the thicknesses and sizes which are most suitable for the individual parts of the installation. Do not forget - your KAIFLEX dealer can give expert advice.
USING KAIFLEX INSULATION MATERIALSInsulation tubing that is oval or flattened (e.g. the larger cross-section) should be cut along the flattened surface. The pipes which show an oval form, are to be slit always in the flat side.
USING KAIFLEX-FINISH PAINTThe paint can be applied as soon as the KAIFLEX K 414 glue has dried.Paint within two weeks of fitting.
USING PRODUCTS AND ACCESSORIES
GEN
ERAL
INFO
RMAT
IONTOOLS A selection of good tools
is essential for carrying out jobs to the highest standards.
RIGID AND FLEXIBLE TAPE MEASUREfor measuring and tracing lines to cut.
CHALK AND COMPASSto draw reference lines for measurements andcuts.
STANLEY; OR OTHER KNIFEuse both long and short bladed knives, withspare blades.
CALLIPERfor measuring theexternal diameterof surfaces to beinsulated.
CIRCULAR PUNCHESin common size,sharp at one end to punch out holes in the insulation in the diameter required.
BRUSHES (VARIOUS) AND FLEXIBLE SPATULAfor spreading glue and painting.
METAL BANDto help cut insulating sheets at the end of large diameter pipes.
SCISSORSto facilitate cuttinginsulating material.
6-7

Many tasks encountered when insulating a system are repetitive.We have attempted to provide examples which can help to bring optimum results straight away, saving time and effort.
MEASURING A CIRCUMFERENCE
The measurement is obtained by using a strip of KAIFLEX of the same thickness to be used as insulation.
This gives you the measurement of the circumference,including the thickness of the insulating material itself.
Do not stretch the strip when encircling the pipe, as this will alter the measurement. Mark the strip with chalk where the two edges overlap.
GLUEING THE EDGES OF A TUBE CUT ALONG ITSLENGTH
To glue the edges, wrap the tube arounda larger diameter pipe so that the edgesdo not overlap and apply the glue. Then
slide the tubing over the pipe to be insulated, taking care to avoid the edges
sticking before the tube is in place.
If the tube is not very long, or is not very thick, it can be rolled up and glued.
This way, the tube can be quickly and easily applied to the pipe.
PRACTICAL TIPS
GEN
ERAL
INFO
RMAT
IONGLUEING THE EDGES
OF A KAIFLEX SHEETWhen insulating large diameter pipes,sheeting should be cut to fit and bothedges glued.For the best results, a thin, even layerof KAIFLEX K 414 should be appliedusing a brush with short, hard bristles.
After having spread the glue,ensure that it has dried properly
before attempting to stick the edges together.
Test the glued surface by touching it with your finger:
if the KAIFLEX K414 no longer sticks to your finger forming threads, it is
ready to be positioned.
8-9

When attaching the two surfaces, press them together firmly with both hands,starting at the far ends, working your way to the centre to avoid an irregular joint.
Use a straight-edged spatula or a roll fromlambskin to spread the glue over largeareas. If the whole of the surface is to beattached, first apply the glue to the KAIFLEXsheet, then to the surface it is to be stuck to.When the glue has dried sufficiently, attachthe sheet to the surface.
GEN
ERAL
INFO
RMAT
ION
PAINTING INSULATION FITTED OUTDOORS
We recommend painting insulationoutdoors with KAIFINISH to
protect it from the weather and from UV rays. To complete the protection,
apply two layers of top coat.Allow at least 36 hours
(or a maximum of five days) between the first and second coat.
An extra layer of paint should be applied every two years.
USING OFF-CUTS
Off-cuts from KAIFLEX tubesand sheets can be re-usedwhen filling in gaps, orwhen smaller quantities ofmaterial are required.
10-1
1

LAGGING PIPES UP TO 160 mm IN DIAMETERWITH KAIFLEX TUBING
Around 80% of piping used in buildings can beinsulated before fitting. This
simplifies the task and saves time, taking advantage of the wide range of
applications offered by an elastomeric produktlike KAIFLEX.
PIPES TO BE FITTED
Slide the KAIFLEX tube directly over the pipe from one end.
Do not force the tube while fittingas this will deform the material.
Instead push it smoothly without making unnecessary pressure.
This will ensure that it grips to the surface of the pipe naturally,
especially around the all-important curved sections.
When a section of tubing has been positioned satisfactorily,
fix at least one end with KAIFLEX K414 to the pipe.
3
2
1
PIPE
S TO
BE
FITT
ED
Apply glue to the edges of the tubing already in place and the edge of the next section of tubing to be positioned.
Test for strength around critical stress points in the pipes, such as elbow joints, branches or stopcocks, before proceeding to gluethe tubing around them.
If the underlying pipe has to be brazed, free an area 25/30 cm long between the part of the tubing.Once the pipes have cooled, the insulation can be completed.
Bring the edges of the tubing to be glued together and press tightly.
7
6
5
4
12-1
3

Use only the sharpest knife to effect the cut - this makes the subsequent glueing far easier.
We recommend using the KAIFLEX cutter which is ideal for
longitudinal cuts. The use of the cutter is illustrated in these
two diagrams. Let the blade run along the tube without the
tool`s surfaces touching it to avoid fouling the edge.
FITTED PIPES
If the piping has already beeninstalled, the KAIFLEX tubing must be cut along its length
to fit in.
1
FITT
ED P
IPES
Position the tube so that the edges are separated,and apply an even layerof KAIFLEX K 414 glue.
When making a joint between two lengths of tubing, cut the insert a little longer than necessary (a couple of millimetres).
If the insert is not long enough,the insulating properties in that area will be reduced.
Cut the insert along its length and glue into place.
Once the glue has dried,reseal the tube, pressing the edges firmly together.
5
4
3
2
14-1
5
90° ELBOW FITTINGS
An elbow is a pipe with a 90ºbend, either curved or fitted.
The attachment points themselves may present a different diameter to the pipes either side. There are thus two solutions
to insulating them:• a right-angled section
• or a segmented section.
INSULATING AN ELBOW FITTING with pipes
of the same diameter
Cut a KAIFLEX tube to the right length to cover the elbow.
Cut in the middle at an angle of 45º.
Use a cutting board to form a template for the angle of the cut.
A long-bladed knife is required.
Turn on the pieces of tube until you form a right angle...
1
2
. . . then glue the two sections with KAIFLEX K 414.
After having let the glue dry,cut the right-angled section along its length on the inside.
Position it on the pipe and glue the two edges.
90°
ELBO
W F
ITTI
NGS
5
4
3
16-1
7

Carefully glue the edges of theelbow section to the straight tubes
to be positioned either side.
Press the edges together to seal.
If the straight sections have already been glued into place,
the right-angled section will have to be accurately
measured to fit.
6
7
INSULATING AN ELBOW with pipes of different diameters
Should the elbow fitting be substantially different in size to the pipes either side, the latter should be insulated first.
... and cut the right-angled joint sothat it overlaps the ends (see illustration).
Then find a section of tubing with an internal diameter that is the same as theexternal diameter of the smallertubes either side...
90°
ELBO
W F
ITTI
NGS
18-1
9

SEGMENTED INSULATION OF AN ELBOW FITTING with pipes
of the same diameter
An elbow can also be insulated using jointed sections of tubing.
This requires two angled cuts to be made.
Cut a piece of KAIFLEX tubing to the right length
to cover the elbow.
Calculate the tube’s external diameter and trace two parallel
lines this far apart in the middle.
Draw a line between the two to mark the centre line. Then make
two marks (C and D) on either side of the centre line one
centimetre from it and draw two lines running A to C,
and B to D (see diagram).
1
2
3
90°
ELBO
W F
ITTI
NGS
Cut along lines AC and BD.
Rotate the two ends to obtain a right-angled section.
Glue the three sections together.6
4
5
20-2
1

Cut the segmented elbowsection along its length on
the inside surface only.
Slide the elbow section overthe pipe and carefully glue
the edges together.
After having completed thisstage, fix the elbow section
to the tubing either side withKAIFLEX K 414 glue.
If the adjacent tubes are already in place, the length
of the elbow section will haveto be accurately measured.
Cut the length of the tuberequired a little longer than it
should be and trim it if necessary.
8
9
10
11
SEGMENTED INSULATION OF AN ELBOW FITTINGwith pipes of different diameters
If the pipes either side of the elbow are smaller in diameter, first insulatethe straight pipe sections.
This way, the segmented elbow section will overlap the edges of the insulation either side.
Then find a tube with an internal diameter the same as the external diameter of the neighbouring pipes.
90°
ELBO
W F
ITTI
NGS
22-2
3
T-FITTINGS
The T-fitting can be lagged withor without the tubing either side
having been applied. The latteris the simplest method and
thus the one illustrated here.
There are two methods of insulating a T-fitting:
By dovetailing two tubes with a 90º cut-out or by
punching a circular hole.
INSULATING A T-FITTINGwith a 90º cut-out
Cut a section of KAIFLEX tubinginto a third and two-thirds of
its original length respectively.The overall length shouldobviously be sufficient to
cover the three pipes leadingfrom the fitting.
Using a cutting board,cut the first part of tube
twice at an angle of 45º.
1
2
T-FI
TTIN
GS
Taking the second, longer segment,make two 45º cuts in the middle.The cut-away section should havethe same cross-section as the outside of the tube so that the twosections (see 2) dovetail perfectly.
Glue the cut edges and stick them together in the shape of a „T“.
Cut the lower half of the „T“ along its entire length so that it fits snuggly over the T-junction.Then once more apply a layer of KAIFLEX K 414 glue to the edges.
3
4
5
24-2
5
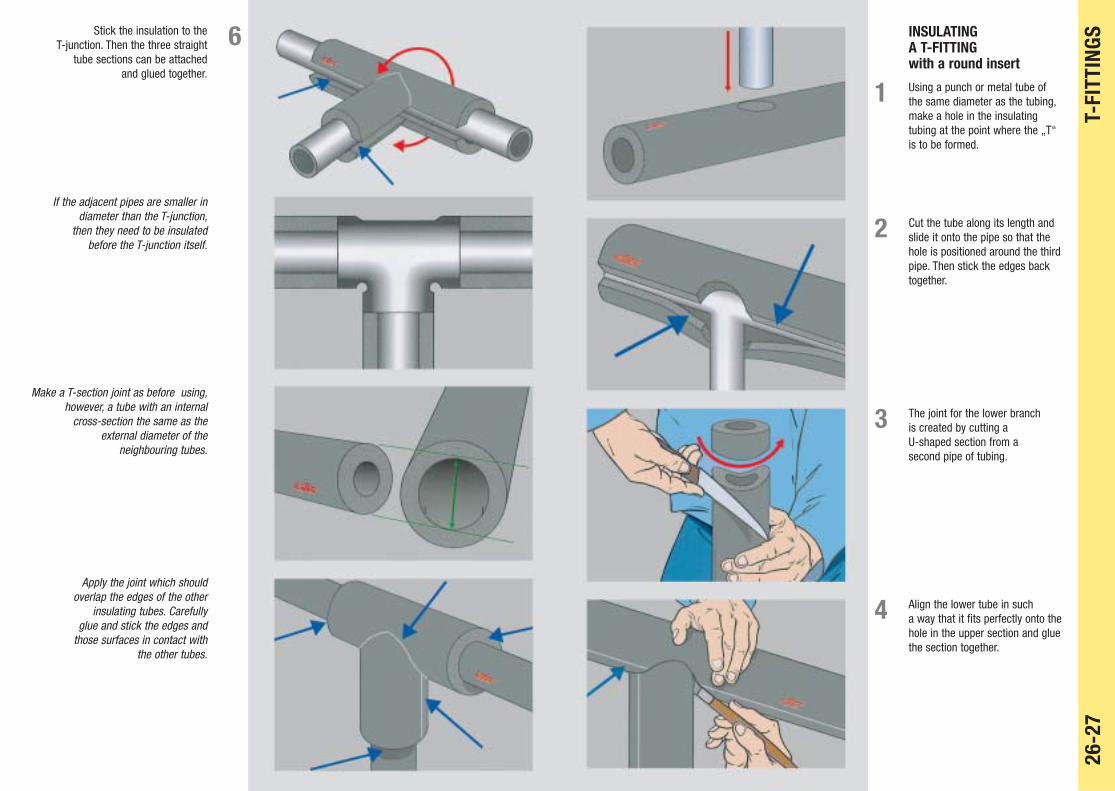
Stick the insulation to the T-junction. Then the three straight
tube sections can be attached and glued together.
If the adjacent pipes are smaller in diameter than the T-junction,
then they need to be insulated before the T-junction itself.
Make a T-section joint as before using,however, a tube with an internal
cross-section the same as the external diameter of the
neighbouring tubes.
Apply the joint which should overlap the edges of the other
insulating tubes. Carefully glue and stick the edges and
those surfaces in contact with the other tubes.
6
T-FI
TTIN
GS
INSULATING A T-FITTING with a round insert
Using a punch or metal tube of the same diameter as the tubing,make a hole in the insulating tubing at the point where the „T“ is to be formed.
Align the lower tube in such a way that it fits perfectly onto thehole in the upper section and gluethe section together.
The joint for the lower branch is created by cutting a U-shaped section from a second pipe of tubing.
Cut the tube along its length andslide it onto the pipe so that thehole is positioned around the thirdpipe. Then stick the edges backtogether.
4
3
2
1
26-2
7

Large diameter valve stem
Insulate the pipe right up to the stopcock on both sides.
Wrap KAIFLEX-self-adhesive insulating tape around the
base of the stopcock.
STOPCOCKS
These can be insulated in a number of ways, depending on the type of
stopcock.
From the edge of the KAIFLEX,make a cut long enough to house the
stopcock and punch a hole to fit the stem.
Fit the tube snuggly around the stopcock and glue the edges together, then attach it to the
adjacent tube.
Small valve stem
1
2
1
STOP
COCK
SCut a section of KAIFLEX tubing as long as the circumference of the tubing already in place and cut it along its length.
Glue and stick the sleeve’s edges.If necessary, the stem of the stopcock can also be insulated byapplying a ring-shaped sectionfrom one of the off-cuts.
Position this around the stopcock so that the sleeve overlaps the ends of the two underlying tubes.If necessary, remove the stopcockif this gets in the way.
Flatten the tube out and make a longitudinal cut with a hole punched at its end to take the stopcock housing.
5
4
3
2
28-2
9

INSULATING A COLLARWhen insulating a collar that
connects two pipes of different diameters, leave sufficient space
between the sections of insulating tubing on either side of it.
SPECIALAPPLICATIONS
Take a piece of KAIFLEX the same diameter as the larger of the twopipes, and cut it a lot longer than
the space left between the two sections of tubing already in place.
At one end, cut out two equalwedges from either side sufficient
to create a reduction in circumference that will fit the
smaller tube.
Glue the edges of the cut-outstogether so that the diameter
of the tubing reduces.
1
2
3
4
SPEC
IAL
APPL
ICAT
ION
STrim the smaller end to the lengthat which its diameter matchesthat of the smaller tube.
Shorten the other end, too, so that the coupling can be insertedneatly into the space left betweenthe two existing sections.
Cut the coupling along its length to install it on the pipe.
After having positioned it on the pipe, stick the edges together, and glue the sleeving to the other two sections of tubing.
8
7
6
5
30-3
1
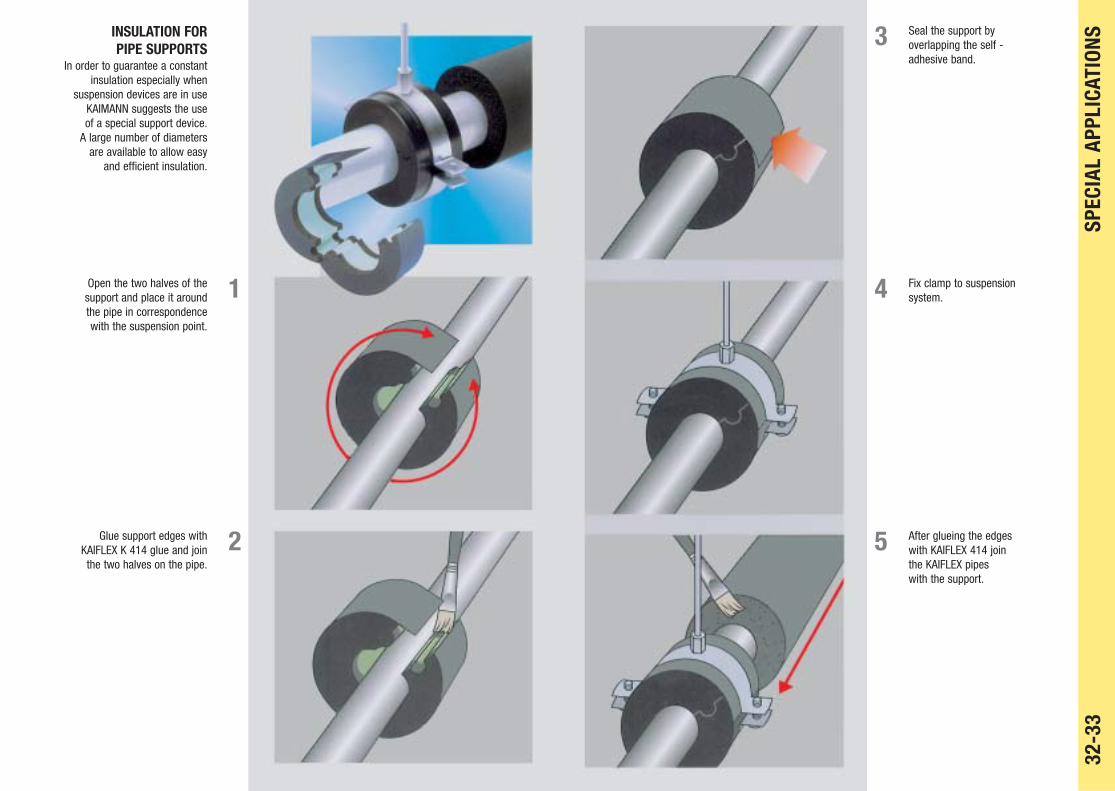
INSULATION FOR PIPE SUPPORTS
In order to guarantee a constantinsulation especially when
suspension devices are in use KAIMANN suggests the use of a special support device.
A large number of diameters are available to allow easy
and efficient insulation.
Open the two halves of the support and place it around the pipe in correspondence with the suspension point.
Glue support edges with KAIFLEX K 414 glue and join the two halves on the pipe.
1
2
SPEC
IAL
APPL
ICAT
ION
SSeal the support by overlapping the self - adhesive band.
Fix clamp to suspension system.
After glueing the edges with KAIFLEX 414 join the KAIFLEX pipes with the support.
5
4
3
32-3
3

BLOCKING OFFENDS OF PIPE
Using the correct size punch,make a plug from a spare piece of
KAIFLEX-sheeting. Glue all the facing surfaces and insert in the open end of the insulating tube.
INSULATING „Y“ BRANCHES
a)Cut a section of KAIFLEX
tubing to the right length.
b)Use a punch to pierce a hole at the right angle.
c)Cut the tube along its length,
position it on the „Y“ branch and glue the edges together with
KAIFLEX K 414.
d)Using a second piece of tubing,
cut out a U-shaped indent at the correct angle and cut the tube
along one side to attach it to the branch.
e)Fit it over the branch and
glue it in place.
SPEC
IAL
APPL
ICAT
ION
SSEGMENTED CURVES
When it is not possible to slidethe tubing around bends in thepiping, a segmented curve can be made.
Take a section of tubing of thecorrect diameter and cut it either three or five times at thesame angle at 90º to eachother.
Use the KAIFLEX cutting boardto ensure accurate results.
Rotate every second segment 180° to get a curved section.
Position the tubing over the bend in the pipe and bond the edges to neighbouring tubes on either side (a-b).
After having glued all the sections together, cut along the resultingsleeve’s inner surface.
1
2
3
4
34-3
5

ELBOW FITTINGS(over 90º)
This is a joint created by welding two sections of pipe at an angle
of more than 90º.
1)The adjacent tubes would normally
already be in place when calculating the length of tubing
necessary to complete the insulation of the joint.
We recommend cutting the central section slightly longer than strictly
necessary so that it can be trimmed down to size when fitting.
Measure the radius of theexternal circumference and draw two parallel lines that far apart in
the middle. Draw a line at an anglebetween points A and B.
2)Cut along this line and rotate one of the sections until the required
angle is obtained. Glue the two parts together with KAIFLEX K 414.
4)Trim the joint to fit between the
two adjacent tubes and then glueall the edges together.
3)Cut along the inner surface of the joint.
SELF-ADHESIVE INSULATION TUBING
KAIFLEX self-adhesive insulation is particularly
useful in situations where the piping is already in place.
Its advantage is its extreme simplicity of use which increases the speed on
installation. KAIFLEX self-adhesive tubing can even be attached to bends in pipes
with little effort. Carefully read the installation suggestion that follows.
Make sure that the surfaces to be insulated are perfectly clean, grease-free and dry.For the best results, we recommend cleaningwith KAIFLEX thinner.
1
36-3
7

The pre-cut tubes allow an easy positioning.
Line the edges up and straighten the tubing.
Using both hands, carefully lift the backing strips that cover the
self-adhesive edges.
Slowly pull the backing strip away from the tubing, ensuring
that the two sticky surfaces match up properly.
2
3
4
5
SELF
-AD
HESI
VE T
UBIN
GLightly press the two edgestogether, first from the far ends,then at the centre so as to form a neat seal without puckering.
To avoid deformation of the insulation tube whilst attaching it use even force on all parts of the piping.
Watch out that the seal is under pressure near the curve.
Once the tubing is in place,attach it to the neighbouring section of insulation tubing using KAIFLEX K 414 glue.
9
6
7
8
38-3
9

INSULATINGA STRAIGHT PIPE
Wrap a strip of KAIFLEX, using the thickness you want, round the pipe to measure the exact
length required.
Mark out the length required ona KAIFLEX sheet.
Cut carefully along the line.
To ensure accurate results,use a metal ruler.
INSULATING PIPING OVER 160 mm IN DIAMETER WITH KAIFLEX SHEETS
1
2
3
STRA
IGHT
PIP
ES
Apply an even layer of KAIFLEX K 414 glue along each edge and allow to dry.
Wrap the insulation sheet around the pipe and press theglued edges together starting at the ends, then the centre andthen working along the rest of the length.
Glue the insulating sheetingto the subsequent sections along the length of the pipe.
If the tubing thus created is not correctly lined up, push one against the other slipping the brush in the gap and twist until they are aligned.
6
5
4
40-4
1

BENDS
First of all, measure the internalradius of the curve using a ruler
and a rule lying perpendicular to it, as shown in the diagram.
To insulate a bend in a large diameter pipe, calculate its radius and mark it out on
a sheet of KAIFLEX.
Using a compass, mark the outline of the internal radius on the KAIFLEX sheeting, using the
corner of the square marked out on theinsulating material as
the axis.
Measure the exact circumference of the pipe using a strip of
KAIFLEX of the correct thickness (do not stretch the strip).
1
2
3
BEN
DSDivide the circumference
by two, and mark the middle of the strip accordingly.
Add the outer radius to the measurement of the inner radius and, using the same axis, draw a semicircle onto the sheet with the compass.
Carefully cut around the outline.
Place the section obtained on the reverse side of another sheet and use it as a template to cut out a second, mirror image section.
7
6
5
4
42-4
3

Holding the two sections together with the smooth
surface on the outside, applyglue to the outer edges.
Allow the glue to dry and stickthe edges together, starting from
the two far ends.
Apply pressure in thecentre too.
Make sure that the two sections have bonded securely
on the inside, pressing with your fingers along the joint.
8
9
10
11
... so that they butt precisely up against the tubing to be fitted either side.
Wrap the KAIFLEX insulation around the pipe and press the edges tightly together...
Next spread the glue alongthe inside edges and leave to dry.
BEN
DS
14
13
12
44-4
5
COLLARS
To insulate a collar section that connects pipes of different diameters, take
measurements and mark them out on a sheet of KAIFLEX.
Measure the height of thecollar section, including the
welded joints.
Use the calliper to measure themaximum and minimum pipe
cross-sections and add twice the thickness of the KAIFLEX to each
measurement (see figure 1).
Carry over all the measurements (maximum diameter, minimum
diameter, height) onto the sheet.Draw two lines from the ends of
the measurements until theyconverge on a centre point.
Using the compass, measurethe distance between the
point of intersection and thetwo diameters and draw
two arcs.
1
2
3
4
smaller diameter
bigger diameter
Measure the circumference of the widest pipe using a strip of KAIFLEX of the samethickness as the sheet.
Mark the centre of the circumference on the strip, and line it up on the larger of the two arcs. Draw two lines from the ends of the strip to the centre of convergence.
Cut out carefully.
Glue the edges and, after they have dried, fit the insulation to the collar.Press the two edges together starting at the far ends.
Glue the upper and lower edges and attach the otherKAIFLEX sections.
COLL
ARS
9
8
7
6
5
46-4
7
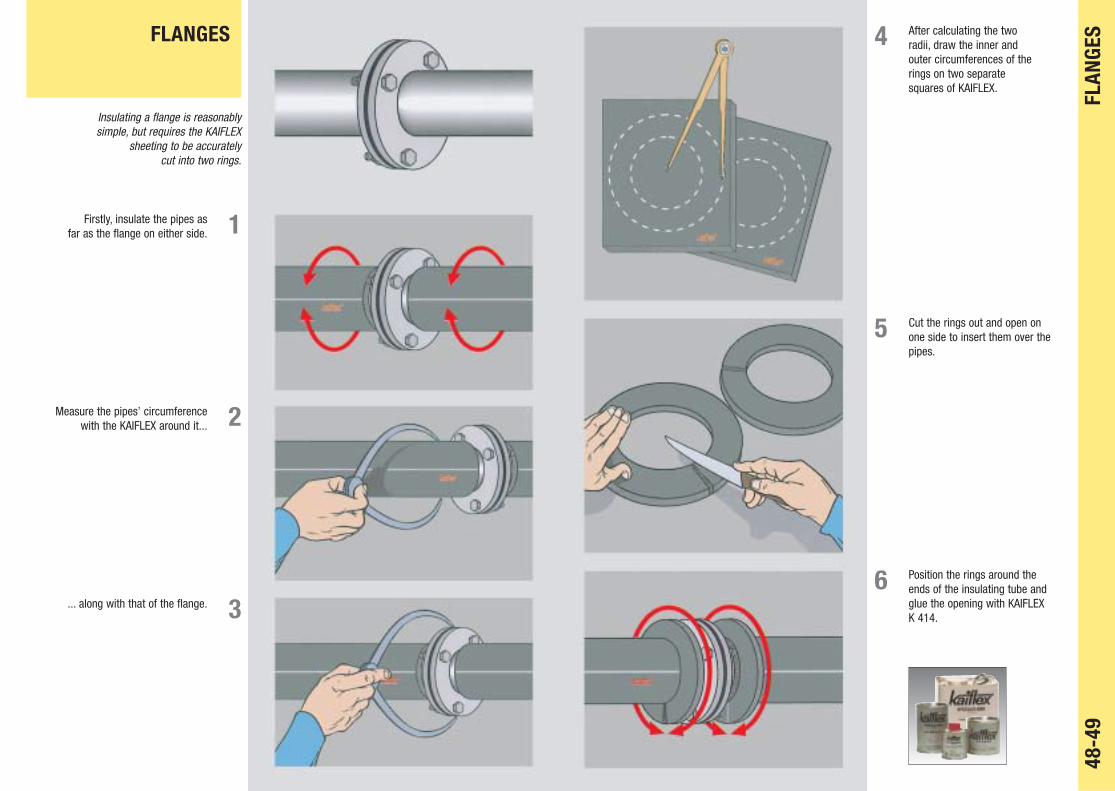
FLANGES
Insulating a flange is reasonably simple, but requires the KAIFLEX
sheeting to be accurately cut into two rings.
Firstly, insulate the pipes asfar as the flange on either side.
Measure the pipes’ circumference with the KAIFLEX around it...
... along with that of the flange.
1
2
3
FLAN
GESAfter calculating the two
radii, draw the inner and outer circumferences of the rings on two separate squares of KAIFLEX.
Cut the rings out and open onone side to insert them over thepipes.
Position the rings around the ends of the insulating tube andglue the opening with KAIFLEX K 414.
6
5
4
48-4
9

Use a strip of KAIFLEX of thesame thickness to measure the
circumference of theinsulating ring.
Measure the distance betweenthe two rings, including thethickness of the insulating
material itself.
Draw the measurements outonto a sheet of KAIFLEX to get the
outline of the sleeve that willcomplete the flange’s insulation.
7
8
9
Cut the sleeve section out.
Mount it around the rings andglue the edges.
Stick the sleeves section to theouter edges of the rings, thenstick theinner surface of the rings to theends of the adjacent tubing.
FLAN
GES
12
11
10
50-5
1

STOPCOCKS
Before starting to insulate thestopcock housing, first fit tubing
to the pipes either side of it.
Measure the diameter of theinsulated pipes and the flanges.
Use these measurements tocalculate the relevant radii.
After calculating the radii,mark out the respective innerand outer circumferences on
two separate squares ofKAIFLEX of the same
thickness.
1
2
STOP
COCK
SCarefully cut out the rings.
Make an opening so that they can be fitted over the pipes.
Put a ring on the outsideof each flange and glue their edges togetherwith KAIFLEX K 414.
Stick the inner surfaces of the rings to the ends of the insulating tubingcovering the pipes.
6
5
4
3
52-5
3

Use a strip of insulation of the same thickness, measure the circumferences of the rings.
Measure the distance betweenthe rings, including the thickness
of the rings themselves.
Draw the outline of the sleevesection measurements onto
a sheet of KAIFLEX and drawa line down the middle.
7
8
9
STOP
COCK
S
After cutting around the outline, put glue on the joining edges.
Measure the diameter of the stopcock housing.
Continuous cavities makingair exchange possible, must be filled out with adhesive,sealing compound or KAIFLEX material.
Divide the diameter by two to get the radius.Place the compass at the end of the sleeve’s centreline and draw a semi-circleat each end.
12
11
10
54-5
5

Once the glue is dry, fit thesheeting around the rings and
stick the edges together.
Next, calculate the shape ofthe disc for the front flange.
Measure the circumference ofthe supporting flange and theform of the face plate around
which the disc must fit.
Mark out the measurementson a piece of KAIFLEX and
cut the disc out.
13
14
15
STOP
COCK
S
Once it is in position,measure the circumferenceof the disc.
Position the disc and stick theedges together with KAIFLEX K 414. Make sure to stick the inside edges to the face plate, too.
Make an opening sothat the disc can be fitted over the face plate.
18
17
16
56-5
7

Mark the measurement out on a piece of KAIFLEX of the same thickness and divide its length
into four equal parts.
Measure the distance between the disc and the
existing lagging at itsnearest and furthest points.
19
20
STOP
COCK
SMark these measurementon the existing lines as shown in the figures.
Use the difference in the two lengths as a radius,draw circles around the ends of the lines. Use the arcs of the circles, draw a continuous line to link them up, as illustrated.
22
21
58-5
9
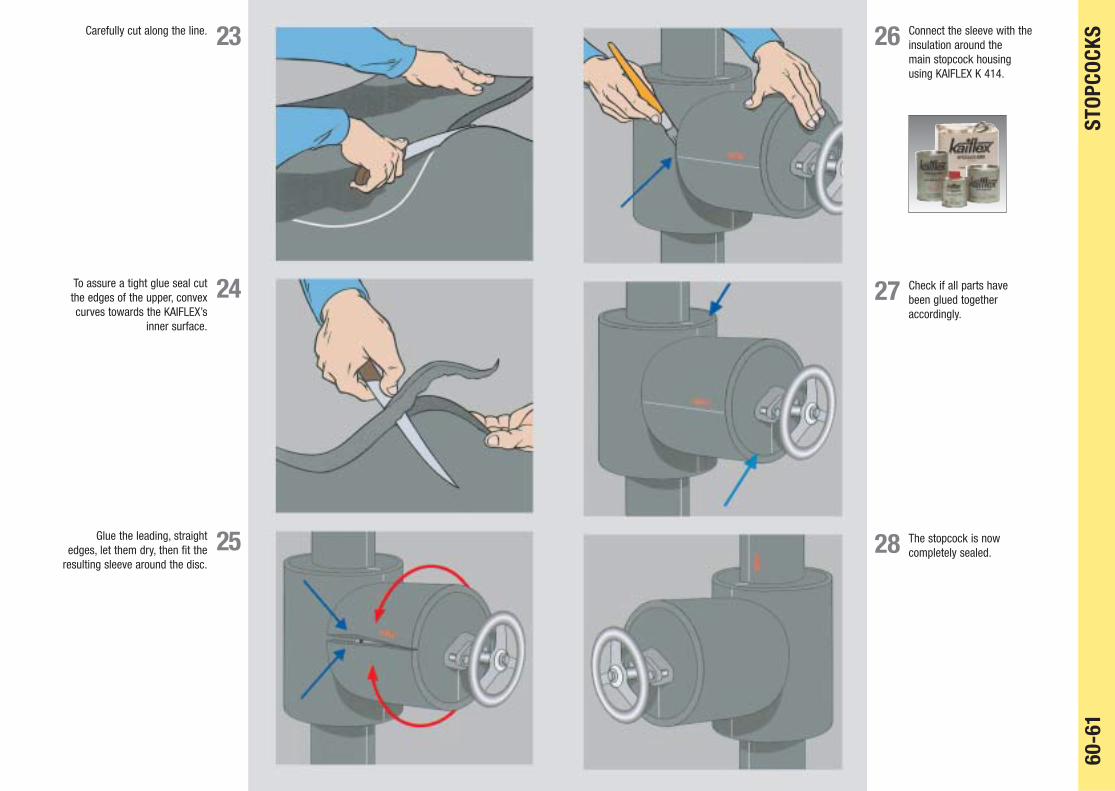
Carefully cut along the line.
To assure a tight glue seal cut the edges of the upper, convex curves towards the KAIFLEX’s
inner surface.
Glue the leading, straightedges, let them dry, then fit the
resulting sleeve around the disc.
25
24
23
STOP
COCK
S
Check if all parts have been glued together accordingly.
Connect the sleeve with theinsulation around the main stopcock housingusing KAIFLEX K 414.
The stopcock is now completely sealed.28
27
26
60-6
1

ANGLED STOPCOCKS
Before insulating an angled stopcock, first lag the pipes either
side of the flanges.
Following the same procedure as on page 49 (insulating flanges),
cut out two rings of KAIFLEX and fit them over the tubing
next to the flanges.
Measure the distance between the two KAIFLEX rings, including
the material itself, and the distance between each ring
and the stopcock housing.
Measure the diameter of the base of the stopcock housing.
Use this to calculate the radius needed to draw the circumference
at point 5.
1
2
3
ANGL
ED S
TOPC
OCKS
Measure the circumference of the rings.
Mark the measurements of the rings’ circumference out on a sheet of KAIFLEX (figure 4), along with the semi-circles for the base of thehouses (figure 3) positioned along the length of the sleeve according to the measurements taken in figure 2.
Cut out the piece, wrap it around the rings to seal the central stopcock housing, then stick the edges together using KAIFLEX K 414.
Cut out a second sleeve section to fit around the stopcock mechanism.
7
6
5
4
62-6
3

Cut out a ring of KAIFLEX in the size of the stopcock wheel.The inner diameter should be the same as the outer circumference
of the sleeve already attached.
Measure the distance between the ring and main housing
insulation at the two points a and b.
Draw the shape of the sleeveon a sheet of KAIFLEX, using a
compass and the measurements taken. The
reference circle in the middle has a radius equivalent to a
quarter of the diameter of the stopcock housing already
insulated (see point 6).
Join the two semicircles and cut along the line.
8
9
10
11
Bevel the curved edges towards the inner surface.
Attach the insulation material around the ring and glue the connectingsurfaces together.
Make a cylindrical, removable cap with a strip ot KAIFLEX.The dimension to use is shown in the figure.
The cap should slide on and off easily. Once this is ensured, stick the edges together with KAIFLEX K 414 glue.
ANGL
ED S
TOPC
OCKS
15
14
13
12
64-6
5

TANKS
There are two possibilities to insulate the tank. Either insulate the domed surface and the subsoil or the walls.We will show the second possibility
exemplary.
Before insulating, clean the whole surface carefully with KAIFLEX thinner.
First of all, lag the tank walls. Use the same method as with piping.
Measure the circumference of the tank with a strip of KAIFLEX, and
measure the height.
Mark the dimensions out on a sheet of KAIFLEX and cut out.
Spread KAIFLEX K 414 glue over the entire surface of the sheetingwith a flexible spatula and, with a brush, over the walls of the tank.Glue the edges of the sheet, then
stick the insulation to the tank,joining the edges together.
1
2
TAN
KS
To insulate the domed surface, first measure its overall diameter witha strip of the same KAIFLEX.
Use the diameter to calculatethe radius and draw the complete circumference.
4
3
66-6
7

Cut the circle out accurately.
Coat the disc ...
... and the top of the tank with KAIFLEX K 414 glue.
5
6
7
TAN
KS
Leave to dry, then press firmly together.
When the sheet is firmly attached, glue the edges all the way round.
Place the KAIFLEX disc on the top of the tank and press it down firmlyfrom the centre outwards to avoid it moving.
10
9
8
68-6
9
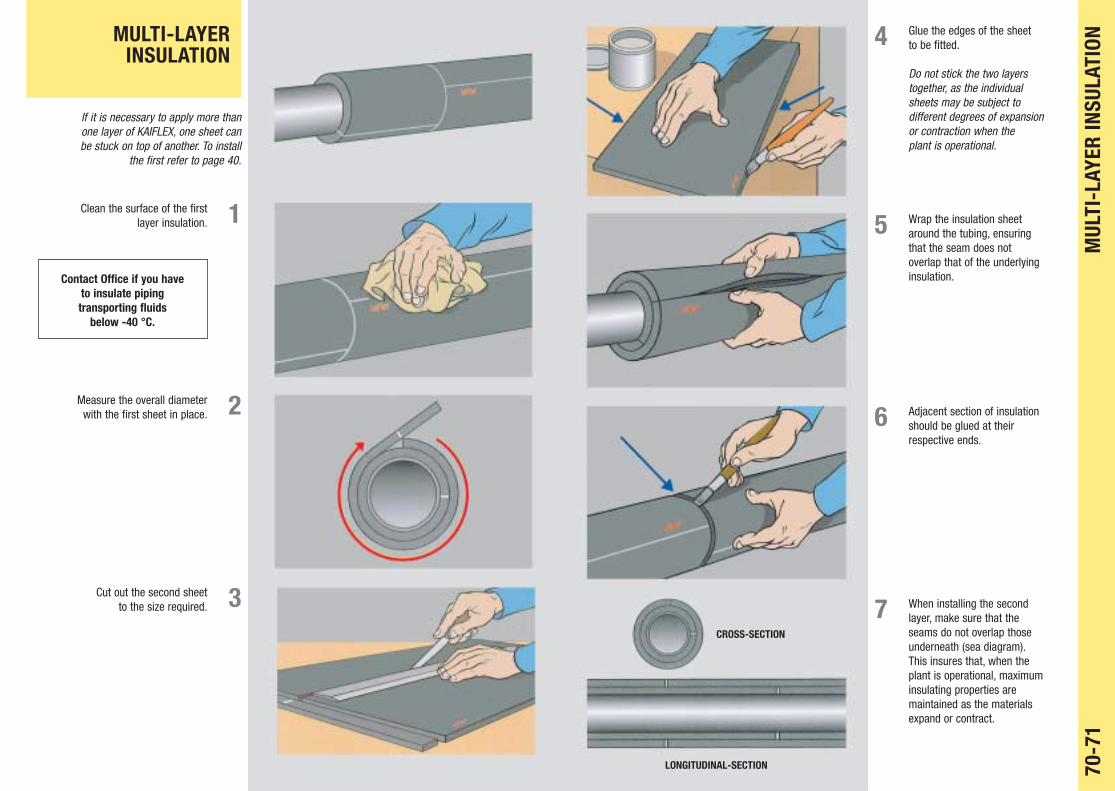
If it is necessary to apply more than one layer of KAIFLEX, one sheet can be stuck on top of another. To install
the first refer to page 40.
Clean the surface of the first layer insulation.
Measure the overall diameter with the first sheet in place.
Cut out the second sheet to the size required.
Contact Office if you have to insulate piping transporting fluids
below -40 °C.
MULTI-LAYER INSULATION
1
2
3
MUL
TI-L
AYER
INSU
LATI
ON
When installing the secondlayer, make sure that the seams do not overlap thoseunderneath (sea diagram).This insures that, when theplant is operational, maximum insulating properties are maintained as the materials expand or contract.
Adjacent section of insulation should be glued at their respective ends.
Wrap the insulation sheet around the tubing, ensuring that the seam does not overlap that of the underlyinginsulation.
Glue the edges of the sheetto be fitted.
Do not stick the two layerstogether, as the individual sheets may be subject to different degrees of expansionor contraction when the plant is operational.
CROSS-SECTION
LONGITUDINAL-SECTION
4
7
6
5
70-7
1

SELF-ADHESIVE ROLLS
Sheet insulation in roll form with self-adhesive backing for quick and
simple installation. Remove the backing paper prior to positioning
the insulation. The rolls of material are particularly suitable for extra-
large surfaces, for example ducting or tanks, where installation is
relatively straightforward.
When, for example, insulating ducting, make sure all the
surfaces are clean and grease-free using KAIFLEX
thinner. Do not apply insulationover rust or corrosion as the
adhesive backing may not stick.
Do not process KAIFLEX at a surrounding temperatur less
+ 10 °C and above + 35 °C.
Cut the size required out of the roll.
1
2
Lift the leading edge of the backing paper.
Line the edge up and stickit down. Pull the backing paper off gradually, pressing the material down as you go.In the example given, for the best results we recommend first lagging the lower surface of the conduit, then the side walls and lastly the top.This will prevent the penetration of humidity.
Attention: Before glueing the SK-sheet onto an open cellular edge, glue the open cellular material with KAIFLEX K 414!
Glue the edges of each length of KAIFLEX to the successive one.
With multi-layer insulation of SK-sheets, the jointsshould be removed.
SELF
-AD
HESI
VE R
OLLS
5
4
3
72-7
3
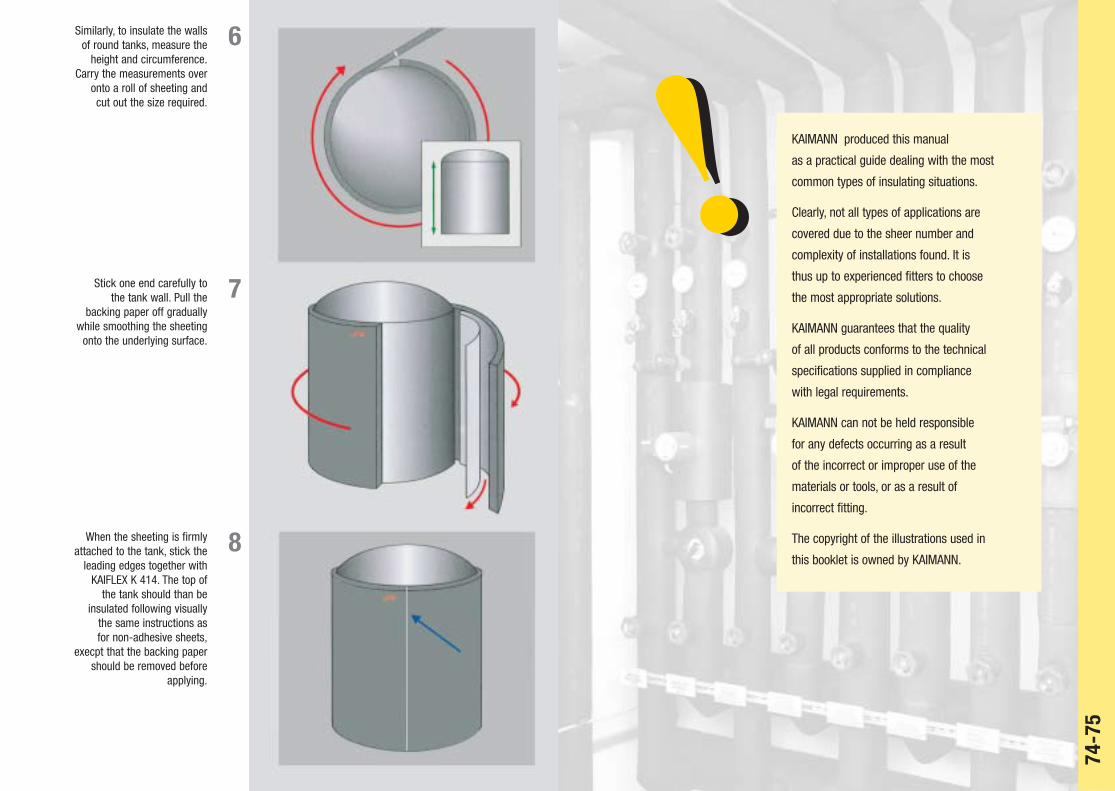
Similarly, to insulate the walls of round tanks, measure the
height and circumference.Carry the measurements over
onto a roll of sheeting andcut out the size required.
Stick one end carefully to the tank wall. Pull the
backing paper off graduallywhile smoothing the sheeting
onto the underlying surface.
When the sheeting is firmly attached to the tank, stick the
leading edges together with KAIFLEX K 414. The top of
the tank should than be insulated following visually
the same instructions as for non-adhesive sheets,
execpt that the backing paper should be removed before
applying.
6
7
8
! KAIMANN produced this manual
as a practical guide dealing with the most
common types of insulating situations.
Clearly, not all types of applications are
covered due to the sheer number and
complexity of installations found. It is
thus up to experienced fitters to choose
the most appropriate solutions.
KAIMANN guarantees that the quality
of all products conforms to the technical
specifications supplied in compliance
with legal requirements.
KAIMANN can not be held responsible
for any defects occurring as a result
of the incorrect or improper use of the
materials or tools, or as a result of
incorrect fitting.
The copyright of the illustrations used in
this booklet is owned by KAIMANN.
!
74-7
5
Related Documents