East Carolina University Marching Pirates Drumline 2015 2016 Technique Handbook "The Sound of Pirate Nation"

Welcome message from author
This document is posted to help you gain knowledge. Please leave a comment to let me know what you think about it! Share it to your friends and learn new things together.
Transcript
East Carolina University
Marching Pirates Drumline
2015 2016
Technique Handbook
"The Sound of Pirate Nation"

Preface
This technique handbook is but part of our program
here with the ECU Marching Pirates Drumline.
Please do not forget to read through the Policy
Handbook as well. This handbook is to help you
understand our expectations playing wise and how to
achieve the way we will be playing this season.
Please print this, the policy handbook, and all of the
music provided at your earliest chance so you have a
hard copy with you at all practice sessions,
rehearsals, audition days, etc.

Disclaimer and Thank you
Because I have always believed it is right to give credit where it is due, I
feel it is important to state that this packet is not entirely my own work. This
packet comes from many of my old teachers and I would like to give a quick
“Thank You!” to them for allowing me to use and edit parts of their well written
handbooks in order to create a comprehensive understanding of what is going to
be expected in ECU’s Drumline.
I also feel it is important to know the history of the group, where it comes
from, and to maintain a sense of flow as the line evolves from year to year. As
such, I do feel that it is important to state that parts of this packet were written
by the instructors of the ECU Drumline from when I was a member: Nick
Nichols (ECU Drumline Instructor from 2011-2013) and Will Goodyear (ECU
Drumline Instructor 2008-2010).
As an addition, many of the ergonomics and specifics of the technique come
from my teachers: Ralph Hardimon, Brian Stevens, Murray Gusseck, Mike
Jackson, Ken Hardy, and many more. While they are not specifically quoted
within the handbook, the technique aspects largely come from their teachings
and a few of the exercises are edited versions of concepts and pieces they wrote.
This is just a quick note to give credit where credit is due and to help
establish where this approach and school of thought has come from.
Thanks guys!
-Colin Williams

Welcome Letter and Audition FAQ
Thank you for your interest in the Marching Pirates Drumline. This is the technique packet for
the 2015-2016 season. This packet can be broken into three parts: Our technique breakdown, the
exercises, and the remaining audition material (fight song, cadences, etc.) You will be held accountable for your own familiarity, understanding, and execution of
each aspect of this packet. As such, it is very important that you not only learn the music
associated with the audition (the exercises, pregame, etc.), but also read through the technique
guidelines, even if you are a veteran, as some things may have changed from the previous year.
If you are able to get to some of the non-auditioned parts of the packet, it will greatly assist the
line if you end up making the spot you want, and will save you from the stress of learning it all at
band camp. So if you are feeling good about your audition, feel free to get a head start on the
other material.
Before we dive into the technique portion of the packet, we will quickly discuss what
your audition will consist of.
What will I be asked to play? The “required exercises” contained within this packet (the “supplemental exercises” will be
played as a line, but not auditioned with) and the “pregame set” at the end of this packet. All
material will be expected to be memorized.
What will my audition consist of? The audition will have two general settings. First, we will play in a group setting, where we will
go through parts of the packet, as well as see how well you play with others and adjust to our
technique. Second, there will be a brief individual audition, in which we will be looking at your
understanding of the concepts laid out in the packet and in the group setting, as well as your
knowledge of the audition material at a variety of tempos.
Best way to prepare? The best way to be ready for the audition is to practice daily with specific goals in mind for each
session. Use a metronome and come up with a main focus for each practice session. Instead of
setting a length of time to practice, make it about completing that goal. If you finish early, great!
If you finish later, ALSO GREAT! In this way, you will never show up unprepared so long as
you have set a specific central focus for yourself in each practice session that helps you progress.
If you are doing well and want to keep practicing after completing your goal, set another goal
and go for it.
If you have any further questions, you may feel free to contact us at [email protected] I look forward to having a great season with the Marching Pirates. Happy Drumming!
Sincerely,
Colin Williams and the ECU Drumline Staff

TECHNIQUE OUTLINE
I. GENERAL CONCEPTS All great drummers share a few things in common no matter what discipline of percussion they
are involved with. This technique program is designed to establish a process of thought that can
be applied to all percussive situations. Each brand of percussion has its own requirements and
limitations as far as technique is concerned, and marching percussion is no different. We have to
do things that make sense for our specific application, but we do not have to completely abandon
common sense and logic for the sake of our uniformity. Ideally, you will learn things from your
experience in this ensemble that will help you succeed in any musical situation. The following
four terms are absolutely crucial to your development as an instrumentalist. Make sure that you
are constantly evaluating your own growth using these ideas as criteria.
Timing (rhythmic accuracy):
Any great musician knows that it is more difficult and also more satisfying to play with
immaculate timing. This is achieved through patience and attention to rhythm. Practice with a
metronome and/or music recorded in time to reinforce good timing.
Expression (quality of sound and interpretation of music):
It is our job as musicians to bring out the best sound possible from our instruments, and translate
music into feeling. Good sound quality, dynamic shaping and body language are things that you
need to utilize in order to be completely expressive in your playing. Sound quality is completely
dependent on mastering your technique, but there is so much more involved with expression than
mechanics. There is a delicate balance we must have, as members of a marching percussion
section, between technical uniformity and individual expression. This will be explained further in
rehearsals and at auditions.
Muscle Memory:
In order for any segment of the drum line to play together, in time with great sound, each of the
drummers must be able to play their part the exact same way every time, whether it be 2 people
or 40. When first learning a piece of music, our brains tell our hands what to do, but after we
play that piece of music hundreds of times our brains are able to focus on other things besides the
execution of the rhythms. This is a result of our muscles memorizing how to perfectly control
space, velocity, and volume. In order for this to happen, you must rehearse your music with a
consistent time source, paying close attention to dynamics and technique so that you are
absolutely sure the music is being played perfectly. Then, continue that intense, focused practice
until you cannot get the part wrong. Making a drumline sound great isn't hard to do... so long as
everyone cares enough to play perfectly.
Chops:
Strength is by far the easiest aspect of drumming to understand and develop, but the frustrating
part is that without continuous practice you'll lose your chops faster than you acquired them. It's
like lifting weights. You build muscle and coordination through pushing your limits as much as
possible until you are satisfied with your physical ability and then focus your efforts on
sustaining that level of strength. What's different is that we're developing chops in order to add

more to our music, not just to play faster and harder than anyone out there. Work on exercises
that will improve your endurance, but do not lose sight of the fact that you're still a musician, not
just a drum jock.
II. NUTS AND BOLTS Now that we've covered some general ideas, here's a detailed explanation of how to apply these
ideas directly to your marching instrument.
1. Ergonomics
Starting from the feet:
Whether in first or second position (feet together or apart), it is important that how you are
standing does not add tension to your body. You should be standing on the platforms of your feet
(not on your toes but not on your heels). Moving upwards you should have straight legs
(without locking your knees). Your chest should be projecting up and outward with your core
muscles extended (spine straight). Your shoulders should be pulled slightly back and your arms
relaxed at your sides. Your head should be held slightly upwards but should not feel extended
(no tension!)
Going into playing:
Relaxation from your head down to your neck, shoulders, arms and fingers is absolutely
necessary to create a desirable sound. Tension is these areas will affect your playing in a
negative way, hurting both the length of sound and your muscles and joints. A perfectly straight
spine and level chin will allow your muscles to relax even more since you won't be using any of
them to compensate for an off balance upper body. This posture may take some getting used to,
but in the end will help you tremendously. Both elbows should be relaxed, comfortably at your
sides allowing only the space that your body naturally provides. Snares and tenors, the height of
the drum should allow your arms and wrists to be slightly angled towards the ground. Keep your
beads in the proper playing zones in order to produce an equal sound from both sticks.
1-A. Snare Drum Detail:
Right Hand:
The wrist is flat to angle of the drum. The fulcrum is located between the thumb, index and
middle fingers, the ring and pinky fingers should be connected the stick. Allow a small amount
of space between the stick and the palm for maximum rebound. Fingers will remain in loose
contact with the stick at all times, and the stick shaft will never pull the fingers further away
from the palm than they are in the tacet position. The stick angle off of the drum will be 2 fingers
wide at the rim. This relaxed contact with the stick is commonly referred to as “neutral finger
position”.
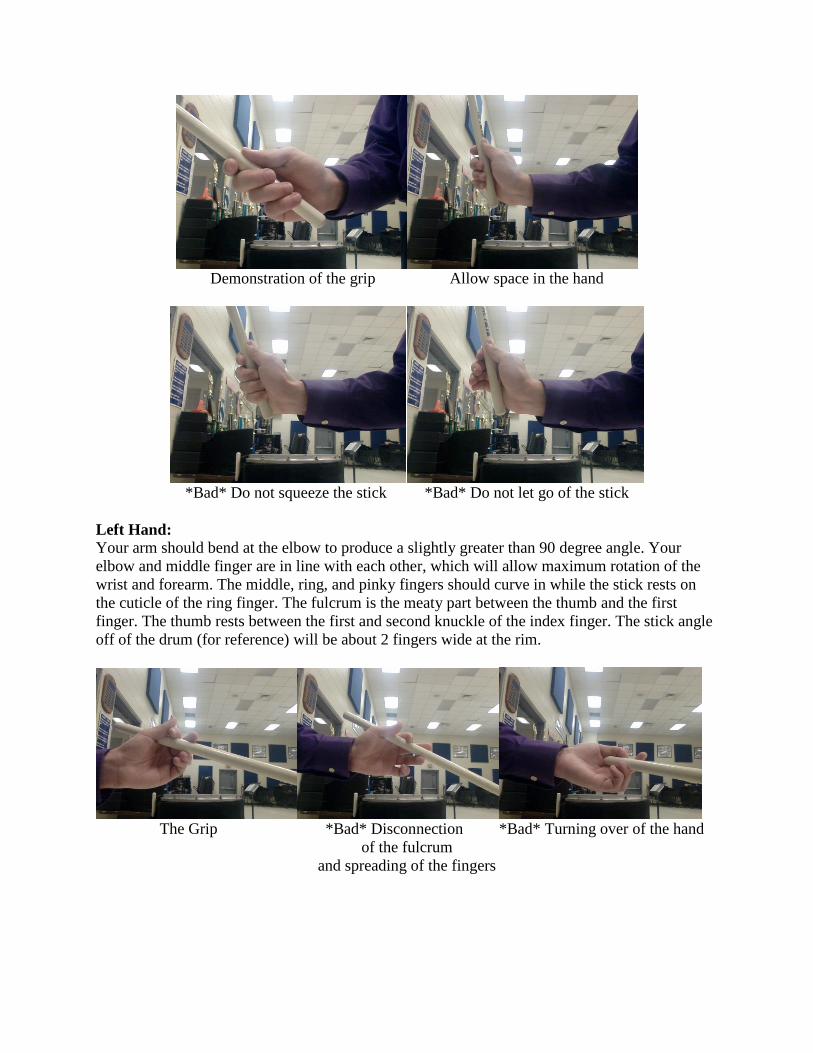
Demonstration of the grip Allow space in the hand
*Bad* Do not squeeze the stick *Bad* Do not let go of the stick
Left Hand:
Your arm should bend at the elbow to produce a slightly greater than 90 degree angle. Your
elbow and middle finger are in line with each other, which will allow maximum rotation of the
wrist and forearm. The middle, ring, and pinky fingers should curve in while the stick rests on
the cuticle of the ring finger. The fulcrum is the meaty part between the thumb and the first
finger. The thumb rests between the first and second knuckle of the index finger. The stick angle
off of the drum (for reference) will be about 2 fingers wide at the rim.
The Grip *Bad* Disconnection *Bad* Turning over of the hand
of the fulcrum
and spreading of the fingers

Resting Position Playing Positions
1-B. Tenor Detail:
Your arm should bend at the elbow to produce a slightly greater than 90 degree angle, allowing
the forearm and wrist to be angled downward towards the drums. The fulcrum is located between
the thumb, index and middle fingers. The ring and pinky fingers should be connected the stick
but relaxed and neutral. Allow a small amount of space between the stick and the palm for
maximum rebound. Fingers will remain in loose contact with the stick at all times, and the stick
shaft will never pull the fingers further away from the palm than they are in the tacet position
(see pictures in the snare drum detail- right hand section). The palms should be angled slightly
inward (not “french grip”, but leaning in that direction) to allow for better mobility around the
drums. The elbow, wrist, and bead of the stick should all be in a straight line with each other.
The best playing zone for each drum is located 1 inch away from the rim, in the area of the drum
that is closest to the body. During crossover and scrape patterns, the best sound possible still
needs to be kept in mind, so shoot for a good sounding playing zone that make the most
ergonomic sense.

This grip is too “French” This grip is too “German”
This grip is juuuuust right
When playing, the beads are brought toward the shoulders.

Resting Position zones are pictured below:
The zones for playing each drum are as shown below:
The spock drum(s) is/are played in the center of the head.

Scrapes:
Scrapes are when you have two or more stokes on the same hand that are not on the same drum.
These are achieved by having the same Y-axis motion as playing a non-scrape, but by moving
the X-axis to the new location between the two strokes. When in doubt, more velocity into the
head helps, as it will help you have more rebound off the first drum to move to the second. When
scraping, it is wise to use “scrape zones” or the two points on the drum that qualify as a playing
zone (1 inch away from the rim) that are closest to where you are going or coming from. If this is
confusing, do not worry. We will go over it.
Cross-Overs:
When crossing over hands, it is important to note which hand is supposed to be on top and which
one on bottom (it will be notated on your music usually or defined by your section leader).
For adjacent drums, the sticks will cross at the sticks just before the fulcrum. (see below on the
left). For non-adjacent drums, the stick will cross at the wrist (see below on the right)
It is important that the two hands still sound the same (volume wise) as when not crossed.
1-C. Bass Drum Detail:
Your arm should hang relaxed from the shoulder and bend at the elbow to create a 90 degree
angle. The wrist or forearm (depending on the size of the drum) should graze the rim and the
mallet head should be angled inward towards the head. The fulcrum is located between the
thumb, index and middle fingers. The ring and pinky fingers should be connected to the stick.
Allow a small amount of space between the stick and the palm for maximum rebound.
Loosely close all space between fingers including the space between your thumb and index
finger. All wrist movement will require a rotation of the wrist and forearm and any arm
movement will occur in conjunction with that wrist rotation in an outward fashion. Fingers will
remain in loose contact with the mallet at all times, and the mallet shaft will never pull the
fingers further away from the palm than they are in the tacet position. Initiation (prep) of the

mallet will be done in a very relaxed fashion using wrist rotation and gravity to get the mallet
away from the head.
Grip- notice the pad of the thumb is on the opposite side of the stick compared to the index and
middle finger. The ring and pinky finger are in contact with the mallet but not squeezing (notice
the space).
Resting Position Rotation
Louder dynamics may require an outward motion of the arm
2. Basic stroke concepts
2-A. Motivators:
There are three parts of your body which you will use to generate strokes: wrist, arm and fingers.
Which of these you use depends on tempo and volume and generally should be decided upon
more by your body (what feels natural) than your brain. No matter what you are using to
motivate your stroke, you must allow the stick to rebound as much as possible. Wrist will be
used most of all and should be as much a part of every stroke you play as possible. All wrist
motion is executed as quickly as possible. For fundamental strokes, the wrist moves downward
as fast as possible to create maximum velocity and remains in the down position. For rebound
strokes, the wrist moves downward as fast as possible and then moves back up as quickly as
possible to allow for maximum rebound, maintaining the stick's velocity.
Fingers will be used at very fast tempos in conjunction with wrist. When using fingers, you
should never squeeze the stick all the way against your palm, thus allowing it to resonate at all
times. IMPORTANT: If you are used to using a finger technique for most of your strokes,
concentrate on developing your wrist strength and understanding of rebound. We will only use
fingers as a way to relax our wrists… not as a primary motivator.
Arm as a motivator is something that may take some time to understand and should not be
attempted in an incorrect fashion nor used in playing situations that don't make sense. Arm will
be used in lifting situations such as the initiation of strokes and multi-dynamic passages
(changing from a lesser to larger dynamic). It will also be used on the first stroke of any multi-
stroke passage. For example... in a double beat scenario, arm will be used in conjunction with the
wrist to lift for the first stroke and will travel downward with the first stroke, staying down as the
wrist moves upward for the second stroke. Same thought process applies for triple beats, etc. If
you’ve never been taught how to use your arm effectively, don’t worry about it. We’ll get to it!
I’d rather you come in to auditions with a good understanding of the rest of the technique and
arms will be explained later.
2-B. Initiation:
Initiation of the stroke (prep) occurs on the & of the beat before your entrance for any tempo up
to around 145 bpm. Any other tempo will require a full count initiation. The wrist and arm
initiate together keeping the top of the hand relaxed. In fast passages involving both hands (ex.
Sixteenth note singles at a fast tempo), both hands are prepped simultaneously. So if you are
trying to play the example given above, you would prep both hands on beat 4 despite the right
hand playing on the downbeat of 1 and the left hand on the E. The stroke is primarily led by the
bead of the stick (though occasionally, we will led with the wrist; but more on that when you get
to auditions…once again…do not worry about it yet.)
2-C. Fundamental stroke (Isolated stroke):
All concepts thus far apply. Keeping your grip relaxed, using the weight of the hand to stop the
motion after impact. The stick should always resonate even when restricting the motion (no
squeezing with your fingers). This fundamental stroke applies to isolated attacks as well as

accent/tap situations where you have to stop the motion of the stick after an accent in order to
play the following tap. After striking the accent, the stick will actually rebound for a fraction of a
second before the tap as a result of the lack of tension in the grip. This is ideal so long as you do
not follow that rebound upward with your wrist. IN SUMMARY: Wrist stays down, grip stays
relaxed; stick is allowed to resonate while remaining low enough to play a quality tap.
2-D. Rebound stroke:
All previous concepts apply, but in the rebound stroke you will not be stopping the motion of the
stick with the weight of your hand. Rather, you will lift your wrist immediately after it moves
downward allowing the stick to rebound back to the desired dynamic as fast as possible. Please
note that you are not up-stroking (lifting the stick up with your wrist or arm). You are simply
getting your wrist out of the way after it down strokes so that the stick is free to rebound
independently of the wrist. The up stroke is taken care of by rebound. The rebound stroke is used
in many scenarios such as playing multiple notes at the same dynamic. One thing to consider
when playing both of these strokes (fundamental and rebound) is that they feel very similar. Both
require a relaxed approach and both are allowing the stick and drum to resonate fully.
3. Cymbal Technique and Sounds
3-A. Set-Up:
Straps: Refer to the diagram below to tie a proper cymbal knot.

The grip we use (the standard Garfield Grip) requires a half turn in the strap before inserting the
strap into the cymbal. To ensure this is done correctly, the same side of the strap will be facing
upwards on both ends (leather and leather or suede and suede).
Grip: Be sure the strap fits snuggly. The cymbal remains in contact with the hand even when
hanging freely. However, the strap should be loose enough to allow for proper blood flow. In
addition, keep your fingers spread at all times..
3-B. Basic Positions:
Set: Arms should bend at the elbows slightly. Your shoulders should remain relaxed and arms at
your side. The cymbals should remain flush to the hips and there should be about an inch of
space between the cymbals and your legs and between your cymbals and arms.
Vertical Port: Hold the cymbals parallel to each other and perpendicular to the ground straight
out in front of you. Your thumbs should be at eye level and your elbows should be bend in a 110-
degree angle. You may have to push the cymbals away from your body to accomplish this.
Horizontal Port/ Gumption: Hold the cymbals parallel to each other and at a 35-degree angle
to the ground with the right cymbal on top. They should be 1.5” apart. Your thumbs should be
sternum-level and 2 inches to the left of the center of your body.
Hip Rest: Form a V with the cymbals in front of your belt buckle.
Hinge Choke: Hold the cymbals 1.5” apart, parallel to each other, and parallel to the ground
with the right on top. Now touch the edge of your cymbals slightly above your belly-button.
3-C. Moving Between Positions: Moving Between Vertical Port, Hip Rest, and Set: Moving Upward- Rotate the cymbals (also
called a flare or flip) rotate the cymbals so your palms face downward first, then out, then to up
and over to the position. Moving Downward- Reverse what was done before (so palms face
upward, then out, then down, then into position).
Moving to and from Horizontal Port/Gumption: Moving from Vertical to Horizontal or
Horizontal to Set- Rotate the cymbals (also called a flare or flip) clockwise in both hands.
Moving from Horizontal to Vertical or Set to Horizontal- Rotate the cymbals (also called a flare
or flip) in a similar fashion to the moving “upward portion” of the “moving between vertical
port, hip rest, and set” in both hands.
Moving between Horizontal Port and Hinge Choke position: Go straight to each position (no
flips)
3-D. Basic Techniques:
Crash: We approach the crash with a slight grace-note flam to keep the cymbals from catching
air and to get the full tone of the cymbal. To illustrate this, think of a plane hitting water. It will
come in and a slight angle, but flatten out as soon as it makes contact. There will be two contacts
with the cymbals, but not far enough apart to hear both. Also, be sure not to grasp the cymbals
with your fingers as this will deaden the sound. We perform basic crashes at vertical port using
an “A,V” prep, as well as at horizontal port prepping the right hand back into the bicep and
following through past the stationary left cymbal. Other forms of crashes will be discussed at
auditions and camps.
Sizzle: Sizzles can be done at horizontal or vertical port. Prep by pulling the cymbals apart an
inch or two. Allow the cymbals to make contact with each other and let remove your fingers
from the cymbal. This should result in a long sizzzzzzzzzz sound. You have to approach this
technique with some finesse or it will cut off the sound quickly.
Slam: Slams can be done at horizontal or vertical port. Prep by pulling the cymbals apart an inch
or two. Using your entire right arm, push the right cymbal into the left so they are flush. Squeeze
tightly right after impact to insure no noise after the note. This should give you a quick, deep
sound.
Hinge Choke: Performed at the hinge choke position, a hinge choke is played by hinging the
cymbals on your stomach. Open the front of the cymbals two inches and then squeeze them
closed. This should give you a Hi-Hat type sound.
Slide/Siz-choke: The technique can be referred to as a slide or a siz-choke. Start by playing a Sizzle
put push the cymbal away from you during the sizzle. Now Push the cymbals together and pull the
right back in to the left until they are flush. You should catch some air and get a “thunk” sound after
the sizzle.
Taps: Taps can be performed at many different positions. Our primary tap position is vertical port
with a slight difference: move the bottoms of the cymbals away from each other until they form an A
with a 45-degree angle between them. To get a tap, prep the right cymbal by moving the top of the
cymbal to the right until it is straight up and down. Now let the top of the right cymbal hit the top of
the left and move back to the starting position. You should get some ring out of this ‘ting’ sound.
Crash Chokes, Tap Chokes: Cut the sound off after the initial attack by dampening the cymbals on
your forearms, right above the armpits, or slightly below your chest (body).
Belly Taps: Put your hands in between your belly button and chest. Looking down at the cymbals
they should form an “A” pointing away from your body. Perform a tap as described above, but allow
the cymbals to stay in contact with your body. This should give you a dull thud sound.
Double Muffle Taps: Play a tap as described above in the modified vertical port position, but allow
the cymbals to touch your forearms. This should produce a sound similar to the belly taps.
*Note* There will be other sounds, but these are good starting points.
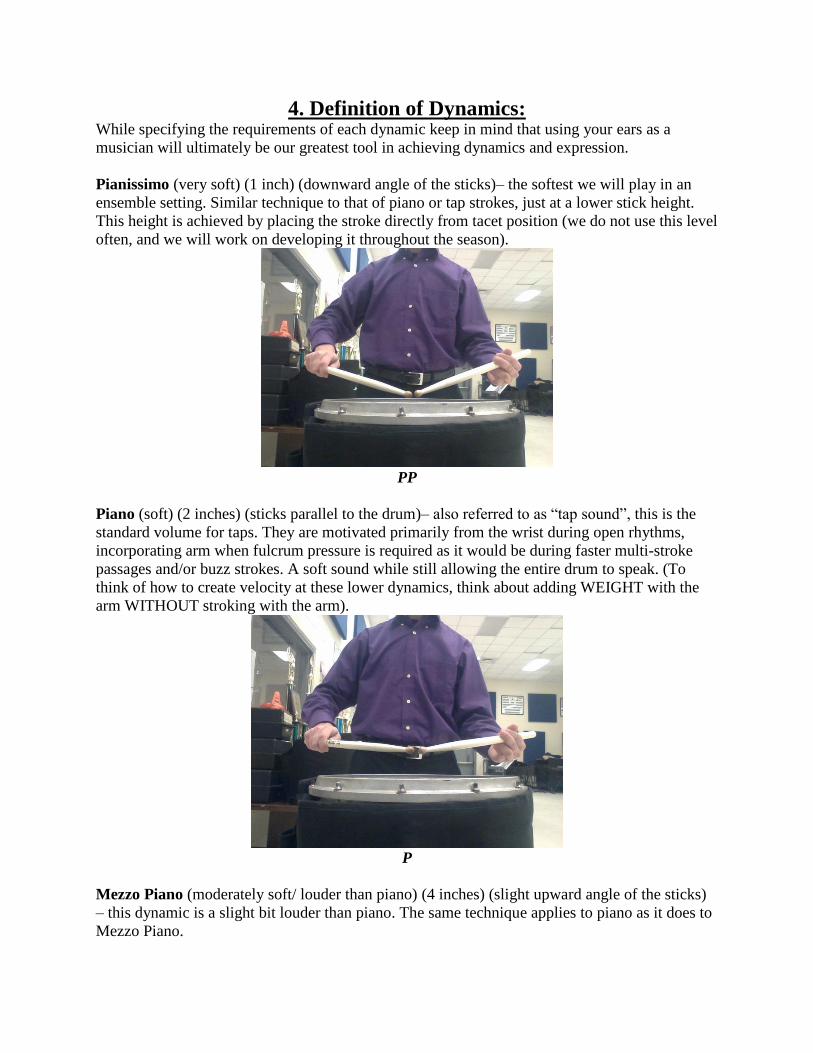
4. Definition of Dynamics: While specifying the requirements of each dynamic keep in mind that using your ears as a
musician will ultimately be our greatest tool in achieving dynamics and expression.
Pianissimo (very soft) (1 inch) (downward angle of the sticks)– the softest we will play in an
ensemble setting. Similar technique to that of piano or tap strokes, just at a lower stick height.
This height is achieved by placing the stroke directly from tacet position (we do not use this level
often, and we will work on developing it throughout the season).
PP
Piano (soft) (2 inches) (sticks parallel to the drum)– also referred to as “tap sound”, this is the
standard volume for taps. They are motivated primarily from the wrist during open rhythms,
incorporating arm when fulcrum pressure is required as it would be during faster multi-stroke
passages and/or buzz strokes. A soft sound while still allowing the entire drum to speak. (To
think of how to create velocity at these lower dynamics, think about adding WEIGHT with the
arm WITHOUT stroking with the arm).
P
Mezzo Piano (moderately soft/ louder than piano) (4 inches) (slight upward angle of the sticks)
– this dynamic is a slight bit louder than piano. The same technique applies to piano as it does to
Mezzo Piano.

MP
Mezzo Forte (moderately loud / Less loud than Forte) (8 inches) (45 degrees) (halfway to
vertical) – Starting to incorporate more arm to produce a louder, weighted sound.
MF
Forte (Loud) (12 inches) (almost vertical) – A balance between arm and wrist movement. A full
sound that is almost the loudest dynamic that you can play (while keeping technique in mind).
F

Fortissimo (Very Loud) (16 inches) (vertical) - The loudest sound possible, incorporating extra
weight of the arm and a full wrist stroke. It is important to remember that this is still a regular
stroke and is not an excuse to slam the instrument.
Material and Purpose
REQUIRED EXERCISES FOR AUDITION:
8-8-16: (Traditional Exercise) This exercise focuses on our rebound strokes. A common issue is the transitions between hands.
This will also be used as a general warm-up for us (stretching out the muscles and such).
Samba Taps: (by Brian Stevens, edited by Colin Williams) This exercise focuses on two height passages and the fundamental strokes mentioned earlier in
the packet. Some common issues include poor timing of the tap notes after the accents,
transitions between hands, playing too lightly and/or too high on the taps, and the incorporation
of feet (marking time). As a special note for this exercise, practice marking time to the half notes
as well as to the quarter notes. Use the first 2 bars as a check to create a framework of taps for
your accents to lie in.
Parrott Control: (by Colin Williams) This exercise focuses on two things. For snares and tenors, it focuses on creating an equal sound
between hands, regardless of the sticking. For the bass drums, the focus is on timing, playing on
each of the partials of a set of 16th
notes.
Triplet Diddles: (mostly traditional, tag by Colin Williams) This exercise is designed to work on…well… diddles…doubles…stuff like that. Okay but
seriously. While fairly stock (other than the tag added from C to D), this exercise is critical to the
success of the upper battery. The basses focus on a triplet form of Parrott Control with a focus on
the triplet partials.
Piradiddles: (by Colin Williams, with quotes from Will Goodyear’s “Proud
Mary”, Nick Nichols’ “Jojo”, and hints of some Ralph Hardimon and Murray
Gusseck) This exercise is intended to work on double strokes in a more meaningful context. As such, I
consider this (and “Abra-Flam Lincoln”) more of an etude than an exercise. It works on two
height passages with doubles (like paradiddles) and many other similar things. Focus on
consistent timing and incorporating everything you have worked on in Samba Taps. Play slow
and with a metronome at first to make sure each and every note is under control in your hands.
Abra-Flam Lincoln: (by Colin Williams) Title credit does to Alex Robb (the snareline captain for this year).
I find this to be a fun thing to play when I want something a little more meaty. Focus on keeping
your grace notes down and controlling the rebound in the accents...and most importantly, stay
relaxed. As far as the structure of the exercise, we will play four possible versions of the
exercise. Version one is as written (what is required for your audition). Version two replaces the
tenor part from A to B with the solo in “AbraFlam Lincoln Solos”. Version three replaces the
snare part from A to B with the solo. Version four replaces both the snare and tenor part from A
to B with the solos.
*NOTE* For auditions, we will only require the base exercise for AbraFlam Lincoln, not the
solos (though you are free to get a head start on the solos if you would like).
SUPPLIMENTAL EXERCISES:
*While not required for auditions, we will be using these exercises in developing
as players throughout the season.
Moeller: (by Colin Williams) This exercise focuses on creating a Moeller approach to the drum. We will talk more about how
we will do that in rehearsal, but in the meantime learn the format of the exercise.
Check Patterns (Sixteenth and Triplet): (Traditional Exercise)
While this exercise is not a part of the audition, it is an essential exercise to develop immaculate
timing and reading skills. There are two types, duple and triple check patterns. I highly
recommend spending time on these exercises everyday as a part of developing strong time. Bass
drums and cymbals, this exercise is even more important for you, since you rarely play an entire
passage by yourself, but instead are part of a larger whole.
To modify the exercises for cymbals: Use one sound (crash, taps…etc.)
For sixteenth check play downbeats when you see a bar of sixteenth notes and play the
1’s variation.
For triplet check, play downbeats when you see a bar of triplets and play starting in bar 7.
For all drum sections, it is easy to creatively use this exercise. For instance, while playing the 1’s
variation, play the whole exercise on one hand, while the other plays 1e+ 2e+ 3e+ 4e+ over and
over. Use your creativity and come up with a variation or two per week to work on daily and you
will find yourself a much better player.
Scrapes (Tenor Specific): (by Ken Hardy) This exercise is specifically for the tenors. It focuses on establishing a solid scrape technique.
Take the exercise slowly and focus on treating each part of the scrape as its own strong,
independent note. Sticks should come straight up and down at all times, not at a slanted angle.

Other Materials
CADENCES: *(Not required for auditions, but highly recommended that you get started on some of
them). To be played on the way to the stadium, when playing for high school retreat ceremonies, etc.
(the list could go on forever). We have four “street beat” cadences.
NOTE: Please learn “Eye Patch” and “Peg Leg” first then move on to the other two.
Eye Patch: (by Will Goodyear) A Latin music inspired cadence that has been played at ECU for a long time. There have been a
few changes from the music since this was last printed, but go ahead and get started learning this
version for now and we will get you up to speed during band camp. For the snares, this is notated
differently than some of your music. As a rule (generally), if “Will Goodyear” wrote the music
you are playing, then the notes on top of the line are for your right hand and the ones below are
for your left (with things on the line being both hands).
Peg Leg: (by Will Goodyear) Another fun cadence based around a groove in 6/4 time. Focus on placing your feet correctly
throughout this cadence, as that is probably the hardest thing about it. Tenors, it is common to
have your feet fall apart from bars 17 to 24 (so work on that).
E.C. Boogie: (by Nick Nichols) A more traditional sounding cadence.
Swashbuckle Swagger: (by Nick Nichols) A more choppy cadence to show off and highlight a few sections. CHANGES: Please skip bar 3.
PRE-GAME MATERIALS FOR AUDITIONS: If you have ever been to a football game, you know that a bands pre-game show is one of the
most important parts of their performance on game day. We have a lot of pre-game material, and
it would be impractical to ask you to do all of it in our short audition time period. As such, we
have split the pregame materials into “for auditions” and “other pregame materials”. You are
only required to learn the “for auditions” set. However, once auditions have resolved and we
know who is on what instrument, we will dive in heavily to the other materials.
ECU Fanfare The big loud intro of the winds in pregame.
Fight Song/ EC Victory: (Drumline score by Will Goodyear) The piece of music that we are a drumline will play more than any other thing we have. You may
also hear us call it the “new fight song” because we have had two major fight songs in our
schools history and we still play both. I highly recommend learning this one sooner rather than
later. For snares, stickings are notated by where the note heads are in relation to the middle line

(right is top, left is bottom, both is middle). Tip: Focus on keeping immaculate timing, and
accent to tap definition.
Go Cheer To be played as a drum break before repeating EC Victory (do not worry too much about the
format, we will help you at camp with it).
Here’s to the Pirates The “old fight song”. We play this less often than EC Victory, but it is still important to the
alumni for whom it was their fight song.
OTHER PRE-GAME MATERIALS There are various cadences and other parts of pregame that you will have to learn at camp.
However, these first four pieces will give us a healthy start going forward.

Official Audition List:
Exercises:
8-8-16
Samba Taps
Parrott Control
Triplet Diddle
Piradiddles
AbraFlam Lincoln (without solos)
Pregame:
ECU Fanfare
EC Victory/ Fight Song
Go Cheer
Here’s to the Pirates
*All other materials will be learned by the end of camp, which is about a week
after auditions. I suggest getting a head start on some of the other stuff too.*
ANY QUESTIONS?!?
If so, please email us at [email protected]
Both instructors and all of the section leaders are on this email in order to allow
you to have easy access to all of us and so we can answer your question as quickly
and thoroughly as possible.
Related Documents


![Mansfietd High School Spring Drumline Camps1].pdf · Mansfietd High School Spring Drumline Camps ... Exercises for the section you would like to try out for ... Marching Bass Drum](https://static.cupdf.com/doc/110x72/5a9f942a7f8b9a7f178cfc6d/mansfietd-high-school-spring-drumline-1pdfmansfietd-high-school-spring-drumline.jpg)