9 HOME ECONOMICS: DRESSMAKING (PRODUCE SLEEPING GARMENTS) Learner’s Material Department of Education Republic of the Philippines This instructional material was collaboratively developed and reviewed by educators from public and private schools, colleges, and/or universities. We encourage teachers and other education stakeholders to email their feedback, comments, and recommendations to the Department of Education at [email protected]. We value your feedback and recommendations.

Welcome message from author
This document is posted to help you gain knowledge. Please leave a comment to let me know what you think about it! Share it to your friends and learn new things together.
Transcript

9
HOME ECONOMICS:
DRESSMAKING (PRODUCE SLEEPING
GARMENTS)
Learner’s Material
Department of Education
Republic of the Philippines
This instructional material was collaboratively
developed and reviewed by educators from public and
private schools, colleges, and/or universities. We
encourage teachers and other education stakeholders
to email their feedback, comments, and
recommendations to the Department of Education at
We value your feedback and recommendations.
Technology and Livelihood Education – Grade 9
Home Economics - Dressmaking
Learner’s Material
First Edition, 2014
Republic Act 8293, section 176 states that: No copyright shall subsist in any
work of the Government of the Philippines. However, prior approval of the
government agency or office wherein the work is created shall be necessary for
exploitation of such work for profit. Such agency or office may, among other things,
impose as a condition the payment of royalties.
Borrowed materials (i.e., songs, stories, poems, pictures, photos, brand
names, trademarks, etc.) included in this book are owned by their respective
copyright holders. Every effort has been exerted to locate and seek permission to
use these materials from their respective copyright owners. The publisher and
authors do not represent nor claim ownership over them.
Published by the Department of Education
Secretary: Br. Armin A. Luistro FSC
Undersecretary: Dina S. Ocampo, Ph.D.
Department of Education-Instructional Materials Council Secretariat (DepEd-IMCS) Office Address: 5th Floor Mabini Building, DepEd Complex Meralco Avenue, Pasig City Philippines 1600 Telefax: (02) 634-1054 or 634-1072 E-mail Address: [email protected]
Development Team of the Learner’s Material Authors: Haydee C. Bueza, Socorro A. Bulic, Jenny A. Da-Anton,
Albert Datu, Jeffrey A. De Guzman, Anicita P. Domo, Alvin L. Espiritu, Ellen P. Gonzaga, Girlie F. Guian, Aniceta S. Kong, Dorothy Manalanzan, Lowela P. Margallo, Sandy Montano, Maria A. Roque, Juvy C. Valdemoro
Reviewers: Unina A. Bejarin, Winnie dela Cruz, Annabel Despabiladeras,
Jelly Flores, Karen Kate C. Villanueva, Catherine Villaruz Editors: Merlyn Lee, Betty Puzon, Noel B. Bejo Illustrator and Layout Artists: Henry Allen M. Arcos, Arlene A. Guiao Consultant: Eleanor A. Malicdem Subject Specialist: Cristeta M. Arcos
Management Team: Jocelyn DR Andaya, Jose D. Tuguinayo, Jr.
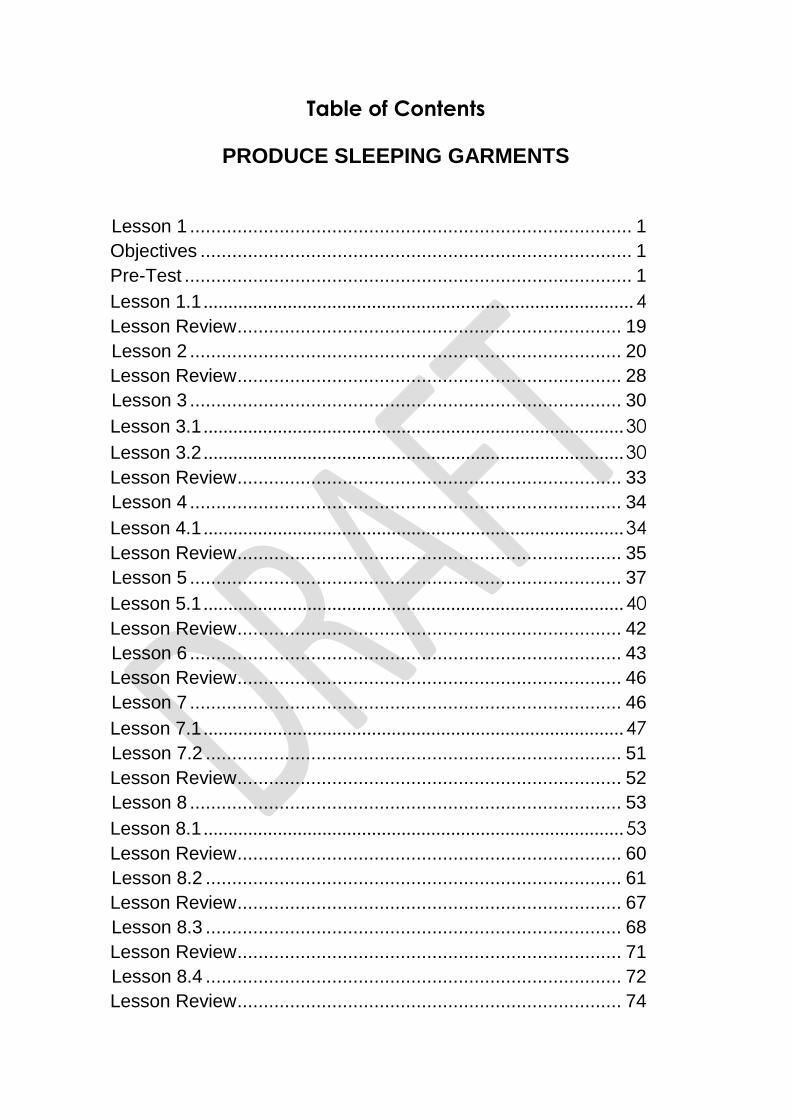
Table of Contents
PRODUCE SLEEPING GARMENTS
Lesson 1 .................................................................................... 1
Objectives .................................................................................. 1
Pre-Test ..................................................................................... 1
Lesson 1.1 ....................................................................................... 4
Lesson Review ......................................................................... 19
Lesson 2 .................................................................................. 20
Lesson Review ......................................................................... 28
Lesson 3 .................................................................................. 30
Lesson 3.1 ..................................................................................... 30
Lesson 3.2 ..................................................................................... 30
Lesson Review ......................................................................... 33
Lesson 4 .................................................................................. 34
Lesson 4.1 ..................................................................................... 34
Lesson Review ......................................................................... 35
Lesson 5 .................................................................................. 37
Lesson 5.1 ..................................................................................... 40
Lesson Review ......................................................................... 42
Lesson 6 .................................................................................. 43
Lesson Review ......................................................................... 46
Lesson 7 .................................................................................. 46
Lesson 7.1 ..................................................................................... 47
Lesson 7.2 ............................................................................... 51
Lesson Review ......................................................................... 52
Lesson 8 .................................................................................. 53
Lesson 8.1 ..................................................................................... 53
Lesson Review ......................................................................... 60
Lesson 8.2 ............................................................................... 61
Lesson Review ......................................................................... 67
Lesson 8.3 ............................................................................... 68
Lesson Review ......................................................................... 71
Lesson 8.4 ............................................................................... 72
Lesson Review ......................................................................... 74

Lesson 8.5 ............................................................................... 75
Lesson Review ......................................................................... 78
Lesson 8.6 ............................................................................... 79
Lesson Review ......................................................................... 82
Lesson 8.7 ..................................................................................... 83
Lesson Review ......................................................................... 85
Lesson 9 .................................................................................. 86
Lesson Review ......................................................................... 88
Lesson 10 ................................................................................ 89
Lesson Review ......................................................................... 94
Lesson 11 ................................................................................ 95
Lesson Review ......................................................................... 99
Lesson 12 .............................................................................. 100
Lesson Review ....................................................................... 100
POST TEST ........................................................................... 101


1
LESSON 1 PRODUCE SLEEPING GARMENTS
Objectives
At the end of the module, the learner is expected to
1. plan, design and sew sleeping garments and children’s wear;
2. apply finishing touches on sleeping garments and children’s wear; and
3. pack the finished garments attractively.
Draft and Cut Pattern for Sleeping Garments
This DRESSMAKING course leads to National Certificate Level II. This is designed
for Grade 9 student to develop competencies: plans, designs and sews sleeping garments
and children’s wear. It discusses and explains the tools, materials and equipment used in the
making of desired products. It also demonstrates different techniques and processes which
will guide the learner in developing the skills and knowledge to work effectively and
efficiently.
PRE- TEST
Multiple Choice
Directions: Read the statements carefully. Choose the letter that best describes the
statement. Write the answer in your quiz notebook.
1. The tool used to take body measurement accurately
a. Ruler c. L – square
b. Tape measure d. Curve rule
2. The principle of design which can be achieved by creating a center of interest in the
garment
a. Balance c. Emphasis
b. Rhythm d. Proportion
3. The type of pattern which does not contain any symbol and allowances
a. Basic pattern c. Final pattern
b. Construction pattern d. Commercial pattern

2
4. Fabric which is ideal for sleeping because it contains lustrous fiber material from
plant
a. Cotton c. Linen
b. Wool d. Silk
5. One of the characteristics of the sleeping garment
a. It is made of expensive materials. c. It is thick and long.
b. It is comfortable to the wearer. d. It is easy to wash.
6. The measurement from the shoulder neck junction to the waistline with the tape
measure passing at the highest portion of the bust
a. Blouse length c. Front Figure
b. Bust height d. Chest dept
7. Marking tool used for drafting pattern
a. Tailor’s chalk c. Pencil
b. Carbon paper d. Ballpen
8. A dressmaker’s guide in cutting fabric pieces in accordance with the garment design
a. Dressmaker scale c. Pattern
b. Manuscript d. Design
9. The pattern symbols that direct the dressmakers where to stitch the garment fabric.
a. Grainline c. Seamline
b. Hemline d. Stitchline
10. A color that is neutral
a. Yellow c. Red
b. Black d. Violet
11. The elements of design that create visual dimension
a. Length and width c. Size and bulkiness
b. Depth and height d. Center and emphasis
12. The result of combining primary and secondary colors
a. neutral colors c. prime-see colors
b. complementary colors d. intermediate colors
13. The cellulose materials made into long, lustrous fibers.
a. leaves. c. twigs.
b. seedpods. d. flowers
14. An example of silk fabric
a. Brocale c. Georgette
b. Canvass d. Challis
15. A fabric which can be easily dyed because of its absorptive capacity
a. Wool c. Cotton
b. Nylon d. Silk

3
16. Which of the following characteristics of sleeping garment will you consider first
when designing?
a. Age of the wearer c. Tools and material
b. Price of the cloth d. Design of sleeping garment
17. When do we prepare the project plan?
a. During the execution c. Before the execution
b. Towards the completion d. At the end of the execution
18. A part of a project plan that depicts the chronological steps on how to accomplish
the job
a. Objectives c. Bill of material
b. Procedure d. Evaluation
19. If you want to determine and prepare the logistics needed to finance the project,
which part of the project plan will you check?
a. Working drawing c. Objectives
b. Bill of materials d. Tools and materials
20. A flexible tape used to take body measurement
a. Ruler c. Curve ruler
b. L-square d. Tape measure
21. The material needed in the construction of a sleeping garment
a. cloth c. ripper
b. needle d. tracing wheel
22. In drafting the back blouse sloper, the following measurements are needed
EXCEPT one.
a. Back across width c. Shoulder width
b. Waist circumference d. Chest width
23. Jovie is drafting a front blouse sloper. Which are you going to divide to obtain the
accurate measurement?
a. 1 c. ¼
b. ½ d. 1/3
24. The body measurement that is needed in drafting back and front blouse slope
a. Bust circumference c. Back across width
b. Chest width d. Front figure length
25. The sloper or basic pattern is the foundation of all final patterns. Which one is
characterized as a sloper?
a. with provision for alteration c. ready for cutting
b. flexible for cutting d. no allowances and symbol
4
26. The body measurement which is taken around the arm where the sleeve length
falls
a. Sleeve length c. Arm circumference
b. Elbow circumference d. Armhole circumference
27. The measurement needed in drafting pajama trousers where the female customer
is allowed to sit while the measurement is being taken
a. Thigh circumference c. Full length
b. Leg circumference d. Crotch
28. The tool used in making a construction line
a. L-square c. Tape measure
b. Ruler d. Meter stick
29. The drafting tool used in the construction of a garment
a. Tracing wheel c. Scissors
b. Seam ripper d. Curve rule
30. A pattern needed in manipulating one piece blouse
a. Bodice and shirt c. Bodice and sleeve
b. Bodice and trousers d. Sleeve and skirt
Lesson 1.1
Principles and Elements of Design
The personality of the wearer shows the kind of image she projects. Personalities
differ depending on the kind of clothing people wear. Most introvert persons prefer clothes
of simple yet classical cut with pastel or light colors. Extroverts, on the other hand are
creative, artistic, expressive and energetic. Hence, they prefer clothing that is comfortable,
attractive and fashionable. They can wear all kinds of clothing of varied style, colors and
design with confidence.
5
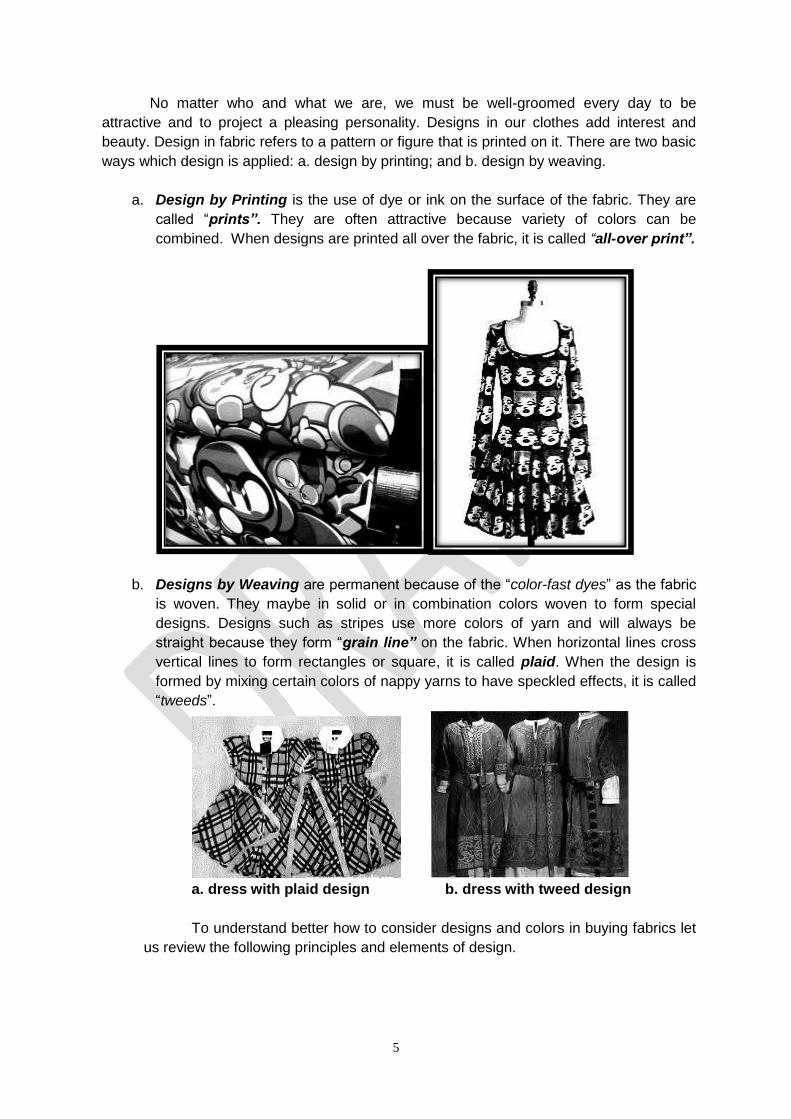
No matter who and what we are, we must be well-groomed every day to be
attractive and to project a pleasing personality. Designs in our clothes add interest and
beauty. Design in fabric refers to a pattern or figure that is printed on it. There are two basic
ways which design is applied: a. design by printing; and b. design by weaving.
a. Design by Printing is the use of dye or ink on the surface of the fabric. They are
called “prints”. They are often attractive because variety of colors can be
combined. When designs are printed all over the fabric, it is called “all-over print”.
b. Designs by Weaving are permanent because of the “color-fast dyes” as the fabric
is woven. They maybe in solid or in combination colors woven to form special
designs. Designs such as stripes use more colors of yarn and will always be
straight because they form “grain line” on the fabric. When horizontal lines cross
vertical lines to form rectangles or square, it is called plaid. When the design is
formed by mixing certain colors of nappy yarns to have speckled effects, it is called
“tweeds”.
a. dress with plaid design b. dress with tweed design
To understand better how to consider designs and colors in buying fabrics let
us review the following principles and elements of design.
6
Principles of Design
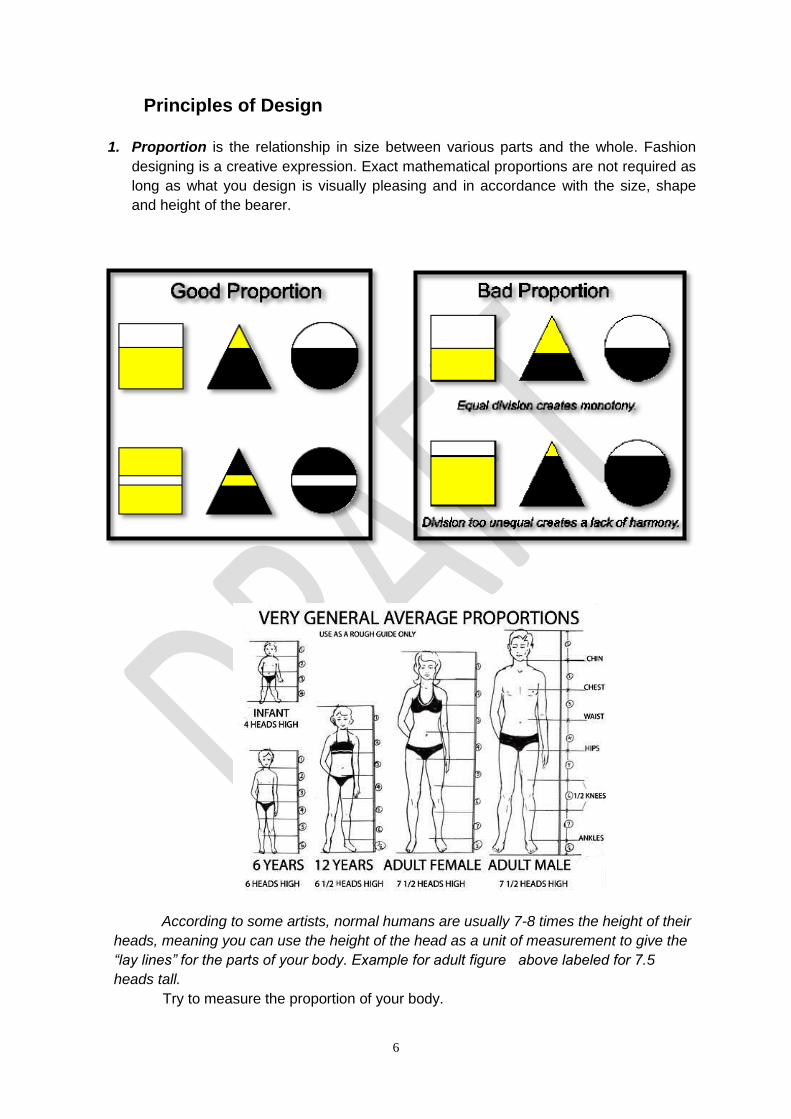
1. Proportion is the relationship in size between various parts and the whole. Fashion
designing is a creative expression. Exact mathematical proportions are not required as
long as what you design is visually pleasing and in accordance with the size, shape
and height of the bearer.
According to some artists, normal humans are usually 7-8 times the height of their
heads, meaning you can use the height of the head as a unit of measurement to give the
“lay lines” for the parts of your body. Example for adult figure above labeled for 7.5
heads tall.
Try to measure the proportion of your body.
7
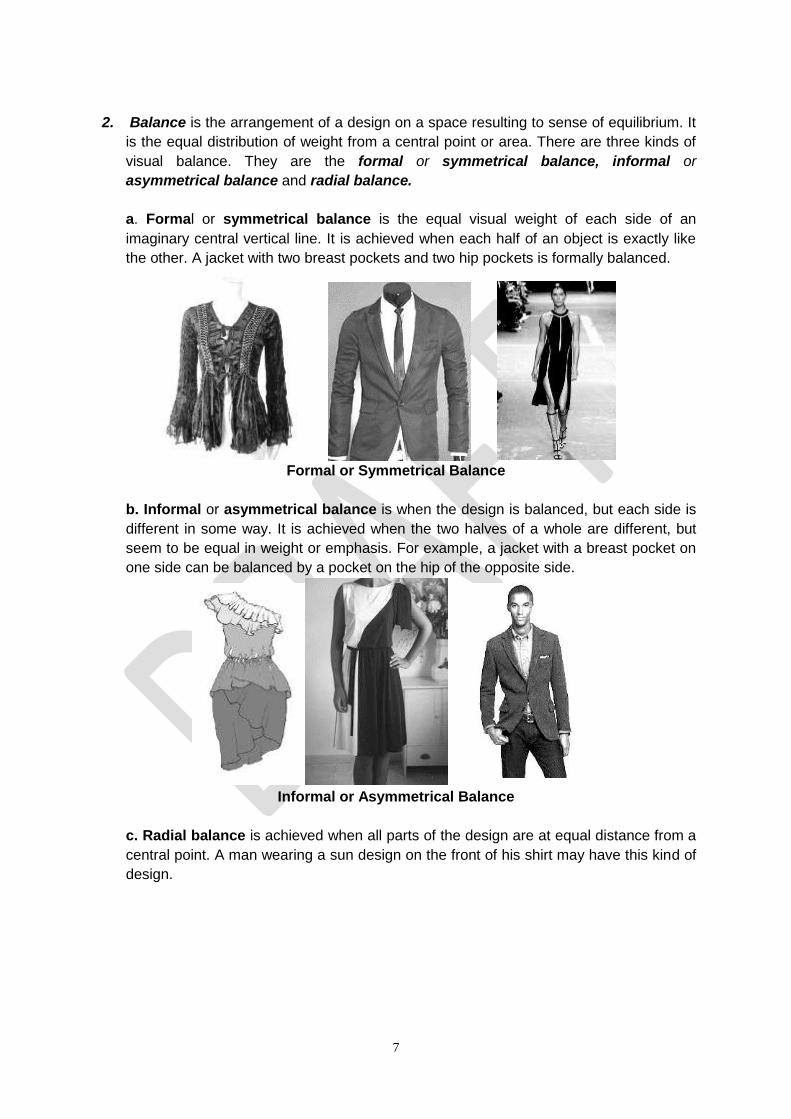
2. Balance is the arrangement of a design on a space resulting to sense of equilibrium. It
is the equal distribution of weight from a central point or area. There are three kinds of
visual balance. They are the formal or symmetrical balance, informal or
asymmetrical balance and radial balance.
a. Formal or symmetrical balance is the equal visual weight of each side of an
imaginary central vertical line. It is achieved when each half of an object is exactly like
the other. A jacket with two breast pockets and two hip pockets is formally balanced.
Formal or Symmetrical Balance
b. Informal or asymmetrical balance is when the design is balanced, but each side is
different in some way. It is achieved when the two halves of a whole are different, but
seem to be equal in weight or emphasis. For example, a jacket with a breast pocket on
one side can be balanced by a pocket on the hip of the opposite side.
Informal or Asymmetrical Balance
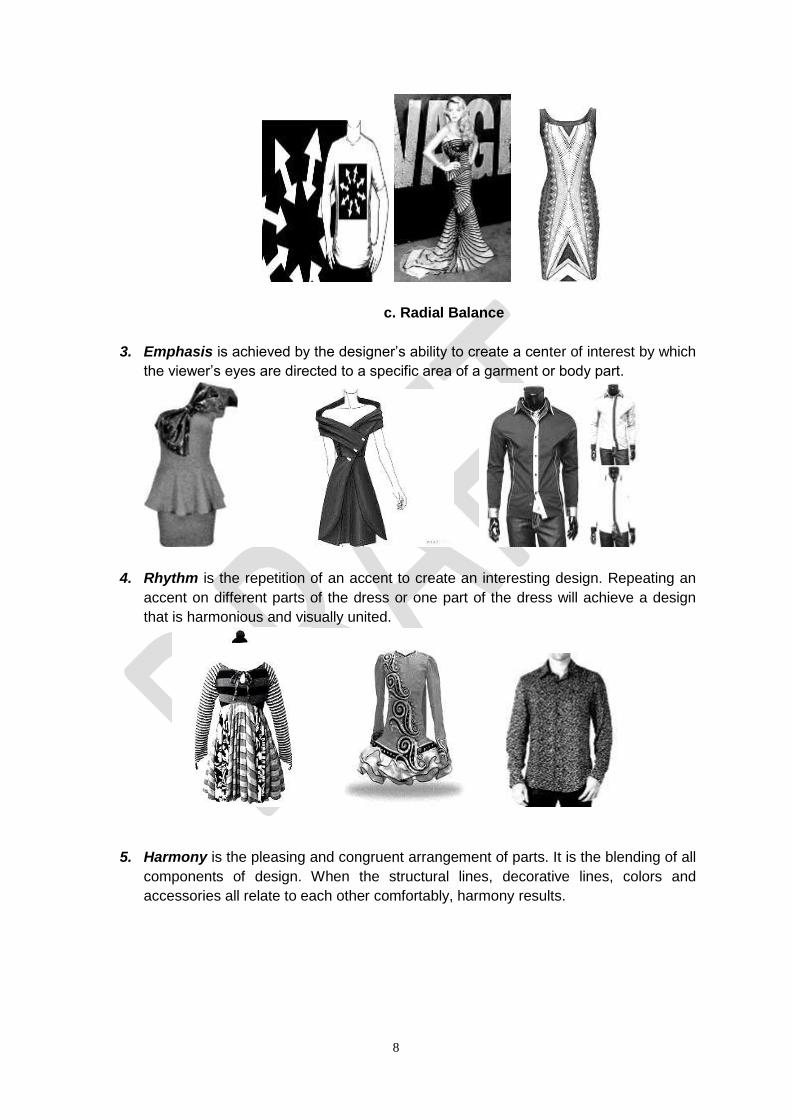
c. Radial balance is achieved when all parts of the design are at equal distance from a
central point. A man wearing a sun design on the front of his shirt may have this kind of
design.
8
c. Radial Balance
3. Emphasis is achieved by the designer’s ability to create a center of interest by which
the viewer’s eyes are directed to a specific area of a garment or body part.
4. Rhythm is the repetition of an accent to create an interesting design. Repeating an
accent on different parts of the dress or one part of the dress will achieve a design
that is harmonious and visually united.
5. Harmony is the pleasing and congruent arrangement of parts. It is the blending of all
components of design. When the structural lines, decorative lines, colors and
accessories all relate to each other comfortably, harmony results.

9
Elements of Design
1. Line creates a visual dimension of length and width. When lines meet, space is
enclosed and a shape is defined. Lines direct the eyes to a certain path of vision, or it
can draw the eyes away from an undesirable area of the body.
It defines a shape or silhouette and conveys a mood of character.
There are two kinds of lines in garments:
a. The Directional line such as vertical, horizontal, diagonal, checkered, broken
and curved. These affect the height and size of an individual. Lines are
serving as clothing designs like the art of printing flowers, dots and others on
fabric.
a. vertical b. horizontal c. diagonal

10
d. checkered e. with curve neckline
b. Structural lines are found on necklines, armholes, hemlines, darts, side
seams, sleeves, collars, tucks and pleats of garments.
a. with bateau neckline b. with plunging neckline c. with cape collar
d. skirt with pleats
11
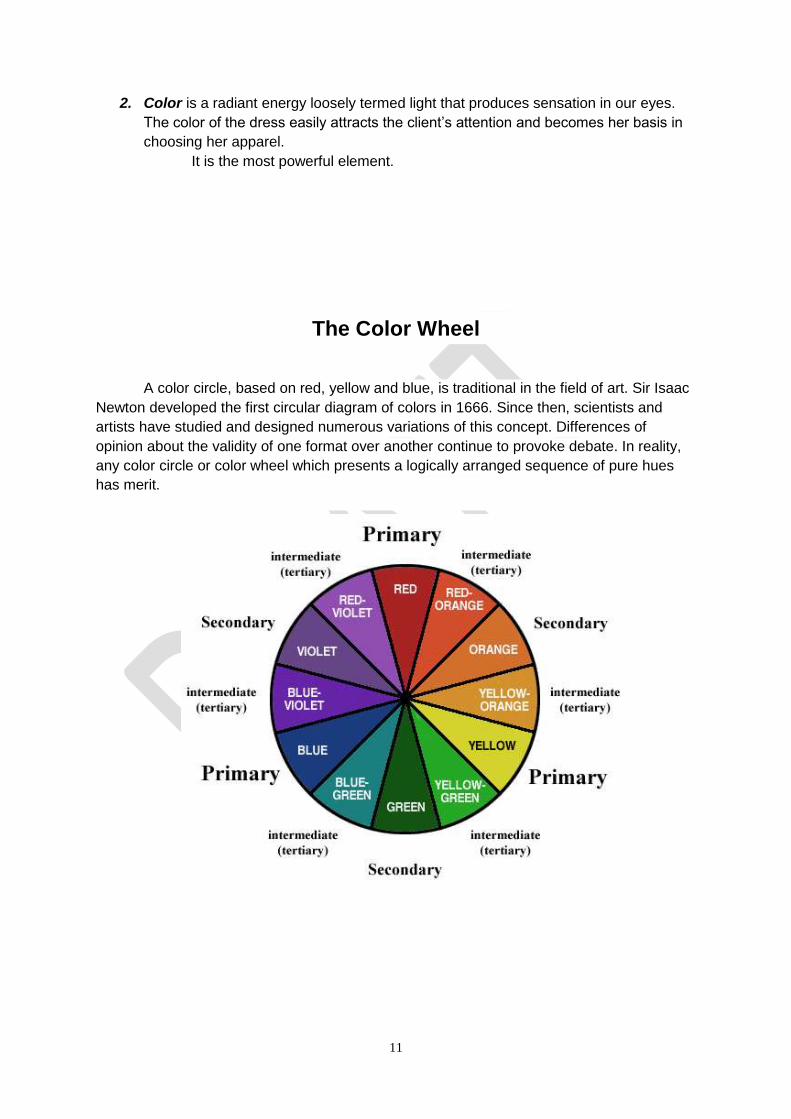
2. Color is a radiant energy loosely termed light that produces sensation in our eyes.
The color of the dress easily attracts the client’s attention and becomes her basis in
choosing her apparel.
It is the most powerful element.
The Color Wheel
A color circle, based on red, yellow and blue, is traditional in the field of art. Sir Isaac
Newton developed the first circular diagram of colors in 1666. Since then, scientists and
artists have studied and designed numerous variations of this concept. Differences of
opinion about the validity of one format over another continue to provoke debate. In reality,
any color circle or color wheel which presents a logically arranged sequence of pure hues
has merit.
12
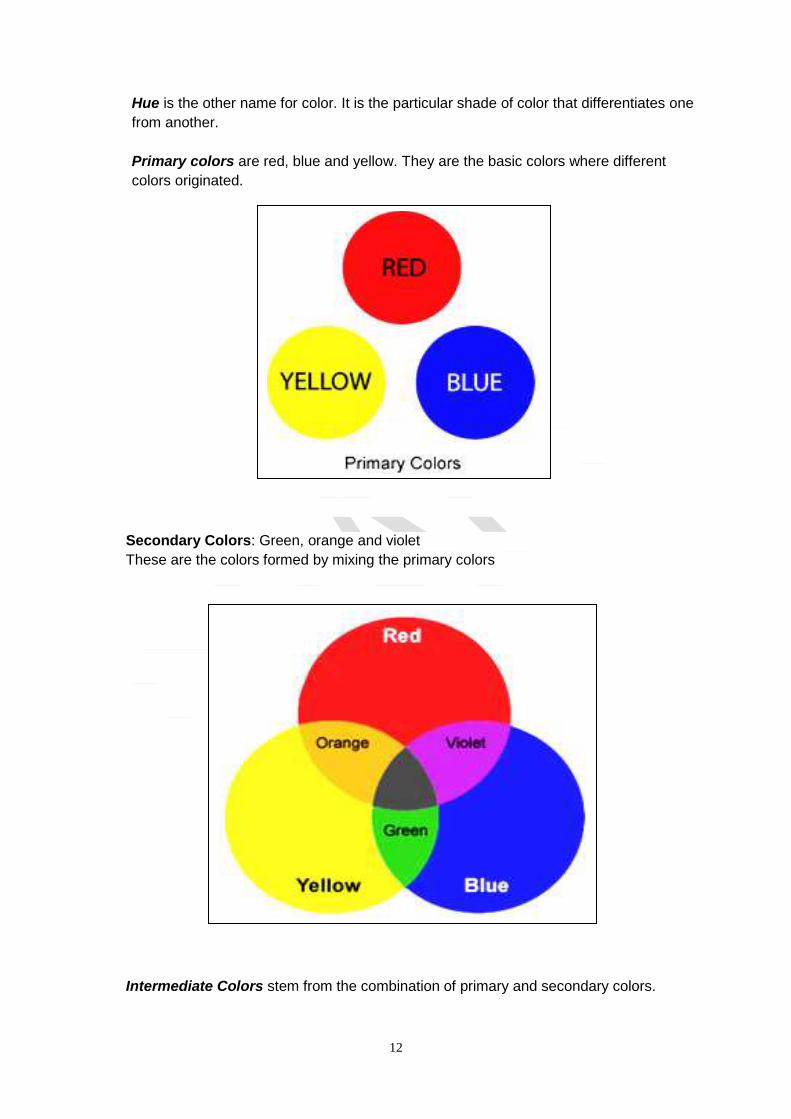
Hue is the other name for color. It is the particular shade of color that differentiates one
from another.
Primary colors are red, blue and yellow. They are the basic colors where different
colors originated.
Secondary Colors: Green, orange and violet
These are the colors formed by mixing the primary colors
Intermediate Colors stem from the combination of primary and secondary colors.

13
Tertiary colors are made by mixing either one primary color with one secondary color,
or two secondary colors. Tertiary colors are a combination of full saturation of one
primary color plus half saturation of another primary color and none of a third primary
color. They have specific names, one set of names for the RGB color wheel and a
different set of names and colors for the RYB color wheel.
a. Primary, secondary, and tertiary colors b. A traditional RYB color 'Violet' is
of the commonly RGB color wheel wheel. called 'purple'.

14
Neutral colors are the white, black and gray and are predominantly grayish and brownish.
They are sometimes called “earth tones.”
Value is the lightness or darkness of color. White added to a color will produce tints. For
example, pink is a tint of red. Black added to a color will produce shades. Maroon is a
shade of red.
A Color Wheel showing the tint, tone and shade of colors
Intensity or chroma is of a color corresponds to its purity and saturation in a color other
than black, white and gray.
Color impressions or image from a complex overlaying of value and chroma
15
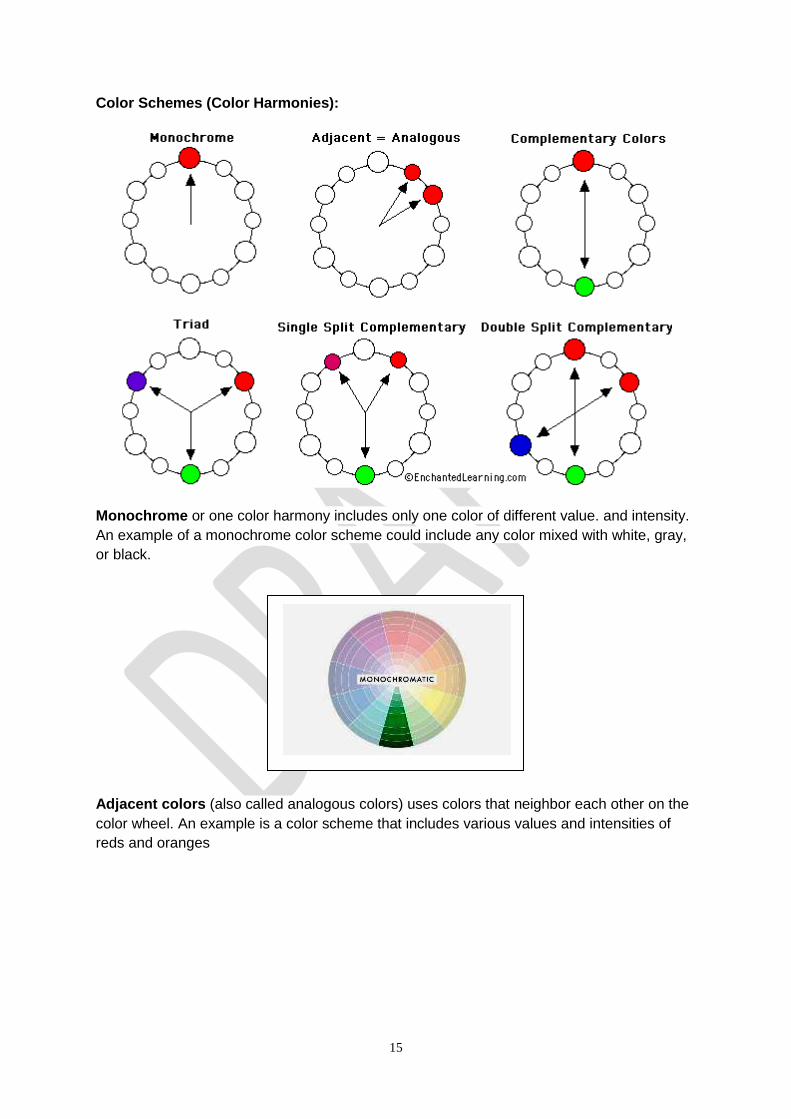
Color Schemes (Color Harmonies):
Monochrome or one color harmony includes only one color of different value. and intensity.
An example of a monochrome color scheme could include any color mixed with white, gray,
or black.
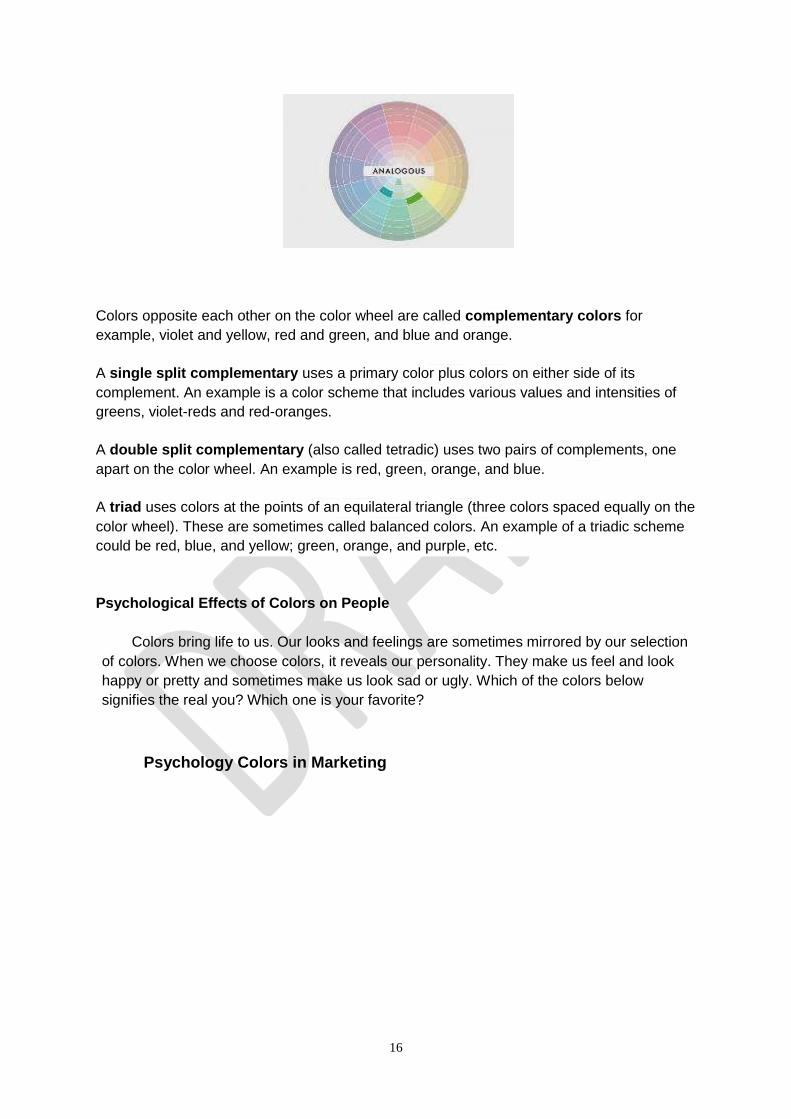
Adjacent colors (also called analogous colors) uses colors that neighbor each other on the
color wheel. An example is a color scheme that includes various values and intensities of
reds and oranges
16
Colors opposite each other on the color wheel are called complementary colors for
example, violet and yellow, red and green, and blue and orange.
A single split complementary uses a primary color plus colors on either side of its
complement. An example is a color scheme that includes various values and intensities of
greens, violet-reds and red-oranges.
A double split complementary (also called tetradic) uses two pairs of complements, one
apart on the color wheel. An example is red, green, orange, and blue.
A triad uses colors at the points of an equilateral triangle (three colors spaced equally on the
color wheel). These are sometimes called balanced colors. An example of a triadic scheme
could be red, blue, and yellow; green, orange, and purple, etc.
Psychological Effects of Colors on People
Colors bring life to us. Our looks and feelings are sometimes mirrored by our selection
of colors. When we choose colors, it reveals our personality. They make us feel and look
happy or pretty and sometimes make us look sad or ugly. Which of the colors below
signifies the real you? Which one is your favorite?
Psychology Colors in Marketing

17
White makes us feel clean and fresh. White connotes innocence and purity.
Red makes us feel bold and daring. Red connotes passion and bravery.
Yellow makes us feel joyful. It also connotes cowardice and treachery.
Blue represents truth, loyalty, calmness and wisdom. Deep blue could also make us feel
depressed.
Green suggests life and abundance as this is the color of plants, but green could also
suggest jealousy.
Purple is the color of royalty, but it can also symbolize suffering.
Orange is a warm color that suggests deliciousness and ripeness. Eateries, especially fast
food joints use orange with a touch of green to stimulate appetite.
Black suggests strength and dignity and is usually worn for formal evening affairs. Black
also symbolizes mourning and death.
3. Space is the area inside an enclosed shape. The use of space can lead to an interesting
design. But the overuse of a space could make the design confusing while an empty space
could be unattractive and boring.
18
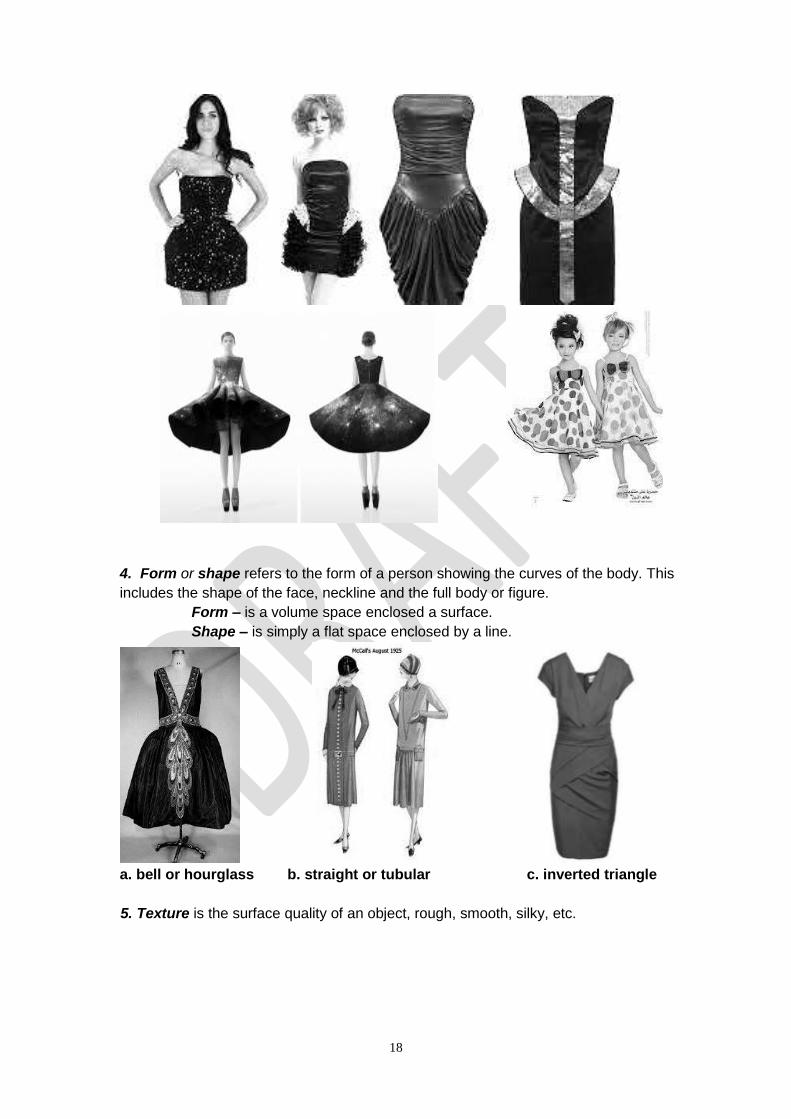
4. Form or shape refers to the form of a person showing the curves of the body. This
includes the shape of the face, neckline and the full body or figure.
Form – is a volume space enclosed a surface.
Shape – is simply a flat space enclosed by a line.
a. bell or hourglass b. straight or tubular c. inverted triangle
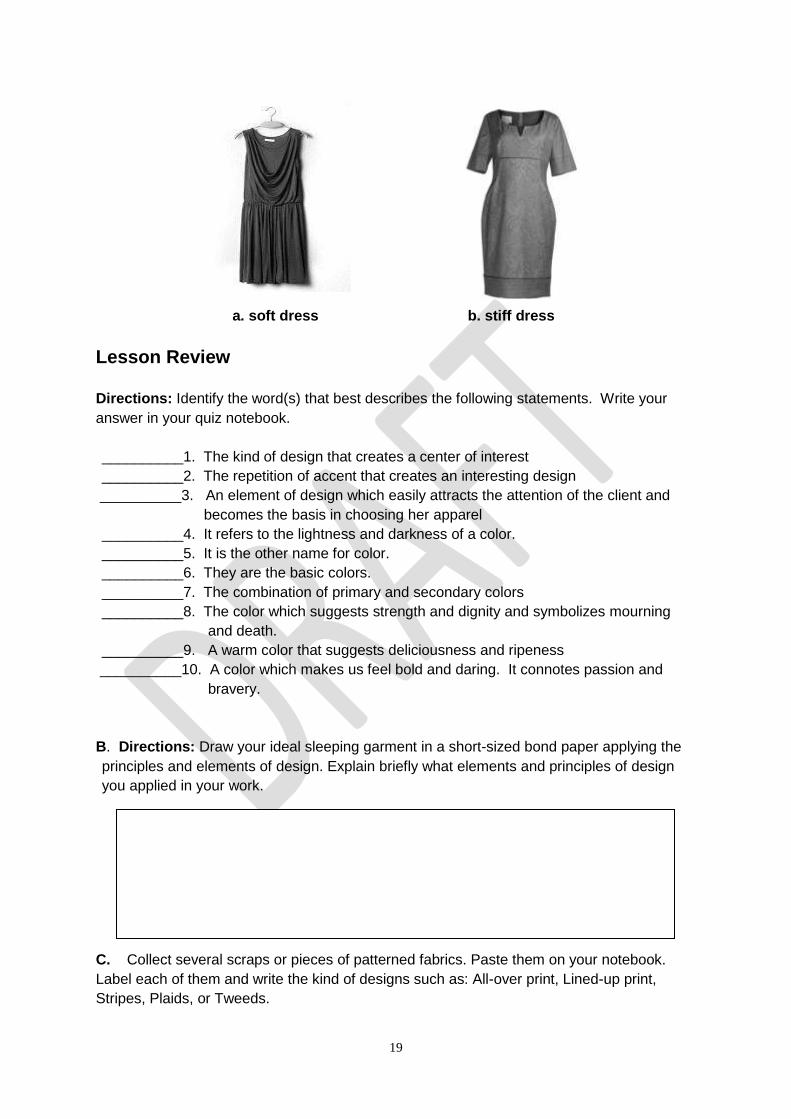
5. Texture is the surface quality of an object, rough, smooth, silky, etc.
19
a. soft dress b. stiff dress
Lesson Review
Directions: Identify the word(s) that best describes the following statements. Write your
answer in your quiz notebook.
__________1. The kind of design that creates a center of interest
__________2. The repetition of accent that creates an interesting design
__________3. An element of design which easily attracts the attention of the client and
becomes the basis in choosing her apparel
__________4. It refers to the lightness and darkness of a color.
__________5. It is the other name for color.
__________6. They are the basic colors.
__________7. The combination of primary and secondary colors
__________8. The color which suggests strength and dignity and symbolizes mourning
and death.
__________9. A warm color that suggests deliciousness and ripeness
__________10. A color which makes us feel bold and daring. It connotes passion and
bravery.
B. Directions: Draw your ideal sleeping garment in a short-sized bond paper applying the
principles and elements of design. Explain briefly what elements and principles of design
you applied in your work.
C. Collect several scraps or pieces of patterned fabrics. Paste them on your notebook.
Label each of them and write the kind of designs such as: All-over print, Lined-up print,
Stripes, Plaids, or Tweeds.
20
Lesson 2
FABRICS
Fabric is cloth made of fibers. Fibers are hair-like strands that are wound to make
yarn or thread used to make fabric. Fabric is the cloth or material used in making our
clothes, curtains, tablecloths, sheets and many other items.
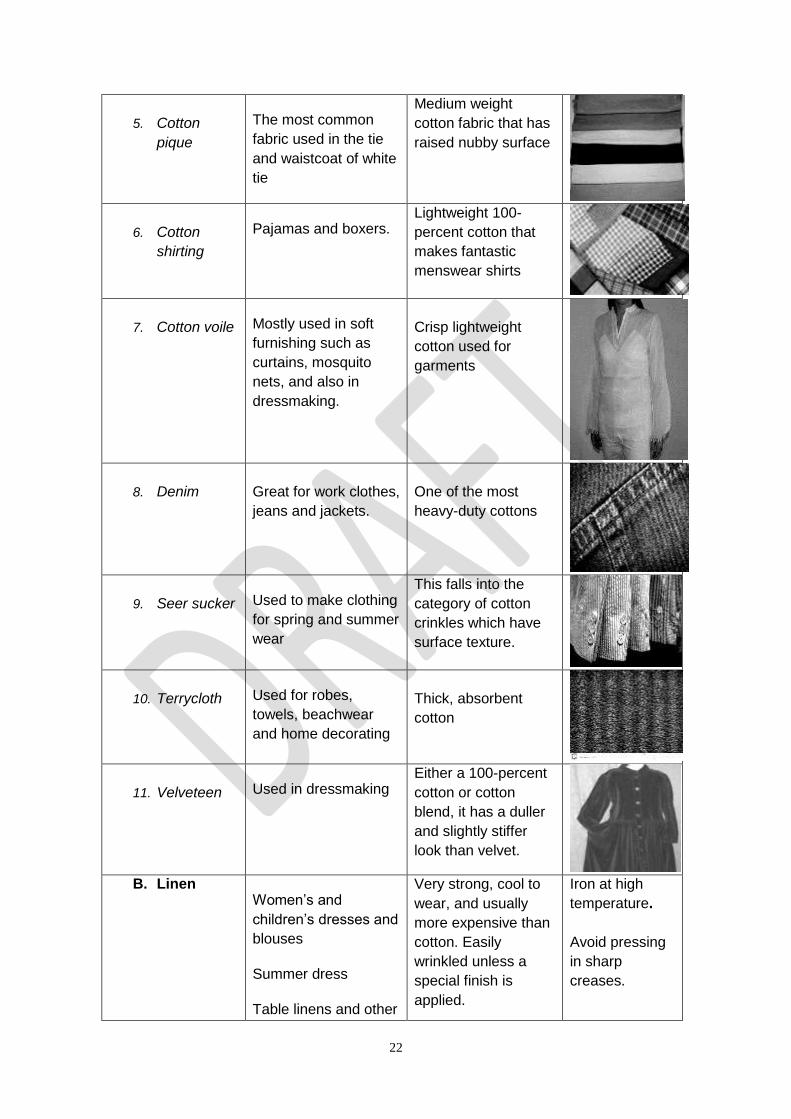
Types of Fabrics
Woven fabric does not stretch
except on the bias. Woven fabric is
made up of fibers which run straight at
ninety degree angles to each other.
Knit fabric has loops of fiber that
allow the fabric to stretch. The amount
and the direction of stretches are all
variables. A knit may stretch in one
direction or it may stretch in both
directions. This is an important
consideration when choosing fabric for
a specific pattern. For example, a
bathing suit pattern will require equal
two way stretch. If you choose a fabric
that only stretches in one direction, the
suit is not going to fit properly and you
cannot even put it on.

21
KINDS OF FABRICS, THEIR USES, CHRACTERISTICS AND CARE
NATURAL FIBERS
USES (Home and
Apparel)
Characteristics Care
Vegetable Fibers
A. Cotton
Good for items that
need to be washed
often like sheets and
pillows, school
clothes, and work
clothes.
The world's most
popular fabric. It is
cool to wear and
easy to wash and
sew. It is versatile,
durable and
comfortable.
Inexpensive but
shrinks and wrinkles
easily.
Special for
durable press
Maybe machine
laundered
Avoid risk of
mildew
Kinds of Cotton Fabrics
1. Canvas
Used for crafts, home
decorating (curtains
cushions and outdoor
gear)
Tightly woven heavy-
duty cotton
2. Cotton Batiste
For elegant garments
(blouses, baby
dresses, and
underlinings)
A finely woven
lightweight cotton
Use straight stitch/
jeans presser foot
and 60/8 or 70/10
machine needle
3. Broadcloth
Perfect for shirts.
Fantastic, closely
woven cotton that
has slight rib
4. Cotton chintz For home decorations
(curtains and
cushions)
100 percent cotton.
Needs special fabric
treatment that leaves
it shiny and smooth
22
5. Cotton
pique
The most common
fabric used in the tie
and waistcoat of white
tie
Medium weight
cotton fabric that has
raised nubby surface
6. Cotton
shirting
Pajamas and boxers. Lightweight 100-
percent cotton that
makes fantastic
menswear shirts
7. Cotton voile Mostly used in soft
furnishing such as
curtains, mosquito
nets, and also in
dressmaking.
Crisp lightweight
cotton used for
garments
8. Denim
Great for work clothes,
jeans and jackets.
One of the most
heavy-duty cottons
9. Seer sucker Used to make clothing
for spring and summer
wear
This falls into the
category of cotton
crinkles which have
surface texture.
10. Terrycloth Used for robes,
towels, beachwear
and home decorating
Thick, absorbent
cotton
11. Velveteen Used in dressmaking Either a 100-percent
cotton or cotton
blend, it has a duller
and slightly stiffer
look than velvet.
B. Linen Women’s and
children’s dresses and
blouses
Summer dress
Table linens and other
Very strong, cool to
wear, and usually
more expensive than
cotton. Easily
wrinkled unless a
special finish is
applied.
Iron at high
temperature.
Avoid pressing
in sharp
creases.

23
household fabrics
Known as the oldest
fiber and used by the
Egyptians thousands
of years ago. It
comes from the stem
of a very pretty plant
called flax.
Avoid risk of
mildew
Animal Fibers
A. Silk- collected
from the cocoon of
silk worm.
For high-end clothing
and accessories
Some expensive
upholstery and
drapery fabrics
Strong and luxurious
fabric with natural
luster; moderately
resilient and resists
wrinkling
More expensive than
manmade (filament)
silky yarns
Dry cleaning is
preferred.
Maybe hand
washed in mild
suds.
Avoid over
exposure to
light.
Can be
attacked by
insects.
Kinds of Silk Fabric
1. China silk Used almost
exclusively for lining
A very lightweight silk
2. Brocade Luxurious fabrics
made into clothing or
wall hangings,
Textured silk with
some stiffness
3. Chiffon Can be used in all
sorts of garments
Lightweight, very
drapery silk .This is
the fabric that goes
with the flow.
24
4. Charmeuse Works well as a 1940s
redux dressing gown,
dresses and blouses
A slinky, satiny,
supple silk
5. Crepe de
Chine
For making a full
range of garments
A light to medium
weight silk and
comes in two-ply,
three- ply, and four-
ply (the heaviest)
weights
6. Dupioni For making Capri
pants or a fancy room
divider
A stiffer and crisper
silk that has telltale
slubs and raised yarn
on the fabric; easy-
to-sew silk that adds
a lot of fashion flair
7. Georgette
used for blouses,
dresses, evening
gowns, and trimmings
Lightweight silk and
barely visible
8. Raw silk
woven into textiles.
Rough-looking silk
with a dull finish
made from short silk
filaments discarded
as waste but easy to
sew and has a
distinctive look
9. Washed silk A great travel fabric
The washing process
makes this silk
creamy and soft.
10. Shantung For special occasion
uses
Especially crisp and
shiny silk
25
11. Taffeta for special occasion
clothing
A crisp silk that
wrinkles and swishes
upon movement
Wool - made from the sleets of sheep
Perfect for tailoring
blankets and
upholstery
Outerwear
Medium-weight
clothing
Springs back into
shape
Requires little
pressing; with great
versatility in fabric
and with insulating
capacity
Dry cleaning is
preferred; will
shrink and felt
in presence of
moisture and
heat and can be
attacked by
insects.
Kinds of Wool Fabric
1. Boiled
For blankets and
jackets
Made in similar
fashion as felt, but
much richer and more
supple. There’s no
need to finish the
seam edges.
2. Boucle
Perfect for soft
shaping in coats and
jackets
Has a distinctive
sweater-like nubby
surface created with
little loops
3. Challis
Perfect for all types
of garments
Medium to lightweight,
it is hand washable
and doesn’t wrinkle
much.

26
4. Crepe
for scarves,
shawls, and bonnet
trimmings
Perfect for
Making shirts
Can be composed of
wool, silk, cotton, or
synthetic. It varies in
quality and it is
expensive. It is a
beautiful fabric that
drapes well and is
extremely wearable.
5. Gabardine
Works well on
tailored and
constructed garments
A twill-weave fabric,
hand washable and
do not wrinkle
6. Melton
Used for coats
Thick and bulky wool
with a soft napped
surface but too thick to
handle
7. Merino
widely used in the
textile industries
A very fine, expensive,
closely-woven wool
made from Merino
sheep’s coats.
8. Worsted
Used for tailoring
jackets, skirts and
pants.
Lustrous wool in a
variety of weights
Synthetic or
Manmade Fibers
USES (Home and
Apparel)
Characteristics Care
a. Rayon Light and medium-
weight clothing
Drapery and
upholstery fabrics
Blankets, throw rugs
and table coverings
Soft, cheap and
comfortable fabric
absorbent; lacks
resilience; wrinkles
easily.
Not easy to sew as
plain cottons.
Hand washing
to dry cleaning.
Tends to shrink
and stretch
unless proper
chemical finish
is applied.
27
b. Polyester Wash and wear
clothing- often in
combination with
other fibers,
especially cotton
Curtains, carpets,
fiberfill, raincoats and
hats. It is ideal for
constructing strong
outerwear for damp
climates.
Strong and durable
synthetic fabric; dries
quickly, with sharp
pleat and crease
retention.
Can be
washable or dry
clean. Remove
oily stains
before washing.
Needs little
ironing or
pressing. Use
steam iron at
warm setting.
c. Nylon Women's stockings
were the first
commercial use of
nylon.
Also used for
clothing, upholstery
and carpet, rope,
tents and fishing line.
It was first developed
as a substitute for
imported silk. With
exceptional strength,
excellent elasticity;
retains shape. Woven
fabrics feel
uncomfortable in
contact with skin.
Remove oily
stains before
washing.
Washes easily;
wash with care
to maintain
whiteness.
Press at low
temperatures.
Dry clean only.
d.Rubber
Foundation garments
Swimwear
Stretch and recovery
rate is high
Damaged by oils and
light
With discoloration
Frequent
washing in mild
suds; avoid
constant
overstretch at
high
temperature
e. Spandex
Foundation
garments;
Swimwear
Surgical hose
Ski pants and other
sportswear
Stretch and recovery
rate is high
Resists abrasion and
body oils
With discoloration
May be
machine
laundered with
warm water
Dry on lowest
heat, shortest
cycle.
f. Acrylic
Tailored outerwear;
knitted wear, pile
fabrics, blankets and
carpets
Resists wrinkling
High bulking power
Wool-like texture
Very resistant to
effects of sunlight
Remove oily
stains before
washing.
Washable or
dry cleanable
Medium iron
temperature.

28
Lesson Review
I. MATCHING TYPE
Directions: Match column A (Descriptions) with column B (Fabric). Choose the letter that
best describes the statement. Write the answer in your quiz notebook.
A B
1. It is made out of flax plants that give more stiffness
and fewer drapes.
a. Denim
2. It is made from the silkworm’s cocoon b. Shantung
3. A fabric made from cellulose-based cotton plants
c. Chiffon
4. A specially crisp and shiny silk for special occasions
d. Canvas
5. A fabric that goes with the flow e. Linen
6. Tightly woven heavy-duty cotton used for crafts and
home decorations
f. Cotton
7. A heavy duty cotton great for working clothes,
jeans and jackets
g. Silk
8. A textured silk with some stiffness.
h. Wool
9. It is made from the coat of sheep, and is perfect for
tailoring.
i. Georgette
10. A twill weave fabric that works well on
tailored and constructed garments
j. China Silk
k. Gabardine
l. Challis
m. Brocade
29
B. Venn Diagram
Directions: Using a Venn diagram list the fabrics with common properties. Write your
answers in your quiz notebook.
C. Directions: Make an album and collect swatches of fabric (3 x 4 inches) and classify
their type. Paste them in 5x8 index card.
D. Directions: Using a Venn diagram, identify fabrics with common fabric care. Write your
answers in your quiz notebook.

30
Lesson 3
SLEEPING GARMENTS
Nightwear, also called sleepwear, nightclothes, or nightdress, is clothing designed
to be worn while sleeping. The style of nightwear worn may vary with the seasons, with
warmer styles being worn in colder conditions and vice versa. Some styles or materials are
selected to be visually appealing or erotic in addition to their functional purposes.
Lesson 3.1
Characteristics of a Sleeping Garment
Sleeping garments must provide us the comfort while sleeping. They should p
possess the following characteristics:
1. They should not exceed the maximum dimensions specified in the regulations for the
chest, waist, seat, upper arm, thigh, wrist, or ankle;
2. They should have no fabric ornament or trim, such as lace or ribbon, which extends
more than ¼ inch from the point at which it is attached to the garment;
3. They should have sleeves that taper from the shoulders to the ends of the sleeves;
4. They should have pant legs that taper from the thighs to the ends of the legs;
5. If they are 1-piece, they should taper from the chest down to the waist and from the
seat up to the waist;
6. If they are 2-piece,
a. The upper piece should tapers from the chest down to the bottom of the piece,
b. If the upper piece has fastenings it should be located within 6 inches of the
bottom of the piece.
c. It has a lower piece that tapers from the seat to the bottom.
7. They should bear a permanent label stating the size of garment;
8. They should bear a hang tag alerting buyers that the garments are not flame-
resistant and should be worn snug fitting because loose-fitting garments are more
likely to catch fire.
3.2 Types and Selection of Fabrics for Sleeping Garments
Types of Sleeping
Garment
Suggested Fabrics
Adult jumpsuits or footed
pajamas
Usually made of cotton and marketed under a number of
different brand names
All-in-one footed sleep suits worn by adults but similar to
an infant one size or children's blanket sleeper
Usually made from cotton and marketed under a number of
different brand names
31
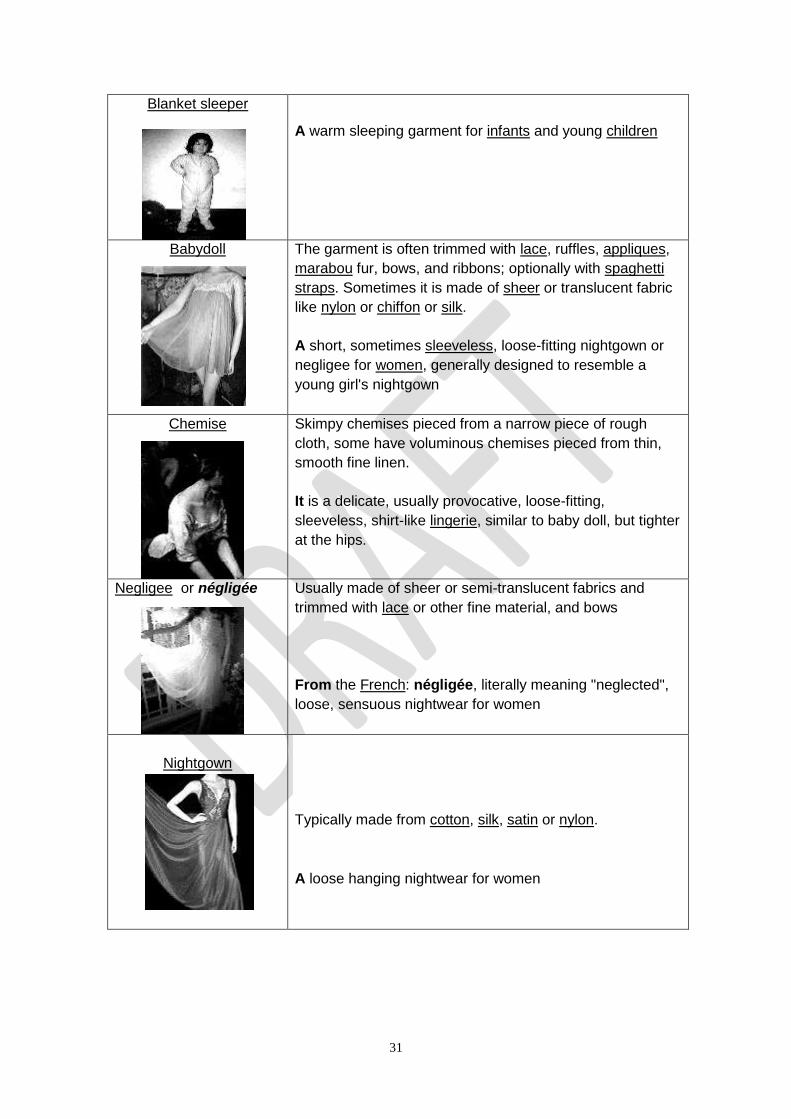
Blanket sleeper
A warm sleeping garment for infants and young children
Babydoll The garment is often trimmed with lace, ruffles, appliques,
marabou fur, bows, and ribbons; optionally with spaghetti
straps. Sometimes it is made of sheer or translucent fabric
like nylon or chiffon or silk.
A short, sometimes sleeveless, loose-fitting nightgown or
negligee for women, generally designed to resemble a
young girl's nightgown
Chemise Skimpy chemises pieced from a narrow piece of rough
cloth, some have voluminous chemises pieced from thin,
smooth fine linen.
It is a delicate, usually provocative, loose-fitting,
sleeveless, shirt-like lingerie, similar to baby doll, but tighter
at the hips.
Negligee or négligée Usually made of sheer or semi-translucent fabrics and
trimmed with lace or other fine material, and bows
From the French: négligée, literally meaning "neglected",
loose, sensuous nightwear for women
Nightgown
Typically made from cotton, silk, satin or nylon.
A loose hanging nightwear for women

32
Nightshirt
Usually made of cotton fabric
A garment somewhat longer than most regular shirts,
reaching down to the thighs or below the knees while
leaving some of the legs uncovered. It is generally loose-
fitting to avoid restricting the wearer's movement while
sleeping.
Nightcap Ideally made from cotton fabrics
A warm cloth cap worn while sleeping, often with pajamas
or a nightgown. It is similar to winter 'beanies' worn in cold
climates. They were common in northern Europe before
central heating was available.
Women's night caps usually consist of a long piece of cloth
wrapped around the head. Men's nightcaps were
traditionally pointed with a long top and usually
accompanied by a small ball similar to a scarf. They keep
the neck warm as wrapped around but not so tight to
become a choking hazard.
Pajamas They may be made from cotton, silk, satin or synthetic
materials made of soft fabric, such as flannel;[6]
Loose fitting two-piece garments for women, men and
children. Traditional pajamas consist of jacket-and-
trousers. The jacket element usually has a placket front
and its sleeves have no cuffs. For a number of reasons
(increased freedom of movement, aesthetic appeal, etc.),
many men opt to sleep or lounge bare chested in just the
pajama trousers.
Dressing gown or
bathrobe.
Made of chiffon, silk or cotton fabrics
A long outer garment for women usually sheer. They are
usually sold with a matching nightgown, negligee or panties
33
Lesson Review
A. Identification
Directions: Choose the letter of the word that best fits the description. Write your answers
in your quiz notebook.
________ 1. A delicate sleepwear, usually provocative, loose fitting, sleeveless,
shirt like lingerie
________ 2. A warm sleeping garment for infants and young children
________ 3. Loose hanging nightwear for women
________ 4. A nightwear which is longer than most regular shirts
________ 5. A warm cloth cap worn while sleeping
________ 6. Loose fitting two-piece garments for women, men and children
________ 7. A long outer garment for women usually sold with a matching night
gown, negligee or panties
________ 8. A clothing designed to be worn while sleeping
________ 9. All-in-one footed sleep suits worn by adults similar to an infant onesie
or blanket sleeper
________ 10. A short, sometimes sleeveless, loose-fitting night gown or negligee for
women, generally designed to resemble a young girl’s night gown
a. Night Cap b. Night Shirt c. Night gown d. Chemise e. Blanket
Sleeper
f. Adult
jumpsuits
g. Baby doll h. Night wear i. Pajamas j. Bathrobe
B. True or False
Directions: Read the statements carefully. Write T if the statement is correct and F if it is
wrong. Write your answer in your test booklet
1. Sleeping garments can be worn only at night.
2. Ideally, all sleeping garments should be made quite loose to achieve comfort.
3. With adults 2- piece sleeping garments with fastenings, the lowest fastening should
have 1 inch distance from the bottom of the piece
4. The lower piece of sleeping garments should taper from the seat to the bottom of the
piece
Other types of garment such as t-shirts, tank tops, sweatpants and gym shorts as well as underwear are commonly worn for sleeping. Also, sleeping
without clothing is not uncommon.

34
5. Sleeping garments should have no fabric ornaments that extends more than ¼ inch
from the point of attachment.
Lesson 4
Project Plan for Sleeping Garment
Construction of sleeping garment is just like cooking a recipe for a party that requires
careful planning. In every task or project you have, it should be accompanied with a project
plan. This serves as a guide in making any kind of project. It contains the materials and tools
to be used, design and procedure in making the project and the criteria for evaluating the
finish output coupled with rubrics designed by the teacher and students.
Lesson 4.1
Components of a Project Plan
1. Project Plan No. – reflects the number of projects
2. Date Begun – date when the construction of the project will starts
3. Date Finished – the exact date when the project will be completed
4. Name of the Project – a specific description of the job/ project.
5. Objectives - states the purpose why a project should be done. This is usually stated
in three learning domains: the cognitive, psychomotor and affective.
6. Word Study – unlocks the terms used operationally and conceptually
7. Tools and Equipment – list of tools and equipment in the accomplishment of the job
8. Materials and Supplies Needed – the itemized list of tools and supplies needed to
produce a project.
a. Quantity suggests the amount needed.
b. Unit is the unit of measure of the quantity.
c. Description refers to the features and characteristics of the materials and
supply needed.
d. Unit Cost is the selling price per quantity and unit of the materials
e. Total Cost is the total amount needed per quantity of supply and material
needed.
Congratulations!
You are now knowledgeable with the characteristics of good and
suitable sleeping garment. It’s now time to practice making your own.
Are you ready? Produce your own sleeping garment!
Take note: you are going to prepare first your project plan.
35
f. Total is the over-all total cost of all the supplies and materials to be used.
9. Design Specifications – the photographic representation of the project in two to five
views: front, back, right, left and top views.
10. Procedure – the chronological steps or operations involved to accomplish the project.
This is divided into two stages:
a. Preparation stage – depicts the preparation to be done before the actual
execution or performance of the operations.
b. Performance stage – the actual procedures involve in the actual making of
the project where all tools, supplies, materials and equipment intended to
make the project are ready.
11. Evaluation – the process of assessing the finished project with its given criteria
prepared during planning and evaluating.
Lesson Review
Make a Project Plan
Directions: Make a project plan for your sleeping garment using the template below.
Use separate sheet if necessary.
Project Plan No. ___
Name: ______________________________Date Begun: __________
Year and Section: _____________________Date Finished: ______________
I. Name of the Project: _______________________________________
II. Objectives:
1. ______________________________________________________
2. ______________________________________________________
3. ______________________________________________________
III. Word Study:
1.
2.
3.
IV. Tools and Equipment:
1.
2.
3.
4.
5.
36
V. Materials and Supplies Needed:
Quantity Unit Description Unit Cost Total Cost
Total
VI. Design Specifications:
VII. Procedure:
A. Pre-sewing stage
A1.
A2.
A3.
B. Sewing Stage
B1.
B2.
B3.
VIII. Evaluation:
Criteria for Evaluation (Rubrics of Performance)
37
Lesson 5
Tools, Materials and Equipment used in Sewing
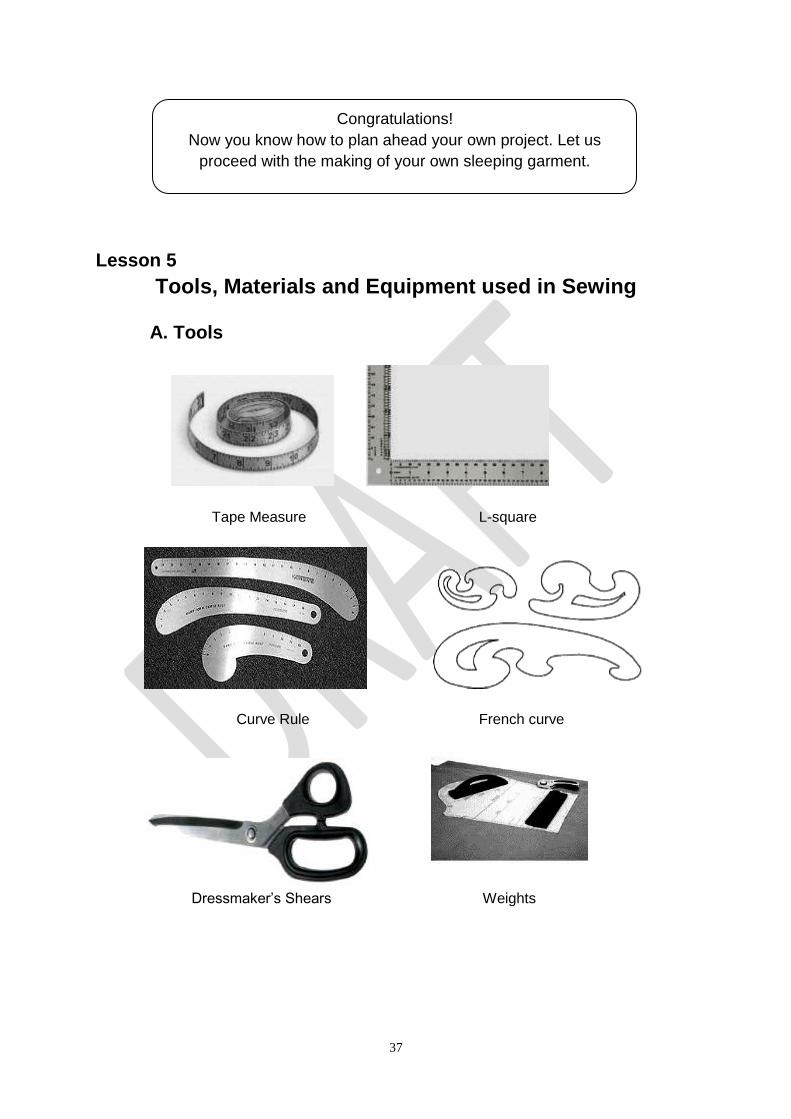
A. Tools
Tape Measure L-square
Curve Rule French curve
Dressmaker’s Shears Weights
Congratulations!
Now you know how to plan ahead your own project. Let us
proceed with the making of your own sleeping garment.
38
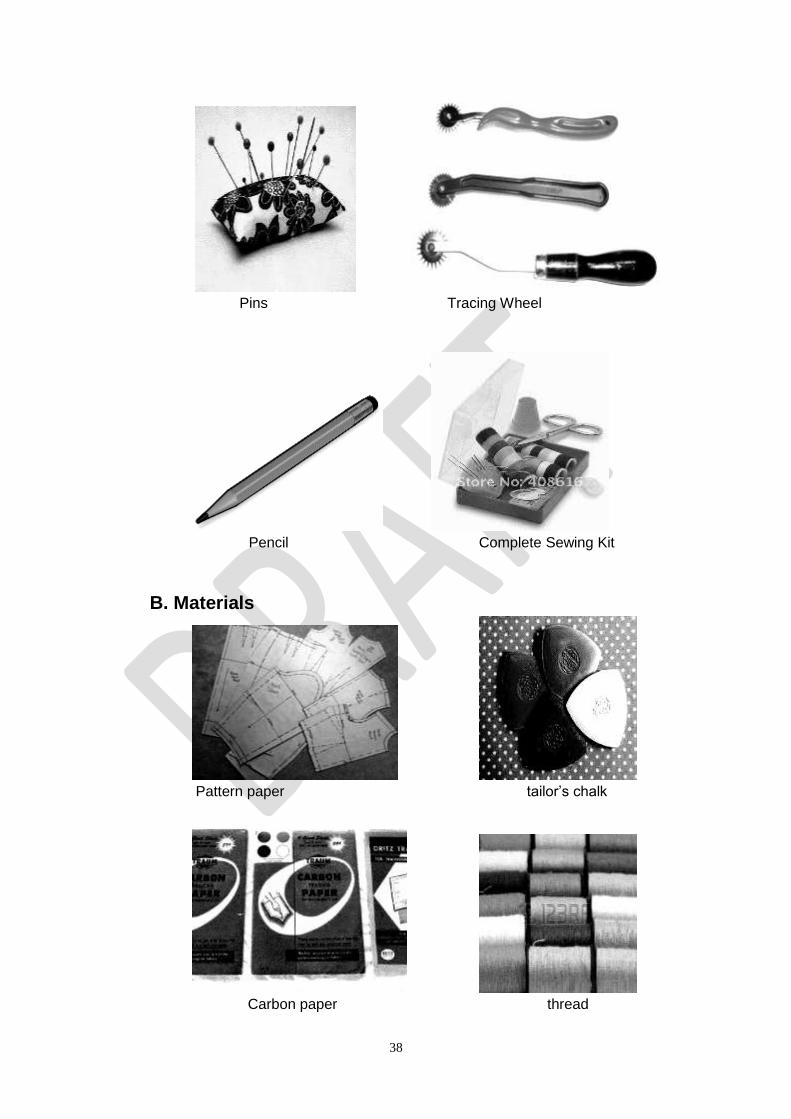
Pins Tracing Wheel
Pencil Complete Sewing Kit
B. Materials
Pattern paper tailor’s chalk
Carbon paper thread
39
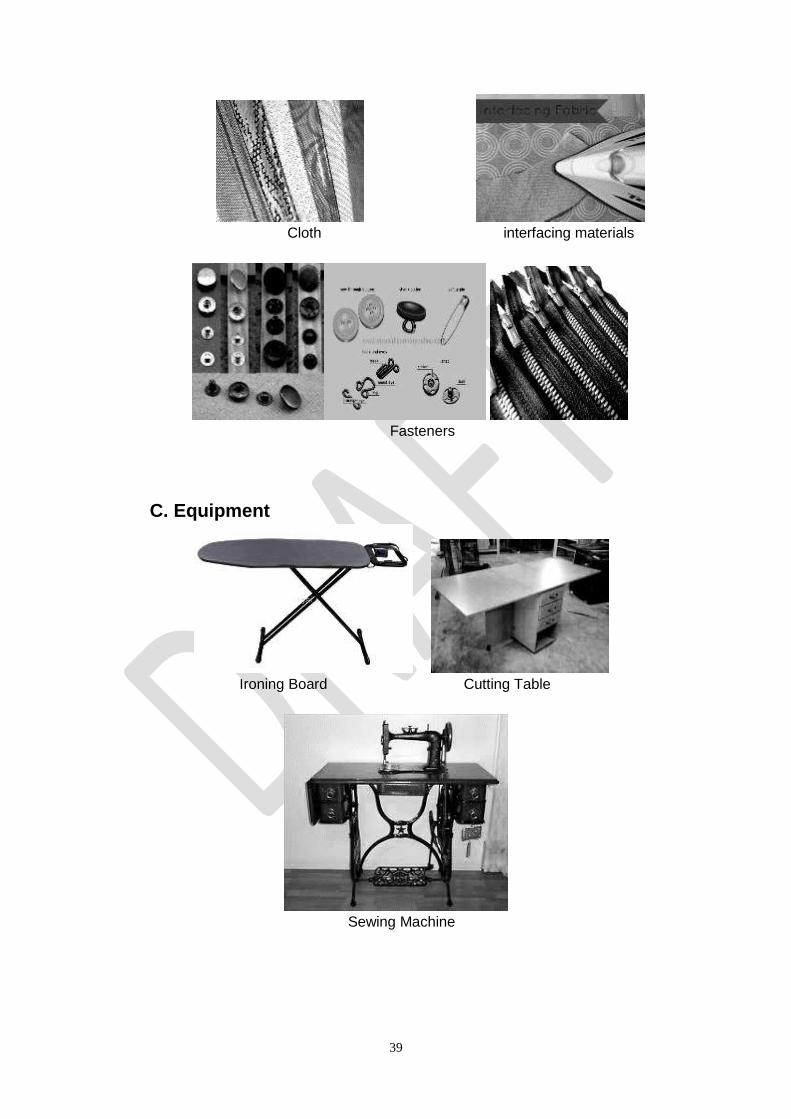
Cloth interfacing materials
Fasteners
C. Equipment
Ironing Board Cutting Table
Sewing Machine

40
Lesson 5.1
Marking Tools Used in Pattern Drafting
Marking tools are used to transfer the pattern symbols onto the fabric. It is essential to
transfer these symbols for correct fitting and sewing. Below are some tools used to transfer
the pattern markings onto the fabric.
1. Tracing wheel is available in a serrated or smooth edge. The serrated edge is used
to make a dotted link marking in most fabrics. The smooth edge makes a solid line
marking and is used for delicate fabrics such as silk and chiffon.
2. Dressmaker’s carbon/tracing paper is used to transfer the tracing wheel’s line to
the wrong side of the fabric. Select a color close to your fabric which is visible
enough to see.
41
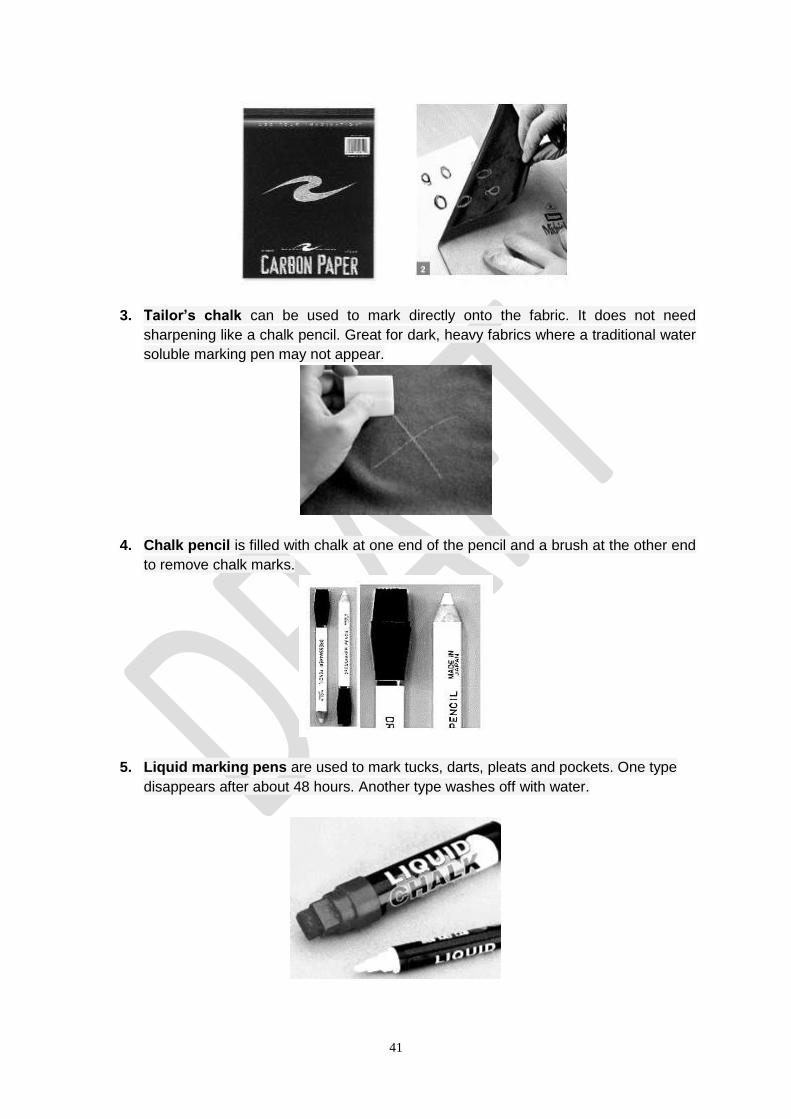
3. Tailor’s chalk can be used to mark directly onto the fabric. It does not need
sharpening like a chalk pencil. Great for dark, heavy fabrics where a traditional water
soluble marking pen may not appear.
4. Chalk pencil is filled with chalk at one end of the pencil and a brush at the other end
to remove chalk marks.
5. Liquid marking pens are used to mark tucks, darts, pleats and pockets. One type
disappears after about 48 hours. Another type washes off with water.
42
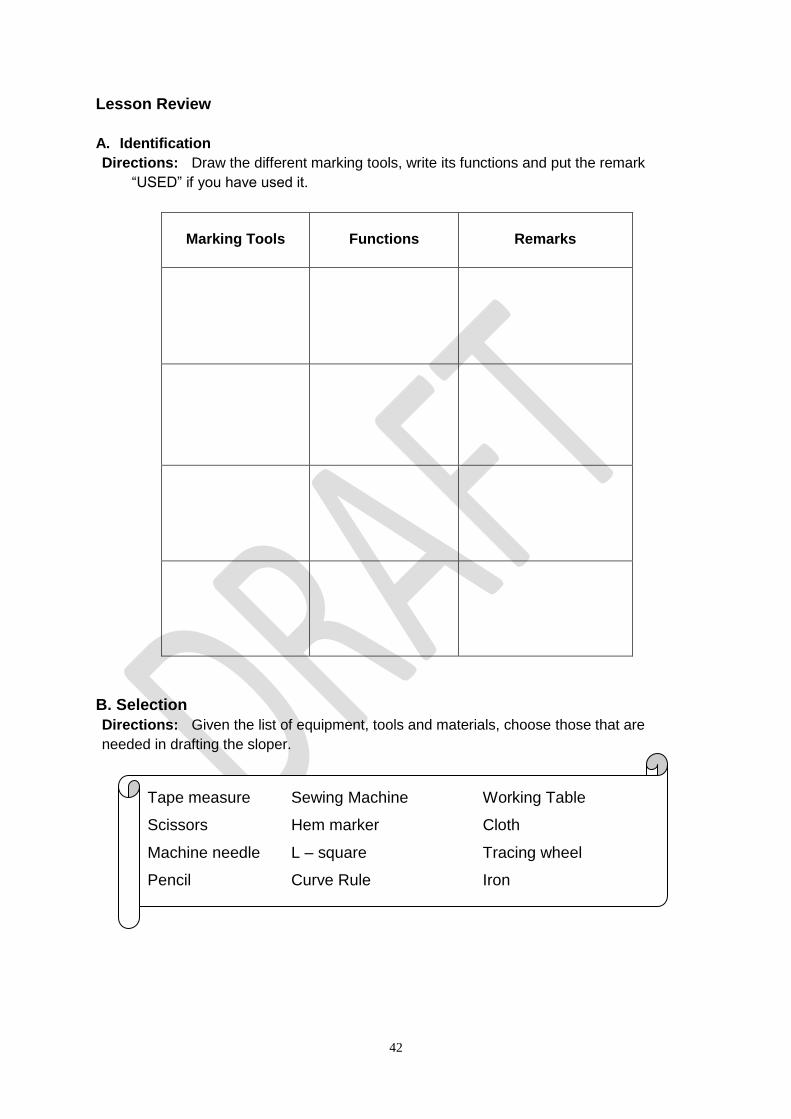
Lesson Review
A. Identification
Directions: Draw the different marking tools, write its functions and put the remark
“USED” if you have used it.
Marking Tools Functions Remarks
B. Selection
Directions: Given the list of equipment, tools and materials, choose those that are
needed in drafting the sloper.
Tape measure Sewing Machine Working Table
Scissors Hem marker Cloth
Machine needle L – square Tracing wheel
Pencil Curve Rule Iron

43
Lesson 6
Pattern Symbols
Sewing will be easier if you know how to read patterns. Pay attention to every
symbol. Immediately transfer the symbols to the fabric after cutting. This way you won't
forget this step. It's not fun to look for these symbols after removing the pattern.
Pattern Symbols or Construction Markings
These guides help the sewer put together and sew the pieces of garment easily.
Several markings are evident in some patterns but others have only few, depending on the
design and style of their project.
1. Straight Grain or Direction
The selvage is the finished edge of fabric. It usually has a different color or texture.
Sometimes it also has little holes.
Every woven fabric is made of crosswise (from selvage to selvage) and
lengthwise threads. They are called the grain threads. The grain is the direction
that tells where they're going.
In patterns, this arrow must be in the same direction as the length and parallel to the
selvage. This will make the fabric prevent from falling and be more resistant to movement. If
you place it parallel to the crosswise grain, the fabric will hang after it is sewn.
When fabric yarns do not cross at exact right angles, the cloth is off-grain. But if the
lengthwise and crosswise yarns cross ech other at exact right angle, the fabric is grain-
perfect.
Pleat
This little symbol marks the beginning and ending of a pleat. The arrow indicates
which way to fold. In this example, you would pleat from left to right. It is usually
indicated by an alternating solid and broken line.
44
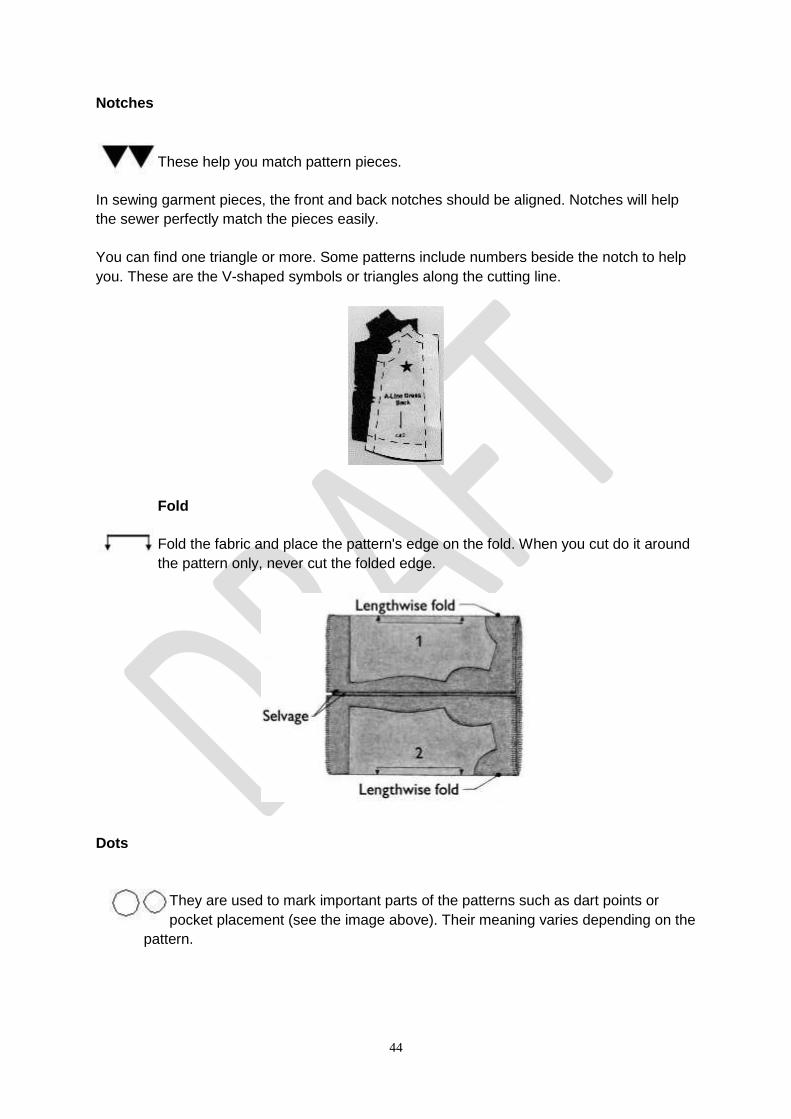
Notches
These help you match pattern pieces.
In sewing garment pieces, the front and back notches should be aligned. Notches will help
the sewer perfectly match the pieces easily.
You can find one triangle or more. Some patterns include numbers beside the notch to help
you. These are the V-shaped symbols or triangles along the cutting line.
Fold
Fold the fabric and place the pattern's edge on the fold. When you cut do it around
the pattern only, never cut the folded edge.
Dots
They are used to mark important parts of the patterns such as dart points or
pocket placement (see the image above). Their meaning varies depending on the
pattern.
45
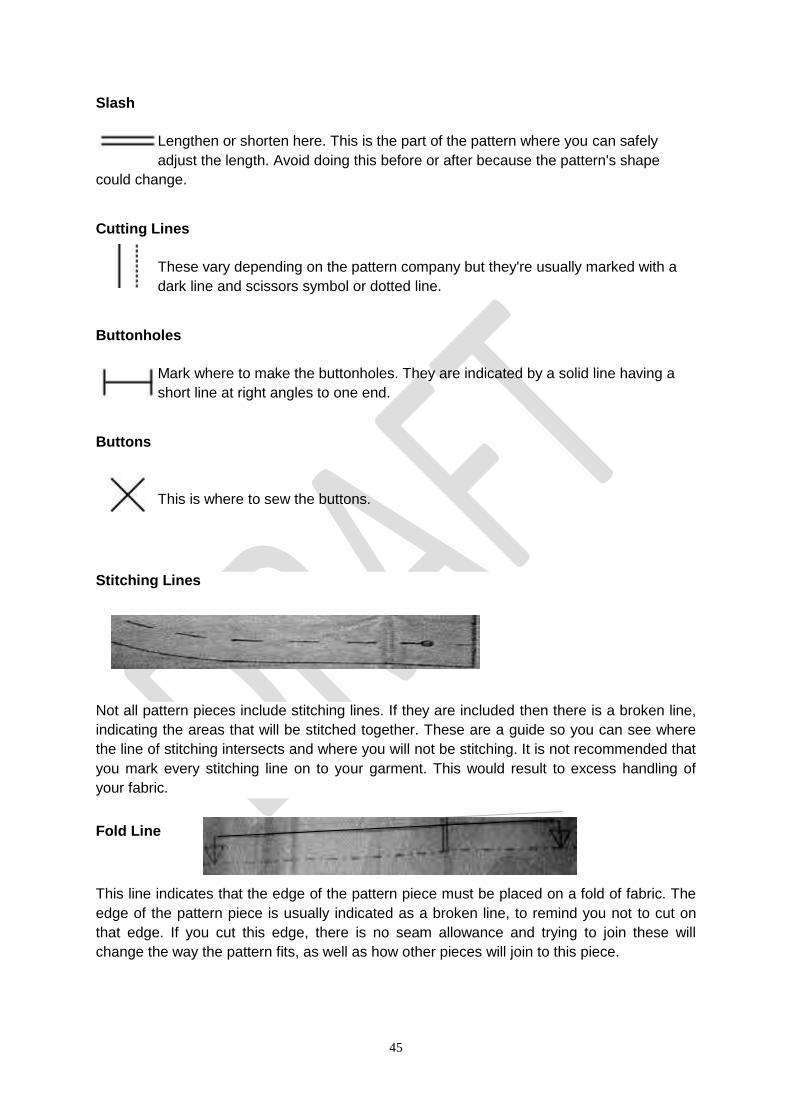
Slash
Lengthen or shorten here. This is the part of the pattern where you can safely
adjust the length. Avoid doing this before or after because the pattern's shape
could change.
Cutting Lines
These vary depending on the pattern company but they're usually marked with a
dark line and scissors symbol or dotted line.
Buttonholes
Mark where to make the buttonholes. They are indicated by a solid line having a
short line at right angles to one end.
Buttons
This is where to sew the buttons.
Stitching Lines
Not all pattern pieces include stitching lines. If they are included then there is a broken line,
indicating the areas that will be stitched together. These are a guide so you can see where
the line of stitching intersects and where you will not be stitching. It is not recommended that
you mark every stitching line on to your garment. This would result to excess handling of
your fabric.
Fold Line
This line indicates that the edge of the pattern piece must be placed on a fold of fabric. The
edge of the pattern piece is usually indicated as a broken line, to remind you not to cut on
that edge. If you cut this edge, there is no seam allowance and trying to join these will
change the way the pattern fits, as well as how other pieces will join to this piece.

46
Centerfold
This indicates that the edge of the pattern must be placed on the folded part of the fabric.
This is when cutting two sides of the garment parts as left and right or back and front parts.
Lesson Review
A. Directions: Draw the following pattern symbols:
Buttons
Grainline
Buttonholes
Stitching line/Seam line
Pleats
Notches
Slash
Cutting line
B. Make a sample pattern using a skirt or t-shirt with proper markings. Let your teacher
check your work.
Lesson 7
Measurements Needed in Sleeping Garments
As variety of ready-to wear garments is largely available in our market, you may think
there’s no need for you to sew and make a dress for yourself. That’s not a good idea! Now
that you have acquired some of the basic learning about the different kinds of fabric, let us
continue to develop your ability and skill in sewing. It would be a great accomplishment for
you if you know what you are wearing is a product of your own talent, skill and creativity.
Let’s deal first with the different tools, materials and sewing equipment. Perhaps, you have
How are you doing with your exercises? Are you doing well?
Very Good! After familiarizing with the essential markings on the pattern and using the
most common tools used in pattern making, you are halfway to the making of your sleeping garment.
Enjoy learning!
47
already encountered all of these during your Grade 8. As a review, find time to discuss and
be familiar again with tools and sewing equipment.
Apparel requires specific measurement to come up with a well-designed and
comfortable sleeping garment. The following measurements are needed:
Lesson 7.1
BODY MEASUREMENTS NEEDED IN SEWING SLEEPING
GARMENT
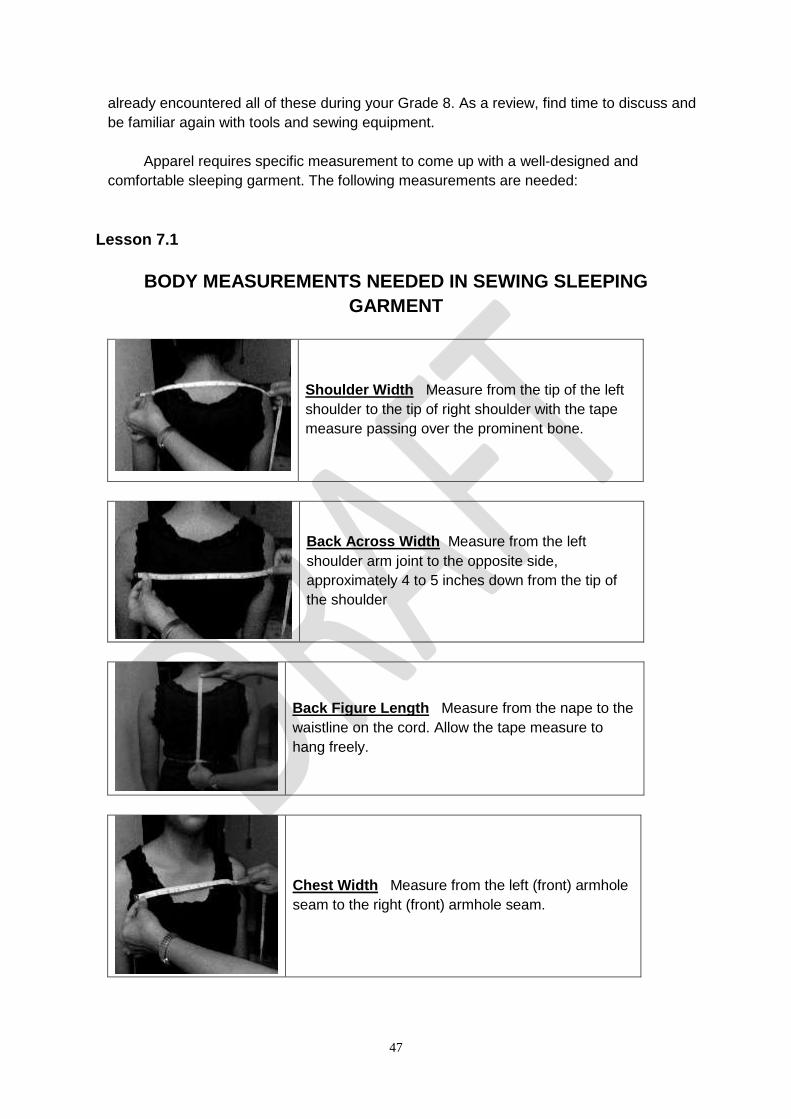
Shoulder Width Measure from the tip of the left
shoulder to the tip of right shoulder with the tape
measure passing over the prominent bone.
Back Across Width Measure from the left
shoulder arm joint to the opposite side,
approximately 4 to 5 inches down from the tip of
the shoulder
Back Figure Length Measure from the nape to the
waistline on the cord. Allow the tape measure to
hang freely.
Chest Width Measure from the left (front) armhole
seam to the right (front) armhole seam.
48
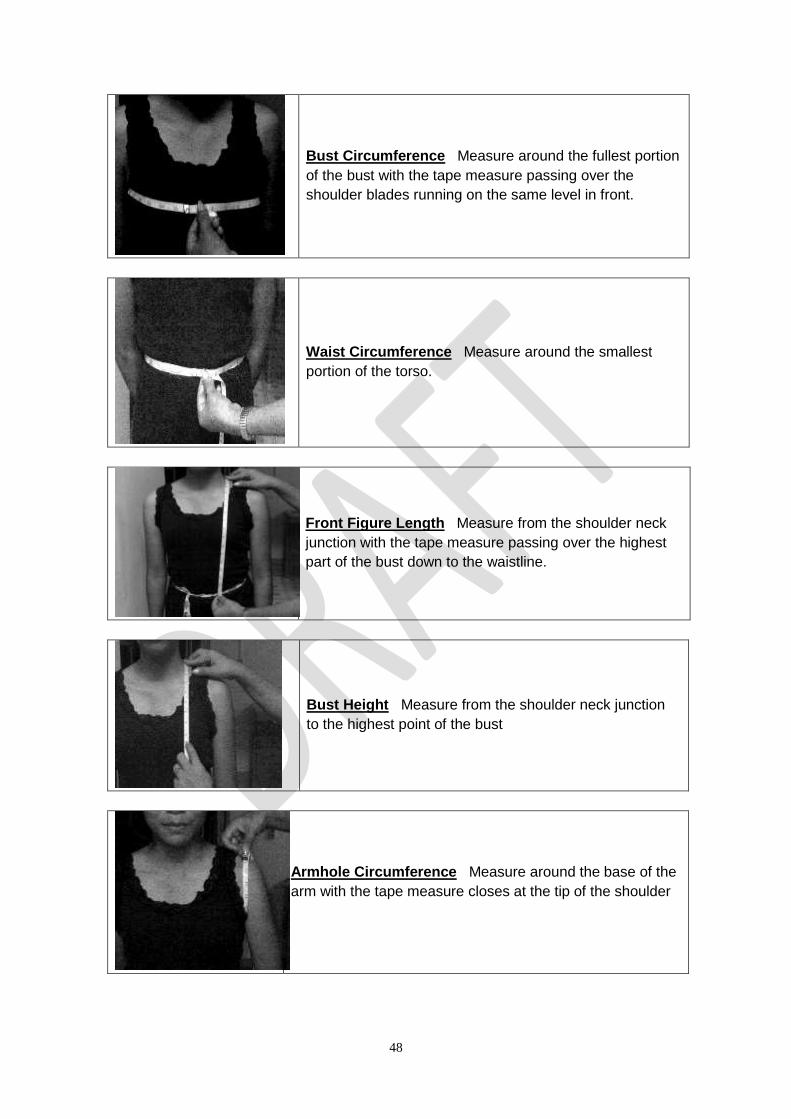
Bust Circumference Measure around the fullest portion
of the bust with the tape measure passing over the
shoulder blades running on the same level in front.
Waist Circumference Measure around the smallest
portion of the torso.
Front Figure Length Measure from the shoulder neck
junction with the tape measure passing over the highest
part of the bust down to the waistline.
Bust Height Measure from the shoulder neck junction
to the highest point of the bust
Armhole Circumference Measure around the base of the
arm with the tape measure closes at the tip of the shoulder

49
Sleeve Length Measure from the tip of the shoulder to the desired length of the sleeve
Arm Circumference This measurement is taken around the arm where the sleeve
length falls.
1st Hip
Hip1 Circumference This measurement is taken 5 inches
below the waistline measure around the hip level.
2nd Hip
Hip2 Circumference This measurement is taken 7 to 8
inches below the waistline. Measure around the fullest part
of the buttocks with the tape measure closest at the side.
Thigh Circumference Measure around the fullest part
of the thigh with the tape measure closest at the side.

50
Bust Distance Measure from the highest point of the
bust to the opposite side.
Crotch/seat/rise This measurement is taken in two
ways. For male customer insert a ruler on the rise and
measure from the waistline to the upper edge of the ruler.
For female customer allow her to sit on a flat chair, and
measure at the side from the waistline to the surface of the
chair.
Skirt’s Length Measure from the waistline to the desired
length.
Full Length Measure from the
waistline down to the desired
length of the shorts / pants.

51
Knee and Bottom Circumference
Measure around the legs where
the full length falls.
Lesson 7.2
INDIVIDUAL MEASUREMENT CHART (IMC)
Customer’s Name ____________ Date Taken: __________
Parts of the body
measured
Actual Body
Measurement
Measurement
Needed
Computed
Measurement
Shoulder width ½
Back Across width ½
Back Figure length 1
Chest width ½
Bust Circumference ¼
Waist Circumference ¼
Front Figure length 1
Bust height 1
Bust Distance ½
Armhole circumference ½
Sleeve length 1
Arm Circumference ½
Hip1 Circumference ¼
52
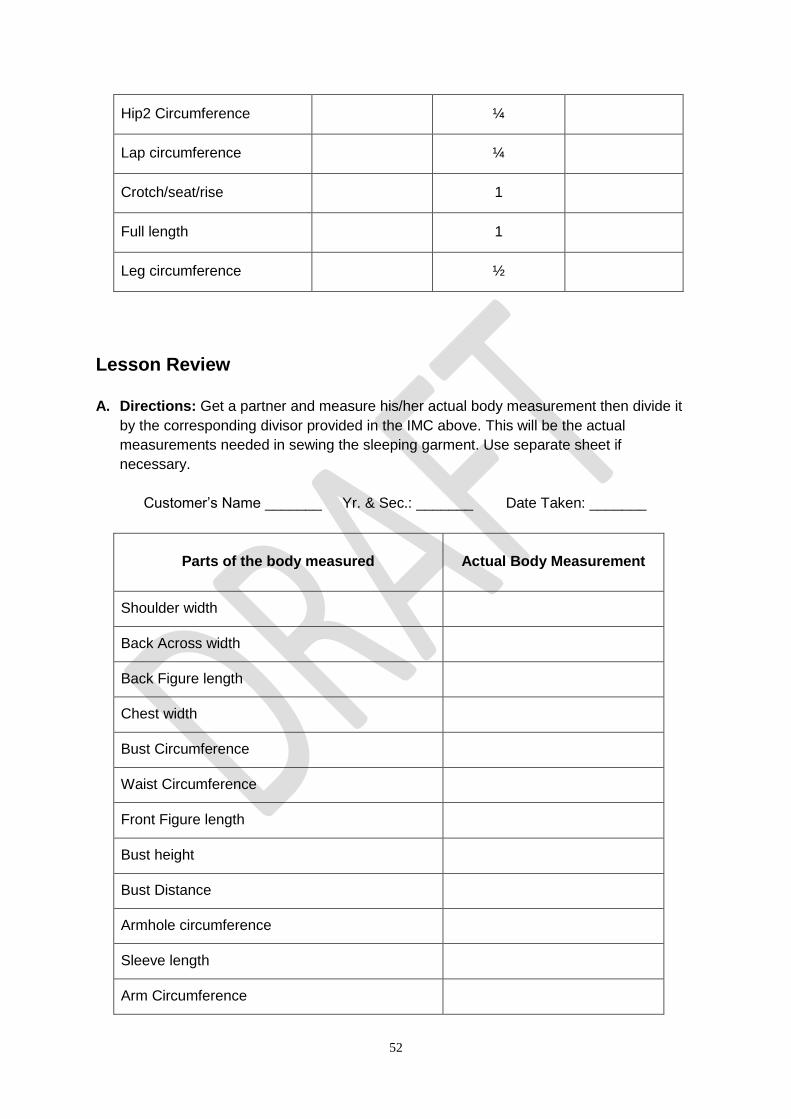
Hip2 Circumference ¼
Lap circumference ¼
Crotch/seat/rise 1
Full length 1
Leg circumference ½
Lesson Review
A. Directions: Get a partner and measure his/her actual body measurement then divide it
by the corresponding divisor provided in the IMC above. This will be the actual
measurements needed in sewing the sleeping garment. Use separate sheet if
necessary.
Customer’s Name _______ Yr. & Sec.: _______ Date Taken: _______
Parts of the body measured Actual Body Measurement
Shoulder width
Back Across width
Back Figure length
Chest width
Bust Circumference
Waist Circumference
Front Figure length
Bust height
Bust Distance
Armhole circumference
Sleeve length
Arm Circumference

53
Hip1 Circumference
Hip2 Circumference
Lap circumference
Crotch/seat/rise
Full length
Leg circumference
Lesson 8
Drafting Basic / Block Pattern of Sleeping Garment
Lesson 8.1
Front Blouse Sloper
Measurements Needed in Drafting Front Blouse Sloper
(Sample Measurement)
Parts of the body
measured
Actual Body
Measurement
Measurement
Needed
Computed
Measurement
Shoulder width 15 ½ 7 1/2
Chest width 13 1/2 ½ 6 3/4
Bust Circumference 35 ¼ 8 3/4
Waist Circumference 26 1/4 6 1/2
How do you feel now that you know how to take body measurements?
Amazing! Right?
Practice this regularly and you will master the sequence without looking at
your notes.
Great!
You are now ready to make your pattern. But, let us be familiar first with the
symbols or markings that you will use in making your own pattern.
54
Always remember that the best fit of one’s dress depends largely on the body measurements, height and body shape and not on his/her age.
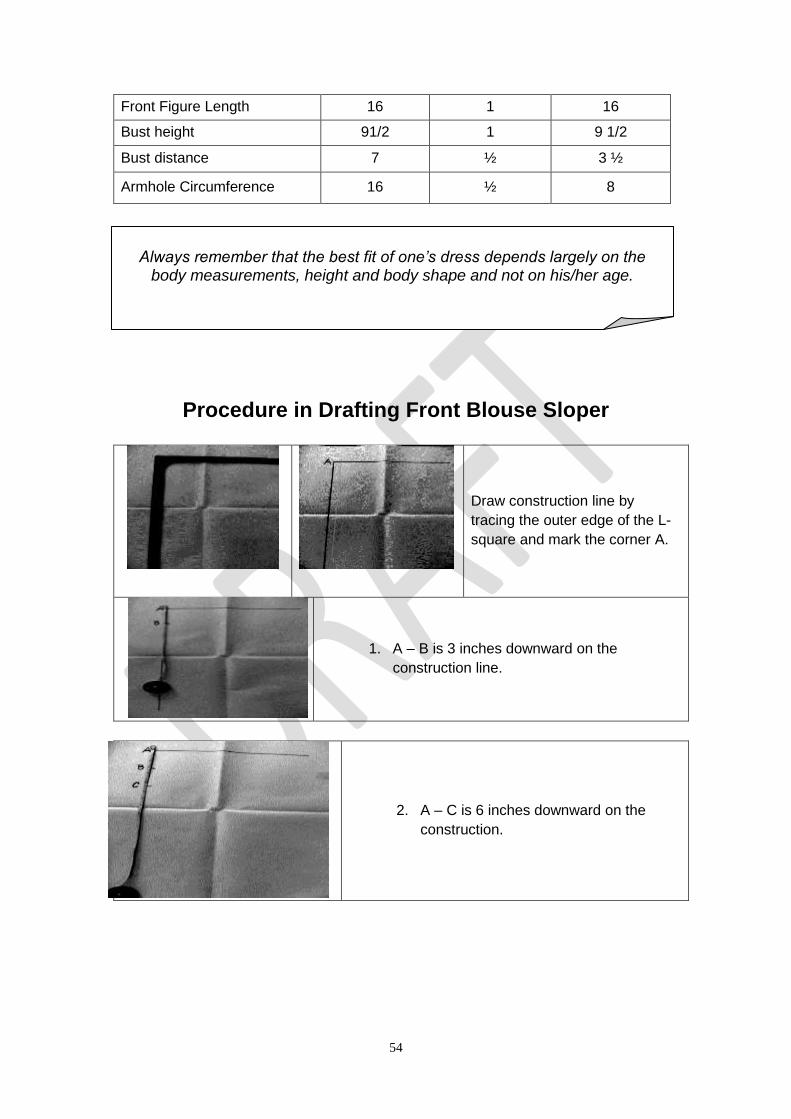
Front Figure Length 16 1 16
Bust height 91/2 1 9 1/2
Bust distance 7 ½ 3 ½
Armhole Circumference 16 ½ 8
Procedure in Drafting Front Blouse Sloper
Draw construction line by
tracing the outer edge of the L-
square and mark the corner A.
1. A – B is 3 inches downward on the
construction line.
2. A – C is 6 inches downward on the
construction.
55
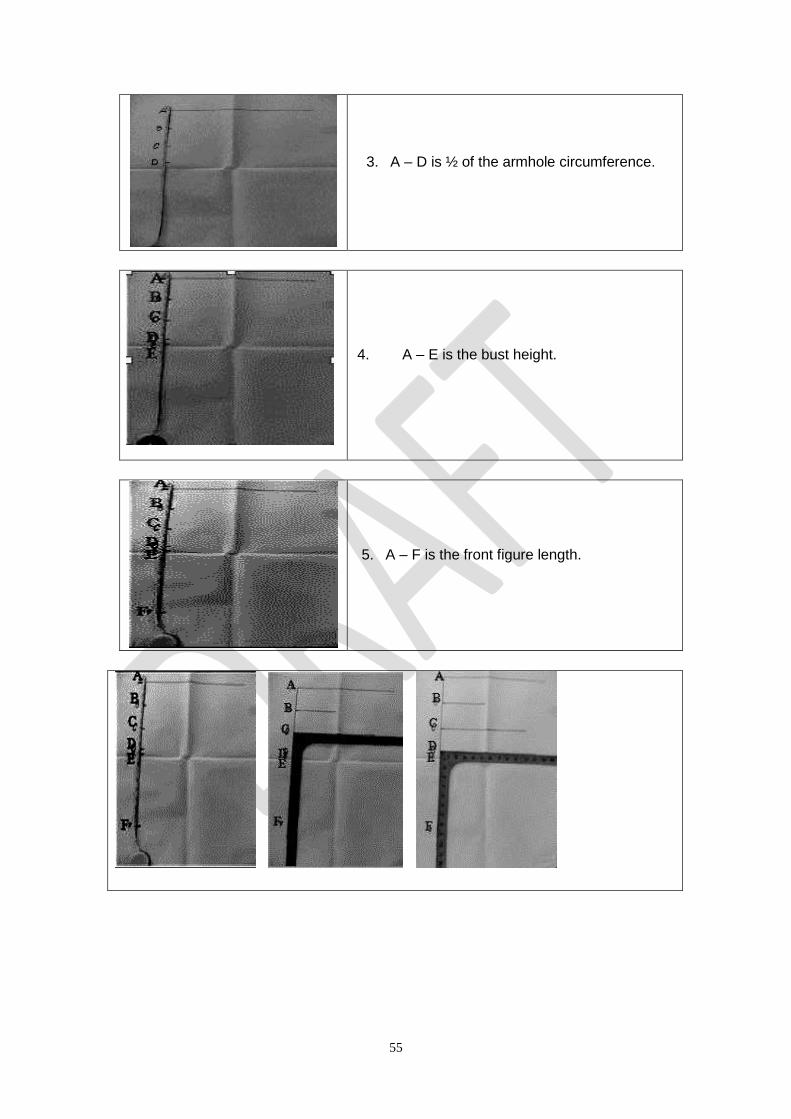
3. A – D is ½ of the armhole circumference.
4. A – E is the bust height.
5. A – F is the front figure length.

56
8.A – G is 2 1/2 inches.
10. Shape front neckline
from point G to B with
a French curve.
11. A – H is 1/2 of the shoulder measurement.
12. H - I is 1 ½ inches down on the swayed line.
7. Square out points B – C – D – E – F.

57
13. Connect points I G with
a straight line.
14. C – J is ½ of the chest width or ½ shoulder
measurement minus ¾ inch.
15. D – K is ¼ of the bust circumference plus ½
inch for allowance.
16. Shape front armhole from
points I – J – K with a
French curve.
17. F – L is ¼ of the waist circumference plus 1
inch for the front dart and ½ inch for allowance.
58
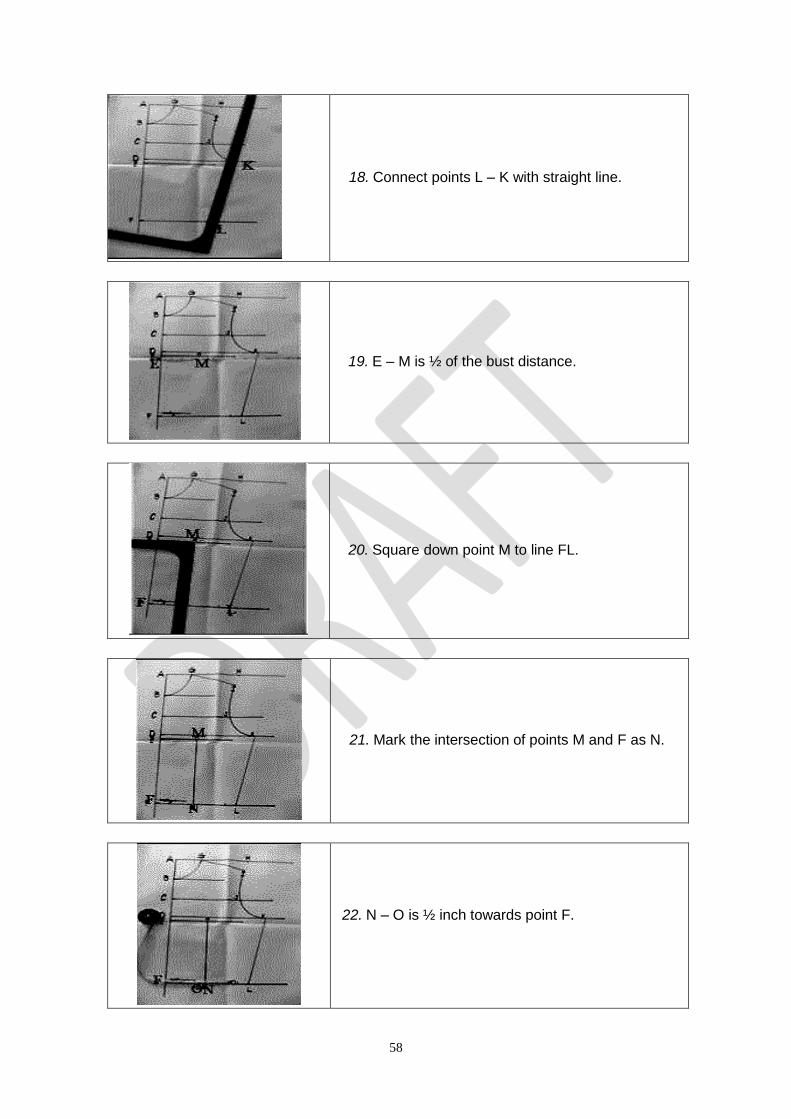
18. Connect points L – K with straight line.
19. E – M is ½ of the bust distance.
20. Square down point M to line FL.
21. Mark the intersection of points M and F as N.
22. N – O is ½ inch towards point F.
59
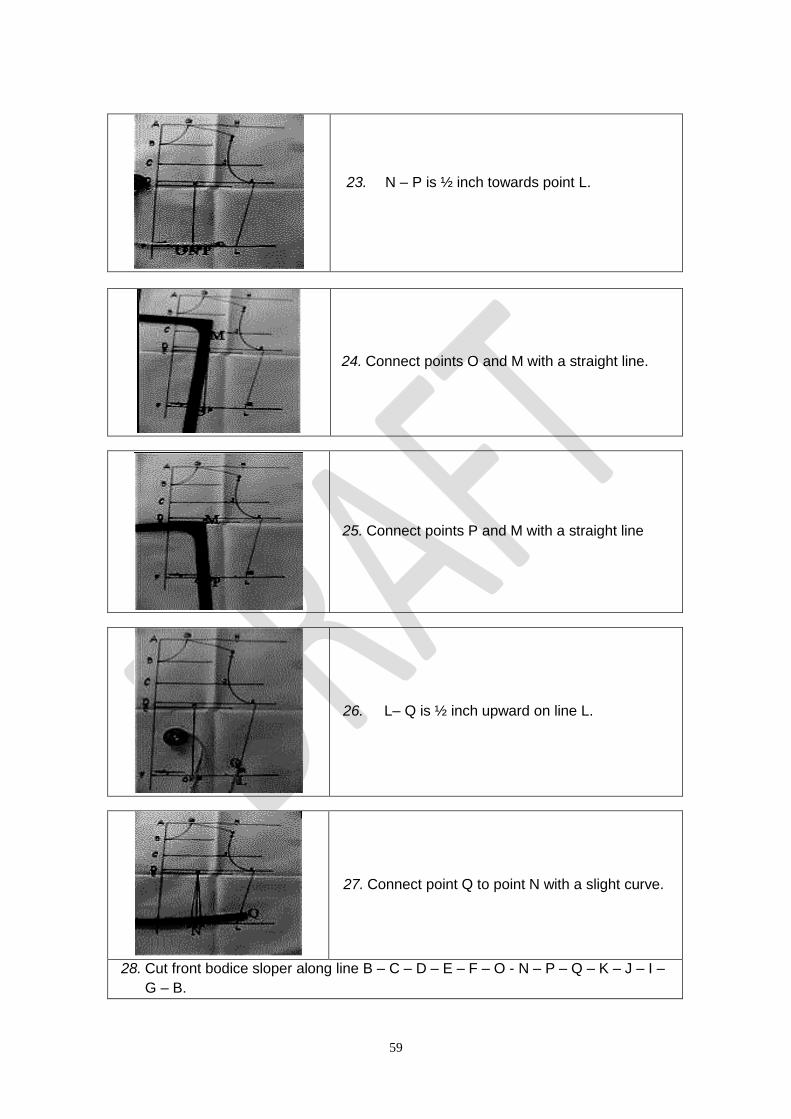
23. N – P is ½ inch towards point L.
24. Connect points O and M with a straight line.
25. Connect points P and M with a straight line
26. L– Q is ½ inch upward on line L.
27. Connect point Q to point N with a slight curve.
28. Cut front bodice sloper along line B – C – D – E – F – O - N – P – Q – K – J – I –
G – B.

60
Lesson Review
A. Fill in the blanks.
Directions: Fill in the missing data to complete the procedure in drafting the front bodice
pattern.
A – B is 3 inches downward and the
A – C is _______________on the construction.
A – D is ½ of the armhole circumference.
A – E is the _______________
A – F is the ___________________
A – G is 2 ½ inches of the shoulder width sway point G down.
A – H is 1/2 of the shoulder width sway point H down
H – I is _________________down on the swayed line
C – J is ½ of the ___________________
D – K is ¼ of the bust circumference plus ½ inch.
B. Front Blouse Sloper
Directions: Based from the body measurement obtained in IMC, draft the front blouse
sloper.
Find out how far you have done by accomplishing the Scoring Rubric to the best of your
competence. This will be your passport to proceed for the next learning experiences.
(1)
(2)
(3)
(4)
(5)
Front Blouse Sloper Measurements Needed
61
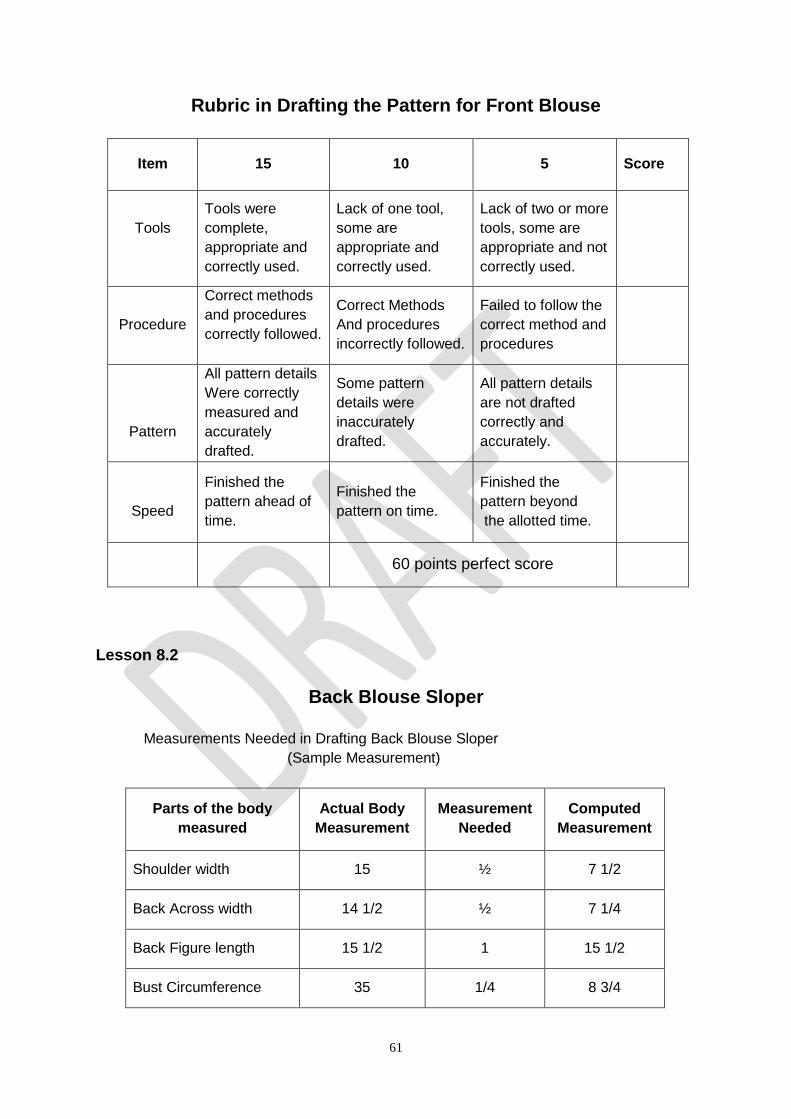
Rubric in Drafting the Pattern for Front Blouse
Item 15 10 5 Score
Tools
Tools were
complete,
appropriate and
correctly used.
Lack of one tool,
some are
appropriate and
correctly used.
Lack of two or more
tools, some are
appropriate and not
correctly used.
Procedure
Correct methods
and procedures
correctly followed.
Correct Methods
And procedures
incorrectly followed.
Failed to follow the
correct method and
procedures
Pattern
All pattern details
Were correctly
measured and
accurately
drafted.
Some pattern
details were
inaccurately
drafted.
All pattern details
are not drafted
correctly and
accurately.
Speed
Finished the
pattern ahead of
time.
Finished the
pattern on time.
Finished the
pattern beyond
the allotted time.
60 points perfect score
Lesson 8.2
Back Blouse Sloper
Measurements Needed in Drafting Back Blouse Sloper
(Sample Measurement)
Parts of the body
measured
Actual Body
Measurement
Measurement
Needed
Computed
Measurement
Shoulder width 15 ½ 7 1/2
Back Across width 14 1/2 ½ 7 1/4
Back Figure length 15 1/2 1 15 1/2
Bust Circumference 35 1/4 8 3/4

62
Waist Circumference 26 ¼ 6 1/2
Armhole circumference 16 ½ 8
Bust distance 7 1/2 3 ½
Procedure in Drafting Pattern for Back Blouse Sloper
1. Draw construction line
by tracing the outer
edge of the L-square.
Make corner A.
2. A – B is ½ inch downward on the
construction line.
3. A – C is 5 inches downward on the
construction.
4. A – D is ½ of the armhole circumference.

63
5. A – E is the back figure length.
17. Square out points B – C – D – E.
18. A – F on the horizontal construction line is 2½ inches.
19. Shape back neckline
from point F to B with a
French curve.

64
20. A –G IS ½ of the shoulder width sway point G
down.
21. G – H is 1 ½ inches down on the swayed line
22. Connect points F and H with a straight line.
23. C – I is ½ of the back across width.
24. D – J is ¼ of the bust circumference.

65
25. Shape back armhole from
points H – I – J with a French
curve.
26. E – K is ¼ of the waist circumference plus 1 inch
for the back dart.
27. Connect points J – K
with straight line.
28. E – L is 7 inches upward
on line AE. Square out
point L.
29. E – M is 3 ½ inches on line
EK square M up.

66
30. Mark intersection of line LM as point N.
31. M – O is ½ inch towards point E.
32. M – P is ½ inch towards point K.
33. Connect points N and O to pint
P with a straight line.
34. K – Q is ½ inch upward on line KJ.

67
35. Connect point Q to point M with a slight curve.
36. Cut back bodice sloper along lines B – C – D – L - E – N - M – O - Q –J – I – H –
F – B.
Lesson Review
Directions: Based on the body measurement obtained in Activity No. 8 draft the
back blouse sloper.
Find out how far you have done by accomplishing the Scoring Rubric to the best of your
competence. This will be your passport to proceed for the next learning experiences.
Rubric in Drafting the Pattern for Back Blouse
Item 15 10 5 Score
Tools
Tools were
complete,
appropriate and
correctly used.
Lack of one tool,
some are
appropriate and
correctly used.
Lack of two or
more tools, some
are appropriate
and not correctly
used.
Procedure
Correct methods
and procedures
correctly
followed.
Correct Methods
and procedures
incorrectly
followed.
Failed to follow
the correct
method and
procedures
Back Blouse Sloper Measurements Needed
68
Pattern
All pattern
details were
correctly
measured and
accurately
drafted.
Some pattern
details were
inaccurately
drafted.
All pattern details
are not drafted
correctly and
accurately.
Speed
Finished the
pattern ahead of
time.
Finished the
pattern on time.
Finished the
pattern beyond
the allotted time.
60 points perfect score
Lesson 8.3
Sleeves
Measurements Needed in Set –in Sleeve Pattern
Parts of the body
measured
Actual Body
Measurement
Measurement
Needed
Computed
Measurement
Armhole circumference 16 ½ 8
Sleeve length 10 1 10
Arm Circumference 13 ½ 6 ½
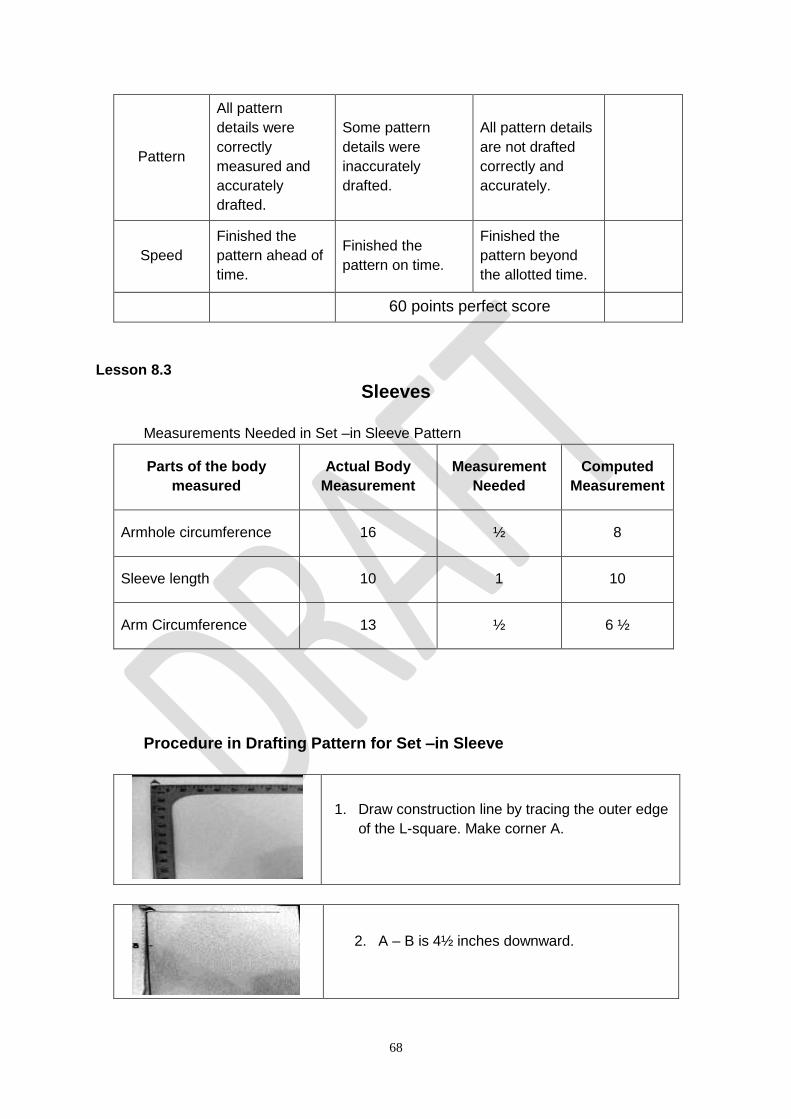
Procedure in Drafting Pattern for Set –in Sleeve
1. Draw construction line by tracing the outer edge
of the L-square. Make corner A.
2. A – B is 4½ inches downward.
69
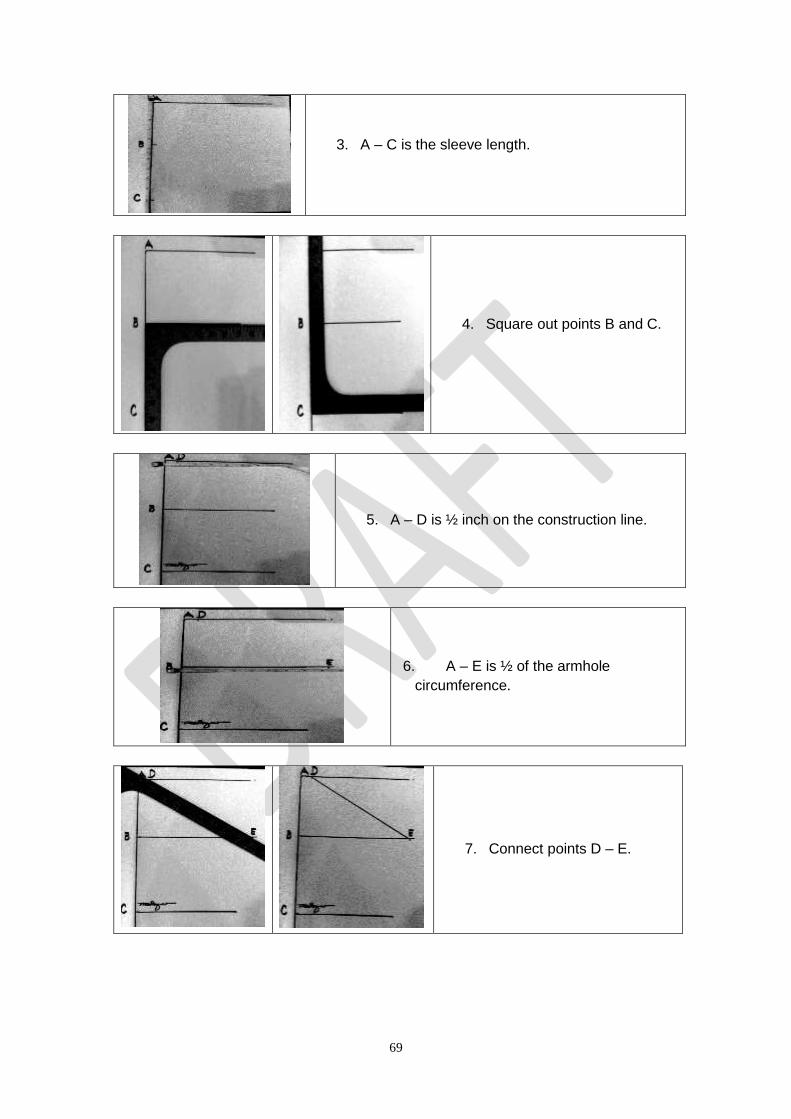
3. A – C is the sleeve length.
4. Square out points B and C.
5. A – D is ½ inch on the construction line.
6. A – E is ½ of the armhole
circumference.
7. Connect points D – E.
70
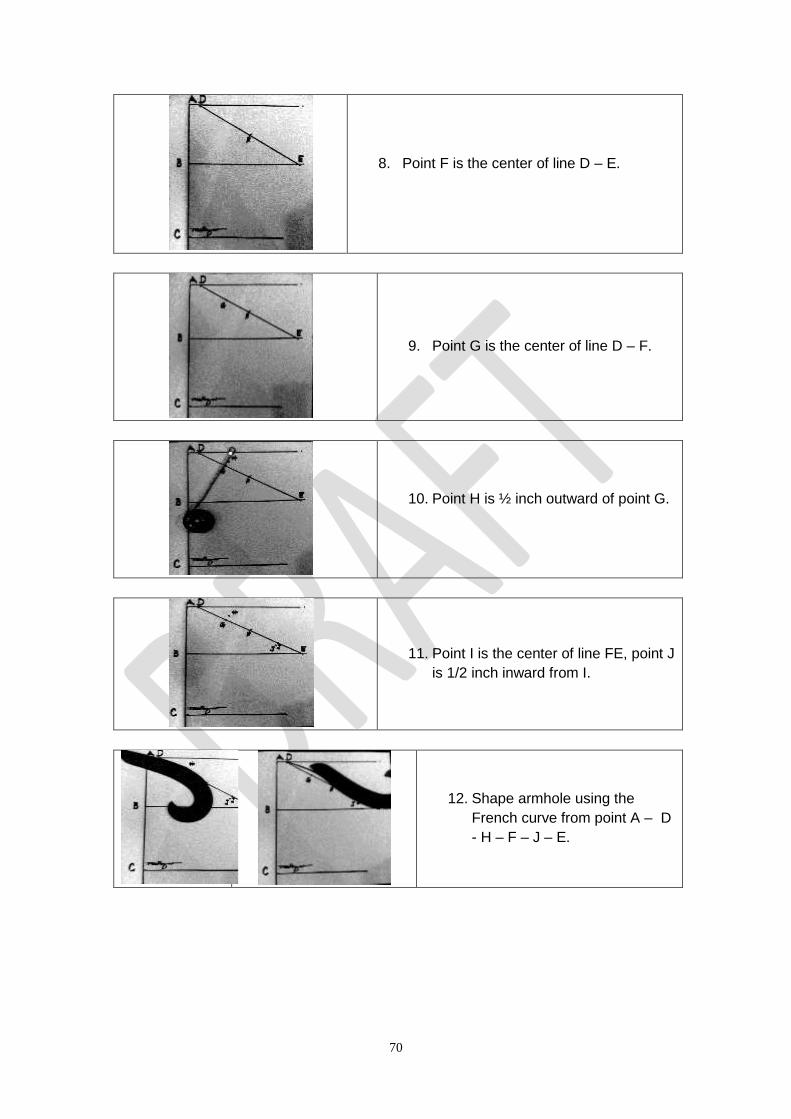
8. Point F is the center of line D – E.
9. Point G is the center of line D – F.
10. Point H is ½ inch outward of point G.
11. Point I is the center of line FE, point J
is 1/2 inch inward from I.
12. Shape armhole using the
French curve from point A – D
- H – F – J – E.

71
13. C – K is ½ of the arm
circumference.
14. Connect K to E using straight line.
15. Cut Back sleeve pattern from point A – D – H – F – J – E – K – C – B – A.
16. Trace back sleeve pattern transfer points A – D – H – F – J – E.
17. H – 1 is ¼ inch inward.
18. F – 2 is 3/8 inch inward.
19. J – 3 is 3/8 inch inward.
20. Shape front armhole from point A – D – 1 – 2 – 3 and E with hand manipulation.
21. Cut front sleeve pattern from point A – D – 1 – 2 – 3 – E – K – C – B – A.
Lesson Review
Directions: Based on the body measurement obtained in IMC draft the sleeve’s sloper.
Find out how far you have done by accomplishing the Scoring Rubric to the best of your
competence. This will be your passport to proceed for the next learning experiences.
Measurements Needed Sleeve Sloper

72
Rubric in Drafting the Pattern for Sleeves
Item 15 10 5 Score
Tools
Tools were
complete,
appropriate and
correctly used.
Lack of one tool,
some are
appropriate and
correctly used.
Lack of two or
more tools,
some are
appropriate and
not correctly
used.
Procedure
Correct methods
and procedures
correctly followed.
Correct methods
and procedures
incorrectly
followed.
Failed to follow
the correct
method and
procedures
Pattern
All pattern details
Were correctly
measured and
accurately drafted.
Some pattern
details were
inaccurately
drafted.
All pattern
details are not
drafted correctly
and accurately.
Speed Finished the pattern
ahead of time.
Finished the
pattern on time.
Finished the
pattern beyond
the allotted time.
60 points perfect score
Lesson 8.4
Patch Pocket
Procedure in Drafting Pattern for Patch Pocket
1. Draw construction line mark the corner point A.
73
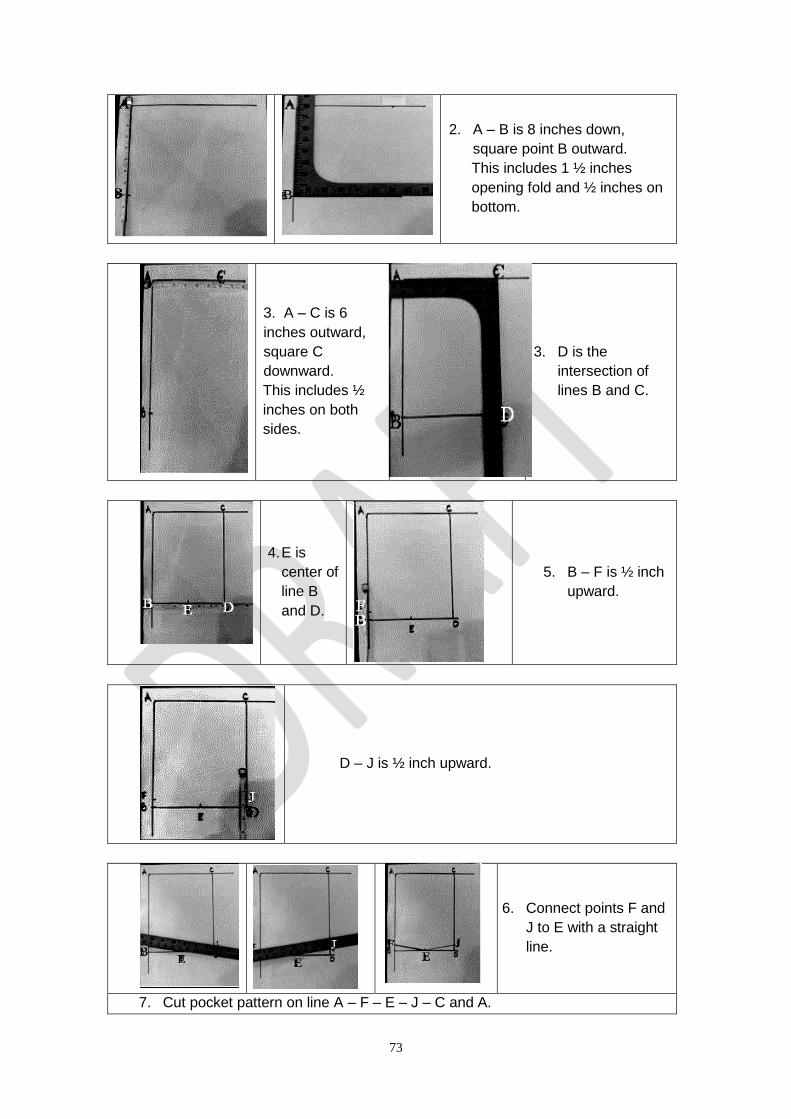
2. A – B is 8 inches down,
square point B outward.
This includes 1 ½ inches
opening fold and ½ inches on
bottom.
3. A – C is 6
inches outward,
square C
downward.
This includes ½
inches on both
sides.
3. D is the
intersection of
lines B and C.
4. E is
center of
line B
and D.
5. B – F is ½ inch
upward.
D – J is ½ inch upward.
6. Connect points F and
J to E with a straight
line.
7. Cut pocket pattern on line A – F – E – J – C and A.
74
Lesson Review
Directions: Based on the body measurement obtained in IMC, draft pattern for patch
pocket. Use separate sheet if necessary.
Find out how far you have done by accomplishing the Scoring Rubric to the best of your
competence. This will be your passport to proceed for the next learning experiences.
Rubric in Drafting the Pattern for Patch Pocket
Item 15 10 5 Score
Tools
Tools were
complete,
appropriate and
correctly used.
Lack of one tool,
some are
appropriate and
correctly used.
Lack of two or
more tools, some
are appropriate
and not correctly
used.
Procedure
Correct methods
and procedures
correctly
followed.
Correct methods
And procedures
incorrectly
followed.
Failed to follow
the correct
method and
procedures
Pattern All pattern
details were
correctly
measured and
accurately
drafted.
Some pattern
details were
inaccurately
drafted.
All pattern details
are not drafted
correctly and
accurately.
Speed Finished the
pattern ahead of
time.
Finished the
pattern on time.
Finished the
Pattern beyond
the allotted
time.
60 points perfect score
Measurements Needed
Patch Pocket
75
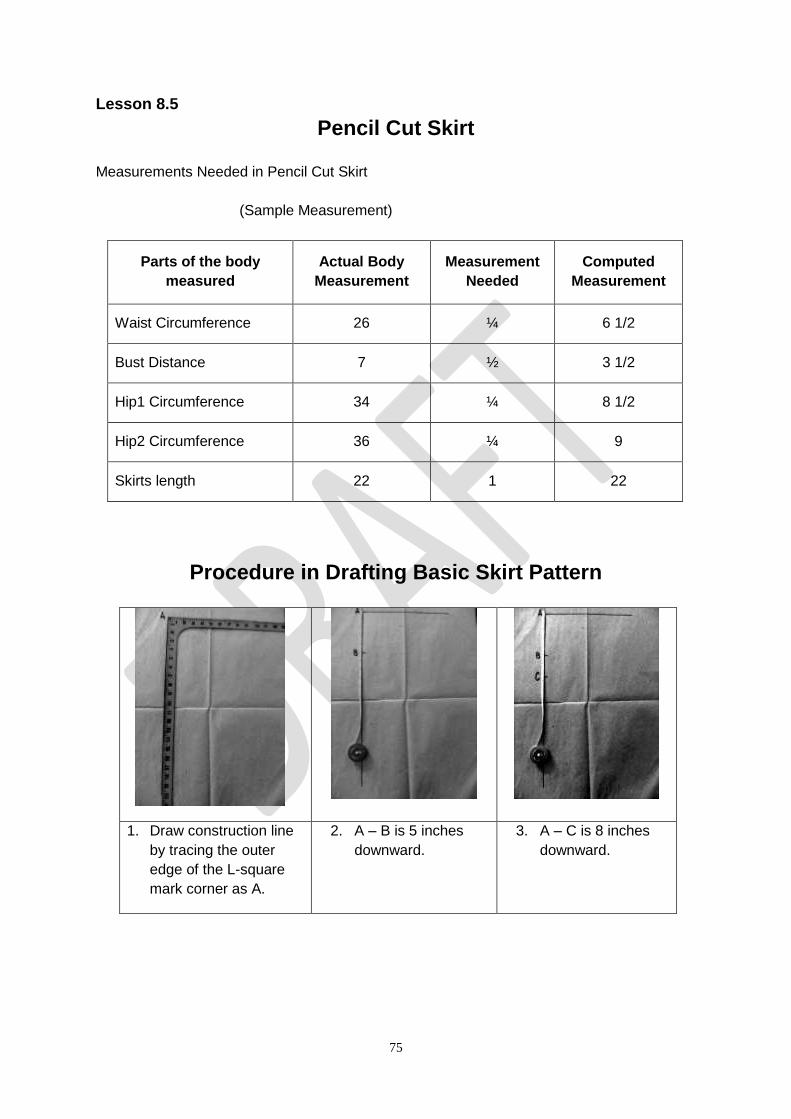
Lesson 8.5
Pencil Cut Skirt
Measurements Needed in Pencil Cut Skirt
(Sample Measurement)
Parts of the body
measured
Actual Body
Measurement
Measurement
Needed
Computed
Measurement
Waist Circumference 26 ¼ 6 1/2
Bust Distance 7 ½ 3 1/2
Hip1 Circumference 34 ¼ 8 1/2
Hip2 Circumference 36 ¼ 9
Skirts length 22 1 22
Procedure in Drafting Basic Skirt Pattern
1. Draw construction line
by tracing the outer
edge of the L-square
mark corner as A.
2. A – B is 5 inches
downward.
3. A – C is 8 inches
downward.
76
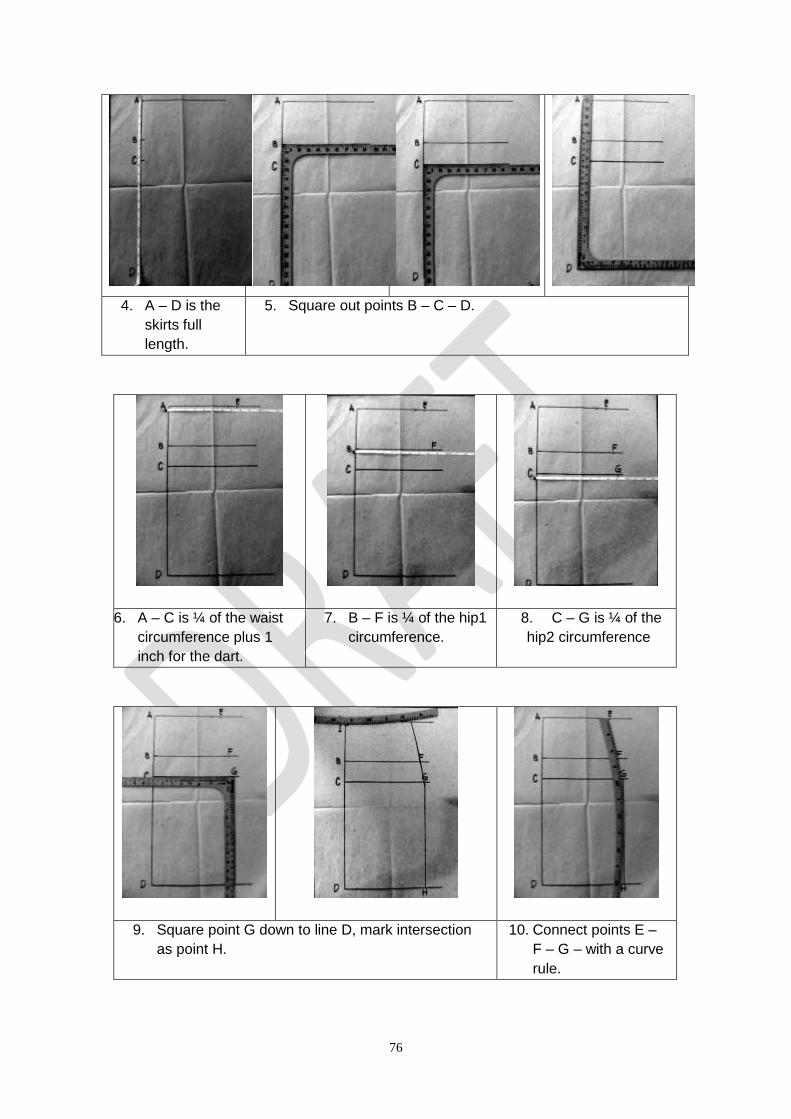
4. A – D is the
skirts full
length.
5. Square out points B – C – D.
6. A – C is ¼ of the waist
circumference plus 1
inch for the dart.
7. B – F is ¼ of the hip1
circumference.
8. C – G is ¼ of the
hip2 circumference
9. Square point G down to line D, mark intersection
as point H.
10. Connect points E –
F – G – with a curve
rule.
77
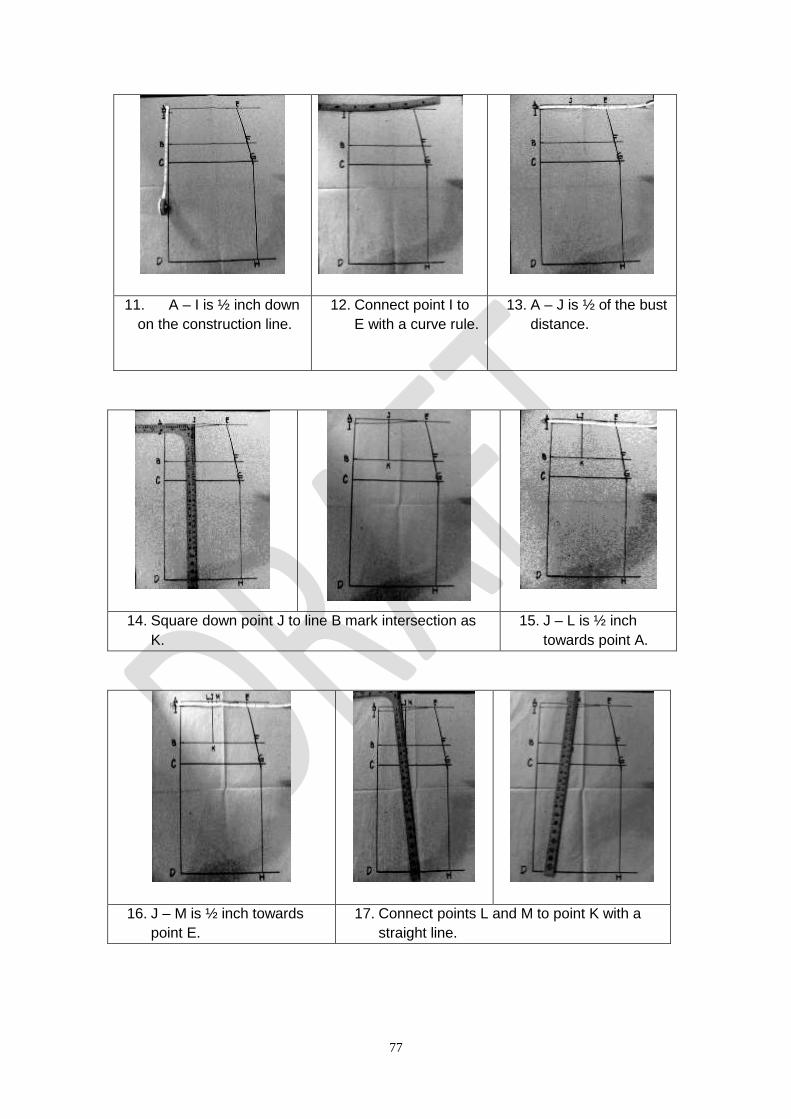
11. A – I is ½ inch down
on the construction line.
12. Connect point I to
E with a curve rule.
13. A – J is ½ of the bust
distance.
14. Square down point J to line B mark intersection as
K.
15. J – L is ½ inch
towards point A.
16. J – M is ½ inch towards
point E.
17. Connect points L and M to point K with a
straight line.
78
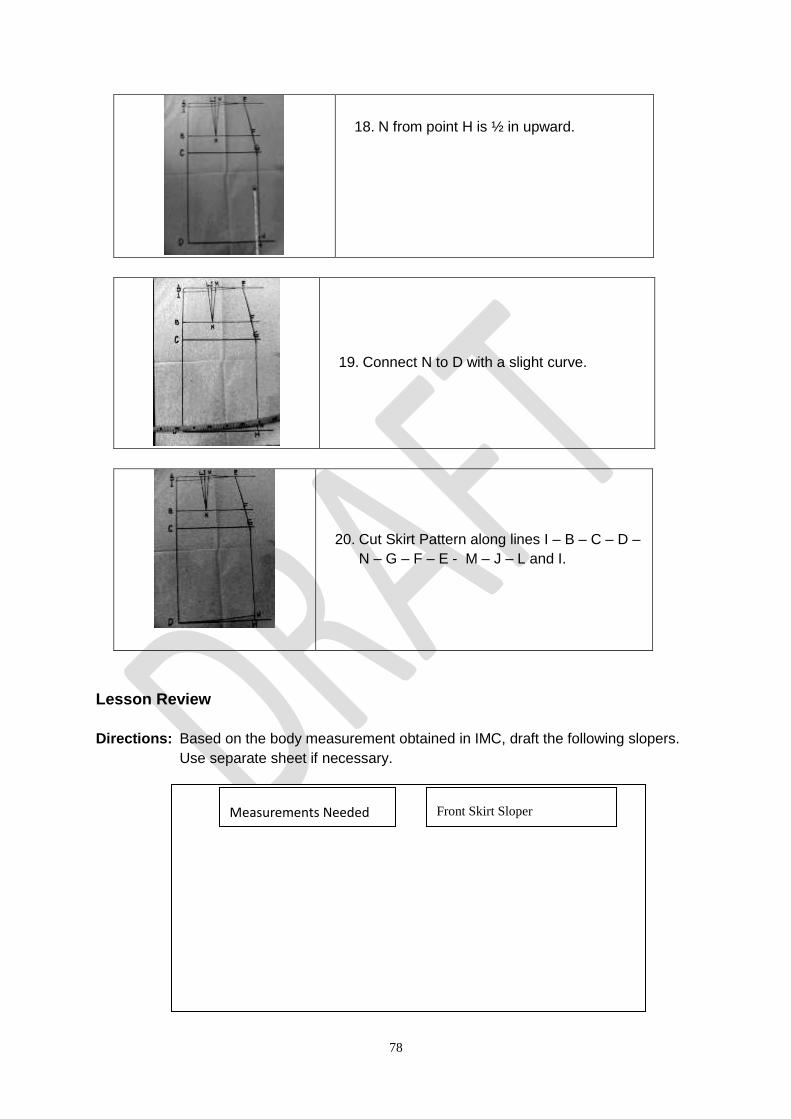
18. N from point H is ½ in upward.
19. Connect N to D with a slight curve.
20. Cut Skirt Pattern along lines I – B – C – D –
N – G – F – E - M – J – L and I.
Lesson Review
Directions: Based on the body measurement obtained in IMC, draft the following slopers.
Use separate sheet if necessary.
Front Skirt Sloper Measurements Needed
79
Find out how far you have done by accomplishing the Scoring Rubric to the best of your
competence. This will be your passport to proceed for the next learning experiences.
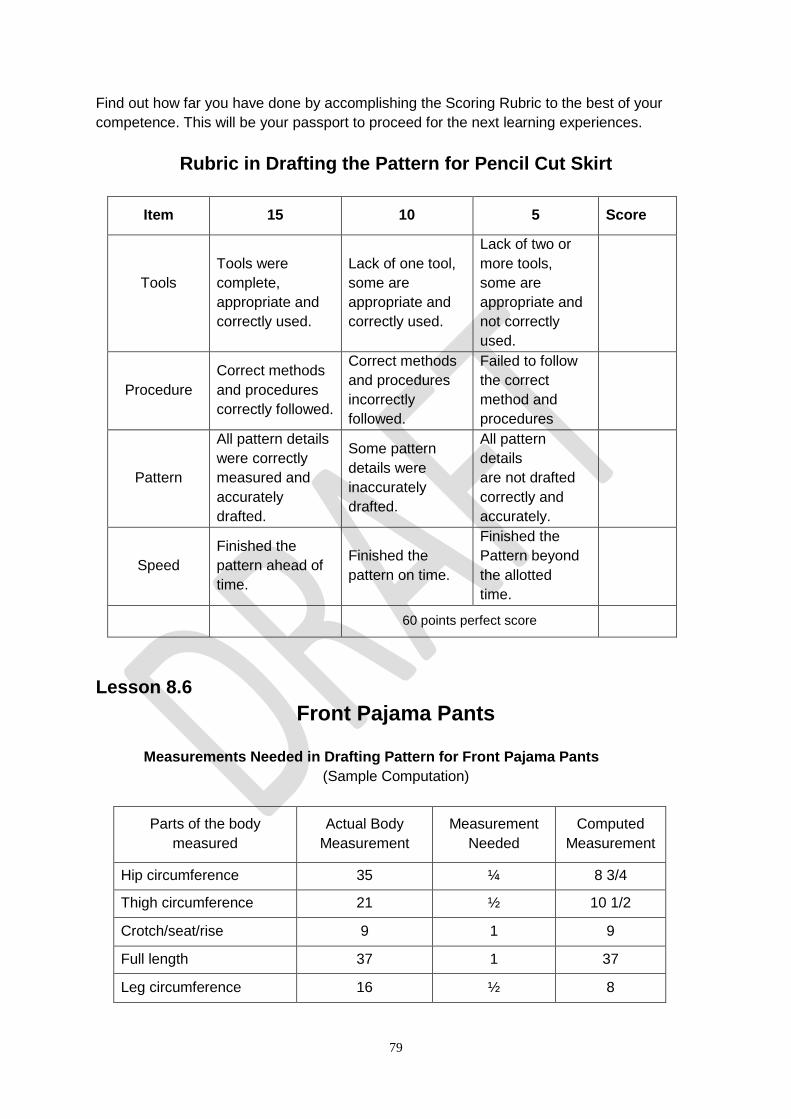
Rubric in Drafting the Pattern for Pencil Cut Skirt
Item 15 10 5 Score
Tools
Tools were
complete,
appropriate and
correctly used.
Lack of one tool,
some are
appropriate and
correctly used.
Lack of two or
more tools,
some are
appropriate and
not correctly
used.
Procedure
Correct methods
and procedures
correctly followed.
Correct methods
and procedures
incorrectly
followed.
Failed to follow
the correct
method and
procedures
Pattern
All pattern details
were correctly
measured and
accurately
drafted.
Some pattern
details were
inaccurately
drafted.
All pattern
details
are not drafted
correctly and
accurately.
Speed
Finished the
pattern ahead of
time.
Finished the
pattern on time.
Finished the
Pattern beyond
the allotted
time.
60 points perfect score
Lesson 8.6
Front Pajama Pants
Measurements Needed in Drafting Pattern for Front Pajama Pants
(Sample Computation)
Parts of the body
measured
Actual Body
Measurement
Measurement
Needed
Computed
Measurement
Hip circumference 35 ¼ 8 3/4
Thigh circumference 21 ½ 10 1/2
Crotch/seat/rise 9 1 9
Full length 37 1 37
Leg circumference 16 ½ 8
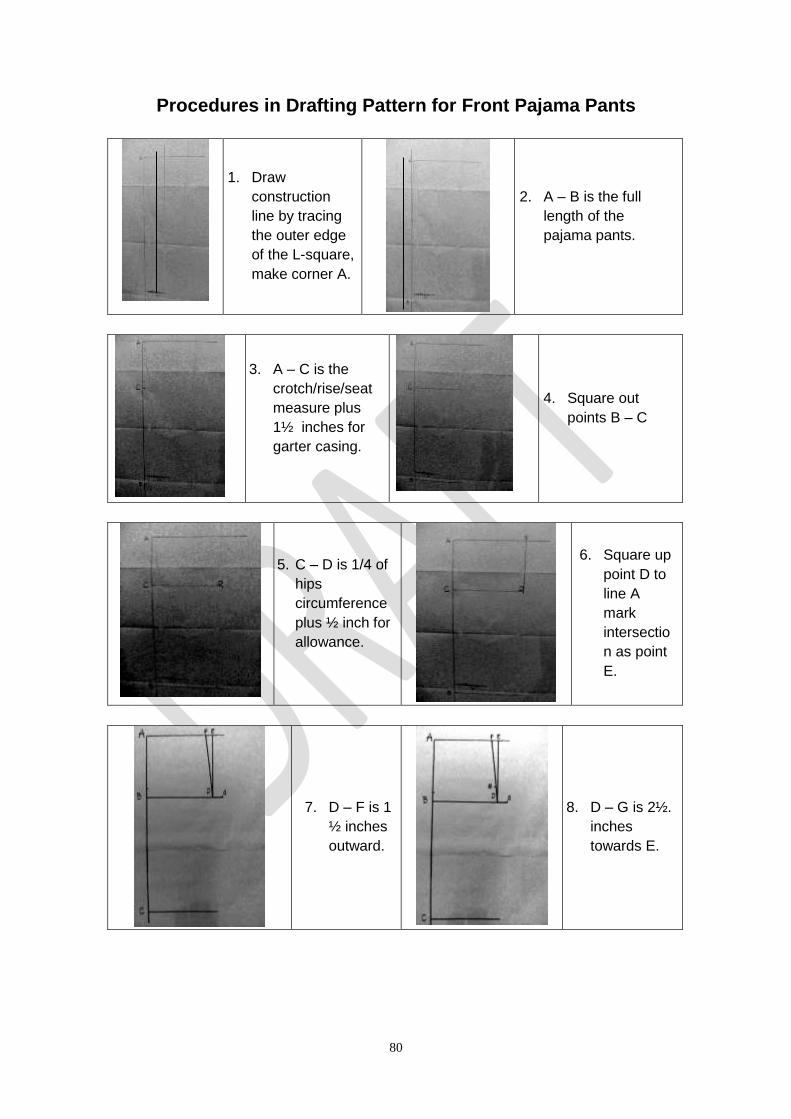
80
Procedures in Drafting Pattern for Front Pajama Pants
1. Draw
construction
line by tracing
the outer edge
of the L-square,
make corner A.
2. A – B is the full
length of the
pajama pants.
3. A – C is the
crotch/rise/seat
measure plus
1½ inches for
garter casing.
4. Square out
points B – C
5. C – D is 1/4 of
hips
circumference
plus ½ inch for
allowance.
6. Square up
point D to
line A
mark
intersectio
n as point
E.
7. D – F is 1
½ inches
outward.
8. D – G is 2½.
inches
towards E.

81
9. Shape front
crotch from
point G to F
with a
French
curve.
10. C – I is ½ of
the leg
circumferenc
e plus ½ inch
for
allowance.
11. Connect
points F and
H with a
straight line.
12. I is the
center of line
IG.
13. J is ½ inch
from I
inward.
14. Connect points
HJ with a
straight line.
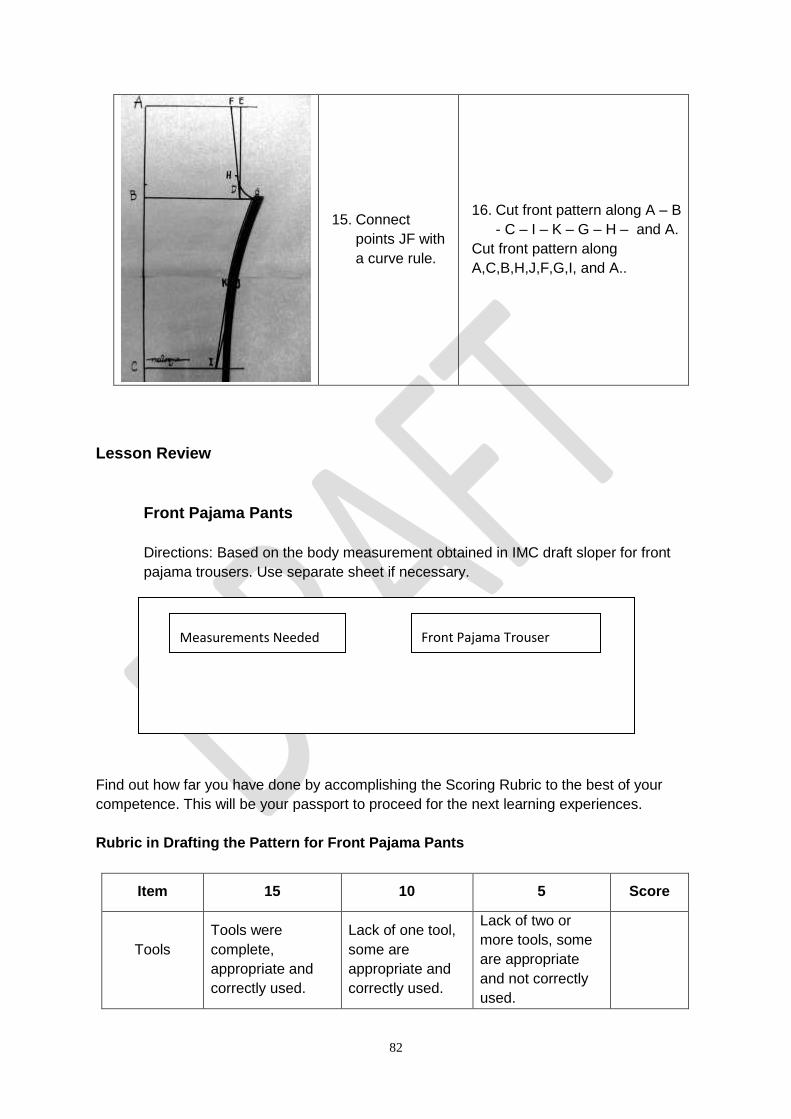
82
15. Connect
points JF with
a curve rule.
16. Cut front pattern along A – B
- C – I – K – G – H – and A.
Cut front pattern along
A,C,B,H,J,F,G,I, and A..
Lesson Review
Front Pajama Pants
Directions: Based on the body measurement obtained in IMC draft sloper for front
pajama trousers. Use separate sheet if necessary.
Find out how far you have done by accomplishing the Scoring Rubric to the best of your
competence. This will be your passport to proceed for the next learning experiences.
Rubric in Drafting the Pattern for Front Pajama Pants
Item 15 10 5 Score
Tools
Tools were
complete,
appropriate and
correctly used.
Lack of one tool,
some are
appropriate and
correctly used.
Lack of two or
more tools, some
are appropriate
and not correctly
used.
Measurements Needed
Front Pajama Trouser

83
Procedure
Correct methods
and procedures
correctly followed.
Correct Methods
And procedures
Incorrectly
followed.
Failed to follow the
correct method
and procedures
Pattern
All pattern details
Were correctly
measured and
accurately drafted.
Some pattern
details were
inaccurately
drafted.
All pattern details
are not drafted
correctly and
accurately.
Speed
Finished the
pattern ahead of
time.
Finished the
pattern on time.
Finished the
pattern beyond the
allotted time.
60 points perfect score
Lesson 8.7
Back Pajama Pants
Procedure in Drafting Pattern for Back Pajama Pants
1. Trace the front
pajama pants pattern.
2. Add 1 ½ inches from F
outward and mark it as point K.
3. J-L is ¾ inch
outward.
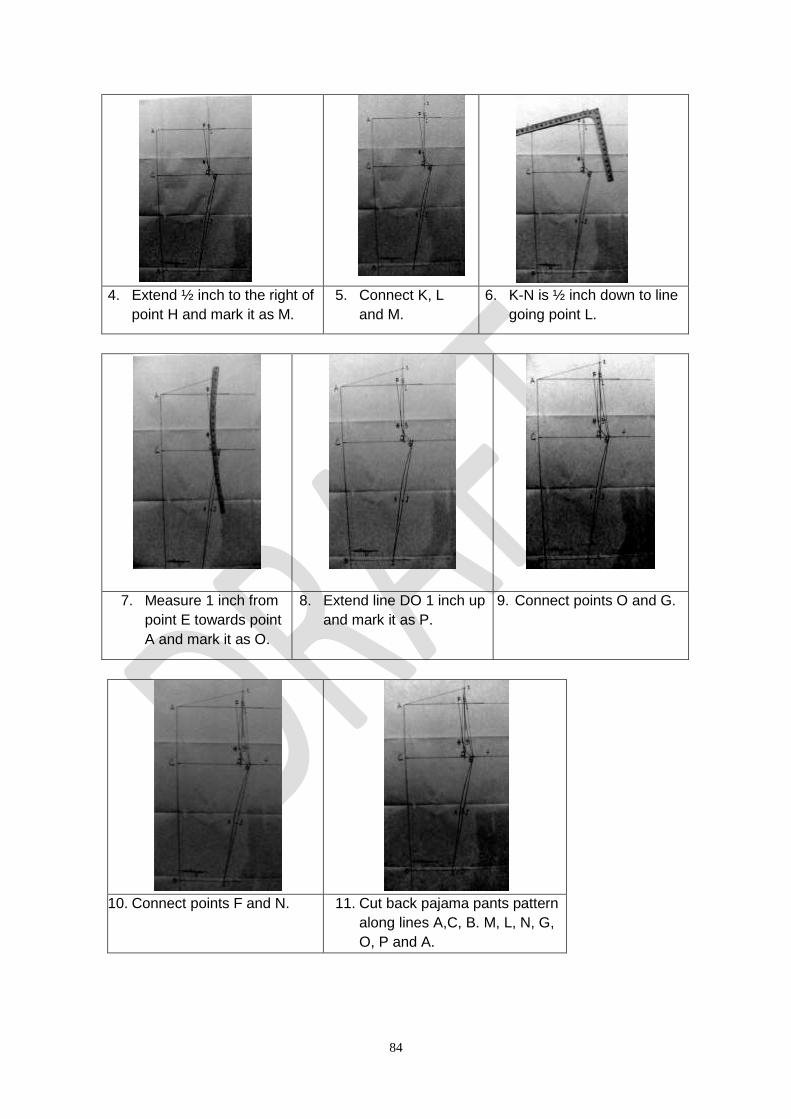
84
4. Extend ½ inch to the right of
point H and mark it as M.
5. Connect K, L
and M.
6. K-N is ½ inch down to line
going point L.
7. Measure 1 inch from
point E towards point
A and mark it as O.
8. Extend line DO 1 inch up
and mark it as P.
9. Connect points O and G.
10. Connect points F and N. 11. Cut back pajama pants pattern
along lines A,C, B. M, L, N, G,
O, P and A.
85
Lesson Review
A. Directions: Based on the body measurement obtained in IMC draft pattern for back
pajama trouser. Use separate sheet if necessary.
B. Compare the following slopers. Identify the differences between them.
Back and front body sloper
Back and front pajama pants
Back and front skirt sloper
Find out how far you have done by accomplishing the Scoring Rubric to the best of your
competence. This will be your passport to proceed for the next learning experiences.
Rubric in Drafting the Pattern for Back Pajama
Item 15 10 5 Score
Tools
Tools were
complete,
appropriate and
correctly used.
Lack of one tool,
some are
appropriate and
correctly used.
Lack of two or
more tools, some
are appropriate
and not correctly
used.
Procedure
Correct methods
and procedures
correctly followed.
Correct Methods
And procedures
incorrectly
followed.
Failed to follow the
correct method
and procedures
Pattern
All pattern details
Were correctly
measured and
accurately
drafted.
Some pattern
details were
inaccurately
drafted.
All pattern details
are not drafted
correctly and
accurately.
Back Pajama Trouser Measurements Needed

86
Speed
Finished the
pattern ahead of
time.
Finished the
pattern on time.
Finished the
pattern beyond the
allotted time.
60 points perfect score
Lesson 9
Manipulating Basic/Block Pattern
In manipulating basic pattern, it is always based on the previous pattern such as
making blouse from bodice and skirt.
Steps in Manipulating Pattern
1. Determine the design needed in sleeping garments.
2. Prepare the basic patterns for the:
a. Blouse
b. Sleeve
c. Pockets
d. Pants
3. Determine parts, needs, subdivisions and extensions calls by the design.
4. Pin and trace basic pattern in a pattern paper.
5. Transfer points needed in design manipulation
a. Blouse
b. Sleeve
c. Pockets
d. Pants
6. Work on the design based on the project plan.
7. Provide seam and hem allowances.
8. Transfer seam and hem lines and other symbols needed.
Final patterns

87
Cutting the Final Pattern
Final patterns consists all the necessary symbols, number of pieces per part and
garment design that will guide the fabric cutter and the sewer. Final pattern is cut at
the allowance provided for seams and design. (Refer to picture below)
Blouse
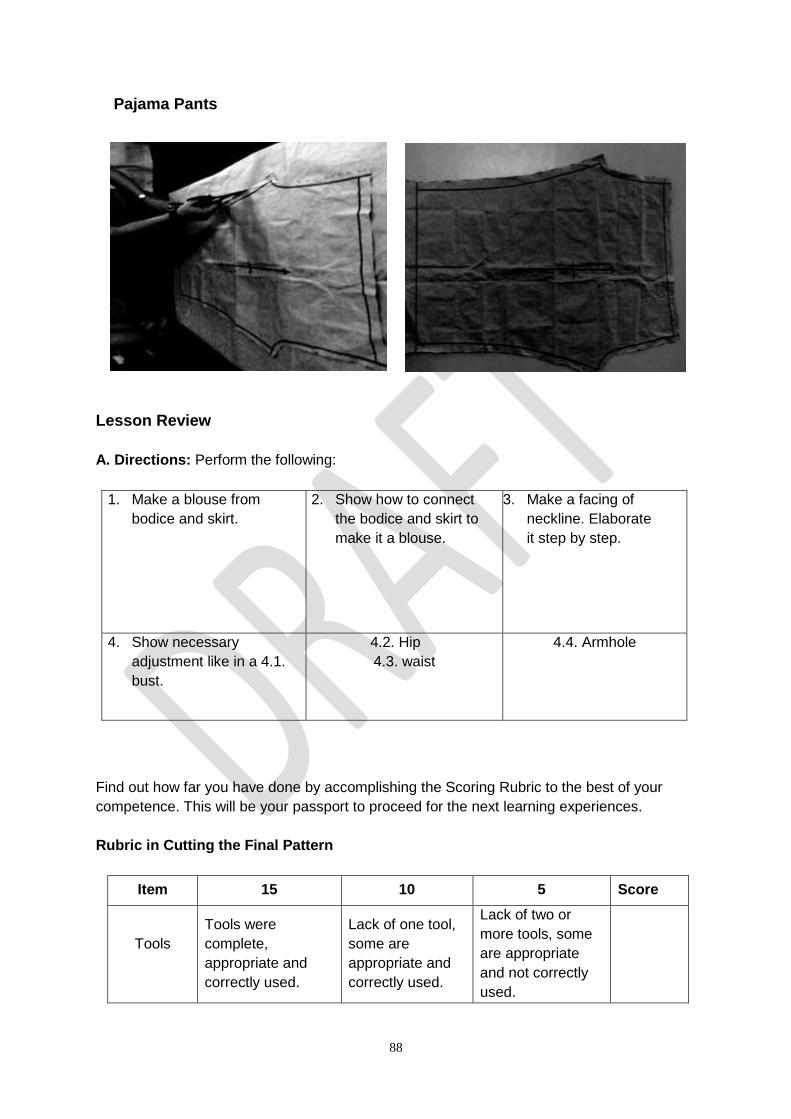
88
Pajama Pants
Lesson Review
A. Directions: Perform the following:
1. Make a blouse from
bodice and skirt.
2. Show how to connect
the bodice and skirt to
make it a blouse.
3. Make a facing of
neckline. Elaborate
it step by step.
4. Show necessary
adjustment like in a 4.1.
bust.
4.2. Hip
4.3. waist
4.4. Armhole
Find out how far you have done by accomplishing the Scoring Rubric to the best of your
competence. This will be your passport to proceed for the next learning experiences.
Rubric in Cutting the Final Pattern
Item 15 10 5 Score
Tools
Tools were
complete,
appropriate and
correctly used.
Lack of one tool,
some are
appropriate and
correctly used.
Lack of two or
more tools, some
are appropriate
and not correctly
used.

89
Procedure
Correct methods
and procedures
correctly followed.
Correct Methods
and procedures
Incorrectly
followed.
Failed to follow the
correct method
and procedures
Pattern
All pattern details
were correctly
measured and
accurately drafted.
Some pattern
details were
inaccurately
drafted.
All pattern details
are not drafted
correctly and
accurately.
Speed
Finished the
pattern ahead of
time.
Finished the
pattern on time.
Finished the
pattern beyond the
allotted time.
60 points perfect score
Lesson 10
Principles in Laying Out the Fabric
General Guidelines to Laying Out a Pattern
Laying out your pattern on the fabric in preparation for cutting is an important step. It
must be done carefully and accurately for great-looking results.
Pattern preliminaries
Be sure you have all the necessary pattern pieces. Most instruction sheets, list pieces by
letter or number next to the layout diagrams.
1. Make changes or fitting alterations to the pattern. If you significantly alter a garment's
length, you may need extra yardage to make sure you have a workable layout. Press the
pattern pieces with a dry iron set to a low-temperature so that they're easier to work with.
Preshrink your fabric if necessary and make sure the grain is straight. Do this by
a. tearing across the grain at the ends of your fabric piece (if it's firmly woven),

90
b. pulling a thread across the width of the fabric at the ends,
c. cutting along a dominant line in the pattern or weave,
d. fold lengthwise, matching selvages, to see whether the ends now match, and
e. If they don't and the fabric needs to be straightened, gently pull on the fabric's length
from opposite corners.
Laying out pattern pieces
When positioning pattern pieces with straight arrows, keep the arrows parallel to the
selvage so that the fabric will be straighten when cut. Pieces with a straight line and bent
arrows should be cut double on the fabric. For a fabric with a nap, the lay out must run in
the same direction and so a pattern piece can be reversed, placed printed side down, and
cut on a single layer.
Folded pieces of Fabric
Pattern pieces extending across fold are cut last from single fabric layer
Half unshaded, half shaded pieces are cut from folded fabric last of all
Double layer of fabric is arranged with right sides together
Selvage
Unshaded pattern pieces are placed printed side up
Fabric fold
Pieces with bent arrows are placed on fold of fabric
PLEASE RE-DRAW
Folded Pieces of Fabric
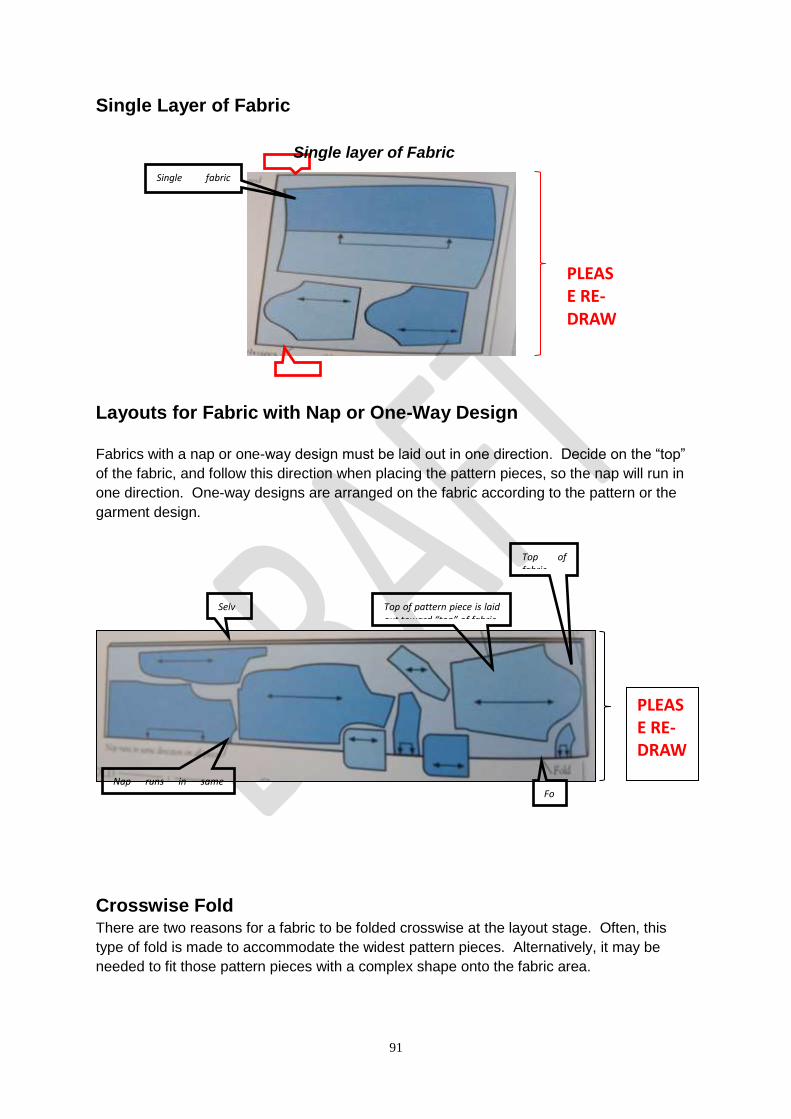
91
Single Layer of Fabric
Layouts for Fabric with Nap or One-Way Design
Fabrics with a nap or one-way design must be laid out in one direction. Decide on the “top”
of the fabric, and follow this direction when placing the pattern pieces, so the nap will run in
one direction. One-way designs are arranged on the fabric according to the pattern or the
garment design.
Crosswise Fold There are two reasons for a fabric to be folded crosswise at the layout stage. Often, this
type of fold is made to accommodate the widest pattern pieces. Alternatively, it may be
needed to fit those pattern pieces with a complex shape onto the fabric area.
Selvages
Top of pattern piece is laid out toward “top” of fabric
Top of fabric
Fold
Nap runs in same direction on al pieces
PLEASE RE-DRAW
Selvages
Single fabric layer is arranged with right side uppermost
Selvages
PLEASE RE-DRAW
Single layer of Fabric

92
Crosswise Fold with Nap When a crosswise fold cutting layout is used with a fabric that has a nap, it requires a special
layout method. The fabric is folded with wrong sides together, and cut into two pieces along
the folds. The top layer is then turned around so that the nap runs in the same direction on
both layers of fabric.
Partial Fold The fabric is folded part ways for this layout, so that one section of the fabric forms a double
layer on a fold and the other forms a single layer. If a pattern piece is to be cut from a single
layer, cut out only the piece from the single fabric layer.
PLEASE RE-DRAW
Selvages Overlappin
g piece is cut from single fabric layer
Selvages
Fold
Partial Fold
PLEASE RE-DRAW
Selvages
Selvages
Two fabrics layers are placed wrong sides together
Crosswise Fold with Nap
Crosswise Fold
Selvages
Selvages
Fold
PLEASE RE-DRAW
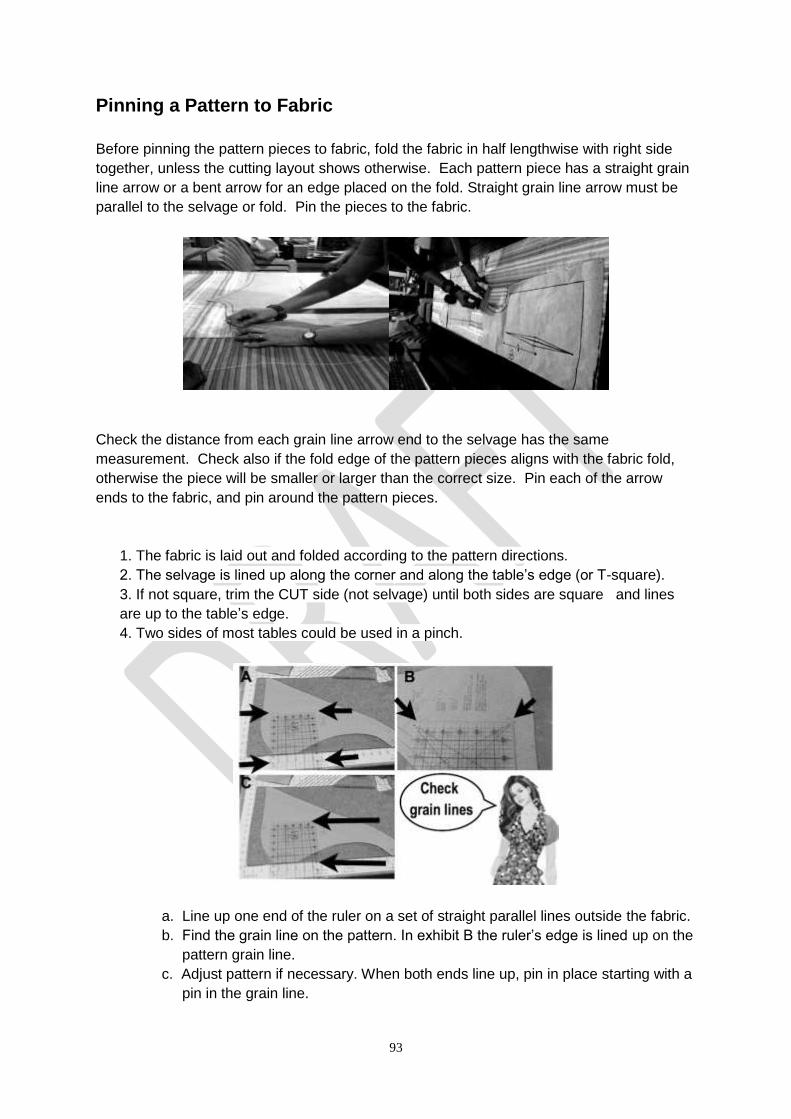
93
Pinning a Pattern to Fabric
Before pinning the pattern pieces to fabric, fold the fabric in half lengthwise with right side
together, unless the cutting layout shows otherwise. Each pattern piece has a straight grain
line arrow or a bent arrow for an edge placed on the fold. Straight grain line arrow must be
parallel to the selvage or fold. Pin the pieces to the fabric.
Check the distance from each grain line arrow end to the selvage has the same
measurement. Check also if the fold edge of the pattern pieces aligns with the fabric fold,
otherwise the piece will be smaller or larger than the correct size. Pin each of the arrow
ends to the fabric, and pin around the pattern pieces.
1. The fabric is laid out and folded according to the pattern directions.
2. The selvage is lined up along the corner and along the table’s edge (or T-square).
3. If not square, trim the CUT side (not selvage) until both sides are square and lines
are up to the table’s edge.
4. Two sides of most tables could be used in a pinch.
a. Line up one end of the ruler on a set of straight parallel lines outside the fabric.
b. Find the grain line on the pattern. In exhibit B the ruler’s edge is lined up on the
pattern grain line.
c. Adjust pattern if necessary. When both ends line up, pin in place starting with a
pin in the grain line.

94
NOTE: Always minimize pin holes if possible.
Line up the grain line on the pattern and the grain line on the fabric, parallel to
the selvage.
Lesson Review
A. Directions: Secure fabrics with the following width, 30 inches, 45 inches and 60 inches.
Following the principles learned in this topic, lay- out the fabric on the cutting table.
Find out how far you have done by accomplishing the Scoring Rubric to the best of your
competence. This will be your passport to proceed for the next learning experiences.
95
Rubric in Laying Pattern on the Cloth
Item 15 10 5 Score
Tools
Tools were
complete,
appropriate and
correctly used.
Lack of one tool,
some are
appropriate and
correctly used.
Lack of two or
more tools, some
are appropriate
and not correctly
used.
Procedure
Procedures in
laying out fabrics
are correctly
followed.
Procedures in
laying out fabrics
are incorrectly
followed.
Failed to follow
the correct
procedures in
laying out fabrics
Speed
Finished laying
out fabrics ahead
of time.
Finished laying
out fabrics ahead
of time.
Finished laying
out fabrics
beyond the
allotted time.
45 points perfect score
Lesson 11
Guidelines in Cutting Fabric
As what Bailey and Draper stated in their book, Steps in Clothing Skills, our hands
are very important when we sew. “Teach” our hands to work for us. They are as important to
beautiful sewing as pianist’s hands are to beautiful music.
They emphasized that before cutting the garments, ask the teacher first to approve your
layout. Then study your layout and decide on the order in which to cut. Where should you
start? How should your fabric be placed on the work surface? Where should you stand?
Here are some of the important reminders when cutting the final pattern.
1. Practice using the shears on a piece of cloth to have a smooth cutting line.
2. Cut along the pattern so that the other hand rests on the pattern.
3. Start cutting at an edge within your reach.
4. Do not let the blades of the shears slant toward the table.
5. Do not lift the fabric.
6. When you reach a notch, cut directly towards it. Close the points at the exact
stopping place.
7. Close the points of the shears to an exact stopping point only.
96
8. When cutting curves, your strokes will be shorter. Keep your free hand close to the
cutting line to help you cut smooth curved line.
Ways on How to Cut Fabric
1) Pins + Dressmaking Scissors
Cut the pattern pieces out with paper scissors – either exactly on (or just within) the
lines, or leaving some extra paper around the lines. Pin the pattern pieces to the
fabric – use enough pins to hold the pattern in place, but not so many that the pinning
distorts the pattern or fabric. Now cut the fabric with dressmaking scissors. If you’ve
cut the pattern pieces out roughly, cut directly on the lines through both pattern and
fabric. This can dull your fabric scissors though; but on the other hand, it can be more
accurate than cutting around a pre-cut pattern.
2) Pattern Weights + Chalk/Pen + Dressmaking Scissors/Rotary Cutter
Cut the pattern pieces out with paper scissors precisely on (or just within) the lines.
Instead of pinning the pattern pieces in place, this time use weights to hold them in
place. The idea is that weights keep the pattern and fabric flatter than the pinning
method. You don't have to buy specialist pattern weights - you can use whatever you
have around the house, such as food tins. Draw around the pieces with a sharp chalk
pencil or washable pen. Remove the pattern and use dressmaking scissors or a
rotary cutter to cut the fabric just within the pattern lines you've just drawn.
97
3) Pattern Weights + Dressmaker's Carbon + Tracing Wheel + Dressmaking
Scissors
Hold the pattern pieces down on the fabric with weights. Slip a piece of dressmaker's
carbon between the pattern and fabric, face down against the fabric. Trace over the
pattern lines using a tracing wheel moving the dressmaker's carbon as needed.
Remove the pattern. Cut out the fabric directly on the traced lines using dressmaking
scissors.
In marking the cutting lines of the pattern, don't forget to mark in the other bits and
bobs such as darts, buttonholes and gather points.
Cutting the Fabric of the Sleeping Garment (Pajama)
The fabric is then cut with the help of cloth cutting machines suitable for the type of the cloth.
These can be band cutters having similar work method like that of band saws; cutters having
rotary blades; machines having reciprocal blades which saw up and down; die clickers
similar to die or punch press; or computerized machines that use either blades or laser
beams to cut the fabric in desired shapes.
For beginners/ students cutting shears are appropriate as seen in the picture below.
Check pattern alignment of grain line and
pattern design.

98
Cutting extra notches will help mark your garment parts. It is the most important way in marking pattern details. The first extra notches you may use will mark the center which are cut on fold, thus, locating the exact center of the garment part. Don’t forget to put allowance for casing, seam lines, shoulder, armhole, side hem, sleeve, pocket and facing.
Cut the fabric following the pattern. Cut the
bigger parts first.
Place your free hand on top of the cloth with
pattern.
Smaller parts should be cut last.

99
Lesson Review
A. Directions: Put a check () to the statement that is applicable when cutting fabrics and
(X) if not applicable.
1. Pinning method can flatten the fabrics.
2 Take time when cutting the fabric.
3 Hold fabric gently in place.
4 Use only two pins to hold fabrics.
5 Scissors is used to cut fabrics.
6 Fabrics are cut outside of the cutting lines.
7 In the absence of dressmaker’s pins weights can be used.
8 In tracing wheel always used with dressmaker’s carbon paper.
9 Keep fabric as flat as possible against the table.
10 Cutting paper with fabric scissors can dull it.
B. Directions: Check the checklist below if you can perform the operations stated:
Put a check opposite each statement under the proper
heading: YES NO
I can cut cloth for front blouse.
I can cut cloth for back blouse.
I can cut cloth for front trouser.
I can cut cloth for back trouser.
I can cut cloth for patch pocket.
I can cut cloth for sleeves.
I can cut cloth for facings.
C. Directions: Cut the final pattern of the following:
1. Front blouse
2. Back blouse
3. Sleeves
4. Front trousers

100
5. Back trousers
6. Pockets
7. Sleeves
8. Facings
Lesson 12
Transferring Pattern Marking and Symbols on the Fabric
Transferring pattern markings to the cloth must be done accurately so that the
finished garment will look peculiar. You are now familiar with the tools used in transferring
pattern markings. Now, remember these pointers for accurate markings on your fabric.
Kate’s words of wisdom: Never mark fabric with something that won’t come out in a
place where it can be seen!
Pointers to remember:
* The pattern details should be marked on the wrong side of garment pieces.
* The tracing paper and tracing wheel will make following markings easy.
* Avoid marks that can be seen outside.
* Mark once along one line with the tracing wheel.
* Protect the table with cardboard.
Lesson Review
A. Directions: Transfer all pattern marks using the appropriate marking tools. Use the
previous patterns. Let your teacher check your works.

101
Find out how far you have done by accomplishing the Scoring Rubric to the best of your
competence. This will be your passport to proceed for the next learning experiences.
Rubric in Transferring Marks to the cloth
Item 15 10 5 Score
Tools
Tools were
complete,
appropriate and
correctly used.
Lack of one tool,
some are
appropriate and
correctly used.
Lack of two or
more tools, some
are appropriate
and not correctly
used.
Procedure
Procedures in
transferring marks
to the cloth
correctly followed.
Procedures in
transferring marks
to the cloth
followed.
Failed to follow
the correct
procedures
transferring marks
to the cloth
Speed
Finished
transferring marks
to the cloth ahead
of time.
Finished
transferring marks
to the cloth on
time.
Finished
transferring marks
to the cloth
beyond the
allotted time.
45 points perfect score
POST TEST
I. MULTIPLE CHOICE
Directions: Read the statements carefully. Choose the letter that best describes the
statement. Write the answer in your quiz notebook.
1. The tool used to take body measurement accurately
A. Curve rule C. Ruler
B. L-square D. Tape measure
1. Principle of design which can be achieved by creating a center of interest in the garment
A. Balance C. Proportion
B. Emphasis D. Rhythm
2. A pattern which is the basis of all types of pattern.
A. Basic pattern C. Final pattern
B. Construction pattern D. Commercial pattern
102
3. A plant fiber that contains lustrous fiber suited for sleeping garments.
A. Cotton C. Linen
B. Wool D. Silk
4. One of the characteristics of the sleeping garment.
A. It is made of expensive materials. C. It is thick and long.
B. It is comfortable to the wearer. D. It is easy to wash.
5. The measurement from the shoulder neck junction to the waistline with the tape measure
passing at the highest portion of the bust.
A. Blouse length C. Front Figure
B. Bust height D. Chest dept
6. Luis will transfer pattern marks to the fabric, what marking tool will he use?
A. Tailor’s chalk C. Pencil
B. Carbon paper D. Ballpen
7. A dressmaker’s guide in cutting fabric pieces in accordance with the garment design.
A. Dressmaker scale C. Pattern
B. Manuscript D. Design
8. The pattern symbols that directs the dressmakers where to stitch the garment fabric.
A. Grainline C. Seamline
B. Hemline D. Stitchline
9. A color that is neutral.
A. Yellow C. Red
B. Black D. Violet
11. The elements of design that create visual dimension.
A. length and width C. size and bulkiness
B. depth and height D. center and emphasis
12. The result of combining primary and secondary colors.
A. neutral colors C. prime-see colors
B. complementary colors D. intermediate colors
13. The cellulose materials made into long, lustrous fibers.
A. leaves C. twigs.
B. seedpods D. flowers
14. An example of silk fabric.
A. Brocale C. Georgette
B. Canvass D. Challis
15. A fabric which can be easily dyed because of its absorptive capacity.
A. Wool C. Cotton
B. Nylon D. Silk
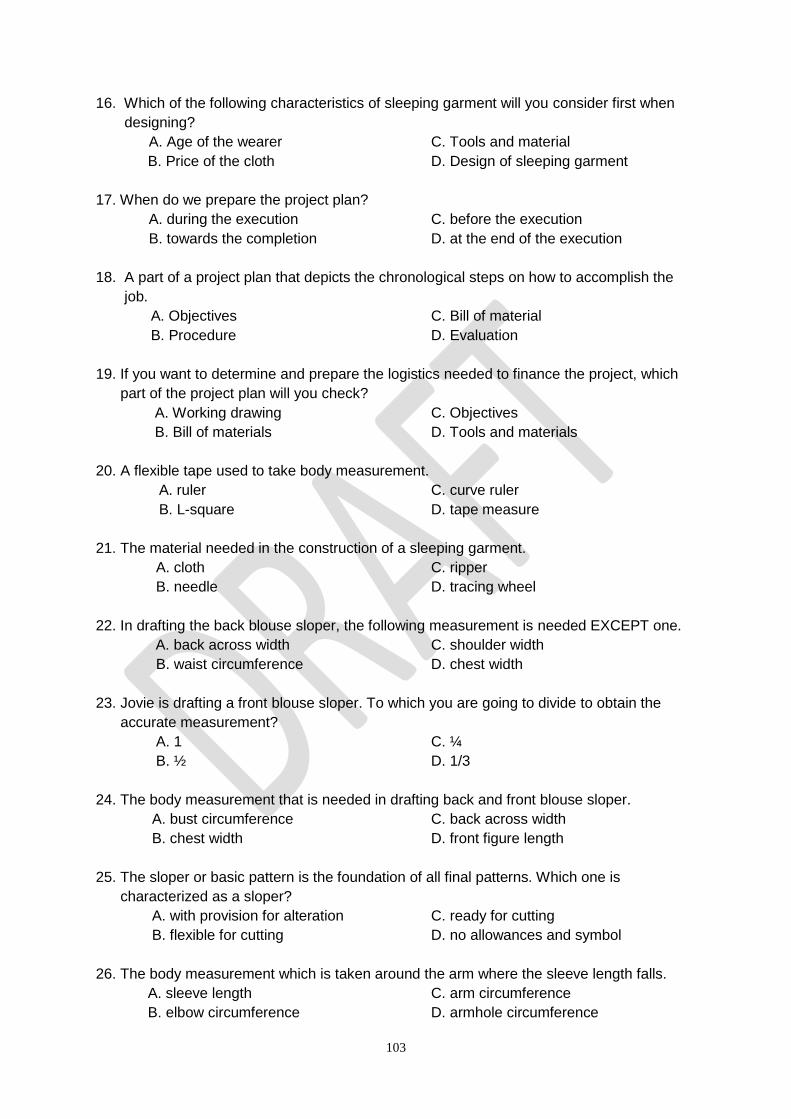
103
16. Which of the following characteristics of sleeping garment will you consider first when
designing?
A. Age of the wearer C. Tools and material
B. Price of the cloth D. Design of sleeping garment
17. When do we prepare the project plan?
A. during the execution C. before the execution
B. towards the completion D. at the end of the execution
18. A part of a project plan that depicts the chronological steps on how to accomplish the
job.
A. Objectives C. Bill of material
B. Procedure D. Evaluation
19. If you want to determine and prepare the logistics needed to finance the project, which
part of the project plan will you check?
A. Working drawing C. Objectives
B. Bill of materials D. Tools and materials
20. A flexible tape used to take body measurement.
A. ruler C. curve ruler
B. L-square D. tape measure
21. The material needed in the construction of a sleeping garment.
A. cloth C. ripper
B. needle D. tracing wheel
22. In drafting the back blouse sloper, the following measurement is needed EXCEPT one.
A. back across width C. shoulder width
B. waist circumference D. chest width
23. Jovie is drafting a front blouse sloper. To which you are going to divide to obtain the
accurate measurement?
A. 1 C. ¼
B. ½ D. 1/3
24. The body measurement that is needed in drafting back and front blouse sloper.
A. bust circumference C. back across width
B. chest width D. front figure length
25. The sloper or basic pattern is the foundation of all final patterns. Which one is
characterized as a sloper?
A. with provision for alteration C. ready for cutting
B. flexible for cutting D. no allowances and symbol
26. The body measurement which is taken around the arm where the sleeve length falls.
A. sleeve length C. arm circumference
B. elbow circumference D. armhole circumference
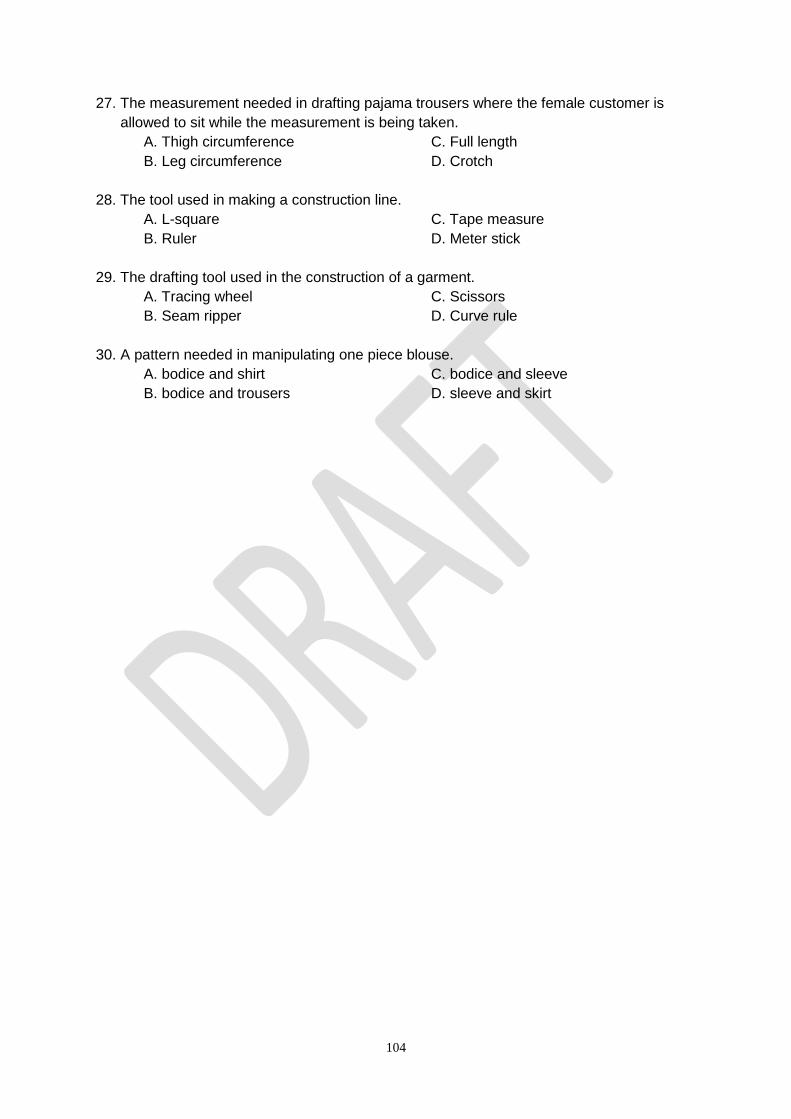
104
27. The measurement needed in drafting pajama trousers where the female customer is
allowed to sit while the measurement is being taken.
A. Thigh circumference C. Full length
B. Leg circumference D. Crotch
28. The tool used in making a construction line.
A. L-square C. Tape measure
B. Ruler D. Meter stick
29. The drafting tool used in the construction of a garment.
A. Tracing wheel C. Scissors
B. Seam ripper D. Curve rule
30. A pattern needed in manipulating one piece blouse.
A. bodice and shirt C. bodice and sleeve
B. bodice and trousers D. sleeve and skirt
Related Documents