Dell Latitude E6410 Screen Assembly Replacement In this guide, you will be shown how to remove the entire screen assembly from the Dell Latitude e6410 laptop and replace it. Written By: Esteban Damian Dell Latitude E6410 Screen Assembly Re… Draft: 2018-08-07 Guide ID: 63755 - This document was generated on 2020-11-28 05:12:07 AM (MST). © iFixit — CC BY-NC-SA www.iFixit.com Page 1 of 7

Welcome message from author
This document is posted to help you gain knowledge. Please leave a comment to let me know what you think about it! Share it to your friends and learn new things together.
Transcript
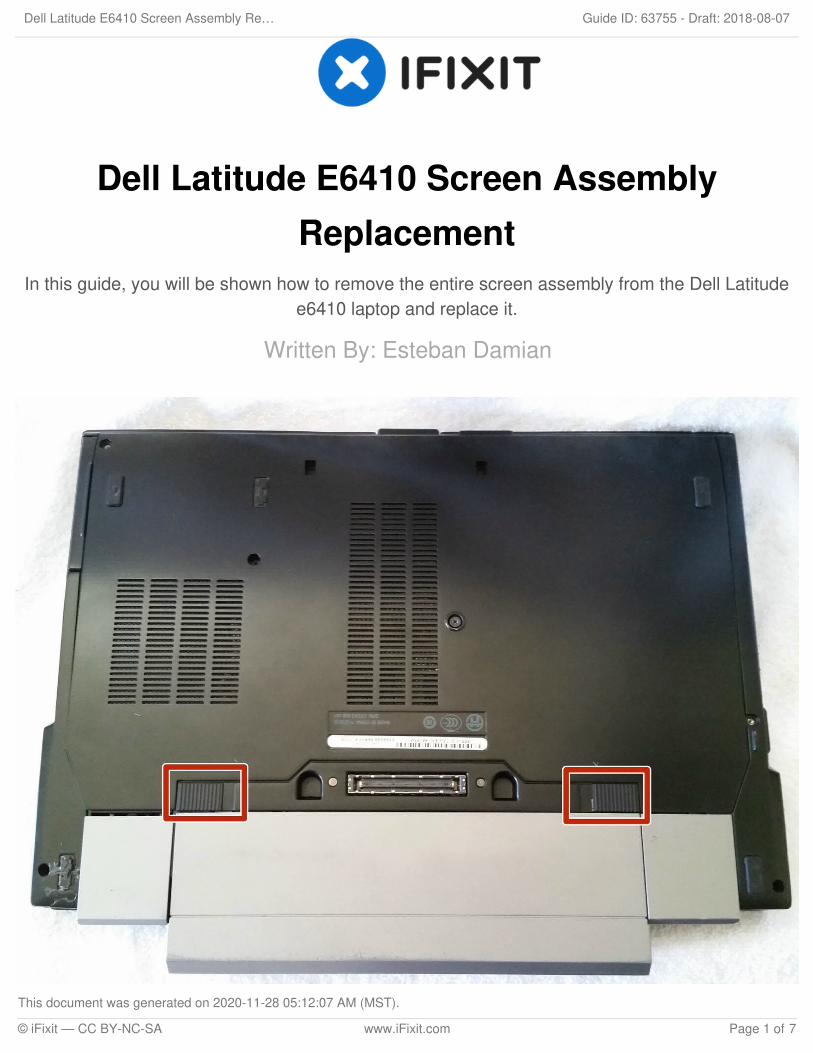
Dell Latitude E6410 Screen AssemblyReplacement
In this guide, you will be shown how to remove the entire screen assembly from the Dell Latitudee6410 laptop and replace it.
Written By: Esteban Damian
Dell Latitude E6410 Screen Assembly Re… Draft: 2018-08-07Guide ID: 63755 -
This document was generated on 2020-11-28 05:12:07 AM (MST).
© iFixit — CC BY-NC-SA www.iFixit.com Page 1 of 7
INTRODUCTION
Use this guide to replace the entire Dell Latitude e6410 screen assembly. You will be removing theentire old screen assembly and replacing it with the new screen.
Use this guide only to replace the entire screen assembly. "Screen assembly" refers to the all of thescreen components fully assembled into the screen case including the display, camera, and othercomponents.
TOOLS:Phillips #0 Screwdriver (1)
Dell Latitude E6410 Screen Assembly Re… Draft: 2018-08-07Guide ID: 63755 -
This document was generated on 2020-11-28 05:12:07 AM (MST).
© iFixit — CC BY-NC-SA www.iFixit.com Page 2 of 7
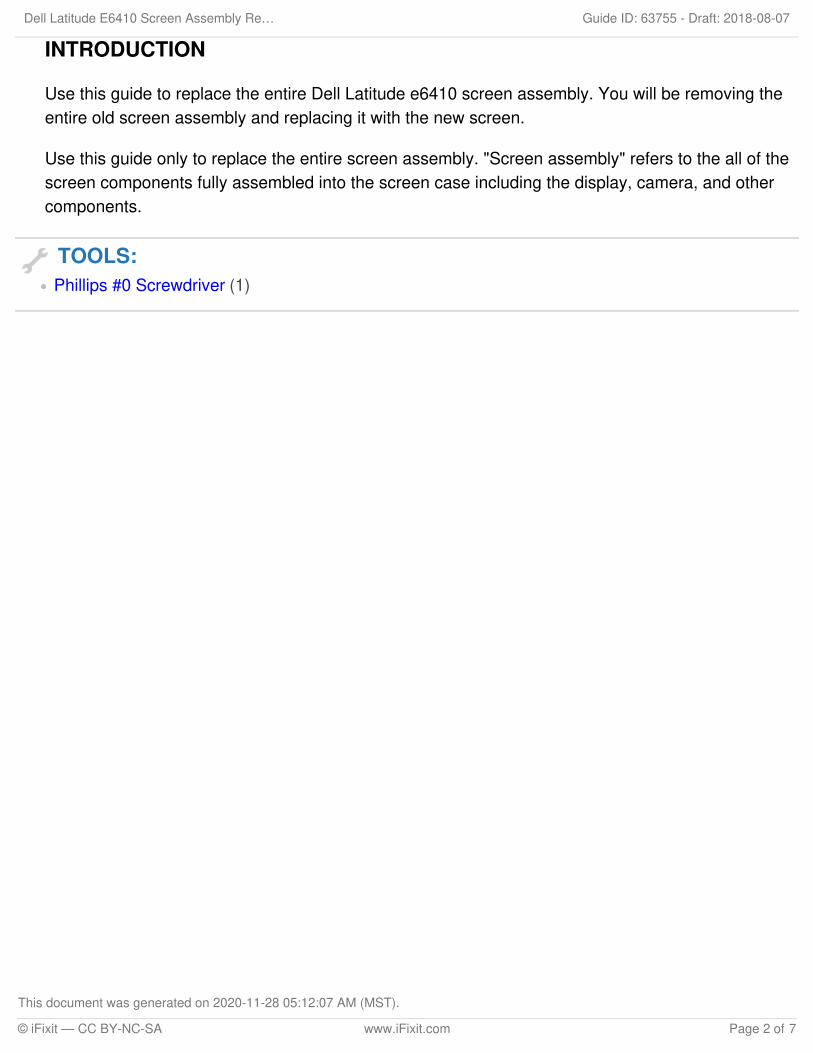
Step 1 — Dell Latitude E6410 Screen Assembly
Slide both clips in towards each other to remove the battery from the laptop.
It is always important to remove an electronic device's power source when taking it apart to preventelectrocution.
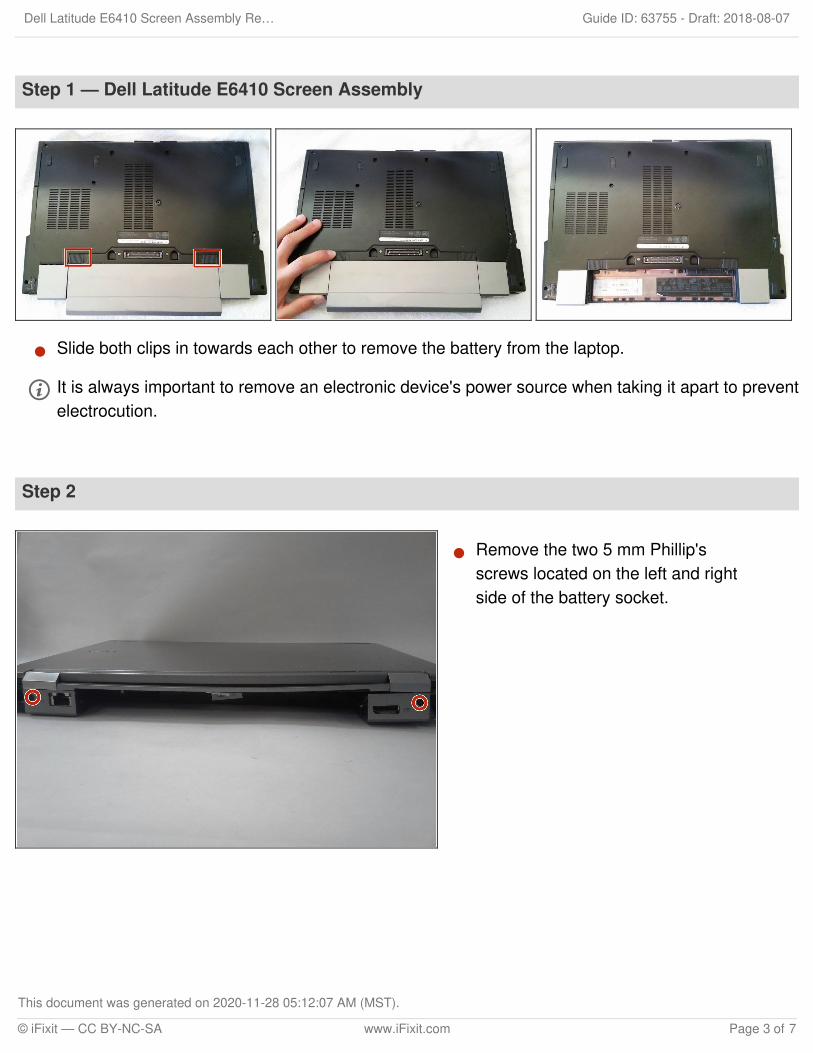
Step 2
Remove the two 5 mm Phillip'sscrews located on the left and rightside of the battery socket.
Dell Latitude E6410 Screen Assembly Re… Draft: 2018-08-07Guide ID: 63755 -
This document was generated on 2020-11-28 05:12:07 AM (MST).
© iFixit — CC BY-NC-SA www.iFixit.com Page 3 of 7
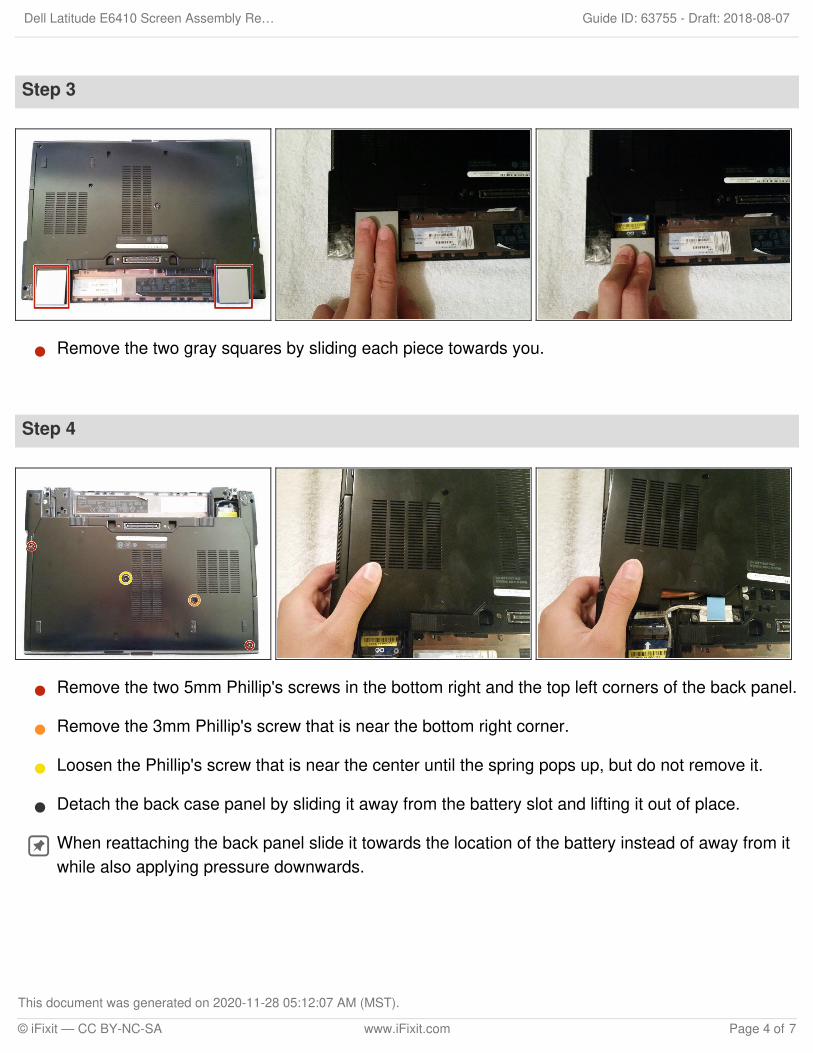
Step 3
Remove the two gray squares by sliding each piece towards you.
Step 4
Remove the two 5mm Phillip's screws in the bottom right and the top left corners of the back panel.
Remove the 3mm Phillip's screw that is near the bottom right corner.
Loosen the Phillip's screw that is near the center until the spring pops up, but do not remove it.
Detach the back case panel by sliding it away from the battery slot and lifting it out of place.
When reattaching the back panel slide it towards the location of the battery instead of away from itwhile also applying pressure downwards.
Dell Latitude E6410 Screen Assembly Re… Draft: 2018-08-07Guide ID: 63755 -
This document was generated on 2020-11-28 05:12:07 AM (MST).
© iFixit — CC BY-NC-SA www.iFixit.com Page 4 of 7
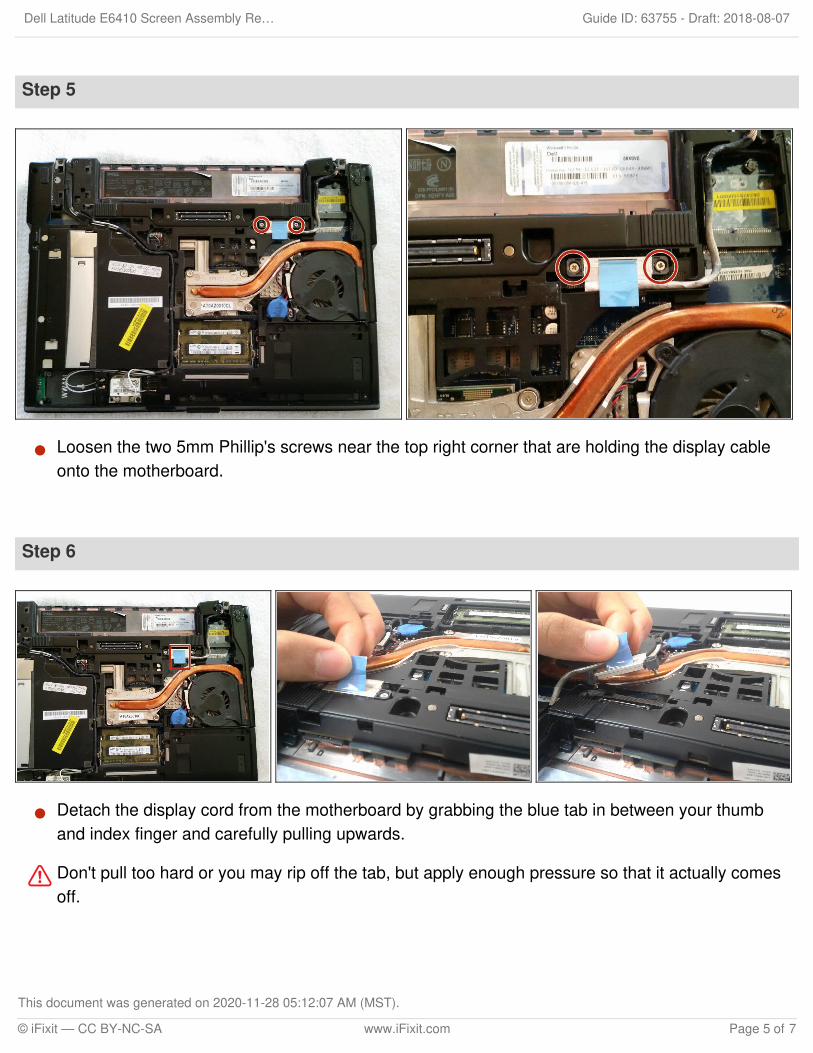
Step 5
Loosen the two 5mm Phillip's screws near the top right corner that are holding the display cableonto the motherboard.
Step 6
Detach the display cord from the motherboard by grabbing the blue tab in between your thumband index finger and carefully pulling upwards.
Don't pull too hard or you may rip off the tab, but apply enough pressure so that it actually comesoff.
Dell Latitude E6410 Screen Assembly Re… Draft: 2018-08-07Guide ID: 63755 -
This document was generated on 2020-11-28 05:12:07 AM (MST).
© iFixit — CC BY-NC-SA www.iFixit.com Page 5 of 7

Step 7
Near the bottom left corner, detach the grey, black, and white wires from the graphics card and thetwo wires hooked in place by carefully unhooking them or pulling them off.
When reassembling use the second or last picture to reference where each wire goes.
Step 8
Carefully unthread the wiresdetached in the last step from thehooks to completely free them fromthe laptop.
Dell Latitude E6410 Screen Assembly Re… Draft: 2018-08-07Guide ID: 63755 -
This document was generated on 2020-11-28 05:12:07 AM (MST).
© iFixit — CC BY-NC-SA www.iFixit.com Page 6 of 7
To reassemble your device, follow these instructions in reverse order.
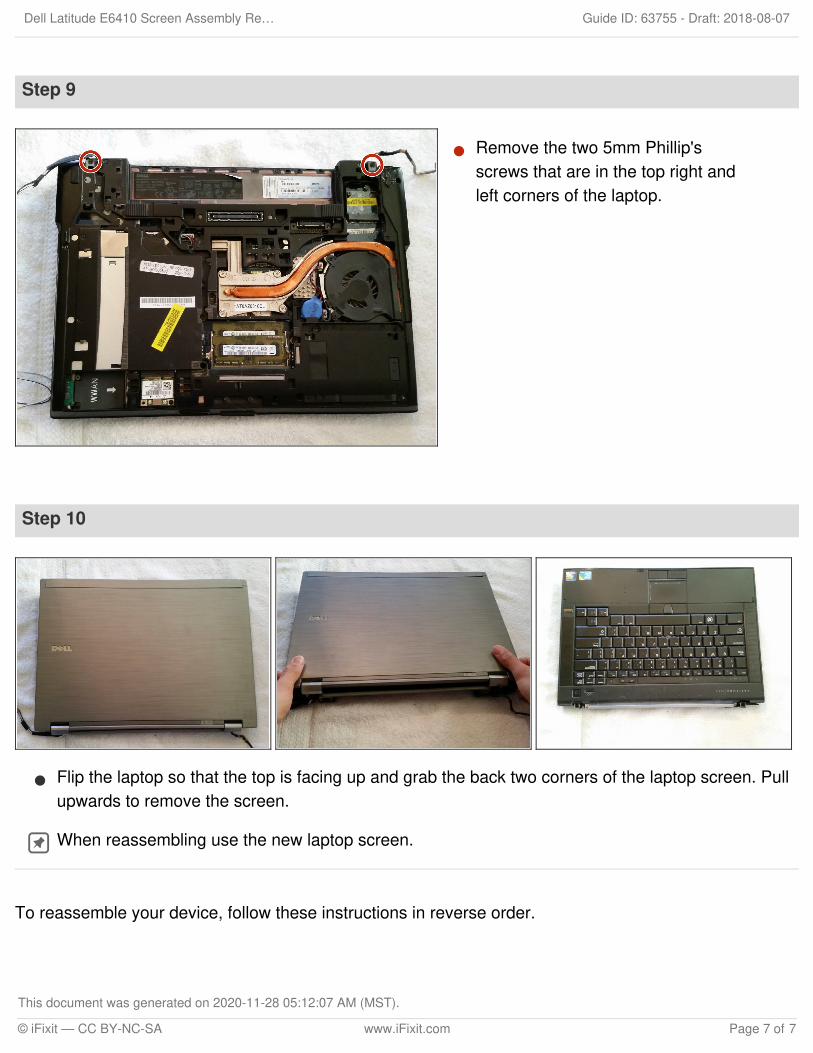
Step 9
Remove the two 5mm Phillip'sscrews that are in the top right andleft corners of the laptop.
Step 10
Flip the laptop so that the top is facing up and grab the back two corners of the laptop screen. Pullupwards to remove the screen.
When reassembling use the new laptop screen.
Dell Latitude E6410 Screen Assembly Re… Draft: 2018-08-07Guide ID: 63755 -
This document was generated on 2020-11-28 05:12:07 AM (MST).
© iFixit — CC BY-NC-SA www.iFixit.com Page 7 of 7
Related Documents