PowerBook G3 Pismo PC Card Cage Replacement Written By: iRobot PowerBook G3 Pismo PC Card Cage Rep… Draft: 2013-07-31 Guide ID: 37 - This document was generated on 2020-11-20 09:26:58 PM (MST). © iFixit — CC BY-NC-SA www.iFixit.com Page 1 of 28

Welcome message from author
This document is posted to help you gain knowledge. Please leave a comment to let me know what you think about it! Share it to your friends and learn new things together.
Transcript
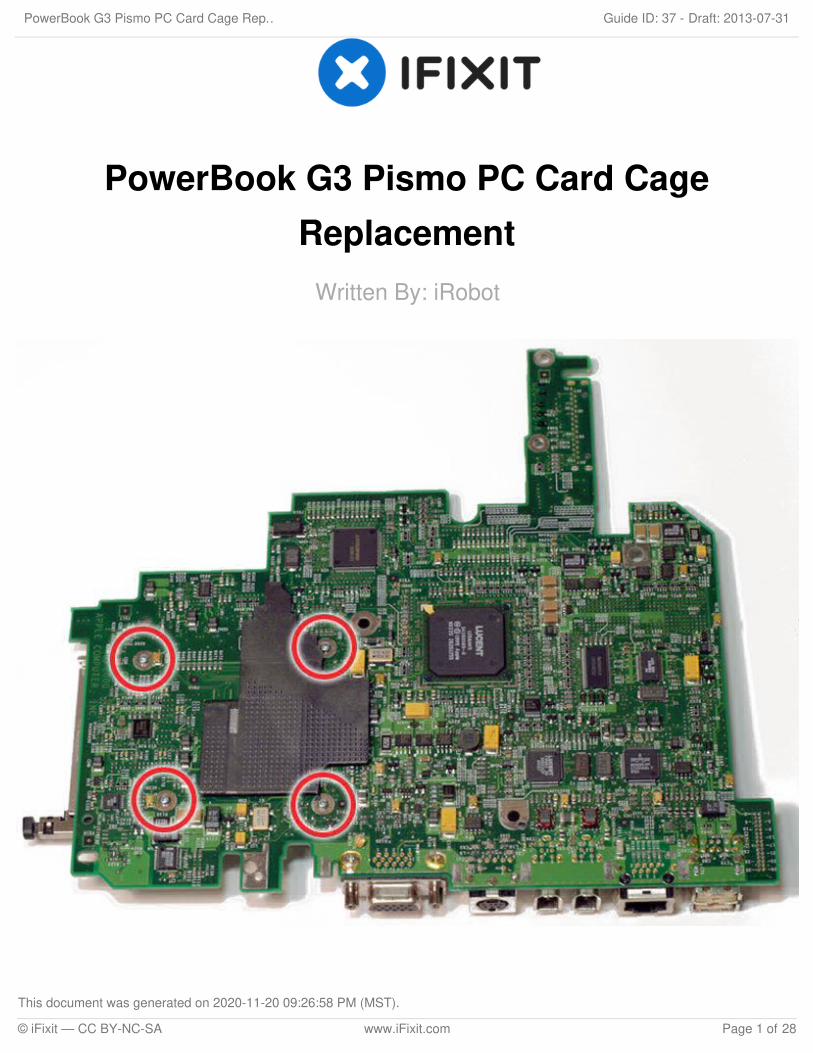
PowerBook G3 Pismo PC Card CageReplacement
Written By: iRobot
PowerBook G3 Pismo PC Card Cage Rep… Draft: 2013-07-31Guide ID: 37 -
This document was generated on 2020-11-20 09:26:58 PM (MST).
© iFixit — CC BY-NC-SA www.iFixit.com Page 1 of 28
INTRODUCTION
How to remove the PCMCIA card cage holder.
TOOLS:Anti-Static Wrist Strap (1)Phillips #0 Screwdriver (1)Spudger (1)T8 Torx Screwdriver (1)
PARTS:G3 Pismo PCMCIA Card Cage (1)
PowerBook G3 Pismo PC Card Cage Rep… Draft: 2013-07-31Guide ID: 37 -
This document was generated on 2020-11-20 09:26:58 PM (MST).
© iFixit — CC BY-NC-SA www.iFixit.com Page 2 of 28
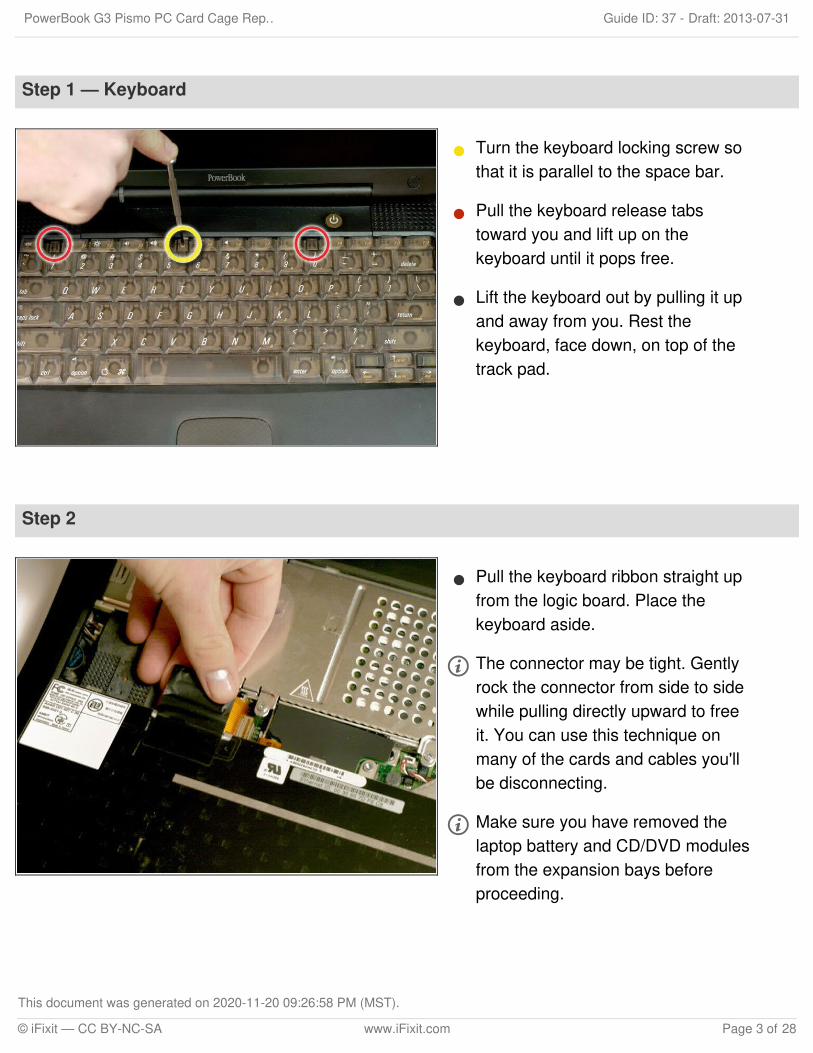
Step 1 — Keyboard
Turn the keyboard locking screw sothat it is parallel to the space bar.
Pull the keyboard release tabstoward you and lift up on thekeyboard until it pops free.
Lift the keyboard out by pulling it upand away from you. Rest thekeyboard, face down, on top of thetrack pad.
Step 2
Pull the keyboard ribbon straight upfrom the logic board. Place thekeyboard aside.
The connector may be tight. Gentlyrock the connector from side to sidewhile pulling directly upward to freeit. You can use this technique onmany of the cards and cables you'llbe disconnecting.
Make sure you have removed thelaptop battery and CD/DVD modulesfrom the expansion bays beforeproceeding.
PowerBook G3 Pismo PC Card Cage Rep… Draft: 2013-07-31Guide ID: 37 -
This document was generated on 2020-11-20 09:26:58 PM (MST).
© iFixit — CC BY-NC-SA www.iFixit.com Page 3 of 28
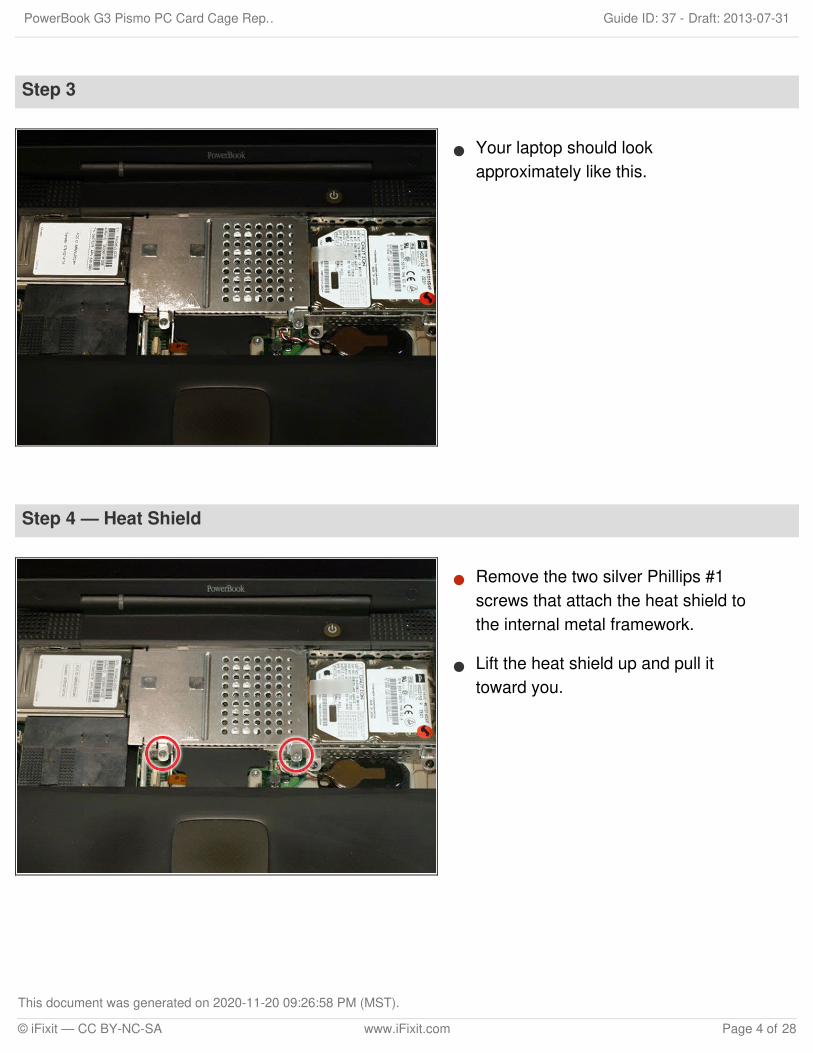
Step 3
Your laptop should lookapproximately like this.
Step 4 — Heat Shield
Remove the two silver Phillips #1screws that attach the heat shield tothe internal metal framework.
Lift the heat shield up and pull ittoward you.
PowerBook G3 Pismo PC Card Cage Rep… Draft: 2013-07-31Guide ID: 37 -
This document was generated on 2020-11-20 09:26:58 PM (MST).
© iFixit — CC BY-NC-SA www.iFixit.com Page 4 of 28
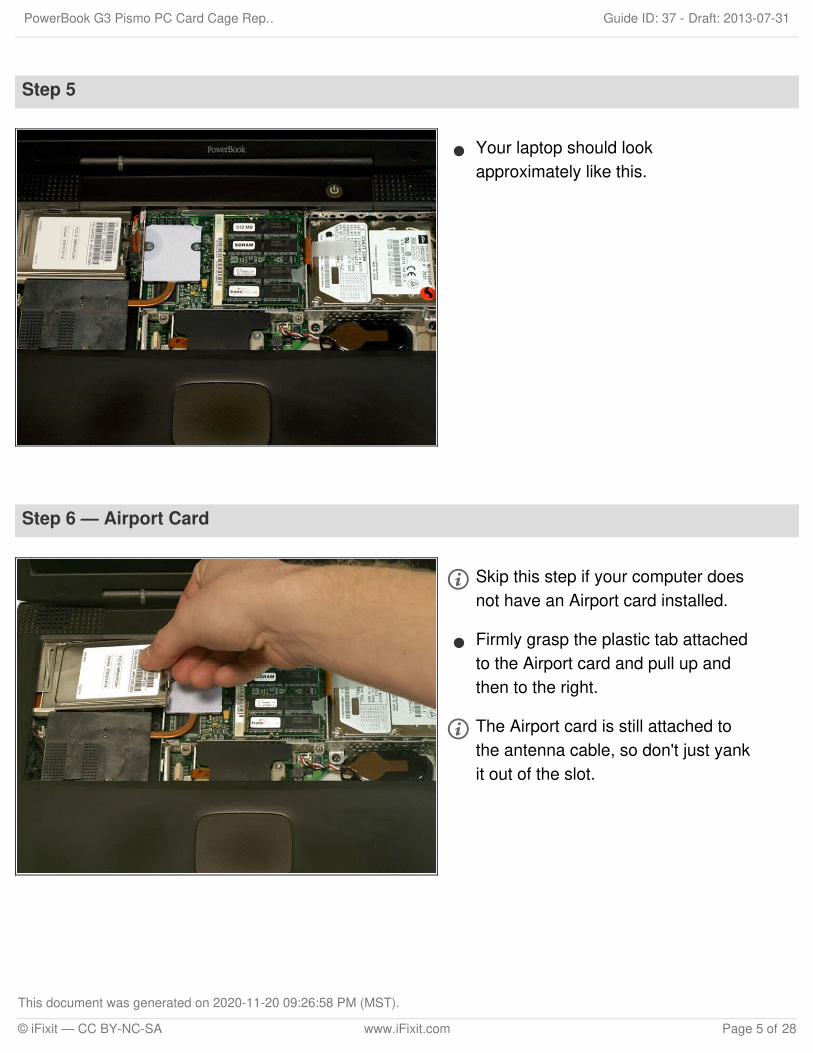
Step 5
Your laptop should lookapproximately like this.
Step 6 — Airport Card
Skip this step if your computer doesnot have an Airport card installed.
Firmly grasp the plastic tab attachedto the Airport card and pull up andthen to the right.
The Airport card is still attached tothe antenna cable, so don't just yankit out of the slot.
PowerBook G3 Pismo PC Card Cage Rep… Draft: 2013-07-31Guide ID: 37 -
This document was generated on 2020-11-20 09:26:58 PM (MST).
© iFixit — CC BY-NC-SA www.iFixit.com Page 5 of 28
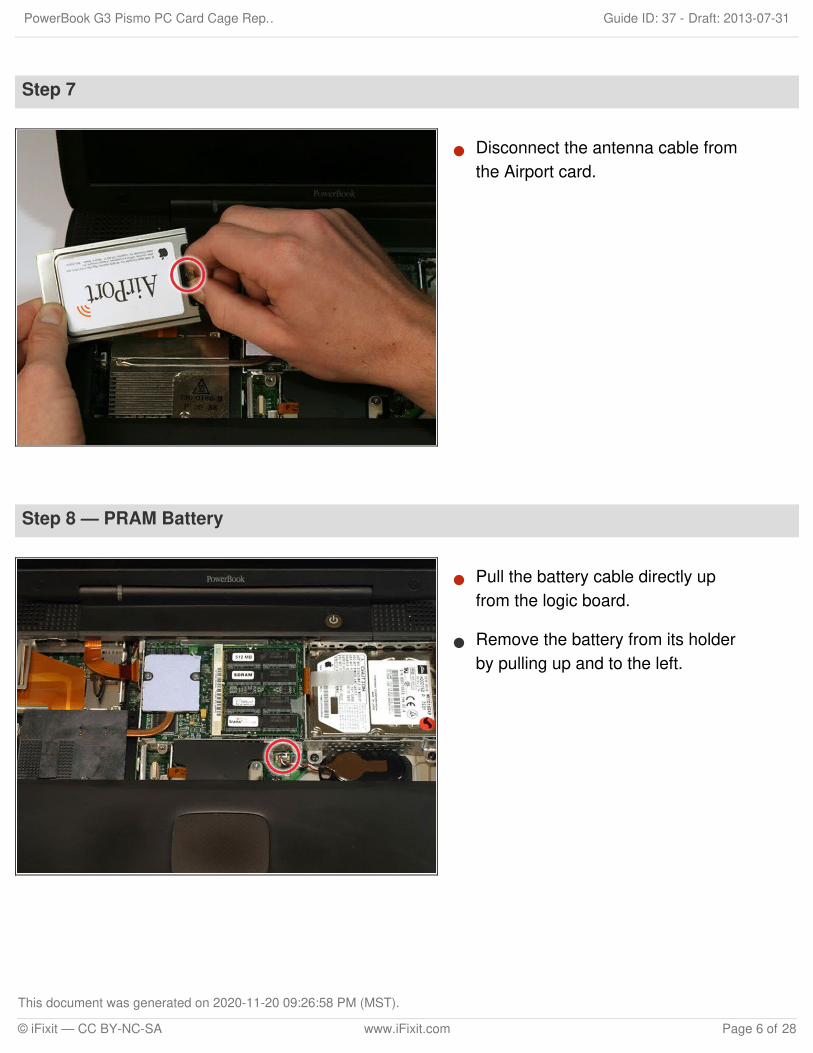
Step 7
Disconnect the antenna cable fromthe Airport card.
Step 8 — PRAM Battery
Pull the battery cable directly upfrom the logic board.
Remove the battery from its holderby pulling up and to the left.
PowerBook G3 Pismo PC Card Cage Rep… Draft: 2013-07-31Guide ID: 37 -
This document was generated on 2020-11-20 09:26:58 PM (MST).
© iFixit — CC BY-NC-SA www.iFixit.com Page 6 of 28
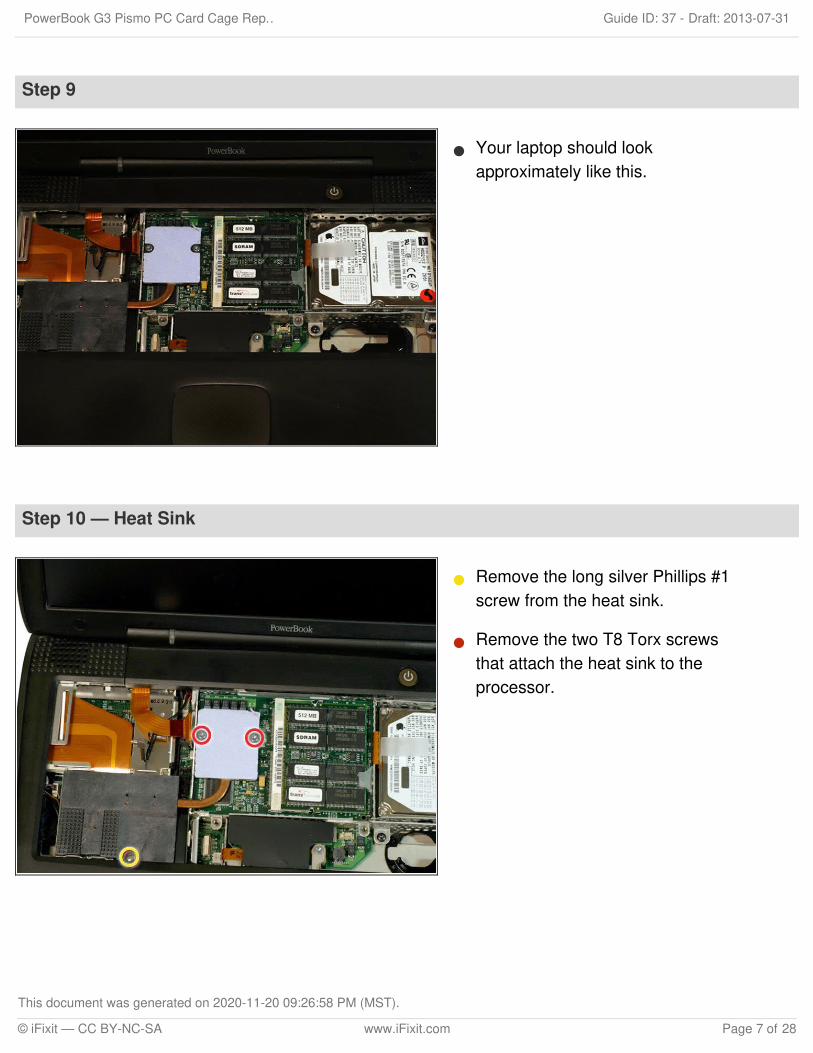
Step 9
Your laptop should lookapproximately like this.
Step 10 — Heat Sink
Remove the long silver Phillips #1screw from the heat sink.
Remove the two T8 Torx screwsthat attach the heat sink to theprocessor.
PowerBook G3 Pismo PC Card Cage Rep… Draft: 2013-07-31Guide ID: 37 -
This document was generated on 2020-11-20 09:26:58 PM (MST).
© iFixit — CC BY-NC-SA www.iFixit.com Page 7 of 28
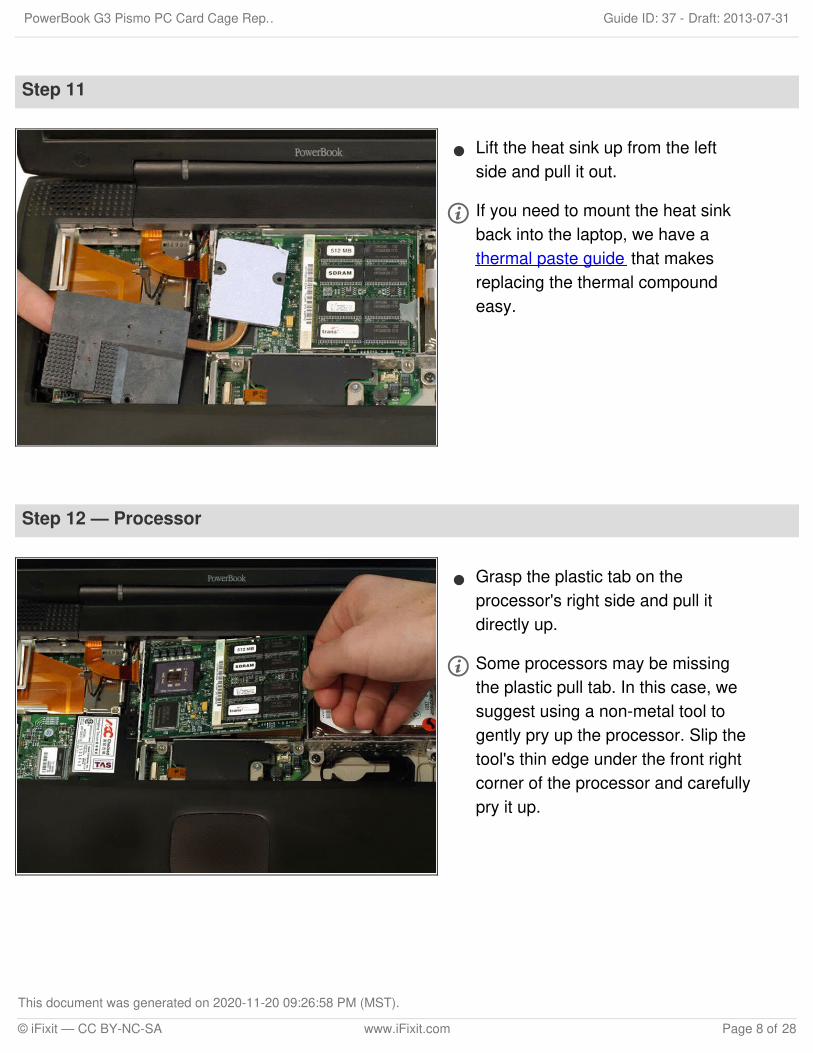
Step 11
Lift the heat sink up from the leftside and pull it out.
If you need to mount the heat sinkback into the laptop, we have athermal paste guide that makesreplacing the thermal compoundeasy.
Step 12 — Processor
Grasp the plastic tab on theprocessor's right side and pull itdirectly up.
Some processors may be missingthe plastic pull tab. In this case, wesuggest using a non-metal tool togently pry up the processor. Slip thetool's thin edge under the front rightcorner of the processor and carefullypry it up.
PowerBook G3 Pismo PC Card Cage Rep… Draft: 2013-07-31Guide ID: 37 -
This document was generated on 2020-11-20 09:26:58 PM (MST).
© iFixit — CC BY-NC-SA www.iFixit.com Page 8 of 28
Step 13
Your laptop should lookapproximately like this.
Step 14 — Modem
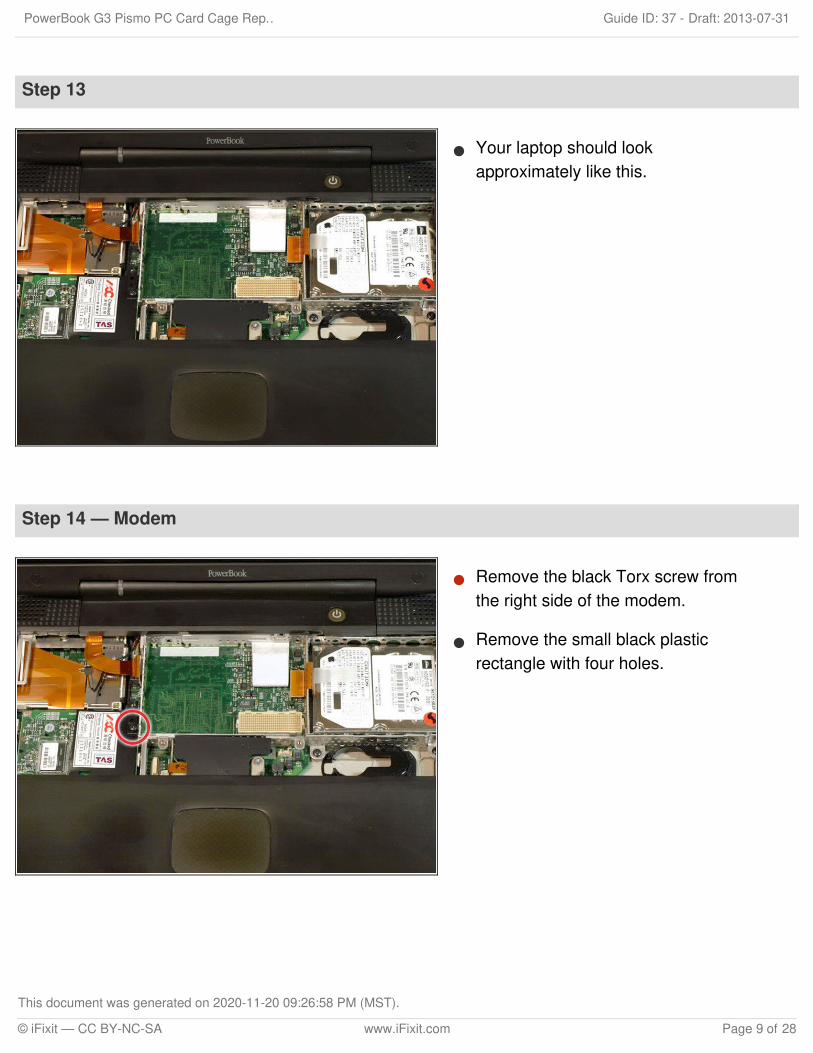
Remove the black Torx screw fromthe right side of the modem.
Remove the small black plasticrectangle with four holes.
PowerBook G3 Pismo PC Card Cage Rep… Draft: 2013-07-31Guide ID: 37 -
This document was generated on 2020-11-20 09:26:58 PM (MST).
© iFixit — CC BY-NC-SA www.iFixit.com Page 9 of 28
Step 15
Use the tips of your fingers, aspudger, or a flat non-metal tool toget under the modem's edge and pryit up from its socket.
Step 16
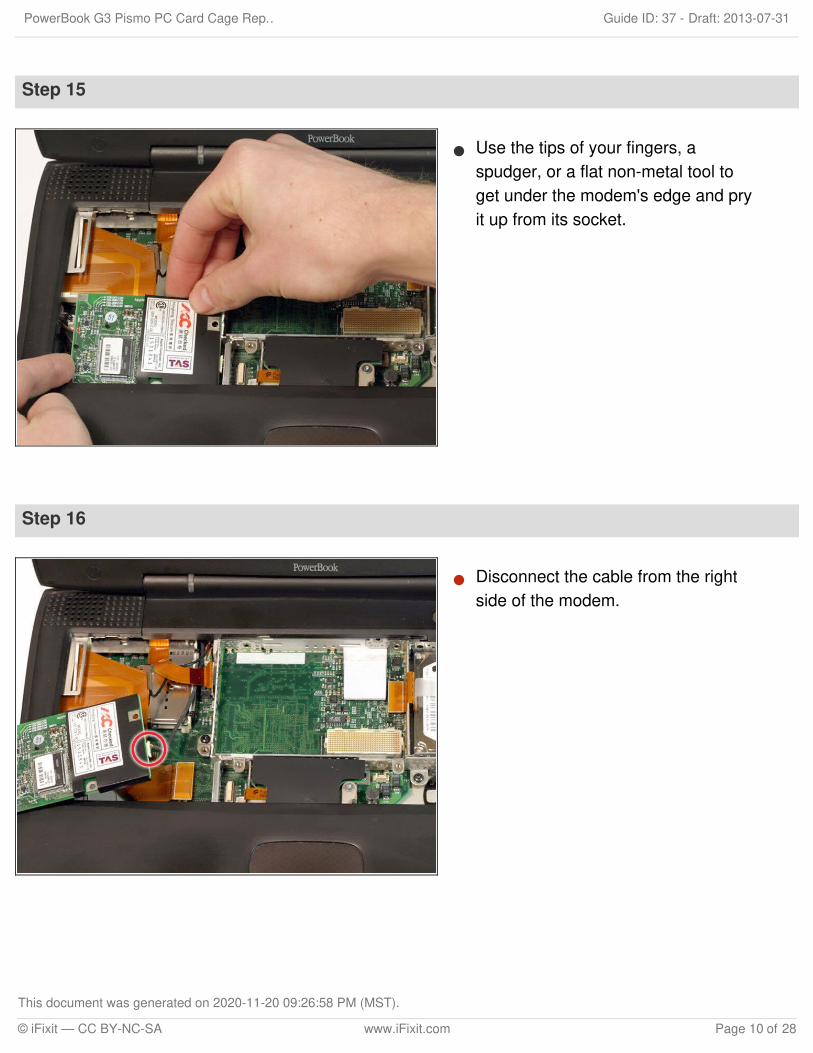
Disconnect the cable from the rightside of the modem.
PowerBook G3 Pismo PC Card Cage Rep… Draft: 2013-07-31Guide ID: 37 -
This document was generated on 2020-11-20 09:26:58 PM (MST).
© iFixit — CC BY-NC-SA www.iFixit.com Page 10 of 28
Step 17 — Hard Drive
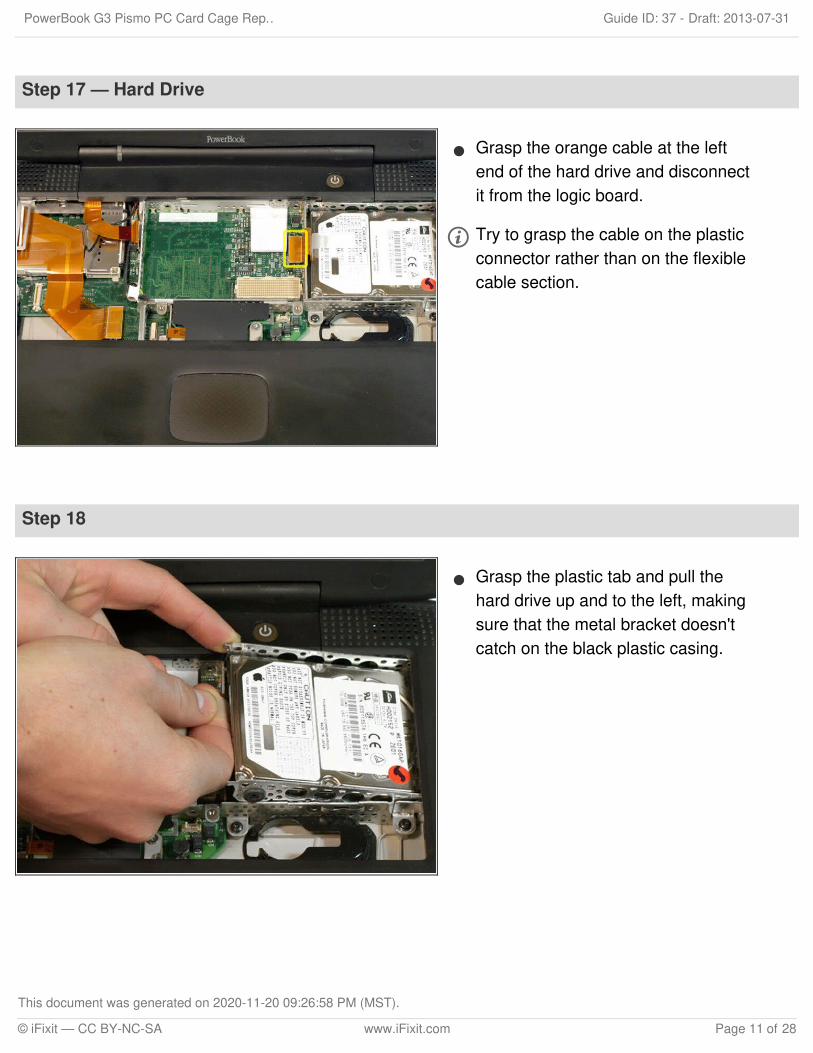
Grasp the orange cable at the leftend of the hard drive and disconnectit from the logic board.
Try to grasp the cable on the plasticconnector rather than on the flexiblecable section.
Step 18
Grasp the plastic tab and pull thehard drive up and to the left, makingsure that the metal bracket doesn'tcatch on the black plastic casing.
PowerBook G3 Pismo PC Card Cage Rep… Draft: 2013-07-31Guide ID: 37 -
This document was generated on 2020-11-20 09:26:58 PM (MST).
© iFixit — CC BY-NC-SA www.iFixit.com Page 11 of 28
Step 19
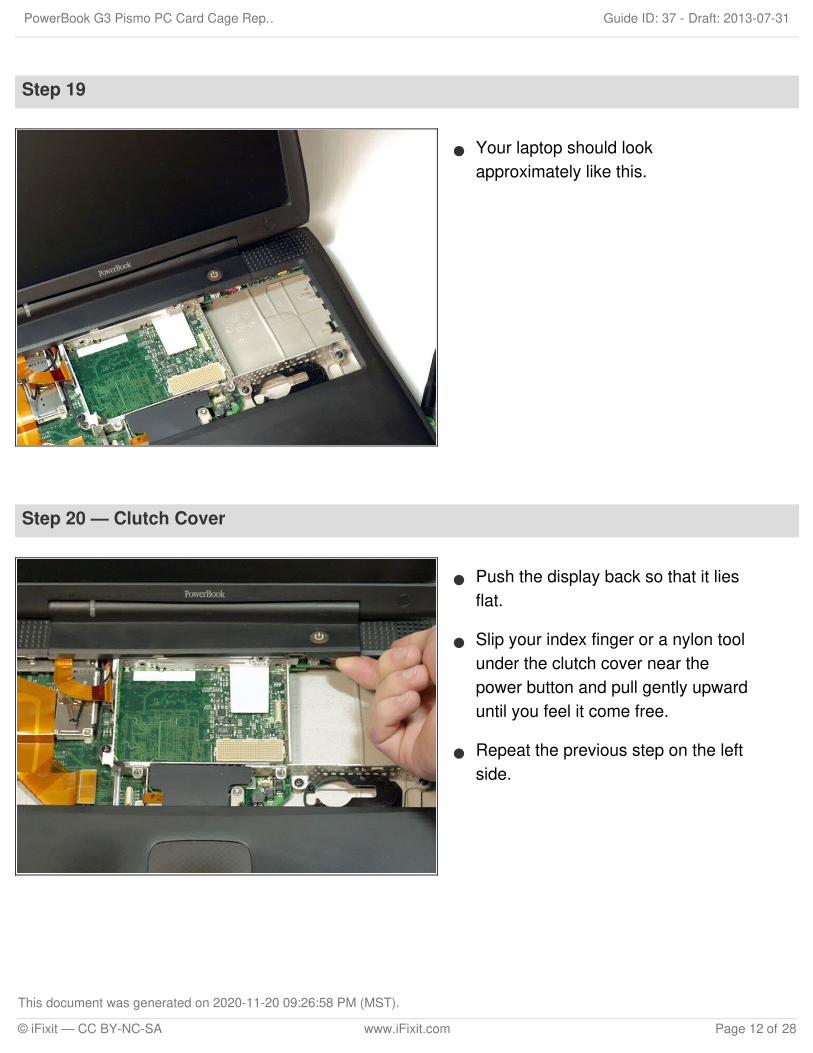
Your laptop should lookapproximately like this.
Step 20 — Clutch Cover
Push the display back so that it liesflat.
Slip your index finger or a nylon toolunder the clutch cover near thepower button and pull gently upwarduntil you feel it come free.
Repeat the previous step on the leftside.
PowerBook G3 Pismo PC Card Cage Rep… Draft: 2013-07-31Guide ID: 37 -
This document was generated on 2020-11-20 09:26:58 PM (MST).
© iFixit — CC BY-NC-SA www.iFixit.com Page 12 of 28
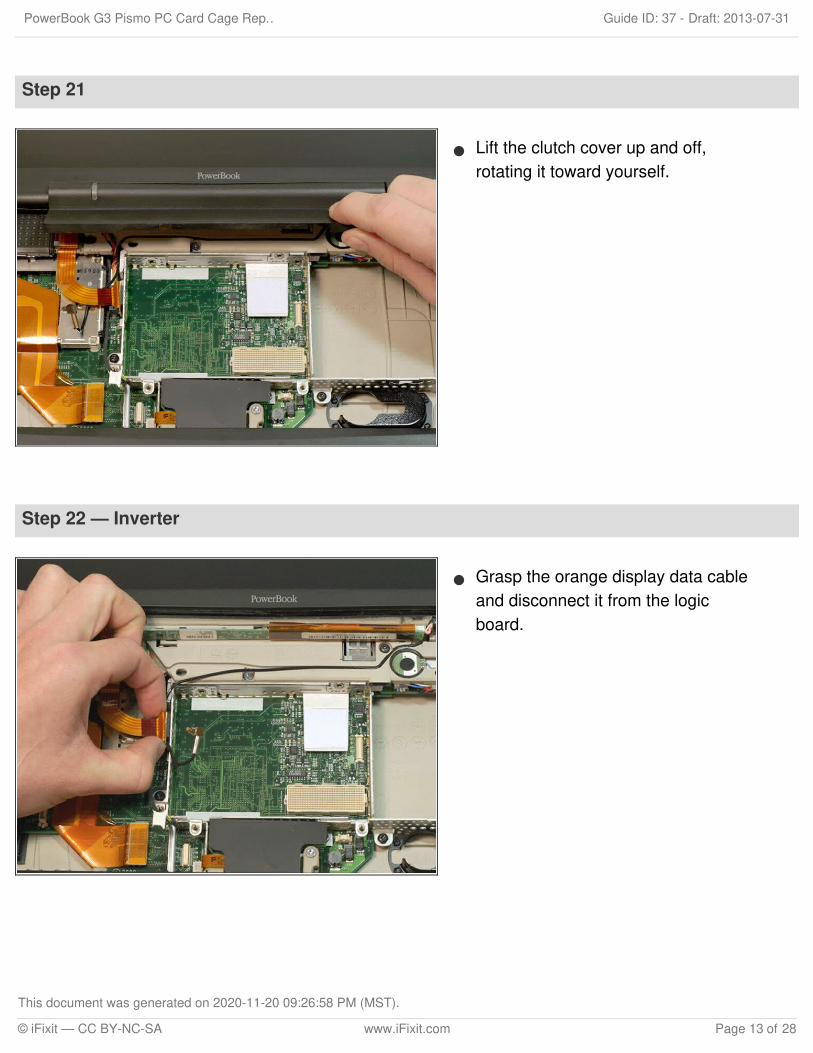
Step 21
Lift the clutch cover up and off,rotating it toward yourself.
Step 22 — Inverter
Grasp the orange display data cableand disconnect it from the logicboard.
PowerBook G3 Pismo PC Card Cage Rep… Draft: 2013-07-31Guide ID: 37 -
This document was generated on 2020-11-20 09:26:58 PM (MST).
© iFixit — CC BY-NC-SA www.iFixit.com Page 13 of 28
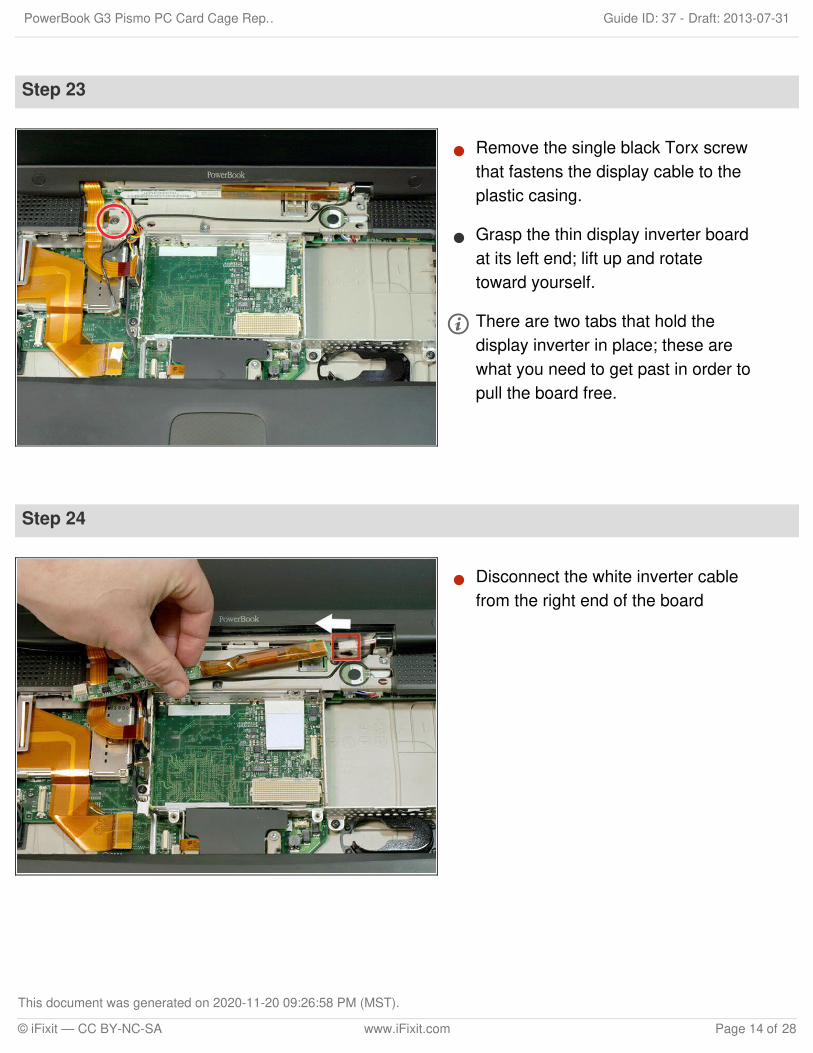
Step 23
Remove the single black Torx screwthat fastens the display cable to theplastic casing.
Grasp the thin display inverter boardat its left end; lift up and rotatetoward yourself.
There are two tabs that hold thedisplay inverter in place; these arewhat you need to get past in order topull the board free.
Step 24
Disconnect the white inverter cablefrom the right end of the board
PowerBook G3 Pismo PC Card Cage Rep… Draft: 2013-07-31Guide ID: 37 -
This document was generated on 2020-11-20 09:26:58 PM (MST).
© iFixit — CC BY-NC-SA www.iFixit.com Page 14 of 28
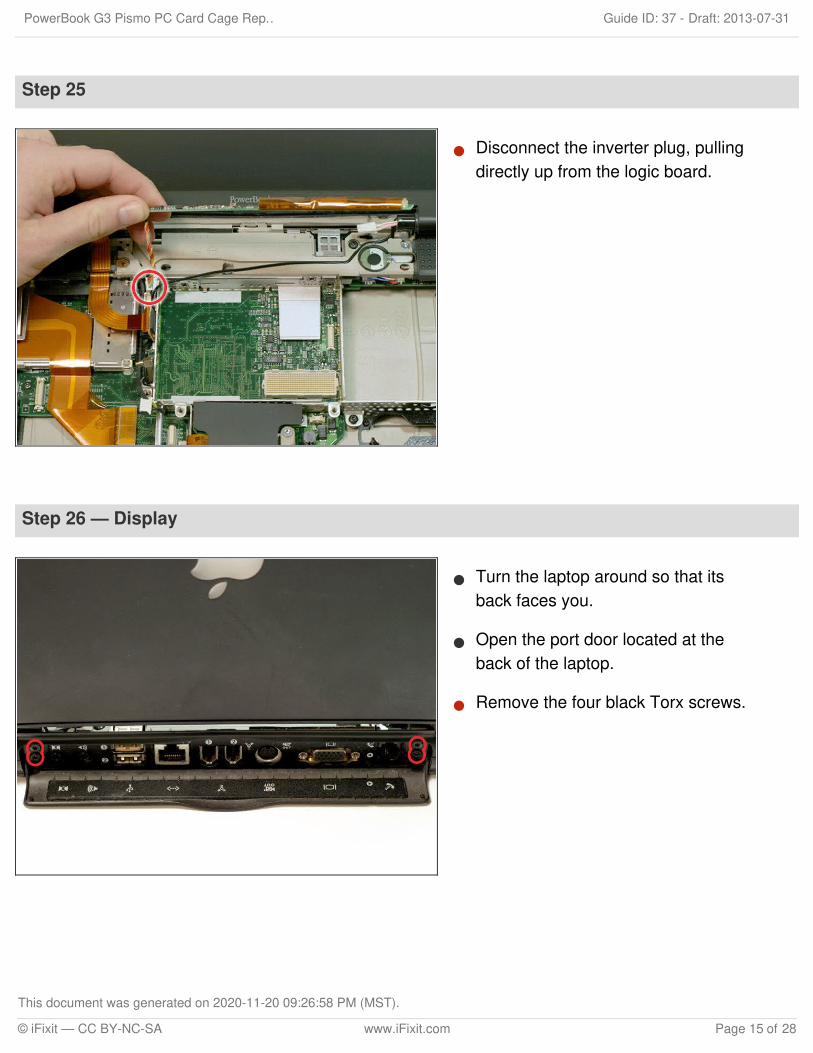
Step 25
Disconnect the inverter plug, pullingdirectly up from the logic board.
Step 26 — Display
Turn the laptop around so that itsback faces you.
Open the port door located at theback of the laptop.
Remove the four black Torx screws.
PowerBook G3 Pismo PC Card Cage Rep… Draft: 2013-07-31Guide ID: 37 -
This document was generated on 2020-11-20 09:26:58 PM (MST).
© iFixit — CC BY-NC-SA www.iFixit.com Page 15 of 28
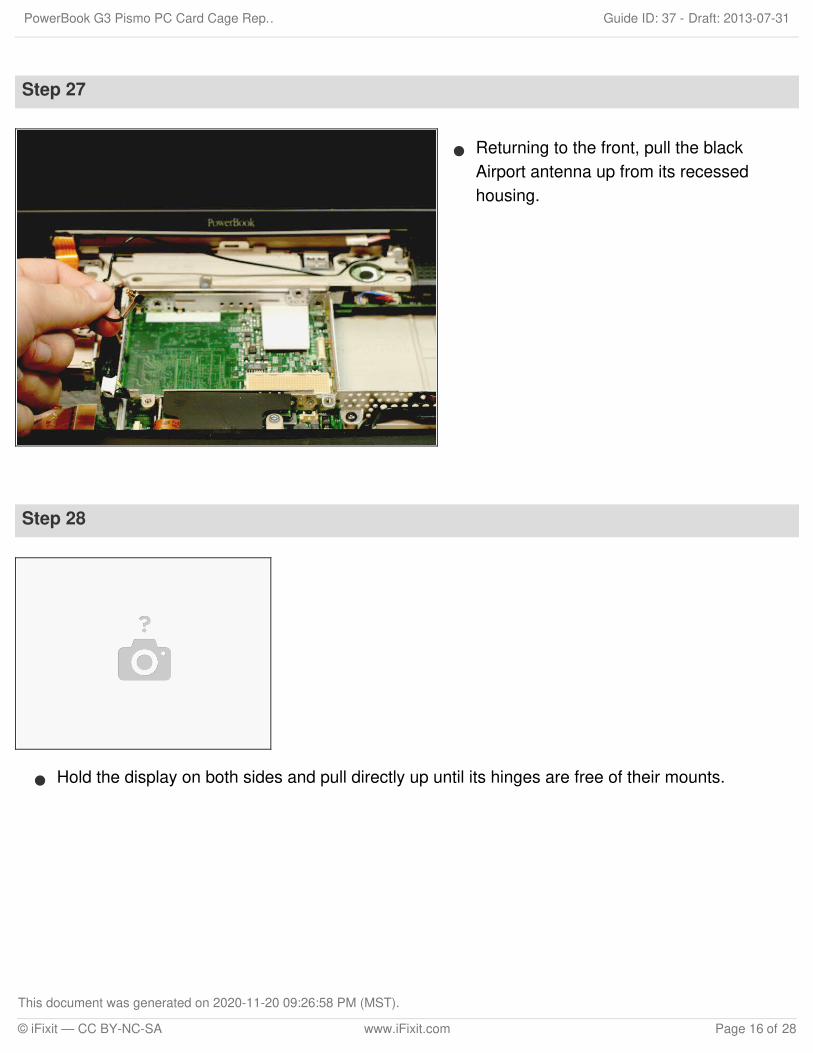
Step 27
Returning to the front, pull the blackAirport antenna up from its recessedhousing.
Step 28
Hold the display on both sides and pull directly up until its hinges are free of their mounts.
PowerBook G3 Pismo PC Card Cage Rep… Draft: 2013-07-31Guide ID: 37 -
This document was generated on 2020-11-20 09:26:58 PM (MST).
© iFixit — CC BY-NC-SA www.iFixit.com Page 16 of 28
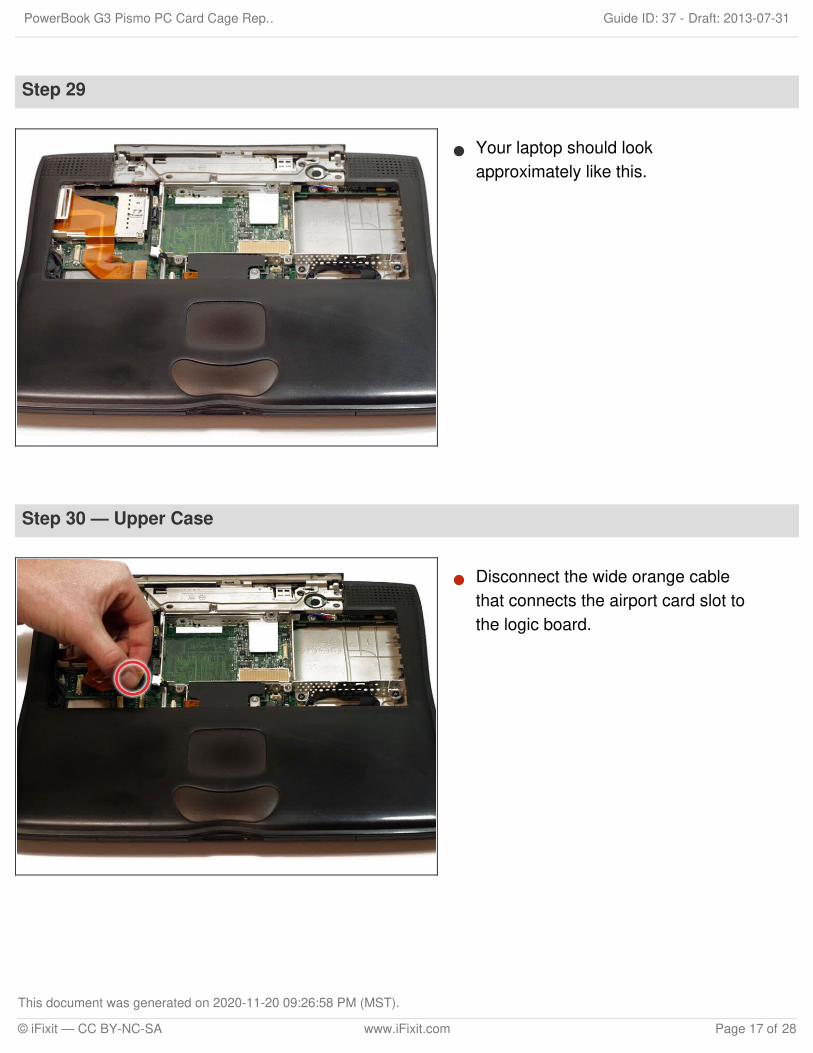
Step 29
Your laptop should lookapproximately like this.
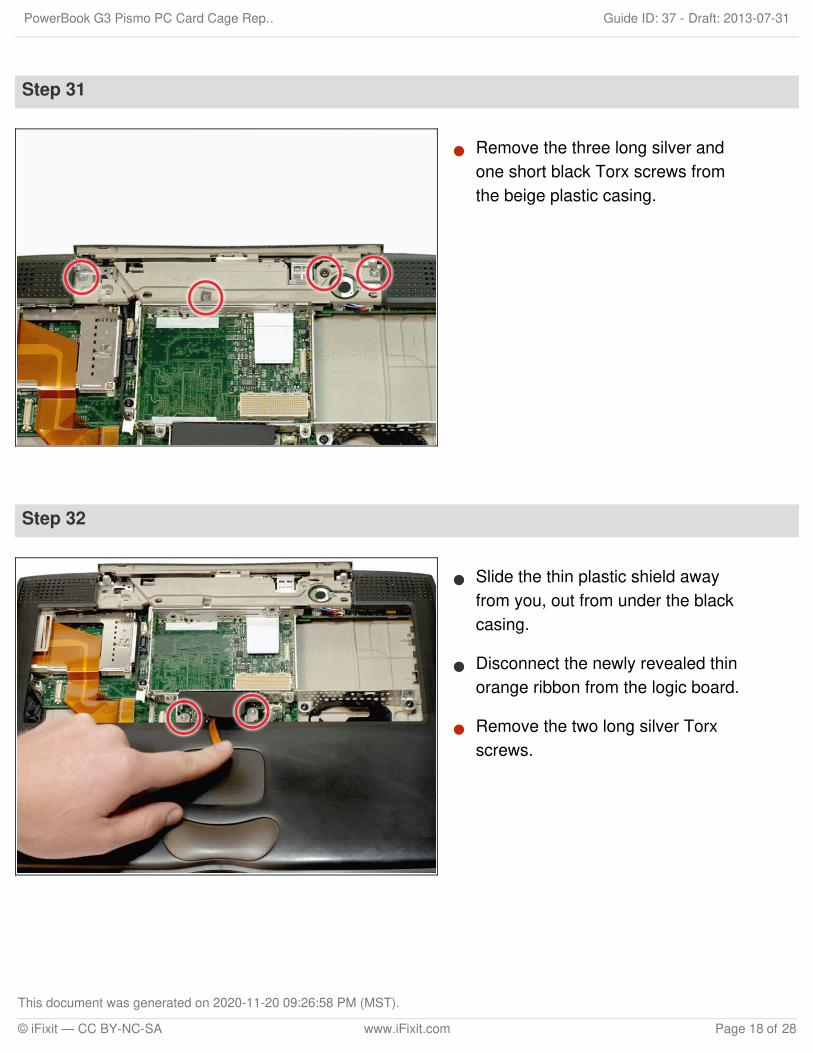
Step 30 — Upper Case
Disconnect the wide orange cablethat connects the airport card slot tothe logic board.
PowerBook G3 Pismo PC Card Cage Rep… Draft: 2013-07-31Guide ID: 37 -
This document was generated on 2020-11-20 09:26:58 PM (MST).
© iFixit — CC BY-NC-SA www.iFixit.com Page 17 of 28
Step 31
Remove the three long silver andone short black Torx screws fromthe beige plastic casing.
Step 32
Slide the thin plastic shield awayfrom you, out from under the blackcasing.
Disconnect the newly revealed thinorange ribbon from the logic board.
Remove the two long silver Torxscrews.
PowerBook G3 Pismo PC Card Cage Rep… Draft: 2013-07-31Guide ID: 37 -
This document was generated on 2020-11-20 09:26:58 PM (MST).
© iFixit — CC BY-NC-SA www.iFixit.com Page 18 of 28
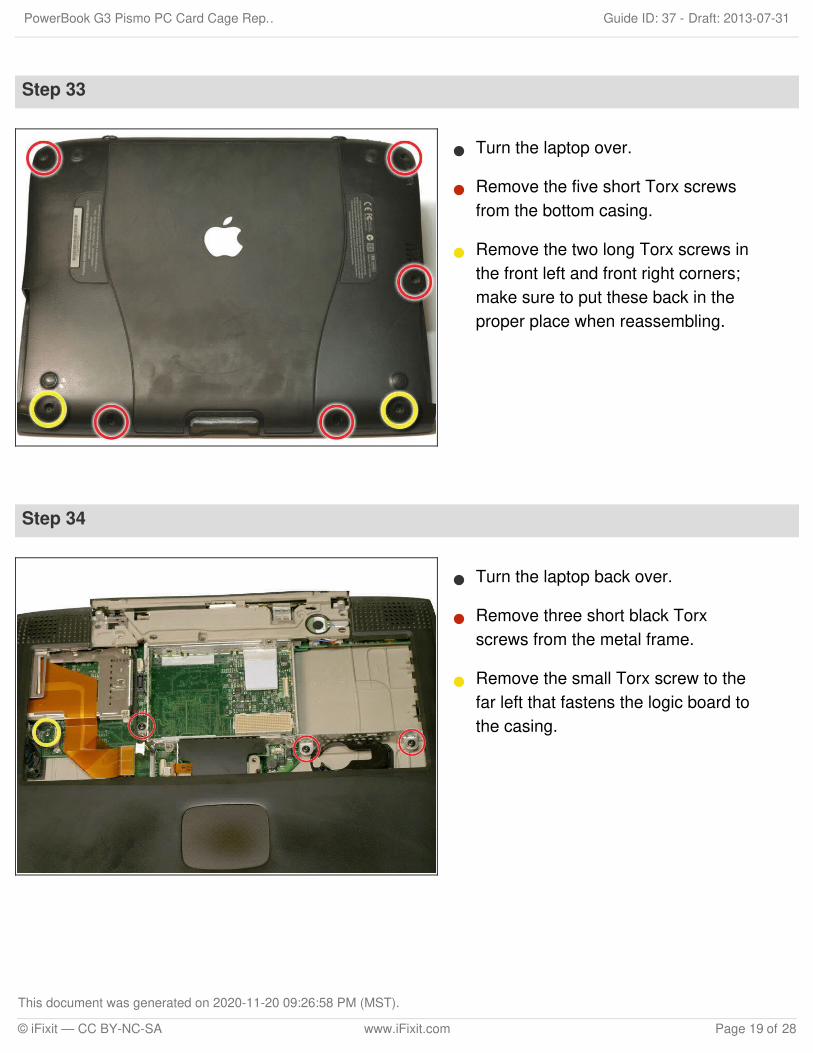
Step 33
Turn the laptop over.
Remove the five short Torx screwsfrom the bottom casing.
Remove the two long Torx screws inthe front left and front right corners;make sure to put these back in theproper place when reassembling.
Step 34
Turn the laptop back over.
Remove three short black Torxscrews from the metal frame.
Remove the small Torx screw to thefar left that fastens the logic board tothe casing.
PowerBook G3 Pismo PC Card Cage Rep… Draft: 2013-07-31Guide ID: 37 -
This document was generated on 2020-11-20 09:26:58 PM (MST).
© iFixit — CC BY-NC-SA www.iFixit.com Page 19 of 28
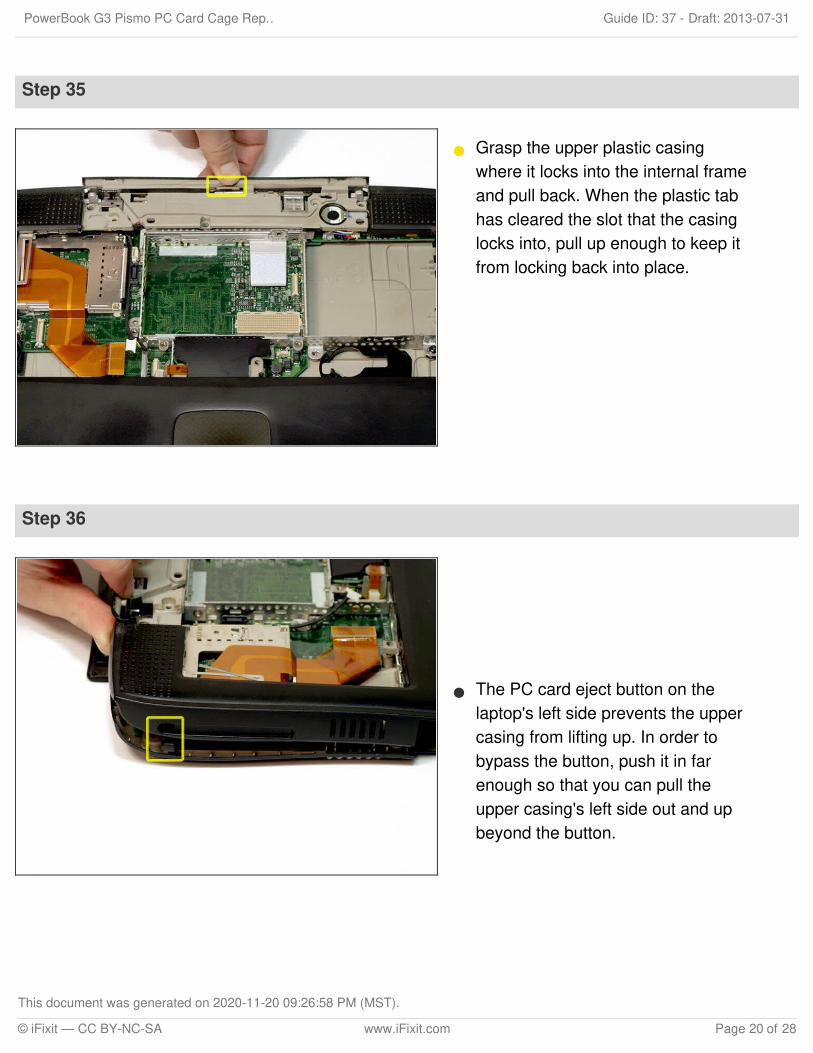
Step 35
Grasp the upper plastic casingwhere it locks into the internal frameand pull back. When the plastic tabhas cleared the slot that the casinglocks into, pull up enough to keep itfrom locking back into place.
Step 36
The PC card eject button on thelaptop's left side prevents the uppercasing from lifting up. In order tobypass the button, push it in farenough so that you can pull theupper casing's left side out and upbeyond the button.
PowerBook G3 Pismo PC Card Cage Rep… Draft: 2013-07-31Guide ID: 37 -
This document was generated on 2020-11-20 09:26:58 PM (MST).
© iFixit — CC BY-NC-SA www.iFixit.com Page 20 of 28
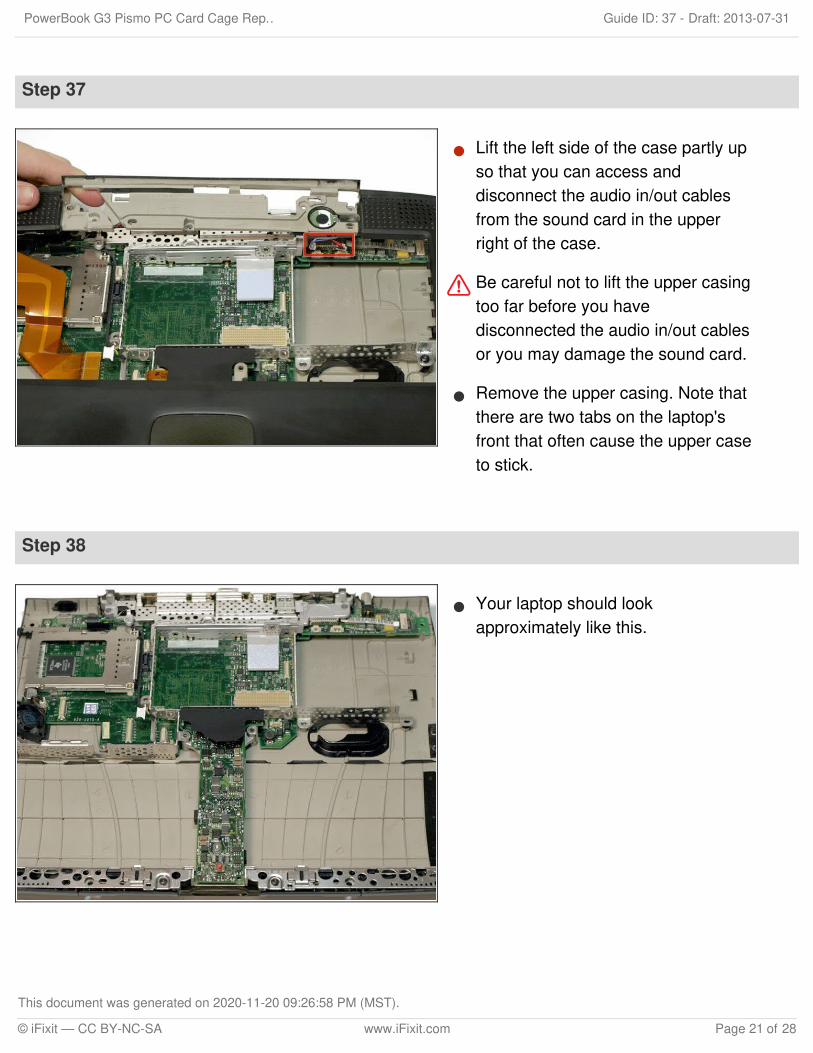
Step 37
Lift the left side of the case partly upso that you can access anddisconnect the audio in/out cablesfrom the sound card in the upperright of the case.
Be careful not to lift the upper casingtoo far before you havedisconnected the audio in/out cablesor you may damage the sound card.
Remove the upper casing. Note thatthere are two tabs on the laptop'sfront that often cause the upper caseto stick.
Step 38
Your laptop should lookapproximately like this.
PowerBook G3 Pismo PC Card Cage Rep… Draft: 2013-07-31Guide ID: 37 -
This document was generated on 2020-11-20 09:26:58 PM (MST).
© iFixit — CC BY-NC-SA www.iFixit.com Page 21 of 28
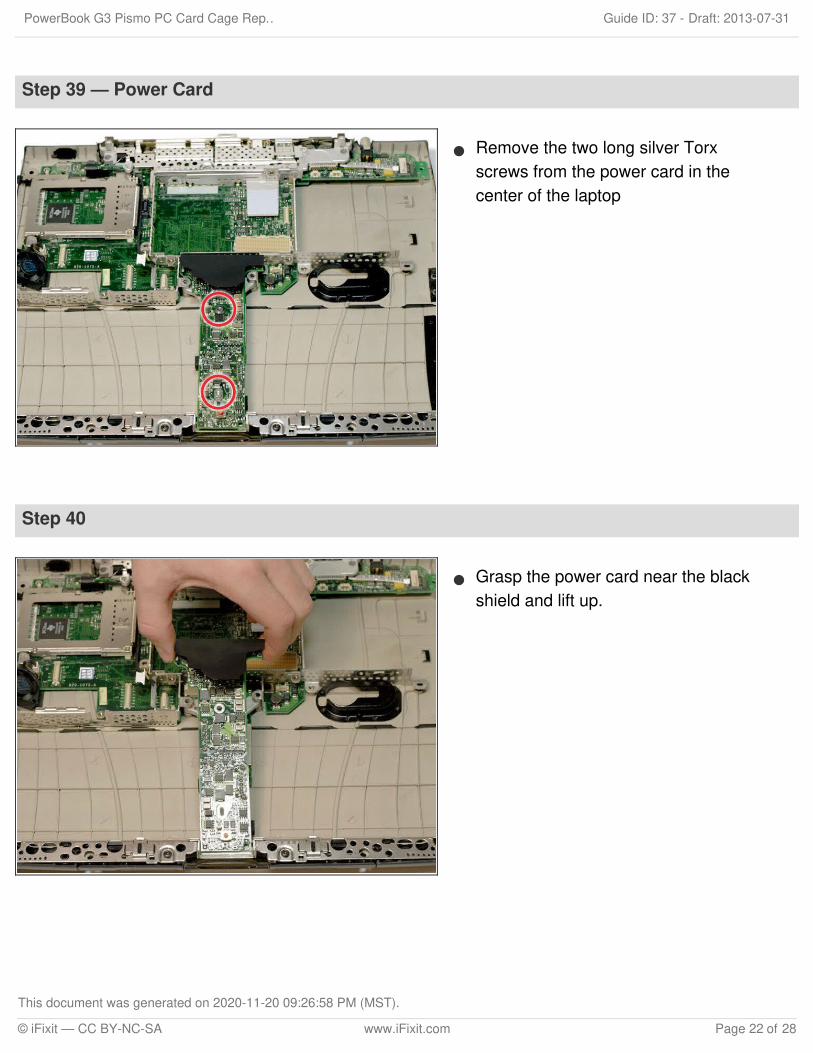
Step 39 — Power Card
Remove the two long silver Torxscrews from the power card in thecenter of the laptop
Step 40
Grasp the power card near the blackshield and lift up.
PowerBook G3 Pismo PC Card Cage Rep… Draft: 2013-07-31Guide ID: 37 -
This document was generated on 2020-11-20 09:26:58 PM (MST).
© iFixit — CC BY-NC-SA www.iFixit.com Page 22 of 28
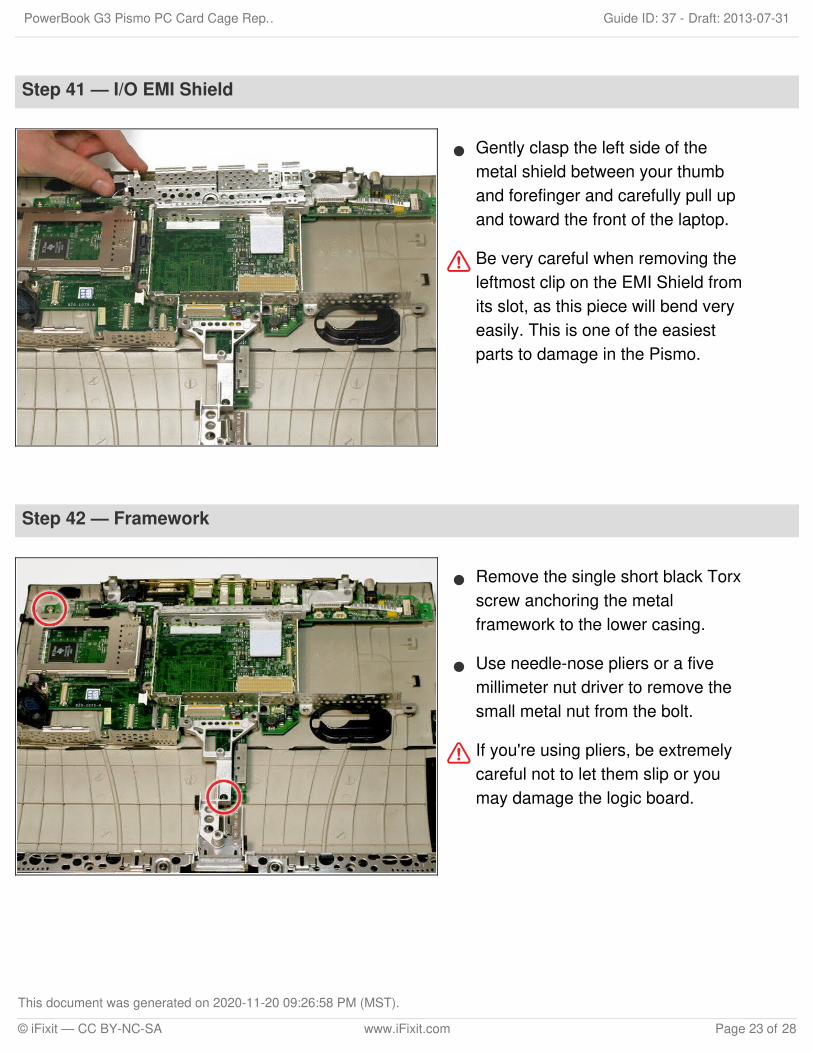
Step 41 — I/O EMI Shield
Gently clasp the left side of themetal shield between your thumband forefinger and carefully pull upand toward the front of the laptop.
Be very careful when removing theleftmost clip on the EMI Shield fromits slot, as this piece will bend veryeasily. This is one of the easiestparts to damage in the Pismo.
Step 42 — Framework
Remove the single short black Torxscrew anchoring the metalframework to the lower casing.
Use needle-nose pliers or a fivemillimeter nut driver to remove thesmall metal nut from the bolt.
If you're using pliers, be extremelycareful not to let them slip or youmay damage the logic board.
PowerBook G3 Pismo PC Card Cage Rep… Draft: 2013-07-31Guide ID: 37 -
This document was generated on 2020-11-20 09:26:58 PM (MST).
© iFixit — CC BY-NC-SA www.iFixit.com Page 23 of 28
Step 43
Disconnect the fan cable from the left side of the logic board.
Step 44
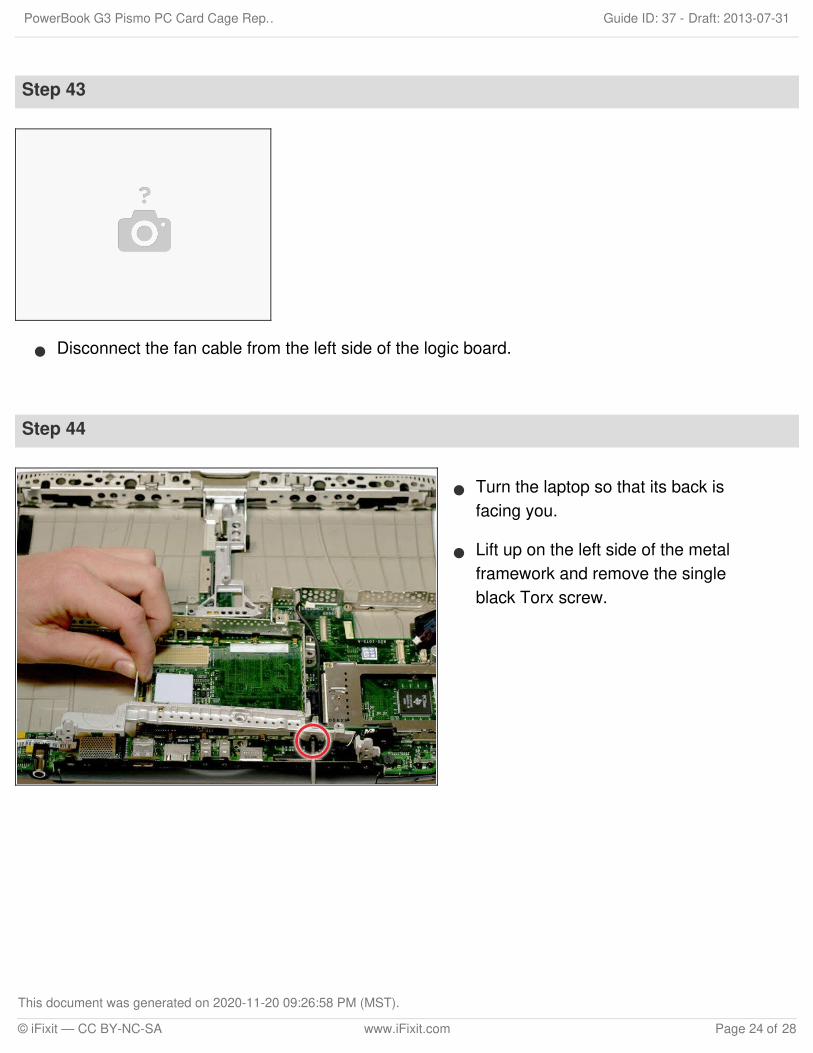
Turn the laptop so that its back isfacing you.
Lift up on the left side of the metalframework and remove the singleblack Torx screw.
PowerBook G3 Pismo PC Card Cage Rep… Draft: 2013-07-31Guide ID: 37 -
This document was generated on 2020-11-20 09:26:58 PM (MST).
© iFixit — CC BY-NC-SA www.iFixit.com Page 24 of 28
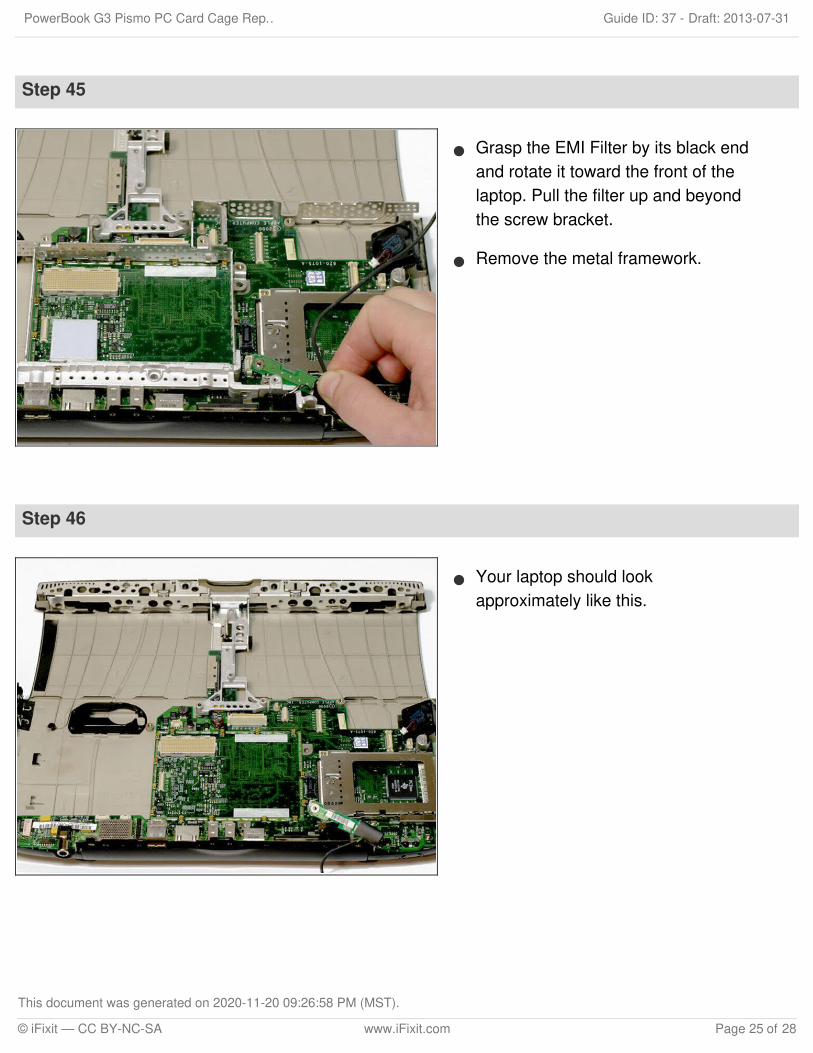
Step 45
Grasp the EMI Filter by its black endand rotate it toward the front of thelaptop. Pull the filter up and beyondthe screw bracket.
Remove the metal framework.
Step 46
Your laptop should lookapproximately like this.
PowerBook G3 Pismo PC Card Cage Rep… Draft: 2013-07-31Guide ID: 37 -
This document was generated on 2020-11-20 09:26:58 PM (MST).
© iFixit — CC BY-NC-SA www.iFixit.com Page 25 of 28
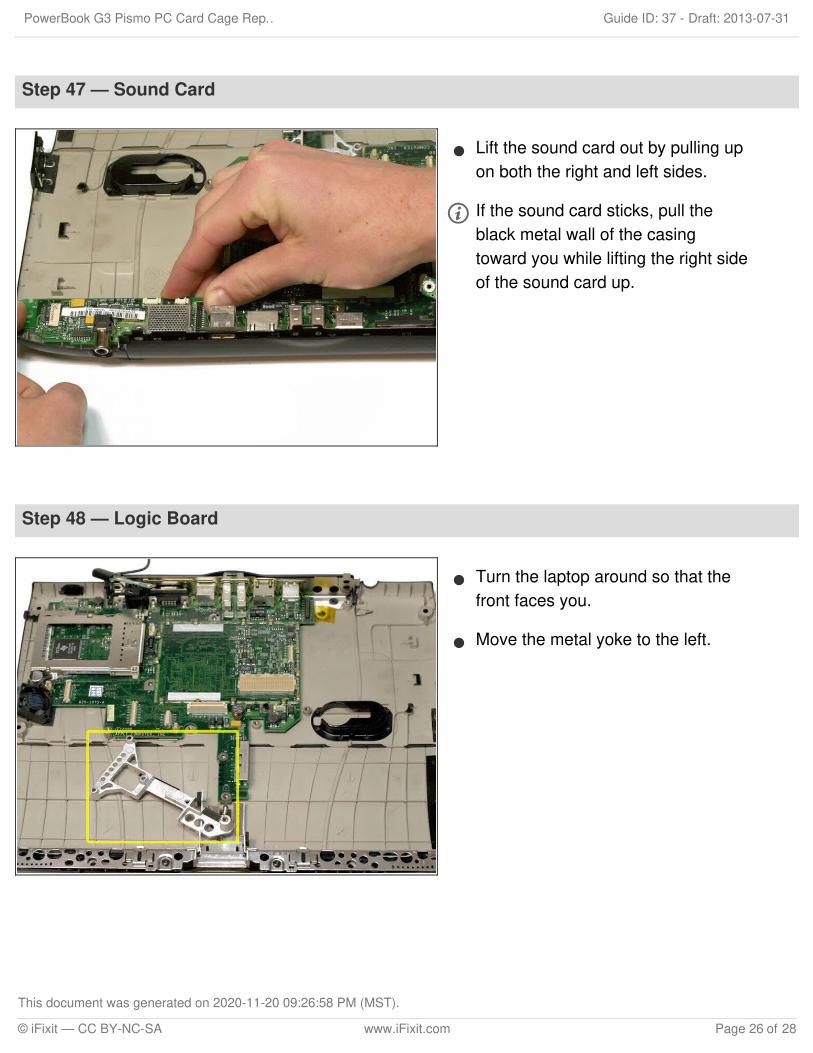
Step 47 — Sound Card
Lift the sound card out by pulling upon both the right and left sides.
If the sound card sticks, pull theblack metal wall of the casingtoward you while lifting the right sideof the sound card up.
Step 48 — Logic Board
Turn the laptop around so that thefront faces you.
Move the metal yoke to the left.
PowerBook G3 Pismo PC Card Cage Rep… Draft: 2013-07-31Guide ID: 37 -
This document was generated on 2020-11-20 09:26:58 PM (MST).
© iFixit — CC BY-NC-SA www.iFixit.com Page 26 of 28
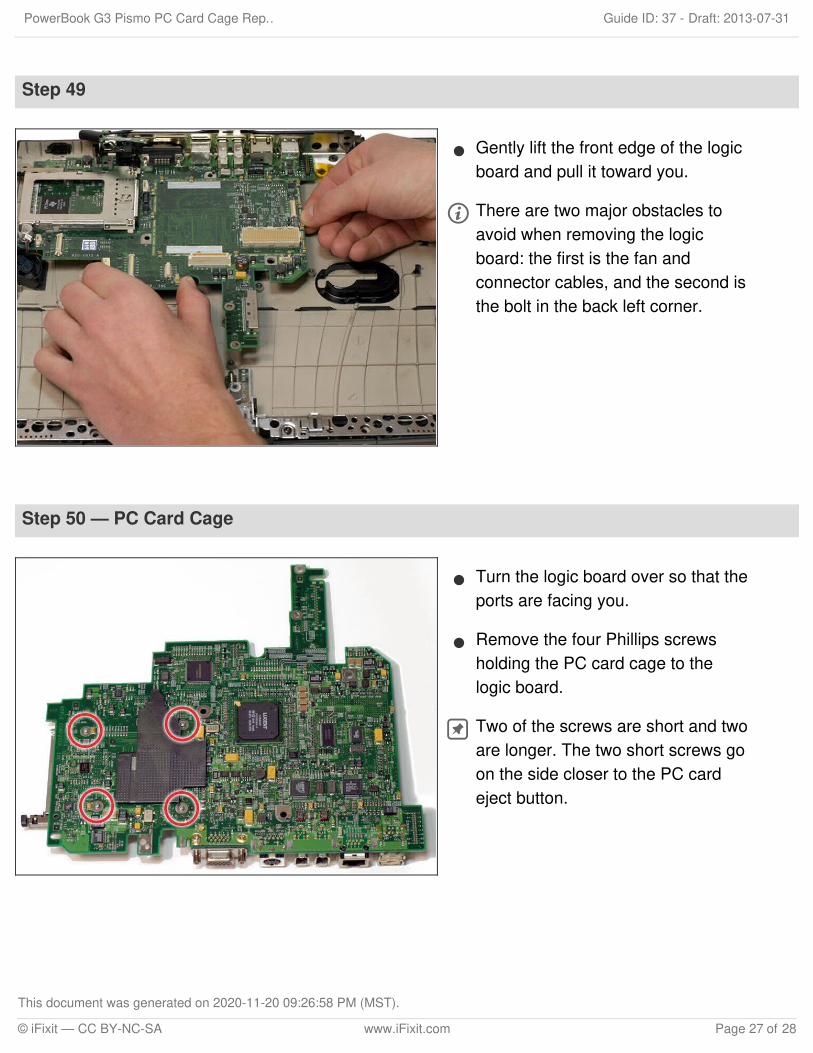
Step 49
Gently lift the front edge of the logicboard and pull it toward you.
There are two major obstacles toavoid when removing the logicboard: the first is the fan andconnector cables, and the second isthe bolt in the back left corner.
Step 50 — PC Card Cage
Turn the logic board over so that theports are facing you.
Remove the four Phillips screwsholding the PC card cage to thelogic board.
Two of the screws are short and twoare longer. The two short screws goon the side closer to the PC cardeject button.
PowerBook G3 Pismo PC Card Cage Rep… Draft: 2013-07-31Guide ID: 37 -
This document was generated on 2020-11-20 09:26:58 PM (MST).
© iFixit — CC BY-NC-SA www.iFixit.com Page 27 of 28
To reassemble your device, follow these instructions in reverse order.
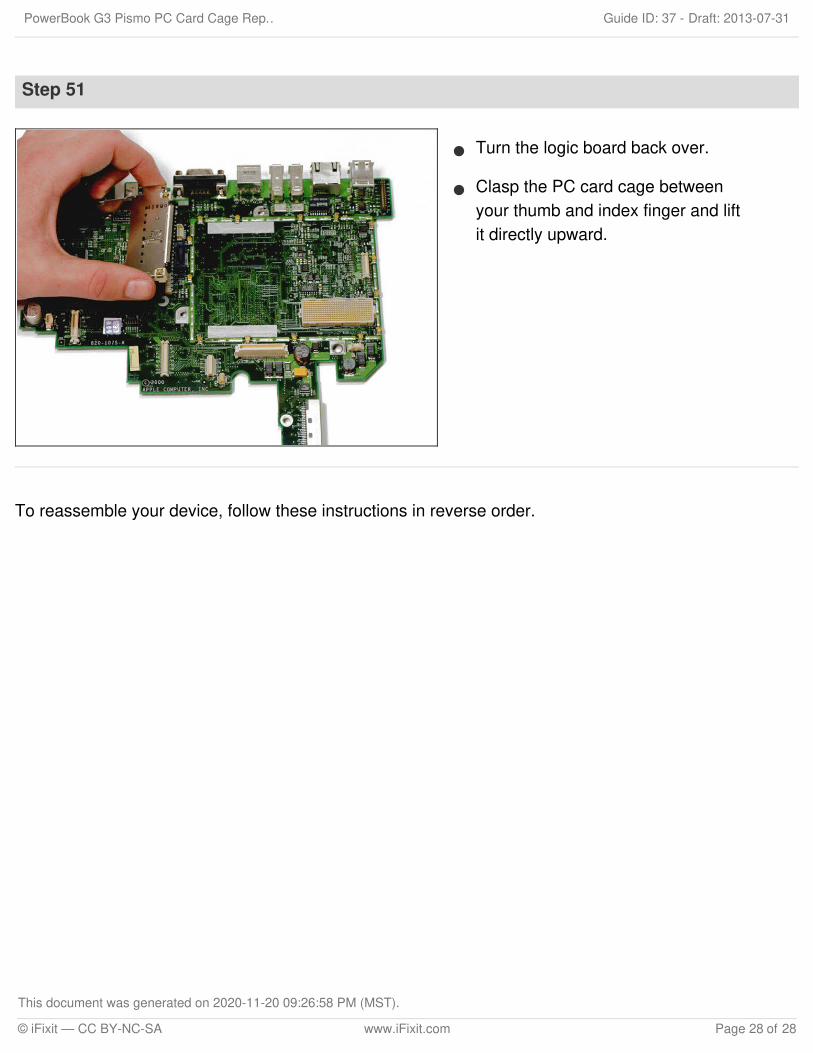
Step 51
Turn the logic board back over.
Clasp the PC card cage betweenyour thumb and index finger and liftit directly upward.
PowerBook G3 Pismo PC Card Cage Rep… Draft: 2013-07-31Guide ID: 37 -
This document was generated on 2020-11-20 09:26:58 PM (MST).
© iFixit — CC BY-NC-SA www.iFixit.com Page 28 of 28
Related Documents


