CUSTODIAL SERVICES OPERATIONS MANUAL November 2006

Welcome message from author
This document is posted to help you gain knowledge. Please leave a comment to let me know what you think about it! Share it to your friends and learn new things together.
Transcript

CUSTODIAL SERVICES
OPERATIONS MANUAL
November 2006
Table Of Contents
II
Introduction.................................................................................................... 1 OUR VISION................................................................................................. 1 OUR MISSION.............................................................................................. 1 CORE VALUES: ........................................................................................... 1
Section I- General Policies ............................................................................2 Personal Attire Guidelines ............................................................................. 3 Custodial Closet and Storage Policy.............................................................. 4 Temporary Parking Passes............................................................................. 5 Overtime Rotation Policy .............................................................................. 6 Leaving From and Returning to Assigned Work Area .................................. 7 Submitting Work Orders................................................................................ 7 Supply Requests............................................................................................. 8 Use of Cell Phones......................................................................................... 8 Use of Headphones and Radios ..................................................................... 8 Removal of Property...................................................................................... 9 Restricted Entry of College Buildings ........................................................... 9 Keys ............................................................................................................. 10 Personal Communications ........................................................................... 10 Absenteeism Limits ..................................................................................... 10
Section II - Safety.........................................................................................11 Introduction.................................................................................................. 12 Accident Reporting ...................................................................................... 13 Emergencies................................................................................................. 14 Machine and Equipment Safety ................................................................... 15 Electrical Safety ........................................................................................... 17 Equipment Guarding.................................................................................... 19 First Aid /CPR Awareness ........................................................................... 20 Ergonomics .................................................................................................. 22 Stress Management ...................................................................................... 23 Heat Related Illness ..................................................................................... 24 Universal Waste ........................................................................................... 27 Hazardous Waste ......................................................................................... 28 Recycling Practice and Policy ..................................................................... 29 Personal Protective Equipment .................................................................... 31 Blood Borne Pathogens/ Universal Precautions .......................................... 33 Ladder Safety ............................................................................................... 34 Slips and Trips ............................................................................................. 35 Ride On Auto Scrubber Safety .................................................................... 37 Forklift Safety .............................................................................................. 38 Motor Vehicle Safety................................................................................... 39 Fire Extinguishers ........................................................................................ 40 Flammable/Combustible Material Safety .................................................... 42 Facility Fire Safety Guidelines .................................................................... 43 Chemical Spill Response and Reporting...................................................... 44 Emergency Evacuation ................................................................................ 46 Safe Lifting Practices................................................................................... 49 Custodial Closet Safety................................................................................ 50 MSDS Sheets ............................................................................................... 51

Table Of Contents
III
The JHA..........................................................................................................53 Job Hazard Analysis ................................................................................................ 53
Scrubbing VCT with Rotary Swing Machine.............................................. 54 Operating Electric Powered Auto Scrubber................................................. 55 Operating Battery Powered Auto Scrubber ................................................. 56 Operating Ride On Auto Scrubber............................................................... 57 Cleaning Shower Units ................................................................................ 58 Wet/Damp Mopping Resilient Flooring ...................................................... 59 Sweeping/Mopping Stair Towers ................................................................ 60 Operating Upright Vacuum Cleaners........................................................... 61 Moving Furniture ......................................................................................... 62 Operating a Motor Vehicle .......................................................................... 63 Shoveling Snow ........................................................................................... 64 Cleaning Bathrooms..................................................................................... 65 Mixing Cleaning Chemicals ........................................................................ 66 Working From a Step Ladder ...................................................................... 67 Operating a Forklift...................................................................................... 68 Delivering Supplies/handling Heavy Loads ................................................ 69 Changing Light bulbs................................................................................... 70 Response Protocol for Spill of Unknown Material...................................... 71 Science Center General Duties .................................................................... 72 List Arts Center General Duties................................................................... 73 Blood/Body Fluid Clean Up ........................................................................ 74
Section III- Equipment................................................................................75 Introduction.................................................................................................. 76 Auto Scrubbers............................................................................................. 77 Carpet Extractors ......................................................................................... 79 Vacuum Cleaners ......................................................................................... 81 Water Pick Ups/ Wet Dry Vacuums ............................................................ 83 Rotary Swing Machines............................................................................... 83 High Speed Burnishers ................................................................................ 84 Whistle Fans................................................................................................. 85 Miscellaneous Custodial Equipment............................................................ 85
Section IV - Cleaning Chemicals ..................................................................88 Cleaning Chemical Overview...................................................................... 89 Cleaning Chemical Quick Reference Sheet................................................. 90 ABC Dry Chemical Fire Extinguisher......................................................... 91 Ammonia...................................................................................................... 92 Appearance .................................................................................................. 93 Behold Furniture Polish ............................................................................... 94 Bleach .......................................................................................................... 95 Cello Bright.................................................................................................. 96 Comet Cleanser............................................................................................ 97 Crew Clinging Acid Bowel Cleaner ............................................................ 98 Crew Shower, Tub and Tile Cleaner............................................................ 99 GP Forward................................................................................................ 100 Liberty Polish............................................................................................. 101 Liquid Gum-Go.......................................................................................... 102
Table Of Contents
IV
Liquizyme .................................................................................................. 103 Lysol Disinfectant Spray............................................................................ 104 Murphy Oil Soap........................................................................................ 105 Mr. Muscle Oven Cleaner.......................................................................... 106 Nutra rinse.................................................................................................. 107 Pile Driver.................................................................................................. 108 Pine Sol Cleaner......................................................................................... 109 PM20 Acid Detergent ................................................................................ 110 Premia Floor Finish.................................................................................... 111 Reliable Stainless Polish ............................................................................ 112 Rust Spotter Gel......................................................................................... 113 Salvation .................................................................................................... 114 Shine Line Emulsifier Stripper .................................................................. 115 Solventless Cleaner.................................................................................... 116 Spitfire Power Cleaner............................................................................... 117 Stride Neutral Cleaner................................................................................ 118 Shine line Emulsifier Stripper.................................................................... 119 Spray and Dissolve .................................................................................... 120 T.E.T. Defoamer ........................................................................................ 121 TLC Pool Care ........................................................................................... 122 TR 103 Carpet detergent............................................................................ 123 Triad II Disinfectant Cleaner ..................................................................... 124 Trouble Shooter ......................................................................................... 125 Trouble Shooter ......................................................................................... 126 VP Vinyl Cleaner....................................................................................... 127 Waterthane 701 .......................................................................................... 128 Windex....................................................................................................... 129
Section V - Procedures ..............................................................................130 Cleaning Standards and Levels of Cleanliness .......................................... 131
General Cleaning Procedures................................................................................. 134 Emptying Trash/ Recyclables .................................................................... 134 Chalkboard Cleaning ................................................................................. 136 Dusting Building Surfaces and Furnishings .............................................. 138 Furniture Polishing .................................................................................... 140 Window Cleaning ...................................................................................... 142 Spot Cleaning Glass-Method 1 .................................................................. 144 Spot Cleaning Glass Method 2 (Preferred Method) .................................. 146 Metal Cleaning........................................................................................... 147 Spot Cleaning Walls and Furnishings........................................................ 149 Wall and Ceiling Washing ......................................................................... 151 Cleaning Water Fountains.......................................................................... 153
Bathroom & Shower Cleaning Procedures ............................................................ 154 Bathroom Cleaning Procedure................................................................... 154 Cleaning Sinks and Wash Basins............................................................... 156 Cleaning Commodes.................................................................................. 158 Cleaning Urinals ........................................................................................ 160 Cleaning Tubs and Showers....................................................................... 162
Carpet Care Procedures.......................................................................................... 164
Table Of Contents
V
Vacuuming Carpet ..................................................................................... 164 Spot Cleaning Carpets................................................................................ 166 Carpet Cleaning-Hot Water Extraction Method ........................................ 168
Hard Floor Care Procedures................................................................................... 171 Dust Mopping ............................................................................................ 171 Manual Sweeping....................................................................................... 173 Spot Mopping............................................................................................. 175 Damp Mopping .......................................................................................... 177 Wet Mopping ............................................................................................. 179 Automatic Scrubbing ................................................................................. 182 Spray Buffing............................................................................................. 184 Top Scrubbing Floors ................................................................................ 186 Stripping Waxed or Finished Floors .......................................................... 189 Applying Wax or Synthetic Floor finish.................................................... 192 Screening and Recoating Wood Floors...................................................... 195
Section VI- Special Operations.................................................................198 Special Pool Deck Cleaning Operation...................................................... 199 Protocol for Summer Dorm Cleaning........................................................ 200 Protocol for Bristol Campus Center Guest Room Service......................... 204
Section VII- Glossary of Terms .................................................................206

1
Introduction
Custodial Services is the largest shop within the physical plant and provides daily cleaning and specialty services to over 75 buildings and 1.6 million square feet of academic, administrative, athletic, residential and auxiliary space. The role of each custodian is critical to the operation and upkeep of the facilities of Hamilton College. Each custodian will have daily contact with the Hamilton College Community and it is imperative that each person be a professional and courteous representative of Custodial Services and the Physical Plant as a whole.
In order to direct our efforts into a unified and focused force, Custodial Services has established a collective vision, mission and set of core values to guide us in our day to day activities and drive the shops future growth.
OUR VISION: It is Custodial Service’s vision to be a productive, customer oriented service organization that values and respects all members of the Hamilton College community. We are committed to building and fostering a safe, enjoyable and diverse working atmosphere.
OUR MISSION:
Hamilton College Custodial Services strives to effectively serve the Hamilton community in a professional manner and to provide a safe, clean, and sanitary environment in which to live, learn, and work. Additionally, it is our mission to build a cohesive work team that supports trust, pride and open communications within the Hamilton community.
CORE VALUES:
• Service: We endeavor to provide top quality service by recognizing and fulfilling our customer’s needs.
• Integrity: Earning the trust of the Hamilton community through professional conduct that includes honesty, reliability, and competency.
• Teamwork: Coordinating our individual contributions into a cooperative effort aimed at fulfilling a common purpose. Each individual is considered to be an integral part of a greater whole and is treated with respect and dignity.
• Safety: Operating under the principle that each of us is responsible for the safety and security of all members of the Hamilton community and conducting our business in a manner that is reflective of that belief.
• Excellence: Working diligently to continuously improve Custodial Services through creativity and innovation.

2
Section I- General Policies

3
Personal Attire Guidelines
As outlined in the Hamilton College Maintenance and Operations Handbook on page 7 paragraph 8 “Employees are expected to be courteous to all people with whom they come in contact and to keep personal appearance and attire as neat as possible in keeping with regular job duties”. It is the intent of the college to ensure that all employees project a professional image in both behavior and appearance. In consideration of these standards the following guidelines have been established with regard to the personal attire of the custodial staff;
General Rules 1) All attire must be worn in accordance with expected standards of professional appearance
and accepted safety guidelines. Those standards and guidelines include;
a) Neat, clean and free from holes rips and tears.
b) Clothing must not be ragged or un-hemmed.
c) Shirts and pants must be of appropriate length and made of appropriate material. Mesh or other see through materials may not be worn.
d) Tank tops, half shirts, halter tops and tube tops may not be worn.
e) Excessively tight or loose fitting clothing may not be worn.
f) No open toe shoes may be worn.
g) Clothing with obscene language, gestures, logos or images may not be worn.
h) Shorts may be worn throughout the year provided they are:
1) Hemmed and of appropriate length. (No shorter than four inches above the
knee) 2) Running, tennis, spandex or “short-shorts” may not be worn.
3) Appropriate for the activity in accordance with accepted safety standards.
It is highly recommended that if you choose to wear shorts you have a pair of long pants available in the event that a change of work assignment requires a change in attire. Custodians arriving at work wearing attire that falls outside of these guidelines will be asked to change the clothing in question and will not be allowed to start work until they have done so.

4
Custodial Closet and Storage Policy
As stated in the Hamilton College Position Description, dated April 9, 1997, the basic duties of the custodial staff include maintaining assigned areas in a clean and safe condition and maintaining cleaning supplies. The areas assigned to the custodians include any and all storage spaces and custodial closets within that assigned area. As part of regularly assigned duties, each custodian is responsible for the upkeep and control of all storage spaces and custodial closets located within their work area. It is expected that every area will be monitored for safety hazards and if any hazard is discovered it will be promptly remedied or reported to the area supervisor. The custodial staff is required to inspect each closet in their work area daily and ensure that;
• All closets are to be kept in a neat and orderly manner. • All closets are properly stocked. • All supplies are properly stored. • All equipment is properly stored and in good working condition. • All electrical cords are in good condition and stored properly. • All chemical containers are properly labeled, diluted and stored. • Any visible hazards are identified and properly remedied or reported. • No unauthorized products or supplies are present. • Electrical panels are free of obstruction. • Flammable and combustible materials are properly stored. • All universal waste is properly packaged, labeled, and stored.
All storage spaces and custodial closets are to be locked at the conclusion of the work assignment. It is the responsibility of the custodians to ensure that all storage spaces and custodial closets are locked and secured before leaving the work area. No custodial closets are to be left open in order for students to gain access to cleaning supplies. RA closets are provided for this purpose and the availability of equipment and supplies shall be restricted to those areas.

5
Temporary Parking Passes Custodial Services has been issued twelve temporary parking passes to be used on a daily basis. These passes are to be used in accordance with the following guidelines; 1) No passes are to be signed out without being approved by the Assistant Director for Custodial
Services or the Custodial Services Manager. 2) Custodians leaving campus early for approved time off are permitted to sign out a pass at the
end of the preceding work day. Approved time includes vacation, sick, and personal time in which the request was submitted properly and prior approval was granted.
3) Custodians assigned in a manner such that their work assignments are a considerable distance
apart making vehicle travel necessary are permitted to sign out a temporary pass. Using a temporary parking pass for this purpose is an option and does not entitle the user to vehicle use pay.
4) Passes signed out for any other purpose must be approved by the Assistant Director or
Custodial Services Manager prior to the pass being removed from the office. 5) Temporary parking passes are valid only in the following parking areas;
• Admissions lot (Excluding visitor area) • Anderson-Connell Alumni Center • Pub lot (excluding visitor area) • Root Faculty/staff lot • Milbank/Babbitt lot (single space only) • Dunham Lot • Bristol Campus Center • Emerson Literary Society • Phillip Spencer House • Field House lot
Custodians parking in any other areas will be illegally parked and subject to penalties as defined in the Hamilton College Parking Guide 2005-2006. 6)Anyone not permitted to sign out a parking pass is required to ride the travel vans to their work
assignments. While the Custodial forepersons are required to transport custodians to their work assignments, they are not required to transport custodians for break periods. Custodians wishing to leave their work areas for breaks must make arrangements to do so keeping in mind policies regarding leaving assigned work areas.
Remember- The use of temporary parking passes is a privilege not a benefit. Abuse of this
policy will result in the revocation of driving privileges.
6
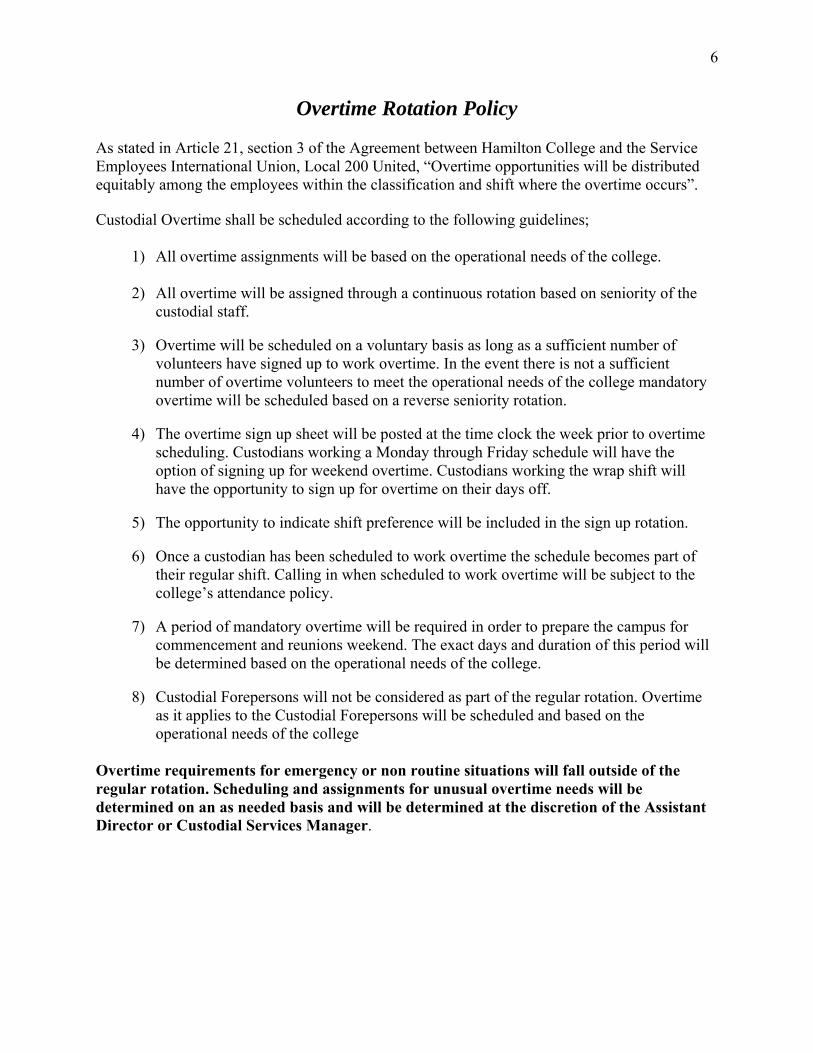
Overtime Rotation Policy
As stated in Article 21, section 3 of the Agreement between Hamilton College and the Service Employees International Union, Local 200 United, “Overtime opportunities will be distributed equitably among the employees within the classification and shift where the overtime occurs”.
Custodial Overtime shall be scheduled according to the following guidelines;
1) All overtime assignments will be based on the operational needs of the college. 2) All overtime will be assigned through a continuous rotation based on seniority of the
custodial staff. 3) Overtime will be scheduled on a voluntary basis as long as a sufficient number of
volunteers have signed up to work overtime. In the event there is not a sufficient number of overtime volunteers to meet the operational needs of the college mandatory overtime will be scheduled based on a reverse seniority rotation.
4) The overtime sign up sheet will be posted at the time clock the week prior to overtime
scheduling. Custodians working a Monday through Friday schedule will have the option of signing up for weekend overtime. Custodians working the wrap shift will have the opportunity to sign up for overtime on their days off.
5) The opportunity to indicate shift preference will be included in the sign up rotation.
6) Once a custodian has been scheduled to work overtime the schedule becomes part of
their regular shift. Calling in when scheduled to work overtime will be subject to the college’s attendance policy.
7) A period of mandatory overtime will be required in order to prepare the campus for
commencement and reunions weekend. The exact days and duration of this period will be determined based on the operational needs of the college.
8) Custodial Forepersons will not be considered as part of the regular rotation. Overtime
as it applies to the Custodial Forepersons will be scheduled and based on the operational needs of the college
Overtime requirements for emergency or non routine situations will fall outside of the regular rotation. Scheduling and assignments for unusual overtime needs will be determined on an as needed basis and will be determined at the discretion of the Assistant Director or Custodial Services Manager.

7
Leaving From and Returning to Assigned Work Area
As stated in the Maintenance and Operations Handbook, page six paragraph three, “An Employee must not leave his/her work area until five minutes before noon and ten minutes before quitting time”. It is expected that custodians will adhere to this police and not leave their work areas. Additionally, if custodians choose to leave their work area during their break periods it is expected that they will return to their areas by the end of their scheduled break time. The work schedule for the custodial staff is as follows;
• 6:00 am Shift begins • 9:00 am to 9:20 am Break -Custodians not to leave work area before 9:00am • 12:00 to 12:30 Lunch -Custodians not to leave work area before 11:55am • 2:30 pm Shift ends - Custodians not to leave work area before 2:20 pm
Beginning breaks early and extending them dramatically reduces the efficiency of the operation and inhibits the shops ability to provide superior service to the campus community. All custodians are expected to follow these guidelines
Submitting Work Orders
As stated in the Hamilton College Custodial Position Description. It is the responsibility of the custodians to report building damage and malfunctions to the work control secretary. Custodial work order submissions should adhere to the following guidelines; 1) Work order requests must be complete and detailed as possible. 2) Requests must be submitted to the work control secretary properly and not left on the counter
outside of the custodial office. Non-emergency requests should be submitted at the end of the shift.
3) Emergency work order submissions must be called into the work control secretary as soon as
the emergency is discovered. Examples of emergency requests include:
• Floods • Leaks • Plugged Drains • Damaged electrical equipment that is energized • Any situation that creates a hazard if not addressed immediately.
4) If the situation seems to be the result of student damage indicate it as such on the request. Very often the custodial staff are the “eyes and ears” of the Physical Plant. Report any and all damage and all malfunctions as promptly as possible.

8
Supply Requests Custodians are responsible for ordering and maintaining the cleaning chemicals, materials and equipment. In order to ensure the most efficient use of the colleges resources the following guidelines have been established with regard to ordering supplies;
1) Only order those supplies needed to perform assigned job duties.
2) Order enough supplies for one week. Supplies are delivered every week making it unnecessary to hold more than a weeks worth of supplies in custodial closets.
3) Supply cards must be submitted by Friday at the end of the shift in order to ensure that
orders are properly submitted and filled by the stockroom. 4) Cards must be clearly marked as to what building they are to be delivered.
5) Do not order supplies requested by building occupants. Special requests must be made
through the Custodial Service Office.
6) Do not order large items such as vacuum cleaners or other large equipment on supply cards. Speak to your supervisor to make the request in order for proper authorization to be given to the stock room.
7) All supply cards must be reviewed by the supervisor. Do not go directly to the
stockroom to order supplies.
All custodial closets must be kept properly stocked. It is the responsibility of all custodians to ensure that adequate supplies are ordered and maintained in all areas.
Use of Cell Phones
The use of cell phone while working shall be limited to emergencies only. At no time should a custodian be talking on a cell while performing their assigned job duties. In the event of an emergency in which making or receiving a phone call becomes necessary, stop the work you are performing, handle the call in as short a time as possible then resume working or contact your supervisor if the situation requires immediate attention. Additionally, talking on a cell phone while operating a college vehicle is not permitted.
Use of Headphones and Radios The use of personal headphones, Walkmans, MP3 players and other personal listening devices is permitted within the custodial shop if;

9
1) Their use adheres to accepted safety standards and their cords, connections or application does not create a hazard to the custodian or others in the area.
2) The volume is kept at a level low enough will allow the user to hear activity and
speech in the immediate area. 3) The volume is kept at a level low enough that it does not create a disturbance to others
in the work area. 4) The use of such equipment does not have a negative impact on the performance of the
custodian. Personal radios are permitted in the work area if their use falls within the guidelines established for the use of headphones. Additionally, the material being broadcasted must be of an appropriate nature and does not create a threatening or otherwise negative environment for others in the work area.
Removal of Property
Custodial Services employees are not permitted to remove any property from Hamilton College premises except under the following conditions;
1) The item is property of Hamilton College and prior authorization has been given in writing by a college official authorized to give permission.
2) If borrowing a piece of college equipment it is understood that the equipment will be
returned cleaned and in good working order.
3) If damage or malfunction occurs while the equipment is in your possession disclosure of the damage or malfunction will be made immediately upon the equipment’s return.
At no time shall a custodian keep any property found in any work area. All found property will be reported to the supervisor and attempts will be made to return the property to the rightful owner. Any property deemed to be abandoned will be discarded or donated to an area charity.
Restricted Entry of College Buildings
Custodians should enter a college building only when performing their assigned job duties during their scheduled work hours, to take advantage of facility privileges or to attend campus events. At no time should a custodian enter a residence hall or other restricted access area for the purpose of social interaction unless prior authorization by a college official has been given.

10
Keys
All College keys are to be picked up at the beginning of the shift and returned at the end of the shift. Unless other arrangements have been made to accommodate unusual work assignments all keys are to be placed in the key box outside of the custodial services office in order to secure them for the night. At no time are college keys to be removed or added to a custodial assignment key ring by anyone other than the Assistant Director or Custodial Services Manager in order to maintain the accuracy of the custodial assignment key log.
Personal Communications
Every effort will be made to accommodate the communication needs of custodians with regard to relaying personal communications that come into the Physical Plant office. The following guidelines will be followed with regard to personal messages;
1) All personal messages are to be received through the Physical Plant Staff Assistant or Work Control Secretary @ X4500 or X4502. No messages are to be received in the Custodial Services office.
2) Emergency messages will be delivered immediately to the custodian in their assigned
work area.
3) Non-emergency but time sensitive messages will be relayed to the custodian in a reasonably timely manner that will allow for a timely response to the message.
4) Routine and non-time sensitive messages will be recorded and attached to the
custodian’s time card.
5) At no time should the Custodial Services Office telephone number be given for personal purposes including telemarketers, credit applications or other non work related reasons.
Absenteeism Limits
In order to adequately fulfill the operational needs of the college, limitations for authorized time off within the custodial shop will be as follows;
1) The number of custodians permitted to be off work during regular semester operations will be limited to six (6) individuals on a given day. This includes individuals absent from work due to long term illnesses or injuries.
2) Absences of less than a full day will be included in the above limitations.
3) Absences over the above stated limitations will be permitted during semester breaks
and during periods when operational demands allow for reduced staffing without significant impact to the operation of the custodial shop

11
Section II - Safety

12
Introduction
Safety is the most important concept of any work environment. Each and every
employee in an organization must work diligently to minimize the hazards associated with the
type of work they do. Regardless of the occupation all employees face countless hazards at work
every day. However, there are certain occupations that present a greater hazard to employees.
Physically demanding work, work with hazardous materials and occupations that are inherently
dangerous such as firefighting and law enforcement pose the greatest risk.
As a custodian at Hamilton you are required to perform tasks that may present a risk if
safe work practices are not followed. The hazards associated with custodial work range from
chemical burns to eye injuries to serious bodily injuries and can affect not only the custodian
performing the work but anyone in the immediate area. Most, if not all, of the hazards associated
with custodial operations can be greatly reduced or completely eliminated by adhering to safe
work practices while performing assigned job duties. It is the responsibility of the employee to
follow safety guidelines while working and to report any unsafe conditions in their assigned
work areas.
Increasing regulations and workloads place a greater demand on employees to complete
their assignments in the time allotted. Often shortcuts are used to make up for lost time and
increased demands. It is essential that such shortcuts do not come at the expense of safe work
habits. No matter how restricted time limits become, safety habits should never be compromised.
In most, if not all cases, creative and innovative methods can be utilized to meet these additional
demands. The number one goal of every work day should be to complete the day safe and
healthy. This section outlines safety guidelines for situations and tasks that may be encountered
during the work day. By incorporating the information in this section into your regular work
routine you can significantly reduce the hazards associated with custodial operations here at
Hamilton. Remember, you and only you can make the decision to work safely. Always be aware
of your surroundings, focus on the work being done, and avoid distractions while working.
Never risk an injury in order to complete your assigned duties and always make safety your
number one priority every day.
13
Accident Reporting Timely reporting of on the job accidents is essential to properly administering the workers compensation process. In the event an accident occurs on the job follow the procedures below. For medical emergencies;
1) Call campus safety at X4000. Request an ambulance and be sure to give the exact nature and location of the injury. Campus Safety will notify emergency responders including on-campus EMT’s during the academic year.
2) Secure the accident scene and guard any unsafe conditions to eliminate further
exposure.
3) After the employee has been taken care of, complete the supervisors Accident Investigation Report A-1.
4) Submit the completed form to the Human Resources office within twenty four hours.
For non emergencies;
1) Complete the supervisors Accident Investigation Report A-1. Submit the report to the Human resources office within twenty four hours.
2) Ask the employee to read and sign the Information release form and submit to the
Human Resource office.
3) Give employee Medical provider form to take to their medical provider when they seek treatment.
Even if the employee does not seek medical attention, the Supervisor’s Accident Investigation Report A-1 must be completed for all accidents occurring on the job. Filling out an accident report promptly ensures that should a minor injury become aggravated and more serious, accurate and timely documentation has already been filed with the Human Resources office.

14
Emergencies
Emergencies can and do happen anywhere at any time. Knowing how and when to report emergencies quickly may mean the difference between life and death for any one of us.
FOR EMERGENCIES ON CAMPUS CALL
859-4000 FOR EMERGENCIES OFF CAMPUS CALL
911
Remember, it is always better to be safe than sorry. If you believe that you are faced with an emergency but are not sure call for help anyway. Emergency personnel would rather respond to a false alarm that to have an emergency go unreported!!
Important points to remember when reporting an emergency
When reporting an Emergency be specific about who, what, when, where. Who- Who is involved in the emergency and how many. What- What is the nature of the emergency. (Medical, Fire, Chemical spill, etc.) When- How long has it been since the discovery of the emergency? Where- Identify the exact location of the emergency. Give the building name, floor, and room number when possible.
Remain on the line with the dispatcher until emergency responders arrive or you are instructed by the dispatcher to leave the line.
If you are accompanied by another person, send them to meet the emergency responders and tell the person on the phone you have done so.
15
Machine and Equipment Safety Working in Custodial Services requires the use of many different types of machines including;
• Auto scrubbers • Rotary floor or “Swing” machines • High speed buffers • Vacuum cleaners • Carpet extractors
All of this equipment can present a hazard if not maintained and operated properly. These hazards fall into three major types. They are;
1. Mechanical- Mechanical hazards are those associated with the machines moving parts. The critical areas of a machine are the point of operation and power train.
a. Point of operation is the point that the work actually takes place. In custodial
services this will nearly always be where the machine pad or brush comes into contact with the floor.
b. Power Train is the point at which energy is transferred through moving parts like
gears, drives, cables, belts and shafts.
2. Electrical- These hazards include electric shock, burns and fire. Electrical hazards associated with custodial work are most commonly the result of improper use of the equipment or damaged electrical parts or cords.
3. Noise- Excessive machinery noise may result in temporary or permanent hearing loss.
Generally speaking, equipment used in custodial work does not create enough noise to cause such damage. However, other work being done in the area may create a noise hazard.
When using machinery at work or at home follow these simple steps and minimize the hazards associated with the task at hand;
1. Thoroughly inspect the equipment BEFORE you begin working. Look for damaged parts such as missing guards, cords with damaged insulation, or loose or damaged parts.
2. Be sure to use all PPE necessary to protect yourself AND those around you. This includes, safety glasses, hearing protection, and appropriate safety signage.
3. Work conscientiously. Be aware of your surroundings and what is happing in the area. 4. Upon completion of the work, thoroughly clean and maintain the machine. If any damage
has occurred in the course of operation promptly repair the damage if you can or, if you cannot immediately make the repairs, tag the machine out and report it to your supervisor.

16
Any piece of equipment or machinery that is found to be damaged or malfunctioning should not be used and be immediately tagged out at the power source or other conspicuous place indicating that the equipment is down until repairs are made.

17
Electrical Safety
Electrocution is one of the leading causes of death in the workplace. More than half of these electricity related deaths are caused by two primary causes;
1. Defective electrical equipment 2. Failure to follow safety procedures
Working safely with energized equipment is as important in custodial services as it is in every other occupation. While other employees such as electricians and mechanics may be in contact with energized equipment more frequently, the hazards associated with electrical equipment are still present in everyday custodial operations. The electrical hazards associated with custodial work include;
• Electrical cords that are damaged or have broken insulation. • Loose electrical connections. • Electrical cords or connections that are exposed to water or other liquids. • Electrical equipment that spark, shock, or smoke because they are damaged. • Lack of or improper grounding. • Obstructed access to electrical panels and switches.
Any and all of these hazards could cause electrical current to flow outside of its intended path. If the electrical current does flow through an unintended path, such as your body, the result could be death or serious injury. The injuries that could be caused by electrical shock include;
• Burns • Muscle damage • Heart attack • Organ damage • Blunt force injury caused by falls
To avoid electrical hazards in the workplace follow these helpful hints: DO:
• Check that insulation on vacuums, scrubbers, extractors, and etc. is intact. • Keep electrical equipment properly maintained. • Keep work area clean and organized. • Follow manufacturer’s instructions for all electrical equipment. • Keep electrical panels and switches free from obstructions by at least three feet. • Tag out any piece of equipment that is found to be damaged or malfunctioning.
DON’T:
• Use damaged or defective cords or equipment. • Disable a grounding system. • Use improperly grounded equipment near water. • Make electrical repairs unless you are qualified to do so.

18
• Overload outlets. • Run cords under carpets or mats where they can be damaged.

19
Equipment Guarding
While only a few pieces of custodial equipment have safety guards as a part of their construction, it is nonetheless vital for us all to recognize the importance of machine guarding. Machine guards are in place to prevent contact with the moving parts of a machine. Moving parts such as spinning fan blades, rotating gears, pulleys, belts, and drive heads have the potential to cause injuries if contact with body parts occurs. Additionally, injuries may result from flying objects propelled out of a machine without guarding. These injuries include;
• Amputations • Friction burns • Broken bones • Cuts and bruises • Torn muscles, ligaments, and tendons • Eye and other injuries from flying debris or sparks
OSHA requires that one or more machine guarding methods be in place at;
• Point of operation • Ingoing nip points • Rotating parts • Blades • Pinch points
Machine guards may be fixed, adjustable, interlocking or may be in the form of restraints, controls, or pressure sensing devices.To avoid hazards caused by improper machine guarding in the work place follow these helpful hints; DO:
• Check for guards or other safety devices. • Know and understand how to operate equipment safely. • Make sure all parts are in place. • Ensure all routine maintenance is completed. • Wear appropriate PPE. • Tag out any equipment with missing or damaged guards.
DON’T:
• Disable or remove any guard or safety device. • Operate any piece of equipment that is damaged or improperly maintained. • Wear clothing or jewelry that dangles or may become caught in moving parts • Allow your attention to be distracted from the work being performed. • Allow those in your work area to engage in unsafe behavior.
Machine guards should NEVER be removed, disabled or reached through.
20
First Aid /CPR Awareness
FIRST AID First aid on the job is not strictly related to moderate or serious injuries or illnesses. It is also important to treat minor injuries such as scrapes, burns and slivers promptly. An injury that seems to be nothing more than a scratch can become infected and quickly turn into a serious condition. Examples of situations requiring first aid could include; Stings Burns Asphyxiation Bleeding HeatstrokeAbrasions Dislocations Fainting FracturesFrostbite Hypothermia Choking ContusionsNosebleeds Poisoning Sprains Strains CPR CPR or Cardiopulmonary Resuscitation consists of mouth-to-mouth respiration and chest compressions. CPR allows oxygenated blood to circulate to vital organs such as the brain and heart. CPR can keep a person alive until more advanced methods can be delivered to treat a cardiac arrest victim. CPR started by a bystander doubles the likelihood of survival for victims of cardiac arrest. If you or someone you are working with experiences a minor injury while working, appropriately treat the injury yourself if you can or by going to the health center and immediately notify your supervisor. If a more serious injury or illness occurs, remember these helpful hints: Follow the three C’s; CHECK-CALL-CARE Check the condition of the area and status of the victim Call for help if needed Care for the victim KEEP CALM. Remaining calm while helping the victim will help him/her to keep calm and cooperate. If the victim becomes anxious or excited the extent of the damage from the injury could be increased. ASSESS THE SITUATION. Can you assist the injured person or do you need professional help. SEND FOR PROFESSIONAL HELP. Reaching help quickly could save a life. Know your local emergency telephone numbers. On campus call X4000 BE AN ENCOURAGEMENT TO THE INJURED PERSON. Let the victim know that help

21
is on the way and try to make them as comfortable as possible. Showing care and concern for the victim can give them hope during their circumstances. Working safely and preventing accidents is always the best case scenario. However, despite our best efforts injuries and illnesses can and do occur while working. Knowing what to do and how to do it may be the difference between life and death.
22
Ergonomics Ergonomics is the science of designing a task to fit the worker rather than forcing the worker’s body to fit the task. Adapting the process, work stations, tools, and equipment to fit the worker’s body can reduce the physical stress and prevent many types of repetitive motion injuries. Ergonomics reduce the risk of Musculoskeletal Disorders or MSD’s. These are injuries to the soft tissue of the body including muscles, ligaments, tendons, joints, and cartilage. The parts of the body most frequently affected by MSD’s are;
● Arms ● Back ● Hands ● Wrists ● Fingers ● Legs ● Neck ● Shoulders
There are many factors that contribute to the development of MSD’s. In most cases MSDs are the result when the physical capabilities of the worker do not match the physical requirements of the job. The most common risk factors of MSD’s in custodial services include;
• Force • Repetition from work such mopping, sweeping or vacuuming • Awkward posture from bending, reaching, or squatting • Static posture • Quick motions from trying to work too quickly • Compression or contact stress • Vibration from operating equipment • Cold temperatures
The risk of MSD’s can be minimized or completely eliminated with the right efforts. In order to keep the risk factors at a minimum follow these simple guidelines:
1. Minimize the distance between the load and the body. 2. Use proper lifting techniques. 3. Keep travel distance for the lift to less than ten feet. 4. Avoid twisting at the waist while lifting. 5. Ensure a solid grasp on the load. 6. Tools should be lightweight and designed to allow a relaxed grip and straight wrist. 7. Tools should be designed to be used with either the left or right hand. 8. Handles should be designed to allow for the greatest possible contact with the hands. 9. Use power tools whenever possible to reduce human force necessary to complete the
work. 10. Minimize vibration of tools and equipment.
Following these simple steps can greatly reduce the risk of injury or illness due to physical demands on the job. Be conscious of how you are performing tasks and take steps to minimize the ergonomic hazards associated with custodial work.

23
Stress Management Stress is an unavoidable fact of life. We all experience stress in our lives from time to time from various causes. How we deal with stress can either compound or reduce the effects stress has on our bodies. By definition stress is the physical and emotional response to pressure, change, fear, or the unknown. In order to understand and control stress in our lives we must first learn to identify the physical and emotional responses. Physical reactions to stress include;
• The release of adrenaline. • Muscle tension • Increased heart rate • Perspiration
Emotional responses to stress include;
• Anger • Fear • Sadness • Mental fatigue • Confusion
Long term repeated or constant stress can be physically and emotionally harmful. If long term stress is not dealt with positively it could lead to;
• Increased risk of heart attack • Strong headaches • Exhaustion and susceptibility to illness • Depression • Panic or anxiety attacks
Dealing Effectively with Stress
Signs and Symptoms of stress
Physical & Emotional Responses
Identify cause Identify ways to release
Long Term Short Term
Eliminate cause
Learn to cope

24
Heat Related Illness
People suffer heat-related illness when the body's temperature control system is overloaded. The body normally cools itself by sweating. However, under some conditions sweating just isn't enough to cool the body sufficiently. In such cases, a person's body temperature rises rapidly. Very high body temperatures may damage the brain or other vital organs. Several factors affect the body's ability to cool itself during extremely hot weather. When the humidity is high, sweat will not evaporate as quickly, preventing the body from releasing heat quickly. Other conditions that can limit the ability to regulate temperature include age, obesity, fever, dehydration, heart disease, poor circulation, sunburn, and drug and alcohol use. As a custodian here at Hamilton College you are required to work in conditions that are hot and physically demanding. In order to protect yourself from the dangers of heat related illnesses, know how to recognize the signs and how to treat them once they occur.
Two common heat related illnesses are Heat Exhaustion and Heat stroke.
Heat Exhaustion
Heat exhaustion is the body's response to an excessive loss of water and salt contained in sweat. Those most prone to heat exhaustion are elderly people, people with high blood pressure and people working or exercising in a hot environment.
Recognizing Heat Exhaustion; warning signs of heat exhaustion include:
• Heavy sweating • Paleness • Muscle cramps • Tiredness • Weakness • Dizziness • Headache • Nausea or vomiting • Fainting
The skin may be cool and moist. The victim's pulse rate will be fast and weak, and breathing will be fast and shallow. If heat exhaustion is untreated, it may progress to heat stroke. Seek medical attention immediately if;
• Symptoms are severe, or • The victim has heart problems or high blood pressure.
Otherwise, help the victim to cool off, and seek medical attention if symptoms worsen or last longer than 1 hour. Cooling measures that may be effective include:
• Drinking Cool, non-alcoholic beverages • Rest

25
• Cool shower, bath, or sponge bath • An air-conditioned environment • Lightweight clothing
Heat Stroke
Heat stroke occurs when the body becomes unable to control its temperature and the body's temperature rises rapidly, the sweating mechanism fails, and the body is unable to cool down. Body temperature may rise to 106°F or higher within 10-15 minutes. Heat stroke can cause death or permanent disability if emergency treatment is not given.
Recognizing Heat Stroke; Warning signs of heat stroke vary but may include:
• An extremely high body temperature (above 103°F, orally) • Red, hot, and dry skin (no sweating) • Rapid, strong pulse • Throbbing headache • Dizziness • Nausea • Confusion • Unconsciousness
What to Do
If you see any of these signs, you may be dealing with a life threatening emergency. Have someone call for immediate medical assistance while you begin cooling the victim.
• Get the victim to a shady area.
• Cool the victim rapidly using whatever methods you can For example, immerse the
victim in a tub of cool water; place in a cool shower; spray with cool water from a
garden hose; sponge with cool water; or if the humidity is low, wrap the victim in a
cool, wet sheet and fan him or her vigorously.
• Monitor body temperature, and continue cooling efforts until the body temperature
drops to 101-102°F.
• If emergency medical personnel are delayed, call the hospital emergency room for
further instructions.
• Do not give the victim alcohol to drink.
• Get medical assistance as soon as possible.
Sometimes a victim's muscles will begin to twitch uncontrollably as a result of heat stroke. If this happens, keep the victim from injuring himself, but do not place any object in the mouth and do

26
not give fluids. If there is vomiting, make sure the airway remains open by turning the victim on his or her side.
These self-help measures are not a substitute for medical care but may help you recognize and respond promptly to warning signs of trouble. Your best defense against heat-related illness is prevention. Staying cool and making simple changes in your fluid intake, activities, and clothing during hot weather can help you remain safe and healthy.

27
Universal Waste
Universal waste in general is waste material of high volume but low toxicity. These materials fall into four major categories. They are;
• Batteries ( Rechargeable not alkaline) • Used lamps • Mercury containing thermostats • Pesticides
While all four of these categories are universal waste by definition, only batteries and lamps are handled as universal waste by Custodial Services. Each work area on campus has a designated universal waste collection point. It is the responsibility of the custodial assigned to the work area to ensure that all applicable regulations are followed. These regulations include;
• All lamp types must be collected in an original container or other sturdy container to prevent breakage.
• Each lamp type must be collected in a separate container. • The container must be labeled properly as soon as the first bulb is placed in it. Correct labeling procedures include;
1. Contents ( Type of lamp) 2. Accumulation start date ( Date first bulb is placed in container) 3. Shipper ( College name & address)
• Contents line is filled in when container is full indicating total number of lamps in container and ready to be transported to Physical Plant.
Weekly inspections must be conducted to ensure that;
1. All lamps are stored in a container and all constrainers are closed and
labeled properly.
2. Start date on container does not exceed 1 year.
3. No broken lamps are stored in a collection point or custodial closet. We all share in the responsibility to ensure that the college is managing generated waste streams appropriately. Not only is it mandatory by regulatory requirements but it is the right thing to do to protect the environment. While this summary outlines custodial services role in managing universal waste, it does not discuss every facet of the college’s program. For a comprehensive discussion of the college’s universal waste program please obtain and review a copy of the Hamilton College EHS Waste Management and Minimization Plan

28
Hazardous Waste Hazardous waste generated in the performance of custodial operations is generally minimal. However, it is likely that hazardous waste will be in your work area and it is therefore important to recognize the different types of hazardous waste and what to do if it becomes necessary to handle it. Examples of hazardous waste you may encounter during your work day include;
• Flammable, corrosive, reactive and toxic waste generated by laboratories. • Waste solvents, oils, and paints generated from vehicle/equipment maintenance and
painting operations. • Waste pesticides generated by horticulture operations. • Flammable and corrosive waste generated from printing operations. • Photographic chemicals from darkroom operations. • Ceramic, painting, and printmaking waste from art department activities. • Other miscellaneous waste from non-specific sources.
In most cases where hazardous waste is generated in your work area, someone in that area is designated as being responsible for collection, storage and disposal of hazardous waste. Examples of areas where hazardous waste is routinely generated are the List Arts Center, the Science Building, and the Physical Plant. There are two primary situations in custodial operations that would result in you being required to handle hazardous waste. The first is if you were to discover an old container of an obsolete cleaning chemical that is a corrosive. In this situation you should contact your supervisor to deal with the chemical. The second is if you discover some type of hazardous material in a student’s room during dorm clean up. In this case you should immediately contact your supervisor for guidance. As a rule of thumb to keep you safe, when in doubt error on the side of caution. If you discover some type of material that you cannot identify or are unsure of the identity, contact your supervisor for guidance. NEVER dispose of unknown materials in the trash or down the drain. Likewise, if you discover an old container of chemicals that you are familiar with but is no longer used, do not dispose of down the drain. Notify your supervisor to deal with the material. While this summary outlines custodial services role in managing hazardous waste, it does not discuss every facet of the college’s program. For a comprehensive discussion of the college’s hazardous waste program please obtain and review a copy of the Hamilton College EHS Waste Management and Minimization Plan.

29
Recycling Practice and Policy Recycling practice is often misunderstood. Recycling is really only one component of a three step process. A comprehensive waste reduction and minimization program is structured around the concept of Reduce, Reuse, and Recycle.
• Reduce- Always look for ways to reduce the amount of waste generated in the first place. A good example of this is to always try to print documents on BOTH sides of each sheet of paper. This simple step will significantly reduce the amount of printer paper used. How many other simple ways can you think of to reduce waste?
• Reuse- Always try to get the maximum use out of any type of material. For example, If you drink beverages out of paper or Styrofoam cups, rinse the cup out and reuse it rather than throwing it out after the first use. How many times do you think a paper cup can be reused?
• Recycle- Lastly is the concept of recycling. Many materials can be collected and processed into other useful products. While there is a limitless list of materials that can be recycled, the materials recycled in any program depends on the structure of the program.
Here at Hamilton, materials that are collected and recycled include;
• Office paper • Junk Mail • Newspaper • Ink Cartridges • Cardboard • Paper Board
• Used Batteries • Beverage Containers • Tires • Pallets • Scrap iron
Each of the above groups, with the exception of used batteries, pallets, tires, and scrap iron, must have a receptacle at each collection point. Used batteries and ink cartridges are collected in a centralized collection point located it the lobby of Beinecke Village. Tires, pallets, and scrap iron is collected at the Physical Plant. Contamination of the recyclable is another concern. A small amount of contamination is acceptable but is undesirable. +/- 5% contamination is the acceptable level of contamination here at Hamilton with the exception of liquids on paper. NO wet paper is acceptable. In order to ensure that custodial Services is doing all we can to support recycling efforts here at Hamilton follow these simple guidelines;
• All recyclables must be collected in clear bags. • All collection containers and/areas must be properly marked. • Small desk side containers are the responsibility of the office occupants. • Materials must be separated into groups before being placed out for curbside
collection. • If you encounter a trash receptacle that is routinely filled with recyclable material
contact Terry Hawkridge so that he can address the issue with the individual.

30
Remember 90% of any recycling program is public relations and promotion. Always encourage those around you to participate to the highest degree they can.

31
Personal Protective Equipment Personal Protective Equipment, or PPE, is used to reduce employee exposure to hazards when engineering and administrative controls are not feasible or effective. PPE includes;
• Eye and face Protection • Respiratory Protection • Head Protection • Occupational foot protection • Hand protection • Electrical protective devices
Eye and Face Protection-Eye and face protection includes Safety glasses, Goggles, and face shields. Custodians should use eye and face protection when there is a risk of being exposed to hazards from flying particles, liquid chemicals, acids or caustic liquids, chemical gases or vapors, potentially injurious light radiation, or during procedures that are likely to generate droplets of blood or body fluid that could be splashed onto mucous membranes of the mouth, nose and eyes.
Respiratory Protection-Respiratory protection ranges from Atmosphere Supplying Respirator such as SCBA equipment down to a simple filtering face piece such as a dust mask. Custodians should never wear, or be working in conditions that require, respiratory protection other than a filtering face piece for voluntary reasons. All other types of respirators require the individual to be fit tested and certified before they can be used. Serious health risks may occur if an uncertified individual wears a respirator other than a filtering face piece.
Head Protection -Custodians must wear a protective helmet when working in areas where there is a potential for injury to the head from falling objects. Custodians here at Hamilton will most likely not be exposed to this type of hazard in the performance of their regular job duties. However, should it become necessary for a custodian to enter a work area where falling objects may be present, such as an active construction area, it will be necessary to contact a supervisor and obtain proper head protection.
Occupational Foot Protection -Custodians must use protective footwear when working in areas where there is a danger of foot injuries due to falling or rolling objects, or objects piercing the sole, and where such employee's feet are exposed to electrical hazards. In general, the only type of foot wear not allowed while working in custodial services is open toe shoes, clogs, or slides. Custodians may wear sneakers, work boots, casual shoes or any other type of shoe that covers the entire foot up to the ankle.
Hand Protection- Custodians must use appropriate hand protection when they are exposed to hazards such as those from skin absorption of harmful substances; severe cuts or lacerations; severe abrasions; punctures; chemical burns; thermal burns; and harmful temperature extremes. A variety of types of gloves are supplied and the appropriate type and size should be used according to the hazard associated with the task being performed.

32
Electrical Protective Devices- Electrical protective devices are those pieces of PPE designed to protect individuals while working on electrical equipment. AT NO TIME SHOULD A
CUSTODIAN BE MAKING ELECTRICAL REPAIRS. Therefore this type of PPE will not be applicable to Custodial Services.
Hearing Protection- Custodians generally are not subjected to hazardous noise exposure while working. However, it is nonetheless important to recognize the importance of hearing protection and the risk associated with exposure to excessive noise. 85 Decibels (dB) is the “Action Level” at which hearing protection is required. Ear plugs and ear muffs are the two most common types of hearing protection. When used properly, these two types of devices will provide adequate hearing protection. In order to gain an understanding of the amount of noise generated under varying conditions, the following list identifies dB levels of a few common sources.
• 10 dB- Rustle of a leaf. • 20 dB- A whisper. • 60 dB- Normal conversation. • 80 dB- City traffic. • 90 to 110 dB-Typical stereo headphone volume. • 100 dB- Wood working tools. • 140 dB- rock concert, firecrackers, jet engine at takeoff. • 140 to 165 dB- Gunfire.
General PPE- Personal Protective Equipment also includes protective clothing such as aprons, laboratory coats, coveralls, specialized clothing used in welding and cutting operations, and even everyday clothing such as long sleeve shirts, long pants, and clothing worn to protect from cold temperatures. It is essential to recognize the importance and understand the proper use of PPE. The risk of injury on the job can be significantly reduced with the proper selection and use of PPE. As a custodian at Hamilton College you share in the responsibility to be sure that all appropriate PPE is being used as required and recommended. The college supplies all PPE as necessary and encourages each custodian to do all they can to ensure the safety of themselves and those around them.

33
Blood Borne Pathogens/ Universal Precautions What are Universal Precautions?
Universal precautions are infection control guidelines designed to protect workers from exposure to diseases spread by blood and certain body fluids.
Barrier protection should be used at all times to prevent skin and mucous membrane contamination with blood, body fluids containing visible blood, or other body fluids (cerebrospinal, synovial, pleural, peritoneal, pericardial, and amniotic fluids, semen and vaginal secretions). The type of barrier protection used should be appropriate for the type of procedures being performed and the type of exposure anticipated. Examples of barrier protection include disposable lab coats, gloves, and eye and face protection.
Gloves are to be worn when there is potential for hand or skin contact with blood, other potentially infectious material, or items and surfaces contaminated with these materials.
Wear face protection (face shield/eye protection) during procedures that are likely to generate droplets of blood or body fluid to prevent exposure to mucous membranes of the mouth, nose and eyes.
Wear protective body clothing (disposable laboratory coats) when there is a potential for splashing of blood or body fluids.
Wash hands or other skin surfaces thoroughly and immediately if contaminated with blood, body fluids containing visible blood, or other body fluids to which universal precautions apply.
Wash hands immediately after gloves are removed.
Avoid accidental injuries that can be caused by needles, scalpel blades, laboratory instruments, etc. when performing procedures, cleaning instruments, handling sharp instruments, and disposing of used needles, pipettes, etc.
Used needles, disposable syringes, scalpel blades, pipettes, and other sharp items are to be places in puncture resistant containers marked with a biohazard symbol for disposal.
Universal precautions were developed for those working in the healthcare field. However, the relevance and applicability of these guidelines to custodial and housekeeping operations makes them useful as a sound guide to best practice policy. Exposure to potentially infectious material is a very real hazard in custodial services. It is essential that every precaution be taken in order to prevent exposure to biological pathogens while performing assigned job duties. These guidelines are directly applicable to Blood Borne Pathogen procedures for custodians here at Hamilton. When the need to deal with a significant blood spill or other potentially infectious material arises, be sure to follow these guidelines in order to protect yourself and those around you.

34
Ladder Safety
Custodians at Hamilton College are often required to work from step ladders in order to safely perform their regular job duties. Step ladders generally are found in standard heights of three, four, six, eight, and ten foot heights continuing up to eighteen feet. Ladders are generally made from aluminum, wood, and fiberglass. Each has different advantages and disadvantage. Aluminum, for example, is very light and easy to carry and maneuver. However, it is a good conductor of electricity making it unsuitable for an electrician. Ladders are also “Duty Rated” meaning they are designed to support only a limited amount of weight. If this duty rating is exceeded the ladder could collapse causing serious injury to the custodian or a bystander. It is therefore extremely important to know the duty rating of a ladder and stay within those limits. Ladders are sold with all pertinent information clearly printed and displayed. However, over the course of time this labeling can become obscured and unreadable. If you need to know the load rating or other pertinent information about a ladder but cannot read the labels, contact your supervisor to obtain the information before using the ladder. In order to minimize the risk associated with this type of work follow these simple guidelines;
• Always inspect the ladder steps and frame for damage before using. • If damage is discovered, promptly report it to your supervisor and
do not use the ladder. Tag out procedures used for tagging out equipment should also be applied to ladders.
• Position the ladder so that it is firmly situated on all four legs and level. • Position the ladder so that the work can be done with a minimum of reaching. • Never exceed the duty rating of the ladder. • Never stand on the top two steps of the ladder. • Never place a ladder on a table or other desk to gain height. • Never use a ladder in a manner other than it is designed for.
Ladders are necessary for safe completion of many tasks in custodial operations. Their use should be an aid to getting the work done and not a hazard in the workplace. It is essential to use them properly to avoid any injuries from falling off of a ladder. In addition to using ladders safely, it is important to understand the importance of knowing when to use them in the first place. Chairs, desks, tables, and other pieces of furniture should never be used to reach work overhead. If you are unable to reach the work you should use a ladder to gain the needed elevation. Items such as tables and chairs are not designed to be used in such a manner and doing so greatly increases the risk of tipping and falling. Additionally, tables and chairs are generally not load rated and it is therefore a risky gamble to see if the item will bear your weight and the weight of tools and materials.

35
Slips and Trips Slip, trip and fall accidents are among the most common accidents resulting in work related injuries and general liability lawsuits. This type of accident can happen anywhere, anytime and, to anyone and may result in serious injuries such as back injuries, serious head injuries, broken bones, strains, sprains, lacerations, and even death. Most of these injuries result from a fall to the same level as the individual is walking on or on stairs. It is very infrequent that a slip and fall is from one level to another such as from a stage to a floor. The custodial staff has a high degree of influence in preventing this type of accident. Hamilton’s custodians are the first line defense in identifying and correcting potential slip hazard on a daily and ongoing basis. Slips Slips occur because there is too little friction or traction between footwear and the walking surface. Common causes of slipping include;
• Wet walking surfaces • Oil or other slippery substances on surfaces. • Ice, snow or mud on the bottom of footwear. • Scraps of paper, cloth, or plastic on the floor. • Unanchored runner matting or area rugs. • Highly polished floors or smooth floor coverings. • Inappropriate footwear.
Trips Trips are a result of a person’s foot or feet comming in contact with obstructions or dropping to a lower level unexpectedly causing them to lose their balance. Common causes of trips include;
• Cords, hoses, or ropes across walking surfaces. • Uneven or damaged walking surfaces. • Frayed, wrinkled, or torn carpeting. • Tools, equipment, or supplies laying in isles or walking areas. • Insufficient lighting. • Obstructed views of walking surfaces. • Changes in elevation of walking surfaces such as thresholds, curbs, or ramps.
Preventing Slip, Trip, and Fall Accidents
Most if not all of slip, trip, and fall accidents are preventable with the right precautions. In order to minimize the risk of this type of accident at Hamilton, follow these helpful guidelines aimed at reducing the hazards most commonly associated with slip, trip, and fall accidents;

36
1. Regularly inspect your assigned work area to identify slip, trip and fall hazards and promptly remedy them or report hazards to your supervisor.
2. Work consciously of your physical environment. Know where steps are and avoid
distractions while working.
3. Increase slip resistance of walking areas by ensuring proper placement of entry matting, performing appropriate floor maintenance, and promptly responding to spills.
4. Clearly display safety signage in all areas where floors are wet due to custodial
operations, rain or snow being tracked in from the outside, or liquids on the floors from leaks etc.
5. Ensure that handrails or railings are secure and in good condition.
6. Changes in floor elevation are clearly marked and illuminated.
7. Wear proper footwear when working on slippery surfaces.
8. Keep all walking areas free from obstructions which could create a tripping hazard.
9. Keep your view unobstructed while walking.
10. Practice good housekeeping while working. Keep tools and equipment organized and
properly stored.
11. Promptly report any and all falls to your supervisor whether you are involved or you are a witness to the fall.
37
Ride On Auto Scrubber Safety Ride on auto scrubbers are included in the equipment used in custodial services each day here at Hamilton College. While not all custodians use this type of equipment every day, it may become necessary to operate this type of equipment at any time. In order to prevent injury to the operator and damage to the machine, it is important to practice good safety habits while operating the equipment. Before beginning work with a ride on auto scrubber, know and understand the safety guidelines for this type of equipment. They include;
• Always receive training on the proper operation of ride on auto scrubbers and read and understand operator’s manual BEFORE beginning operation.
• Check to be sure that all caution, warning, and instructional decals are in place
prior to operation.
• Store or park the machine on level surfaces only. Remove keys from switch if machine is left unattended.
• Never leave machine unattended while it is running.
• Always engage safety break when not on the machine.
• Never pick up flammable materials or liquids with the machine.
• Never operate the machine with bare feet or open toe shoes.
• Keep hands and feet away from moving parts.
• Always remove large debris from floor before operating machine.
• Never pick up and carry or attempt to move objects while operating the machine.
• Always remain aware of others in your work area. Be sure that nobody has
walked up behind the machine before backing up.
• Never use the machine to push or pull another machine or object.
• Always shut machine off and remove the keys before changing pads or other moving parts.
• Maintenance and repairs should only be made by a qualified technician.
Failure to follow these guidelines could result in death or serious injuries to the operator or bystanders. A ride on auto scrubber could weigh as much as a small automobile and if not properly operated could be as dangerous as an automobile. If you have not received proper training on the operation of a ride on auto scrubber, always contact your supervisor before attempting to use the machine.

38
Forklift Safety There are nearly 100 fatal accidents and another 20,000 people are injured in the United States every year involving forklift related accidents. The most frequent causes of forklift accidents are overturns, bystanders being struck, and operators falling from forklifts. Of these three causes of forklift accidents turnovers are the leading cause of death. Because of the infrequency with which custodial services uses forklifts, a tendency to become complacent may occur. It is important to remember that it is necessary to be safety conscious no matter how often a piece of equipment is operated. In order to minimize the hazards associated with the operation of a forklift, remember and follow these safety guidelines;
• Do not use a forklift unless you are trained and certified to do so.
• Always perform a pre operation inspection to look for damage or other problems.
• Always use seat belts and other safety devices provided.
• Use extreme caution on ramps and grades.
• Do not raise or lower the forks while moving.
• Never exceed the load capacity of the forklift.
• Never operate the forklift at excessive speeds.
• Slow down and sound the horn when entering or crossing areas where vision is limited.
• Never allow passengers to ride on the forklift.
• Do not use forks to elevate other workers standing on the forks or a pallet.
• Always set the parking break, completely lower the forks, and neutralize the
controls before dismounting the forklift.
• Avoid sharp or fast turns. Keep turning radius as wide as space permits.
• Never jump from an overturning forklift. Stay with it and lean in the opposite direction.
When operating a forklift or any other piece of material handling equipment always adhere to all safety rules pertaining to that type of equipment. Accidents can and do happen quickly and working safely is essential. If you are unsure of correct operation or discover any damage or other problems contact your supervisor immediately and wait to use the equipment.
39
Motor Vehicle Safety As Custodians here at Hamilton College you are required to either ride in or operate motor vehicles during work every day. These motor vehicles include pick up trucks, passenger vans, and cargo vans. All drivers must observe all local, state and federal motor vehicle laws pertaining to operating a vehicle on public roadways. Additionally, OHSA and college rules apply to the operation of College vehicles in the performance of your regular job duties. General guidelines for the safe operation of a motor vehicle include;
• Keep all doors closed during operation. • Obey all traffic laws including speed limits and directional signals.
• Keeping arms and legs inside of the vehicle while it is moving.
• Do not fill portable gasoline containers while they are in the vehicle.
• Avoid leaving portable gasoline containers in a vehicle while it is being operated.
• Pull over and turn engine off if temperature or oil pressure gauges go in to danger
zones. Additionally, it is important that you do not use a vehicle that does not comply with OSHA and manufacturer standards. These include;
• At least two operational headlamps and taillights.
• A working parking and emergency brake system.
• Operational horn, reflectors, and other warning devices.
• Functioning windshield wipers and a windshield with no broken or cracked glass.
• Functioning seat adjustments and seatbelts.
• Proper tire pressure and adequate tread.
• Properly charged fire extinguisher in an accessible location. A safety inspection should be performed on each vehicle at the beginning and end of each shift. If you become aware of damage or other problems notify your supervisor immediately.

40
Fire Extinguishers Knowing how and when to use fire extinguishers properly may mean the difference between a minor incident and a disastrous large scale fire. As a custodian here at Hamilton College It is not part of your assigned job duties to use a fire extinguisher. However, if a small fire erupts in your work area and you are confident that you can contain the flames with a fire extinguisher your fast actions can prevent serious injury or property damage. As a custodian it may be helpful to know three basic facts regarding fire extinguishers in your work area;
1. Location of each fire extinguisher- The placement of each extinguisher has been determined through the building and fire codes. Knowledge of the locations of the extinguishers in your work area could save precious seconds if a fire erupts.
2. Correct operation of a fire extinguisher- There is a simple acronym to help remember
how to operate most fire extinguishers - PASS. PASS stands for Pull, Aim, Squeeze and Sweep.
Pull the pin at the top of the cylinder. Some units require the releasing of a lock latch or pressing a puncture lever.
Aim the nozzle at the base of the fire.
Squeeze or press the handle.
Sweep the contents from side to side at the base of the fire until it goes out.
3. Types and uses of various extinguishers- Fires are divided into five classes. They are class A, B, C, D, and K. depending on the type of materials that catches fire.
a. Class A- Ordinary combustible materials such as wood, paper, rags, and etc. For
this class of fire a water or dry chemical (ABC) multi-purpose extinguisher may be used.
b. Class B- Flammable and combustible liquids and gasses including oils, greases
and other similar materials. A Carbon Dioxide, Dry-Chemical (AB), or Dry Chemical (ABC) extinguisher may be used. A water extinguisher should never be used on a class B fire.
c. Class C- Energized or live electrical equipment and wiring. A Carbon Dioxide,
Dry-Chemical (AB), or Dry Chemical (ABC) extinguisher may be used. A water extinguisher should never be used on a class C fire.
d. Class D- Combustible metals such as aluminum, magnesium, titanium, sodium,
and potassium. A dry powder extinguisher should be used on a class D fire. This class of fire should never be approached by untrained personnel. A water extinguisher should never be used on a class D fire
41
e. Class K- Cooking oils and combustible cooking materials.
In order to ensure that you do not become a victim of a fire you are trying to control, you should fight a fire with a fire extinguisher only when you are confident that:
1. Everyone has left or is leaving the building.
2. Campus Safety has been called at X4000
3. The fire is small and confined to the immediate areas where it started such as in a wastebasket, cushion, small appliance, stove, etc.
4. You can fight the fire with your back to a safe escape route.
5. Your extinguisher is rated for the type of fire you are fighting and is in good working order.
6. You have had training in use of the extinguisher and are confident that you can operate it effectively.
Remember, if you have the slightest doubt about whether or not to fight the fire DON'T. Instead, get out closing the door behind you to slow the spread of the fire. You have your local fire departments standing by ready to protect you. Let the professionals do their job.
42
Flammable/Combustible Material Safety One of the simplest ways to prevent a fire is to ensure that flammable and combustible materials are stored and handled properly. While these two terms are often used interchangeably there is a difference between the two. The accurate definitions of each are; Combustible Materials- A material that has the ability to act as a fuel and will burn when introduced to a source of ignition. Combustible materials include materials such as wood, paper, plastics, cloth, and etc. Simply stated combustible materials create a risk of fire only when heated. Flammable Materials- Materials that have the ability to generate a sufficient concentration of combustible vapors at room temperature. Gasoline is a common example of a flammable material. Simply stated flammable materials present a risk of fire at room temperature. As custodians here at Hamilton College you share the responsibility to control the storage of combustible and flammable materials in your work areas. In order to minimize the hazards associated with storage of flammable and combustible materials, be sure that these materials are properly stored and handled according to the following guidelines;
1. Storage of combustible and flammable materials must be at least two feet from the ceiling and 18 inches below sprinkler head deflectors.
2. Combustible and flammable materials must not be stored in exit corridors or exit
enclosures.
3. Combustible and flammable materials should not be stored in boiler rooms, mechanical rooms, or electrical equipment rooms.
4. Flammable liquids must be stored in approved containers.
5. Oily rags and similar materials must be stored in approved containers.
6. Lighted matches, cigarettes, cigars, or other burning objects must not be discarded
in such a way that they could cause ignition of other combustible materials.
7. Combustible and flammable materials should not be stored in custodial closets or storage areas.
8. Smoking is not permitted when using aerosol sprays or other flammable liquids.
Fire safety on campus is a shared responsibility. By ensuring that we have done all we can to reduce the risk of fire we significantly improve the status of our facilities here at Hamilton. If you are unsure if a certain situation in your work area presents a fire risk, contact your supervisor immediately to address the situation.
43
Facility Fire Safety Guidelines Facility fire requirements are guidelines that have been established as fire inspection safety points as identified by Hamilton’s Office of Campus Safety. Campus Safety inspects all college facilities based on ten requirements; these ten requirements are;
1. All areas are generally clean and free of clutter and unnecessary debris.
2. No excess storage of combustible material is present.
3. Fire extinguishers are present, in working order, and unobstructed.
4. Fire doors are present, in working order, and unobstructed.
5. Exit corridors, passageways, hallways, etc are maintained free of obstruction.
6. Exit signs are clearly visible and maintained.
7. Flammable and combustible liquids are properly stored and maintained as needed.
8. Electrical panels/equipment are maintained properly and unobstructed.
9. Extension cords/power strips are being used properly.
10. Decorative materials are not obstructing safety equipment nor posing a hazard. These guidelines are the same as those used by Residential life and Campus Safety to conduct their fire safety inspections. By being watchful of these same situations we can help to ensure that Hamilton’s facilities are as safe as they can be. Fire safety on campus is a shared responsibility. By ensuring that we have done all we can to reduce the risk of fire we significantly improve the status of our facilities here at Hamilton. If you are unsure if a certain situation in your work area presents a fire risk, contact your supervisor immediately to address the situation.

44
Chemical Spill Response and Reporting Chemical spills can be as harmless as spilling a small amount of undiluted cleaning concentrate to a catastrophic spill of thousands of gallons of fuel from a tanker. As a custodian here at Hamilton College your response to a spill will depend on the type and size of the spill. Minor non-emergency spills can be contained and cleaned up without extraordinary measures being implemented. Take the necessary steps to contain the spill, clean it up, and report it to your supervisor promptly. However, if an emergency spill takes place the following steps must be carried out; 1. Any emergency spillage of a hazardous chemical or radioactive material must be reported
immediately to Campus Safety ext 4000. 2. When reporting be specific about the nature of the involved material and exact location.
Campus Safety will contact the necessary specialized authorities and medical personnel. (Campus Safety must contact the Radiation Safety Officer, Dave Gapp, for radiation spills.)
3. If possible, the individual discovering the spill should vacate the affected area at once and
seal it off to prevent further contamination of other areas until the arrival of Campus Safety Personnel.
4. Anyone who may be contaminated by the spill is to avoid contact with others as much as
possible, remain in the vicinity and give their names to Campus Safety. Required first aid and cleanup by specialized authorities should be started at once.
5. If the spill threatens other building occupants, an emergency spill exists. Activate the
building alarm to signal an evacuation, walk quickly to the nearest marked exit, and proceed to the building’s initial gathering point.
6. ASSIST THE HANDICAPPED IN EXITING THE BUILDING! Remember that elevators
are reserved for handicapped persons. Do not use elevators in case of fire. Do not panic. 7. During actual emergencies with building evacuations, your designated place of shelter is the
primary assembly point, or alternate assembly point if the emergency is impacting your primary location. Proceed to your assembly point from your initial gathering point once instructed to do so by your Building Coordinator or RA. Keep streets, fire lanes, hydrants and walkways clear for emergency vehicles and crews.
8. If requested to do so, assist emergency crews as necessary. 9. A command post may be set up near the emergency site. Keep clear of the command Post
unless you have official business. 10. DO NOT RETURN TO AN EVACUATED BUILDING unless told to do so by college
officials. IMPORTANT: Remember—During an actual emergency resulting in a building evacuation, HEADCOUNTS are to be performed at the assembly point(s), not the initial

45
gathering point. Stay there until an accurate HEADCOUNT has been taken. Building Coordinators will take attendance for all college employees, faculty/supervisory personnel will take attendance for all students/student employees, and RA’s will take attendance for all students in evacuated dormitories.
46
Emergency Evacuation Hamilton Faculty, Staff, Administrators & Students
• Know the location of both the initial gathering point and assembly point for the primary buildings where you reside, teach, work, etc., and understand the difference between the two.
• Always respond to an evacuation signal (fire alarm) as if it were an actual emergency.
• If you discover an actual emergency, immediately leave the area, alert others to do the same by verbal commands or a fire alarm station, and go to the nearest telephone and call Campus Safety at x4000. Give the dispatcher as much information as possible regarding the type, nature and location of the emergency. If a building evacuation is required, report to your initial gathering point to await further instruction by your designated building coordinator, faculty member or RA. Initial Gathering Points Each building on campus, academic and residential, has an initial gathering point, which is a location near the building where occupants should gather immediately following an evacuation signal (fire alarm) to await further instructions. These initial gathering points have been selected by Building Coordinators for academic buildings, and RA’s for residential facilities. Please contact your designated Building Coordinator or RA if you have not been advised of your building’s initial gathering point. Assembly Points Each building on campus, academic and residential, has a primary and alternate assembly point, which is a secure location of assembly in the event of a real emergency. Were a true emergency to exist, individuals at the initial gathering point will be instructed to proceed to the primary or alternate assembly point, until either the emergency is terminated or further instructions are received from local authorities.
South Campus Residence Halls
Building Primary Location Alternate
Major Beinecke Events Barn McEwen Dining Hall
Minor Beinecke Events Barn McEwen Dining Hall
Mcintosh Beinecke Events Barn McEwen Dining Hall
Keene Beinecke Events Barn McEwen Dining Hall
Root Beinecke Events Barn McEwen Dining Hall
Babbit Beinecke Events Barn McEwen Dining Hall

47
Milbank Beinecke Events Barn McEwen Dining Hall
Root Farm House McEwen Dining Hall Commons Dining Hall
South Campus Academic Buildings
Building Primary Location Alternate
List Art Beinecke Events Barn McEwen Dining Hall
Schambach Center Beinecke Events Barn McEwen Dining Hall
Kirner-Johnson Beinecke Events Barn McEwen Dining Hall
McEwen Beinecke Events Barn Commons Dining Hall
Beinecke Village McEwen Dining Hall Commons Dining Hall
Pub McEwen Dining Hall Commons Dining Hall
ELS McEwen Dining Hall Commons Dining Hall
North Campus Residence Halls
Building Primary Location Alternate
Dunham Commons Dining Hall Field House
Saunders Commons Dining Hall Field House
Griffin Road Apartments Commons Dining Hall Field House
Carnegie Commons Dining Hall Field House
South Commons Dining Hall Field House
North Commons Dining Hall Field House
Kirkland Commons Dining Hall Field House
Rogers Bristol Hub Bundy Dining Hall
Woollcott Bristol Hub Bundy Dining Hall
Ferguson Bristol Hub Bundy Dining Hall
Bundy East Bristol Hub Bundy Dining Hall
Bundy West Bristol Hub Bundy Dining Hall
DKE Bristol Hub Bundy Dining Hall
Wally Johnson Bristol Hub Bundy Dining Hall
Eells Bristol Hub Bundy Dining Hall
Skenandoa Bristol Hub Bundy Dining Hall
North Campus Academic Buildings
Building Primary Location Alternate
Physical Plant Bristol Hub Beinecke Events Barn
Saunders Hall Commons Dining Hall Field House
48
Athletics Commons Dining Hall Field House
Bristol Pool Commons Dining Hall Field House
Sage Rink Commons Dining Hall Field House
Scott Field House Commons Dining Hall Beinecke Events Barn
Science Center Commons Dining Hall Field House
C.A. Johnson Commons Dining Hall Field House
Root Commons Dining Hall Field House
South Court Commons Dining Hall Field House
North Court Commons Dining Hall Field House
Buttrick Hall Commons Dining Hall Field House
Commons Dining Field House Beinecke Events Barn
Health Center Commons Dining Hall Field House
Backus Hall Commons Dining Hall Field House
Benedict Hall Commons Dining Hall Field House
Couper Hall Commons Dining Hall Field House
Chapel Commons Dining Hall Field House
Burke Library Commons Dining Hall Field House
Minor Theatre Bristol Hub Bundy Dining Hall
Bristol Center Bundy Dining Hall Beinecke Events Barn
Alumni Center Beinecke Events Barn McEwen Dining Hall
Carriage House Beinecke Events Barn McEwen Dining Hall
Admissions Bristol Hub Bundy Dining Hall
Bundy Dining Hall Bristol Hub Beinecke Events Barn
ALCC Commons Dining Hall Field House
Ferry Building Commons Dining Hall Field House
210 College Hill Road Commons Dining Hall Field House
Campus Safety Commons Dining Hall Field House
Career Center Commons Dining Hall Field House
Philip Spencer House Bristol Hub Bundy Dining Hall
Emergency evacuation of a college facility may be the result of any number of causes. However, evacuation of a building or buildings will follow the same protocol. For a detailed discussion of emergency response guidelines under various circumstances, see the Hamilton College Emergency Response quick Reference Guide or Contact Brian Hansen.
49
Safe Lifting Practices Back injuries are among the most common injuries that occur on the job. Custodians are required to lift heavy loads on a daily basis as part of their daily work assignments. Removing trash, carrying supplies and moving furniture are among those activities that present the greatest risk to the custodial staff. Practicing safe lifting techniques will greatly reduce the risk of injury while performing these tasks. The basics of good lifting are:
• Size up the load before you lift. Test by lifting one of the corners or pushing. If it's heavy or feels too clumsy, get a mechanical aid or help from another worker. When in doubt, don't lift alone. But remember ALWAYS ask the other person if they are capable of lifting their half of the load. One mistake and you BOTH can get injured.
• BEND the KNEES!! This is the single most important aspect of lifting.
• Place your feet close to the object and center yourself over the load.
• Get a good handhold.
• Lift straight up, smoothly and let your legs do the work, not your back.
• Avoid overreaching or stretching to pick up or set down a load.
• Do not twist or turn your body once you have made the lift.
• Make sure beforehand that you have a clear path to carry the load.
• Set the load down properly.
• Always push, not pull, the object whenever possible.
• Change the lifting situation if possible to minimize a lifting hazard.
• If it's a heavy load, get some help.
• Split the load into several smaller ones to achieve a manageable lifting weight.
• Avoid lifts from below the knees or above the shoulders by using mechanical aids, positioning yourself so that the object to move is within an acceptable lifting range (between the shoulders and knees), and/or getting help from your co-workers.
Most if not all back injuries are preventable. Make sure that you follow these simple guidelines in order to protect yourself and those around you. If you are at all unsure of your ability to handle a task contact your supervisor for assistance.
50
Custodial Closet Safety As stated in the Hamilton College Custodian Position Description, the basic duties of the custodial staff include maintaining assigned areas in a clean and safe condition and maintaining cleaning supplies and equipment. The area assigned to each custodian includes any and all storage spaces and custodial closets within that area. As part of regularly assigned duties, each custodian is responsible for the upkeep and control of all storage spaces and custodial closets located within their work area. It is expected that every area will be monitored for safety hazards and if any hazard is discovered it will be promptly remedied or reported to the area supervisor. The custodial staff is required to inspect each closet in their work area daily and ensure that;
• All closets are properly stocked. • All supplies are properly stored. Large heavy items should be stored at lower levels
while lighter items stored on upper shelves.
• All equipment is properly stored and in good working condition.
• All electrical cords are appropriately rated, in good condition, and stored properly.
• All chemical containers are properly labeled, diluted and stored. Concentrates are equipped with proportioning devices.
• Any visible hazards are identified and properly remedied or reported.
• No unauthorized products or supplies are present. Only those products that are
supplied by the college are to be used.
• Electrical panels are free of obstruction.
• Flammable and combustible materials are properly stored.
• All universal waste is properly packaged, labeled, and stored. All storage spaces and custodial closets are to be locked at the conclusion of the work assignment. It is the responsibility of the custodians to ensure that all storage spaces and custodial closets are locked and secured before leaving the work area. No custodial closets are to be left open in order for students to gain access to cleaning supplies or equipment. RA closets are provided for this purpose and the availability of equipment and supplies shall be restricted to those areas.
51
MSDS Sheets Material Safety Data Sheets (MSDS's) are documents that supply information about a particular hazardous substance, chemical or compounds. Manufacturers are required to provide MSDS's when the hazardous materials are sold to distributors or consumers. MSDS’s must be in English and will typically provide the following information.
• Chemical product and company identification • Composition and information on ingredients • Hazard identification • First aid measures • Firefighting measures • Accidental release measures • Exposure controls - personal protection • Handling and storage • Physical and chemical properties • Stability and reactivity • Toxicological information • Ecological information • Disposal considerations • Transport information • Regulatory information
Each department shall maintain updated MSDS files for all materials listed within their departmental chemical product inventory, in a manner such that they are readily accessible for review by any employee, faculty member or student. On a regular basis, but no longer than annually, departments should submit copies of new chemical product MSDS to the Office of Environmental Protection and Safety, located in the Phillip Spencer House, which shall be the central depository for the comprehensive MSDS files, inclusive of all Hamilton College departments. This centralized file will be updated every January, or more often as needed. The college shall retain all MSDSs for 30 years as required by the HCS. Physical Plant MSDS logs are located in two primary locations. There is a copy of the MSDS log book in the Custodial Services office and a copy in the stock room. Either is available for your review upon request. Additionally, a copy of any MSDS will be made available to you upon distribution of a new product or chemical or at your request. Custodians are welcome to request copies of MSDS for any or all products they regularly use in order to have them at their assigned areas for convenient access. It is also a good idea for MSDS sheets to be reviewed for products and chemicals that are used in the home. On-line availability of MSDS is limitless. If you would like an MSDS for a certain product and are unable to locate one, feel free to ask the John McGovern or Casey Wick and they will be happy to obtain one for you.
52
Chemical Compatibility Cleaning chemicals should NEVER be mixed together unless you are specifically told to do so by your supervisor. There are two primary reasons for this; First and foremost mixing chemicals together could cause a dangerous chemical reaction to take place. For example, the dangerous gas chlorine will be created if you mix bleach and ammonia or bleach and drain cleaner together. If this occurs in a closed area such as a bathroom the dangerous gasses may become concentrated enough to cause serious illness or even death. Another example that is a very real concern in custodial services is mixing a strong acid with a strong base (alkaline). While it may seem that the two will neutralize one another, and they will, the byproduct will also be a great deal of heat, pressure, and carbon dioxide. This reaction could erupt violently causing chemical burns, injury from a bursting container, or even fire if enough heat is produced. Secondly mixing chemicals will most likely render them ineffective for their intended purpose. For example, Shower cleaners are generally an acid. They are acidic in order to remove hard water deposits, rust and soap scum. Deodorants are generally alkaline. It has been common practice to add a small amount of a liquid deodorant to a shower cleaning solution in order to add greater fragrance. However, in addition to adding fragrance to the solution, it is very likely that the active properties of the solution have been neutralized rendering the solution too weak to be effective. In order to ensure the safety of yourself and those around you, and to ensure that cleaning chemicals are as effective as they are designed to be, follow these simple guidelines with regard to mixing chemicals.
• Never mix two or more chemicals unless they are designed to be mixed.
• Mix chemicals at the concentration recommended by the manufacturer only.
• Always keep chemicals properly labeled and stored.
• Know and understand the type and kind of chemical you are using. If you are unsure ask your supervisor.
• Know and understand the pH scale, how it is used, and what it means.
• If a spill occurs and two or more chemicals are mixed together leave the area and
contact campus safety immediately. Because many cleaners used in the job area are consumer products commonly found in our homes, you may underestimate the hazard they pose. Protect yourself from these hazards by reading the labels and following the recommended precautions. Wear gloves and eye protection. Avoid inhaling the vapors and mists. Wash your hands and face thoroughly before eating, drinking or smoking.
53
The JHA
Job Hazard Analysis

54
Scrubbing VCT with Rotary Swing Machine
Job/Task/Equipment Scrubbing VCT using swing machine and water pick-up Building/Location Campus wide Shop Doing Analysis Custodial Services Manager Approval/Date Director Approval/Date
PRINCIPAL STEPS
POTENTIAL HAZARDS
RECOMMENDED CONTROLS
Assemble and inspect equipment & supplies.
Over exertion / Strains
Exercise safe lifting practices- Bend at the knee, lift with legs NOT back, avoid twisting and turning at the waist
Dry mop area. Remove gum and other debris with putty knife.
Repetitive motion injury. Puncture/cut with tool. Eye injury from flying debris.
Keep wrists straight while guiding dust mop. Use handles of appropriate length and width. Avoid twisting and turning at the waist Wear appropriate Eye protection Direct tool away from body.
Set up equipment/ work area
Tripping over cords.
Pinched Fingers. Electrical shock
Place wet floor/caution signs at conspicuous points. _____________________________________________ Keep fingers clear of moving parts. Avoid using fingers to tighten nuts, screws, and other fasteners. Inspect cords for proper grounding, insulation damage or other defects.
Mix chemicals. _________________
Chemical burns to eyes and skin.
Wear Proper PPE including eye protection and proper clothing
Apply solution and scrub floor
Slips, trips, and falls Chemical burns to eyes and skin.
Ensure caution/wet floor signs are in place and visible. Begin working at power source and work away keeping power cord between you and power source. Always wear Slip resistant shoes Wear Proper PPE including eye protection and proper clothing
Pick up solution with water /Rinse floor by mopping with rinse solution
Slips, trips, and falls Repetitive motion injury
Ensure caution/wet floor signs are in place and visible. Begin working at power source and work away keeping power cord between you and power source. Always wear Slip resistant shoes Keep wrists straight while guiding mop. Use handles of appropriate length and width. Avoid twisting and turning at the waist
Clean, Inspect, and store equipment
Over exertion / Strains Pinched Fingers
Exercise safe lifting practices- Bend at the knee, lift with legs NOT back, avoid twisting and turning at the waist. Keep fingers clear of moving parts. Avoid using fingers to tighten nuts, screws, and other fasteners.
Equipment to be used, including PPE: Eye protection, protective clothing, anti-slip shoes, water pick up, rotary floor machine, mop and bucket, dust mop, putty knife, Training or other requirements: effective use of PPE, product usage and dilution, equipment operation, and safe lifting/ergonomics principals.
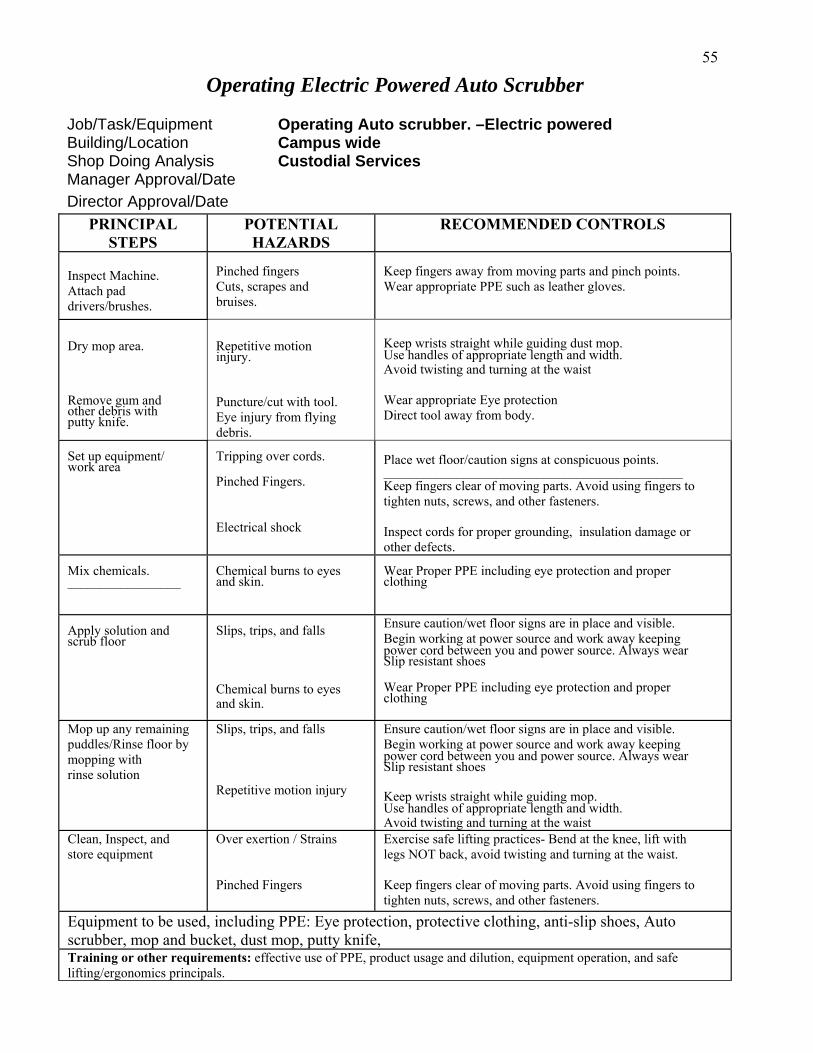
55
Operating Electric Powered Auto Scrubber
Job/Task/Equipment Operating Auto scrubber. –Electric powered Building/Location Campus wide Shop Doing Analysis Custodial Services Manager Approval/Date Director Approval/Date
PRINCIPAL STEPS
POTENTIAL HAZARDS
RECOMMENDED CONTROLS
Inspect Machine. Attach pad drivers/brushes.
Pinched fingers Cuts, scrapes and bruises.
Keep fingers away from moving parts and pinch points. Wear appropriate PPE such as leather gloves.
Dry mop area. Remove gum and other debris with putty knife.
Repetitive motion injury. Puncture/cut with tool. Eye injury from flying debris.
Keep wrists straight while guiding dust mop. Use handles of appropriate length and width. Avoid twisting and turning at the waist Wear appropriate Eye protection Direct tool away from body.
Set up equipment/ work area
Tripping over cords.
Pinched Fingers. Electrical shock
Place wet floor/caution signs at conspicuous points. _____________________________________________ Keep fingers clear of moving parts. Avoid using fingers to tighten nuts, screws, and other fasteners. Inspect cords for proper grounding, insulation damage or other defects.
Mix chemicals. _________________
Chemical burns to eyes and skin.
Wear Proper PPE including eye protection and proper clothing
Apply solution and scrub floor
Slips, trips, and falls Chemical burns to eyes and skin.
Ensure caution/wet floor signs are in place and visible. Begin working at power source and work away keeping power cord between you and power source. Always wear Slip resistant shoes Wear Proper PPE including eye protection and proper clothing
Mop up any remaining puddles/Rinse floor by mopping with rinse solution
Slips, trips, and falls Repetitive motion injury
Ensure caution/wet floor signs are in place and visible. Begin working at power source and work away keeping power cord between you and power source. Always wear Slip resistant shoes Keep wrists straight while guiding mop. Use handles of appropriate length and width. Avoid twisting and turning at the waist
Clean, Inspect, and store equipment
Over exertion / Strains Pinched Fingers
Exercise safe lifting practices- Bend at the knee, lift with legs NOT back, avoid twisting and turning at the waist. Keep fingers clear of moving parts. Avoid using fingers to tighten nuts, screws, and other fasteners.
Equipment to be used, including PPE: Eye protection, protective clothing, anti-slip shoes, Auto scrubber, mop and bucket, dust mop, putty knife, Training or other requirements: effective use of PPE, product usage and dilution, equipment operation, and safe lifting/ergonomics principals.

56
Operating Battery Powered Auto Scrubber Job/Task/Equipment Operating Auto scrubber. –Battery powered Building/Location Campus wide Shop Doing Analysis Custodial Services Manager Approval/Date Director Approval/Date
PRINCIPAL STEPS
POTENTIAL HAZARDS
RECOMMENDED CONTROLS
Disconnect charger/Inspect Machine.
Attach pad drivers/brushes.
Chemical burns to skin and eyes Pinched fingers Cuts, scrapes and bruises.
Avoid contact of battery acid with skin and eyes Wear safety glasses and protective clothing.
Keep fingers away from moving parts and pinch points. Wear appropriate PPE such as leather gloves.
Dry mop area. Remove gum and other debris with putty knife.
Repetitive motion injury. Puncture/cut with tool. Eye injury from flying debris.
Keep wrists straight while guiding dust mop. Use handles of appropriate length and width. Avoid twisting and turning at the waist Wear appropriate Eye protection Direct tool away from body.
ipment/ Set up equ
work area
Slips/trips/falls.
Pinched Fingers.
Place wet floor/caution signs at conspicuous points. __________________________________________Keep fingers clear of moving parts. Avoid using fingers to tighten nuts, screws, and other fasteners.
Mix chemicals. _________________
Chemical burns to eyes and skin.
Wear Proper PPE including eye protection and proper clothing
Apply solution and scrub floor
Slips Trips rips, and falls Chemical burns to eyes
Ensure caution/wet floor signs are in place and visible. Begin working at power source and work away keeping power cord between you and power source. Always wear slip resistant shoes Wear Proper PPE including eye protection and proper clothing
Mop up any remaining puddles/rinse floor by mopping with rinse solution
Slips, trips, and fall Repetitive motion injury
Ensure caution/wet floor signs are in place and visible Keep wrists straight while guiding mop. Use handles of appropriate length and width. Avoid twisting and turning at the waist
Clean, Inspect, and store equipment
Over exertion / Strains Pinched Fingers Explosion
Exercise safe lifting practices- Bend at the knee, lift with legs NOT back, avoid twisting and turning at the waist. Keep fingers clear of moving parts. Avoid using fingers to tighten nuts, screws, and other fasteners. Ensure proper venting of battery while charging, Always connect charger to battery first then connect charger to power source.
Equipment to be used, including PPE: Eye protection, protective clothing, anti-slip shoes, Auto scrubber, mop and bucket, dust mop, putty knife, Training or other requirements: effective use of PPE, product usage and dilution, equipment operation, and safe lifting/ergonomics principals.

57
Operating Ride On Auto Scrubber
Job/Task/Equipment Operating a Ride On Auto Scrubber Building/Location Campus wide Shop Doing Analysis Custodial Services Manager Approval/Date Director Approval/Date
PRINCIPAL STEPS
POTENTIAL HAZARDS
RECOMMENDED CONTROLS
Inspect Machine before operating
Equipment failure
Ensure warning alarms, lights, brakes and controls are intact and working properly.
Fill Solution Tanks
Chemical Burns to eyes and skin
Avoid splashing chemicals while mixing. Wear PPE
Operate Machine
verturns O Bystanders being struck Falling from Machine
Operate machine at appropriate speed and avoid sharp turns. Always sound horn when rounding corners or passing through doorways Wear Safety belts
Park Machine Being crushed by rolling machine
Set parking break
Equipment to be used, including PPE: Seatbelts, Warning lights and alarms, Eye protection Training or other requirements: Principals of safe equipment operation, Eye protection

58
Cleaning Shower Units
Job/Task/Equipment Cleaning shower units Building/Location Campus wide Shop Doing Analysis Custodial Services Manager Approval/Date Director Approval/Date
PRINCIPAL STEPS
POTENTIAL HAZARDS
RECOMMENDED CONTROLS
Assemble and inspect equipment & supplies. Post “Restroom Closed” signs
Over exertion / Strains
Exercise safe lifting practices- Bend at the knee, lift with legs NOT back, avoid twisting and turning at the waist.
Dry mop area. Remove gum and other debris with putty knife.
Repetitive motion injury. Puncture/cut with tool. Eye injury from flying debris.
Keep wrists straight while guiding dust mop. Use handles of appropriate length and width. Avoid twisting and turning at the waist Wear appropriate Eye protection Direct tool away from body.
Set up equipment/ work area
Tripping over hoses.
Place wet floor/caution signs at conspicuous points. Uncoil hoses and arrange so the hose lays flat on the floor
Fill Gilmore gun with acid cleaner. _________________
Chemical burns to eyes and skin.
Wear Proper PPE including eye protection and proper clothing
Apply solution and scrub surfaces with deck brush
Slips, trips, and falls Chemical burns to eyes and skin.
Ensure caution/wet floor signs are in place and visible. Begin working at power source and work away keeping power cord between you and power source. Always wear Slip resistant shoes Wear Proper PPE including eye protection and proper clothing
Rinse walls and floors by hosing down with water.
Slips, trips, and falls Repetitive motion injury
Ensure caution/wet floor signs are in place and visible. Begin working at power source and work away keeping power cord between you and power source. Always wear Slip resistant shoes Keep wrists straight while guiding hose. Avoid twisting and turning at the waist
Apply disinfectant to surfaces with spray equipment.
Slips, trips, and falls Chemical burns to eyes and skin.
Ensure caution/wet floor signs are in place and visible. Begin working at power source and work away keeping power cord between you and power source. Always wear Slip resistant shoes Wear Proper PPE including eye protection and proper clothing
Clean, Inspect, and store equipment
Over exertion / Strains
Exercise safe lifting practices- Bend at the knee, lift with legs NOT back, avoid twisting and turning at the waist. Do not store equipment and supplies above head level on closets or on shelves.
Equipment to be used, including PPE: Eye protection, protective clothing, anti-slip , Gilmore gun, putty knife, restroom closed signs. Training or other requirements: effective use of PPE, product usage and dilution, equipment operation, and safe lifting/ergonomics principals.
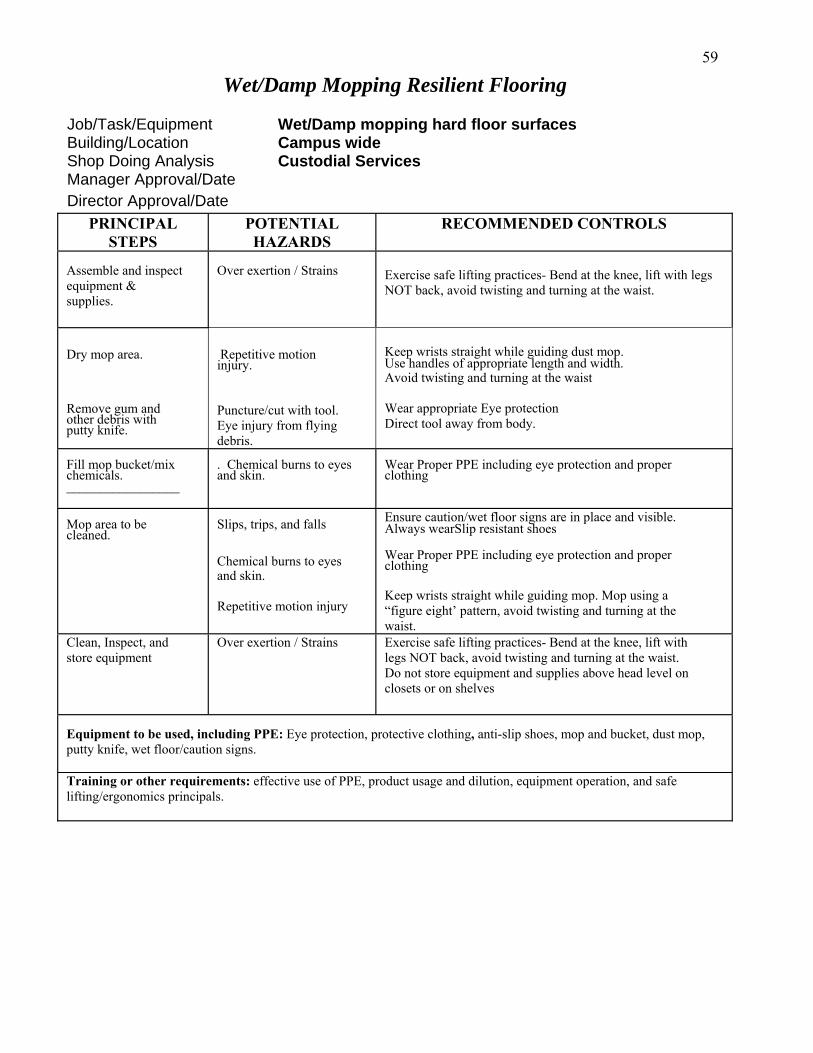
59
Wet/Damp Mopping Resilient Flooring
Job/Task/Equipment Wet/Damp mopping hard floor surfaces Building/Location Campus wide Shop Doing Analysis Custodial Services Manager Approval/Date Director Approval/Date
PRINCIPAL STEPS
POTENTIAL HAZARDS
RECOMMENDED CONTROLS
Assemble and inspect equipment & supplies.
Over exertion / Strains
Exercise safe lifting practices- Bend at the knee, lift with legs NOT back, avoid twisting and turning at the waist.
Dry mop area. Remove gum and other debris with putty knife.
Repetitive motion injury. Puncture/cut with tool. Eye injury from flying debris.
Keep wrists straight while guiding dust mop. Use handles of appropriate length and width. Avoid twisting and turning at the waist Wear appropriate Eye protection Direct tool away from body.
Fill mop bucket/mix chemicals. _________________
. Chemical burns to eyes and skin.
Wear Proper PPE including eye protection and proper clothing
Mop area to be cleaned.
Slips, trips, and falls Chemical burns to eyes and skin. Repetitive motion injury
Ensure caution/wet floor signs are in place and visible. Always wearSlip resistant shoes Wear Proper PPE including eye protection and proper clothing Keep wrists straight while guiding mop. Mop using a “figure eight’ pattern, avoid twisting and turning at the waist.
Clean, Inspect, and store equipment
Over exertion / Strains
Exercise safe lifting practices- Bend at the knee, lift with legs NOT back, avoid twisting and turning at the waist. Do not store equipment and supplies above head level on closets or on shelves
Equipment to be used, including PPE: Eye protection, protective clothing, anti-slip shoes, mop and bucket, dust mop, putty knife, wet floor/caution signs. Training or other requirements: effective use of PPE, product usage and dilution, equipment operation, and safe lifting/ergonomics principals.
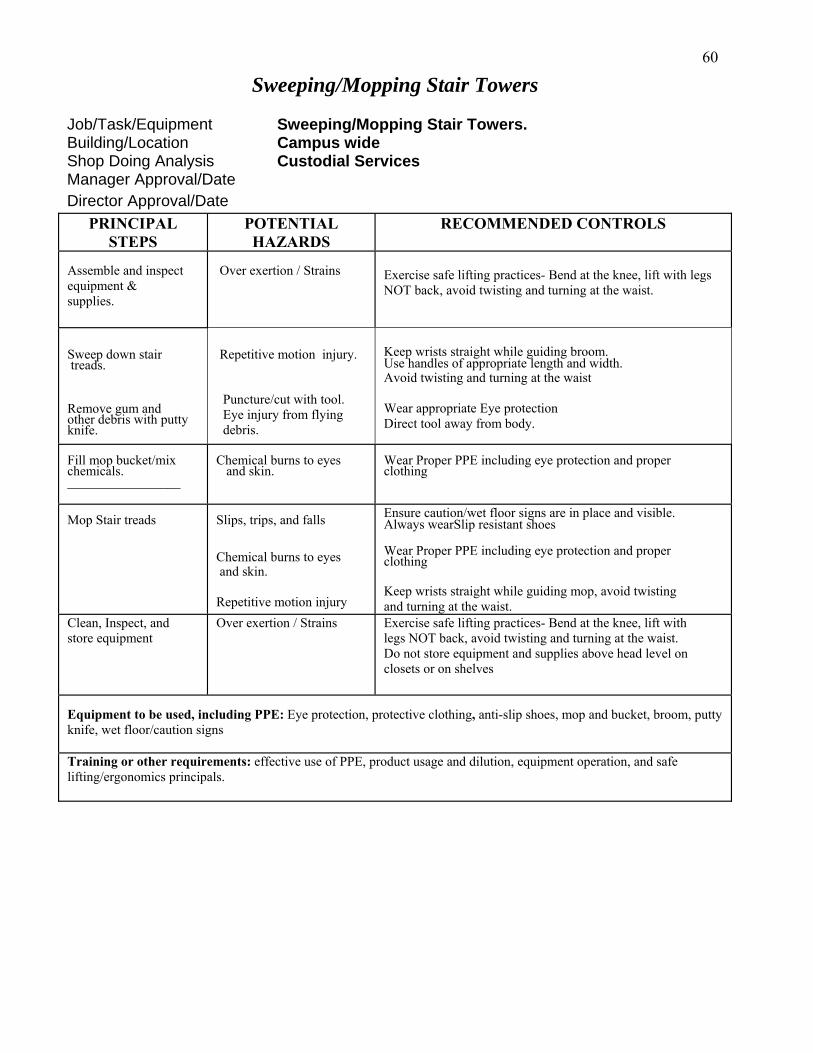
60
Sweeping/Mopping Stair Towers
Job/Task/Equipment Sweeping/Mopping Stair Towers. Building/Location Campus wide Shop Doing Analysis Custodial Services Manager Approval/Date Director Approval/Date
PRINCIPAL STEPS
POTENTIAL HAZARDS
RECOMMENDED CONTROLS
Assemble and inspect equipment & supplies.
Over exertion / Strains
Exercise safe lifting practices- Bend at the knee, lift with legs NOT back, avoid twisting and turning at the waist.
Sweep down stair treads.
Remove gum and other debris with putty knife.
Repetitive motion injury. Puncture/cut with tool. Eye injury from flying debris.
Keep wrists straight while guiding broom. Use handles of appropriate length and width. Avoid twisting and turning at the waist Wear appropriate Eye protection Direct tool away from body.
Fill mop bucket/mix chemicals. _________________
Chemical burns to eyes and skin.
Wear Proper PPE including eye protection and proper clothing
Mop Stair treads
Slips, trips, and falls Chemical burns to eyes and skin. Repetitive motion injury
Ensure caution/wet floor signs are in place and visible. Always wearSlip resistant shoes Wear Proper PPE including eye protection and proper clothing Keep wrists straight while guiding mop, avoid twisting and turning at the waist.
Clean, Inspect, and store equipment
Over exertion / Strains
Exercise safe lifting practices- Bend at the knee, lift with legs NOT back, avoid twisting and turning at the waist. Do not store equipment and supplies above head level on closets or on shelves
Equipment to be used, including PPE: Eye protection, protective clothing, anti-slip shoes, mop and bucket, broom, putty knife, wet floor/caution signs Training or other requirements: effective use of PPE, product usage and dilution, equipment operation, and safe lifting/ergonomics principals.

61
Operating Upright Vacuum Cleaners
Job/Task/Equipment Operating an upright vacuum cleaner. Building/Location Campus wide Shop Doing Analysis Custodial Services Manager Approval/Date Director Approval/Date
PRINCIPAL STEPS
POTENTIAL HAZARDS
RECOMMENDED CONTROLS
Assemble and inspect equipment
Over exertion / Strains
Exercise safe lifting practices- Bend at the knee, lift with legs NOT back, avoid twisting and turning at the waist.
Connect Vacuum to power source
Electric shock
Use only properly grounded equipment with all cords and connections intact
Vacuum area to be cleaned
Slips, trips, and falls Back Injury
Ensure cords are laying flat. Begin operation at power source working away from it Avoid twisting and turning at the waist.
Clean, Inspect, and store equipment
Over exertion / Strains
Exercise safe lifting practices- Bend at the knee, lift with legs NOT back, avoid twisting and turning at the waist. Do not store equipment and supplies above head level on closets or on shelves
Equipment to be used, including PPE: Vacuum Cleaner Training or other requirements: Equipment operation, and safe lifting/ergonomics principals.

62
Moving Furniture
Job/Task/Equipment Moving Furniture. Building/Location Campus wide Shop Doing Analysis Custodial Services Manager Approval/Date Director Approval/Date
PRINCIPAL STEPS
POTENTIAL HAZARDS
RECOMMENDED CONTROLS
Assess load and path.
Over exertion / Strains Trips and falls.
Evaluate weight and size of load. Request assistance if needed Ensure path is clear from obstructions.
Secure load to hand truck or other material handling equipment being used
Pinched fingers/ toes, cuts scrapes, and bruises
Keep fingers free from moving parts and in between load and walls /door frames. Wear protective gloves and footwear
Move load Over exertion / Strains
Exercise safe lifting practices- Bend at the knee, lift with legs NOT back, avoid twisting and turning at the waist.
Equipment to be used, including PPE: Gloves, proper footwear, hand cart or other appropriate material handling equipment. Training or other requirements: effective use of PPE. Equipment operation and safe lifting /ergonomics principals.
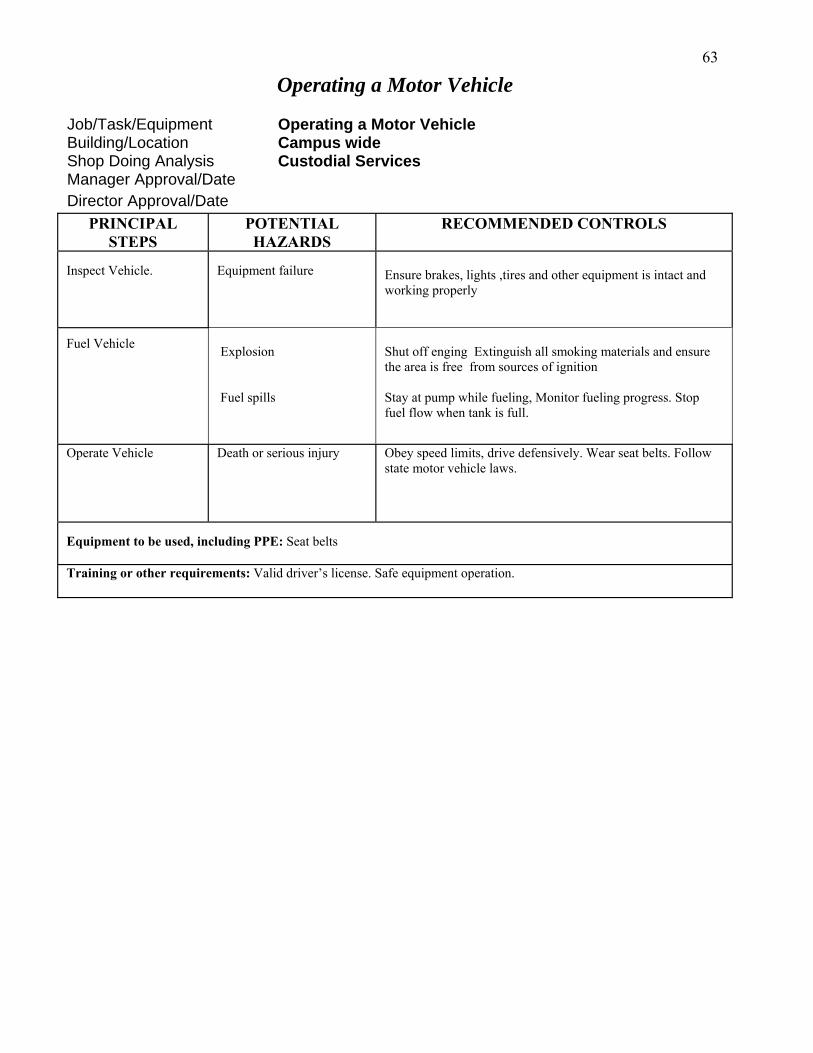
63
Operating a Motor Vehicle
Job/Task/Equipment Operating a Motor Vehicle Building/Location Campus wide Shop Doing Analysis Custodial Services Manager Approval/Date Director Approval/Date
PRINCIPAL STEPS
POTENTIAL HAZARDS
RECOMMENDED CONTROLS
Inspect Vehicle.
Equipment failure
Ensure brakes, lights ,tires and other equipment is intact and working properly
Fuel Vehicle
Explosion Fuel spills
Shut off enging Extinguish all smoking materials and ensure the area is free from sources of ignition Stay at pump while fueling, Monitor fueling progress. Stop fuel flow when tank is full.
Operate Vehicle Death or serious injury
Obey speed limits, drive defensively. Wear seat belts. Follow state motor vehicle laws.
Equipment to be used, including PPE: Seat belts Training or other requirements: Valid driver’s license. Safe equipment operation.
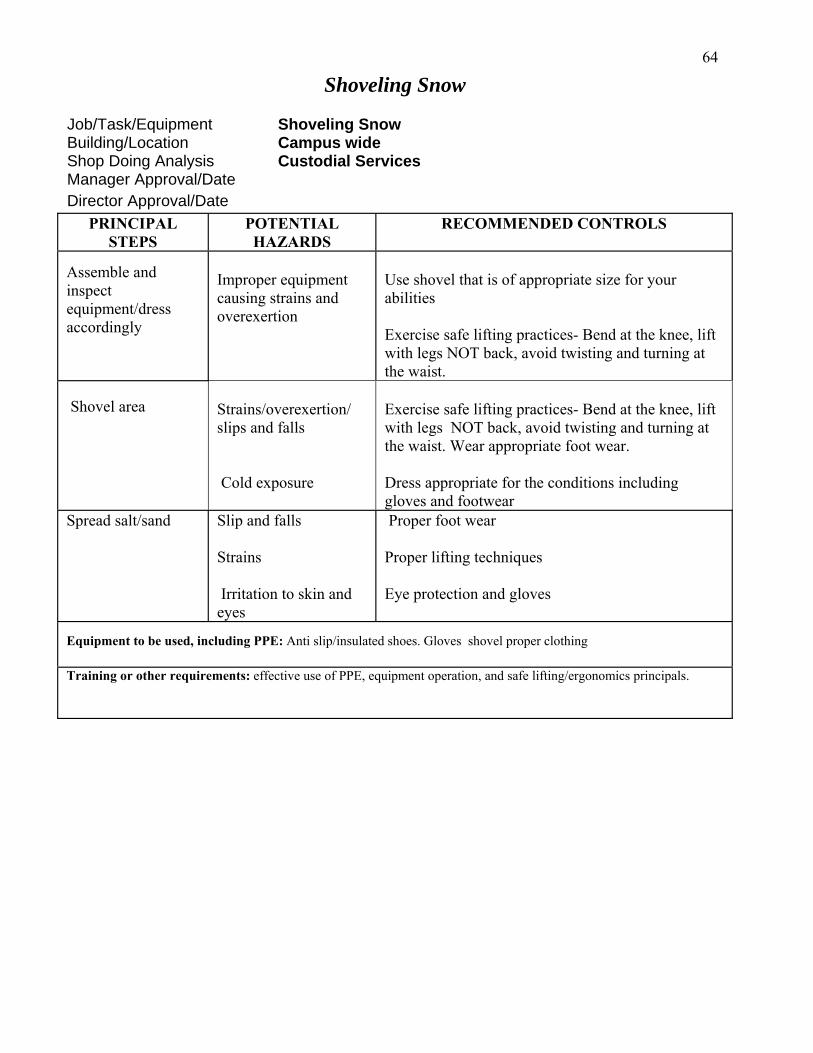
64
Shoveling Snow
Job/Task/Equipment Shoveling Snow Building/Location Campus wide Shop Doing Analysis Custodial Services Manager Approval/Date Director Approval/Date
PRINCIPAL STEPS
POTENTIAL HAZARDS
RECOMMENDED CONTROLS
Assemble and inspect equipment/dress accordingly
Improper equipment causing strains and overexertion
Use shovel that is of appropriate size for your abilities Exercise safe lifting practices- Bend at the knee, lift with legs NOT back, avoid twisting and turning at the waist.
Shovel area
Strains/overexertion/ slips and falls Cold exposure
Exercise safe lifting practices- Bend at the knee, lift with legs NOT back, avoid twisting and turning at the waist. Wear appropriate foot wear. Dress appropriate for the conditions including gloves and footwear
Spread salt/sand Slip and falls Strains Irritation to skin and eyes
Proper foot wear Proper lifting techniques Eye protection and gloves
Equipment to be used, including PPE: Anti slip/insulated shoes. Gloves shovel proper clothing Training or other requirements: effective use of PPE, equipment operation, and safe lifting/ergonomics principals.

65
Cleaning Bathrooms
Job/Task/Equipment Cleaning Bathrooms Building/Location Campus wide Shop Doing Analysis Custodial Services Manager Approval/Date Director Approval/Date
PRINCIPAL STEPS
POTENTIAL HAZARDS
RECOMMENDED CONTROLS
Assemble and inspect equipment & supplies. Post “Restroom Closed” signs
Over exertion / Strains
Exercise safe lifting practices- Bend at the knee, lift with legs NOT back, avoid twisting and turning at the waist.
Dry mop area. Remove gum and other debris with Putty knife.
Repetitive motion injury. Puncture/cut with tool. Eye injury from flying debris.
Keep wrists straight while guiding dust mop. Use handles of appropriate length and width. Avoid twisting and turning at the waist Wear appropriate Eye protection Direct tool away from body.
Fill paper products and dispensers
Pinched fingers.
Keep fingers clear when closing dispensers.
Mix disinfectant cleaner _________________
Chemical burns to eyes and skin.
Wear Proper PPE including eye protection and proper clothing
Apply disinfectant to surfaces with spray equipment.
Slips, trips, and falls Chemical burns to eyes and skin.
Always wear slip resistant shoes Wear Proper PPE including eye protection, proper Clothing, and gloves
Clean, Inspect, and store equipment and supplies
Over exertion / Strains
Exercise safe lifting practices- Bend at the knee, lift with legs NOT back, avoid twisting and turning at the waist. Do not store equipment and supplies above head level on closets or on shelves.
Equipment to be used, including PPE: Eye protection, protective clothing, anti-slip , spray equipment putty knife, restroom closed signs. Training or other requirements: effective use of PPE, product usage and dilution, equipment operation, and safe lifting/ergonomics principals.
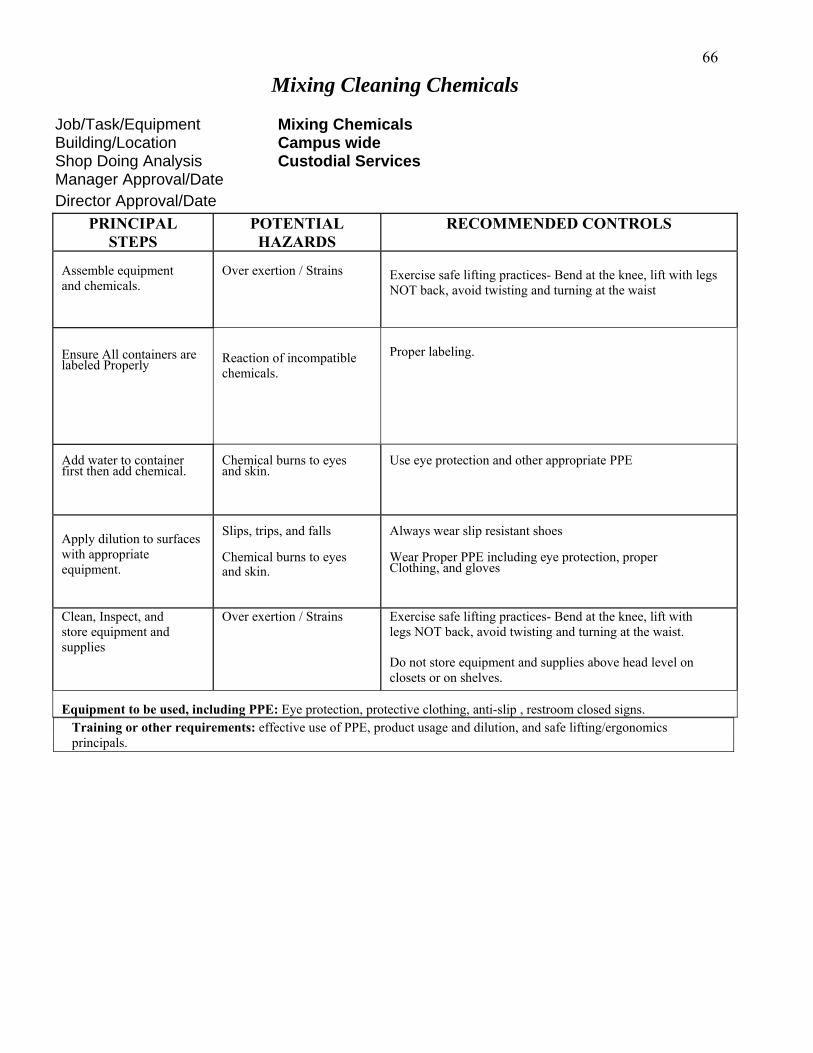
66
Mixing Cleaning Chemicals
Job/Task/Equipment Mixing Chemicals Building/Location Campus wide Shop Doing Analysis Custodial Services Manager Approval/Date Director Approval/Date
PRINCIPAL STEPS
POTENTIAL HAZARDS
RECOMMENDED CONTROLS
Assemble equipment and chemicals.
Over exertion / Strains
Exercise safe lifting practices- Bend at the knee, lift with legs NOT back, avoid twisting and turning at the waist
Ensure All containers are labeled Properly
Reaction of incompatible chemicals.
Proper labeling.
Add water to container first then add chemical.
Chemical burns to eyes and skin.
Use eye protection and other appropriate PPE
Apply dilution to surfaces with appropriate equipment.
Slips, trips, and falls Chemical burns to eyes and skin.
Always wear slip resistant shoes Wear Proper PPE including eye protection, proper Clothing, and gloves
Clean, Inspect, and store equipment and supplies
Over exertion / Strains
Exercise safe lifting practices- Bend at the knee, lift with legs NOT back, avoid twisting and turning at the waist. Do not store equipment and supplies above head level on closets or on shelves.
Equipment to be used, including PPE: Eye protection, protective clothing, anti-slip , restroom closed signs.
Training or other requirements: effective use of PPE, product usage and dilution, and safe lifting/ergonomics principals.
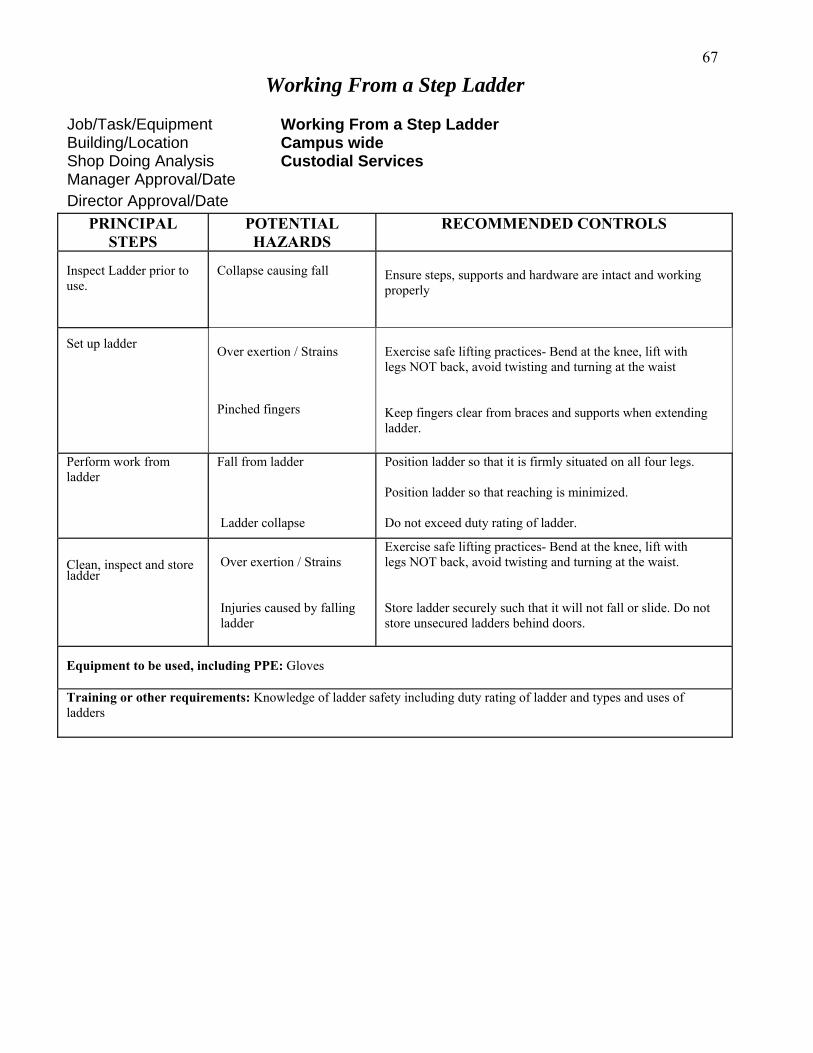
67
Working From a Step Ladder
Job/Task/Equipment Working From a Step Ladder Building/Location Campus wide Shop Doing Analysis Custodial Services Manager Approval/Date Director Approval/Date
PRINCIPAL STEPS
POTENTIAL HAZARDS
RECOMMENDED CONTROLS
Inspect Ladder prior to use.
Collapse causing fall
Ensure steps, supports and hardware are intact and working properly
Set up ladder
Over exertion / Strains Pinched fingers
Exercise safe lifting practices- Bend at the knee, lift with legs NOT back, avoid twisting and turning at the waist Keep fingers clear from braces and supports when extending ladder.
Perform work from ladder
Fall from ladder Ladder collapse
Position ladder so that it is firmly situated on all four legs. Position ladder so that reaching is minimized. Do not exceed duty rating of ladder.
Clean, inspect and store ladder
Over exertion / Strains Injuries caused by falling ladder
Exercise safe lifting practices- Bend at the knee, lift with legs NOT back, avoid twisting and turning at the waist. Store ladder securely such that it will not fall or slide. Do not store unsecured ladders behind doors.
Equipment to be used, including PPE: Gloves Training or other requirements: Knowledge of ladder safety including duty rating of ladder and types and uses of ladders

68
Operating a Forklift
Job/Task/Equipment Operating a Forklift Building/Location Furniture Barn Shop Doing Analysis Custodial Services Manager Approval/Date Director Approval/Date
PRINCIPAL STEPS
POTENTIAL HAZARDS
RECOMMENDED CONTROLS
Inspect forklift before operating
Equipment failure
Ensure warning alarms, lights, brakes and controls are intact and working properly.
Operate Forklift
verturns O Bystanders being struck Falling from forklift
Operate forklift at appropriate speed and avoid sharp turns. Always sound horn when rounding corners or passing through doorways Wear Safety belts
Park Forklift Being crushed by rolling forklift
Lower forks to the ground. Set parking break
Equipment to be used, including PPE: Seatbelts, Warning lights and alarms. Training or other requirements: Forklift operator’s certification. Principals of safe equipment operation
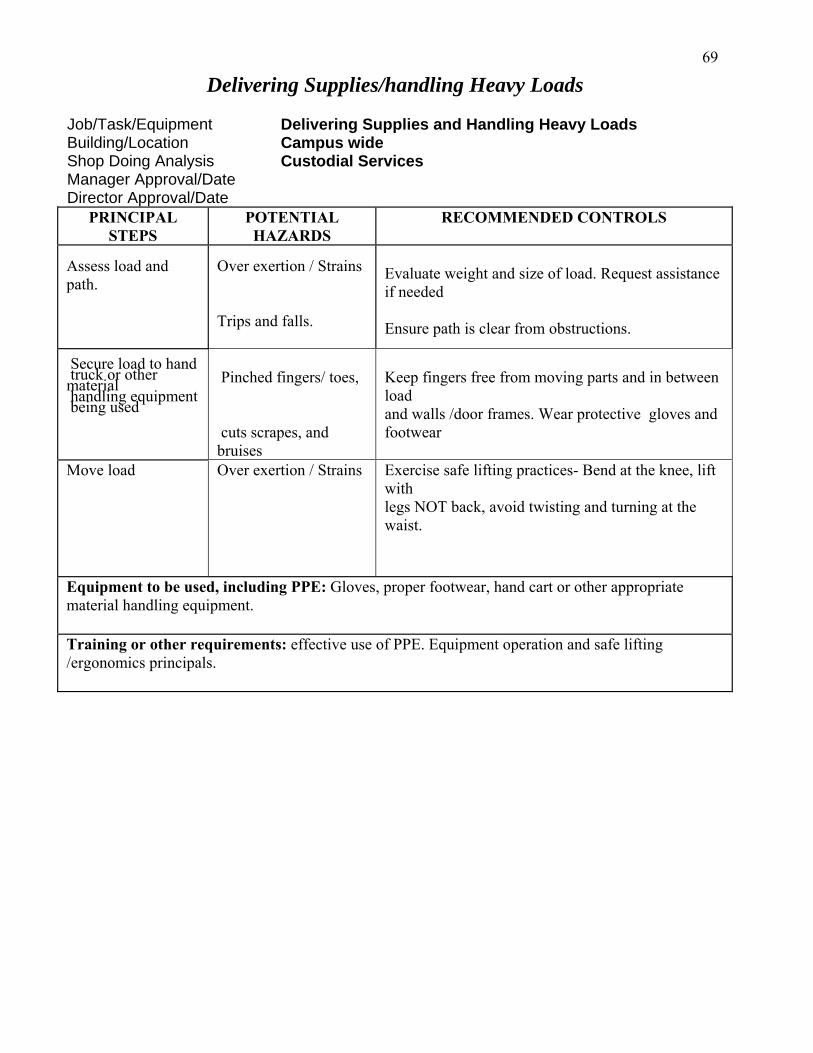
69
Delivering Supplies/handling Heavy Loads
Job/Task/Equipment Delivering Supplies and Handling Heavy Loads Building/Location Campus wide Shop Doing Analysis Custodial Services Manager Approval/Date Director Approval/Date
PRINCIPAL STEPS
POTENTIAL HAZARDS
RECOMMENDED CONTROLS
Assess load and path.
Over exertion / Strains Trips and falls.
Evaluate weight and size of load. Request assistance if needed Ensure path is clear from obstructions.
hand Secure load to
truck or other material
ment handling equip being used
Pinched fingers/ toes, cuts scrapes, and bruises
Keep fingers free from moving parts and in between load and walls /door frames. Wear protective gloves and footwear
Move load Over exertion / Strains
Exercise safe lifting practices- Bend at the knee, lift with legs NOT back, avoid twisting and turning at the waist.
Equipment to be used, including PPE: Gloves, proper footwear, hand cart or other appropriate material handling equipment. Training or other requirements: effective use of PPE. Equipment operation and safe lifting /ergonomics principals.
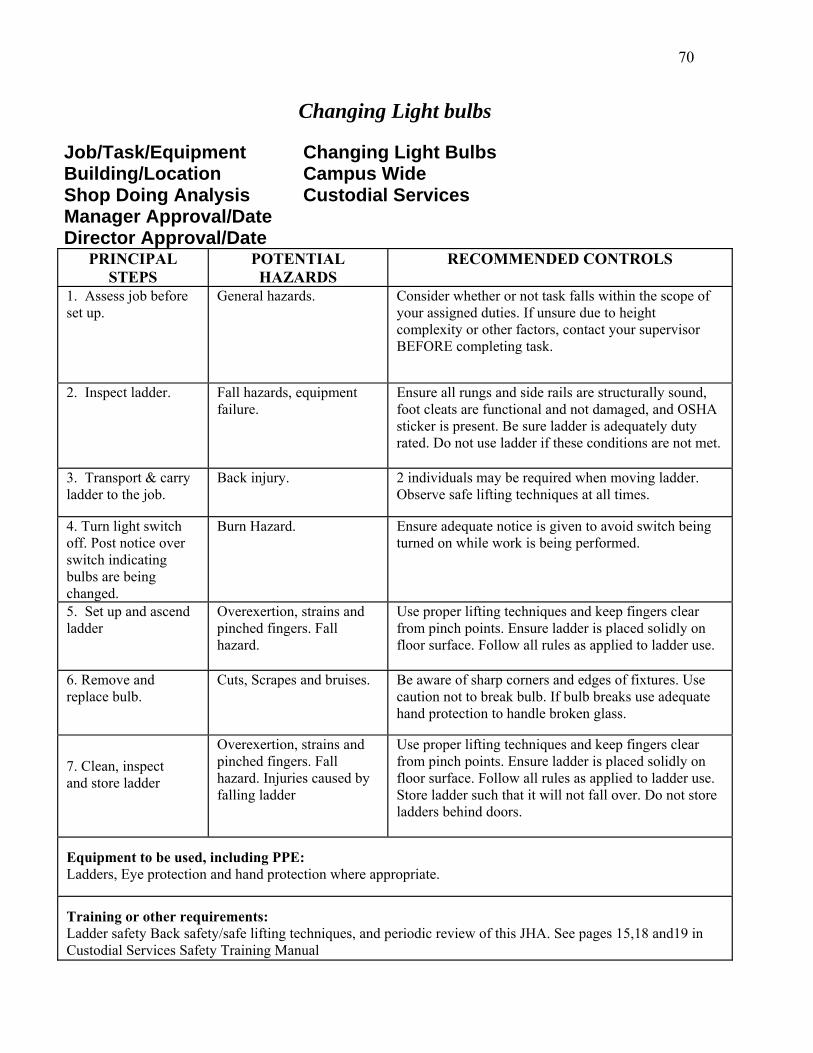
70
Changing Light bulbs
Job/Task/Equipment Changing Light Bulbs Building/Location Campus Wide Shop Doing Analysis Custodial Services Manager Approval/Date Director Approval/Date
PRINCIPAL STEPS
POTENTIAL HAZARDS
RECOMMENDED CONTROLS
1. Assess job before set up.
General hazards. Consider whether or not task falls within the scope of your assigned duties. If unsure due to height complexity or other factors, contact your supervisor BEFORE completing task.
2. Inspect ladder. Fall hazards, equipment failure.
Ensure all rungs and side rails are structurally sound, foot cleats are functional and not damaged, and OSHA sticker is present. Be sure ladder is adequately duty rated. Do not use ladder if these conditions are not met.
3. Transport & carry ladder to the job.
Back injury. 2 individuals may be required when moving ladder. Observe safe lifting techniques at all times.
4. Turn light switch off. Post notice over switch indicating bulbs are being changed.
Burn Hazard. Ensure adequate notice is given to avoid switch being turned on while work is being performed.
5. Set up and ascend ladder
Overexertion, strains and pinched fingers. Fall hazard.
Use proper lifting techniques and keep fingers clear from pinch points. Ensure ladder is placed solidly on floor surface. Follow all rules as applied to ladder use.
6. Remove and replace bulb.
Cuts, Scrapes and bruises. Be aware of sharp corners and edges of fixtures. Use caution not to break bulb. If bulb breaks use adequate hand protection to handle broken glass.
7. Clean, inspect and store ladder
Overexertion, strains and pinched fingers. Fall hazard. Injuries caused by falling ladder
Use proper lifting techniques and keep fingers clear from pinch points. Ensure ladder is placed solidly on floor surface. Follow all rules as applied to ladder use. Store ladder such that it will not fall over. Do not store ladders behind doors.
Equipment to be used, including PPE: Ladders, Eye protection and hand protection where appropriate.
Training or other requirements: Ladder safety Back safety/safe lifting techniques, and periodic review of this JHA. See pages 15,18 and19 in Custodial Services Safety Training Manual

71
Response Protocol for Spill of Unknown Material
Job/Task/Equipment Response protocol for spill of unknown material Building/Location General Campus Shop Doing Analysis Custodial Services Manager Approval/Date Director Approval/Date
PRINCIPAL STEPS
POTENTIAL HAZARDS
RECOMMENDED CONTROLS
1. Evaluate the area for any hazards that may be present and to determine if the spilled material can be identified. Refer to the signage posted at the entrance to the area. Look for signs such as an acrid odor, bubbling or effervescing of the spilled material or a broken or tipped container bearing a Haz Com label that may indicate the material is hazardous. Look for other possible sources such as a leaking pipe, faucet or other supply line . 2. If the material can be identified as non hazardous and can be cleaned up safely, proceed with clean up using appropriate procedures. 3. If a positive identification cannot be made contact your supervisor, David Gapp, Brian Hanson or Mary Collis. 4. If the spill exhibits an acrid odor, visible vapors, effervescing or somehow threatens other building occupants, an emergency spill exists. Activate the building alarm to signal an evacuation, walk quickly to the nearest marked exit, and proceed to the building’s initial gathering point. 5. Once the material has been identified a determination will be made by a supervisor as to the most appropriate means of clean up.
Principal Hazard Abatement Concerns: The chief issue is to eliminate the possibility an employee will be exposed to a potential chemical hazard unknowingly. Due to the inherent dangers associated with approaching an unidentified Substance each employee should know and understand the appropriate protocol to follow. Equipment to be used, including PPE: Eye protection, hand protection, protective clothing and anti-slip shoes. Training or other requirements: effective use of PPE, product usage and dilution, equipment operation, and safe lifting/ergonomics principals. Chemical safety principals.

72
Science Center General Duties
Job/Task/Equipment General Custodial Activities in the Science Center Building/Location Science Center Shop Doing Analysis Custodial Services Manager Approval/Date Director Approval/Date
PRINCIPAL STEPS
POTENTIAL HAZARDS
RECOMMENDED CONTROLS
1.General Housekeeping.
1. Exposure to chemicals and/or physical hazards.
1. Have a general understanding of the Science center Lab
processes and inherent hazards, as per the below: General Lab Processes/Hazards: Biology Labs— These are teaching and research facilities used to conduct instruction and research in the various disciplines under the general umbrella of Biology. The chief hazards associated with these labs include; a. Chemical Hazards from exposure to biological infectious substances and radioactive chemical material. b. Physical Hazards from exposure to radioactive energy from X-ray machine Chemistry Labs— These are teaching and research facilities used to conduct instruction and research in the various disciplines under the general umbrella of Chemistry. The chief hazards associated with these labs include; a. Chemical Hazards from exposure to strong acidic and alkaline materials. b. Physical Hazards from exposure to radioactive energy from X-ray machine Physics Labs— These are teaching and research facilities used to conduct instruction and research in the various disciplines under the general umbrella of Physics. The chief hazards associated with these labs include; a. No chemical Hazards associated with the Physics labs b. Physical Hazards from exposure to lazar machines, electrical and mechanical equipment Geology labs— These are teaching and research facilities used to conduct instruction and research in the various disciplines under the general umbrella of Geology. The chief hazards associated with these labs include; a. The chemical hazards associated with the geology labs are exposure to irritant/fugitive dust generated by rock grinding equipment. b. Physical Hazards from exposure to radioactive energy from X-ray machines, rock grinding and crushing equipment Principal Hazard Abatement Concerns: The chief issue to understand here is that custodial activities must support the academic science activities, but not do their work for them. It is critical for the custodian(s) assigned to the Science Center to have an understanding of what each Lab does functionally, so they know what work the should and should not be doing. Custodian(s) assigned to the Science Center must have an understanding of the signage displayed at the entrance of each area and what it means. General Lab cleanup is a part of the academic process, and not a primary custodial job requirement. However, the Science center custodian(s) should develop a good working relationship first and foremost with the Science Stockroom and Facility Coordinator (Mary Collis). As an example, the custodian(s) should have an idea of what chemicals are used in the Chemistry labs and the general hazards they pose, so he/she can determine if there is a problem. But they should not have an understanding of these chemicals to enable them to clean up a spill. That would be the responsibility of either the Stockroom and Facility Coordinator, or the Director of Environmental Protection & Safety. Equipment to be used, including PPE: Eye protection, protective clothing, anti-slip shoes, water pick up, rotary floor machine, mop and bucket, dust mop, putty knife, Training or other requirements: effective use of PPE, product usage and dilution, equipment operation, and safe lifting/ergonomics principals. Annual Radiation Awareness training
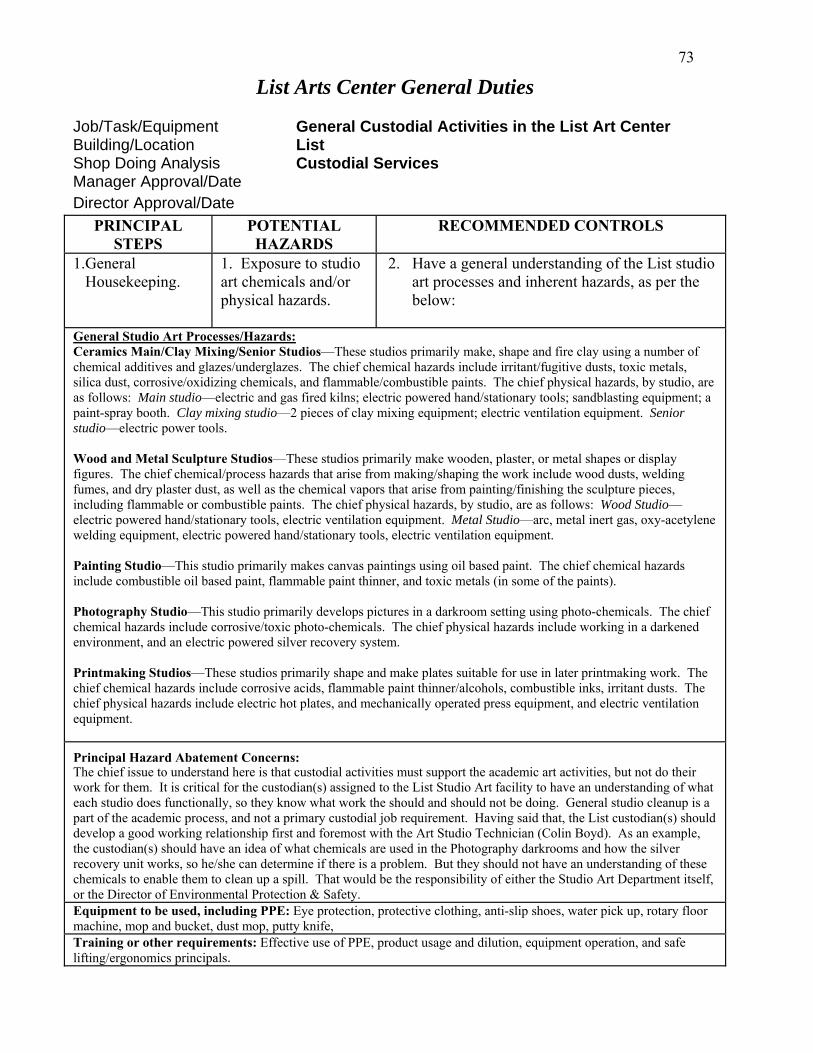
73
List Arts Center General Duties
Job/Task/Equipment General Custodial Activities in the List Art Center Building/Location List Shop Doing Analysis Custodial Services Manager Approval/Date Director Approval/Date
PRINCIPAL STEPS
POTENTIAL HAZARDS
RECOMMENDED CONTROLS
1.General Housekeeping.
1. Exposure to studio art chemicals and/or physical hazards.
2. Have a general understanding of the List studio art processes and inherent hazards, as per the below:
General Studio Art Processes/Hazards: Ceramics Main/Clay Mixing/Senior Studios—These studios primarily make, shape and fire clay using a number of chemical additives and glazes/underglazes. The chief chemical hazards include irritant/fugitive dusts, toxic metals, silica dust, corrosive/oxidizing chemicals, and flammable/combustible paints. The chief physical hazards, by studio, are as follows: Main studio—electric and gas fired kilns; electric powered hand/stationary tools; sandblasting equipment; a paint-spray booth. Clay mixing studio—2 pieces of clay mixing equipment; electric ventilation equipment. Senior studio—electric power tools. Wood and Metal Sculpture Studios—These studios primarily make wooden, plaster, or metal shapes or display figures. The chief chemical/process hazards that arise from making/shaping the work include wood dusts, welding fumes, and dry plaster dust, as well as the chemical vapors that arise from painting/finishing the sculpture pieces, including flammable or combustible paints. The chief physical hazards, by studio, are as follows: Wood Studio—electric powered hand/stationary tools, electric ventilation equipment. Metal Studio—arc, metal inert gas, oxy-acetylene welding equipment, electric powered hand/stationary tools, electric ventilation equipment. Painting Studio—This studio primarily makes canvas paintings using oil based paint. The chief chemical hazards include combustible oil based paint, flammable paint thinner, and toxic metals (in some of the paints). Photography Studio—This studio primarily develops pictures in a darkroom setting using photo-chemicals. The chief chemical hazards include corrosive/toxic photo-chemicals. The chief physical hazards include working in a darkened environment, and an electric powered silver recovery system. Printmaking Studios—These studios primarily shape and make plates suitable for use in later printmaking work. The chief chemical hazards include corrosive acids, flammable paint thinner/alcohols, combustible inks, irritant dusts. The chief physical hazards include electric hot plates, and mechanically operated press equipment, and electric ventilation equipment. Principal Hazard Abatement Concerns: The chief issue to understand here is that custodial activities must support the academic art activities, but not do their work for them. It is critical for the custodian(s) assigned to the List Studio Art facility to have an understanding of what each studio does functionally, so they know what work the should and should not be doing. General studio cleanup is a part of the academic process, and not a primary custodial job requirement. Having said that, the List custodian(s) should develop a good working relationship first and foremost with the Art Studio Technician (Colin Boyd). As an example, the custodian(s) should have an idea of what chemicals are used in the Photography darkrooms and how the silver recovery unit works, so he/she can determine if there is a problem. But they should not have an understanding of these chemicals to enable them to clean up a spill. That would be the responsibility of either the Studio Art Department itself, or the Director of Environmental Protection & Safety. Equipment to be used, including PPE: Eye protection, protective clothing, anti-slip shoes, water pick up, rotary floor machine, mop and bucket, dust mop, putty knife, Training or other requirements: Effective use of PPE, product usage and dilution, equipment operation, and safe lifting/ergonomics principals.
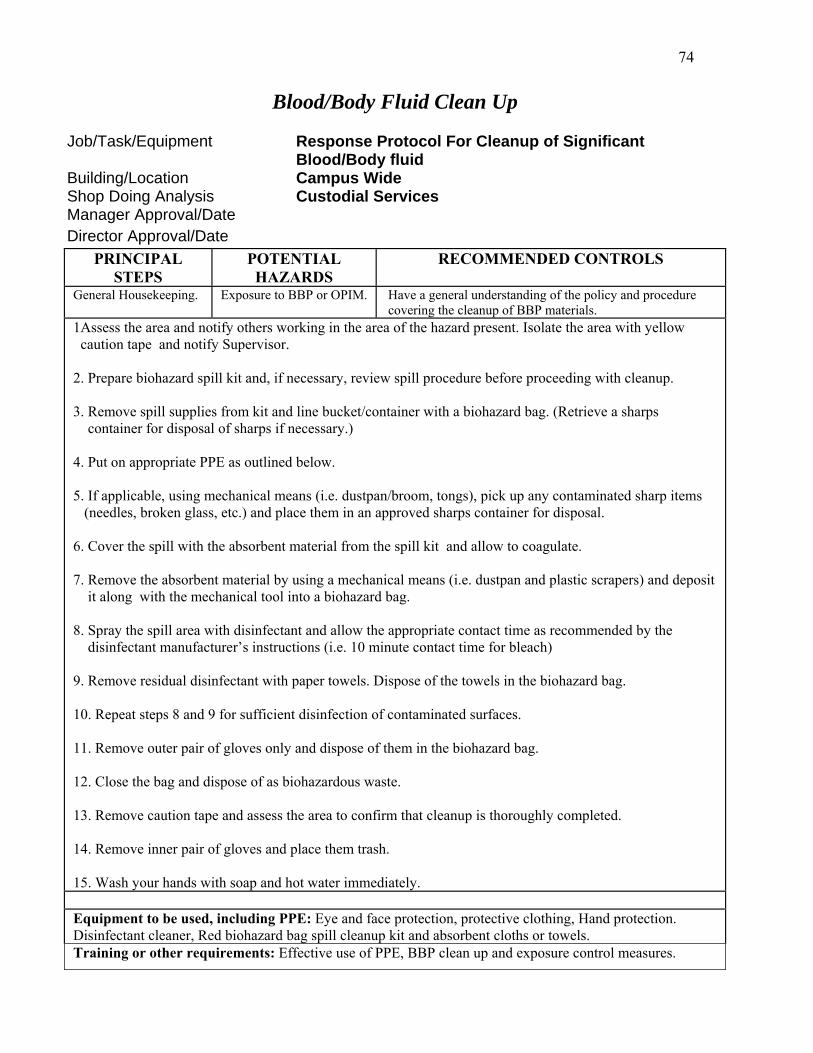
74
Blood/Body Fluid Clean Up
Job/Task/Equipment Response Protocol For Cleanup of Significant Blood/Body fluid
Building/Location Campus Wide Shop Doing Analysis Custodial Services Manager Approval/Date Director Approval/Date
PRINCIPAL STEPS
POTENTIAL HAZARDS
RECOMMENDED CONTROLS
General Housekeeping. Exposure to BBP or OPIM. Have a general understanding of the policy and procedure covering the cleanup of BBP materials.
1Assess the area and notify others working in the area of the hazard present. Isolate the area with yellow caution tape and notify Supervisor. 2. Prepare biohazard spill kit and, if necessary, review spill procedure before proceeding with cleanup. 3. Remove spill supplies from kit and line bucket/container with a biohazard bag. (Retrieve a sharps container for disposal of sharps if necessary.) 4. Put on appropriate PPE as outlined below. 5. If applicable, using mechanical means (i.e. dustpan/broom, tongs), pick up any contaminated sharp items (needles, broken glass, etc.) and place them in an approved sharps container for disposal. 6. Cover the spill with the absorbent material from the spill kit and allow to coagulate. 7. Remove the absorbent material by using a mechanical means (i.e. dustpan and plastic scrapers) and deposit it along with the mechanical tool into a biohazard bag. 8. Spray the spill area with disinfectant and allow the appropriate contact time as recommended by the disinfectant manufacturer’s instructions (i.e. 10 minute contact time for bleach) 9. Remove residual disinfectant with paper towels. Dispose of the towels in the biohazard bag. 10. Repeat steps 8 and 9 for sufficient disinfection of contaminated surfaces. 11. Remove outer pair of gloves only and dispose of them in the biohazard bag. 12. Close the bag and dispose of as biohazardous waste. 13. Remove caution tape and assess the area to confirm that cleanup is thoroughly completed. 14. Remove inner pair of gloves and place them trash. 15. Wash your hands with soap and hot water immediately. Equipment to be used, including PPE: Eye and face protection, protective clothing, Hand protection. Disinfectant cleaner, Red biohazard bag spill cleanup kit and absorbent cloths or towels. Training or other requirements: Effective use of PPE, BBP clean up and exposure control measures.

75
Section III- Equipment

76
Introduction
Technological advances in custodial equipment have been rapid and profound over the past few years. Much of the equipment used today has been designed to be not only highly effective but has also been designed to be simple to use and to accommodate the needs of the operator. These advances include ergonomically friendly designs, consideration of operator stature and the integration of light weight materials. The use of modern equipment in custodial operations will serve to not only increase productivity but will enable cleaning professionals to improve the service they are providing while reducing the hazards associated with custodial work.
The equipment section of this manual is not meant to be an exhaustive list of all cleaning equipment available on the market today. This section is intended to identify the array of equipment used on the Hamilton Campus, its basic appearance and function and general information regarding the use and care of each piece.
The information contained within this section is not a substitute for that which is found in the machines operator and parts manual. It is important to always read and understand the operator manual before using a piece of equipment. All operator and parts manuals pertaining to custodial equipment are maintained in the Custodial Services Office and can be reviewed upon request.
A 26” Auto Scrubber, pictured here being operated by Bobby Evans, makes hard floor care in large facilities fast and effective.

77
Auto Scrubbers
Automatic scrubbing machines are the workhorse of custodial equipment. They range in
size from fifteen inch walk behind up to industrial sized ride on models. While auto scrubbers are distributed by a large number of manufacturers and in numerous models and styles, Hamilton College Custodial Services has standardized to the Tennant line of auto scrubbers and has a variety of models appropriate to the size of the area the unit is being used. The diagram below illustrates the basic design and layout of auto scrubbers commonly found on the market today followed by information about the specific models found on the Hamilton campus.
Model 5100 - The model 5100 delivers superior water pickup even on tight turns. The sond recovery tanks each have a cap
lution acity of 8 gallons making the unit ideal for the smaller area
s
aassignments. The brush or pad pressure can be adjusted from 0 to 95 lbs for allowing for effective performance at all levels of soil loads on a variety of floor surfaces. All Tennant model 5100 auto scrubbers on the Hamilton campus are seventeen inch and can be operated with a pad or brush. Tennant Model 5100 Auto scrubbers are located in The Howard Diner, Commons Dining Hall, Bristol Pool, Science Center 3rd floor, McEwen Dining Hall and Bristol CampuCenter

78
Model 540 T on auto scrubber on the amilton campus. With a twenty six inch cleaning width utilizing two thirteen inch pads or
brushes, th ssignments. The 5400 enables the user to adjust the pad or brush pressure up to 130 pounds of
pressure mrecoat operatio bbers are located in the Annex, Science Center
oors Ground, One and Two, The Scott Field House and McEwen Dining Hall first floor
odel 7200 - The Tennant model 7200 is the only ride on model auto scrubber on the Hamilton campus. It different in tha er that walking behind it, the general
peration is very much the same.
uto Scrubber Maintenance and Care – In order to keep Auto scrubbers in good working conditi ece of equi e of Tennant auto scrubbers the manufactures recommends maintenance be performed at daily, weekly and monthly intervals.
Daily (After each operation) – Whenever an auto scrubber is used certain steps must be taken to clean and prepare the unit for the next use. After every operation;
1. Drain and flush Both the solution and recovery tanks.
2. ut-off screen located inside of the recovery tank.
are worn or otherwise damaged.
ring storage.
Weekly (After 20 hours of operation) – Upon reaching 20 hours of operation several othe maintenance. After 20 hours of operation;
1. Be sure the solution tank is empty and remove the bowl filter from the machine
0 - he Tennant model 5400 auto scrubber is the most commH
e Tennant model 5400 allows for exceptional productivity in even the largest of areaa
aking the unit ideal for every task from day to day floor maintenance to scrub and ns. Tennant model 5400 auto scru
fl
Mis a large area unit located in the Scott Field House. While the ride on operation is
t the operator is on the machine ratho
Aon routine maintenance and care must be part of their regular operation. As with any pipment routine maintenance will need to be performed at regular intervals. In the cas
Remove and rinse the float sh
3. Check all the pads/brushes for entangled debris. Change pads or brushes if they
4. Check the scrub head skirt(s) for wear and adjustment.
5. Raise squeegee and wipe it down with a clean dry cloth. Leave the squeegee in the raised position du
6. Clean the machine housing with a general purpose cleaner and a damp cloth.
r checks must be made in addition to the daily
and clean the filter.
2. Check The fluid level an all of the battery cells.

79
3. Clean battery tops an s to prevent corrosion. Check for loose cables or connections.
ore is it is
odel nce.
1. Flush the solution system using hot water and an alkaline detergent following the
procedure outlined in the operators and parts manual pertaining to the model.
2. Check pad drivers for proper adjustment.
3. Lubricate the castor grease fitting using the appropriate lubricant.
4. Lubricate all pivot points and rollers.
5. Check machine for water leaks and loose nuts and bolts.
ers,
ansported and shared among all the various locations on campus. In terms of the type of
d around cable connection
4. If the machine is equipped with pneumatic tires check the air pressure in the tires.
Monthly (After 80 ours of operation) – Monthly maintenance of auto scrubbers is mcomprehensive and detailed than either daily or weekly maintenance. Because of thadvised the equipment operation and parts manual pertaining to the particular mbeing maintained is reviewed and understood prior to beginning monthly maintenaAfter 80 hours of operation;
Carpet Extractors
Carpet extractors are an integral part of the custodial equipment arsenal. As with auto scrubbExtractors range from small portable spotter/upholstery cleaners to large area ride on units. Carpet extractors are generally not permanently located in a certain work area. They are trextractor used on the Hamilton campus there are three primary types. Tennant 1610 Advanced Aquaclean 15
80
Advan lightwe extractors are exceptionally easy to use and transport. Cleaning solution is sprayed into carpet fibers, and a power brush loosens soi se configuration i tool.
Tennant Munit. There are he solution is sprayed into
e carpet via jets in the head of the wand. The dirty solution is then extracted manually out of the carpet t u Tennant 1000 - The Tennant 1000 portable spot extractor weighs only 18 lbs for easy transportati afor floor spot chand tool and 8 ft solution vacuum hose. Due to the portable nature of these units, Tennant 1000 arpet spotter/extractors are being continually transported to work areas across the campus. If ou have the need for a unit in your work area contact your supervisor to arrange to a unit
brough Carpet Extractor Maintenance and Care – Routine maintenance and care of carpet extractors must also be ine maintenance of carpet xtractors must occur at daily, weekly and monthly intervals.
Dai properly care for a carpet extractor. Those steps include;
d
ilter screen. Debris and other material can
accumulate and clog the screen.
4. Inspect and clean the floor tool including the intake and spray tips. NEVER use a pin or other pointed object to clean a clogged spray tip. Doing so may result in damage to the tip.
ce Aqua clean 15 - The Advance AquaClean 15 is a self contained type extractor unit. Asight, portable carpet cleaners, the cord-electric AquaClean
l. A vacuum pick-up tool removes dirty solution to a recovery tank. A wand and hos available for use with these units making them a versatile cleaning
odel 1160 - The Tennant Model 1160 is a canister wand and hose operation only
no brushes that agitate the carpet during operation. Tth
hro gh the stainless steel vacuum wand and hose.
on nywhere. Its 2 gal solution and 1.5 gal/6 L recovery tanks are just large enough leaning, auto detailing or upholstery cleaning. Standard tools include a 4 inch
cy
t to you.
performed at set intervals. As with Auto scrubbers, route
ly (After each operation) Regardless of duration, certain steps must be carried out to
1. Empty and rinse BOTH solution and recovery tanks. Never leave fluid in the solution tank overnight or a buildup and clogged lines may occur.
2. Remove and clean float shut off valve. Lint and other debris can accumulate an
will need to be removed to maintain proper vacuum.
3. Remove and clean solution tank f
Weekly (After 20 hours of operation) – Upon reaching 20 hours of operation with a carpet extractor it is necessary to;
1. Remove and soak spray tips in a detergent solution.
2. Flush solution pump system using an alkaline detergent solution.

81
3. Inspect the floor tool for loose shoes or other parts. Inspect all hoses and cfor damage or wear.
ords
manual for specific details about proper lubricants and instructions.
Monthly (After 80 ours of operation) Unlike auto scrubbers monthly maintenance on carpet extractors is relatively simple. Upon reaching 80 hours of operation;
1. Inspect tank for cracks or leaks.
2. Lubricate casters with appropriate lubricant.
Vacuum Cleaners
Vacuum cleaners are available in an infinite number of models and configurations. While there are certain configurations that are more appropriate to some applications, there is no real formula to determine the best type of vacuum cleaner for a work area. With the prevalence of the use of the term High Efficiency Particulate Air (HEPA) filters, it is worth noting the specifics that apply
this term. A HEPA vacuum is one in which 99.97% of all particles .03 micrometers or larger re removed from the exhaust air of a vacuum cleaner. It is important to remember a vacuum
um
4. Grease solution pump with appropriate lubricant. Refer to operator and parts
toacleaner equipped with a HEPA filtration system is not the same as a true HEPA certified vacuum. On the Hamilton campus there are three primary types of vacuum cleaners in use. Commercial Upright Vacuum Canister Vacuum Back pack Vacu

82
Commercial Upright - The commercial upright vacuum cleaner is the most commonly found
s. Due ry changing designs and demands of vacuum cleaners there are several models and
akes found across the campus. The primary advantage of the commercial upright is the use of a “Beater Ba omodels feature upholstery.
anister Vacuum - Canister vacuums are used in work areas where an upright vacuum is not practical. C classrooms, auvacuum would r vacuum is the bsence of a beater bar in the wand head. The canister vacuum relies solely on the suction of the
unit to lift
ack Pack Vacuum - Backpack vacuums are very similar to canister vacuums in design and function. T rolls along on much more versatile. However, as with the canister vacuum, the back pack vacuum does not have a beater bar makin
e eeds of
to have the bags changed when they are approximately 50% filled. While this may seem like a waste of resources is not. The vacuum will not function properly and will loose suction if the bag is allowed to overfill.
2. Inspect all filters prior to using the vacuum. If filters are dirty or clogged clean
them if possible or change them. Dirty filters significantly reduce suction and allow greater amounts of dust and dirt to be come airborne.
3. Inspect cords, belts and brushes for wear or damage. Be sure beater bar is rotating
freely and belts are in good condition.
4. Avoid vacuuming wet ma acuum other than a wet/dry vacuum which is set up to be used in the wet mode. Electric shock or equipment damage may result
piece of equipment in custodial services. Most designs today are very similar across the many models available. Advances in the design and technology of the commercial up right include ergonomically friendly designs, incorporation of light weight materials and the use high efficiency particulate air filters. Upright vacuums are located in every work area on camputo the evem
r” t agitate and lift the carpet fibers during vacuuming. Additionally, many upright on board tools to accommodate vacuuming corners, overhead areas, and furniture
Canister vacuums feature a lightweight body and an extended hose and wand. Tiered
ditoriums and other areas with multiple levels are areas in which a canister be an appropriate application. The disadvantage of a caniste
athe soil and debris from the floor.
B
he primary difference between the two is the canister vacuum rests on the floor anda set of casters. The back pack vacuum is worn on the operators back making it
g it less effective at deep carpet vacuuming.
Vacuum Maintenance and Care – Vacuum cleaners are perhaps the most frequently used piecof custodial equipment. Unlike other equipment vacuum cleaners do not have maintenance nat set intervals. Instead, Vacuum cleaners are maintained depending on the type and intensity use. Some important guidelines to follow when performing Vacuum cleaner maintenance include;
1. Always be sure the paper bag is not over full. Vacuums are designed
terial wi h any vt

83
Water Pick Ups/ Wet Dry Vacuums
r
Canister Wet/Dry Type Front Mounted Squeegee Type
Water pick ups and wet dry vacuums are generally used to pick up large quantities of debris owater. Most often these pieces of equipment are used in scrubbing and stripping operations where and auto scrubber is not available or practical or where large quantities of water have leaked. Water pick ups and wet dry vacuums are available in two primary configurations, the anister type and front mounted squeegee type. c
Rotary Swing Machines
otary Swing Machines, also called floor machines, can be fitted with a number of pads and
floors, reening wood floors and lastly bonnet or brush agitating carpets prior to extraction. Swing
Rbrushed in order to perform a wide array of operations including scrubbing and stripping finished floors, scrubbing and restoring grouted floors, buffing and polishing finishedscmachines are offered in configurations from battery powered six inch models up to weighted twenty inch models and come in three primary types. They Are;

84
1. Heavy-Duty Floor Machines – These machines are built for long-term performance and optimum user comfort. They are typically used for commercial purposes and maintain all types of floors. 2. Single-Speed Floor Machines – This equipment is built with a single speed motor. It includes user-friendly features that make operating this machine simple and easy. 3. Dual-Speed Floor Machines – These machines are designed to be workhorses, with two- RPM speeds. They are flexible and tough, with the capability to handle everyday operations. Maintenance and Care of Rotary Swing Machines – Rotary swing machines require little routine maintenance to keep them working properly. Thorough cleaning after each use and regular inspection of cords, pad drivers and other components is satisfactory for care of a swing machine.
High Speed Burnishers
hese e
attery Powered Walk Behind Model Cord Electric Model
As the name implies, High speed machines operate at speeds of 1000, 1500 and 2000 rpm. Tmachines are used to perform interim maintenance on finished floors preserving the luster of thfloor. High speed burnishers are available in two general configurations. The battery powered walk behind models and the traditional cord electric models. B
Burnisher Maintenance and Care – Like swing machines, care of burnishers is relatively simple. Thorough cleaning and inspection of moving parts are all that is necessary for cord electric models. In addition to thorough cleaning, battery walk behind models require regular maintenance of batteries and lubrication of caste and other moving parts. Battery walk behind rs
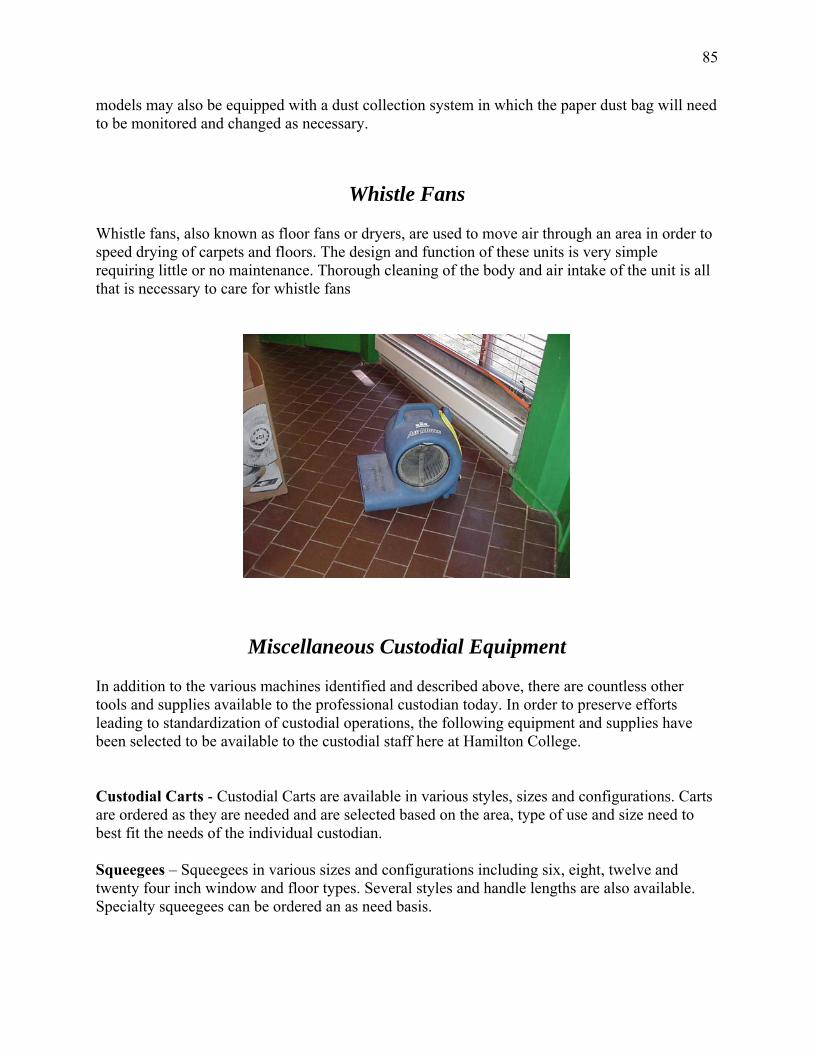
85
models may also be equipped with a dust collection system in which the paper dust bag will need
ed to move air through an area in order to eed drying of carpets and floors. The design and function of these units is very simple
all
to be monitored and changed as necessary.
Whistle Fans
Whistle fans, also known as floor fans or dryers, are ussprequiring little or no maintenance. Thorough cleaning of the body and air intake of the unit is that is necessary to care for whistle fans
Miscellaneous Custodial Equipment n addition to the various machines identified and described above, there are countless other I
tools and supplies available to the professional custodian today. In order to preserve efforts leading to standardization of custodial operations, the following equipment and supplies have been selected to be available to the custodial staff here at Hamilton College.
Custodial Carts - Custodial Carts are available in various styles, sizes and configurations. Carts are ordered as they are needed and are selected based on the area, type of use and size need to best fit the needs of the individual custodian. Squ gtweSpecialty squeegees can be ordered an as need basis.
ee ees – Squeegees in various sizes and configurations including six, eight, twelve and nty four inch window and floor types. Several styles and handle lengths are also available.

86
Joh y ee styles. Blue long handle, blue short handle and white short handle. Blue Johnny mops are to be used for toilet and urinal disi c er fixtures.
op a Cotton, Cotton Blend and Rayon varieties are available along with wooden
soil making
ber cloths are available as stock items.
r furniture products. Doing so may result in a chemical action or poor performance. Micro fiber cloths are also available. These cloths should not be
s a
• White – High/low speed polishing and buffing and light duty cleaning including sealed wood athletic floors.
• Pink – High Speed burnishing and polishing. • Beige – Dry or spray buffing. • Red – Dry or spray buffing and light duty cleaning. • Tan- Burnishing • Blue - Scrubbing prior to recoating and heavy duty cleaning • Black - Stripping
Spray Bottles and other sprayers – Trigger spray bottles, pump sprayers and Gilmore guns are available as stock items. Each of these three items has varied uses and can greatly improve the controlled use of cleaning chemicals. The type of task being performed will determine which
nn Mops – Johnny, or bowel, mops are available in thr
nfe tion only. White Johnny mops are to be used for sinks and oth
M s nd Handles - and aluminum handles. It is important to remember that natural fiber mops, cotton and cotton blend, contain linseed oil found naturally in the cotton. These mops must be soaked in an alkaline detergent prior to use and must be thoroughly rinsed after soaking. Rayon or other synthetic mops are designed to release rather than absorb and are used for application of floor finish and sealer. Because synthetic mops are less absorbent they tend to spread
em unsuitable for cleaning purposes. All string mops are available in 12 oz. 16oz and 24 oz thsizes. Select the type and size of mop appropriate to the task being performed. Brooms - Six inch angle and twenty-four inch push brooms are available.
leaning Cloths- Treated stretch and dust cloths, Micro fiCStretch and dust cloths are pre treated with a dust attraction product and should not be used for any task other than dusting horizontal and vertical surfaces. Likewise stretch and dust cloths should not be used with dust spray orediscarded after use but should be sent to the physical plant for laundering. Micro fiber cloths are designed to be used with little or no cleaning chemicals. Tasks such as window cleaning can be performed with waster and a micro fiber cloth only with excellent results. Floor Pads – Generally speaking, floor pads are divided into four categories; buffing/burnishing,cleaning, scrubbing and stripping. In each of these categories there are numerous pads which are designed to perform specific tasks. While the effectiveness and quality of each pad is subjective and a function of application and user preference, there are some general guidelinethat can be applied when selecting the right pad. Most if not all floor pad manufacturers follow color coding to indicate the level of aggressiveness of the pads. The general rule for pad color isthe darker the pad the more aggressive it will be. The most commonly used colors and their applications include;

87
sprayer will be appropriate. When selecting a sprayer consider the task being performed, the type of chemical being used and the amount of chemical needed to do the job. Hand Tools – A wide array of hand tools are available to the custodial staff including pliers adjustable wrenches, screw and nut drivers, hammers and etc. It is worth mentioning that if a custodian has the need to use hand tools the supervisor should be consulted to determine if the work falls outside of the scope of custodial duties. Material Handling Equipment – Hand carts, dollies and other material handling equipment is available for the custodial staff to use. The use of this equipment can greatly reduce the risk of injury when handling heavy loads. Having the right equipment can make the difference between success and failure. Modern custodial equipment allows professional cleaners to perform tasks faster, safer and more effective than ever before. However, just having the equipment is not enough. It is extremely to know and understand the application, operation and care for the equipment found in the various work areas. Maintaining equipment in good condition will ensure the unit will perform properly without creating unnecessary hazards to the operator. Hamilton College has made a considerable investment in the recent past to equip the custodial staff with the tools to be successful. It is paramount that each piece is cared for properly in order to get the most out of the machines. Routine maintenance and care is part of regular operation of the equipment. Therefore, routine
operators of the , weekly and eperson or
supervisor.
maintenance and care is the responsibility of the custodial staff as the primary equipment. Be sure to read and understand the operator manuals, perform dailymonthly maintenance and promptly report any malfunctions or damage to a for
88
Section IV - Cleaning Chemicals
89
Cleaning Chemical Overview Cleaners contain acids, alkalis, aromatics, surfactants, petroleum products, ammonia and hypochlorite. Because of these ingredients cleaning chemicals are considered to be irritants, and can be harmful to you if swallowed, inhaled or contact with unprotected skin occurs. Many macause eye, nose, throat, and skin and lung irritation. Some cleaners are flammable and burn easily. Others may be caustic or corrosive and cause severe skin burns. In order to protect yourself and those around you, an understanding of the basic properties of cleaning chemwill be necessary. The properties of and hazards associated with cleaning chemicals include;
• Acids- Acids are compounds that have a pH of less than 7 and are frequently found inshower and bathroom cleaners in the form of Phosphoric acid. Acids with a pH of less than 2 are corrosive and may cause severe burns to skin, eyes, and respiratory tissue ifinhaled.
y
icals
• n
dded to cleaning products o the
ate
s. removers are the most likely to contain petroleum
products. Petroleum products are well known to be carcinogenic and neurotoxins.
• Ammonia –Frequently used in glass cleaners and floor strippers, ammonia is not recommended as a cleaning chemical. When ammonia is combined with bleach, highly toxic gases are released which can be fatal. Ammonia also is poisonous, a suspected mutagen, corrosive, and explosive when exposed to flame and is highly irritating to the eyes, nose, and lungs
Cleaning chemicals can and do present a wide array of hazards to users and bystanders if improperly used, handled or stored. However, these hazards can be greatly reduced or completely eliminated with proper handling and use of PPE.
Alkalis- Alkalis, also referred to as Bases, are compounds that have a pH of greater tha7. Alkalis with a pH of greater than 12 are also corrosive and may cause burns to skin, eyes, and respiratory tissue if inhaled. Alkalis in cleaning chemicals are more common than acids and are found in most other products such as degreasers, deodorants, glass cleaners and spray and wipe cleaners.
• Aromatics – Aromatics are added to cleaning chemicals in order to increase the fragrance of the product. Generally speaking there are only minor hazards associated with aromatics which affect individuals with allergies or are highly sensitive to fragrances.
• Surfactants- Surfactants or “wetting agents’’ are compounds ain order to break the surface tension of water allowing the chemicals to penetrate intsurface being cleaned. Surfactants are believed to present some health risks if overexposure occurs. Exposure may occur from absorption through the skin if adequPPE is not used.
• Petroleum Products- Petroleum products are used in cleaning chemicals as solventCleaners such as chewing gum
Adequate PPE should always be worn wh products.
en using products containing petroleum

90
Cleaning Chemical Quick Reference Sheet
nce Sheets are designed to simplify the format of
each of the products. While
SDS’s have evolved over the years to include a somewhat standardized format, they can still
lt to read and understand. The quick
eference sheets summarize the product information such as product name, hazards associated
xposu e to th easures. This
directly from the products MSDS and has been condensed into a
orm
It must be noted however that the information contained in each quick reference sheet
are shipped. So what does that mean? If a product is shipped in a
oncentrated form and later diluted for use, the information contained in the quick reference
t dilution. Generally speaking a
t has been diluted for use. However, this is not always
d in their ready to use, or RTU, form making the information
the quick reference sheet pertinent to the product as it is packaged.
ith a diluted product are lesser than the
azards associated with a product concentrate. This is because the harsh components of the
corrosives, are diluted and weakened. However, the same first aid measures
the product
every
lly dangerous. Always use appropriate PPE and take every precaution to protect yourself and those around you.
The following Cleaning Chemical Quick Refere
essential information found in the Material Safety Data Sheet for
M
be complicated and confusing making them difficu
r
with each product, first aid for e r e product, and exposure control m
information has been taken
simple one page f at.
pertains to the products as they
c
sheet will pertain to the product concentrate and not the produc
product will present less of a hazard when i
the case. Some products are shippe
in
Generally speaking the hazards associated w
h
product, such as
identified in the cleaning chemical quick reference sheet should be applied for
concentrate and the product dilution.
When working with cleaning chemicals always use caution and consider each andproduct potentia
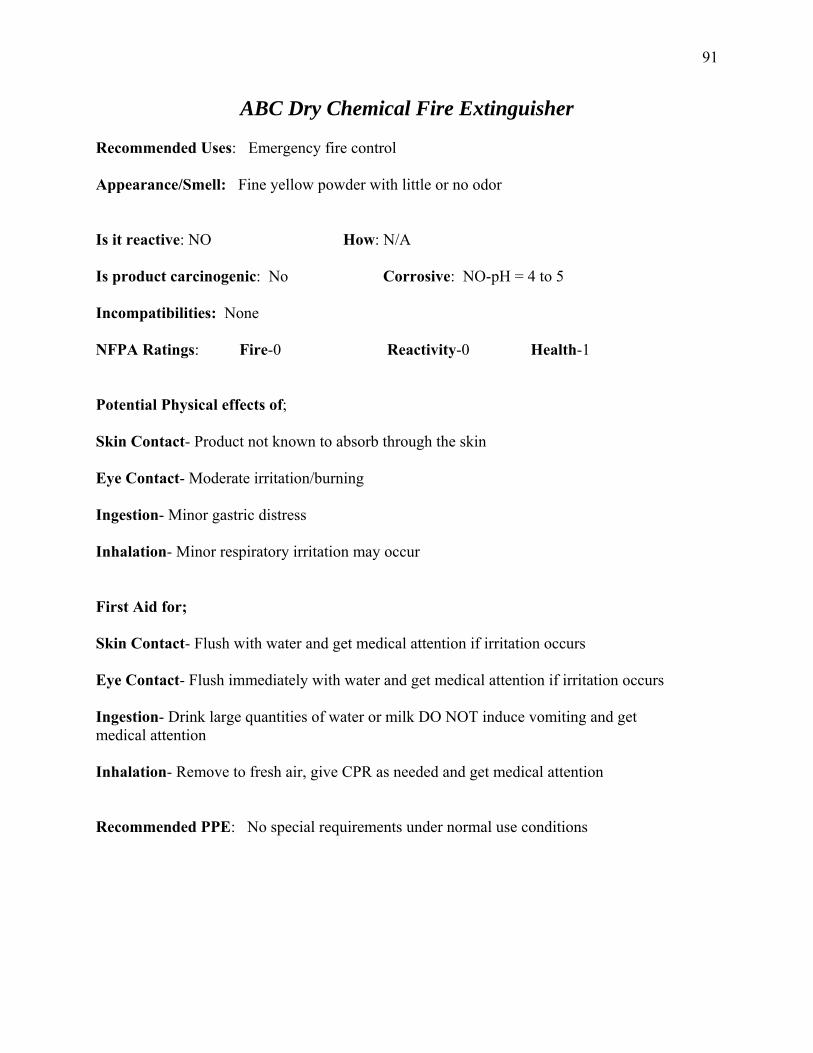
91
ABC Dry Chemical Fire Extinguisher
t ity-0 alth-1
through the skin
irritation occurs
edical attention
halation- Remove to fresh air, give CPR as needed and get medical attention
Recommended PPE: No special requirements nder normal use conditions
Recommended Uses: Emergency fire control Appearance/Smell: Fine yellow powder with little or no odor Is it reactive: NO How: N/A Is product carcinogenic: No Corrosive: NO-pH = 4 to 5 Incompatibilities: None NFPA Ratings: Fire-0 Reac iv He Potential Physical effects of; Skin Contact- Product not known to absorb Eye Contact- Moderate irritation/burning Ingestion- Minor gastric distress Inhalation- Minor respiratory irritation may occur First Aid for; Skin Contact- Flush with water and get medical attention if irritation occurs Eye Contact- Flush immediately with water and get medical attention if Ingestion- Drink large quantities of water or milk DO NOT induce vomiting and get m In
u

92
Ammonia Recommended Uses: Heavy degreasing and cleaning
odor
trong Acids, Bleach, Iodine
Reactiv
Appearance/Smell: Clear liquid with a strong ammonia Is it reactive: No How: N/A Is product carcinogenic: No Corrosive: No- pH = 11.5 Incompatibilities: Yes- S NFPA Ratings: Fire-0 ity-0 Health-3 Potential Physical effects of; Skin Contact- Mildly irritating to the skin Eye Contact- Minor irritation/burning may occur Ingestion- Minor irritation /burns to gastrointestinal tract accompanied by nausea Inhalation- Moderate respiratory irritation may occur First Aid for; Skin Contact- Flush immediately with water and get medical attention if irritation occurs Eye Contact- Flush immediately with water and get medical attention Ingestion- Drink large quantities of water do not induce vomiting and get medical attention Inhalation- Remove to fresh air and get medical attention if irritation persists Recommended PPE: Rubber Gloves Eye Protection
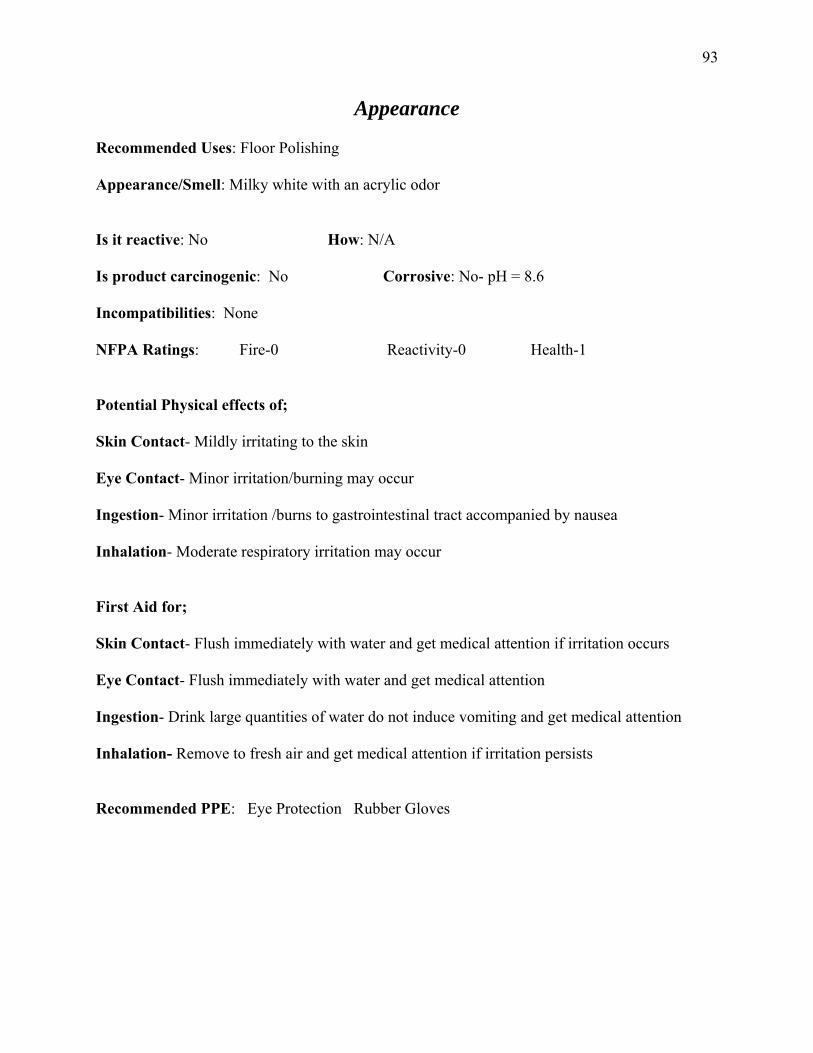
93
Appearance Recommended Uses: Floor Polishing Appearance/Smell: Milky white with an acrylic odor Is it reactive: No How: N/A Is product carcinogenic: No Corrosive: No- pH = 8.6 Incompatibilities: None NFPA Ratings: Fire-0 Reactivity- He0 alth-1
ay occur
ccompanied by nausea
irst Aid for;
kin Contact- Flush immediately with water and get medical attention if irritation occurs
lush immediately with water and get medical attention
gestion- Drink large quantities of water do not induce vomiting and get medical attention
halation- Remove to fresh air and get medical attention if irritation persists
ecommended PPE: Eye Protection Rubber Gloves
Potential Physical effects of; Skin Contact- Mildly irritating to the skin Eye Contact- Minor irritation/burning m Ingestion- Minor irritation /burns to gastrointestinal tract a Inhalation- Moderate respiratory irritation may occur F S Eye Contact- F In In R
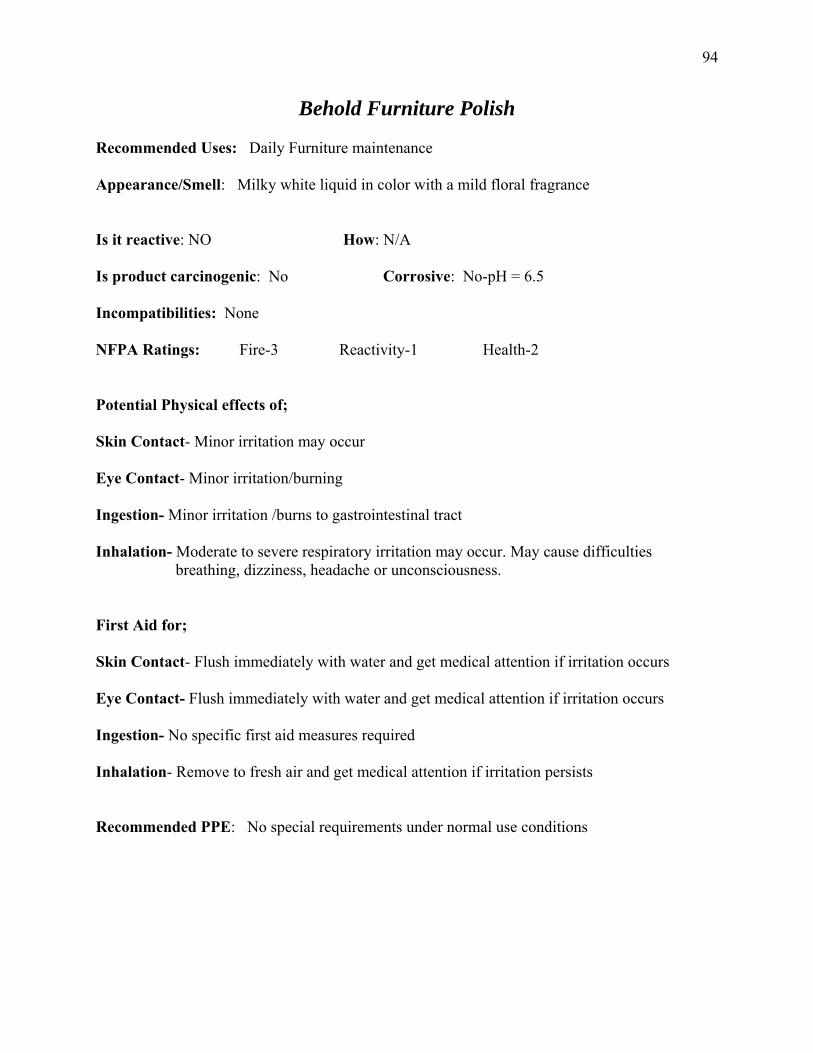
94
Behold Furniture Polish
ance
May cause difficulties breathing, dizziness, headache or unconsciousness.
irst Aid for;
Flush immediately with water and get medical attention if irritation occurs
ye Contact- Flush immediately with water and get medical attention if irritation occurs
ngestion- No specific first aid measures required
nhalation- Remove to fresh air and get medical attention if irritation persists
Recommended PPE: No special requirements under normal use conditions
Recommended Uses: Daily Furniture maintenance Appearance/Smell: Milky white liquid in color with a mild floral fragr Is it reactive: NO How: N/A Is product carcinogenic: No Corrosive: No-pH = 6.5 Incompatibilities: None NFPA Ratings: Fire-3 Reactivity-1 Health-2 Potential Physical effects of; Skin Contact- Minor irritation may occur Eye Contact- Minor irritation/burning Ingestion- Minor irritation /burns to gastrointestinal tract Inhalation- Moderate to severe respiratory irritation may occur. F Skin Contact- E I I
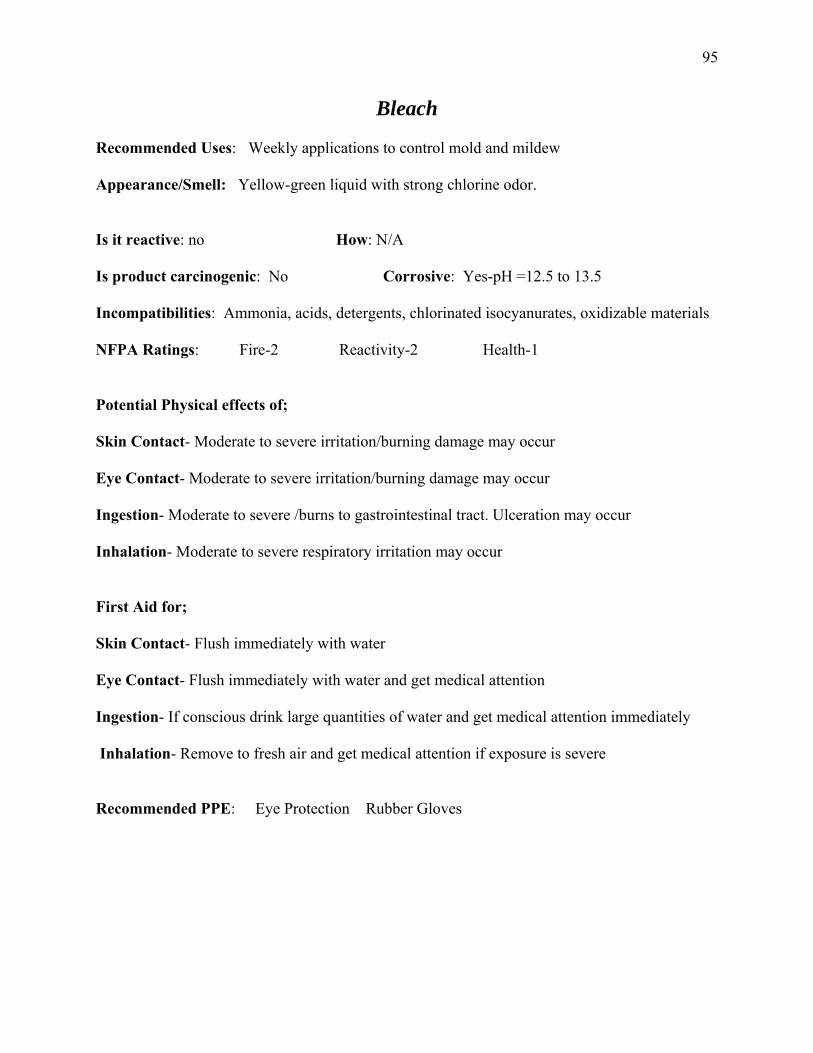
95
Bleach Recommended Uses: Weekly applications to control mold and mildew
r.
.5 to 13.5
nia, acids, detergents, chlorinated isocyanurates, oxidizable materials
/burning damage may occur
on/burning damage may occur
ct. Ulceration may occur
may occur
nhalation- Remove to fresh air and get medical attention if exposure is severe
ecommended PPE: Eye Protection Rubber Gloves
Appearance/Smell: Yellow-green liquid with strong chlorine odo Is it reactive: no How: N/A Is product carcinogenic: No Corrosive: Yes-pH =12 Incompatibilities: Ammo NFPA Ratings: Fire-2 Reactivity-2 Health-1 Potential Physical effects of; Skin Contact- Moderate to severe irritation Eye Contact- Moderate to severe irritati Ingestion- Moderate to severe /burns to gastrointestinal tra Inhalation- Moderate to severe respiratory irritation First Aid for; Skin Contact- Flush immediately with water Eye Contact- Flush immediately with water and get medical attention Ingestion- If conscious drink large quantities of water and get medical attention immediately I R
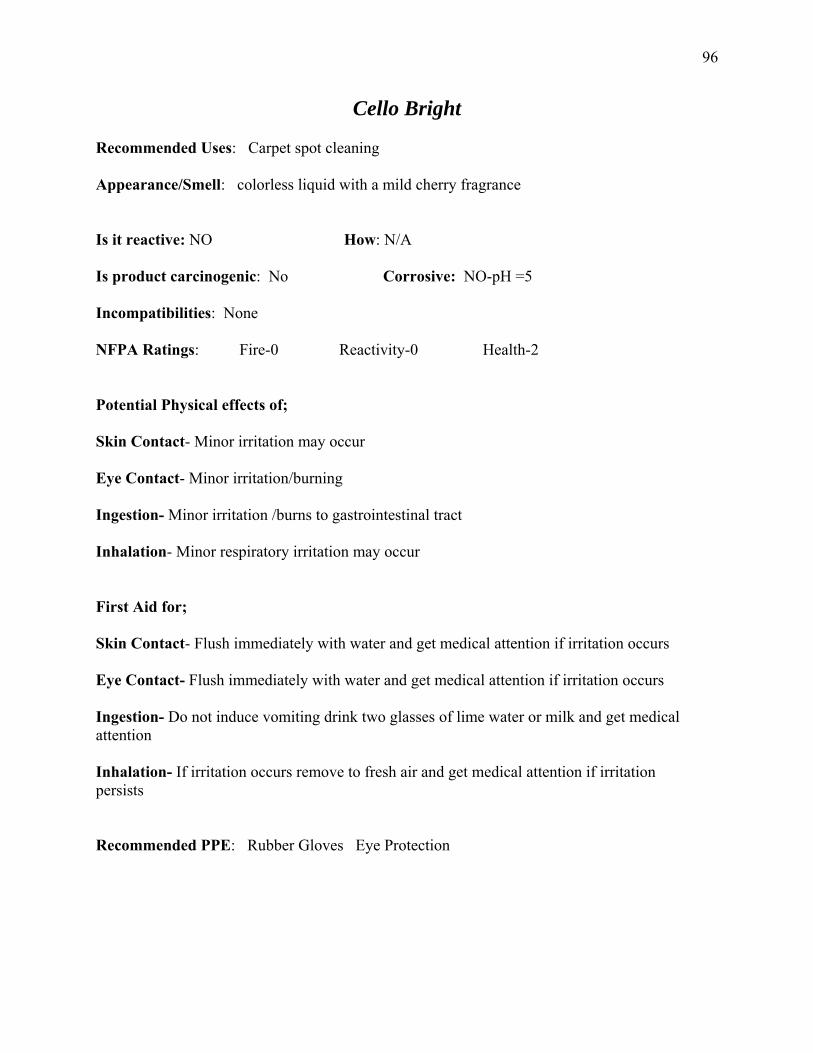
96
Cello Bright Recommended Uses: Carpet spot cleaning Appearance/Smell: colorless liquid with a mild cherry fragrance
d get medical ttention
irritation occurs remove to fresh air and get medical attention if irritation ersists
Recommended PPE: Rubber Gloves Eye Protection
Is it reactive: NO How: N/A Is product carcinogenic: No Corrosive: NO-pH =5 Incompatibilities: None NFPA Ratings: Fire-0 Reactivity-0 Health-2 Potential Physical effects of; Skin Contact- Minor irritation may occur Eye Contact- Minor irritation/burning Ingestion- Minor irritation /burns to gastrointestinal tract Inhalation- Minor respiratory irritation may occur First Aid for; Skin Contact- Flush immediately with water and get medical attention if irritation occurs Eye Contact- Flush immediately with water and get medical attention if irritation occurs Ingestion- Do not induce vomiting drink two glasses of lime water or milk ana Inhalation- Ifp

97
Comet Cleanser Recommended Uses: Scouring/ abrasive cleaning Appearance/Smell: Green powder with a cedar pine odor Is it reactive: NO How: N/A Is product carcinogenic: No Corrosive: NO-pH =9 Incompatibilities: Yes-Ammonia and Acids NFPA Ratings: Fire-0 Reactivity-0 Health-1 Potential Physical effects of; Skin Contact- Minor irritation may occur Eye Contact- Minor irritation/burning Ingestion- Minor irritation /burns to gastrointestinal tract Inhalation- Minor respiratory irritation may occur First Aid for; Skin Contact- Flush immediately with water and get medical attention if irritation occurs
curs
ntion if irritation persists
ater or milk and get medical attention mediately
ded PPE Rubber Gloves
Eye Contact- Flush immediately with water and get medical attention if irritation oc Ingestion- Drink water or milk and get medical atte Inhalation- Do not induce vomiting drink two glasses of wim Recommen
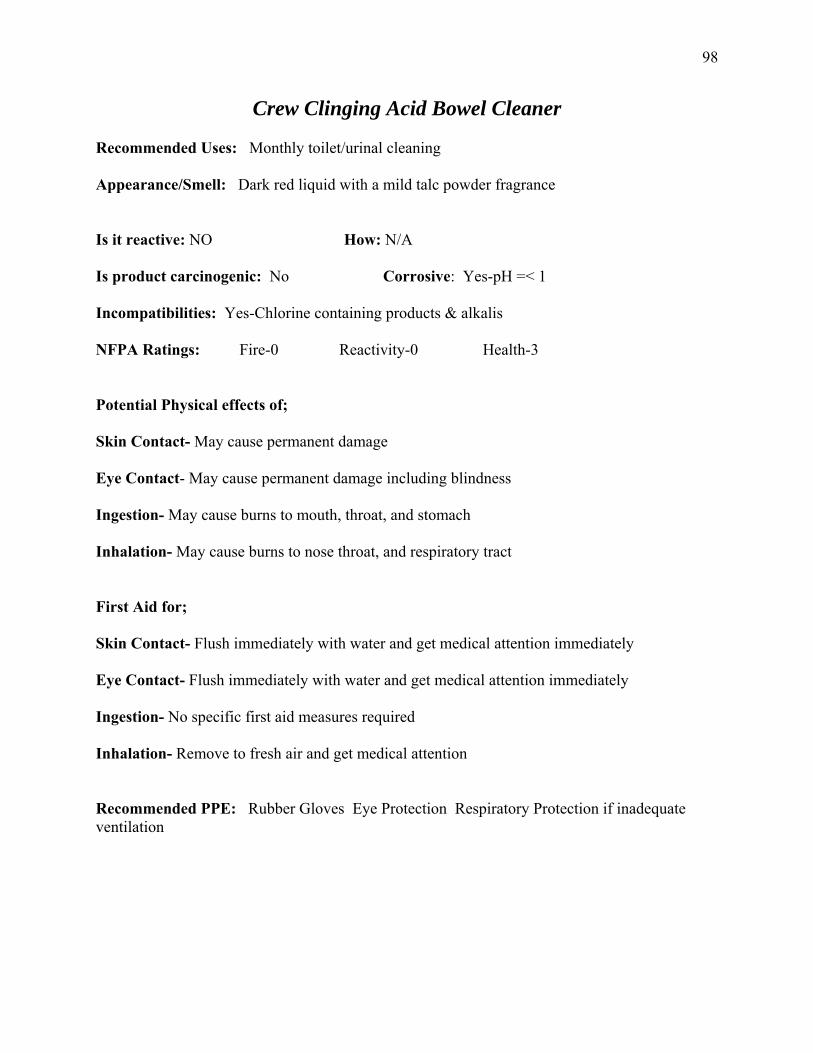
98
Crew Clinging Acid Bowel Cleaner Recommended Uses: Monthly toilet/urinal cleaning
=< 1
Appearance/Smell: Dark red liquid with a mild talc powder fragrance Is it reactive: NO How: N/A Is product carcinogenic: No Corrosive: Yes-pH Incompatibilities: Yes-Chlorine containing products & alkalis NFPA Ratings: Fire-0 Reactivity-0 Health-3 Potential Physical effects of; Skin Contact- May cause permanent damage Eye Contact- May cause permanent damage including blindness Ingestion- May cause burns to mouth, throat, and stomach Inhalation- May cause burns to nose throat, and respiratory tract First Aid for; Skin Contact- Flush immediately with water and get medical attention immediately Eye Contact- Flush immediately with water and get medical attention immediately Ingestion- No specific first aid measures required Inhalation- Remove to fresh air and get medical attention Recommended PPE: Rubber Gloves Eye Protection Respiratory Protection if inadequate ventilation

99
Crew Show le Cleaner
ts & alkalis
Respiratory Protection if inadequate ventilation
er, Tub and Ti Recommended Uses: Monthly shower cleaning Appearance/Smell: Dark red liquid with a mild talc powder fragrance Is it reactive: NO How: N/A Is product carcinogenic: No Corrosive: Yes-pH =< 1 Incompatibilities: Yes-Chlorine containing produc NFPA Ratings: Fire-0 Reactivity-0 Health-3 Potential Physical effects of; Skin Contact- May cause permanent damage Eye Contact- May cause permanent damage including blindness Ingestion- May cause burns to mouth, throat, and stomach Inhalation- May cause burns to nose throat, and respiratory tract First Aid for; Skin Contact- Flush immediately with water and get medical attention immediately Eye Contact- Flush immediately with water and get medical attention immediately Ingestion- No specific first aid measures required Inhalation- Remove to fresh air and get medical attention Recommended PPE: Rubber Gloves Eye Protection

100
GP Forward Recommended Uses: General purpose cleaning/floor maintenance
agrance
.5 to 13
idizing agents and acids
ge
ing blindness
ention
Appearance/Smell: Light green in color with a mild citrus fr Is it reactive: NO How: N/A Is product carcinogenic: No Corrosive: Yes-pH =12 Incompatibilities: Yes- ox NFPA Ratings: Fire-0 Reactivity-0 Health-2 Potential Physical effects of; Skin Contact- May cause permanent dama Eye Contact- May cause permanent damage includ Ingestion- May cause burns to mouth, throat, and stomach Inhalation- May cause burns to nose throat, and respiratory tract First Aid for; Skin Contact- Flush immediately with water and get medical attention immediately Eye Contact- Flush immediately with water and get medical attention immediately Ingestion- No specific first aid measures required Inhalation- Remove to fresh air and get medical att Recommended PPE: Rubber Gloves Eye Protection

101
Liberty Polish Recommended Uses: Metal polish Appearance/Smell: Tan in color with a mild ammonia odor Is it reactive: NO How: N/A Is product carcinogenic: No Corrosive: NO-pH =9 Incompatibilities: None NFPA Ratings: Fire-0 Reactivity-0 Health-1 Potential Physical effects of; Skin Contact- Minor irritation may occur Eye Contact- Minor irritation/burning may occur
respiratory tract
Ingestion- May cause burns to mouth, throat, and stomach Inhalation- May cause irritation to nose throat, and First Aid for; Skin Contact- Flush immediately with water and get medical attention if irritation occurs Eye Contact- Flush immediately with water and get medical attention if irritation occurs Ingestion- No specific first aid measures required Inhalation- No specific first aid measures required Recommended PPE: Eye Protection Rubber Gloves

102
Liquid Gum-Go
f chewing gum
trointestinal tract
may occur
nd get medical attention if irritation occurs
nd get medical attention if irritation occurs
quired
nd get medical attention if irritation persists
Recommended Uses: Removal o Appearance/Smell: Light green liquid with a mild citrus fragrance Is it reactive: NO How: N/A Is product carcinogenic: No Corrosive: NO-pH =8.2 Incompatibilities: None NFPA Ratings: Fire-2 Reactivity-0 Health-1 Potential Physical effects of; Skin Contact- Minor irritation may occur Eye Contact- Minor irritation/burning Ingestion- Minor irritation /burns to gas Inhalation- Minor respiratory irritation First Aid for; Skin Contact- Flush immediately with water a Eye Contact- Flush immediately with water a Ingestion- No specific first aid measures re Inhalation- Remove to fresh air a Recommended PPE: Eye Protection Rubber Gloves
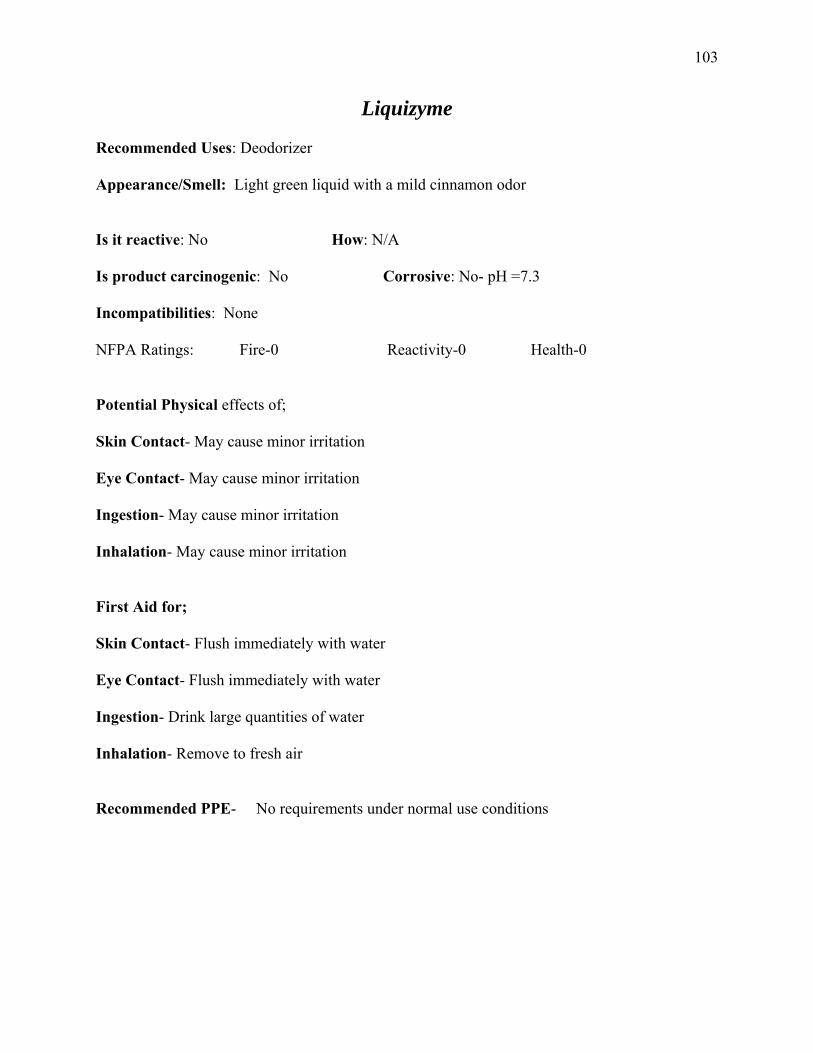
103
Liquizyme Recommended Uses: Deodorizer Appearance/Smell: Light green liquid with a mild cinnamon odor Is it reactive: No How: N/A Is product carcinogenic: No Corrosive: No- pH =7.3 Incompatibilities: None NFPA Ratings: Fire-0 Reactivity- He0 alth-0
Recommended PPE- No requirements under normal use conditions
Potential Physical effects of; Skin Contact- May cause minor irritation Eye Contact- May cause minor irritation Ingestion- May cause minor irritation Inhalation- May cause minor irritation First Aid for; Skin Contact- Flush immediately with water Eye Contact- Flush immediately with water Ingestion- Drink large quantities of water Inhalation- Remove to fresh air
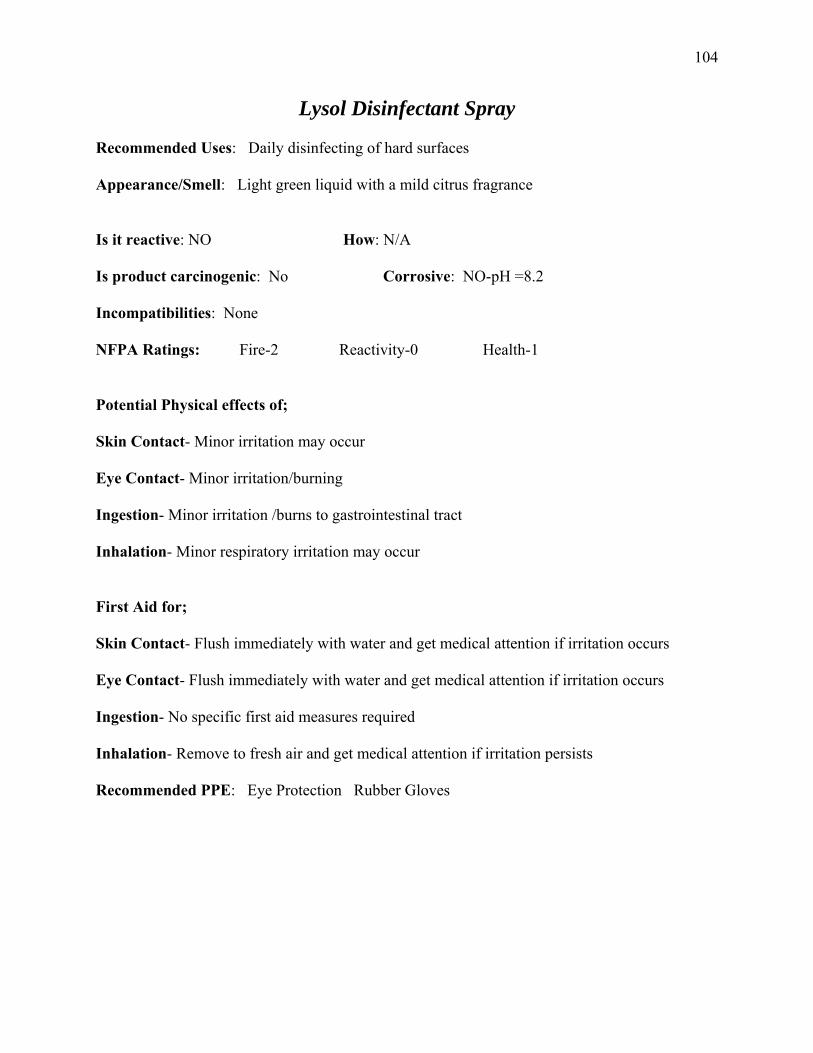
104
Lys ay
surfaces
ragrance
2
r
strointestinal tract
halation- Minor respiratory irritation may occur
y with water and get medical attention if irritation occurs
and get medical attention if irritation occurs
easures required
halation- Remove to fresh air and get medical attention if irritation persists
Recommended PPE: Eye Protection Rubber Gloves
ol Disinfectant Spr Recommended Uses: Daily disinfecting of hard Appearance/Smell: Light green liquid with a mild citrus f Is it reactive: NO How: N/A Is product carcinogenic: No Corrosive: NO-pH =8. Incompatibilities: None NFPA Ratings: Fire-2 Reactivity-0 Health-1 Potential Physical effects of; Skin Contact- Minor irritation may occu Eye Contact- Minor irritation/burning Ingestion- Minor irritation /burns to ga In First Aid for; Skin Contact- Flush immediatel Eye Contact- Flush immediately with water Ingestion- No specific first aid m In

105
Murphy Oil Soap Recommended Uses: General purpose cleaning Appearance/Smell: Amber liquid with a mild citrus odor Is it reactive: No How: N/A Is product carcinogenic: No Corrosive: No-pH =9 Incompatibilities: None NFPA Ratings: Fire-1 Reactivity- He0 alth-1
ay occur
irst Aid for;
Rinse with water
ecommended PPE: Eye Protection Rubber Gloves
Skin Contact- Mild irritation m Eye Contact- Mild irritation may occur Ingestion- Mild irritation may occur Inhalation- Mild irritation may occur F Skin Contact- Eye Contact- Rinse with water Ingestion- Drink Large quantities of water Inhalation- Remove to fresh air R
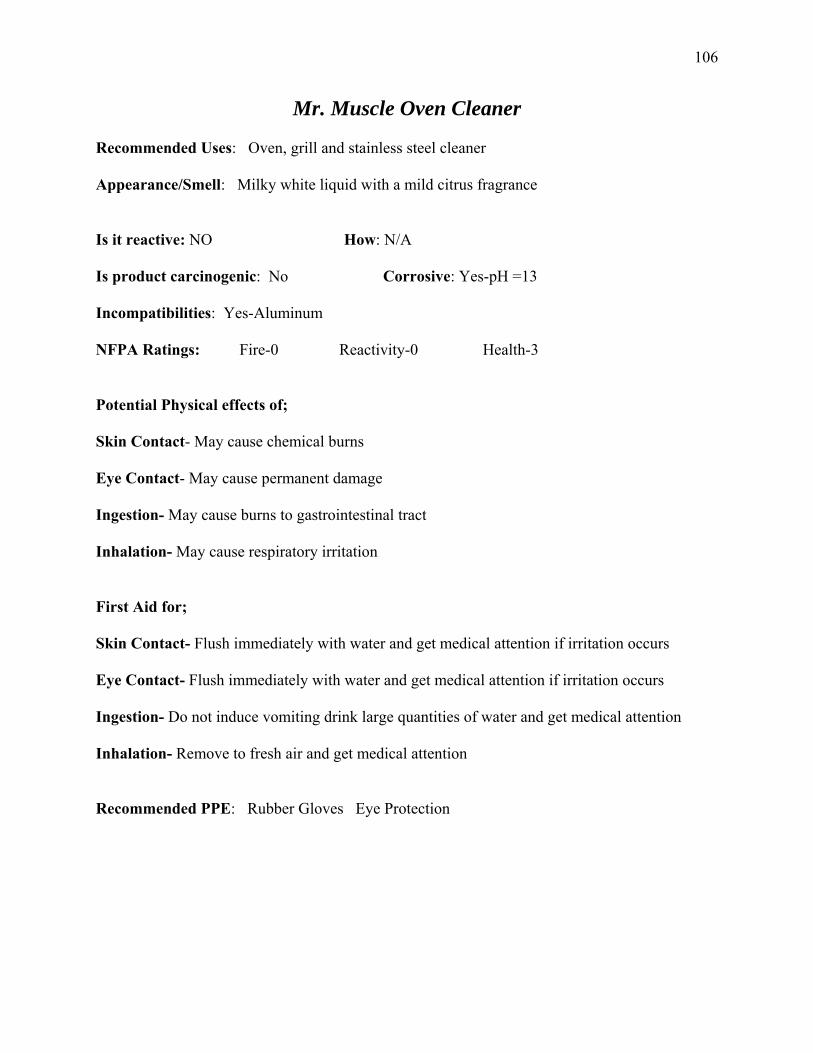
106
Mr. Mu leaner
and stainless steel cleaner
agrance
luminum
s
amage
testinal tract
halation- May cause respiratory irritation
y with water and get medical attention if irritation occurs
and get medical attention if irritation occurs
g drink large quantities of water and get medical attention
halation- Remove to fresh air and get medical attention
Recommended PPE: Rubber Gloves Eye Protection
scle Oven C Recommended Uses: Oven, grill Appearance/Smell: Milky white liquid with a mild citrus fr Is it reactive: NO How: N/A Is product carcinogenic: No Corrosive: Yes-pH =13 Incompatibilities: Yes-A NFPA Ratings: Fire-0 Reactivity-0 Health-3 Potential Physical effects of; Skin Contact- May cause chemical burn Eye Contact- May cause permanent d Ingestion- May cause burns to gastroin In First Aid for; Skin Contact- Flush immediatel Eye Contact- Flush immediately with water Ingestion- Do not induce vomitin In
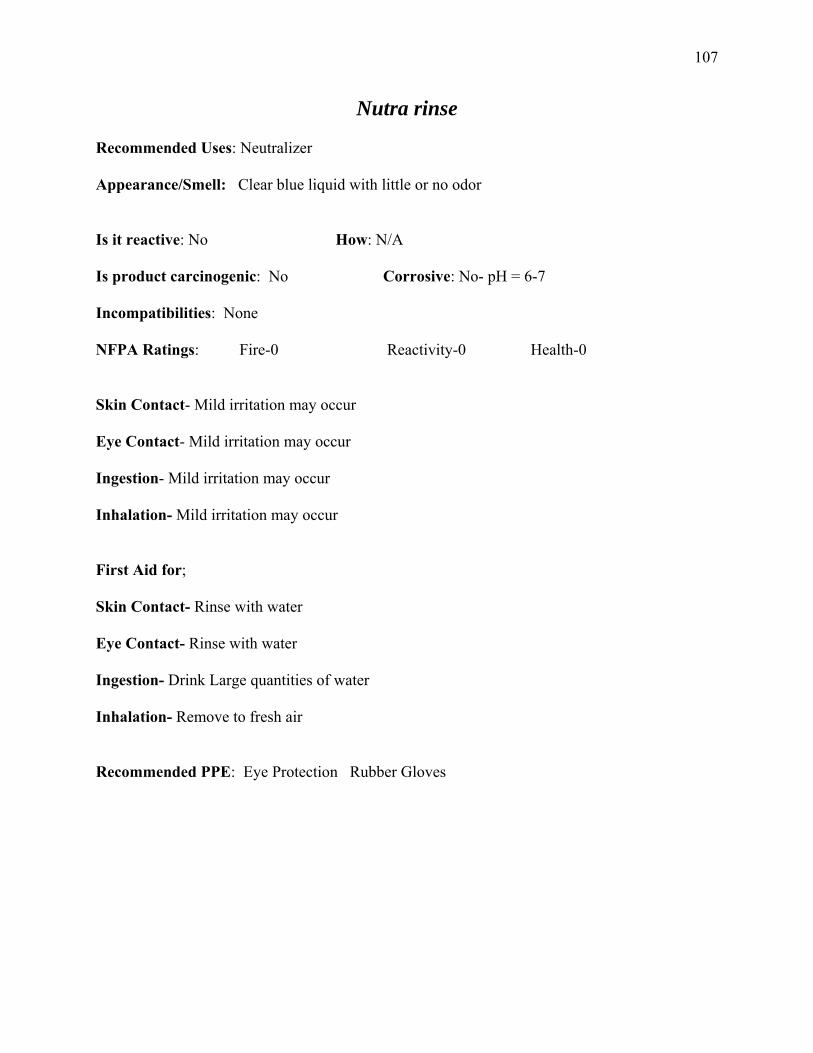
107
Nutra rinse Recommended Uses: Neutralizer Appearance/Smell: Clear blue liquid with little or no odor Is it reactive: No How: N/A Is product carcinogenic: No Corrosive: No- pH = 6-7
Incompatibilities: None NFPA Ratings: Fire-0 Reactivity-0 Health-0 Skin Contact- Mild irritation may occur Eye Contact- Mild irritation may occur Ingestion- Mild irritation may occur Inhalation- Mild irritation may occur First Aid for; Skin Contact- Rinse with water Eye Contact- Rinse with water Ingestion- Drink Large quantities of water Inhalation- Remove to fresh air Recommended PPE: Eye Protection Rubber Gloves

108
Pile Driver Recommended Uses: Carpet stain cleaner Appearance/Smell: Clear aerosol with s strong butyl odor Is it reactive: No How: N/A Is product carcinogenic: No Corrosive: pH =6 Incompatibilities: None
0 alth-1
ay occur
r
ding dizziness and fainting
irst Aid for;
kin Contact- Rinse with water
ye Contact- Rinse with water
gestion- Drink Large quantities of water
ecommended PPE: Eye Protection Rubber Gloves
NFPA Ratings: Fire-3 Reactivity- He Skin Contact- Mild irritation m Eye Contact- Moderate irritation may occu Ingestion- Mild irritation may occur Inhalation- moderate to sever irritation may occur inclu F S E In Inhalation- Remove to fresh air R

109
Pine Sol Cleaner Recommended Uses: General purpose cleaning
lear amber liquid with a mild pine fragrance
ract
ritation
irst Aid for;
kin Contact- Flush immediately with water and get medical attention if irritation occurs
ye Contact- Flush immediately with water and get medical attention if irritation occurs
gestion- Do not induce vomiting drink large quantities of water and get medical attention if
nd get medical attention if irritation persists
Appearance/Smell: C Is it reactive: NO How: N/A Is product carcinogenic: No Corrosive: No-pH =3-4 Incompatibilities: No NFPA Ratings: Fire-0 Reactivity-0 Health-1 Potential Physical effects of; Skin Contact- May cause minor irritation Eye Contact- May cause moderate irritation Ingestion- May cause irritation to gastrointestinal t Inhalation- May cause minor respiratory ir F S E Inirritation persists Inhalation- Remove to fresh air a Recommended PPE: Rubber Gloves Eye Protection

110
PM20 Acid Detergent Recommended Uses: Tile and grout cleaning Appearance/Smell: Is it reactive: No How: N/A Is product carcinogenic: No Corrosive: Yes- pH = 1 Incompatibilities: Yes-Strong alkalis
FPA Ratings: Fire-0 Reactivity-0 Health-3
y occur
may occur
y occur
get medical attention if burns are severe
N Potential Physical effects of; Skin Contact- Moderate irritation ma Eye Contact- Moderate to sever irritation Ingestion- Moderate to sever irritation ma Inhalation- Moderate irritation may occur First Aid for; Skin Contact- Rinse with water and Eye Contact- Rinse with water get medical attention Ingestion- Drink Large quantities of water get medical attention Inhalation- Remove to fresh air Recommended PPE: Eye Protection Rubber Gloves
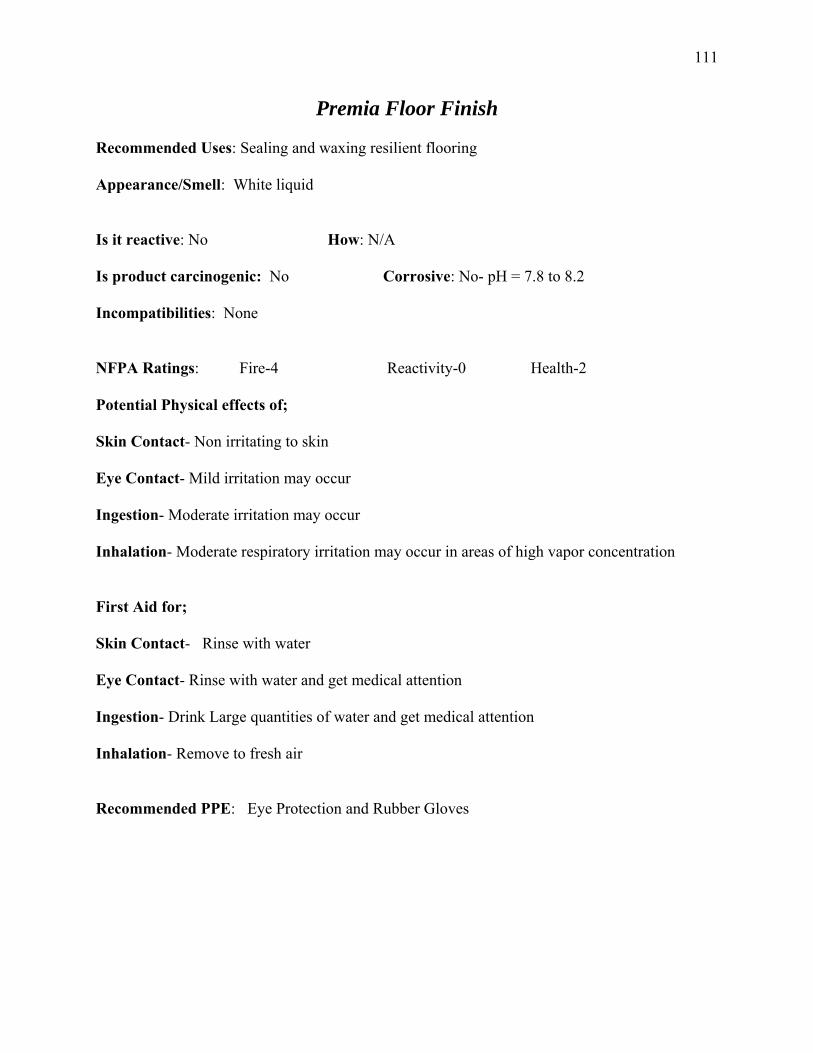
111
Premia Floor Finish Recommended Uses: Sealing and waxing resilient flooring
o 8.2
kin Contact- Non irritating to skin
ye Contact- Mild irritation may occur
gestion- Moderate irritation may occur
halation- Moderate respiratory irritation may occur in areas of high vapor concentration
es
Appearance/Smell: White liquid Is it reactive: No How: N/A Is product carcinogenic: No Corrosive: No- pH = 7.8 t Incompatibilities: None NFPA Ratings: Fire-4 Reactivity-0 Health-2 Potential Physical effects of; S E In In First Aid for; Skin Contact- Rinse with water Eye Contact- Rinse with water and get medical attention Ingestion- Drink Large quantities of water and get medical attention Inhalation- Remove to fresh air Recommended PPE: Eye Protection and Rubber Glov

112
Reliable Stainless Polish
Strong oxidizers
FPA Ratings: Fire-4 Reactivity-0 Health-2
kin Contact- Mild irritation may occur
ye Contact- Mild irritation may occur
gestion- Moderate irritation may occur
halation- Mild irritation may occur
Recommended Uses: Polishing stainless steel Appearance/Smell: Clear Aerosol Spray with a mild mint odor Is it reactive: No How: N/A Is product carcinogenic: No Corrosive: No- pH = 9.5 Incompatibilities: Yes- N Potential Physical effects of; S E In In First Aid for; Skin Contact- Rinse with water Eye Contact- Rinse with water and get medical attention Ingestion- Drink Large quantities of water and get medical attention Inhalation- Remove to fresh air Recommended PPE: Eye Protection Rubber Gloves
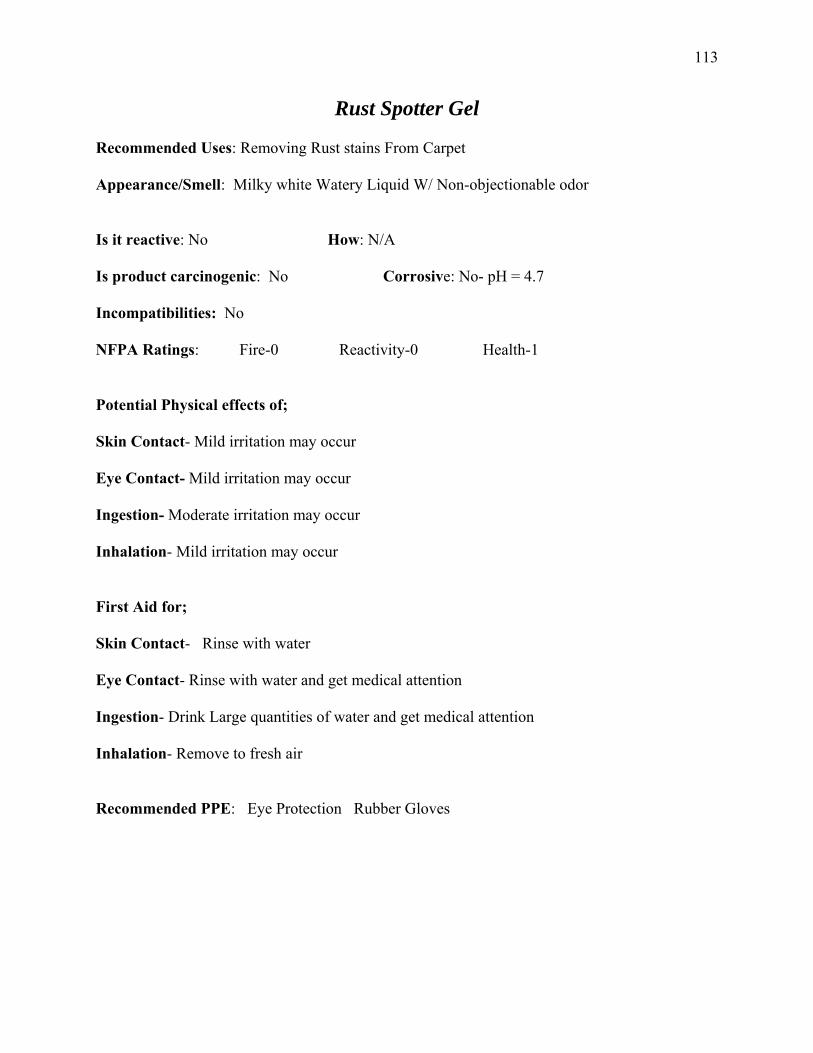
113
Rust Spotter Gel
stains From Carpet
ctionable odor
eacti ealth
tention
Recommended Uses: Removing Rust Appearance/Smell: Milky white Watery Liquid W/ Non-obje Is it reactive: No How: N/A Is product carcinogenic: No Corrosive: No- pH = 4.7 Incompatibilities: No NFPA Ratings: Fire-0 R vity-0 H -1 Potential Physical effects of; Skin Contact- Mild irritation may occur Eye Contact- Mild irritation may occur Ingestion- Moderate irritation may occur Inhalation- Mild irritation may occur First Aid for; Skin Contact- Rinse with water Eye Contact- Rinse with water and get medical attention Ingestion- Drink Large quantities of water and get medical at Inhalation- Remove to fresh air Recommended PPE: Eye Protection Rubber Gloves

114
Salvation Recommended Uses: Floor stripping Appearance/Smell: Clear liquid with a mild detergent odor Is it reactive: No How: N/A Is product carcinogenic: No Corrosive: Yes -pH =12.5-13.5 Incompatibilities: Yes- Strong Acids and oxidizers
0 alth-3
irritation
amage including blindness
mach
at, and respiratory tract
mediately
NFPA Ratings: Fire-0 Reactivity- He Potential Physical effects of; Skin Contact- May cause Moderate to severe Eye Contact- May cause permanent d Ingestion- May cause burns to mouth, throat, and sto Inhalation- May cause irritation to nose thro First Aid for; Skin Contact- Flush immediately with water and get medical attention im Eye Contact- Flush immediately with water and get medical attention immediately Ingestion- Drink one cup of water and get medical attention Inhalation- Remove to fresh air and get medical attention Recommended PPE: Rubber Gloves Eye Protection

115
Shine Line Emulsifier Stripper
from resilient flooring
to 13.7
Acids oxidizing agents
estinal tract
nd get medical attention
nd get medical attention if irritation persists
tention
nhalation- Remove to fresh air and get medical attention
ecommended PPE: Rubber Gloves Eye protection
Recommended Uses: Stripping wax and sealer Appearance/Smell: Clear liquid with a mild fresh fragrance Is it reactive: Yes How: N/A Is product carcinogenic: No Corrosive: Yes-pH =13.5 Incompatibilities: Yes- NFPA Ratings: Fire-0 Reactivity-0 Health-3 Potential Physical effects of; Skin Contact- May cause chemical burns Eye Contact- May severely irritating Ingestion- May cause burns to gastroint Inhalation- May cause respiratory irritation First Aid for; Skin Contact- Flush immediately with water a Eye Contact- Flush immediately with water a Ingestion- Do not induce vomiting drink large quantities of water and get medical at I R

116
Solventless Cleaner Recommended Uses: Wood floor preparation Appearance/Smell: Green liquid with a mild citrus fragrance
on
ions
mmediately
Is it reactive: NO How: N/A Is product carcinogenic: No Corrosive: No-pH =10.5 Incompatibilities: No NFPA Ratings: Fire-0 Reactivity-0 Health-1 Potential Physical effects of; Skin Contact- May cause minor irritation Eye Contact- May cause minor irritati Ingestion- May cause minor irritation Inhalation-Unlikely under normal use condit First Aid for; Skin Contact- Flush immediately with water Eye Contact- Flush immediately with water Ingestion- Do not induce vomiting drink large quantities of water and get medical attention i Inhalation- Remove to fresh air Recommended PPE- Eye Protection

117
Spitfire Power Cleaner Recommended Uses: Heavy duty spray cleaning Appearance/Smell: Red liquid with a mild fresh fragrance
5
cids oxidizing agents
estinal tract
tion
nd get medical attention
nd get medical attention if irritation persists
nd get medical attention
e Protection
Is it reactive: Yes How: N/A Is product carcinogenic: No Corrosive: Yes-pH =12 to 12. Incompatibilities: Yes-A NFPA Ratings: Fire-0 Reactivity-0 Health-2 Potential Physical effects of; Skin Contact- May cause chemical burns Eye Contact- May severely irritating Ingestion- May cause burns to gastroint Inhalation- May cause respiratory irrita First Aid for; Skin Contact- Flush immediately with water a Eye Contact- Flush immediately with water a Ingestion- Do not induce vomiting drink large quantities of water and get medical attention Inhalation- Remove to fresh air a Recommended PPE: Rubber Gloves Ey
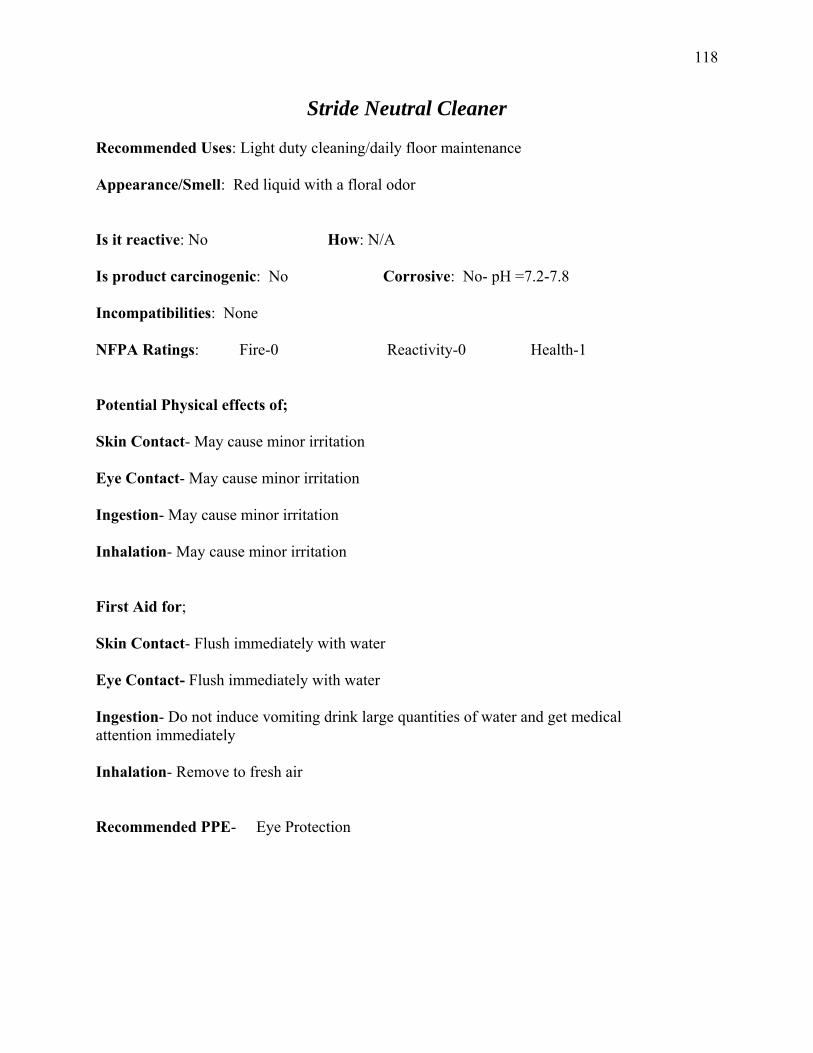
118
Stride Neutral Cleaner Recommended Uses: Light duty cleaning/daily floor maintenance
8
0 alth-1
ater and get medical ttention immediately
nhalation- Remove to fresh air
Recommended PPE- Eye Protection
Appearance/Smell: Red liquid with a floral odor Is it reactive: No How: N/A Is product carcinogenic: No Corrosive: No- pH =7.2-7. Incompatibilities: None NFPA Ratings: Fire-0 Reactivity- He Potential Physical effects of; Skin Contact- May cause minor irritation Eye Contact- May cause minor irritation Ingestion- May cause minor irritation Inhalation- May cause minor irritation First Aid for; Skin Contact- Flush immediately with water Eye Contact- Flush immediately with water Ingestion- Do not induce vomiting drink large quantities of wa I
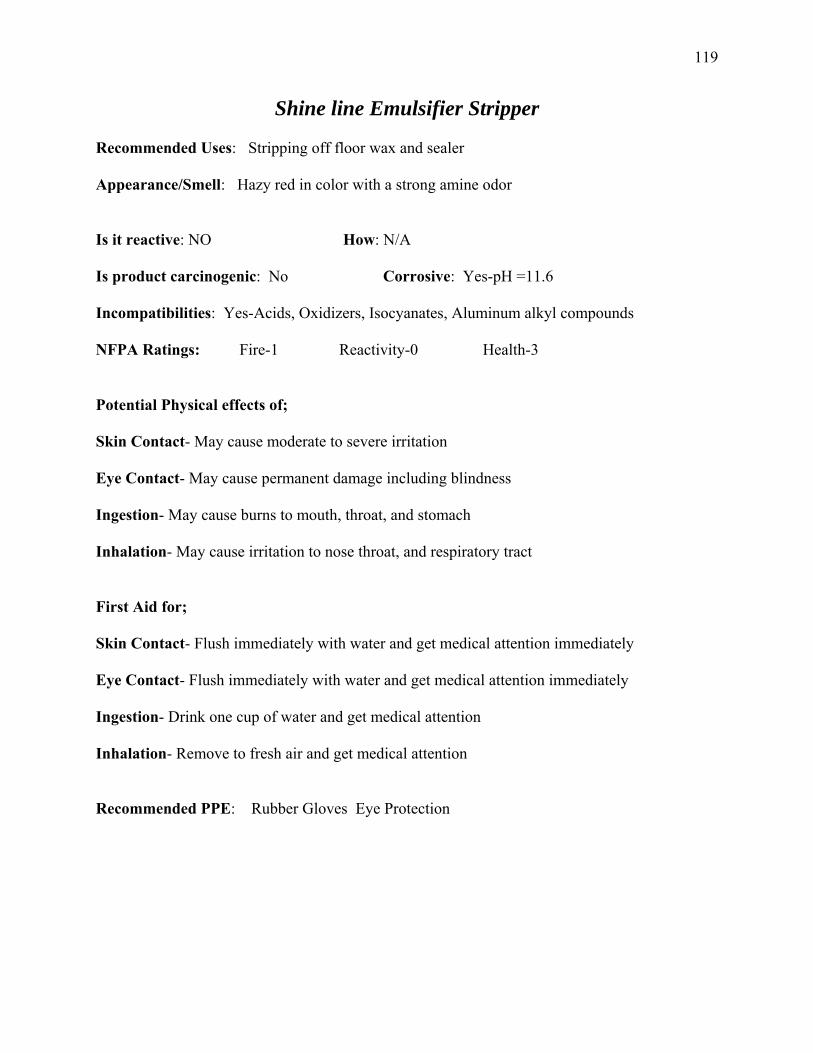
119
Shine line Emulsifier Stripper
d sealer
or
6
izers, Isocyanates, Aluminum alkyl compounds
re irritation
ncluding blindness
mach
at, and respiratory tract
Recommended Uses: Stripping off floor wax an Appearance/Smell: Hazy red in color with a strong amine od Is it reactive: NO How: N/A Is product carcinogenic: No Corrosive: Yes-pH =11. Incompatibilities: Yes-Acids, Oxid NFPA Ratings: Fire-1 Reactivity-0 Health-3 Potential Physical effects of; Skin Contact- May cause moderate to seve Eye Contact- May cause permanent damage i Ingestion- May cause burns to mouth, throat, and sto Inhalation- May cause irritation to nose thro First Aid for; Skin Contact- Flush immediately with water and get medical attention immediately Eye Contact- Flush immediately with water and get medical attention immediately Ingestion- Drink one cup of water and get medical attention Inhalation- Remove to fresh air and get medical attention Recommended PPE: Rubber Gloves Eye Protection
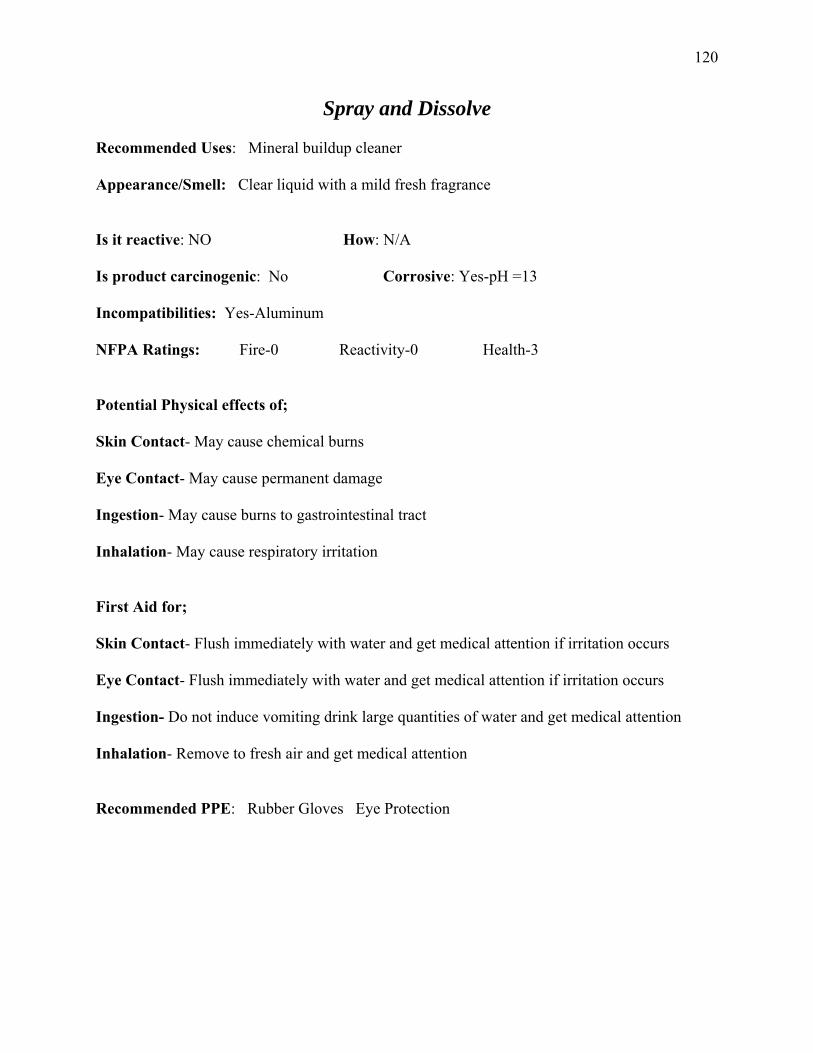
120
S
ge
nd get medical attention
pray and Dissolve Recommended Uses: Mineral buildup cleaner Appearance/Smell: Clear liquid with a mild fresh fragrance Is it reactive: NO How: N/A Is product carcinogenic: No Corrosive: Yes-pH =13 Incompatibilities: Yes-Aluminum NFPA Ratings: Fire-0 Reactivity-0 Health-3 Potential Physical effects of; Skin Contact- May cause chemical burns Eye Contact- May cause permanent dama Ingestion- May cause burns to gastrointestinal tract Inhalation- May cause respiratory irritation First Aid for; Skin Contact- Flush immediately with water and get medical attention if irritation occurs Eye Contact- Flush immediately with water and get medical attention if irritation occurs Ingestion- Do not induce vomiting drink large quantities of water and get medical attention Inhalation- Remove to fresh air a Recommended PPE: Rubber Gloves Eye Protection

121
T.E.T. Defoamer
rpet extractors
e
6
trong acids
Recommended Uses: Defoaming ca Appearance/Smell: Milky white liquid with a mild citrus fragranc Is it reactive: NO How: N/A Is product carcinogenic: No Corrosive: No-pH =6 to 7. Incompatibilities: Yes- S NFPA Ratings: Fire-0 Reactivity-0 Health-1 Potential Physical effects of; Skin Contact- May cause minor irritation Eye Contact- May cause minor irritation Ingestion- May cause irritation to gastrointestinal tract Inhalation- No hazards under normal use conditions First Aid for; Skin Contact- Flush immediately with water and get medical attention if irritation occurs Eye Contact- Flush immediately with water and get medical attention if irritation occurs Ingestion- Do not induce vomiting drink large quantities of water and get medical attention Inhalation- Remove to fresh air Recommended PPE: Rubber Gloves Eye Protection
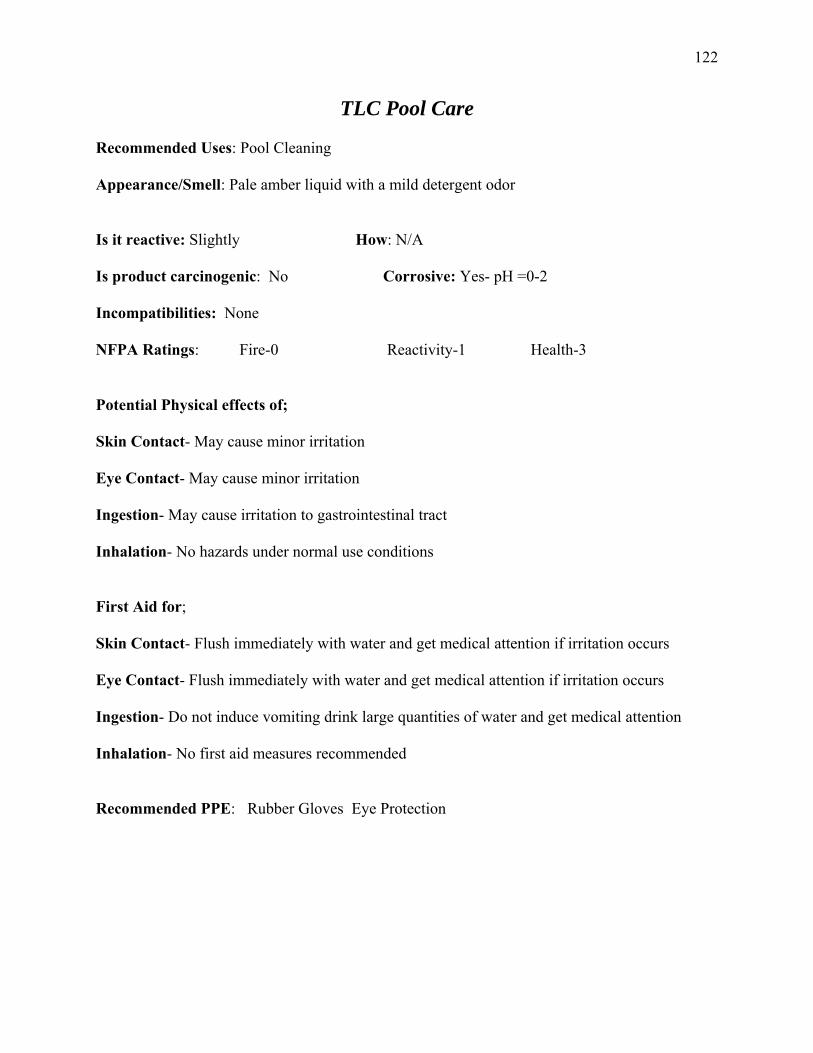
122
TLC Pool Care Recommended Uses: Pool Cleaning Appearance/Smell: Pale amber liquid with a mild detergent odor
e
1 alth-3
irst Aid for;
kin Contact- Flush immediately with water and get medical attention if irritation occurs
ye Contact- Flush immediately with water and get medical attention if irritation occurs
gestion- Do not induce vomiting drink large quantities of water and get medical attention
halation- No first aid measures recommended
Recommended PPE: Rubber Gloves Eye Protection
Is it reactive: Slightly How: N/A Is product carcinogenic: No Corrosive: Yes- pH =0-2 Incompatibilities: Non NFPA Ratings: Fire-0 Reactivity- He Potential Physical effects of; Skin Contact- May cause minor irritation Eye Contact- May cause minor irritation Ingestion- May cause irritation to gastrointestinal tract Inhalation- No hazards under normal use conditions F S E In In
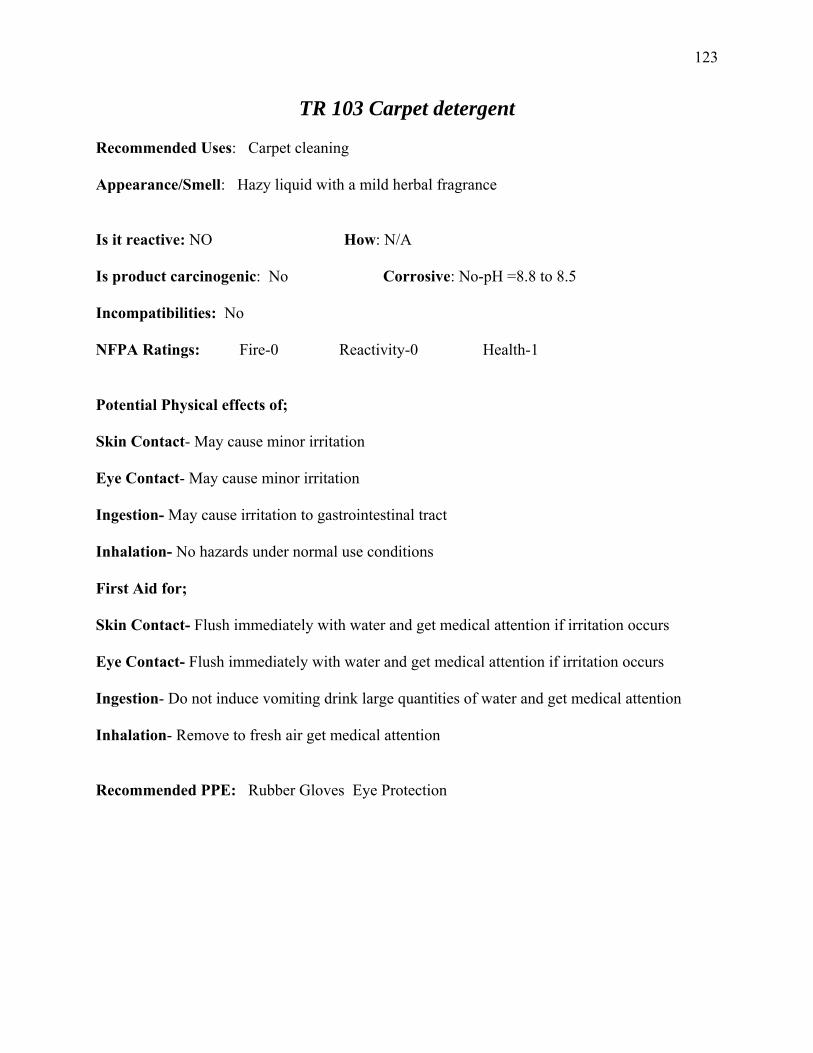
123
TR 103 Carpet detergent Recommended Uses: Carpet cleaning Appearance/Smell: Hazy liquid with a mild herbal fragrance Is it reactive: NO How: N/A Is product carcinogenic: No Corrosive: No-pH =8.8 to 8.5
irst Aid for;
kin Contact- Flush immediately with water and get medical attention if irritation occurs
ye Contact- Flush immediately with water and get medical attention if irritation occurs
gestion- Do not induce vomiting drink large quantities of water and get medical attention
halation- Remove to fresh air get medical attention
ecommended PPE: Rubber Gloves Eye Protection
Incompatibilities: No NFPA Ratings: Fire-0 Reactivity-0 Health-1 Potential Physical effects of; Skin Contact- May cause minor irritation Eye Contact- May cause minor irritation Ingestion- May cause irritation to gastrointestinal tract Inhalation- No hazards under normal use conditions F S E In In R

124
Triad II Disinfectant Cleaner
leaning
act
ater and get medical attention
Recommended Uses: Disinfecting/ C Appearance/Smell: Green liquid with a mild mint fragrance Is it reactive: NO How: N/A Is product carcinogenic: No Corrosive: YES-pH =13 Incompatibilities: No NFPA Ratings: Fire-0 Reactivity-0 Health-3 Potential Physical effects of; Skin Contact- May cause permanent damage Eye Contact- May cause Permanent damage including blindness Ingestion- May cause burns to mouth and gastrointestinal tr Inhalation- No hazards under normal use conditions First Aid for; Skin Contact- Flush immediately with water and get medical attention Eye Contact- Flush immediately with water and get medical attention Ingestion- Do not induce vomiting drink large quantities of w Inhalation- No specific measures recommended Recommended PPE: Rubber Gloves Eye Protection
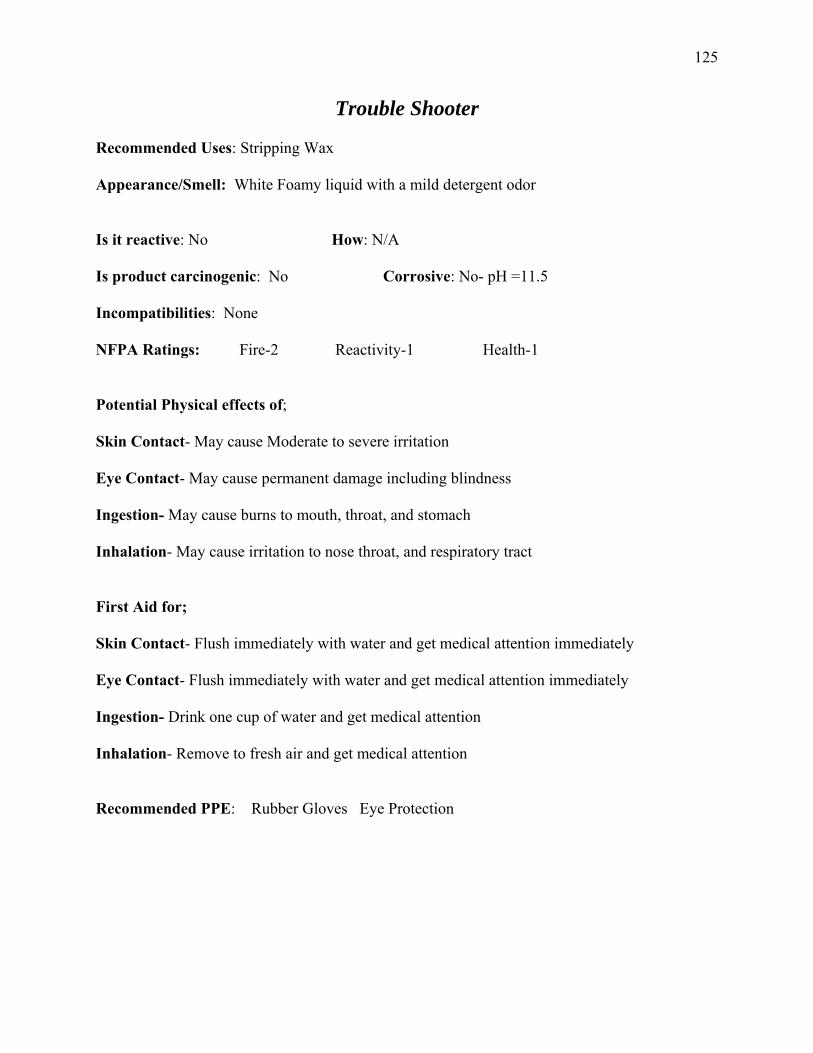
125
Trouble Shooter Recommended Uses: Stripping Wax Appearance/Smell: White Foamy liquid with a mild detergent odor Is it reactive: No How: N/A Is product carcinogenic: No Corrosive: No- pH =11.5 Incompatibilities: None NFPA Ratings: Fire-2 Reactivity-1 Health-1 Potential Physical effects of; Skin Contact- May cause Moderate to severe irritation Eye Contact- May cause permanent damage including blindness Ingestion- May cause burns to mouth, throat, and stomach Inhalation- May cause irritation to nose throat, and respiratory tract First Aid for; Skin Contact- Flush immediately with water and get medical attention immediately Eye Contact- Flush immediately with water and get medical attention immediately Ingestion- Drink one cup of water and get medical attention Inhalation- Remove to fresh air and get medical attention Recommended PPE: Rubber Gloves Eye Protection

126
Trouble Shooter Recommended Uses: Stripping Wax Appearance/Smell: White Foamy liquid with a mild detergent odor
it reactive: No How: N/A
product carcinogenic: No Corrosive: No- pH =11.5
compatibilities: None
eactiv
e irritation
ge including blindness
hroat, and stomach
throat, and respiratory tract
nd get medical attention immediately
nd get medical attention immediately
edical attention
nd get medical attention
Eye Protection
Is Is In NFPA Ratings: Fire-2 R ity-1 Health-1 Potential Physical effects of; Skin Contact- May cause Moderate to sever Eye Contact- May cause permanent dama Ingestion- May cause burns to mouth, t Inhalation- May cause irritation to nose First Aid for; Skin Contact- Flush immediately with water a Eye Contact- Flush immediately with water a Ingestion- Drink one cup of water and get m Inhalation- Remove to fresh air a Recommended PPE: Rubber Gloves

127
VP Vinyl Cleaner
lstery
s it reactive: No How: N/A
s product carcinogenic: No Corrosive: No- pH = 7.5
ncompatibilities: None
0 alth-2
irst Aid for;
kin Contact- Flush immediately with water
ye Contact- Flush immediately with water
ngestion- Drink large quantities of water
nhalation- Remove to fresh air
Recommended PPE- Eye Protection
Recommended Uses: Cleaning vinyl upho Appearance/Smell: White liquid with no discernable odor I I I NFPA Ratings: Fire-0 Reactivity- He Potential Physical effects of; Skin Contact- May cause minor irritation Eye Contact- May cause minor irritation Ingestion- May cause minor irritation Inhalation- May cause minor irritation F S E I I

128
Waterthane 701
ish
ce
Strong acids
nd get medical attention
rink large quantities of water and get medical attention
et medical attention if irritation persists
Recommended Uses: Wood floor fin Appearance/Smell: Milky white liquid with a mild citrus fragran Is it reactive: NO How: N/A Is product carcinogenic: No Corrosive: No-pH =8 to 9 Incompatibilities: Yes- NFPA Ratings: Fire-0 Reactivity-0 Health-0 Potential Physical effects of; Skin Contact- May cause minor irritation Eye Contact- May cause minor irritation Ingestion- May cause irritation to mouth and gastrointestinal tract Inhalation- May cause irritation to respiratory tract First Aid for; Skin Contact- Flush immediately with water Eye Contact- Flush immediately with water a Ingestion- Do not induce vomiting d Inhalation- Remove to fresh air g Recommended PPE: Rubber Gloves Eye Protection
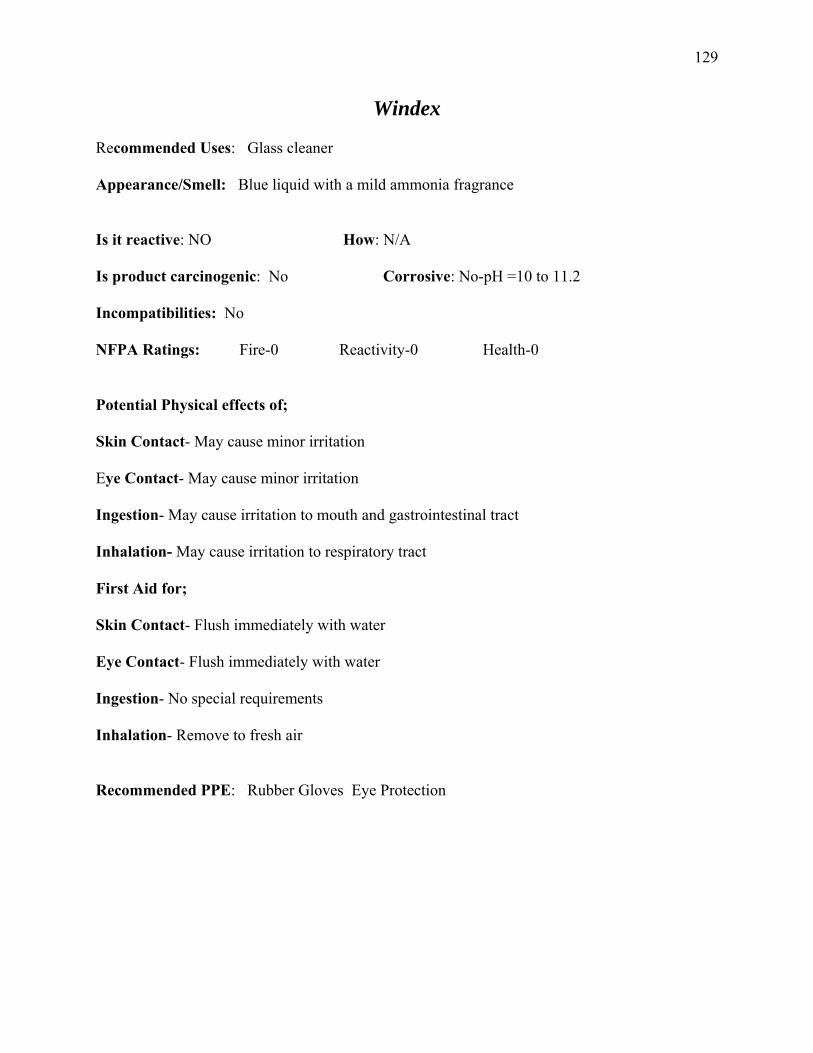
129
Windex Recommended Uses: Glass cleaner Appearance/Smell: Blue liquid with a mild ammonia fragrance Is it reactive: NO How: N/A Is product carcinogenic: No Corrosive: No-pH =10 to 11.2 Incompatibilities: No NFPA Ratings: Fire-0 Reactivity-0 Health-0 Potential Physical effects of; Skin Contact- May cause minor irritation Eye Contact- May cause minor irritation
al tract
Inhalation- May cause irritation to respiratory ct First Aid for; Skin Contact- Flush immediately with water Eye Contact- Flush immediately with water Ingestion- No special requirements Inhalation- Remove to fresh air Recommended PPE: Rubber Gloves Eye Protection
Ingestion- May cause irritation to mouth and gastrointestin
tra
130
Secti no V - Procedures

131
Cleaning Standards and Levels of Cleanliness
milton C lof Cleanlin
auged. The Fi c definition of each are as follows;
1. Lev 1 shes cleanliness at the highest level. This leve fhist c
• p in
cil sharpeners are empty, wiped
•
ll
aintained and stored.
2. Lev 2 ss is the targeted level of cleanliness Hamsho rwhich ipresent
All vertical and horizontal surfaces have a freshly cleaned or polished appearance.
Ha ol ege Custodial Services has adopted a modified version of the APPA’s Five Levels ess as the standard by which cleaning performance and facility cleanliness will be
ve levels and the basig
el - Orderly Spotlessness Level 1 establil o cleanliness was developed for the executive office, High profile public space, or ori al focal point. Descriptors for level 1 cleanliness are;
Floors and base moldings shine and are bright and clean. There is no build ucorners or along walls and all colors are fresh and bright.
• All vertical and horizontal surfaces have a freshly cleaned or polished appearance
and have no accumulation of dust, dirt, grime, marks, streaks, smudges or fingerprints.
• Bathroom and shower tile and fixtures gleam and are odor free. All supplies and materials are adequate.
Trash and recycling containers, ash trays and pen•clean and odor free.
All lamps are lit and fixtures are clean and bright.
• Custodial closets and storage areas are neatly arranged, adequately stocked and amaterials, including universal waste, are properly labeled, stored and diluted. All equipment is in good working order and is properly m
el – Ordinary Tidiness Level 2 cleanlineilton College Custodial Services strives to achieve. In Bathrooms, locker rooms,
we areas and similar facilities, level 2 cleanliness is the absolute minimum level s acceptable. Allowing such facilities to fall below a level 2 cleanliness may health risks to building occupants and the custodial staff alike. Descriptors for
level 2 cleanliness are;
• Floors and base moldings shine and are bright and clean. There can be a slight build up in corners or along walls and all colors are fresh and bright.
•
An accumulation of dust, dirt, marks, streaks, smudges or fingerprints is visible only upon close inspection.
132
• Bathroom and shower tile and fixtures gleam and are odor free. All supplies and
•
clean and odor free.
•
tely stocked and all materials, including universal waste, are properly labeled, stored and diluted. All
3. Level 3
shortcomings or other staffing related issues. While level 3 cleanliness is not completely
• Floors are swept clean but there are visible signs of dirt and debris. There is a
All vertical and horizontal surfaces have an obvious accumulation of dust, dirt,
• Trash containers, ash trays and pencil sharpeners are empty. They appear clean
• All lamps are lit and fixtures are clean.
• Custodial closets and storage areas are generally arranged, adequately stocked and
4. Level 4 Moderate Dinginess Level 4 cleanliness generally reflects significant funding
shortcomings or other significant staffing related issues. At level 4 cleanliness, facilities
t
dings are dull and have visible signs of buildup and splashes. Carpets have multiple visible stains and are matted and soiled in traffic lanes.
materials are adequate.
Trash and recycling containers, ash trays and pencil sharpeners are empty, wiped
All lamps are lit and fixtures are clean.
• Custodial closets and storage areas are neatly arranged, adequa
equipment is in good working order and is properly maintained and stored
– Casual Inattention Level 3 cleanliness generally reflects initial funding
unacceptable, the overall appearance of the facilities begins to show outward signs of untidiness. Descriptors for level 3 cleanliness are;
build up of dust, dirt and/or floor finish along walls and in corners. Moldings are dull and have visible signs of buildup and splashes. Carpets have multiple visible stains and are matted and soiled in traffic lanes.
•marks, streaks, smudges or fingerprints. Bathroom and shower tile and fixtures appear clean and are odor free. All supplies and materials are adequate.
and odor free.
all materials, including universal waste, are properly labeled, stored and diluted. All equipment is in good working order and is properly maintained and stored
constantly appear to be dirty and in need of a thorough cleaning. Building occupants begin to accept facilities in a substandard condition. Descriptors for level 4 cleanliness are;
• Floors are swept clean but are dull and blotchy. There are obvious signs of dir
and debris. There is a build up of dust, dirt and/or floor finish along walls and in corners. Mol
133
• dust, dirt,
marks, streaks, smudges or fingerprints. Bathroom and shower tile and fixtures are dull and s d materials are adequate.
ntainers, ash trays and pencil sharpeners hold old trash and shavings are d clean and odors are present.
ps are burned out and fixtures are dingy.
nd some beling, storage and dilution.
not properly maintained and stored.
empt Neglect Level 5 cleanliness is the lowest level of cleanliness and is l 5 cleanliness, facilities are constantly filthy and table levels. Descriptors for level 5 cleanliness are;
n e
dings are dirty and have obvious signs of soil and floor finish buildup and lashes.
ot wiped
erials, is
in sive
rations across the nation. Experts in the cleaning industry education have developed these standards as a tool to be
sed in developing efficient custodial operations. The five levels of cleanliness are a part of ustodial Staffing Guidelines for Educational Facilities Published by he Association of Higher ducation facility Officers
All vertical and horizontal surfaces have an obvious accumulation of
light odor is detectable. Not all supplies an
• Trash conot wipe
• Less than 5% of lam
• Custodial closets and storage a
g universal waste, lack proper lareas are unorganized, poorly stocked a
materials, includinEquipment is in poor working order and is
5. Level 5 – Unkcompletely unacceptable. At levecleaning is performed at unaccep
• Floors and carpets are dirty and have visible signs of wear and pitting. There is a
excessive build up of dust, dirt and/or floor finish along walls and in corners. Basmolsp
• All vertical and horizontal surfaces have an obvious accumulation of dust, dirt,
grime marks, streaks, smudges or fingerprints. Bathroom and shower tile and fixtures are dull and odor is present. Many supplies and materials are inadequate.
• Trash containers, ash trays and pencil sharpeners overflow and are n
clean. Foul, sour odors are present.
urned out and fixtures are dingy. • More than 5% of lamps are b
• Custodial closets and storage areas are unorganized, poorly stocked and matincluding universal waste, lack proper labeling, storage and dilution. Equipmentin poor working order and is not properly maintained and stored.
The five levels of cleanliness and the descriptors of each are the guides which will be usedevaluation of facility condition. These standards have been developed as a result of extenresearch and analysis of custodial opend in custodial operations in highera
uCE

134
General Cleaning Procedures
CY-Daily
• Supply of clear and grey plastic trash can liners • Metal polish
PREPARATION OF MATERIALS Prepare a disinfectant/ detergent solution in the plastic bottle in accordance with the manufacturer’s instructions. Dampen a rag or sponge with the triad solution to be used to wipe down containers. PROCEDURE 1) Empty the trash receptacle into the trash collection bag. Do not reach into the waste basket,
but carefully dump the contents into the bag or remove the liner from the container with the contents inside.
2) If the plastic liner in the can is torn, soiled or wet, replace it with a fresh liner. 3) If the inside of the waste basket itself is soiled or wet, damp wipe the inside using the detergent solution and a sponge or rag. 4) Damp wipe the outside of the basket to remove soil and smudges. If the receptacle is stainless steel or another bright metal, use the metal polish to remove smudges and finger prints. Reline the receptacle with the appropriate liner and double bag standard. 5) When the trash collection bag is full, remove it and place it at the designated pickup location. Do not place trash bags on carpeted floors as liquids may seep out and stain the carpeting. If necessary, place a folded plastic liner under the collection bag to catch any spills that may occur.
Emptying Trash/ Recyclables
REQUENF
ATERIALS & EQUIPMENT M
• Trash/recycling collection receptacle or other means of consolidating trash • Triad solution in plastic spray bottle • Clean rags and sponges

135
SAFETY & PPE RECCOMEN
protection. Use caution when removing liners our leg and arm strength without bending or lifting with your otruding from the bag and avoid reaching into a trash
ece a PE O
e clean and odor free. Liners must be tear free and fitted for trash removal are approximately one minute per
DATIONS
PE recommended includes hand, foot and eye Pfrom large receptacles. Lift using y
ack. Be aware of sharp objects prbr pt cle.
RF RMANCE STANDARDS All waste containers and liners must bappropriately to the containers. Time standards container. Clear liners are for recycling only and grey liners are for trash.

136
Chalkboard Cleaning
• Clean felt erasers • One clean, dry Micro fiber cloth • One damp Micro fiber cloth
AREAS WHERE APPLICABLE The following method should be used on all types of chalkboards, slate blackboards as well as synthetic dry erase boards. PREPARATION OF EQUIPMENT Clean the felt eraser or cloth if necessary. The felt eraser should be vacuumed to remove dust or the cloth laundered. PREPARATION OF THE AREA Collect all dirty erasers and pieces of chalk, and move them to one end of the chalk tray. PROCEDURE
1) Use the felt eraser to erase the entire board, except for areas marked "Save" or "Do Not Erase", do not be picky about this, if the exact text is not right, but the meaning clear, save the area.
2) After erasing, wipe the entire board with the chamois or cloth. 3) Damp wipe the entire chalk tray with the micro fiber cloth. 4) While wiping the chalk tray, collect and discard small pieces of chalk. 5) Do not put felt erasers with the erasing surface down in a damp chalk tray. 6) Wipe down any adjacent wall surfaces in which chalk dust or water marks are present.
CLEANUP After all chalkboards in an area have been cleaned, vacuum the felt eraser and rinse out the Micro fiber cloth that was used to clean out the chalk tray. SAFETY & PPE RECCOMENDATIONS PPE recommended includes hand and eye protection. Use caution when reaching to clean the top of the board. Use an extension handle if you are unable to reach the top of the board. PERFORMANCE STANDARDS
FREQUENCY-Daily MATERIALS & EQUIPMENT

137
ll boards should
ins on walls from cleaning the chalk trays must be wiped off. Time Achalk dust. Any water sta
andards equal .0192 minutes per Sq. Ft.
be clean and streak free. Chalk trays should be free of excessive chalk and
st
138
Dusting Building Surfaces and Furnishings
• Whisk broom AREAS WHERE APPLICABLE Horizontal surfaces include the tops of desks, tables, cabinets, and similar surfaces, ledges, window sills, decorative moldings, wall-mounted HVAC vents, and Venetian blinds. Vertical surfaces include sides of desks, tables, cabinets, furniture legs, picture frames doors and moldings. PROCEDURE 1) Dust furniture surfaces using the treated dust cloth or dusting tool. Items such as telephones, desk-sets, and picture frames should be dusted, avoiding those things which appear too fragile to be handled safely. Papers, books and other work material left on tops of furniture should not be moved. Never read or look through paperwork left on furniture. 2) Dusting tool should be used to dust wall surfaces up to a height of about eight feet, and most low surfaces. 3) Move the treated cloth or dusting tool over the surface so that the dust particles are trapped in the fibers, avoid snapping, flicking or shaking the dust cloth or tool, which would redistribute the dust to other surfaces. 4) To dust decorative moldings, venetian blinds, upholstered furniture and other irregular surfaces, use a portable tank vacuum equipped with a soft brush attachment. Use a whisk broom to remove soil from crevices in upholstered furniture. CLEANUP Vacuum dusting tool heads after use. If dusting cloths or tools become soiled and lose their effectiveness, send them to the physical plant be laundered. If dust cloth is the disposable type, and is no longer usable, discard it properly.
FREQUENCY-Weekly
ATERIALS & EQUIPMENT M
• Stretch & Dust® cloths or Micro fiber cloth • Dusting tool W/ telescoping handle • Vacuum with attachments

139
SAFETY & PPE RECCOMENDPE recommended includes hand and eye protec
use of ladders.
ll r ee from dust, smudges and other debris. Weekly dusting sho aerosol dusting products that may cause buildup. Time
an r r Sq. Ft.
ATIONS tion. Use caution when dusting overhead, avoid P
over reaching or improper PERFORMANCE STANDARDS A su faces should be clean and fr
uld be done without the use ofda ds equal to .012 minutes pest

140
Furniture Polishing
MATERIALS & EQUIPMENT
• Aerosol Furniture polish • Several clean, soft cloths
AREAS WHERE APPLICABLE Wood, vinyl, and Formica surfaces such as tables, desks, chairs and countertops. . PREPARATION OF THE AREA On desks, tables and other work surfaces, move all items to one side unless specific instruction have been given to leave items alone. PROCEDURE 1) Hold the can about eight inches from the surface and spray the area lightly. Avoid overspray onto surrounding surfaces. 2) Wipe immediately with a soft, clean cloth. do not allow the spray to dry before wiping. 3) On narrow surfaces where much of the spray may be wasted, such as arm chairs, or on areas where the spray may wet and damage papers, spray the cloth and then wipe the area. wipe again with a clean cloth. 4) After the exposed part of the surface has been completed, move the materials to the other side and repeat the procedure. CLEANUP Rinse all the cloths in warm water, wring them so that they do not drip, and hang to dry or send them to be laundered. SAFETY & PPE RECCOMENDATIONS PPE recommended includes hand and eye protection. Use caution when spraying product. Always spray away from face to prevent polish from getting into eyes. Always clean up any overspray that could create a slip hazard
FREQUENCY-Monthly

141
PERFORMANCE STANDARDS ll surfaces should be clean and free ris. Polishing should not
n order to prevent excessive buildup of polish. Time A from dust, smudges and other debbe more frequently than monthly istandards equal to .08 minutes per Sq. Ft.
142
Window Cleaning
Glass cleaner solution in a plastic spray bottle or bucket ination aper towels
Glass doors, mirrors, and glass partitions are examples of areas that require full cleaning. PREPARATION OF MATERIALS Generally speaking glass cleaning products will be distributed in their RTU form. However, if glass cleaning solution has not already been mixed, do so. Fill the spray bottle approximately 3/4 full of clean water, and add the appropriate amount of glass cleaning concentrate. Remember that instructions for dilution are usually given in ounces per gallon. Spray bottles normally hold between 1/8 and 1/4 gallon. PREPARATION OF THE AREA If cleaning is done on a door in a high traffic area, it may be necessary to prop the door open so that traffic and the cleaning process do not interfere with each other. Never prop a door on the top hinge side. Use a door wedge placed at the bottom side opposite the hinges. Always remove wedge upon completion of task. PROCEDURE 1) Using scrapper or putty knife remove any tape or adhesive on glass. 2) Spray areas with an adequate amount of the cleaning solution. 3) Using the fabric side of the squeegee/mop agitate solution. 4) Squeegee window starting at the top and working across and down. 5) Using cloth or paper towels wipe off all frames and ledges. CLEANUP Rinse and wring dry any cloths used. If the glass cleaning solution is to be left in the bottle for future use, properly label the bottle according to the guidelines in the safety section of this manual. Dispose of any paper toweling used. Rinse squeegee/mop and place in open area to dry.
FREQUENCY-Daily or as needed MATERIALS & EQUIPMENT
• • Window squeegee/mop comb• Several, clean dry cloths or p• Scrapper or putty knife
AREAS WHERE APPLICABLE
143
SAFETY & PPE RECCO
protection. Use caution when spraying product. Always s cleaner from getting into eyes. Always clean up any
azard. Be aware of traffic through doors if cleaning glass in
PE O
smudges, tape and other marks. Time standards
MENDATIONS PPE recommended includes and eyespray away from face to prevent glasoverspray that could create a slip h
oors. d
RF RMANCE STANDARDS All glass surfaces should be clean and free fromequal to .11 minutes per Sq. Ft.

144
Spot Cleaning Glass-Method 1
aper towels
Any glass surface that is likely to be touched by someone. Glass doors, mirrors, and glass partitions are examples of areas that require frequent spot cleaning. PREPARATION OF MATERIALS Generally speaking glass cleaning products will be distributed in their RTU form. However, if glass cleaning solution has not already been mixed, do so. Fill the spray bottle approximately 3/4 full of clean water, and add the appropriate amount of glass cleaning concentrate. Remember that instructions for dilution are usually given in ounces per gallon. Spray bottles normally hold between 1/8 and 1/4 gallon. PREPARATION OF THE AREA If spot cleaning is done on a door in a high traffic area, it may be necessary to prop the door open so that traffic and the cleaning process do not interfere with each other. PROCEDURE 1) Spray visibly soiled areas with a small amount of the cleaning solution. Avoid spraying so much that it begins to drip or run. 2) Wipe the area with a dry cloth or paper towel 3) Be sure to wipe off any cleaner that may have gotten on frames or other non-glass materials that border the area to be cleaned. CLEANUP Rinse and wring dry any cloths used. If the glass cleaning solution is to be left in the bottle for future use, properly label the bottle according to the Right to Know rules in the RTK manual. Dispose of any paper toweling used.
FREQUENCY-Daily or as needed MATERIALS & EQUIPMENT
• Several, clean dry cloths or p• Windex®
AREAS WHERE APPLICABLE

145
SAFETY & P
protection. Use caution when spraying product. Always s cleaner from getting into eyes. Always clean up any
azard. Be aware of traffic through doors if cleaning glass in
PE O
smudges, tape and other marks. Time standards
PE RECCOMENDATIONS PPE recommended includes and eyespray away from face to prevent glasoverspray that could create a slip h
oors. d
RF RMANCE STANDARDS All glass surfaces should be clean and free fromequal to .11 minutes per Sq. Ft.

146
Spot Cleaning Gl eferred Method)
fiber cloth
REAS WHERE APPLICABLE
ny glass surface that is likely to be touched by someone. Glass doors, mirrors, and glass
REPARATION OF MATERIALS
ampen one of the micro fiber cloths and wring out as mush water as possible
spot cleaning is done on a door in a high traffic area, it may be necessary to prop the door open
ith a dry micro fiber cloth
aundered.
q. Ft.
TE
ly soiled areas method 1 should be applied.
ass Method 2 (Pr FREQUENCY-Daily or as needed MATERIALS & EQUIPMENT
• One damp Micro fiber cloth • One dry Micro
A Apartitions are examples of areas that require frequent spot cleaning. P D PREPARATION OF THE AREA Ifso that traffic and the cleaning process do not interfere with each other. PROCEDURE ) wipe visibly soiled areas with the damp micro fiber cloth. 1
) Wipe the area w2
CLEANUP Rinse and wring dry any cloths used. Hang micro fiber cloths to dry. If Micro fiber cloths are excessively dirty send to be l SAFETY & PPE RECCOMENDATIONS No specific PPE recommended . Be aware of traffic through doors if cleaning glass in doors.
RFORMANCE STANDARDS PE All glass surfaces should be clean and free from smudges, tape and other marks. Time standards qual to .11 minutes per Se
SPECIAL NO Method 2 is the preferred method for spot cleaning class. However, under certain conditions such as freezing temperatures or excessive
147
Metal Cleaning
urpose cleaner
AREAS WHERE APPLICABLE Any exposed interior metal surface, structural or decorative. Metal parts of doors, railings, and other metal parts frequently touched require regular cleaning and disinfecting. PREPARATION OF MATERIALS Fill your plastic spray bottle about 3/4 full of clean water, and add the appropriate amount of cleaner disinfectant. Bottles are usually 1/8 to 1/4 of a gallon. Your measuring cup is eight ounces to a cup. Measure carefully. PRERARATION OF THE AREA If metal to be cleaned is on a door in or high traffic area, it mat be necessary to prop it open so that the traffic and cleaning process do not interfere with each other. PROCEDURE 1) Spray the metal lightly with the mixed detergent solution. 2) Wipe the area dry with a soft, clean cloth. For stubborn soil, it may be necessary to use the general purpose cleaner. 3) Spray a small amount of the general purpose on the area and wipe clean. 4) If the metal being cleaned is a handrail or other “touch surface” it must be wiped down with the disinfectant cleaner even if the general purpose cleaner in used first. NOTE: Lotion, crème, and powder type cleaners are abrasive, and should never be used on a polished metal surface. CLEANUP Rinse and wring dry any cloths used. If the detergent solution is left in the plastic spray bottle for future use, properly label the bottle.
FREQUENCY-Daily or as needed MATERIALS & EQUIPMENT
• Disinfectant and/or general p• Clean cloths • Measuring device

148
SAFETY & PPE REC
es hand and eye protection. Use caution when spraying product. ent glass cleaner from getting into eyes. Always clean up
ip hazard. Be aware of traffic through doors if cleaning doors.
E O All t d free from smudges, tape and other marks. Time standards qu to .11 minutes per Sq. Ft.
COMENDATIONS PPE recommended includAlways spray away from face to prevany overspray that could create a sl P RF RMANCE STANDARDS
mal
e al surfaces should be clean ane

149
Spot Cleaning Walls and Furnishings
MATERIALS & EQUIPMENT
• Disinfectant cleaner solution in a plastic spray bottle • Clean cloths and/or sponges
AREAS WHERE APPLICABLE Non-fabric, above floor surfaces that are frequently touched such as hand rails, areas around wall switches, elevator buttons, push plates on doors, and wall areas near telephones require frequent spot disinfectant cleaning. PREPARATION OF MATERIALS Dampen a cloth or sponge with clean water and wring it as dry as possible. If a properly diluted detergent is not already available, mix the solution. Fill your plastic spray bottle about 3/4 full with clean water, and add the appropriate amount of detergent. PROCEDURE 1) If the soiled area is non-electrical, spray the area with a small amount of detergent solution and wipe with a damp cloth. Never spray solution directly on top of a switch, elevator button or other electrical device. Instead, spray a small amount onto the damp cloth, and use the cloth to clean the soiled area. 2) For stubborn wall stains, it may be necessary to use a stronger detergent solution. 3) Do not rinse disinfectant cleaner. Wipe excess solution from surface and allow to air dry. CLEANUP Rinse and dry all cloths and sponges. If the detergent solution remains in the spray bottle for future use, label it properly as directed in the Right to Know rules in the Safety Training manual. SAFETY & PPE RECCOMENDATIONS PPE recommended includes hand and eye protection. Use caution when spraying product. Always spray away from face to prevent detergent solution from getting into eyes. Always clean up any overspray that could create a slip hazard or cause damage to finished floors.
FREQUENCY-Weekly

150
PERFORMANCE STANDA
and free from smudges, tape and other marks. Time standards
RDS All wall surfaces should be cleanqual to .11 minutes per Sq. Ft. e
151
Wall and Ceiling Washing
nsion handle
Make a detergent solution in one bucket of clear, warm water. Fill second bucket with clear, warm rinse water. Rinse water must be changed frequently. PREPARATION OF THE AREA Remove all furniture, pictures and other objects from the area to be cleaned. Remove all excess dust and cobwebs from wall and ceiling with vacuum or dust mop. Use bottom to top stroke to catch cobwebs. PROCEDURE 1) Spread drop cloth to control spillages, and move it as you progress. 2) Be sure that ceiling is washable, these techniques do not work with soft, spray acoustic materials. Begin at one corner of the ceiling. Sponge the detergent solution onto an area about four feet square. Use the same stroke each time. 3) Wring the detergent sponge dry, and pick up the applied solution. 4) Apply the rinse sponge to the same area, then squeeze dry and pick up the rinse water. 5) Continue across the ceiling in this manner until finished. 6) Begin at the top of the wall, and work toward the bottom, following the same washing and rinsing technique used on the ceiling. Try not to let the solution run down the wall. 7) Wash adjacent woodwork and baseboards using the same methods. 8) When possible, two workers should form a team, with one doing the top half, and the other following on the bottom half.
FREQUENCY-Semi annually MATERIALS & EQUIPMENT
• GP Forward solution • 2 Buckets • Dusting Tool W/ Telescoping handle • Lightweight sponge mop exte• Sponges or cloths • Large drop cloth (if needed)
PREPARATION OF MATERIALS
152
CLEANUP
return to custodial equipment storage area.
ATIONS
PE and and eye protection. Use caution when spraying product. Alw s to prevent detergent solution from getting into eyes. Always clean up any overspray that could create a slip hazard or cause damage to finished floors. PE O
smudges, tape and other marks. All corners free st. Time standards equal to .11 minutes per Sq. Ft.
Clean all equipment and SAFETY & PPE RECCOMEND P recommended includes h
faceay spray away from
RF RMANCE STANDARDS All wall surfaces should be clean and free fromfrom cob webs and accumulations of du
153
Cleaning Water Fountains F MATERIALS & EQUIP
• Disinfectant cleaner
onges
PREPARATION OF MATERI Pre e astic spray bottle according to the manufacturer's dire PR 1) Rem her debris with scrapper/putty knife.
p surfaces of the drinking fountain. Allow adequate dwell time.
) Wipe all lower surfaces with a cloth dampened with the disinfectant cleaner solution.
) To remove soil or mineral buildup, Use a small amount of cream cleanser on a soft cloth. A
f spigots and faucets.
wipe dry. Glass cleaner may be used lastly to brighten the surfaces
cloths used. Properly label the spray bottle before storing it.
raying product. y away from face to prevent disinfectant detergent solution from getting into eyes.
ime standards
REQUENCY-Daily
MENT
• Cream cleanser • Scrapper/ Putty Knife • Supply of clean cloths or sp• Detail brush
ALS
par a disinfectant cleaner solution in a plctions on the label.
OCEDURE
ove gum or ot 2) Spray disinfectant cleaner on all to 3 4 small amount of lotion may be used on a detail brush to remove soil and mineral deposits in the drain area and around the base o 5) Rinse the area with clear water and CLEANUP Rinse and dry the SAFETY & PPE RECCOMENDATIONS PPE recommended includes hand and eye protection. Use caution when spAlways spra PERFORMANCE STANDARDS All wall surfaces should be clean and free from smudges, tape and other marks. Tequal to .11 minutes per Sq. Ft.
154
Bathroom & Shower Cleaning Procedures
CY-Daily
• Paper products
er solution is not already in a spray bottle or pump sprayer, mix the ding to the directions on the label.
en with a closed sign posted, or some other and is not to be used.
for cleaning” signs(s) and “wet floor” sign(s)
rfaces including all ventilation ducts.
) Spray disinfectant cleaner on all surfaces to be cleaned. Allow disinfectant to
Bathroom Cleaning Procedure FREQUEN MATERIALS & EQUIPMENT
• Disinfectant cleaner • Glass cleaner • Clean, dry cloths/ Paper towels • Plastic spray bottle or pump sprayer • Small detail brush • Mop • Mop Bucket
• Trash Liners AREAS WHERE APPLICABLE All restroom facilities, locker and athletic areas equipped with toilet facilities; PREPARATION OF MATERIALS If the disinfectant cleansolution accor PREPARATION OF THE AREA The door to the rest room should be propped opindication given, that the area is being serviced, PROCEDURE 1) Posting “closed 2) Dust all horizontal and vertical su 3) Complete sweep all floor surfaces and remove all trash. 4) Remove hair, pieces of soap and other debris from drains. 5

155
dwell for up to 10 min inals, toilets, all plumbing around and near
er and near each fixture. Be sure to include all trash
aper product, soap and any other, fill when necessary.
7) C a ch surfaces including dispensers, door handles and stall d r 8) e s, spot clean walls, etc. 9) After allowing disinfectan ing. Scrub insi s. Be sure to scrub under lip of toilets. Use the
behind and underneath toilets and urinals. ray each with the disinfectant solution and
seats and etc. Replace any
n.
A
o that they will dry.
SAFETY & PPE RECCOMENDATIONS PPE recommended includes hand and eye protection and safety signage. Use caution when spraying products. Always spray away from face to prevent disinfectant detergent solution from getting into eyes. PERFORMANCE STANDARDS All Sink basins should be clean and odor free. All surfaces should be free from buildup and rust stains Chrome should be bright and free from water marks. All dispensers must be filled and functioning properly. Time standards equal to 3 minutes per fixture.
utes. Be sure to spray entire surface of sinks, ur these units, the tile wall area around units,
and the tile floor und receptacles.
) Check all dispensers, including p6
le n and disinfect all touoo s,
Cl an mirrors, shelving, stall divider
t to dwell, proceed with fixtures clean de toilets and urinal bowl brush to scrub flush valves, Flush toilets and urinals. Then sp leave. Wipe the toilet seats dry with a paper towel or clean rag. Scrub the sinks and sink fixtures, scrub clean the traps and plumbing underneath the sinks. Scrub, detail, and wipe all sink area with a scrub sponge pad.
10) Inspect area for leaking valves, sticking handles, loose toilet lamps that are out. Submit work orders for any repairs that need to be made.
1) Mop entire floor surface with disinfectant cleaning solutio1 RESTRICTIONS ON USE OF THE ARE No use should be permitted while work is taking place. CLEANUP Rinse and wring out the cloths as thoroughly as possible and store them s
nsure all containers are labeled and stored properly in designated storage areas. E

156
Cleaning Sinks and Wash Basins FREQUENCY-Daily MATERIALS & EQUIPMENT
• Disinfectant cleaner • Cream cleanser • Glass cleaner • Clean, dry cloths/ Paper towels • Plastic spray bottle or pump sprayer • Small detail brush
AREAS WHERE APPLICABLE All restroom facilities, locker and athletic areas equipped with toilet facilities; classroom, medical, and laboratory areas where basins are provided for wash-up. PREPARATION OF MATERIALS If the disinfectant cleaner solution is not already in a spray bottle or pump sprayer, mix the solution according to the directions on the label. PREPARATION OF THE AREA The door to the rest room should be propped open with a closed sign posted, or some other indication given, that the area is being serviced, and is not to be used. PROCEDURE 1) Remove any large debris such as bits of paper or hair from the sink. 2) If there is heavy soil or mineral build up, use a small amount of cream cleanser on a cloth or detail brush to remove prior to disinfection cleaning. 3) Spray the basin and all fixtures liberally with the disinfectant cleaner and allow adequate dwell time. 4) Wipe the skirts and sides of the basin with a cloth dampened with the disinfectant cleaner. 5) Rinse the hardware and basin with clean water and wipe dry. Glass cleaner may be used to brighten the hardware and basin after drying. 6) Wipe the walls and/or partitions to remove any overspray or splashed solution.

157
7) The bottoms of sinks and basins, and the pipes and valves do not need to be cleaned every time the tops are done. However, do not neglect these areas. Wipe them with a cloth dampened with the cleaner disinfectant solution weekly. RESTRICTIONS ON USE OF THE AREA If only the basins are being cleaned, as in a lab or classroom setting, no restrictions are in order. If the entire room is being serviced, such as in a restroom, no use should be permitted while work is taking place. CLEANUP Rinse and wring out the cloths as thoroughly as possible and store them so that they will dry. Ensure all containers are labeled and stored properly in designated storage areas. SAFETY & PPE RECCOMENDATIONS PPE recommended includes hand and eye protection and safety signage. Use caution when spraying products. Always spray away from face to prevent disinfectant detergent solution from getting into eyes. PERFORMANCE STANDARDS All Sink basins should be clean and odor free. All surfaces should be free from buildup and rust stains Chrome should be bright and free from water marks. Time standards equal to 3 minutes per fixture.
158
Cleaning Commodes FREQUENCY-Daily MATERIALS & EQUIPMENT
• Disinfectant cleaner • Acid-type bowl cleaner • Clean colored cloths • Bowl mop • Pump Sprayer • Rubber gloves
AREAS WHERE APPLICABLE All restroom facilities, locker and athletic areas with toilet facilities. Clean these areas thoroughly and properly every day. PREPARATION OF MATERIAL If the cleaner disinfectant solution is not ready in a spray bottle or pump sprayer, Mix the solution according to the manufacturers directions. PREPARATION OF THE AREA The door to the rest room should be propped open with a closed sign posted, or some other indication given, that the area is being serviced, and is not to be used. PROCEDURE 1) Flush the fixture and pick up any debris such as scrapes of paper from around the fixture. 2) Spray the top of the toilet seat with a liberal amount of disinfectant cleaner solution and lift the seat and spray the remaining parts of the fixture. Allow adequate dwell time. 3) Rinse the fixture with clean water and wipe thoroughly with a clean cloth. 4) Flush the fixture and follow the water line as it goes down with the bowl mop, scrubbing in a circular motion. After the inside of the bowl has been thoroughly cleaned, flush the fixture one more time to ensure that all chemicals have been removed from the surface. 5) Because of buildup due to minerals in the water, an acid bowl cleaner to clean the interior of the commode must be used weekly. Apply acid bowel cleaner as directed by manufacturer

159
9) Scrub vigorously under the flushing rim and at the water level to remove all buildup, rust and scale.
10) Flush the fixture and follow the water line as it goes down with the bowl mop, scrubbing in a circular motion. 11) Flush the fixture one more time to remove acid from all surfaces. 12) After cleaning each commode, damp wipe all partitions, including the tops. Either spray
with the cleaner disinfectant and wipe with a damp sponge, or dip a sponge in a pail of cleaner disinfectant solution and wipe all surfaces of the partition, remove any writing or drawing on the partition surfaces as Thoroughly as possible.
RESTRICTIONS ON USE OF THE AREA No traffic should be allowed until all restroom cleaning has been completed. CLEANUP Spray bowl mop liberally with cleaner disinfectant solution and rinse it thoroughly. Spray and rinse all sponges and cloths. Wring sponges and cloths as dry as possible and store so that they will be easily recognized by their color as materials dedicated to toilet fixture cleaning. If the cleaner disinfectant is to be used later, make sure that is properly labeled as specified in the Right to Know rule in the Safety Training manual before storing it. SAFETY & PPE RECCOMENDATIONS PPE recommended includes hand and eye protection and safety signage. Use caution when spraying products. Always spray away from face to prevent disinfectant detergent solution from getting into eyes. PERFORMANCE STANDARDS All Commodes should be clean and odor free. All surfaces should be free from buildup and rust stains Chrome should be bright and free from water marks. Time standards equal to 3 minutes per fixture.

160
Cleaning Urinals FREQUENCY-Daily MATERIALS & EQUIPMENT • Cleaner disinfectant • Acid-type bowl cleaner • Colored sponges • Clean, dry cloths • Bowl mop • Plastic spray bottle • Rubber gloves • Small plastic pail AREAS WHERE APPLICABLE All restroom facilities, locker and athletic areas with toilet facilities. Clean these areas thoroughly and properly every day. PREPARATION OF MATERIAL If the cleaner disinfectant solution is not ready in a spray bottle, mix the solution in a bucket according to the directions on the label. During the normal restroom cleaning procedure, a bucket of cleaner disinfectant solution will be used to mop the floor. The plastic spray bottle can be filled from this bucket. PREPARATION OF THE AREA The door to the rest room should be propped open with a closed sign posted, or some other indication given, that the area is being serviced, and is not to be used. PROCEDURE 1) After cleaning commodes and partitions, urinals should be cleaned with a method similar to that used for cleaning commodes. First the fixture should be flushed. 2) The walls above and to the sides of the fixture should be sprayed with cleaner disinfectant and adequate dwell time must be permitted. 3) Spray all exterior surfaces of the urinal, including the base and areas underneath the urinal. 4) Spray the interior of the urinal with a liberal amount of cleaner disinfectant solution. Beginning at the top of the urinal, scrub thoroughly with the bowl mop, particularly the underside of the upper flushing rim.

161
5) Flush the fixture, and follow the water level down with the bowl mop, scrubbing vigorously. 6) Flush the fixture again to remove remaining chemicals. Rinse all disinfected surfaces with clean water and wipe down with a clean cloth or paper towel 7) It is periodically necessary to clean the fixtures with an acid type bowl cleaner. Begin by flushing the fixture and wetting the bowl mop. Pour the acid cleaner on the mop head while holding it over the bowl of the urinal. Be very careful, if acid cleaner gets in the eyes, flush with clean water for fifteen minutes and seek medical attention. 8) Scrub the interior of the urinal thoroughly with the mop, especially around the edges and under the upper flushing rim. Scrub until all buildup, scale and rust is removed. 9) Flush the fixture and scrub the lower part of the bowl as the water level decreases. 10) Flush the fixture one more time to remove acid from surfaces. 11) Pipes, valves and other hardware associated with the urinal should be damp wiped with the sponge and dried with a clean cloth to prevent water spotting. RESTRICTIONS ON USE OF THE AREA No traffic should be allowed until all restroom cleaning is complete. CLEANUP Spray bowl mop liberally with cleaner disinfectant solution and rinse it thoroughly. Spray and rinse all sponges and cloths. Wring sponges and cloths as dry as possible and store so that they will be easily recognized by their color as materials dedicated to toilet fixture cleaning. If the cleaner disinfectant is to be used later, make sure that is properly labeled as specified in the Right to Know rule in the RTK manual before storing it. SAFETY & PPE RECCOMENDATIONS PPE recommended includes hand and eye protection and safety signage. Use caution when spraying products. Always spray away from face to prevent disinfectant detergent solution from getting into eyes. PERFORMANCE STANDARDS All Commodes should be clean and odor free. All surfaces should be free from buildup and rust stains Chrome should be bright and free from water marks. Time standards equal to 3 minutes per fixture.
162
Cleaning Tubs and Showers FREQUENCY-Weekly MATERIALS & EQUIPMENT
• Cleaner disinfectant • Shower stall cleaner • Hose and Gilmore gun • Sponge • Clean, dry cloths • Deck brush with handle • Squeegee with handle • Detail brush • Rubber gloves
AREAS WHERE APPLICABLE All shower and restrooms in residence halls, locker rooms and athletic areas. PREPARATION OF MATERIALS Fill Gilmore gun with Triad disinfectant cleaner. PREPARATION OF THE AREA The door to the shower, locker, or restroom should be propped open with a closed sign or some other indication that cleaning is in progress and the area is not to be used. PROCEDURE 1) Before cleaning, pick up all bits of soap from the dishes, floor gutter and drain areas. Remove hair and other debris from the drains. 2) Using the Gilmore gun and hose, completely cover all wall surfaces of the shower or tub area with solution oo disinfectant cleaner. A spray bottle may be used if the area to be cleaned is small or would not warrant preparing a large amount of cleaner disinfectant solution. 3) Agitate the cleaner disinfectant solution using a hand held deck brush. Use a deck brush with handle for gang shower situations. use a sponge dampened with cleaner disinfectant solution to reach place that the deck brush cannot get, such as soap dishes, corners, chrome fixtures etc. A small amount of lotion cleanser may be used to remove built up soap from the soap dishes. 4) Again using the pump up sprayer, completely cover the floor of the shower or tub area
163
with cleaner disinfectant solution. Agitate the cleaner disinfectant solution with a deck brush; use a sponge in the bottom of a tub. 5) Check the drain for scum or mineral buildup. If buildup is present, use a small amount dissolving cleaner on a detail brush to remove the buildup. If drains in shower rooms and locker rooms are not used for long periods, pour water into the drains at frequent intervals to keep the traps full so that sewer gas does not leak into the room. 6) On a monthly basis apply Crew shower stall cleaner using the same procedure as weekly cleaning. Always use eye protection, as shower cleaners are acid based. Agitate the cleaner using a deck brush or sponge. Use a brush with handle or sponge mop for gang showers. Immediately rinse walls and floors with clear water to prevent acid damage to tile grout. Always read directions for shower cleaners, as some will react with metals, especially aluminum. 7) Using a squeegee, remove excess solution from the wall and floor surfaces. Wipe all chrome fixtures with a clean dry cloth to prevent water spotting. If the shower area or tub has a shower curtain, thoroughly wipe with a sponge dampened with the cleaner disinfectant. CLEANUP Rinse all sponges and cloths. Wring all cloths and sponges as dry as possible and store for subsequent use in cleaning showers and tubs. If shower stall cleaner has been used, thoroughly rinse all equipment in clear water, including spray bottles, deck brushes, sponges, and cloths. SAFETY & PPE RECCOMENDATIONS PPE recommended includes hand and eye protection and safety signage. Use caution when spraying products. Always spray away from face to prevent disinfectant detergent solution from getting into eyes. PERFORMANCE STANDARDS All units should be clean and odor free. All surfaces should be free from buildup and rust stains Chrome should be bright and free from water marks. Time standards equal to 10 minutes per shower head

164
Carpet Care Procedures
Vacuuming Carpet FREQUENCY- Daily/ Every Other Day -depending on traffic and area type. MATERIALS & EQUIPMENT
• Commercial vacuum appropriate to the application • Putty Knife/ Razor Scrapper
NOTE: The type and size of the vacuum to be used will be the result of the area being services. One of three general types including a 14 inch commercial upright, canister, back pack and wide area walk behind models are those found to be most effective in nearly all applications. AREAS WHERE APPLICABLE All carpeted floors require regular vacuuming including entrance matting. PREPARATION OF MATERIALS Collection bags and or cups should be emptied before any vacuuming is done. Belts, brushes and beater bars should be checked. Make sure parts are revolving in the proper direction and beater bar is adjusted to proper height. PREPARATION OF THE AREA Pick up all large debris such as paper clips, large pieces of paper and bottle tops. These materials are to large to be picked up by the vacuum and may cause damage to the unit. PROCEDURE 1) Carpet vacuuming can be divided into two basic processes: frequent vacuuming of traffic Patterns and less frequent vacuuming of the entire carpeted area including all corners and hard to reach areas. 2) To clean traffic areas begin at one end of the carpet, and using a back and forth “zig-zag”
type of motion work in one direction. Return ahead of or along side of the first pass and slightly overlap the edge of each previous pass. This pattern should be repeated two or three times for heavily soiled areas. When vacuuming using a back pack or canister vacuum such as in a tiered classroom or auditorium, begin working closest to the power source and work

165
away from it. This will prevent becoming entangled in the cord. Use a motion similar that when using an upright vacuum.
3) When vacuuming the entire area is desired, the standard upright carpet vacuum should be
used in the pattern described for the traffic pattern. A wand and carpet tool is used for areas that are inaccessible for the upright machine. Do not ignore these areas, as they will make the whole job look bad.
4) When using a wide area walk behind vacuum, Begin at one side of the area and work toward
the opposite side as if you were mowing a lawn. Vacuum areas inaccessible with the walk behind with an upright or canister vacuum.
NOTE The collection bag or cup on any vacuum should not be allowed to fill more than half way. It should be checked and emptied often. When emptying the bag, be careful to avoid spreading dust. CLEANUP Empty all dirt bags. Wipe dust from the machine and cord with a clean cloth. Wind the cord properly around the hooks provided on the machine. Do not wind too tightly or damage may occur to the cord and/or electrical connections. Properly store the machine for future use. SAFETY & PPE RECCOMENDATIONS No specific PPE recommended. Always inspect equipment prior to use to ensure all cords, plugs and moving parts are intact and in good working order. NEVER use a vacuum without a grounded plug ar signs of damage to the cords insulation. Work the strength of arms and shoulders. Avoid bending, twisting and overextension of back muscles. When maintaining equipment by changing brushes, belts and bags use caution and be aware of sharp objects or jagged edges. PERFORMANCE STANDARDS Carpets should be free from visible loose soil. Gum, tape and other debris stuck to the carpet fibers should be removed using Putty knife or razor scrapper. All corners should be free from build up of dust and other debris. Time standards equal to .021 minutes per square feet when using a 14 inch upright vacuum, .02 minutes per Sq. Ft. using a canister or backpack vacuum and .01 Sq. Ft per minute with a 26 inch walk behind wide area vacuum.
166
Spot Cleaning Carpets FREQUENCY-Daily MATERIALS & EQUIPMENT
• Carpet spotter product or Shampoo solution in a plastic spray bottle • Brush with stiff plastic bristles • Water extraction unit • Supply of clean cloths • Carpet Bonnet pad • Aerosol can of compressed gas • Putty knife
AREAS WHERE APPLICABLE All carpet including entry matting Note; If carpet is made of natural material such as wool or you are unsure of fiber composition. See your supervisor before beginning with spotting procedure due to the possibility of damaging the carpet fibers. PREPARATION OF MATERIALS Prepare a carpet shampoo solution in a plastic spray bottle according to the manufacturer's directions. PROCEDURE 1) Before attempting to spot clean liquid spills, absorb as much of the liquid from the carpet as possible using appropriate materials. 2) Apply shampoo solution from a spray bottle directly on the spot. Avoid excessive wetting of the carpet. 3) Work from the outside of the spot to the center with a stiff bristled brush. This prevents spreading the spot over a larger area. 4) Blot the shampoo solution from the carpet with clean cloths or a sponge. Repeat procedure several times, if necessary, or until the spot has disappeared. If traffic permits, place carpet bonnet pad on area and weight down leaving for as long as possible. The hydrostatic draw of the pad will pull and absorb any remaining water and soil from the carpet. 5) For large area spills, a water extraction unit may be used. Refer to the procedure outlining water extraction for proper instructions on the use of this equipment.
167
6) Gum or tar-like substances can be removed using compressed gas in an aerosol can and a putty knife. Freeze the substance by spraying the compressed gas directly on the material. Then lift the material from the carpet fibers using the putty knife. 7) After removing spots from the carpet, allow the area to dry and vacuum to restore the pile to
its original condition. CLEANUP Thoroughly rinse the cloths and sponges, and wring as dry as possible prior to drying for storage. Properly label the spray bottle of shampoo solution if it is to be stored for future use, Refer to the labeling rules in the Safety Training manual. Clean and properly store the extraction unit. SAFETY & PPE RECCOMENDATIONS PPE recommended includes hand and eye protection and safety signage. Use caution when spraying products. Always spray away from face to prevent compressed gas from getting into eyes or on skin. Direct contact with the compressed gas could cause severe burns due to extreme cold PERFORMANCE STANDARDS All visible signs of the stain should be removed. Carpet fibers should be thoroughly rinsed and free from sticky residue. All frayed fibers should be neatly trimmed and any damage should be reported to supervisor. No specific time standards apply to this task.

168
Carpet Cleaning-Hot Water Extraction Method FREQUENCY- As needed MATERIALS & EQUIPMENT
• Anti-foam emulsion • Carpet shampoo • Upright Vacuum with beater bar • Carpet Extractor • Spray Bottle or Pump Sprayer
AREAS WHERE APPLICABLE Almost any carpeted floor or entry matting may be cleaned using the water extraction process. PREPARATION OF EQUIPMENT If paper dirt bags are used in the vacuum, a clean bag should be installed. If a permanent bag is used, it should be emptied and replaced. The carpet extractor should be assembled according to the manufacturer's directions. Some models must be hooked directly to a water source, while others have a tank on the machine which must be filled. Some manufacturers recommend the use of hot water with their equipment, others cold water, and others provide a heating element in the solution tank. Although hot water may react more quickly with shampoo residue in the carpet, cold water will generally provide adequate cleaning without risks of shrinkage, color bleeding, or damage to the carpet backing that may result from excessive use of hot water. PREPARATION OF MATERIALS Mix a solution of shampoo in the spray bottle or pump sprayer to be used for a pre-spray.Add the proper amount of carpet cleaner solution to the filled solution tank, only if the carpet has never been shampooed. Add the proper amount of anti-foam emulsion to the recovery tank and follow any specific directions given by the manufacturer of the emulsion. PREPARATION OF THE AREA Remove all furnishings from the area. Thoroughly vacuum the entire area with the upright vacuum. Isolated stains should be spot cleaned. PROCEDURE 1) Begin in a corner of the area furthest away from the door. Spray an area of approximately ten feet by ten feet with the pre spray solution. If too great of an area is sprayed the pre spray will dry before the area can be extracted.
169
2) Begin working in the corned and working away from the wall. Activate the spray system while pulling the spray vacuum head away from the wall in a straight line. 3) Shut off the spray about six inches away from the end of the stroke. If the spray vacuum head can be pushed easily, push it back to the wall, over the same path with the spray shut off. If the spray vacuum head cannot be pushed easily, but can only be pulled, lift it at the end of the stroke, return it to the spot where the pass began, and pull over the same area with the spray shut off. This technique gives each area a minimum of two passes, one with the spray and vacuum, and one with the vacuum only. NOTE: It is extremely important not to over wet carpet and to be sure to thoroughly
extract as much moisture out of the carpet as possible. If too much moisture is left in the carpet the growth of mold and odor could result.
4) After making the two passes described above, move the head and repeat the process. 5) The degree of overlap, and the speed of the passes depends on how heavily the carpet is soiled. Along walls, baseboards and other areas that receive little or no traffic, the machine can be moved quickly and with as little overlap as possible without leaving streaks. In heavily soiled or high traffic areas, the spray vacuum head should be moved more slowly, and the passes should overlap fifty percent. 6) The recovery tank must be watched and emptied whenever the foam gets within two to three inches of the top. If foam or water is allowed to enter the vacuum motor housing it may be damaged seriously. 7) After the entire carpet has been cleaned, it should be allowed to dry for as long as possible before replacing furniture. If possible a whistle fan should be places in the area to speed drying. 8) When returning furniture and accessories to a carpeted area which has just been cleaned, pieces of plastic should be placed under the legs and other furniture parts which may leave rust or wood stain marks on the carpet if it is still damp. CLEANUP The recovery tank should be emptied. Any water remaining in the solution tank should be emptied, or may drawn into the recovery tank with the vacuum head. Both the solution and recovery tanks should be rinsed and wiped dry with a clean cloth. Rinse the vacuum head, hose and wand by running clean water through them. All exterior surfaces of the machine, including the cord, should be wiped clean and dry with a clean cloth. The dirt bag of the pile lifter vacuum should be emptied if it is a permanent bag, or replaced.
170
SAFETY & PPE RECCOMENDATIONS PPE recommendations include shoes with slip resistant soles. Use caution when working close to doors or corners where visibility is limited. Use arm and shoulder muscles to move extractor wand. Avoid twisting at the waist and overextending back. When bending to pick up soil and debris, bend at the knees and not the waist. PERFORMANCE STANDARDS All carpets should be free from visible stains and soil. All materials stuck to the floor surface should be removed using the putty knife. Loose or frayed fibers should be trimmed off Time standards equal to sixty minutes per 1000 square feet of carpet.
171
Hard Floor Care Procedures
Dust Mopping FREQUENCY-Daily MATERIALS & EQUIPMENT
• Dust mop assembly • Dust mop head • Counter brush • Dust pan • Putty knife
NOTE: the size and type of the dust mop head will depend on the situation. An 18 to 24" size is best for offices and other congested areas, while a 36", or wider mop should be used for corridors or other wide open areas. A treated dust mop should NEVER be used on a wooden athletic floor. Only clean untreated dust mops are to be used on gym, racquet ball, and squash courts. AREAS WHERE APPLICABLE Any smooth non-carpeted floor that is not wet or heavily soiled may be dust mopped. Rough floors such as brick, unsealed concrete, stone or brick pavers should not be dust mopped. PREPARATION OF THE AREA Heavy soil and any liquids should be removed before dust mopping. PROCUUDURE 1) For open areas, place the dust mop against the wall, and push it in a straight line as far as possible. 2) If light objects such as trash cans are encountered, hold the mop in place in one hand and move the object aside with the other. Push the mop over the area where the object was, and repeat the procedure, replacing the object. 3) At the end of each pass, turn the dust mop without lifting it from the floor and return, overlapping the previous pass by one or two inches. Continue this pattern until the entire area has been dust mopped, or visible soil begins to accumulate at the front edge of the mop.
172
4) For small, congested areas, such as offices, begin at the door or entrance to the area and push the mop around the outside of the area. It is usually best to follow a counter- clockwise pattern with the last pass sweeping the center of the area, and then moving back out the door. 5) After an area has been dust mopped, or when visible soil begins to accumulate at the front of the mop, the soil must be collected and the mop head cleaned. To remove the soil that does not cling to the mop, carefully lift the mop head off the floor, and lean the mop against the waste receptacle. Use caution and do not to let the mop head touch walls, furniture, or other building surfaces. Brush the soil on the floor into a dust pan with the counter brush. Dump the dust pan into the waste receptacle, holding the pan as low as possible to prevent spreading dust. 6) There are three ways that soil may be removed from the mop head: Vacuuming the head, brushing the head over a waste receptacle, and placing the head in a plastic trash bag and shaking it. Each of these methods yields adequate results, and the one selected depends on the location. If a vacuum is easily available, it may be used to vacuum the head. If trash bags are close at hand, shake it. If neither are easily available, use the counter brush to clean soil from the mop head while holding it over or in the waste receptacle. 7) If gum or sticky substances are encountered while dust mopping, remove them with the putty knife. CLEANUP Remove the dust mop head from the mop assembly and place it in the proper receptacle. If it is to be laundered send to the Physical Plant for cleaning. If the mop head is a treated mop provided by the rental service, bag and label dirty mop heads and send to physical plant for service by Friday Afternoon. Clean dust mops will be available Monday morning after 7:30 am. The dust mop assembly should be properly hung in a tool holder. Wipe the dust pan and putty knife clean. SAFETY & PPE RECCOMENDATIONS No specific PPE recommendations made. Use caution when working close to doors or corners where visibility is limited. Use arm and shoulder muscles to move mop. Avoid twisting at the waist and overextending back. When bending to pick up soil and debris, bend at the knees and not the waist. PERFORMANCE STANDARDS All floors should be free from loose soil and debris. All materials stuck to the floor surface should be removed using the putty knife. Time standards equal to .0072 minutes per Sq. Ft. with a 24 inch dust mop.
173
Manual Sweeping FREQUENCY-As needed MATERIALS & EQUIPMENT
• Push broom (24") with handle that reaches approximately eye level when the broom is resting on the floor with the handle straight up.
• Counter brush • Putty knife • Dust pan • Waste container
AREAS WHERE APPLICABLE Smooth floors that are wet or heavily soiled, usually around entrances, heavily used lobbies, and rough floor surfaces such as brick and slate in which a dust mop cannot be used. PREPARATION OF MATERIALS Check broom handle to make sure that it is properly and securely fitted into the brush. Bristles should be intact and in good condition. PREPARATION OF THE AREA Create as much open space as possible by moving lightweight items such as chairs, trash receptacles etc. PROCEDURE 1) If a sweeping compound is to be used, apply the compound across area according to the
manufactures application recommendations. 2) Beginning in a corner, place the broom flush against the baseboard, and pull the soil approximately three feet from the wall. Do not be too aggressive in the sweeping motion as this may lead to excessive dust and dirt becoming airborne. Dust and dirt particles in the air affect indoor air quality and will create more work when they settle on surrounding surfaces. 3) Go around all walls, or approximately twenty to thirty feet of each wall of a corridor. 4) After the soil has been pulled away from the walls and congested areas, push it to a central area for pickup. 5) Push the soil with short strokes of two to four feet. Strokes that are too short require excessive effort, while strokes that are too long make it difficult to control the soil.
174
6) Use the putty knife to loosen gum or other sticky material. 7) Push the soil onto the dust pan with the counter brush. 8) Dump the soil into a waste receptacle. Hold the pan deep inside the receptacle to avoid spreading soil and dust. 9) If no other cleaning is to follow, replace items that were moved. CLEANUP Return all equipment to the proper storage area. Wipe the dust pan and putty knife clean. Hang broom and counter brush in the proper tool holder. Do not leave a broom resting on the bristles in order to prevent permanent bending and damage. SAFETY & PPE RECCOMENDATIONS No specific PPE recommendations made. Use caution when working close to doors or corners where visibility is limited. Use arm and shoulder muscles to move broom. Avoid twisting at the waist and overextending back. When bending to pick up soil and debris, bend at the knees and not the waist. PERFORMANCE STANDARDS All floors should be free from loose soil and debris. All materials stuck to the floor surface such as gum and tar should be removed using the putty knife. Time standards equal to .02 minutes per Sq. Ft using a 24 inch push broom.
175
Spot Mopping FREQUENCY-Daily MATERIALS & EQUIPMENT
• Neutral detergent or disinfectant cleaner depending on application • Mop bucket • Wringer • Mop handle, reaching from the floor to approximately eye level of the user • Safety signage • Putty knife
AREAS WHERE APPLICABLE Non-carpeted floors that are subject to soiling from sources other than traffic such as lounges , dining areas and laboratories that are frequently soiled by spills. Spot mopping may also be used where isolated soil or liquids occurs from leaks in equipment such as water fountains, radiators, vending machines etc. PREPARATION OF MATERIALS Properly attach the mop head to the handle. Fill the mop bucket approximately half full of clean, hot water. Add four ounces of detergent for each gallon of hot water, or add 1/2 ounce of cleaner disinfectant per gallon. A 44 quart bucket is eleven gallons. NOTE: Always put the water in the bucket before the cleaner or detergent. Do not use too much of either as it is wasteful, and can harm the floor finish. it may also leave a film or buildup on the floor that makes it more difficult to clean next time. PREPARATION OF THE AREA Wet floor signs are to be placed at logical and conspicuous points around the area prior to beginning. Loose soil should be removed by sweeping or dust mopping before spot mopping begins. If a situation occurs in which someone could walk through a door and directly onto a wet floor, safety signage should be placed such that it indicates the presence of the hazard. PROCEDURE 1) Dip the mop into the mop solution and agitate it slowly in order to mix the solution and saturate the mop head. 2) Place the mop in the wringer, and wring it nearly dry. 3) Mop the soiled area until all visible soil is removed.

176
4) Stains and scuffs that are not removed by normal mopping should be rubbed with the heel of the mop. If this method is not effective, the putty knife or scouring pad should be used. 5) After each spot of obvious soil has been cleaned, dip, agitate, and wring the mop before moving on to the next soiled area. RESTRICTIONS ON USE OF THE AREA Avoid walking on the spots that have been mopped until they are completely dry. CLEANUP Rinse the mop head and the scouring pad completely. Wring the mop head as dry as possible and hang it in the proper tool holder, head down, but with all the strings off the floor. Wash the wringer and buckets, inside and outside. Wipe the putty knife clean. SAFETY & PPE RECCOMENDATIONS No specific PPE recommendations made. Use caution when working close to doors or corners where visibility is limited. Use arm and shoulder muscles to move mop. Avoid twisting at the waist and overextending back. When bending wring out mop, bend at the knees and not the waist. PERFORMANCE STANDARDS All floors should be free from visible soil and liquids. All materials stuck to the floor surface should be removed using the putty knife. No specific time standards apply to this task.
177
Damp Mopping FREQUENCY-Daily MATERIALS & EQUIPMENT
• Neutral detergent or cleaner disinfectant depending on application • Mop bucket • Wringer • Cotton or cotton blend Mop • Putty knife
AREAS WHERE APPLICABLE Non-carpeted floors that have been soiled by general traffic but are not dirty enough to require wet mopping. Corridors, exhibit areas, and lobbies are examples of areas that may require damp mopping as a part of a routine floor care program. Damp mopping with disinfectant cleaner to be done in restrooms, shower rooms and any other area that may be soiled bodily fluids. PREPARATION OF MATERIALS Properly attach the mop head to the handle. Fill the mop bucket approximately half full of clean, cool water. Add detergent or disinfectant cleaner according to manufacturer’s recommendations. NOTE: Always put the water in the bucket before the cleaner or detergent. Do not use too much of either as it is wasteful, and can harm the floor finish. it may also leave a film or buildup on the floor that makes it more difficult to clean next time. PREPARATION OF THE AREA Loose soil should be removed by sweeping or dust mopping before spot mopping begins. PROCEDURE 1) Place the "Wet Floor-Caution" signs at the edges and the entrances to the area. 2) Dip the mop in the solution, and agitate it slowly to mix the solution and saturate the mop head. 3) Use a figure eight stroke to mop all open areas, particularly traffic patterns. Turn the mop over after every four or five strokes. Resoak and wring the mop whenever it collects a noticeable amount of soil. 4) Stains and scuffs that are not removed through the normal mopping action should be rubbed with the heel of the mop. If this method is not effective, use the scouring pad or putty knife.

178
5) Change the solution in the bucket when it becomes too dirty to be an effective cleaning agent. RESTRICTIONS ON USE OF THE AREA Traffic should not be allowed in the area until the floor is completely dry. CLEANUP Rinse the mop head and the scouring pad. Wring the mop head as dry as possible and hang it in the proper tool holder, head down, but with all the strings off the floor. Wash the wringer and buckets, inside and outside. Wipe the putty knife clean. SAFETY & PPE RECCOMENDATIONS Shoes with slip resistant soles should be worn. Use caution when working close to doors or corners where visibility is limited. Use arm and shoulder muscles to move mop. Avoid twisting at the waist and overextending back. When bending to pick up soil and debris, bend at the knees and not the waist. PERFORMANCE STANDARDS All floors should be free from visible soil and liquids. All materials stuck to the floor surface should be removed using the putty knife. Time standards equal to .0144 Minutes per Sq. Ft.
179
Wet Mopping FREQUENCY-Daily or as needed MATERIALS & EQUIPMENT
• Neutral Detergent or cleaner disinfectant depending on application • Two mop buckets • 2 wringers • Cotton or cotton blend Mop • "Wet Floor-caution" signs • Putty knife • Hand scouring pad or putty knife • Measuring device
AREAS WHERE APPLICABLE Almost all non-carpeted floors require wet mopping at some time. Entrances, vending and dining areas, biological and medial labs, and rest rooms must be wet mopped frequently. Raised floors in computer rooms, cork floors, wooden floors that are not sealed, and badly worn linoleum floors should never be wet mopped. PREPARATION OF MATERIALS Properly attach the mop head to the handle. Fill the mop buckets approximately half full of clean, cool water. Add detergent to one bucket according to manufacturer’s instructions. NOTE: Always put the water in the bucket before the cleaner or detergent. Do not use too much of either as it is wasteful, and can harm the floor finish. It may also leave a film or buildup on the floor that makes it more difficult to clean next time. PREPARATION OF THE AREA Loose soil should be removed by sweeping or dust mopping before spot mopping begins. Create as much open area as possible by moving items such as trash receptacles, chairs and portable furniture. INSTRUCTIONS 1) Place the "Wet Floor-Caution" signs at the edges and entrances of the area. Dip the mop in the solution and agitate slowly to mix the solution and saturate the mop head. 2) Place the mop in the wringer and squeeze until the solution quits dripping from the mop head. 3) Beginning in a corner of the area to be mopped, place the mop head as near the base board
180
as possible without actually touching it. Pull the mop along the edges of the area until roughly 200 sq ft has been "striped". If too large an area is mopped at one time, the solution will dry before it can be rinsed. 4) Place the mop in the rinse bucket, agitate it, and wring it dry. Then place it back in the solution bucket and wring again until the head quits dripping. When wet mopping, never move the mop directly from the floor into the solution bucket, always perform the rinse procedure in the rinse bucket. 5) Carefully apply solution to hard to reach areas. Then use a figure eight stroke to spread solution onto the open area, just overlapping the "striping" around the edges. turn the mop over every four or five strokes. Rinse, wring, and re-soak the mop whenever it starts spreading soil, or whenever it does not appear to be leaving enough solution on the floor. 6) Stains and scuff marks should be removed by using the heel of the mop. If this method is not effective, use the putty knife or scouring pad. 7) Change the rinse water or cleaner solution whenever either becomes dirty. 8) After the area has been wet with solution, rinse the mop and wring it nearly dry. Following the same pattern in which the solution was put down, pick it up with the mop. Rinse the mop and wring it frequently. Change the rinse water as it collects soil. 9) If an area is large enough to require mopping in sections, overlap each previously mopped section by about a foot. Or if one is available use an autoscrubber. NOTE: A single bucket method may also be used if the soil load permits. The single bucket method follows the same procedure using only one bucket for the cleaning and rinsing functions. In such cases the solution must be changed more frequently to achieve effectivness. RESTRICTIONS ON USE OF THE AREA After an area has been wet mopped, do not remove signs, replace furnishings, or allow traffic until the floor is completely dry. CLEANUP Rinse the mop head and scouring pad thoroughly. Wring the mop as dry as possible and hang it in the proper too holder, head down, with the strings of the floor. Wash the wringers and buckets, inside and outside. Wipe the putty knife clean. SAFETY & PPE RECCOMENDATIONS Shoes with slip resistant soles should be worn. Always place safety signage in logical and conspicuous locations around the area. Use caution when working close to doors or corners
181
where visibility is limited. Use arm and shoulder muscles to move mop. Avoid twisting at the waist and overextending back. When bending to pick up soil and debris, bend at the knees and not the waist. PERFORMANCE STANDARDS All floors should be free from loose soil and debris. All materials stuck to the floor surface should be removed using the putty knife. Time standards equal to .03 minutes per Sq. Ft.
182
Automatic Scrubbing FREQUENCY-Daily or as needed MATERIALS & EQUIPMENT
• Neutral Detergent • Auto scrubber • Red Scrubbing pads • Mop bucket • Cotton mop head, 24-ounce (a lighter or heavier mop head may be used if it better fit the
physical characteristics of the user) • Wet Floor-Caution signs • Putty knife • Hand scouring pad or putty knife • Measuring device
AREAS WHERE APPLICABLE Any non-carpeted floors except raised floors in computer rooms, cork floors, unsealed wooden floors and badly worn linoleum may be cleaned with an automatic scrubber. However, it takes time to prepare and put away the machine and it is difficult to maneuver in congested areas. For these reasons, the auto scrubber is most effective in large, open areas. Large lobbies, galleries, exhibition areas and long corridors are areas where an automatic scrubber can be most effective. PREPARATION OF MATERIALS Check the squeegee to see that it is properly attached, and does not have any cuts or breaks. See that the valves for emptying the solution and pickup tanks are properly closed. Fill the solution tank with clean water. Add the proper amount of detergent or cleaner disinfectant to the solution tank. NOTE: Always put the water in the solution tank before adding the neutral detergent PREPARATION OF THE AREA Create as much open space as possible by removing such items as chairs, trash cans, and portable furniture. Loose soil should be removed by sweeping or dust mopping before auto scrubbing begins. PROCUUDURE 1) Place the "Wet Floor-Caution" signs at the edges and entrances to the area. 2) Move the machine into the far corner of the area to be scrubbed. Always keep the pads
183
and squeegee in the up position when the machine is being moved and is not scrubbing. Plan a pattern the allows the longest passes and fewest turns. 3) Lower the pads and squeegee, turn on the solution, and begin scrubbing along a wall or edge of the area. Scrub close to the walls, but remember, it is better to leave a small area unscrubbed than to damage the machine or walls. 4) Continue scrubbing in as straight a line as possible to the end of the area. Approximately six feet before the end of the pass, the solution should be turned off. The machine should be turned as quickly as possible, and the solution turned on again at the end of the turn. Scrub parallel to the previous pass, overlapping it by one to three inches. 5) Continue this back and forth pattern until all the open area has been scrubbed. Even with an effective vacuum and squeegee system, it is impossible to pick up all the solution. After an area has been scrubbed, any remaining spots of water may be picked up with a mop and wrung into the bucket. sometimes it possible to place the mop head on a towel on top of the scrubber with the mop handle pointed safely away from the operator or passers-by. Then, any puddles left by the machine may be conveniently picked up by the operator, and the mop wrung when the pattern takes the machine by the bucket. Some areas are too large to be scrubbed with one tank of solution. Whenever the solution tank is refilled, the pickup tank should be emptied in the same operation. RESTRICTIONS ON USE OF THE AREA After an area has been scrubbed, do not remove the "Wet Floor-Caution" signs, replace furniture and fixtures, or allow traffic until the floor is dry. CLEANUP Drain both the solution and pickup tanks of the scrubber and flush each tank thoroughly with clean, hot water. rinse the brushes, brush cover, and squeegee. Wipe the squeegee and exterior of the machine with a clean cloth. rinse the mop head thoroughly, wring as dry as possible, and hang in the proper tool holder, head down, with the strings off the floor. Wash the wringer and bucket, inside and outside. SAFETY & PPE RECCOMENDATIONS PPE recommendations include shoes with slip resistant soles. Use caution when working close to doors or corners where visibility is limited. Use arm and shoulder muscles to move mop. Avoid twisting at the waist and overextending back. When bending to pick up soil and debris, bend at the knees and not the waist. PERFORMANCE STANDARDS All floors should be free from loose soil and debris. All materials stuck to the floor surface should be removed using the putty knife.

184
Spray Buffing FREQUENCY-As Needed MATERIALS & EQUIPMENT
• Spray Buff Product • Rotary swing machine with pad holder • Red Buffing Pad • Pistol-grip spray bottle (or spray buffing machine attachment) • Hand scouring pad • Safety Signage
AREAS WHERE APPLICABLE Any floor coated with a synthetic polymer finish specifically developed for spray buffing (or any polymer floor finish that tests show holds up under spray buffing) can be spray buffed. However, spray buffing is less successful in heavily soiled, uneven, or extremely congested areas. Traffic patterns, places under desks and tables where people rub their feet an the floor, and areas just inside doors, where people turn after entering a room or building are areas where spray buffing can be particularly helpful. PREPARATION OF MATERIALS Be sure that the electric cord on the floor machine is in good condition. Gently lean the machine back on the handle, check the driving block for proper installation and condition, and center the buffing pad on the driving block. Prepare the spray buff solution according to the manufacturers recommendations PREPARATION OF THE AREA Remove as much soil as possible by sweeping, dust mopping, spot mopping, or damp mopping before spray buffing. If possible, move tables, desks, and other pieces of furniture that may obstruct worn areas. PROCEDURE 1) Begin spray buffing by spraying a small amount of solution onto the floor in front of the floor machine. Avoid spraying too much solution onto the floor as the pad will become too wet, and begin to grab. Buff back and forth across the area that has been sprayed allowing each arc to overlap the previous one by approximately one half the width of the pad. 2) Repeating these steps, work forward until the entire area desired has been spray buffed. 3) Do not spray areas that cannot be buffed because they are too close to a wall or other
185
obstruction. Do not spray solution onto parts of the floor where people do not walk. Spraying onto these areas will cause an undesirable build up of buffing compound, and cause the floor to require stripping earlier than would otherwise be necessary. 4) When stains or scuffs are not removed by normal spray buffing, spray the spot with a small amount of solution, and rub it with the scouring pad. Before the solution dries, buff the spot with the floor machine until the stain is removed and the finish restored. 5) After an area has been spray buffed, dust mop the floor completely to remove floor finish dust that may have been generated during the spray buffing. Other horizontal surfaces must also be checked. Door casings, window ledges, , heating unit covers and similar surfaces are likely to collect dust from floor finishes. CLEANUP Rinse the inside of the spray bottle, and fill it with warm water. Spray this water in order to clean the nozzle. Remove the pad, brush it with another piece of spray buff pad, and wash it out under cold water. Wipe the cord and exterior of the machine with a clean cloth. Store the machine in the proper position with the cord properly wound around the handles or hooks provided on the machine. SAFETY & PPE RECCOMENDATIONS PPE recommendations include shoes with slip resistant soles. Use caution when working close to doors or corners where visibility is limited. Use arm and shoulder muscles to move machine. Avoid twisting at the waist and overextending back. When bending to pick up soil and debris, bend at the knees and not the waist. PERFORMANCE STANDARDS All floors should be free from loose soil and debris and have a high luster. All materials stuck to the floor surface should be removed using the putty knife. Time standards equal to 34.80 minutes per 1000 Sq. Ft.

186
Top Scrubbing Floors FREQUENCY- As needed MATERIALS & EQUIPMENT
• General Purpose detergent • Rotary Swing Machine • Blue Scrubbing pad • Mop Bucket • Water Pick-up or wet dry Vac • Wringer • Cotton Mop head and Handle • Wet Floor-caution signs • Putty knife or razor scrapper • Doodle bug W/ brown pad • Measuring device
AREAS WHERE APPLICABLE Any non-carpeted floors other than raised computer room floors, cork floors, unsealed wood floors and badly worn linoleum floors may be machine scrubbed. Rest rooms and locker rooms are frequently machine scrubbed. PREPARATION OF EQUIPMENT Properly attach the mop head to the handle. Fill one bucket approximately half full of clean, hot water. Properly attach the driving block to the floor machine. Then attach and center the scrub brush or scrubbing pad. PREPARATION OF MATERIALS Add General Purpose detergent according to the manufacturer’s instructions. PREPARATION OF THE AREA Create as much open space as possible by moving items such as trash receptacles, chairs, and portable furniture. Remove all loose soil by sweeping or dust mopping before scrubbing. PROCEDURE 1) Place the "Wet Floor-Caution" signs at the edges and entrances of the area. 2) Dip the mop into the solution and slowly agitate to mix the solution and saturate the mop head. Place the mop head in the wringer and squeeze down gently so that a moderate

187
amount of solution remains in the mop head. Apply solution to the edges of the area by pulling the mop slowly along, but not touching, the baseboard. 3) After the solution has been applied to the edges of the area, use a figure eight stroke to apply solution to the open area of the floor. Do not flood the floor. Turn the mop after every four or five strokes. Resoak the mop head when it begins to leave too little solution on the floor. Do not apply solution to too large of an area or the solution may dry before the area can be scrubbed 4) Allow the solution adequate dwell time of approximately five to seven minutes. 5) Using the doodle bug and brown pad thoroughly scrub the edged of the area using caution not to splash the solution onto the baseboard. Corners and other tight areas should be thoroughly cleaned using the putty knife or razor scrapper. 6) Following the same pattern in which the solution was put down, go over the entire area with the floor machine, overlap each previous arc by approximately one-half the diameter of the pad. 7) After scrubbing the area, Use a water pick up to retrieve the solution. If no water pick up is available use a cotton mop to absorb the solution. After several passes with the mop, place the head in the wringer of the empty bucket, and wring as dry as possible. 8) Rinse the scrubbed floor by damp mopping with clean water. Be sure to thoroughly rinse the mop head or use a clean mop head designated for rinsing only. RESTRICTIONS ON USE OF THE AREA Do not remove "Wet Floor-Caution" signs, replace furnishings, or allow traffic until the floor is completely dry. CLEANUP Rinse the mop heads and doodle bug pads thoroughly. Rinse the mops and wring them as dry as possible and hang them in the proper tool holder, heads down, with the strings off the floor. Wash the wringers and buckets inside and outside. Wipe the hand scraper clean. Remove the scrub brush or scrubbing pad from the floor machine and clean it thoroughly. Wipe the exterior of the floor machine and its cord dry and clean with a clean cloth. Store it in the proper position with its cord correctly wound around the hooks on the machine. If a wet/dry vacuum was used, empty and rinse it thoroughly. Remember to rinse the wand, hose, and floor tool. SAFETY & PPE RECCOMENDATIONS PPE recommendations include shoes with slip resistant soles, eye protection and hand protection. Use caution when working close to doors or corners where visibility is limited. Use arm and shoulder muscles to move swing machine. Avoid twisting at the waist and overextending back.

188
When bending to pick up buckets, soil and debris, bend at the knees and not the waist. Safety signage must be placed in conspicuous points around the area PERFORMANCE STANDARDS All areas should be free from visible stains and soil. All materials stuck to the floor surface should be removed using the putty knife. Loose or damaged tiles should be repaired or replaced. Time standards equal to 31.20 minutes per 1000 square feet of floor area.

189
Stripping Waxed or Finished Floors FREQUENCY- As needed MATERIALS & EQUIPMENT
• An appropriate floor stripping concentrate • Two mob buckets • Two wringers • Two cotton mop with handles • "Wet Floor-Caution" signs • Putty knife • Doodle bug and brown pad • Measuring device • Rotary Swing Machine • Black stripping pad or aggressive brush • Wet/dry vacuum
AREAS WHERE APPLICABLE All floors coated with conventional floor finishes, waxes or sealers will need to be periodically stripped. PREPARATION OF EQUIPMENT Assemble all equipment in the area to be stripped. See that buckets, wringers and mop heads are thoroughly clean. Properly attach the mop heads to the handles. Fill each bucket with about five gallons of clean, hot water. PREPARATION OF MATERIALS Add the proper amount of stripper to one bucket after water has been put into bucket. PREPARATION OF THE AREA All loose soil should be removed by thorough sweeping or dust mopping before stripping. Gum or other sticky substances should be removed with the putty knife or Razor scraper. Remove furnishings from the area. PROCEDURE 1) Place "Wet Floor-Caution" signs at the edges or entrances of the area. 2) Dip the mop into the solution bucket and lay it gently in the wringer. Beginning in a corner of the area furthest from the door, draw the mop slowly along, but not touching the

190
baseboard. Apply stripper to the open areas of the floor using a figure-eight stroke with the mop. 3) Apply a liberal amount of solution to all area, but do not flood the floor. Do not apply solution to too large of an area or the solution could dry before the area is scrubbed 4) Allow the solution adequate dwell time of five to seven minutes. 5) Using the doodle bug and pad or scraper all corners and edges should be thoroughly scraped and cleaned so that no wax or finish remains 6) Beginning in a corner, use the floor machine with stripping pad to go over the entire area in overlapping arcs. Do not move over the area too fast or all the wax may not be removed. However, work must proceed fast enough to prevent “dry back” 7) Pick up all solution with a wet/dry vacuum. If any area does appear to be drying before getting picked up with the vacuum, apply additional solution to these spots. 8) Using the clean mop, and following the pattern in which the solution was put down, apply clean water from the second bucket to the entire floor. Pick up this rinse water with a wet/dry vacuum or water pick up. 9) Thoroughly clean all baseboards, door frames or other surfaces that have had solution splashed onto them while scrubbing. NOTE: After the area has been rinsed a thorough inspection must be completed to ensure all finish has been removed from the floor surface. Glossy or spotty patches are indicators that finish remains on the floor and additional stripping must be done to remove all traces of floor finish. Additionally, if a wet/dry vacuum is not available, solution and rinse water may be picked up using a mop, wringer, and bucket instead. When using this technique, it will be necessary to rinse the floor two or three times, rinsing the mop and changing the rinse water frequently. RESTRICTIONS ON USE OF THE AREA Do not remove "Wet Floor-Caution" signs, replace furnishings, or allow traffic in the area until the new finish has been applied to the floor and allowed to dry. CLEANUP Rinse the mop heads thoroughly. Wring the mops as dry as possible and hang them in proper tool holders, head down, with the strings off the floor. Wash the wringers and mop buckets inside and outside. Empty and thoroughly rinse the wet/dry vacuum, including the hose, wand and floor tool. Remove and thoroughly wash the stripping pad. Wipe the exteriors of the vacuum and floor machine with a clean cloth. Store the machines in the proper position with the cords properly wound around the hooks on the machine.

191
SAFETY & PPE RECCOMENDATIONS PPE recommendations include shoes with slip resistant soles, eye protection and hand protection. Use caution when working close to doors or corners where visibility is limited. Use arm and shoulder muscles to move swing machine. Avoid twisting at the waist and overextending back. When bending to pick up buckets, soil and debris, bend at the knees and not the waist. Safety signage must be placed in conspicuous points around the area PERFORMANCE STANDARDS All areas should be free from visible stains and soil. All materials stuck to the floor surface should be removed using the putty knife . Loose or damaged tiles should be repaired or replaced. All baseboards are free from splashed or otherwise spread solution Time standards equal to 79.80 minutes per 1000 square feet of floor area.
192
Applying Wax or Synthetic Floor finish
FREQUENCY-After Scrubbing or Stripping MATERIALS & EQUIPMENT
• Wax or floor finish • Mop bucket • Wringer • Liner for Bucket • Rayon or micro fiber mop head W/ Handle • Wet Floor-Caution signs
AREAS WHERE APPLICABLE Wax or synthetic finish may be successfully applied to any resilient floor such as VCT, Sheet vinyl, Fritz Tile® or terrazzo. PREPARATION OF EQUIPMENT Properly attach the mop head to the handle. Since absolute cleanliness of the mop head is essential, it is better to use a new mop that has been soaked overnight, washed in detergent solution and thoroughly rinsed. The mop should not be allowed to dry completely, since a dry mop does not does not absorb certain types of floor finish quickly. Wash and thoroughly rinse the bucket and wringer. .Line bucket with plastic liner PREPARATION OF MATERIALS Pour a small amount of wax or finish into the bucket. Never return any product that is not used to the container, since it will contaminate what is left. One gallon of product normally provides one coat for about 1,200 square feet. It is better to begin with too little and have to return for more, than to waste excess product. PREPARATION OF THE AREA The floor should have been scrubbed or stripped and rinsed, allowed to dry thoroughly, and protected from any traffic before the product is applied. PROCEDURE 1) Place the "Wet Floor-Caution" signs at the edges or entrances of the area. 2) Dip the mop into the floor finish until it is saturated, then place it in the wringer and press down until it does not drip when lifted from the wringer.
193
3) Begin in a corner, and pull the mop slowly along, but not quite touching the baseboard. Apply the finish in an outline pattern that creates a box. Once the box has been created begin filling in the box using a figure eight pattern. Each time the mop is soaked with finish, press it in the wringer until excess finish is removed. No finish should drip from the mop when it is lifted from the wringer, nor should an excessive amount of finish be put down when the mop first touches the floor. 4) Allow the floor to dry at least one half hour before applying a second coat of finish. The time between coats may vary depending on drying conditions. 6) Apply a second coat of finish only to the open areas of the floor. Do not apply a second coat immediately next to baseboards and other areas that obviously receive little or no traffic. Use the figure eight stroke to apply the second coat. If the size and shape of the area permit, the pattern used to apply the second coat should be perpendicular to the first coat. 7) After the second coat has dried, a third coat may be added to high traffic areas. If the floor has been completely stripped out up to five coats of finish will be necessary. If the floor finish being used is not a combination sealer/finish, the first two coats applied to the floor should be a sealer compatible with the finish being used. NOTE: Although good quality floor finish dries to a shine without buffing, some improvement will result if the new finish is buffed after drying for twenty four hours. RESTRICTIONS ON USE OF THE AREA Do not remove "Wet Floor-Caution" signs, replace furnishings, or allow traffic in the area until the floor is completely dry (at least one hour after the final coat). If the new finish is to be buffed, limit traffic until after the buffing operation. CLEANUP Wash the mop head in detergent solution, rinse it thoroughly, wring it as dry as possible, and hang it in the proper tool holder head down, with the strings off the floor. The mop used for applying floor finish should be designated in the storage area, and not used for other cleaning tasks. Dispose of floor finish remaining in the bucket and wash the bucket and wringer thoroughly. SAFETY & PPE RECCOMENDATIONS PPE recommendations include shoes with slip resistant soles, eye protection and hand protection. Use caution when working close to doors or corners where visibility is limited. Use arm and

194
shoulder muscles to move the mop. Avoid twisting at the waist and overextending back. When bending to pick up buckets, soil and debris, bend at the knees and not the waist. Safety signage must be placed in conspicuous points around the area PERFORMANCE STANDARDS All areas should be evenly coated. All materials stuck to the floor surface should be removed using the putty knife. No floor finish should be applied until loose or damaged tiles can be repaired or replaced. Baseboards should not have finish or sealer applies to them. Time standards equal to 36.00 minutes per 1000 square feet of floor area.

195
Screening and Recoating Wood Floors FREQUENCY-As needed MATERIALS & EQUIPMENT
• Solventless Cleaner • Magee Waterthane 701 • Mop Bucket • Rayon Mop W/ handle • Rotary Swing Machine • Water pick up or wet/dry vac • Clean push broom
• 100 Grit screening discs • "Wet-Floor-Caution" signs • Clean lint free Towels • Weighted T- Bar Applicator
W/pads • Watering can
AREAS WHERE APPLICABLE Any non laminate wood flooring including maple athletic flooring, hardwood and softwood applications including Rochester type wood flooring. PREPARATION OF EQUIPMENT Assemble all equipment in the area to be screened. Be sure that bucket, wringer, mop heads and towels are thoroughly clean. Properly attach the mop heads to the handles. Properly attach the driving block to the floor machine. Attach a scrubbing pad between the drive block and the screening disc to allow for flexibility in the screening operation. PREPARATION OF MATERIALS Fill mop bucket with 2.5 gallons of solvent less cleaner. The product is in its ready to use form and does not require dilution. PREPARATION OF THE AREA The floor should be cleaned and free from loose soil and debris. All material stuck to the floor such as gum and tape should be removed with the putty knife or razor scrapper. PROCEDURE 1) Place the "Wet Floor-Caution" signs at the edges or entrances of the area. 2) Dip the mop into solventless cleaner, lift it just above the level of the liquid and allow excess liquid to run out of the mop. While the product should not be applied at a flood rate the floor should be wetted thoroughly enough to prevent drying. If the rotary swing machine is equipped with a tank the solventless cleaner can be applied using this method.
1963) Beginning in a corner of the area, operate the rotary swing machine in a back and forth motion moving along at a moderate pace. The goal of screening the floor is to sufficiently abrade the floor to allow for proper adhesion of the floor finish. Moving too slowly will remove excessive finish from the floor. Each side of the screen will be effective to abrade apporimimatly 400 square feet of flooring. 4) Using the wet/dry vac or water pick up remove the dirty solution from the floor. If the area is open and accessible an auto scrubber with clean water may be used to pick up the dirty solution 5) Once the entire area has been screened and the dirty solution picked up, clean and fill the mop bucket with clean water or fill a second clean mop bucket with clean cold water. Place the clean lint free towels in the bucket and thoroughly soak. Remove the towels from the water and place in the wringer and to remove as much water as possible. 6) Wrap one of the wet towels around the head of the push broom. Beginning at one side of the room, push the towel along the floor to tack up the remaining residue from the floor. Change or rinse the towel in the clean water after each pass. The entire floor surface must be tacked twice to ensure all cleaner residue is removed. 7) Fill watering can or other dispensing vessel with appropriate finish. Begin by making a small puddle of finish in the corner furthest from the door. Using the T-bar applicator disperse the puddle of finish in a small area allowing the applicator pad to become filled with finish. 8) Lay a steady bead of finish approximately four inches from the wall and running parallel the entire length of the area with the grain of the wood. Using the T-bar applicator begin spreading the finish onto the floor in long continuous strokes along the length of the room where the bead of finish has been layed out. Hold the applicator at approximately 45 degrees allowing the excess finish to flow off the outside edge of the applicator head. 9) Apply additional beads of finish as it becomes necessary while applying finish to the floor. Be cautious when nearing the end not to apply excessive finish. 10) After entire floor has been coated allow to dry to a tack free state before applying second coat. The second coat must be applied within eighteen hours of the first. If it is not the floor will need to be abraded before re coating. RESTRICTIONS ON USE OF THE AREA Do not remove the "Wet Floor-Caution" signs, replace furnishings, or allow traffic in the area until the floor is completely dry. Allow at least 48 hours before allowing light foot traffic and 72 hours for heavy foot traffic. CLEANUP Rinse the mop heads and applicator pads thoroughly with clean water. Wring the mops as dry
197as possible and hang them in proper tool holders, head down, with the strings off the floor. Place applicator pads in a manner that allows for adequate drying. Wash the wringers and mop buckets inside and outside. Empty and thoroughly rinse the wet/dry vacuum, including the hose, wand and floor tool.. Wipe the exteriors of the vacuum and floor machine with a clean cloth. Store the machines in the proper position with the cords properly wound around the hooks on the machine. Collect and thoroughly wash the towels being sure not to use fabric softener. SAFETY & PPE RECCOMENDATIONS PPE recommendations include shoes with slip resistant soles, eye protection and hand protection. Use caution when working close to doors or corners where visibility is limited. Use arm and shoulder muscles to move the mop. Avoid twisting at the waist and overextending back. When bending to pick up buckets, soil and debris, bend at the knees and not the waist. Safety signage must be placed in conspicuous points around the area PERFORMANCE STANDARDS All areas should be evenly coated. All materials stuck to the floor surface should be removed using the putty knife. Baseboards and surrounding areas should not have finish applied to them.
198
Section VI- Special Operations
199
Special Pool Deck Cleaning Operation
FREQUENCY-As needed MATERIALS AND EQUIPMENT
• PM 20 Cleaning solution • TLC tile and grout cleaner • Green Brillo scrub pads • Mop bucket and wringer • Cotton blend mop • Pressure washer • Walk behind floor machine • Rubber gloves • Small pail
AREAS WHERE APPLICABLE Based on the high amount of usage and very limited down time there becomes certain areas in the pool that need special detailing. These are the pool deck, and the stainless steel in and around the pool such as railings and the bulkhead. PREPERATION OF AREA Pool Deck Properly attach the mop head to the handle. Fill the mop bucket to the 4 gallon mark and add the correct amount of PM 20 according to the manufactures recommendations. Wet mop the solution onto the deck area and allow to dwell for 5 minutes. Using the pressure washer clean the solution off the deck working towards the side drains that border the pool. Do not use a high pressure setting! The chemical does most of the work. Using a walk behind floor machine do a final rinse of the cleaned area. Stainless steel areas Pour the TLC cleaner into a small bucket or pail. Wearing rubber gloves and using a green scrub pad apply the chemical to the stainless and scrub off any build up. Rinse immediately with pool water. NOTE: If the TLC is left on the stainless and not rinsed it may turn the stainless black. When cleaning around the gutters it may be necessary to actually get into the water. The same technique applies to the cleaning of hand rails. After the cleaning is done, rinse areas with clean water. Restrictions on use of area When applying the PM20 it important that swimmers are not in the immediate area.
200
Protocol for Summer Dorm Cleaning
The following is a detailed description of the tasks to be performed in the process of summer cleaning dorms. Each task is to be performed fully and thoroughly. Summer cleaning encompasses the entire residential hall and shall be completed as follows; Resident Rooms
• Remove any remaining items not part of regular room inventory. • Sweep, dust mop and/or vacuum all floor surfaces. • Remove all nails, tacks, tape and adhesives from walls and ceiling. • Complete dusting of all wall surfaces. • Completely wash all room walls and room inventory. • Disassemble all lofts. • Wipe down All room furniture with disinfectant cleaner. • Thoroughly clean all windows, screens, blinds, shades and/or curtains. • If room has multiple beds adjust all to the same height. • Ensure all lights are working properly. • Inspect entire room to ensure completion of all tasks and complete work order requests
for any repairs or work needed. • Close and lock all windows, shut off lights and lock room door
Corridors, Lounges and Stairways
• Remove all trash and recyclables • Remove all items that are not part of regular inventory. • Clean and disinfect all trash and recycling receptacles and reline with appropriate liners. • Completely clean all vertical and horizontal surfaces including ceiling, walls, doors and
knobs, heater covers, and railings. • Sweep, dust mop, mop and/or Vacuum all floors including stairs. • Ensure all lights are working properly. • Inspect entire area to ensure completion of all tasks and complete work order requests for
any repairs or work needed.
Kitchens and Kitchenettes
• Remove and discard all food items from refrigerators, cupboards and shelves. • Defrost and clean freezer with disinfectant cleaner. • Thoroughly clean refrigerator with disinfectant cleaner. • Completely clean stovetop, oven and console. Replace pans and burners as necessary. • Completely clean ceiling, walls, cupboards, shelves, countertops and floors. • Ensure all lights are working properly. • Inspect entire area to ensure completion of all tasks and complete work order requests for
any repairs or work needed
201
Common Washrooms/Bathrooms
• Completely remove all items including paper products from dispensers and shower curtains.
• Clean shower/tub area with acid shower cleaner. • Completely clean ceiling, walls and dividers with disinfectant cleaner. • Clean Toilets and/or urinals with acid bowel cleaner. • Completely clean all countertops, sinks and toilets/urinals with disinfectant cleaner. • Thoroughly wipe down all fixtures and hardware with disinfectant cleaner. • Polish all chrome. • Replace shower curtains and paper products. • Damp mop floor with disinfectant cleaner. • Inspect entire area to ensure completion of all tasks and complete work order requests for
any repairs or work needed
202
Protocol for Reunions Dorm Preparation
The following is a detailed description of the tasks to be performed in the process of preparing dorms for reunions weekend. Each task is to be performed fully and thoroughly. Reunions dorm preparation encompasses the entire residential hall and shall be completed as follows; Resident Rooms
• Remove any remaining items not part of regular room inventory. • Remove all nails, tacks, tape and adhesives from walls and ceiling. • Complete dusting of all wall surfaces. • Wipe down All room furniture with disinfectant cleaner including inside of drawers. • Thoroughly dust all window sills, screens, blinds, shades and/or curtains. • Disassemble all lofts. • If room has multiple beds adjust all to the same height. SPECIAL NOTE: North, South,
Kirkland, Eells, Woolcott, and Fergusson dorms must have all beds adjusted to lowest setting.
• Sweep, dust mop and/or vacuum all floor surfaces • Ensure all lights are working properly. • Inspect entire room to ensure completion of all tasks and complete work order requests
for any repairs or work needed. • Close and lock all windows, shut off lights and lock room door
Corridors, Lounges and Stairways
• Remove all items that are not party of regular inventory. • Remove all trash and recyclables • Clean and disinfect all trash and recycling receptacles and reline with appropriate liners. • Completely dust and spot clean all vertical and horizontal surfaces including ceiling,
walls, doors and knobs, heater covers, and railings. • Sweep, dust mop, mop and/or Vacuum all floors including stairs. • Ensure all lights are working properly. • Inspect entire area to ensure completion of all tasks and complete work order requests for
any repairs or work needed.
Kitchens and Kitchenettes
• Remove and discard all food items from refrigerators, cupboards and shelves. • Thoroughly clean refrigerator with disinfectant cleaner. • Completely clean stovetop and console. • Completely dust cupboards, shelves, countertops and wipe down with disinfectant
cleaner.. • Ensure all lights are working properly. • Inspect entire area to ensure completion of all tasks and complete work order requests for
any repairs or work needed
203
Common Washrooms/Bathrooms
• Completely remove all items including paper products from dispensers. • Clean shower/tub area with acid shower cleaner. • Completely clean ceiling, walls and dividers with disinfectant cleaner. • Clean Toilets and/or urinals with acid bowel cleaner. • Completely clean all countertops, sinks and toilets/urinals with disinfectant cleaner. • Thoroughly wipe down all fixtures and hardware with disinfectant cleaner. • Polish all chrome. • Replace shower curtains if necessary and paper products in dispensers. • Damp mop floor with disinfectant cleaner. • Inspect entire area to ensure completion of all tasks and complete work order requests for
any repairs or work needed

204
Protocol for Bristol Campus Center Guest Room Service The Campus Bristol Center is one of Hamilton College’s most public facilities. Very often, esteemed guests such as national celebrities, members of the board of trustees or special guests of the college will stay in the center. It is the responsibility of those assigned to the facility to represent the college in a manner that reflects the values and integrity of the college. It is strongly recommended that all custodians assigned to the Bristol center present themselves, in both appearance and behavior, in a manner that will up hold the highest of standards.
1) Begin By checking guest book, key box and check-in slips in the front office. This will help to determine which rooms are occupied, which rooms have been or will be checked out and any rooms that are stay overs.
2) After reviewing room status, proceed to the fourth floor lounge area to check coffee station.
Restock if necessary.
3) Return to First floor and completely clean area. This will include the Hub, lobby, all administrative offices and common areas.
4) After completing the First floor, proceed to the third floor. Completely clean all classrooms
and bathrooms daily. Clean the Spectator office Monday, Wednesday and Friday.
5) After the Third floor is complete, clean South stair tower daily including all stairs, railings and landings.
6) At this point, return to the front office to review check out status. Then proceed to the
fourth floor and prepare cart for room service. Be sure cart is fully stocked and all necessary supplies are filled and properly prepared.
7) Begin room service. Take linen and proceed to the first available room. Completely strip
linens from used beds unless the room is a stay over. SPECIAL NOTE: Stay over rooms has linens changed every other day unless condition of the linens warrants daily changing. If the room is a stay over re make bed according to procedure. If the room is NOT a stay over completely remove all linens including sheets, pillowcases towels, washcloths, bathmats, and etc.
8) Beds are to be made using hospital corners with all sheet ends tucked in all the way around
the bed. The top sheet is to be folded down at the head.
9) Completely clean bathroom. Disinfect ALL fixtures including sink, toilet, shower and mirror. Dry and polish all fixtures including, sink and all faucets and chrome, shower door and toilet. Re- stock Bath Supplies including shampoo, soap, cups, tissues, toilet paper and etc. SPECIAL NOTE: Showers must be cleaned every third week with Crew shower cleaner.

205
10) Completely dust entire room including all furniture top to bottom, windows and window sills and window seating area, pictures. Inspect under bed, in drawers, and in the closet. Any property found in to be places in a bag marked with room number and turned in to front office.
11) Inspect carpet for any spots or stains. If any are found use Tennant 1000 upholstery
machine and appropriate detergent to clean using procedure described in the Custodial Services Operations Manual.
12) Inspect all lights and appliances to be sure they are working properly. Change any bulbs
that are out and report any repairs that need to be made.
13) Begin at the wall furthest from the door and vacuum your way out of the room being sure not to leave any foot prints in the carpet.
14) After room service is complete, bag soiled linen separating sheets in one bag and bathroom
linen in another.
15) Collect another set of clean appropriate linen and proceed to the next guest room to be cleaned and service room following procedure described above.
16) Once all rooms have been services restock cart. Clean and restock coffee station for the
next day.
17) Vacuum all hallway carpets, clean and/or dust all hallway areas and water plants weekly or as needed.
18) Deliver all soiled linen to basement storage area. All soiled linen must be placed on the
loading dock Monday morning for pick up. Clean linen will be delivered and re stocked Tuesday morning
Other duties may be assigned to meet the operational needs of the college.

206
Section VII- Glossary of Terms

207
Abrasion- The wearing away or cleaning by friction. Abrasion can also relate to the wearing away of a floor finish film by friction. Abrasive- A product that works by abrasion. Products such as cleaners, polishes and pads may contain an abrasive. Acid- A compound that ionizes in water to produce hydrogen ions. It readily donates protons to other substances and, when dissolved in water, creates solutions that conduct electricity, taste sour and turns litmus paper red. Inorganic acids (sometimes called mineral acids) include sulfuric, nitric, hydrochloric and phosphoric. Organic acids include acetic, oxalic, hydroxyacetic and citric. Acids are used in toilet bowl cleaners, rust removers and hard water stain removers. Active Ingredients- The ingredients in a product that are specifically designed to achieve the product performance objectives. Adhesion- One characteristic of soils or films which causes soils and oils to stick or bond to surfaces making them difficult to remove. Alcohols- Organic compounds that contain one or more hydroxyl groups (-OH functional groups) in each molecule. Alcohols used in cleaners include ethyl, methyl, propyl and butyl.
Aliphatic Solvents- These are sometimes referred to as paraffins. They are also referred to as straight chain or open chain solvents. Kerosene, Odorless Mineral Spirits and Mineral Seal Oil are examples of aliphatic solvents.
Alkali or Base- Describes a solution formed when a base dissolves in water to form a solution which contains more hydroxide ions than hydrogen ions. Alkaline solutions have a pH of more than 7, turn red litmus paper blue, and feel soapy because they react with the skin. Alkalinity is exhibited in solution by alkalies such as sodium or potassium hydroxide or alkaline salts such as sodium carbonate. A substance used in some wax strippers, degreasers and cleaners to assist in soil and finish removal.
Ammonia- An alkaline gas composed of nitrogen and hydrogen. Aqueous solutions of with 5-10% ammonia are sold as household ammonia.
Amphoteric Surfactant- A surfactant that, in water solution, may be either anionic or cationic, depending upon the pH.
Anhydrous- A product that has had all of the water removed.
Anion- An ion with a negative charge, formed when an atom gains electrons in a reaction. The atom now has more electrons than protons.
Anionic Surfactant- Negatively charged part of a molecule. Anionic surfactants are widely used in high-sudsing detergents.
208
Antiredeposition Agent- An ingredient used in detergents to help prevent soil from redepositing on surfaces or fabrics. Sodium carboxymethylcellulose (CMC) is the most widely used.
Aromatic Solvents- Solvents made of compounds that contain an unsaturated ring of carbon atoms, typified by benzene structures. Xylene and toluene are aromatic solvents sometimes referred to as Ring Hydrocarbons.
Atom- The smallest particle of an element that retains the chemical properties of that element. The atoms of many elements are bonded together in groups to form particles called molecules. Atoms consist of three main types of smaller particles. These include the electrons, protons and neutrons.
Biodegradable- The ability of a substance to be broken down into simpler, smaller parts by a biological process. Many plastics are not biodegradable.
Bleach- A product that cleans, whitens, removes stains and brightens fabrics.
Boiling Point- The temperature at which a liquid changes to a vapor state at a given pressure.
Buffer- In chemistry, any substance in a fluid which tends to resist a sudden change in pH when acid or alkali is added. Buffering is provided by complex phosphate builders, sodium carbonate, sodium silicate and sodium citrate. Usually a solution of a weak acid and its conjugate base or a weak base and its conjugate acid.
Builder- A material that upgrades or protects the cleaning efficiency of a surfactant. Builders inactivate water hardness, supply alkalinity to assist cleaning, provide buffering to maintain alkalinity, prevents redeposition of soil and emulsification of oily and greasy soils.
Build-up- A heavy deposit of floor finish, wax, dirt and grime. It is caused by adding layer after layer of floor finish over dirt without deep scrubbing the old layers away first. These build-ups are frequently found along baseboards and corners.
Calcium Carbonate- An inorganic compound that occurs naturally as chalk and limestone. Its very slight solubility in water is a chief cause of "hardness" in water.
Catalyst- An element or compound that accelerates the rate of a chemical reaction but is neither changed nor consumed by it.
Cation- An ion with a positive charge, formed when an atom loses electrons in a reaction. The atom now has more protons than electrons.
Cationic Surfactant- A surfactant with a positively charged ionic group. The most common cationic surfactants are known as quaternary ammonium compounds such as alkyl dimethyl benzyl ammonium chloride. These are widely used as disinfectants and sanitizers.
Caustic- Strong alkaline substance which irritates the skin.
209
Ceramic Tile- Clay tile with an impervious, usually glossy, layer on the surface.
Chelating Agent- An organic sequestering agent used to inactivate hard water and other metallic ions in water. Additives in detergents for inactivating the minerals in water that interfere with cleaning. Ingredients include ethylene diamine tetraacetic acid (EDTA), NTA and sodium citrate.
Chemical Reaction- Any change which alters the chemical properties of a substance or which forms a new substance. During a chemical reaction, products are formed from reactants.
Chemical Symbol- A shorthand way of representing an element in formula and equations. Sodium Chloride is represented in chemical symbols by NaCl (Na is Sodium and Cl is Chlorine).
Chemistry- The study of substances. What they are made of and how they work. It is divided into three main branches -- physical chemistry, inorganic chemistry and organic chemistry.
Chlorinated Solvents- An organic solvent that contains chlorine atoms as part of the molecular structure. Examples include methylene chloride and trichloroethylene.
Chlorine Bleach- A group of strong oxidizing agents commonly sold in an approximately 5% solution of sodium hypochlorite. Care should be taken to never mix chlorine bleach with ammonia or hydrochloric acid.
Cleaning- Cleaning is locating, identifying, containing, removing and disposing of unwanted substances (pollutants) from the environment. It is our most powerful means of managing our immediate surrounding and protecting our health.
Cleanser- A powdered or liquid cleaning product containing abrasives, surfactants and frequently a bleach.
Cloud Point- The temperature at which a surfactant becomes insoluble in water. This becomes important when designing detergents for use in hot water.
Coagulation- An irreversible process in which a number of emulsion droplets coalesce, leading to complete separation of the emulsion.
Colloid- A type of solution in which the particles are not dissolved but are dispersed throughout the solvent or medium and held in suspension.
Compatibility- The ability of two or more substances to mix without objectionable changes in their physical or chemical properties.
Compound- A combination of two or more elements, bonded together in some way. It has different physical and chemical properties from the elements it is made of. Compounds are often difficult to split into their elements and can only be separated by chemical reactions.
210
Concrete- A mixture of sand, gravel, Portland cement and water that forms a very hard surface when dry. It is one of the most common floor types found in buildings. Other types of floors like vinyl and vinyl composition tile are often laid over the top of concrete.
Corrosion Inhibitor- A material that protects against the wearing away of surfaces. Sodium silicate is a corrosion inhibitor commonly used in detergents.
Critical Micelle Concentration- The concentration of a surfactant in solution at which the molecules begin to form aggregates called micelles while the concentration of surfactant in solution remains constant.
Defoamers- Substance used to reduce or eliminate foam.
Degreaser- A specialty product that removes grease and greasy/oily soils from hard surfaces. Basic ingredients include surfactants that penetrate and emulsify along with alcohol or glycol derivatives to boost cleaning.
Deionized Water- Water from which charged or ionizable organic or inorganic salts are removed.
Deliquescent- Describes a substance which absorbs water vapor from the air and dissolves in it, forming a concentrated solution. Calcium chloride is an example.
Density- Equal to its mass divided by its volume.
Detergent- A washing and cleaning agent with a composition other than soap. Detergents unlike soaps are less sensitive to minerals in water.
Diffusion- The spontaneous and even mixing of gases or liquids.
Dispersing Agent- A material that reduces the cohesive attraction between like particles.
Dispersion- A colloidal system characterized by a continuous (external phase) and a discontinuous (internal phase). Uniformity of dispersions can be improved by the use of dispersing agents.
Distilled Water- Water which has had salts removed by distillation. It is very pure, but does contain some dissolved gases.
Dwell or Contact Time- Describes the time a substance is in contact with a surface.
Efflorescent- Describes a crystal which loses part of its water of crystallization to the air. A powdery coating is left on its surface. The forming of a white powdery substance on the surface of concrete or brick is an example.

211
Electrolytes- Substances capable of conducting an electric current, either in their pure liquid state or when in solution. Acids, bases and salts are all electrolytes.
Electrostatic Attraction- Attractive force between two oppositely charged ions.
Elements- A pure substance that cannot be broken down into smaller substances. Elements are considered the building blocks of all matter. There are just over 100 known elements classified in the periodic table.
Elements, Compounds and Mixtures- These are the three main types of chemical substances. All substances are made of elements, and most are a combination of two or more elements.
Emulsification- The action of breaking up fats, oils and other soils into small particles which are then suspended in a solution.
Emulsion- A two-phase liquid system in which small droplets of one liquid are uniformly dispersed throughout the second. An oil in water (O/W) emulsion, is one in which the continuous phase is aqueous, while a water in oil (W/O) +-emulsion is one in which the continuous phase is oil.
Enzyme- Protein molecules produced within an organism that are used as catalysts for biochemical reactions.
Etch- A chemically caused change on the outside of a smooth floor surface which causes the floor to be pitted or rough.
Eutrophication- An overgrowth of aquatic plants caused by an excess of nitrates, nitrites and phosphates. It results in a shortage of oxygen in the water, causing the death of aquatic life.
Evaporation- A change of state from liquid to gaseous (vapor), due to the escape of molecules from the surface. A liquid which evaporates readily is described as volatile.
Evaporation Speed- Expressed in relation to the evaporation rate of n-Butyl Acetate which is standardized at 1.0. All products with evaporation rates greater than 1.0 are faster evaporating than n-Butyl Acetate and conversely numbers lower than 1.0 indicate a slower rate.
Exothermic Reaction- A reaction in which heat is given off to the surroundings as the products of the reaction are formed. The addition of high concentrations of sodium hydroxide to water produces an exothermic reaction.
Fatty Acid- An organic substance which reacts with a base to form a soap. Tallow and coconut oil are examples.
Flashpoint- The minimum temperature at which a liquid gives off a vapor in sufficient concentration to ignite when tested.
212
Flocculation- A reversible process in which a number of emulsion droplets stick together to form a cluster which can be broken up by mechanical action restoring the emulsion to its original form.
Foam- A mass of bubbles formed on liquids by agitation. Foam can be unstable, transient or stable depending upon the presence and nature of the components in the liquid.
Gas Form of Matter- A gas has no shape, diffuses readily, and assumes the full-volume shape of any closed container. Gas molecules are widely distributed and can move in any direction.
Grains Hardness- A measure of water hardness. The actual amount of dissolved calcium and magnesium salts measured in parts per million.
Hard Water- Water which contains calcium and magnesium salts that have dissolved from the rocks over which the water has flowed. Water that does not contain these salts is called soft water. There are two types of hardness -- temporary hardness, which can be removed relatively easy and permanent hardness, which is more difficult to remove.
Heterogeneous- Describes a substance which varies in its composition and properties from one part to another. Properties differ from place to place within the solution.
HLB (Hydrophile-Lipophile Balance)- A property of a surfactant which is represented by an arbitrary scale of 0-20 wherein the most hydrophilic materials have the highest numbers. The HLB of a nonionic surfactant is the approximate weight of ethylene oxide in the surfactant divided by 5.
Homogeneous- Describes a substance which is the same throughout in its properties and composition.
Humidity- A measure of moisture in the atmosphere. It depends on the temperature and is higher in warm air than cold air.
Hydrophilic- A descriptive term applied to the group or radical of a surfactant molecule that makes or tends to make it soluble in water. Associated with the hydrophilic portion of a surfactant molecule is the opposite hydrophobic (water-hating) portion.
Hydrotrope- A substance that increases the insolubility in water of another material, which is only partially soluble. Hygroscopic- Describes a substance which can absorb up to 70% of its own mass of water vapor. Such a substance becomes damp, but does not dissolve. Insolubility- The inability of one substance to dissolve in another. Interfacial Tension- A measure of the molecular forces existing at the boundary between two phases. It is expressed in dynes/cm. Liquids with low interfacial tension are more easily

213
emulsified. Ions- An electrically charged particle, formed when an atom loses or gains one or more electrons to form a stable outer shell. All ions are either cations or anions. Liquid Form of Matter- A liquid assumes the shape of its container. The molecules of a liquid are in constant motion and do not have the fixed arrangement found in solids. Matter- Any substance that has mass (weight) and occupies space. It exists in any of three forms including a solid, liquid or gas. Micelle- A spherical grouping of detergent molecules in water. Oils and greases dissolve in the hydrophobic center of the micelle. Miscibility- A term often used interchangeably with solubility. It is the ability of a liquid or gas to dissolve uniformly in another liquid or gas. Mixture- A blend of two or more elements and/or compounds which are not chemically combine. A mixture can usually be separated into its elements or compounds fairly easily by physical means. Molecules- The smallest particle of an element or compound that normally exists on its own and still retains its properties. Molecules normally consist of two or more atoms bonded together. Some molecules have thousands of atoms. Ionic compounds consist of ions and do not have molecules. Neutral- A chemical state that is neither acid nor alkali. A pH of 7 is considered neutral. Neutral Cleaner- A floor cleaner that has a pH that is compatible with the finish to be cleaned. Generally this means a pH of between 7-9. Higher pH floor cleaners can attack the floor finish and dull it. Nonionic Surfactant- A surface active agent that contains neither positively or negatively charged functional groups. These surfactants have been found to be especially effective in removing oily soil. Oxidation- To combine with oxygen. Slow oxidation is typified by the rusting of a metal. Oxidizing Agent- A substance that accepts electrons in an oxidation-reduction reaction. A substance that causes the oxidation of a reactant molecule. pH- A measurement of the acidity or alkalinity of a substance. It is expressed in a number from 0-14. Zero being a powerful acid and 14 being a powerful alkali. Distilled water is a 7. Phosphates- A substance that is added to a detergent to increase its water softening ability.

214
Physical Properties- Qualitative and Quantitative properties that describe a substance. They include smell, taste, color, melting point, density, hardness etc. Pine Oil- An oil process from gum of pine trees. Polar Solvent- Water is the most common polar solvent. Porous- A surface that was many tiny openings. A porous surface will require more finish or sealer to fill and smooth out these openings. Precipitate- Material settled out of solution. Preservatives- Floor finishes are susceptible to bacterial contamination. This is why finishes contain small amounts of antimicrobial agents to prevent microbial deterioration. These preservatives protect the unopened container, but do not substantially protect finish after it has been used. This is why it is important to never pour used floor finish back into a container of unused finish. Reagent- A substance used to start a chemical reaction. In the laboratory, hydrochloric acid, sulfuric acid and sodium hydroxide are reagents. Salt- An ionic compound formed by the reaction between an acid and a base. Saponification- The process of converting a fat into soap by treating it with an alkali. Also the process used by some to remove grease and oil. Saturated- Describes a solution that will not dissolve any more solute at a given temperature. Any more solute will remain as crystals. Scientific Method- A standardized way that scientists research and find answers to questions and problems. Sequestering Agents- Chemicals that tie up water hardness and prevent the precipitation of hard water salts. This action causes clarity in liquid soap. Soils- Describes a wide group of substances that attach themselves to surfaces creating a pollutant. Soils loosely attach themselves to surfaces by surface tension, electrical attraction or chemical bonding. Solid Form of Matter- A solid holds its shape and volume even when not in a container. The molecules of a solid are tightly compacted and move only slightly. Solvents- A liquid which dissolves another substance. Water is the most common solvent. Specific Gravity- The ratio of the weight of a given volume of a liquid to the weight of an equal volume of distilled water. Water at that temperature has a specific gravity of 1. If the specific

215
gravity of the other substance is greater than 1 it floats in water; if less than 1 it sinks. States of Matter- A substance can be solid, liquid or gaseous. Substances can change between states, normally when heated or cooled to increase or decrease the energy of the particles. Surface Tension- The attractive forces which liquid molecules have for each other. Surfactant- Substances which lower the surface tension of water. These surface-active agents modify the emulsifying, foaming, dispersing, spreading and wetting properties of a product. Suspension- The process of a cleaning agent holding insoluble dirt particles in the cleaning solution and keeping them from redepositing on a clean floor.
Synergistic- Chemicals that when combined have a greater effect than the sum of the two independently.
Synthetic Detergents- These are sometimes called soapless detergents. They are typically made from by-products of refining crude oil. They do not form a scum in hard water and lather better than soaps. Thinner - A liquid used to reduce the viscosity of a coating and that will evaporate before or during the cure of a film. Titration- A procedure that uses a neutralization reaction to determine the normality (the number of equivalents per liter of solution) of an unknown acid or base solution. Universal Solvent- Water is called the universal solvent because it dissolves both ionic compounds and polar molecular compounds. Water usually cannot dissolve nonpolar molecules. Use-Dilution- The final concentration at which a product is used. Vapor Pressure- Describes a measure of a liquids tendency to evaporate. Every liquid has a characteristic vapor pressure that changes as the internal temperature of the liquid changes. Generally, as the temperature of a liquid increases, its vapor pressure also increases. Viscosity- The thickness of a liquid which determines pourability. Water has a viscosity of 1 centipoise. The resistance to flow is measured in relationship to water in centipoise. Volatile- The part of a product that evaporates during drying. Water Hardness- A measure of the amount of metallic salts found in water. Hard water can inhibit the action of some surfactants and reduce the effectiveness of the cleaning process. Weight per Gallon- The weight per gallon of any liquid is determined by multiplying the weight of a gallon of distilled water (8.33 lbs.) by the specific gravity of the liquid.

216
Wetting Agent- A chemical which reduces surface tension of water, allowing it to spread more freely.
Related Documents