Customising a Business Card 1 Creating a Business Card A Tutorial for Catalogue Managers

Welcome message from author
This document is posted to help you gain knowledge. Please leave a comment to let me know what you think about it! Share it to your friends and learn new things together.
Transcript

Customising a Business Card 1
Creating a Business CardA Tutorial for Catalogue Managers

The completed two-sided Business Card that we will be creating. All files can be downloaded from http://www.mtivity.com/tutorial/files.zip

Customising a Business Card 3
Contents
ContentsGetting Started 4
Uploading Files 5
Creating Pricing 7
Creating an Item 8
Creating the Business Card 8
Adding Text Customisations 9
Adding Image Customisations 14
Create an Image List 14
Define the Customisation’s Positioning 15
View your Customisation 15
A Note on Catalogue terminology
The Examples in this document may use Cata-logue, Catalog or Campaign.
The name of this component may be personal-ized for your company - please contact Mtivity Support to make this change.

Customising a Business Card 4
Getting Started
PrerequisitesBefore beginning this tutorial, you should ensure you have an account in Mtivity, a Catalogue Manager license and are familiar with the system’s navigation and basic catalogue functionality.
The resource files needed to complete this lesson may be downloaded from:
http://www.mtivity.com/tutorial/files.zip
Tutorial Files
In this lesson, you’ll learn how to do the following:
Upload files and fonts•
Create materials for pricing•
Create items•
Adding text customisations•
Adding image customisations•
Use and create image lists•
Additional Resources
Further Reading
Catalogue Administration - This is an overall ad-•ministration guide that covers creation and pub-lishing of items
Customisations Guide - This focuses solely on •adding customisations to templates
These documents are available at http://mtivity.zendesk.com/forums/121332-guides-and-documen-tation
Support
Mtivity’s support desk is available from 09:00 AM to 17:30 PM, Monday - Friday (excluding public holi-days).
Telephone• : 0333 666 1890
Email• : [email protected]
Skype• : mtivity.support

Customising a Business Card 5
Uploading Files
In this lesson you will upload the PDF template, fonts, thumbnails and images that are required to build the Jump Business Card.
Note: If you have not done so already, you should download the resource files to your hard drive from:
http://www.mtivity.com/tutorial/files.zip
Upload a File
Location: Admin > Catalogues > Files
Click New in the Tools menu on the right hand 1. side. This will open the New File window.
Click the Browse button on the File field and 2. select the bc_template.pdf file, this is the blank business card which will be customised.
Select your client - this will help when locating 3. files later. If you don’t have a client set up yet just select your own company. Leave the other fields as their defaults.
Now click the Add Another File button, this will 4. allow us to upload multiple files from the same screen ( ).
For the second file, click the Browse button and 5. select bc_thumbnail.jpg, we will use this as the item’s thumbnail.
Click the Save button 6.
Once your file has uploaded it will be available for 7. selection immediately but the automatically cre-
ated thumbnail and preview images may take a few seconds to render.
Upload a Zip File
Next we will upload a zip file for the image options, Mtivity will automatically extract the images.
Location: Admin > Catalogues > Files
Click Import from Zip in the Tools menu on the 1. right hand side. This will open the Select Zip File window.
Click the Browse button on the Zip File field and 2. select images.zip.
Select your client3.
Click Next to proceed to the next step. 4.
The system will scan the zip file and detail the files 5. to be uploaded. Click the Import Now button.
Upload Fonts
Now we will upload the special fonts that are required for this business card. Mtivity includes Helvetica, Courier, Times and Symbol - if other fonts are required they should be first uploaded into the system.
Location: Admin > Catalogues > Font Management
Fonts need to be uploaded to a particular client, 1. so first, click on the name of the client that you selected when uploading the PDFs.

Customising a Business Card 6
Click New in the Tools menu on the right hand 2. side. This will open the New Font screen.
In the Name field type Solex Regular.3.
Leave the format as Type 1.4.
Click the Browse button next to the PFM file field 5. and select solexreg.pfm.
Click the Browse button next to the PFB file field 6. and select solexreg.pfb.
Click the Save button.7.
Once your font has uploaded it will be available for 8. selection when creating customisations.

Customising a Business Card 7
Creating Pricing
In this lesson you will create a Material, this will deter-mine the Business Card’s pricing, printer, delivery date and quantities that can be ordered.
Creating a Material
Location: Admin > Organization > Materials
From the Materials page, click New in the Tools 1. menu on the right hand side. This will open the new Material screen.
In the Name field enter “Business Card - Print” 2.
In the Margin field enter “10%”. Your suppliers will 3. see the cost price in their purchase orders and your clients will see the cost price plus margin when ordering an Item.
Select Standard VAT as the Sales Tax.4.
In the Lead Time field enter “3”, this is the number 5. of days that the Material will take to be produced. This displays to the Client as the Estimated Deliv-ery Date.
From the Suppliers section on the right hand side, 6. click the Contact Selection Tool ( ) and select yourself as the Supplier.
In the Pricing Details section enter a Qty of “100” 7. and a Cost of “50.00”, then click the Add Row icon ( ) and enter a Qty of “250” with a Cost of “100.00”. This means that your client can select one of two options when ordering the Business
Card. See Pricing Examples below for more infor-mation.
When you’re done, click Save8.
Pricing Examples
Here your client will only be able to order one of three quantities - 100, 200 or 300, costing $1000.00, $2000.00, and $3000.00 respectively.
In this example, a Run On of 100 has been entered. This means that your client is able to order any quantity of items in multiples of 100. Because the first Quantity is 100, that is the minimum orderable amount, there is no maximum.
This example is the same as above except that a maximum orderable quantity of 10000 has been set.
This example is the same as the first except the Shipping column has an entry for each Quantity band. This is a fixed fee that is applied to each order, so for example, if 100 were ordered this would cost your client the $1000.00 from the Cost column, plus the $50.00 from the Shipping column, totalling $150.00.
This is a Flat Rate Material, It is typically used as a ‘per order cost’ in conjunction with a standard Material. When you associate Materials to an Item, you are able to select one standard Material and an unlimited number of Flat Rate Materials.
Customising a Business Card 8
Creating an Item
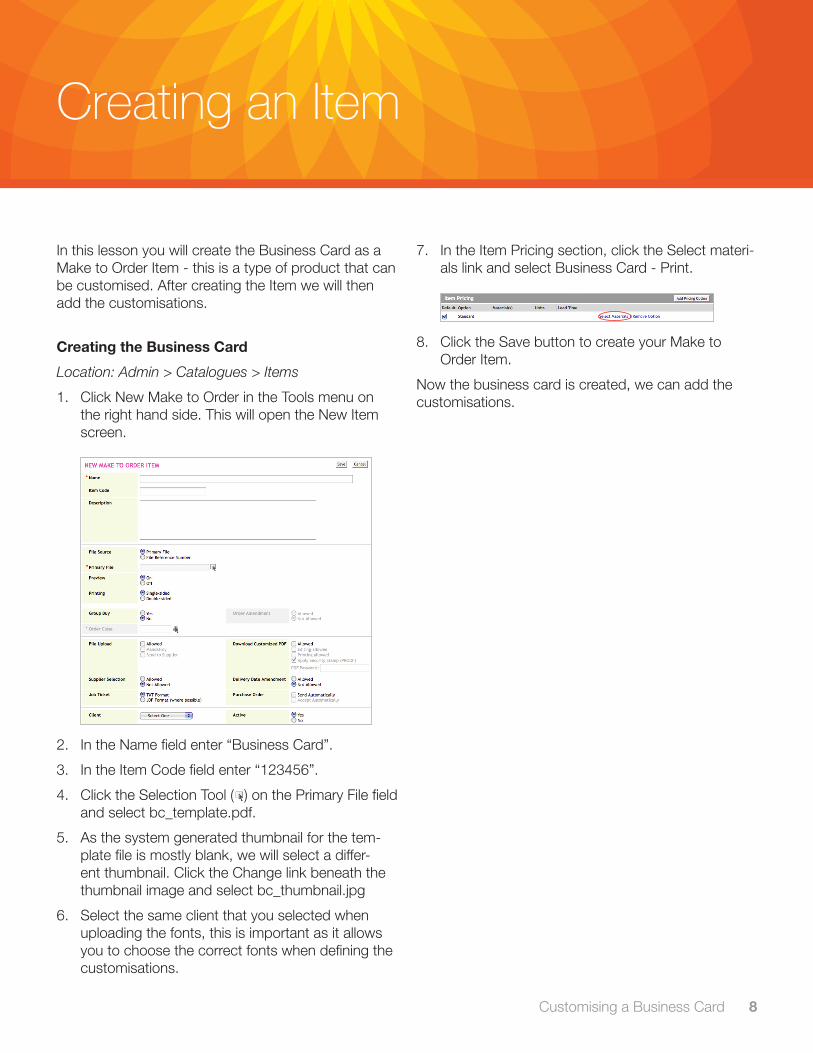
In this lesson you will create the Business Card as a Make to Order Item - this is a type of product that can be customised. After creating the Item we will then add the customisations.
Creating the Business Card
Location: Admin > Catalogues > Items
Click New Make to Order in the Tools menu on 1. the right hand side. This will open the New Item screen.
In the Name field enter “Business Card”.2.
In the Item Code field enter “123456”.3.
Click the Selection Tool (4. ) on the Primary File field and select bc_template.pdf.
As the system generated thumbnail for the tem-5. plate file is mostly blank, we will select a differ-ent thumbnail. Click the Change link beneath the thumbnail image and select bc_thumbnail.jpg
Select the same client that you selected when 6. uploading the fonts, this is important as it allows you to choose the correct fonts when defining the customisations.
In the Item Pricing section, click the Select materi-7. als link and select Business Card - Print.
Click the Save button to create your Make to 8. Order Item.
Now the business card is created, we can add the customisations.

Customising a Business Card 9
Adding Customisations
In this lesson we will add the customisable fields to the Business Card.
The Business card PDF we uploaded earlier has two pages: front and back. On the front your client will enter their Name, Job Title, Email, Mobile, Direct Number and Address. The back will contain an image stamped to the full width of the card.
To accomplish the above we will complete the follow-ing customisations:
Name•
Job Title•
Email, Mobile & Direct Number•
Club Address•
Background Image for the back of the card•
Throughout this lesson you will notice we use the terminology Tags and Customisations, these are best defined as:
Tag - This relates directly to the input field that your client enters their data into. A Tag defines the input field’s label, size, type, default text and character limit.
Customisation - This defines the positioning and formatting details of the client-entered data. A Cus-tomisation may contain any number of Tags.
NameThe first step in this lesson is to add a new Text Cus-tomisation. Then we will create a Tag for your Client’s Name. Next, we will add the Tag to the Customisa-tion, and finally, we will define the Customisation’s attributes.
Add a Text Customisation
Customisations are always created from the Item de-tail page so make sure you are on the Business Card Item page before beginning this lesson.
Click the Add Text Customisation button. This will 1. open the Add Text Customisation screen.
Create a ‘Name’ Tag
Since Name requires an input by your client, it must be specified as a Tag. Rather than asking the user to input their name from scratch, we will query the data-base and pull their name through by using a ‘Lookup’ field.
From the Add Text Customisation screen, click the 1. New Tag icon.
This will open the Tag Attributes window. 2.

Customising a Business Card 10
Enter the following details: 3.
Label• : “Name” (this is the label that appears to your client, it lets them know what information to enter.
Mandatory:• “Yes”
Type:• “Lookup”.
Lookup Data:• “First Name Last Name”
Field Size:• “Large Single Line (30 Characters)”
Editable:• Leave this checked
Default Text:• Leave this blank
Character Limit:• Leave this blank
Click on Save to create the Tag.4.
Include the Tag in the Customisation
Double click on the Tag you just created, (or click 1. on the tag and select the left arrow) to send the Tag to the Customisation window.
.
Once moved to the left, it will appear as [TXT1: 2. Name] and we can apply the formatting and posi-tioning information.
Define the Customisation’s Formatting
First we will format the Tag using the font formatting fields shown below. This defines how your client’s name will appear.
Select the text in the Customisation window by 1. dragging the cursor over the [TXT1:Name] text. The formatting attributes are only applied to se-lected text.
Enter the following details: 2.
Font Family:• Solex Regular.
Font Size:• 24
Select Colour (• ): Ensure the CMYK option is selected and enter the following: C:1, M: 95, Y:20, B:0
Define the Customisation’s Positioning
Now we will define where on the PDF template the cli-ent’s name should be placed. This tutorial uses points as the unit of measure, if you need to change yours, you can do so in your Personal Setup area.
Enter the following details: 1.
X:• 16 points
Y:• 45 points
W:• 180 points (this will stop the name from run-ning off the right hand edge of the card)
Word Wrap:• Ensure this is unchecked
You can leave everything else at its default values•
View your Customisation.
Now you can preview the customisation by clicking on the Save and Preview button.

Customising a Business Card 11
Job TitleThe next step in this lesson is to add a Customisation for your client’s Job Title.
Add a Text Customisation
Click the Add Customisation button. This will open 1. the Add Text Customisation screen.
Create a ‘Job Title’ Tag
This time we will ask your client to input their Job Title by making a Free Text field
From the Add Text Customisation screen, click the 1. New Tag icon.
This will open the Tag Attributes window. 2.
Enter the following details: 3.
Label• : “Job Title”
Mandatory:• “Yes”
Type:• “Free Text”.
Field Size:• “Large Single Line (30 Characters)”
Default Text:• Leave this blank
Character Limit:• = Leave this blank
Click on Save to create the Tag.4.
Include the Tag in the Customisation
Double click on the Tag you just created, (or click 1. on the tag and select the left arrow) to send the Tag to the Customisation window.
Once moved to the left, it will appear as [TXT2: 2.
Job Title] and we can apply the formatting and positioning information.
Define the Customisation’s Formatting
Now we will format the Tag using the font formatting fields shown below.
Select the text in the Customisation window by 1. dragging the cursor over the [TXT1:Job Title] text.
Enter the following details: 2.
Font Family:• Solex Regular.
Font Size:• 12
Select Colour (• ): Ensure the CMYK option is selected and enter the following: C: 0, M: 0, Y: 0, B: 100
Define the Customisation’s Positioning
Now we will define where on the PDF template the client’s Job Title should be placed.
Enter the following details: 1.
X:• 16 points
Y:• 71 points
W:• 180 points
Word Wrap:• Ensure this is unchecked
You can leave everything else at its default values•
View your Customisation.
Now you can preview the customisation by clicking on the Save and Preview button.

Customising a Business Card 12
Email, Mobile & DirectThe next step in this lesson is to add a Customisation for your client’s contact details.
Add a Text Customisation
Click the Add Customisation button. This will open 1. the Add Text Customisation screen.
Create Tags for ‘Email’, ‘Mobile’ and ‘Direct’
From the Add Text Customisation screen, click the 1. New Tag icon.
This will open the Tag Attributes window. 2.
Enter the following details: 3.
Label• : “Email Address”
Mandatory:• “Yes”
Type:• “Lookup”.
Lookup Data:• “Email”
Field Size:• “Large Single Line (30 Characters)”
Editable:• Leave this checked
Default Text:• Leave this blank
Character Limit:• Leave this blank
Click on the Save & New button to save the Tag 4. and create another with the following details:
Label• : “Mobile”
Mandatory:• “Yes”
Type:• “Free Text”.
Field Size:• “Large Single Line (30 Characters)”
Default Text:• Leave this blank
Character Limit:• = Leave this blank
Click on the Save & New button and enter the fol-5. lowing details:
Label• : “Direct”
Mandatory:• “Yes”
Type:• “Free Text”.
Field Size:• “Large Single Line (30 Characters)”
Default Text:• Leave this blank
Character Limit:• = Leave this blank
Include the Tags in the Customisation
Move the Email Tag to the customisation window.1.
Insert a carriage return after the Tag so the cursor 2. appears on the next line and type “Mobile:”
Add a space and move the Mobile Tag to the 3. customisation window so that it appears after the “Mobile:” text you just typed.
Insert a carriage return after the Tag so the cursor 4. appears on the next line and type “Direct:”
Add a space and move the Direct Tag to the 5. customisation window so that it appears after the “Direct:” text you just typed.
Define the Customisation’s Formatting
Select all the text in the Customisation window. 1.
Enter the following details: 2.
Font Family:• Solex Regular.
Font Size:• 9
Select Colour (• ): Ensure the CMYK option is selected and enter the following: C: 0, M: 0, Y: 0, B: 100
Define the Customisation’s Positioning
Enter the following details: 1.
X:• 16 points
Y:• 99 points
Word Wrap:• Ensure this is unchecked

Customising a Business Card 13
View your customisation.
Now you can preview the customisations by clicking on the Save and Preview button.
Club & AddressThe next step in this lesson is to add a Customisation for your client’s club name and address.
Add a Text Customisation
Click the Add Customisation button. This will open 1. the Add Text Customisation screen.
Create Tags for ‘Club’ and ‘Address’
From the Add Text Customisation screen, click the 1. New Tag icon.
This will open the Tag Attributes window. 2.
Enter the following details: 3.
Label• : “Club”
Mandatory:• “Yes”
Type:• “Free Text”.
Field Size:• “Large Single Line (30 Characters)”
Default Text:• Leave this blank
Character Limit:• Leave this blank
Click on the Save & New button to save the Tag 4. and create another with the following details:
Label• : “Address”
Mandatory:• “Yes”
Type:• “Free Text”.
Field Size:• “Multiple Line”
Default Text:• Leave this blank
Character Limit:• 60
Note: You could also define the address as Lookup fields to save your client from keying in the informa-tion. To do this you would need to create a Tag for each line of the address e.g. Address Line 1, Address Line 2, Town/City, Postcode. Each of these Tags would pull the information from the client’s profile.
Include the Tags in the Customisation
Move the Club Tag to the customisation window.1.
Insert a carriage return after the Tag so the cursor 2. appears on the next line.
Move the Address Tag to the customisation win-3. dow so that it appears under the Club Tag
Define the Customisation’s Formatting
Select all the text in the Customisation window. 1.
Enter the following details: 2.
Font Family:• Solex Regular.
Font Size:• 9
Select Colour (• ): Ensure the CMYK option is selected and enter the following: C: 0, M: 0, Y: 0, B: 100
Text Alignment:• Select the Align Right icon
Define the Customisation’s Positioning
Enter the following details: 1.
X:• 126 points
Y:• 99 points
W:• 112 points
H:• 100 points
Word Wrap:• Ensure this is checked - as the Ad-dress is multiple lines we want the text to wrap
View your Customisation.
Now you can preview the customisations by clicking on the Save and Preview button.

Customising a Business Card 14
Background ImageThe final step in this lesson is to add a image customi-sation to the back page of the Business Card.
Create an Image List
As we want the client to select from a list of image options we are going to first create a List. This is done from the Lists Sub Tab
From the Lists page, click the New Tool. This will 1. open the New List screen.
In the Name field enter “Business Card Back-2. ground Images”
Select Image from the Type dropdown menu3.
Select the same client that you have used previ-4. ously
Enter “300” in the Resolution field.5.
Click Save. Next we will add the images to the 6. List.
Click the Add Item Tool 7.
In the Name field enter “Lime”8.
Click the Selection Tool icon and select Lime.pdf 9. from the file selection window.
Leave the Available To option set to All and click 10. the Save & New button.
Repeat these steps to add the Pink and Blue op-11. tions. When finished, we will have a list with three image options.
Add an Image Customisation
Now that our Image List is ready we can go ahead and add it to a customisation. Remember, we add customisations from the Item page, so navigate back to the Business Card Item you were working on previ-ously.
Click the Add Image Customisation button. This 1. will open the Add Image Customisation screen.
Create a ‘Background Image’ Tag
The Image Customisation window is very similar to the Text Customisation window.
From the Add Image Customisation screen, click 1. the New Tag icon.
This will open the Tag Attributes window. 2.

Customising a Business Card 15
Enter the following details: 3.
Label• : “Background Image”
Mandatory:• “Yes”
Type:• “Option Set”
Options:• Here we will import the list we just cre-ated. Click the Import List link and select the Busi-ness Card Background Images list.
Click on Save to create the Tag.4.
Define the Customisation’s Positioning
Now we will define where on the PDF template the background image will appear.
Enter the following details: 1.
X:• 0 points
Y:• 0 points
W & H: • Leave these blank and Mtivity will use the dimensions of the Business Card as the Width & Height of the image.
Pages:• 2 (This will place the image on the second page).
You can leave everything else at its default values•
View your Customisation.
That’s it! Now you can preview the customisations by clicking on the Save and Preview button.
Congratulations. You have finished the Tutorial.
Related Documents