rat Comodo Dome Firewall Software Version 2.4 Dome Firewall Virtual Appliance Quick Start Guide Guide Version 2.4.061118 Comodo Security Solutions 1255 Broad Street Clifton, NJ 07013

Welcome message from author
This document is posted to help you gain knowledge. Please leave a comment to let me know what you think about it! Share it to your friends and learn new things together.
Transcript
rat
Comodo Dome FirewallSoftware Version 2.4
Dome Firewall Virtual ApplianceQuick Start Guide
Guide Version 2.4.061118
Comodo Security Solutions1255 Broad StreetClifton, NJ 07013
Comodo Dome Firewall Virtual Appliance - Quick Start Guide
Comodo Dome Firewall Virtual Appliance -Quick StartThis tutorial explains how to setup Comodo Dome Firewall Virtual Appliance, connect networks and create firewall policies.
The guide will take you through the following processes:
• Step 1 - Setup Dome Firewall Virtual appliance and login to the console
• Step 2 - Configure a 'System Access' rule for hosts in the network to connect to the firewall
• Step 3 - Configure network interfaces
• Step 4 - Activate your license
• Step 5 - Configure firewall policy
• Step 6 - View logs
Step 1 - Setup Dome Firewall Virtual Appliance and Login to theConsoleThe trial version of Dome Firewall Virtual Appliance covers unlimited users for one year. The license can be upgraded at anytime for continued usage.
There are two ways to sign-up for a license:
• New customers - Sign-up for a free license at https://cdome.comodo.com/firewall.
• Comodo One MSP/Enterprise customers - Log in at https://one.comodo.com/ > Click 'Store' > Click 'Basic Version' on the 'Dome Firewall Virtual Appliance' tile
See https://help.comodo.com/topic-289-1-716-12123-Add-Comodo-Dome-Firewall-Virtual-Appliance.html if you need further help with this.
• After signing up, you can download the setup file, install the appliance and activate your license.
• The virtual appliance setup file is available in two formats:
• .OVA File
• .ISO File
• Please ensure your PC meets the following minimum requirements:
• 1 x Intel or equivalent CPU
• 2 GB RAM
• 4 GB Storage
• 2 x 1 GbE NIC
Install from OVA File
• Download the .ova file from https://download.comodo.com/dome-repo/dome-fw-image/domefirewall.ova.
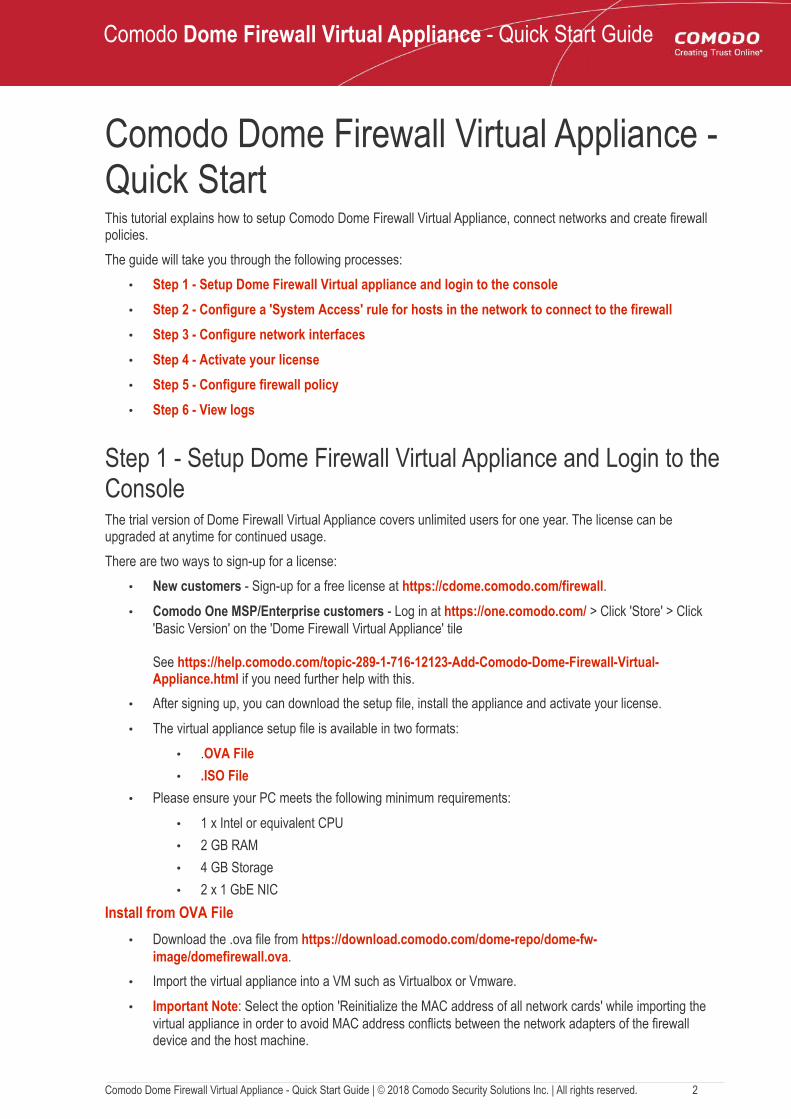
• Import the virtual appliance into a VM such as Virtualbox or Vmware.
• Important Note: Select the option 'Reinitialize the MAC address of all network cards' while importing the virtual appliance in order to avoid MAC address conflicts between the network adapters of the firewall device and the host machine.
Comodo Dome Firewall Virtual Appliance - Quick Start Guide | © 2018 Comodo Security Solutions Inc. | All rights reserved. 2
Comodo Dome Firewall Virtual Appliance - Quick Start Guide
Install from ISO File
• Download the .iso file from https://download.comodo.com/dome-repo/dome-fw-image/domefirewall.iso.
• Create a CentOS virtual machine on a VM such as Virtualbox or Vmware.
• Install the firewall virtual appliance from the .iso file
Login to the Console
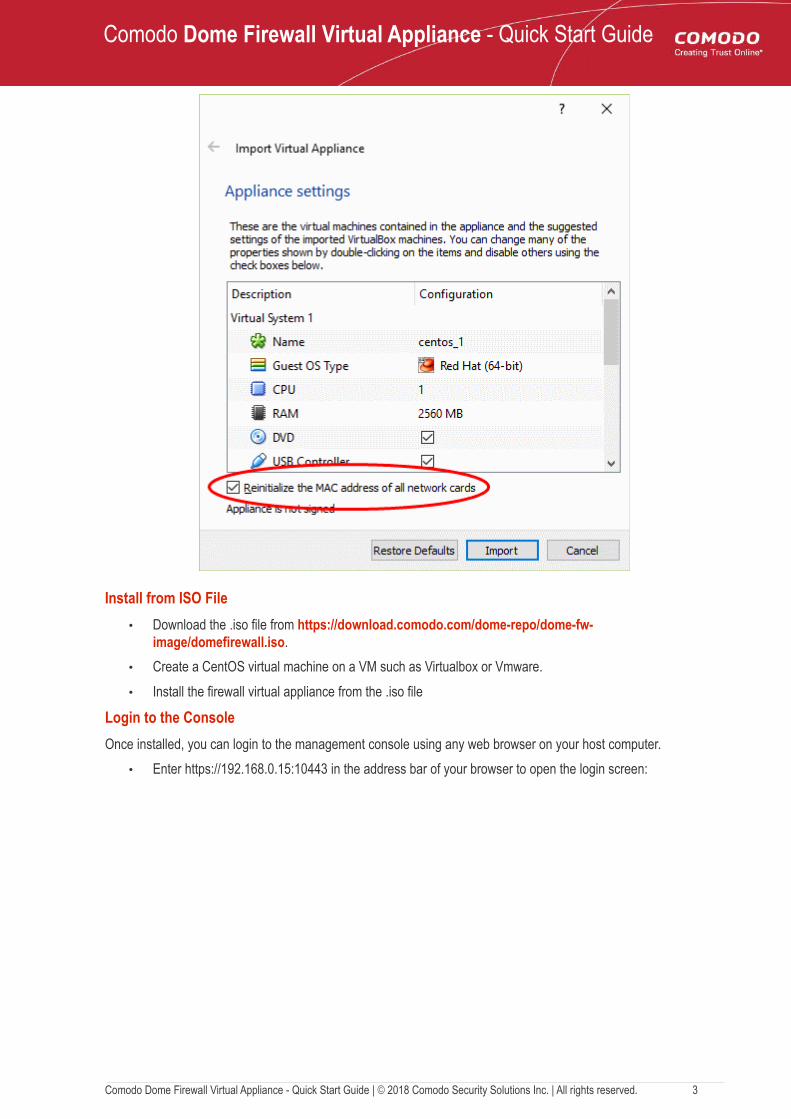
Once installed, you can login to the management console using any web browser on your host computer.
• Enter https://192.168.0.15:10443 in the address bar of your browser to open the login screen:
Comodo Dome Firewall Virtual Appliance - Quick Start Guide | © 2018 Comodo Security Solutions Inc. | All rights reserved. 3
Comodo Dome Firewall Virtual Appliance - Quick Start Guide
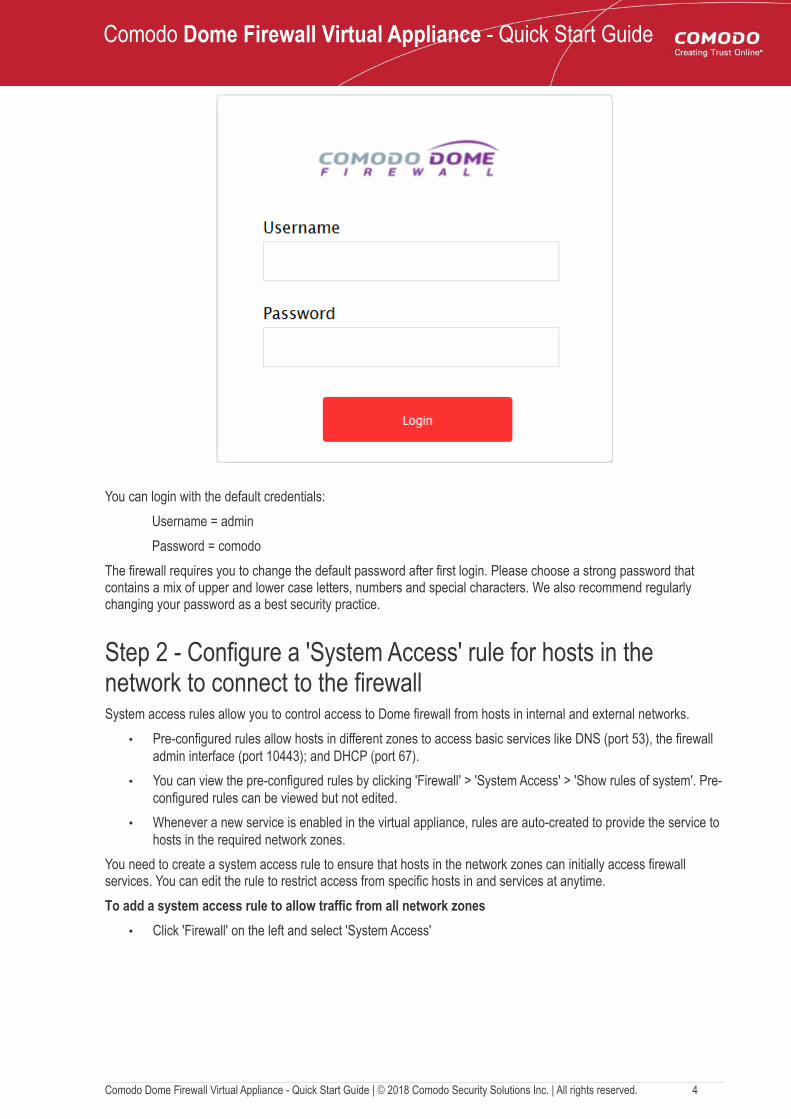
You can login with the default credentials:
Username = admin
Password = comodo
The firewall requires you to change the default password after first login. Please choose a strong password that contains a mix of upper and lower case letters, numbers and special characters. We also recommend regularly changing your password as a best security practice.
Step 2 - Configure a 'System Access' rule for hosts in the network to connect to the firewallSystem access rules allow you to control access to Dome firewall from hosts in internal and external networks.
• Pre-configured rules allow hosts in different zones to access basic services like DNS (port 53), the firewall admin interface (port 10443); and DHCP (port 67).
• You can view the pre-configured rules by clicking 'Firewall' > 'System Access' > 'Show rules of system'. Pre-configured rules can be viewed but not edited.
• Whenever a new service is enabled in the virtual appliance, rules are auto-created to provide the service to hosts in the required network zones.
You need to create a system access rule to ensure that hosts in the network zones can initially access firewall services. You can edit the rule to restrict access from specific hosts in and services at anytime.
To add a system access rule to allow traffic from all network zones
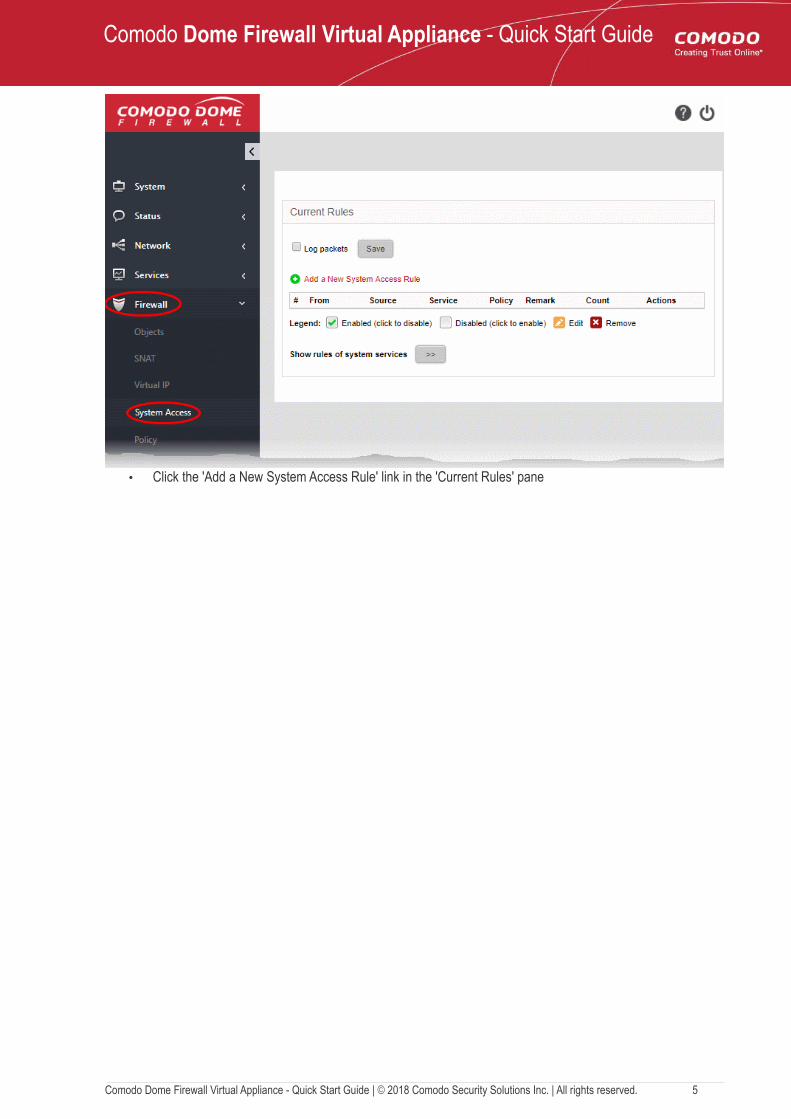
• Click 'Firewall' on the left and select 'System Access'
Comodo Dome Firewall Virtual Appliance - Quick Start Guide | © 2018 Comodo Security Solutions Inc. | All rights reserved. 4
Comodo Dome Firewall Virtual Appliance - Quick Start Guide
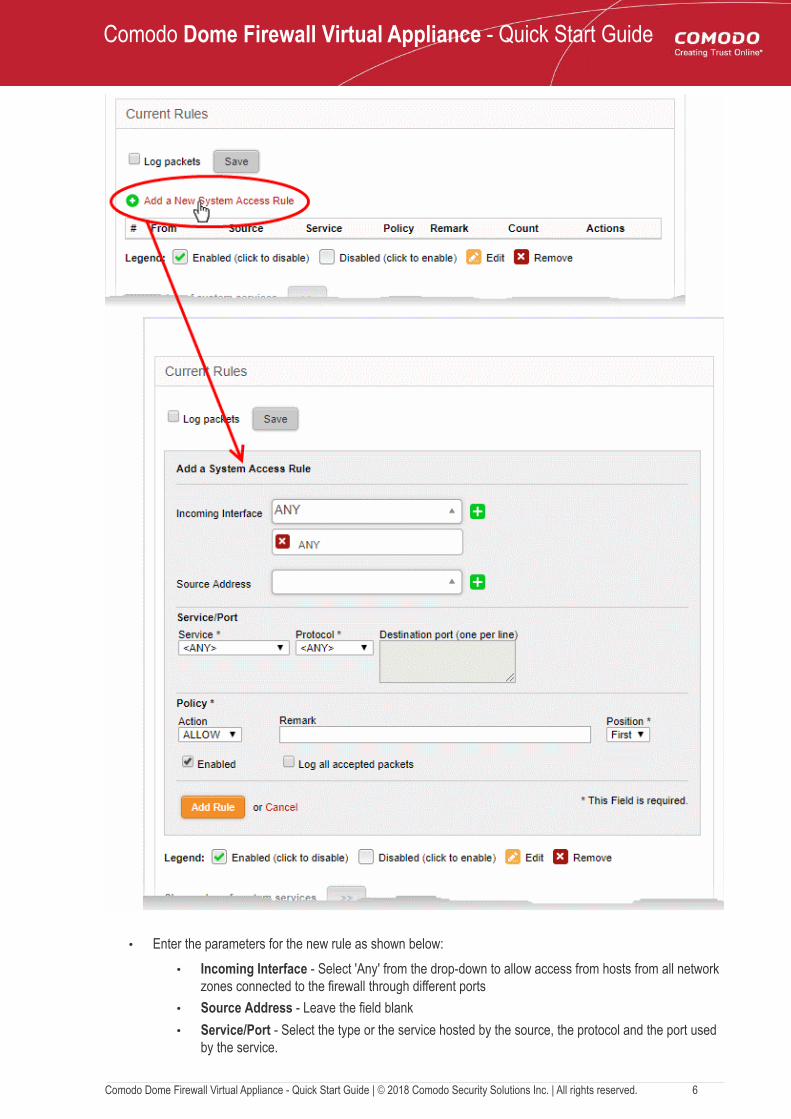
• Click the 'Add a New System Access Rule' link in the 'Current Rules' pane
Comodo Dome Firewall Virtual Appliance - Quick Start Guide | © 2018 Comodo Security Solutions Inc. | All rights reserved. 5
Comodo Dome Firewall Virtual Appliance - Quick Start Guide
• Enter the parameters for the new rule as shown below:
• Incoming Interface - Select 'Any' from the drop-down to allow access from hosts from all network zones connected to the firewall through different ports
• Source Address - Leave the field blank
• Service/Port - Select the type or the service hosted by the source, the protocol and the port used by the service.
Comodo Dome Firewall Virtual Appliance - Quick Start Guide | © 2018 Comodo Security Solutions Inc. | All rights reserved. 6
Comodo Dome Firewall Virtual Appliance - Quick Start Guide
• Service - Choose 'Any' to allow traffic pertaining to all services
• Protocol - Choose 'Any' from the drop-down
• Destination port - Leave the field blank
• Policy - Choose 'Allow' from the drop-down, to pass the packets from the all sources to their destined ports of the firewall device.
• Enabled - Leave enabled to activate the rule after saving.
• Remark - Enter a short description of the rule.
• Position - Set the priority for the rule to 'First' in the list of 'System Access' rules list. The rules in the iptables are processed in the order they appear on the list.
• Log all accepted packets - Select if you want packets allowed by the rule to be logged. See ViewLogs for more details on configuring storage of logs and viewing the logs.
• Click 'Add Rule'. A confirmation dialog will appear.
• Click 'Apply'. The firewall will be restarted with the new rule applied.
Step 3 - Configure the Network InterfacesThe firewall has a minimum of two ports to connect devices in different network zones to external networks like the internet. This number depends on how many network adapters were enabled when you installed the appliance.
After logging-in to the management interface, you need to complete an initial network configuration to successfully deploy the virtual appliance to the network. Dome Firewall has a built-in wizard which assists you to do this.
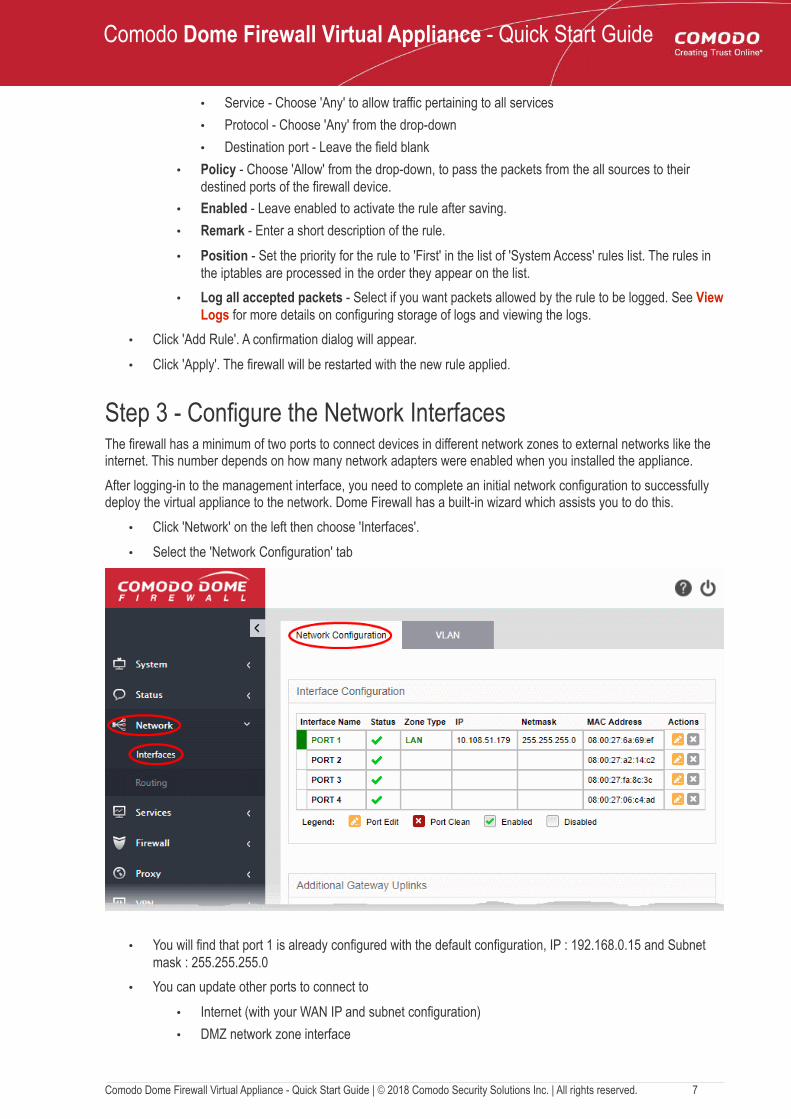
• Click 'Network' on the left then choose 'Interfaces'.
• Select the 'Network Configuration' tab
• You will find that port 1 is already configured with the default configuration, IP : 192.168.0.15 and Subnet mask : 255.255.255.0
• You can update other ports to connect to
• Internet (with your WAN IP and subnet configuration)
• DMZ network zone interface
Comodo Dome Firewall Virtual Appliance - Quick Start Guide | © 2018 Comodo Security Solutions Inc. | All rights reserved. 7
Comodo Dome Firewall Virtual Appliance - Quick Start Guide
• Wi-Fi network zone interface
The following sections explain how to configure network zone interfaces:
• Configure untrusted external network zones for connecting to the internet (e.g. WAN)
• Configure trusted internal network zone interfaces (e.g. LAN, DMZ, WiFi)
Configure untrusted external network zone for connecting to the internet (e.g. WAN)
• For your INTERNET connection please use any port other than your LAN port (port 1) and update it with your WAN IP and subnet configuration.
To configure the external network zone
• Click the edit icon in the row of the port you want to use for the internet.
The settings page lets you configure the interface device on the selected port:
Comodo Dome Firewall Virtual Appliance - Quick Start Guide | © 2018 Comodo Security Solutions Inc. | All rights reserved. 8
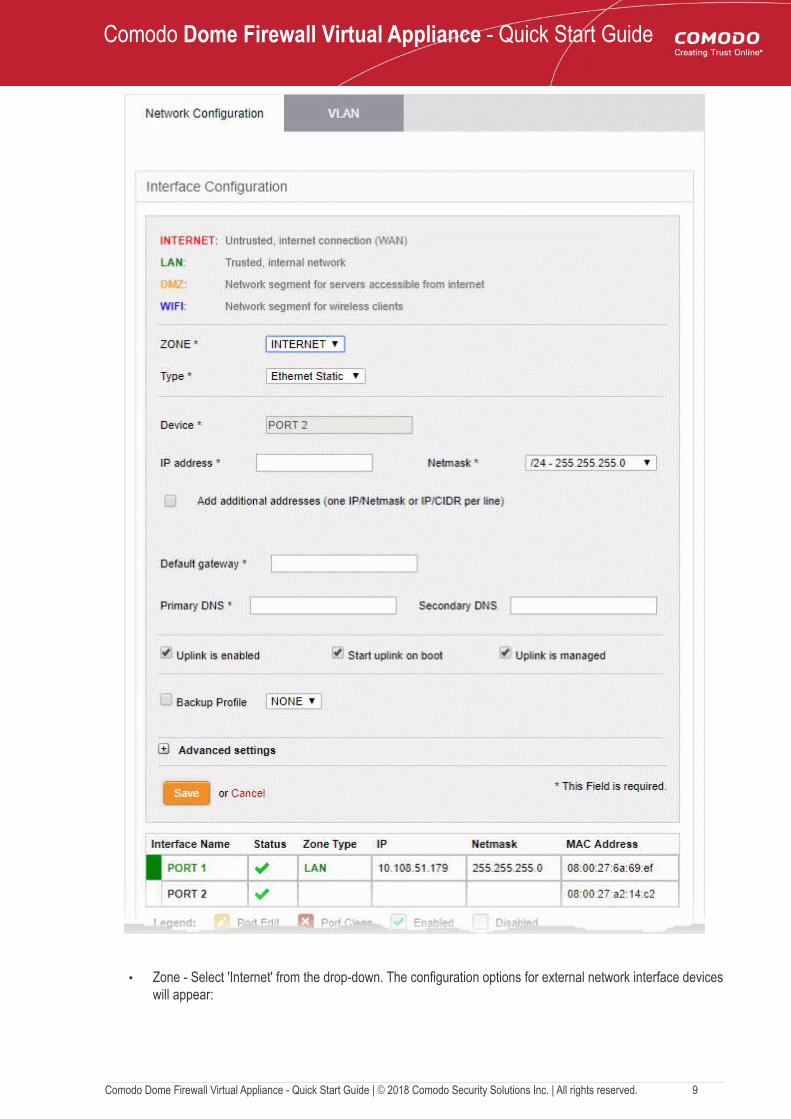
Comodo Dome Firewall Virtual Appliance - Quick Start Guide
• Zone - Select 'Internet' from the drop-down. The configuration options for external network interface deviceswill appear:
Comodo Dome Firewall Virtual Appliance - Quick Start Guide | © 2018 Comodo Security Solutions Inc. | All rights reserved. 9
Comodo Dome Firewall Virtual Appliance - Quick Start Guide
• Type - Choose the interface type through which the virtual appliance is connected to the internet. The available options are:
• ETHERNET STATIC - The external network interface is in a LAN and has a fixed IP address and netmask. An example is a router in which the DFW virtual appliance is assigned a fixed IP address.
• ETHERNET DHCP - The external network interface receives its network configuration through dynamic host control protocol (DHCP) from a local server, router, or modem.
• PPPoE - The external interface is connected to an ADSL modem through an ethernet cable. Selectthis option only if the modem uses the Point-to-Point Protocol over Ethernet (PPPoE) to connect tothe service provider.
The following sections explain configuration parameters for each interface type:
• ETHERNET STATIC
• ETHERNET DHCP
• PPPoE
ETHERNET STATIC
• Configure the following for the external network zone
Device Settings
• Device - The port to which the interface device is connected. The port is pre-selected.
• IP Address - Enter the IP address of the interface device
• Netmask - Choose the network mask containing the possible masks from the drop-down (e.g. /24 -255.255.255.0)
• Add additional addresses - If additional IP address(es)/netmask(s) are to be added to the interface,select the 'Add additional addresses' checkbox and enter the additional IP address(es)/netmask(s) of different subnets one by one per line.
• Default gateway - Enter the IP address of the default gateway through which the virtual appliance connects to internet in the 'Default Gateway' text box
• DNS Settings - Enter the IP addresses/hostnames of the primary and secondary DNS servers to be used in the respective fields.
Uplink Settings
• Uplink is Enabled - The uplink will be activated immediately after it is created. Deselect this if you don't want to enable the uplink device at this time. You can enable the uplink later in two ways:
• Interface configuration screen - Enable the port in the Interface Configuration screen• Dashboard - Enable the 'Active' checkbox beside the uplink in the 'Uplinks' box.
• Start uplink on boot - The uplink will start automatically on every restart of the DFW virtual appliance. Deselect this checkbox if you want to manually start the uplink only when required.
• Uplink is managed - The uplink will be managed by Dome Firewall and its details will be displayed in the Dashboard. Deselect this option if you do not want the uplink details to be displayed in the Dashboard. You can switch the uplink to managed state at any time by selecting the 'Managed' checkbox beside the uplink in the Dashboard.
• Backup Profile - Select this checkbox if you want to specify an alternative uplink connection to be activated in the event this uplink fails and choose the alternative uplink device from the drop-down.
• Additional Link check hosts - The uplink reconnects automatically after a time period set by your ISP, in the event of a connection failure. If you want the virtual appliance to check whether the uplink has connected successfully, you can try to ping known hosts in an external network. Enabling this option will reveal a text field where you should enter a list of one or more perpetually reachable IP addresses or hostnames. One of the hosts could be your ISP's DNS server or gateway.
Advanced Settings:
Comodo Dome Firewall Virtual Appliance - Quick Start Guide | © 2018 Comodo Security Solutions Inc. | All rights reserved. 10
Comodo Dome Firewall Virtual Appliance - Quick Start Guide
The Advanced Settings pane allows you to specify the MAC address and the Maximum Transmission Unit (MTU) of the data packets for the interface device. These settings are optional. If you need to specify custom values for these fields, click on the '+' sign beside 'Advanced Settings' to expand the 'Advanced Settings' pane.
• Use custom MAC address - The virtual appliance has the capability to automatically detect the MAC address of the device connected to the port specified and populates the same in the MAC address column. If you need to specify a different MAC address to override and replace the defaultMAC address of the external interface, select the ' Use custom MAC address' checkbox and enter the MAC address in the text box that appears below the checkbox.
• Reconnection timeout - Specify the maximum time period (in seconds) that the uplink should attempt to reconnect in the event of a connection failure. The reconnection timeout period dependson the ISP configuration. If you are unsure, leave this field blank.
• MTU - Enter the Maximum Transmission Unit (MTU) of the data packets that can be sent over the network.
• Click 'Save'.
• Network configuration activities like date, time, type of event, subject id, component name and the event outcome are logged.
ETHERNET DHCP
• Configure the following for the external network zone with Ethernet DHCP interface
Device Settings
• Device - The port to which the interface device is connected. The port is pre-selected.
• DNS Settings - Select whether the DNS servers are to be automatically or manually assigned. If the latter, select the 'Use Custom DNS Settings' checkbox and enter the IP addresses/hostnames of the your primary and secondary DNS servers.
Uplink Settings
• Uplink is Enabled - The uplink will be activated immediately after it is created. Deselect this if you don't want to enable the uplink device at this time. You can enable the uplink later in two ways:
• Interface configuration screen - Enable the port in the Interface Configuration screen• Dashboard - Enable the 'Active' checkbox beside the uplink in the 'Uplinks' box.
• Start uplink on boot - The uplink will start automatically on every restart of the DFW virtual appliance. Deselect this checkbox if you want to manually start the uplink when required.
• Uplink is managed - The uplink will be managed by Dome Firewall and its details displayed in the dashboard. Deselect this option if you do not want the uplink to be listed in the dashboard. You canswitch the uplink to managed state at any time by selecting the 'Managed' checkbox beside the uplink in the dashboard.
• Backup Profile - Select if you want to specify an alternative uplink connection which is activated in the event this uplink fails. You need to choose the alternative uplink device from the drop-down.
• Additional Link check hosts - The uplink reconnects automatically after a time period set by your ISP in the event of a connection failure. If you want the virtual appliance to check whether the uplink has connected successfully, you can try to ping known hosts in an external network.
Enabling this option will reveal a text field where you should enter a list of one or more perpetually reachable IP addresses or hostnames. One of the hosts could be your ISP's DNS server or gateway.
Advanced Settings:
The 'Advanced Settings' pane allows you to specify the MAC address and the Maximum Transmission Unit (MTU) of the data packets for the interface device. These settings are optional. If you need to specify custom values for these fields, click on the '+' sign beside 'Advanced Settings' to expand the 'Advanced Settings' pane.
Comodo Dome Firewall Virtual Appliance - Quick Start Guide | © 2018 Comodo Security Solutions Inc. | All rights reserved. 11
Comodo Dome Firewall Virtual Appliance - Quick Start Guide
• Use custom MAC address - By default, the virtual appliance automatically detects the MAC address of the device connected to the specified port and populates the MAC address column withthis information. If you need to specify a different MAC address (and replace the default MAC address of the external interface), select the ' Use custom MAC address' checkbox and enter the MAC address in the text box that appears below the checkbox.
• Reconnection timeout - Specify the maximum time period (in seconds) that the uplink should attempt to reconnect in the event of a connection failure. The reconnection timeout period dependson the ISP configuration. If you are unsure, leave this field blank.
• MTU - Enter the Maximum Transmission Unit (MTU) of the data packets that can be sent over the network.
• Click 'Save'.
• Network configuration activities like date, time, type of event, subject id, component name and the event outcome are logged.
PPPoE
• Configure the following for external network zones with PPPoP interface
Device Settings
• Device - The port to which the interface device is connected. The port is pre-selected.
• Add additional addresses - If additional IP address(es)/netmask(s) are to be added to the interface,select the 'Add additional addresses' checkbox and enter the additional IP address(es)/netmask(s) of different subnets one by one per line.
• Username - Enter the login username for internet connection as provided by your Internet Service Provider (ISP)
• Password - Enter the login password as provided by your ISP for internet connection
• Authentication Method - Enter the method of authentication used by your ISP for your device to connect to internet from the drop-down. The options available are: Password Authentication Protocol (PAP); Challenge Handshake Authentication Protocol (CHAP); or both. If you are not sureabout the authentication method, choose PAP or CHAP (Default).
• DNS Settings - Select whether the DNS servers are to be automatically assigned or manually assigned. If the later, select the Use 'Custom DNS Settings' checkbox and enter the IP addresses/hostnames of the primary and secondary DNS servers to be used.
Uplink Settings
• Uplink is Enabled - The uplink will be activated immediately after it is created. Deselect this if you don't want to enable the uplink device at this time. You can enable the uplink later in two ways:
• Interface configuration screen - Enable the port in the Interface Configuration screen• Dashboard - Enable the 'Active' checkbox beside the uplink in the 'Uplinks' box.
• Start uplink on boot - The uplink will start automatically on every restart of the DFW virtual appliance. Deselect this checkbox if you want to manually start the uplink only when required.
• Uplink is managed - The uplink will be managed by Dome Firewall and its details will be displayed in the Dashboard. Deselect this option if you do not want the uplink details to be displayed in the Dashboard. You can switch the uplink to managed state at any time by selecting the 'Managed' checkbox beside the uplink in the Dashboard.
• Backup Profile - Select this checkbox if you want to specify an alternative uplink connection to be activated in the event this uplink fails and choose the alternative uplink device from the drop-down.
• Additional Link check hosts - The uplink reconnects automatically after a time period set by your ISP, in the event of a connection failure. If you want the virtual appliance to check whether the uplink has connected successfully, you can try to ping known hosts in an external network. Enabling this option will reveal a text field where you should enter a list of one or more perpetually reachable IP addresses or hostnames. One of the hosts could be your ISP's DNS server or gateway.
Comodo Dome Firewall Virtual Appliance - Quick Start Guide | © 2018 Comodo Security Solutions Inc. | All rights reserved. 12

Comodo Dome Firewall Virtual Appliance - Quick Start Guide
Advanced Settings:
The Advanced Settings pane allows you to specify the MAC address and the Maximum Transmission Unit (MTU) of the data packets for the interface device. These settings are optional. If you need to specify custom values for these fields, click on the '+' sign beside 'Advanced Settings' to expand the 'Advanced Settings' pane.
• Use custom MAC address - The virtual appliance has the capability to automatically detect the MAC address of the device connected to the port specified and populates the same in the MAC address column. If you need to specify a different MAC address to override and replace the defaultMAC address of the external interface, select the ' Use custom MAC address' checkbox and enter the MAC address in the text box that appears below the checkbox.
• Concentrator name - Enter the identifier of the remote access concentrator setup by your service provider (Optional, usually not needed).
• Service Name - Enter the name of your ISP (Optional, usually not needed).
• Reconnection timeout - Specify the maximum time period (in seconds) that the uplink should attempt to reconnect in the event of a connection failure. The reconnection timeout period dependson the ISP configuration. If you are unsure, leave this field blank.
• MTU - Enter the Maximum Transmission Unit (MTU) of the data packets that can be sent over the network.
• Click 'Save'.
• Network configuration activities like date, time, type of event, subject id, component name and the event outcome are logged.
Tip: You can edit the network configuration e.g. for changing selected parameters like hostname or the network range of a zone, at any time depending on changes in your network. Click Network > Interface, click the 'Edit icon'
in the 'Internet' row of the table, make the changes and save the changes.
Configure trusted internal network zone interfaces (e.g. LAN, DMZ, WiFi)
• For your DMZ and Wi-Fi connections please use any port other than your LAN port (port 1) and INTERNET port and update it.
To configure an internal network zone
• Click on the edit icon in the row of the port to connect to internet.
The pane for configuring the interface device on the selected port, will open.
Comodo Dome Firewall Virtual Appliance - Quick Start Guide | © 2018 Comodo Security Solutions Inc. | All rights reserved. 13
Comodo Dome Firewall Virtual Appliance - Quick Start Guide
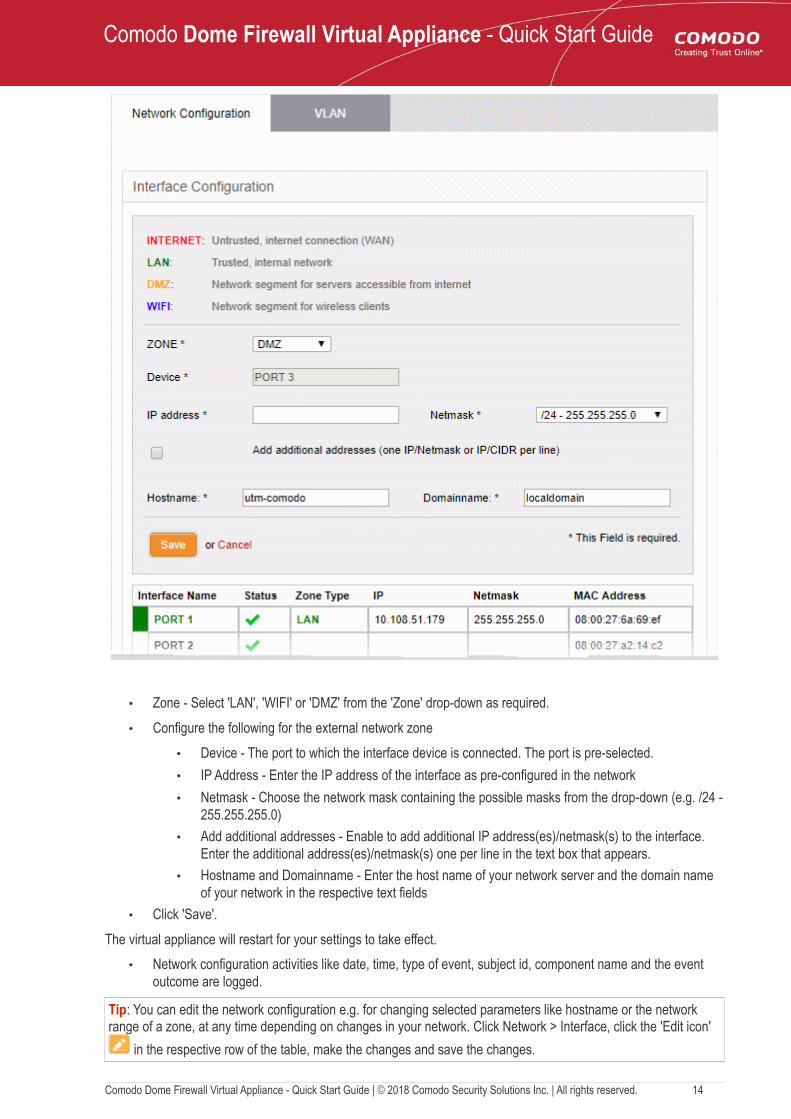
• Zone - Select 'LAN', 'WIFI' or 'DMZ' from the 'Zone' drop-down as required.
• Configure the following for the external network zone
• Device - The port to which the interface device is connected. The port is pre-selected.
• IP Address - Enter the IP address of the interface as pre-configured in the network
• Netmask - Choose the network mask containing the possible masks from the drop-down (e.g. /24 -255.255.255.0)
• Add additional addresses - Enable to add additional IP address(es)/netmask(s) to the interface. Enter the additional address(es)/netmask(s) one per line in the text box that appears.
• Hostname and Domainname - Enter the host name of your network server and the domain name of your network in the respective text fields
• Click 'Save'.
The virtual appliance will restart for your settings to take effect.
• Network configuration activities like date, time, type of event, subject id, component name and the event outcome are logged.
Tip: You can edit the network configuration e.g. for changing selected parameters like hostname or the network range of a zone, at any time depending on changes in your network. Click Network > Interface, click the 'Edit icon'
in the respective row of the table, make the changes and save the changes.
Comodo Dome Firewall Virtual Appliance - Quick Start Guide | © 2018 Comodo Security Solutions Inc. | All rights reserved. 14
Comodo Dome Firewall Virtual Appliance - Quick Start Guide
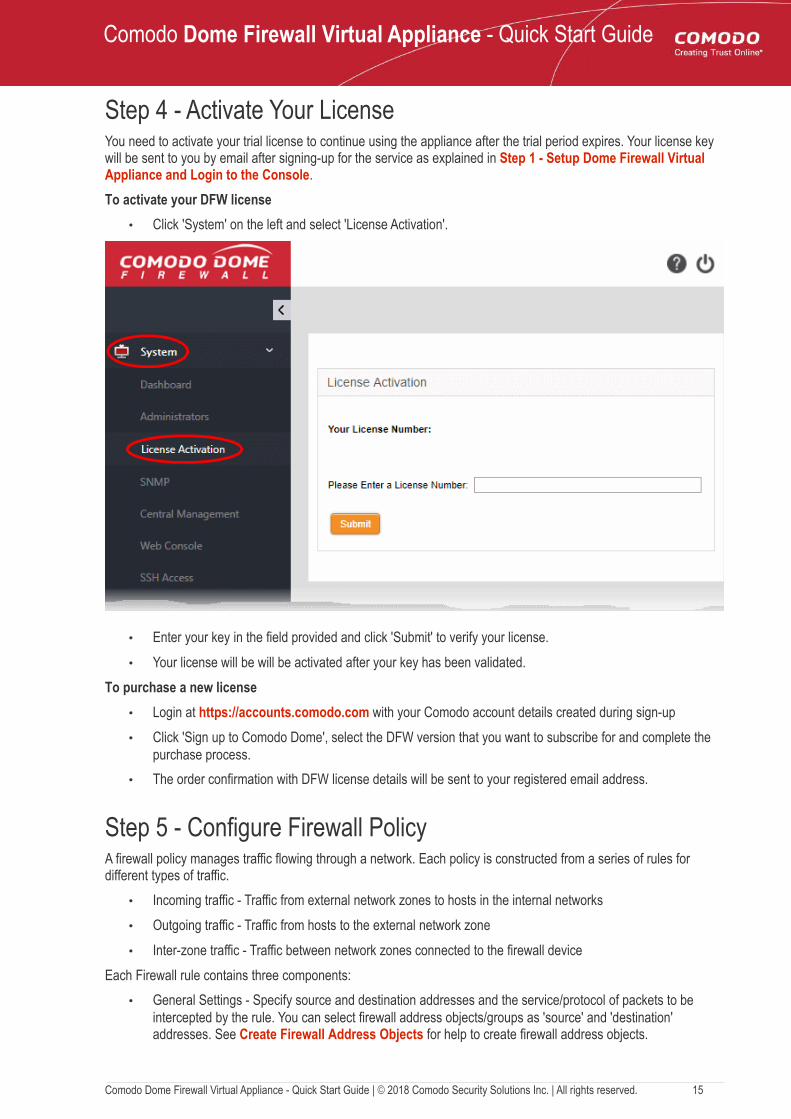
Step 4 - Activate Your LicenseYou need to activate your trial license to continue using the appliance after the trial period expires. Your license key will be sent to you by email after signing-up for the service as explained in Step 1 - Setup Dome Firewall Virtual Appliance and Login to the Console.
To activate your DFW license
• Click 'System' on the left and select 'License Activation'.
• Enter your key in the field provided and click 'Submit' to verify your license.
• Your license will be will be activated after your key has been validated.
To purchase a new license
• Login at https://accounts.comodo.com with your Comodo account details created during sign-up
• Click 'Sign up to Comodo Dome', select the DFW version that you want to subscribe for and complete the purchase process.
• The order confirmation with DFW license details will be sent to your registered email address.
Step 5 - Configure Firewall PolicyA firewall policy manages traffic flowing through a network. Each policy is constructed from a series of rules for different types of traffic.
• Incoming traffic - Traffic from external network zones to hosts in the internal networks
• Outgoing traffic - Traffic from hosts to the external network zone
• Inter-zone traffic - Traffic between network zones connected to the firewall device
Each Firewall rule contains three components:
• General Settings - Specify source and destination addresses and the service/protocol of packets to be intercepted by the rule. You can select firewall address objects/groups as 'source' and 'destination' addresses. See Create Firewall Address Objects for help to create firewall address objects.
Comodo Dome Firewall Virtual Appliance - Quick Start Guide | © 2018 Comodo Security Solutions Inc. | All rights reserved. 15
Comodo Dome Firewall Virtual Appliance - Quick Start Guide
• Web Protection - Enable or disable URL filtering, advanced threat protection (ATP) and SSL Interception. You can also choose pre-configured profiles. See Manage ATP Profile, Ceate URL Filter Profiles and Manage SSL Interception Profile for help to create these profiles.
• Intrusion Prevention - Enable or disable intrusion prevention and application detection settings for the rule. See Manage Intrusion Prevention Profile for help to create this profile.
You can create different rules for different configurations for each of these components. The rules will be applied to the inbound and outbound packets in order.
• Before creating a firewall policy, you must first create firewall address objects, an advanced threat protection (ATP) profile, URL filters, and an intrusion prevention profile.
• Once done, these objects and profiles can be used in firewall, source network address translation (SNAT) and system access rules.
• Firewall Address Objects
• Firewall Address Object Groups (Optional)
• ATP Profile (Optional)
• URL Filter Profiles (Optional)
• SSL Interception Profile (Optional)
• Intrusion Prevention Profile (Optional)
• Configure Firewall Policy
Tip: You can integrate the firewall with Active Directory to import users and user groups.
• The firewall will map usernames with IP addresses. This allows you to add users/groups as address objects/address object groups.
• These objects/groups can be specified as source/destination addresses when creating a firewall rule, allowing you to apply firewall policies to individuals or groups.
See the online help page https://help.comodo.com/topic-436-1-912-12092-Active-Directory-Integration.html if you wish to implement this.
Create Firewall Address Objects
An address object is a reference to an IP, IP range or FQDN. Address objects can be used as source and destinationaddresses when creating firewall rules.
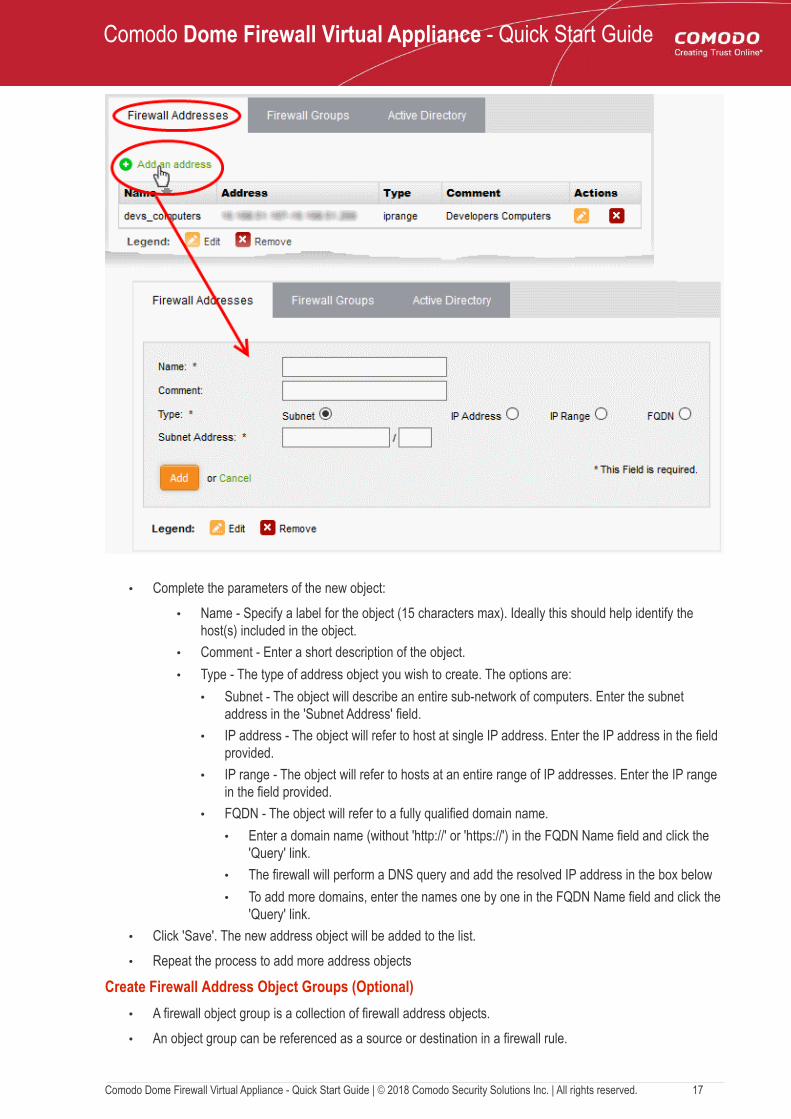
• Click 'Firewall' on the left and select 'Objects'
• Select the 'Firewall Addresses' tab
• Click the 'Add an address' link at the top
Comodo Dome Firewall Virtual Appliance - Quick Start Guide | © 2018 Comodo Security Solutions Inc. | All rights reserved. 16
Comodo Dome Firewall Virtual Appliance - Quick Start Guide
• Complete the parameters of the new object:
• Name - Specify a label for the object (15 characters max). Ideally this should help identify the host(s) included in the object.
• Comment - Enter a short description of the object.
• Type - The type of address object you wish to create. The options are:
• Subnet - The object will describe an entire sub-network of computers. Enter the subnet address in the 'Subnet Address' field.
• IP address - The object will refer to host at single IP address. Enter the IP address in the field provided.
• IP range - The object will refer to hosts at an entire range of IP addresses. Enter the IP range in the field provided.
• FQDN - The object will refer to a fully qualified domain name.
• Enter a domain name (without 'http://' or 'https://') in the FQDN Name field and click the 'Query' link.
• The firewall will perform a DNS query and add the resolved IP address in the box below
• To add more domains, enter the names one by one in the FQDN Name field and click the 'Query' link.
• Click 'Save'. The new address object will be added to the list.
• Repeat the process to add more address objects
Create Firewall Address Object Groups (Optional)
• A firewall object group is a collection of firewall address objects.
• An object group can be referenced as a source or destination in a firewall rule.
Comodo Dome Firewall Virtual Appliance - Quick Start Guide | © 2018 Comodo Security Solutions Inc. | All rights reserved. 17
Comodo Dome Firewall Virtual Appliance - Quick Start Guide
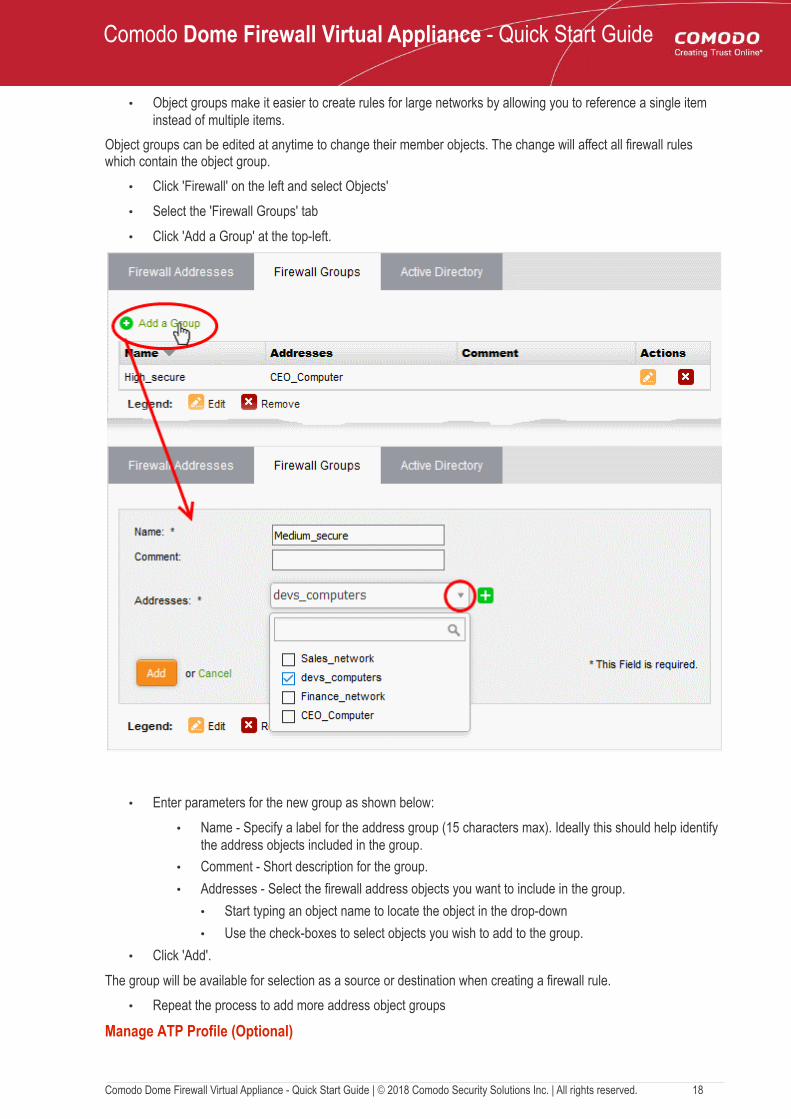
• Object groups make it easier to create rules for large networks by allowing you to reference a single item instead of multiple items.
Object groups can be edited at anytime to change their member objects. The change will affect all firewall rules which contain the object group.
• Click 'Firewall' on the left and select Objects'
• Select the 'Firewall Groups' tab
• Click 'Add a Group' at the top-left.
• Enter parameters for the new group as shown below:
• Name - Specify a label for the address group (15 characters max). Ideally this should help identify the address objects included in the group.
• Comment - Short description for the group.
• Addresses - Select the firewall address objects you want to include in the group.
• Start typing an object name to locate the object in the drop-down
• Use the check-boxes to select objects you wish to add to the group.
• Click 'Add'.
The group will be available for selection as a source or destination when creating a firewall rule.
• Repeat the process to add more address object groups
Manage ATP Profile (Optional)
Comodo Dome Firewall Virtual Appliance - Quick Start Guide | © 2018 Comodo Security Solutions Inc. | All rights reserved. 18
Comodo Dome Firewall Virtual Appliance - Quick Start Guide
• The settings you save in the ATP profile will be applied to all rules in your policy that have 'Advanced ThreatProtection' enabled.
• Advanced threat protection (ATP) safeguards networks against malware, hack attempts, data breaches andmore.
• ATP intercepts files downloaded from websites or email attachments and uses a combination of antivirus scans, behavior analysis and blacklist checks to quickly block threats.
• Application containment protects your endpoints from unknown threats. Unknown threats are those that have not yet been identified as malware by the antivirus industry. If enabled, all files with an 'Unknown' trust rating will be run in an isolated sandbox on your endpoints. This prevents them from modifying other processes, stealing user data or otherwise infecting the local machine. Please note that containment for unknown applications is only applied to Windows endpoints.
ATP uses the following techniques to analyze the files:
• Comodo Antivirus - Always-on antivirus scanner which provides dependable protection against known malicious files.
• Comodo Valkyrie - A behavior analysis service which improves detection of zero-day threats by rigorously testing the run-time actions of unknown files.
To configure the ATP profile
• Click 'Services' on the left and select 'Advanced Threat Protection'.
• The interface lets you configure settings for application containment and antivirus.
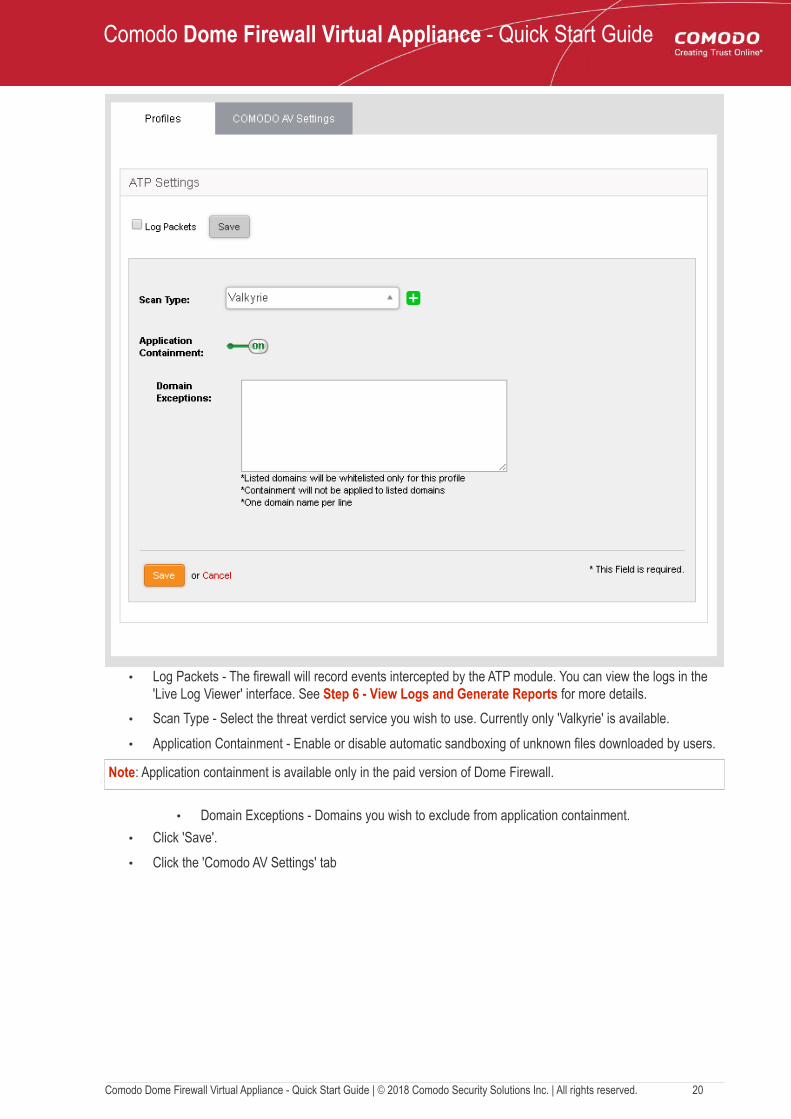
• Select the 'Profiles' tab
Comodo Dome Firewall Virtual Appliance - Quick Start Guide | © 2018 Comodo Security Solutions Inc. | All rights reserved. 19
Comodo Dome Firewall Virtual Appliance - Quick Start Guide
• Log Packets - The firewall will record events intercepted by the ATP module. You can view the logs in the 'Live Log Viewer' interface. See Step 6 - View Logs and Generate Reports for more details.
• Scan Type - Select the threat verdict service you wish to use. Currently only 'Valkyrie' is available.
• Application Containment - Enable or disable automatic sandboxing of unknown files downloaded by users.
Note: Application containment is available only in the paid version of Dome Firewall.
• Domain Exceptions - Domains you wish to exclude from application containment.
• Click 'Save'.
• Click the 'Comodo AV Settings' tab
Comodo Dome Firewall Virtual Appliance - Quick Start Guide | © 2018 Comodo Security Solutions Inc. | All rights reserved. 20
Comodo Dome Firewall Virtual Appliance - Quick Start Guide
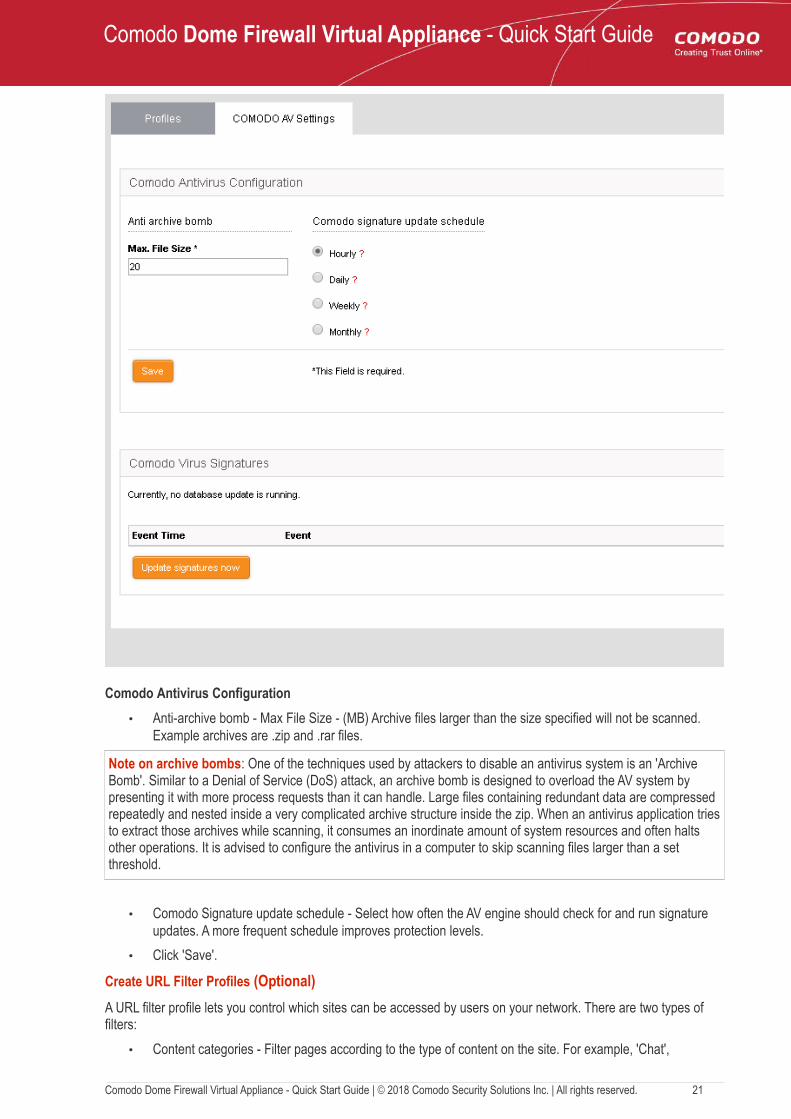
Comodo Antivirus Configuration
• Anti-archive bomb - Max File Size - (MB) Archive files larger than the size specified will not be scanned. Example archives are .zip and .rar files.
Note on archive bombs: One of the techniques used by attackers to disable an antivirus system is an 'Archive Bomb'. Similar to a Denial of Service (DoS) attack, an archive bomb is designed to overload the AV system by presenting it with more process requests than it can handle. Large files containing redundant data are compressed repeatedly and nested inside a very complicated archive structure inside the zip. When an antivirus application triesto extract those archives while scanning, it consumes an inordinate amount of system resources and often halts other operations. It is advised to configure the antivirus in a computer to skip scanning files larger than a set threshold.
• Comodo Signature update schedule - Select how often the AV engine should check for and run signature updates. A more frequent schedule improves protection levels.
• Click 'Save'.
Create URL Filter Profiles (Optional)
A URL filter profile lets you control which sites can be accessed by users on your network. There are two types of filters:
• Content categories - Filter pages according to the type of content on the site. For example, 'Chat',
Comodo Dome Firewall Virtual Appliance - Quick Start Guide | © 2018 Comodo Security Solutions Inc. | All rights reserved. 21
Comodo Dome Firewall Virtual Appliance - Quick Start Guide
'Entertainment', 'Sports' etc.
• URL Whitelist/Blacklist - Filter pages by blocking or allowing specific URLs. For example, you may want to blacklist 'www.facebook.com', but whitelist 'www.linkedin.com').
A profile can feature a combination of categories and white/blacklists. Profiles can be added to firewall rules created for an organization or device.
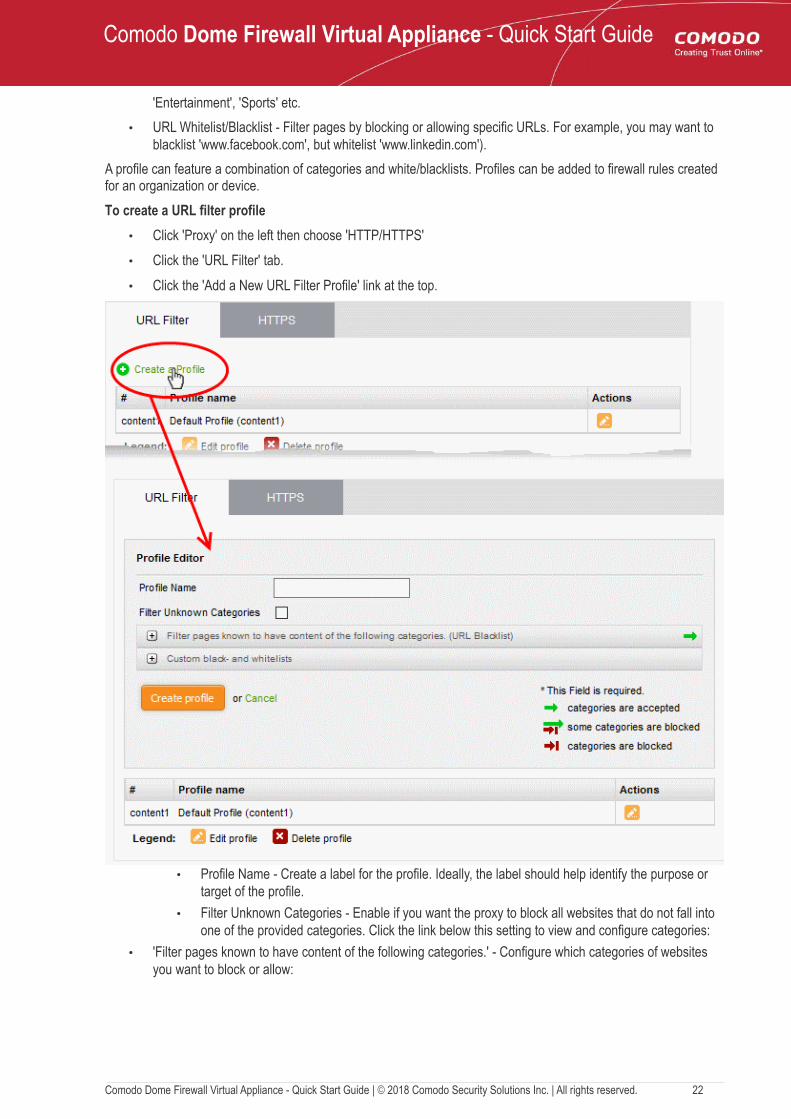
To create a URL filter profile
• Click 'Proxy' on the left then choose 'HTTP/HTTPS'
• Click the 'URL Filter' tab.
• Click the 'Add a New URL Filter Profile' link at the top.
• Profile Name - Create a label for the profile. Ideally, the label should help identify the purpose or target of the profile.
• Filter Unknown Categories - Enable if you want the proxy to block all websites that do not fall into one of the provided categories. Click the link below this setting to view and configure categories:
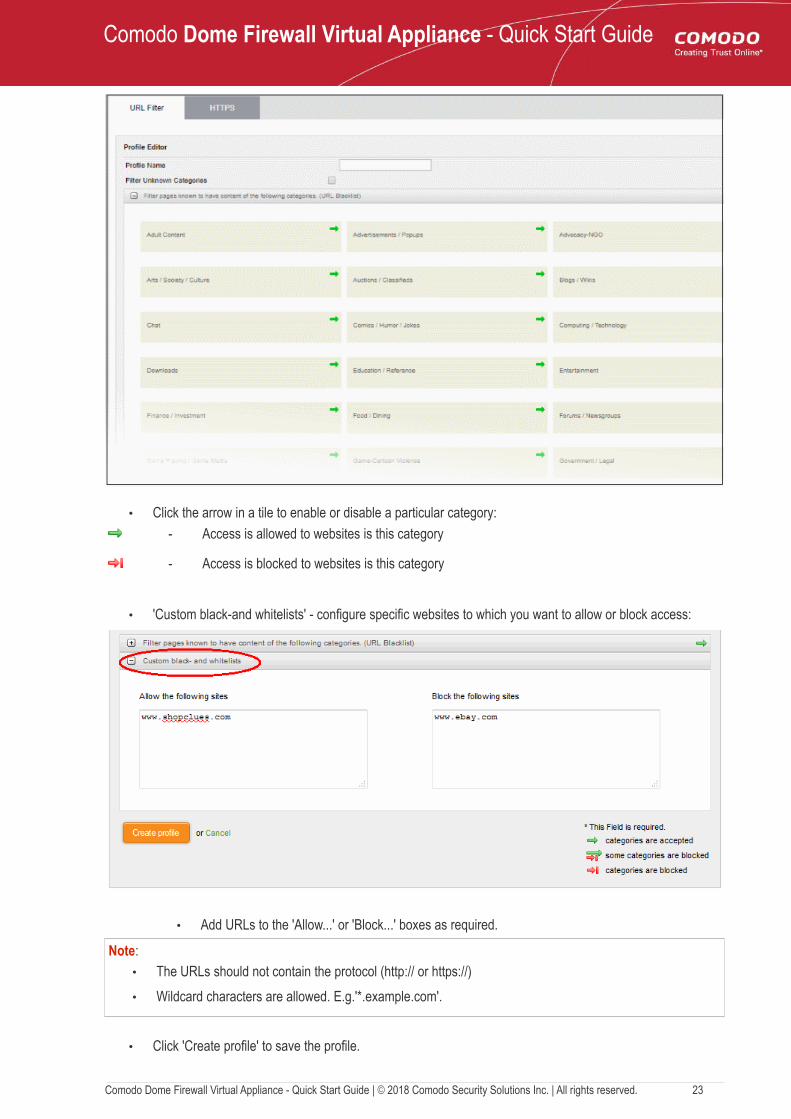
• 'Filter pages known to have content of the following categories.' - Configure which categories of websites you want to block or allow:
Comodo Dome Firewall Virtual Appliance - Quick Start Guide | © 2018 Comodo Security Solutions Inc. | All rights reserved. 22
Comodo Dome Firewall Virtual Appliance - Quick Start Guide
• Click the arrow in a tile to enable or disable a particular category:
- Access is allowed to websites is this category
- Access is blocked to websites is this category
• 'Custom black-and whitelists' - configure specific websites to which you want to allow or block access:
• Add URLs to the 'Allow...' or 'Block...' boxes as required.
Note:
• The URLs should not contain the protocol (http:// or https://)
• Wildcard characters are allowed. E.g.'*.example.com'.
• Click 'Create profile' to save the profile.
Comodo Dome Firewall Virtual Appliance - Quick Start Guide | © 2018 Comodo Security Solutions Inc. | All rights reserved. 23
Comodo Dome Firewall Virtual Appliance - Quick Start Guide
• You can find the profile in the 'URL Filter' drop-down under 'Web Protection' in the add/edit firewall rule interface.
• Repeat the process to add more URL filter profiles.
Manage SSL Interception Profile (Optional)
• Dome Firewall also offers a HTTPS Proxy service. The service receives requests for encrypted webpages, retrieves and caches the requested resources, applies any access control policies and forwards them to therequesting hosts.
• An intermediate SSL certificate needs to be installed on the firewall and on the endpoints to enable this service. See Certificate Settings for more details.
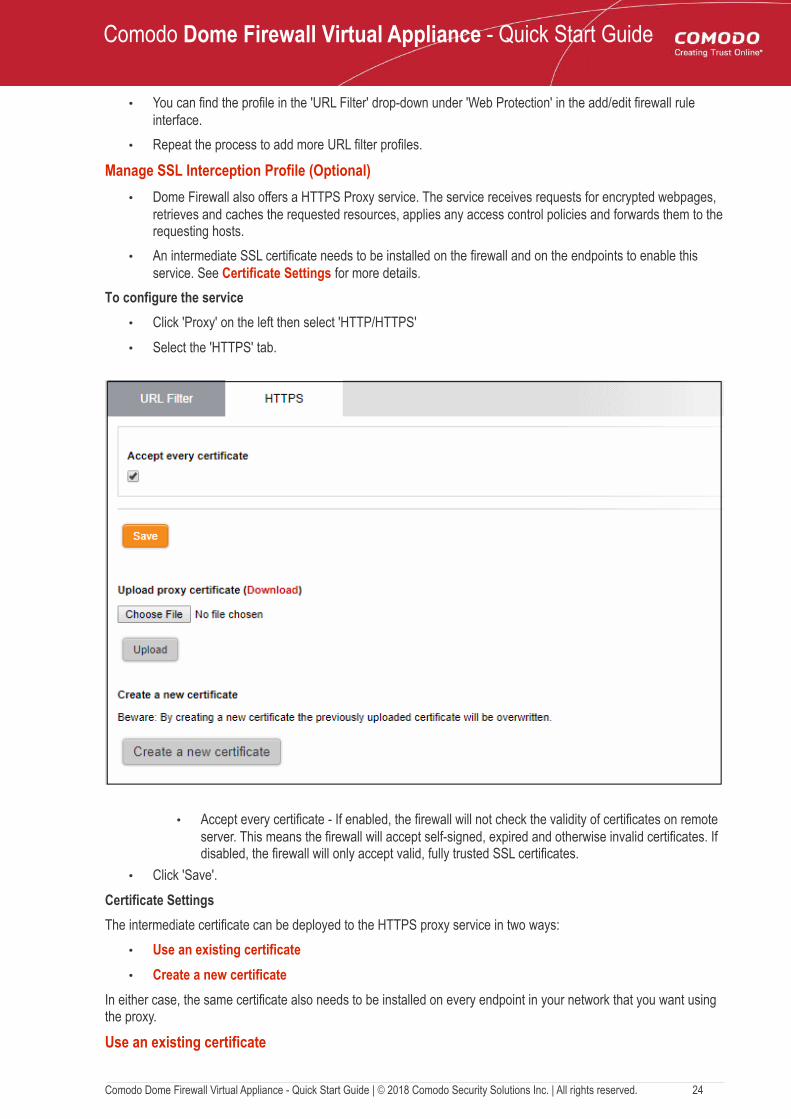
To configure the service
• Click 'Proxy' on the left then select 'HTTP/HTTPS'
• Select the 'HTTPS' tab.
• Accept every certificate - If enabled, the firewall will not check the validity of certificates on remote server. This means the firewall will accept self-signed, expired and otherwise invalid certificates. If disabled, the firewall will only accept valid, fully trusted SSL certificates.
• Click 'Save'.
Certificate Settings
The intermediate certificate can be deployed to the HTTPS proxy service in two ways:
• Use an existing certificate
• Create a new certificate
In either case, the same certificate also needs to be installed on every endpoint in your network that you want using the proxy.
Use an existing certificate
Comodo Dome Firewall Virtual Appliance - Quick Start Guide | © 2018 Comodo Security Solutions Inc. | All rights reserved. 24
Comodo Dome Firewall Virtual Appliance - Quick Start Guide
If you already have an intermediate cert, you can upload it to the firewall appliance and install it on client computers.
Prerequisite: Ensure that the intermediate certificate is locally stored in the computer from which you are accessing the administrative console of the Dome Firewall virtual appliance.
To upload an existing certificate
• Click the 'Browse' button under the 'Upload proxy certificate' option, navigate to the location where the certificate is stored and click 'Open'.
• Click 'Upload'
The certificate will be uploaded to the virtual appliance and deployed.
Create a New Certificate
The Dome Firewall is capable of creating a new self signed intermediate certificate with one year validity and use it for authentication. Once a new certificate is created, the existing certificate, if any, will be replaced by the new certificate. Hence the administrator should download the certificate and install it on to the host computers in the network infrastructure that need to authenticate them to the HTTPS proxy service.
To create a certificate
• Click the 'Create a new certificate' button. A confirmation dialog will be displayed.
• Click 'OK'
A new certificate will be created and deployed in the DFW virtual appliance.
• To download the certificate for transferring to the clients in the network, click the 'Download' link within the parenthesis beside 'Upload proxy certificate'. Transfer the certificate onto the computers in the network and install it on their Intermediate Certificate Store.
The settings you save from this interface will be applied to all rules in your firewall policy that have 'SSL Interception' enabled.
Manage Intrusion Prevention Profile (Optional)
• Comodo Dome Firewall uses 'Snort', a state-of-the-art network intrusion prevention and detection system (IDS/IPS) directly built-in to its IP tables. Snort employs signature, protocol, and anomaly-based inspection of incoming traffic to detect and block intrusion attempts.
• Snort uses IPS 'rulesets'. Each ruleset contains a number of ips and application rules to identify applications that generate traffic on your network.
• Application identification rulesets intercept traffic from web based applications and allow or block data packets from them.
• All rule sets are constantly updated to confront emerging network intrusion techniques.
• The settings you save in the default profile will be applied to all rules in your firewall policy that have the 'default' intrusion prevention profile enabled.
There are three components of an intrusion prevention profile:
• Rules update schedule
• IPS Rulesets
• Application Identification Rulesets
Configure Rules Update Schedule
• Click 'Services' on the left then select 'Intrusion Prevention'
• Select the 'IPS Settings' tab
Comodo Dome Firewall Virtual Appliance - Quick Start Guide | © 2018 Comodo Security Solutions Inc. | All rights reserved. 25

Comodo Dome Firewall Virtual Appliance - Quick Start Guide
• Automatically fetch IPS rules - If enabled, Dome Firewall will download and install ruleset updates at the schedule you choose.
• Choose update schedule - Select the interval for automatic updates.
• Click 'Save and Restart'
Your settings will be saved.
Configure IPS Rulesets
You can enable/disable IPS rulesets and configure them to allow or block data packets as required.
To configure IPS Rulesets
• Click Services on the left then select 'Intrusion Prevention'
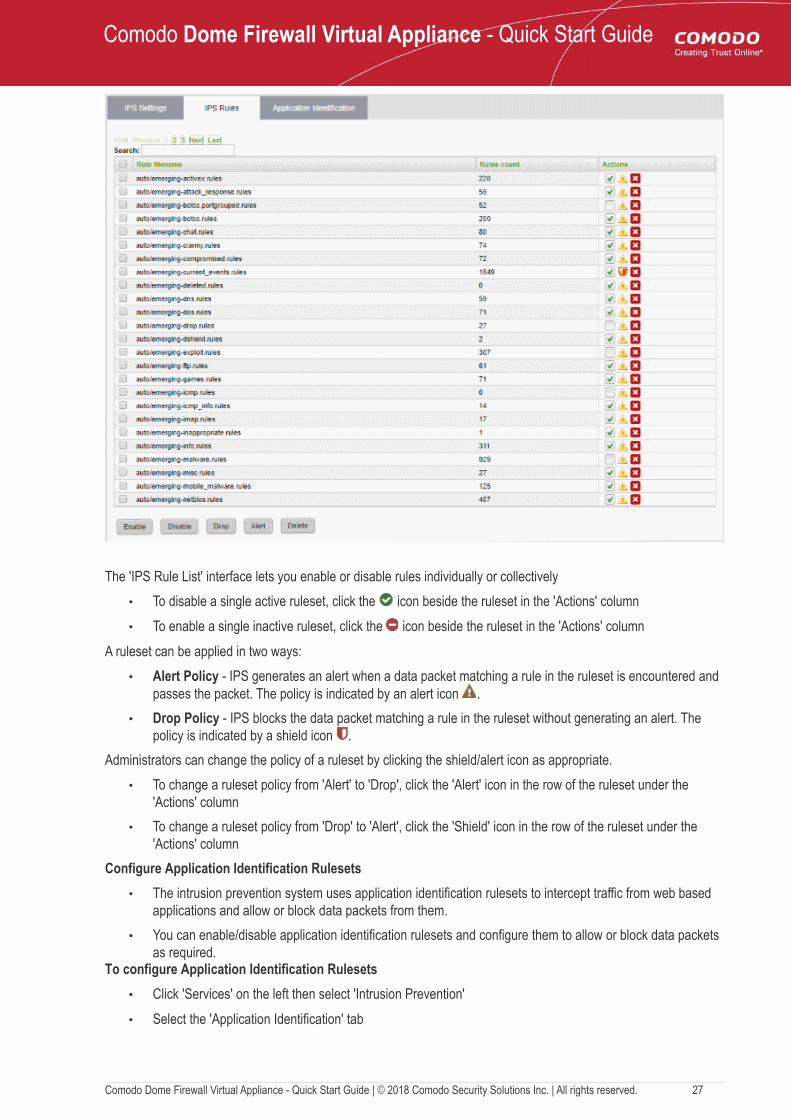
• Select the 'IPS Rules' tab
Comodo Dome Firewall Virtual Appliance - Quick Start Guide | © 2018 Comodo Security Solutions Inc. | All rights reserved. 26
Comodo Dome Firewall Virtual Appliance - Quick Start Guide
The 'IPS Rule List' interface lets you enable or disable rules individually or collectively
• To disable a single active ruleset, click the icon beside the ruleset in the 'Actions' column
• To enable a single inactive ruleset, click the icon beside the ruleset in the 'Actions' column
A ruleset can be applied in two ways:
• Alert Policy - IPS generates an alert when a data packet matching a rule in the ruleset is encountered and passes the packet. The policy is indicated by an alert icon .
• Drop Policy - IPS blocks the data packet matching a rule in the ruleset without generating an alert. The policy is indicated by a shield icon .
Administrators can change the policy of a ruleset by clicking the shield/alert icon as appropriate.
• To change a ruleset policy from 'Alert' to 'Drop', click the 'Alert' icon in the row of the ruleset under the 'Actions' column
• To change a ruleset policy from 'Drop' to 'Alert', click the 'Shield' icon in the row of the ruleset under the 'Actions' column
Configure Application Identification Rulesets
• The intrusion prevention system uses application identification rulesets to intercept traffic from web based applications and allow or block data packets from them.
• You can enable/disable application identification rulesets and configure them to allow or block data packets as required.
To configure Application Identification Rulesets
• Click 'Services' on the left then select 'Intrusion Prevention'
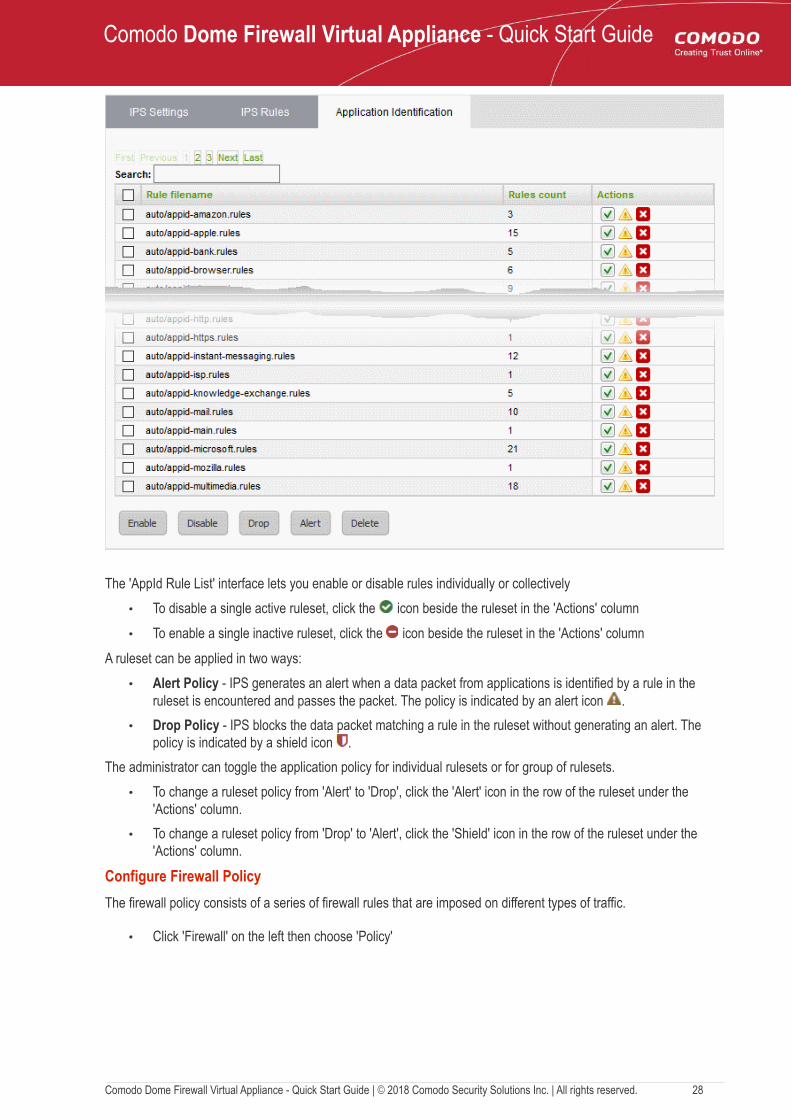
• Select the 'Application Identification' tab
Comodo Dome Firewall Virtual Appliance - Quick Start Guide | © 2018 Comodo Security Solutions Inc. | All rights reserved. 27
Comodo Dome Firewall Virtual Appliance - Quick Start Guide
The 'AppId Rule List' interface lets you enable or disable rules individually or collectively
• To disable a single active ruleset, click the icon beside the ruleset in the 'Actions' column
• To enable a single inactive ruleset, click the icon beside the ruleset in the 'Actions' column
A ruleset can be applied in two ways:
• Alert Policy - IPS generates an alert when a data packet from applications is identified by a rule in the ruleset is encountered and passes the packet. The policy is indicated by an alert icon .
• Drop Policy - IPS blocks the data packet matching a rule in the ruleset without generating an alert. The policy is indicated by a shield icon .
The administrator can toggle the application policy for individual rulesets or for group of rulesets.
• To change a ruleset policy from 'Alert' to 'Drop', click the 'Alert' icon in the row of the ruleset under the 'Actions' column.
• To change a ruleset policy from 'Drop' to 'Alert', click the 'Shield' icon in the row of the ruleset under the 'Actions' column.
Configure Firewall Policy
The firewall policy consists of a series of firewall rules that are imposed on different types of traffic.
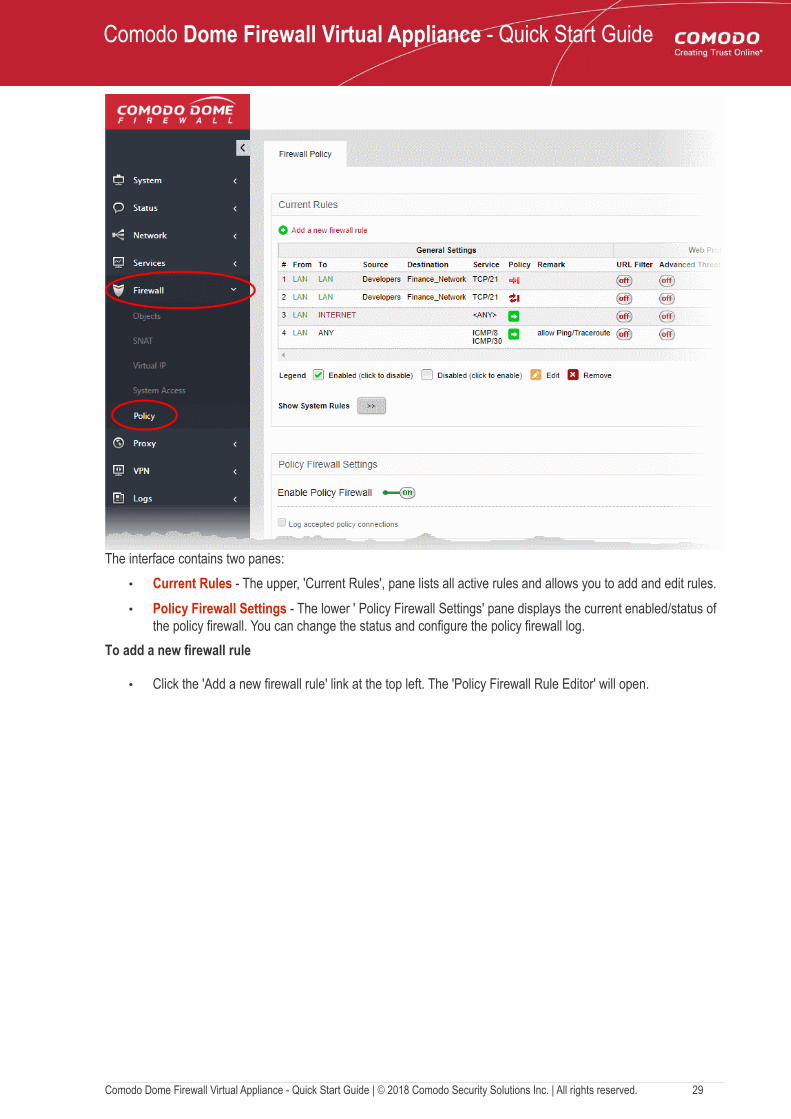
• Click 'Firewall' on the left then choose 'Policy'
Comodo Dome Firewall Virtual Appliance - Quick Start Guide | © 2018 Comodo Security Solutions Inc. | All rights reserved. 28
Comodo Dome Firewall Virtual Appliance - Quick Start Guide
The interface contains two panes:
• Current Rules - The upper, 'Current Rules', pane lists all active rules and allows you to add and edit rules.
• Policy Firewall Settings - The lower ' Policy Firewall Settings' pane displays the current enabled/status of the policy firewall. You can change the status and configure the policy firewall log.
To add a new firewall rule
• Click the 'Add a new firewall rule' link at the top left. The 'Policy Firewall Rule Editor' will open.
Comodo Dome Firewall Virtual Appliance - Quick Start Guide | © 2018 Comodo Security Solutions Inc. | All rights reserved. 29

Comodo Dome Firewall Virtual Appliance - Quick Start Guide
General Settings:
• Incoming Interface - Choose the interface through which traffic is received. The drop-down shows the common and custom interfaces connected to the firewall.
• You can select more than one interface for the rule
• Use the 'Search' box to search for a specific interface
Comodo Dome Firewall Virtual Appliance - Quick Start Guide | © 2018 Comodo Security Solutions Inc. | All rights reserved. 30
Comodo Dome Firewall Virtual Appliance - Quick Start Guide
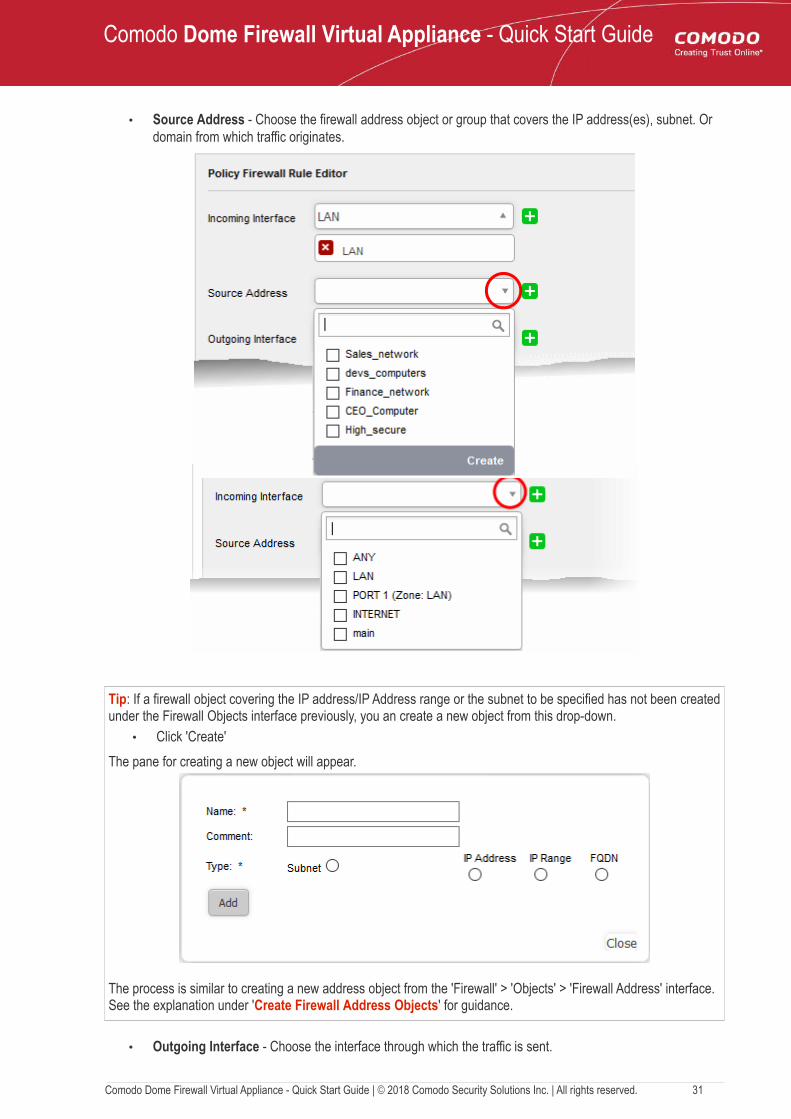
• Source Address - Choose the firewall address object or group that covers the IP address(es), subnet. Or domain from which traffic originates.
Tip: If a firewall object covering the IP address/IP Address range or the subnet to be specified has not been createdunder the Firewall Objects interface previously, you an create a new object from this drop-down.
• Click 'Create'
The pane for creating a new object will appear.
The process is similar to creating a new address object from the 'Firewall' > 'Objects' > 'Firewall Address' interface. See the explanation under 'Create Firewall Address Objects' for guidance.
• Outgoing Interface - Choose the interface through which the traffic is sent.
Comodo Dome Firewall Virtual Appliance - Quick Start Guide | © 2018 Comodo Security Solutions Inc. | All rights reserved. 31
Comodo Dome Firewall Virtual Appliance - Quick Start Guide
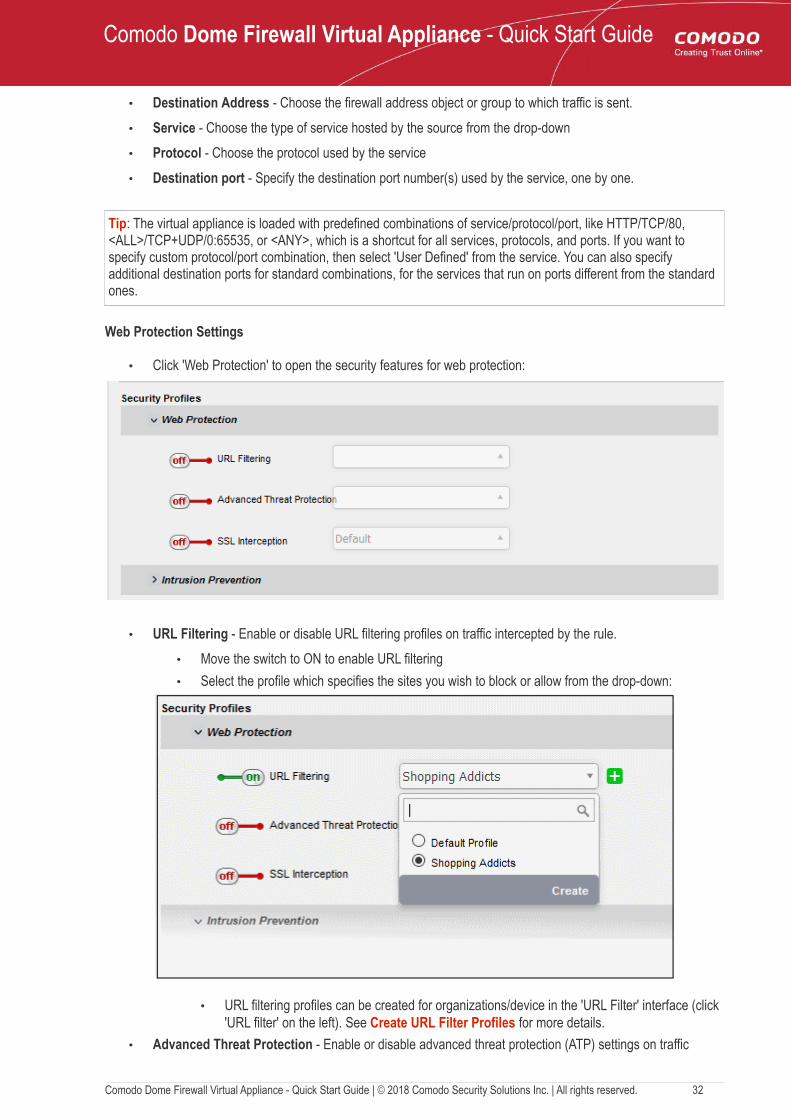
• Destination Address - Choose the firewall address object or group to which traffic is sent.
• Service - Choose the type of service hosted by the source from the drop-down
• Protocol - Choose the protocol used by the service
• Destination port - Specify the destination port number(s) used by the service, one by one.
Tip: The virtual appliance is loaded with predefined combinations of service/protocol/port, like HTTP/TCP/80, <ALL>/TCP+UDP/0:65535, or <ANY>, which is a shortcut for all services, protocols, and ports. If you want to specify custom protocol/port combination, then select 'User Defined' from the service. You can also specify additional destination ports for standard combinations, for the services that run on ports different from the standard ones.
Web Protection Settings
• Click 'Web Protection' to open the security features for web protection:
• URL Filtering - Enable or disable URL filtering profiles on traffic intercepted by the rule.
• Move the switch to ON to enable URL filtering
• Select the profile which specifies the sites you wish to block or allow from the drop-down:
• URL filtering profiles can be created for organizations/device in the 'URL Filter' interface (click 'URL filter' on the left). See Create URL Filter Profiles for more details.
• Advanced Threat Protection - Enable or disable advanced threat protection (ATP) settings on traffic
Comodo Dome Firewall Virtual Appliance - Quick Start Guide | © 2018 Comodo Security Solutions Inc. | All rights reserved. 32
Comodo Dome Firewall Virtual Appliance - Quick Start Guide
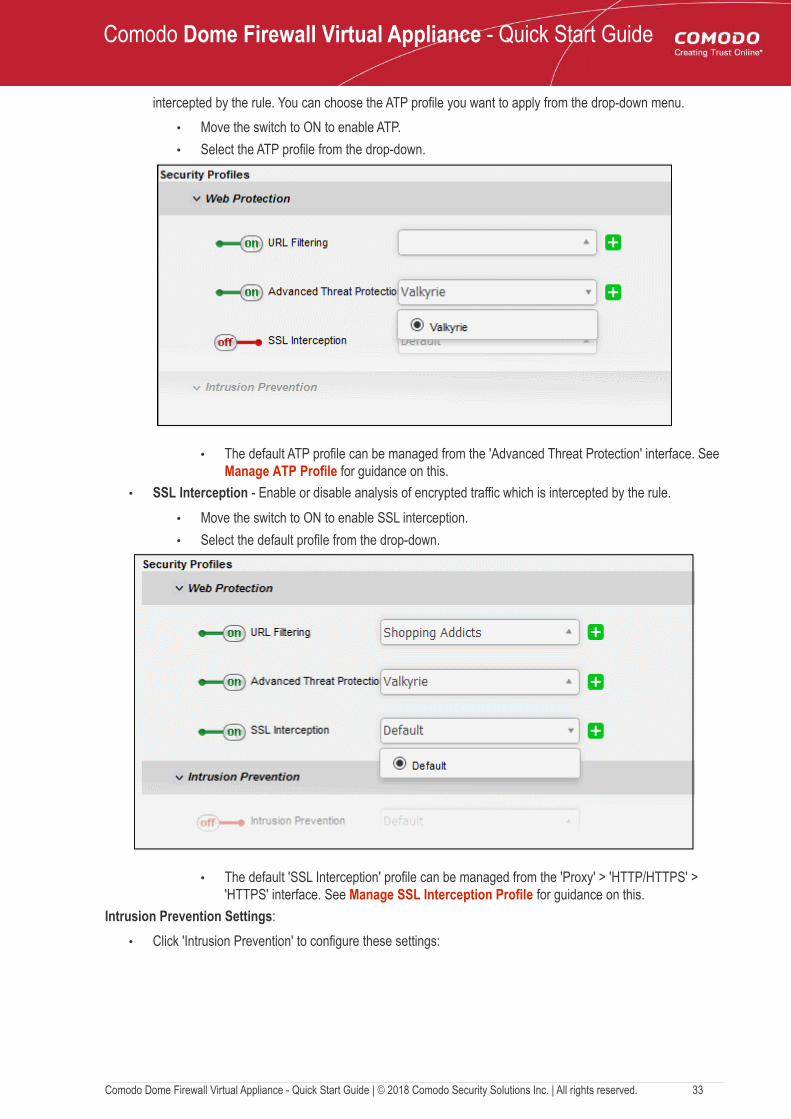
intercepted by the rule. You can choose the ATP profile you want to apply from the drop-down menu.
• Move the switch to ON to enable ATP.
• Select the ATP profile from the drop-down.
• The default ATP profile can be managed from the 'Advanced Threat Protection' interface. See Manage ATP Profile for guidance on this.
• SSL Interception - Enable or disable analysis of encrypted traffic which is intercepted by the rule.
• Move the switch to ON to enable SSL interception.
• Select the default profile from the drop-down.
• The default 'SSL Interception' profile can be managed from the 'Proxy' > 'HTTP/HTTPS' > 'HTTPS' interface. See Manage SSL Interception Profile for guidance on this.
Intrusion Prevention Settings:
• Click 'Intrusion Prevention' to configure these settings:
Comodo Dome Firewall Virtual Appliance - Quick Start Guide | © 2018 Comodo Security Solutions Inc. | All rights reserved. 33
Comodo Dome Firewall Virtual Appliance - Quick Start Guide
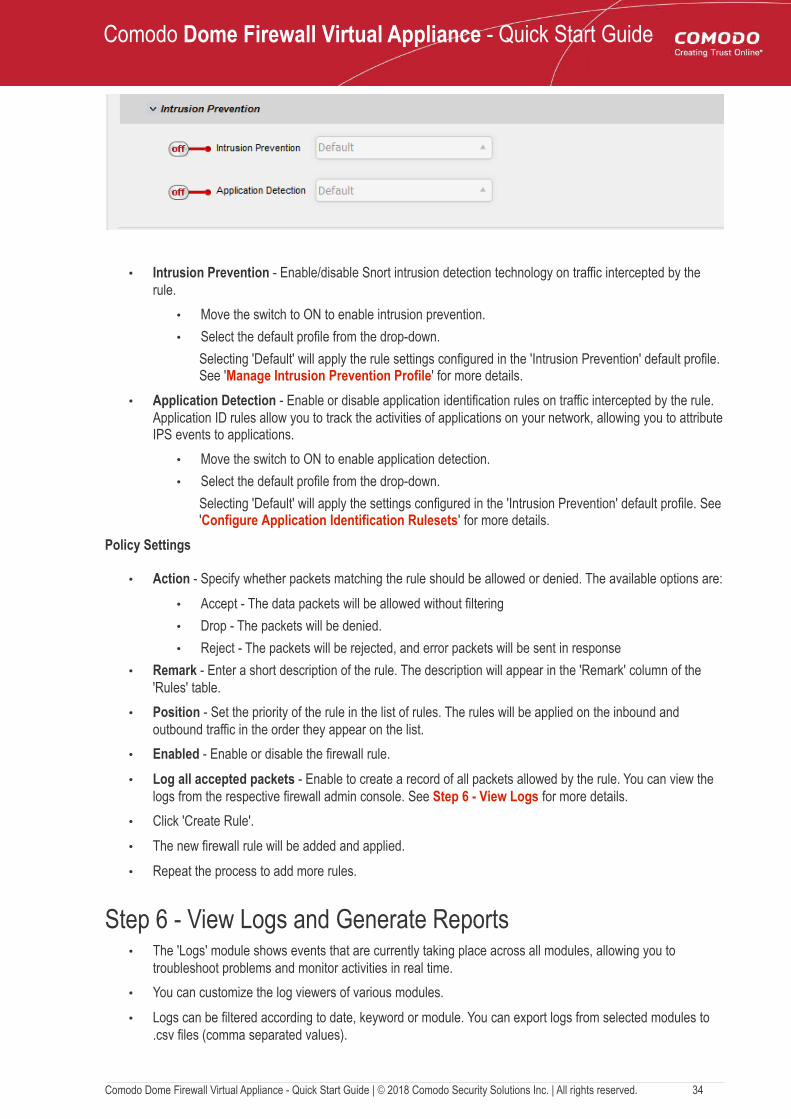
• Intrusion Prevention - Enable/disable Snort intrusion detection technology on traffic intercepted by the rule.
• Move the switch to ON to enable intrusion prevention.
• Select the default profile from the drop-down.
Selecting 'Default' will apply the rule settings configured in the 'Intrusion Prevention' default profile. See 'Manage Intrusion Prevention Profile' for more details.
• Application Detection - Enable or disable application identification rules on traffic intercepted by the rule. Application ID rules allow you to track the activities of applications on your network, allowing you to attributeIPS events to applications.
• Move the switch to ON to enable application detection.
• Select the default profile from the drop-down.
Selecting 'Default' will apply the settings configured in the 'Intrusion Prevention' default profile. See 'Configure Application Identification Rulesets' for more details.
Policy Settings
• Action - Specify whether packets matching the rule should be allowed or denied. The available options are:
• Accept - The data packets will be allowed without filtering
• Drop - The packets will be denied.
• Reject - The packets will be rejected, and error packets will be sent in response
• Remark - Enter a short description of the rule. The description will appear in the 'Remark' column of the 'Rules' table.
• Position - Set the priority of the rule in the list of rules. The rules will be applied on the inbound and outbound traffic in the order they appear on the list.
• Enabled - Enable or disable the firewall rule.
• Log all accepted packets - Enable to create a record of all packets allowed by the rule. You can view the logs from the respective firewall admin console. See Step 6 - View Logs for more details.
• Click 'Create Rule'.
• The new firewall rule will be added and applied.
• Repeat the process to add more rules.
Step 6 - View Logs and Generate Reports• The 'Logs' module shows events that are currently taking place across all modules, allowing you to
troubleshoot problems and monitor activities in real time.
• You can customize the log viewers of various modules.
• Logs can be filtered according to date, keyword or module. You can export logs from selected modules to .csv files (comma separated values).
Comodo Dome Firewall Virtual Appliance - Quick Start Guide | © 2018 Comodo Security Solutions Inc. | All rights reserved. 34
Comodo Dome Firewall Virtual Appliance - Quick Start Guide
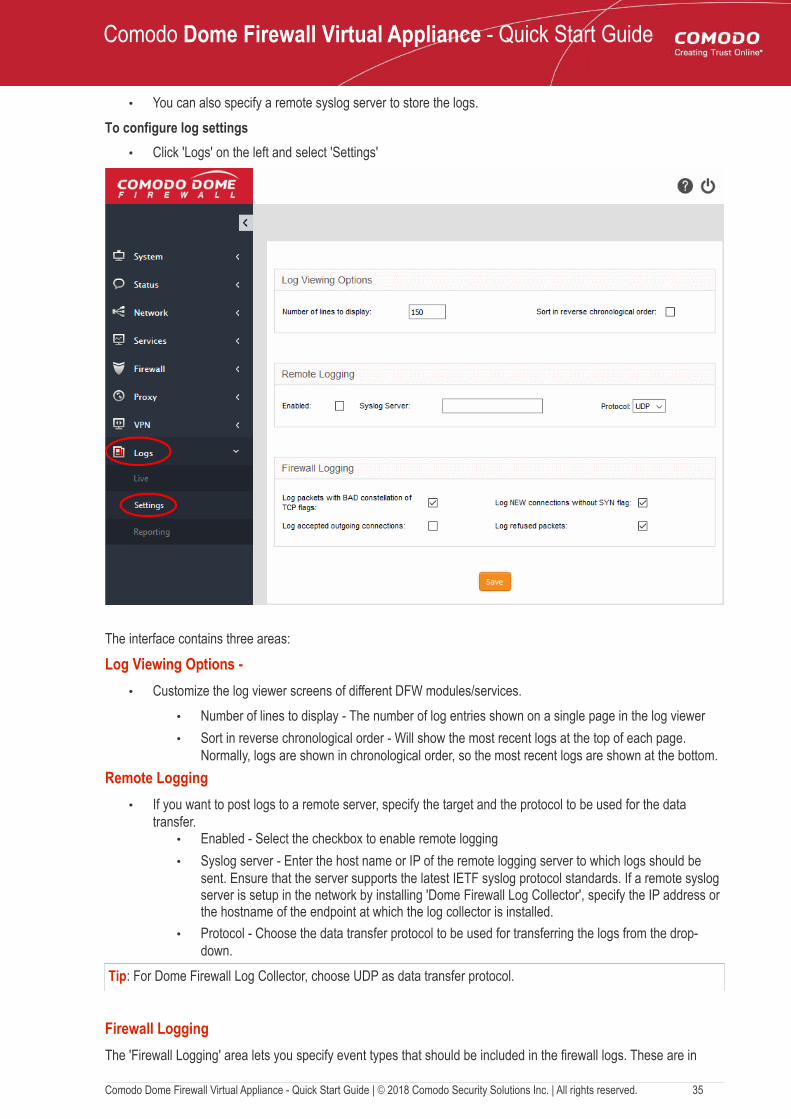
• You can also specify a remote syslog server to store the logs.
To configure log settings
• Click 'Logs' on the left and select 'Settings'
The interface contains three areas:
Log Viewing Options -
• Customize the log viewer screens of different DFW modules/services.
• Number of lines to display - The number of log entries shown on a single page in the log viewer
• Sort in reverse chronological order - Will show the most recent logs at the top of each page. Normally, logs are shown in chronological order, so the most recent logs are shown at the bottom.
Remote Logging
• If you want to post logs to a remote server, specify the target and the protocol to be used for the data transfer.
• Enabled - Select the checkbox to enable remote logging
• Syslog server - Enter the host name or IP of the remote logging server to which logs should be sent. Ensure that the server supports the latest IETF syslog protocol standards. If a remote syslog server is setup in the network by installing 'Dome Firewall Log Collector', specify the IP address or the hostname of the endpoint at which the log collector is installed.
• Protocol - Choose the data transfer protocol to be used for transferring the logs from the drop-down.
Tip: For Dome Firewall Log Collector, choose UDP as data transfer protocol.
Firewall Logging
The 'Firewall Logging' area lets you specify event types that should be included in the firewall logs. These are in
Comodo Dome Firewall Virtual Appliance - Quick Start Guide | © 2018 Comodo Security Solutions Inc. | All rights reserved. 35
Comodo Dome Firewall Virtual Appliance - Quick Start Guide
addition to the usually logged events.
• Select the event types from the options in this area:
• Log packets with BAD constellation of TCP flags - Log packets with all flags set.
• Log NEW connections without SYN flag - Log all new connections without the synchronization flag.
• Log accepted outgoing connections - Log outgoing connections that pass through the firewall from internal network zones.
• Log refused packets - Log packets from external sources that were rejected.
• Click 'Save' for your configuration to take effect.
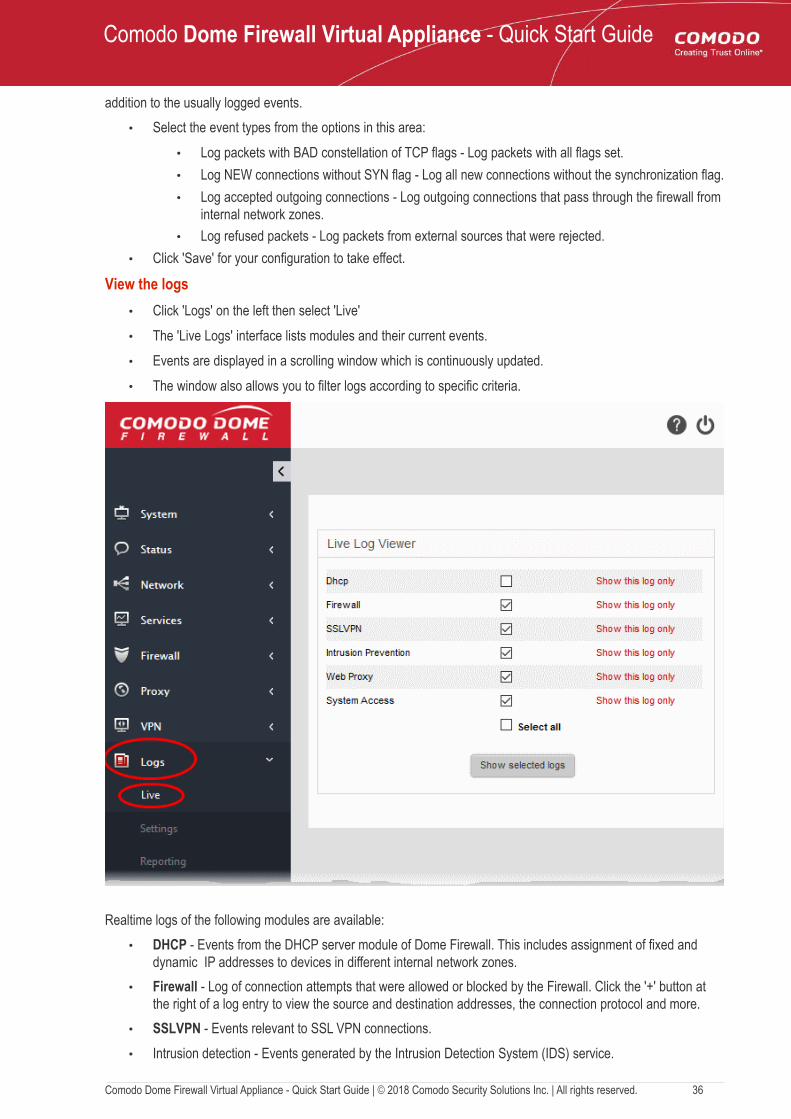
View the logs
• Click 'Logs' on the left then select 'Live'
• The 'Live Logs' interface lists modules and their current events.
• Events are displayed in a scrolling window which is continuously updated.
• The window also allows you to filter logs according to specific criteria.
Realtime logs of the following modules are available:
• DHCP - Events from the DHCP server module of Dome Firewall. This includes assignment of fixed and dynamic IP addresses to devices in different internal network zones.
• Firewall - Log of connection attempts that were allowed or blocked by the Firewall. Click the '+' button at the right of a log entry to view the source and destination addresses, the connection protocol and more.
• SSLVPN - Events relevant to SSL VPN connections.
• Intrusion detection - Events generated by the Intrusion Detection System (IDS) service.
Comodo Dome Firewall Virtual Appliance - Quick Start Guide | © 2018 Comodo Security Solutions Inc. | All rights reserved. 36
Comodo Dome Firewall Virtual Appliance - Quick Start Guide
• Web proxy - Events generated by the HTTP/HTTPS Proxy services.
• System Access - Record of user logins to the firewall.
You can add or remove modules in the live log interface as required.
• To view the log of events for a specific module, click the 'Show this log only' link beside the module
• To view logs from several modules, select the modules and click the 'Show selected logs' button
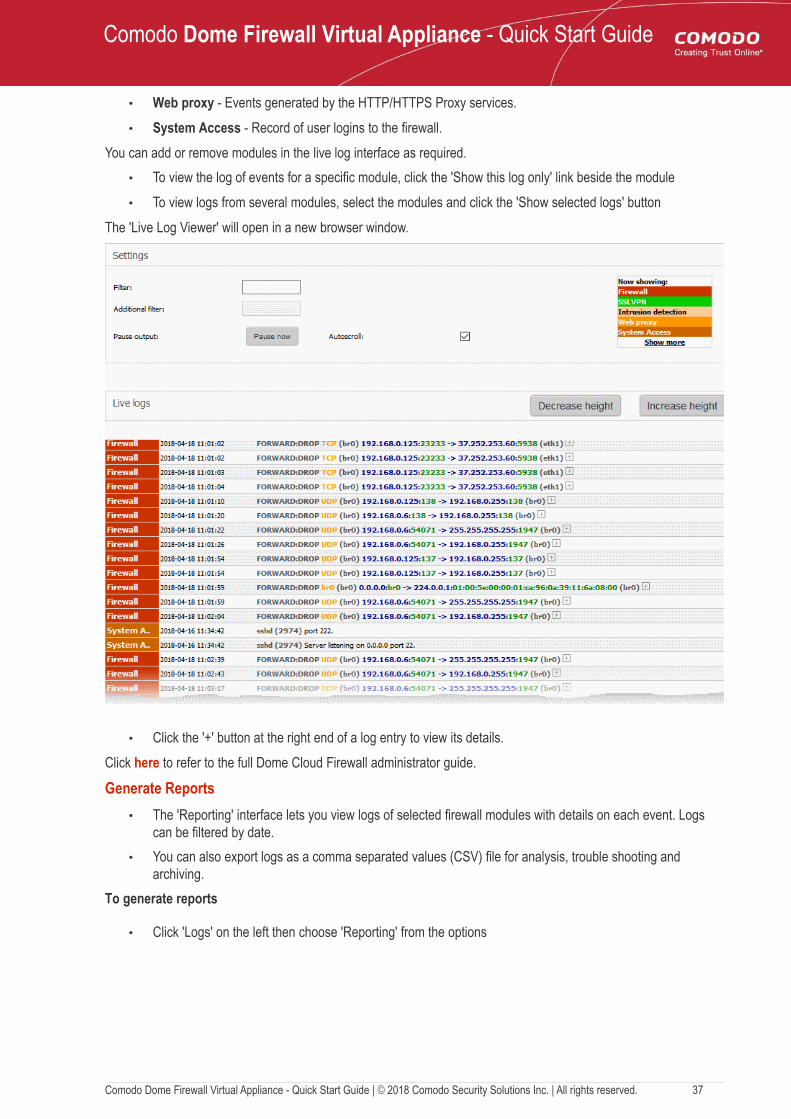
The 'Live Log Viewer' will open in a new browser window.
• Click the '+' button at the right end of a log entry to view its details.
Click here to refer to the full Dome Cloud Firewall administrator guide.
Generate Reports
• The 'Reporting' interface lets you view logs of selected firewall modules with details on each event. Logs can be filtered by date.
• You can also export logs as a comma separated values (CSV) file for analysis, trouble shooting and archiving.
To generate reports
• Click 'Logs' on the left then choose 'Reporting' from the options
Comodo Dome Firewall Virtual Appliance - Quick Start Guide | © 2018 Comodo Security Solutions Inc. | All rights reserved. 37
Comodo Dome Firewall Virtual Appliance - Quick Start Guide
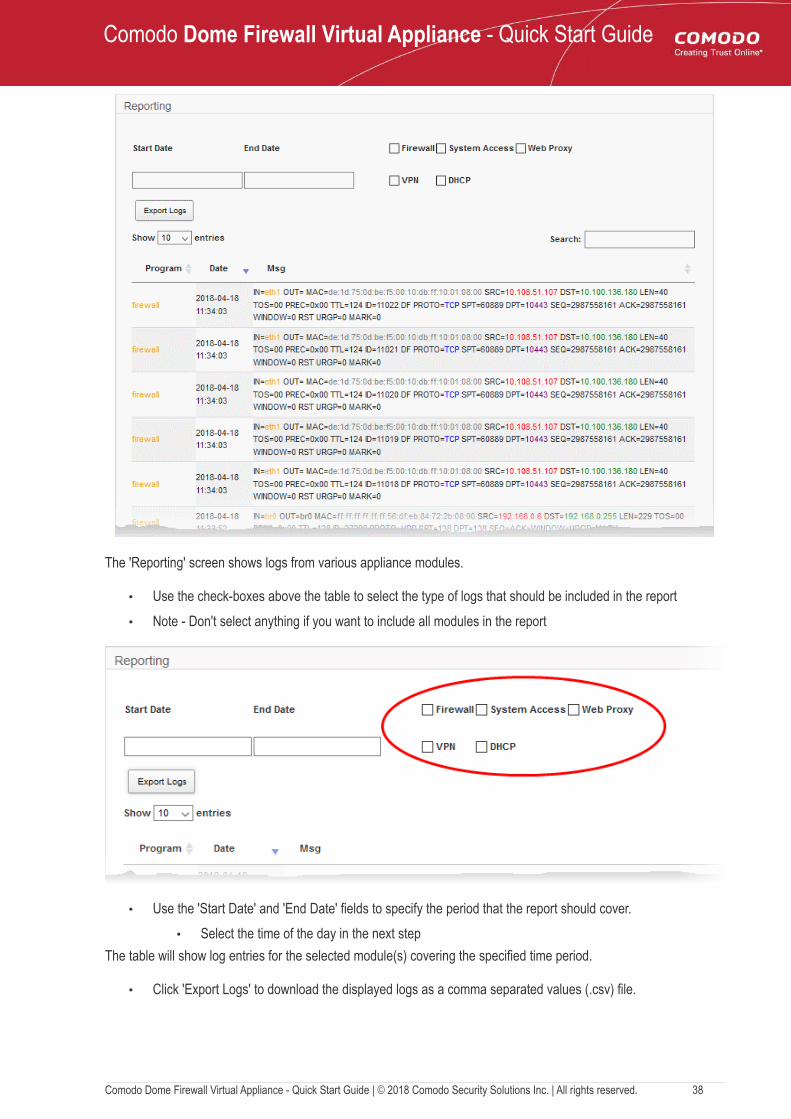
The 'Reporting' screen shows logs from various appliance modules.
• Use the check-boxes above the table to select the type of logs that should be included in the report
• Note - Don't select anything if you want to include all modules in the report
• Use the 'Start Date' and 'End Date' fields to specify the period that the report should cover.
• Select the time of the day in the next step
The table will show log entries for the selected module(s) covering the specified time period.
• Click 'Export Logs' to download the displayed logs as a comma separated values (.csv) file.
Comodo Dome Firewall Virtual Appliance - Quick Start Guide | © 2018 Comodo Security Solutions Inc. | All rights reserved. 38

Comodo Dome Firewall Virtual Appliance - Quick Start Guide
About Comodo Security SolutionsComodo Security Solutions is a global innovator of cybersecurity solutions, protecting critical information across the digital landscape. Comodo provides complete, end-to-end security solutions across the boundary, internal network and endpoint with innovative technologies solving the most advanced malware threats. With over 80 million installations of its threat prevention products, Comodo provides an extensive suite of endpoint, website and network security products for MSPs, enterprises and consumers.
Continual innovation and a commitment to reversing the growth of zero-day malware, ransomware, data-breaches and internet-crime distinguish Comodo Security Solutions as a vital player in today's enterprise and home security markets.
About Comodo CybersecurityIn a world where preventing all cyberattacks is impossible, Comodo Cybersecurity delivers an innovative cybersecurity platform that renders threats useless, across the LAN, web and cloud. The Comodo Cybersecurity platform enables customers to protect their systems and data against even military-grade threats, including zero-day attacks. Based in Clifton, New Jersey, Comodo Cybersecurity has a 20-year history of protecting the most sensitive data for both businesses and consumers globally. For more information, visit comodo.com or our blog. You can also follow us on Twitter (@ComodoDesktop) or LinkedIn.
1255 Broad Street
Clifton, NJ 07013
United States
Tel : +1.888.266.636
Tel : +1.703.581.6361
https://www.comodo.com
Email: [email protected]
Comodo Dome Firewall Virtual Appliance - Quick Start Guide | © 2018 Comodo Security Solutions Inc. | All rights reserved. 39
Related Documents