Cloudera ODBC Driver for Apache Hive Version 2.5.15

Welcome message from author
This document is posted to help you gain knowledge. Please leave a comment to let me know what you think about it! Share it to your friends and learn new things together.
Transcript
Cloudera ODBC Driver for Apache HiveVersion 2.5.15
Important Notice
©2010-2015 Cloudera, Inc. All rights reserved.
Cloudera, the Cloudera logo, Cloudera Impala, Impala, and any other product or service names orslogans contained in this document, except as otherwise disclaimed, are trademarks of Clouderaand its suppliers or licensors, and may not be copied, imitated or used, in whole or in part,without the prior written permission of Cloudera or the applicable trademark holder.
Hadoop and the Hadoop elephant logo are trademarks of the Apache Software Foundation. Allother trademarks, registered trademarks, product names and company names or logosmentioned in this document are the property of their respective owners. Reference to anyproducts, services, processes or other information, by trade name, trademark, manufacturer,supplier or otherwise does not constitute or imply endorsement, sponsorship orrecommendation thereof by us.
Complying with all applicable copyright laws is the responsibility of the user. Without limiting therights under copyright, no part of this document may be reproduced, stored in or introduced intoa retrieval system, or transmitted in any form or by any means (electronic, mechanical,photocopying, recording, or otherwise), or for any purpose, without the express writtenpermission of Cloudera.
Cloudera may have patents, patent applications, trademarks, copyrights, or other intellectualproperty rights covering subject matter in this document. Except as expressly provided in anywritten license agreement from Cloudera, the furnishing of this document does not give you anylicense to these patents, trademarks copyrights, or other intellectual property.
The information in this document is subject to change without notice. Cloudera shall not be liablefor any damages resulting from technical errors or omissions which may be present in thisdocument, or from use of this document.
Cloudera, Inc.1001 Page Mill Road, Building 2Palo Alto, CA [email protected]: 1-888-789-1488Intl: 1-650-843-0595www.cloudera.com
Release Information
Version: 2.5.15
Date: May 12, 2015
2 | Cloudera ODBC Driver for Apache Hive
Table of Contents
INTRODUCTION 5
WINDOWS DRIVER 5
SYSTEM REQUIREMENTS 5
INSTALLING THE DRIVER 6
VERIFYING THE VERSION NUMBER 6
CREATING A DATA SOURCE NAME 6
CONFIGURING A DSN-LESS CONNECTION 9
CONFIGURING AUTHENTICATION 11
CONFIGURING ADVANCED OPTIONS 13
CONFIGURING SERVER-S IDE PROPERTIES 14
CONFIGURING HTTP OPTIONS 15
CONFIGURING SSL VERIFICATION 16
CONFIGURING THE TEMPORARY TABLE FEATURE 17
LINUX DRIVER 18
SYSTEM REQUIREMENTS 18
INSTALLING THE DRIVER 18
VERIFYING THE VERSION NUMBER 19
SETTING THE LD_LIBRARY_PATH ENVIRONMENT VARIABLE 20
MAC OS X DRIVER 20
SYSTEM REQUIREMENTS 20
INSTALLING THE DRIVER 20
VERIFYING THE VERSION NUMBER 21
SETTING THE DYLD_LIBRARY_PATH ENVIRONMENT VARIABLE 21
AIX DRIVER 22
SYSTEM REQUIREMENTS 22
INSTALLING THE DRIVER 22
VERIFYING THE VERSION NUMBER 23
SETTING THE LD_LIBRARY_PATH ENVIRONMENT VARIABLE 23
DEBIAN DRIVER 23
SYSTEM REQUIREMENTS 23
INSTALLING THE DRIVER 24
VERIFYING THE VERSION NUMBER 25
SETTING THE LD_LIBRARY_PATH ENVIRONMENT VARIABLE 25
CONFIGURING ODBC CONNECTIONS FOR NON-WINDOWS PLATFORMS 25
FILES 26
Cloudera ODBC Driver for Apache Hive | 3

SAMPLE F ILES 26
CONFIGURING THE ENVIRONMENT 27
CONFIGURING THE ODBC.INI FILE 27
CONFIGURING THE ODBCINST.INI FILE 29
CONFIGURING THE CLOUDERA.HIVEODBC.INI FILE 30
CONFIGURING SERVICE DISCOVERY MODE 31
CONFIGURING AUTHENTICATION 31
CONFIGURING SSL VERIFICATION 33
FEATURES 34
SQL QUERY VERSUS HIVEQL QUERY 34
SQL CONNECTOR 34
DATA TYPES 35
CATALOG AND SCHEMA SUPPORT 36
HIVE_SYSTEM TABLE 36
SERVER-S IDE PROPERTIES 36
TEMPORARY TABLE 37
GET TABLES W ITH QUERY 38
ACTIVE DIRECTORY 38
WRITE-BACK 38
DYNAMIC SERVICE DISCOVERY USING ZOOKEEPER 39
CONTACT US 39
APPENDIX A USING A CONNECTION STRING 40
DSN CONNECTIONS 40
DSN-LESS CONNECTIONS 40
APPENDIX B AUTHENTICATION OPTIONS 41
APPENDIX C CONFIGURING KERBEROS AUTHENTICATION FOR W INDOWS 43
ACTIVE DIRECTORY 43
MIT KERBEROS 43
APPENDIX D DRIVER CONFIGURATION OPTIONS 47
CONFIGURATION OPTIONS APPEARING IN THE USER INTERFACE 47
CONFIGURATION OPTIONS HAVING ONLY KEY NAMES 63
APPENDIX E ODBC API CONFORMANCE LEVEL 65
4 | Cloudera ODBC Driver for Apache Hive
IntroductionThe Cloudera ODBC Driver for Apache Hive is used for direct SQL and HiveQL access to ApacheHadoop / Hive distributions, enabling Business Intelligence (BI), analytics, and reporting onHadoop / Hive-based data. The driver efficiently transforms an application’s SQL query into theequivalent form in HiveQL, which is a subset of SQL-92. If an application is Hive-aware, then thedriver is configurable to pass the query through to the database for processing. The driverinterrogates Hive to obtain schema information to present to a SQL-based application. Queries,including joins, are translated from SQL to HiveQL. For more information about the differencesbetween HiveQL and SQL, see "Features" on page 34.
The Cloudera ODBC Driver for Apache Hive complies with the ODBC 3.52 data standard and addsimportant functionality such as Unicode and 32- and 64-bit support for high-performancecomputing environments.
ODBC is one the most established and widely supported APIs for connecting to and working withdatabases. At the heart of the technology is the ODBC driver, which connects an application to thedatabase. For more information about ODBC, see http://www.simba.com/resources/data-access-standards-library. For complete information about the ODBC specification, see the ODBC APIReference at http://msdn.microsoft.com/en-us/library/windows/desktop/ms714562(v=vs.85).aspx.
The Installation and Configuration Guide is suitable for users who are looking to access dataresiding within Hive from their desktop environment. Application developers may also find theinformation helpful. Refer to your application for details on connecting via ODBC.
Windows Driver
System Requirements
You install the Cloudera ODBC Driver for Apache Hive on client computers accessing data in aHadoop cluster with the Hive service installed and running. Each computer where you install thedriver must meet the following minimum system requirements:
l One of the following operating systems (32- and 64-bit editions are supported):o Windows® XP with SP3o Windows® Vistao Windows® 7 Professional and Enterpriseo Windows® 8 Pro and Enterpriseo Windows® Server 2008 R2
l 25MB of available disk space
Important:
To install the driver, you must have Administrator privileges on the computer.
Cloudera ODBC Driver for Apache Hive | 5
Introduction
The driver is suitable for use with all versions of ApacheHive.
Installing the Driver
On 64-bit Windows operating systems, you can execute 32- and 64-bit applications transparently.You must use the version of the driver matching the bitness of the client application accessingdata in Hadoop / Hive:
l ClouderaHiveODBC32.msi for 32-bit applications
l ClouderaHiveODBC64.msi for 64-bit applications
You can install both versions of the driver on the same computer.
Note:
For an explanation of how to use ODBC on 64-bit editions of Windows, seehttp://www.simba.com/wp-content/uploads/2010/10/HOW-TO-32-bit-vs-64-bit-ODBC-Data-Source-Administrator.pdf
To install the Cloudera ODBC Driver for Apache Hive:
1. Depending on the bitness of your client application, double-click to runClouderaHiveODBC32.msi or ClouderaHiveODBC64.msi
2. Click Next
3. Select the check box to accept the terms of the License Agreement if you agree, and thenclick Next
4. To change the installation location, click Change, then browse to the desired folder, andthen click OK. To accept the installation location, click Next
5. Click Install
6. When the installation completes, click Finish
Verifying the Version Number
If you need to verify the version of the Cloudera ODBC Driver for Apache Hive that is installed onyour Windows machine, you can find the version number in the ODBC Data Source Administrator.
To verify the version number:
1. Click the Start button, then click All Programs, then click the Cloudera ODBC Driver forApache Hive 2.5 program group corresponding to the bitness of the client applicationaccessing data in Hadoop / Hive, and then click ODBC Administrator
2. In the ODBC Data Source Administrator, click the Drivers tab and then find the ClouderaODBC Driver for ApacheHive in the list of ODBC drivers that are installed on your system.The version number is displayed in the Version column.
Creating a Data Source Name
After installing the Cloudera ODBC Driver for Apache Hive, you need to create a Data Source Name(DSN).
6 | Cloudera ODBC Driver for Apache Hive
Windows Driver
Alternatively, for information about DSN-less connections, see "Configuring a DSN-lessConnection" on page 9.
To create a Data Source Name:
1. Click the Start button, then click All Programs, then click the Cloudera ODBC Driver forApache Hive 2.5 program group corresponding to the bitness of the client applicationaccessing data in Hadoop / Hive, and then click ODBC Administrator
2. In the ODBC Data Source Administrator, click the Drivers tab, and then scroll down asneeded to confirm that the Cloudera ODBC Driver for ApacheHive appears in thealphabetical list of ODBC drivers that are installed on your system.
3. To create a DSN that only the user currently logged into Windows can use, click the UserDSN tab.
OR
To create a DSN that all users who log into Windows can use, click the System DSN tab.
4. Click Add
5. In the Create New Data Source dialog box, select Cloudera ODBC Driver for Apache Hiveand then click Finish
6. Use the options in the Cloudera ODBC Driver for ApacheHive DSN Setup dialog box toconfigure your DSN:
a) In the Data Source Name field, type a name for your DSN.
b) Optionally, in the Description field, type relevant details about the DSN.
c) In the Hive Server Type list, select Hive Server 1 or Hive Server 2
Note:
If you are connecting through Apache ZooKeeper, then Hive Server 1 isnot supported.
d) To connect to Hive without using the Apache ZooKeeper service, in the ServiceDiscovery Mode list, select No Service Discovery
OR
To enable the driver to discover Hive Server 2 services via the ZooKeeper service, inthe Service Discovery Mode list, select ZooKeeper
e) In the Host(s) field, if you selected No Service Discovery in step d, then type the IPaddress or host name of the Hive server.
OR
If you selected ZooKeeper in step d, then type a comma-separated list of ZooKeeperservers. Use the following format, where zk_host is the IP address or host name ofthe ZooKeeper server and zk_port is the number of the port that the ZooKeeperserver uses:zk_host1:zk_port1,zk_host2:zk_port2
Cloudera ODBC Driver for Apache Hive | 7
Windows Driver
f) In the Port field, if you selected No Service Discovery in step d, then type thenumber of the TCP port on which the Hive server is listening. Otherwise, do not typea value in the field.
g) In the Database field, type the name of the database schema to use when a schemais not explicitly specified in a query.
Note:
You can still issue queries on other schemas by explicitly specifying theschema in the query. To inspect your databases and determine theappropriate schema to use, type the show databases command at theHive command prompt.
h) In the ZooKeeper Namespace field, if you selected ZooKeeper in step d, then type thenamespace on ZooKeeper under which Hive Server 2 znodes are added. Otherwise,do not type a value in the field.
i) In the Authentication area, configure authentication as needed. For moreinformation, see "Configuring Authentication" on page 11.
Note:
Hive Server 1 does not support authentication. Most defaultconfigurations of Hive Server 2 require User Name authentication. Toverify the authentication mechanism that you need to use for yourconnection, check the configuration of your Hadoop / Hive distribution.For more information, see "Authentication Options" on page 41.
j) Optionally, if the operations against Hive are to be done on behalf of a user that isdifferent than the authenticated user for the connection, type the name of the userto be delegated in the Delegation UID field.
Note:
This option is applicable only when connecting to a Hive Server 2instance that supports this feature.
k) In the Thrift Transport list, select the transport protocol to use in the Thrift layer.
l) To configure HTTP options such as custom headers, click HTTP Options. For moreinformation, see "Configuring HTTP Options" on page 15.
Note:
The HTTP options are available only when the Thrift Transport option isset to HTTP.
m) To configure client-server verification over SSL, click SSL Options. For moreinformation, see "Configuring SSL Verification" on page 16.
n) To configure advanced driver options, click Advanced Options. For moreinformation, see "Configuring Advanced Options" on page 13.
8 | Cloudera ODBC Driver for Apache Hive
Windows Driver
o) To configure server-side properties, click Advanced Options and then click ServerSide Properties. For more information, see "Configuring Server-Side Properties" onpage 14.
p) To configure the Temporary Table feature, click Advanced Options and then clickTemporary Table Configuration. For more information, see "Configuring theTemporary Table Feature" on page 17 and "Temporary Table" on page 37.
Important:
When connecting to Hive 0.14 or later, the Temporary Tables feature isalways enabled and you do not need to configure it in the driver.
7. To test the connection, click Test. Review the results as needed, and then click OK.
Note:
If the connection fails, then confirm that the settings in the Cloudera ODBCDriver for Apache Hive DSN Setup dialog box are correct. Contact your Hiveserver administrator as needed.
8. To save your settings and close the Cloudera ODBC Driver for Apache Hive DSN Setup dialogbox, click OK
9. To close the ODBC Data Source Administrator, click OK
Configuring a DSN-less Connection
Some client applications provide support for connecting to a data source using a driver without aData Source Name (DSN). To configure a DSN-less connection, you can use a connection string orthe Cloudera Hive ODBC Driver Configuration tool that is installed with the Cloudera ODBC Driverfor ApacheHive. The following section explains how to use the driver configuration tool. Forinformation about using connection strings, see "DSN-less Connections" on page 40.
To configure a DSN-less connection using the driver configuration tool:
1. Click the Start button, then click All Programs, and then click the Cloudera ODBC Driver forApache Hive 2.5 program group corresponding to the bitness of the client applicationaccessing data in Hadoop / Hive.
2. Click Driver Configuration, and then click OK if prompted for administrator permission tomake modifications to the computer.
Note:
You must have administrator access to the computer in order to run thisapplication because it makes changes to the registry.
3. In the Hive Server Type list, select Hive Server 1 or Hive Server 2
Note:
If you are connecting through Apache ZooKeeper, then Hive Server 1 is notsupported.
Cloudera ODBC Driver for Apache Hive | 9
Windows Driver
4. To connect to Hive without using the Apache ZooKeeper service, in the Service DiscoveryMode list, select No Service Discovery
OR
To enable the driver to discover Hive Server 2 services via the ZooKeeper service, in theService Discovery Mode list, select ZooKeeper
5. In the ZooKeeper Namespace field, if you selected ZooKeeper in step 4, then type thenamespace on ZooKeeper under which Hive Server 2 znodes are added. Otherwise, do nottype a value in the field.
6. In the Authentication area, configure authentication as needed. For more information, see"Configuring Authentication" on page 11.
Note:
Hive Server 1 does not support authentication. Most default configurations ofHive Server 2 require User Name authentication. To verify the authenticationmechanism that you need to use for your connection, check the configurationof your Hadoop / Hive distribution. For more information, see "AuthenticationOptions" on page 41.
7. Optionally, if the operations against Hive are to be done on behalf of a user that is differentthan the authenticated user for the connection, type the name of the user to be delegatedin the Delegation UID field.
Note:
This option is applicable only when connecting to a Hive Server 2 instance thatsupports this feature.
8. In the Thrift Transport list, select the transport protocol to use in the Thrift layer.
9. To configure HTTP options such as custom headers, click HTTP Options. For moreinformation, see "Configuring HTTP Options" on page 15.
Note:
The HTTP options are available only when the Thrift Transport option is set toHTTP.
10. To configure client-server verification over SSL, click SSL Options. For more information, see"Configuring SSL Verification" on page 16.
11. To configure advanced options, click Advanced Options. For more information, see"Configuring Advanced Options" on page 13.
12. To configure server-side properties, click Advanced Options and then click Server SideProperties. For more information, see "Configuring Server-Side Properties" on page 14.
13. To configure the Temporary Table feature, click Advanced Options and then clickTemporary Table Configuration. For more information, see "Temporary Table" on page 37and "Configuring the Temporary Table Feature" on page 17.
10 | Cloudera ODBC Driver for Apache Hive
Windows Driver
Important:
When connecting to Hive 0.14 or later, the Temporary Tables feature is alwaysenabled and you do not need to configure it in the driver.
14. To save your settings and close the Cloudera Hive ODBC Driver Configuration tool, click OK
Configuring Authentication
Some Hive servers are configured to require authentication for access. To connect to a Hiveserver, you must configure the Cloudera ODBC Driver for ApacheHive to use the authenticationmechanism that matches the access requirements of the server and provides the necessarycredentials.
For information about how to determine the type of authentication your Hive server requires, seeAppendix B "Authentication Options" on page 41.
ODBC applications that connect to Hive Server 2 using a DSN can pass in authenticationcredentials by defining them in the DSN. To configure authentication for a connection that uses aDSN, use the ODBC Data Source Administrator.
Normally, applications that are not Hive Server 2 aware and that connect using a DSN-lessconnection do not have a facility for passing authentication credentials to the Cloudera ODBCDriver for Apache Hive for a connection. However, the Cloudera Hive ODBC Driver Configurationtool enables you to configure authentication without using a DSN.
Important:
Credentials defined in a DSN take precedence over credentials configured using thedriver configuration tool. Credentials configured using the driver configuration toolapply for all connections that are made using a DSN-less connection unless the clientapplication is Hive Server 2 aware and requests credentials from the user.
Using No Authentication
When connecting to a Hive server of type Hive Server 1, you must use No Authentication. Whenyou use No Authentication, SASL is not supported.
To configure a connection without authentication:
1. To access authentication options for a DSN, open the ODBC Data Source Administratorwhere you created the DSN, then select the DSN, and then click Configure
OR
To access authentication options for a DSN-less connection, open the Cloudera Hive ODBCDriver Configuration tool.
2. In the Mechanism list, select No Authentication
3. In the Thrift Transport list, select the transport protocol to use in the Thrift layer.
Cloudera ODBC Driver for Apache Hive | 11
Windows Driver
Important:
When using this authentication mechanism, SASL is not supported.
4. If the Hive server is configured to use SSL, then click SSL Options to configure SSL for theconnection. For more information, see "Configuring SSL Verification" on page 16.
5. To save your settings and close the dialog box, click OK
Using Kerberos
Kerberos must be installed and configured before you can use this authentication mechanism. Formore information, see Appendix C "Configuring Kerberos Authentication for Windows" on page43.
This authentication mechanism is available only for Hive Server 2. When you use Kerberosauthentication, the Binary transport protocol is not supported.
To configure Kerberos authentication:
1. To access authentication options for a DSN, open the ODBC Data Source Administratorwhere you created the DSN, then select the DSN, and then click Configure
OR
To access authentication options for a DSN-less connection, open the Cloudera Hive ODBCDriver Configuration tool.
2. In the Mechanism list, select Kerberos
3. If your Kerberos setup does not define a default realm or if the realm of your Hive Server 2host is not the default, then type the Kerberos realm of the Hive Server 2 host in the Realmfield.
OR
To use the default realm defined in your Kerberos setup, leave the Realm field empty.
4. In the Host FQDN field, type the fully qualified domain name of the Hive Server 2 host.
5. In the Service Name field, type the service name of the Hive server.
6. In the Thrift Transport list, select the transport protocol to use in the Thrift layer.
Important:
When using this authentication mechanism, the Binary transport protocol isnot supported.
7. If the Hive server is configured to use SSL, then click SSL Options to configure SSL for theconnection. For more information, see "Configuring SSL Verification" on page 16.
8. To save your settings and close the dialog box, click OK
Using User Name
This authentication mechanism requires a user name but not a password. The user name labelsthe session, facilitating database tracking.
12 | Cloudera ODBC Driver for Apache Hive
Windows Driver
This authentication mechanism is available only for Hive Server 2. Most default configurations ofHive Server 2 require User Name authentication. When you use User Name authentication, SSL isnot supported and you must use SASL as the Thrift transport protocol.
To configure User Name authentication:
1. To access authentication options for a DSN, open the ODBC Data Source Administratorwhere you created the DSN, then select the DSN, and then click Configure
OR
To access authentication options for a DSN-less connection, open the Cloudera Hive ODBCDriver Configuration tool.
2. In the Mechanism list, select User Name
3. In the User Name field, type an appropriate user name for accessing the Hive server.
4. In the Thrift Transport list, select SASL
5. To save your settings and close the dialog box, click OK
Using User Name and Password
This authentication mechanism requires a user name and a password.
This authentication mechanism is available only for Hive Server 2.
To configure User Name and Password authentication:
1. To access authentication options for a DSN, open the ODBC Data Source Administratorwhere you created the DSN, then select the DSN, and then click Configure
OR
To access authentication options for a DSN-less connection, open the Cloudera Hive ODBCDriver Configuration tool.
2. In the Mechanism list, select User Name and Password
3. In the User Name field, type an appropriate user name for accessing the Hive server.
4. In the Password field, type the password corresponding to the user name you typed in step3.
5. In the Thrift Transport list, select the transport protocol to use in the Thrift layer.
6. If the Hive server is configured to use SSL, then click SSL Options to configure SSL for theconnection. For more information, see "Configuring SSL Verification" on page 16.
7. To save your settings and close the dialog box, click OK
Configuring Advanced Options
You can configure advanced options to modify the behavior of the driver.
Cloudera ODBC Driver for Apache Hive | 13
Windows Driver
To configure advanced options:
1. To access advanced options for a DSN, open the ODBC Data Source Administrator whereyou created the DSN, then select the DSN, then click Configure, and then click AdvancedOptions
OR
To access advanced options for a DSN-less connection, open the Cloudera Hive ODBC DriverConfiguration tool, and then click Advanced Options
2. To disable the SQL Connector feature, select the Use Native Query check box.
3. To defer query execution to SQLExecute, select the Fast SQLPrepare check box.
4. To allow driver-wide configurations to take precedence over connection and DSN settings,select the Driver Config Take Precedence check box.
5. To use the asynchronous version of the API call against Hive for executing a query, selectthe Use Async Exec check box.
Note:
This option is applicable only when connecting to a Hive cluster running Hive0.12.0 or later.
6. To retrieve the names of tables in a database by using the SHOW TABLES query, select theGet Tables With Query check box.
Note:
This option is applicable only when connecting to Hive Server 2.
7. To enable the driver to return SQL_WVARCHAR instead of SQL_VARCHAR for STRING andVARCHAR columns, and SQL_WCHAR instead of SQL_CHAR for CHAR columns, select theUnicode SQL character types check box.
8. To enable the driver to return the hive_system table for catalog function calls such asSQLTables and SQLColumns, select the Show System Table check box.
9. In the Rows fetched per block field, type the number of rows to be fetched per block.
10. In the Default string column length field, type the maximum data length for STRINGcolumns.
11. In the Binary column length field, type the maximum data length for BINARY columns.
12. In the Decimal column scale field, type the maximum number of digits to the right of thedecimal point for numeric data types.
13. To save your settings and close the Advanced Options dialog box, click OK
Configuring Server-Side Properties
You can use the driver to apply configuration properties to the Hive server.
14 | Cloudera ODBC Driver for Apache Hive
Windows Driver
To configure server-side properties:
1. To configure server-side properties for a DSN, open the ODBC Data Source Administratorwhere you created the DSN, then select the DSN and click Configure, then click AdvancedOptions, and then click Server Side Properties
OR
To configure server-side properties for a DSN-less connection, open the Cloudera Hive ODBCDriver Configuration tool, then click Advanced Options, and then click Server SideProperties
2. To create a server-side property, click Add, then type appropriate values in the Key andValue fields, and then click OK
Note:
For a list of all Hadoop and Hive server-side properties that yourimplementation supports, type set -v at the Hive CLI command line or Beeline.You can also execute the set -v query after connecting using the driver.
3. To edit a server-side property, select the property from the list, then click Edit, then updatethe Key and Value fields as needed, and then click OK
4. To delete a server-side property, select the property from the list, and then click Remove. Inthe confirmation dialog box, click Yes
5. To configure the driver to apply each server-side property by executing a query whenopening a session to the Hive server, select the Apply Server Side Properties with Queriescheck box.
OR
To configure the driver to use a more efficient method for applying server-side propertiesthat does not involve additional network round-tripping, clear the Apply Server SideProperties with Queries check box.
Note:
The more efficient method is not available for Hive Server 1, and it might not becompatible with some Hive Server 2 builds. If the server-side properties do nottake effect when the check box is clear, then select the check box.
6. To force the driver to convert server-side property key names to all lower case characters,select the Convert Key Name to Lower Case check box.
7. To save your settings and close the Server Side Properties dialog box, click OK
Configuring HTTP Options
You can configure options such as custom headers when using the HTTP transport protocol in theThrift layer.
Cloudera ODBC Driver for Apache Hive | 15
Windows Driver
To configure HTTP options:
1. If you are configuring HTTP for a DSN, open the ODBC Data Source Administrator where youcreated the DSN, then select the DSN, then click Configure, and then ensure that the ThriftTransport option is set to HTTP
OR
If you are configuring HTTP for a DSN-less connection, open the Cloudera Hive ODBC DriverConfiguration tool and then ensure that the Thrift Transport option is set to HTTP
2. To access HTTP options, click HTTP Options
Note:
The HTTP options are available only when the Thrift Transport option is set toHTTP.
3. In the HTTP Path field, type the partial URL corresponding to the Hive server.
4. To create a custom HTTP header, click Add, then type appropriate values in the Key andValue fields, and then click OK
5. To edit a custom HTTP header, select the header from the list, then click Edit, then updatethe Key and Value fields as needed, and then click OK
6. To delete a custom HTTP header, select the header from the list, and then click Remove. Inthe confirmation dialog box, click Yes
7. To save your settings and close the HTTP Options dialog box, click OK
Configuring SSL Verification
You can configure verification between the client and the Hive server over SSL.
To configure SSL verification:
1. To access SSL options for a DSN, open the ODBC Data Source Administrator where youcreated the DSN, then select the DSN, then click Configure, and then click SSL Options
OR
To access advanced options for a DSN-less connection, open the Cloudera Hive ODBC DriverConfiguration tool, and then click SSL Options
2. Select the Enable SSL check box.
3. To allow self-signed certificates from the server, select the Allow Self-signed ServerCertificate check box.
4. To allow the common name of a CA-issued SSL certificate to not match the host name of theHive server, select the Allow Common Name Host Name Mismatch check box.
5. To configure the driver to load SSL certificates from a specific PEM file when verifying theserver, specify the full path to the file in the Trusted Certificates field.
OR
To use the trusted CA certificates PEM file that is installed with the driver, leave the TrustedCertificates field empty.
16 | Cloudera ODBC Driver for Apache Hive
Windows Driver
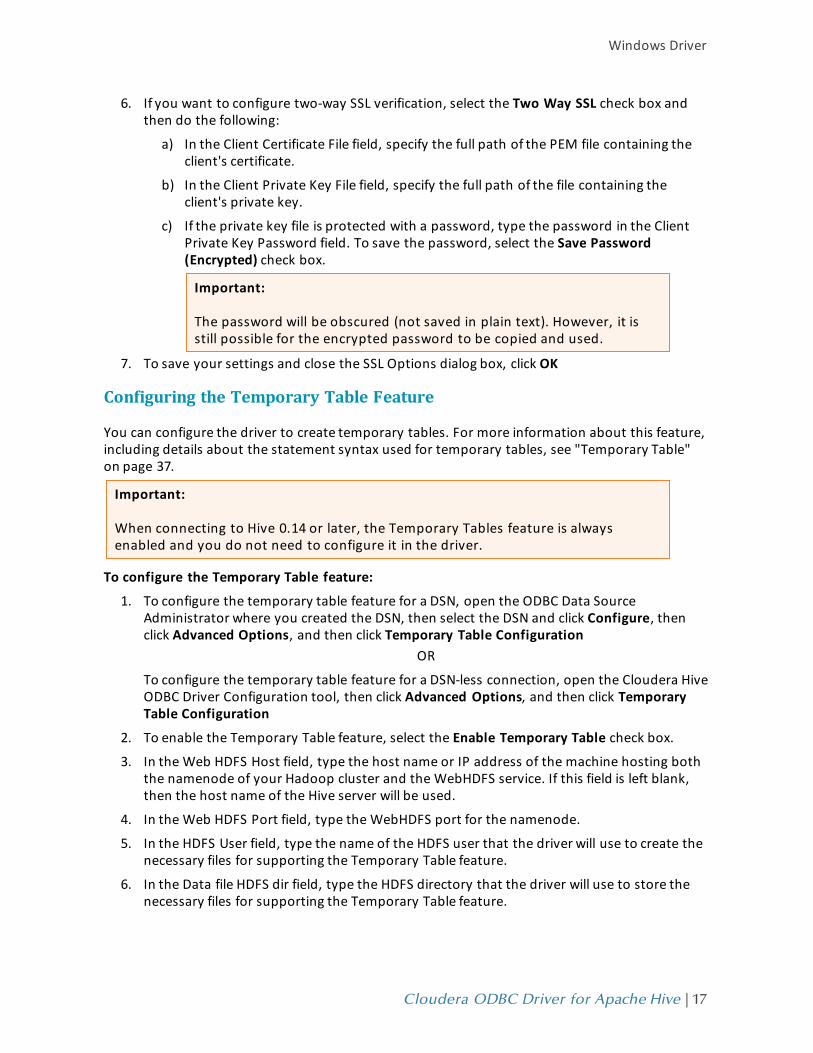
6. If you want to configure two-way SSL verification, select the Two Way SSL check box andthen do the following:
a) In the Client Certificate File field, specify the full path of the PEM file containing theclient's certificate.
b) In the Client Private Key File field, specify the full path of the file containing theclient's private key.
c) If the private key file is protected with a password, type the password in the ClientPrivate Key Password field. To save the password, select the Save Password(Encrypted) check box.
Important:
The password will be obscured (not saved in plain text). However, it isstill possible for the encrypted password to be copied and used.
7. To save your settings and close the SSL Options dialog box, click OK
Configuring the Temporary Table Feature
You can configure the driver to create temporary tables. For more information about this feature,including details about the statement syntax used for temporary tables, see "Temporary Table"on page 37.
Important:
When connecting to Hive 0.14 or later, the Temporary Tables feature is alwaysenabled and you do not need to configure it in the driver.
To configure the Temporary Table feature:
1. To configure the temporary table feature for a DSN, open the ODBC Data SourceAdministrator where you created the DSN, then select the DSN and click Configure, thenclick Advanced Options, and then click Temporary Table Configuration
OR
To configure the temporary table feature for a DSN-less connection, open the Cloudera HiveODBC Driver Configuration tool, then click Advanced Options, and then click TemporaryTable Configuration
2. To enable the Temporary Table feature, select the Enable Temporary Table check box.
3. In the Web HDFS Host field, type the host name or IP address of the machine hosting boththe namenode of your Hadoop cluster and the WebHDFS service. If this field is left blank,then the host name of the Hive server will be used.
4. In the Web HDFS Port field, type the WebHDFS port for the namenode.
5. In the HDFS User field, type the name of the HDFS user that the driver will use to create thenecessary files for supporting the Temporary Table feature.
6. In the Data file HDFS dir field, type the HDFS directory that the driver will use to store thenecessary files for supporting the Temporary Table feature.
Cloudera ODBC Driver for Apache Hive | 17
Windows Driver

Note:
Due to a problem in Hive (see https://issues.apache.org/jira/browse/HIVE-4554), HDFS paths with space characters do not work with versions of Hiveprior to 0.12.0.
7. In the Temp Table TTL field, type the number of minutes that a temporary table isguaranteed to exist in Hive after it is created.
8. To save your settings and close the Temporary Table Configuration dialog box, click OK
Linux Driver
System Requirements
You install the Cloudera ODBC Driver for Apache Hive on client computers accessing data in aHadoop cluster with the Hive service installed and running. Each computer where you install thedriver must meet the following minimum system requirements:
l One of the following distributions (32- and 64-bit editions are supported):o Red Hat® Enterprise Linux® (RHEL) 5.0 or 6.0o CentOS 5.0 or 6.0o SUSE Linux Enterprise Server (SLES) 11
l 45MB of available disk space
l One of the following ODBC driver managers installed:o iODBC 3.52.7 or latero unixODBC 2.2.12 or later
The driver is suitable for use with all versions of Hive.
Installing the Driver
There are two versions of the driver for Linux:
l ClouderaHiveODBC-32bit-Version-Release.LinuxDistro.i686.rpm for the 32-bit driver
l ClouderaHiveODBC-Version-Release.LinuxDistro.x86_64.rpm for the 64-bit driver
Version is the version number of the driver, and Release is the release number for this version ofthe driver.
The bitness of the driver that you select should match the bitness of the client applicationaccessing your Hadoop / Hive-based data. For example, if the client application is 64-bit, then youshould install the 64-bit driver. Note that 64-bit editions of Linux support both 32- and 64-bitapplications. Verify the bitness of your intended application and install the appropriate version ofthe driver.
18 | Cloudera ODBC Driver for Apache Hive
Linux Driver
Important:
Ensure that you install the driver using the RPM corresponding to your Linuxdistribution.
The Cloudera ODBC Driver for Apache Hive driver files are installed in the following directories:
l /opt/cloudera/hiveodbc contains release notes, the Cloudera ODBC Driver for Apache HiveInstallation and Configuration Guide in PDF format, and a Readme.txt file that providesplain text installation and configuration instructions.
l /opt/cloudera/hiveodbc/ErrorMessages contains error message files required by thedriver.
l /opt/cloudera/hiveodbc/Setup contains sample configuration files named odbc.ini andodbcinst.ini
l /opt/cloudera/hiveodbc/lib/32 contains the 32-bit shared libraries and the clouder-a.hiveodbc.ini configuration file.
l /opt/cloudera/hiveodbc/lib/64 contains the 64-bit shared libraries and the clouder-a.hiveodbc.ini configuration file.
To install the Cloudera ODBC Driver for Apache Hive:
1. In Red Hat Enterprise Linux or CentOS, log in as the root user, then navigate to the foldercontaining the driver RPM packages to install, and then type the following at the commandline, where RPMFileName is the file name of the RPM package containing the version of thedriver that you want to install:yum --nogpgcheck localinstall RPMFileName
OR
In SUSE Linux Enterprise Server, log in as the root user, then navigate to the foldercontaining the driver RPM packages to install, and then type the following at the commandline, where RPMFileName is the file name of the RPM package containing the version of thedriver that you want to install:zypper install RPMFileName
The Cloudera ODBC Driver for Apache Hive depends on the following resources:
l cyrus-sasl-2.1.22-7 or above
l cyrus-sasl-gssapi-2.1.22-7 or above
l cyrus-sasl-plain-2.1.22-7 or above
If the package manager in your Linux distribution cannot resolve the dependencies automaticallywhen installing the driver, then download and manually install the packages required by theversion of the driver that you want to install.
Verifying the Version Number
If you need to verify the version of the Cloudera ODBC Driver for Apache Hive that is installed onyour Linuxmachine, you can query the version number through the command-line interface.
Cloudera ODBC Driver for Apache Hive | 19
Linux Driver
To verify the version number:
At the command prompt, run the following command:yum list | grep ClouderaHiveODBC
OR
Run the following command:rpm -qa | grep ClouderaHiveODBC
The command returns information about the Cloudera ODBC Driver for Apache Hive that isinstalled on your machine, including the version number.
Setting the LD_LIBRARY_PATH Environment Variable
The LD_LIBRARY_PATH environment variable must include the paths to the installed ODBC drivermanager libraries.
For example, if ODBC driver manager libraries are installed in /usr/local/lib, then set LD_LIBRARY_PATH as follows:export LD_LIBRARY_PATH=$LD_LIBRARY_PATH:/usr/local/lib
For information about how to set environment variables permanently, refer to your Linux shelldocumentation.
For information about creating ODBC connections using the Cloudera ODBC Driver for ApacheHive, see "Configuring ODBC Connections for Non-Windows Platforms" on page 25.
Mac OS X Driver
System Requirements
You install the Cloudera ODBC Driver for Apache Hive on client computers accessing data in aHadoop cluster with the Hive service installed and running. Each computer where you install thedriver must meet the following minimum system requirements:
l Mac OS X version 10.6.8 or later
l 100 MB of available disk space
l iODBC 3.52.7 or later
The driver is suitable for use with all versions of Hive. The driver supports both 32- and 64-bitclient applications.
Installing the Driver
The Cloudera ODBC Driver for Apache Hive driver files are installed in the following directories:
l /opt/cloudera/hiveodbc contains release notes and the Cloudera ODBC Driver for ApacheHive Installation and Configuration Guide in PDF format.
l /opt/cloudera/hiveodbc/ErrorMessages contains error messages required by the driver.
20 | Cloudera ODBC Driver for Apache Hive
Mac OS X Driver
l /opt/cloudera/hiveodbc/Setup contains sample configuration files named odbc.ini andodbcinst.ini
l /opt/cloudera/hiveodbc/lib/universal contains the driver binaries and the clouder-a.hiveodbc.ini configuration file.
To install the Cloudera ODBC Driver for Apache Hive:
1. Double-click ClouderaHiveODBC.dmg to mount the disk image.
2. Double-click ClouderaHiveODBC.pkg to run the installer.
3. In the installer, click Continue
4. On the Software License Agreement screen, click Continue, and when the prompt appears,click Agree if you agree to the terms of the License Agreement.
5. Optionally, to change the installation location, click Change Install Location, then select thedesired location, and then click Continue
6. To accept the installation location and begin the installation, click Install
7. When the installation completes, click Close
Verifying the Version Number
If you need to verify the version of the Cloudera ODBC Driver for Apache Hive that is installed onyour Mac OS X machine, you can query the version number through the Terminal.
To verify the version number:
At the Terminal, run the following command:pkgutil --info cloudera.hiveodbc
The command returns information about the Cloudera ODBC Driver for Apache Hive that isinstalled on your machine, including the version number.
Setting the DYLD_LIBRARY_PATH Environment Variable
The DYLD_LIBRARY_PATH environment variable must include the paths to the installed ODBCdriver manager libraries.
For example, if ODBC driver manager libraries are installed in /usr/local/lib, then set DYLD_LIBRARY_PATH as follows:export DYLD_LIBRARY_PATH=$DYLD_LIBRARY_PATH:/usr/local/lib
For information about how to set environment variables permanently, refer to your Mac OS Xshell documentation.
For information about creating ODBC connections using the Cloudera ODBC Driver for ApacheHive, see "Configuring ODBC Connections for Non-Windows Platforms" on page 25.
Cloudera ODBC Driver for Apache Hive | 21
Mac OS X Driver

AIX Driver
System Requirements
You install the Cloudera ODBC Driver for Apache Hive on client computers accessing data in aHadoop cluster with the Hive service installed and running. Each computer where you install thedriver must meet the following minimum system requirements:
l IBM AIX 5.3, 6.1, or 7.1 (32- and 64-bit editions are supported)
l 150 MB of available disk space
l One of the following ODBC driver managers installed:o iODBC 3.52.7 or latero unixODBC 2.3.0 or later
The driver is suitable for use with all versions of Hive.
Installing the Driver
There are two versions of the driver for AIX:
l ClouderaHiveODBC-32bit-Version-Release.ppc.rpm for the 32-bit driver
l ClouderaHiveODBC-Version-Release.ppc.rpm for the 64-bit driver
Version is the version number of the driver, and Release is the release number for this version ofthe driver.
The bitness of the driver that you select should match the bitness of the client applicationaccessing your Hadoop / Hive-based data. For example, if the client application is 64-bit, then youshould install the 64-bit driver. Note that 64-bit editions of AIX support both 32- and 64-bitapplications. Verify the bitness of your intended application and install the appropriate version ofthe driver.
The Cloudera ODBC Driver for Apache Hive driver files are installed in the following directories:
l /opt/cloudera/hiveodbc contains release notes, the Cloudera ODBC Driver for Apache HiveInstallation and Configuration Guide in PDF format, and a Readme.txt file that providesplain text installation and configuration instructions.
l /opt/cloudera/hiveodbc/ErrorMessages contains error message files required by thedriver.
l /opt/cloudera/hiveodbc/Setup contains sample configuration files named odbc.ini andodbcinst.ini
l /opt/cloudera/hiveodbc/lib/32 contains the 32-bit driver and the cloudera.hiveodbc.iniconfiguration file.
l /opt/cloudera/hiveodbc/lib/64 contains the 64-bit driver and the cloudera.hiveodbc.iniconfiguration file.
22 | Cloudera ODBC Driver for Apache Hive
AIX Driver
To install the Cloudera ODBC Driver for Apache Hive:
1. Log in as the root user, then navigate to the folder containing the driver RPM packages toinstall, and then type the following at the command line, where RPMFileName is the filename of the RPM package containing the version of the driver that you want to install:rpm --install RPMFileName
Verifying the Version Number
If you need to verify the version of the Cloudera ODBC Driver for Apache Hive that is installed onyour AIX machine, you can query the version number through the command-line interface.
To verify the version number:
At the command prompt, run the following command:rpm -qa | grep ClouderaHiveODBC
The command returns information about the Cloudera ODBC Driver for Apache Hive that isinstalled on your machine, including the version number.
Setting the LD_LIBRARY_PATH Environment Variable
The LD_LIBRARY_PATH environment variable must include the path to the installed ODBC drivermanager libraries.
For example, if ODBC driver manager libraries are installed in /usr/local/lib, then set LD_LIBRARY_PATH as follows:export LD_LIBRARY_PATH=$LD_LIBRARY_PATH:/usr/local/lib
For information about how to set environment variables permanently, refer to your AIX shelldocumentation.
For information about creating ODBC connections using the Cloudera ODBC Driver for ApacheHive, see "Configuring ODBC Connections for Non-Windows Platforms" on page 25.
Debian Driver
System Requirements
You install the Cloudera ODBC Driver for Apache Hive on client computers accessing data in aHadoop cluster with the Hive service installed and running. Each computer where you install thedriver must meet the following minimum system requirements:
l Debian 7 (Ubuntu 12.04 LTS and Ubuntu 14.04 LTS)
l 45MB of available disk space
l One of the following ODBC driver managers installed:o iODBC 3.52.7 or latero unixODBC 2.2.12 or later
Cloudera ODBC Driver for Apache Hive | 23
Debian Driver
The driver is suitable for use with all versions of Hive. It supports both 32- and 64-bit clientapplications.
Installing the Driver
There are two versions of the driver for Debian:
l ClouderaHiveODBC-32bit-Version-Release_i386.deb for the 32-bit driver
l ClouderaHiveODBC-Version-Release_amd64.deb for the 64-bit driver
Version is the version number of the driver, and Release is the release number for this version ofthe driver.
The bitness of the driver that you select should match the bitness of the client applicationaccessing your Hadoop / Hive-based data. For example, if the client application is 64-bit, then youshould install the 64-bit driver. Note that 64-bit editions of Debian support both 32- and 64-bitapplications. Verify the bitness of your intended application and install the appropriate version ofthe driver.
The Cloudera ODBC Driver for Apache Hive driver files are installed in the following directories:
l /opt/cloudera/hiveodbc contains release notes, the Cloudera ODBC Driver for Apache HiveInstallation and Configuration Guide in PDF format, and a Readme.txt file that providesplain text installation and configuration instructions.
l /opt/cloudera/hiveodbc/ErrorMessages contains error message files required by thedriver.
l /opt/cloudera/hiveodbc/Setup contains sample configuration files named odbc.ini andodbcinst.ini
l /opt/cloudera/hiveodbc/lib/32 contains the 32-bit shared libraries and the clouder-a.hiveodbc.ini configuration file.
l /opt/cloudera/hiveodbc/lib/64 contains the 64-bit shared libraries and the clouder-a.hiveodbc.ini configuration file.
To install the Cloudera ODBC Driver for Apache Hive:
1. In Ubuntu, log in as the root user, then navigate to the folder containing the driver Debianpackages to install, and double-click ClouderaHiveODBC-32bit-Version-Release_i386.deb orClouderaHiveODBC-Version-Release_amd64.deb
2. Follow the instructions in the installer to complete the installation process.
3. If you received a license file via e-mail, then copy the license file into the/opt/cloudera/hiveodbc/lib/32 or /opt/cloudera/hiveodbc/lib/64 folder, depending on theversion of the driver that you installed.
Note:
To avoid security issues, you may need to save the license file on your localcomputer prior to copying the file into the folder.
24 | Cloudera ODBC Driver for Apache Hive
Debian Driver
The Cloudera ODBC Driver for Apache Hive depends on the following resources:
l cyrus-sasl-2.1.22-7 or above
l cyrus-sasl-gssapi-2.1.22-7 or above
l cyrus-sasl-plain-2.1.22-7 or above
If the package manager in your Ubuntu distribution cannot resolve the dependenciesautomatically when installing the driver, then download and manually install the packagesrequired by the version of the driver that you want to install.
Verifying the Version Number
If you need to verify the version of the Cloudera ODBC Driver for Apache Hive that is installed onyour Debian machine, you can query the version number through the command-line interface.
To verify the version number:
At the command prompt, run the following command:dpkg -l | grep ClouderaHiveODBC
The command returns information about the Cloudera ODBC Driver for Apache Hive that isinstalled on your machine, including the version number.
Setting the LD_LIBRARY_PATH Environment Variable
The LD_LIBRARY_PATH environment variable must include the path to the installed ODBC drivermanager libraries.
For example, if ODBC driver manager libraries are installed in /usr/local/lib, then set LD_LIBRARY_PATH as follows:export LD_LIBRARY_PATH=$LD_LIBRARY_PATH:/usr/local/lib
For information about how to set environment variables permanently, refer to your Ubuntu shelldocumentation.
For information about creating ODBC connections using the Cloudera ODBC Driver for ApacheHive, see "Configuring ODBC Connections for Non-Windows Platforms" on page 25.
Configuring ODBC Connections for Non-Windows PlatformsThe following sections describe how to configure ODBC connection when using the Cloudera ODBCDriver for Apache Hive with non-Windows platforms:
l "Files" on page 26
l "Sample Files" on page 26
l "Configuring the Environment" on page 27
l "Configuring the odbc.ini File" on page 27
l "Configuring the odbcinst.ini File" on page 29
Cloudera ODBC Driver for Apache Hive | 25
Configuring ODBC Connections for Non-Windows Platforms
l "Configuring the cloudera.hiveodbc.ini File" on page 30
l "Configuring Service Discovery Mode" on page 31
l "Configuring Authentication" on page 31
Files
ODBC driver managers use configuration files to define and configure ODBC data sources anddrivers. By default, the following configuration files residing in the user’s home directory are used:
l .odbc.ini is used to define ODBC data sources, and it is required for DSNs.
l .odbcinst.ini is used to define ODBC drivers, and it is optional.
Also, by default the Cloudera ODBC Driver for Apache Hive is configured using thecloudera.hiveodbc.ini file, which is located in one of the following directories depending on theversion of the driver that you are using:
l /opt/cloudera/hiveodbc/lib/32 for the 32-bit driver on Linux/AIX/Debian
l /opt/cloudera/hiveodbc/lib/64 for the 64-bit driver on Linux/AIX/Debian
l /opt/cloudera/hiveodbc/lib/universal for the driver on Mac OS X
The cloudera.hiveodbc.ini file is required.
Note:
The cloudera.hiveodbc.ini file in the /lib subfolder provides default settings for mostconfiguration options available in the Cloudera ODBC Driver for Apache Hive.
You can set driver configuration options in your odbc.ini and cloudera.hiveodbc.ini files.Configuration options set in a cloudera.hiveodbc.ini file apply to all connections, whereasconfiguration options set in an odbc.ini file are specific to a connection. Configuration options setin odbc.ini take precedence over configuration options set in cloudera.hiveodbc.ini. Forinformation about the configuration options available for controlling the behavior of DSNs thatare using the Cloudera ODBC Driver for Apache Hive, see Appendix D "Driver ConfigurationOptions" on page 47.
Sample Files
The driver installation contains the following sample configuration files in the Setup directory:
l odbc.ini
l odbcinst.ini
These sample configuration files provide preset values for settings related to the Cloudera ODBCDriver for Apache Hive.
The names of the sample configuration files do not begin with a period (.) so that they will appearin directory listings by default. A filename beginning with a period (.) is hidden. For odbc.ini andodbcinst.ini, if the default location is used, then the filenames must begin with a period (.).
26 | Cloudera ODBC Driver for Apache Hive
Configuring ODBC Connections for Non-Windows Platforms
If the configuration files do not exist in the home directory, then you can copy the sampleconfiguration files to the home directory, and then rename the files. If the configuration filesalready exist in the home directory, then use the sample configuration files as a guide to modifythe existing configuration files.
Configuring the Environment
Optionally, you can use three environment variables—ODBCINI, ODBCSYSINI, andCLOUDERAHIVEINI—to specify different locations for the odbc.ini, odbcinst.ini, andcloudera.hiveodbc.ini configuration files by doing the following:
l Set ODBCINI to point to your odbc.ini file.
l Set ODBCSYSINI to point to the directory containing the odbcinst.ini file.
l Set CLOUDERAHIVEINI to point to your cloudera.hiveodbc.ini file.
For example, if your odbc.ini and cloudera.hiveodbc.ini files are located in /etc and yourodbcinst.ini file is located in /usr/local/odbc, then set the environment variables as follows:export ODBCINI=/etc/odbc.ini
export ODBCSYSINI=/usr/local/odbc
export CLOUDERAHIVEINI=/etc/cloudera.hiveodbc.ini
The following search order is used to locate the cloudera.hiveodbc.ini file:
1. If the CLOUDERAHIVEINI environment variable is defined, then the driver searches for thefile specified by the environment variable.
Important:
CLOUDERAHIVEINI must specify the full path, including the file name.
2. The directory containing the driver’s binary is searched for a file namedcloudera.hiveodbc.ini (not beginning with a period).
3. The current working directory of the application is searched for a file namedcloudera.hiveodbc.ini (not beginning with a period).
4. The directory ~/ (that is, $HOME) is searched for a hidden file named .cloudera.hiveodbc.ini
5. The directory /etc is searched for a file named cloudera.hiveodbc.ini (not beginning with aperiod).
Configuring the odbc.ini File
Note:
If you are using a DSN-less connection, then you do not need to configure theodbc.ini file. For information about configuring a DSN-less connection, see "DSN-lessConnections" on page 40.
Cloudera ODBC Driver for Apache Hive | 27
Configuring ODBC Connections for Non-Windows Platforms
ODBC Data Source Names (DSNs) are defined in the odbc.ini configuration file. The file is dividedinto several sections:
l [ODBC] is optional and used to control global ODBC configuration, such as ODBC tracing.
l [ODBC Data Sources] is required, listing DSNs and associating DSNs with a driver.
l A section having the same name as the data source specified in the [ODBC Data Sources] sec-tion is required to configure the data source.
The following is an example of an odbc.ini configuration file for Linux/AIX/Debian:[ODBC Data Sources]
Sample Cloudera Hive DSN 32=Cloudera Hive ODBC Driver 32-bit
[Sample Cloudera Hive DSN 32]
Driver=/opt/cloudera/hiveodbc/lib/32/libclouderahiveodbc32.so
HOST=MyHiveServer
PORT=10000
MyHiveServer is the IP address or host name of the Hive server.
The following is an example of an odbc.ini configuration file for Mac OS X:[ODBC Data Sources]
Sample Cloudera Hive DSN=Cloudera Hive ODBC Driver
[Sample Cloudera Hive DSN]
Driver=/opt/cloudera/hiveodbc/lib/universal/libclouderahiveodbc.dylib
HOST=MyHiveServer
PORT=10000
MyHiveServer is the IP address or host name of the Hive server.
To create a Data Source Name:
1. Open the .odbc.ini configuration file in a text editor.
2. In the [ODBC Data Sources] section, add a new entry by typing the Data Source Name (DSN),then an equal sign (=), and then the driver name.
3. In the .odbc.ini file, add a new section with a name that matches the DSN you specified instep 2, and then add configuration options to the section. Specify configuration options askey-value pairs.
Note:
Hive Server 1 does not support authentication. Most default configurations ofHive Server 2 require User Name authentication, which you configure by settingthe AuthMech key to 2. To verify the authentication mechanism that you needto use for your connection, check the configuration of your Hadoop / Hivedistribution. For more information, see "Authentication Options" on page 41.
28 | Cloudera ODBC Driver for Apache Hive
Configuring ODBC Connections for Non-Windows Platforms
4. Save the .odbc.ini configuration file.
For information about the configuration options available for controlling the behavior of DSNsthat are using the Cloudera ODBC Driver for ApacheHive, see Appendix D "Driver ConfigurationOptions" on page 47.
Configuring the odbcinst.ini File
ODBC drivers are defined in the odbcinst.ini configuration file. The configuration file is optionalbecause drivers can be specified directly in the odbc.ini configuration file, as described in"Configuring the odbc.ini File" on page 27.
The odbcinst.ini file is divided into the following sections:
l [ODBC Drivers] lists the names of all the installed ODBC drivers.
l A section having the same name as the driver name specified in the [ODBC Drivers] sectionlists driver attributes and values.
The following is an example of an odbcinst.ini configuration file for Linux/AIX/Debian:[ODBC Drivers]
Cloudera Hive ODBC Driver 32-bit=Installed
Cloudera Hive ODBC Driver 64-bit=Installed
[Cloudera Hive ODBC Driver 32-bit]
Description=Cloudera Hive ODBC Driver (32-bit)
Driver=/opt/cloudera/hiveodbc/lib/32/libclouderahiveodbc32.so
[Cloudera Hive ODBC Driver 64-bit]
Description=Cloudera Hive ODBC Driver (64-bit)
Driver=/opt/cloudera/hiveodbc/lib/64/libclouderahiveodbc64.so
The following is an example of an odbcinst.ini configuration file for Mac OS X:[ODBC Drivers]
Cloudera Hive ODBC Driver=Installed
[Cloudera Hive ODBC Driver]
Description=Cloudera Hive ODBC Driver
Driver=/opt/cloudera/hiveodbc/lib/universal/libclouderahiveodbc.dylib
To define a driver:
1. Open the .odbcinst.ini configuration file in a text editor.
2. In the [ODBC Drivers] section, add a new entry by typing the driver name and then typing=Installed
Cloudera ODBC Driver for Apache Hive | 29
Configuring ODBC Connections for Non-Windows Platforms
Note:
Type a symbolic name that you want to use to refer to the driver in connectionstrings or DSNs.
3. In the .odbcinst.ini file, add a new section with a name that matches the driver name youtyped in step 2, and then add configuration options to the section based on the sampleodbcinst.ini file provided in the Setup directory. Specify configuration options as key-valuepairs.
4. Save the .odbcinst.ini configuration file.
Configuring the cloudera.hiveodbc.ini File
The cloudera.hiveodbc.ini file contains configuration settings for the Cloudera ODBC Driver forApacheHive. Settings that you define in the cloudera.hiveodbc.ini file apply to all connections thatuse the driver.
To configure the Cloudera ODBC Driver for Apache Hive to work with your ODBC drivermanager:
1. Open the cloudera.hiveodbc.ini configuration file in a text editor.
2. Edit the DriverManagerEncoding setting. The value is usually UTF-16 orUTF-32 if you areusing Linux/Mac OS X, depending on the ODBC driver manager you use. iODBC uses UTF-32, and unixODBC uses UTF-16. To determine the correct setting to use, refer to your ODBCDriverManager documentation.
OR
If you are using AIX and the unixODBC driver manager, then set the value to UTF-16. If youare using AIX and the iODBC driver manager, then set the value to UTF-16 for the 32-bitdriver or UTF-32 for the 64-bit driver.
3. Edit the ODBCInstLib setting. The value is the name of the ODBCInst shared library for theODBC driver manager you use. To determine the correct library to specify, refer to yourODBC driver manager documentation.
The configuration file defaults to the shared library for iODBC. In Linux/AIX/Debian, theshared library name for iODBC is libiodbcinst.so. In Mac OS X, the shared library name foriODBC is libiodbcinst.dylib.
Note:
You can specify an absolute or relative filename for the library. If you intend touse the relative filename, then the path to the library must be included in thelibrary path environment variable. In Linux/AIX/Debian, the library pathenvironment variable is named LD_LIBRARY_PATH. In Mac OS X, the librarypath environment variable is named DYLD_LIBRARY_PATH.
4. Save the cloudera.hiveodbc.ini configuration file.
30 | Cloudera ODBC Driver for Apache Hive
Configuring ODBC Connections for Non-Windows Platforms
Configuring Service Discovery Mode
You can configure the Cloudera ODBC Driver for Apache Hive to discover Hive Server 2 services viaZooKeeper.
To enable service discovery via ZooKeeper:
1. Open the odbc.ini configuration file in a text editor.
2. Set the ServiceDiscoveryMode connection attribute to 1
3. Set the ZKNamespace connection attribute to specify the namespace on ZooKeeper underwhich Hive Server 2 znodes are added.
4. Set the Host connection attribute to specify the ZooKeeper ensemble as a comma-separated list of ZooKeeper servers. For example, type the following, where zk_host is theIP address or host name of the ZooKeeper server and zk_port is the number of the portthat the ZooKeeper server uses:
zk_host1:zk_port1,zk_host2:zk_port2
Important:
When ServiceDiscoveryMode is set to 1, connections to Hive Server 1 are notsupported and the Port connection attribute is not applicable.
Depending on whether service discovery mode is enabled or disabled, you may need to providedifferent connection attributes or values in your connection string or DSN. For more informationabout connection attributes, see "Driver Configuration Options" on page 47.
Configuring Authentication
Some Hive servers are configured to require authentication for access. To connect to a Hiveserver, you must configure the Cloudera ODBC Driver for ApacheHive to use the authenticationmechanism that matches the access requirements of the server and provides the necessarycredentials.
For information about how to determine the type of authentication your Hive server requires, seeAppendix B"Authentication Options" on page 41.
You can select the type of authentication to use for a connection by defining the AuthMechconnection attribute in a connection string or in a DSN (in the odbc.ini file). Depending on theauthentication mechanism you use, there may be additional connection attributes that you mustdefine. For more information about the attributes involved in configuring authentication, seeAppendix D "Driver Configuration Options" on page 47.
Using No Authentication
When connecting to a Hive server of type Hive Server 1, you must use No Authentication. Whenyou use No Authentication, SASL is not supported.
Cloudera ODBC Driver for Apache Hive | 31
Configuring ODBC Connections for Non-Windows Platforms
To configure a connection without authentication:
1. Set the AuthMech connection attribute to 0
2. Set the ThriftTransport connection attribute to the transport protocol to use in the Thriftlayer.
Important:
When using this authentication mechanism, SASL (ThriftTransport=1) is notsupported.
3. If the Hive server is configured to use SSL, then configure SSL for the connection. For moreinformation, see "Configuring SSL Verification" on page 33.
Using Kerberos
Kerberos must be installed and configured before you can use this authentication mechanism. Formore information, refer to the MIT Kerberos documentation.
This authentication mechanism is available only for Hive Server 2. When you use Kerberosauthentication, the Binary transport protocol is not supported.
To configure Kerberos authentication:
1. Set the AuthMech connection attribute to 1
2. If your Kerberos setup does not define a default realm or if the realm of your Hive server isnot the default, then set the appropriate realm using the KrbRealm attribute.
OR
To use the default realm defined in your Kerberos setup, do not set the KrbRealm attribute.
3. Set the KrbHostFQDN attribute to the fully qualified domain name of the Hive Server 2 host.
4. Set the KrbServiceName attribute to the service name of the Hive server.
5. Set the ThriftTransport connection attribute to the transport protocol to use in the Thriftlayer.
Important:
When using this authentication mechanism, Binary (ThriftTransport=0) is notsupported.
6. If the Hive server is configured to use SSL, then configure SSL for the connection. For moreinformation, see "Configuring SSL Verification" on page 33.
Using User Name
This authentication mechanism requires a user name but does not require a password. The username labels the session, facilitating database tracking.
This authentication mechanism is available only for Hive Server 2. Most default configurations ofHive Server 2 require User Name authentication. When you use User Name authentication, SSL isnot supported and you must use SASL as the Thrift transport protocol.
32 | Cloudera ODBC Driver for Apache Hive
Configuring ODBC Connections for Non-Windows Platforms
To configure User Name authentication:
1. Set the AuthMech connection attribute to 2
2. Set the UID attribute to an appropriate user name for accessing the Hive server.
3. Set the ThriftTransport connection attribute to 1
Using User Name and Password
This authentication mechanism requires a user name and a password.
This authentication mechanism is available only for Hive Server 2.
To configure User Name and Password authentication:
1. Set the AuthMech connection attribute to 3
2. Set the UID attribute to an appropriate user name for accessing the Hive server.
3. Set the PWD attribute to the password corresponding to the user name you provided instep 2.
4. Set the ThriftTransport connection attribute to the transport protocol to use in the Thriftlayer.
5. If the Hive server is configured to use SSL, then configure SSL for the connection. For moreinformation, see "Configuring SSL Verification" on page 33.
Configuring SSL Verification
You can configure verification between the client and the Hive server over SSL.
To configure SSL verification:
1. Open the odbc.ini configuration file in a text editor.
2. To enable SSL, set the SSL attribute to 1
3. To allow self-signed certificates from the server, set the AllowSelfSignedServerCert attributeto 1.
4. To allow the common name of a CA-issued SSL certificate to not match the host name of theHive server, set the CAIssuedCertNamesMismatch attribute to 1.
5. To configure the driver to load SSL certificates from a specific PEM file when verifying theserver, set the TrustedCerts attribute to the full path of the PEM file.
OR
To use the trusted CA certificates PEM file that is installed with the driver, do not specify avalue for the TrustedCerts attribute.
6. If you want to configure two-way SSL verification, set the TwoWaySSL attribute to 1 andthen do the following:
a) Set the ClientCert attribute to the full path of the PEM file containing the client'scertificate.
b) Set the ClientPrivateKey attribute to the full path of the file containing the client'sprivate key.
Cloudera ODBC Driver for Apache Hive | 33
Configuring ODBC Connections for Non-Windows Platforms
c) If the private key file is protected with a password, set the ClientPrivateKeyPasswordattribute to the password.
7. Save the odbc.ini configuration file.
FeaturesMore information is provided on the following features of the Cloudera ODBC Driver for ApacheHive:
l "SQL Query versus HiveQL Query" on page 34
l "SQL Connector" on page 34
l "Data Types" on page 35
l "Catalog and Schema Support" on page 36
l "hive_system Table" on page 36
l "Server-Side Properties" on page 36
l "Get Tables With Query" on page 38
l "Active Directory" on page 38
l "Write-back" on page 38
l "Dynamic Service Discovery using ZooKeeper" on page 39
SQL Query versus HiveQL Query
The native query language supported by Hive is HiveQL. For simple queries, HiveQL is a subset ofSQL-92. However, the syntax is different enough that most applications do not work with nativeHiveQL.
SQL Connector
To bridge the difference between SQL and HiveQL, the SQL Connector feature translates standardSQL-92 queries into equivalent HiveQL queries. The SQL Connector performs syntacticaltranslations and structural transformations. For example:
l Quoted Identifiers — The double quotes (") that SQL uses to quote identifiers are trans-lated into back quotes (`) to match HiveQL syntax. The SQL Connector needs to handle thistranslation because even when a driver reports the back quote as the quote character,some applications still generate double-quoted identifiers.
l Table Aliases — Support is provided for the AS keyword between a table reference and itsalias, which HiveQL normally does not support.
l JOIN, INNER JOIN, and CROSS JOIN —SQL JOIN, INNER JOIN, and CROSS JOIN syntax istranslated to HiveQL JOIN syntax.
l TOP N/LIMIT—SQL TOP N queries are transformed to HiveQL LIMIT queries.
34 | Cloudera ODBC Driver for Apache Hive
Features
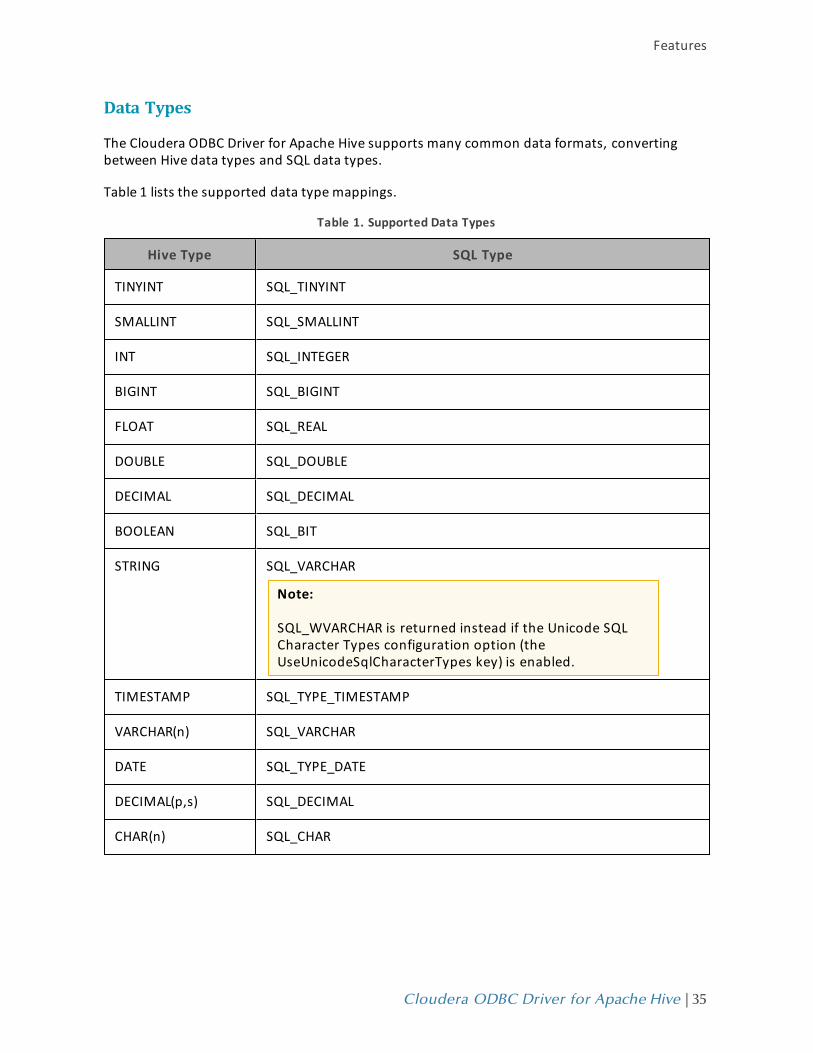
Data Types
The Cloudera ODBC Driver for Apache Hive supports many common data formats, convertingbetween Hive data types and SQL data types.
Table 1 lists the supported data type mappings.
Hive Type SQL Type
TINYINT SQL_TINYINT
SMALLINT SQL_SMALLINT
INT SQL_INTEGER
BIGINT SQL_BIGINT
FLOAT SQL_REAL
DOUBLE SQL_DOUBLE
DECIMAL SQL_DECIMAL
BOOLEAN SQL_BIT
STRING SQL_VARCHAR
Note:
SQL_WVARCHAR is returned instead if the Unicode SQLCharacter Types configuration option (theUseUnicodeSqlCharacterTypes key) is enabled.
TIMESTAMP SQL_TYPE_TIMESTAMP
VARCHAR(n) SQL_VARCHAR
DATE SQL_TYPE_DATE
DECIMAL(p,s) SQL_DECIMAL
CHAR(n) SQL_CHAR
Table 1. Supported Data Types
Cloudera ODBC Driver for Apache Hive | 35
Features
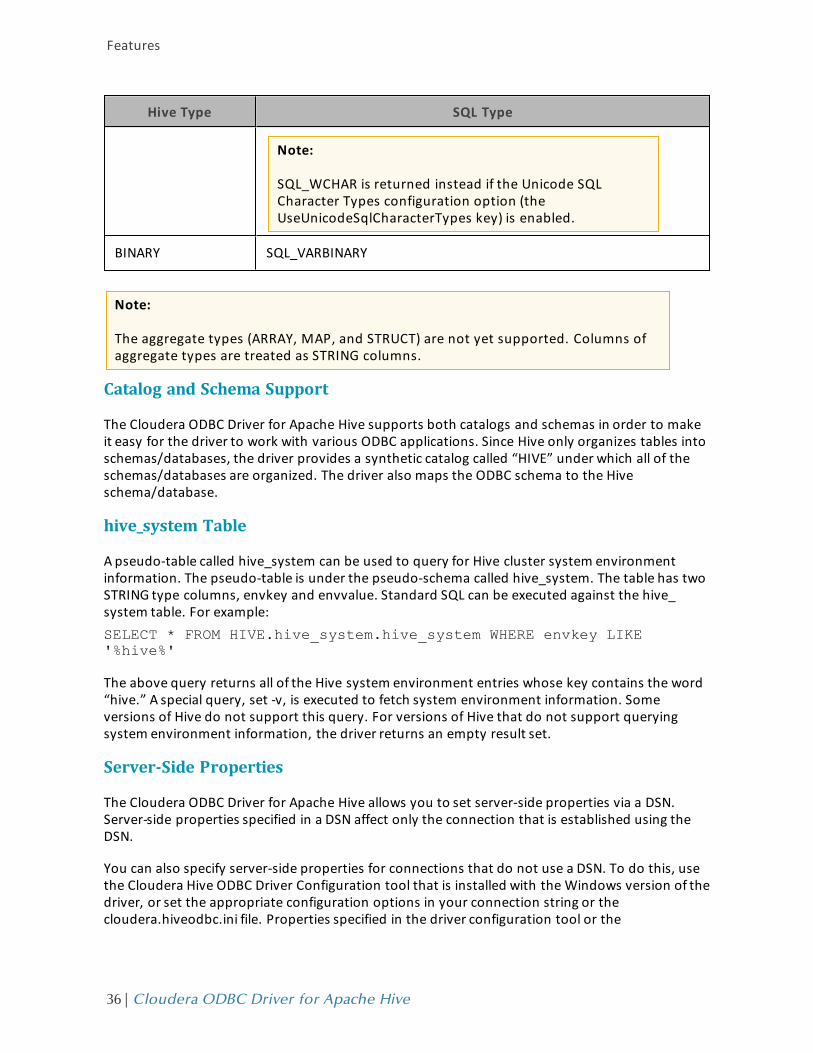
Hive Type SQL Type
Note:
SQL_WCHAR is returned instead if the Unicode SQLCharacter Types configuration option (theUseUnicodeSqlCharacterTypes key) is enabled.
BINARY SQL_VARBINARY
Note:
The aggregate types (ARRAY, MAP, and STRUCT) are not yet supported. Columns ofaggregate types are treated as STRING columns.
Catalog and Schema Support
The Cloudera ODBC Driver for Apache Hive supports both catalogs and schemas in order to makeit easy for the driver to work with various ODBC applications. Since Hive only organizes tables intoschemas/databases, the driver provides a synthetic catalog called “HIVE” under which all of theschemas/databases are organized. The driver also maps the ODBC schema to the Hiveschema/database.
hive_system Table
A pseudo-table called hive_system can be used to query for Hive cluster system environmentinformation. The pseudo-table is under the pseudo-schema called hive_system. The table has twoSTRING type columns, envkey and envvalue. Standard SQL can be executed against the hive_system table. For example:SELECT * FROM HIVE.hive_system.hive_system WHERE envkey LIKE'%hive%'
The above query returns all of the Hive system environment entries whose key contains the word“hive.” A special query, set -v, is executed to fetch system environment information. Someversions of Hive do not support this query. For versions of Hive that do not support queryingsystem environment information, the driver returns an empty result set.
Server-Side Properties
The Cloudera ODBC Driver for Apache Hive allows you to set server-side properties via a DSN.Server-side properties specified in a DSN affect only the connection that is established using theDSN.
You can also specify server-side properties for connections that do not use a DSN. To do this, usethe Cloudera Hive ODBC Driver Configuration tool that is installed with the Windows version of thedriver, or set the appropriate configuration options in your connection string or thecloudera.hiveodbc.ini file. Properties specified in the driver configuration tool or the
36 | Cloudera ODBC Driver for Apache Hive
Features
cloudera.hiveodbc.ini file apply to all connections that use the Cloudera ODBC Driver for ApacheHive.
For more information about setting server-side properties when using the Windows driver, see"Configuring Server-Side Properties" on page 14. For information about setting server-sideproperties when using the driver on a non-Windows platform, see "Driver Configuration Options"on page 47.
Temporary Table
The Temporary Table feature adds support for creating temporary tables and inserting literalvalues into temporary tables. Temporary tables are only accessible by the ODBC connection thatcreated them and they will be dropped upon disconnect.
CREATE TABLE Statement for Temporary Tables
The driver supports the following DDL syntax for creating temporary tables:<create table statement> := CREATE TABLE <temporary table name><left paren><column definition list><right paren>
<column definition list> := <column definition>[, <columndefinition>]*
<column definition> := <column name> <data type>
<temporary table name> := <double quote><number sign><tablename><double quote>
<left paren> := (
<right paren> := )
<double quote> := "
<number sign> := #
The following is an example of a SQL statement for creating a temporary table:CREATE TABLE "#TEMPTABLE1" (C1 DATATYPE_1, C2 DATATYPE_2, …, CnDATATYPE_n)
The temporary table name in a SQL query must be surrounded by double quotes ("), and thenamemust begin with a number sign (#).
Note:
You can only use data types that are supported by Hive.
INSERT Statement for Temporary Tables
The driver supports the following DDL syntax for inserting data into temporary tables:<insert statement> := INSERT INTO <temporary table name> <leftparen><column name list><right paren> VALUES <left paren><literalvalue list><right paren>
<column name list> := <column name>[, <column name>]*
Cloudera ODBC Driver for Apache Hive | 37
Features
<literal value list> := <literal value>[, <literal value>]*
<temporary table name> := <double quote><number sign><tablename><double quote>
<left paren> := (
<right paren> := )
<double quote> := "
<number sign> := #
The following is an example of a SQL statement for inserting data into temporary tables:INSERT INTO "#TEMPTABLE1" values (VAL(C1), VAL(C2) … VAL(Cn) )
VAL(C1) is the literal value for the first column in the table, and VAL(Cn) is the literal value for thenth column in the table.
Note:
The INSERT statement is only supported for temporary tables.
Get Tables With Query
The Get Tables With Query configuration option allows you to choose whether to use the SHOWTABLES query or the GetTables API call to retrieve table names from a database.
Hive Server 2 has a limit on the number of tables that can be in a database when handling theGetTables API call. When the number of tables in a database is above the limit, the API call willreturn a stack overflow error or a timeout error. The exact limit and the error that appearsdepends on the JVM settings.
As a workaround for this issue, enable the Get Tables with Query configuration option (orGetTablesWithQuery key) to use the query instead of the API call.
Active Directory
The Cloudera ODBC Driver for Apache Hive supports Active Directory Kerberos onWindows. Thereare two prerequisites for using Active Directory Kerberos on Windows:
l MIT Kerberos is not installed on the client Windows machine.
l The MIT Kerberos Hadoop realm has been configured to trust the Active Directory realm,according to Cloudera's documentation, so that users in the Active Directory realm canaccess services in the MIT Kerberos Hadoop realm.
Write-back
The Cloudera ODBC Driver for Apache Hive supports translation for INSERT, UPDATE, and DELETEsyntaxwhen connecting to a Hive Server 2 instance that is running Hive 0.14 or later.
38 | Cloudera ODBC Driver for Apache Hive
Features
Dynamic Service Discovery using ZooKeeper
The Cloudera ODBC Driver for Apache Hive can be configured to discover Hive Server 2 services viathe ZooKeeper service.
For information about configuring this feature in the Windows driver, see "Creating a Data SourceName" on page 6 or "Configuring a DSN-less Connection" on page 9. For information aboutconfiguring this feature when using the driver on a non-Windows platform, see "ConfiguringService Discovery Mode" on page 31.
Contact UsIf you have difficulty using the driver, please contact our Technical Support staff. We welcomeyour questions, comments, and feature requests.
Important:
To help us assist you, prior to contacting Technical Support please prepare a detailedsummary of the client and server environment including operating system version,patch level, and configuration.
For details on contacting Technical Support, seehttp://www.cloudera.com/content/cloudera/en/products/cloudera-support.html
Cloudera ODBC Driver for Apache Hive | 39
Contact Us
Appendix A Using a Connection StringFor some applications, you may need to use a connection string to connect to your data source.
DSN Connections
The following is an example of a connection string for a connection that uses a DSN:DSN=DataSourceName;Key=Value
DataSourceName is the DSN that you are using for the connection. Key is any connectionattribute that is not already specified as a configuration key in the DSN, and Value is the value forthe attribute. Add key-value pairs to the connection string as needed, separating each pair with asemicolon (;). For information about the connection attributes that are available, see "DriverConfiguration Options" on page 47.
DSN-less Connections
Some client applications provide support for connecting to a data source using a driver without aDSN. The following is an example of a connection string for a DSN-less connection:Driver=DriverNameOrFile;HOST=MyHiveServer;PORT=PortNumber;Schema=DefaultSchema;HiveServerType=ServerType
The placeholders in the connection string are defined as follows:
l DriverNameOrFile is either the symbolic name of the installed driver defined in the odb-cinst.ini file or the absolute path of the shared object file for the driver. If you use the sym-bolic name, then you must ensure that the odbcinst.ini file is configured to point to thesymbolic name to the shared object file. For more information, see "Configuring the odb-cinst.ini File" on page 29.
l MyHiveServer is the IP address or host name of the Hive server.
l PortNumber is the number of the port that the Hive server uses.
l DefaultSchema is the database schema to use when a schema is not explicitly specified in aquery.
l ServerType is either 1 (for Hive Server 1) or 2 (for Hive Server 2).
Add key-value pairs to the connection string as needed, separating each pair with a semicolon (;).For information about the connection attributes that are available, see "Driver ConfigurationOptions" on page 47.
40 | Cloudera ODBC Driver for Apache Hive
Appendix A Using a Connection String
Appendix B Authentication OptionsTo connect to a Hive server, you must configure the Cloudera ODBC Driver for Apache Hive to usethe authentication mechanism that matches the access requirements of the server and providesthe necessary credentials. To determine the authentication settings that your Hive serverrequires, check the server type and then refer to the corresponding section below.
Hive Server 1
You must use No Authentication as the authentication mechanism. Hive Server 1 instances do notsupport authentication.
Hive Server 2
Note:
Most default configurations of Hive Server 2require User Name authentication.
Configuring authentication for a connection to a Hive Server 2 instance involves setting theauthentication mechanism, the Thrift transport protocol, and SSL support. To determine thesettings that you need to use, check the following three properties in the hive-site.xml file in theHive server that you are connecting to:
l hive.server2.authentication
l hive.server2.transport.mode
l hive.server2.use.SSL
Use Table 2 to determine the authentication mechanism that you need to configure, based on thehive.server2.authentication value in the hive-site.xml file:
hive.server2.authentication Authentication Mechanism
NOSASL No Authentication
KERBEROS Kerberos
NONE User Name
LDAP User Name and Password
Table 2. Authentication Mechanismto Use
Cloudera ODBC Driver for Apache Hive | 41
Appendix B Authentication Options
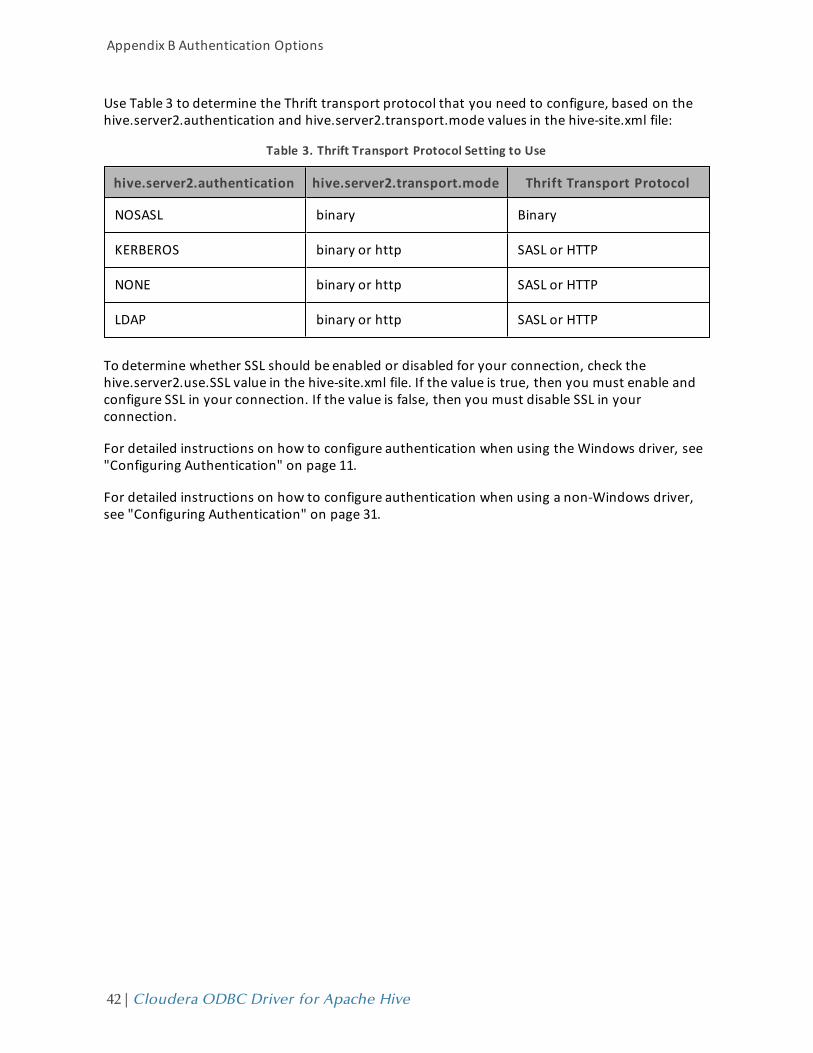
Use Table 3 to determine the Thrift transport protocol that you need to configure, based on thehive.server2.authentication and hive.server2.transport.mode values in the hive-site.xml file:
hive.server2.authentication hive.server2.transport.mode Thrift Transport Protocol
NOSASL binary Binary
KERBEROS binary or http SASL or HTTP
NONE binary or http SASL or HTTP
LDAP binary or http SASL or HTTP
Table 3. Thrift Transport Protocol Setting to Use
To determine whether SSL should be enabled or disabled for your connection, check thehive.server2.use.SSL value in the hive-site.xml file. If the value is true, then you must enable andconfigure SSL in your connection. If the value is false, then you must disable SSL in yourconnection.
For detailed instructions on how to configure authentication when using the Windows driver, see"Configuring Authentication" on page 11.
For detailed instructions on how to configure authentication when using a non-Windows driver,see "Configuring Authentication" on page 31.
42 | Cloudera ODBC Driver for Apache Hive
Appendix B Authentication Options
Appendix C Configuring Kerberos Authentication for Windows
Active Directory
The Cloudera ODBC Driver for Apache Hive supports Active Directory Kerberos onWindows. Thereare two prerequisites for using Active Directory Kerberos on Windows:
l MIT Kerberos is not installed on the client Windows machine.
l The MIT Kerberos Hadoop realm has been configured to trust the Active Directory realm sothat users in the Active Directory realm can access services in the MIT Kerberos Hadooprealm.
MIT Kerberos
Downloading and Installing MIT Kerberos for Windows 4.0.1
For information about Kerberos and download links for the installer, see the MIT Kerberoswebsite at http://web.mit.edu/kerberos/
To download and install MIT Kerberos for Windows 4.0.1:
1. To download the Kerberos installer for 64-bit computers, use the following download linkfrom the MIT Kerberos website: http://web.mit.edu/kerberos/dist/kfw/4.0/kfw-4.0.1-amd64.msi
OR
To download the Kerberos installer for 32-bit computers, use the following download linkfrom the MIT Kerberos website: http://web.mit.edu/kerberos/dist/kfw/4.0/kfw-4.0.1-i386.msi
Note:
The 64-bit installer includes both 32-bit and 64-bit libraries. The 32-bit installerincludes 32-bit libraries only.
2. To run the installer, double-click the .msi file that you downloaded in step 1.
3. Follow the instructions in the installer to complete the installation process.
4. When the installation completes, click Finish
Setting Up the Kerberos Configuration File
Settings for Kerberos are specified through a configuration file. You can set up the configurationfile as a .INI file in the default location—the C:\ProgramData\MIT\Kerberos5 directory— or as a.CONF file in a custom location.
Normally, the C:\ProgramData\MIT\Kerberos5 directory is hidden. For information about viewingand using this hidden directory, refer to Microsoft Windows documentation.
Cloudera ODBC Driver for Apache Hive | 43
Appendix C Configuring Kerberos Authentication for Windows
Note:
For more information on configuring Kerberos, refer to the MIT Kerberosdocumentation.
To set up the Kerberos configuration file in the default location:
1. Obtain a krb5.conf configuration file from your Kerberos administrator.OR
Obtain the configuration file from the /etc/krb5.conf folder on the computer that is hostingthe Hive Server 2 instance.
2. Rename the configuration file from krb5.conf to krb5.ini
3. Copy the krb5.ini file to the C:\ProgramData\MIT\Kerberos5 directory and overwrite theempty sample file.
To set up the Kerberos configuration file in a custom location:
1. Obtain a krb5.conf configuration file from your Kerberos administrator.OR
Obtain the configuration file from the /etc/krb5.conf folder on the computer that is hostingthe Hive Server 2 instance.
2. Place the krb5.conf file in an accessible directory and make note of the full path name.
3. Click the Start button , then right-click Computer, and then click Properties
4. Click Advanced System Settings
5. In the System Properties dialog box, click the Advanced tab and then click EnvironmentVariables
6. In the Environment Variables dialog box, under the System variables list, click New
7. In the New System Variable dialog box, in the Variable name field, type KRB5_CONFIG
8. In the Variable value field, type the absolute path to the krb5.conf file from step 2.
9. Click OK to save the new variable.
10. Ensure that the variable is listed in the System variables list.
11. Click OK to close the Environment Variables dialog box, and then click OK to close theSystem Properties dialog box.
Setting Up the Kerberos Credential Cache File
Kerberos uses a credential cache to store and manage credentials.
To set up the Kerberos credential cache file:
1. Create a directory where you want to save the Kerberos credential cache file. For example,create a directory named C:\temp
2. Click the Start button , then right-click Computer, and then click Properties
3. Click Advanced System Settings
44 | Cloudera ODBC Driver for Apache Hive
Appendix C Configuring Kerberos Authentication for Windows
4. In the System Properties dialog box, click the Advanced tab and then click EnvironmentVariables
5. In the Environment Variables dialog box, under the System variables list, click New
6. In the New System Variable dialog box, in the Variable name field, type KRB5CCNAME
7. In the Variable value field, type the path to the folder you created in step 1, and thenappend the file name krb5cache. For example, if you created the folder C:\temp in step 1,then type C:\temp\krb5cache
Note:
krb5cache is a file (not a directory) that is managed by the Kerberos software,and it should not be created by the user. If you receive a permission errorwhen you first use Kerberos, ensure that the krb5cache file does not alreadyexist as a file or a directory.
8. Click OK to save the new variable.
9. Ensure that the variable appears in the System variables list.
10. Click OK to close the Environment Variables dialog box, and then click OK to close theSystem Properties dialog box.
11. To ensure that Kerberos uses the new settings, restart your computer.
Obtaining a Ticket for a Kerberos Principal
A principal refers to a user or service that can authenticate to Kerberos. To authenticate toKerberos, a principal must obtain a ticket by using a password or a keytab file. You can specify akeytab file to use, or use the default keytab file of your Kerberos configuration.
To obtain a ticket for a Kerberos principal using a password:
1. Click the Start button , then click All Programs, and then click the Kerberos for Windows(64-bit) or Kerberos for Windows (32-bit) program group.
2. ClickMIT Kerberos Ticket Manager
3. In the MIT Kerberos Ticket Manager, click Get Ticket
4. In the Get Ticket dialog box, type your principal name and password, and then click OK
If the authentication succeeds, then your ticket information appears in the MIT Kerberos TicketManager.
To obtain a ticket for a Kerberos principal using a keytab file:
1. Click the Start button , then click All Programs, then click Accessories, and then clickCommand Prompt
2. In the Command Prompt, type a command using the following syntax:kinit -k -t keytab_path principal
keytab_path is the full path to the keytab file. For example: C:\mykeytabs\myUser.keytab
Cloudera ODBC Driver for Apache Hive | 45
Appendix C Configuring Kerberos Authentication for Windows
principal is the Kerberos user principal to use for authentication. For example:[email protected]
3. If the cache location KRB5CCNAME is not set or used, then use the -c option of the kinitcommand to specify the location of the credential cache. In the command, the -c argumentmust appear last. For example:kinit -k -t C:\mykeytabs\myUser.keytab [email protected] -cC:\ProgramData\MIT\krbcache
Krbcache is the Kerberos cache file, not a directory.
To obtain a ticket for a Kerberos principal using the default keytab file:
Note:
For information about configuring a default keytab file for your Kerberosconfiguration, refer to the MIT Kerberos documentation.
1. Click the Start button , then click All Programs, then click Accessories, and then clickCommand Prompt
2. In the Command Prompt, type a command using the following syntax:kinit -k principal
principal is the Kerberos user principal to use for authentication. For example:[email protected]
3. If the cache location KRB5CCNAME is not set or used, then use the -c option of the kinitcommand to specify the location of the credential cache. In the command, the -c argumentmust appear last. For example:kinit -k -t C:\mykeytabs\myUser.keytab [email protected] -cC:\ProgramData\MIT\krbcache
Krbcache is the Kerberos cache file, not a directory.
46 | Cloudera ODBC Driver for Apache Hive
Appendix C Configuring Kerberos Authentication for Windows
Appendix D Driver Configuration OptionsAppendix D "Driver Configuration Options" on page 47 lists the configuration options available inthe Cloudera ODBC Driver for Apache Hive alphabetically by field or button label. Options havingonly key names—not appearing in the user interface of the driver—are listed alphabetically by keyname.
When creating or configuring a connection from a Windows computer, the fields and buttons areavailable in the Cloudera Hive ODBC Driver Configuration tool and the following dialog boxes:
l Cloudera ODBC Driver for Apache Hive DSN Setup
l HTTP Properties
l SSL Options
l Advanced Options
l Server Side Properties
When using a connection string or configuring a connection from a Linux/Mac OS X/AIX/Debiancomputer, use the key names provided.
Note:
You can pass in configuration options in your connection string or set them in yourodbc.ini and cloudera.hiveodbc.ini files. Configuration options set in acloudera.hiveodbc.ini file apply to all connections, whereas configuration optionspassed in in the connection string or set in an odbc.ini file are specific to aconnection. Configuration options passed in using the connection string takeprecedence over configuration options set in odbc.ini. Configuration options set inodbc.ini take precedence over configuration options set in cloudera.hiveodbc.ini
Configuration Options Appearing in the User Interface
The following configuration options are accessible via the Windows user interface for the ClouderaODBC Driver for ApacheHive, or via the key name when using a connection string or configuring aconnection from a Linux/Mac OS X/AIX/Debian computer:
l "AllowCommon Name Host NameMis-match" on page 48
l "Allow Self-signed Server Certificate"on page 48
l "Apply Properties with Queries" onpage 49
l "Binary Column Length" on page 49
l "Client Certificate File" on page 50
l "Client Private Key File" on page 50
l "Client Private Key Password" on page50
l "Host FQDN" on page 55
l "HTTP Path" on page 55
l "Mechanism" on page 56
l "Password" on page 56
l "Port" on page 56
l "Realm" on page 57
l "Rows Fetched Per Block" on page 57
l "Save Password (Encrypted)" on page57
l "Service Discovery Mode" on page 58
Cloudera ODBC Driver for Apache Hive | 47
Appendix D Driver Configuration Options
l "Convert Key Name to Lower Case" onpage 51
l "Data File HDFS Dir" on page 51
l "Database" on page 51
l "Decimal Column Scale" on page 52
l "Default String Column Length" onpage 52
l "Delegation UID" on page 52
l "Driver Config Take Precedence" onpage 52
l "Enable SSL" on page 53
l "Enable Temporary Table" on page 53
l "Fast SQLPrepare" on page 53
l "Get Tables With Query" on page 54
l "HDFS User" on page 54
l "Hive Server Type" on page 54
l "Host(s)" on page 55
l "Service Name" on page 58
l "Show System Table" on page 58
l "Temp Table TTL" on page 59
l "Thrift Transport" on page 59
l "Trusted Certificates" on page 60
l "Two Way SSL" on page 60
l "Unicode SQL Character Types" onpage 61
l "Use Async Exec" on page 61
l "Use Native Query" on page 61
l "User Name" on page 62
l "Web HDFS Host" on page 62
l "Web HDFS Port" on page 62
l "ZooKeeper Namespace" on page 63
Allow Common Name Host Name Mismatch
Key Name Default Value Required
CAIssuedCertNamesMismatch Clear (0) No
Description
When this option is enabled (1), the driver allows a CA-issued SSL certificate name to not matchthe host name of the Hive server.
When this option is disabled (0), the CA-issued SSL certificate namemust match the host name ofthe Hive server.
Note:
This setting is applicable only when SSL is enabled.
Allow Self-signed Server Certificate
Key Name Default Value Required
AllowSelfSignedServerCert Clear (0) No
48 | Cloudera ODBC Driver for Apache Hive
Appendix D Driver Configuration Options
Description
When this option is enabled (1), the driver authenticates the Hive server even if the server is usinga self-signed certificate.
When this option is disabled (0), the driver does not allow self-signed certificates from the server.
Note:
This setting is applicable only when SSL is enabled.
Apply Properties with Queries
Key Name Default Value Required
ApplySSPWithQueries Selected (1) No
Description
When this option is enabled (1), the driver applies each server-side property by executing a setSSPKey=SSPValue query when opening a session to the Hive server.
When this option is disabled (0), the driver uses a more efficient method for applying server-sideproperties that does not involve additional network round-tripping. However, some Hive Server 2builds are not compatible with the more efficient method.
Note:
When connecting to a Hive Server 1 instance, ApplySSPWithQueries is alwaysenabled.
Binary Column Length
Key Name Default Value Required
BinaryColumnLength 32767 No
Description
The maximum data length for BINARY columns.
By default, the columns metadata for Hive does not specify a maximum data length for BINARYcolumns.
Cloudera ODBC Driver for Apache Hive | 49
Appendix D Driver Configuration Options
Client Certificate File
Key Name Default Value Required
ClientCert None Yes, if two-waySSL verification is enabled.
Description
The full path to the PEM file containing the client's SSL certificate.
Note:
This setting is applicable only when two-say SSL is enabled.
Client Private Key File
Key Name Default Value Required
ClientPrivateKey None Yes, if two-waySSL verification is enabled.
Description
The full path to the PEM file containing the client's SSL private key.
If the private key file is protected with a password, then provide the password using the driverconfiguration option "Client Private Key Password" on page 50.
Note:
This setting is applicable only when two-say SSL is enabled.
Client Private Key Password
Key Name Default Value Required
ClientPrivateKeyPassword None Yes, if two-waySSL verification is enabledand the client's private keyfile is protected with apassword.
Description
The password of the private key file that is specified in the Client Private Key File field (theClientPrivateKey key).
50 | Cloudera ODBC Driver for Apache Hive
Appendix D Driver Configuration Options
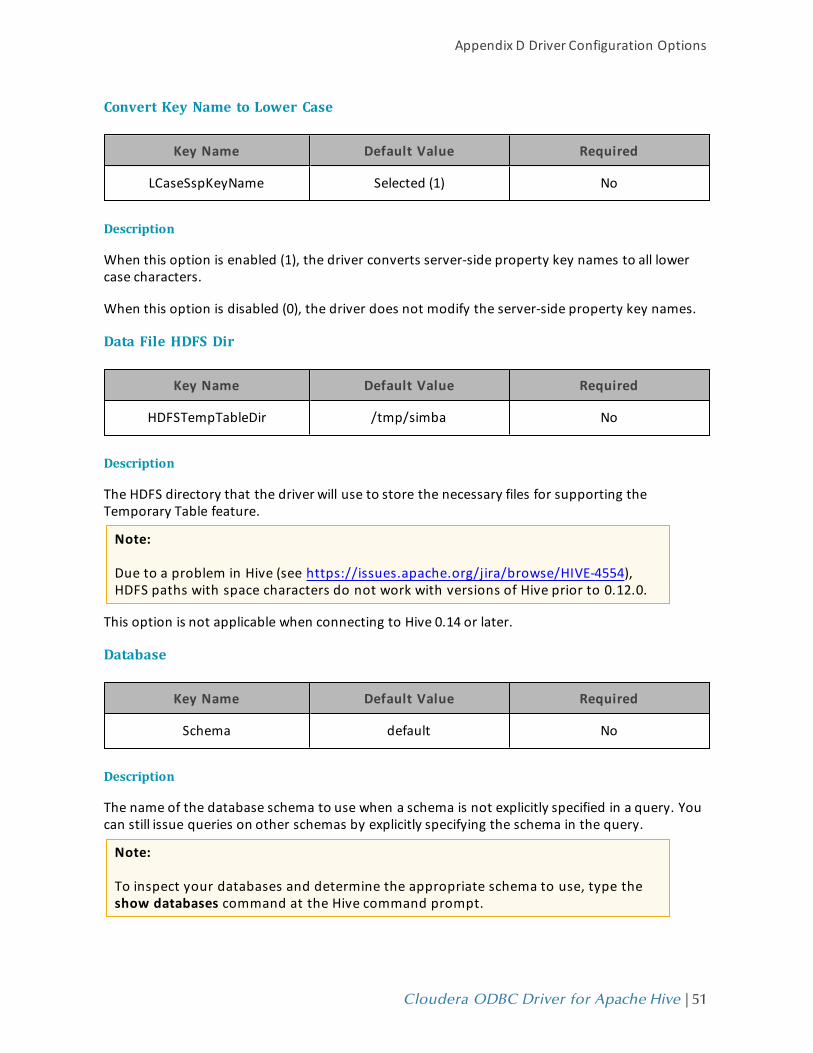
Convert Key Name to Lower Case
Key Name Default Value Required
LCaseSspKeyName Selected (1) No
Description
When this option is enabled (1), the driver converts server-side property key names to all lowercase characters.
When this option is disabled (0), the driver does not modify the server-side property key names.
Data File HDFS Dir
Key Name Default Value Required
HDFSTempTableDir /tmp/simba No
Description
The HDFS directory that the driver will use to store the necessary files for supporting theTemporary Table feature.
Note:
Due to a problem in Hive (see https://issues.apache.org/jira/browse/HIVE-4554),HDFS paths with space characters do not work with versions of Hive prior to 0.12.0.
This option is not applicable when connecting to Hive 0.14 or later.
Database
Key Name Default Value Required
Schema default No
Description
The name of the database schema to use when a schema is not explicitly specified in a query. Youcan still issue queries on other schemas by explicitly specifying the schema in the query.
Note:
To inspect your databases and determine the appropriate schema to use, type theshow databases command at the Hive command prompt.
Cloudera ODBC Driver for Apache Hive | 51
Appendix D Driver Configuration Options
Decimal Column Scale
Key Name Default Value Required
DecimalColumnScale 10 No
Description
The maximum number of digits to the right of the decimal point for numeric data types.
Default String Column Length
Key Name Default Value Required
DefaultStringColumnLength 255 No
Description
The maximum data length for STRING columns.
By default, the columns metadata for Hive does not specify a maximum data length for STRINGcolumns.
Delegation UID
Key Name Default Value Required
DelegationUID None No
Description
Use this option to delegate all operations against Hive to a user that is different than theauthenticated user for the connection.
Note:
This option is applicable only when connecting to a Hive Server 2 instance thatsupports this feature.
Driver Config Take Precedence
Key Name Default Value Required
DriverConfigTakePrecedence Clear (0) No
52 | Cloudera ODBC Driver for Apache Hive
Appendix D Driver Configuration Options

Description
When this option is enabled (1), driver-wide configurations take precedence over connection andDSN settings.
When this option is disabled (0), connection and DSN settings take precedence instead.
Enable SSL
Key Name Default Value Required
SSL Clear (0) No
Description
When this option is set to (1), the client verifies the Hive server using SSL.
When this option is set to (0), SSL is disabled.
Note:
This option is applicable only when connecting to a Hive server that supports SSL.
Enable Temporary Table
Key Name Default Value Required
EnableTempTable Clear (0) No
Description
When this option is enabled (1), the driver supports the creation and use of temporary tables.
When this option is disabled (0), the driver does not support temporary tables.
Important:
When connecting to Hive 0.14 or later, the Temporary Tables feature is alwaysenabled and you do not need to configure it in the driver.
Fast SQLPrepare
Key Name Default Value Required
FastSQLPrepare Clear (0) No
Cloudera ODBC Driver for Apache Hive | 53
Appendix D Driver Configuration Options
Description
When this option is enabled (1), the driver defers query execution to SQLExecute.
When this option is disabled (0), the driver does not defer query execution to SQLExecute.
When using Native Query mode, the driver will execute the HiveQL query to retrieve the result setmetadata for SQLPrepare. As a result, SQLPrepare might be slow. If the result set metadata is notrequired after calling SQLPrepare, then enable Fast SQLPrepare.
Get Tables With Query
Key Name Default Value Required
GetTablesWithQuery Clear (0) No
Description
When this option is enabled (1), the driver uses the SHOW TABLES query to retrieve the names ofthe tables in a database.
When this option is disabled (0), the driver uses the GetTables Thrift API call to retrieve the namesof the tables in a database.
Note:
This option is applicable only when connecting to a Hive Server 2 instance.
HDFS User
Key Name Default Value Required
HDFSUser hdfs No
Description
The name of the HDFS user that the driver will use to create the necessary files for supporting theTemporary Tables feature.
This option is not applicable when connecting to Hive 0.14 or later.
Hive Server Type
Key Name Default Value Required
HiveServerType Hive Server 2 (2) No
54 | Cloudera ODBC Driver for Apache Hive
Appendix D Driver Configuration Options
Description
Select Hive Server 1 or set the key to 1 if you are connecting to a Hive Server 1 instance.
Select Hive Server 2 or set the key to 2 if you are connecting to a Hive Server 2 instance.
Note:
If Service Discovery Mode is enabled, then connections to Hive Server 1 are notsupported.
Host(s)
Key Name Default Value Required
HOST None Yes
Description
If Service Discovery Mode is disabled, specify the IP address or host name of the Hive server.
If Service Discovery Mode is enabled, specify a comma-separated list of ZooKeeper servers in thefollowing format, where zk_host is the IP address or host name of the ZooKeeper server and zk_port is the number of the port that the ZooKeeper server uses:zk_host1:zk_port1,zk_host2:zk_port2
Host FQDN
Key Name Default Value Required
KrbHostFQDN None Yes, if the authenticationmechanism is Kerberos.
Description
The fully qualified domain name of the Hive Server 2 host.
HTTP Path
Key Name Default Value Required
HTTPPath None Yes, if you are using HTTP asthe Thrift transport protocol.
Description
The partial URL corresponding to the Hive server.
Cloudera ODBC Driver for Apache Hive | 55
Appendix D Driver Configuration Options

Note:
This option is applicable only when you are using HTTP as the Thrift transportprotocol. For more information, see "Thrift Transport" on page 59.
Mechanism
Key Name Default Value Required
AuthMech No Authentication (0) if youare connecting to HiveServer 1.
User Name (2) if you areconnecting to Hive Server 2.
No
Description
The authentication mechanism to use.
Select one of the following settings, or set the key to the corresponding number:
l No Authentication (0)
l Kerberos (1)
l User Name (2)
l User Name and Password (3)
Password
Key Name Default Value Required
PWD None Yes, if the authenticationmechanism is User Nameand Password.
Description
The password corresponding to the user name that you provided in the User Name field (the UIDkey).
Port
Key Name Default Value Required
PORT 10000 Yes, if Service DiscoveryMode is disabled.
56 | Cloudera ODBC Driver for Apache Hive
Appendix D Driver Configuration Options
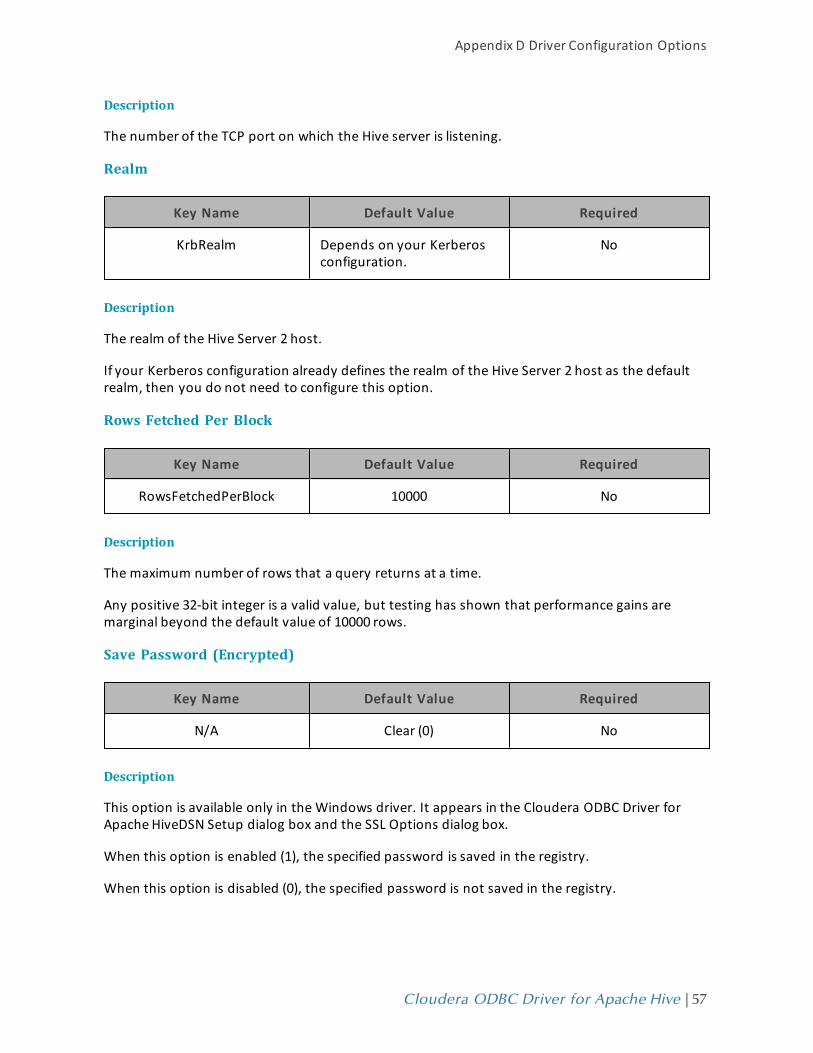
Description
The number of the TCP port on which the Hive server is listening.
Realm
Key Name Default Value Required
KrbRealm Depends on your Kerberosconfiguration.
No
Description
The realm of the Hive Server 2 host.
If your Kerberos configuration already defines the realm of the Hive Server 2 host as the defaultrealm, then you do not need to configure this option.
Rows Fetched Per Block
Key Name Default Value Required
RowsFetchedPerBlock 10000 No
Description
The maximum number of rows that a query returns at a time.
Any positive 32-bit integer is a valid value, but testing has shown that performance gains aremarginal beyond the default value of 10000 rows.
Save Password (Encrypted)
Key Name Default Value Required
N/A Clear (0) No
Description
This option is available only in the Windows driver. It appears in the Cloudera ODBC Driver forApacheHiveDSN Setup dialog box and the SSL Options dialog box.
When this option is enabled (1), the specified password is saved in the registry.
When this option is disabled (0), the specified password is not saved in the registry.
Cloudera ODBC Driver for Apache Hive | 57
Appendix D Driver Configuration Options
Important:
The password will be obscured (not saved in plain text). However, it is still possible forthe encrypted password to be copied and used.
Service Discovery Mode
Key Name Default Value Required
ServiceDiscoveryMode No Service Discovery (0) No
Description
When this option is enabled (1), the driver discovers Hive Server 2 services via the ZooKeeperservice.
When this option is disabled (0), the driver connects to Hive without using the ZooKeeper service.
Service Name
Key Name Default Value Required
KrbServiceName None Yes, if the authenticationmechanism is Kerberos.
Description
The Kerberos service principal name of the Hive server.
Show System Table
Key Name Default Value Required
ShowSystemTable Clear (0) No
Description
When this option is enabled (1), the driver returns the hive_system table for catalog function callssuch as SQLTables and SQLColumns
When this option is disabled (0), the driver does not return the hive_system table for catalogfunction calls.
58 | Cloudera ODBC Driver for Apache Hive
Appendix D Driver Configuration Options
Temp Table TTL
Key Name Default Value Required
TempTableTTL 10 No
Description
The number of minutes a temporary table is guaranteed to exist in Hive after it is created.
This option is not applicable when connecting to Hive 0.14 or later.
Thrift Transport
Key Name Default Value Required
ThriftTransport Binary (0) if you areconnecting to Hive Server 1.
SASL (1) if you areconnecting to Hive Server 2.
No
Description
The transport protocol to use in the Thrift layer.
Select one of the following settings, or set the key to the corresponding number:
l Binary (0)
l SASL (1)
l HTTP (2)
Cloudera ODBC Driver for Apache Hive | 59
Appendix D Driver Configuration Options

Trusted Certificates
Key Name Default Value Required
TrustedCerts The cacerts.pem file in thelib folder or subfolder withinthe driver's installationdirectory.
The exact file path variesdepending on the version ofthe driver that is installed.For example, the path forthe Windows driver isdifferent from the path forthe Mac OS X driver.
No
Description
The location of the PEM file containing trusted CA certificates for authenticating the Hive serverwhen using SSL.
If this option is not set, then the driver will default to using the trusted CA certificates PEM fileinstalled by the driver.
Note:
This setting is applicable only when SSL is enabled.
Two Way SSL
Key Name Default Value Required
TwoWaySSL Clear (0) No
Description
When this option is enabled (1), the client and the Hive server verify each other using SSL. See alsothe driver configuration options "Client Certificate File" on page 50, "Client Private Key File" onpage 50, and "Client Private Key Password" on page 50.
When this option is disabled (0), then the server does not verify the client. Depending on whetherone-way SSL is enabled, the client may verify the server. For more information, see "Enable SSL"on page 53.
60 | Cloudera ODBC Driver for Apache Hive
Appendix D Driver Configuration Options
Note:
This option is applicable only when connecting to a Hive server that supports SSL.You must enable SSL before Two Way SSL can be configured. For more information,see "Enable SSL" on page 53.
Unicode SQL Character Types
Key Name Default Value Required
UseUnicodeSqlCharacterTypes Clear (0) No
Description
When this option is enabled (1), the driver returns SQL_WVARCHAR for STRING and VARCHARcolumns, and returns SQL_WCHAR for CHAR columns.
When this option is disabled (0), the driver returns SQL_VARCHAR for STRING and VARCHARcolumns, and returns SQL_CHAR for CHAR columns.
Use Async Exec
Key Name Default Value Required
EnableAsyncExec Clear (0) No
Description
When this option is enabled (1), the driver uses an asynchronous version of the API call againstHive for executing a query.
When this option is disabled (0), the driver executes queries synchronously.
Due to a problem in Hive 0.12.0 (see https://issues.apache.org/jira/browse/HIVE-5230), Hivereturns generic error messages for errors that occur during query execution. To see the actualerror message relevant to the problem, turn off asynchronous query execution and execute thequery again.
Note:
This option only takes effect when connecting to a Hive cluster running Hive 0.12.0 orhigher.
Use Native Query
Key Name Default Value Required
UseNativeQuery Clear (0) No
Cloudera ODBC Driver for Apache Hive | 61
Appendix D Driver Configuration Options
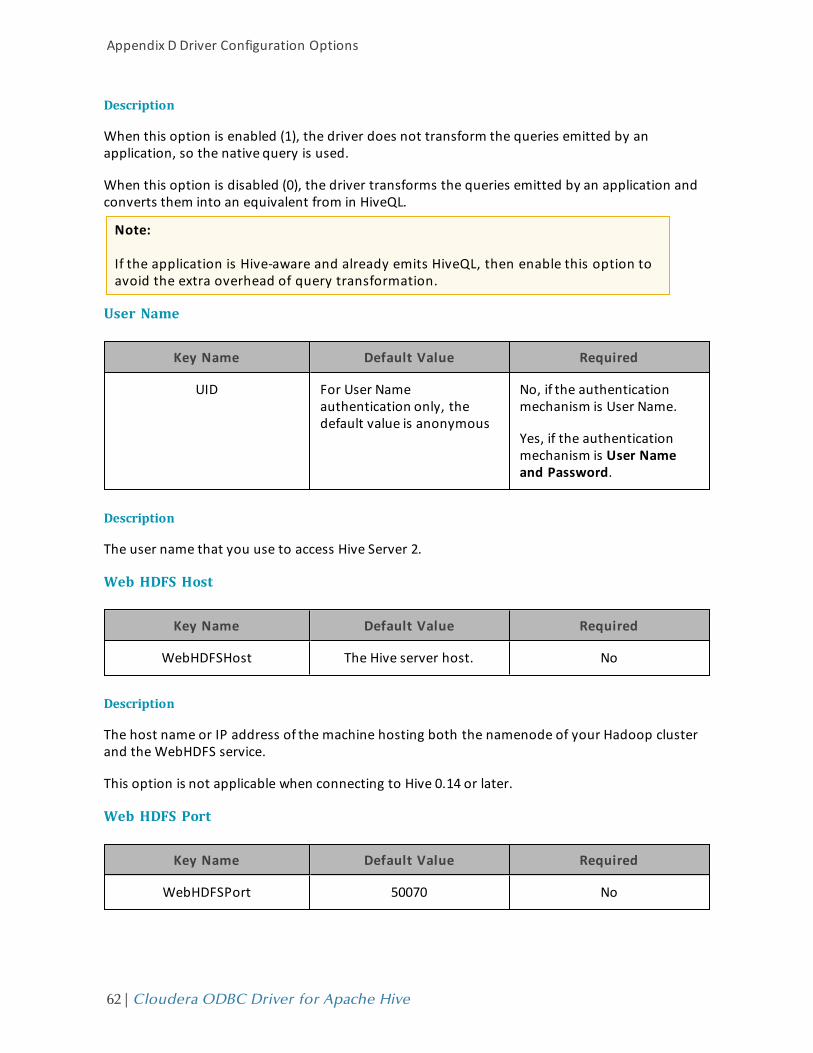
Description
When this option is enabled (1), the driver does not transform the queries emitted by anapplication, so the native query is used.
When this option is disabled (0), the driver transforms the queries emitted by an application andconverts them into an equivalent from in HiveQL.
Note:
If the application is Hive-aware and already emits HiveQL, then enable this option toavoid the extra overhead of query transformation.
User Name
Key Name Default Value Required
UID For User Nameauthentication only, thedefault value is anonymous
No, if the authenticationmechanism is User Name.
Yes, if the authenticationmechanism is User Nameand Password.
Description
The user name that you use to access Hive Server 2.
Web HDFS Host
Key Name Default Value Required
WebHDFSHost The Hive server host. No
Description
The host name or IP address of the machine hosting both the namenode of your Hadoop clusterand the WebHDFS service.
This option is not applicable when connecting to Hive 0.14 or later.
Web HDFS Port
Key Name Default Value Required
WebHDFSPort 50070 No
62 | Cloudera ODBC Driver for Apache Hive
Appendix D Driver Configuration Options
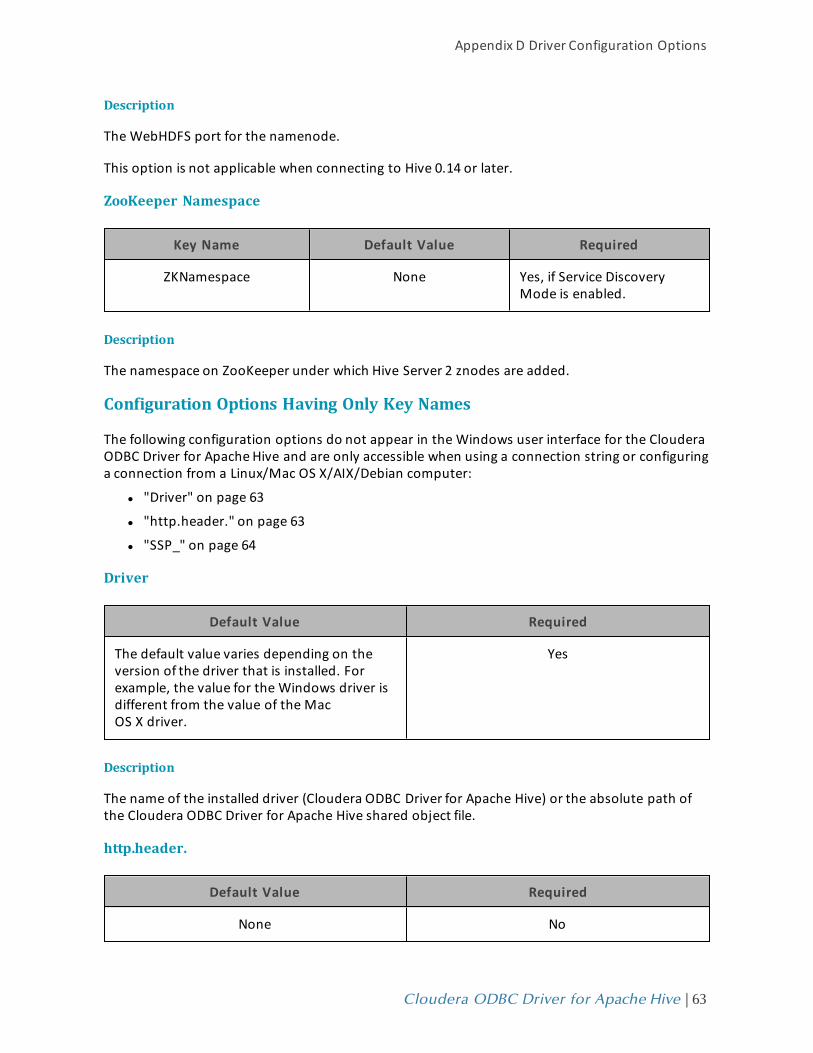
Description
The WebHDFS port for the namenode.
This option is not applicable when connecting to Hive 0.14 or later.
ZooKeeper Namespace
Key Name Default Value Required
ZKNamespace None Yes, if Service DiscoveryMode is enabled.
Description
The namespace on ZooKeeper under which Hive Server 2 znodes are added.
Configuration Options Having Only Key Names
The following configuration options do not appear in the Windows user interface for the ClouderaODBC Driver for ApacheHive and are only accessible when using a connection string or configuringa connection from a Linux/Mac OS X/AIX/Debian computer:
l "Driver" on page 63
l "http.header." on page 63
l "SSP_" on page 64
Driver
Default Value Required
The default value varies depending on theversion of the driver that is installed. Forexample, the value for the Windows driver isdifferent from the value of the MacOS X driver.
Yes
Description
The name of the installed driver (Cloudera ODBC Driver for Apache Hive) or the absolute path ofthe Cloudera ODBC Driver for Apache Hive shared object file.
http.header.
Default Value Required
None No
Cloudera ODBC Driver for Apache Hive | 63
Appendix D Driver Configuration Options
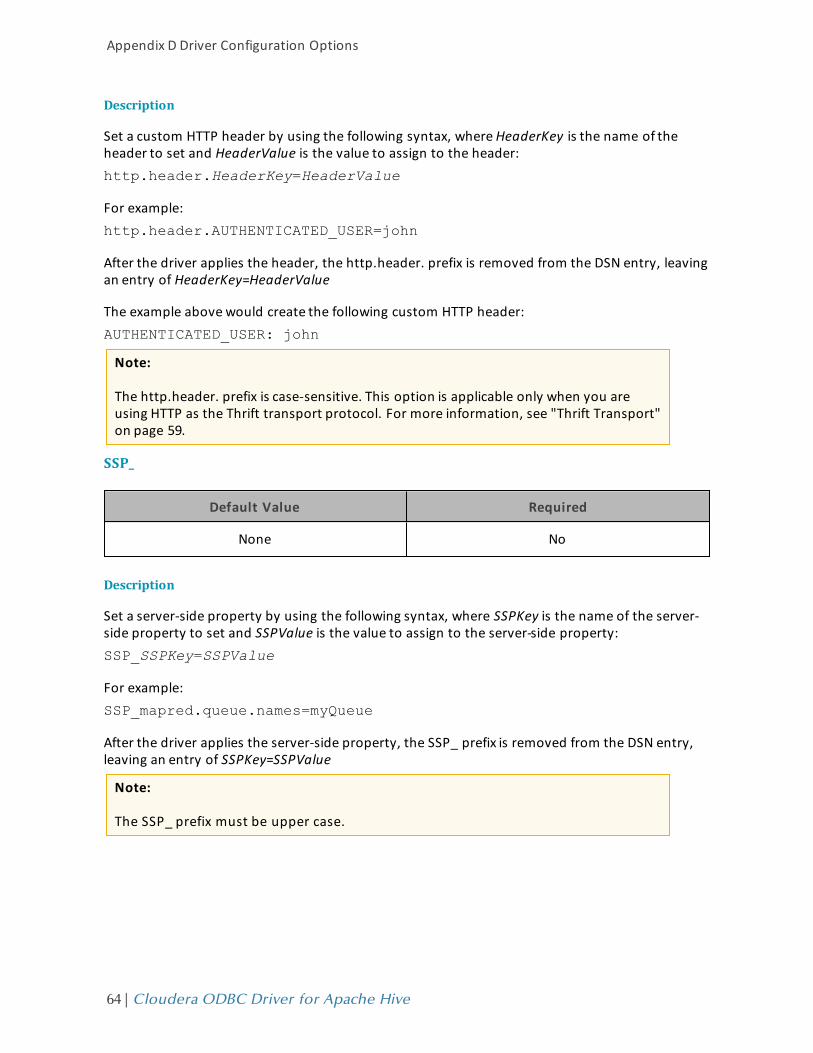
Description
Set a custom HTTP header by using the following syntax, whereHeaderKey is the name of theheader to set and HeaderValue is the value to assign to the header:http.header.HeaderKey=HeaderValue
For example:http.header.AUTHENTICATED_USER=john
After the driver applies the header, the http.header. prefix is removed from the DSN entry, leavingan entry of HeaderKey=HeaderValue
The example above would create the following custom HTTP header:AUTHENTICATED_USER: john
Note:
The http.header. prefix is case-sensitive. This option is applicable only when you areusing HTTP as the Thrift transport protocol. For more information, see "Thrift Transport"on page 59.
SSP_
Default Value Required
None No
Description
Set a server-side property by using the following syntax, where SSPKey is the name of the server-side property to set and SSPValue is the value to assign to the server-side property:SSP_SSPKey=SSPValue
For example:SSP_mapred.queue.names=myQueue
After the driver applies the server-side property, the SSP_ prefix is removed from the DSN entry,leaving an entry of SSPKey=SSPValue
Note:
The SSP_ prefix must be upper case.
64 | Cloudera ODBC Driver for Apache Hive
Appendix D Driver Configuration Options
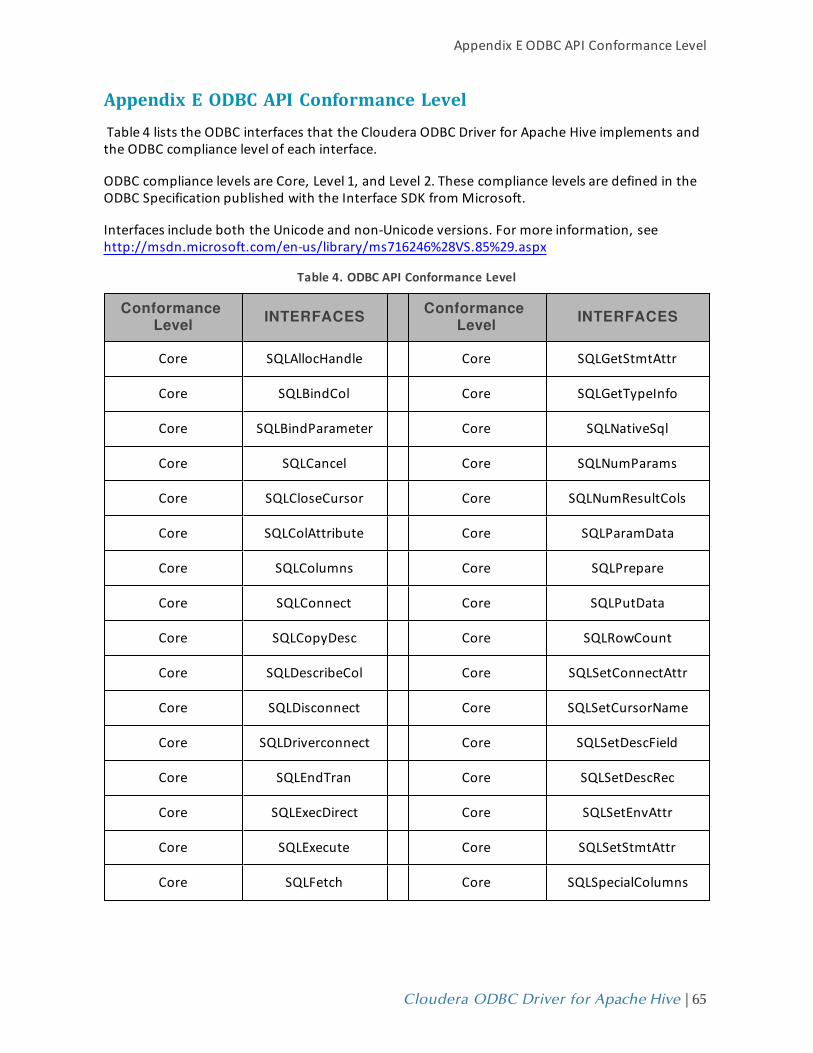
Appendix E ODBC API Conformance LevelTable 4 lists the ODBC interfaces that the Cloudera ODBC Driver for Apache Hive implements andthe ODBC compliance level of each interface.
ODBC compliance levels are Core, Level 1, and Level 2. These compliance levels are defined in theODBC Specification published with the Interface SDK from Microsoft.
Interfaces include both the Unicode and non-Unicode versions. For more information, seehttp://msdn.microsoft.com/en-us/library/ms716246%28VS.85%29.aspx
ConformanceLevel INTERFACES Conformance
Level INTERFACES
Core SQLAllocHandle Core SQLGetStmtAttr
Core SQLBindCol Core SQLGetTypeInfo
Core SQLBindParameter Core SQLNativeSql
Core SQLCancel Core SQLNumParams
Core SQLCloseCursor Core SQLNumResultCols
Core SQLColAttribute Core SQLParamData
Core SQLColumns Core SQLPrepare
Core SQLConnect Core SQLPutData
Core SQLCopyDesc Core SQLRowCount
Core SQLDescribeCol Core SQLSetConnectAttr
Core SQLDisconnect Core SQLSetCursorName
Core SQLDriverconnect Core SQLSetDescField
Core SQLEndTran Core SQLSetDescRec
Core SQLExecDirect Core SQLSetEnvAttr
Core SQLExecute Core SQLSetStmtAttr
Core SQLFetch Core SQLSpecialColumns
Table 4. ODBC API Conformance Level
Cloudera ODBC Driver for Apache Hive | 65
Appendix E ODBC API Conformance Level

ConformanceLevel INTERFACES Conformance
Level INTERFACES
Core SQLFetchScroll Core SQLStatistics
Core SQLFreeHandle Core SQLTables
Core SQLFreeStmt Core SQLBrowseConnect
Core SQLGetConnectAttr Core SQLPrimaryKeys
Core SQLGetCursorName Core SQLGetInfo
Core SQLGetData Level 1 SQLProcedureColumns
Core SQLGetDescField Level 1 SQLProcedures
Core SQLGetDescRec Level 2 SQLColumnPrivileges
Core SQLGetDiagField Level 2 SQLDescribeParam
Core SQLGetDiagRec Level 2 SQLForeignKeys
Core SQLGetEnvAttr Level 2 SQLTablePrivileges
Core SQLGetFunctions
66 | Cloudera ODBC Driver for Apache Hive
Appendix E ODBC API Conformance Level
Related Documents