infocaptor.com Infocaptor.com Page 1 of 20 How to connect to Cloudera Hadoop Data Sources InfoCaptor works with both ODBC and JDBC protocol. Depending on the availability of suitable drivers for the appropriate platform you can leverage either protocols for your visualization purpose. In addition, InfoCaptor implements certain native functions of Impala and Hive within the visualizer. InfoCaptor processes the data within Hadoop. It leverages the processing engines within Hadoop to get high level aggregated data.

Welcome message from author
This document is posted to help you gain knowledge. Please leave a comment to let me know what you think about it! Share it to your friends and learn new things together.
Transcript
infocaptor.com
Infocaptor.com Page 1 of 20
How to connect to Cloudera Hadoop Data Sources
InfoCaptor works with both ODBC and JDBC protocol. Depending on the availability of suitable drivers for the appropriate platform you can leverage either protocols for your visualization purpose.
In addition, InfoCaptor implements certain native functions of Impala and Hive within the visualizer. InfoCaptor processes the data within Hadoop. It leverages the processing engines within Hadoop to get high level aggregated data.

infocaptor.com
Infocaptor.com Page 2 of 20
Contents Connect InfoCaptor to Cloudera Impala using ODBC ............................................................................................................................................ 3
1. Download Cloudera ODBC driver ........................................................................................................................................................................ 3
2. Install and configure .................................................................................................................................................................................................. 3
3. Download and Install InfoCaptor ......................................................................................................................................................................... 6
4. Create Database connection ................................................................................................................................................................................. 6
5. Select table for Analysis ........................................................................................................................................................................................ 11
6. Begin Analysis ........................................................................................................................................................................................................... 13
Connect InfoCaptor to Cloudera Hive using ODBC.............................................................................................................................................. 16
Connect InfoCaptor to Cloudera Impala using JDBC .......................................................................................................................................... 17
1. Download JDBC drivers for impala from Cloudera .............................................................................................................................. 17
2. Unzip the driver ..................................................................................................................................................................................................... 17
3. Restart InfoCaptor Tomcat ............................................................................................................................................................................... 18
4. Setup JDBC connection ....................................................................................................................................................................................... 19
Connect InfoCaptor to Cloudera Hive using JDBC ............................................................................................................................................... 20
infocaptor.com
Infocaptor.com Page 3 of 20
Connect InfoCaptor to Cloudera Impala using ODBC
1. Download Cloudera ODBC driver Download Cloudera ODBC driver from Cloudera website http://www.cloudera.com/content/cloudera/en/downloads/connectors/impala/odbc/impala-odbc-v2-5-26.html
[ all other downloads http://www.cloudera.com/content/cloudera/en/downloads.html ]
[ Note the vendor may change the availability and location of the downloads ]
Make sure to get appropriate drivers for your operating system where InfoCaptor is installed. The following tests were documented on a 64bit Windows machine.
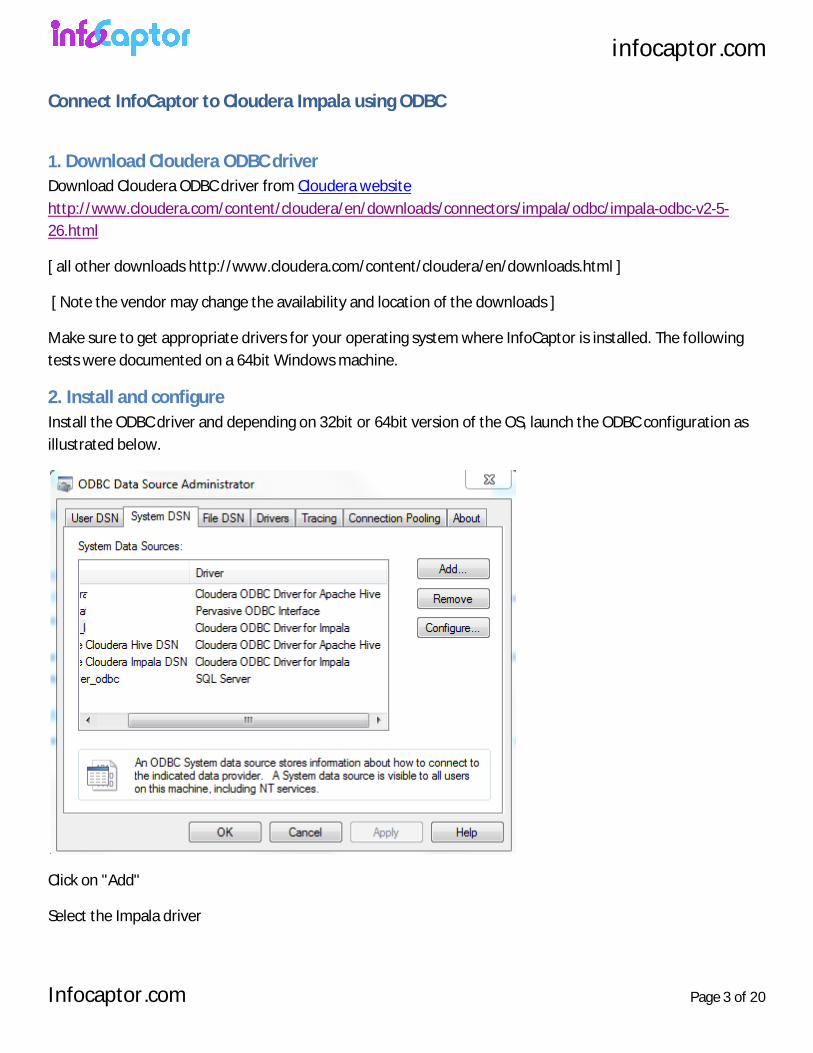
2. Install and configure Install the ODBC driver and depending on 32bit or 64bit version of the OS, launch the ODBC configuration as illustrated below.
Click on "Add"
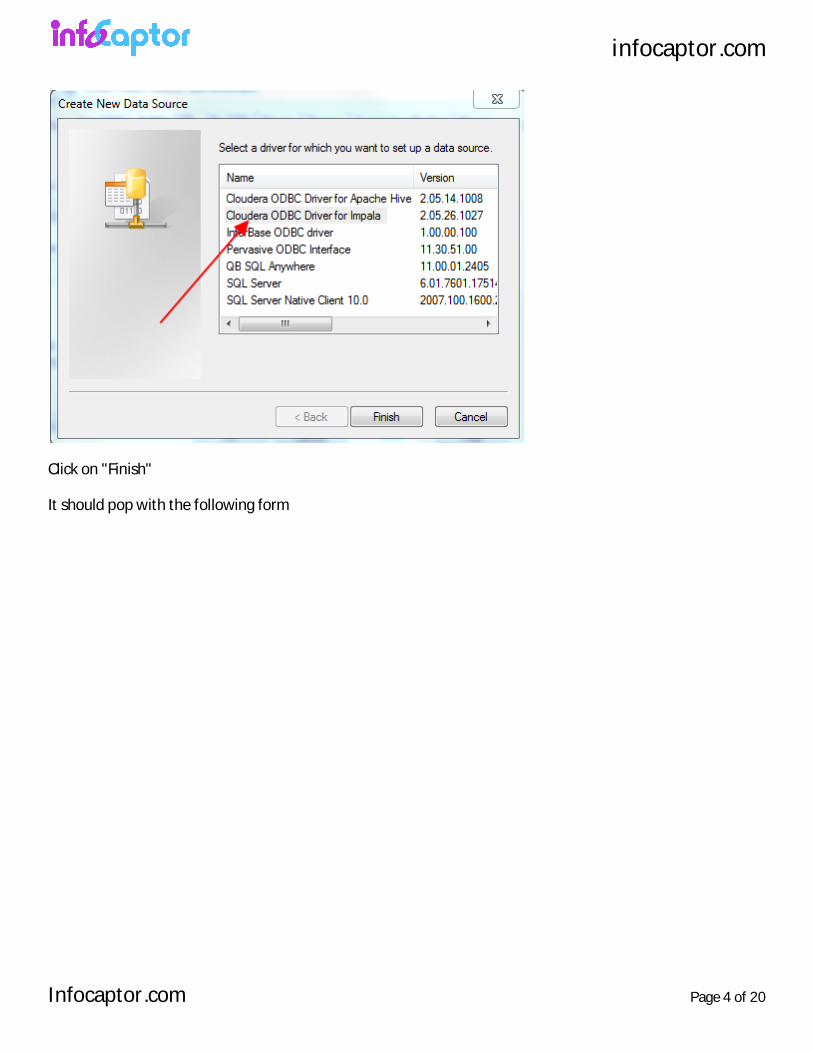
Select the Impala driver
infocaptor.com
Infocaptor.com Page 4 of 20
Click on "Finish"
It should pop with the following form
infocaptor.com
Infocaptor.com Page 5 of 20
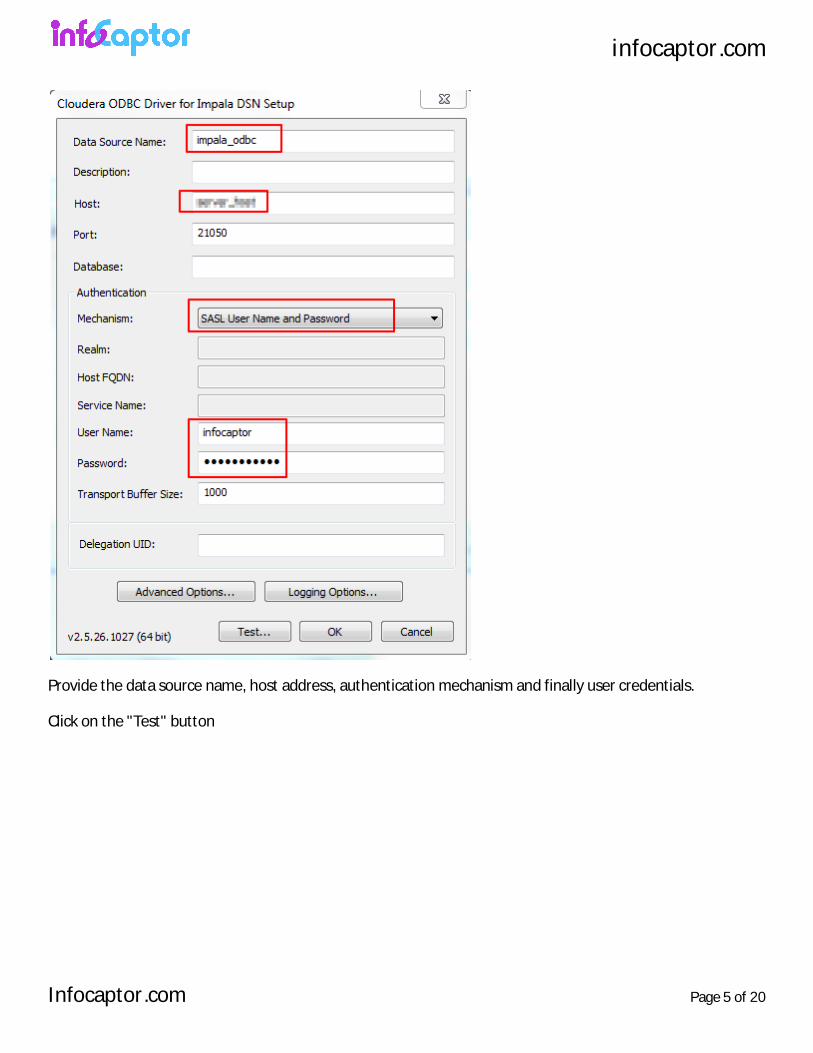
Provide the data source name, host address, authentication mechanism and finally user credentials.
Click on the "Test" button

infocaptor.com
Infocaptor.com Page 6 of 20
Click "OK"
Click "OK" again to add the Data Source Name "impala_odbc"
NOTE: Use the System DSN tab to add the DSN.
3. Download and Install InfoCaptor Skip this section if you already installed.
Download link: http://infocaptor.s3.amazonaws.com/infocaptor_enterprise_setup.exe
Download and run the setup for InfoCaptor.
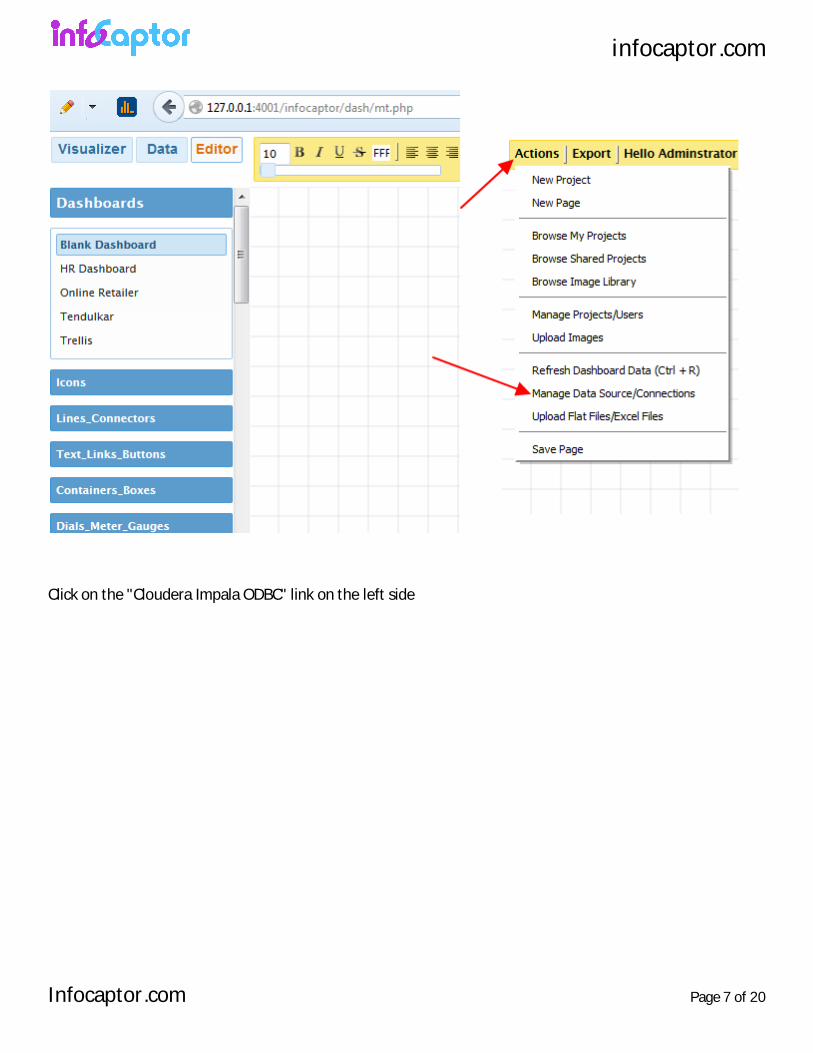
4. Create Database connection Launch the database connection screen within infocaptor.
This can be done from two locations within Infocaptor
1. Editor Tab > Actions Menu > Manage Data Sources/Connections
infocaptor.com
Infocaptor.com Page 7 of 20
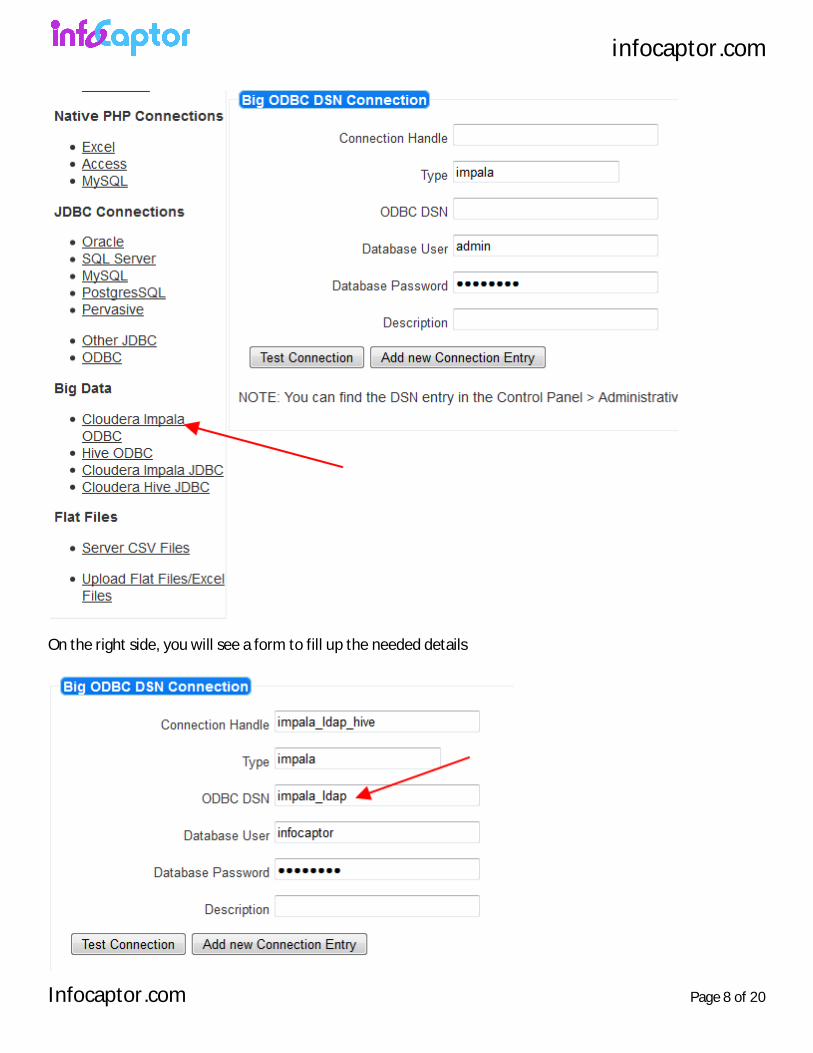
Click on the "Cloudera Impala ODBC" link on the left side
infocaptor.com
Infocaptor.com Page 8 of 20
On the right side, you will see a form to fill up the needed details
infocaptor.com
Infocaptor.com Page 9 of 20
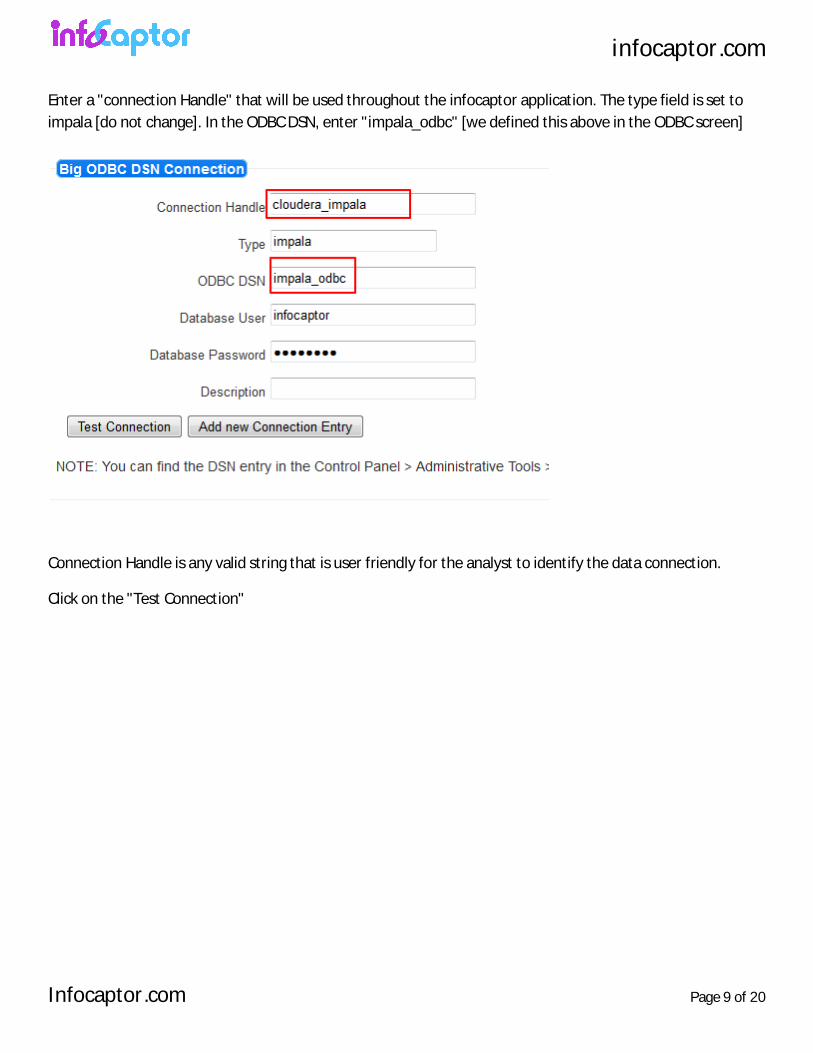
Enter a "connection Handle" that will be used throughout the infocaptor application. The type field is set to impala [do not change]. In the ODBC DSN, enter "impala_odbc" [we defined this above in the ODBC screen]
Connection Handle is any valid string that is user friendly for the analyst to identify the data connection.
Click on the "Test Connection"
infocaptor.com
Infocaptor.com Page 10 of 20
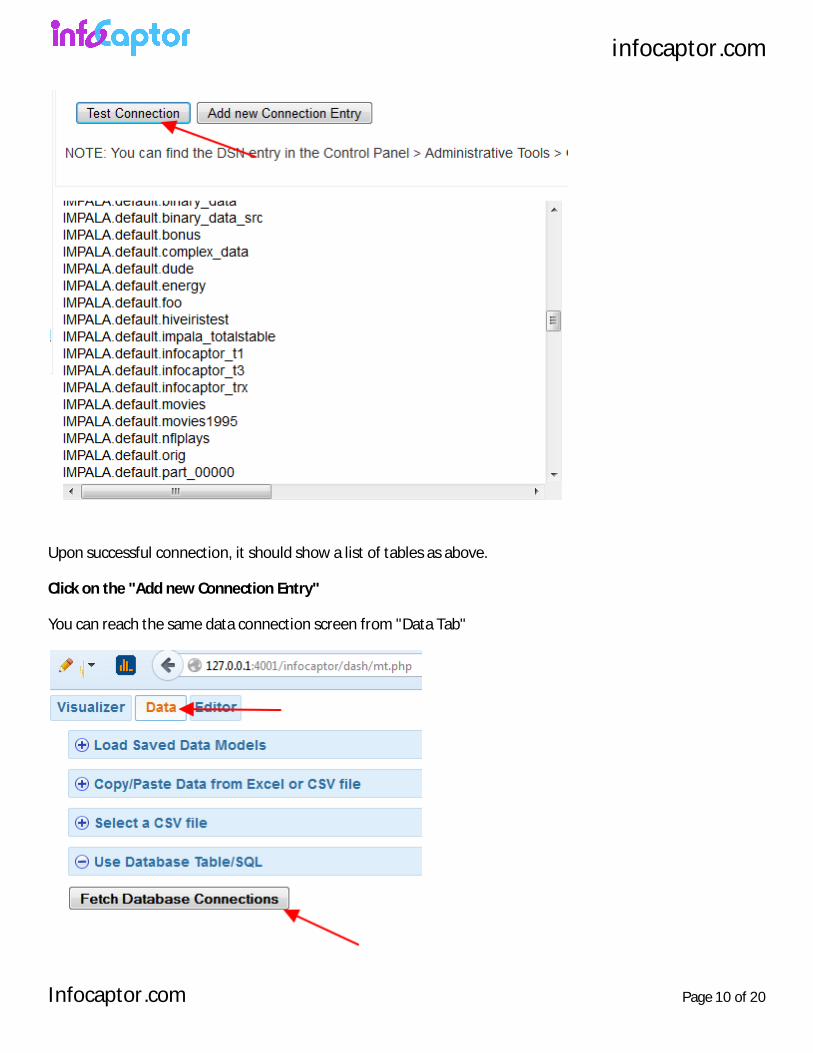
Upon successful connection, it should show a list of tables as above.
Click on the "Add new Connection Entry"
You can reach the same data connection screen from "Data Tab"
infocaptor.com
Infocaptor.com Page 11 of 20
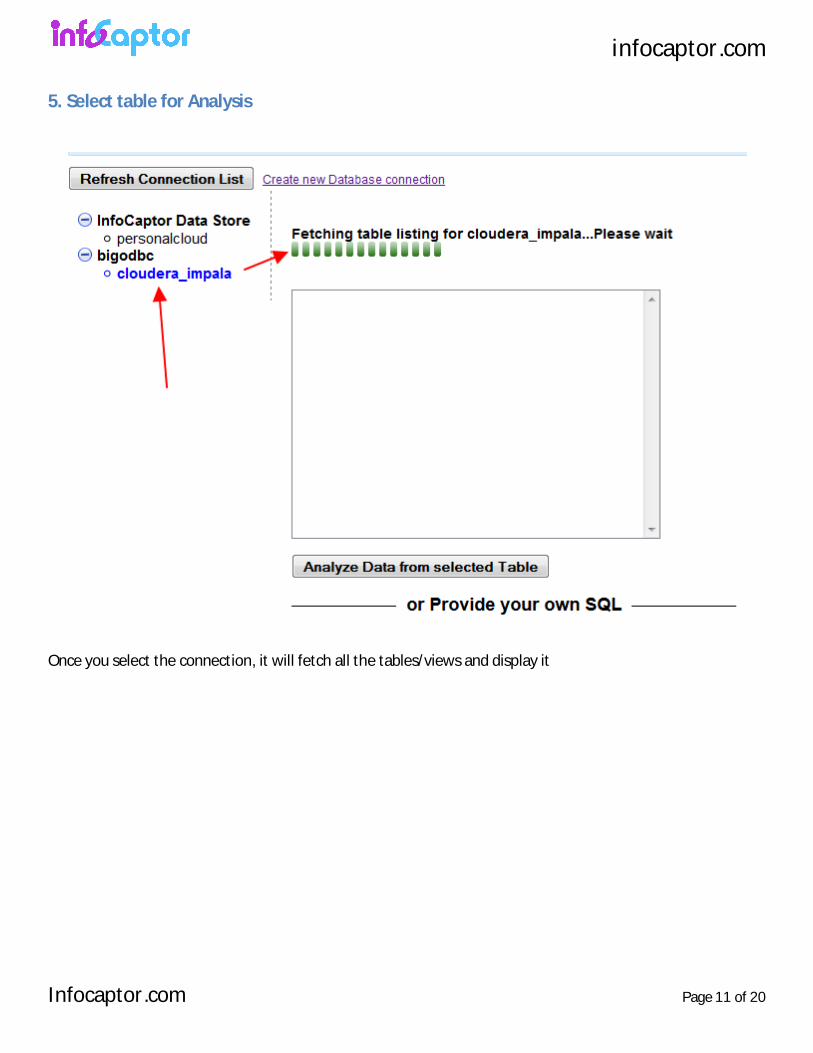
5. Select table for Analysis
Once you select the connection, it will fetch all the tables/views and display it
infocaptor.com
Infocaptor.com Page 12 of 20
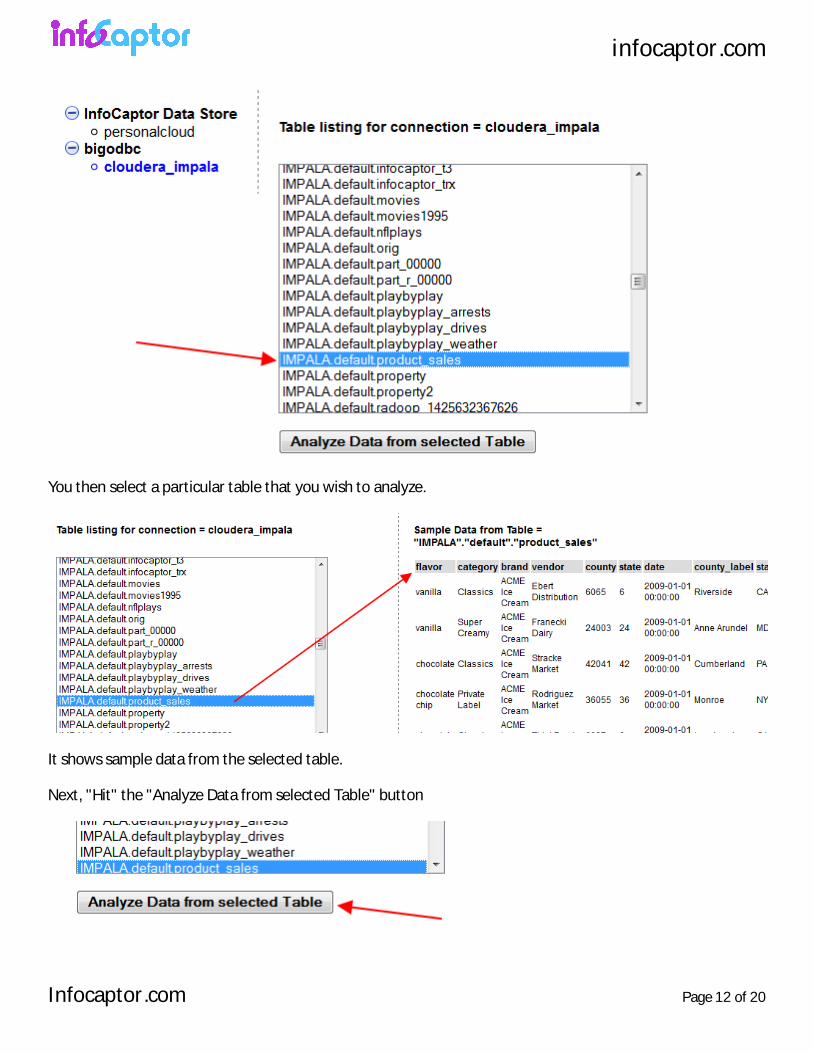
You then select a particular table that you wish to analyze.
It shows sample data from the selected table.
Next, "Hit" the "Analyze Data from selected Table" button
infocaptor.com
Infocaptor.com Page 13 of 20
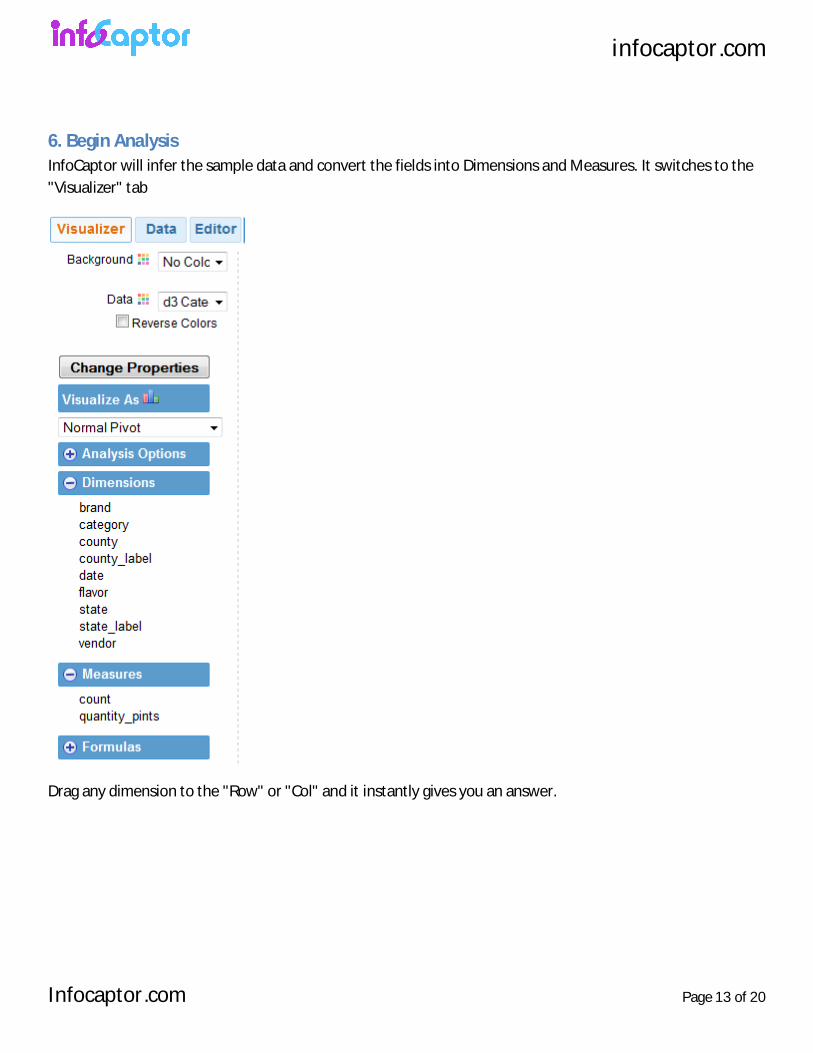
6. Begin Analysis InfoCaptor will infer the sample data and convert the fields into Dimensions and Measures. It switches to the "Visualizer" tab
Drag any dimension to the "Row" or "Col" and it instantly gives you an answer.
infocaptor.com
Infocaptor.com Page 14 of 20
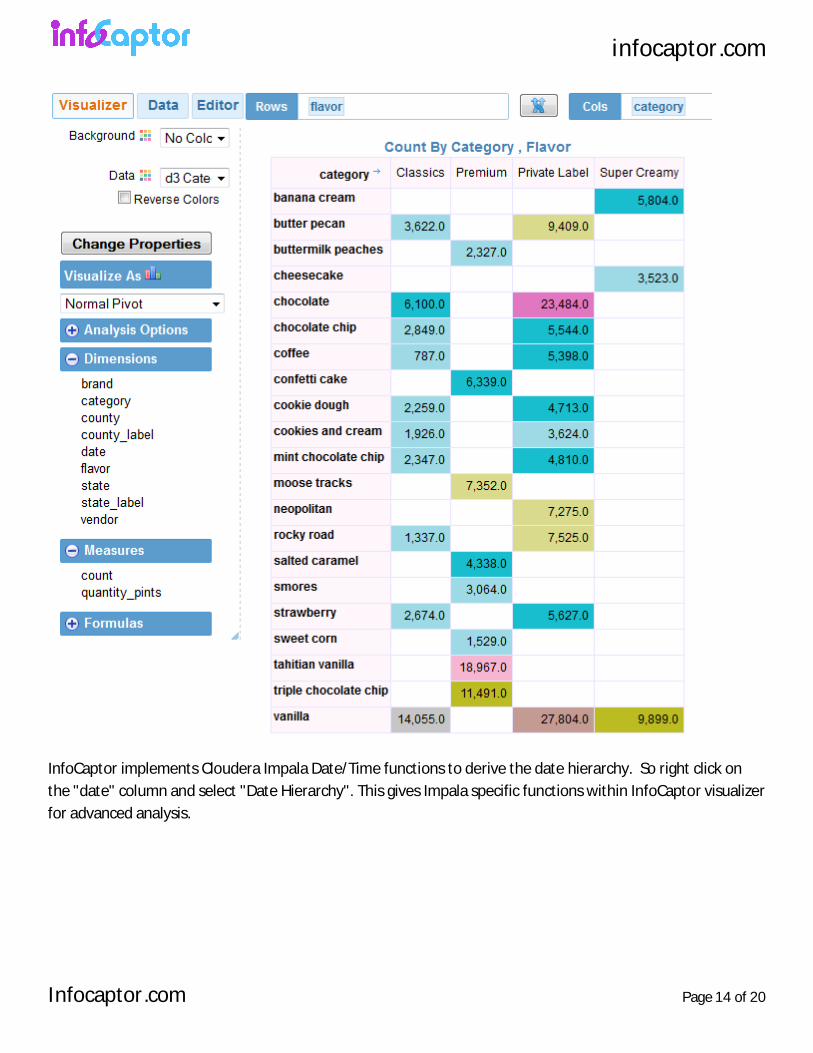
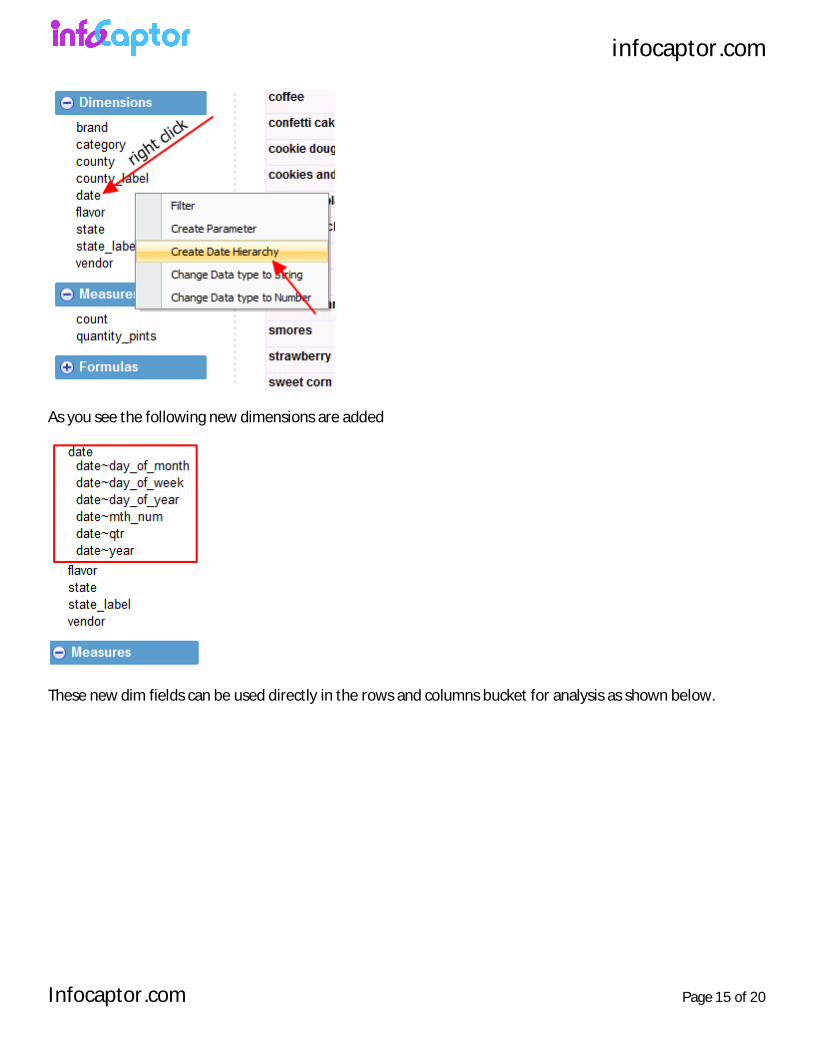
InfoCaptor implements Cloudera Impala Date/Time functions to derive the date hierarchy. So right click on the "date" column and select "Date Hierarchy". This gives Impala specific functions within InfoCaptor visualizer for advanced analysis.
infocaptor.com
Infocaptor.com Page 15 of 20
As you see the following new dimensions are added
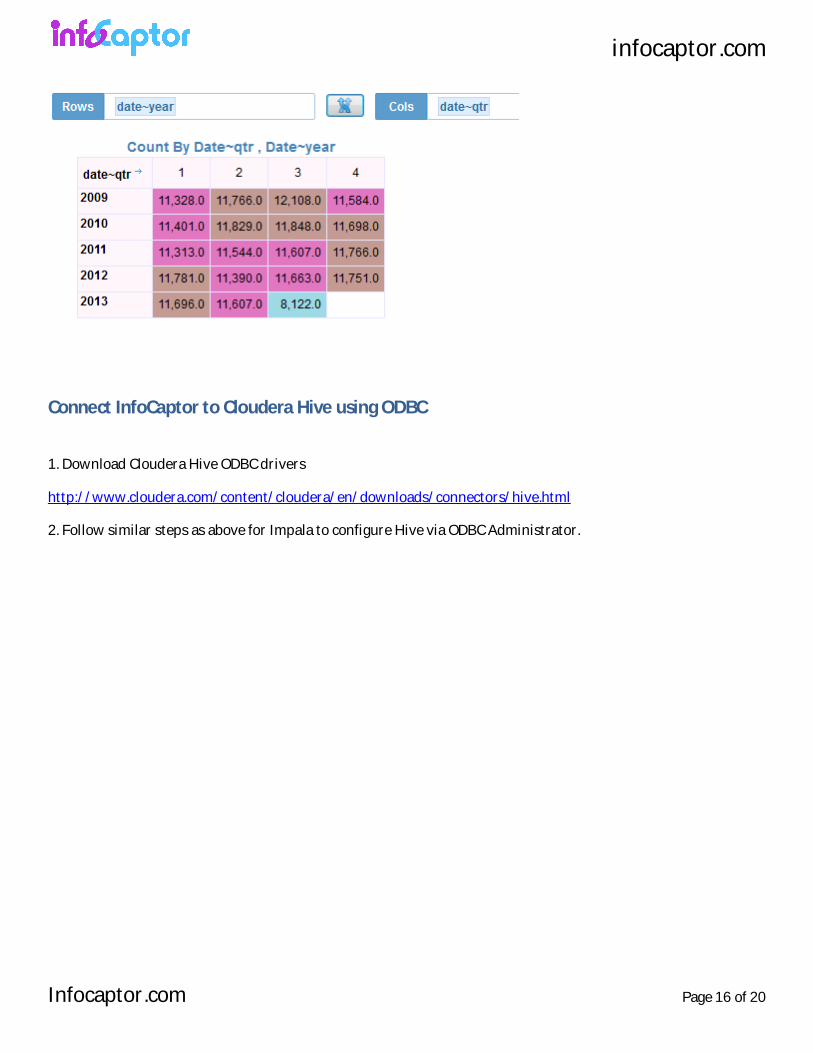
These new dim fields can be used directly in the rows and columns bucket for analysis as shown below.
infocaptor.com
Infocaptor.com Page 16 of 20
Connect InfoCaptor to Cloudera Hive using ODBC
1. Download Cloudera Hive ODBC drivers
http://www.cloudera.com/content/cloudera/en/downloads/connectors/hive.html
2. Follow similar steps as above for Impala to configure Hive via ODBC Administrator.
infocaptor.com
Infocaptor.com Page 17 of 20
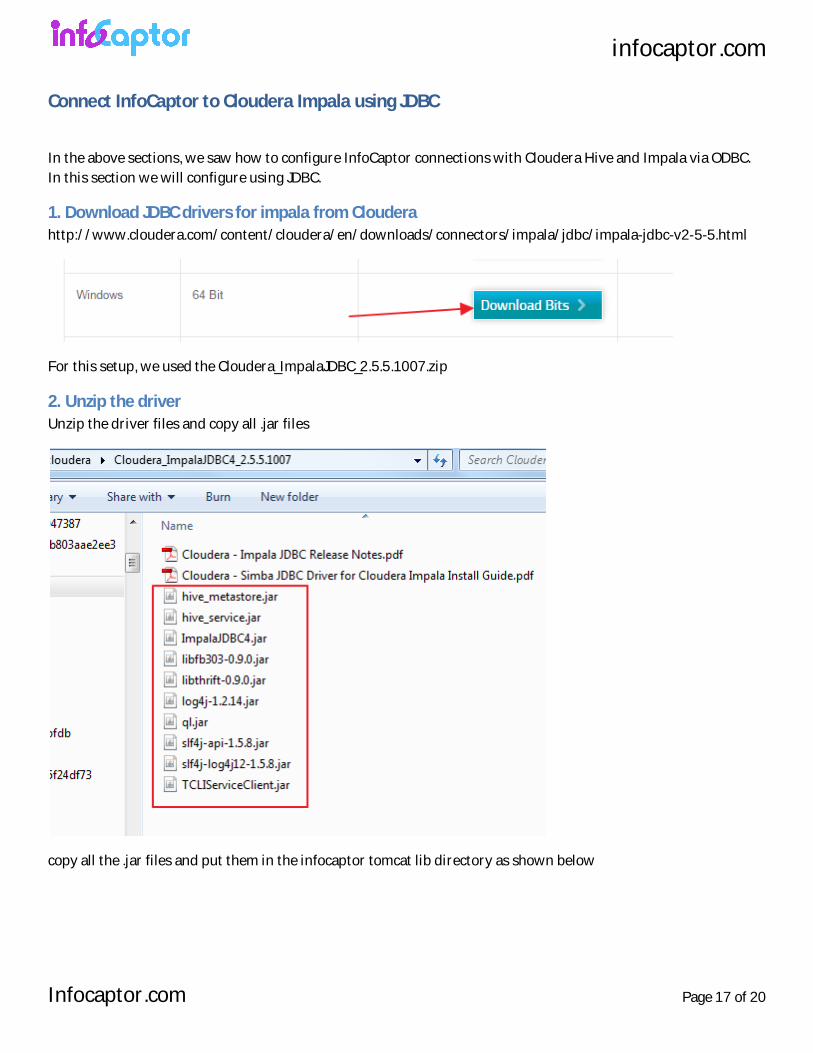
Connect InfoCaptor to Cloudera Impala using JDBC
In the above sections, we saw how to configure InfoCaptor connections with Cloudera Hive and Impala via ODBC. In this section we will configure using JDBC.
1. Download JDBC drivers for impala from Cloudera http://www.cloudera.com/content/cloudera/en/downloads/connectors/impala/jdbc/impala-jdbc-v2-5-5.html
For this setup, we used the Cloudera_ImpalaJDBC_2.5.5.1007.zip
2. Unzip the driver Unzip the driver files and copy all .jar files
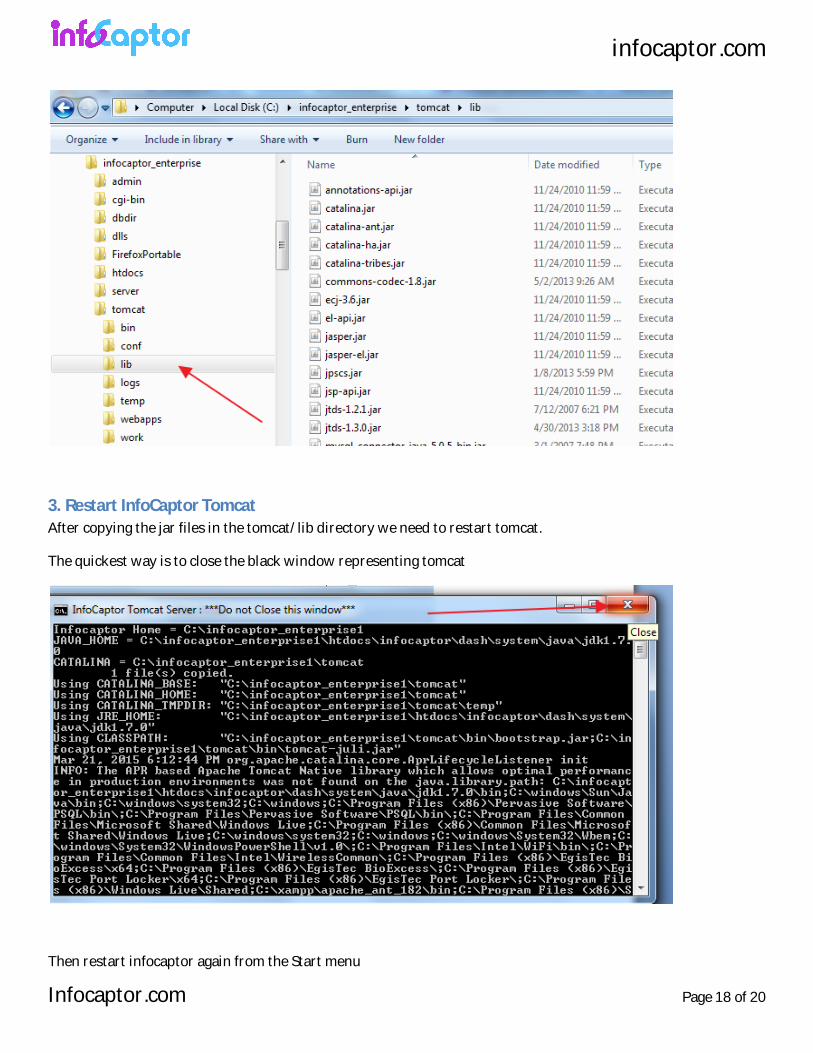
copy all the .jar files and put them in the infocaptor tomcat lib directory as shown below
infocaptor.com
Infocaptor.com Page 18 of 20
3. Restart InfoCaptor Tomcat After copying the jar files in the tomcat/lib directory we need to restart tomcat.
The quickest way is to close the black window representing tomcat
Then restart infocaptor again from the Start menu
infocaptor.com
Infocaptor.com Page 19 of 20
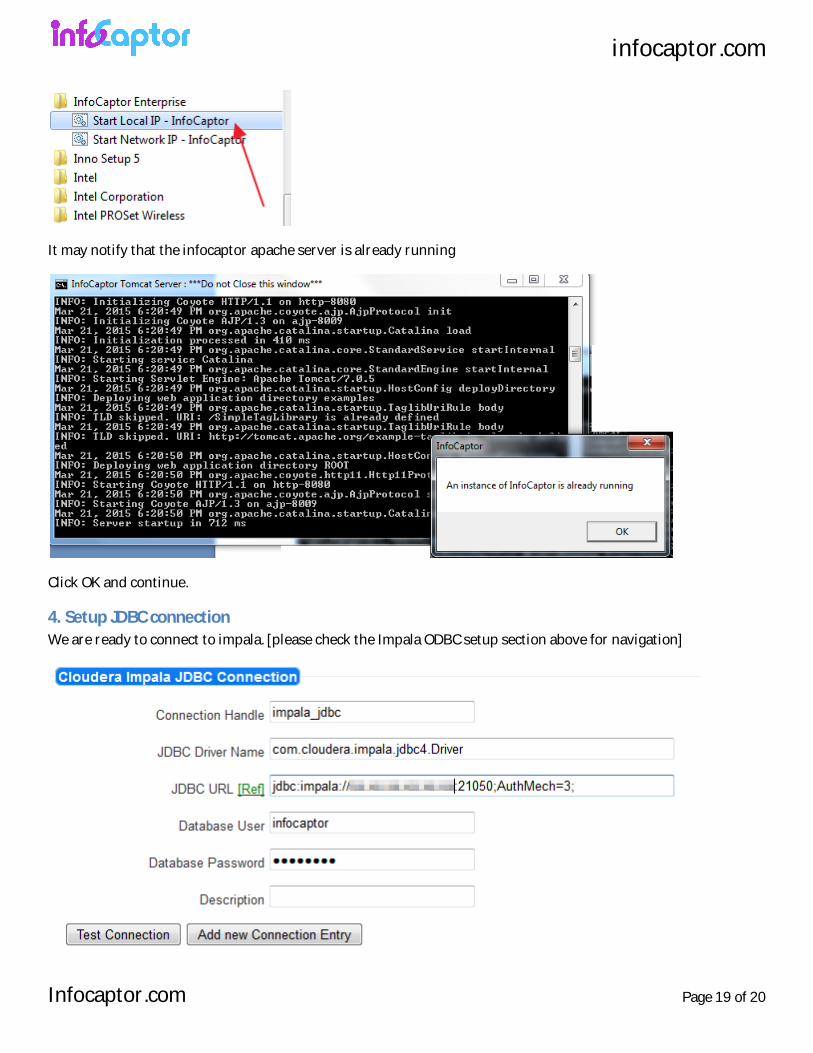
It may notify that the infocaptor apache server is already running
Click OK and continue.
4. Setup JDBC connection We are ready to connect to impala. [please check the Impala ODBC setup section above for navigation]
infocaptor.com
Infocaptor.com Page 20 of 20
Please check the PDF document that comes with the JDBC driver to form the correct JDBC URL
For e.g to connect using Username and password the setting AuthMech=3 needs to be prefixed to the JDBC URL
The different JDBC URLs are as follows
To use No authentication the URL is as follows
jdbc:impala://localhost:21050;AuthMech=0
To use Kerberos
jdbc:impala://localhost:21050;AuthMech=1;KrbRealm=example.com;KrbHostFQDN-impala.example.com;KrbSserviceName=impala
The above are just examples.
Please refer to the Cloudera - Simba JDBC Driver for Impala Install Guide for accurate URL structure
Once you define the connection and Test it successfully you can begin your Analysis journey the same way as illustrated in the Impala ODBC section.
Connect InfoCaptor to Cloudera Hive using JDBC
The steps for connecting Hive via JDBC are exactly similar to the Impala JDBC. The only difference being you need to download the Hive JDBC drivers, copy the jar files into Infocaptor/tomcat/lib directory and setup the JDBC URL connections
http://www.cloudera.com/content/cloudera/en/downloads/connectors/hive/jdbc/hive-jdbc-v2-5-12.html
Related Documents